

Trimble GeoExplorer 2008 series Quick Start Manual
This guide provides an overview of
the features and functions of the
Trimble® GeoExplorer® 2008 series
handheld.
For more information, refer to
the GeoExplorer 2008 Series User
Guide, provided on the GeoExplorer
2008 Series Getting Started Disc.
For the latest information,
including release notes, go to
www.trimble.com/support.shtml.
Click the link for your model of
handheld (GeoXH™, GeoXM™, or
GeoXT™) and then click GeoExplorer
2008 series.
GEOEXPLORER 2008 SERIES
QUICK START GUIDE
1
2
What’s in the box?
4
Charge the battery first
C
Warning – For safety information, refer to the “Safety” section of the
GeoExplorer 2008 Series User Guide.
Place the handheld in the support module as shown:
Connect the support module to an AC power outlet and leave to charge. This
may take up to eight hours. When charging, the Power LED on the handheld is
solid orange . When fully charged, the Power LED is green .
Remove the handheld from the support module as shown:
TIP – To improve battery performance, turn off the integrated Bluetooth
and wireless LAN radios and disconnect from the integrated GPS receiver
when not in use.
3
Getting to know your handheld
5
Turn on the handheld
Press and release the Power key to turn on or to turn off
the handheld.
The first time you turn on your handheld, you must select
the language used by the Windows Mobile® operating
system.
C
caution – You can only select the language once.
To change the language used on the handheld, you must
return the device to your Trimble service provider.
To select the language used on the handheld:
1. Press the Up or Down Navigation key to select the language you want to
use and then press the Enter key.
2. In the confirmation screen that appears:
– To select a different language, press the Enter key to return to the
previous screen.
– To use the selected language on the handheld:
a. Use the Up Navigation key and the Enter key to check the box and
confirm your selection.
b. Use the Down and Right Navigation keys to select the Next button.
c. Press the Enter key to install the selected language onto the
handheld.
Once the selected language is installed, the handheld restarts.
Follow the on-screen instructions to align the touch screen, using the stylus to
tap on the screen.
6
Interacting with the handheld
Trimble recommends that you use only the stylus
provided to tap on the touch screen.
To remove the stylus from its holder on the front
of the handheld, press the spring on the stylus
downwards and then lift the stylus forward, as shown.
Use the stylus to:
• Tap the screen once to open items and select
options.
• Tap and hold the stylus on an item to see a pop-up
menu of available actions. Then tap the action you
want to perform.
To enter text, use one of the input panels.
To display the current input panel, tap a text box.
To select an input panel, tap the arrow next to the
Input Panel button and then tap the input panel you
want to use.
The Keyboard input panel is shown to
the right. To enter characters, tap on the
keyboard.
TIPS –
To enter special characters, tap to display keypads containing numbers and
symbols. To switch back to the main keyboard, tap again.
To make the keys larger, tap the Input Selector arrow and then tap Options.
In the Input method list, select Keyboard and then select Large Keys.
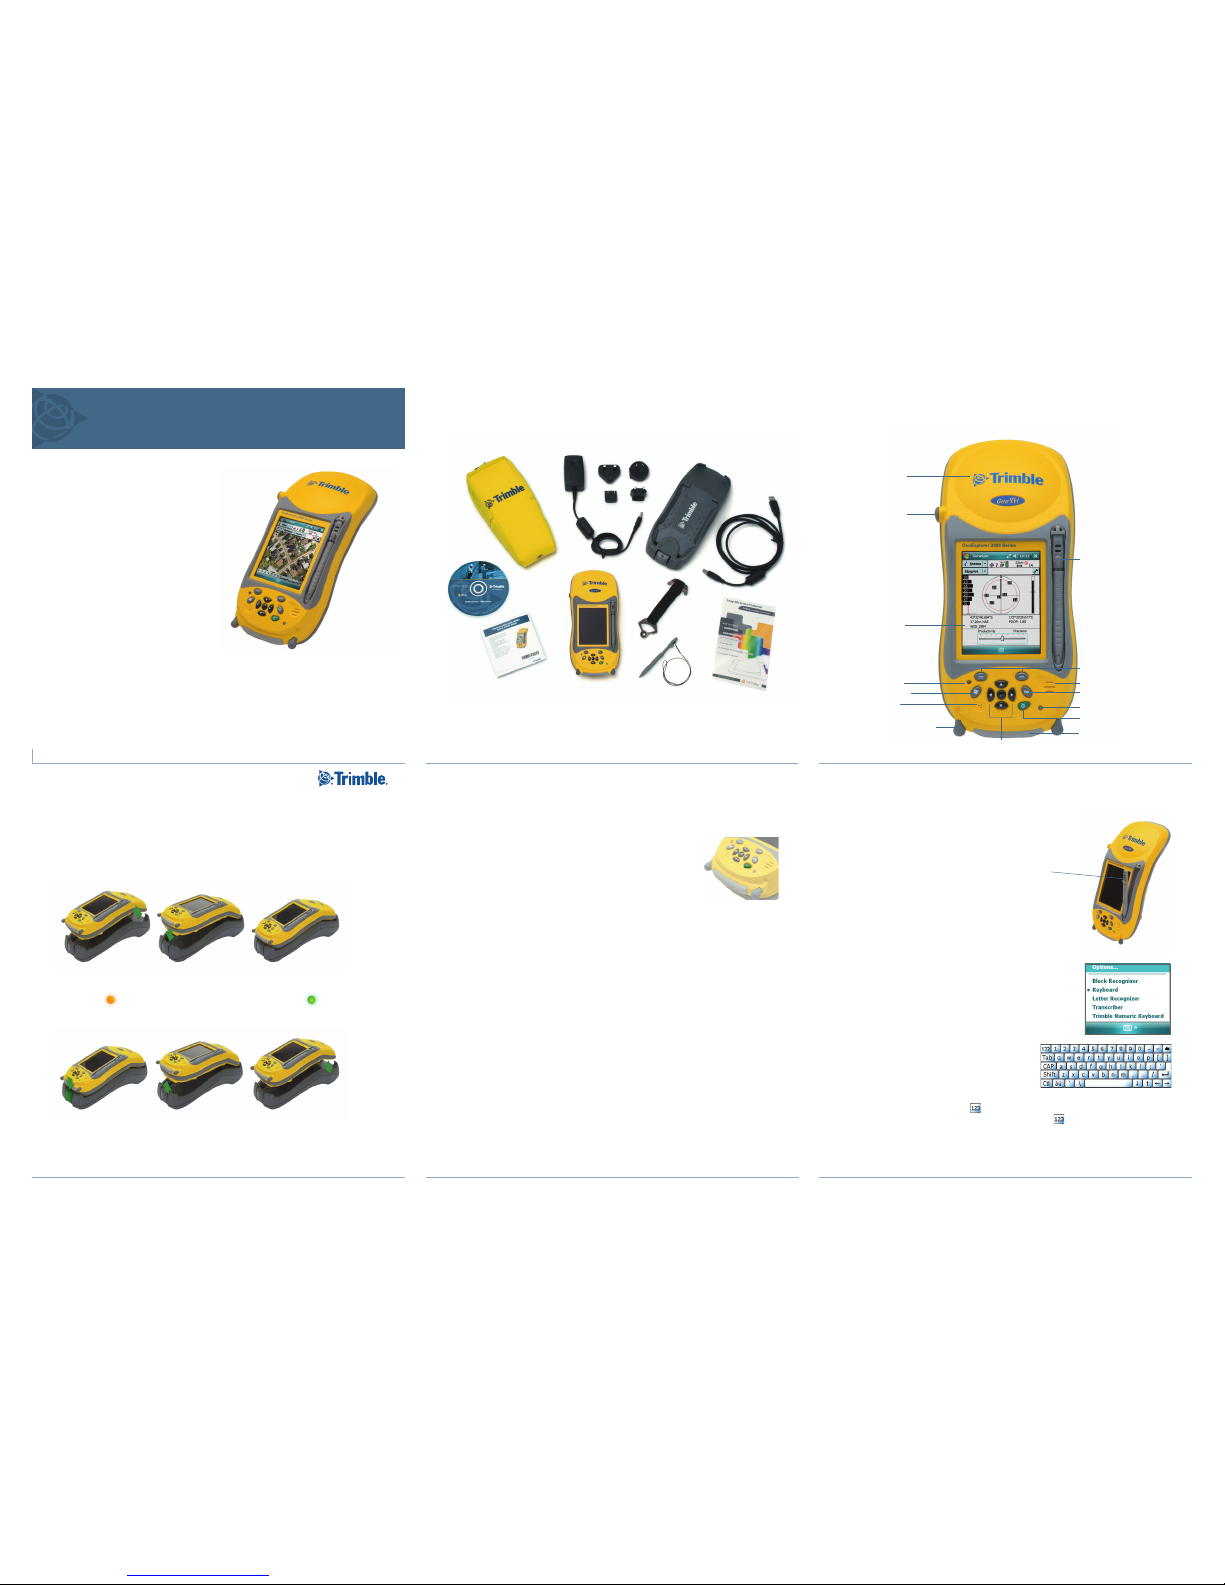
Integrated GPS
receiver
External antenna
connector
Touch screen
Reset button
Start menu key
Microphone
Thumb screws for
memory card slot door
Stylus
Application keys
Speaker
OK key
Power status LED
Power key
Memory card slot door
Navigation keys and Enter key
7
Set the date and time zone
In the Today screen, tap the clock
icon . The Clock Settings screen
appears. Tap the Time tab, select the
Home option and then select the
correct time zone for your location.
Inserting a memory card
To use an SD or SDHC memory card:
1. Use the thumb screws on the base of
the handheld to remove the memory
card slot door.
2. Insert the memory card into the
memory card slot with the swipes
facing down. Gently press the card
until you hear a click, and the card is
locked into place.
3. Reattach the memory card slot door and use the thumb screws to tighten.
4. When you select the
Save As option in an application, the memory card
appears in the list of available storage locations.
Note – Do not store required data or applications to a memory card if the card
will be removed. Data saved to a memory card is available only when the card
is inserted in the handheld.
To remove the memory card, gently press the card in. The card pops out.
12
Fitting the handstrap
1. Align the straight bracket with the slots below
the Microsoft Windows Mobile logo. Insert the
bracket by pressing down and into the slots.
2. Insert the first screw and then use a coin or
screwdriver to tighten the screw.
3. Align the curved bracket with the slots above
the communication swipes at the base of the
handheld.
4. Insert the second screw and then use a coin or
screwdriver to tighten the screw.
Applying the screen protector
To protect the screen from pressure and abrasive objects, Trimble recommends
that you apply one of the screen protectors provided with your GeoExplorer
2008 series handheld to the touch screen.
8
Connecting to a computer
To transfer files to the handheld, or to install software onto the handheld,
you must connect the handheld to a computer. If the computer is running the:
• Windows Vista
®
operating system, use the Windows Mobile Device Center
(WMDC) to manage the connection.
• Windows
®
XP or 2000 operating system, use Microsoft® ActiveSync®
technology to manage the connection
Note – You must install the Windows Mobile Device Center or ActiveSync
technology onto the computer before you connect the handheld.
To download the Windows Mobile Device Center or ActiveSync technology
from the Microsoft website, go to www.microsoft.com/windowsmobile.
9
Status indicators
Status indicators are displayed in the title bar at the top of the screen.
Icon Descri ption Tap ico n to…
Battery level
check battery levelLow battery (20% or less remaining)
Battery charging/using external power
Speaker is on
change volume
Speaker is off
Connected to ActiveSync or the Windows Mobile
Device Center (WMDC) on a computer
configure the
connection or access the
Wireless Manager
Connected to a Bluetooth-enabled phone
Disconnected from ActiveSync or WMDC
Disconnected from a Bluetooth-enabled phone
Wireless LAN radio is on
A wireless LAN is detected
Sending or receiving wireless signals
The Wi-Fi and Bluetooth icons on the Today screen show the status of
each radio. Tap the icon to access the Wireless Manager and turn on or turn
off the radio.
The Power LED on the handheld flashes red when the battery is low (less
than 15%).
10
Connecting to GPS
To collect GPS data, install GPS field software onto the handheld and, if
required, configure the software to connect to the integrated GPS receiver.
Icon Descri ption
TerraSync™ software
No configuration required. The software automatically
activates the GPS receiver on COM3.
GPS Controller software
ArcPad with the
GPScorrect™ extension
During installation, the Trimble GPScorrect extension
automatically configures the ArcPad software to use the GPS
receiver on COM3.
To connect to GPS, tap the GPS button and then tap
Yes.
ArcPad 7 without the
GPScorrect extension
In ArcPad, tap the GPS button drop-down menu and
select GPS Preferences. Then tap the GPS tab.
In the Protocol field, select NMEA 0183 and then select
COM2 from the Port field. Tap OK.
To connect to GPS, tap the GPS button and then tap
Yes.
NMEA application
Configure the software to connect to GPS on COM2 and then
use the Connect or Activate GPS command.
TIP – To configure GPS receiver or real-time correction settings when using
NMEA applications, use the GPS Controller software provided on the handheld.
11
Troubleshooting
If the screen on the handheld is blank, do one of the following:
• Tap the screen with the stylus or press one of the
Navigation keys to turn
on the backlight.
• Press the
Power button to turn on the handheld.
If the handheld stops responding to the stylus, or if it does not respond when
you press any keypad button, you may need to reset it. First, try a soft reset.
If the handheld does not respond, perform a hard reset.
Performing a soft reset
A soft reset retains all data and settings.
To perform a soft reset, use the tip of the
stylus to lightly press the Reset button on
the keypad.
Performing a hard reset
Note – Any unsaved data may be lost after
a hard reset.
Perform a hard reset only if performing a
soft reset does not resolve the issue.
To perform a hard reset, press and hold the
Power button as you use the tip of the stylus
to lightly press the Reset button on the keypad.
© 2008. Trimble Navigation Limited. All rights reserved.
This product is protected by US and international copyright,
trademark, and patent law as described in "Legal Notices"
in the GeoExplorer 2008 Series User Guide.
www.tri mble. com
Trimble Navigation Limited
10355 Westmoor Drive
Suite #100
Westminster, CO 80021
USA
 Loading...