

Mesureur Puissance Optique
Optical Power Meter
TOM 011 – Référence / Part Number: 307967
User manual
Soucieux de la qualité de ses produits, le fournisseur se réserve le droit d’effectuer
des modifications sans préavis au produit et à ce document.
The information contained in this document is assumed to be correct and current. The
manufacturer is not responsible for errors of omissions and reserves the right to change
specifications at any time without notice.
Mode d’emploi / User manual TOM 011
1 / 18

Mesureur Puissance Optique
Optical Power Meter
TOM 011 – Référence / Part Number: 307967
Contents
11. Overview 11
12. Main Features 11
13. Specifications 12
14. Standard Packages 12
15. Function 13
16. Operation and Notes 14
17. Maintenance 15
18. Troubleshooting 15
19. Notice 16
20. Warranty and Service 17
Mode d’emploi / User manual TOM 011
10 / 18

Mesureur Puissance Optique
Optical Power Meter
TOM 011 – Référence / Part Number: 307967
11. Overview
TOM 011 optical power meter is the latest multi-functional power meter
designed for the installation, construction and maintenance of optical fiber
network.
It features compact size, smooth appearance, user friendly design, optional
backlight, auto shut off function, wide measurement range, accurate test,
self-calibrating function and universal connector. The stability and reliability
of this power meter are greatly improved with the large square (ф1.0mm)
detector.
12. Features
Wide dynamic measurement range (up to 80dB)
Reference power level storage(Ref Setting)
User self-calibration function
Comfortable LCD display and backlight LCD display supports
night operation.
Power measurements in dBm or mw and insertion loss in dB
Optional 10 minutes Auto-off function
AA alkaline batteries can last more than 140 hours, AC adaptor also
available
Low battery power indication
Mode d’emploi / User manual TOM 011
11 / 18

Mesureur Puissance Optique
Optical Power Meter
TOM 011 – Référence / Part Number: 307967
MODEL
TOM 011
Wavelength(nm)
800~1700nm
Detector Type
InGaAs
Detector Size
Ø 1.0mm
Measurement Range (dBm)
-50~+30
Uncertainty
±5%
Calibrated Wavelength(nm)
850,1300,1310,1490,1550,1625
Resolution(dB)
0.01
Optical Connector
FC/PC and SC/APC
Power Supply
Alkaline Battery(3 AA 1.5V batteries); AC Adaptor(9V)
Battery Operating Time
140 h with 1.5V Battery(3pcs)
Operating Temperatrue(℃)
-10 ~ +60
Storage Temperatrue(℃)
-25 ~ +70
Relative Humidity
0 to 95% (non-condensing)
Dimension(mm)
190X100X50
Weight(g)
370
13. Specifications
14. Standard Accessories
1. Main unit 1
2. Operation Manual 1
3. Cleaning Swabs 1
4. AC Power Supply Adapter 1
5. Soft Carrying Case 1
6. FC/PC and SC/APC adaptors 1
Mode d’emploi / User manual TOM 011
12 / 18

Mesureur Puissance Optique
Optical Power Meter
TOM 011 – Référence / Part Number: 307967
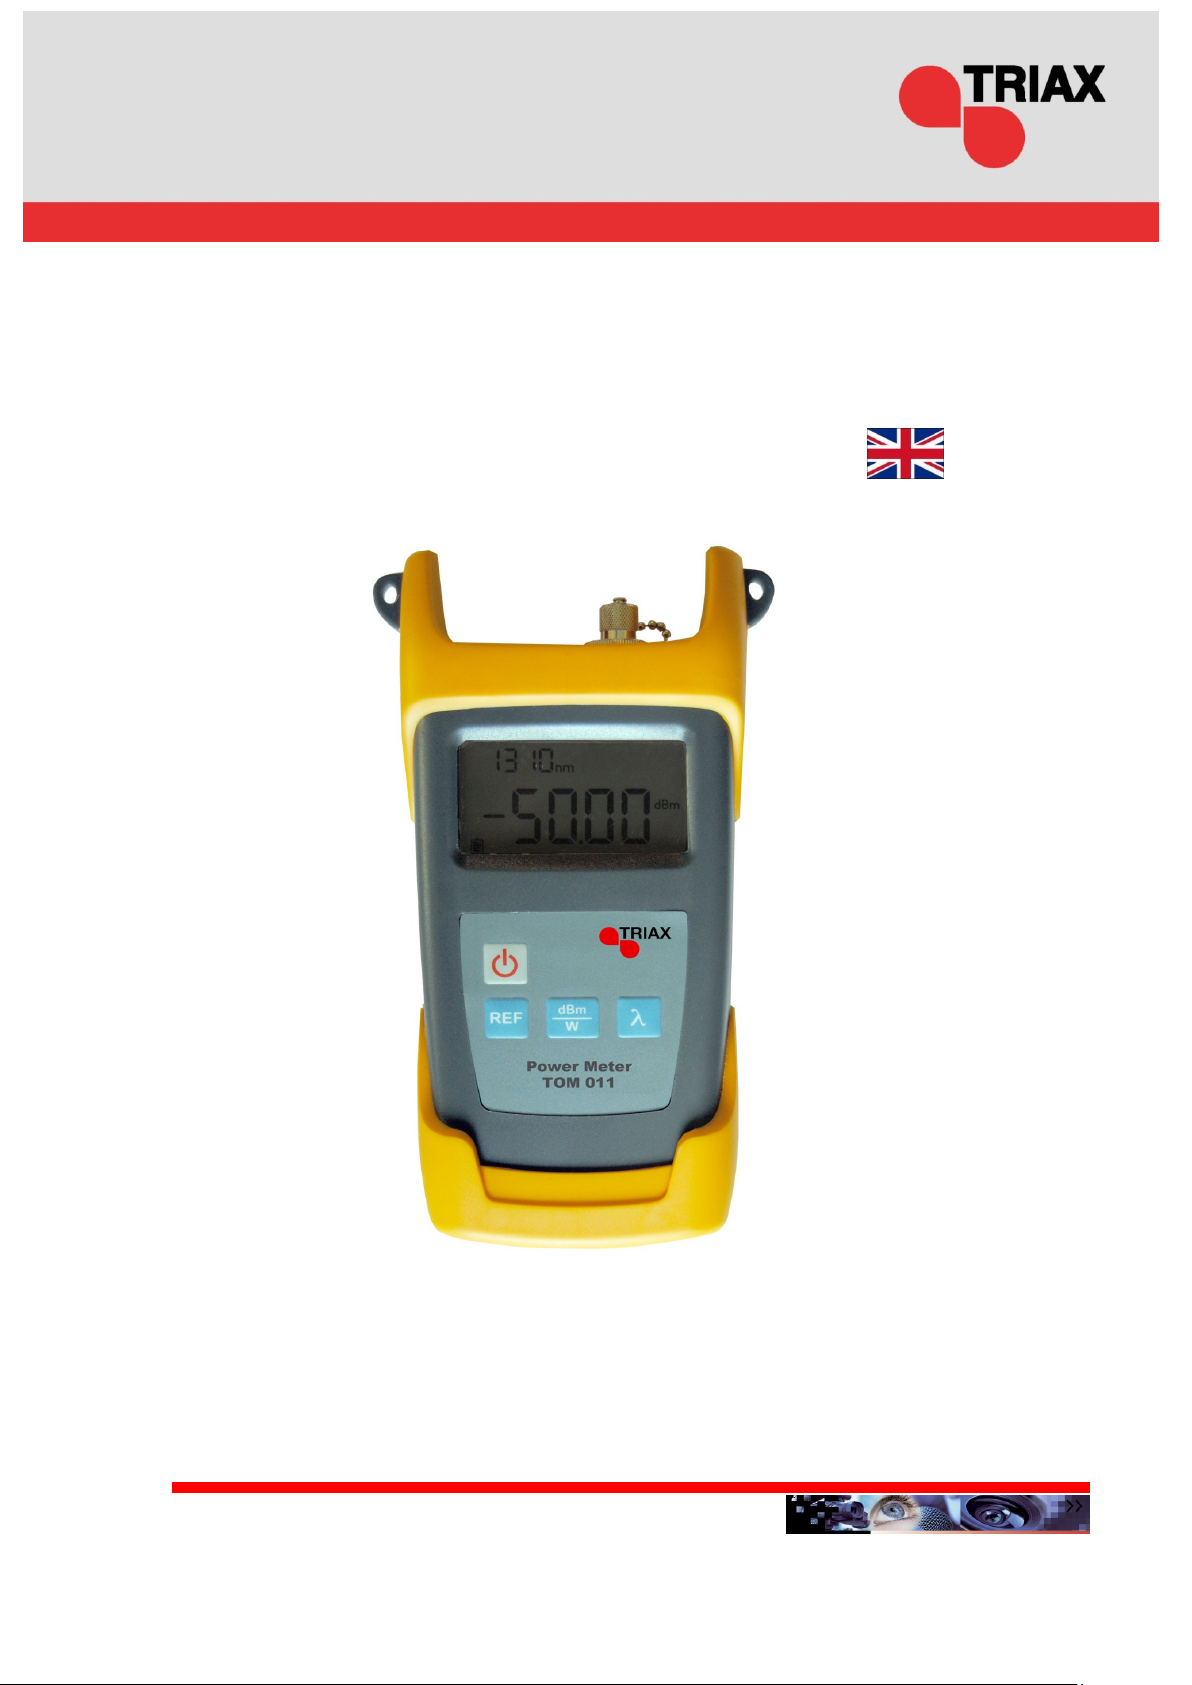
1. Function
5.1 Function Instructions
(1) “ “ Power Supply Switch:
Press it to turn on or off the unit Auto Shut Off
Selection: Press this key shortly to turn on or off the
auto shut off function. Under this situation, the unit
will automatically shut off after ten minutes idle time.
(2) “λ” Wavelength Selection:
Press this key to switch the wavelength and display
it on the top left of the LCD screen.
(3) “dBm/W” Press this key to switch
between the absolute measurement and relative measurement of the
ptical power.
(4) “REF” Press this key for a few seconds to store the current
power value as the reference value which will be displayed on the top left of
the LCD screen. Press this key shortly to enter the relative measurement
mode and the reference value will be displayed on the top left of the LCD
screen. It will compare the current power with the reference power and show
the relative power value in dB.
Mode d’emploi / User manual TOM 011
13 / 18

Mesureur Puissance Optique
Optical Power Meter
TOM 011 – Référence / Part Number: 307967
2. Operation and Notes
6.1 Turn on/off the unit
Press key to turn it on, then the LCD screen display the following
information.:
(1) When using the AC adapter, the AC adapter’s mark will be showed
on the central left screen and lighted.
(2) The battery mark is showed on the left bottom screen and will be
lighted when using the battery. The capacity in the mark will decrease with
battery power. Please replace the battery when the mark is empty.
(3) The ”auto-off” mark is showed on the bottom screen. The auto off
function is lighted and valid after the unit turned on. The unit will
automatically shut off after ten minutes idle time.。
(4) The power value is displayed in the middle of the screen, the unit is
dBm,W,dB.
(5) The reference power value is displayed on the top right screen, the
unit is dBm.
(6) The working wavelength is displayed on the top left screen., the unit
is nm Press” “again to turn off TOM 011 power meter.
(7) User self-calibrating function
Mode d’emploi / User manual TOM 011
14 / 18

Mesureur Puissance Optique
Optical Power Meter
TOM 011 – Référence / Part Number: 307967
Setting Process
H. After opening the battery compartment and taking out the batteries, you
will find a little red switch with a white button on it and push the white
button to “on” position. Then please put the batteries and compartment
back and open the unit to re-calibrate it.
I. Press the “REF” key once to increase the current power by 0.05dB
which will be displayed on the LCD screen.
J. Press the “dBm/w” key once to decrease the current power by 0.05dB
which will be displayed on the LCD screen.
K. Press“λ”key to switch the working wavelength.
L. Press “ON/OFF”key shortly to store the self-calibrating value.
M. Press “ON/OFF”key for 2 seconds to turn off the unit.
N. Take out the battery and push that white button to “OFF” position to exit
the self-calibrating mode.
3. Maintenance
Clean the optical connector and adapter regularly.
Use the regulated optical connector for the test.
Shut off the power and cover the dust-proof cap after your test.
Select the power supply within the required voltage range when using
AC adapter.
Please take out the battery when it is not in operation for a period of time.
Mode d’emploi / User manual TOM 011
15 / 18

Mesureur Puissance Optique
Optical Power Meter
TOM 011 – Référence / Part Number: 307967
Problems
Possible reasons
Solution
Faint display on the LCD
screen
The battery power is
low
Charge or replace the battery.
Fail to turn the unit on
Low battery power or
the battery is put
wrongly
1. Replace the battery.
2. Re-put the battery
Optical power is not
stable after the unit
turned off.
Use it after 15 minutes warm-up.
4. Troubleshooting
5. Notice
9.1 Ensure the connector is clean when test.
9.2 Do not plug in the power supply when install the battery.
9.3 Do not look into the laser beam when test.
9.4 Please charge the battery before using
and do not charge it in the unit.
9.5 Please cover the dust-proof cap when it is not in operation.
Mode d’emploi / User manual TOM 011
16 / 18

Mesureur Puissance Optique
Optical Power Meter
TOM 011 – Référence / Part Number: 307967
6. Warranty and service
Caution: Repair it in the field is Forbidden.
24 months warranty for Our TOM 011 Power Meter.
10.1 We warrant that TOM 011 power meter will be free from defects in
material and workmanship for 24 months. Should the device fail at any time
during this warranty period, we will, at its sole discretion, replace, and repair
or refund the purchase price of the product. The worth of the repair or
replace will not be higher than purchasing price of this unit.
10.2 If the problems occurred can not be solved by the trouble shooting
methods, please contact us or the local distributor directly.
10.3 This warranty is limited to defects in our production, workmanship or
material; we will repair or replace the unit free of charge. This warranty only
applies to the unit under normal operation without any damage or wrong
operation.
10.4 The warranty does not include the following problems:
Repair the unit by yourself without our official authorization.
Wrong operation or accident,
10.5 As to the freight cost caused by repair or replaces the unit under
warranty; it will be shared by the customer and Triax.
Mode d’emploi / User manual TOM 011
17 / 18

Mesureur Puissance Optique
Optical Power Meter
TOM 011 – Référence / Part Number: 307967
e-mail : sc@triax.fr
Internet : www.triax.com
Mode d’emploi du TOM 011 - Version 1.0 / Novembre 2011
TOM 011 Notice - Version 1.0 / November 2011
Mode d’emploi / User manual TOM 011
18 / 18
 Loading...