

Page 1
Quick Installation Guide
TV-M7
H/W: A1
Page 2

Table of Contents
Table of Contents
Español ..................................................................................................................
1. Antes de iniciar ..
2. Instalación del Hardware ...............................................................................
3. Establezca las opciones de configuración inalámbrica ................................
4. Añada la C mara IP .......................................................................................
5. Función del control remoto ............................................................................
Troubleshooting .......................................................................................................
............................................................................................
á
1
1
2
3
6
8
10
Version 11.18.2008
Page 3
1. Antes de iniciar
Contenidos del paquete
TV-M7
?
CD-ROM para guía del usuario
?
Guía de instalación rápida
?
Adaptador de corriente AC
? (12V,
1.5A)
?Control remoto
?Cable USB (tipo A a mini B)
?2 láminas para el diseño del marco
Requisitos del sistema
?
Enrutador inalámbrico o punto de acceso
?
Un servidor DHCP disponible, los enrutadores inalámbricos tienen por lo
general un servidor DHCP integrado
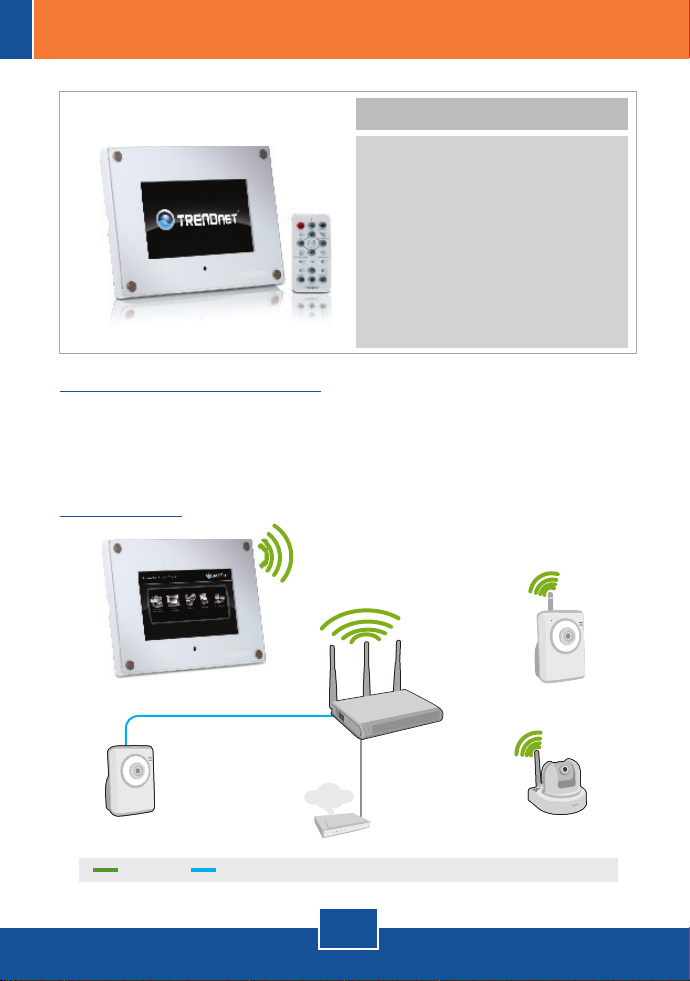
Aplicación
7” Wireless Internet
Camera and Photo Monitor
(TV-M7)
Home Monitoring
(TV-IP110)
Wireless 54Mbps
100Mbps
Internet
1
Español
300Mbps Wireless N
Gigabit Router
(TEW-639GR)
Cable/DSL
Modem
Family Monitoring
(TV-IP212W)
Business Monitoring
(TV-IP410W)
Page 4
2. Instalación del Hardware
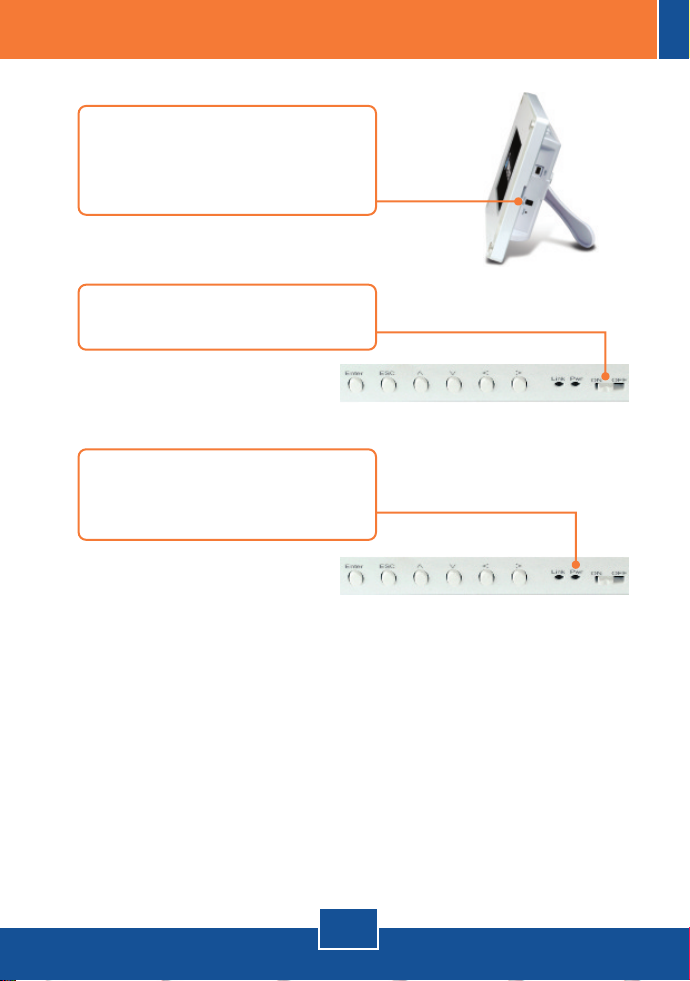
1. Conecte el adaptador de
alimentación AC al Marco de
fotos digital y luego a una toma
de corriente.
2. Ponga el interruptor en la posición
On en la parte superior de TV-M7.
3. Compruebe que el indicador LED
de alimentación tiene una luz
verde.
2
Español
Page 5
3. Establezca las opciones de configuración inalámbrica
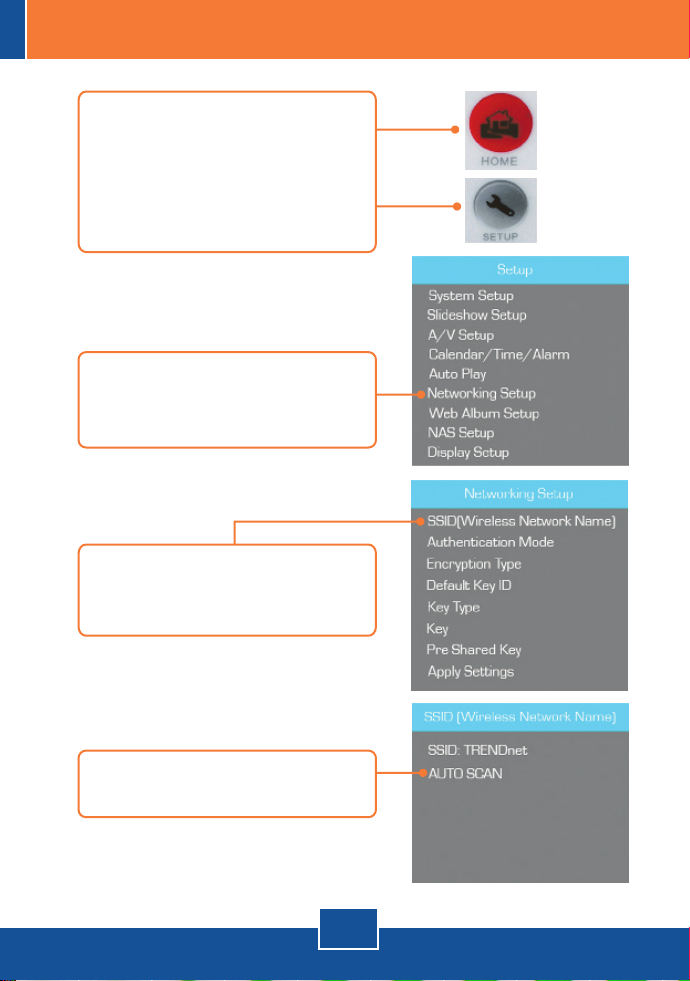
1. El menú principal aparecerá
después de que encienda el
TV-M7. Si no le aparece el menú
principal, pulse Home (Inicio) en
el control remoto. Luego presione
Setup (Configurar).
2. Seleccione Networking Setup
(Configurar redes) a través de la
flecha inferior en el control remoto.
3. Seleccione el SSID (Nombre de la
red inalámbrica) y luego presione
Enter (Intro).
4. Seleccione AUTOESCANEO y
luego presione Enter (Intro).
Español
3
Page 6

5. Seleccione el SSID del RED
inalámbrica y luego pulse Enter
(Intro).
6. Pulse ESC.
7. Seleccione el Modo de
autenticación para seleccionar el
tipo de encriptación (p.ej. WEP,
WPA-PSK, WPA2-PSK).
8. Seleccione la Clave (WEP) o la
Clave precompartida
(WPA-PSK/WPA2-PSK) para
introducir la clave de encriptación.
Español
4
Page 7

9. Seleccione Apply Settings
(Aplicar opciones de configuración)
a través de la flecha inferior en el
control remoto. Luego presione
Enter(Intro).
10. Pulse ESC para salir de la
Configuración.
11. Compruebe que el indicador de
ENLACE enciende una luz verde
intermitente.
5
Español
Page 8

4. Añada la Cámara IP
Nota:
1. El TV-M7 es compatible con las siguientes cámaras IP: TV-IP110,
TV-IP110W, TV-IP212, TV-IP212W, TV-IP312, TV-IP312W, TV-IP410,
TV-IP410W, TV-IP422 y TV-IP422W. No es compatible con el resto de
cámaras IP.
2. Compruebe que tanto el TV-M7 y su(s) cámara(s) IP tienen una dirección IP
en la misma subred. Por ejemplo, si el TV-M7 tiene una dirección IP de
192.168.10.80, entonces su cámara debe usar 192.168.10.X.
1. El menú principal aparecerá
después de que encienda el
TV-M7. Si no le aparece el menú
principal, pulse Home (Inicio) en
el control remoto. Luego presione
Setup (Configurar).
2. Seleccione IP Camera y Network.
(Cámaras IP y Red) ) y luego
presione Enter (Intro).
3. Seleccione IP Camera (Cámaras
IP) y luego presione Enter (Intro).
Español
6
Page 9

4. Utilice la cámara vertical para
seleccionar sus cámaras IP y
luego pulse Enter (Intro). Si desea
seleccionar múltiples cámaras,
presione el botón Zoom/Select
(Zoom/Seleccionar) para cada
cámara y luego presione Enter
(Intro).
5. Ahora podrá ver su video en vivo
desde la cámara IP.
7
Español
Page 10

5. Función del control remoto
Botón Función
HOME (INICIO)
SETUP
SNAPSHOT
ESC
PHOTO/MUSIC
UP ARROW Desplazar hacia arriba
LEFT ARROW
RIGHT ARROW
Entrar al menú de pantalla principal
Entrar a la pantalla de configuración
Tomar instantánea a través de la cámara IP. Las fotos se guardan
en la memoria interna
Salir del menú
Reproducir presentación de diapositivas
Desplazar hacia la izquierda
Desplazar hacia la derecha
8
Español
Page 11

Botón Función
DOWN ARROW
INTRO
ROTATE /
REFRESH
ZOOM /
SELECT
VOLUME UP
VOLUME DOWN
MUTE
IP CAM
PLAY/PAUSE
CALENDAR Configurar hora y fecha
REWIND Rebobinar video
STOP Parar video
FAST FORWARD Adelantar video de forma rápida
Desplazar hacia abajo
Ejecutar selección
Rotar o actualizar imagen en modo de fotografía
Actualizar pantalla
5x Acercar o alejar imagen
Seleccionar cámara o cámaras en las cámaras IP y el Menú de red.
Subir volumen
Bajar volumen
Apagar audio
Desplegar su(s) cámara(s) IP
Reproducir/suspender presentación de diapositivas y video
La instalación ha sido completada
Nota: Para obtener información más detallada sobre la configuración y las
opciones de configuración avanzadas de la TV-M7 por favor consulte la
sección de resolución de problemas en el CD-ROM de la Guía del Usuario, o
el sitio Web de Trendnet en http://www.trendnet.com.
,
Para asegurar los más altos niveles de servicio y apoyo al cliente, registre su producto
Registre su producto
en línea en: www.trendnet.com/register
Gracias por elegir TRENDnet
9
Español
Page 12

Troubleshooting
The Digital Picture Frame doesn't power on. What should I do?
Q1:
First, make sure that you connect the power adapter securely to the Digital Frame and to a
A1:
working power outlet. Second, make sure to set the power switch to the On position. Please
note: there is no power button on the remote control.
Q2:
After I successfully configured the TV-M7 to match my wireless network settings, I can
not connect or view my IP cameras.
A2:
First, verify that you are using the following IP Cameras: TV-IP110/W, TV-IP212/W,
TV-IP312/W, TV-IP410/W and TV-IP422W. All other IP Cameras are not supported. Second,
verify that the wireless settings on the TV-M7 match your wireless network settings. Third,
make sure that you clicked Apply Settings. Fourth, if a camera is not detected, press the
ROTATE/REFRESH button on the remote control to refresh the list of cameras. Fifth, make
sure both the TV-M7 and your IP camera(s) have IP address in the same subnet. For
example, if TV-M7 has an IP Address of 192.168.10.80, then your IP camera must use
192.168.10.X. Sixth, make sure the HTTP port on the IP camera is set to port 80. If it is not set
to port 80, please enter the configuration for your IP camera to change the HTTP port. By
default, the TV-IP110/W, TV-IP212/W, TV-IP312/W, TV-IP410/W and TV-IP422W is set to port
80. Seventh, perform a factory reset on the TV-M7 and reconfigure the wireless network
settings. To reset the TV-M7, take a pin or paper clip and press the reset button on the side of
the TV-M7 for 10 seconds, then let go.
Q3
: Nothing happens when I press any buttons on the remote control. What should I do?
A3:
First, make sure that the TV-M7 is powered on. Second, the battery may be running low.
Please replace the battery. The remote control uses a 3V Lithium CR2025 battery.
Q4:
Can I put a static IP address on the TV-M7?
A4:
You can not put a static IP address on the TV-M7. The TV-M7 receives an IP address
automatically. Please verify that you have an available DHCP server on your network.
Q5:
Can I change the design of the frame?
A5:
Yes you can. Please go to www.trendnet.com to download the frame design files and
instructions.
If you still encounter problems or have any questions regarding the TV-M7, please contact
TRENDnet's Technical Support Department.
10
Page 13

Certifications
This equipment has been tested and found to comply with FCC and CE Rules.
Operation is subject to the following two conditions:
(1) This device may not cause harmful interference.
(2) This device must accept any interference received. Including interference that may
cause undesired operation.
Waste electrical and electronic products must not
be disposed of with household waste. Please
recycle where facilities exist. Check with you Local
Authority or Retailer for recycling advice.
NOTE: THE MANUFACTURER IS NOT RESPONSIBLE FOR ANY RADIO OR TV
INTERFERENCE CAUSED BY UNAUTHORIZED MODIFICATIONS TO THIS
EQUIPMENT. SUCH MODIFICATIONS COULD VOID THE USER’S AUTHORITY TO
OPERATE THE EQUIPMENT.
ADVERTENCIA
En todos nuestros equipos se mencionan claramente las caracteristicas del adaptador de
alimentacón necesario para su funcionamiento. El uso de un adaptador distinto al
mencionado puede producir daños fisicos y/o daños al equipo conectado. El adaptador
de alimentación debe operar con voltaje y frecuencia de la energia electrica domiciliaria
existente en el pais o zona de instalación.
Page 14

Product Warranty Registration
Please take a moment to register your product online.
Go to TRENDnet’s website at http://www.trendnet.com/register
20675 Manhattan Place
Torrance, CA 90501
USA
Copyright ©2008. All Rights Reserved. TRENDnet.
 Loading...