

Guide d'installation rapide
Quick Installation Guide
TPL-302E
TPL-302E2K
H/W: V1

Table of Contents
Table of Contents
Français ....................................................................................................
1. Avant de commencer ........................................................................
2. .....................................................................Procéder à l'installation
English .....................................................................................................
1. Before You Start
2. ....................................................................................
How to Install
Dépannage ...............................................................................................
Troubleshooting ........................................................................................
................................................................................
1
1
2
7
7
8
13
15
Version 02.18.2009
1. Avant de commencer
Contenu de l'emballage
?TPL-302E
?CD-ROM d'utilités
?Guide d'installation rapide
Configuration du système
Lecteur de CD-ROM
?
?Un ordinateur de bureau ou un laptop avec un adaptateur réseau installé
?Microprocesseur : 300 MHz ou supérieur / 800MHz ou supérieur
(Windows Vista)
?émoire : 256MB ou supérieur ou supérieur
M / 512MB
(Windows Vista)
?Réseau HomePlug AV existant
?Réseau câblé 10/100Mbps lorsque le TPL-302E est utilisé comme pont
Conditions de service
?
Windows 2000/XP/Vista
?Microsoft Net Framework 1.1
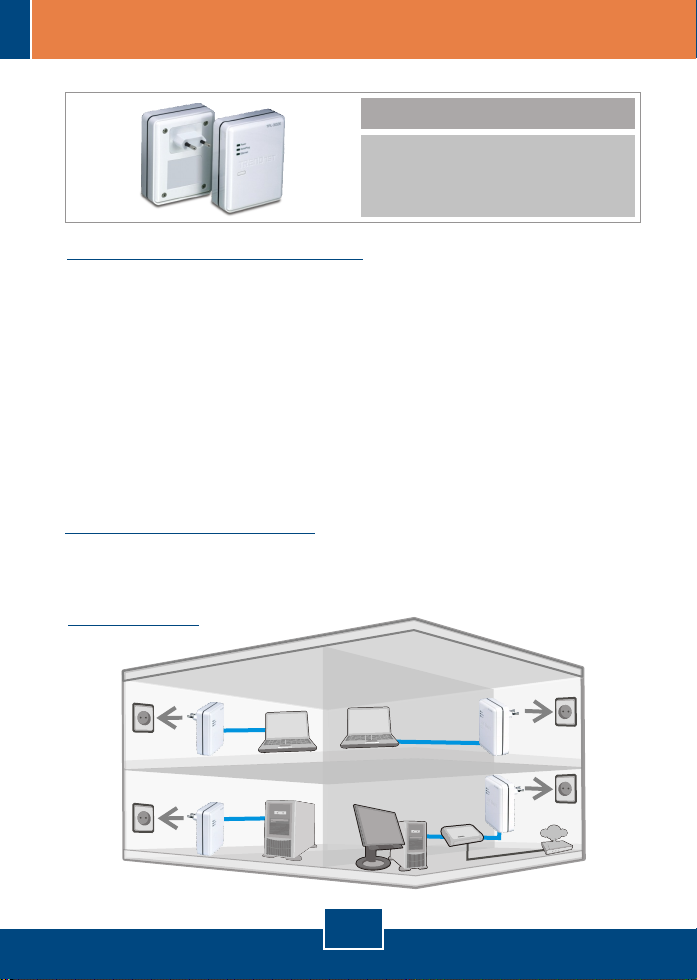
Application
1
Français
I
I
n
n
t
t
e
e
r
r
n
n
et
et
2. Procéder à l'installation
Important ! NE PAS installer le TPL-302E avant d'en avoir reçu la consigne.
Utilisateurs Windows
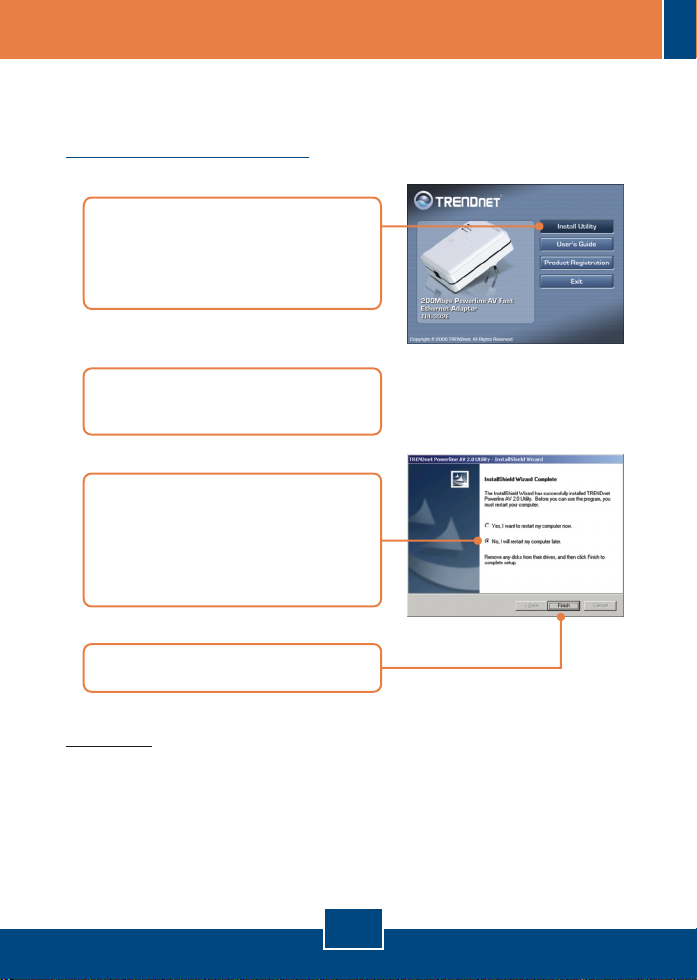
1. Insérez le CD-ROM dans le lecteur
de CD-ROM de votre ordinateur et
cliquez sur Install Utility (Installer
le matériel).
2. Suivez les instruction de
l'assistant d'installation.
3. Sélectionnez No, I will restart my
computer later (Non, je
redémarrerai mon ordinateur plus
tard Uniquement pour Windows
2000.
4. Cliquez sur Finish.
Remarque: SI Microsoft Net Framework 1.1 est installé sur votre ordinateur,
passez à l'étape 7. Si ce n'est pas le cas, poursuivez avec l'étape 5.
2
Français
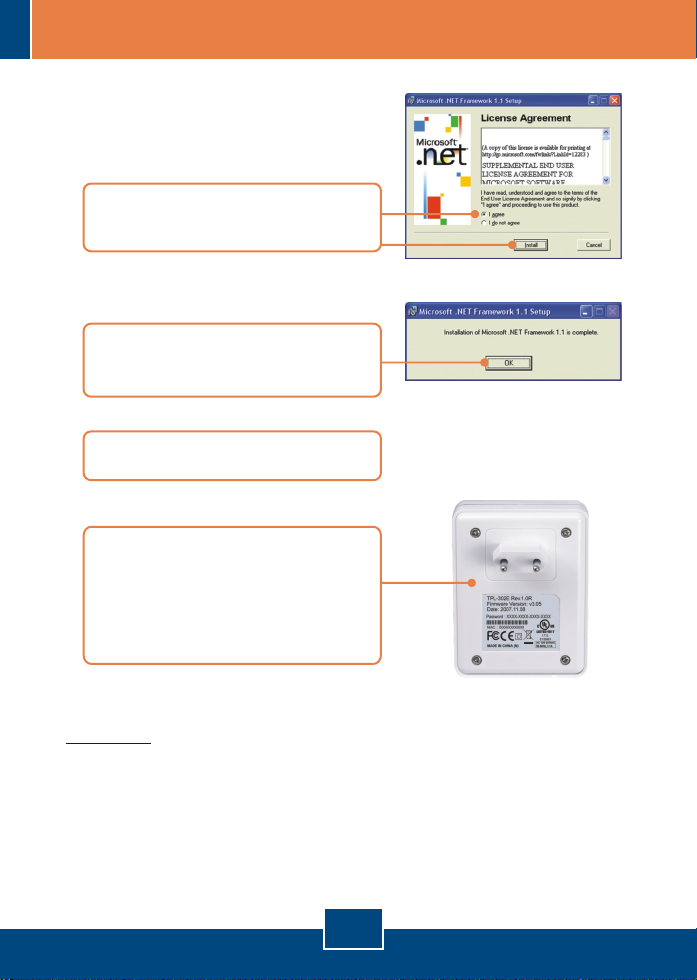
5. Sélectionnez I agree, et cliquez sur
Install.
6. Suivez les instructions d'installation
et cliquez sur OK.
7. Redémarrez votre ordinateur.
8. A l'arrière de chaque TPL-302E,
inscrivez le mot de passe de 12
caractères du périphérique, avec
les tirets. Le mot de passe est
sensible à la casse.
Remarque :
1. NE BRANCHEZ PAS le TPL-302E sur un cordon multiprise ou un régulateur
de tension.
2. Afin que le TPL-302E procède à la reconnaissance, chaque périphérique
doit se trouver sur le même coupe-circuit.
3. Un maximum de 16 TPL-302E peut être installé en réseau.
3
Français
9. Branchez les TPL-302E à une
prise de courant disponible.
10. Relier un câble CAT-5 du TPL 302E à un port disponible de LAN
sur votre routeur (par exemple
TEW-633GR). Connectez ensuite
un câble CAT-5 entre un port LAN
disponible de votre routeur et
votre ordinateur.
11. Branchez un deuxième TPL-302E
à une prise de courant où votre
PC ou matériel réseau distant se
trouve.
12. Double-cliquez sur Powerline AV
Utility sur votre bureau.
Outlet
Outlet
13. Dans le menu déroulant Device
selection (Sélection de
l'appareil), sélectionnez Remote.
Remartque : Distant fait référence au TPL-302E qui est branché à votre PC ou
à votre matériel réseau éloigné.
4
Français
14. Network ID.Cliquez sur
Remarque:
Le nom de réseau de défaut est TRENDnet. Si le nom de réseau
de votre réseau existant de ligne électrique n'est pas TRENDnet, vous devez
changer ceci dans l'utilité.
15. Si vous désirez modifier l'ID
réseau, saisissez l'ID désiré.
Ensuite saisissez les 12
caractères du mot de passe
DAK (périphérique) du TPL-302E
distant (voir étape 8). Remarque
le mot de passe DAK
(périphérique) est sensible à la
casse. Vous devez le saisir avec
les tirets. Par exemple : XXXX XXXX-XXXX-XXXX. Cliquez
ensuite sur Save Changes
(Enregistrer les modifications).
Attendez 30 secondes pour que
les modifications soient
enregistrées.
16. Si Device Selection (Sélection
de l'appareil) ne passe pas
automatiquement en Local,
sélectionnez Local dans le menu
déroulant.
5
Français

Remarque: Local fait référence au TPL-302E qui est branché à une connexion
Ethernet de votre réseau ou à un port LAN disponible de votre routeur.
17. Saisissez le même ID réseau que
celui que vous avez indiqué à
l'étape 15. Cliquez ensuite sur
Save Changes (Enregistrer les
modifications).
18. Branchez un câble CAT 5 entre le
TPL-302E et votre PC ou matériel
réseau distant.
Outlet
La configuration Powerline est à présent terminée.
Si vous désirez des informations détaillées sur la configuration et les
paramètres avancés du TPL-302E, veuillez consulter le Guide de l'utilisateur
fourni sur le CD-ROM ou le site Internet de TRENDnet sur www.trendnet.com.
Afin d’être sûr de recevoir le meilleur niveau de service clientèle et le meilleur support
possibles, veuillez prendre le temps d’enregistrer votre produit en ligne sur:
www.trendnet.com/register
Nous vous remercions d’avoir choisi Trendnet
6
Français
Enregistrez votre produit

1. Before You Start
Package Contents
?TPL-302E
?Utility CD-ROM
?Quick Installation Guide
System Requirements
C
D-ROM drive
?
?A Desktop or Laptop PC with Network Adapter Installed
?CPU: 300MHz or above / 800MHz or above (Windows Vista)
Memory: 256MB or above / 512MB or above (Windows Vista)
?
?Existing HomePlug AV network
?Existing 10/100Mbps wired network when TPL-302E is used as a bridge
device
Utility Requirements
Windows 2000/XP/Vista
?
?Microsoft Net Framework 1.1
Application
7
English
In
In
t
t
er
er
n
n
e
e
t
t

2. How to Install
Important! DO NOT install the TPL-302E until instructed to do so
For Windows Users
1. Insert the Utility CD-ROM into
your computer's CD-ROM Drive
and then click Install Utility.
2. Follow the InstallShield Wizard
instructions.
3. Select No, I will restart my
computer later (Windows 2000
only).
4. Click Finish.
Note: If Microsoft Net Framework 1.1 is installed on your computer skip to step
7. If Microsoft Net Framework 1.1 is not installed continue to step 5.
8
English

5. Select I agree, then click Intall.
6. Follow the setup instructions and
then click OK.
7. Restart your computer.
8. On the back of the each TPL-302E,
copy down the 12 digit device
password with the dashes in
between. The device password is
case sensitive.
Note:
1. DO NOT plug the TPL-302E into a power strip or surge protector.
2. In order for the TPL-302E to see each other, each unit must be on the same
circuit breaker box.
3. A maximum of 16 TPL-302E can be networked.
9
English

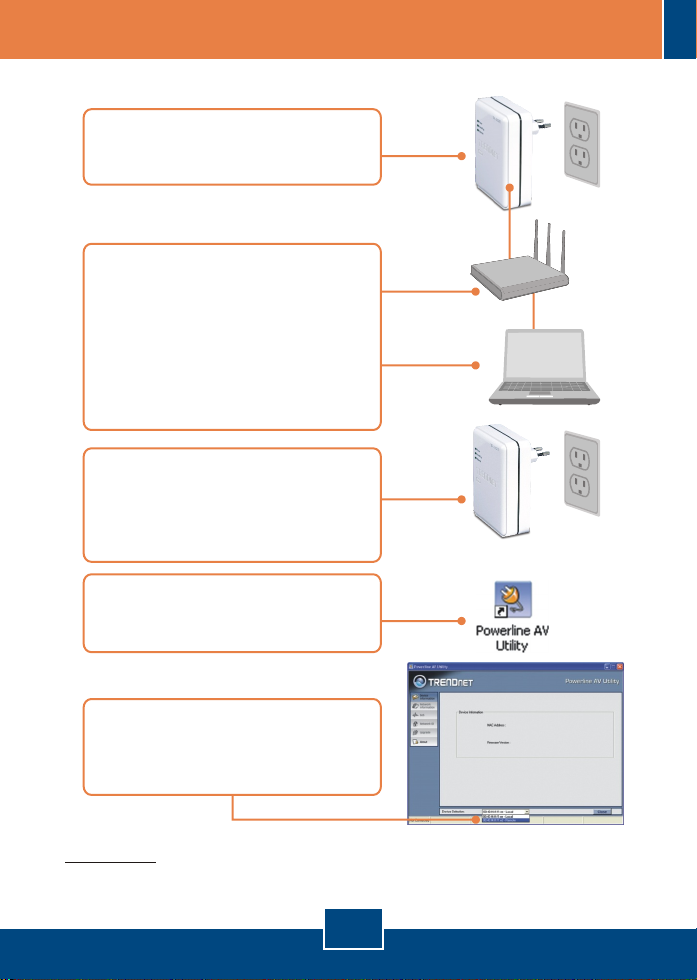
9. Plug the TPL-302E into an
available power outlet.
10. Connect a CAT-5 cable from the
TPL-302E to an available LAN
port on your router (e.g. TEW 633GR). Then connect a CAT-5
cable from an available LAN port
on your router to your computer.
11. Plug a second TPL-302E into an
outlet where your remote PC or
network appliance is located.
12. Double-click the Powerline AV
Utility on your desktop.
Outlet
Outlet
13. Select Remote from the Device
Selection dropdown box.
Note: Remote refers to the TPL-302E that is connected to your remote PC or
network appliance.
10
English

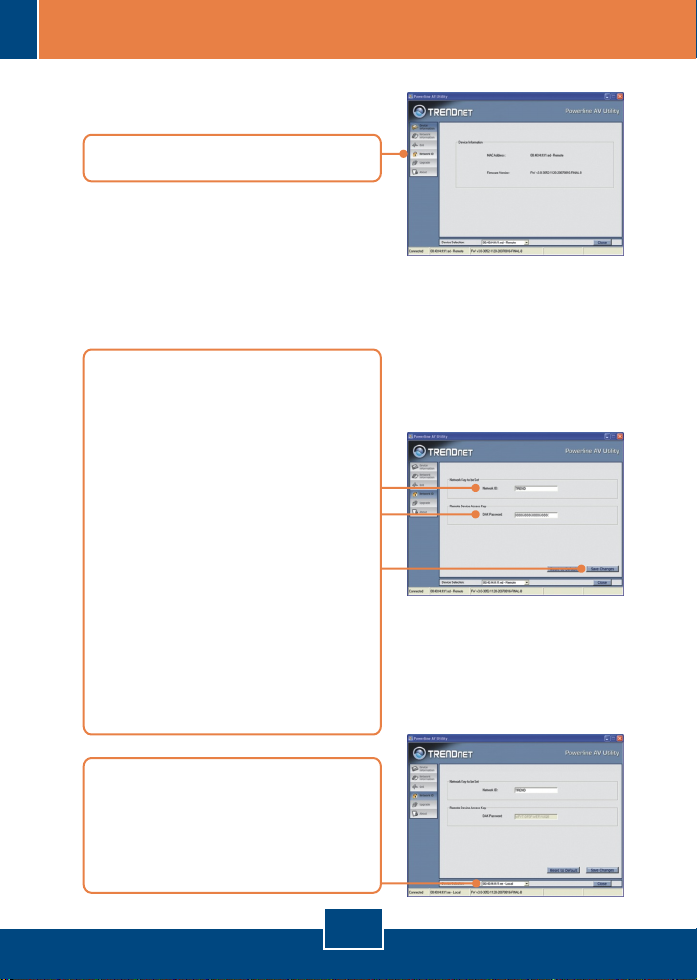
14. Click Network ID.
Note: The default network name is TRENDnet. If the network ID of your
existing Powerline network is NOT TRENDnet, you must change this in the
utility.
15. If you would like to change the
Network ID, enter the desired ID.
Then enter the 12 digit DAK
(device) Password for the
Remote TPL-302E (see step 8).
Note: The DAK (device)
Password is case sensitive. You
must enter the DAK (device)
password with the dashes. For
example: XXXX-XXXX-XXXX-
XXXX. Then click Save Changes.
Wait 30 seconds while changes
are being saved.
16. If Device Selection does not
automatically switch to Local,
select Local from the dropdown
list.
Note: Local refers to the TPL-302E that is connected to an Ethernet
connection on your network or an available LAN port on your router.
11
English

17. Enter the same Network ID that
you entered in Step 15. Then
click Save Changes.
18. Connect a CAT 5 cable from the
TPL-302E into your remote PC or
Outlet
network appliance.
Your installation is now complete.
For detailed information regarding the TPL-302E configuration and advanced
settings, please refer to the User's Guide included on the Utility CD-ROM or
TRENDnet's website at www.trendnet.com
To ensure the highest level of customer service and support, please take a moment to
register your product Online at: www.trendnet.com/register
Thank you for choosing TRENDnet
12
English
Register Your Product

Dépannage
J'ai inséré le CD-ROM du TPL-302E dans le lecteur de CR-ROM de mon PC et
Q1 :
le menu d'installation n'apparaît pas automatiquement. Que faire ?
Si le menu d'installation n'apparaît pas automatiquement, cliquez sur
R1:
Démarrer, sur Exécuter, et tapez D:\Autorun.exe, « D » étant la lettre attribuée au
lecteur de CD-ROM de votre ordinateur. Cliquez ensuite sur OK pour débuter
l'installation.
J'ai vérifié si mon périphérique Powerline était branché à mon poste de
Q2:
travail, mais je n'arrive pas à détecter d'autres périphériques Powerline.
Que faire ?
Vérifiez tout d'abord que vous utilisez bien des câbles Ethernet Cat. 5.
R2:
Ensuite, ouvrez l'utilitaire AV Powerline TRENDnet et cliquez sur scan.
Troisièmement, branchez le périphérique éloigné près du périphérique local.
Enfoncez le bouton d'installation rapide (quick setup) à l'avant du périphérique
local et du périphérique éloigné pendant 10 secondes pour réinitialiser le
périphérique. Ensuite, enfoncez le bouton d'installation rapide du périphérique
local durant 3 secondes. Enfin, enfoncez le bouton d'installation rapide du
périphérique éloigné durant 3 secondes. Enfin, vérifiez que la prise de courant à
laquelle le TPL-302E est branchée se trouve sur le même réseau de distribution
électrique et/ou disjoncteur.
J'arrive à détecter les périphériques Powerline de mon réseau Powerline,
Q3 :
mais n'arrive pas à me brancher à Internet. Que faire ?
Assurez-vous tout d'abord que vous n'avez pas connecté le périphérique à
R3 :
une barrette multiprise ou à un régulateur de tension. Ensuite, assurez-vous que
votre routeur est bien branché à Internet. Enfin, vérifiez que les paramètres
TCP/IP sont positionnés sur Obtain an IP address automatically (Obtenir une
adresse IP automatiquement).
13

1. Allez dans le Panneau de configuration, doublecliquez sur l'icône Connexions réseau, ensuite faites
un clic droit sur l'icône Connexion au réseau local et
cliquez sur Propriétés.
2. Cliquez sur Internet Protocol (TCP/IP) (Protocole
Internet (TCP/IP) et ensuite sur Properties
(Propriétés). Cliquez sur Obtain an IP address
automatically (Obtenir une adresse IP
automatiquement) et ensuite sur OK.
Q4:
Lorsque je tente de configurer un périphérique éloigné, un message d'erreur
apparaît. Que faire ?
R4:
Assurez-vous tout d'abord de copier le mot de passe de 12 caractères.
Ensuite, saisissez ces 12 caractères dans l'utilitaire. Le mot de passe du
périphérique est sensible à la différence entre majuscules et minuscules et vous
devrez saisir les traits d'union. Par exemple : XXXX-XXXX-XXXX-XXXX.
J'ai un réseau HomePlug 1.0 ou HomePlug tubo. Puis-je l'utiliser avec mon
Q5:
réseau ?
Le TPL-302E n'est pas rétrocompatible avec HomePlug 1.0 ou HomePlug
R5:
turbo.
Si vous avez la moindre question concernant la , veuillez contacter le
département d’assistance technique de TRENDnet.
TPL-302E
14

Troubleshooting
Q1:
I inserted the TPL-302E CD-ROM into my computer's CD-ROM Drive and the
installation menu does not appear automatically. What should I do?
If the installation menu does not appear automatically, click Start, click Run,
A1:
and type D:\Autorun.exe where "D" in "D:\Autorun.exe" is the letter assigned to
your computer's CD-ROM Drive. And then click OK to start the installation.
I have verified that my Powerline device is connected to my workstation, but I
Q2:
cannot detect other Powerline devices. What should I do?
First, verify that you are using Cat 5 Ethernet cables. Second, open up the
A2:
Powerline AVUtility and click scan. Third, plug the remote device near the local
device. Press on the quick setup button on the front of the local device and
remote device for 10 seconds to reset the device. Then press on the quick setup
button on the local device for 3 seconds. Then press on the quick setup button on
the remote device for 3 seconds. Fourth, verify that the power outlet the TPL-302E
is plugged into is on the same electrical power distribution and/or circuit breaker
box.
I can detect my Powerline devices on my Powerline network, but I cannot
Q3:
connect to the Internet. What should I do?
First, make sure you are not connecting the device into a power strip or surge
A3:
protector. Second, make sure that your Router is connected to the internet. Third,
verify that the TCP/IP settings are set to Obtain an IP address automatically.
1. Go into the Control Panel and double-click the
Network Connections icon, and then right-click the
Local Area Connection icon and then click
Properties.
2. Click Internet Protocol (TCP/IP) and then click
Properties. Click on Obtain an IP automatically and
then click OK.
15

When I try to configure a remote device, an error message appears. What
Q4:
should I do?
First, make sure you copy down the 12 digit device password. Second, enter
A4:
the 12 digit device password in the utility. You need to enter dashes. For
example: XXXX-XXXX-XXXX-XXXX.
I have a HomePlug 1.0 or HomePlug turbo network. Can I use this with my
Q5:
network?
The TPL-302E is not backwards compatible with HomePlug 1.0 or HomePlug
A5:
turbo.
If you still encounter problems or have any questions regarding the TPL-302E, please
refer to the User's Guide included on the Utility CD-ROM or contact TRENDnet's
Technical Support Department.
16

Limited Warranty
TRENDnet warrants its products against defects in material and workmanship, under
normal use and service, for the following lengths of time from the date of purchase.
TPL-302E/TPL-302E2K
If a product does not operate as warranted above during the applicable warranty period,
TRENDnet shall, at its option and expense, repair the defective product or deliver to
customer an equivalent product to replace the defective item. All products that are
replaced will become the property of TRENDnet. Replacement products may be new or
reconditioned.
TRENDnet shall not be responsible for any software, firmware, information, or memory
data of customer contained in, stored on, or integrated with any products returned to
TRENDnet pursuant to any warranty.
There are no user serviceable parts inside the product. Do not remove or attempt to
service the product through any unauthorized service center. This warranty is voided if
(i) the product has been modified or repaired by any unauthorized service center, (ii) the
product was subject to accident, abuse, or improper use (iii) the product was subject to
conditions more severe than those specified in the manual.
Warranty service may be obtained by contacting TRENDnet office within the applicable
warranty period for a Return Material Authorization (RMA) number, accompanied by a
copy of the dated proof of the purchase. Products returned to TRENDnet must be preauthorized by TRENDnet with RMA number marked on the outside of the package, and
sent prepaid, insured and packaged appropriately for safe shipment.
- 3-Year Limited Warranty
17

WARRANTIES EXCLUSIVE: IF THE TRENDNET PRODUCT DOES NOT OPERATE
AS WARRANTED ABOVE, THE CUSTOMER’S SOLE REMEDY SHALL BE, AT
TRENDNET’S OPTION, REPAIR OR REPLACEMENT. THE FOREGOING
WARRANTIES AND REMEDIES ARE EXCLUSIVE AND ARE IN LIEU OF ALL OTHER
WARRANTIES, EXPRESSED OR IMPLIED, EITHER IN FACT OR BY OPERATION OF
LAW, STATUTORY OR OTHERWISE, INCLUDING WARRANTIES OF
MERCHANTABILITY AND FITNESS FOR A PARTICULAR PURPOSE. TRENDNET
NEITHER ASSUMES NOR AUTHORIZES ANY OTHER PERSON TO ASSUME FOR IT
ANY OTHER LIABILITY IN CONNECTION WITH THE SALE, INSTALLATION,
MAINTENANCE OR USE OF TRENDNET’S PRODUCTS.
TRENDNET SHALL NOT BE LIABLE UNDER THIS WARRANTY IF ITS TESTING AND
EXAMINATION DISCLOSE THAT THE ALLEGED DEFECT IN THE PRODUCT DOES
NOT EXIST OR WAS CAUSED BY CUSTOMER’S OR ANY THIRD PERSON’S
MISUSE, NEGLECT, IMPROPER INSTALLATION OR TESTING, UNAUTHORIZED
ATTEMPTS TO REPAIR OR MODIFY, OR ANY OTHER CAUSE BEYOND THE
RANGE OF THE INTENDED USE, OR BY ACCIDENT, FIRE, LIGHTNING, OR OTHER
HAZARD.
LIMITATION OF LIABILITY: TO THE FULL EXTENT ALLOWED BY LAW TRENDNET
ALSO EXCLUDES FOR ITSELF AND ITS SUPPLIERS ANY LIABILITY, WHETHER
BASED IN CONTRACT OR TORT (INCLUDING NEGLIGENCE), FOR INCIDENTAL,
CONSEQUENTIAL, INDIRECT, SPECIAL, OR PUNITIVE DAMAGES OF ANY KIND,
OR FOR LOSS OF REVENUE OR PROFITS, LOSS OF BUSINESS, LOSS OF
INFORMATION OR DATE, OR OTHER FINANCIAL LOSS ARISING OUT OF OR IN
CONNECTION WITH THE SALE, INSTALLATION, MAINTENANCE, USE,
PERFORMANCE, FAILURE, OR INTERRUPTION OF THE POSSIBILITY OF SUCH
DAMAGES, AND LIMITS ITS LIABILITY TO REPAIR, REPLACEMENT, OR REFUND
OF THE PURCHASE PRICE PAID, AT TRENDNET’S OPTION. THIS DISCLAIMER OF
LIABILITY FOR DAMAGES WILL NOT BE AFFECTED IF ANY REMEDY PROVIDED
HEREIN SHALL FAIL OF ITS ESSENTIAL PURPOSE.
Governing Law: This Limited Warranty shall be governed by the laws of the state of
California.
Note: AC/DC Power Adapter, Cooling Fan, Power Supply, and Cables carry a 1-Year
Warranty
18

Certifications
This equipment has been tested and found to comply with FCC and CE Rules.
Operation is subject to the following two conditions:
(1) This device may not cause harmful interference.
(2) This device must accept any interference received. Including interference that may
cause undesired operation.
Waste electrical and electronic products must not
be disposed of with household waste. Please
recycle where facilities exist. Check with you Local
Authority or Retailer for recycling advice.
NOTE: THE MANUFACTURER IS NOT RESPONSIBLE FOR ANY RADIO OR TV
INTERFERENCE CAUSED BY UNAUTHORIZED MODIFICATIONS TO THIS
EQUIPMENT. SUCH MODIFICATIONS COULD VOID THE USER’S AUTHORITY TO
OPERATE THE EQUIPMENT.
ADVERTENCIA
En todos nuestros equipos se mencionan claramente las caracteristicas del adaptador de
alimentacón necesario para su funcionamiento. El uso de un adaptador distinto al
mencionado puede producir daños fisicos y/o daños al equipo conectado. El adaptador
de alimentación debe operar con voltaje y frecuencia de la energia electrica domiciliaria
existente en el pais o zona de instalación.

Product Warranty Registration
Please take a moment to register your product online.
Go to TRENDnet’s website at http://www.trendnet.com/register
20675 Manhattan Place
Torrance, CA 90501
USA
Copyright ©2009. All Rights Reserved. TRENDnet.
 Loading...