

Page 1

IQ3 Web User Guide
Issue 2
Page 2

Author: Technical Publications
Issue: 2
Date: 02/02/2009
Part Number: TC200631
Copyright: © 2009 Honeywell Technologies Sàrl, ECC Division. All rights reserved.
This manual contains proprietary information that is protected by copyright. No part of this manual may be reproduced,
transcribed, stored in a retrieval system, translated into any language or computer language, or transmitted in any
form whatsoever without the prior consent of the publisher.
Manufactured for and on behalf of the Environmental and Combustion Controls Division of Honeywell Technologies
Sàrl, ZA, La Pièce, 16, 1180 Rolle, Switzerland by its Authorized Representative, Trend Control Systems Limited
For information contact:
Trend Control Systems Limited
P.O. Box 34
Horsham
West Sussex
RH12 2YF
United Kingdom
NOTICE: Trend Control Systems Limited makes no representations or warranties of any kind whatsoever with
respect to the contents hereof and specically disclaims any implied warranties of merchantability or tness for any
particular purpose. Trend Control Systems Limited shall not be liable for any errors contained herein or for incidental
or consequential damages in connection with the furnishing, performance or use of this material. Trend Control
Systems Limited reserves the right to revise this publication from time to time and make changes in the content
hereof without obligation to notify any person of such revisions or changes.
Please send any comments on this or any other Trend technical publication to techpubs@trendcontrols.com
Page 3

IQ3 Web User Guide TC200631 Issue 2, 02/02/2009 3
Table of Contents
TABLE OF CONTENTS
1 ABOUT THIS MANUAL ..................................................................................................................................5
1.1 Conventions Used in this Manual ........................................................................................................................5
1.2 Contacting Trend .................................................................................................................................................6
2 ABOUT IQ3 .......................................................................................................................................................7
3 IQ3 PAGES ........................................................................................................................................................9
3.1 Welcome Page .....................................................................................................................................................9
3.2 Alarms Page .......................................................................................................................................................10
3.3 Modules Page ....................................................................................................................................................11
3.4 Module Detail Pages ..........................................................................................................................................13
3.5 Graphical Display Pages ....................................................................................................................................14
3.6 Graph Pages .......................................................................................................................................................15
4 USING IQ3 FROM A WEB BROWSER ......................................................................................................17
4.1 Basic Use ...........................................................................................................................................................17
4.1.1 Connect to the IQ3 Controller.....................................................................................................18
4.1.2 Login ...........................................................................................................................................18
4.1.3 Log Out .......................................................................................................................................19
4.1.4 Refresh the Display .....................................................................................................................19
4.2 Add a User .........................................................................................................................................................19
4.3 View Occupation Times .....................................................................................................................................21
4.3.1 View Normal Occupation Times .................................................................................................21
4.3.2 View Exceptions .........................................................................................................................22
4.3.3 Adjust Occupation Times ............................................................................................................23
4.3.4 Change Normal Occupation Times .............................................................................................23
4.3.5 Set up Exceptions ........................................................................................................................24
4.4 Adjust Values .....................................................................................................................................................28
4.4.1 Adjust a Knob’s Value ................................................................................................................28
4.4.2 Adjust a Switch’s Status..............................................................................................................29
4.4.3 Adjust Module Parameters ..........................................................................................................30
4.5 Display a Graph .................................................................................................................................................31
4.5.1 Display the Graph Data ...............................................................................................................32
4.5.2 Zoom in and Out of a Graph .......................................................................................................32
4.5.3 Formatting Graphs ......................................................................................................................32
4.6 Display 10 Modules From a Specied Module .................................................................................................33
4.7 Display Other Modules ......................................................................................................................................33
4.8 View Graphical Display Pages ..........................................................................................................................34
4.9 View the Alarm Log ..........................................................................................................................................35
4.10 View Module List Pages ....................................................................................................................................36
4.11 View Module Detail Pages ................................................................................................................................37
4.12 Goto the Associated Module ..............................................................................................................................37
INDEX ..........................................................................................................................................................................39
Page 4

4 IQ3 Web User Guide TC200631 Issue 2, 02/02/2009
Table of Contents
Page 5

IQ3 Web User Guide TC200631 Issue 2, 02/02/2009 5
About This Manual
1 ABOUT THIS MANUAL
This manual applies to IQ3 controllers with version 2.10 rmware. It provides a description of how to use an IQ3
controller when accessing it using a web browser. It is intended for a reader with knowledge of the IQ3 modules. It is
assumed that the controller has already been set up and congured, and the user is familiar with basic computer use,
and has knowledge of IQ conguration modules and of BMS. It is divided into several sections.
About IQ3
This section describes IQ3 controller.
IQ3 Pages
This section describes the different displays available when an IQ3 controller is accessed from a web
browser.
Using IQ3 From a Web Browser
This section describes how to use an IQ3 controller from a web browser once it has been installed and
congured.
Other relevant documentation is:
IQ3 Data Sheet (TA200505)
Product Data Sheets
To ensure you have the latest issue of these documents check our WEB site (www.trend-controls.com).
1.1 Conventions Used in this Manual
There are numerous items and instructions in this manual, the conventions below are designed to make it quick and
easy to nd and understand the information.
Options that you need to select are in ▪ bold type.
The names of text boxes and screens are in ▪ bold type.
Text you should enter is in ▪ Italic type.
Page 6

6 IQ3 Web User Guide TC200631 Issue 2, 02/02/2009
About This Manual
1.2 Contacting Trend
Head Ofce
Trend Control Systems Ltd
PO Box 34
Horsham
Sussex
RH12 2YF
England
Tel: +44 (0) 1403 211888
Fax: +44 (0) 1403 241608
Details of regional ofces can be found on our web site.
Internet
Our company web site (www.trend-controls.com) provides information about our products and us, or our support
web site (http://pnet.trend-controls.com).
Technical Support
Our support department provides technical support during normal ofce hours. Before contacting our support
department ensure that you have your Technical Support PIN number available, without this we will be unable to
provide you with any support.
Technical Support Department
Trend Control Systems Ltd.
PO Box 34
Horsham
Sussex
RH12 2YF
England
Tel: +44 (0) 1403 226600
Email: trendts@trendcontrols.com
Fax: +44 (0) 1403 226310
Technical Publications
Please send any comments on this or any other Trend technical publication to techpubs@trendcontrols.com.
Page 7

IQ3 Web User Guide TC200631 Issue 2, 02/02/2009 7
About IQ3
2 ABOUT IQ3
The IQ3 controllers are Building Management System controllers that use Ethernet and TCP/IP networking
technologies. Each controller incorporates a web server which can deliver user-specic web pages to a PC or mobile
device with a web browser. If a system is set up with the correct connections, a user with the appropriate security
codes can monitor or adjust the controller from any internet access point in the world.
This manual describes how to access an IQ3 controller from a web browser, and the pages that it displays.
Page 8

8 IQ3 Web User Guide TC200631 Issue 2, 02/02/2009
About IQ3
Page 9

IQ3 Web User Guide TC200631 Issue 2, 02/02/2009 9
IQ3 Pages
Refreshes the data in the alarm list.
Login/
Logout
This button changes between Login, and Logout depending on whether you have entered a valid
user name and password. Login enables the user name and password to be entered, and Logout
enables you to logout when you nish
Alarms
Displays the Alarms page which lists modules in the controller’s alarm log.
Time Zones
Displays the Time Zone Overview page which contains a list of the time zone modules.
Modules
Displays the Modules page which provides access to the module pages.
GraphIQs
Displays the top level graphical display page congured for the controller if one exists.
3 IQ3 PAGES
This section describes how IQ3 controllers appear when accessed using a web browser. There are a number of
different pages:
Welcome Page
Alarms Page
Modules Page
Module Detail Pages
Graphical Display Pages
Graph Pages
Welcome Page3.1
When accessing an IQ3 controller from a web browser the Welcome Page shown below is displayed. This page
allows you to login, and provides access to alarms, timezones list of modules, and GraphIQs pages.
The Welcome Page has a menu bar along the top which provides access to other pages, and enables the data on the
existing page to be refreshed. The table below describes the function of each button.
Button Description
Page 10
10 IQ3 Web User Guide TC200631 Issue 2, 02/02/2009
IQ3 Pages
Refreshes the data in the alarm list.
Login/
Logout
This button changes between Login, and Logout depending on whether you have entered a valid
user name and password. Login enables the user name and password to be entered, and Logout
enables you to logout when you nish
Alarms
Displays the Alarms page which lists modules in the controller’s alarm log.
Time Zones
Displays the Time Zone Overview page which contains a list of the time zone modules.
Modules
Displays the Modules page which provides access to the module pages.
GraphIQs
Displays the top level graphical display page congured for the controller if one exists.
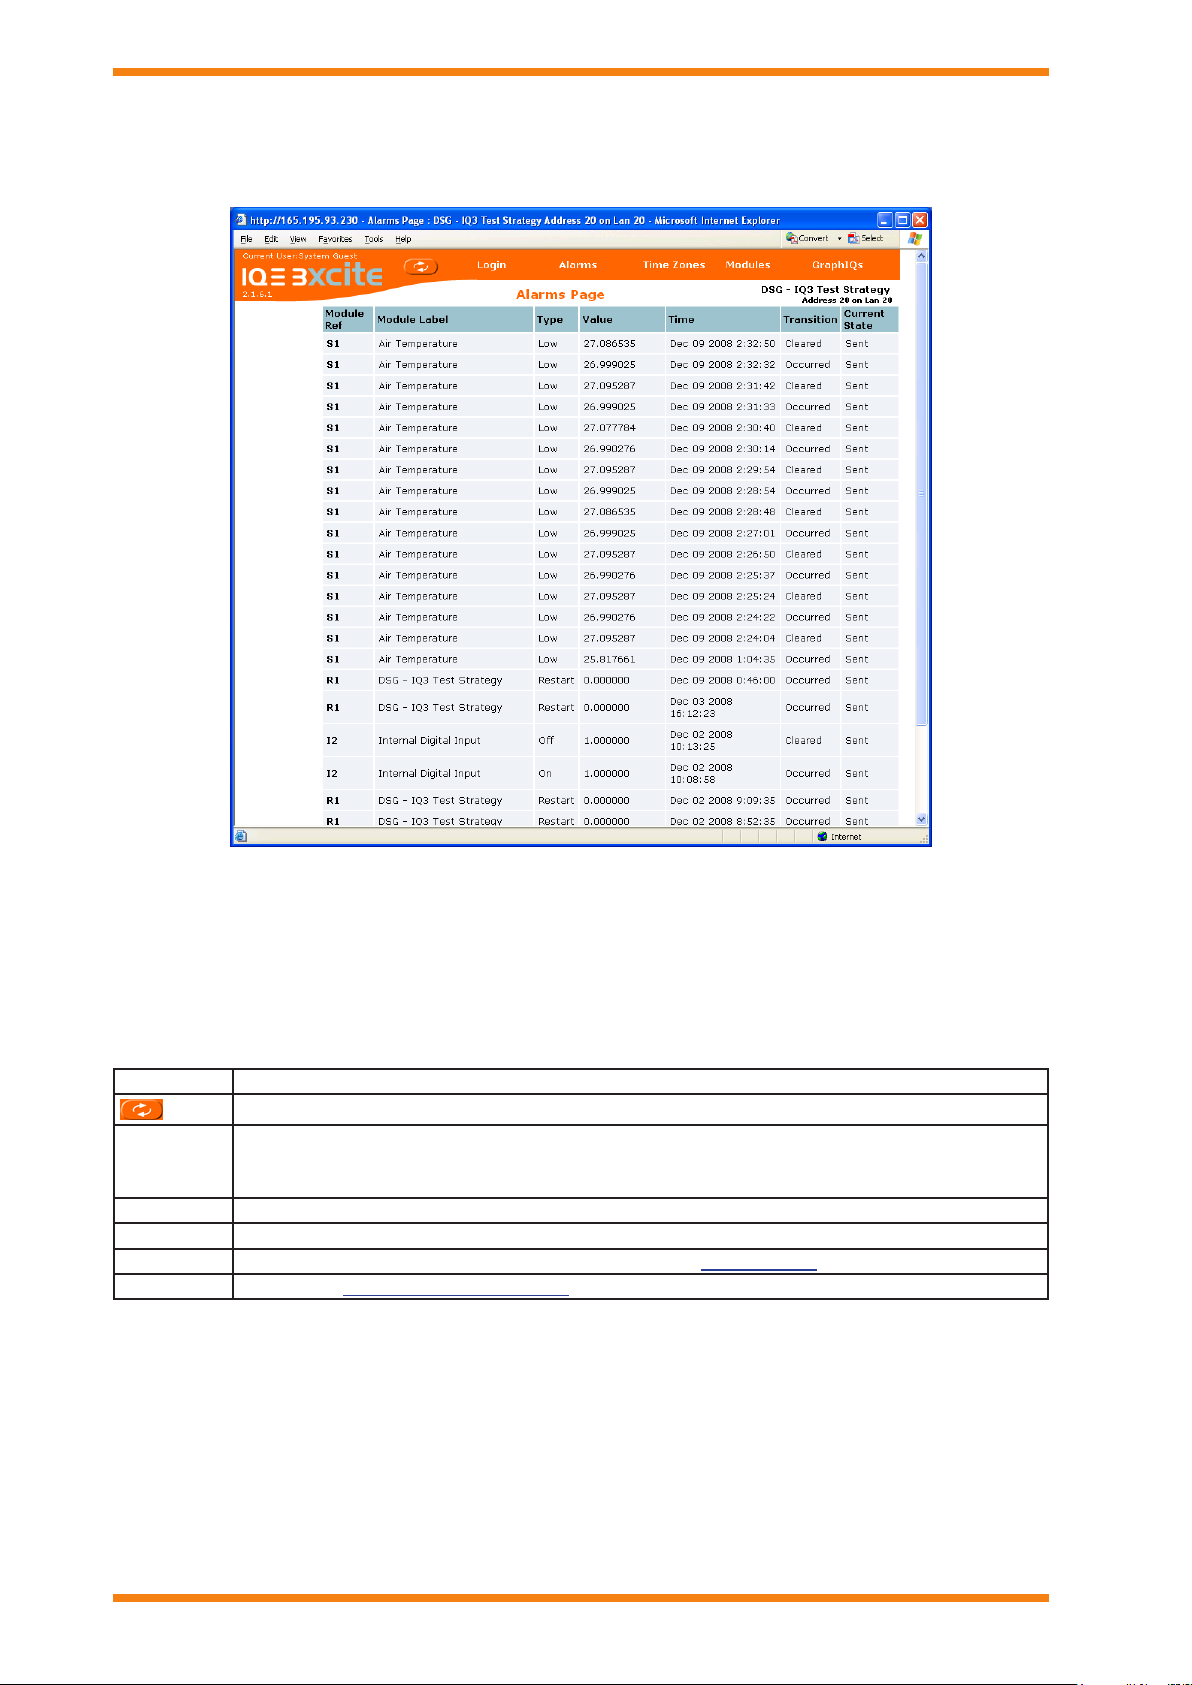
3.2 Alarms Page
The Alarms page, shown below, is accessed by clicking Alarms on the menu bar. It enables you to view the alarm log.
The Alarms page is divided into two areas:
Menu Bar
Alarm List
Menu Bar
The menu bar provides access to other pages, and enables the data on the existing page to be refreshed. The table
below describes the function of each button.
Button Description
Alarm List
The alarm list displays the alarms in the controller’s alarm log, the following information is page displays a list of the
basic alarm attributes from the alarm log. The following information is displayed for each alarm.
Module reference (e.g. S1 for sensor 1)
Label
Alarm type (e.g. high)
Value at the time of alarm
Date and time the alarm occurred
Transition state (occurred or cleared)
Alarm state (e.g. sent), or Event for v2.10 and later
for the Log Buffer events.
Clicking the module reference in the Module Ref column will take you straight to module details page for the module
to which the alarm applies.
Page 11
IQ3 Web User Guide TC200631 Issue 2, 02/02/2009 11
IQ3 Pages
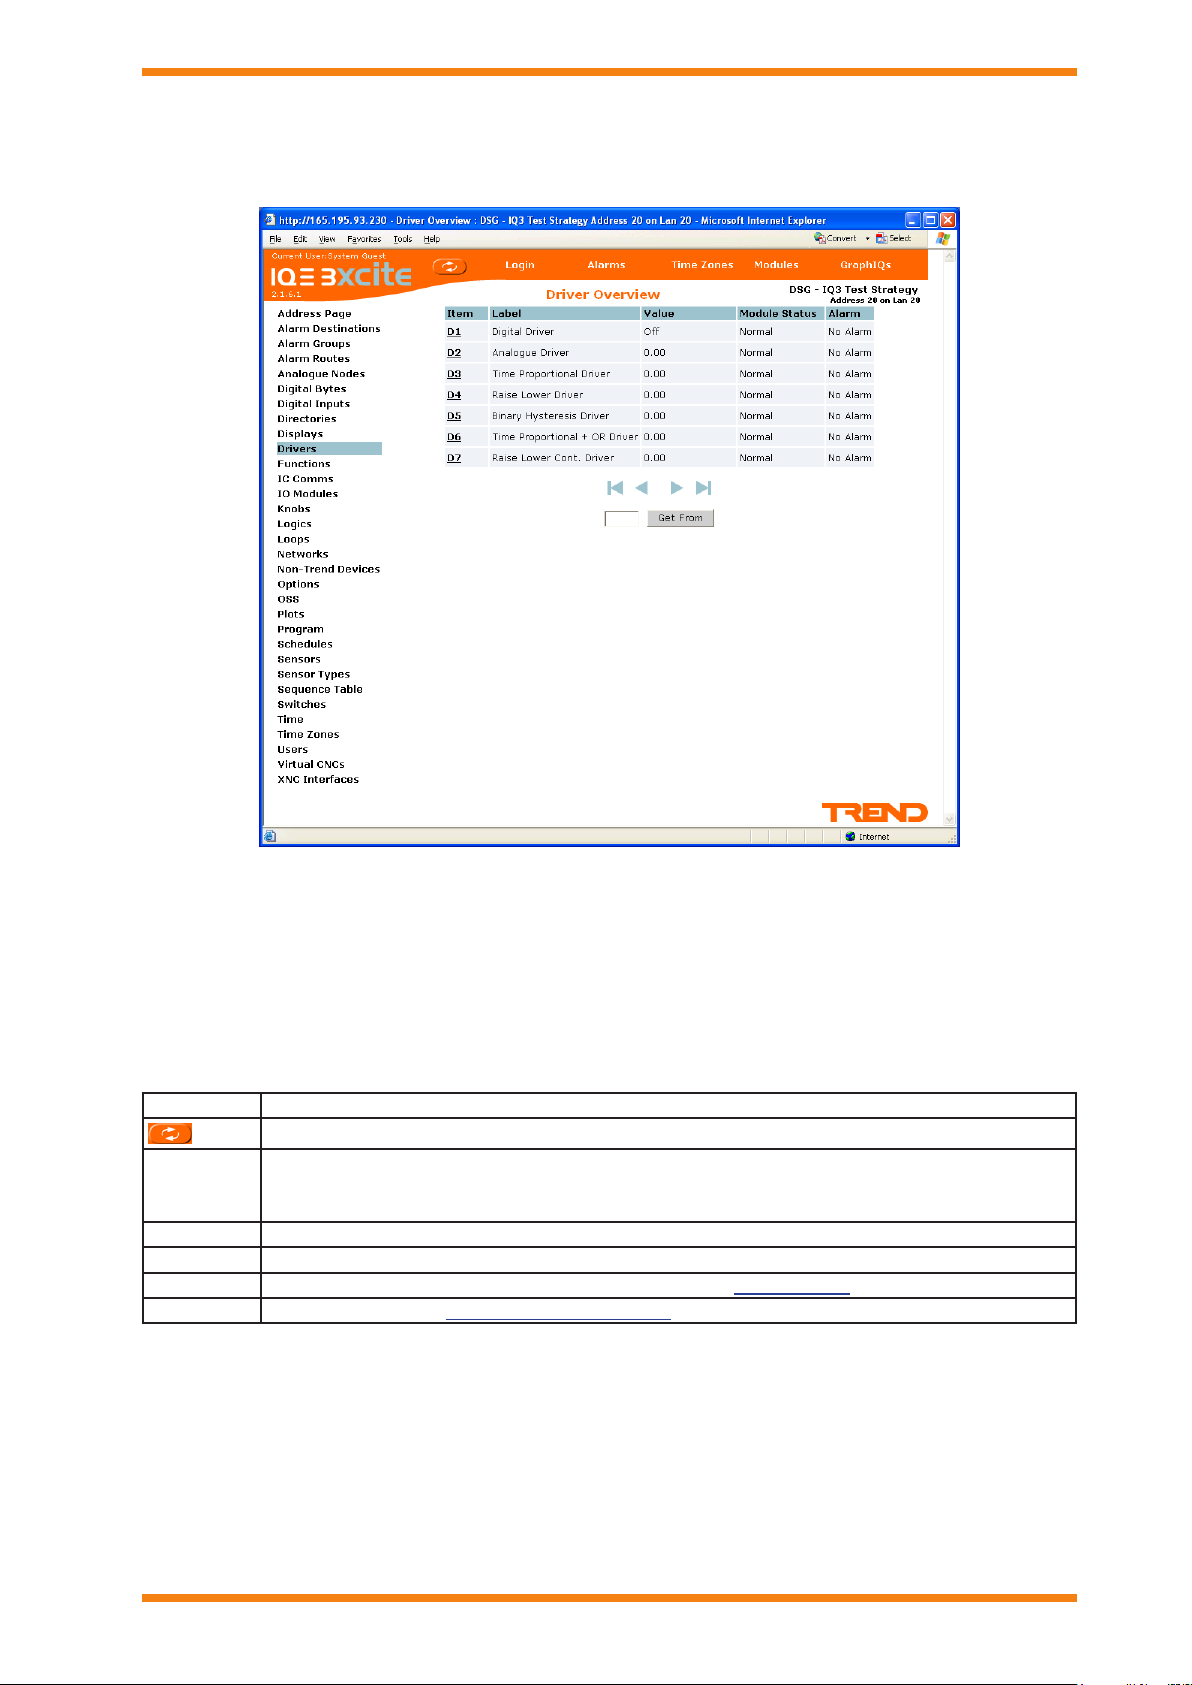
3.3 Modules Page
Refreshes the data in the module list.
Login/
Logout
This button changes between Login, and Logout depending on whether you have entered a valid
user name and password. Login enables the user name and password to be entered, and Logout
enables you to logout when you nish
Alarms
Displays the Alarms page which lists modules in the controller’s alarm log.
Time Zones
Displays the Time Zone Overview page which contains a list of the time zone modules.
Modules
Displays the Modules page which provides access to the module pages.
GraphIQs
Displays the top level top level graphical display congured for the controller if one exists.
The Modules page, shown below, is accessed by clicking Modules.
Module Overview pages are divided into three areas:
Menu Bar
Module Type List
Module List
Menu Bar
The menu bar provides access to other pages, and enables the data on the existing page to be refreshed. The table
below describes the function of each button.
Button Description
Module Type List
The module type list lists all the module types available in the controller. The actual types of module available
depends on the password level of the user currently logged in. Clicking on the module type displays a list of the
modules of that type in the controllers strategy.
Module List
The module list contains a list of the modules of the selected type in the controllers strategy. Clicking a module type
will produce a list of modules which enables a module to be selected to view its parameters, and, if authorised, to
change them.
Page 12
12 IQ3 Web User Guide TC200631 Issue 2, 02/02/2009
IQ3 Pages
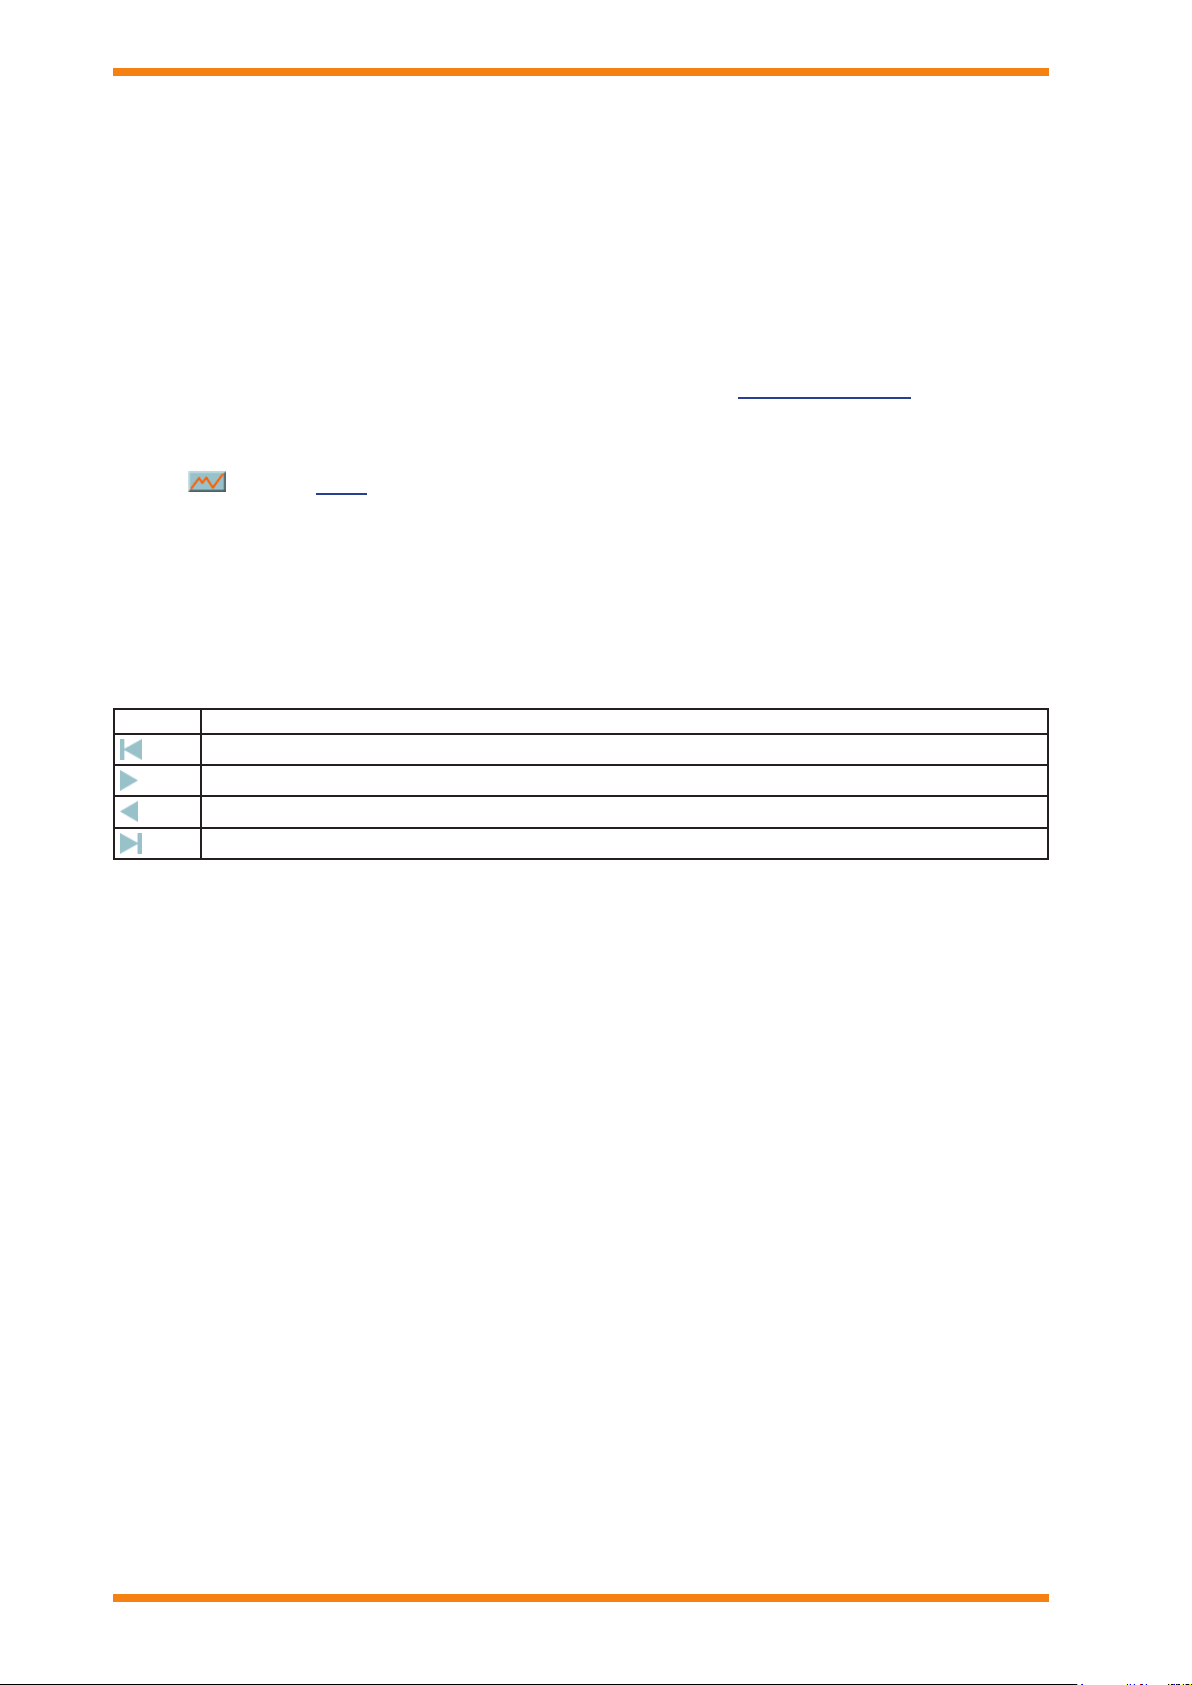
First 10 modules
Next 10 modules
Previous 10 modules
Last 10 modules
3.3 Modules Page (continued)
The list contains all the instances (10 on a page) of that module type in the strategy. The information displayed varies
slightly depending on the module type. An example of the type of information displayed is described below.
Item (e.g. module D1)
Label
Valu e
Status
Alarm condition (e.g. Readback)
Clicking the module reference in the Item column will take you straight to module details page for that module.
In the case of adjustment modules (i.e. knobs and switches), the value/status can be changed, and of sensor and plot
modules can be graphed. Modules that have a current alarm condition associated with them are displayed in red.
Clicking displays a graph.
If time zones have been selected the list provides a list of all the time zones together with the label, the current
occupation state (O=unoccupied, I=occupied), and links to the normal week and exceptions.
Selecting the normal week enables the normal occupation times for each day of the week to be set up. If required the
times can be copied from one to the other. Additional occupation periods can be added to a day.
Buttons at the bottom of the list enable navigation to other modules of the same type.
Button Description
Page 13

IQ3 Web User Guide TC200631 Issue 2, 02/02/2009 13
IQ3 Pages
Button
Description
at the top of the page
Displays the module details page for the previous module of that type e.g. if D2 is
selected D1 is displayed.
at the top of the page
Displays the module details page for the next module of that type e.g. if D1 is
selected D2 is displayed.
in Connection column
Displays the module details page for connected module. If more than one module is
connected the required module can be selected from the list.
Saves any data that has been changed.
3.4 Module Detail Pages
Module Detail Pages are displayed from the modules page or from where a module is referenced clicking it will
display the Module Detail Page for that module providing the reference is underlined.
Module Overview pages are divided into three areas:
Menu Bar
Module Parameter Area
Menu Bar
The menu bar contains the module label and the which refreshes the data in the module parameter area.
Module Parameter Area
The module parameter area displays the parameters for the selected module, and any strategy connections. The
parameters displayed vary depending on the type of module and your password level. If you have a high enough level
of authority, you can make changes to the module parameters, although no structural changes can be made to the
strategy. Buttons enable navigation around the strategy in the controller.
Page 14

14 IQ3 Web User Guide TC200631 Issue 2, 02/02/2009
IQ3 Pages
Refreshes the data in the alarm list.
Login/
Logout
This button changes between Login, and Logout depending on whether you have entered a valid
user name and password. Login enables the user name and password to be entered, and Logout
enables you to logout when you nish
Alarms
Displays the Alarms page which lists modules in the controller’s alarm log.
Time Zones
Displays the Time Zone Overview page which contains a list of the time zone modules.
Modules
Displays the Modules page which provides access to the module pages.
GraphIQs
Displays the top level graphical display page congured for the controller if one exists.
3.5 Graphical Display Pages
The Graphical Display Pages are accessed by clicking GraphIQs, they may also be displayed when you login
depending on how your user has been congured. Graphical Display Pages provide a graphical way of viewing
information from the IQ3 controller, and making changes.
The Graphical Display pages are divided into three areas:
Menu Bar
Directory Tree
Data Area
Menu Bar
The menu bar provides access to other pages, and enables the data on the existing page to be refreshed. The table
below describes the function of each button.
Button Description
Directory Tree
The directory tree contains all the directory modules in the controller in a hierarchal structure. Selecting a directory
module causes the associated display modules to be displayed in the data area.
Data Area
The data area displays the graphical display pages for the directory module that has been selected in the directory
tree.
contains all the directory modules in the controller in a hierarchal structure.
Page 15

IQ3 Web User Guide TC200631 Issue 2, 02/02/2009 15
IQ3 Pages
3.6 Graph Pages
The Graph Pages are accessed by clicking the button when it appears next to a module. The Graph Page
contains a graph of the values in the plot module. Moving the mouse over the graph will display the value of the
graph at that point.
Clicking List displays the values used to draw the graph. The graph can be viewed in more detail by zooming in.
If the value is being logged at more than one interval other intervals can be selected from the list at the top of the
page.
Page 16

16 IQ3 Web User Guide TC200631 Issue 2, 02/02/2009
IQ3 Pages
Page 17

IQ3 Web User Guide TC200631 Issue 2, 02/02/2009 17
Using IQ3 From a Web Browser
Refreshes the data in the alarm list.
Login/
Logout
This button changes between Login, and Logout depending on whether you have entered a
valid user name and password. Login enables the user name and password to be entered, and
Logout enables you to logout when you nish
Alarms
Displays the Alarms page which lists modules in the controller’s alarm log.
Time Zones
Displays the Time Zone Overview page which contains a list of the time zone modules.
Modules
Displays the Modules page which provides access to the module pages.
GraphIQs
Displays the top level graphical display page congured for the controller if one exists.
Button
Description
at the top of the page
Displays the module details page for the previous module of that type e.g. if
D2 is selected D1 is displayed.
at the top of the page
Displays the module details page for the next module of that type e.g. if D1 is
selected D2 is displayed.
in Connection column
Displays the module details page for connected module. If more than one
module is connected the required module can be selected from the list.
Saves any data that has been changed.
Displays a graph of the associated value
4 USING IQ3 FROM A WEB BROWSER
Information from IQ3 controllers can easily be accessed using a web browser, over any TCP/IP network (e.g. the
company intranets, or the internet). This section describes how to use an IQ3 controller from a web browser.
Web browsers running on a PC may be of any conguration providing they are running TCP/IP networking protocol,
have an Ethernet connection, Internet Explorer v6.0 or greater, and a SUN JAVA runtime environment v1.4 or greater
installed. Clients running on PDAs require Windows CE4, and clients running on smartphones require Windows
Mobile 2003 Second Edition and do not support graphs and right to left languages.
Note that IQ3 has not been tested with all devices and Trend cannot guarantee a particular device’s compatibility.
There is a summary of using an IQ3 controller from a web browser in the following section:
Basic Use
For a more detailed description of the different tasks, see the appropriate section of the manual.
4.1 Basic Use
Information from an IQ3 controller can easily be accessed using a web browser, over any TCP/IP network (e.g.
the company intranets, or the Internet). All that is required is the URL of the controller, and a valid user name and
password. Once connection to the controller has been made, it is possible to view and adjust occupation times, view
the alarm history, and view/adjust/graph individual module parameters.
To access an IQ3 controller from a web browser:
Connect to the IQ3 controller as described in the ‘1. Connect to the IQ3 Controller’ section of this manual.
If you have a user name and password for the controller you should click 2. Login to login to ensure the controller
presents you with information that is relevant to you as described in the ‘Login’ section of this manual. This
may cause the controller to display a different page (your homepage).
Having accessed the controller you can navigate around the pages to view the required information and make 3.
adjustments. Clicking the different parts of the screen will enable you to perform different tasks. The display
will make is clear what can be done. The menu bar provides access to other pages, and enables the data on the
existing page to be refreshed. The table below describes the function of each button.
Button Description
Buttons on the different pages enable access to other pages, and navigation around the strategy.
When a reference to a module is displayed with an underline clicking it will display the module’s detail page.
There are a number of standard icons that enable certain task to be performed:
Page 18

18 IQ3 Web User Guide TC200631 Issue 2, 02/02/2009
Using IQ3 From a Web Browser
100
Assigned if no users are set up which gives total access.
-1
Assigned if users are set up, and there is no user called guest that allows the module details and
parameters to be viewed but not adjusted.
Congurable
If a user named guest has been congured, the password level associated with that user is used.
4.1 Basic Use (continued)
The table below lists the common tasks:
Add a User
Adjust Occupation Times
Adjust Values
Display a Graph
Display 10 Modules From a Specied Module
Display Other Modules
4.1.1 Connect to the IQ3 Controller
It is possible to connect to an IQ3 controller from anywhere, providing a TCP/IP connection can be made to it.
To connect to the IQ3 controller:
Connect to the IP network, and ensure that you network setting are set up to enable a TCP/IP connection to 1.
the IQ3 controller.
Run Internet Explorer.2.
Enter the URL of the IQ3 controller. This will be the IP address or name of controller (if DNS is available). 3.
The IQ3 controller’s Welcome Page will be displayed.
Click 4. Login and enter your user name and password to ensure the controller presents you with information
that is relevant to you. For more information see the ‘Login’ section of this manual. This may cause the
controller to display a different page.
If you do not login, you will be given the status of either ‘System Guest’, or ‘Guest’ and the password level that may
be one of:
Password Level Description
View Graphical Display Pages
View Occupation Times
View the Alarm Log
View Module List Pages
View Module Detail Pages
Goto the Associated Module
4.1.2 Login
If it is enabled the IQ3 controller’s security will prevent unauthorised users viewing, and changing information that
they are not authorised to use. This means that when you access the controller from a web browser you should login
so that you see all the information that you need.
The user name and password should be entered. This must correspond to those set up in one of the controller’s user
modules. The user module will dene the password level (i.e. what can be changed), and the home page for that user.
If the home page is set up, it will be displayed once the user is logged in.
To login:
Connect to the IQ3 controller as described in the ‘1. Connect to the IQ3 Controller’ section of this manual.
Click 2. Login.
In the 3. User Name box enter your user name.
In the 4. Password box enter your password.
Caution: If you check the Save this password in your password list box anybody accessing the IQ3 from
your PC will automatically be logged in as you.
Click 5. OK. You will now be logged in, and if one has been set up your home page will be displayed.
The home page can be one of the directory pages, which can be graphical display pages, or could also be any other
HTML page (e.g. any standard IQ3 page, or a company web site). Once you have logged in the Login button changes
to Logout. You should logout and close the browser after completing a session in order to preserve security.
Page 19

IQ3 Web User Guide TC200631 Issue 2, 02/02/2009 19
Using IQ3 From a Web Browser
4.1.3 Log Out
Once use of the IQ3 controller is nished, it is advisable to log out to prevent unauthorised changes being made.
To log out:
Click 1. Logout.
Close the browser.2.
Note that if left unattended for a period of time the controller may automatically log the current user out if it has
been congured in this way.
4.1.4 Refresh the Display
The data displayed can be refreshed to ensure that it is up-to-date.
To refresh the display:
Click 1. .
4.2 Add a User
If required users can be added to prevent unauthorised changes.
To add a user:
Connect to the IQ3 controller as described in the ‘1. Connect to the IQ3 Controller’ section of this manual.
Note that you must login as a use with a password level of at least 99.
Click 2. Modules.
Click 3. Users.
Click 4. Create New User. The display shown below is displayed.
In the 5. User Name box enter the required user name. This is a 30-character name used when logging in from
a web browser.
Page 20

20 IQ3 Web User Guide TC200631 Issue 2, 02/02/2009
Using IQ3 From a Web Browser
4.2 Add a User (continued)
In the 6. Password box enter the password associated with the user name. This must be entered by the user when
logging in from a web browser.
In the 7. Re-type Password box re-enter the password associated with the user name. This must be entered by
the user when logging in from a web browser.
Click 8. Create New. The new user will be added.
Edit the new user module to set up the necessary parameters as described in the ‘9. Adjust Module Parameters’
section of this manual.
Page 21

IQ3 Web User Guide TC200631 Issue 2, 02/02/2009 21
Using IQ3 From a Web Browser
View Occupation Times4.3
Information about the normal weekly occupation times any exceptions to those occupation times can be viewed:
View Normal Occupation Times
View Exceptions
Selecting the normal week enables the normal occupation times for each day of the week to be set up. If required
the times can be copied from one to the other. Additional occupation periods can be added to a day. Selecting the
exceptions enables exceptions to standard working to be set up. Clicking the module in the ‘Zone’ column will take
you straight to module details page for the zone.
4.3.1 View Normal Occupation Times
The normal occupation times specify the occupation times that will be used for each day unless there is an
exception.
To view the normal occupation times:
Connect to the IQ3 Controller as described in the ‘1. Connect to the IQ3 Controller’ section of this manual.
Click 2. Time Zones. If the required time zone is not displayed use the buttons to navigate to
the required time zone.
Click 3. Normal Week. A display similar to the one shown below appears in a different window.
This display indicates the occupation times for each day of the week. To view details of the occupation times
for a particular day click the required day.
Page 22

22 IQ3 Web User Guide TC200631 Issue 2, 02/02/2009
Using IQ3 From a Web Browser
4.3.2 View Exceptions
The exceptions dene the date(s) to which the exception applies, and occupation times that will be used one those
dates.
To view exceptions:
Connect to the IQ3 Controller as described in the ‘1. Connect to the IQ3 Controller’ section of this manual.
Click 2. Time Zones. If the required time zone is not displayed use the buttons to navigate to
the required time zone.
Click 3. Exceptions. A list of the exceptions is displayed, shown below, this list contains the dates to which the
exceptions apply their priority, and whether they occur once, or every year.
This display lists the exceptions for the time zone. To view the occupation times for the exception click
next to the required exception.
Once the times are displayed clicking the button at the top of the page will return to the list of exceptions.
Page 23

IQ3 Web User Guide TC200631 Issue 2, 02/02/2009 23
Using IQ3 From a Web Browser
4.3.3 Adjust Occupation Times
The occupation times of the controller can be changed by changing the normal occupation times. If the change to
the normal occupation times is temporary then exceptions can be set up to dene occupation times for a specied
period.
Change Normal Occupation Times
Set up Exceptions
4.3.4 Change Normal Occupation Times
The normal occupation times can be changed providing you have the appropriate level of authority for that
timezone.
To change the normal occupation times:
View the normal occupation times as described in the ‘1. View Normal Occupation Times’ section of this
manual.
Click the day for which the occupation times are to be changed. A display similar to the one shown below will 2.
be displayed.
In the box in the 3. Time column enter the start or stop time for a period type. To change the time from a start
time to a stop time or from stop time to a start time in the box in the Valu e column click On or Off.
To add another period click Create New Time Zone Period Module another period will be added to the list
enter the time, and specify whether it is a start or stop time. Unwanted periods can be removed by clicking
.
Note that two periods should be added, one to switch occupation on, and one it switch it off.
Click 4. .
Repeat for any other period that requires changing.5.
The occupation times for an entire day can be copied to other days as described in the ‘Copying Occupation Times’
section of this manual.
Page 24

24 IQ3 Web User Guide TC200631 Issue 2, 02/02/2009
Using IQ3 From a Web Browser
4.3.4.1 Copying Occupation Times
The occupation times for one day can be copied to other days speeding up the process of setting up occupation times
and exceptions. This is only possible if you have the appropriate level of authority.
To copy occupation times:
View the 1. normal occupation times, or view the exception times as described in the appropriate section of
this manual.
Select the radio button in the 2. column next to the days whose occupation times are to be copied.
Select the check boxes in the 3. column next to the days to which the times are to be pasted.
Click 4. .
4.3.5 Set up Exceptions
If the change to the normal occupation times is temporary then exceptions can be set up to dene occupation times
for a specied period.
Add an Exception
Copy an Exception
Set up an Exception’s Times
Set up an Exception’s Parameters
Delete an Exception
4.3.5.1 Add an Exception
If occupation times other than the normal times or existing exception is required other exceptions must be added.
This is only possible if you have the appropriate level of authority.
To add an exception:
View the exceptions as described in the ‘1. View Exceptions’ section of this manual.
Click 2. Create New Exception Prole. The exception will be added to the list.
Click 3. to save the new exception.
Set up the exceptions occupation times as described in the ‘4. Set up an Exception’s Times’ section of this
manual.
Set up the exception’s parameters as described in the ‘5. Set up an Exception’s Parameters’ section of this
manual.
Exceptions can be added by copying an existing exception, and then editing it as required.
Note that adding an exception will take up extra memory in the controller therefore if there is not enough memory
available the exception cannot be added.
Page 25

IQ3 Web User Guide TC200631 Issue 2, 02/02/2009 25
Using IQ3 From a Web Browser
4.3.5.2 Copy an Exception
All the parameters for an exception can be copied to another allowing one exception to be used as the base for
another. This is only possible if you have the appropriate level of authority.
To copy an exception:
View the exceptions as described in the ‘1. View Exceptions’ section of this manual.
Select the radio button in the 2. column next to that is to be copied to be copied.
Select the check boxes in the 3. column next to the exceptions to which the information is to be pasted.
Click 4. .
Note that adding an exception will take up extra memory in the controller therefore if there is not enough memory
available the exception cannot be added.
Page 26

26 IQ3 Web User Guide TC200631 Issue 2, 02/02/2009
Using IQ3 From a Web Browser
4.3.5.3 Set up an Exception’s Times
Once an exception has been added its occupation times must be set up. This is only possible if you have the appropriate
level of authority.
To set up an exception’s times:
View the exceptions as described in the ‘1. View Exceptions’ section of this manual.
Click 2. Times. The display shown below is displayed that enables the exception’s parameters to be specied.
If there are no time periods set up, or to add another click 3. Create New Time Zone Period Module. Unwanted
periods can be removed by clicking next to the period that is to be deleted.
Note that two periods should be added, one to switch occupation on, and one to switch it off.
In the box in the 4. time column enter the start or stop time for a period type. To change the time from a start
time to a stop time or from stop time to a start time in the box in the value column click On or Off.
Repeat steps (4) and (5) until all the exception’s times are correctly set.5.
Click 6. .
Page 27

IQ3 Web User Guide TC200631 Issue 2, 02/02/2009 27
Using IQ3 From a Web Browser
4.3.5.4 Set up an Exception’s Parameters
The exception’s parameters must be dened to specify when the exception is to occur, whether it is to be repeated
every year, and its priority. This is only possible if you have the appropriate level of authority.
To set up an exception’s parameters:
View the exceptions as described in the ‘1. View Exceptions’ section of this manual.
Enter a label for the exception in the left most box.2.
In the 3. Start Day box click the day the exception times are to be rst used.
In the 4. Start Month box click the month the exception times are to be rst used.
In the 5. Stop Day box click the last day the exception times are to be used.
In the 6. Stop Month box click the month for the exception is to end.
In the 7. Priority box click the priority for the exception.
The priority parameter is used when two exceptions happen on the same day. The exception priority with the
lower value will take precedence. E.g. priority of 1 takes precedence over 3. If there are exceptions with the
same priority the exception that starts earliest takes precedence.
In the 8. Use box click the required option to specify whether the exception is to occur once, is to be repeated
each year, or is unused by selecting the required option from the list. Every cause the exception to be repeated
each year, Next causes it to occur only once, and Free means it won’t be used.
Click 9. to send the changes to the controller.
The exceptions times must be set up separately as described in the ‘Set up an Exception’s Times’ section of this
manual.
Page 28

28 IQ3 Web User Guide TC200631 Issue 2, 02/02/2009
Using IQ3 From a Web Browser
4.3.5.5 Delete an Exception
Unwanted exceptions can be deleted. This is only possible if you have the appropriate level of authority.
To delete an exception:
View the exceptions as described in the ‘1. View Exceptions’ section of this manual.
Click 2. .
The controller will prompt for conrmation click 3. Yes.
4.4 Adjust Values
4.4.1 Adjust a Knob’s Value
The value of a knob can be adjusted providing you have the appropriate level of authority.
To adjust a knob’s value:
Connect to the IQ3 controller as described in the ‘1. Connect to the IQ3 Controller’ section of this manual.
If you have a user name and password for the controller you should click 2. Login to login now to ensure the
controller presents you with information that is relevant to you as described in the ‘Login’ section of this
manual. This may cause the controller to display a different page.
Navigate to the 3. module details page for the knob that is to be adjusted. A knob can be accessed from any
display where its value is underlined by clicking it, or by clicking Modules, then clicking Knobs.
In the 4. Value box enter the new value for the knob.
Click 5. .
Page 29

IQ3 Web User Guide TC200631 Issue 2, 02/02/2009 29
Using IQ3 From a Web Browser
4.4.2 Adjust a Switch’s Status
The status of a switch can be adjusted providing you have the appropriate level of authority.
To adjust a switch’s status:
Connect to the IQ3 controller as described in the ‘1. Connect to the IQ3 Controller’ section of this manual.
If you have a user name and password for the controller you should click 2. Login to login now to ensure the
controller presents you with information that is relevant to you as described in the ‘Login’ section of this
manual. This may cause the controller to display a different page.
Navigate to the 3. module details page for the switch that is to be adjusted. A switch can be accessed from any
display where its value is underlined by clicking it, or by clicking Modules, then clicking Switch.
In the box 4. Status box click the required status.
Click 5. The value will be sent to the controller.
Page 30

30 IQ3 Web User Guide TC200631 Issue 2, 02/02/2009
Using IQ3 From a Web Browser
4.4.3 Adjust Module Parameters
The values of a module’s conguration parameters can be adjusted providing you have the appropriate level of
au thorit y.
To adjust a module’s conguration parameters:
Connect to the IQ3 controller as described in the ‘1. Connect to the IQ3 Controller’ section of this manual.
If you have a user name and password for the controller you should click 2. Login to login now to ensure the
controller presents you with information that is relevant to you as described in the ‘Login’ section of this
manual. This may cause the controller to display a different page.
Navigate to the 3. module details page for the module for which the conguration parameters are to be
adjusted.
In the box next to the parameter that is to be adjusted in the 4. Value column enter the new value for each of the
module parameters that are to be adjusted.
Once all the required values have been made click 5. .
Note that only the module’s parameters can be changed; changes to the strategy structure (i.e. module interconnections,
and creation/deletion of modules) are not allowed.
Page 31

IQ3 Web User Guide TC200631 Issue 2, 02/02/2009 31
Using IQ3 From a Web Browser
4.5 Display a Graph
Graphs of data logged in the controller can be displayed. Any module with a next to it can be graphed.
To display a graph of data logged in the controller:
Connect to the IQ3 controller as described in the ‘1. Connect to the IQ3 Controller’ section of this manual.
If you have a user name and password for the controller you should click 2. Login to login now to ensure the
controller presents you with information that is relevant to you as described in the ‘Login’ section of this
manual. This may cause the controller to display a different page.
Navigate to the 3. modules page for the module for which logged data is to be graphed.
Click 4. . The graph will be displayed as shown below.
Clicking List displays the co-ordinates of the graph see the ‘Display Graph Data’ section of this manual. The
graph can be viewed in more detail by dragging the mouse over the required area of the graph see the ‘Zoom
in and Out of a Graph’ section of this manual for more details. If the value is being logged at more than one
interval other intervals can be selected from the list at the top of the page. To display the values for a points on
the graph as the mouse is moved press ALT+V or right click the graph and click Show trace value window.
To display a horizontal grid on the View menu point to Grid lines and then click Left or Right, depending
which axis is to be used for the grid. To display a vertical grid on the View menu point to Grid lines and then
click Time axis.
Page 32

32 IQ3 Web User Guide TC200631 Issue 2, 02/02/2009
Using IQ3 From a Web Browser
4.5.1 Display the Graph Data
The co-ordinates of a graph can be displayed as a list of points.
To display the graph as a list of points:
Display a graph of the value for which the co-ordinates are to be displayed as described in the appropriate 1.
section of this manual.
Click 2. List. The dialogue box shown below is displayed.
4.5.2 Zoom in and Out of a Graph
It is possible to zoom in and out on any graph so that the data can be more easily seen.
To zoom in on the graph:
Display the graph.1.
Click the mouse button and drag over the required area of the graph.2.
Release the mouse button.3.
To return to the original zoom level:
Press ALT+R, or right click the graph and click1. Zoom to original.
Formatting Graphs4.5.3
Display a Grid on a Graph4.5.3.1
A vertical and/or horizontal grid can be displayed on any graph. When a horizontal grid is selected, the grid can be
based on either the left, or right hand axis.
To display a horizontal grid:
Display either a compact graph, or a precision graph as described in the appropriate section of this manual. 1.
On the 2. View menu point to Grid lines and then click Left or Right, depending which axis is to be used for
the grid.
To display a vertical grid:
Display either a compact graph, or a precision graph as described in the appropriate section of this manual. 1.
On the 2. View menu point to Grid lines and then click Time axis.
Page 33

IQ3 Web User Guide TC200631 Issue 2, 02/02/2009 33
Using IQ3 From a Web Browser
First 10 modules
Next 10 modules
Previous 10 modules
Last 10 modules
Display a Point’s Co-ordinates4.5.3.2
The co-ordinates of points on the graph can be displayed in the trace value window. The window displays the time
and value of the point closest to the position of the mouse, as the mouse is moved the value will change.
To display a point’s co-ordinates:
Display either a compact graph, or a precision graph as described in the appropriate section of this manual. 1.
Press 2. ALT+V or right click the graph and click Show trace value window, or on the View menu click Show
trace value window.
Move the mouse over the point whose co-ordinates are required.3.
4.6 Display 10 Modules From a Specied Module
The previous 10 modules of the selected type in the strategy can be displayed.
To display the next 10 modules from a specied module:
In the box next to 1. Get From enter the required module.
Click 2. Get From.
4.7 Display Other Modules
The rst 10, previous 10, next 10, and last 10 modules of the selected type in the strategy can be displayed.
To display other modules:
Click the appropriate button.1.
Button Description
Page 34

34 IQ3 Web User Guide TC200631 Issue 2, 02/02/2009
Using IQ3 From a Web Browser
4.8 View Graphical Display Pages
The Graphical Display Pages provided a graphical way of viewing information from the IQ3 controller, and making
changes. When you login a Graphical Display Page may be displayed otherwise you can access them by clicking
GraphIQs.
To view graphical display pages:
Connect to the IQ3 controller as described in the ‘1. Connect to the IQ3 Controller’ section of this manual.
If you have a user name and password for the controller you should click 2. Login to login now to ensure the
controller presents you with information that is relevant to you as described in the ‘Login’ section of this
manual. This may cause the controller to display a different page.
Click 3. GraphIQs. The top-level graphic display page is displayed.
Note that a Graphical Display Page may be displayed when you login if the controller has been set up that
way.
Display the required page by clicking the directory containing the page in the 4. Navigator, and then clicking
the page name.
Once the page is displayed you will be able to view the information. If required access to the 5. Module Detail
Page for modules whose parameters are displayed on the page by clicking the parameter. Clicking text that is
a line (underlined) will go to another web page. This depends on how the controller has been set up
Note that only parameters that are displayed underlined can be clicked on to display the Module Detail Page.
Page 35

IQ3 Web User Guide TC200631 Issue 2, 02/02/2009 35
Using IQ3 From a Web Browser
View the 4.9 Alarm Log
The alarm log contains the source module reference (e.g. S1 for sensor 1), its label, the type of alarm (e.g. high), the
value at the time of alarm, the time (time and date) the alarm occurred, the reported state (occurred or cleared), and
the current state of the alarm message (whether it is active or completed).
To view the alarm log:
Connect to the IQ3 controller as described in the ‘1. Connect to the IQ3 Controller’ section of this manual.
If you have a user name and password for the controller you should click 2. Login to login now to ensure the
controller presents you with information that is relevant to you as described in the ‘Login’ section of this
manual. This may cause the controller to display a different page.
Click 3. Alarms. The display shown below will be displayed.
Page 36

36 IQ3 Web User Guide TC200631 Issue 2, 02/02/2009
Using IQ3 From a Web Browser
4.10 View Module List Pages
Lists of the modules of each type that provide basic information about the module, and the facility to graph or adjust
values can be displayed.
To view Module List Pages:
Connect to the IQ3 controller as described in the ‘1. Connect to the IQ3 Controller’ section of this manual.
If you have a user name and password for the controller you should click 2. Login to login now to ensure the
controller presents you with information that is relevant to you as described in the ‘Login’ section of this
manual. This may cause the controller to display a different page.
Click 3. Modules. The display shown below will be displayed.
Note that the modules in the list are dependent on your authority level. This ensures that the information you
see is what is required.
Click the required module type on the left of the screen. The display will change to display the 4. Module List
Page containing the rst 10 modules of that module type. The list will contain basic information about the
module (e.g. module number, label, and value). This information will vary depending on module type as
appropriate.
If the parameter has a next to it, it can be graphed by selecting the required period for the graph in the
list next to the icon, and then clicking .
The value of the parameter can be changed providing you have a high enough level of authority by entering
the new value in the box and clicking next to it.
Clicking will display the rst 10 modules of the type. Clicking will display the previous 10 modules.
Clicking will display the next 10 modules. Clicking displays the last 10 modules. To view 10 modules
starting from a specied module enter the module number in the box next to the Get From button and then
click Get From.
To display all of the parameters for a module click the module number. A new window containing all of the
module’s parameters is displayed.
Page 37

IQ3 Web User Guide TC200631 Issue 2, 02/02/2009 37
Using IQ3 From a Web Browser
4.11 View Module Detail Pages
The parameters of individual modules can be displayed on Module Detail Pages.
To view Module Detail Pages:
View the 1. Module List Page for the required module type as described in the ‘View Module List Pages’
section of this manual.
Click the module number. A new window containing all of the module’s parameters is displayed.2.
Or
Click the module when it is displayed as a line (1. underlined). A new window containing all of the module’s
parameters is displayed.
Note that the parameters on the page are dependent on your authority level. This ensures that the information you
see is what is required.
The values of the parameters can be changed by entering the new value in the box and clicking
You can go directly to a module that is a destination or source of the current module by selecting the required module
in the list next to source or destination parameter and clicking to goto the destination module, or to goto the
source module. The display shown below will be displayed.
Clicking Next will display the parameters for next module, and clicking Prev will display the parameters for the
previous module.
4.12 Goto the Associated Module
You can go directly to a module that is a source to, or destination of the current module. This enables you to move
easily through the strategy.
To goto the associated module:
From the list next to the 1. Source or Destination column click the required source/destination.
Click 2. to goto the destination, or to goto the source module.
Page 38

38 IQ3 Web User Guide TC200631 Issue 2, 02/02/2009
Using IQ3 From a Web Browser
Page 39

IQ3 Web User Guide TC200631 Issue 2, 02/02/2009 39
Index
INDEX
A
About
IQ3 ........................................................................................ 7
This Manual ......................................................................... 5
Access IQ3 Controllers .............................................................. 17, 18
Add
Exceptions .................................................................... 24, 25
Users ............................................................................. 19, 20
Adjust
Knob Values ....................................................................... 28
Module Parameters ............................................................ 30
Normal Occupation Times ................................................. 23
Occupation ......................................................................... 24
Switch Status ...................................................................... 29
Alarm Log ........................................................................................ 35
Alarm Page ....................................................................................... 10
B
Basic Use .................................................................................... 17, 18
C
Change
Knob Values ....................................................................... 28
Module Parameters ............................................................ 30
Occupation Times ............................................ 23, 24, 25, 26
Switch Status ...................................................................... 29
Connect to IQ3 Controllers .............................................................. 18
Contacting Trend ................................................................................ 6
Conventions Used in this Manual ...................................................... 5
Copy
Exceptions .......................................................................... 25
Occupation Times .............................................................. 24
D
Delete Exceptions ............................................................................. 28
Display
10 Modules From a Specied Module ............................... 33
Exceptions .......................................................................... 22
Exception Times ................................................................. 23
Graph Data ......................................................................... 32
Graphs ................................................................................ 31
Next 10 Modules ................................................................ 33
Normal Occupation Times ................................................. 21
Occupation Times .................................................. 21, 22, 23
Other Modules .................................................................... 33
Refresh ................................................................................ 19
E
Edit
Exceptions .................................................................... 24, 25
Knob Values ....................................................................... 28
Module Parameters ............................................................ 30
Occupation Times ........................................................ 23, 24
Switch Status ...................................................................... 29
Exceptions
Add ..................................................................................... 24
Copy .................................................................................... 25
Delete .................................................................................. 28
Edit................................................................................ 26, 27
Set up Parameters ............................................................... 27
Set up Times ....................................................................... 26
View .................................................................................... 22
View Times......................................................................... 23
G
Goto Associated Modules ................................................................ 37
Graph
Data ..................................................................................... 32
Display ................................................................................ 31
Zoom In .............................................................................. 32
Zoom Out............................................................................ 32
Graphical Display Pages .................................................................. 14
Graph Pages ...................................................................................... 15
I
IQ3 Controller
Basic Use ...................................................................... 17, 18
Connect To ......................................................................... 18
Login................................................................................... 18
Using from a Web Browser ................................................ 17
IQ3 Pages ............................................................................................ 9
Alarm Page ......................................................................... 10
Graphical Display Pages .............................................. 14, 34
Module Detail Pages .................................................... 13, 37
Module List Pages .................................................. 11, 12, 36
L
Login ................................................................................................. 18
Log Out ............................................................................................. 19
M
Module Detail Pages .................................................................. 13, 37
Module List Pages ................................................................ 11, 12, 36
Module Parameters
Edit...................................................................................... 30
View .................................................................................... 37
Modules
Goto Destination ................................................................ 37
Goto Source ........................................................................ 37
O
Occupation Times
Adjust .................................................................................. 23
Copy .................................................................................... 24
Set up .................................................................................. 24
View .............................................................................. 21, 22
R
Refresh the Display .......................................................................... 19
S
Set up
Exception Parameters ........................................................ 27
Exceptions .......................................................................... 24
Exception Times ................................................................. 26
Source Module ................................................................................. 37
Switch Status .................................................................................... 29
U
Users
Add ............................................................................... 19, 20
Login................................................................................... 18
Log Out ............................................................................... 19
Using IQ3 From a Web Browser ...................................................... 17
V
Val ue
Adjust .................................................................................. 28
View
Graphical Display Pages .................................................... 34
W
Web Browser
Using IQ3 From .................................................................. 17
Z
Zoom In ............................................................................................ 32
Zoom Out .......................................................................................... 32
Page 40

Trend Control Systems Limited
P.O. Box 34, Horsham, West Sussex, RH12 2YF, UK. Tel:+44 (0)1403 211888 Fax:+44 (0)1403 241608 www.trend-controls.com
Trend Control System USA
6670 185th Avenue NE, Redmond, Washington 98052, USA. Tel:(425) 869-3900 Fax:(425) 869-8445 www.trend-controls.com
 Loading...