TREND 963 User Manual

963 User GuideIssue 3
Author: |
Technical Publications |
Issue: |
3 |
Date: |
25/03/2008 |
Part Number: |
TC200635 |
Copyright: |
© 2008 Honeywell Technologies Sàrl, ECC Division. All rights reserved. |
This manual contains proprietary information that is protected by copyright. No part of this manual may be reproduced, transcribed, stored in a retrieval system, translated into any language or computer language, or transmitted in any form whatsoever without the prior consent of the publisher.
Manufactured for and on behalf of the Environmental and Combustion Controls Division of Honeywell Technologies Sàrl, Ecublens, Route du Bois 37, Switzerland by its Authorized Representative, Trend Control Systems Limited.
For information contact:
Trend Control Systems Limited P.O. Box 34
Horsham
W. Sussex
RH12 2YF
NOTICE: Trend Control Systems Limited makes no representations or warranties of any kind whatsoever with respect to the contents hereof and specifically disclaims any implied warranties of merchantability or fitness for any particular purpose. Trend Control Systems Limited shall not be liable for any errors contained herein or for incidental or consequential damages in connection with the furnishing, performance or use of this material. Trend Control Systems Limited reserves the right to revise this publication from time to time and make changes in the content hereof without obligation to notify any person of such revisions or changes.
Windows, Windows XP Professional, Windows XP Home, Windows 2003, Windows 2003, and Windows Vista are trademarks of Microsoft Corporation. BACnet is a trademark of ASHRAE.
Please send any comments on this or any other Trend technical publication to techpubs@trendcontrols.com
|
|
|
|
Table of Contents |
|
|
|
|
|
||
|
|
|
|
||
|
TABLE OF CONTENTS |
|
|
||
1 |
ABOUT THIS MANUAL................................................................................................................................. |
5 |
|
||
1.1 |
Conventions Used in this Manual ................................................................................................................ |
5 |
|
||
1.2 |
Contacting Trend.......................................................................................................................................... |
6 |
|
||
2 |
ABOUT 963 ....................................................................................................................................................... |
7 |
|
||
2.1 |
The 963 Window.......................................................................................................................................... |
7 |
|
||
|
|
2.1.1 |
Data Display ..................................................................................................................................... |
9 |
|
|
|
2.1.2 |
Menu Bar ........................................................................................................................................ |
19 |
|
|
|
2.1.3 |
Navigator ........................................................................................................................................ |
19 |
|
|
|
2.1.4 |
Network Comms Status Lights ....................................................................................................... |
24 |
|
|
|
2.1.5 |
Selection Buttons ............................................................................................................................ |
24 |
|
|
|
2.1.6 |
Status Bar........................................................................................................................................ |
24 |
|
2.2 |
The Information Centre Window ............................................................................................................... |
25 |
|
||
3 |
USING 963....................................................................................................................................................... |
27 |
|
||
3.1 |
Basic Use.................................................................................................................................................... |
27 |
|
||
|
|
3.1.1 |
Run 963........................................................................................................................................... |
28 |
|
|
|
3.1.2 |
Log In.............................................................................................................................................. |
28 |
|
|
|
3.1.3 |
Log Off ........................................................................................................................................... |
28 |
|
|
|
3.1.4 |
Close 963 ........................................................................................................................................ |
29 |
|
3.2 |
Display a Schematic Page .......................................................................................................................... |
29 |
|
||
|
|
3.2.1 |
Zoom in and Out of a Schematic Page............................................................................................ |
30 |
|
|
|
3.2.2 |
Print a Schematic Page.................................................................................................................... |
30 |
|
3.3 |
Adjust Values............................................................................................................................................. |
31 |
|
||
|
|
3.3.1 |
Adjust Knob Values........................................................................................................................ |
31 |
|
|
|
3.3.2 |
Adjust Switches .............................................................................................................................. |
32 |
|
|
|
3.3.3 |
Adjust a Module Parameter ............................................................................................................ |
33 |
|
|
|
3.3.4 |
Relinquish Control of a BACnet Value .......................................................................................... |
34 |
|
3.4 |
Alarms........................................................................................................................................................ |
35 |
|
||
|
|
3.4.1 |
View Alarms................................................................................................................................... |
35 |
|
|
|
3.4.2 |
Action Alarms................................................................................................................................. |
38 |
|
|
|
3.4.3 |
Hide Alarm Panels .......................................................................................................................... |
39 |
|
|
|
3.4.4 |
Mute an Alarm Panel ...................................................................................................................... |
39 |
|
|
|
3.4.5 |
Reset the Count of SMS Alarms ..................................................................................................... |
40 |
|
|
|
3.4.6 |
Run a Manual Alarm Action........................................................................................................... |
40 |
|
|
|
3.4.7 |
Print................................................................................................................................................. |
40 |
|
3.5 |
Display Graphs........................................................................................................................................... |
42 |
|
||
|
|
3.5.1 |
Display a Compact Graph............................................................................................................... |
42 |
|
|
|
3.5.2 |
Display a Precision Graph .............................................................................................................. |
43 |
|
|
|
3.5.3 |
Display a Chart ............................................................................................................................... |
44 |
|
|
|
3.5.4 |
Load a Graph Definition ................................................................................................................. |
44 |
|
|
|
3.5.5 |
Display the Graph Data................................................................................................................... |
45 |
|
|
|
3.5.6 |
Zoom in and Out of a Graph ........................................................................................................... |
45 |
|
|
|
3.5.7 |
Formatting Graphs .......................................................................................................................... |
46 |
|
|
|
3.5.8 |
Save a Graph Definition.................................................................................................................. |
48 |
|
|
|
3.5.9 |
Print a Graph................................................................................................................................... |
48 |
|
3.6 |
Occupation Times ...................................................................................................................................... |
49 |
|
||
|
|
3.6.1 |
View Occupation Times ................................................................................................................. |
49 |
|
|
|
3.6.2 |
Adjust Occupation Times ............................................................................................................... |
50 |
|
|
|
3.6.3 |
Printing ........................................................................................................................................... |
57 |
|
3.7 |
Record Data................................................................................................................................................ |
58 |
|
||
|
|
3.7.1 |
Record a Graph Automatically ....................................................................................................... |
58 |
|
|
|
3.7.2 |
Record a Graph Manually............................................................................................................... |
59 |
|
|
|
3.7.3 |
Record a Schematic Page................................................................................................................ |
61 |
|
3.8 |
Playback Recorded Data ............................................................................................................................ |
62 |
|
||
|
|
3.8.1 |
Playback a Recorded Page .............................................................................................................. |
63 |
|
3.9 |
Display the IQ System ............................................................................................................................... |
66 |
|
||
|
|
3.9.1 |
Print the Device Viewer.................................................................................................................. |
67 |
|
3.10 |
Display Scheduled Events.......................................................................................................................... |
67 |
|
||
|
|
3.10.1 |
Print the Scheduled Events ............................................................................................................. |
68 |
|
3.11 |
Display IQ3 Web Pages ............................................................................................................................. |
68 |
|
||
|
|
|
|
|
|
|
|
|
|
|
|
|
|
|
|
|
|
963 User Guide TC200635 Issue 3 25/03/2008 |
3 |

Table of Contents
3.12 |
Display HTML Pages ................................................................................................................................ |
68 |
|
|
3.13 |
Display the Information Centre ................................................................................................................. |
69 |
|
|
3.14 |
Send an SMS Message............................................................................................................................... |
69 |
|
|
3.15 |
Layout the Window ................................................................................................................................... |
70 |
|
|
|
3.15.1 |
Automatically Hide the Navigator.................................................................................................. |
70 |
|
|
3.15.2 |
Collapse Message Boxes ................................................................................................................ |
70 |
|
|
3.15.3 |
Hide Selection Buttons ................................................................................................................... |
70 |
|
|
3.15.4 |
Hide the Menu Bar ......................................................................................................................... |
70 |
|
|
3.15.5 |
Hide the Status Bar......................................................................................................................... |
70 |
|
|
3.15.6 |
Minimise Selection Buttons............................................................................................................ |
71 |
|
|
3.15.7 |
Move the Navigator........................................................................................................................ |
71 |
|
|
3.15.8 |
Reset the Display............................................................................................................................ |
71 |
|
3.16 |
Manage Your User Account ...................................................................................................................... |
71 |
|
|
|
3.16.1 |
Change Your Password .................................................................................................................. |
72 |
|
3.17 |
Administer a 963 System........................................................................................................................... |
73 |
|
|
|
3.17.1 |
Users............................................................................................................................................... |
73 |
|
|
3.17.2 |
Data ................................................................................................................................................ |
77 |
|
|
3.17.3 |
View an Audit Trail........................................................................................................................ |
81 |
|
|
3.17.4 |
Clear the Print Buffer ..................................................................................................................... |
81 |
|
3.18 |
Enter Configuration Mode on Pre IQ3 Controllers.................................................................................... |
82 |
|
|
|
3.18.1 |
Print Text from a Configuration Session ........................................................................................ |
83 |
|
3.19 |
Control Scripts........................................................................................................................................... |
83 |
|
|
3.20 |
Insert a List into an HTML File................................................................................................................. |
84 |
|
|
3.21 |
Save a List to HTML ................................................................................................................................. |
84 |
|
|
3.22 |
Setup Exception Templates ....................................................................................................................... |
85 |
|
|
|
3.22.1 |
Add a Special Day Template .......................................................................................................... |
85 |
|
|
3.22.2 |
Add a Week Set Template .............................................................................................................. |
85 |
|
|
3.22.3 |
Delete a Template........................................................................................................................... |
87 |
|
|
3.22.4 |
Edit a Template............................................................................................................................... |
87 |
|
|
3.22.5 |
Import Exception Templates .......................................................................................................... |
87 |
|
|
3.22.6 |
Load Existing Times....................................................................................................................... |
88 |
|
|
3.22.7 |
Load Times From a Controller ....................................................................................................... |
88 |
|
|
3.22.8 |
View Where Templates are Used ................................................................................................... |
89 |
|
3.23 |
View Communications Information .......................................................................................................... |
89 |
|
|
|
3.23.1 |
View Communications in the Communications Window .............................................................. |
89 |
|
|
3.23.2 |
View Communications in the Remote Connection Window.......................................................... |
89 |
|
|
3.23.3 |
View SMS Activity ........................................................................................................................ |
90 |
|
3.24 |
View External Database Records............................................................................................................... |
90 |
|
|
INDEX ....................................................................................................................................................................... |
|
93 |
|
|
|
|
|
|
|
|
|
|
|
|
|
|
|
|
|
4 |
963 User Guide TC200635 Issue 3 25/03/2008 |

About This Manual
1ABOUT THIS MANUAL
This manual applies to 963 version 3.0 software. It provides a description of how to use the 963. It is intended for a reader with no knowledge of the 963 who operates it on a daily basis. It is assumed that the system has already been set up and engineered to suit user requirements, and the user is familiar with basic computer use, and has knowledge of BMS. It is divided into several sections.
About 963
This section describes 963, and how it works.
The 963 Window
This section explains the different parts of the 963 Window.
Using 963
This section describes how to use 963 once it has been installed and engineered.
After having read and fully understood this manual the user will be familiar with the 963 Supervisor, the environment in which it operates, making changes to HVAC equipment parameters, coping with incoming alarms, and all other aspects of using the 963 on a day-to-day basis.
For details about using the 963 when accessing it from a web browser see the 963 Web User Guide (TC200631). Other relevant documentation is:
Printable copy of this Help file in PDF format (963 User Guide) 963 Data Sheet (TA200636)
963 Web User Guide (TC200631) Product Data Sheets
1.1Conventions Used in this Manual
There are numerous items and instructions in this manual, the conventions below are designed to make it quick and easy to find and understand the information.
!Menu commands are in bold type.
!Buttons, and options in dialogue box that you need to select are in bold type.
!The names of text boxes and dialogue boxes are in bold type.
!Key combinations that you should press appear in normal type. If joined with a plus sign (+), press and hold the first key while you press the remaining one(s). For example CTRL+P indicates holding down the control key while pressing P.
!Text you should enter is in Italic type.
963 User Guide TC200635 Issue 3 25/03/2008 |
5 |

About This Manual
1.2Contacting Trend
Head Office
Trend Control Systems Ltd PO Box 34
Horsham
Sussex RH12 2YF England
Tel: +44 (0) 1403 211888
Fax: +44 (0) 1403 241608
Details of regional offices can be found on our Web site.
Internet
Our company web site (www.trend-controls.com) provides information about our products and us, or our support web site (http://pnet.trend-controls.com).
Technical Support
Our support department provides technical support during normal office hours. Before contacting them ensure that you have your Technical Support PIN number available, without this we will be unable to provide you with any support.
Trend Control Systems Ltd. Technical Support Department PO Box 34
Horsham
Sussex RH12 2YF England
Tel: +44 (0) 1403 226600
Email: trendts@trendcontrols.com Fax: +44 (0) 1403 226310
Technical Publications
Please send any comments on this or any other Trend technical publication to techpubs@trendcontrols.com
6 |
963 User Guide TC200635 Issue 3 25/03/2008 |
About 963
2ABOUT 963
Once engineered the 963 Supervisor provides the user with a system wide control panel with the facility to monitor and change the Building Management System (BMS) ensuring that the HVAC equipment operates safely and efficiently.
The use of colour graphics specially designed for the system displays this information in a simple and effective way. Graphs and pages of text information can be used to supplement monitored information. A fast and efficient communications network allows this information to be obtained from HVAC equipment that may scattered miles apart in different buildings, on other sites, or even other countries.
It enables the user to monitor HVAC equipment/building services, and make changes to the way the building is controlled using colour graphics displays. Fault reporting, analysis, and data recording features promote efficient HVAC equipment operation and effective energy use.
The information and adjustments available to a user can be exactly tailored to that user’s needs. This means that an operator is never presented with more data or options than he or she requires, thus eliminating a major source of potential confusion. However, for those whose job function demands it, access can be provided to detailed information on the BMS.
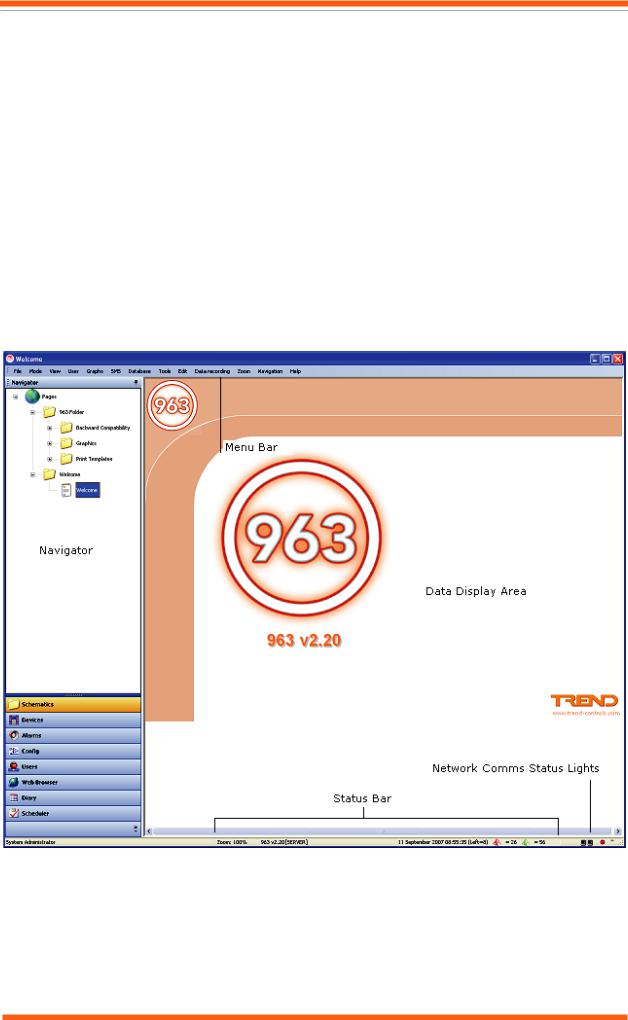
2.1The 963 Window
The 963 Window consists of six areas:
Data Display
The Data Display is where the 963 displays the selected information. In the example above, a schematic page is displayed, but information from other areas of 963 may also be displayed depending which button is selected, for example the Alarm Viewer, web pages etc.
Menu Bar
The Menu Bar contains 963’s menus, which provide access to the application’s various features.
963 User Guide TC200635 Issue 3 25/03/2008 |
7 |

About 963
Navigator
The Navigator appears on the left of the 963 Window, and provides a way of selecting the information that appears in the Data Display. For example, if a schematic page is displayed the Navigator will enable the page that is displayed to be selected, where as if the User Display is selected; it enables a particular user or workgroup to be selected.
Network Comms Status Lights
The Network Comms Status Lights appear at the bottom of the 963 Window. They provide information about the status of communications.
Selection Buttons
The Selection Buttons appear at the bottom of the Navigator. They provide access to the 963’s different displays. Access to these buttons can be protected, preventing unauthorised users accessing the displays.
Status Bar
The Status Bar is located at the bottom of the 963 Window and provides information about the version of 963 running, and the name of the user that is currently logged on as well as the current date and time.
8 |
963 User Guide TC200635 Issue 3 25/03/2008 |
About 963
2.1.1Data Display
The Data Display is where 963 displays the information specified in the Navigator. The Selection Buttons determine the type of data displayed, and the selection made hat has been chosen. There are eight different type of display that can appear in the data display.
Alarm Viewer Configuration Mode Display Device Viewer
Web Browser Display Event Scheduler Display Diary Display Schematic Page Display User Display
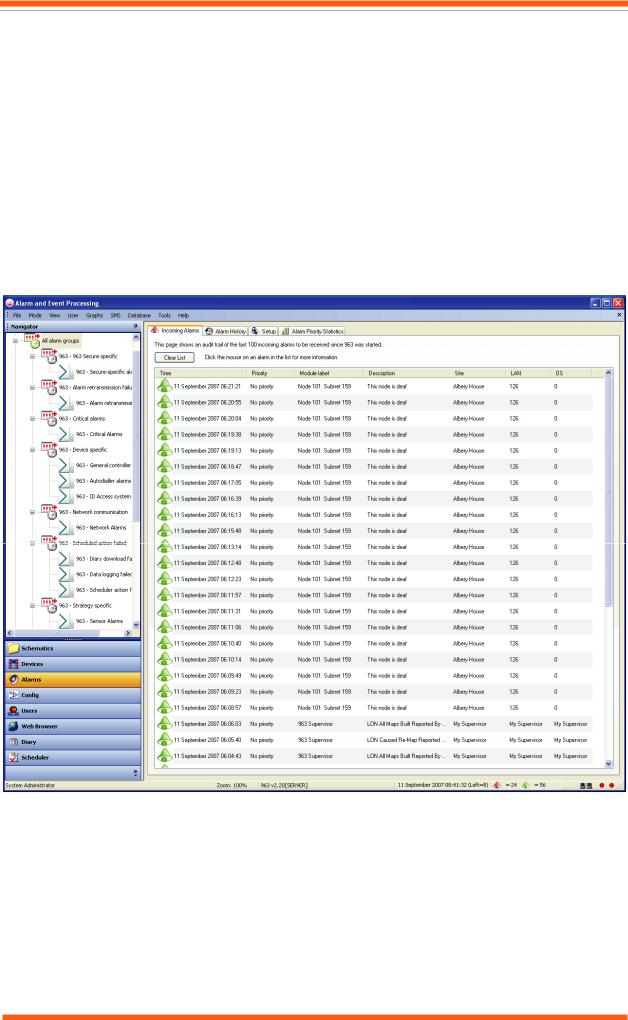
2.1.1.1Alarm Viewer
The Alarm Viewer, shown below, displays the alarms that have been received. These alarms can be filtered by type to reduce the amount of data displayed.
It has four tabs:
Alarm History
The Alarm History tab stores all the alarms after they have been processed, whether or not they have been actioned by the user. The alarms can be viewed in Chronological View order or a Summary View.
The Summary View gives a count for each alarm type for each point, providing the following information: The label of the module that generated the alarm, its priority, the device that sent the alarm, a description of the alarm, and a count of how many alarm of that type have occurred.
The Chronological View displaysan alarm history sorted by time order, providing the following information: The time the alarm occurred, its priority, the label of the module that generated the alarm, a description of the alarm, the device that sent the alarm, and any text entered by the user when it was acknowledged.
963 User Guide TC200635 Issue 3 25/03/2008 |
9 |
About 963
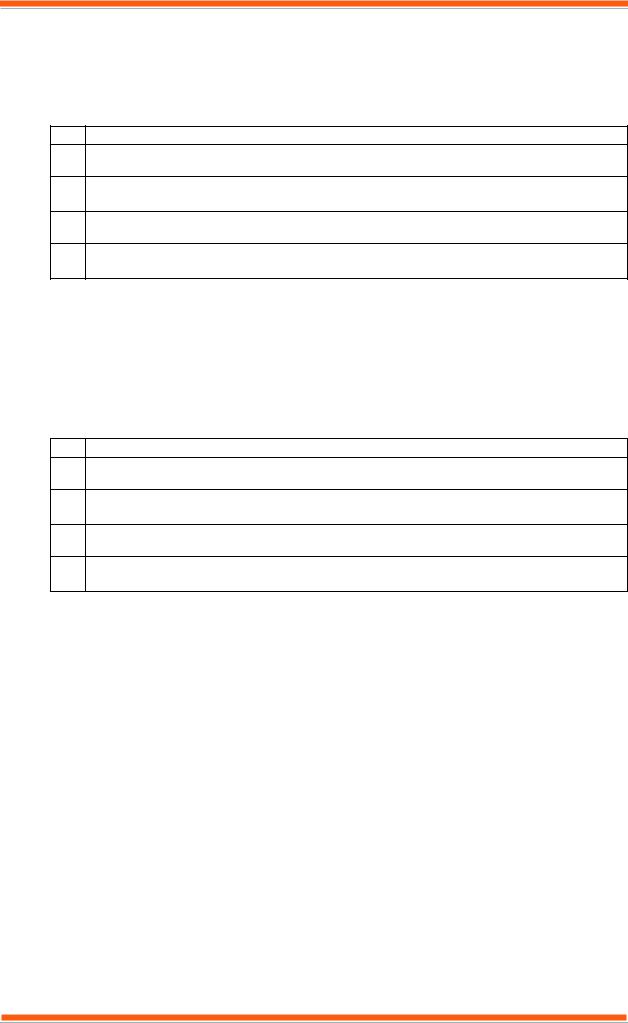
Clicking any alarm gives a pop-up display containing details about the alarm. The alarms in both view are determined by the currently selected group or filter in the Navigator. The list can be further filtered using a drop-down list of standard options. The list is colour coded to indicate whether the alarm is current. Red indicates that the alarm is current. Icons are used to indicate whether the alarm is a set alarm or a cleared alarm. A red bell indicates a set alarm, and a green bell indicates a cleared alarm. If the alarm has been actioned by the user, the bell will appear with a tick over it. The table below shows the different icons.
Icon Description
 Set alarm that has not been actioned.
 Set alarm that has been actioned.
 Cleared alarm that has not been actioned.
 Cleared alarm that has been actioned.
Alarm Priority Statistics
The Alarm Priority Statistics tab displays all the alarms grouped by priority in the form of a bar, or pie chart.
Incoming alarms
The Incoming Alarms tab contains the last 100 alarms to be received as they arrive. The list is colour coded to indicate whether the alarm is current. Red indicates that the alarm is current. Icons are used to indicate whether the alarm is a set alarm or a cleared alarm. A red bell indicates a set alarm, and a green bell indicates a cleared alarm. If the alarm has been actioned by the user, the bell will appear with a tick over it. The table below shows the different icons.
Icon Description
 Set alarm that has not been actioned.
 Set alarm that has been actioned.
 Cleared alarm that has not been actioned.
 Cleared alarm that has been actioned.
The list displays the time the alarm occurred, it priority, a description of the alarm, and the module label, site, Lan, and device there generated the alarm. Clicking any alarm gives a pop-up display containing details about the alarm
Set up
The Set up tab enables certain settings relating to alarm handling to be defined.
Access to this display can be restricted.
10 |
963 User Guide TC200635 Issue 3 25/03/2008 |
About 963
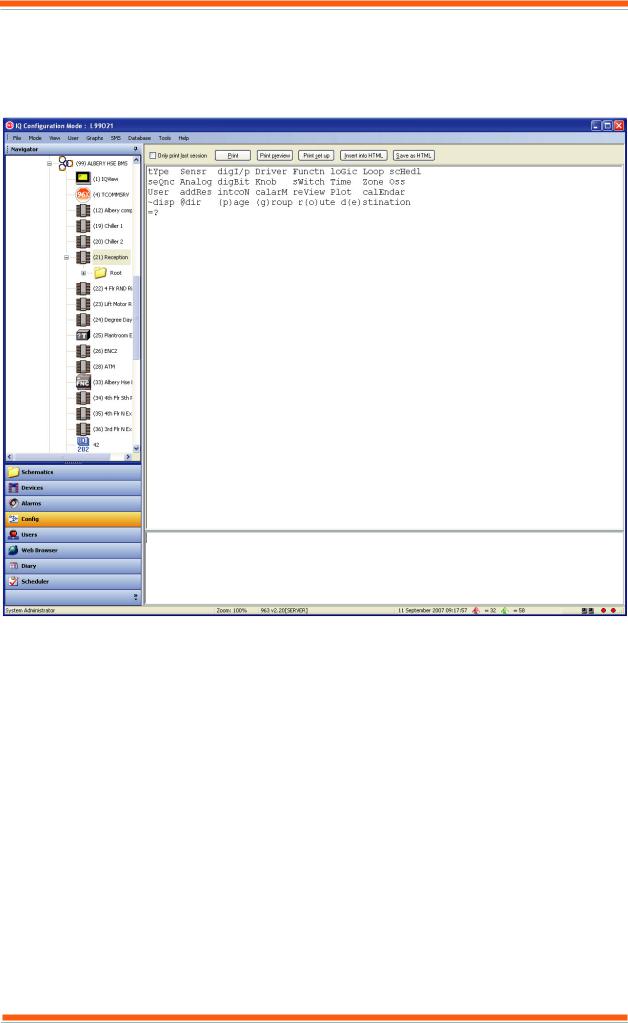
2.1.1.2Configuration Mode Display
The Configuration Mode Display, shown below, displays the configuration mode on IQ system devices that support the feature. The required devices is selected from the Navigator which displays a tree view of the system to which 963 is connected,. Clicking a controller will cause it to enter configuration mode, and the configuration prompts displayed in the Data Display.
Once in this mode, simple adjustments can be made to the strategy. When in configuration mode, 963 is effectively converted into a terminal, all the screen prompts originate from the controller, and all keyboard inputs are sent to the controller when the ENTER key is pressed.
Access to this display can be restricted.
963 User Guide TC200635 Issue 3 25/03/2008 |
11 |
About 963
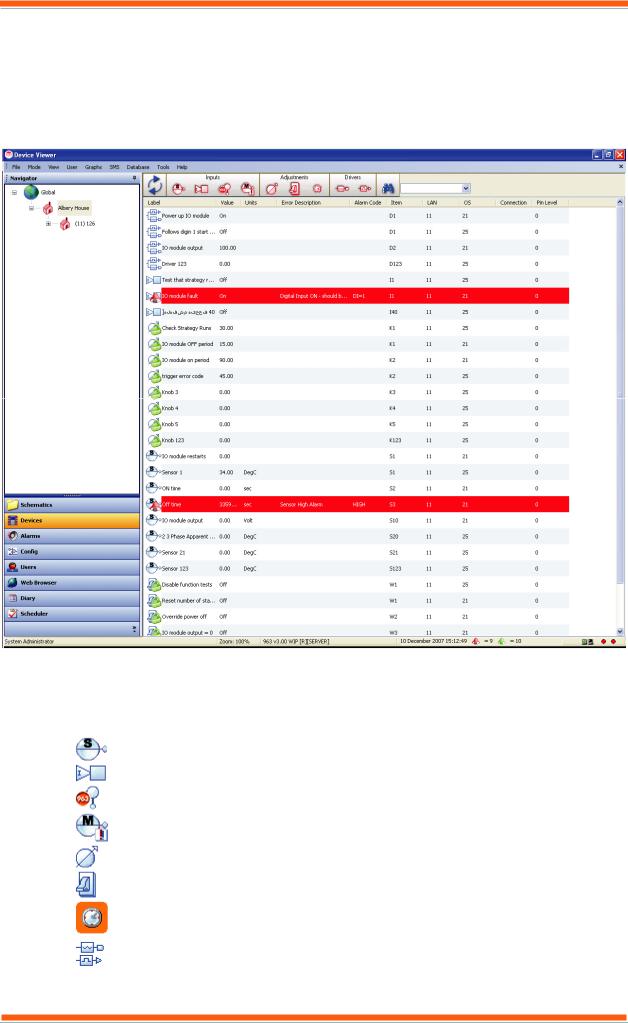
2.1.1.3Device Viewer
The Device Viewer, shown below, enables inputs, outputs, adjustments, time zones, and critical alarms from the part of the system selected in the Navigator to be displayed, and for values to be adjusted, or graphed. E.g. if the internetwork is selected, all values from the internetwork are displayed. If a particular Lan is selected only values from that Lan are displayed. The display can be filtered further so that only modules whose label matches a search string are displayed. The display is colour coded to indicate whether the alarm is current. Red indicates that the alarm is current. Once the values have been displayed it is possible to adjust values, or display a graph.
It contains a number of columns that display the values of the inputs, outputs, adjustments, time zones, and critical alarms.
Column |
Description |
Icon |
Contains an icon that indicates the module type. |
|
Sensor Modules |
|
Digital Input Modules |
|
Virtual Sensor Modules |
|
Critical Alarm Modules |
|
Knob Modules |
|
Switch Modules |
|
Time zone Modules |
|
Analogue Driver Modules |
|
Digital Driver Modules |
Label |
The module label. |
12 |
963 User Guide TC200635 Issue 3 25/03/2008 |
About 963
Column |
Description |
|
Value |
The current value of the module. |
|
Units |
The value’s engineering units. |
|
Item |
A code indicating the module type and number (e.g. S1 specifies Sensor module number 1) |
|
|
S |
Sensor Modules |
|
I |
Digital Input Modules |
|
W |
Switch Modules |
|
Z |
Time zone Modules |
|
K |
Knob Modules |
|
D |
All Driver modules for IQ system sites, Analogue Driver Modules for BACnet sites |
|
J |
Digital Driver Modules for BACnet sites |
|
X |
Virtual Sensor Modules |
|
M |
Critical Alarm Modules |
LAN |
The Lan number of the controller containing the module |
|
OS |
The network address of the controller containing the module |
|
Tele |
The phone number or IP address used to address the site containing the module. |
|
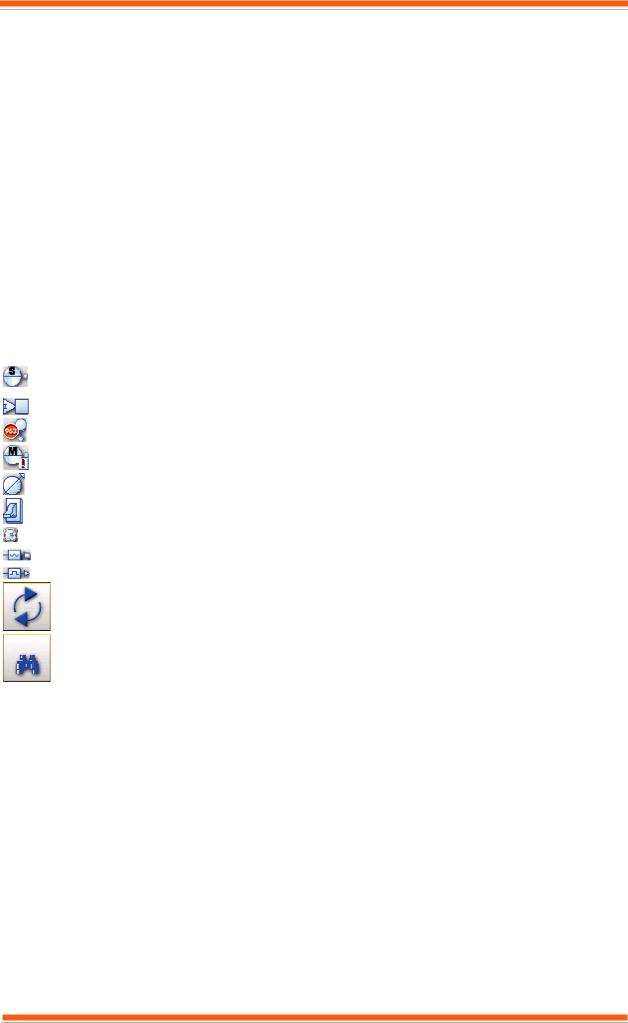
The display also contains a number of buttons that enable the types of modules displayed to be selected. |
||
Icon |
What is Displayed |
|
Sensors |
|
|
|
Digital Inputs |
|
Virtual sensors (calculated MKT values) |
|
|
|
Critical Alarms |
|
|
|
Knobs |
|
|
|
Switches |
|
|
|
Time Zones |
|
Analogue Driver |
|
Digital Driver |
|
Refreshes the values. |
|
|
|
This causes 963 to only display items of the selected item types whose label matches the search string. |
|
|
Inputs |
Select/deselects all inputs |
Adjustments |
Select/deselects all adjustments |
Drivers |
Select/deselects all drivers |
Access to this display can be restricted.
963 User Guide TC200635 Issue 3 25/03/2008 |
13 |
About 963
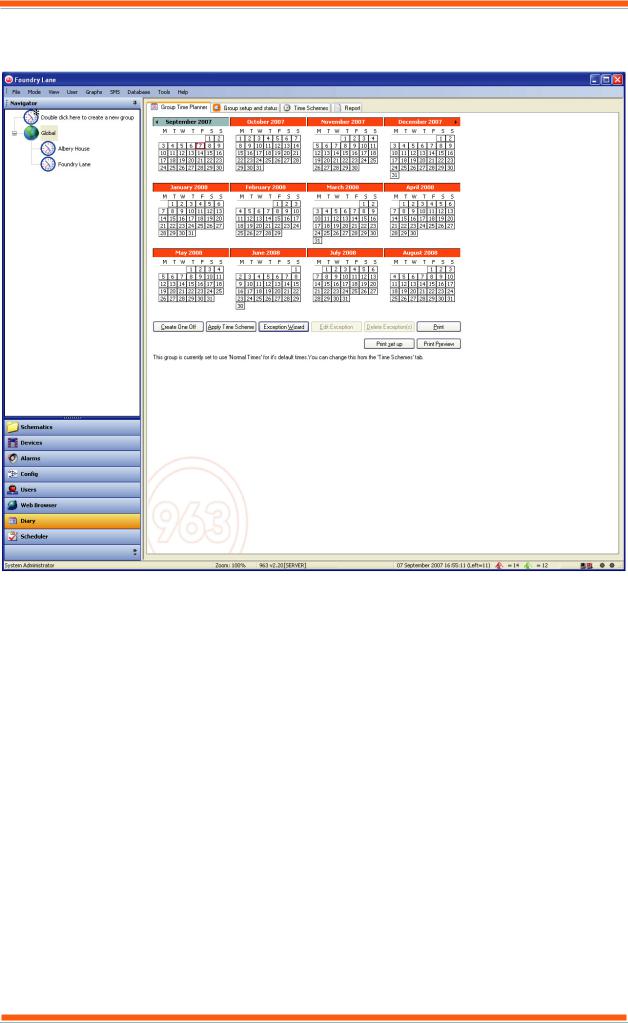
2.1.1.4Diary Display
The Diary Display, shown below, provides information about there system's occupation times.
It has four tabs:
Group Time Planner
The Group Time Planner tab provides a calendar view of the occupation times for the diary group in diary or groups selected in the Navigator. It indicates whether a day follows the normal occupation times for the selected group, or an exception using colours. Information about exceptions can be displayed by clicking the exception. A dot in the top right corner of a day indicates that the day has more than one exception applied, moving the mouse over the day will display more information. Buttons enable exception sot be added, edited, or deleted, and entire time schemes to be applied.
Group setup and status
The Group setup and status tab displays a list of the timezones that are linked to the diary group(s) selected in the Navigator. The list indicates the site, Lan, controller name, timezone label, item code, value, and device type. Buttons enable timezones to be added to the group, times to be sent to the controllers, actual times to be viewed, and group setting to be edited.
Time Schemes
The Time Schemes tab displays the normal occupation times, and the time schemes that have been set up for the Diary group selected in the Navigator in a list. Buttons enable new time schemes to be created, existing one to be edited, or deleted, and time schemes to be imported from other diary groups.
Report
The Report tab provides information about the download of occupation times toe the diary group selected in the Navigator. Buttons enable selection between a list of current download failure, all download failures, and a full download history.
Access to this display can be restricted to certain users.
14 |
963 User Guide TC200635 Issue 3 25/03/2008 |
About 963
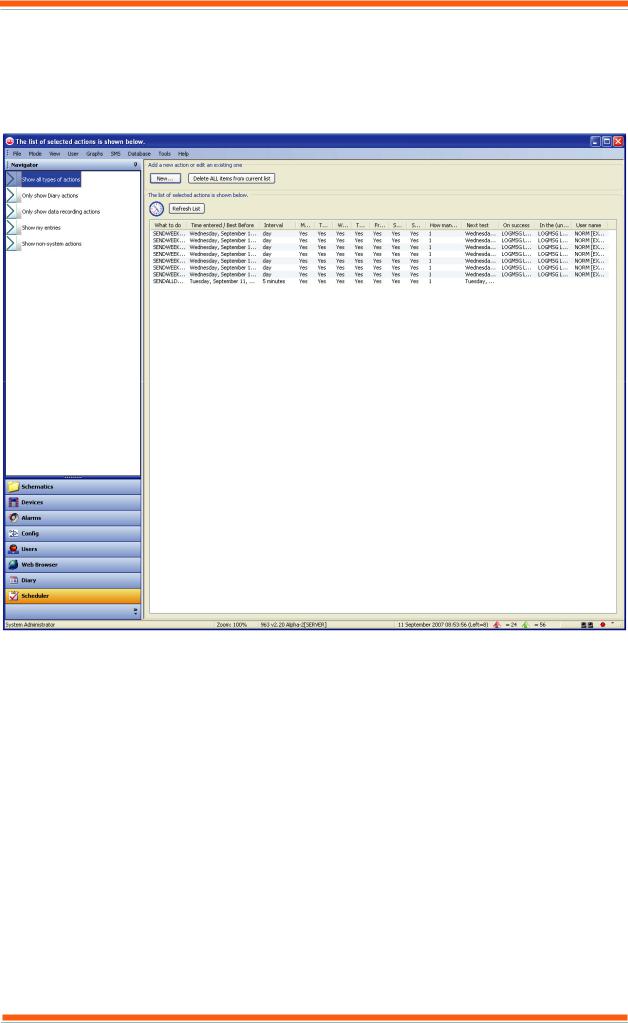
2.1.1.5Event Scheduler Display
The Event Scheduler Display, shown below, displays a list of all the scheduled events that 963 is going to perform in the future. It displays events that 963 has been set to perform by the engineer; it also displays scheduled events created by 963’s Diary functions. The types of events can be filtered by clicking the required filter in the Navigator. It is used to organise and display all the automated actions carried out by 963, e.g. sensor-recording actions, or diary exceptions.
Access to this display can be restricted.
963 User Guide TC200635 Issue 3 25/03/2008 |
15 |
About 963
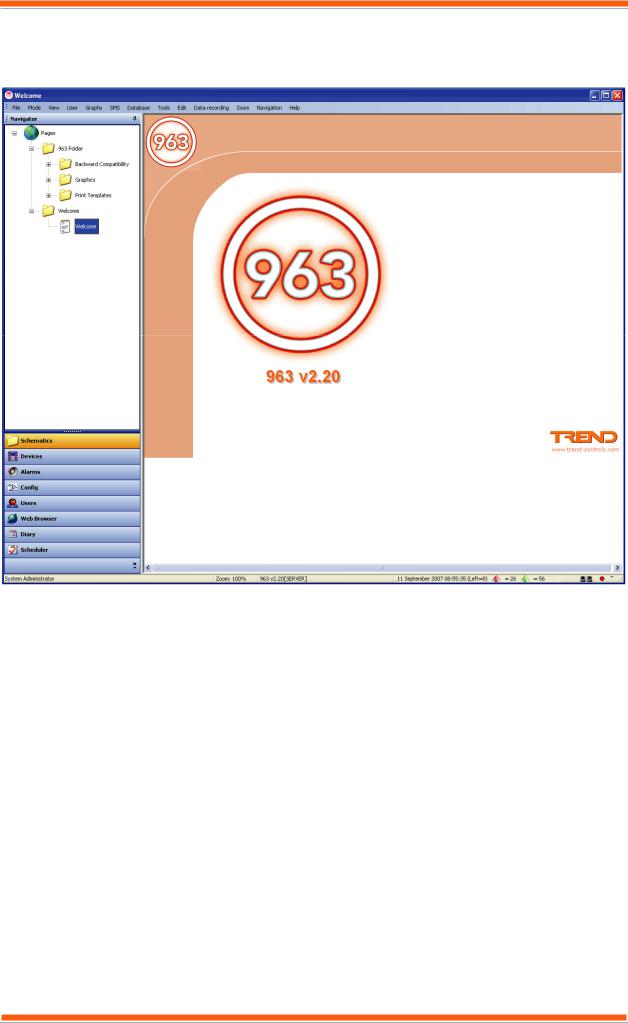
2.1.1.6Schematic Page Display
The Schematic Page Display, shown below, enables a schematic page to be displayed. The Navigator displays a tree view of all the schematic pages, clicking a page will display it in the Data Display.
The Navigator provides a way of organising pages into folders, so that they can be located quickly, or to prevent access to particular users.
16 |
963 User Guide TC200635 Issue 3 25/03/2008 |
About 963
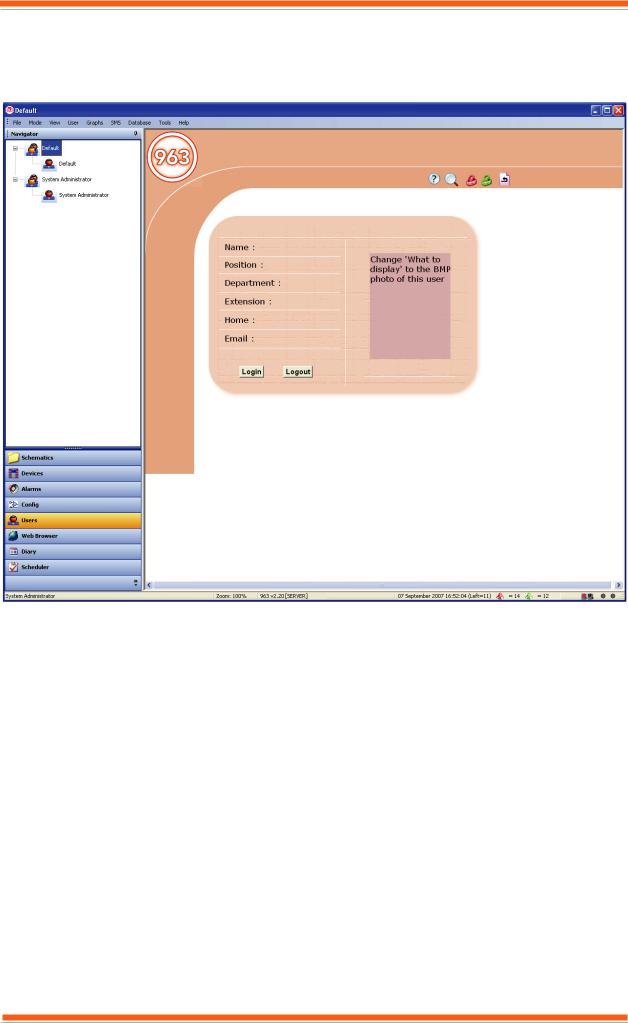
2.1.1.7User Display
The User Display, shown below, Displays a page for the user selected in the Navigator. This page enables the user to log in, log off, or to change their password. It also enables the engineer to define access rights for people who require to use 963.
963 User Guide TC200635 Issue 3 25/03/2008 |
17 |
About 963
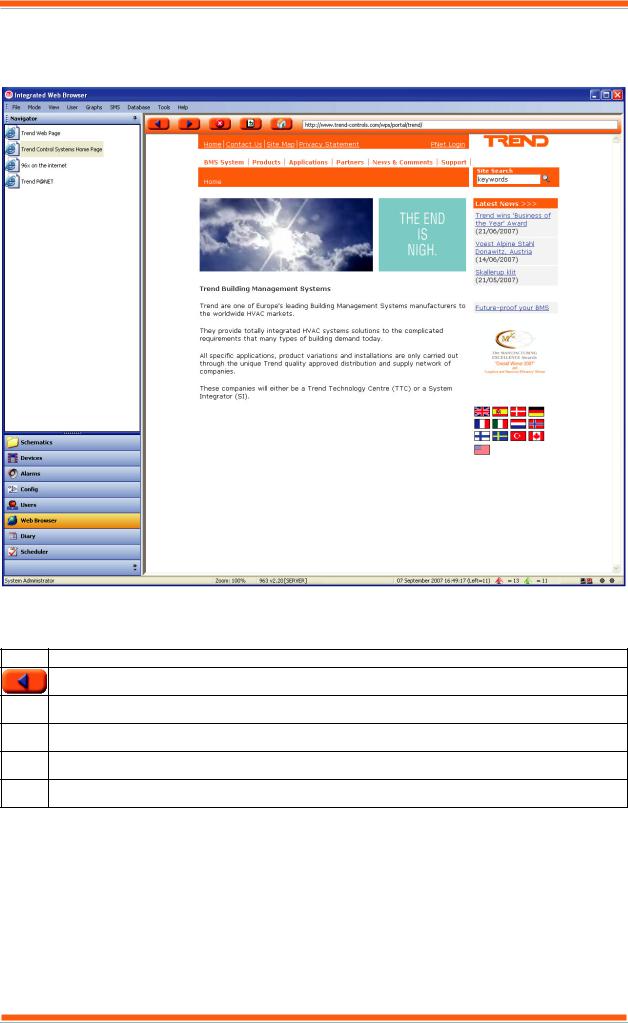
2.1.1.8Web Browser Display
The Web Browser Display, shown below, enables selected web sites to be accessed. By default, it has some pages set up.
The Navigator displays the different sites that are available. Clicking a site in the Navigator will cause it to be displayed in the Data Display. The top of the Data Display contains five buttons, shown below, that enable navigation around the selected web site in a similar way to other web browsers.
Icon Description
Goes to the previous HTML page.
 Goes to next HTML page.
 Stops the current HTML page being uploaded.
 Goes to the Home HTML page.
 Updates the current HTML page.
Access to this display can be restricted.
18 |
963 User Guide TC200635 Issue 3 25/03/2008 |
About 963
2.1.2Menu Bar
The Menu Bar contains 963’s menus, which provide access to the application’s various features. The following menus are available:
Data Recording Menu Database Menu
Edit Menu
File Menu
Help Menu Graphs Menu Mode Menu Navigation Menu
SMS Menu
Tools Menu
User Menu
View Menu
Zoom Menu
The menus available at a particular time and the commands they contain will depend on the job currently being carried out by 963.
If required the Menu Bar can be hidden, or made unavailable for some users.
2.1.3Navigator
The Navigator appears on the left of the 963 Window. It allows the information displayed in the Data Display to be specified. For example, if a schematic page is displayed, the Navigator enables the page to be selected, whereas if the User Display is selected, it enables a particular user or workgroup to be selected. The contents of the Navigator associated with each display is described below:
Alarm Viewer
Displays a tree view the alarm handling structure containing Alarm filters, alarm groups, alarm priorities, and retransmission destinations. It enables the alarms displayed in the Data Display to be selected. For example, clicking an alarm filter will filter the alarms in the Data Display. Icons indicate the type of object. The table below lists the different icons.
Icon Description
 Alarm Filters Section
 All Alarms
 Alarm Filter
 Alarm Group Section, and Default Alarm Group
 Alarm Group
 Alarm Priority, and Alarm Priority Level
 Retransmission Destination Section (all retransmission destinations)
 Retransmission Destination
963 User Guide TC200635 Issue 3 25/03/2008 |
19 |
About 963
Configuration Mode Display
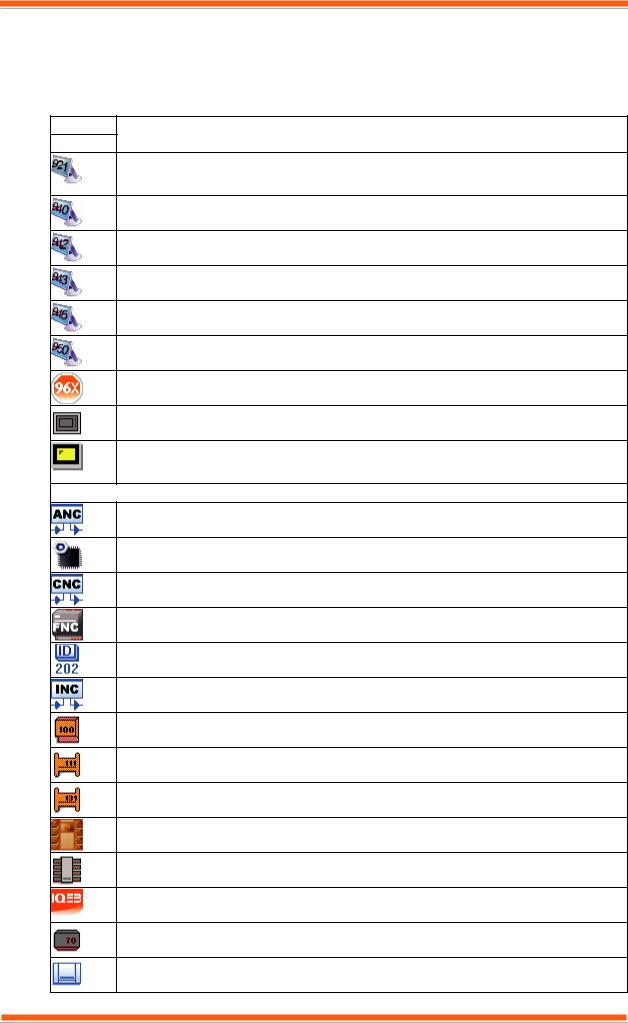
Displays a tree view of the system to which 963 is connected enabling the controller for which configuration mode is required to be selected. Clicking a controller will cause it to enter configuration mode, and the configuration prompts displayed in the Data Display. Icons indicate the type of object. The table below lists the different icons.
Icon Description
Supervisors
921 Supervisor
940 Supervisor
942 Supervisor
943 Supervisor
945 Supervisor
950 Supervisor
963 Supervisor, 962 Supervisor, S2 Supervisor, or ViewPoint
NDP
IQView
Devices
ANC
BACnet Device
CNC
FNC
ID200
INC
IQ100 Controller
IQ111 Controller
IQ131 Controller
IQ151 Controller
IQ2 Controller
IQ3 Controller
IQ70 Controller
IQ90 Controller
20 |
963 User Guide TC200635 Issue 3 25/03/2008 |
About 963
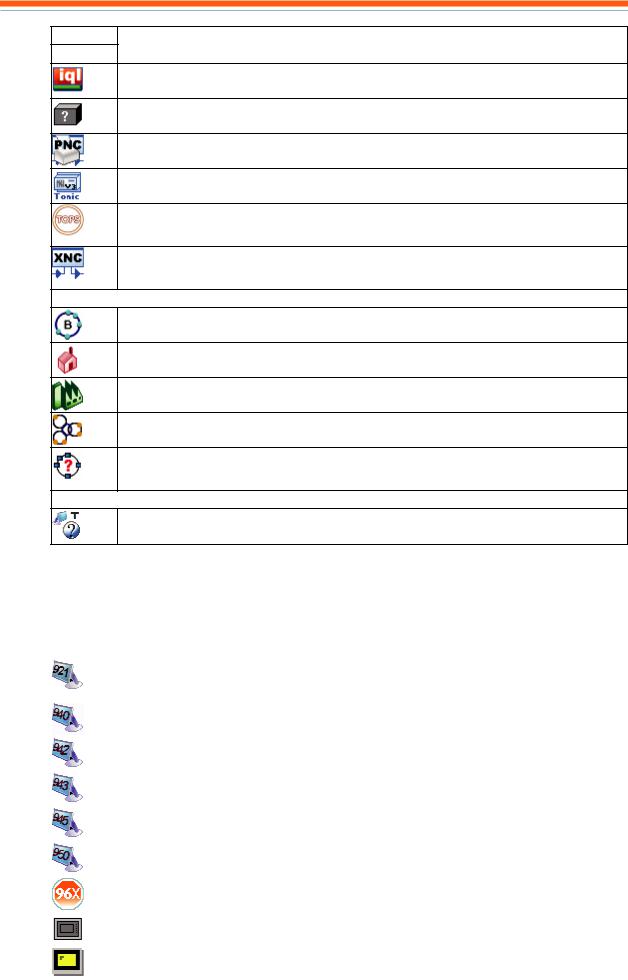
Icon Description
Supervisors
IQL Controller
Non IQ system device
PNC
TONIC
TOPS
XNC
Site Structure
BACnet Lan
Local site
Remote Site
Trend Lan
Unknown Lan
General
Unknown Device
Device Viewer
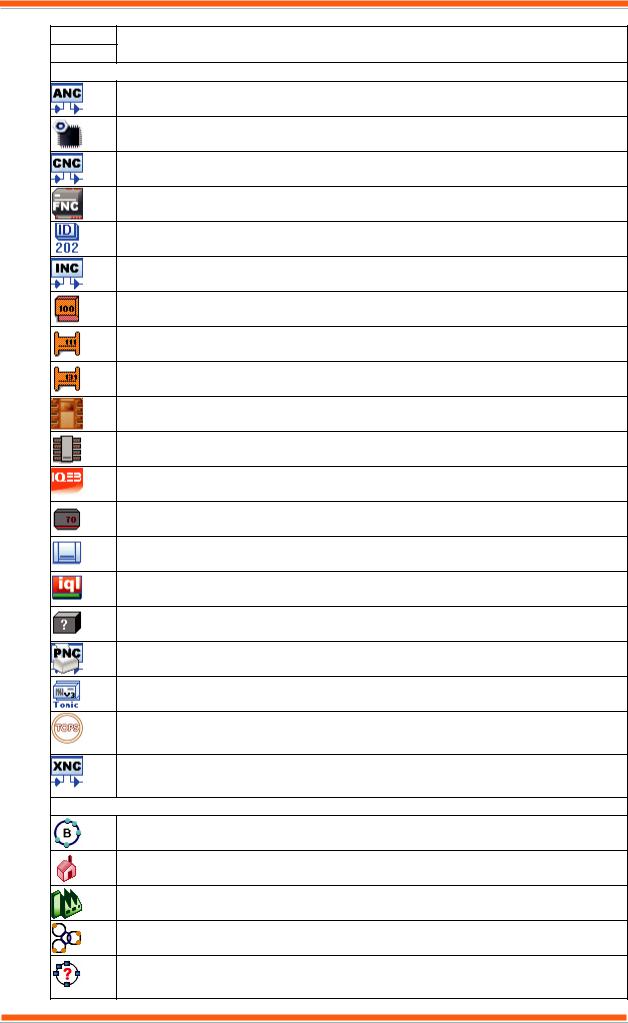
Displays a tree view of the system to which 963 is connected, enabling the level at which the system is displayed in the Data Display to be selected. For example, clicking a Lan will display all the points with labels on that Lan. Icons indicate the type of object. The table below lists the different icons.
|
Icon |
Description |
|
|
|
Supervisors |
|
|
|
|
|
921 |
Supervisor |
|
|
|
|
|
|
|
|
940 |
Supervisor |
|
|
|
|
|
|
|
|
942 |
Supervisor |
|
|
|
|
|
|
|
|
943 |
Supervisor |
|
|
|
|
|
|
|
|
945 |
Supervisor |
|
|
|
|
|
|
|
|
950 |
Supervisor |
|
|
|
|
|
|
|
|
963 |
Supervisor, 962 Supervisor, S2 Supervisor, or ViewPoint |
|
|
|
|
|
|
|
|
NDP |
|
|
|
|
|
|
|
|
|
IQView |
|
|
|
|
|
|
|
|
|
|
|
|
|
|
|
|
|
|
|
|
|
|
963 User Guide TC200635 Issue 3 25/03/2008 |
21 |
About 963
Icon Description
Supervisors
Devices
ANC
BACnet Device
CNC
FNC
ID200
INC
IQ100 Controller
IQ111 Controller
IQ131 Controller
IQ151 Controller
IQ2 Controller
IQ3 Controller
IQ70 Controller
IQ90 Controller
IQL Controller
Non IQ system device
PNC
TONIC
TOPS
XNC
Site Structure
BACnet Lan
Local site
Remote Site
Trend Lan
Unknown Lan
22 |
963 User Guide TC200635 Issue 3 25/03/2008 |
About 963
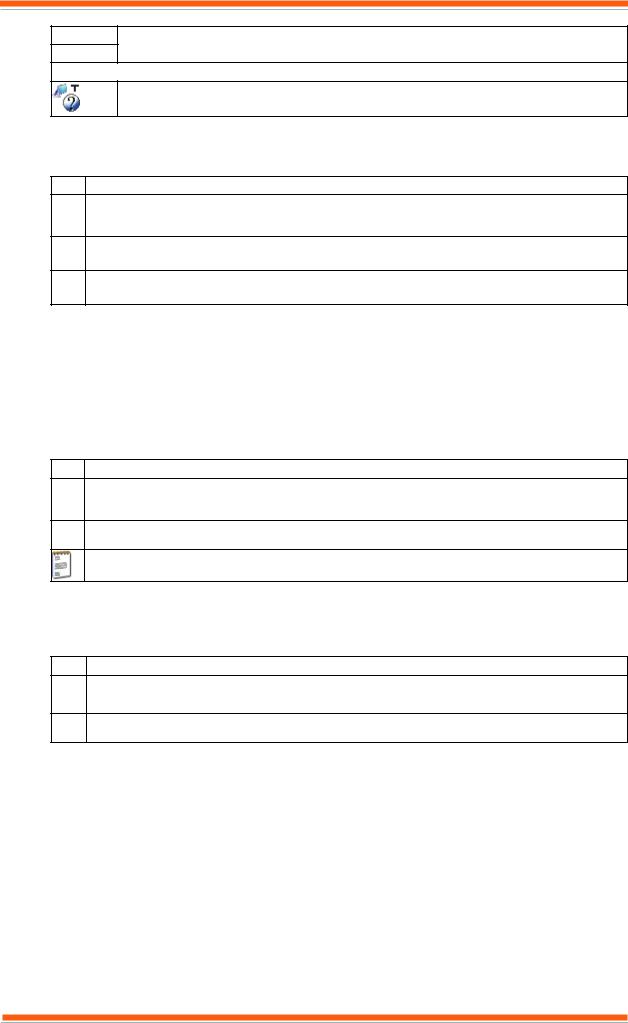
Icon Description
Supervisors
General
Unknown Device
Diary Display
Displays a tree view of all the diary groups and folders. Clicking a group will display the associated times in the Data Display. Icons indicate the type of object. The table below lists the different icons.
Icon Description
 Diary Groups Section (all diary groups)
 Diary Group
 New Diary Group
Event Scheduler Display
Displays a list of different types of events. Clicking one of these will display a list of events of that type in the Data Display.
Schematic Page Display
Displays the available schematic pages. It allows the pages to be organised into folders to make locating the required page easier. Clicking a folder will expand it to display any sub folders, or pages. Click a page will cause it to be displayed in the Data Display. Folders can be set up with user access levels to prevent particular users accessing them. Pages not in a folder are always visible to all users. Each folder can contain both folders and pages. Icons indicate the type of object. The table below lists the different icons.
Icon Description
 All Schematic Page
 Folder of schematic pages
Schematic Page
User Display
Displays a tree view of all the workgroups and users. Clicking a workgroup will expand it revealing the users in that workgroup. Clicking a particular user will display that user’s login page in the Data Display. Icons indicate the type of object. The table below lists the different icons.
Icon Description
 Workgroup
 User
User
Web Browser Display
Displays a list of web sites that can be selected. Clicking one will cause it to be displayed in the Data Display.
963 User Guide TC200635 Issue 3 25/03/2008 |
23 |
About 963
2.1.4Network Comms Status Lights
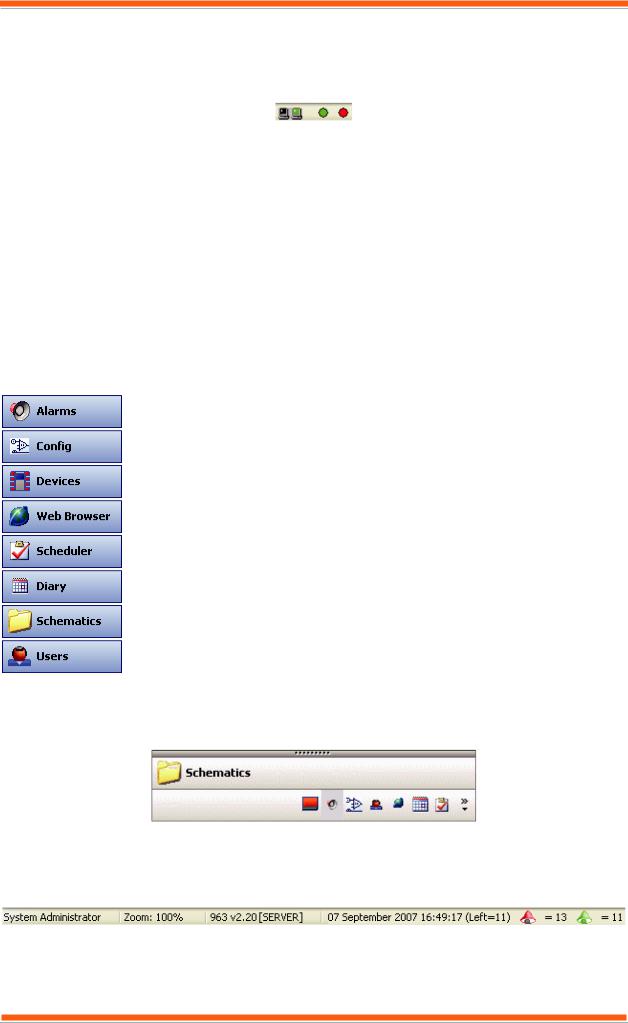
The Network Comms Status Lights appear at the bottom of the 963 Window. They provide information about the status of communications in and out of the node connecting 963 to the IQ network, and the status of any remote connection devices on the system.
 TX and RX indicators: These flash green when 963 is receiving, or transmitting information. If they appear grey, 963 has been unable to locate the CNC.
 Remote connection indicator: If grey, all of the devices are available for use, if red, at least one of them is attempting to make a connection, and if green, at least one is connected. Clicking this icon displays the Remote Connection Window.
If 963 has been licenced with SMS Direct an additional icon ( ) is displayed. This icon indicates the status of the modem, if a 963 is busy talking to the phone the icon will flash between green and red. The icon will be grey if the is a problem communicating with the phone. If the PIN for the modem is incorrect, an exclamation mark will appear next to the icon. Clicking this icon displays the SMS Activity Window.
2.1.5Selection Buttons
The Selection Buttons, shown below, appear at the bottom of the Navigator of the 963 Window. They provide access to the 963’s different displays. Access to these buttons can be protected, preventing unauthorised users accessing the displays.
Button |
Information Displayed |
|
Alarm Viewer. |
|
|
|
Configuration Mode Display. |
|
|
|
Device Viewer. |
|
|
|
Web Browser Display. |
|
|
|
Event Scheduler Display. |
|
|
|
Diary Display. |
|
|
|
Schematic Page Display. |
|
|
|
User Display |
|
|
If a button is greyed out, this indicates that the user currently logged on does not have access to that display. It is also possible to minimise buttons that are not used very often doing this displays the button as shown below. Clicking these minimised buttons will also display the corresponding display. Buttons can also be hidden from the toolbar as required.
2.1.6Status Bar
The Status Bar, shown below, is located at the bottom of the 963 Window. It provides information about the version of 963, the name of the user that is currently logged on, and the number of alarms that are left to acknowledge, as well as the current date and time.
The name of the user currently logged on is displayed in the left of Status Bar, the version of 963 in the next column, with the number of occurred alarms waiting to be actioned (red bell), number of cleared alarms waiting to be actioned (green bell) and the current date and item in the last one.
24 |
963 User Guide TC200635 Issue 3 25/03/2008 |
About 963
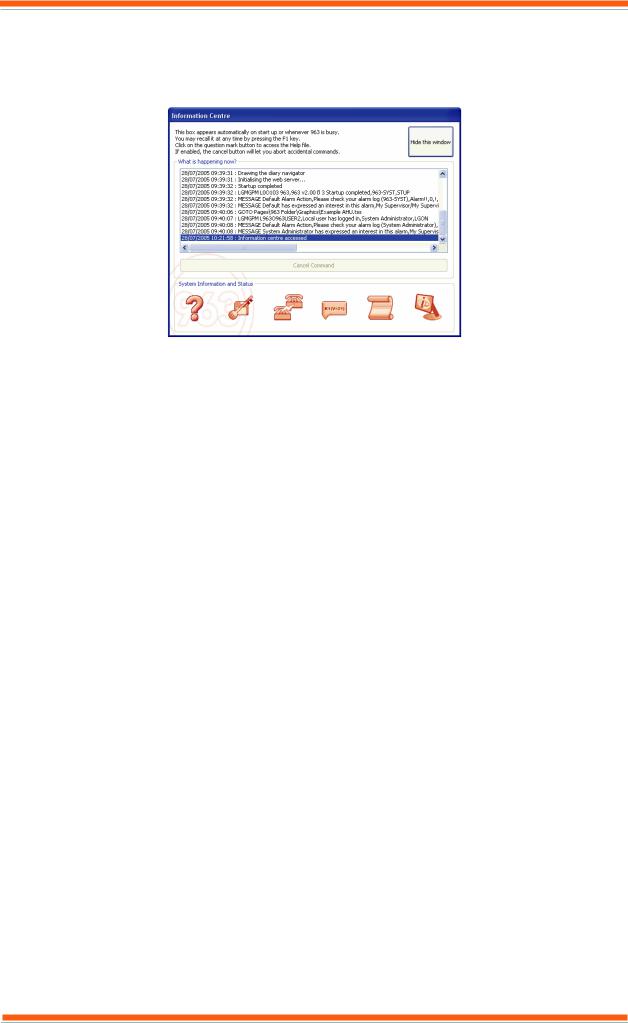
2.2The Information Centre Window
The Information Centre Window, shown below, is designed to inform the user what 963 is doing (i.e. starting up, downloading times etc), and to provide access to more detailed information such as communications. It is automatically displayed when 963 is performing a task, but can also be displayed when required by pressing F1.
The information about what 963 is currently doing is displayed in the What is happening now? box. The current command can be cancelled by clicking Cancel Command.
The buttons at the bottom of the window provide access to licence details, communications information, autodialler status, system information, script information, and the on-line help.
Note that the availability of these buttons is dependent on the user’s level of authority, therefore some of the buttons may be greyed out.
963 User Guide TC200635 Issue 3 25/03/2008 |
25 |

About 963
This page is intentionally left blank.
26 |
963 User Guide TC200635 Issue 3 25/03/2008 |
Using 963
3USING 963
This section describes how to use 963. It describes all the necessary tasks required to operate 963, and make adjustments to the system once it has been correctly engineered. A summary of using 963 is provided in the 'Basic Use' section of this manual. For a more detailed description of the different tasks see the following sections:
Action Alarms |
Adjust Occupation Times |
Adjust Values |
Administer the System |
Control Scripts |
Display a Schematic Page |
Display Graphs |
Display IQ3 Web Pages |
Display Scheduled Events |
Display the Information Centre |
Display the IQ System |
Display HTML Pages |
Enter Configuration Mode on Pre IQ3 Controllers |
Insert a List into an HTML File |
Layout the Window |
Manage Your User Account |
Playback Recorded Data |
Record Data |
Save a List to HTML |
Send an SMS Message |
Setup Exception Templates |
View Alarms |
View Communications Information |
View Occupation Times |
3.1Basic Use
This section of the manual describes the most basic use of the 963. It assumes that the user only has access to the pages that have been engineered. Most of the information presented to the user is displayed on schematic pages that have been set up. Clicking certain parts of the page will cause something to happen; exactly what happens is dependent on how the 963 is set up. When the mouse pointer is moved over a part of the screen that will do
something it changes to a hand ( ). These areas of the screen will generally be obvious because of text that appears in, or next to them.
To use 963:
1.On the Start menu point to All Programs point to Trend Control Systems and click 963 to run 963.
2.On the User menu click Log in and enter your user name and password to log in as described in the ‘Log In’ section of this manual. It is necessary to log in so that 963 knows what information and facilities you are able to access.
Remember the username is case sensitive.
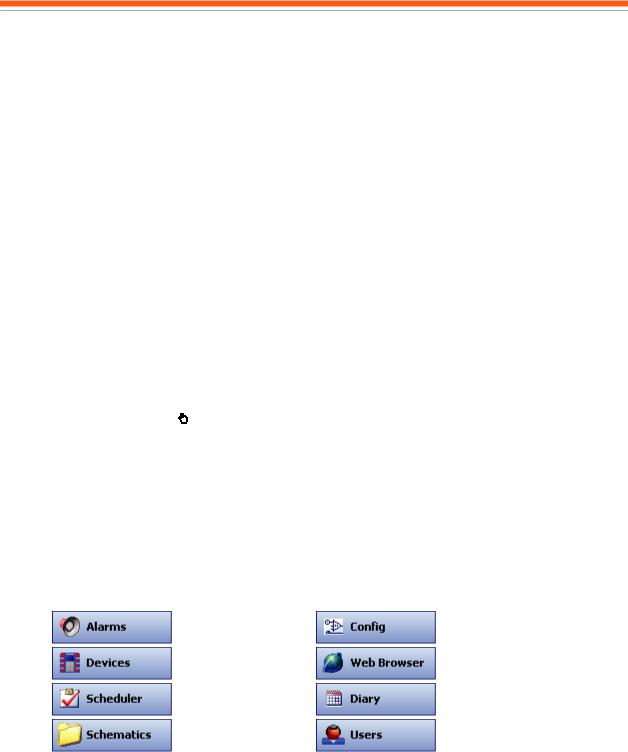
3.In the Navigator click the appropriate Selection Button to select the required display. These are listed in the table below. For details about each of the displays see the ‘The 963 Window’ section of this manual.
Button |
Description |
|
Button |
Description |
|
||
|
Displays |
the |
Alarm |
|
Displays |
the |
Configuration |
|
Viewer. |
|
|
|
Mode Display. |
|
|
|
Displays |
the |
Device |
|
Displays |
the |
Web Browser |
|
Viewer. |
|
|
|
Display. |
|
|
|
Displays |
the |
Event |
|
Displays the Diary Display. |
||
|
Scheduler Display. |
|
|
|
|
||
|
Displays |
the Schematic |
|
Displays the User Display. |
|||
|
Page Display. |
|
|
|
|
|
|
4.Once you have selected the required display you will be able to view the information such as schematic pages, the Device Viewer, and alarms. Clicking the different objects will enable you to perform different tasks the display should make it clear what can be done. The table below lists the common tasks you should see the corresponding section of this manual for more details.
|
Action Alarms |
Adjust Occupation Times |
|
|
Adjust Values |
Administer the System |
|
|
Control Scripts |
Display a Schematic Page |
|
|
Display Graphs |
Display IQ3 Web Pages |
|
|
Display Scheduled Events |
Display the Information Centre |
|
|
Display the IQ System |
Display HTML Pages |
|
|
Enter Configuration Mode on Pre IQ3 Controllers |
Insert a List into an HTML File |
|
|
Layout the Window |
Manage Your User Account |
|
|
Playback Recorded Data |
Record Data |
|
|
|
|
|
|
|
|
|
|
|
|
|
963 User Guide TC200635 Issue 3 25/03/2008 |
27 |
Using 963
Save a List to HTML |
Send an SMS Message |
Setup Exception Templates |
View Alarms |
View Communications Information |
View Occupation Times |
5.Log off as described in the ‘Log Off’ section of this manual when the use of 963 is finished.
3.1.1Run 963
963 can run in the same way as any Windows application, from the Start menu, from a shortcut, or from the Taskbar. 963’s installation process adds an option to run it from the Start menu.
To run 963:
1.On the Start menu point to All Programs and then point to Trend Control Systems and click 963.
If 963 has been licenced, it will run up displaying the 963 Window. An icon  is displayed at the bottom left of the screen. If 963 is not licenced a message indicating how many days you have left to evaluate the product will be displayed.
Note that 963 is to access information on a BACnet network (963 BACnet), and TOPS has been installed on a different PC to 963 TOPS must be running. See the 'Start TOPS Manually' section of the 963 Engineering Manual (TE200637).
3.1.2Log In
Before 963 can be used, it is necessary to log in so that 963 knows what information and facilities you are able to access.
To log in:
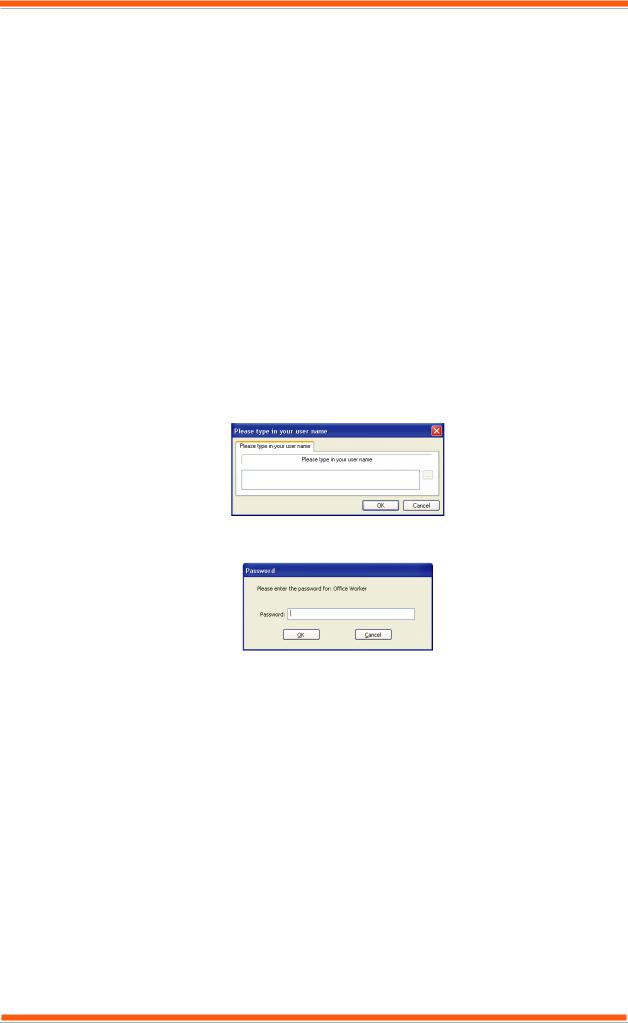
1.On the User menu click Log in. The Please type in you username dialogue box displayed.
2.In the box enter your username. Remember the username is case sensitive.
3.Click OK. The Password dialogue box is displayed.
4.In the Password box enter your password.
Note that passwords are case sensitive.
5.Click OK.
Note that a button may have been provided on the page that enables you to log in.
3.1.3Log Off
Once use of 963 is finished, it is advisable to log off to prevent unauthorised changes being made.
To log off:
1.On the User menu click Log off.
Note that if left unattended for a period of time 963 may automatically log the current user off if it has been configured in this way.
It is recommended that after logging off, the computer be locked to prevent other people accessing the PC.
Note that a button may have been provided on the page that enables you to log off.
28 |
963 User Guide TC200635 Issue 3 25/03/2008 |

Using 963
3.1.4Close 963
963 should be left running all the time to ensure alarms are processed correctly, and other tasks carried out. However it can be closed.
To close 963:
1.Log in as described in the ‘Log In’ section of this manual.
2.On the File menu click Exit, or click  . A dialogue box asking if you are sure you want to close 963 is displayed.
3.Click Yes.
Note that not all users will be able to close 963.
3.2Display a Schematic Page
This section of the manual describes how to access and use the 963’s schematic pages. Most of the information presented to the user is displayed on schematic pages that have been set up. Clicking certain parts of the page will cause something to happen; exactly what happens is dependent on how the 963 is set up. When the mouse pointer is
moved over a part of the screen that will do something it changes to a hand ( ). These areas of the screen will generally be obvious because of text that appears in, or next to them.
To display a schematic page:
1.Run 963 as described in the ‘Run 963’ section of this manual.
2.On the User menu click Log in to log in and enter your user name and password as described in the ‘Log In’ section of this manual. A schematic page may now be displayed if not got to (3) if one is displayed go to (4).
3.Click  or on the Mode menu click Schematics to select the Schematic Page Display.
4.Click the button or picture that displays the required page or click on the page in the Navigator. To display the page in a new window hold down the CTRL key and click the button or picture. To move from page to page click the button or picture that provides access to the required page.
As you move from page to page 963 keeps a record of the pages and enables you to move backwards and forwards through the pages. To do this on the Navigation menu click Move backwards or Move forwards, or right-click the page and click Forward or Backward.
Note that the Navigator can be refreshed by right clicking it, and clicking Refresh View from the displayed menu.
5.Once the required page is displayed you will be able to view the information, clicking the different objects will enable you to perform different tasks the page display should make is clear what can be done.
Values can be adjusted by clicking the button or picture that enables the value to be changed and specifying the new value. Values that have been overridden ON/OFF will have a flashing border unless configured otherwise. Compact graphs can be displayed by clicking the value that is to be graphed. Precision graphs can be displayed by right-clicking the value and clicking Collect full precision log graph(s). The page can be made to fit completely in the display area by right-clicking the page and on the displayed menu clicking Fit to page, or on the Zoom menu click Fit to page. If it has been set up a list of points associated with a value can be displayed by holding down the CTRL key and clicking the value. Configuration parameters of the configuration modules within IQ controllers can be viewed by right clicking on a value and clicking Edit Item from the displayed menu. Clicking Home from the User menu will display the schematic page displayed when you first logged in.
6.Log off when the use of 963 is finished.
963 User Guide TC200635 Issue 3 25/03/2008 |
29 |
 Loading...