

Page 1

963 Installation Instructions
Issue 2
Page 2

Author: Technical Publications
Issue: 2
Date: 09/01/2009
Part Number: TG201026
Copyright: © 2009 Honeywell Technologies Sàrl, ECC Division. All rights reserved.
This manual contains proprietary information that is protected by copyright. No part of this manual may be
reproduced, transcribed, stored in a retrieval system, translated into any language or computer language, or
transmitted in any form whatsoever without the prior consent of the publisher.
Manufactured for and on behalf of the Environmental and Combustion Controls Division of Honeywell
Technologies Sàrl, Ecublens, La Pièce, 16, 1180 Rolle, Switzerland by its Authorized Representative, Trend Control
Systems Limited.
For information contact:
Trend Control Systems Limited
P.O. Box 34
Horsham
W. Sussex
RH12 2YF
NOTICE: Trend Control Systems Limited makes no representations or warranties of any kind whatsoever with
respect to the contents hereof and specifically disclaims any implied warranties of merchantability or fitness for any
particular purpose. Trend Control Systems Limited shall not be liable for any errors contained herein or for
incidental or consequential damages in connection with the furnishing, performance or use of this material. Trend
Control Systems Limited reserves the right to revise this publication from time to time and make changes in the
content hereof without obligation to notify any person of such revisions or changes.
Windows, Windows XP Professional, Windows XP Home, Windows 2003, and Windows Vista are trademarks of
Microsoft Corporation. BACnet is a trademark of ASHRAE.
Please send any comments on this or any other Trend technical publication to [email protected]
Page 3

Table of Contents
TABLE OF CONTENTS
1 ABOUT THESE INSTRUCTIONS................................................................................................................. 5
1.1 Conventions Used in this Manual ................................................................................................................ 5
1.2 Contacting Trend.......................................................................................................................................... 5
2 INSTALLATION.............................................................................................................................................. 7
2.1 System Requirements................................................................................................................................... 7
2.2 Standard Installation.....................................................................................................................................8
2.3 Installation for BACnet Communications....................................................................................................9
2.4 Installation for use with a Remote SQL Server.......................................................................................... 10
2.5 Installation for use with full version of SQL Server .................................................................................. 10
2.6 Installation on an Unsupported Language Version of Windows................................................................ 10
2.7 Install the 963 Software .............................................................................................................................11
2.8 License 963 ................................................................................................................................................ 11
2.8.1 Obtain an Unlock Code................................................................................................................... 11
2.8.2 Enter the Unlock Code.................................................................................................................... 12
2.9 Connect the GSM Modem .........................................................................................................................13
2.10 Configure the GSM Connection.................................................................................................................14
2.10.1 Configure the GSM Connection Automatically.............................................................................. 14
2.10.2 Configure the GSM Connection Manually..................................................................................... 15
2.11 Connect the PC to the Ethernet Network ...................................................................................................16
2.12 Connect to the IQ Network ........................................................................................................................16
2.12.1 Connect over the Current Loop.......................................................................................................17
2.13 Check Communications............................................................................................................................. 17
2.14 SQL Server Installation and Configuration................................................................................................ 18
2.14.1 SQL Server 2005 Express Edition with Advanced Services...........................................................18
2.14.2 SQL 2005 Full Version................................................................................................................... 22
2.15 Configure 963 to Connect to a Remote SQL Server .................................................................................. 22
2.16 Upgrade...................................................................................................................................................... 23
2.16.1 Upgrade 963 when the Database is on a Remote PC...................................................................... 23
2.16.2 Upgrade from 963 v1.x or 962........................................................................................................ 24
2.17 Transfer the Licence to a Different Location ............................................................................................. 26
INDEX........................................................................................................................................................................ 29
963 Installation Instructions TG201026 Issue 09/01/2009 2
3
Page 4

Table of Contents
This page is intentionally left blank.
4
963 Installation Instructions Issue 09/01/2009 TG201026 2
Page 5

About These Instructions
1 ABOUT THESE INSTRUCTIONS
These instructions apply to 963 version 3.10 software. They provide information about installing, upgrading, and
licensing the 963.
Other relevant documentation is:
963 Data Sheet (TA200636)
963 Engineering Manual (TE200637)
963 User Guide (TC200635)
963 Web User Guide (TC200685)
Product Data Sheets
These documents are available in PDF format in the Documentation directory as well as the Data CD-ROM.
1.1 Conventions Used in this Manual
There are numerous items and instructions in this manual, the conventions below are designed to make it quick and
easy to find and understand the information.
Menu commands are in bold type.
Buttons and options in dialogue box that you need to select are in bold type.
The names of text boxes and dialogue boxes are in bold type.
Key combinations that you should press appear in normal type. If joined with a plus sign (+), press and
hold the first key while you press the remaining one(s). For example CTRL+P indicates holding down the
control key while pressing P.
Text you should enter is in Italic type.
1.2 Contacting Trend
Head Office
Trend Control Systems Ltd
PO Box 34
Horsham
Sussex
RH12 2YF
England
Tel: +44 (0) 1403 211888
Fax: +44 (0) 1403 241608
Details of regional offices can be found on our Web site.
Internet
Our company web site (www.trend-controls.com) provides information about our products and us, or our support
web site (http://pnet.trend-controls.com).
Technical Support
Our support department provides technical support during normal office hours. Before contacting them ensure that
you have your Technical Support PIN number available, without this we will be unable to provide you with any
support.
Trend Control Systems Ltd.
Technical Support Department
PO Box 34
Horsham
Sussex
RH12 2YF
England
Tel: +44 (0) 1403 226600
Email: [email protected]
Fax: +44 (0) 1403 226310
Technical Publications
Please send any comments on this or any other Trend technical publication to [email protected].
963 Installation Instructions TG201026 Issue 09/01/2009 2
5
Page 6

About These Instructions
This page is intentionally left blank.
6
963 Installation Instructions TG201026 Issue 09/01/2009 2
Page 7

Installation
2 INSTALLATION
This section describes how 963 should be installed to ensure that it operates correctly. 963 can be run free of charge,
for a 28-day trial period but after this a licence must be purchased in order to continue using 963.
The process for installing the 963 differs slightly depending on your requirements, and system configuration, you
should follow the one that matches your needs.
Standard Installation - This section describes the standard 963 installation procedure, it should be suitable
for most installations.
Installation for BACnet Communications - This section describes the installation procedure required if the
963 is to communicate with BACnet devices.
Installation for use with a Remote SQL Server - This section describes the installation procedure required if
the 963 is to access a remote SQL Server.
Installation for use with full version of SQL Server - This section describes the installation procedure if the
963 is to connect to a full version of SQL Server instead of SQL Server 2005 Express Edition with
Advanced Services.
Installation on an Unsupported Language Version of Windows® - This section describes the installation
procedure required if the 963 is to be installed on a PC running a Windows® language other than English
(UK), Simplified Chinese, Czech, Danish, French, German, Italian, Polish, Russian, Spanish, Swedish or
Finnish.
2.1 System Requirements
Before installing 963 or upgrading to 963 v3.10, you should ensure that the PC meets the system requirements.
963 System Requirements
The specifications below are those recommended to run 963. They refer to a standard PC with mouse, keyboard,
hard drive, floppy disk drive, DVD drive, monitor, and sound capabilities (optional).
Recommended
Hardware
1
Processor
2 GHz.
RAM 1 GB
Disk space 40 GB hard disk with 1 GB for installation + space for site data.
Graphics card 128 MB, 1280x1024 resolution.
Network card Ethernet Network Card (required for 963 Server, if 963 is to access the IT network e.g. is
to connect to the IQ network using Ethernet, if SNMP is to be used, or communication
with BACnet devices is required).
COM ports
2 (for connection to LNC2, or CNC2 and GSM modem)
Parallel/USB ports 1 (for Alarm Printer).
3
2
PCI Slots 2 standard size (for Ethernet card, and LNC2).
Software
5
Operating system Windows XP SP3 Professional with Internet Explorer version 6 SP1 or greater4
Minimum
Hardware
1
Processor
1 GHz.
RAM 512 MB
Disk space 20 GB hard disk with 1 GB for installation + space for site data.
Graphics card 64 MB, 1280x1024 resolution.
Network card Ethernet Network Card (required for 963 Server, if 963 is to access the IT network e.g. is
to connect to the IQ network using Ethernet, if SNMP is to be used, or communication
with BACnet devices is required).
COM ports 2 (for connection to LNC2, or CNC2 and GSM modem)
Parallel/USB ports 1 (for Alarm Printer).
3
2
PCI Slots 2 standard size (for Ethernet card, and LNC2).
Software
5
Operating system Windows XP SP3 Professional with Internet Explorer version 6 SP1 or greater4
1
If TOPS and 963 are to be run on a single PC a dual core processor is recommended.
2
A built in COM port is required for the GSM modem supplied with 963 SMS.
963 Installation Instructions TG201026 Issue 09/01/2009 2
7
Page 8

Installation
3
The use of a dot matrix printer is recommended for alarms. Use of inkjet or laser printers for alarm printing is likely
to cause undesirable results e.g. each line of the alarm on a separate page. A separate printer for graphs and
schematic pages (graphics printer) is recommended. The graphics printer can be connected using a parallel or USB
port. The printer may also be accessed over the office IT network (providing a network card is fitted). This should
be taken into account when specifying the required ports for the PC.
4
963 will also operate on Windows Vista™ Business4 SP1 and Windows Server 20035 SP2 Standard, and Enterprise
with Internet Explorer version 6 SP1.
5
963 will only operate on 32 bit operating systems.
If installing 963 on a PC that has a full installation of SQL server earlier than SQL Server 2005 it is necessary to
upgrade to SQL Server 2005.
If the 963 is to communicate with devices on a BACnet network TOPS must also be installed. This installation can
be on the same PC as 963, or on a different PC providing communication is possible between the two over Ethernet.
The installation of TOPS is carried out by a step-by-step installation program. Once installed TOPS must be
licensed, and configured, as described in the 963 Engineering Manual (TE200637).
If 963 is to communicate with BACnet devices using TOPS installed on the same PC the PC must be running
Windows XP, or Windows 2003 SP1.
963 Clients
PCs: 963 Clients may be of any configuration providing they are running TCP/IP networking protocol, and have an
Ethernet card, and have a web browser installed. For full graphics capabilities (graphic mode) Internet Explorer v6.0
or greater, or Firefox 2 (recommended Internet Explorer version 6 or greater) and the SUN JAVA runtime
environment J2SE 5.0 or greater is required. The browser must have JAVA script enabled. Other browsers will
provide a text only display (text mode).
PDAs: PDA’s running Windows Mobile 2003 Second Edition or greater (text mode only).
Smartphones: Nokia 9210i, and smartphones running Window Mobile 5 or greater (text mode only).
Note that the 963 has not been tested with all devices and Trend cannot guarantee a particular device’s
compatibility with 963 Server.
Popup blocking software must be disabled, or configured to allow popups from the 963 Server.
PC Resources
963 is a real time application; installed PCs must have enough free resources to safely run 963 under peak load
conditions. We cannot guarantee system performance if other 3
rd party software is installed, for example virus
checking software.
2.2 Standard Installation
This section describes the standard installation procedure for installing the 963. This procedure should be suitable
for most installations.
Standard installation:
1. Ensure that the PC meets the system requirements see the 'System Requirements' section of these
instructions for more details.
2. Install the 963 software as described in the 'Install the 963 Software' section of these instructions.
3. Run 963 and licence it as described in the 'Licence 963' section of these instructions.
When the 963 is run for the first time, it displays a password for the System Administrator. This password
MUST be noted, as without this password it will not be possible to gain access to the default program’s
functionality.
4. Connect the GSM modem as described in the 'Connect the GSM Modem' section of these instructions. (963
SMS Direct only).
5. Configure the GSM connection as described in the 'Configure the GSM Connection' section of these
instructions. (963 SMS Direct only).
6. Connect the PC to the Ethernet Network as described in the 'Connect the PC to the Ethernet Network'
section of these instructions.
7. Connect the PC to the IQ network as described in the 'Connect the PC to the IQ Network' section of these
instructions.
8. Check communications as described in the 'Check Communications' section of these instructions.
After the installation is complete it is strongly recommended that the 963 be configured to automatically
archive the database to prevent it becoming to large as described in the 'Configure Automatic Archiving'
section of 963 Engineering Manual (TE200637).
8
963 Installation Instructions TG201026 Issue 09/01/2009 2
Page 9

Installation
2.3 Installation for BACnet Communications
This section describes the standard installation procedure for installing the 963 if it is to communicate with BACnet
devices. To carry out this procedure you must have a copy of the Trend Open Protocol Server TOPS as this is
required during the installation.
For the 963 to communicate with BACnet devices it must be able to communicate with the Trend Open Protocol
Server (TOPS).
To install 963 for BACnet communications:
1. Ensure that the PC meets the system requirements see the 'System Requirements' section of these
instructions for more details.
2. Install the 963 Software as described in the 'Install the 963' section of these instructions.
3. Run 963 and licence it as described in the 'Licence 963' section of these instructions.
When the 963 is run for the first time, it displays a password for the System Administrator. This password
MUST be noted, as without this password it will not be possible to gain access to the default program’s
functionality.
4. Install and Licence TOPS as described in the TOPS Installation Instructions (TE201036).
Note that TOPS can either be installed on the same PC as the 963, or a different one. If TOPS is on the
same PC as 963 the PC must be connected to the BACnet network using Ethernet. If TOPS is running on a
different PC the PC running TOPS must be connected to the BACnet network using Ethernet, and the PC
running 963 must be able to access it over Ethernet.
5. Connect the GSM modem as described in the 'Connect the GSM Modem' section of these instructions. (963
SMS Direct only).
6. Configure the GSM connection as described in the 'Configure the GSM Connection' section of these
instructions. (963 SMS Direct only).
7. Connect the PC to the Ethernet Network as described in the 'Connect the PC to the Ethernet Network'
section of these instructions.
8. Connect the PC to the IQ network as described in the 'Connect the PC to the IQ Network' section of these
instructions.
9. Set the 963's timeout value for remote TCP/IP sites to 13s. If non-default values have been used of APDU
Timeout, ADPU Segment Timeout, or Number of APDU Retries in TOPS see the 'Configure the BACnet
Connection' section of the TOPS BACnet Driver Configuration Manual (TE201027) for more details of
setting the 963's timeout value for remote TCP/IP sites. Ensure that the timeout set in 963 is greater than
the APDU timeout.
10. Configure the TOPS BACnet driver as described in the TOPS BACnet Driver Configuration Manual
(TE201027).
11. Check communications as described in the 'Check Communications' section of these instructions.
After the installation is complete it is strongly recommended that the 963 be configured to automatically
archive the database to prevent it becoming to large as described in the 'Configure Automatic Archiving'
section of 963 Engineering Manual (TE200637).
963 Installation Instructions TG201026 Issue 09/01/2009 2
9
Page 10

Installation
2.4 Installation for use with a Remote SQL Server
This section describes how 963 should be installed for use with a remote SQL Server.
To install 963 for use with a remote SQL Server:
1. Ensure that the PC meets the system requirements see the 'System Requirements' section of these
instructions for more details.
2. Install the required version of SQL Server. For details of installing SQL Server 2005 Express Edition with
Advanced Services see the 'Install SQL Server 2005 Express Edition with Advanced Services' section of
this manual. For details of installing a Full Version of SQL Server see the 'Install a Full Version of SQL
Server' section of this manual.
3. Configure the SQL Server. For details of configuring SQL Server 2005 Express Edition with Advanced
Services see the 'Configure SQL Server 2005 Express Edition with Advanced Services' section of this
manual. For details of configuring a full version of SQL Server see the 'Configure a Full Version of SQL
Server' section of this manual.
4. Ensure that the PC running 963 (PC 1) and the PC running SQL Server (PC 2) are set up on the same
network or domain.
5. Create a directory on PC 2 that is the same as directory 963 is installed in on PC 1 normally c:\program
files\trend control systems\963) on PC 2.
6. Follow either the Standard Installation, or the Installation for BACnet Communications procedure as required as
described in the 'Standard Installation', and 'Installation for BACnet Communications' sections of these instructions.
7. Configure the 963 to Connect to a Remote SQL Server as described in the 'Configure 963 to Connect to a
Remote SQL Server' section of these instructions.
8. Ensure that the user account that is to be used to run 963 has the rights within SQL Server to manage the
963 database.
2.5 Installation for use with full version of SQL Server
This section describes how 963 should be installed for full version of SQL Server that is installed on the same PC as
963. To carry out this procedure a full version of SQL Server is required. This must be purchased separately, and is
not available from Trend.
To install 963 for use with a full version of SQL Server:
1. Ensure that the PC meets the system requirements see the 'System Requirements' section of these
instructions for more details.
2. Install a Full Version of SQL Server as described in the 'Install a Full Version of SQL Server' section of
these instructions.
3. Configure a Full Version of SQL Server as described in the 'Configure a Full Version of SQL Server'
section of these instructions.
4. Install and Configure a SQL Server as described in the 'Install and Configure a SQL Server' section of these
instructions.
5. Follow either the Standard Installation, or the Installation for BACnet Communications procedure as
required as described in the 'Standard Installation', and 'Installation for BACnet Communications' sections
of these instructions.
6. Ensure that the user account that is to be used to run 963 has the rights within SQL Server to manage the
963 database.
2.6 Installation on an Unsupported Language Version of Windows
This section describes how 963 should be installed on a PC running a Windows language other than English (UK),
Simplified Chinese, Danish, French, German, Italian, Polish, Russian, Spanish, Swedish or Finnish.
To install 963 on an unsupported language version of Windows®:
1. Ensure that the PC meets the system requirements see the 'System Requirements' section of these
instructions for more details.
2. Install SQL Server 2005 Express Edition with Advanced Services as described in the 'Install SQL Server
2005 Express Edition with Advanced Services' section of these instructions.
3. Configure SQL Server 2005 Express Edition with Advanced Services as described in the 'Configure SQL
Server 2005 Express Edition with Advanced Services' section of these instructions.
4. Install SQL Server Backward Compatibility Components as described in the 'Install SQL Server Backward
Compatibility Components' section of these instructions.
5. Follow either the Standard Installation, or the Installation for BACnet Communications procedure as
required as described in the 'Standard Installation', and 'Installation for BACnet Communications' sections
of these instructions to complete the installation.
Note that during the installation of the 963 software will inform you that SQL Server is installed and that the
installation of SQL Server 2005 Express Edition with Advanced Services will not be carried out.
10
963 Installation Instructions TG201026 Issue 09/01/2009 2
Page 11
Installation
2.7 Install the 963 Software
The installation of the 963 software is performed by a step-by-step installation program. During the installation
procedure you will be required to enter the serial number for the software. This located on the back of the CD case;
you should keep this number in a safe place because it will be required when you purchase a licence.
Note that if a full version of SQL Server 2000 is already installed then 963 will not upgrade the SQL server. SQL
Server must then be upgraded to a full version of SQL Server 2005 separately. The installation will install SQL
Server 2005 Express with Advanced Services operating in Mixed (SQL) mode. If MSDE 2000 is installed it will
upgrade to SQL Server 2005 Express with Advanced Services. If an earlier SQL version is installed the installation
will fail and it will be necessary to uninstall the earlier version before 963 can be installed.
To install the software:
1. Log on to the PC as someone with Administrator rights.
2. Insert the CD into the CD-ROM drive, and wait for the installation screen to appear.
Note that if autorun is disabled run SETUP.exe from the CD.
3. Follow the instructions on the screen.
2.8 License 963
Before 963 can be used, it must be licensed. The licence will allow you to run 963 on a single PC. If you wish to run
963 on another PC, another licence must be purchased, or the existing licence transferred to the other PC as
described in the 'Transfer the Licence to a Different PC' section of these instructions.
If 963 is already licensed, and you want to upgrade the licence to allow client/server operation, or more clients,
contact us and purchase the appropriate upgrade. You will then be provided with a new site key that must be entered
before the new facilities will be available.
To licence 963:
1. Obtain an unlock code as described in the ‘Obtain an Unlock Code’ section of these instructions.
2. Enter the unlock code as described in the ‘Enter the Unlock Code’ section of these instructions.
The 963 uses CrypKey to perform the licensing functions. CrypKey may not work after disk defragmentation using
Speed Disk included in Norton utilities. This problem may exist with other defragmentation programs; see the
‘Problems with Defragmentation Programs’ section of the 963 Engineering Manual (TE200637).
The use of virus scanning and anti spyware programs may also cause problems with the licence as the may remove
one of the CrypKey files, see the ‘Problems with Virus Scanning and Anti Spyware Programs’ section of the 963
Engineering Manual (TE200637).
2.8.1 Obtain an Unlock Code
To licence 963 it is necessary to obtain an unlock code.
o obtain an unlock code:
T
1. Run 963.
2. Log in as someone with a PIN level of 99.
3. Press F1 to display the Information Centre.
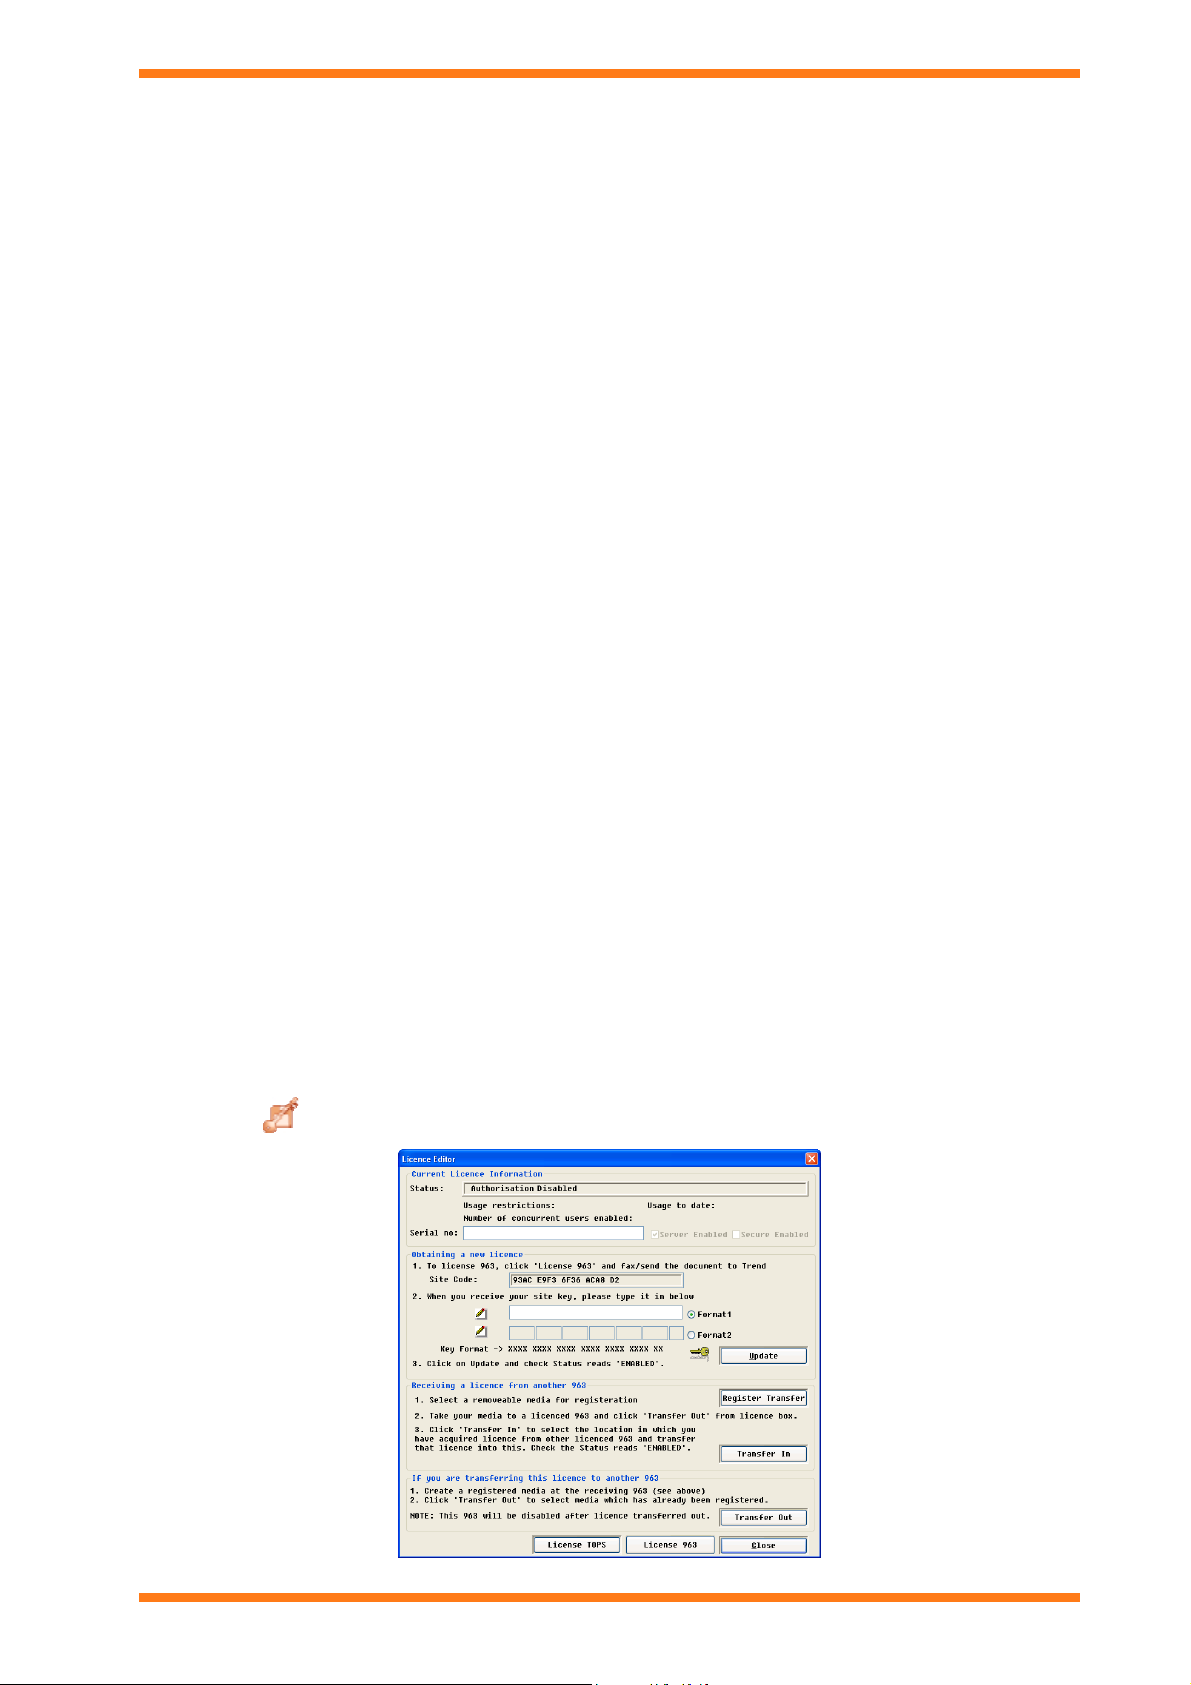
4. Click
. The Licence Editor dialogue box is displayed.
963 Installation Instructions TG201026 Issue 09/01/2009 2
11
Page 12

Installation
5. If it is not displayed in the Serial no box enter the serial number. The serial number can be found on the
back of the CD case.
6. Click Licence 963. The Licence Details dialogue box is displayed.
7. In the Contact Name box enter your name.
8. In the Company Name box enter your company name.
9. In the Your Fax No box enter your fax number. This is the fax number to which the unlock code will be
faxed.
10. In the Contact Number box enter a telephone number at which you can be contacted.
11. In the Email box enter your email address.
12. In the Site Name box enter the site on which 963 is to be installed.
13. In the Site Address box enter the address of the site.
14. Click OK. Notepad will now be run with the file 'faxform.txt'.
15. On the File menu click Print in notepad to print out this file.
16. Click Close to close the Licence Editor dialogue box.
17. Email the ‘faxform.txt’ file (located in c:\trend control systems\963) to [email protected], fax the
printout to our Customer Services Department on +44 (0) 1403 226310 or phone customer services on +44
(0)1403 226600.
18. When you receive the licence information, you should licence 963 immediately. You will be supplied with
a Site Key that will allow 963 to run; no further software installation is necessary.
2.8.2 Enter the Unlock Code
enter the unlock code:
To
1. Obtain an unlock code as described in the 'Obtain an Unlock Code' section of these instructions.
2. Run 963.
3. If the trial period has not expired log in as someone with a PIN level of 99, press F1 to display the
Information Centre, and click
.
4. The Licence Editor dialogue box is displayed.
5. In the When you receive your site key, please type it in below box enter the unlock code either by
clicking Format 1 and copying and pasting it into the box, or clicking Format 2 and typing it into the box.
12
963 Installation Instructions TG201026 Issue 09/01/2009 2
Page 13

Installation
6. Click Update, a dialogue box is displayed informing you that the 963 has been licensed. If you want to
view a text file containing detailed licence information is displayed click Yes, otherwise click No.
Note that the text file containing detailed licence information is '963LicenceDetail.txt' store in the directory
the 963 is installed in, and can be viewed in Notepad.
7. Click Close.
Note that the procedure described above can also be used to update the licence if it has changed.
8. Restart the 963.
If the 963 has been licensed with SMS Direct a dialogue box is displayed allowing the GSM connection to be
configured click OK to configure the GSM Connection now, or Cancel to leave it until later. For details of
configuring the connection see the ‘Configure the GSM Connection’ section of these instructions.
2.9 Connect the GSM Modem
If 963 SMS Direct is being used it is necessary to connect the PC the supplied GSM modem. The modem should be
connected to the PC as described in the documentation supplied with the modem. Once the modem is connected to
the PC the GSM connection must be configured as described in the ‘Configure the GSM Connection’ section of
these instructions.
Note that the GSM modem supplied with 963SMS Direct does not contain a SIM card. The SIM card should be
obtained separately before connecting the GSM modem.
To connect the GSM modem:
1. Obtain a SIM card.
2. Connect the GSM modem to the PC as described the supplied documentation.
Do not install the mobile phone tools on the CD supplied in the modem package as they may interfere with
the operation of 963 SMS.
963 Installation Instructions TG201026 Issue 09/01/2009 2
13
Page 14
Installation
2.10 Configure the GSM Connection
If the 963 has been licensed with SMS direct it is necessary to configure the GSM connection that is to be used. The
first time 963/…/SMS is run a dialogue box enabling the GSM connection to be configured is displayed. You can
choose to configure it then, or it can be done later. The GSM connection can either be configured automatically or
manually, as described in the ‘Manually Configure the GSM Connection’, or ‘Configure the GSM Connection
Manually’ sections of these instructions.
When configuring the GSM connection it is recommended that any PIN requirement of the SIM be disabled, the use
of PINs is NOT recommended. 963 does allow the use of PINs, however if the SIM card is swapped and an
incorrect PIN number is present within the supervisor the SIM is likely to become locked. This is because 963
attempts to unlock the SIM and after three incorrect attempts the SIM will be locked and a PUK number is required.
963 keeps track of how many times the PIN is entered and will warn you if it thinks you are about to lock your SIM.
The PUK is available from whatever mobile phone network you are using and can be unlocked using any standard
mobile phone.
If a pay as you go SIM is being used to send the alarms it is recommended that a scheduled event be set up to send a
regular SMS message to keep the SIM active. Some pay as you go SIM cards will be deactivated by the provider if
they are not used for a period of time.
2.10.1 Configure the GSM Connection Automatically
63 will scan all the PC’s COM ports looking for a GSM device if one is found it will be used.
9
To configure the GSM connection automatically:
1. Run 963 and log in as someone with authority to configure SMS settings.
2. If the SMS Management dialogue box is not displayed on the SMS menu click Properties to display it.
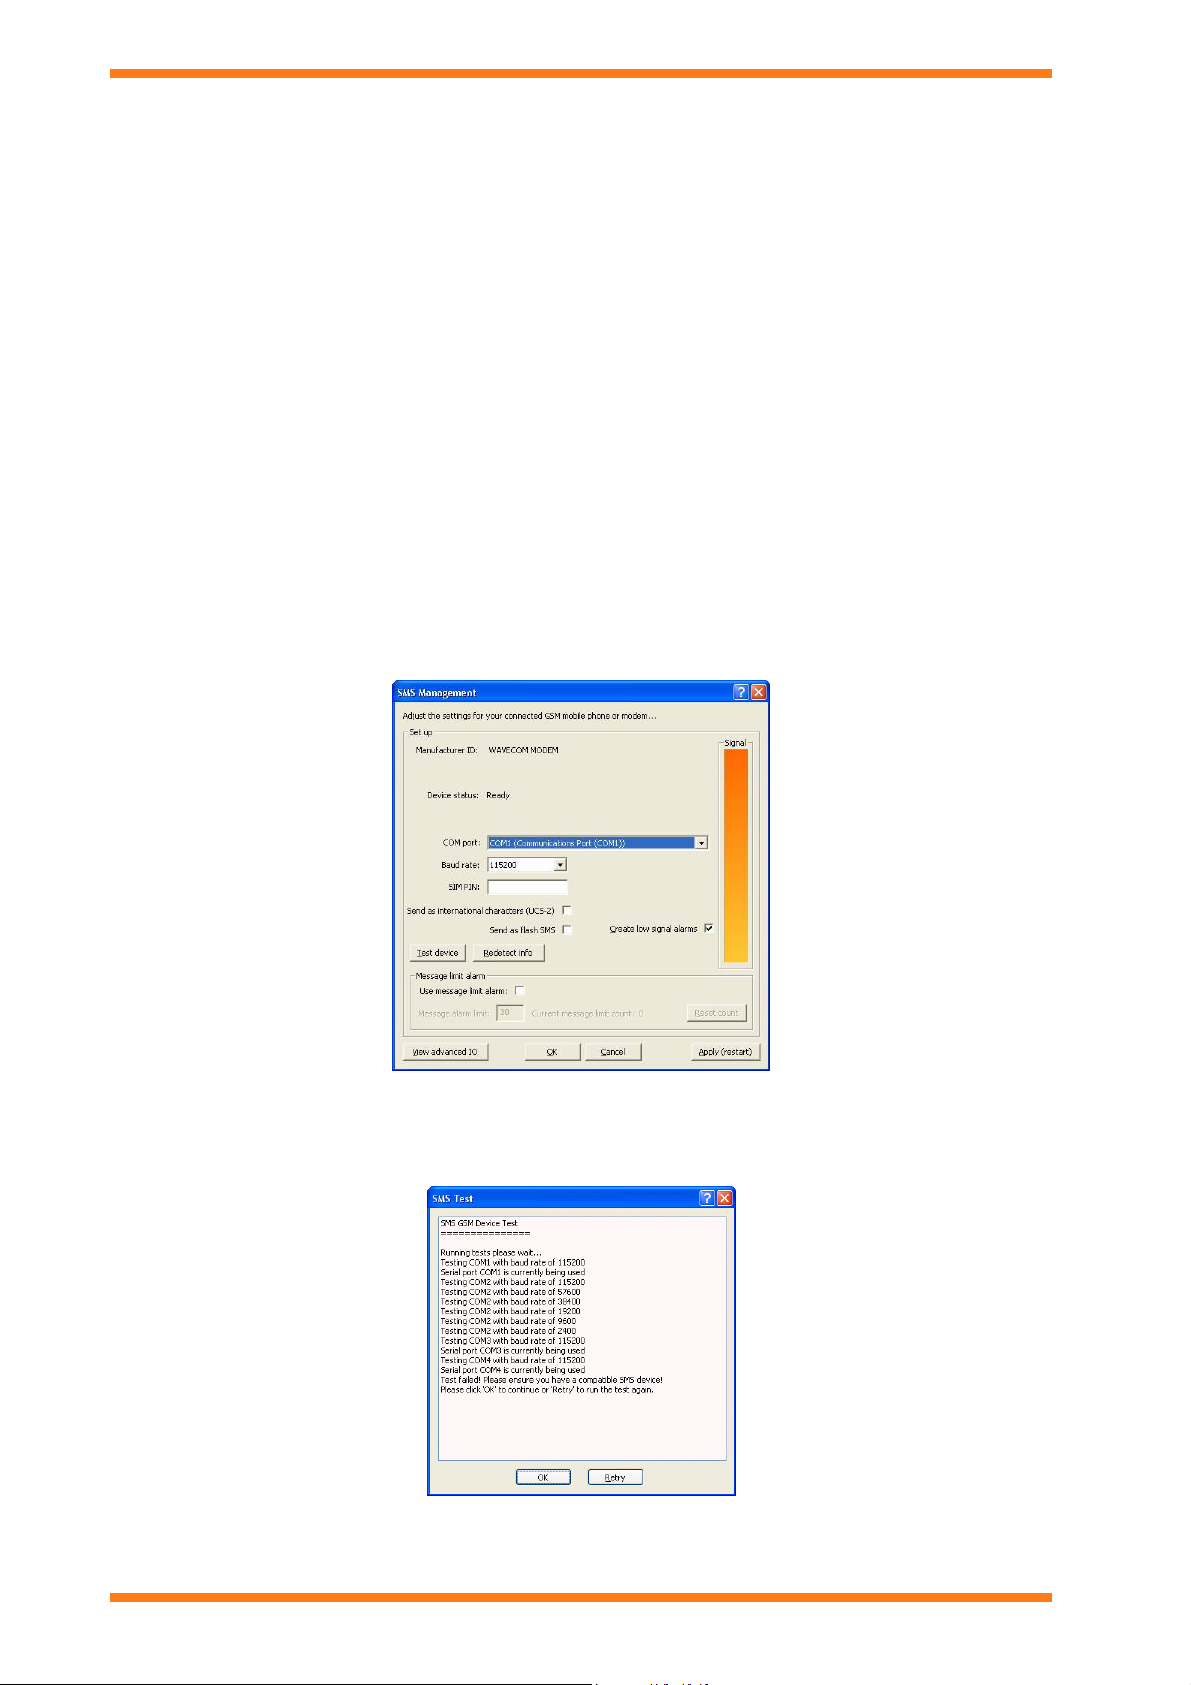
3. Click Test device. A dialogue box is displayed asking you to ensure the GSM modem is connected.
4. Check the GSM modem is correctly connected to the PC and turned on.
5. Click OK. The SMS Test dialogue box is displayed. And 963 will scan all the COM ports to locate the
GSM modem. The progress is reported in the dialogue box. To repeat the process click Retry.
14
963 Installation Instructions TG201026 Issue 09/01/2009 2
Page 15

Installation
6. Once the process is completed click OK to return to the SMS Management dialogue box. If 963 found the
GSM modem its details will be used. If the GSM modem was not correctly detected you can configure the
connection manually as described in the ‘Manually Configure the GSM Connection’ section of these
instructions.
7. If a PIN is required to access the SIM enter the required PIN in the SIM PIN box.
Caution: If the PIN is incorrect all SMS activity will cease until a correct PIN has been entered and
activated. Incorrect entry of a PIN number may result in the SIM being locked requiring a PUK
number from the network service provider. It is recommended that any requirement for entry of a
PIN to activate the SIM is disabled.
8. If text messages are to include international (UCS-2) characters select the Send as international
characters (USC-2) check box.
Note that if international characters are used only 70 characters are allowed in the SMS message. If
international characters are not used the message can be up to 140 characters.
9. If text messages are to flash on the phone to select the Send as Flash SMS check box.
10. If an alarm is to be generated after a certain number of alarms have been sent select the Use message limit
alarm check box, and in the Message alarm limit box enter the number of alarms that are sent before the
message alarm limit alarm is generated.
This alarm is useful if a pay as you go SIM is being used to send the alarms. The message alarm limit can
be set to the number of alarms that can be sent using the available credit on the SIM.
11. Click Apply. 963 will attempt to communicate with the modem to determine the manufacturer ID, and
status.
If successful the information will be displayed in the dialogue box. The signal strength is also displayed in
the Signal area. If unsuccessful 963 will inform you that it was unable to configure the GSM connection.
Failure could be because the COM port may be in use by another program. The manufacturer ID and status
can be re detected by clicking Redect info.
12. Click OK.
2.10.2 Configure the GSM Connection Manually
SM connection can be configured manually if for example the automatic configuration fails, or selects the
The G
wrong device if there is more than one.
To configure the GSM connection manually:
1. Run 963 and log in as someone with authority to configure SMS settings.
2. If the SMS Management dialogue box is not displayed on the SMS menu click Properties to display it.
3. In the COM port box click the COM port connecting the PC to the GSM modem.
4. In the Baud rate box click the baud rate for communications between the modem and PC.
5. If a PIN is required to access the SIM enter the required PIN in the SIM PIN box.
Caution: If the PIN is incorrect all SMS activity will cease until a correct PIN has been entered and
activated. Incorrect entry of a PIN number may result in the SIM being locked requiring a PUK
number from the network service provider. It is recommended that any requirement for entry of a
PIN to activate the SIM is disabled.
963 Installation Instructions TG201026 Issue 09/01/2009 2
15
Page 16

Installation
6. If text messages are to include international (UCS-2) characters select the Send as international
characters (USC-2) check box.
Note that if international characters are used only 70 characters are allowed in the SMS message. If
international characters are not used the message can be up to 140 characters.
7. If text messages are to flash on the phone to select the Send as Flash SMS check box.
8. If an alarm is to be generated after a certain number of alarms have been sent select the Use message limit
alarm check box, and in the Message alarm limit box enter the number of alarms that are sent before the
message alarm limit alarm is generated.
This alarm is useful if a pay as you go SIM is being used to send the alarms. The message alarm limit can
be set to the number of alarms that can be sent using the available credit on the SIM.
9. Click Apply. 963 will attempt to communicate with the modem to determine the manufacturer ID, and
status.
If successful the information will be displayed in the dialogue box. The signal strength is also displayed in
the Signal area. If required the manufacturer ID, and status can be re detected by clicking Redect info.
10. Click OK.
2.11 Connect the PC to the Ethernet Network
If the 963 is to act as a server providing BMS information to clients, or if access to company IT information such as
the company Intranet, or the Internet is required, the PC must be connected to the office IT network using an
Ethernet connection. Connection in this way does not prevent connection to the IQ network over the Ethernet.
To connect the PC to the Ethernet network:
1. If necessary fit a suitable Ethernet adaptor to the PC, following the manufacturer’s instructions.
2. If connection is to be made using a wireless network necessary configure the device to connect to the
wireless network, otherwise plug the Ethernet network cabling into the Ethernet adaptor.
3. Configure Windows Networking to suit the Ethernet network.
4. Configure any other necessary parameters required for the office network.
Note that assistance from the IT department responsible for the Ethernet network will normally be required.
2.12 Connect to the IQ Network
963 can be connected to the IQ network over Ethernet using a standard Ethernet connection; this allows the office IT
network to be used to connect 963 to the IQ network. Connecting 963 in this way requires a device (e.g.
3xtend/EINC L) containing a virtual CNC operating in supervisor mode.
To connect 963 to the IQ network over Ethernet:
1. Ensure the PC is connected to the Ethernet network as described in the 'Connect the PC to the Ethernet
Network' section of this manual.
2. Run 963.
3. Log in as someone who can display the Communications Window.
4. Press F1 to display the Information Centre.
5. Click
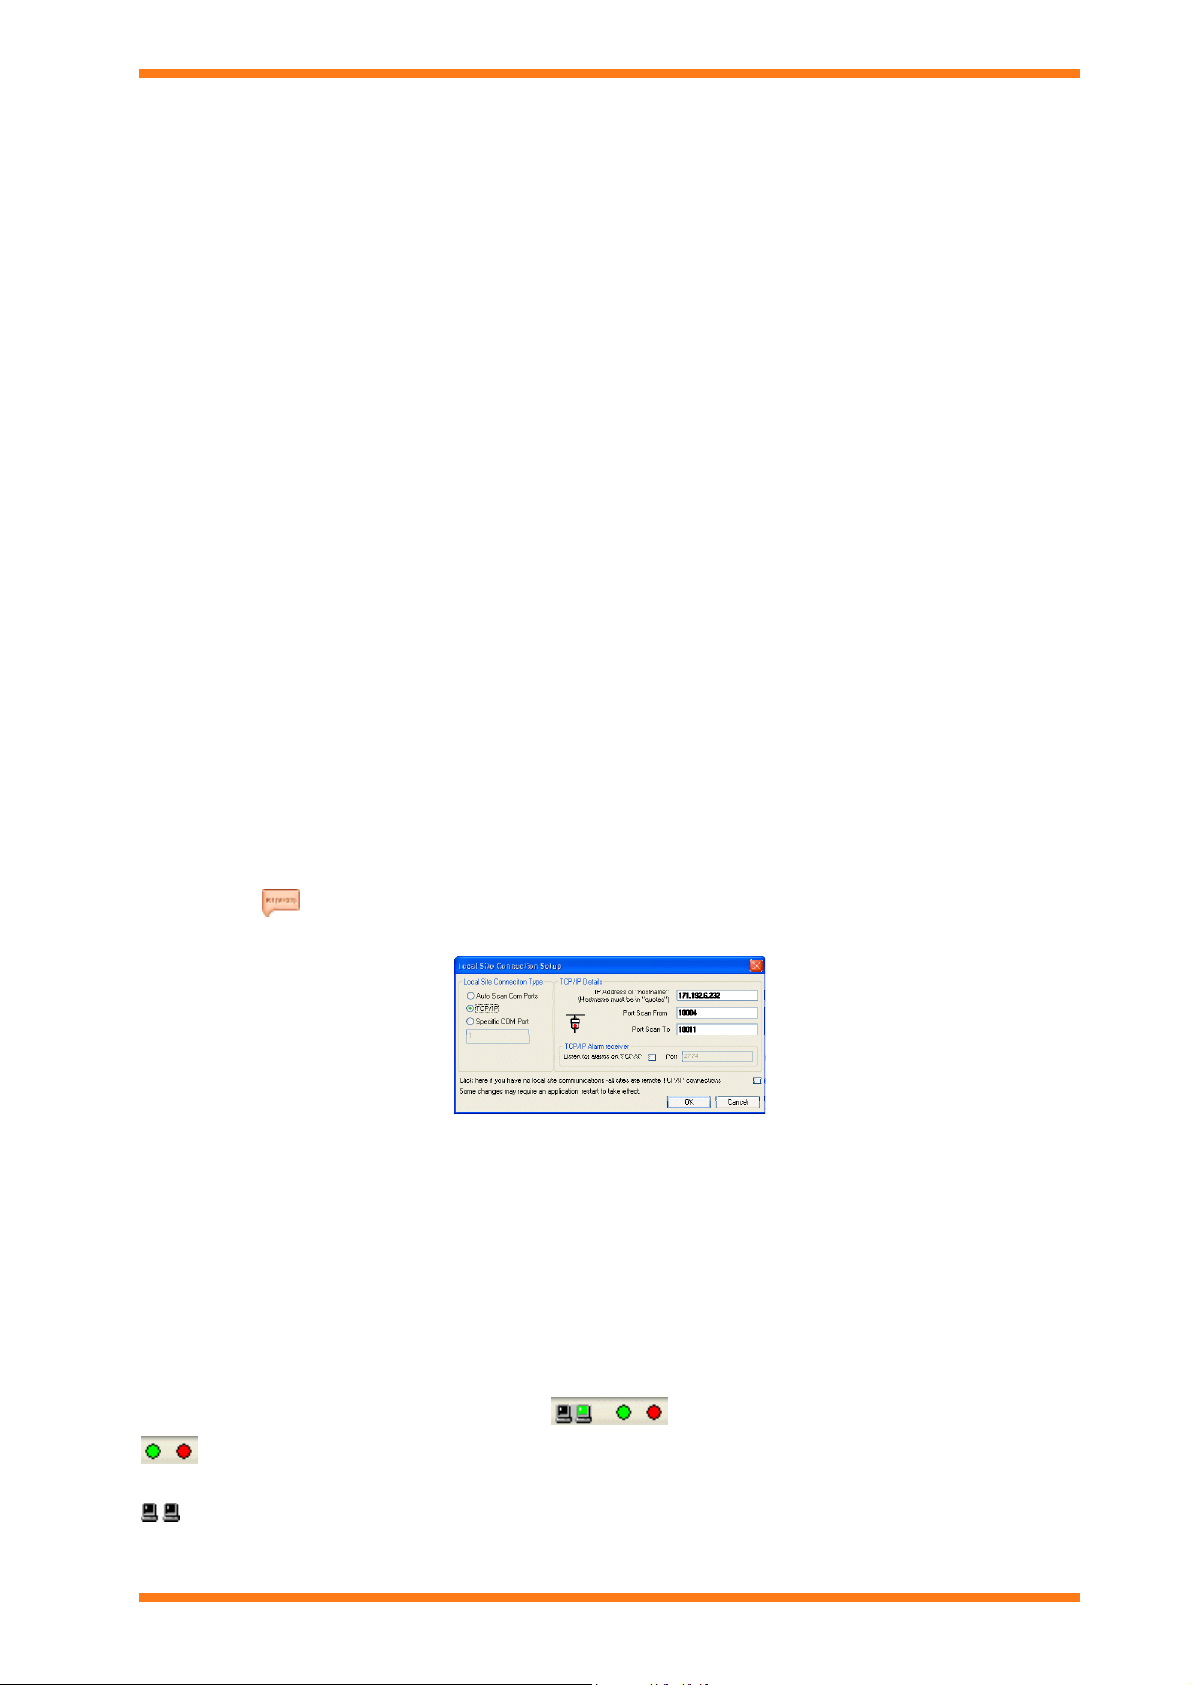
6. Click Configure Comms. The Local Site Connection Setup dialogue box is displayed.
. The Communications Window will be displayed.
7. Click TCP/IP.
8. In the IP Address or hostname box enter the IP address or hostname of the device containing the virtual
CNC to which 963 is to connect. The hostname must be entered in quotes e.g. "Boilers".
Note that a hostname should be used if a DHCP server is being used on the system to setup the IP settings
of the device containing the virtual CNC. You should also remember that 3xtend/EINC L's, and IQ3
controllers earlier than v1.3 do not support hostname addressing.
16
963 Installation Instructions TG201026 Issue 09/01/2009 2
Page 17
Installation
9. In the Socket Scan From box enter the port number of the first vCNC in the range of vCNCs to which 963
can connect (e.g. 10005).
10. In the Socket Scan To box enter the port number of the last vCNC in the range of vCNCs to which 963 can
connect (e.g. 10006).
963 will be able to connect to the IQ network using any of the ports in the specified range. Because each
port has a specific address on the IQ network, the address of 963 on the IQ network will vary depending on
which port it uses.
If alarms are to be sent to 963 through this device, the top and bottom of the range must be the same
to ensure the same network address is used each time 963 is started.
11. If 963 is to only access remote TCP/IP sites select the Click here if you have no local site
communications check box.
12. Click OK.
13. Restart 963.
Note that if the device containing the virtual CNC goes into link/local mode (e.g. DHCP server fails) the 963s
connection to the IQ network will be lost. This is expected behaviour if the PC is on the same network segment as
the device containing the virtual CNC restart the PC. If the device is on a different subnet it will be necessary to fix
the problem that caused the device to go into link/local mode.
2.12.1 Connect over the Current Loop
3 can be connected the IQ network over the IQ current loop using a NBOX/CNC2, which must be purchased
96
separately.
To connect to the IQ network over the current loop:
1. Ensure the 963 is not running.
2. Install the NBOX/CNC2 as described in the supplied installation instructions and connect it to the PC
running 963.
3. Run 963. It will automatically detect the communications speed between its serial port and the
NBOX/CNC2 used for this communication.
If this automatic detection fails the communications settings can be configured manually.
To configure the communications setting manually:
1. Log in as someone who can display the Communications Window.
2. Press F1 to display the Information Centre.
3. Click
. The Communications Window will be displayed.
4. Click Configure Comms. The Local Site Connection Setup dialogue box is displayed.
5. Click Specific COM Port and enter the required COM port number. Clicking Auto Scan Com Port will
cause 963 to find the port that is connected to the NBOX/CNC2 automatically which is the default, and
should only be changed if there are communication problems.
6. Click OK.
7. Restart 963.
2.13 Check Communications
Once 963 is connected to the IQ network it is advisable to check that the communications are working correctly by
looking at the Basic Communications Display, shown below. The display appears at the bottom of 963’s window.
It provides information about the status of communications in and out of the node connecting 963 to the IQ network,
and the status of any remote connection devices on the system.
TX and RX indicators: These flash green when 963 receives, or transmits information. If they appear grey,
the 963 has been unable to locate the CNC.
Remote connection indicator: If grey, all of the devices are available for use, if red, at least one of them is
attempting to make a connection, and if green, at least one is connected. Clicking this icon displays the Remote
Connection Window.
963 Installation Instructions TG201026 Issue 09/01/2009 2
17
Page 18
Installation
2.14 SQL Server Installation and Configuration
The information contained in this section is only required if a non standard installation of 963 or SQL server is
required. It contains information about installing SQL Server 2005 Express Edition with Advanced Services,
installing SQL Server Backward Compatibility Components, and configuring SQL Server 2005 Express Edition
with Advanced Services required if 963 is to be installed on a PC running a Windows language other than English
(UK), Simplified Chinese, Czech, Danish, French, German, Italian, Polish, Russian, Spanish, Swedish or Finnish. It
also describes installation and configuration of a full version of SQL Server.
2.14.1 SQL Server 2005 Express Edition with Advanced Services
2.14.1.1
If i
Install SQL Server 2005 Express Edition with Advanced Services
nstalling on a PC running a Windows language other than English (UK), Simplified Chinese, Danish, French,
German, Italian, Polish, Russian, Spanish, Swedish or Finnish it is necessary o install the SQL Server before 963 is
installed.
To install SQL Server 2005 Express Edition with Advanced Services:
1. Download the SQL Server 2005 Express Edition installation from
'https://www.microsoft.com/downloads/details.aspx?familyid=5B5528B9-13E1-4DB9-A3FC82116D598C3D&displaylang=en' to an empty folder.
Trend is not responsible for the content of external internet sites. This is a large download, and may take
sometime depending on your connection speed.
2. Log on to the PC as someone with Administrator rights.
3. Run 'SQLEXPR_ADV.EXE'. The Open File - Security Warning dialogue box is displayed.
4. Click Run. The End User License Agreement screen is displayed.
5. Read the terms of the license and if you are happy with them select the I accept the terms is the license
agreement option.
6. Click Next>. The Installing Prerequisites screen is displayed.
7. Click Install. The prerequisites will be installed. Once the installation is complete the Install button
changes to Next>.
8. Click Next>. The SQL Server Installation Wizard is displayed.
9. Click Next>. The wizard checks the PC to ensure that the system configuration suitable for the installation.
10. Once the check has completed click Next>. The Registration Information screen is displayed. If the
configuration is not suitable take the necessary steps to resolve the issues.
11. Check that the registration information is correct.
12. Clear the Hide advanced configuration options check box.
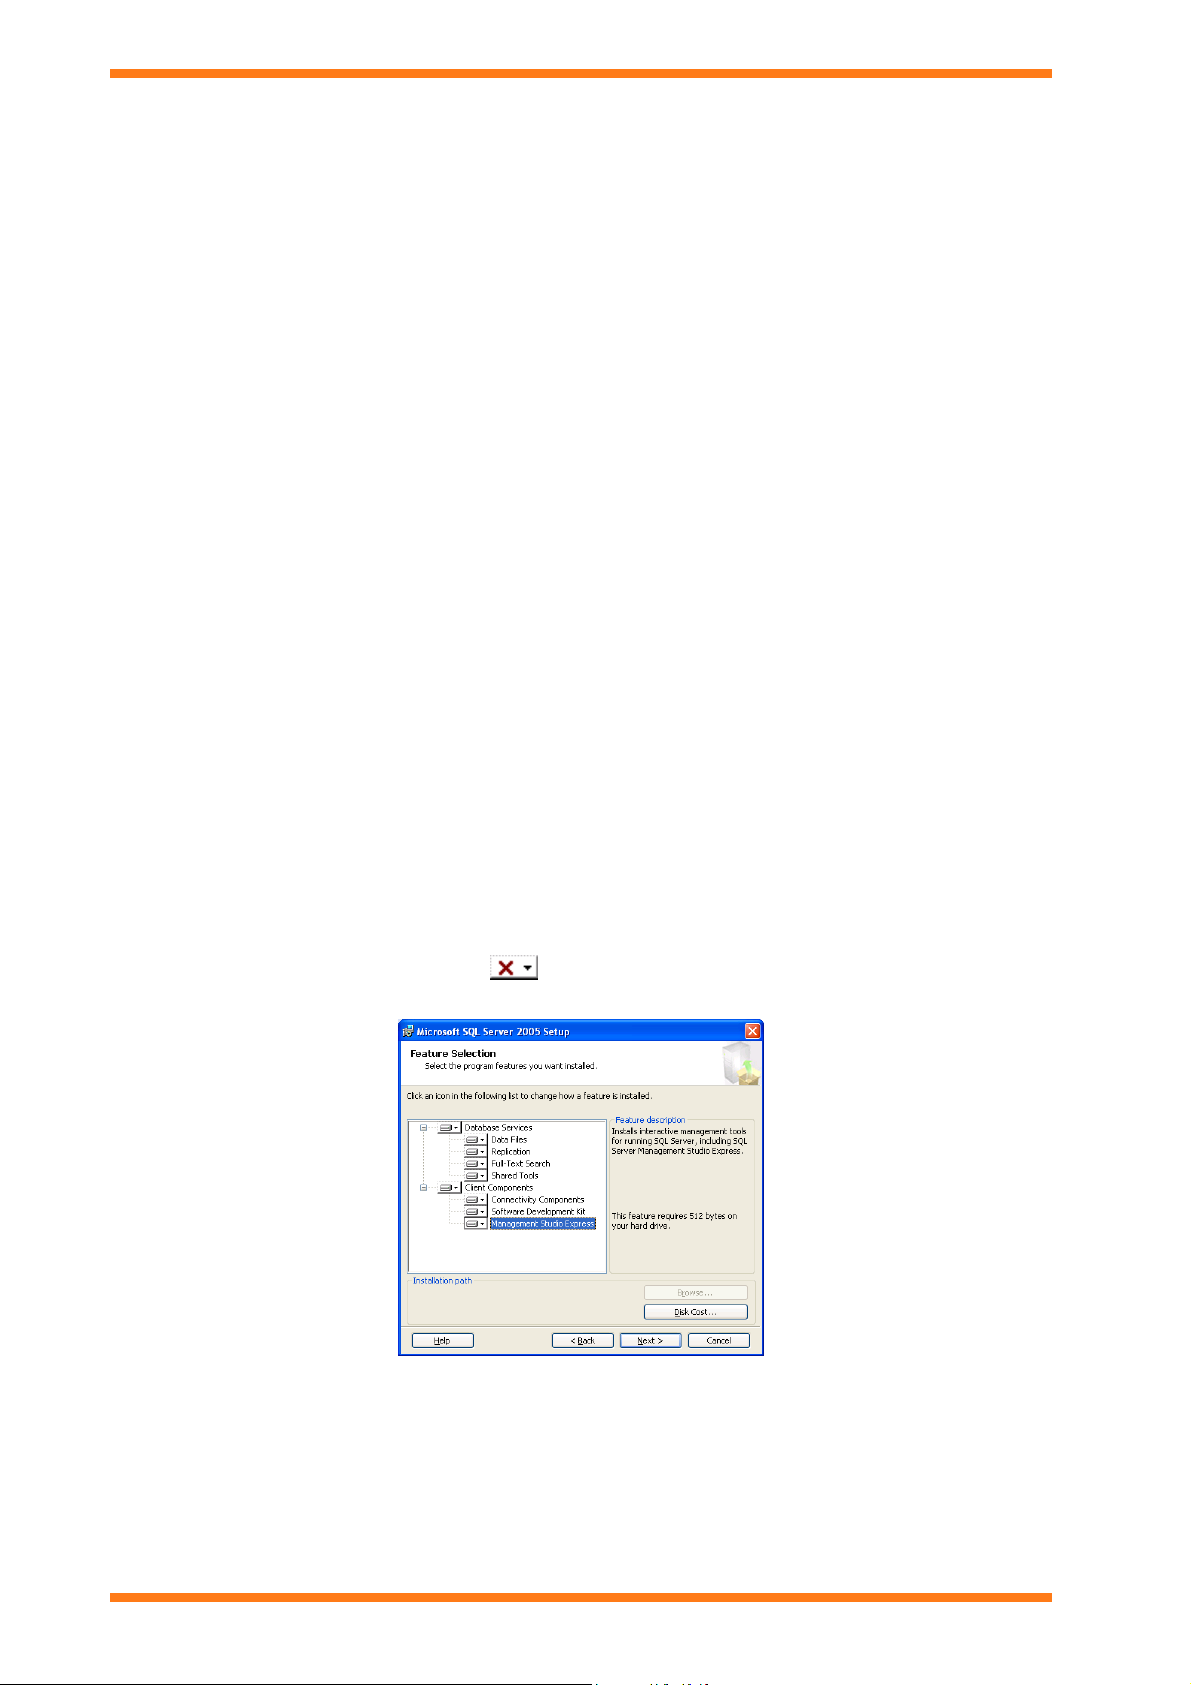
13. Click Next>. The Feature Selection screen is displayed.
14. Select all the features by clicking the
next to each feature and selecting the option. When all options
are selected the display show appear as shown below.
The image above shows how the Feature Selection screen should appear when all the options are selected.
15. Click Next>. The Instance Name screen is displayed.
16. In the Named Instance box enter MSSQLSERVER.
17. Click Next>. The Service Account screen is displayed.
18. In the Use the built-in System account box select Local System.
19. Select the SQL Browser check box.
20. Click Next>. The Authentication Mode screen is displayed.
21. Select the Mixed Mode (Windows Authentication and SQL Server Authentication) option.
18
963 Installation Instructions TG201026 Issue 09/01/2009 2
Page 19
Installation
22. In the Enter password box enter saTrend06.
23. In the Confirm password box enter saTrend06.
24. Click Next>. The Collection Settings screen is displayed.
25. Click Next>. The Configuration Options screen is displayed.
26. Select the Add user to the SQL Server Administrator role check box
27. Click Next>. The Error Usage Report Settings screen is displayed.
28. Click Next>. The Ready to Install screen is displayed.
29. Click Install. The Setup Progress screen is indicates the installation progress. Once the installation is
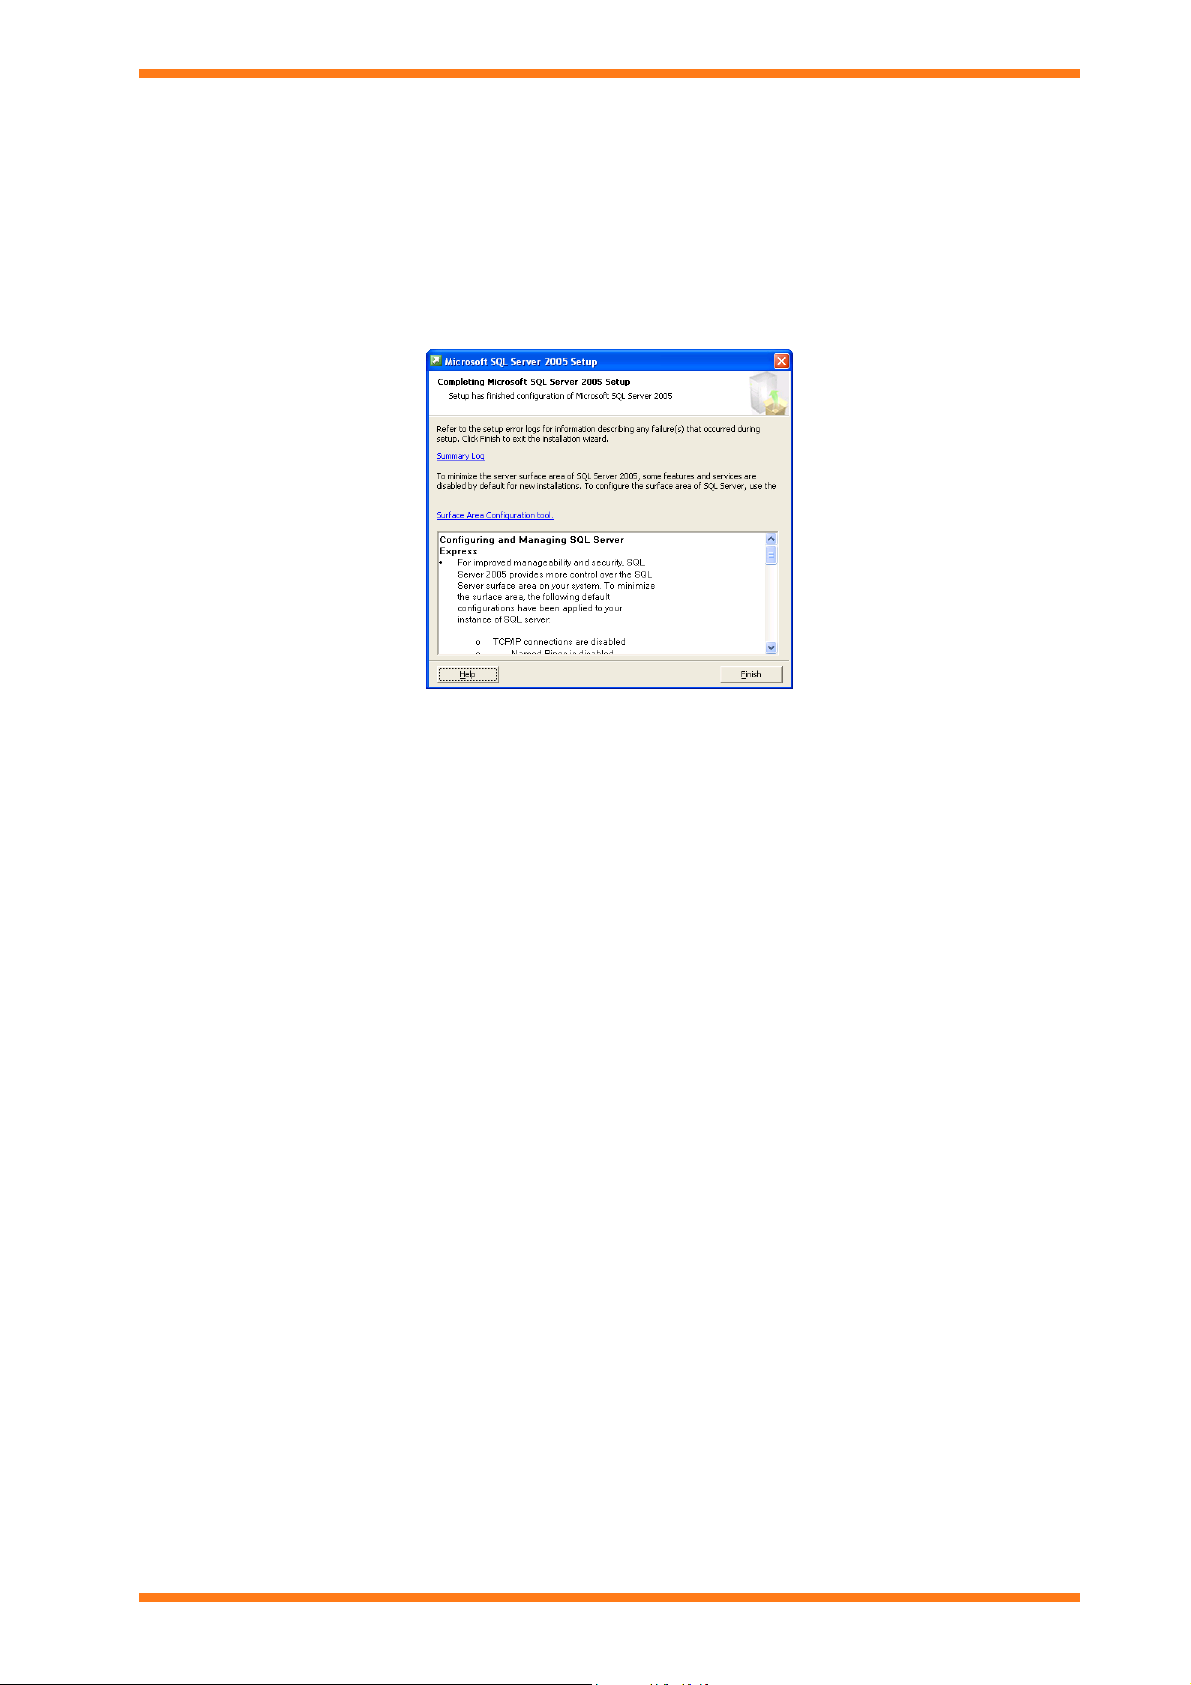
complete ticks appear next to all the options.
30. Click Next>. The Completing Microsoft SQL Server 2005 Setup screen is displayed.
31. Click Finish.
32. For 963 to operate it is necessary to configure SQL Server 2005 Express Edition with Advanced Services
as described in the 'Configure SQL Server 2005 Express Edition with Advanced Services' section of these
instructions.
2.14.1.2 Install SQL Server Backward Compatibility Components
e installation of SQL Server is not carried out by the 963's installation program it is necessary to install the SQL
If th
Server Backward Compatibility Components.
To install SQL Server Backward Compatibility Components:
1. Goto http://www.microsoft.com/downloads/details.aspx?FamilyID=50B97994-8453-4998-8226-
FA42EC403D17&displaylang=en, and click X86 Package (SQLServer2005_BC.msi) - 11258 KB located
in the 'Microsoft SQL Server 2005 Backward Compatibility Components' section to download the
installation to and empty directory.
Trend is not responsible for the content of external internet sites. This is a large download, and may take
sometime depending on your connection speed.
2. Run 'SQLServer2005_BC.msi'. The Open File - Security Warning dialogue box is displayed.
3. Click Run. The SQL Server 2005Backward Compatibility Wizard is displayed.
4. Click Next>. The License Agreement screen is displayed.
5. Read the terms of the license and if you are happy with them select the I accept the terms is the license
agreement option.
6. Click Next>. The Registration Information screen is displayed.
7. Check that the registration information is correct.
8. Click Next>. The Feature Selection screen is displayed.
9. Click Next>. All features are required. The Ready to Install the Program screen is displayed.
10. Click Install. The Installing Microsoft SQL Server 2005 Backward compatibility screen is displayed
indicating the progress of the install.
11. Once the installation is complete the Completing the Microsoft SQL Server 2005 Backward
compatibility setup screen is displayed.
12. Click Finish.
963 Installation Instructions TG201026 Issue 09/01/2009 2
19
Page 20
Installation
2.14.1.3 Configure SQL Server 2005 Express Edition with Advanced Services
If SQL Server 2005 Express Edition with Advanced Services has been installed manually as described in the 'Install
SQL Server 2005 Express Edition with Advanced Services' section of this manual it must be configured correctly so
that 963 can be used.
Note that this configuration is performed automatically if SQL Server 2005 Express Edition with Advanced Services
is installed by the 963's installation program.
To configure SQL Server 2005 Express Edition with Advanced Services:
1. Ensure that the 963 is not running.
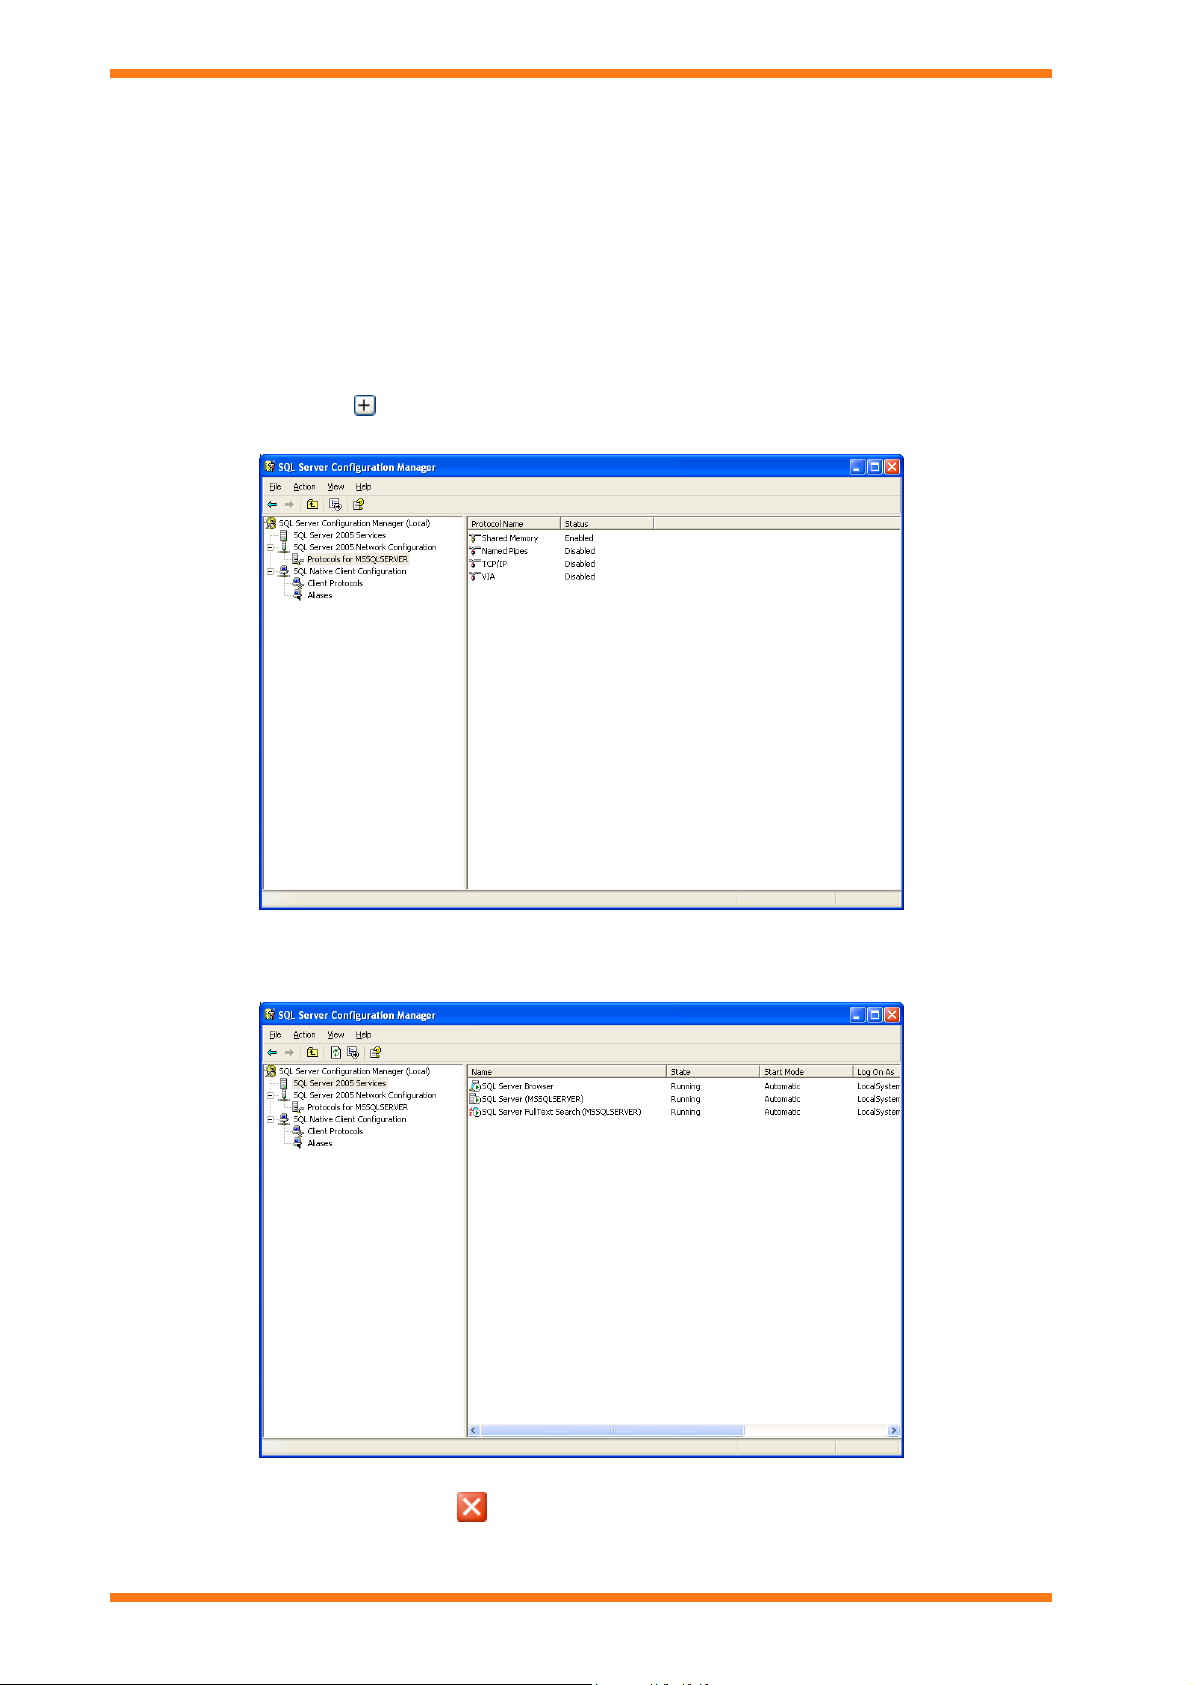
2. On the Start menu point to Programs, point to Microsoft SQL Server 2005, then point to Configuration
Tools and click SQL Server Configuration Manager. The SQL Server Configuration Manager
window is displayed.
3. In the left pane click
4. In the left pane click Protocols for MSSQLSERVER.
next to 'SQL Server 2005 Network Configuration Services'.
5. Right click Named Pipes and click Enable. A dialogue box is displayed, click OK.
6. Right click TCP/IP and click Enable. A dialogue box is displayed, click OK.
7. In the pane click SQL Server 2005 Services.
8. Right click SQL Server (MSSQLSERVER) and click Restart.
9. Once the restart is complete click
.
20
963 Installation Instructions TG201026 Issue 09/01/2009 2
Page 21

Installation
10. On the Start menu point to Programs, point to Microsoft SQL Server 2005, then point to Configuration
Tools and click SQL Server Surface Area Configuration. The SQL Server 2005 Surface Area
Configuration window is displayed.
11. Click Surface Area Configuration for Features. The Surface Area Configuration for Features
dialogue box is displayed.
12. Click xp_cmdshell. The display changes.
13. Select the Enable xp_cmdshell check box.
14. Click Apply.
15. Click OK to return to the SQL Server 2005 Surface Area Configuration window.
16. If the SQL server is installed on a remote PC click Surface Area Configuration for Services and
Connections. The Surface Area Configuration for Services and Connections dialogue box is displayed.
17. Under 'Database Engine' click Remote Connections.
18. Ensure that the Local and remote connections, and the Using both TCP/IP and named pipes options are
selected.
19. Click Apply.
20. Click SQL Server Browser.
21. Ensure that Automatic is selected in the Startup type box.
22. Click Apply.
23. Click OK.
24. Click
963 Installation Instructions TG201026 Issue 09/01/2009 2
.
21
Page 22

Installation
2.14.2 SQL 2005 Full Version
2.14.2.1 Install a Full Version of SQL Server 2005
install a full version of SQL Server 2005:
To
1. Install SQL Server according to the instructions supplied by Microsoft®. During the installation you must
ensure that the following information is configured.
Ensure that the advanced configuration options are not hidden.
Install all features.
SQL Server instance. The SQL server can be installed using any instance, however Trend recommend
MSSQLSERVER.
The built-in System account should be set to 'Local System'.
The SQL Browser service must be started at the end of set up.
Mixed Mode (Windows Authentication and SQL Server Authentication) must be used with a password
of 'saTrend06'.
The currently logged on user must be added to the SQL Server Administrator role.
2. For 963 to operate it is necessary to configure a Full Version of SQL Server as described in the 'Configure
SQL Server 2005 Express Edition with Advanced Services' section of these instructions.
Caution the operation should only be carried out by an SQL specialist.
2.14.2.2 Configure a Full Version of SQL Server
ull version of SQL Server has been installed manually as described in the 'Install a Full Version of SQL Server'
If a f
section of this manual it must be configured correctly so that 963 can be used.
To configure SQL Server:
1. Ensure that the 963 is not running.
2. Following the instructions supplied by Microsoft® configure the following:
Enable 'Named Pipes'.
Enable 'TCP/IP'.
Note that if 963 is to connect to SQL on the same PC it is recommended that 'TCP/IP' is disabled.
Enable 'xp_cmdshell'.
If the SQL server is installed on a remote ensure the following must also be configured.
Enable local and remote connections.
Enable both TCP/IP and named pipes for local and remote connections.
Set the SQL Browser service to start automatically.
Caution the operation should only be carried out by an SQL specialist.
2.15 Configure 963 to Connect to a Remote SQL Server
If required 963 can connect to a SQL Server on a different device this enables 963's database to be located on a
network drive.
To configure 963 to connect to a remote SQL server:
1. Run 963 and log in. If using 963 Secure log in as a user in the ‘System Administrator’ workgroup.
2. On the Database menu click Properties. The Database Properties dialogue box is displayed.
3. In the Current database server box specify the location of the SQL Server. A full stop '.' species a local
server. To specify a remote server enter the name of the PC running SQL server, and the instance used in
the form shown below.
<SQL server PC name>\<instance name>
<SQL server PC name> specifies name of the PC on the network on which the SQL Server is installed.
<instance name> specifies instance name used to install the SQL Server.
4. Click OK. A dialogue box is displayed reminding you that you need to restart 963.
5. Click OK.
6. Close 963.
7. Run 963. If the database exists 963 will connect to it, if not a dialogue box is displayed informing you that
it can't connect to the database, click Yes to enable 963 to create a new database.
22
963 Installation Instructions TG201026 Issue 09/01/2009 2
Page 23

Installation
2.16 Upgrade
In most situations upgrading form an earlier version of 963 will simply be a matter of inserting the 963 CD and
following the instructions on the screen. the existing version of 963 will be upgraded to the latest version, and the
963's database updated accordingly. There should be no need to relicence 963.
In the following circumstances it will be necessary to follow a different installation procedure.
Upgrading a 963 where the 963's database is running on a remote SQL server (i.e. on another PC). See the
'Upgrade 963 when the Database is on a Remote PC' section of this manual for details.
Upgrading from 963v1.x or 962 it may be necessary to check the SQL queries. See the 'Upgrade from 936
v1.x or 962' section of this manual for details.
2.16.1 Upgrade 963 when the Database is on a Remote PC
If u
pgrading a 963 where the 963's database is running on a remote SQL server (i.e. on another PC) the installation
program will not be able to perform the necessary updates to the 963's database on the remote PC therefore it will be
necessary to manually upgrade the 963 database on the remote PC.
To upgrade 963 when the database is on a remote PC:
1. Run 963.
2. Log in. If using 963 Secure log in as a user in the ‘System Administrator’ workgroup.
3. On the Database menu click Properties. The Database Properties dialogue box is displayed.
4. Select the Detach database after supervisor has been shutdown check box.
5. Click OK.
5. Close 963.
6. Backup the database files, and any other data files before upgrading 963.
7. Upgrade the 963 on the 963 PC ensuring that the 963 is installed in the same directory as original 963 as
described in the 'Install the 963 Software' section of this manual.
8. Do not run 963.
9. Copy the 963 database files (mdf and ldf files in the C:\Program Files\Trend Control Systems\963\database
directory) from the remote PC to the same location on the 963 PC.
10. Run notepad, and open the S2.INI file in the install directory (normally c:\program files\trend control
systems\963).
Note that if the 963 is running on Windows Vista™ you must run notepad with administrator rights. This
will require you to have access to a password for a Windows user with administrator rights.
13. Search through the file to find the following line:
[DATABASE]
Server=
14. Make a note of the 'Server=' setting you will need it later.
15. Change the 'Server=' setting to '.' so 963 uses the local database files as shown below.
Server=.
15. Run 963. The local database files will be updated.
16. Close 963.
17. Copy the 963 database files (mdf and ldf files in the C:\Program Files\Trend Control Systems\963\database
directory) from the 963 PC to the same location on the remote PC.
963 Installation Instructions TG201026 Issue 09/01/2009 2
23
Page 24

Installation
18. Set the 'Server=' setting in the [DATABASE] section of S2.INI file back to the original setting before it
was changed in step (15).
19. Run 963.
2.16.2 Upgrade from 963 v1.x or 962
f 963 v1.x or 962 has been installed and engineered on the PC, it is possible to upgrade to the latest version of 963
I
without having to re-engineer the system. However a new licence is required to enable 963 to run if upgrading from
962. The upgrade process will make a backup of the previous system so that if you decide not to purchase 963 it is
possible to return to the original system.
If installing 963 on a PC that has a full installation of SQL server earlier than SQL Server 2005 it is necessary to
upgrade to SQL Server 2005.
Note that historic alarms are not imported from the old 963 database. However they can still be viewed by viewing
historic records, and specifying the old database. Schematic pages in version 2 are not backwards compatible with
version 1. Therefore if pages are required to run in both version 1 and version 2 they must be engineered with 963
v1.
To upgrade from 963 v1.x or 962:
1. If upgrading a 963 which has password protection set up turn off the password as described in the ‘Turn
Off the Database Password in 963 v1’ section of these instructions.
2. Backup the database files, and any other data files before upgrading 963.
3. If SQL Server has been prevented from performing command execution this must be re-enabled, see the
'Restrict SQL Servers Ability to Perform Command Execution' section of the 963 Engineering Manual
(TE200637).
4. Close 963.
5. Install 963 as described earlier in this section ensuring that the 963 is installed in the same directory as
original 963.
6. If the old configuration uses the VIEWQUERY, QUERYTOTEXTFILE, or PRINTQUERY actions it is
recommended that you check the SQL queries to ensure that they work correctly and if necessary fix the
problem as described in the ‘Check SQL Queries’ section of these instructions.
7. Alarm actions configured for a specific point are no longer supported a suitable alarm filter and alarm
group should be configured instead
2.16.2.1 Turn Off the Database Password in 963 v1
If upgra
ding a 963 Secure that has password protection set up it is necessary to turn the password off.
To turn off the database password:
1. Log in as a user in the ‘System Administrator’ workgroup.
2. Click
, or on the Mode menu click Users to select the User Display.
3. Right-click the System Administrator workgroup, and click Properties. The Workgroup Information
dialogue box is displayed.
4. Click the System Administrator tab.
5. Click Set Database Password. A dialogue box asking if you are sure you want to change the database
password is displayed.
6. Click Yes. A dialogue box is displayed that instructs you to restart 963.
7. Click OK to return to the Workgroup Information dialogue box.
8. Click OK to close the Workgroup Information dialogue box.
9. Close 963.
10. Run 963. As 963 loads the Database Password dialogue box is displayed.
11. In the Please enter the old password box enter the current password.
12. Clear the Use a password check box.
24
963 Installation Instructions TG201026 Issue 09/01/2009 2
Page 25
Installation
2.16.2.2 Check SQL Queries
If upgrading from a version of 963 earlier than v2.1 that uses the VIEWQUERY, QUERYTOTEXTFILE, or
PRINTQUERY actions it is recommended that you locate the places they are use and ensure that they work
correctly and if necessary fix the problem. This is because the database format used by v2.1 is different from earlier
versions of 963 and therefore these actions may now fail. Theses action can be used on schematic pages, alarms
actions, and in scheduled events. Some tools have been provided help you locate the places these actions are being
used. Once you locate where these actions are used you should check each one in turn to ensure that it works
correctly, and if not modify the SQL. For details of the 963’s database structure see the ‘Databases’ section of the
963 Engineering Manual (TE200637)l.
To check the SQL queries:
1. Log in.
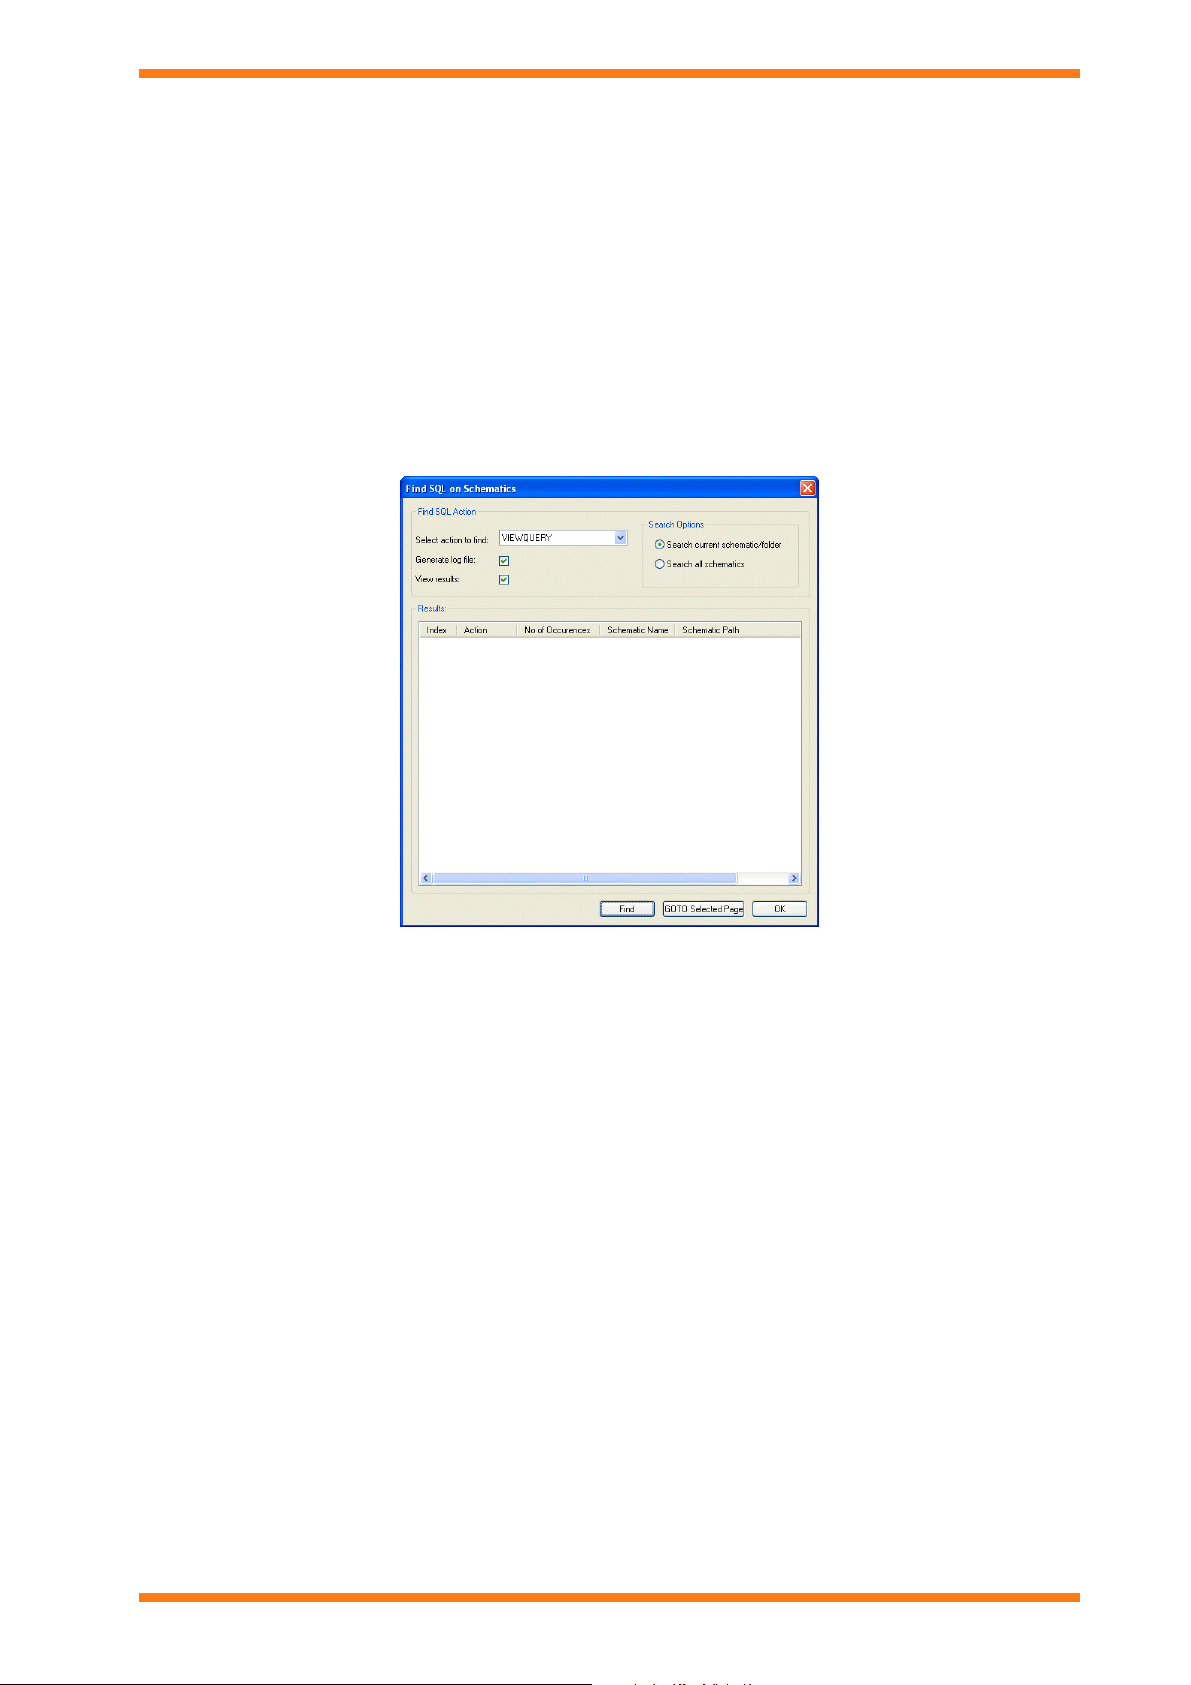
2. On the Tools menu point to Search SQL From and then click Schematics, Scheduler, or Alarms
depending on which area of the 963 is to be searched. It may be necessary to search all three areas.
If Schematics was selected the Find SQL on Schematic dialogue box is displayed.
In the Select action to find box select the action that you want to search for. To search for all three
actions select All.
In the Search Options area select the schematic pages that are to be searched. Click Search current
schematic/folder to search the folder selected in the Navigator, or Search all schematics to search all
schematics.
To create a log file of the search results select the Generate log file check box.
To prevent the search results being displayed in the Results box clear the View Results check box.
Click Find. The search will be carried out. If the View Results check box is selected the results will be
displayed in the Results box. To goto to a schematic page that has matched the search click it in the
Results box and click GOTO Selected Page.
If Scheduler was selected a dialogue box listing any scheduled events that use the VIEWQUERY,
QUERYTOTEXTFILE, or PRINTQUERY actions.
If Alarms was selected a dialogue box listing any alarm actions that use the VIEWQUERY,
QUERYTOTEXTFILE, or PRINTQUERY actions.
963 Installation Instructions TG201026 Issue 09/01/2009 2
25
Page 26
Installation
2.16.2.3 Return to the Original 963 System
When you upgrade from an earlier version of 963, or 962 a backup of the system is made in a subdirectory of the
install directory called 963_backup, or 962_backup. This means that if you decide not to use the latest version of
963 it is possible to return to the original system.
To return to the original system:
1. Copy the entire contents of the backup directory Backups into the install directory, normally c:\program
files\trend control systems\963 or c:\program files\trend control systems\962.
2.17 Transfer the Licence to a Different Location
If you want to use your 963 licence to run 963 in a different location e.g. on a different PC, or in a different
directory, it is necessary to transfer the licence to that location.
To transfer the licence:
1. Install 963 in the new location as described in the 'Install the 963 Software' section of these instructions.
2. Run 963 in the new location.
3. Log in as someone with a PIN level of 99.
4. Press F1 to display the Information Centre.
5. Click
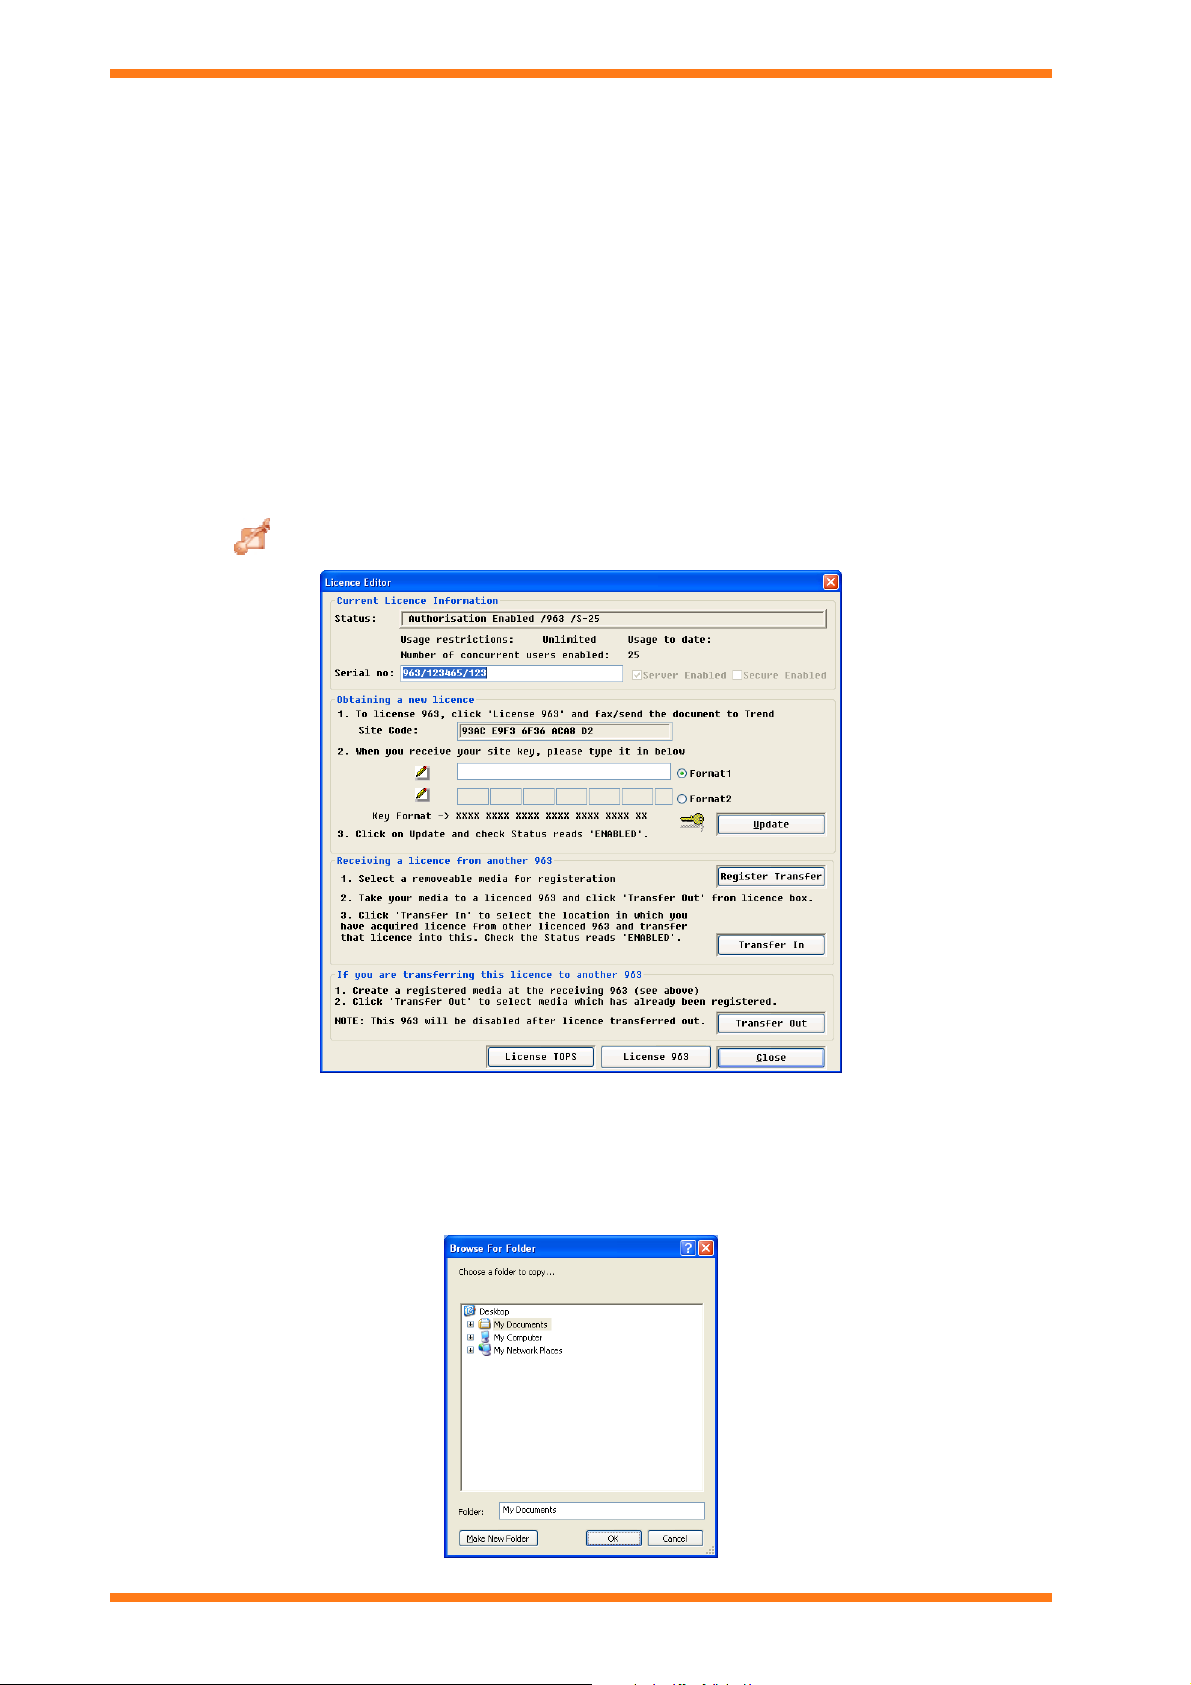
. The Licence Editor dialogue box is displayed.
6. If transferring the licence to a different PC connect the removable media that is to be used to transfer the
licence.
Note that this has been tested on floppy disk, USB flash disk. Trend cannot guarantee that other removable
media type will work.
7. Click Register transfer. The Browse for Folder dialogue box is displayed.
26
963 Installation Instructions TG201026 Issue 09/01/2009 2
Page 27

Installation
8. Click the location to which the licence is to be copied. If moving the licence to a different PC this is the
removable media. To create a new folder click Make New Folder.
9. Click OK. The Are you sure? dialogue box is displayed.
10. Click OK.
11. If transferring the licence to a different PC remove the removable media.
12. Run 963 the currently licensed 963.
13. Log on as someone with a PIN level of 99.
14. Press F1 to display the Information Centre.
15. Click
. The Licence Editor dialogue box is displayed.
16. If transferring the licence to a different PC connect the removable media being used to transfer the licence.
17. Click Transfer Out. The Browse for Folder dialogue box is displayed.
18. Click the location specified in (8).
19. Click OK. The Are you sure? dialogue box is displayed.
20. Click OK. The licence will be moved to the specified location. The 963 is no longer licensed to run in that
location.
21. Run 963 in the new location.
22. Log on as someone with a PIN level of 99.
23. Press F1 to display the Information Centre.
24. Click
. The Licence Editor dialogue box is displayed.
25. If transferring the licence to a different PC connect the removable media being used to transfer the licence.
26. Click Transfer In. The Browse for Folder dialogue box is displayed.
Note that if Transfer In is not available, it is necessary to delete the ‘s2.key’ in the install directory.
27. Click the location specified in (8). Click OK. The Are you sure? dialogue box is displayed.
28. Click OK. The licence will be moved to the new location. The 963 is now licensed to run in the new
location.
29. Click Close.
963 Installation Instructions TG201026 Issue 09/01/2009 2
27
Page 28

Installation
This page is intentionally left blank.
28
963 Installation Instructions Issue 09/01/2009 TG201026 2
Page 29

INDEX
Basic Communication Display ......................................................17
Check
Communications .......................................................................17
Check SQL Queries .......................................................................25
Communications
Check ........................................................................................17
Connect .....................................................................................17
Port............................................................................................ 17
Configure
GSM Connection ................................................................14, 15
SQL Server................................................................................ 20
Connect
Ethernet Network...................................................................... 16
GSM Modem ............................................................................13
IQ Network ...............................................................................17
Contacting Trend .............................................................................5
Conventions Used in this Manual.................................................... 5
Database
Remote ...................................................................................... 22
Database Password
Turn Off ....................................................................................24
Ethernet Network........................................................................... 16
GSM Connection
Configure ............................................................................14, 15
Signal Strength.................................................................... 14, 15
GSM Modem
Connect .....................................................................................13
Install
963........................................................................................... 8, 9
Software ....................................................................................11
Index
SQL Server ......................................................................... 18, 22
SQL Server Backward Compatibility Components ................. 19
IQ Current Loop ............................................................................ 17
IQ Network ....................................................................................17
Licence
963 ............................................................................................ 12
Obtain Unlock Code .................................................................11
Transfer..................................................................................... 26
Remote
Database.................................................................................... 22
SQL Server ............................................................................... 22
Return to the Original 963 System................................................ 26
Set up
GSM Connection ................................................................14, 15
Software Installation...................................................................... 11
SQL Queries
Check ........................................................................................25
SQL Server
Configure ..................................................................................20
Install .................................................................................. 18, 22
Remote...................................................................................... 22
SQL Server Backward Compatibility Components ...................... 19
System Requirements ...................................................................... 7
Transfer the Licence ...................................................................... 26
Trend Network............................................................................... 17
Unlock Code
Enter.......................................................................................... 12
Obtain........................................................................................ 11
Upgrade
From 963 v1.............................................................................. 26
963 Installation Instructions
TG201026 Issue 09/01/2009 2
29
Page 30

Index
30
963 Installation Instructions TG201026 Issue 09/01/2009 2
Page 31

Index
963 Installation Instructions Issue 09/01/2009 TG201026 2
31
Page 32

Trend Control Systems Limited
P.O. Box 34, Horsham, West Sussex, RH12 2YF, UK. Tel:+44 (0)1403 211888 Fax:+44 (0)1403 241608 www.trend-controls.com
Trend Control Systems USA
6670 185th Avenue NE, Redmond, Washington 98052, USA. Tel: (425)897-3900, Fax: (425)869-8445 www.trend-controls.com
 Loading...