

Page 1
Diagnostic
Troubleshooting
Repair
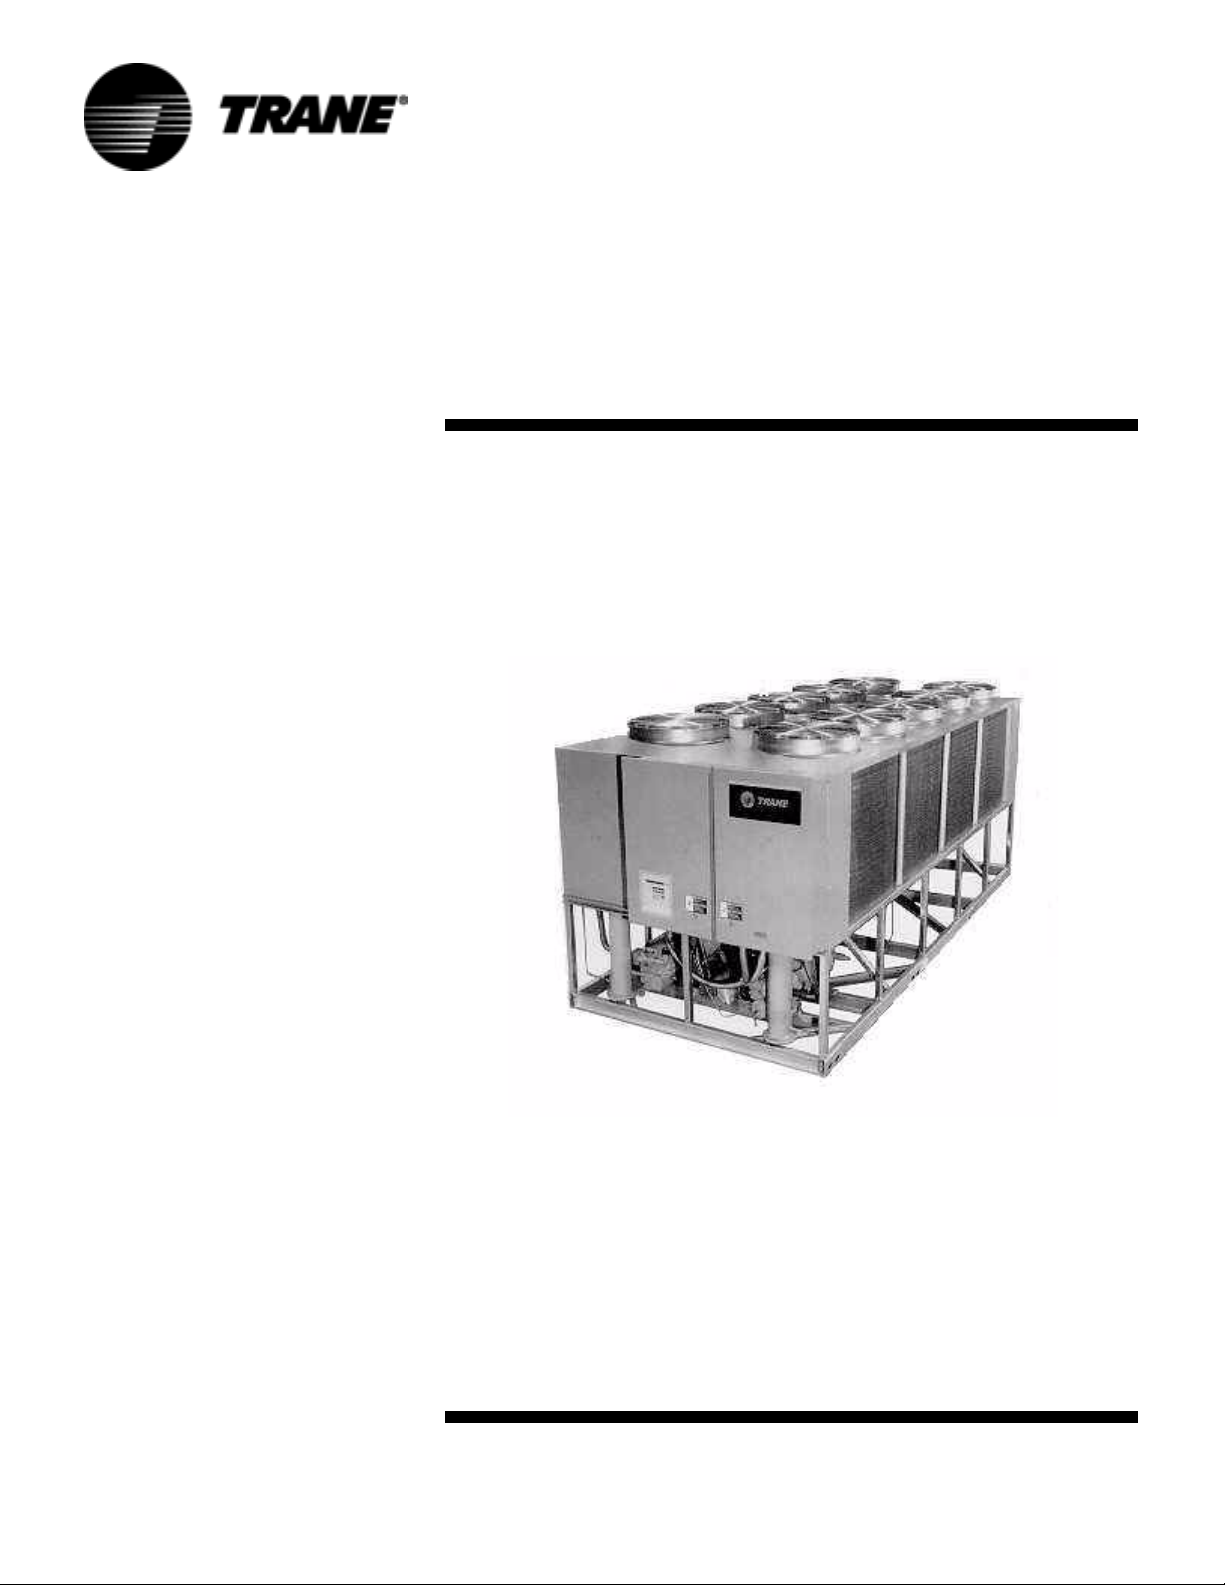
Series R®
70-125 Ton Air-Cooled and Water-Cooled
Rotary Liquid Chillers
© American Standard Inc. 2005
Model
RTAA 70-125 Ton
RTWA 70-125 Ton
RTUA 70-125 Ton
August 2005 RLC-SVD03A-EN
Page 2

NOTICE: Warnings and Cautions appear at appropriate sections through-
out this literature. Read these carefully.
WARNING: Indicates a potentially hazardous situation which, if not
avoided, could result in death or serious injury.
CAUTION: Indicates a potentially hazardous situation which, if not
avoided, may result in minor or moderate injury. It may also be used to
alert against unsafe practices.
CAUTION: Indicates a situation that may result in equipment or propertydamage only accidents.
Important - Read This First!
This manual is intended for experienced service personnel familiar with the
proper use of electrical diagnostic instruments and all personal safety
procedures when working on live electrical circuits.
This Manual is not intended for individuals who have not been properly trained
in handling live electrical circuits.
Environmental Concerns!
Scientific research has shown that certain man-made chemicals can affect the
earth’s naturally occurring stratospheric ozone layer when released to the
atmosphere. In particular, several of the identified chemicals that may affect the
ozone layer are refrigerants that contain Chlorine, Fluorine and Carbon (CFCs)
and those containing Hydrogen, Chlorine, Fluorine and Carbon (HCFCs). Not all
refrigerants containing these compounds have the same potential impact to the
environment. Trane advocates the responsible handling of all refrigerants—
including industry replacements for CFCs such as and HCFCs and HFCs.
Responsible Refrigerant Practices!
Trane believes that responsible refrigerant practices are important to the
environment, our customers, and the air conditioning industry. All technicians
who handle refrigerants must be certified. The Federal Clean Air Act (Section
608) sets forth the requirements for handling, reclaiming, recovering and
recycling of certain refrigerants and the equipment that is used in these service
procedures. In addition, some states or municipalities may have additional
requirements that must also be adhered to for responsible management of
refrigerants. Know the applicable laws and follow them.
WARNING
Contains Refrigerant!
System contains oil and refrigerant under high pressure. Recover refrigerant to
relieve pressure before opening the system. See unit nameplate for refrigerant
type. Do not use non-approved refrigerants, refrigerant substitutes, or refrigerant
additives.
Failure to follow proper procedures or the use of non-approved refrigerants,
refrigerant substitutes, or refrigerant additives could result in death or serious
injury or equipment damage.
2 RLC-SVD03A-EN
Page 3

Contents
General Information . . . . . . . . . . . . . . . . . . . . . . . . . . . . . . . . . . . . . . . . . . 4
Service Philosophy . . . . . . . . . . . . . . . . . . . . . . . . . . . . . . . . . . . . . . . . . . . . . . 4
System Description . . . . . . . . . . . . . . . . . . . . . . . . . . . . . . . . . . . . . . . . . . . . . . 5
System Level Components . . . . . . . . . . . . . . . . . . . . . . . . . . . . . . . . . . . . . . . . 5
Interprocessor Communications . . . . . . . . . . . . . . . . . . . . . . . . . . . . . . . . 8
IPC Diagnostics . . . . . . . . . . . . . . . . . . . . . . . . . . . . . . . . . . . . . . . . . . . . . . . . . 8
Troubleshooting Modules Using IPC Diagnostics . . . . . . . . . . . . . . . . . . . . . . . 9
Troubleshooting Procedure . . . . . . . . . . . . . . . . . . . . . . . . . . . . . . . . . . . . . . . 12
Temperature Sensor Checkout . . . . . . . . . . . . . . . . . . . . . . . . . . . . . . . . 15
Temperature Sensor Checkout Procedure . . . . . . . . . . . . . . . . . . . . . . . . . . . 15
Compressor Operation . . . . . . . . . . . . . . . . . . . . . . . . . . . . . . . . . . . . . . . 19
Restart Inhibit Timer . . . . . . . . . . . . . . . . . . . . . . . . . . . . . . . . . . . . . . . . . . . . 19
Compressor Start/Stop . . . . . . . . . . . . . . . . . . . . . . . . . . . . . . . . . . . . . . 20
Variable Speed Inverter/Condenser Fan Control . . . . . . . . . . . . . . . . . . 21
Outdoor Air Temperature and Fan Control . . . . . . . . . . . . . . . . . . . . . . . . . . . 22
VSF Inverter Fault . . . . . . . . . . . . . . . . . . . . . . . . . . . . . . . . . . . . . . . . . . . . . . 22
Current Transformer . . . . . . . . . . . . . . . . . . . . . . . . . . . . . . . . . . . . . . . . . 23
CT and MCSP Compressor Current Input Checkout Procedure . . . . . . . . . . . 24
Under-Over Voltage Transformer . . . . . . . . . . . . . . . . . . . . . . . . . . . . . . 32
Under-Over Voltage Transformer Checkout . . . . . . . . . . . . . . . . . . . . . . . . . . 32
Compressor Capacity . . . . . . . . . . . . . . . . . . . . . . . . . . . . . . . . . . . . . . . . 34
Checkout Procedure for MCSP Load/Unload Outputs . . . . . . . . . . . . . . . . . . 35
Checkout Procedure for the Slide Valve and Load/
Unload Solenoids . . . . . . . . . . . . . . . . . . . . . . . . . . . . . . . . . . . . . . . . . . . . . . . 36
Checkout Procedure for MCSP Step Load Output . . . . . . . . . . . . . . . . . . . . . 39
Checkout Procedure for Step Load Solenoid Valve
and Piston . . . . . . . . . . . . . . . . . . . . . . . . . . . . . . . . . . . . . . . . . . . . . . . . . . . . 40
Module Power and Miscellaneous I/O . . . . . . . . . . . . . . . . . . . . . . . . . . 41
Power Supply . . . . . . . . . . . . . . . . . . . . . . . . . . . . . . . . . . . . . . . . . . . . . . . . . 41
Clear Language Display (CLD) 1U6 Keypad Overview . . . . . . . . . . . . . . . . . . 42
Chiller Module (CPM) (1U1) . . . . . . . . . . . . . . . . . . . . . . . . . . . . . . . . . . . . . . . 46
Options Module (CSR) (1U2) . . . . . . . . . . . . . . . . . . . . . . . . . . . . . . . . . . . . . . 50
Electronic Expansion Valve Module (EXV) (1U3) . . . . . . . . . . . . . . . . . . . . . . . 58
Compressor Module (MCSP) (1U4 AND 1U5) . . . . . . . . . . . . . . . . . . . . . . . . . 72
Interprocessor Communication Bridge Module (IPCB) (1U7) . . . . . . . . . . . . . 78
LonTalk® Communications Interface - Chillers Module
(LCI-C) (1U8) . . . . . . . . . . . . . . . . . . . . . . . . . . . . . . . . . . . . . . . . . . . . . . . . . . 79
Variable Speed Fan System . . . . . . . . . . . . . . . . . . . . . . . . . . . . . . . . . . . 80
Inverter Diagnostics . . . . . . . . . . . . . . . . . . . . . . . . . . . . . . . . . . . . . . . . . . . . 80
Troubleshooting Procedure . . . . . . . . . . . . . . . . . . . . . . . . . . . . . . . . . . . . . . . 82
Other Service Features . . . . . . . . . . . . . . . . . . . . . . . . . . . . . . . . . . . . . . . 85
Service Pumpdown . . . . . . . . . . . . . . . . . . . . . . . . . . . . . . . . . . . . . . . . . . . . . 85
Circuit Lockout . . . . . . . . . . . . . . . . . . . . . . . . . . . . . . . . . . . . . . . . . . . . . . . . 87
Circuit Diagnostic Reset . . . . . . . . . . . . . . . . . . . . . . . . . . . . . . . . . . . . . . . . . 87
RLC-SVD03A-EN 3
Page 4
General Information
The Unit Control Modules (UCMs) described in this troubleshooting guide
provide a microprocessor based refrigeration control system, intended for
use with Trane 70-125 ton helical rotor chillers. Six types of modules are
used, and throughout this publication will be referred to by their abbreviations
or their Line Wiring Drawing Designations, see Tab le 1.
Table 1 Unit Control Module Designations
Line Drawing
Designation
1U2 Options Module CSR
1U3 Expansion Valve Module EXV
1U4 & 1U5 Compressor Module MCSP A & B
1U6 Clear Language Display CLD
1U7 Interprocessor
Controller Name
Chiller Module
Communications Bridge
(Remote Display Buffer)
Abbrev.
CPM
IPCB
Service Philosophy
With the exception of the fuses, no other parts on or within the modules are
serviceable. The intent of the troubleshooting is to determine which module
is potentially at fault and then to confirm a module problem. This is done
either through voltage or resistance measurements at the suspected input or
output terminals or by checking related wiring and external control devices
(connectors, sensors, transformers, contactors etc.) in a process of elimination. Once a problem has been traced to a module, the module can be
easily replaced using only basic tools. In general, all dip switch settings of the
replaced modules should be copied onto the replacement module's dip
switches before applying control power. CPM replacement is more involved
as there are numerous configuration and set-up items that must be
programmed at the Clear Language Display in order to insure proper unit
operation.
It is helpful to include with the return of a module, a brief explanation of the
problem, sales office, job name, and a contact person for possible follow-up.
The note can be slipped into the module enclosure. Early and timely
processing of Field Returns allows for real measurements of our product
quality and reliability, providing valuable information for product improvement
and possible design changes.
4 RLC-SVD03A-EN
Page 5

General Information
System Description
The CPM is the master module and coordinates operation of the entire
system. One is used per chiller. The MCSP is a compressor protection
module with one being used for each of the compressors in the chiller. The
EXV is the expansion valve controller module which controls two Electronic
Expansion Valves. There is one valve on each of the two refrigeration circuits.
The CLD is a two line, 40 character alphanumeric interface to the system. It
allows the operator to read operating and diagnostic information, as well as
change control parameters. The Interprocessor Communications Bridge
(IPCB) provides an extension of the IPC link to the Remote Clear Language
Display, while protecting the integrity of the IPC communications link
between the local modules.
The CSR is an optional communications module which allows for communications between the chiller and a remote building automation system (i.e.
Tracer, Tracer Summit, Generic BAS).
All modules in the system communicate with each other over a serial interprocessor communications bus (IPC) consisting of a twisted wire pair “daisy
chain” link and RS485 type signal levels and drive capability. Multiple modules
of the same type (i.e. MCSPs) in an operating system are differentiated by
address dip switches.
All the modules operate from 115VAC, 50 or 60Hz power and each have their
own internal step-down transformer and power supply. Each is individually
fused with a replaceable fuse. The modules also are designed to segregate
their high and low voltage terminals by placing the high voltage on the right
side of the module and the low voltage on the left. When stacked, segregation is maintained.
In addition to the modules, there are a number of “system level” components that are closely associated with the modules. These components were
specifically designed and/or characterized for operation with the modules. For
this reason, the exact Trane part must be used in replacement.
System Level Components
Description
The following is a list of all the components that may be found connected to
the various modules.
Transformer, Under/Over voltage
Current Transformer - Compressor
Evap EntlLvg Water Temp Sensor Pair
Sat Evap/Cprsr Suc Rfgt Temp. Sensor Pair
Sat Cond RfgtIOil Temp Sensor Pair
Outdoor Air Temperature Sensor
Zone Temp Sensor
Connector (UCM mating connectors)
Connector Keying Plug
Electronic Expansion Valve
RLC-SVD03A-EN 5
Page 6

General Information
High Pressure Cutout Switch
Low Pressure Cutout Switch
Variable Speed Fan Drive
Motor Temperature Thermostats
Slide Valve Load/Unload Solenoids
Step Load Solenoid Valve
Chiller Module (CPM) IU1
The CPM module performs machine (chiller) level control and protection
functions. Only one CPM is present in the chiller control system. The CPM
acts as the master controller to the other modules, running top level machine
control algorithms, initiating and controlling all inter-module communication
over the IPC, and providing parameters and operational requests (i.e. loading
and unloading, starting and stopping) to the other modules in the system via
the IPC. The CPM also contains nonvolatile memory, which allows it to
remember configuration and set-up values, setpoints, historical diagnostics
etc. for an indefinite period of time following a power loss. Direct hard wired
I/O associated with the CPM includes low voltage analog inputs, low voltage
binary inputs, 115 VAC binary inputs and 115 VAC (rated) relay outputs. See
Chiller Module (CPM) (1U1) on page 46 for further details.
Compressor Module (MCSP) 1U4 and 1U5
The MCSP module employs the input and output circuits associated with a
particular compressor and refrigeration circuit. Two MCSP modules are used
in the UCM system, one for each compressor. Included are low voltage
analog and digital circuits, 115 VAC input, and 115 VAC output switching
devices. The output switching devices associated with the compressor motor
controlling function are contained in this module. The outputs of this module
control one compressor motor stop/start contactor, one compressor motor
transition contactor, one oil heater, three solenoid valves (compressor load,
compressor unload, step loader), and up to four fan motor contactors or
groups of contactors. Refer to the chiller's line wiring diagrams for details. Dip
switches are provided for redundant programming of the compressor current
overload gains, and for unique IPC address identification during operation.
Inputs to this module include motor temperature thermostats, thermisters,
and safety switches. See Compressor Module (MCSP) (1U4 AND 1U5) on
page 72 for details.
Expansion Valve Module (EXV) 1U3
The EXV module provides power and control to the stepper motor driving the
electronic expansion valves of the chiller. Each module handles two valves,
one in each refrigeration circuit.
Input to the EXV Module is provided by four temperature sensors (two per
refrigeration circuit). The sensors are located in the respective refrigeration
circuits of the chiller and sense Saturated Evaporator and Suction temperatures and calculate the superheat temperatures. High level operational
commands as well as superheat setpoints are received by the EXV Module
over the IPC from the CPM module to modulate the EXV's.
6 RLC-SVD03A-EN
Page 7

General Information
Real time data for temperatures, diagnostics and control algorithms etc. are
made available to the CPM and the other modules for display and for input to
higher level functions. See Electronic Expansion Valve Module (EXV) (1U3) on
page 58 for details.
Options Module (CSR) 1U2
The CSR module is an optional part of the system and employs communications circuits for interface to Trane Building Automation Systems, done
through 1C17. The CSR also provides inputs for hard wired external setpoints
and reset functions. Included are low voltage analog and digital input circuits.
See Options Module (CSR) (1U2) on page 50 for details.
Clear Language Display (CLD) 1U6
The CLD Module provides an operator interface to the system, through a two
line, 40 character alphanumeric display. Three reports may be displayed and
various operating parameters may be adjusted by depressing a minimal
number of keys on the CLD. Also, chiller Start/Stop functions may be
performed at this keypad. See Clear Language Display (CLD) 1U6 Keypad
Overview on page 42 for details.
Interprocessor Communication Bridge (IPCB) 1U7
The IPCB module allows connection of a Remote Clear Language Display
module to the UCM, for distances of up to 1500 feet. The Remote Clear
Language Display communicates with the UCM, utilizing the same IPC
protocol, and provides most of the same functions as the local CLD. The IPCB
then serves to protect the UCM's IPC if wires to the Remote CLD become
shorted or broken. See Section 2 and on page 75 for details.
RLC-SVD03A-EN 7
Page 8

Interprocessor Communications
The respective modules communicate with each other via an InterProcessor
Communication link (IPC). The IPC allows the modules to work in a coordinated manner with the CPM directing overall chiller operation while each
module handles specific subfunctions. This IPC link is integral and necessary
to the operation of the Unit Controls and should not be confused with the
Optional ICS (Integrated Comfort System) communication.
In the IPC communication protocol scheme, the CPM acts as the initiator and
the arbitrator of all module communication. The CPM essentially requests all
the possible “packets” of information from each module in turn, (including
itself), in a predefined serial sequence. The other modules act as
“responders” only and cannot initiate communication. Modules which are not
currently responding to a specific request, can listen to the data and thus,
indirectly, they communicate with each other. It is helpful to remember when
troubleshooting that a module must be able to hear a request for its information from the CPM, or it will not talk.
The link is non-isolated, which means that a good common ground between
all the modules is necessary for trouble-free operation (provided by the
module enclosures' mounting using star washers). Also, the link requires
consistent polarity on all of the module interconnections. Connections
between modules are made at the factory, using unshielded #18 gauge
twisted pair cable terminated into a 4-position MTA type connector (orange
color code). This connector is plugged onto the 4 pin IPC connection jack
designated as J1, located in the upper left corner of the PC board edge on all
of the modules. The 4 pins actually represent 2 pairs of communications
terminals (J1-1 (+) internally connected to J1-3, and J1-2 (-) internally
connected to J1-4) to allow for easy daisy chaining of the bus.
IPC Diagnostics
The modules, in order to work together to control the chiller, must constantly
receive information from each other over the IPC. Failure of certain modules
to communicate or degradation of the communication link, could potentially
result in chiller misoperation. To prevent this situation, each module monitors
how often it is receiving information from designated other modules. If a
module fails to receive certain other module's transmitted data over a 15
second time period it will:
1. On its own, take specific action to safely shut-down (or to default) its controlled loads.
2. Report a diagnostic to the CPM (over the IPC link).
The CPM (if it properly receives such) will then report and display the
diagnostic on the Clear Language Display accordingly. The diagnostic will:
• identify which module is reporting the communication problem and
• identify which module was to have sent the missing information.
The CPM itself will then send out further commands to the other modules to
shutdown or take default actions as the particular case may warrant.
All IPC diagnostics are displayed in the Clear Language Display's diagnostics
section. For example, “Chiller Mod indicating Options Mod Comm Failure”
indicates that the CPM Module has detected a loss of IPC communication
8 RLC-SVD03A-EN
Page 9

Interprocessor Communication
from the Options Module. When some problem exists with the IPC link or a
module fails, it is not uncommon for more than one of these IPC diagnostics
to be displayed. Note that only those diagnostics that are indicated to be
active currently exist. All other historic diagnostics should be disregarded for
the purpose of the following troubleshooting discussion. See RTAA-IOM-4 for
a complete listing of diagnostics.
Troubleshooting Modules Using IPC Diagnostics
WARNING
Live Electrical Components!
During installation, testing, servicing and troubleshooting of this
product, it may be necessary to work with live electrical
components. Have a qualified licensed electrician or other
individual who has been properly trained in handling live
electrical components perform these tasks. Failure to follow all
electrical safety precautions when exposed to live electrical
components could result in death or serious injury.
Communication problems can result from any of the following:
1. Improperly set IPC address dip switches
2. Opens or shorts in the twisted pair IPC wiring or connectors
3. Loss of power to a module
4. Internal module failure
5. Improper connections on terminal J2
6. High levels of EMI (Electro-Magnetic Interference)
7. Module specific function selected without the Options Module.
These are discussed in more detail in the following paragraphs.
1. Improperly set IPC address dip switches:
This could result in more than one module trying to talk at the same time,
or cause the mis-addressed module to not talk at all. Only the MCSP and
the EXV modules have IPC address dip switches, found in the upper left
hand portion of the Module labeled as SW-1. The proper dip switch setups are shown in Table 2.
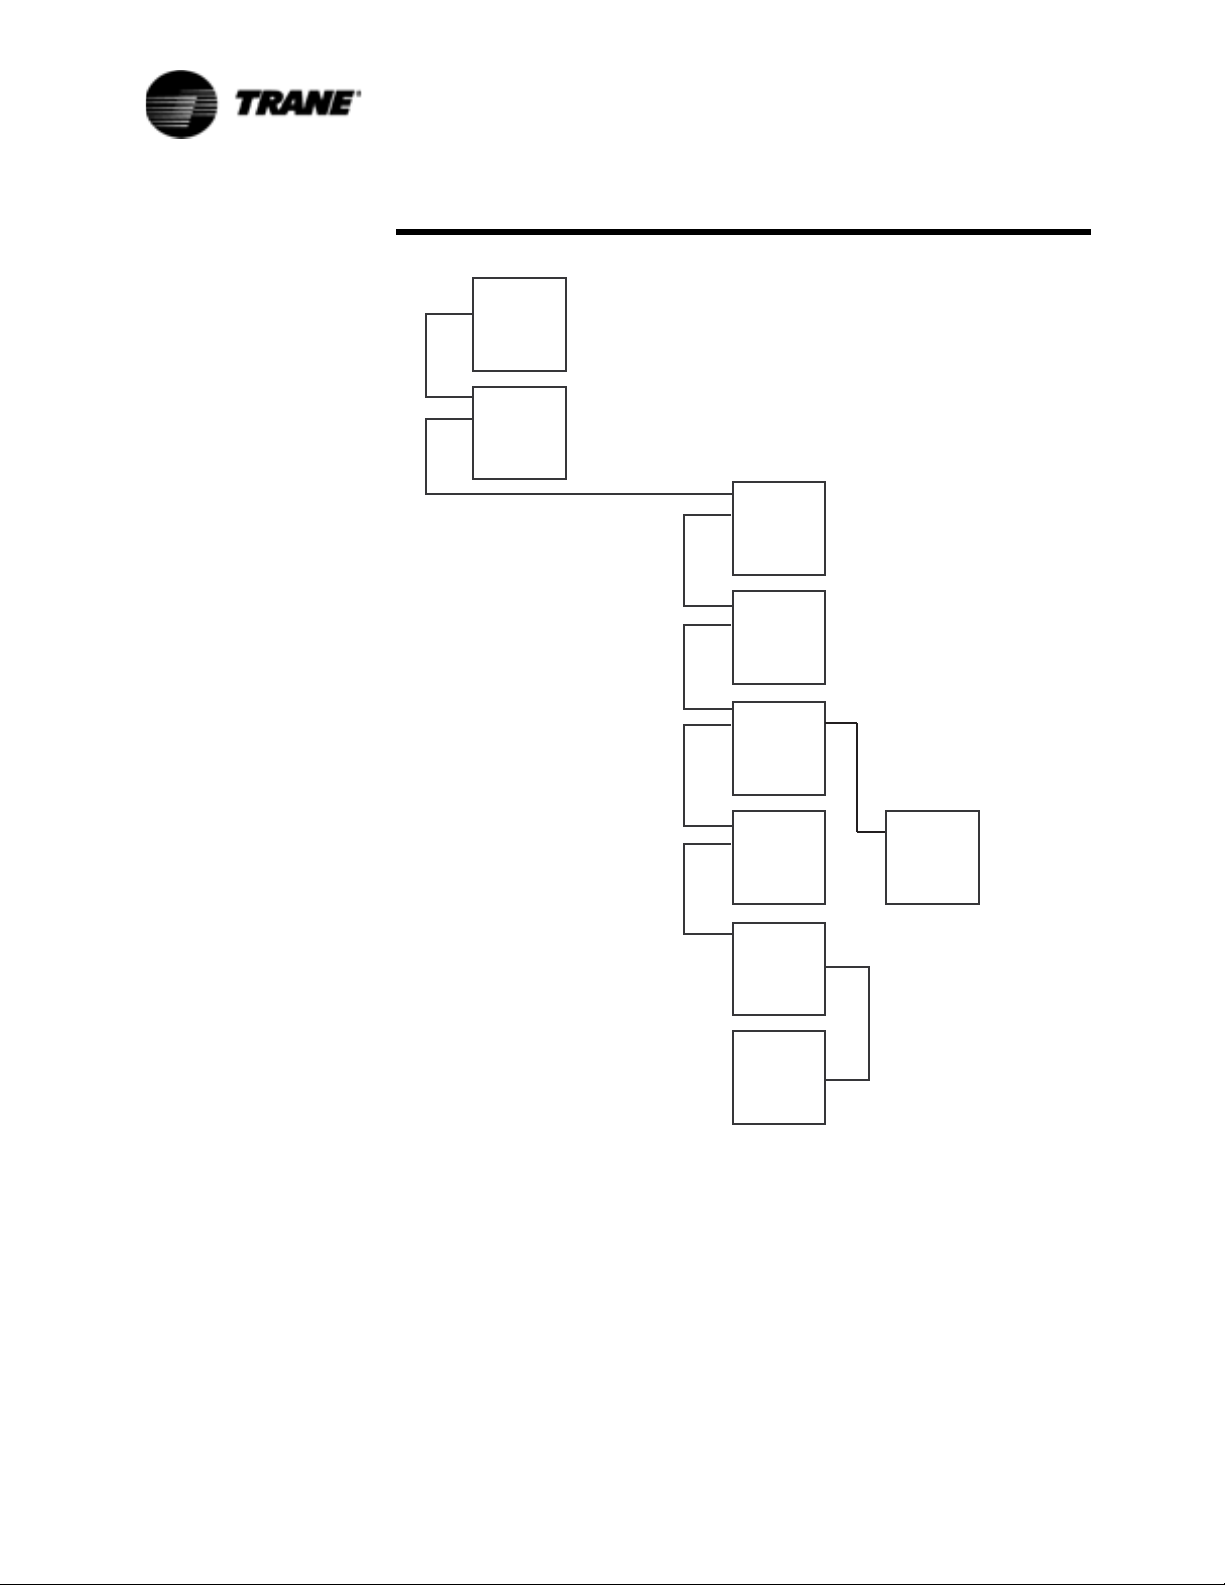
2. Opens or shorts in the twisted pair IPC wiring or connectors:
One or more modules may be affected by an open or a short in the IPC
wiring, depending on the location of the fault in the daisy chain. The diagram below shows the daisy chain order and is helpful in diagnosis of an
open link.
Extreme care should be used in making any dip switch changes or when
replacing MCSP modules. “Swapping” of addresses on the MCSPs
cannot be detected by the communication diagnostics discussed above
and serious chiller misoperation will result.
RLC-SVD03A-EN 9
Page 10
Interprocessor Communication
*
#,$
5
*
#05
*
-3#0"
5
*
-3#0!
5
*
%86
-!34%2
5
*
#32
5
*
)0#"
5
2%-/4%
#,$
5AND5AREMUTUALLYEXCLUSIVEOPTIONS
4HE2EMOTE#,$ISNOTAVAILABLEIFTHE5OPTIONISINSTALLED
Figure 1 IPC Link Order For 70-125 Ton RTAA
/R
*
,#)#
5
10 RLC-SVD03A-EN
Page 11
833(55,*+7
&251(52)
02'8/(
Interprocessor Communication
.
Table 2 IPC Address Dip Switch (SW1) Settings for MCSP an EXV Modules
MODULE DESIG. CONTROLLING DIP SWITCH SETTING
SW1-1 SW1-2
MCSP “A” 1U4 COMPRESSOR A OFF OFF
MCSP “B” 1U5 COMPRESSOR B OFF ON
EXV 1U3 CKTS. 1 & 2 OFF OFF
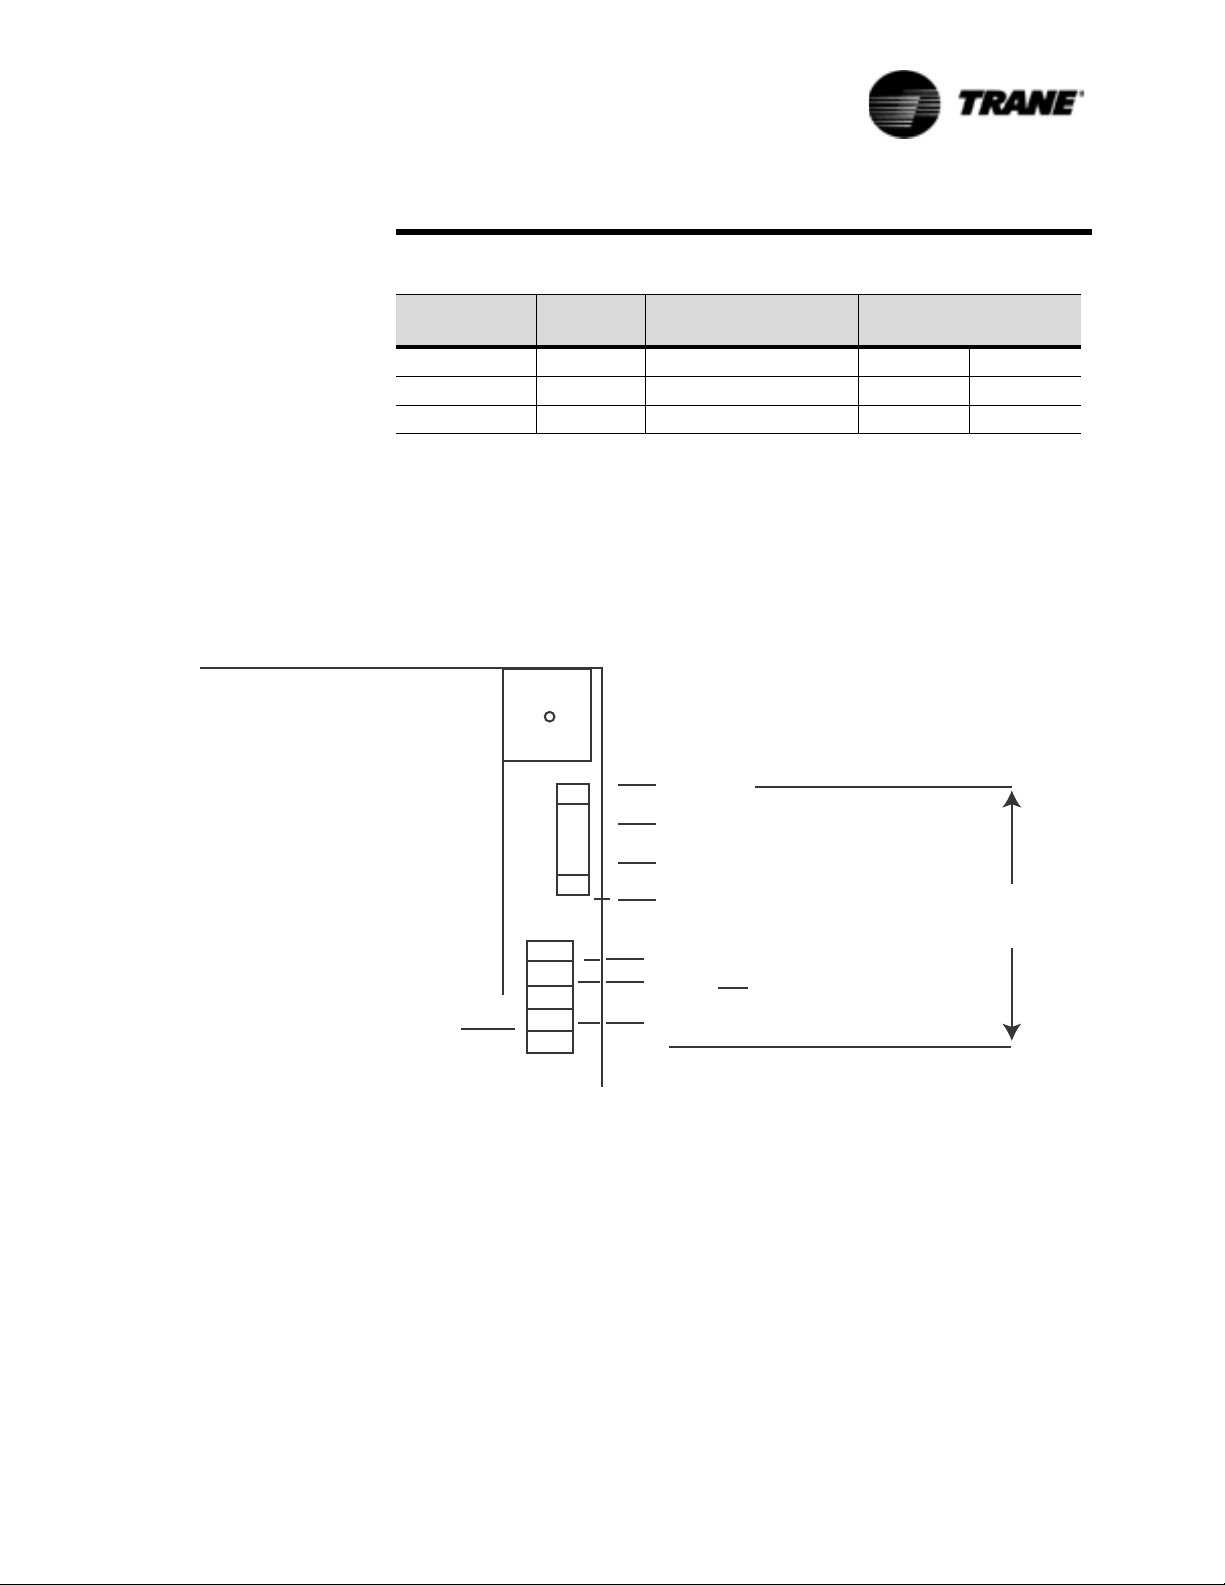
3. Loss of power to a module:
Generally a power loss to a particular module will only affect communications with that module. The module can usually be identified by analysis
of the IPC diagnostics. (When the display is blank, check power at the
CLD). Loss of power can most directly be diagnosed by measuring the
AC voltage at the top of the fuse with respect to the neutral of the power
connection (pins 4 or 5) on the terminal just below the fuse:
IXVHGVLGH
)86(
+
-
1&
1(875$/
Figure 2 Module Fuse and Power Connection, Except CLD
4. Internal module failure:
Internal module failures usually result only in communication loss to the
failed module, but could, in some cases, affect all the modules because
the failed module may “lock up” the IPC bus and prevent all communications. The former can be identified by analyzing all of the active IPC diagnostics. The latter can be identified in a process of elimination, whereby
each module, in turn, is taken out of the IPC link and a jumper installed in
its place. See Figure 3. The CPM can then be reset and the new IPC diagnostics that result can be analyzed.
XQVZLWFKHGVLGH
+
+
1
1
³9$&´
7R&KHFN
)XVH
9$&3RZHU
&RQQHFWLRQ
1
RLC-SVD03A-EN 11
Page 12
Interprocessor Communication
-
$03FF
KHDGHUSLQV
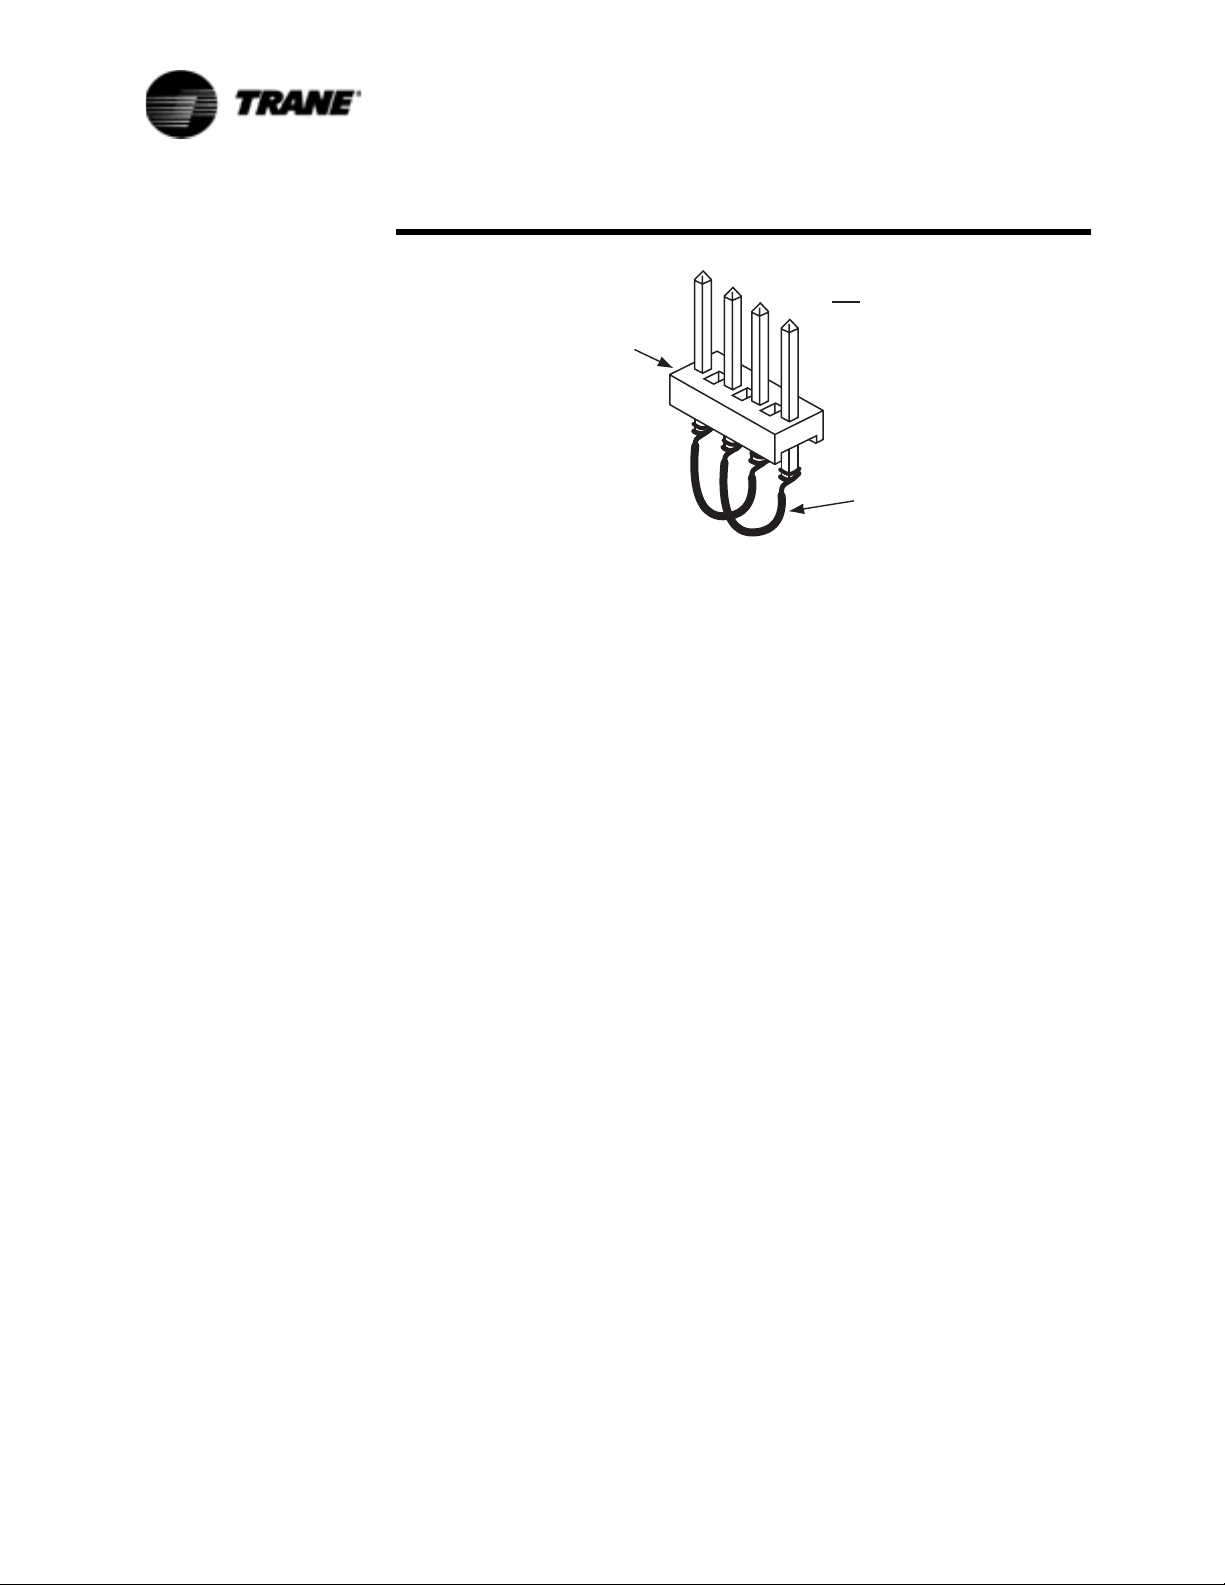
Figure 3 IPC Jumper For Bypassing Modules (to be inserted into MTA connector in place of module)
5. Improper connections to terminal J2:
Jack J2, present on all modules except CLD, should have no connections.
This input is for manufacturing test purposes only and any connections,
shorts, etc. will potentially cause the module to not respond, respond to
the wrong address, or (in the case of the CPM) fail to initiate any communications and thus fail the entire IPC.
6. High levels of Electro-Magnetic Interference:
The modules and the IPC have been qualified under severe EMI (both
radiated and conducted) and the system was determined to be immune
to all but extremely high noise levels. Always be sure to close and latch
the control panel cabinet doors as the panel enclosure provides significant shielding and is integral in the overall noise immunity of the control
system.
7. Module specific function selected without the Options Module:
If any of the functions on the Options Module are selected but the
Options Module is not present, the UCM will look for this module and
generate an error. The Options Module functions include Chilled Water
Reset, Ice Machine Control, External Chilled Water Setpoint, External
Current Limit Setpoint, and Tracer/Summit Communications.
RUHTXLY
:LUH
MXPSHUV
VROGHUHGRU
ZUDSSHGLQWR
SLQV
Troubleshooting Procedure
1. Place the CPM in “Stop”. Record the active IPC diagnostics as shown in
the Diagnostics Report of the CLD. The communication failure diagnostics and their meanings are shown in IPC Diagnostics of the RTAA-IOM-4
manual.
2. Determine which modules are not talking. These modules must be
affected by one of the previously stated problems. If there is a group of
modules not talking, suspect a wiring problem early in the daisy chain
link. If only one module is not talking, suspect a loss of power or blown
fuse.
12 RLC-SVD03A-EN
Page 13

Interprocessor Communication
3. Determine which modules are still talking. Wiring up to these is likely to
be OK.
4. Try disconnecting the link or jumping out modules in the link at various
places (use Figure 1). Reset the diagnostics and note which diagnostics
reappear.
Here are some examples of IPC diagnostics:
Diagnostics present:
Chiller Mod Indicating EXV Mod Communications
Cprsr A Indicating EXV Mod Communications
Cprsr B Indicating EXV Mod Communications
The CPM and both MCSP modules are detecting a loss of communications
with the EXV. Suspect power to the EXV or its fuse or a wiring problem
downstream of the MCSP A and B modules.
Diagnostics present:
Chiller Mod Indicating Options Mod Communications
Chiller Mod Indicating EXV Mod Communications
Chiller Mod Indicating Cprsr A Communications
Chiller Mod Indicating Cprsr B Communications
The CPM is reporting that it cannot talk to any of the other modules. Suspect
a shorted IPC bus or a module locking up the bus. The CPM could also be bad
and not be sending recognizable tokens. Discriminating between these possibilities is done by disconnecting the link or jumping out modules in the link at
various places. Refer to Item 4 in Troubleshooting Modules (Troubleshooting
Modules Using IPC Diagnostics on page 9) for the procedure and the IPC
Jumper for bypassing the Modules.
Diagnostics present:
Chiller Mod Indicating Cprsr B Communications
EXV Mod Indicating Cprsr B Communications
The CPM and EXV have both detected a communication loss with MCSP B.
Suspect the address switch on MCSP B or a power/fuse problem.
Diagnostics present:
Chiller Mod Indicating Cprsr A Communications
Chiller Mod Indicating Cprsr B Communications
EXV Mod Indicating Cprsr A Communications
EXV Mod Indicating Cprsr B Communications
The CPM and EXV have both detected a communication loss with MCSP A
and MCSP B. Suspect that the address switches on both modules are set to
the same address. Wiring is probably OK since the EXV can talk to the CPM.
Diagnostics present:
Chiller Mod Indicating Cprsr B Communications
Chiller Mod Indicating Cprsr A Communications
Chiller Mod Indicating EXV Mod Communications
RLC-SVD03A-EN 13
Page 14

Interprocessor Communication
The CPM has detected loss of communications with MCSP A, MCSP B,
and EXV. Suspect an open early in the IPC link between the CPM and
MCSP B.
There are a large number of possible combinations of diagnostics. One must
deduce what is causing the problem using all available information.
If the CLD Comm link to the CPM is broken, the message is:
No Communication, Data Not Valid
14 RLC-SVD03A-EN
Page 15

Temperature Sensor Checkout
With the exception of the thermostats located in the motor windings of the
screw compressors, all the temperature sensors used on the UCMs are
negative temperature coefficient (NTC) thermistors. The thermistors
employed all have a base resistance of 10 Kohms at 77F (25C) and display a
decreasing resistance with an increasing temperature. The UCMs “read” the
temperature by measuring the voltage developed across the thermistors in a
voltage divider arrangement with a fixed internal resistance. The value of this
“pull-up” resistor is different depending on the temperature range where the
most accuracy is desired. The voltage source for this measurement is a
closely regulated 5.0 VDC supply.
An open or shorted sensor will cause the UCM to indicate the appropriate
diagnostic. In most cases, an open or short will cause a CMR or MMR
diagnostic that will result in a machine or circuit shutdown. Open or shorts on
less critical Outdoor Air or Zone Temperature sensors will result in an
Informational Warning Diagnostics and the use of default values for
that parameter.
Temperature Sensor Checkout Procedure
WARNING
Live Electrical Components!
During installation, testing, servicing and troubleshooting of this
product, it may be necessary to work with live electrical
components. Have a qualified licensed electrician or other
individual who has been properly trained in handling live
electrical components perform these tasks. Failure to follow all
electrical safety precautions when exposed to live electrical
components could result in death or serious injury.
1. Measure the temperature at the sensor using an accurate thermometer.
Record the temperature reading observed.
2. With the sensor leads connected to the UCM and the UCM powered,
measure the DC voltage across the sensor leads at the terminal or probe
the back of the MTA plug.
NOTE: Always use a digital volt-ohmmeter with 10 megohm or greater input
impedance to avoid “loading down” the voltage divider. Failure to do so will
result in erroneously high temperature calculations.
3. Locate the appropriate sensor table. Table 3: Evaporator Water and
Refrigerant Temperature Sensors, Tab l e 4 : Saturated Condenser Refrigerant and Entering Oil Temperature Sensors. Then compare the temperature in the table corresponding to the voltage reading recorded in Step 2
with the actual temperature observed in Step 1. If the actual temperature
measured falls within the allowable tolerance range, both the sensor and
the UCM's temperature input circuits are operating properly. However, if
the actual temperature is outside the allowable sensor tolerance range,
proceed to Step 4.
RLC-SVD03A-EN 15
Page 16

Temperature Sensor Checkout
4. Again measure the temperature at the sensor with an accurate thermometer; record the temperature reading observed.
5. Remove the sensor leads from the terminal strip or unplug the respective
MTA. Measure the resistance of the sensor directly or probe the MTA
with a digital volt-ohmmeter. Record the resistance observed.
6. Next, with the sensor still disconnected from the module, check the
resistance from each of the sensor leads to the control panel chassis.
Both readings should be more than 1 Megohm. If not, the sensor or the
wiring to the sensor is either shorted or leaking to chassis ground and
must be repaired.
7. Select the appropriate sensor table and locate the resistance value
recorded in Step 5. Verify that the temperature corresponding to this
resistance value matches (i.e. within the tolerance range specified for
that sensor) the temperature measured in Step 4.
8. If the sensor temperature is out of range, the problem is either with the
sensor, wiring, or the MTA connector (if applicable). If an MTA connector
is used and the thermistor reads open, first try cutting off the MTA, stripping a small amount of insulation from the sensor wire's end and repeating the measurement directly to the leads. Once the fault has been
isolated in this manner, install a new sensor, connector or both. When
replacing a sensor, it is easiest to cut the sensor wire near the MTA end
and splice on a new sensor using wire nuts.
9. A decade box can be substituted for the sensor and any sensor table
value used to relate resistance to temperature. By removing the MTA
plug and applying the resistance to the proper pin terminals, the temperature, as sensed by the UCM, can be confirmed. Using the CLD menu displays, scroll to the display of the temperature of interest.
NOTE: All displayed temperatures are slew rate limited and only accurate
within a specified normal range. It is therefore important to be certain that
the temperature readings are stable and that adequate time, up to 1 minute,
is allowed after step changes in resistance inputs are made.
10. In all instances where module replacement is indicated, first perform the
power supply/fuse check according to the information in the section
“Module Power and Miscellaneous I/O” starting on page 41.
16 RLC-SVD03A-EN
Page 17
Temperature Sensor Checkout
Table 3 Sensor Conversion Data: Outdoor Air (6RT3), Entering and Leaving Evap Water Temp Matched
.
Pairs (6RT7, 6RT8), and Saturated Evap and Comp Suction Refrigeration Temp (6RT9, 3B1RT5; 6RT10, 4B1RT6)
Actual
Te m p .
(F)
-20.0 170040.3 4.448 30.0 34838.9 3.120 80.0 9297.5 1.533
-19.0 164313.4 4.434 31.0 33833.3 3.086 81.0 9075.9 1.509
-18.0 158796.5 4.414 32.0 32861.4 3.047 82.0 8860.2 1.484
-17.0 153482.9 4.395 33.0 31935.3 3.018 83.0 8650.4 1.460
-16.0 148365.0 4.380 34.0 31038.7 2.983 84.0 8446.2 1.436
-15.0 143432.2 4.360 35.0 30170.5 2.949 85.0 8247.5 1.411
-14.0 138679.6 4.341 36.0 29329.5 2.910 86.0 8054.1 1.387
-13.0 134098.6 4.321 37.0 28515.0 2.876 87.0 7865.8 1.362
-12.0 129684.9 4.302 38.0 27725.9 2.842 88.0 7682.5 1.343
-11.0 125428.5 4.282 39.0 26961.4 2.808 89.0 7504.2 1.318
-10.0 121326.1 4.263 40.0 26220.8 2.773 90.0 7330.5 1.294
-9.0 117369.6 4.238 41.0 25503.0 2.739 91.0 7161.4 1.274
-8.0 113554.9 4.219 42.0 24807.5 2.705 92.0 6996.7 1.250
-7.0 109876.5 4.194 43.0 24133.3 2.671 93.0 6836.3 1.230
-6.0 106328.1 4.175 44.0 23479.7 2.637 94.0 6680.1 1.211
-5.0 102904.9 4.150 45.0 22846.1 2.603 95.0 6528.0 1.187
-4.0 99602.3 4.126 46.0 22231.9 2.568 96.0 6379.8 1.167
-3.0 96416.1 4.106 47.0 21636.2 2.534 97.0 6235.5 1.147
-2.0 93341.6 4.082 48.0 21058.7 2.505 98.0 6094.8 1.128
-1.0 90374.2 4.058 49.0 20498.4 2.471 99.0 5957.8 1.108
0.0 87510.3 4.033 50.0 19955.0 2.437 100.0 5824.3 1.089
1.0 84745.9 4.004 51.0 19427.9 2.402 101.0 5694.2 1.069
2.0 82077.1 3.979 52.0 18916.5 2.368 102.0 5567.4 1.050
3.0 79500.5 3.955 53.0 18420.3 2.334 103.0 5443.8 1.030
4.0 77012.3 3.926 54.0 17938.8 2.305 104.0 5323.3 1.016
5.0 74609.7 3.901 55.0 17471.6 2.271 105.0 5205.9 0.996
6.0 72288.8 3.872 56.0 17018.0 2.236 106.0 5091.5 0.977
7.0 70047.4 3.848 57.0 16577.8 2.207 107.0 4979.9 0.962
8.0 67881.9 3.818 58.0 16150.5 2.173 108.0 4871.1 0.942
9.0 65790.2 3.789 59.0 15735.7 2.144 109.0 4765.0 0.928
10.0 63768.7 3.760 60.0 15332.9 2.109 110.0 4661.5 0.913
11.0 61815.3 3.730 61.0 14941.7 2.080 111.0 4560.6 0.894
12.0 59927.8 3.701 62.0 14561.9 2.046 112.0 4462.2 0.879
13.0 58103.1 3.672 63.0 14193.0 2.017 113.0 4366.3 0.864
14.0 56339.6 3.643 64.0 13834.6 1.987 114.0 4272.6 0.850
15.0 54634.7 3.608 65.0 13486.5 1.958 115.0 4181.3 0.835
16.0 52986.4 3.579 66.0 13148.3 1.924 116.0 4092.2 0.820
17.0 51392.6 3.550 67.0 12819.8 1.895 117.0 4005.3 0.806
18.0 49851.6 3.516 68.0 12500.5 1.865 118.0 3920.5 0.791
19.0 48360.9 3.486 69.0 12190.2 1.836 119.0 3837.7 0.776
20.0 46919.2 3.452 70.0 11888.7 1.807 120.0 3756.9 0.762
21.0 45524.6 3.418 71.0 11595.6 1.777 121.0 3678.1 0.747
22.0 44175.6 3.389 72.0 11310.7 1.753 122.0 3601.1 0.732
23.0 42870.3 3.354 73.0 11033.7 1.724 123.0 3526.5 0.723
24.0 41607.6 3.320 74.0 10764.4 1.694 124.0 3453.6 0.708
25.0 40385.3 3.286 75.0 10502.6 1.670 125.0 3382.4 0.698
26.0 39202.7 3.257 76.0 10248.0 1.641 126.0 3313.0 0.684
27.0 38057.9 3.223 77.0 10000.4 1.616 127.0 3245.1 0.674
28.0 36950.0 3.188 78.0 9759.6 1.587 128.0 3178.9 0.659
29.0 35877.4 3.154 79.0 9525.4 1.563 129.0 3114.2 0.649
1. Overall accuracy for any of the sensors is at least + 2 F over the range shown. Accuracy of matched sensors is + 1 F over specific ranges.
2. As you compare a thermistor resistance (or input voltage) reading with the “actual” temperature indicated by the thermometer, be sure to
consider the precision and location of the thermometer when you decide whether or not the thermistor is out of specified accuracy.
3. The thermistor resistances given do not account for the self-heating effects that are present when connected to the UCM. A connected
“operating” thermistor will read a slightly lower (less than 1%) resistance.
Actual
Resistance
(Ohms)
Thermistor
Vo lt ag e
(Volts DC)
Actual
Te m p .
(F)
Actual
Resistance
(Ohms)
Thermistor
Vo lt ag e
(Volts DC)
Actual
Te m p .
(F)
130.0 3051.0 0.635
Actual
Resistance
(Ohms)
Thermistor
Vo lt ag e
(Volts DC)
RLC-SVD03A-EN 17
Page 18
Temperature Sensor Checkout
Table 4 Sensor Conversion Data: Saturated Condenser and Entering Oil Temperature Matched Pairs
(6RT12, 3B1RT1; 6RT13, 4B1RT2)
Actual
Te m p .
(F)
0.0 87510.3 4.651 50.0 19955.0 3.765 100.0 5824.3 2.356
1.0 84745.9 4.641 51.0 19427.9 3.740 101.0 5694.2 2.327
2.0 82072.1 4.630 52.0 18916.5 3.715 102.0 5567.4 2.300
3.0 79500.1 4.619 53.0 18420.3 3.689 103.0 5443.8 2.272
4.0 77012.3 4.608 54.0 17938.8 3.664 104.0 5323.3 2.244
5.0 74609.7 4.596 55.0 17471.6 3.638 105.0 5205.9 2.217
6.0 72288.8 4.584 56.0 17018.0 3.611 106.0 5091.5 2.189
7.0 70047.4 4.572 57.0 16577.8 3.585 107.0 4979.9 2.162
8.0 67881.9 4.560 58.0 16150.5 3.558 108.0 4871.1 2.135
9.0 65790.2 4.547 59.0 15735.7 3.531 109.0 4765.0 2.108
10.0 63768.7 4.534 60.0 15332.9 3.504 110.0 4661.5 2.082
11.0 61815.3 4.521 61.0 14941.7 3.477 111.0 4560.6 2.055
12.0 59927.8 4.507 62.0 14561.9 3.450 112.0 4462.2 2.029
13.0 58103.1 4.494 63.0 14193.0 3.422 113.0 4366.3 2.003
14.0 56339.6 4.479 64.0 13834.6 3.394 114.0 4272.6 1.977
15.0 54634.7 4.465 65.0 13486.5 3.366 115.0 4181.3 1.951
16.0 52986.4 4.450 66.0 13148.3 3.338 116.0 4092.2 1.926
17.0 51392.6 4.435 67.0 12819.8 3.310 117.0 4005.3 1.901
18.0 49851.6 4.420 68.0 12500.5 3.282 118.0 3920.5 1.876
19.0 48360.9 4.404 69.0 12190.2 3.253 119.0 3837.7 1.851
20.0 46919.2 4.388 70.0 11888.7 3.225 120.0 3756.9 1.826
21.0 45524.6 4.372 71.0 11595.6 3.196 121.0 3678.1 1.802
22.0 44175.6 4.355 72.0 11310.7 3.167 122.0 3601.1 1.777
23.0 42870.3 4.338 73.0 11033.7 3.139 123.0 3526.5 1.754
24.0 41607.6 4.321 74.0 10764.4 3.110 124.0 3453.6 1.730
25.0 40385.3 4.303 75.0 10502.6 3.081 125.0 3382.4 1.707
26.0 39202.7 4.285 76.0 10248.0 3.051 126.0 3313.0 1.684
27.0 38057.9 4.266 77.0 10000.0 3.022 127.0 3245.1 1.661
28.0 36950.0 4.248 78.0 9759.6 2.993 128.0 3178.9 1.638
29.0 35877.4 4.229 79.0 9525.4 2.964 129.0 3114.2 1.615
30.0 34838.9 4.209 80.0 9297.5 2.935 130.0 3051.0 1.593
31.0 33833.3 4.190 81.0 9075.9 2.905 131.0 2989.2 1.571
32.0 32861.4 4.170 82.0 8860.2 2.876 132.0 2928.9 1.549
33.0 31935.3 4.150 83.0 8650.4 2.847 133.0 2870.0 1.528
34.0 31038.7 4.130 84.0 8446.2 2.817 134.0 2812.4 1.506
35.0 30170.5 4.109 85.0 8247.5 2.788 135.0 2756.2 1.485
36.0 29329.5 4.088 86.0 8054.1 2.759 136.0 2701.2 1.464
37.0 28515.0 4.067 87.0 7865.8 2.730 137.0 2647.5 1.444
38.0 27725.9 4.045 88.0 7682.5 2.700 138.0 2595.0 1.423
39.0 26961.4 4.024 89.0 7504.2 2.671 139.0 2543.7 1.403
40.0 26220.8 4.002 90.0 7330.5 2.642 140.0 2493.6 1.383
41.0 25503.0 3.979 91.0 7161.4 2.613 141.0 2444.6 1.364
42.0 24807.5 3.957 92.0 6996.7 2.584 142.0 2396.7 1.344
43.0 24133.3 3.934 93.0 6836.3 2.555 143.0 2349.9 1.325
44.0 23479.7 3.910 94.0 6680.1 2.526 144.0 2304.1 1.306
45.0 22846.1 3.887 95.0 6528.0 2.498 145.0 2259.2 1.287
46.0 22231.9 3.863 96.0 6379.8 2.469 146.0 2216.0 1.269
47.0 21636.2 3.839 97.0 6235.5 2.440 147.0 2172.8 1.250
48.0 21058.7 3.815 98.0 6094.8 2.412 148.0 2131.6 1.232
49.0 20498.4 3.790 99.0 5957.8 2.384 149.0 2090.4 1.215
1. Overall accuracy for the sensor is at least + 2 F over the range shown.
2. As you compare a thermistor resistance (or input voltage) reading with the “actual” temperature indicated by the thermometer, be sure to
consider the location and precision of the thermometer when you decide whether or not the thermistor is out of specified accuracy.
3. The thermistor resistances given do not account for the self-heating effects that are present when connected to the UCM. A connected
“operating” thermistor will read a slightly lower (less than 1%) resistance.
Actual
Resistance
(Ohms)
Thermistor
Volta ge
(Volts DC)
Actual
Te m p .
(F)
Actual
Resistance
(Ohms)
Thermistor
Vo lt ag e
(Volts DC)
Actual
Te m p .
(F)
150.0 2051.2 1.197
Actual
Resistance
(Ohms)
Thermistor
Volta ge
(Volts DC)
18 RLC-SVD03A-EN
Page 19

Compressor Operation
This feature is called the Auto Lead/Lag and can be found in the Service
Settings Group, under the “Balanced CPRSR Starts and Hours” menu. When
this function is disabled, the UCM always starts compressor “A” first. When
this function is enabled, the following occurs:
The UCM equalizes operating starts and hours. This will cause the
compressor with the least amount of starts to be started first. When a
compressor starts, it is always started unloaded.
When a compressor is stopped, it shuts down in an unloaded state, unless
taken out by a manual reset diagnostic.
When the first compressor is brought on line, it attempts to meet the load by
staging on the step load solenoid and by pulsing the male slide valve load
solenoid. If one compressor cannot meet the load demand, the second
compressor is brought on line. It also attempts to meet the load demand by
staging on its step load solenoid and by pulsing its male slide valve solenoid.
When both compressors are running and both of their step load solenoids are
energized, the male load and unload solenoids on both compressors are
pulsed, thus modulating their respective slide valves to balance the load. The
UCM attempts to distribute the load evenly between the two compressors.
When the load drops off, the compressor with the most hours will always be
the first to unload and turn off. The anti-recycle timer is approximately 5
minutes from start to start. The minimum time between compressor
shutdown and restart is approximately 10 seconds, but only if the
compressor has been running over 5 minutes or longer prior to shutting down
on temperature. Otherwise, it is the remaining portion of the 5 minutes.
Restart Inhibit Timer
If compressor operation is interrupted by an extended (not momentary) loss
of power or a manual reset, there will be a two minute delay between the
power up or manual reset and the start of a compressor, assuming there is a
call for cooling. The timer is factory set at 2 minutes but can be field adjusted
from 30 seconds to two minutes in the Service Settings Group.
RLC-SVD03A-EN 19
Page 20

Compressor Start/Stop
To start a compressor after either a “normal' shutdown, a Diagnostic reset, or
power-on-reset, the following sequence will occur:
1. On a call for a compressor, the Restart Inhibit Timer will time out, if any
time remains.
2. The EXV is positioned to the initial closed start position. At the same
time, the unload solenoid is energized and the load solenoid is de-energized. Timing is determined by the time required to position the EXV
3. After the EXV is positioned:
• the compressor is turned on
• the compressor heater is de-energized
• the saturated evaporator ref. temp. cutout ignore time is set, based on
the saturated condenser temperature. Prior to start, the condenser temperature approximates the ambient temperature.
• the fan control algorithm is executed
To stop a compressor due to either the Stop button on the CLD or an
External/Remote “STOP”, the sequence shall be as follows:
1. The unload solenoid is energized for 20 seconds and the load solenoid is
de-energized. The compressor continues to run for the remaining 20 seconds. This is defined as the RUN:UNLOAD mode.
2. The compressor and the fans are turned off. The crankcase heater is
energized.
3. The unload solenoid remains energized for 60 minutes after the compressor stops. The load solenoid is de-energized.
4. The EXV is closed. Closing begins at maximum speed when the compressor is turned off. (Max. speed is 25 steps per second, full stroke is
757 steps.
5. After 60 minutes, the unload solenoid de-energizes.
The RUN:UNLOAD mode is also used to stop a compressor due to normal
LWT control, Low Ambient Run Inhibit, or Freeze Avoidance.
A compressor stop due to any diagnostic will skip step 1 above and go
directly to step 2.
20 RLC-SVD03A-EN
Page 21
Variable Speed
Inverter/Condenser Fan Control
When Fan Control and Variable Speed Fan (VSF) are set to Enable in the
Machine Configuration Menu, the UCM will control both the variable speed
fan and the remaining constant speed fans per the VSF Control Algorithm. If
VSF Control is disabled for a given circuit but Fan Control is enabled for the
machine, the circuit will perform normal constant speed fan control. The VSF
is enabled and operational, the control attempts to provide a 70 ± 5 psid
between the Condenser Pressure and the Evaporator Pressure (as derived
from the temperature sensor measurements).
23(5$7,1*
35(6685(
',))(5(17,$/
36,'
1RQ$GMXVWDEOH
'LII3UHVV6HWSRLQW
&035
/RDG6WHS
67$7(
0LQ/RDG
2II
3DQLF)DQ$GGV
96)3,',QFUHDVLQJ)DQ6SHHG
96)3,''HFUHDVLQJ)DQ6SHHG
96)DWPD[VSHHG
,QYHUWHU)DQ0D[5DPS
UDWHLV+]VHF
'HDG%DQG36,'
'HDG%DQG36,'
%HJLQ3HU6WDUW8S)DQ6WDWH
6HHLQVHWDERYH
$GGLWLRQDO)DQV
LIDYDLODEOHDUH
LPPHGLDWHO\VWDUWHG
DWHDFKFRQGHQVHU
WHPSHUDWXUHVKRZQ
6WDJHRQQH[W&RQVWDQW
VHF
VSHHG)DQGXHWR96)
DWPD[6SHHG
+LJK'LIIHUHQWLDO3UHVVXUH/RFNRXW$UHD'LDJQRVWLF2FFXUVZKHQ
'HOWD3LV!36,'DQGLQWHJUDOH[FHHGV36,PLQXWHV
6WDUW8S)DQ6WDWH
)DQV96)PLQVSHHG
$PELHQW
7HPS
'HJUHHV)
'HFUHDVHVSHHGRI96)
WRPDNHXSIRUDGGHGIDQ
/RZ'LIIHUHQWLDO3UHVVXUH/RFNRXW$UHD
'LDJQRVWLF2FFXUVLI'HOWD3LV36,'IRUPLQXWHV
)DQV96)PLQVSHHG
)DQV96)PLQVSHHG
)DQ96)PLQVSHHG
9DU6SG)DQRQO\PLQVSHHG
96)DWPD[VSHHG
6WDJHRQQH[W)DQ
GXHWR&RPSUHVVRU
ORDG6WHS6HH$QWLFLSDWRU\
)DQ&RQWUROLQVHWDERYH
VHF
2SHUDWLQJ
'LIIHUHQWLDO
6WDJHRQQH[W&RQVWDQW
VSHHG)DQGXHWR96)
DWPD[6SHHG
7,0(
$QWLFLSDWRU\)DQ&RQWURO)XQFWLRQ
,QWKLVDUHDVWDUWDIDQZLWK
DFRPSUHVVRUVWHSEXW
WDNHQRDFWLRQZLWKXQVWHS
3UHVVXUH
36,'
6WDJHRII)DQGXHWR&RPSUHVVRU
ORDG6WHS6HH$QWLFLSDWRU\
)DQ&RQWUROLQVHWDERYH
,QWKLVDUHDDOZD\VVWDUW
RUVWRSDIDQZLWKD
FRPSUHVVRUVWHSRUXQVWRS
(YDS/HDYLQJ:DWHU7HPS)
Figure 4 Variable Speed Fan (VSF) and Fan Staging Control
The VSF Inverter is commanded to a given speed by the UCM, using a PWM
(Pulse Width Modulated) signal (10V, 15mA, 10 Hz Fundamental) with a duty
cycle proportional to the desired voltage and frequency from the Inverter. The
UCM also controls power to the Inverter through a contactor. The Inverter
Contactor for the respective circuit is energized approximately 20 seconds
prior to compressor start on that circuit. The VSF Control algorithm runs on a
5-second interval and is limited to a commanded rate of change of no greater
than 40% of full speed per interval. The same algorithm that controls the
RLC-SVD03A-EN 21
Page 22

Variable Speed Inverter/
Condenser Fan Control
speed will also cause constant speed fans to stage On and Off when the
inverter is commanded to full speed and minimum speed respectively. The
stage On (or Off) of a constant speed fan will occur if the inverter speed
command is at max (or min.) for three consecutive intervals (15 seconds).
Outdoor Air Temperature and Fan Control
Outdoor air temperature is used to provide a reasonable startup state. Using
this temperature, the algorithm automatically determines the number of
constant speed fans to turn on immediately at compressor start. The outdoor
air temperature sensor is also used to anticipate new states during normal
running to minimize pressure upsets. This anticipation is based on the staging
and unstaging of compressor steps at given leaving water temperatures. In
this way, precise airflow can be maintained, allowing for stable differential
pressures under part load and low ambient conditions.
VSF Inverter Fault
A fault signal will be sent to the UCM from the Inverter when it has gone
through a self-shutdown or if the output frequency of the Inverter is being
limited to less than 50% of the signal speed commanded by the UCM. Upon
receipt of the fault signal, the UCM shall attempt to reset the fault by sending
a 0 PWM command to the Inverter for a total of five seconds. The fault signal
will again be checked and repeated if still in fault. If four faults are detected
within one minute of each other, the power to the Inverter will be cycled off
for 30 seconds (through contactor control) and then re-powered. If the fault
still remains or occurs again within one minute, an IFW diagnostic occurs.
The UCM will remove power from the Inverter and attempt to run the
remaining constant-speed fans using normal constant-speed Fan Control
Algorithm. See page 80 for step-by-step troubleshooting procedure.
22 RLC-SVD03A-EN
Page 23

Current Transformer
Each compressor motor has all three of its line currents monitored by torroid
(doughnut) current transformers. While the MCSP utilizes all three of the
signals, it only displays the maximum phase at any given time. These currents
are normalized with respect to the Rated Load Amps of the respective
compressor and thus are expressed in terms of % (percent) RLA. The
currents are “normalized” thru the proper selection of the Current Transformer, the setting of the Compressor Current Overload dip switch (SW2) on
the MCSPs, and the redundant programming of the decimal equivalent of
these settings in the Service Settings Group of the CLD. (The term
“Compressor Current Overload setting” is actually a misnomer. Instead the
setting should be thought of as an internal software gain that normalizes the
currents to a % RLA for a given CT and compressor rating. The true nominal
steady state overload setting is fixed at 132%). Refer to Tables 5 thru 9 for
setup details.
The current transformers provide the input for six basic functions of the
MCSP:
1. Motor overload protection using a programmed “% RLA versus time to
trip” characteristic. Refer to Ta bl e 6 for details. The steady state “must
trip” value is 140% RLA and the “must hold” value is 125% RLA. The
MCSP will trip out the compressor. The appropriate diagnostic descriptions are then displayed in the CLD diagnostic section.
2. Verifying contactor drop-out. If currents corresponding to less than 12
±7% RLA are not detected on all three of the monitored compressor
phases within approximately 5 seconds after an attempted contactor
drop-out, the compressor will continue to be commanded Off, the Unload
solenoid will be pulsed, the EXV will be opened to its fullest position, and
the fans will continue to be controlled. This condition will exist until the
diagnostic is manually reset.
3. Loss of Phase Current. If the detection of any or all of the three motor
phase currents falls below 12 ±7% RLA for 2 ±1 seconds while the
branch circuit should be “energized”, the MCSP will trip out the compressor. The Phase Loss diagnostic, or the Power Loss diagnostic, will be displayed. Failure of a contactor to pull in will cause the Phase Loss
diagnostic. However when reduced voltage starting is employed, it may
take an additional 3 seconds to detect a phase loss at startup, as phase
loss protection is not active during the 3 second transition time.
4. Phase Rotation. Screw compressors cannot be allowed to run in reverse
direction. To protect the compressors, the phase rotation is detected by
the current transformers immediately at start up. If improper phasing is
detected, within 1 second of startup, the MCSP will trip out the compressor. The Phase Rotation diagnostics will be displayed. This function is not
sensitive to the current transformer's polarity.
5. Phase Unbalance. The MCSP will shut down the compressor if a phase
current unbalance is detected by the current transformers while the compressor is running. A 15% unbalance, if protection is enabled, will cause
the MCSP to trip out the compressor. The Phase Unbalance diagnostics
RLC-SVD03A-EN 23
Page 24

Current Transformer
will be displayed. If this protection is disabled, a 30% phase unbalance
will still be in effect with the diagnostic code Severe Phase Imbalance
being displayed.
6. Current Limit. The MCSP will begin to unload its compressor as the
%RLA exceeds 120%. Further, the CPM will cause the compressors to
automatically unload when the Chiller Current Limit Setpoint is reached.
The Current Limit Setpoint is set in the Service Setting Group. Individual
compressor phase currents are averaged and added together to compare
to the Chiller Current Limit which is in terms of % Total of all of the
Compressor RLNs.
NOTE: The current transformers are NOT polarity or directionally sensitive.
CT and MCSP Compressor Current Input Checkout Procedure
WARNING
Live Electrical Components!
During installation, testing, servicing and troubleshooting of this
product, it may be necessary to work with live electrical
components. Have a qualified licensed electrician or other
individual who has been properly trained in handling live
electrical components perform these tasks. Failure to follow all
electrical safety precautions when exposed to live electrical
components could result in death or serious injury.
1. Check incoming 3-phase power for voltage within 10% of nominal per
Chiller nameplate.
2. Interrogate the CPM for all of the presently active diagnostic codes or the
historic diagnostic codes in the Diagnostics Menu. Narrow the problem
down to a particular compressor or contactor as noted above. Write down
all of the diagnostic codes stored in the diagnostic registers.
If there is any question as to which compressor or current transformer is
causing a problem, or simply to verify and “witness” the problem, an
attempt should be made to restart the chiller after clearing diagnostics.
The diagnostics can be cleared by entering the Diagnostics Menu and
stepping to the CLEAR DIAGNOSTICS display.
It is possible to “force” certain compressors to be the first or next compressor to stage on, using the “Compressor Test” feature in the Service
Tests Menu. The Leaving Water Temperature must, however, be above
the Chilled Water Setpoint by more than the “differential to start” setting,
in order to stage on the first compressor.
At startup, verify the appropriate contactor(s) pull-in. The “Compressors
On” menu item in the Chiller Report Group will indicate which compressor started approximately five seconds after the contactor pulls in. Note
the diagnostic(s) that results, then place the Chiller into the “Stop” mode
by depressing the Stop button on the CLD.
24 RLC-SVD03A-EN
Page 25

Current Transformer
WARNING
Hazardous Voltage w/Capacitors!
Disconnect all electric power, including remote disconnects
before servicing. Follow proper lockout/tagout procedures to
ensure the power cannot be inadvertently energized. For variable
frequency drives or other energy storing components provided by
Trane or others, refer to the appropriate manufacturer’s literature
for allowable waiting periods for discharge of capacitors. Verify
with an appropriate voltmeter that all capacitors have discharged.
Failure to disconnect power and discharge capacitors before
servicing could result in death or serious injury.
Note: For additional information regarding the safe discharge of
capacitors, see PROD-SVB06A-EN or PROD-SVB06A-FR
3. For the next portion of the procedure, pull the unit's disconnect and interrupt all high voltage power to the control panel. Locate the torroid (doughnut) current transformers encircling the compressor power wiring and
branching to the compressor contactors of the suspect compressor-in the
control panel. Refer to the Component Location Drawing in the panel to
identify the particular current transformer(s) of interest. Locate the part
number/UL tag on the transformer leads and note the Trane part number
which identifies the transformers. Note: all compressors of a given tonnage should have the same transformer extension number. Verify the
proper current transformer using Tabl e 5 in this section. Also check the
setting of the dip switch (SW2) on each of the MCSP modules and verify
these against Tab l e 5 for each compressor. (Switch position SW2-1 is the
Most Significant Bit). The decimal equivalent of this setting should also
be verified in the Service Setting Group under the “CURRENT OVRLD
SETTINGS” display. If the programmed value does not agree with the dip
switch setting for each of the MCSP's, an informational diagnostic will
result. The compressors will be allowed to run, but default settings (the
most sensitive possible) will be used for the internal software compressor current gains.
4. Utilizing the Schematic Wiring Diagram, locate the termination of the
transformer's wiring into the MTA plug at the appropriate MCSP module
at pin header J5. Pull off the appropriate MTA connector from the pin
header on the MCSP.
Current Transformers can be damaged and high voltages can result due
to running the compressors without a suitable burden load for the CTs.
This load is provided by the MCSP input. Take care to properly reconnect
the CT's MTA prior to attempted start of the compressors.
5. Using a digital volt-ohmmeter, measure the resistance of the transformer(s) by probing the appropriate pair(s) of receptacles within the
MTA. The receptacle pairs of the MTA are most easily measured by using
meter leads with pointed probes and contacting the exposed metal of the
connector through either the top or the side of the MTA. (It may be nec-
RLC-SVD03A-EN 25
Page 26

Current Transformer
essary to remove a cap over the top of the connector to gain access to
the connector conductors.)
6. Refer to Tab le 7 which lists the normal resistance range for each extension of current transformer. Check the measured resistance against the
value listed per transformer extension. If the resistance is within tolerance, the transformer and MTA can be considered good. Go on to step 8.
7. If the resistance reading above is out of tolerance, the problem is either
with the transformer, its wiring, or the MTA connector. First double check
the schematic to be sure you are working the proper lead pair. Then cut
the leads to the particular transformer near the MTA connector and
repeat the resistance measurement by stripping insulation from the
wire's end. Once the fault has been isolated in this manner, reconnect
leads or install a new transformer or connector.
More than one current transformer is terminated to a single MTA. When
replacing, take care to note the proper positions of the respective transformer wire terminations on the MTA for the re-termination. The current
transformers are NOT polarity or directionally sensitive. The transformer
lead wiring is #22 AWG, UL 1015 600V and the proper MTA connector
(red color code) must be used to ensure a reliable connection. If the fault
can be isolated to the current transformer or its wiring apart from the connector, the connector can be reused by cutting off the bad transformer
and splicing in a new transformer using wire nuts.
8. If the transformer/connector resistance proves accurate, recheck the
resistance with the connector held at different angles and with a light
lead pull (less than 5 lb.) to test for an intermittent condition.
9. To perform the following test, you will need to use a digital voltmeter with
a diode test function,. With the transformer MTA disconnected and the
power off to the MCSP, perform a diode test across the corresponding
pair of current transformer input pins on the MCSP (header J5). The
meter should read from 1.0 to 1.5 volts for each current transformer input.
Repeat using the opposite polarity. The same reading should result.
Extreme errors suggest a defective MCSP module. If the diode voltage
drops prove accurate, reconnect the transformers to the MCSP and
repower the unit.
10. With the CT's reconnected to the MCSP, attempt a restart of the chiller.
As the given compressor is started, and the inrush locked rotor transient
has passed, (locked rotor transient should last less than one second)
simultaneously monitor the actual compressor phase current(s) (using a
clamp-on type ammeter) and the voltage developed at the respective current transformer's termination at the MCSP (using a digital volt-meter on
a 0-20 VAC scale). Refer to Table 8 for the compressor phase current to
output voltage relationship for each extension current transformer. Using
Tab l e 8 , look up to current that corresponds to the output voltage read by
the voltmeter and compare to ammeter reading. Assuming relatively
accurate meters, the values should agree to within 5%.
11. If the measured current and the output voltage from the CT agree within
the tolerance specified, the CT is good. If diagnostics, overload trips, or
other problems potentially involving current sensing continue to occur
26 RLC-SVD03A-EN
Page 27

Current Transformer
with all phase currents to the compressors verified to be within their normal range, then the problem is either with the CT selection, MCSP Compressor Overload Dip Switch Setting, or the MCSP's current input, analog
to digital (A/D), or dip switch input circuitry. Since the first two items
were verified in Step 2 using Tabl e 5, that leaves only the MCSP circuitry
as an issue. It is advisable to replace the MCSP module at this point.
However if verification of the MCSP Current sensing operation is desired,
go to step 12 below.
12. There are two ways that the MCSP's current sensing can be checked.
Both methods use the CLD display of the %RLA from each MCSP (Compressor Report) for indication of the sensed current. The first is straightforward equation and assumes that the proper Compressor Overload dip
switch setting and current transformer have been selected:
Measured Compr. amps of max. phase
%RLA =
To check the displayed % RLA as a function of the output voltage from the
current transformers (as connected at the MCSP), Tables 8 and 9 are utilized.
In Tab l e 8 look up (or interpolate) the “% of CT rating” corresponding to the
maximum of the three CT Input Voltages (VAC rms) as read at the MCSP. (The
table is necessary because the voltage developed at the MCSP is not linear
with the CT's secondary current). Next, check the Compressor Current
Overload setting of switch SW2 on the MCSP and find the corresponding
“SOFTWARE GAIN” in Tabl e 9 . The % RLA displayed by the CPM should be:
The preceding equations should only be applied during steady state current
draws (after transition). Inrush transient currents and associated CT output
voltages can be expected to be from 3 to 6 times the steady state values, and
the displayed value only reads up to 255% RLA. The accuracy of the
displayed value should be within ± 5% of that predicted using the Input
voltage. However, the end to end accuracy of the displayed value compared
to the actual %RLA max. phase current is ± 3.3% over the range of 50 to
150% of CT rating.
13. If no phase currents are measured with the amprobe on any or all of the
------------------------------------------------------------------------------------------------------- -
Nameplate Compressor RLA
%RLA = % CT Rating X SOFTWARE GAIN
legs to a given compressor immediately following the attempted staging
of that compressor by the MCSP, the problem lies either with the
contactor, motor circuit or the MCSP relay outputs. Refer to MCSP
Checkout Procedure in Compressor Module (MCSP) (1U4 AND 1U5) on
page 72.
RLC-SVD03A-EN 27
Page 28

Current Transformer
Table 5 Compressor Overload DIP Switch Settings
Primary Turns
Compressor
To n s Vo lt s/ Hz RLA
35 200/60 115 1 -02 01011/11
230/60 100 1 -01 11111/ 3 1
346/50 58 1 -10 01100/12
380/60 61 1 -10 10000/16
400/50 50 1 -10 00000/0
460/60 50 1 -10 00000/0
575/60 40 1 -01 01111/15
40 200/60 142 1 -02 11011/27
230/60 124 1 -02 10001/17
346/50 72 1 -01 00111/7
380/60 75 1 -01 01010/10
400/50 62 1 -10 10001/17
460/60 62 1 -10 10001/17
575/60 50 1 -01 11111/ 3 1
50 200/60 192 1 -03 11100/28
230/60 167 1 -03 10010/18
346/50 96 1 -01 11100/28
380/60 101 1 -02 00001/1
400/50 84 1 -01 10011/19
460/60 84 1 -01 10011/19
575/60 67 1 -02 10111/23
60 200/60 233 1 -04 10011/19
230/60 203 1 -04 01000/8
346/50 117 1 -02 01101/13
380/60 123 1 -02 10001/17
400/50 101 1 -02 00001/1
460/60 101 1 -02 00001/1
575/60 81 1 -03 10000/16
Through Current
Transformer
Current
Transformer
Extension
*
Overload Setting
Dip Sw/Decimal
**
12345
*The current transformer base part number is X13580253. The numbers in this column are suffixes of the base part number.
**On the DIP switch, 1=ON, O=OFF. The decimal value should be set in the compressor overload setting menu of the UCM. If the
DIP switch value does not match the decimal value entered into the UCM, the related compressor(s) will continue to run, but a
diagnostic will be initiated, both settings will be ignored, and the UCM will use the lowest possible trip setting value.
28 RLC-SVD03A-EN
Page 29

Current Transformer
Table 6 Trip Times Vs. % Current
MOTOR CURRENT
(% RATED RLA) MINIMUM
127.7 or below No trip No Trip No Trip
132.0 27.2 No Trip No Trip
132.1 27.2 30.08 No Trip
140.0 (must trip pt.) 22.8 25.28 28.09
150.0 18.8 20.48 22.89
160.0 16.0 17.28 19.29
170.0 14.0 15.28 16.89
180.0 12.4 13.28 14.89
190.0 11.2 12.08 13.29
200.0 10.4 10.88 12.09
210.0 9.6 10.08 10.89
220.0 8.8 9.28 10.09
230.0 8.0 8.48 9.69
240.0 7.6 8.08 8.89
250.0 7.2 7.68 8.49
260.0 6.8 6.88 7.69
270.0 6.4 6.88 7.29
280.0 6.0 6.48 6.89
290.0 5.6 6.08 6.89
300.0 4.0 5.68 6.49
300.1 4.0 4.08 6.49
310.2 or above 4.0 4.08 4.49
TRIP TIME (SEC)
NOMINAL MAXIMUM
Ta b le 7 C ur re nt Tra ns fo rm ers Ratings and Resistance
*
EXT
01 10 0A
02 150A
03 200A 134 - 200A 46.0
04 275A 184 -275A 67.0
05 400A 267 - 400A 68.0
09 50A 33.37 - 50A 11.5
10 75A 50 - 75A 17.0
*The current transformer base part number is X13580253. The
numbers in this column are suffixes of the base part number.
RATING
USABLE
RANGE
66.67 -100A
100 - 150A
RESISTANCE
OHMS + 10%
23.5
35.0
RLC-SVD03A-EN 29
Page 30

Current Transformer
Table 8 Compressor Phase Current vs. AC Input Voltage at MCSP
ACTUAL COMPRESSOR PHASE AMPS THRU CT
EXT
-01
00000000.000
5 8 10 14 20 2.5 3.75 1.19 5
10 15 20 28 40 5 7.5 1.37 10
15 23 30 41 60 7.5 11.25 1.53 15
20 30 40 55 80 10 15 1.67 20
25 38 50 69 100 12.5 18.75 1.81 25
30 45 60 83 120 15 22.5 1.95 30
35 53 70 96 140 17.5 26.25 2.09 35
40 60 80 110 160 20 30 2.23 40
45 68 90 124 180 22.5 33.75 2.36 45
50 75 100 138 200 25 37.5 2.50 50
55 83 110 151 220 27.5 41.25 2.63 55
60 90 120 165 240 30 45 2.77 60
65 98 130 179 260 32.5 48.75 2.90 65
70 105 140 193 280 35 52.5 3.03 70
75 113 150 206 300 37.5 56.25 3.17 75
80 120 160 220 320 40 60 3.30 80
85 128 170 234 340 42.5 63.75 3.43 85
90 135 180 248 360 45 67.5 3.57 90
95 143 190 261 380 47.5 71.25 3.70 95
100 150 200 275 400 50 75 3.83 100
105 158 210 289 420 52.5 78.75 3.96 105
110 165 220 303 440 55 82.5 4.10 110
115 173 230 316 460 57.5 86.25 4.23 115
120 180 240 330 480 60 90 4.36 120
125 188 250 344 500 62.5 93.75 4.49 125
130 195 260 358 520 65 97.75 4.62 130
135 203 270 371 540 67.5 101.25 4.75 135
140 210 280 385 560 70 105 4.88 140
145 218 290 399 580 72.5 108.75 5.02 145
150 225 300 413 600 75 112.5 5.15 150
160 240 320 440 640 80 120 5.41 160
170 255 340 468 680 85 127.5 5.67 170
180 270 360 495 720 90 135 5.94 180
190 285 380 523 760 95 142.5 6.20 190
200 300 400 550 800 100 150 6.46 200
210 315 420 578 840 105 157.5 6.72 210
220 330 440 605 880 110 165 6.99 220
230 345 460 632 920 115 172.5 7.25 230
240 360 480 660 960 120 180 7.51 240
250 375 500 687 1000 125 187.5 7.77 250
260 390 520 715 1040 130 195 8.03 260
270 405 540 742 1080 135 202.5 8.29 270
280 420 560 770 1120 140 210 8.56 280
290 435 580 797 1160 145 217.5 8.82 290
300 450 600 825 1200 150 225 9.08 300
EXT
-02
EXT
-03
EXT
-04
EXT
-05
EXT
-09
EXT
-10
TERMINAL
VOLTAGE
(V RMS)
% OF CT
RATING
30 RLC-SVD03A-EN
Page 31

Current Transformer
Table 9 Overload Dip Switch Setting vs. Internal Software Gain
CPRSR RATED RLA
AS A % OF CT RATING
66 00000 00 1.500000
67 00001 01 1.483870
68 00010 02 1.467743
69 00011 03 1.451613
70 00100 04 1.435483
71 00110 06 1.403226
72 00111 07 1.387097
73 01000 08 1.370969
74 01001 09 1.354839
75 01010 10 1. 338709
76 01011 11 1. 322580
77 01100 12 1.306452
78 01101 13 1.290323
79 01111 15 1.258065
80 01111 15 1.258065
81 10000 16 1.241936
82 10001 17 1.225806
83 10010 18 1.209678
84 10011 19 1.193549
85 10100 20 1.177419
86 10101 2 1 1.16 129 1
87 10110 22 1.145162
88 10110 22 1.145162
89 10111 23 1.129032
90 11000 24 1.112903
91 11001 25 1.096775
92 11001 25 1.096775
93 11010 2 6 1.080645
94 11011 27 1.064516
95 11100 28 1.048387
96 11100 28 1.048387
97 11101 29 1.032258
9 8 11110 3 0 1. 016 12 8
9 9 11110 3 0 1. 016 12 8
10 0 11111 3 1 1. 000000
OVERLOAD DP
SWITCH SETTING
DECIMAL
SETTING
SOFTWARE
GAIN
RLC-SVD03A-EN 31
Page 32

Under-Over Voltage Transformer
The hardware required for the Under/Over voltage sensing function of the
UCM is standard on the 70-125 Ton RTAA chiller. This feature must be
Enabled in the Service Settings Menu for it to be active. A custom designed
transformer whose primary is connected across the Line Voltage phases A to
B, provides a stepped down and isolated AC voltage to the CPM at input J4.
This secondary voltage is directly proportional to the line voltage applied to
the primary. The Chiller Report on the CLD can directly display the % Line
Voltage and, when so enabled, can cause automatically reset MAR
diagnostics for High and Low Line condition. The % Line Voltage is internally
calculated by dividing the selected nominal voltage rating (only certain
discrete values are selectable in the Service Settings Group) by the actual line
voltage as read and processed by the CPM. With the Under-Over Voltage
Protection Function enabled, an Over Voltage diagnostic will occur if the
calculated % Line Voltage equals or exceeds 114%, or an Under Voltage
diagnostic will occur if it equals or falls below 87% for 15 continuous
seconds. Reset differential is set at 3%.
Under-Over Voltage Transformer Checkout
WARNING
Live Electrical Components!
During installation, testing, servicing and troubleshooting of this
product, it may be necessary to work with live electrical
components. Have a qualified licensed electrician or other
individual who has been properly trained in handling live
electrical components perform these tasks. Failure to follow all
electrical safety precautions when exposed to live electrical
components could result in death or serious injury.
1. Locate the Under-Over Voltage Transformer [1T2] in the panel by referring
to the Component Location Drawing. Carefully measure the primary voltage across the Transformer (Line Voltage Phase A to B) and note the
value in Vac rms.
2. Next disconnect the transformers secondary from J4 on the CPM. Using
voltmeter probes, measure and note the unloaded secondary voltage
(Vac rms). (low voltage class 2 less than 32 Vac).
3. The ratio of the primary or line voltage to the open circuity secondary
voltage should be 20 to 1. If the unloaded turns ratio is not within ±2% of
this value, replace the transformer.
4. Reconnect the secondary back to J4 and remeasure the loaded (connected) secondary voltage. The new loaded ratio should be approximately
20.2 to 1. If not within ±2% of this ratio the transformer's secondary
should be disconnected from the CPM and a 1 Kohm resistor connected
across the secondary. Measuring the voltage across the 1 Kohm resistor
should give us a voltage ratio of 20.17. Ratios more than ±2% in error suggest a bad transformer. If the 1 Kohm loaded ratio is within tolerance, but
the CPM connected ratio is out of tolerance suspect a bad CPM. Before
32 RLC-SVD03A-EN
Page 33

Under-Over Voltage Transformer
replacing the CPM, double check the Under-Over Voltage Function's
Nominal Line Voltage Setup in the Service Settings Group.
5. If the Under-Over Voltage Protection function continues to misoperate,
and all of the above measured ratios are within tolerance, and all CLD
Under Over Voltage setups have been verified, replace the CPM. It is a
good idea, before replacing the CPM, however, to copy down all of setup
data. This data will be very helpful in making the necessary setup on the
replacement CPM.
RLC-SVD03A-EN 33
Page 34

Compressor Capacity
The 35 to 60 ton helical rotary screw compressors are loaded and unloaded
by means of an internal slide valve and a female unloader valve. In simple
terms, these valves can regulate the amount of “bite” of the compressor
rotors as they turn at relatively constant speeds.
The slide valve is moved by a hydraulic cylinder and piston internal to the
compressor (the hydraulic fluid is oil from the refrigerant system). The
movement of the cylinder is controlled by the load and unload solenoid
valves, which either add oil at compressor discharge pressures, or withdraw
oil to suction pressures.
The female unloader valve is moved to either the On or Off position by using
internal suction and discharge gas pressure. The movement of this valve is
controlled by the female unloader valve solenoid. These solenoid valves are
electrically controlled by the MCSP module to handle compressor startup and
shutdown, maintain chilled water temperature setpoints and limit current,
condenser pressures, and evaporator temperatures etc.
Although the solenoids are an “on - off” device, effective modulation and high
resolution of the slide valve (under steady state conditions) is possible by
pulsing on and off the solenoid valves and varying the displaced volume of
the cylinder/piston. When a given compressor is operating, the MCSP will
energize (apply 115 VAC) either the load or the unload solenoid, if necessary,
for a period of between 40 and 400 milliseconds, once every 10 seconds to
control water temperature or limit conditions.
The female unloader valve solenoid receives a constant signal from the UCM
as the first step in compressor loading and the last step in compressor
unloading. Just prior to and just after a compressor start, and just before a
compressor stop, the MCSP will continuously energize the unload solenoid
for 20 to 30 seconds to assure unloaded starts. After a compressor stop, the
unload solenoid valve will remain energized for approximately one hour to
prevent slide valve movement due to changing cylinder/compressor
pressures.
The first procedure below will allow the checkout of the MCSP load and
unload outputs. The next procedure will allow the checkout of the Load and
Unload Solenoid valves located on the compressor as well as the operation of
the Slide Valve modulating unloader. Lastly, the female unloader valve and
solenoid will be discussed.
RLC-SVD03A-EN 34
Page 35

Compressor Capacity
Checkout Procedure for MCSP Load/Unload Outputs
WARNING
Live Electrical Components!
During installation, testing, servicing and troubleshooting of this
product, it may be necessary to work with live electrical
components. Have a qualified licensed electrician or other
individual who has been properly trained in handling live
electrical components perform these tasks. Failure to follow all
electrical safety precautions when exposed to live electrical
components could result in death or serious injury.
The MCSP controls the Load and Unload Solenoid valves on the respective
compressor with 115 V triacs (solid state relays). Unlike mechanical relays
however, a triac has a rather high leakage current when off, comparatively
speaking. While this leakage is not nearly enough to actuate a solenoid valve,
it may, under no load conditions (as would be experienced when a solenoid
coil failed open), look like it was stuck “on” when using a voltmeter to test it.
Thus it is important to verify that the solenoid coil is continuous and providing
a normal load or to connect a known good load, such as a low wattage 115
Volt lamp, to the terminals when testing the outputs. Refer to the Chiller
Control Wiring diagrams and Component Location Drawings for the following
procedure.
With the particular compressor running, the triacs may be checked (under
load as explained above) by measuring the voltage from terminals E7 or E8 to
115 neutral. The triacs operate in the high side and switch 115 Vac power from
J7-1 to either E7 (load solenoid) or E8 (unload solenoid) to move the slide
valve in the appropriate direction. Except during compressor starts and stops,
in normal operation, the solenoid valves can only be energized for a period of
between 40 and 400 milliseconds once every 10 seconds. Often, if the chilled
water setpoint is being met under steady state conditions, they may not
energize at all. To assure loading and unloading is occurring it may be
necessary to make slight adjustments to the chilled water setpoints to force
action. As the pulsed on-time is potentially short it may be difficult to see,
especially if using a meter movement type voltmeter. (Use of a low wattage
115 Vac test lamp may be of some help for a visual indication of output triac
operation.)
When a triac is off, about 0 Vac should be measured on its terminal with the
solenoid load connected. When it is on, the voltage should be close to 115
Vac (the drop across the triac is about 1-2 volts).
The best time to check the unload solenoid is immediately after a power-up
reset of the MCSP. For the first 30 seconds after applying power the unload
solenoid should be on continuously. The next best time to check it is after the
compressor starts. For the first 30 seconds after a start the unload solenoid
should be on continuously.
Checking the load solenoid is more difficult. 30 seconds after a start, the
compressor will usually start loading, until water temperatures are satisfied.
Remember however, that under certain limit conditions, the MCSP may
RLC-SVD03A-EN 35
Page 36

Compressor Capacity
prevent a compressor from loading even if the chilled water setpoint is not
satisfied. Refer to the RTAA-IOM-4 for discussion on condenser, evaporator,
and current limiting functions and setpoints. Refer to the Mode display under
the Chiller Report on the CLD for an indication of the current running mode.
Checkout Procedure for the Slide Valve and Load/ Unload Solenoids
Make sure unit is off and there is no power in the control panel before
beginning this procedure.
Setup
1. Identify the MCSP Module associated with the compressor to be tested
(1U4 or 1U5). Disconnect the stake-on terminals for the Load and Unload
Solenoid Valves at the MCSP UCM (E7 and E8 respectively) but take care
to identify the wires so as to prevent crosswiring when reconnecting.
WARNING
Hazardous Voltage w/Capacitors!
Disconnect all electric power, including remote disconnects
before servicing. Follow proper lockout/tagout procedures to
ensure the power cannot be inadvertently energized. For variable
frequency drives or other energy storing components provided by
Trane or others, refer to the appropriate manufacturer’s literature
for allowable waiting periods for discharge of capacitors. Verify
with an appropriate voltmeter that all capacitors have discharged.
Failure to disconnect power and discharge capacitors before
servicing could result in death or serious injury.
Note: For additional information regarding the safe discharge of
capacitors, see PROD-SVB06A-EN or PROD-SVB06A-FR
2. Install a toggle switch between Control Power HOT (1TB3-8 or 9) and the
Load and Unload Solenoid Valve leads (previously connected to E7 and
E8). Initially make sure that the Load toggle switch is open and the
Unload toggle switch is closed.
3. Install a pressure gauge with a refrigerant hose (hose should be long
enough to read the gauge from the control panel) to the slide valve piston/cylinder cavity Schrader valve located near the load/unload solenoids.
4. Reapply power to the unit and place the chiller in the “Stop” mode. Using
the CLD, select and enable the “Compressor Test” (in the Service Tests
Menu) for the compressor that is to be run. Additionally, to prevent the
opposite refrigeration circuit from running, if desired, the circuit can be
locked out through the CIRCUIT LOCKOUT display in the Service Tests
Menu for the appropriate circuit. Next place the Chiller into the “Auto“
mode and provide all necessary interlocks and a load (or adjust chilled
water setpoint) to start the chiller. The selected compressor will be the
first to stage on (after the restart inhibit timer has expired).
36 RLC-SVD03A-EN
Page 37

Compressor Capacity
NOTE: Enabling the “Compressor Test” only affects which compressor will
be cycled on next and is not an override mode. The chiller will continue to
operate normally (not withstanding circuit lockout) and will stage
compressors on and off, as well as attempt to modulate running compressors
to maintain chilled water setpoint. Be aware that during manual control of the
load/unload solenoids, as explained in item 6, below, other compressors may
stage and/or attempt to modulate and thus will affect the leaving chilled water
temperature. However, all diagnostics are still active. No specific action, other
than reconnecting the solenoid valves to their respective outputs on the
MCSP, is required to return the Chiller to normal operation.
5. Allow the compressor to start and monitor compressor currents either in
the Compressor Report display (maximum phase % RLA) or with a
clamp-on type ammeter.
Load
1. Once the compressor has started, allow the Unload Solenoid Valve to
remain energized for approximately 30 seconds, then open the Unload
toggle switch to de-energize the valve. Verify that at least one condenser
fan is on before continuing with the checkout, as low differential refrigerant pressures will preclude proper Slide Valve operation. Record the cylinder cavity pressure and the compressor currents.
2. Manually close and open the Load toggle switch, to energize the Load
Solenoid, in 4 or 5 short “pulses”. Each load pulse should be approximately one second in duration, with approximately 10 seconds between
pulses.
NOTE: Loading the compressor faster than this rate could cause control
instability and possible diagnostics. Leave the toggle switch open, i.e., valve
de-energized.
3. If the %RLA or the current and pressure increases,' then the Load Solenoid and Slide Valve are operating properly.
4. If the %RLA or current does not increase, read the pressure at the cylinder cavity; Pressure increases, to approximately condenser pressure
(condenser pressure read via the CLD) without an increase in % RLA
(unless already fully loaded), indicate the Slide Valve is bound.
5. If cylinder cavity pressure does not increase, check the coil of the Load
Solenoid.
6. If the coil checks out, then one of two problems exist. Either the Load
Solenoid Valve is malfunctioning or the Unload Valve is stuck open.
NOTE: Refer to the flow chart shown in Figure 5.
RLC-SVD03A-EN 37
Page 38

Compressor Capacity
1. Install toggle switches across load and unload solenoid
2. Install Pressure Gage on slide valve piston/cylinder cavity Schrader valve.
3. Start Unit.
Load:
4. Manually load compressor in short increments.
5. Does RLA increase?
No
6. Does Cavity Press
increase to a level close
to discharge pressure?
No
7. Does Magnetic Field on
Solenoid Coil exist?
No
8. Is wiring to valve OK?
No
Ye s
Ye s
Ye s
Ye s
Check UCM Repeat
Bad
Replace
Slide valve mechanism bound
Solenoid valve mechanism bound
or unloader valve stuck open
Check for open solenoid coil
Good
procedure
for unload
9. Repair and reverify.
Figure 5 Manual Slide Valve Diagnostic Flow Chart - Load
Unload
NOTE: The following assumes that the compressor's slide valve is already
at some loaded position and %RLA is higher than the minimum noted in step
1.
1. Manually close the Unload toggle switch to continuously energize the
Unload Solenoid Valve.
2. If the %RLA decreases, then the Unload Valve and Slide Valve are operating properly.
3. If the %RLA does not decrease, observe the cylinder cavity pressure
reading.
4. If cylinder cavity pressure reading decreases to approximately the suction
38 RLC-SVD03A-EN
Page 39

Compressor Capacity
pressure, then the Slide Valve is bound.
5. If cylinder cavity pressure does not decrease or is at suction pressure
before the Unload toggle switch was closed, the problem lies with either
the solenoid coil or valve.
6. Check coil
7. If coil checks out, change the valve.
NOTE: Refer to the Flow Chart in Figure 6.
Unload:
10. Manually unload compressor in short increments.
11. Does RLA Decrease?
No
12. Does Cavity Press
decrease to a level
close to suct pressure?
No
13. Does Magnetic Field on
Solenoid Coil exist?
No
14. Is wiring to valve OK?
No
Ye s
Ye s
Ye s
Ye s
Check UCM Stop
Bad
Replace
Slide valve mechanism bound
Solenoid valve mechanism bound
Check for open solenoid coil
Good
15. Repair and reverify.
Figure 6 Manual Slide Valve Diagnostic Flow Chart
Checkout Procedure for MCSP Step Load Output
The MCSP controls the step load solenoid valve on the respective
compressor with a 115 VAC dry contact output relay. This differs from the
Load/Unload solenoid output, which is from a triac (solid state relay). Refer to
the Chiller Control Wiring diagrams and the Component Layout Drawings for
the following procedure.
RLC-SVD03A-EN 39
Page 40

Compressor Capacity
WARNING
Live Electrical Components!
During installation, testing, servicing and troubleshooting of this
product, it may be necessary to work with live electrical
components. Have a qualified licensed electrician or other
individual who has been properly trained in handling live
electrical components perform these tasks. Failure to follow all
electrical safety precautions when exposed to live electrical
components could result in death or serious injury.
With a particular compressor running, the relay may be checked (under load,
as explained above) by measuring the voltage from terminal J7-9 to the 115
VAC neutral. The relay operates in the high side and switches power from
J7-8 to J7-9, to move the step load valve to the loaded position. When the
CPM decides to load the compressor, the step load solenoid is energized
continuously. To assure that loading and unloading is occurring, it may be
necessary to make slight adjustments to the chilled water setpoints to force
action.
Checkout Procedure for Step Load Solenoid Valve and Piston
Prior to a compressor start, connect a pressure gauge to the Schrader port
near the step load solenoid valve. This port is connected to the back side of
the step load piston and, therefore, will allow direct measurement of the
pressure that actuates the step load valve. Observe the pressure gauge
during a compressor start, either from a manual compressor test or a normal
call for cooling. Initially, the pressure should drop to the suction pressure and,
when the MCSP calls for compressor loading, the solenoid will actuate and
supply discharge pressure to the piston. If, after verifying that 115 VAC has
been applied to the step load solenoid, the pressure does not increase to
discharge pressure, the step load solenoid coil and/or valve must be replaced.
Also, when the solenoid valve is energized and the piston pressure is near
discharge pressure, the percent RLA of the compressor, as seen in the
Compressor Report, should increase. If the percent RLA does not increase,
the step load valve is stuck and should be repaired.
40 RLC-SVD03A-EN
Page 41

Module Power and Miscellaneous I/O
This section will detail the normal voltage levels present on each of the
modules inputs and outputs under various conditions or states. Typical
operation of the I/O will be discussed in terms of chiller operation. This should
help the serviceman determine when and how they should function. Certain
inputs have been presented in greater detail in earlier sections and these are
referenced where applicable.
Power Supply
All of the modules are powered from 115 VAC 50/60hz Control Power except
the CLD and the IPCB, which are powered by 24 VAC. This power is provided
by either a control power transformer or is customer supplied. With the
exception of the CLD, LCI-C and the IPCB modules, the other modules have
incoming power connected to the upper-most terminal on the right hand side
of the module, just below the fuse. The terminal is arranged with two hot
pins (1 and 2), a keying pin (3), and two neutral pins (4 and 5), for ease of
“daisy chaining” power from one module to another. Incoming power can be
verified by measuring the voltage between the fuse bottom (hot side) and the
connector's neutral (pins 4 or 5). The voltage should read between 97.8 to
132.2 volts AC rms. Refer to Figure 7. (The ±15% voltage criteria is most
important for the EXV module's operation, as the Electronic Expansion
Valve's available torque is directly related to this value).
The fuses can be checked by looking for the supply voltage at the top of the
fuse (fused side) with respect to the connector neutral.
If some modules have power and some do not, the “daisy chain” wiring or
power connections should be suspected. Refer to the Unit Wiring diagrams
for the specifics on the power wiring.
Generally a power loss to a particular module will first be noticed as a
communications loss with that module. The module can be identified by
analysis of the IPC diagnostics as displayed by the CPM. Refer to Section 2
Interprocessor Communication for more information about Communication
(IPC) diagnostics. If the CLD's display is blank, 24 VAC power should be
checked at the CLD.
RLC-SVD03A-EN 41
Page 42

Module Power and Miscellaneous I/O
833(55,*+7
&251(52)
02'8/(
1(875$/
Figure 7 AC Power Connection To Modules
Clear Language Display (CLD) 1U6 Keypad Overview
Local operator interface with the system is accomplished using the 16 keys
on the front of the Clear Language Display panel. The readout screen is a two
line, 40 character liquid crystal display with a backlight. The backlight allows
the operator to read the display in low-light conditions. The depression of any
key will activate the backlight. The backlight will stay activated for 10 minutes
after the last key is pressed. At 10 F or below the backlight will stay activated
continuously.
The keys are grouped on the keyboard by the following functions (refer to
Figure 8):
- Select Report Group
- Select Settings Group
- Selection Keys
- Stop & Auto Keys
-
IXVHGVLGH
)86(
XQVZLWFKHGVLGH
1&
+
+
1
1
9$&3RZHU
&RQQHFWLRQ
42 RLC-SVD03A-EN
Page 43

Module Power and Miscellaneous I/O
Figure 8 Operator Interface Adaptive Control
Select Report Group
This group of four keys allows the operator to select and view the following
reports:
- Custom Report
- Chiller Report
- Refrigerant Report
- Compressor Report
The Custom Report is the only report of the four that is defined by the
operator. Any display under the other three reports can be added to the
Custom Report by pressing the plus key while the desired read-out is on
the display. A maximum of 20 entries can be contained under the Custom
Report. Items can be deleted from the Custom Report by pressing the minus
key when the desired read-out is on the display. The operator must be in
the Custom Report menu to delete the desired item.
The Chiller Report, Refrigerant Report and Compressor Report are informational reports that give current status. Each report and its contents are
discussed in detail on the following pages.
RLC-SVD03A-EN 43
Page 44

Module Power and Miscellaneous I/O
When any of the four report keys are pressed, the first readout on the display
will be the header. The header identifies the title of the report and summarizes the items in the report.
The Next key and Previous key allow the operator to scroll up and down
through the display items listed under the report menus. When the last item
of a report is displayed and the Next key is pressed, the display will wrap
around to the header of the report. When the first item of a report is
displayed and the Previous key is pressed, the display will wrap around to the
last item.
Select Settings Group
The first three keys on the second row - Operator Settings, Service Settings
and Service Tests - allow the operator to adjust various setpoints and perform
various tests. Certain items in these groups are password protected. Refer to
the Password section for additional information.
When a setpoint key is pressed, a header will be displayed. The setpoint
headers identify the available items and setpoint functions.
The Next and Previous keys function in the same manner as that described in
Selected Report Group, above.
Setpoint values are incremented by pressing the Plus key and decremented by pressing the Minus key. Once a setpoint is changed, the Enter
key must be pressed to save the new setpoint. If the Cancel key is pressed,
the setpoint value on the display will be ignored and the original setpoint will
remain.
Passwords
Passwords are needed to enter into the Service Setup Menu and the
Machine Configuration Menu. Both of these menus are accessed through the
Service Settings key. If access into these menus is necessary, follow the list
of steps below:
1. Press Service Settings
2. Press Next until the readout in the display is:
Password Required For Further Access “Please enter Password”
3. To enter into the Service Setup Menu, press: Enter
4. To enter into the Machine Configuration Menu, press: Enter
Refer to RTAA or RTWA IOM for the list of items found in the Service Setup
Menu and Machine Configuration Menu.
Select Report Group and Select Settings Group Flowcharts
Refer to RTAA or RTWA IOM for the display readouts found under each
menu. The first block of the flowchart is the header which is shown on the
display after the menu key is pressed. For example:
Press Chiller Report and the readout on the display will be
CHILLER RPRT:STATUS, WTR TEMPS & SETPTS
“PRESS (NEXT) (PREVIOUS) TO CONTINUE”
44 RLC-SVD03A-EN
Page 45

Module Power and Miscellaneous I/O
Press Next to move down through the Chiller Report. As shown in the
figures, the flowchart explains the conditions that the UCM looks at to
determine which readout is to be displayed next. For example:
Press Chiller Report to display the header
Press Next to display
MODE: [OPERATING MODE]
REQUESTED SETPOINT SOURCE: [SETPT SOURCE]
Press Next to display
COMPRESSOR ON
CIRCUITS LOCKED OUT
Press Next to display
ACTIVE ICE TERMINATION SETPOINT
or
ACTIVE CHILLED WATER SETPOINT
The UCM will determine which screen will be displayed after looking at the
current Operating Mode. If the Operating Mode is “Ice Making” or “Ice
Making Complete”, ACTIVE ICE TERMINATION SETPOINT will be displayed.
Otherwise, ACTIVE CHILLED WATER SETPOINT will be shown.
The flowcharts also list the setpoint ranges, default options and a brief
description of the item, when necessary. This information is shown in the
lefthand column of the page, adjacent to the appropriate display.
Auto/Stop Keys
The chiller will go through a “STOPPING” mode when the Stop key is
pressed, if a compressor is running. This key has a red background color
surrounding it, to distinguish it from the others.
If the chiller is in the Stop mode, pressing the Auto key will cause the UCM to
go into the Auto/Local or Auto/Remote mode, depending on the Setpoint
Source setting. The Auto key has a green back-ground color.
When either the Auto or Stop key is pressed, Chiller Operating Mode (Chiller
Report Menu) will be shown on the display.
Power Up
When power is first applied to the control panel, the Clear Language Display
goes through a self-test. For approximately five seconds, the readout on the
display will be
SELF TEST IN PROGRESS
During the self-test, the backlight will not be energized. When the tests are
successfully complete, the readout on the display will be
6200 xxxx-xx [TYPE] configuration
Updating Unit Data, Please Wait
RLC-SVD03A-EN 45
Page 46

Module Power and Miscellaneous I/O
When updating is successfully completed, the system will default to the first
display after the Chiller Report header:
MODE: OPERATING MODE]
REQUESTED SETPOINT SOURCE: [SETPT SOURCE]
and the backlight will be activated.
7%
$%* *
7%
9'&
7;67 5;
9$&
TB1-1,2 IPC Communications 19.2K Baud serial data
5 V signal level
Refer to Interprocessor Communication (IPC)
TB2-1,2 24 VAC Power 18-30 VAC, neither side grounded
Figure 9 CLD Module (1U6)
LEDs
There are four LEDs located to the right of TB1 of the CLD module. See
Figure 9. The ST LED should be on continuously. If it blinks, it indicates the
processor is repeatedly being reset. The +5 VDC LED should also be on
continuously. It will go out if power drops below normal operating voltage.
The TX LED should blink every second or two, as the CLD transmits on the
IPC. The RX LED should blink continuously, indicating that other modules are
communicating.
Chiller Module (CPM) (1U1)
WARNING
Live Electrical Components!
During installation, testing, servicing and troubleshooting of this
product, it may be necessary to work with live electrical
components. Have a qualified licensed electrician or other
individual who has been properly trained in handling live
electrical components perform these tasks. Failure to follow all
electrical safety precautions when exposed to live electrical
components could result in death or serious injury.
46 RLC-SVD03A-EN
Page 47

Module Power and Miscellaneous I/O
Te st Po i n t s
There are two test points associated with the CPM module. They are easily
read with a DC voltmeter by probing the PC board solder pads found in the
upper left hand corner of the module. The positive meter lead should be
connected to the pad while referencing the negative meter lead to the board
edge ground plane.
NOTE: Don't use the aluminum module enclosure as a reference as it has
an anodized surface with insulating properties.
The DC voltages shall be within the tolerance specified below. If not replace
the module.
TP1: + 5 volts DC ± 5%
TP2: +12 volts DC ± 5%
RLC-SVD03A-EN 47
Page 48

Module Power and Miscellaneous I/O
IPC (+) —
IPC (-) —
IPC (+) —
IPC (-) —
MANUF. NO
USE ONLY NO
OUTDOOR AIR —
TEMP —
EMERGENCY —
STOP —
° TP1 + 5V
° TP2 +12V
J1-4 J5-4 — 115V N
J1-3 J5-5 — 115V N
J1-2
J1-1
J2-2 WATER FLOW
J2-1 TB3-2 — SWITCH
TB1-1
TB1-2 TB3-3 — EXTERNAL
TB1-3 TB3-4 — INPUT
TB1-4
J5-1 — 115V H
J5-2 — 115V H
J5-3 — KEY (N/C)
TB3-1 — CHILLED
AUTO/STOP
L A
W
0
V
NOT USED{CEWT —
0
NNS —
NNS —
CEWT —
L
T
A
NOT USED{CLWT —
CLWT —
TB1-5 TB4-1 — COM ALARM
TB1-6 TB4-2 — (NO) RELAY
TB4-3 — (NC)
TB2-1
TB2-2
TB4-4 — COM COMPR
TB2-3 TB4-5 — (NO) RUN
TB2-4 RELAY
G S
E
EVAP ENTERING —
WATER TEMP —
I
N
KEY J3-3
P
U
T
EVAP LEAVING —
WATER TEMP —
S
AUX TEMP —
KEY (N/C) J6-2
AUX TEMP —
J3-5
J3-4 TB4-6 — COM MAX CAPACITY
TB4-7 — (NO) RELAY
TB4-8 — COM EVAP PUMP
J3-2 TB4-9 — (NO) RELAY
J3-1
TB4-10 — COM SPARE
J6-3 TB4-11 — (NO) RELAY
J6-1
H
I
G
H
V
0
L
T
G
E
I
N
P
U
T
0
U
T
P
U
T
S
U/O VOLT TRANSF —
KEY J4-2
U/O VOLT TRANSF —
J4-3
J 4-1
Figure 10 CPM (Chiller) Module (1U1)
I/O terminals
For the checkout of the I/O, refer to the block diagram of the module in Figure
10 and the Chiller Wiring Diagrams for both high and low voltage circuits. All
voltages are measured differentially between terminal pairs specified unless
otherwise indicated. The first terminal in the pair is the positive (or hot)
terminal. Voltages given are nominals and may vary by ±5%. Unregulated
Voltages (unreg) or 115 VAC voltages may vary by ±15%.
48 RLC-SVD03A-EN
Page 49

Module Power and Miscellaneous I/O
Table 16 CPM (Chiller) Nominal Terminal Input and Output (1U1)
Te r m i n a l
Designation
J1-4 to 3 to CLD
J1-2 to 1 to 1U5
J2-2, 1 Manufacturing Address Use Only +5 VDC No connection intended.
TB1-1, 2 Outdoor Air Temperature Refer to Temperature Sensor Checkout
TB1-3, 4 Emergency Stop open: 20.6 VDC unreg: Stopped
TB1-5, 6 NNS (Not Used) open: 20.6 Vdc unreg: Normal
TB2-1, 2 ECWT (Not Used) N/A
TB2-3, 4 LCWT (Not Used) N/A
J3-5, 4 Entering Evaporator Water Temper-
J3-2, 1 Leaving Evaporator
J4-3, 1 Under/Over Voltage
J5-1 or 2
to J5-4 or 5
J6-3, 1 Auxiliary Temp. Input Refer to Temperature Sensor Checkout
TB3-2, 1 Chilled Water
TB3-3,4 Chilled Water Demand Switch and
TB4-1, 2 Chiller Alarm or Alarm Ckt 1
TB4-1, 3 Chiller Alarm or Alarm Ckt 1
TB4-4, 5 Unit Running, Alarm Ckt 2, or
TB4-6, 7 Maximum Capacity or Ckt 2 Running
TB4-8, 9 Chilled Water Pump Starter
TB4-10, 11 Spare Relay}
Description
of Circuit
IPC Communications 19.2 kbaud serial data, 5 volt signal level.
ature
Water Temperature
Transformer Input
Input Power 115 VAC, Power Supply on page 41.
Flow Switch Input
External Auto Stop
(N.O. Contact)
(N.O. Contact)
Ckt 1 Running
(N.O. Contact)
(N.O. Contact)
(N.O. Contact)
(N.O.) Contact
Normal Terminal Voltages
for Various Conditions
Refer to Interprocessor Communication ([PC)
closed: 0 VDC: Normal
Must be jumpered if this feature is not used.
closed: 0 VDC: Setback
Refer to Temperature Sensor Checkout
Refer to Temperature Sensor Checkout
Refer to Under/Over Voltage Transformer
Checkout Procedure
open: 115VAC: No Flow
closed: < 5VAC: Flow (Software imposes a 6 second delay
to respond to opening or closing.
open: 115VAC: Stop
closed: < 5VAC: Auto
Dry SPDT Contact closes on Alarm, intended for 115 VAC
customer control circuit.
Dry SPDT Contact opens on Alarm, intended for 115 VAC
customer control circuit.
Dry SPDT Contact closes on Unit Running,
Alarm Ckt 2 or Ckt 1 Running, intended for
115 VAC customer control circuit.
Dry SPDT Contact closes on Maximum Capacity or Ckt 2
Running, intended for 115 VAC customer control circuit.
Dry SPST Contact closes when Chilled Water
Demand Switch is closed, opens after time
delay specified in UCM 115 VAC customer control circuit.
Dry SPST contact. 115 VAC customer control circuit.
RLC-SVD03A-EN 49
Page 50

Module Power and Miscellaneous I/O
Options Module (CSR) (1U2)
WARNING
Live Electrical Components!
During installation, testing, servicing and troubleshooting of this
product, it may be necessary to work with live electrical
components. Have a qualified licensed electrician or other
individual who has been properly trained in handling live
electrical components perform these tasks. Failure to follow all
electrical safety precautions when exposed to live electrical
components could result in death or serious injury.
Te st Po i n t s
There are three test points associated with the CSR module. They are easily
read with a DC voltmeter by probing the PC board solder pads found in the
upper left hand corner of the module. The positive meter lead should be
connected to the pad, while referencing the negative meter lead to the board
edge ground plane.
Note: don't use the aluminum module enclosure as a reference as it has
an anodized surface with insulating properties. The DC voltages shall be
within the tolerance specified below. If not replace the module.
TP1: + 5 volts DC ±5%
TP2: + 6 volts DC ±5%
TP3: +12 volts DC ±25%
Switch SW-1
Switch SW1 is used to configure the External Chilled Water Setpoint input
and the External Current Limit Setpoint input for either a 2-10VDC, or a 420ma signal. With the respective switch closed (on), a shunt resistor is
switched into the input circuit to provide a fixed low value input impedance
(499 ohms) for current loop operation. With the switch off, the input
impedance is differentially 40Kohms.
External Setpoint Inputs (4-20ma/2-10VDC)
The chiller setpoint source should always be set to LOCAL when using any
external inputs, except a Tracer. When using a Tracer, always set the chiller
setpoint source to the Tracer mode. The setpoint source can be found in the
Operator Settings Menu.
These inputs accept either an isolated 4-20mA or 2-10VDC signal from an
external controller or programming resistor connected to an internal +5V
source. The switches SW1-1 and SW1-2 are used to select either the voltage
or current option for External Chilled Water Setpoint and External Current
Setpoint respectively. See Test Points, above. Alternately, either input may be
used with a resistor or potentiometer.
NOTE: Note: For proper operation, the 4-20mA/2-10VDC inputs are required
to be used with a current or voltage source that:
1. Is isolated (floats) with respect to ground, or
50 RLC-SVD03A-EN
Page 51

Module Power and Miscellaneous I/O
2. Has its negative terminal tied to chassis ground.
If the intended source does not meet the above requirement, an isolation
module must be used
The 4-20mA/2-10VDC inputs may be tested in the following ways:
1. Enable External Chilled Water Setpoint and/or External Current Limit Setpoint in the Operator Settings Menu. Advance display to Active Chilled
Water Setpoint or Active Current Limit Setpoint to observe the respective
setpoint in the Chiller Report.
2. With all wiring in place, apply an external voltage or current to the External Chilled Water Setpoint inputs (TB1-4 & 5) or the External Current Limit
Setpoint (TB1-7 & 8). The voltage measured at the terminals and the
resulting setpoint, as read on the CLD, should agree with the Ta bl e 17 for
Chilled Water Setpoint inputs and Tab le 18 for Current Limit Setpoints
inputs. Be sure to wait long enough when reading the display as the values are slew rate limited.
3. Disconnect all wiring to these inputs. The setpoints should slew back to
the chiller's Front Panel settings.
4. Disconnect all wiring and install fixed resistors of values near those
shown in the following tables across TB1-3,5 or TBl-6,8. The resulting setpoints should agree with the table values.
Table 17 Input Values vs. External Chilled Water Setpoint
INPUTS
Resist (ohms)
94433 4.0 2.0 0.0
68609 5.2 2.6 5.0
52946 6.5 3.2 10.0
42434 7.7 3.9 15.0
34889 8.9 4.5 20.0
29212 10.2 5.1 25.0
24785 11.4 5.7 30.0
21236 12.6 6.3 35.0
18327 13.8 6.9 40.0
15900 15.1 7.6 45.0
13844 16.3 8.2 50.0
12080 17.5 8.8 55.0
10549 18.8 9.4 60.0
Current (ma) Voltage (Vdc)
Resulting Chilled
Water Setpt (F)±4F
RLC-SVD03A-EN 51
Page 52

Module Power and Miscellaneous I/O
Table 18 Input Values vs. External Current Limit Setpoint
INPUTS
Resist (ohms)
49000 4.0 2.0 40
29000 6.0 3.0 50
19000 8.0 4.0 60
13000 10.0 5.0 70
9000 12.0 6.0 80
6143 14.0 7.0 90
4010 16 .0 8 . 0 10 0
2333 18.0 9.0 110
1000 20.0 10.0 120
Current (ma) Voltage (Vdc)
Resulting Current
Limit Setpt (%RLA)±5%
Setpoint Priority
There are many ways in which the Chilled Water and Current Limit setpoints
can be adjusted or reset when the Options Module is present in the Chiller
control system. The following flow charts show how these methods are prioritized and arbitrated under normal operating conditions. When abnormal
conditions are present, such as loss of Tracer communications or out of range
values on external setpoint inputs, the system will default to other methods.
52 RLC-SVD03A-EN
Page 53

Module Power and Miscellaneous I/O
67$57
/2&$/
,&(02'(
&01'"
1R
/RFDO
(;&(37)25&+,//(':$7(5
86($//27+(5)52173$1(/
6(732,176
(;7(51$/
1R
6(732,176,1387
(1$%/('"
<HV
<HV <HV
<HV
/2&$/
25
75$&(5
/2&$/
,&(02'(
&01'"
1R
7UDFHU
(;&(37)25&+,//(':$7(5
86($//27+(5)52173$1(/
<HV
6(732,176
(;7(51$/
6(732,176,1387
(1$%/('"
1R
75$&(5
,&(02'(
&01'"
/2&$/
,&(02'(
&01'"
<HV
1R
$1<
7<3(5(6(7
(1$%/('
<HV
3(5)2505(6(7
21)5217
3$1(/
&:6(732,17
3$1(/&+,//('
1R
,&(02'(
/2&$/
7(50,1$7,21
6(732,17
86()5217
:$7(5
6(732,17
$1<
7<3(5(6(7
(1$%/('
<HV
3(5)2505(6(7
21(;7(51$/
&:6(732,17
86((;7(51$/
&+,//(':$7(5
1R
6(732,17
$1<
7<3(5(6(7
(1$%/('
<HV
3(5)2505(6(7
2175$&(5
&:6(732,17
86(75$&(5
&+,//(':$7(5
1R
,&(02'(
75$&(5
7(50,1$7,21
6(732,17
6(732,17
“TRACER” implies Trane Integrated Comfort System remote device (ICS) using the digital communication link.
“EXTERNAL” implies generic building automation system or process controller interface using a 4-20ma loop or a 2-10 VDC analog
signal.
Figure 11 Chilled Water Setpoint Arbitration
RLC-SVD03A-EN 53
Page 54

Module Power and Miscellaneous I/O
67$57
<HV
(;7(51$/
&855(17/,0,7,1387
(1$%/('"
1R
/2&$/
25
75$&(5"
/RFDO
7UDFHU
,&6
7,0('
<HV
1R
86((;7(51$/
&855(17/,0,7
6(732,17
86()52173$1(/
&855(17/,0,7
6(732,17
86(75$&(5
&855(17/,0,7
6(732,17
86()5217
3$1(/
&855(17/,0,7
6(732,17
“TRACER” implies Trane Integrated Comfort System remote device (ICS) using the digital communication link.
“EXTERNAL” implies generic building automation system or process controller interface using a 420ma loop or a 2-10 VDC analog
signal.
Figure 12 Current Limit Setpoint Arbitration
54 RLC-SVD03A-EN
Page 55

Module Power and Miscellaneous I/O
ICS Communications
ICS (Tracer) communication is handled the same as on previous products
using the Trane proprietary Comm3 standard 1200 baud isolated serial
communication link. The following are some things to check when experiencing loss of ICS communications:
1. If ICS control is desired, check that “Tracer” has been selected in Setpoint Source of the Operator Settings Menu. In any case, the Tracer
should be able to communicate to the chiller for monitoring purposes,
regardless of the Setpoint Source selection. Refer to Figure 11 for a
description of the normal operation of setpoint and setpoint reset arbitration.
2. Check for the proper ICS address in the Service Settings Menu and compare to the address programmed at the ICS device.
3. Check for proper termination of the twisted pair communication link wiring to terminals TB2-1 and TB2-2 (or TB2-3 and TB2-4)
4. Check for a diagnostic at the display indicating loss of IPC communications with the Options module. This could indicate IPC bus problems or a
dead Options module. (See Options Module (CSR) (1U2) on page 50). The
Options module needs to receive 4 good packets of data from the CPM
before it will talk on the ICS link.
5. Check power to the Options module and the condition of the fuse. (See
Power Supply on page 41)
6. Check the Test Point voltages on the module. (See Test Points on page
47).
NOTE: The red LED on the module blinks each time a proper message or
query is received from the Remote ICS device.
I/O Terminals
For the checkout of the I/O refer to the block diagram of the module on the
following page and the Chiller Wiring Diagrams for low and high voltage
circuits. All voltages are measured differentially between terminal pairs
specified unless otherwise indicated. The first terminal in the pair is the
positive (or hot) terminal. Voltages given are nominals and may vary by ±5%.
Unregulated Voltages (unreg) may vary by ±25% and 115 VAC voltages may
vary by ±15%.
RLC-SVD03A-EN 55
Page 56

Module Power and Miscellaneous I/O
Table 19 CSR Normal Terminal Voltages for Options Module 1U2
Te r m i n a l
Designation
J1-4 to 3
or J1-2 to 1
J2-2, 1 Manufacturing
TB1-3 +5V Source for use with
TB1-3, 5 Ext. Chilled Water Setpoint
TB1-4, 5 Ext. Chilled Water Setpoint
TB1-6 +5V Source for use with
TB1-6, 8 Ext. Current Limit Setpoint
TB1-7, 8 Ext. Current Limit Setpoint
TB1-9, 10 Unused
TB2A-1,2
or TB2B-3,4
J6-1 or 2
to J6-4 or 5
Dip Switch
SW1-1
Dip Switch
SW1-2
Description
of Circuit
IPC Communications 19.2 kbaud serial data, 5 volt signal level.
Address Use Only
Resistor programming of CW
setpoint
(Resistive option)
(Current or Voltage option)
Resistor programming of CL
setpoint
(Resistive option)
(Current or Voltage option)
Serial Comm.Input Refer to Section 2, ICS Communications.
Input Power 115 VAC, Refer to Power Supply on page 41.
External Chilled Water Setpoint
Dip Switch
External Current
Limit Setpoint
Dip Switch
Normal Terminal Voltages
for Various Conditions
Refer to Interprocessor Communication Link (IPC).
+5 VDC No connection intended.
+5VDC open circuit with respect to chassis ground.
Refer to External Setpoint Inputs (4-20ma/2-10VDC) on page 50.
Refer to External Setpoint Inputs (4-20ma/2-10VDC) on page 50.
+5VDC open circuit.
Refer to External Setpoint Inputs (4-20ma/2-10VDC) on page 50.
Refer to External Setpoint Inputs (4-20ma/2-10VDC) on page 50.
Off for 2-10 VDC input.
On for 4-20 mA input.
Off for 2-10 VDC input.
On for 4-20 mA input.
56 RLC-SVD03A-EN
Page 57

Module Power and Miscellaneous I/O
IPC (+) —
IPC (-) —
IPC (+) —
IPC (-) —
MANUF. NO CONN. —
USE ONLY NO CONN. —
° TP1 +5V
° TP2 + 6V
° TP2 + 12V J6-3 — KEY (N/C)
J1-4 J6-5 — NEUTRAL
J1-3
J1-2
J1-1
J2-2
J2-1
1 SW1
2 ON
J6-1 — 115VAC HOT
J6-2 — 115VAC HOT
J6-4 — NEUTRAL
L I
ZONE TEMPERATURE —
0
RESET/ICE MAKING —
W
V
0
L
EXTERNAL CHILLED +5V —
WATER 4-20mA/2-10V —
SETPOINT COM —
TB1-1
TB1-2
TB1-3
TB1-4
TB1-5
T T
A
G
E
I
EXTERNAL CHILLED +5V —
LIMIT 4-20mA/2-10V —
SETPOINT COM —
HPO —
N
—
TB1-6
TB1-7
TB1-8
TB1-9
TB 1-10
P P
U
LED 1
T T
S S
COMM3 A —
COMM3 A —
COMM3 B —
COMM3 B —
TB2-1
TB2-2
TB2-3
TB2-4
H
G
H
V
0
L
A
G
E
I
N
U
Figure 13 CSR (Options) Module (IU2)
RLC-SVD03A-EN 57
Page 58

Module Power and Miscellaneous I/O
Electronic Expansion Valve Module (EXV) (1U3)
WARNING
Live Electrical Components!
During installation, testing, servicing and troubleshooting of this
product, it may be necessary to work with live electrical
components. Have a qualified licensed electrician or other
individual who has been properly trained in handling live
electrical components perform these tasks. Failure to follow all
electrical safety precautions when exposed to live electrical
components could result in death or serious injury.
Valve Operation
The electronic expansion valve is an electronic flow device that replaces the
thermostatically controlled expansion valve and liquid line solenoid. A
sectional view of the valve is shown in Figure 16 and Figure 17.
The control method uses two sensors that measure the temperature
difference between the inlet and outlet evaporator refrigerant temperature.
This enables the system to control the temperature difference and maintain
superheat.
The SEO-70 and SEO-100 valves were used on units until November 1, 2003.
All units built after that date will have a SEHI-100 valve installed.
The module for the SEHI is different because the new valve uses a two coil
instead of three. The locations of the keying pins are different on the module.
Design Sequence Information, digit 10-11 of the unit model number.
RTWA/UA A0 - E0 SEO Valve
RTWA/UA F0 and later SEHI Valve
RTAA A0 - P0 SEO Valve
RTAA Q0 and later SEHI Valve
NOTE: For units with remote evaporator use 16 AWG wire.
SEO-70 and SEO-100 Valve
The valve is a stepper-motor type, direct acting valve. It uses a three-phase
motor (not to be confused with3-phase AC), with each phase having 40 ohms
of resistance.
The supply voltage (24 VDC) is switched on and off to each phase, to step the
valve open or closed. Each step is 0.0003" of stroke, with a full stroke of 757
steps.
The motor's rotary motion is translated into linear movement through a lead
screw and drive coupling arrangement. A clockwise rotation of the motor
shaft creates a downward movement of the drive coupling. This presses the
pushrod and piston against the return spring, opening the valve. A counterclockwise rotation of the motor shaft retracts the drive coupling. The return
spring moves the piston and pushrod in the closing direction.
58 RLC-SVD03A-EN
Page 59

Module Power and Miscellaneous I/O
A “FLAG” stop is located at either end of the threaded portion of the motor
shaft. The stops interfere with the milled flag on the drive coupling, restricting
rotation of the motor shaft and producing a clicking sound when the valve is
driven fully OPEN or CLOSED.
5DLQWLJKW)OH[&RQQHFWRU
0RWRU&DS
0RWRU&DS1XW
0RWRU$OXPLQXP+RXVLQJ
'ULYH&RXSOLQJ
3XVKURG
([WHQGHG&RSSHU)LWWLQJV
)ORZ
3LVWRQ
%RWWRP&DS
Figure 14 SEO 70, 100 Electronic Expansion Valve Cut Away View
SEHI-100 Valve
The valve is a stepper-motor type, direct acting valve. It uses a two-phase
motor, with each phase having 75 ohms of resistance.
The supply voltage (12 VDC) is switched on and off to each phase, to step the
valve open or closed. Each step is 0.00007" of stroke, with a full stroke of
6376 steps.
The step motor used in the SEHI valve is a permanent magnet rotor type.
Each step creates a 3.6° rotation of the rotor. This rotation is increased in
torque and reduced in speed by a 12.25:1 gear train. Final rotation is
converted to linear motion by the use of a lead screw and threaded drive
coupling. Forward motion of the motor extends the drive coupling and pin,
which moves the valve to the closed position. Backward rotation of the motor
retracts the drive coupling and pin modulating the valve in the opening
direction. Full forward or backward travel, while the valve is assembled, is
limited by the valve seat in the closed position or an upper stop in the open
direction. A slight clicking sound may be heard at either of these two
positions and does no harm to the valve or drive mechanism.
6WRSV
%RQQHW
9DOYH%RG\%UDVV
6SULQJ
RLC-SVD03A-EN 59
Page 60

Module Power and Miscellaneous I/O
5DLQWLJKW)OH[&RQQHFWRU
([WHQGHG&RSSHU)LWWLQJV
Figure 15 SHEI Valve
0RWRU
)ORZ
0RWRU&DS
'ULYH$VVHPEO\
3XVK5RG
9DOYH%RG\
Electronic Expansion Valve Location
The valve should be installed with the motor in a vertical position, or no
greater than 45° from vertical, as shown in Figure 16. This will prevent oil
logging and the possibility of contamination reaching the motor cavity. The
valve should also be installed as close to the evaporator as possible.
60 RLC-SVD03A-EN
Page 61

Module Power and Miscellaneous I/O
Figure 16 Electronic Expansion Valve Location
Te st Po i n t s
There is only one test point associated with the EXV module. It is easily read
with a DC voltmeter by probing the PC board solder pad found in the upper
left hand corner of the module. The positive meter lead should be connected
to the pad while referencing the negative meter lead to the board edge
ground plane.
NOTE: Don't use the aluminum module enclosure as a reference as it
has an anodized surface with insulating properties. The DC voltage shall
be within the tolerance specified below. If not replace the module.
TP1: +5 volts DC ±5%
EXV Test
The EXV module has a built in test which is designed to allow the service
technician to confirm a problem with the EXV control system and to identify
which of the components of the system (the Valve/Stepper Motor assembly,
the EXV Module, or the interconnecting wiring) is at fault. The directions to
perform this test are given below:
EXV Test Procedure
1. Place the Chiller in the “STOP” mode using the Stop Button on the CLD.
2. Determine which refrigeration circuit is associated with the EXV valve you
want to test. Advance to the EXV TEST display in the Service Tests Menu.
3. Press the or keys to change the displayed “d” to an “E”, which
will enable or initiate the preprogrammed procedure. Display will automatically return the item to disabled when the test is completed.
Electrical Integrity Test
4. Initially the UCM will perform an Electrical Integrity test on the valve's
stepper motor phases and associated wiring. If a failure is detected, it will
report a diagnostic indicating “EXV Elect. Drive CKT” at this time. This
RLC-SVD03A-EN 61
Page 62

Module Power and Miscellaneous I/O
diagnostic suggests that there is a problem with the valve or the valve
wiring. To confirm this, it is necessary to continue the procedure. The
Electrical Integrity test will be completed in about 2 seconds. Regardless
of whether or not a diagnostic occurs, the UCM will proceed with the
stroke timing portion of the test.
Stroke Timing Test
5. At this time the UCM will drive the valve closed. Thus the total closing
time will be 25 seconds. Due to mechanical characteristics of the valve, it
will make a clicking sound when it reaches its end stops (either full open
or full closed). In most cases, the valve will already be closed when this
test is initiated, so a normally operating valve will exhibit the clicking for
approximately 25 seconds.
NOTE: The loudness of the clicking varies from one valve to another and
ambient noise can muffle the clicking sound. Therefore, it may be necessary
to use a tool to aid in the hearing of the clicking (such as a screwdriver held
between the EXV and the ear.)
6. Following the 25 seconds of closing, the valve will immediately be
stepped open for the same period of time (25 seconds). As soon as the
valve begins its opening movement the clicking should stop. while it
moves through its stroke. The service technician would then note the
time between when the clicking stopped until the time it restarts. This
would give an indication of the opening stroke time.
NOTE: If the valve and switching circuitry is operating properly, the silent
valve movement should last for approximately 15 seconds.
End of stroke clicking should then be heard for 10 seconds.
7. The module will then reverse direction and the valve will be stepped
closed again for a full 25 seconds. Since the valve should have started
from the full open position, the time to stroke closed should be noted and
it should be approximately the same as the opening time above. If both
opening and closing stroke times are correct to within ±5 seconds of the
time specified, no further testing is required. If any valve fails this test,
the service technician should perform the EXV Valve Winding Resistance
Check, steps 8 thru 10 below.
SEO EXV Valve Winding Resistance Check
1. Disconnect the appropriate EXV valve from the pin header of the EXV
module.
2. With a digital ohm-meter, check the resistance of the valve windings and
associated leads/connector by measuring the resistance of pin pairs at
the connector plug. Pin pairs are #5 and #3, #5 and #2, and #5 and #1 for
Circuit 1. Pin numbers are indicated by corresponding position # on the
board or by the raised numbers of the connector block. The resistances
should all be 40 ohms ±4 ohms at 75F winding temperature. (At a valve
winding temp of 148F the resistance would be no more than 54 ohms; at
a valve winding temp of 32F the resistance would be no less than 33
ohms).
62 RLC-SVD03A-EN
Page 63

Module Power and Miscellaneous I/O
3. Check the resistance from each of the three phase pins (J4-3, J4-2, and
J4-1) to the board edge GND, with the connector unplugged. This resistance should be between 100K and 200K ohms.
If the valve/wiring/connector combination fails the above tests, suspect the
connector or the wiring first. At the valve for circuit #1; wire color black corresponds to pin #5, red to pin #3, white to #2 and green to #1. For circuit #2:
black to pin #6, red to pin #4, white to #2, and green to pin #1. Refer to Tab le
20 and use the pass-fail results above to determine the prescribed action.
SEHI EXV Valve Winding Resistance Check
1. Disconnect the appropriate EXV valve from the pin header of the EXV
module.
2. With a digital ohm-meter, check the resistance of the valve windings and
associated leads/connector by measuring the resistance of pin pairs at
the connector plug. Pin pairs are #5 and #4, #2 and #1 for Circuit 1 and #6
and #5, and #2 and # 1 for Circuit 2. Pin numbers are indicated by corresponding position # on the board or by the raised numbers of the connector block. The resistances should all be 75 ohms ±10 ohms.
3. Check the resistance from each lead to the board edge GND, with the
connector unplugged. This resistance should be greater than 1 meg
ohms.
If the valve/wiring/connector combination fails the above tests, suspect the
connector or the wiring first. At the valve for circuit #1; wire color black corresponds to pin #1, red to pin #5, white to #2 and green to #4. For circuit #2:
black to pin #1, red to pin #6, white to #2, and green to pin #5. Refer to Table
20 and use the pass-fail results above to determine the prescribed action.
Table 20 Test Results Logic Table
ELECT. INTEGRITY TEST
PASS PASS NOT REQ. VALVE/BOARD ARE WORKING PROPERLY -
PASS FAIL PASS VALVE IS MECHANICALLY STUCK -
PASS FAIL FAIL HIGHLY UNLIKELY CONDITION
FAIL PASS PASS HIGHLY UNLIKELY CONDITION
FAIL FAIL PASS CHECK CONNECTION AT MODULE
FAIL FAIL FAIL SUSPECT WIRING, PLUG OR VALVE-
*.INDICATION OF PASS OR FAIL OF THIS TEST IS DISPLAYED AT THE CLD IN THE DIAGNOSTICS MENU.
*
STROKE TIMING RESISTANCE PRESCRIBED ACTION
NO ACTION REQ.
REPLACE/REPAIR VALVE
RETEST-REPLACE MODULE
RETEST-NO ACTION REQ.
RETEST-REPLACE MODULE
REPLACE/REPAIR SAME
Solder Techniques for Installation
It is not necessary to disassemble the valve when soldering to the
connecting lines. Most commonly used types of solder (eg. Sil-Fos, EasyFlow, PhosCopper or equivalent) are satisfactory. Regardless of the solder
RLC-SVD03A-EN 63
Page 64

Module Power and Miscellaneous I/O
used, it is important to direct the flame away from the valve body. See Figure
17. A wet cloth should be wrapped around the body during soldering to
provide extra protection. This will help prevent overheating and damage to
the synthetic seals and subsequent degradation in valve performance. Valves
are shipped in the full-open position, to allow for the flow of inert gas
while soldering.
Figure 17 Electronic Expansion Valve Soldering
SEO Electronic Expansion Valve Servicing
The procedures listed below are to. be followed for proper disassembly,
inspection, cleaning and reassembly to the valve. The valve does not need to
be removed from the refrigerant piping before servicing.
1. Before disassembly of the valve, be sure the refrigerant pressure in the
system has been reduced to a safe level (0 psig) on both sides of valve.
See RTAA-SB-10 for preferred refrigerant handling in this area.
WARNING
Hazardous Voltage w/Capacitors!
Disconnect all electric power, including remote disconnects
before servicing. Follow proper lockout/tagout procedures to
ensure the power cannot be inadvertently energized. For variable
frequency drives or other energy storing components provided by
Trane or others, refer to the appropriate manufacturer’s literature
for allowable waiting periods for discharge of capacitors. Verify
with an appropriate voltmeter that all capacitors have discharged.
Failure to disconnect power and discharge capacitors before
servicing could result in death or serious injury.
Note: For additional information regarding the safe discharge of
capacitors, see PROD-SVB06A-EN or PROD-SVB06A-FR
64 RLC-SVD03A-EN
Page 65

Module Power and Miscellaneous I/O
2. Disconnect all the line voltage to the power supply of this unit.
3. Refer to the exploded view in Figure 18 while performing the remaining
instructions.
CAUTION
Prevent Injury!
Refer to Figure 18. The pushrod is under spring pressure and will
be accelerated out of the top or bottom of the valve body
assembly if the activator assembly or bottom cap is removed.
When unscrewing either the activator assembly or bottom cap,
make sure these assemblies are kept in line with the valve body
and moved away from the valve body very slowly in the vertical
direction, until you feel the pressure is relieved from the pushrod.
At this time hold the pushrod with one hand and then move the
activator or bottom cap away from the valve body. * Do not try to
remove either the activator assembly or bottom cap under any
system pressure. System pressure must be at 0 psig on both
sides of the valve before attempting any disassembly of
this valve. Failure to slowly relieve spring pressure may result in
minor to moderate injury.
4. Remove the actuator assembly from the valve body using large hex nut to
turn.
5. Remove pushrod and check for excessive wear or scratches. The pushrod
must move freely in the valve body.
6. Remove the bottom cap, spring and piston. Inspect these parts for foreign matter and physical damage.
7. Clean all parts with a suitable solvent and blow dry with clean compressed air.
8. To reassemble, carefully install the piston, spring and bottom cap. Be
sure that the piston nose guides are on the inside diameter of the port.
The seating surface may be damaged if the piston is improperly
installed.
9. Check that the sealing surfaces are free of foreign material or nicks that
may prevent a leak-tight joint. Tighten the bottom cap approximately 1/8
turn past hand tight to seal the knife edge joint.
10. Place the pushrod in the valve body. Press the pushrod down to open the
valve and insure proper piston installation. Approximately 8 ft.-lbs. are
required to open the valve. If the valve cannot be opened, repeat steps 9
and 10.
Clean with a suitable solvent, blow dry with clean compressed air and
replace the pushrod in the valve body.
11. Before replacing the actuator assembly, be sure that all sealing surfaces
are free of foreign material or nicks that may prevent a leak-tight joint.
Carefully install the pushrod bonnet and thread the actuator assembly on
RLC-SVD03A-EN 65
Page 66

Module Power and Miscellaneous I/O
to the valve body until the sealing surfaces make contact. Tighten the
actuator approximately 1/8 turn to seal the knife edge joint.
12. The motor cap quad-ring may be replaced by removing the ferrule motor
cap nut.
Be sure that the motor cap does not rotate with the motor cap nut. The
wires internal to the motor can be damaged.
13. When reassembling, be sure that the internal wires do not get crimped
between the motor cap and motor housing
14. Pressurize the system and check for leaks.
0RWRU&DS
0RWRU&DS1XW
0RWRU
$OXPLQXP+RXVLQJ
$FWLYDWRU$VVHPEO\
0RWRU$GDSWHU$VVHPEO\
Z3XVKURG%RQQHW
3XVKURG
9DOYH%RG\$VVHPEO\
3LVWRQ$VVHPEO\
6SULQJ
%RWWRP&DS
Figure 18 SEO Electronic Expansion Valve Exploded View
66 RLC-SVD03A-EN
Page 67

Module Power and Miscellaneous I/O
SEHI Electronic Expansion Valve Servicing
The procedures listed below are to. be followed for proper disassembly,
inspection, cleaning and reassembly to the valve. The valve does not need to
be removed from the refrigerant piping before servicing. If the motor is found
to be defective the entire motor assembly must be replaced.
1. Before disassembly of the valve, be sure the refrigerant pressure in the
system has been reduced to a safe level (0 psig) on both sides of valve.
See RTAA-SB-10 for preferred refrigerant handling in this area.
WARNING
Hazardous Voltage w/Capacitors!
Disconnect all electric power, including remote disconnects
before servicing. Follow proper lockout/tagout procedures to
ensure the power cannot be inadvertently energized. For variable
frequency drives or other energy storing components provided by
Trane or others, refer to the appropriate manufacturer’s literature
for allowable waiting periods for discharge of capacitors. Verify
with an appropriate voltmeter that all capacitors have discharged.
Failure to disconnect power and discharge capacitors before
servicing could result in death or serious injury.
Note: For additional information regarding the safe discharge of
capacitors, see PROD-SVB06A-EN or PROD-SVB06A-FR
2. Disconnect all the line voltage to the power supply of this unit.
3. Refer to the exploded view in Figure 19 while performing the remaining
instructions.
4. Unplug valve.
5. Using the appropriate wrenches or a vice to properly support the valve
body, remove the motor assembly from the valve body by loosening the
lock nut. To prevent permanent damage to the motor, DO NOT attempt to
disassemble the motor housing.
NOTE: Regardless of whether the valve is in the system or in a vise,
care must be taken to prevent distorting the valve parts when tightening.
6. Verify that the new motor assembly is in the "OPEN" position.
7. Lightly oil the threads and knife-edge on the new motor adapter. Carefully
seat the adapter on the valve body.
8. Engage and tighten the lock nut. One eighth turn more than hand tight is
sufficient to achieve a leak proof seal.
9. Pressurize the system and check for leaks.
RLC-SVD03A-EN 67
Page 68

Module Power and Miscellaneous I/O
-OTOR!DAPTOR
!SSEMBLY
0ISTON!SSEMBLY
"ODY!SSEMBLY
3IGHTGLASS
Figure 19 SEHI Electronic Expansion Valve Exploded View
68 RLC-SVD03A-EN
Page 69

Module Power and Miscellaneous I/O
SEO Valve Module
° TP1 +5V J6-1 — 115VAC HOT
J6-2 — 115VAC HOT
J6-3 — KEY (N/C)
J6-4 — NEUTRAL
IPC (+) — J1-4 J6-5 — NEUTRAL
IPC (-) — J1-3
IPC (+) — J1-2
IPC (-) — J1-1
on
MANUF. NO CONN. — J2-2
USE ONLY NO CONN. — J2-1
L H
LOW PRESSURE SIG.— J7-5
SWITCH CIRCUIT 1 GND — J7-4
KEY — J7-3
W
0
V
0
LOW PRESSURE SIG. — J7-2
SWITCH CIRCUIT 2 GND — J7-1
L 0
T
A
SATURATED EVAPORATOR — J3-9
TEMPERATURE CIRCUIT 1 — J3-8
T A
A
G
E
I
COMPRESSOR SUCTION — J3-7
TEMPERATURE CIRCUIT 1 — J3-6
N/C KEYING — J3-5
SATURATED EVAPORATOR — J3-4
TEMPERATURE CIRCUIT 2 — J3-3
N P
P
U
COMPRESSOR SUCTION — J3-2
TEMPERATURE CIRCUIT 2 — J3-1
T S
S
.
O
U
ELECTRONIC
EXPANSION
VALVE
CIRCUIT 1
T
GND — J4-5
KEY (N/C) — J4-4
PHASE 1 — J4-3
PHASE 2 —
PHASE 3 — J4-1
J4-2
P
U
T
S
ELECTRONIC
EXPANSION
VALVE
CIRCUIT 2
GND — J5-6 24 VDC Peak only
KEY (N/C) — J5-5
PHASE 1 — J5-4
KEY (N/C) — J5-3
PHASE 2 — J5-2
PHASE 3 — J5-1
off
SW-1
when the Phase is
being stepped.
I
G
H
V
L
T
G
E
I
N
U
T
Figure 20 SEO Electronic Expansion Valve Module (1U3)
RLC-SVD03A-EN 69
Page 70

Module Power and Miscellaneous I/O
SEHI Valve Module
° TP1 +5V J6-1 — 115VAC HOT
J6-2 — 115VAC HOT
J6-3 — KEY (N/C)
J6-4 — NEUTRAL
IPC (+) — J1-4 J6-5 — NEUTRAL
IPC (-) — J1-3
IPC (+) — J1-2
IPC (-) — J1-1
on
MANUF. NO CONN. — J2-2
USE ONLY NO CONN. — J2-1
L H
LOW PRESSURE SIG.— J7-5
SWITCH CIRCUIT 1 GND — J7-4
KEY — J7-3
W
0
V
0
LOW PRESSURE SIG. — J7-2
SWITCH CIRCUIT 2 GND — J7-1
L 0
T
A
SATURATED EVAPORATOR — J3-9
TEMPERATURE CIRCUIT 1 — J3-8
T A
A
G
E
I
COMPRESSOR SUCTION — J3-7
TEMPERATURE CIRCUIT 1 — J3-6
N/C KEYING — J3-5
SATURATED EVAPORATOR — J3-4
TEMPERATURE CIRCUIT 2 — J3-3
N P
P
U
COMPRESSOR SUCTION — J3-2
TEMPERATURE CIRCUIT 2 — J3-1
T S
S
.
O
U
ELECTRONIC
EXPANSION
VALVE
CIRCUIT 1
T
RED — J4-5
GREEN — J4-4
KEY (N/C) — J4-3
WHITE —
BLACK — J4-1
J4-2
P
U
T
S
ELECTRONIC
EXPANSION
VALVE
CIRCUIT 2
RED — J5-6 24 VDC Peak only
GREEN — J5-5
KEY (N/C) — J5-4
KEY (N/C) — J5-3
WHITE — J5-2
BLACK — J5-1
off
SW-1
when the Phase is
being stepped.
I
G
H
V
L
T
G
E
I
N
U
T
Figure 21 SEHI Electronic Expansion Valve Module (1U3)
I/0 terminals
For the checkout of the I/O, refer to the block diagram of the EXV module in
Table 21 and the Chiller Wiring Diagrams for both high and low voltage
circuits. All voltages are measured differently between terminal pairs
70 RLC-SVD03A-EN
Page 71

Module Power and Miscellaneous I/O
specified, unless otherwise indicated. The first terminal in the pair is the
positive (or hot) terminal. Voltages given are nominals and may vary by ±5%.
Unregulated Voltages (unreg) or 115 VAC voltages may vary by ±15%.
Table 21 EXV Module Normal Terminal Voltages
Te r m i n a l
Designation
J1-4 to 3
Description
of Circuit
IPC Communications 19.2 kbaud serial data, 5 volt signal level.
or J1-2 to 1
J2-2, 1 Manufacturing
Address Use Only
J3-9, 8 Saturated Evap.
Rfrg. Temp. CKT 1
J3-7, 6 Compressor Suct.
Rfrg. Temp. CKT 2
J3-4, 3 Saturated Evap.
Rfrg. Temp. CKT 2
J3-2, 1 Compressor Suct.
Rfrg. Temp. CKT2
1
J4-5
1
J4-3
1
J4-2
1
J4-1
1
J5-6
1
J5-4
1
J5-2
1
J5-1
J4-1, 2, 4,5
J4-1, 2, 5, 6
J6-1 or 2
EXV CKT1 GND OVDC GND.
EXV CKT1 Phase 1 Between 0 and 1 VDC when the phase is not being stepped. When
EXV CKT1 Phase 2
EXV CKT1 Phase 3
EXV CKT2 GND OVDC GND.
EXV CKT2 Phase 1 Same a CKT 1.
EXV CKT2 Phase 2 Same as above.
EXV CKT2 Phase 3 Same as above.
2
EXV CKT 1 10-12 VDC
2
EXV CKT 2 10-12 VDC
Input Power 115 VAC, Refer to Power Supply on page 41.
to J6-4 or 5
J7-5, 4 Low Pressure
Switch, Circuit 1
J7-2, 1 Low Pressure
Switch, Circuit 2
Normal Terminal Voltages
for Various Conditions.
Refer to Interprocessor Communication Link (IPC).
+5 VDC No connection intended.
Refer to Temperature Sensor Checkout.
Refer to Temperature Sensor Checkout.
Refer to Temperature Sensor Checkout.
Refer to Temperature Sensor Checkout.
the valve is being stepped, this signal is actually a 24.2±17% VDC
peak square wave with a period of 60 msec and a 1/3 duty cycle
low (On) and 2/3 duty cycle high (Off). An averaging DC voltmeter
can be used to measure this voltage. The meter will show fluctuations but the average should be approximately 8 volts.
Open = 12 VDC, Low Pressure Cutout
Closed = 0 VDC, Normal
Open = 12 VDC, Low Pressure Cutout
Closed = 0 VDC, Normal
Note: On a power up or a front panel reset, the valve will always be driven closed for approximately 1000 steps. During this time,
approximately 40 seconds, an alternating audible clicking sound can be observed on the valves
1
SEO Valve
2
SEHI Valve
RLC-SVD03A-EN 71
Page 72

Module Power and Miscellaneous I/O
Compressor Module (MCSP) (1U4 AND 1U5)
WARNING
Live Electrical Components!
During installation, testing, servicing and troubleshooting of this
product, it may be necessary to work with live electrical
components. Have a qualified licensed electrician or other
individual who has been properly trained in handling live
electrical components perform these tasks. Failure to follow all
electrical safety precautions when exposed to live electrical
components could result in death or serious injury.
Te st Po i n t s
There are two test points associated with the MCSP module. They are easily
read with a DC voltmeter by probing the PC board solder pads found in the
upper left hand corner of the module. The positive meter lead should be
connected to the pad while referencing the negative meter lead to the board
edge ground plane.
NOTE: Don't use the aluminum module enclosure as a reference as it
has an anodized surface with insulating properties.
The DC voltage shall be within the tolerance specified below. If not replace
the module.
TP1: +5 volts DC ±5%
TP2: +12 volts DC ±5%
IPC Address Switch SW1
Refer to Troubleshooting Modules Using IPC Diagnostics on page 9.
Current Gain (or Overload) Dip Switch SW2
The Compressor phase current inputs on the individual MCSP modules are
“normalized” thru the proper setting on this switch. The term “Compressor
Current Overload setting” is actually a misnomer. Instead the setting should
be thought of as an internal software gain that normalizes the currents to a %
RLA for a given CT and compressor rating. The true nominal steady state
overload setting is fixed at 132%.
The setting of the dip switch SW2 on each of the MCSP modules should
match those of Tab le 18 for each compressor. Switch position SW2-1 is the
Most Significant Bit. The decimal equivalent of this setting should also be
verified in the Service Settings Menu, in the CLD display. If the programmed
value does not agree with the dip switch setting for each of the MCSP's, an
informational diagnostic will result. The compressors will be allowed to run,
but default settings (the most sensitive possible) will be used for the internal
software compressor current gains. Refer to Section 7 Current Transformer
and Current Input Checkout for more details.
72 RLC-SVD03A-EN
Page 73

Module Power and Miscellaneous I/O
Binary Inputs
The binary inputs shown in Table 22 all use the same basic circuit. A pullup
resistor to the 12V power supply is connected to the higher numbered input
pin. The lower numbered pin is connected to ground. The voltage between
the two pins is sensed by the microprocessor To check the input, measure
the voltage between the two associated pins. With the external switch open,
approximately 12 Vdc should be measured. With the switch closed, 0 Vdc
should be measured.
Temperature Inputs
These inputs use Trane's standard thermistor,. an NTC device giving 10,000
ohms at 25 C (75 F). Refer to Temperature Sensor Checkout, Tab l e 4 , for a
table of temperature vs., resistance vs. voltage.
Three measurements can be made:
1. With the probe connected, the voltage across the input terminals may be
measured. The voltage should agree with the table values in the Tem p er -
ature Sensor Checkout Procedure on page 15.
2. The probe may be disconnected from the module and its resistance measured. It should agree with the table values.
3. With the probe disconnected, the terminal voltage may be measured
with a high impedance voltmeter. It should be between 4.975 and 5.025
Vdc. If the meter loads the input, a slightly lower voltage may be
expected.
Refer to Temperature Sensor Checkout for more details.
Current Inputs
The following tests may be used to check a current input circuit:
1. With the compressor off, the AC voltage across the terminals with the
current transformer connected should read 0 V The corresponding current as read on the CPM display should read 0.
2. With the compressor on, the AC voltage across the terminals should
agree with the data of Tabl e 8 . The %RLA read on the CPM display will
depend on the setting of the gain switch. If the gain switch is set to 11111,
the percent CT rating values should agree with the display. For any other
switch setting, the gain factor as found in Tabl e 9 must be taken into
account using one of the following procedures:
• Start with the displayed %RLA. Multiply by .67 and divide by the gain
where the gain is found in Tab le 16 . The result is the percent CT rating.
Use this and the Tabl e 8 to find the corresponding terminal voltage.
• Start with an actual current measurement (such as from a clamp-on
ammeter). Determine which CTs are being used and use the Tab l e 8 to
find the corresponding terminal voltage and percent CT rating. Multiply
the percent CT rating by the gain and divide by.67 to find the %RLA that
should be displayed.
NOTE: If the MCSP gain switch and CPM gain setting do not agree, a
diagnostic will be generated and the MCSP will continue operating using a
default gain setting of 00000 (max gain). This will result in the MCSP thinking
RLC-SVD03A-EN 73
Page 74

Module Power and Miscellaneous I/O
the currents are higher than actual and will show up as an error in the %RLA
displayed by the CPM. The compressor will operate safely but may unload
due to the current limit function.
Refer to Current Transformers and Current Inputs for more details on
operation and troubleshooting.
Isolated Binary Input: Winding Temperature
This input may be checked by disconnecting all wiring from the terminals and
measuring the open circuit voltage. It should read between 10 and 15 Vac. A
“Winding Temp. - Cprsr A or B” diagnostic should appear on the CPM's
display depending on which compressor module it is. A jumper may then be
placed across the input to short it out. After clearing diagnostics, the
diagnostic should no longer be present. It a diagnostic continues to occur, the
module needs replacement.
Relay Outputs
Compressor and Fan Control relays may be checked by measuring the voltage
drop across the contacts. 115 Vac should be seen when the relay is off. 0 Vac
should be seen when the relay is on. Before condemning a module for bad
relays, make sure to check all diagnostics, power to the module, communications, and the state of the high pressure cutout. Refer to the units' schematic
wiring diagram for the control circuitry.
Triac Outputs
The Load/Unload triacs may be checked by measuring the voltage from
terminals E7 or E8 to 115 V neutral, with a load connected. The triacs operate
in the high side and switch 115 Vac power from J7-1 to either E7 or E8 to turn
on the appropriate slide valve solenoid.
When a triac is off, about 0 Vac should be measured on its terminal with the
solenoid load connected. When it is on, the voltage should be close to 115
Vac (the drop across the triac is about 1-2 volts). Except during a start or stop,
the triacs normally pulse on for short durations (as low as 40mS) once every
10 seconds. If chiller load is satisfied the triacs may not pulse. Because of
this, it may be difficult to see the pulses on a meter. A low wattage 115 Vac
test lamp may be of help.
The best time to check the unload solenoid is immediately after a power-up
reset. For the first 30 seconds after applying power, the unload solenoid
should be on continuously. The next best time to check it is after the
compressor starts. For the first 30 seconds after a start, the unload solenoid
should be on continuously.
Checking the load solenoid is more difficult. Shortly after a start, the
compressor will usually start loading. If, however, water temperature is
dropping rapidly enough, it will stay unloaded. It may take a while to begin
seeing load pulses.
Refer to on page 36, for a more detailed procedure on how to accomplish the
load / unload solenoid and slide valve check on the MCSP and associated
compressor.
74 RLC-SVD03A-EN
Page 75

Module Power and Miscellaneous I/O
I/O Terminals
For the checkout of the I/O, refer to the block diagram of the MCSP module in
Figure 22 and the Chiller Wiring Diagrams for both high and low voltage
circuits. All voltages are measured differentially between terminal pairs
specified unless otherwise indicated. The first terminal in the pair is the
positive (or hot) terminal. Voltages given are nominals and may vary by ±5%.
Unregulated Voltages (unreg) or 115 VAC voltages may vary by ±15%.
Table 22 Compressor Module Normal Terminal Voltages (1 U4 and 1 U5)
Te r m i n a l
Designation
J1-4 to 3
or J1-2 to 1
J2-2, 1 Manufacturing Address Use
J3-7, 6 External Circuit Lockout Open = 12 VDC: ckt lockout
J3-4, 3 Transition Complete Open = 12 VDC: pre-transition
J3-2, 1 Not Used Must be jumpered.
J4-5, 4 Saturated Condenser
J4-3, 1 Entering Oil Temperature Refer to Temperature Sensor Checkout.
J5-7, 6 Phase A Current
J5-5, 4 Phase B Current
J5-2, 1 Phase C Current
J6-1 or 2
to J6-4 or 5
E3, E4 Compressor Motor
E5 to High Pressure Externally powered isolation transformer input,
J6-4 or 5 Cutout Input 2 VA, 115 Vac 115 volts input: normal 0 volts: trip
E5, J7-3 Compressor Contactor
J7-1, E6 Crankcase Heater Output Normally closed contact, powers crankcase heater when compressor is
J7-5,6 Transition Command Output Normally open contact, closes to initiate Wye to Delta Starter transition if
Description
of Circuit
IPC Communications 19.2 kbaud serial data, 5 volt signal level.
Only
Refrigerant Temp
Transformer Input
Transformer Input
Transformer Input
Input Power 115 VAC, Refer to Power Supply in Module.
Winding Temp
Thermostat.
Output
Normal Terminal Voltages
for Various Conditions
Refer to Interprocessor Communication Interface.
+5 VDC No connection intended.
Closed 0 VDC: normal
(ckt. lockout' only if feature is enabled in Service Settings)
Must be jumpered if this feature is not used.
Closed = 0 VDC: transition complete
(only used with reduced voltage starters)
Refer to Temperature Sensor Checkout.
Input for 100-400:0.1 Ratio CT using digital VOM
in diode test mode open circuit input should read between 1.0 to 1.5
Vol t s.
Refer to Current Transformer Checkout.
Same as above.
Same as above.
Power and Miscellaneous I/O.
Internally powered Isolated input.
Open = 16 Vac: high temp
Closed = 0 Vac: Ok temp
Normally open contact, closes for compressor start
Uses same power input as High Pressure Cutout input above.
off.
configured for Reduced Voltage start.
RLC-SVD03A-EN 75
Page 76

Module Power and Miscellaneous I/O
Table 22 Compressor Module Normal Terminal Voltages (1 U4 and 1 U5)
Te r m i n a l
Designation
J7-8,9 Step Load Solenoid Normally open contact, closes to energize the Step Load Solenoid Valve.
J7-1, E7 Slide Valve Open
J7-1, E8 Slide Valve Close
J8-1, 3 Fan Relay 1 Output Normally open contact for Variable Speed Fan contactor control.
J8-1, 4 Fan Relay 2 Output Normally open contact for fan contactor(s) control.
J8-1, 5 Fan Relay 3 Output Same as above.
J8-1, 6 Fan Relay 4 Output Same as above.
J9-6, 5 Variable Frequency
J9-4, 3 Variable Frequency
J9-2, 1 Not Used N/A
Description
of Circuit
(Load Solenoid) Output
(Unload Solenoid) Output
Fan Output PWM
Fan Fault Signal
Normal Terminal Voltages
for Various Conditions
Triac Output, Refer to Checkout Procedure for MCSP Load/Unload
Outputs.
Triac Output, Refer to Checkout Procedure for MCSP Load/Unload
Outputs.
10 Volt Peak, 10 Hz fundamental. Its average value can be read with a DC
voltmeter. Refer to Section 11 Variable Speed Fan System Troubleshooting.
Fault: 11 V (connector plugged on)
No Fault: 0 VDC (connector plugged on)
Refer to Section 11 Variable Speed Fan System Troubleshooting.
76 RLC-SVD03A-EN
Page 77

Module Power and Miscellaneous I/O
MANUF. NO CONN. —
USE ONLY NO CONN. —
LOW PRESSURE SIG.—
L
LOCKOUT INPUT —
O
W
TRANSITION —
COMPLETE INPUT —
V
0
L
T
IPC (+) —
IPC (-) —
IPC (+) —
IPC (-) —
KEY (N/C) —
NOT USED —
° TP1 +5V
° TP2 +12V
J1-4 J6-5 — NEUTRAL
J1-3
J1-2
J1-1
J2-2
J2-1
J3-7
J3-6 J7-1 — 115VAC HOT
J3-5 J7-2 — KEY (N/C)
J3-4 J7-4 — KEY (N/C)
J3-3
J3-2 J7-6 — TRANSITION OUTPUT
J3-1 J7-7 — KEY (N/C)
J6-1 — 115VAC HOT
J6-2 — 115VAC HOT
J6-3 — KEY (N/C)
J6-4 — NEUTRAL
E3
— COMPRESSOR MOTOR
E4
— WINDING THERMOST.
E5
— HIGH PRESS SWITCH
E6
— CRANKCASE HEATER
J7-3 — COMPRESSOR CONTCR
J7-5 — COMPRESSOR
A T
G
E
CONDENSER TEMP —
I
N
P
SATURATED —
ENTERING —
OIL KEY —
TEMPERATURE —
J4-5 J7-8 — STEP LOAD
J4-4 J7-9 — SOLENOID VALVE
J4-3
J4-2
J4-1
E7
— SLIDE VALVE LOAD
E8
— SLIDE VALVE UNLOAD
U
T
COMPRESSOR PhA —
O
U
PHASE PhA —
CURRENTS PhB —
T
P
U
PhA —
KEY (N/C) —
PhC —
PhC —
J5-7 J8-1 — 115VAC (FANS)
J5-6 J8-2 — KEY (N/C)
J5-5 J8-3 — FAN RELAY 1
J5-4 J8-4 — FAN RELAY 2
J5-3 J8-5 — FAN RELAY 3
J5-2 J8-6 — FAN RELAY 4
J5-1
T U
C —
J9-6
CR —
J9-5
FAN VARIABLE
FREQUENCY DRIVE
NOT USED —
NOT USED —
F —
FR —
J9-4
J9-3
J9-2
J9-1
H
I
G
H
V
0
L
A
G
E
I
N
P
U
T
O
U
T
P
T
Figure 22 Compressor Module (MCSP) (1U4 and 1U5)
RLC-SVD03A-EN 77
Page 78

Module Power and Miscellaneous I/O
Interprocessor Communication Bridge Module (IPCB) (1U7)
The IPCB provides an extension of the IPC link to the Remote Clear Language
Display. See Figure 23 It prevents “crashes” of the IPC and UCM if the link to
the RCLD is shorted or misapplied. The IPCB receives and retransmits data to
and from local to remote links. Therefore the data is available on either link.
SW1 should be set per the label on the IPCB. LEDs RXA, TXA, RXB and TXB
should be constantly blinking, synchronously, in normal operation.
9$&
%$
-
)URP,3&/LQN 7R5HPRWH&/'
,3&%1RPLQDO7HUPLQDO9ROWDJHV
-RU-
-RU-
-RU-
/RFDO,3&
3RZHU
5HPRWH,3&
Figure 23 IPCB Nominal Terminal Voltages
-
-
21
2))
2))
5;$
5;%
7;$
7;%
6:
.%DXG9VLJQDOOHYHO
9$&QHLWKHUVLGHJURXQGHG
.%DXG9VLJQDOOHYHO
78 RLC-SVD03A-EN
Page 79

Module Power and Miscellaneous I/O
LonTalk® Communications Interface - Chillers Module (LCI-C) (1U8)
The Tracer LCI-C interface acts as a translator between Trane's IPC (InterProcessor Communication) and Echelon's LonTalk® communications protocol
(ANSI/EIA/CEA 709.1). This allows the chiller to communicate with building
automation systems which also communicate using the LonTalk® protocol.
The LonTalk® communications protocol also allows for peer to peer communications between controllers so they can share information. Communicated
setpoints have priority over locally wired inputs to the controller unless the
controller is set to the "Local" control mode.
The LCI-C module provides connectivity to Trane's Rover® service tool for
proper configuration of the LCI-C module.
Note: LonTalk® communication links are not polarity sensitive.
9$&
$%
$%
-
-RU-
-RU-
-RU-
Figure 24 LCI-C Nominal Terminal Voltages
-
)URP,3&/LQN 7R%$6
/&,&1RPLQDO7HUPLQDO9ROWDJHV
/RFDO,3&
3RZHU
%$6
-
.%DXG9VLJQDOOHYHO
9$&QHLWKHUVLGHJURXQGHG
.%DXG9VLJQDOOHYHO
RLC-SVD03A-EN 79
Page 80

Variable Speed Fan System
The purpose of this troubleshooting guide is to help technicians determine if
the variable speed fan inverter, the compressor module, the variable speed
fan inverter contactor, the fan motor or the interconnecting wiring is faulty.
WARNING
Hazardous Voltage w/Capacitors!
Disconnect all electric power, including remote disconnects
before servicing. Follow proper lockout/tagout procedures to
ensure the power cannot be inadvertently energized. For variable
frequency drives or other energy storing components provided by
Trane or others, refer to the appropriate manufacturer’s literature
for allowable waiting periods for discharge of capacitors. Verify
with an appropriate voltmeter that all capacitors have discharged.
Failure to disconnect power and discharge capacitors before
servicing could result in death or serious injury.
Note: For additional information regarding the safe discharge of
capacitors, see PROD-SVB06A-EN or PROD-SVB06A-FR
In this troubleshooting procedure, the components will be referred to by the
descriptions below:
Description Circuit 1 Circuit 2
Compressor Module 1U4 1U5
Variable Speed Fan Motor 3B2 4B2
Variable Speed Fan Inverter 6U9 6U10
Variable Speed Fan Inverter Contactor 1K9 1K13
Variable Speed Fan Inverter Fuses 1F18 - 1F20 1F21 - 1F23
Inverter Diagnostics
The Inverter has two LED’s for diagnostic purposes. They are:
Power On LED: This green LED is illuminated any time that more than 50
VDC is present on the DC Bus Capacitors. Typically when power is removed
from the TRANE AC INVERTER this LED will remain illuminated for up to 60
seconds while the DC Bus Capacitor Voltage discharges. This LED also
indicates that the 5 VDC Supply Voltage on the TRANE AC INVERTER control
board is present.
Alarm LED: When this red LED is illuminated constantly, it indicates that the
motor is overloaded and the drive is about to fault on a motor overload. When
the Alarm LED is flashing, it indicates the drive is faulted. By counting the
number of times the Alarm LED flashes, the cause of the fault can be determined. The following table lists the possible fault conditions for the TRANE
AC INVERTERS and the number of times the Alarm LED will flash:
Fault Condition Number of Alarm LED flashes
Bus Overcurrent Fault 1
80 RLC-SVD03A-EN
Page 81

Variable Speed Fan System
Bus Overvoltage Fault 2
Motor Overload Fault 3
Low Bus Voltage Fault 4
PWM Generator Fault 5
Logic Fault 6
Stalled Motor Fault 7
Fault Descriptions
Bus Overcurrent Fault: DC Bus Current exceeds the drive rated peak
current.
Bus Overvoltage Fault: DC Bus Voltage exceeds 400 VDC on 200/230 VAC
input units or exceeds 800 VDC on 400/460 VAC input units.
Motor Overlad Fault: The drive operated in current limit (110 % of rated
current) for a period of 60 consecutive seconds. If the motor current reduces
to less than 110 % and the motor reaches commanded speed the overload
timer will begin to count down.
Low Bus Voltage Fault: DC Bus Voltage is less than 200 VDC on a 200/230
VAC input unit or is less than 400 VDC on a 400/460 VAC input unit. If the
motor is already running, this fault will not occur. Instead, the motor speed
will be reduced to a speed that the proper voltage can be applied to the
motor.
PWM Generator Fault: The drive failed to switch a PWM output properly.
Logic Fault: The Microcontroller in the drive executed an illegal instruction.
Stalled Motor Fault: Motor failed to accelerate to ½ the motor speed setpoint
in 30 seconds.
Automatic Restart: If the drive should fault, the drive will automatically
attempt one restart after a delay of 5 seconds. If the drive faults a second
time, the drive will not attempt to restart and the fault must be cleared before
the drive will run again.
Fault Clearing:
Drive Faults may be cleared by one of the following methods:
Removing and reapplying power to the controller.
Setting the speed control input duty cycle to less than 7% for 1 second.
RLC-SVD03A-EN 81
Page 82

Variable Speed Fan System
Troubleshooting Procedure
WARNING
Live Electrical Components!
During installation, testing, servicing and troubleshooting of this
product, it may be necessary to work with live electrical
components. Have a qualified licensed electrician or other
individual who has been properly trained in handling live
electrical components perform these tasks. Failure to follow all
electrical safety precautions when exposed to live electrical
components could result in death or serious injury.
1. Go into the "Machine Configuration Menu" by performing the following
keystrokes: Service Settings, Previous, +, -, +, -, +, -, Enter. Check this
menu to be sure that "Fan Control" and "Variable Speed Fan" are Enabled
for both circuits. The "Fan Control" menu item was replaced with "Unit
Type" on units built after September 1, 1994 (SN U94HXXXXX and later).
Set "Unit Type" to RTA or RTU, which-ever applies. Be sure that "Variable
Speed Fan" is Enabled for both circuits.
2. Verify that all inverter power and control signal wiring is correct for the
affected circuit, using Figure 11-1 and Trane wiring diagram 2307-3328.
The wiring diagram is found in the Unit Wiring Section of RTAA-IOM-4 or
on the inside of the unit control panel door.
3. Attempt to start the compressor on the affected circuit. Twenty-five or
thirty seconds prior to compressor start, the variable speed fan inverter
contactor is energized. Be sure that this is heard. If not heard, attach an
AC voltmeter from pin J8-3 to ground on the compressor module. Reset
the control and look for a 115 volts reading on the voltmeter at pin J8-3,
25 to 30 seconds prior to compressor start. If this voltage is read but the
contactor does not pull in, check for an open circuit in the contactor coil or
an open circuit in the interconnecting wiring to the contactor.
4. Check the fan motor by completely bypassing the inverter. Disconnect
power from the unit and remove the three-phase power wiring from the
inverter. Connect it to the three-phase power wiring of the fan motor,
using splice wires with 1/4 inch male quick connects on both ends. Reapply power to the unit and reset the circuit being tested. Twenty-five or
thirty seconds before the compressor starts, the contactor that would
normally apply power to the inverter should pull in and the fan should run.
If the fan does not run, check the line fuses and contactor contacts.
5. Disconnect power from the unit and reconnect the inverter module. At
the same time, check for damaged wiring or loose quick connects on the
inverter.
6. Re-apply power to the chiller and check the compressor module power
supply, by reading the DC voltage levels from TP1 to the circuit board
edge ground and from TP2 to the circuit board edge ground. TP1 and TP2
are found on the upper lefthand side of the compressor module. The voltage at TP1 should be +5 ± .25 VDC. The voltage at TP2 should be +12 ±
82 RLC-SVD03A-EN
Page 83

Variable Speed Fan System
.6 VDC. If there is no voltage at either of these two test points, check the
incoming 115 VAC between pins J6-1 (hot) and J6-5 (neutral) and check
fuse F1, mounted on the upper right-hand corner of the circuit board. If
the fuse is OK and the voltage between J6-1 and J6-5 is 115 VDC, but the
TP1 and TP2 voltages are out of range, replace the compressor module.
Figure 25 Variable Speed Fan Inverter
7. Remove connector P9 or P10 (whichever applies) from the inverter and
place a jumper wire between terminals F and FR on the female connector. See Figure 11-1 for the location of these wires. This will prevent the
control from reporting a fault diagnostic. Restart the unit and carefully
measure the DC voltage between wires C (+) and CR ( - ) on the same
female connector. The voltage should be 2 to 10 VDC when the compressor on the affected circuit is running. At compressor start, this voltage
will start at approximately 2 VDC and gradually ramp up to about 10 VDC.
This voltage level is directly proportional to fan speed. At 5 VDC, the fan
should be running at 50% of full speed and at 7 VDC the fan should be
running at 70% of full speed.
NOTE: The output from the compressor module is a pulse width modulated
signal, 10 volt peak and 10 Hz. fundamental. It's average value can be read
with a DC voltmeter.
8. Remove the jumper wire and reconnect connector P9 or P10. While the
inverter is still powered, measure the DC voltage between pins J9-4 (+)
and J9-3 ( - ) on the compressor module. The connector must be plugged
RLC-SVD03A-EN 83
Page 84

Variable Speed Fan System
on at both ends while measuring this voltage. If the reading is between
11.5 and 12.5 VDC, two problems may exist:
• The inverter indicates that it has a fault by opening a semiconductor
switch within the inverter. The inverter will send a fault signal to the UCM
when:
– It has gone through a self-shutdown. One cause of this could be
high line voltage. A 10% high line voltage could cause a diagnostic trip.
– The output frequency of the inverter is being internally limited to
a less than 50% of the signal speed commanded by the UCM.
Excessive fan motor current, high temperature or internal inverter
failures could cause this to occur.
• There is an open circuit in the fault signal wiring, somewhere between
the inverter and the compressor module.
If the reading is 2 VDC or less between pins J9-4 and J9-3, an inverter fault
diagnostic for the affected circuit should not be displayed. But if the variable
speed fan in still not working, check these two interconnecting wires from
the compressor module to the inverter, to be sure they are not shorted. The
inverter cannot send the compressor module a fault signal if these two wires
are shorted together.
9. If all settings and voltages through Step 8 are acceptable and the fan
does not operate, replace the variable speed fan inverter.
84 RLC-SVD03A-EN
Page 85

Other Service Features
Service Pumpdown
The UCM provides for a "onetime" Service Pumpdown mode, in which a
service-technician can direct a particular compressor to start and run for one
minute, to accomplish pumpdown of the low side of the refrigeration system
(evaporator and EXV).
To aid in accomplishing this pumpdown, certain noncritical diagnostics will be
ignored or disabled during this mode. Critical diagnostics such as those
associated with motor protection, high pressure, and chilled water flow, will
still be' enforced and may prevent or terminate the sequence.
Service Pumpdown Procedure
1. Place the Chiller in the Stop Mode using the Stop Button on the CLD and
allow the Chiller, if currently running, to go through its shutdown
sequence.
2. Manually close the liquid line shutoff valve on the circuit to be pumped
down.
3. Use the CPM's Operator Interface to begin the mode specifically for the
compressor/circuit you wish to pumpdown by selecting and "Enabling" it
in the Service Tests Group. The CLD will then be displaying an Operating
Code for Service.
4. The UCM shall then begin the start sequence (without restart inhibit) and
turn on the selected compressor once the EXV has opened to its preposition. The compressor shall run for a period of 1 minute at its minimum load and the condenser fans will stage under normal fan control.
The UCM will automatically shut off the compressor and condenser fans,
close the EXV, and return the chiller to the normal stop mode once the 1
minute timer has expired. The pumpdown sequence cannot be repeated
again without a UCM power down reset.
NOTE: The unload solenoid is always kept energized for approximately 1
hour after any compressor shutdown and the oil sump heater is continuously
energized.
5. Manually close the discharge line shutoff valve and the oil line shutoff
valve.
6. Remove all power to the chiller and service as required.
RLC-SVD03A-EN 85
Page 86

Other Service Features
WARNING
Hazardous Voltage w/Capacitors!
Disconnect all electric power, including remote disconnects
before servicing. Follow proper lockout/tagout procedures to
ensure the power cannot be inadvertently energized. For variable
frequency drives or other energy storing components provided by
Trane or others, refer to the appropriate manufacturer’s literature
for allowable waiting periods for discharge of capacitors. Verify
with an appropriate voltmeter that all capacitors have discharged.
Failure to disconnect power and discharge capacitors before
servicing could result in death or serious injury.
Note: For additional information regarding the safe discharge of
capacitors, see PROD-SVB06A-EN or PROD-SVB06A-FR
NOTE: If it is necessary to service the circuit/ compressor while allowing
the opposite circuit to start and run, first temporarily disconnect all power to
the chiller and then disconnect all control power connections to the
compressor and associated controls, by pulling off all the control power
voltage connectors on the right hand side of the associated MCSP module.
Control power to the associated contactor should also be disconnected, as
should the power lead(s) to the high pressure switch at the control power
terminal block. Repower the chiller, and lockout the circuit you are servicing
by entering the Service Tests Menu and enabling CIRCUIT LOCKOUT for the
desired circuit. Placing the chiller switch into the Auto mode will then allow
the opposite circuit to run.
7. Return all valves to their normal position. temporarily remove all power
and reconnect all wiring when servicing is completed.
8. Reset the chiller to clear diagnostics (and diagnostic history if desired) to
resume normal operation.
COMPRESSOR TEST
The UCM provides for a Compressor Test feature which is designed to allow a
service-technician to direct a particular compressor to be the next
compressor to stage on, run and modulate. This allows the temporary
override of the lead/lag sequencing currently in effect and relieves the
technician from forcing staging of compressors thru load or setpoint changes.
It is important to note that invoking this feature does not put the chiller into
any kind of override "mode" and no action is required to return to "normal
operation". The chiller will continue to run normally and the current lead/lag
sequence will again be in effect, once the selected compressor has started.
This feature is used in the Slide Valve Checkout Procedure detailed in Slide
Valve Checkout Procedure.
Invoking Compressor Test
1. With the Chiller in the Auto Mode, regardless of whether or not other
compressors are currently running, use the CLD to enter the Service
Tests Menu and enable the COMPRESSOR TEST for the appropriate
compressor. The selected compressor will automatically stage on, once
the anti-recycle or restart inhibit timer is satisfied and the EXV is preposi-
86 RLC-SVD03A-EN
Page 87

Other Service Features
tioned (if not already controlling). Most often the stage-on will be accompanied by a controlled stage-off of an already running compressor. Since
normal operation is in effect, a constant load or setpoint change may be
required to keep the compressor from staging off later.
Circuit Lockout
The UCM provides for a circuit lockout feature which prevents the
compressor(s) of the selected refrigeration circuit(s) from starting or- running.
If currently running, the compressor(s) and circuit will go through a controlled
shutdown. This lockout can be initiated with either an external hardware
interlock on either MCSP of a given circuit or can be invoked through the CLD.
Invoking Circuit Lockout
To invoke circuit lockout manually, simply enter the Service Tests Menu and
move to the CIRCUIT LOCKOUT display, and "enable" the circuit lockout for
the appropriate circuit. Circuit Lockout can then be verified in the Chiller
Report under "Circuits Locked Out". The circuit will remain locked out until
manually "disabled" at the same place in the menu.
To use an external hardwired interlock to accomplish lockout, refer to the IOM
or system wiring diagrams for the field installed interlock connections. The
external interlock feature must also be "enabled" in the Service Settings
Menu. (Open = normal, and closed = locked out).
Circuit Diagnostic Reset
The UCM provides for a Circuit Diagnostic Reset feature which unlike the
Chiller Reset, does not require a complete chiller shutdown to clear CMR
diagnostics. By using this feature it is possible to service and restart a circuit
that has been latched out on a circuit diagnostic while allowing the alternate
circuit to remain on-line making chilled water.
Invoking Circuit Diagnostic Reset
Using the CLD, enter the Diagnostic Menu, and "enable" circuit reset on the
appropriate circuit. This will clear all latching diagnostics for that circuit (but
will not remove them from the historical list. Clearing the History list can be
accomplished when compressors are running, by entering the Diagnostic
Menu and scrolling to the CLEAR DIAGNOSTIC HISTORY display). Press
Enter to clear the historical diagnostics.
RLC-SVD03A-EN 87
Page 88

Trane
A business of American Standard Companies
www.trane.com
Literature Order Number RLC-SVD03A-EN
File Number SV-RF-RLC-SVD03A-EN-0805
Supersedes RTAA-SB-9
Stocking Location Inland
For more information contact your local district
office or e-mail us at comfort@trane.com
Trane has a policy of continuous product data and product improvement and reserves
the right to change design and specifications without notice. Only qualified
technicians should perform the installation and servicing of equipment referred to in
this bulletin.
 Loading...