

Page 1
Determine Operation Mode
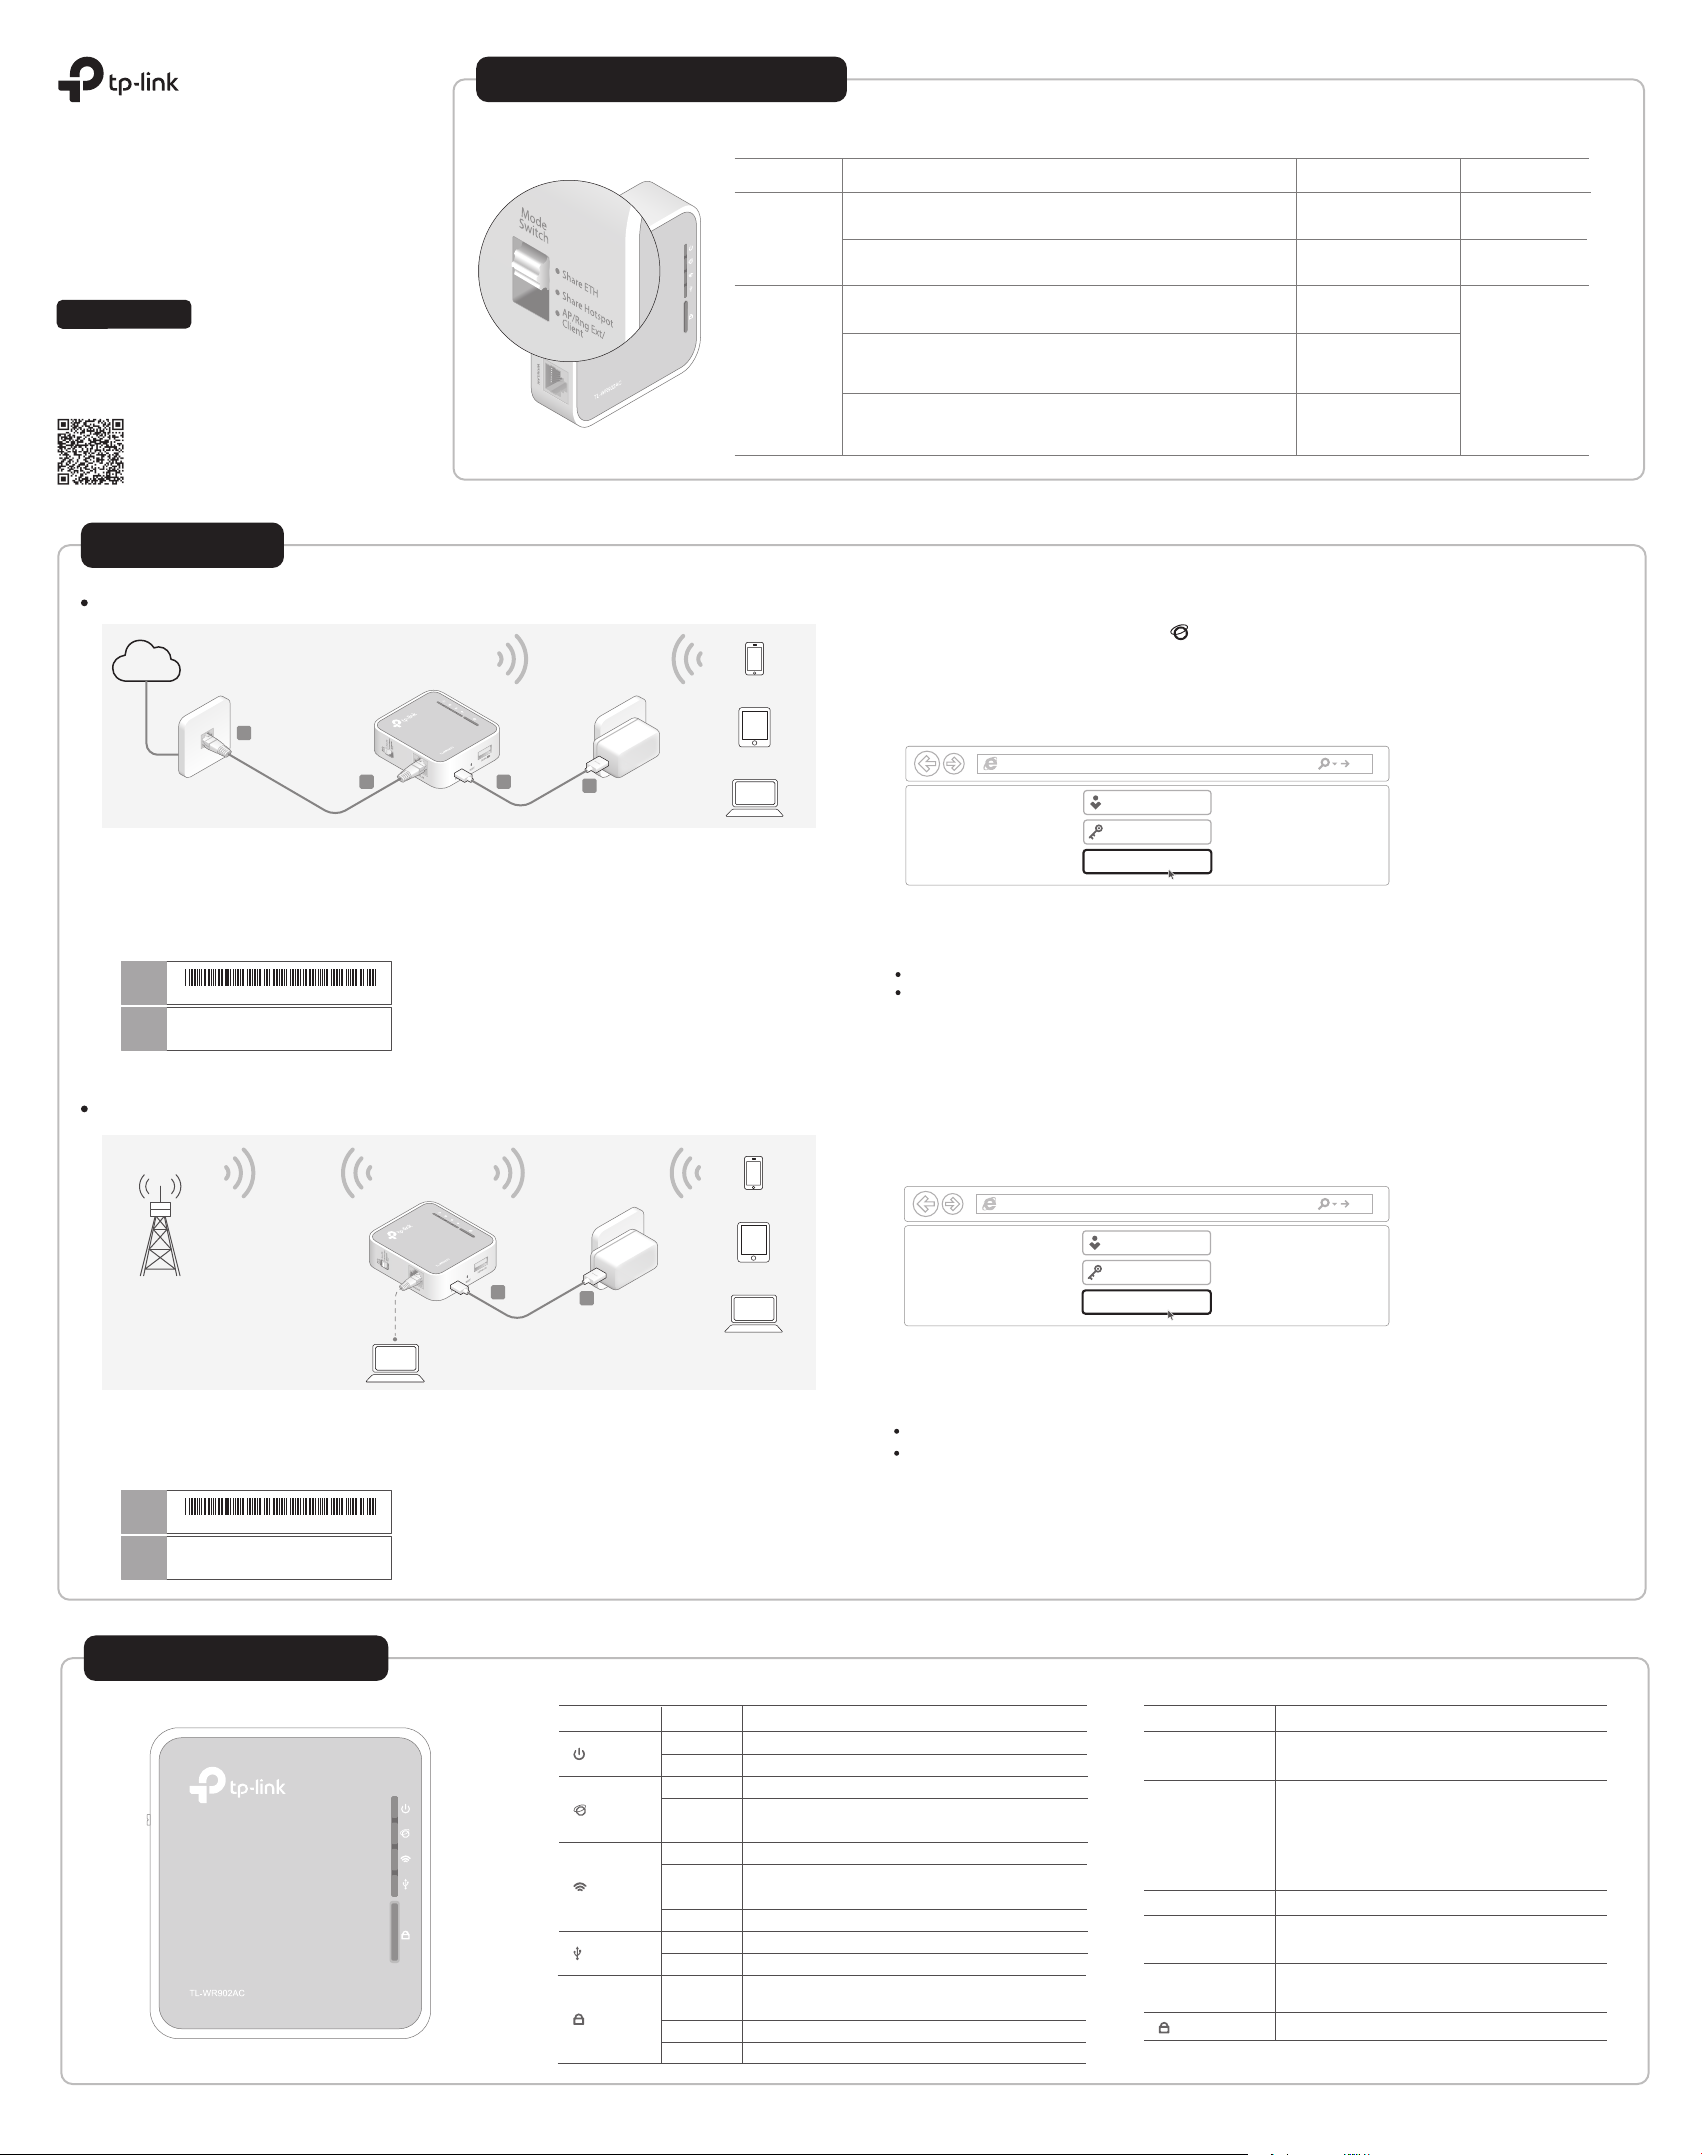
Refer to the following scenarios to determine an appropriate operation mode.
7106508201 REV3.0.1
Quick Installation Guide
AC750 Wi-Fi Travel Router
TL-WR902AC
Need setup video?
Scan the QR code, or visit
https://www.tp-link.com/download/TL-WR902AC.html#videos
During Travel
Router Mode
Internet
A
Wired Network
B C
1. Switch the Mode Switch to Share ETH and connect the hardware from Step A to D.
Tip: If you are using a 3G/4G USB modem with a SIM/UIM card, plug the USB modem into the 3G/4G USB port
to transfer the 3G/4G signal to Wi-Fi.
2. Connect your device to the router’s Wi-Fi. The default SSID (network name) and
Wireless Password are printed on the label at the back of the router.
Wireless
Password
/PIN
XXXXXXXX
2.4G: TP-Link_XXXX
SSID
5G: TP-Link_XXXX_5G
D
Scenario
During Travel
At Home
I Want To...
The wired network is only limited to one device to connect at a
time and I want to share the internet with more wireless devices.
I want to turn existing public Wi-Fi into a private network (wired and
wireless).
I want to turn the existing wired-only network into a wireless network.
I am in a Wi-Fi "dead zone" or a place with weak wireless signal. I want
to expand an existing Wi-Fi network for a better internet connection.
I have a wired-only device, for example, a smart TV, media player, or
game console. I want to connect it to a Wi-Fi network.
Operation Mode
Router (Default Mode)
Hotspot
Access Point
Range Extender
Client
Mode Switch
Share ETH
Share Hotspot
AP/Rng Ext/Client
3. Check whether the Internet LED is on.
- If yes, skip to Step 6.
- If no, continue with the steps below.
4. Launch a web browser and enter http://tplinkwifi.net in the address bar. Log in with
admin (in lowercase) for both username and password.
http://tplinkwi.net
admin
admin
Log In
5. Click Next to start the Quick Setup and then follow the step-by-step web instructions
to set up the internet connection.
Notes:
If you are not sure about your WAN Connection Type, click Auto Detect.
You can customize your
the Quick Setup, but you need to reconnect your wireless devices to the new Wi-Fi network(s).
Wireless Network Name
and
Password
for the 2.4GHz/5GHz wireless network during
6. Connect your own devices to the router’s Wi-Fi to enjoy the internet. The WAN/LAN
port functions as the WAN port in this mode.
Hotspot Mode
Public Hotspot
1. Switch the Mode Switch to Share Hotspot and connect the hardware from Step A to B.
2. Connect your device to the router wirelessly or via an Ethernet cable. The default SSID
(network name) and Wireless Password are printed on the label at the back of the router.
Wireless
Password
/PIN
XXXXXXXX
2.4G: TP-Link_XXXX
SSID
5G: TP-Link_XXXX_5G
A
B
Hardware Information
3. Launch a web browser and enter http://tplinkwifi.net in the address bar. Log in with
admin (in lowercase) for both username and password.
http://tplinkwi.net
admin
admin
Log In
4. Click Next to start the Quick Setup and then follow the step-by-step web instructions
to set up the internet connection.
Notes:
If you are not sure about your WAN Connection Type, use Dynamic IP in most cases or consult the ISP.
You can customize your
Quick Setup, but you need to reconnect your wireless devices to the new Wi-Fi network(s).
Local Network SSID
and
Password
for the 2.4GHz/5GHz wireless network during the
5. Connect your own device to the router wirelessly or via an Ethernet cable to enjoy the
internet. The WAN/LAN port functions as the LAN port in this mode.
(Power)
(Internet)
(Wireless)
(USB)
(WPS)
On/O
Blinking
On/O
Blinking
On
Blinking
O
On
O
On
Blinking
O
IndicationStatusLED
The router is on or o.
The router is initializing or being upgraded.
The internet is available or unavailable.
The WAN/LAN port is connected but internet is
unavailable when in Router or Access Point mode.
The wireless network is enabled.
The router is connecting to the host network
when in Range Extender or Client mode.
The wireless network is disabled.
A USB device is connected.
No USB device is connected.
This light stays on for 5 minutes when a WPS
connection is established, then goes o.
WPS connection is in progress.
No WPS connection is established.
Mode Switch
WAN/LAN Port
POWER Port
RESET Button
3G/4G USB Port
(WPS Button)
DescriptionItem
This switch is used to change the operation
mode of the router.
This port functions as the WAN port in Router
mode and as the LAN port in Hotspot, Range
Extender and Client modes. This port is for
connecting to the existinig router in Access
Point mode.
The port is used to connect the power adapter.
To reset the router, use a pin to press and hold
the button until all the LEDs turn o.
This port is used for plugging in a 3G/4G
modem or USB drive.
To establish WPS connection, press this button.
Page 2
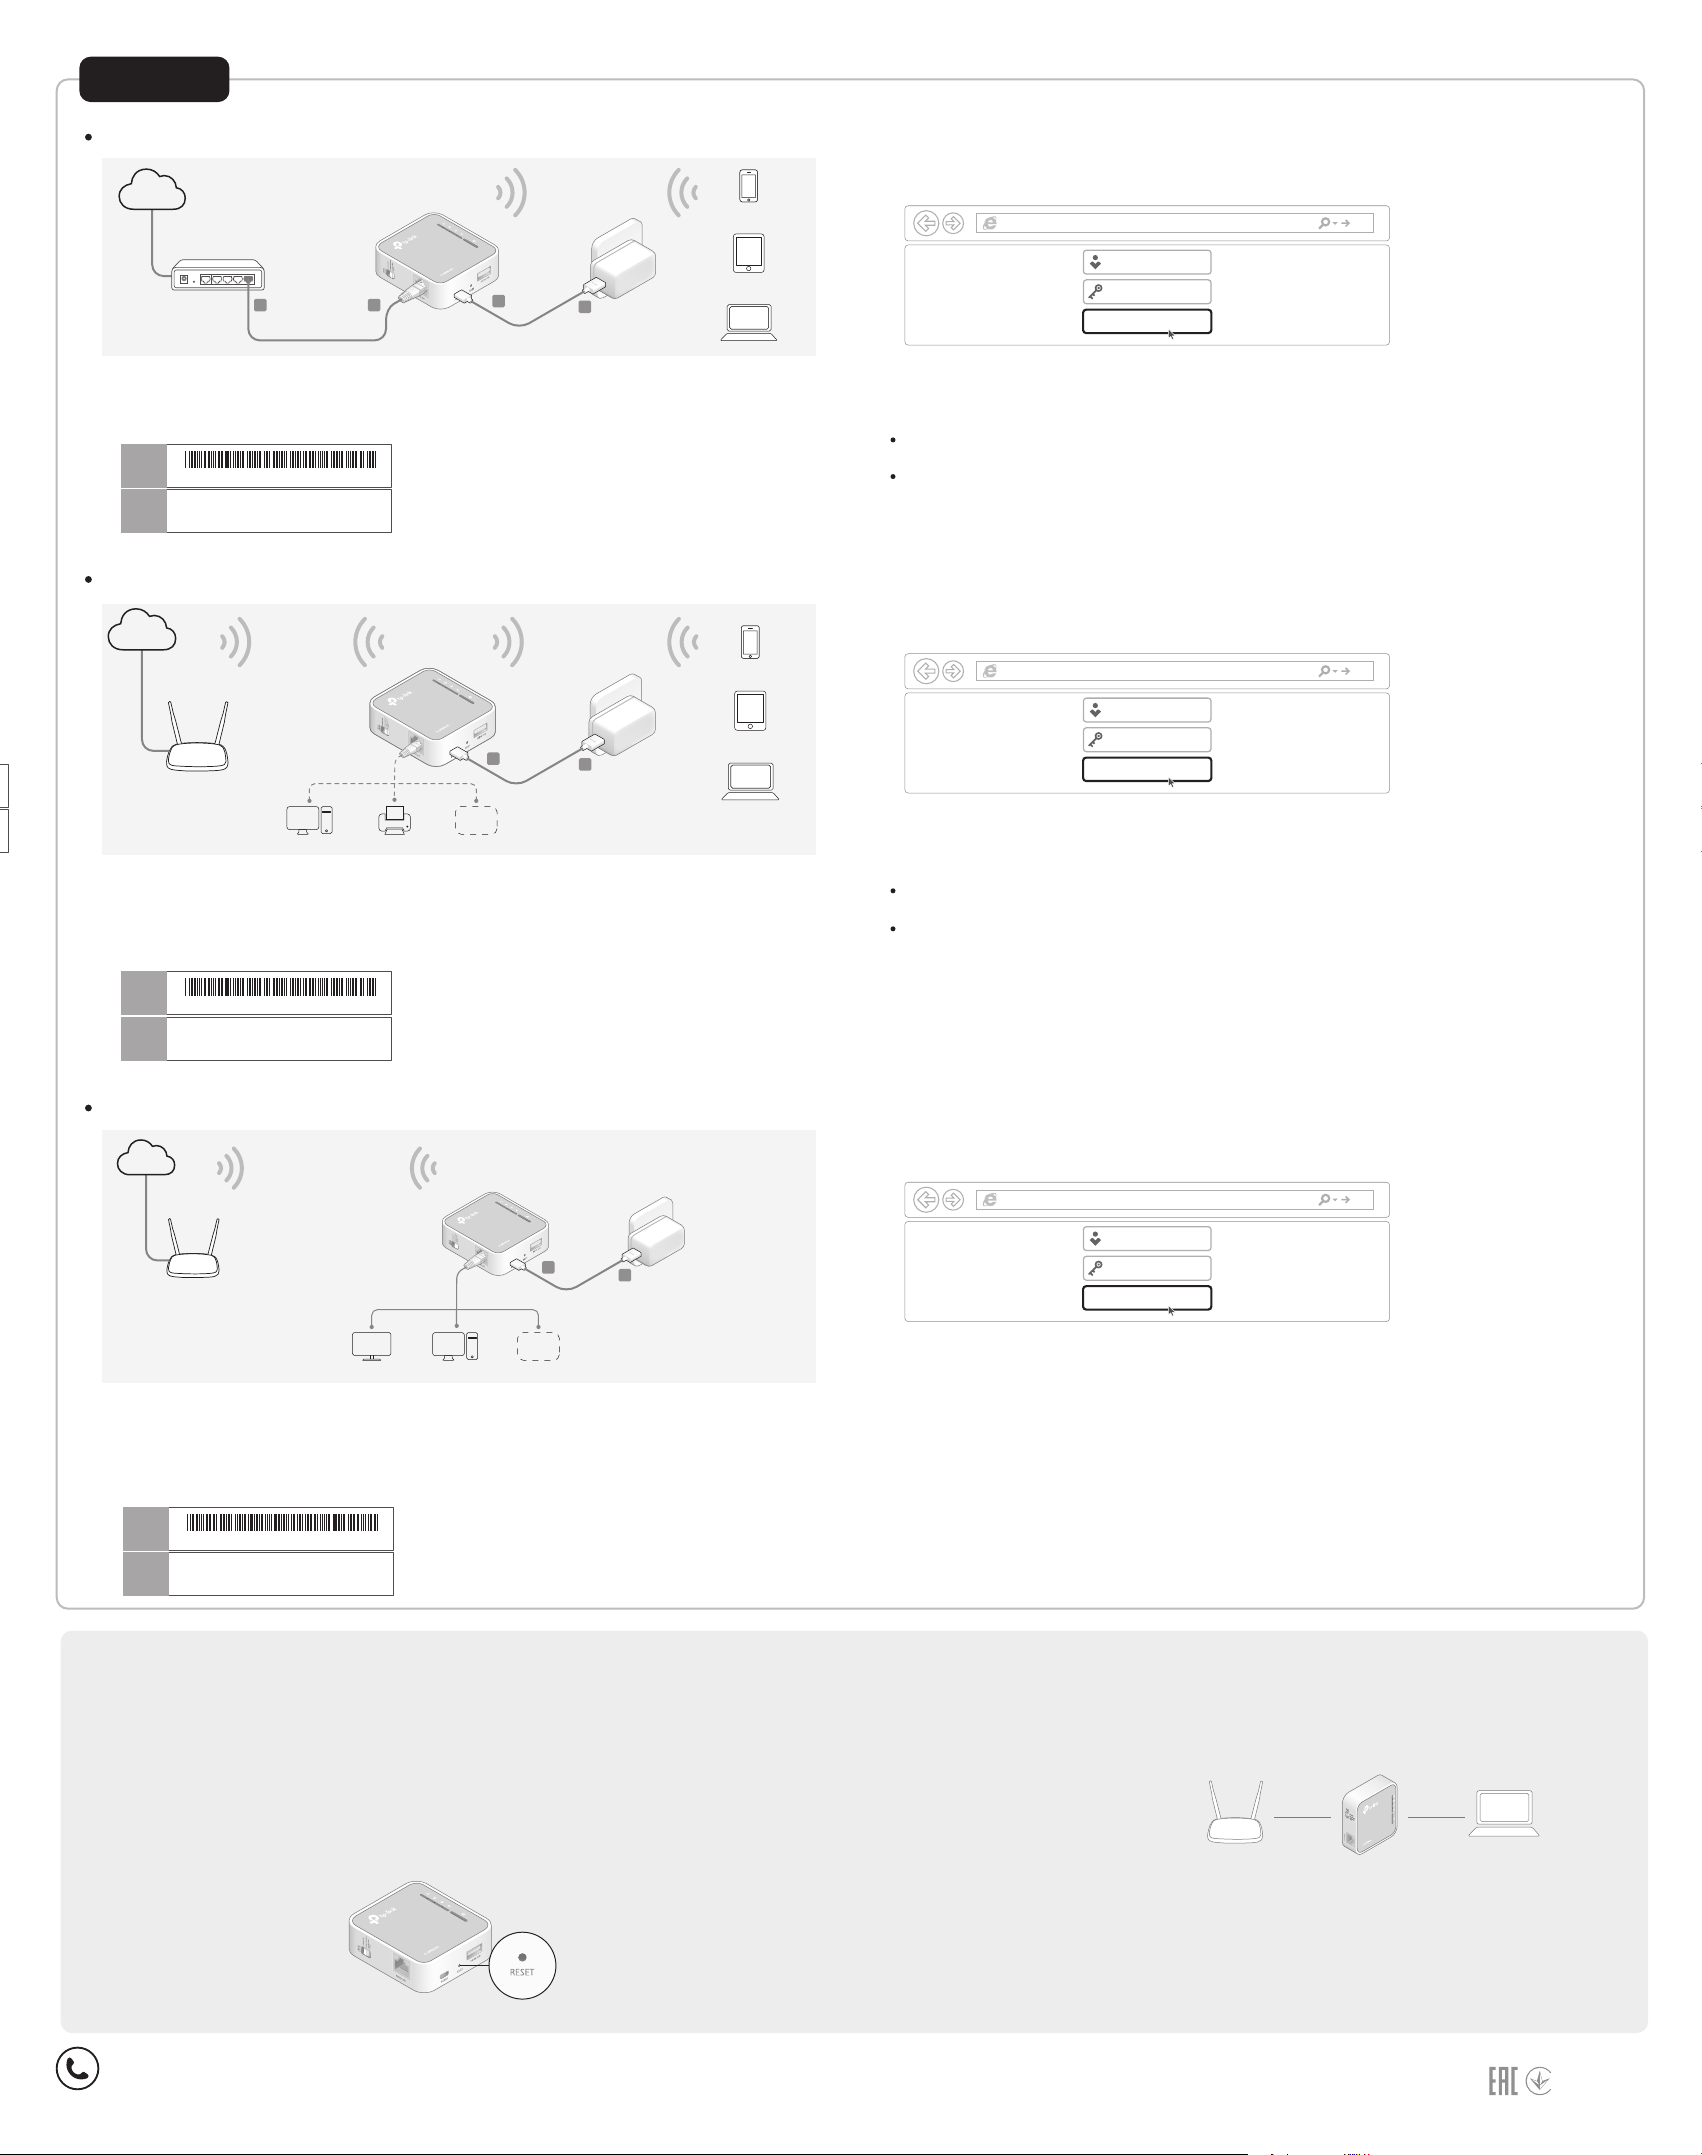
At Home
Access Point Mode
Internet
Existing Router
LAN
A
3. Launch a web browser and enter http://tplinkwifi.net in the address bar. Log in with
admin (in lowercase) for both username and password.
http://tplinkwi.net
admin
B
C
D
admin
Log In
1. Switch the Mode Switch to AP/Rng Ext/Client and connect the hardware from Step A to D.
2. Connect your device to the router’s Wi-Fi. The default SSID (network name) and Wireless
Password are printed on the label at the back of the router.
Wireless
Password
/PIN
XXXXXXXX
2.4G: TP-Link_XXXX
SSID
5G: TP-Link_XXXX_5G
Range Extender Mode
Internet
A
Host AP
OR OR
Desktop
Printer
1. Switch the Mode Switch to AP/Rng Ext/Client and
B
near your host AP.
Other Device
connect the hardware from Step A to
2. Connect your device to the router wirelessly or via an Ethernet cable. The default SSID
(network name) and Wireless Password are printed on the label at the back of the router.
Wireless
Password
/PIN
XXXXXXXX
2.4G: TP-Link_XXXX
SSID
5G: TP-Link_XXXX_5G
B
4. Click Next to start the Quick Setup, select Access Point and then follow the
step-by-step web instructions to set up the internet connection.
Notes:
You can customize your
Setup, but you need to reconnect your wireless devices to the new Wi-Fi network(s).
If you are not sure about the LAN Type of the router, use Smart IP in most cases.
Network Name
and
Password
for the 2.4GHz/5GHz wireless network during the Quick
5. Connect your own devices to the router’s Wi-Fi to enjoy the internet. The WAN/LAN
port is for connecting to the existing router in this mode.
3. Launch a web browser and enter http://tplinkwifi.net in the address bar. Log in with
admin (in lowercase) for both username and password.
http://tplinkwi.net
admin
admin
Log In
4. Click Next to start the Quick Setup, select Range Extender and then follow the
step-by-step web instructions to set up the internet connection.
Notes:
You can either copy or customize your
shares the same Wi-Fi password as that of your host network
If you are not sure about the LAN Type of the router, use Smart IP in most cases.
SSID
(Network Name) during the Quick Setup. The extended network
.
5. Relocate the router about halfway between your host AP and the Wi-Fi dead zone.
6. Connect your own device to the router wirelessly or via an Ethernet cable to enjoy the
internet. The WAN/LAN port functions as the LAN port in this mode.
Client Mode
Internet
A
Host AP
OR OR
Smart TV Desktop
1. Switch the Mode Switch to AP/Rng Ext/Client
Other Device
and connect the hardware from Step A to B
near your host AP.
2. Connect your device like smartphone, computer or pad to the router wirelessly or via an
Ethernet cable. The default SSID (network name) and Wireless Password are printed on
the label at the back of the router.
Wireless
Password
/PIN
XXXXXXXX
2.4G: TP-Link_XXXX
SSID
5G: TP-Link_XXXX_5G
Frequently Asked Questions (FAQ)
Q1. What should I do if there is no internet access?
• If you are using a cable modem, unplug the Ethernet cable and reboot the
modem. Wait until its Online LED is on and stable, and then reconnect the
cable to the modem.
• If you’re in a hotel room or on a trade show, the internet may be limited
and requires that you authenticate for the service or purchase the
internet access.
• If internet access is still unavailable, contact TP-Link Technical Support.
Q2. How do I restore the router to
its factory default settings?
• With the router powered on, use a
pin to press and hold the RESET
button until all the LEDs turn o,
and then release the button.
B
Q3. What should I do if I forget the router’s web management
uername or password?
• If you have not changed the default account, use the default admin (all
lowercase) for both username and password to log in.
• If you have changed the default account, refer to FAQ > Q2 to reset the
router and then use the default admin (all lowercase) to log in.
Q4. What should I do if I forget my Wi-Fi password?
• If you have not changed the default wireless password, it can be found on
the label of the router.
• If you have changed the default wireless password, please log in to the
router’s web management and go to Wireless 2.4GHz (or Wireless 5GHz)
> Wireless Security to retrieve or reset your password.
Q5. What should I do if my wireless signal is unstable or too weak?
It may be caused by too much interference.
• Set your wireless channel to a dierent one.
• Choose a location with less obstacles that may block the signal between
the travel router and the host AP. An open corridor or a spacious location is
ideal.
• Move the router to a new location away from Bluetooth devices and other
3. Launch a web browser and enter http://tplinkwifi.net in the address bar. Log in with
admin (in lowercase) for both username and password.
http://tplinkwi.net
admin
admin
Log In
4. Click Next to start the Quick Setup, select Client and then follow the step-by-step web
instructions to set up the internet connection.
Note: If you are not sure about the LAN Type of the router, use Smart IP in most cases.
5. After the setup, connect your wired-only device like smart TV, game console or media
player to the router via an Ethernet cable to enjoy the internet. The WAN/LAN port
functions as the LAN port in this mode.
household electronics, such as cordless phones, microwaves, and baby
monitors, to minimize signal interference.
• When in Range Extender mode, the ideal location to place the router is
halfway between your host AP and the Wi-Fi dead zone. If that is not
possible, place the router closer to your host AP to ensure stable
performance.
Safety Information
·Keep the device away from water, re, humidity or hot environments.
·Do not attempt to disassemble, repair, or modify the device.
·Do not use damaged charger or USB cable to charge the device.
·Do not use any other chargers than those recommended.
·Do not use the device where wireless devices are not allowed.
·Adapter shall be installed near the equipment and shall be easily accessible.
TP-Link hereby declares that the device is in compliance with the essential requirements and other relevant
provisions of directives 2014/53/EU, 2009/125/EC and 2011/65/EU.
The original EU declaration of conformity may be found at https://www.tp-link.com/en/ce.
For technical support, the user guide and more information, please visit https://www.tp-link.com/support
©2019 TP-Link
 Loading...