

Page 1

Configuration Guide
JetStream 24-Port Gigabit Stackable Smart Switch
with 4 10GE SFP+ Slots
T1700G-28TQ
1910011953 REV2.0.0
Page 2

FCC STATEMENT
This equipment has been tested and found to comply with the limits for a Class A digital
device, pursuant to part 15 of the FCC Rules. These limits are designed to provide
reasonable protection against harmful interference when the equipment is operated in a
commercial environment. This equipment generates, uses, and can radiate radio frequency
energy and, if not installed and used in accordance with the instruction manual, may cause
harmful interference to radio communications. Operation of this equipment in a residential
area is likely to cause harmful interference in which case the user will be required to correct
the interference at his own expense.
This device complies with part 15 of the FCC Rules. Operation is subject to the following
two conditions:
1) This device may not cause harmful interference.
2) This device must accept any interference received, including interference that may
cause undesired operation.
Any changes or modifications not expressly approved by the party responsible for
compliance could void the user’s authority to operate the equipment.
CE Mark Warning
This is a class A product. In a domestic environment, this product may cause radio
interference, in which case the user may be required to take adequate measures.
Industry Canada Statement
CAN ICES-3 (A)/NMB-3(A)
BSMI Notice
安全諮詢及注意事項
•請使用原裝電源供應器或只能按照本產品注明的電源類型使用本產品。
•清潔本產品之前請先拔掉電源線。請勿使用液體、噴霧清潔劑或濕布進行清潔。
•注意防潮,請勿將水或其他液體潑灑到本產品上。
•插槽與開口供通風使用,以確保本產品的操作可靠並防止過熱,請勿堵塞或覆蓋開口。
Page 3

•請勿將本產品置放於靠近熱源的地方。除非有正常的通風,否則不可放在密閉位置中。
•請不要私自打開機殼,不要嘗試自行維修本產品,請由授權的專業人士進行此項工作。
此為甲類資訊技術設備,于居住環境中使用時,可能會造成射頻擾動,在此種情況下,使用者
會被要求採取某些適當的對策。
Продукт сертифіковано згідно с правилами системи УкрСЕПРО на відповідність
вимогам нормативних документів та вимогам, що передбачені чинними законодавчими
актами України.
Safety Information
When product has power button, the power button is one of the way to shut off the
product; When there is no power button, the only way to completely shut off power is to
disconnect the product or the power adapter from the power source.
Don’t disassemble the product, or make repairs yourself. You run the risk of electric
shock and voiding the limited warranty. If you ne ed service, please contact us.
Avoid water and wet locations.
Explanation of the symbols on the product label
Symbol Explanation
AC voltage
RECYCLING
This product bears the selective sorting symbol for Waste electrical and
electronic equipment (WEEE). This means that this product must be handled
pursuant to European directive 2012/19/EU in order to be recycled or
dismantled to minimize its impact on the environment.
User has the choice to give his product to a competent recycling
organization or to the retailer when he buys a new electrical or electronic
equipment.
Page 4

CONTENTS
About This Guide
Intended Readers ................................................................................................................................................................1
Conventions ...........................................................................................................................................................................1
More Information .................................................................................................................................................................2
Accessing the Switch
Overview ................................................................................................................................................................................4
Web Interface Access ........................................................................................................................................................5
Login ................................................................................................................................................................................................................5
Save Config Function ..............................................................................................................................................................................6
Disable the Web Server .........................................................................................................................................................................7
Configure the Switch's IP Address and Default Gateway ...................................................................................................8
Command Line Interface Access ............................................................................................................................... 11
Console Login (only for switch with console port) ...............................................................................................................11
Telnet Login ...............................................................................................................................................................................................13
SSH Login ...................................................................................................................................................................................................14
Disable Telnet login ...............................................................................................................................................................................18
Disable SSH login ...................................................................................................................................................................................19
Copy running-config startup-config ............................................................................................................................................19
Change the Switch's IP Address and Default Gateway .....................................................................................................20
Managing System
System .................................................................................................................................................................................. 22
Overview ......................................................................................................................................................................................................22
Supported Features ..............................................................................................................................................................................22
System Info Configurations .......................................................................................................................................... 24
Using the GUI ............................................................................................................................................................................................24
Viewing the System Summary ...........................................................................................................................................24
Specifying the Device Description ..................................................................................................................................26
Setting the System Time ......................................................................................................................................................27
Setting the Daylight Saving Time .....................................................................................................................................28
Using the CLI .............................................................................................................................................................................................29
Viewing the System Summary ...........................................................................................................................................29
Setting the System Time ......................................................................................................................................................32
Page 5

Setting the Daylight Saving Time .....................................................................................................................................34
User Management Configurations ............................................................................................................................. 37
Using the GUI ............................................................................................................................................................................................37
Creating Admin Accounts ....................................................................................................................................................37
Creating Accounts of Other Types .................................................................................................................................38
Using the CLI .............................................................................................................................................................................................40
Creating Admin Accounts ....................................................................................................................................................40
Creating Accounts of Other Types .................................................................................................................................41
System Tools Configurations ...................................................................................................................................... 45
Using the GUI ............................................................................................................................................................................................45
Configuring the Boot File ......................................................................................................................................................45
Restoring the Configuration of the Switch .................................................................................................................46
Backing up the Configuration File ....................................................................................................................................46
Upgrading the Firmware ........................................................................................................................................................47
Rebooting the switch ..............................................................................................................................................................48
Configuring the Reboot Schedule ...................................................................................................................................48
Reseting the Switch .................................................................................................................................................................49
Using the CLI .............................................................................................................................................................................................49
Configuring the Boot File ......................................................................................................................................................49
Restoring the Configuration of the Switch .................................................................................................................50
Backing up the Configuration File ....................................................................................................................................51
Upgrading the firmware .........................................................................................................................................................51
Rebooting the switch ..............................................................................................................................................................52
Configuring the Reboot Schedule ...................................................................................................................................52
Reseting the Switch .................................................................................................................................................................53
Access Security Configurations ................................................................................................................................. 54
Using the GUI ............................................................................................................................................................................................54
Configuring the Access Control Feature .....................................................................................................................54
Configuring the HTTP Function ........................................................................................................................................56
Configuring the HTTPS Function .....................................................................................................................................57
Configuring the SSH Feature .............................................................................................................................................59
Enabling the Telnet Function ..............................................................................................................................................60
Using the CLI .............................................................................................................................................................................................60
Configuring the Access Control .......................................................................................................................................60
Configuring the HTTP Function ........................................................................................................................................62
Configuring the HTTPS Function .....................................................................................................................................63
Configuring the SSH Feature .............................................................................................................................................65
Enabling the Telnet Function ..............................................................................................................................................68
Page 6

SDM Template Configuration ....................................................................................................................................... 69
Using the GUI ............................................................................................................................................................................................69
Using the CLI .............................................................................................................................................................................................70
Appendix: Default Parameters ..................................................................................................................................... 72
Configuring Stack
Overview ............................................................................................................................................................................. 76
Stack Membership .................................................................................................................................................................................76
Stack Topology........................................................................................................................................................................................76
Stack Master Election and Re-election ......................................................................................................................................77
Unit ID ............................................................................................................................................................................................................77
Configuration Synchronization .......................................................................................................................................................78
Provisioned Configuration .................................................................................................................................................................78
Stack Configuration ......................................................................................................................................................... 79
Using the GUI ............................................................................................................................................................................................79
Configuring the Stack .............................................................................................................................................................79
Viewing the Stack Information ...........................................................................................................................................82
Using the CLI .............................................................................................................................................................................................84
Configuring the Stack Member’s Priority .....................................................................................................................84
Renumbering the Stack Member .....................................................................................................................................85
Configuring the Stack Port ..................................................................................................................................................85
Configuring the Provisioned Stack Member .............................................................................................................87
Configuration Example .................................................................................................................................................. 89
Ring Stack Application .........................................................................................................................................................................89
Network Requirements ..........................................................................................................................................................89
Configuration Scheme ...........................................................................................................................................................89
Using the GUI ...............................................................................................................................................................................89
Using the CLI ...............................................................................................................................................................................91
Replacing a Stack Member with a New Unit ...........................................................................................................................93
Network Requirements ..........................................................................................................................................................93
Configuration Scheme ...........................................................................................................................................................93
Using the GUI ...............................................................................................................................................................................93
Using the CLI ...............................................................................................................................................................................95
Appendix: Default Parameters ..................................................................................................................................... 98
Managing Physical Interfaces
Physical Interface ...........................................................................................................................................................100
Page 7

Overview ...................................................................................................................................................................................................100
Supported Features ...........................................................................................................................................................................100
Basic Parameters Configurations .............................................................................................................................101
Using the GUI .........................................................................................................................................................................................101
Using the CLI ..........................................................................................................................................................................................102
Port Mirror Configuration .............................................................................................................................................105
Using the GUI .........................................................................................................................................................................................105
Using the CLI ..........................................................................................................................................................................................107
Port Security Configuration ........................................................................................................................................109
Using the GUI .........................................................................................................................................................................................109
Using the CLI ..........................................................................................................................................................................................110
Port Isolation Configurations .....................................................................................................................................113
Using the GUI .........................................................................................................................................................................................113
Using the CLI ..........................................................................................................................................................................................114
Loopback Detection Configuration .........................................................................................................................116
Using the GUI .........................................................................................................................................................................................116
Using the CLI ..........................................................................................................................................................................................117
Configuration Examples ...............................................................................................................................................120
Example for Port Mirror ....................................................................................................................................................................120
Network Requirements .......................................................................................................................................................120
Configuration Scheme ........................................................................................................................................................120
Using the GUI ............................................................................................................................................................................120
Using the CLI ............................................................................................................................................................................122
Example for Port Isolation ...............................................................................................................................................................122
Network Requirements .......................................................................................................................................................122
Configuration Scheme ........................................................................................................................................................123
Using the GUI ............................................................................................................................................................................123
Using the CLI ............................................................................................................................................................................124
Example for Loopback Detection...............................................................................................................................................125
Network Requirements .......................................................................................................................................................125
Configuration Scheme ........................................................................................................................................................125
Using the GUI ............................................................................................................................................................................125
Using the CLI ............................................................................................................................................................................126
Appendix: Default Parameters ...................................................................................................................................128
Configuring LAG
LAG ......................................................................................................................................................................................131
Page 8

Overview ...................................................................................................................................................................................................131
Supported Features ...........................................................................................................................................................................131
LAG Configuration ..........................................................................................................................................................132
Using the GUI .........................................................................................................................................................................................133
Configuring Load-balancing Algorithm .....................................................................................................................133
Configuring Static LAG or LACP....................................................................................................................................134
Using the CLI ..........................................................................................................................................................................................136
Configuring Load-balancing Algorithm .....................................................................................................................136
Configuring Static LAG or LACP....................................................................................................................................137
Configuration Example .................................................................................................................................................141
Network Requirements .....................................................................................................................................................................141
Configuration Scheme .....................................................................................................................................................................141
Using the GUI .........................................................................................................................................................................................142
Using the CLI ..........................................................................................................................................................................................143
Appendix: Default Parameters ...................................................................................................................................145
Monitoring Traffic
Traffic Monitor .................................................................................................................................................................147
Using the GUI .........................................................................................................................................................................................147
Viewing the Traffic Summary ..........................................................................................................................................147
Viewing the Traffic Statistics in Detail ........................................................................................................................148
Using the CLI ..........................................................................................................................................................................................151
Appendix: Default Parameters ...................................................................................................................................152
Managing MAC Address Table
MAC Address Table .......................................................................................................................................................154
Overview ...................................................................................................................................................................................................154
Supported Features ...........................................................................................................................................................................154
Address Configurations ...............................................................................................................................................156
Using the GUI .........................................................................................................................................................................................156
Adding Static MAC Address Entries ..........................................................................................................................156
Modifying the Aging Time of Dynamic Address Entries...................................................................................159
Adding MAC Filtering Address Entries.......................................................................................................................160
Viewing Address Table Entries .......................................................................................................................................160
Using the CLI ..........................................................................................................................................................................................161
Adding Static MAC Address Entries ..........................................................................................................................161
Modifying the Aging Time of Dynamic Address Entries...................................................................................163
Page 9

Adding MAC Filtering Address Entries.......................................................................................................................163
Security Configurations ...............................................................................................................................................165
Using the GUI .........................................................................................................................................................................................165
Configuring MAC Notification Traps ...........................................................................................................................165
Limiting the Number of MAC Addresses in VLANs ............................................................................................166
Using the CLI ..........................................................................................................................................................................................167
Configuring MAC Notification Traps ...........................................................................................................................167
Limiting the Number of MAC Addresses in VLANs ............................................................................................169
Example for Security Configurations ......................................................................................................................171
Network Requirements .....................................................................................................................................................................171
Configuration Scheme .....................................................................................................................................................................171
Using the GUI .........................................................................................................................................................................................172
Using the CLI ..........................................................................................................................................................................................173
Appendix: Default Parameters ...................................................................................................................................174
Configuring 802.1Q VLAN
Overview ...........................................................................................................................................................................176
802.1Q VLAN Configuration .......................................................................................................................................177
Using the GUI .........................................................................................................................................................................................177
Configuring the PVID of the Port ...................................................................................................................................177
Configuring the VLAN ..........................................................................................................................................................178
Using the CLI ..........................................................................................................................................................................................179
Creating a VLAN .....................................................................................................................................................................179
Configuring the PVID of the Port ...................................................................................................................................180
Adding the Port to the Specified VLAN .....................................................................................................................181
Configuration Example .................................................................................................................................................183
Network Requirements .....................................................................................................................................................................183
Configuration Scheme .....................................................................................................................................................................183
Network Topology ...............................................................................................................................................................................184
Using the GUI .........................................................................................................................................................................................184
Using the CLI ..........................................................................................................................................................................................186
Appendix: Default Parameters ..................................................................................................................................188
Configuring MAC VLAN
Overview ............................................................................................................................................................................190
MAC VLAN Configuration ............................................................................................................................................191
Using the GUI .........................................................................................................................................................................................191
Page 10

Configuring 802.1Q VLAN ................................................................................................................................................191
Binding the MAC Address to the VLAN .....................................................................................................................192
Enabling MAC VLAN for the Port ...................................................................................................................................192
Using the CLI ..........................................................................................................................................................................................193
Configuring 802.1Q VLAN ................................................................................................................................................193
Binding the MAC Address to the VLAN .....................................................................................................................193
Enabling MAC VLAN for the Port ...................................................................................................................................194
Configuration Example ................................................................................................................................................196
Network Requirements .....................................................................................................................................................................196
Configuration Scheme .....................................................................................................................................................................196
Using the GUI .........................................................................................................................................................................................197
Using the CLI ..........................................................................................................................................................................................200
Appendix: Default Parameters ...................................................................................................................................204
Configuring Protocol VLAN
Overview ............................................................................................................................................................................206
Protocol VLAN Configuration.....................................................................................................................................207
Using the GUI .........................................................................................................................................................................................207
Configuring 802.1Q VLAN ................................................................................................................................................207
Creating Protocol Template ............................................................................................................................................208
Configuring Protocol VLAN .............................................................................................................................................208
Using the CLI ..........................................................................................................................................................................................209
Configuring 802.1Q VLAN ................................................................................................................................................209
Creating a Protocol Template .........................................................................................................................................210
Configuring Protocol VLAN ..............................................................................................................................................211
Configuration Example ................................................................................................................................................213
Network Requirements .....................................................................................................................................................................213
Configuration Scheme .....................................................................................................................................................................213
Using the GUI .........................................................................................................................................................................................214
Using the CLI ..........................................................................................................................................................................................219
Appendix: Default Parameters ...................................................................................................................................223
Configuring Spanning Tree
Spanning Tree ..................................................................................................................................................................225
Overview ...................................................................................................................................................................................................225
Basic Concepts ....................................................................................................................................................................................225
STP/RSTP Concepts ............................................................................................................................................................225
Page 11

MSTP Concepts .....................................................................................................................................................................229
STP Security ...........................................................................................................................................................................................230
STP/RSTP Configurations ...........................................................................................................................................233
Using the GUI .........................................................................................................................................................................................233
Configuring STP/RSTP Parameters on Ports .........................................................................................................233
Configuring STP/RSTP Globally .....................................................................................................................................235
Verifying the STP/RSTP Configurations ....................................................................................................................237
Using the CLI ..........................................................................................................................................................................................238
Configuring STP/RSTP Parameters on Ports .........................................................................................................238
Configuring Global STP/RSTP Parameters .............................................................................................................240
Enabling STP/RSTP Globally ............................................................................................................................................241
MSTP Configurations ....................................................................................................................................................243
Using the GUI .........................................................................................................................................................................................243
Configuring Parameters on Ports in CIST ................................................................................................................243
Configuring the MSTP Region ........................................................................................................................................245
Configuring MSTP Globally ...............................................................................................................................................250
Verifying the MSTP Configurations .............................................................................................................................252
Using the CLI ..........................................................................................................................................................................................253
Configuring Parameters on Ports in CIST ................................................................................................................253
Configuring the MSTP Region .......................................................................................................................................255
Configuring Global MSTP Parameters .......................................................................................................................258
Enabling Spanning Tree Globally...................................................................................................................................260
STP Security Configurations ......................................................................................................................................263
Using the GUI .........................................................................................................................................................................................263
Configuring the STP Security ..........................................................................................................................................263
(Optional) Configuring the Threshold and Cycle of TC Protect ...................................................................264
Using the CLI ..........................................................................................................................................................................................265
Configuring the STP Security ..........................................................................................................................................265
Configuring the TC Protect ..............................................................................................................................................267
Configuration Example for MSTP .............................................................................................................................269
Network Requirements .....................................................................................................................................................................269
Configuration Scheme .....................................................................................................................................................................269
Using the GUI .........................................................................................................................................................................................270
Using the CLI ..........................................................................................................................................................................................281
Appendix: Default Parameters ...................................................................................................................................288
Page 12

Configuring Layer 2 Multicast
Layer 2 Multicast .............................................................................................................................................................291
Overview ...................................................................................................................................................................................................291
Supported Layer 2 Multicast Protocols ..................................................................................................................................292
IGMP Snooping Configurations .................................................................................................................................293
Using the GUI .........................................................................................................................................................................................293
Configuring IGMP Snooping Globally .........................................................................................................................293
Enabling IGMP Snooping Globally ................................................................................................................293
(Optional) Configuring Unknown Multicast ..............................................................................................293
(Optional) Configuring Report Message Suppression ......................................................................294
Configuring Router Port Time and Member Port Time .....................................................................294
Configuring IGMP Snooping Last Listener Query ...............................................................................295
Verifying IGMP Snooping Status ...................................................................................................................295
Configuring the Port’s Basic IGMP Snooping Features....................................................................................296
Enabling IGMP Snooping on the Port .........................................................................................................296
(Optional) Configuring Fast Leave ................................................................................................................296
Configuring IGMP Snooping in the VLAN .................................................................................................................297
Configuring IGMP Snooping Globally in the VLAN ..............................................................................297
(Optional) Configuring the Static Router Ports in the VLAN ..........................................................298
Configuring the Multicast VLAN ....................................................................................................................................298
Creating Multicast VLAN and Configuring Basic Settings ..............................................................299
Viewing Dynamic Router Ports in the Multicast VLAN ......................................................................300
(Optional) Configuring the Static Router Ports ......................................................................................300
(Optional) Configuring the Querier ................................................................................................................................300
Configuring the Querier ......................................................................................................................................300
Viewing Settings of IGMP Querier ................................................................................................................301
Configuring IGMP Profile ....................................................................................................................................................301
Creating Profile .......................................................................................................................................................301
Searching Profile ....................................................................................................................................................302
Editing IP Range of the Profile ........................................................................................................................302
Binding Profile and Member Ports ................................................................................................................................303
Binding Profile and Member Ports ...............................................................................................................303
Configuring Max Groups a Port Can Join.................................................................................................304
Viewing IGMP Statistics on Each Port ........................................................................................................................304
Configuring Auto Refresh .................................................................................................................................305
Viewing IGMP Statistics .....................................................................................................................................305
Enabling IGMP Accounting and Authentication ....................................................................................................305
Page 13

Configuring IGMP Accounting Globally .....................................................................................................306
Configuring IGMP Authentication on the Port .......................................................................................306
Configuring Static Member Port ....................................................................................................................................307
Configuring Static Member Port ...................................................................................................................307
Viewing IGMP Static Multicast Groups ......................................................................................................308
Using the CLI ..........................................................................................................................................................................................308
Enabling IGMP Snooping Globally ................................................................................................................................308
Enabling IGMP Snooping on the Port .........................................................................................................................308
Configuring IGMP Snooping Parameters Globally ..............................................................................................309
Configuring Report Message Suppression ............................................................................................309
Configuring Unknown Multicast ....................................................................................................................310
Configuring IGMP Snooping Parameters on the Port .......................................................................................312
Configuring Router Port Time and Member Port Time .....................................................................312
Configuring Fast Leave ......................................................................................................................................313
Configuring Max Group and Overflow Action on the Port ..............................................................314
Configuring IGMP Snooping Last Listener Query ...............................................................................................315
Configuring IGMP Snooping Parameters in the VLAN ......................................................................................316
Configuring Router Port Time and Member Port Time .....................................................................316
Configuring Static Router Port .......................................................................................................................317
Configuring Static Multicast (Multicast IP and Forward Port)........................................................318
Configuring IGMP Snooping Parameters in the Multicast VLAN ................................................................319
Configuring Router Port Time and Member Port Time .....................................................................319
Configuring Static Router Port .......................................................................................................................320
Configuring the Querier ......................................................................................................................................................321
Enabling IGMP Querier ........................................................................................................................................321
Configuring Query Interval, Max Response Time and General Query Source IP ...............321
Configuring Multicast Filtering ........................................................................................................................................323
Creating Profile .......................................................................................................................................................323
Binding Profile to the Port .................................................................................................................................324
Enabling IGMP Accounting and Authentication ....................................................................................................325
Enabling IGMP Authentication on the Port ..............................................................................................325
Enabling IGMP Accounting Globally ............................................................................................................326
Configuring MLD Snooping.........................................................................................................................................327
Using the GUI .........................................................................................................................................................................................327
Configuring MLD Snooping Globally ...........................................................................................................................327
Enabling MLD Snooping Globally..................................................................................................................327
(Optional) Configuring Unknown Multicast ..............................................................................................327
(Optional) Configuring Report Message Suppression ......................................................................328
Page 14

Configuring Router Port Time and Member Port Time .....................................................................328
Configuring MLD Snooping Last Listener Query .................................................................................329
Verifying MLD Snooping Status ....................................................................................................................329
Configuring the Port’s Basic MLD Snooping Features .....................................................................................330
Enabling MLD Snooping on the Port ..........................................................................................................330
(Optional) Configuring Fast Leave ................................................................................................................330
Configuring MLD Snooping in the VLAN ..................................................................................................................331
Configuring MLD Snooping Globally in the VLAN ...............................................................................331
(Optional) Configuring the Static Router Ports in the VLAN ..........................................................332
Configuring the Multicast VLAN ....................................................................................................................................332
Creating Multicast VLAN and Configuring Basic Settings ..............................................................333
Viewing Dynamic Router Ports in the Multicast VLAN ......................................................................334
(Optional) Configuring the Static Router Ports ......................................................................................334
(Optional) Configuring the Querier ................................................................................................................................334
Configuring the Querier ......................................................................................................................................334
Viewing Settings of MLD Querier ..................................................................................................................335
Configuring MLD Profile .....................................................................................................................................................335
Creating Profile .......................................................................................................................................................335
Searching Profile ....................................................................................................................................................336
Editing IP Range of the Profile ........................................................................................................................336
Binding Profile and Member Ports ................................................................................................................................336
Binding Profile and Member Ports ...............................................................................................................337
Configuring Max Groups a Port Can Join.................................................................................................337
Viewing MLD Statistics on Each Port .........................................................................................................................338
Configuring Auto Refresh .................................................................................................................................338
Viewing MLD Statistics .......................................................................................................................................339
Configuring Static Member Port ....................................................................................................................................339
Configuring Static Member Port ...................................................................................................................339
Viewing MLD Static Multicast Groups ........................................................................................................340
Using the CLI ..........................................................................................................................................................................................340
Enabling MLD Snooping Globally ..................................................................................................................................340
Enabling MLD Snooping on the Port ...........................................................................................................................340
Configuring MLD Snooping Parameters Globally ................................................................................................341
Configuring Report Message Suppression ............................................................................................341
Configuring Unknown Multicast ....................................................................................................................342
Configuring MLD Snooping Parameters on the Port .........................................................................................344
Configuring Router Port Time and Member Port Time .....................................................................344
Configuring Fast Leave ......................................................................................................................................345
Page 15

Configuring Max Group and Overflow Action on the Port ..............................................................346
Configuring MLD Snooping Last Listener Query .................................................................................................347
Configuring MLD Snooping Parameters in the VLAN .......................................................................................348
Configuring Router Port Time and Member Port Time .....................................................................348
Configuring Static Router Port .......................................................................................................................349
Configuring Static Multicast (Multicast IP and Forward Port)........................................................350
Configuring MLD Snooping Parameters in the Multicast VLAN ..................................................................351
Configuring Router Port Time and Member Port Time .....................................................................351
Configuring Static Router Port .......................................................................................................................352
Configuring the Querier ......................................................................................................................................................353
Enabling MLD Querier .........................................................................................................................................353
Configuring Query Interval, Max Response Time and General Query Source IP ...............353
Configuring Multicast Filtering ........................................................................................................................................355
Creating Profile .......................................................................................................................................................355
Binding Profile to the Port .................................................................................................................................356
Viewing Multicast Snooping Configurations ........................................................................................................358
Using the GUI .........................................................................................................................................................................................358
Viewing IPv4 Multicast Snooping Configurations ................................................................................................358
Viewing IPv6 Multicast Snooping Configurations ................................................................................................358
Using the CLI ..........................................................................................................................................................................................359
Viewing IPv4 Multicast Snooping Configurations ................................................................................................359
Viewing IPv6 Multicast Snooping Configurations ................................................................................................360
Configuration Examples ...............................................................................................................................................362
Example for Configuring Basic IGMP Snooping .................................................................................................................362
Network Requirements .......................................................................................................................................................362
Configuration Scheme ........................................................................................................................................................362
Using the GUI ............................................................................................................................................................................363
Using the CLI ............................................................................................................................................................................366
Example for Configuring Multicast VLAN ...............................................................................................................................368
Network Requirements .......................................................................................................................................................368
Configuration Scheme ........................................................................................................................................................368
Network Topology .................................................................................................................................................................368
Using the GUI ............................................................................................................................................................................369
Using the CLI ............................................................................................................................................................................372
Example for Configuring Unknown Multicast and Fast Leave ....................................................................................374
Network Requirement ..........................................................................................................................................................374
Configuration Scheme ........................................................................................................................................................375
Using the GUI ............................................................................................................................................................................375
Page 16

Using the CLI ............................................................................................................................................................................378
Example for Configuring Multicast Filtering ..........................................................................................................................379
Network Requirements .......................................................................................................................................................379
Configuration Scheme ........................................................................................................................................................379
Network Topology .................................................................................................................................................................379
Using the GUI ............................................................................................................................................................................380
Using the CLI ............................................................................................................................................................................387
Appendix: Default Parameters ..................................................................................................................................390
Default Parameters for IGMP Snooping .................................................................................................................................390
Default Parameters for MLD Snooping ...................................................................................................................................391
Configuring Logical Interfaces
Overview ............................................................................................................................................................................398
Logical Interfaces Configurations ............................................................................................................................399
Using the GUI .........................................................................................................................................................................................399
Creating a Layer 3 Interface .............................................................................................................................................399
Configuring IPv4 Parameters of the Interface .......................................................................................................400
Configuring IPv6 Parameters of the Interface .......................................................................................................401
Viewing Detail Information of the Interface .............................................................................................................404
Using the CLI ..........................................................................................................................................................................................404
Creating a Layer 3 Interface .............................................................................................................................................404
Configuring IPv4 Parameters of the Interface .......................................................................................................406
Configuring IPv6 Parameters of the Interface .......................................................................................................407
Appendix: Default Parameters ...................................................................................................................................410
Configuring Static Routing
Overview ............................................................................................................................................................................412
IPv4 Static Routing Configuration ............................................................................................................................413
Using the GUI .........................................................................................................................................................................................413
Using the CLI ..........................................................................................................................................................................................414
IPv6 Static Routing Configuration ............................................................................................................................415
Using the GUI .........................................................................................................................................................................................415
Using the CLI ..........................................................................................................................................................................................416
Viewing Routing Table ..................................................................................................................................................418
Using the GUI .........................................................................................................................................................................................418
Viewing IPv4 Routing Table ..............................................................................................................................................418
Viewing IPv6 Routing Table ..............................................................................................................................................418
Page 17

Using the CLI ..........................................................................................................................................................................................419
Viewing IPv4 Routing Table ..............................................................................................................................................419
Viewing IPv6 Routing Table ..............................................................................................................................................420
Example for Static Routing ..........................................................................................................................................421
Network Requirements .....................................................................................................................................................................421
Configuration Scheme .....................................................................................................................................................................421
Using the GUI .........................................................................................................................................................................................421
Using the CLI ..........................................................................................................................................................................................422
Appendix: Default Parameter .....................................................................................................................................425
Configuring DHCP Relay
Overview ............................................................................................................................................................................427
DHCP Relay Configuration ..........................................................................................................................................428
Using the GUI .........................................................................................................................................................................................428
Enabling DHCP Relay and Configuring Option 82 ...............................................................................................428
Specifying DHCP Server for the Interface ...............................................................................................................429
Using the CLI ..........................................................................................................................................................................................430
Enabling DHCP Relay ...........................................................................................................................................................430
Configuring Option 82 .........................................................................................................................................................430
Specifying DHCP Server for the Interface ...............................................................................................................432
Configuration Example ................................................................................................................................................434
Network Requirements .....................................................................................................................................................................434
Configuration Scheme .....................................................................................................................................................................434
Using the GUI .........................................................................................................................................................................................435
Using the CLI ..........................................................................................................................................................................................436
Appendix: Default Parameters ...................................................................................................................................437
Configuring ARP
Overview ............................................................................................................................................................................439
ARP Configurations ........................................................................................................................................................440
Using the GUI .........................................................................................................................................................................................440
Viewing the ARP Entries .....................................................................................................................................................440
Adding Static ARP Entries Manually ............................................................................................................................441
Using the CLI ..........................................................................................................................................................................................441
Configuring ARP Function .................................................................................................................................................441
Page 18

Configuring QoS
QoS ......................................................................................................................................................................................446
Overview ...................................................................................................................................................................................................446
Supported Features ...........................................................................................................................................................................446
DiffServ Configuration ..................................................................................................................................................447
Using the GUI .........................................................................................................................................................................................448
Configuring Priority Mode .................................................................................................................................................448
Configuring Schedule Mode ............................................................................................................................................451
Using CLI ..................................................................................................................................................................................................452
Configuring Priority Mode .................................................................................................................................................452
Configuring Schedule Mode ............................................................................................................................................456
Bandwidth Control Configuration .............................................................................................................................459
Using the GUI .........................................................................................................................................................................................459
Configuring Rate Limit .........................................................................................................................................................459
Configuring Storm Control ...............................................................................................................................................460
Using the CLI ..........................................................................................................................................................................................461
Configuring Rate Limit on Port .......................................................................................................................................461
Configuring Storm Control ...............................................................................................................................................462
Configuration Examples ...............................................................................................................................................465
Example for Configuring SP Mode .............................................................................................................................................465
Network Requirements .......................................................................................................................................................465
Configuration Scheme ........................................................................................................................................................465
Using the GUI ............................................................................................................................................................................466
Using the CLI ............................................................................................................................................................................467
Example for Configuring WRR Mode ........................................................................................................................................468
Network Requirements .......................................................................................................................................................468
Configuration Scheme ........................................................................................................................................................469
Using the GUI ............................................................................................................................................................................469
Using the CLI ............................................................................................................................................................................478
Appendix: Default Parameters ...................................................................................................................................482
Configuring Voice VLAN
Overview ...........................................................................................................................................................................485
Voice VLAN Configuration ..........................................................................................................................................487
Using the GUI .........................................................................................................................................................................................488
(Optional) Configuring OUI Addresses .......................................................................................................................488
Configuring Voice VLAN Globally .................................................................................................................................489
Page 19

Configuring Voice VLAN Mode on Ports ..................................................................................................................490
Using the CLI .........................................................................................................................................................................................491
Configuration Example .................................................................................................................................................494
Network Requirements .....................................................................................................................................................................494
Configuration Scheme .....................................................................................................................................................................494
Network Topology..............................................................................................................................................................................494
Using the GUI .........................................................................................................................................................................................495
Using the CLI ..........................................................................................................................................................................................503
Appendix: Default Parameters ...................................................................................................................................508
Configuring ACL
Overview ............................................................................................................................................................................510
Introduction.............................................................................................................................................................................................510
Supported Features ...........................................................................................................................................................................510
ACL Configuration ..........................................................................................................................................................511
Using the GUI .........................................................................................................................................................................................511
Configuring Time-Range .................................................................................................................................................511
(Optional) Configuring Holiday ........................................................................................................................................512
Creating an ACL ......................................................................................................................................................................513
Configuring ACL Rules ........................................................................................................................................................514
Configuring Policy ..................................................................................................................................................................520
Configuring the ACL Binding and Policy Binding .................................................................................................522
Using the CLI ..........................................................................................................................................................................................526
Configuring Time Range ....................................................................................................................................................526
Configuring ACL .....................................................................................................................................................................527
Configuring Policy ..................................................................................................................................................................533
ACL Binding and Policy Binding .....................................................................................................................................535
Configuration Example for ACL .................................................................................................................................538
Network Requirements .....................................................................................................................................................................538
Network Topology ...............................................................................................................................................................................538
Configuration Scheme .....................................................................................................................................................................538
Using the GUI .........................................................................................................................................................................................539
Using the CLI ..........................................................................................................................................................................................544
Appendix: Default Parameters ...................................................................................................................................546
Configuring Network Security
Network Security ............................................................................................................................................................548
Page 20

Overview ...................................................................................................................................................................................................548
Supported Features ...........................................................................................................................................................................548
IP-MAC Binding Configurations.................................................................................................................................552
Using the GUI .........................................................................................................................................................................................552
Binding Entries Manually ....................................................................................................................................................552
Binding Entries Dynamically .............................................................................................................................................553
Viewing the Binding Entries ..............................................................................................................................................555
Using the CLI ..........................................................................................................................................................................................556
Binding Entries Manually ....................................................................................................................................................556
Viewing Binding Entries ......................................................................................................................................................558
DHCP Snooping Configuration ..................................................................................................................................559
Using the GUI .........................................................................................................................................................................................559
Enabling DHCP Snooping on VLAN .............................................................................................................................559
Configuring DHCP Snooping on Ports ......................................................................................................................560
(Optional) Configuring Option 82 ..................................................................................................................................561
Using the CLI ..........................................................................................................................................................................................562
Globally Configuring DHCP Snooping ........................................................................................................................562
Configuring DHCP Snooping on Ports ......................................................................................................................563
(Optional) Configuring Option 82 ..................................................................................................................................565
ARP Inspection Configurations .................................................................................................................................567
Using the GUI .........................................................................................................................................................................................567
Configuring ARP Detection ..............................................................................................................................................567
Configuring ARP Defend ....................................................................................................................................................568
Viewing ARP Statistics ........................................................................................................................................................569
Using the CLI ..........................................................................................................................................................................................570
Configuring ARP Detection ..............................................................................................................................................570
Configuring ARP Defend ....................................................................................................................................................571
Viewing ARP Statistics ........................................................................................................................................................573
DoS Defend Configuration ..........................................................................................................................................574
Using the GUI .........................................................................................................................................................................................574
Using the CLI ..........................................................................................................................................................................................575
802.1X Configuration ....................................................................................................................................................578
Using the GUI .........................................................................................................................................................................................578
Configuring the RADIUS Server .....................................................................................................................................578
Configuring 802.1X Globally ............................................................................................................................................582
Configuring 802.1X on Ports ...........................................................................................................................................584
Using the CLI ..........................................................................................................................................................................................585
Configuring the RADIUS Server .....................................................................................................................................585
Page 21

Configuring 802.1X Globally ............................................................................................................................................587
Configuring 802.1X on Ports ...........................................................................................................................................589
AAA Configuration ..........................................................................................................................................................592
Using the GUI .........................................................................................................................................................................................593
Globally Enabling AAA .........................................................................................................................................................593
Adding Servers ........................................................................................................................................................................593
Configuring Server Groups ...............................................................................................................................................595
Configuring the Method List ............................................................................................................................................596
Configuring the AAA Application List .........................................................................................................................597
Configuring Login Account and Enable Password .............................................................................................598
Using the CLI ..........................................................................................................................................................................................599
Globally Enabling AAA .........................................................................................................................................................599
Adding Servers ........................................................................................................................................................................599
Configuring Server Groups ...............................................................................................................................................602
Configuring the Method List ............................................................................................................................................603
Configuring the AAA Application List .........................................................................................................................604
Configuring Login Account and Enable Password .............................................................................................607
Configuration Examples ...............................................................................................................................................609
Example for DHCP Snooping and ARP Detection ............................................................................................................609
Network Requirements .......................................................................................................................................................609
Configuration Scheme ........................................................................................................................................................609
Using the GUI ............................................................................................................................................................................610
Using the CLI ............................................................................................................................................................................613
Example for 802.1X ............................................................................................................................................................................615
Network Requirements .......................................................................................................................................................615
Configuration Scheme ........................................................................................................................................................615
Network Topology .................................................................................................................................................................616
Using the GUI ............................................................................................................................................................................616
Using the CLI ............................................................................................................................................................................619
Example for AAA ..................................................................................................................................................................................621
Network Requirements .......................................................................................................................................................621
Configuration Scheme ........................................................................................................................................................622
Using the GUI ............................................................................................................................................................................622
Using the CLI ............................................................................................................................................................................625
Appendix: Default Parameters ...................................................................................................................................628
Page 22

Configuring LLDP
LLDP .....................................................................................................................................................................................633
Overview ...................................................................................................................................................................................................633
Supported Features ...........................................................................................................................................................................633
LLDP Configurations .....................................................................................................................................................634
Using the GUI .........................................................................................................................................................................................634
Global Config ............................................................................................................................................................................634
Port Config .................................................................................................................................................................................636
Using the CLI ..........................................................................................................................................................................................637
Global Config ............................................................................................................................................................................637
Port Config .................................................................................................................................................................................639
LLDP-MED Configurations ..........................................................................................................................................641
Using the GUI .........................................................................................................................................................................................641
Global Config ............................................................................................................................................................................641
Port Config .................................................................................................................................................................................642
Using the CLI ..........................................................................................................................................................................................644
Global Config ............................................................................................................................................................................644
Port Config .................................................................................................................................................................................645
Viewing LLDP Settings..................................................................................................................................................648
Using GUI ..................................................................................................................................................................................................648
Viewing LLDP Device Info .................................................................................................................................................648
Viewing LLDP Statistics .....................................................................................................................................................651
Using CLI ..................................................................................................................................................................................................652
Viewing LLDP-MED Settings ......................................................................................................................................653
Using GUI ..................................................................................................................................................................................................653
Using CLI ..................................................................................................................................................................................................655
Configuration Example .................................................................................................................................................656
Example for Configuring LLDP ....................................................................................................................................................656
Network Requirements .......................................................................................................................................................656
Network Topology .................................................................................................................................................................656
Configuration Scheme ........................................................................................................................................................656
Using the GUI ............................................................................................................................................................................656
Using CLI .....................................................................................................................................................................................657
Example for Configuring LLDP-MED ........................................................................................................................................663
Network Requirements .......................................................................................................................................................663
Configuration Scheme ........................................................................................................................................................663
Network Topology .................................................................................................................................................................663
Page 23

Using the GUI ............................................................................................................................................................................664
Using the CLI ............................................................................................................................................................................668
Appendix: Default Parameters ...................................................................................................................................675
Configuring Maintenance
Maintenance ....................................................................................................................................................................677
Overview ...................................................................................................................................................................................................677
Supported Features ...........................................................................................................................................................................677
Monitoring the System .................................................................................................................................................678
Using the GUI .........................................................................................................................................................................................678
Monitoring the CPU ..............................................................................................................................................................678
Monitoring the Memory ......................................................................................................................................................679
Using the CLI ..........................................................................................................................................................................................679
Monitoring the CPU ..............................................................................................................................................................679
Monitoring the Memory ......................................................................................................................................................680
System Log Configurations .......................................................................................................................................681
Using the GUI .........................................................................................................................................................................................682
Configuring the Local Log .................................................................................................................................................682
Configuring the Remote Log ...........................................................................................................................................682
Backing up the Log File .....................................................................................................................................................683
Viewing the Log Table .........................................................................................................................................................683
Using the CLI ..........................................................................................................................................................................................684
Configuring the Local Log .................................................................................................................................................684
Configuring the Remote Log ...........................................................................................................................................686
Diagnosing the Device ..................................................................................................................................................688
Using the GUI .........................................................................................................................................................................................688
Using the CLI ..........................................................................................................................................................................................689
Diagnosing the Network ...............................................................................................................................................690
Using the GUI .........................................................................................................................................................................................690
Configuring the Ping Test ..................................................................................................................................................690
Configuring the Tracert Test ...........................................................................................................................................691
Using the CLI ..........................................................................................................................................................................................691
Configuring the Ping Test ..................................................................................................................................................691
Configuring the Tracert Test ...........................................................................................................................................692
Configuration Example for Remote Log .................................................................................................................694
Network Requirements .....................................................................................................................................................................694
Configuration Scheme .....................................................................................................................................................................694
Page 24

Using the GUI ........................................................................................................................................................................................694
Using the CLI .........................................................................................................................................................................................695
Appendix: Default Parameters ...................................................................................................................................696
Configuring SNMP & RMON
SNMP Overview ...............................................................................................................................................................698
SNMP Configurations ....................................................................................................................................................699
Using the GUI .........................................................................................................................................................................................700
Enabling SNMP ........................................................................................................................................................................700
Creating an SNMP View......................................................................................................................................................700
Creating an SNMP Group ..................................................................................................................................................701
Creating SNMP Users .........................................................................................................................................................703
Creating SNMP Communities .........................................................................................................................................704
Using the CLI ..........................................................................................................................................................................................705
Enabling SNMP ........................................................................................................................................................................705
Creating an SNMP View......................................................................................................................................................707
Creating an SNMP Group ..................................................................................................................................................708
Creating SNMP Users ..........................................................................................................................................................710
Creating SNMP Communities .........................................................................................................................................711
Notification Configurations .........................................................................................................................................713
Using the GUI .........................................................................................................................................................................................713
Using the CLI ..........................................................................................................................................................................................715
Configuring the Host ............................................................................................................................................................715
Enabling SNMP Notification .............................................................................................................................................716
RMON Overview ..............................................................................................................................................................720
RMON Configurations ...................................................................................................................................................721
Using the GUI .........................................................................................................................................................................................721
Configuring Statistics ..........................................................................................................................................................721
Configuring History ...............................................................................................................................................................722
Configuring Event ..................................................................................................................................................................723
Configuring Alarm ..................................................................................................................................................................724
Using the CLI ..........................................................................................................................................................................................726
Configuring Statistics ..........................................................................................................................................................726
Configuring History ...............................................................................................................................................................727
Configuring Event ..................................................................................................................................................................728
Configuring Alarm ..................................................................................................................................................................730
Configuration Example ................................................................................................................................................732
Page 25

Network Requirements .....................................................................................................................................................................732
Configuration Scheme .....................................................................................................................................................................732
Network Topology ...............................................................................................................................................................................733
Using the GUI .........................................................................................................................................................................................733
Using the CLI ..........................................................................................................................................................................................738
Appendix: Default Parameters ...................................................................................................................................744
Page 26

About This Guide Intended Readers
About This Guide
This Configuration Guide provides information for managing T1700G Series Switches.
Please read this guide carefully before operation.
Intended Readers
This Guide is intended for network managers familiar with IT concepts and network
terminologies.
Conventions
When using this guide, please notice that features of the switch may vary slightly
depending on the model and software version you have. All screenshots, images,
parameters and descriptions documented in this guide are used for demonstration only.
The information in this document is subject to change without notice. Every effort has
been made in the preparation of this document to ensure accuracy of the contents, but
all statements, information, and recommendations in this document do not constitute
the warranty of any kind, express or implied. Users must take full responsibility for their
application of any products.
In this Guide, the following conventions are used:
The symbol
make better use of your device.
For GUI:
Menu Name > Submenu Name > Tab page indicates the menu structure. System >
System Info > System Summary means the System Summary page under the System Info
menu option that is located under the System menu.
Bold font indicates a button, a toolbar icon, menu or menu item.
For CLI:
stands for
. Notes contains suggestions or references that helps you
Note
Bold Font An unalterable keyword.
For example: show logging
Normal Font A constant (several options are enumerated and only one can be
selected).
For example: no bandwidth {all | ingress | egress}
{} Items in braces { } are required.
Configuration Guide 1
Page 27

About This Guide More Information
[] Items in square brackets [ ] are optional.
| Alternative items are grouped in braces and separated by vertical bars |.
For example: speed {10 | 100 | 1000 | 10000}
Italic Font
Common combination:
{[ ][ ][ ]} A least one item in the square brackets must be selected.
A variable (an actual value must be assigned).
For example: bridge aging-time
For example: bandwidth {[ingress
This command can be used on three occasions:
bandwidth ingress
bandwidth egress
bandwidth ingress
ingress and egress bandwidth.
i
ngress-rate
egress-rate
ingress-rate
aging-time
ingress-rate
is used to restrict ingress bandwidth.
is used to restrict egress bandwidth.
egress
egress-rate
] [egress
egress-rate
is used to restrict
More Information
The latest software and documentations can be found at Download Center at http://
www.tp-link.com/support.
]}
The Installation Guide (IG) can be found where you find this guide or inside the package
of the switch.
Specifications can be found on the product page at http://www.tp-link.com.
A Technical Support Forum is provided for you to discuss our products at http://forum.
tp-link.com.
Our Technical Support contact information can be found at the Contact Technical
Support page at http://www.tp-link.com/support.
Configuration Guide 2
Page 28

Part 1
Accessing the Switch
CHAPTERS
1. Overview
2. Web Interface Access
3. Command Line Interface Access
Page 29

Accessing the Switch Overview
1
Overview
You can access and manage the switch using the GUI (Graphical User Interface, also called
web interface in this text) or using the CLI (Command Line Interface). There are equivalent
functions in the web interface and the command line interface, while web configuration is
easier and more visual than the CLI configuration. You can choose the method according
to their available applications and preference.
Configuration Guide 4
Page 30
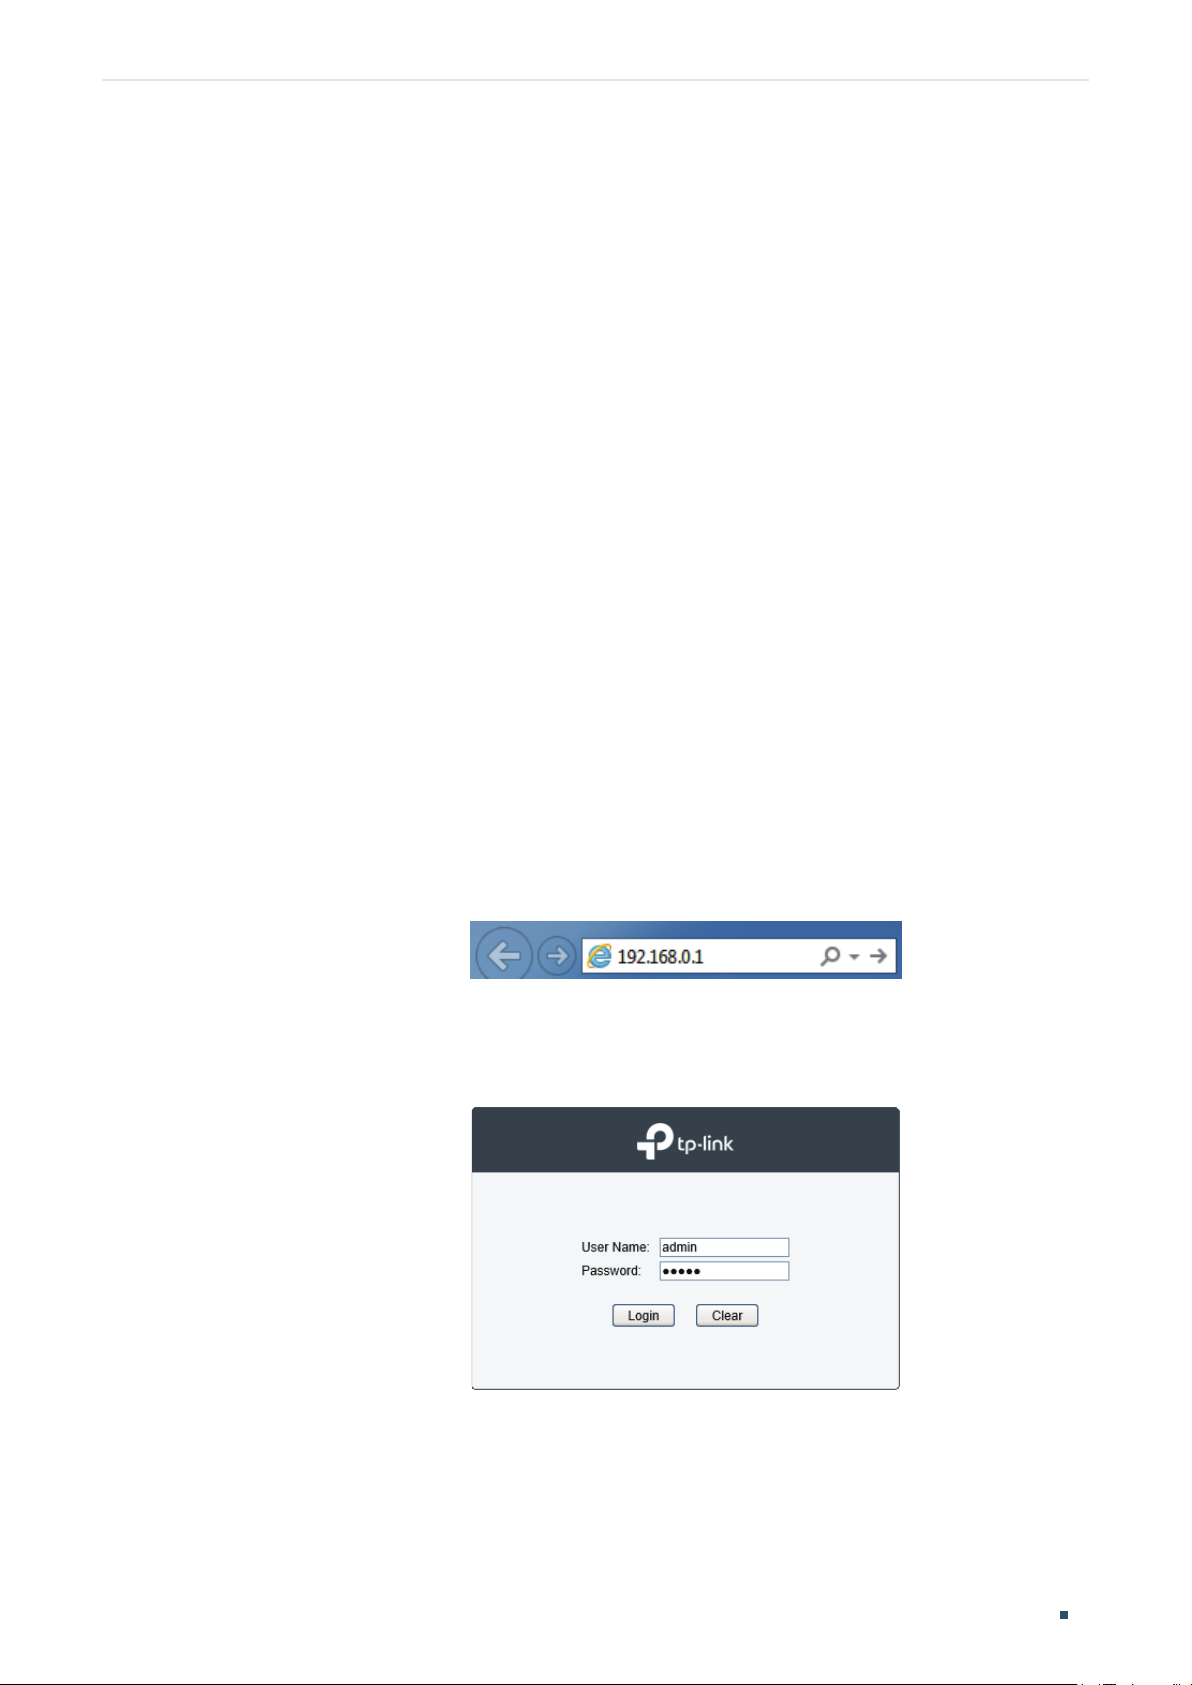
Accessing the Switch Web Interface Access
2
Web Interface Access
You can access the switch’s web interface through the web-based authentication.
The switch uses two built-in web servers, HTTP server and HTTPS server, for user
authentication.
The following example shows how to login via the HTTP server.
2.1 Login
To manage your switch through a web browser in the host PC:
1) Make sure that the route between the host PC and the switch is available.
2) Launch a web browser. The supported web browsers include, but are not limited to, the
following types:
IE 8.0, 9.0, 10.0, 11.0
Firefox 26.0, 27.0
Chrome 32.0, 33.0
3) Enter the switch’s IP address in the web browser’s address bar. The switch’s default IP
address is 192.168.0.1.
Figure 2-1 Enter the switch's IP addresss in the browser
4) Enter the username and password in the pop-up login window. Use admin for both
username and password in lower case letters.
Figure 2-2 Login authentication
5) The typical web interface displays below. You can view the switch’s running status and
configure the switch on this interface.
Configuration Guide
5
Page 31

Accessing the Switch Web Interface Access
Figure 2-3 Web interface
2.2 Save Config Function
The switch’s configuration files fall into two types: the running configuration file and the
start-up configuration file.
After you perform configurations on the sub-interfaces and click Apply, the modifications
will be saved in the running configuration file. The configurations will be lost when the
switch reboots.
If you need to keep the configurations after the switch reboots, please use the Save Config
function on the main interface to save the configurations in the start-up configuration file.
Configuration Guide 6
Page 32

Accessing the Switch Web Interface Access
Figure 2-4 Save Config
2.3 Disable the Web Server
You can shut down the HTTP server or HTTPS server to block any access to the web
interface.
System > Access Security > HTTP Config, disable the HTTP server and click Apply.
Go to
Figure 2-5 Shut down HTTP server
Configuration Guide
7
Page 33

Accessing the Switch Web Interface Access
System > Access Security > HTTPS Config, disable the HTTPS server and click Apply.
Go to
Figure 2-6 Disbale the HTTPS Server
2.4 Configure the Switch's IP Address and Default Gateway
If you want to access the switch via a specified port (hereafter referred to as the access
port), you can configure the port as a routed port and specify its IP address, or configure
the IP address of the VLAN which the access port belongs to.
Change the IP Address
By default, all the ports belong to VLAN 1 with the VLAN interface IP 192.168.0.1.
The following example shows how to change the switch’s default access IP address
192.168.0.1.
1) Go to
Routing > Interface > Interface Config
the Interface List. Click Edit to modify the VLAN1’s IP address.
Figure 2-7 Change VLAN1's IP address
. The default access IP address in VLAN 1 in
Configuration Guide 8
Page 34

Accessing the Switch Web Interface Access
2) Choose the IP Address Mode as Static. Enter the new access address in the IP
Address field and click Apply. Make sure that the route between the host PC and the
switch’s new IP address is available.
Figure 2-8 Specify the IP address
3) Enter the new IP address in the web browser to access the switch.
4) Click Save Config to save the settings.
Configure the Default Gateway
The following example shows how to configure the switch’s gateway. By default, the switch
has no default gateway.
1) Go to page
Routing > Static Routing > IPv4 Static Routing Config
. Configure the parameters
related to the switch’s gateway and click Create.
Figure 2-9 Configure the default gateway
Destination Specify the destination as 0.0.0.0.
Configuration Guide
9
Page 35

Accessing the Switch Web Interface Access
Subnet Mask Specify the subnet mask as 255.255.255.0.
Next Hop Configure your desired default gateway as the next hop’s IP address.
Distance Specify the distance as 1.
2) Click Save Config to save the settings.
3) Check the routing table to verify the default gateway you configured. The entry marked
in red box displays the valid default gateway.
Figure 2-10 View the default gateway
Configuration Guide 10
Page 36

Accessing the Switch Command Line Interface Access
3
Command Line Interface Access
Users can access the switch's command line interface through the console (only for switch
with console port), Telnet or SSH connection, and manage the switch with the command
lines.
Console connection requires the host PC connecting to the switch’s console port directly,
while Telnet and SSH connection support both local and remote access.
The following table shows the typical applications used in the CLI access.
Table 3-1 Method list
Method Using Port Typical Applications
Console Console port (connected
directly)
Telnet RJ-45 port CMD
SSH RJ-45 port Putty
Hyper Terminal
3.1 Console Login (only for switch with console port)
Follow these steps to log in to the switch via the Console port:
1) Connect the PC or terminal to the Console port on the switch with the serial cable.
2) Start the terminal emulation program (such as the Hyper Terminal) on the PC and
configure the terminal emulation program as follows:
·Baud Rate: 38400bps
·Data Bits: 8
·Parity: None
·Stop Bits: 1
·Flow Control: None
3) Press Enter in the main window and Switch> will appear, indicating that you have
successfully logged in to the switch and you can use the CLI now.
Configuration Guide
11
Page 37

Accessing the Switch Command Line Interface Access
Figure 3-1 CLI Main Window
4) Enter enable to enter the User EXEC Mode to further configure the switch.
Figure 3-2 User EXEC Mode
Note:
In Windows XP, go to Start > All Programs > Accessories > Communications > Hyper Terminal to
open the Hyper Terminal and configure the above settings to log in to the switch.
Configuration Guide 12
Page 38

Accessing the Switch Command Line Interface Access
3.2 Telnet Login
The switch supports Login Local Mode for authentication by default.
Login Local Mode: Username and password are required, which are both admin by default.
The following steps show how to manage the switch via the Login Local Mode:
1) Make sure the switch and the PC are in the same LAN (Local Area Network). Click Start
and type in cmd in the Search bar and press Enter.
Figure 3-3 Open the cmd Window
2) Type in telnet 192.168.0.1 in the cmd window and press Enter.
Figure 3-4 Log In to the Switch
3) Type in the login username and password (both admin by default). Press Enter and you
will enter User EXEC Mode.
Figure 3-5 Enter User EXEC Mode
4) Type in enable command and you will enter Privileged EXEC Mode. By default no
password is needed. Later you can set a password for users who want to access the
Privileged EXEC Mode.
Configuration Guide
13
Page 39

Accessing the Switch Command Line Interface Access
Figure 3-6 Enter Privileged EXEC Mode
Now you can manage your switch with CLI commands through Telnet connection.
3.3 SSH Login
SSH login supports the following two modes: Password Authentication Mode and Key
Authentication Mode. You can choose one according to your needs:
Password Authentication Mode: Username and password are required, which are both
admin by default.
Key Authentication Mode (Recommended): A public key for the switch and a private key
for the client software (PuTTY) are required. You can generate the public key and the
private key through the PuTTY Key Generator.
Before logging in via SSH, follow the steps below to enable SSH on the terminal emulation
program:
Figure 3-7 Enable SSH
Password Authentication Mode
1) Open PuTTY and go to the Session page. Enter the IP address of the switch in the Host
Name field and keep the default value 22 in the Port field; select SSH as the Connection
type. Click Open.
Configuration Guide 14
Page 40

Accessing the Switch Command Line Interface Access
Figure 3-8 Configurations in PuTTY
2) Enter the login username and password to log in to the switch, and you can continue to
configure the switch.
Figure 3-9 Log In to the Switch
Key Authentication Mode
1) Open the PuTTY Key Generator. In the Parameters section, select the key type and
enter the key length. In the Actions section, click Generate to generate a public/private
key pair. In the following figure, an SSH-2 RSA key pair is generated, and the length of
each key is 1024 bits.
Configuration Guide
15
Page 41

Accessing the Switch Command Line Interface Access
Figure 3-10 Generate a Public/Private Key Pair
Note:
The key length should be between 512 and 3072 bits.
•
You can accelerate the key generation process by moving the mouse quickly and randomly in
•
the Key section.
2) After the keys are successfully generated, click Save public key to save the public key
to a TFTP server; click Save private key to save the private key to the host PC.
Figure 3-11 Save the Generated Keys
Configuration Guide 16
Page 42

Accessing the Switch Command Line Interface Access
3) On Hyper Terminal, download the public key file from the TFTP server to the switch as
shown in the following figure:
Figure 3-12 Download the Public Key to the Switch
Note:
The key type should accord with the type of the key file. In the above CLI, v1 corresponds to
•
SSH-1 (RSA), and v2 corresponds to SSH-2 RSA and SSH-2 DSA.
The key downloading process cannot be interrupted.
•
4) After the public key is downloaded, open PuTTY and go to the Session page. Enter the
IP address of the switch and select SSH as the Connection type (keep the default value
in the Port field).
Figure 3-13 Configure the Host Name and Connection Type
5) Go to Connection > SSH > Auth. Click Browse to download the private key file to
PuTTY. Click Open to start the connection and negotiation.
Configuration Guide
17
Page 43

Accessing the Switch Command Line Interface Access
Figure 3-14 Download the Private Key to PuTTY
6) After negotiation is completed, enter the username to log in. If you can log in without
entering the password, the key authentication completed successfully.
Figure 3-15 Log In to the Switch
3.4 Disable Telnet login
You can shut down the Telnet function to block any Telnet access to the CLI interface.
Using the GUI:
System > Access Security > Telnet Config, disable the Telnet function and click Apply.
Go to
Figure 3-16 Disable Telnet login
Configuration Guide 18
Page 44

Accessing the Switch Command Line Interface Access
Using the CLI:
Switch#configure
Switch(config)#telnet disable
3.5 Disable SSH login
You can shut down the SSH server to block any SSH access to the CLI interface.
Using the GUI:
System > Access Security > SSH Config, disable the SSH server and click Apply.
Go to
Figure 3-17 Shut down SSH server
Using the CLI:
Switch#configure
Switch(config)#no ip ssh server
3.6 Copy running-config startup-config
The switch’s configuration files fall into two types: the running configuration file and the
start-up configuration file.
After you enter each command line, the modifications will be saved in the running
configuration file. The configurations will be lost when the switch reboots.
If you need to keep he configurations after the switch reboots, please user the command
copy running-config startup-config to save the configurations in the start-up
configuration file.
Switch(config)#end
Switch#copy running-config startup-config
Configuration Guide
19
Page 45

Accessing the Switch Command Line Interface Access
3.7 Change the Switch's IP Address and Default Gateway
If you want to access the switch via a specified port (hereafter referred to as the access
port), you can configure the port as a routed port and specify its IP address, or configure
the IP address of the VLAN which the access port belongs to.
Change the IP Address
By default, all the ports belong to VLAN 1 with the VLAN interface IP 192.168.0.1/24. In
the following example, we will show how to replace the switch’s default access IP address
192.168.0.1/24 with 192.168.0.10/24.
Switch#configure
Switch(config)#interface vlan 1
Switch(config-if)#ip address 192.168.0.10 255.255.255.0
The connection will be interrupted and you should telnet to the switch's new IP address
192.168.0.10.
C:\Users\Administrator>telnet 192.168.0.10
User:admin
Password:admin
Switch>enable
Switch#copy running-config startup-config
Configure the Default Gateway
In the following example, we will show how to configure the switch’s gateway as
192.168.0.100. By default, the switch has no default gateway.
Switch#configure
Switch(config)#ip route 0.0.0.0 255.255.255.0 192.168.0.100 1
Switch(config)#end
Switch#copy running-config startup-config
Configuration Guide 20
Page 46

Part 2
Managing System
CHAPTERS
1. System
2. System Info Configurations
3. User Management Configurations
4. System Tools Configurations
5. Access Security Configurations
6. SDM Template Configuration
7. Appendix: Default Parameters
Page 47

Managing System System
1
System
1.1 Overview
The System module is mainly used to configure and view the system information of the
switch. It provides controls over the type of the access users and the access security.
1.2 Supported Features
System Info
The System Info is mainly used for the basic properties configuration. You can view the
switch’s port status and system information, and configure the device description, system
time, and daylight saving time.
User management
User Management function is used to configure the user name and password for users to
log into the switch with a certain access level so as to protect the settings of the switch
from being randomly changed.
System Tools
The System Tools are used to manage the configuration file of the switch. With these tools,
you can configure the boot file of the switch, backup and restore the configurations of the
switch, update the firmware, reset the switch, and reboot the switch.
Boot Config function is used to configure the boot file of the switch uploaded before, and
the switch will boot up according to your configuration file.
Reboot Schedule function is used to set a schedule for the switch to reboot.
Access Security
Access Security provides different security measures for accessing the switch remotely
so as to enhance the configuration management security.
Access Control function is used to control the users’ access to the switch by filtering IP
address, MAC address or port.
HTTP Config function is based on the HTTP protocol. It can allow or deny users to access
the switch via a web browser.
HTTPS Config function is based on the SSL or TLS protocol working in transport layer. It
supports a security access via a web browser.
Configuration Guide 22
Page 48

Managing System System
SSH Config function is based on the SSH protocol, a security protocol established on
application and transport layers. The function with SSH is similar to a telnet connection, but
SSH can provide information security and powerful authentication.
SDM Template
The switch SDM (Switch Database Management) templates prioritize system resources to
optimize support for certain features. SDM Template function provides three templates for
users to allocate hardware resources for different usage.
Configuration Guide
23
Page 49

Managing System System Info Configurations
2
System Info Configurations
With system information configurations, you can:
View the system summary
Specify the device description
Set the system time
Set the daylight saving time
2.1 Using the GUI
2.1.1 Viewing the System Summary
Choose the menu System > System Info > System Summary to load the following page.
Configuration Guide 24
Page 50

Managing System System Info Configurations
Figure 2-1 Viewing the System Summary
Port Status Indication
Indicates that the corresponding 1000Mbps port is not connected to a device.
Indicates that the corresponding 1000Mbps port is at the speed of 1000Mbps.
Indicates that the corresponding 1000Mbps port is at the speed of 10Mbps or
100Mbps.
Indicates that the corresponding SFP port is not connected to a device.
Indicates the SFP port is at the speed of 1000Mbps.
Move the cursor to the port to view the detailed information of the port.
Configuration Guide
25
Page 51

Managing System System Info Configurations
Figure 2-2 Port Information
Port Information Indication
Port Displays the port number of the switch.
Type Displays the type of the port.
Speed Displays the maximum transmission rate of the port.
Status Displays the connection status of the port.
Click a port to view the bandwidth utilization on this port.
Figure 2-3 Bnadwidth Utilization
Rx Select Rx to view the bandwidth utilization of receiving packets on this port.
Tx Select Tx to view the bandwidth utilization of sending packets on this port.
2.1.2 Specifying the Device Description
Choose the menu System > System Info > Device Description to load the following page.
Figure 2-4 Specifying the Device Description
Configuration Guide 26
Page 52

Managing System System Info Configurations
1) In the Device Description section, specify the following information.
Device Name Enter the name of the switch.
Device Location Enter the location of the switch.
System Contact Enter the contact information.
2) Click Apply.
2.1.3 Setting the System Time
Choose the menu System > System Info > System Time to load the following page.
Figure 2-5 Setting the System Time
In the Time Info section, view the current time information of the switch.
Current System
Time
Current Time
Source
Displays the current date and time of the switch.
Displays the current time source of the switch.
In the Time Config section, follow these steps to configure the system time:
1) Choose one method to set the system time and specify the information.
Manual Set the system time manually.
Date: Specify the date of the system.
Time: Specify the time of the system.
Configuration Guide
27
Page 53

Managing System System Info Configurations
Get Time from
NTP Server
Synchronize
with PC’s Clock
Set the system time by getting time from NTP server. Make sure the NTP server
is accessible on your network. If the NTP server is on the Internet, connect the
switch to the Internet first.
Time Zone: Select your local time zone.
Primary Server: Enter the IP Address of the primary NTP server.
Secondary Server: Enter the IP Address of the secondary NTP server.
Update Rate: Specify the interval the switch fetching time from NTP server, which
ranges from 1 to 24 hours. The default value is 12 hours.
Synchronize the system time of the switch with PC’s clock.
2) Click Apply.
2.1.4 Setting the Daylight Saving Time
Choose the menu System > System Info > Daylight Saving Time to load the following
page.
Figure 2-6 Setting the Daylight Saving Time
Follow these steps to configure Daylight Saving Time:
1) In the DST Config section, select Enable to enable the Daylight Saving Time function.
2) Choose one method to set the Daylight Saving Time of the switch and specify the
information.
Configuration Guide 28
Page 54

Managing System System Info Configurations
Predefined
Mode
Recurring Mode If you select Recurring Mode, specify a cycle time range for the Daylight Saving
If you select Predefined Mode, choose a predefined DST schedule for the switch.
USA: Select the Daylight Saving Time of the USA. It is from 2: 00 a.m. on the
Second Sunday in March to 2:00 a.m. on the First Sunday in November.
Australia: Select the Daylight Saving Time of Australia. It is from 2:00 a.m. on the
First Sunday in October to 3:00 a.m. on the First Sunday in April.
Europe: Select the Daylight Saving Time of Europe. It is from 1: 00 a.m. on the Last
Sunday in March to 1:00 a.m. on the Last Sunday in October.
New Zealand: Select the Daylight Saving Time of New Zealand. It is from 2: 00 a.m.
on the Last Sunday in September to 3:00 a.m. on the First Sunday in April.
Time of the switch. This configuration will be used every year.
Offset: Specify the time to set the clock forward by.
Start Time: Specify the start time of Daylight Saving Time. The interval between
start time and end time should be more than 1 day and less than 1 year(365 days).
End Time: Specify the end time of Daylight Saving Time. The interval between
start time and end time should be more than 1 day and less than 1 year (365 days).
Date Mode If you select Date Mode, specify an absolute time range for the Daylight Saving
Time of the switch. This configuration will be used only one time.
Offset: Specify the time to set the clock forward by.
Start Time: Specify the start time of Daylight Saving Time. The interval between
start time and end time should be more than 1 day and less than 1 year(365 days).
End Time: Specify the end time of Daylight Saving Time. The interval between
start time and end time should be more than 1 day and less than 1 year (365 days).
3) Click Apply.
2.2 Using the CLI
2.2.1 Viewing the System Summary
On privileged EXEC mode or any other configuration mode, you can use the following
command to view the system information of the switch:
show interface status [ fastEthernet
| gigabitEthernet
port
| ten-gigabitEthernet
port
port
]
View status of the interface.
: Enter the number of the Ethernet port.
port
show system-info
View the system information including system Description, Device Name, Device Location, System
Contact, Hardware Version, Firmware Version, System Time, Run Time and so on.
Configuration Guide
29
Page 55

Managing System System Info Configurations
The following example shows how to view the interface status and the system information
of the switch.
Switch#show interface status
Port Status Speed Duplex FlowCtrl Jumbo Active-Medium
---- ------ ----- ------ -------- ----- -------------
Gi1/0/1 LinkDown N/A N/A N/A Disable Copper
Gi1/0/2 LinkDown N/A N/A N/A Disable Copper
Gi1/0/3 LinkUp 1000M Full Disable Disable Copper
...
Gi1/0/50 LinkDown N/A N/A N/A Disable Fiber
Gi1/0/51 LinkDown N/A N/A N/A Disable Fiber
Gi1/0/52 LinkDown N/A N/A N/A Disable Fiber
Switch#show system-info
Master Unit ID - 1
System Description - JetStream 24-Port Gigabit Stackable Smart Switch with 4 10GE
SFP+ Slots
Device Name - T1700G-28TQ
Device Location - SHENZHEN
Contact Information - www.tp-link.com
MAC - 00-0A-EB-13-12-3E
System Time - 2006-01-01 12:39:00
Running Time: - 0 day - 4 hour - 40 min - 11 sec
Device Info
Unit 1
Unit State - Ready
Hardware Version - T1700G-28TQRev2
Firmware Version - 2.0.0 Build 20160905 Rel.74744(s)
Power Supply Module - Operational
Redundant Power Supply - Not Support
Configuration Guide 30
Page 56

Managing System System Info Configurations
Specifying the Device Description
Follow these steps to specify the device description:
Step 1 configure
Enter global configuration mode.
Step 2 hostname [
Specify the system name of the switch.
hostname
default, it is the model name of the switch.
Step 3 location [
Specify the system location of the switch.
location
it is “SHENZHEN”.
Step 4 contact-info [
Specify the system contact Information.
contact-info
default, it is “www.tp-link.com”.
Step 5 show system-info
Verify the system information including system Description, Device Name, Device Location,
System Contact, Hardware Version, Firmware Version, System Time, Run Time and so on.
Step 6 end
Return to privileged EXEC mode.
hostname
: Enter the system name. The length of the name ranges from 1 to 32 characters. By
location
: Enter the device location. It should consist of no more than 32 characters. By default,
contact-info
: Enter the contact information. It should consist of no more than 32 characters. By
]
]
]
Step 7 copy running-config startup-config
Save the settings in the configuration file.
The following example shows how to set the device name as Switch_A, set the location as
BEIJING and set the contact information as http://www.tp-link.com.
Switch#configure
Switch(config)#hostname Switch_A
Switch(config)#location BEIJING
Switch(config)#contact-info http://www.tp-link.com
Switch(config)#show system-info
System Description - JetStream 24-Port Gigabit Stackable Smart Switch with 4 10GE
SFP+ Slots
System Name - Switch_A
System Location - BEIJING
Configuration Guide
31
Page 57

Managing System System Info Configurations
Contact Information - http://www.tp-link.com
...
Switch(config)#end
Switch#copy running-config startup-config
2.2.2 Setting the System Time
Follow these steps and choose one method to set the system time:
Step 1 configure
Enter global configuration mode.
Step 2 Use the following command to set the system time manually:
system-time manual
Configure the system time manually.
: Specify the date and time manually in the format of MM/DD/YYYY-HH:MM:SS. The valid
time
value of the year ranges from 2000 to 2037.
Use the following command to set the system time by getting time from the NTP server:
system-time ntp {
Configure the time zone and the NTP server to get time from the NTP server. Ensure the NTP
server is accessible. If the NTP server is on the Internet, connect the switch to the Internet first.
timezone
: Enter your local time-zone, which ranges from UTC-12:00 to UTC+13:00.
time
timezone
} {
ntp-server
} {
backup-ntp-server
} {
fetching-rate
}
Configuration Guide 32
Page 58

Managing System System Info Configurations
The detailed information of each time-zone are displayed as follows:
UTC-12:00 —— TimeZone for International Date Line West.
UTC-11:00 —— TimeZone for Coordinated Universal Time-11.
UTC-10:00 —— TimeZone for Hawaii.
UTC-09:00 —— TimeZone for Alaska.
UTC-08:00 —— TimeZone for Pacific Time (US Canada).
UTC-07:00 —— TimeZone for Mountain Time (US Canada).
UTC-06:00 —— TimeZone for Central Time (US Canada).
UTC-05:00 —— TimeZone for Eastern Time (US Canada).
UTC-04:30 —— TimeZone for Caracas.
UTC-04:00 —— TimeZone for Atlantic Time (Canada).
UTC-03:30 —— TimeZone for Newfoundland.
UTC-03:00 —— TimeZone for Buenos Aires, Salvador, Brasilia.
UTC-02:00 —— TimeZone for Mid-Atlantic.
UTC-01:00 —— TimeZone for Azores, Cape Verde Is.
UTC —— TimeZone for Dublin, Edinburgh, Lisbon, London.
UTC+01:00 —— TimeZone for Amsterdam, Berlin, Bern, Rome, Stockholm, Vienna.
UTC+02:00 —— TimeZone for Cairo, Athens, Bucharest, Amman, Beirut, Jerusalem.
UTC+03:00 —— TimeZone for Kuwait, Riyadh, Baghdad.
UTC+03:30 —— TimeZone for Tehran.
UTC+04:00 —— TimeZone for Moscow, St.Petersburg, Volgograd, Tbilisi, Port Louis.
UTC+04:30 —— TimeZone for Kabul.
UTC+05:00 —— TimeZone for Islamabad, Karachi, Tashkent.
UTC+05:30 —— TimeZone for Chennai, Kolkata, Mumbai, New Delhi.
UTC+05:45 —— TimeZone for Kathmandu.
UTC+06:00 —— TimeZone for Dhaka,Astana, Ekaterinburg.
UTC+06:30 —— TimeZone for Yangon (Rangoon).
UTC+07:00 —— TimeZone for Novosibrisk, Bangkok, Hanoi, Jakarta.
UTC+08:00 —— TimeZone for Beijing, Chongqing, Hong Kong, Urumqi, Singapore.
UTC+09:00 —— TimeZone for Seoul, Irkutsk, Osaka, Sapporo, Tokyo.
UTC+09:30 —— TimeZone for Darwin, Adelaide.
UTC+10:00 —— TimeZone for Canberra, Melbourne, Sydney, Brisbane.
UTC+11:00 —— TimeZone for Solomon Is., New Caledonia, Vladivostok.
UTC+12:00 —— TimeZone for Fiji, Magadan, Auckland, Welington.
UTC+13:00 —— TimeZone for Nuku’alofa, Samoa.
ntp-server
backup-ntp-server
fetching-rate
: Specify the IP address of the primary NTP server.
: Specify the IP address of the backup NTP server.
: Specify the interval fetching time from the NTP server.
Configuration Guide
33
Page 59

Managing System System Info Configurations
Step 3 Use the following command to verify the system time information.
show system-time
Verify the system time information.
Use the following command to verify the NTP mode configuration information.
show system-time ntp
Verify the system time information of NTP mode.
Step 4 end
Return to privileged EXEC mode.
Step 5 copy running-config startup-config
Save the settings in the configuration file.
The following example shows how to set the system time by Get Time from NTP Server and
set the time zone as UTC+08:00, set the NTP server as 133.100.9.2, set the backup NTP
server as 139.78.100.163 and set the update rate as 11.
Switch#configure
Switch(config)#system-time ntp UTC+08:00 133.100.9.2 139.78.100.163 11
Switch(config)#show system-time ntp
Time zone : UTC+08:00
Prefered NTP server: 133.100.9.2
Backup NTP server: 139.78.100.163
Last successful NTP server: 133.100.9.2
Update Rate: 11 hour(s)
Switch(config)#end
Switch#copy running-config startup-config
2.2.3 Setting the Daylight Saving Time
Follow these steps and choose one method to set the Daylight Saving Time:
Step 1 configure
Enter global configuration mode.
Configuration Guide 34
Page 60

Managing System System Info Configurations
Step 2 Use the following command to select a predefined Daylight Saving Time configuration:
system-time dst predefined [ USA | Australia | Europe | New-Zealand ]
Specify the Daylight Saving Time using a predefined schedule.
USA | Australia | Europe | New-Zealand: Select one mode of Daylight Saving Time.
USA: 02:00 a.m. on the Second Sunday in March ~ 02:00 a.m. on the First Sunday in November.
Australia: 02:00 a.m. on the First Sunday in October ~ 03:00 a.m. on the First Sunday in April.
Europe: 01:00 a.m. on the Last Sunday in March ~ 01:00 a.m. on the Last Sunday in October.
New Zealand: 02:00 a.m. on the Last Sunday in September ~ 03:00 a.m. on the First Sunday in
April.
Use the following command to set the Daylight Saving Time in recurring mode:
system-time dst recurring {
} [
etime
Specify the Daylight Saving Time in Recuring mode.
: Enter the start week of Daylight Saving Time. There are 5 values showing as follows:
sweek
first, second, third, fourth, last.
: Enter the start day of Daylight Saving Time. There are 7 values showing as follows: Sun,
sday
Mon, Tue, Wed, Thu, Fri, Sat.
smonth
Jan, Feb, Mar, Apr, May, Jun, Jul, Aug, Sep, Oct, Nov, Dec.
: Enter the start time of Daylight Saving Time,in the format of HH:MM.
stime
: Enter the end week of Daylight Saving Time. There are 5 values showing as follows:
eweek
first, second, third, fourth, last.
: Enter the end day of Daylight Saving Time. There are 7 values showing as follows: Sun,
eday
Mon, Tue, Wed, Thu, Fri, Sat.
emonth
Jan, Feb, Mar, Apr, May, Jun, Jul, Aug, Sep, Oct, Nov, Dec.
: Enter the end time of Daylight Saving Time,in the format of HH:MM.
etime
: Enter the offset of Daylight Saving Time. The default value is 60.
offset
]
offset
: Enter the start month of Daylight Saving Time. There are 12 values showing as follows:
: Enter the end month of Daylight Saving Time. There are 12 values showing as follows:
sweek
} {
sday
} {
smonth
} {
stime
} {
eweek
} {
eday
} {
emonth
} {
Use the following command to set the Daylight Saving Time in date mode:
system-time dst date {
]
offset
Specify the Daylight Saving Time in Date mode.
smonth
} {
sday
} {
stime
} {
syear
} {
emonth
} {
eday
Configuration Guide
} {
etime
} {
eyear
} [
35
Page 61

Managing System System Info Configurations
: Enter the start month of Daylight Saving Time. There are 12 values showing as follows:
smonth
Jan, Feb, Mar, Apr, May, Jun, Jul, Aug, Sep, Oct, Nov, Dec.
: Enter the start day of Daylight Saving Time, which ranges from 1 to 31.
sday
: Enter the start time of Daylight Saving Time,in the format of HH:MM.
stime
: Enter the start year of Daylight Saving Time.
syear
: Enter the end month of Daylight Saving Time. There are 12 values showing as follows:
emonth
Jan, Feb, Mar, Apr, May, Jun, Jul, Aug, Sep, Oct, Nov, Dec.
: Enter the end day of Daylight Saving Time, which ranges from 1 to 31.
eday
: Enter the end time of Daylight Saving Time,in the format of HH:MM.
etime
: Enter the end year of Daylight Saving Time.
eyear
: Enter the offset of Daylight Saving Time. The default value is 60.
offset
Step 3 show system-time dst
Verify the DST information of the switch.
Step 4 end
Return to privileged EXEC mode.
Step 5 copy running-config startup-config
Save the settings in the configuration file.
The following example shows how to set the Daylight Saving Time by Date Mode. Set the
start time as 01:00 August 1st, 2016, set the end time as 01:00 September 1st,2016 and
set the offset as 50.
Switch#configure
Switch(config)#system-time dst date Aug 1 01:00 2016 Sep 1 01:00 2016 50
Switch(config)#show system-time dst
DST starts at 01:00:00 on Aug 1 2016
DST ends at 01:00:00 on Sep 1 2016
DST offset is 50 minutes
DST configuration is one-off
Switch(config)#end
Switch#copy running-config startup-config
Configuration Guide 36
Page 62

Managing System User Management Configurations
3
User Management Configurations
With user management configurations, you can:
Create Admin accounts
Create accounts of other types
3.1 Using the GUI
3.1.1 Creating Admin Accounts
Choose the menu System > User Management > User Config to load the following page.
Figure 3-1 Create Admin Accounts
Follow these steps to create an Admin account:
1) In the User Info section, select Admin from the drop-down list and specify the user
name and password.
User Name Create a user name for users' login. It contains 16 characters at most,
composed of digits, English letters and underscore only.
Configuration Guide
37
Page 63

Managing System User Management Configurations
Access Level Select the access level as Admin.
Admin: Admin can edit, modify and view all the settings of different
functions.
Operator: Operator can edit, modify and view most of the settings of
different functions.
Power User: Power User can edit, modify and view some of the settings of
different functions.
User: User can only view the settings without the right to edit or modify.
Password Type a password for users' login. It is a string from 1 to 31 alphanumeric
characters or symbols. You can use digits, English letters (case sensitive),
underscore and sixteen special characters.
Confirm
Password
Retype the password.
2) Click Create.
3.1.2 Creating Accounts of Other Types
You can create accounts with the access level of Operator,Power User and User here. You
also need to go to the AAA section to create an Enable Password for these accounts. The
Enable Password is used to change the users’ access level to Admin.
Creating an Account
Choose the menu System > User Management > User Config to load the following page.
Figure 3-2 Create Accounts of Other Types
Follow these steps to create an account of other types:
1) In the User Info section, select the access level from the drop-down list and specify the
user name and password.
Configuration Guide 38
Page 64

Managing System User Management Configurations
User Name Create a user name for users' login. It contains 16 characters at most,
composed of digits, English letters and under dashes only.
Access Level Select the access level as Operator, Power User or User.
Admin: Admin can edit, modify and view all the settings of different
functions.
Operater: Operator can edit, modify and view most of the settings of
different functions.
Power User: Power User can edit, modify and view some of the settings of
different functions.
User: User can only view the settings without the right to edit or modify.
Password Type a password for users' login. It is a string from 1 to 31 alphanumeric
characters or symbols. You can use digits, English letters (case sensitive),
underscore and sixteen special characters.
Confirm
Password
Retype the password.
2) Click Create.
Configuring Enable Password
Choose the menu Network Security > AAA > Global Config to load the following page.
Figure 3-3 Configure the AAA Function
1) Select Enable and Click Apply to enable the AAA function.
2) Specify the Enable Password and Click Apply.
Tips:
The AAA function applies another method to manage the access users' name and
password. For details, refer to
The logged-in users can enter the Enable Password on this page to get the
AAA Configuration
in
Configuring Network Security.
administrative privileges.
Configuration Guide
39
Page 65

Managing System User Management Configurations
3.2 Using the CLI
3.2.1 Creating Admin Accounts
Follow these steps to create an Admin account:
Step 1 configure
Enter global configuration mode.
Step 2 Use the following command to create an account unencrypted or symmetric encrypted.
user name
Create an account whose access level is Admin.
: Enter a user name for users’ login. It contains 16 characters at most, composed of
name
digits, English letters and underscore only.
admin: Select the access level for the user. Admin can edit, modify and view all the settings of
different functions.
0: Specify the encryption type. 0 indicates that the password you entered is unencrypted, and
the password is saved to the configuration file unencrypted. By default, the encryption type is 0.
password
or symbols. The password is case sensitive, allows digits, English letters (case sensitive),
underlines and sixteen special characters.
7: Specify the encryption type. 7 indicates that the password you entered is symmetric
encrypted, and the password is saved to the configuration file symmetric encrypted.
encrypted-password
copy from another switch’s configuration file. After the encrypted password is configured, you
should use the corresponding unencrypted password to reenter this mode.
Use the following command to create an account MD5 encrypted.
user name
: Enter a password for users’ login. It is a string from 1 to 31 alphanumeric characters
{ privilege admin } password { [ 0 ]
name
: Enter a symmetric encrypted password with fixed length, which you can
{ privilege admin } secret { [ 0 ]
name
password
password
| 7
encrypted-password
| 5
encrypted-password
}
}
Create an account whose access level is Admin.
: Enter a user name for users’ login. It contains 16 characters at most, composed of
name
digits, English letters and underscore only.
admin: Select the access level for the user. Admin can edit, modify and view all the settings of
different functions.
0: Specify the encryption type. 0 indicates that the password you entered is unencrypted, but
the password is saved to the configuration file MD5 encrypted. By default, the encryption type
is 0.
password
or symbols. The password is case sensitive, allows digits, English letters (case sensitive),
underlines and sixteen special characters.
5: Specify the encryption type. 5 indicates that the password you entered is MD5 encrypted,
and the password is saved to the configuration file MD5 encrypted.
encrypted-password
from another switch’s configuration file.
: Enter a password for users’ login. It is a string from 1 to 31 alphanumeric characters
: Enter a MD5 encrypted password with fixed length, which you can copy
Configuration Guide 40
Page 66

Managing System User Management Configurations
Step 3 show user account-list
Verify the information of the current users.
Step 4 end
Return to privileged EXEC mode.
Step 5 copy running-config startup-config
Save the settings in the configuration file.
3.2.2 Creating Accounts of Other Types
You can create accounts with the access level of Operator, Power user and User here. You
also need to go to the AAA section to create an Enable Password for these accounts. The
Enable Password is used to change the users’ access level to Admin.
Follow these steps to create an account of other type:
Step 1 configure
Enter global configuration mode.
Configuration Guide
41
Page 67

Managing System User Management Configurations
Step 2 Use the following command to create an account unencrypted or symmetric encrypted.
user name
encrypted-password
Create an account whose access level is Operator, Power User or User.
: Enter a user name for users’ login. It contains 16 characters at most, composed of
name
digits, English letters and underscore only.
operator | power_user | user: Select the access level for the user. Operator can edit, modify
and view mostly the settings of different functions. Power User can edit, modify and view some
the settings of different functions. User only can view the settings without the right to edit and
modify.
0: Specify the encryption type. 0 indicates that the password you entered is unencrypted, and
the password is saved to the configuration file unencrypted. By default, the encryption type is 0.
password
or symbols. The password is case sensitive, allows digits, English letters (case sensitive),
underlines and sixteen special characters.
7: Specify the encryption type. 7 indicates that the password you entered is symmetric
encrypted, and the password is saved to the configuration file symmetric encrypted.
: Enter a password for users’ login. It is a string from 1 to 31 alphanumeric characters
encrypted-password
copy from another switch’s configuration file. After the encrypted password is configured, you
should use the corresponding unencrypted password to reenter this mode.
{ privilege operator | power_user | user } password { [ 0 ]
name
}
: Enter a symmetric encrypted password with fixed length, which you can
password
| 7
Use the following command to create an account MD5 encrypted.
user name
password
Create an account whose access level is Operator, Power User or User.
name
digits, English letters and underscore only.
operator | power_user | user: Select the access level for the user. Operator can edit, modify
and view mostly the settings of different functions. Power User can edit, modify and view some
the settings of different functions. User only can view the settings without the right to edit and
modify.
0: Specify the encryption type. 0 indicates that the password you entered is unencrypted, but
the password is saved to the configuration file MD5 encrypted. By default, the encryption type
is 0.
password
or symbols. The password is case sensitive, allows digits, English letters (case sensitive),
underlines and sixteen special characters.
5: Specify the encryption type. 5 indicates that the password you entered is MD5 encrypted,
and the password is saved to the configuration file MD5 encrypted.
}
: Enter a user name for users’ login. It contains 16 characters at most, composed of
: Enter a password for users’ login. It is a string from 1 to 31 alphanumeric characters
encrypted-password
from another switch’s configuration file. After the encrypted password is configured, you
should use the corresponding unencrypted password to reenter this mode.
{ privilege operator | power_user | user } secret { [ 0 ]
name
: Enter a MD5 encrypted password with fixed length, which you can copy
password
| 5
encrypted-
Step 3 aaa enable
Globally enable the AAA function.
Configuration Guide 42
Page 68

Managing System User Management Configurations
Step 4 Use the following command to create an enable password unencrypted or symmetric
encrypted.
enable admin password { [ 0 ]
Create an Enable Password. It can change the users’ access level to Admin. By default, it is
empty.
0: Specify the encryption type. 0 indicates that the password you entered is unencrypted, and
the password is saved to the configuration file unencrypted. By default, the encryption type is 0.
password
or symbols. The password is case sensitive, allows digits, English letters (case sensitive),
underlines and sixteen special characters.
7: Specify the encryption type. 7 indicates that the password you entered is symmetric
encrypted, and the password is saved to the configuration file symmetric encrypted.
encrypted-password
copy from another switch’s configuration file. After the encrypted password is configured, you
should use the corresponding unencrypted password to reenter this mode.
Use the following command to create an enable password unencrypted or MD5 encrypted.
enable admin secret { [ 0 ]
Create an Enable Password. It can change the users’ access level to Admin. By default, it is
empty.
0: Specify the encryption type. 0 indicates that the password you entered is unencrypted, but
the password is saved to the configuration file MD5 encrypted. By default, the encryption type
is 0.
: Enter an enable password. It is a string from 1 to 31 alphanumeric characters
: Enter a symmetric encrypted password with fixed length, which you can
password
password
| 7
encrypted-password
| 5
encrypted-password
}
}
password
or symbols. The password is case sensitive, allows digits, English letters (case sensitive),
underlines and sixteen special characters.
5: Specify the encryption type. 5 indicates that the password you entered is MD5 encrypted,
and the password is saved to the configuration file MD5 encrypted.
encrypted-password
from another switch’s configuration file. After the encrypted password is configured, you
should use the corresponding unencrypted password to reenter this mode.
Step 5 show user account-list
Verify the information of the current users.
Step 6 end
Return to privileged EXEC mode.
Step 7 copy running-config startup-config
Save the settings in the configuration file.
: Enter an enable password. It is a string from 1 to 31 alphanumeric characters
: Enter a MD5 encrypted password with fixed length, which you can copy
Tips:
The AAA function applies another method to manage the access users’ name and
password. For details, refer to
AAA Configuration
in
Configuring Network Security
.
The logged-in users can enter the Enable Password on this page to get the
administrative privileges.
Configuration Guide
43
Page 69

Managing System User Management Configurations
The following example shows how to create a uesr with the access level of Operator, set
the user name as user1 and set the password as 123. Enable AAA function and set the
enable password as abc123.
Switch#configure
Switch(config)#user name user1 privilege operator password 123
Switch(config)#aaa enable
Switch(config)#enable admin password abc123
Switch(config)#show user account-list
Index User-Name User-Type
----- --------- ---------
1 user1 Operator
2 admin Admin
Switch(config)#end
Switch#copy running-config startup-config
Configuration Guide 44
Page 70

Managing System System Tools Configurations
4
System Tools Configurations
With system tools configurations, you can:
Configure the boot file
Restore the configuration of the switch
Back up the configuration file
Upgrade the firmware
Reboot the switch
Configure the reboot schedule
Reset the switch
4.1 Using the GUI
4.1.1 Configuring the Boot File
Choose the menu System > System Tools > Boot Config to load the following page.
Figure 4-1 Configuring the Boot File
Follow these steps to configure the boot file:
1) In the Boot Table section, select one or more units and configure the relevant
parameters.
Configuration Guide
45
Page 71

Managing System System Tools Configurations
Select Select one or more units to be configured.
Unit Displays the number of the unit.
Current Startup
Image
Next Startup
Image
Backup Image Select the backup image. When the switch fails to start up with the next startup
Displays the current startup image.
Select the next startup image. When the switch is powered on, it will try to start up
with the next startup image. The next startup and backup image should not be the
same.
image, it will try to start up with the backup image. The next startup and backup
image should not be the same.
2) Click Apply.
4.1.2 Restoring the Configuration of the Switch
Choose the menu System > System Tools > Config Restore to load the following page.
Figure 4-2 Restoring the Configuration of the Switch
Follow these steps to restore the configuration of the switch:
1) In the Config Restore section, select one unit and one configuration file.
Target Unit Select a member switch to import configuration file. .
Config file Select the desired configuration file to import.
2) Click Import to import the configuration file.
Note:
It will take a long time to restore the configuration. Please wait without any operation.
•
After the configuration is restored successfully, the device will reboot to make the configura-
•
tion change effective.
4.1.3 Backing up the Configuration File
Choose the menu System > System Tools > Config Backup to load the following page.
Configuration Guide 46
Page 72

Managing System System Tools Configurations
Figure 4-3 Backing up the Configuration File
In the Config Backup section, select one unit and click Export to export the configuration
file.
4.1.4 Upgrading the Firmware
Choose the menu System > System Tools > Firmware Upgrade to load the following
page.
Figure 4-4 Upgrading the Firmware
In the Firmware Upgrade section, select one file and click Upgrade to upgrade the system.
Firmware File Select the desired firmware file to upgrade the system.
Image Name Displays the image to upgrade. It means that the operation will only effect the
backup image.
Firmware Version Displays the current firmware version of the system.
Hardware Version
After upgrading, the
device will reboot
automatically with
the backup image
Displays the current hardware version of the system.
Select this option to reboot automatically with the backup image after upgrading.
Configuration Guide
47
Page 73

Managing System System Tools Configurations
4.1.5 Rebooting the switch
Choose the menu System > System Tools > System Reboot to load the following page.
Figure 4-5 Rebooting the switch
In the System Reboot section, select the desired unit and click Reboot.
Target Unit Select the desired unit to reboot. By default, it is ALL Unit.
Save Config Select this option to save the configuration before the reboot.
4.1.6 Configuring the Reboot Schedule
Choose the menu System > System Tools > Reboot Schedule to load the following page.
Figure 4-6 Configuring the Reboot Schedule
Follow these steps to restore the configuration of the switch:
1) In the Reboot Schedule Setting section, select one method and specify the
parameters.
Time Interval Specify a period of time. The switch will reboot after this period. The valid values
are from 1 to 43200 minutes. This reboot schedule recurs if users check the Save
Before Reboot.
Time (HH:MM)/
Date (DD/MM/
YY)
Specify the date and time for the switch to reboot.
Time (HH:MM): Specify the time for the switch to reboot, in the format of HH:MM
Date (DD/MM/YY): Specify the date for the switch to reboot, in the format of DD/
MM/YYYY. The date should be within 30 days.
Configuration Guide 48
Page 74

Managing System System Tools Configurations
Save Before
Reboot
Select to save the switch’s configurations before it reboots.
4.1.7 Reseting the Switch
Choose the menu System > System Tools > System Reset to load the following page.
Figure 4-7 Reseting the Switch
In the System Reset section, select the desired unit and click Reset.
Target Unit Select the desired unit to reset. By default, it is ALL Unit.
Note:
After the system is reset, configurations of the switch will be reset to the default.
4.2 Using the CLI
4.2.1 Configuring the Boot File
Follow these steps to configure the boot file:
Step 1 configure
Enter global configuration mode.
Step 2 boot application filename { image1 | image2 } { startup | backup }
Specify the configuration of the boot file. By default, the image1.bin is the startup image and
the image2.bin is the backup image.
image1 | image2: Select the image file to be configured.
startup | backup: Select the property of the image file.
Step 3 show boot
Verify the boot configuration of the system.
Step 4 end
Return to privileged EXEC mode.
Step 5 copy running-config startup-config
Save the settings in the configuration file.
Configuration Guide
49
Page 75

Managing System System Tools Configurations
The following example shows how to set the next startup image as image 1 and set the
backup image as image 2.
Switch#configure
Switch(config)#boot application filename image1 startup
Switch(config)#boot application filename image2 backup
Switch(config)#show boot
Boot config:
Current Startup Image - image1.bin
Next Startup Image - image1.bin
Backup Image - image2.bin
Switch(config)#end
Switch#copy running-config startup-config
4.2.2 Restoring the Configuration of the Switch
Follow these steps to restore the configuration of the switch:
Step 1 enable
Enter privileged mode.
Step 2 copy tftp startup-config ip-address
Download the configuration file to the switch from TFTP server.
: Specify the IP address of the TFTP server. Both IPv4 and IPv6 addresses are
ip-addr
supported.
: Specify the name of the configuration file to be downloaded.
name
Note:
It will take a long time to restore the configuration. Please wait without any operation.
•
After the configuration is restored successfully, the device will reboot to make the configura-
•
tion change effective.
ip-addr
filename
name
The following example shows how to restore the configuration file named file1 from the
TFTP server with IP address 192.168.0.100.
Switch>enable
Switch#copy tftp startup-config ip-address 192.168.0.100 filename file1
Start to load user config file......
Operation OK! Now rebooting system......
Configuration Guide 50
Page 76

Managing System System Tools Configurations
4.2.3 Backing up the Configuration File
Follow these steps to back up the current configuration of the switch in a file:
Step 1 enable
Enter privileged mode.
Step 2 copy startup-config tftp ip-address
Back up the configuration file to TFTP server.
: Specify the IP address of the TFTP server. Both IPv4 and IPv6 addresses are
ip-addr
supported.
: Specify the name of the configuration file to be saved.
name
The following example shows how to backup the configuration file named file2 from TFTP
server with IP address 192.168.0.100.
Switch>enable
Switch#copy startup-config tftp ip-address 192.168.0.100 filename file2
Start to backup user config file......
Backup user config file OK.
4.2.4 Upgrading the firmware
Follow these steps to upgrade the firmware:
ip-addr
filename
name
Step 1 enable
Enter privileged mode.
Step 2 firmware upgrade ip-address
Upgrade the switch’s backup image via TFTP server. To boot up with the new firmware, you
need to choose to reboot the switch with the backup image.
: Specify the IP address of the TFTP server. Both IPv4 and IPv6 addresses are
ip-addr
supported.
: Specify the name of the desired firmware file.
name
Step 3 Enter Y to continue then enter Y to reboot.
ip-addr
filename
name
The following example shows how to upgrade the firmware using the configuration file
named file3.bin. The TFTP server is 190.168.0.100.
Switch>enable
Switch#firmware upgrade ip-address 192.168.0.100 filename file3.bin
It will only upgrade the backup image. Continue? (Y/N):Y
Operation OK!
Configuration Guide
51
Page 77

Managing System System Tools Configurations
Reboot with the backup image? (Y/N): Y
4.2.5 Rebooting the switch
Follow these steps to reboot the switch:
Step 1 enable
Enter privileged mode.
Step 2 reboot
Reboot the switch.
4.2.6 Configuring the Reboot Schedule
Follow these steps and choose one type to configure the reboot schedule:
Step 1 configure
Enter global configuration mode.
Step 2 Use the following command to set the interval to reboot:
reboot-schedule in
(Optional) Specify the reboot schedule.
: Specify a period of time. The switch will reboot after this period. The valid values are
interval
from 1 to 43200 minutes.
save_before_reboot: Save the configuration file before the switch reboots.
Use the following command to set the time and date to reboot:
reboot-schedule at
(Optional) Specify the reboot schedule.
: Specify the time for the switch to reboot, in the format of HH:MM.
time
: Specify the date for the switch to reboot, in the format of DD/MM/YYYY. The date should
date
be within 30 days.
save_before_reboot: Save the configuration file before the switch reboots.
If no date is specified, the switch reboots according to the time you have set. If the time you
set is later than the time that this command is executed, the switch will reboot later the same
day; otherwise the switch will reboot the next day.
[ save_before_reboot ]
interval
[
time
] [ save_before_reboot ]
date
Step 3 end
Return to privileged EXEC mode.
Step 4 copy running-config startup-config
Save the settings in the configuration file.
The following example shows how to set the switch to reboot at 12:00 on 15/01/2016.
Configuration Guide 52
Page 78

Managing System System Tools Configurations
Switch#configure
Switch(config)#reboot-schedule at 12:00 15/01/2016 save_before_reboot
Reboot system at 15/01/2016 12:00. Continue? (Y/N): Y
Reboot Schedule Settings
---------------------------
Reboot schedule at 2016-01-15 12:00 (in 17007 minutes)
Save before reboot: Yes
Switch(config)#end
Switch#copy running-config startup-config
4.2.7 Reseting the Switch
Follow these steps to reset the switch:
Step 1 enable
Enter privileged mode.
Step 2 reset
Reset the switch.
Note:
After the system is reset, configurations of the switch will be reset to the default.
Configuration Guide
53
Page 79

Managing System Access Security Configurations
5
Access Security Configurations
With access security configurations, you can:
Configure the Access Control feature
Configure the HTTP feature
Configure the HTTPS feature
Configure the SSH feature
Enable the telnet function
5.1 Using the GUI
5.1.1 Configuring the Access Control Feature
Choose the menu System > Access Security > Access Control to load the following page.
Figure 5-1 Configuring the Access Control
1) In the Access Control section, select one control mode and specify the parameters.
Control Mode Select the control mode for users to log in to the web management page.
Disable: The Access Control function is disabled.
IP-based: Only the users within the IP-range you set here are allowed to access
the switch.
MAC-based: Only the users with the MAC address you set here are allowed to
access the switch.
Port-based: Only the users connecting to the ports you set here are allowed to
access the switch.
Configuration Guide 54
Page 80

Managing System Access Security Configurations
Access
Interface
IP Address/
Mask
MAC Address
Select the interface to control the methods for users’ accessing. The selected
access interfaces will only affect the users you set before.
SNMP: A function to manage the network devices via NMS.
Telnet: A connection type for users to remote login.
SSH: A connection type based on SSH protocol.
HTTP: A connection type based on HTTP protocol.
HTTPS: A connection type based on SSL protocol.
Ping: A communication protocol to test the connection of the network.
If you select IP-based mode, enter the IP address and mask to specify an IP
range. Only the users within this IP range can access the switch.
If you select MAC-based mode, specify the MAC address. Only the users with the
correct MAC address can access the switch.
When the IP-based mode is selected, the following section will display.
IP Address Displays the IP range of the entry.
Access
Interface
Operation
Displays the access interface you set of the entry.
Click Edit to modify the parameters of the desired entry.
When the Port-based mode is selected, the following section will display.
Port Select one or more ports to configure. Only the users connected to these ports are
allowed to access the switch.
2) Click Apply.
Configuration Guide
55
Page 81

Managing System Access Security Configurations
5.1.2 Configuring the HTTP Function
Choose the menu System > Access Security > HTTP Config to load the following page.
Figure 5-2 Configuring the HTTP Function
1) In the Global Control section, Select Enable and click Apply to enable the HTTP
function.
HTTP HTTP function is based on the HTTP protocol. It allows users to manage the
switch through a web browser.
2) In the Session Config section, specify the Session Timeout and click Apply.
Session
Timeout
The system will log out automatically if users do nothing within the Session
Timeout time.
3) In the Access User Number section, select Enable and specify the parameters.
Number Control Select Enable to control the number of the users logging on to the web
management page at the same time. The total number of users should be no more
than 16.
Admin Number Specify the maximum number of users whose access level is Admin.
Guest Number Specify the maximum number of users whose access level is Operator, Power
User or User.
4) Click Apply.
Configuration Guide 56
Page 82

Managing System Access Security Configurations
5.1.3 Configuring the HTTPS Function
Choose the menu System > Access Security > HTTPS Config to load the following page.
Table 5-1 Configuring the HTTPS Function
1) In the Global Config section, select Enable to enable HTTPS function and select the
protocol the switch supports. Click Apply.
HTTPS Select Enable to enable the HTTPS function.
HTTPS function is based on the SSL or TLS protocol. It provides a secure
connection between the client and the switch.
Configuration Guide
57
Page 83

Managing System Access Security Configurations
SSL Version 3 Select Enable to make the switch support SSL Version 3 protocol.
SSL is a transport protocol. It can provide server authentication, encryption and
message integrity to allow secure HTTP connection.
TLS Version 1 Select Enable to make the switch support TLS Version 1 protocol.
TLS is a transport protocol upgraded from SSL. It supports a different encryption
algorithm from SSL, so TLS and SSL are not compatible. TLS can support a more
secure connection.
2) In the CipherSuite Config section, select the algorithm to be enabled and click Apply.
RSA_WITH_
RC4_128_MD5
RSA_WITH_
RC4_128_SHA
RSA_WITH_
DES_CBC_SHA
RSA_
WITH_3DES_
EDE_CBC_SHA
Key exchange with RC4 128-bit encryption and MD5 for message digest.
Key exchange with RC4 128-bit encryption and SHA for message digest.
Key exchange with DES-CBC for message encryption and SHA for message
digest.
Key exchange with 3DES and DES-EDE3-CBC for message encryption and SHA
for message digest.
3) In the Session Config section, specify the Session Timeout and click Apply.
Session
Timeout
The system will log out automatically if users do nothing within the Session
Timeout time.
4) In the Access User Number section, select Enable and specify the parameters. Click
Apply.
Number Control Select Enable to control the number of the users logging in to the web
management page at the same time.
Admin Number Specify the maximum number of users whose access level is Admin.
Guest Number Specify the maximum number of users whose access level is Operator, Power
User or User.
5) In the Certificate Download and Key Download section, download the certificate and
key.
Certificate File Select the desired certificate to download to the switch. The certificate must be
BASE64 encoded. The SSL certificate and key downloaded must match each
other, otherwise the HTTPS connection will not work.
Key File Select the desired Key to download to the switch. The key must be BASE64
encoded. The SSL certificate and key downloaded must match each other,
otherwise the HTTPS connection will not work.
Configuration Guide 58
Page 84

Managing System Access Security Configurations
5.1.4 Configuring the SSH Feature
Choose the menu System > Access Security > SSH Config to load the following page.
Figure 5-3 Configuring the SSH Feature
1) In the Global Config section, select Enable to enable SSH function and specify other
parameters.
SSH Select Enable to enable the SSH function.
SSH is a protocol working in application layer and transport layer. It can provide a
secure, remote connection to a device. It is more secure than Telnet protocol as it
provides strong encryption.
Protocol V1 Select Enable to enable SSH version 1.
Protocol V2 Select Enable to enable SSH version 2.
Idle Timeout Specify the idle timeout time. The system will automatically release the
connection when the time is up.
Max Connect Specify the maximum number of the connections to the SSH server. New
connection will not be established when the number of the connections reaches
the maximum number you set.
Configuration Guide
59
Page 85

Managing System Access Security Configurations
2) In the Encryption Algorithm section, select the encryption algorithm you want the
switch to support and click Apply.
3) In Data Integrity Algorithm section, select the integrity algorithm you want the switch
to support and click Apply.
4) In Key Download section, select key type from the drop-down list and select the
desired key file to down.
Key Type Select the key type. The algorithm of the corresponding type is used for both key
generation and authentication.
Key File Select the desired public key to download to the switch. The key length of the
downloaded file ranges of 512 to 3072 bits.
Note:
It will take a long time to download the key file. Please wait without any operation.
5.1.5 Enabling the Telnet Function
Choose the menu System > Access Security > Telnet Config to load the following page.
Figure 5-4 Configuring the Telnet Function
In Global Config section, select Enable and click Apply.
Telnet Select Enable to make the Telnet function effective. Telnet function is based on the
Telnet protocol subjected to TCP/IP protocol. It allows users to log on to the switch
remotely.
5.2 Using the CLI
5.2.1 Configuring the Access Control
Follow these steps to configure the access control:
Step 1 configure
Enter global configuration mode.
Configuration Guide 60
Page 86

Managing System Access Security Configurations
Step 2 Use the following command to control the users’ access by limiting the IP address:
user access-control ip-based {
] [ all ]
Only the users within the IP-range you set here are allowed to access the switch.
: Specify the IP address of the user.
ip-addr
ip-mask
[ snmp ] [ telnet ] [ ssh ] [ http ] [ https ] [ ping ] [ all ]: Select to control the types for users’
accessing. By default, these types are all enabled.
Use the following command to control the users’ access by limiting the MAC address:
user access-control mac-based {
all ]
Only the users with the MAC address you set here are allowed to access the switch.
mac-addr
[ snmp ] [ telnet ] [ ssh ] [ http ] [ https ] [ ping ] [ all ]: Select to control the types for users’
accessing. By default, these types are all enabled.
Use the following command to control the users’ access by limiting the ports connected to the
users:
: Specify the subnet mask of the user.
: Specify the MAC address of the user.
ip-addr ip-mask
mac-addr
} [ snmp ] [ telnet ] [ ssh ] [ http ] [ https ] [ ping
} [ snmp ] [ telnet ] [ ssh ] [ http ] [ https ] [ ping ] [
user access-control port-based interface { fastEthernet
ten-gigabitEthernet
Only the users connecting to the ports you set here are allowed to access the switch.
: Specify the list of Ethernet port, in the format of 1/0/1-4. You can appoint 5 ports at
port-list
most.
[ snmp ] [ telnet ] [ ssh ] [ http ] [ https ] [ ping ] [ all ]: Select to control the types for users’
accessing. By default, these types are all enabled.
Step 3 show user configuration
Verify the security configuration information of the user authentication information and the
access interface.
Step 4 end
Return to privileged EXEC mode.
Step 5 copy running-config startup-config
Save the settings in the configuration file.
} [ snmp ] [ telnet ] [ ssh ] [ http ] [ https ] [ ping ] [ all ]
port-list
| gigabitEthernet
port-list
port-list
|
The following example shows how to set the type of access control as IP-based. Set the
IP address as 192.168.0.100,set the subnet mask as 255.255.255.0 and make the switch
support snmp, telnet, http and https.
Switch#configure
Switch(config)#user access-control ip-based 192.168.0.100 255.255.255.0 snmp telnet
http https
Switch(config)#show user configuration
Configuration Guide
61
Page 87

Managing System Access Security Configurations
User authentication mode: IP based
Index IP Address Access Interface
----- ------------------ -------------------------------
1 192.168.0.0/24 SNMP Telnet HTTP HTTPS
Switch(config)#end
Switch#copy running-config startup-config
5.2.2 Configuring the HTTP Function
Follow these steps to configure the HTTP function:
Step 1 configure
Enter global configuration mode.
Step 2 ip http server
Enable the HTTP function. By default, it is enabled.
Step 3 ip http session timeout
Specify the Session Timeout time. The system will log out automatically if users do nothing
within the Session Timeout time.
minutes
Step 4 ip http max-users
Specify the maximum number of users that are allowed to connect to the HTTP server. The
total number of users should be no more than 16.
admin-num
are from 1 to 16.
guest-num
or User. The valid values are from 0 to 15.
Step 5 show ip http configuration
Verify the configuration information of the HTTP server, including status, session timeout,
access-control, max-user number and the idle-timeout, etc.
: Specify the timeout time, which ranges from 5 to 30 minutes. The default value is 10.
: Enter the maximum number of users whose access level is Admin. The valid values
: Enter the maximum number of users whose access level is Operator, Power User
minutes
admin-num guest-num
Step 6 end
Return to privileged EXEC mode.
Step 7 copy running-config startup-config
Save the settings in the configuration file.
The following example shows how to set the session timeout as 9, set the maximum admin
number as 6, and set the maximum guest number as 5.
Switch#configure
Switch(config)#ip http server
Configuration Guide 62
Page 88

Managing System Access Security Configurations
Switch(config)#ip http session timeout 9
Switch(config)#ip http max-user 6 5
Switch(config)#show ip http configuration
HTTP Status: Enabled
HTTP Session Timeout: 9
HTTP User Limitation: Enabled
HTTP Max Admin Users: 6
HTTP Max Guest Users: 5
Switch(config)#end
Switch#copy running-config startup-config
5.2.3 Configuring the HTTPS Function
Follow these steps to configure the HTTPS function:
Step 1 configure
Enter global configuration mode.
Step 2 ip http secure-server
Enable the HTTPS function. By default, it is enabled.
Step 3 ip http secure-protocol { [ ssl3 ] [ tls1 ] }
Configure to make the switch support the corresponding protocol. By default, the switch
supports SSLv3 and TLSv1.
ssl3: Enable the SSL version 3 protocol. SSL is a transport protocol. It can provide server
authentication, encryption and message integrity to allow secure HTTP connection.
tls1: Enable the TLS version 1 protocol. TLS is s transport protocol upgraded from SSL. It
supports different encryption algorithm from SSL, so TLS and SSL are not compatible. TLS
can support a more secure connection.
Step 4 ip http secure-ciphersuite { [ 3des-ede-cbc-sha ] [ rc4-128-md5 ] [ rc4-128-sha ] [ des-cbc-
sha ] }
Enable the corresponding ciphersuite. By default, these types are all enabled.
[ 3des-ede-cbc-sha ]: Key exchange with 3DES and DES-EDE3-CBC for message encryption
and SHA for message digest.
[ rc4-128-md5 ]: Key exchange with RC4 128-bit encryption and MD5 for message digest.
[ rc4-128-sha ]: Key exchange with RC4 128-bit encryption and SHA for message digest.
[ des-cbc-sha ]: Key exchange with DES-CBC for message encryption and SHA for message
digest.
Configuration Guide
63
Page 89

Managing System Access Security Configurations
Step 5 ip http secure-session timeout
Specify the Session Timeout time. The system will log out automatically if users do nothing
within the Session Timeout time.
minutes
Step 6 ip http secure-max-users
Specify the maximum number of users that are allowed to connect to the HTTPS server. The
total number of users should be no more than 16.
admin-num
are from 1 to 16.
guest-num
or User. The valid value are from 0 to 15.
Step 7 ip http secure-server download certificate
Download the desired certificate to the switch from TFTP server.
ssl-cert
certificate must be BASE64 encoded. The SSL certificate and key downloaded must match
each other.
ip-addr
supported.
: Specify the timeout time, which ranges from 5 to 30 minutes. The default value is 10.
: Enter the maximum number of users whose access level is Admin. The valid value
: Enter the maximum number of users whose access level is Operator, Power User
: Specify the name of the SSL certificate, which ranges from 1 to 25 characters. The
: Specify the IP address of the TFTP server. Both IPv4 and IPv6 addresses are
minutes
admin-num guest-num
ssl-cert
ip-address
ip-addr
Step 8 ip http secure-server download key
Download the desired key to the switch from TFTP server.
: Specify the name of the key file saved in TFTP server. The key must be BASE64
ssl-key
encoded.
: Specify the IP address of the TFTP server. Both IPv4 and IPv6 addresses are
ip-addr
supported.
Step 9 show ip http secure-server
Verify the global configuration of HTTPS.
Step 10 end
Return to privileged EXEC mode.
Step 11 copy running-config startup-config
Save the settings in the configuration file.
ssl-key
ip-address
ip-addr
The following example shows how to configure the HTTPS function. Enable SSL3 and TLS1
protocol. Enable the ciphersuite of 3des-ede-cbc-sha. Set the session timeout time as 15,
the admin number as 1 and the guest number as 2. Download the certificate named ca.crt
and the key named ca.key from the TFTP server with the IP address 192.168.0.100.
Switch#configure
Switch(config)#ip http secure-server
Switch(config)#ip http secure-protocol ssl3 tls1
Switch(config)#ip http secure-ciphersuite 3des-ede-cbc-sha
Configuration Guide 64
Page 90

Managing System Access Security Configurations
Switch(config)#ip http secure-session timeout 15
Switch(config)#ip http secure-max-users 1 2
Switch(config)#ip http secure-server download certificate ca.crt ip-address
192.168.0.100
Start to download SSL certificate......
Download SSL certificate OK.
Switch(config)#ip http secure-server download key ca.key ip-address 192.168.0.100
Start to download SSL key......
Download SSL key OK.
Switch(config)#show ip http secure-server
HTTPS Status: Enabled
SSL Protocol Level(s): ssl3 tls1
SSL CipherSuite: 3des-ede-cbc-sha
HTTPS Session Timeout: 15
HTTPS User Limitation: Enabled
HTTPS Max Admin Users: 1
HTTPS Max Guest Users: 2
Switch(config)#end
Switch#copy running-config startup-config
5.2.4 Configuring the SSH Feature
Follow these steps to configure the SSH function:
Step 1 configure
Enter global configuration mode.
Step 2 ip ssh server
Enable the SSH function. By default, it is disabled.
Step 3 ip ssh version { v1 | v2 }
Configure to make the switch support the corresponding protocol. By default, the switch
supports SSHv1 and SSHv3.
v1 | v2: Select to enable the corresponding protocol.
Configuration Guide
65
Page 91

Managing System Access Security Configurations
Step 4 ip ssh timeout
Specify the idle timeout time. The system will automatically release the connection when the
time is up.
: Enter the value of the timeout time, which ranges from 1 to 120 seconds. The default
value
value is 120 seconds.
Step 5 ip ssh max-client
Specify the maximum number of the connections to the SSH server. New connection will not
be established when the number of the connections reaches the maximum number you set.
: Enter the number of the connections, which ranges from 1 to 5. The default value is 5.
num
Step 6 ip ssh algorithm { AES128-CBC | AES192-CBC | AES256-CBC | Blowfish-CBC | Cast128-CBC |
3DES-CBC | HMAC-SHA1 | HMAC-MD5 }
Enable the corresponding algorithm. By default, these types are all enabled.
AES128-CBC | AES192-CBC | AES256-CBC | Blowfish-CBC | Cast128-CBC | 3DES-CBC:
Specify the encryption algorithm you want the switch supports.
HMAC-SHA1 | HMAC-MD5: Specify the data integrity algorithm you want the switch supports.
Step 7 ip ssh download { v1 | v2 }
value
num
key-file
ip-address
ip-addr
Select the type of the key file and download the desired file to the switch from TFTP server.
v1 | v2: Select the key type. The algorithm of the corresponding type is used for both key
generation and authentication.
: Specify the name of the key file saved in TFTP server. Ensure the key length of the
key-file
downloaded file is in the range of 512 to 3072 bits.
: Specify the IP address of the TFTP server. Both IPv4 and IPv6 addresses are
ip-addr
supported.
Step 8 show ip ssh
Verify the global configuration of SSH.
Step 9 end
Return to privileged EXEC mode.
Step 10 copy running-config startup-config
Save the settings in the configuration file.
Note:
It will take a long time to download the key file. Please wait without any operation.
The following example shows how to configure the SSH function. Set the version as SSH
V1 and SSH V2. Enable the AES128-CBC and Cast128-CBC encryption algorithm. Enable
the HMAC-MD5 data integrity algorithm. Choose the key type as SSH-2 RSA/DSA.
Switch(config)#ip ssh server
Switch(config)#ip ssh version v1
Configuration Guide 66
Page 92

Managing System Access Security Configurations
Switch(config)#ip ssh version v2
Switch(config)#ip ssh timeout 100
Switch(config)#ip ssh max-client 4
Switch(config)#ip ssh algorithm AES128-CBC
Switch(config)#ip ssh algorithm Cast128-CBC
Switch(config)#ip ssh algorithm HMAC-MD5
Switch(config)#ip ssh download v2 publickey ip-address 192.168.0.100
Start to download SSH key file......
Download SSH key file OK.
Switch(config)#show ip ssh
Global Config:
SSH Server: Enabled
Protocol V1: Enabled
Protocol V2: Enabled
Idle Timeout: 100
MAX Clients: 4
Encryption Algorithm:
AES128-CBC: Enabled
AES192-CBC: Disabled
AES256-CBC: Disabled
Blowfish-CBC: Disabled
Cast128-CBC: Enabled
3DES-CBC: Disabled
Data Integrity Algorithm:
HMAC-SHA1: Disabled
HMAC-MD5: Enabled
Key Type: SSH-2 RSA/DSA
Key File:
---- BEGIN SSH2 PUBLIC KEY ----
Comment: “dsa-key-20160711”
Configuration Guide
67
Page 93

Managing System Access Security Configurations
Switch(config)#end
Switch#copy running-config startup-config
5.2.5 Enabling the Telnet Function
Follow these steps enable the Telnet function:
Step 1 configure
Enter global configuration mode.
Step 2 telnet enable
Enable the telnet function. By default, it is enabled.
Step 3 end
Return to privileged EXEC mode.
Step 4 copy running-config startup-config
Save the settings in the configuration file.
Configuration Guide 68
Page 94

Managing System SDM Template Configuration
6
SDM Template Configuration
SDM Template function is used to configure system resources in the switch to optimize
support for specific features. The switch provides three templates, and the hardware
resources allocation is different. Users can choose one according to how the switch is
used in the network.
6.1 Using the GUI
Choose the menu System > SDM Template to load the following page.
Figure 6-1 Configuring the SDM Template Function
In Select Options section, select one template and click Apply. The setting will be effective
after the reboot.
Current
Template ID
Next Template
ID
Select Next
Template
The Template Table displays the resources allocation of each template.
Displays the template currently in effect.
Displays the template that will be effective after the reboot.
Select the template that will be effective after the next reboot.
default: Select the template of default. It gives balance to the IP ACL rules, MAC ACL
rules and ARP detection entries.
enterpriseV4: Select the template of enterpriseV4. It maximizes system resources for
IP ACL rules and MAC ACL rules.
enterpriseV6: Select the template of enterpriseV6. It allocates resources to IPv6 ACL
rules.
Configuration Guide
69
Page 95

Managing System SDM Template Configuration
SDM Template Displays the name of the templates.
IP ACL Rules Displays the number of IP ACL Rules including Lay3 ACL Rules and Lay4 ACL Rules.
MAC ACL Rules Displays the number of Lay2 ACL Rules.
IPv6 ACL Rules Displays the number of IPv6 ACL rules.
ARP Detection
Entries
6.2 Using the CLI
Follow these steps to configure the SDM template function:
Step 1 configure
Enter global configuration mode.
Step 2 show sdm prefer { used | default | enterpriseV4 | enterpriseV6 }
View the template table to select the desired template.
used: Displays the resource allocation of the current template.
default: Displays the resource allocation of the default template.
enterpriseV4: Displays the resource allocation of the enterpriseV4 template.
enterpriseV6: Displays the resource allocation of the enterpriseV6 template.
Displays the number of TCAM entries for ARP defend.
Step 3 sdm prefer { default | enterpriseV4 | enterpriseV6 }
Select the template that will be effective after the next reboot.
default: Select the template of default. It gives banlance to the IP ACLrules, MAC ACL rules and
ARP detection entries.
enterpriseV4: Select the template of enterpriseV4. It maximizes system resources for IP ACL
rules and MAC ACL rules.
enterpriseV6: Select the template of enterpriseV4. It allocates resources to IPv6 ACL rules.
Step 4 end
Return to privileged EXEC mode.
Step 5 copy running-config startup-config
Save the settings in the configuration file.
The following example shows how to set the SDM template as enterpriseV4.
Switch#config
Switch(config)#show sdm prefer enterpriseV4
Configuration Guide 70
Page 96

Managing System SDM Template Configuration
“enterpriseV4” template:
number of IP ACL Rules : 360
number of MAC ACL Rules : 230
number of IPV6 ACL Rules : 0
number of ARP Detection Entries : 7
Switch(config)#sdm prefer enterpriseV4
Switch to “enterpriseV4” tempale.
Changes to the running SDM preferences have been stored, but cannot take effect until
reboot the switch.
Switch(config)#end
Switch#copy running-config startup-config
Configuration Guide
71
Page 97

Managing System Appendix: Default Parameters
7
Appendix: Default Parameters
Default settings of System Info are listed in the following tables.
Table 7-1 Default Settings of Device Description Configuration
Parameter Default Setting
Device Name The model name
of the switch.
Device Location SHENZHEN
System Contact www.tp-link.com
Table 7-2 Default Settings of System Time Configuration
Parameter Default Setting
Time Source Manual
System Time 2006-01-01
08:01:56 Sunday
Table 7-3 Default Settings of Daylight Saving Time Configuration
Parameter Default Setting
DST status Disabled
Default settings of User Management are listed in the following table.
Table 7-4 Default Settings of User Configuration
Parameter Default Setting
User Name admin
Password admin
Access Level Admin
Default settings of System Tools are listed in the following table.
Table 7-5 Default Settings of Boot Configuration
Parameter Default Setting
Current Startup Image image1.bin
Next Startup Image image1.bin
Backup Image image2.bin
Configuration Guide 72
Page 98

Managing System Appendix: Default Parameters
Default settings of Access Security are listed in the following tables.
Table 7-6 Default Settings of Access Control Configuration
Parameter Default Setting
Control Mode Disabled
Table 7-7 Default Settings of HTTP Configuration
Parameter Default Setting
HTTP Enabled
Session Timeout 10 minutes
Number Control Disabled
Table 7-8 Default Settings of HTTPS Configuration
Parameter Default Setting
HTTPS Enabled
SSL Version 3 Enabled
TLS Version 1 Enabled
RSA_WITH_RC4_128_MD5 Enabled
RSA_WITH_RC4_128_SHA Enabled
RSA_WITH_DES_CBC_SHA Enabled
RSA_WITH_3DES_EDE_CBC_
SHA
Session Timeout 10 minutes
Number Control Disabled
Table 7-9 Default Settings of SSH Configuration
Parameter Default Setting
SSH Disabled
Protocol V1 Enabled
Protocol V2 Enabled
Idle Timeout 120 seconds
Enabled
Max Connect 5
AES128-CBC Enabled
AES192-CBC Enabled
AES256-CBC Enabled
Blowfish-CBC Enabled
Cast128-CBC Enabled
3DES-CBC Enabled
Configuration Guide
73
Page 99

Managing System Appendix: Default Parameters
Parameter Default Setting
HMAC-SHA1 Enabled
HMAC-MD5 Enabled
Key Type: SSH-2 RSA/DSA
Table 7-10 Default Settings of Telnet Configuration
Parameter Default Setting
Control Mode Enabled
Default settings of SDM Template are listed in the following table.
Table 7-11 Default Settings of SDM Template Configuration
Parameter Default Setting
Current Template ID Default
Next Template ID Default
Configuration Guide 74
Page 100

Part 3
Configuring Stack
CHAPTERS
1. Overview
2. Stack Configuration
3. Configuration Example
4. Appendix: Default Parameters
 Loading...