

Toyota 3314 - OTHER, SL1SL1T - OTHER, SL1T-X - OTHER, SL3335 - OTHER, SL3487 - OTHER User Manual
...
SL1T-X Series All Models

English
UK ONLY IMPORTANT PLEASE READ CAREFULLY
The wires in this mains lead are coloured in accordance with the following code:
BLUE-NEUTRAL BROWN-LIVE (OR ACTIVE)
As the colours of the mains lead of this appliance may not correspond with the coloured markings identifying the terminals in your plug
— PROCEED AS FOLLOWS: The earth plug pin is unnecessary. As the Machine is designed under double insulation structure, the earth
wire is removed from the machine. The wire coloured BROWN must be connected to the terminal marked L or A or coloured RED.
The wire coloured BLUE must be connected to the terminal marked N or coloured BLACK. Neither core is to be connected to the earth
terminal of a three-pin plug.

IMPORTANT SAFETY INSTRUCTIONS
When using an electrical appliance, basic safety precautions should always be followed, including the following:
Read all instructions before using (this appliance).
DANGER – –
To reduce the risk of electric shock:
An appliance should never be left unattended when plugged in. Always unplug this appliance from the electric outlet immediately after
using and before cleaning.
WARNING – – To reduce the risk of burns, fire, electric shock, or injury to persons:
1. Do not allow to be used as a toy. Close attention is necessary when this appliance is used by or near children.
2. Use this appliance only for its intended use as described in this manual. Use only attachments recommended by the manufacturer
as contained in this manual.
3. Never operate this appliance if it has a damaged cord or plug, if it is not working properly, if it has been dropped or damaged, or
dropped into water. Return the appliance to the nearest authorized dealer or service center for examination, repair, electrical or
mechanical adjustment.
4. Never operate the appliance with any air openings blocked. Keep ventilation openings of the sewing machine and foot controller
free from the accumulation of lint, dust, and loose cloth.
5. Never drop or insert any object into any opening.
6. Do not use outdoors.
7. Do not operate where aerosol (spray) products are being used or where oxygen is being administered.
8. To disconnect, turn all controls to the off (“O”) position, then remove plug from outlet.
9. Do not unplug by pulling on cord. To unplug, grasp the plug, not the cord.
DANGER
1. Always unplug before relamping. Replace the bulb with same type rated 15 watts.
2. Do not reach for an appliance that has fallen into water. Unplug immediately.
3. Do not place or store appliance where it can fall or be pulled into a tub or sink. Do not place or drop into water or other liquid.
English

English
WARNING
3. Keep fingers away from all moving parts. Special care is required around the sewing machine needle.
4. Always use proper needle plate. The wrong plate can cause the needle to break.
1. Switch off or unplug the appliance when leaving it unatteneded.
2. Unplug the appliance before carrying out maintenance or replacing lamps.
5. Do not use bent needles.
6. Do not pull or push fabric while stitching. It may deflect the needle causing it to break.
7. Switch the sewing machine off (“O”) when making any adjustments in the needle area, such as threading needle, changing
needle, threading bobbin, or changing presser foot, etc.
8. Always unplug sewing machine from the electrical outlet when removing covers, lubricating, or when making any other user
servicing adjustments mentioned in the instruction manual.
9. Never operate on a soft surface such as a bed or couch where the air openings may be blocked.
SAVE THESE INSTRUCTIONS

English
1. NAMES OF PARTS ....................................................................1
2. PREPARATION FOR SEWING ................................................................3
Connecting Power Cord ........................................................................... 3
Setting Telescopic Thread Stand ............................................................. 4
Opening The Front Panel and Side Cover ............................................. 5
How to Change Threads ...........................................................................6
Replacing Needles ................................................................................... 7
Threading ................................................................................................ 8
Preparation for Sewing and Checking ................................................. 13
3. FOUR THREAD OVEREDGING STITCH USING 2 NEEDLES ...... 14
Before Sewing ........................................................................................ 14
Presser Foot Lifter .................................................................................. 14
Beginning and Ending of Sewing ......................................................... 15
Adjustment of The Presser Foot Pressure .......................................... 16
Thread Tension Adjustment .................................................................. 16
Adjustments for the Differential Feed ................................................... 22
Adjustments for Size of Bite ................................................................. 23
How to Adjust Stitch Length ................................................................... 24
Sewing for Curved Seams .................................................................... 24
Standard Chart for the Thread Tension .............................................. 25
4. SETTING WASTE TRAY ................................................................... 26
5. THREE THREAD OVEREDGING STITCH USING ONE NEEDLE
...................................................................................................................27
TWO THREAD OVERLOCK ........................................................... 28
6. ROLL HEMMING ............................................................... 29
7. PIN TUCKING ................................................................... 32
8. CORDED OVERLOCK ...................................................... 34
9. REPLACING THE CUTTING KNIVES ............................... 35
10. CHANGING THE LIGHT BULB ..........................................37
11. LUBRICATION .................................................................... 38
12. TABLE OF SEWING MATERIALS, NEEDLES AND
THREAD ..............................................................................39
13. ACCESSORIES ................................................................. 40
14. SPECIFICATIONS ............................................................. 42
CONTENTS

Page 1
Section
1
SL1T-X
17
16
987654321
151413121110
1. NAMES OF PARTS / NOMBRE DE LAS PARTES / NOM DES PIECES / HAUPTTEILE DER
MASCHINE / VOORNAAMSTE ONDERDELEN / ELENCO DEI COMPONENTI

Page 2
1. Kloshouder
2. Hendel van het persvoetje
3. Schroef voor het regelen van de persvoetdruk
4. Telescopische draadgeleider
5. Hendel draadgeleider
6. Draadgeleider
7. Knoppen draadspanning
8. Voorpaneel
9. Knop voor het differentieel transport
10. Zij-afdekplaat
11. Steeklengte regelaar
12. Persvoetje
13. Instelknop steekbreedte
14. Bovenste mes
15. Voor-afdekplaat
16. Handwiel (aan de rechterzijde van de machine)
17. Naaitongschuifje
1. Garnrollenstift
2. Nähfuß Lüfterhebei
3. Füßchendruck-Regulierung
4. Teleskop-Fadenführung
5. Gelenkfadenhebel
6. Fadenführungen
7. Fadenspannungen
8. Vordere Verkleidung
9. Differential-Transport Einstellknopf
10. Seitenklappe
11. Stichlängenregulierung
12. Nähfuß
13. Stichbreiten-Einstellung
14. Beweglicher Abschneider
15. Frontklappe
16. Handrad (rechts an der Maschine)
17. Rollsaumhebel (Kettelzungen-Einstellung)
1. Spool pin
2. Presser foot lifter
3. Pressure regulator screw
4. Telescopic thread stand
5. Thread take up lever
6. Thread tension support
7. Thread tension dials
8. Front panel
9. Differential feed dial
10. Side cover
11. Stitch length adjuster
12. Presser foot
13. Bite wicith adjusting dial
14. Upper knife
15. Front cover
16. Handwheel (Right side of machine)
17. Stitch finger lever
1. Vástago porta carrete.
2. Palanca alzadora.
3. Tornillo ajustador de presión.
4. Porta hilo telescópico (Guía hilo telescópico).
5. Palanca de elevncion del hilo.
6. Soporte de tensión del hilo.
7. Reguladores de tensión.
8. Panel frontal.
9. Botón de arrastre de suministro diferencial.
10. Tapa lateral.
11. Botón de ajuste pie largo de puntada.
12. Prensatelas.
13. Botón de ajuste del ancho de la puntada.
14. Cuchillo superior.
15. Tapa frontal.
16. Volante, lado derecho de la máquina.
17. Tacón de la lengüeta de puntada
1. Tige porte bobine
2. Levier du pied de biche
3. Vis de réglage de pression du pied de biche
4. Guide fil à tube télescopique
5. Levier releveur de fil
6. Support de tension de fil
7. Boutons régulateurs de tension
8. Cache avant
9. Bouton d’entrainement (différentiel)
10. Couvercle lateral
11. Réglage de longueur de point
12. Pied de biche
13. Bouton de réglage de largeur de point
14. Couteau superieur
15. Couvercle frontal
16. Volant (à droite de la machine)
17. Languette d’escamotage du doigt mailleur
English Français Nederlands
Español Deutsch Italiano
1. Perno portarocchetti
2. Leva di sollevamento piedino premistoffa
3. Vite di regolazione pressione premistoffa
4. Guida-filo a tubo telescopico
5. Leva di sollevamento filo
6. Supporto di tensione filo
7. Bottoni regolatori di tensione
8. Coperchio anteriore
9. Bottone di trasporto (differenziale)
10. Coperchio laterale
11. Regolazione lunghezza punto
12. Piedino premistoffa
13. Bottone di regolazione lunghezza punto
14. Coltello superiore lame
15. Coperchio frontale
16. Volantino (a destra della macchina)
17. Cursore dell’indice

Page 3
English Español
Section
2
OFF ONOFF ON
PREPARACION PARA LA COSTURA
Conectando El Cable De Suministro
Conecte el pedal de pie y el cable de
suministrostro, ➀ y ➁.
Antes de enchufar su máquina,
asegúrese que el voltaje para su
máquina es el adecuado. Este está
escrito sobre una placa en la parte
posterior de su máquina.
❈ Las especificaciones varían de un
país a otro.
Press the switch on the machine to turn
on the power and the sewing light.
Always switch off or unplug machine
when not in use.
Presione el interruptor en la máquina
para activar la máquina y encender la
luz de costura.
Siempre apague el interruptor o
desconecte el cable de suministro
mientras la máquina no esté en uso.
A mayor presión del pie sobre el pedal,
mayor será la velocidad de costura de
la máquina.
Al apagar el interruptor, la máquina no
funcionará aún si se aprieta el pedal.
❈ Controlador de tipo electrónico.
Este control de pie es potente y estable,
aún a velocidades bajas.
Es fácil operarlo con simplicidad y así
obtener una terminación pareja y de
buena apariencia.
The more you press foot controller, the
faster the machine runs.
When the power switch is turned off,
the machine will not operate even by
pressure on the toot controller.
❈ Electronic type of controller
This foot controller is powerful and
stable, even at a slow speed.
It is posible to operate simply and
produce neat finish, even detailed
operation.
PREPARATION FOR SEWING
Connecting Power Cord
Connect foot controller and power cord
➀ ➁.
Before plugging in your machine, be
sure that the voltage is same as that of
your machine.
(written on a plate at back of machine).
❈ Specifications vary from country to
country.
English: Electronic type of foot controller
Español: Control de tipo electrónico
Français: Rhéostat de type électronique
Deutsch: Elekronisher Fußanlasser
Nederlands: Elektronisch voedpedaal
Italiano: Pedale a controllo eletronico

Setting Telescopic Thread Stand
Extend the telescopic thread stand to
its full height, then turn it until the shaft
clicks into its locked position.
Page 4
English Español
Section
2
Instalacion Del Guía Hilos
Telescópico
Estire el guía hilos a su altura máxima
y gire hasta que el pie se trabe en su
posición fija.

Opening The Front Panel and Side
Cover
• How to Open the Front Panel:
a. Push panel to the right as far as it will
go, and
b. Pull panel down towards you.
Page 5
English Español
Section
2
Apertura del Panel Frontal y de la
Tapa Lateral
• Cómo abrir el panel frontal:
a. Presionar el panel hacia la derecha lo
más que se pueda, y
b. Atraer el panel hacia uoi
• How to Open Side Cover:
a. Push cover to the left to unlock, and
b. Swing cover back away from you.
• How to Close Side Cover:
a. Push cover to the right, and
b. Lock into place.
• Cómo cerre la Tapa Lateral:
a. Presionar la tapa hacia la derecha, y
b. Cerra con cerrojo en sirio.
English: Front panel
Español: Panel frontal
Français: Panneau frontal
Deutsch: Frontklappe
Nederlands: Afdekklep
Italiano: Coperchio frontale
pannello frontale
English: Side cover
Español: Tapa lateral
Français: Couvercle latéral
Deutsch: Seitenteil
Nederlands: Zijklep
Italiano: Coperchio laterale
Page 6
English Español
Section
1
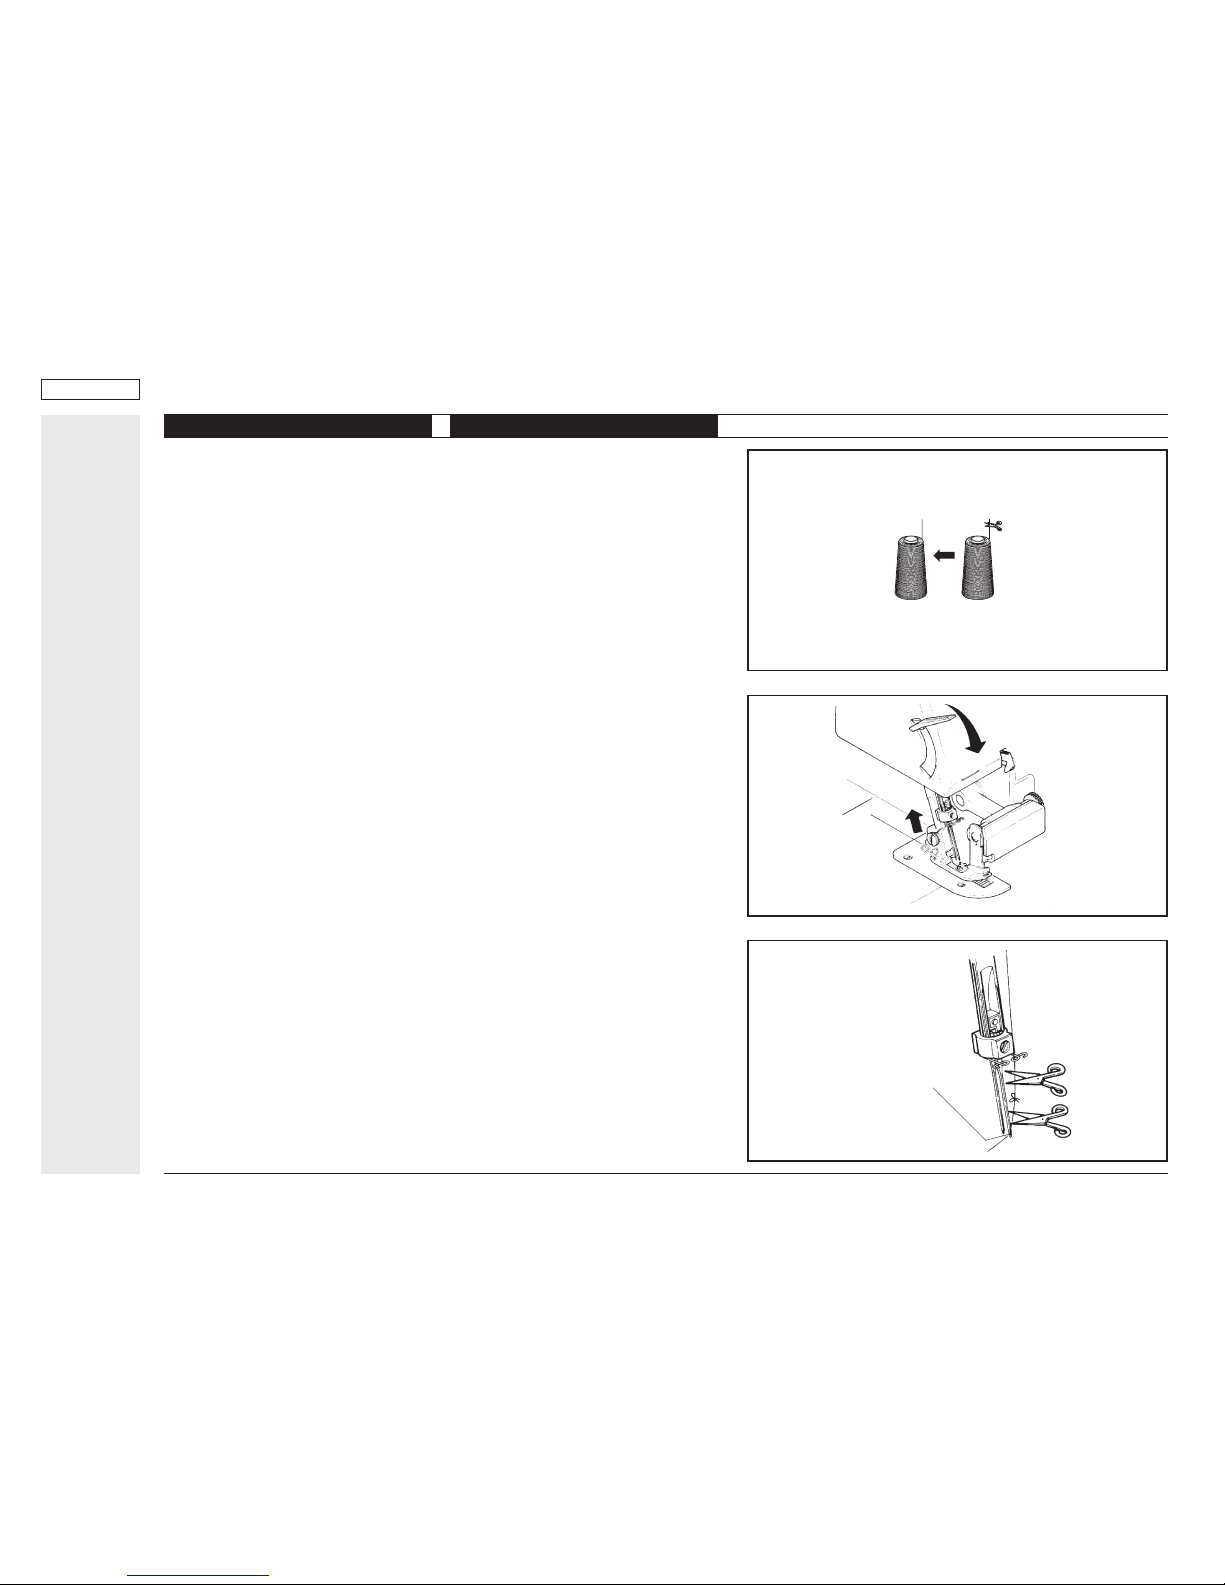
How to Change Threads
The machine is supplied with thread but
the following is an easy way to change
them:
(1) Cut the thread in use near the cone
spool (behind the telescopic thread
stand). Place the new thread on the
spindle and tie it to the end of the
original thread.
Section
2
Cambio De Hilos
La máquina es entregada con hilos
que se pueden cambiar de la siguiente
manera:
(1) Corte el hilo siendo utilizado cerca
del carrete, (cono), ubicado detrás
del guía hilos telescópico.
Coloque el nuevo hilo sobre el
carrete y ate los cabos de éste y el
hilo original.
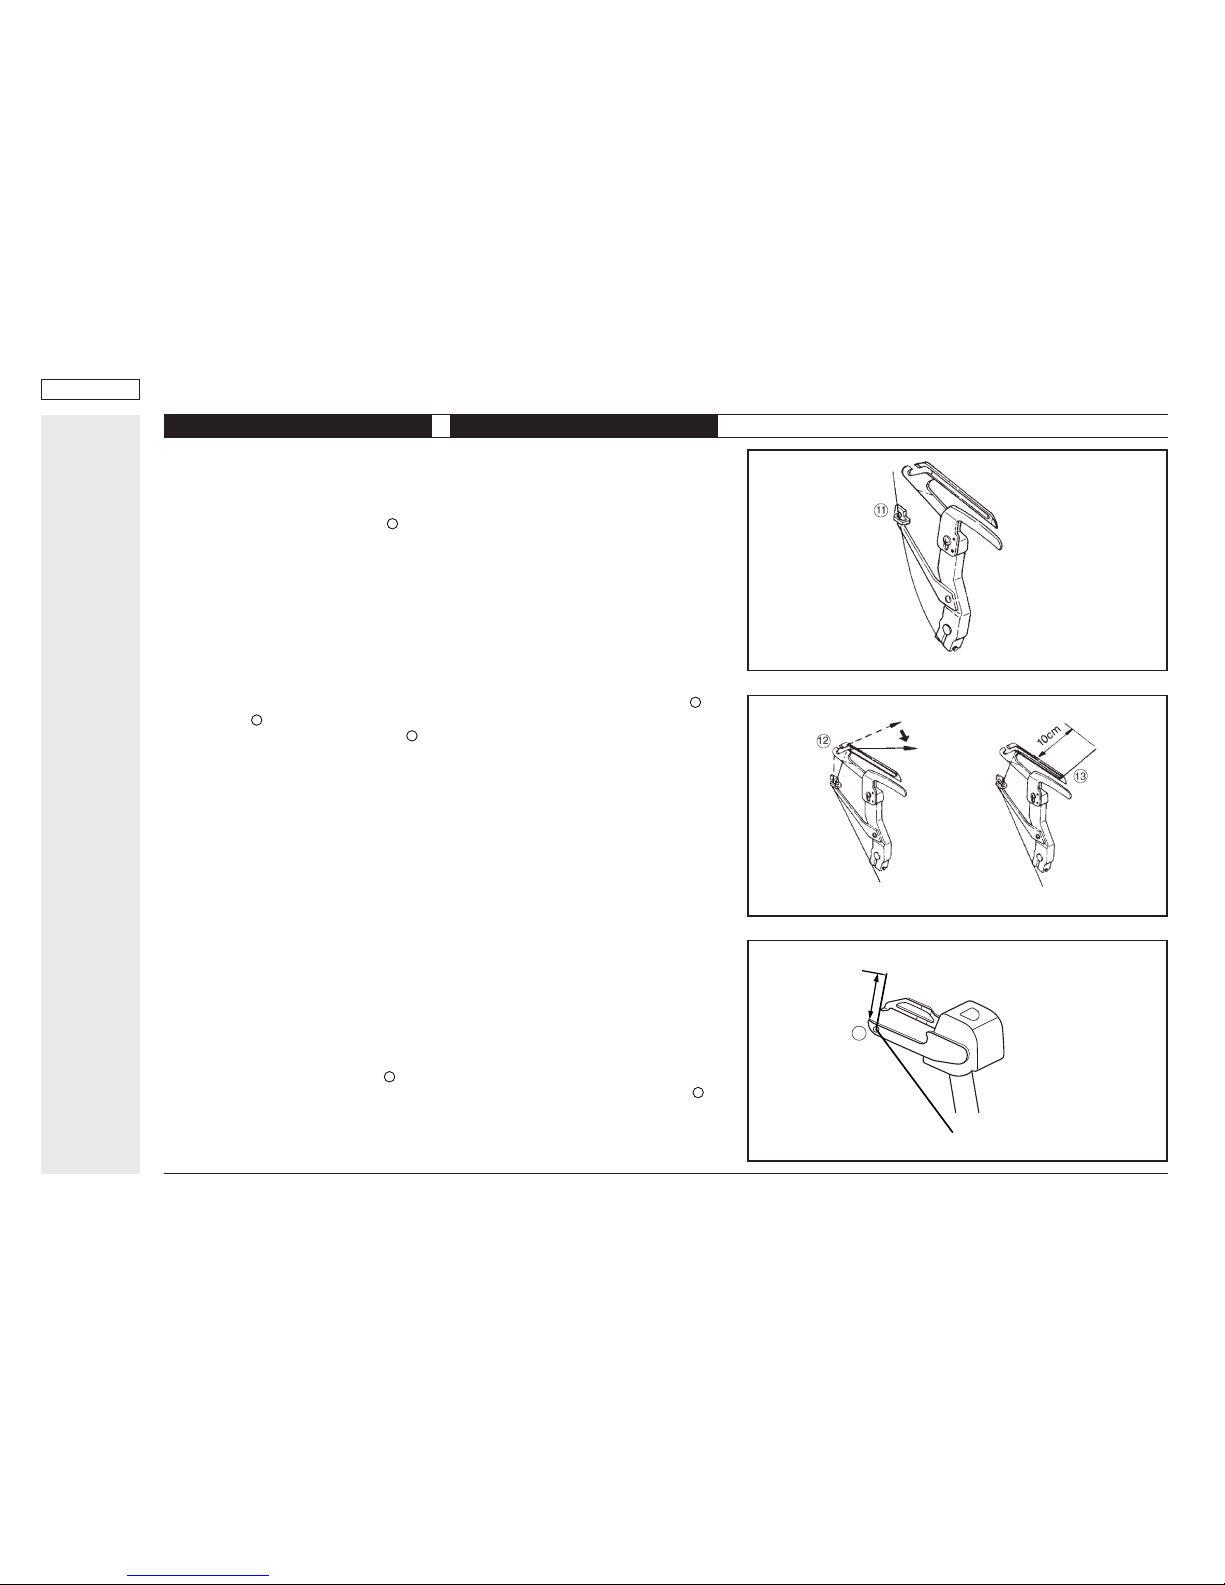
(2) Lower the presser foot lifter to lift up
the presser foot.
(3) Set tensions to “0” so that the thread
knot can pass through smoothly,
draw out the looper thread until the
thread knot comes to about 10 cm
past the presser fool.
(2) Baje la palanca alzadora para así
alzar el prensatelas.
(3) Fije las tensiones en “0” para que así
el nudo del hilo pueda pasar
facilmente, saque hacia afuera el
anillo de hilo hasta que éste haya
pasado unos 10 cm. más allá del
prensatelas.
(4) Al cambiar el hilo de la aguja, corte el
nudo antes que éste alcance el ojo
de la aguja para evitar doblar la
aguja al atraparse el nudo en el
mismo.
Para enhebrar con mayor facilidad,
utilice pinzas.
(4) When changing the needle thread,
cut off the thread knot before it
reaches the eye of the needle to
avoid bending the needle as the knot
is pulled and caught in the needle’s
eye.
To make the above threading easier,
use tweezers.
English: Needle eye
Español: Ojo de aguja
Français: Chas de l’aiguille
Deutsch: Nadel-Öhr
Nederlands: Oog van de naald
Italiano: Cruna dell’ago
English: Cut thread
Español: Corte hilo
Français: Couper le fil
Deutsch: Faden abschneiden
Nederlands: Knip de draad
door
Italiano: Tagliare il filo
English: Tie threads
Español: Ate los hilos
Français: Nouer les fils
Deutsch: Fäden verknoten
Nederlands: Knoop de
draden vast
Italiano: Annodare i fili

Cover the spool with the “NET” as
chemical fibers (fibres) and the like are
easily frayed.
Page 7
English Español
Section
2
Cubra el conó de hilo con la malla ya
que las fibras químicas y otras similares
se desgastan facilmente.
When using a real type thread spool,
insert the spool adapter (supplied with
the machine) (as shown).
Al utilizar el carrete de tipo corriente,
inserte el adaptador de carrete
suministrado con la máquina, en la
forma aquí ilustrada.
Cambio De Agujas
Para cambiar agujas, siga los siguientes
pasos:
Nota: Asegúrese de desenchufar o
cortar el suministro eléctrico antes de su
máquina antes de combiar agujas.
(1) Suba las agujas tan alto como sea
posible girando el volante hacia Ud.
(2) Afloje el tornillo de cepo y retire las
dos agujas al mismo tiempo.
(3) Con el lado plano de las agujas hacia
la máquina. inserte las dos agujas
juntas dentro de la ranura porta
agujas, empuje lo más adentro
posible.
Use las agujas “HA ✕ 1SP (705/130)”
#11 (80) or #14 (90) u otras que sean las
mismas utlizadas para uso doméstico.
Replacing Needles
Replace needles in the following way:
Note: Be sure to take out the power
supply plug before replacing needles.
(1) Bring needles to their highest position
by turning handwheel towards you.
(2) Loosen the needle clamp screw and
remove the two needles together.
(3) With the flat side away from you,
insert the new two needles together
into the groove of needle bar as far
as it will go.
Use “HA ✕ 1SP (705/130)” #11(80) or
#14(90) or ones the same as for homeuse sewing machine.
English: Net Deutsch: Netz
Español: Malla Nederlands: Net
Français: Filet Italiano: Rete
English: Needle clamp screw
Español: Tornillo de cepo
Français: Vis serre aiguille
Deutsch: Nadelhalte-Schraube
Nederlands: Naaldklemschroef
Italiano: Vite di fissaggio dell’ago

Threading
When threading the machine from the
beginning, threading must be carried out
in the following sequence:
First: Lower looper threading (A)
Second :Upper looper threading (B)
Finally: Needle threading (C,D)
Page 8
English Español
Section
2
2
2
3
4
4
4
5
5
3
6
6 6
7
5
9
8
⑫
⑪
⑪
8
9
0
0
7
2
2
Enhebrado Del Hilo
Al enhebrar la máquina desde del
principio, el enhebrado debe ser hecho
siguiendo los pasos detallados a
continuación:
Primero: Enhebrado del crochet inferior
(A)
Segundo: Enhebrado del crochet
superior (B)
Finalmente: Enhebrado de las agujas
(C, D)
Lower looper threading
Push the front cover to the right, and
fold it down towards you.Take the
thread drawn from the spool and pass it,
through guide ➁ of the thread stand and
then, in order, through guides ➂, ➃, ➄
and thread tension dial ➅. (Fig. A)
Enhebrado del crochet inferior
Empuje la tapa frontal hacia la derecha
y dóblela hacia abajo, hacia Ud. Afirme
el hilo sacado del cono y páselo a través
de la guía dos del guía hilos telescópico,
y después, siguiendo el orden, a través
de las guías ➂, ➃ y ➄, finalmente por el
disco de tensión ➅. (Fig A)
Fig.
Abb.
A
Pass the thread through guides ➆ ⑧ ➈
and ➉. Bring the lower looper to the
far left position by turning handwheel
towards you, and pass the thread
through lower looper thread guide .
Then, move the lower looper slightly
to the right by turning the handwheel
towards you. (Fig. B)
10 cm
11
Page 9
English Español
Section
2
Pase el hilo a través de las guías ➆, ⑧,
➈ y ➉.
Inferior el volante hacia Ud. ubique el
crochet totalmente hacia la izquierda y
pase el hilo a través del guía hilos del
crochet inferior.
Enseguida, siempre moviendo el
volante, ubique el crochet ligeramente
hacia la derecha. (Fig. B)
Pass the thread through lower looper
thread guide as shown. (Fig. C)
Then thread the hole of lower looper
using tweezzrs. Cut the thread leaving
about 10 cm (4") of spare thread.
(Fig. D)
Pase el hilo a través de la guía hilos ,
según se muestra en la. (Fig. C)
A continuación, enhebre el resto del
crochet, utilizando pinzas. Corte el hilo,
dejando un cabo de hilo sobrante de
aprox. 10 cm. (Fig. D)
Enhebrado del crochet superior
• Ubique el crochet superior en su
posición más baja, girando el volante
hacia Ud.
• Desenrolle una porción de hilo del
carrete y pásela a través de la guía
dos del guia-hilos, enseguida, y siempre
manteniendo el orden, a través de las
guías ➂ ~ ➉. (Fig. A)
• Enhebre el ojo del crochet superior ,
con la ayuda de pinzas. Corte el hilo,
dejando un cabo de aprox. 10 cm de
hilo sobrante. (Fig. E)
• Cierre la tapa frontal.
Upper looper threading
• Bring the upper looper to its lowest
position by turning handwheel toward
you.
• Draw thread from spool and pass it,
through guide ② of the thread stand
and then, in order, through guides ➂ ~
➉ (Fig. A).
• Thread the hole of upper looper
using tweezers. Cut the thread leaving
about 10cm (4") of spare thread
(Fig. E).
• Close the front cover.
Fig.
Abb.
B
Fig.
Abb.
D
Fig.
Abb.
C
Fig.
Abb.
E
12
13
11
11
11
12
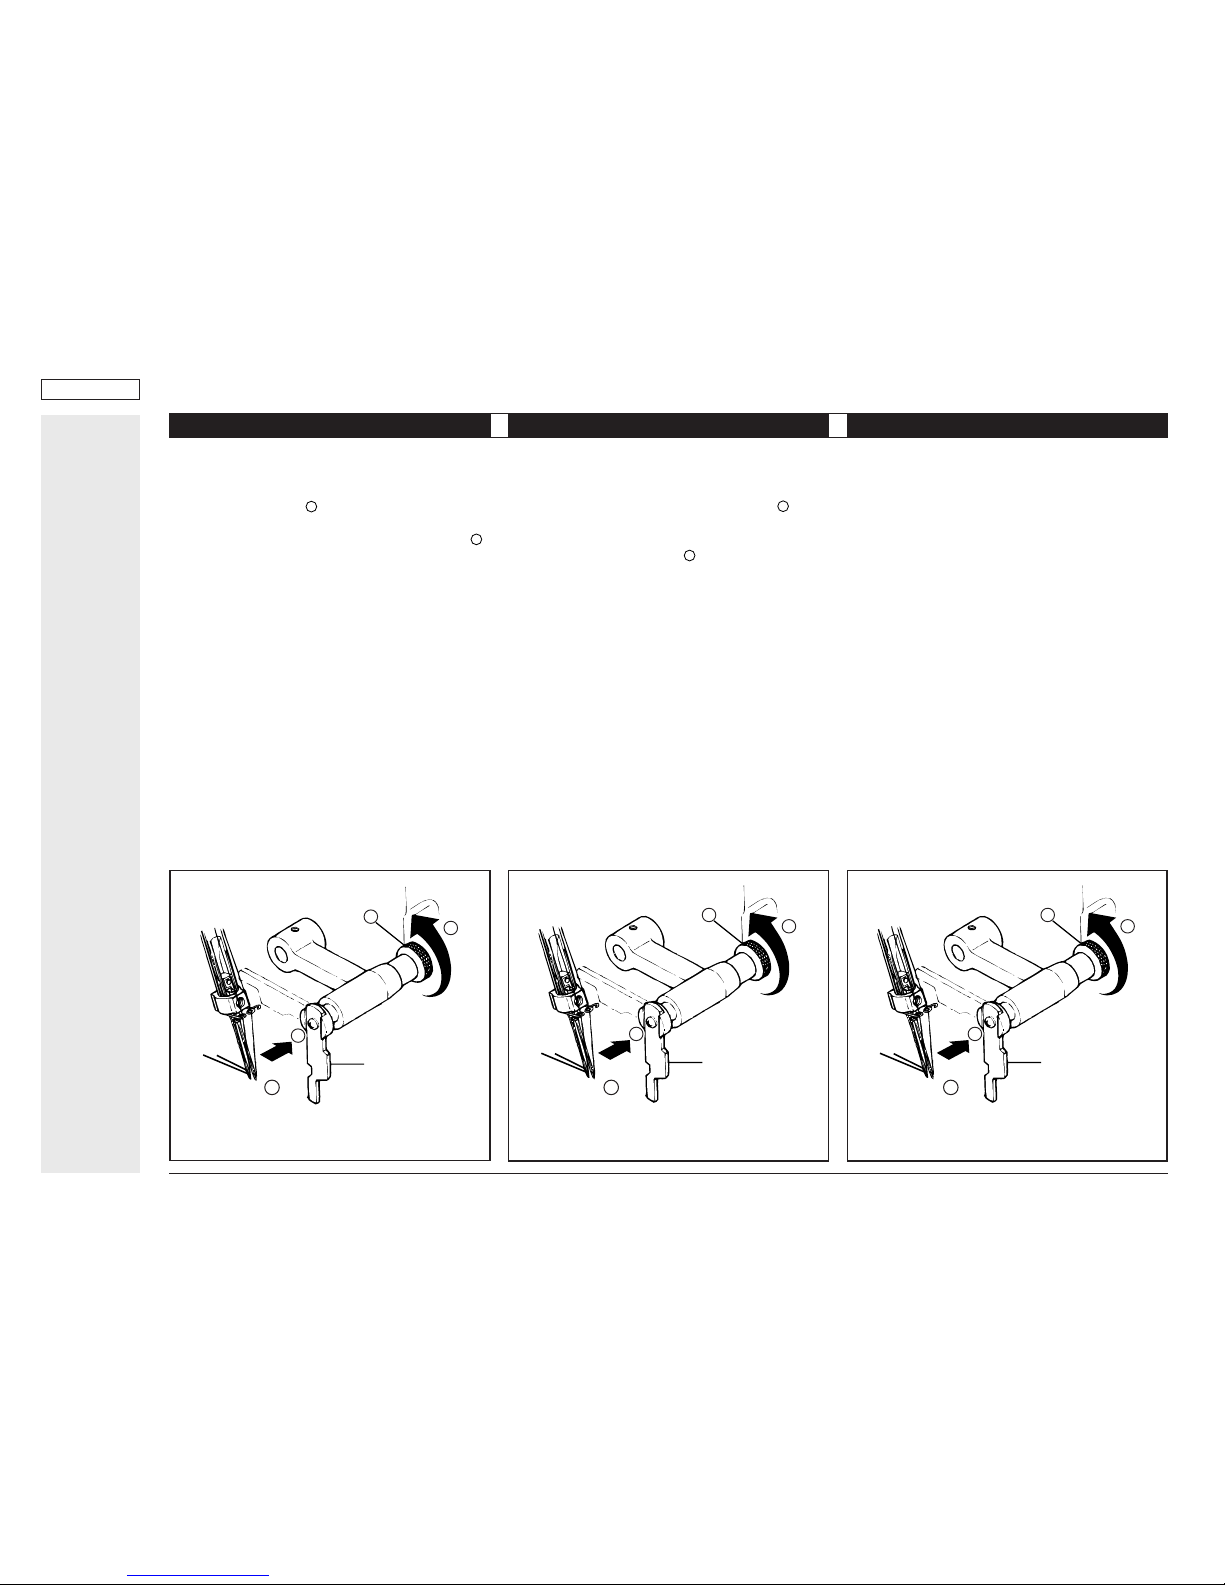
Right needle threading
• For ease in threading, push the upper knife
holder screw from side with the forefinger of
your left hand ❈ and grasp the right end of the
holder © and turn it in the direction of arrow
with your right hand. (Fig. F)
• Take the thread drawn from spool, and pass it
through thread guide ➁ ~ ⑧, then thread to the
right-hand needle’s eye ➈ from front to back.
Cut the thread leaving about 10cm (4") of
spare thread. (Fig. A)
Left needle threading
• Take the thread drawn from spool, and pass it
through thread guides ➁ ~ ➃, ➅ ~ ⑧, and
thread the left-hand needle’s eye ➈ from front
to back. (Fig. A, F)
F
A
C
B
Page 10
English Español
Français
Section
2
Enhebrado de la aguja derecha
• Para facilitar el enhebrado, presione el tornillo
afirmador del cuchillo superior del lado con
el dedo índice de su mano izquierda ❈ y afirme
el extremo derecho del afirmador © girándolo
en dirección de la flecha con su mano
derecha. (Fig. F)
• Tome el hilo desenrollado del carrete y páselo
a través de los guía-hilos ➁ - ⑧, enhebrándolo
después por el ojo de la aguja derecha ➈
desde adelante hacia atrás.
Corte el hilo, dejando un cabo sobrante de
aprox. 10 cm.
Enhebrado de la aguja izquierda
• Tome el hilo desenrollado del carrete y páselo
a través de los guía-hilos ➁ - ➃, ➅ - ⑧, y
enhebre el ojo de la aguja izquierda, ➈, desde
adelante hacia atrás. (Fig. A, F)
Enfilage de l’aiguille de droite
• Pour faciliter l’enfilage, remonter le couteau
supérieur en tirant la vis du support vers la
droite pour le déverrouiller et en la tournant
vers le haut.
• Prendre le fil de la 3ème bobine et l’enfiler en
suivant le parcours orange, puis passer dans le
chas de l’aiguille de droite, de l’avant vers
l’arrière. Laisser environ 10 cm de fil après le
pied de biche.
Enfilage de l’aiguille de gauche
Prendre le fil de la dernière bobine et l’enfiler
en suivant le parcours jaune. Puis passer dans
le chas de l’aiguille de gauche de l’avant vers
l’arrière.
F
A
C
B
F
A
C
B
A
B
A
B
Upper knife
❈ As the upper knife is sharpined, care
should be taken when moving this part.
Cuchillo superior
❈ Al maniobrar el cuchillo tenga cuidado
con el filo del mismo.
Couteau supérieur
❈ Le couteau supérieur etant tres efile, faites
attention lorsque vous deplacez cette piece.
9 9 9
 Loading...