

Toyota Prius Prime 2020 Quick Reference Guide

1
The quick guide is not intended as a substitute for your “OWNER’S
MANUAL”. We strongly encourage you to review the “OWNER’S MANUAL”
and supplementary manuals so you will have a better understanding of your
vehicle’s capabilities and limitations.
Depending on specifications, the vehicle shown in the illustration may differ
from your vehicle in terms of equipment.
Charging operation
2
Plug-in Hybrid Applications
3
Basic operation
4
Things you must know
PRIUS PRIME_QG_OM47C92U_(U)
2
1. Charging operation
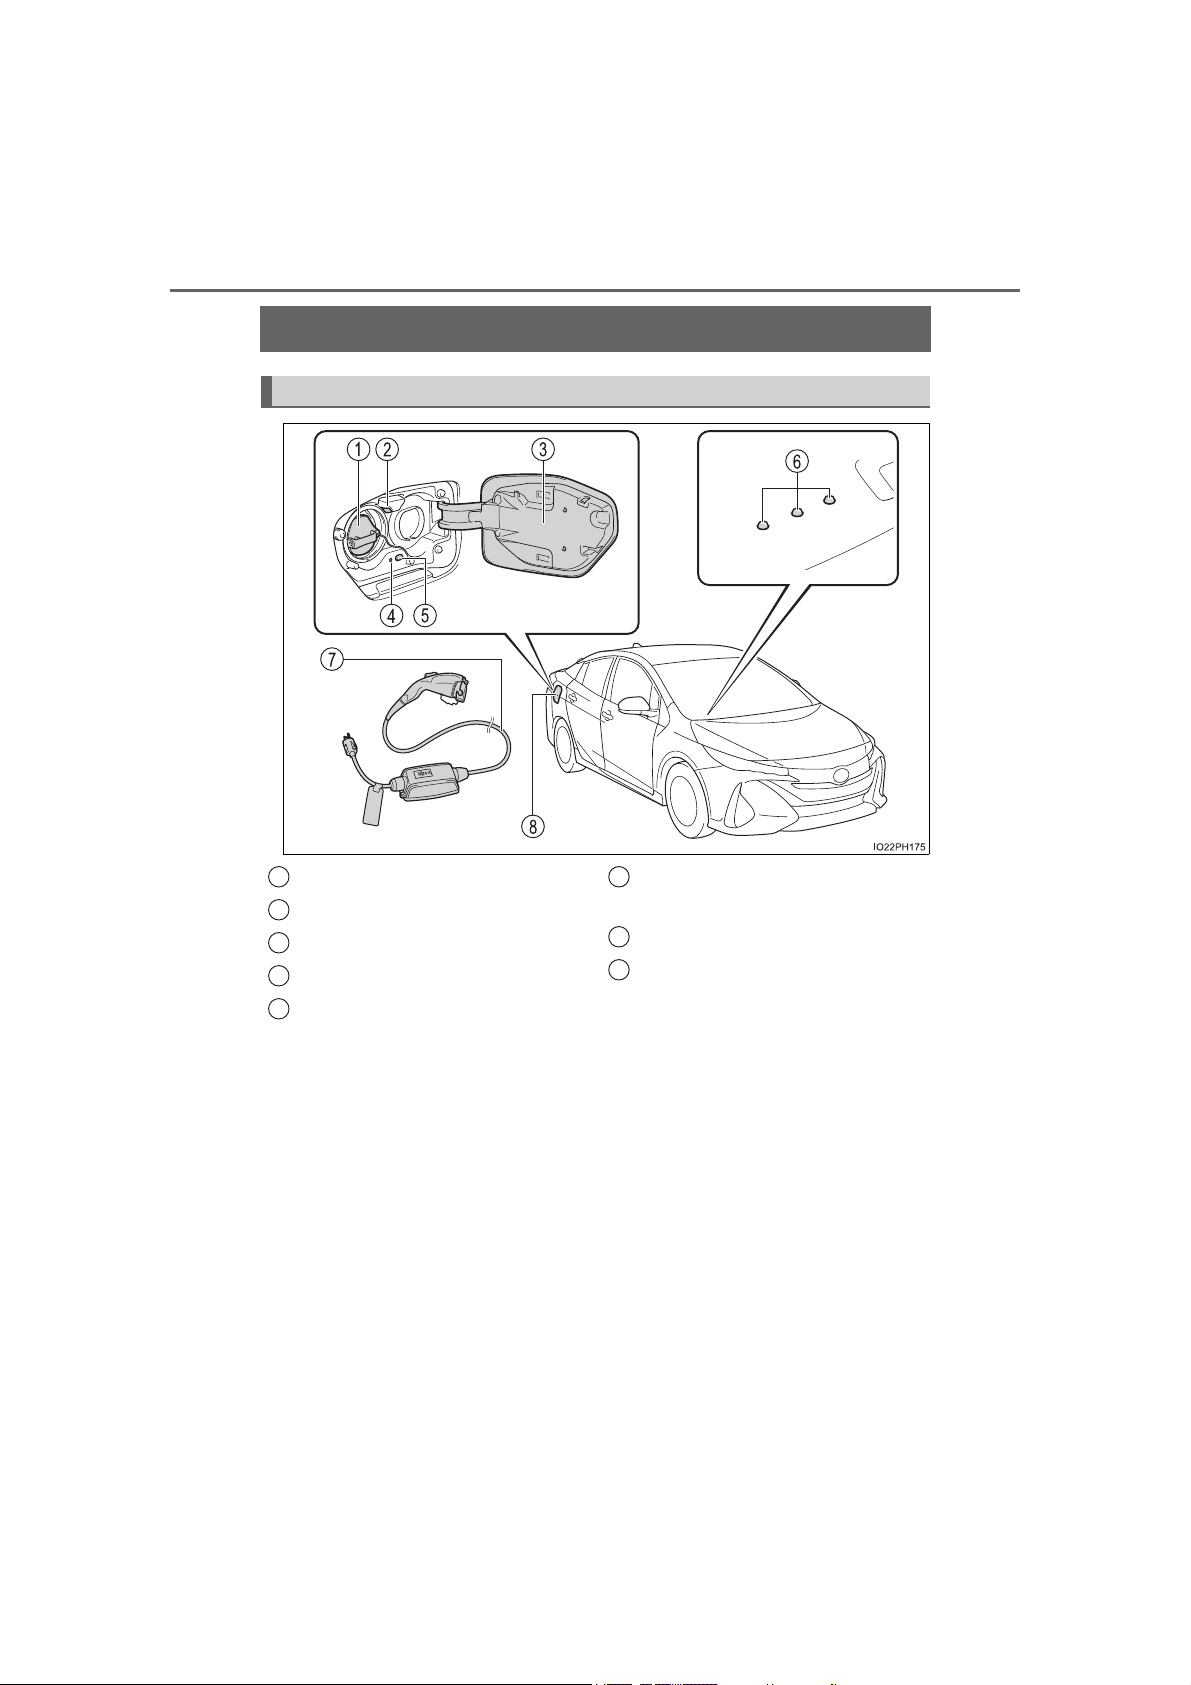
Charging equipment
Charging equipment and names
1
Charging inlet
2
Charging inlet light
3
Charging port lid
4
Charging indicator
5
Charging connector lock
switch
*
6
7
8
*: If equipped, refer to “OWNER’S MANUAL”
Hybrid battery (traction battery) status indicator
Charging cable
Charging port
PRIUS PRIME_QG_OM47C92U_(U)
1. Charging operation
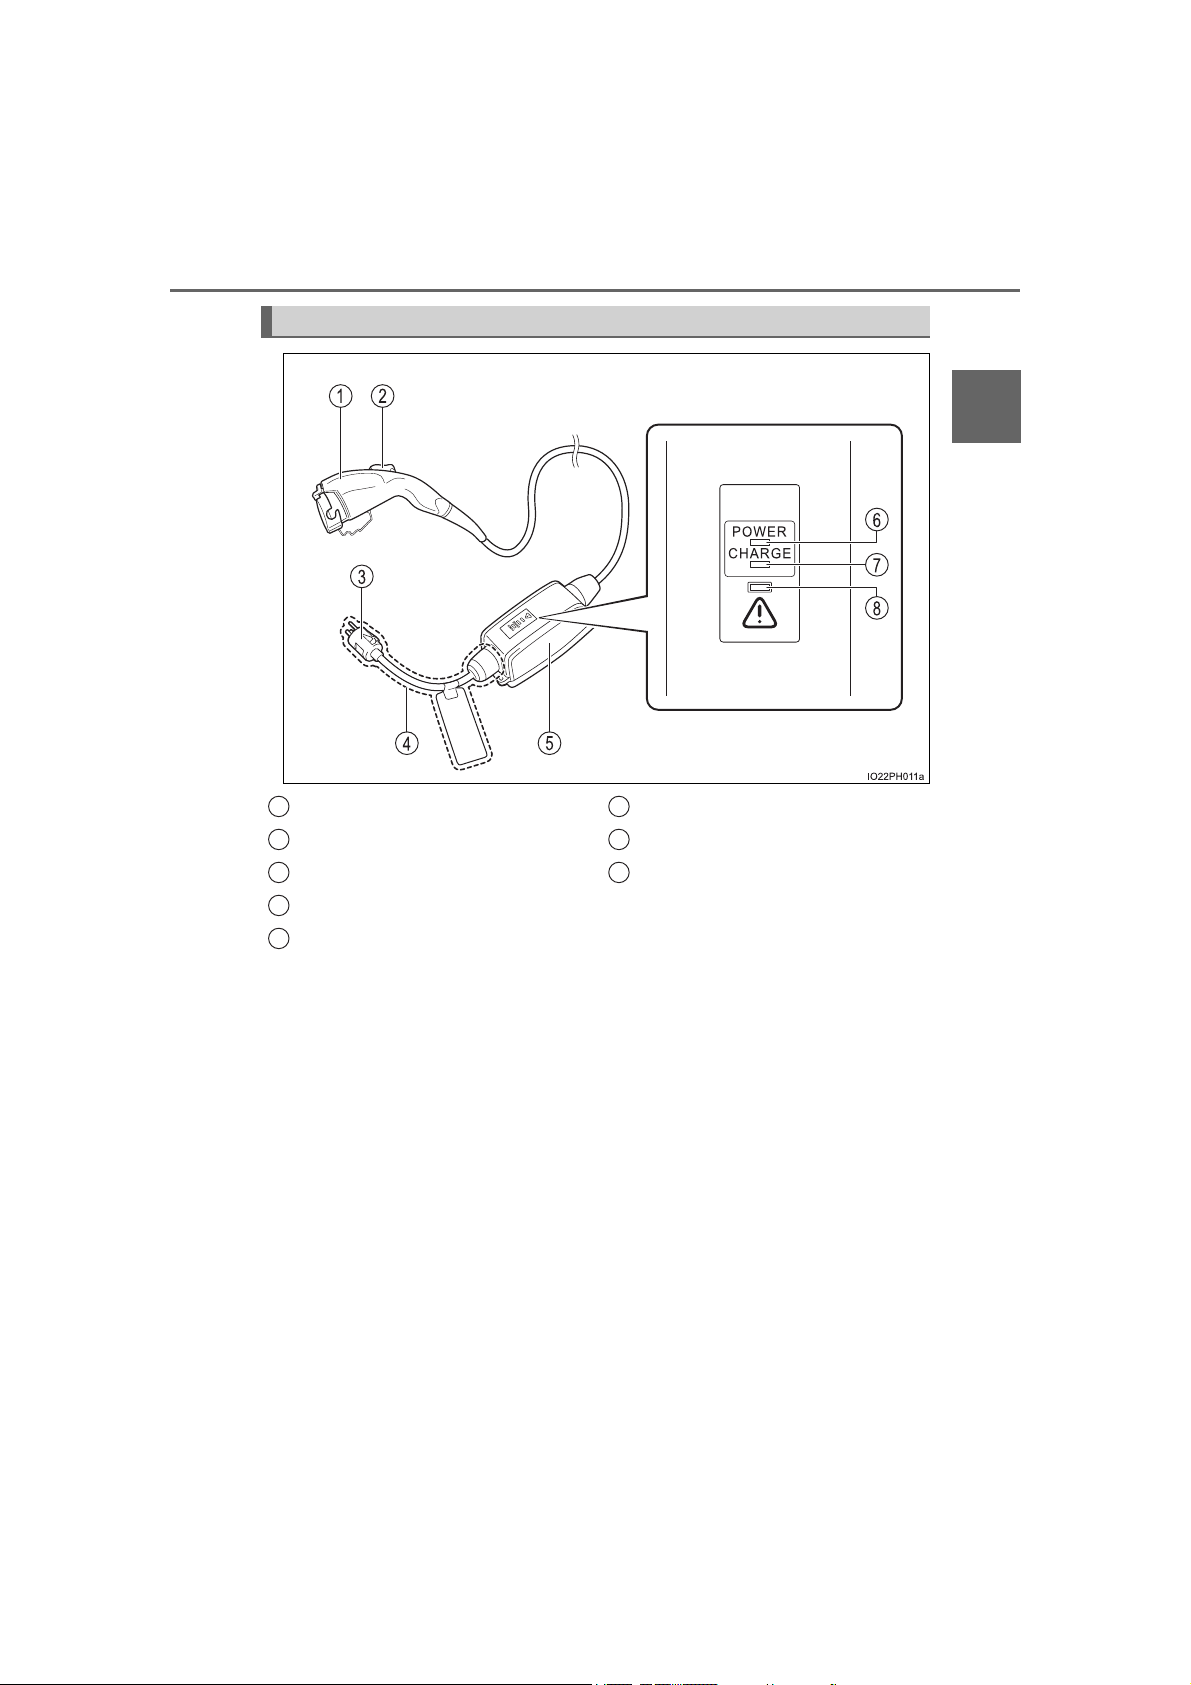
The names of each part of the charging cable
3
1
Charging operation
1
Charging connector
2
Latch release button
3
Plug
4
Plug-cord
5
CCID (Charging Circuit Interrupting Device)
6
Power indicator
7
Charging indicator
8
Error warning indicator
PRIUS PRIME_QG_OM47C92U_(U)

4
■ Safety functions
1. Charging operation
The CCID (Charging Circuit Interrupting Device) has the following
safety features.
● Electrical leakage detection function
If an electrical leakage is detected during charging, the power
source will be automatically interrupted, thus preventing fires or
electrical shocks caused by electrical leakage.
● Automatic check function
This is an automatic system check that is run before charging
begins to check for problems in the operation of the electrical
leakage detection function.
● Temperature detection function
A temperature detection function is equipped to the plug. While
charging, if heat is generated due to looseness on the outlet side
etc., this function suppresses heat by controlling the charging
current.
● Conditions for supplying current to the vehicle
The CCID (Charging Circuit Interrupting Device) is designed to
prevent electrical current from being supplied to the charging
connector when it is not connected to the vehicle, even if the plug
is inserted into the outlet.
● The hybrid system will not start while the charging cable is attached to the
vehicle, even if the power switch is operated.
● If the charging cable is connected while the “READY” indicator is illumi-
nated, the hybrid system will stop automatically and driving will not be possible.
● When the charging cable is connected to the vehicle, the shift position can-
not be changed from P to another position.
PRIUS PRIME_QG_OM47C92U_(U)

1. Charging operation
WARNING
● Do not connect the charging cable to a
ITO12P109
ITO12P110
■ Power sources precautions
Observe the following precautions.
If you do not follow them, fire, electrical shock or damage may occur, possibly resulting in death or serious injury.
● Connect to an AC 120 V outlet (NEMA 5-15R) with a Ground-Fault Circuit-
Interrupter (GFCI) and supplied by a circuit breaker per your local code.
Use of a 15A individual circuit is strongly recommended.
multi-outlet adapter, multi-plugs, or conversion plug.
● Connecting the charging cable to an
extension cord is strictly prohibited. The
extension cord may overheat and does
not contain a Ground-Fault Circuit-Interrupter (GFCI).
5
1
Charging operation
● Do not connect to a power strip.
● Use of a block heater for charging is prohibited.
● Make sure to connect the charging connector and charging inlet directly.
Do not connect a converting adaptor or extension cord between the
charging connector and charging inlet.
PRIUS PRIME_QG_OM47C92U_(U)
6
1. Charging operation
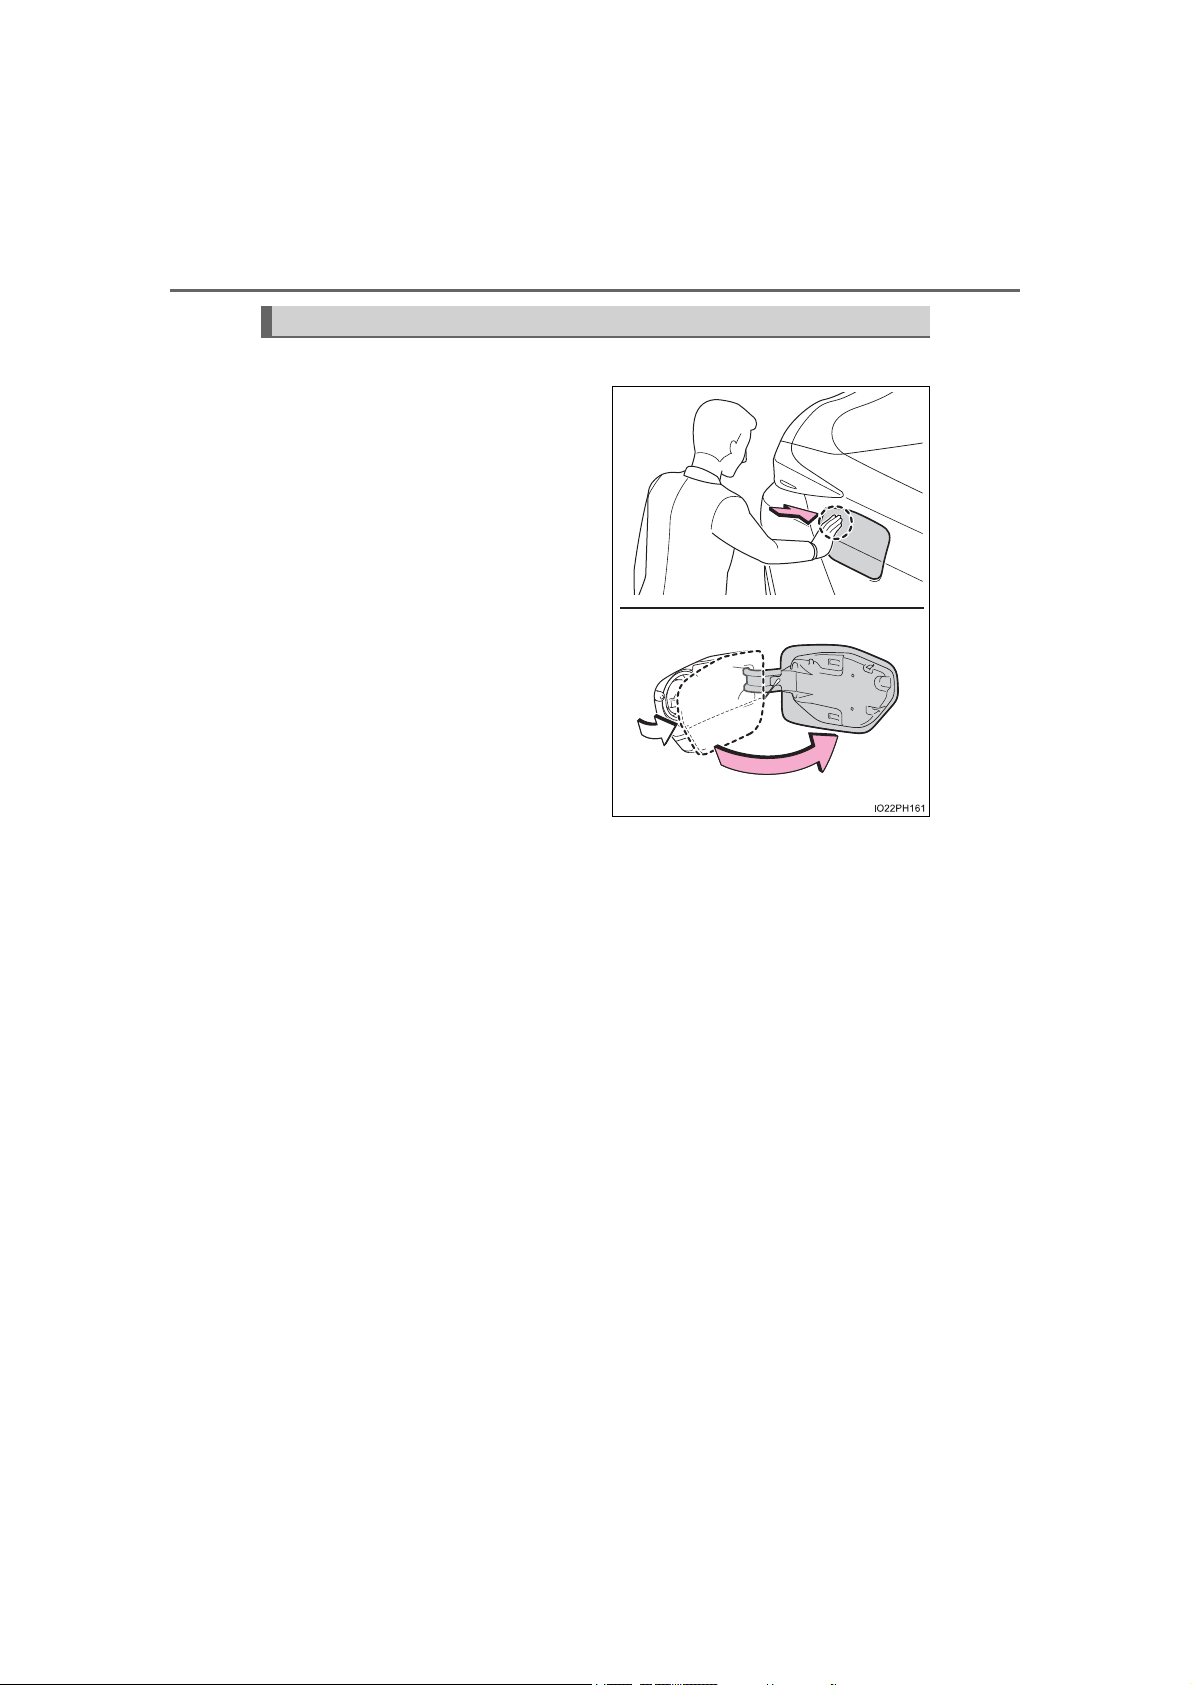
Opening and closing the charging port lid
■ Opening the charging port lid
Vehicles without smart lid &
connector locking system:
Press the rear edge of the
charging port lid (the position
shown in the illustration).
Push and take your hand away
to slightly open the charging port
lid. Then open the lid fully by
hand.
Vehicles with smart lid & connector locking system:
Press the rear edge of the
charging port lid (the position
shown in the illustration) with
the doors unlocked.
Push and take your hand away
to slightly open the charging port
lid. Then open the lid fully by
hand.
While the doors are locked, only the charging port lid can be unlocked
by carrying an electronic key and pressing the charging port lid.
PRIUS PRIME_QG_OM47C92U_(U)
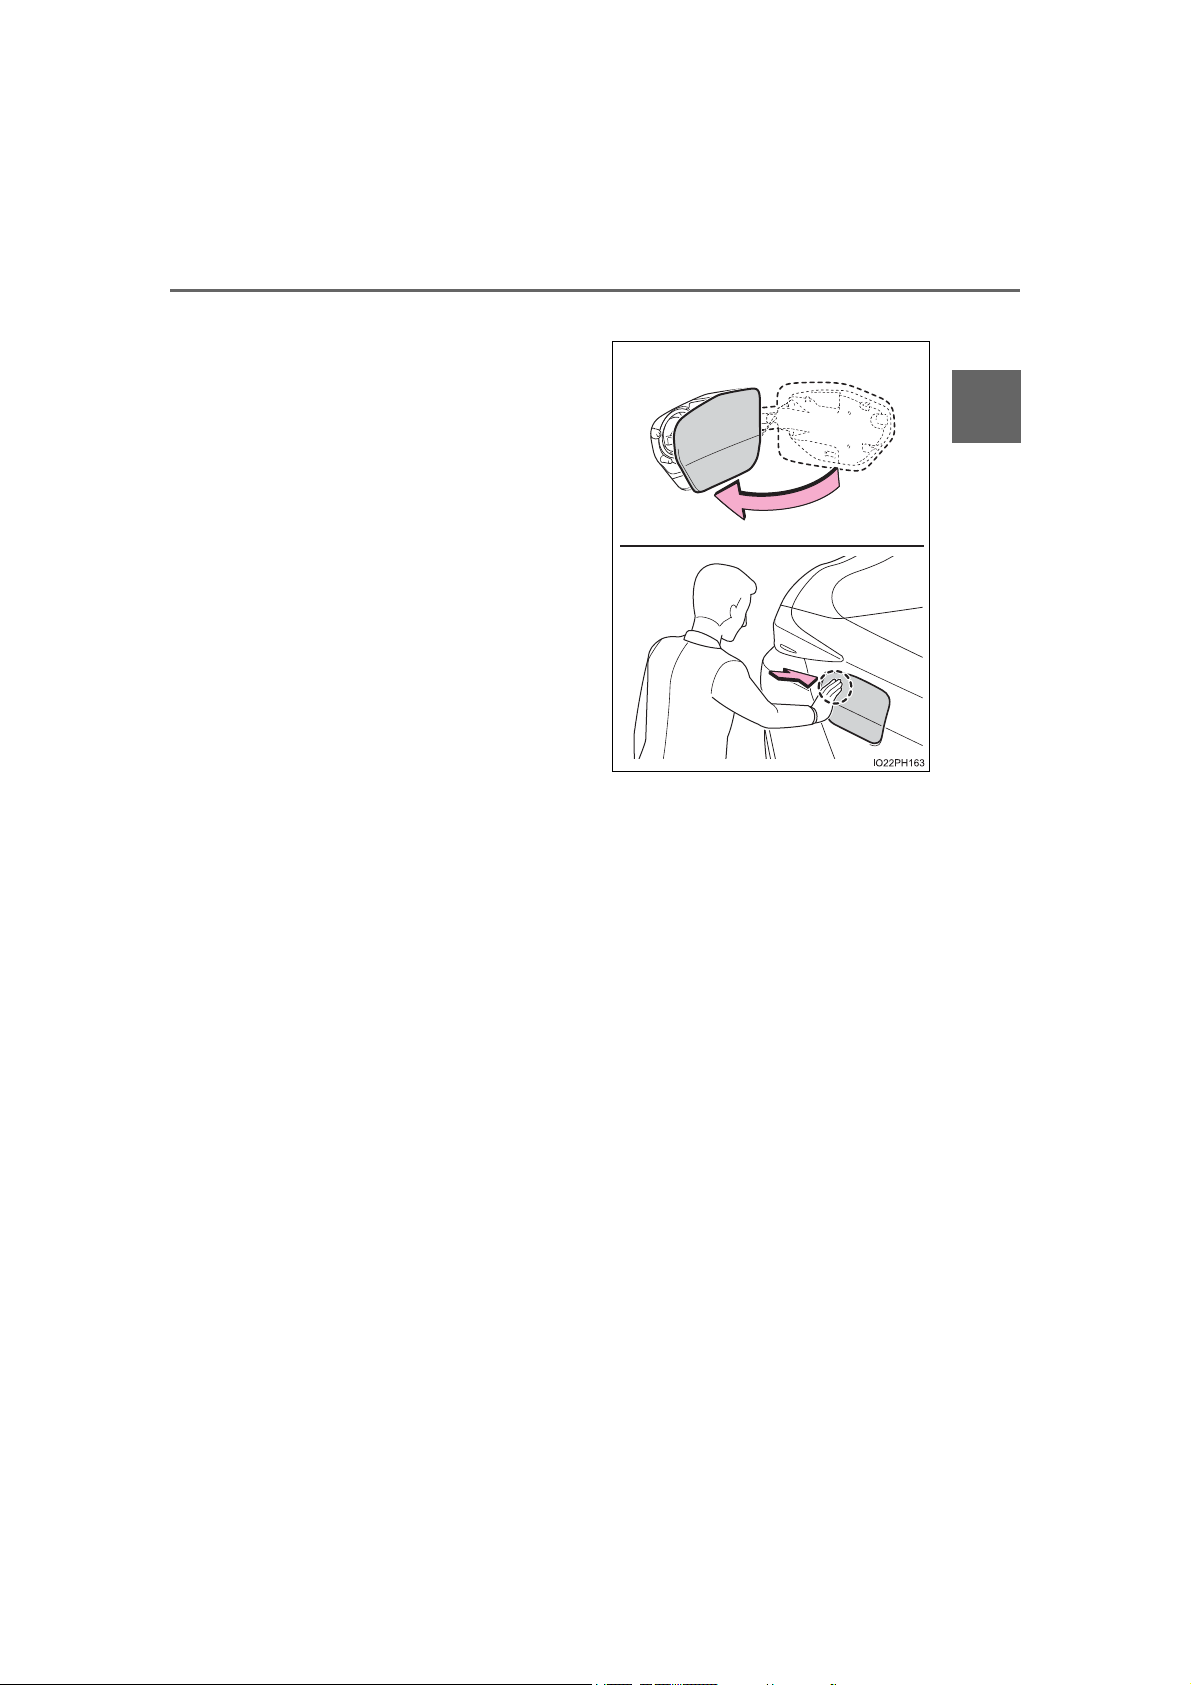
■ Closing the charging port lid
Close the charging port lid and
press the rear edge of the
charging port lid (the position
shown in the illustration).
Vehicles with smart lid & connector locking system:
• When the doors are locked
with the smart key system,
wireless remote control or
door lock switch, the charging
port lid is also locked.
• If the charging port lid is
closed with the doors locked,
the charging port lid locks.
1. Charging operation
7
1
Charging operation
PRIUS PRIME_QG_OM47C92U_(U)
8
1. Charging operation
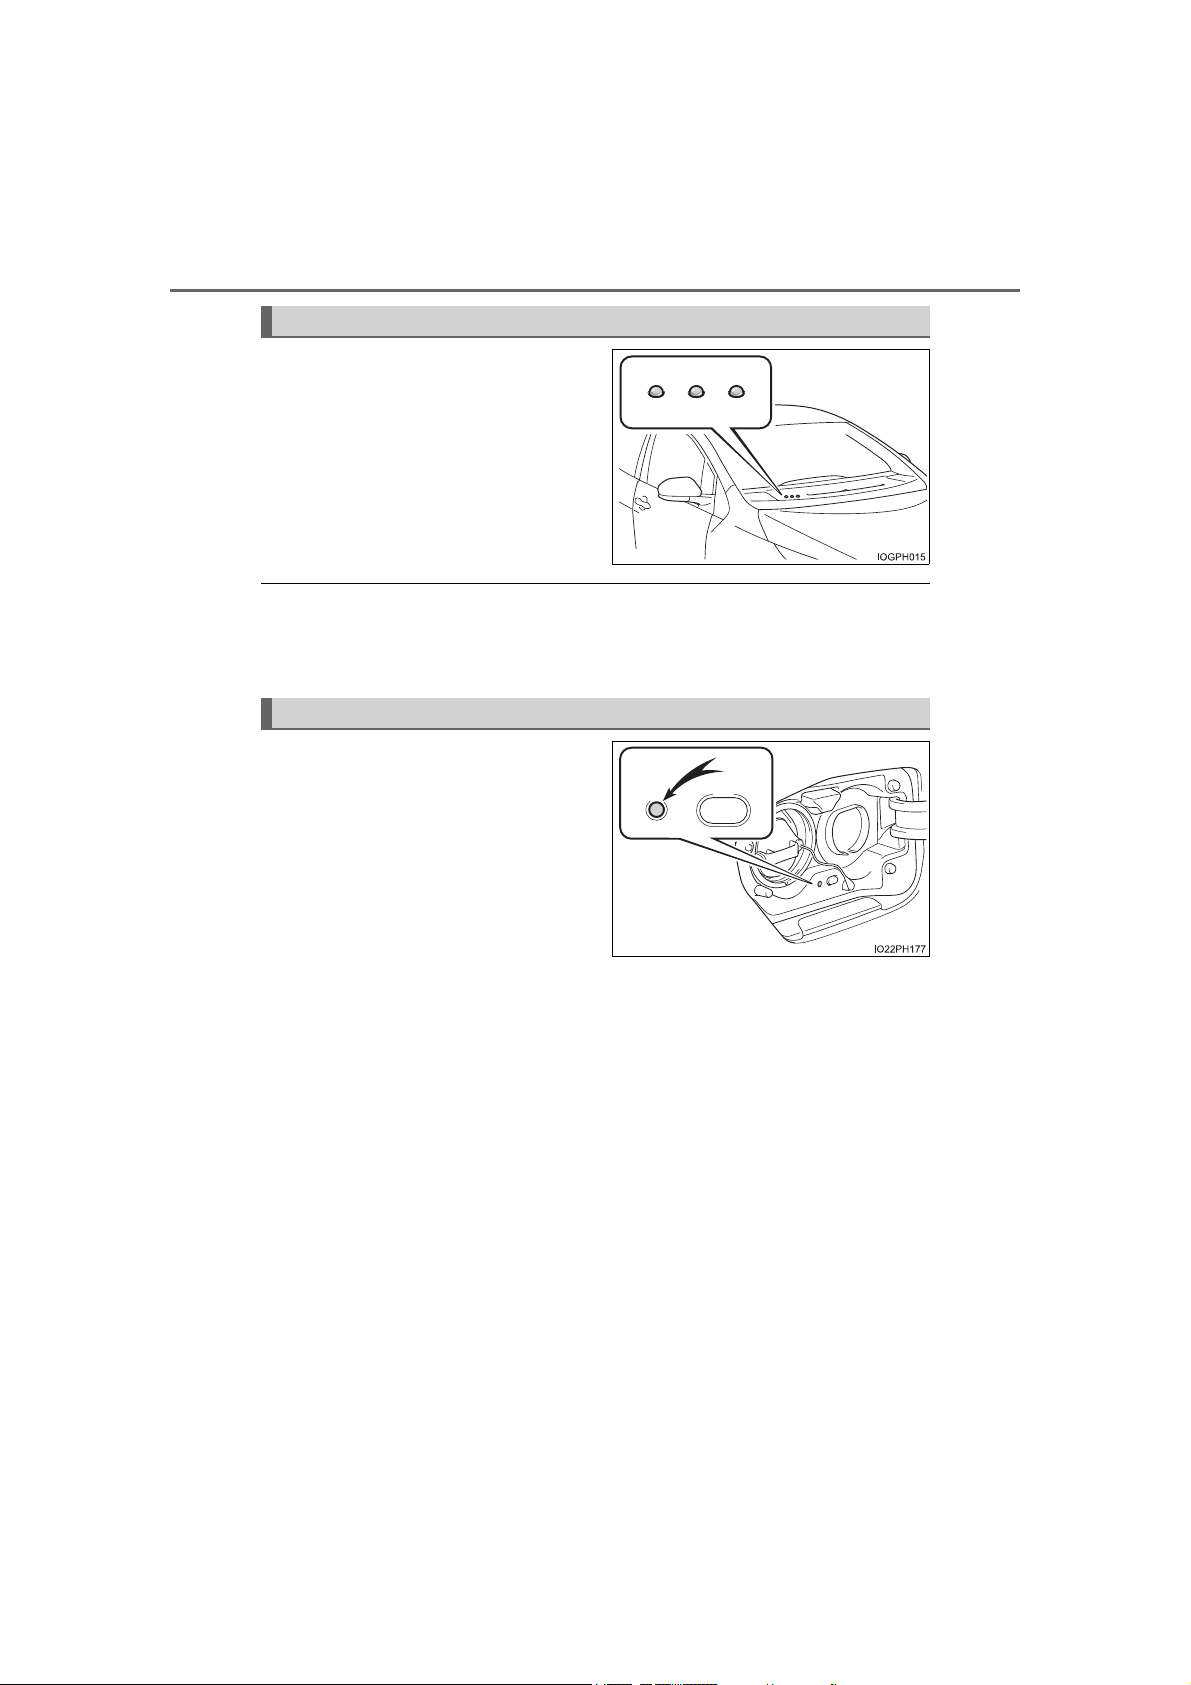
Hybrid battery (traction battery) status indicator
When the charging cable is connected to the charging inlet, the
user is informed of the charging
status of the hybrid battery (traction battery) by the statuses of 3
indicators (turned off, illuminated
or flashing).
■ When the hybrid battery (traction battery) is fully charged
When the charging cable is connected, all 3 hybrid battery (traction battery)
status indicators illuminate to inform the user that the hybrid battery (traction
battery) is fully charged.
Charging indicator
The illumination/flashing pattern
changes to inform the user of the
charging status.
PRIUS PRIME_QG_OM47C92U_(U)

How to charge
1. Charging operation
9
Charging precautions
This vehicle has been designed to allow charging from an external
power source using a charging cable for exclusive use with standard
household AC outlets.
However, the vehicle differs greatly from standard household electrical goods in the following ways, and incorrect usage could cause fire
or electric shock, possibly leading to death or serious injury.
● The charging operation is designed to operate at 12A continuously
for the charge duration (up to 5 hours 10 minutes).
● Charging can be conducted outdoors.
To charge properly, follow the procedure after reading the explanation
below. Charging is intended to be carried out by licensed drivers only
who properly understand the charging procedure.
● Charging should not be carried out by children.
● When charging with a charging equipment, follow the procedures
for using each equipment.
● When charging using a public charging facility, check the setting of
the charging timer function.
• When the charge schedule is registered, temporarily turn off the
function or turn “Charge Now” on.
• When the charge schedule is set to ON, charging will not start
even if the charging cable is connected. Also, charging fee may
occur due to connection of the charging cable.
1
Charging operation
PRIUS PRIME_QG_OM47C92U_(U)

10
1. Charging operation
Confirm the following before charging
Before charging, always check the following items.
● The parking brake is applied.
● The headlights are switched off or set to AUTO, and lights such as
the emergency flashers and interior lights etc. are switched off.
If these light switches are turned ON, then these features will consume
electricity, and charging time will increase.
● The power switch is off.
Estimated charging time
The time required to charge the hybrid battery (traction battery) differs
according to the charging voltage and charging current.
Connected power
source
Charging voltage AC 240 V AC 120 V
Charging current*
Estimated charging
*
time
1
*
: This is the maximum value.
2
*
: The time required for charging to complete depends on conditions such as
the remaining charge of the hybrid battery (traction battery) and the outside
temperature.
1
2
Charging station Home power source
16A 12A
Approximately 2 hours
Approximately 5 hours
10 minutes
PRIUS PRIME_QG_OM47C92U_(U)

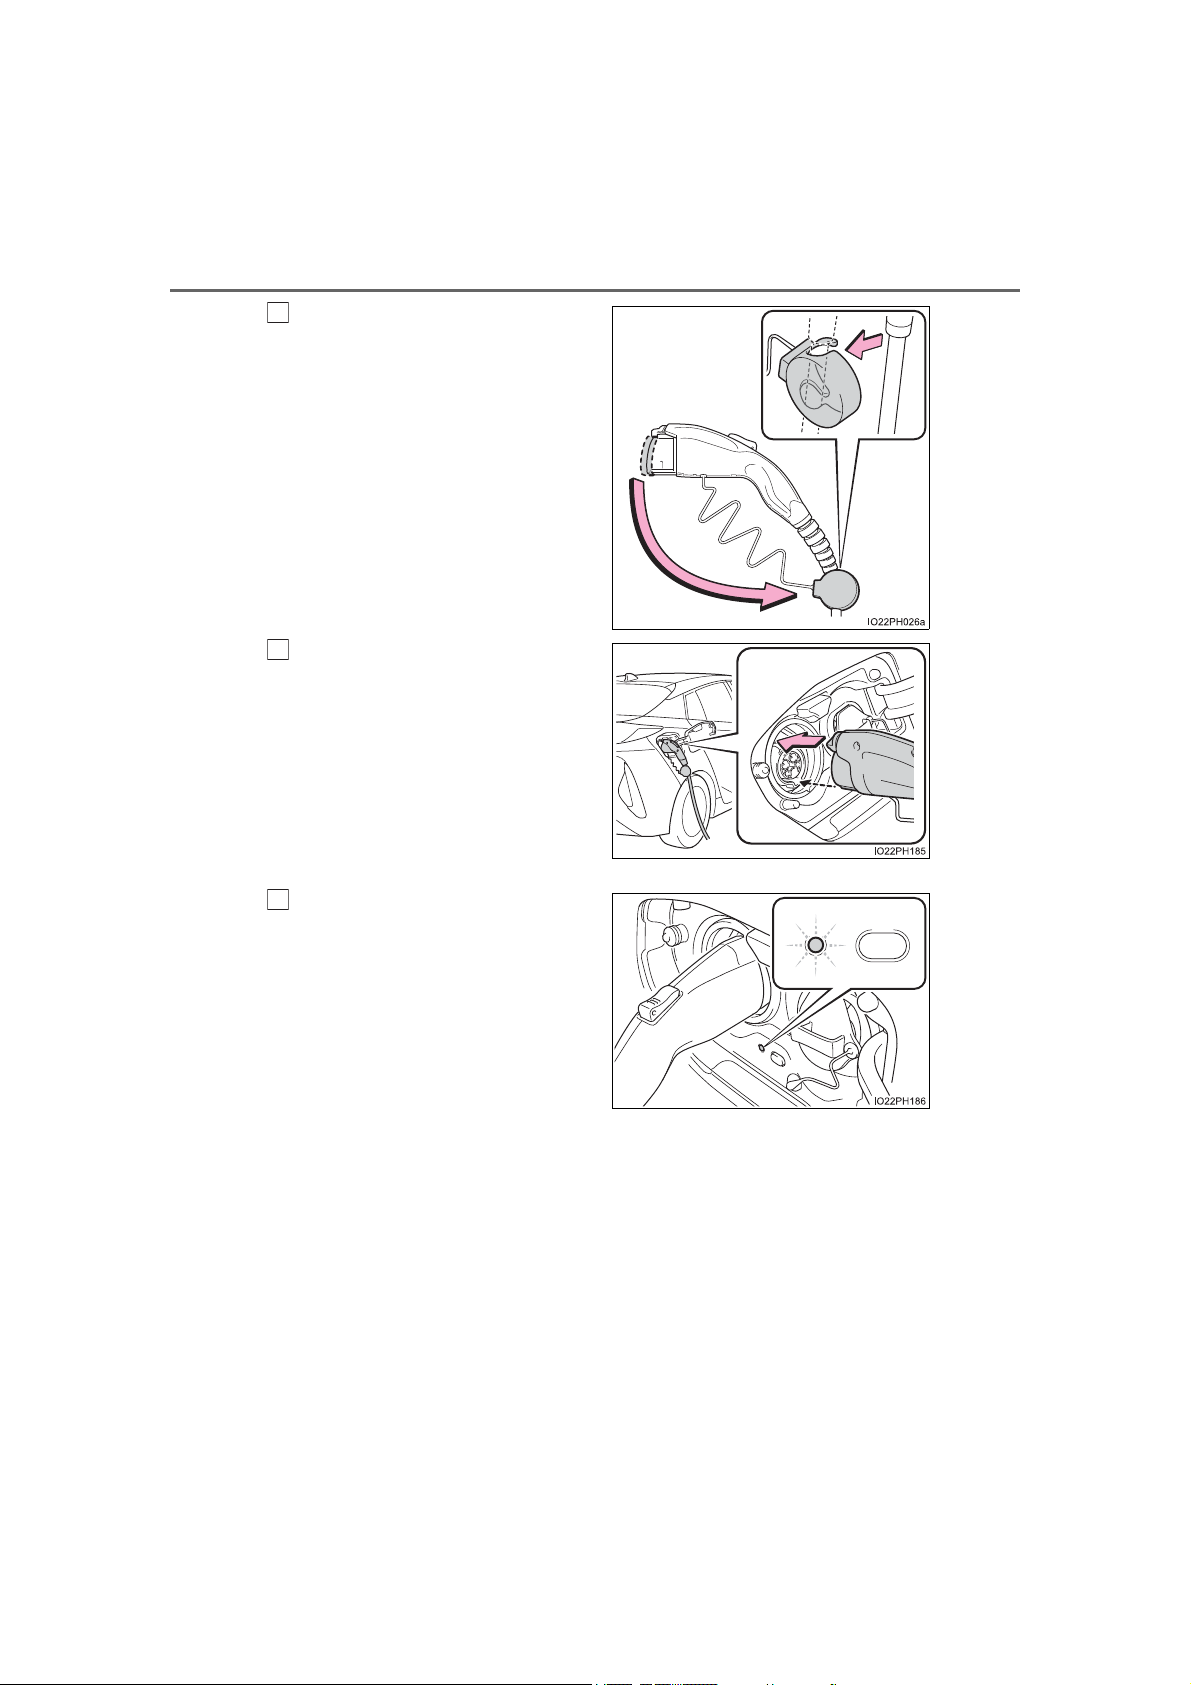
When charging
Charging inlet light
1
Prepare the charging cable.
2
Insert the charging cable into
the outlet of the external power
source.
Make sure to hold the body of the
plug and insert it firmly into the outlet.
Check that the power indicator on
the CCID (Charging Circuit Interrupting Device) is illuminated.
In order to reduce the load on the
outlet and plug, when inserting the
plug, use a string, etc. to hang the
CCID (Charging Circuit Interrupting
Device) on a hook or equivalent.
3
Open the charging port lid.
The charging inlet light will illuminate.
1. Charging operation
11
1
Charging operation
4
Remove the charging inlet cap
and secure it as shown in the
illustration.
PRIUS PRIME_QG_OM47C92U_(U)
12
5
1. Charging operation
Remove the protective cap of
the charging connector and
secure it to the cable.
6
Insert the charging connector
into the charging inlet.
Align the guide position on the bottom of the charging connector, and
push the charging connector
straight into the charging inlet as
far as possible.
Once a “click” sound is heard,
check that the charging connector
is securely locked.
7
Confirm that the charging indicator is illuminated.
Charging will not start if the
charging indicator does not illuminate when the charging connector
is inserted.
If the charging indicator is flashing,
the charge schedule is registered.
If the error warning indicator on the
CCID (Charging Circuit Interrupting
Device) flashes during charging,
refer to “OWNER’S MANUAL” and
follow the correction procedure.
PRIUS PRIME_QG_OM47C92U_(U)
 Loading...