

Toyota PRIUS 2003 Owner Manual

SECTION 1–
FEATURES ON NEW TOYOTA VEHICLE
1.Overview of instruments and controls
Instrument panel overvieww2. . . . . . . . . . . . . . . . . . . . . . . . . . . . . . . . . . .
Instrument cluster and multi–information display overview 4. . . . . . . .
Indicator symbols on the instrument p anel and multi–information
display 5. . . . . . . . . . . . . . . . . . . . . . . . . . . . . . . . . . . . . . . . . . . . . . . . . . . . . .
1
1
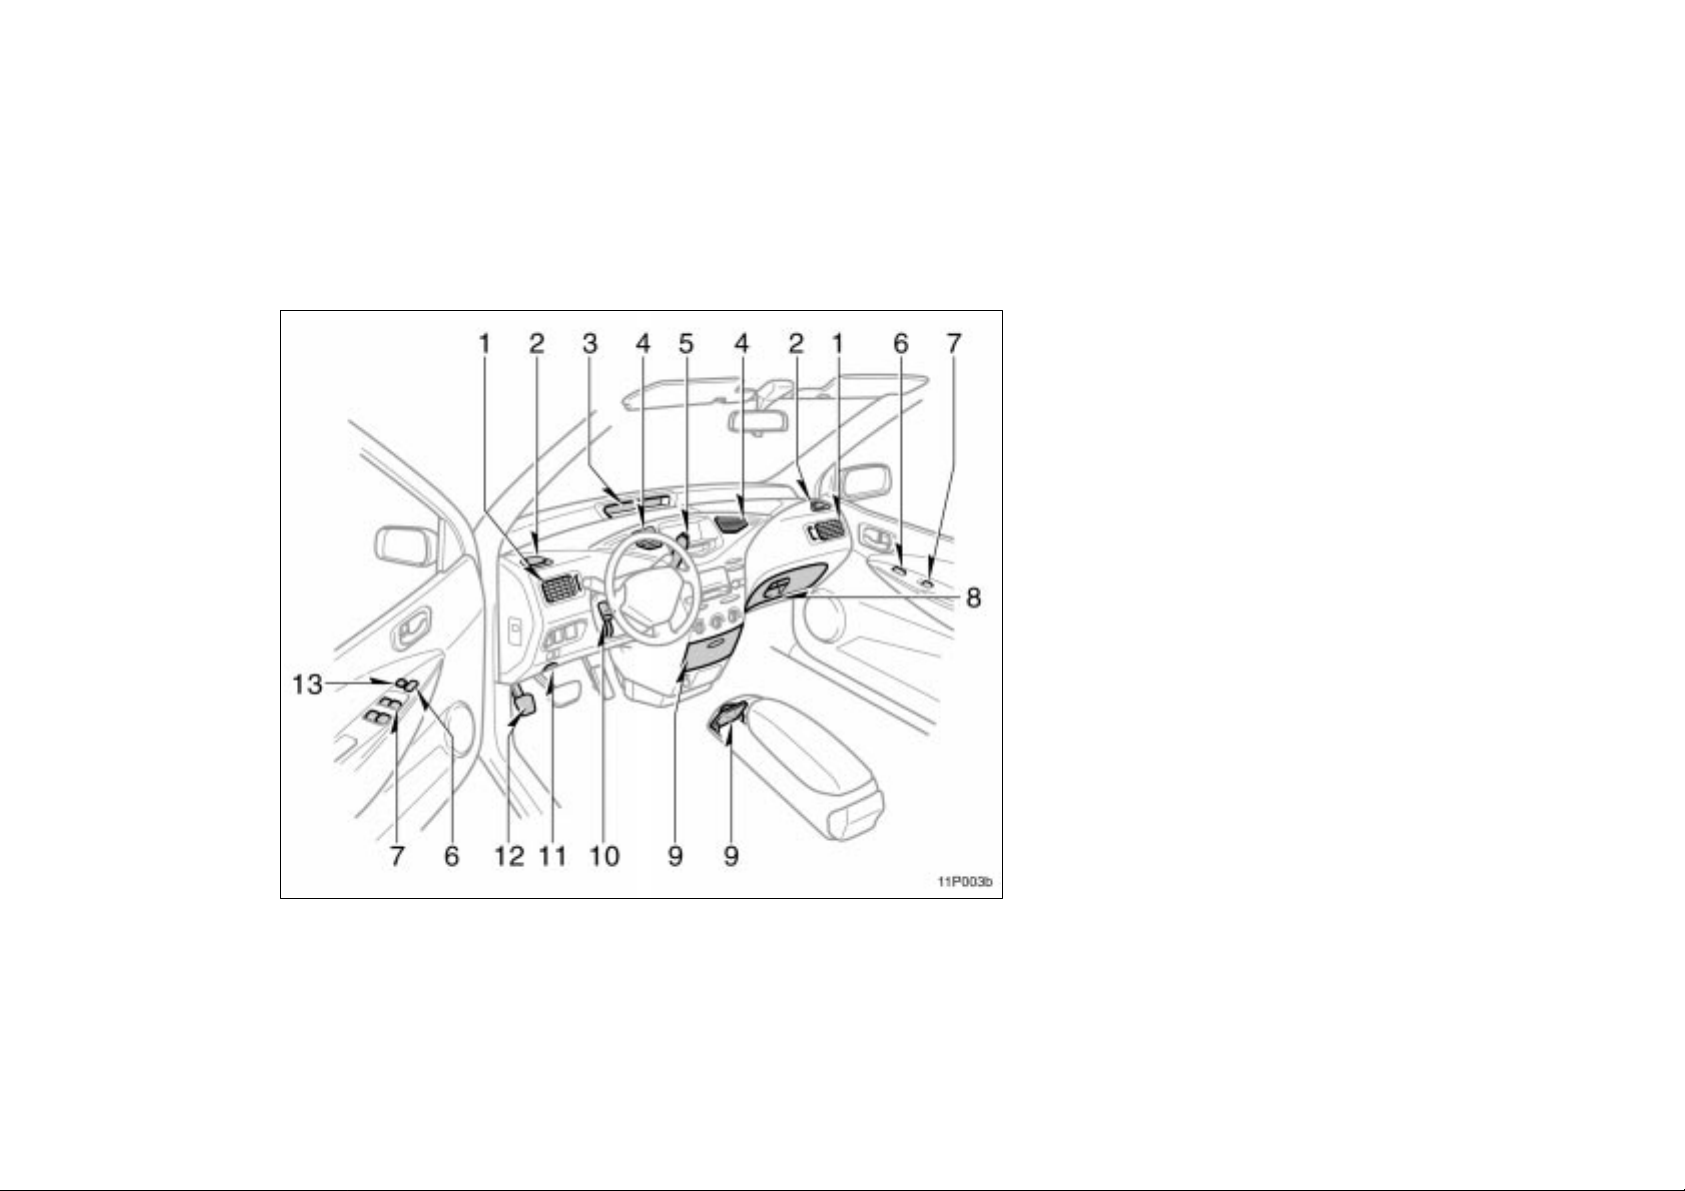
2.Instrument panel overview
11p003b
1. Side vents
2. Side defroster outlets
3. Instrument cluster
4. Center vents
5. Running mode selector lever
6. Power door lock switches
7. Power window switches
8. Glove box
9. Auxiliary boxes
10. Tilt steering lock release lever
11. Hood lock release lever
12. Parking brake pedal
13. Window lock switch
2
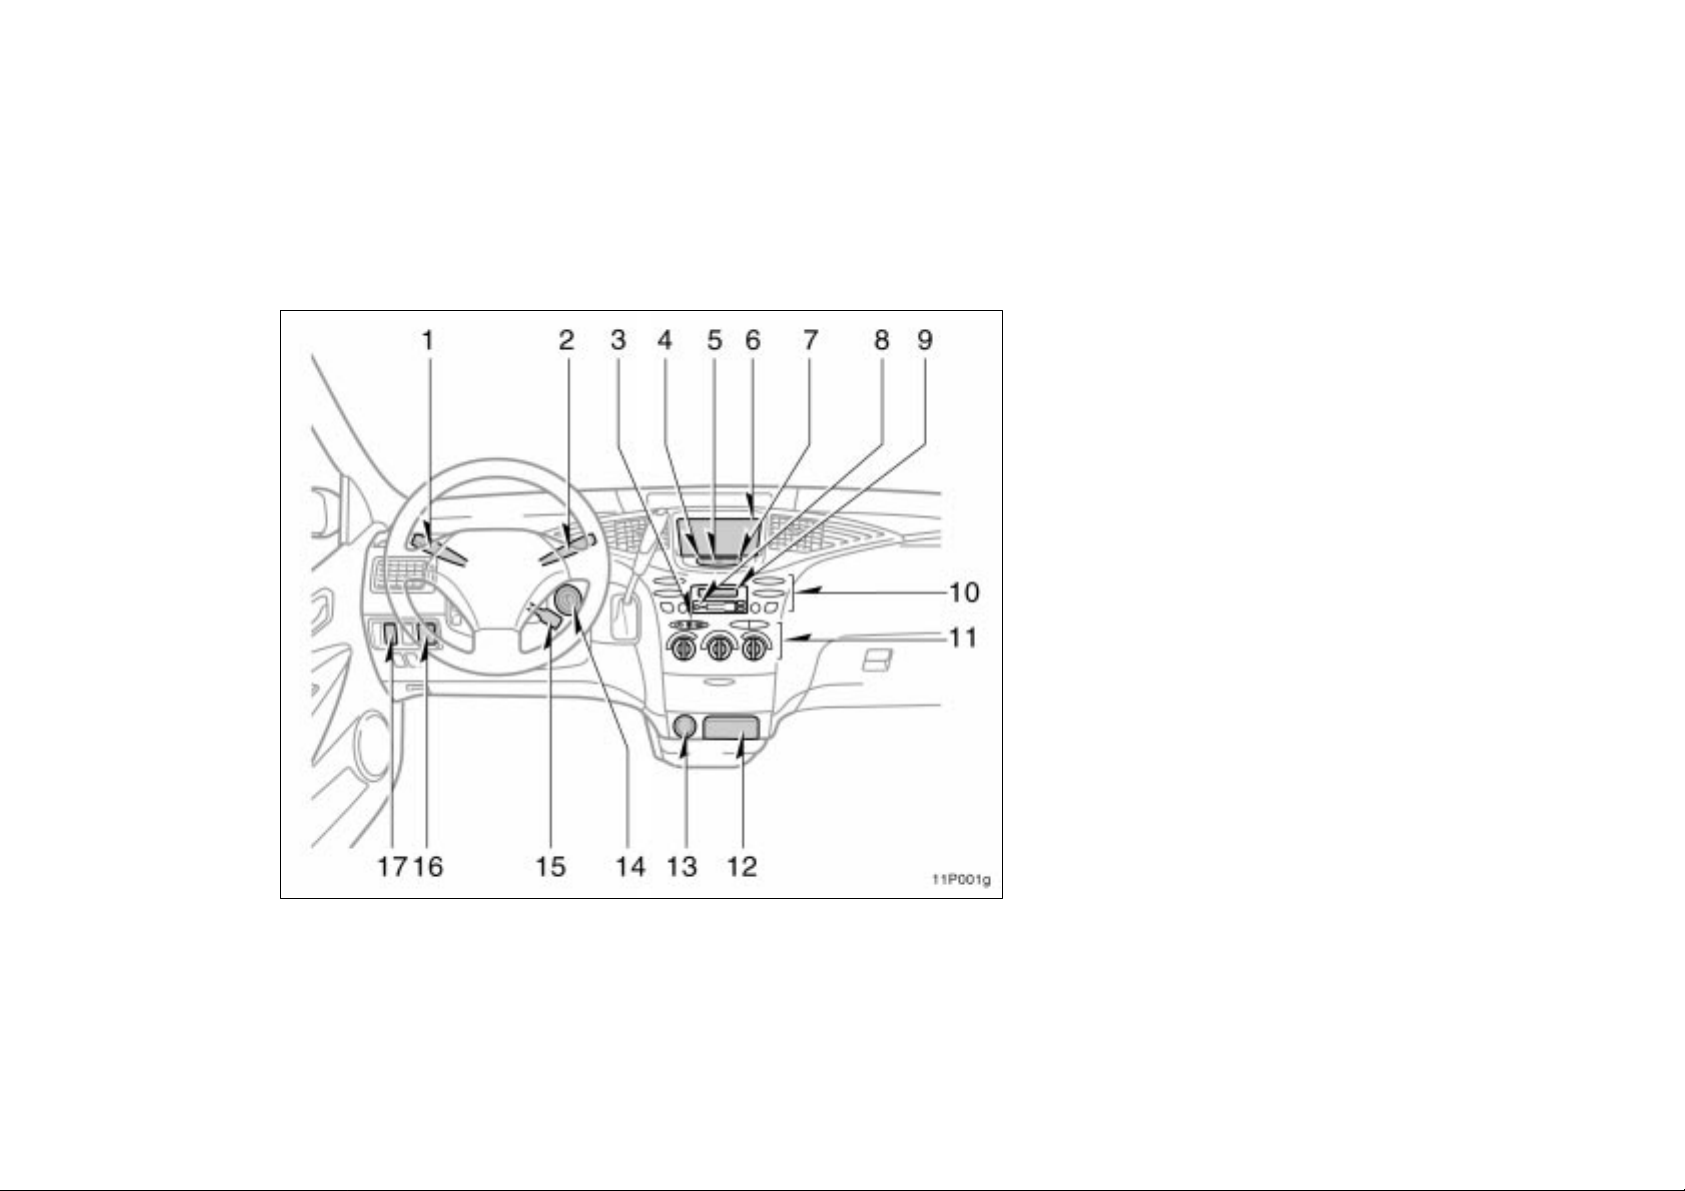
11p001g
1. Headlight and turn signal switch
2. Wiper and washer switch
3. Rear window defogger switch
4. Trip meter reset button
5. Emergency flasher switch
6. Multi–information display
7. km/h or MPH button
8. Security indicator light
9. Clock
10. Car audio
11. Air conditioning controls
12. Auxiliary box
13. Power outlet
14. Ignition switch
15. Cruise control switch
16. Power rear view mirror control switch
17. Instrument panel light control dial
3
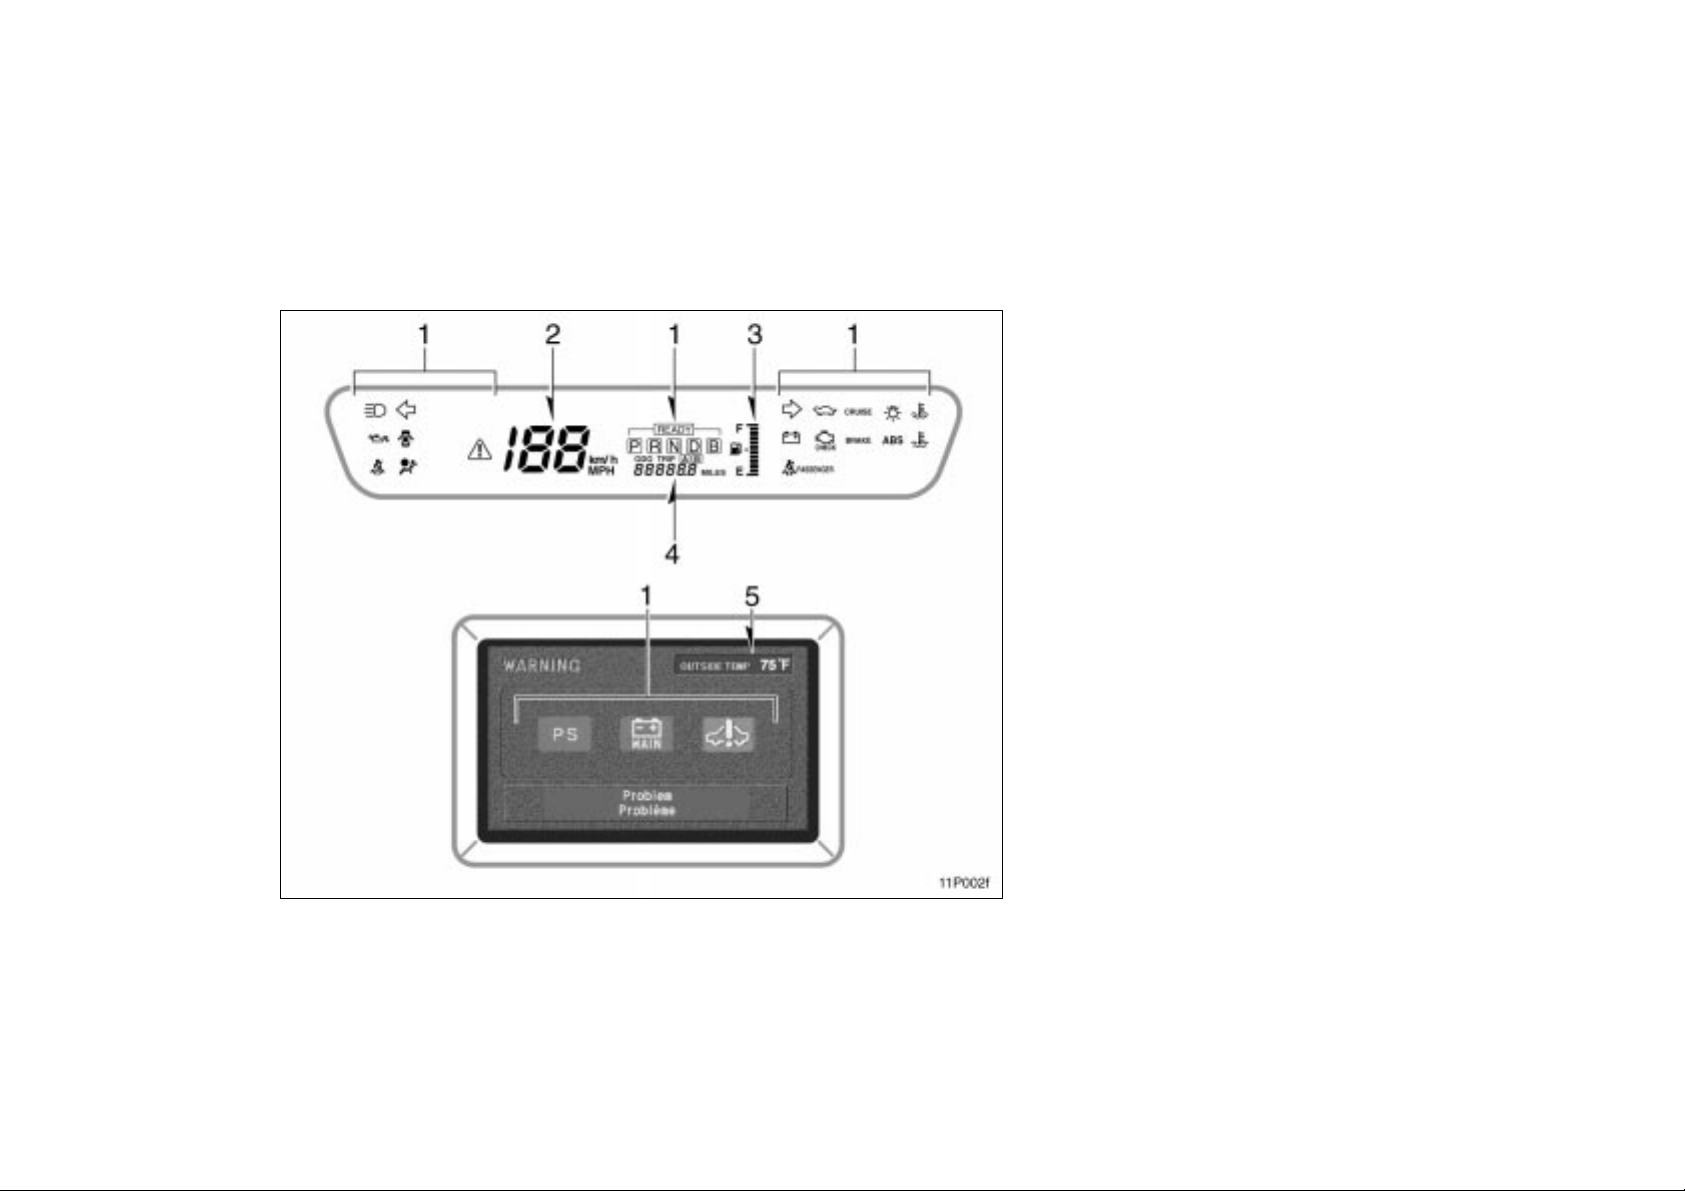
3.Instrument cluster and multi–information display overview
11p002f
1. Service reminder indicators and indicator lights
2. Speedometer
3. Fuel gauge
4. Odometer and trip meter
5. Outside temperature display
4
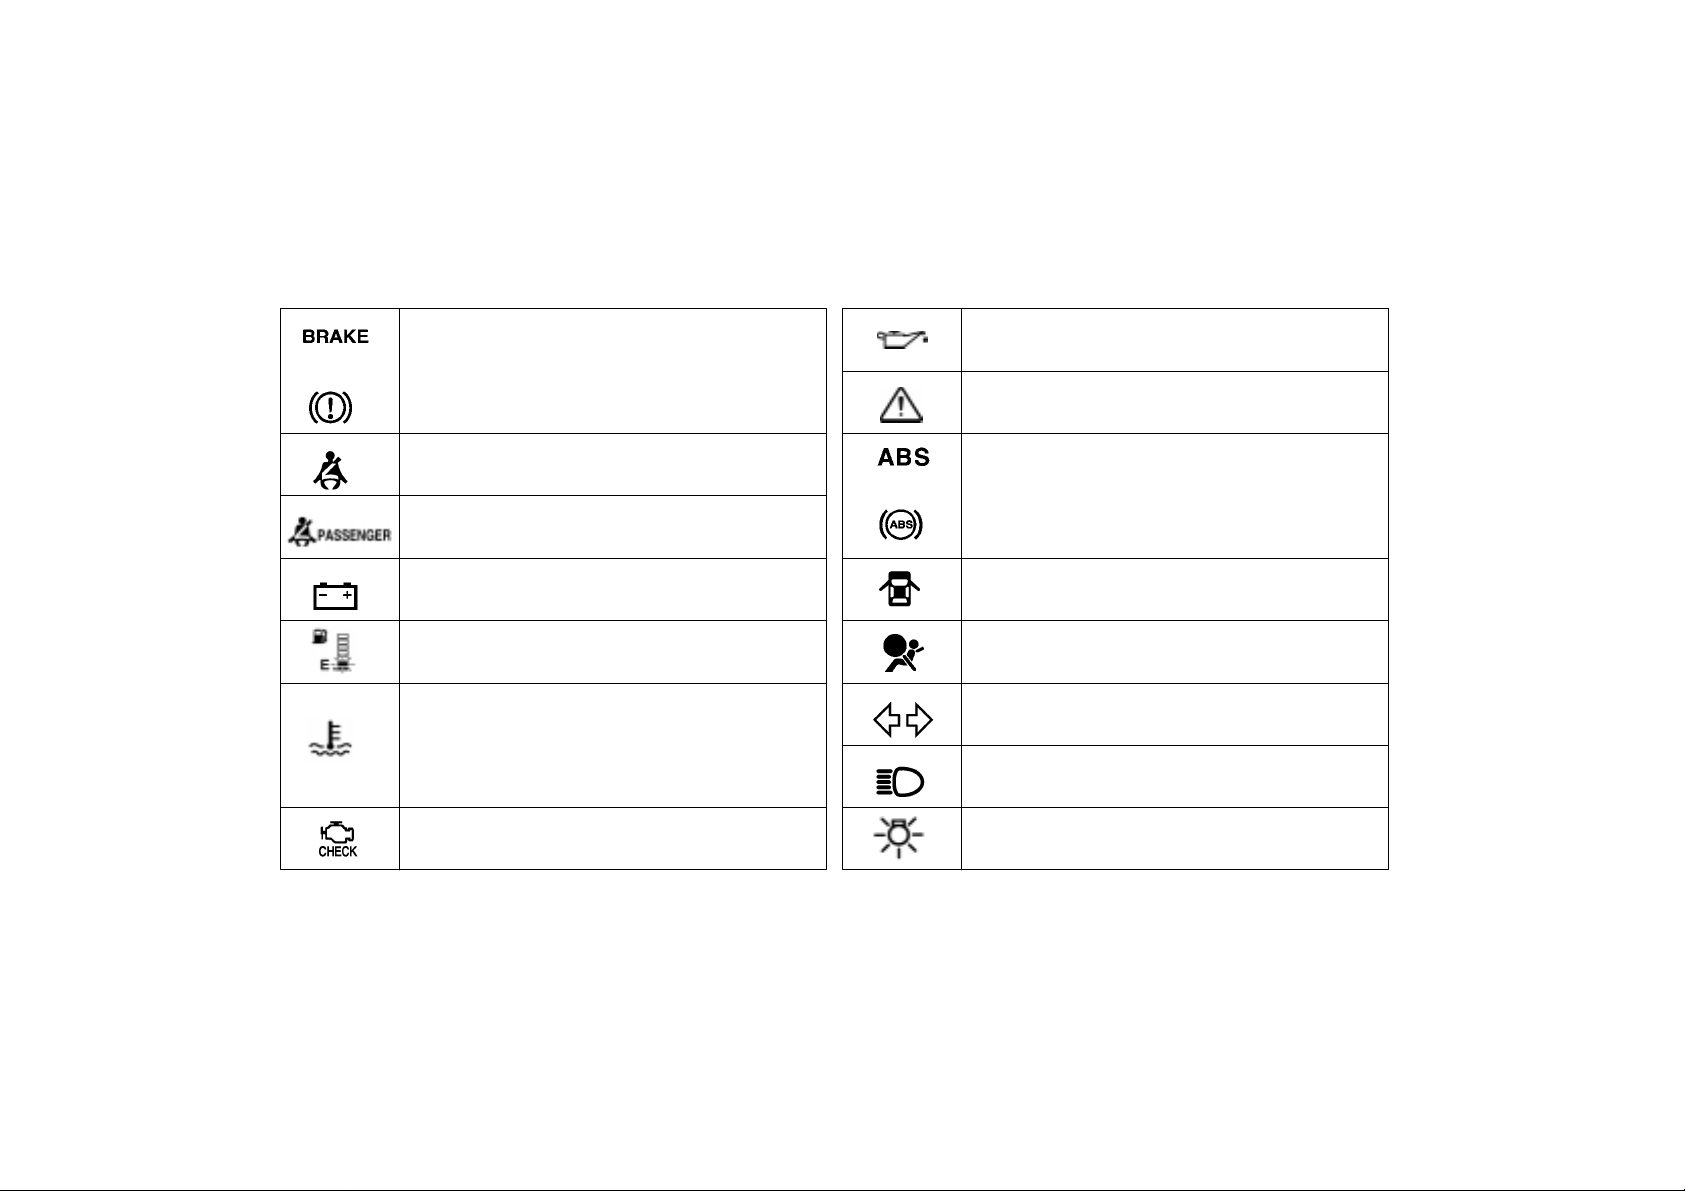
4.Indicator symbols on the instrument panel and Multi–information display
Low engine oil pressure warning light
∗
or
Brake system warning light
Seat belt reminder light
Front passenger’s seat belt reminder light
1
Master warning light
∗
1
or
∗
1
Anti–lock brake system warning light
∗
1
∗
1
∗
1
∗
Discharge warning light
Low fuel level indicator light
Low coolant temperature indicator light
(in blue)
∗
1
1
∗
1
High coolant temperature warning light (in red)
∗
Malfunction indicator lamp
1
∗
Open door warning light
SRS warning light
1
∗
1
Turn signal indicator lights
∗
1
Headlight high beam indicator light
Headlight indicator light
5
Tail light indicator light
∗
Cruise control indicator light
3
Running mode position indicator light
Driving ready light
∗
Output control warning light
1
Hybrid vehicle battery warning light
∗
Power steering warning light
Hybrid system warning light
2
∗
2
∗
1
: For details, see ”Service reminder indicators and warning
buzzers— —Instrument cluster” on page 92 in Section 2–4.
∗
2
: For details, see “Service reminder indicators and warning
buzzers— —Multi–information display” on page 99 in Section
2–4.
∗
3
: If this light flashes, see ”Cruise control” on page 109 in
Section 2–5.
∗
2
6

SECTION
FEATURES ON NEW TOYOTA VEHICLE
5.Toyota hybrid system
Toyota hybrid system 8. . . . . . . . . . . . . . . . . . . . . . . . . . . . . . . . . . . . . . . . .
Toyota hybri d system operat ing conditionn8. . . . . . . . . . . . . . . . . . . . . .
Starting your vehicle 11. . . . . . . . . . . . . . . . . . . . . . . . . . . . . . . . . . . . . . . . .
For efficient use of your vehi cle 11. . . . . . . . . . . . . . . . . . . . . . . . . . . . . . .
Precautions for use 12. . . . . . . . . . . . . . . . . . . . . . . . . . . . . . . . . . . . . . . . . .
1
–
2
7

6.Toyota hybrid system
Toyota hybrid system combines the
gasoline engine and the electric motor
power to improve the fuel economy
largely and minimize the emissions as
well as to provide higher power performance than the ordinary gasoline–powered vehicles.
Depending on the driving condition, the
vehicle runs on the best combination of;
Gasoline engine power
Electric motor power generated by
the gasoline engine
Electric motor power of the hybrid
vehicle battery
Furthermore, the energy is effectively used
in the following ways:
When stopping the vehicle, the gaso-
line engine is automatically stopped.
When decreasing the speed by apply-
ing the brakes, electricity converted
from the turning force of the wheels is
stored in the hybrid vehicle battery.
(This is called regenerative brake.)
Since the battery is charged by the
gasoline engine as needed, it does not
require charging from the outside like
an electric vehicle.
In this way, greatly improved fuel economy
and reduced emissions are attained.
If you do not use the vehicle for a long
time (2 weeks or more), the hybrid ve-
hicle battery and auxiliary battery will discharge and their condition is liable to decline. Therefore, in order to make up for
discharging, charge them once in every 2
weeks for about 30 minutes by starting
the hybrid system with all electrical components turned off.
7.Toyota hybrid system
operating condition
Basic operations are described below. Besides, Toyota hybrid system performs various controls depending on the operating
condition, such as at the time of hybrid
system starting, at the time of charging
should be required, at the time of the air
conditioning is in use, etc.
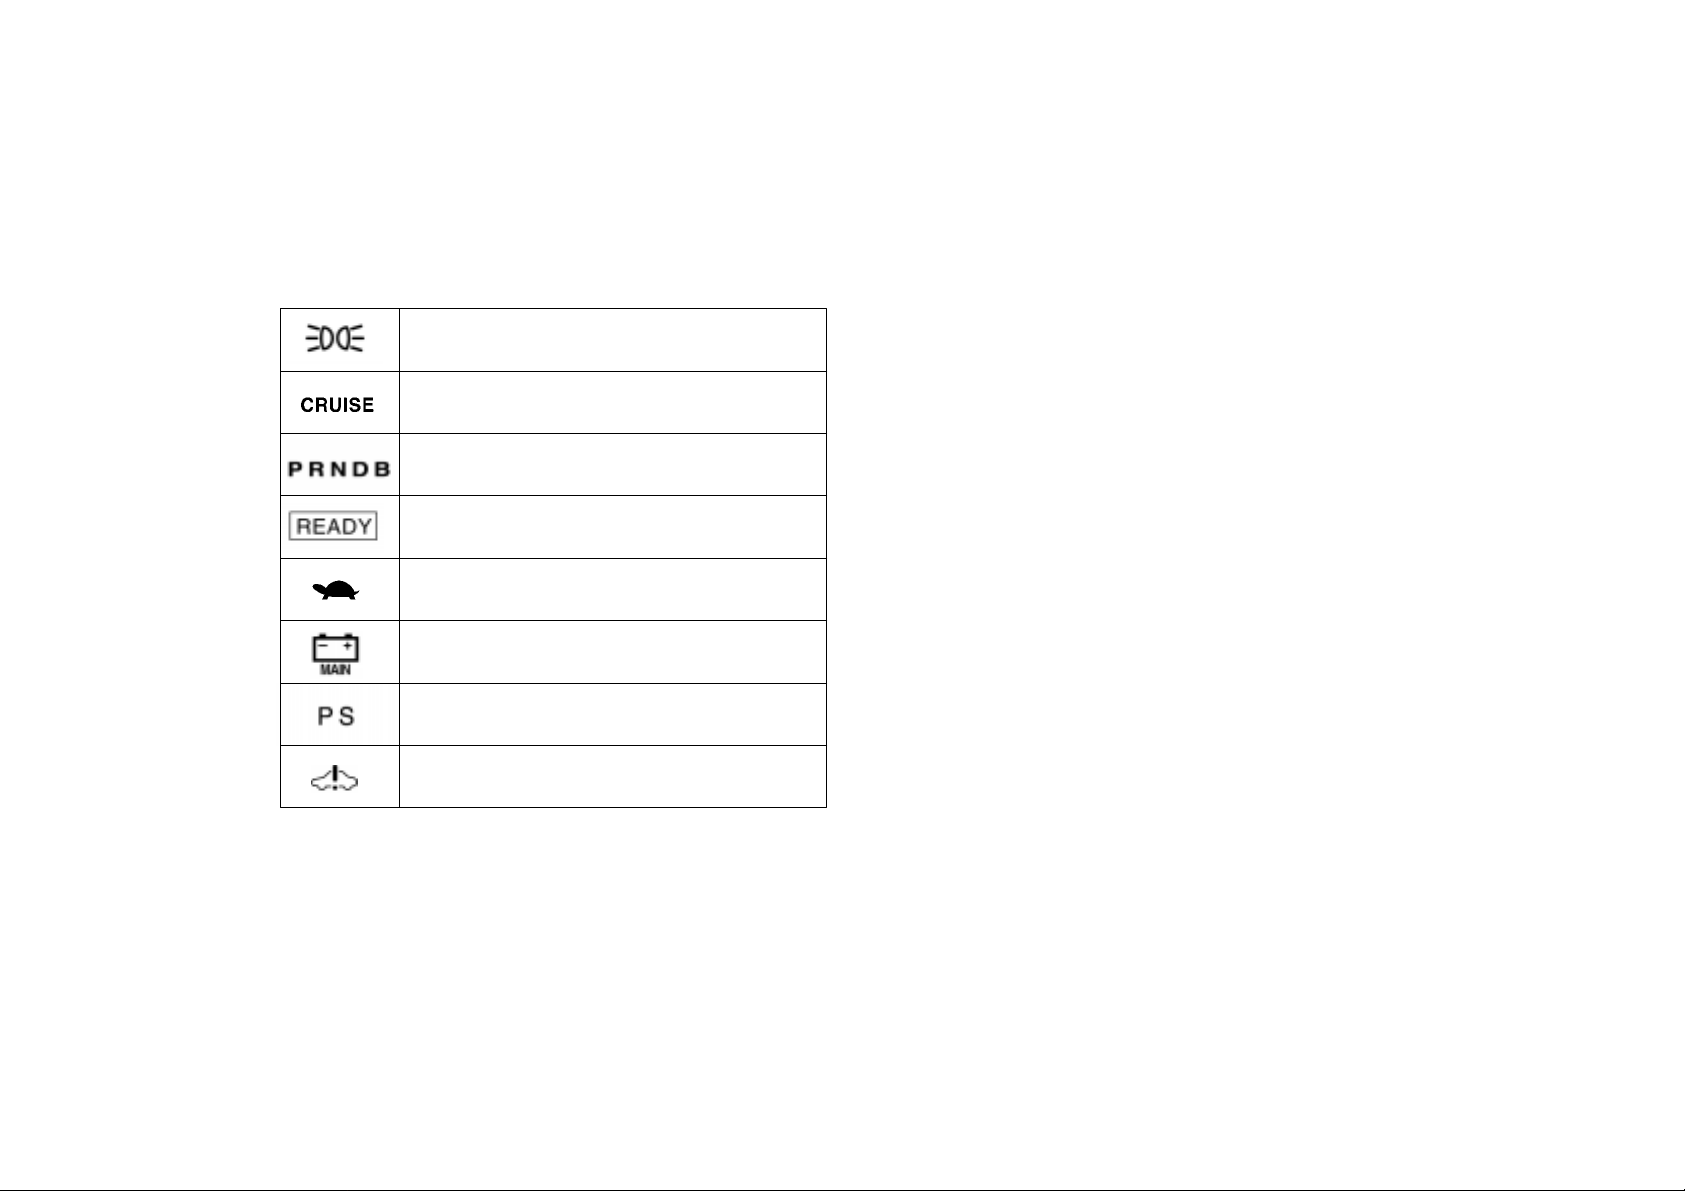
8
12p016a
12p017a
12p018a
Electric power
in use
When starting or backing up, etc., the
gasoline engine efficiency worsens, so
the vehicle runs on electric power from
hybrid vehicle battery.
Gasoline power
in use
During normal driving, the vehicle runs
mainly on gasoline power. However, the
electric motor, using electric power generated by the gasoline engine, makes up for
any deficiency of gasoline power.
The vehicle controls the optimum ratio of
the gasoline and electric power to help
save energy more effectively.
Electric and gasoline
power in use
When driving at full throttle, electric
power is further applied from the hybrid
vehicle battery. Vehicle performance improves.
9

12p019a
12p020a
12p030
Storing electric power
When decreasing speed or applying the
brakes, the turning force of the wheels
makes the electric motor operate as a
generator and additional electricity is
stored in the hybrid vehicle battery (regenerative brake).
10
Not in use
When stopping, the gasoline engine automatically shuts off.
Charging hybrid vehicle battery
When the hybrid vehicle battery power is
insufficient, the gasoline engine charges
the hybrid vehicle battery. The system always supplies electricity at a constant level.

8.Starting your vehicle
Turn the ignition key from “ON” to
“START” with the running mode selector
lever in “P” position only. When the
“READY” light flashes and stays on and
a beep sounds after a few seconds, the
hybrid system starts. (If the ambient temperature is low such as during winter conditions, it may take time until the
“READY” light is on.) Being different from
ordinary vehicles, you cannot start your
vehicle with the running mode selector lever in “N” position. (For details, see “How
to start the hybrid system—” on page 164
in Section 4.)
9.For efficient use of your
vehicle
Drive your vehicle with a smooth acceleration and deceleration.
When driving, energy is effectively re-
covered through the regenerative brake
as the vehicle decelerates. However,
for more efficient use, do not accelerate or decelerate your vehicle more
than necessary.
By avoiding abrupt acceleration and de-
celeration, the remaining capacity of
the hybrid vehicle battery can be preserved and it makes it possible to run
the vehicle utilizing the gasoline engine
and the electric power from the hybrid
vehicle battery.
The remaining capacity of the hybrid
vehicle battery can be confirmed on
the energy monitor screen of the multi–
information display. See “Information”
on 115 page in Section 2–6 for details.
As the way in which you drive may
decrease the remaining capacity of the
hybrid vehicle battery and reduce fuel
economy, drive your vehicle without
abrupt acceleration or deceleration.
Use the “A/C” mode (with the “A/C”
button only on) when you use the air
conditioning.
As the gasoline engine starts and
stops automatically in this mode, economical driving with less emissions is
possible.
In the “MAX” mode (with the “A/C” but-
ton and “MAX” button on), the gasoline
engine is frequently used. Use this
mode only when you need to operate
the air conditioning fully such as when
you should dehumidify or when you are
under a burning sun.
When parking, be sure to put the running mode selector lever in “P” position. While driving, use “D” position.
With the selector lever in “N” position,
the gasoline engine operates but electricity cannot be generated. The
constant electrical power remaining in
the hybrid vehicle battery becomes insufficient and the battery will be discharged.
11
The hybrid system automatically con-
trols the level of electrical power remaining in the hybrid vehicle battery.
With the selector lever in a position
other than “N”, electricity is generated
and charging occurs when the level of
electrical power in the hybrid vehicle
battery decreases. It is unnecessary to
charge the hybrid vehicle battery from
outside.
INFORMATION:
The gasoline engine starts and stops
automatically. (It stops during a low
load driving, deceleration or when the
vehicle stopped.)
If the “READY” light remains on, you
can start your vehicle using the electric
motor even with the gasoline engine
stopped.
The gasoline engine may not stop automatically in the following conditions:
During under gasoline engine warm–
up
During hybrid vehicle battery charging
When the air conditioning is used in
the “MAX” mode, the gasoline engine
is frequently used.
If the output control warning light
( )
comes on in the instrument cluster, the
hybrid vehicle battery temperature is
low or high, or the hybrid vehicle battery capacity is decreased with the selector lever at “R” during driving. As it
does not indicate the failure of the system, you can continue driving but avoid
hard acceleration because the power is
insufficient (which is caused by the battery power deterioration).
10.Precautions for use
The vehicle runs in combination with
the gasoline and electric power. Pay
special attention to the following items.
Be careful of a high voltage and high
temperature.
Your vehicle is equipped with the orange
colored cables connected to the hybrid
vehicle battery which contain a high voltage (about 300 V) and to other high voltage parts.
CAUTION
Do not touch or come in contact with
orange cables or battery terminals.
Electric shock may cause serious injury or death. Read all caution labels.
A electric motor, coolant radiator and
some other parts reach high temperature
when you are driving. Caution labels are
applied to these parts. Carefully observe
the instructions on these caution labels.
12
CAUTION
Never remove or disassemble the
high voltage parts, high voltage
cables (orange color) and their connectors. It may cause death or serious injury.
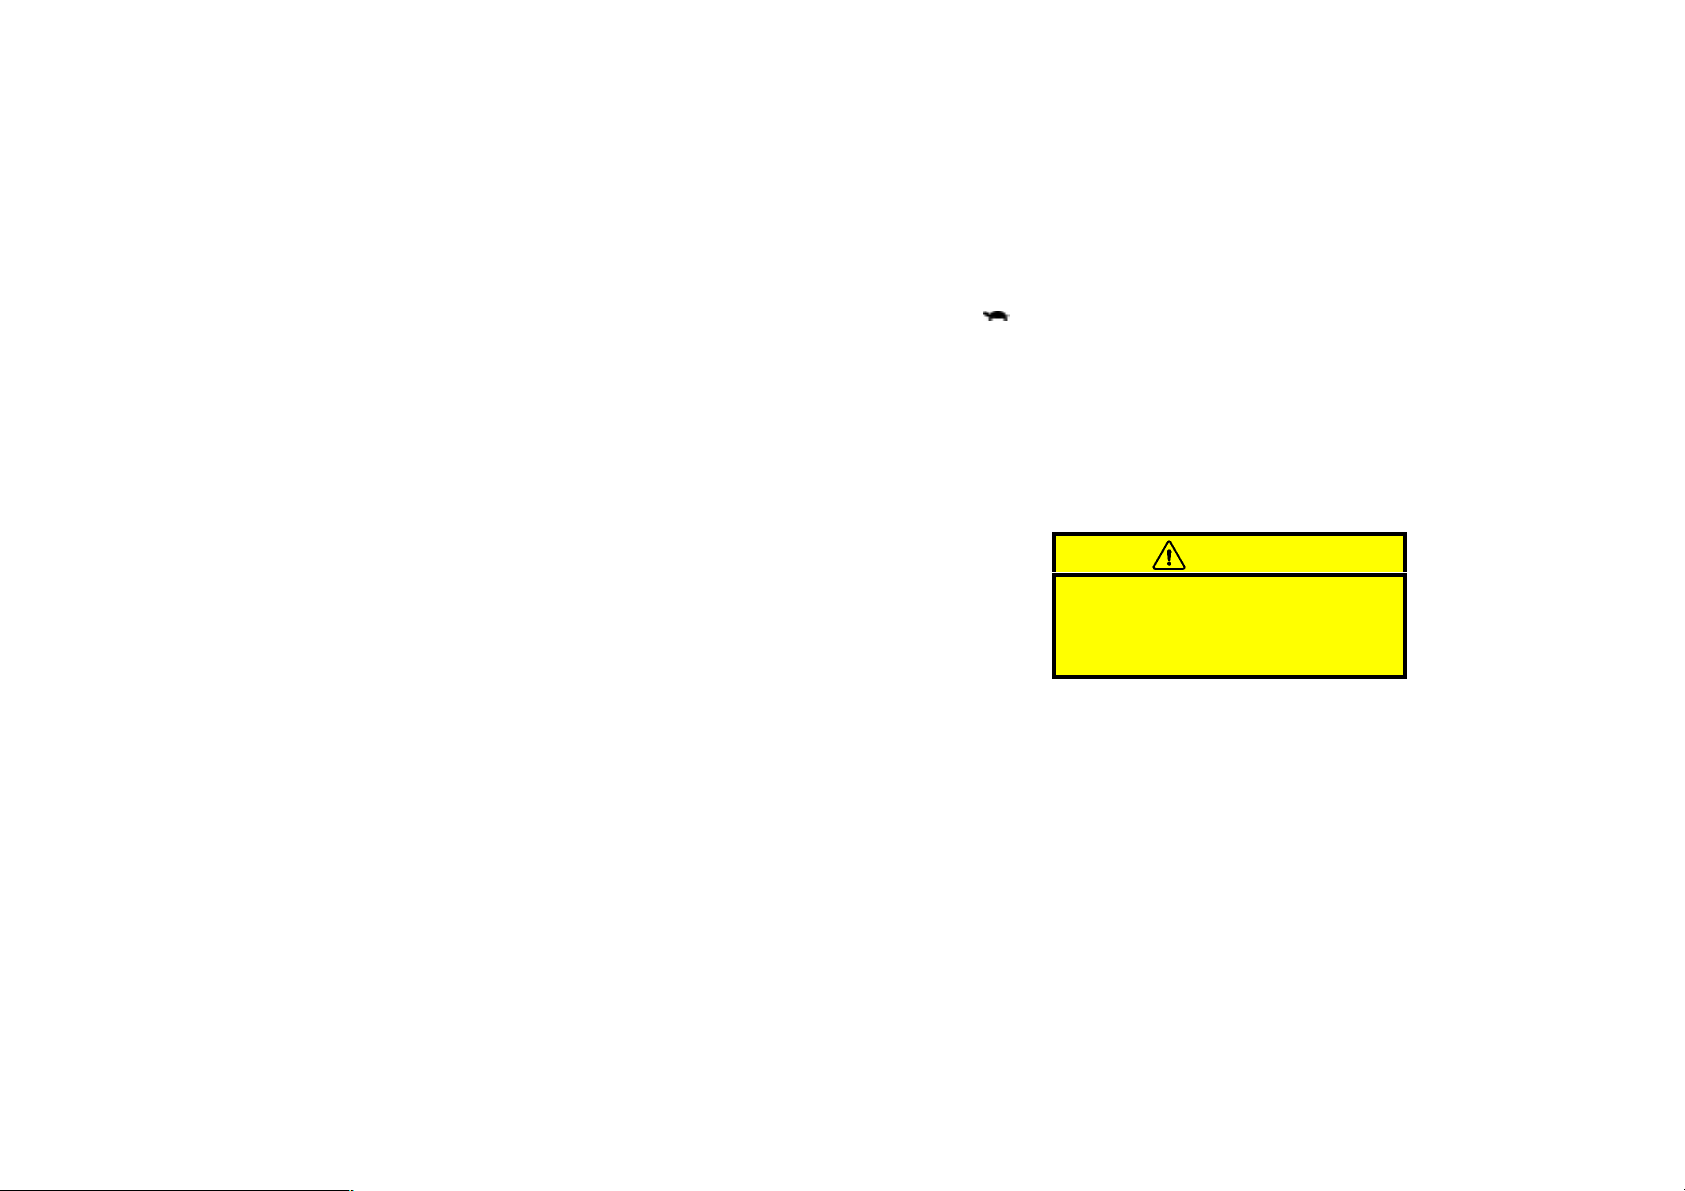
Hybrid vehicle battery
Service
plug
12p007d
High voltage cables
Inverter unit
Do not touch the service plug.
The service plug is installed in the left
side trim of the trunk. It is provided to
shut out high voltage current of the hybrid
vehicle battery when the vehicle is in
need of repairs at a Toyota dealer.
CAUTION
The shaded parts in the illustration
are subjected to a high voltage.
Inappropriate handling may cause
an electric shock resulting in serious injury or death. Never touch
any item in shaded area.
Keep your hybrid vehicle’s driving characteristics in mind.
As the vehicle runs with both the gaso-
line engine and electric motor, you may
hear a motor sound coming from the
engine compartment.
When the ignition switch is turned to
on or off, you may hear a sound coming from the hybrid vehicle battery in
the trunk. However, this does not indicate any trouble.
If the “READY” light is on, you can
start even with the gasoline engine
stopped.
When the hybrid vehicle battery tem-
perature is low or high, or the hybrid
vehicle battery capacity is decreased
with the selector lever at “R” during
driving, the output control warning light
comes on and the output might be limited for longer battery charge life.
If the output control warning light is on,
drive your vehicle without hard acceleration. The output power will be limited particularly when backing up.
13
When you put the running mode selec-
tor lever in “B” position and release
your foot from the accelerator pedal,
engine braking will be applied. However, during the high speed driving you
may feel that deceleration by engine
braking is less than that of ordinary
vehicle.
Drive your vehicle without hard acceleration if the output control warning
light
( ) is on.
The hybrid vehicle battery temperature is
low or high, or the hybrid vehicle battery
capacity is decreased with the selector
lever at “R” during driving. If this occurs,
the output control warning light comes on.
If the output control warning light is on,
the hybrid system output is limited. Drive
your vehicle without hard acceleration.
Vehicle performance might be reduced significantly especially when backing up.
Be sure to put the running mode selector lever in “P” position when parking.
With the selector lever in “N” position, the
hybrid vehicle battery assembly is not
charged, even if the gasoline engine is
operating. You cannot run your vehicle if
the selector lever is left in “N” position for
a long time because the hybrid vehicle
battery assembly will be discharged.
14
When you leave your vehicle, apply the
parking brake with the running mode
selector lever in “P” position and be
sure to remove the key and lock all the
doors.
When you leave the the ignition key in the
“ACC” or “ON” position if the hybrid system is not operating, the hybrid system
may not start because the auxiliary battery will be discharged.
CAUTION
When you leave your vehicle, be
sure to shut off the hybrid system.
Be sure to put the running mode
selector lever in “P” position because the vehicle can start with the
“READY” light on and the engine
stopped (no engine sound and
vibration). When the “READY” light
is on, if you leave your vehicle with
the running mode selector lever in
a position other than “P” and “N”,
the vehicle will creep and start
abruptly with the accelerator pedal
being depressed by mistake. It may
cause death or serious injury.
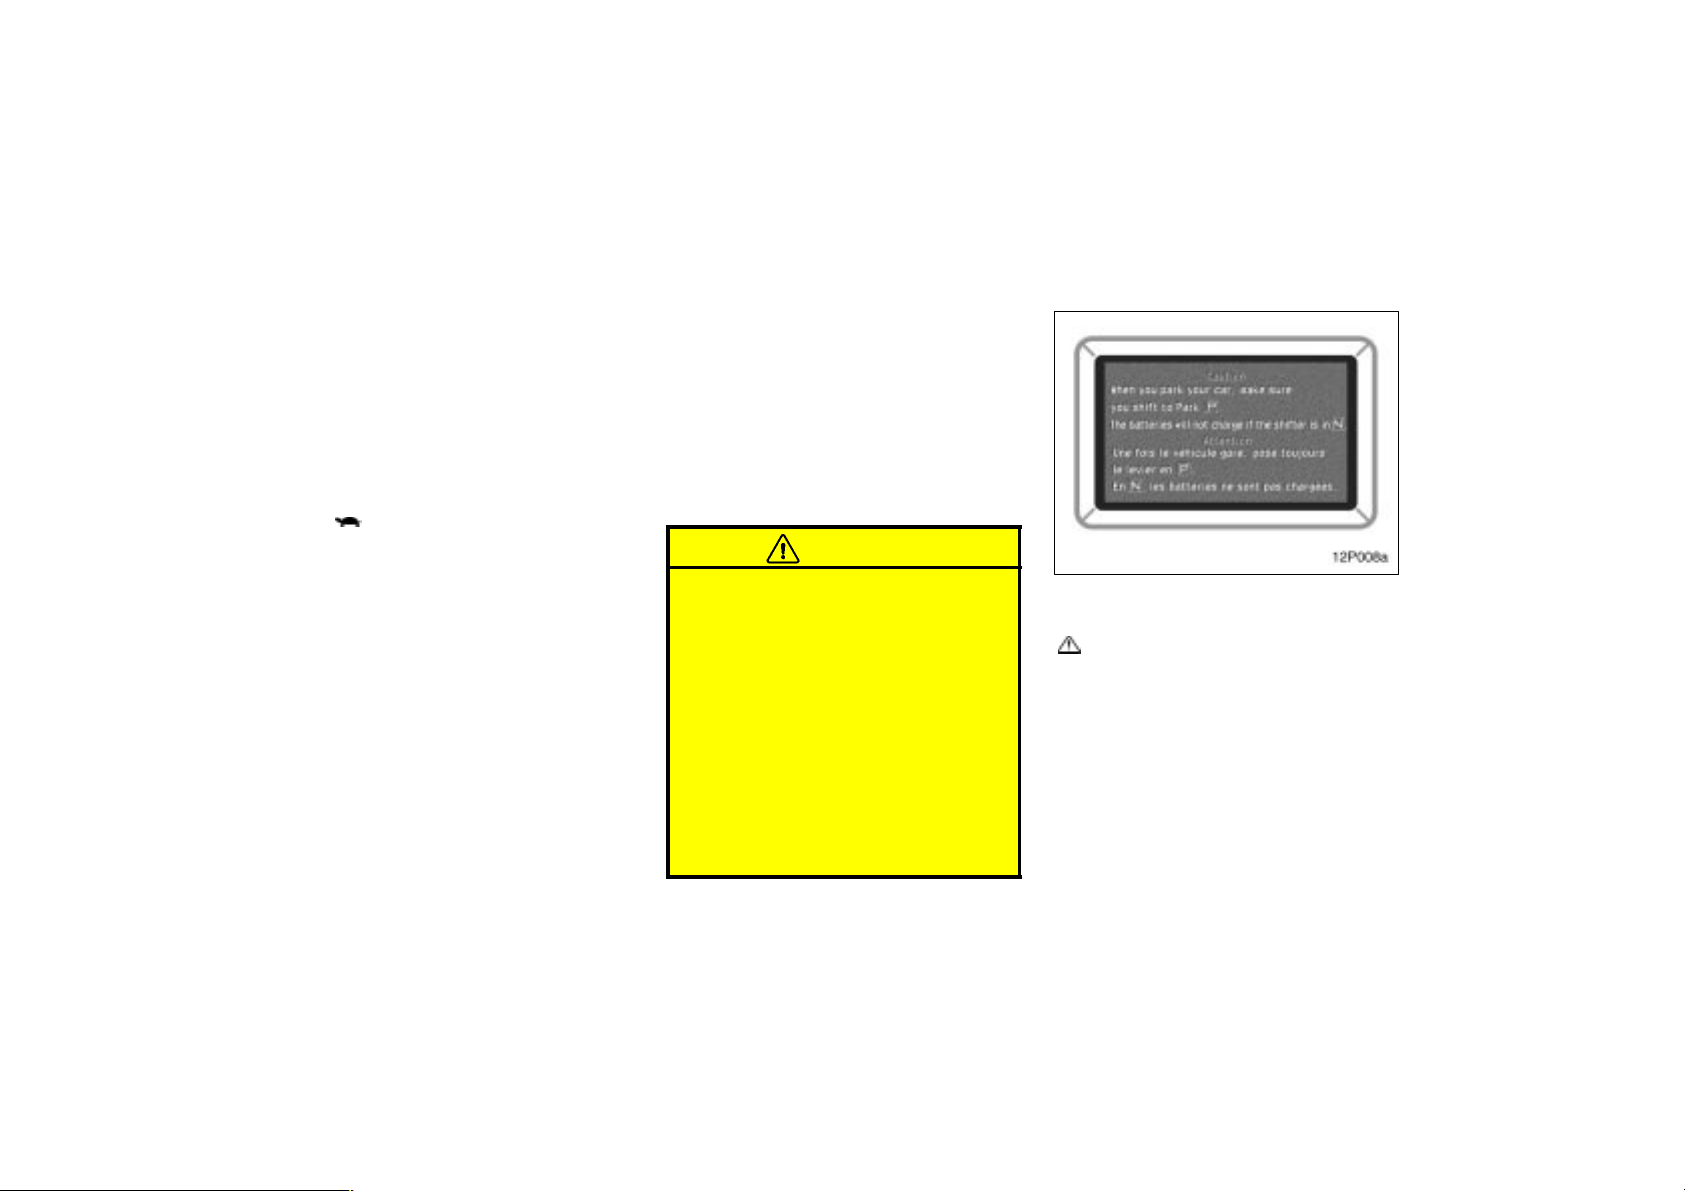
12p008a
If the multi–information display shows
a message, the master warning light
( ) comes on in the instrument clus-
ter. Read the message and follow the
instruction.
When you leave your vehicle, or stop
or park for a while, put the selector
lever in “P”.
Charging is necessary. With the selec-
tor lever in “N” position, charging will
not be applied. The electric generator
operates in “P”, “D” or “B” position. If
you continue driving, put the selector
lever in “D” or “B” position and depress
the accelerator pedal. Do not leave it
in “N” position. When driving in traffic
jam, run in “D” position.
12p009c
Do not put the luggage on the package
tray behind the rear seatback.
An air vent is provided on the package
tray behind the rear seatback to cool
the hybrid vehicle battery. If this vent
is covered with something, the hybrid
vehicle battery will overheat resulting in
a reduction of the output performance
of the hybrid system.
Do not apply water or put foreign ob-
jects over the air vent. Otherwise, it
may affect the hybrid vehicle battery
adversely and cause damage.
You may hear a cooling fan noise from
the air vent.
For vehicle repairs or maintenance, be
sure to consult your Toyota dealer.
If your vehicle is beyond repair because
of accident or something, be sure to
consult your Toyota dealer.
As sealed Nickel–Metal hydride batteries
are used, be sure to consult your Toyota
dealer when disposing of your vehicle.
CAUTION
If you are involved in an accident,
follow these precautions.
Move the vehicle to a safe place
and perform the followings to reduce the risk of high voltage electricity leakage.
Depress the brake pedal and put the
selector lever in “P” position.
Apply the parking brake.
Turn the ignition switch to “LOCK”
and remove the key.
If your vehicle has experienced ma-
jor damage, you may get an electric
shock. To prevent this, never touch
the high voltage parts (hybrid vehicle battery assembly, etc.) or
cables (orange color) connecting
these parts. If some exposed electric wiring is protruding inside or
outside of the vehicle, an electric
shock may also occur. Never touch
them.
If the fluid leaks or gets in some
part of the vehicle, never touch it
because it may be electrolyte
(strong alkali) from the hybrid vehicle battery. If it gets on your skin
or eyes, wash off immediately with
a large amount of water, if possible,
with boric acid solution, and get
immediate medical attention in order to help avoid serious injury.
If a vehicle fire occurs, extinguish
it using a fire extinguisher for the
exclusive use on electric fires. As
a small amount of water may be
dangerous, use a large amount of
water, for example from a fire hydrant, or wait for a fire–fighting
team arrival.
15

When your vehicle needs to be
towed, do it with the front wheels
or all four wheels raised. If the
front wheels are on the ground
when towing, the electric motor
may continue to generate electricity
which could cause leakage of electricity and a fire depending on the
degree of damage. See “If your vehicle needs to be towed” on page
182 in Section 5.
16

SECTION
2
–
OPERATION OF INSTRUM ENTS AND
CONTROLS
11.Key s and Doo rs
Keys 18. . . . . . . . . . . . . . . . . . . . . . . . . . . . . . . . . . . . . . . . . . . . . . . . . . . . . . .
Hybrid vehicle immobiliser system 20. . . . . . . . . . . . . . . . . . . . . . . . . . . . .
Side doors 22. . . . . . . . . . . . . . . . . . . . . . . . . . . . . . . . . . . . . . . . . . . . . . . . .
Power windows 28. . . . . . . . . . . . . . . . . . . . . . . . . . . . . . . . . . . . . . . . . . . . . .
Trunk lid 31. . . . . . . . . . . . . . . . . . . . . . . . . . . . . . . . . . . . . . . . . . . . . . . . . . . .
Hood 32. . . . . . . . . . . . . . . . . . . . . . . . . . . . . . . . . . . . . . . . . . . . . . . . . . . . . . .
Theft deterrent system 34. . . . . . . . . . . . . . . . . . . . . . . . . . . . . . . . . . . . . . .
Fuel tank cap 35. . . . . . . . . . . . . . . . . . . . . . . . . . . . . . . . . . . . . . . . . . . . . . .
1
17
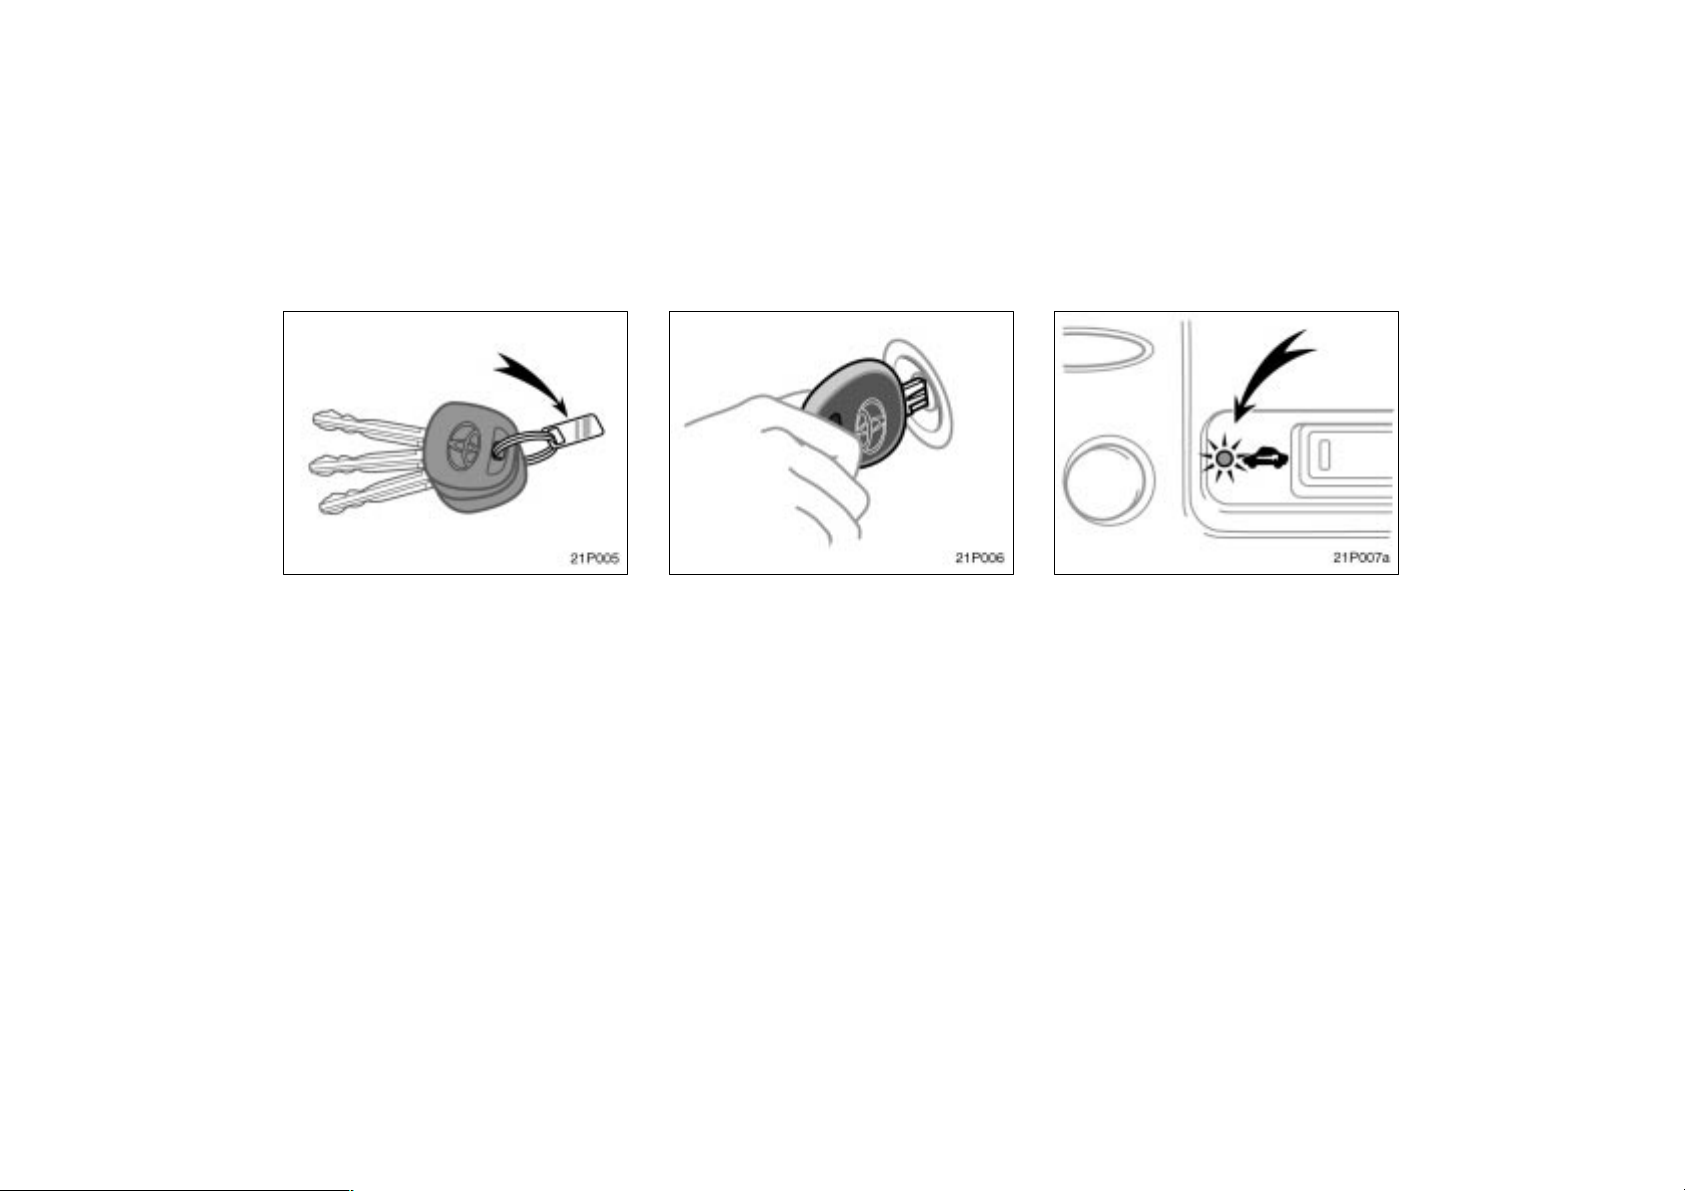
12.Keys
21p001
Your vehicle is supplied with two kinds
of keys.
1. Master keys (black)—These keys work
in every lock. Your Toyota dealer will
need one of them to make a new key
with built–in transponder chip.
2. Sub key (gray)—This key will not work
in the trunk.
A transponder chip for the hybrid vehicle
immobiliser system has been placed in the
head of the master and sub keys. These
chips are required for the system to function correctly, so be careful not to lose
these keys. If you make your own duplicate key, you will not be able to cancel
the system or start the hybrid system.
To protect items locked in the trunk when
using valet parking, leave the sub key
with the attendant.
Since the doors and trunk can be locked
without a key, you should always carry a
spare master key in case you accidentally
lock your keys inside the vehicle.
21p002a
NOTICE
When using a key containing a transponder chip, observe the following
precautions:
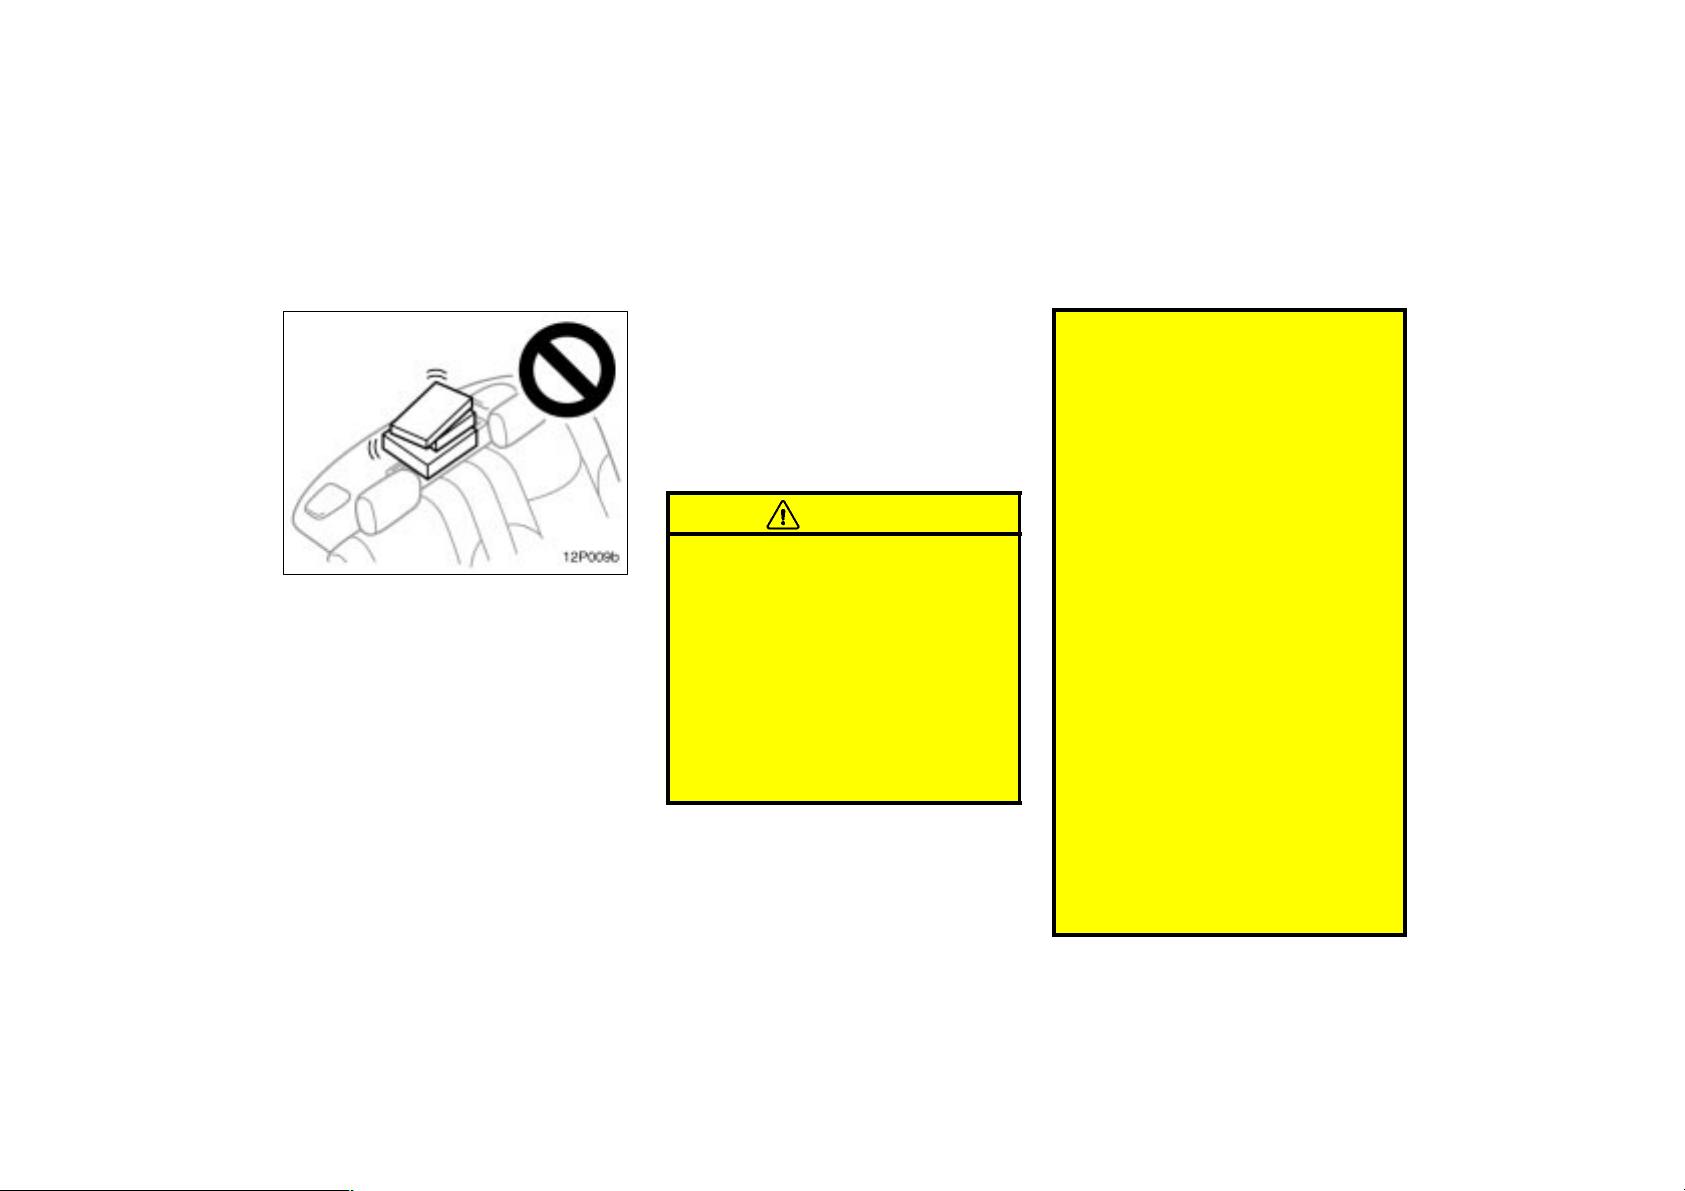
When starting the hybrid system,
do not use the key with a key ring
resting on the key grip and do not
press the key ring against the key
grip. Doing so may prevent the hybrid system from starting.
18
21p003a
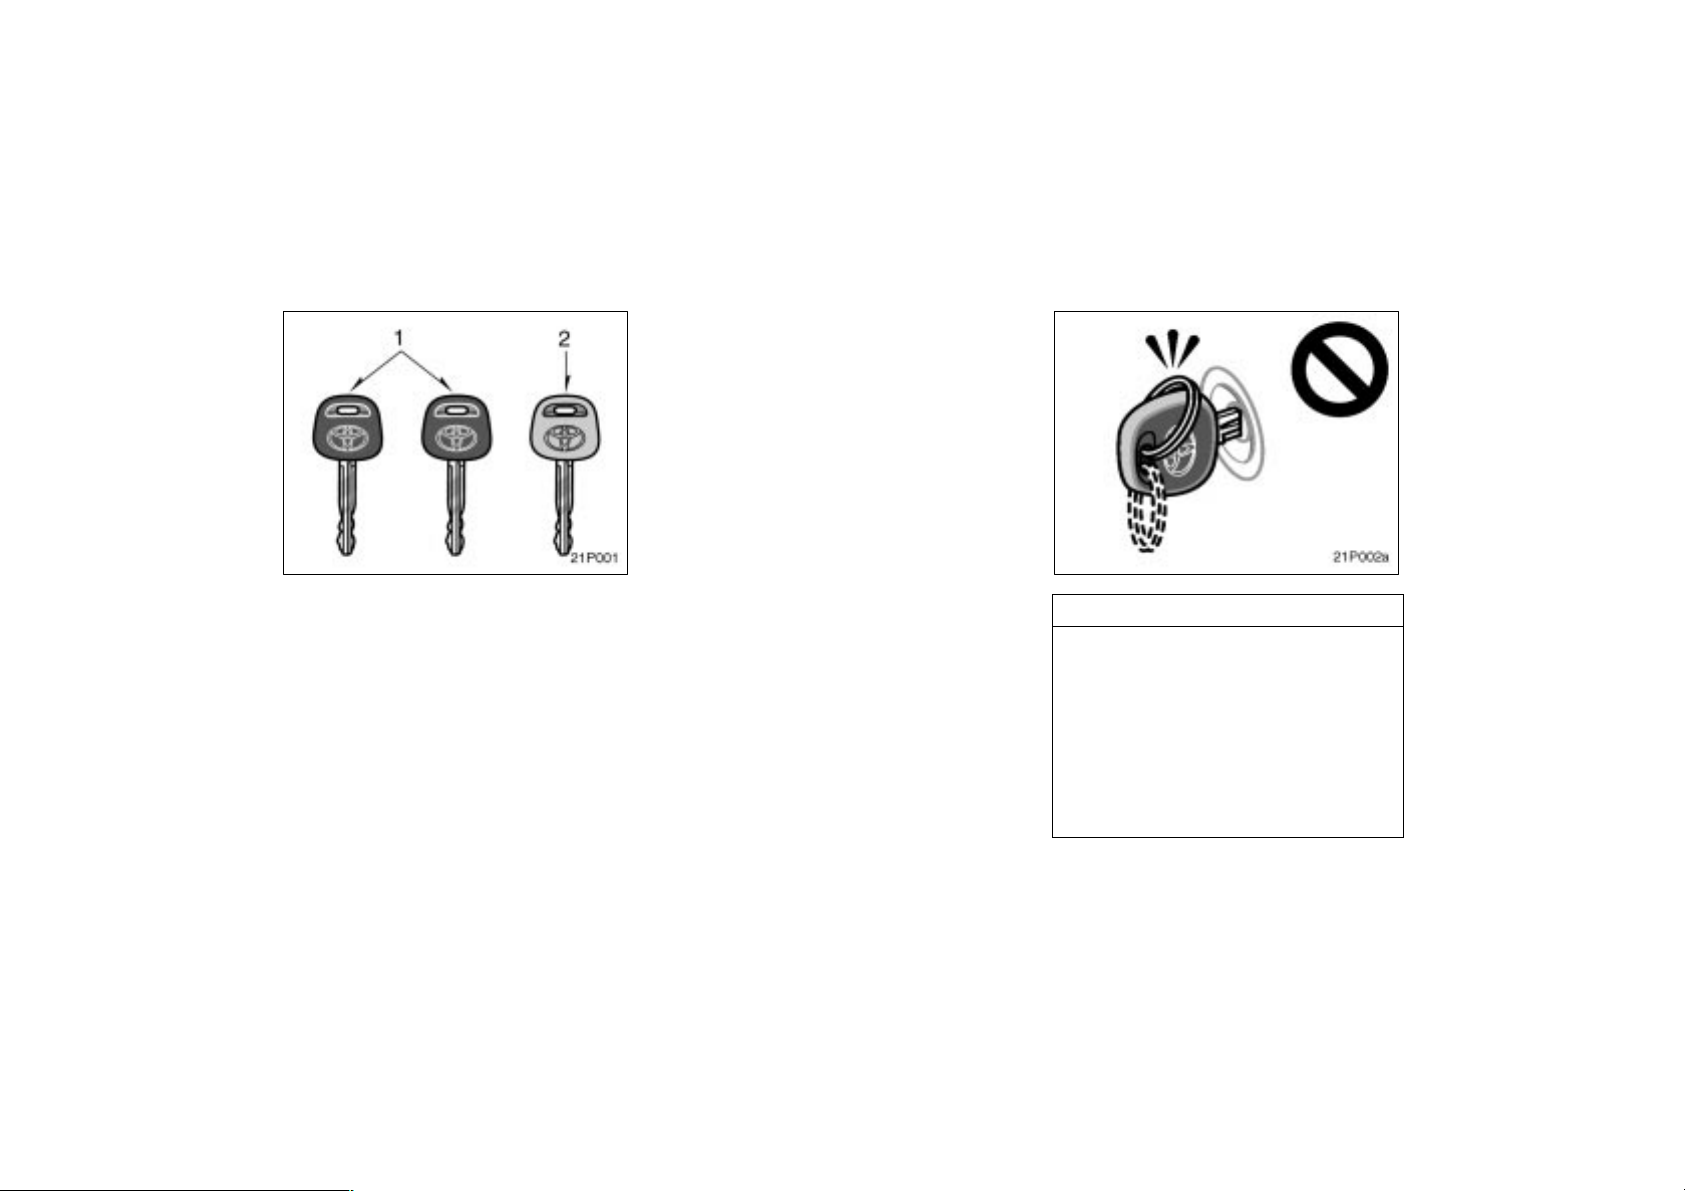
When starting the hybrid system,
do not use the key in proximity
with other transponder keys (including keys of other vehicles) and do
not press other key plates against
the key grip. Doing so may prevent
the hybrid system from starting or,
may cause the hybrid system to
stop soon after it starts. If this happens, remove the key once and
then insert it again after taking off
other transponder keys (including
keys of other vehicles) from the
ring or while gripping or covering
them with your hand to start the
hybrid system.
21p004a
Do not bend the key grip.
Do not cover the key grip with any
material that cuts off electromagnetic waves.
Do not knock the key hard against
other objects.
Do not leave the key exposed to
high temperatures for a long period,
such as on the dashboard or hood
under direct sunlight.
Do not put the key in water or
wash it in an ultrasonic washer.
Do not use the key with electromagnetic materials.
19
13.Hybrid vehicle immobiliser
system
21p005
KEY NUMBER PLATE
Your key number is shown on the plate.
Keep the plate in a safe place such as
your wallet, not in the vehicle.
If you should lose your keys or if you
need additional keys, duplicates can be
made by a Toyota dealer using the key
number.
We recommend writing down the key number and storing it in a safe place.
20
21p006
The hybrid vehicle immobiliser system
is a theft prevention system. When you
insert the key in the ignition switch,
the transponder chip in the key’s head
transmits an electronic code to the vehicle. The hybrid system will start, only
when the electronic code in the chip
corresponds to the registered ID code
for the vehicle.
21p007a
The system is automatically set when the
key is removed from the ignition switch.
The indicator light will start flashing to
show the system is set.
If either of the following indicator conditions occurs, contact your Toyota dealer.
The indicator light stays on except
when the theft deterrent system is setting or activating. (See ”Theft deterrent
system” on page 34 in this section.)
The indicator light does not start flash-
ing when the key is removed from the
ignition switch.
The indicator light flashes unsteady.
Inserting the registered key in the ignition
switch automatically cancels the system,
which enables the hybrid system to start.
The indicator light will go off.
For your Toyota dealer to make you a
new key with built–in transponder chip,
your dealer will need your key number
and master key. However, there is a limit
to the number of additional keys your
Toyota dealer can make for you.
If you make your own duplicate key,
you will not be able to cancel the system or start the hybrid system.
For vehicles sold in U.S.A.
FCC ID: MOZ RI–9BTY–1
MADE IN JAPAN
This device complies with Part 15 of the
FCC Rules. Operation is subject to the
following two conditions:
(1) This device may not cause harmful
interference, and (2) this device must
accept any interference received, including interference that may cause undesired operation.
For vehicles sold in Canada
This device complies with RSS–210 of
industry Canada. Operation is subject to
the following two conditions:
(1) This device may not cause interference, and (2) this device must accept
any interference, including interference
that may cause undesired operation of
the device.
NOTICE
Do not modify, remove or disassemble the hybrid vehicle immobiliser
system. If any unauthorized changes
or modifications are made, the proper
operation of the system cannot be
guaranteed.
CAUTION
Changes or modifications not expressly approved by the party responsible for compliance could void the
user’s authority to operate the equipment.
21

14.Side doors—
The driver’s window can be opened and
closed from outside the vehicle using a
key. For details, see “Power windows” on
page 28 in this section.
21p008
LOCKING AND UNLOCKING WITH KEY
Insert the key into the keyhole and turn
it.
To lock: Turn the key forward.
To unlock: Turn the key backward.
All the doors lock and unlock simultaneously with either front door. In the driver’s door lock, turning the key once will
unlock the driver’s door and twice in succession will unlock all the doors simultaneously.
22
21p009
LOCKING AND UNLOCKING WITH INSIDE LOCK KNOB
Move the lock knob.
To lock: Push the knob forward.
To unlock: Pull the knob backward.
The driver’s door can be opened by pulling the inside door handle even if the lock
knob is depressed.
Closing the door with the lock knob in the
lock position will also lock the door. Be
careful not to lock your keys in the vehicle.
The door cannot be locked if you leave
the key in the ignition switch.
21p010
LOCKING AND UNLOCKING WITH
POWER DOOR LOCK SWITCH
Push the switch.
To lock: Push the switch down on the
front side.
To unlock: Push the switch down on the
rear side.
All the doors lock or unlock simultaneously.
21p012a
Driver’s side
21p011
Passenger’s side
REAR DOOR CHILD–PROTECTORS
Move the lock lever to the “LOCK”
position as shown on the label.
This feature allows you to lock a rear
door so it can be opened from the outside
only, not from inside. We recommend using this feature whenever small children
are in the vehicle.
23
CAUTION
Before driving, be sure that the doors
are closed and locked, especially
when small children are in the vehicle. Along with the proper use of
seat belts, locking the doors helps
prevent the driver and passengers
from being thrown out from the vehicle during an accident. It also helps
prevent the doors from being opened
unintentionally.
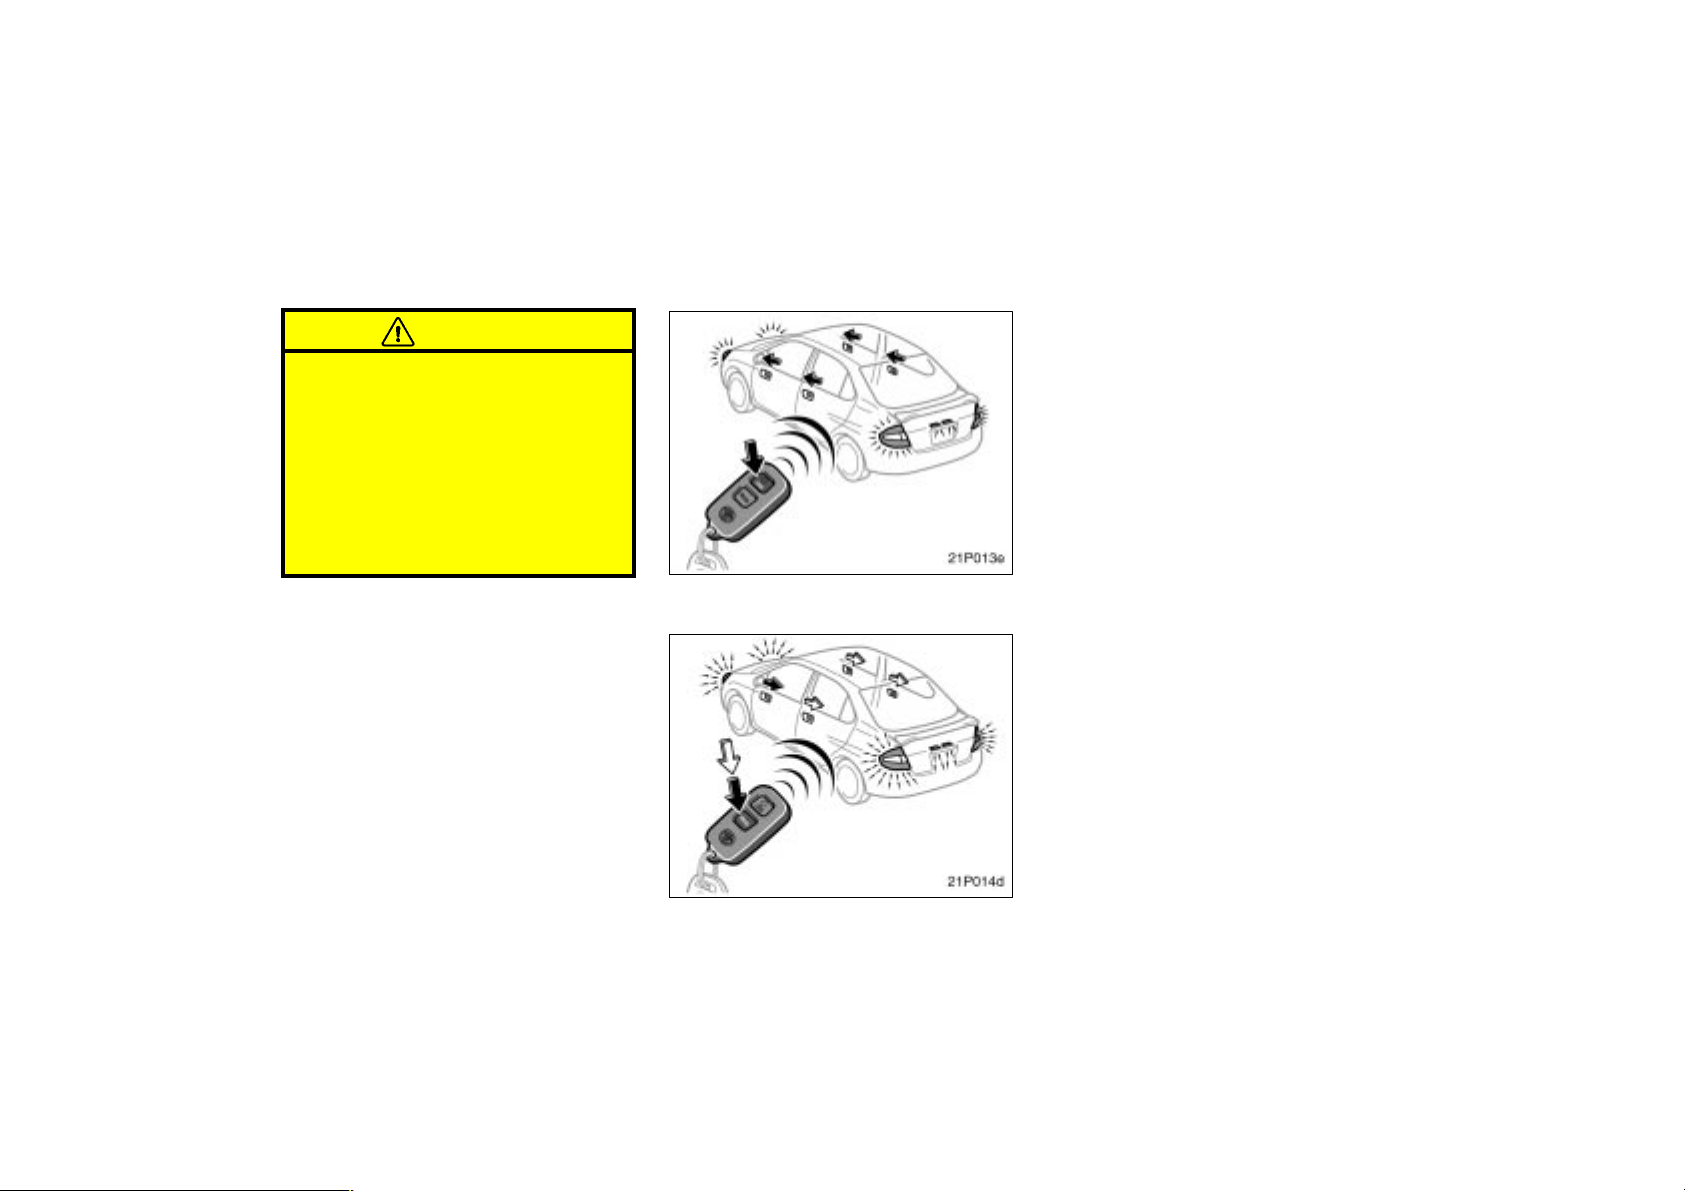
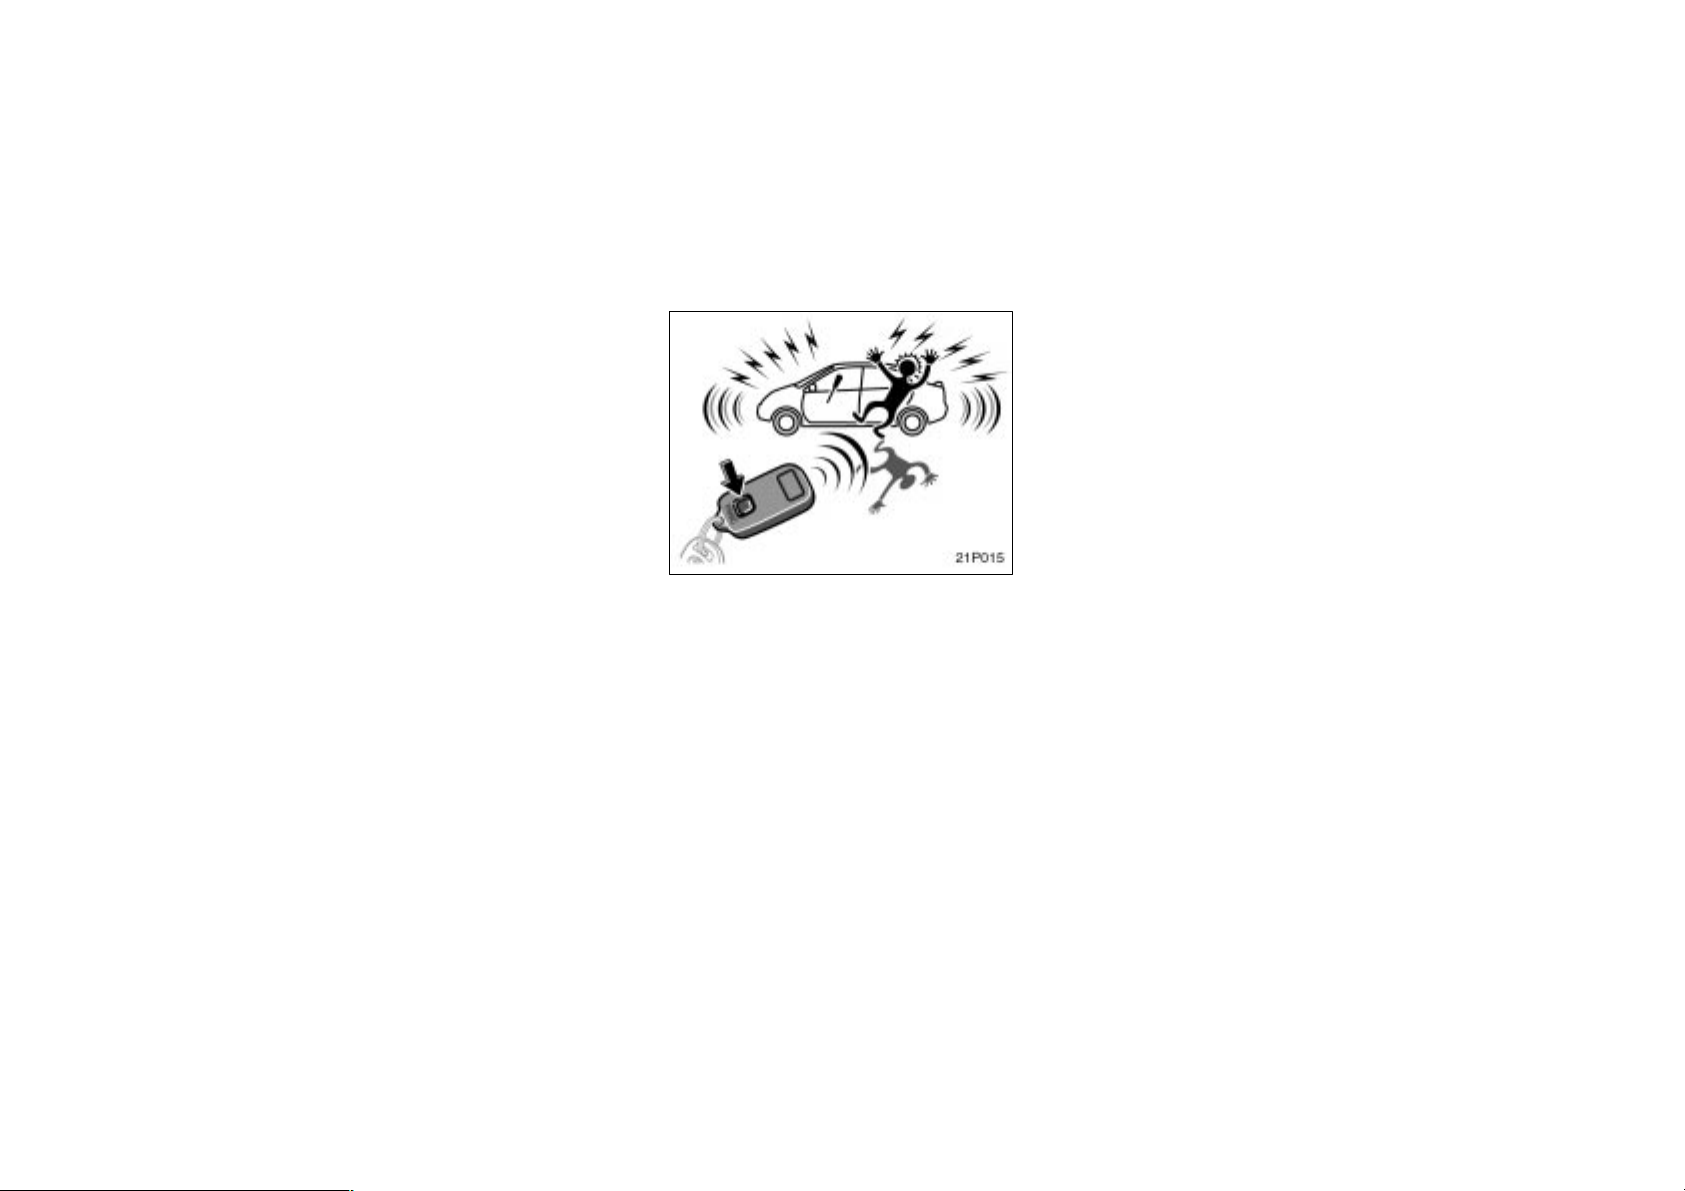
—Wireless remote control
21p013e
Locking operation
21p014d
The wireless remote control system is
designed to lock or unlock both doors,
or activate the theft deterrent system
from a distance within approximately 1
m (3 ft.) of the vehicle.
LOCKING AND UNLOCKING THE
DOORS
To lock and unlock all the doors, push
the switches of the transmitter slowly
and securely.
To lock: Push the “LOCK” switch. All the
doors are locked simultaneously. At this
time the parking lights, side marker lights,
license plate lights and tail lights will flash
once.
Check to see that the doors are securely
locked.
If either door is not securely closed, locking cannot be performed by the “LOCK”
switch.
24
Unlocking operation
To unlock: Push the “UNLOCK” switch
once to unlock the only driver’s door.
Pushing the switch twice within 3 seconds
unlocks all the doors simultaneously. Each
time the “UNLOCK” switch is pushed, the
parking lights, side marker lights, license
plate lights and tail lights will flash twice.
When the “UNLOCK” switch is pressed
the interior light comes on. The lights remains on for about 15 seconds unless
either door is opened then and closed.
(For further information, see “Interior light”
on page 84 in Section 2–3.)
You have 30 seconds to open a door after
using the wireless remote unlock feature.
If a door is not opened by then, all the
doors will be automatically locked again.
If the “LOCK” or “UNLOCK” switch is kept
pressed in, the locking or unlocking operation is not repeated. Release the button
and then push again.
21p015
“PANIC” SWITCH
Pushing the “PANIC” switch blows the
horn intermittently and flashes the
headlights and tail lights.
The “PANIC” switch is used to deter vehicle theft when you witness anyone attempting to break into or damage your
vehicle.
The alarm will have for one minute. To
stop alarm midway, push the “PANIC” or
“UNLOCK” switch once again, unlock any
door with the key or transmitter, or turn
the ignition key from the “LOCK” to “ON”
position.
The “PANIC” mode does not work when
the ignition key is in the “ON” position.
WIRELESS REMOTE CONTROL TRANSMITTER
The wireless remote control transmitter is
an electronic component. Observe the following instructions in order not to cause
damage to the transmitter.
Do not leave the transmitter on places
where the temperature becomes high
such as on the dashboard.
Do not disassemble it.
Avoid knocking it hard against other
objects or dropping it.
Avoid putting it in water.
You can use up to 4 wireless remote control transmitters for the same vehicle.
Contact your Toyota dealer for detailed
information.
If the wireless remote control transmitter
does not actuate the doors or alarm, or
operate from a normal distance.
Check for closeness to a radio trans-
mitter such as a radio station or an
airport which can interfere with normal
operation of the transmitter.
The battery may have been consumed.
Check the battery in the transmitter. To
replace the battery, see “REPLACING
TRANSMITTER BATTERY” on page 27.
25

If you lose your transmitter, contact your
Toyota dealer as soon as possible to
avoid the possibility of theft, or an accident. (See “If you lose your wireless remote control transmitter” on page 187 in
Section 5.)
For vehicles sold in U.S.A.
This device complies with Part 15 of the
FCC Rules. Operation is subject to the
following two conditions:
(1) This device may not cause harmful
interference, and (2) this device must
accept any interference received, including interference that may cause undesired operation.
NOTICE:
This equipment has been tested and
found to comply with the limits for a
Class B digital device, pursuant to Part
15 of the FCC Rules. These limits are
designed to provide reasonable protection against harmful interference in a
residential installation. This equipment
generates, uses and can radiate radio
frequency energy and, if not installed
and used in accordance with the instructions, may cause harmful interference to
radio communications. However, there is
no guarantee that interference will not
occur in a particular installation. If this
equipment does cause harmful interference to radio or television reception,
which can be determined by turning the
equipment off and on, the user is encouraged to try to correct the interference by one or more of the following
measures:
Reorient or relocate the receiving an-
tenna.
Increase the separation between the
equipment and receiver.
Connect the equipment into an outlet
on a circuit different from that to
which the receiver is connected.
Consult the dealer or an experienced
radio/TV technician for help.
FCC WARNING:
Changes or modifications not ex-
pressly approved by the party responsible for compliance could void the
user’s authority to operate the equipment.
For vehicles sold in Canada
Operation is subject to the following two
conditions: (1) this device may not
cause interference, and (2) this device
must accept any interference, including
interference that may cause undesired
operation of this device.
26
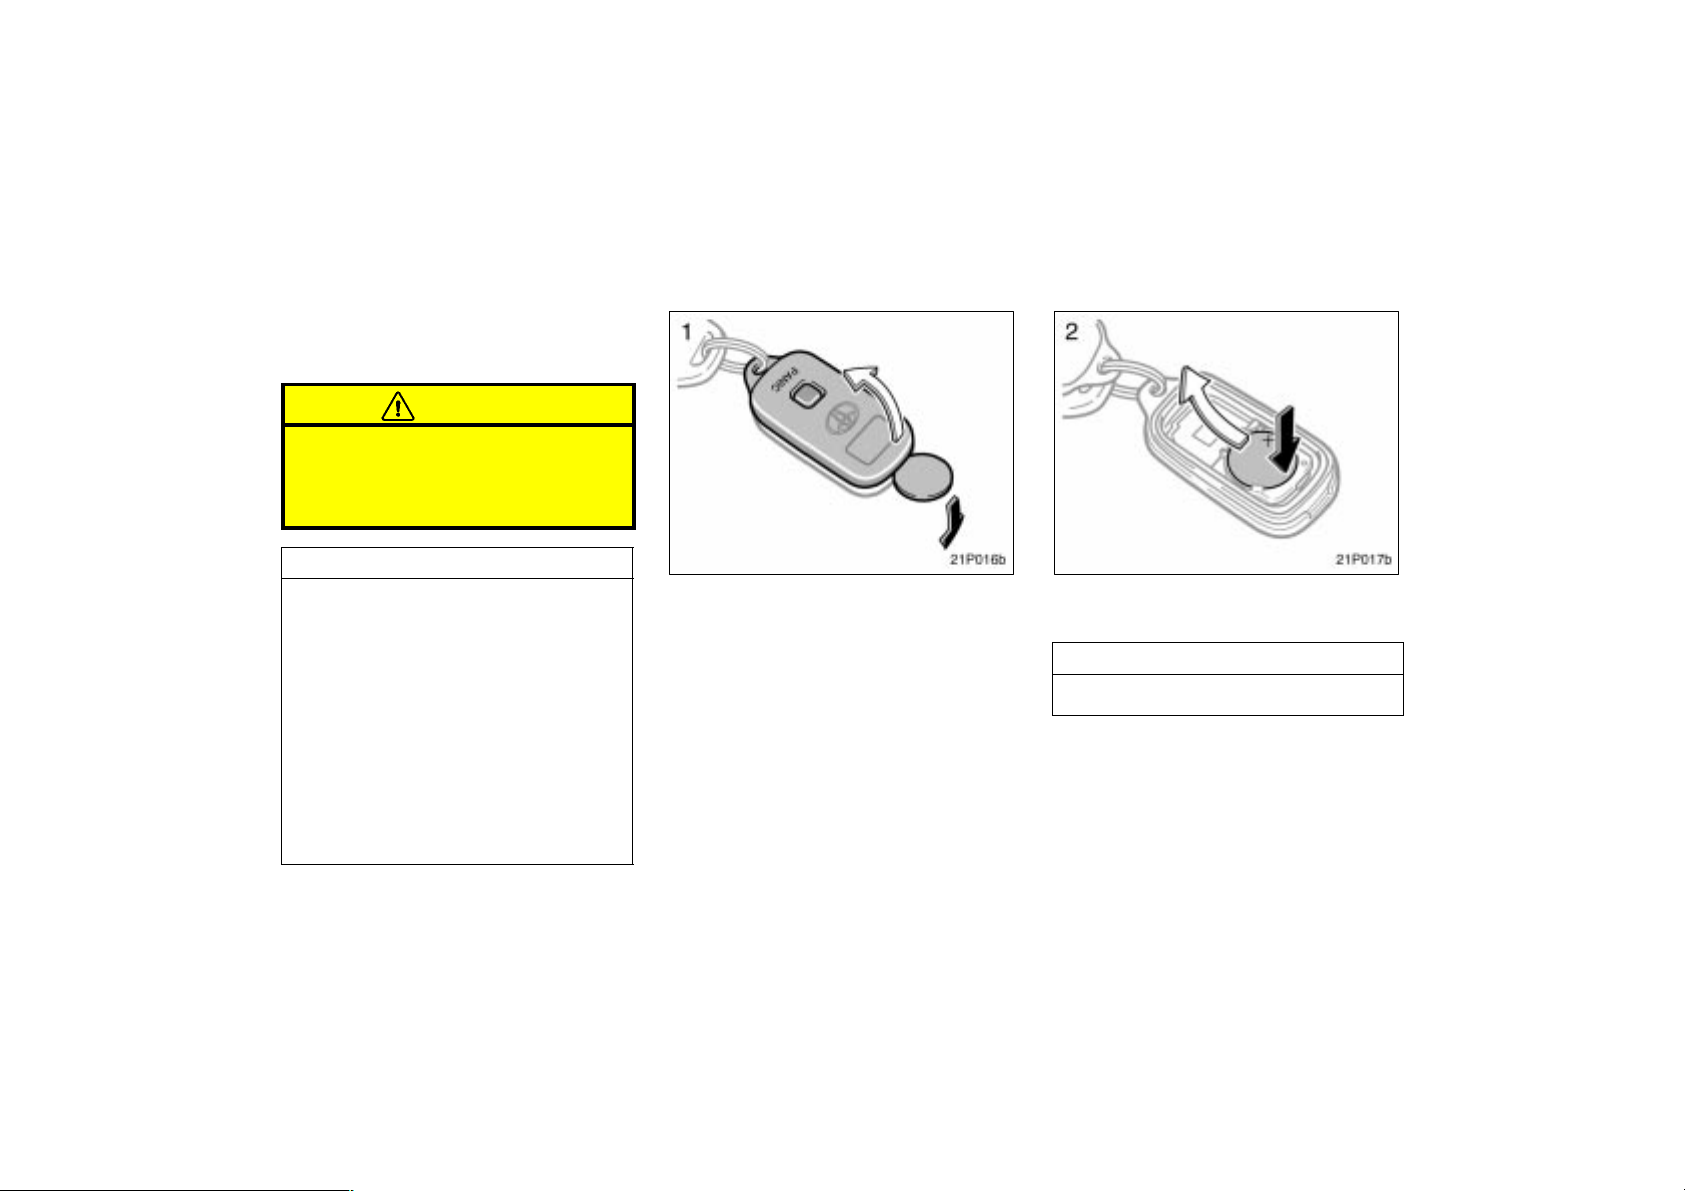
15.REPLACING TRANSMITTER BATTERY
For replacement, use CR2016 lithium battery or equivalent.
CAUTION
Special care should be taken that
small children do not swallow the removed transmitter battery or components.
NOTICE
During replacing the transmitter
battery, do not push the “LOCK”
and “UNLOCK” switches many
times.
When replacing the transmitter battery, be careful not to lose the
components.
Replace only with the same or
equivalent type recommended by a
Toyota dealer.
Dispose of used batteries according
to the local laws.
Replace the transmitter battery by the following procedures.
21p016b
1. Using a coin or equivalent, open the
transmitter case.
21p017b
2. Remove the discharged transmitter battery.
NOTICE
Do not bend the terminals.
27
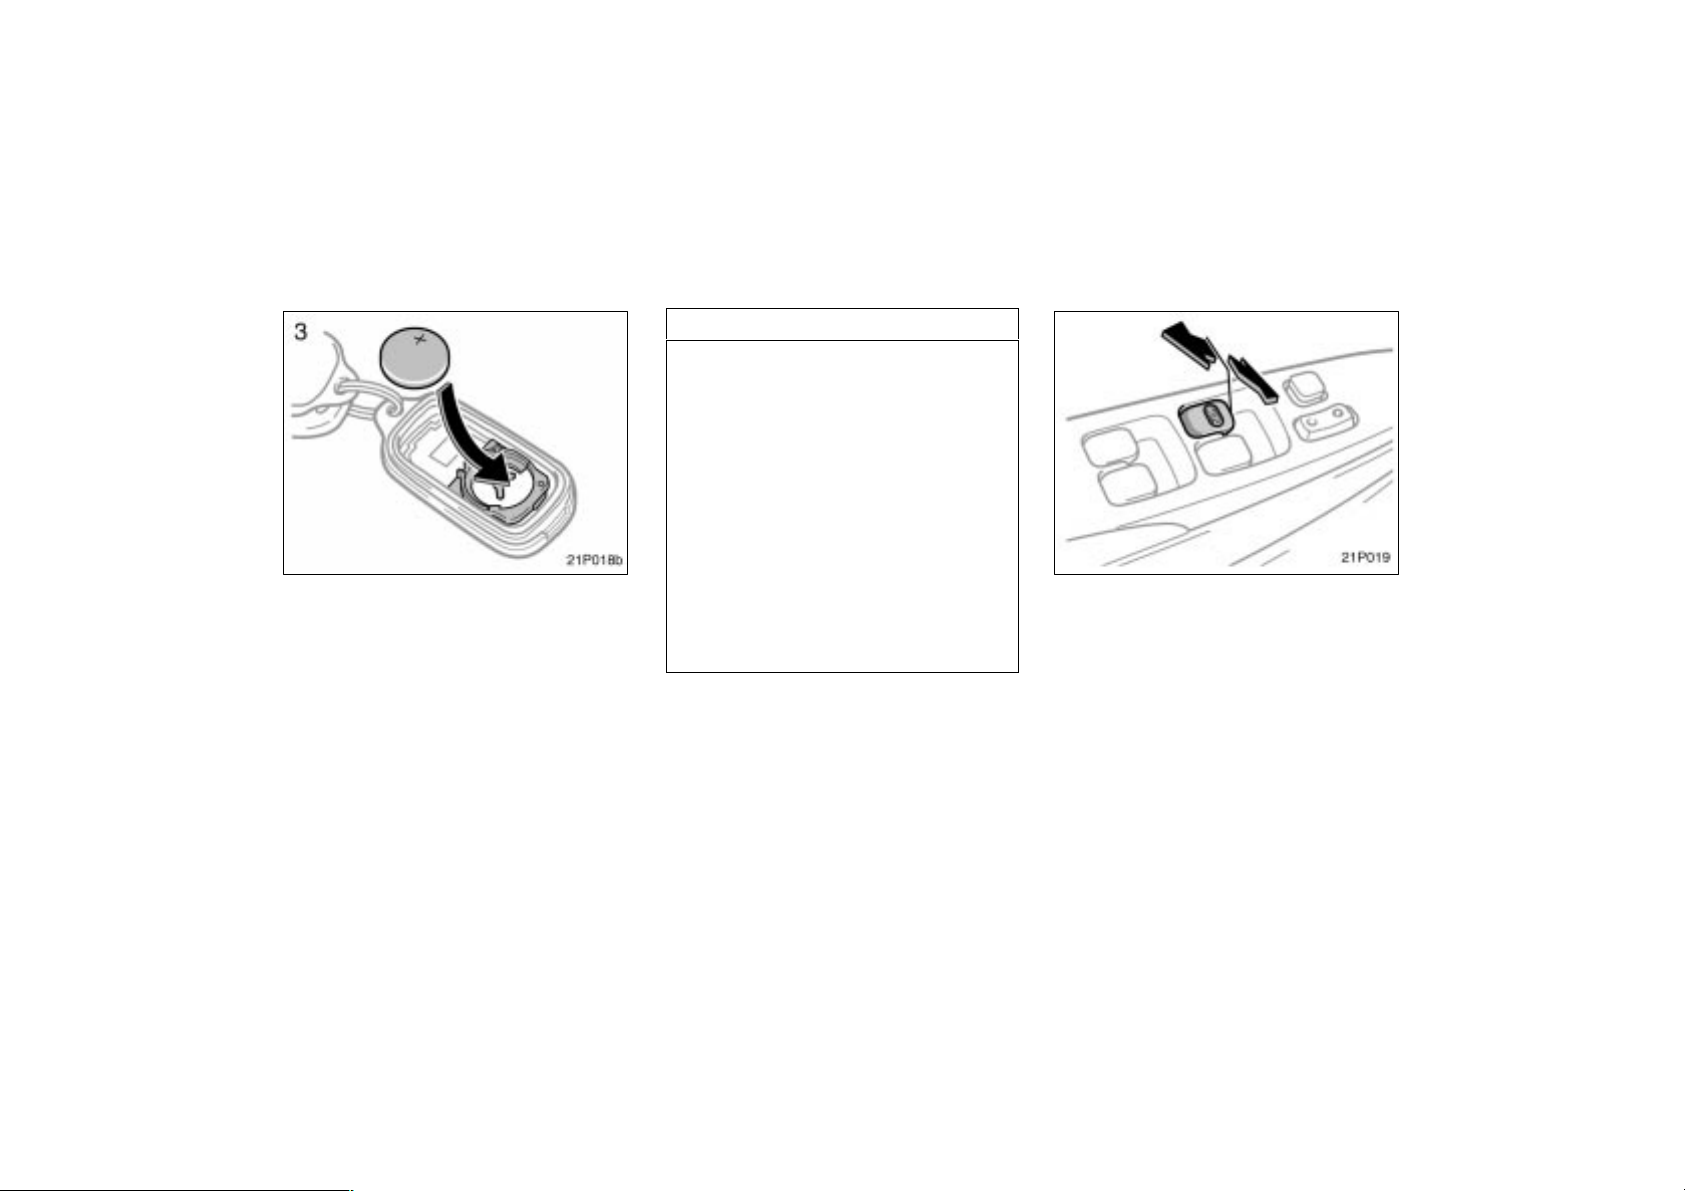
21p018b
3. Put a new transmitter battery with positive (+) side up.
Close the transmitter case securely.
NOTICE
Make sure the positive side and
negative side of the transmitter battery should be faced correctly.
Do not replace the battery with wet
hands. Water may cause unexpected
rust.
Do not touch or move any components inside the transmitter, or it
may interfere with proper operation.
Be careful not to bend the electrode
of the transmitter battery insertion
and that dust or oils do not adhere
to the transmitter case.
Close the transmitter case securely.
After replacing battery, check that the
transmitter operates properly. If the transmitter still does not operate properly, contact your Toyota dealer.
16.Power windows
21p019
The windows can be operated with the
switch on each door.
The power windows work when the ignition
switch is in the “ON” position.
Key off operation: If both front doors are
closed, they work for 45 seconds even
after the ignition switch is turned off. They
stop working when either front door is
opened.
OPERATING THE DRIVER’S WINDOW
Use the switch on the driver’s door.
Normal operation: The window moves as
long as you hold the switch.
To open: Lightly push down the switch.
To close: Lightly pull up the switch.
28
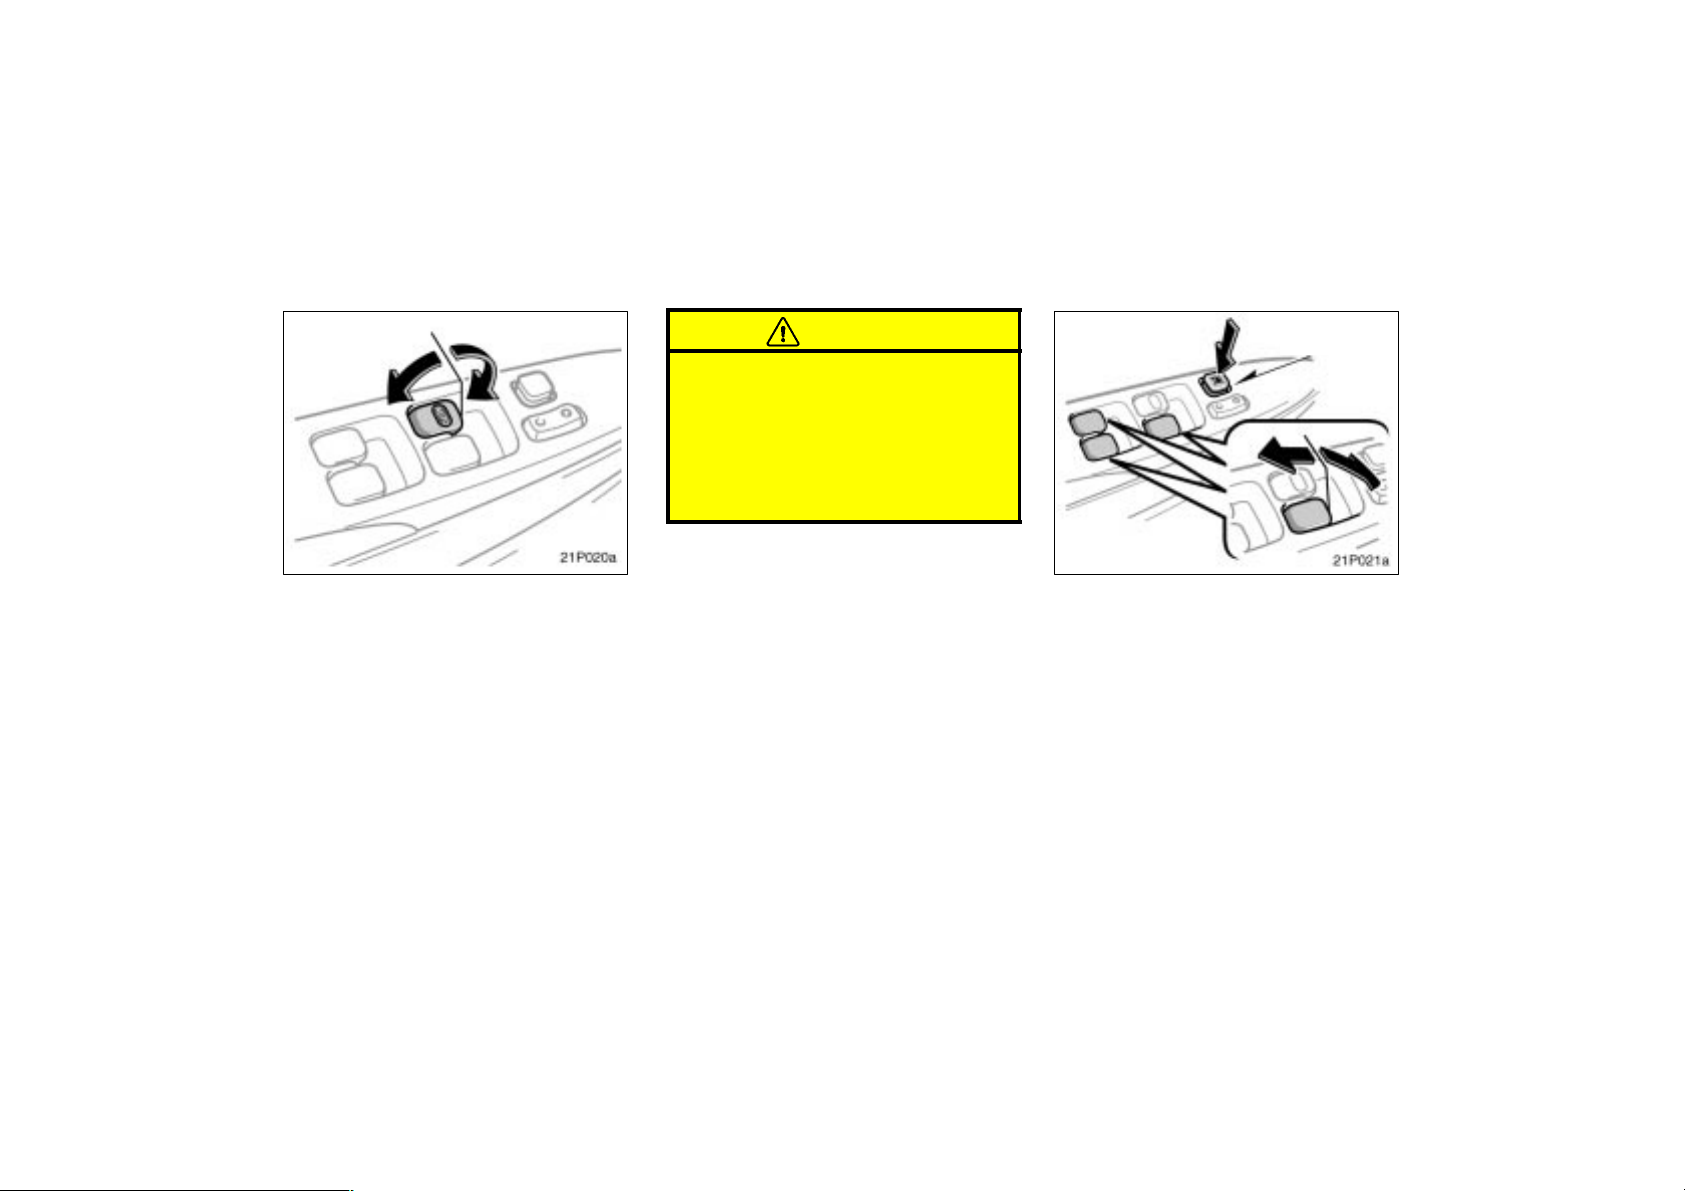
21p020a
CAUTION
Never try jamming any part of your
body to make the jam protection
function work intentionally.
The jam protection function may
not work if something gets caught
just before the window is fully
closed.
Window lock
switch
21p021a
Automatic operation: Push the switch
completely down or pull it completely up,
and then release it. The window will fully
open or close. To stop the window partway, lightly move the switch in the opposite direction and then release it.
Jam protection function: During automatic closing operation or key off closing operation, the window stops and opens half–
way if something gets caught between the
window and window frame.
If the window receives a strong impact,
this function may work even if nothing is
caught.
OPERATING THE PASSENGERS’
WINDOWS
Use the switch on each passenger’s
door or the switches on the driver’s
door that control each passengers’ window.
The window moves as long as you hold
the switch.
To open: Push down the switch.
To close: Pull up the switch.
If you push in the window lock switch on
the driver’s door, the passengers’ windows
cannot be operated.
29
30
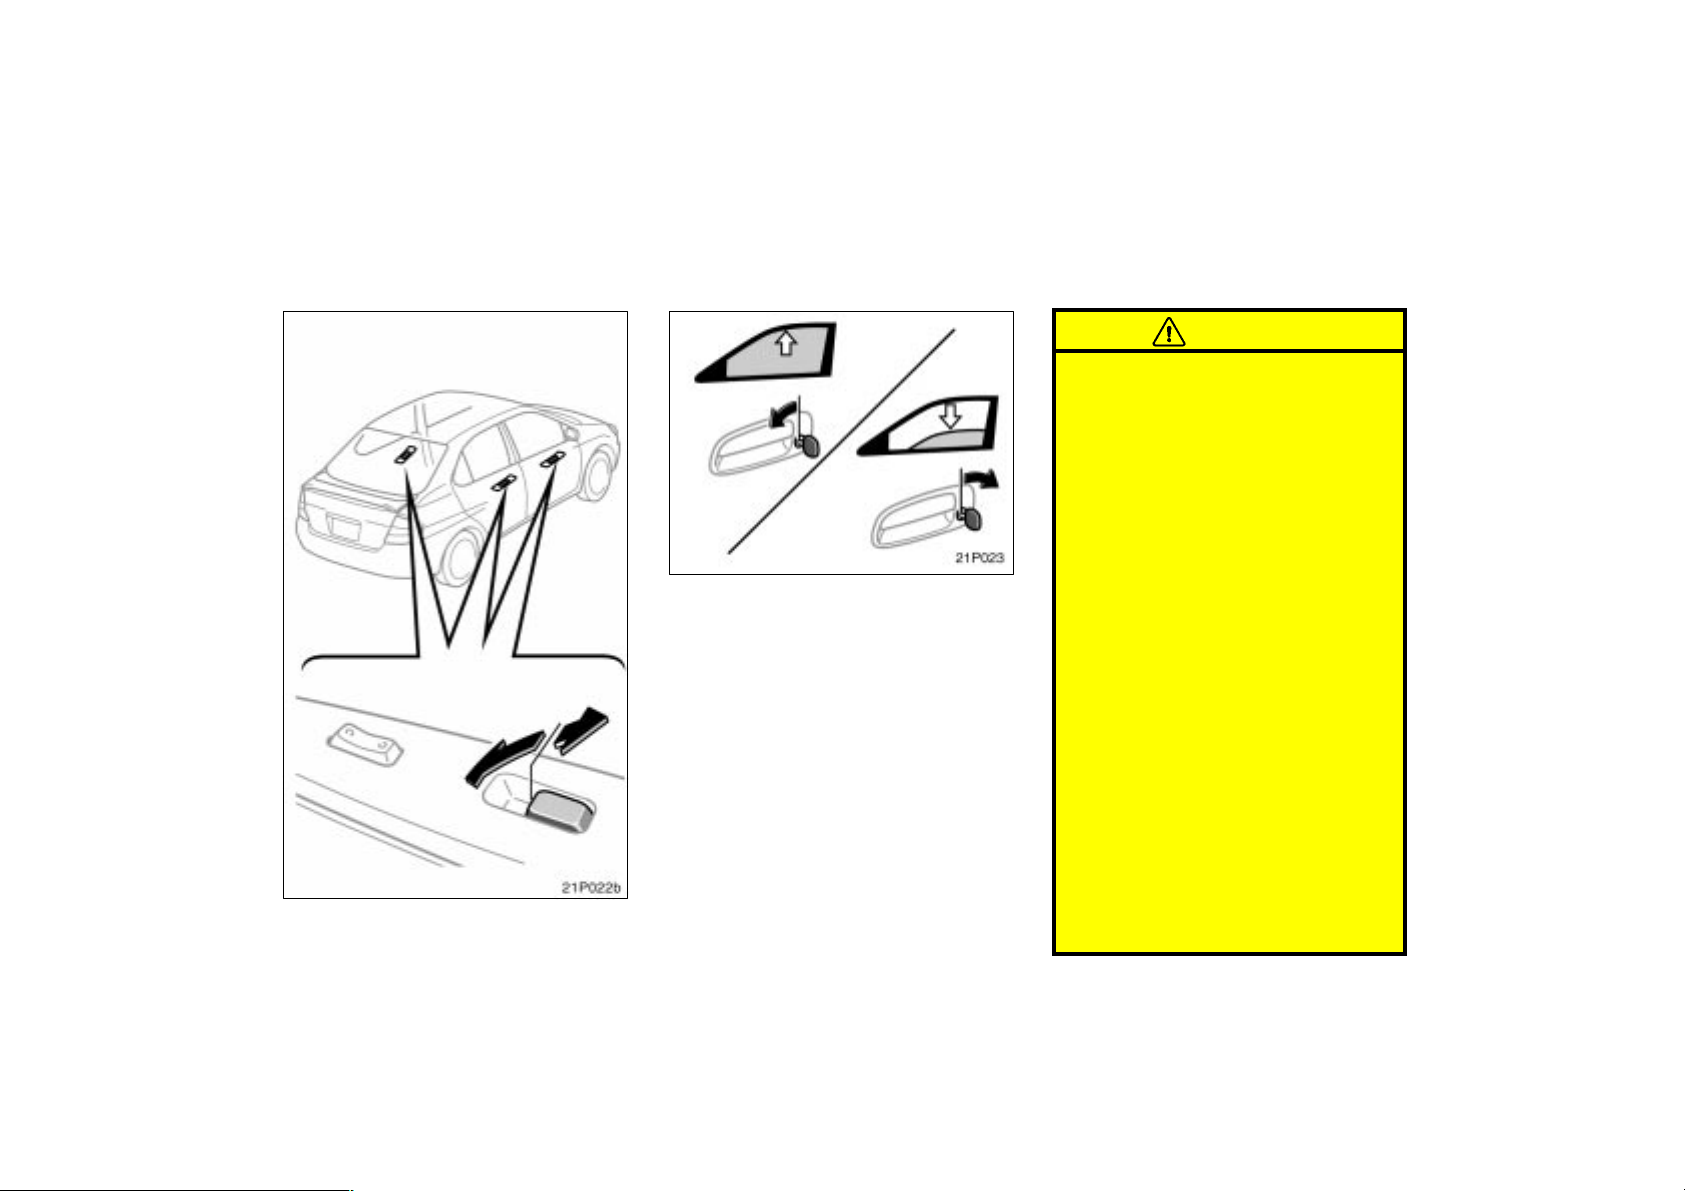
21p022b
21p023
OPERATING THE DRIVER’S WINDOW
FROM OUTSIDE THE VEHICLE
The driver’s window can be raised or lowered using an ignition key.
Insert the ignition key into the key
hole.
To close the window: Turn the key in the
locking direction and hold it.
After the door is locked, the window be-
gins to close. To stop in the middle, return
the key.
To open the window: Turn the key in the
unlocking direction and hold it.
After the door is unlocked, the window
begins to open. To stop in the middle,
return the key.
CAUTION
To avoid serious personal injury, you
must do the following.
Before you close the power win-
dows, always make sure there is nobody around the power windows.
You must also make sure the heads,
hands and other parts of the bodies
of all occupants are kept completely
inside the vehicle. If someone’s
neck, head or hands get caught in a
closing window, it could result in a
serious injury. When anyone closes
the power windows, make sure that
he or she operates the windows
safely.
When small children are in the ve-
hicle, never let them use the power
window switches without supervision. Use the window lock switch to
prevent them from making unexpected use of the swit ches.
Never leave small children alone in
the vehicle, especially with the ignition key still inserted. They could
use the power window switches and
get trapped in a window. Unattended children can become involved in serious accidents.
 Loading...