

Page 1

FILE NO. E05-412
TCS-NET Air-Conditioning Control System
[Setting File Creation Software]
User’s Manual
Page 2

Introduction
This is the User’s Manual for the Setting File Creation Software (here after referred to as the “software”)
for the Air-conditioning Control System.
· Setting File Creation Software Ver 2.00 Revision 02
* This Software (Ver 2.0 Rev 02) is not compatible with Ver 1.0
• “Windows 2000” and “Windows XP” are trademarks or registered trademarks of Microsoft Corporation in
the United States and other countries.
• “Microsoft Excel” is a trademark or registered trademark of Microsoft Corporation in the United States
and other countries.
• All company names and product names appearing in this manual are the trademark or registered
trademark of their respective holders.
No indication such as “TM”, “®” or “©” that stands for a trademark or registered trademark appears in
this manual.
2
Page 3

Table of Contents
Introduction ........................................................................................................................... 2
Table of Contents .................................................................................................................. 3
1. What is Setting File Creation Software?............................. 6
2. Operating Environment........................................................ 7
3. Installation/Uninstallation Procedures ............................... 8
3-1 Program file structure ..................................................................................................... 8
3-2 Installation .................................................................................................................... 10
3-3 Uninstallation ................................................................................................................ 12
4. Operation ............................................................................ 13
4-1 Transition of windows .................................................................................................... 13
4-2 Startup and exiting ........................................................................................................ 14
4-2-1 Starting the software program ..................................................................................................... 14
4-2-2 Exiting the software program ....................................................................................................... 14
4-3 Data input window ........................................................................................................ 15
5. Setting File Creation Procedure ........................................ 15
5-1 New file creation ...........................................................................................................17
5-1-1 Starting the program .................................................................................................................... 17
5-1-2 Creating a new file ....................................................................................................................... 17
5-2 Setting file update .........................................................................................................22
5-2-1 Starting the program .................................................................................................................... 22
5-2-2 Updating data .............................................................................................................................. 22
6. Window Descriptions and Buttons on Each Sheet ......... 26
6-1 “System Setting” sheet.................................................................................................. 26
6-1-1 Window Image ............................................................................................................................. 26
6-1-2 Window Description ..................................................................................................................... 26
6-1-3 Buttons ........................................................................................................................................ 28
6-2 “System equipment configuration” sheet ...................................................................... 29
6-2-1 Window Image ............................................................................................................................. 29
6-2-2 Window Description ..................................................................................................................... 29
6-2-3 Buttons ........................................................................................................................................ 29
3
Page 4

6-3 “Address Setting” sheet ................................................................................................ 30
6-3-1 Window Image ............................................................................................................................. 30
6-3-2 Window Description ..................................................................................................................... 30
6-3-3 Buttons ........................................................................................................................................ 32
6-4 “Block number issue” sheet .......................................................................................... 33
6-4-1 Window Image ............................................................................................................................. 33
6-4-2 Window Description ..................................................................................................................... 33
6-4-3 Buttons ........................................................................................................................................ 33
6-5 “Area number issue” sheet ........................................................................................... 35
6-5-1 Window Image ............................................................................................................................. 35
6-5-2 Window Description ..................................................................................................................... 35
6-5-3 Buttons ........................................................................................................................................ 35
6-6 “Monthly report tenant name definition” sheet ............................................................. 37
6-6-1 Window Image ............................................................................................................................. 37
6-6-2 Window Description ..................................................................................................................... 37
6-6-3 Buttons ........................................................................................................................................ 38
6-7 “Tenant number issue” sheet ......................................................................................... 39
6-7-1 Window Image ............................................................................................................................. 39
6-7-2 Window Description ..................................................................................................................... 39
6-7-3 Buttons ........................................................................................................................................ 39
6-8 “Fire alarm input definition” sheet ................................................................................. 41
6-8-1 Window Image ............................................................................................................................. 41
6-8-2 Window Description ..................................................................................................................... 41
6-8-3 Buttons ........................................................................................................................................ 42
6-9 “Door-lock input definition” sheet .................................................................................. 43
6-9-1 Window Image ............................................................................................................................. 43
6-9-2 Window Description ..................................................................................................................... 43
6-9-3 Buttons ........................................................................................................................................ 44
6-10 “Emergency external output definition” sheet.............................................................. 45
6-10-1 Window Image ........................................................................................................................... 45
6-10-2 Window Description ................................................................................................................... 45
6-10-3 Buttons ...................................................................................................................................... 46
6-11 “Power meter input definition” sheet............................................................................ 47
6-11-1 Window Image ........................................................................................................................... 47
6-11-2 Window Description ................................................................................................................... 47
6-11-3 Buttons ...................................................................................................................................... 48
6-12 “S-MMS outdoor unit group definition” sheet .............................................................. 49
6-12-1 Window Image ........................................................................................................................... 49
6-12-2 Window Description ................................................................................................................... 49
6-12-3 Buttons ...................................................................................................................................... 51
4
Page 5

6-13 “Indoor unit group definition” sheet ............................................................................. 52
6-13-1 Window Image ........................................................................................................................... 52
6-13-2 Window Description ................................................................................................................... 52
6-13-3 Buttons ...................................................................................................................................... 56
6-14 “Outdoor unit group definition other than S-MMS” sheet ............................................. 57
6-14-1 Window Image .............................................................................................................................. 57
6-14-2 Window Description ...................................................................................................................... 57
6-14-3 Buttons ........................................................................................................................................58
7. Notes ....................................................................................59
7-1 Equipment model table “unit_table.xls” ......................................................................... 59
7-1-1 Registering indoor unit/outdoor unit model names in Equipment model table .................................. 59
7-2 Setting file output .......................................................................................................... 62
5
Page 6

1. What is Setting File Creation Software?
This software is a tool to create setting files for the Air-conditioning Control System.
Setting files of Touch Screen Controller
Character code used for setting files
Japan version
Overseas version
Verified foreign languages
• Japanese
• English
• Chinese (Simplified/Traditional)
The software is composed of Excel VBA output setting files, according to the specific format of the data in
the Excel workbook.
Shift JIS
Unicode
Setting File Creation Software
Font used for input on Microsoft Excel sheets
MS UI Gothic
MS UI Gothic
6
Page 7
Table 1-1 Output setting files
File name
AC_GROUP.DEF
AC_MAP.DEF
AC_NAME.DEF
ANBUN_MAP.DEF
ANBUN_NAME.DEF
BACKLIGHT.DEF
BLOCK_NAME.DEF
BUILD_NAME.DEF
CONT_IP.DEF
CONT_no*.DEF
DISP_FORM.DEF
EMGOUT_CH.DEF
EREA_NAME.DEF
ERROR_CODE.DEF
FIRE_CH.DEF
IO_IP.DEF
KEY_CH.DEF
ListOfApparatus*.txt
ListOfEpcPackage*.txt
LSV_IP.DEF
OUT_GROUP.DEF
REPORT.DEF
RUN_MODE.DEF
TENANT_NAME.DEF
WHM_CH.DEF
WHM_MAP.DEF
WHM_MAP_OUT.DEF
Description
Indoor unit group config file
R.C. group/indoor setting file
R.C. group/indoor name definition file
Energy monitoring tenant name conversion setting file
Energy monitoring tenant name setting file
Backlight save count setting file
Block name definition file
Building name definition file
Touch Screen Controller IP address definition file
Touch Screen Controller number check file
Display setting file
Emergency external output definition file
Area name definition file
Error code definition file
Fire alarm input definition file
I/O Controller IP address definition file
Door-lock input definition file
Equipment definition file
View at once file
Intelligent Server IP address definition file
Outdoor unit group config file
Report setting file
Operation mode setting file
Tenant name definition file
Power meter input definition file
Energy monitoring setting file
Energy monitoring setting file for outdoor units
2. Operating Environment
Operating environment Personal computer
Operating system (OS)
Microsoft Excel
Windows 2000 or XP compatible PC
Windows 2000, XP
Excel 2000 or newer is required separately.
7
Page 8
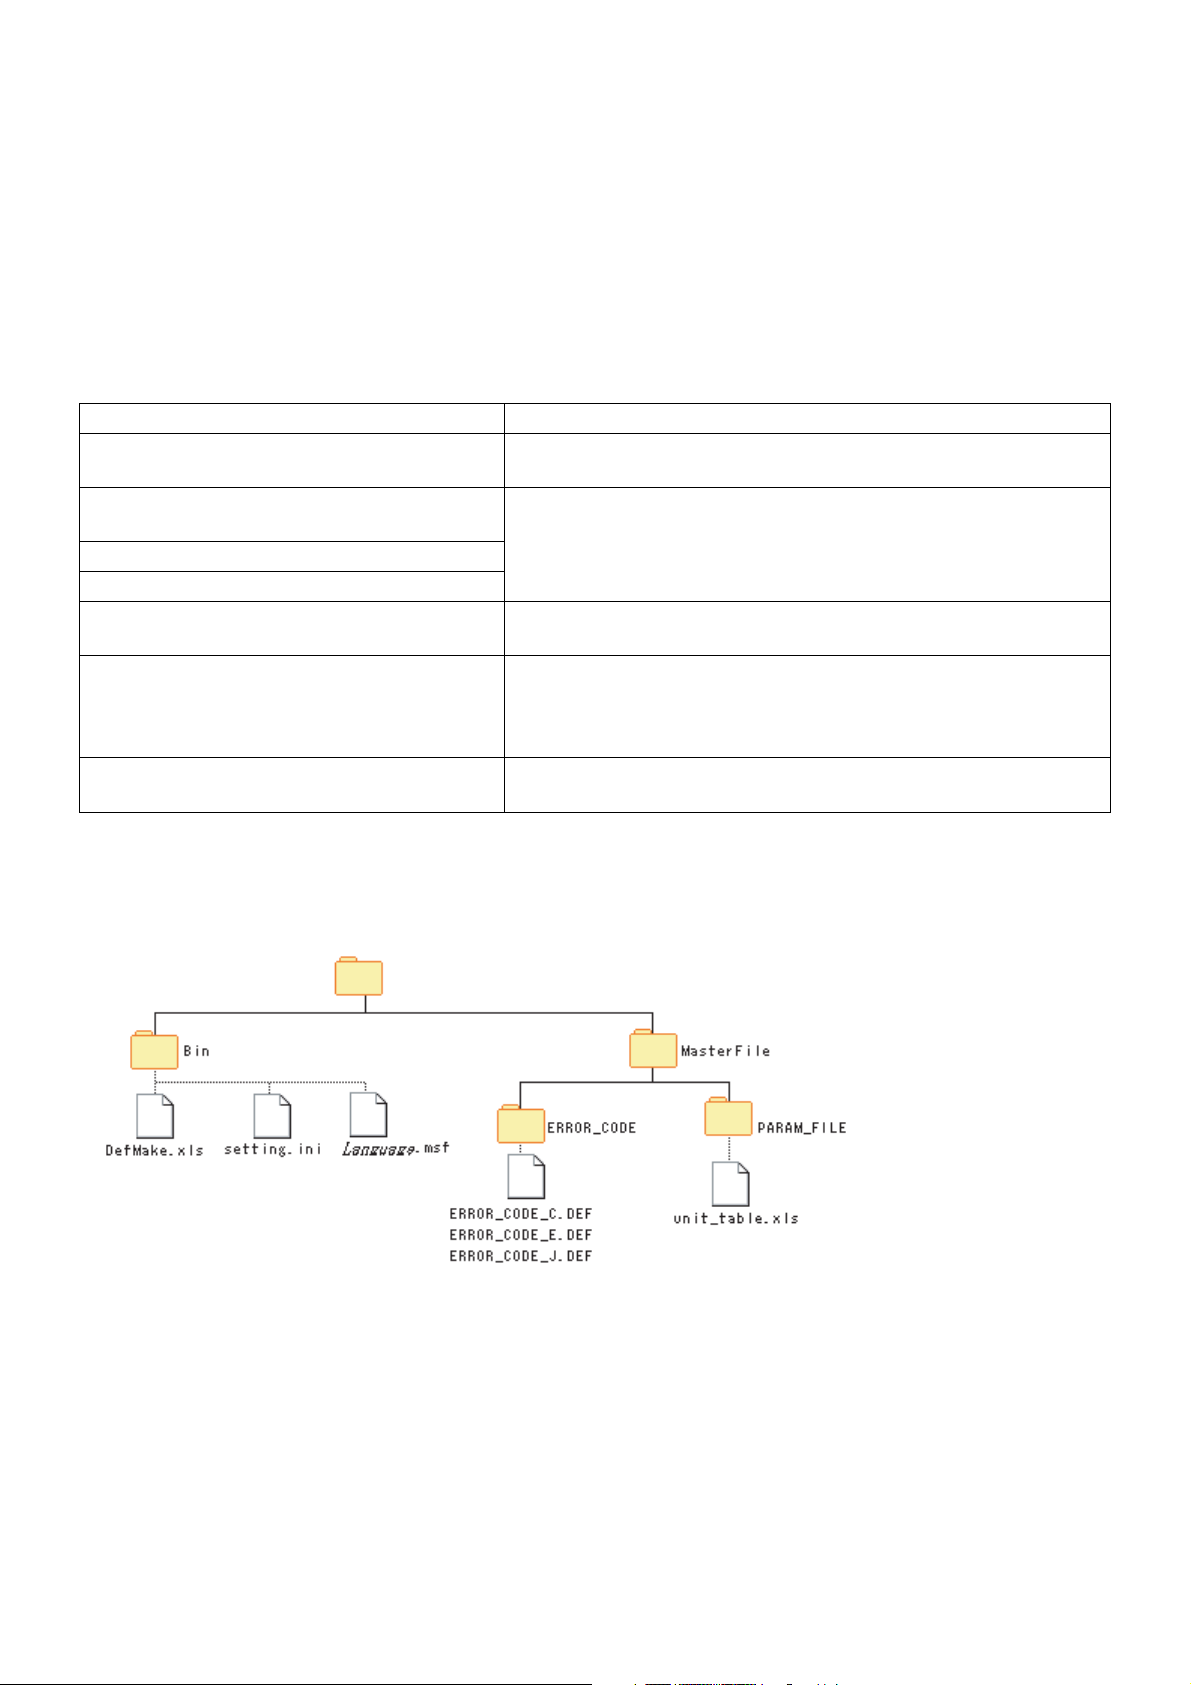
3. Installation/Uninstallation Procedures
3-1 Program file structure
The software is composed of 5 files: “DefMake.xls,” “ERROR_CODE_C.DEF,” “ERROR_CODE_E.DEF,”
“ERROR_CODE_J.DEF”, and “unit_table.xls”.
Details of these files are described in the table below.
Table 3-1 File structure
File name
DefMake.xls
ERROR_CODE_C.DEF
(Simplified Chinese)
ERROR_CODE_E.DEF (English)
ERROR_CODE_J.DEF (Japanese)
setting.ini
Language
unit_table.xls (Equipment model name file)
.msf
Description
Included in this software.
Start this file to run the software.
Master file of the Chinese/English/Japanese versions of the setting
file ERROR_CODE_DEF
An INI file stores the language to be used and previously stored
data such as file path
A file describing a message number/word correspondence table
to make this software multilingual.
“Japanese” (Japanese environment) or “English” (English
environment) is applied for
Excel Workbook file describing equipment parameters
Used to determine parameters (power, model, etc.)
The following shows the directory structure of these files.
Destination folder
Language
.
Fig. 3-1 Directory structure of the software
8
Page 9

Do not change the directory, file name or file saving place of the installation destination.
In this software, create a new Excel Workbook file to input data (equipment data, tenant data, etc.) this is
necessary for the creation of setting files.
9
Page 10
3-2 Installation
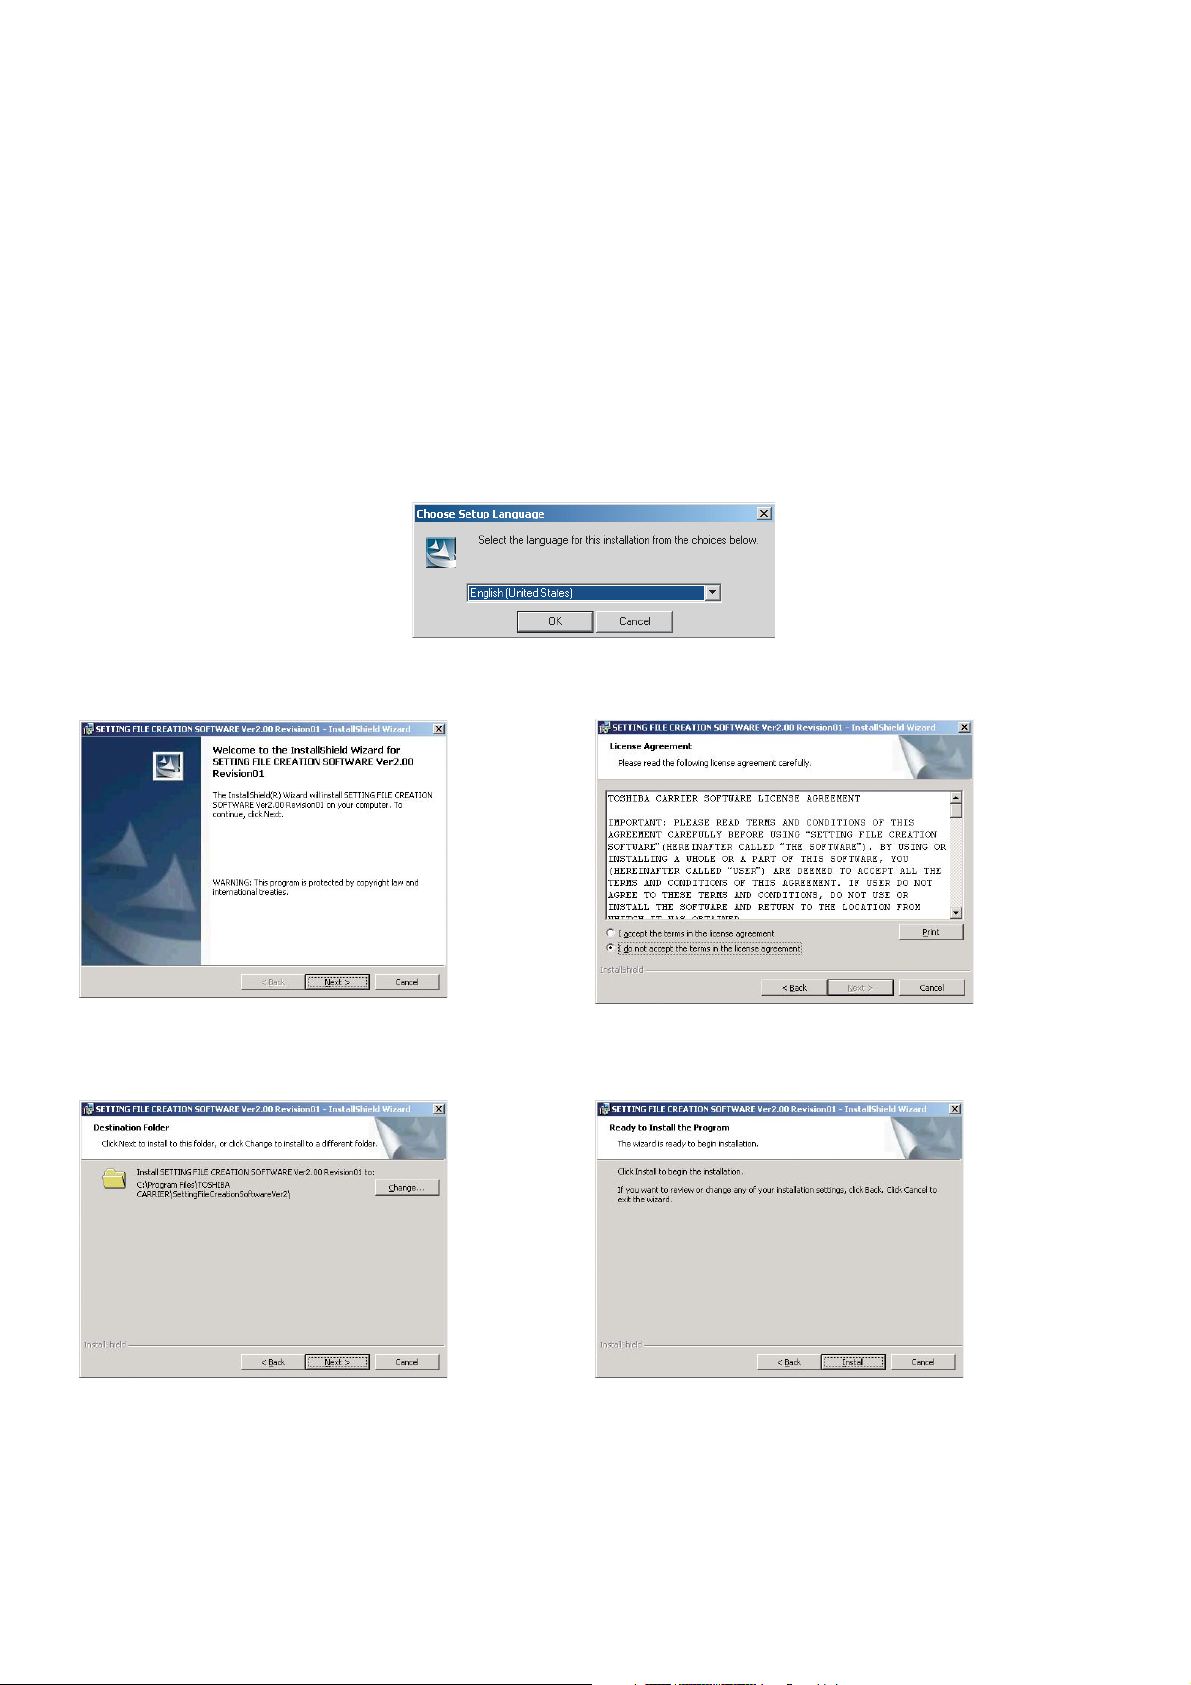
Insert the installation CD into the drive. The setup operation starts automatically. If it does not start,
execute “SETUP.EXE” on the CD.
The “Choose Setup Language” dialog (Fig. 3-2) appears first. Choose the language to be used for the
software and Click [OK]. The “Welcome” window (Fig. 3-3) opens next, click [Next >]. The “License
Agreement” dialog (Fig. 3-4) appears. Read the license agreement and select “I accept the terms in the
license agreement” and then click [Next >]. The window changes to the “Destination Folder” window (Fig.
3-5). Choose a folder in the installation destination (default folder usually) and click [Next >].
Click [Install] on the dialog (Fig. 3-6) that opens next. Installation of the selected file starts. The dialog (Fig.
3-7) appears during the installation and then changes to the “InstallShield Wizard Completed” window (Fig.
3-8).
Click [Finish] on the window to complete the installation operation.
Fig. 3-2 “Choose Setup Language” dialog
Fig. 3-3 “Welcome” window
Fig. 3-5 “Destination Folder” window
Fig. 3-4 “License Agreement” dialog
Fig. 3-6 “Ready to Install the Program” dialog
10
Page 11

Fig. 3-7 “Installing ...” dialog Fig. 3-8 “InstallShield Wizard Completed” window
11
Page 12
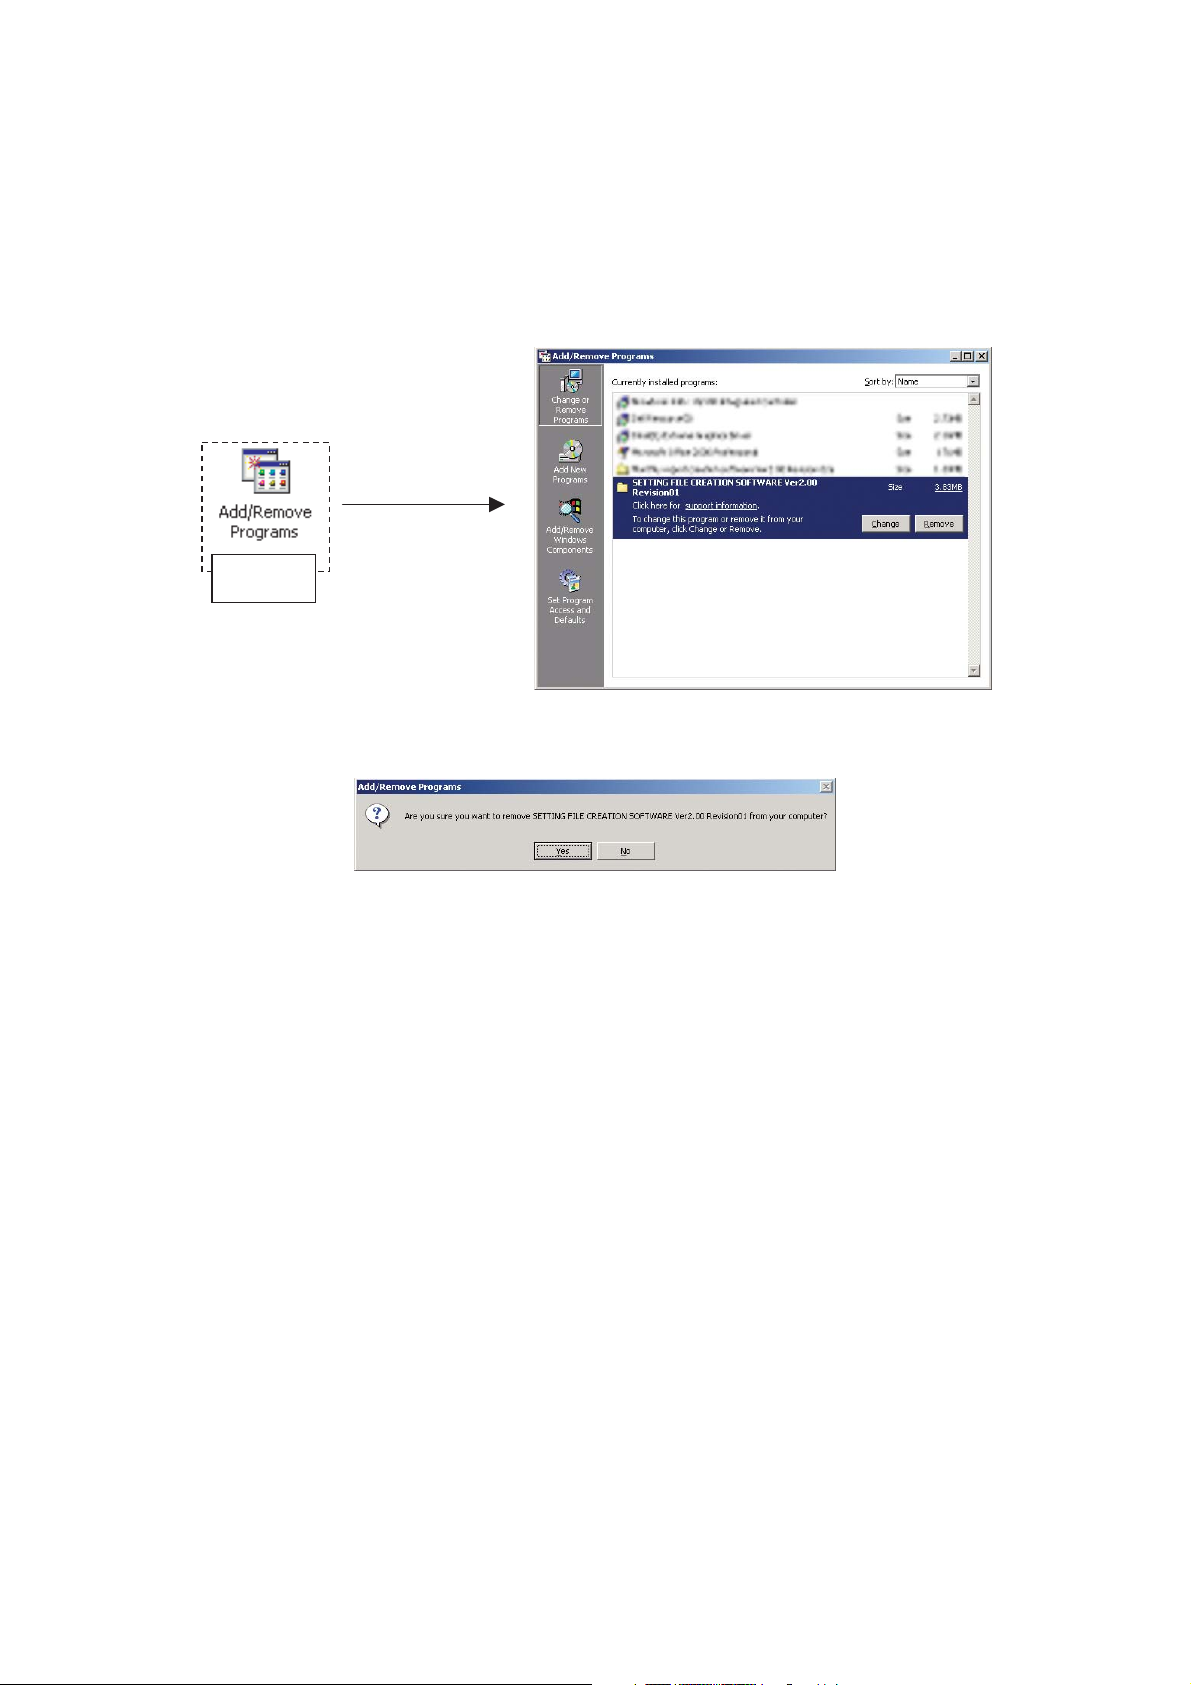
3-3 Uninstallation
When the software is running, close the software down completely.
Double-click the [Add/Remove Programs] icon in the Control Panel to open the “Add/Remove Programs”
dialog (Fig. 3-9). Choose “SETTING FILE CREATION SOFTWARE” and click [Remove]. The
Comfirmation dialog (Fig. 3-10) appears. Click [Yes] to start un-installing of the program. Upon completion,
the dialog disappears automatically.
Control
Panel
Fig. 3-9 “Add/Remove Programs” dialog
Fig. 3-10 Confirmation dialog
12
Page 13
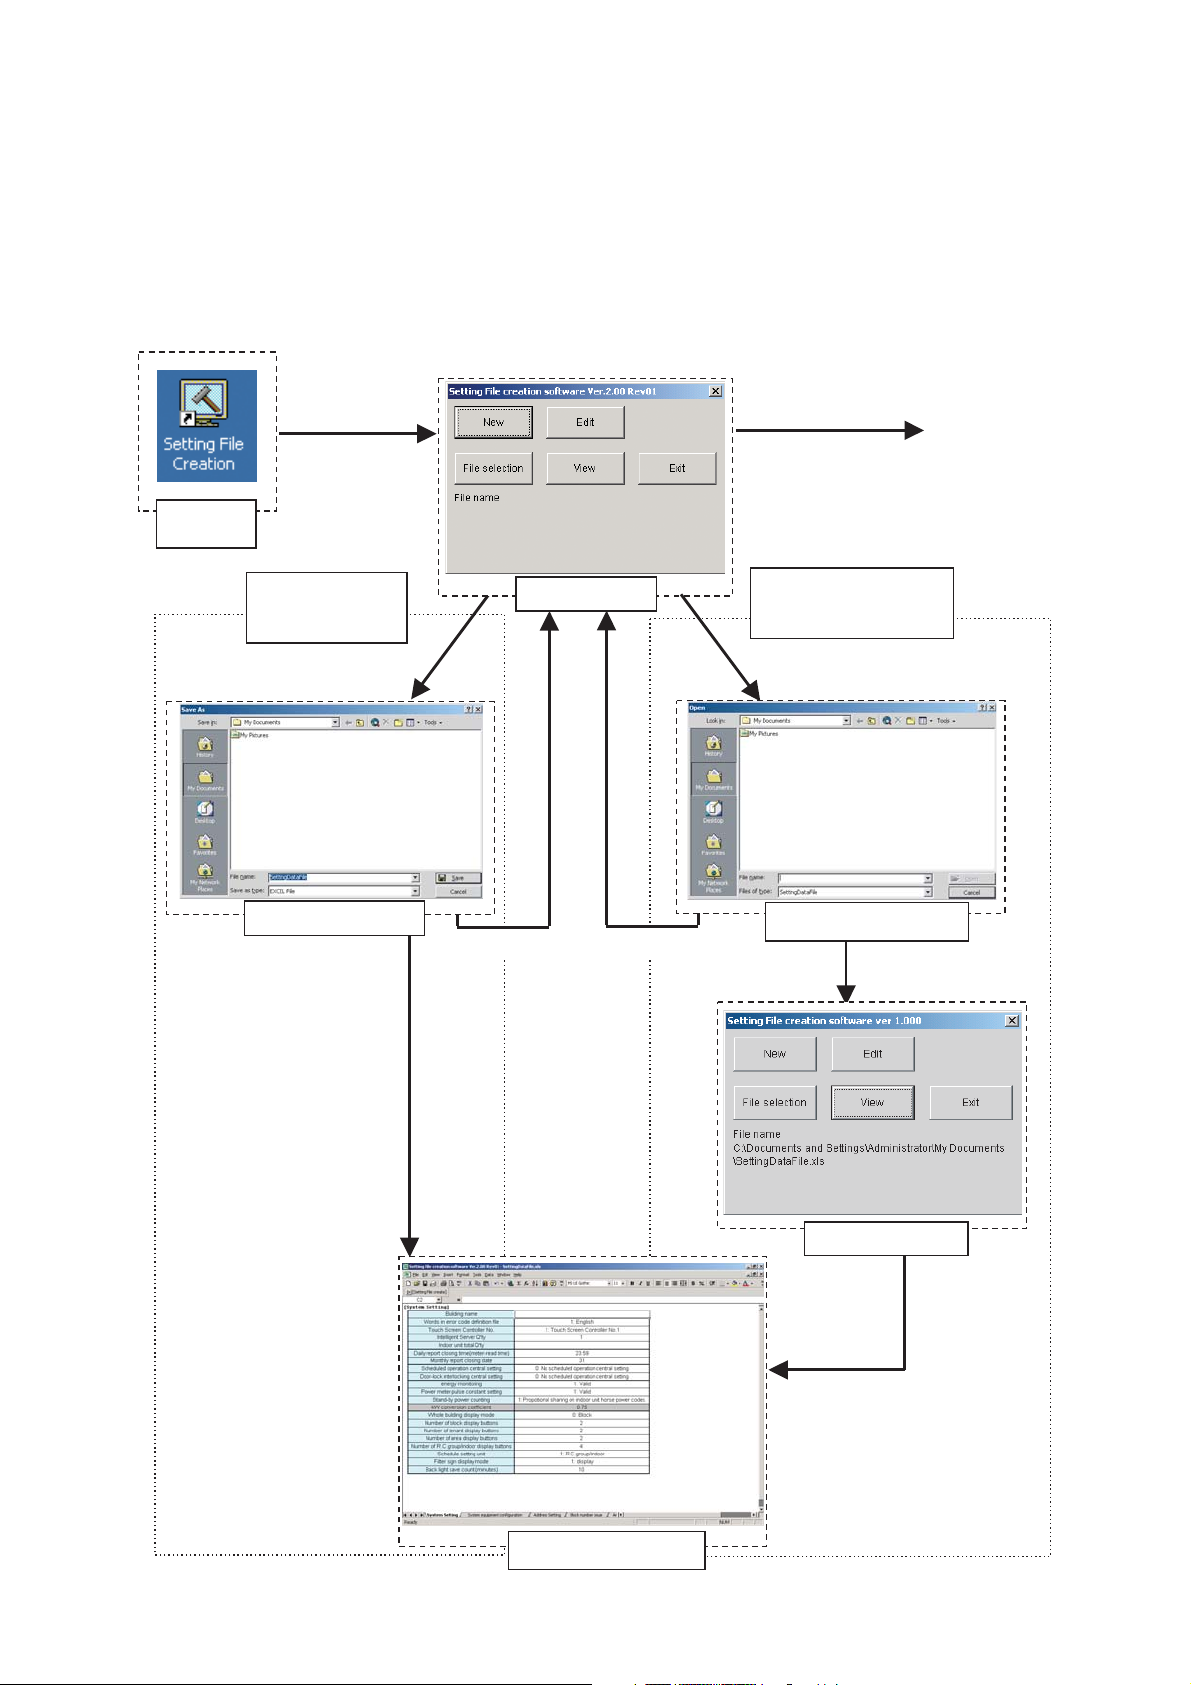
4. Operation
4-1 Transition of windows
The following shows the window transitions of the software. Details of this diagram are described in the
following.
Fig. 4-1 Transition of windows
Desktop
icon
Double-click
(startup)
Create a setting
file. See 5-1.
[New] button
“Save As” dialog
Main dialog
[Cancel] button [Cancel] button
[Exit] button
END
Edit a file to input
existing setting data.
See 5-2.
[File selection] button
File selection dialog
[Open] button
[Save] button
Main dialog
[Edit] or [View]
button
Data input window
13
Page 14
4-2 Startup and exiting
4-2-1 Starting the software program
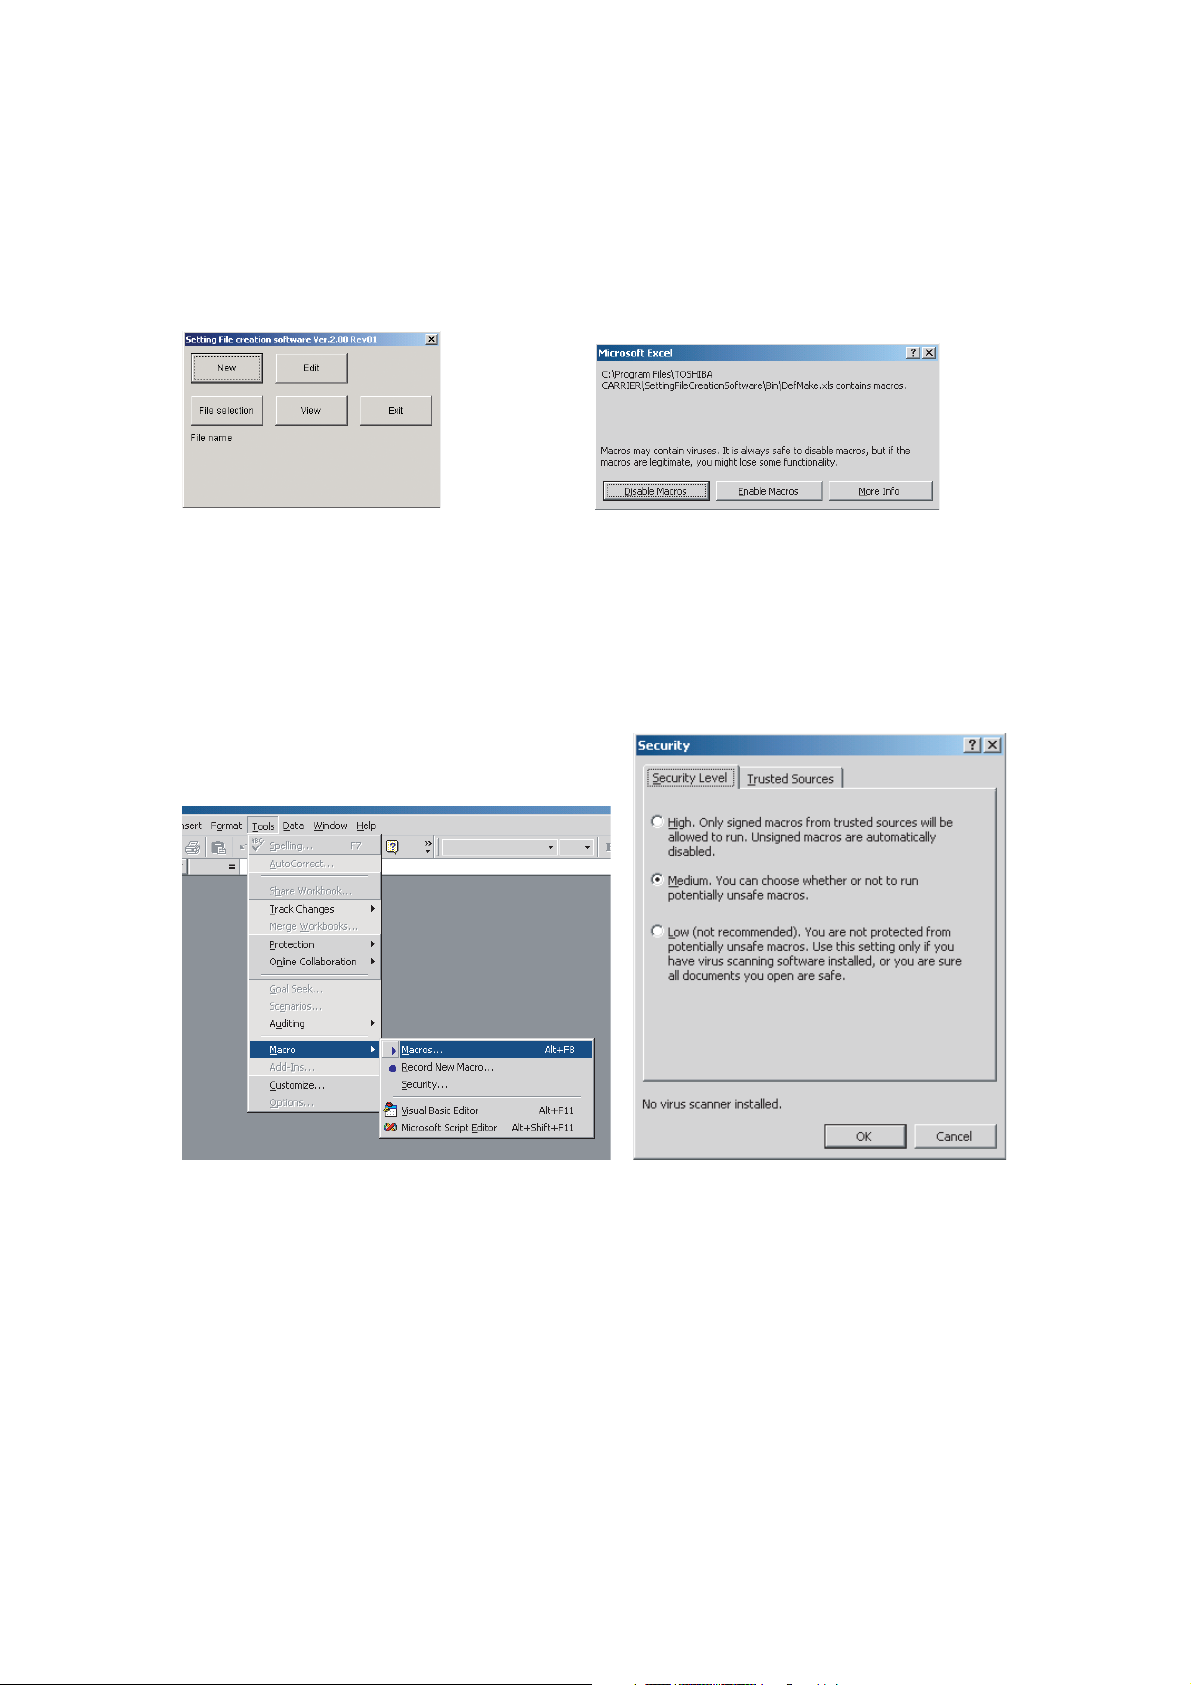
Double-click the [DEF Make Tool] icon on the desktop to start the software program. The main dialog (Fig.
4-2) appears. If the dialog of Fig. 4-3 appears, click [Enable Macros].
Fig. 4-2 Main dialog
If the dialog does not appear, click [Tools] - [Macro] - [Security...] from the Excel menu bar to open the
“Security” dialog. Choose “Medium” security level (Fig. 4-4). Then exit Excel and double-click the [DEF
Make Tool] icon on the desktop to restart the software.
Fig. 4-3 Macro enable/disable selection dialog
Fig. 4-4 “Security” dialog
4-2-2 Exiting the software program
To exit the software program with the main dialog open, click [Exit] on the main dialog or click [X] at the
upper right of the dialog.
When the data input window is open, click [X] at the upper right of the window or click [Files] - [Exit] on
the menu bar in the same way as exiting Excel.
14
Page 15
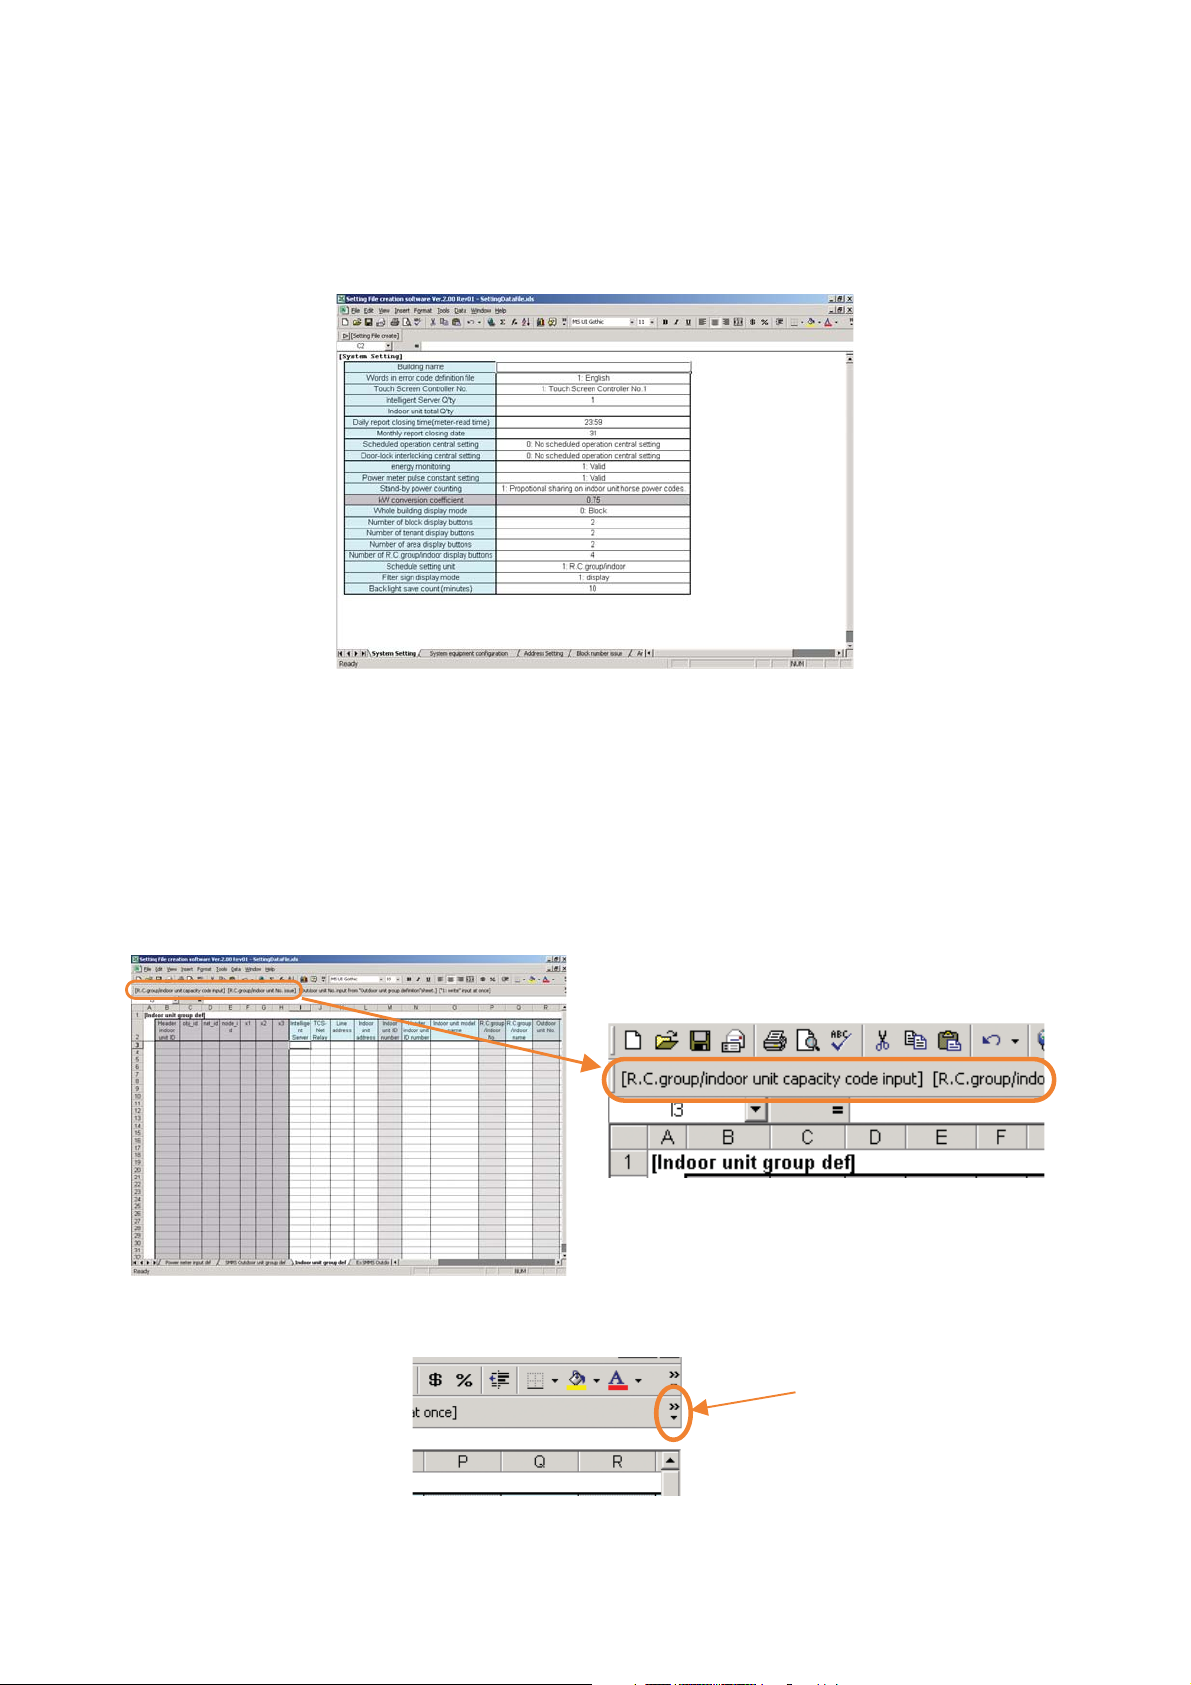
4-3 Data input window
Fig. 4-5 shows the setup data input window. Enter setup data in the blank area of the table on each sheet
in the same way as Excel data input. You do not need to input data into the grey coloured cells on the
table, data will be automatically generated within these cells.
Fig. 4-5 Setting data input window
Customized buttons are displayed on the Excel toolbar (Fig. 4-6). The customized toolbar is displayed on
each of the work sheets with their respective buttons. These buttons are assigned to the following:
number issue for setting files, data update, setting file creation, etc. Details of the buttons are described in
chapter 6. When the length of the button is insufficient, some buttons are hidden. In this case, click the
arrow at the right end of the toolbar to display the hidden buttons (Fig. 4-7).
Fig. 4-6 Buttons on the toolbar
Fig. 4-7 Display hidden buttons
15
Page 16

5. Setting File Creation Procedure
The Excel Workbook file for setup data input includes 14 sheets in total. Complete them in the following
order.
1 : “System Setting” sheet
2 : “System equipment configuration” sheet
3 : “Address Setting” sheet
4 : “Block number issue” sheet
5 : “Area number issue” sheet
6 : “Monthly report tenant name definition” sheet
7 : “Tenant number issue” sheet
8 : “Fire alarm input definition” sheet
9 : “Door-lock input definition” sheet
10 : “Emergency external output definition” sheet
11 : “Power meter input definition” sheet
12 : “S-MMS outdoor unit group definition” sheet
13 : “Indoor unit group definition” sheet
14 : “Outdoor unit group definition other than S-MMS” sheet
(Do not input data in the “R.C. group/indoor unit No. manage” sheet.)
Input data in the white cells of the table on each sheet.
16
Page 17

5-1 New file creation
5-1-1 Starting the program
Double-click the [DEF Make Tool] icon on the desktop, to start the program. The main dialog opens. Click
[New]. The “Save As” dialog opens. Specify the destination and the name of the Excel Workbook file for
entering setup data. Click [Save]. The specified Excel Workbook file opens and is ready for data entry.
5-1-2 Creating a new file
Input data in the following procedure.
Input data in the “System Setting” sheet.
Data must be entered for all items except “kW conversion coefficient” in the table.
For details of each item, refer to 6-1 in this manual.
* Notes on the “System Setting” sheet
• Setting numbers for the scheduled operation central setting items.
Scheduled operation ON/OFF patterns vary depending on the setting.
Setting
No central setting
Setting No. 1
Setting No. 2
Setting No. 3
OFF (10 minutes after)
OFF
OFF + [ON/OFF]
switching prohibition reset
OFF + [ON/OFF]
switching prohibition reset
OFF + [ON/OFF]
switching prohibition reset
OFF (within 10 minutes)
OFF
OFF + [ON/OFF]
switching prohibition reset
OFF + [ON/OFF]
switching prohibited
OFF + [ON/OFF]
switching prohibited
ON
ON
ON + [ON/OFF] switching
prohibition reset
[ON/OFF] switching
prohibition reset
ON + [ON/OFF] switching
prohibition reset
• Setting numbers for door-lock interlocking central setting items.
Interlocking operation patterns vary depending on the setting.
Setting
No central setting
Setting No. 1
Setting No. 2
Setting No. 3
Locking (OFF to ON)
OFF
OFF
OFF + [ON/OFF] switching prohibited
OFF
Unlocking (ON to OFF)
No action
[ON/OFF] switching prohibition reset
[ON/OFF] switching prohibition reset
No action
• When energy monitoring is not used, “Stand-by power counting” and “Power meter pulse constant
setting” are not entered.
Input data in the “System equipment configuration” sheet.
Specify the number of interfaces connected to each Intelligent Server.
Depending on the number input in “Intelligent Server Qty” on the “System Setting” sheet, areas allowing
data input will vary. Input the number of interfaces in the white cells on the table.
For details of each item, refer to 6-2 in this manual.
17
Page 18

Input data in the “Address Setting” sheet.
Input data in the white cells (“Device type” and “TCS-Net Relay Interface No.”).
Leave items “TCS-Net Relay Interface No.,” “Header indoor unit ID number,” “object_id,” “net_id,”
“node_id,” “x1,” “x2,” and “x3” in the Intelligent Server table at their lowest value, because this data is
entered automatically for these items in the following processes.
Input data in the “Block number issue” sheet.
Firstly input all the block names to be registered from the uppermost line of the “Block name”. Then
press
[Block number issue] and [“List display” input at once] to input data automatically into the “Block
No.” and “List display validity” columns.
* [List display validity] is used to select whether to display the block name on the line in the list
displayed, when “Block name” in the “Indoor unit group definition” sheet is selected.
Input data in the “Area number issue” sheet.
Firstly input all the area names to be registered from the uppermost line of “Area name”. Then press
[Area number issue] and [“List display” input at once] to input data automatically into the “Area No.” and
“List display validity” columns.
* [List display validity] is used to select whether to display the area name on the line in the list
displayed, when “Area name” in the “Indoor unit group definition” sheet is selected.
Input data in the “Monthly report tenant name definition” sheet.
Firstly input all the monthly report tenant names to be registered in “Monthly report tenant name”. Then
press
[Monthly report tenant number issue] and [“List display” input at once] to input data automatically
in the “Monthly report tenant No.” and “List display validity” columns.
Press
Register one or more monthly report tenants.
[“Tenant” input at once] as required to input “2: tenant” for “Summing up category” at a time.
Input data in the “Tenant number issue” sheet.
Firstly input all the tenant names to be registered in “Tenant name”. Then press
and [“List display” input at once] to input the data automatically in the “Tenant No.” and “List display
validity” columns.
Choose a monthly report tenant name corresponding to the tenant name on the line from the list for the
“Monthly report tenant name”. When the entered monthly report tenant name is registered in the
“Monthly report tenant number issue” sheet, the tenant number is automatically entered into the
“Monthly report tenant No.” column.
Input data in the “Fire alarm input definition” sheet when using a fire alarm interlocking function.
Input “Input device ID,” “Input channel,” and “Signal logic” on the line of fire alarm input number to be
used (usually from line 1) and select “1: write” for “Output to setting file” on the line.
* If no data is input in the “System Setting” sheet and “System equipment configuration” sheet, no list
is displayed when “Input device ID” is selected.
Input data in the “Door-lock input definition” sheet when using the door-lock interlocking function.
Input “Input device ID,” “Input channel” and “Signal logic” on the line of door-lock input number to be
used (usually from line 1), select “1: write” for “Write into setting file” on the line.
* If no data is input in the “System Setting” sheet and “System equipment configuration” sheet, no list
is displayed when the “Input device ID” is selected.
[Tenant number issue]
18
Page 19

Input data in the “Emergency external output definition” sheet when using the external emergency
output function.
Input “Output device ID” and “Output channel” on the line of an external emergency output number to
be used (usually line 1), and select “1: write” for “Write into setting file” on the line.
* If no data is input in the “System Setting” sheet and “System equipment configuration” sheet, no list
is displayed when the “Output device ID” is selected.
* Only external emergency output No. 1 is used usually.
Input data in the “Power meter input definition” sheet when using power meters.
Input “Input device ID,” “Input channel” and “Pulse constants (kWh/pulse)” on the line where a power
meter input number is to be used (usually from line 1) and select “1: write” for “Write into setting file” on
the line.
* When specifying pulse constants by the Monthly Report Creation Software, set “Pulse constants
(kWh/pulse)” in the “System Setting” sheet to “N/A”. In such case, the “Pulse constants (kWh/pulse)”
item is not available.
Input data in the “S-MMS outdoor unit group definition” sheet.
Input data for the white cells in the table (“Intelligent Server No.,” “TCS-Net Relay Interface No.,” “Line
address,” “Outdoor unit model name” and “Outdoor unit No.” from the uppermost line for all outdoor
units.
If a model name you want to input is not included in the model list displayed when entering data in the
“Outdoor unit model name” column, the model name must be registered in the equipment model table
(see 7-1). However, this is not necessary when energy monitoring is not used. In such case, a similar
model name can be entered.
No data input in this sheet is required for the outdoor units of Digital Inverter/Super Digital Inverter
equipment.
*
When using an outdoor unit of outdoor set model, input the line of the header outdoor unit of the
model (input an outdoor set model for “Outdoor model name” and “1” for “Outdoor unit No.”), and then
press [Outdoor follower unit insert]. Lines of outdoor follower units of the outdoor set model are
inserted automatically.
Press
automatically in the “Outdoor unit No.” and “Write into setting file” columns.
Choose the name of the power meter input corresponding to the outdoor unit on the line from the list for
“Power meter input name”. Also enter the name of the power meter input corresponding to the follower
outdoor unit on the line of follower outdoor unit. (Set the power meter input name for each outdoor unit.)
When you do not assign the power meter input, select “No setting”.
Leave “Header outdoor unit ID number” and “object_id” because these items are completed
automatically in the following process.
* When the system is configured with Digital Inverter/Super Digital Inverter equipment only, this sheet
* “Write into setting file” is used to specify whether to output the outdoor unit data on the line to
[Outdoor unit number issue] and [Input at once “Write into setting file”] buttons to input data
requires no data input.
“OUT_GROUP.DEF” or “listOfApparatus*.txt” file. Select “1: write” usually.
Input data in the “Indoor unit group definition” sheet.
Press [Indoor unit ID number issue] first to input data automatically into the “Indoor unit ID number”
column.
Then input data into the white cells for the table from the uppermost line for all indoor units. For “Header
indoor unit ID number,” input “0” when the indoor unit on the line is a header or an individual unit or input
the header indoor unit ID number when the indoor unit is a follower unit.
If a model you want to input is not included in the model list displayed when entering data in the
“Indoor unit model name” column, the model name must be registered in the equipment model table
(see 7-1). However, this is not necessary when energy monitoring is not used. In such case, a similar
model name can be entered. (Be careful with MMS and Digital Inverter/Super Digital Inverter
equipment.)
19
Page 20

Press
indoor number issue]
number,” “Write into setting file” and “R.C. group/indoor No.” columns.
Press
“Indoor unit capacity code” to “Power consumption through HA control interface” columns. For general
purpose interfaces, input data directly into “Power consumption through HA control interface”.
Press [R.C.group/indoor unit capacity code input] button to input the data automatically into the “Indoor
unit capacity code” columns.
Press
automatically into the “Outdoor unit No.” column.
* For Digital Inverter/Super Digital Inverter equipment, input a set model name for “Indoor unit model
* “Write into setting file” is used to specify whether to output the indoor unit data on the line of
* “R.C. group/indoor name,” “Tenant name,” “Area name,” “Block name,” “Door-lock input name,” “Fire
Input data in the “Outdoor unit group definition other than S-MMS” sheet.
(When using Digital Inverter/Super Digital Inverter units with energy monitoring)
Data must be entered in this sheet when using Digital Inverter/Super Digital Inverter units or general
purpose interface while using energy monitoring. If energy monitoring is not used, this sheet is not
used irrespective whether it is completed or left blank. Even when energy monitoring is used, this
sheet is not used either if no Digital Inverter/Super Digital Inverter unit is used.
Click [New] first. Outdoor units corresponding to all Digital Inverter/Super Digital Inverter units
registered in the “Indoor unit group definition” sheet are entered in each line in the table. Enter the
power meter input name corresponding to each outdoor unit in the “Power meter input name” column.
When you do not assign a power meter input, select “No setting”. When assigning power meter input to
multiple outdoor units in a Digital Inverter/Super Digital Inverter system, make the cell in the line of the
outdoor unit in the system active and click [Insert]. Then a line of the second outdoor unit of the system
is added to the table. Repeat this operation to register three or more outdoor units in the system.
[Input at once “Write into setting file”], [Header indoor unit “object_id” number] and [R.C. group/
buttons to input data automatically into the “object_id,” “Header indoor unit ID
[R.C. group/indoor unit capacity code input] button (see 7-1) to input the data automatically in the
[Outdoor unit No. input from “Outdoor unit group definition” sheet] button to input data
name”. (Data of outdoor unit or follower indoor units is not required.)
“OUT_GROUP.DEF” or “listOfApparatus*.txt” file. Select “1: write” usually.
alarm input name” and “Power meter input name” in the follower indoor unit line are not used.
However, if these items are left blank, no setting file can be created. Input the same data as header
indoor unit.
20
Page 21

Create a setting file.
Open the ”System Setting“ sheet and press
button, see 7-2.) Upon completion of the data checking, the following dialog appears.
Fig. 5-1 ”Data checking completed“ dialog
Click [OK] on the dialog. The folder selection dialog appears. Choose a setting file output folder and
click [OK]. The file type setting dialog appears. Specify a character code and signal logic on the dialog.
In principle, select “Signal logic N/A” when a Digital I/O Relay Interface is not used.
[Setting File create]. (For details of the [Setting File create]
Fig. 5-2 “File type setting” dialog
Click [OK] on the dialog. The selected setting file is created in the specified folder.
Save Excel Workbook files for data input in the same way as normal Excel Workbook files.
Excel Workbook files for data input can be saved at any time.
Exit the program.
Click the [X] button at the upper right of the window to close the window.
The software program can be exited at any time.
21
Page 22

5-2 Setting file update
5-2-1 Starting the program
Double-click the [DEF Make Tool] icon on the desktop to start the program. The main dialog opens. Press
[File selection]. The “File open” dialog opens. Select the Excel Workbook file for data input which was
saved previously and press [Open] to reopen the main dialog. Confirm that the selected file name is
displayed under “File name” and then click [Edit]. The selected Excel Workbook file is displayed and the
program enters the data entry standby state.
5-2-2 Updating data
The following describes notes on updating data.
“System Setting” sheet.
• When “Intelligent Server Qty” data is updated.
Check the data in the “System equipment configuration” sheet first and then data in the “Address
Setting” sheet.
• When “I/O kit Qty” or “Energy Monitoring Relay Interface Qty” data is updated.
Check data input in the “Address Setting” sheet.
• When “Stand-by power counting” data is updated.
Press
“Indoor unit capacity code” and other necessary items.
[R.C. group/indoor unit capacity code input] in the “Indoor unit group definition” sheet to update
“System equipment configuration” sheet.
• When interface quantity is updated.
Check the data in the “Address Setting” sheet.
“Address Setting” sheet.
• When “TCS-Net Relay Interface No.” is updated in the Intelligent Server table at the bottom.
Press
“object_id” and “Header indoor unit ID number”.
• No item needs to be updated when these items are updated.
“Block number issue” sheet.
• To add a block.
Input a block name you want to add to the blank line* of “Block name”.
Then press
display” for “List display validity”. * A line can be inserted by clicking [Insert] - [Line] on the menu bar.
• To delete a block.
Choose a cell in the line you want to delete and click [Edit] - [Delete] on the menu bar. Select “All
lines” on the dialog displayed and click [OK].
• When “Block name” is updated.
“Block name” in the “Indoor unit group definition” sheet can be easily updated by pressing
[Equipment setting sheet block name update]. Further, [Block No.] in the same sheet can be updated
with the [Equipment setting sheet block number update] button.
[Header indoor unit “object_id” number] in the “Indoor unit group definition” sheet to update
[Block number issue] to input data automatically in the “Block No.” column. Choose “1:
• To re-issue “Block No.”
Delete all data in “Block No.” and then press [Block number issue] to issue a block number.
22
Page 23

“Area number issue” sheet.
Same as “Block number issue” sheet.
“Monthly report tenant name definition” sheet.
Same as “Block number issue” sheet.
Press
name update in tenant number issue sheet]
report tenant name” in the “Tenant number issue” sheet.
“Tenant number issue” sheet.
Same as “Block number issue” sheet.
“Fire alarm input definition” sheet.
• To increase input.
• To decrease input. (to invalidate currently valid input)
• When “Fire alarm input name” is updated.
[Monthly report tenant number update in tenant number issue sheet] and [Monthly report tenant
buttons to update “Monthly report tenant No.” or “Monthly
Input the necessary data such as input device ID in the line where fire alarm input number you want
to set is displayed and select “1: write” for “Write into setting file” on the line.
Select “2: no write” for “Write into setting file” in the line where fire alarm input number you want to
invalidate is displayed.
Press
name” in the “Indoor unit group definition” sheet. When the button is pressed, “Fire alarm input No.” in
the same sheet is also updated.
[Indoor unit-equipment sheet update by fire alarm input No.] button to update “Fire alarm input
“Door-lock input definition” sheet.
Same as a “Fire alarm input definition” sheet.
“Emergency external output definition” sheet.
• To increase output.
Input necessary data such as output device ID on the line of the target output number and then
select “1: write” for “Write into setting file”.
• To decrease output.
Select “2: no write” for “Write into setting file” in the line where the external emergency output number
you want to invalidate is displayed.
“Power meter input definition” sheet.
Same as “Fire alarm input definition” sheet.
23
Page 24

“S-MMS outdoor unit group definition” sheet.
• When “Intelligent Server No.,” “TCS-Net Relay Interface No.,” “Line address,” or “Outdoor unit model
name” is updated.
Press
definition” sheet]
[R.C. group/indoor unit capacity code input], [Outdoor unit No. input from “Outdoor unit group
and [Header indoor unit “object_id” number] buttons in the “Indoor unit group
definition” sheet to update the data.
• To add a outdoor unit.
Input data in the white cell on the blank line*. Press
automatically in the “Outdoor unit No.” column and then press
input]
, [Outdoor unit No. input from “Outdoor unit group definition” sheet] and [Header indoor unit
“object_id” number]
buttons on the “Indoor unit group definition” sheet to update data.
* A line can be inserted by clicking [Insert] - [Line] on the menu bar.
[Outdoor unit number issue] to input data
[R.C. group/indoor unit capacity code
• To delete a outdoor unit.
Choose a cell on the line where the outdoor unit is that you want to delete and click [Edit] - [Delete]
on the menu bar. Select “All lines” on the dialog displayed and click [OK]. The line is deleted. Next
press
[R.C. group/indoor unit capacity code input] in the “Indoor unit group definition” sheet to update
“Indoor unit capacity code” to “Model”.
“Indoor unit group definition” sheet.
• To add a indoor unit.
Update “Indoor unit total Qty” in the “System Setting” sheet first. Then input data in the white cells
except for “Header indoor unit ID number” on the blank line* on the “Indoor unit group definition” sheet
and press
“Header indoor unit ID number” column and press
data automatically in the “object_id” and “Header indoor unit ID number” columns. Then press
group/indoor unit capacity code input]
[Indoor unit ID number issue] to input indoor unit ID number automatically. Input data in the
[Header indoor unit “object_id” number] to input
[R.C.
to input data automatically in the “Indoor unit capacity code” to
“Power consumption through HA control interface” columns. For general purpose interfaces, input
data directly in “Power consumption through HA control interface”. Then press
capacity code input]
Press
[Outdoor unit No. input from “Outdoor unit group definition” sheet] to input data automatically in
to input data automatically in the “Indoor unit capacity code” column, etc.
[R.C.group/indoor unit
the “Outdoor unit No.” column.
* A line can be inserted by clicking [Insert] - [Line] on the menu bar.
• To delete a indoor unit.
Update “Indoor unit total Qty” in the “System Setting” sheet. Then select a cell in the line with an
indoor unit you want to delete in the “Indoor unit group definition” sheet and click [Edit] - [Delete] on
the menu bar. Select [All lines] on the dialog displayed and click [OK] to delete the indoor unit.
• When “Indoor unit model name” is updated.
Press
[R.C. group/indoor unit capacity code input] to input data automatically in the “Indoor unit
capacity code” to “Power consumption through HA control interface” columns. For general purpose
interfaces, input data directly in “Power consumption through HA control interface”. Press
[R.C.group/indoor unit capacity code input] to input data automatically in the “Indoor unit capacity
code” column, etc.
Then press
[Outdoor unit No. input from “Outdoor unit group definition” sheet] to input data
automatically in the “Outdoor unit No.” column.
24
Page 25

• When the “Intelligent Server No.,” “TCS-Net Relay Interface No.,” “Line address,” “Indoor unit
address,” or “Header indoor unit ID number” is updated
Press
indoor unit “object_id” number]
ID number” columns. Then press
automatically in the “Indoor unit capacity code” to “Power consumption through HA control interface”
columns. For general purpose interfaces, input data directly in “Power consumption through HA
control interface”. Press
“Indoor unit capacity code” column, etc.
Then press
automatically in the “Outdoor unit No.” column.
* Once “R.C. group/indoor No.” is issued, an issue log is recorded in the “R.C. group/indoor unit No.
[R.C. group/indoor number issue] to re-issue R.C. group/indoor No.* Then press [Header
to input data automatically in the “object_id” and “Header indoor unit
[R.C. group/indoor unit capacity code input] to input data
[R.C.group/indoor unit capacity code input] to input data automatically in the
[Outdoor unit No. input from “Outdoor unit group definition” sheet] to input data
manage” sheet and so a number that was previously issued can no longer be issued unless the
issue log is cleared. To clear the log and re-issue R.C. group/indoor No. from the beginning, clear all
the data in “R.C. group/indoor No.” and “R.C. group/indoor unit No. manage” sheet and then re-issue
R.C. group/indoor No. If the
indoor No. issued already, the “Do you re-issue” dialog appears. Click [Yes] to re-issue R.C. group/
indoor No.
When a Digital Inverter/Super Digital Inverter unit is added or removed, the “Outdoor unit group
definition other than S-MMS” sheet must be updated. Click [New] on the sheet to update the table.
When a Digital Inverter/Super Digital Inverter unit is added, a line of the corresponding outdoor unit
is created. Perform setting on the line for power meter input.
[R.C. group/indoor number issue] button is pressed with R.C. group/
• When “R.C. group/indoor name,” “Tenant name,” “Area name,” “Block name,” “Door-lock input name,”
“Fire alarm input name,” or “Power meter input name” is updated, no item must be updated.
“Outdoor unit group definition other than S-MMS” sheet
No item need to be updated when these items are updated.
25
Page 26

6.
Window Descriptions and Buttons on Each Sheet
6-1 “System Setting” sheet
This sheet is used to input general system information such as building name and window display.
6-1-1 Window Image
6-1-2 Window Description
(1) Building name
Input a building name.
The name set here is also displayed in the “Building name” column on the Touch Screen Controller
screen.
(2) Word in error code definition file Choose “0: Japanese,” “1: English2” or “2: Chinese (Simplified)” for the
ERROR_CODE.DEF language output.
(3) Touch Screen Controller No.
Specify this when using two or more Touch Screen Controllers on a network. When only one
Controller is used, leave this item as the default setting (1: Touch Screen Controller No.1).
(4) Intelligent Server Qty
Specify the number of Intelligent Servers to be used.
(5) Indoor unit total Qty
Specify the number of indoor units to be controlled.
For Digital Inverter/Super digital Inverter equipment, twin, triple and group control system is counted
as one unit.
(6) Daily report closing time (meter-read time)
Specify daily report closing time in the “hh:mm” format.
Default: 23:59
26
Page 27

(7) Monthly report closing date
Specify monthly report closing date.
(8) Scheduled operation central setting
Specify an operation mode for scheduled operation.
The following 4 patterns can be selected.
Setting
No central setting
Setting No. 1
Setting No. 2
Setting No. 3
OFF (10 minutes after)
OFF
OFF + [ON/OFF]
switching prohibition reset
OFF + [ON/OFF]
switching prohibition reset
OFF + [ON/OFF]
switching prohibition reset
(9) Door-lock interlocking central setting
Specify a door-lock interlocking operation.
The following 4 patterns can be selected.
OFF (within 10 minutes)
OFF
OFF + [ON/OFF]
switching prohibition reset
OFF + [ON/OFF]
switching prohibited
OFF + [ON/OFF]
switching prohibited
ON
ON
ON + [ON/OFF]
switching prohibition reset
[ON/OFF] switching
prohibition reset
ON + [ON/OFF]
switching prohibition reset
Setting
No central setting
Setting No. 1
Setting No. 2
Setting No. 3
Locking (OFF to ON)
OFF
OFF
OFF + [ON/OFF] switching prohibited
OFF
Unlocking (ON to OFF)
No action
[ON/OFF] switching prohibition reset
[ON/OFF] switching prohibition reset
No action
(10) Energy monitoring
Choose “1: Valid” or “0: Void” for whether to use energy monitoring.
(11) Power meter pulse constant setting
Choose “1: Valid” or “0: Void” for whether to input power meter pulse constant in “WHM_CH.DEF”.
Set “0: Void” usually.
(12) Stand-by power counting
Specify “Outdoor refrigerant system heater capacity kW” calculation method in the “Indoor unit group
definition” sheet.
The following 3 methods can be selected.
1:
Proportional sharing on indoor unit horse power codes: Calculated using the proportional sharing method.
2: Equal sharing on indoor units Qty : Calculated using the equal sharing method.
0: N/A : Stand-by power counting is always 0.
(13) kW conversion coefficient (
input prohibited)
This coefficient is used when calculating outdoor refrigerant system heater capacity kW of indoor unit
sw using the proportional sharing on indoor unit horse power codes. Do not change this value as it is
fixed to 0.75.
27
Page 28

(14) Whole building display mode
Specify a display unit when [Whole building] button is pressed.
Choose “0: block,” “1: tenant,” “2: area,” or “3: R.C. group/indoor”.
(15) Number of block display buttons
Specify the number of horizontal buttons in the block display mode.
(16) Number of tenant display buttons
Specify the number of horizontal buttons in the tenant display mode.
(17) Number of area display buttons
Specify the number of horizontal buttons in the area display mode.
(18) Number of R.C. group/indoor display buttons
Specify the number of horizontal buttons in the R.C. group/indoor display mode.
(19) Schedule setting unit
Choose “1: R.C. group/indoor” or “0: area unit” for schedule setting unit.
(20) Filter sign display mode
Choose “1: display” or “0: not display” for filter sign display mode.
(21) Backlight save count (minutes)
Set backlight save count on the Touch Screen Controller screen in units of minute.
6-1-3 Buttons
[Setting File create]
Used to output setting files.
Press this button after entering all data on every sheet to execute the creation of a setting file.
28
Page 29

6-2 “System equipment configuration” sheet
This sheet is used to specify the number of the following interfaces connected to each Intelligent Server.
Input correct number of interfaces beforehand in the “System Setting” sheet as the system equipment
configuration table is automatically created based on the “Intelligent Server Qty” data in the “System
Setting” sheet.
6-2-1 Window Image
6-2-2 Window Description
(1) TCS-Net Relay Interface Qty (for use in Japan and overseas)
Specify the number of TCS-Net Relay Interfaces connected to each Intelligent Server.
(2) Digital I/O Relay Interface Qty (for overseas use)
Specify the number of Digital I/O Relay Interfaces connected to each Intelligent Server.
(3) Energy Monitoring Relay Interface Qty (for overseas use)
Specify the number of Energy Monitoring Relay Interfaces connected to each Intelligent Server.
6-2-3 Buttons
No buttons are provided on this sheet.
29
Page 30

6-3 “Address Setting” sheet
This sheet is used to specify the interface number of each device to be connected.
Input correct data beforehand in the “System Setting” and “System equipment configuration” sheets as
the address setting table is automatically created based on the data entered in these sheets.
6-3-1 Window Image
6-3-2 Window Description
• The uppermost table
(1) Equipment category (
Equipment names are listed. Do not input data directly in this column.
(2) Unit number (
Equipment numbers are listed. Do not input data directly in this column.
(3) IP address (
Equipment IP addresses are listed. Do not input data directly in this column.
• I/O kit table (for use in Japan)
(Displayed when a number more than 0 is set for “I/O kit Qty” in the “System Setting” sheet.)
(1) Equipment category (
“I/O kit” is displayed. Do not update this column directly.
(2) Unit number (
I/O kit numbers are listed. Do not update this column directly.
(3) Device type
Specify I/O kit type (8ch or 16ch).
Though this setting is not used, no setting file can be output if this item is left blank.
input prohibited)
input prohibited)
input prohibited)
input prohibited)
input prohibited)
30
Page 31

• Energy Monitoring Relay Interface table (for use in Japan)
(Displayed when a number more than 0 is set for “Energy Monitoring Relay Interface Qty” in the
“System Setting” sheet.)
(1) Equipment category (
“Energy Monitoring Relay Interface” is displayed. Do not update this column directly
(2) Unit number (
Energy Monitoring Relay Interface unit numbers are listed. Do not update this column directly.
(3) TCS-Net Relay Interface No.
Specify an Energy Monitoring Relay Interface number.
Though this setting is not used, no setting file can be output if this item is left blank.
• Intelligent Server Interface table (lowest)
(1) Intelligent Server No. (
Intelligent Server numbers are listed. Do not update this column directly.
(2) IP address (
IP addresses assigned to respective Intelligent Servers in each line are listed.
Do not update this column directly.
(3) Equipment category (
Interface names connected to respective Intelligent Servers in each line are listed.
(4) Unit number (
Interface unit numbers in each line are listed.
Do not update this column directly.
(5) TCS-Net Relay Interface No.
Specify an interface number connected to each Intelligent Server.
When an interface number is updated, press [Header indoor unit “object_id” number] on the “Indoor
unit group definition” sheet to update data of items (6) to (12).
input prohibited)
input prohibited)
input prohibited)
input prohibited)
input prohibited)
input prohibited)
(6) Header indoor unit ID number (
Hexadecimal data to be described in the setting files is displayed.
Do not input data here directly because the appropriate values are input automatically by pressing
[Header indoor unit “object_id” number] in the “Indoor unit group definition” sheet.
(7) object_id (
Hexadecimal data to be described in the setting files is displayed.
Do not input data here directly because the appropriate values are input automatically by pressing
[Header indoor unit “object_id” number] in the “Indoor unit group definition” sheet.
(8) net_id (
Hexadecimal data to be described in the setting files is displayed.
Do not input data here directly because the appropriate values are input automatically by pressing
[Header indoor unit “object_id” number] in the “Indoor unit group definition” sheet.
(9) node_id (
Hexadecimal data to be described in the setting files is displayed.
Do not input data here directly because the appropriate values are input automatically by pressing
[Header indoor unit “object_id” number] in the “Indoor unit group definition” sheet.
(10) x1 (
Hexadecimal data to be described in the setting files is displayed.
Do not input data here directly because the appropriate values are input automatically by pressing
[Header indoor unit “object_id” number] in the “Indoor unit group definition” sheet.
input prohibited)
input prohibited)
input prohibited)
input prohibited)
input prohibited)
31
Page 32

(11) x2 (
input prohibited)
Hexadecimal data to be described in the setting files is displayed.
Do not input data here directly because the appropriate values are input automatically by pressing
[Header indoor unit “object_id” number] in the “Indoor unit group definition” sheet.
(12) x3 (
input prohibited)
Hexadecimal data to be described in the setting files is displayed.
Do not input data here directly because the appropriate values are input automatically by pressing
[Header indoor unit “object_id” number] in the “Indoor unit group definition” sheet.
6-3-3 Buttons
No buttons are provided on this sheet.
32
Page 33

6-4 “Block number issue” sheet
This sheet is used to register block names. Ensure one or more blocks are registered.
6-4-1 Window Image
6-4-2 Window Description
(1) Block No.
A unique number is assigned to each block name. Block numbers can be issued by pressing [Block
number issue] button.
(2) Block name
Input a block name to be displayed on the Touch Screen Controller screen.
(3) List display validity
Specify whether to display the block name on this line when entering data in the “Block name” column
in the “Indoor unit group definition” sheet.
6-4-3 Buttons
[Block number issue]
Used to issue block numbers to the “Block No.” column sequentially beginning with 1.
[Equipment setting sheet block number update]
Used to update “Block No.” by finding a block number based on the “Block name” data in the “Indoor
unit group definition” sheet.
[Equipment setting sheet block name update]
Used to update “Block name” by finding a block name based on the “Block No.” data in the “Indoor unit
group definition” sheet.
33
Page 34

[“List display” input at once]
Used to set “1: display” for “List display validity” in all lines with a block name.
[Delete duplicated block name]
Used to delete the line of duplication if any block name is duplicated.
[Sort block name]
Used to sort “Block name” from the top.
34
Page 35

6-5 “Area number issue” sheet
This sheet is used to register area names. Ensure one or more area names are registered.
6-5-1 Window Image
6-5-2 Window Description
(1) Area No.
A unique number assigned to each area name. Area numbers can be issued by pressing [Area
number issue] button.
(2) Area name
Input an area name to be displayed on the Touch Screen Controller screen.
(3) List display validity
Specify whether to display the area name on this line when entering data in the “Area name” column
in the “Indoor unit group definition” sheet.
6-5-3 Buttons
[Area number issue]
Used to issue area numbers to the “Area No.” column sequentially beginning with 1.
[Equipment setting sheet area number update]
Used to update ”Area No.” by finding an area number based on the “Area name” data in the “Indoor unit
group definition” sheet.
[Equipment setting sheet area name update]
Used to update “Area name” by finding an area name based on the “Area No.” data in the “Indoor unit
group definition” sheet.
35
Page 36

[“List display” input at once]
Used to set “1: display” for “List display validity” in all lines with an area name.
[Delete duplicated area name]
Used to delete the line of duplication if any area name is duplicated.
[Sort area name]
Used to sort “Area name” from the top.
36
Page 37

6-6 “Monthly report tenant name definition” sheet
This sheet is used to register monthly report tenant names.
Be sure to register one or more monthly report tenants. This setting is only used when a monthly report is
created.
6-6-1 Window Image
6-6-2 Window Description
(1) Monthly report tenant number
A unique number assigned to each monthly report tenant name. Monthly report tenant numbers can
be issued by pressing [Monthly report tenant number issue] button.
(2) Monthly report tenant name
Input a tenant name to be used for the monthly report.
(3) Summing up category
Specify a section to be displayed when a monthly report is created.
Choose “0: N/A,” “1: Common use area” or “2: Tenant”.
Choose “2: Tenant” usually.
(4) List display validity
Specify whether to display the monthly report tenant name on this line when entering data in the
“Monthly report tenant name” column in the “Tenant number issue” sheet.
37
Page 38

6-6-3 Buttons
[Monthly report tenant number issue]
Used to issue tenant numbers to the “Monthly report tenant No.” column sequentially beginning with 1.
[Monthly report tenant number update in tenant number issue sheet]
Used to update “Monthly report tenant No.” by finding a monthly report tenant number based on the
“Monthly report tenant name” data on the “Tenant number issue” sheet.
[Monthly report tenant name update in tenant number issue sheet]
Used to update “Monthly report tenant name” by finding a monthly report tenant name based on the
“Monthly report tenant No.” data on the “Tenant number issue” sheet.
[“List display” input at once]
Used to set “1: display” for “List display validity” on all lines with a monthly report tenant name.
[Delete duplicate monthly report tenant name]
Used to delete the duplicated line, if any monthly report tenant names are duplicated.
[Sort monthly report tenant name]
Used to sort “Monthly report tenant name”.
38
Page 39

6-7 “Tenant number issue” sheet
This sheet is used to register tenant names. Be sure to register one or more tenants.
6-7-1 Window Image
6-7-2 Window Description
(1) Tenant No.
A unique number assigned to each tenant name. Tenant numbers can be issued by pressing [Tenant
number issue] button.
(2) Tenant name
Input a tenant name to be displayed on the Touch Screen Controller screen.
(3) Monthly report tenant name
Input a monthly report tenant name corresponding to the tenant on the line.
(4) Monthly report tenant number (
Monthly report tenant numbers corresponding to respective monthly report tenant name on each line
are displayed. You need not input data in this column because data is automatically input by finding a
tenant number from the “Monthly report tenant name definition” sheet when a monthly report tenant
name is entered.
(5) List display validity
Specify whether to display the tenant name on this line when entering data in the “Tenant name”
column on the “Indoor unit group definition” sheet.
input prohibited)
39
Page 40

6-7-3 Buttons
[Tenant number issue]
Used to issue tenant numbers to the “Tenant No.” column sequentially beginning with 1.
[Equipment setting sheet tenant number update]
Used to update “Tenant No.” by finding a tenant number based on the “Tenant name” data in the “Indoor
unit group definition” sheet.
[Equipment setting sheet tenant name update]
Used to update “Tenant name” by finding a tenant name based on the “Tenant No.” data in the “Indoor
unit group definition” sheet.
[“List display” input at once]
Used to set “1: display” for “List display validity” on all lines with a tenant name.
[Delete duplicated tenant name]
Used to delete the line of duplication, if any tenant name is duplicated.
[Sort tenant name]
Used to sort “Tenant name” from the top.
40
Page 41

6-8 “Fire alarm input definition” sheet
This sheet is used to set I/O interfaces and input channels used for fire alarm inputs when using the fire
alarm interlocking function.
No setting is required when fire alarm interlocking is not used.
6-8-1 Window Image
6-8-2 Window Description
(1) Fire alarm input name
Input another name for a fire alarm input number.
This name is used on the “Indoor unit group definition” sheet.
(2) Fire alarm input No. (
Fire alarm input numbers are displayed in this column. Do not update these numbers.
(3) Input device ID
Specify a device ID corresponding to the fire alarm input number on the line.
Items that can be selected in the list vary depending on the settings of the “System Setting” and
“System equipment configuration” sheets.
(4) Input channel
Specify a device input channel corresponding to the fire alarm input number on the line.
(5) Signal logic
Specify whether to stop operation of equipment when a fire alarm input turns ON (positive logic) or
when it turns OFF (negative logic).
(6) Output to a setting file
Specify whether to output data on the line to a setting file.
input prohibited)
41
Page 42

6-8-3 Buttons
[Indoor unit-equipment sheet update by fire alarm input No.]
Used to update “Fire alarm input name” based on the “Fire alarm input No.” data on the “Indoor unit
group definition” sheet.
[Indoor unit-equipment sheet update by fire alarm input name]
Used to update “Fire alarm input No.” based on the “Fire alarm input name” data on the “Indoor unit
group definition” sheet.
42
Page 43

6-9 “Door-lock input definition” sheet
This sheet is used to set I/O interfaces and input channels used for door-lock inputs when using the doorlock interlocking function.
No setting is required when door-lock interlocking is not used.
6-9-1 Window Image
6-9-2 Window Description
(1) Door-lock input name
Input another name for a door-lock input number.
This name is used on the “Indoor unit group definition” sheet.
(2) Door-lock input No. (
Door-lock input numbers are displayed in this column. Do not update these numbers.
(3) Input device ID
Specify a device ID corresponding to the door-lock input number on the line.
Items that can be selected in the list vary depending on the settings of the “System Setting” and
“System equipment configuration” sheets.
(4) Input channel
Specify a device input channel corresponding to the door-lock input number on the line.
(5) Signal logic
Specify whether to stop operation of equipment when a door-lock input turns ON (positive logic) or
when it turns OFF (negative logic).
(6) Write to setting file
Specify whether to output data on the line to a setting file.
input prohibited)
43
Page 44

6-9-3 Buttons
[Indoor unit-equipment sheet update by door-lock input No.]
Used to update “Door-lock input name” based on the “Door-lock input No.” data on the “Indoor unit
group definition” sheet.
[Indoor unit-equipment sheet update by door-lock input name]
Used to update “Door-lock input No.” based on the “Door-lock input name” data on the “Indoor unit
group definition” sheet.
44
Page 45

6-10 “Emergency external output definition” sheet
This sheet is used to set I/O interfaces and output channels used for emergency external outputs when
using the emergency external output function.
Use external emergency output No. 1 usually when the emergency external output function is used.
No setting is required when the emergency external output is not used.
6-10-1 Window Image
6-10-2 Window Description
(1) External emergency output name
Input another name for an external emergency output number.
This name is not used.
(2) External emergency output No. (
External emergency output numbers are displayed in this column. Do not update these numbers.
(3) Output device ID
Specify a device ID corresponding to the external emergency output number on the line.
Items that can be selected in the list vary depending on the settings of the “System Setting” and
“System equipment configuration” sheets.
(4) Output channel
Specify a device output channel corresponding to the external emergency output number on the line.
(5) Write to setting file
Specify whether to output data on the line to a setting file.
input prohibited)
45
Page 46

6-10-3 Buttons
No buttons are provided on this sheet.
46
Page 47

6-11 “Power meter input definition” sheet
This sheet is used to set Energy Monitoring Relay Interface and its input channels when energy
monitoring is used.
No setting is required when energy monitoring is not used.
6-11-1 Window Image
6-11-2 Window Description
(1) Power meter input name
Input another name for a power meter input number.
This name is used on the “Indoor unit group definition” sheet.
(2) Power meter input No. (
Power meter input numbers are displayed in this column. Do not update these numbers.
(3) Input device ID
Specify a device ID corresponding to the power meter input number on the line.
Items that can be selected in the list vary depending on the settings of the “System Setting” and
“System equipment configuration” sheets.
(4) Input channel
Specify a device input channel corresponding to the power meter input number on the line.
(5) Pulse constants (kWh/pulse)
Specify power meter pulse constants on the line.
(6) Write to setting file
Specify whether to output data on the line to a setting file.
input prohibited)
47
Page 48

6-11-3 Buttons
[Indoor unit-equipment sheet update by power meter input No.]
Used to update “Power meter input name” based on the “Power meter input No.” data on the “Indoor
unit group definition” sheet.
[Indoor unit-equipment sheet update by power meter input name]
Used to update “Power meter input No.” based on the “Power meter input name” data on the “Indoor
unit group definition” sheet.
48
Page 49

6-12 “S-MMS outdoor unit group definition” sheet
This sheet is used to input various setting data for Super Modular Multi System outdoor units.
Input data for all connected outdoor units.
When input data of outdoor set model name, fill in the header outdoor unit line and press [Outdoor follower
unit insert]. Lines of outdoor follower units corresponding to the outdoor set model name are inserted
automatically.
6-12-1 Window Image
6-12-2 Window Description
• Input items
(1) Intelligent Server No.
Input Intelligent Server No. corresponding to the outdoor unit on the line.
(2) TCS-Net Relay Interface No.
Input TCS-Net Relay Interface address corresponding to the outdoor unit on the line.
(3) Line address
Input refrigerant line address of the outdoor unit on the line.
(4) Outdoor unit model name
Input outdoor unit model name of the outdoor unit on the line.
(5) Outdoor unit address
Input outdoor unit address of the outdoor unit on the line.
(6) Power meter input name
Input the name of power meter input corresponding to the outdoor unit on the line when using energy
monitoring. Also enter the name of the power meter input corresponding to the follower outdoor unit
in the line of the follower outdoor unit. (Set power meter input name for each outdoor unit.)
When you do not use energy monitoring or assign power meter input, select “No setting”.
(7) Write to setting file
Specify whether to output the outdoor unit data on the line to the OUT_GROUP.DEF or
listOfApparatus*.txt file.
49
Page 50

• Input prohibited items
(8) Header outdoor unit ID number (
Hexadecimal data to be described in setting files is displayed, indicating outdoor unit group data.
Do not input data directly as appropriate values are input automatically by pressing [Header indoor
unit “object_id” number] button in the “Indoor unit group definition” sheet.
(9) object_id (
Hexadecimal data to be described in setting files is displayed. The data is unique to the interfaces
and all units connected to the Intelligent Server.
Do not input data directly as appropriate values are input automatically by pressing [Header indoor
unit “object_id” number] button in the “Indoor unit group definition” sheet.
(10) net_id (
Hexadecimal data to be described in setting files is displayed, indicating TCS-Net Relay Interface
number.
Do not input data directly as appropriate values are input automatically by entering data in the “TCSNet Relay Interface No.” column.
(11) node_id (
Hexadecimal data to be described in setting files is displayed, indicating line address.
Do not input data directly as appropriate values are input automatically by entering data in the “Line
address” column.
(12) x1 (
Hexadecimal data to be described in setting files is displayed, indicating device type.
Do not input data directly as appropriate values are input automatically by entering data in the
“Outdoor unit model name” column.
input prohibited)
input prohibited)
input prohibited)
input prohibited)
input prohibited)
(13) x2 (
(14) x3 (
(15) Outdoor unit No. (
(16) Power meter input No. (
(17) Device type (
input prohibited)
Hexadecimal data to be described in setting files is displayed, indicating device type.
Do not input data directly as appropriate values are input automatically by entering data in the
“Outdoor unit model name” column.
input prohibited)
Hexadecimal data to be described in setting files is displayed, indicating outdoor unit number.
Do not input data directly as appropriate values are input automatically by entering data in the
“Outdoor unit No.” column.
input prohibited)
The outdoor unit number (used for setting files) on the line is displayed.
Outdoor unit numbers are issued automatically by pressing [Outdoor unit number issue] button.
input prohibited)
Power meter input number corresponding to the value in the “Power meter input name” column on
the line is displayed.
Do not input data directly as this number is input automatically by entering data in the “Power meter
input name” column.
input prohibited)
Device type number corresponding to the outdoor unit model name on the line is displayed.
Do not input data directly as appropriate values are input automatically by entering data in the
“Outdoor unit model name” column.
50
Page 51

6-12-3 Buttons
[Outdoor unit number issue]
Used to issue an outdoor unit number unique to each outdoor unit group to input data automatically in
the “Outdoor unit No.” column.
[Outdoor follower unit insert]
Used to insert lines by finding the number of follower outdoor units from the model name when the
model name in “Outdoor unit model name” is a set model name.
[Check with “Indoor unit group definition” sheet]
Used to check whether multi-system indoor units are included in the same refrigerant system by
comparing with the data in the “Indoor unit group definition” sheet.
[Insert parting line for line address]
Used to separate refrigerant systems in the table with horizontal lines.
[Insert at once “Write into setting file”]
Used to specify “1: write” for “Write into setting file” on all the lines with data.
[“No setting” input at once]
Input “No setting” in all lines in the “Power meter input name” column.
51
Page 52

6-13 “Indoor unit group definition” sheet
This sheet is used to input various setting data of indoor units.
For Digital Inverter/Super digital Inverter indoor units, input data for header indoor unit only and input a
Digital Inverter/Super digital Inverter set model name for “Outdoor unit model name”.
For HA control interfaces, select “General purpose interface” for “Outdoor unit model name”. When using
energy monitoring, input appropriate values in the “Power consumption through HA control interface”
column.
6-13-1 Window Image
6-13-2 Window Description
• Input items
(1) Intelligent Server No.
Input Intelligent Server No. corresponding to the indoor unit on the line.
(2) TCS-Net Relay Interface No.
Input TCS-Net Relay Interface address corresponding to the indoor unit on the line.
(3) Line address
Input refrigerant line address of the indoor unit on the line.
(4) Indoor unit address
Input indoor unit address of the indoor unit on the line.
(5) Header indoor unit ID number
When the indoor unit on the line is a header unit, set to “0”. When it is a follower unit, input the header
indoor unit ID number.
(6) Indoor unit model name
Specify indoor unit model name of the indoor unit on the line.
52
Page 53

(7) R.C. group/indoor name
Specify R.C. group/indoor name of the indoor unit on the line.
(8) Tenant name
Specify tenant name to which the indoor unit on the line belongs.
(9) Area name
Specify area name to which the indoor unit on the line belongs.
(10) Block name
Specify block name to which the indoor unit on the line belongs.
(11) Door-lock input name
Specify a door-lock input name when the indoor unit on the line performs door-lock interlocking.
Select “No setting” when door-lock interlocking is not used.
(12) Fire alarm input name
Specify a fire alarm input name when the indoor unit on the line performs fire alarm interlocking.
Select “No setting” when fire alarm interlocking is not used.
(13) Power meter input name
Specify a power meter input name corresponding to the indoor unit on the line when using energy
monitoring.
Select “No setting” when energy monitoring is not used.
(14) Write to setting file
When “2: no write” is selected in this column, the indoor unit data on the line is not written in the
AC_MAP.DEF, AC_GROUP.DEF or listOfApparatus*.txt file.
(15) Power consumption through HA control interface
Input appropriate power consumption through HA control interface in this column when the model
name on the line is a general purpose interface.
If the model name on the line is MMS or a Digital Inverter/Super digital Inverter model, “0” is input
automatically by pressing [R.C. group/indoor unit capacity code input] button, requiring no data
input.
When energy monitoring is not used, data input is not required.
(16) “Power consumption through HA control interface (indoor unit group)” (for use in Japan only)
Input appropriate power consumption through HA control interface of indoor unit group in this
column when the model name on the line is a general purpose interface.
If the model name on the line is MMS or Digital Inverter/Super Digital Inverter model, “0” is input
automatically by pressing [R.C.group/indoor unit capacity code input] button, requiring no data input.
When energy monitoring is not used, data input is not required.
(17) “Power consumption through HA control interface (outdoor unit group)” (for use in Japan only)
Input appropriate power consumption through HA control interface of outdoor unit group in this
column when the model name on the line is a general purpose interface.
If the model name on the line is MMS or Digital Inverter/Super Digital Inverter model, “0” is input
automatically by pressing [R.C.group/indoor unit capacity code input] button, requiring no data input.
When energy monitoring is not used, data input is not required.
• Input prohibited items
(18) Header indoor unit ID number (
Hexadecimal data to be described in setting files is displayed, indicating indoor unit group data.
Do not input data directly as appropriate values are input automatically by pressing [Header indoor
unit “object_id” number] button on the “Indoor unit group definition” sheet.
input prohibited)
53
Page 54

(19) object_id (
Hexadecimal data to be described in the setting files is displayed. The data is unique to each of all
the interfaces and units connected to the Intelligent Server.
Do not input data directly as appropriate values are input automatically by pressing [Header indoor
unit “object_id” number] in the “Indoor unit group definition” sheet.
input prohibited)
(20) net_id (
Hexadecimal data to be described in setting files is displayed, indicating TCS-Net Relay Interface
number.
Do not input data directly as appropriate values are input automatically by entering data in the “TCSNet Relay Interface No.” column.
(21) node_id (
Hexadecimal data to be described in setting files is displayed, indicating line address.
Do not input data directly as appropriate values are input automatically by entering data in the “Line
address” column.
(22) x1 (
Hexadecimal data to be described in setting files is displayed, indicating device type.
Do not input data directly as appropriate values are input automatically by entering data in the
“Indoor unit model name” column
(23) x2 (
Hexadecimal data to be described in setting files is displayed, indicating device type.
Do not input data directly as appropriate values are input automatically by entering data in the
“Indoor unit model name” column.
(24) x3 (
Hexadecimal data to be described in setting files is displayed, indicating indoor unit address.
Do not input data directly as appropriate values are input automatically by entering data in the
“Indoor unit address” column.
input prohibited)
input prohibited)
input prohibited)
input prohibited)
input prohibited)
(25) Indoor unit ID number (
A number used for this software only to identify indoor units. This is used to specify group in (13).
Press [Indoor unit ID number issue] to input data automatically.
(26) R.C. group/indoor No. (
Numbers used in setting files, which are issued for each indoor unit group.
Press [R.C. group/indoor unit No. issue] to input data automatically.
(27) Outdoor unit No. (
Outdoor unit number of the outdoor unit in the R.C. group of the indoor unit on the line.
Do not input data directly as appropriate values are input automatically by pressing [Outdoor unit No.
input from “Outdoor unit group definition” sheet] button.
(28) Device type (
Device type number corresponding to the indoor unit model name on the line is displayed.
0: MMS indoor units
1: Digital Inverter/Super Digital Inverter indoor units
2: General purpose interfaces
Do not input data directly as appropriate values are input automatically by entering data in the
“Indoor unit model name” column.
(29) Tenant No. (
Tenant number corresponding to the “Tenant name” data on the line.
Do not input data directly as appropriate values are input automatically by entering data in the
“Tenant name” column.
input prohibited)
input prohibited)
input prohibited)
input prohibited)
input prohibited)
(30) Area No. (
Area number corresponding to the “Area name” data on the line.
Do not input data directly as appropriate values are input automatically by entering data in the “Area
name” column.
input prohibited)
54
Page 55

(31) Block No. (
Block number corresponding to the “Block name” data on the line.
Do not input data directly as appropriate values are input automatically by entering data in the “Block
name” column.
input prohibited)
(32) Door-lock input No. (
Door-lock input number corresponding to the “Door-lock input name” data on the line.
Do not input data directly as appropriate values are input automatically by entering data in the “Doorlock input name” column.
(33) Fire alarm input No. (
Fire alarm input number corresponding to the “Fire alarm input name” data on the line.
Do not input data directly as appropriate values are input automatically by entering data in the “Fire
alarm input name” column.
(34) Power meter input No. (
Power meter input number corresponding to the “Power meter input name” data on the line.
Do not input data directly as appropriate values are input automatically by entering data in the
“Power meter input name” column.
(35) Indoor unit capacity code (
Indoor unit capacity code corresponding to the indoor unit model name on the line is displayed.
Do not input data directly as appropriate values are input automatically by pressing [R.C. group/
indoor unit capacity code input] button.
When energy monitoring is not used, data input is not required.
(36) R.C. group/indoor unit capacity code (
When the indoor unit on the line is a header or individual unit, R.C. group/indoor unit capacity code
(total of indoor unit capacity code in the indoor unit group) is described here. When the indoor unit is
a follower unit, “-” is displayed.
Do not input data directly as appropriate values are input automatically by pressing [R.C. group/
indoor unit capacity code input] button.
input prohibited)
input prohibited)
input prohibited)
input prohibited)
input prohibited)
(37) Indoor unit fan motor capacity kW (
Indoor unit fan motor capacity corresponding to the indoor unit model name on the line is displayed.
Do not input data directly as appropriate values are input automatically by pressing [R.C. group/
indoor unit capacity code input] button.
When energy monitoring is not used, data input is not required.
(38) R.C. group/indoor unit fan motor capacity kW (
When the indoor unit on the line is a header or individual unit, R.C. group/indoor unit fan motor
capacity (total of indoor unit fan motor capacity in the indoor unit group) is described here. When the
indoor unit is a follower unit, “-” is displayed.
Do not input data directly as appropriate values are input automatically by pressing [R.C. group/
indoor unit capacity code input] button.
(39) Outdoor unit stand-by consumption kW (
When the indoor unit on the line is a header or individual unit, outdoor unit stand-by consumption is
described here. When the indoor unit is a follower unit, “-” is displayed.
Do not input data directly as appropriate values are input automatically by pressing [R.C. group/
indoor unit capacity code input] button.
input prohibited)
input prohibited)
input prohibited)
55
Page 56

6-13-3 Buttons
[Indoor unit ID number issue]
Used to issue indoor unit specific numbers to the “Indoor unit ID number” column sequentially from the
top.
[Header indoor unit “object_id” number]
Used to issue object_id to input data automatically in the “object_id” and “Header indoor unit ID
number” columns.
[R.C. group/indoor unit capacity code input]
Used to input data automatically in the “Indoor unit capacity code” to “Power consumption through HA
control interface” columns by finding capacity code of each indoor unit, indoor unit fan motor capacity
and indoor unit heater capacity using the “Indoor unit model name” data.
[R.C. group/indoor No. issue]
Used to input indoor unit group specific data automatically in the “R.C. group/indoor No.” column.
[Outdoor unit No. input from “Outdoor unit group definition” sheet]
Used to input appropriate data automatically in the “Outdoor unit No.” column in the “Indoor unit group
definition” sheet based on the outdoor unit numbers issued for each refrigerant system in the “S-MMS
outdoor unit group definition” sheet.
[Insert parting line for line address]
Used to separate refrigerant systems in the table with horizontal lines.
[“No setting” input at once]
Used to specify “No setting” in all the lines of selected items when “Door-lock input name,” “Fire alarm
input name” and “Power meter input name” are currently selected.
[“1: write” input at once]
Used to specify “1: write” in all the lines of “Write into setting file”.
56
Page 57

6-14 “Outdoor unit group definition other than S-MMS”
sheet
When using Digital Inverter/Super Digital Inverter units or general purpose interface with energy
monitoring, this sheet is used to specify power meter input corresponding outdoor units of Digital Inverter/
Super Digital Inverter unit or general purpose interface.
Data must be entered in this sheet when using Digital Inverter/Super Digital Inverter units or general
purpose interface while using energy monitoring.
If energy monitoring is not used, this sheet is not used irrespective whether it is completed or blank. Even
when energy monitoring is used, this sheet is not used either if neither Digital Inverter/Super Digital
Inverter unit nor general purpose interface is used.
6-14-1 Window Image
6-14-2 Window Description
• Input items
(1) Power meter input name
Input the name of the power meter input corresponding to the outdoor unit on the line.
(2) Write into setting file
When “2: no write” is selected on the line, the description of the line is not output to
“WHM_OUT_MAP.DEF”.
• Input prohibited items
(3) Device type (
Device type of the outdoor unit on the line is input.
This is entered automatically each time you press [New].
input prohibited)
57
Page 58

(4) R.C. group/indoor No. (
R.C. group/indoor No. of Digital Inverter/Super Digital Inverter unit and general purpose interface
(corresponding to the outdoor unit on the line) entered in the in “Indoor unit group definition” sheet is
input. This number is entered automatically each time you press [New].
input prohibited)
(5) Power meter input No. (
Power meter input number corresponding to the “Power meter input name” data on the line is
displayed.
Do not input data directly as appropriate values are input automatically by entering data in the
“Power meter input name” column.
(6) Outdoor unit model name (
The Digital Inverter/Super Digital Inverter model name of the outdoor unit on the line is input.
For general purpose interfaces, “General purpose interface (outdoor unit)” is input.
This model name is entered automatically each time you press [New].
(7) Outdoor unit address (
This unit address is used to identify each outdoor unit when multiple outdoor units of the same
system are registered.
This address is entered automatically by clicking [New] or [Insert].
input prohibited)
input prohibited)
input prohibited)
6-14-3 Buttons
[New]
Used to automatically input data of the system that is not registered in the table in the “Outdoor unit
group definition other than S-MMS” sheet among Digital Inverter/Super Digital Inverter units and
general purpose interfaces registered in the “Indoor unit group definition” sheet, in a line for each
system.
When energy monitoring is not used (when “0: None” is selected for “Energy monitoring” in the
“System Setting” sheet), this button does not function as you do not need to enter data on this
“Outdoor unit group definition other than S-MMS” sheet.
[Add lines]
Used to add a new line for the system on the line where a cell is active.
Use this button to assign power meter input to multiple outdoor units in the system of a Digital
Inverter/Super Digital Inverter unit or general purpose interface.
58
Page 59

7. Notes
7-1 Equipment model table “unit_table.xls”
The model lists displayed by “Indoor unit model name” in the “Indoor unit group definition” sheet and by
“Outdoor unit model name” in the “S-MMS outdoor unit group definition” sheet are described in the
“unit_table.xls” file. Registration of new model names and model name parameter change are made
possible by editing this file. Once a model name is registered, the model name can be selected from the
model list displayed by “Indoor unit model name” in the “Indoor unit group definition” sheet and by
“Outdoor unit model name” in the “S-MMS outdoor unit group definition” sheet. Furthermore, parameters
such as indoor unit capacity code can be input automatically.
Destination folder
Describes indoor/outdoor unit model
names and parameters
7-1-1 Registering indoor unit/outdoor unit model names in Equipment model
table
Open “unit_table.xls” with Microsoft Excel (Fig. 7-1).
Fig. 7-1 “unit_table.xls” window
59
Page 60

The “unit_table.xls” file includes 3 sheets: “Outdoor,” “Indoor,” and “Parameter”. The Outdoor sheet
describes the outdoor unit parameters and the Indoor sheet describes the indoor unit parameters.
To register an outdoor unit model name, describe the parameters for the following items in the table on the
Outdoor sheet.
• “Device type”
Input “0” for multi-system models.
• “Model name”
Input an outdoor unit model name to be registered.
• “Total indoor unit capacity code (HP),” “Total indoor unit fan motor capacity (kW),” “Total indoor unit
heater capacity (kW)”
Input “0”.
• “Total outdoor unit crankcase heater capacity (kW)”
Input total outdoor unit crankcase heater capacity of the models to be registered in kW.
• “Indoor unit Qty”
Input “0”.
• “Outdoor unit Qty”
Input “1” for single outdoor unit model name.
For outdoor units with set model name, input the number of outdoor units defined by the set model
name.
• “Indoor unit object management No.”
Input “FFFF”.
• “Outdoor unit object management No.”
Input “0F02” for multi-system equipment.
• “Domestic/overseas,” “Date of addition”
Do not input data for these items. Use for reference.
To register an indoor unit model name, describe the parameters for the following items in the table on the
Indoor sheet.
• “Device type”
Input “0” for multi-system models or “1” for Digital Inverter/Super Digital Inverter models.
• “Model name”
Input the outdoor unit model name to be registered.
Input a set model name for Digital Inverter/Super Digital Inverter models.
• “Total indoor unit capacity code (HP),” “Total indoor unit fan motor capacity (kW),” “Total indoor unit
heater capacity (kW)”
Input parameters of the models to be registered.
• “Total outdoor unit crankcase heater capacity (kW)”
Input “0” for multi-system models.
For Digital Inverter/Super Digital Inverter models, input the total outdoor unit crankcase heater capacity
in kW.
• “Indoor unit Qty”
Input “1” for single indoor unit model name.
For indoor units with set model name, input the number of indoor units defined by the set model name.
60
Page 61

• “Outdoor unit Qty”
Input “0” for multi-system models.
For Digital Inverter/Super Digital Inverter models, input the number of outdoor units defined by the set
model name.
• “Indoor unit object management No.”
Input “0F01” for multi-system models.
Input “0F88” for Digital Inverter/Super Digital Inverter models.
• “Outdoor unit object management No.”
Input “FFFF”.
• “Domestic/overseas,” “Date of addition,” “Outdoor unit model name” and “Indoor unit model name”
You need not input data for these items. Use for reference.
When input of these items is completed, overwrite (save) the “unit_table.xls” file and close the window.
Registered model names are available for the next time the Setting File Creation Software is used.
61
Page 62

7-2 Setting file output
Setting file output starts by pressing [Setting File create] on the “System Setting” sheet.
When the [Setting File create] button is pressed, the following dialog (Fig. 7-2) appears. Click [OK] on the
dialog.
Fig. 7-2 Data checking start dialog
Checking of data in the sheets start. If no data or invalid data is found, an error dialog appears and the
ongoing processing is interrupted. In such case, correct the error and then press [Setting File create]
again. Upon completion of the data checking, the following dialog (Fig. 7-3) appears.
Fig. 7-3 “Data checking completed” dialog
Click [OK] on the dialog. The “Browse for Folder” dialog (Fig. 7-4) appears. Choose a folder to save the
setting file to, and click [OK].
* Do not choose “Desktop” or “My Computer”. This will result in an error.
Fig. 7-4 “Browse for Folder” dialog
Then the “File type setting” dialog (Fig. 7-5) opens.
62
Page 63

Specify a character code and the applicable signal logic used for the output setting file.
When “English, Chinese” is selected for character code, the setting file is output in Unicode. Select this to
create a setting file for overseas air-conditioning control system.
Select “Signal logic applicable” when performing fire alarm/door-lock interlocking using the Digital I/O
Relay Interface. Select “Signal logic N/A” for use in Japan where a Digital I/O Relay Interface is not used.
Fig. 7-5 “File type setting” dialog
Click [OK] on the dialog. The setting file is output to the specified folder. Upon completion of the setting file
output, the following dialog (Fig. 7-6) opens. Click [OK] on the dialog to close the output procedure.
Fig. 7-6 “Setting file output completed” dialog
63
Page 64

TCS-NET Air-conditioning Control System
Setting File Creation Software (Version 2.00)
User’s Manual
June 2005 First Edition
2005.08.09 Fourth Edition
 Loading...