

INSTALLATION MANUAL
Use for Indoor Unit Only
Digital Inverter Air Conditioner
“1 : 1 Model” Connection Interface
[For Installation Professionals]
• Before installation work, please read this manual thoroughly and install the products correctly.
CAUTIONS for SAFETY
WARNING
•
Ask an authorized dealer or qualified installation professional to install/maintain the air conditioner .
Inappropriate installation may result in water leakage, electric shock or fire .
• Perform installation work surely based on this Installation Manual.
Incomplete installation causes an electric shock or a fire.
• Ask an authorized dealer or qualified installation professional to reinstall adapters.
Incomplete installation causes an electric shock or a fire.
• For an electric work, this Installation Manual shall be referred and exclusive circuit shall be
necessarily used. The used voltage shall be also match with the rated voltage of the product.
If there is capacity shortage of electric circuit or installation work is poor, an electric shock or a fire may be
caused.
MODEL : TCB-PCNT30TLE2
CAUTION
• Using the specified wires, surely connect wires so that external force of wire is not applied to connecting part
of the terminals; otherwise disconnection, heating or fire will generate.
• For wiring work, use wires with correct current capacity; otherwise leakage, heating or fire will generate.
• Do not apply an excessiv e force on the board body, otherwise bending, separ ation, or disconnection gener ates
resulted in heating or fire.
• After installation work, execute a test run to confirm there is no trouble.
And also ask the customers to keep this Manual by themselves.
n Components
Name
P.C. board
U3, U4 terminal block
Relay wire (A)
Relay wire (B)
Installation Manual
Q’ty
1
1 : 1 model connection interface board
1
2P terminal block for relay (U3, U4)
For connection of “1 : 1 Model” Connection Interface board with U3, U4 relay terminal block
1
(Blue connector)
For connection of “1 : 1 Model” Connection Interface board with indoor control board
1
(Red connector)
1
This manual
Application
Spacer (A)
Spacer (B)
Screws to fix terminal block
Bundling band
Terminal nameplate
For fixing “1 : 1 Model” Connection Interface board
3
(Used when installing P.C. board on sheet metal of the electric parts box of indoor unit)
1
For fixing “1 : 1 Model” Connection Interface board (Required according to shape of indoor unit)
2
For fixing relay terminal block (M4 × 14l)
3
Used to process wires
1
To be adhered near the relay terminal block
1
Before Installation
This adapter corresponds to the digital inverter air conditioner.
Do not use or connect this adapter for other type of air conditioner than the above because the indoor P.C. boards of
other air conditioners differ from one of the digital inverter air conditioner .
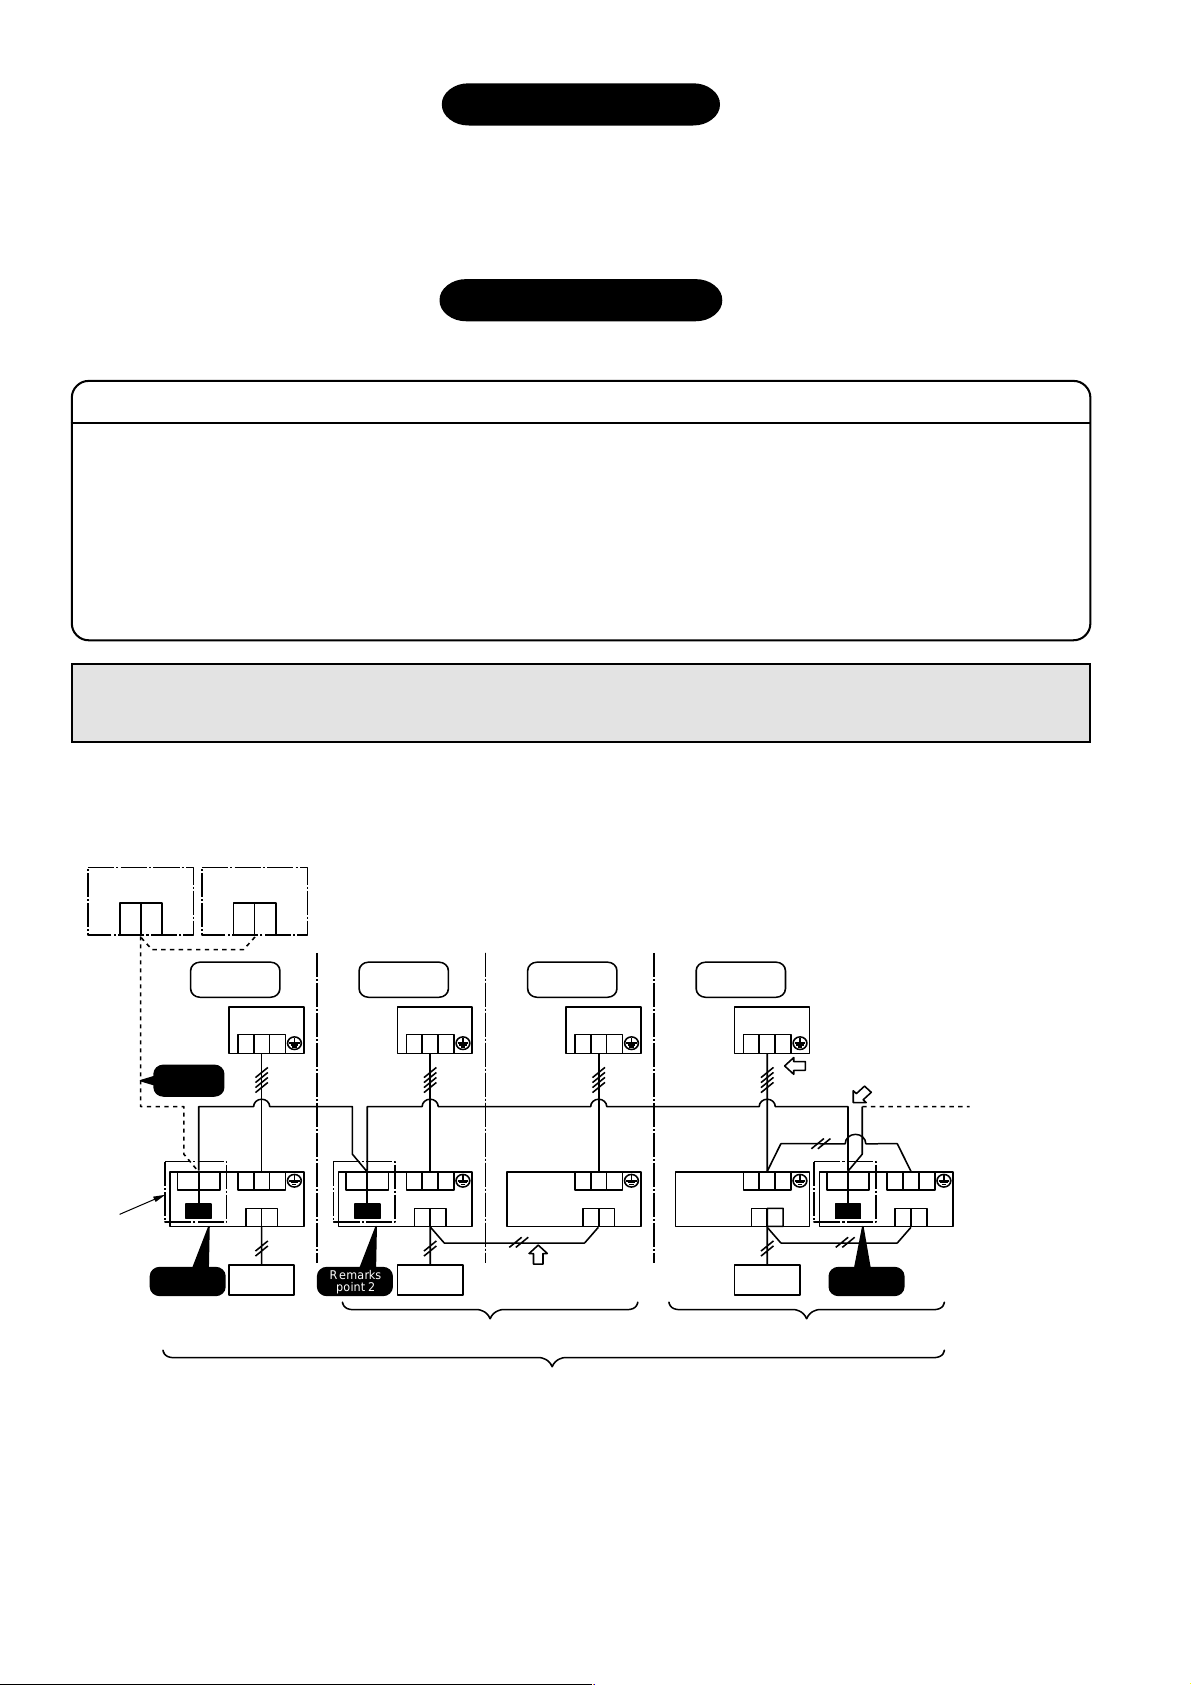
Wiring Connection
1. Wiring connection
Remarks
Point 1) When controlling the digital in verter air conditioner collectively, “1 : 1 Model” Connection Interface
(This option) is required.
Point 2) In group control or twin system, this adapter must be connected to Header unit of the indoor unit.
(Connection to follower unit is unavailable.)
Point 3) Connect the central control devices to wires of the central control system.
Point 4) When controlling the digital inverter air conditioner collectively, turn on Bit 1 of SW01 in the line with the
least line address No. (OFF has been set up at shipment from the factory.)
For the digital inverter air conditioner, re-setup of the address from the wired remote
controller is required after automatic addressing.
Central control
device
U1U3U2
U4
Indoor unit
1 : 1 Model
Connection Interface
(option)
Outdoor
unit
Remarks
point 3
U3U4
Remarks
point 1
Central control
device
U1U3U2
U4
Refrigerant
line 1
1
2 3
1 2 3
A B
Remote
controller
Central control device: Max. 10 units
U3U4
Remarks
point 2
Refrigerant
line 2
1 2 3
1 2 3
A B
Remote
controller
Header Header
Refrigerant
line 3
Remote controller wiring
1 2 3
Follower
1 2 3
A B
Refrigerant
line 4
1 2 3
1 2 3
A B
Remote
controller
Inter-unit wire between indoor
and outdoor units (220-240V~, serial,earth)
Wiring of central control system
* Wiring for No. 1 and 2 only
Follower
U3U4
Remarks
point 2
1 2 3
A B
Group control (Max. 8 units)
Max. 64 indoor units of all the refrigerant lines can be connected.
[When mixed with VRF type (Link wiring), No. of indoor units of VRF type is also included.]
* However , group, twin follower units of the digital inverter air conditioner are not included in No. of units.
Twin system
VRF : Variable Refrigerant Flow
2

2. Wire Specifications
No. of wires
2
Up to 1000m, braided wire 1.25mm
Up to 2000m, braided wire 2.0mm
Size
Specifications
2
2-core shield wire
2
• Wire is 2-core and non-polarity.
• The length is same to wire length of the central control system.
In case of system mixed with VRF type, the length includes all length of control wiring between indoor unit and
outdoor units at VRFside .
• To prevent noise defect, use 2-core shield wire.
• Connect shield wires with closed-terminal connection and apply open process (insulation process) to the last
termination. F or g rounding (earth), perform grounding with one point at indoor unit side. (During central control for
digital inverter air conditioner only)
Remarks
Point 1) Closed terminal connection of shield wire (Connection of connecting parts of each indoor unit)
Point 2) Apply open process (insulation process) to the last termination.
Point 3) For grounding (earth), perform grounding with one point at indoor unit side.
Central control
device
U1U2
Remarks
point 2
Outdoor unit Outdoor unit Outdoor unit Outdoor unit
Indoor
unit
U3U4
1 2 3
1 2 3
A B
Remote
controller
Remarks
point 1
U3U4
1 2 3
Header Header
1 2 3
A B
Remote
controller
(Group control) (Twin system)
3. Wiring Diagram with Indoor Control P.C. Board
For details, refer to installation procedure for each model.
T erminal bloc k
for connection
of remote
controller
1 2
1 2 3
Black Black
A B
Remote
controller
Indoor control P.C. board
3
“1 : 1 Model”
Connection
Interface
board
CN40 (Blue)
1 2
1 2
U3 U4
T erminal bloc k to centr al control de vice
CN050 (White)CN041 (Blue)
1 2
1 2 34455
1 1
2 2
3 3
4 4
5 5
CN51 (Red)
3
: “1 : 1 Model”
1 2 3
Wiring of central
control system
Follower Follower
1 2 3
A B
1 2 3
1 2 3
A B
Remote
controller
Remarks
point 3
U3U4
Connection Interface
(Option)
1 2 3
A B
Earth
• Parts encircled with chain line are accessories
attached to this product.
• ???? indicates control P.C. board, and indi-
cates terminal block (Characters inside of mark
indicate terminal number.)
• There is no polarity for wire connection to terminal
blocks U3 and U4.
(NOTE)
Do not apply voltage to terminals U3 and U4.
If applying voltage to U3 or U4 terminal by mistake,
fusing occurs to protect terminals.
After checking wires, exchange connection of connect-
ing connector on “1 : 1 Model” Connection Interface
board from CN40 (Blue) to the spare CN44 (Brown).
3
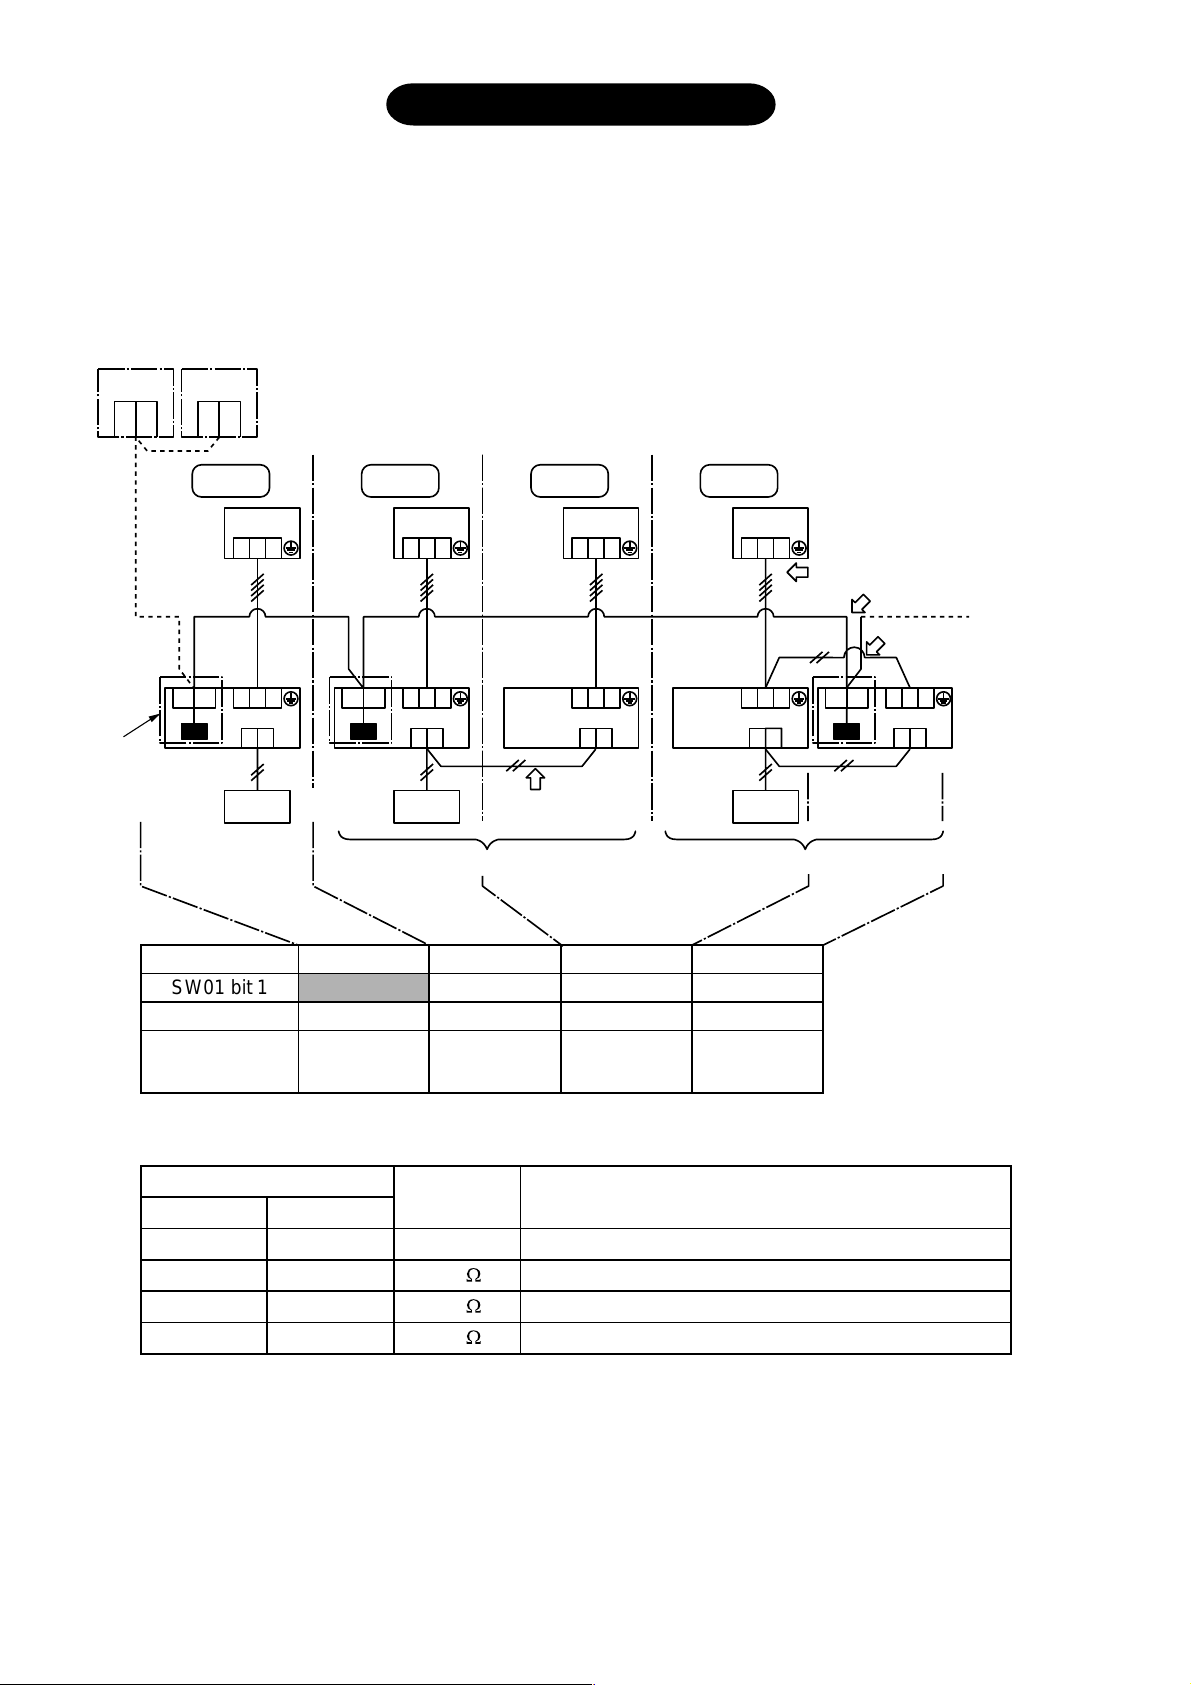
Setup of P.C. Board Switch
When the units controlled collectively are all digital inverter air conditioners, it is required to set up the terminator
resistor. (Collective control for units without VRF type air conditioner)
• Using SW01, set up the terminator resistor.
• Set up the terminator resistor to only adapter connected to the indoor unit in the line with the least line
address No.
Central control
device
U1U3U2
U4
Outdoor
unit
Indoor unit
“1 : 1 Model”
Connection Interface
(option)
U3U4
Central control
device
U1U3U2
U4
Refrigerant
line 1
1
1 2 3
Remote
controller
Central control device: Max. 10 units
Refrigerant
line 2
2 3
U3U4
A B
1 2 3
Header Header
1 2 3
A B
Remote
controller
Group control (Max. 8 units)
Refrigerant
Remote
controller
wiring
line 3
1 2 3
Follower
1 2 3
A B
Refrigerant
line 4
1 2 3
1 2 3
A B
Remote
controller
Twin system
Wiring between indoor
and outdoor units
Follower
U3U4
Wiring of central control system
* Wiring for No . 1 and 2 only
1 2 3
A B
Line address
SW01 bit 1
SW01 bit 2
Remarks
1
ON
OFF
Turn on
SW01 bit 1.
OFF
OFF
As status at
shipment
from factory
(Reference) Contents of switch setup
Bit 1
OFF
ON
OFF
ON
SW01
Bit 2
OFF
OFF
ON
ON
Terminator
resistor
None
100
75
43
2
4
OFF
OFF
(OFF when shipped from factory)
(OFF when shipped from factory)
As status at
shipment
from factory
Remarks
Mixed with VRF at shipment from factory (Link wiring)
Central control by digital inverter air conditioners
Spare
Spare
4
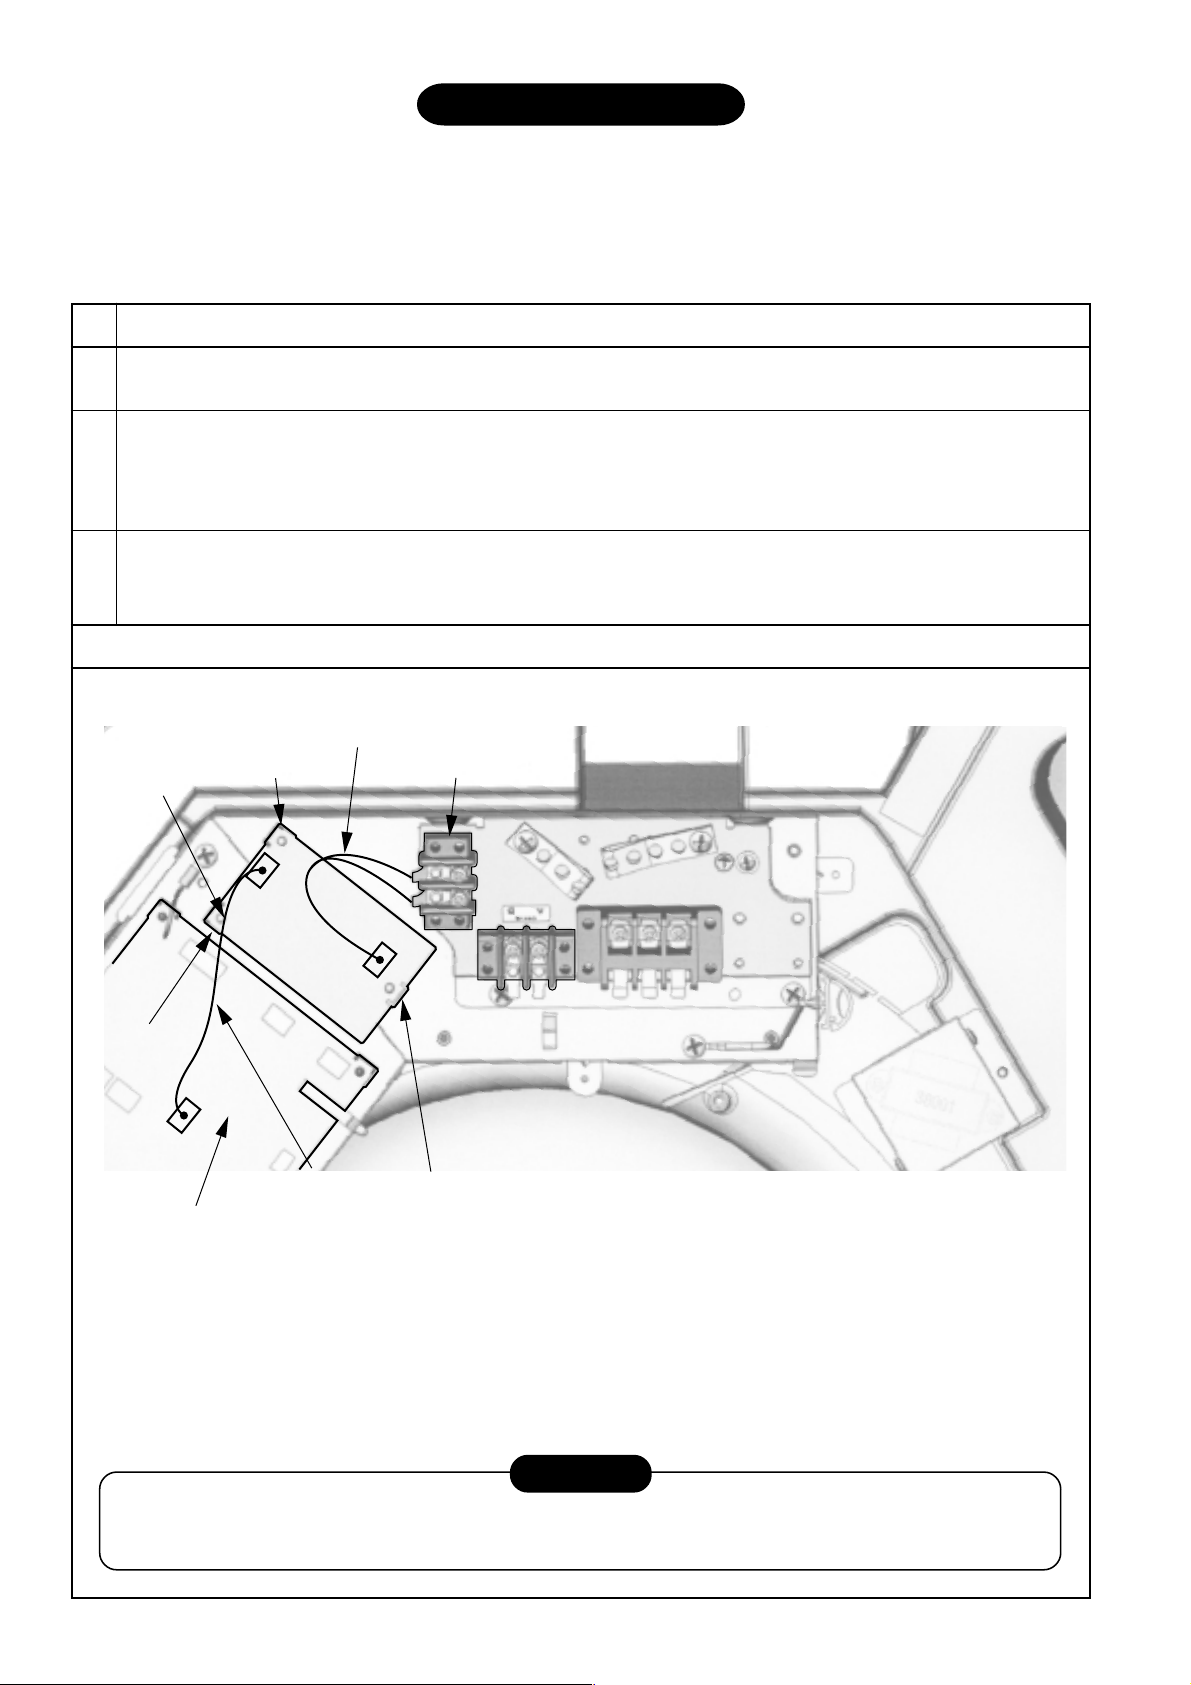
Installation Procedure
• For installation of “1 : 1 Model” Connection Interface board and removal of relay wire, be sure to wait for a while
(approx. 1 minute) after turning off the power supplies of the air conditioner and the collective control devices. If not
doing so, “1 : 1 Model” Connection Interface board may be damaged.
n In case of 4-way Air Discharge Cassette type
(RAV-SM
∗∗∗∗∗∗
UT-E, RAV-SP
∗∗∗
∗∗∗∗∗∗
∗∗∗∗∗∗
UT-E, RAV-SM
∗∗∗
∗∗∗∗∗∗
∗∗∗∗∗∗
UT-K, RAV-SM
∗∗∗
∗∗∗∗∗∗
∗∗∗∗∗∗
∗∗∗
∗∗∗∗∗∗
UT-4C)
No.
1
Using board installing spacer (A), install “1 : 1 Model” Connection Interface board to the position of electric parts box of
the indoor unit. (See the figure below.)
2
Using terminal block fixing screws, install U3, U4 terminal block to the position of electric parts box of the indoor unit.
(See the figure below.)
• When tightening the screws, be sure not to damage wires.
• Adhere the attached nameplate near the relay terminal block.
3
Connect the relay wire (A) from U3, U4 terminal block to CN40 (Blue) of “1 : 1 Model” Connection Interface board.
Connect the relay wire (B) from CN50 (White) on the indoor P.C. board to CN51 (Red) on “1 : 1 Model” Connection
Interface board.
1.1 model
connection
interface
P.C. board
Spacer (A)
CN51
(Red)
Relay wire (A)
U3, U4 terminal block
Procedure
Details
CN40
(Blue)
Spacer (A)
CN50
(White)
Relay wire (B)
Indoor P.C. board
* Relay wire (A)
Connect U3, U4 terminal block with “1 : 1 Model” Connection Interface CN40 (Blue). There is no polarity for wire
connection.
• Relay wire (B)
Connect CN50 (White) on indoor control P.C. board with CN51 (Red) on “1 : 1 Model” Connection Interface board.
• When installing “1 : 1 Model” Connection Interface board to electric parts box, insert three board installing spacers (A)
into holes of P.C. board.
Spacer (A)
CAUTION
After connection of the relay wires (A) and (B), bind them with banding band so that wires are not caught in. In this
time, be sure not to bind the relay wires (A) and (B) together with the power supply lines such as power cable, earth
wire, etc.; otherwise a trouble may be caused.
5

n In case of Concealed Duct type (RAV-SM
∗∗∗∗
∗∗0BT-E, RAV-SM
∗∗∗∗
∗∗∗∗
∗∗0BT-4C)
∗∗∗∗
No.
1
Using board installing spacer (A), (B) install <Installation position of spacers for fixing P.C. board>
“1 : 1 Model” Connection Interface board to
the position of electric parts box of the indoor unit.
(See the figure below.)
2
Using terminal block fixing screws, install U3, U4 terminal block to the position of electric parts box of the indoor unit.
(See the figure below.)
• When tightening the screws, be sure not to damage wires.
• Adhere the attached nameplate near the relay terminal block.
3
Connect the relay wire (A) from U3, U4 relay terminal block to CN40 (Blue) of “1 : 1 Model” Connection Interface board.
Connect the relay wire (B) from CN050 (White) on the indoor P.C. board to CN51 (Red) on “1 : 1 Model” Connection
Interface board.
U3, U4 relay terminal block Indoor P.C. board
Procedure
Details
Relay wire (A)
CN40 (Blue)
Spacer (B)
CN51 (Red)
Spacer (A)
CN050
(White)
CN40
(Blue)
CN51
(Red)
Spacer (B) 1 pc.
Spacer (A) 2 pcs.1:1 model commection interface P.C. board Relay cable (B)
* Relay wire (A)
Connect U3, U4 terminal block with “1 : 1 Model” Connection Interface CN40 (Blue). There is no polarity for wire
connection.
• Relay wire (B)
Connect CN050 (White) on indoor control P.C. board with CN51 (Red) on “1 : 1 Model” Connection Interface board.
* When installing “1 : 1 Model” Connection Interface board to electric parts box of Concealed type air conditioner, insert
two board installing spacers (A) into holes of P.C. board (at upper side and lower right of P.C. board) and install one of
them to the electric parts box (at lower left of P.C. board) using the board installing spacer (B) of a type which pinches
the P.C. board.
CAUTION
After connection of the relay wires (A) and (B), bind them with banding band so that wires are not caught in. In this
time, be sure not to bind the relay wires (A) and (B) together with the power supply lines such as power cable, earth
wire, etc.; otherwise a trouble may be caused.
6

n In case of Concealed Duct Standard type
(RAV-SM
∗∗∗∗
∗∗2BT-E, RAV-SM
∗∗∗∗
∗∗∗∗
∗∗1BT-E, RAV-SM
∗∗∗∗
∗∗∗∗
∗∗1BT-4C)
∗∗∗∗
No.
1
Using board installing spacer (A), install “1 : 1 Model” Connection Interface board to the position of electric parts box of
the indoor unit. (See the figure below.)
2
Using terminal block fixing screws, install U3, U4 terminal block to the position of electric parts box of the indoor unit.
(See the figure below.)
• When tightening the screws, be sure not to damage wires.
• Adhere the attached nameplate near the relay terminal block.
3
Connect the relay wire (A) from U3, U4 terminal block to CN40 (Blue) of “1 : 1 Model” Connection Interface board.
Connect the relay wire (B) from CN50 (White) on the indoor P.C. board to CN51 (Red) on “1 : 1 Model” Connection
Interface board.
Relay wire (A)
Procedure
Details
Relay wire (B)Indoor P.C. board
Spacer (A)
CN51 (Red)
1:1 model connection
interface P.C. board
CN02 (Blue)
U3, U4
terminal block
Spacer (A)
* Relay wire (A)
Connect U3, U4 terminal block with “1 : 1 Model” Connection Interface CN40 (Blue). There is no polarity for wire
connection.
• Relay wire (B)
Connect CN50 (White) on indoor control P.C. board with CN51 (Red) on “1 : 1 Model” Connection Interface board.
• When installing “1 : 1 Model” Connection Interface board to electric parts box, insert three board installing spacers (A)
into holes of P.C. board.
CAUTION
After connection of the relay wires (A) and (B), bind them with banding band so that wires are not caught in. In this
time, be sure not to bind the relay wires (A) and (B) together with the power supply lines such as power cable, earth
wire, etc.; otherwise a trouble may be caused.
7

n In case of Under Ceiling type (RAV-SM
∗∗∗∗∗∗
∗∗∗CT-E, RAV-SM
∗∗∗∗∗∗
∗∗∗∗∗∗
∗∗∗CT-4C)
∗∗∗∗∗∗
No.
1
Using board installing spacer (A), install “1 : 1 Model” Connection Interface board to the position of electric parts box of
the indoor unit. (See the figure below.)
2
Using terminal block fixing screws, install U3, U4 terminal block to the position of electric parts box of the indoor unit.
(See the figure below.)
• When tightening the screws, be sure not to damage wires.
• Adhere the attached nameplate near the relay terminal block.
3
Connect the relay wire (A) from U3, U4 terminal block to CN40 (Blue) of “1 : 1 Model” Connection Interface board.
Connect the relay wire (B) from CN50 (White) on the indoor P.C. board to CN51 (Red) on “1 : 1 Model” Connection
Interface board.
Indoor control P.C. board
U3, U4 terminal
block for connection
Procedure
Details
1:1 model connection interface board
Relay wire (A)
Spacer (A)
CN40
(Blue)
CN51
(Red)
CN050 (White)
• Relay wire (A)
Connect U3, U4 terminal block with “1 : 1 Model” Connection Interface CN40 (Blue). There is no polarity for wire
connection.
• Relay wire (B)
Connect CN50 (White) on indoor control P.C. board with CN51 (Red) on “1 : 1 Model” Connection Interface board.
• When installing “1 : 1 Model” Connection Interface board to electric parts box, insert three board installing spacers (A)
into holes of P.C. board.
CAUTION
After connection of the relay wires (A) and (B), bind them with banding band so that wires are not caught in. In this
time, be sure not to bind the relay wires (A) and (B) together with the power supply lines such as power cable, earth
wire, etc.; otherwise a trouble may be caused.
8

Usage
• Refer to Owner’s Manual for the central control devices (TCB-SC642TLE2, TCB-CC163TLE2)
Other Cautions
• In a group operation, be sure to turn on power supplies of all the indoor units in group control. (Within 3 minutes)
When power supply of the Header unit is not turned on, there is a possibility that the Header unit exchanges with
Follow er unit. (If Header unit is exchanged, the central control is unavailable.)
Address No. Setup
n Outline
To connect the digital inverter air conditioner to TCC-LINK centr al control system using this interface, it is required to
set up address of each connected indoor unit for central control in the f o llo wing procedure .
Completion of wiring work
System power ON
Automatic address setup
Manual setup and change of line address
Is a group control executed?
(Including twin system)
YES
Are all the indoor units
attached with this interface Header units
(Group address = 1)?
NO
After power ON, the system itself sets up automatically.
Change of line address
If automatic address setup is not correctly done, set up address manually.
* Refer the next page to item
“Manual setup/change of line address in indoor unit”.
NO
YES
Re-setup of indoor unit with this interface to
Header unit, and re-setup of indoor units
without this interface to Follower units
* Refer to item “Check and change of group address of indoor unit”.
(Page 11)
Setup of central control address
* Refer to item “Setup of central control address”.
End
9

n Manual Setup/Change of Line Address in Indoor Unit
[In case of 29 refrigerant lines or less (Includes No. of refrigerant lines at Multi side if mix ed)]
After the system power supply has been turned on, all the line addresses are allocated to “1” by automatic address
setup except group control. Therefore change setup of the line address using the wired remote controller for each
refrigerant line.
Change line address for each refrigerant line.
Central
control
device
Line
address
Indoor unit
address
Group
address
Line
address (1)
Indoor unit
address
Group
address
Refrigerant
line 1
Outdoor
Indoor
Remote
controller
unit
unit
1
1
0
Refrigerant
line 2
Outdoor
unit
Indoor
unit
Remote
controller
2
1
1
0
Refrigerant
Outdoor
unit
Indoor
unit
Remote
controller
1 3
1
1
line 3
Indoor
unit
1 3
2
2
Refrigerant
line 4
Outdoor
unit
Indoor
unit
Remote
controller
1 4
1
1
Refrigerant
line 5
Outdoor
unit
Indoor
unit
2 5
1
2
Refrigerant
Outdoor
unit
Indoor
unit
Remote
controller
2
1
1
6
line 6
Indoor
unit
2 6
3
2
Refrigerant
line 7
Outdoor
unit
Indoor
unit
7
2
2
1
2
In case of group control including twin system, the automatic address does not normally work.
Set the automatic address again from the wireless remote controller manually.
1
1
0
2
1
0
3
1
1
3
2
2
4
1
1
5
1
2
6
1
1
6
2
2
7
1
2
Indoor
unit
2 7
2
2
7
2
2
[ “1 : 1 Model” connection interface]
* For change/setup method by wired remote controller, refer to “Change method of address setup”. (Page 15)
* Allocating different numeral value for each refrigerant line, set up the line address so that it does not overlap with
other address No. (When controlling collectively VRF type units mixed with digital inverter air conditioner unit, set
up numeral value which also differs from line address at VRF type air conditioner side.)
10

n Manual Setup/Change of Line Address in Indoor Unit
[In case of 30 refrigerant lines or more (Includes No. of refrigerant lines at Multi side if mix ed)]
After the system power supply has been turned on, all the line addresses are allocated to “1” by automatic address
setup except group control. Therefore change setup of the line address using the wired remote controller for each
refrigerant line.
Central
control
device
Refrigerant
line 30
Outdoor
Indoor
Remote
controller
Line
address
Indoor unit
address
Group
address
Point (1) Set “30” to all the line addresses of indoor units attached
with these interface
Point (2) Change the indoor address so that the indoor unit numbers
do not overlap.
Point (3) When the indoor unit attached with this interface is controlled with twin
or system, change also line address of the follower unit to “30”.
1
®
unit
unit
1
0
30
Refrigerant
line 31
Outdoor
unit
Indoor
unit
Remote
controller
®
1
30
®
1
2
0
Outdoor
unit
Indoor
unit
Remote
controller
®
1
®
1
1
Refrigerant
line 32
30
1
3
Indoor
®
1
unit
®
2
30
4
Refrigerant
line 33
Outdoor
unit
Indoor
unit
Remote
controller
®
1
30
®
1
5
1
Refrigerant
line 34
Outdoor
unit
Indoor
unit
2
1
2
Refrigerant
line 35
Outdoor
unit
Indoor
unit
Remote
controller
®
1
30
®
1
1
In case of group control including twin system,
the automatic address does not normally work.
Set the automatic address again from the
wireless remote controller manually.
Indoor
unit
®
2
30
®
1
7
6
2
Refrigerant
Outdoor
unit
Indoor
unit
2
1
2
line 36
Indoor
unit
2
2
2
Line
address (1)
Indoor unit
address
Group
address
30
1
0
30
2
0
30
30
3
1
4
2
30
5
1
2
1
2
30
30
6
1
7
2
2
1
2
2
2
2
[ ® “1 : 1 Model” connection interface]
* For change/setup method by wired remote controller, refer to “Change method of address setup”. (Page 15)
* Allocating different numeral value for each refrigerant line, set up the line address so that it does not overlap with
other address No. (When controlling collectively VRF type units mixed with digital inverter air conditioner unit, set
up numeral value which also differs from line address at VRF type air conditioner side.)
11

n Check and Change of Group Address of Indoor Unit
ON / OFF
FAN
TEMP.
SWING/FIXTIME
MODE
VENT
UNITSET CL
FILTER
RESET
TEST
TIMER SET
CODE No.
UNIT No.
DATA
SET
R.C. No.
ON / OFF
FAN
TEMP.
SWING/FIXTIME
MODE
VENT
UNITSET CL
FILTER
RESET
TEST
TIMER SET
CODE No.
UNIT No.
DATA
SET
R.C. No.
3
1
1
5
4
3
In group control or twin operation, the group address is allocated to indoor unit by automatic address setup after the
system power supply has been turned on. From these addresses, “Header unit”: “1” and “Follower unit”: “2” can be
recognized. As the central control device (remote controller) communicates with “Header unit” only , set up the g roup
address from wired remote controller so that the indoor unit attached with the adapter becomes “Header unit”.
• Check method for Header unit
Beforehand check the indoor unit attached with this interface.
During stop of the equipment.
<Procedure>
Push
SET
, CL and
1
for 4 seconds or more.
(The firstly displayed unit No. is the header indoor
unit No. in the group control.)
2
The indoor unit of which fan was turned on is
the header indoor unit.
If the header unit is not one with this interface,
change it according to “How to set up Header unit”.
3
Pushing
TEST
button returns the mode to normal
mode.
TEST
buttons simultaneously
• How to set up Header unit
(In case when the indoor unit of which fan was turned on is not one attached with adapter)
Change address in the following procedure .
<Procedure>
1
Push
for 4 seconds or more.
(The firstly displayed unit No. is the header indoor
SET
, CL and
TEST
buttons simultaneously
unit No. in the group control.)
2
The indoor unit of which fan was turned on is
the header indoor unit.
3
Using the setup temperature and
buttons, select item code “14”.
4
Check that the setup data is 0001, and then
change the setup data to 0002 using the timer
and buttons.
SET
button. In this time, the setup ends
5
time
Push
if display changes from flashing to lighting.
ò
(To be continued)
12

ò
6
Push
7
Leave the item code as it is. (Select item code 14.)
8
Check that the setup data is 0002, and then change the setup data to 0001 using the timer time
9
Push
10
When the above setup completed, push
changed and then check the changed contents. (Item code 14 as it is)
* When pushing
(In this case, repeat procedure from
Note) Cancellation is unavailable if the item code is changed.
11
Push
When pushing
(The remote controller operation is not accepted for approx. 1 minute after pushing
* If the remote controller operation is not accepted for 1 minute or more after pushing
considered that the address setup is incorrect and the automatic address setup is being performed
again. Change setup again after approx. 5 minutes.
UNIT
button, and then turn on fan of the indoor unit which is attached with adapter.
and buttons.
SET
button. In this time, the setup ends if display changes from flashing to lighting.
UNIT
button to select indoor unit of which setup was
CL
button, the setup contents can be cleared.
1
.)
TEST
button. (Setup is determined.)
TEST
button, the display disappears and the status becomes the normal stop status.
TEST
button.)
TEST
button, it is
CODE No.
ON / OFF
FAN
MODE
VENT
UNITSET CL
6, 10
8
11
FILTER
RESET
SET
TEMP.
DATA
TEST
UNIT No.
R.C. No.
TIMER SET
SWING/FIXTIME
9
n Setup of Central Control Address
* For details, refer to Installation Manual for central remote controller.
1. Address setup method is classified into the following three methods .
1) Manual setup from wired remote controller
2) Manual setup from central remote controller
3) Automatic setup from central remote controller
2. In group control, set up the central control address to the Header unit of the group .
13

Determination of indoor address
Is automatic address set up?
Manual setup
Setup from wired remote controller
Manual address setup from
wired remote controller
Push
TEST
1
and
VENT
buttons
simultaneously for 4 seconds
or more.
Do not push
2
Set “03” to item code with
temperature setup
UNIT
button.
and
buttons.
3
Using timer setup/time and
buttons, set up the central
control address.
4
Registration completes with
SET
button. (
SETTING
changes
from flashing to lighting.)
5
6
TEST
Push
button.
Initial setup starts.
(For approx. 1 minute)
7
End
Automatic setup
Setup from central remote controller
Manual address setup with item code
“C1” of central remote controller
1
Push and
ZONE
buttons
simultaneously for 4 seconds or
more.
2
Set “C1” to item code with temperature setup
and
buttons.
3
4
Push
Select
SET
ZONE
button.
or
buttons to select zone and group to
be registered.
5
Using and , perform registration. (Select the indoor unit.)
6
Registration completes with
button.
7
Repeat procedure 4 to 6.
8
Push button.
9
flashes and the initial setup
SETTING
starts.
SET
Automatic address setup with
item code “C2” of central
remote controller
1
Push and
ZONE
buttons simultaneously for 4
seconds or more.
2
Set “C2” to item code with
temperature setup
and buttons.
3
Push
button and the
SET
address setup starts. “C2”
goes on and
4
When
SETTING
flashes.
SETTING
goes off and “C2”
flashes, setup ends.
5
Push button.
SETTING
6
flashes and the initial
setup starts.
(For approx. 1 minute)
7
End
10
End
Check method
Check overlap of central
control addresses
Make operation status by
pushing
buttons
(Example)
Central
control device
of central remote controller
three times each.
When there is overlapped units
An alarm code “L20” is
displayed on the remote
controller and alarm code
“L20” or “P30” on central
remote controller, respectively.
Wired remote controller:
Displayed immediately
central remote controller:
After 4 minutes at maximum
Overlapped
YES
Overlapped?
No overlap
(Line - Indoor - Group)
<Central control address/zone/group correspondence table>
Central
control
Address
1
2
3
4
5
6
7
8
9
10
11
12
13
14
15
16
Zone Group
1
End
Outdoor unit
Indoor unit
Central
control
Address
1
2
3
4
5
6
7
8
9
10
11
12
13
14
15
16
1-1-0
17
18
19
20
21
22
23
24
25
26
27
28
29
30
31
32
Outdoor unit
Indoor unit
1-2-0
Zone Group
2
1
2
3
4
5
6
7
8
9
10
11
12
13
14
15
16
*1
In case of digital inverter air conditioner,
if the same line address is set up to the
multiple indoor units which are controlled
collectively, the central control address
setup is impossible by this method.
Central
control
Address
33
34
35
36
37
38
39
40
41
42
43
44
45
46
47
48
Zone Group
3
10
11
12
13
14
15
16
1
2
3
4
5
6
7
8
9
Central
control
Address
49
50
51
52
53
54
55
56
57
58
59
60
61
62
63
64
99
Zone Group
4
Not set up
1
2
3
4
5
6
7
8
9
10
11
12
13
14
15
16
14

n Address Setup/Change Method
Outdoor
#1
Indoor Indoor Indoor
Outdoor
#2
Indoor Indoor
1
2
2
1
3
2
2
1
2
2
2
2
Follower unitHeader unit
Line address 1
Indoor unit address 1
Group address 1
Remote
controller
<Wiring example of 2 lines>
DATA
SET
TEMP.
3, 6, 9
4, 7, 10
<Procedure>
SET
1
Push
simultaneously for 4 seconds or more.
LCD changes to flashing.
(The firstly displayed unit No. is the header indoor unit No. in the group control.)
2
In group control, use
Select the indoor unit No. (The fan of the selected indoor unit is turned on.)
, CL and
TEST
buttons
UNIT
button for change.
14
1
FILTER
RESET
TEST
TIMER SET
UNIT No.
R.C. No.
FAN
SWING/FIXTIME
UNITSET CL
<Line address>
3
Using the setup temperature and buttons, select item code “12”.
CODE No.
ON / OFF
MODE
VENT
5, 8, 11
2, 12, 13
4
Using timer time and buttons, set up the line address.
5
SET
Push
<Indoor unit address>
6
Using the setup temperature and
buttons, select item code “13”.
7
Using timer time and buttons, set up
the indoor unit address.
8
SET
Push
<Group address>
9
Using the setup temperature and
buttons, select item code “14”.
10
Using timer time and buttons, set up Individual
= 0000, Header unit = 0001, and Follower unit = 0002.
11
Push
12
Using
13
After the above change, push
14
If all is right, push
SET
Repeat procedure from
button. (OK when display goes on.)
button. (OK when display goes on.)
button. (OK when display goes on.)
UNIT
button, select an indoor unit No. to be changed at the next time.
3
to 12 and change setup so that addresses are not overlapped.
UNIT
button to check the changed contents.
TEST
button. Setup ends.
15
Group address
Individual : 0000
Header unit : 0001
Follower unit : 0002
In case of group control

Alarm code when addresses are overlapped
Case 1
Case 2
Procedure
When line addresses are overlapped
Central
control device
Line address : 1
Indoor address : 1
Group address : 0
Central control
address : 1
When line addresses are overlapped (Both Line 1 and 2 operate)
Central
control device
Line 1
Outdoor
Indoor
Remote
controller
Line 1
Outdoor
Line address : 1
Indoor address : 1
Group address : 0
Central control
address : 2
Line 2
Outdoor
Indoor
Remote
controller
Line 2
Outdoor
Alarm code
Wired remote controller side
Line 1: E08
Line 2: E08
Central remote controller side
E08 to Line 1 or Line 2
Wired remote controller side
Line 1: L20
Line 2: L20
Central remote controller side
L20 to Line 1 or Line 2
Indoor
Line address : 1
Indoor address : 1
Group address : 0
Central control
address : 1
Case 3 Wired remote controller side
When only one-side Line 2 operates from remote controller, and overlap of the
central control address is detected in Case 2
Remote
controller
Line address : 2
Indoor address : 1
Group address : 0
Central control
address : 1
• Line 1: During stop
• Line 2: Under operation (Overlap of central control address is detected.)
Indoor
Remote
controller
Line 1: No alarm
Line 2: L20
Central remote controller side
Line 1: No alarm
Line 2: L20
or
Line 1: Alarm code is output even if it stops.
Line 2: Alarm code is not output to the central side.
(Alarm is displayed on the wired remote controller.)
Line 1: P30
Line 2: No alarm
16
EH99845701
 Loading...