

915_TCB-EXS21E.book Page 1 Wednesday, August 1, 2007 1:26 AM
Save These Instructions!
Conserver ce mode d’emploi
Bewahren Sie bitte diese
Bedienungsanleitung auf.
Conservate queste istruzioni
Guarde estas instruções
Φυλάξτε τις οδηγίες αυτές
Guarde estas instrucciones
Bewaar deze gebruiksaanwijzing!
TCB-EXS21TLE
Schedule Timer
Temporisateur
Zeitplangeber
Timer programmatore
Temporizador
Χρονοδιακπτης προγραμματισμού
Temporizador de programas
Tijdklok
• INSTRUCTION MANUAL
• MODE D’EMPLOI
• BEDIENUNGSANLEITUNG
• ISTRUZIONI PER L’USO
• MANUAL DE INSTRUÇÕES
• EΓXEIPIΔIO OΔHΓIΩN
• MANUAL DE INSTRUCCIONES
• HANDLEIDING
EG
F
D
I
P
GR
ES
NE
Pub. OI-85464189915000Pub. OI-85464189915000
Made in Japan
915_TCB-EXS21E.book Page 2 Wednesday, August 1, 2007 1:26 AM
Contents
Product Information........................................................................................... 2
Alert Symbols .................................................................................................... 2
Installation Location .......................................................................................... 3
Electrical Requirements .................................................................................... 3
Safety Instructions............................................................................................. 3
Names and Functions of Parts.......................................................................... 4
Using the Schedule Timer................................................................................. 5
Important Information to Remember ............................................................... 19
Troubleshooting............................................................................................... 21
Page
Operating Buttons................................................................................. 4
Display .................................................................................................. 5
Setting the Present Time ...................................................................... 6
Setting Today’s Day of the Week .......................................................... 7
Setting Up Programmed Operations..................................................... 8
Setting Errors...................................................................................... 10
How to Check Program Times ............................................................ 11
How to Copy Program Times.............................................................. 12
How to Set Holidays in a Scheduled Week of Operation .................... 16
How to Disable the Timer Operation................................................... 17
How to Clear Programs....................................................................... 18
1 Schedule Timer and Air Conditioner Operation .................................. 19
2 Power Outages ................................................................................... 20
Product Information
If you have problems or questions concerning your Air Conditioner, you will
need the following information. Model and serial numbers are on the nameplate
on the bottom of the cabinet.
Model No. Serial No. ____________________
Date of purchase ________________________________________________
Dealer’s address ________________________________________________
TCB-EXS21TLE
Phone number ________________
DECLARATION OF CONFORMITY
This product is marked « » as it satisfies EEC Directive No. 72/23/EEC, 89/
336/EEC, 92/31/EEC and 93/68/EEC, and conforms with following standards.
EN60335-1 EN55014-1
EN60335-2-40 EN55014-2
This declaration will become void in case of misusage and/or from non
observance though partial of Manufacturer’s installation and/or operating
instructions.
Alert Symbols
The following symbols used in this manual, alert you to potentially
dangerous conditions to users, service personnel or the appliance:
This symbol refers to a hazard or unsafe
practice which can result in severe personal
injury or death.
CAUTION
This symbol refers to a hazard or unsafe
practice which can result in personal injury
or product or property damage.
2
OI-915-2-EG
915_TCB-EXS21E.book Page 3 Wednesday, August 1, 2007 1:26 AM
Installation Location
• We recommend that this schedule timer be installed properly by
qualified installation technicians in accordance with the Installation
Instructions provided with the schedule timer.
• Do not install this schedule timer where there are fumes or
• Do not install the schedule timer where excessively high heat-
Electrical Requirements
1. All wiring must conform to the local electrical codes. Consult your dealer or a
qualified electrician for details.
2. Wiring must be done by a qualified electrician.
flammable gases, or in an extremely humid space such as a
greenhouse.
generating objects are placed.
CAUTION
CAUTION
To warm up the system, the power mains must
be turned on at least twelve (12) hours before
operation. Leave the power mains ON unless
you will not be using this appliance for an
extended period.
Power mains
ON
Safety Instructions
• Read this Instruction carefully before using this schedule timer. If you
still have any difficulties or problems, consult your dealer for help.
• The air conditioner is designed to give you comfortable room
conditions. Use this only for its intended purpose as described in this
Instruction Manual.
• Never touch the unit with wet hands.
• Never use or store gasoline or other flammable vapor or liquid near
the air conditioner — it is very dangerous.
• The air conditioner has no ventilator for intaking fresh air from
outdoors. You must open doors or windows frequently when you
use gas or oil heating appliances in the same room, which consume
a lot of oxygen from the air. Otherwise there is a risk of suffocation
in an extreme case.
• Do not turn the air conditioner on and off from the power mains
switch. Use the ON/OFF operation button.
• Do not stick anything into the air outlet of the outdoor unit. This is
dangerous because the fan is rotating at high speed.
• Do not let children play with the air conditioner.
• Do not cool or heat the room too much if babies or invalids are
present.
EG
OI-915-3-EG
3
915_TCB-EXS21E.book Page 4 Wednesday, August 1, 2007 1:26 AM
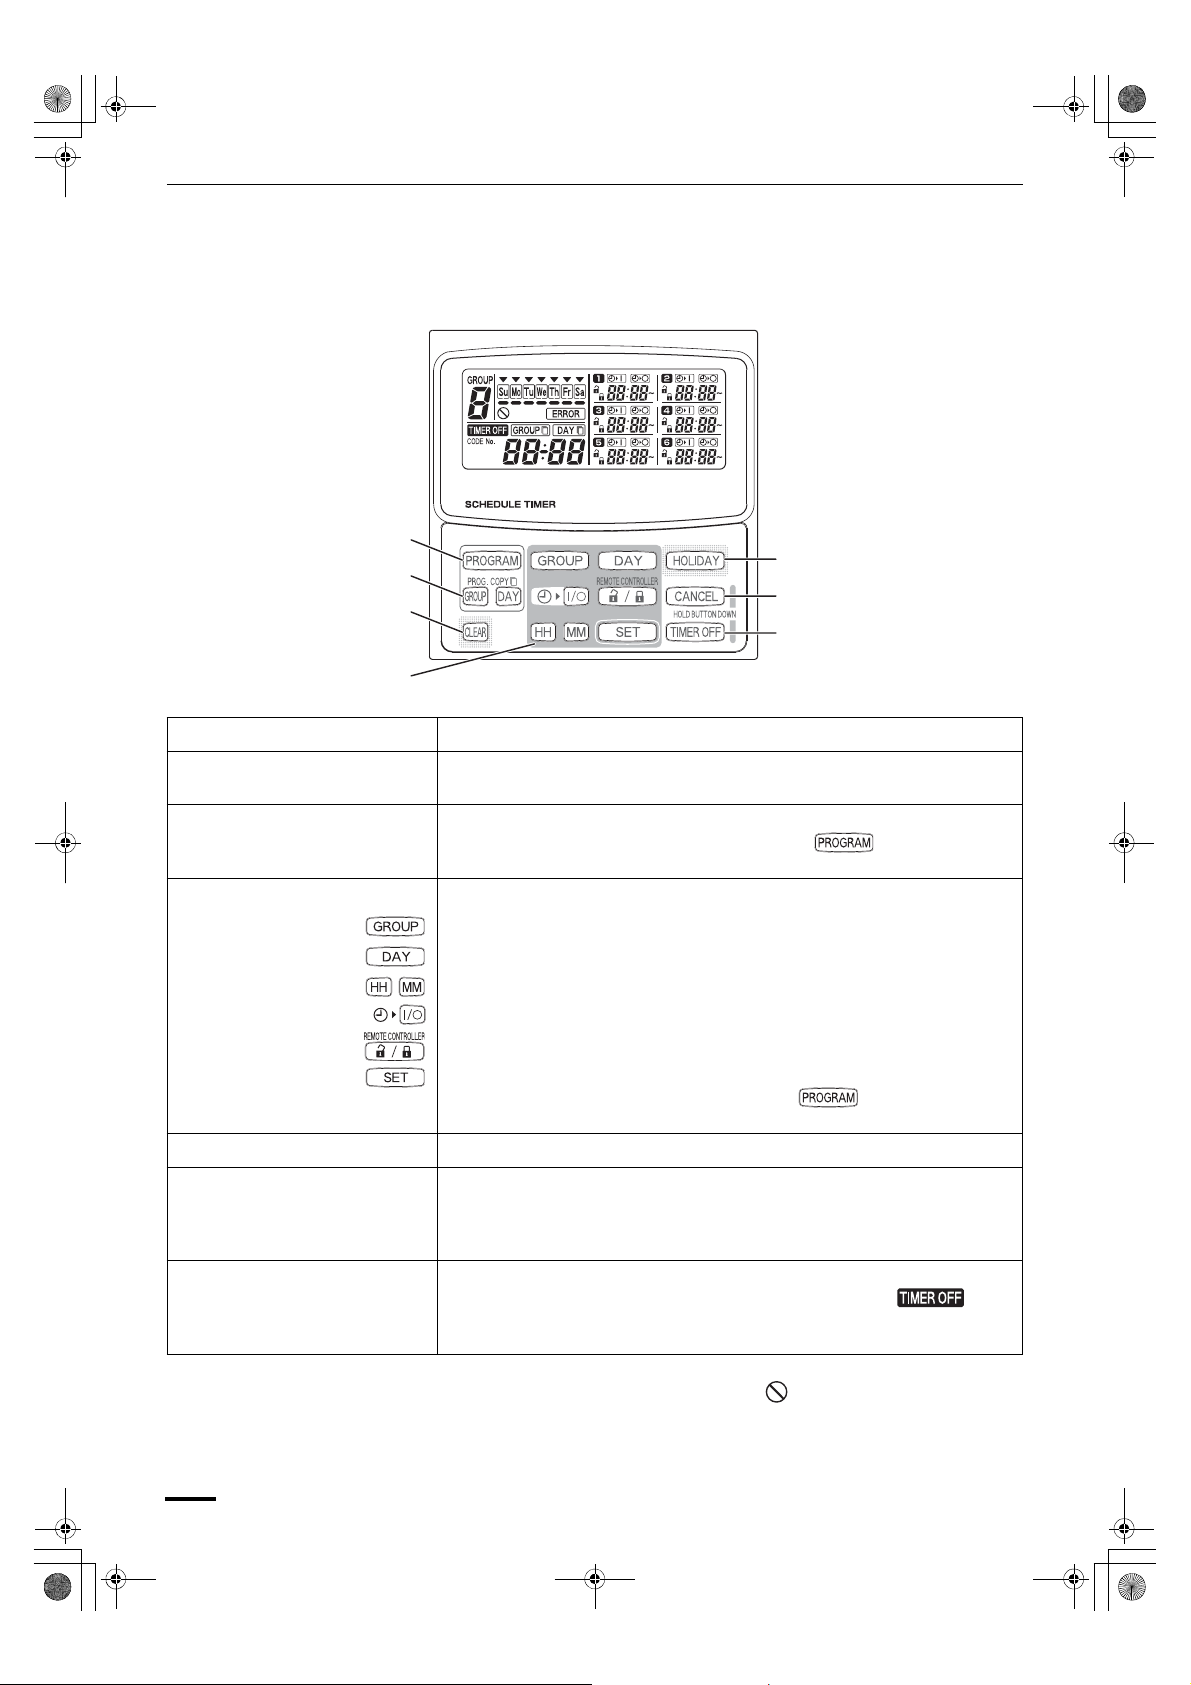
Names and Functions of Parts
Operating Buttons
A: PROGRAM button
B: PROG. COPY buttons
C: CLEAR button
D: Setting buttons
E: HOLIDAY button
F: CANCEL button
G: TIMER OFF button
A: PROGRAM button Use to start setting programs and to enter program settings.
B: PROG. COPY buttons Use to copy programs to groups or specific days in a schedule. (Refer to
page 12)
C: CLEAR button Press to clear the settings of the currently displayed program.
• The current program is not cleared unless the button is pressed
after pressing the CLEAR button.
D: Setting buttons Use to make program settings and to set the present time.
Press to set groups for programmed operation.
Press to set today’s day and days of programmed operation.
Press to set the present time and times used in programmed operation.
Use to start/stop indoor units via the timer.
Use to enable/disable remote controller operation via the timer.
Use to set programmed operation trigger time.
• Program settings are not entered unless the button is pressed at
the end of setting operations.
E: HOLIDAY button Press to set and cancel holidays during a scheduled week of operation.
F: CANCEL button Press to cancel the current program setting operation, copying operation or
holiday setting operation. When the CANCEL button is held down for 2
seconds, the current setting operation or copying operation is canceled and
the normal display returns.
G: TIMER OFF button Press to turn the timer OFF when timer operation will not be used for a long
period of time. When this button is held down for 2 seconds,
appears on the display. Programs cannot be run until the button is again held
down for 2 seconds.
• Some of the above features are disabled when the unit is installed. If the
button of a disabled feature is pressed, appears on the display.
For more information, contact your dealer.
4
OI-915-4-EG
915_TCB-EXS21E.book Page 5 Wednesday, August 1, 2007 1:26 AM
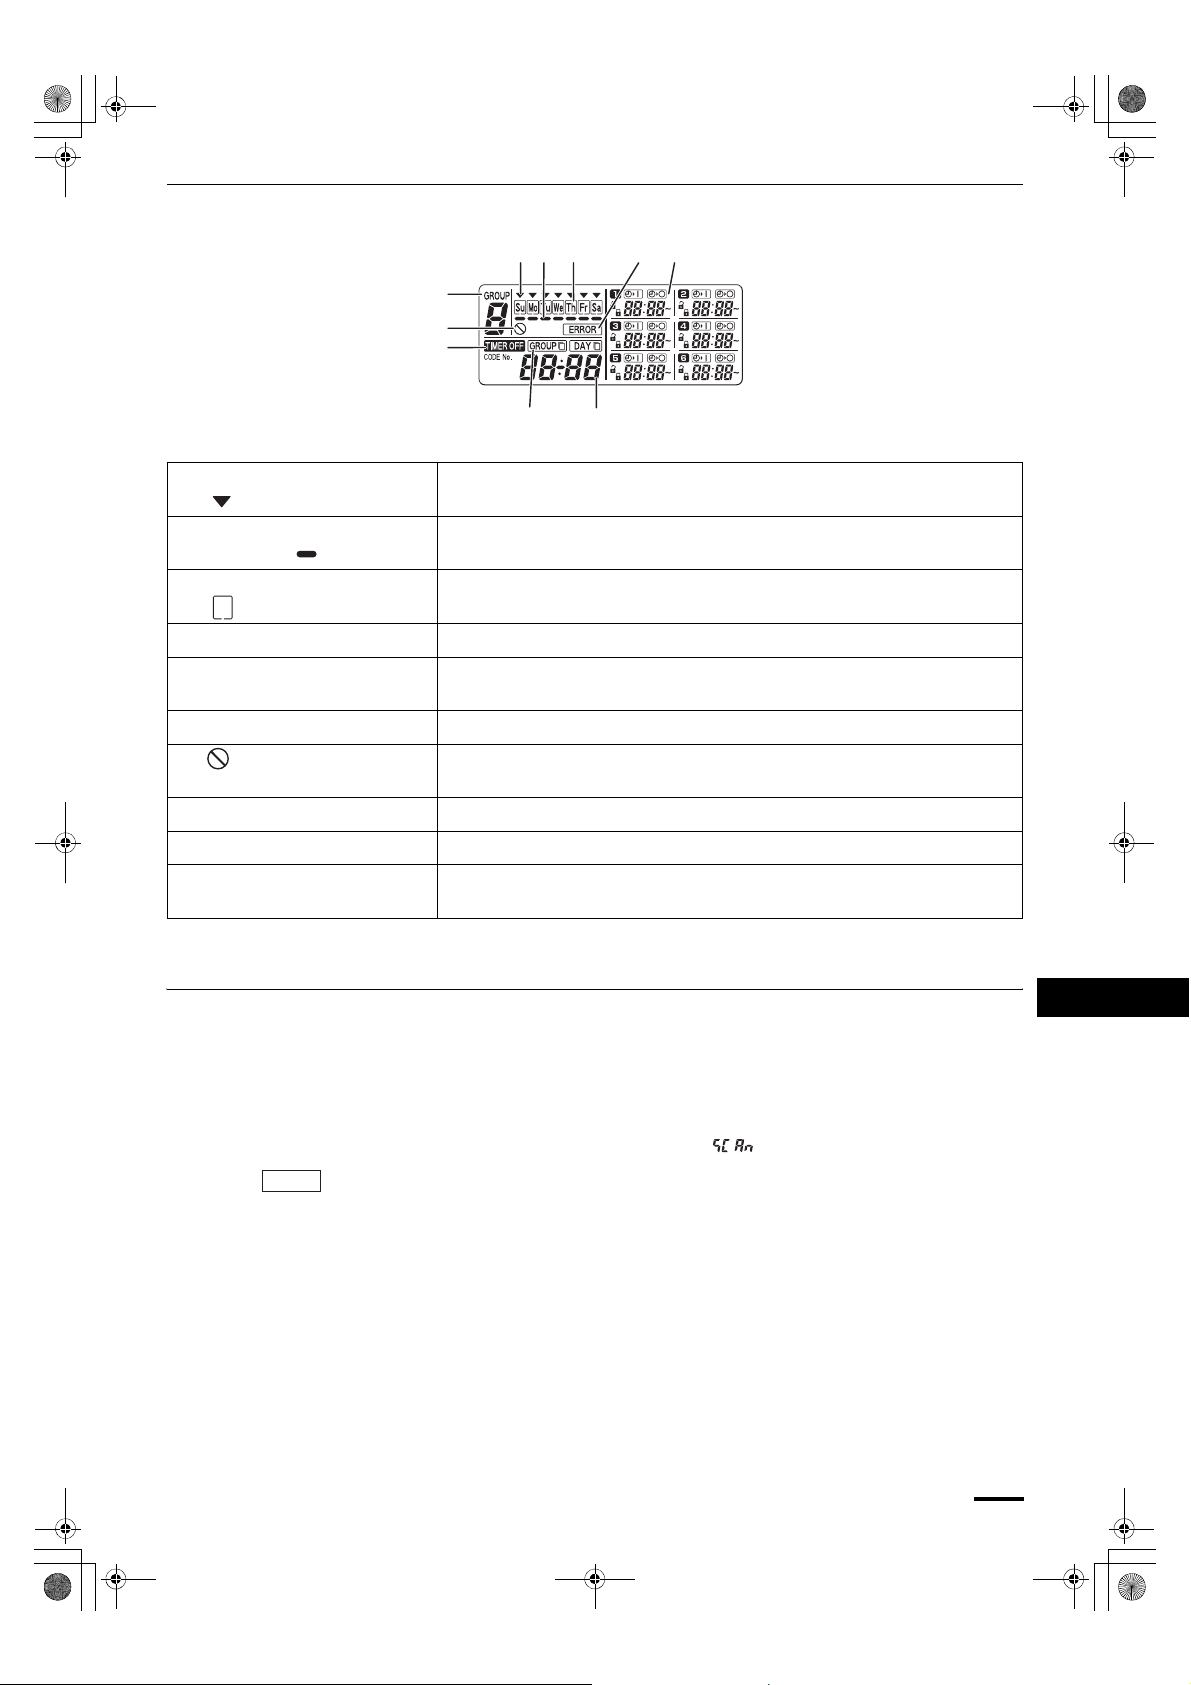
Display
F
G
H
AB C D E
IJ
A: Today’s day of the week
()
B: Program schedule
indication ( )
C: Holiday schedule indication
()
D: ERROR indication Displayed when a mistake is made during timer setting.
E: Timer program Displays set timer programs. Also, indicates the copy source/destination
F: Group No. Up to 8 groups can be selected and displayed.
G: (Disabled Feature)
indication
H: TIMER OFF indication Displayed when the timer has been turned OFF.
I: Copy mode indication Displayed when copying a program into a group or day of the schedule.
J: Present time Displays the present time on a 24-hour clock. Also, displays settings in the
Indicates today’s day of the week.
Appears under days that are scheduled for program operation.
Appears around scheduled holidays. (Refer to page 16)
during group program copying.
Displayed if the selected feature was disabled during installation.
various setting modes.
Using the Schedule Timer
EG
To use the schedule timer, follow the steps below.
STEP 1 Turn ON power to the air conditioner.
• Turn ON power to the air conditioner connected to the schedule timer. The schedule timer performs
initial communications with the indoor units, during which blinks on the display.
NOTE
Do not turn off the power mains in heating and cooling seasons. (This keeps the crankcase heater
electricity turned on, which protects the compressor at startup.) If the air conditioner has been OFF for
a long period of time, turn on power 12 hours before starting operation.
STEP 2 Make the initial settings of the schedule timer.
• Set the present time and today’s day of the week. (Refer to page 6)
STEP 3 Set up programs of the schedule timer.
• Make settings for programmed operation. (Refer to page 8)
OI-915-5-EG
5
915_TCB-EXS21E.book Page 6 Wednesday, August 1, 2007 1:26 AM
Setting the Present Time
Set the present time. (Example: When the present time is 12:45)
STEP 1 Hold down the SET button and press the HH button to
set the hour.
• The hour increases one hour at a time with each single
press of the HH button while the SET button is held
down.
• The hour scrolls rapidly when both the SET button and
HH button are held down. (Example: To set 12:00,
release the HH button when “12” is displayed.)
• When the SET button is released, the hour is set and
the indication changes from blinking to lighting.
STEP 2 Hold down the SET button and press the MM button to
set the minutes.
• The minutes increase one minute at a time with each
single press of the MM button while the SET button is
held down.
• The minutes scroll rapidly when both the SET button
and MM button are held down. (Example: To set 00:45,
release the MM button when “45” is displayed.)
• When the SET button is released, the minutes are set
and the indication changes from blinking to lighting.
NOTE
• Pressing just the HH or MM button does not change the time.
6
OI-915-6-EG
915_TCB-EXS21E.book Page 7 Wednesday, August 1, 2007 1:26 AM
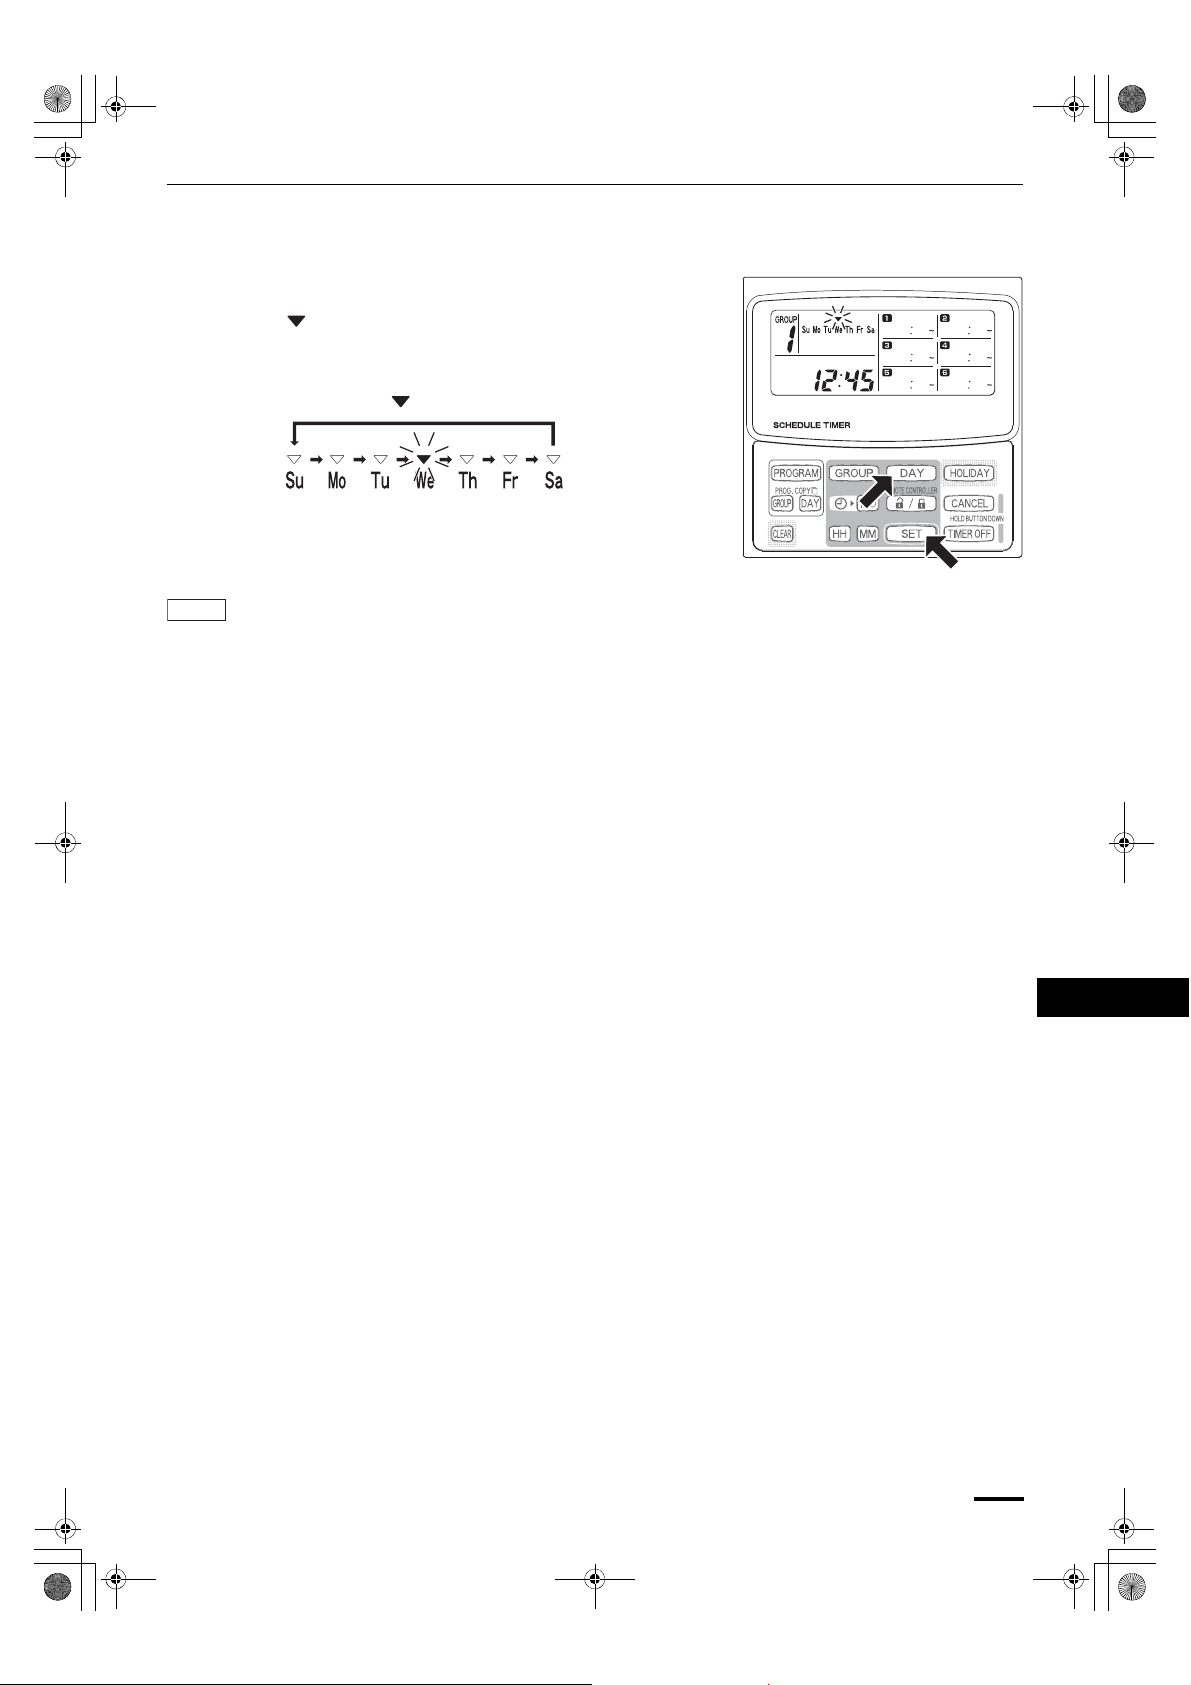
Setting Today’s Day of the Week
Set today’s day of the week. (Example: When today is Wednesday)
STEP 1 Hold down the SET button and press the DAY button
to set today’s day of the week.
• blinks and moves one day at a time across the days
of the week with each single press of the DAY button
while the SET button is held down.
• When the SET button is released, the day of the week
is set and the changes from blinking to lighting.
NOTE
• Pressing just the DAY button does not change the day of the week.
OI-915-7-EG
EG
7
915_TCB-EXS21E.book Page 8 Wednesday, August 1, 2007 1:26 AM
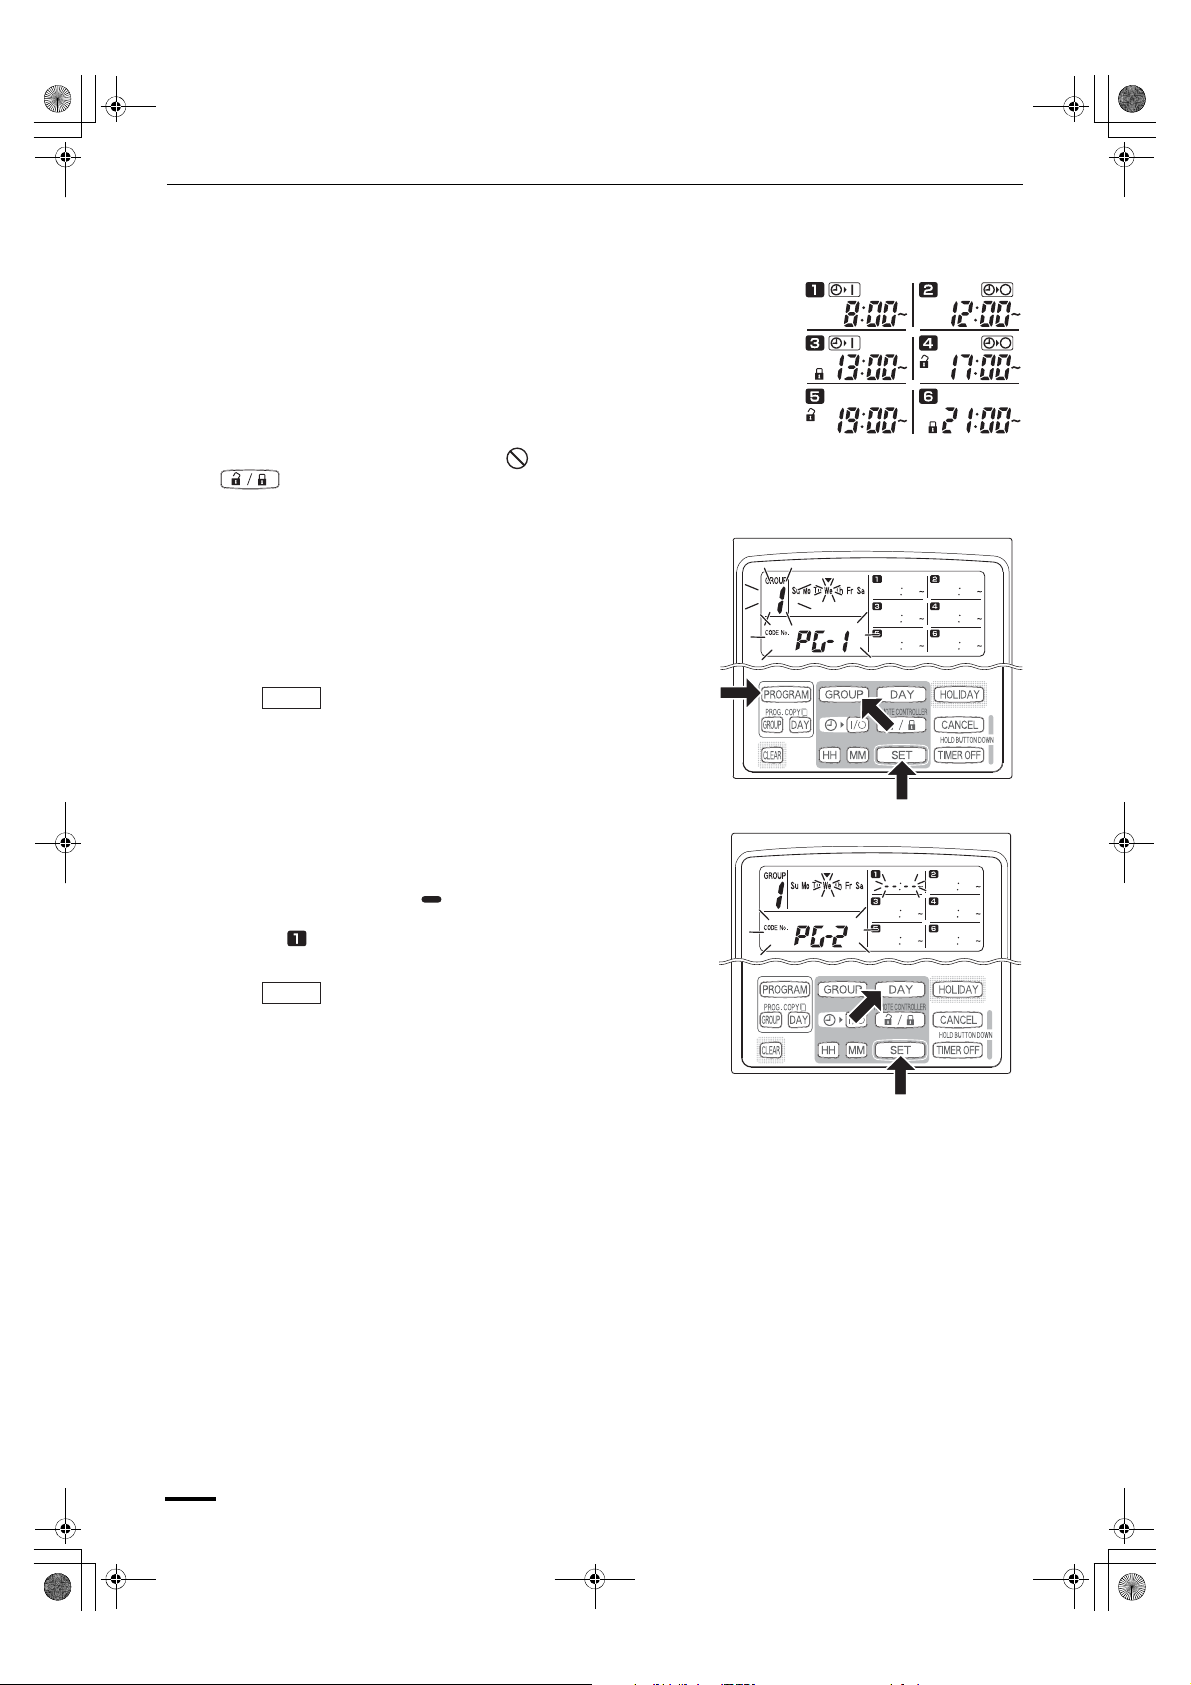
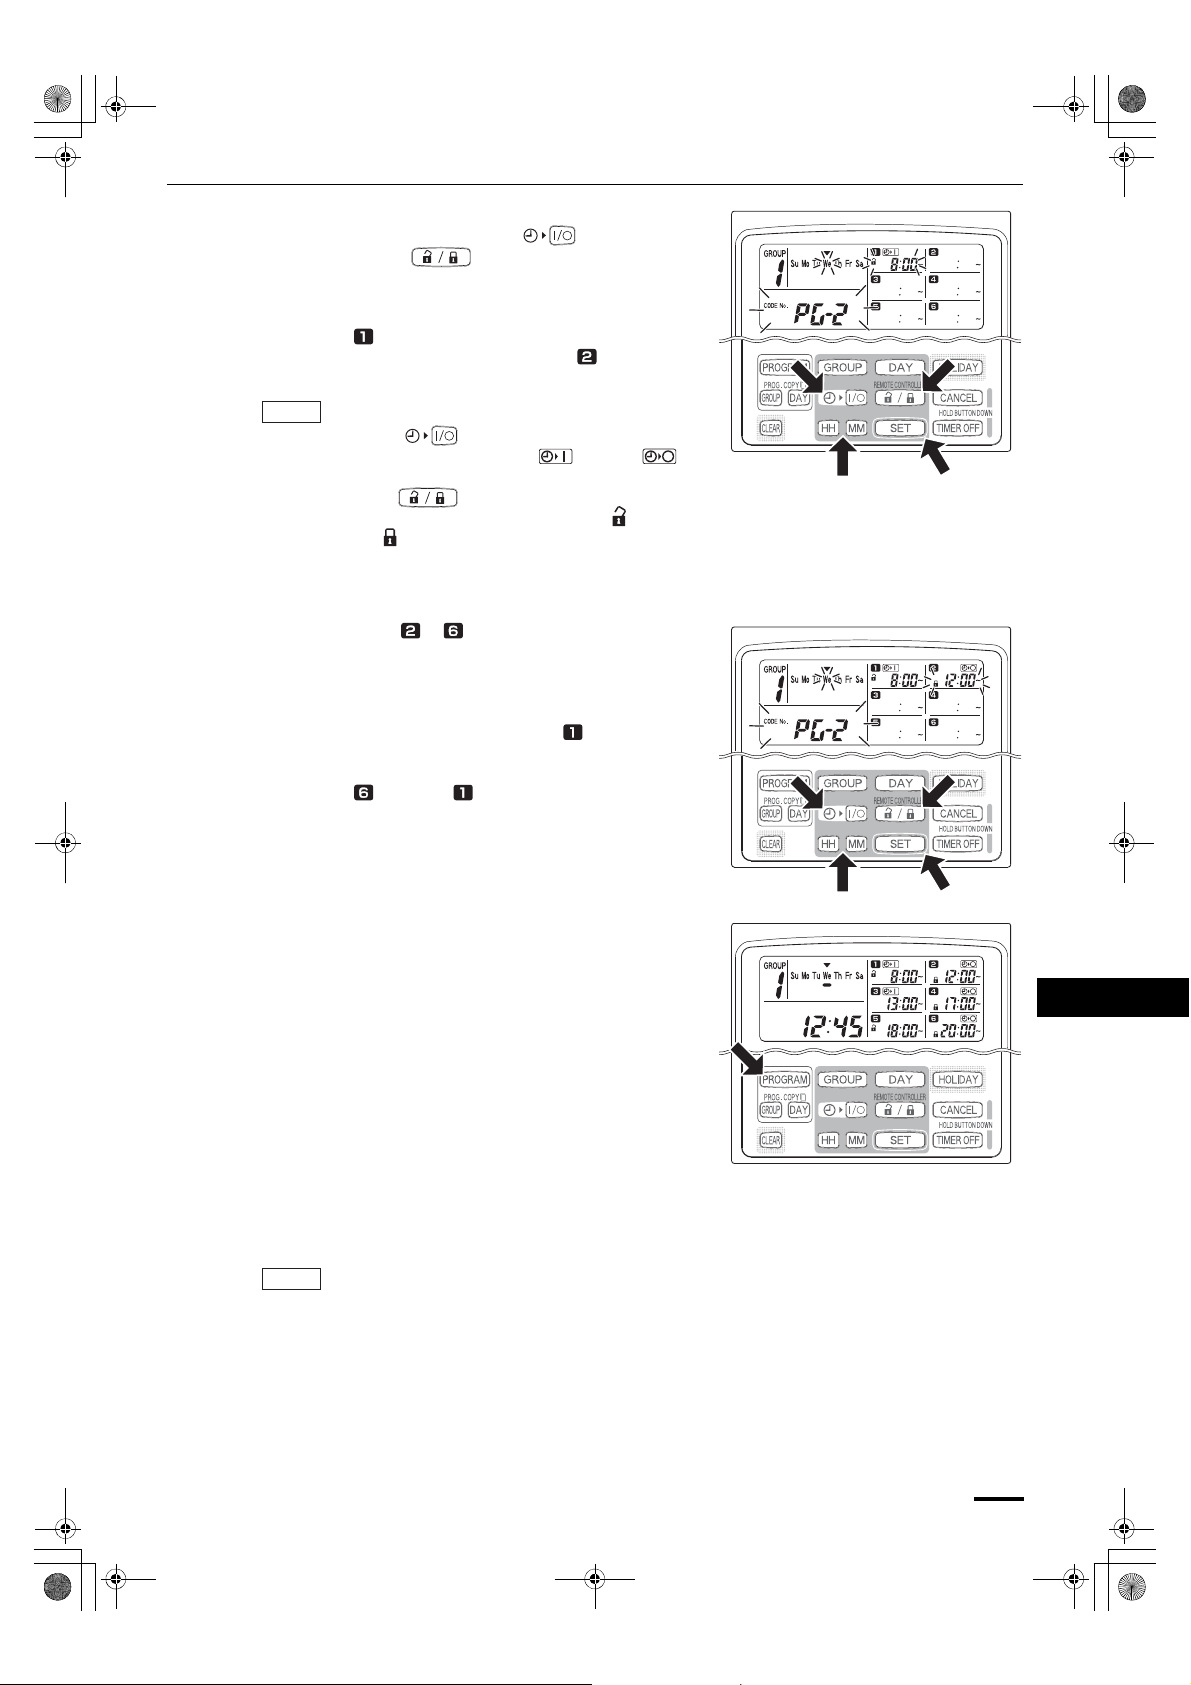
Setting Up Programmed Operations
Correctly set the present time and today’s day of the week.
Unless both are correctly set, the programs will not run as expected.
• Up to 6 programmed operations can be set per day for each group and day
of the week.
• A combination of the below operations can be set for each timer program.
– Air conditioner starting/stopping
– Remote controller operation enable/disable *
• To change the settings of an existing program, use the same below
procedure used to set up a new program.
*1 The remote controller operation enable/disable setting is disabled
depending on installation conditions. If so, appears on the display when
the button is pressed.
For more information, contact your dealer.
STEP 1 Press the PROGRAM button to select a group.
• When the PROGRAM button is pressed, the group
No. and today’s day of the week start blinking and the
present time indication changes to a blinking “PG-1”.
• Press the GROUP button to select a group for
programmed operation and then press the SET
button.
1
Example settings
NOTE
• Group selection is disabled depending on installation
conditions. If so, proceed to the next step.
• The number of selectable groups is set during
installation.
STEP 2 Press the DAY button and select a day of the week for
programmed operation.
• When the SET button is pressed, the program
schedule marker ( ) changes from blinking to
lighting and, at the same time, the time set in program
starts blinking. Also, the present time indication
changes to a blinking “PG-2”.
NOTE
• The currently selected day of the week blinks slowly at
this time.
8
OI-915-8-EG
915_TCB-EXS21E.book Page 9 Wednesday, August 1, 2007 1:26 AM
STEP 3 Set up the program and press the SET button.
• Select timer operation with the (timer ON/
OFF) button and (remote controller operation
enable/disable) button. Then, set the trigger time with
the HH and MM buttons, and press the SET button.
• When the SET button is pressed, the time set in
program changes from blinking to lighting and, at
the same time, the time set in program starts
blinking.
NOTE
• Every time the button is pressed, the timer
indication changes in the order of (ON) o
(OFF) o no indication.
• Every time the button is pressed, the remote
controller indication changes in the order of
(enabled) o (disabled) o no indication.
• The remote control operation enable/disable setting is
disabled depending on installation conditions. In this
case, only timer ON/OFF can be set.
STEP 4 Set up programs ~ in the same way.
• When the SET button is pressed, settings are
automatically arranged in the order of earliest time
first.
• If the SET button is pressed without any new settings
being made in the program, program starts
blinking again and settings can be changed.
• Similarly, if the SET button is pressed after setting up
program , program starts blinking again.
STEP 5 Press the PROGRAM button.
• Program settings are entered and the normal display
returns.
STEP 6 Set up programmed operation for other groups and days of the week in the same way.
Programs that have already been set up can be copied into other groups and days of the week. (Refer
to page 12)
NOTE
• A “0:00” time setting is interpreted to mean 12:00 midnight.
• To cancel program settings during program setup (while “PG-1” or “PG-2”is blinking on the
display), hold down the CANCEL button for more than 2 seconds. The normal display
returns.
• If settings are canceled without pressing the PROGRAM button, settings are not entered.
EG
OI-915-9-EG
9
915_TCB-EXS21E.book Page 10 Wednesday, August 1, 2007 1:26 AM
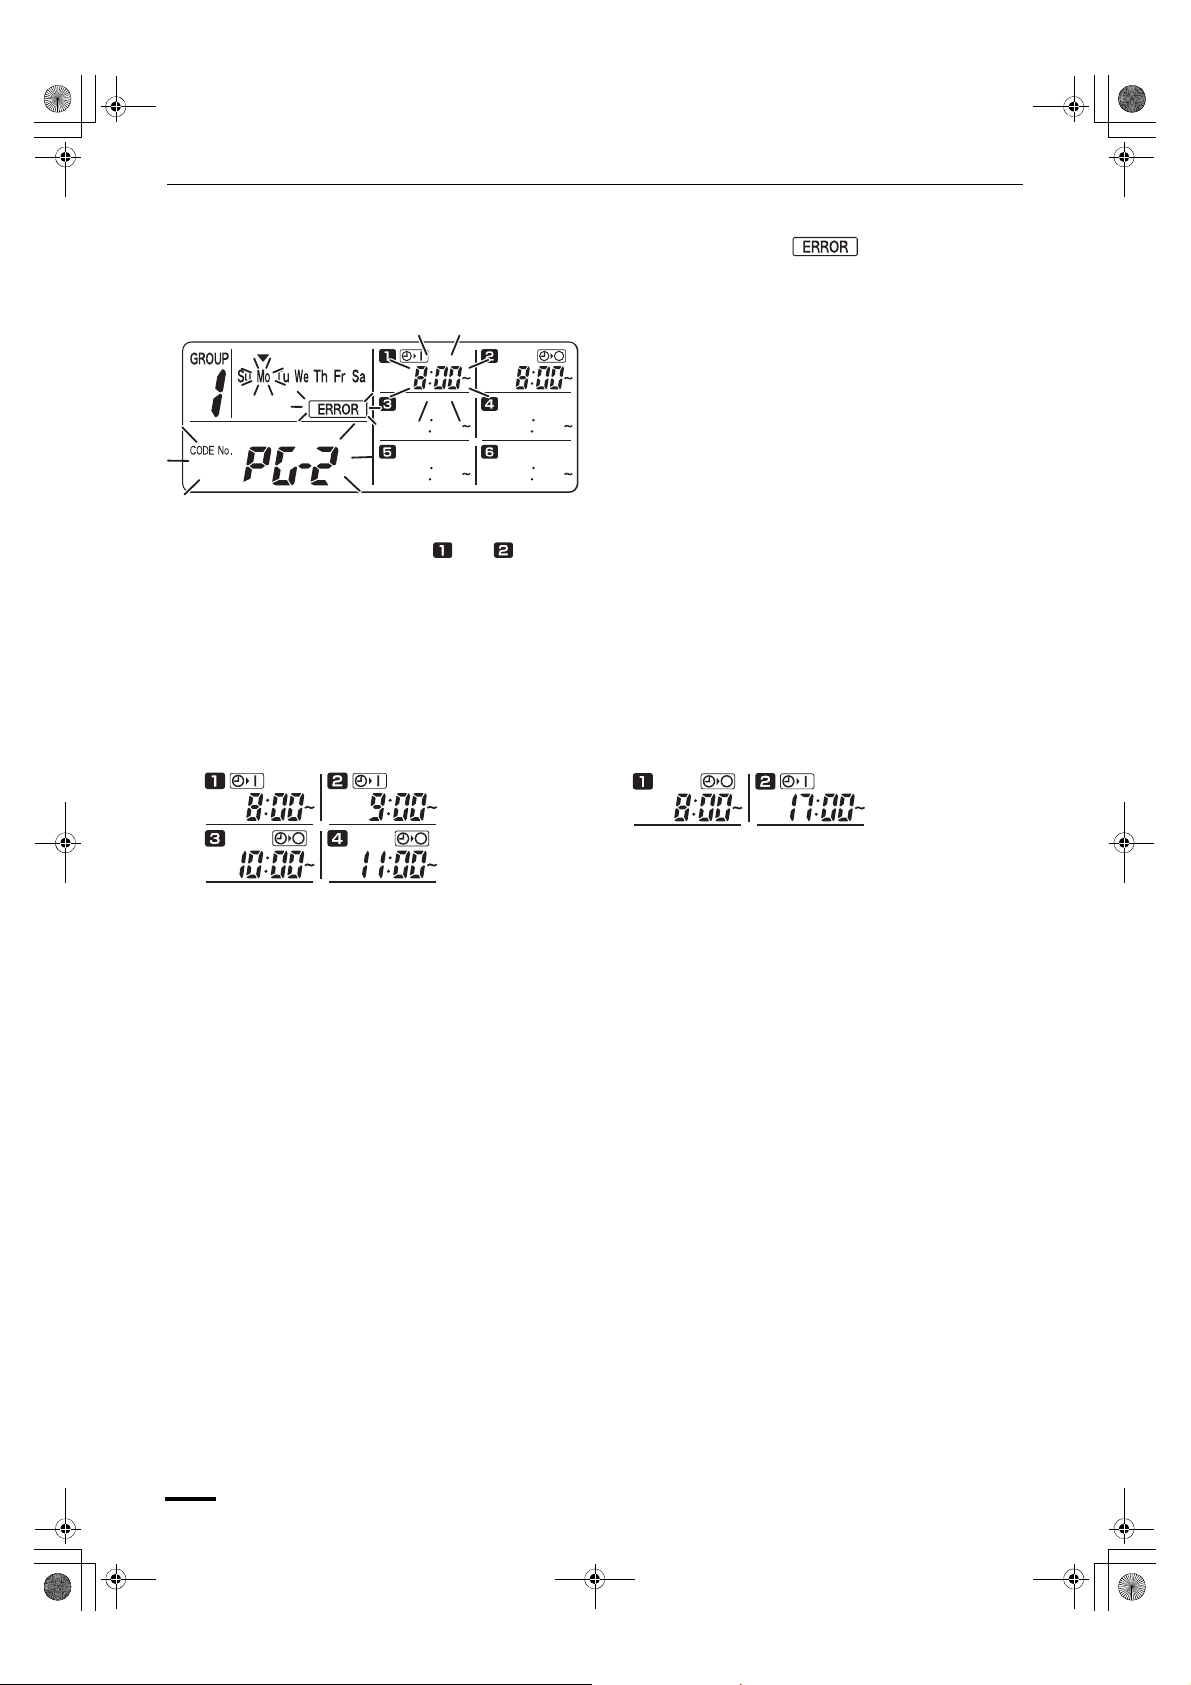
Setting Errors
If time is set as shown below while setting up a program, “ERROR” is displayed (the indication blinks).
Therefore, correct the time setting.
If Program Times Are the Same
STEP 1 Every time the SET button is pressed, the setting mode switches between programmed operations of
the same time setting ( and in the above example), therefore select the time setting to correct.
STEP 2 Change the time setting with the HH and MM buttons so that the times are no longer the same.
STEP 3 Press the SET button and check “ERROR” is not displayed.
STEP 4 Press the PROGRAM button to end the setting mode.
Example Time Settings That Do Not Cause Errors
The below time settings do not generate an error.
1) When ON and OFF times are staggered 2) When OFF time is earlier than ON time
10
OI-915-10-EG
915_TCB-EXS21E.book Page 11 Wednesday, August 1, 2007 1:26 AM
How to Check Program Times
You can check the programmed times for each group and day of the week.
STEP 1 Press the GROUP button and select a group whose
time you want to check.
NOTE
• Group selection is disabled depending on
installation conditions. If so, proceed to the next
step.
STEP 2 Press the DAY button.
• When the DAY button is pressed the first time,
tomorrow’s day of the week starts blinking and the
program settings for tomorrow are displayed.
• Every time the DAY button is pressed, the program
settings change in order of the days of the week.
• Pressing the GROUP button displays the program
settings of another group on that same day.
STEP 3 End checking.
• Press the CLEAR button. The normal display
returns.
NOTE
• Holding down the CANCEL button for more than 2
seconds also returns the normal display.
EG
OI-915-11-EG
11
915_TCB-EXS21E.book Page 12 Wednesday, August 1, 2007 1:26 AM
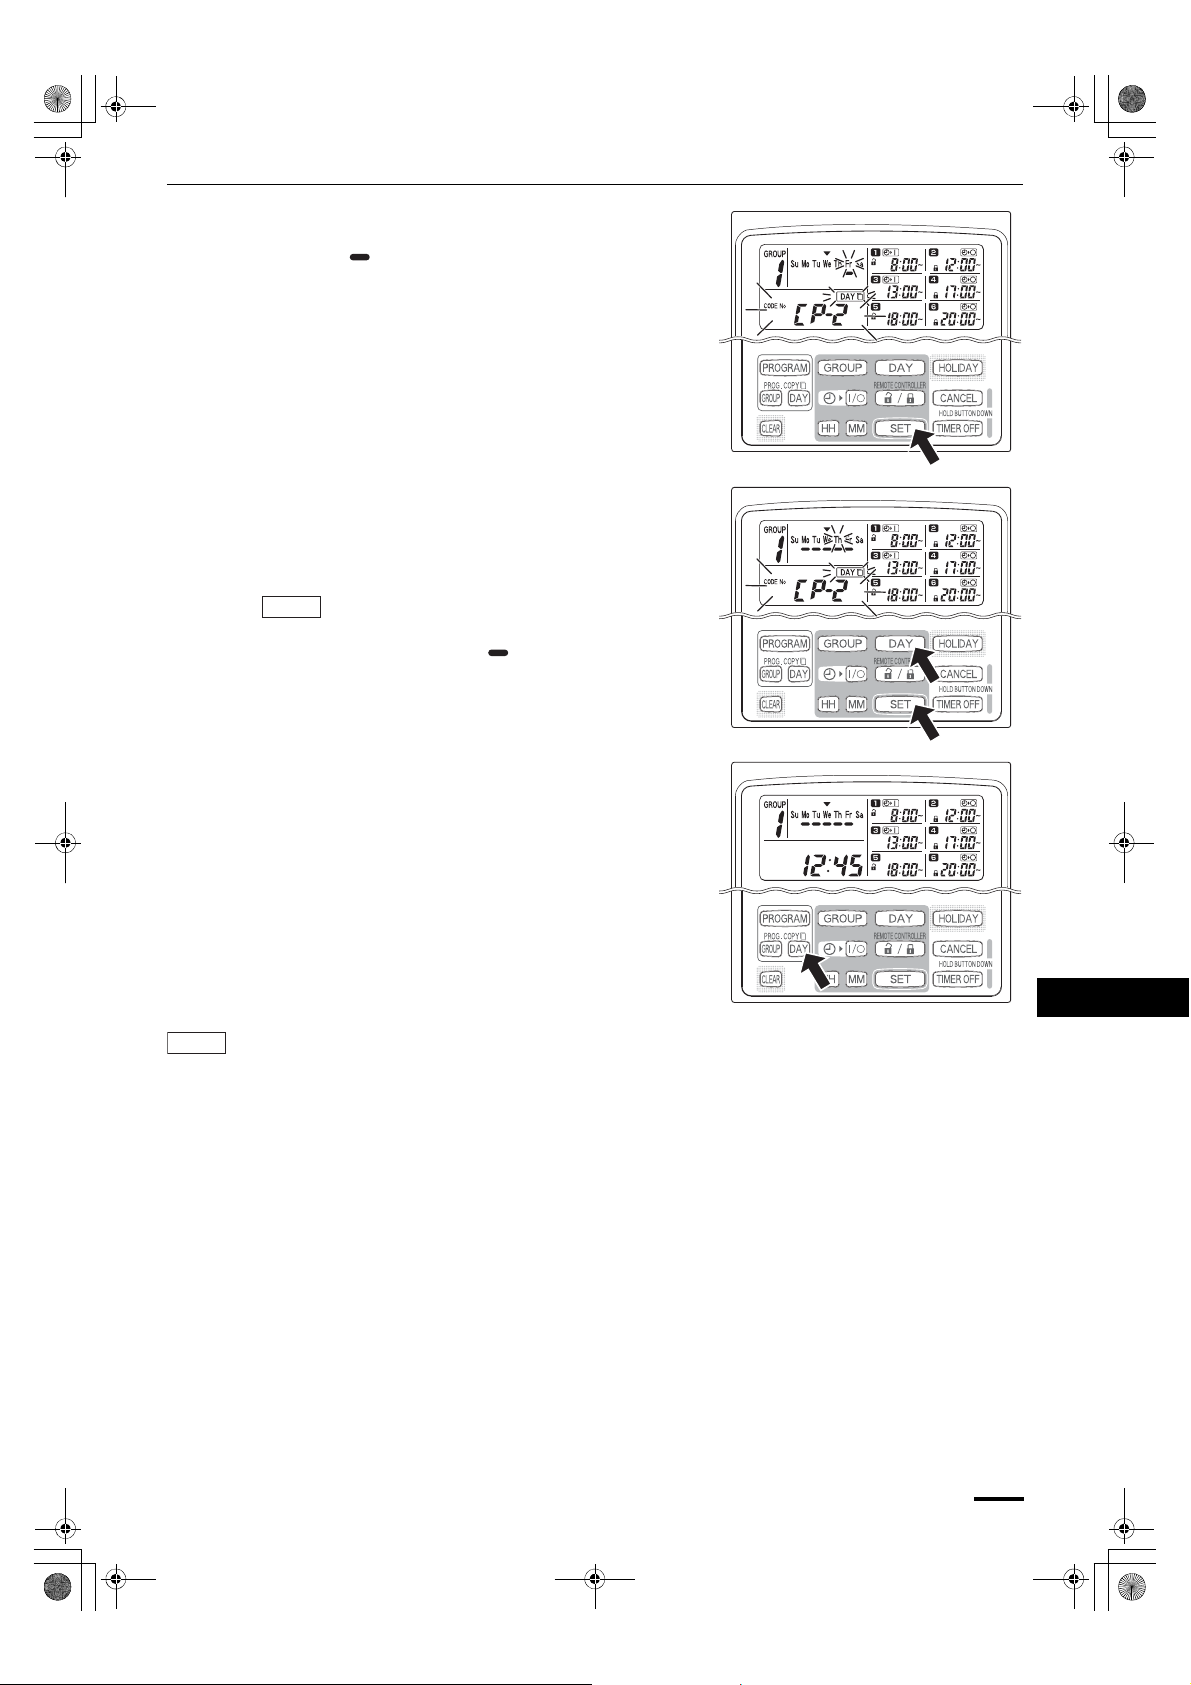
How to Copy Program Times
You can copy the already set program of one day into another day (Day Program Copying), as well as copy the entire
week programmed for one group into another group (Group Program Copying).
Example of Day Program Copying
(Copying Monday’s program into Tuesday)
How to Copy Day Programs
STEP 1 Press the PROG. COPY DAY button.
• The group No. and the over today’s day start
blinking and “CP-1” starts blinking in the present
time display area. In this state, select a group in
which to copy day programs, using the GROUP
button.
Example of Group Program Copying
(Copying group No. 1’s program into group No. 2)
STEP 2 Select a source day program to copy.
• Every time the DAY button is pressed, the
moves across the days of the week display,
therefore select a day of the week that will serve as
the copy source.
• Once having selected the copy source day, press
the SET button to set it. The display changes to key
you to select a copy destination day.
STEP 3 Select a copy destination day.
• When the schedule timer is ready for you to select a
copy destination day, “CP-2” starts blinking in the
present time display area, while the selected copy
source day blinks in the days of the week.
Therefore, select a day of the week as the copy
destination, using the DAY button.
12
OI-915-12-EG
915_TCB-EXS21E.book Page 13 Wednesday, August 1, 2007 1:26 AM
STEP 4 Press the SET button to copy.
• Press the SET button and the program schedule
marker ( ) will be displayed.
STEP 5 Select other copy destination days if desired.
• You can copy the selected source day program into
other days by repeatedly pressing the DAY button to
select a day of the week followed by the SET button
to set it.
NOTE
• Pressing the CLEAR button extinguishes the
program schedule marker ( ) and cancels the
copy operation.
STEP 6 Press the PROG. COPY DAY button to enter the
copied program in the selected days.
• The normal display returns.
NOTE
• If a program already exists in the copy destination day, the newly copied program overwrites the existing
program.
• If you accidentally copy over a program in the day program copy mode, holding down the CANCEL
button for more than 2 seconds returns the program to the point prior to pressing the PROG. COPY DAY
button in STEP 1. (All changes and copy operations made up until that point are cleared.)
EG
OI-915-13-EG
13

915_TCB-EXS21E.book Page 14 Wednesday, August 1, 2007 1:26 AM
How to Copy Group Programs
STEP 1 Press the PROG. COPY GROUP button.
• “CP-1” starts blinking in the present time display
area and “CP” (copy) starts blinking in the program
area to indicate the copy source.
STEP 2 Select a source group program to copy.
• Select a copy source group using the GROUP
button.
• Once having selected the copy source group, press
the SET button to set it. The display changes to key
you to select a copy destination group.
STEP 3 Select a copy destination group.
• After pressing the SET button, “CP-2” starts blinking
in the present time display area, the copy source
group No. set appears in the program area, and
“PA” (paste) starts blinking in the program area
to indicate the copy destination.
• Select a copy destination group using the GROUP
button.
STEP 4 Enter the selected copy destination group.
• When the SET button is pressed, the number of the
copy destination group appears in the program No.
area.
NOTE
• If a group from numbers 1 to 4 was selected as the
copy destination group, that number appears in the
program area. If a group from numbers 5 to 8
was selected, that number appears in the program
area.
14
OI-915-14-EG

915_TCB-EXS21E.book Page 15 Wednesday, August 1, 2007 1:26 AM
STEP 5 Select other copy destination groups if desired.
• You can copy the selected source group programs
into other groups by repeatedly pressing the
GROUP button to select a group followed by the
SET button to set it.
NOTE
• If a group from numbers 1 to 4 was selected as the
copy destination group, that number appears in the
program area. If a group from numbers 5 to 8
was selected, that number appears in the program
area.
STEP 6 Press the PROG. COPY GROUP button to enter the
copied programs in the selected groups.
• The normal display returns.
NOTE
• If a program already exists in the copy destination group, the newly copied program overwrites the
existing program.
• If you accidentally copy over a program in the group program copy mode, holding down the CANCEL
button for more than 2 seconds returns the program to the point prior to pressing the PROG. COPY
GROUP button in STEP 1. (All changes and copy operations made up until that point are cleared.)
EG
OI-915-15-EG
15

915_TCB-EXS21E.book Page 16 Wednesday, August 1, 2007 1:26 AM
How to Set Holidays in a Scheduled Week of Operation
Operations programmed for a specific day during the week can be temporarily disabled by setting that day as a
holiday.
• When the set holiday passes, the holiday setting is canceled and operation is resumed as programmed the
following week.
• Holidays can be selected for the week starting from today’s day. If today is selected as a holiday, the holiday
setting is canceled from the next programmed operation. (Depending on the program, if the program is currently
running, the program may not stop.)
Example Setting
Today is Thursday and Friday is
set as a holiday.
STEP 1 Press the GROUP button to select a group to go on
holiday.
NOTE
• Depending on installation conditions, group
selection is disabled or set so that all groups are
automatically selected for the holiday feature. If so,
proceed to the next step.
STEP 2 Press the HOLIDAY button.
• “HL” starts blinking in the present time display area
and today’s day of the week starts blinking.
When Friday comes, the
program set for that day does
not run.
When Saturday comes,
Friday’s holiday setting is
canceled.
STEP 3 Select a day as the holiday using the DAY button,
and press the SET button.
• A “ ” appears over the selected holiday.
• To select other holidays, select a day using the DAY
button and set it with the SET button.
• If you made a mistake or want to cancel a holiday,
press the CLEAR button.
16
OI-915-16-EG

915_TCB-EXS21E.book Page 17 Wednesday, August 1, 2007 1:26 AM
STEP 4 Press the HOLIDAY button to enter the holiday.
• The normal display returns.
How to Disable the Timer Operation
To halt programmed operation for one week or more, you can disable all timer programs.
• Once the timer has been disabled, programmed operations are not run until the below procedure is performed.
NOTE
• During installation, the remote controller may be set to disable the timer for individual groups. In this state, the
timer is disabled only for the selected group, therefore press the GROUP button to confirm which group is
selected.
Hold down the TIMER OFF button for more than
2 seconds
To turn the timer back ON, hold down the TIMER
OFF button for more than 2 seconds
• appears on the display. The timer is
disabled from the next scheduled program.
OI-915-17-EG
EG
• goes out and the timer is enabled from
the next scheduled program.
17

915_TCB-EXS21E.book Page 18 Wednesday, August 1, 2007 1:26 AM
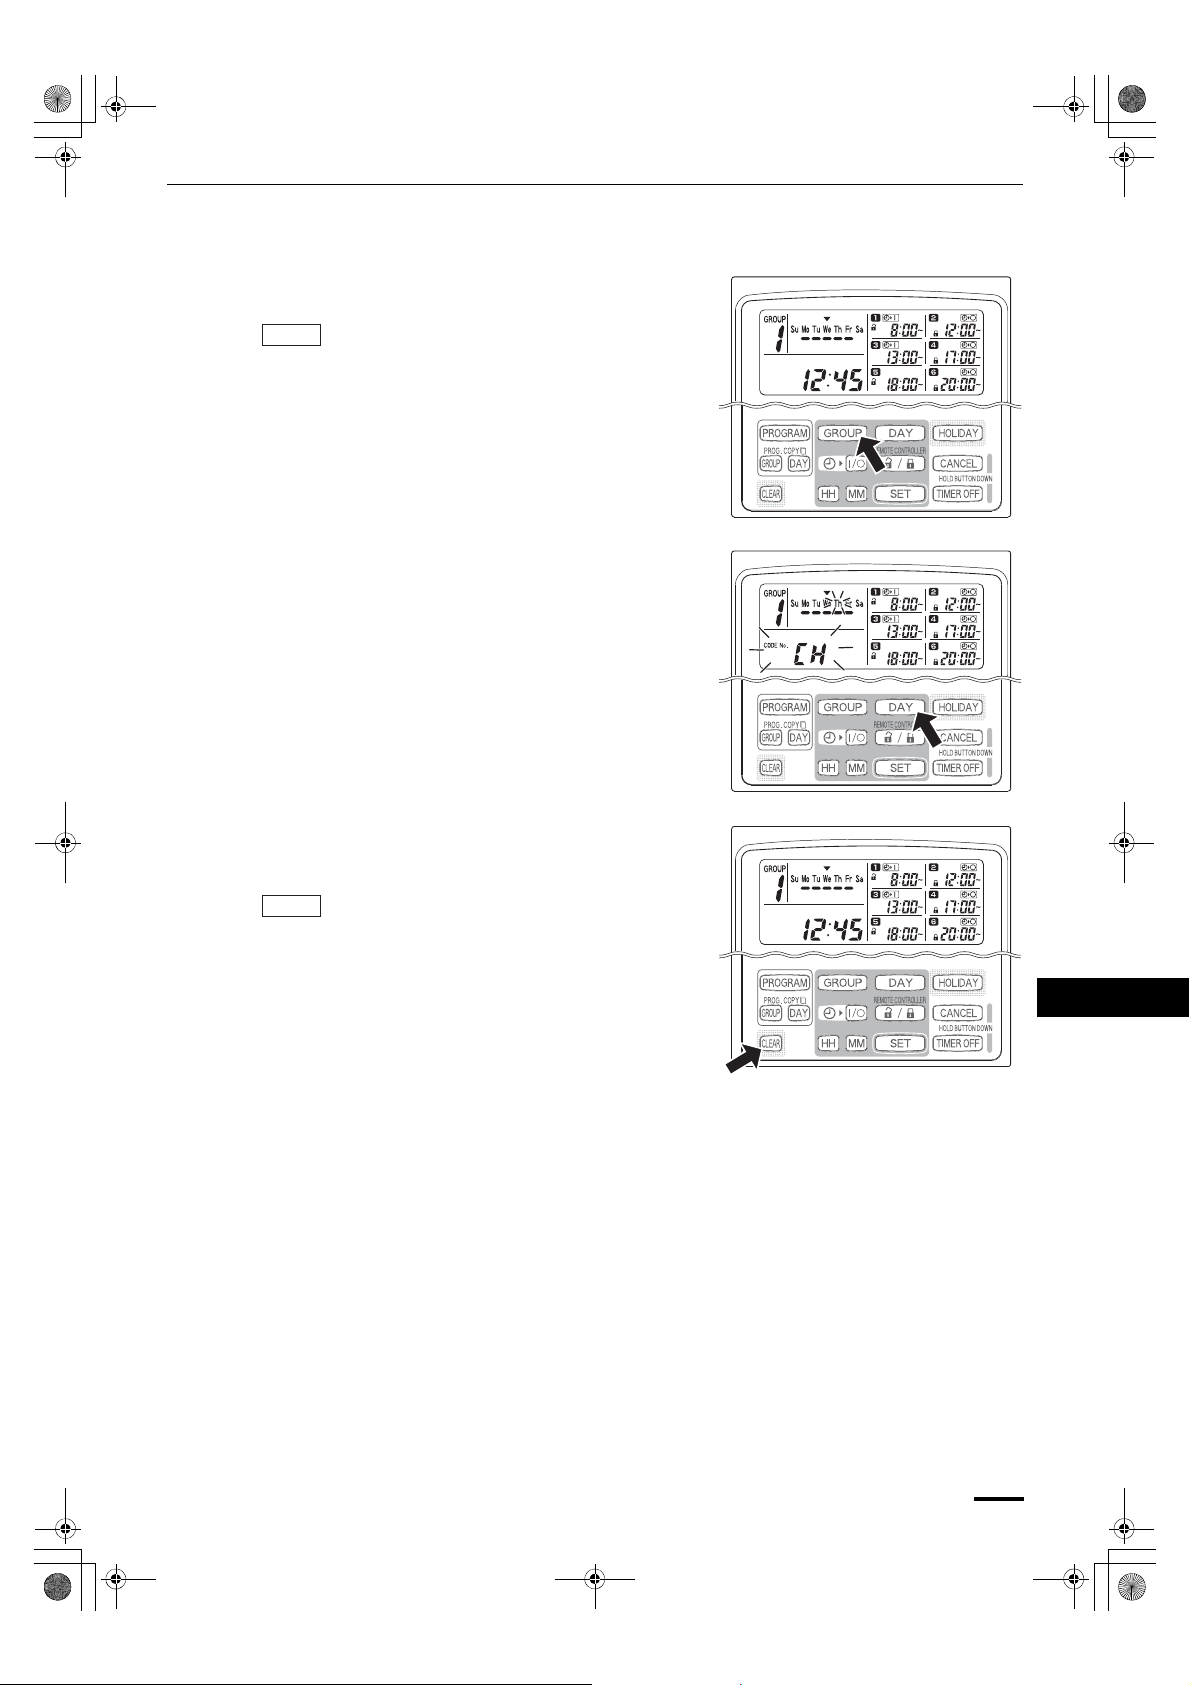
How to Clear Programs
Press the PROGRAM button.
• When the PROGRAM button is pressed, the group No. and the
present day of the week start blinking and the present time
indication changes to a blinking “PG-1”.
• Press the GROUP button to select a group to clear.
NOTE
• Group selection may be disabled during installation. If so,
proceed to the next step.
• Holding down the CANCEL button for more than 2 seconds
returns the program to the point prior to pressing the PROGRAM
button. (All operations made up until that point are cleared.)
To cancel specific days
• Select a day to cancel using the DAY button
and press the CLEAR button. All settings in
programmed operations through are
cleared. The display appears as shown above.
• Press the PROGRAM button to enter the clear
operation. The normal display returns without
the program schedule marker ( ) underneath
the days of the week.
To cancel individual programs on specific days
• Select a day and press the SET button.
Programmed operations through start
blinking in rotation, therefore press the CLEAR
button when the programmed operation to clear
starts blinking. (The remaining programmed
operations are automatically arranged in the
order of earliest time first.)
• Press the PROGRAM button to enter the clear
operation. The normal display returns.
Example:
Display after clearing
programmed operation
above
18
OI-915-18-EG

915_TCB-EXS21E.book Page 19 Wednesday, August 1, 2007 1:26 AM
Important Information to Remember
1. Schedule Timer and Air Conditioner Operation
Air conditioners operate either according to operations programmed from the schedule timer (starting/stopping and
remote control operation enable/disable) or according to a connected remote controller or system controller.
Schedule timer settings (Example)
Operation without system controller operation
• If remote controller operation is enabled, the air conditioner can be started/stopped from the remote controller.
(The air conditioner responds to the most recently pressed button.)
8:00 12:00 17:00 20:0013:00 18:00
Stopped StoppedStopped
Air conditioner
operation
Running Running
Remote controller
operation
*1
Enabled EnabledDisabled Disabled
*3
*2
*1 Whether remote controller operation is enabled or disabled depends on the setting of
the previous day.
*2 Since remote controller operation is disabled, operation remains disabled.
*3 The remote controller remains disabled the next day and thereafter until it is enabled
in the remote controller operation enable/disable setting.
Operation with system controller operation
• If remote controller operation is enabled, the air conditioner can be started/stopped from the remote controller.
(The air conditioner responds to the most recently pressed button.)
• The remote controller operation enable/disable set from the system controller (Centralized control 1 to 4) is
canceled according to programmed operations.
Operation from the system controller
[Stop + RC operation disable]
[Stop + RC operation enable]
8:00 12:00 17:00 20:0013:00 18:00
Air conditioner
operation
Remote controller
operation
Stopped StoppedStoppedRunning Running
Disabled
*1
EnabledEnabled
Disabled Disabled
Enabled
EG
OI-915-19-EG
*1 Whether remote controller operation is enabled or disabled depends on the setting of
the previous day.
19

915_TCB-EXS21E.book Page 20 Wednesday, August 1, 2007 1:26 AM
2. Power Outages
If the air conditioner is running when power is lost, the air conditioner remains OFF when power is restored. Also, if
remote controller operation was disabled when power was lost, it is enabled for a few minutes when power is
restored.
• Programmed operations scheduled for times that come after power is restored run as usual.
• Program settings are retained in the non-volatile memory of the schedule timer, therefore they are not cleared in
the event of a power outage. Also, the present time and today’s day of the week are retained for a maximum of
100 hours by the internal battery.
Schedule timer settings (Example)
Operation when power is not lost
8:00 12:00 17:00 20:0013:00 18:00
Stopped
Running
Air conditioner
operation
Stopped StoppedStopped
Running Running
Remote controller
operation
*1
Enabled
Disabled
*1 Whether remote controller operation is enabled or disabled depends on the setting of
the previous day.
Operation when power is lost at 15:00 and subsequently restored
Power lost here.
15:00
8:00 12:00 17:00
Air conditioner
operation
Remote controller
operation
Stopped
*1
Running Running Running
Enabled EnabledDisabled Disabled
Stopped
*1 Whether remote controller operation is enabled or disabled depends on the setting of
the previous day.
*2 Remote controller operation is enabled for a few minutes after power is
restored.
Power outage
Stopped
Disabled
*2
Enabled
Running
Disabled
20:0013:00 18:00
Stopped
20
OI-915-20-EG

915_TCB-EXS21E.book Page 21 Wednesday, August 1, 2007 1:26 AM
Troubleshooting
Before requesting servicing, check the following.
Trouble Cause/Remedy
blinks on the display. The schedule timer is performing initial
Air conditioners do not operate as scheduled when
the set time comes.
Air conditioners can be started and stopped from
the remote controller even though the program
disables remote controller operation.
blinks in the present time display area. Power to the air conditioner was lost for a long period
Check before requesting servicing
communications with connected indoor units. Wait for
communications to finish.
The timer has been disabled. (Refer to page 17)
A holiday has been scheduled. (Refer to page 16)
Power to the air conditioner was lost and
subsequently restored. (Refer to page 20)
of time. Set the present time and today’s day of the
week again. (Refer to page 6 and 7)
If trouble persists despite taking the above action, stop the schedule timer, turn off the unit and report the serial
number and problem to your dealer. Never service the unit yourself as this is dangerous.
EG
OI-915-21-EG
21

915_TCB-EXS21E.book Page 22 Wednesday, August 1, 2007 1:26 AM
Table des matières
Table des matières.......................................................................................... 22
Informations sur le produit .............................................................................. 22
Symboles d’avertissement .............................................................................. 22
Emplacement d’installation ............................................................................. 23
Instructions relatives à l’alimentation .............................................................. 23
Conseils de sécurité........................................................................................ 23
Noms et fonctions des pièces ......................................................................... 24
Utilisation du temporisateur ............................................................................ 25
Informations importantes à retenir .................................................................. 39
Dépannage ..................................................................................................... 41
Page
Boutons de fonctionnement ................................................................ 24
Affichage............................................................................................. 25
Réglage de l’heure actuelle ................................................................ 26
Réglage du jour de la semaine........................................................... 27
Erreurs de réglage .............................................................................. 30
Vérification des heures de programmation ......................................... 31
Copie des heures de programmation ................................................. 32
Régler les jours fériés pour une semaine d’opération programmée ... 36
Désactivation du temporisateur .......................................................... 37
Effacer des programmations............................................................... 38
1 Fonctionnement du temporisateur et du climatiseur........................... 39
2 Coupure de courant ............................................................................ 40
Informations sur le produit
Pour tout problème ou toute question relatifs au climatiseur, il faudra les
informations ci-dessous. Les numéros de série et de modèle figurent sur la
plaque signalétique placée sur le fond du coffret.
No. modèle No. série _____________________
Date d’achat ____________________________________________________
Adresse du concessionnaire _______________________________________
TCB-EXS21TLE
Numéro de téléphone ___________
DÉCLARATION DE CONFORMITÉ
Ce produit est marqué « » puisqu’il est conforme aux Directives CEE No. 72/
23, 89/336, 92/31 et 93/68 et conforme aux normes suivantes.
EN60335-1 EN55014-1
EN60335-2-40 EN55014-2
Cette déclaration sera nulle en cas d’une utilisation différente de celle déclarée
par le Constructeur et/ou de la non observation, même si partiale des
instructions d’installation et/ou d’usage.
Symboles d’avertissement
Les symboles suivants utilisés dans ce manuel avertissent d’un danger
potentiel pour l’utilisateur, le personnel d’entretien ou l’appareil :
AVERTISSEMENT
ATTENTION
Ce symbole signale un danger ou des
opérations dangereuses qui risquent
d’entraîner des blessures physiques graves,
ou mortelles.
Ce symbole signale un danger ou des
opérations dangereuses qui risquent
d’entraîner des blessures physiques ou des
dommages matériels, notamment de l’appareil.
22
OI-915-2-F

e
915_TCB-EXS21E.book Page 23 Wednesday, August 1, 2007 1:26 AM
Emplacement d’installation
• Il est recommandé de faire installer ce temporisateur par un technicien
qualifié et conformément aux instructions fournies avec l’appareil.
• Ne pas installer le temporisateur dans un endroit où existent des
AVERTISSEMENT
• Ne pas installer le temporisateur où se trouvent des objets
Instructions relatives à
l’alimentation
1. Tous les câbles doivent respecter les codes électriques locaux. Pour les
détails, consulter son magasin ou un électricien qualifié.
2. Les raccordements devront être confiés à un électricien qualifié.
émanations gazeuses ou des gaz inflammables ou dans un endroit
très humide comme une serre.
dégageant une très forte chaleur.
ATTENTION
Pour chauffer le système, il doit être mis sous
tension au moins douze (12) heures avant son
fonctionnement. Laissez le système sous
tension, en position ON, sauf si vous n’allez
pas l’utiliser pendant une période de temps
importante.
Conseils de sécurité
• Lisez attentivement ce mode d’emploi avant d’utiliser le temporisateur.
Si l’on rencontre des difficultés ou des problèmes, consulter son
concessionnaire.
• Le climatiseur est conçu pour créer un environnement confortable
chez soi. L’utiliser qu’aux fins pour lesquelles il a été prévu, en suivant
les instructions de ce mode d’emploi.
AVERTISSEMENT
• Ne jamais toucher l’unité avec des mains humides.
• Ne jamais utiliser ni entreposer d’essence ni aucune autre vapeur
ou liquides inflammables près du climatiseur — cela serait
extrêmement dangereux.
• Le climatiseur ne possède pas de ventilateur d’admission d’air frais
extérieur. Il faudra donc ouvrir fréquemment les portes ou les
fenêtres si l’on utilise dans la même pièce des appareils de
chauffage à gaz ou au mazout, qui consomment beaucoup
d’oxygène. Sinon, il y aurait risque d’asphyxie dans les cas
extrêmes.
Alimentation du systèm
ON
F
OI-915-3-F
ATTENTION
• Ne pas mettre le climatiseur sous et hors tension à l’aide de
l’interrupteur d’alimentation du système. Utiliser le bouton de
marche/arrêt de fonctionnement (ON/OFF).
• Ne rien introduire dans la sortie d’air de l’élément extérieur. Cela est
très dangereux car le ventilateur marche à grande vitesse.
• Ne pas laisser les enfants jouer avec le climatiseur.
• Ne pas trop refroidir ou chauffer une pièce où se trouvent des bébés
ou des malades.
23

915_TCB-EXS21E.book Page 24 Wednesday, August 1, 2007 1:26 AM
Noms et fonctions des pièces
Boutons de fonctionnement
A: Bouton PROGRAM
(Programmer)
B: Boutons PROG. COPY
(Programmer Copier)
C: Bouton CLEAR (Effacer)
D: Boutons de réglage
E: Bouton HOLIDAY
(Jour férié)
F: Bouton CANCEL (Annuler)
G: Bouton TIMER OFF
(Temporisateur désactivé)
A: Bouton PROGRAM
(Programmer)
B: Boutons PROG.
COPY
(Programmer Copier)
C: Bouton CLEAR
(Effacer)
D: Boutons de réglage Utiliser pour configurer les paramètres de programmation et l’heure actuelle.
E: Bouton HOLIDAY
(Jour férié)
F: Bouton CANCEL
(Annuler)
G: Bouton TIMER OFF
(Temporisateur
désactivé)
Utiliser pour configurer des programmations et pour saisir les paramètres.
Utiliser pour copier des programmations vers des groupes ou des jours spécifiques
dans un calendrier. (Voir à la page 32)
Appuyer sur ce bouton pour effacer les paramètres de la programmation affichée
actuellement à l’écran.
• La programmation actuelle n’est pas effacée, sauf si le bouton est activé
après avoir appuyé sur le bouton CLEAR (Effacer).
Appuyer sur ce bouton pour définir des groupes pour des opérations programmées.
Appuyer sur ce bouton pour configurer la date du jour et les jours des opérations
programmées.
Appuyer sur ce bouton pour configurer l’heure actuelle et les heures utilisées pour les
opérations programmées.
Utiliser ce bouton pour démarrer/arrêter des unités intérieures via le temporisateur.
Utiliser ce bouton pour activer/désactiver le fonctionnement de la télécommande via
le temporisateur.
Utiliser ce bouton pour configurer l’heure de déclenchement des opérations
programmées.
• Les paramètres de programmation ne sont pas entrés, sauf si le bouton
est activé à la fin des opérations de réglage.
Appuyer sur ce bouton pour configurer et annuler des jours fériés pendant une
semaine d’opération programmée.
Appuyer sur ce bouton pour annuler la configuration de la programmation en cours,
l’opération de copie ou l’opération de réglage des jours fériés. Lorsque le bouton
CANCEL (Annuler) est maintenu enfoncé pendant 2 secondes, l’opération de réglage
ou de copie en cours est annulée et l’affichage normal est restauré.
Appuyer sur ce bouton pour désactiver le temporisateur si celui-ci ne sera
pas utilisé pendant une longue période. Lorsque ce bouton est maintenu
enfoncé pendant 2 secondes, apparaît à l’écran. Les
programmations ne peuvent être exécutées aussi longtemps que ce bouton
n’est pas à nouveau maintenu enfoncé pendant 2 secondes.
• Certaines des fonctions ci-dessus seront désactivées lors de l’installation de
l’unité. Si le bouton d’une fonction désactivée est activé, apparaît à l’écran.
Contacter le revendeur pour obtenir davantage d’informations.
24
OI-915-4-F

915_TCB-EXS21E.book Page 25 Wednesday, August 1, 2007 1:26 AM
Affichage
F
G
H
AB C D E
IJ
A: Jour de la semaine en
cours ( )
B: Indicateur de
programmation dans le
calendrier ( )
C: Indicateur de jour férié
dans le calendrier ( )
D: Indicateur ERROR (erreur) S’affiche lorsqu’une erreur est commise pendant le réglage du temporisateur.
E: Programmation du
temporisateur
F: Numéro de groupe Jusqu’à 8 groupes peuvent être sélectionnés et affichés.
G: Indicateur (de fonction
désactivée)
H: Indicateur TIMER OFF
(Temporisateur désactivé)
I: Indicateur du mode de
copie
J: Heure actuelle Affiche l’heure actuelle sur une horloge au format 24 heures. Affiche
Indique le jour de la semaine en cours.
Apparaît sous les jours programmés d’exécution d’une programmation.
Apparaît pour les jours fériés programmés. (Voir à la page 36)
Affiche les programmations configurées dans le temporisateur. Indique
également la source/destination pour la copie des groupes de
programmations.
S’affiche si la fonction sélectionnée est désactivée pendant l’installation.
S’affiche lorsque le temporisateur est désactivé.
S’affiche lors de la copie de programmations vers un groupe ou un jour du
calendrier.
également les paramètres pour les différents modes de réglage.
F
Utilisation du temporisateur
Pour utiliser le temporisateur, procéder comme suit :
ÉTAPE 1 Allumer le climatiseur.
• Mettre le climatiseur connecté au temporisateur sous tension. Le temporisateur exécute les
communications initiales avec les unités intérieures, au cours desquelles clignote à l’écran.
REMARQUE
Ne pas couper l’alimentation secteur pendant les saisons de chauffage et de refroidissement.
(L’électricité dans la résistance de chauffage du carter est ainsi maintenue et permet de protéger le
compresseur au démarrage.) Si le climatiseur est resté hors tension pendant une longue période, le
mettre sous tension 12 heures avant de l’utiliser.
ÉTAPE 2 Effectuer le réglage initial du temporisateur.
• Configurer l’heure et le jour de la semaine en cours. (Voir à la page 26)
ÉTAPE 3 Configurer des programmations dans le temporisateur.
• Configurer les paramètres pour les opérations programmées. (Voir à la page 28)
OI-915-5-F
25

915_TCB-EXS21E.book Page 26 Wednesday, August 1, 2007 1:26 AM
Réglage de l’heure actuelle
Permet de régler l’heure actuelle. (Exemple : Si l’heure actuelle est 12:45)
ÉTAPE 1 Maintenir le bouton SET enfoncé et appuyer sur le
bouton HH pour régler l’heure.
• L’heure est incrémentée d’une heure chaque fois que le
bouton HH est activé lorsque le bouton SET est
maintenu enfoncé.
• L’heure défile rapidement lorsque les boutons SET et
HH sont tous les deux maintenus enfoncés. (Exemple :
Pour régler l’heure sur 12:00, relâcher le bouton HH
quand « 12 » est affiché.)
• Lorsque le bouton SET est relâché, l’heure est réglée
et l’indicateur clignotant est allumé en permanence.
ÉTAPE 2 Maintenir le bouton SET enfoncé et appuyer sur le
bouton MM pour régler les minutes.
• Les minutes sont incrémentées d’une minute chaque
fois que le bouton MM est activé lorsque le bouton SET
est maintenu enfoncé.
• Les minutes défilent rapidement lorsque les boutons
SET et MM sont tous les deux maintenus enfoncés.
(Exemple : Pour régler les minutes sur 00:45, relâcher
le bouton MM quand « 45 » est affiché.)
• Lorsque le bouton SET est relâché, les minutes sont
réglées et l’indicateur clignotant est allumé en
permanence.
REMARQUE
• L’heure n’est pas modifiée si seul le bouton HH ou le bouton MM est activé.
26
OI-915-6-F

915_TCB-EXS21E.book Page 27 Wednesday, August 1, 2007 1:26 AM
Réglage du jour de la semaine
Permet de régler le jour de la semaine en cours. (Exemple : Si le jour d’aujourd’hui est mercredi)
ÉTAPE 1 Maintenir le bouton SET (Régler) enfoncé et appuyer
sur le bouton DAY (Jour) pour régler le jour de la
semaine.
• clignote et est incrémenté d’un jour à la fois chaque
fois que le bouton DAY est activé lorsque le bouton
SET est maintenu enfoncé.
• Lorsque le bouton SET est relâché, le jour de la
semaine est réglé et l’indicateur clignotant est
allumé en permanence.
REMARQUE
• Le jour de la semaine n’est pas modifié si seul le bouton DAY est activé.
OI-915-7-F
F
27

915_TCB-EXS21E.book Page 28 Wednesday, August 1, 2007 1:26 AM
Configurer des opérations programmées
Régler correctement l’heure et le jour de la semaine en cours.
Les programmations ne seront pas exécutées comme prévu si l’heure et
la date ne sont pas correctement réglées.
• Jusqu’à 6 opérations programmées peuvent être configurées par jour pour
chaque groupe et jour de la semaine.
• Une combinaison des opérations ci-dessous peut être configurée pour
chaque programmation du temporisateur.
– Démarrage/arrêt du climatiseur
– Activation/désactivation de la télécommande *
1
• Pour modifier les paramètres d’une programmation existante, utiliser la
procédure ci-dessous, identique à la procédure utilisée pour configurer des
nouvelles programmations.
*1 Le paramètre d’activation/désactivation de la télécommande est désactivé en fonction des conditions
d’installation. Si tel est le cas, apparaît sur l’écran lorsque le bouton est activé.
Contacter le revendeur pour obtenir davantage d’informations.
ÉTAPE 1 Appuyer sur le bouton PROGRAM (Programmer)
pour sélectionner un groupe.
• Lorsque le bouton PROGRAM est activé, le numéro
de groupe et le jour de la semaine en cours
commencent à clignoter, et l’heure actuelle clignote et
affiche « PG-1 ».
• Appuyer sur le bouton GROUP (Groupe) pour
sélectionner un groupe pour l’opération programmée,
et appuyer ensuite sur le bouton SET (Régler).
Exemple de paramètres
REMARQUE
• La sélection de groupes est désactivée en fonction
des conditions d’installation. Si tel est le cas, passer à
l’étape suivante.
• Le nombre de groupes pouvant être sélectionnés est
configuré lors de l’installation.
ÉTAPE 2 Appuyer sur le bouton DAY et sélectionner le jour de
la semaine de l’opération programmée.
• Lorsque le bouton SET est activé, l’indicateur
clignotant ( ) de la programmation dans le
calendrier s’allume en permanence et, au même
moment, l’heure réglée dans se met à clignoter.
De plus, l’indicateur de l’heure actuelle se met à
clignoter et affiche « PG-2 ».
REMARQUE
• Le jour de la semaine sélectionné clignote lentement
à cet instant.
28
OI-915-8-F

915_TCB-EXS21E.book Page 29 Wednesday, August 1, 2007 1:26 AM
ÉTAPE 3 Configurer la programmation et appuyer sur le bouton
SET.
• Sélectionner le mode de fonctionnement du
temporisateur à l’aide du bouton (Marche/Arrêt
du temporisateur) et du bouton (Activation/
Désactivation de la télécommande).
Régler ensuite l’heure de déclenchement à l’aide des
boutons HH et MM, puis appuyer sur le bouton SET.
• Lorsque le bouton SET est activé, l’heure définie
clignotante dans la programmation s’allume en
permanence et, au même moment, l’heure réglée dans
se met à clignoter.
REMARQUE
• Chaque fois que le bouton est activé,
l’indicateur du temporisateur change dans l’ordre
(Marche) o (Arrêt) o aucune indication.
• Chaque fois que le bouton est activé,
l’indicateur de la télécommande change dans l’ordre
(Activée) o (Désactivée) o aucune indication.
• Le paramètre d’activation/désactivation de la
télécommande est désactivé en fonction des conditions
d’installation. Dans ce cas, seuls les modes marche/
arrêt du temporisateur peuvent être définis.
ÉTAPE 4 Configurer les programmations ~ de la même
manière.
• Lorsque le bouton SET est activé, les paramètres sont
organisés automatiquement en commençant par l’heure
au plus tôt.
• Si le bouton SET est activé sans qu’aucun nouveau
paramètre de programmation ne soit configuré, se
met à nouveau à clignoter et les paramètres peuvent
être modifiés.
• De même, si le bouton SET est activé après avoir
configurer , se met à nouveau à clignoter.
ÉTAPE 5 Appuyer sur le bouton de programmation (PROGRAM).
• Les paramètres de programmation sont entrés et
l’affichage normal est restauré.
ÉTAPE 6 Configurer des opérations programmées pour d’autres
groupes et jours de la même manière.
Les programmations déjà configurées peuvent être copiées vers d’autres groupes et jours de la
semaine. (Voir à la page 32)
REMARQUE
• L’heure « 0:00 » est interprétée comme étant minuit.
• Pour annuler les paramètres d’une programmation pendant la configuration de celle-ci
(lorsque « PG-1 » ou « PG-2 » clignote à l’écran), maintenir le bouton CANCEL (Annuler)
enfoncé pendant 2 secondes au moins. L’affichage normal est restauré.
• Si les paramètres sont annulés sans activer le bouton PROGRAM (Programmer), les paramètres ne
sont pas entrés.
OI-915-9-F
F
29

915_TCB-EXS21E.book Page 30 Wednesday, August 1, 2007 1:26 AM
Erreurs de réglage
Si l’heure est réglée comme affiché ci-dessous lors de la configuration d’une programmation, « ERROR » apparaît
(l’indicateur clignote). Le réglage de l’heure doit alors être corrigé.
Si des heures de programmation sont identiques
ÉTAPE 1 Chaque fois que le bouton SET est activé, le mode de réglage passe en revue les opérations
programmées ayant une heure identique ( et dans l’exemple ci-dessus), et un réglage approprié
peut alors être sélectionné.
ÉTAPE 2 Modifier le réglage des heures à l’aide des boutons HH et MM, de telle manière que les heures soient
différentes.
ÉTAPE 3 Appuyer sur le bouton SET et s’assurer que « ERROR » n’est plus affiché.
ÉTAPE 4 Appuyer sur le bouton PROGRAM (Programmer) pour quitter le mode de réglage.
Exemple de réglages des heures ne causant pas d’erreur
Les réglages ci-dessous ne génèrent aucune erreur.
1) Lorsque les heures de démarrage et d’arrêt
sont échelonnées
2) Lorsque l’heure d’arrêt est antérieure à l’heure
de démarrage
30
OI-915-10-F

915_TCB-EXS21E.book Page 31 Wednesday, August 1, 2007 1:26 AM
Vérification des heures de programmation
Les heures de programmation de chaque groupe et jour de la semaine peuvent être vérifiées.
ÉTAPE 1 Appuyer sur le bouton GROUP (Groupe) et
sélectionner le groupe dont l’heure doit être
vérifiée.
REMARQUE
• La sélection de groupes est désactivée en fonction
des conditions d’installation. Si tel est le cas, passer
à l’étape suivante.
ÉTAPE 2 Appuyer sur le bouton DAY (Jour).
• Lorsque le bouton DAY est activé pour la première
fois, le jour de la semaine suivant (le lendemain) se
met à clignoter et les paramètres de programmation
pour ce jour s’affichent.
• Chaque fois que le bouton DAY est activé, les
paramètres de programmation changent dans
l’ordre des jours de la semaine.
• L’activation du bouton GROUP permet d’afficher les
paramètres de programmation pour un autre groupe
du même jour.
ÉTAPE 3 Terminer la vérification.
• Appuyer sur le bouton CLEAR (Effacer). L’affichage
normal est restauré.
REMARQUE
• L’affichage normal est également restauré lorsque
le bouton CANCEL (Annuler) est maintenu enfoncé
pendant 2 secondes au moins.
F
OI-915-11-F
31

915_TCB-EXS21E.book Page 32 Wednesday, August 1, 2007 1:26 AM
Copie des heures de programmation
Les programmations configurées pour un jour peuvent être copiées vers un autre jour (Copie des programmations
d’un jour), et une semaine entière programmée pour un groupe peut être copiée vers un autre groupe (Copie des
programmations d’un groupe).
Exemple de copie des programmations d’un jour
(Copier les programmations de lundi vers mardi)
Copie des programmations d’un jour
ÉTAPE 1 Appuyer sur le bouton PROG. COPY DAY.
• Le numéro de groupe et de la date du jour se
mettent à clignoter, de même que « CP-1 » dans la
zone d’affichage de l’heure actuelle. Sélectionner
maintenant un groupe dans lequel les
programmations d’un jour doivent être copiées en
utilisant le bouton GROUP.
Exemple de copie des programmations d’un
groupe
(Copier les programmations du groupe 1 vers le
groupe 2)
ÉTAPE 2 Sélectionner les programmations du jour source à
copier.
• Chaque fois que le bouton DAY (Jour) est activé,
se déplace au travers de l’affichage des jours
de la semaine, et le jour de la semaine désiré peut
être sélectionné comme source pour la copie.
• Une fois le jour source choisi, appuyer sur le
bouton SET pour le sélectionner. L’affichage
change pour permettre de sélectionner le jour de
destination de la copie.
ÉTAPE 3 Sélectionner le groupe de destination de la copie.
• Lorsque le temporisateur est prêt pour la sélection
d’un jour de destination pour la copie, « CP-2 » se
met à clignoter dans la zone d’affichage de l’heure
actuelle, et le jour de copie source clignote dans
l’affichage de la semaine. Sélectionner alors un jour
de la semaine comme destination de la copie en
utilisant le bouton DAY.
32
OI-915-12-F

915_TCB-EXS21E.book Page 33 Wednesday, August 1, 2007 1:26 AM
ÉTAPE 4 Appuyer sur le bouton SET pour lancer la copie.
• Appuyer sur le bouton SET pour afficher l’indicateur
de la programmation dans le calendrier ( ).
ÉTAPE 5 Sélectionner d’autres jours de destination pour la
copie, le cas échéant.
• La programmation source sélectionnée peut être
copiée vers d’autres jours en appuyant plusieurs
fois sur le bouton DAY pour choisir un jour de la
semaine, suivi du bouton SET pour sélectionner ce
jour..
REMARQUE
• Appuyer sur le bouton CLEAR (Effacer) efface
• l’indicateur de la programmation dans le calendrier
( ) et annule l’opération de copie..
ÉTAPE 6 Appuyer sur le bouton PROG. COPY DAY (Copier le
jour) pour entrer la programmation copiée dans les
jours sélectionnés.
• L’affichage normal est restauré.
REMARQUE
• Si la programmation existe déjà pour le jour de destination de la copie, la programmation copiée
remplace la programmation existante.
• Si une programmation est remplacée par accident en mode de copie des programmations d’un jour,
maintenir la touche CANCEL (Annuler) pendant 2 secondes au moins pour restaurer les paramètres de
programmation tels qu’ils étaient avant d’appuyer sur le bouton PROG. COPY DAY lors de l’ÉTAPE 1.
(Toutes les opérations de modification et de copie réalisées jusqu’à cet instant sont annulées.)
F
OI-915-13-F
33

915_TCB-EXS21E.book Page 34 Wednesday, August 1, 2007 1:26 AM
Copie des programmations d’un groupe
ÉTAPE 1 Appuyer sur le bouton PROG. COPY GROUP
(Copier le groupe).
• « CP-1 » commence à clignoter dans la zone
• d’affichage de l’heure actuelle, et « CP » (copier) se
• met à clignoter dans la zone de programmation
pour indiquer la source de la copie.
ÉTAPE 2 Sélectionner les programmations du groupe
source à copier.
• Sélectionner un groupe source pour la copie en
utilisant le bouton GROUP.
• Une fois le groupe source choisi, appuyer sur le
bouton SET pour le sélectionner. L’affichage change
pour permettre de sélectionner le groupe de
destination de la copie.
ÉTAPE 3 Sélectionner le groupe de destination de la copie..
• Après avoir appuyé sur le bouton SET, « CP-2 »
• commence à clignoter dans la zone d’affichage de
• l’heure actuelle, le numéro du groupe source à
• copier apparaît dans la zone de programmation ,
area, and “PA” (paste) starts blinking in the program
pour indiquer la destination de la copie.
• Sélectionner le groupe de destination de la copie en
utilisant le bouton GROUP.
ÉTAPE 4 Entrer le groupe de destination sélectionné pour la
copie.
• Lorsque le bouton SET est activé, le numéro du
groupe de destination de la copie apparaît dans la
zone du numéro de la programmation.
REMARQUE
• Si un groupe dont le numéro est compris entre 1 et
4 est sélectionné comme groupe de destination de
la copie, le numéro de ce groupe apparaît dans la
zone de programmation . Si un groupe dont le
numéro est compris entre 5 et 8 est sélectionné, le
numéro de ce groupe apparaît dans la zone de
programmation .
34
OI-915-14-F

915_TCB-EXS21E.book Page 35 Wednesday, August 1, 2007 1:26 AM
ÉTAPE 5 Sélectionner d’autres groupes de destination pour
la copie, le cas échéant.
• La programmation source sélectionnée peut être
copiée vers d’autres groupes en appuyant plusieurs
fois sur le bouton GROUP pour choisir un groupe,
suivi du bouton SET pour le sélectionner.
REMARQUE
• Si un groupe dont le numéro est compris entre 1 et
4 est sélectionné comme groupe de destination de
la copie, le numéro de ce groupe apparaît dans la
zone de programmation . Si un groupe dont le
numéro est compris entre 5 et 8 est sélectionné, le
numéro de ce groupe apparaît dans la zone de
programmation .
ÉTAPE 6 Appuyer sur le bouton PROG. COPY GROUP
(Copier le groupe) pour entrer les programmations
copiées dans les groupes sélectionnés.
• L’affichage normal est restauré.
REMARQUE
• Si la programmation existe déjà pour le groupe de destination de la copie, la programmation copiée à
nouveau remplace la programmation existante.
• Si une programmation est remplacée par accident en mode de copie des programmations d’un groupe,
maintenir la touche CANCEL (Annuler) pendant 2 secondes au moins pour restaurer les paramètres de
programmation tels qu’ils étaient avant d’appuyer sur le bouton PROG. COPY GROUP lors de l’ÉTAPE 1.
(Toutes les opérations de modification et de copie réalisées jusqu’à cet instant sont annulées.)
F
OI-915-15-F
35

915_TCB-EXS21E.book Page 36 Wednesday, August 1, 2007 1:26 AM
Régler les jours fériés pour une semaine d’opération programmée
Les opérations programmées pour un jour spécifique de la semaine peuvent être provisoirement désactivées en
définissant ce jour comme étant un jour férié.
• Lorsque le jour férié défini est passé, le paramètre du jour férié est annulé et les opérations programmées
reprennent leur cours normal la semaine suivante.
• Les jours fériés peuvent être sélectionnés pour la semaine commençant à la date du jour. Si la date du jour est
sélectionnée comme jour férié, le paramètre de jour férié est annulé pour l’opération programmée suivante. (Une
programmation en cours d’exécution peut ne pas s’arrêter ; cela dépend de la programmation même.)
Exemple de réglage
Le jour d’aujourd’hui est jeudi et
vendredi est réglé comme étant
un jour férié.
ÉTAPE 1 Appuyer sur le bouton GROUP pour sélectionner
un groupe à définir comme jour férié.
REMARQUE
• En fonction des conditions d’installation, la sélection
des groupes peut être désactivée ou activée de telle
manière que les groupes sont sélectionnés
automatiquement pour la fonction de jour férié. Si tel
est le cas, passer à l’étape suivante.
ÉTAPE 2 Appuyer sur le bouton HOLIDAY (Jour férié).
• « HL » commence à clignoter dans la zone
d’affichage de l’heure actuelle, de même que le jour
de la semaine en cours.
La programmation configurée
pour vendredi ne sera pas
exécutée.
Le paramètre de jour férié
du vendredi s’annule le
samedi.
ÉTAPE 3 Sélectionner le jour férié en utilisant le bouton DAY,
et appuyer sur le bouton SET.
• Un « » apparaît sur le jour férié sélectionné.
• Pour sélectionner d’autres jours fériés, choisir un
jour à l’aide du bouton DAY, et le sélectionner avec
le bouton SET.
• En cas d’erreur ou si le jour férié doit être annulé,
appuyer sur le bouton CLEAR (Effacer).
36
OI-915-16-F

915_TCB-EXS21E.book Page 37 Wednesday, August 1, 2007 1:26 AM
ÉTAPE 4 Pour entrer le jour férié, appuyer sur le bouton
HOLIDAY.
• L’affichage normal est restauré.
Désactivation du temporisateur
Pour stopper une opération programmée pour une ou plusieurs semaines, toutes les programmations du
temporisateur peuvent être désactivées.
• Une fois le temporisateur désactivé, les opérations programmées ne sont exécutées que lorsque la procédure
cidessous réalisée.
REMARQUE
• Pendant l’installation, la télécommande peut être configurée pour désactiver le temporisateur pour des groupes
individuels. Si tel est le cas, le temporisateur n’est désactivé que pour le groupe sélectionné, et le groupe
sélectionné peut alors être confirmé en appuyant sur le bouton GROUP.
Maintenir le bouton TIMER OFF (Temporisateur
désactivé) pendant 2 secondes au moins.
Pour activer à nouveau le temporisateur, maintenir
le bouton TIMER OFF pendant 2 secondes au
moins.
• apparaît à l’écran. Le temporisateur est
désactivé à partir de la programmation suivante.
OI-915-17-F
• disparaît et le temporisateur est activé à
partir de la programmation suivante.
37
F

915_TCB-EXS21E.book Page 38 Wednesday, August 1, 2007 1:26 AM
Effacer des programmations
Appuyer sur le bouton de programmation (PROGRAM).
• Lorsque le bouton PROGRAM est activé, le numéro de groupe et
le jour de la semaine en cours commencent à clignoter, et l’heure
actuelle change et « PG-1 » clignote.
• Appuyer sur le bouton GROUP pour sélectionner un groupe à
effacer.
REMARQUE
• La sélection de groupes peut être désactivée pendant
l’installation. Si tel est le cas, passer à l’étape suivante.
• Maintenir le bouton CANCEL (Annuler) enfoncé pendant 2
secondes au moins permet de rétablir l’état de la programmation
tel qu’il était avant d’appuyer sur le bouton PROGRAM. (Toutes
les opérations réalisées à ce point sont annulées.)
Pour annuler des jours spécifiques
• Sélectionner le jour à annuler à l’aide du
bouton DAY (Jour), et appuyer sur le bouton
CLEAR (Effacer). Tous les paramètres des
opérations programmées à sont
effacés. L’écran apparaît tel qu’illustré cidessus.
• Pour entrer dans l’opération d’effacement,
appuyer sur le bouton PROGRAM. L’affichage
normal est restauré, sans l’indicateur de
programmation ( ) situé sous les jours de la
semaine.
Pour annuler des programmations
individuelles pour des jours spécifiques
• Sélectionner un jour et appuyer sur le bouton
SET. Les opérations programmées à se
mettent à clignoter tout à tour, et le bouton
CLEAR (Effacer) peut être activé dès que
l’opération programée à effacer clignote. (Les
opérations programmées restantes sont
organisées automatiquement, en commençant
par l’heure au plus tôt.)
• Pour entrer dans l’opération d’effacement,
appuyer sur le bouton PROGRAM. L’affichage
normal est restauré.
Exemple :
Écran tel qu’il apparaît après
avoir effacé l’opération
programmée ci-dessus.
38
OI-915-18-F

915_TCB-EXS21E.book Page 39 Wednesday, August 1, 2007 1:26 AM
Informations importantes à retenir
1. Fonctionnement du temporisateur et du climatiseur
Les climatiseurs fonctionnent sur base des opérations programmées à partir du temporisateur (démarrage/arrêt et
activation/désactivation de la télécommande), ou sur base d’une télécommande ou d’un contrôleur système
connectée.
Paramètres du temporisateur (Exemple)
Fonctionnement sans contrôleur système
• Si la télécommande est activée, le climatiseur peut être démarré ou arrêté à partir de celle-ci. (Le climatiseur
répond au bouton ayant été activé en dernier.)
8:00 12:00 17:00 20:0013:00 18:00
Arrêté ArrêtéArrêté
Fonctionnement du
climatiseur
Opérationnel Opérationnel
Fonctionnement de la
télécommande
*1
Activée ActivéeDésactivée Désactivée
*3
*2
*1 L’activation ou la désactivation du fonctionnement de la télécommande dépend du
réglage du jour précédent.
*2 Le fonctionnement de la télécommande étant désactivé, les opérations sont
également désactivées.
*3 La télécommande reste désactivée le jour suivant et les jours d’après, jusqu’à ce que
le paramètre de fonctionnement de la télécommande soit activé.
Fonctionnement avec un contrôleur système
• Si la télécommande est activée, le climatiseur peut être démarré ou arrêté à partir de celle-ci. (Le climatiseur
répond au bouton ayant été activé en dernier.)
• Le paramètre d’activation/désactivation du fonctionnement de la télécommande défini dans le contrôleur système
(Commandes centralisées 1 à 4) est annulé en fonction des opérations programmées.
Fonctionnement à partir du contrôleur système
[Arrêter + Désactiver l’opération de la télécommande]
[Arrêter + Activer l’opération de la télécommande]
8:00 12:00 17:00 20:0013:00 18:00
Fonctionnement du
climatiseur
Fonctionnement de la
télécommande
Arrêté ArrêtéArrêtéOpéra-
tionnel
*1
Désactivée
Opérationnel
Désactivée Désactivée
ActivéeActivée
Activée
F
OI-915-19-F
*1 L’activation ou la désactivation du fonctionnement de la télécommande dépend du
réglage du jour précédent.
39

915_TCB-EXS21E.book Page 40 Wednesday, August 1, 2007 1:26 AM
2. Coupure de courant
Si le courant est coupé alors que le climatiseur est en marche, ce dernier reste à l’arrêt lorsque le courant est rétabli.
De plus, si le fonctionnement de la télécommande était désactivé au moment de la coupure de courant, celui-ci est
activé pendant quelques minutes lorsque le courant est rétabli.
• Les opérations programmées prévues pour des heures postérieures à la coupure de courant seront exécutées
normalement.
• Les paramètres de programmation sont conservés dans la mémoire non volatile du temporisateur ; ils ne sont
donc pas effacés lorsqu’une coupure de courant survient. De plus, l’heure actuelle et le jour de la semaine en
cours sont également conservés pour un maximum de 100 heures par la batterie interne.
Paramètres du temporisateur (Exemple)
Fonctionnement lorsque l’alimentation n’est pas coupée
8:00 12:00 17:00 20:0013:00 18:00
Arrêté ArrêtéArrêtéArrêté
Fonctionnement du
climatiseur
Opérationnel Opérationnel
Arrêté
Fonctionnement de la
télécommande
*1
Activée
Désactivée
*1 L’activation ou la désactivation du fonctionnement de la télécommande dépend du
réglage du jour précédent.
Fonctionnement lorsque l’alimentation est coupée à 15:00 et restaurée ensuite
Alimentation coupée à cet instant.
15:00
8:00 12:00 17:00
Fonctionnement du
climatiseur
Fonctionnement de la
télécommande
Arrêté
*1
Arrêté
Opérationnel Opération-
nel
Activée ActivéeDésactivée Désactivée
Arrêté
Opérati-
onnel
Désactivée
Coupure de courant
*2
*1 L’activation ou la désactivation du fonctionnement de la télécommande dépend du
réglage du jour précédent.
*2 Le fonctionnement de la télécommande est activé pour quelques minutes
lorsque le courant est rétabli.
Activée
Opération-
nel
Désactivée
20:0013:00 18:00
Arrêté
40
OI-915-20-F

915_TCB-EXS21E.book Page 41 Wednesday, August 1, 2007 1:26 AM
Dépannage
Effectuer les vérifications suivantes avant de contacter le service d’assistance technique.
Panne Cause/Remède
clignote à l’écran. Le temporisateur exécute les communications
initiales avec les unités intérieures connectées.
Attendre la fin des communications.
Les climatiseurs ne fonctionnent pas comme prévu
à l’instant programmé.
Les climatiseurs peuvent être démarrés/arrêtés à
partir du contrôleur système, bien que la
programmation ait désactivé le fonctionnement de
la télécommande.
clignote dans la zone d’affichage de
l’heure actuelle.
Le temporisateur est désactivé. (Voir à la page 37)
Un jour férié a été programmé. (Voir à la page 36)
L’alimentation du climatiseur a été coupée puis
restaurée. (Voir à la page 40)
L’alimentation du climatiseur a été coupée pendant
une longue période. Reconfigurer l’heure et le jour de
la semaine en cours. (Voir les pages 26 et 27)
À vérifier avant de contacter le service d’assistance
Si le problème persiste après avoir appliqué les actions suggérées, arrêter le temporisateur, éteindre l’unité et
contacter le revendeur en lui indiquant le numéro de série de l’unité et le problème associé. En raison du danger que
cela représente, ne jamais tenter d’entretenir l’unité soi-même.
F
OI-915-21-F
41

915_TCB-EXS21E.book Page 162 Wednesday, August 1, 2007 1:26 AM
 Loading...