

Page 1
OWNERS MANUAL
MANUEL DU PROPRIETAIRE
BETRIEBSANLEITUNG
MANUALE DEL PROPRIETARIO
MANUAL DEL PROPIETARIO
MANUAL DO UTILIZADOR
GEBRUIKSAANWIJZING
ПДЗГЙЕУ ЧСЗУЗУ
REMOTE CONTROLLER FOR AIR CONDITIONER (SPLIT TYPE)
TELECOMMANDE POUR CLIMATISEUR (TYPE SPLIT)
FERNBEDIENUNG FÜR KLIMAGERÄT (SPLIT-SYSTEM)
TELECOMANDO PER CONDIZIONATORE D'ARIA (TIPO MULTIAMBIENTI)
CONTROL REMOTO PARA EL APARATO DE AIRE ACONDICIONADO (TIPO SPLIT)
CONTROLADOR REMOTO PARA AR CONDICIONADO (TIPO SPLIT)
AFSTANDSBEDIENING VOOR DE AIRCONDITIONER (GESPLITST TYPE)
УYУKEYH THЛEXEIPIУMOY ГЙБ КЛЙМБФЙУФЙКП (ФХРПУ SPLIT)
<Wireless T ype>
<Type sans fil>
<Drahtloses System>
<Tipo via radio>
<Modelo inalámbrico>
<Tipo Sem Fios>
<Draadloos model>
<Буэсмбфпх Фэрпх>
TCB-AX21E
Page 2
Thank you very much for purchasing TOSHIBA Remote Controller for Air Conditioner .
Please read this owner's manual carefully bef ore using your Remote Controller for Air Conditioner .
• Be sure to obtain the “Owner’s manual” and “Installation manual” from constructor (or dealer).
Request to constructor or dealer
Please clearly explain the contents of the Owner’ s man ual and hand o ver it.
Nous vous remercions pour av oir choisi une télécommande pour climatiseur TOSHIBA.
Veuillez lire attentivement ce Manuel du propriétaire av ant d’utiliser v otre télécommande pour climatiseur.
• Assurez-vous que le constructeur (ou le rev endeur) vous remette le “Manuel du propriétaire” et le “Manuel
d’installation”.
Demande au constructeur ou au revendeur
Veuillez expliquer clairement le contenu du Manuel du propriétaire et le remettre au client.
Wir danken Ihnen, dass Sie sich für eine TOSHIBA Fernbedienung für Klimageräte entschieden haben.
Bitte lesen Sie diese Bedienungsanleitung sorgfältig, ehe Sie Ihre Fernbedienung für Klimageräte benutzen.
• Lassen Sie sich die “Bedienungsanleitung” und das “Installations-Handbuch” unbedingt vom Installateur oder vom
Lieferanten aushändigen.
Eine Bitte an den Installateur oder Lieferanten:
Bitte erklären Sie dem Käufer den Inhalt der Bedienungsanleitung und händigen sie ihm aus.
Grazie di av er acquistato un telecomando TOSHIBA per condizionatore d'aria.
Prima di usare il telecomando per condizionatore d'aria, leggere con attenzione questo manuale del proprietario.
• Si raccomanda di tenere a portata di mano il "Manuale del proprietario" e il "Manuale di installazione" ricevuti dal
produttore (o dal rivenditore).
Richiesta al produttore o al rivenditore
Spiegare chiaramente il contenuto del Manuale del proprietario e consegnarne una copia all'utente.
Muchas gracias por haber adquirido el control remoto TOSHIBA para su aparato de aire acondicionado .
Lea atentamente este manual del propietario antes de utilizar el control remoto para el aparato de aire acondicionado .
• Asegúrese de que el fabricante (o distribuidor) le proporcione el “Manual del propietario” y el “Manual de
instalación”.
Solicitud al fabricante o distribuidor
Explique con claridad el contenido del Manual del propietario y entréguelo al cliente.
Agradecemos o facto de ter adquirido o Controlador Remoto par a Ar Condicionado da T OSHIBA.
Lei atentamente o presente Manual do Utilizador antes de utilizar o Controlador Remoto para Ar Condicionado .
• Peça o “Manual do Utilizador” e o “Manual de Instalação” ao fabricante (ou concessionário).
Peça ao fabricante ou representante
Explique claramente o conteúdo do Manual do Utilizador e proceda à sua entrega.
Hartelijk dank voor uw keuze voor een afstandsbediening bij uw airconditioner van TOSHIBA.
Lees deze gebruiksaanwijzing zorgvuldig door voordat u de afstandsbediening gaat gebruik en.
• Zorg ervoor dat u zowel de ‘gebruiksaanwijzing’ als de ‘installatiehandleiding’ van de installateur (of le verancier)
krijgt.
Verzoek aan de installateur of de lev erancier
Leg de inhoud van de gebruiksaanwijzing duidelijk uit en ov erhandig de gebruiksaanwijzing nadien aan de klant.
Убт ехчбсйуфпэме рплэ рпх рспфймЮубфе фзн TOSHIBA гйб фз УхукехЮ Фзлечейсйумпэ гйб Клймбфйуфйкь.
Рбсбкблпэме дйбвЬуфе рспуекфйкЬ фйт пдзгЯет чсЮузт рсйн брь фз чсЮуз фзт УхукехЮт Фзлечейсйумпэ гйб
Клймбфйуфйкь.
ЦспнфЯуфе нб рспмзиехфеЯфе фп ЕгчейсЯдйп ЧсЮуфз кбй фп ЕгчейсЯдйп ЕгкбфЬуфбузт брь фпн кбфбукехбуфЮ (Ю фпн рщлзфЮ).
РбсЬклзуз гйб фпн кбфбукехбуфЮ Ю фпн рщлзфЮ
Рбсбкблю еозгЮуфе ме убцЮнейб фб ресйечьменб фщн Пдзгйюн ЧсЮузт кбй рбсбдюуфе фп.
Page 3
CONTENTS
PRECAUTIONS FOR SAFETY........................................................ 1
NAME AND OPERATION ................................................................ 2
HOW T O SET THE F AN SPEED ...................................................... 4
HOW T O OPERA TE THE UNIT ........................................................ 6
HOW T O OPERA TE THE TIMER ...................................................... 7
HOW TO ADJUST AIR DIRECTION ................................................ 8
SLIDE SWITCH ............................................................................... 9
SOMMAIRE
MESURES DE SECURITE ............................................................ 14
NOM ET FONCTIONNEMENT....................................................... 15
MODE DE REGLAGE DE LA VITESSE DE VENTILATION........... 17
MODE D’EMPLOI DE L’UNITE ...................................................... 19
MODE D’EMPLOI DE LA MINUTERIE ..........................................20
MODE DE REGLAGE DU SENS DE DIFFUSION D’AIR .............. 21
CURSEUR ..................................................................................... 22
INHALT
SICHERHEITSVORKEHRUNGEN................................................. 27
BEZEICHNUNGEN UND FUNKTIONEN ....................................... 28
EINSTELLUNG DER GEBLÄSEGESCHWINDIGKEIT ................. 30
BEDIENUNG DES KLIMAGERÄTS .............................................. 32
BEDIENUNG DER ZEITSCHALTUHR ...........................................33
EINSTELLEN DES LUFTSTROMS ............................................... 34
SCHIEBESCHALTER .................................................................... 35
INDICE
PRECAUZIONI PER LA SICUREZZA ........................................... 40
NOME E FUNZIONAMENTO ......................................................... 41
COME IMPOSTARE LA VELOCITÀ DELLA VENTOLA ................ 43
COME FAR FUNZIONARE L’UNITÀ .............................................. 45
COME FAR FUNZIONARE IL TIMER ............................................ 46
COME REGOLARE LA DIREZIONE DELL'ARIA ......................... 47
INTERRUTTORE A SCORRIMENTO ............................................ 48
HO W TO INSERT THE BATTERIES................................................. 9
HO W TO HANDLE THE REMOTE CONTROLLER ........................ 10
HO W TO USE THE REMOTE CONTROLLER CORRECTLY ......... 10
ADDRESS ..................................................................................... 11
HO W TO PERFORM TEMPORARY OPERA TION .......................... 12
BEFORE ASKING REPAIR WORK ............................................... 13
MODE D’INSERTION DES PILES ................................................. 22
MODE DE MANIPULATION DE LA TELECOMMANDE ................23
MODE D’EMPLOI CORRECT DE LA TELECOMMANDE .............23
ADRESSE ...................................................................................... 24
COMMENT EFFECTUER LE
FONCTIONNEMENT PROVISOIRE .............................................. 25
AVANT TOUTE DEMANDE DE REPARATION .............................. 26
AUSTAUSCHEN DER BATTERIEN ............................................... 35
HANDHABUNG DER FERNBEDIENUNG ..................................... 36
KORREKTE HANDHABUNG DER FERNBEDIENUNG ................ 36
ADRESS ........................................................................................37
MANUELLEN BETRIEB STARTEN ............................................... 38
EHE SIE DEN SERVICE RUFEN ................................................... 39
COME INSERIRE LE BATTERIE................................................... 48
COME MANEGGIARE IL TELECOMANDO .................................. 49
COME USARE IL TELECOMANDO CORRETTAMENTE .............. 49
INDIRIZZO .....................................................................................50
COME ESEGUIRE IL FUNZIONAMENTO TEMPORANEO ........... 51
PRIMA DI RICHIERE UN INTERVENTO
D’ASSISTENZA O RIPARAZIONE ................................................52
FRANCAISDEUTSCHNEDERLANDS ENGLISH
ITALIANOESPAÑOLPORTUGUÊS
CONTENIDO
PRECAUCIONES PARA SU SEGURIDAD.................................... 53
NOMBRE Y FUNCIÓN ................................................................... 54
CÓMO AJUST AR LA VELOCIDAD DEL VENTILADOR ............... 56
CÓMO UTILIZAR LA UNIDAD ...................................................... 58
CÓMO UTILIZAR EL TEMPORIZADOR ........................................59
CÓMO AJUSTAR LA DIRECCIÓN DE SALIDA DEL AIRE .......... 60
CONMUTADOR DESLIZANTE ...................................................... 61
ÍNDICE
PRECAUÇÕES DE SEGURANÇA ................................................ 66
NOMES E FUNCIONAMENTO ......................................................67
COMO CONFIGURAR A VELOCIDADE DA VENTOINHA ............69
COMO UTILIZAR UNIDADE.......................................................... 71
COMO UTILIZAR O TEMPORIZADOR .......................................... 72
COMO REGULAR A DIRECÇÃO DE AR ...................................... 73
INTERRUPTOR DE CORRER ....................................................... 7 4
INHOUD
VOORZORGSMAA TREGELEN V OOR UW VEILIGHEID .............. 79
NAAM EN FUNCTIE ...................................................................... 80
ZO STELT U DE VENTILATORSNELHEID IN ............................... 82
ZO BEDIENT U HET APPARAAT .................................................. 84
ZO BEDIENT U DE TIMER ............................................................ 8 5
ZO STELT U DE UITBLAASRICHTING VAN DE LUCHT IN ......... 86
SCHUIFSCHAKELAAR ................................................................. 87
РЕСЙЕЧПМЕНБ
РСПЦХЛБОЕЙУ БУЦБЛЕЙБУ .......................................................... 92
ПНПМБ КБЙ ЛЕЙФПХСГºБ .............................................................. 93
СХИМЙУЗ ФБЧХФЗФБУ БНЕМЙУФЗСБ ........................................... 95
ФСПРПУ ЛЕЙФПХСГЙБУ МПНБДБУ .............................................. 97
ФСПРПУ ЛЕЙФПХСГЙБУ ЧСПНПДЙБКПРФЗ ................................. 98
ФСПРПУ СХИМЙУЗУ ФЗУ ДЙЕХИХНУЗУ ФПХ БЕСБ ................... 99
ÓYPOMENOÓ ÄÉAKOÐTHÓ .......................................................... 100
CÓMO COLOCAR LAS PILAS ..................................................... 61
CÓMO UTILIZAR EL CONTROL REMOTO .................................. 62
CÓMO UTILIZAR CORRECTAMENTE EL CONTROL REMOTO .. 62
DIRECCIÓN ...................................................................................63
CÓMO ACTIVAR EL FUNCIONAMIENTO TEMPORAL ................64
ANTES DE PEDIR REPARACIONES ............................................ 65
COMO COLOCAR AS PILHAS ..................................................... 74
COMO UTILIZAR O CONTROLADOR REMOTO .......................... 75
COMO UTILIZAR CORRECTAMENTE O
CONTROLADOR REMOTO ........................................................... 75
ENDEREÇO ................................................................................... 76
COMO ACTIVAR O BOTÃO DE FUNCIONAMENTO TEMPORÁRIO
ANTES DE SOLICITAR ASSISTÊNCIA ........................................ 78
ZO PLAATST U DE BATTERIJEN ................................................. 87
ZO BEDIENT U DE AFSTANDSBEDIENING ................................ 88
ZO GEBRUIKT U DE AFSTANDSBEDIENING
OP DE JUISTE MANIER ............................................................... 88
ADRES .......................................................................................... 89
ZO BEDIENT U HET APPARAAT HANDMATIG ............................ 90
VOORDAT U EEN ONDERHOUDSMONTEUR INSCHAKELT ...... 91
ФСПРПУ ЕЙУБГЩГЗУ ФЩН МРБФБСЙЩН .................................... 100
ФСПРПУ XEIPIУMOY УYУKEYHУ THЛEXEIPIУMOY ................. 101
ФСПРПУ УЩУTOY XEIPIУMOY УYУKEYHУ THЛEXEIPIУMOY . 101
ДЙЕХИХНУЗ ................................................................................... 102
ЕКФЕЛЕУЗ РСПУЩСЙНЗУ ЛЕЙФПХСГЙБУ .................................. 103
РСПФПХ ЖЗФЗУЕФЕ ЕРЙУКЕХЗ ................................................. 104
77
ЕЛЛЗНЙКБ
Page 4
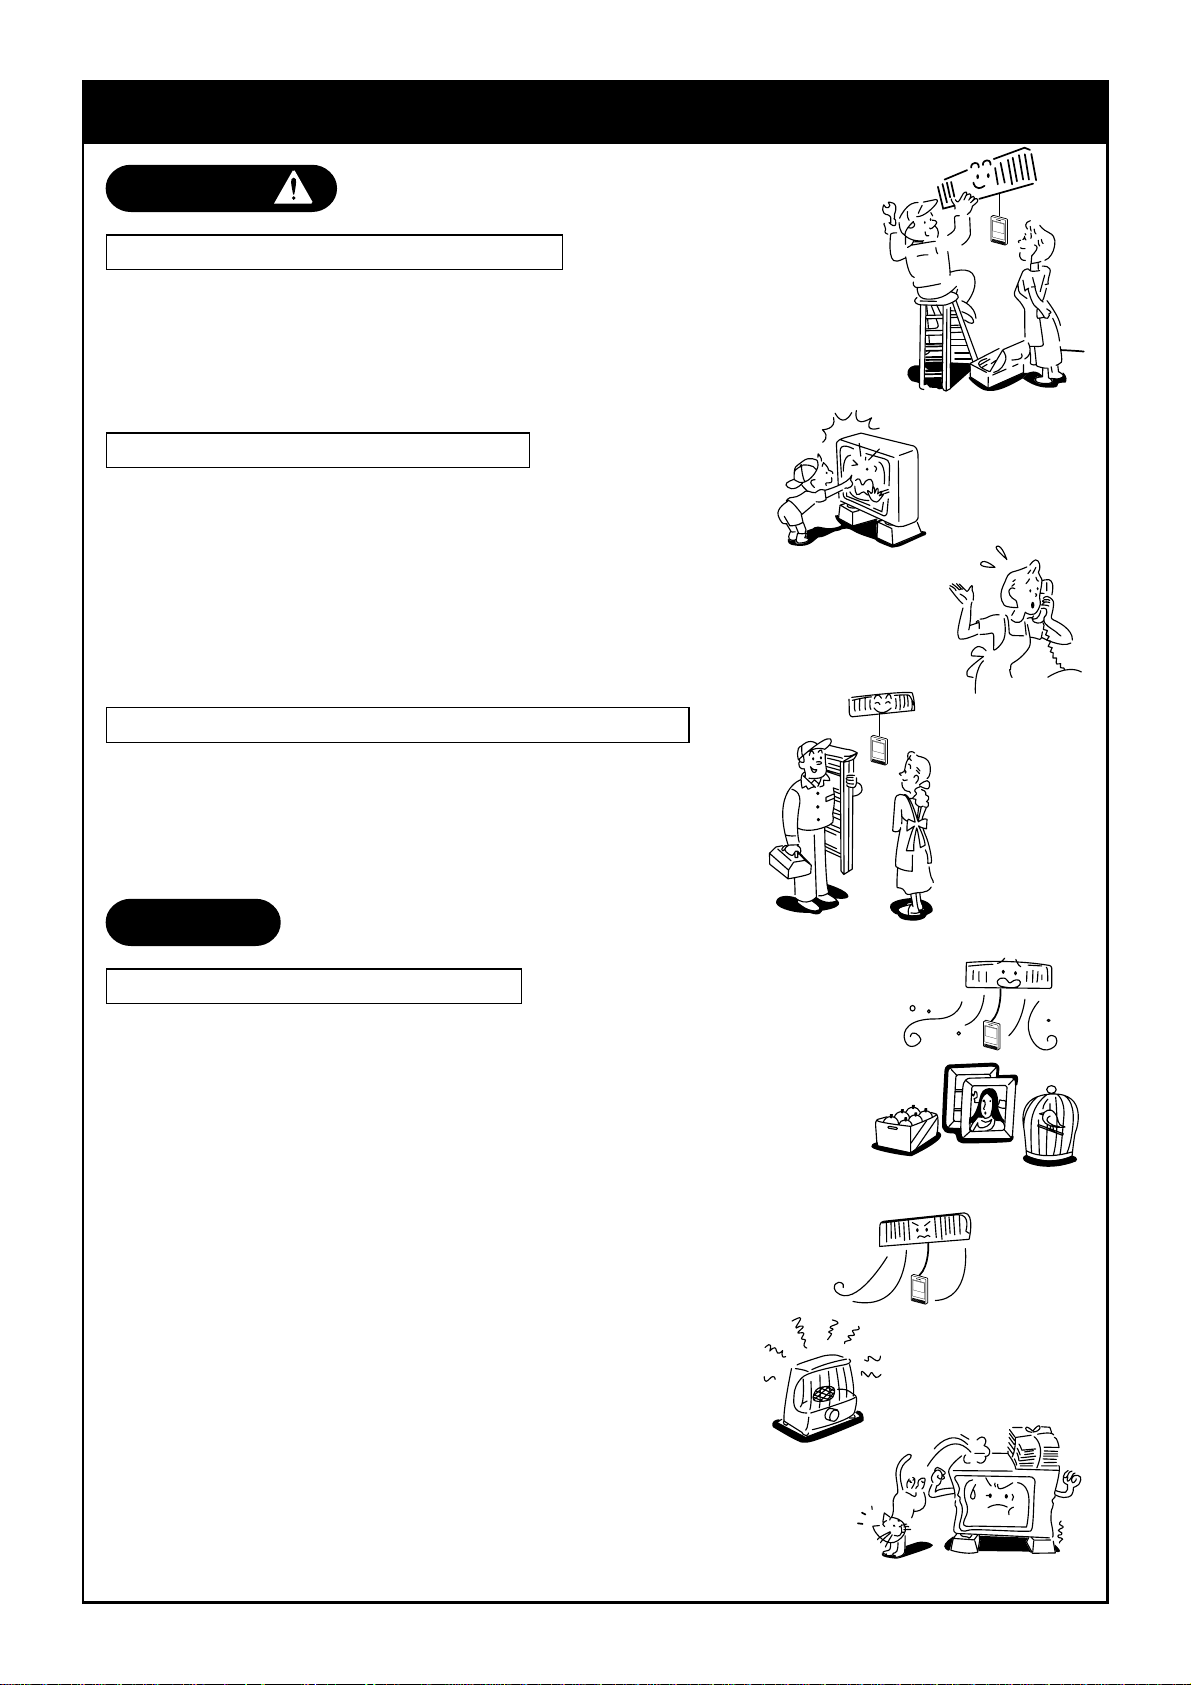
PRECAUTIONS FOR SAFETY
WARNING
WARNINGS ABOUT INSTALLATION
• Make sure to ask the qualified installation professional in
electric work to install the remote controller.
If the remote controller is inappropriate installed by
yourself, it may cause, electric shock, fire, and so on.
WARNINGS ABOUT OPERATION
• When you are aware of something abnormal with the air
conditioner (smells like something etc.), immediately turn
off the main power supply switch or circuit breaker, from
the mains to stop the air conditioner, and make contact
with the dealer. If the air conditioner is continuously
operated with something abnormal, it may cause machine
failure , electric shock, fire, and so on.
WARNINGS ABOUT MOVEMENT AND REPAIR
• Do not repair any unit by yourself.
• Whenever the air conditioner needs repair, make sure to
ask the dealer to do it. If it is repaired imperfectly, it may
cause electric shock or fire.
CAUTION
CA UTIONS ABOUT OPERATION
• Carefully read this manual before starting the air conditioner. There are many important things for the safety and
the correct usage.
• Do not touch any switches with wet finger, otherwise you
may get an electric shock.
• When the air conditioner was not be used for a considerably long time, turn off the main switch or the circuit
breaker, for safety. Disconnect from the power supply
prevents the unit from lightning and power supply surge.
• Prevent any liquid from falling into the remote controller.
Do not spill juice, water or any kind of liquid.
1
Page 5

NAME AND OPERATION
Remote Controller
• Max. 8 indoor units can be operated by a remote controller as a group. (See 11 page.)
4
Start/Stop button
Pushing this button starts, and pushing
again stops the unit.
5
Mode Select button
Pushing this button selects an operation
mode.
6
Air volume button
7
Time Setup button
This button is used when the timer is
setup.
8
Reset button
This button is used after replacement of
battery or selection of slide switch.
9
Slide switch
(See 9 page.)
10
11
12
13
Part storing batteries
(See 9 page.)
Cover
Slide the cover holding its both sides.
AUTO flap display differs according
to the installed unit. (See 8 page.)
Setup Temp. button
Every pushing this button, temperature
rises by 1°C.
Every pushing this button, temperature
lowers by 1°C.
2
3
5
7
9
10
4
6
8
ADR
SET
CL
SKN AHC
ACL
1
ADR
SENSOR
12
13
14
15
16
17
18
ENGLISH
11
1
Transmitting part
2
Remote controller sensor
The peripheral temperature is sensed when
the sensor button is pushed to remote
controller side.
3
Mode display section
The operation mode is displayed.
14
15
16
17
18
2
Filter button
The remote controller is not operated
even if this switch is pushed.
Swing/Air direction button
(See 8 page.)
Address button
(See 11 page.)
Ventilation button
The remote controller is not operated
even if this switch is pushed.
Sensor button
This button is used when selecting the
temp. sensor at the remote controller
side. At the shipment from the factory,
this button is set to the temp. sensor at
the indoor unit.
Page 6

• The signal receiving part is mounted to the ceiling panel.
Signal Receiving Part
4
5
6
7
2
1
1
Temporary operation button
(See 12 page.)
2
Signal receiving part
The signal sent from the remote controller is received.
3
Display lamp
One of displays flashed while a trouble
occurs. When the display lamp flashes,
refer to “Before asking of repair” in 13
page.
4
lamp
This lamp goes on during operation.
3
5
lamp
This lamp goes on while the timer is
reserved.
6
lamp
• In heating operation this lamp in the
following cases;
The operation has started.
The temp. controller has worked.
The unit is under defrost operation.
• This lamp flashes while a trouble occurs
7
lamp
This lamp lights to indicate that it is time to
clean the filter.
.
• If “pi, pi” sound is heard, the MODE lamp of the display lamp goes on, and the lamp
and
lamp flash alternately, the operation is not performed with the desired mode.
3
Page 7

HOW TO SET THE F AN SPEED
6
8
Display Section
All indicators are shown in the right and the lower figures for the
explanation.
Only selected contents are display in actual operation.
• When turning on the leakage breaker at the first time 3
minutes later, [SET DATA] flashes about for 1 minute on the
display part of the remote controller. While this display is
flashing, the model is being automatically confirmed.
Accordingly, wait for 1 minute after [SET DATA] display has
disappeared, and then use the remote controller.
1
5
2
Display
ADR
SENSOR
section
Operation
section
ADR
SET
CL
ACL
3
ADR
4
10
1
Transmitting indication
Displayed while operating the switches of
the remote controller.
2
Mode display
The selected operation mode is displayed.
3
Fan mode select display
The selected fan mode is displayed.
(AUTO)
(HIGH)
(MED.)
(LOW)
4
Filter display
If “FILTER
filter.
5
CHECK display
Displayed while the protective device
works or a trouble occurs.
” is displayed, clean the air
7
9
6
Set up temperature display
The selected set up temp. is displayed.
7
Flap position display
8
SWING display
Displayed during up/down movement of
the flap.
9
Timer time display
Time of the timer is displayed.
(When a trouble occurs, the check code is
displayed.)
10
Timer SETIN setup display
When pushing the Timer SET button,
the display of the timer is selected in
order of [OFF]
[OFF] repeat OFF timer
→ No display.
→
→ [ON]
4
Page 8

Operation Section
Push each button to select a desired operation.
• The details of the operation needs to be set up once, afterward, the air conditioner can be
used by pushing
2
button only.
1
3
4
SET
CL
ACL
5
6
ADR
SENSOR
1
Operation select button
Selects desired operation mode.
2
Fan mode select button
Selects a fan mode.
3
Timer set button
TIMER SET button is used when the
timer is set up.
4
Check button
CHECK button is used for check
operation. During normal operation, do
not use this button.
5
Temperature set button
Adjusts required room temperature.
Set required set temperature by
pushing
or .
7
6
Start/Stop button
When the button is pushed, operation starts,
and it stops by pushing the button again.
When the operation stops, the operation lamp
and all displays disappear.
7
Filter reset button
Resets (Erases) “FILTER
OPTION :
Remote controller sensor
Usually the TEMP. sensor of the indoor unit
measured a temperature. A temperature around
the remote controller can also be measured.
For details, contact the dealer from which you
hav e purchased the air conditioner.
” display.
5
Page 9

HOW TO OPERA TE THE UNIT
4
Cool/Heat AUTO, Heat, Dry, Cool, Fan
Power supply
Turn on the power of the wireless remote controller 12 hours before starting the operation.
• After the power supply has been turned on, the operation of the remote controller is not
accepted for approx. 1 minute. It is not a failure.
(The sensor receives the signal once, but the received contents are cleared.)
1
Push Start/Stop button.
2
Push (Operation Select button)
1
operation to select one of
, , and .
2
3
Push (Fan Mode Select button)
3
to select one of fan speed modes.
When selecting
automatically changed.
(During FAN mode, the air speed is
not automatically changed.)
, the fan speed is
, ,
4
Push either or to select the desired temperature.
• During FAN mode, the temperature cannot be set up.
5
Stop
Push Start/Stop button.
When using the remote controller to stop the unit, the outdoor unit fan may keep operating for
a while even if the compressor of the outdoor unit has stopped.
• In heating operation, if the room is not comfortably heated with FAN , select FAN
or .
Although they are displayed, the function may not be provided according to the used indoor
unit. (Fan speed is constant.)
• When the unit cannot be stopped by the normal operation
Turn off the power switch or leakage breaker, and then contact the shop which you purchased
the unit.
Automatic cool/heat
When all indoor units in the identical refrigerant system are controlled as a group, the cooling/
heating operation is automatically performed with the difference between the setup temperature
and the room temperature.
Dry operation
• There is no dry function according to the used indoor unit even if DRY is displayed on the
display section of the remote controller. (Same to Cooling operation)
• When the room temperature approaches the setup temperature, running/stop operations are
automatically repeated.
• In order not to return humidity to the room as possible, the mode of indoor fan enters LOW
mode when the operation has stopped.
• The fan speed cannot be adjusted according to the used indoor unit or status of the room
temperature.
• The DRY mode cannot be used according to the used indoor unit when the outdoor temperature is 15°C or lower.
6
Page 10

HOW TO OPERA TE THE TIMER
• After setting of the timer, set the remote controller at a position where the signal can reach the
sensors (indoor unit body) .
(The signal of the timer operation is sent from the remote controller.)
• Set up the timer during display of the operation mode.
Use in the following cases
To stop the air conditioner
after the previously set time
has passed
To stop the air conditioner
every time after the previously
set time has passed
To operate the air conditioner
after the previously set time
has passed
During display
Timer time
Every pushing , the setup time increases by
0.5 hour (30 minutes).
The maximum time to be set is 72.0 hours.
Every pushing , the setup time decreases by
0.5 hour (30 minutes).
The minimum time to be set is 0.5 hours.
<Use example>
How to use OFF timer
(Ex.) To stop the unit 30 minutes after
1 When pushing the timer
SET
once,
and the time flash on the remote
controller.
2 Push TIME
or to set the time
to 0.5.
3 Push
SET
and the go on timer.
How to use the repeat timer
(Ex.) To stop the air conditioner every time
after 2.5 hours has passed
1 When pushing the timer
, and the time flash on the
remote controller.
2 Push TIME
or to set the time
to 2.5.
SET
twice,
Every pushing
follows;
Timer display
SET
, the display changes as
ADR
No display
3 Push
SET
and the , go on
timer.
The
works, and the operation stops
after 2.5 hours. When pushing
(Start/Stop) button again to operate the
unit, the operation stops after 2.5 hours.
How to use ON timer
(Ex.) To operate the unit 8 hours after
1 When pushing the timer
times,
and the timer flash on the
SET
three
remote controller.
2 Push TIME
or to set the time
to 8.0.
3 Push
SET
The operation mode display disappears,
and then time and the
go on.
To stop the timer operation
To stop the timer operation
Push
C L
button. Then the timer display
disappears.
7
Page 11

HOW T O ADJUST AIR DIRECTION
• Never move the flap (Air direction up/down adjusting plate) which is operated on the remote
controller with hands except a case of cleaning of the flap.
• While the unit stops, the flap (Air direction up/down adjusting plate) directs downward automatically.
• During preparation of heating, the flap (Air direction up/down adjusting plate) directs upward.
The swinging operation starts after heating preparation status has been cleared. However,
swinging is displayed on the AUTO flap display of the remote controller even if the heating
operation is being prepared.
How to set up the air direction
Every pushing button during operation, the air direction changes.
How to start swinging
When pushing button, set the direction of the flap (Air direction up/down adjusting plate) to
the lowest position, and then push
automatically changes upward/downward.
How to stop swinging
button again, the swinging is displayed and the air direction
Pushing button once again during swinging of the flap stops the flap at the desired position.
Then, when pushing
position.
• In cooling or dry operation, the flap does not stop when the flap directs downward.
If doing so, the flap stops at the 3
button, the air direction can be set to position from the uppermost
rd
position from the uppermost position.
In heating operation
Direct the flap (Air direction up/down adjusting plate) downward, otherwise the hot air may not reach at the foot.
Initial setup
In cooling/dry operation
Direct the flap (Air direction up/down adjusting plate) upward,
otherwise dewdrops may adhere or drip down to near of the
discharge grille.
In air
blowing operation
In all
operation modes
Initial setup
Initial setup
Display when swinging stopped
Series of
operation
Fan/Heat operation Cool/Dry operation
8
Page 12

SLIDE SWITCH
• Do not change setting of the slide switch because a malfunction occurs by other settings.
• Before usage, check the slide switch is set to the position as follows;
Removal of battery cover
Slide switch position
Flashing position
on remote controller
SKN AHC
Corresponding model
for change of flap
SKN
HIGH
MED.
Operation mode display
of remote controller
Slide switch position
Degital inverter (RAV)
A H C
Super Modular Multi
(Heat pump type)
Swing
A H C
Super Modular Multi
(Cooling only type)
HOW TO INSERT THE BATTERIES
1. Holding the both sides of the cover and remove it by sliding downward.
2. Correctly insert 2 AAA alkali batteries matching + and - polarities with
indications.
3. Push RESET button with something tipped and attach the cover.
• Replace the batteries when the display
section of the remote controller is difficult
to be read, or when the signal cannot be
sent if you are not close to the sensor.
(The standard replacement time of the
alkali batteries is approx. one year.)
• Use the same type of new batteries for
replacing two batteries.
• In case when you do not the remote
controller for a long time, remove the
batteries.
Cover
A H C
RESET button
9
Page 13

HOW T O HANDLE THE REMOTE CONTR OLLER
• Direct the transmitter of the remote controller toward the sensor (indoor unit body).
When the signal is normally received, “Pi” sound is heard once.
(“Pi, pi” sounds are heard only when the operation has started.)
• The standard distance which the signal can be received is approx. 7m.
The distance differs a little according to the capacity of the battery, etc.
• Be careful there is not something to block the signal between the sensor (indoor unit body)
and the remote controller.
• Do not put the remote controller on the place exposed to the direct sunlight or air from the air
conditioner or near the stove, etc.
• Do not drop, throw, or clean with water the remote controller.
• The signal may be accepted in a room where the electronic instantaneous-ON type or
inverter type florescent light is set. For details, contact the shop which you purchased the air
conditioner.
To Use the Remote Controller Setting to Wall, etc.
• Check a signal is received correctly by pushing Start/Stop button at the position to be
fixed.
• To take off remote controller, pull it toward you.
Fix the remote controller
holder with the screws.
Mounting screw
Truss tapping
Setting method of
remote controller
Put on.
1
Push.
2
Remote controller holder
HOW TO USE THE REMOTE CONTROLLER CORRECTL Y
Set the remote controller so that it is not excessively far from the sensor
•
(indoor unit), otherwise a malfunction is caused.
Be sure to set the remote controller in the same room where the sensor (indoor unit) is
installed.
Direct the remote controller toward the sensor (indoor unit) for operation.
•
When a signal is correctly received, “Pi” sound can be heard.
Avoid to set the remote controller at a place where it is covered with curtain,
•
etc.
10
Page 14
ADDRESS
When the multiple indoor units corresponding to the wireless remote controller are
installed in the same room, an address can be set up to prevent an interference.
Matching the address switch of the sensor with number of the remote controller ad
dress, Max. 6 indoor units can be controlled by the corresponding remote controller
individually.
The address switch for receiving the signal is prepared to the sensor (inside of panel or
indoor unit) and the address switch for sending the signal is prepared to the remote
controller. For details, contact the shop which you purchased the air conditioner.
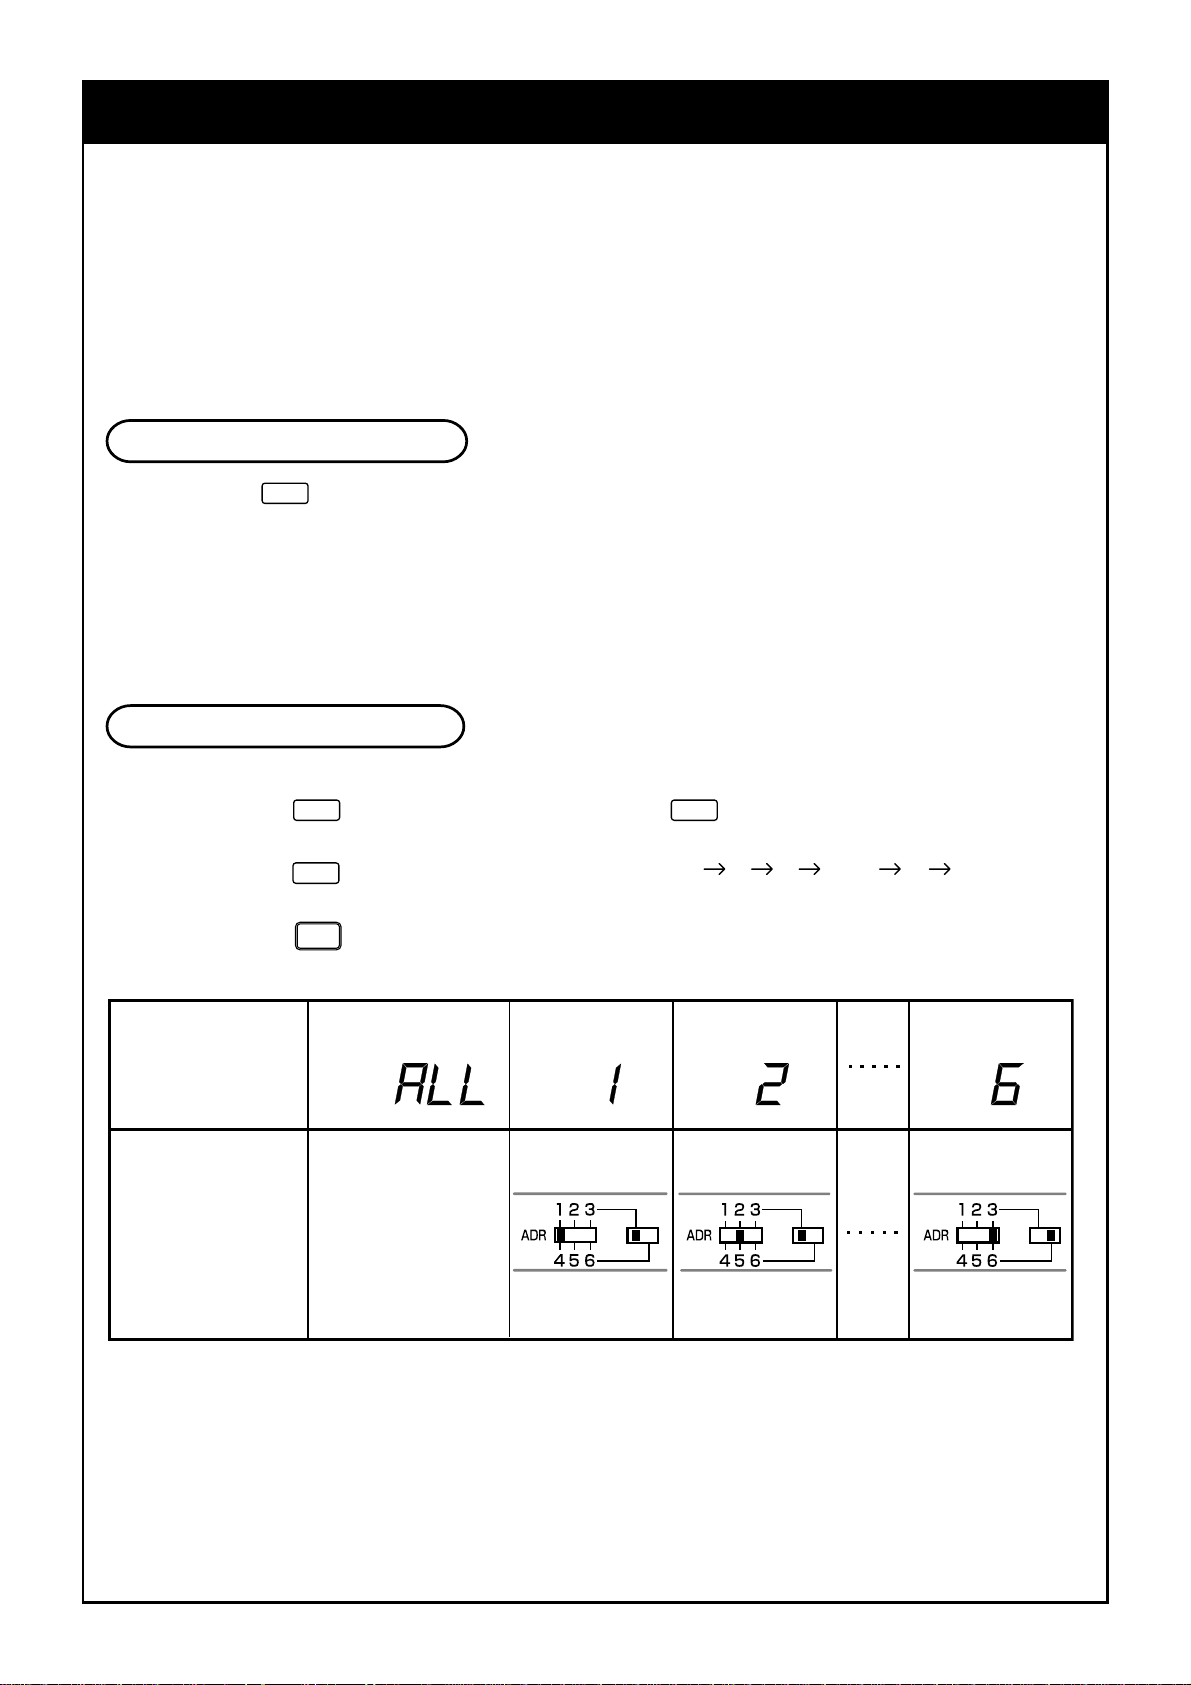
How to Check the Address
When pushing
y section of the remote controller. If this address matches with the address of the sensor
displa
(inside of panel or indoor unit), a buzzer sounds.
(When ALL is displayed, buzzer sound is necessarily heard.)
When ALL is displayed, the air conditioner can be operated regardless of any address of the
sensor (inside of the indoor unit). Send the signal by directing the remote controller toward the
sensor (panel or indoor unit body) to be handled.
button on the remote controller, the present address is displayed on the
ADR
How to Match the Address
Setup to remote controller address
1. When keeping
section of the remote controller and the present address is displayed with flashing.
2. Every pushing
one of them with the address switch of the indoor unit sensor to be handled.
3. When pushing
If the address matches with the address switch of the operation part, the buzzer sounds.
Display of
pushed for 4 seconds or more,
ADR
, the address is exchanged as ALL 1 2 3 … 6 ALL. Match
ADR
, the address display goes on and is displayed for 5 seconds.
C L
Address Address Address Address
lamp goes on at the display
ADR
remote
controller
address
Address switch
position of
sensor
* Address switch
of sensor unit
can be set any
position.
The address switch is inside the cover of receiver unit.
Contact the dealer for setting of the switch.
Turn the knob to the right side for 1 to 3 while to the left side for 4 to 6 of Address select switch
S001.
11
Page 15

HOW TO PERFORM TEMPORARY OPERATION
In the following cases, operate the air conditioner in temporary by
temporary operation of the operation part (inside of panel or indoor
unit).
• The battery in the remote controller expired.
• A trouble occurred on the remote controller.
• The remote controller have disappeared.
1,2
1
Start
Push temporary operation.
(If starting the operation when the room temperature is 24 C or higher, the mode enters
COOL mode. If starting the operation when the room temperature is 24 C or lower, the mode
enters HEAT mode.)
2
Stop
Push temporary operation once more.
CAUTION
• The ON switch of the test run and the ON switch of the test are used for the test run mode in
the installation time. Do not use them in the normal time.
• If the ìall stopî is selected in the normal/all stop switches, a signal from the remote controller
is not accepted.
12
Page 16

BEFORE ASKING REPAIR WORK
Before asking a repair work, check the following items.
Phenomenon
Check
again
Operation
does not
start even if
the switch is
turned on.
Cause
Stopped? or after power failure?
Is the power supply of the power
switch?
Fuse?
Is not the mode ON timer?
Is not [ALL OFF] of [Signal
Receiving Part] selected?
Is not the battery of the remote
controller expired?
Is not the state of the display lamp
“Disagreement of (cool) and
(heat)” or “No ”?
Phenomenon
Measures
Push Star t/Stop of the remote
controller.
Turn on the power supply switch if not.
Contact the shop which you
purchased the air conditioner.
Delete the timer operation.
Set the switch to [Normal position],
and stop the operation.
Replace the battery.
Change the operation mode.
Cause
Contact the shop
which you purchased
the air conditioner
<Display lamp flashes.>
• It is a communication error between
the sensor and the indoor unit, or
setup error of the address when the
wired remote controller is used.
• A communication error between the
indoor unit and the outdoor unit.
• A protective device of the indoor unit
works.
• A protective device of the outdoor
unit works.
• A trouble occurred on the temperature sensor.
• The compressor of the outdoor unit
is protected.
• The test run is performed.
Turn off the Trial ON switch.
Please check the above items. If the trouble yet remains, stop the operation, turn off the power
switch, and then notify the shop which you purchased the air conditioner of the part No. and
phenomenon. Never repair any part by yourself because it is very dangerous. If the display lamp
is flashing, also tell of its contents.
13
Page 17

85464189672000
 Loading...