

Toshiba SD-24VB User Manual
1-6
SD-24VBSB
OWNER’S MANUAL
DVD PLAYER &
VIDEO CASSETTE RECORDER
Before connecting, operating or adjusting this product,
please read this instruction booklet carefully and completely.
©2004 Toshiba Corporation
This device does not tape-record copy protected DVD Video Discs.
1-7
Safety Precautions
This lightning flash with arrowhead symbol within an
equilateral triangle is intended to alert the user to
the presence of uninsulated dangerous voltage
within the product’s enclosure that may be of
sufficient magnitude to constitute a risk of electric
shock to persons.
The exclamation mark within an equilateral triangle
is intended to alert the user to the presence of
important operating and maintenance (servicing)
instructions in the literature accompanying the
product.
WARNING: Do not install this equipment in a confined space
such as a book case or similar unit.
CAUTION:
This Digital Video Disc Player employs a Laser System.
To ensure proper use of this product, please read this owner’s
manual carefully and retain for future reference, should the unit
require maintenance, contact an authorized service locationsee service procedure.
Use of controls, adjustments or the performance of procedures
other than those specified herein may result in hazardous
radiation exposure.
To prevent direct exposure to laser beam, do not try to open
the enclosure. Visible laser radiation when open. DO NOT
STARE INTO BEAM.
CAUTION: The apparatus shall not be exposed to water,
dripping or splashing and that no objects filled with liquids,
such as vases, shall be placed on the apparatus.
This product is manufactured to comply with the
radio interference requirements of EEC DIRECTIVE
89/336/EEC, 93/68/EEC and 73/23/EEC.
Notes on copyrights:
It is forbidden by law to copy, broadcast, show, broadcast
via cable, play in public, or rent copyright material without
permission.
This product features the copy protection function developed
by Macrovision. Copy protection signals are recorded on some
discs.
This product incorporates copyright protection technology that
is protected by method claims of certain U.S. patents and other
intellectual property rights owned by Macrovision Corporation
and other rights owners. Use of this copyright protection technology must be authorized by Macrovision Corporation, and is
intended for home and other limited viewing uses only unless
otherwise authorized by Macrovision Corporation. Reverse
engineering or disassembly is prohibited.
CONSUMERS SHOULD NOTE THAT NOT ALL HIGH DEFINITION TELEVISION SETS ARE FULLY COMPATIBLE WITH
THIS PRODUCT AND MAY CAUSE ARTIFACTS TO BE DISPLAYED IN THE PICTURE. IN CASE OF 625 PROGRESSIVE
SCAN PICTURE PROBLEMS, IT IS RECOMMENDED THAT
THE USER SWITCH THE CONNECTION TO THE ‘STANDARD DEFINITION’ OUTPUT. IF THERE ARE QUESTIONS
REGARDING OUR TV SET COMPATIBILITY WITH THIS
MODEL 625p DVD PLAYER, PLEASE CONTACT OUR CUSTOMER SERVICE CENTER.
Features:
• Complete versatility to play DVD, VCDs, audio CDs or VHS
Tapes.
• Watch a DVD while recording a TV show to the VCR.
• Remote controls DVD and VCR decks.
• Records from DVD to VHS (unless DVD is copy protected
with Macrovision).
• Hi-Fi Stereo VCR.
SERIAL NUMBER: The serial number is found on the back of
this unit. This number is unique to this unit and not available to
others. You should record requested information here and
retain this guide as a permanent record of your purchase.
Model No. ___________________________________
Serial No. ___________________________________
WARNING: TO REDUCE THE RISK OF FIRE OR ELECTRIC SHOCK, DO NOT EXPOSE THIS PRODUCT TO
RAIN OR MOISTURE.
CAUTION
RISK OF ELECTRIC SHOCK
DO NOT OPEN
CAUTION: TO REDUCE THE RISK
OF ELECTRIC SHOCK
DO NOT REMOVE COVER (OR BACK)
NO USER-SERVICEABLE PARTS INSIDE
REFER SERVICING TO QUALIFIED SERVICE
PERSONNEL.
POWER: This unit operates on a mains supply of 200-240V,
50Hz.
WIRING: This unit is supplied with a BSI 1363 approved 13
amp mains plug, fused at 5 amp. When replacing the fuse
always use a 5 amp BS 1362, BSI or ASTA approved type.
Never use this plug with the fuse cover omitted. To obtain a
replacement fuse cover contact your dealer. If the type of plug
supplied is not suitable for the mains sockets in your home,
then the plug should be removed and a suitable type fitted.
Please refer to the wiring instructions below:
WARNING: A mains plug removed from the mains lead of this
DVD player must be destroyed. A mains plug with bared wires
is hazardous if inserted in a mains socket.
Do not connect either wire to the earth pin, marked with the
letter E or with the earth symbol or coloured green or
green and yellow.
If any other plug is fitted, use a 5 amp fuse, either in the plug,
or at the distribution board.
IMPORTANT: The wires in this mains lead are coloured in
accordance with the following codes:
- BLUE: NEUTRAL, BROWN: LIVE - As the colours of the
wires in the mains lead of this unit may not correspond with
the coloured marking identifying the terminals in your plug,
proceed as follows: The wire which is coloured blue must be
connected to the terminal which is marked with the letter N or
coloured black. The wire which is coloured brown must be
connected to the terminal which is marked with the letter L or
coloured red.

1-8
Safety Precautions(Continued)
SOME DOS AND DON'TS ON THE SAFE USE OF EQUIPMENT
This equipment has been designed and manufactured to meet international safety standards
but, like any electrical equipment, care must be taken if you are to obtain the best results and
safety is to be assured. So, please read the points below for your own safety. They are of a
general nature, intended to help you with all your electronic consumer products and some
points may not apply to the goods you have just purchased.
**************
DO read the operating instructions before you attempt to use the equipment.
DO ensure that all electrical connections (including the mains plug, extension leads and inter-
connections between the pieces of equipment) are properly made and in accordance with the
manufacturer's instructions. Switch off and withdraw the mains plug before making or changing
connections.
DO consult your dealer if you are ever in doubt about the installation, operation or safety of
your equipment.
DO be careful with glass panels or doors on equipment
**************
DON'T remove any fixed cover as this may expose dangerous voltages.
DON'T obstruct the ventilation openings of the equipment with items such as newspapers,
tablecloths, curtains, etc. Overheating will cause damage and shorten the life of the equipment.
DON'T allow electrical equipment to be exposed to dripping or splashing, or objects filled with
liquids, such as vases, to be placed on the equipment.
DON'T place hot objects or naked flame sources such as lighted candles or nightlights on, or
close to equipment. High temperatures can melt plastic and lead to fires.
DON'T use makeshift stands and NEVER fix legs with wood screws - to ensure complete safe-
ty always fit the manufacturer's approved stand or legs with the fixings provided according to
the instructions.
DON'T use equipment such as personal stereos or radios so that you are distracted from the
requirements of traffic safety. It is illegal to watch television whilst driving.
DON'T listen to headphones at high volume, as such use can permanently damage your hear-
ing.
DON'T leave equipment switched on when it is unattended unless it is specifically stated that it
is designed for unattended operation or has a stand-by mode. Switch off using the switch on
the equipment and make sure that your family know how to do this. Special arrangements may
need to be made for infirm or handicapped people.
DON'T continue to operate the equipment if you are in any doubt about it working normally, or
if it is damaged in any way -switch off, withdraw the mains plug and consult your dealer.
ABOVE ALL
---NEVER let anyone especially children push anything into holes, slots or any other
opening in the case - this could result in a fatal electrical shock;
---NEVER guess or take chances with electrical equipment of any kind
---it is better to be safe than sorry!
*************
INTRODUCTION

1-9
Table of Contents
Introduction
Safety Precautions. . . . . . . . . . . . . . . . . . . . . . . . 2-3
Table of Contents . . . . . . . . . . . . . . . . . . . . . . . . . . 4
About the symbols for instructions . . . . . . . . . . . . 4
Before Use . . . . . . . . . . . . . . . . . . . . . . . . . . . . . . 5-6
Playable Discs . . . . . . . . . . . . . . . . . . . . . . . . . . . 5
Moisture Condensation . . . . . . . . . . . . . . . . . . . . 5
Remote Control Operation Range . . . . . . . . . . . . 5
Precautions . . . . . . . . . . . . . . . . . . . . . . . . . . . . . 6
Notes on Discs . . . . . . . . . . . . . . . . . . . . . . . . . . 6
About Symbols . . . . . . . . . . . . . . . . . . . . . . . . . . 6
Selecting the Viewing Source. . . . . . . . . . . . . . . . 6
Front Panel . . . . . . . . . . . . . . . . . . . . . . . . . . . . . . . 7
Display Window. . . . . . . . . . . . . . . . . . . . . . . . . . . . 8
Remote Control . . . . . . . . . . . . . . . . . . . . . . . . . . . . 9
Rear Panel . . . . . . . . . . . . . . . . . . . . . . . . . . . . . . . 10
Preparation
Connections . . . . . . . . . . . . . . . . . . . . . . . . . . . 11-12
Connecting to a TV . . . . . . . . . . . . . . . . . . . . . . 11
Connecting to Optional Equipment . . . . . . . . . . . 12
Before Operation - VCR part . . . . . . . . . . . . . . 13-17
Tuning in a video channel on your TV . . . . . . . . 13
Initial preset . . . . . . . . . . . . . . . . . . . . . . . . . . . . 13
Setting the clock Manually . . . . . . . . . . . . . . . . . 14
To set the colour system . . . . . . . . . . . . . . . . . . 14
To set the RF OUT sound system. . . . . . . . . . . . 14
How to use the main menu . . . . . . . . . . . . . . . . 15
Tuning in TV stations Automatically . . . . . . . . . . 15
Tuning in TV stations Manually. . . . . . . . . . . . . . 16
Changing the other of TV stations . . . . . . . . . . . 17
Deleting TV stations. . . . . . . . . . . . . . . . . . . . . . 17
Before Operation - DVD part . . . . . . . . . . . . . . 18-21
General Explanation. . . . . . . . . . . . . . . . . . . . . . 18
On-Screen Display. . . . . . . . . . . . . . . . . . . . . . . 18
Initial Settings . . . . . . . . . . . . . . . . . . . . . . . . 19-21
z General Operation . . . . . . . . . . . . . . . . . . . . 19
z Language . . . . . . . . . . . . . . . . . . . . . . . . . . 19
z Picture. . . . . . . . . . . . . . . . . . . . . . . . . . . . . 19
z Sound . . . . . . . . . . . . . . . . . . . . . . . . . . . . . 20
z Others . . . . . . . . . . . . . . . . . . . . . . . . . . . . . 20
z Parental Control. . . . . . . . . . . . . . . . . . . . . . 21
Operation
Operation with tape . . . . . . . . . . . . . . . . . . . . . 22-25
Playing a tape . . . . . . . . . . . . . . . . . . . . . . . . . . 22
z CM (Commercial Message) Skip . . . . . . . . . . . 22
z OPR (Optimum Picture Response) . . . . . . . . . 22
One-touch Timer Recording (OTR). . . . . . . . . . . 23
Timer recording using On Screen Display . . . 24-25
Operation with DVD and Video CD . . . . . . . . . . 26-28
Playing a DVD and Video CD. . . . . . . . . . . . . . . 26
General Features . . . . . . . . . . . . . . . . . . . . . . . . 26
z Moving to another TITLE . . . . . . . . . . . . . . . 26
z Moving to another CHAPTER/TRACK . . . . . 26
z Search. . . . . . . . . . . . . . . . . . . . . . . . . . . . . 26
z
Still Picture and Frame-by-Frame Playback
. . . . 26
z Slow Motion. . . . . . . . . . . . . . . . . . . . . . . . . 27
z Random . . . . . . . . . . . . . . . . . . . . . . . . . . . 27
z Repeat . . . . . . . . . . . . . . . . . . . . . . . . . . . . 27
z Repeat A-B . . . . . . . . . . . . . . . . . . . . . . . . . 27
z Time Search . . . . . . . . . . . . . . . . . . . . . . . . 27
z 3D Surround . . . . . . . . . . . . . . . . . . . . . . . . 27
z Screen Saver. . . . . . . . . . . . . . . . . . . . . . . . 27
z Zoom. . . . . . . . . . . . . . . . . . . . . . . . . . . . . . 28
z Marker Search. . . . . . . . . . . . . . . . . . . . . . . 28
z One Touch Replay . . . . . . . . . . . . . . . . . . . . 28
Special DVD Features . . . . . . . . . . . . . . . . . . . . 28
z Title Menu . . . . . . . . . . . . . . . . . . . . . . . . . . 28
z Disc Menu . . . . . . . . . . . . . . . . . . . . . . . . . . 28
z Camera Angle . . . . . . . . . . . . . . . . . . . . . . . 28
z Changing the Audio Language. . . . . . . . . . . 28
z Changing the Audio Channel . . . . . . . . . . . . 28
z Subtitles . . . . . . . . . . . . . . . . . . . . . . . . . . . 28
Operation with Audio CD and MP3 Disc
. . . . . . . . 29-30
Playing an Audio CD and MP3 Disc . . . . . . . . . . 29
z Notes on MP3 Recordings . . . . . . . . . . . . . . 29
z Pause . . . . . . . . . . . . . . . . . . . . . . . . . . . . . 30
z Moving to another Track . . . . . . . . . . . . . . . 30
z Repeat Track/All/Off. . . . . . . . . . . . . . . . . . . 30
z Search. . . . . . . . . . . . . . . . . . . . . . . . . . . . . 30
z Random . . . . . . . . . . . . . . . . . . . . . . . . . . . 30
z Repeat A-B . . . . . . . . . . . . . . . . . . . . . . . . . 30
z 3D Surround . . . . . . . . . . . . . . . . . . . . . . . . 30
z Changing the Audio Channel . . . . . . . . . . . . 30
Operation with JPEG Disc. . . . . . . . . . . . . . . . . . . 31
Viewing a JPEG disc . . . . . . . . . . . . . . . . . . . . . 31
z Moving to another File . . . . . . . . . . . . . . . . . 31
z Still Picture . . . . . . . . . . . . . . . . . . . . . . . . . 31
z To flip the picture . . . . . . . . . . . . . . . . . . . . . 31
z To rotate Picture . . . . . . . . . . . . . . . . . . . . . 31
z Notes on JPEG Recordings . . . . . . . . . . . . . 31
Programmed Playback . . . . . . . . . . . . . . . . . . . . .32
Programmed Playback with Audio CD
and MP3 Discs . . . . . . . . . . . . . . . . . . . . . . . . . 32
Programmed Playback with Video CD . . . . . . . . 32
z Repeat Programmed Tracks . . . . . . . . . . . . 32
z Erasing a Track from Program list . . . . . . . . 32
z Erasing the Complete Program list. . . . . . . . 32
Additional Operation with tape . . . . . . . . . . . . 33-35
Hi-Fi Stereo Sound System (NIC). . . . . . . . . . . . 33
Blank Search . . . . . . . . . . . . . . . . . . . . . . . . . . . 33
On Screen Display(F.OSD). . . . . . . . . . . . . . . . . 33
Tape Counter Memory Stop . . . . . . . . . . . . . . . . 33
Video Doctor (Self-Diagnosis) . . . . . . . . . . . . . . 34
To set the decoder . . . . . . . . . . . . . . . . . . . . . . . 34
Wide Screen Compatibility 16:9 . . . . . . . . . . . . . 34
Copying from DVD to VCR. . . . . . . . . . . . . . . . . 35
Recording from another video recorder . . . . . . . 35
Reference
Troubleshooting. . . . . . . . . . . . . . . . . . . . . . . . 36-37
Language Code List . . . . . . . . . . . . . . . . . . . . . . . 38
Country/Area Code list . . . . . . . . . . . . . . . . . . . . . 39
Specification . . . . . . . . . . . . . . . . . . . . . . . . . . . . . 40
About the symbols for instructions
Indicates hazards likely to cause harm to the unit
itself or other material damage.
Indicates special operating features of this unit.
Indicates tips and hints for making the task easier.
1-10
Before Use
Playable Discs
DVD
(8 cm / 12 cm disc)
Video CD (VCD)
(8 cm / 12 cm disc)
Audio CD
(8 cm / 12 cm disc)
In addition, this unit can play SVCD, DVD±R/RW and
CD-R/RW that contains audio titles, MP3 or JPEG files.
Notes
z
Depending on the conditions of the recording
equipment or the CD-R/RW (or DVD±R/RW) disc
itself, some CD-R/RW (or DVD±R/RW) discs cannot
be played on the unit.
z
Do not attach any seal or label to either side (the
labeled side or the recorded side) of a disc.
z
Do not use irregular shaped CDs (e.g., heart-shaped
or octagonal). It may result in malfunctions.
Notes on DVDs and Video CDs
Some playback operations of DVDs and Video CDs
may be intentionally fixed by software manufacturers.
As this unit plays DVDs and Video CDs according to
disc content designed by the software manufacturer,
some playback features of the unit may not be available, or other functions may be added.
Refer also to the instructions applied with the DVDs and
Video CDs. Some DVDs made for business purposes
may not be played on the unit.
Regional code of the DVD player and DVDs
This DVD player is designed and manufactured for playback of region “2” encoded DVD software. The
region code on the labels of some DVD discs
indicates which type of player can play those
discs. This unit can play only DVD discs
labeled “2” or “ALL”. If you try to play any other discs, the
message “Check Regional Code” will appear on the TV
screen. Some DVD discs may not have a region code
label even though their playback is prohibited by area
limits.
Disc-related terms
Title (DVD only)
The main film content or accompanying feature content
or additional feature content, or music album. Each title
is assigned a title reference number enabling you to
locate it easily.
Chapter (DVD only)
Sections of a picture or a musical piece that are smaller
than titles. A title is composed of one or several chapters. Each chapter is assigned a chapter number,
enable you to locate the chapter you want. Depending
on the disc, chapters may not be recorded.
Track (Video CD and audio CD only)
Sections of a picture or a musical piece on a video CD
or an audio CD. Each track is assigned a track number,
enabling you to locate the track you want.
Scene
On a video CD with PBC (Playback control) functions,
moving pictures and still pictures are divided into
sections called “Scenes”. Each scene is displayed in the
menu screen and assigned a scene number, enabling
you to locate the scene you want.
A scene is composed of one or several tracks.
Types of video CDs
There are two types of video CDs:
Video CDs equipped with PBC (Version 2.0)
PBC (Playback control) functions allow you to interact
with the system via menus, search functions, or other
typical computer-like operations. Moreover, still pictures
of high resolution can be played if they are included in
the disc.
Video CDs not equipped with PBC (Version 1.1)
Operated in the same way as audio CDs, these discs
allow playback of video pictures as well as sound, but
they are not equipped with PBC.
Moisture Condensation
Never operate the DVD+VCR immediately after moving
it from a cold location to a warm location. Leave it for
two or three hours without operating it. If you use the
DVD+VCR in such a situation, it may damage
discs/tapes and internal parts.
INTRODUCTION
Remote Control Operation Range
Point the remote control at the remote sensor and
press the buttons.
z
Distance: About 23 ft (7 m) from the front of the
remote sensor
z
Angle: About 30° in each direction of the front of the
remote sensor
Remote control battery installation
Detach the battery cover on the rear of
the remote control, and insert two
(R03/AAA) size batteries with
and aligned correctly.
Caution
Do not mix old and new batteries. Never mix different
types of batteries (standard, alkaline, etc.).
2
AAA
AAA
1-11
Before Use (Continued)
Precautions
Handling the unit
When shipping the unit
The original shipping carton and packing materials
come in handy. For maximum protection, re-pack the
unit as it was originally packed at the factory.
When setting the unit
The picture and sound of a nearby TV or radio may be
distorted during playback. In this case, position the unit
away from the TV or radio, or turn off the unit after
removing the disc.
To keep the surface clean
Do not use volatile liquids, such as insecticide spray,
near the unit. Do not leave rubber of plastic products in
contact with the unit for a long period of time. They will
leave marks on the surface.
Cleaning the unit
To clean the cabinet
Use a soft, dry cloth. If the surfaces are extremely dirty,
use a soft cloth lightly moistened with a mild detergent
solution. Do not use strong solvents, such as alcohol,
benzine, or thinner, as these might damage the surface
of the unit.
To obtain a clear picture
The DVD player is a high-tech, precision device. If the
optical pick-up lens and disc drive parts are dirty or
worn down, the picture quality will be poor.
Regular inspection and maintenance are recommended
after every 1,000 hours of use. (This depends on the
operating environment.)
For details, please contact your nearest dealer.
Notes on Discs
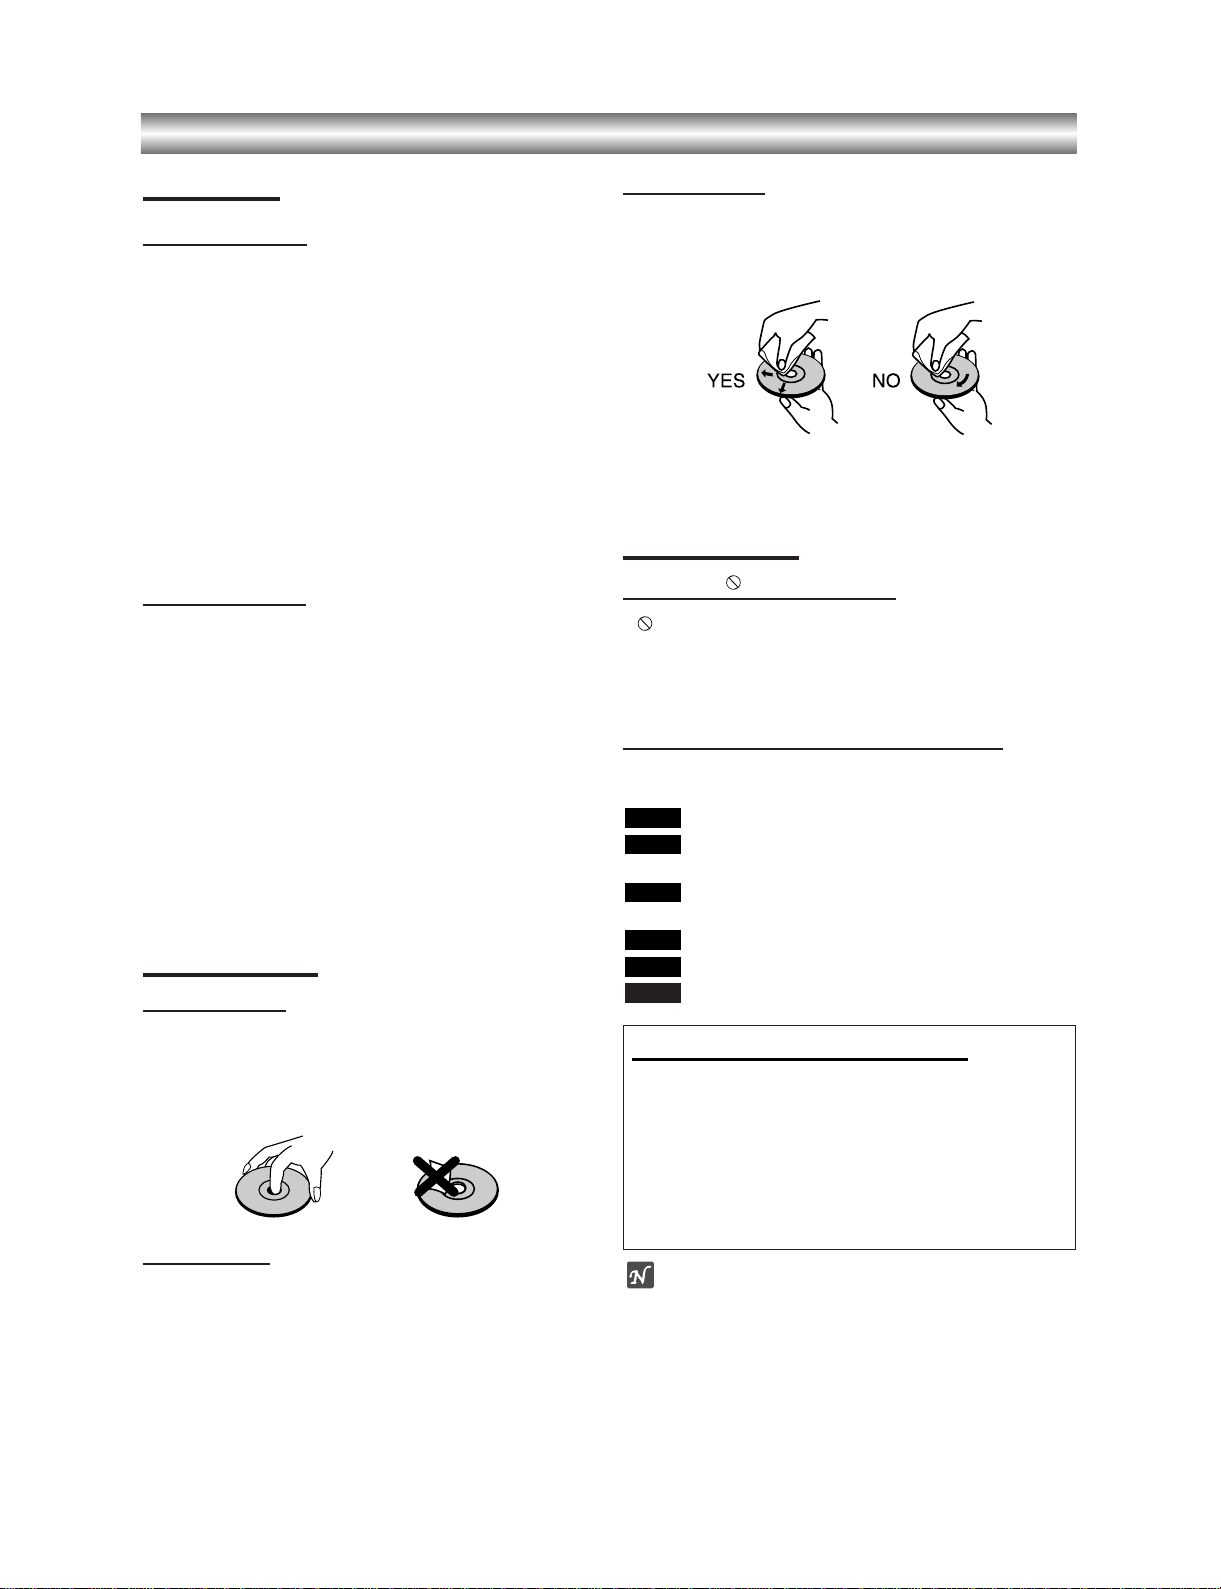
Handling discs
Do not touch the playback side of the disc.
Hold the disc by the edges so that fingerprints will not
get on the surface.
Do not stick paper or tape on the disc.
Storing discs
After playing, store the disc in its case.
Do not expose the disc to direct sunlight or sources of
heat, or leave it in a parked car exposed to direct sunlight, as there may be a considerable temperature
increase inside the car.
Cleaning discs
Fingerprints and dust on the disc can cause poor picture quality and sound distortion. Before playing, clean
the disc with a clean cloth. Wipe the disc from the center out.
Do not use strong solvents such as alcohol, benzine,
thinner, commercially available cleaners, or anti-static
spray intended for older vinyl records.
About Symbols
About the symbol display
“ ” may appear on the TV screen during operation.
This icon means the function explained in this owner’s
manual is not permitted by the DVD+VCR or is not
available on that specific DVD video disc.
About the disc symbols for instructions
A section whose title has one of the following symbol is
applicable only to the disc represented by the symbol.
DVD
Video CDs with the PBC (playback control)
function.
Video CDs without the PBC (playback control)
function.
Audio CDs.
MP3 disc.
JPEG disc.
JPEG
MP3
CD
VCD1.1
VCD2.0
DVD
Selecting the Viewing Source
You must select one of your output sources (DVD or
VCR) to view on the TV screen.
• If you want to view DVD deck output source:
Press DVD until DVD indicator in the display window lights
and output source of DVD deck is viewed on the TV screen.
• If you want to view VCR deck output source:
Press VCR until VCR indicator in the display window lights
and output source of VCR deck is viewed on the TV screen.
Notes
• If you insert a disc while the DVD+VCR is in the VCR
mode, the DVD+VCR will switch to DVD mode
automatically.
• If you insert a cassette tape without prevention tab
while the DVD+VCR is in the DVD mode, the
DVD+VCR will switch to VCR mode automatically.

1-12
Front Panel
INTRODUCTION
AV3
OPEN/CLOSE
Opens or closes the disc tray.
Remote Sensor
Point the DVD+VCR remote control here.
Display window
Shows the current status of the DVD+VCR.
Disc Tray (DVD deck)
Insert a disc here.
ON/ST ANBY
Switches the DVD+VCR
ON and OFF.
AV3 (VIDEO IN/AUDIO IN (Left/Right))
Connect to the audio/video output of an external source (Audio
system, TV/Monitor, Another VCR).
Cassette Compartment (VCR deck)
Insert a video cassette here.
EJECT
Ejects the tape in the VCR deck.
DVD/VCR indicator
Indicates the active deck.
REC
To record normally or to
activate One-touch Timer
Recording by repeated
presses.
FWD
Advances the tape during the STOP mode
or for fast forward picture search.
REW
Rewinds the tape during the STOP
mode or for fast reverse picture search.
PLAY (BB)
Starts playback of a tape in the VCR deck.
PLAY (BB)
Starts playback of a
disc in the DVD deck.
STOP (xx)
Stops playback of
disc.
STOP (xx)
Stops playback of tape.
SKIP (./> )
-
Skip to beginning of current chap-
ter or track, press twice in quick suc-
cessions to go to previous chapter
or track.
- Skip to next chapter or track.
Press and hold button for about two
seconds to search backward or for-
ward.
1-13
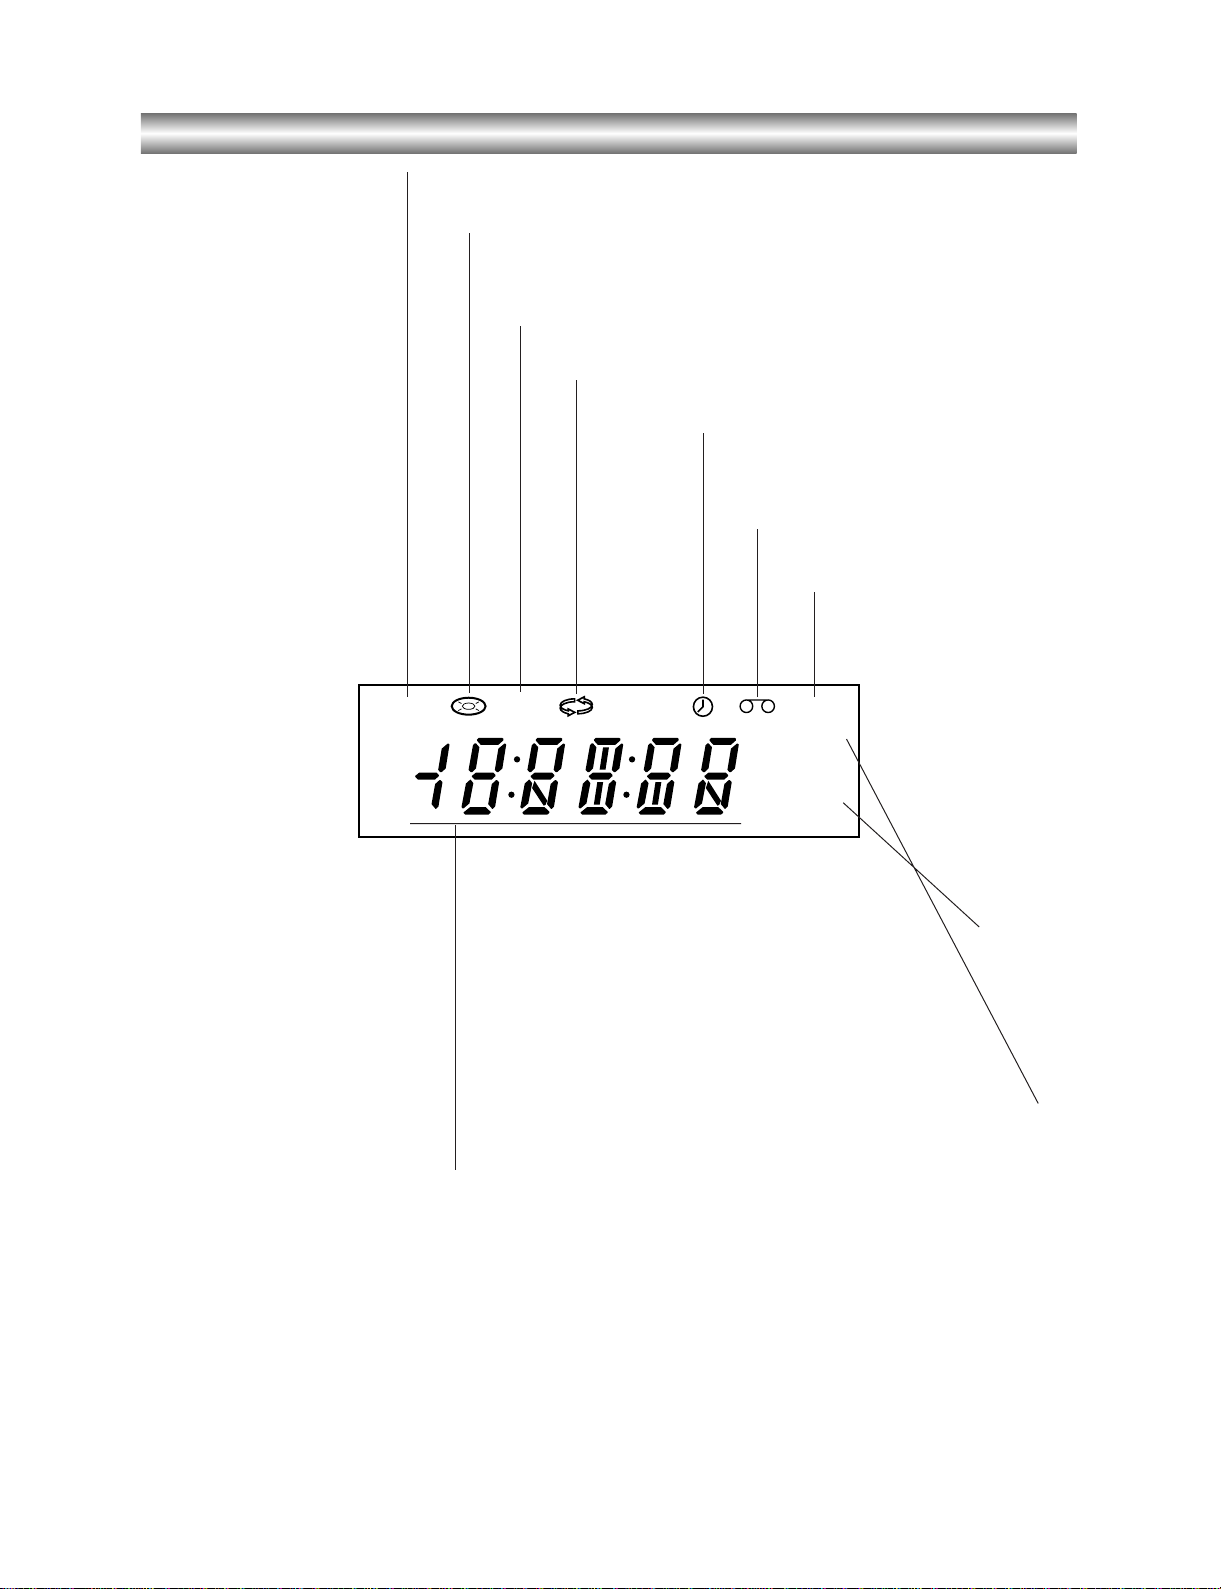
Display Window
DVD
VCR
REC
TV
[P]
DVD+VCR is in timer recording or a timer
recording is programmed.(VCR part only)
A cassette is in the VCR deck.
The VCR deck is selected.
DVD+VCR is Recording.
(VCR part only)
Lights when TV mode is active.
A disc is in the DVD deck.
(Lights when a disc is in the DVD deck
and Flashes when no disc.)
Indicates when the Progressive scan is active.
Indicates total playing time, elapsed time, remaining time or
current deck status (Playback, Pause, etc).
The DVD deck is selected.
Indicates repeat mode.
1-14
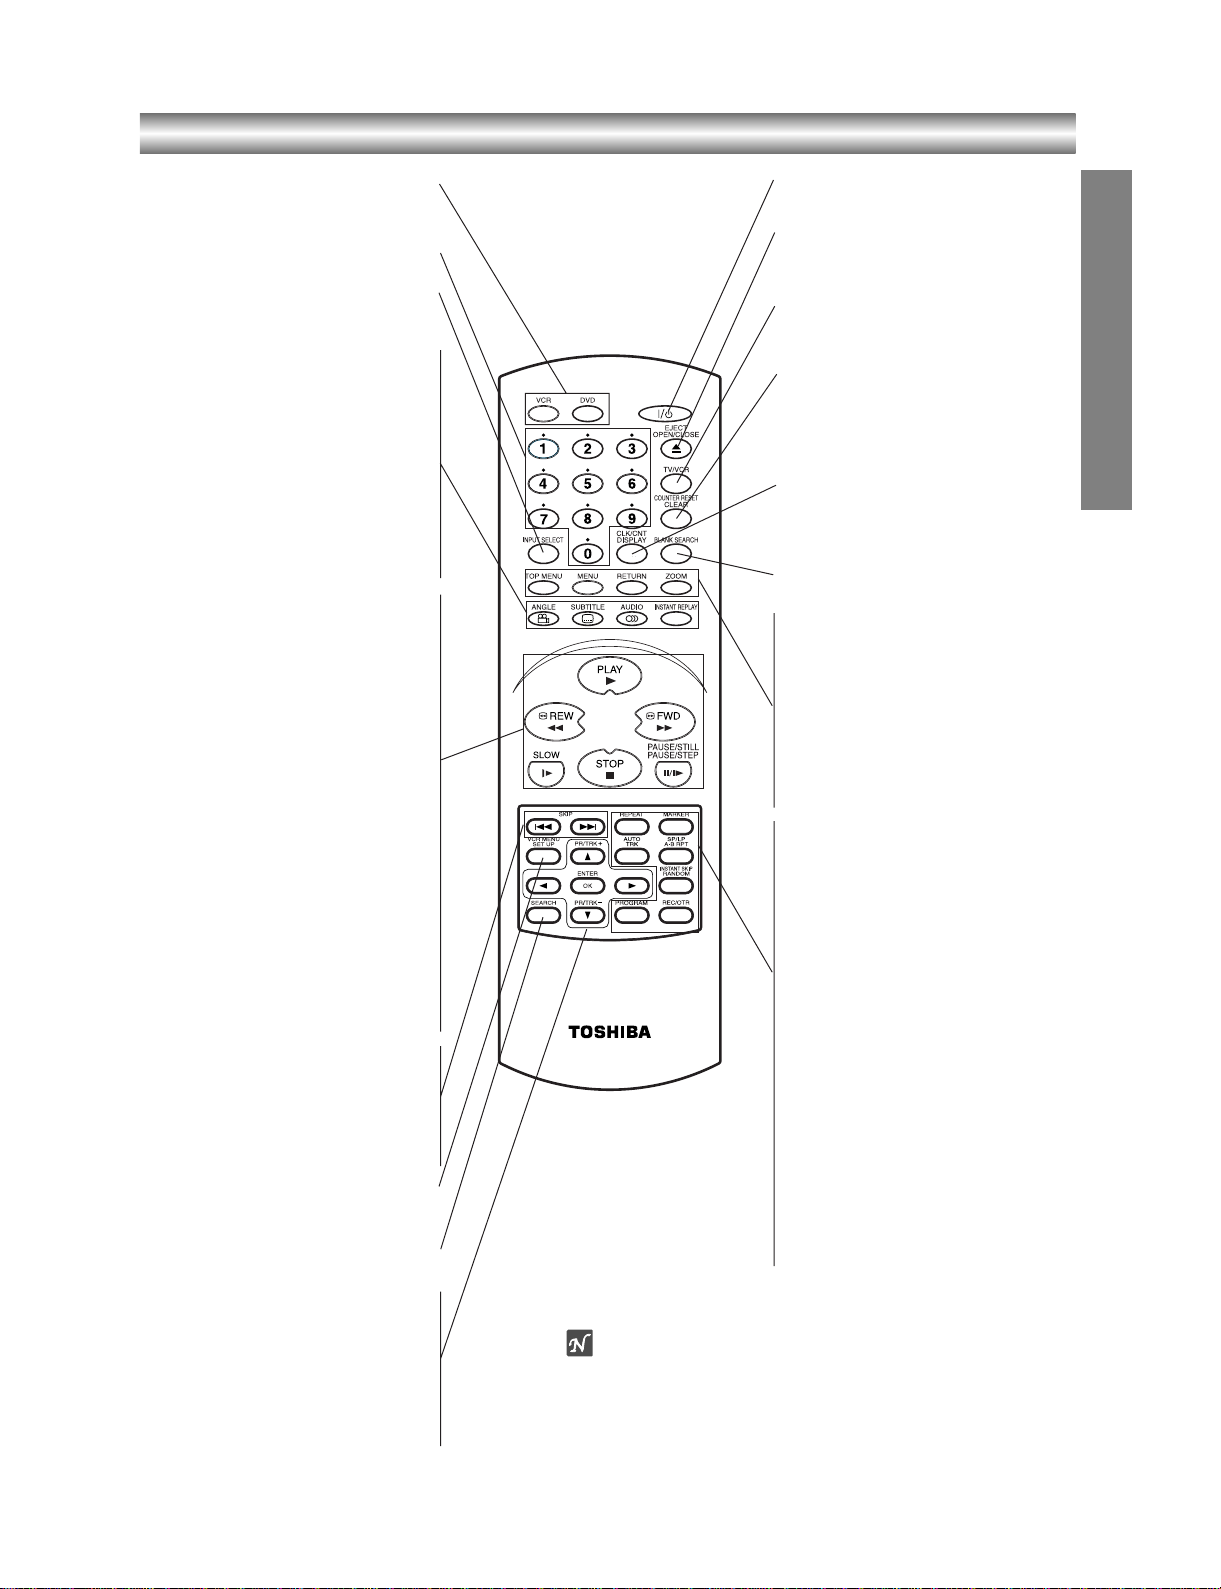
Remote Control
INTRODUCTION
DVD/VCR select button
Select the output source (DVD or VCR)
to view on the TV screen.
0-9 numerical buttons
Selects numbered options in a menu.
INPUT SELECT
To select the VCR deck’s source (Tuner,
AV1, AV2 or AV3).
ANGLE
z
Selects a DVD camera angle if
available.
SUBTITLE
z
Selects a subtitle language (DVD).
AUDIO
z
Selects an audio language (DVD) or an
audio channel (CD).
INSTANT REPLAY
z
Replays through 10 seconds of
playback.
PLAY
z
Starts playback.
REW
z
Rewinds the tape during the STOP
mode or for fast reverse picture search.
Press and hold button for about two sec-
onds to search backward. (For DVD
only)
FWD
z
Advances the tape during the STOP
mode or for fast forward picture search.
Press and hold button for about two sec-
onds to search forward.(For DVD only)
SLOW
z
Forward slow playback.
STOP
z
Stops playback.
PAUSE/STILL, PAUSE/STEP
z
Pause playback or recording.
Press repeatedly for frame-by-frame
playback during pause.
SKIP .
z
Skip to beginning of current chapter or track,
press twice in quick successions to go to
previous chapter or track.
SKIP >
z
Skip to next chapter or track.
SET UP, VCR MENU
Accesses or removes DVD setup menu
and VCR menu.
SEARCH
Displays MARKER SEARCH menu.
b/B/v/V (left/right/up/down)
z
- Selects an option in the menu
-
PR/TRK (+/-): Selects channel of VCR.
Adjusts manually the tape’s picture
onscreen.
ENTER/OK
z
- Acknowledges menu selection.
- Displays functions on the TV screen.
++//11
(POWER)
Switches DVD+VCR ON and OFF.
EJECT, OPEN/CLOSE
- Opens and closes the disc tray.
- Ejects the tape in the VCR deck.
TV/VCR
To view channels selected by the VCR
tuner or by the TV tuner.
COUNTER RESET, CLEAR
- Resets tape counter to M 0:00:00
- Removes a track number on the
program menu or a mark on the
MARKER SEARCH menu.
CLK/CNT, DISPLAY
Accesses On-Screen display.
Switches among the clock, tape counter
and tape remaining modes on the display.
BLANK SEARCH
Finds end points of recording.
z
TOP MENU
Displays the disc’s Title menu, if
available.
z
MENU
Accesses menu on a DVD disc.
z
RETURN
Removes the setup menu.
z
ZOOM
Enlarges video image.
z
REPEAT
Repeat chapter, track, title, all.
z
A-B RPT (REPEAT), SP/LP
- Repeats sequence.
- Selects recording speed of the tape.
z
MARKER
Marks any point during playback.
z
RANDOM, INSTANT SKIP
- Plays tracks in random order.
- Fast forwards picture search through
30 seconds of recording.
z
REC/OTR
Records normally or activates Onetouch Timer Recording with repeated
presses.
z
AUTO TRK
Adjusts automatically the tape’s picture
onscreen.
z
PROGRAM
Accesses or removes Program menu.
Note
This remote control uses the same buttons for VCR and DVD
functions (ex. PLAY).
When using a VCR, first press the VCR button.
When using a DVD, first press the DVD button.

1-15
Rear Panel
DVD/VCR OUT (VIDEO/AUDIO (Left/Right))
Connect to a TV with video and audio inputs.
AUDIO OUT (Left/Right) (DVD EXCLUSIVE OUT)
Connect to an amplifier, receiver or stereo system.
AERIAL
Connect the aerial using this jack.
EURO A V2 DECODER
Connect to pay-TV decoder, Set Top Box or another
video recorder.
EURO AV1 AUDIO/VIDEO (VCR IN+OUT/DVD OUT)
Connect to your TV set or another video recorder.
RF.OUT (DVD/VCR OUT)
Connect to your TV using this jack.
AC Power Cord
Connect to a power source.
S-VIDEO OUT (DVD EXCLUSIVE OUT)
Connect to a TV With S-Video input.
COMPONENT/PROGRESSIVE SCAN VIDEO OUT (Y Pb Pr)
(DVD EXCLUSIVE OUT)
Connect to a TV With Y Pb Pr inputs.
OPTICAL (DVD EXCLUSIVE OUT)
(Digital audio out jack)
Connect to digital (optical) audio equipment.
VIDEO OUTPUT Switch
Select either COMPONENT or RGB depending on
how you connect this unit to the TV.
COAXIAL (DVD EXCLUSIVE OUT)
(Digital audio out jack)
Connect to digital (coaxial) audio equipment.
Do not touch the inner pins of the jacks on the rear panel.
Electrostatic discharge may cause permanent damage to the unit.
1-16
Connections
Tips
zz
Depending on your TV and other equipment you wish
to connect, there are various ways you could connect
the unit.
zz
Please refer to the manuals of your TV, Stereo
System or other devices as necessary to make the
best connections.
zz
For better sound reproduction, connect this unit’s
AUDIO OUT jacks to the audio in jacks of your
amplifier, receiver, stereo or audio/video equipment.
See “Connecting to Optional Equipment” on page 12.
Caution
– Make sure this unit is connected directly to the TV.
Set the TV to the correct video input channel.
– Do not connect this unit’s AUDIO OUT jack to the
phono in jack (record deck) of your audio system.
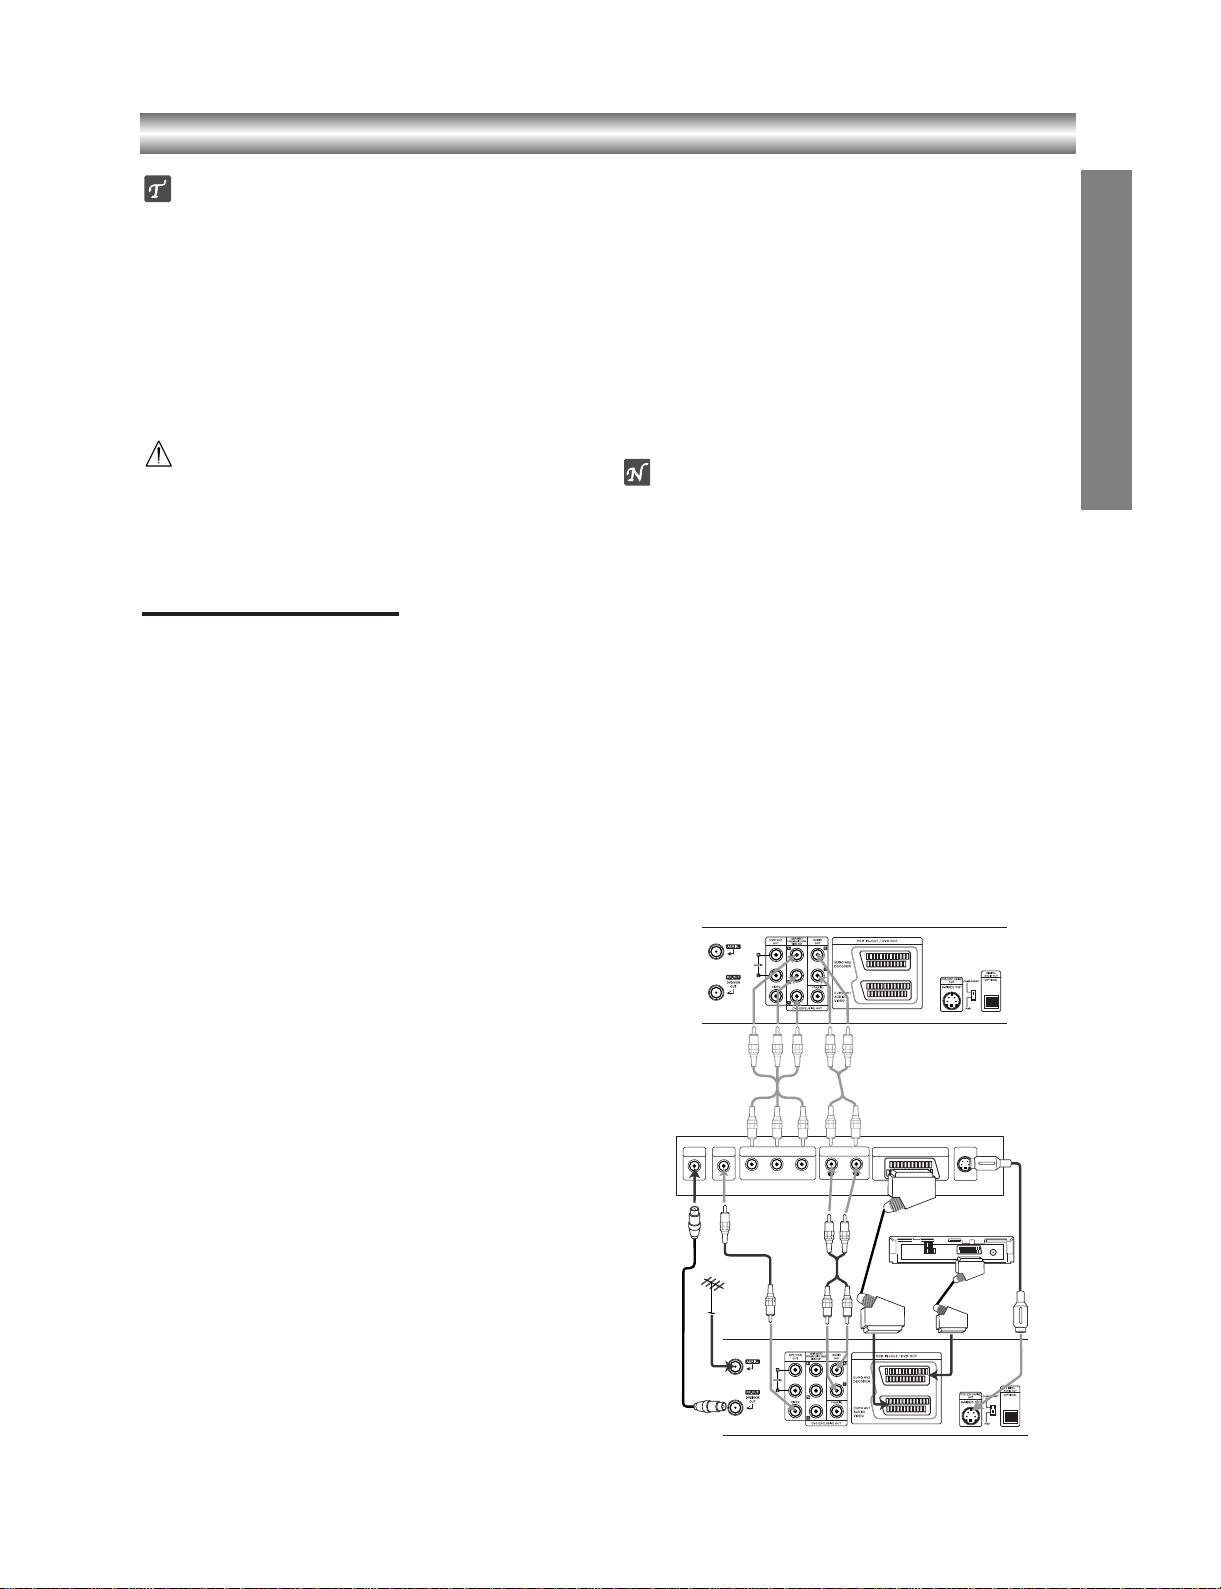
Connecting to a TV
zz
Make one of the following connections, depending on
the capabilities of your existing equipment.
zz
When using the SCART’s RGB signal, set the video
output switch to RGB. When using the COMPO-
NENT/PROGRESSIVE SCAN VIDEO OUT jacks, set
the video output switch to COMPONENT.
zz
RGB signal is only exclusive for DVD playback.
Basic connection (AV)
11
Connect the EURO A V1 AUDIO/VIDEO on the rear
panel of this unit to the SCART input socket on the
TV using a SCART lead.
For TV without SCART, connect the yellow VIDEO
OUT jack and DVD/VCR AUDIO OUT jacks of this
unit to the TV.
22
Some TV broadcasters transmit encoded television
signals which you can only see with a purchased or
rented decoder. You can connect such a decoder
(descrambler) to this unit.
Basic connection (RF)
11
Connect the RF antenna cable from your indoor/
outdoor antenna to AERIAL jack on the rear panel
of this unit.
22
Connect the supplied RF antenna cable from the
RF.OUT (DVD/VCR OUT) jack on the rear panel of
this unit to your television’s Antenna Input.
S-Video connection
11
Connect the S-VIDEO OUT jack on this unit to the
S-Video in jack on the TV using the S-Video cable
(not supplied).
22
Connect the Left and Right AUDIO OUT (DVD
EXCLUSIVE OUT) jacks of this unit to the audio
left/right in jacks on the TV using the audio cables.
Component (Color Stream®) / Progressive Scan
(ColorStream®pro) Video connection
(DVD EXCLUSIVE OUT)
11
Connect the COMPONENT/PROGRESSIVE SCAN
VIDEO OUT/(DVD EXCLUSIVE OUT) jacks on the
DVD+VCR to the corresponding in jacks on the TV
using an Y Pb Pr cable (not supplied).
22
Connect the Left and Right AUDIO OUT (DVD
EXCLUSIVE OUT) jacks of the DVD+VCR to the
audio left/right in jacks on the TV using the audio
cables.
Notes
z If your television is a high-definition or “digital ready” televi-
sion, you may take advantage of the DVD+VCR’s progressive scan output for the highest video resolution possible.
z Set the Progressive Scan to “On” on the setup menu for pro-
gressive scan signal, see page 19.
z When you use Component Video signal (interlace mode), set
the Progressive Scan to “Off” on the setup menu.
z If you set Progressive Scan to ON in error, you must reset
the DVD+VCR. First, remove the disc in the DVD+VCR.
Next, press STOP (x) and hold it for five seconds before
releasing it. The video output will be restored to the standard
setting, and a picture will once again be visible on a conventional analog TV or monitor.
z Progressive scan on does not work with the analog video
connections (yellow VIDEO OUT jack or S-VIDEO OUT
jack).
z If the TV has an S-video input, connect the DVD player with
the S-video cable. When using an S-video cable, do not connect the yellow video cable.
PREPARATION
Rear of TV
S-
VIDEO OUT
VIDEO INAERIAL
AUDIO INPUT
L
R
SCART INPUT
COMPONENT/PROGRESSIVE SCAN VIDEO INPUT
Pr
Pb
Y
Rear of this unit (Component/Progressive scan Video connection)
Rear of this unit (Basic connection)
Satellite or Set Top Box
1-17
Connections (Continued)
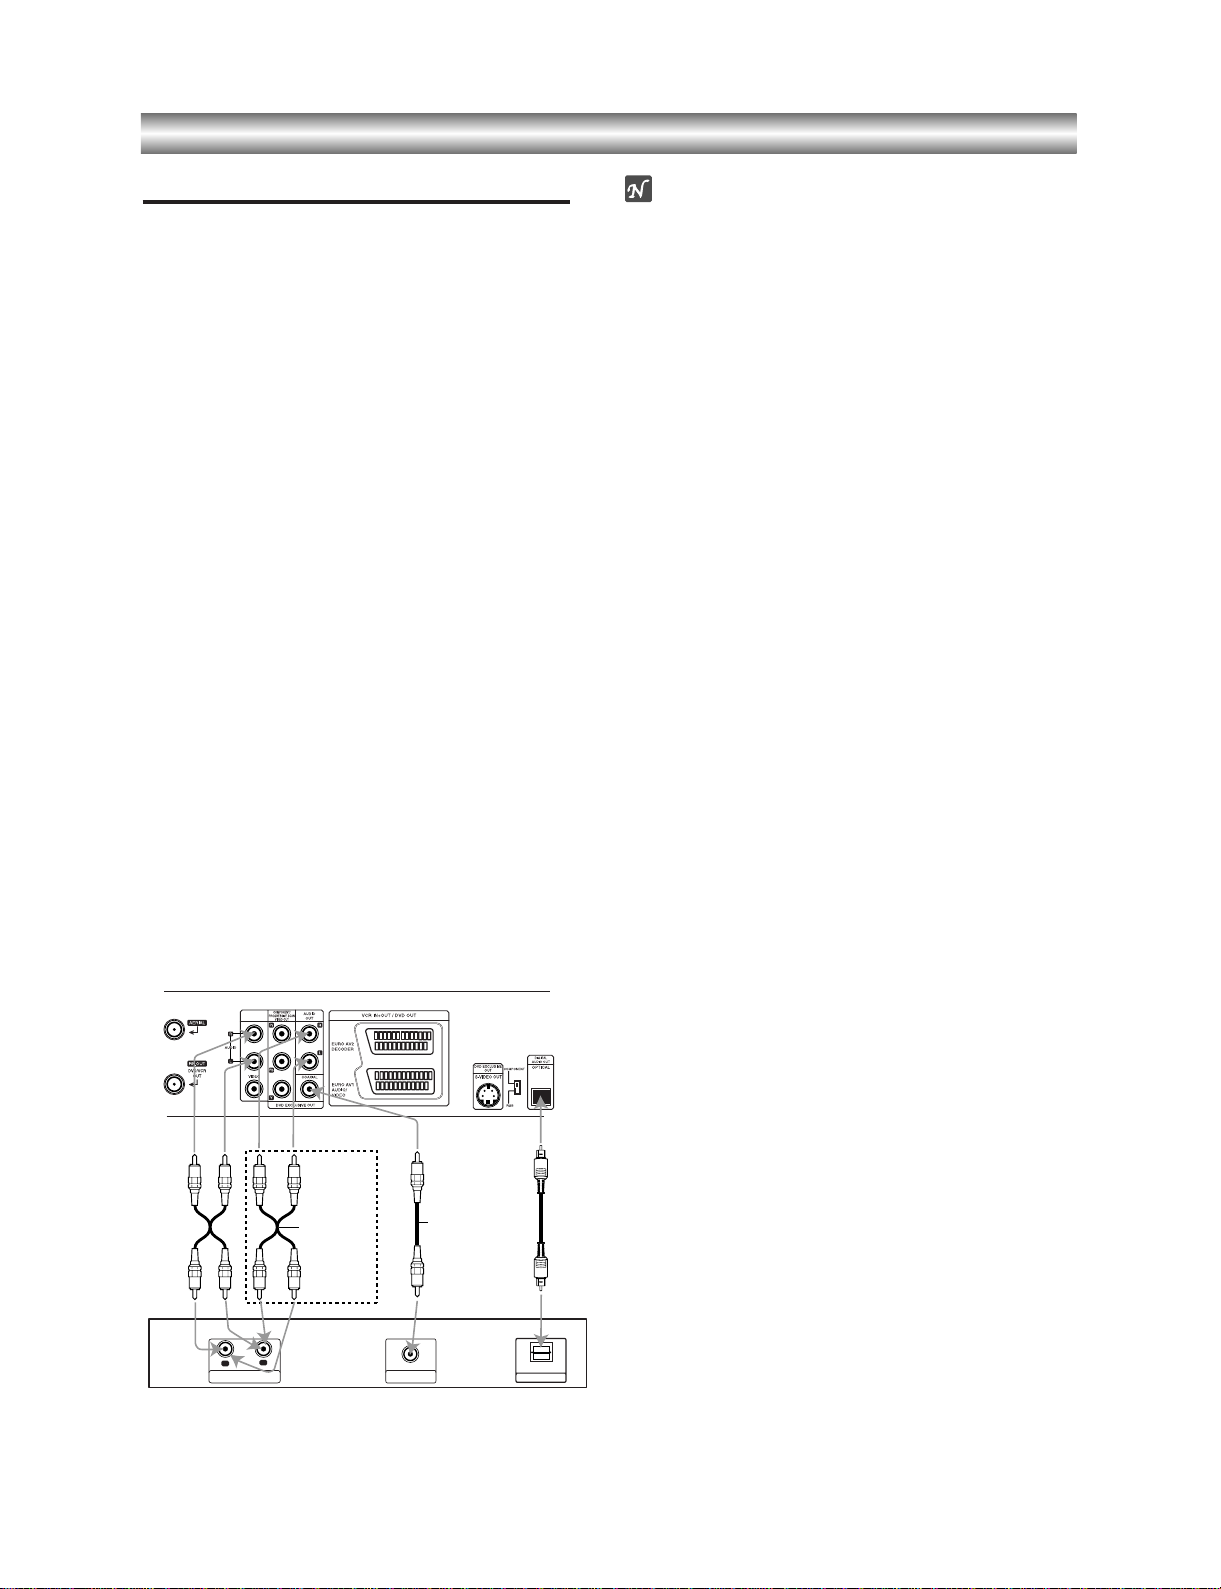
Connecting to Optional Equipment
Connecting to an amplifier equipped with two
channel analog stereo or Dolby Surround.
Connect the Left and Right DVD/VCR AUDIO OUT or
AUDIO OUT (DVD EXCLUSIVE OUT) jacks on this unit
to the audio left and right in jacks on your amplifier,
receiver or stereo system, using the audio cables.
Connecting to an amplifier equipped with two
channel digital stereo (PCM) or to an Audio/
Video receiver equipped with a multi-channel
decoder (Dolby Digital™, MPEG 2 or DTS)
11
Connect one of this unit’s DIGITAL AUDIO OUT
jack (COAXIAL or OPTICAL) to the corresponding
in jack on your amplifier. Use an optional digital
(optical or coaxial) audio cable.
22
You will need to activate this unit’s digital output.
(See “Digital Audio Output” on page 20).
Digital Multi-channel sound
A digital multi-channel connection provides the best
sound quality. For this you need a multi-channel
Audio/Video receiver that supports one or more of the
audio formats supported by your unit (MPEG 2, Dolby
Digital and DTS). Check the receiver manual and the
logos on the front of the receiver.
Warning:
Due to the DTS Licensing agreement, the digital output
will be in DTS digital out when DTS audio stream is
selected.
Notes
zz
If the audio format of the digital output does not match
the capabilities of your receiver, the receiver will
produce a strong, distorted sound or no sound at all.
zz
Six Channel Digital Surround Sound via digital
connection can only be obtained if your receiver is
equipped with a Digital Multi-channel decoder.
zz
To see the audio format of the current DVD in the
On-Screen Display, press AUDIO.
2 channel analog stereo or Dolby Surround connection.
Rear of this unit
DIGITAL INPUT
OPTICAL
Amplifier (Receiver)
DVD exclusive out
Digital multi-channel
connection
L
R
AUDIO INPUT
DIGITAL INPUT
COAXIAL
1-18
Before Operation - VCR part
Tuning in a video channel on your TV
Notes
zz
The output frequency of this video recorder (VCR) is
set at UHF channel 36. If channel 36 is already used
by another TV station, or if the picture is distorted,
you can change the transmitter channel of your VCR.
Stages 5 ~ 8 will show you how to change the output
frequency of your DVD+VCR.
zz
Your TV receives signals from the video recorder
(VCR) like another TV station. You have to select a
channel number on your TV and tune it in so that you
may watch video tapes. If you have used a
SCART
then your TV should already have a dedicated video
channel built into it, usually called
AV.
1
Make sure that you have correctly installed your
VCR as described earlier in this book.
Press
++//11
to turn on your DVD+VCR.
Turn on your TV.
2
Insert a pre-recorded video tape into your VCR and
press
PLAY
NN
on the remote control.
Select a TV channel number on which you wish to
watch video’s.
Don’t worry if you don’t have a video-tape to play at
this stage! If you switch your DVD+VCR on and
continue stages
3 ~ 4, instead of seeing video playback tune your TV until you see a bright blue
screen.
3
Tune this channel until the video picture is sharp
and the sound is clear.
If you have used a
SCART or AUDIO and VIDEO
cables you will not have to tune your TV, simply
select the AV channel. The
AV channel is already
pre-tuned for optimum video playback on your TV.
4
Store this channel on your TV.
You will need to look at the TV instruction book if
you do not know how to do this.
5
Only carry out stages 5 ~ 8 if you cannot obtain
clear video playback as described in stages 1 ~ 4.
Select a TV channel number on which you wish to
watch video’s.
Make sure that your DVD+VCR is in standby pressing
++//11
on the remote control (only the clock will be
displayed).
6
Press REW
mm
or FWD
MM
on the front of your
DVD+VCR for more than 4 seconds.
RF36 will appear in the display window.
The following picture will be displayed on the TV
screen.
7
Use REW
mm
or FWD
MM
to select another video
channel. You may select any channel number
between 22 and 68.
You can also set it to “OFF” if there is any
interference when your TV is connected to the VCR
with a SCART lead.
8
Select a TV channel number on which you wish to
watch video’s.
Press
ON/STANDBY
++//11
on the front of your
DVD+VCR when you have finished.
Tune this channel so that a bright blue screen
appears.
Store this channel on your TV.
Notes
Make sure that you have correctly installed your
DVD+VCR and successfully tuned in a dedicated
video channel on your TV. If you do not tune in a
dedicated video channel on your TV you will be
unable to view and record video tapes!
Initial preset
For the following steps we do assume that you have just
connected your video recorder for the very first time. In
this case the video recorder is on after mains connection.
You should not touch any buttons yet. On the connected
TV you will now see.
Note
If this menu does not appear, your video recorder was
programmed already.
1
If you have a satellite receiver make sure that it is
connected to your vcr, switched on and Sky News
has been selected.
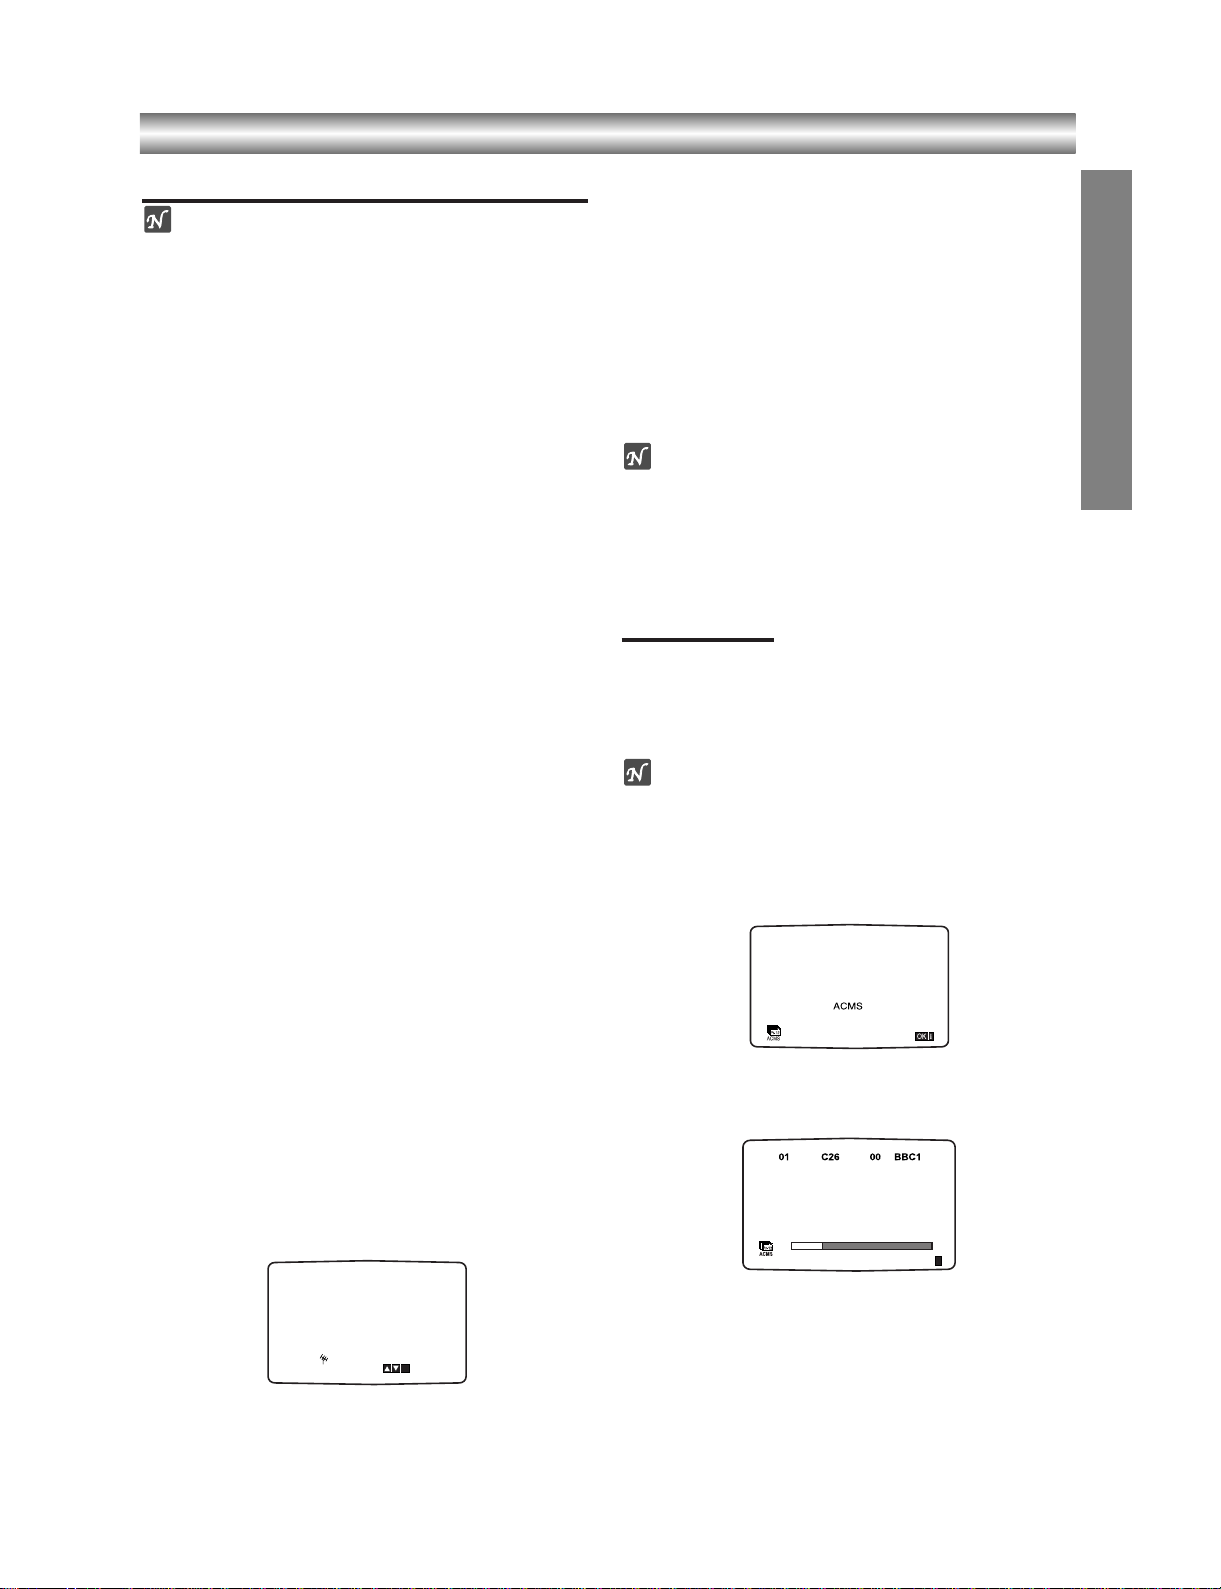
2
Press ENTER/OK to start the automatic storing of
the channels of the TV stations in your area.
33
The TV STATION TABLE will appear when tuning
is completed.
Press VCR MENU to save your settings.
PREPARATION
i
RF CHANNEL 36
P
SET
R
ES
i
 Loading...