

Page 1
O
WNER'S
M
ANUAL
Color Television
29CZ5DE
29CZ6DA
29CZ6TES
©TOSHIBA CORPORATION, 2005
All Rights Reserved
EN-01-20[29CZ5DE/29CZ6DA/TES]-1 23/9/05, 9:25 AM1
Owner's Record
You will find the model number and serial number on
the back of the TV. Record these numbers in the spaces
provided below. Refer to them whenever you call upon
your TOSHIBA dealer regarding this product.
Model number:
Serial number:
Printed in Indonesia
23566823
Page 2

SAFETY INSTRUCTIONS AND MAINTENANCE
For safety
1) If and when anything abnormal occurs, unplug the power cord from the outlet immediately.
Make sure that the smoke has stopped, then contact for a service.
Continual usage of TV in such condition may cause a fire or an electric shock.
2) Do not cut, break, heat, modify, twist, bunch up or bent the cord or apply excessive force
or tension to it, as this may cause damage, fire or electric shock. Contact a service
technician if the power cord is damaged.
3) Do not pull on the power cord when removing the plug from the wall outlet. Always hold
the plug firmly when removing it. If the power cord is yanked, the cord may become
damaged and fire or electric shock may occur.
4) Do not repair, modify or disassemble the TV by yourself. Let qualified technicians check
and adjust your TV. To avoid electrical shock or fire, never modify the TV.
5) Do not place hot objects or naked flame sources, such as lighted candles or nightlights, on
or close to the TV. High temperature can melt plastic and lead to fires.
6) The TV shall not be exposed to dripping or splashing and that no objects filled with
liquids, such as vases, shall be placed on the TV. This may cause a fire or electric shock.
7) Do not let metallic materials and/or combustibles get in the TV. These items may cause a
fire or an electric shock. Be especially observant when children are present.
8) Do not stand or climb on the TV. The TV is dangerous if it is broken or if it has fallen
down. Be especially observant when children are present.
9) When the TV will not be used for a long period of time, unplug the cord.
10) During lightning storm, do not touch any part of the TV, including the power cord and the
antenna lead-in-wire. You may suffer an electric shock.
2) 3) 4) 5), 6)
7) 8) 9) 10)
2
EN-01-20[29CZ5DE/29CZ6DA/TES]-1 23/9/05, 9:25 AM2
Page 3

SAFETY INSTRUCTIONS AND MAINTENANCE (continued)
Notes on installation and on use
11) Place the TV on a horizontal, stable surface. Avoid location subject to vibration. Do not
place the TV on its side or back. Otherwise, the TV may drop or fall down which may
cause injury or damage.
12) Do not block the ventilation holes. Place the TV at least 10 cm away from the walls for
good air circulation. The inside of this TV will overheat if the ventilation holes are sealed,
which may result in a fire.
13) Take measures to prevent the TV from falling over. If not, the TV may lean or fall over and
cause an injury. When moving, watch out for the ties.
14) Avoid placing the TV in direct sunshine, near a heating source or places with a high
temperature, such as in a closed car. A fire may result when the inside temperature
increases.
15) Also avoid the placing the TV on dusty or damp places. This may cause a fire or electric
shock.
16) Set up the outdoor antenna away from high ways, power lines and neon signs. If the
antenna falls down or drops, it may cause injury or electric shock accidents.
The antenna should be checked and replaced periodically.
17) Do not jolt the TV, resulting in the TV falling over, dropping or causing an injury.
18) Keep magnets, electric clocks, speakers, etc. away from the TV.
19) Do not spray volatile compounds such as insecticide on the cabinet. This may cause a
discoloration or damage of the cabinet.
Notes on cleaning
20) Before cleaning, unplug the power cord.
Clean the cabinet with a soft and dry cloth.
Do not use benzine, thinner, etc. to clean the TV.
21) Sometimes disconnect the power plug from the outlet and check it.
If dust has collected on the power plug connectors, clean off the dust.
12) 14)
16) 20) 21)
EN-01-20[29CZ5DE/29CZ6DA/TES]-1 23/9/05, 9:25 AM3
13)
Not lean
and
protrude
Sturdy tie
3
Page 4

TABLE OF CONTENTS
GETTING STARTED .................................................................................... 5
NAME AND FUNCTIONS OF CONTROLS ................................................. 6
TV Front and Remote control ................................................................ 6
MENU FUNCTION ....................................................................................... 7
Menu display chart .................................................................................7
BASIC OPERATIONS .................................................................................. 8
To turn TV on/off.....................................................................................8
Selecting the channels ...........................................................................8
Selecting the menu language................................................................8
To display on-screen information .........................................................8
To activate Blue screen ..........................................................................8
PICTURE AND SOUND ADJUSTMENT ..................................................... 9
Color and Sound system........................................................................9
Picture quality adjustment ..................................................................... 9
Sound quality adjustment....................................................................10
Stereo/ Bilingual selection ...................................................................11
TIMER SETTING ........................................................................................12
Setting the Timer ..................................................................................12
CHANNEL PRESET .................................................................................... 13
Presetting channel ................................................................................13
VIEWING TELETEXT ................................................................................. 15
Teletext control functions ....................................................................15
Fast / List Mode ..................................................................................... 16
Double Window Teletext......................................................................17
EXTERNAL EQUIPMENT CONNECTIONS ............................................. 18
TROUBLESHOOTING................................................................................19
SPECIFICATIONS ........................................................................
Exemptions
9 Toshiba is not liable for any damage caused by natural disaster (such as thunder,
earthquake),fire, acts by third parties, accidents, misuse, or uses in other improper
conditions.
9 Toshiba is not liable for incidental damages (such as profit loss or interruption in business,
modification or erasure of record data, etc.) caused by use or inability to use of product.
9 Toshiba is not liable for any damage caused by neglect of the instructions described in the
owner’s manual.
9 Toshiba is not liable for any damage caused by misuse or malfunction through simultaneous
use of this product and the connected equipment.
Back Cover
4
EN-01-20[29CZ5DE/29CZ6DA/TES]-1 23/9/05, 9:25 AM4
Page 5
ote sensor
5m
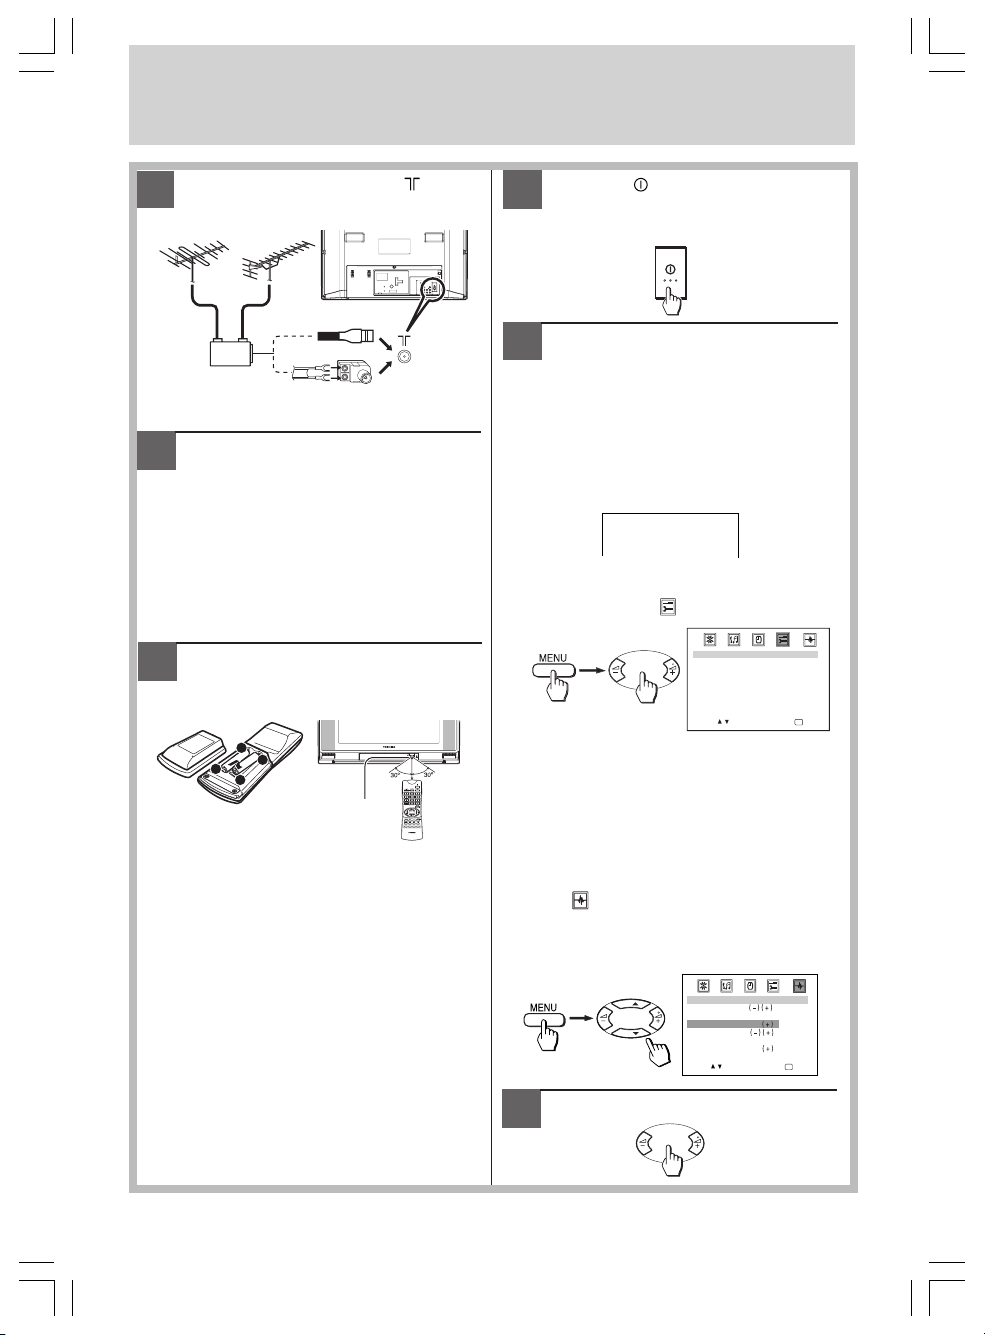
GETTING STARTED
Connect the antenna to at the
1
rear of the TV.
VHF
Outdoor
antenna
Mixer
Connect the power cord to an
2
electrical outlet with standard
UHF
75-ohm coaxial cable
or
300-ohm twin-lead feeder with
optional antenna adapter
household power within the range
of ~110-240V, 50/60Hz.
Notes
• Do not connect the power cord until all
your equipments have been connected.
• The antenna cables should not be
bundled with the power cord and the like.
Insert the batteries into the remote
3
control.
Operating range
+
-
+
Requires two R03
(AAA) batteries
• If the remote control does not operate
correctly, if the operating range becomes
reduced, replace both batteries with
new ones.
• When the remote control will not used for
a long period of time or when the batteries
are worn out, remove the batteries to
prevent leakage.
• Do not drop, dampen or disassemble the
remote control.
Cautions
• Do not dispose batteries into fire. Dispose
batteries into the designated disposal areas
according to the local regulations.
• Do not mix battery types or combine used
batteries with new ones.
Rem
Push the (Power switch) until it
4
clicks to turn on the power.
Refer to page 8 for details on power on and off.
Preset the channels automatically
5
(ASM function).
Use remote control for this operation. The
buttons on the TV with similar name may also
be use.
1 Select the starting position for channel
to be preset. Press the Number buttons
(-/--, 0~9) or CH s/t.
1
2 Set the correct broadcast system for
your region. Press MENU and then ;
to highlight the “
SET UP” icon.
SETUP
LANGUAGE
COLOR MODE
SOUND MODE
SKIP
BLUE SCREEN
TEXT
SELECT / MENU –/+ BACK
Confirm “COLOR MODE” is set to “AUTO”
and “SOUND MODE” is set to proper
system. (Refer to the table on page 9.) If
not, press CH s /t to select “COLOR
MODE” or “SOUND MODE, press ; -/+
and then CH s /t to set each proper
system.
3 Press MENU and then ;
the “
TUNING” icon. Select “ASM”,
then press ;
+ to start the search. When
-/+ to highlight
the TV screen returns to the start position,
the procedure is complete.
TUNING
MFT
AFT
ASM
SEARCH
POSITION
MEMORY
SELECT / ADJUST –/+ BACK
-/+ to adjust the sound
6
CH
CH
Press ;
volume.
ENGLISH
AUTO
OFF
FAST
OFF
P001
-/+
B/G
ON
MENU
MENU
5
EN-01-20[29CZ5DE/29CZ6DA/TES]-1 23/9/05, 9:26 AM5
Page 6
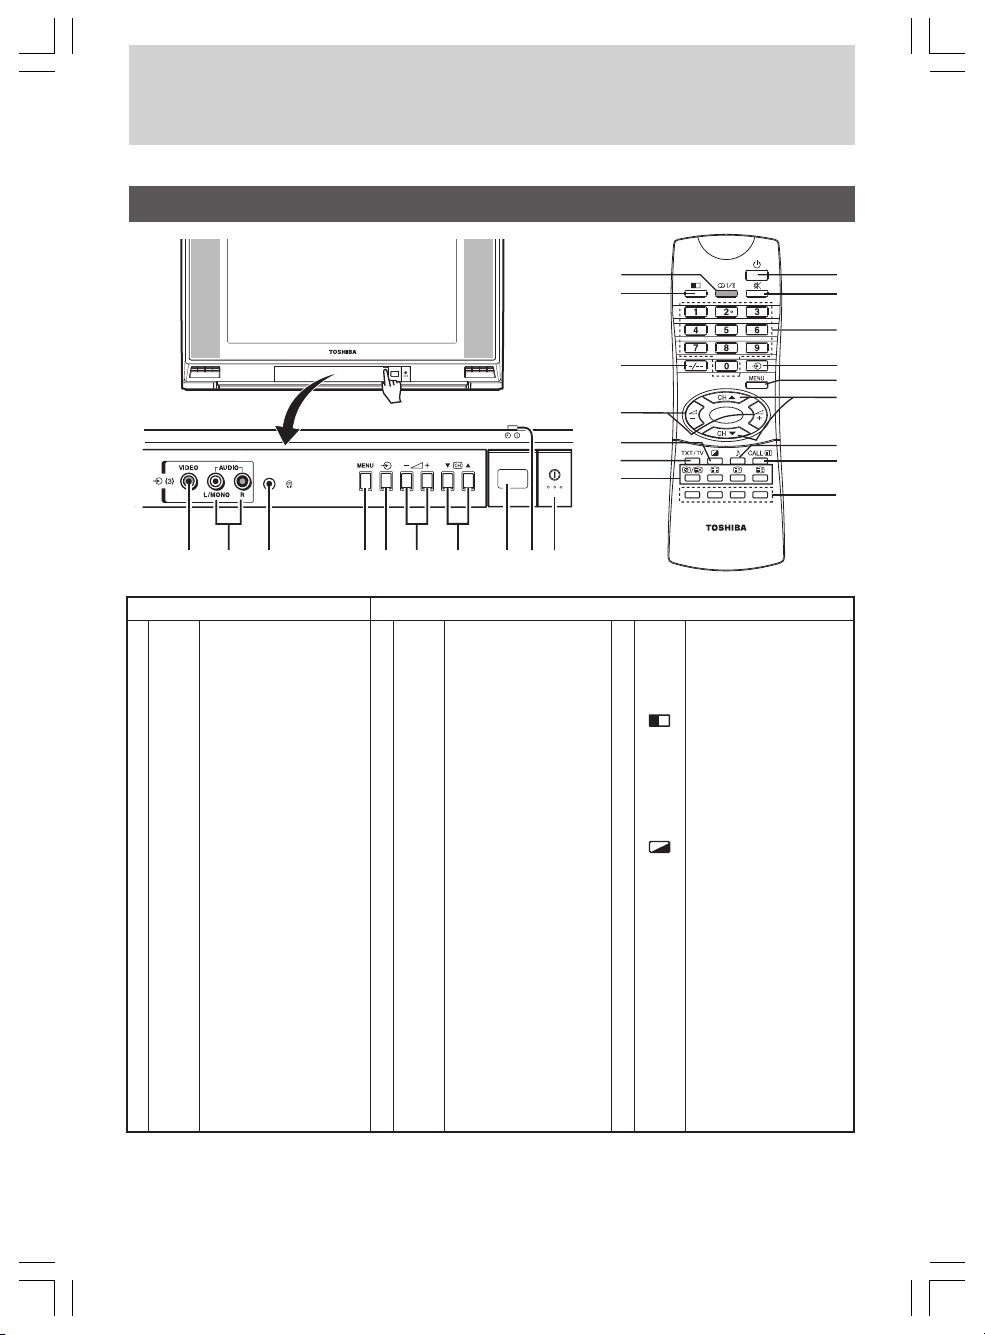
NAMES AND FUNCTIONS OF CONTROLS
For details on the use of each control, refer to the page numbers in [ ] brackets.
TV Front and Remote control
Open the lid
j
i
h
TV Remote Control
a q Main power on/off [8]
b Remote sensor [5]
c q Power indicator (red) [8]
r Timer-ON indicator
(green) [12]
d MENU Turn on menu display
e a Input source selection
f - ;
g tcs Channel down/up [8],
h L Stereo headphones jack
i
j
[7]
[18]
+ Volume down/up [5],
Menu selection or item
adjust [7]
Menu item selection
[7]
(Ø3.5mm) for private
listening. The sound
from the speakers will
be cut off automatically.
AUDIO
Audio input terminals
[18]
VIDEO
Video input terminal
[18]
d
e
1
2
3
4
5
6
7
8
9 Teletext colored buttons
g
f
f
Power on/standby [8]
o
Sound Mute, press
again or
restore the sound.
0~9
Number buttons [8]
a
Input source selection
[18],
Timer-ON position
setting [12]
Switch the active
teletext page of the
double window mode
[17]
MENU
Turn on menu display
[7]
CH s/t
Channel up/down [8],
Menu item selection [7]
8
Sound menu [10]
CALL/i
On-screen on/off [8],
Turn off the menu [8],
Teletext initial/index [15]
Red/Green/Yellow/Blue
[16]
b
; -/+
c
a
to
!
"
#
$
%
&
(
0
mI/II
Stereo/bilingual
selection [11]
Only available for
29CZ5DE and 29CZ6DA.
-
=
~
!
@
# Teletext functions [15]
Double-window on/off
[17]
-/--
Digit selection [8]
; -/+
Volume down/up [5],
Menu selection or
item adjust [7]
Picture menu [9]
TXT/TV
Teletext/TV selection
[15]
y/X
– Time display, To select
a page while viewing a
normal picture
^
– To enlarge teletext
display size
?
– To reveal concealed
text
v
– To hold a wanted page
1
2
3
4
5
6
7
8
9
Note: The shaded button is not available for 29CZ6TES. If you press the button, “MODE NOT
AVAILABLE” will appear on the screen.
6
EN-01-20[29CZ5DE/29CZ6DA/TES]-1 23/9/05, 9:26 AM6
Page 7

MENU FUNCTION
• Before watching the TV, please familiarize yourself the method to use the menu function of
this TV.
• Instructions in this manual are based on using the remote control.
Press the MENU to display menu, then press the ;
Press the CH s/t to select an item and then press the ;
• This manual shows the On-Screen Display of 29CZ5DE model.
Menu display chart
-/+ to select menu.
-/+ to select or adjust setting.
PICTURE
DYNAMIC
MODE
CONTRAST
BRIGHTNESS
COLOR
TINT
SHARPNESS
INTELLIGENT PICTURE
SELECT / MENU –/+ BACK
SOUND
MODE
BASS
TREBLE
BALANCE
EQUALIZER
MTS MODE
INTELLIGENT SOUND
SELECT / MENU –/+ BACK
TIMER
TIMER OFF 00:00
TIMER ON 00:00 P001
SELECT / MENU –/+ BACK
SETUP
LANGUAGE
COLOR MODE
SOUND MODE
SKIP
BLUE SCREEN
TEXT
SELECT / MENU –/+ BACK
TUNING
MFT
AFT
ASM
SEARCH
POSITION
MEMORY
SELECT / MENU –/+ BACK
100
50
50
00
00
MEMORY
00
00
00
AUTO
ENGLISH
AUTO
B/G
OFF
ON
FAST
OFF
P002
ON
MENU
ON
MENU
MENU
MENU
MENU
PICTURE
DYNAMIC
MODE
CONTRAST
BRIGHTNESS
COLOR
TINT
SHARPNESS
INTELLIGENT PICTURE
SELECT / ADJUST –/+ BACK
SOUND
MODE
BASS
TREBLE
BALANCE
EQUALIZER
MTS MODE
INTELLIGENT SOUND
SELECT / ADJUST –/+ BACK
TIMER
TIMER OFF 00:00
TIMER ON 00:53 P001
SELECT / ADJUST –/+ BACK
SETUP
LANGUAGE
COLOR MODE
SOUND MODE
SKIP
BLUE SCREEN
TEXT
SELECT / ADJUST –/+ BACK
TUNING
MFT
AFT
ASM
SEARCH
POSITION
MEMORY
SELECT / ADJUST –/+ BACK
100
50
50
00
00
MEMORY
00
00
00
( + )
AUTO
ENGLISH
AUTO
B/G
OFF
ON
FAST
OFF
P002
MENU
MENU
MENU
MENU
MENU
ON
ON
CONTRAST
BASS
SEARCH VHF L P002
BACK
BACK
STOP
100
MENU
00
MENU
Notes
• If you do not make a selection within 15 seconds, the menu display disappears automatically.
• To return to the previous menu, press MENU.
• The
area on the SOUND, SET UP and TUNING menu display does not appear when video
input source is selected.
• MTS MODE will not display on the SOUND menu for 29CZ6TES model.
EN-01-20[29CZ5DE/29CZ6DA/TES]-1 23/9/05, 9:27 AM7
7
Page 8

BASIC OPERATIONS
To turn TV on/off
1 Press the q power switch on the TV. The q
red power indicator lights up.
2 If no picture appears, it is in the standby mode,
press the
f button on the remote control.
Notes
• You can also turn on the TV by pressing
one of the Number buttons (0~9) on the
remote control instead of the f button.
By pressing the number (one digit only)
where the channel you want to watch is
preset, you can turn on the TV and
channel selection at the same time.
• When the remote control is not at hand,
you can turn on the TV by pressing the
a, -;
+ or tcs button on the TV.
3 To switch to the standby mode, press the
f button.
4 To turn off the main power, press the
power switch.
Auto Power Off
The TV will automatically turn itself off after
about 15 minutes if it is tuned to a vacant
channel, TV broadcasts for a day are finished,
or the signal is interrupted for any reason. This
feature does not work in video input mode.
q
Selecting the channels
• Press the -/-- button to select the input digit
of position number and then press 0~9 to
select the number. (e.g., for 25, press -/-- to
display “--”, then 2 and 5)
Selecting the menu language
Choose from five different languages (English,
Mandarin, Malay, Vietnamese and Thai), select
to display all on-screen Menus in your language
of choice.
1 Press MENU and then ;
-/+ to highlight the
“ SETUP” icon.
2 Press CH s/t to select “LANGUAGE”, then
press ; -/+ to enter to LANGUAGE menu
mode.
3 Press CH s/t and then ;
-/+ to select the
desired language.
SETUP
LANGUAGE
COLOR MODE
SOUND MODE
SKIP
BLUE SCREEN
TEXT
SELECT / ADJUST –/+ BACK
ENGLISH
AUTO
D/K
OFF
ON
FAS T
MENU
LANGUAGE
ENGLISH
MELAYU
SELECT / ADJUST –/+ BACK
MENU
To display on-screen information
Press CALL/ i to display the position number
or video input mode selected (A1, A2, DVD
or A 3) and the Mono/Stereo/Bilingual*
audio status. To erase the display, press
i again.
CALL/
Position number or
25
(*Mono/Stereo/Bilingual symbol only appears
on 29CZ5DE and 29CZ6DA model)
The CALL/
the on-screen menu display.
i button can also be used to erase
video input mode
Mono/Stereo/Bilingual
audio status*
--
• Press t to select lower position number, s to
select higher ones.
Note
When a TV channel with teletext service is
selected, a black bar with channel indication will
display on the screen for a second. However,
abnormal indication may appear depending on
the received signal. This is not a malfunction of
the TV.
8
EN-01-20[29CZ5DE/29CZ6DA/TES]-1 23/9/05, 9:27 AM8
25
To activate Blue screen
With the blue screen function ON, the TV screen
will automatically turn blue and the sound will
be muted when no TV signal is received.
1 Press MENU and then ;
the “ SETUP” icon.
2 Press CH s/t to select “BLUE SCREEN”,
then press ;
-/+ to set ON or OFF.
-/+ to highlight
Page 9

PICTURE AND SOUND ADJUSTMENT
Color and Sound system
If the color or sound of a certain channel
is abnormal
The color or sound system setting may be incorrect.
Press MENU and then ;
“ SETUP” icon.
SETUP
LANGUAGE
COLOR MODE
SOUND MODE
SKIP
BLUE SCREEN
TEXT
SELECT / MENU –/+ BACK
Press CH s/t to select the following items:
COLOR MODE system setting
Press ; -/+ to enter COLOR MODE selection.
Press CH s/t and then ;
appropriate color system. AUTO, PAL, SECAM,
NTSC4.43 or NTSC3.58 can be selected.
SOUND MODE system setting
If the picture or sound is abnormal when
receiving programs through the
terminal, the sound system setting may be
incorrect. Press ;
selection. Press CH s/t and then ;
select the appropriate sound system according
to the broadcast system of your region.
Refer to the table below. B/G, I, D/K or M can
be selected.
-/+ to highlight the
ENGLISH
AUTO
D/K
OFF
ON
FAST
MENU
-/+ to select the
(antenna)
-/+ to enter SOUND MODE
-/+ to
Picture quality adjustment
To access the PICTURE menu
Press for direct selection or press MENU and
then ;
Press CH s/t to select the following items:
Four preset picture modes can be selected.
Press ;
CH s/t and then ;
picture mode.
-/+ to highlight the “ PICTURE” icon.
PICTURE
SELECT / MENU –/+ BACK
DYNAMIC
MODE
CONTRAST
BRIGHTNESS
COLOR
TINT
SHARPNESS
INTELLIGENT PICTURE
100
50
50
00
00
MENU
ON
MODE (Preset picture mode)
-/+ to enter MODE selection. Press
-/+ to select the desired
DYNAMIC select for a bright and dynamic
picture
STANDARD select for standard picture
settings
MILD select to display a softer picture
MEMORY select for a picture quality set
according to your preferences
Broadcast Transmission Systems in Each Country or Region
Area Country or Region
Bahrain, Kuwait, Israel, Oman, Qatar, United Arab
Emirates, Yemen, and other middle Eastern countries.
Indonesia, Malaysia, Singapore, Thailand, and other
Southeast Asian Countries.
Asia China PAL D/K
M. E.
China Hong Kong PAL I
Iraq, Islamic Republic of Iran, Lebanon, Saudi Arabia SECAM B/G
Russian Federation SECAM D/K
Myanmar NTSC M
Oceania Australia, New Zealand PAL B/G
Africa Republic of South Africa PAL I
South
America
EN-01-20[29CZ5DE/29CZ6DA/TES]-1 23/9/05, 9:27 AM9
Argentina, Paraguay, Uruguay PAL N
Brazil PAL M
Chile, Colombia NTSC M
Color Sound
PAL B/G
System
9
Page 10

PICTURE AND SOUND ADJUSTMENT (continued)
CONTRAST Adjust to increase or decrease
the picture contrast with + or respectively.
BRIGHTNESS
Adjust to brighten or
darken the picture with + or respectively.
COLOR Adjust to increase or decrease
the color intensity with + or respectively.
TINT Adjust the picture to be more
greenish or more purplish
with + or - respectively. This
effect is provided for NTSC
system only.
SHARPNESS
Adjust to sharpen or soften the
picture with + or - respectively.
INTELLIGENT PICTURE
The Intelligent picture mode
equipped with Black/White/
Blue stretch feature. It enable
a maximum of visible details
in the darker parts of the
picture and over the whole
range of luminance. A brighter
and sharper impression of the
picture is percepted.
Press ;
-/+ to set “ON” or
“OFF”.
Notes
• Any adjustment of the BRIGHTNESS,
CONTRAST, COLOR, TINT or SHARPNESS
settings will be stored in the MEMORY mode.
• If you adjust any one of items: BRIGHTNESS,
CONTRAST, COLOR, TINT or SHARPNESS in
the DYNAMIC, STANDARD or MILD modes,
the TV will automatically change to the
MEMORY mode.
Sound quality adjustment
To access the SOUND menu
Press 8 for direct selection or press MENU and
then ;
Press CH s/t to select the following items:
Three preset sound modes can be selected.
Press ;
CH
sound mode.
-/+ to highlight the “ SOUND” icon.
SOUND
MODE
BASS
TREBLE
BALANCE
EQUALIZER
MTS MODE
INTELLIGENT SOUND
SELECT / MENU –/+ BACK
MEMORY
00
00
00
AUTO
ON
MENU
MODE (Preset sound mode)
-/+ to enter MODE selection. Press
s/t and then ; -/+ to select desired
THEATER select for playing music and
movie
NEWS select to emphasize human voice
MEMORY select for a sound quality set
according to your preferences
BASS Adjust to increase or decrease
lower-pitched sound with
+ or - respectively.
TREBLE Adjust to increase or decrease
higher-pitched sound with
+ or - respectively.
BALANCE Adjust to decrease left or right
speaker balance with + or respectively. This adjusted
condition is not stored in the
Memory mode.
EQUALIZER Press ; -/+ to enter EQUALIZER
menu mode. A total of 5
equalizer bands can be adjusted
according to your preference.
10
EN-01-20[29CZ5DE/29CZ6DA/TES]-1 23/9/05, 9:27 AM10
EQUALIZER
100HZ
300HZ
1KHZ
3KHZ
8KHZ
SELECT / ADJUST –/+ BACK
00 DB
00 DB
+02 DB
00 DB
00 DB
MENU
Page 11

PICTURE AND SOUND ADJUSTMENT (continued)
Press CH s /t to select the
desired band and then press ;
-/+ to adjust the level.
MTS MODE (Multi-channel TV Sound)
Only available for 29CZ5DE/29CZ6DA model
The TV receives both stereo and bilingual
broadcasts transmitted in either the NICAM
or German stereo/bilingual broadcast system.
Press ;
AUTO The “AUTO” setting of the
MONO If you experience noise or poor
INTELLIGENT SOUND
Notes
• Any adjustment of the BASS, TREBLE or
EQUALIZER settings will be stored in the
MEMORY mode.
• If you adjust any one of items: BASS, TREBLE
or EQUALIZER in the THEATER or NEWS
modes, the TV will automatically change to
the MEMORY mode.
• When the volume is set above 80, it is not
recommended to adjust the bass, treble or
equalizer to a high value.
-/+ to select “AUTO” or “MONO”.
MTS mode automatically
recognize stereo/bilingual
programs depending on the
broadcast signal.
reception of any stereo/
bilingual program, set the MTS
MODE to “MONO”. Noise will
be reduced and reception may
improve.
The Intelligent sound mode
equipped with Automatic
Volume Levelling (AVL) and
Extended Spatial Stereo (ESS)
feature. It stabilize the volume
to prevent any sudden
loudness occured. And also
provides user an experience of
expanded stereo image by
widening stereo sound effects.
Press ;
“OFF”.
-/+ to set “ON” or
Stereo/ Bilingual selection
(Only available for 29CZ5DE/29CZ6DA model)
To select the stereo programs
1 When a stereo program is received, M
appears on the screen.
2 Press mI/II to select the stereo/monaural
mode. M and U appear cyclically on
the screen.
Display Reception mode
M Stereo
U Monarual
Note
If you experience noise with a particular
program on whose channel reception is usually
good, try setting MTS MODE to AUTO, then
switch the mI/II button to U (monaural).
To select the bilingual programs
1 When a bilingual program is received, I/II
appears on the screen.
2 Press m I/II to select the sound to be
heard. The sound differs according to the
transmission system: NICAM or German
stereo/bilingual broadcast. I, II and U
appear cyclically on the screen.
Sound to be heard
Display
I Sub I sound Main sound
II Sub II sound Sub sound
U Main sound Main sound
NICAM
German stereo/
bilingual broadcast
EN-01-20[29CZ5DE/29CZ6DA/TES]-1 23/9/05, 9:27 AM11
11
Page 12

TIMER SETTING
Setting the Timer
To access the TIMER menu
Press MENU and then ; -/+ to highlight the
“ TIMER” icon.
TIMER
TIMER OFF 00:00
TIMER ON 00:00 P001
SELECT / MENU –/+ BACK
Press CH s/t to select the required timer
mode (TIMER OFF or TIMER ON). Complete
the following steps to set the effective time.
TIMER OFF
With the TIMER OFF set, the TV will automatically switch to standby mode at a preset time.
To set the TIMER OFF
Highlight the TIMER OFF, press ;
how many hours and minutes you want the TV
to switch into standby mode.
;;
When you
press once
hold down
;
-/+ Setting time is
;;
;
+ increased by 1 minute
; - decreased by 1 minute
;
+ increased by 30 minutes
- decreased by 30 minutes
;
To cancel the TIMER OFF
Press f twice (to turn off the TV once and turn
it on again) or set the TIMER OFF time to 00:00.
MENU
-/+ to set after
TIMER ON
With the TIMER ON set, the TV will automatically turn on to a preset channel at a preset time.
To set the TIMER ON
Highlight the TIMER ON, press ;
-/+ to set
after how many hours and minutes you want
the TV to turn on. The setting method will be
similar to the TIMER OFF.
The Y timer-ON indicator (green) will light up.
Press a to highlight the position number,
“P***”. Then, press ;
-/+ to set the position
number.
TIMER
TIMER OFF 00:00
TIMER ON 00:53 P001
MENU
When you
SELECT / ADJUST –/+ BACK
;;
;
-/+ Setting position
;;
number is
;
press once
hold down
+ increased by 1
; - decreased by 1
;
+ increased by 10
- decreased by 10
;
Press f to switch the TV to standby mode.
At the preset time, the TV will turn on
automatically.
To cancel the TIMER ON
Press the q power switch to turn off the TV or
set the TIMER ON time to 00:00.
12
EN-01-20[29CZ5DE/29CZ6DA/TES]-1 23/9/05, 9:27 AM12
Page 13

CHANNEL PRESET
Presetting channel
• First, use the ASM (Automatic Search
Memory) function to preset all active
channels in your area automatically. Refer to
step 5 of “GETTING STARTED”, page 5.
Then, arrange the preset channels with the
SEARCH, SKIP and MFT (Manual Fine Tuning)
functions so that you can tune into only
desired channels.
• Use the SEARCH function if desired channels
cannot be preset with the ASM or if you would
like to preset channels to specific position
numbers one by one.
To use the SEARCH function
1 Press MENU and then ; -/+ to highlight
TUNING” icon.
the “
TUNING
MFT
AFT
ASM
SEARCH
POSITION
MEMORY
SELECT / MENU –/+ BACK
2 Press CH s/t to select “SEARCH”. Press
; -/+ to start searching. Pressing “–”
searches for channels at lower frequencies
while pressing “+” searches for channels at
higher frequencies. While searching,
pressing the opposite direction button, + and
- respectively, will cancel SEARCH function.
TUNING
MFT
AFT
ASM
SEARCH
POSITION
MEMORY
SELECT / ADJUST –/+ BACK
ON
P001
MENU
ON
P001
MENU
SEARCH VHF H P001
STOP
4 Press CH s/t to select “MEMORY”, then
press ;
+ to memorize the channel at the
current position.
TUNING
MFT
AFT
ASM
SEARCH
POSITION
MEMORY
SELECT / ADJUST –/+ BACK
OFF
P002
MENU
5 When you program other channels, repeat
steps 2 to 4.
To skip a position number
After presetting the channels, you may skip
unnecessary position numbers so that only
the channels you want to watch are selected
using CH s/t.
1 First, select the position number to be
skipped with CH s/t or digit selection and
number buttons (-/--, 0~9).
2 Highlight the “
CH s/t to select “SKIP”.
3 Press ; -/+ to set “SKIP” to “ON”. This
completes the setting for skipping the
selected position number.
SET UP” icon and press
SETUP
LANGUAGE
COLOR MODE
SOUND MODE
SKIP
BLUE SCREEN
TEXT
SELECT / ADJUST –/+ BACK
ENGLISH
AUTO
B/G
ON
ON
FAST
MENU
Repeat this process until you can get the
desired channel.
3 When the desired channel is shown, press
CH t to select “POSITION”. Press ;
repeatedly until the position number to be
preset is shown.
TUNING
MFT
AFT
ASM
SEARCH
POSITION
MEMORY
SELECT / ADJUST –/+ BACK
EN-01-20[29CZ5DE/29CZ6DA/TES]-1 23/9/05, 9:27 AM13
OFF
P002
MENU
-/+
13
Page 14

CHANNEL PRESET (continued)
Notes
• When “SKIP” is set to “ON” for the selected
position number, a “ * ” mark appears to the
left of the position number.
12
The position number will then be skipped
when you select the position with CH s/t.
• If you want to restore a skipped position
number, select it using the -/-- and 0~9 buttons
then switch the “SKIP” setting to “OFF”.
Manual fine tuning (MFT)
The adjustments below are not necessary
under normal conditions. However, under
some reception conditions, fine tuning may
be necessary to improve the picture quality.
In such cases, adjust the manual fine tuning
(MFT).
1 Select the position number where the
channel you want to fine-tune with CH s/t
or digit selection and number buttons
(-/--, 0~9).
2 Press MENU and then ; -/+ to highlight
TUNING” icon.
the “
3 Press CH s/t to select “MFT”. Press ; -/+
to start fine tuning. Press ; -/+ repeatedly
until the best possible picture and sound
are obtained.
TUNING
MFT
AFT
ASM
SEARCH
POSITION
MEMORY
SELECT / ADJUST –/+ BACK
ON
P002
MENU
Auto fine tuning (AFT)
If the signal frequency is unstable due to
environmental conditions, use auto fine tuning.
1 Select the position number where the
channel you want to fine-tune with CH s/t
or the digit selection and number (-/--, 0~9)
buttons.
Note
When the position is set to “AFT OFF”
status, the “ R ” mark appears to the left of
the position number.
25
When the channel is set to “AFT ON”
status, the position number is displayed
without the “R” mark.
2 Press MENU then ;
“
TUNING” icon.
3 Press CH s/t to select “AFT”. Press ;
-/+ to highlight the
-/+
to select the “ON” indication.
TUNING
MFT
AFT
ASM
SEARCH
POSITION
MEMORY
SELECT / ADJUST –/+ BACK
OFF
P002
MENU
Notes
• When you operate MFT, AFT is switched “OFF”
automatically. If you switch on AFT after fine
tuning with MFT, MFT may be canceled.
• AFT may be set independently for each
position.
14
EN-01-20[29CZ5DE/29CZ6DA/TES]-1 23/9/05, 9:28 AM14
Page 15

k
VIEWING TELETEXT
The TV is capable of showing both normal text
and the text information selected by FAST mode
and LIST mode. The Teletext buttons on the
remote control have the same function for both
text information types.
To display a page of text
1 Select a position number preset a TV
channel with the text service desired.
2 Press TXT/TV. The index page will appear.
3 Enter the 3-digit page number using the
Number buttons (0-9). Ex. Page 110:
Press
1, 1 and 0.
Broadcast station information
Selected page Running cloc
100 100 TELETEXT 11:00:18
TELETEXT
Teletext control functions
To superimpose the text over a normal broadcast
picture (TXT/TV)
Press TXT/TV again.
To return to the normal TV mode (TXT/TV)
Press TXT/TV repeatedly until the text
disappears.
To display an index/initial page (CALL/i)
Press CALL/i if no page number is displayed
in the text mode. The index page (FAST mode)
or the preset initial page (LIST mode) will
appear.
To go to the previous or next page (CH s/t)
Press CH s to switch to the next page.
Press CH t to switch to the previous page.
To stop a page of text (v)
When a page is divided into sub pages, it is
convenient to hold a given page.
Press v to stop the page. “v” will appear in
the top left of the screen.
Press again to release the stop mode.
To enlarge the text display size (^)
Press ^ once to enlarge the top half of the page.
Press again to enlarge the bottom half of the
page, and again to return to the normal (full)
size.
Note
When viewing the enlarged format teletext page
with sub pages changes automatically, the top
half of the page is always displayed first; thus
disturb the flow of text.
Press v stop button to hold the sub page while
viewing the enlarged teletext.
To select a page while viewing a TV picture
(y/X)
When in teletext mode, if a page selection is
made and then y/X is pressed, a normal
picture will be displayed. The TV will indicate
when the page is present by displaying the
number of the text page at the top of the screen.
Press TXT/TV to view the page.
To display news flashes (y/X)
To view news flashes as they are broadcast,
select the news flash page for the particular
teletext service (see the index page of teletext
service). The news flashes will be displayed as
and when they are broadcast. Press y/X to
cancel the news flash display.
Note
Press TXT/TV to cancel the news flash page
before changing channels.
To display the time (y/X) (with the teletext
service only)
To display the accurate time on the screen while
watching a normal TV picture, press y/X.
Press again to turn off the time display.
To reveal concealed text (?)
Some pages have sections that are concealed,
such as the answers to quizzes and the
punchlines of jokes. To see the concealed part,
press ?. Press ? again to conceal.
To adjust MFT in teletext mode
During teletext mode, when the teletext or
picture reception is poor, MFT adjustment is
possible. Press MENU, “MFT–+” will display on
the bottom left of the screen. Press ;
repeatedly to adjust until the best possible text
and picture are obtain.
-/+
EN-01-20[29CZ5DE/29CZ6DA/TES]-1 23/9/05, 9:28 AM15
15
Page 16

VIEWING TELETEXT (continued)
Fast / List Mode
• FAST mode is a method of viewing Teletext
pages by related subjects grouped by the
broadcast studio. You can access any given
topic shown on the screen simply by pressing
the corresponding colored button on the
remote control.
• LIST mode is provided for easier operation
for normal text broadcast. By presetting up to
four of the most frequently used text pages,
you can access these pages easily with single
button operation. The first of these four pages
is set as the initial page. Each time you select
the teletext mode, this page appears.
To select the FAST mode
When you select the FAST mode, four colored
prompts will appear at the bottom of the
screen. The colors correspond to those of
the teletext colored buttons on the remote
control. So, press the corresponding teletext
colored button to go to the desired topic
page instantly.
ENGLISH
AUTO
D/K
OFF
ON
FAST
MENU
-/+ to highlight
1 Press MENU and then ;
SET UP” icon.
the “
SETUP
LANGUAGE
COLOR MODE
SOUND MODE
SKIP
BLUE SCREEN
TEXT
SELECT / MENU –/+ BACK
2 Press CH s/t to select “TEXT”. Then, press
-/+ to set “TEXT” to “FAST”(Fastext
;
mode).
To view Fastext
1 Select a position number preset a TV
channel with the desired FASTEXT service.
2 Press TXT/TV to select the text mode. Four
colored prompts will appear at the bottom
of the screen.
100 100 TELETEXT 11:00:18
3 Press the colored button which corresponds
to your desired topic.
The screen will switch to the selected page.
4 Repeat step 3 to switch to the next topic
you want to view.
To return to the normal TV mode
Press TXT/TV twice.
To display an index page
Press CALL/i.
To select the LIST mode
1 Press MENU and then ; -/+ to highlight
SET UP” icon.
the “
2 Press CH s/t to select “TEXT”. Then, press
-/+ to set “TEXT” to “LIST”(LIST mode).
;
To preset an initial page
1 Select a position number preset a TV
channel with the normal TEXT service.
2 Press TXT/TV to select the text mode.
Four colored prompts will blink at the
bottom of the screen.
100 100 TELETEXT 11:00:18
Prompts
3 Press the number buttons to enter the 3-digit
page number that you want to preset as an
initial page. Ex. page 120: Press 1, 2 and 0.
Red prompt will stop blinking at the bottom
left of the screen. And the preset page
displays on the screen. (When a vacant
teletext page is preset, the prompt will not
stop blinking.)
100 200 300 400
Green
Red
120 120 TELETEXT 11:00:18
120 200 300 400
Yellow
Blue
Prompts
Green
Red
16
EN-01-20[29CZ5DE/29CZ6DA/TES]-1 23/9/05, 9:28 AM16
Yellow
4 Press the red colored button momently.
Four colored prompts will turn to white
momentarily and will be stored in memory.
Blue
Page 17

VIEWING TELETEXT (continued)
To preset desired pages
1 Press the green colored button.
2 Enter the 3-digit page number you want to
preset by using the number buttons.
250 250 TELETEXT 11:00:18
120 250 300 400
3 Repeat steps 1 and 2 to preset other two
pages by using the yellow and blue colored
buttons.
4 Press the blue colored button momently.
Four colored prompts will turn to white
momentarily and will be stored in memory.
To display a desired page
Press the desired colored button according to
the four colored prompts on the screen.
To display an initial page
Press CALL/i.
Note
• You cannot preset the same teletext page
twice.
• When a vacant teletext page is preset, the
colored prompt will be blink.
Double Window Teletext
To switch the active page
Press a. The running time clock on the top
shows the active page.
To view a normal broadcast picture and a text
page simultaneously
Press
broadcast picture is shown on the left side of
the screen while the active teletext page is on
the right.
. A compressed version of the
101 101 TELETEXT 11:00:18
TELETEXT
Press again. The left half portion of the
normal picture is shown on the left side of the
screen while the active teletext page is on
the right.
101 101 TELETEXT 11:00:18
TELETEXT
To return to single teletext window, press
again.
Double window feature allow us to view two
text pages of the same broadcast station at a
time ,or to view a normal broadcast picture and
a text page simultaneously.
To activate Double Window
During teletext mode, press
Two teletext pages appear side by side on the
screen. Only one page is in active mode. All the
teletext operation can be done on the active
page. The other page is for viewing only.
100 100 TELETEXT 11:00:18
TELETEXT
EN-01-20[29CZ5DE/29CZ6DA/TES]-1 23/9/05, 9:28 AM17
once.
101 101 TELETEXT
TELETEXT
17
Page 18

EXTERNAL EQUIPMENT CONNECTIONS
• You can connect video equipments such as a VTR and video camera to this TV and enjoy the
high quality picture. The front A/V terminal a (3) is convenient when hooking up video camera
or game equipment.
• The following describes how to use and connect the TV with other AV equipment. Refer to the
owner’s manual of the equipment to be connected as well.
• If your video equipment has an S-VIDEO output terminal, connect it to the S-VIDEO a (1) input
terminal (special S-VIDEO type) of the TV. If not, connect it to the video terminal (phono type).
• Connection cables are not supplied.
Caution: Do not plug in any power cords until you have finished connecting all equipment.
Video camera
VTR
*
Y WR
VIDEO output
To S-VIDEO or
DVD (or another VTR)
COMPONENT
VIDEO OUTPUTS
PB/CBPR/C
Y
R
To
antenna
output
To audio outputs
AUDIO
OUTPUTS
W
RRBY
RL/MONO
Back
Y
1
• The > MONITOR terminals output the TV
program or video (A1, A2/DVD, A3) signals
being displayed on the screen.You can record
a TV program or video signals by connecting a
VTR from the output terminals (
>MONITOR)
to the input terminals of the VTR. However,
except for personal use, you are not allowed
to use video or sound you have recorded
without consent of the owner of copyright
according to copyright law.
• When playing back DVD images by connecting
to COMPONENT VIDEO INPUT, the (
>
MONITOR) video terminal will output “Y”
(Black and White) signal only. In such condition,
abnormal images will occur if recorded.
To video
output
R
W
2
To audio
WRY
outputs
: Signal flow
Y
: yellow (video/Y)
W
: white (audio L/MONO)
: red (audio R, P
R
: blue (P
B/CB
B
VTR for recording
Y WR
To video input
)
Notes
• Do not connect one VTR to the output and
input terminals on the TV simultaneously, it
may cause interference.
• Your DVD video player should have either the
B
, PR or CB, CR output terminals. This TV is
P
available for either type.
* Connect either the S-VIDEO terminal or the
VIDEO terminal of the input terminals a(1).
If you use both terminals at the same time,
unusual phenomena may happen to the TV
set and/or VTR.
To select the video input source
Each time you press a, the “A1” mark,“A2”
mark (or “DVD” mark when there is a DVD
B/CB
input), “A3” mark, and channel position
P
number appear and selected cyclically.
R/CR
)
To audio inputs
18
EN-01-20[29CZ5DE/29CZ6DA/TES]-1 23/9/05, 9:28 AM18
Page 19

TROUBLESHOOTING
Before calling service personnel, please check the following chart for a possible cause to the
trouble you are experiencing.
Symptom Solution
Power is not turned on. • Be sure the power cord is plugged in.
No sound. • The headphones may be plugged in.
Poor color/tint. • The contrast, color and tint may need to be adjusted.
• If you change the direction of the TV while the TV is on, the picture
may suffer from color shading. If so, turn off the TV and allow about
30 minutes to cool, then turn on the TV again. The picture may
be improved.
Spots appear on • The broadcast signal may be jammed by other electrical sources
the screen. such as cars, motorcycles, electric trains, high tension lines,
neon signs, hair dryers.
Lines appear on • The broadcast signal may be jammed by other TV receivers, personal
the screen. computers, and TV games, as well as interference from radio stations.
Double or triple • Interference may be due to broadcast waves reflected from mountains
images. or buildings.
• Check if the direction of the antenna has changed due to strong wind.
Snowy picture. • The antenna lead may be broken or disconnected.
• Check if the direction of the antenna has changed.
Remote control does • The batteries in the remote control may be exhausted.
not work. • The batteries may be improperly installed.
• Check that there is no obstruction between the remote control and
the remote (infrared) sensor.
• Check that a strong light is shining on the remote (infrared) sensor.
• Check that the main power is not turned off.
The following phenomena are not malfunctions
The cabinet clicks. • The clicking is a creaking sound produced when the cabinet expands
or contracts due to changes in the temperature. This will not affect
the picture or sound.
Unevenness in color • If the brightness is set too high, such unevenness in color may occur
sometimes develops depending upon the nature of the picture. The proper color can be
in part of the screen. restored by reducing the contrast.
EN-01-20[29CZ5DE/29CZ6DA/TES]-1 23/9/05, 9:28 AM19
19
Page 20

SPECIFICATIONS
MODEL 29CZ5DE/ 29CZ6DA/29CZ6TES
Rated voltage ~ 110 V–240 V, 50/60Hz
Power consumption
(at ~ 220V, 50Hz)
Dimensions
(Width x Depth x Height)
Mass 44 kg
Picture Tube Type 29 Flat super crystal picture tube
Television system Channel
(Antenna input) coverage PAL B/G CCIR 2 - 12 21 - 69 X~Z+2, S1~S41
Special RF
Signal
Color system PAL50/PAL60/SECAM/NTSC4.43/NTSC3.58
Sound output 10 W X 2
Speaker 6 x 12cm (2)
Terminals Input [
Accessories • Remote control (1)
System Channel VHF UHF CATV
PAL I UK –– 21 - 69 ––
PAL D/K CHINA 1 -12 13 - 57 Z-1~ Z-38
SECAM B/G CCIR 2 - 12 21 - 69 X~Z+2, S1~S41
SECAM D/K OIRT 1 -12 21 - 69 X1~X19
NTSC M US 2 -13 14 - 69
NTSC M JAPAN 1-12 13 - 62 M1~M10, S1~41
Color system
Sound system
a
a
Input [
a
Input [
Output [
Headphone output : Ø 3.5 mm (mini jack stereo type)
• Batteries (R03, AAA) (2)
• This Owner’s Manual
782.1(W) X 492.5(D) X 585.1(H) mm
(727.4mm) Overall picture tube measured diagonally
(676mm) Viewable picture tube measured diagonally
104° deflection
NTSC4.43, PAL 60Hz
5.5/6.0/6.5 MHz
(1) : S-Video/Video, Audio L/MONO, Audio R
(2)/DVD] :
(3)] : Video, Audio L/MONO, Audio R
>
(MONITOR)] : Video, Audio L/MONO, Audio R
123W
A-6~A-1, A~W, AA~ZZ, AAA, BBB
Video/Y, PB/CB, PR/CR, Audio L/MONO,
Audio R
Design and specifications are subject to change without notice.
Help to recycle, this product indicates material names on main plastic parts.
EN-01-20[29CZ5DE/29CZ6DA/TES]-1 23/9/05, 9:28 AM20
 Loading...