

Page 1

SERVICE MANUAL
Color Television
29SZ5DA
FILE NO. 060-200325
S3ES Chassis
29SZ5DE
29SZ5SH
29SZ5ST
PRINTED IN MALAYSIA Dec. 2003 (YC/X)
Page 2

CHAPTER 1 GENERAL ADJUSTMENTS
SAFETY INSTRUCTIONS ........................................................................................................................................ 3
SET-UP ADJUSTMENT ............................................................................................................................................ 4
SERVICE MODE ...................................................................................................................................................... 8
DESIGN MODE ...................................................................................................................................................... 11
ELECTRICAL ADJUSTMENTS .............................................................................................................................. 12
CIRCUIT CHECK.................................................................................................................................................... 14
GENERAL ADJUSTMENTS
CHAPTER 2 SPECIFIC INFORMATIONS
SETTING & ADJUSTING DATA .............................................................................................................................. 15
LOCATION OF CONTROLS ................................................................................................................................... 16
PROGRAMMING CHANNEL MEMORY................................................................................................................. 18
CHASSIS AND CABINET REPLACEMENT PARTS LIST ......................................................................................21
PC BOARDS TOP & BOTTOM VIEW...................................................................................................................... 32
TERMINAL VIEW OF TRANSISTORS ................................................................................................................... 41
CIRCUIT BLOCK DIAGRAM .................................................................................................................................. 43
TABLE OF CONTENTS
SPECIFICATIONS .............................................................................................................................................. END
APPENDIX:
CIRCUIT DIAGRAM
– 2 –
Page 3

CHAPTER 1 GENERAL ADJUSTMENTS
SAFETY INSTRUCTIONS
WARNING: BEFORE SERVICING THIS CHASSIS, READ THE “X-RAY RADIATION PRECAUTION”, “SAFETY PRECAU-
TION” AND “PRODUCT SAFETY NOTICE” INSTRUCTIONS BELOW.
X-RAY RADIATION PRECAUTION
1. Excessive high voltage can produce potentially hazardous X-RAY RADIATION. To avoid such hazards, the high
voltage must not be above the specified limit. The nominal
value of the high voltage of this receiver is (A) kV at zero
beam current (minimum brightness) under a (C) V AC power
source. The high voltage must not, under any circumstances, exceed (B) kV.
Refer to table-1 for high voltage (A), (B) & AC voltage (C).
(See SETTING & ADJUSTING DATA on page 15)
Each time a receiver requires servicing, the high voltage
should be checked following the HIGH VOLTAGE CHECK
procedure in this manual. It is recommended that the reading of the high voltage be recorded as a part of the service
record. It is important to use an accurate and reliable high
voltage meter.
SAFETY PRECAUTION
WARNING : Service should not be attempted by anyone unfamiliar with the necessary precautions on this receiver. The following
are the necessary precautions to be observed before servicing this chassis.
1. An isolation transformer should be connected in the power line between the receiver and the AC line before any service is
performed on the receiver.
2. Always discharge the picture tube anode to the CRT conductive coating before handling the picture tube. The picture tube
is highly evacuated and if broken, glass fragments will be violently expelled. Use shatter proof goggles and keep picture tube
away from the unprotected body while handling.
3. When replacing a chassis in the cabinet, always be certain that all the protective devices are put back in place, such as; nonmetallic control knobs, insulating covers, shields, isolation resistor-capacitor network etc.
2. The only source of X-RAY RADIATION in this TV receiver
is the picture tube. For continued X-RAY RADIATION protection, the replacement tube must be exactly the same
type tube as specified in the parts list.
3. Some part in this receiver have special safety-related characteristics for X-RAY RADIATION protection. For continued safety, parts replacement should be undertaken only
after referring to the PRODUCT SAFETY NOTICE below.
GENERAL ADJUSTMENTS
PRODUCT SAFETY NOTICE
Many electrical and mechanical parts in this chassis have special safety-related characteristics. These characteristics are
often passed unnoticed by a visual inspection and the protection afforded by them cannot necessarily be obtained by using
replacement components rated for higher voltage, wattage, etc. Replacement parts which have these special safety characteristics are identified in this manual and its supplements; electrical components having such features are identified by
the international hazard symbols on the schematic diagram and the parts list.
Before replacing any of these components, read the parts list in this manual carefully. The use of substitute replacement
parts which do not have the same safety characteristics as specified in the parts list may create shock, fire, X-ray
radiation or other hazards.
– 3 –
Page 4
WARNING: BEFORE SERVICING THIS CHASSIS, READ THE “X-RAY RADIATION PRECAUTION”, “SAFETY PRECAU-
TION” AND “PRODUCT SAFETY NOTICE” ON PAGE 3 OF THIS MANUAL.
SET-UP ADJUSTMENT
■ The following adjustments should be made when a complete realignment is required or a new picture tube is installed.
Perform the adjustments in order as follows :
1. Color Purity
2. Convergence
3. White Balance
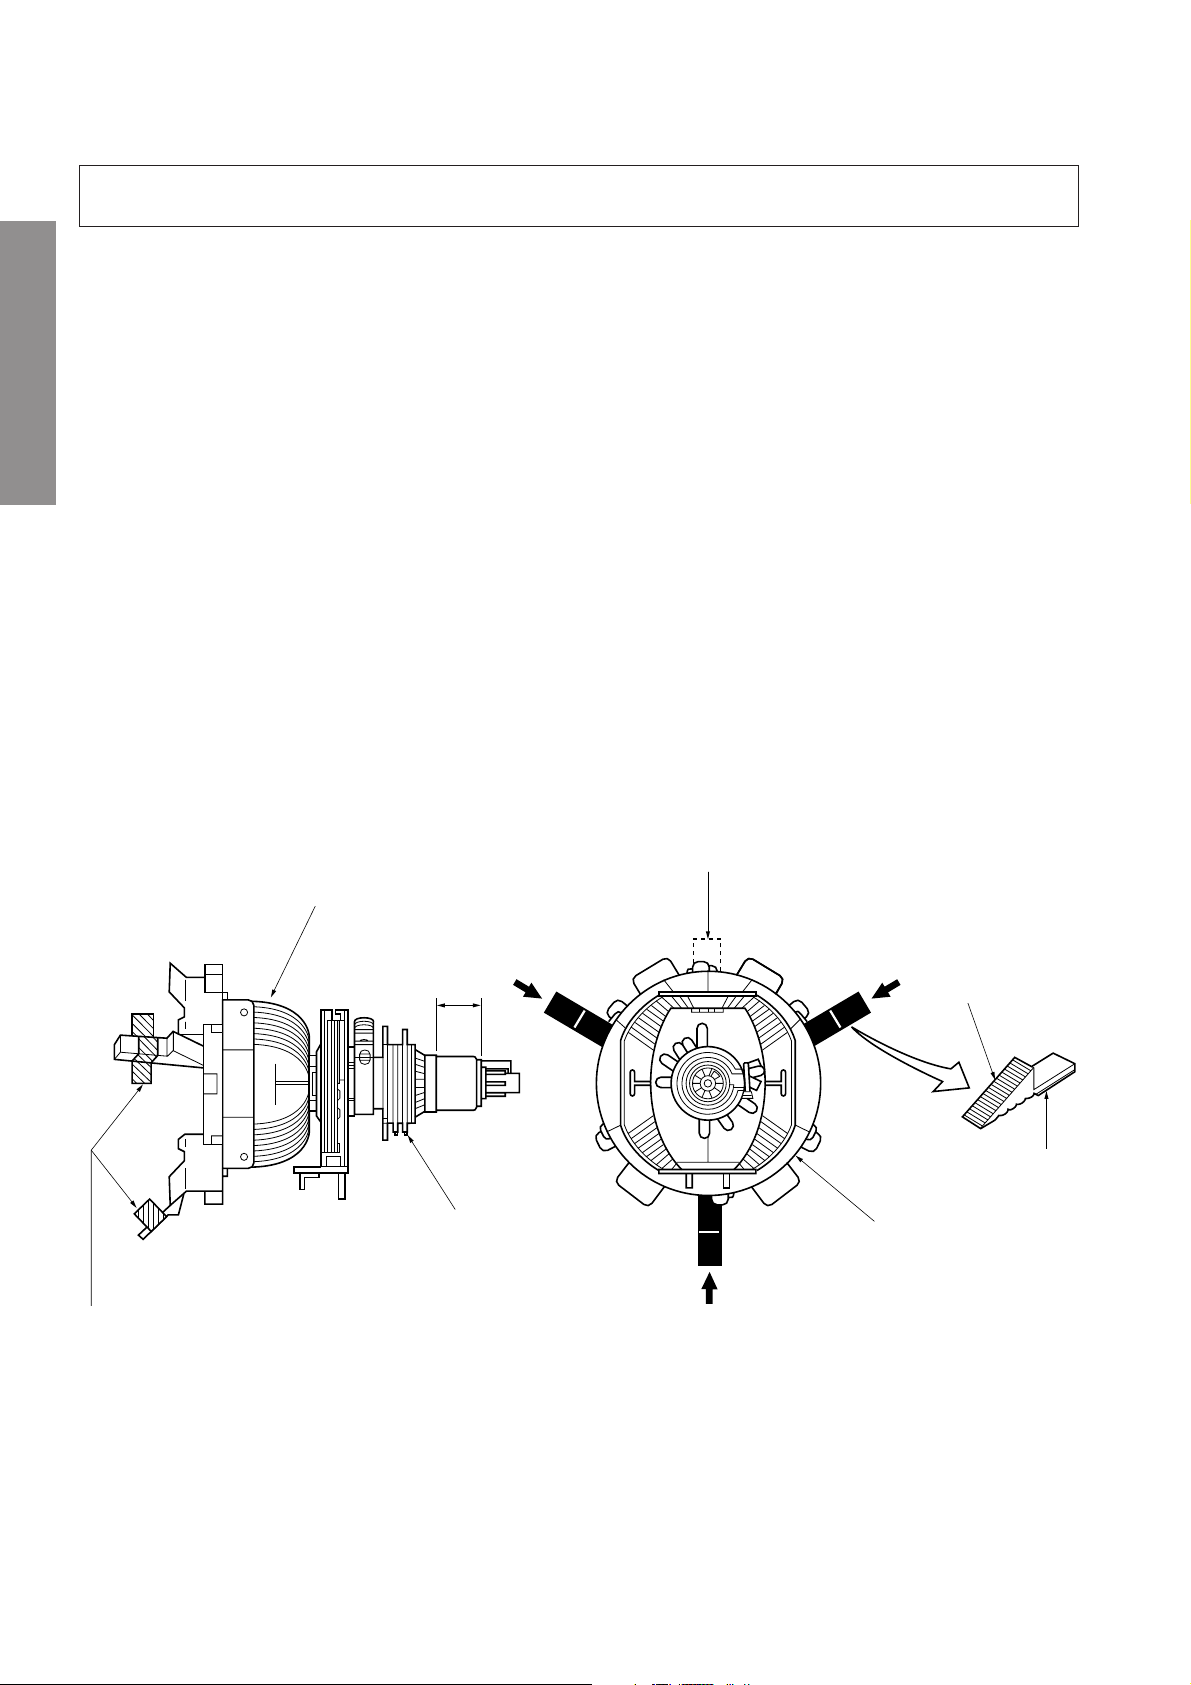
Note: 1.The PURITY/CONVERGENCE MAGNET assembly and rubber wedges need mechanical positioning.
Refer to figure 1.
GENERAL ADJUSTMENTS
*
COLOR PURITY ADJUSTMENT
NOTE : Before attempting any purity adjustments, the receiver
1. Demagnetize the picture tube and cabinet using a degauss-
2. Set the brightness and contrast to maximum.
3. Use a green raster from among the built-in test signals.
4. Loosen the clamp screw holding the yoke and slide the
2.Mounting position of the purity magnet assembly should fit to same position as old one because slightly difference
to the position depend on a kind of tube.
There are no adjustment of purity and convergence in some picture tube (Unified with purity magnet)
5. Remove the Rubber Wedges.
should be operated for at least fifteen minutes.
ing coil.
yoke backward or forward to provide vertical green belt
(zone) in the picture screen.
6. Rotate and spread the tabs of the purity magnet (See figure 2.) around the neck of the picture tube until the green
belt is in the center of the screen. At the same time, enter
the raster vertically.
7. Slowly move the yoke forward or backward until a uniform
green screen is obtained. Tighten the clamp screw of the
yoke temporarily.
8. Check the purity of the red and blue raster.
GLASS CLOTH
TAPES
DEFLECTION
YOKE
29.1mm(28", 29")
25mm(25")
19mm(19", 20", 21")
14mm(13", 14")
PURITY/
CONVERGENCE
MAGNET ASS'Y
Figure 1.
TEMPORARY
MOUNTING
RUBBER WEDGE
ADHESIVE
DEFLECTION
YOKE
– 4 –
Page 5
CONVERGENCE ADJUSTMENTS
NOTE: Before attempting any convergence adjustments, the
receiver should be operated for at least fifteen minutes.
■ CENTER CONVERGENCE ADJUSTMENT
1. Use the cross-dot pattern from among the built-in test signals.
2. Set the brightness and contrast for well defined pattern.
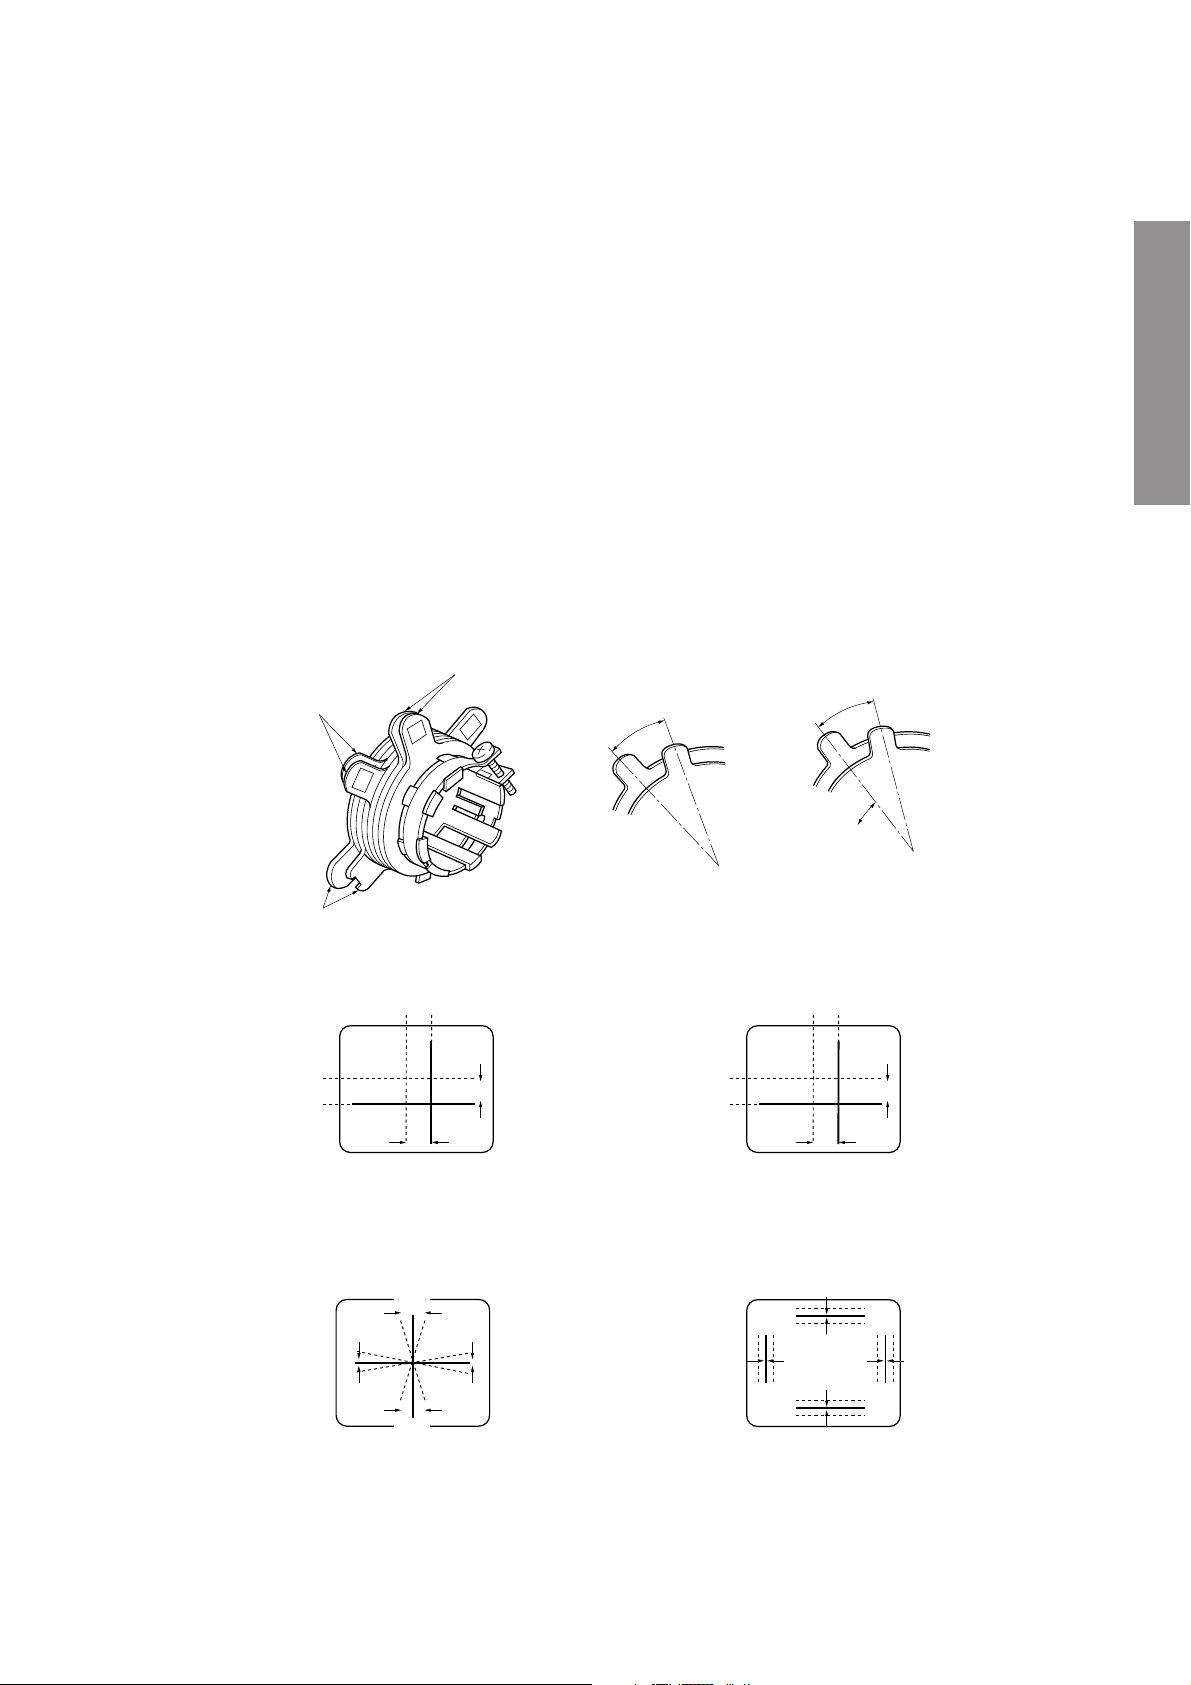
3. Adjust two tabs of the 4-Pole Magnets to change the angle between them (See figure 2.) and superimpose red
and blue vertical lines in the center area of the picture
screen.
4. Turn the both tabs at the same time keeping the angle
constant to superimpose red and blue horizontal lines at
the center of the screen.
5. Adjust two tabs of 6-Pole Magnets to superimpose red/
blue line and green one. Adjusting the angle affects the
vertical lines and rotating both magnets affects the horizontal lines.
6. Repeat adjustments 3, 4, 5 keeping in mind red, green
and blue movement, because 4-Pole Magnets and 6-Pole
Magnets have mutual interaction and make dot movement
complex.
4-POLE
MAGNETS
6-POLE
MAGNETS
ADJUST THE ANGLE
(VERTICAL LINES)
■ CIRCUMFERENCE CONVERGENCE ADJUSTMENT
1. Loosen the clamping screw of deflection yoke slightly to
allow the yoke to tilt.
2. Temporarily put a wedge as shown in figure 1. (Do not
remove cover paper on adhesive part of the wedge.)
3. Tilt front of the deflection yoke up or down to obtain better
convergence in circumference. (See figure 3.) Push the
mounted wedge into the space between picture tube and
the yoke to fix the yoke temporarily.
4. Put other wedge into bottom space and remove the cover
paper to stick.
5. Tilt front of the yoke right or left to obtain better convergence in circumference. (See figure 3.)
6. Keep the yoke position and put another wedge in either
upper space. Remove cover paper and stick the wedge
on picture tube to fix the yoke.
7. Detach the temporarily mounted wedge and put it in another upper space. Stick it on picture tube to fix the yoke.
8. After fixing three wedges, recheck overall convergence.
Tighten the screw firmly to fix the yoke and check the yoke
is firm.
9. Stick three adhesive tapes on wedges as shown in figure
1.
FIXED
GENERAL ADJUSTMENTS
ROTATE TWO TABS
AT THE SAME TIME
(HORIZONTAL LINES)
PURITY
MAGNETS
CONVERGENCE MAGNET ASSEMBLY ADJUSTMENT OF MAGNETS
Figure 2.
BLU RED
BLU
RED
4-POLE MAGNETS MOVEMENT
BGR
R
G
B
RGB
RED/BLU
GRN
Center Convergence by Convergence Magnets
B
G
R
RED/BLU GRN
6-POLE MAGNETS MOVEMENT
B
G
R
BGR
RGB
R
G
B
INCLINE THE YOKE UP (OR DOWN)
Circumference Convergence by DEF Yoke
Figure 3. Dot Movement Pattern
INCLINE THE YOKE RIGHT (OR LEFT)
– 5 –
Page 6
WARNING: BEFORE SERVICING THIS CHASSIS, READ THE “X-RAY RADIATION PRECAUTION”, “SAFETY PRECAU-
TION” AND “PRODUCT SAFETY NOTICE” ON PAGE 3 OF SERVICE MANUAL.
■ The following adjustments should be made when a complete realignment is required or a new picture tube is installed.
Perform the adjustments in order as follows :
1. Color Purity
2. Convergence
3. White Balance
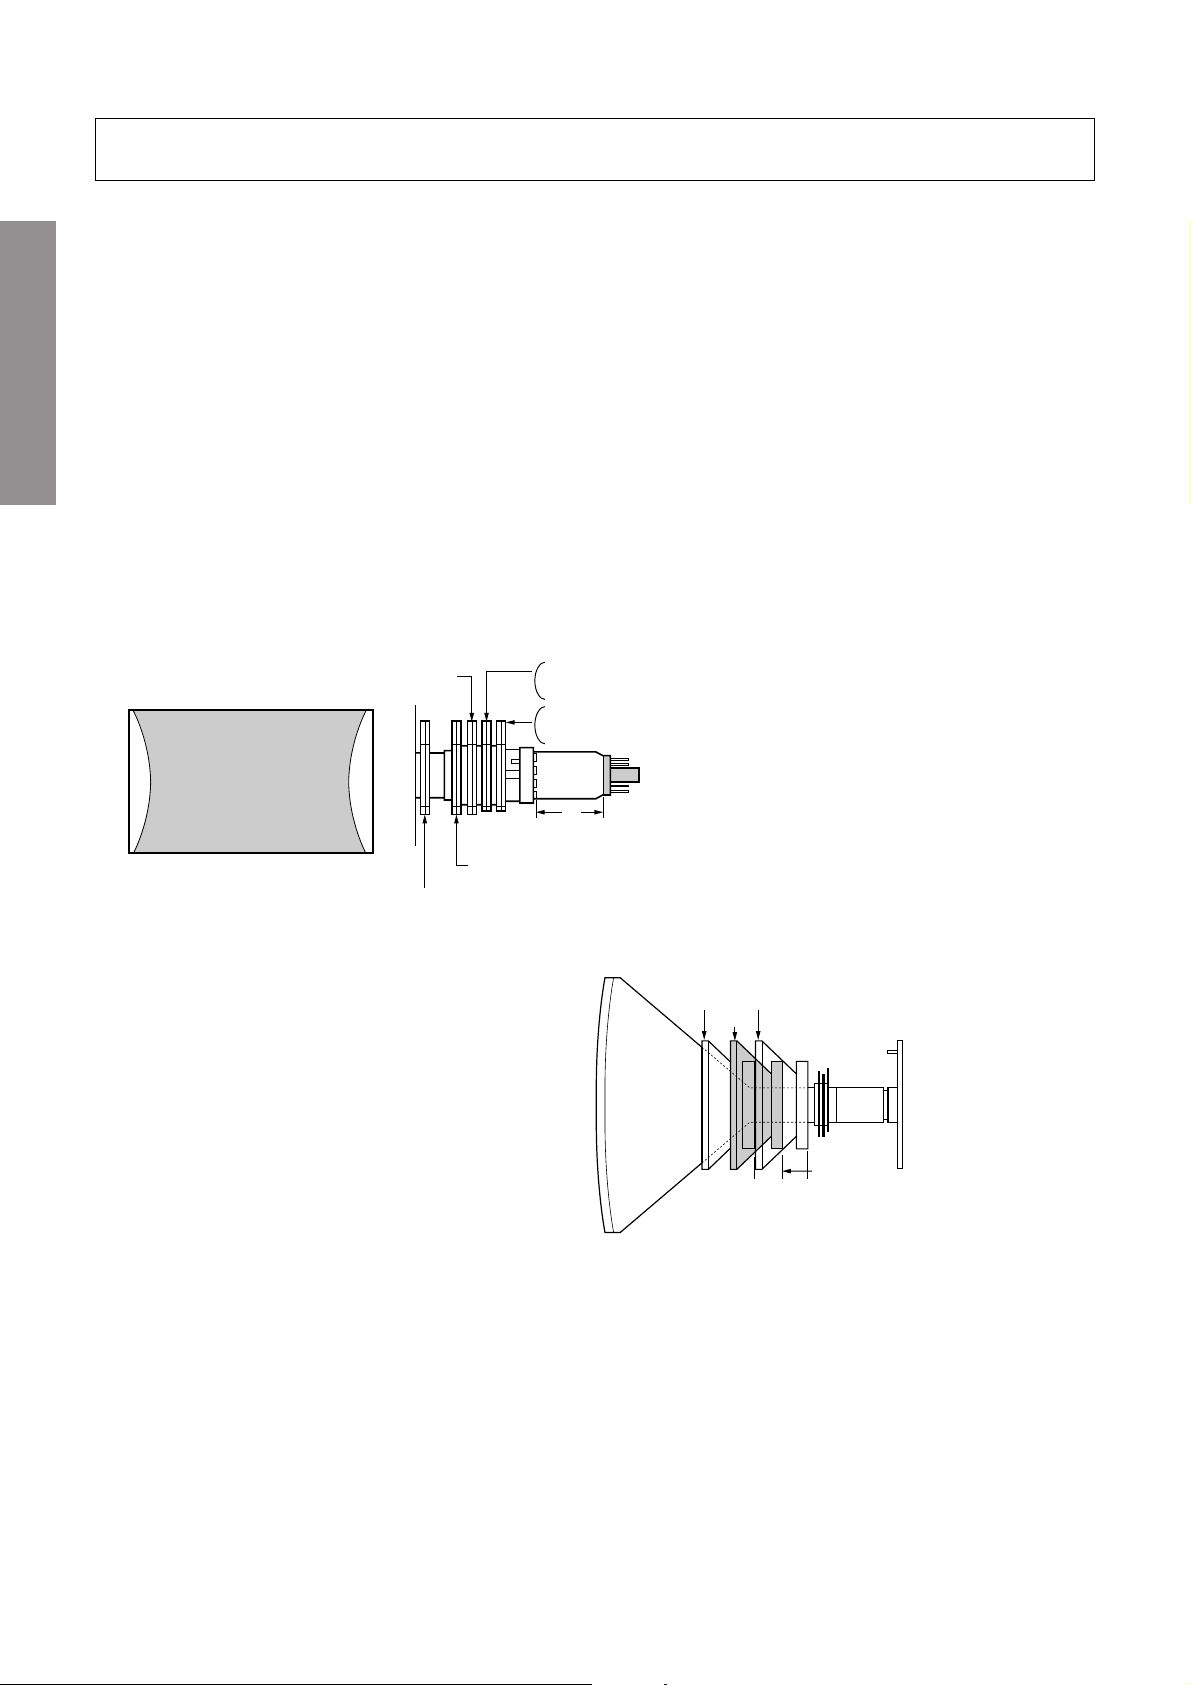
Note:The PURITY/CONVERGENCE MAGNET assembly and rubber wedges need mechanical positioning.
Refer to figure 1.
COLOR PURITY ADUSTMENT
(1)Let the screen face in the installing direction or toward the east (when it is to be moved), bring up the service mode
screen after demagnetizing (front, left, right, and top) with the degaussing coil, receive white signals by pressing the
GENERAL ADJUSTMENTS
[TV/VIDEO] button, and then the receiver should be operated for more than 40 minutes.
(2)Perform rough adjustment of the central convergence with the P/C magnet according to the adjustment item.
(3)Receive built-in green signals, loosen set screws on the deflection yoke, remove rubber wedges, and shift the deflection
yoke to toward front.
(4)Move alternately the two 2-pole magnets of the P/C magnets so that the green raster can come to the center of the
screen.
SET-UP ADJUSTMENT (FOR FLAT TUBE)
Figure 1.
2-pole purity magnet
(27": Magnet is fixed with deflection yoke.)
Green Belt
Sub-4-pole convergence magnet (32" : 34")
Sub-4-pole convergence magnet (to be installed on deflection yoke for 30", 32”)
Main 4-pole convergence magnet (30" : 32")
6-pole convergence magnet (34")
6-pole convergence magnet (30" : 32")
Main 4-pole convergence magnet (34")
P/C magnet installing position A
• 30"=26.5 mm
A
• 32"=30.5 mm or 32.5 mm
• 34"=37 mm
• 34"=39 mm
(5)Receive built-in red and blue signals, check that there is no inclination of the single color raster toward one side, and if
each color tilts to a great extent, make adjustment with the 2-pole magnet so that the 3 colors will come to the center
evenly.
(6)Receive the green raster, shift the deflection yoke from a
foremost position (hitting against the picture tube) to a
Shift deflection yoke
(7) Perform marking of each point
(6)
(8)
on the tape of picture tube
backward position horizontally, stop the deflection yoke
at a position where it begins to become a green raster,
and perform accurate marking on the picture tube.
(7)Shift the deflection yoke further backward, and perform
Picture tube
CRT-D board
accurate marking at a position where the green raster
begins to being luck.
(8)Fix the deflection yoke at a position 60% forward within
the range marked in items (6) and (7) above.
CONVERGENCE ADJUSTMENTS
100 60 0%
Fix the deflection yoke at a position 60% forward from a
point between (6) and (7)
P/C Mag
* Adjust the convergence magnet to get vest convergence in the the order to (1) ~ (5).
■ CENTER CONVERGENCE:
(1)Receive the white crosshatch or dot pattern from the service signal generator.
(2)Use the 2 pieces of main 4-pole magnets of P/C magnets, change the open angle, and align the red and blue vertical
lines on the screen center.
(3)Freeze the open angle of the main 4-pole magnets, turn them simultaneously, and align the horizontal lines.
(4)Take the same steps for items (2) and (3) above and align red/blue with green on the screen center using two 6-pole
magnets.
– 6 –
Page 7
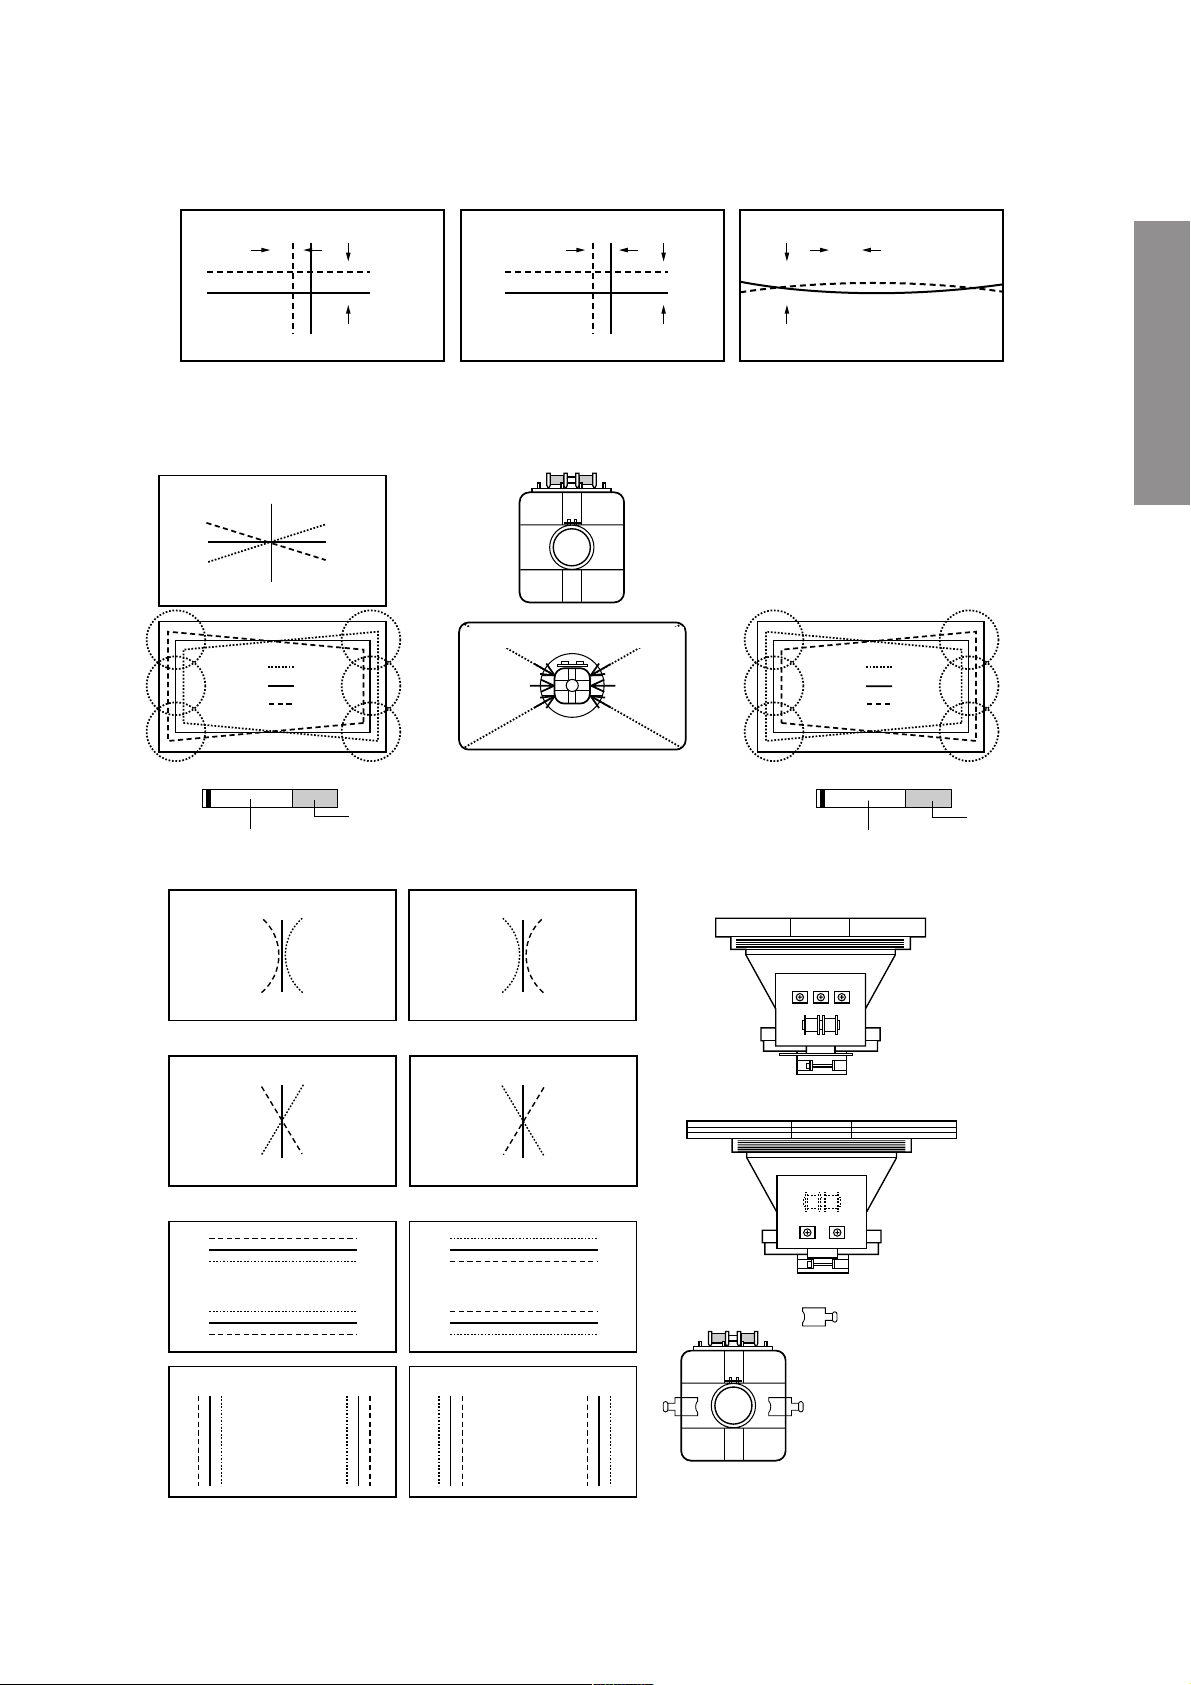
(5)Adjust the sub-4-pole magnets only in case there is any deviation of Xv bow-shaped convergence. (To be usually set at
the initial position)
Align both sides with the sub-4-pole magnets and minimize the deviation of blue and red with the main 4-pole magnets.
blue
blue
red
red
Main 4-pole magnet
red/blue
red/blue
green
6-pole magnet
■ CIRCUMFERENCE CONVERGENCE:
Perform correction in the following manner.
*
blue
green
red
A
B
C
(Parts code:23 948 274) TC-S
blue
green
red
S
N
Blue color or blue mark
D
E
F
*Insert the correction piece between the
picture tube and the deflection yoke.
Bonded surface
(Insertion position of correction
piece)
D
E
F
A
B
C
Adjust VR 1 and minimize the deviation of YH. *Only 27", 30" and 32".
Red
green
blue
blue
green
Red
Xv bow-shaped deviation of convergence
blue
green
red
Sub-4-pole magnet
• Adjust coils and minimize deviation
(The 27” unit has coils underneath it)
A
B
C
■ 30", 27", 32"
blue
green
red
(Parts code:23 948 464)
N
S
Transparent
GENERAL ADJUSTMENTS
D
E
F
Bonded surface
Red
green
blue
blue
green
Red
Adjust VR 2 (YHC) and minimize the deviation of YH.
Red
blue
green
green
blue
Red
blue
Red
green
green
Red
blue
Adjust VR 3 (YV) and minimize the deviation of YV.
Red
green
blue
blue
green
Red
GH
Red
blue
green
green
blue
red
green
blue
red
blue
green
Red
Red
green
blue
green
Red
blue
VR3
VR2 VR1
■ 34"
YV YHC
27" (Part No. 23 947 371)
32", 30" (Part No. 23 947 121)
34" (Part No. 23 993 080)
GH
Perform correction by inserting the
correction piece into the clearance of terminal board coils of
the deflection yoke.
Note:
Perform insertion by turning the
metal side to the terminal board
side of the deflection yoke.
– 7 –
Page 8
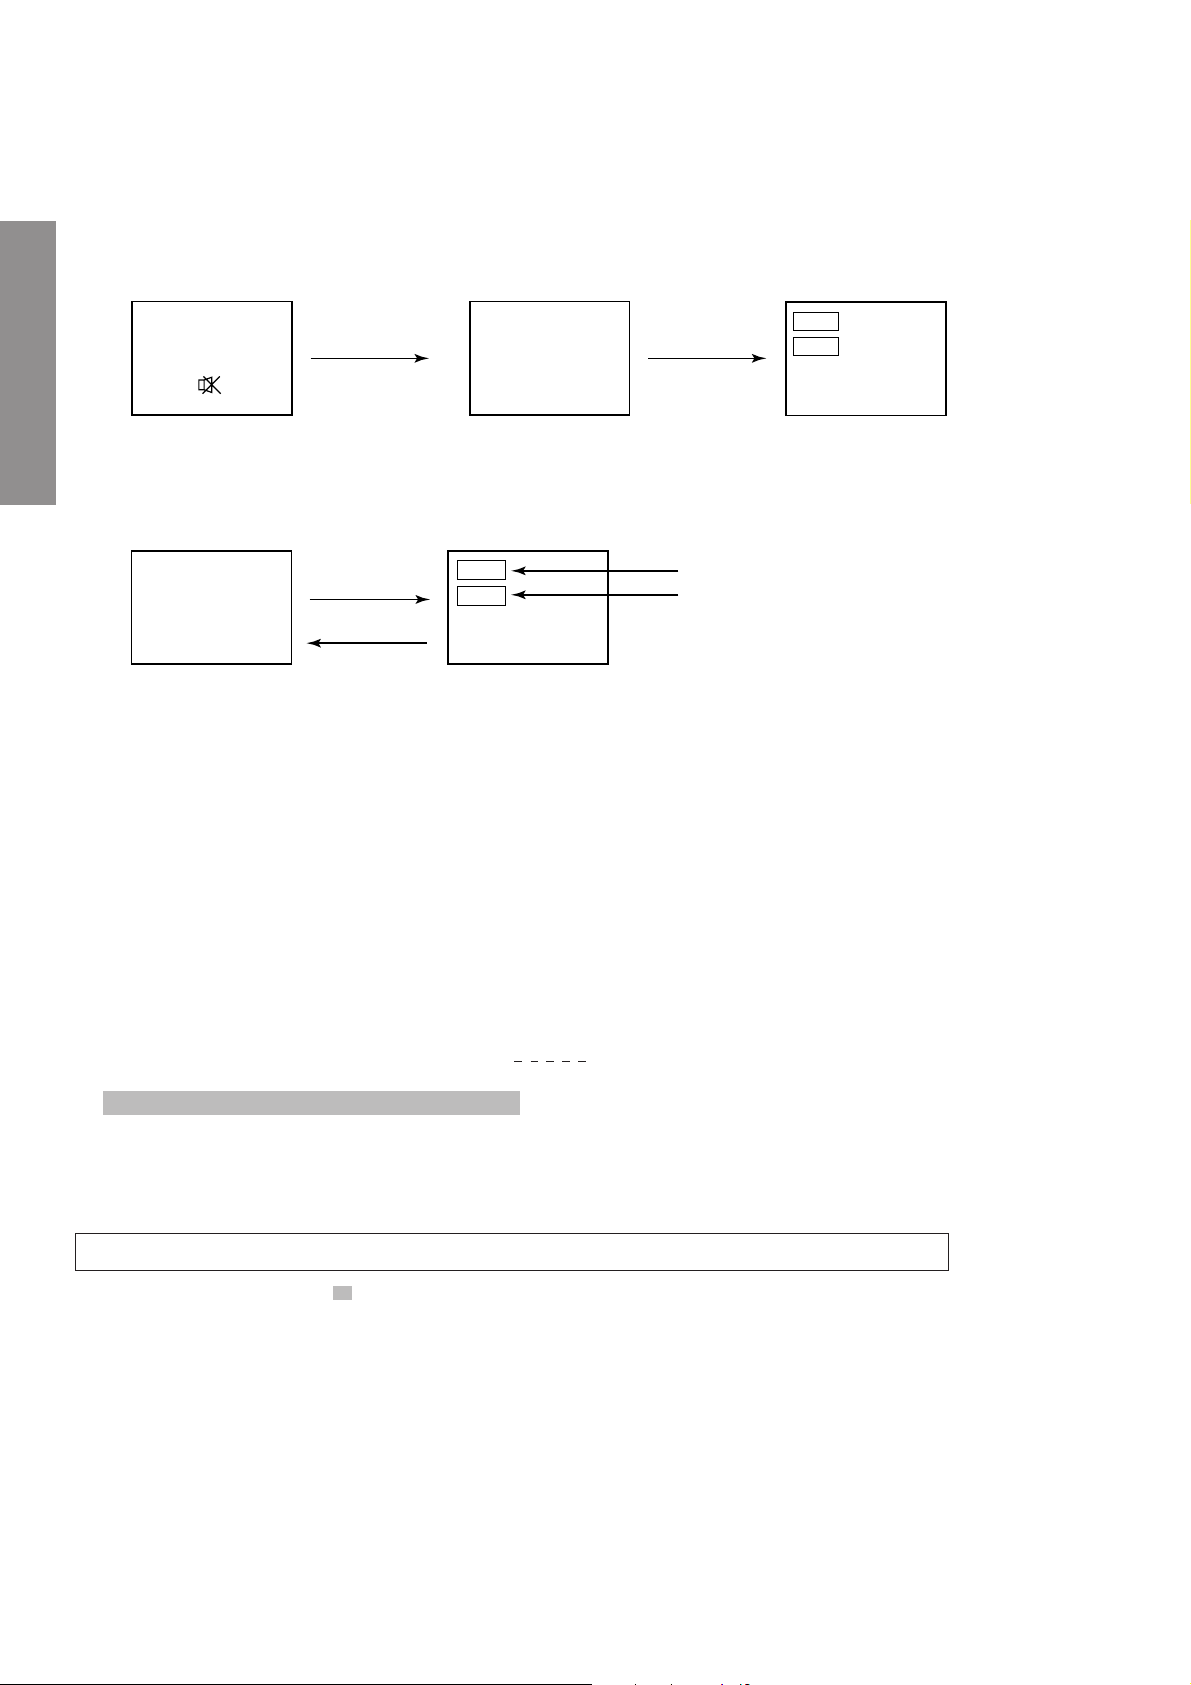
1. ENTERING TO SERVICE MODE
1) Press o button once on
Remote Control.
SERVICE MODE
2) Press o button again to
keep pressing.
3) While pressing the o button,
press MENU button on TV set.
GENERAL ADJUSTMENTS
2. DISPLAYING THE ADJUSTMENT MENU
1) Press MENU button on TV.
Service mode
S
3. KEY FUNCTION IN THE SERVICE MODE
The following key entry during display of adjustment menu provides special functions.
A single horizontal line ON/OFF: - / - - button (on Remote) or a button (on TV)
Test signal selection : a button (on Remote)
Selection of the adjustment items : Channel s/t (on TV or Remote)
Change of the data value : Volume ; +/– (on TV or Remote)
Adjustment menu mode ON/OFF : MENU button (on TV)
Initialization of the memory (QA02) : CALL + Channel button on TV (s)
Reset the count of operating protect
circuit to “00”: CALL + Channel button on TV (t)
“RCUT” selection : 1 button
“GCUT” selection : 2 button
“BCUT” selection : 3 button
“CNTX” (or “SCNT”) selection : 4 button
“COLC” selection : 5 button
“TNTC” selection : 6 button
Test audio signal ON/OFF (1kHz) : 8 button
Self diagnostic display ON/OFF : 9 button
Press
Press
Adjustment mode
Item
Data
(Service mode display)
Item
Data
Color thickness correction
note: Displayed differently as shown below, de-
pending on the setting of the receiving color
system.
COLP (PAL)
COLC (NTSC)
COLS (SECAM)
S
CAUTION : Never try to perform initialization unless you have changed the memory IC.
The key function marked with are not usable to control in the Test signal for some model.
*
– 8 –
Page 9
4. SELECTING THE ADJUSTING ITEMS
1) Every pressing of CHANNEL s button in the service mode changes the adjustment items in the order of table-2.
(t button for reverse order)
Refer to table-2 for preset data of adjustment mode.
(See SETTING & ADJUSTING DATA on page 15)
5. ADJUSTING THE DATA
1) Pressing of VOLUME ; +/– button will change the value of data in the range from 00H to FFH. The variable
range depends on the adjusting item.
6. EXIT FROM SERVICE MODE
1) Pressing POWER button to turn off the TV once.
■ INITIALIZATION OF MEMORY DATA OF QA02
After replacing QA02, the following initialization is required.
1. Enter the service mode, then select any register item.
2. Press and hold the CALL button on the Remote, then press the CHANNEL s button on the TV. The initialization of QA02 has
been complated.
3. Check the picture carefully. If necessary, adjust any adjustment item above.
Perform “Auto search Memory” on the owner’s manual.
CAUTION: Never attempt to initialize the data unless QA02 has been replaced.
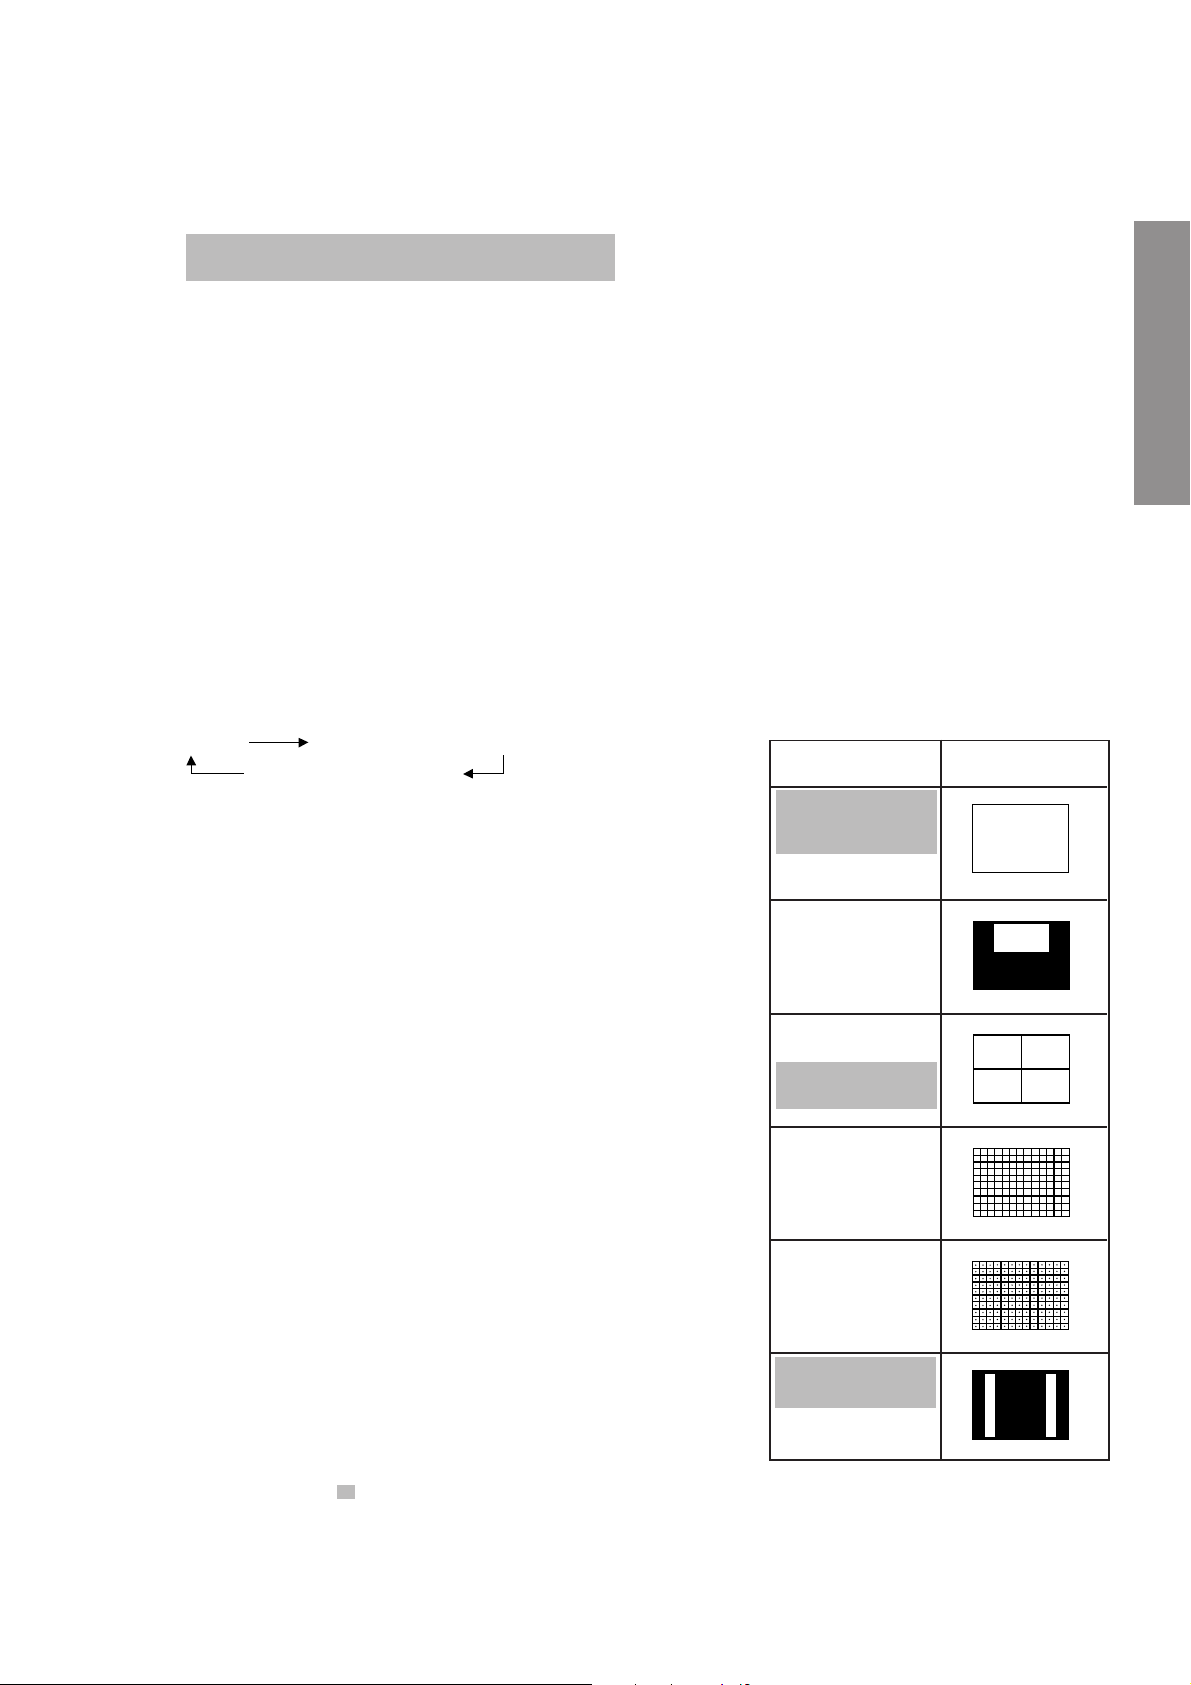
7. TEST SIGNAL SELECTION
1) Every pressing of a button on the Remote Control changes the built-in test patterns on screen as described below
in SERVICE MODE.
GENERAL ADJUSTMENTS
Signal off
NTSC signals (14 patterns)
PAL signals (14 patterns)
Signals Picture
• Red raster
• Green raster
• Blue raster
• All Black
• All White
• Black & White
• Black cross-bar
• White cross-bar
• Black cross-bar
on green raster
• Black cross-hatch
• White cross-hatch
• Black cross-dot
• White cross-dot
• H signal (white)
• H signal (black)
The signals marked with are not usable to display in the Test signal for some model.
*
– 9 –
Page 10

8. SELF DIAGNOSTIC FUNCTION
1) Press “9” button on Remote Control during display of adjustment menu in the service mode.
The diagnosis will begin to check if interface among IC’s are executed properly.
2) During diagnosis, the following displays are shown.
Indicated color of mode now selected : Green and Red
<SELF CHECK>
23******
POWER : 00
BUS LINE : OK
BUS CONT : OK
BLOCK : UV V1 V2
V3 QV01
Indicated color of other modes : White
Green : Normal
Red : The microprocessor operates to provide judgement
of no video signal. The red color is still indicated
though the signal is input, failure may exist in input
signal line including QV01.
QV01 : In case of indication green ---Normal
In case of indication red with input signal----
GENERAL ADJUSTMENTS
Failure may exist in output line including QV01.
Part number of microprocessor (QA51)
Operation number of protecting circuit ----“00” is nor-
mal.
When indication is other than “00”, overcurrent apts to
flow, and circuit parts may possibly be damaged.
BUS LINE CHECK ----“OK” is normal.
“SDA1-GND” ------------- SDA-GND short circuit.
“SCL1-GND” -------------- SCL-GND short circuit.
“SCL1-SDA1” ------------- SCL-SDA short circuit.
BUS CONT ----“OK” is normal.
When indication shows “Q uuu NG”, the device with
the number may possibly be damaged.
BLOCK
NOTE: Component which controls character display on
screen is QA51 (TELETEXT IC.). If this display
function fails to operate due to damage in QA51,
self diagnosis procedure is as follows.
(1) In case that power indicator is blinking with
interval of 0.5 seconds; it means protecting
circuit (Current limiter) is operating, and circuit components may possibly be damaged.
Check related components.
(2) In case that power indicator is blinking with
interval of 1 second; Protecting circuit does
not operate, but a part of Bus line does not
operate normally. Check Bus line.
UV : TV reception mode
V1 : VIDEO 1 input mode (a1)
V2 : VIDEO 2 input mode (a2)
V3 : VIDEO 3 input mode (a3)
The items marked with are not usable to display in the SELF DIAGNOSTIC FUNCTION for some model.
*
– 10 –
Page 11
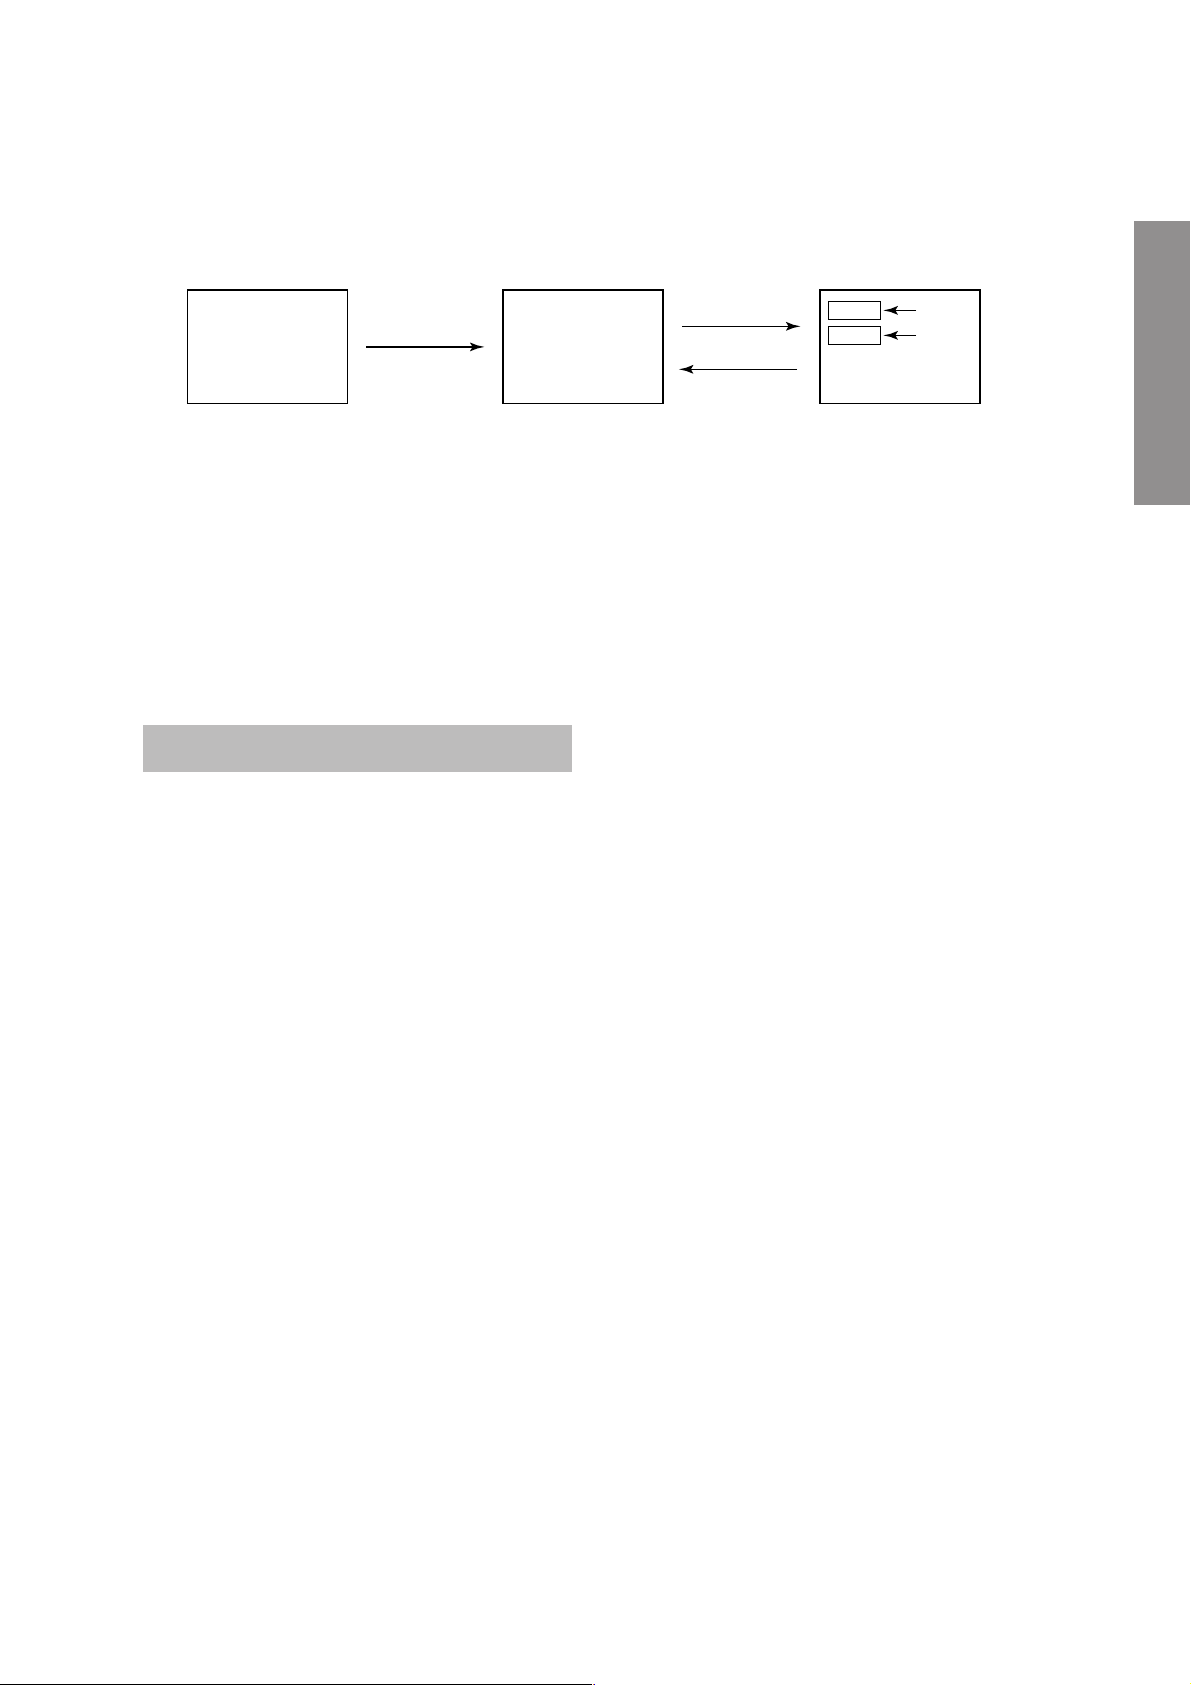
1. ENTERING TO DESIGN MODE
1) Select the Service mode.
DESIGN MODE
2) While pressing
Remote and press MENU button on TV.
o(or CALL) button on
3) Press MENU button on TV.
S D
(Design mode) (Adjustment mode)
When QA02 is initialized, items “OPT0” and “OPT1” of DESIGN MODE are set to the data of the representative model of this
chassis family.
Therefore, because ON-SCREEN specification remains in the state of the representative of model. This model is required to
reset the data of items “OPT0” and “OPT1”.
2. SELECTING THE ADJUSTING ITEMS
Every pressing of CHANNEL t button in the design mode changes the adjustment items in the order of table-3.
(s button for reverse order)
Refer to table-3 for data of design mode.
(See SETTING & ADJUSTING DATA on page 15)
3. ADJUSTING THE DATA
Pressing of VOLUME s or t button will change the value of data.
Press
Press
ITEM
DATA
GENERAL ADJUSTMENTS
– 11 –
Page 12
ELECTRICAL ADJUSTMENTS
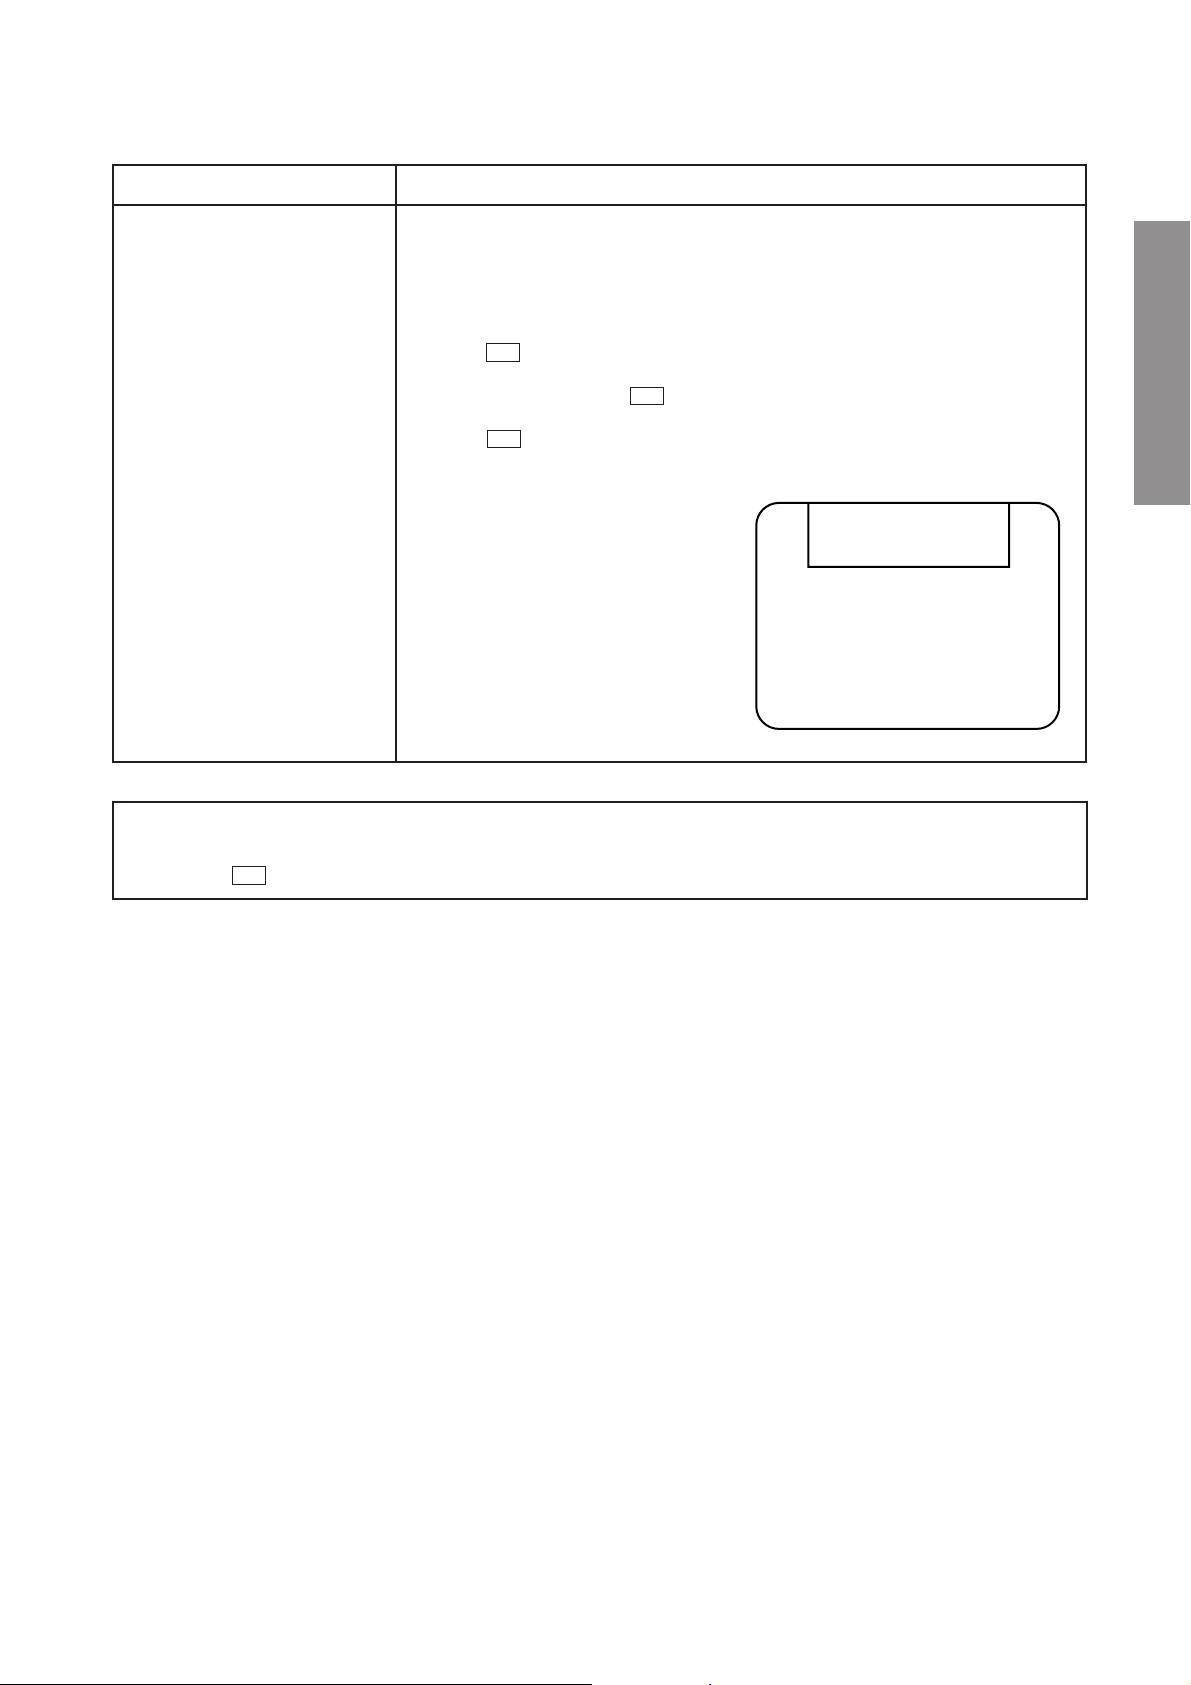
ITEM ADJUSTMENT PROCEDURE
FOCUS VR ADJ
SUB-BRIGHTNESS
(BRTC)
GENERAL ADJUSTMENTS
Note: Constrict the picture height
until the vertical retrace line
appears adjusting the item
HIT (HEIGHT).
HORIZONTAL POSITION
ADJUSTMENT (HPOS)
VERTICAL POSITION
ADJUSTMENT (VPOS)
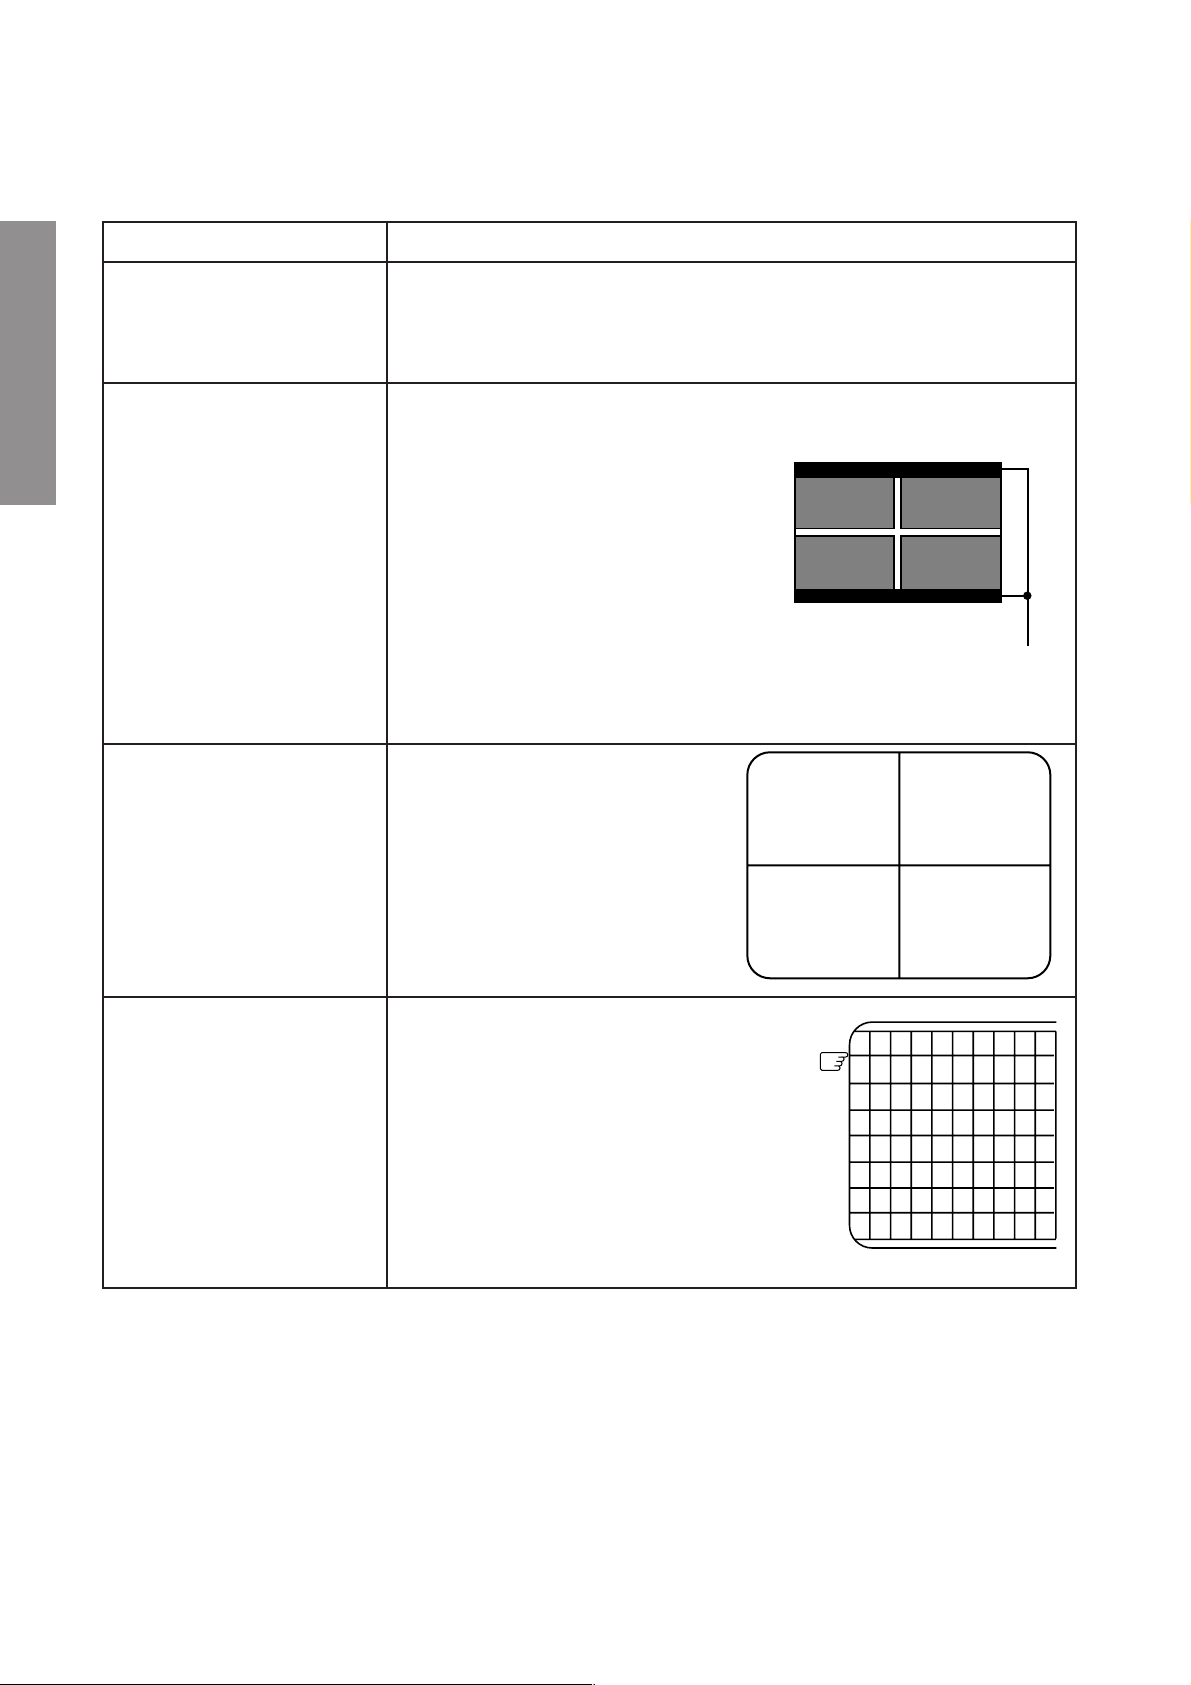
1. Enter the service mode, then select any register item.
2. Press the TV/VIDEO button on the Remote until the black cross-bar pattern appears on the screen.
3. Adjust the FOCUS control (on T461) for well defined scanning lines on the picture
screen.
1. Set CONTRAST to minimum, and
BRIGHTNESS to center by adjusting user
controls.
2. Set the TV in service mode to get white
cross-bar of inside pattern.
3. Select BRTC (brightness correction), and
adjust the ; – /+ button to reduce the
value so that white portion of inside pattern slightly light.
4. Adjust ; – /+ button to increase the data
value of BRTC, and set it just before the
difference between the belt of vertical retrace and the border of black portion of
inside pattern is visible.
After that, return vertical height and contrast.
1. Set the TV in service mode, and get
black or white cross-bar signal with
VIDEO button on remote hand unit.
2. Select either HPOS (Horizontal pic-
ture phase) or VPOS (Vertical picture
phase) with CHANNEL s, t buttons,
and adjust horizontal or vertical picture position in the center of screen
with VOLUME ; – /+ buttons.
Belt of vertical retrace
VERTICAL AMPLITUDE
ADJUSTMENT (HIT)
1. Set the TV in service mode, and get
black or white cross-hatch signal with
VIDEO button on remote hand unit.
2. Select HIT (Vertical amplitude) with
CHANNEL s, t buttons, and adjust
vertical amplitude with VOLUME
; – /+ buttons so that vertical am-
plitude lacks a little.
3. Adjust vertical amplitude with VOL-
UME ; – /+ buttons so that the first
bar on cross-hatch signal touches
edge of screen.
The first
– 12 –
Page 13
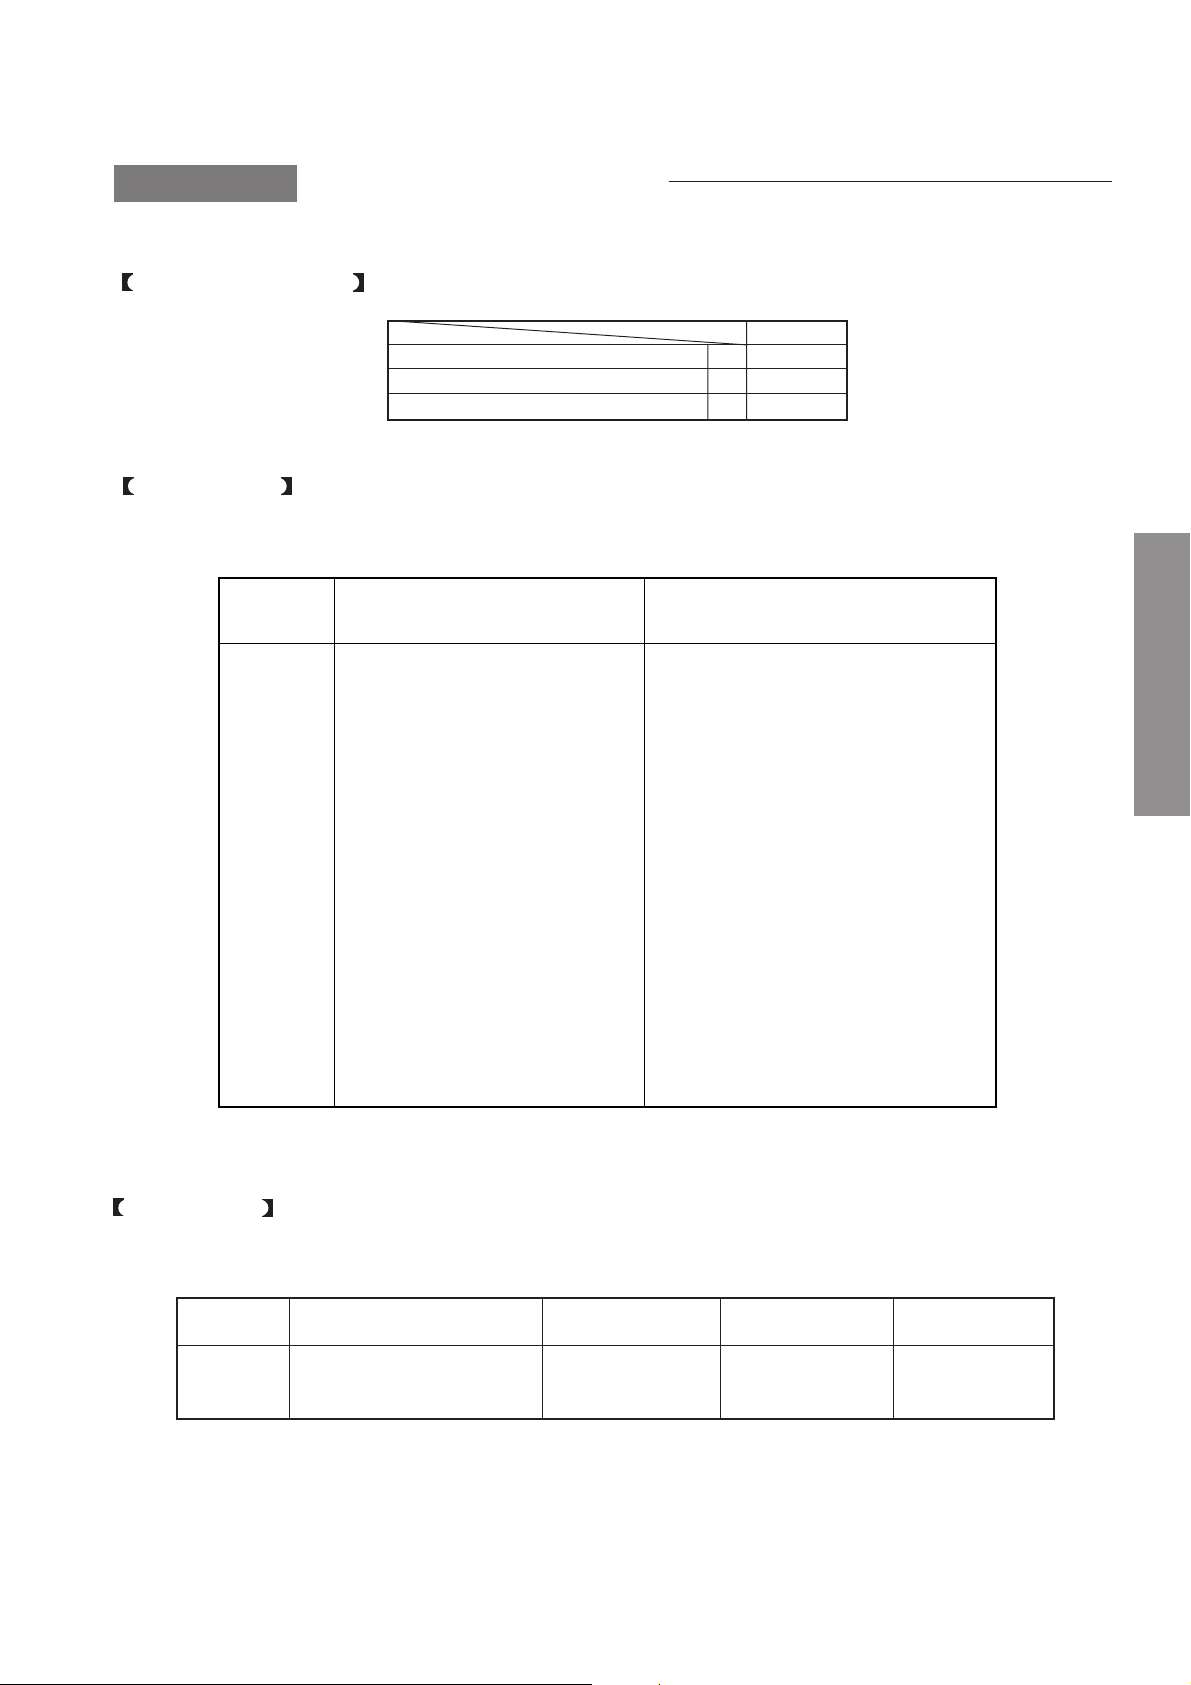
ITEM ADJUSTMENT PROCEDURE
WHITE BALANCE
ADJUSTMENT
CUTOFF ADJUSTMENT
•
(RCUT)
(GCUT)
(BCUT)
DRIVE ADJUSTMENT
•
(GDRV)
(BDRV)
1. Set Contrast to 40, and brightness to +20 by picture control.
2. Set the TV in service mode, and get the inside W/B adjusting signal with VIDEO
button.
3. Select RCUT, GCUT and BCUT with CHANNEL s, t buttons, to set individual
values to Initial reference data, and to set GDRV and BDRV to Initial reference
data with VOLUME ; – /+ buttons (See page 19).
4. Press -/- - button on the remote control and rotate Screen VR to get one slight
horizontal line on screen.
Note: Every pressing of -/- - button provides Horizontal line picture and Normal
picture alternately.
5. Press -/- - button to release horizontal line picture, and select the two other colors
which did not light in the above step with CHANNEL s, t buttons. Then tap VOL-
UME ; – /+ buttons so that three colors slightly light in the same level.
X To correct white balance in light area,
select GDRV and BDRV with CHANNEL
s, t buttons to adjust.
X To correct white balance in dark area,
perform fine adjustment of RCUT, GCUT
and BCUT.
Light area check
(to show white)
Dark area check
(to show black)
GENERAL ADJUSTMENTS
NOTE: It is released built-in test pattern by changing the adjustment item for some model.
In this case, select the adjustment item with channel st button first and then select the built-in test pattern
with -/- - button.
– 13 –
Page 14

CIRCUIT CHECK
HIGH VOLTAGE CHECK
CAUTION: There is no HIGH VOLTAGE ADJUSTMENT on this chassis. Checking should be done following the steps
below.
1. Connect an accurate high voltage meter to the second anode of the picture tube.
2. Turn on the receiver. Set the BRIGHTNESS and CONTRAST controls to minimum (zero beam current).
3. High voltage must be measured below (B) kV.
Refer to table-1 for high voltage (B).
(See SETTING & ADJUSTING DATA on page 15)
4. Vary the BRIGHTNESS control to both extremes to be sure the high voltage does not exceed the limit under any conditions.
GENERAL ADJUSTMENTS
– 14 –
Page 15
CHAPTER 2 SPECIFIC INFORMATIONS
SETTING & ADJUSTING DATA
SAFETY INSTRUCTIONS
HIGH VOLTAGE AT ZERO BEAM: (A) 32.8 kV
MAX HIGH VOLTAGE:
AC VOLTAGE
Table-1
SERVICE MODE
ADJUSTING ITEMS AND DATAS IN THE SERVICE MODE:
Item Adjustment Reference data
29"
(B) 33.0 kV
(C) 110~240 V
RCUT
GCUT
BCUT
RDRV
GDRV
BDRV
BRTC
COLC
TNTC
COLP
COLS
SCNT
HPOS
VPOS
HIT
VLIN
WID
PARA
TRAP
BELL
SRY
SBY
DESIGN MODE
R CUTOFF H
G CUTOFF H
B CUTOFF H
R DRIVE H
G DRIVE H
B DRIVE H
SUB BRIGHT CEN
SUB COLOR CEN NTSC
SUB TINT CEN
SUB COLOR CEN PAL
SUB COLOR CEN SECAM
SUB CONTRAST
50Hz H-POSITION
V-POSITION
HEIGHT
V-LINEARITY
PICTURE WIDTH
E-W PARABOLA
TRAPEZIUM
SECAM BELL FILTER
SECAM R-Y
SECAM-B-Y
Table-2
04H
04H
04H
07H
07H
07H
80H
80H
40H
F6H
F6H
07H
12H
03H
20H
07H
2CH
2BH
0BH
01H
08H
08H
SPECIFIC INFORMATIONS
ADJUSTING ITEMS AND DATAS IN THE DESIGN MODE:
Item Name of adjustment Preset Data Data Remarks
OPT 1 OPTION 1 05H 22H
OPT 2 OPTION 2 10H 1DH
Table-3
– 15 –
Page 16
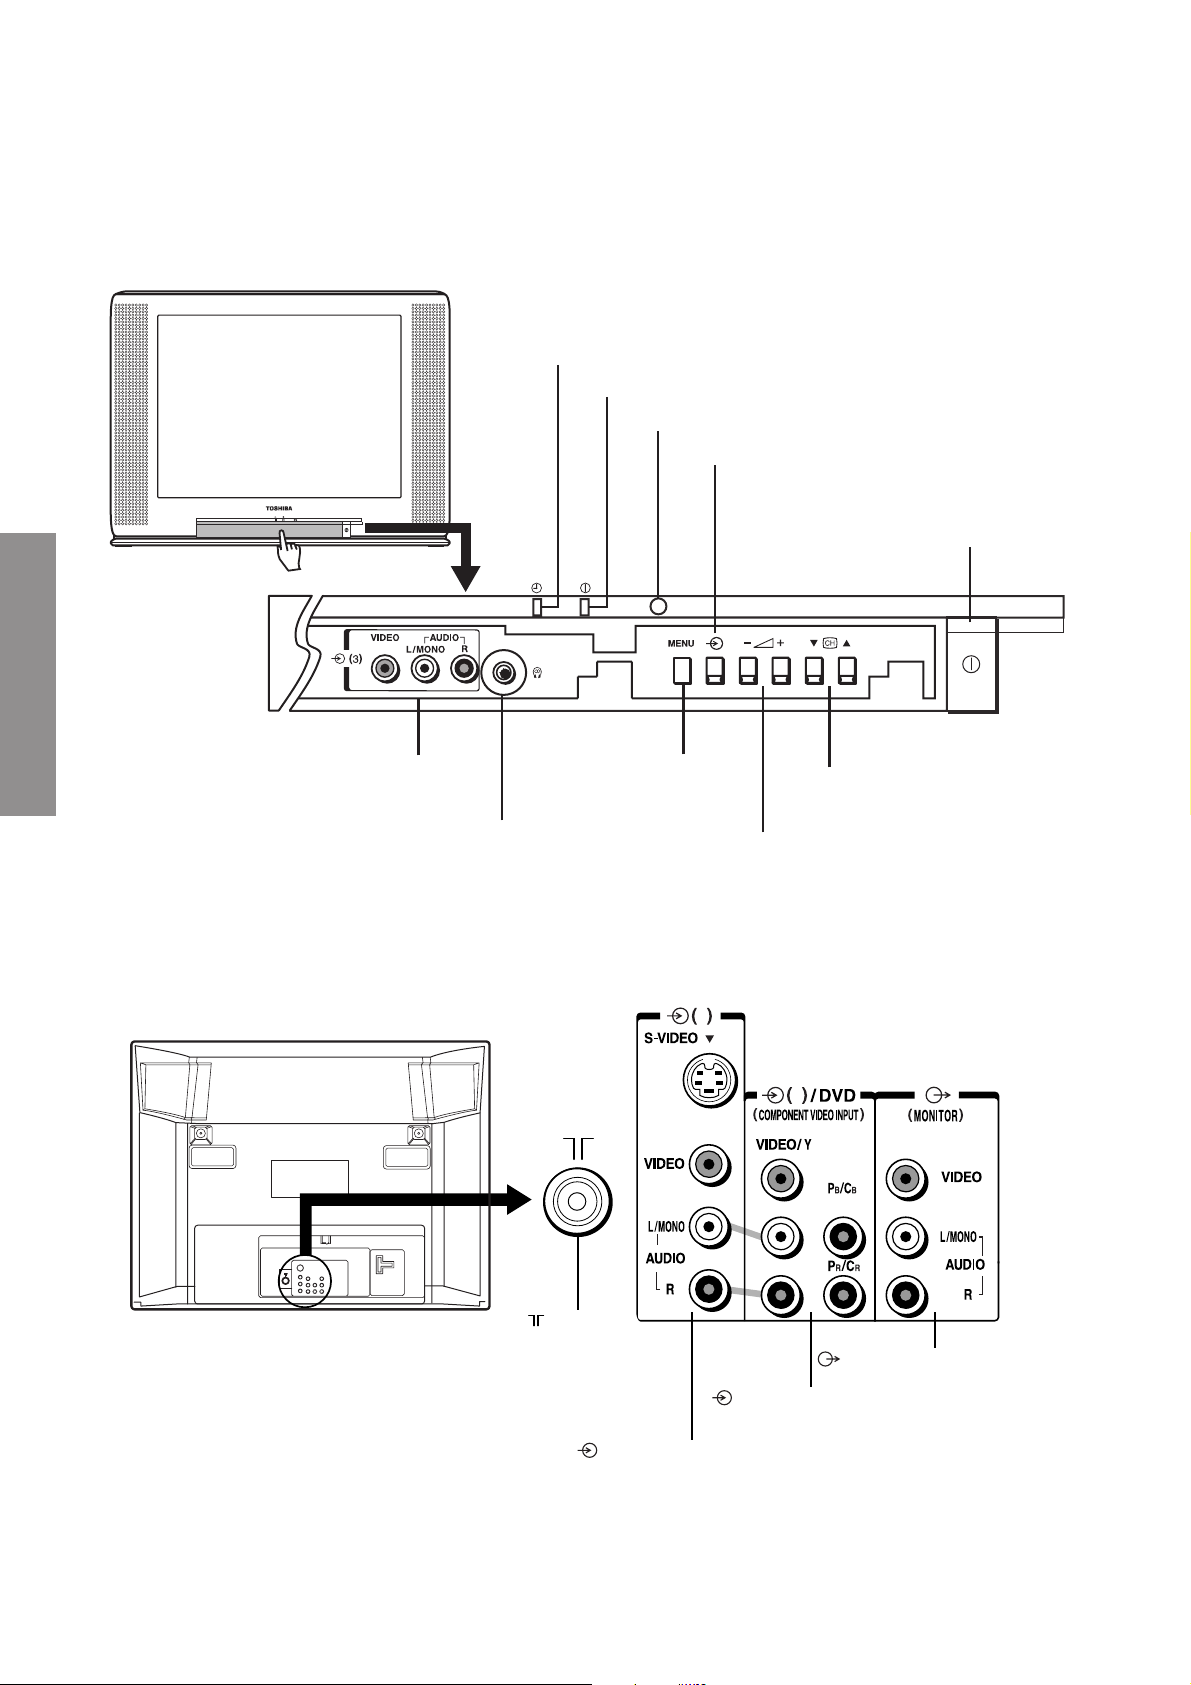
Front
Behind the door
LOCATION OF CONTROLS
Y
ON-timer indicator (green)
z Power indicator (red)
Remote sensor
a Input source selection
z Power switch
SPECIFIC INFORMATIONS
Back
a (3) Video 3 input
terminals
Headphones jack (ø3.5 mm)
For private listening, connect headphones.
The sound from the speakers will be cut off
automatically.
To adjust the volume, press the –; + buttons.
Aerial input
MENU
t c s
Channel select
Menu item select
–; +
Volume down/up
Menu item adjust
1
2
(1) Video 1 input terminals
– 16 –
MONITOR output terminals
(2) DVD/Video 2 input terminals
COMPONENT VIDEO INPUT terminals
Page 17
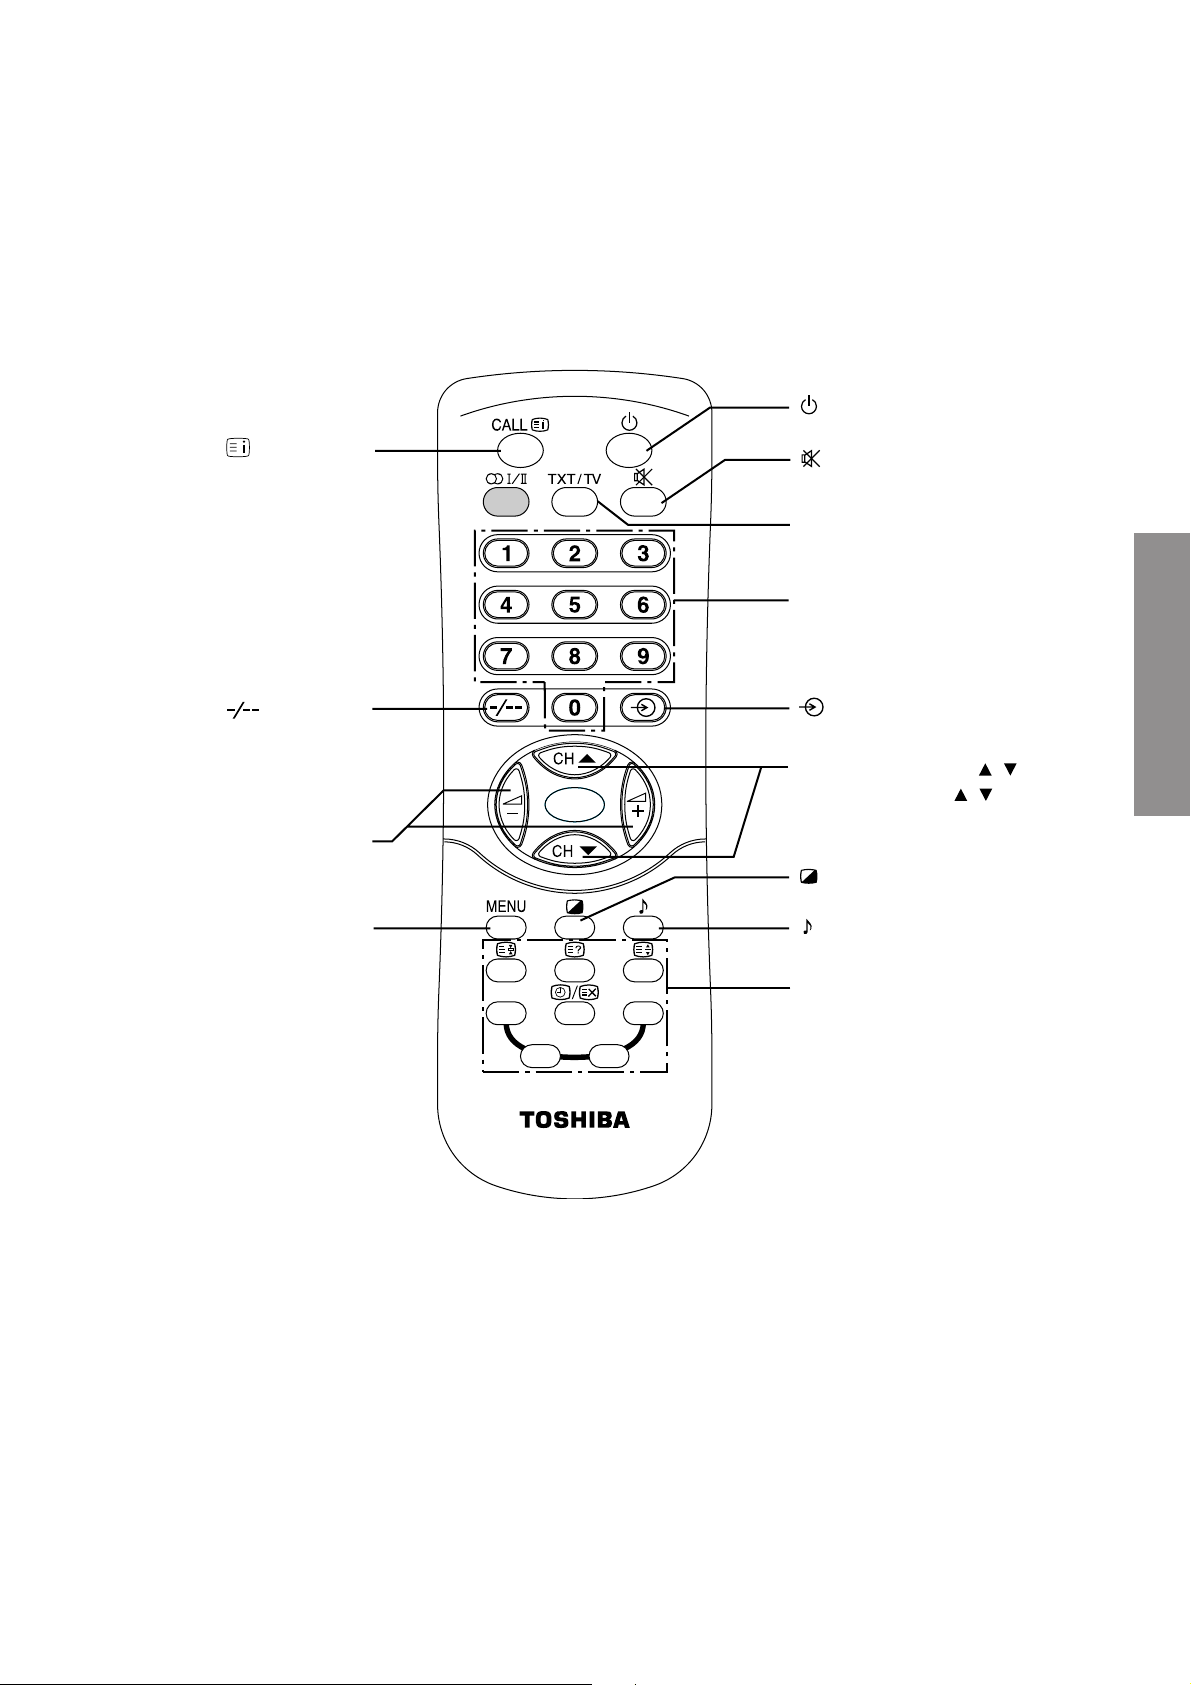
Remote control
CALL
index, initial
Digit select
Volume _/+
Menu item adjust _/+
MENU
Power on/standby
Sound mute
TXT/TV selection
Direct select (0_9)
Input source selection
CH (channel select) /
Menu item select /
Picture menu
Sound menu
SPECIFIC INFORMATIONS
Teletext function
– 17 –
Page 18
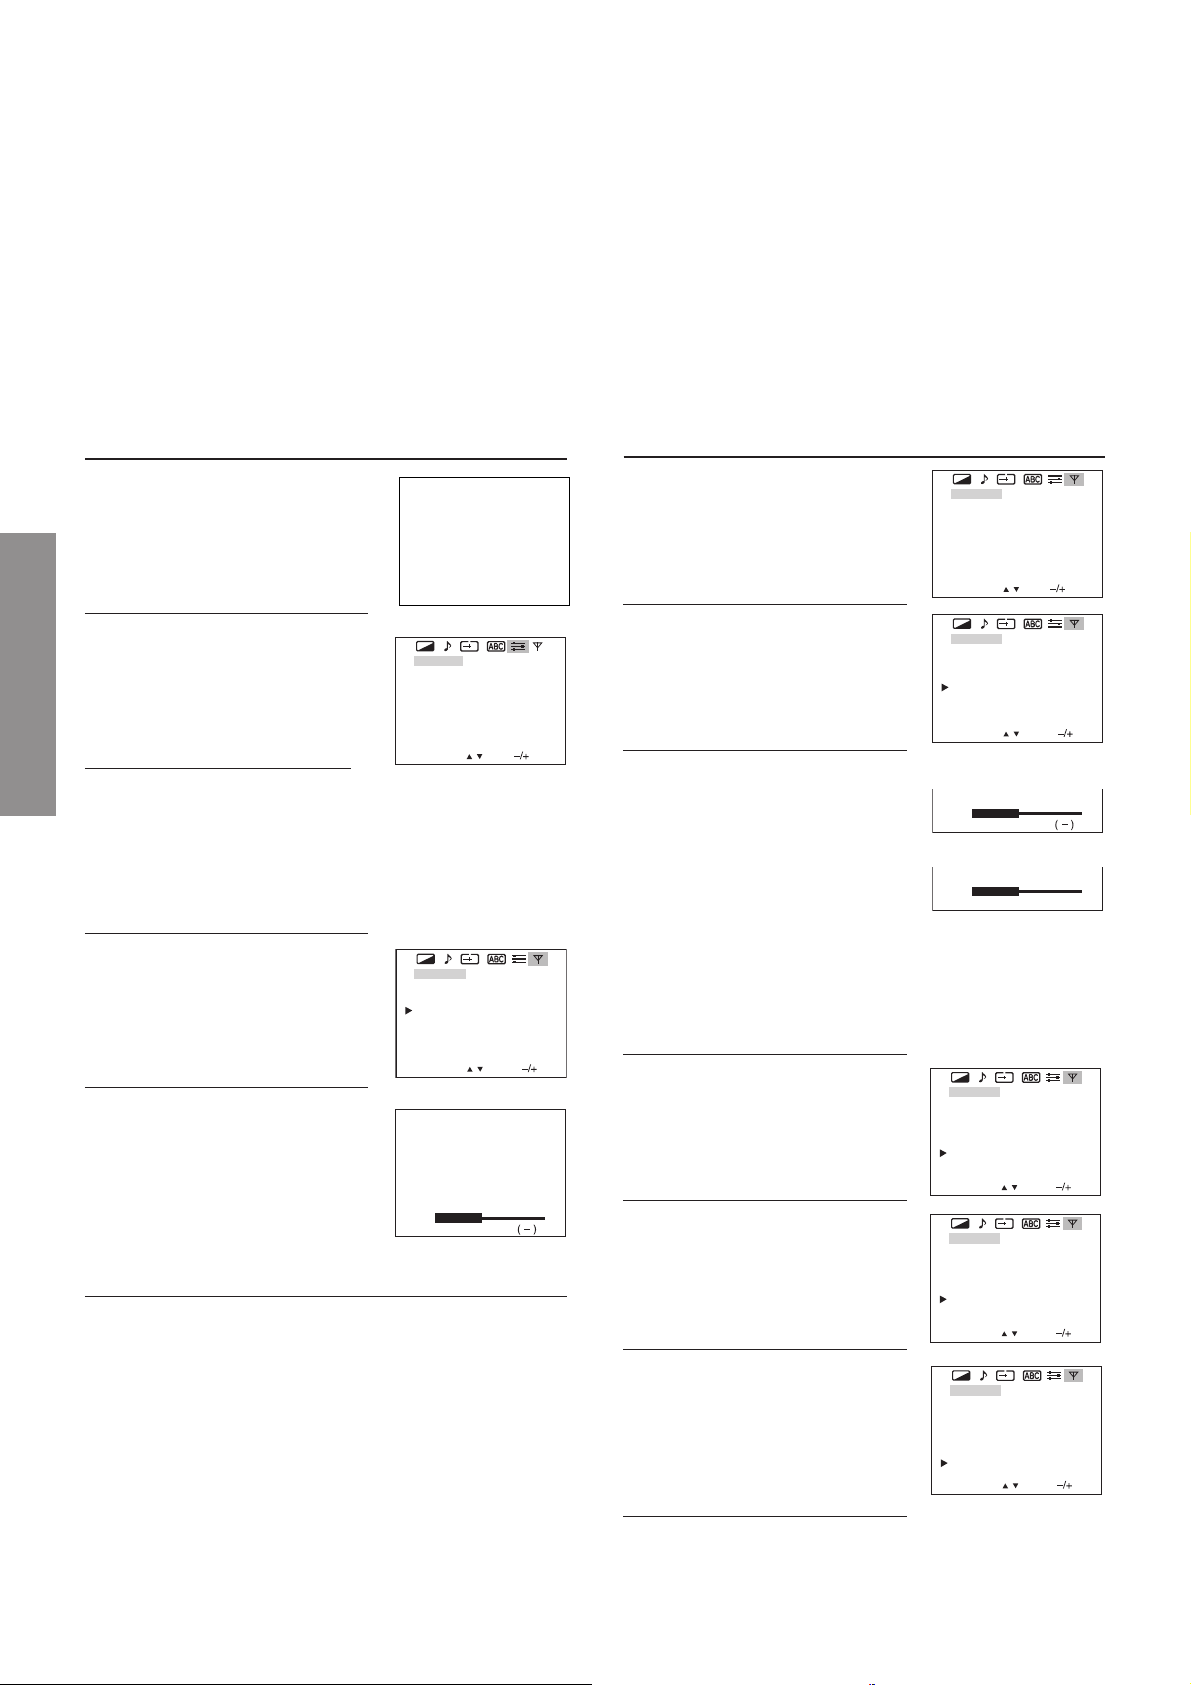
PROGRAMMING CHANNEL MEMORY
• First, use the ASM (Automatic Search Memory) function to preset all active channels in your area
automatically.
Then, arrange the preset channels with the SEARCH, SKIP and MFT (Manual Fine Tuning) functions so that
you can tune into only desired channels.
• Use the SEARCH function if desired channels cannot be preset with the ASM or if you would like to preset
channels to specific position numbers one by one.
To preset channels (ASM, SEARCH)
To use the ASM function
Select the head of the position
number to start the ASM with
1
the CH s/t buttons or the
digit/direct select (-/--, 0 – 9)
buttons.
Press the MENU button and
2
press the ; –/+ buttons to
display the SET UP menu on
the screen.
SPECIFIC INFORMATIONS
Confirm that “COLOR” is set to “AUTO” and “SOUND”
3
is set to proper system.
If not, press the CH s/t buttons to move the cursor
(S) to “COLOR” or “SOUND” and press the ; –/+
buttons to select each proper system.
Select the TUNING menu
page, and move the cursor
4
(S) to “ASM”.
Press the ; + button to start
the ASM. All active channels
5
will be preset automatically.
When presetting is
complete, the initial position
number will reappear.
Press the ; – button to
cancel ASM function.
After presetting
Check the preset channels by pressing the CH s/t buttons.
• If the picture or sound of a certain channel is not good, fine-
tune the channel using the MFT function.
• If the color of a certain channel is abnormal, automatic color
system selection (AUTO) may malfunction, or sound system
selection is wrong. In such a case, select another color and/
or sound system.
SET UP
COLOR
SOUND
SK I P
TEXT
TEXT LANGUAGE 1
SELECT / MENU
TUN I NG
MFT
AFT
ASM
SEARCH
POSITION
MEMORY
SELECT / ADJUST
ASM
STOP
AUTO
B/G
OFF
FAST
[ – ] [ + ]
ON
[ + ]
[ – ] [ + ]
P001
[ + ]
VHF L
001
To use the SEARCH function
1
Press the MENU button and
1
press the ; –/+ buttons to
display the TUNING menu on
the screen.
Press the CH s/t buttons to
2
move the cursor (S ) to
“SEARCH”.
Press the ; –/+ buttons to
3
start searching.
The ; + button searches
for the higher-numbered
channels.
Press the ; – button to
cancel SEARCH function.
TUN I NG
MFT
AFT
ASM
SEARCH
POSITION
MEMORY
SELECT / MENU
TUN I NG
MFT
AFT
ASM
SEARCH
POSITION
MEMORY
SELECT / ADJUST
Ex. + button
SEARCH
STOP
Ex. – button
SEARCH
STOP ( + )
The ; – button searches
for the lower-numbered
channels.
Press the ; + button to cancel SEARCH function.
Repeat this process until you can get the desired
channel.
When the desired channel is
shown, press the CH t button
4
to select “POSITION”.
Press the ; –/+ buttons
5
repeatedly until the position
number to be preset is shown.
TUN I NG
MFT
AFT
ASM
SEARCH
POSITION
MEMORY
SELECT / ADJUST
TUN I NG
MFT
AFT
ASM
SEARCH
POSITION
MEMORY
SELECT / ADJUST
When the desired program
appears, press the CH s/t
6
buttons to select “MEMORY”,
then press the ; + button to
memorize the channel at the
current position.
TUN I NG
MFT
AFT
ASM
SEARCH
POSITION
MEMORY
SELECT / ADJUST
[ – ] [ + ]
ON
[ + ]
[ – ] [ + ]
P001
[ + ]
[ – ] [ + ]
ON
[ + ]
[ – ] [ + ]
P001
[ + ]
VHF L
VHF L
[ – ] [ + ]
ON
[ + ]
[ – ] [ + ]
P001
[ + ]
[ – ] [ + ]
ON
[ + ]
[ – ] [ + ]
P004
[ + ]
[ – ] [ + ]
ON
[ + ]
[ – ] [ + ]
P004
[ + ]
001
001
– 18 –
When you program other
7
channels, repeat steps 2
to 6.
Page 19
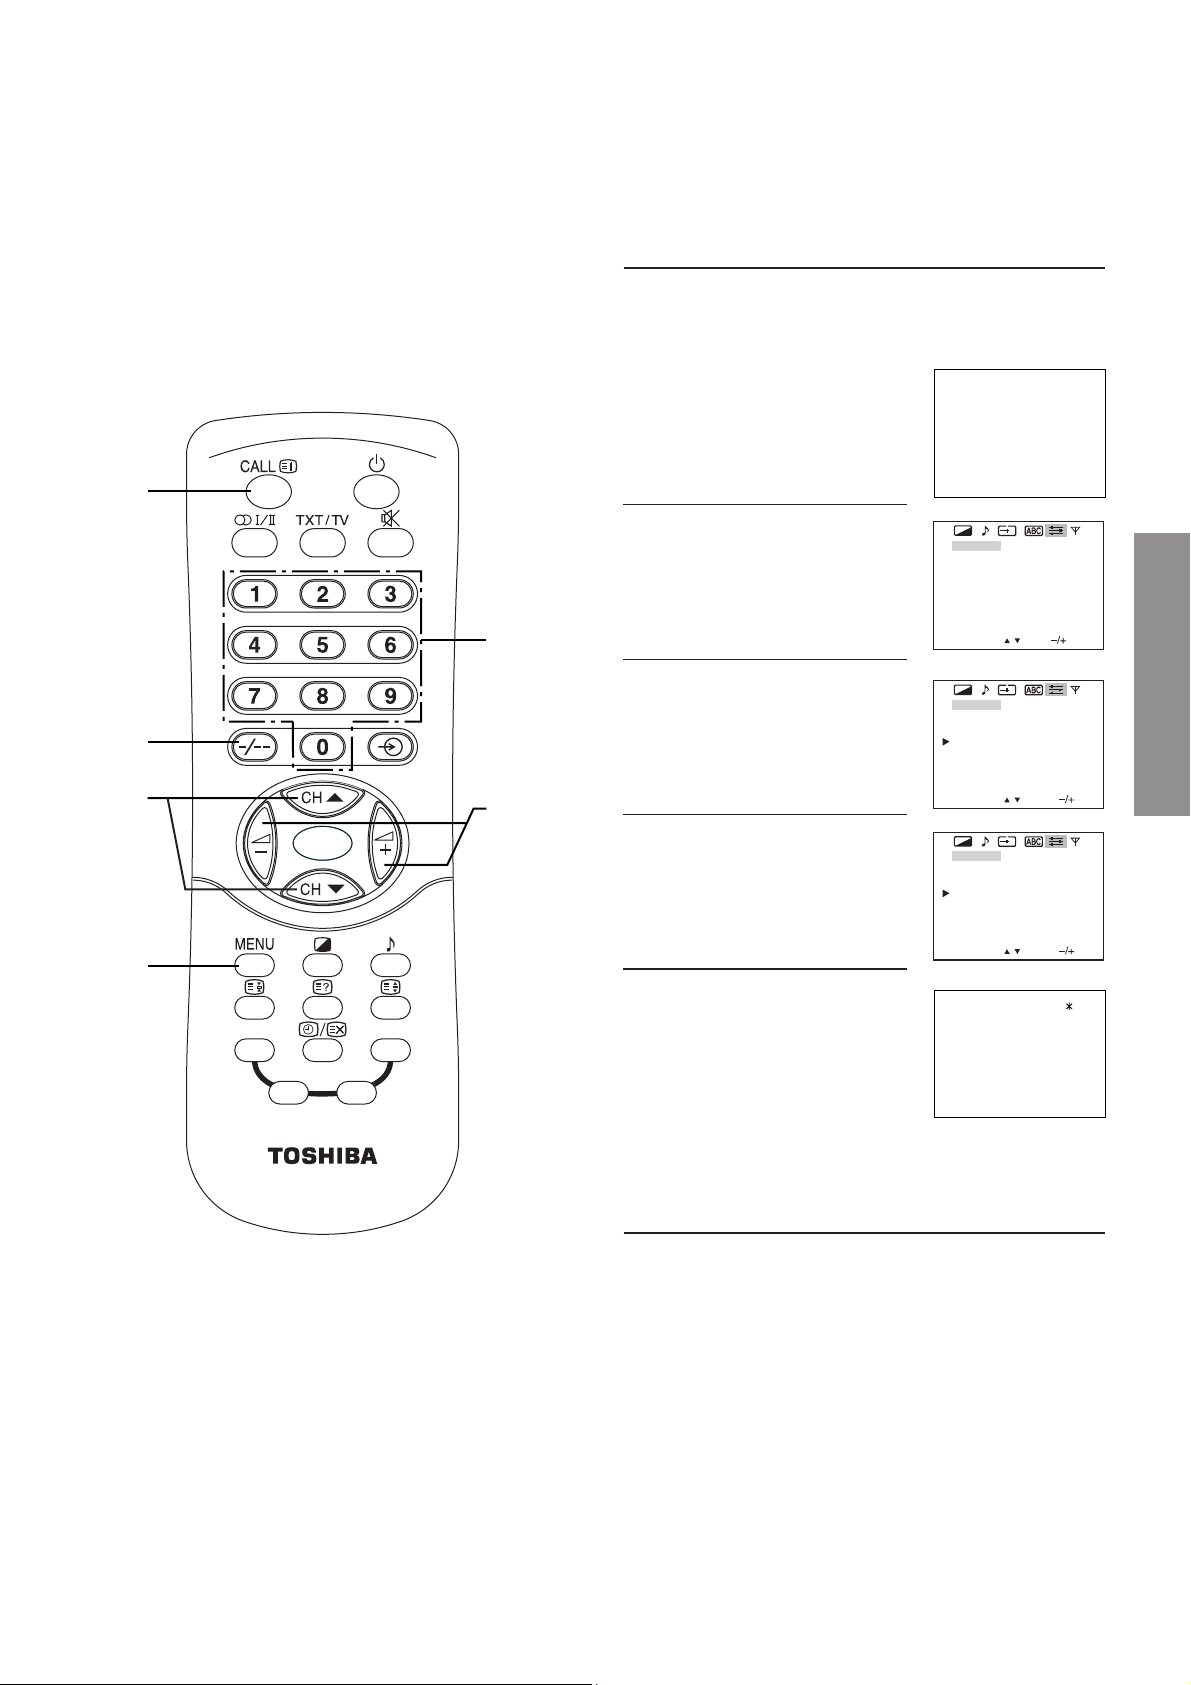
To preset channels (SKIP)
12
12
CALL
To skip a position number
After presetting the channels, you may skip unnecessary
position numbers so that only the channels you want to watch
are selected.
Select the position number to
be skipped with the
1
CH s/t buttons or the digit/
direct select (-/--, 0 – 9)
buttons.
//
/
//
(Digit
select)
CH s/t
MENU
Direct select
(0 – 9)
; –/+
Press the MENU button and
press the ; –/+ buttons to
2
display the SET UP menu on
the screen.
SET UP
COLOR
SOUND
SK I P
TEXT
TEXT LANGUAGE 1
SELECT / MENU
Press the CH s/t buttons to
3
move the cursor (S) to “SKIP”.
Press the ; –/+ buttons to
4
select “SKIP ON”.
SET UP
COLOR
SOUND
SK I P
TEXT
TEXT LANGUAGE 1
SELECT / ADJUST
SET UP
COLOR
SOUND
SK I P
TEXT
TEXT LANGUAGE 1
SELECT / ADJUST
Press the CALL button to turn
5
off the SET UP menu display.
Select the position number to
be skipped with the digit/direct
select (-/--, 0 – 9) buttons. The
“ * ” mark appears to the left of
the position number.
The position number will then be skipped when you select
the position with the CH s/t buttons.
AUTO
B/G
OFF
FAST
AUTO
B/G
OFF
FAST
AUTO
B/G
ON
FAST
SPECIFIC INFORMATIONS
To restore a skipped position number
1 Select the position number you want to restore with the digit/
direct select (-/--, 0 – 9) buttons.
2 Press the MENU button, then press the ; –/+ buttons to
display the SET UP menu and press the CH s/t
select “SKIP”.
3 Press the ; –/+ buttons to select “SKIP OFF”.
– 19 –
buttons to
Page 20
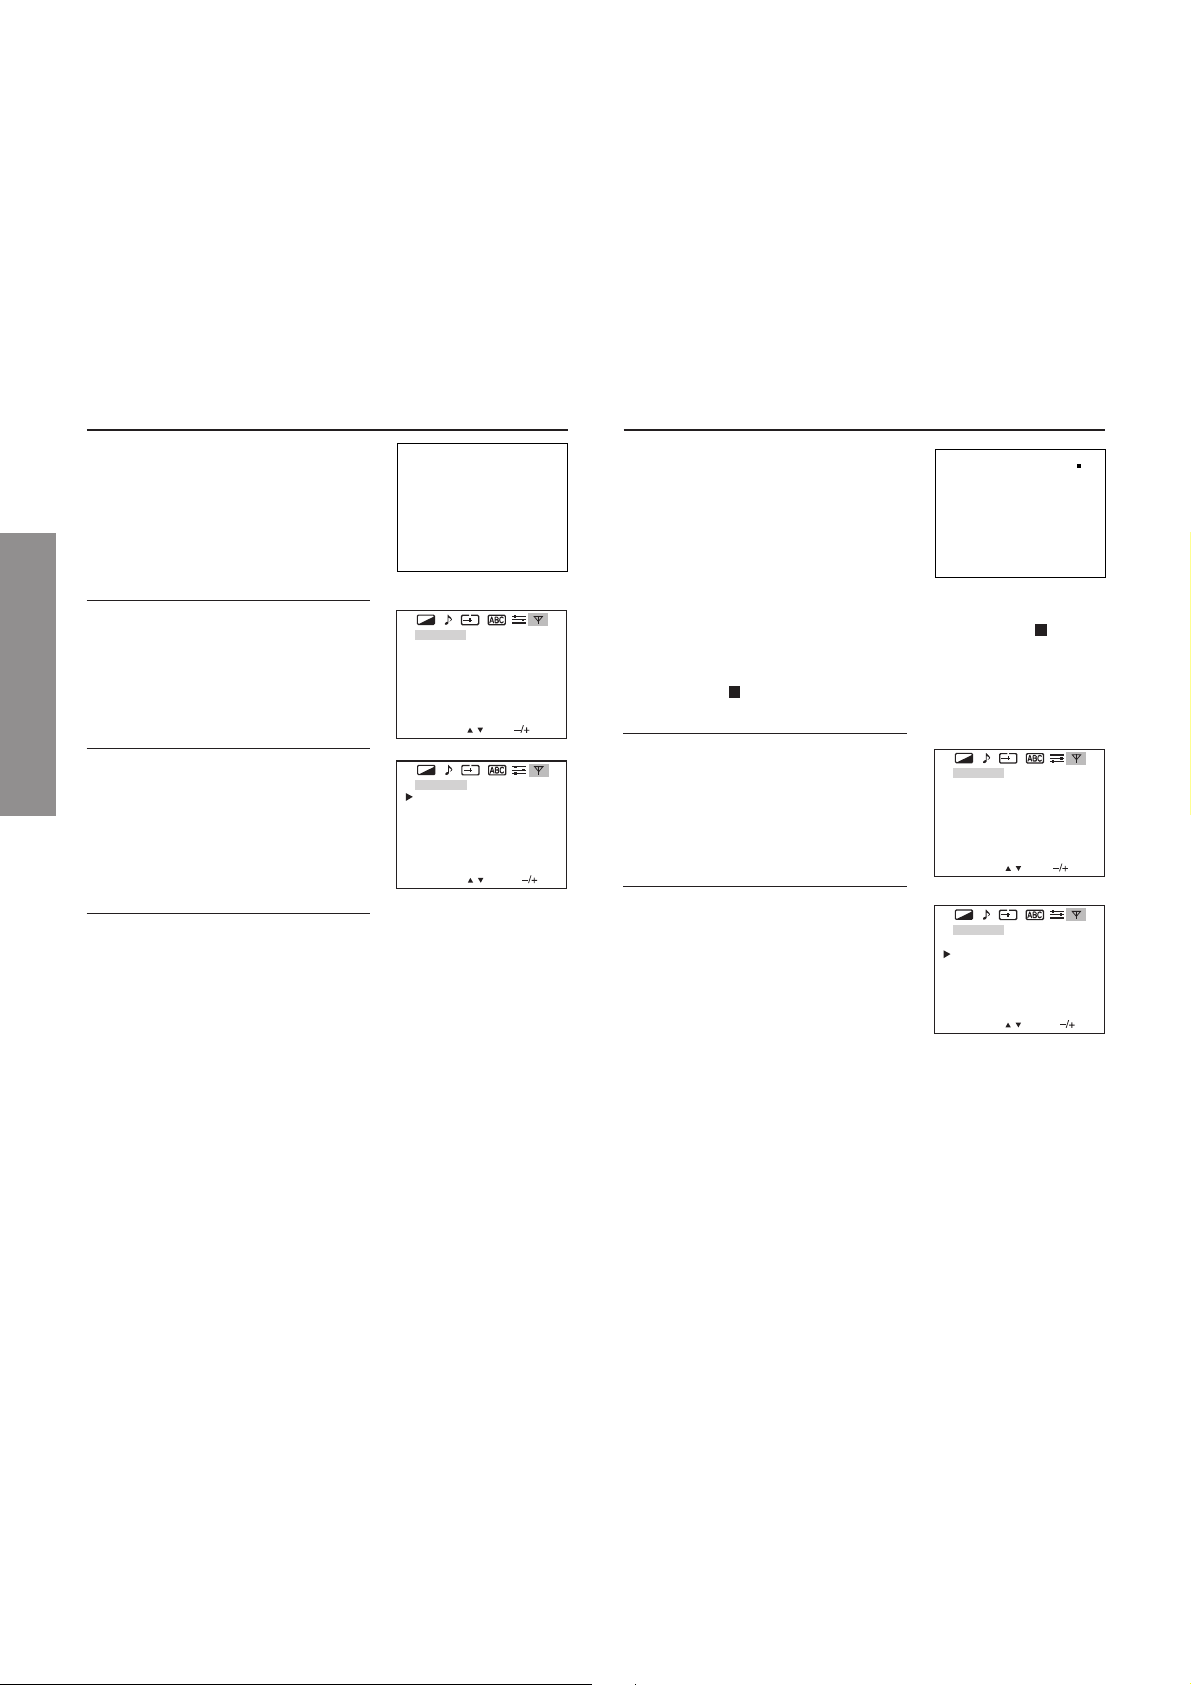
• The adjustments below are not necessary under normal conditions. However, in areas of inferior broadcast
conditions where adjustment is necessary for a better picture, adjust the tuning with the MFT (Manual Fine Tuning).
The AFT OFF status automatically keeps the condition adjusted with the MFT function.
• The AFT (Automatic Fine Tuning) function automatically corrects slight fluctuations when receiving signals.
• When using Manual Search to preset the channel, the AFT will automatically turn ON and SKIP to OFF.
To preset channels (MFT, AFT)
MFT (Manual Fine Tuning)
Select the position number
where the channel you want
1
to fine-tune with the
CH s/t buttons or the digit/
direct select (-/--, 0 – 9)
buttons.
Press the MENU button
and press the ; –/+ buttons
2
to display the TUNING menu
on the screen.
Press the CH s/t buttons to
3
SPECIFIC INFORMATIONS
select “MFT”.
Press the ; –/+ buttons repeatedly until the best
possible picture and sound are obtained.
4
Note
When operating the MFT function, the AFT
status is automatically set to OFF.
TUN I NG
MFT
AFT
ASM
SEARCH
POSITION
MEMORY
SELECT / MENU
TUN I NG
MFT
AFT
ASM
SEARCH
POSITION
MEMORY
SELECT / ADJUST
[ – ] [ + ]
ON
[ + ]
[ – ] [ + ]
P006
[ + ]
[ – ] [ + ]
ON
[ + ]
[ – ] [ + ]
P006
[ + ]
AFT (Automatic Fine Tuning)
6
Select the position number
1
where the channel you want
3
to fine-tune with the
CH s/t buttons or the digit/
direct select (-/--, 0 – 9)
buttons.
Note
When the position is set to AFT OFF status, the “
” mark
appears to the left of the position number. When the channel
is set to AFT ON status, the position number is displayed
without the “
Press the MENU button and
2
press the ; –/+ buttons to
display the TUNING menu on
the screen.
” mark.
TUN I NG
MFT
AFT
ASM
SEARCH
POSITION
MEMORY
SELECT / MENU
[ – ] [ + ]
OFF
[ + ]
[ – ] [ + ]
P003
[ + ]
Press the CH s/t buttons to
3
move the cursor (S) to “AFT”.
Press the ; –/+ buttons to
select the “ON” indication.
TUN I NG
MFT
AFT
ASM
SEARCH
POSITION
MEMORY
SELECT / ADJUST
[ – ] [ + ]
ON
[ + ]
[ – ] [ + ]
P003
[ + ]
– 20 –
Page 21
CHASSIS AND CABINET REPLACEMENT PARTS LIST
WARNING: BEFORE SERVICING THIS CHASSIS, READ THE "X-RAY RADIATION PRECAUTION", "SAFETY PRE-
CAUTION" AND "PRODUCT SAFETY NOTICE" ON PAGE 3 OF THIS MANUAL.
CAUTION: The international hazard symbols " " in the schematic diagram and the parts list designate components
which have special characteristics important for safety and should be replaced only with types identical to those in the
original circuit or specified in the parts list. The mounting position of replacements is to be identical with originals.
Before replacing any of these components, read carefully the PRODUCT SAFETY NOTICE. Do not degrade the safety
of the receiver through improper servicing.
NOTICE:
··
·
The part number must be used when ordering parts, in order to assist in processing, be sure to include the
··
Model number and Description.
··
·
The PC board assembly with * mark is no longer available after the end of the production.
··
Model : 29SZ5DA/29SZ5DE/29SZ5SH/29SZ5ST
Capacitors ............. CD : Ceramic Disk PF : Plastic Film EL : Electrolytic
Resistors ............... CF : Carbon Film CC : Carbon Composition MF : Metal Film
OMF : Oxide Metal Film VR : Variable Resistor FR : Fusible Resistor
(All CD and PF capacitors are
±5%, 50V and all resistors, ±5%, 1/6W unless otherwise noted.)
Location Parts No. Descriptiopn
No.
#1 : [29SZ5DA]
#2 : [29SZ5DE]
#3 : [29SZ5SH]
#4 : [29SZ5ST]
CAPACITORS
C101 #1 24206479 ELECTROLYTIC, 50V 4.7UF M 7L 3A
#2 24797479 ELECTROLYTIC, 50V 4.7UF M
#3 24797479 ELECTROLYTIC, 50V 4.7UF M
#4 24797479 ELECTROLYTIC, 50V 4.7UF M
C103 24797221 ELECTROLYTIC, 50V 220UF M
C105 24109102 CERAMIC CHIP, 50V B 1000PF K
C106 24797100 ELECTROLYTIC, 50V 10UF M
C110 24797221 ELECTROLYTIC, 50V 220UF M
C200 24793101 ELECTROLYTIC, 10V 100UF M
C201 24092538 CERAMIC CHIP, 10V F 1UF Z
C202 24092538 CERAMIC CHIP, 10V F 1UF Z
C203 24092538 CERAMIC CHIP, 10V F 1UF Z
C204 24793470 ELECTROLYTIC CE04G 10V 47UF M
C205 24092538 CERAMIC CHIP, 10V F 1UF Z
C206 24109103 CERAMIC CHIP, 50V B 0.01UF K
C207 24092538 CERAMIC CHIP, 10V F 1UF Z
C208 #1 24203220 ELECTROLYTIC, 16V 22UF M 7L 3A
#2 24794220 ELECTROLYTIC, 16V 22UF M
#3 24794220 ELECTROLYTIC, 16V 22UF M
#4 24794220 ELECTROLYTIC, 16V 22UF M
C209 #1 24203220 ELECTROLYTIC, 16V 22UF M 7L 3A
#2 24794220 ELECTROLYTIC, 16V 22UF M
#3 24794220 ELECTROLYTIC, 16V 22UF M
#4 24794220 ELECTROLYTIC, 16V 22UF M
C210 24085949 ELEC. NONPOLAR CE04J 25V 10UF M 11L NP
C211 24092538 CERAMIC CHIP, 10V F 1UF Z
C212 24203100 ELECTORLYTIC, 16V 10UF M 7L 3A
C213 24203100 ELECTORLYTIC, 16V 10UF M 7L 3A
C220 24085944 ELECTROLYTIC, NONPOLAR, 50V 2.2UF M 11L
C221 24092538 CERAMIC CHIP, 10V F 1UF Z
C303 24214471 CERAMIC DISC, 500V B 470PF K
C306 24073059 ELECTROLYTIC, 25V 3300UF M 3A
C308 #1 24766101 ELECTROLYTIC, 50V 100UF M
#2 24669101 ELECTROLYTIC, 50V 100UF M 3A
#3 24669101 ELECTROLYTIC, 50V 100UF M 3A
#4 24669101 ELECTROLYTIC, 50V 100UF M 3A
C309 #1 24766331 ELECTROLYTIC CE04G 50V 330UF M
#2 24669331 ELECTROLYTIC, 50V 330UF M 3A
#3 24669331 ELECTROLYTIC, 50V 330UF M 3A
#4 24669331 ELECTROLYTIC, 50V 330UF M 3A
Location Parts No. Descriptiopn
No.
C310 #1 24766222 ELECTROLYTIC CE04G 50V 2200UF M
#2 24669222 ELECTROLYTIC, 50V 2200UF M 3A
#3 24669222 ELECTROLYTIC, 50V 2200UF M 3A
#4 24669222 ELECTROLYTIC, 50V 2200UF M 3A
C311 24435560 CERAMIC DISC, 500V SL 56PF J
C313 24082061 PLASTIC FILM, 100V 0.47UF J
C314 24693472 PLASTIC FILM, 100V 4700PF J
C315 24109102 CERAMIC CHIP, 50V B 1000PF K
C320 24503052 MT PLA CAP 63V 0.82UF J
C321 24591183 PLASTIC FILM, 50V 0.018UF J
C323 #1 24765101 ELECTROLYITC, 35V 100UF M
#2 24668101 ELECTROLYTIC, 35V 100UF M 3A
#3 24668101 ELECTROLYTIC, 35V 100UF M 3A
#4 24668101 ELECTROLYTIC, 35V 100UF M 3A
C324 #1 24796479 ELECTROLYTIC, 35V 4.7UF M
#2 24668101 ELECTROLYTIC, 35V 100UF M 3A
#3 24668101 ELECTROLYTIC, 35V 100UF M 3A
#4 24668101 ELECTROLYTIC, 35V 100UF M 3A
C325 24206479 ELECTROLYTIC, 50V 4.7UF M 7L 3A
C341 24794101 ELECTROLYTIC, 16V 100UF M
C342 24795100 ELECTROLYTIC, 25V 10UF M
C363 24693104 PLASTIC FILM, 100V 0.1UF J
C401 24108680 CERAMIC CHIP, 50V SL 68PF J
C402 24693393 PLASTIC FILM, 100V 0.039UF J
C406 24109221 CERAMIC CHIP, 50V B 220PF K
C407 24092730 CERAMIC CHIP, 16V B 0.1UF K
C408 24108330 CERAMIC CHIP, 50V SL 33PF J
C409 24109103 CERAMIC CHIP, 50V B 0.01UF K
C410 #1 24203100 ELECTORLYTIC, 16V 10UF M 7L 3A
#2 24794100 ELECTROLYTIC, 16V 10UF M
#3 24794100 ELECTROLYTIC, 16V 10UF M
#4 24794100 ELECTROLYTIC, 16V 10UF M
C413 24214821 CERAMIC DISC, 500V B 820PF K
C415 24109103 CERAMIC CHIP, 50V B 0.01UF K
C416 24678229 ELECTROLYTIC, 200V 2.2UF M 3A
C417 24214391 CERAMIC DISC, 500V B 390PF K
C418 24109221 CERAMIC CHIP, 50V B 220PF K
C419 #1 24765221 ELECTROLYTIC, 35V 220UF M
#2 24668221 ELECTROLYTIC, 35V 220UF M 3A
#3 24668221 ELECTROLYTIC, 35V 220UF M 3A
#4 24668221 ELECTROLYTIC, 35V 220UF M 3A
C430 24092730 CERAMIC CHIP, 16V B 0.1UF K
C431 24794101 ELECTROLYTIC, 16V 100UF M
C439 24829753 PLASTIC FILM, 400V 0.075UF J
C442 24503298 PLASTIC FILM, 315V 0.3UF J
C443 24503194 PLASTIC FILM, 1500VH 0.01UF H
SPECIFIC INFORMATIONS
– 21 –
Page 22
Location Parts No. Descriptiopn
No.
C444 24503225 PLASTIC FILM CF92 T 1500VH 6200PF H
C445 24828563 PLASTIC FILM, 200V 56000PF J
C447 24679220 ELECTROLYTIC, 250V 22UF M 3A
C448 #1 24073118 ELECTROLYTIC, 160V 33UF M
#2 24640908 ELECTROLYTIC, 160V 33UF M 3A LI
#3 24640908 ELECTROLYTIC, 160V 33UF M 3A LI
#4 24640908 ELECTROLYTIC, 160V 33UF M 3A LI
C449 #1 24764102 ELECTROLYTIC, 25V 1000UF M
#2 24667102 ELECTROLYTIC, 25V 1000UF M 3A
#3 24667102 ELECTROLYTIC, 25V 1000UF M 3A
#4 24667102 ELECTROLYTIC, 25V 1000UF M 3A
C462 24092729 CERAMIC CHIP CK73B 16V 68000PFK
C463 24212222 CERAMIC DISC, 50V B 2200PF K
C464 #1 24073124 100V 10U TOKUSHU 100YXG10MCA10X20
#2 24640872 ELECTROLYTIC, 100V 10UF M 3A
#3 24640872 ELECTROLYTIC, 100V 10UF M 3A
#4 24640872 ELECTROLYTIC, 100V 10UF M 3A
C466 #1 24693102 PLASTIC FILM, 100V 1000PF J
#2 24693562 PLASTIC FILM, 100V 5600PF J
#3 24693562 PLASTIC FILM, 100V 5600PF J
#4 24693562 PLASTIC FILM, 100V 5600PF J
C467 24503160 PLASTIC FILM, 630V 0.043UF J
C470 24797101 ELECTROLYTIC, 50V 100UF M
C472 #1 24503049 PLASTIC FILM, 63V 0.47UF J
#2 24539474 PLASTIC FILM, 50V 0.47UF J
#3 24539474 PLASTIC FILM, 50V 0.47UF J
#4 24539474 PLASTIC FILM, 50V 0.47UF J
C475 24092730 CERAMIC CHIP, 16V B 0.1UF K
C476 24105100 CERAMIC CHIP, 50V CH 10PF D
C496 24829223 PLASTIC FILM, 400V 0.022U J
C498 #1 24591182 PLASTIC FILM, 50V 1800PF J
C500 24092730 CERAMIC CHIP, 16V B 0.1UF K
C501 24109103 CERAMIC CHIP, 50V B 0.01UF K
C502 24793102 ELECTROLYTIC, 10V 1000UF M
SPECIFIC INFORMATIONS
C503 24109103 CERAMIC CHIP, 50V B 0.01UF K
C510 #1 24105390 CERAMIC CHIP, 50V CH 39PF J
C511 #1 24105390 CERAMIC CHIP, 50V CH 39PF J
C512 #1 24105390 CERAMIC CHIP, 50V CH 39PF J
C543 #1 24203100 ELECTORLYTIC, 16V 10UF M 7L 3A
#2 24794100 ELECTROLYTIC, 16V 10UF M
#3 24794100 ELECTROLYTIC, 16V 10UF M
#4 24794100 ELECTROLYTIC, 16V 10UF M
C547 24793101 ELECTROLYTIC, 10V 100UF M
C560 24794101 ELECTROLYTIC, 16V 100UF M
C561 24109103 CERAMIC CHIP, 50V B 0.01UF K
C597 #2 24436390 CERAMIC DISC, 50V SL 39PFJ
#3 24436390 CERAMIC DISC, 50V SL 39PFJ
#4 24436390 CERAMIC DISC, 50V SL 39PFJ
C598 #2 24436390 CERAMIC DISC, 50V SL 39PFJ
#3 24436390 CERAMIC DISC, 50V SL 39PFJ
#4 24436390 CERAMIC DISC, 50V SL 39PFJ
C599 #2 24436390 CERAMIC DISC, 50V SL 39PFJ
#3 24436390 CERAMIC DISC, 50V SL 39PFJ
#4 24436390 CERAMIC DISC, 50V SL 39PFJ
C624 #1 24206478 ELECTROLYTIC, 50V 0.47UF M 7L 3A
#2 24797478 ELECTROLYTIC, 50V 0.47UF M
#3 24797478 ELECTROLYTIC, 50V 0.47UF M
#4 24797478 ELECTROLYTIC, 50V 0.47UF M
C660 #1 24206010 ELECTROLYTIC, 50V 1.0UF M 7L 3A
#2 24797010 ELECTROLYTIC, 50V 1UF M
#3 24797010 ELECTROLYTIC, 50V 1UF M
#4 24797010 ELECTROLYTIC, 50V 1UF M
C661 #1 24591183 PLASTIC FILM, 50V 0.018UF J
#2 24539183 PLASTIC FILM, 50V 0.019UF J
#3 24539183 PLASTIC FILM, 50V 0.020UF J
#4 24539183 PLASTIC FILM, 50V 0.021UF J
C663 #1 24766229 ELECTROLYTIC, 50V 2.2UF M
#2 24669229 ELECTROLYTIC, 50V 2.2UF M 3A
#3 24669229 ELECTROLYTIC, 50V 2.2UF M 3A
#4 24669229 ELECTROLYTIC, 50V 2.2UF M 3A
C664 #1 24206478 ELECTROLYTIC, 50V 0.47UF M 7L 3A
#2 24797010 ELECTROLYTIC, 50V 1UF M
#3 24797010 ELECTROLYTIC, 50V 1UF M
#4 24797010 ELECTROLYTIC, 50V 1UF M
C665 #1 24591183 PLASTIC FILM, 50V 0.018UF J
#2 24539183 PLASTIC FILM, 50V 0.019UF J
Location Parts No. Descriptiopn
No.
#3 24539183 PLASTIC FILM, 50V 0.020UF J
#4 24539183 PLASTIC FILM, 50V 0.021UF J
C667 #1 24766229 ELECTROLYTIC, 50V 2.2UF M
#2 24669229 ELECTROLYTIC, 50V 2.2UF M 3A
#3 24669229 ELECTROLYTIC, 50V 2.2UF M 3A
#4 24669229 ELECTROLYTIC, 50V 2.2UF M 3A
C668 24797100 ELECTROLYTIC, 50V 10UF M
C670 24797470 ELECTROLYTIC, 50V 47UF M
C671 24797471 ELECTROLYTIC, 50V 470UF M
C672 #1 24206229 ELECTROLYTIC, 50V 2.2UF M 7L 3A
#2 24797229 ELECTROLYTIC, 50V 2.2UF M
#3 24797229 ELECTROLYTIC, 50V 2.2UF M
#4 24797229 ELECTROLYTIC, 50V 2.2UF M
C681 #1 24765102 ELECTROLYTIC CE04G 35V 1000UF M
#2 24668102 ELECTROLYTIC, 35V 1000UF M 3A
#3 24668102 ELECTROLYTIC, 35V 1000UF M 3A
#4 24668102 ELECTROLYTIC, 35V 1000UF M 3A
C682 #1 24765221 ELECTROLYTIC, 35V 220UF M
#2 24668221 ELECTROLYTIC, 35V 220UF M 3A
#3 24668221 ELECTROLYTIC, 35V 220UF M 3A
#4 24668221 ELECTROLYTIC, 35V 220UF M 3A
C683 #1 24765102 ELECTROLYTIC CE04G 35V 1000UF M
#2 24668102 ELECTROLYTIC, 35V 1000UF M 3A
#3 24668102 ELECTROLYTIC, 35V 1000UF M 3A
#4 24668102 ELECTROLYTIC, 35V 1000UF M 3A
C686 #1 24591104 PLASTIC FILM, 50V 0.1UF J
#2 24539104 PLASTIC FILM, 50V 0.1UF J
#3 24539104 PLASTIC FILM, 50V 0.1UF J
#4 24539104 PLASTIC FILM, 50V 0.1UF J
C687 #1 24591104 PLASTIC FILM, 50V 0.1UF J
#2 24539104 PLASTIC FILM, 50V 0.1UF J
#3 24539104 PLASTIC FILM, 50V 0.1UF J
#4 24539104 PLASTIC FILM, 50V 0.1UF J
C690 #1 24766101 ELECTROLYTIC, 50V 100UF M
#2 24669101 ELECTROLYTIC, 50V 100UF M 3A
#3 24669101 ELECTROLYTIC, 50V 100UF M 3A
#4 24669101 ELECTROLYTIC, 50V 100UF M 3A
C700 24109103 CERAMIC CHIP, 50V B 0.01UF K
C704 24591822 PLASTIC FILM, 50V 8200PF J
C705 24232103 CERAMIC DISC, 50V F 0.01UF Z
C707 24795470 ELECTROLYTIC, 25V 47UF M
C712 24795470 ELECTROLYTIC, 25V 47UF M
C713 24709100 ELECTROLYTIC, 200V 10UF M
C714 24436101 CERAMIC DISC, 50V SL 100PF J
C715 24214472 CERAMIC DISC, 500V B 4700PF K
C716 24436101 CERAMIC DISC, 50V SL 100PF J
C717 24214472 CERAMIC DISC, 500V B 4700PF K
C718 #1 24203470 ELECTROLYTIC, 16V 47UF M 7L 3A
#2 24794470 ELECTROLYTIC, 16V 47UF M
#3 24794470 ELECTROLYTIC, 16V 47UF M
#4 24794470 ELECTROLYTIC, 16V 47UF M
C719 24435560 CERAMIC DISC, 500V SL 56PF J
C720 24709100 ELECTROLYTIC, 200V 10UF M
C721 #1 24203470 ELECTROLYTIC, 16V 47UF M 7L 3A
#2 24794470 ELECTROLYTIC, 16V 47UF M
#3 24794470 ELECTROLYTIC, 16V 47UF M
#4 24794470 ELECTROLYTIC, 16V 47UF M
C722 24436561 CERAMIC DISC, 50V SL 560PF J
C726 24212102 CERAMIC DISC, 50V B 1000PF K
C739 #1 24203100 ELECTORLYTIC, 16V 10UF M 7L 3A
#2 24794100 ELECTROLYTIC, 16V 10UF M
#3 24794100 ELECTROLYTIC, 16V 10UF M
#4 24794100 ELECTROLYTIC, 16V 10UF M
C801 24503507 PLASTIC FILM, AC275V 0.22UF K
C802 24503507 PLASTIC FILM, AC275V 0.22UF K
C805 24092281 CERAMIC DISC, AC250V E 4700PF
C806 24092281 CERAMIC DISC, AC250V E 4700PF
C808 24795101 ELECTROLYTIC, 25V 100UF M
C809 #1 24503049 PLASTIC FILM, 63V 0.47UF J
#2 24539474 PLASTIC FILM, 50V 0.47UF J
#3 24539474 PLASTIC FILM, 50V 0.47UF J
#4 24539474 PLASTIC FILM, 50V 0.47UF J
C810 24086857 ELECTROLYTIC, 400V 560UF
C811 24092555 CERAMIC DISC, AC250V E 1000PF M
C813 24092555 CERAMIC DISC, AC250V E 1000PF M
C814 24092555 CERAMIC DISC, AC250V E 1000PF M
– 22 –
Page 23
Location Parts No. Descriptiopn
No.
C815 24092555 CERAMIC DISC, AC250V E 1000PF M
C816 24766479 ELECTROLYTIC, 50V 4.7UF M
C817 24092339 CERAMIC DISC, 2KV 330PF K
C819 24676220 ELECTROLYTIC, 100V 22UF M 3A
C821 24214471 CERAMIC DISC, 500V B 470PF K
C822 #1 24503049 PLASTIC FILM, 63V 0.47UF J
#2 24539474 PLASTIC FILM, 50V 0.47UF J
#3 24539474 PLASTIC FILM, 50V 0.47UF J
#4 24539474 PLASTIC FILM, 50V 0.47UF J
C823 24214471 CERAMIC DISC, 500V B 470PF K
C830 24503047 PLASTIC FILM, 63V 0.33UF J
C831 24503047 PLASTIC FILM, 63V 0.33UF J
C832 24503047 PLASTIC FILM, 63V 0.33UF J
C833 24678010 ELECTROLYTIC, 200V 1UF M 3A
C834 24503047 PLASTIC FILM, 63V 0.33UF J
C840 #1 24763470 16MV47HC +T 16MV47HC +T
#2 24666470 ELECTORLYTIC, 16V 47UF M 3A
#3 24666470 ELECTORLYTIC, 16V 47UF M 3A
#4 24666470 ELECTORLYTIC, 16V 47UF M 3A
C841 24503047 PLASTIC FILM, 63V 0.33UF J
C842 24503047 PLASTIC FILM, 63V 0.33UF J
C884 24086052 ELECTRORYTIC, 200V 220UF M 22A
C885 24214471 CERAMIC DISC, 500V B 470PF K
C889 #1 24765222 ELECTROLYTIC CE04G 35V 2200UF M
#2 24668222 ELECTROLYTIC, 35V 2200UF M 3A
#3 24668222 ELECTROLYTIC, 35V 2200UF M 3A
#4 24668222 ELECTROLYTIC, 35V 2200UF M 3A
C891 #1 24763102 ELECTROLYTIC, 16V 1000UF M
#2 24666102 ELECTROLYTIC, 16V 1000UF M 3A
#3 24666102 ELECTROLYTIC, 16V 1000UF M 3A
#4 24666102 ELECTROLYTIC, 16V 1000UF M 3A
C893 24092337 CERAMIC DISC, 2KV 220PF K
C898 24503045 PLASTIC FILM, 63V 0.22UF J
C899 24214471 CERAMIC DISC, 500V B 470PF K
C902 #1 24092349 CERAMIC DISC, 2KV R 2200PF K
#2 24092353 CERAMIC DISC, 2KV 4700PF K
#3 24092353 CERAMIC DISC, 2KV 4700PF K
#4 24092353 CERAMIC DISC, 2KV 4700PF K
C904 24436471 CERAMIC DISC, 50V SL 470PF J
C905 24436561 CERAMIC DISC, 50V SL 560PF J
C907 24436561 CERAMIC DISC, 50V SL 560PF J
C909 24679330 ELECTROLYTIC, 250V 33UF M 3A
C910 #1 24206478 ELECTROLYTIC, 50V 0.47UF M 7L 3A
#2 24797478 ELECTROLYTIC, 50V 0.47UF M
#3 24797478 ELECTROLYTIC, 50V 0.47UF M
#4 24797478 ELECTROLYTIC, 50V 0.47UF M
C911 24203100 ELECTORLYTIC, 16V 10UF M 7L 3A
C912 #1 24073043 ELECTROLYTIC, 16V 2200UF M 3A
#2 24073044 ELECTROLYTIC, 16V 3300UF M 3A
#3 24073044 ELECTROLYTIC, 16V 3300UF M 3A
#4 24073044 ELECTROLYTIC, 16V 3300UF M 3A
C913 #1 24203220 ELECTROLYTIC, 16V 22UF M 7L 3A
#2 24794220 ELECTROLYTIC, 16V 22UF M
#3 24794220 ELECTROLYTIC, 16V 22UF M
#4 24794220 ELECTROLYTIC, 16V 22UF M
C914 24212103 CERAMIC DISC, 50V B 10000PF K
C930 24214101 CERAMIC DISC, 500V B 100PF K
C931 24214101 CERAMIC DISC, 500V B 100PF K
C4200 24109221 CERAMIC CHIP, 50V B 220PF K
C4300 24109103 CERAMIC CHIP, 50V B 0.01UF K
C4700 #1 24109153 CERAMIC CHIP, 50V B 0.015UF K
#2 24109182 CERAMIC CHIP, 50V B 1800PF K
#3 24109182 CERAMIC CHIP, 50V B 1800PF K
#4 24109182 CERAMIC CHIP, 50V B 1800PF K
C4701 #2 24109682 CERAMIC CHIP, 50V B 6800PF K
#3 24109682 CERAMIC CHIP, 50V B 6800PF K
#4 24109682 CERAMIC CHIP, 50V B 6800PF K
C4710 #1 24503042 PLASTIC FILM, 63V 0.12UF J
#2 24539274 PLASTIC FILM, 50V 0.27UF J
#3 24539274 PLASTIC FILM, 50V 0.27UF J
#4 24539274 PLASTIC FILM, 50V 0.27UF J
C4711 #2 24539274 PLASTIC FILM, 50V 0.27UF J
#3 24539274 PLASTIC FILM, 50V 0.27UF J
#4 24539274 PLASTIC FILM, 50V 0.27UF J
C4712 24109103 CERAMIC CHIP, 50V B 0.01UF K
CA09 24109103 CERAMIC CHIP, 50V B 0.01UF K
Location Parts No. Descriptiopn
No.
CA14 24105680 CERAMIC CHIP, 50V CH 68PF J
CA15 24105680 CERAMIC CHIP, 50V CH 68PF J
CA48 24105221 CERAMIC CHIP, 50V CH 220PF J
CA49 #1 24203100 ELECTORLYTIC, 16V 10UF M 7L 3A
#2 24794100 ELECTROLYTIC, 16V 10UF M
#3 24794100 ELECTROLYTIC, 16V 10UF M
#4 24794100 ELECTROLYTIC, 16V 10UF M
CA50 24105270 CERAMIC CHIP, 50V CH 27PF J
CA51 24105270 CERAMIC CHIP, 50V CH 27PF J
CA54 24092730 CERAMIC CHIP, 16V B 0.1UF K
CA55 24100103 CERAMIC CHIP, 50V F 0.01UF Z
CA56 24100103 CERAMIC CHIP, 50V F 0.01UF Z
CA60 24092538 CERAMIC CHIP, 10V F 1UF Z
CA61 24793101 ELECTROLYTIC, 10V 100UF M
CA65 24092729 CERAMIC CHIP CK73B 16V 68000PFK
CA72 24105680 CERAMIC CHIP, 50V CH 68PF J
CA73 24105680 CERAMIC CHIP, 50V CH 68PF J
CA77 24092538 CERAMIC CHIP, 10V F 1UF Z
CA82 24793470 ELECTROLYTIC CE04G 10V 47UF M
CA99 24353101 CERAMIC DISC, 50V CH 100PF J
CB01 #1 24203470 ELECTROLYTIC, 16V 47UF M 7L 3A
#2 24794470 ELECTROLYTIC, 16V 47UF M
#3 24794470 ELECTROLYTIC, 16V 47UF M
#4 24794470 ELECTROLYTIC, 16V 47UF M
CB05 #1 24203100 ELECTORLYTIC, 16V 10UF M 7L 3A
#2 24666100 ELECTROLYTIC, 10V 10UF M 3A
#3 24666100 ELECTROLYTIC, 10V 10UF M 3A
#4 24666100 ELECTROLYTIC, 10V 10UF M 3A
CC01 24109103 CERAMIC CHIP, 50V B 0.01UF K
CC14 24232103 CERAMIC DISC, 50V F 0.01UF Z
CC20 24105100 CERAMIC CHIP, 50V CH 10PF D
CC28 24105100 CERAMIC CHIP, 50V CH 10PF D
CD01 #1 24203100 ELECTORLYTIC, 16V 10UF M 7L 3A
#2 24794100 ELECTROLYTIC, 16V 10UF M
#3 24794100 ELECTROLYTIC, 16V 10UF M
#4 24794100 ELECTROLYTIC, 16V 10UF M
CD02 #1 24203100 ELECTORLYTIC, 16V 10UF M 7L 3A
#2 24794100 ELECTROLYTIC, 16V 10UF M
#3 24794100 ELECTROLYTIC, 16V 10UF M
#4 24794100 ELECTROLYTIC, 16V 10UF M
CD03 24109152 CERAMIC CHIP, 50V B 1500PF K
CD04 24105471 CERAMIC CHIP, 50V CH 470PF J
CD05 #1 24203100 ELECTORLYTIC, 16V 10UF M 7L 3A
#2 24794100 ELECTROLYTIC, 16V 10UF M
#3 24794100 ELECTROLYTIC, 16V 10UF M
#4 24794100 ELECTROLYTIC, 16V 10UF M
CD06 24092730 CERAMIC CHIP, 16V B 0.1UF K
CD07 24797339 ELECTROLYTIO, 50V 3.3UF M
CD08 #1 24203100 ELECTORLYTIC, 16V 10UF M 7L 3A
#2 24794100 ELECTROLYTIC, 16V 10UF M
#3 24794100 ELECTROLYTIC, 16V 10UF M
#4 24794100 ELECTROLYTIC, 16V 10UF M
CD09 24085944 ELECTROLYTIC, NONPOLAR, 50V 2.2UF M 11L
CD10 24085944 ELECTROLYTIC, NONPOLAR, 50V 2.2UF M 11L
CD11 24109103 CERAMIC CHIP, 50V B 0.01UF K
CD12 24105560 CERAMIC CHIP, 50V CH 56PF J
CD13 24109152 CERAMIC CHIP, 50V B 1500PF K
CD14 24105471 CERAMIC CHIP, 50V CH 470PF J
CD15 #1 24203100 ELECTORLYTIC, 16V 10UF M 7L 3A
#2 24794100 ELECTROLYTIC, 16V 10UF M
#3 24794100 ELECTROLYTIC, 16V 10UF M
#4 24794100 ELECTROLYTIC, 16V 10UF M
CD16 #1 24206229 ELECTROLYTIC, 50V 2.2UF M 7L 3A
#2 24797229 ELECTROLYTIC, 50V 2.2UF M
#3 24797229 ELECTROLYTIC, 50V 2.2UF M
#4 24797229 ELECTROLYTIC, 50V 2.2UF M
CD17 24109152 CERAMIC CHIP, 50V B 1500PF K
CD18 24105471 CERAMIC CHIP, 50V CH 470PF J
CD19 24105221 CERAMIC CHIP, 50V CH 220PF J
CD20 24109222 CERAMIC CHIP, 50V B 2200PF K
CD21 24105220 CERAMIC CHIP, 50V CH 22PF J
CD22 24105220 CERAMIC CHIP, 50V CH 22PF J
CD23 24092730 CERAMIC CHIP, 16V B 0.1UF K
CD24 #1 24203100 ELECTORLYTIC, 16V 10UF M 7L 3A
#2 24794100 ELECTROLYTIC, 16V 10UF M
#3 24794100 ELECTROLYTIC, 16V 10UF M
SPECIFIC INFORMATIONS
– 23 –
Page 24
Location Parts No. Descriptiopn
No.
#4 24794100 ELECTROLYTIC, 16V 10UF M
CD25 24092743 CERAMIC CHIP, 10V F 0.47UF Z
CD26 24105560 CERAMIC CHIP, 50V CH 56PF J
CD27 24105560 CERAMIC CHIP, 50V CH 56PF J
CD28 24109102 CERAMIC CHIP, 50V B 1000PF K
CD29 24109102 CERAMIC CHIP, 50V B 1000PF K
CD30 24109102 CERAMIC CHIP, 50V B 1000PF K
CD31 24109102 CERAMIC CHIP, 50V B 1000PF K
CD32 24109222 CERAMIC CHIP, 50V B 2200PF K
CD33 24109222 CERAMIC CHIP, 50V B 2200PF K
CD34 24092743 CERAMIC CHIP, 10V F 0.47UF Z
CD35 24092743 CERAMIC CHIP, 10V F 0.47UF Z
CD36 24109103 CERAMIC CHIP, 50V B 0.01UF K
CD37 24105010 CERAMIC CHIP CC73CK 50V 1PF C
CD38 24105050 CERAMIC CHIP, 50V CH 5PF C
CD39 24109103 CERAMIC CHIP, 50V B 0.01UF K
CI01 24109103 CERAMIC CHIP, 50V B 0.01UF K
CI02 24109103 CERAMIC CHIP, 50V B 0.01UF K
CI03 24109103 CERAMIC CHIP, 50V B 0.01UF K
CI04 24109103 CERAMIC CHIP, 50V B 0.01UF K
CI05 24109103 CERAMIC CHIP, 50V B 0.01UF K
CI06 24109103 CERAMIC CHIP, 50V B 0.01UF K
CI08 #1 24206229 ELECTROLYTIC, 50V 2.2UF M 7L 3A
#2 24797229 ELECTROLYTIC, 50V 2.2UF M
#3 24797229 ELECTROLYTIC, 50V 2.2UF M
#4 24797229 ELECTROLYTIC, 50V 2.2UF M
CI09 24109103 CERAMIC CHIP, 50V B 0.01UF K
CI10 24797101 ELECTROLYTIC, 50V 100UF M
CI12 24092573 CERAMIC CHIP, 16V B 0.47UF K
CI13 24109102 CERAMIC CHIP, 50V B 1000PF K
CI14 24109103 CERAMIC CHIP, 50V B 0.01UF K
CI15 24105150 CERAMIC CHIP, 50V CH 15PF J
CI17 #1 24206229 ELECTROLYTIC, 50V 2.2UF M 7L 3A
#2 24797229 ELECTROLYTIC, 50V 2.2UF M
SPECIFIC INFORMATIONS
#3 24797229 ELECTROLYTIC, 50V 2.2UF M
#4 24797229 ELECTROLYTIC, 50V 2.2UF M
CI18 24203220 ELECTROLYTIC, 16V 22UF M 7L 3A
CI20 24105560 CERAMIC CHIP, 50V CH 56PF J
CI21 24105430 CERAMIC CHIP CC73CH 50V 43PF J
CI30 24109103 CERAMIC CHIP, 50V B 0.01UF K
CI31 #1 24206479 ELECTROLYTIC, 50V 4.7UF M 7L 3A
#2 24797479 ELECTROLYTIC, 50V 4.7UF M
#3 24797479 ELECTROLYTIC, 50V 4.7UF M
#4 24797479 ELECTROLYTIC, 50V 4.7UF M
CI56 24105120 CERAMIC CHIP, 50V CH 12PF J
CI57 24105510 CERAMIC CHIP, 50V CH 51PF J
CI60 24105470 CERAMIC CHIP, 50V CH 47PF J
CI61 24105470 CERAMIC CHIP, 50V CH 47PF J
CI71 24109103 CERAMIC CHIP, 50V B 0.01UF K
CI81 24109103 CERAMIC CHIP, 50V B 0.01UF K
CS02 #1 24206010 ELECTROLYTIC, 50V 1.0UF M 7L 3A
#2 24797010 ELECTROLYTIC, 50V 1UF M
#3 24797010 ELECTROLYTIC, 50V 1UF M
#4 24797010 ELECTROLYTIC, 50V 1UF M
CS03 #1 24206010 ELECTROLYTIC, 50V 1.0UF M 7L 3A
#2 24797010 ELECTROLYTIC, 50V 1UF M
#3 24797010 ELECTROLYTIC, 50V 1UF M
#4 24797010 ELECTROLYTIC, 50V 1UF M
CS04 #1 24206010 ELECTROLYTIC, 50V 1.0UF M 7L 3A
#2 24797010 ELECTROLYTIC, 50V 1UF M
#3 24797010 ELECTROLYTIC, 50V 1UF M
#4 24797010 ELECTROLYTIC, 50V 1UF M
CS05 #1 24206010 ELECTROLYTIC, 50V 1.0UF M 7L 3A
#2 24797010 ELECTROLYTIC, 50V 1UF M
#3 24797010 ELECTROLYTIC, 50V 1UF M
#4 24797010 ELECTROLYTIC, 50V 1UF M
CS06 #1 24206010 ELECTROLYTIC, 50V 1.0UF M 7L 3A
#2 24797010 ELECTROLYTIC, 50V 1UF M
#3 24797010 ELECTROLYTIC, 50V 1UF M
#4 24797010 ELECTROLYTIC, 50V 1UF M
CS07 #1 24206010 ELECTROLYTIC, 50V 1.0UF M 7L 3A
#2 24797010 ELECTROLYTIC, 50V 1UF M
#3 24797010 ELECTROLYTIC, 50V 1UF M
#4 24797010 ELECTROLYTIC, 50V 1UF M
CS10 #1 24203100 ELECTORLYTIC, 16V 10UF M 7L 3A
#2 24794100 ELECTROLYTIC, 16V 10UF M
Location Parts No. Descriptiopn
No.
#3 24794100 ELECTROLYTIC, 16V 10UF M
#4 24794100 ELECTROLYTIC, 16V 10UF M
CS11 #1 24203100 ELECTORLYTIC, 16V 10UF M 7L 3A
#2 24794100 ELECTROLYTIC, 16V 10UF M
#3 24794100 ELECTROLYTIC, 16V 10UF M
#4 24794100 ELECTROLYTIC, 16V 10UF M
CS12 #1 24203220 ELECTROLYTIC, 16V 22UF M 7L 3A
#2 24797010 ELECTROLYTIC, 50V 1UF M
#3 24797010 ELECTROLYTIC, 50V 1UF M
#4 24797010 ELECTROLYTIC, 50V 1UF M
CS13 #1 24203220 ELECTROLYTIC, 16V 22UF M 7L 3A
#2 24797010 ELECTROLYTIC, 50V 1UF M
#3 24797010 ELECTROLYTIC, 50V 1UF M
#4 24797010 ELECTROLYTIC, 50V 1UF M
CS15 24109103 CERAMIC CHIP, 50V B 0.01UF K
CS29 #1 24203220 ELECTROLYTIC, 16V 22UF M 7L 3A
#2 24794220 ELECTROLYTIC, 16V 22UF M
#3 24794220 ELECTROLYTIC, 16V 22UF M
#4 24794220 ELECTROLYTIC, 16V 22UF M
CV01 24794101 ELECTROLYTIC, 16V 100UF M
CV02 24092730 CERAMIC CHIP, 16V B 0.1UF K
CV03 24092730 CERAMIC CHIP, 16V B 0.1UF K
CV04 #1 24206010 ELECTROLYTIC, 50V 1.0UF M 7L 3A
#2 24797010 ELECTROLYTIC, 50V 1UF M
#3 24797010 ELECTROLYTIC, 50V 1UF M
#4 24797010 ELECTROLYTIC, 50V 1UF M
CV05 #1 24203220 ELECTROLYTIC, 16V 22UF M 7L 3A
#2 24794220 ELECTROLYTIC, 16V 22UF M
#3 24794220 ELECTROLYTIC, 16V 22UF M
#4 24794220 ELECTROLYTIC, 16V 22UF M
CV06 #1 24591473 PLASTIC FILM, 50V 0.047UF J
#2 24539473 PLASTIC FILM, 50V 0.047UF J
#3 24539473 PLASTIC FILM, 50V 0.047UF J
#4 24539473 PLASTIC FILM, 50V 0.047UF J
CV11 24109103 CERAMIC CHIP, 50V B 0.01UF K
CV19 24092730 CERAMIC CHIP, 16V B 0.1UF K
CV20 24092730 CERAMIC CHIP, 16V B 0.1UF K
CV22 24092730 CERAMIC CHIP, 16V B 0.1UF K
CV33 24109103 CERAMIC CHIP, 50V B 0.01UF K
CV34 24762471 ELECTROLYTIC, 10V 470UF M
CV36 24794221 ELECTROIYTIC, 16V 220UF M
RESISTORS
R101 24553183 OXIDE METAL FILM, 1W 18K OHM J
R121 24011472 CHIP, METAL FILM, 1/20W 4.7K OHM J
R200 24011103 CHIP, METAL FILM, 1/20W 10K OHM J
R201 24011103 CHIP, METAL FILM, 1/20W 10K OHM J
R202 24011102 CHIP, METAL FILM, 1/20W 1K OHM J
R203 24011103 CHIP, METAL FILM, 1/20W 10K OHM J
R204 24011103 CHIP, METAL FILM, 1/20W 10K OHM J
R205 24011821 CHIP, METAL FILM, 1/20W 820 OHM J
R206 24011472 CHIP, METAL FILM, 1/20W 4.7K OHM J
R207 24011821 CHIP, METAL FILM, 1/20W 820 OHM J
R208 24011102 CHIP, METAL FILM, 1/20W 1K OHM J
R210 24011272 CHIP, 1/20W 2.7K OHM J
R212 24011273 CHIP, METAL FILM, 1/20W 27K OHM J
R215 24011362 CHIP, 1/20W 3.6K OHM J
R216 24011223 CHIP, METAL FILM, 1/20W 22K OHM J
R217 24366103 CARBON FILM, 1/6W 10K OHM J
R218 #1 24367622 CARBON FILM, 1/6W 6.2K OHM G
#2 24367562 CARBON FILM, 1/6W 5.6K OHM G
#3 24367562 CARBON FILM, 1/6W 5.6K OHM G
#4 24367562 CARBON FILM, 1/6W 5.6K OHM G
R219 24011682 CHIP, METAL FILM, 1/20W 6.8K OHM J
R220 24011822 CHIP, METAL FILM, 1/20W 8.2K OHM J
R221 #1 24011183 CHIP, METAL FILM, 1/20W 18K OHM J
#2 24011821 CHIP, METAL FILM, 1/20W 820 OHM J
#3 24011821 CHIP, METAL FILM, 1/20W 820 OHM J
#4 24011821 CHIP, METAL FILM, 1/20W 820 OHM J
R222 24011681 CHIP, METAL FILM, 1/20W 680 OHM J
R225 24011223 CHIP, METAL FILM, 1/20W 22K OHM J
R227 #1 24367912 CARBON FILM, 1/6W 9.1K OHM G
#2 24367103 CARBON FILM, 1/6W 10K OHM G
#3 24367103 CARBON FILM, 1/6W 10K OHM G
#4 24367103 CARBON FILM, 1/6W 10K OHM G
R231 24011622 CHIP, METAL FILM, 1/20W 6.2K OHM J
– 24 –
Page 25
Location Parts No. Descriptiopn
No.
R232 24011123 CHIP, METAL FILM, 1/20W 12K OHM J
R233 24367273 CARBON FILM, 1/6W 27K OHM G
R303 24321229 OXIDE METAL FILM, 1/2W 2.2 OHM J
R305 24322109 OXIDE METAL FILM, 1W 1 OHM J
R314 24011562 CHIP, METAL FILM, 1/20W 5.6K OHM J
R319 24000445 CHIP JUMPER, 1608TYPE
R320 24000445 CHIP JUMPER, 1608TYPE
R321 24011183 CHIP, METAL FILM, 1/20W 18K OHM J
R322 24011243 CHIP, METAL FILM, 1/20W 24K OHM J
R324 24011182 CHIP, METAL FILM, 1/20W 1.8K OHM J
R325 24011752 CHIP, METAL FILM, 1/20W 7.5K OHM J
R327 24339569 OXIDE METAL FILM, 2W 5.6 OHM J
R328 24367562 CARBON FILM, 1/6W 5.6K OHM G
R329 24000633 METAL FILM, 1/4W 10K OHM F
R330 24000245 METAL FILM, 1/4W 33K OHM F
R331 24000637 METAL FILM, 1/4W 15K OHM F
R336 24383101 OXIDE METAL FILM, 2W 100 OHM J
R341 24011182 CHIP, METAL FILM, 1/20W 1.8K OHM J
R342 24366562 CARBON FILM, 1/6W 5.6K OHM J
R343 24310159 OXIDE METAL FILM, 1/2W 1.5 OHM J
R344 24366392 CARBON FILM, 1/6W 3.9K OHM J
R345 24383102 OXIDE METAL FILM, 2W 1K OHM J
R349 24011473 CHIP, METAL FILM, 1/20W 47K OHM J
R363 24552181 OXIDE METAL FILM, 1/2W 180 OHM J
R400 24946561 CARBON COMPOSITION, 1/2W 560 OHM K
R401 24011471 CHIP, METAL FILM, 1/20W 470 OHM J
R402 24011471 CHIP, METAL FILM, 1/20W 470 OHM J
R403 24382472 OXIDE METAL FILM, 1W 4.7K OHM J
R404 24011680 CHIP, METAL FILM, 1/20W 68 OHM J
R405 24011222 CHIP, METAL FILM, 1/20W 2.2K OHM J
R406 24011682 CHIP, METAL FILM, 1/20W 6.8K OHM J
R407 24011223 CHIP, METAL FILM, 1/20W 22K OHM J
R408 24011471 CHIP, METAL FILM, 1/20W 470 OHM J
R409 24011101 CHIP, METAL FILM, 1/20W 100 OHM J
R410 24872102 CHIP, METAL FILM, 1/16W 1K OHM J
R411 24011470 CHIP, METAL FILM, 1/20W 47 OHM J
R415 24553272 OXIDE METAL FILM, 1W 2.7K OHM J
R416 24019329 OXIDE FILM 5W 3R3K J
R417 24011104 CHIP, METAL FILM, 1/20W 100K OHM J
R418 24011103 CHIP, METAL FILM, 1/20W 10K OHM J
R420 24011101 CHIP, METAL FILM, 1/20W 100 OHM J
R424 24011103 CHIP, METAL FILM, 1/20W 10K OHM J
R425 24011103 CHIP, METAL FILM, 1/20W 10K OHM J
R431 24011103 CHIP, METAL FILM, 1/20W 10K OHM J
R432 24366332 CARBON FILM, 1/6W 3.3K OHM J
R433 24531680 FUSIBLE, 1/2W 68 OHM J
R434 24366101 CARBON FILM, 1/6W 100 OHM J
R441 24532102 FUSIBLE, 1W 1K OHM J
R448 24338398 OXIDE METAL FILM, 1W 0.39 OHM J
R460 24366513 CARBON FILM, 1/6W 51K OHM J
R461 24366272 CARBON FILM, 1/6W 2.7K OHM J
R462 24322689 OXIDE METAL FILM, 1W 6.8 OHM J
R463 #1 24092731 CERAMIC CHIP, 16V B 1UF K
#2 24011103 CHIP, METAL FILM, 1/20W 10K OHM J
#3 24011103 CHIP, METAL FILM, 1/20W 10K OHM J
#4 24011103 CHIP, METAL FILM, 1/20W 10K OHM J
R465 24011102 CHIP, METAL FILM, 1/20W 1K OHM J
R466 24000445 CHIP JUMPER, 1608TYPE
R469 24011103 CHIP, METAL FILM, 1/20W 10K OHM J
R470 24338568 OXIDE METAL FILM, 1W 0.56 OHM J
R471 #1 24381680 OXIDE METAL FILM, 1/2W 68 OHM J
#2 24531680 FUSIBLE, 1/2W 68 OHM J
#3 24531680 FUSIBLE, 1/2W 68 OHM J
#4 24531680 FUSIBLE, 1/2W 68 OHM J
R473 24000242 METAL FILM, 1/4W 18K OHM F
R479 #1 24381271 OXIDE METAL FILM, 1/2W 270 OHM J
#2 24531271 FUSIBLE, 1/2W 270 OHM J
#3 24531271 FUSIBLE, 1/2W 270 OHM J
#4 24531271 FUSIBLE, 1/2W 270 OHM J
R492 24546229 FUSIBLE, 1/2W 2.2 OHM J
R501 24011562 CHIP, METAL FILM, 1/20W 5.6K OHM J
R502 24011152 CHIP, METAL FILM, 1/20W 1.5K OHM J
R512 24011121 CHIP, METAL FILM, 1/20W 120 OHM J
R513 24011121 CHIP, METAL FILM, 1/20W 120 OHM J
R515 24011472 CHIP, METAL FILM, 1/20W 4.7K OHM J
R520 24011271 CHIP, METAL FILM, 1/20W 270 OHM J
Location Parts No. Descriptiopn
No.
R521 24011271 CHIP, METAL FILM, 1/20W 270 OHM J
R522 24011271 CHIP, METAL FILM, 1/20W 270 OHM J
R544 24011333 CHIP, METAL FILM, 1/20W 33K OHM J
R545 24011121 CHIP, METAL FILM, 1/20W 120 OHM J
R623 24011103 CHIP, METAL FILM, 1/20W 10K OHM J
R624 24011104 CHIP, METAL FILM, 1/20W 100K OHM J
R660 24011222 CHIP, METAL FILM, 1/20W 2.2K OHM J
R661 24000445 CHIP JUMPER, 1608TYPE
R662 24011272 CHIP, 1/20W 2.7K OHM J
R663 24011103 CHIP, METAL FILM, 1/20W 10K OHM J
R664 24011222 CHIP, METAL FILM, 1/20W 2.2K OHM J
R665 24000445 CHIP JUMPER, 1608TYPE
R666 24011272 CHIP, 1/20W 2.7K OHM J
R667 24011103 CHIP, METAL FILM, 1/20W 10K OHM J
R671 24011103 CHIP, METAL FILM, 1/20W 10K OHM J
R672 24011103 CHIP, METAL FILM, 1/20W 10K OHM J
R673 24011104 CHIP, METAL FILM, 1/20W 100K OHM J
R674 24011103 CHIP, METAL FILM, 1/20W 10K OHM J
R675 24011104 CHIP, METAL FILM, 1/20W 100K OHM J
R686 24011229 CHIP, METAL FILM, 1/16W 2.2 OHM J
R687 24011229 CHIP, METAL FILM, 1/16W 2.2 OHM J
R700 24011121 CHIP, METAL FILM, 1/20W 120 OHM J
R701 24011331 CHIP, METAL FILM, 1/20W 330 OHM J
R702 24366821 CARBON FILM, 1/6W 820 OHM J @U901
24011821 CHIP, METAL FILM, 1/20W 820 OHM J @U902
R703 24011153 CHIP, METAL FILM, 1/2OW 15K OHM J
R704 24011392 CHIP, METAL FILM, 1/20W 3.9K OHM J
R705 24011472 CHIP, METAL FILM, 1/20W 4.7K OHM J
R706 24011102 CHIP, METAL FILM, 1/20W 1K OHM J
R707 24011472 CHIP, METAL FILM, 1/20W 4.7K OHM J
R708 24011332 CHIP, METAL FILM, 1/20W 3.3K OHM J
R709 24366563 CARBON FILM, 1/6W 56K OHM J @U901
24011102 CHIP, METAL FILM, 1/20W 1K OHM J @U902
R710 24011821 CHIP, METAL FILM, 1/20W 820 OHM J
R713 24366393 CARBON FILM, 1/6W 39K OHM J
R715 24366223 CARBON FILM, 1/6W 22K OHM J
R716 24366273 CARBON FILM, 1/6W 27K OHM J
R717 24366333 CARBON FILM, 1/6W 33K OHM J
R719 24366392 CARBON FILM, 1/6W 3.9K OHM J
R720 24366392 CARBON FILM, 1/6W 3.9K OHM J
R721 #1 24366102 CARBON FILM, 1/6W 1K OHM J
#2 24366103 CARBON FILM, 1/6W 10K OHM J
#3 24366103 CARBON FILM, 1/6W 10K OHM J
#4 24366103 CARBON FILM, 1/6W 10K OHM J
R722 24552471 OXIDE METAL FILM, 1/2W 470 OHM J
R723 24366471 CARBON FILM, 1/6W 470 OHM J
R724 24366470 CARBON FILM, 1/6W 47 OHM J
R725 24366182 CARBON FILM, 1/6W 1.8K OHM J
R730 24552100 OXIDE METAL FILM, 1/2W 10 OHM J
R731 24552331 OXIDE METAL FILM, 1/2W 330 OHM J
R732 24366820 CARBON FILM, 1/6W 82 OHM J
R733 24366683 CARBON FILM, 1/6W 68K OHM J
R734 24366820 CARBON FILM, 1/6W 82 OHM J
R735 24366683 CARBON FILM, 1/6W 68K OHM J
R736 24366620 CARBON FILM, 1/6W 62 OHM J
R737 24366152 CARBON FILM, 1/6W 1.5K OHM J
R738 24366102 CARBON FILM, 1/6W 1K OHM J
R739 24366152 CARBON FILM, 1/6W 1.5K OHM J
R740 24366620 CARBON FILM, 1/6W 62 OHM J
R741 24366279 CARBON FILM, 1/6W 2.7 OHM J
R742 24366279 CARBON FILM, 1/6W 2.7 OHM J
R743 24554221 OXIDE METAL FILM, 2W 220 OHM J
R744 24366122 CARBON FILM, 1/6W 1.2K OHM J
R745 24366122 CARBON FILM, 1/6W 1.2K OHM J
R760 24366101 CARBON FILM, 1/6W 100 OHM J
R775 24366182 CARBON FILM, 1/6W 1.8K OHM J
R801 24009954 METAL FILN, 1/2W 2.2M OHM J
R803 24553683 OXIDE METAL FILM, 1W 68K OHM J
R805 24366221 CARBON FILM, 1/6W 220 OHM J
R807 24366104 CARBON FILM, 1/6W 100K OHM J
R808 24019503 THERMISTOR, PTC, AC290V 4.5 OHM M
R811 24366225 CARBON FILM, 1/6W 2.2M OHM J
R812 24510479 CERAMIC COVERED, 5W 4.7 OHM J
R813 24007061 CERAMIC COVERED, 2W 1.8 OHM K
R815 24381102 OXIDE METAL FILM, 1/2W 1K OHM J
R818 24019459 METAL PLATE, 2W 0.12 OHM J
SPECIFIC INFORMATIONS
– 25 –
Page 26
Location Parts No. Descriptiopn
No.
R819 24310829 OXIDE METAL FILM, 1/2W 8.2 OHM J
R821 24366101 CARBON FILM, 1/6W 100 OHM J
R822 24552103 OXIDE METAL FILM, 1/2W 10K OHM J
R823 24552103 OXIDE METAL FILM, 1/2W 10K OHM J
R827 24366681 CARBON FILM, 1/6W 680 OHM J
R828 24381223 OXIDE METAL FILM, 1/2W 22K OHM J
R829 24310109 OXIDE METAL FILM, 1/2W 1 OHM J
R840 24366471 CARBON FILM, 1/6W 470 OHM J
R842 24366332 CARBON FILM, 1/6W 3.3K OHM J
R843 24366471 CARBON FILM, 1/6W 470 OHM J
R844 24321478 OXIDE METAL FILM, 1/2W 0.47 OHM J
R865 24366332 CARBON FILM, 1/6W 3.3K OHM J
R868 24366472 CARBON FILM, 1/6W 4.7K OHM J
R898 24321228 OXIDE METAL FILM, 1/2W 0.22 OHM J
R899 24004718 METAL GLAZE 1/2W 8R2M J
R901 24376102 CARBON FILM, 1/2W 1K OHM J
R902 24376102 CARBON FILM, 1/2W 1K OHM J
R903 24376102 CARBON FILM, 1/2W 1K OHM J
R904 24366472 CARBON FILM, 1/6W 4.7K OHM J
R905 24366150 CARBON FILM, 1/6W 15 OHM J
R912 24366681 CARBON FILM, 1/6W 680 OHM J
R914 24366561 CARBON FILM, 1/6W 560 OHM J
R915 24366820 CARBON FILM, 1/6W 82 OHM J
R916 24366680 CARBON FILM, 1/6W 68 OHM J
R917 24366561 CARBON FILM, 1/6W 560 OHM J
R918 24366151 CARBON FILM, 1/6W 150 OHM J
R919 24366681 CARBON FILM, 1/6W 680 OHM J
R920 24000945 FUSIBLE, 2W 1.8 OHM J
R921 24366561 CARBON FILM, 1/6W 560 OHM J
R922 24366820 CARBON FILM, 1/6W 82 OHM J
R924 24366151 CARBON FILM, 1/6W 150 OHM J
R925 24366561 CARBON FILM, 1/6W 560 OHM J
R926 24366681 CARBON FILM, 1/6W 680 OHM J
R928 24366561 CARBON FILM, 1/6W 560 OHM J
SPECIFIC INFORMATIONS
R929 24366820 CARBON FILM, 1/6W 82 OHM J
R930 24366151 CARBON FILM, 1/6W 150 OHM J
R932 24366102 CARBON FILM, 1/6W 1K OHM J
R934 24366471 CARBON FILM, 1/6W 470 OHM J
R935 24366392 CARBON FILM, 1/6W 3.9K OHM J
R936 24545150 FUSIBLE, 1/4W 15 OHM J
R937 24366561 CARBON FILM, 1/6W 560 OHM J
R942 24366562 CARBON FILM, 1/6W 5.6K OHM J
R943 24366562 CARBON FILM, 1/6W 5.6K OHM J
R944 24366562 CARBON FILM, 1/6W 5.6K OHM J
R945 24366680 CARBON FILM, 1/6W 68 OHM J
R946 24366680 CARBON FILM, 1/6W 68 OHM J
R960 24383153 OXIDE METAL FILM, 2W 15K OHM J
R961 24383153 OXIDE METAL FILM, 2W 15K OHM J
R962 24383153 OXIDE METAL FILM, 2W 15K OHM J
R963 24383153 OXIDE METAL FILM, 2W 15K OHM J
R964 24383153 OXIDE METAL FILM, 2W 15K OHM J
R965 24383153 OXIDE METAL FILM, 2W 15K OHM J
R977 24366122 CARBON FILM, 1/6W 1.2K OHM J
R992 24366150 CARBON FILM, 1/6W 15 OHM J
R4200 24011471 CHIP, METAL FILM, 1/20W 470 OHM J
R4601 24011123 CHIP, METAL FILM, 1/20W 12K OHM J
R4602 24011102 CHIP, METAL FILM, 1/20W 1K OHM J
R4603 24011102 CHIP, METAL FILM, 1/20W 1K OHM J
R4604 24011820 CHIP, 1/20W 82 OHM J
R4605 24011332 CHIP, METAL FILM, 1/20W 3.3K OHM J
R4606 24011223 CHIP, METAL FILM, 1/20W 22K OHM J
R4701 #2 24011274 CHIP, METAL FILM, 1/20W 270K OHM J
#3 24011274 CHIP, METAL FILM, 1/20W 270K OHM J
#4 24011274 CHIP, METAL FILM, 1/20W 270K OHM J
R4702 #2 24011274 CHIP, METAL FILM, 1/20W 270K OHM J
#3 24011274 CHIP, METAL FILM, 1/20W 270K OHM J
#4 24011274 CHIP, METAL FILM, 1/20W 270K OHM J
R4703 #2 24000445 CHIP JUMPER, 1608TYPE
#3 24000445 CHIP JUMPER, 1608TYPE
#4 24000445 CHIP JUMPER, 1608TYPE
R4704 24011274 CHIP, METAL FILM, 1/20W 270K OHM J
R4711 24011684 CHIP, METAL FILM, 1/20W 680K OHM J
R4712 24011224 CHIP, METAL FILM, 1/20W 220K OHM J
R4714 #1 24011154 CHIP, METAL FILM, 1/20W 150K OHM J
R4715 24011102 CHIP, METAL FILM, 1/20W 1K OHM J
R4716 24011333 CHIP, METAL FILM, 1/20W 33K OHM J
Location Parts No. Descriptiopn
No.
R4760 24000247 METAL FILM, 1/4W 39K OHM F
R4770 24011102 CHIP, METAL FILM, 1/20W 1K OHM J
RA01 24011101 CHIP, METAL FILM, 1/20W 100 OHM J
RA03 24011101 CHIP, METAL FILM, 1/20W 100 OHM J
RA04 24011101 CHIP, METAL FILM, 1/20W 100 OHM J
RA05 24011101 CHIP, METAL FILM, 1/20W 100 OHM J
RA11 24011472 CHIP, METAL FILM, 1/20W 4.7K OHM J
RA12 24011472 CHIP, METAL FILM, 1/20W 4.7K OHM J
RA49 24011222 CHIP, METAL FILM, 1/20W 2.2K OHM J
RA50 24011680 CHIP, METAL FILM, 1/20W 68 OHM J
RA54 24011102 CHIP, METAL FILM, 1/20W 1K OHM J
RA55 24011102 CHIP, METAL FILM, 1/20W 1K OHM J
RA56 24011102 CHIP, METAL FILM, 1/20W 1K OHM J
RA59 24011472 CHIP, METAL FILM, 1/20W 4.7K OHM J
RA61 24011102 CHIP, METAL FILM, 1/20W 1K OHM J
RA65 24011333 CHIP, METAL FILM, 1/20W 33K OHM J
RA66 24011333 CHIP, METAL FILM, 1/20W 33K OHM J
RA69 24011101 CHIP, METAL FILM, 1/20W 100 OHM J
RA70 24011101 CHIP, METAL FILM, 1/20W 100 OHM J
RA71 24366683 CARBON FILM, 1/6W 68K OHM J
RA72 24011472 CHIP, METAL FILM, 1/20W 4.7K OHM J
RA73 24366103 CARBON FILM, 1/6W 10K OHM J
RA74 24011222 CHIP, METAL FILM, 1/20W 2.2K OHM J
RA76 24011472 CHIP, METAL FILM, 1/20W 4.7K OHM J
RA77 24011123 CHIP, METAL FILM, 1/20W 12K OHM J
RA78 24366683 CARBON FILM, 1/6W 68K OHM J
RA79 24011472 CHIP, METAL FILM, 1/20W 4.7K OHM J
RA80 24011102 CHIP, METAL FILM, 1/20W 1K OHM J
RA81 24011102 CHIP, METAL FILM, 1/20W 1K OHM J
RA82 24366223 CARBON FILM, 1/6W 22K OHM J
RA83 24366103 CARBON FILM, 1/6W 10K OHM J
RA84 24366223 CARBON FILM, 1/6W 22K OHM J
RB01 24366271 CARBON FILM, 1/6W 270 OHM J
RB02 24366221 CARBON FILM, 1/6W 220 OHM J
RB03 24366103 CARBON FILM, 1/6W 10K OHM J
RB04 24366223 CARBON FILM, 1/6W 22K OHM J
RB05 24011102 CHIP, METAL FILM, 1/20W 1K OHM J
RB09 24366470 CARBON FILM, 1/6W 47 OHM J
RB48 24011332 CHIP, METAL FILM, 1/20W 3.3K OHM J
RB49 24011102 CHIP, METAL FILM, 1/20W 1K OHM J
RC12 24000445 CHIP JUMPER, 1608TYPE
RC13 24000445 CHIP JUMPER, 1608TYPE
RC14 24000445 CHIP JUMPER, 1608TYPE
RC15 24000445 CHIP JUMPER, 1608TYPE
RC16 24000445 CHIP JUMPER, 1608TYPE
RC17 24000445 CHIP JUMPER, 1608TYPE
RD01 24011101 CHIP, METAL FILM, 1/20W 100 OHM J
RD02 24011472 CHIP, METAL FILM, 1/20W 4.7K OHM J
RD04 24011102 CHIP, METAL FILM, 1/20W 1K OHM J
RD05 24011102 CHIP, METAL FILM, 1/20W 1K OHM J
RD06 24011102 CHIP, METAL FILM, 1/20W 1K OHM J
RD07 24000445 CHIP JUMPER, 1608TYPE
RD08 24000445 CHIP JUMPER, 1608TYPE
RD09 24011101 CHIP, METAL FILM, 1/20W 100 OHM J
RD10 24011101 CHIP, METAL FILM, 1/20W 100 OHM J
RD11 24011563 CHIP, METAL FILM, 1/20W 56K OHM J
RD12 24011823 CHIP, METAL FILM, 1/20W 82K OHM J
RD13 24011101 CHIP, METAL FILM, 1/20W 100 OHM J
RD14 24011101 CHIP, METAL FILM, 1/20W 100 OHM J
RD15 24011101 CHIP, METAL FILM, 1/20W 100 OHM J
RD16 24011101 CHIP, METAL FILM, 1/20W 100 OHM J
RD17 24011101 CHIP, METAL FILM, 1/20W 100 OHM J
RD18 24011101 CHIP, METAL FILM, 1/20W 100 OHM J
RD19 24011101 CHIP, METAL FILM, 1/20W 100 OHM J
RD20 24011101 CHIP, METAL FILM, 1/20W 100 OHM J
RD21 24011101 CHIP, METAL FILM, 1/20W 100 OHM J
RD22 24011101 CHIP, METAL FILM, 1/20W 100 OHM J
RD23 24011101 CHIP, METAL FILM, 1/20W 100 OHM J
RD24 24011101 CHIP, METAL FILM, 1/20W 100 OHM J
RD25 24011563 CHIP, METAL FILM, 1/20W 56K OHM J
RD26 24011823 CHIP, METAL FILM, 1/20W 82K OHM J
RD27 24011563 CHIP, METAL FILM, 1/20W 56K OHM J
RD28 24011823 CHIP, METAL FILM, 1/20W 82K OHM J
RI01 24011330 CHIP, 1/20W 33 OHM J
RI02 24011682 CHIP, METAL FILM, 1/20W 6.8K OHM J
RI03 24011272 CHIP, 1/20W 2.7K OHM J
– 26 –
Page 27
Location Parts No. Descriptiopn
No.
RI04 24011330 CHIP, 1/20W 33 OHM J
RI05 24011751 CHIP, METAL FILM, 1/20W 750 OHM J
RI06 24011330 CHIP, 1/20W 33 OHM J
RI07 24871390 CHIP, 1/8W 39 OHM J
RI08 24011821 CHIP, METAL FILM, 1/20W 820 OHM J
RI09 24011102 CHIP, METAL FILM, 1/20W 1K OHM J
RI10 24011103 CHIP, METAL FILM, 1/20W 10K OHM J
RI11 24011302 CHIP, METAL FILM, 1/20W 3K OHM J
RI12 24011103 CHIP, METAL FILM, 1/20W 10K OHM J
RI13 24011332 CHIP, METAL FILM, 1/20W 3.3K OHM J
RI14 24000445 CHIP JUMPER, 1608TYPE
RI15 24011105 CHIP, METAL FILM, 1/20W 1M OHM J
RI16 24011101 CHIP, METAL FILM, 1/20W 100 OHM J
RI17 24011271 CHIP, METAL FILM, 1/20W 270 OHM J
RI18 24011331 CHIP, METAL FILM, 1/20W 330 OHM J
RI19 24011103 CHIP, METAL FILM, 1/20W 10K OHM J
RI20 24011821 CHIP, METAL FILM, 1/20W 820 OHM J
RI21 24011222 CHIP, METAL FILM, 1/20W 2.2K OHM J
RI30 24011473 CHIP, METAL FILM, 1/20W 47K OHM J
RI31 24011433 CHIP, METAL FILM, 1/20W 43K OHM J
RI32 #1 24011123 CHIP, METAL FILM, 1/20W 12K OHM J
#2 24011133 CHIP, METAL FILM, 1/20W 13K OHM J
#3 24011133 CHIP, METAL FILM, 1/20W 13K OHM J
#4 24011133 CHIP, METAL FILM, 1/20W 13K OHM J
RI33 #1 24011272 CHIP, 1/20W 2.7K OHM J
#2 24011152 CHIP, METAL FILM, 1/20W 1.5K OHM J
#3 24011152 CHIP, METAL FILM, 1/20W 1.5K OHM J
#4 24011152 CHIP, METAL FILM, 1/20W 1.5K OHM J
RI40 24011104 CHIP, METAL FILM, 1/20W 100K OHM J
RI41 #1 24011102 CHIP, METAL FILM, 1/20W 1K OHM J
#2 24011122 CHIP, METAL FILM, 1/20W 1.2K OHM J
#3 24011122 CHIP, METAL FILM, 1/20W 1.2K OHM J
#4 24011122 CHIP, METAL FILM, 1/20W 1.2K OHM J
RI42 #1 24011112 CHIP, METAL FILM, 1/20W 1.1K OHM J
#2 24011821 CHIP, METAL FILM, 1/20W 820 OHM J
#3 24011821 CHIP, METAL FILM, 1/20W 820 OHM J
#4 24011821 CHIP, METAL FILM, 1/20W 820 OHM J
RI43 24011561 CHIP, METAL FILM, 1/20W 560 OHM J
RI44 24011471 CHIP, METAL FILM, 1/20W 470 OHM J
RI45 24011561 CHIP, METAL FILM, 1/20W 560 OHM J
RI46 24011122 CHIP, METAL FILM, 1/20W 1.2K OHM J
RI47 24011101 CHIP, METAL FILM, 1/20W 100 OHM J
RI51 24066046 VARIABLE. CARBON, 0.1W 20K N
RI52 24011331 CHIP, METAL FILM, 1/20W 330 OHM J
RI61 24011102 CHIP, METAL FILM, 1/20W 1K OHM J
RI67 24011563 CHIP, METAL FILM, 1/20W 56K OHM J
RI68 24011563 CHIP, METAL FILM, 1/20W 56K OHM J
RI69 24011102 CHIP, METAL FILM, 1/20W 1K OHM J
RI71 24011134 CHIP, METAL FILM, 1/2OW 130K OHM J
RI72 24011134 CHIP, METAL FILM, 1/2OW 130K OHM J
RI73 24011303 CHIP, METAL FILM, 1/20W 30K OHM J
RI74 24011223 CHIP, METAL FILM, 1/20W 22K OHM J
RI79 24011333 CHIP, METAL FILM, 1/20W 33K OHM J
RI80 24011183 CHIP, METAL FILM, 1/20W 18K OHM J
RI81 24011301 CHIP, METAL FILM, 1/20W 300 OHM J
RI82 24011101 CHIP, METAL FILM, 1/20W 100 OHM J
RI84 24011472 CHIP, METAL FILM, 1/20W 4.7K OHM J
RI85 24011472 CHIP, METAL FILM, 1/20W 4.7K OHM J
RI87 24011472 CHIP, METAL FILM, 1/20W 4.7K OHM J
RI88 24011203 CHIP, METAL FILM, 1/20W 20K OHM J
RI91 24011102 CHIP, METAL FILM, 1/20W 1K OHM J
RS01 24011103 CHIP, METAL FILM, 1/20W 10K OHM J
RS02 24011104 CHIP, METAL FILM, 1/20W 100K OHM J
RS03 24011103 CHIP, METAL FILM, 1/20W 10K OHM J
RS04 24011104 CHIP, METAL FILM, 1/20W 100K OHM J
RS10 24011562 CHIP, METAL FILM, 1/20W 5.6K OHM J
RS11 24011562 CHIP, METAL FILM, 1/20W 5.6K OHM J
RS14 24011562 CHIP, METAL FILM, 1/20W 5.6K OHM J
RS15 24011562 CHIP, METAL FILM, 1/20W 5.6K OHM J
RS17 24011562 CHIP, METAL FILM, 1/20W 5.6K OHM J
RS18 24011562 CHIP, METAL FILM, 1/20W 5.6K OHM J
RS19 24011101 CHIP, METAL FILM, 1/20W 100 OHM J
RS20 24011222 CHIP, METAL FILM, 1/20W 2.2K OHM J
RS21 24011102 CHIP, METAL FILM, 1/20W 1K OHM J
RS22 24011222 CHIP, METAL FILM, 1/20W 2.2K OHM J
RS23 24011102 CHIP, METAL FILM, 1/20W 1K OHM J
Location Parts No. Descriptiopn
No.
RS24 24011102 CHIP, METAL FILM, 1/20W 1K OHM J
RS27 24011561 CHIP, METAL FILM, 1/20W 560 OHM J
RS61 24552271 OXIDE METAL FILM, 1/2W 270 OHM J
RS62 24552271 OXIDE METAL FILM, 1/2W 270 OHM J
RV01 24011102 CHIP, METAL FILM, 1/20W 1K OHM J
RV02 24011102 CHIP, METAL FILM, 1/20W 1K OHM J
RV03 24011750 CHIP, METAL FILM, 1/20W 75 OHM J
RV04 24011102 CHIP, METAL FILM, 1/20W 1K OHM J
RV05 24011223 CHIP, METAL FILM, 1/20W 22K OHM J
RV06 24011472 CHIP, METAL FILM, 1/20W 4.7K OHM J
RV07 24011103 CHIP, METAL FILM, 1/20W 10K OHM J
RV10 24011101 CHIP, METAL FILM, 1/20W 100 OHM J
RV11 24011562 CHIP, METAL FILM, 1/20W 5.6K OHM J
RV12 24011101 CHIP, METAL FILM, 1/20W 100 OHM J
RV13 24011562 CHIP, METAL FILM, 1/20W 5.6K OHM J
RV14 24011101 CHIP, METAL FILM, 1/20W 100 OHM J
RV15 24011101 CHIP, METAL FILM, 1/20W 100 OHM J
RV16 24011101 CHIP, METAL FILM, 1/20W 100 OHM J
RV17 24366750 CARBON FILM, 1/6W 75 OHM J
RV18 24366104 CARBON FILM, 1/6W 100K OHM J
RV19 24366104 CARBON FILM, 1/6W 100K OHM J
RV21 #1 24366151 CARBON FILM, 1/6W 150 OHM J
#2 24011151 CHIP, METAL FILM, 1/20W 150 OHM J
#3 24011151 CHIP, METAL FILM, 1/20W 150 OHM J
#4 24011151 CHIP, METAL FILM, 1/20W 150 OHM J
RV24 24552101 OXIDE METAL FILM, 1/2W 100 OHM J
RV25 24011750 CHIP, METAL FILM, 1/20W 75 OHM J
RV26 24011101 CHIP, METAL FILM, 1/20W 100 OHM J
RV29 24011223 CHIP, METAL FILM, 1/20W 22K OHM J
RV30 24011750 CHIP, METAL FILM, 1/20W 75 OHM J
RV31 24011750 CHIP, METAL FILM, 1/20W 75 OHM J
RV33 24011750 CHIP, METAL FILM, 1/20W 75 OHM J
RV34 24011750 CHIP, METAL FILM, 1/20W 75 OHM J
RV90 24011101 CHIP, METAL FILM, 1/20W 100 OHM J
RV91 24011101 CHIP, METAL FILM, 1/20W 100 OHM J
RV92 24011103 CHIP, METAL FILM, 1/20W 10K OHM J
RV93 24011103 CHIP, METAL FILM, 1/20W 10K OHM J
G714 24545220 FUSIBLE, 1/4W 22 OHM J
GJ06 24011472 CHIP, METAL FILM, 1/20W 4.7K OHM J
GJ07 24011472 CHIP, METAL FILM, 1/20W 4.7K OHM J
GJ16 24000445 CHIP JUMPER, 1608TYPE
GJ48 24000445 CHIP JUMPER, 1608TYPE
GJ49 24000445 CHIP JUMPER, 1608TYPE
GJ50 24000445 CHIP JUMPER, 1608TYPE
GJ51 24000445 CHIP JUMPER, 1608TYPE
GJ106 #2 24000445 CHIP JUMPER, 1608TYPE
#3 24000445 CHIP JUMPER, 1608TYPE
#4 24000445 CHIP JUMPER, 1608TYPE
GJ107 #2 24000445 CHIP JUMPER, 1608TYPE
#3 24000445 CHIP JUMPER, 1608TYPE
#4 24000445 CHIP JUMPER, 1608TYPE
GJ108 #2 24000445 CHIP JUMPER, 1608TYPE
#3 24000445 CHIP JUMPER, 1608TYPE
#4 24000445 CHIP JUMPER, 1608TYPE
GJ109 #2 24000445 CHIP JUMPER, 1608TYPE
#3 24000445 CHIP JUMPER, 1608TYPE
#4 24000445 CHIP JUMPER, 1608TYPE
GJ331 24000445 CHIP JUMPER, 1608TYPE
GJ401 24000445 CHIP JUMPER, 1608TYPE
GJ404 #1 24000445 CHIP JUMPER, 1608TYPE
GR30 24000445 CHIP JUMPER, 1608TYPE
GR45 24000445 CHIP JUMPER, 1608TYPE
GR301 24000445 CHIP JUMPER, 1608TYPE
GRI01 24000445 CHIP JUMPER, 1608TYPE
GRI02 24000445 CHIP JUMPER, 1608TYPE
GRI04 24000445 CHIP JUMPER, 1608TYPE
GRI06 24000445 CHIP JUMPER, 1608TYPE
JR001 24000445 CHIP JUMPER, 1608TYPE
JR002 24000445 CHIP JUMPER, 1608TYPE
JR003 24000445 CHIP JUMPER, 1608TYPE
JR004 24000445 CHIP JUMPER, 1608TYPE
JR005 #2 24000445 CHIP JUMPER, 1608TYPE
#3 24000445 CHIP JUMPER, 1608TYPE
#4 24000445 CHIP JUMPER, 1608TYPE
JR006 #2 24000445 CHIP JUMPER, 1608TYPE
#3 24000445 CHIP JUMPER, 1608TYPE
SPECIFIC INFORMATIONS
– 27 –
Page 28
Location Parts No. Descriptiopn
No.
#4 24000445 CHIP JUMPER, 1608TYPE
JR007 24000445 CHIP JUMPER, 1608TYPE
JR008 24000445 CHIP JUMPER, 1608TYPE
JR009 #1 24000445 CHIP JUMPER, 1608TYPE
JR010 #1 24000445 CHIP JUMPER, 1608TYPE
JR011 #1 24000445 CHIP JUMPER, 1608TYPE
COILS & TRANSFORMERS
G815 23103249 CORE, FERRITE BEAD 3.5X4.5, TEM2011AO
G900 23289918 COIL, PEAKING, TRF4100AU
L101 #1 23248367 COIL, CHOKE 9X13H 221MMH 0.6A TLN3278AC
#2 23248296 COIL, CHOKE
#3 23248296 COIL, CHOKE
#4 23248296 COIL, CHOKE
L208 #2 23103251 FILTER, 7.5X6.4X8 0.5A TEM2028AC
#3 23103251 FILTER, 7.5X6.4X8 0.5A TEM2028AC
#4 23103251 FILTER, 7.5X6.4X8 0.5A TEM2028AC
L209 #2 23103251 FILTER, 7.5X6.4X8 0.5A TEM2028AC
#3 23103251 FILTER, 7.5X6.4X8 0.5A TEM2028AC
#4 23103251 FILTER, 7.5X6.4X8 0.5A TEM2028AC
L301 23103249 CORE, FERRITE BEAD 3.5X4.5, TEM2011AO
L320 23103249 CORE, FERRITE BEAD 3.5X4.5, TEM2011AO
L441 23233036 COIL, HOLIZ LINEARITY, TLN2083AT
L442 23248121 COIL, CHOKE, TLN3383D
L461 23248362
L462 23231337
L462A 23993696 BOARD, CORRECTION
L462B 23949616 CONVER CORRECTOR, YV TC-R TC-R(YV)
L462C 23993081
L462D 23948535 SHEET, MAGNETIC FERRITE
L462E 23948536 SHEET, MAGNETIC FERRITE
L501 #1 23289912 COIL, PEAKING COIL 3.3MMH TRF4339AU
#2 23289924 COIL, PEAKING COIL 33MMH TRF4330AU
#3 23289924 COIL, PEAKING COIL 33MMH TRF4330AU
SPECIFIC INFORMATIONS
#4 23289924 COIL, PEAKING COIL 33MMH TRF4330AU
L502 23289924 COIL, PEAKING COIL 33MMH TRF4330AU
L503 23289924 COIL, PEAKING COIL 33MMH TRF4330AU
L505 23289924 COIL, PEAKING COIL 33MMH TRF4330AU
L506 23103249 CORE, FERRITE BEAD 3.5X4.5, TEM2011AO
L507 23289924 COIL, PEAKING COIL 33MMH TRF4330AU
L702 23261974 COIL, FERRITE BEAD, HC5-035
L704 23103249 CORE, FERRITE BEAD 3.5X4.5, TEM2011AO
L705 23103249 CORE, FERRITE BEAD 3.5X4.5, TEM2011AO
L805 23248234 COIL, CHOKE, TLN3481AC
L806 23248234 COIL, CHOKE, TLN3481AC
L811 23103249 CORE, FERRITE BEAD 3.5X4.5, TEM2011AO
L883 23221747 COIL, CHOKE, TRF9253D
L885 #1 23248327 COIL, CHOKE 10X13.3H 100MMH TLN3299AC
#2 23248288 COIL, CHOKE, TLN3299GH
#3 23248288 COIL, CHOKE, TLN3299GH
#4 23248288 COIL, CHOKE, TLN3299GH
L886 23103249 CORE, FERRITE BEAD 3.5X4.5, TEM2011AO
L888 23280016 COIL, PEAKING, TRF4100AZ
L889 23280016 COIL, PEAKING, TRF4100AZ
L891 23103249 CORE, FERRITE BEAD 3.5X4.5, TEM2011AO
L893 23280016 COIL, PEAKING, TRF4100AZ
L901 23200522 COIL, DG, TSB-2389AH
L902 23289934 COIL, PEAKING, TRF4221AU
L903 23289934 COIL, PEAKING, TRF4221AU
L904 23289934 COIL, PEAKING, TRF4221AU
L905 23289925 COIL, PEAKING, TRF4390AU
L906 23289925 COIL, PEAKING, TRF4390AU
L907 23289925 COIL, PEAKING, TRF4390AU
LA01 23103249 CORE, FERRITE BEAD 3.5X4.5, TEM2011AO
LC04 #1 23289910 COIL, PEAKING COIL 2.2MMH TRF4229AU
LC05 #1 23289910 COIL, PEAKING COIL 2.2MMH TRF4229AU
LD01 23103825 INDUCTOR, BEAD, TEM2118M
LD02 23103825 INDUCTOR, BEAD, TEM2118M
LI01 23238554 COIL, PEAKING, TRF4R22AJ
LI03 23238503 COIL, PEAKING, TRF4129AJ
LI04 23238706 COIL, PEAKING, TRF4470AJ
LI06 23238719 COIL, PEAKING, TRF4399AJ
LI07 23238712 COIL, PEAKING, TRF4150AJ
LI10 23289923 COIL, PEAKING COIL 27MMH TRF4270AU
LI54 23232032 COIL, VARIABLE TRF3546D
LI56 23238562 COIL, PEAKING, TRF4109AJ
COIL, CHOKE 19X30H 470MMH 1.5A TLN3335AC
COIL, DEFLECTION YOKE, TDY-8294S, SEMCO 29PF
METAL SHEET, CONV. CORRECTION TCRMXH01H
Location Parts No. Descriptiopn
No.
LI57 23238562 COIL, PEAKING, TRF4109AJ
LI61 23238710 COIL, PEAKING, TRF4220AJ
T400 23224386 TRANSFORMER, FOCUS, TLN2220AH
T401 23224380 TRANSFORMER, HORIZ DRIVE, TLN1098GH
T801 23211787 COIL, LINE FILTER TRF3247AM
T802 23211777 COIL, LINE FILTER 37X40H 4.7MH TRF3202AR
T862 23217640 TRANSFORMER, TPW3536AM TPW3536AM
G402 23103249 CORE, FERRITE BEAD 3.5X4.5, TEM2011AO
G461 23103249 CORE, FERRITE BEAD 3.5X4.5, TEM2011AO
SEMICONDUCTORS
Q104 70200934 IC, IC RESET PST9129N PST9126NR
Q201 #1 23314475 TRANSISTOR, 2SC2712-Y
#2 23314204 TRANSISTOR, 2SC2412K,Q
#3 23314204 TRANSISTOR, 2SC2412K,Q
#4 23314204 TRANSISTOR, 2SC2412K,Q
Q202 #1 23314475 TRANSISTOR, 2SC2712-Y
#2 23314204 TRANSISTOR, 2SC2412K,Q
#3 23314204 TRANSISTOR, 2SC2412K,Q
#4 23314204 TRANSISTOR, 2SC2412K,Q
Q205 #1 23314475 TRANSISTOR, 2SC2712-Y
#2 23314204 TRANSISTOR, 2SC2412K,Q
#3 23314204 TRANSISTOR, 2SC2412K,Q
#4 23314204 TRANSISTOR, 2SC2412K,Q
Q208 #1 23314475 TRANSISTOR, 2SC2712-Y
#2 23314204 TRANSISTOR, 2SC2412K,Q
#3 23314204 TRANSISTOR, 2SC2412K,Q
#4 23314204 TRANSISTOR, 2SC2412K,Q
Q210 #1 23314475 TRANSISTOR, 2SC2712-Y
#2 23314204 TRANSISTOR, 2SC2412K,Q
#3 23314204 TRANSISTOR, 2SC2412K,Q
#4 23314204 TRANSISTOR, 2SC2412K,Q
Q211 #1 23314475 TRANSISTOR, 2SC2712-Y
#2 23314204 TRANSISTOR, 2SC2412K,Q
#3 23314204 TRANSISTOR, 2SC2412K,Q
#4 23314204 TRANSISTOR, 2SC2412K,Q
Q301 23009353 IC, VERTICAL AN5523 MATSUSHITA AN5523
Q321 #1 23314475 TRANSISTOR, 2SC2712-Y
#2 23314204 TRANSISTOR, 2SC2412K,Q
#3 23314204 TRANSISTOR, 2SC2412K,Q
#4 23314204 TRANSISTOR, 2SC2412K,Q
Q340 #1 23314163 TRANSISTOR, 2SA1162-Y
#2 23205045 TRANSISTOR, 2SA1037AKQ
#3 23205045 TRANSISTOR, 2SA1037AKQ
#4 23205045 TRANSISTOR, 2SA1037AKQ
Q402 23114755 TRANSISTOR, 2SC2482FA-1
Q403 70114402 TRANSISTOR, 2SC3437-Y
Q404 23314970 TRANSISTOR, 2SD2539(FA)
Q430 23114733 TRANSISTOR, 2SC2655-Y
Q431 #1 23314475 TRANSISTOR, 2SC2712-Y
#2 23314204 TRANSISTOR, 2SC2412K,Q
#3 23314204 TRANSISTOR, 2SC2412K,Q
#4 23314204 TRANSISTOR, 2SC2412K,Q
Q460 #1 23205160 TRANSISTOR, NPN VCBO=100V KTD2092
#2 23314141 TRANSISTOR, 2SC3852
#3 23314141 TRANSISTOR, 2SC3852
#4 23314141 TRANSISTOR, 2SC3852
Q461 #1 23314163 TRANSISTOR, 2SA1162-Y
#2 23205045 TRANSISTOR, 2SA1037AKQ
#3 23205045 TRANSISTOR, 2SA1037AKQ
#4 23205045 TRANSISTOR, 2SA1037AKQ
Q462 #1 23314163 TRANSISTOR, 2SA1162-Y
#2 23205045 TRANSISTOR, 2SA1037AKQ
#3 23205045 TRANSISTOR, 2SA1037AKQ
#4 23205045 TRANSISTOR, 2SA1037AKQ
Q463 #1 23314163 TRANSISTOR, 2SA1162-Y
#2 23205045 TRANSISTOR, 2SA1037AKQ
#3 23205045 TRANSISTOR, 2SA1037AKQ
#4 23205045 TRANSISTOR, 2SA1037AKQ
Q465 #1 23314163 TRANSISTOR, 2SA1162-Y
#2 23205045 TRANSISTOR, 2SA1037AKQ
#3 23205045 TRANSISTOR, 2SA1037AKQ
#4 23205045 TRANSISTOR, 2SA1037AKQ
Q471 #1 23205257 TRANSISTOR, PNP VCBO=-150V KTA1024-Y
#2 23114759 TRANSISTOR, 2SA949-Y
#3 23114759 TRANSISTOR, 2SA949-Y
– 28 –
Page 29
Location Parts No. Descriptiopn
No.
#4 23114759 TRANSISTOR, 2SA949-Y
Q502 23009508 IC, RGB AMP MATSUSHITA AN15931A
Q610 23906582 IC, AN5277
Q623 #1 23205222
#2 23114493 TRANSISTOR, RN2404
#3 23114493 TRANSISTOR, RN2404
#4 23114493 TRANSISTOR, RN2404
Q670 23205005 TRANSISTOR, KTA2014Y
Q671 70114396 TRANSISTOR, 2SC3326B
Q672 70114396 TRANSISTOR, 2SC3326B
Q701 #1 23314475 TRANSISTOR, 2SC2712-Y
#2 23314204 TRANSISTOR, 2SC2412K,Q
#3 23314204 TRANSISTOR, 2SC2412K,Q
#4 23314204 TRANSISTOR, 2SC2412K,Q
Q702 #1 23314475 TRANSISTOR, 2SC2712-Y
#2 23314204 TRANSISTOR, 2SC2412K,Q
#3 23314204 TRANSISTOR, 2SC2412K,Q
#4 23314204 TRANSISTOR, 2SC2412K,Q
Q703 #1 23314475 TRANSISTOR, 2SC2712-Y
#2 23314204 TRANSISTOR, 2SC2412K,Q
#3 23314204 TRANSISTOR, 2SC2412K,Q
#4 23314204 TRANSISTOR, 2SC2412K,Q
Q706 #1 23205085 TRANSISTOR, 2SC5343-Y
#2 23314965 TRANSISTOR, KTC3198 Y
#3 23314965 TRANSISTOR, KTC3198 Y
#4 23314965 TRANSISTOR, KTC3198 Y
Q707 23114437 TRANSISTOR, 2SC752GTM-Y
Q709 #1 23205085 TRANSISTOR, 2SC5343-Y
#2 23314965 TRANSISTOR, KTC3198 Y
#3 23314965 TRANSISTOR, KTC3198 Y
#4 23314965 TRANSISTOR, KTC3198 Y
Q710 #1 23205081 TRANSISTOR, 2SA1980-Y
#2 23314962 TRANSISTOR, KTA1266 Y
#3 23314962 TRANSISTOR, KTA1266 Y
#4 23314962 TRANSISTOR, KTA1266 Y
Q711 23314909 TRANSISTOR, 2SA1837
Q712 23314912 TRANSISTOR, 2SC4793
Q719 #1 23205085 TRANSISTOR, 2SC5343-Y
#2 23314965 TRANSISTOR, KTC3198 Y
#3 23314965 TRANSISTOR, KTC3198 Y
#4 23314965 TRANSISTOR, KTC3198 Y
Q720 #1 23205085 TRANSISTOR, 2SC5343-Y
#2 23314965 TRANSISTOR, KTC3198 Y
#3 23314965 TRANSISTOR, KTC3198 Y
#4 23314965 TRANSISTOR, KTC3198 Y
Q773 #1 23205085 TRANSISTOR, 2SC5343-Y
#2 23314965 TRANSISTOR, KTC3198 Y
#3 23314965 TRANSISTOR, KTC3198 Y
#4 23314965 TRANSISTOR, KTC3198 Y
Q801 23135037 IC, STR-F6268S
Q802 #1 23205160 TRANSISTOR, NPN VCBO=100V KTD2092
#2 23314141 TRANSISTOR, 2SC3852
#3 23314141 TRANSISTOR, 2SC3852
#4 23314141 TRANSISTOR, 2SC3852
Q805 #1 23205229
#2 23114459 TRANSISTOR, RN1205
#3 23114459 TRANSISTOR, RN1205
#4 23114459 TRANSISTOR, RN1205
Q826 23906937 IC, PHOTO COUPLER, ON3171-R
Q830 #1 23009843 IC, REGULATOR +5V 4% S7805PI
#2 23009188 IC, KIA7805API
#3 23009188 IC, KIA7805API
#4 23009188 IC, KIA7805API
Q835 #1 23009844 IC, REGULATOR +9V 4% S7809PI
#2 23009187 IC, REGULATOR +9V 4% KIA7809API
#3 23009187 IC, REGULATOR +9V 4% KIA7809API
#4 23009187 IC, REGULATOR +9V 4% KIA7809API
Q840 #1 23205160 TRANSISTOR, NPN VCBO=100V KTD2092
#2 23314141 TRANSISTOR, 2SC3852
#3 23314141 TRANSISTOR, 2SC3852
#4 23314141 TRANSISTOR, 2SC3852
Q841 23114879 TRANSISTOR, 2SC2230A-Y(C)
Q842 #1 23205085 TRANSISTOR, 2SC5343-Y
#2 23314965 TRANSISTOR, KTC3198 Y
#3 23314965 TRANSISTOR, KTC3198 Y
#4 23314965 TRANSISTOR, KTC3198 Y
TRANSISTOR, PNP R1=R2=47KOHM SRA2204S (SOT-23)
TRANSISTOR, NPN R1=2.2K R2=47K SRC1205M
Location Parts No. Descriptiopn
No.
Q843 23009512
Q883 23319692 IC, SE130N, LF4
Q901 23314780 TRANSISTOR, 2SC4544
Q902 #1 23205085 TRANSISTOR, 2SC5343-Y
#2 23314965 TRANSISTOR, KTC3198 Y
#3 23314965 TRANSISTOR, KTC3198 Y
#4 23314965 TRANSISTOR, KTC3198 Y
Q903 23314780 TRANSISTOR, 2SC4544
Q904 #1 23205085 TRANSISTOR, 2SC5343-Y
#2 23314965 TRANSISTOR, KTC3198 Y
#3 23314965 TRANSISTOR, KTC3198 Y
#4 23314965 TRANSISTOR, KTC3198 Y
Q905 23314780 TRANSISTOR, 2SC4544
Q906 #1 23205085 TRANSISTOR, 2SC5343-Y
#2 23314965 TRANSISTOR, KTC3198 Y
#3 23314965 TRANSISTOR, KTC3198 Y
#4 23314965 TRANSISTOR, KTC3198 Y
Q907 #1 23205081 TRANSISTOR, 2SA1980-Y
#2 23314962 TRANSISTOR, KTA1266 Y
#3 23314962 TRANSISTOR, KTA1266 Y
#4 23314962 TRANSISTOR, KTA1266 Y
Q908 #1 23205202 TRANSISTOR, 2SC5344Y 2SC5344Y
#2 23114429 TRANSISTOR, 2SC2120-Y(TE)
#3 23114429 TRANSISTOR, 2SC2120-Y(TE)
#4 23114429 TRANSISTOR, 2SC2120-Y(TE)
Q4030 #1 23314475 TRANSISTOR, 2SC2712-Y
#2 23314204 TRANSISTOR, 2SC2412K,Q
#3 23314204 TRANSISTOR, 2SC2412K,Q
#4 23314204 TRANSISTOR, 2SC2412K,Q
Q4710 #1 23314163 TRANSISTOR, 2SA1162-Y
#2 23205045 TRANSISTOR, 2SA1037AKQ
#3 23205045 TRANSISTOR, 2SA1037AKQ
#4 23205045 TRANSISTOR, 2SA1037AKQ
QA10 23009648 IC, AT24C32A-10PI-2.7
QA51 #1 23009719 IC, PANA MICRO VCD COMB TEXT MN101E02G
#2 23009719 IC, PANA MICRO VCD COMB TEXT MN101E02G
#3 23009859
#4 23009859
QA71 #1 23314163 TRANSISTOR, 2SA1162-Y
#2 23205045 TRANSISTOR, 2SA1037AKQ
#3 23205045 TRANSISTOR, 2SA1037AKQ
#4 23205045 TRANSISTOR, 2SA1037AKQ
QB02 23314965 TRANSISTOR, KTC3198 Y
QB05 #1 23314475 TRANSISTOR, 2SC2712-Y
#2 23314204 TRANSISTOR, 2SC2412K,Q
#3 23314204 TRANSISTOR, 2SC2412K,Q
#4 23314204 TRANSISTOR, 2SC2412K,Q
QD01 23009522 IC, NICAM DECODER PLQFP64 MSP3410G
QD02 23009278 IC, RESET 4.2V SMP5 BD4742G-TR
QD03 23205006 TRANSISTOR, KTC4075Y
QD04 23205006 TRANSISTOR, KTC4075Y
QD05 23205006 TRANSISTOR, KTC4075Y
QD06 #1 23205214
#2 23205140 TRANSISTOR, DTC114EUAT106
#3 23205140 TRANSISTOR, DTC114EUAT106
#4 23205140 TRANSISTOR, DTC114EUAT106
QI01 23906820 IC, VIF/SIF SSOP 24PIN TA1267AF(FA02,EL)
QI02 23114611 TRANSISTOR, 2SC3357
QI04 23205005 TRANSISTOR, KTA2014Y
QI05 23205006 TRANSISTOR, KTC4075Y
QI06 23205005 TRANSISTOR, KTA2014Y
QI07 #1 23205214
#2 23205140 TRANSISTOR, DTC114EUAT106
#3 23205140 TRANSISTOR, DTC114EUAT106
#4 23205140 TRANSISTOR, DTC114EUAT106
QI08 #1 23205214
#2 23205140 TRANSISTOR, DTC114EUAT106
#3 23205140 TRANSISTOR, DTC114EUAT106
#4 23205140 TRANSISTOR, DTC114EUAT106
QI09 #1 23205214
#2 23205140 TRANSISTOR, DTC114EUAT106
#3 23205140 TRANSISTOR, DTC114EUAT106
#4 23205140 TRANSISTOR, DTC114EUAT106
QI12 23314926 TRANSISTOR, FET, 2SK880-Y
QI15 #1 23205214
#2 23205140 TRANSISTOR, DTC114EUAT106
IC, REGULATOR, +3.3V 2% TO-220F NJU7223F33
IC, PANA MICRO VCD COMB TEXT MN101E04GAD
IC, PANA MICRO VCD COMB TEXT MN101E04GAD
TRANSISTOR, NPN R1=R2=10KOHM SRC1202U (SOT-323)
TRANSISTOR, NPN R1=R2=10KOHM SRC1202U (SOT-323)
TRANSISTOR, NPN R1=R2=10KOHM SRC1202U (SOT-323)
TRANSISTOR, NPN R1=R2=10KOHM SRC1202U (SOT-323)
TRANSISTOR, NPN R1=R2=10KOHM SRC1202U (SOT-323)
SPECIFIC INFORMATIONS
– 29 –
Page 30
Location Parts No. Descriptiopn
No.
#3 23205140 TRANSISTOR, DTC114EUAT106
#4 23205140 TRANSISTOR, DTC114EUAT106
QI16 #1 23205214
#2 23205140 TRANSISTOR, DTC114EUAT106
#3 23205140 TRANSISTOR, DTC114EUAT106
#4 23205140 TRANSISTOR, DTC114EUAT106
QI17 23205214
QI60 #1 23205214
#2 23205140 TRANSISTOR, DTC114EUAT106
#3 23205140 TRANSISTOR, DTC114EUAT106
#4 23205140 TRANSISTOR, DTC114EUAT106
QI61 23205006 TRANSISTOR, KTC4075Y
QI71 23205006 TRANSISTOR, KTC4075Y
QI81 #1 23205214
#2 23205140 TRANSISTOR, DTC114EUAT106
#3 23205140 TRANSISTOR, DTC114EUAT106
#4 23205140 TRANSISTOR, DTC114EUAT106
QI92 #1 23205214
#2 23205140 TRANSISTOR, DTC114EUAT106
#3 23205140 TRANSISTOR, DTC114EUAT106
#4 23205140 TRANSISTOR, DTC114EUAT106
QS01 23205006 TRANSISTOR, KTC4075Y
QS02 23205006 TRANSISTOR, KTC4075Y
QS03 #1 23205204 TRANSISTOR, NPN VEBO=25V KTC2875B-RTK
#2 70114396 TRANSISTOR, 2SC3326B
#3 70114396 TRANSISTOR, 2SC3326B
#4 70114396 TRANSISTOR, 2SC3326B
QS04 #1 23205204 TRANSISTOR, NPN VEBO=25V KTC2875B-RTK
#2 70114396 TRANSISTOR, 2SC3326B
#3 70114396 TRANSISTOR, 2SC3326B
#4 70114396 TRANSISTOR, 2SC3326B
QV01 23000368 IC, MM1495XF
QV02 #1 23205085 TRANSISTOR, 2SC5343-Y
#2 23314965 TRANSISTOR, KTC3198 Y
SPECIFIC INFORMATIONS
#3 23314965 TRANSISTOR, KTC3198 Y
#4 23314965 TRANSISTOR, KTC3198 Y
QV03 23205006 TRANSISTOR, KTC4075Y
QV04 23205006 TRANSISTOR, KTC4075Y
D101 23118607 DIODE, ZENER, RD33ESA B3
D210 #1 23357447 DIODE, SWITCH SILICON KDS160-RTK/USC
#2 23316231 DIODE, 1SS355
#3 23316231 DIODE, 1SS355
#4 23316231 DIODE, 1SS355
D211 #1 23357447 DIODE, SWITCH SILICON KDS160-RTK/USC
#2 23316231 DIODE, 1SS355
#3 23316231 DIODE, 1SS355
#4 23316231 DIODE, 1SS355
D301 #1 23357448 DIODE, DIODE IF=1.0A GP10D
#2 23118822 DIODE, ERB12-02
#3 23118822 DIODE, ERB12-02
#4 23118822 DIODE, ERB12-02
D302 23357372 DIODE, AXIAL EU2JGF-41U2
D303 23316794 DIODE, SC570A
D340 23118529 DIODE, ZENER, RD5.6ES B2
D406 23357372 DIODE, AXIAL EU2JGF-41U2
D408 23357375 DIODE, 3JHJGR-M2
D431 23118530 DIODE, ZENER, RD5.6ESA B1
D432 23316231 DIODE, 1SS355
D441 23118531 DIODE, ZENER, RD5.1ESA B3
D442 23357372 DIODE, AXIAL EU2JGF-41U2
D444 23316254 DIODE, ERC06-15
D461 23357364 DIODE, RU4JGF- M2 RU4JGF- M2
D462 23316231 DIODE, 1SS355
D463 23316231 DIODE, 1SS355
D467 23357372 DIODE, AXIAL EU2JGF-41U2
D470 23118604 DIODE, ZENER, RD36ESA B2
D473 23118635 DIODE, ZENER, RD2.7ESA B2
D474 23118635 DIODE, ZENER, RD2.7ESA B2
D670 23316231 DIODE, 1SS355
D671 23316231 DIODE, 1SS355
D672 23316231 DIODE, 1SS355
D673 23316231 DIODE, 1SS355
D674 23316231 DIODE, 1SS355
D680 23316231 DIODE, 1SS355
D681 23316231 DIODE, 1SS355
D682 23316231 DIODE, 1SS355
TRANSISTOR, NPN R1=R2=10KOHM SRC1202U (SOT-323)
TRANSISTOR, NPN R1=R2=10KOHM SRC1202U (SOT-323)
TRANSISTOR, NPN R1=R2=10KOHM SRC1202U (SOT-323)
TRANSISTOR, NPN R1=R2=10KOHM SRC1202U (SOT-323)
TRANSISTOR, NPN R1=R2=10KOHM SRC1202U (SOT-323)
Location Parts No. Descriptiopn
No.
D683 23316231 DIODE, 1SS355
D704 23357341 DIODE, 1SS133
D705 23357341 DIODE, 1SS133
D715 23357341 DIODE, 1SS133
D720 23357341 DIODE, 1SS133
D721 23357341 DIODE, 1SS133
D801 23357041 DIODE, LN6SB60-F05
D804 23118505 DIODE, ZENER, RD15ESA B2
D805 23357012 DIODE, 1SS244
D806 23357372 DIODE, AXIAL EU2JGF-41U2
D810 23118496 DIODE, ZENER, RD22ESA B2
D811 23357341 DIODE, 1SS133
D815 23118608 DIODE, ZENER, RD33ES B2
D818 23118496 DIODE, ZENER, RD22ESA B2
D828 23357341 DIODE, 1SS133
D840 23118528 DIODE, ZENER, RD5.6ESA B3
D845 23357341 DIODE, 1SS133
D848 23118531 DIODE, ZENER, RD5.1ESA B3
D882 23118632 DIODE, ZENER, RD3.3ESA B1
D883 23357364 DIODE, RU4JGF- M2 RU4JGF- M2
D885 23118052 DIODE, RU4Z LF-L1
D891 23357372 DIODE, AXIAL EU2JGF-41U2
D901 23357341 DIODE, 1SS133
D903 23357341 DIODE, 1SS133
D904 23357341 DIODE, 1SS133
D905 23357341 DIODE, 1SS133
D906 23357341 DIODE, 1SS133
D907 23357341 DIODE, 1SS133
D908 23357341 DIODE, 1SS133
D909 23357341 DIODE, 1SS133
D910 23357341 DIODE, 1SS133
D911 23357372 DIODE, AXIAL EU2JGF-41U2
D4701 #2 23316231 DIODE, 1SS355
#3 23316231 DIODE, 1SS355
#4 23316231 DIODE, 1SS355
D4710 23316231 DIODE, 1SS355
DA78 #1 23357447 DIODE, SWITCH SILICON KDS160-RTK/USC
#2 23316231 DIODE, 1SS355
#3 23316231 DIODE, 1SS355
#4 23316231 DIODE, 1SS355
DB01 23358571 DIODE, LED, BT-H254N-31-SH
DB02 23358572 LED, LED L-2523SGT
DD01 23118138 DIODE, MA77
DI01 #1 23357446 DIODE, VR=30V IF=50MA KDS112-RTK/USM
#2 23314428
#3 23314428
#4 23314428
DI02 #1 23357212
#2 23118043
#3 23118043
#4 23118043
DI03 #1 23357445 DIODE, KDS114-RTK/USC KDS114-RTK/USC
#2 23118138 DIODE, MA77
#3 23118138 DIODE, MA77
#4 23118138 DIODE, MA77
DV01 23316588 DIODE, ZENER, MA8091-M
DV02 23316588 DIODE, ZENER, MA8091-M
DV04 23316588 DIODE, ZENER, MA8091-M
KB01 23000852 IC, REMOTE PHOTO RECEIVER, PIC-37043TE2
MISCELLANEOUS
B212 23845859 HOLDER, WIRE, PVC-C0AT, L=70MM
F470 23144647 FUSE, CARTRIDGE 5X20 250V 1.0A
F470A 23165433 FUSE HOLDER, 5.2 SOC
F470B 23165433 FUSE HOLDER, 5.2 SOC
F801 23144508 FUSE, CARTRIDGE 5.2X20, 250V 4.0A
F801A #1 23165433 FUSE HOLDER, 5.2 SOC
F801B #1 23165433 FUSE HOLDER, 5.2 SOC
F802 23144652 FUSE, CARTRIDGE 5X20 250V 3.15A
F802A #1 23165433 FUSE HOLDER, 5.2 SOC
F802B #1 23165433 FUSE HOLDER, 5.2 SOC
M461A 23192964 ANODE CAP ASSY, TCC5606CT
M461B 23509089 CABLE, CONTROL-ENGINE C0N 2P-2P
M461C 23505090 CABLE, CABLE FOCUS
M461D 23509372 CABLE ASSY, SCREEN
N724 23965900
DIODE, SILICON BAND SWICHING 1SS312(TE85L)
DIODE, SILICON BAND SWICHING 1SS312(TE85L)
DIODE, SILICON BAND SWICHING 1SS312(TE85L)
DIODE, CHIP VRM=85V IO=200MA KC KDS120-RTK
DIODE, CHIP VRM80V 100MA A-C US DAP202U T106
DIODE, CHIP VRM80V 100MA A-C US DAP202U T106
DIODE, CHIP VRM80V 100MA A-C US DAP202U T106
TAPE, GLASS-CLOTH, W/ADHESIVE W=18 T=0.18
– 30 –
Page 31
Location Parts No. Descriptiopn
No.
N728 23960101 SILICONE RUBBER, TSE-382 RTV
N732 23102959 MAGNET, RUBBER
P405 #2 23845834 LEAD CLAMPER
#3 23845834 LEAD CLAMPER
#4 23845834 LEAD CLAMPER
P501A 23902062 CONNECTOR, SOCKET, B-B
P501B 23368004 CONNECTOR, PLUG B-B 5P 2.5MM JST
P661 23023116 PLUG, HEAD PHONE JACK 3.5MM PJ3-14-7
P801 #1 23372234
#2 23372159 POWER CORD, CEE 250V 2.5A SILV 201
#3 23372168 POWER CORD, UK-HK VO 6A F13A
#4 23372199 POWER CORD, THAI THAI
P802 23368249 POWER CORD, 2P 11.88MM VH-JST
P803B 23164729
P910 23164725 CONNECTOR, PLUG 2P
PI01A 23023145 PLUG, B15PS-TB-2 B15PS-TB-2
PI02A 23023145 PLUG, B15PS-TB-2 B15PS-TB-2
PV02 #1 23023199 JACK, 8P (4SW) DAV8-31B01114S01
#2 23023049 JACK, PIN JACK 8P KUN HSP-269S10(P)-02
#3 23023049 JACK, PIN JACK 8P KUN HSP-269S10(P)-02
#4 23023049 JACK, PIN JACK 8P KUN HSP-269S10(P)-02
PV03 23023050
PV60 #1 23023197 JACK, 3P ,2SW DAV3-23B01112S01
#2 23023048 JACK, PIN JACK 3P KUN KM04036B03-01
#3 23023048 JACK, PIN JACK 3P KUN KM04036B03-01
#4 23023048 JACK, PIN JACK 3P KUN KM04036B03-01
Q301B 70391355
Q610B 70391355
Q801B #2 70391355
#3 70391355
#4 70391355
Q830B 70391355
Q840B 70391355
S801 23344481 SWITCH, POWER, AAPY2211
SA01 #1 23344443 SWITCH, TACTING SWITCH TSV TYP TSVB-1
#2 23145227 SWITCH, PUSH, 1C1P
#3 23145227 SWITCH, PUSH, 1C1P
#4 23145227 SWITCH, PUSH, 1C1P
SA02 #1 23344443 SWITCH, TACTING SWITCH TSV TYP TSVB-1
#2 23145227 SWITCH, PUSH, 1C1P
#3 23145227 SWITCH, PUSH, 1C1P
#4 23145227 SWITCH, PUSH, 1C1P
SA03 #1 23344443 SWITCH, TACTING SWITCH TSV TYP TSVB-1
#2 23145227 SWITCH, PUSH, 1C1P
#3 23145227 SWITCH, PUSH, 1C1P
#4 23145227 SWITCH, PUSH, 1C1P
SA04 #1 23344443 SWITCH, TACTING SWITCH TSV TYP TSVB-1
#2 23145227 SWITCH, PUSH, 1C1P
#3 23145227 SWITCH, PUSH, 1C1P
#4 23145227 SWITCH, PUSH, 1C1P
SA06 #1 23344443 SWITCH, TACTING SWITCH TSV TYP TSVB-1
#2 23145227 SWITCH, PUSH, 1C1P
#3 23145227 SWITCH, PUSH, 1C1P
#4 23145227 SWITCH, PUSH, 1C1P
SA07 #1 23344443 SWITCH, TACTING SWITCH TSV TYP TSVB-1
#2 23145227 SWITCH, PUSH, 1C1P
#3 23145227 SWITCH, PUSH, 1C1P
#4 23145227 SWITCH, PUSH, 1C1P
SR81 23146573 RELAY, DC12V 0.53W, OMR G5PA-1-M
SR83 23146570 RELAY, DC12V, 2M OMR, G5PA-2 DC12
V901A 23903145
V901B 23102959 MAGNET, RUBBER
V901M #1 23102524 MAGNET, CMG29 1VM8TLEAD3P, MAG-1123
#2 23102492 MAGNET, PURITY CONVERGENCE, MAG-1116
#3 23102492 MAGNET, PURITY CONVERGENCE, MAG-1116
#4 23102492 MAGNET, PURITY CONVERGENCE, MAG-1116
W661 23351236
W662 23351236
XA03 23153759 CRYSTAL RESONATOR, 10MHZ
XD01 23153490 CRYSTAL, 18.432 20PPM CL=13PF
Z891 23144542 PROTECTOR, 491SERIES, 125V 4A
ZI01 23303223 SAW FILTER, PIF
ZI02 23303210 SAW FILTER, SIF
ZI05 23303085 CERAMIC TRAP, TCF1092
ZI06 23303136 CERAMIC TRAP, TCF1097
ZI07 23303290 FILTER, FIL-CTRAP-4.5MHZ TCF1142AM
POWER CORD, SAA 250V7.5A VOLEX SAA 250V 7.5AVOLEX
CONNECTOR, PLUG, 3P 5MM B JALCO YKF21-0027
JACK, 1S+3P JACK KUNMING ELECT. KM04016GP
SCREW, BIND HEAD TAP-TITE B, BITTB 3X8 SZN
SCREW, BIND HEAD TAP-TITE B, BITTB 3X8 SZN
SCREW, BIND HEAD TAP-TITE B, BITTB 3X8 SZN
SCREW, BIND HEAD TAP-TITE B, BITTB 3X8 SZN
SCREW, BIND HEAD TAP-TITE B, BITTB 3X8 SZN
SCREW, BIND HEAD TAP-TITE B, BITTB 3X8 SZN
SCREW, BIND HEAD TAP-TITE B, BITTB 3X8 SZN
SOCKET, CRT, WFOCUS ISD35SE INCHANG ISD-35S-E
SPEAKER, 60X120 4-OHM 10W FOSTER SPK-1451AF
SPEAKER, 60X120 4-OHM 10W FOSTER SPK-1451AF
Location Parts No. Descriptiopn
No.
ZI54 23303166 CERAMIC TRAP, 39.5MHZ TCF1107
ZI55 23303224 CERAMIC TRAP, TCF1120AM
ZI64 23303289 FILTER, TCF1141AM
PC BOARD ASSEMBLIES
U901 23761443
*
U902 #1 23761728
*
*
*
*
PICTURE TUBE
TUNER
ACCESSORIES
CABINET PARTS
#2 23761444
#3 23761610
#4 23761609
U903 23761366
U904A #1 23761739
#2 23761445
#3 23761445
#4 23761445
U904B #1 23761740
#2 23761446
#3 23761446
#4 23761446
V901 #1 23324010
#2 23312949 PICTURE TUBE, PSDI 29PF A68QCP891X
#3 23312949 PICTURE TUBE, PSDI 29PF A68QCP891X
#4 23312949 PICTURE TUBE, PSDI 29PF A68QCP891X
H001 23321473 TUNER, ASIA MLT IICPLL SANYO ECA33LXC
23321452 TUNER, ASIA MLT IICPLL SAMSUNG ECA33LXB
23321417 TUNER, ASIA MLT IICPLL D-J LG ECA33LX6
23321428 TUNER, ASIA MLT IICPLL SANYO ECA33LX8
K902 23306459 REMOCON HAND UNIT IR, CTVPAL CT-90119
Y101A #1 23566096 OWNER’S MANUAL, (E)
#2 23566030 OWNER’S MANUAL, ENGLISH
#3 23566100 OWNER’S MANUAL, ENGLISH
#4 23566100 OWNER’S MANUAL, ENGLISH
Y101B #3 23566102 OWNER’S MANUAL, CHINESE
#4 23566103 OWNER’S MANUAL, THAI
Y120 23943846 BAG, POLY
A201 23532311 COVER, FRONT COVER
A401 #2 23532442 COVER, BACK COVER
#3 23532442 COVER, BACK COVER
#4 23532442 COVER, BACK COVER
A423 #2 23929523 PIECE, WASHER T=1.5 ZS15 21ZS15; D010035
#3 23929523 PIECE, WASHER T=1.5 ZS15 21ZS15; D010035
#4 23929523 PIECE, WASHER T=1.5 ZS15 21ZS15; D010035
A701A #1 23067192 CARTON, BOX
#2 23067193 CARTON, BOX
#3 23067321 CARTON, BOX
#4 23067195 CARTON, BOX
A701B 23067394 CARTON, BOTTOM CASE
A702A 23946597 PACKING, TOP PACKING
A702B 23946598 PACKING, BOTTOM PACKING
A710 23845450 JOINT
A902 #1 23428256 DOOR, DOOR PROPER
#2 23428228 DOOR, DOOR PROPER
#3 23428228 DOOR, DOOR PROPER
#4 23428228 DOOR, DOOR PROPER
A905 23445753 BUTTON, BUTTON POWER
A911 #1 23436829 HANDLE
#2 23436774 HANDLE
#3 23436774 HANDLE
#4 23436774 HANDLE
A912 23451868 PUSH CATCH
A951 23532083 COVER, BACK COVER PROPER
AT03 23588765 REMOCON PART, BATTERY COVER, CT-90119
E912 23848729 WEDGE, YOKE HOLDING, 3 REQUIRED
PC BOARD ASSY, CRT/D PD1190G TSP2003052630
PC BOARD ASSY, PD1526R SIG 21S TSP20030730133
PC BOARD ASSY, SIGNAL PD1526D TSP2003052631
PC BOARD ASSY, PD1526H SIG 29S TSP2003063055
PC BOARD ASSY, PD1526G SIG 29S TSP2003063054
PC BRD ASSY, IF STEREO PD1474A TSP2002050268
PC BOARD ASSY, FRONT PD1533D-1 TSP2003080102
PC BOARD ASSY, FRONT PD1533A-1 TSP2003052632
PC BOARD ASSY, FRONT PD1533A-1 TSP2003052632
PC BOARD ASSY, FRONT PD1533A-1 TSP2003052632
PC BOARD ASSY, RMT PD1533D-2 TSP2003080103
PC BOARD ASSY, RMT PD1533A-2 TSP2003052633
PC BOARD ASSY, RMT PD1533A-2 TSP2003052633
PC BOARD ASSY, RMT PD1533A-2 TSP2003052633
PICTURE TUBE, A68QCP891X (S) A68QCP891X (S)
SPECIFIC INFORMATIONS
– 31 –
Page 32
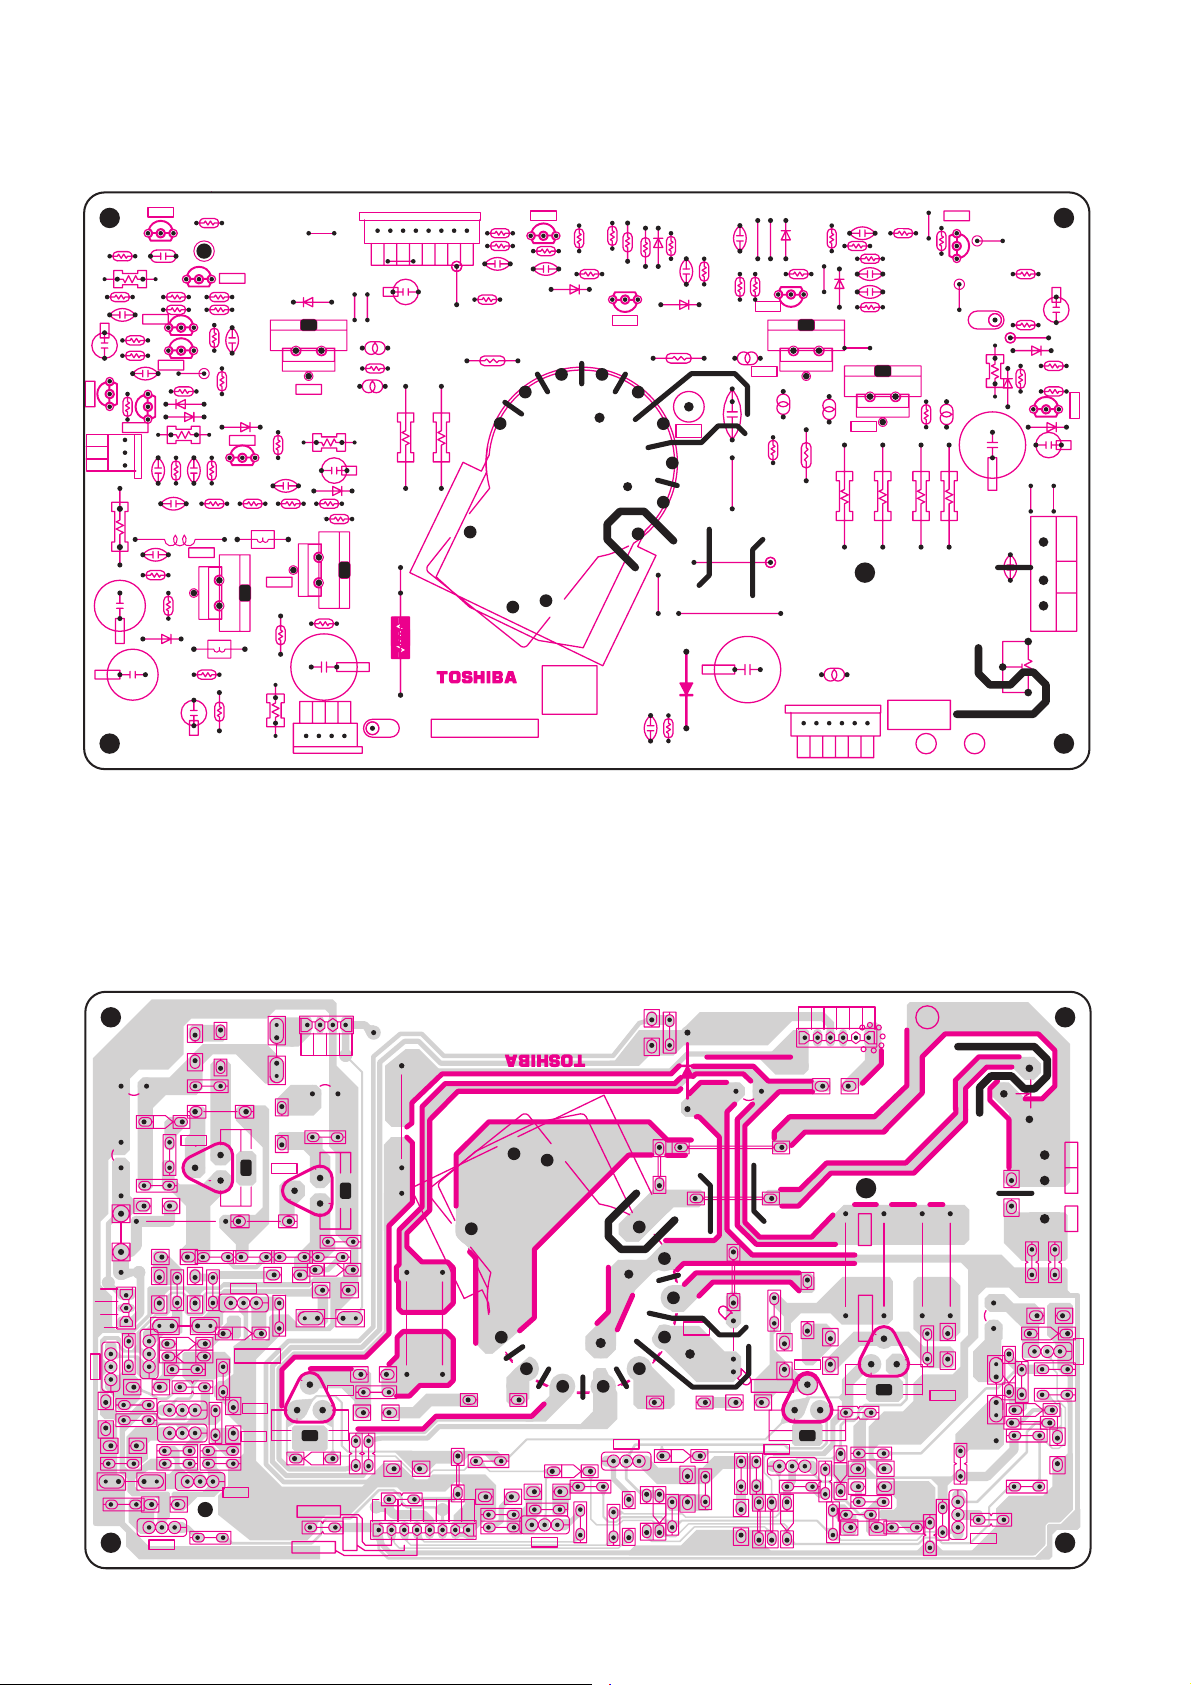
CRT/D BOARD PD1190G
TOP (COMPONENT) SIDE
R724
C722
C712
Q719
3
2
1
B
E
R709
+
+
R743
C720
R775
R713
R722
C713
R725
P703
Q709
Q773
EB
C704
R721
R723
Q707
E
E
Q720
C726
B
E
C714
R732
C715
L702
C719
R744
D704
+
R760
B
E
B
B
GJ01
R719
D720
D715
R730
C716
R733 R738 R735
Q711
Q711A
C
R737
E
L704
R736
+
C718
Q706
R715
R716
C705
R717
R720
D721
Q710
EB
R734
B
L705
Q712
Q712A
R742
R731
R741
P704A
JP001
123 4 56 78
P902B
D909
JP010
JP012
L907
BE
Q905
Q905A
R702
C717
C
+
R944
C
L904
G714
+
C707
D705
R739
R745
B
E
R740
R920
C721
A
1432
JP013
R965
R920Z
C913
GL08
+
R962
PD1190
23599642A
R926
C907
R903
R930
R937
Q906
EB
R929
C908
KB
D906
H
R928
R945
C
R924
C905
C914
R925
JP011
R964
CRT
P903A
GROUND
R977
R943
R961
Q907
L903
GJ02
C912
E
G939
B
R905
A
C911
R904
D903 R932
R934
R909
D910
E
+
C910
JP005
P900
+
Q908
B
D901
JP004
123
G902
R936
+
C930
R950
R946
D905
JP007
E
D908
JP006
C
BE
L906
R902
R963
G900
C906
Q903
Q903A
R922
R935
R960
654321
D904
R921
R914
R912
B
E
D907
Q902
R901
H
KR
G2
JP014
C903
C904
JP002
G910
R918
L905
JP003
JP009
Q901
Q901A
Q904
C902
R942
JP008
R919
B
R917
BE
L902
R915
R916
P905
KG
G1
+
D911
C931
C909
R992
3
Q719
R724
CRT/D BOARD PD1190G
BOTTOM (FOIL) SIDE
56
C904
R917
C902
L905
R942
1234
P903A
G900
C909
+
200V
R960
Q901A
C906
R935
R922
R943
R925
E
C914
C905
R924
R964
R977
R963
R902
TP-47G
L906
L902
Q901
TP-47R
B
Q904
B
D905
B
E
E
D908
R919
R946
R961
L903
Q903A
Q903
R950
P900
32 1
C930
R936
+
Q907
D910
D901
+
C910
Q908
E
R909
R934
R932
D903
+
R904
C911
R905
C912
B
E
R992
KG
H
Q902
EB
R912
R914
D904
C931
D911
P905
KR
R901
R918
D907
R915
C903
R916
E
C908
Q906
H
R929
B
CCP-3400S
D906
R945
R921
R928
R731
R742
Q712
Q712A
432
+
E
B
+
D909
C721
R740
TP-46R
TP-46B
P704A
G714
E
1
C707
Q905A
Q905
TP-46G
R739
L904
L907
D705
R745
1
R920Z
R920
R965
C913
23547300
R962
KB
P902B
R926
R903
C907
R937
R930
R944
+
487 5 32
R741
C718
C713
+
D704
R737
C720
R744
+
C719
L702L705
R743
C715
C714
1
2
R709
E
B
+
C712
C722
R775
Q709
P703
E
C726
R725
R722
B
R713
R723
R721
C704
Q773
R732R734
BE
R736
L704
Q711A
E
Q711
B
R733R738R735
EB
C716
R730
D720
D715
R720
R719
R717
C705
BE
Q706
B
E
R760
Q710
Q720
Q707
R716
R715
D721
TP-47B
C717
R702
B
– 32 –
Page 33
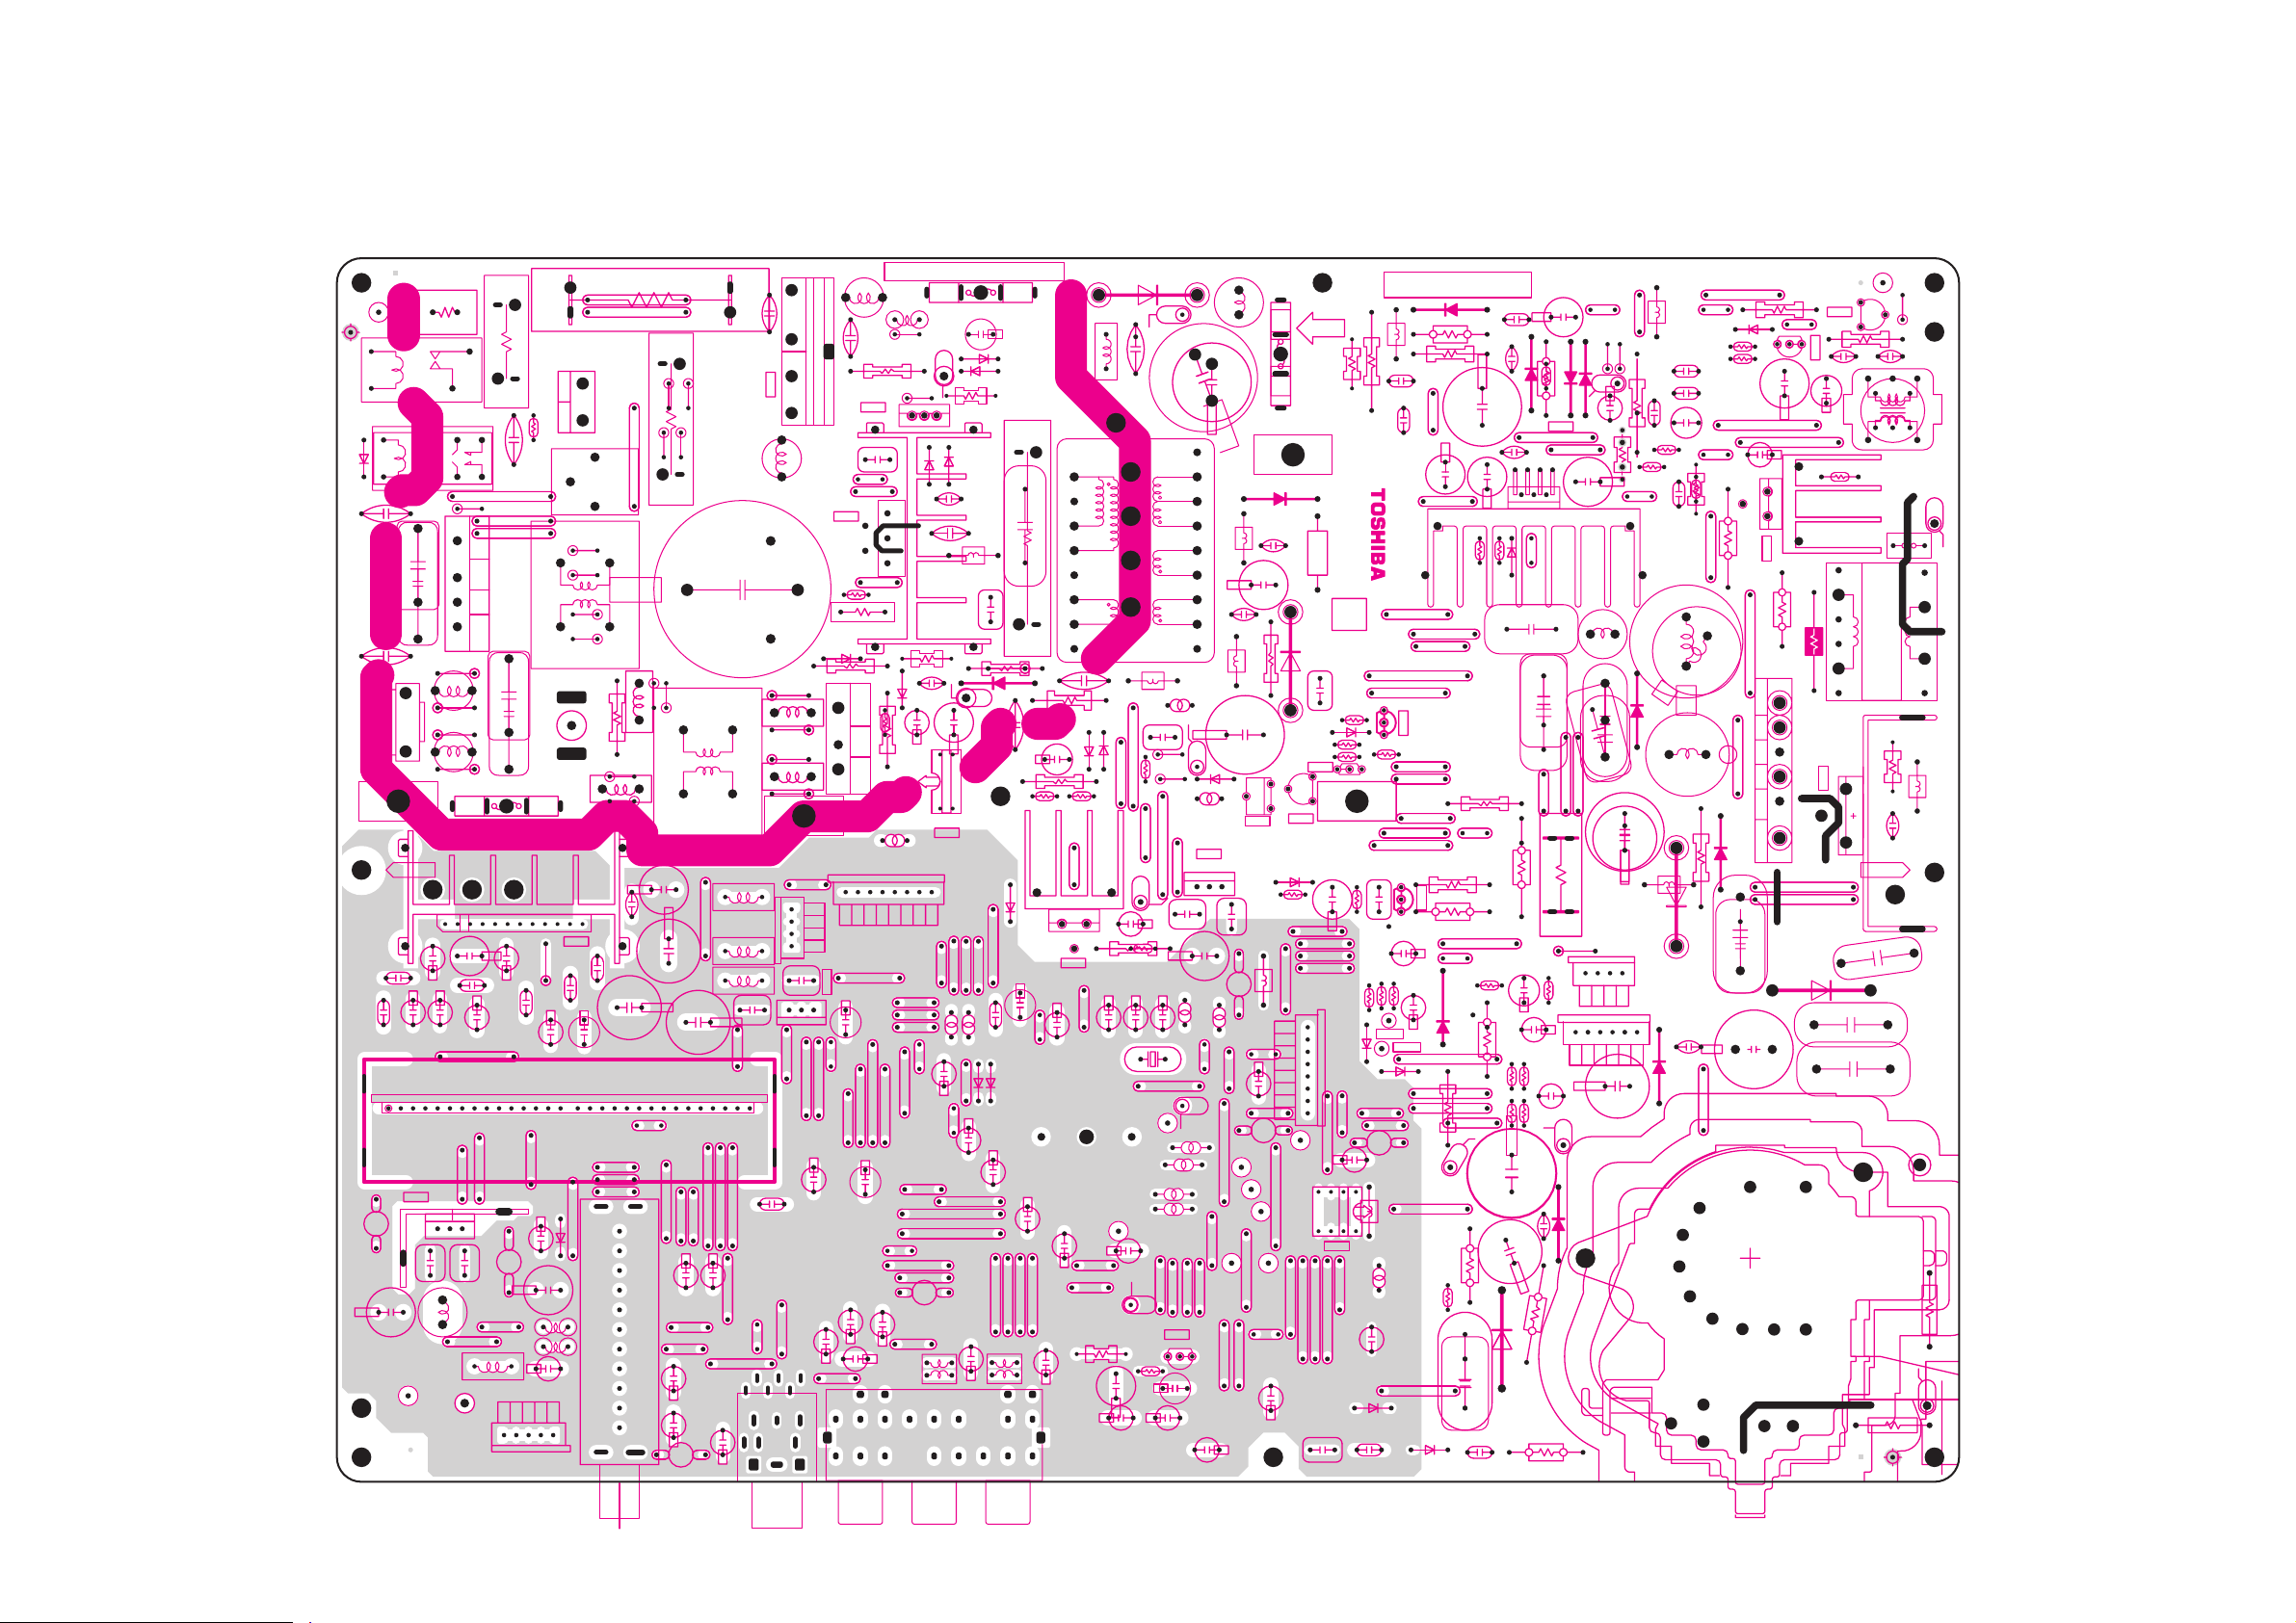
SIGNAL BOARD PD1526R (29SZ5DA)
SIGNAL BOARD PD1526D (29SZ5DE)
SIGNAL BOARD PD1526H (29SZ5SH)
SIGNAL BOARD PD1526G (29SZ5ST)
TOP (COMPONENT) SIDE
D845
C813
C814
U903
B903A
SR81
JP001
P497
C661
PP01
C103
SR83
C662
T400
Q404
R415
P499
G407
E
Q402
C
B
+
C417
C416
C413
T401
R461
A
Z401
R429
B
E
C440
G402
C463
C443
C444
P498
G403
A
R400
L889
LA102
JP162
L502
LA02
JP062
EC
C
JP222
CV34
+
+
1
C502
D
JP064
C624
L893
Q843
L501
+
D882
23
JP044
JP015
JP042
C891
C885
L886
JP066
TE8
L885
T1A L/250V
C884
1711
L891
C899
R898
C
Q883
D470
R4760
C841
+
JP023
L506
JP040
CA61
+
JP059
JP058
TE1
TE2
TE3
JP072
TE7
JP159
JP041
+
PP04
C889
B
G
1
2
34
5
6
7
8
JP060
CS29
D891
C
Q841
TE6
JP067
JP022
Z891
+
F470
+
D885
D848
C470
JP068
R363
F
PD1526
P
C898
R842
R865
R868
Q805
B
E
E
PP03
+
R473
JP095
JP091
PA1 1 A
JP164
JP071
4
5
QA10
JP073
JP069
JP070
C4710
JP115
JP090
JP089
R4650
D4840
1
C472
CB05
8
D4700
C498
E
B
R4670
JP075
R336
C
B
P497R
+
LA01
JP122
JP123
L503
C210
23599866B
D303
L301
R305
C306
C3030
JP218
C363
C323
+
JP219
JP124
JP099
JP100
Q842
R843
JP111
JP103
JP117
JP114
E
Q471
R471
B
R479
+
C4880
R4680
JP094
+
D471
C471
P497X
JP083
D340
JP087
JP088
R472
JP092
JP085
D441
K
C310
R448
R217
JP074
JP163
JP086
JP084
C324
R343
C402
R303
R326
R101
JP093
R344
C449
C308
C313
R309
R331
G309
C311
D308
Q301
JP149
+
C312
+
1753
642
R328
JP097
D305
C496
C439
JP096
JP130
R470
C341
+
R342
+
R233
C342
R230
C220
R227
R218
K
D302
+
+
C303
R327
D408
C445
R403
JP221
+
GJ30
B
D301
+
C325
JP098
C309
L442
JP081
R416
GJ70
4321
3
2
654 1
C447
T461
JP152
GJ31
R310
JP220
+
C442
G461
P903B
D442
P704A
R345
L320
C314
R329
R330
C466
L441
C464
D461
D406
+
4
5
6
16
C321
C473
JP126
R433
JP127
JP063
D431
R432
R434
C326
C322
JP112
JP128
R460
JP080
L461
R474
D467
JP076
3
7
13
14
JP082
C
C419
+
C465
B
E
R462
JP125
6
54
JP079
32
1
C448
2
8
17
C
BE
Q460
R492
R441
P401
C
JPX01
JPX02
C467
+
1
10
9
15
Q430
+
D444
+
GJ43
GJ39
GJ38
GJ42
JP078
CV05
JP140
GND
JP017
CS06
G107
PP02
JP116
C830
+
-
C822
JP215
JP212
Q801
D809
G108
4
P611A
3
2
1
Q835
JP033
JP020
JP145
+
+
L
R
R813
R812
R811
C812
JP203
GJ805
C802
GJ35
P802
BLU
BRN
GJ33
1
1
+
C663
C690
C660
+
+
5
1
Q830
IN
GND
+
C832
+
JP006
P496
GJ34
GJ32
+
JP057
G103C668
M804A
G105
G104
JP002
OUT
C834
L101
JP205
JP206
P802A
C801
T4A L/250V
F801
+
5
C667
C666
C664
+
10
JP007
C106
JP055
LC04
JP109
LC05
54321
P511A
C672
GJ13
C665
JP158
+
C110
C101
M804A
D101
JP209
JP210
R810
JP207
GJ803
GJ801
GJ40
GJ804
R814
GJ802
GJ41
2
P910
1
R808
1
2
3
GJ08
GJ09
GJ11
GJ10
C805
D801
-
L806
C810
T802
R801
G109
T801
GJ36
G106
GJ37
C682
12
CC14
12
10
Q610
C687
C686
+
C670
+
+
C681
15
JP005
JP021
+
H001
20
JP102
IF
NC
32V
NC
+
+5V
NC
SDA
SCL
ADR
Vt
AGC
JP014
JP217
C671
JP004
+
CS03
JP110
C683
+
JP012
JP104
JP105
+
JP160
LC03
LC02
LC01
C831
JP013
OUT IN
JP010
JP009
JP008
25
+
+
CS12
CS13
JP011
+
CS02
CS07
30
CV06
JP156
+
JP216
JP107
PV03
+
CAUTION LIVE AREA
L828
L805
C806
GJ93
R803
GJ161
Q802
E
1
2
3
+
4
5
R805
JP108
R818
R829
R823
D805
R807
1
R815
P803A
C816
3
L888
JP143
C560
JP051
JP052
JP050
JP028
+
JP018
JP054
JP025
JP019
CV01
JP113
+
JP027
JP032
JP024
JP031
JP030
CS04
JP016
+
+
CS05
JP157
+
V/Y
L209
CV04
JP106
SW
E2
COMPONENT
C821
F802
C808
H
D815
+
4
1
Q826
JP049
87654321
L505
+
C410
JP035
Y/SWCB
CR
T3.15A L/250V
+
R822
B
D804
C823
C818
C817
L811
C809
R819
+
H
D806
C819
3
2
P902A
JP046
JP047
JP048
JP053
L507
C320
D474
JP034
D473
C208
+
JP026
JP037
C213
+
JP039
V
L
RSW
MONITER
D810
+
D818
C209
R824
D840
C431
+
C815
JP038
L208
GND
D883
C
L883
+
C893
T862
2
8
G812
R899
C833
R821
D811
R827
JP161
C811
G815
JP200
C846
D828
+
JP201
JP118
R846
GJ81
GJ80
JP029
R828
B
C842
+
PV02
C739
+
C212
Q840
+
C
JP043
JP101
JP065
CV36
RV24
R844
C543
E
XA03
+
TE4
CS11
C547
R840
+
LA72
LA73
CA82
RV21
+
C840
JP153
TE5
D
CA49
+
++
JP061
JP056
QV02
B
CS10
B
JP045
C204
+
C200
JP036
+
GND
E1
– 33 – – 34 –
Page 34
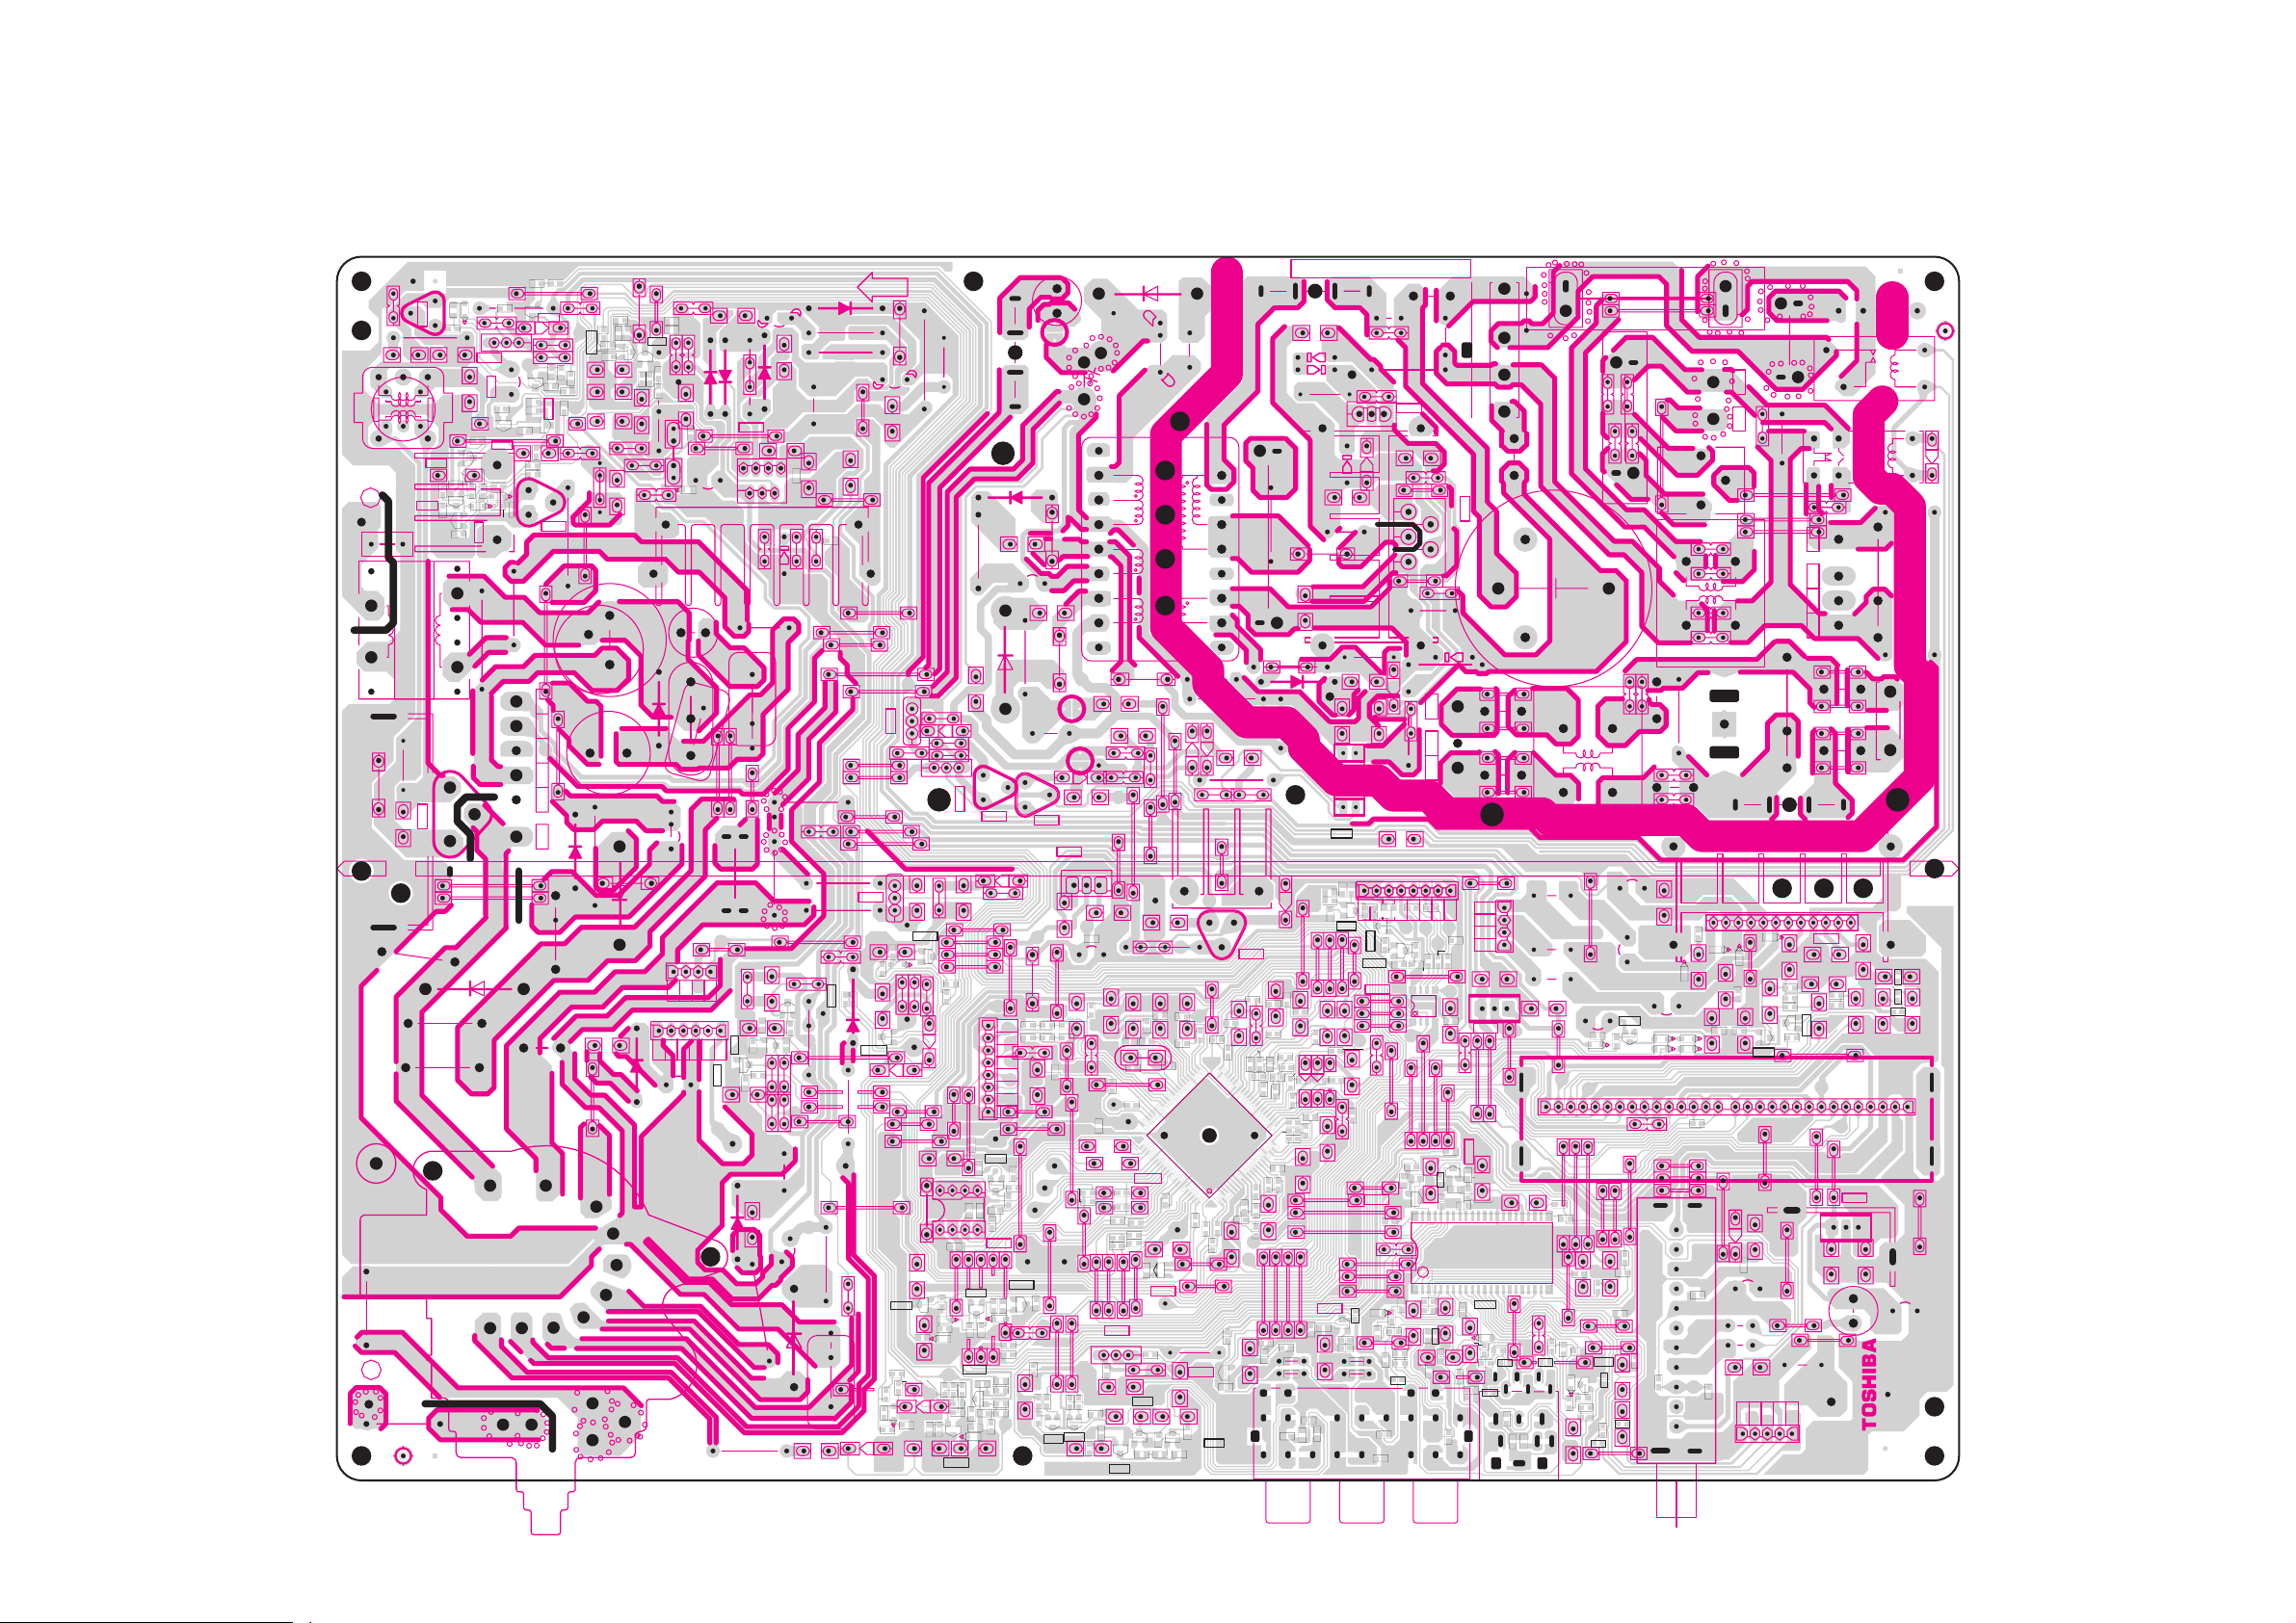
SIGNAL BOARD PD1526R (29SZ5DA)
SIGNAL BOARD PD1526D (29SZ5DE)
SIGNAL BOARD PD1526H (29SZ5SH)
SIGNAL BOARD PD1526G (29SZ5ST)
BOTTOM (FOIL) SIDE
G403
P499
D432
R410
Q402
Q462
E
B
R411
R4604
R4603
R4605R466
EB
C
C
R466
R464
C417
+
B
E
R464
R433
C4300
D432
R410
R411
E
Q430
C416
GJ402
R467
R467
C
Q462
R4602
R4603
R4602
R4604
Q463
D463
E
D463
GJ403
Q461
B
Q461
R441
C
R415
C413
T401
R461
R4605
A
Q463
Z401
T400
R429
G402
C463
BE
Q404
C440
D444
C443
C444
P498
1
10 9
A
R400
R431
C415
R431
C415
B
E
C4300
Q431
C
Q431
B
C
R417
R417
+
E
B
C419
Q403
C
Q403
C418
R469
R469
GJ402
GJ401
Q464
GJ401
B
E
Q464
B
Q465
R468
R468
C
E
Q465
R4606
GJ404
GJ404
GJ405
GJ405
C465
R465
R465
B
D462
D462
GJ403
R463
Q460
R463
E
R492
R337
R460
Q320
L320
R337
R322
JR001
R322
GJ16
GJ16
JR001
Q321
Q320
B
R321
CEC
R323
Q321
B
E
C337
R323
C321
R324
R324
C337
C314
C322
R345
R329
R330
C466
D431
R321
R432
R434
R419
R419
R420
C418
R420
R418
R418
C326
R4607
R4607
C
R4606
R462
C
L441
654
D442
+
GR301
GR301
C325
D310
GR30
D310
R319
R319
R310
C308
R309
D308
D301
R331
+
Q301
37
1
+
C309
462
L442
C496
C439
GR30
R314
R314
GJ331
GJ331
C442
L461
3
G461
+
C464
R416
P401
C
1
D467
R474
D461
C467
+
C448
C473
P704A
D406
2
1
3
4
P903B
4
5
3
6
+
C447
C341
R342
R349
B
C342
+
R349
Q208
B
R232
R232
12
Q208
Q200
E
B
R230
C
E
R228
Q200
R228
R229
C220
R229
R218
2
T461
3
4
5
D302
C303
+
6
7
8
13
16
15
14
17
R403
327
R
C311
G309
C
449
C
+
R227
C313
R470
R231
D303
R303
R305
L301
C3030
B
R363
R336
C312
D305
C306
+
+
C315
C323
C324
C315
R325
R325
R326
R328
C363
+
Z891
C898
R842
C
E
Q842
B
R843
R101
R471
R479
R344
R4740
R4740
C
Q340
Q340
E
R341
R231
D471
R341
R343
R233
E
Q471
C472
B
+
R4620
R4620
C4880
D4810
E
D4810
R4670
R4810
R4810
R4630
+
R4680
R4630
C471
P497R
C
Q4840
BE
P497X
Q4840
D340
R472
Q4860
B
D848
R865
R868
C
E
B
Q805
Q841
+
C470
R473
Q4860
C
R4770
R4770
R4820
R4650
R4820
1
32
D4840
54
6
7
8
PA1 1 A
TE6
C501
C501
QB05
LA01
Q210
R4713
R4716
RB05
CB05
E
1
RB05
4
CA14
RA11
CA15
CA14
CA15
5
8
CA09
CA09
R213
E
Q211
R213
B
E
Q211
D210
C
R211
R214
R212
R215
R212
R214
D211
D211
C469
Q4030
R4710
R408
R4710
C469
R408
R4715
C
R4715
R4714
R4711
Q4030
R4713
C404
B
R4714
C404
E
R4712
R4712
C4712
R4716
Q4710
D4710
C
D4710
C498
C4710
Q4710
C4712
C310
+
+
D408
R448
R217
C445
C402
D441
R4702
R4701
R4701
R4704
C4700
C4700
R4704
R4702
Q210
D210
R215
R4703
D4701
D4701
C4701
C4701
L503
CB
C210
R4703
R4711
D4700
D891
+
B
E
QA10
R210
R211
E
B
L885
F470
T1A L/250V
+
D883
L883
C893
84
C8
T862
17
L891
C899
C891
11
C885
D885
C
B
QB05
RB49
C
JR002
RA11
RA12
RA12
R210
RA74
RA74
DA78
RJ01
RJ02
RJ02
R409
+
R409
C405
R406
R406
C403
R407
R407
+
RB48
RB48
QA71
DA78
C405
C403
JR002
B
E
RJ01
CA55
TE7
R898
CA56
R4760
CA61
TE2
RB49
TE3
QA71
C
CS29
RS24
B
G
D470
L506
L886
C889
D882
C
Q883
Q843
3
C841
+
L501
RA55
RA65
RA65
CA55
RA55
CA56
RA56
RA66
RA66
RA56
CA54
CA54
+
TE1
TE8
CA65
CA65
RS27
RS27
RS21
RS22
RS22
RS21
RS20
RS19
RS20
RS24
B
E
E
QS02
QS01
C
C
QS01
QS02
C624
G815
L889
D828
R899
C846
R846
L893
2
1
C842
C840
R844
C503
C503
R840
C502
C543
C547
RA54
L502
RA54
RA50
XA03
RA61
RA61
CA60
CA60
TE5
LA02
LA102
LA72
RA76
RA72
CA72
RA76
CA72
RA72
CA73
CA73
RA77
LA73
RA59
RA59
RA79
QV02
EC
RV25
RV25
+
RS19
RS23
+
RS23
B
R624
R624
+
R623
C
Q623
R623
RA70
RA77
RA79
CA49
+
CA51
CV34
BE
Q623
R545
CA48
C500
C500
+
CA48
RA49
RA50
RA49
R501
CA51
CA50
CA50
RA70
63
64
QA51
CA77
CA77
TE4
RA01
RA01
+
RA80
RA80
RA81
RA81
3
4
Q104
R121
5
1
Q104
R121
B
RV26
RV26
RV21
CV36
QS04
+
CS10
CS11
C
B
QS04
RS04
QS03
RS04
EE
C
RS03
B
RS01
CS15
RS01
RS03
RV24
R545
R501
84
+
RS02
E
43
RA03
Q201
RS02
CS15
+
CA82
2
8
C811
D811
+
C833
R828
R821
R827
Q840
C
R512
C739
R512
R502
R502
+
+
R544
R513
R513
R401
R515
R544
R515
42
R320
C407
QA51
C201
1
C201
RA05
R225
RA03
RA05
RA69
R225
RA69
C200
RA04
RA04
R202
JR003
JR003
+
C212
C
E
Q201
B
R200
V
R200
L
QS03
R
CAUTION LIVE AREA
F802
T3.15A L/250V
C808
D810
D818
R822
C818
L811
C809
R824
R819
D806
C815
3
2
Q826
R700
R701
C700
D840
B
C430
C430
R4601
R4601
R402
R402
R320
R401
C407
R405
C409
C409
C207
C207
C205
C202
C205
C202
C203
C203
C206
C206
C431
C406
C476
C476
R702
R702
C320
C462
C462
GR45
GR45
+
L507
C401
C401
C408
R404
D474
C408
C406
R4200
R425
R424
C4200
C4200
R424
R4200
R405
C475
C475
D473
R221
R219
R219
22
C221
R222
R221
R220
C221
R222
+
R220
21
C208
C209
R216
R216
+
C204
+
Q202
R208
R204
R208
B
R204
GJ57
R202
GJ57
R201
+
GJ48
C213
GJ48
R201
L208
GJ49
GJ49
Y
CC26
Cb
CC26
RC17
RC16
CC25
RC17
CC25
RC16
Cr
MON OUT COMPORNENT
D801
+
C805
-
L806
R810
R814
P497
R813
R812
SR81
P910
21
R811
C812
1
2
SR83
D845
L805
L828
+
C806
R803
C
Q802
E
B
D804
D815
C822
R808
T802
G109
3
C813
C802
P802A
C814
G105
BLU
C801
G104
P802
BRN
R801
G106
M804A
T4A L/250V
F801
C823
C817
R823
C821
+
+
C816
C819
4
D805
R815
R818
R807
R805
R829
1
32
54
D809
P803A
Q801
+
C810
G107
T801
G108
1
L888
8
R704
R700
R704
R701
C700
R703
Q701
C
R710
R703
E
R705
R710
B
C
Q701
Q703
R705
R706
Q703
R706
E
Q702
R708
Q502
L505
+
R404
C410
R425
C211
C211
Q205
R205
R205
CC28
DV04
DV04
C
JR007
JR007
RV10
Q202
CV20
E
CV20
GJ58
RV06
GJ58
R203
CC10
RV07
GJ50
R203
GJ50
RV07
L209
GJ51
GJ51
JR004
PV02
RV34
RV33
RV33
1234567
C831
LC02
23
23
22
22
RV13
JR010
+
C682
CC14
12
10 5
R687
R687
+5V
SCL
GJ06
D681
C681
D672
D673
D670
D671
ADR
D681
C687
+
C670
D672
D671
++
RJ05
RJ05
IF
NC
32V
NC
CC01
NC
GJ07
Vt
AGC
D683
C686
R673
CC01
GJ07
C683
+
+
C671
Q670
B
E
D673
Q670
R675
R675
D674
R674
C
D674
RV90
RV90
RV91
RV91
RS14
CS03
RS14
+
RV13
CV11
RV30
RV30
CV11
E
B
QV03
DV02
DV02
RV16
RV29
RV14
RV14
RV05
+
CS07
CV19
QV03
C
RV16
D670
R674
20
25
CV03
CS02
CV03
CC20
CC20
RS15
+
RV93
RV93
RS15
SDA
RS10
+
RS10
CS12
JR008
GJ06
JR008
H001
RV29
+
RV05
RV15
RS11
RV15
RS11
CS13
CV19
D680
D683
D680
D682
C667
D682
R686
C665
R686
R672
R673
C
B
Q671
Q672
R672
C
R671
E
R671
C672
Q672
15
10
U903
B903A
D101
C106
+
C105
C105
+
C110
LC04
LC05
G103
C101
+
5432
1
P511A
1
Q610
+
+
+
C663
C690
R666
R664
R666
C666
R664
R667
R665
R665
E
R663
Q671
C664
B
+
R662
R662
C660
C662
R661
R661
C661
R660
R660
1
R667
R663
C668
+
+
5
Q830
OUT
C834
GND
L101
IN
C832
+
C103
23547492
MCL-437F
P496
C512
C511
C512
E
B
R709
B
Q702
C
R520
R709
R707
R708
R520
R707
8
Q502
1
432
C511
P902A
C510
C510
1
R521
P611A
R522
R521
R522
5
C830
LC01
IN
+
C561
C561
Q835
OUT
4
C560
30
RV92
CV01
QV04
RV92
R206
R206
QV04
CV05
RV01
GJ05
C
GJ52
GJ52
LC03
R207
R207
B
C
44
44
E
1
1
RS18
CC28
RV10
+
CS05
RV06
CC10
RS08
CV04
RS08
JR004
RV34
RV01
GJ05
E
B
CV02
RV04
Q205
RV04
CV02
CV33
RV02
RV02
RS18
RV11
+
RS17
RS17
CS04
CS06
CC09
RS07
CV22
CC09
RS07
RC14
RV12
RC12
RC14
RV03
RV03
RC12
CC07
CC07
RS05
RC15
RC15
E2
CV06
CV33
QV01
QV01
RV11
DV01
DV01
CV22
RV31
RV31
JR010
JR011
RV12
JR011
JR009
RS05
JR009
CC08
CC08
RC13
PV03
RS06
RC13
RS06
E1
– 35 – – 36 –
Page 35
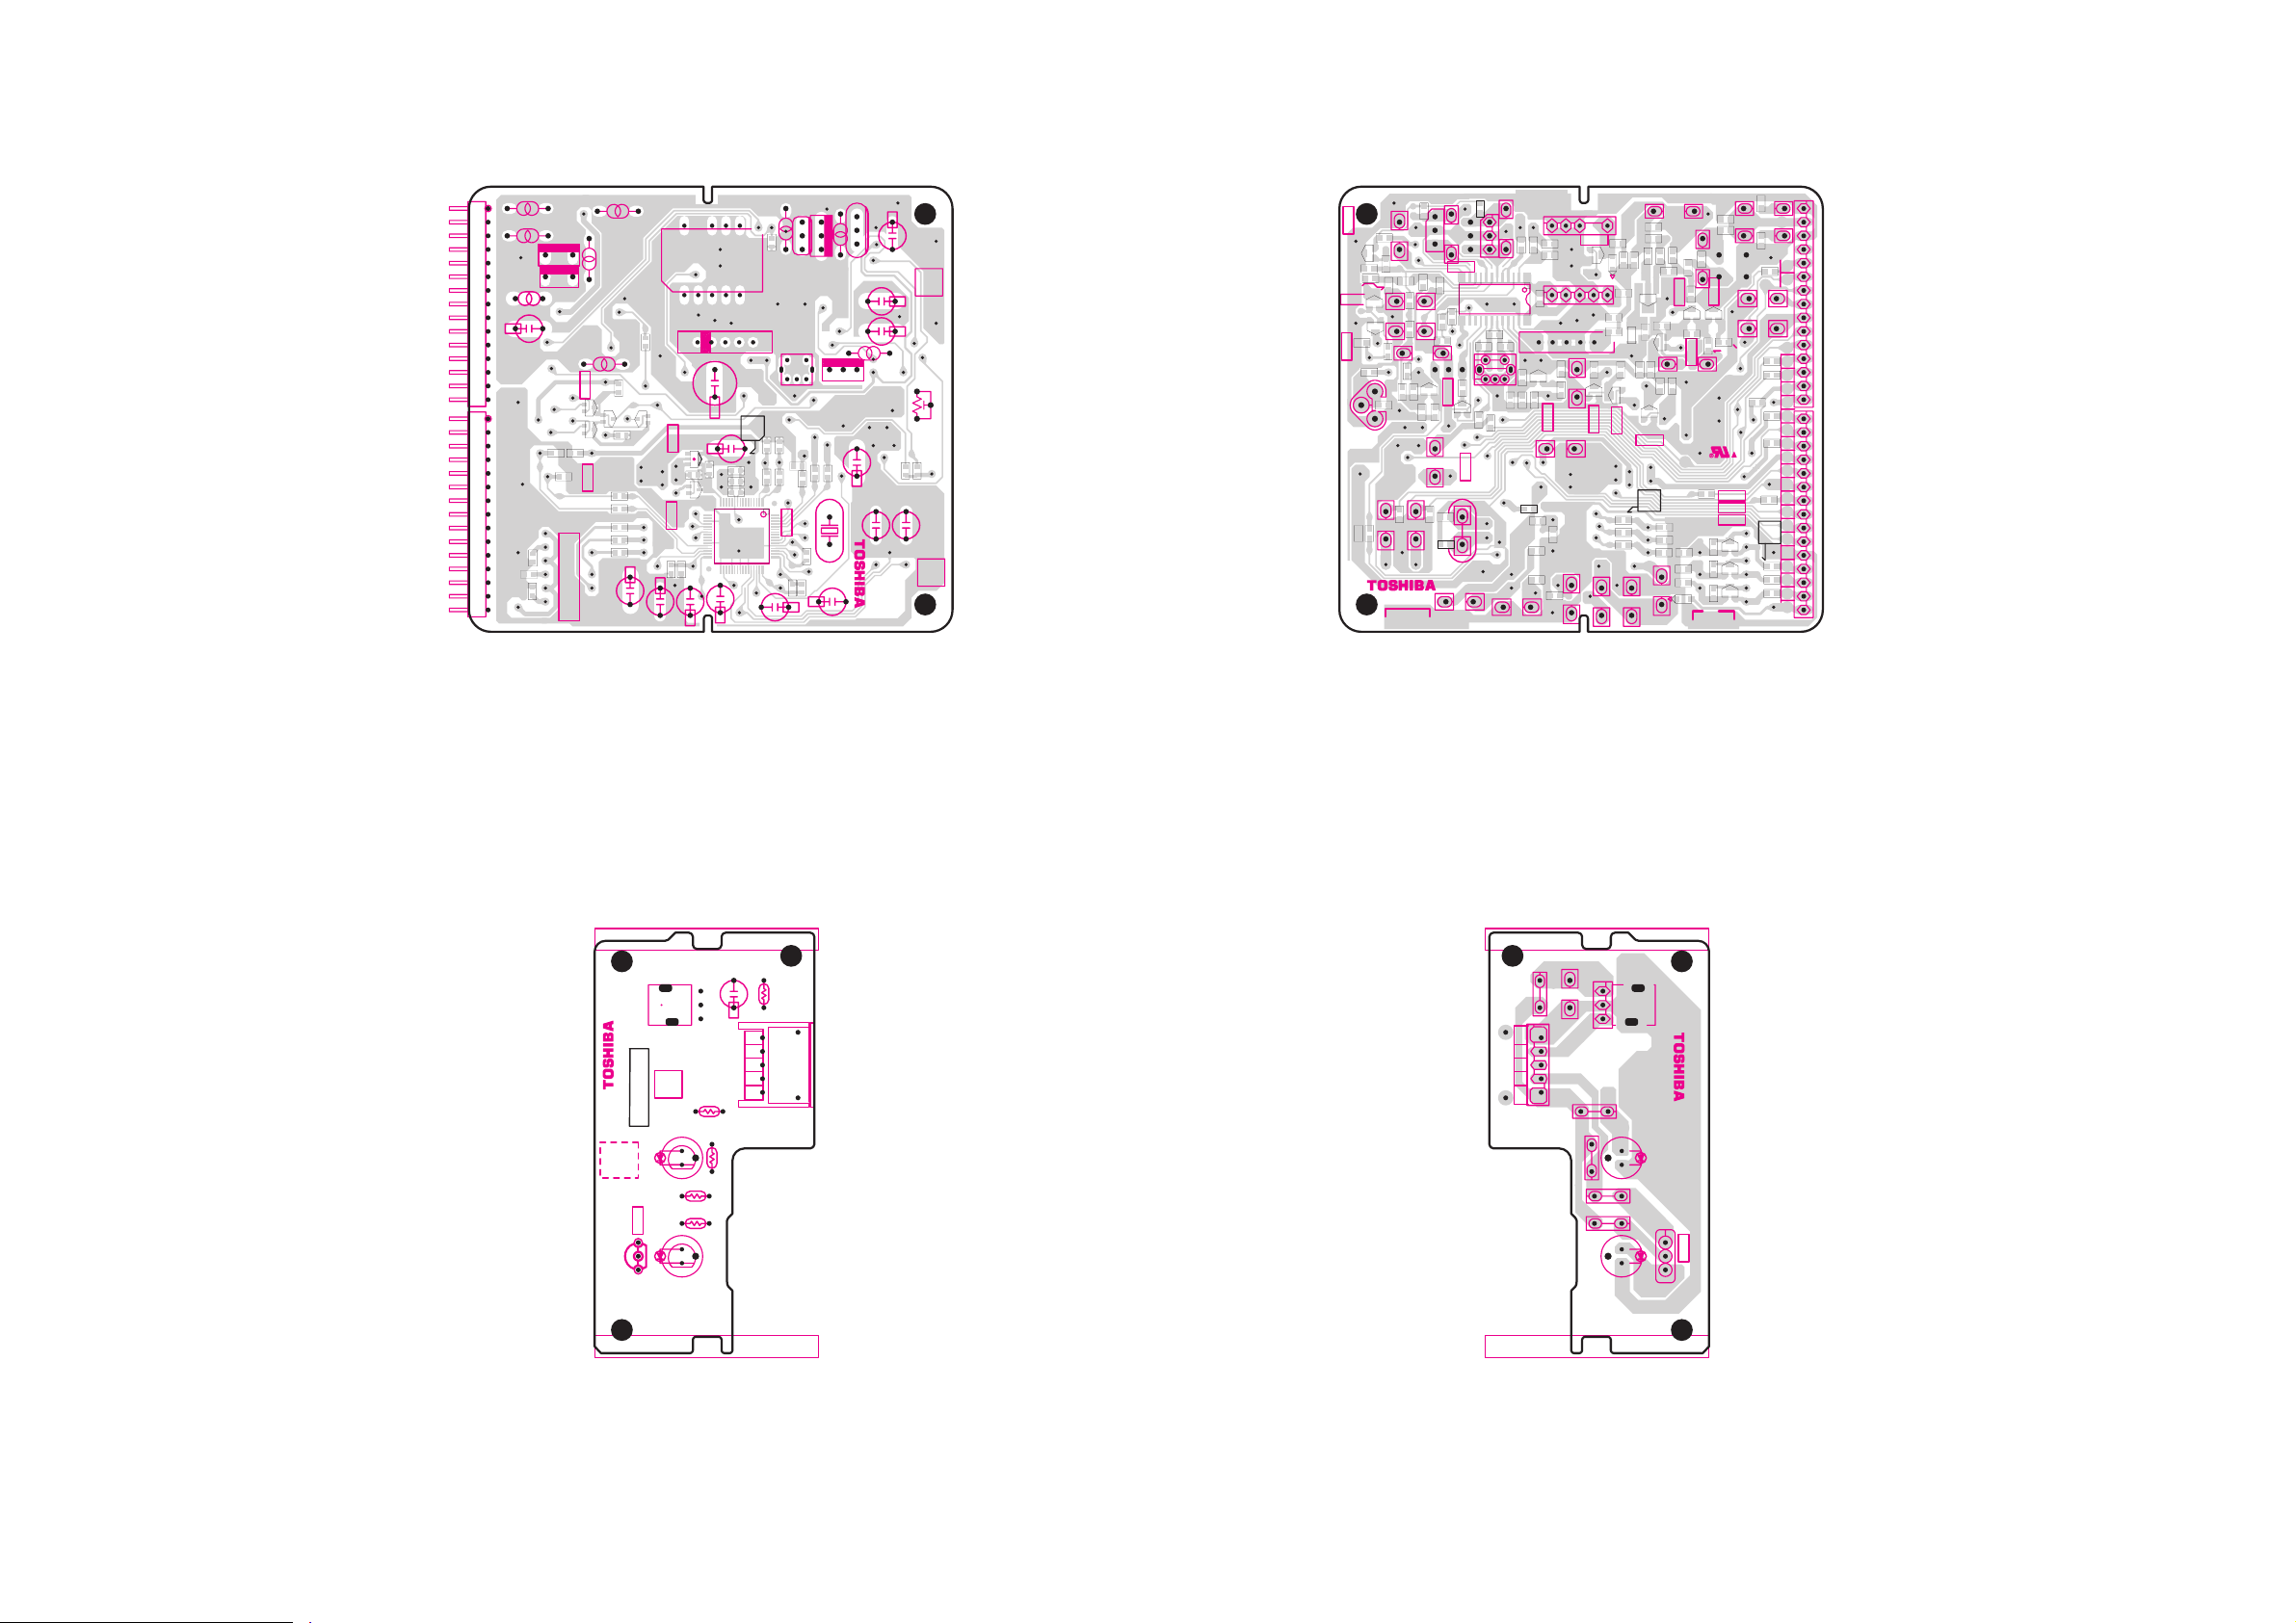
IF STEREO BOARD PD1474A
TOP (COMPONENT) SIDE
IF STEREO BOARD PD1474A
BOTTOM (FOIL) SIDE
1
5
10
PI01A
15
20
PI02A
25
30
16
RD04
CI31
LI01
RI45
RI45
RD27
GRI09
RI03
LI04
CI57
LI57
CI57
RI52
RI52
RI01
CI56
RI01
CI56
ZI54
RI47
GRI09
ZI55
QI06
QI06 QI12
LI10
+
CI31
RI46
CI15
GRI08
RI46
CI15
GRI07
RI83
RI83
RD22
RD21
RD20
QD05
QD03
RD19
QD04
RD18
RD17
RD11
QD05
RD13
RD11
QD03 QD04
RD25
RD25
RD27
15
LI56
RI47
PI01A
10152025
GRI08
GRI07
RD22
RD21
RD19
PI02A
RD18
RD17
RD13
30
RI81
RI21
QI81
RI17
CI17
QI04
RI18
RI18
RI14
+
QI04
RI20
RI20
QI92
CI18
RI14
RI81
CI12
RI21
RI61
QI81
RI61
CI60
QI92
CI60
CI81
CI81
CI91
CI08
LI61
RI82
RI82
RI32
RI32
RI79
RI79
CI61
RI67
CI61
RI33
RI33
RI51
CD09
CD10
CD28
CD28
CD26
CD27
CD26
CD27
23547474
LI57
LI03
LI56
LI01
LI10
ZI54
ZI55
+
QI17
DI01
DI01
QI16QI17
RD08
CD30
RD08
CD30
QI16
CD31
RD10
CD31
RD04
RD09
CD35
CD34
23599848A
CD25
CD02
RD06
RD06
RD05
RD05
RI85
RI84
RI85
RD10
RD09
CD35
CD34
CD25
+
10
ZI01
1
RI40
RI40
LI04
DI02
DI02
QD02
RI84
RD02
QD06
CD14
CD13
CD14
CD13
CD15
+
CD01
6
RI41
RI41
ZI05
LI06
ZI06
LI07
5
ZI02
+
LI54
CI10
CD22
CD21
CD17
+
CD18
CD08
QD02
CD39
QD06
CD39
+
CD21
CD22
CD19
RD02
CD11
RD16
CD17
RD15
RD16
RD15
CD18
CD19
QD01
QD01
+
CD07
CD03
+
CD24
CI08
ZI64
GRI01
GRI01
GRI02
CD11
RD01
GRI02
RD01
XD01
CD12
CD12
CD04
CD03
CD04
CD05
ZI07
+
CI17
+
CI18
+
+
LI61
RI51
GRI04
CD16
CD10
GRI03
GRI03
GRI04
CD09
PD1474
+
CI13
RI68
RI17
CI12
CI13
RI67
CD29
+
ZI07
+
+
QI61
RI68
CD29
RI69
RI69
ZI05
LI07
QI01
RI15
RI80
RI15
RI92
RI80
RI92
CI91
ZI64
QI61
QI60
+
CD16
CD37
CD37
CD38
CD38
DS-1107
CD05
RI16
RI16
ZI06
LI06
QI01
CI25
CI25
CI21
CI20
CI21
LI54
RI91
RI91
RI72
GRI06
GRI05
GRI05
GRI06
QI60
XD01
CD36
RI72
CI20
LD01
RD07
CD24
RI42
RI42
RI71
CI71
CI71
CD23
ZI01
6
RI31
RI31
RI30
CI30
CI30
RI30
5
RI08
RI08
ZI02
CI09
+
CI09
QI71
RI73
RI74
RI73
QI71
RI74
RI71
CI10
CD08
+
LD01
CD36
LD02
LD02
RD07
+
CD23
CD06
CD06
+
QI07
CI04
RI10
CD07
LI03
10
QI07
RI11
RI10
QI08
QI08
+
RI09
RI09
RI13
CI03
RI13
CI03
RI06
RI05
RI02
CI14
CI14
RI12
DI03
RI12
DI03
1
CI05
RI11
CI04
RI07
RI19
QI09
QI09
RD24
RD23
RD14
CD01
CI02
RI02
RI06
RI05
RI04
RI04
CI05
RI19
CI02
QI02
RI03
QI02
RI44
CI06
RI44
CI06
RI07
QI05
QI05
QI12
CI01
RI43
RI43
RI88
RI87
CI01
QI15
RI87
RI88
QI15
RD20
RD24
RD23
RD14
CD33
CD33
CD32
CD32
CD20
RD12
RD12
CD20
RD26
RD26
RD28
CD02
RD28
DD01
DD01
CD15
+
+
FRONT BOARD PD1533D-1 (29SZ5ES)
FRONT BOARD PD1533A-1 (29SZ5DE/29SZ5SH/29SZ5ST)
TOP (COMPONENT) SIDE
+
RB09
RB04
RB02
DB02
CB01
54321
P501B
RB01
RB03
DB02A
KB01
23599873B
-1
QB02
B
PD1533
C
E
DB01A
DB01
FRONT BOARD PD1533D-1 (29SZ5ES)
FRONT BOARD PD1533A-1 (29SZ5DE/29SZ5SH/29SZ5ST)
BOTTOM (FOIL) SIDE
+
RB09
CB01
5 432 1
P501B
RB01
RB03
RB04
RB02
23547497
DB02A
DB02
DB01A
BC
E
KB01
DB01
MCL-437F
QB02
– 37 – – 38 –
Page 36
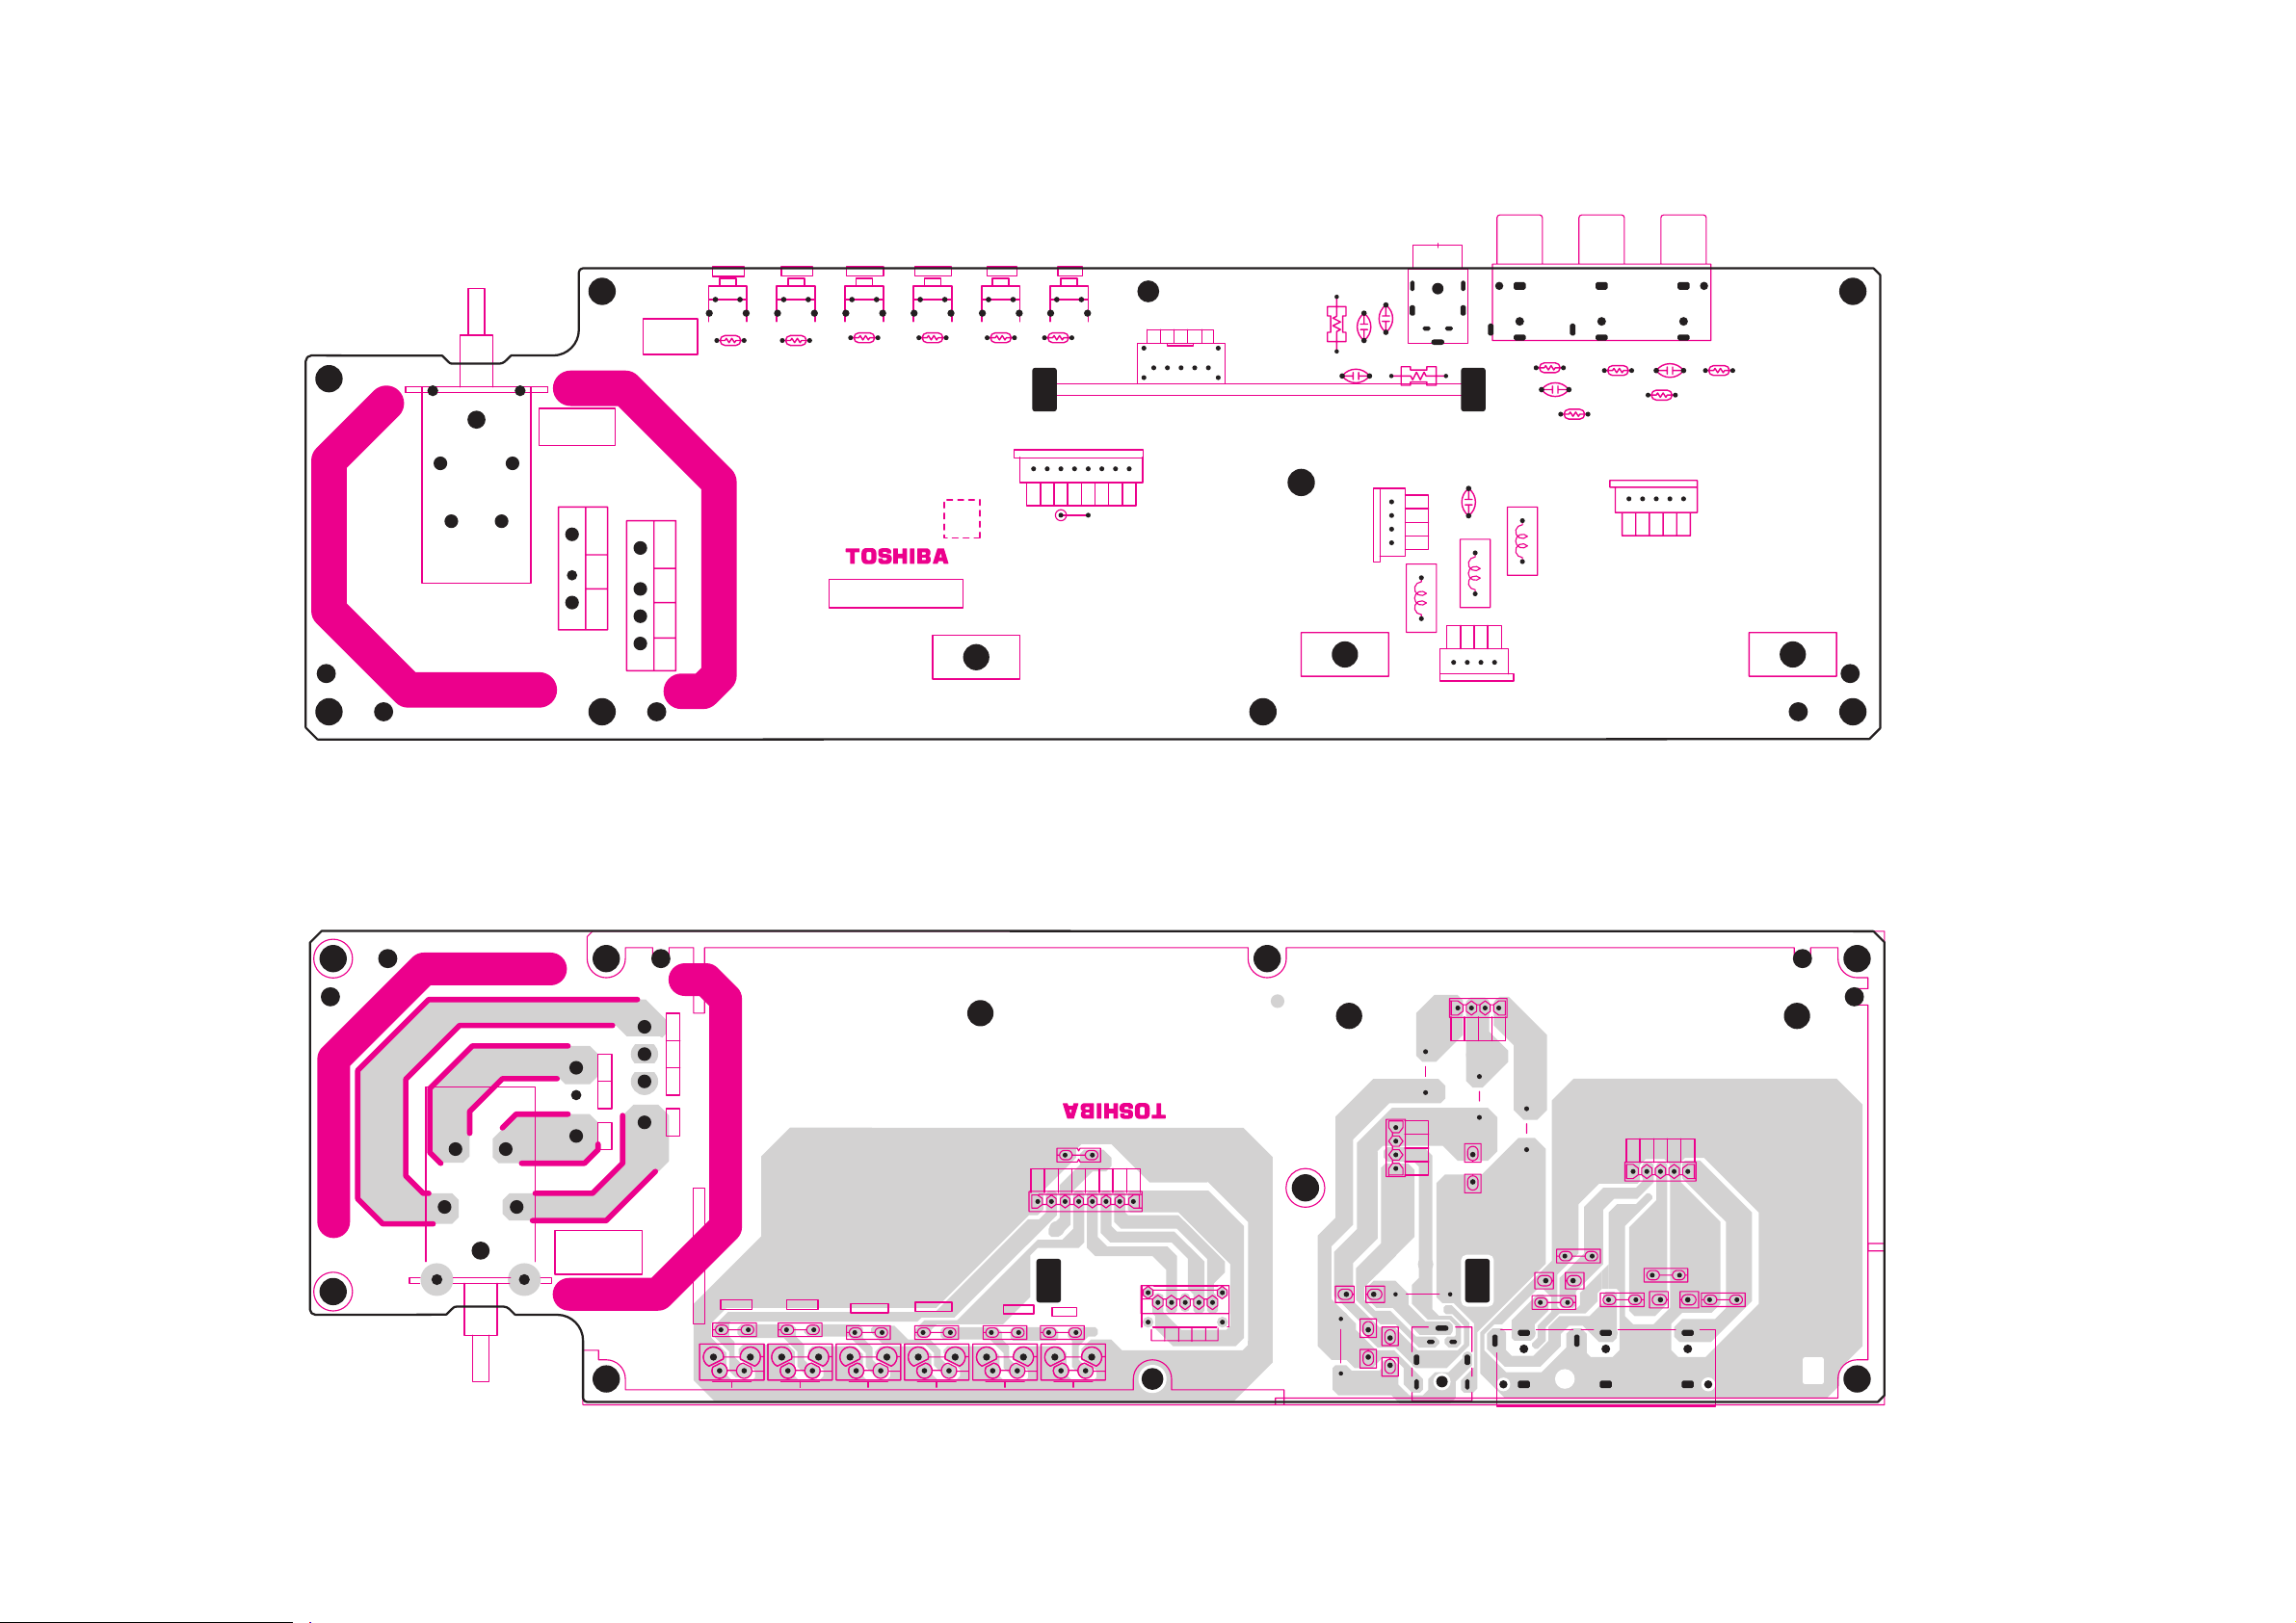
RMT BOARD PD1533D-2 (29SZ5DA)
RMT BOARD PD1533A-2 (29SZ5DE/29SZ5SH/29SZ5ST)
TOP (COMPONENT) SIDE
CH UP
SA01
RA73
S801
CH DN
SA02
RA82
VOL UP
SA03
RA71
VOL DN
SA04
RA83
CAUTION
LIVE AREA
PD1533
23599873B
P803B
1
21
P802B
3
432
VIDEO
SA06
RA84
-2
PP03
RA78
MENU
SA07
PA1 1B
GJ71
CC33
P501A
12354
RS61
87654321
PP02
CC30
CC31
RS62
CC32
P661
RV22
CV08
RV20
RV18
RV19
PV01
CV07 RV17
43
P601
2
1
LC08
LC07
LC06
4
32
1
P611B
54321
P511B
PP01
RMT BOARD PD1533D-2 (29SZ5DA)
RMT BOARD PD1533A-2 (29SZ5DE/29SZ5SH/29SZ5ST)
BOTTOM (FOIL) SIDE
P611B
23547497
MCL-437F
LC08
1
P601
876 12345
PA1 1B
432
32 1
P803B
423
P802B
1
LIVE AREA
CAUTION
P501A
S801
CH UP
RA73
SA01
CH DN
RA82
SA02
VOL UP
RA71
SA03
VOL DN
RA83
SA04SA06
RA84
VIDEO
MENU
RA78
SA07
54321
RS61
CC30
CC33
RS62
CC31
CC32
P661
1
234
LC06
LC07
54321
P511B
RV19
CV08
RV22
RV18
CV07
RV20
PV01
RV17
– 39 – – 40 –
Page 37
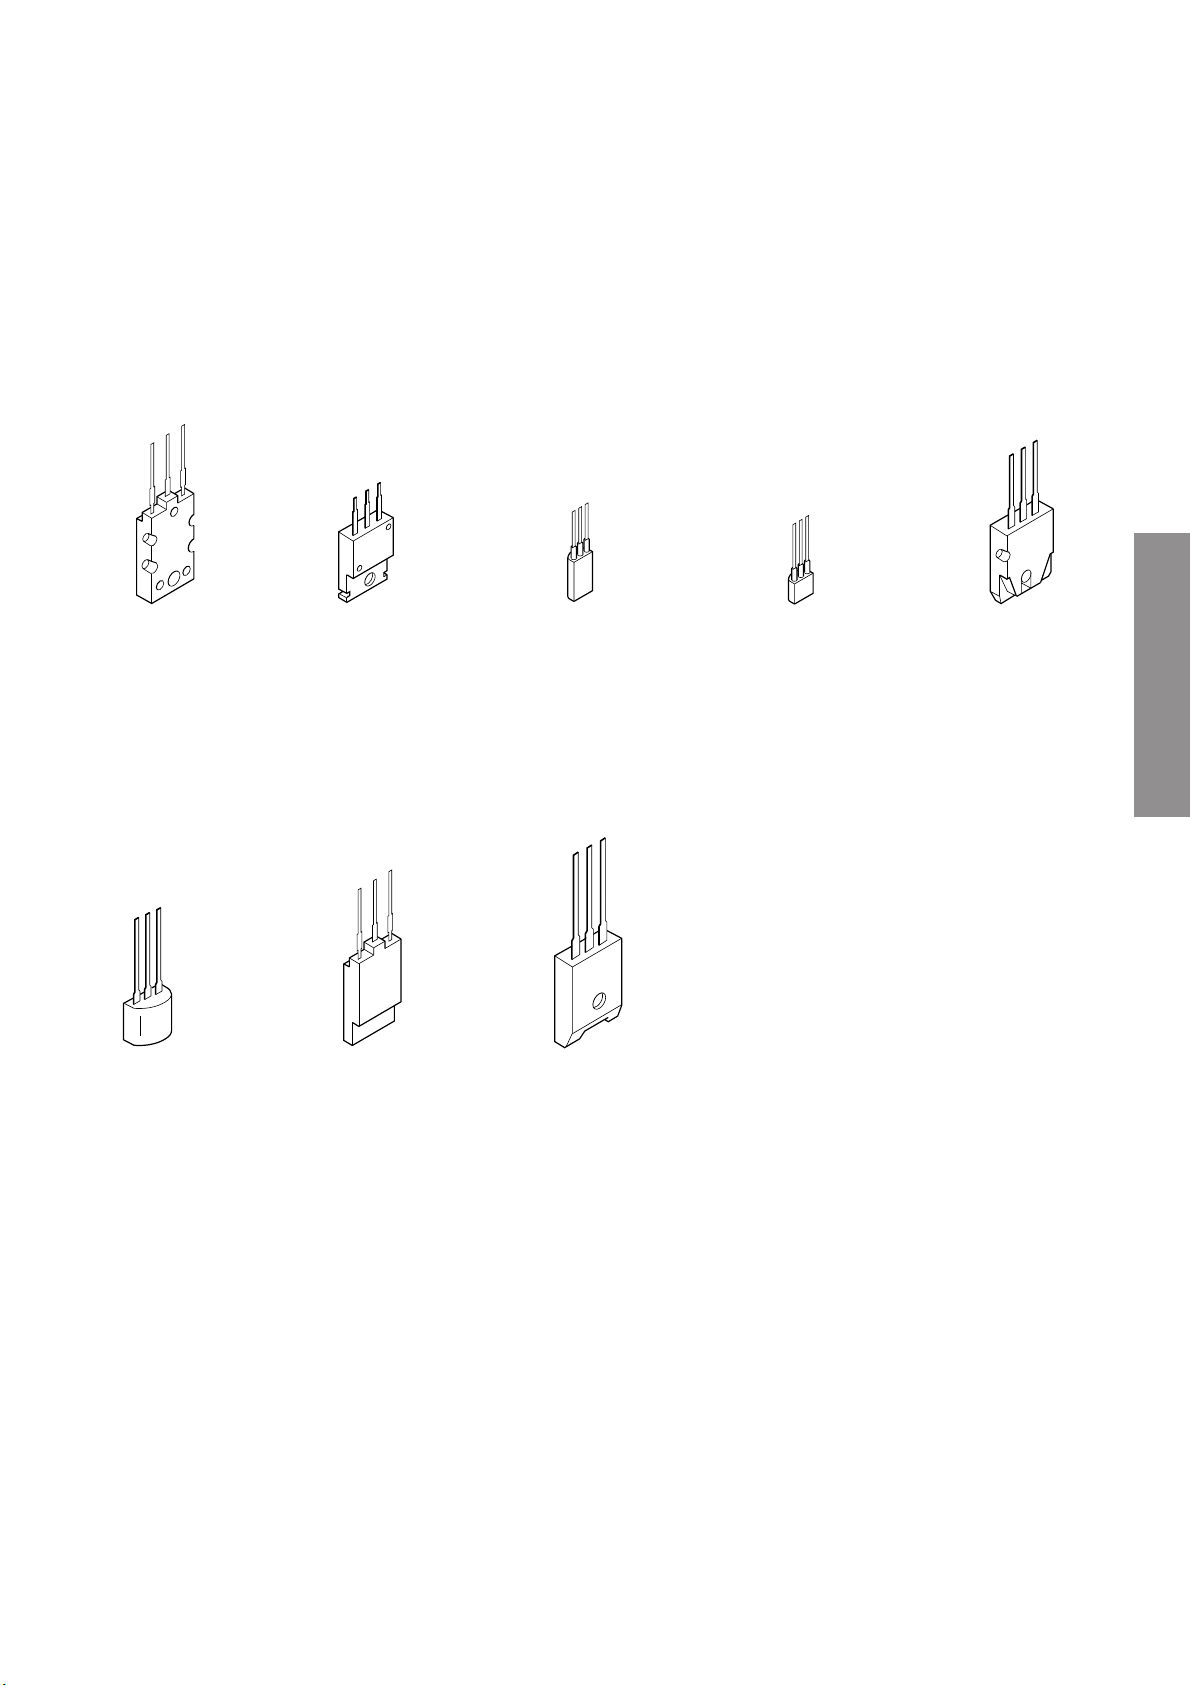
TERMINAL VIEW OF TRANSISTORS
2SD2253
RN2203
(old)
2SC5243
B
C
E
RN2201
RN2004
RN1203
RN1204
RN2204
RN1205
RN1202
RN1201
B
C
E
2SC3852
2SD1763A
2SC1569
2SC4544
2SA1788
2SA1306
2SA1186A
B
C
E
2SD1554
2SD2253
2SD1556
2SC5143
B
C
E
2SC752GTM
2SC2482
2SC2655
2SC4721P
E
C
B
ON4409
B
C
E
2SC752
2SA562TM
2SA1015
2SC1815
2SC2878
2SC1740S
2SC2120
2SA9335
E
C
B
2SA1788
B
C
E
SPECIFIC INFORMATIONS
– 41 –
Page 38
SCHEMATIC DIAGRAM
MODEL : 29SZ5DA/29SZ5DE/29SZ5SH/29SZ5ST
WARNING: BEFORE SERVICING THIS CHASSIS, READ THE "X-RAY RADIATION PRECAUTION", "SAFETY
PRECAUTION" AND "PRODUCT SAFETY NOTICE" ON THE MANUAL FOR THIS MODEL.
CAUTION: The international hazard symbols " " in the schematic diagram and the parts list designate components
which have special characteristics important for safety and should be replaced only with types identical to those in the
original circuit or specified in the parts list. The mounting position of replacements is to be identical with originals.
Before replacing any of these components, read carefully the PRODUCT SAFETY NOTICE on the MANUAL for this
model. Do not degrade the safety of the receiver through improper servicing.
NOTE:
1. RESISTOR Resistance is shown in ohm [K = 1.000, M = 1.000.000]. All resistors are 1/6W and 5% tolerance
carbon resistor, unless otherwise noted as the following marks.
1/2R = Metal or Metal oxide of 1/2 watt 1/2S = Carbon compsistion of 1/2 watt
1RF = Fuse resistor of 1 watt 10W = Cement of 10 watt
±10% G = ±2% F = ±1%
K =
2. CAPACITOR Unless otherwise noted in schematic, all capacitor values less than 1 are expressed in
the values more than 1 in pF.
All capacitors are ceramic 50V, unless otherwise noted as the following marks.
Electolytic capacito
Mylar capacitor
µ
F, and
SPECIFIC INFORMATIONS
3. The parts indicated with "
4. Voltages read with DIGITAL MULTI-METER from point indicated to chassing ground, using a color bar signal with
all controls at normal, line voltage at 220 volts.
5. Waveforms are taken receiving color bar signal with enough sensitivity.
6. Voltage reading shown are nominal values and may vary ±20% except H.V.
SCHEMATIC DIAGRAM STRUCTURE:
– MAIN Circuit TUNER [ SHEET– 1/9 ] ........................ 1/11
– CRT DRIVE Circuit ........................................................................................................................ 10/11
– FRONT AV Circuit.......................................................................................................................... 11/11
" have special characteristics, and should be replaced with identical parts only.
– AV SW [ SHEET– 2/9 ] ........................ 2/11
– VERT [ SHEET– 3/9 ] ........................ 3/11
– HDEF [ SHEET– 4/9 ] ........................4/11
– VCD/MICON [ SHEET– 5/9 ] ........................ 5/11
– A-PRO/AUDIO-AMP [ SHEET– 6/9 ] ........................ 6/11
– PROTECTOR [ SHEET– 7/9 ] ........................ 7/11
– POWER [ SHEET– 8/9 ] ........................ 8/11
– LOW B REG [ SHEET– 9/9 ] ........................ 9/11
– 42 –
Page 39
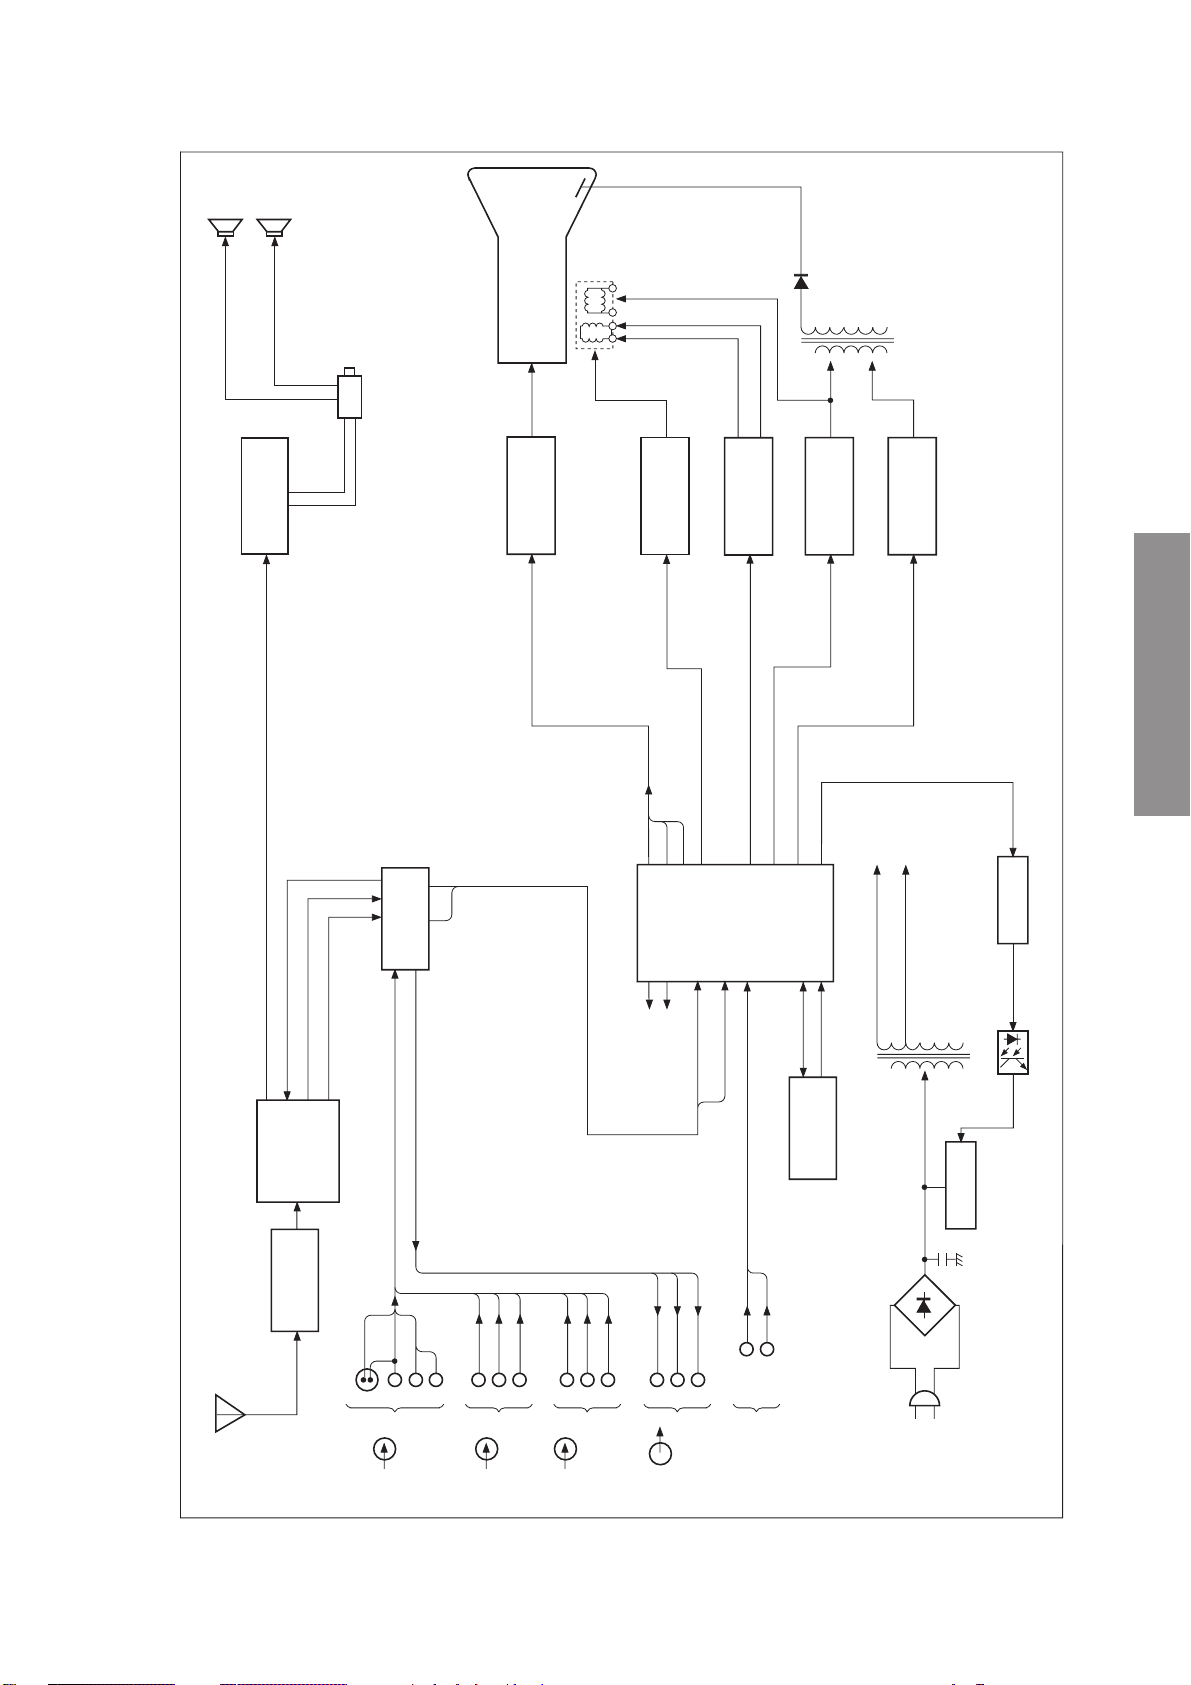
L
R
CRT
H.V.
AUDIO AMP
Q610
HEAD PHONE
C
V901
R/G/BR/G/B
VIDEO DRIVE
Q901,Q903,Q905
H
V
D.Y.
VSM
Q711,Q712
B
R
G
V_DY_Y
Q301
V OUT
V_DY_G
V. DRIVE
Q402-Q404
H OUT
H. DRIVE
Q460-Q463,Q465
F.B.T.
EN
C BUS CONTROL BLOCK
2
*I
SPECIFIC INFORMATIONS
POWER ON/OFF
CIRCUIT BLOCK DIAGRAM
SP_L/W/R
AUDIO_L/R
U903
*
H001
*
TV_VIDEO
TV_L/R
IF
TUNER
SV
QV01
V
(1)
AV SW
*
L
AV IN
VIDEO
R
RESET
Q841,Q842
MICROPROCESSOR
VIDEO
CHROMA
DEF
COMB
*
QA51
C BUS
2
I
C
VIDEO
L
R
V
(2)
AV IN
V
(3)
L
R
AV IN
(FRONT)
L
V
R
OUTPUT
MONITOR
TEXT
SCL
SDA
MEMORY
*
QA10
PR/CR
PB/CB
VIDEO INPUT
COMPONENT
+B VOLTAGE
T862
Q801
~
D801
– +
Q826
CONVERTER TRANS.
HYBRID
~
– 43 –
Page 40

SPECIFIC INFORMATIONS
THIS PAGE IS
INTENTIONALLY LEFT
BLANK.
– 44 –
Page 41
Rated voltage
Power consumption
(at ~ 220 V, 50 Hz)
Dimensions
(Width × Depth × Height)
Mass
Picture tube
Television system
(Aerial input)
Channel
coverage
Special RF
signal
SPECIFICATIONS (Representative: 29SZ5DA/DE)
~ 110 V – 240 V, 50/60 Hz
126 W
782 mm × 498 mm × 585 mm
46 kg
Type29 Flat square picture tube
(728.0mm) Overall picture measured diagonally
(676.0mm) viewable picture measured diagonally
110° deflection
System
PAL B/G
PAL I
PAL D/K
SECAM B/G
SECAM D/K
NTSC M
NTSC M
Channel
CCIR
UK
CHINA
CCIR
OIRT
US
JAPAN
VHF
2 – 12
—
1 – 12
2 – 12
1 – 12
2 – 13
1 – 12
Color system: NTSC4.43
Sound system: 5.5/6.0/6.5 MHz
UHF
21 – 69
21 – 69
13 – 57
21 – 69
21 – 69
14 – 69
13 – 62
CATV
X ~ Z+2, S1 ~ S41
—
Z–1 ~ Z–38
X ~ Z+2, S1 ~ S41
X1 ~ X19
A–6 ~ A–1, A ~ W, AA ~ ZZ, AAA, BBB
M1 ~ M10, S1 ~ S41
SPECIFIC INFORMATIONS
Color system
Sound output
* Please refer to owner's manual in detail.
PAL/SECAM/NTSC4.43/NTSC3.58
10 W × 2
– 35 –– END –
Page 42

TOSHIBA CORPORATION
1-1, SHIBAURA 1- CHOME, MINATO-KU, TOKYO 105-8001, JAPAN
Page 43
SCHEMATIC DIAGRAM
MODEL : 29SZ5DA/29SZ5DE/29SZ5SH/29SZ5ST
WARNING: BEFORE SERVICING THIS CHASSIS, READ THE "X-RAY RADIATION PRECAUTION", "SAFETY
PRECAUTION" AND "PRODUCT SAFETY NOTICE" ON THE MANUAL FOR THIS MODEL.
CAUTION: The international hazard symbols " " in the schematic diagram and the parts list designate components
which have special characteristics important for safety and should be replaced only with types identical to those in the
original circuit or specified in the parts list. The mounting position of replacements is to be identical with originals.
Before replacing any of these components, read carefully the PRODUCT SAFETY NOTICE on the MANUAL for this
model. Do not degrade the safety of the receiver through improper servicing.
NOTE:
1. RESISTOR Resistance is shown in ohm [K = 1.000, M = 1.000.000]. All resistors are 1/6W and 5% tolerance
carbon resistor, unless otherwise noted as the following marks.
1/2R = Metal or Metal oxide of 1/2 watt 1/2S = Carbon compsistion of 1/2 watt
1RF = Fuse resistor of 1 watt 10W = Cement of 10 watt
±10% G = ±2% F = ±1%
K =
2. CAPACITOR Unless otherwise noted in schematic, all capacitor values less than 1 are expressed in
the values more than 1 in pF.
All capacitors are ceramic 50V, unless otherwise noted as the following marks.
Electolytic capacito
Mylar capacitor
µ
F, and
3. The parts indicated with "
4. Voltages read with DIGITAL MULTI-METER from point indicated to chassing ground, using a color bar signal with
all controls at normal, line voltage at 220 volts.
5. Waveforms are taken receiving color bar signal with enough sensitivity.
6. Voltage reading shown are nominal values and may vary
SCHEMATIC DIAGRAM STRUCTURE:
– MAIN Circuit TUNER [ SHEET– 1/9 ] ........................ 1/11
– CRT DRIVE Circuit ........................................................................................................................ 10/11
– FRONT AV Circuit.......................................................................................................................... 11/11
" have special characteristics, and should be replaced with identical parts only.
±20% except H.V.
– AV SW [ SHEET– 2/9 ] ........................ 2/11
– VERT [ SHEET– 3/9 ] ........................ 3/11
– HDEF [ SHEET– 4/9 ] ........................4/11
– VCD/MICON [ SHEET– 5/9 ] ........................ 5/11
– A-PRO/AUDIO-AMP [ SHEET– 6/9 ] ........................ 6/11
– PROTECTOR [ SHEET– 7/9 ] ........................ 7/11
– POWER [ SHEET– 8/9 ] ........................ 8/11
– LOW B REG [ SHEET– 9/9 ] ........................ 9/11
– 42 –
Page 44
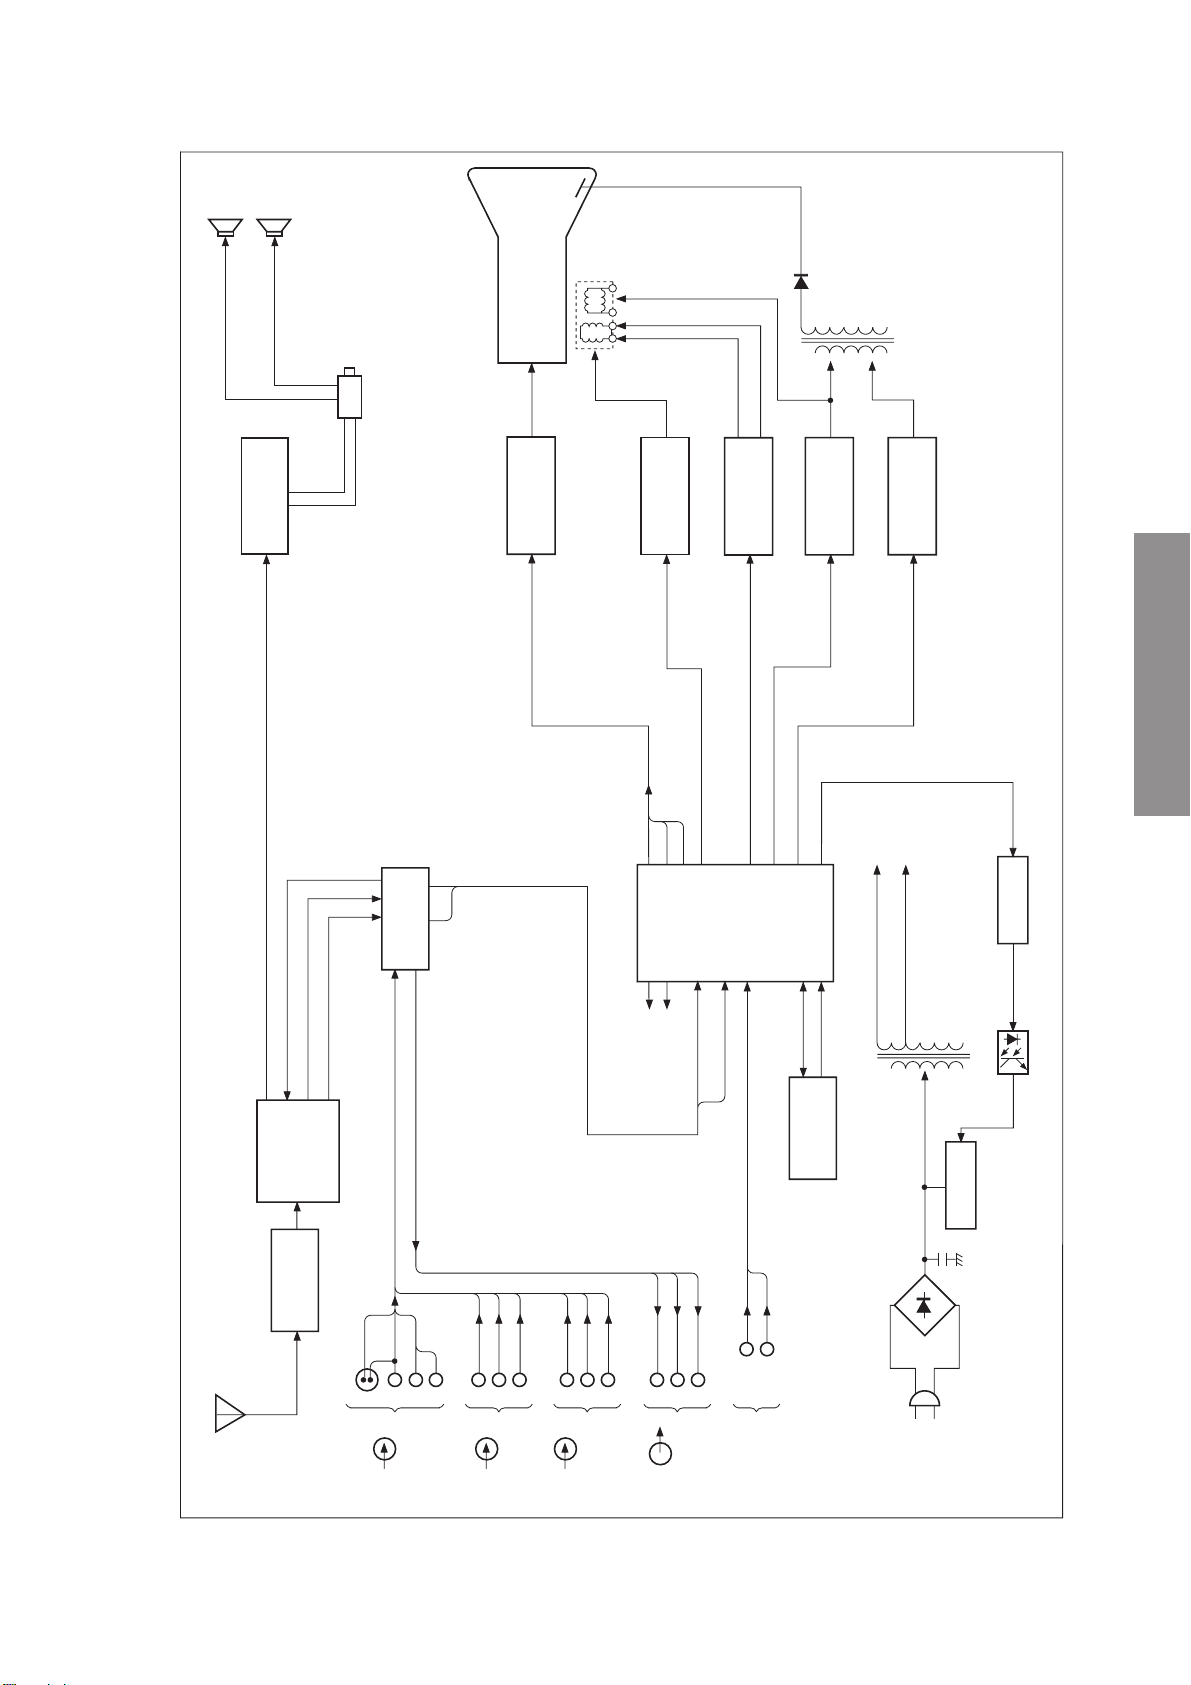
L
R
CRT
H.V.
AUDIO AMP
Q610
HEAD PHONE
C
V901
R/G/BR/G/B
VIDEO DRIVE
Q901,Q903,Q905
H
V
D.Y.
VSM
Q711,Q712
B
R
G
V_DY_Y
Q301
V OUT
V_DY_G
V. DRIVE
Q402-Q404
H OUT
H. DRIVE
Q460-Q463,Q465
F.B.T.
EN
C BUS CONTROL BLOCK
2
*I
SPECIFIC INFORMATIONS
POWER ON/OFF
CIRCUIT BLOCK DIAGRAM
SP_L/W/R
AUDIO_L/R
U903
*
H001
*
TV_VIDEO
TV_L/R
IF
TUNER
SV
QV01
V
(1)
AV SW
*
L
AV IN
VIDEO
R
RESET
Q841,Q842
MICROPROCESSOR
VIDEO
CHROMA
DEF
COMB
*
QA51
C BUS
2
I
C
VIDEO
L
R
V
(2)
AV IN
V
(3)
L
R
AV IN
(FRONT)
L
V
R
OUTPUT
MONITOR
TEXT
SCL
SDA
MEMORY
*
QA10
PR/CR
PB/CB
VIDEO INPUT
COMPONENT
+B VOLTAGE
T862
Q801
~
D801
– +
Q826
CONVERTER TRANS.
HYBRID
~
– 43 –
Page 45
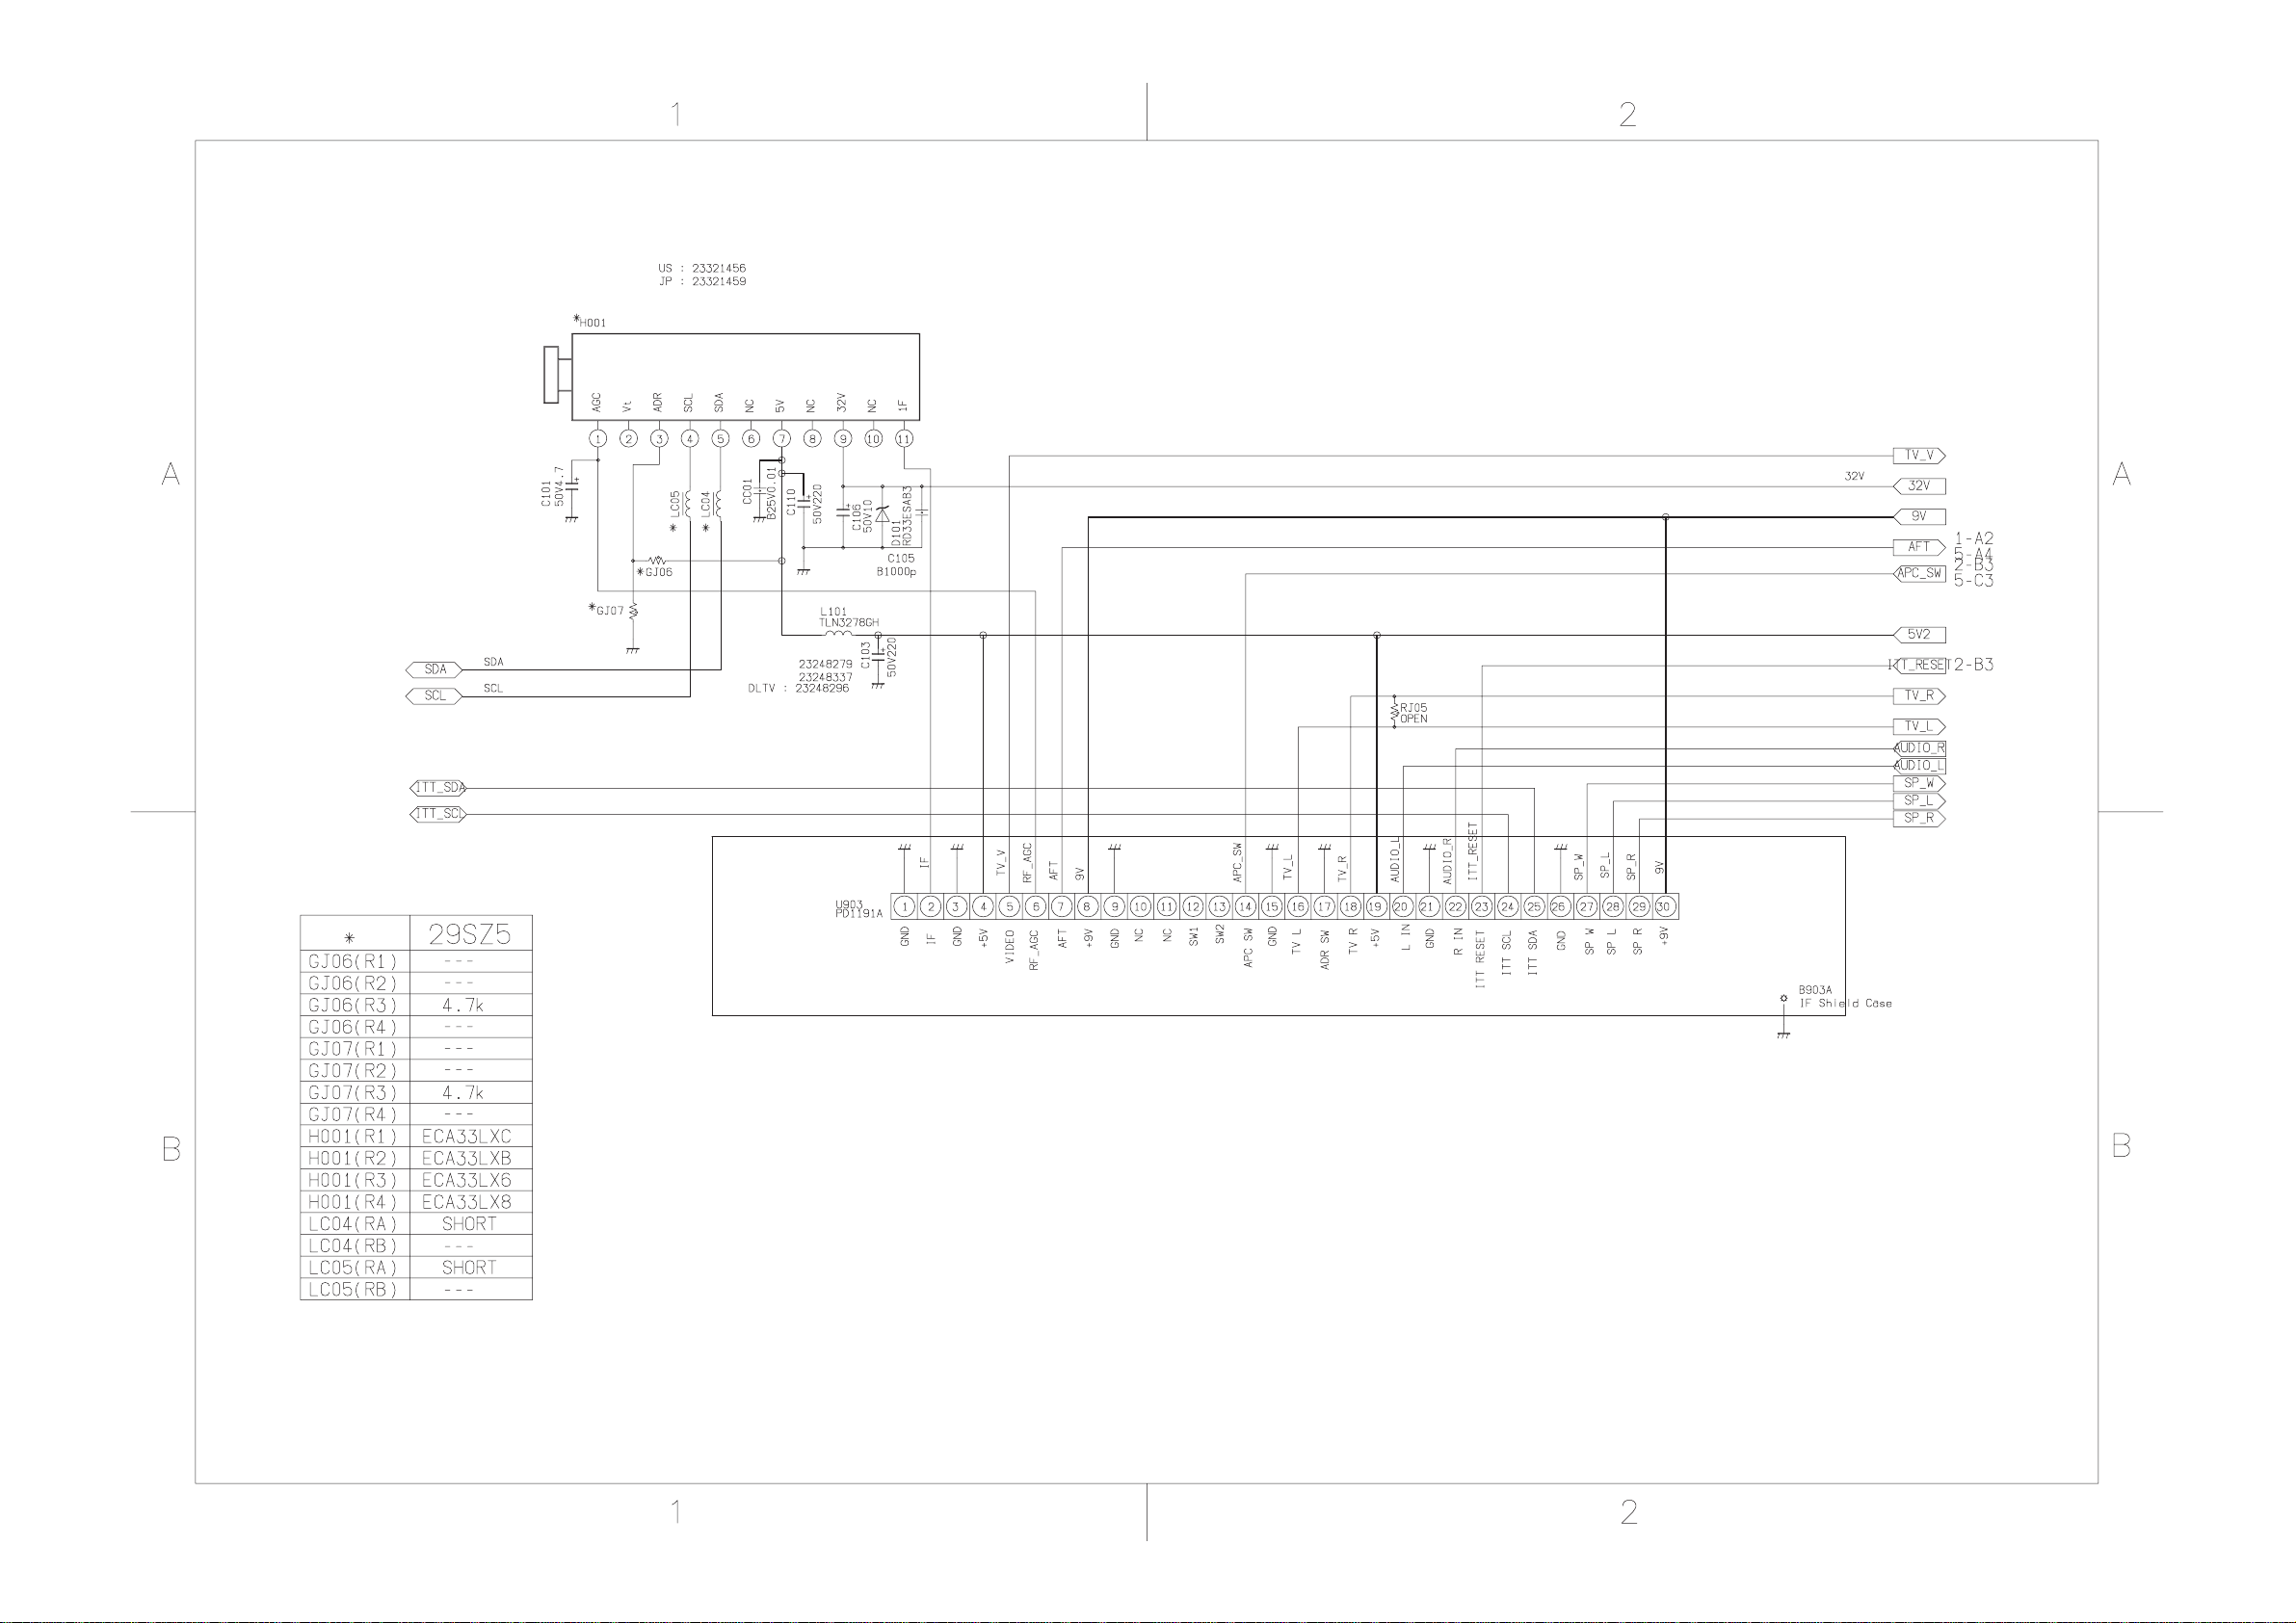
4.5V 4.5V 5.0V 32 .0V
29SZ5DA/29SZ5DE/29SZ5SH/29SZ5ST
MAIN (TUNER)
SHEET-1/9
(1/11)
Page 46
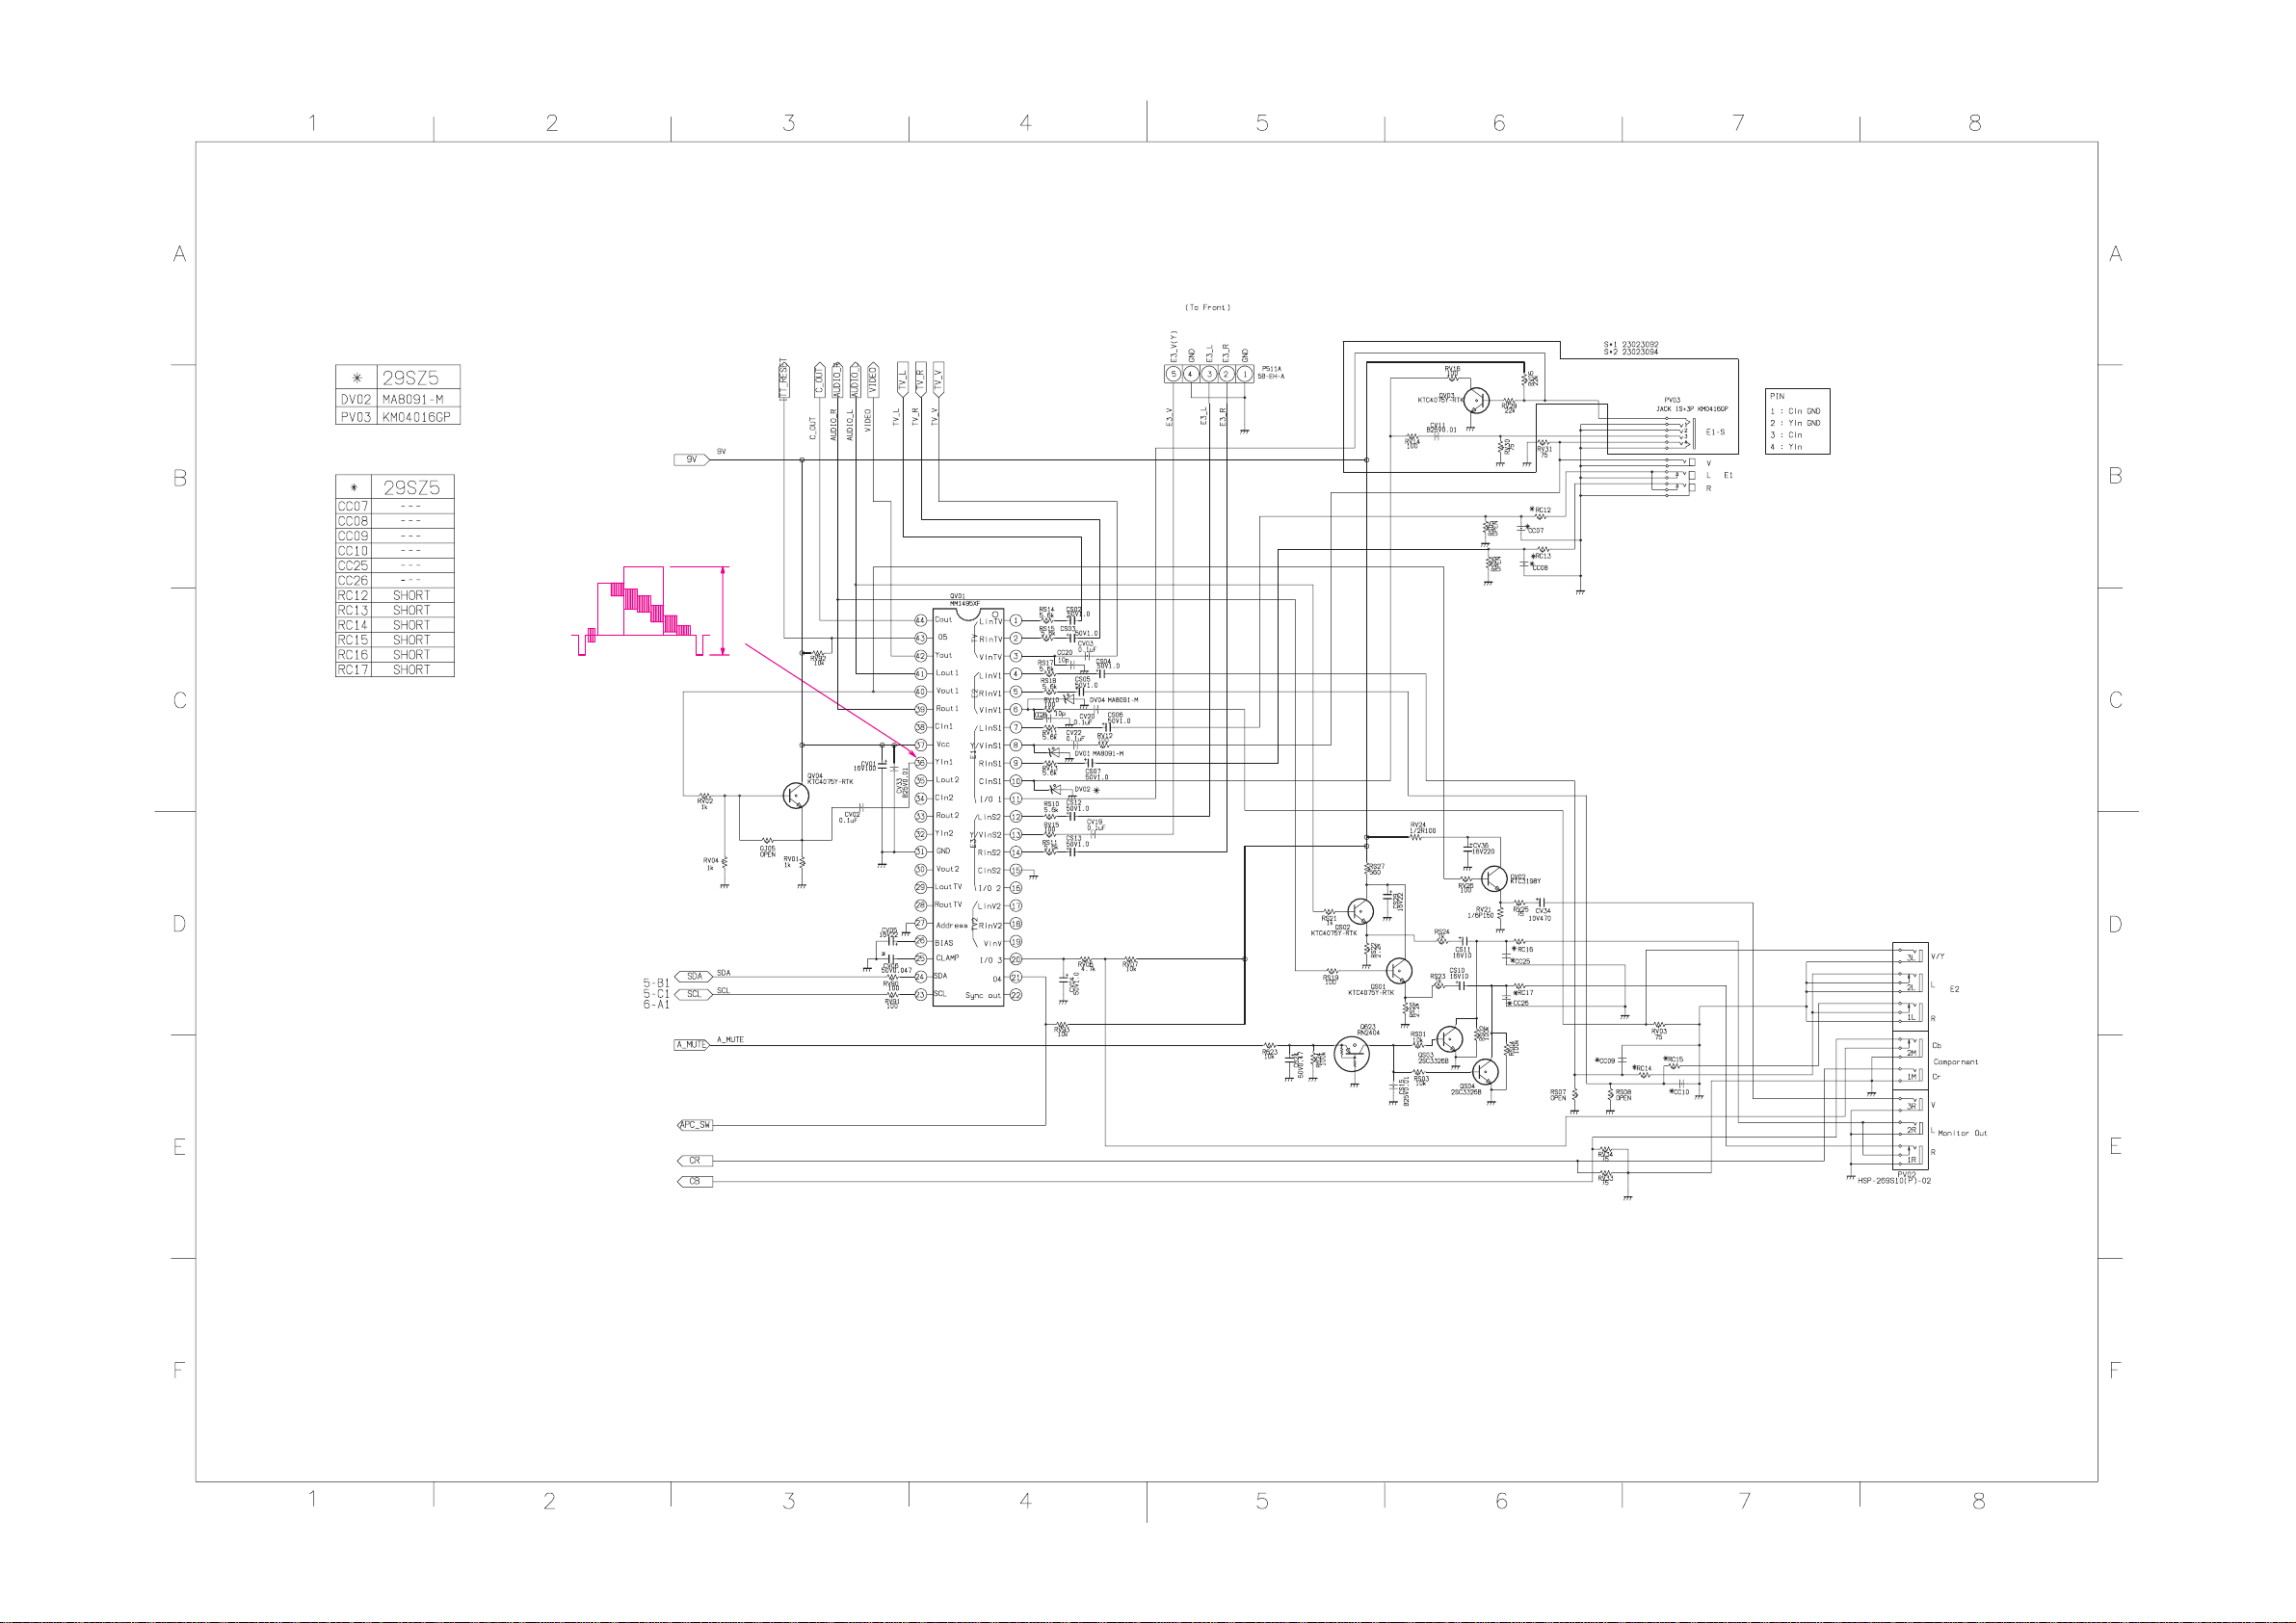
0V
0V
2.0Vp-p
3.8V
3.8V
4.0V
4.5V
4.0V
3.8V
9.0V
3.8V
9.0V
5.2V
4.0V
5.2V
0V
3.5V
3.3V
3.3V
3.3V
4.0V
4.0V
5.2V
5.2V
5.2V
5.2V
5.2V
5.2V
5.2V
5.2V
5.2V
5.2V
5.2V
0V
9.0V
0V
4.0V
3.4V
9.0V
4.0V
3.4V
0V
9.0V
4.5V
3.9V
0V
0V
0V
0V
0V
29SZ5DA/29SZ5DE/29SZ5SH/29SZ5ST
MAIN (AV SW)
SHEET-2/9
(2/11)
Page 47
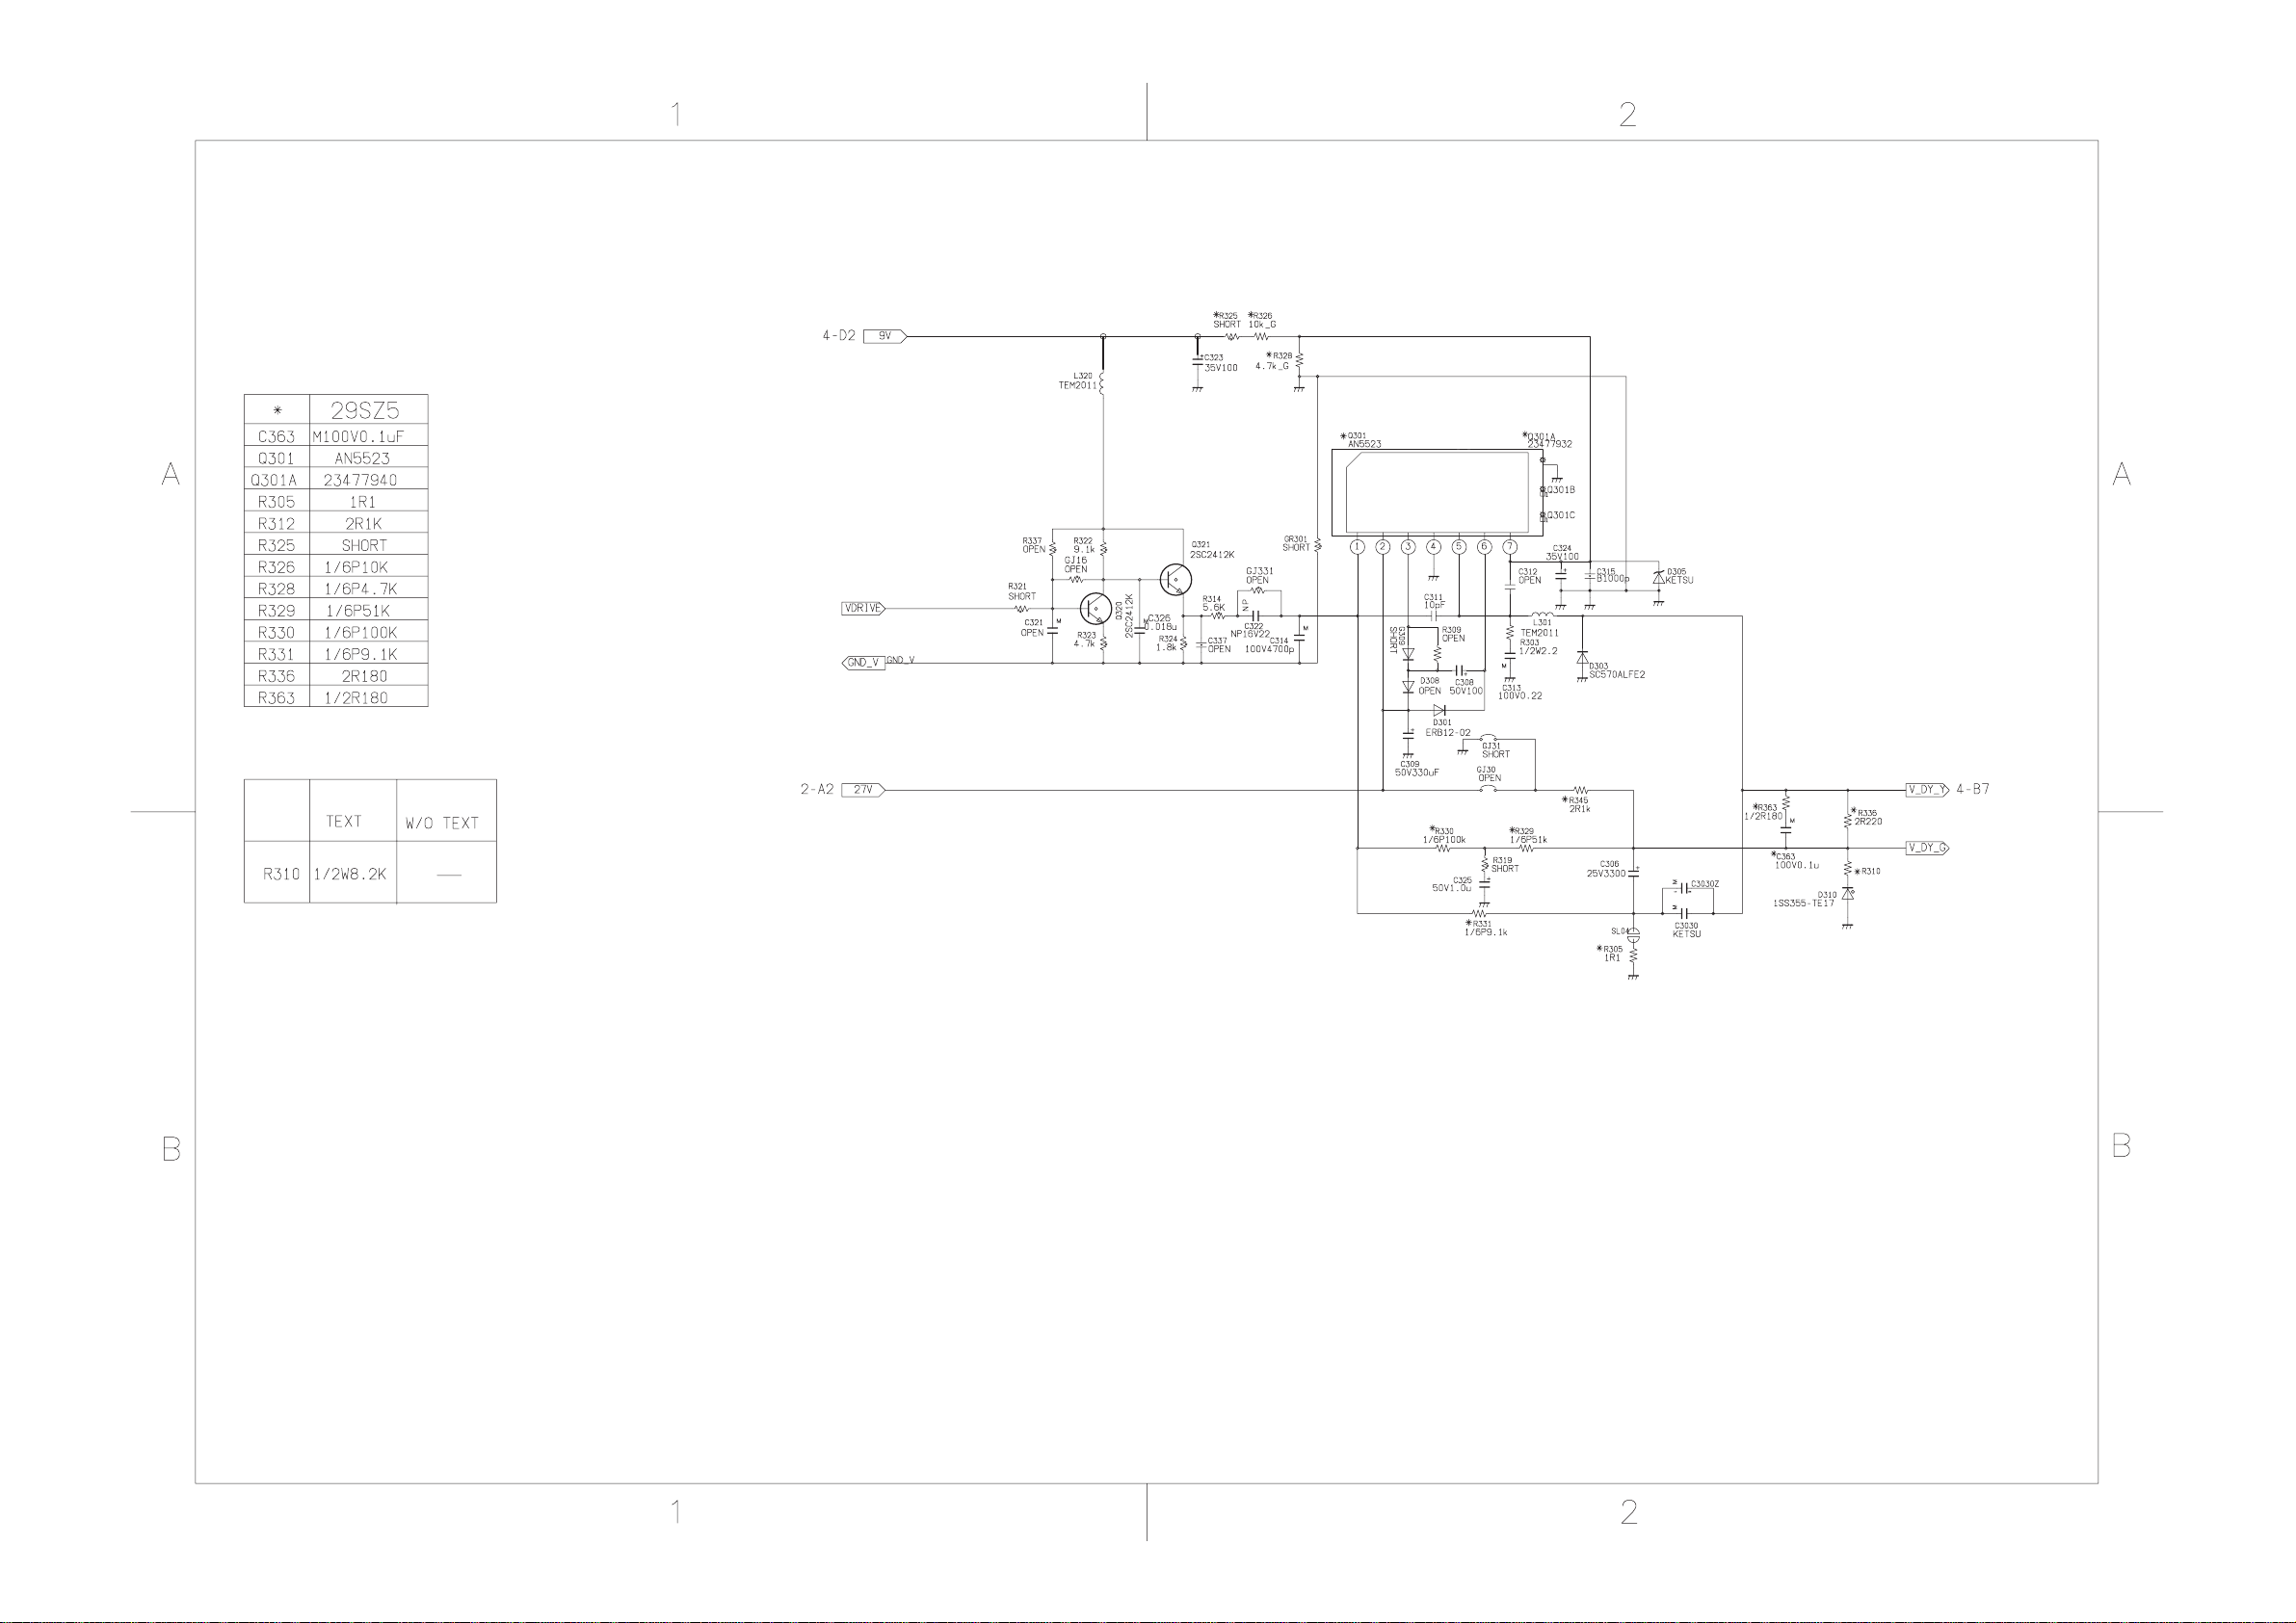
27.0V 0V
29SZ5DA/29SZ5DE/29SZ5SH/29SZ5ST
MAIN (VERT)
SHEET-3/9
(3/11)
Page 48
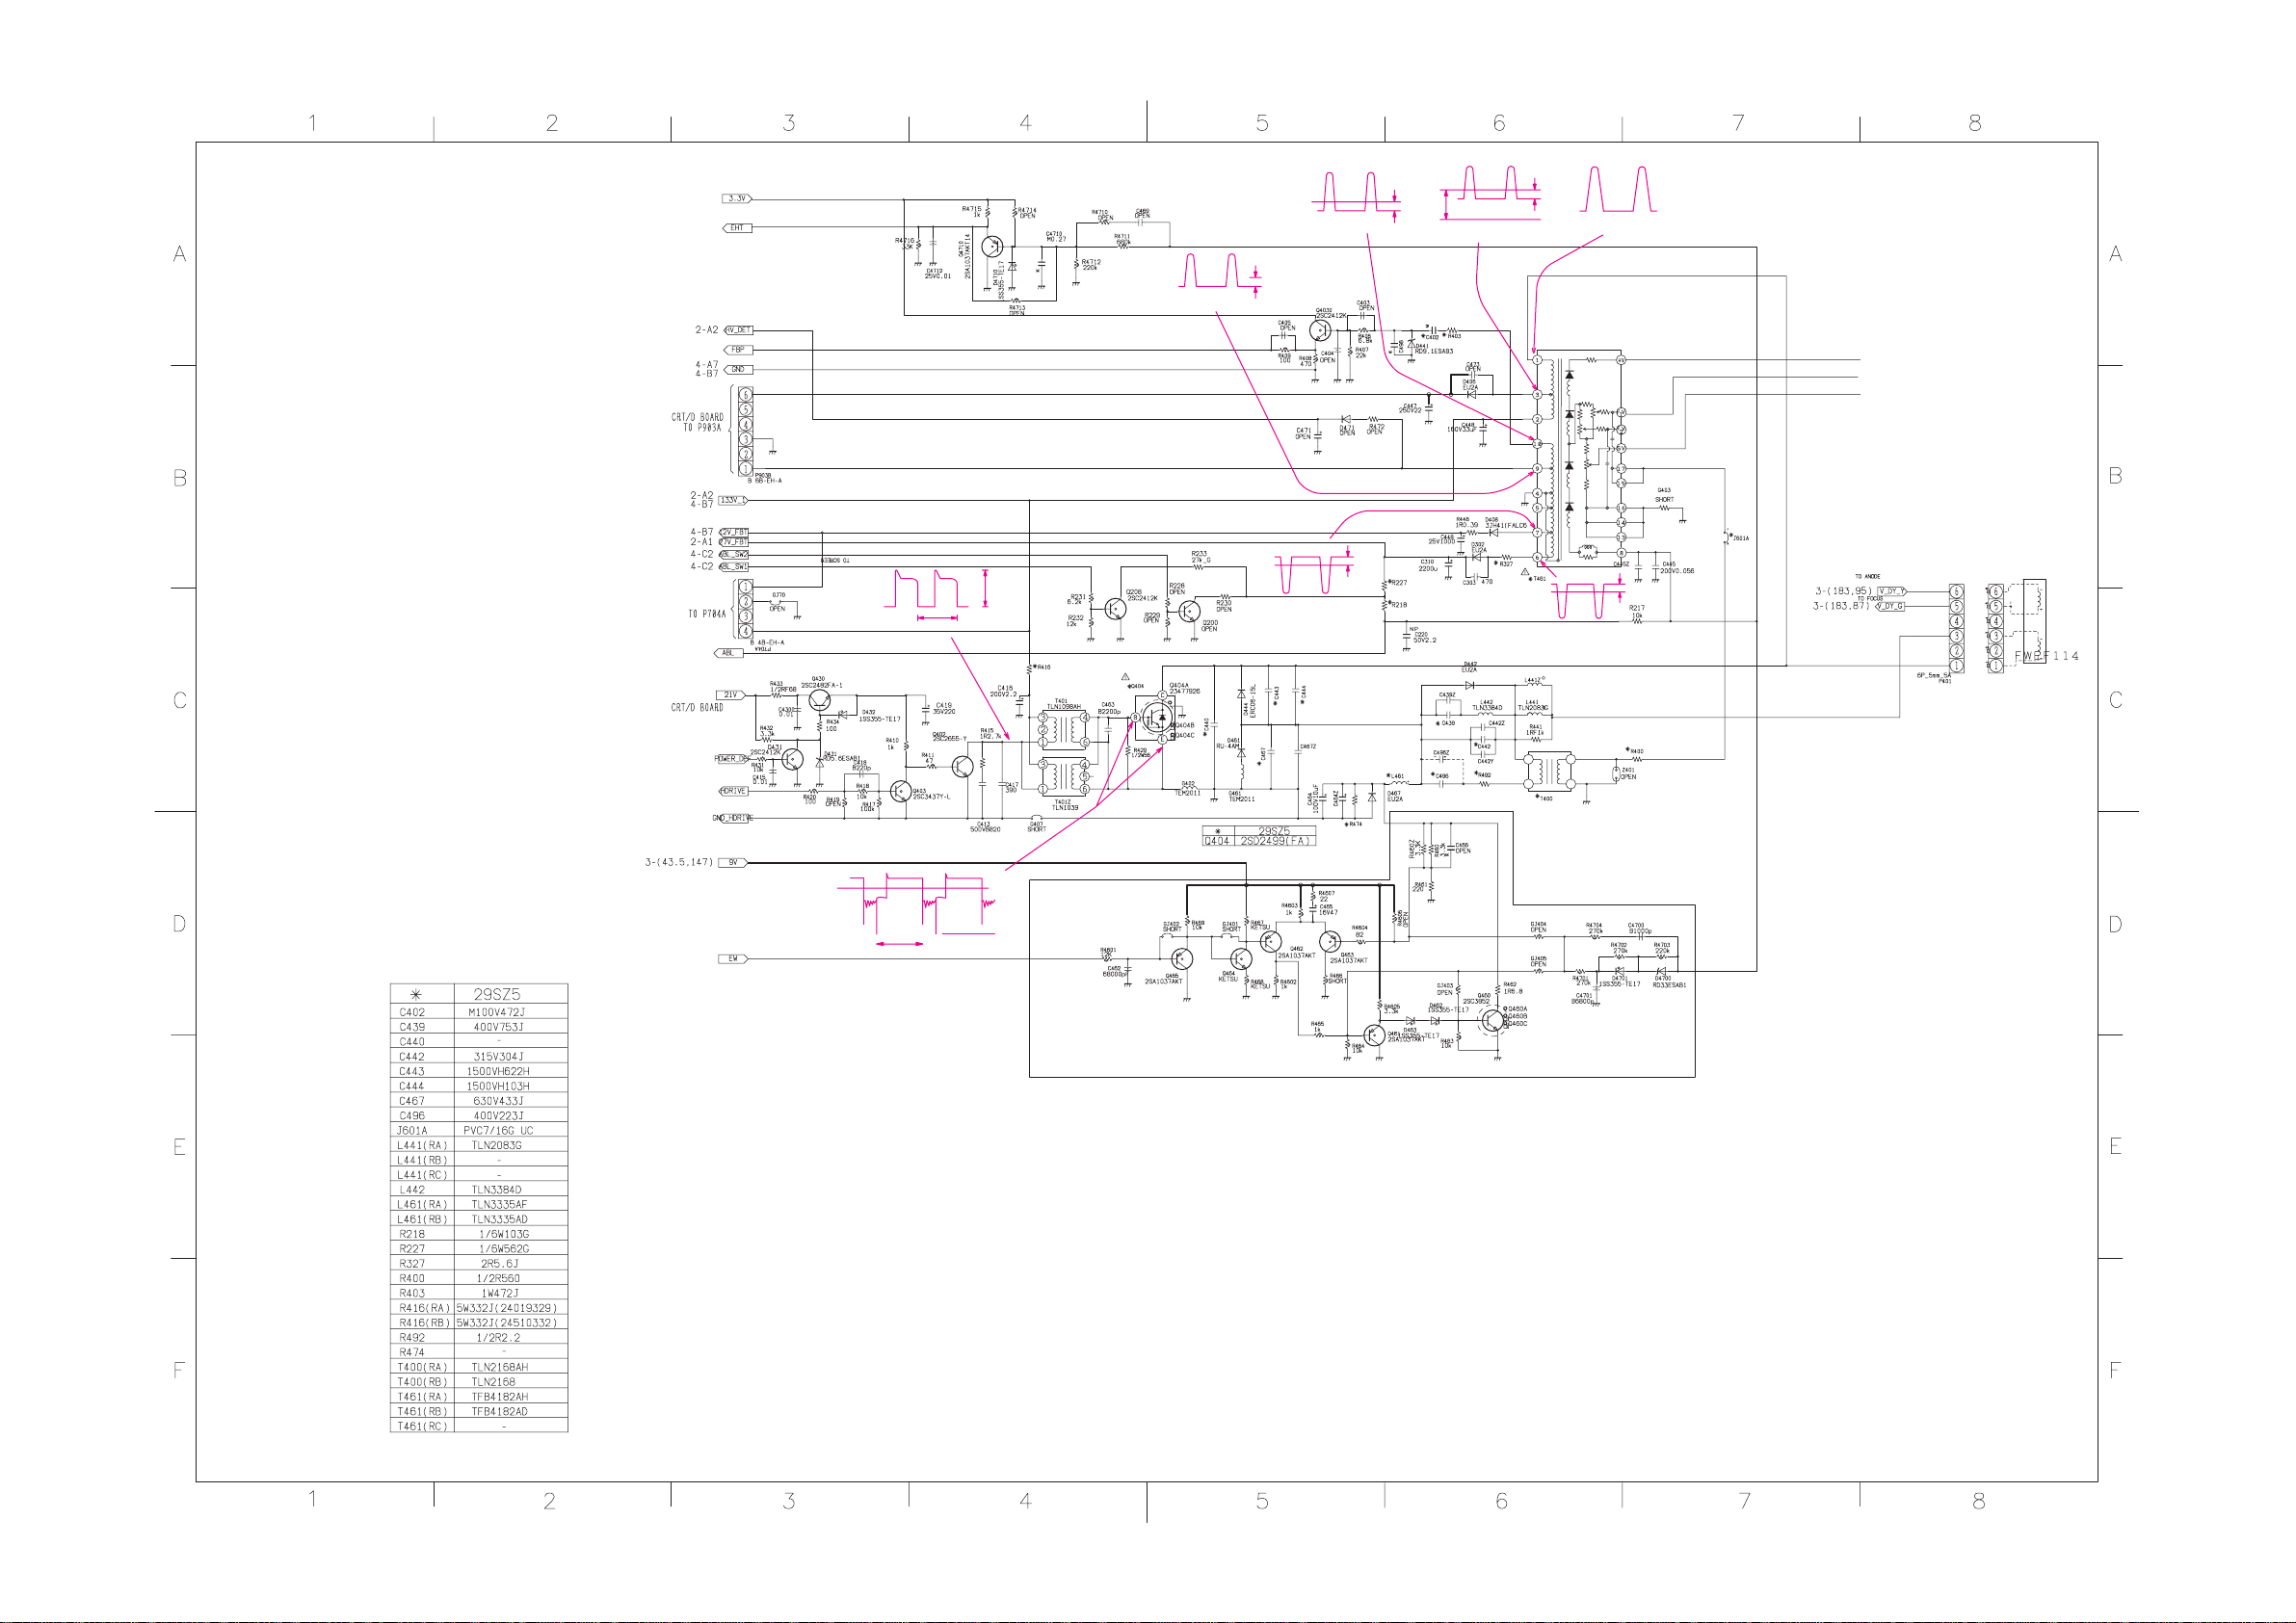
150Vp-p(H)
115
17
82Vp-p(H)
10
1000Vp-p(H)
27Vp-p(H)
0
1H
23.0V
-2.0V
27.0V
0.4V
0V
-2.0V
3
120Vp-p(H)
13
280Vp-p(H)
29
0
150V
1H
5V
-10V
29SZ5DA/29SZ5DE/29SZ5SH/29SZ5ST
MAIN (HDEF)
SHEET-4/9
(4/11)
Page 49
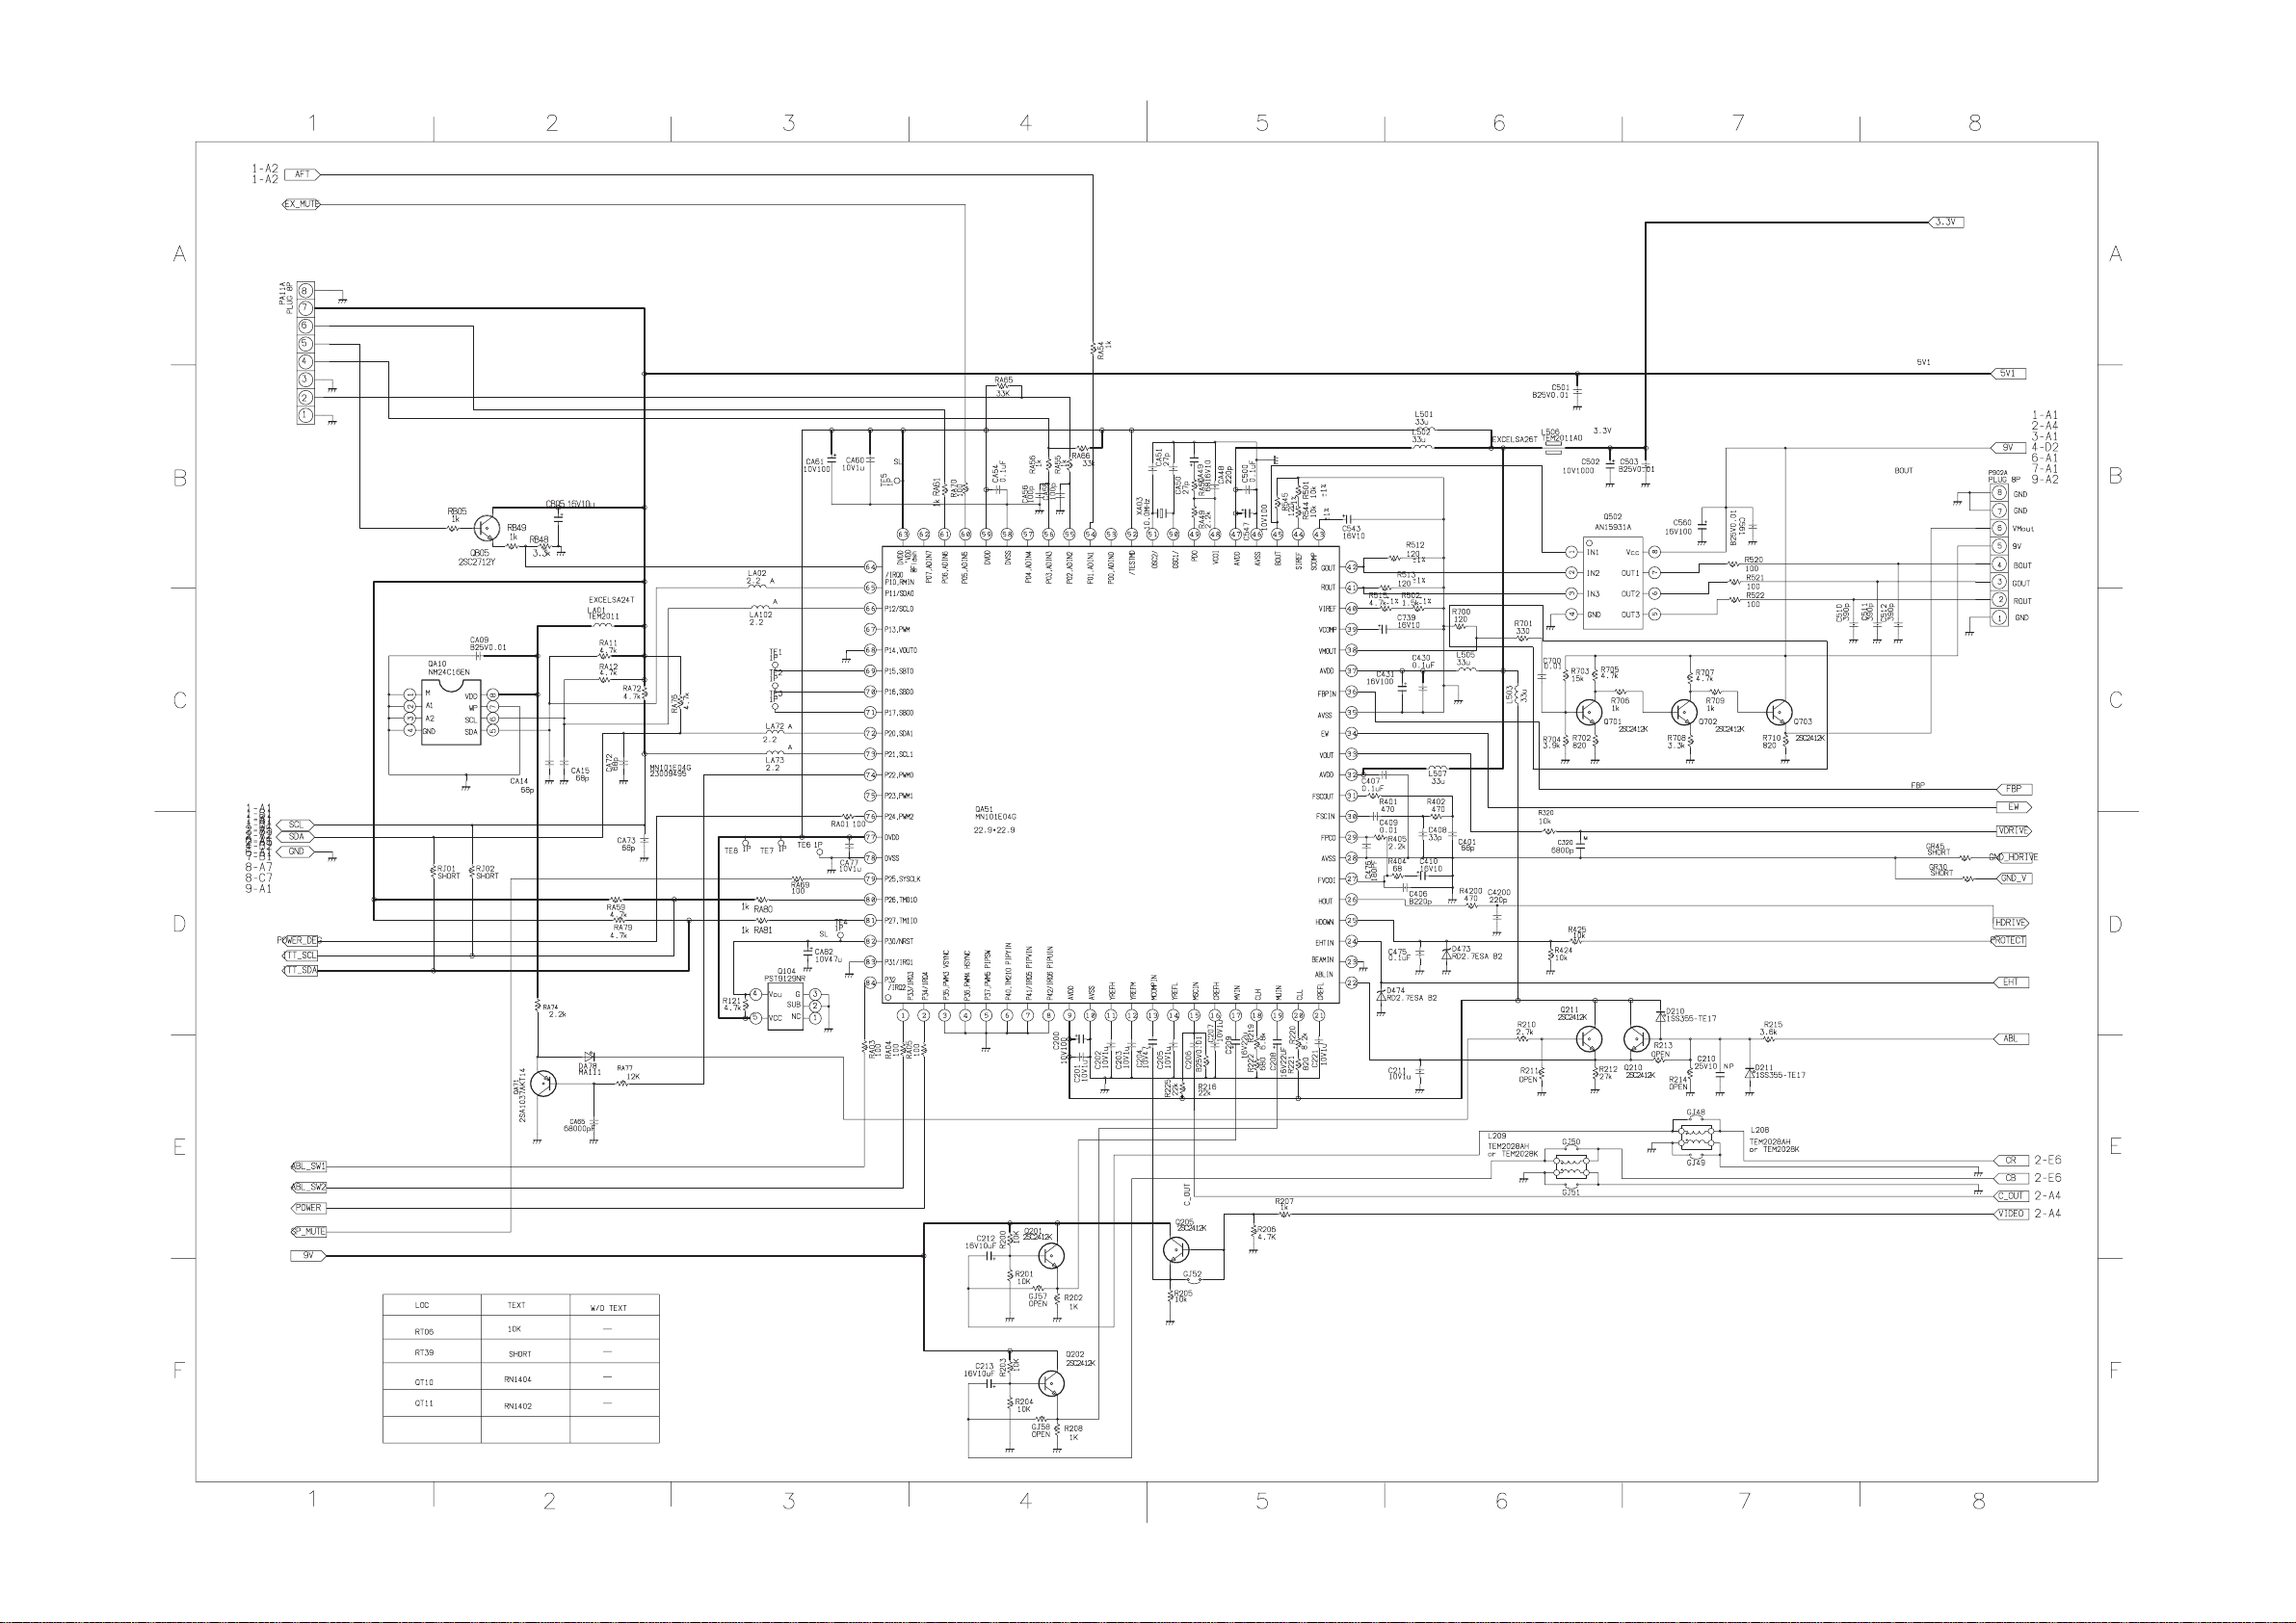
29SZ5DA/29SZ5DE/29SZ5SH/29SZ5ST
MAIN (VCD/MICON)
SHEET-5/9
(5/11)
Page 50
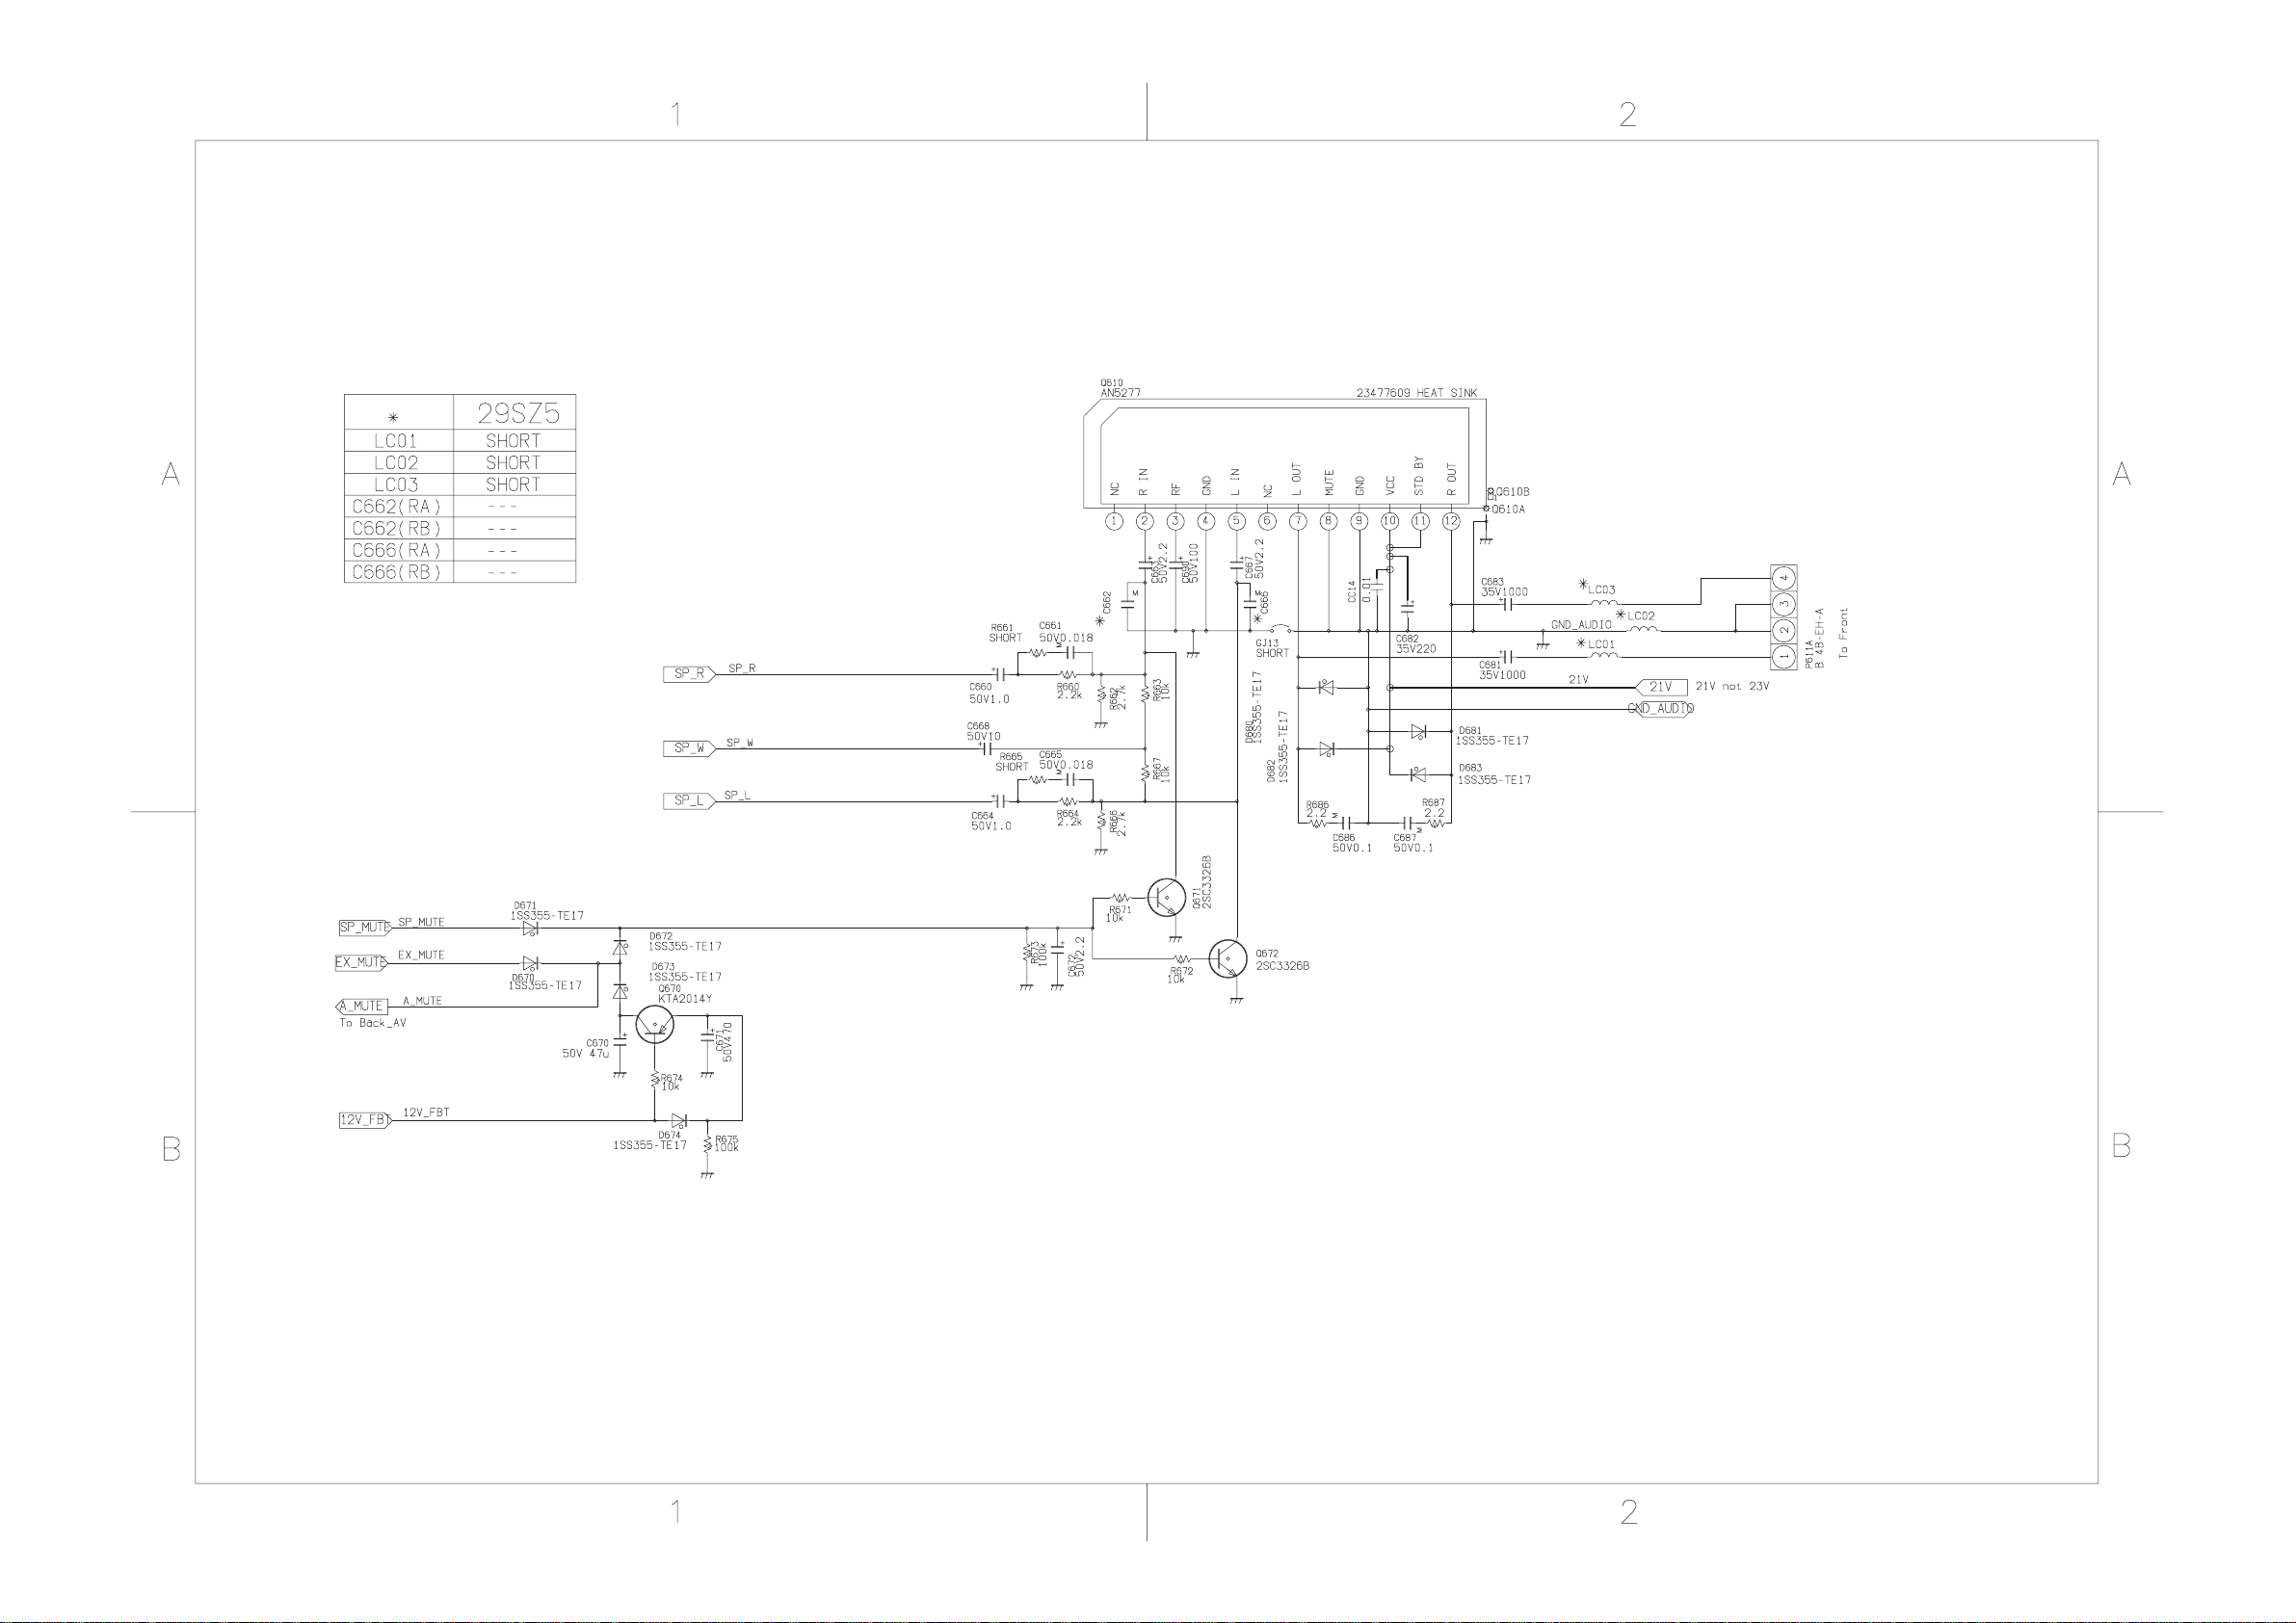
2.2V 0V 2.2V 9.9V 21.0V 9.7V
29SZ5DA/29SZ5DE/29SZ5SH/29SZ5ST
MAIN (A-PRO/AUDIO-AMP)
SHEET-6/9
(6/11)
Page 51
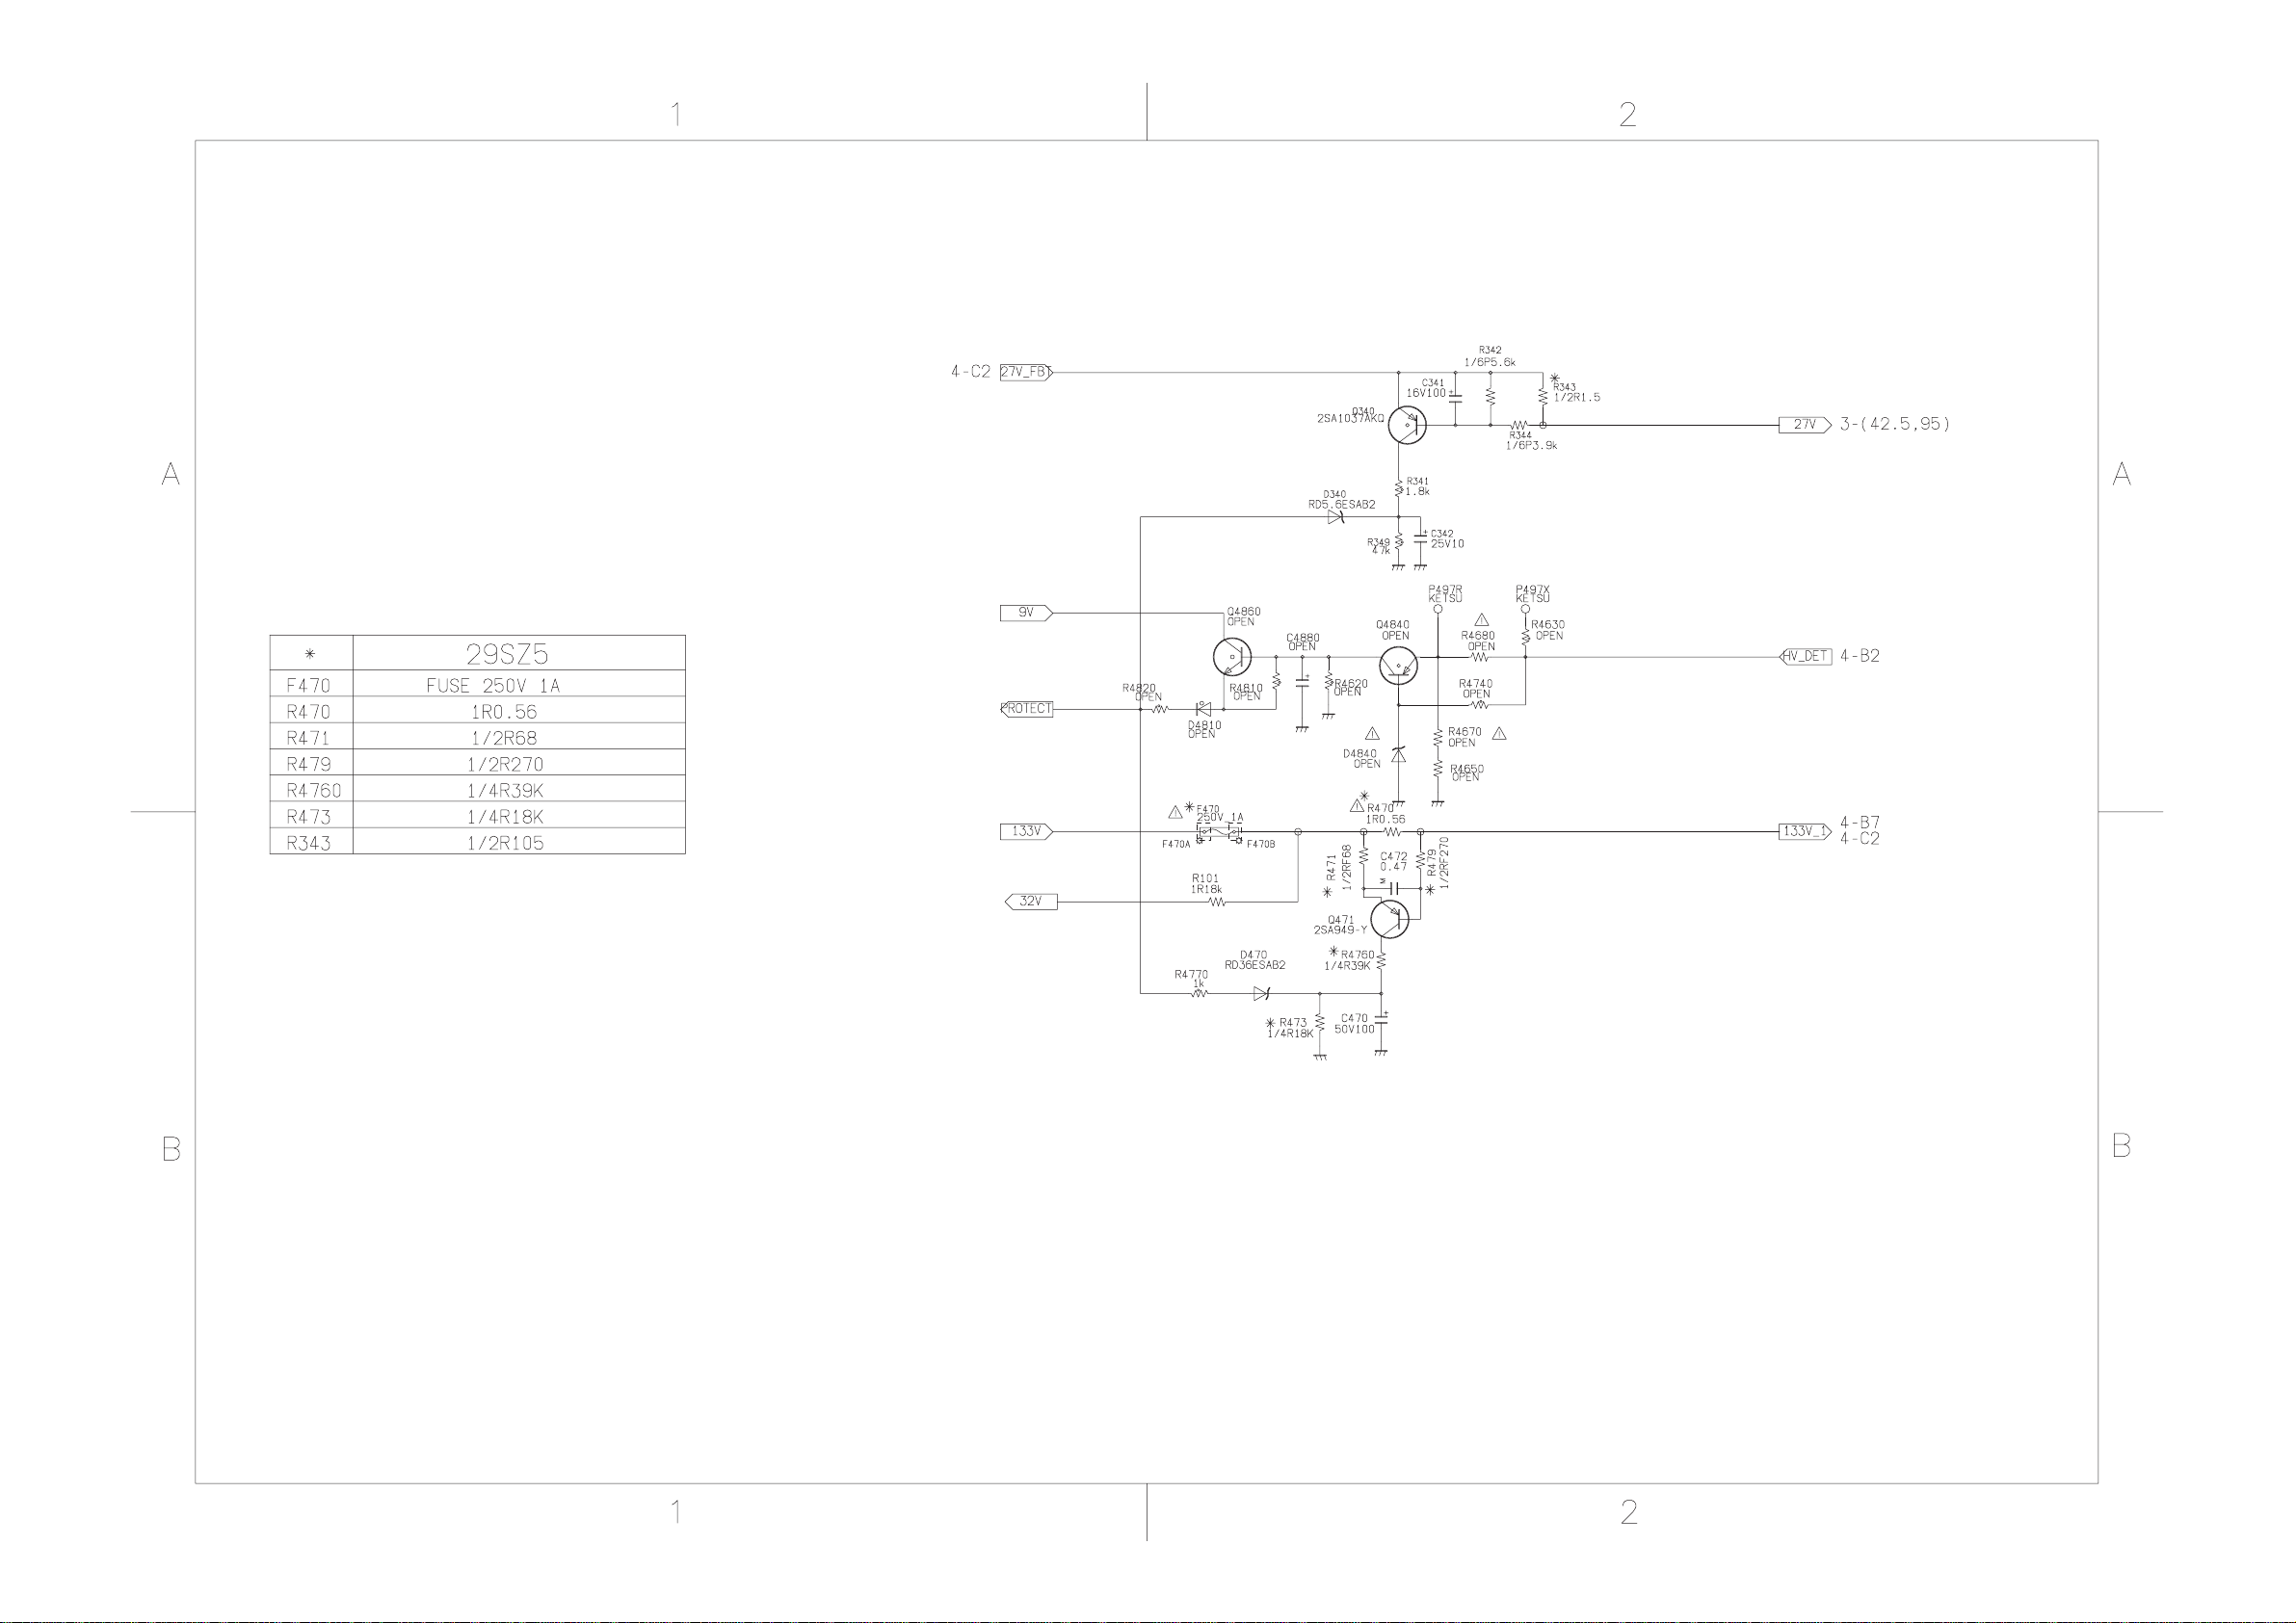
29SZ5DA/29SZ5DE/29SZ5SH/29SZ5ST
MAIN (PROTECTOR)
SHEET-7/9
(7/11)
Page 52
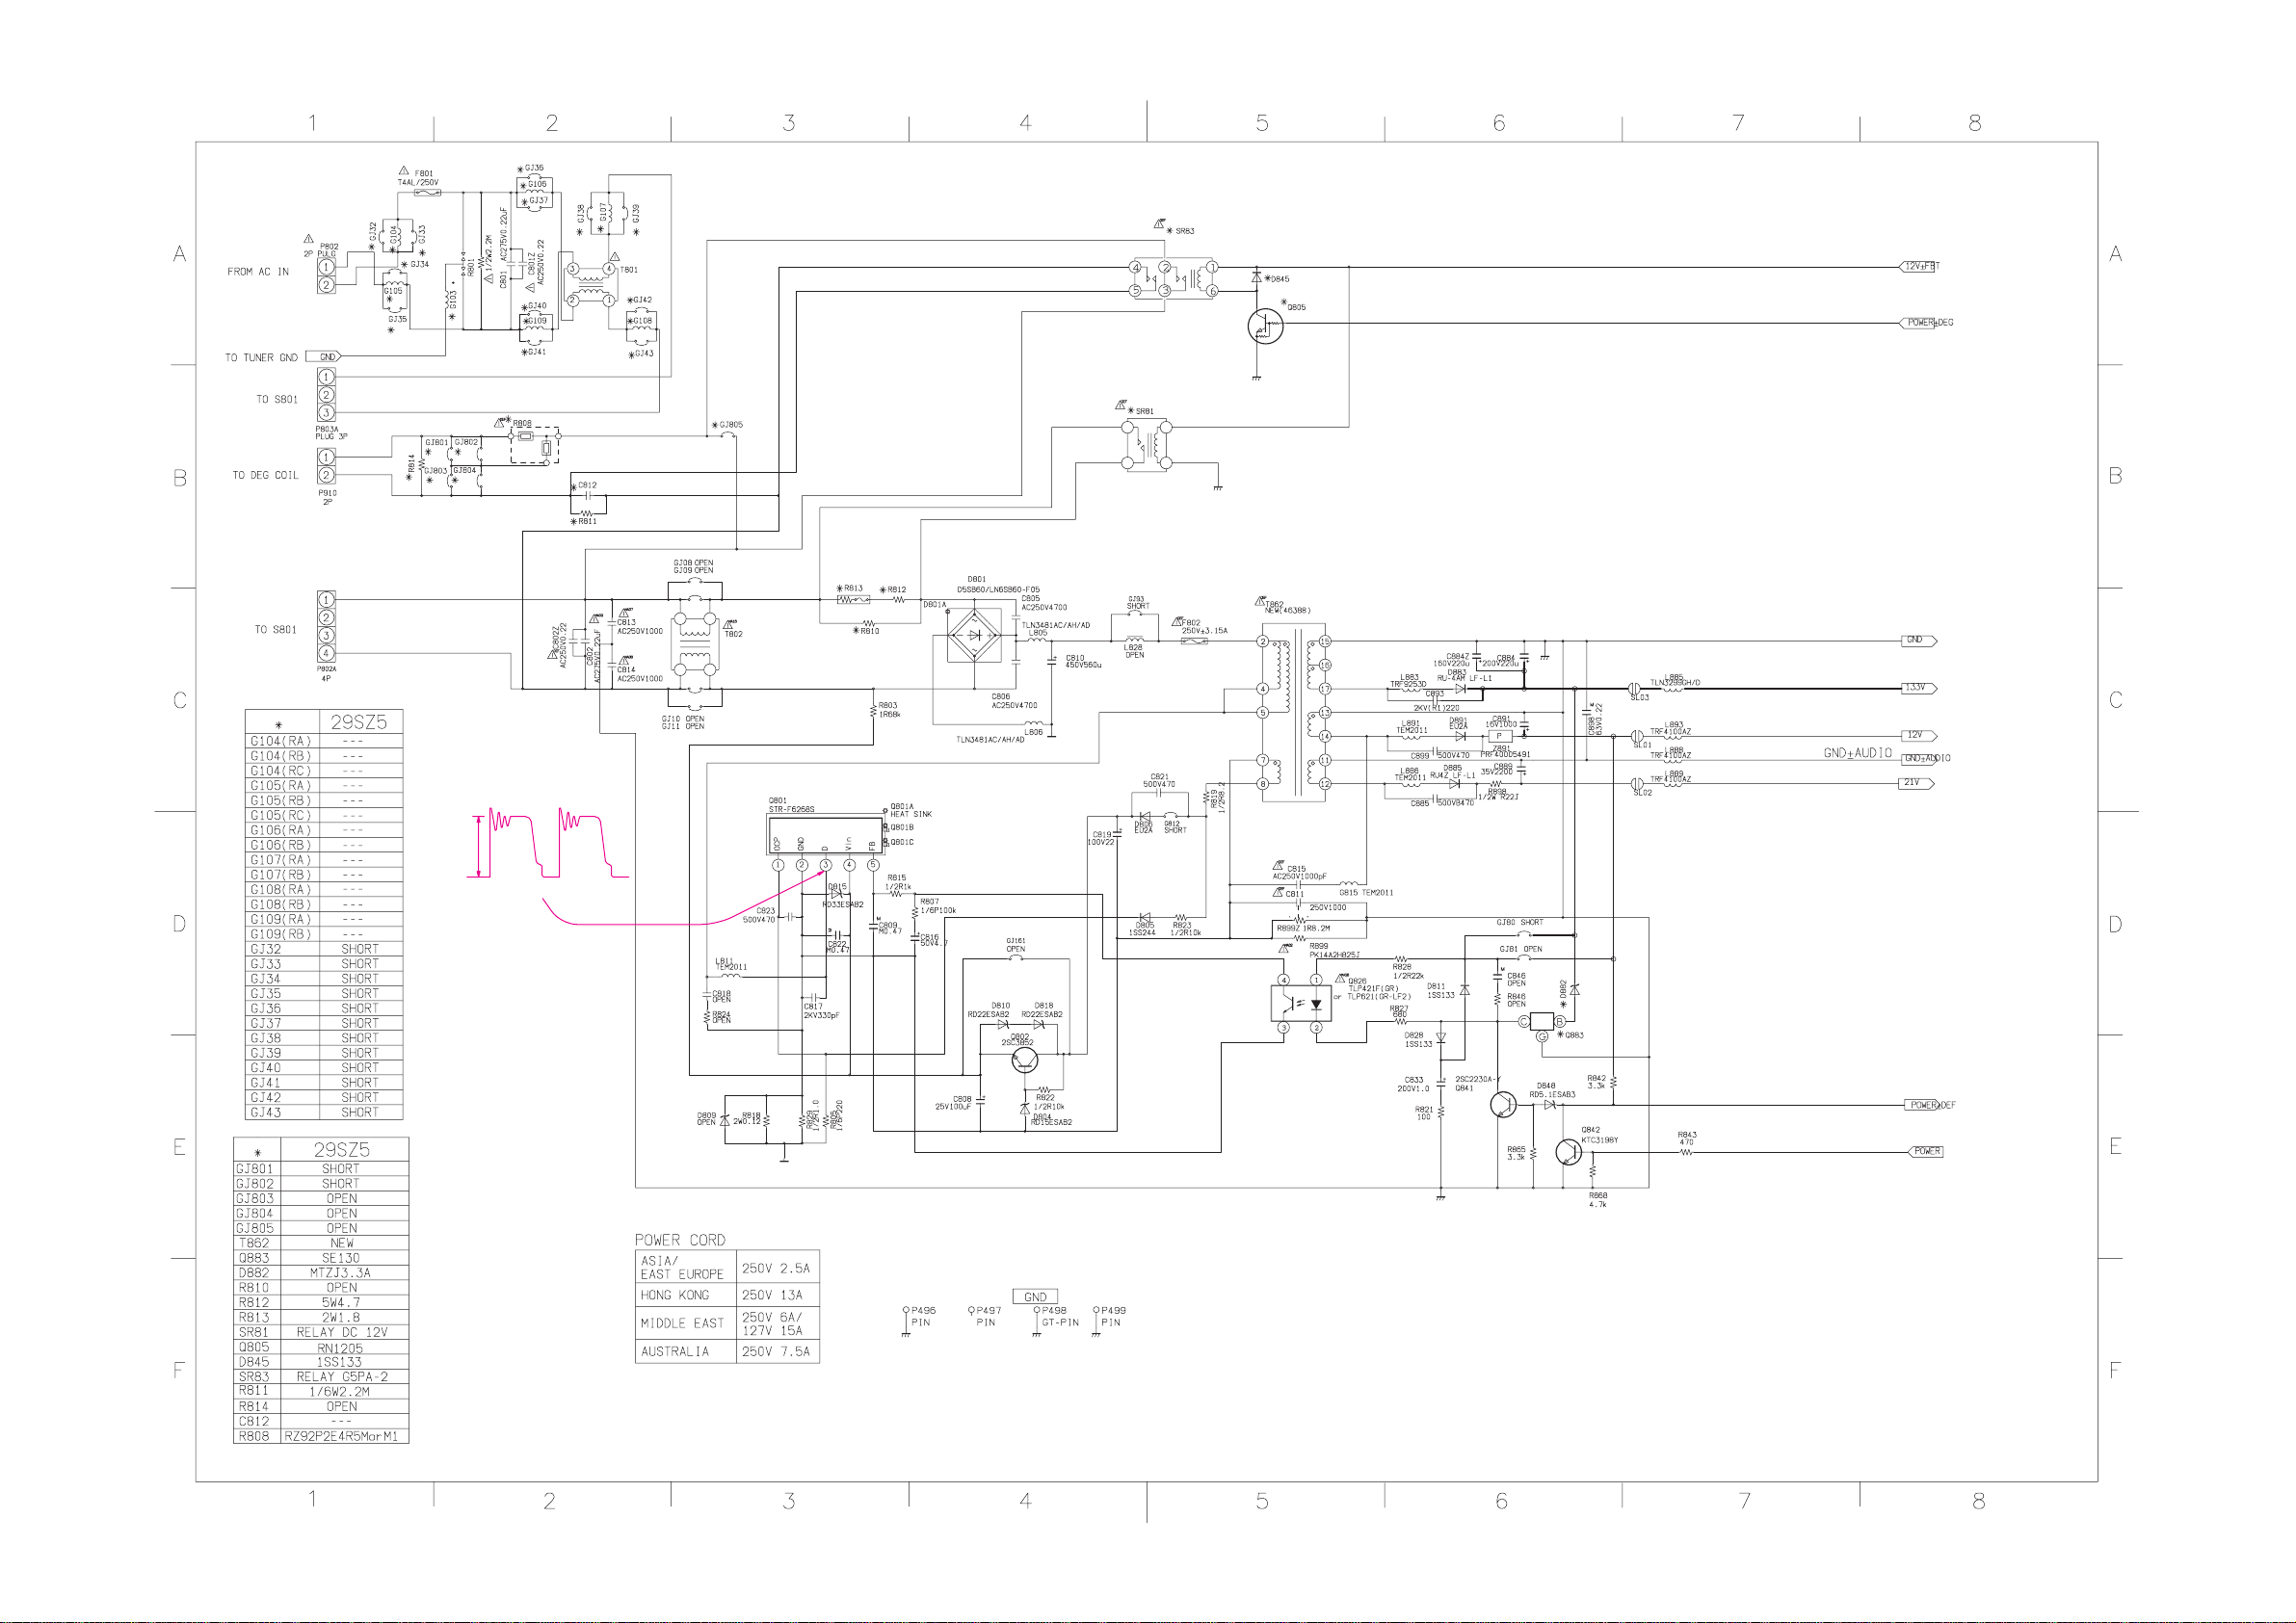
450Vp-p
(AC=220V)
1.5V
40mV
14V 0V
6.7 V
51.0V
14.0V
1.1V
29SZ5DA/29SZ5DE/29SZ5SH/29SZ5ST
MAIN (POWER)
SHEET-8/9
(8/11)
Page 53
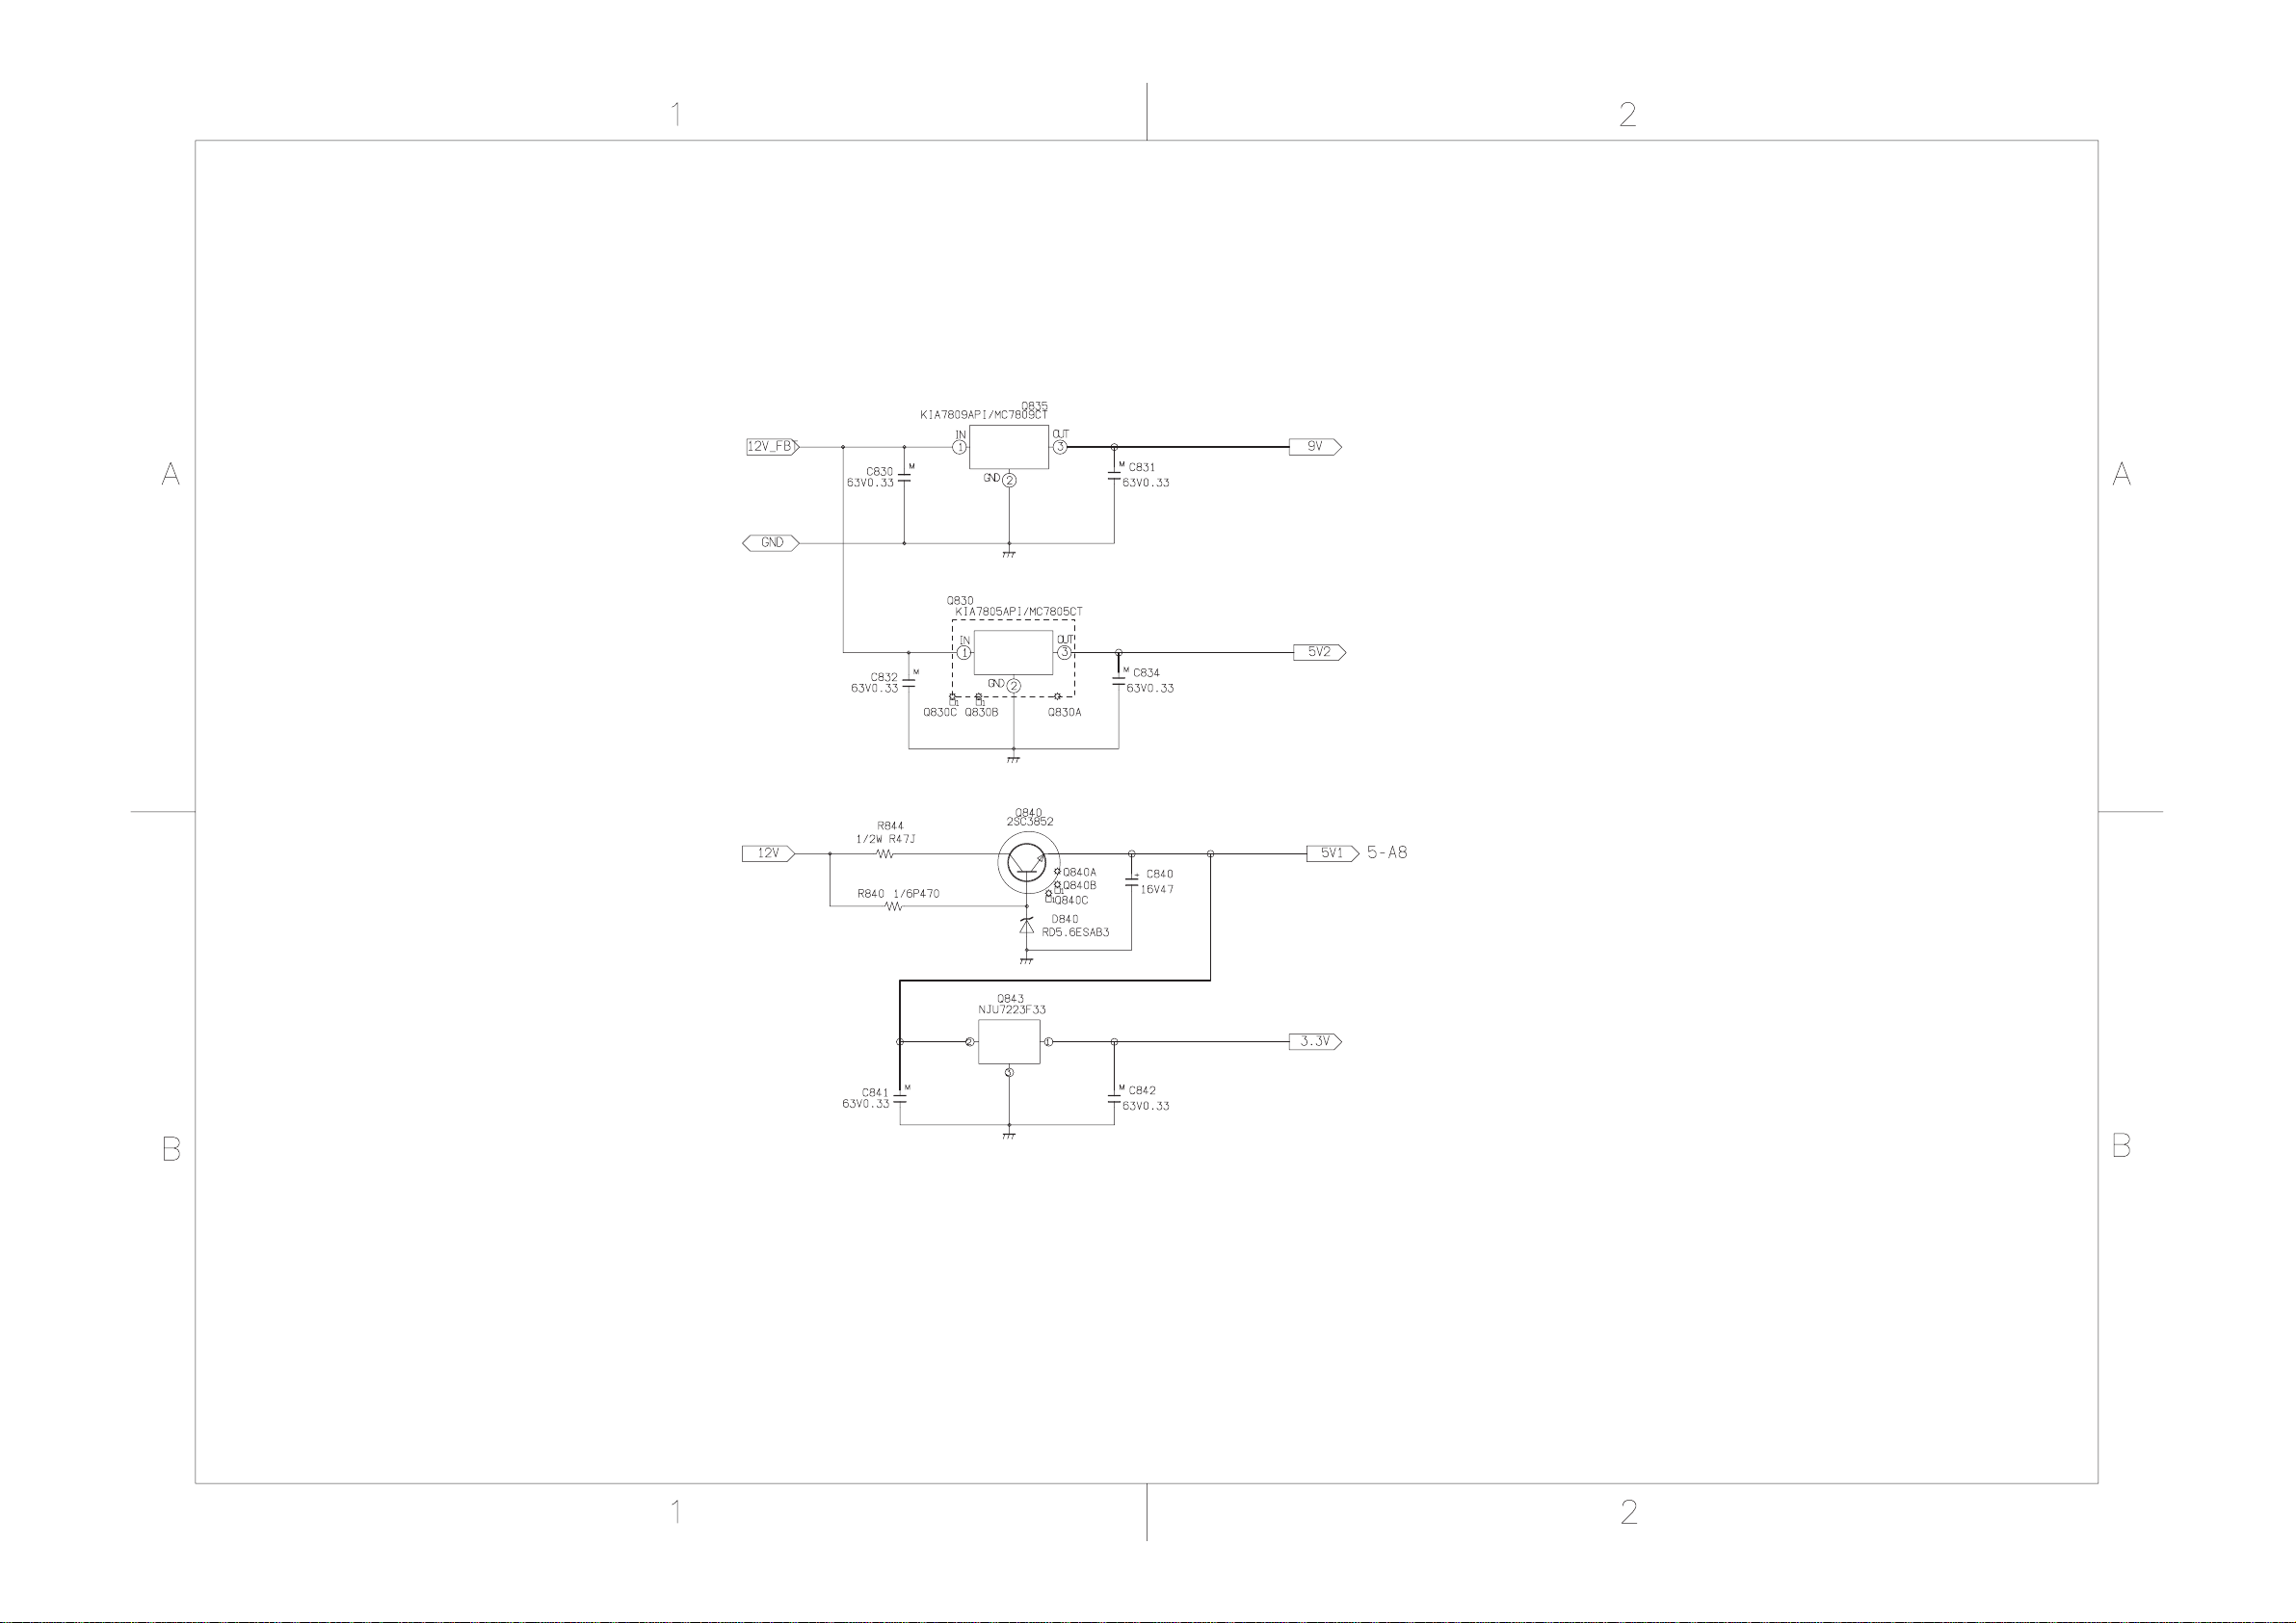
29SZ5DA/29SZ5DE/29SZ5SH/29SZ5ST
MAIN (LOW B REG)
SHEET-9/9
(9/11)
Page 54
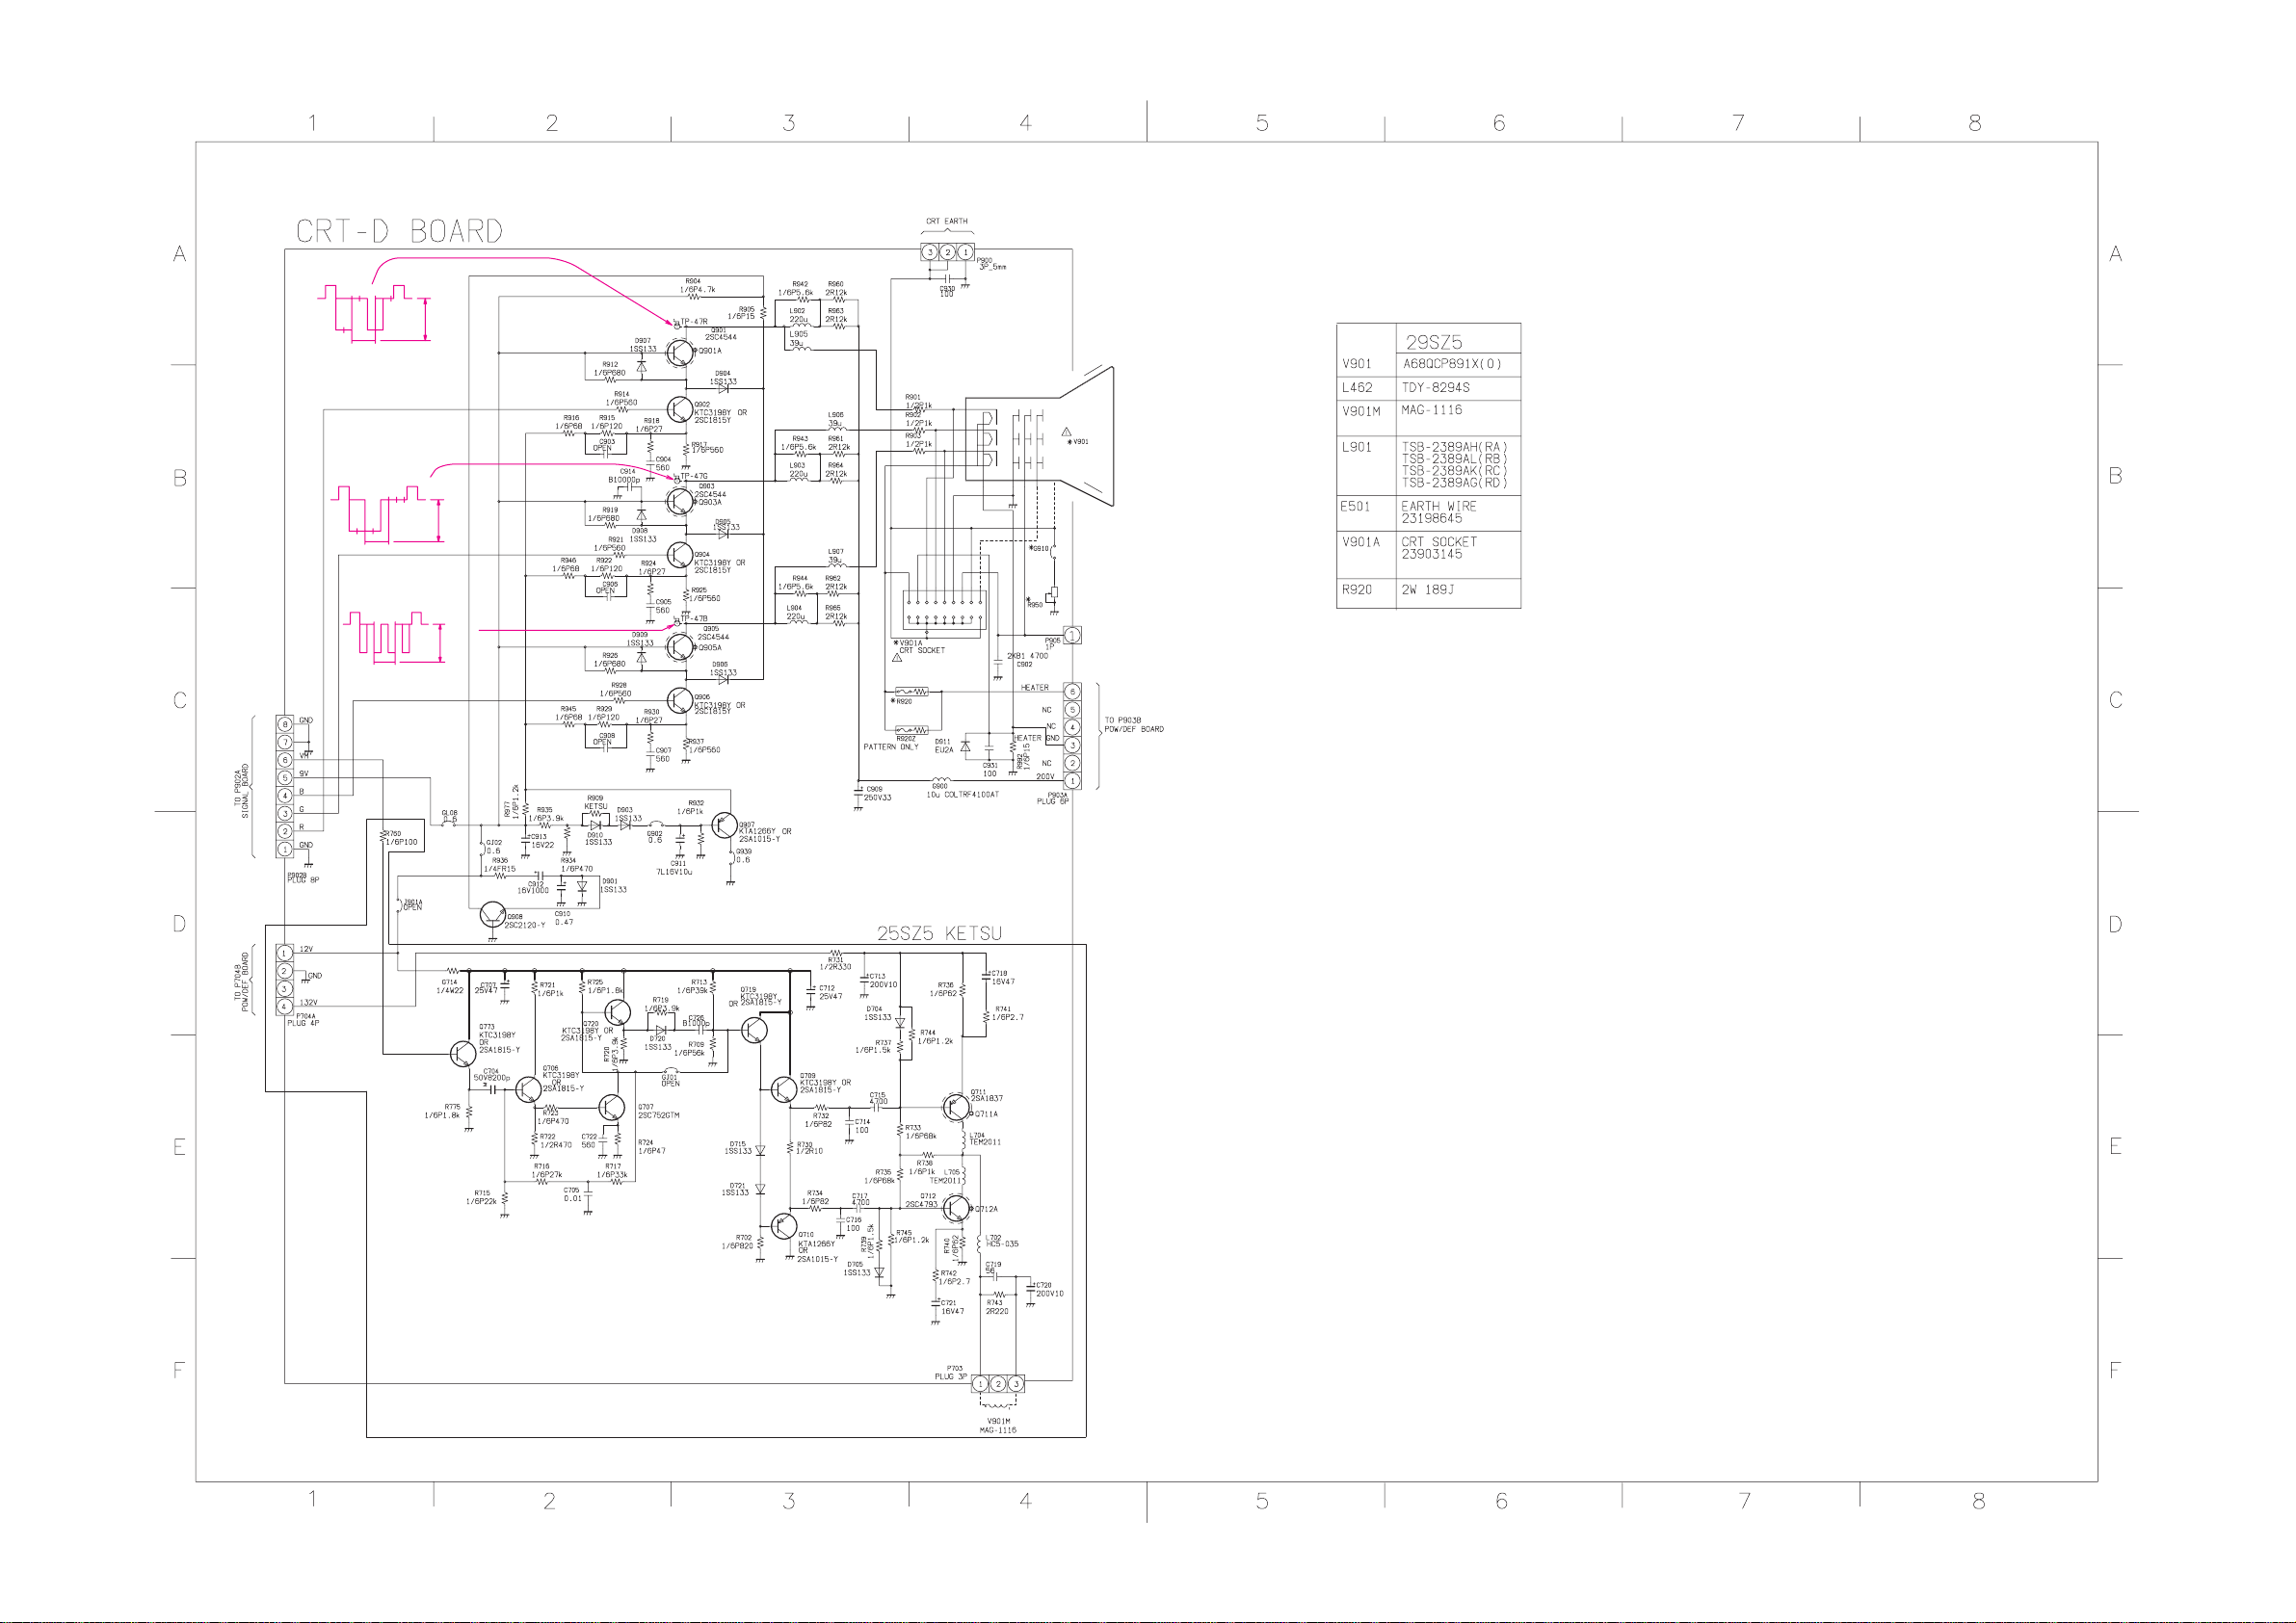
66Vp-p
68Vp-p
68Vp-p
160V
9.0V
8.7V
3.2V
2.2V
160V
9.0V
8.7V
3.2V
2.2V
160.0V
9.0V
8.7 V
3.2V
2.2V
2.2V
2.0V
11.5V
11.5V
8.5V
7.9V
9.8V
1.5V
0.8V
6.0V
0.8V
0.1V
6.5V
11.5V
5.5V
5.5V
5.2V
0V
122.3V
122.7V
6.0V
64.3V
0.8V
0.3V
29SZ5DA/29SZ5DE/29SZ5SH/29SZ5ST
CRT DRIVE
(10/11)
Page 55
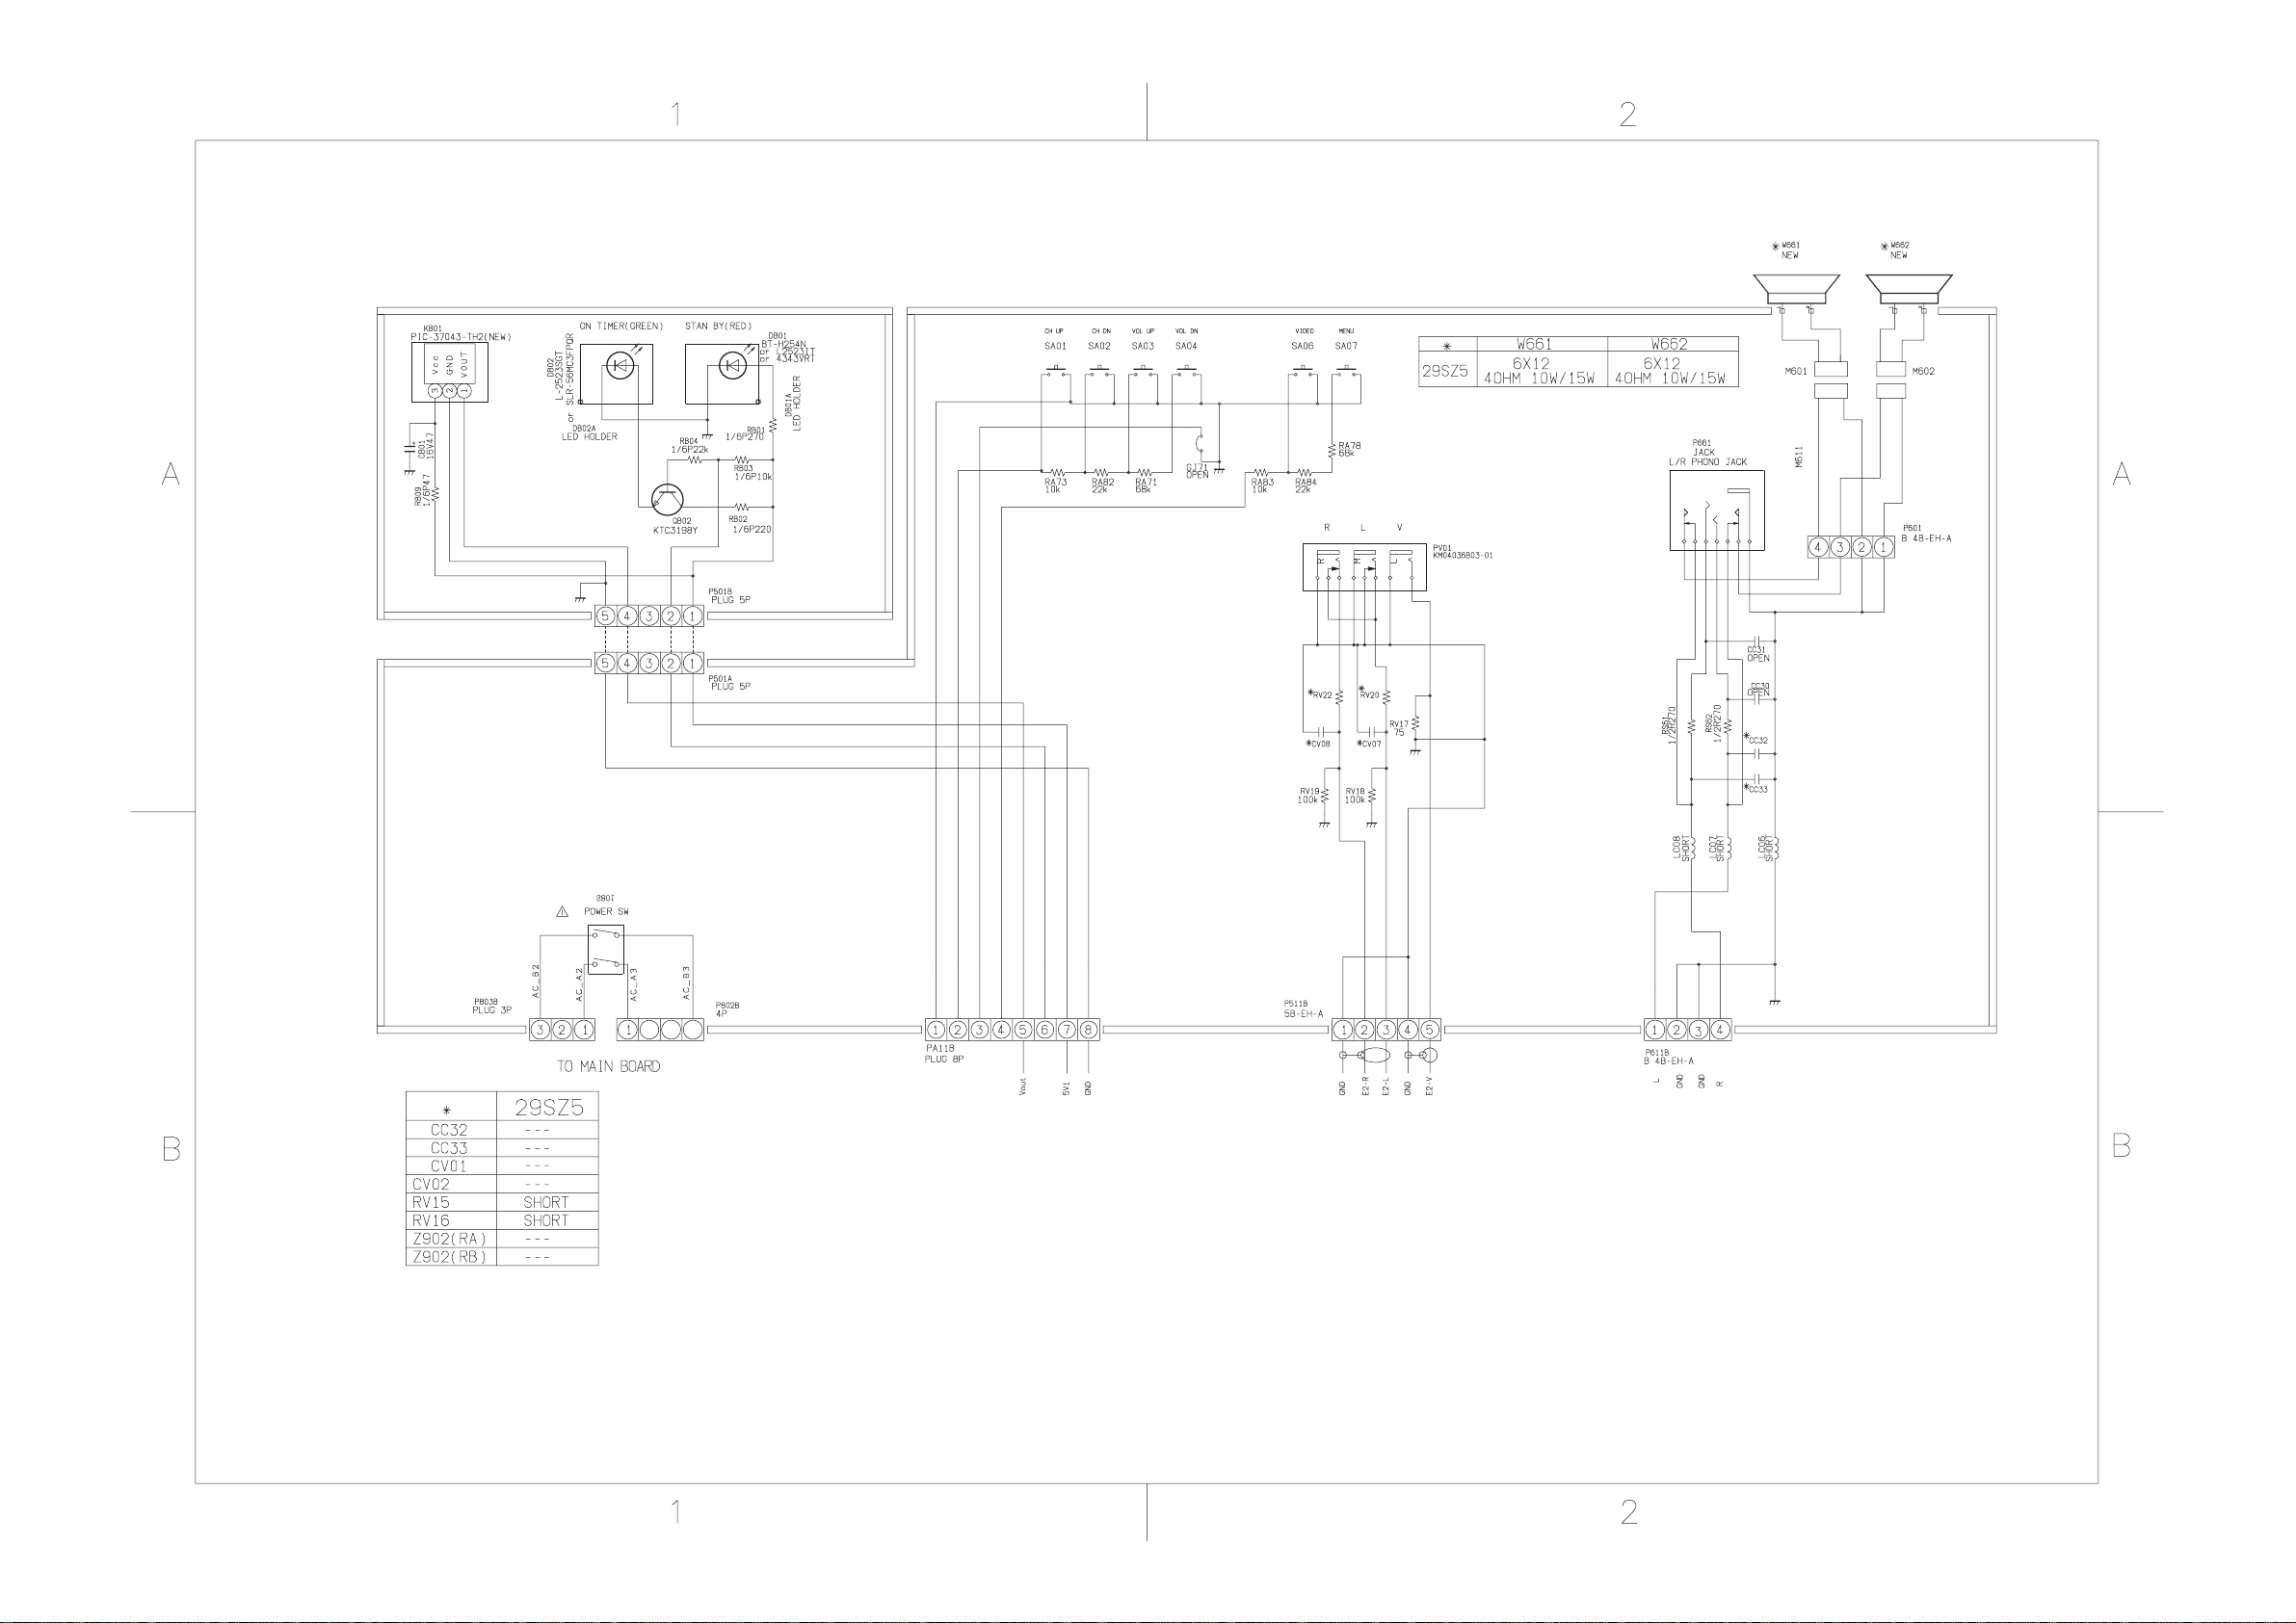
29SZ5DA/29SZ5DE/29SZ5SH/29SZ5ST
FRONT AV
(11/11)
 Loading...