


FormNo.3435-841RevC
ZMaster
®
Commercial3000
SeriesRidingMower
with48in,52in,60in,or72inTURBOFORCE
SideDischargeMower
ModelNo.72932—SerialNo.400000000andUp
ModelNo.72936—SerialNo.400000000andUp
ModelNo.72949—SerialNo.406397819andUp
ModelNo.72949HD—SerialNo.400000000andUp
ModelNo.72950—SerialNo.400000000andUp
ModelNo.72952—SerialNo.400000000andUp
ModelNo.72959—SerialNo.400000000andUp
®
Registeratwww.T oro.com.
OriginalInstructions(EN)
*3435-841*

ItisaviolationofCaliforniaPublicResourceCode
Section4442or4443touseoroperatetheengineon
anyforest-covered,brush-covered,orgrass-covered
landunlesstheengineisequippedwithaspark
arrester,asdenedinSection4442,maintainedin
effectiveworkingorderortheengineisconstructed,
equipped,andmaintainedforthepreventionofre.
GrossorNetTorque:Thegrossornettorque
ofthisenginewaslaboratoryratedbytheengine
manufacturerinaccordancewiththeSocietyof
AutomotiveEngineers(SAE)J1940orJ2723.As
conguredtomeetsafety,emission,andoperating
requirements,theactualenginetorqueonthisclass
ofmowerwillbesignicantlylower.Pleasereferto
theenginemanufacturer’sinformationincludedwith
themachine.
Pleaserefertotheenginemanufacturer’sinformation
includedwiththemachine.
WARNING
CALIFORNIA
Proposition65Warning
Theengineexhaustfromthisproduct
containschemicalsknowntotheStateof
Californiatocausecancer,birthdefects,
orotherreproductiveharm.
Batteryposts,terminals,andrelated
accessoriescontainleadandlead
compounds,chemicalsknownto
theStateofCaliforniatocause
cancerandreproductiveharm.Wash
handsafterhandling.
Useofthisproductmaycauseexposure
tochemicalsknowntotheStateof
Californiatocausecancer,birthdefects,
orotherreproductiveharm.
Visitwww.Toro.comforproductsafetyandoperation
trainingmaterials,accessoryinformation,helpnding
adealer,ortoregisteryourproduct.
Wheneveryouneedservice,genuineToroparts,or
additionalinformation,contactanAuthorizedService
DealerorToroCustomerServiceandhavethemodel
andserialnumbersofyourproductready.Figure1
identiesthelocationofthemodelandserialnumbers
ontheproduct.Writethenumbersinthespace
provided.
Important:Withyourmobiledevice,youcan
scantheQRcode(ifequipped)ontheserial
numberdecaltoaccesswarranty,parts,andother
productinformation.
g233771
Figure1
1.Modelandserialnumberlocation
ModelNo.
Introduction
Thisrotary-blade,ridinglawnmowerisintendedtobe
usedbyprofessional,hiredoperators.Itisdesigned
primarilyforcuttinggrassonwell-maintainedlawns
onresidentialorcommercialproperties.Usingthis
productforpurposesotherthanitsintendedusecould
provedangeroustoyouandbystanders.
Readthisinformationcarefullytolearnhowtooperate
andmaintainyourproductproperlyandtoavoid
injuryandproductdamage.Y ouareresponsiblefor
operatingtheproductproperlyandsafely .
©2022—TheToro®Company
8111LyndaleAvenueSouth
Bloomington,MN55420
SerialNo.
Contactusatwww.Toro.com.
2
PrintedintheUSA
AllRightsReserved

Thismanualuses2wordstohighlightinformation.
Importantcallsattentiontospecialmechanical
informationandNoteemphasizesgeneralinformation
worthyofspecialattention.
Thesafety-alertsymbol(Figure2)appearsbothin
thismanualandonthemachinetoidentifyimportant
safetymessagesthatyoumustfollowtoavoid
accidents.Thissymbolwillappearwiththeword
Danger,Warning,orCaution.
•Dangerindicatesanimminentlyhazardous
situationwhich,ifnotavoided,willresultindeath
orseriousinjury.
•Warningindicatesapotentiallyhazardous
situationwhich,ifnotavoided,couldresultin
deathorseriousinjury.
•Cautionindicatesapotentiallyhazardoussituation
which,ifnotavoided,mayresultinminoror
moderateinjury.
Figure2
Safety-alertsymbol
Contents
Safety.......................................................................4
GeneralSafety...................................................4
SlopeIndicator...................................................5
SafetyandInstructionalDecals..........................6
ProductOverview...................................................13
Controls...........................................................13
Specications..................................................15
Attachments/Accessories.................................15
BeforeOperation.................................................16
BeforeOperationSafety...................................16
AddingFuel......................................................17
PerformingDailyMaintenance..........................17
BreakinginaNewMachine..............................17
UsingtheRollover-ProtectionSystem
(ROPS).........................................................18
UsingtheSafety-InterlockSystem....................19
PositioningtheSeat..........................................20
UnlatchingtheSeat..........................................20
ChangingtheSeatSuspension.........................20
AdjustingtheRear-ShockAssemblies..............21
DuringOperation.................................................22
DuringOperationSafety...................................22
EnteringtheOperator’sPosition.......................24
OperatingtheParkingBrake.............................24
OperatingtheMowerBlade-ControlSwitch
(PTO)............................................................25
OperatingtheThrottle.......................................25
OperatingtheChoke........................................25
StartingtheEngine...........................................26
ShuttingOfftheEngine.....................................26
UsingtheMotion-ControlLevers.......................27
DrivingtheMachine..........................................27
UsingtheSideDischarge.................................28
AdjustingtheHeightofCut...............................29
AdjustingtheAnti-ScalpRollers........................30
AdjustingtheFlowBafeKnob.........................30
PositioningtheFlowBafe................................31
OperatingTips.................................................32
AfterOperation....................................................33
AfterOperationSafety......................................33
UsingtheFuel-ShutoffValve.............................33
UsingtheDrive-Wheel-ReleaseValves............33
TransportingtheMachine.................................34
Maintenance...........................................................36
MaintenanceSafety..........................................36
RecommendedMaintenanceSchedule(s)...........36
Lubrication..........................................................38
GreasingtheMachine.......................................38
LubricatingtheMowerDeck-LiftPivots.............38
sa-black
GreasingtheMowerDeck................................38
GreasingtheCasterPivots...............................39
GreasingtheCaster-WheelHubs.....................40
EngineMaintenance...........................................41
EngineSafety...................................................41
IdentifyingtheEngine.......................................41
ServicingaKawasaki
ServicingaKohler
CheckingtheSparkArrester.............................51
FuelSystemMaintenance...................................52
ReplacingtheFuelFilter...................................52
ServicingtheFuelT ank.....................................52
ElectricalSystemMaintenance...........................53
ElectricalSystemSafety...................................53
ServicingtheBattery.........................................53
ServicingtheFuses..........................................55
DriveSystemMaintenance..................................55
CheckingtheSeatBelt.....................................55
CheckingtheRoll-BarKnobs............................55
AdjustingtheTracking......................................56
CheckingtheTirePressure...............................57
CheckingtheWheelLugNuts...........................57
CheckingtheWheel-HubSlottedNut................57
AdjustingtheCaster-PivotBearing...................57
RemovingtheClutchShim...............................58
CoolingSystemMaintenance..............................60
CoolingSystemSafety.....................................60
CleaningtheEngineScreenandEngine-Oil
Cooler...........................................................60
CleaningtheEngine-CoolingFinsand
Shrouds........................................................60
CheckingandCleaningtheHydraulic-Unit
Shrouds........................................................61
BrakeMaintenance.............................................61
AdjustingtheParkingBrake..............................61
BeltMaintenance................................................62
®
Engine..........................41
®
Engine...............................46
3

InspectingtheBelts..........................................62
ReplacingtheMowerBelt.................................62
ReplacingtheHydraulicPump-Drive
Belt................................................................63
ControlsSystemMaintenance.............................64
AdjustingtheControl-HandlePosition..............64
AdjustingtheMotion-ControlLinkage...............65
AdjustingtheMotion-ControlDamper...............66
AdjustingtheMotion-ControlNeutral-Lock
Pivot..............................................................66
HydraulicSystemMaintenance...........................67
HydraulicSystemSafety...................................67
Hydraulic-FluidSpecications..........................67
CheckingtheHydraulicFluid............................67
ChangingtheHydraulicFluidand
Filters............................................................68
MowerDeckMaintenance....................................69
BladeSafety.....................................................69
ServicingtheCuttingBlades.............................69
LevelingtheMowerDeck..................................72
RemovingtheMowerDeck...............................74
ReplacingtheGrassDeector..........................75
Cleaning..............................................................76
CleaningundertheMowerDeck.......................76
CleaningtheSuspensionSystem.....................76
DisposingofWaste...........................................76
Storage...................................................................77
StorageSafety..................................................77
CleaningandStorage.......................................77
Troubleshooting......................................................78
Schematics.............................................................80
Safety
Thismachinehasbeendesignedinaccordancewith
ANSIstandardB71.4-2017.
GeneralSafety
Thisproductiscapableofamputatinghandsand
feetandofthrowingobjects.Alwaysfollowallsafety
instructionstoavoidseriouspersonalinjuryordeath.
•Readandunderstandthecontentsofthis
Operator’sManualbeforestartingtheengine.
•Keepbystandersandchildrenaway.
•Donotallowchildrenoruntrainedpeopleto
operateorservicethemachine.Allowonlypeople
whoareresponsible,trained,familiarwiththe
instructions,andphysicallycapabletooperateor
servicethemachine.
•Alwayskeeptherollbarinthefullyraisedand
lockedpositionandusetheseatbelt.
•Donotoperatethemachineneardrop-offs,
ditches,embankments,water,orotherhazards,or
onslopesgreaterthan15°.
•Donotputyourhandsorfeetnearmoving
componentsofthemachine.
•Donotoperatethemachinewithoutallguards,
safetyswitches,andothersafetyprotective
devicesinplaceandfunctioningproperly.
•Shutofftheengine,removethekey,andwait
forallmovingpartstostopbeforeleavingthe
operator’sposition.Allowthemachinetocool
beforeservicing,adjusting,fueling,cleaning,or
storingit.
4

SlopeIndicator
Figure3
Youmaycopythispageforpersonaluse.
1.Themaximumslopeyoucanoperatethemachineonis15degrees.Usetheslopecharttodeterminethedegreeofslopeof
hillsbeforeoperating.Donotoperatethismachineonaslopegreaterthan15degrees.Foldalongtheappropriateline
tomatchtherecommendedslope.
2.Alignthisedgewithaverticalsurface,atree,building,fencepole,etc.
3.Exampleofhowtocompareslopewithfoldededge
5
g011841

SafetyandInstructionalDecals
Safetydecalsandinstructionsareeasilyvisibletotheoperatorandarelocatednearanyarea
ofpotentialdanger.Replaceanydecalthatisdamagedormissing.
BatterySymbols
Someorallofthesesymbolsareonyourbattery .
decalbatterysymbols
1.Explosionhazard6.Keepbystandersaway
fromthebattery .
2.Nore,opename,or
smoking
7.Weareyeprotection;
explosivegasescan
causeblindnessandother
injuries.
3.Causticliquid/chemical
burnhazard
8.Batteryacidcancause
blindnessorsevereburns.
4.Weareyeprotection.9.Flusheyesimmediately
withwaterandgetmedical
helpfast.
5.ReadtheOperator's
Manual.
10.Containslead;donot
discard
Manufacturer'sMark
1.Thismarkindicatesthatthebladeisidentiedasapart
fromtheoriginalmachinemanufacturer.
decal99-8936
99-8936
1.Machinespeed4.Neutral
2.Fast5.Reverse
3.Slow
decaloemmarkt
decal106-2655
106-2655
1.Warning—donottouchorapproachmovingbelts;remove
thekeyandreadtheinstructionsbeforeservicingor
performingmaintenance.
decal58-6520
58-6520
1.Grease
106-5517
decal106-5517
1.Warning—donottouchthehotsurface.
6

decal114-4466
114-4466
decal107-3069
107-3069
1.Warning–thereisnorolloverprotectionwhentherollbaris
down.
2.Toavoidinjuryordeathfromarolloveraccident,keepthe
rollbarintheraisedandlockedpositionandweartheseat
belt.Lowertherollbaronlywhenabsolutelynecessary;do
notweartheseatbeltwhentherollbarisdown.
3.ReadtheOperator'sManual;driveslowlyandcarefully.
1.Main,25A
2.PTO,10A
3.Charge,25A
4.Auxiliary,15A
116-1716
1.Fuel6.Hourmeter
2.Empty
3.Half
4.Full9.Neutral
5.Battery
7.PTO
8.Parkingbrake
10.Operatorpresenceswitch
decal116-1716
110-2067
112-9028
1.Warning—stayawayfrommovingparts;keepallguards
andshieldsinplace.
decal116-5988
116-5988
1.Parkingbrake—engaged2.Parking
brake—disengaged
decal110-2067
decal112-9028
decal116-8283
116-8283
1.Warning—readtheOperator'sManualforinstructionson
torquingthebladebolt/nutto75to81N∙m(55to60ft-lb).
7

116-8726
1.ReadtheOperator’sManualfortherecommendedhydraulic
uid.
decal116-8726
decal117-3848
117-3848
1.Thrownobjecthazard—keepbystandersaway.
2.Thrownobjecthazard,raiseddeector—donotoperate
withoutthedeector ,dischargecover,orgrasscollection
systeminplace.
3.Cutting/dismembermenthazardofhandorfoot,mower
blade—stayawayfrommovingparts;keepallguardsand
shieldsinplace.
decal126-2055
126-2055
1.Wheellugnut—torqueto129N∙m(95ft-lb).
2.Wheelhubnut—torqueto319N∙m(235ft-lb).
3.ReadtheOperator’sManualbeforeperforming
maintenance;checkthetorqueaftertherst100hoursand
every500hoursafter.
117-0346
1.Fuelleakhazard—readtheOperator'sManual;donot
attempttoremovetherollbar;donotweld,drillormodify
therollbarinanyway.
decal117-0346
decal133-8062
133-8062
8
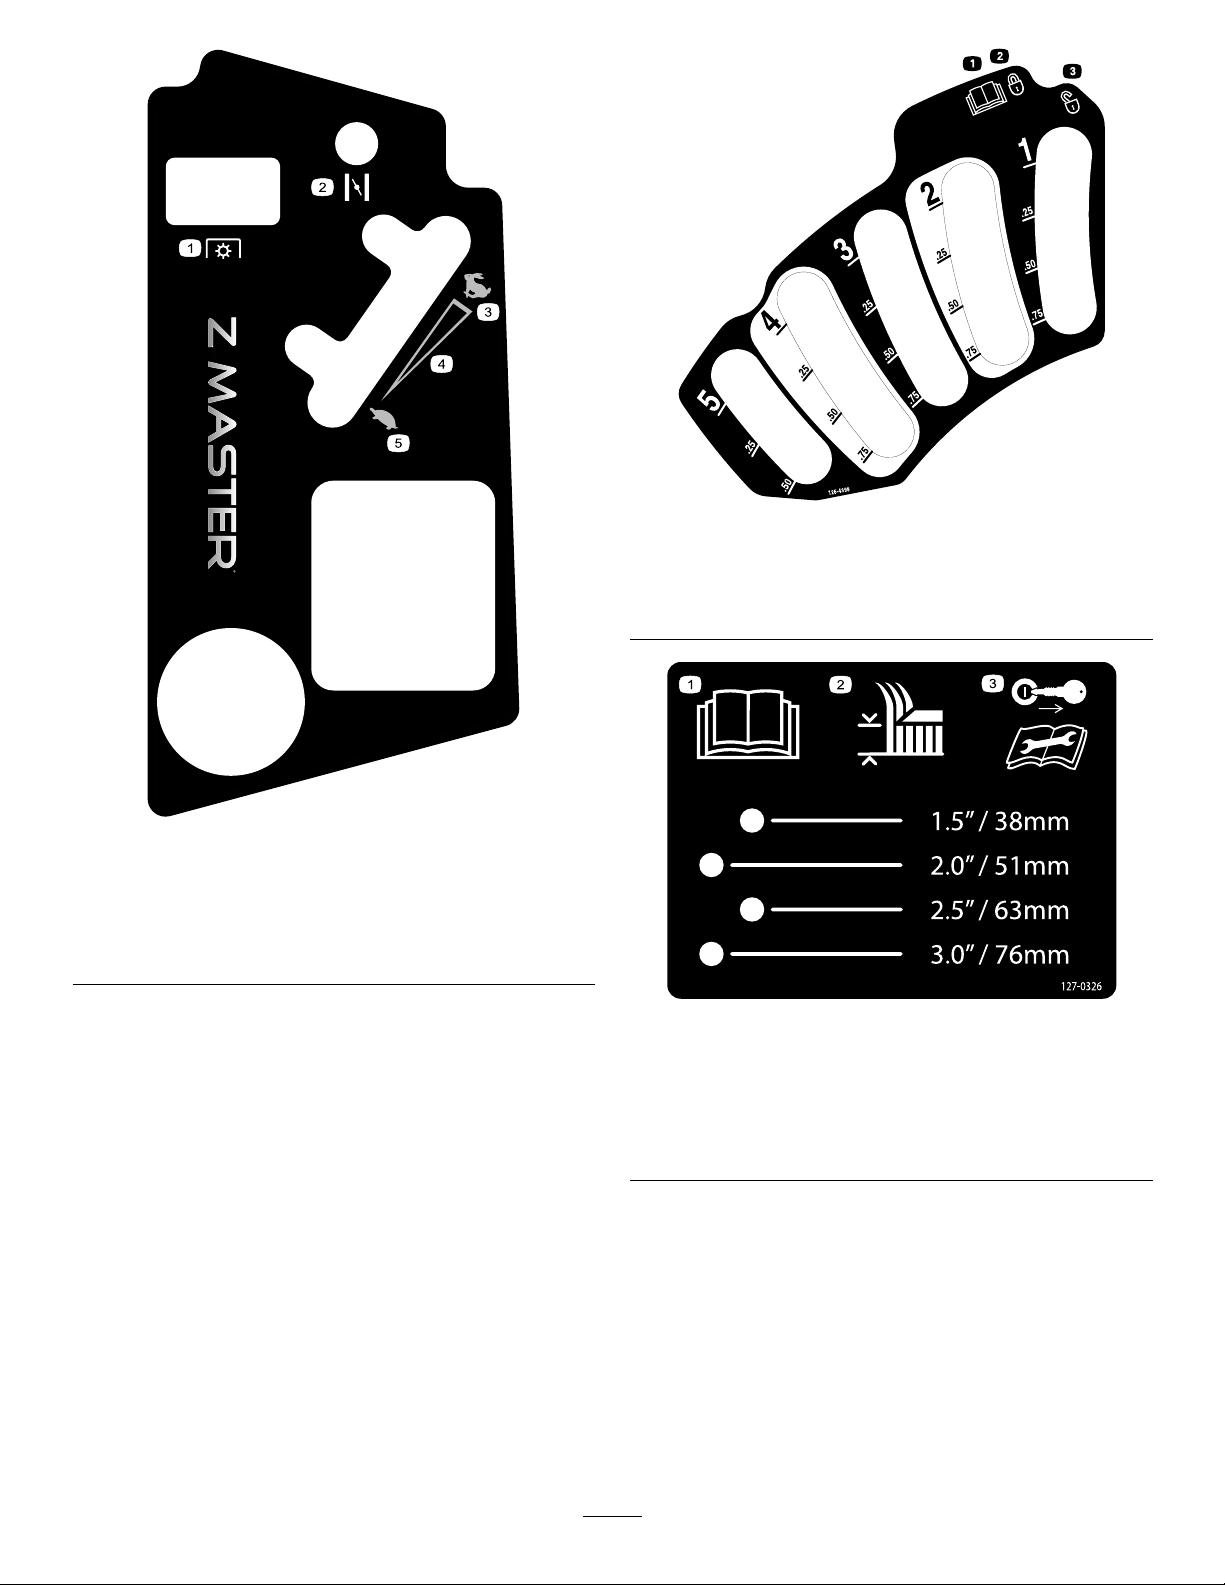
decal126-4398
126-4398
121-7551
1.Powertakeoff(PTO)4.Continuousvariable
setting
2.Choke5.Slow
3.Fast
1.ReadtheOperator’s
3.Unlock
Manual.
2.Lock
decal121-7551
decal127-0326
127-0326
1.ReadtheOperator's
Manual.
2.Heightofcut
3.Removethekeyand
readtheOperator's
Manualbeforeperforming
maintenance.
9

131-1180
decal131-1180
decal136-5508
136-5508
1.Beltrouting
1.ReadtheOperator's
Manual.
2.Short,lightgrass;dry
conditions
MachineswithMyRide™Only
3.Baggingsetting
4.Tall,densegrass;wet
conditions
132-5063
1.Camlock2.Camunlock
decal132-5063
10

125-9383
1.Checkhydraulicuidevery50operatinghours.3.Checkthetirepressureevery50operatinghours.
2.ReadtheOperator’sManualforinformationonlubricating
themachine.
4.ReadtheOperator’sManualbeforeservicingorperforming
maintenance.
decal125-9383
11

132-0871
Note:Thismachinecomplieswiththeindustrystandardstabilitytestinthestaticlateralandlongitudinaltestswiththemaximum
recommendedslopeindicatedonthedecal.ReviewtheinstructionsforoperatingthemachineonslopesintheOperator’sManualas
wellastheconditionsinwhichyouwouldoperatethemachinetodeterminewhetheryoucanoperatethemachineintheconditionson
thatdayandatthatsite.Changesintheterraincanresultinachangeinslopeoperationforthemachine.
decal132-0871
1.Warning—readtheOperator’sManual;alloperatorsshould
betrainedbeforeoperatingthemachine;wearhearing
protection.
2.Cutting/dismembermenthazardofhand—stayawayfrom
movingparts;keepallguardsandshieldsinplace.
3.Thrownobjecthazard—keepbystandersaway.
MachineswithMyRide™Only
4.Tippinghazard—donotusedualrampswhenloadingontoa
trailer;use1rampwideenoughforthemachine;usearamp
withaslopelessthan15°;backuptheramp(inreverse)and
driveforwardofftheramp.
5.Runoverhazard—donotcarrypassengers;lookbehindyou
whenmovinginreverse.
6.Tippinghazard—donotusethemachineneardrop-offsor
onslopesgreaterthan15°;onlyoperateacrossslopesless
than15°.
decal132-5067
132-5067
12
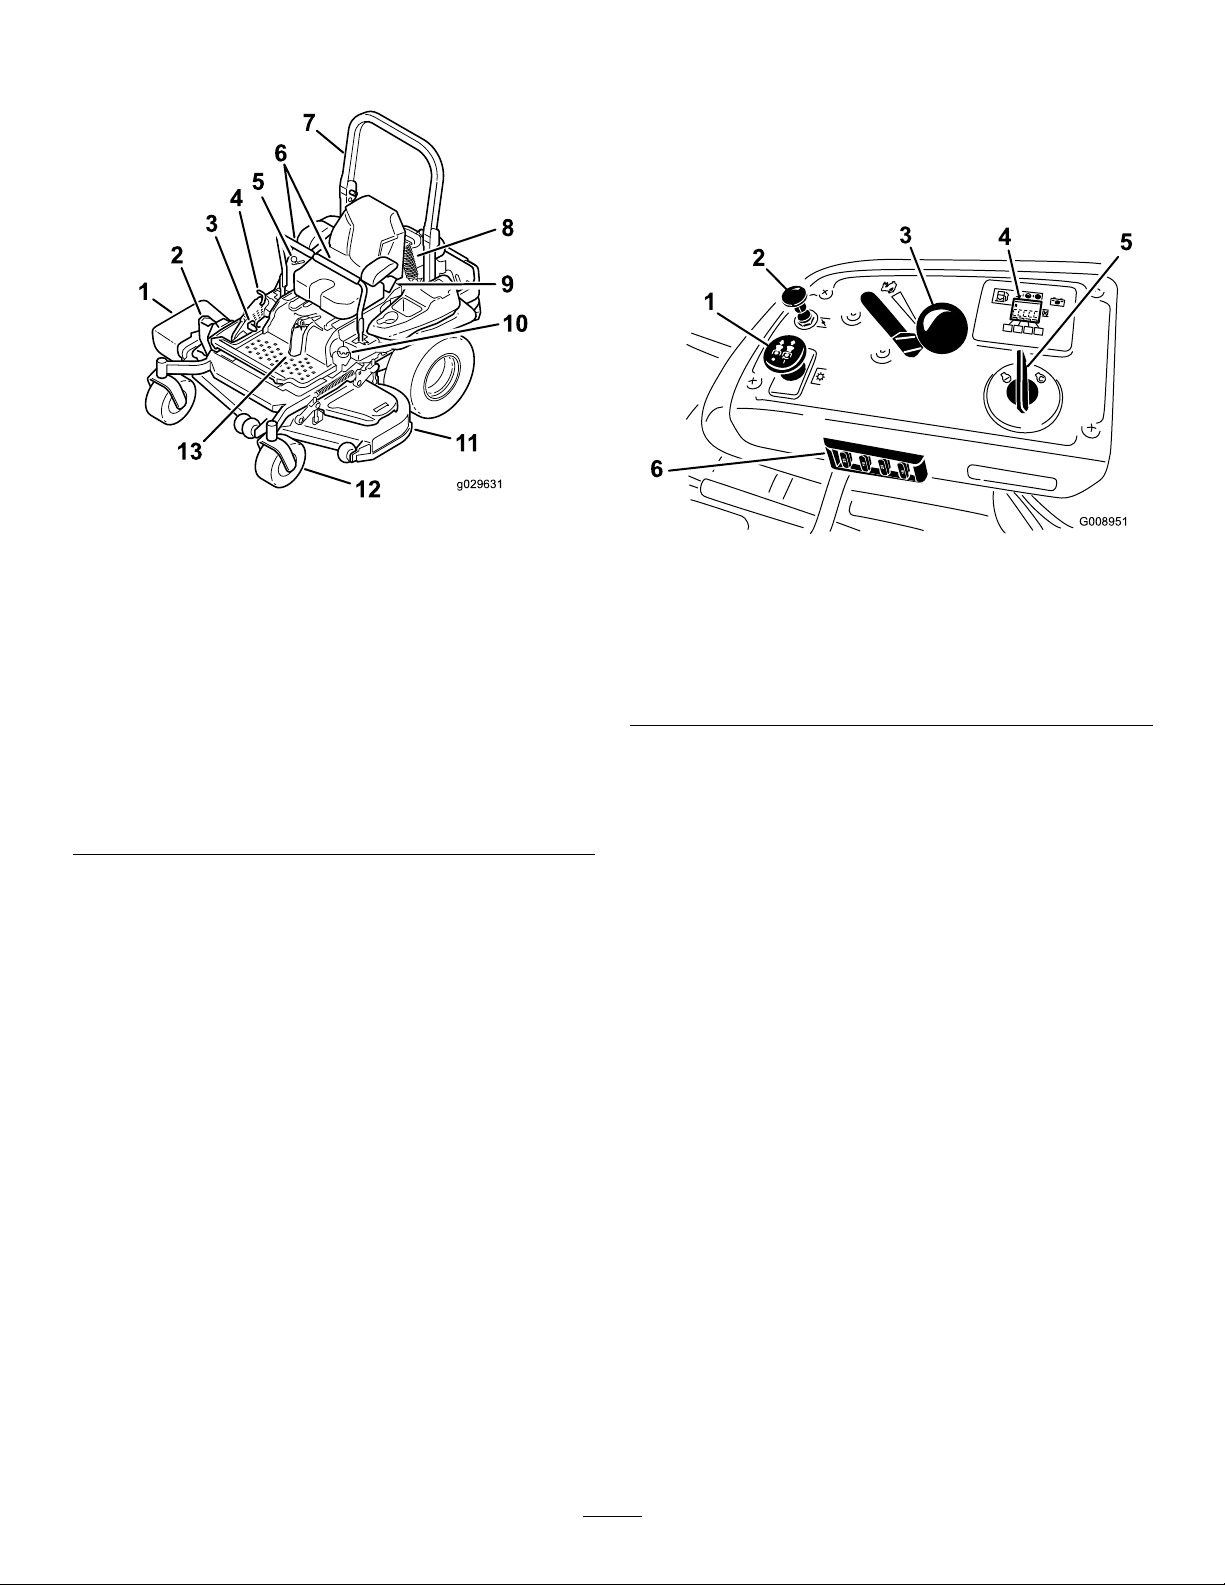
ProductOverview
Figure4
1.Side-dischargedeector
2.Height-of-cutdeck-lift
pedal
3.Parking-brakelever10.Fuelcap
4.Transportlock11.Mowerdeck
5.Controls12.Casterwheel
6.Motion-controllevers13.Front-shockassembly
7.Rollbar
8.Rear-shockassembly
9.Seatbelt
(machineswithMyRide™
only)
(machineswithMyRide™
only)
Controls
Becomefamiliarwithallthecontrolsbeforeyoustart
theengineandoperatethemachine.
ControlPanel
g029631
g008951
Figure5
1.Blade-controlswitch
(powertakeoff)
2.Chokecontrol
3.Throttlecontrol6.Fuses
KeySwitch
Thekeyswitch,usedtostartandshutofftheengine,
has3positions:OFF,RUN,andSTART.Referto
StartingtheEngine(page26).
4.Hour
meter/Safety-interlock
display
5.Keyswitch
ThrottleControl
Thethrottlecontrolstheenginespeed,andithasa
continuous-variablesettingfromtheSLOWtoFAST
position(Figure5).
ChokeControl
Usethechokecontroltostartacoldengine.
Blade-ControlSwitch(Power
Takeoff)
Theblade-controlswitch,representedbya
power-takeoff(PTO)symbol,engagesand
disengagespowertothemowerblades(Figure5).
HourMeter
Thehourmeterrecordsthenumberofhoursthe
enginehasoperated.Itoperateswhentheengine
13

isrunning.Usethesetimesforschedulingregular
maintenance(Figure6).
Figure6
1.Fuelgauge(bars)4.Safety-interlocksymbols
2.Batterylight
3.Hourmeter
5.Lowfuelindicatorlight
FuelGauge
themachine(Figure27).Alwayspositionthe
motion-controlleversintotheNEUTRAL-LOCKposition
whenyoustopthemachineorleaveitunattended.
Parking-BrakeLever
Wheneveryoushutofftheengine,engagetheparking
braketopreventaccidentalmovementofthemachine.
Fuel-ShutoffValve
Closethefuel-shutoffvalvewhentransportingor
storingthemachine;refertoUsingtheFuel-Shutoff
Valve(page33).
g008950
Thefuelgaugeislocatedwithinthehourmeter,and
thebarslightupwhenthekeyswitchisintheON
position(Figure6).
Theindicatorlightappearswhenthefuellevelislow
(approximately1gallonremaininginthefueltank).
Safety-InterlockIndicators
Therearesymbolsonthehourmeterthatindicate
withablacktrianglethattheinterlockcomponentis
positionedcorrectly(Figure6).
Battery-IndicatorLight
IfyouturnthekeyswitchtotheONpositionfora
fewseconds,thebatteryvoltagedisplaysinthearea
wherethehoursarenormallydisplayed.
Thebatterylightturnsonwhenthekeyswitchis
turnedonandwhenthechargeisbelowthecorrect
operatinglevel(Figure6).
Motion-ControlLevers
Usethemotion-controlleverstodrivethemachine
forward,reverse,andturneitherdirection(Figure4).
Neutral-LockPosition
Movethemotion-controlleversoutwardfromthe
centertotheNEUTRAL-LOCKpositionwhenexiting
14

Specications
Note:Specicationsanddesignaresubjecttochangewithoutnotice.
Width
48-inchDeck52-inchDeck60-inchDeck72-inchDeck
Withoutthedeck
Deectorup
Deectordown
Length
Rollbarup
Rollbardown
116cm122cm135cm150cm
(46inches)(48inches)(53inches)(59inches)
137cm137cm157cm187cm
(54inches)(54inches)(62inches)(74inches)
161cm173cm192cm222cm
(64inches)(68inches)(76inches)(88inches)
48-inchDeck52-inchDeck60-inchDeck72-inchDeck
201cm201cm211cm219cm
(79inches)(79inches)(83inches)(86inches)
206cm206cm215cm223cm
(81inches)(81inches)(85inches)(88inches)
Height
48-inchDeck52-inchDeck60-inchDeck72-inchDeck
178cm178cm179cm179cm
Rollbarup
(70inches)(70inches)(71inches)(71inches)
118cm1 18cm1 19cm119cm
Rollbardown
(47inches)(47inches)(47inches)(47inches)
Weight
ModelWeight
72949
72950
72952
72959
72932
72936
72949HD
Attachments/Accessories
495kg(1,092lb)
541kg(1,193lb)
475kg(1,048lb)
588kg(1,296lb)
565kg(1,246lb)
589kg(1,298lb)
492kg(1,085lb)
AselectionofToroapprovedattachmentsandaccessoriesisavailableforusewiththemachinetoenhance
andexpanditscapabilities.ContactyourAuthorizedServiceDealerorauthorizedT orodistributororgoto
www.T oro.comforalistofallapprovedattachmentsandaccessories.
Toensureoptimumperformanceandcontinuedsafetycerticationofthemachine,useonlygenuineT oro
replacementpartsandaccessories.Replacementpartsandaccessoriesmadebyothermanufacturerscouldbe
dangerous,andsuchusecouldvoidtheproductwarranty.
15

Operation
Note:Determinetheleftandrightsidesofthe
machinefromthenormaloperatingposition.
BeforeOperation
BeforeOperationSafety
GeneralSafety
•Donotallowchildrenoruntrainedpeopleto
operateorservicethemachine.Localregulations
mayrestricttheageoftheoperator.Theowner
isresponsiblefortrainingalloperatorsand
mechanics.
•Inspecttheareawhereyouwillusethemachine,
andremoveallobjectsthatcouldinterferewith
theoperationofthemachineorthatthemachine
couldthrow.
•Becomefamiliarwiththesafeoperationofthe
equipment,operatorcontrols,andsafetysigns.
•Checkthatoperator-presencecontrols,safety
switches,andguardsareattachedandworking
properly.Donotoperatethemachineunlessthey
arefunctioningproperly.
•Shutofftheengine,removethekey,andwait
forallmovingpartstostopbeforeleavingthe
operator’sposition.Allowthemachinetocool
beforeservicing,adjusting,fueling,cleaning,or
storingit.
•Beforemowing,inspectthemachinetoensure
thatthecuttingassembliesareworkingproperly .
•Evaluatetheterraintodeterminetheappropriate
equipmentandanyattachmentsoraccessories
requiredtooperatethemachineproperlyand
safely.
•Wearappropriateclothing,includingeye
protection;longpants;substantial,slip-resistant
footwear;andhearingprotection.Tiebacklong
hairanddonotwearlooseclothingorloose
jewelry.
•Donotcarrypassengersonthemachine.
•Keepbystandersandpetsawayfromthemachine
duringoperation.Shutoffthemachineand
attachment(s)ifanyoneentersthearea.
•Donotoperatethemachineunlessallguardsand
safetydevices,suchasthedeectorsandthe
entiregrasscatcher,areinplaceandfunctioning
properly.Replacewornordeterioratedpartswhen
necessary.
FuelSafety
•Fuelisextremelyammableandhighlyexplosive.
Areorexplosionfromfuelcanburnyouand
othersandcandamageproperty.
–Topreventastaticchargefromignitingthe
fuel,removethemachinefromthetruckor
trailerandrefuelitontheground,awayfrom
allvehicles.Ifthisisnotpossible,placea
portablefuelcontainerontheground,away
fromallvehicles,andllit;thenrefuelthe
machinefromthefuelcontainerratherthan
fromafuel-dispensernozzle.
–Fillthefueltankoutdoorsonlevelground,in
anopenarea,andwhentheengineiscold.
Wipeupanyfuelthatspills.
–Donothandlefuelwhensmokingoraroundan
openameorsparks.
–Donotremovethefuelcaporaddfueltothe
tankwhiletheengineisrunningorhot.
–Ifyouspillfuel,donotattempttostartthe
engine.Avoidcreatingasourceofignitionuntil
thefuelvaporshavedissipated.
–Storefuelinanapprovedcontainerandkeep
itoutofthereachofchildren.
•Fuelisharmfulorfatalifswallowed.Long-term
exposuretovaporscancauseseriousinjuryand
illness.
–Avoidprolongedbreathingofvapors.
–Keepyourhandsandfaceawayfromthe
nozzleandthefuel-tankopening.
–Keepfuelawayfromyoureyesandskin.
•Donotstorethemachineorfuelcontainerwhere
thereisanopename,spark,orpilotlight,such
asonawaterheateroronotherappliances.
•Donotoperatethemachinewithouttheentire
exhaustsysteminplaceandinproperworking
condition.
•Keepthefuel-dispensernozzleincontactwith
therimofthefueltankorcontaineropeningat
alltimesuntilfuelingiscomplete.Donotusea
nozzlelock-opendevice.
•Ifyouspillfuelonyourclothing,changeyour
clothingimmediately.
•Donotoverllthefueltank.Replacethefuelcap
andtightenitsecurely.
•Cleangrassanddebrisfromthecuttingunit,
mufer,drives,grasscatcher,andengine
compartmenttohelppreventres.Cleanupoilor
fuelspills.
16

AddingFuel
RecommendedFuel
•Forbestresults,useonlyclean,fresh(lessthan
30daysold),unleadedgasolinewithanoctane
ratingof87orhigher((R+M)/2ratingmethod).
•Ethanol:Gasolinewithupto10%ethanol
(gasohol)or15%MTBE(methyltertiarybutyl
ether)byvolumeisacceptable.Ethanoland
MTBEarenotthesame.Gasolinewith15%
ethanol(E15)byvolumeisnotapprovedforuse.
Neverusegasolinethatcontainsmorethan
10%ethanolbyvolume,suchasE15(contains
15%ethanol),E20(contains20%ethanol),orE85
(containsupto85%ethanol).Usingunapproved
gasolinemaycauseperformanceproblemsand/or
enginedamagewhichmaynotbecoveredunder
warranty.
•Donotusegasolinecontainingmethanol.
•Donotstorefueleitherinthefueltankorfuel
containersoverthewinterunlessyouuseafuel
stabilizer.
Note:Donotllthefueltankcompletelyfull.
Theemptyspaceinthetankallowsthefuelto
expand.
•Donotaddoiltogasoline.
UsingStabilizer/Conditioner
Useafuelstabilizer/conditionerinthemachineto
providethefollowingbenets:
•Keepsfuelfreshlongerwhenusedasdirectedby
thefuel-stabilizermanufacturer
•Cleanstheenginewhileitruns
•Eliminatesgum-likevarnishbuildupinthefuel
system,whichcauseshardstarting
Important:Donotusefueladditives
containingmethanolorethanol.
Addthecorrectamountoffuelstabilizer/conditioner
tothefuel.
Note:Afuelstabilizer/conditionerismost
effectivewhenmixedwithfreshfuel.Tominimize
thechanceofvarnishdepositsinthefuelsystem,
usefuelstabilizeratalltimes.
FillingtheFuelTank
1.Parkthemachineonalevelsurface.
2.Engagetheparkingbrake.
3.Shutofftheengineandremovethekey.
g027726
Figure7
PerformingDaily
Maintenance
Beforestartingthemachineeachday ,performthe
EachUse/DailyprocedureslistedinMaintenance
(page36).
BreakinginaNewMachine
Newenginestaketimetodevelopfullpower.Mower
decksanddrivesystemshavehigherfrictionwhen
new,placingadditionalloadontheengine.Allow
40to50hoursofbreak-intimefornewmachinesto
developfullpowerandbestperformance.
4.Cleanaroundthefuel-tankcap.
5.Fillthefueltanktothebottomofthellerneck
(Figure7).
17

Usingthe
Rollover-ProtectionSystem
(ROPS)
WARNING
Toavoidinjuryordeathfromrollover,keep
therollbarinthefullyraised,lockedposition
andusetheseatbelt.
Ensurethattheseatissecuredtothe
machine.
WARNING
Thereisnorolloverprotectionwhentheroll
barisinthedownposition.
•Lowertherollbaronlywhenabsolutely
necessary.
•Donotweartheseatbeltwhentherollbar
isinthedownposition.
•Driveslowlyandcarefully.
•Raisetherollbarassoonasclearance
permits.
•Checkcarefullyforoverheadclearances
(i.e.,branches,doorways,electricalwires)
beforedrivingunderanyobjectsanddo
notcontactthem.
LoweringtheRollBar
Important:Lowertherollbaronlywhen
absolutelynecessary.
1.T olowertherollbar,applyforwardpressureto
theupperpartoftherollbar.
2.Pullbothknobsoutandrotatethem90degrees
sotheyarenotengaged(Figure8).
3.Lowertherollbartothedownposition(Figure
8).
Figure8
1.Rollbarintheupright
position
2.ROPSknobinthelatched
position
3.PulltheROPSknobout.6.Rollbarinthefolded
4.RotatetheROPSknob90
degrees.
5.ROPSknobinthe
unlatchedposition
position
RaisingtheRollBar
Important:Alwaysusetheseatbeltwiththeroll
barintheraisedposition.
1.Raisetherollbartotheoperatingpositionand
rotatetheknobsuntiltheymovepartiallyinto
thegrooves(Figure8).
g228804
2.Raisetherollbartothefulluprightpositionwhile
pushingontheupperrollbarsothatthepins
snapintopositionwhentheholesalignwiththe
pins(Figure8).
3.Pushontherollbarandensurethatbothpins
areengaged.
18

UsingtheSafety-Interlock
System
Testthesafety-interlocksystembeforeyouusethe
machineeachtime.Ifthesafetysystemdoesnot
operateasdescribedbelow,haveanAuthorized
ServiceDealerrepairthesafetysystemimmediately .
WARNING
Ifthesafety-interlockswitchesare
disconnectedordamaged,themachinecould
operateunexpectedly,causingpersonal
injury.
•Donottamperwiththeinterlockswitches.
•Checktheoperationoftheinterlock
switchesdailyandreplaceanydamaged
switchesbeforeoperatingthemachine.
Understandingthe
Safety-InterlockSystem
Thesafety-interlocksystemisdesignedtopreventthe
enginefromstartingunlessthefollowingoccurs:
•Theparkingbrakeisengaged.
•Theblade-controlswitch(PTO)isdisengaged.
•Themotion-controlleversareintheNEUTRAL-LOCK
position.
Thesafety-interlocksystemalsoisdesignedtoshut
offtheenginewhenthemotion-controlleversare
movedfromtheNEUTRAL-LOCKpositionwiththe
parkingbrakeengagedorifyourisefromtheseat
whenthePTOisengaged.
Thehourmeterhasindicatorstonotifytheuserwhen
theinterlockcomponentisinthecorrectposition.
Whenthecomponentisinthecorrectposition,an
indicatordisplaysonthescreen.
1.Sitontheseat,engagetheparkingbrake,and
movetheblade-controlswitch(PTO)totheON
position.Trystartingtheengine;theengine
shouldnotstart.
2.Sitontheseat,engagetheparkingbrake,and
movetheblade-controlswitch(PTO)totheOFF
position.Moveeithermotion-controlleverout
oftheNEUTRAL-LOCKposition.Trystartingthe
engine;theengineshouldnotstart.Repeatfor
theothercontrollever.
3.Sitontheseat,engagetheparkingbrake,
movetheblade-controlswitch(PTO)totheOFF
position,andmovethemotion-controllevers
totheNEUTRAL-LOCKposition.Nowstartthe
engine.Whiletheengineisrunning,disengage
theparkingbrake,engagetheblade-control
switch(PTO),andriseslightlyfromtheseat;the
engineshouldshutoff.
4.Sitontheseat,engagetheparkingbrake,
movetheblade-controlswitch(PTO)totheOFF
position,andmovethemotion-controllevers
totheNEUTRAL-LOCKposition.Nowstartthe
engine.Whiletheengineisrunning,center
eithermotioncontrolandmove(forwardor
reverse);theengineshouldshutoff.Repeatfor
othermotioncontrol.
5.Sitontheseat,disengagetheparkingbrake,
movetheblade-controlswitch(PTO)totheOFF
position,andmovethemotion-controllevers
totheNEUTRAL-LOCKposition.Trystartingthe
engine;theengineshouldnotstart.
Figure9
1.Indicatorsdisplaywhentheinterlockcomponentsareinthe
correctposition
TestingtheSafety-Interlock
System
ServiceInterval:Beforeeachuseordaily
g009181
19

PositioningtheSeat
Theseatcanmoveforwardandbackward.Position
theseatwhereyouhavethebestcontrolofthe
machineandaremostcomfortable(Figure10).
MachineswithoutMyRide™
SuspensionSystem
Tounlatchtheseat,pushtheseatlatchforward
(Figure12).
UnlatchingtheSeat
MachineswithMyRide™
SuspensionSystem
Figure10
g019754
1.Seatlatch2.Seat
Figure12
g008956
ChangingtheSeat
Suspension
MachineswithoutMyRide™
SuspensionSystemOnly
Theseatisadjustabletoprovideasmoothand
comfortableride.Positiontheseatwhereyouare
mostcomfortable.
Toadjustit,turntheknobinfronteitherdirectionto
providethebestcomfort(Figure13).
Figure11
g019768
g204507
1.Seat-suspensionknob
20
Figure13

AdjustingtheRear-Shock
Assemblies
MachineswithMyRide™
SuspensionSystemOnly
TheMyRide™suspensionsystemadjuststoprovide
asmoothandcomfortableride.Youcanadjustthe
rear2-shockassembliestoquicklyandeasilychange
thesuspensionsystem.Positionthesuspension
systemwhereyouaremostcomfortable.
Theslotsfortherear-shockassemblieshave
detentpositionsforreference.Youcanpositionthe
rear-shockassembliesanywhereintheslot,notjustin
thedetentpositions.Thefollowinggraphicshowsthe
positionforasoftorrmrideandthedifferentdetent
positions(Figure14).
g030024
Figure14
1.Firmestposition3.Detentsintheslots
2.Softestposition
Note:Ensurethattheleftandrightrear-shock
assembliesarealwaysadjustedtothesamepositions.
Adjusttherear-shockassemblies(Figure15).
g030065
g030019
Figure15
21

DuringOperation
DuringOperationSafety
GeneralSafety
•Theowner/operatorcanpreventandisresponsible
foraccidentsthatmaycausepersonalinjuryor
propertydamage.
•Useyourfullattentionwhileoperatingthe
machine.Donotengageinanyactivitythat
causesdistractions;otherwise,injuryorproperty
damagemayoccur.
•Donotoperatethemachinewhileill,tired,or
undertheinuenceofalcoholordrugs.
•Contactingthebladecanresultinseriouspersonal
injury.Shutofftheengine,removethekey,and
waitforallmovingpartstostopbeforeleavingthe
operatingposition.Whenyouturnthekeytothe
OFFposition,theengineshouldshutoffandthe
bladeshouldstop.Ifnot,stopusingyourmachine
immediatelyandcontactanAuthorizedService
Dealer.
•Operatethemachineonlyingoodvisibilityand
appropriateweatherconditions.Donotoperate
themachinewhenthereistheriskoflightning.
•Keepyourhandsandfeetawayfromthecutting
units.Keepclearofthedischargeopening.
•Donotmowwiththedischargedeector
raised,removed,oralteredunlessthereisa
grass-collectionsystemormulchkitinplaceand
workingproperly.
•Donotmowinreverseunlessitisabsolutely
necessary.Alwayslookdownandbehindyou
beforemovingthemachineinreverse.
•Useextremecarewhenapproachingblind
corners,shrubs,trees,orotherobjectsthatmay
blockyourview.
•Stopthebladeswheneveryouarenotmowing.
•Ifthemachinestrikesanobjectorstartstovibrate,
immediatelyshutofftheengine,removethekey
(ifequipped),andwaitforallmovingpartstostop
beforeexaminingthemachinefordamage.Make
allnecessaryrepairsbeforeresumingoperation.
•Slowdownandusecautionwhenmakingturns
andcrossingroadsandsidewalkswiththe
machine.Alwaysyieldtheright-of-way.
•Beforeyouleavetheoperatingposition,dothe
following:
–Parkthemachineonalevelsurface.
–Disengagethepowertakeoffandlowerthe
attachments.
–Engagetheparkingbrake.
–Shutofftheengineandremovethekey.
–Waitforallmovingpartstostop.
•Operatetheengineonlyinwell-ventilatedareas.
Exhaustgasescontaincarbonmonoxide,which
islethalifinhaled.
•Neverleavearunningmachineunattended.
•Attachtowedequipmenttothemachineonlyat
thehitchpoint.
•Donotoperatethemachineunlessallguardsand
safetydevices,suchasthedeectorsandthe
entiregrasscatcher,areinplaceandfunctioning
properly.Replacewornordeterioratedpartswhen
necessary.
•Useonlyaccessoriesandattachmentsapproved
byToro.
•Thismachineproducessoundlevelsinexcess
of85dBAattheoperator’searandcancause
hearinglossthroughextendedperiodsof
exposure.
g229846
Figure16
1.Wearhearingprotection.
•Cleangrassanddebrisfromthecuttingunit,
drives,mufer,andenginetohelppreventres.
•Starttheenginewithyourfeetwellawayfromthe
blades.
•Beawareofthemowerdischargepathanddirect
thedischargeawayfromothers.Avoiddischarging
materialagainstawallorobstructionbecausethe
materialmayricochetbacktowardyou.
•Stoptheblades,slowdownthemachine,anduse
cautionwhencrossingsurfacesotherthangrass
orwhentransportingthemachinetoandfromthe
operatingarea.
•Donotchangetheenginegovernorspeedor
overspeedtheengine.
•Childrenareoftenattractedtothemachineand
themowingactivity.Neverassumethatchildren
willremainwhereyoulastsawthem.
•Keepchildrenoutoftheoperatingareaandunder
thewatchfulcareofaresponsibleadultotherthan
theoperator.
•Bealertandshutoffthemachineifchildrenenter
theoperatingarea.
22

•Beforebackinguporturningthemachine,look
downandallaroundforsmallchildren.
•Donotcarrychildrenonthemachine,evenwhen
thebladesarenotmoving.Childrencouldfall
offandbeseriouslyinjuredorpreventyoufrom
safelyoperatingthemachine.Childrenwhohave
beengivenridesinthepastcouldappearinthe
operatingareawithoutwarningandberunoveror
backedoverbythemachine.
RolloverProtectionSystem
(ROPS)Safety
•TheROPSisanintegralsafetydevice.Donot
removeanyoftheROPScomponentsfromthe
machine.
•Ensurethattheseatbeltisattachedandthatyou
canreleaseitquicklyinanemergency.
•Keeptherollbarinthefullyraisedandlocked
positionandalwayswearyourseatbeltwhenever
therollbarisup.
•Checkcarefullyforoverheadobjectsbeforeyou
driveunderthem,anddonotcontactthem.
•ReplacedamagedROPScomponents.Donot
repairoralterthem.
•Thereisnorolloverprotectionwhentherollbar
isdown.
•Wheelsdroppingoveredges,oversteepbanks,or
intowatercancausearollover,whichmayresult
inseriousinjuryordeath.
•Donotweartheseatbeltwhentherollbarisdown.
•Lowertherollbaronlywhenabsolutelynecessary;
raiseitassoonasclearancepermits.
•Intheeventofarollover,takethemachinetoan
AuthorizedServiceDealertoinspecttheROPS.
•UseonlyT oroapprovedaccessoriesand
attachmentsfortheROPS.
–Evaluatethesiteconditionsofthedayto
determineiftheslopeissafeformachine
operation.Usecommonsenseandgood
judgmentwhenperformingthisevaluation.
Changesintheterrain,suchasmoisture,can
quicklyaffecttheoperationofthemachineon
aslope.
•Identifyhazardsatthebaseoftheslope.Do
notoperatethemachineneardrop-offs,ditches,
embankments,water,orotherhazards.The
machinecouldsuddenlyrolloverifawheelgoes
overtheedgeortheedgecollapses.Keepasafe
distance(twicethewidthofthemachine)between
themachineandanyhazard.Useawalk-behind
machineorahandtrimmertomowthegrassin
theseareas.
•Avoidstarting,stopping,orturningthemachineon
slopes.Avoidmakingsuddenchangesinspeedor
direction;turnslowlyandgradually.
•Donotoperateamachineunderanyconditions
wheretraction,steering,orstabilityisinquestion.
Beawarethatoperatingthemachineonwet
grass,acrossslopes,ordownhillmaycausethe
machinetolosetraction.Lossoftractiontothe
drivewheelsmayresultinslidingandalossof
brakingandsteering.Themachinecanslideeven
ifthedrivewheelsarestopped.
•Removeormarkobstaclessuchasditches,holes,
ruts,bumps,rocks,orotherhiddenhazards.T all
grasscanhideobstacles.Uneventerraincould
overturnthemachine.
•Useextracarewhileoperatingwithaccessoriesor
attachments,suchasgrass-collectionsystems.
Thesecanchangethestabilityofthemachine
andcausealossofcontrol.Followdirectionsfor
counterweights.
•Ifpossible,keepthedeckloweredtotheground
whileoperatingonslopes.Raisingthedeckwhile
operatingonslopescancausethemachineto
becomeunstable.
SlopeSafety
•Slopesareamajorfactorrelatedtolossofcontrol
androlloveraccidents,whichcanresultinsevere
injuryordeath.Theoperatorisresponsiblefor
safeslopeoperation.Operatingthemachineon
anysloperequiresextracaution.Beforeusingthe
machineonaslope,dothefollowing:
–Reviewandunderstandtheslopeinstructions
inthemanualandonthemachine.
–Useanangleindicatortodeterminethe
approximateslopeangleofthearea.
–Neveroperateonslopesgreaterthan15°.
23
Figure17
OperatingtheParking
Brake
Alwaysengagetheparkingbrakewhenyoustopthe
machineorleaveitunattended.
EngagingtheParkingBrake
Parkthemachineonalevelsurface.
g221745
1.SafeZone—usethe
machinehereonslopes
lessthan15°oratareas.
2.DangerZone—usea
walk-behindmowerand/or
ahandtrimmeronslopes
greaterthan15°andnear
drop-offsorwater.
3.Water
4.W=Widthofthemachine
5.Keepasafedistance
(twicethewidthofthe
machine)betweenthe
machineandanyhazard.
EnteringtheOperator’s
Position
Usethemowerdeckasasteptogetintothe
operator’sposition(Figure18).
g027334
Figure19
DisengagingtheParkingBrake
g027335
Figure20
1.Stephere.
g029797
Figure18
24

OperatingtheMower
OperatingtheChoke
Blade-ControlSwitch(PTO)
Theblade-controlswitch(PTO)startsandstopsthe
mowerbladesandanypoweredattachments.
EngagingtheBlade-Control
Switch(PTO)
Note:Engagingtheblade-controlswitch(PTO)with
thethrottlepositionathalforlesscausesexcessive
weartothedrivebelts.
Figure21
Usethechoketostartacoldengine.
1.Pullupthechokeknobtoengagethechoke
beforeusingthekeyswitch(Figure24).
2.Pushdownthechokeknobtodisengagethe
chokeaftertheenginehasstarted(Figure24).
g008945
DisengagingtheBlade-Control
Switch(PTO)
Figure22
OperatingtheThrottle
YoucanmovethethrottlecontrolbetweenFASTand
SLOWpositions(Figure23).
AlwaysusetheFASTpositionwhenengagingthePTO.
g008959
Figure24
1.ONposition2.OFFposition
g009174
Figure23
g008946
25

StartingtheEngine
Important:Donotengagethestarterformore
than5secondsatatime.Iftheenginefailsto
start,wait15secondsbetweenattempts.Failure
tofollowtheseinstructionscanburnoutthe
startermotor.
Note:Y oumayneedmultipleattemptstostartthe
enginethersttimeafteraddingfueltoanemptyfuel
system.
Figure25
ShuttingOfftheEngine
CAUTION
Childrenorbystandersmaybeinjuredifthey
moveorattempttooperatethemachinewhile
itisunattended.
g027337
Figure26
Important:Makesurethatthefuel-shutoffvalve
isclosedbeforetransportingorstoringthe
machine,asfuelleakagemayoccur.Engagethe
parkingbrakebeforetransporting.Makesurethat
youremovethekeyasthefuelpumpmayrunand
causethebatterytolosecharge.
g032328
Alwaysremovethekeyandengagethe
parkingbrakewhenleavingthemachine
unattended.
26
 Loading...