

Page 1

3
Water cooled grinding and
sharpening of edge tools
Page 2

4
©
This handbook is copyright and no part of it may be reproduced
without express written consent by
TORMEK AB
Box 152
S-711 23 Lindesberg
Sweden
Printed by: Strands Tryckeri AB, Lindesberg Sweden.
Second printing.
Page 3

5
Acknowledgement
I should like to thank the TORMEK users around the world for their tips and advice in the
preparation of this handbook. The close contact with the many skilled craftsmen at exhibitions and by correspondence has been most inspiring and beneficial in the development
of our water cooled grinding and sharpening system.
Torgny Jansson
Page 4

6
Fourth edition
This edition is entirely revised as considerable developments in the TORMEK system
have been introduced.
A Horizontal Base for the Universal Support has been developed which permits grinding
away from the edge. This is especially advantageous for grinding and sharpening woodcarving or woodturning tools. A profiled leather honing wheel has been developed for the
inside honing of gouges and V tools.
The latest developments are the Pro AngleMaster WM-200 and the Multi Jig SVS-50. The
Pro AngleMaster WM-200 can be set at any angle and works on any stone diameter. The
Multi Jig SVS-50 is especially developed for oval skew chisels. It is also suitable for
roughing gouges, wide carving gouges and parting tools. This jig replaces the SVS-40 jig.
There is now a detailed instruction on how to grind, sharpen and hone carving gouges
and V tools in the SVD-180 jig.
The function of a burr on turning scrapers and ticketing of the edge is covered.
The chapter The basics of grinding, sharpening and honing of edge tools, has been
completed with the sections Edge angles and bevel angles, Vertical and horizontal
grinders, Hollow bevels, Grinding pressure and Tool rests and grinding jigs.
At the end of the book there is a summary of the recommended way to grind various tools.
The number of pages is increased from 78 to 129 and the number of line drawings from
180 to 450.
Fifth edition
In this edition, the chapter dealing with the grinding, re-sharpening and honing of turning
gouges in the SVD-180 jig is revised. The factors determining the shape of a fingernail
bowl gouge are explained and there is a graph survey showing various shapes. There is
also detailed advice on how you set the jig at re-sharpenings in the easiest way.
Furthermore the mounting of mitre guillotine blades in the SVH-320 jig is described.
The number of line drawings is increased from 450 to 468 and the number of pages is
increased from 129 to 137.
Sixth edition
This edition includes the new Short Tool Jig SVS-32, which has been developed primarily
for palm held woodcarving tools and tools for power carvers. The general instructions for
carving gouges and carving V tools have been revised and put in separate chapter,
Grinding techniques for carving gouges and V tools.
The 2000 series housing now has a new design and there is a scale on the machine label
showing the stone diameter.
The grinding and ticketing of cabinet scrapers are covered in the chapter on the SVD-110
Tool Rest.
The cover is amended. The number of line drawings is increased to 502 and the number
of pages to 147.
Page 5

7
Contents
The basics of grinding, sharpening and honing edge tools ...........................9
Grinding and sharpening..................................................................................10
Edge angle and bevel angle.............................................................................11
Dry grinding and wet grinding...........................................................................12
Vertical and horizontal grinders .......................................................................13
Hollow bevel ....................................................................................................14
Grinding direction .............................................................................................15
Grinding pressure.............................................................................................16
Tool rests and grinding jigs...............................................................................18
Honing..............................................................................................................19
Grinding techniques for carving gouges and V tools........................................20
The TORMEK method of grinding, sharpening and honing..........................25
Instructions........................................................................................................33
Safety ...............................................................................................................34
Preparation before grinding..............................................................................36
The Universal Support......................................................................................37
Setting the edge angle .....................................................................................38
Pro AngleMaster, WM-200...............................................................................40
Straight Edge Jig, SVH-60................................................................................44
Planer/Jointer Blade Jig, SVH-320 ..................................................................50
Universal Gouge Jig, SVD-180.........................................................................55
Multi Jig, SVS-50..............................................................................................78
Short Tool Jig, SVS-32.....................................................................................94
Tool Rest, SVD-110........................................................................................101
Axe Jig, SVA-170 ...........................................................................................106
Knife Jig, SVM-45...........................................................................................108
Long Knife Jig, SVM-100................................................................................115
Scissors Jig, SVX-150....................................................................................116
Grinding without jigs.......................................................................................119
Diamond Truing Tool, ADV-50D.....................................................................120
Stone Grader, SP-650....................................................................................122
Honing and polishing......................................................................................124
Contents
Page 6

8
Contents
Grinding methods. Summary.........................................................................127
Maintenance and tips......................................................................................133
Reduction gear...............................................................................................134
Water trough...................................................................................................134
Keeping the stone running true ......................................................................134
Re-activating the stone...................................................................................135
Exchange of stone..........................................................................................135
Lifetime of the stone.......................................................................................135
Bearings .........................................................................................................136
Steel housing..................................................................................................136
Possible problems and how to solve them.....................................................136
The TORMEK Programme...............................................................................139
Models............................................................................................................140
Grinding Jigs...................................................................................................141
Accessories....................................................................................................142
Spare accessories..........................................................................................142
Spare parts.....................................................................................................144
Page 7

9
The basics of grinding,
sharpening and honing
edge tools
Page 8

The basics of grinding, sharpening and honing edge tools.
10
Grinding means that so much steel is removed from the tool that the edge is restored to
the original angle or altered on purpose to a new angle. The shape of the tool can also
be changed according to your requirements.
Grinding and sharpening
Edge tools need to be sharp to work efficiently. The bevels of a sharp edge tool end in a
uniform tip. After a period of use the tip becomes rounded and the edge is no longer
sharp.
You can sharpen tools with a bench stone or, in the case of knives, with a sharpening
steel. This means that you work on the very tip of the bevel and the tool is sharp again.
However, every time you hone the tool, you increase the edge angle.
When sharpening with a steel or a bench stone, a very limited amount of steel is
removed. After several sharpenings or honings, the edge angle becomes too wide and
the tool must be re-shaped.
Sooner or later all edge tools need to be re-shaped and this is done by grinding on a
grindstone. When only a limited amount of steel is removed this operation is also called
sharpening.
A sharp edge.
The edge is worn and blunt.
After honing on a bench stone
the edge is sharp again, but with
an increased edge angle.
After another period of use the
edge is blunt again.
Another honing sharpens the
edge to a still larger angle.
The edge is now re-ground to its
original shape.
Here is shown, enlarged, the various stages of a knife edge (scale 10:1).
In principle, this is the case for all edge tools.
Page 9
The basics of grinding, sharpening and honing edge tools.
11
Edge angle and bevel angle
The edge angle is the angle of the steel and dictates the cutting and durability character-
istics of the edge. It can be narrow and weak for light cutting, or steep and strong for
heavy cutting. Carving tools have narrow edge angles (approx. 20°). Turning bowl gouges
have wide edge angles (45° - 60°).
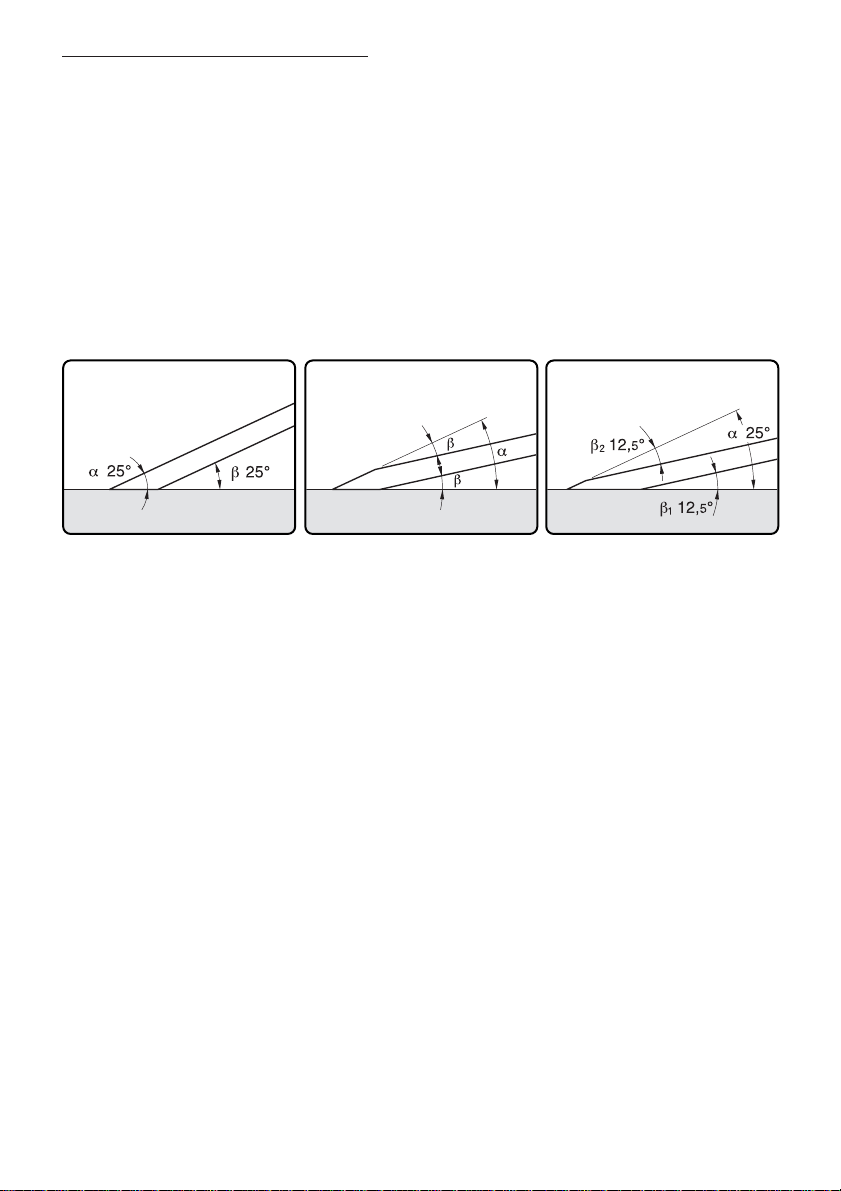
The bevel angle is the angle between the bevel and the longitudinal axis of the tool. For
tools with the bevel on one side, the edge angle is the same as the bevel angle. For tools
with symmetrical bevels on both sides – e.g. knives, axes and skew chisels – the bevel
angle is half that of the edge angle. Woodcarving tools can also have an inner bevel and
here the edge angle is the sum of the outer and inner bevel angles.
On tools with the bevel on one
side, the edge angle (
a
) is the
same as the bevel angle (b).
On tools with symmetrical bevels
on both sides, the edge angle
(a) is twice the bevel angle (b).
On tools with an outer and an
inner bevel, the edge angle (a)
is the sum of the two bevel
angles (
b
1
and
b
2
).
The size of the edge angle is critical for the efficient functioning of the tool. The edge
angle should be as narrow as possible without being too weak to withstand the stresses
when working with the wood. The optimal edge angle for each tool is a compromise
between the need for the tool to cut as easily as possible and stay sharp as long as possible. A basic requirement is that the edge is strong enough to do the work without being
damaged or bent.
A specific tool can be ground at various edge angles depending on how it is to be used.
You can of course also have more than one tool of the same type and grind them with
various edge angles – each optimal for its application.
Recommendations for edge angles are given with the grinding instructions for each tool.
With the TORMEK Pro AngleMaster you can set the desired edge angle before you start
grinding. You can also measure the existing edge angle on a tool. Please see the chapter
WM-200.
Denominations
In the literature on this subject, there are various denominations for the edge angle. It is
called bevel angle, cutting angle or sharpening angle.
The edge angle on a tool with bevels on both sides is called the included bevel angle,
the effective bevel angle, profile angle, total cutting angle or the combined bevel
angle.
Page 10

The basics of grinding, sharpening and honing edge tools.
12
Dry grinding and wet grinding
Edge tools can be ground dry either on high speed bench grinders or belt grinders or
ground wet on a slow turning grindstone running in a water bath.
Dry grinding
Bench grinders and belt grinders have a high cutting ability and they grind quickly. Bench
grinders have the grinding wheel mounted directly on the motor shaft, thus the grinding
wheel runs with the same speed as the motor (usually 2 850 rpm at 50 Hz and 3 400 rpm
at 60 Hz). As there is no reduction gear between the motor and the grinding wheel, bench
grinders are comparatively cheap. The belt on a belt grinder also runs with the same high
rpm as its motor.
A disadvantage of high-speed grinders is that the tool edge is heated up by the friction,
with the risk that the temper is drawn from the steel. The edge then loses its hardness and
the tool soon needs to be ground again.
You can reduce the risk of overheating by regularly placing the tool in water during the
grinding. However, it is very difficult to prevent the extreme edge from becoming too hot
as it is very thin and very sensitive to heat. It is very easy to reach 230° - 240°C which is
the annealing temperature for carbon steel. If the tip is overheated, the tool has to be reground (without overheating!) until you reach material which has not been affected by the
heat.
This is the case not only for hardened carbon steel and stainless steel, but also for high
speed steel (HSS), although the margins for overheating here are larger.
When grinding with a bench grinder, sparks occur and you need either protection goggles
or a face-guard. Alternatively, the machine must be equipped with transparent protection
shields. Because of the high RPM the wheels must have guards, which cover fl of the circumference. This limits the accessability during some grinding operations.
When dry grinding, the surface of the bevel becomes rather rough and it needs to be
smoothed with a fine grain honing stone.
Wet grinding
When grinding on a water cooled grindstone, the stone runs in a bath of water. The stone
carries the water continuously to the grinding surface, thus cooling it and eliminating the
risk of overheating.
Also the length of the bevel is sometimes used to express the size of the edge angle.
Then the bevel length must be related to the thickness of the tool as a thicker tool has a
longer bevel than a thinner tool – both with the same edge angle.
By consistently using the denominations edge angle and bevel angle as explained
above, you know what we mean and this avoids further explanation and confusion.
Page 11

The basics of grinding, sharpening and honing edge tools.
13
The grindstone runs between 50-130 rpm, depending on its diameter. A larger grindstone
runs with a lower axle speed than a small one. The low peripheral speed ensures that the
water is not thrown off by the centrifugal force.
The reduction of the high rpm of the motor (you cannot run a standard electric motor at a
low rpm) can be achieved with a worm gear, gear belts or with a friction gear. Since you
need a reduction gear, wet grinders are more expensive than bench grinders, which do
not have a reduction gear.
It is desirable to be able to lower and remove the water trough for cleaning. Particles from
the steel and the stone will form a hard mass unless they are cleaned away regularly.
The surface finish after wet grinding is finer than with dry grinding. Often honing is not
required after grinding.
The grinding operation on a wet grindstone is easy to control, as the stone runs slowly
and the risk of accidents is minimal due to the low rpm. The wet grindstone does not produce sparks, which means that it can be operated in areas of high fire risk such as wood
working shops. There is also no risk of the stone shattering and injuring people.
Wet grindstones were originally natural sandstone and gave a very finely ground surface.
In recent years man-made stones have been developed. These are ceramically made and
have abrasives of aluminum-oxide. Man-made stones grind much faster and usually have
a coarser grinding surface.
Although the grinding time itself is longer on wet grinders compared to bench grinders, the
total time for grinding and honing of a tool is much shorter. This is because the need for
honing after grinding is greatly reduced or eliminated.
Since wet grinding has obvious advantages compared to dry grinding, the TORMEK
grinding system is designed on this method.
Vertical and horizontal grinders
The most common type of wet grinder is vertical, which means that the sides of the stone
runs vertically and the horizontal circumference is used for grinding.
There are also horizontal grinders, which means that the stone runs horizontally and the
upper side of the stone is used for grinding. Since the water cannot be lifted by the rotation of the stone, there is a water reservoir on top of the machine.
The horizontal wheel gives a truly flat bevel, while the vertical grindstones give the bevel a
slightly hollow shape depending on the diameter of the wheel. The hollow shape is hardly
noticeable and has no influence on the function of the tool, provided that you do not use a
grindstone with a diameter which is too small. Please see next page.
A disadvantage with horizontal grinders is that the speed and the grinding effect vary with
the distance from the centre of the stone. This causes more wear at the periphery than
closer to the centre. It is also difficult to true the stone flat on a horizontal grinder while truing a vertical stone is easy.
Page 12

The basics of grinding, sharpening and honing edge tools.
14
Hollow bevel
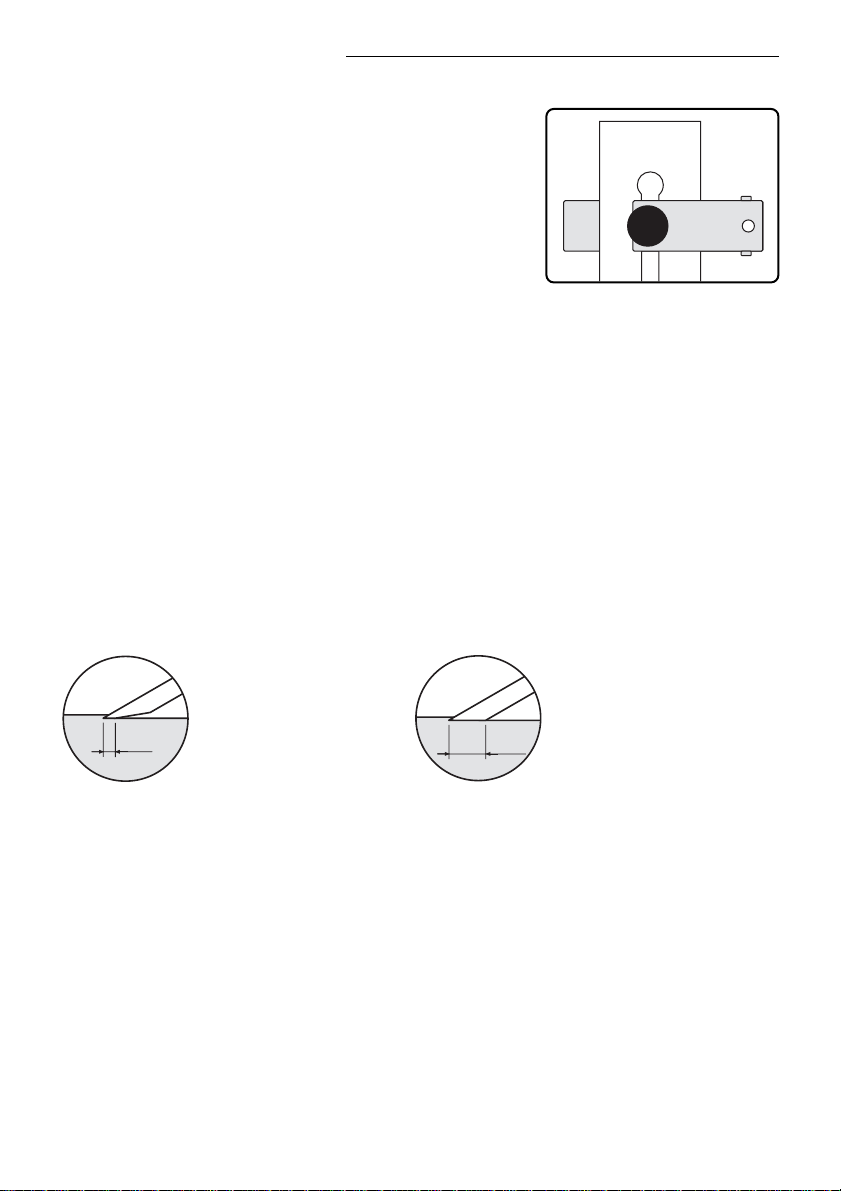
When grinding on a vertical grindstone the bevel has a
slightly hollow shape due to the radius of the grindstone
– the smaller the diameter of the wheel, the larger hollow
grinding.
When you make a line drawing to explain the hollow bevel,
you need to exaggerate the effect to be able to show it.
This creates a wrong impression about the real size of the
hollow.
The hollow shape from a 250 mm (10") grindstone is
minimal. When grinding a tool of 2 mm thickness (
5
/64") with
a 20° edge angle the hollow is as small as 0,03 mm
(0,0012"), which is hardly noticeable and has no practical
influence on the function of the tool.
Hollow grinding. Exaggerated.
Ten times enlargement of a 2 mm thick tool ground with a 20° edge angle. In spite of the enlarged
scale the hollow is hardly noticeable. It is only 0,03 mm or 0,0012".
0,03 mm (0,0012")
Ø 250 mm (10")
2 mm
5
/64
"
20°
Page 13

The basics of grinding, sharpening and honing edge tools.
15
Grinding direction
The question whether to grind away from or towards the
edge is probably as old as the art of water-cooled grinding.
Many experienced and skilled craftsmen state that one
should grind away from the edge whilst others, equally
experienced, maintain that one should grind towards the
edge. Conventionally dry grinding at a high rpm is always
carried out towards the edge.
Our tests show no noticeable difference between the two
methods in relation to the sharpness of the edge. There are
however some practical and essential differences in the
grinding operations.
You achieve a higher grinding pressure and thus faster
grinding when grinding towards the edge as the rotation of
the grindstone helps to press the tool towards the stone.
When grinding away from the edge the grindstone tends to
lift the tool and decrease the grinding pressure.
Grinding towards the edge tends to activate the grindstone
and reduce the risk of a glazed stone surface. The burr
developed during grinding is shorter and stiffer compared to
grinding away from the edge, when it is longer and thinner.
A disadvantage when grinding towards the edge, is the
risk that the tool can accidentally dig into the stone. This
can be eliminated if the tool is mounted in a grinding jig.
Vibration can also occur at steeper edge angles, which is
not the case when grinding away from the edge.
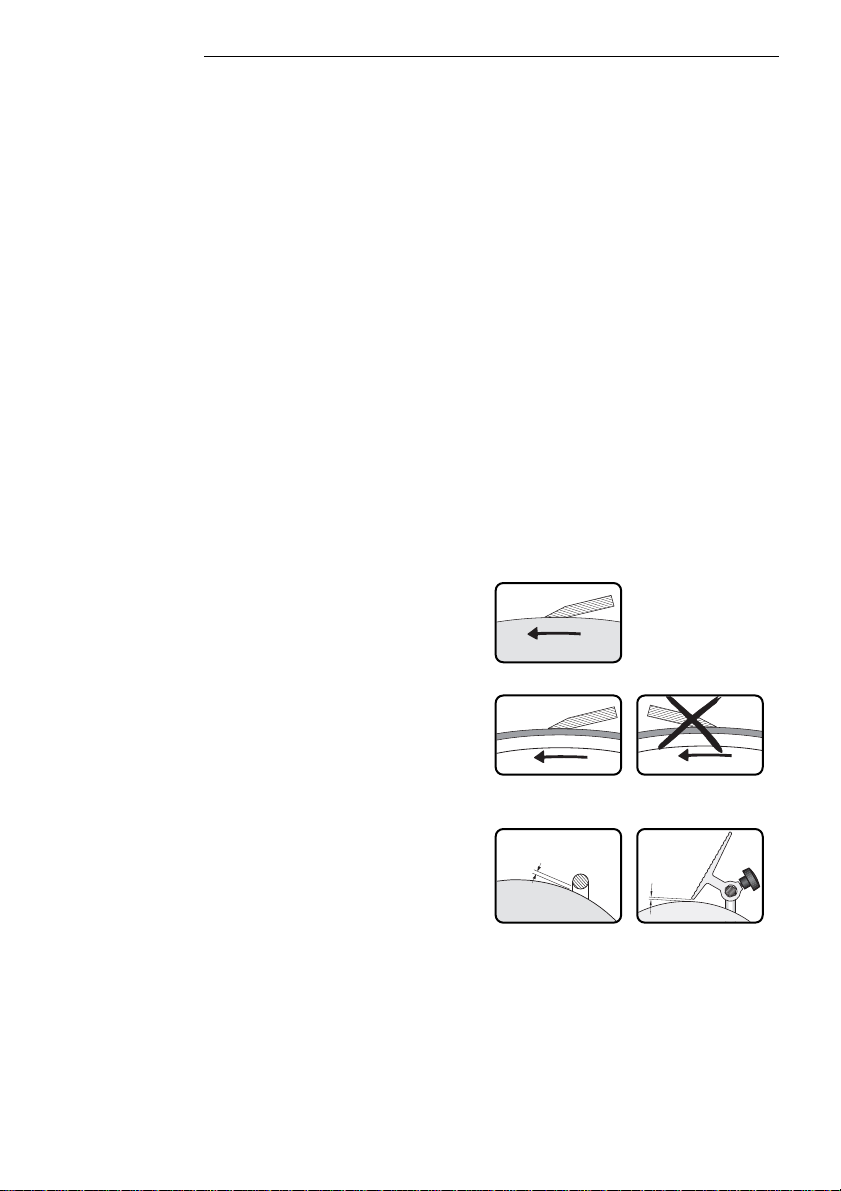
Grinding away from the edge is preferable when you need
a light grinding pressure, e.g. when grinding small and delicate woodcarving tools. In this direction you can easily control the grinding operation and observe the burr developing
as no water flows over the edge.
Free-hand grinding is best done with the stone running
away from the edge.
With the TORMEK system you can grind both towards and
away from the edge. In the chapter Grinding methods
there is a recommendation of the grinding direction for various types of tool.
It should be noted that this question of grinding away from
or towards the edge must not be mixed up with the question whether the grindstone should rotate away from you or
towards you. This depends on how you position the
machine. The TORMEK machines can be positioned either
way.
Grinding away from the edge.
Grinding towards the edge.
Grinding towards the edge
increases the grinding pressure
Grinding away from the edge
decreases the grinding pressure.
Page 14

The basics of grinding, sharpening and honing edge tools.
16
If during the grinding you apply a certain force with your hands on a tool, the grinding
pressure will vary depending on the area which is in contact with the grindstone. A smaller
contact area gives a larger grinding pressure. This is an important factor to be taken into
consideration, since this grinding pressure decides the grinding rate and the extent of
wear on the grindstone.
For example, if you push with the same force on a wide plane iron as on a narrow wood
chisel, the grinding pressure can be 10 times higher on the wood chisel. On a carving
gouge, which has a very small contact area on the grindstone, the grinding pressure can
be as much as 50 times higher.
The following examples illustrate how the grinding pressure varies on three typical tools
ground with a 25° edge angle. The force applied with your hands to each tool is 100 N or
approx. 10 kp (22 lbf).
Plane iron
Grinding area: 235 mm
2
(0,36 in2)
Grinding pressure:0,43 N/mm
2
(61 psi)
Carving gouge
Grinding area: 4,7 mm
2
(0,0078 in2)
Grinding pressure: 21 N/mm
2
(3085 psi)
Wood chisel
Grinding area: 48 mm
2
(0,074 in2)
Grinding pressure: 2,1 N/mm
2
(302 psi)
Grinding pressure
Wet grinding
50 mm (2")
6 mm (
15
/64")
»1 mm (
3
/64")
100 N
22 lbf
100 N
22 lbf
100 N
22 lbf
Page 15

The basics of grinding, sharpening and honing edge tools.
17
As shown in these examples, you must ensure that you do not push too hard when grinding small delicate tools, especially those with a curved edge. Otherwise the grinding pressure will be too high, which could cause you to overgrind. The stone will also wear too
quickly and the tool will make grooves in the grindstone.
On the other hand, there is no limitation to the force you can apply when you utilise the
whole width of the stone, e.g. when grinding a wide plane iron or an electric planer blade.
When grinding hard HSS steel the stone needs a certain grinding pressure to replace old
and worn grains with new, fresh ones. Therefore when grinding electric planer blades,
which have a large grinding area, you should activate the stone with the Stone Grader
SP-650. Please see the chapter SP-650.
After some practice you will soon learn to control the grinding pressure and the optimal
grinding speed for each tool.
Dry grinding
High speed grinders removes steel faster and therefore you must ensure that you do not
overgrind the tool. Woodcarving tools are very sensitive to grinding as they have narrow
edge angles and are made of carbon steel.
Woodcarving tools should therefore not be ground on a high speed grinder – the risk of
overgrinding is too great and there is a big risk of drawing the hardening of the steel,
making it impossible to hold a sharp edge.
Page 16

The basics of grinding, sharpening and honing edge tools.
18
Tool rests and grinding jigs
To achieve an even and sharp edge, the tool must be held steadily and with a consistent
grinding angle to the wheel. This is obtained by resting the tool on a tool rest or clamping
it in a grinding jig.
A common tool rest with fast running bench grinders is a bent plate which is usually too
short to support the tool properly. This simple tool rest can be replaced by a larger and
more sturdy support to enable you to hold the tool steadily towards the grinding wheel.
The tool rest can also have a fence which is guided in a slot, so you can keep the tool at
90° or at a specific skew angle to the grinding wheel.
These type of tool rests have been developed for high speed grinders, where you work
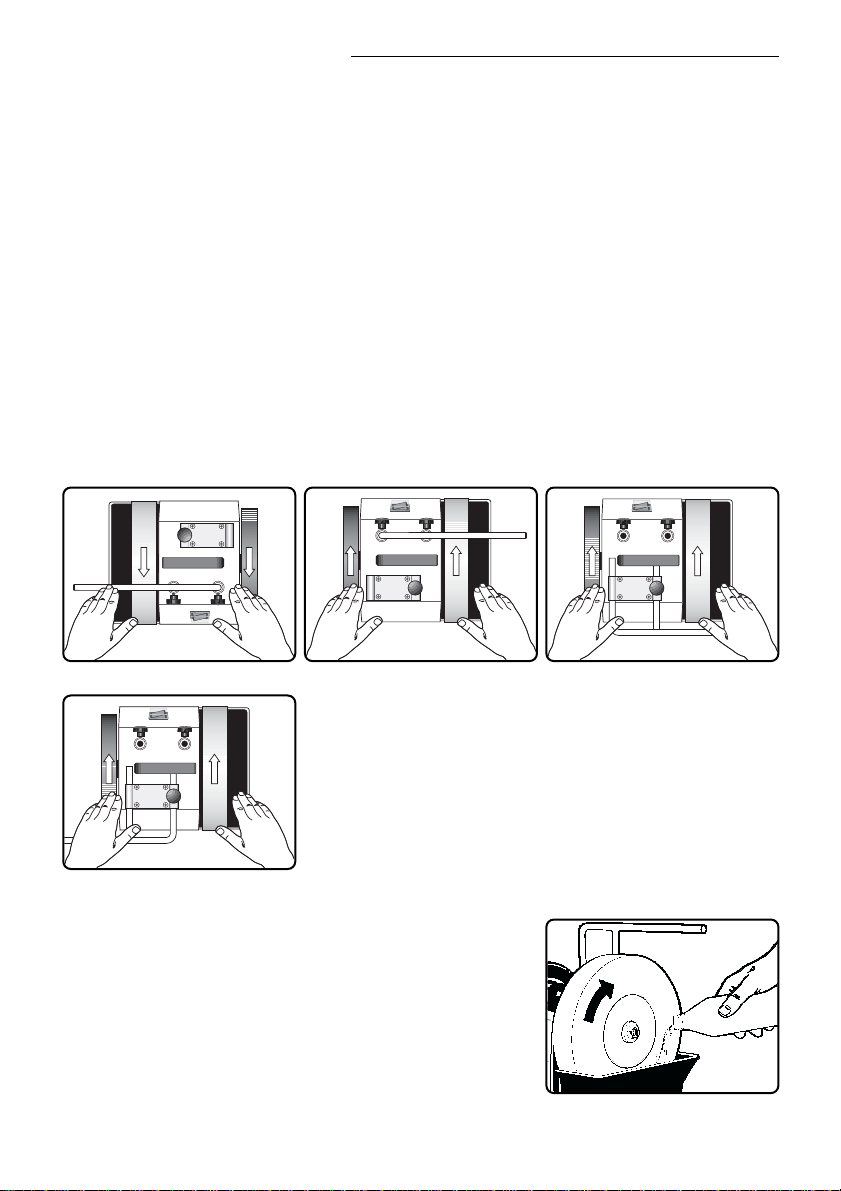
with a low grinding pressure due to the high rpm. However when mounted on a watercooled grinder which requires a higher grinding pressure, they do not work satisfactorily.
This is because the pressure which you apply to the tool does not reach the grinding spot
but instead goes to the tool rest. (Picture no 1).
To obtain the required grinding pressure, you also need to push the tool from the handle
direction towards the wheel. Then the tool tends to climb up on the grindstone and the
precision is lost. (Picture no 2). You need to push the tool both towards the wheel and
downwards so that it does not lose its contact with the tool rest. In practise this is not
possible.
On a conventional tool rest the pressure you
apply to the tool mainly goes to the tool rest.
When you push the tool towards the grindstone
to achieve the required grinding pressure, it
climbs up on the stone.
This effect appears when grinding narrow edge angles and when grinding both towards
and away from the edge. The disadvantage is more severe when grinding turning tools,
as they are often made of HSS-steel which is hard and requires a high grinding pressure.
For turning scrapers which are ground at larger edge angles, this type of tool rest works
satisfactorily on dry or water-cooled grinders.
Page 17

The basics of grinding, sharpening and honing edge tools.
19
The reason that these types of tool rest work fairly well on high speed dry-grinders, is that
they require a lower grinding pressure and therefore the disadvantages can be overcome.
For water-cooled grinders, the tool rest or grinding jig should be designed so that you can
control the grinding pressure. This is achieved by mounting the tool in a jig, which is pivoted around an axle positioned at a distance from the grindstone. The pressure which you
then apply to the tool is distributed to the grinding spot on the grindstone instead of the
tool rest. Furthermore, the tool is guaranteed to be in the same position on the grindstone,
which is necessary for achieving a precisely ground edge.
The tool must be mounted in a jig pivoted at a distance from the grindstone. The pressure applied is
distributed to the grindstone and you have full control over the grinding operation.
Honing
When grinding, a burr (or wire edge) develops on the upper side of the edge. This burr
must be honed off on a fine grit honing stone or slipstone. The honing also removes the
marks left by the grinding wheel which makes the surface finer. When the grinding is
made on a coarse grinding wheel, the surface requires more honing.
The honing stone must work on the entire bevel of the edge otherwise the tip will be
rounded off. The burr bends from side to side and therefore both sides of the edge need
to be honed alternately.
You can also power hone on a felt buffing wheel mounted on a bench grinder. However
there is here a great risk of rounding off the tip of the edge due to the aggressive honing
effect caused by the high speed. (usually 2 850 rpm at 50 Hz and 3 400 rpm at 60 Hz).
You must also pay attention so that you do not press the tool too hard towards the wheel
which could cause overheating of the edge.
With the TORMEK system you hone on leather honing wheels running at a low rpm. The
low speed enables you to control the operation and there is no risk of rounding off or overheating the edge.
The honing process is also controlled with jigs, so you get exactly the same edge angle
and movement pattern towards the wheel as during the previous sharpening.
Page 18
Grinding techniques for
carving gouges and V tools.
The technique for grinding carving gouges and V tools is different from other edge tools
such as plane irons, wood chisels, turning tools, axes and scissors. The reason is that the
edge is not straight – gouges have a curved edge and V tools have two edges meeting
each other. Another difference is that the steel is thinner and the edge angle smaller on
carving gouges and V tools.
Since the grinding takes place on a narrow and convex spot on a gouge instead of on a
flat bevel as on a plane iron, the surface that is in contact with the grindstone is very
small. The grinding area is actually a line whilst for other tools is a rectangle. This means
that the grinding pressure can become very high, even if you apply only a small pressure
on the tool with your hands.
If you grind more than necessary on a flat bevel, e.g. on a plane iron, it does not matter.
But if you over grind on a spot on a curved edge, the shape of the edge will be changed
and needs to be re-ground. This is also the case for V tools – over grinding on one wing
means that the entire edge must be re-ground.
Firstly you should question whether you need to grind your tool or if you should only
hone it. This question is especially important when working with small and delicate tools
with a small edge angle. A slight over grinding on a spot on these tools makes a pronounced pit or hollow on the contour of the edge.
The basic recommendation is therefore not to grind small and delicate tools, which have
become dull, but instead hone them on a bench stone or on a rotating honing wheel.
Grinding/sharpening on a grindstone is however required in the following cases:
• The edge has become too dull to be honed.
• You want to change the shape of the edge, e.g. the edge plane angle. Please see
following page).
• You want to change the edge angle.
• The edge has become damaged.
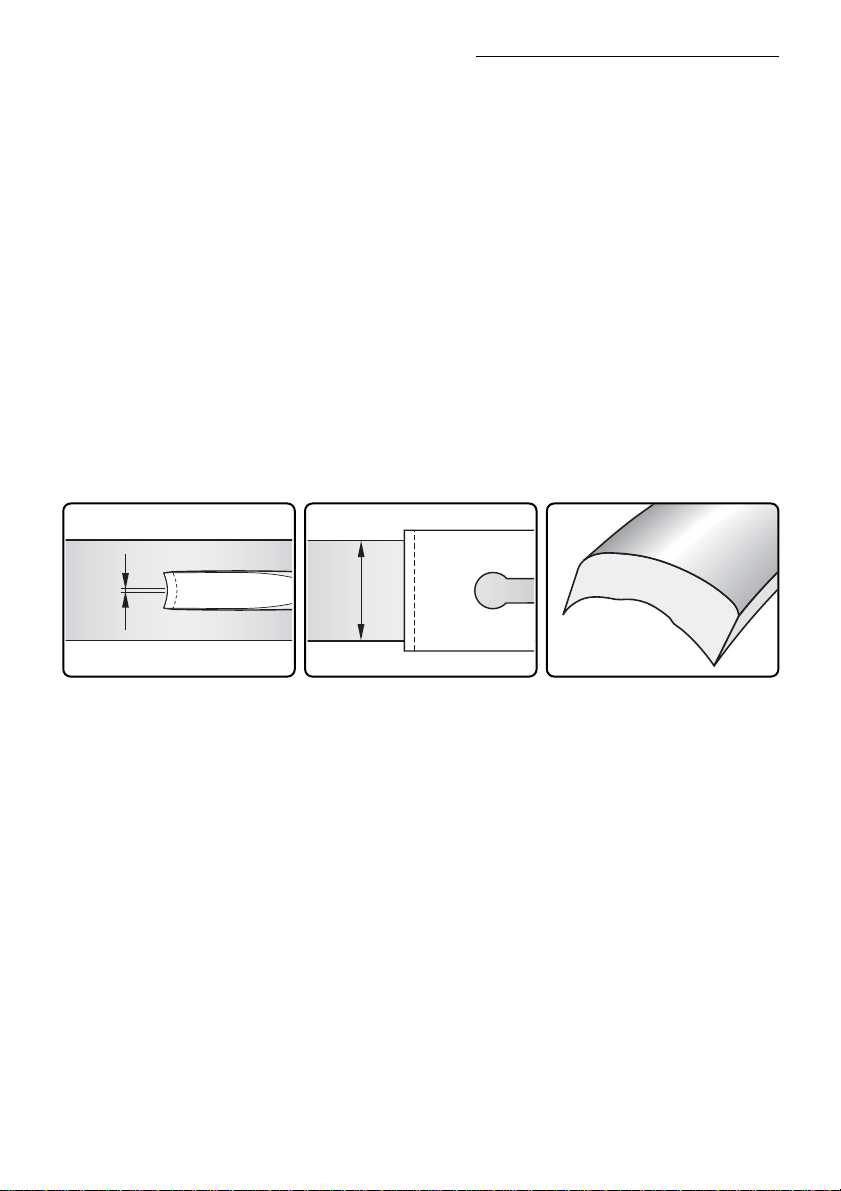
The grinding area on a gouge is
almost as narrow as a line.
The grinding area on a plane
iron is a rectangle.
Over-grinding on a spot on a
gouge means that the entire
edge must be re-shaped.
The basics of grinding, sharpening and honing edge tools.
20
Page 19

It is of greatest importance that you have a very good light to be
able to observe and control this delicate sharpening work. Use a
flexible lamp and position it close to the machine.
The principle
Firstly grind the edge to its correct shape before you start sharpening. Viewed from the
side, the edge should look like a straight line, as in the line drawing below showing the
edge plane angle, (g).
The edge is now blunt, which clearly can be observed as it reflects light. You should see
light reflecting along the entire edge. This blunt edge is called line of light and is a guide
for you where to grind. By closely observing the line of light and only grinding where it is
thickest, you will achieve a perfectly ground edge. The grinding must stop immediately
when the line of light has just been ground away!
Good light is very important for all grinding and honing
work, but it is a demand when grinding carving gouges and
V tools, as you must clearly be able see the line of light.
Carving gouges and V tools have wings. These lean more
or less forward when the bevel lies flat on the wood. The
inclination can be described as the edge plane angle, (g).
This angle controls how the tool will cut in the wood. It
should be around 20° to make the wings and the centre
part of the edge work in the best way and leave a clean cut
in the wood. This recommendation is independent of the
edge angle.
Grind the edge to its correct
shape.
The edge plane angle (
g
)
should be approx. 20°.
Flatten and smooth the blunted
edge with a fine grit honing
stone.
The basics of grinding, sharpening and honing edge tools.
21
Bevel viewed from side of gouge
showing edge plane angle.
Page 20
The grinding of the bevel can be done either free hand on bench stones or with jigs on a
grindstone. Using jigs is easier and gives you a better result as you then can concentrate
on where the edge touches the grinding wheel without needing to pay attention to the
edge angle and position of the tool which is controlled by the jig.
Dry grinding on high speed grinders and belt grinders is absolutely not recommended! They grind too aggressively, which makes it impossible to control the grinding
and the heat development draws the hardening of the thin steel.
After the grinding, the bevel is honed to give it as fine a surface as possible. The remain-
ing burr on the flute (inside) must also be honed off. The outside honing can be done free
hand with a fine grit bench stone or with jigs on a rotating felt or leather wheel. The inside
can be honed freehand with slipstones or on profiled honing wheels.
The honing is of the greatest importance as a finer surface on the bevel and flute makes
the tool cut more easily and also makes the sharpness last longer. The surface left on the
wood will also be smoother with a perfectly honed tool.
Also using jigs for the honing is an advantage. You work at exactly the same honing angle
as the grinding angle and the edge receives exactly the same movement pattern towards
the honing wheel as when grinding. Furthermore, you can make test cuts in the wood and
then – if necessary – go back and continue the honing operation with exactly the same
position of the tool towards the honing wheel.
Honing the bevel with a jig gives
the same movement pattern
towards the honing wheel as
during the previous grinding.
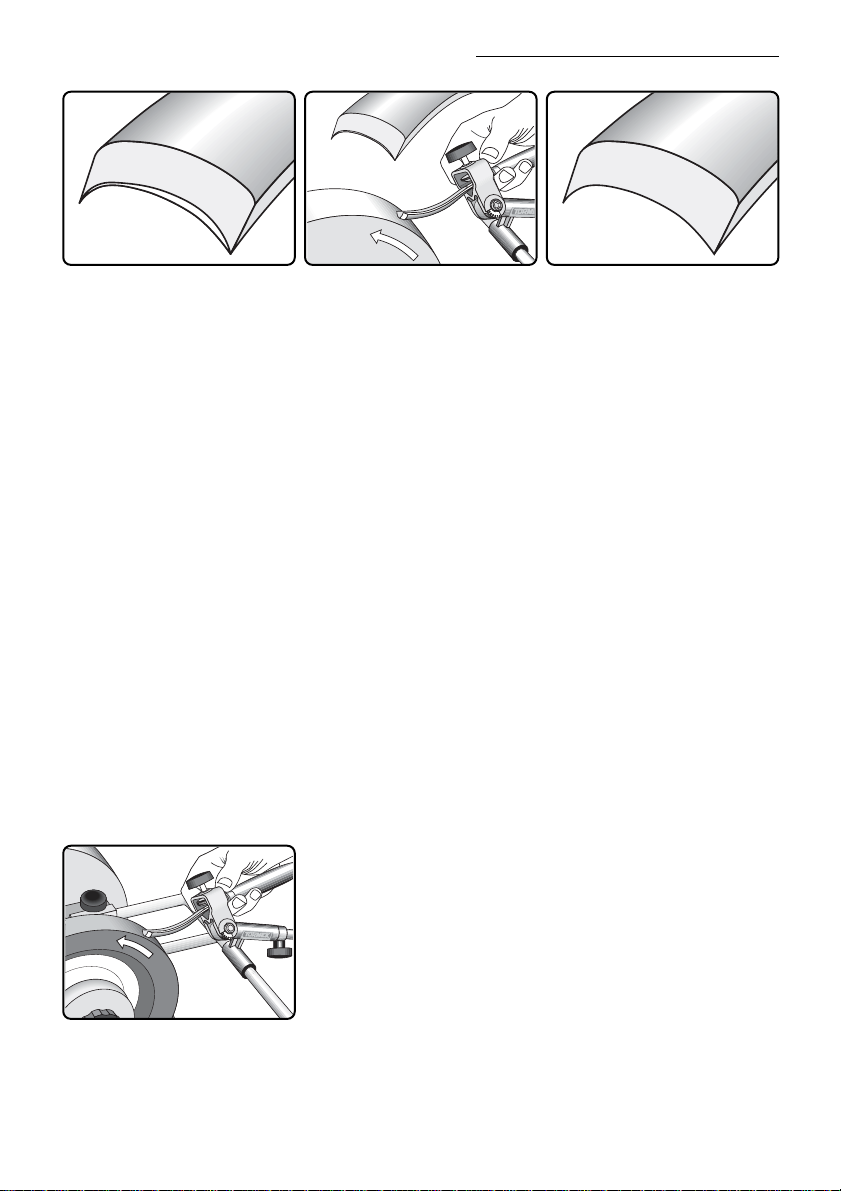
The edge is ground to the
correct shape. The line of light
shows you where to grind.
Grind only where the line of light
is thickest.
Stop grinding immediately when
the line of light disappears,
which is a sign that the edge is
sharp.
The basics of grinding, sharpening and honing edge tools.
22
Page 21

Note:
The TORMEK leather honing wheels work in the same way as a strop made of leather
glued onto a piece of wood.
If you look at the edge under a microscope, you will notice that the very outer tip of the
edge is slightly rounded off as the leather honing wheel is not as firm as a stone. However, when using a jig this rounding off is negligible and has no negative influence on the
cutting ability of the tool. Actually it is likely that the microscopic rounding off reinforces the
very outer sensitive tip of the edge.
Theoretically, an edge tip honed on a flat hard bench stone could be considered to be
sharper. However, this is only the case before you start to work with the tool. As soon as
the edge penetrates into the wood, it will be affected by the fibres and become microscopically rounded off and even bent. This is because the outer tip is extremely sensitive on
these tools, which have small edge angles, sometimes only 20°.
What determines the practical quality of the edge sharpness and its durability, is
how the tool works after a couple of cuts in the wood.
The basics of grinding, sharpening and honing edge tools.
23
Page 22

A 20° edge angle is suitable for
soft wood, but is too weak and
can easily get damaged in
harder wood.
Edge angles
Carving tools are usually ground with a 20° to 25° edge angle. The angle is a compromise
between the easiest possible cutting and the maximum durability of the edge. For soft
wood you can go down to 20° or even less. For hard wood, and when you use a mallet,
you will need a 30° angle or even larger to create an edge which is strong enough.
The choice of edge angle is very important for a carving tool. You can be tempted to
make the angle too narrow in order to make the tool cut as easily as possible. Then there
is a risk that the edge is too weak and becomes easily damaged by the wood. There is a
noticeable difference in the strength of a tool with a 22,5° edge angle and one with a 20°
edge angle.
You might ask, why not put a 25° edge angle on the tool to be sure that it works in any
wood, but it is not that simple. An edge angle which is too large does not cut satisfactorily
in a soft wood because the fibres becomes depressed before they are cut. Furthermore, it
is easier to work with a tool, which has an edge angle which is as small as possible. You
need to test and learn which is the optimal edge angle for your tool and the specific work.
If you work in various hardnesses of wood, it is recommended that you have more than
one tool and grind them with different edge angles.
With the TORMEK System you can measure the edge angle on a tool and set the angle
before grinding. Write the angle on the ferrule.
A slight increase to 22,5° can
enable the edge to withstand
working in harder wood.
When using a mallet you need a
25° or even larger edge angle
depending on the hardness of
the wood.
The basics of grinding, sharpening and honing edge tools.
24
Page 23

The TORMEK method
of grinding, sharpening
and honing.
With the TORMEK method you do not use a conventional bench grinder for the grinding,
coarse benchstones for the initial sharpening or fine benchstones for the fine sharpening/honing.
You do both the initial grinding (when you shape the tool and create the optimal edge
angle) and the sharpening on the same grindstone. The grindstone can easily be changed
from fast grinding to fine sharpening. The grinding/sharpening is carried out with water
cooling, so there is no risk of burning the edge and drawing the hardening from the steel.
The honing and polishing is carried out on a leather honing wheel.
The surface of the grindstone can easily be maintained flat and true with the TORMEK
Diamond Truing Tool.
The grinding and sharpening on the grindstone as well as the honing and polishing on the
leather honing wheel is controlled with uniquely designed jigs. This means that you have
full control of the grinding, sharpening and honing angles.
By means of a patented Angle Master you can exactly pre-set the edge angle which you
have selected.
Precise replicate sharpenings are possible. Once you have ground your tool to the
desired shape and edge angle, you can easily reproduce exactly the same shape with all
future sharpenings. This is even possible for “difficult” tools with special shapes such as
fingernail turning gouges, spoon shaped woodcarving gouges and oval skew chisels with
a curved edge.
Because of the exact repeatability, you remove very little material and therefore the
sharpening is completed quickly. The result is that the lifetime of your tools is considerably prolonged.
The fact that you exactly can replicate the shape of an edge is a great advantage when
working with a tool. You can continue with exactly the same turning and cutting technique
you have learned for the specific tool, as it has not changed its shape and cutting characteristics.
25
Page 24
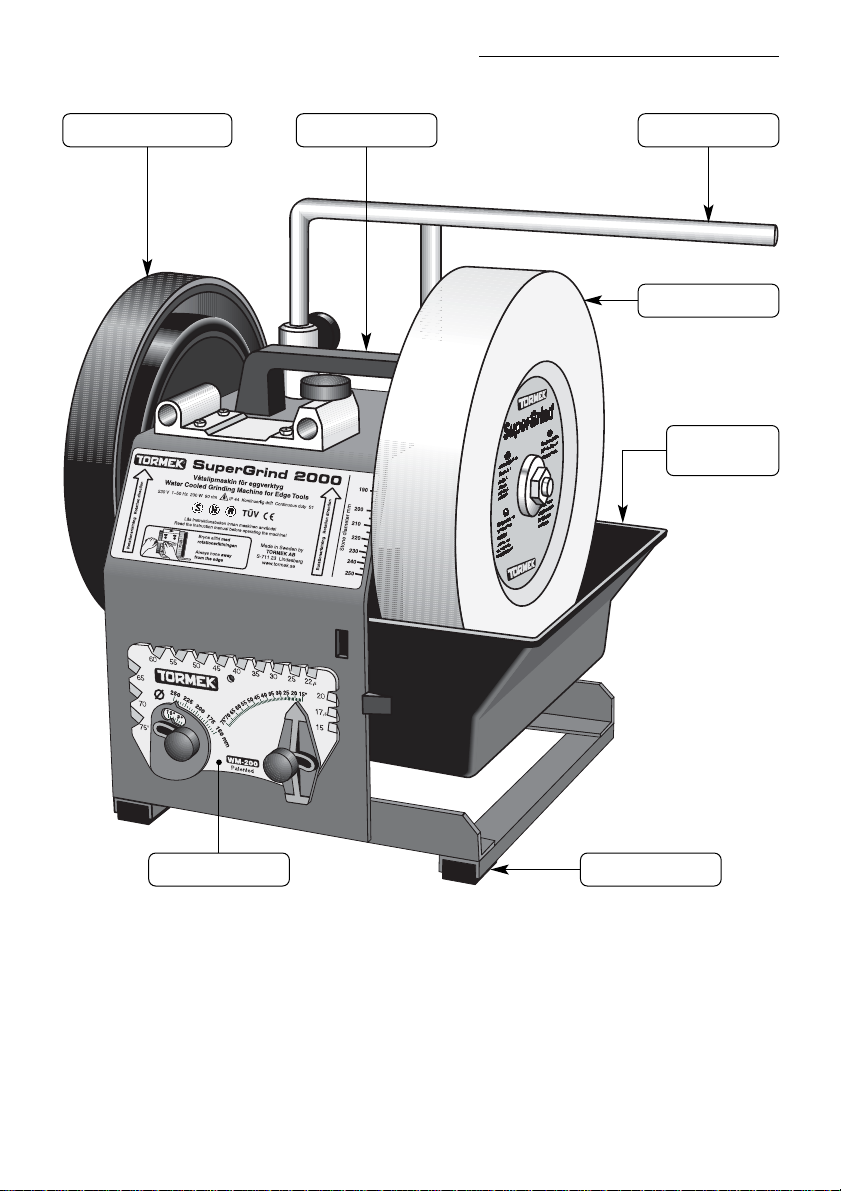
This SuperGrind 2000 series is described and used for all photos and line drawings in this
handbook. The smaller SuperGrind 1200 series works in the same way and uses the
same range of jigs and accessories.
For specifications and technical data for each model, please see the chapter Models,
page 140.
Leather Honing Wheel Carrying handle
Universal Support
SuperGrind stone
Rubber feetAngleMaster
Removable
water trough
The TORMEK method of grinding, sharpening and honing.
26
Page 25

TORMEK Universal Support
This is the basis of the TORMEK system. It has a double
mounting for maximum stability.
The Universal Support can be positioned for grinding either
vertically (1) or horizontally (2) or for honing (3). Please
see page 37.
TORMEK grinding jigs
TORMEK has developed jigs for the accurate and safe grinding of most edge tools.
With these jigs you can grind the tools at exactly the angle you want and achieve a per-
fect edge in a short time. The grinding is controlled and always takes place at the correct
angle for each tool.
1
2
3
•
•
•
The TORMEK method of grinding, sharpening and honing.
27
Page 26

Always an efficient grindstone
With the TORMEK Stone Grader you can reactivate the
grindstone easily so new, fresh grains are put in work
on the surface; the stone is always effective. This is a
benefit when grinding hard HSS steel with a large
grinding surface, e.g. electric planer/jointer blades.
Please see page 122.
Grinding and fine sharpening with the same
grindstone
With the TORMEK Stone Grader you can do both the
initial fast grinding and then the fine sharpening on the
same stone with an identical setting of the grinding jig.
Besides being a very fast method, you also achieve a
superior edge as the sharpening is done at exactly the
same angle as the initial fast grinding.
Please see page 122.
Flat surface
The outside of the SuperGrind stone is machined flat
and has a depressed centre so the grinding surface
does not interfere with the washer and nut in the centre.
This surface is reserved for flattening the back of plane
irons, wood chisels and similar tools.
TORMEK SuperGrind stone
The TORMEK SuperGrind stone has been developed to run at low speed in water. It is
ceramically made (sintered at high temperature) and contains grains of aluminium-oxide.
The SuperGrind stone grinds very effectively and gives a fine finish to the tool. It quickly
grinds large tools for example plane irons, axes, scythes and even HSS steel. The grit
rating is 220 and the grain size is 0,06 mm (0,0024").
The SuperGrind stone can be graded with the TORMEK Stone Grader SP-650 to a finer
surface corresponding to 1000 grit suitable for fine grinding/sharpening.
The special structure of the grindstone combined with the continuously flush of water over
the edge make that the surface does not become clogged by ground away steel particles
from the tool or worn stone particles.
Perfect visibility of the sharpening process
As the grindstone runs slowly in water and no sparks are produced, there are no eye
shields on the machine. This means that you can clearly watch and control the sharpening process.
The TORMEK method of grinding, sharpening and honing.
28
Page 27
Safe
At the low speed of the TORMEK grindstone, you can
fully control the grinding operation.
No sparks are produced so you can use the machine in
areas of high fire risk. Furthermore, the wheel cannot
shatter and injure people.
TORMEK machines are CE-marked and are approved
by SEMKO in Sweden, CSA in Canada and TüV, the
German safety standards authority.
Pre-set edge angle
With the TORMEK Pro AngleMaster you can set the jigs
so that your tools will have the edge angle of your
choice.
It also measures the edge angle. Please see the chapter
on the WM-200, page 40.
Always a smooth running grindstone
A grindstone can, after a period of use, become uneven
on its surface and run out of true. With the TORMEK
Diamond Truing Tool you can easily restore the stone to
an exact roundness while the stone runs normally on the
machine. Please see the chapter ADV-50D, page 120.
TORMEK Honing Compound
If you use the Honing Compound on the Leather
Honing Wheels, you achieve a still finer surface. The
edge is polished to the highest lustre, giving you the
finest cutting edge. Please see page 124.
TORMEK Leather Honing Wheels
After grinding, a burr appears on the edge. You gently
hone away this burr on the TORMEK Leather Honing
Wheels – to leave a razor sharp edge.
There is one wheel with a flat surface, which is standard. As an accessory you can fit a smaller and profiled
wheel for honing the inside of gouges and V tools.
Please see page 124.
The TORMEK method of grinding, sharpening and honing.
29
geprüfte
Sicherheit
Page 28

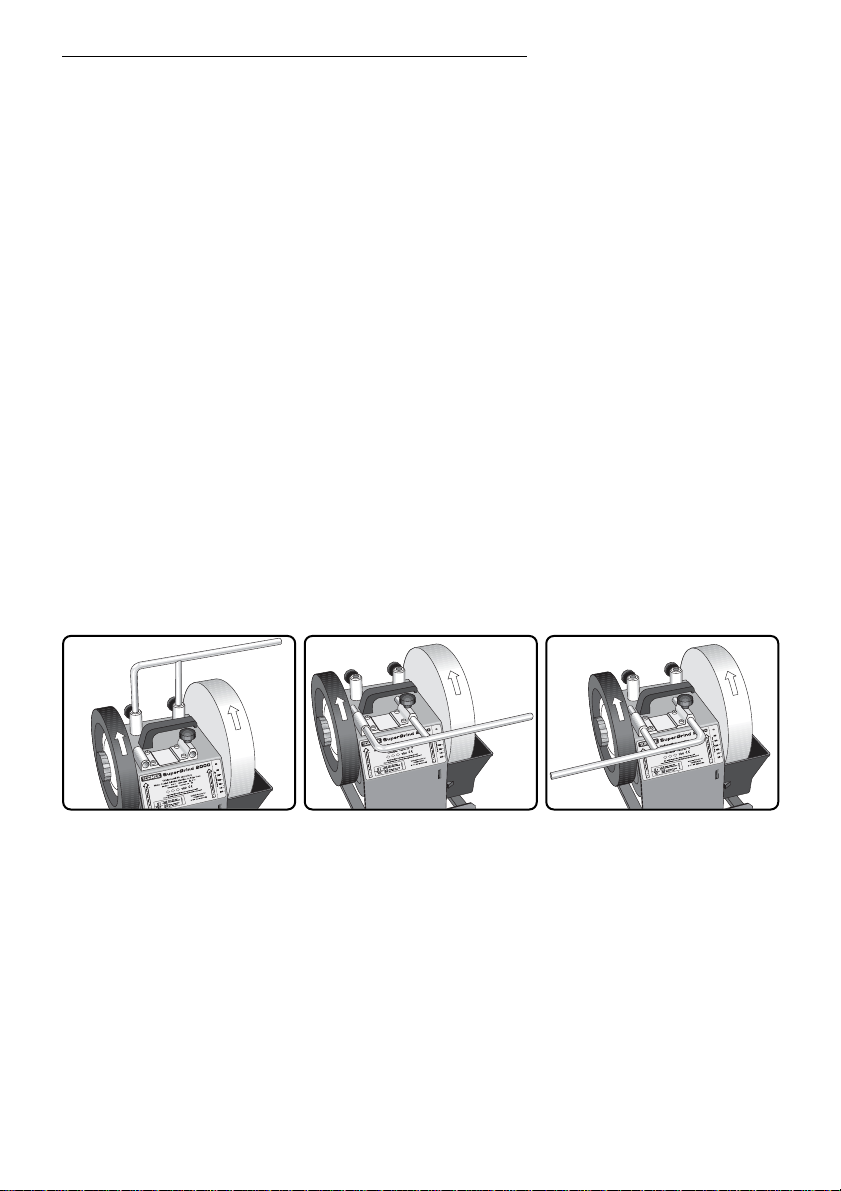
Quick Coupling for the honing wheel
The quick coupling enables you to remove the honing
wheel when grinding large tools, e.g. long knives, axes
or scythes. (The SuperGrind 1200 has no quick coupling).
Removable water trough
The tool is continuously rinsed by water, which cools
the edge.
The water also works as an effective lubricant, which
gives a finer finish to the tool and transports worn
particles from the stone and the steel into the water
trough.
The water trough can be lowered and removed for
emptying and cleaning.
Sturdy construction – high stability
The housing is made of 3 mm (1/8") steel. The machine
remains steady when grinding due to the rubber feet
and does not need to be fixed to the workbench. (The
SuperGrind 1200 series has a housing of ABS plastic.)
The downward force exerted when the Universal
Support is placed vertically, further stabilizes the
machine.
Easy to move and carry
The machine has a convenient handle, which makes it
easy to move and carry. This is an advantage for site
work and can save space in a confined workshop. (The
SuperGrind 1200 has no handle.)
The TORMEK method of grinding, sharpening and honing.
30
Page 29

Continuous operation
The single phase motor is the highest industrial quality and is rated for continuous operation. (The SuperGrind 1200 is rated for 30 min/hour.)
Quiet running
TORMEK machines run very quietly thanks to the silent induction motor and the patented
friction drive.
No grinding dust
No sparks are produced and the steel and grindstone particles are transported by the
water into the water trough. Therefore you get no dust in the air and around the machine,
which is better for your lungs.
The TORMEK method of grinding, sharpening and honing.
31
Page 30

32
Page 31

Instructions
33
Page 32
Safety
TORMEK Water Cooled Grinders run at a slow speed in water and are designed for maximum safety. However – as with all machines – there are some basic rules that must be
followed and we ask you to read these instructions before you commence working with
the machine.
• Only use TORMEK original jigs and accessories and according to the instructions.
• The TORMEK jigs and accessories are especially designed for TORMEK machines
and must not be used on any other grinder.
• Do not use the machine in a dangerous environment, e.g. wet locations and do not
expose it to rain.
3 mm (1/8")
3 mm (1/8")
• Grinding direction:
When working free-hand, grind in the direction
of rotation, i.e. away from the edge
• Honing direction:
Always hone in the direction of rotation (away
from the edge), otherwise the edge can cut
into the wheel.
• When using Toolrest SVD-110 or the Universal
Support as a tool rest, the distance must not
exceed 3 mm (
1
/8") between the support and
grinding wheel.
• Make sure that the switch is in the off position before plugging in to the power supply.
• The machine should be operated on a flat, stable surface. Keep work area clean.
Cluttered areas and benches invite accidents. Keep work area well lit.
• Do not wear loose clothing, gloves, neckties, rings, bracelets etc, which can get caught
in the moving parts. Keep long hair covered or tied back. Keep a proper footing and
balance at all times. Non slip footwear is recommended.
• Ensure that any spanners or adjustable wrenches are removed from the grinding
machine before turning it on.
• Do not lift the machine by gripping the Universal Support – it could pull out and allow
the machine to drop.
• Always keep a part of the tool on the grindstone during grinding – do not let it wholly
slip outside the stone.
Instructions. Safety.
34
Page 33

• Do not leave a wet grindstone in temperatures below freezing point.
• All children or visitors should be kept at a safe distance from the work area. Prevent
the machine from being used by unauthorized persons.
• Never leave the machine running unattended.
• Disconnect the machine from the power supply before servicing and when changing
the grindstone or the honing wheel.
• In case of power failure, switch off the machine so it does not automatically start when
the power returns
• Replace a cracked wheel immediately.
Instructions. Safety.
35
Page 34
Preparation before grinding
Water filling
Fill the trough with the grindstone running and with the
trough raised, until the water reaches the MAX WATER
LEVEL line inside the trough. Continue filling until the
stone cannot absorb any more water, which is approx.
1,2 litre (2 pints).
The stone must run in water at all times when grinding.
Working height
Place the machine on a stable surface at a convenient height. This depends on the type
of grinding operation and of course on your height. You can also for certain operations,
e.g. when grinding scissors and turning gouges, sit on a chair.
Light
Ensure that you have satisfactory light, so that you can see clearly and can control the
grinding process in detail. A perfect light is absolutely necessary when you grind small
and delicate woodcarving tools.
Positioning of the machine
The machine has no front or back side – it is designed to be operated from either side
depending upon the optimal function of each grinding and honing operation. In the instructions there is a recommendation of the best position for each tool.
Grinding towards the edge. Grinding away from the edge.
Honing away from the edge.
Instructions. Preparation before grinding.
36
Page 35
The Universal Support
The versatile TORMEK Universal Support is the basis of the TORMEK system. It is made
of 12 mm (1/2") round steel and has a double mounting for maximum stability.
It has the following functions:
• Support for the grinding jigs.
• Support for the Diamond Truing Tool, ADV-50D.
• Tool rest when grinding without jigs.
• Rest for your hands when grinding free-hand.
• Rest for your hands when grading the stone with the Stone Grader, SP-650.
The Universal Support can be placed either in the vertical sleeves or in a horizontal base*.
These two positions enable you to grind either towards the edge or away from the edge.
Some tools are best ground, or must be ground, in one of the directions while other tools
can be ground in both directions. The recommended grinding direction and the position of
the Universal Support for each tool are shown in the instructions.
The Diamond Truing Tool must operate with the Universal Support placed in the vertical
sleeves (towards the edge position).
The Universal Support can also be placed horizontally for honing with jigs. Honing must
always be done with the wheel running away from the edge.
The Universal Support can be placed in three positions:
Vertically in the two sleeves.
For grinding towards the edge.
* The horizontal base was previously supplied as optional extra (XB-100).
Horizontally for grinding away
from the edge.
Horizontally for honing away
from the edge.
Instructions.The Universal Support.
37
Page 36

Setting the edge angle
For most jigs the edge angle is set by adjusting the Universal Support.
The Tool Rest SVD-110, the Knife Jigs SVM-45 and
SVM-100 and the Scissors Jig SVX-150 have also an integral setting facility. The Planer/Jointer Blade Jig SVH-320
does not work on the Universal Support and has its own
setting facility.
There are two different ways to find the proper settings,
depending on whether you want to replicate an existing edge angle or you want to put a
new specific angle onto your tool.
Exact replication of an edge angle
If you are satisfied with the existing edge angle, you should use this method. You gain
sharpening time and the removal of steel from the tool is reduced to a minimum.
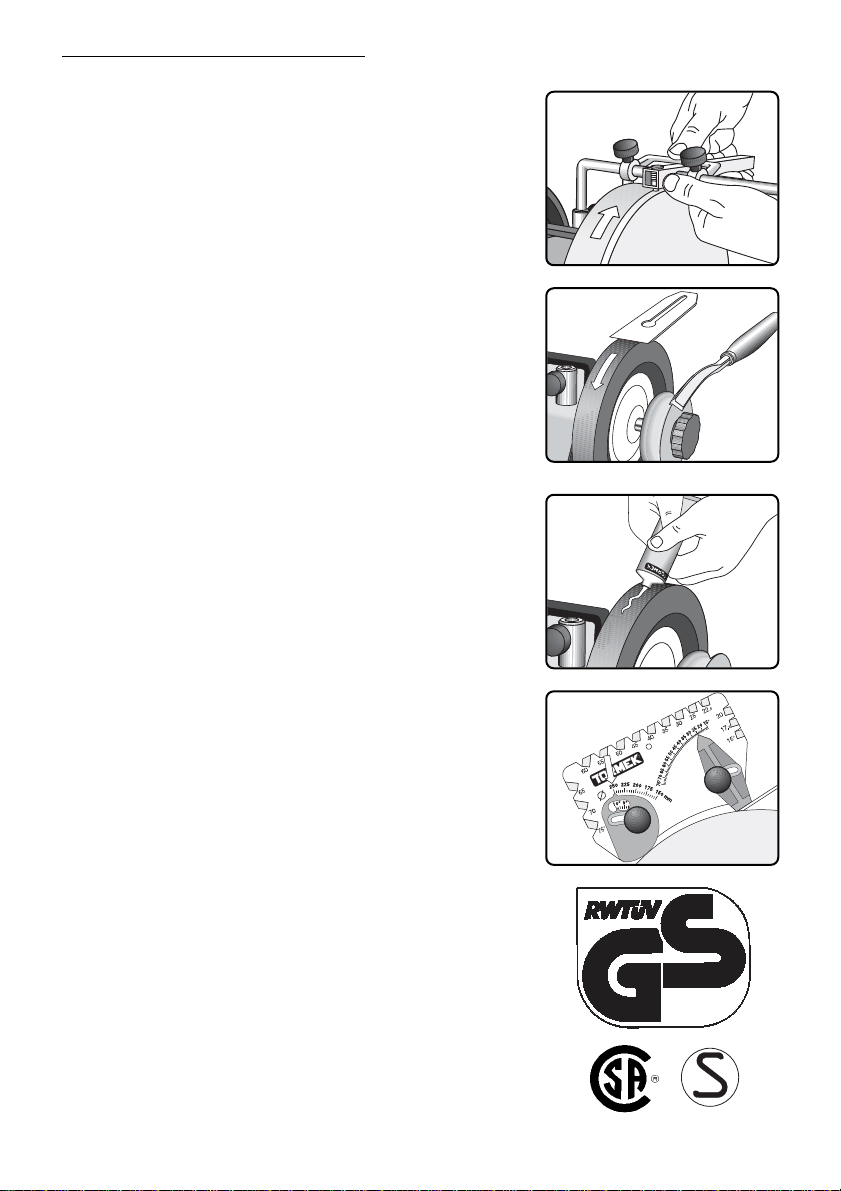
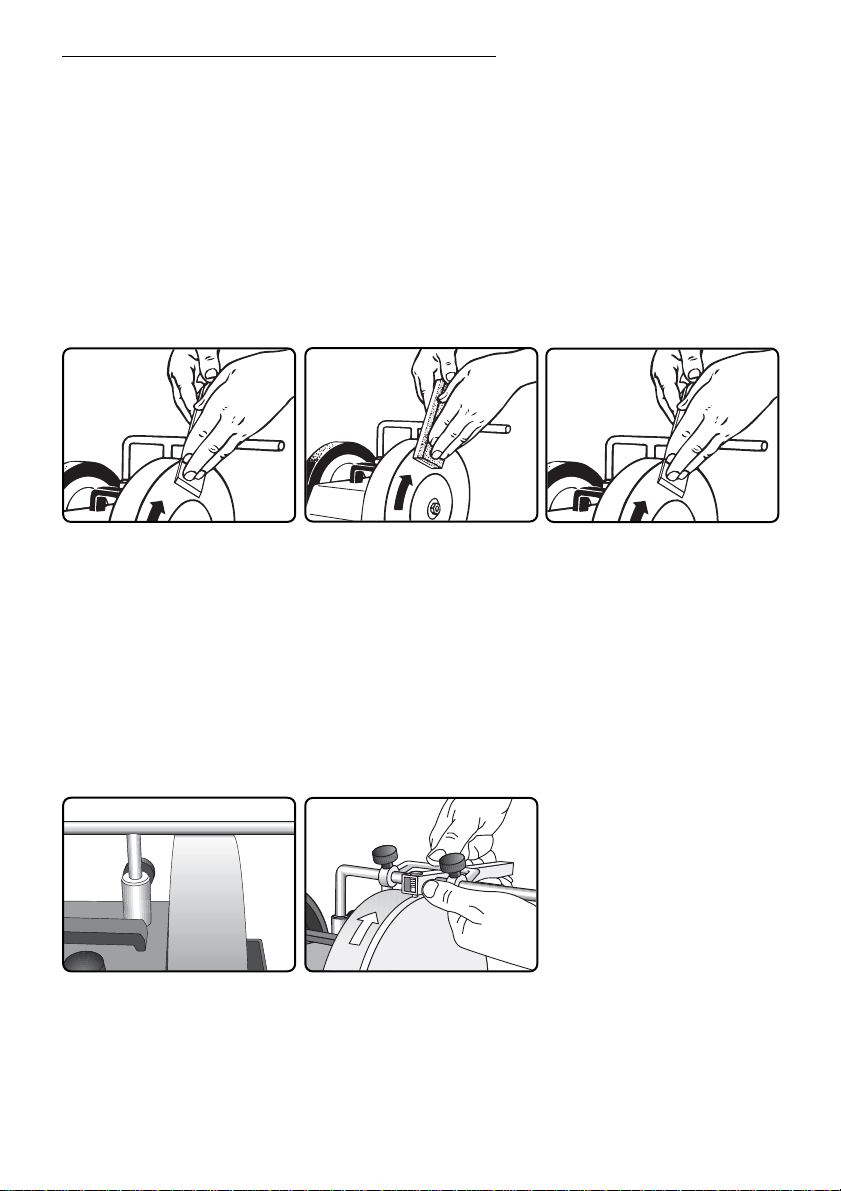
Colour the bevel with a spirit based marker, preferably black, and present the tool to the
grindstone at the estimated angle. Turn the grindstone by hand and check where the
grindstone hits the bevel. Then adjust the setting until the grindstone removes the colour
from the tip to the heel of the bevel.
In this book this method is called the bevel colouring method.
If you make this setting accurately, you will save considerable time during the grinding,
because you only need to grind off a fraction of the steel and your expensive tool will last
for many more years.
Colour the entire bevel with a
marker.
Check where the sharpening will
take place by rotating the grindstone by hand.
This is the correct setting. The
stone hits the full length of the
bevel. The sharpening will now
exactly follow the shape of the
entire bevel profile.
Here the stone is hitting the heel
of the bevel.
Wrong setting
Correct setting
Instructions. Setting the edge angle.
38
Page 37

This bevel colouring method is especially useful when re-sharpening turning bowl gouges,
woodcarving gouges and planer or jointer blades.
This method is also ideal when setting the honing angle. In this case you should check
the setting with the honing wheel running.
Putting a new edge angle on your tool
Using the TORMEK patented Pro AngleMaster, you can set any specific edge angle from
15° to 75° with an accuracy of 1°. Please see page 40.
This method is used when a tool needs a specific edge angle, e.g. when grinding woodcarving tools at narrow angles.
With the Pro AngleMaster you
can set exactly the edge angle
you want.
Instructions. Setting the edge angle.
39
Page 38

Diameter compensator
Can be set to the stone
diameter in steps of
5 mm and
1
/4".
Angle setter
Can be set at any angle
from 15° to 75° with an
accuracy of 1°.
Magnets (2 pcs)
For fixing the Pro AngleMaster to the steel
housing.
Measuring grooves
For measuring an existing
edge angle.
Pro AngleMaster WM-200
This patented AngleMaster has two functions: You can use it to set the jig to the grindstone so that it grinds your tool to any desired edge angle from 15° to 75° and you can
use it to measure an existing edge angle on a tool.
It is designed to work on any grindstone diameter from 250 mm (10") down to 150 mm
(6"). You achieve an exact setting irrespective of the degree of stone wear.
The Pro AngleMaster has two magnets for convenient fixing onto the housing of the
machine. (On SuperGrind 2000 only.)
•
•
•
Instructions. Pro AngleMaster WM-200.
40
Page 39

The same edge angle on a stone worn down to 180 mm (7"). The wear of the stone is compensated
by setting the diameter compensator to the stone diameter.
Setting a plane iron with a 25° edge angle on a 250 mm (10") grindstone.
Setting the edge angle
Diameter compensator
Ø 250 mm
Ø 180 mm
Instructions. Pro AngleMaster WM-200.
41
Page 40

Setting of a bowl gouge at 45° edge angle in the SVD-180 jig. Stone diameter 225 mm (9").
The scale shows that the stone
diameter is Ø 230 mm.
The diameter compensator is set
on Ø 230 mm.
Measuring the stone diameter
When setting the diameter compensator to match the diameter of the stone, you do not
need to measure the grindstone. There is a scale on the machine label, which shows the
diameter in metric mm, which you easily can transfer to the diameter compensator of the
AngleMaster.
This is on the model SuperGrind 2000 series only.
Ø 225 mm
Instructions. Pro AngleMaster WM-200.
42
Page 41

Measuring the edge angle of a knife.
Measuring the edge angle
Measuring the edge angle of a bowl gouge.
Note:
When making a setting to a different edge angle, you should compensate for the material
that will be removed on the edge. The exact angle can be measured when the entire new
bevel touches the stone.
Instructions. Pro AngleMaster WM-200.
43
Page 42

Straight Edge Jig, SVH-60
Suitable for
• plane irons
• wood chisels
• spoke shave
blades
Positioning
of the machine
Max tool width 60 mm (2 3/8").
Wider plane irons can be ground in the
SVH-320 Jig, (page 54).
Design
The jig comprises a base (1) and a clamp (2) for holding
the tool in position. The jig slides across the grindstone
guided in nylon bushings on the Universal Support.
The edge angle is set by adjusting the height of the
Universal Support.
Grinding direction:
Towards the edge.
Honing direction:
Away from the edge.
Grinding direction
Plane irons and wood chisels are best ground towards the edge with the Universal Support placed vertically. You then achieve a higher grinding pressure, which is preferable
since the grinding area is large. Here there is no risk of accidentally overgrinding as the
area of the bevel is flat and large.
1
2
Instructions. Straight Edge Jig, SVH-60.
44
Page 43
Flatten the back of the tool by
holding it flat to the grindstone
while moving it slightly.
Grade the grindstone to a finer
surface by pressing the fine
side on the grindstone for 30 60 seconds.
N.B.
You must keep the tool absolutely flat against the grindstone. Otherwise the tip can cut
into the wheel and be rounded off. Let the side of the tool rest on the Universal Support
placed close to the stone as shown. You do not need to smoothen the tool more than
25 - 30 mm (1 - 1
1
/4") from the edge.
Before you start grinding, check
that the stone is true by letting
the Universal Support touch the
stone.
If necessary, true it with the Diamond Truing Tool ADV-50D so
the surface is flat and parallel to
the Universal Support.
Preparations
Flatten and hone the back of the tools
To achieve a really sharp and durable edge, each of its two meeting surfaces must be
smooth. It does not help if we sharpen and hone the bevel to perfection, if the back is not
equally flat and smooth.
On most new tools, the back has visible grooves from the manufacturing process. These
should be removed and the surface honed and polished.
Remove the grooves on the side of the SuperGrind stone and then hone and polish the
surface on the leather honing wheel. This work only needs to be done once, when you
start using the tool. It is an investment in your quality tool and will last its lifetime.
Do the final smoothing on the
graded stone.
Instructions. Straight Edge Jig, SVH-60.
45
Page 44

Press with your fingers close to
the edge for best control. Move
the tool across the stone.
Set the edge angle by adjusting
the Universal Support. Either at
the original angle using the
bevel colouring method (page
38) or at a new angle using the
Pro AngleMaster WM-200,
(page 40).
Mount the tool protruding (P)
approx. 50 mm (2").
For tools with parallel sides,
check that the tool rests against
the two stops.
For a wood chisel you should check that the entire top face is in
contact with the clamp (2) and that this clamp is parallel to to the
base (1). This is important for achieving an exact 90° grinding.
Align the chisel and the clamp (2) by adjusting the knobs. Loosen
one knob whilst tightening the other.
Grinding
Mounting the tool in the jig and grinding at 90°
Ensure that half of the blade is
always in contact with the stone.
The amount of grinding on each spot along the edge depends upon both the pressure and
the time that it is in touch with the stone. Therefore you should compensate for the fact
that the middle of the plane iron is always in touch with the stone, by grinding more at the
sides.
Check that you are grinding evenly. You can remove the jig from the Universal Support
with the tool mounted.
Towards the end of the grinding, apply a lighter pressure onto the stone and you will
achieve a finer surface.
You should aim to grind a plane iron as closely as possibly to square. However, in practise it does not need to be an exact 90°, since you can compensate for a deviation of one
or two degrees with the setting in the plane.
1 2
•
•
P
Instructions. Straight Edge Jig, SVH-60.
46
Page 45

Plane iron ground with a slightly
convex shape, approx. 0,25 mm
(0,01").
Convex edge angle
Sometimes there is an advantage if the plane iron is
ground with a slightly convex shape, e.g. when joining
boards. Also when planing a wide surface, a convex
shape is recommended as the plane iron will not leave
sharp steps at the sides.
The convex shape is achieved by grinding more at the
sides of the plane iron whilst you move it across the
stone.
Set the Universal Support so
that you get the same honing
angle as the grinding angle. Use
the bevel colouring method.
Honing
Hone the bevel with the tool mounted in the jig as you then have full control of the honing
angle. You can use a higher honing pressure and so achieve a more effective and faster
honing.
Turn the machine around so that the honing wheel rotates away from you and move the
Universal Support to the honing wheel side. Hone the back of the tool free-hand.
Move the tool sideways during
the honing.
The back is honed free-hand.
Finer surface
Grade the stone to a finer grit
with the Stone Grader SP-650.
Check with your fingers that the
stone is entirely smooth.
Do the fine sharpening with the
same jig setting until you have
achieved a finely ground surface
across the entire bevel.
Instructions. Straight Edge Jig, SVH-60.
47
Page 46
Wider plane irons
Irons wider than 60 mm (2 3/8") can be ground, if you
remove the clamp and mount the iron with the slot around
the left mounting screw. Then tighten with the left screw
only.
Use a square to mount the tool straight.
You can also grind plane irons up to 75 mm width in the
SVH-320 jig, (page 54).
Secondary bevel?
Some people recommend that you should put a secondary bevel (or microbevel) on your
plane irons and wood chisels. The reason is that the honing work after the grinding is
quicker since you do not need to hone the entire surface of the bevel, just the smaller new
bevel at the tip.
For wood chisels there is a drawback with a secondary bevel since you do not have the
support of the large original bevel to control the cutting in the wood.
For plane irons, a secondary bevel increases the risk that the heel of the secondary bevel
will touch the wood and cause chattering.
Since the grinding and honing of the entire bevel with the TORMEK method is an easy
and fast operation, there is no need for a secondary bevel. With a single bevel, you can
set exactly the angle that you want and easily maintain it at every grinding and honing.
Reduced support length
with a secondary bevel
on a wood chisel.
Support length with
a monobevel.
Instructions. Straight Edge Jig, SVH-60.
48
Page 47

A spoke shave blade is too short for aligning with the two
stops. Use a square to mount it straight in the jig.
Very short or round faced blades are ground on the Tool
Rest SVD-110.
Spoke shave blades
Edge angle
Plane irons, wood chisels and spoke shave blades are
usually ground with a 25° edge angle (a).
If you need to work delicate details with a wood chisel in
soft wood, you can decrease the edge angle down to 20°.
If you work in hard wood and when using a mallet, you
must increase the edge angle to 30°.
a
a
a
Instructions. Straight Edge Jig, SVH-60.
49
Page 48

Design
The grinding jig comprises support (1), blade holder (2) and allen key (3).
In this jig the tool is guided precisely and ground flat along its whole length to a pre-set
fixed depth. This is not the case with the other TORMEK jigs, where your hand decides
where the grinding occurs and the depth of grinding.
It is important that the grinding angle is set with great accuracy. If you follow the detailed
step by step instructions carefully, you will be satisfied with the results.
For HSS planer/jointer
blades of any length.
Min width (a) 13 mm (
1
/2").
Tungsten carbide blades cannot be ground.
Also for mitre
guillotine blades
You can also grind to a pre-set depth, hand
plane blades and spoke shave blades up to
75 mm (3") width.
Planer/Jointer blade Jig, SVH-320
Positioning
of the machine
1
3
2
The grinding jig comprises support (1), blade holder (2) and allen key (3).
Grinding direction
towards the edge.
50
Instructions. Planer/Jointer blade Jig, SVH-320.
Page 49

Clamp the blade in the holder.
Make sure that it rests on the
stop along the entire length.
Always commence with any
damaged blade in the set.
Remove the Universal Support
and place the support in the
sleeves of the machine. If
required, remove the honing
wheel.
Check that the grinding wheel is
exactly round and that the grinding surface is even. Adjust if
necessary with the TORMEK
Diamond Truing Tool ADV-50D.
Planer/jointer blades
Grind the blade at exactly the
original edge angle (a).
Setting the edge angle
Place the blade holder on the support and set the grinding length
to the length of the blade. This is done by adjusting and locking
both stops (5) to ensure that the blade does not run off the edge of
the stone during grinding.
Colour the grinding bevel with a
marker pen so that you can see
where the grinding occurs when
setting the edge angle.
12-20 mm
(
1
/2-3/4")
12-20 mm
(1/2-3/4")
6
Make an initial height setting with the wheels (6). Set the edge
angle with the adjusting screw (7). Make fine adjustments to the
height with the wheels (6). The bevel should now lie flat on the
stone and the holder (2) should touch the support (1).
a
2
1
7
•
•
•
51
Instructions. Planer/Jointer blade Jig, SVH-320.
Page 50

Make sure that the blade makes
contact along the whole width of
the wheel – a thin piece of paper
simplifies this check. Adjust if
necessary with the wheels (6).
Press down the grinding jig while
locking with the locking screws
so that the two wheels (6) rest
on the base without any gap.
Check the angle setting by turning the wheel by hand. The
stone should make marks on
the whole bevel, from the tip to
the heel.
Lock the support plate – while it
is pressed down – with the two
locking screws (8).
Set the grinding depth by raising the wheels (6). Turn the
wheels equally in order to retain the parallel setting. The grinding depth is shown on the two wheels (6) which are graduated
for each 0,1 mm (0,004").
Setting the grinding depth
8
There is now a gap between the
blade holder and the support.
Unlock the two locking screws
(8) and allow the support plate
to lower by the amount you
have raised the wheels (6).
Note:The numbers on the wheels (6) do not need to be synchronised.
Important!
Do the angle setting with care to get exactly the same edge angle as the existing one. If
you set the jig to grind the heel of the bevel, the operation will take unnecessarily long time.
8
6
52
Instructions. Planer/Jointer blade Jig, SVH-320.
Page 51

For longer blades more than
320 mm (12 1/2"): Move the
blade in the holder and grind in
two steps. Make sure that the
back of the blade rests on the
stop.
You must grind until the blade
holder rests against the support
along the whole length. Grinding
is then complete. Grind the
other blade with the same setting.
Grind by moving the holder with
even pressure from side to side
between the side stops.
Grinding
Tip:
If the grinding effect of the stone
decreases during the operation,
the stone can easily be reactivated with the TORMEK Stone
Grader SP-650, whereby new
grinding grains are brought into
operation.
Hone away the burr gently on
the leather honing wheel. Start
with the reverse side and then
the bevel and repeat this a
couple of times.
Important:
Always hone away from the
edge!
Honing
53
Instructions. Planer/Jointer blade Jig, SVH-320.
Page 52
Mount the blade so the edge is
parallel to the blade holder.
Use a 3 mm allen key to remove
one of the screws.
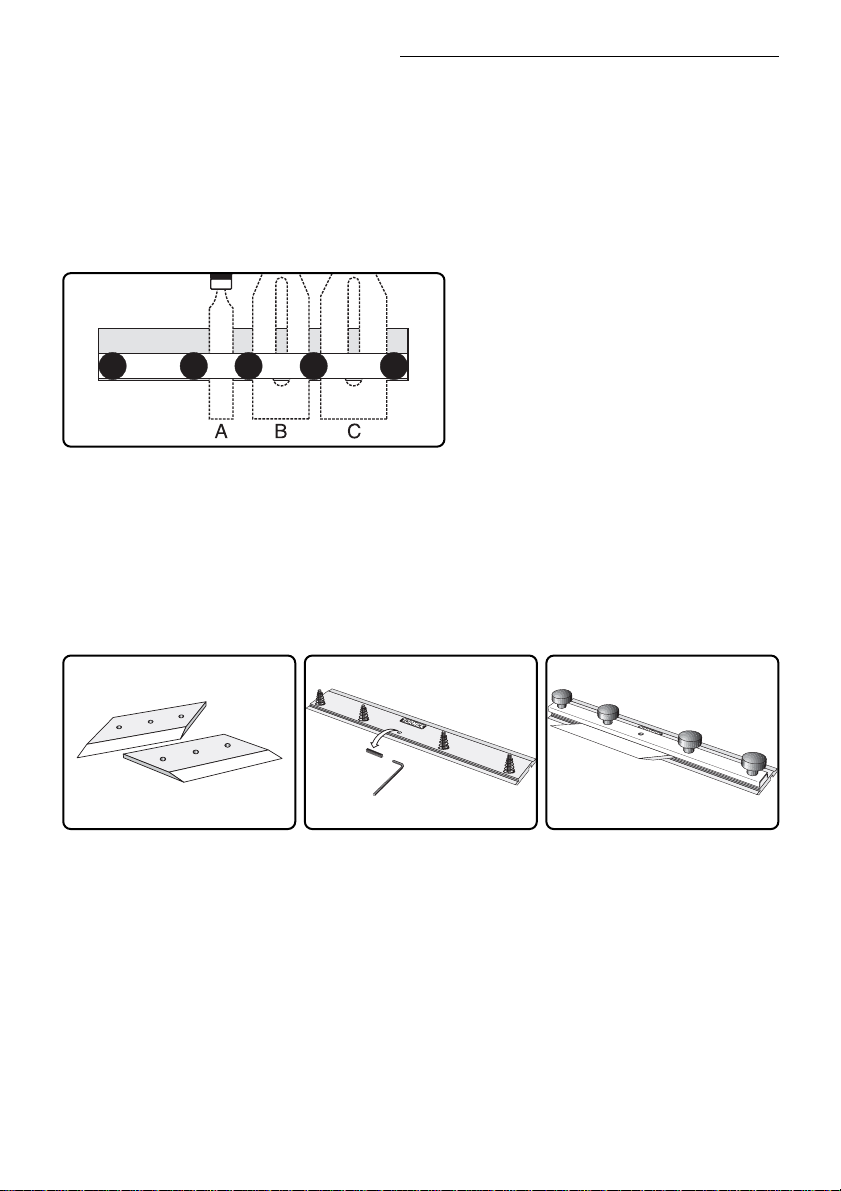
A set of mitre guillotine blades.
Mitre guillotine blades
To mount these wider blades you need to remove one (or two) of the screws in the blade
holder. Use a 3 mm allen key. The sharpening instructions are the same as for
planer/jointer blades.
Re-mount the screws when grinding planer/jointer blades.
Hand plane blades and wood chisels
Hand plane blades and wood chisels are normally ground in the SVH-60 jig, which coops
with blades up to 60 mm (2
3
/8"). Wider blades up to 75 mm (3") you can grind in this
SVH-320 jig.
A up to 50 mm (2").
B up to 60 mm (2
3
/8").
C up to 75 mm (3").
The distance between the clamping screws varies to fit different widths. Use the smallest
possible distance to avoid deflection of the holder when tightening.
54
Instructions. Planer/Jointer blade Jig, SVH-320.
Page 53
Instructions. Universal Gouge Jig, SVD-180.
55
Suitable for:
Turning tools
• Bowl gouges
• Spindle gouges
Carving tools
• Straight gouges
• Curved gouges
• Spoon-shaped gouges
• Back bent gouges
• Down bent gouges
• Tapered gouges
• V tools, curved and straight
Max tool width 25 mm (1").
Min length of tool approx 75 mm (3").
Universal Gouge Jig, SVD-180
Positioning
of the machine
Grinding direction:
away from the edge.
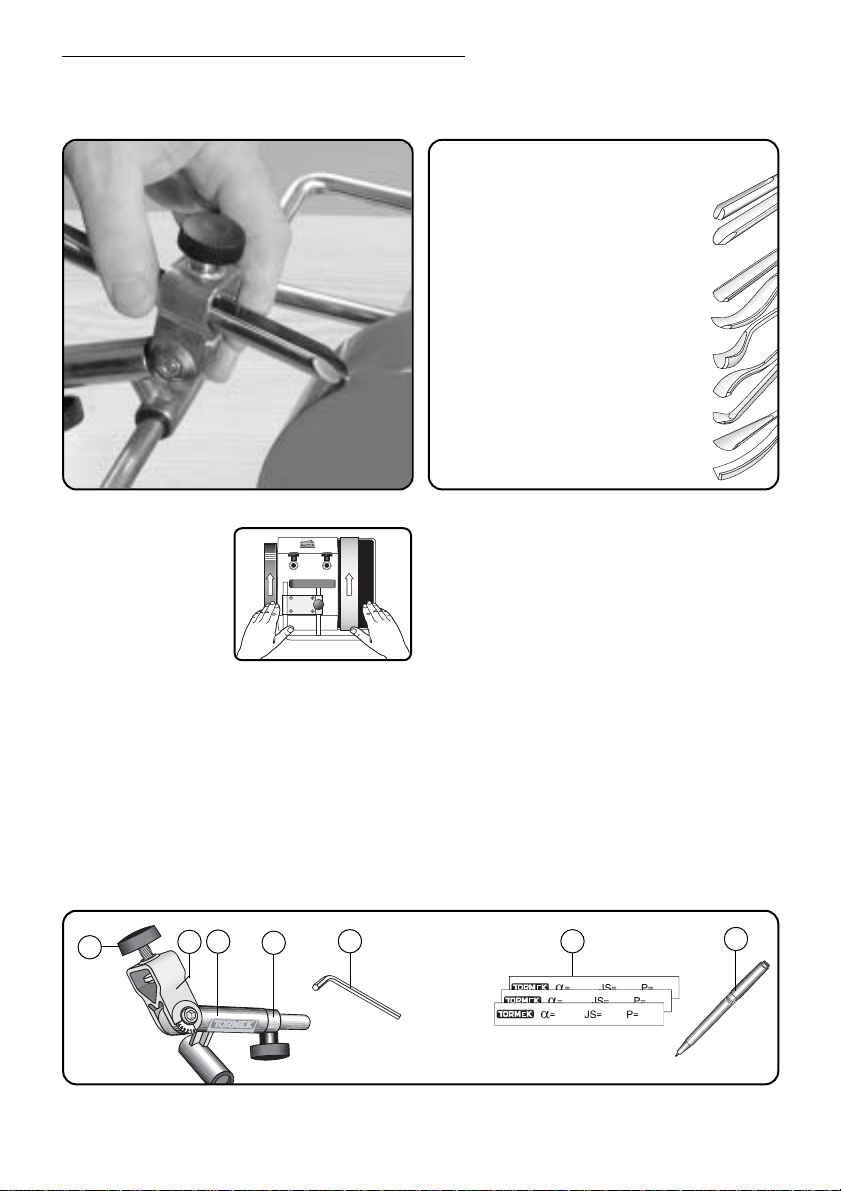
Design
The jig comprises a tool holder (1) which runs on a sleeve (2). The tool is mounted with
the screw (3). The stop ring (4) can be set for a convex bevel.
The tool holder can be turned and locked in any position with the allen key (5).
The settings are marked from 0 to 5.
The setting can be noted on a special recipe label (6), which is attached to the ferrule.
A special pen, which works on these labels is included (7).
1
2
4
3
5
6
7
•
•
•
•
•
•
•
Page 54

Instructions. Universal Gouge Jig, SVD-180.
56
You can grind turning gouges with the so called fingernail shape as well as carving
gouges with various shapes. You can also grind straight and curved V tools.
The jig causes the tool to move towards the grindstone in a special way, according to the
setting selected from 0 to 5. This means, that for turning gouges you can decide the maximum length of the side edges. For carving gouges, which are not ground with a fingernail shape, the jig setting compensates for the shape of the shank.
...carving gouges with various
shapes and V tools.
...turning gouges with various
lengths of side bevels and…
The jig can be set from 0 to 5,
which permits the grinding of…
Page 55

Instructions. Universal Gouge Jig, SVD-180.
57
The instruction is divided into two sections.
The first section shows how to shape a
gouge to a new profile and the other shows
how to re-sharpen an existing profile.
Shaping a gouge takes 5 to 20 minutes
depending on how much steel you need to
remove. This is a time investment you only
do once for the gouge. Re-sharpening an
existing profile, which is the most frequent
use of the jig, takes just 30 – 45 seconds
including the settings.
Shapes of the wings
Shaping the gouge
The jig is designed so you can vary the length of the side bevels (l), which are also called
wings. This is achieved by setting the jig from 0 to 5. Setting 0 gives you an almost
straight grinding, while the highest setting 5 permits the longest side bevels.
At each jig setting there are also other factors determining the shape of the gouge:
• Edge angle (a). A smaller edge angle gives longer side bevels.
• Protrusion. A shorter protrusion gives longer side bevels.
• Extent of grinding. If you grind less on the sides, you get shorter side bevels.
The graph on the next page shows the shapes of a bowl gouge ground with various jig
settings and at various edge angles. The protrusion is the same (P=65 mm or 2
1
/2"),
which we recommend to use as standard. Also the extreme combinations, which are not
recommended, are shown to give you a picture of which factors influence the shape.
The wings can be ground back as much as the setting and edge angle permit. You can
also grind less on the wings and in that way make them shorter. They should be ground so
that they form a slightly convex shape viewed from the side. The wings can also form a
straight line, but they must never be concave.
Bowl gouges
Turning gouges
Convex Straight Concave. Not suitable!
Page 56

Instructions. Universal Gouge Jig, SVD-180.
58
•Protrusion 65 mm (2 1/2").
• Wings ground back to the maximum and with a slightly convex shape.
JS 1
JS 2
JS 3
JS 4
JS 5
Edge angle
35°
JS 0
Edge angle
45°
Edge angle
60°
Edge angle
75°
Fingernail shape on a bowl gouge at various edge angles and jig settings
Page 57

Instructions. Universal Gouge Jig, SVD-180.
59
Recommended shapes
When deciding the jig setting, you must take into consideration which edge angle you
have or want on your gouge. At a narrow edge angle 35°, jig setting at 2 gives pronounced wings whilst at a 60° angle you need to set the jig on 5 to get the same length on
the wings.
Those manufacturers, who deliver bowl gouges ground with a fingernail shape, grind an
edge angle of 45° or 60° on their gouges and the profiles correspond to jig setting 2 and 5.
The large 60° edge angle, or even a larger angle, is needed when turning the bottom of
deep bowls enabling the bevel to rub. For external turning, a smaller edge angle can be
preferable as this cuts more easily, e.g. 35° with setting 2.
Generally, you should use an edge angle as narrow as the hardness of the wood permits,
because a smaller edge angle cuts more easily than a larger one and the risk of vibration
is less. Hard and tough woods with knots require a larger edge angle than a softer wood.
The finer the surface of the edge... the more durable the sharpness. Since you achieve a
finer surface with the TORMEK sharpening and honing method compared with conventional dry, high speed grinders, you can decrease the edge angle and thus your tools will
cut more easily.
The combination of edge angle and jig setting you should use, depends upon which type
of turning you do most and the way you want the tool to behave. There are no “rights” or
“wrongs” – your experience will tell what works best for you. A good tip is to use more
than one gouge and shape them differently so you can quickly go from one type of turning
to another without being forced to go to the grinder and change the shape. One or two
extra gouges used in this way will save you a considerable amount of time and avoid
unneccessary waste of your expensive tools.
Setting the jig and mounting the tool
Mount the gouge protruding (P)
65 mm (2 1/2").
The stop ring (4) must be locked
close to the sleeve (2).
Select the jig setting, which corresponds to the shape you want
on the gouge. (See the previous
page). Tighten the screw properly.
This is a frequent shape on factory pre-shaped gouges. Edge
angle 45° and jig setting JS=2.
Check that the disc aligns the
gouge properly.
4
2
•
•
P
Page 58

Instructions. Universal Gouge Jig, SVD-180.
60
Setting the edge angle
Adjusting the universal support back and forth sets the edge angle. You can either shape
the gouge at the existing edge angle or you can choose a new edge angle to meet your
requirements. The edge angle is always measured in the centre of the gouge.
Place the self-adhesive measure, which comes with the jig, on a
piece of wood and glue a stop at 65 mm (P). This simple device
will make the protrusion setting easier.
Setting the existing edge angle.
Place the centre of the gouge on
the grindstone. Move the Universal Support until the entire bevel
touches the stone.
Protrusion Measure
Setting a new edge angle.
This can be done by eye or you can, as shown here, set the jig to
a pre-determined edge angle using the AngleMaster WM-200.
If you need to clamp the gouge
on the circular section (e.g. short
gouges), flatten the shaft on the
grindstone so that the gouge
does not turn in the jig.
P
P
Tips:
Bench
Page 59
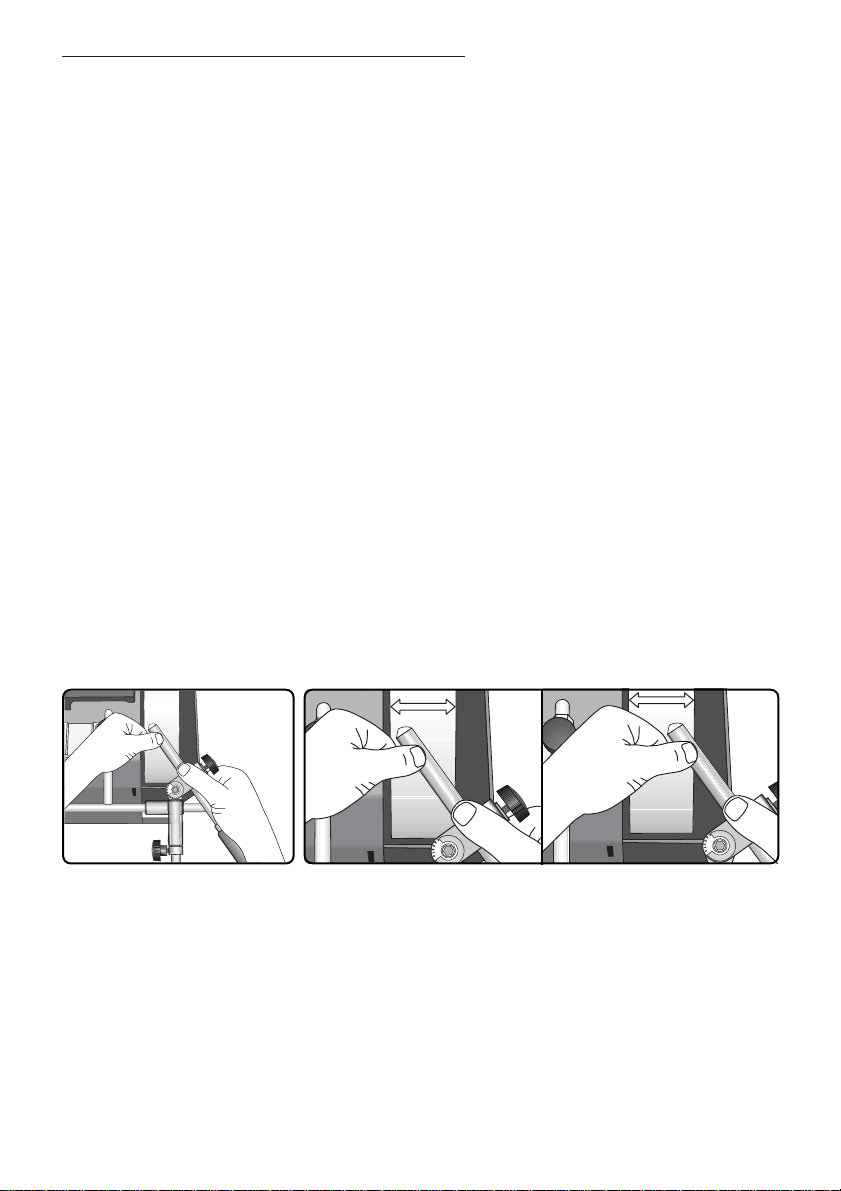
Instructions. Universal Gouge Jig, SVD-180.
61
Tip:
If you need to remove a lot of metal on a gouge at the initial shaping, you can save time
by creating the first rough shape free hand on a conventional high speed grinder, which
removes steel faster due to the high speed. Watch that you do not overheat the edge.
Do the first coarse grinding on
one side at the time and you
avoid having to swing the tool
from side to side.
Move the tool sideways so you use the whole width of the stone
and avoid creating grooves.
Grinding and sharpening
The jig positions the gouge on the grindstone so that you can get a specific and repeatable grinding at any point along the bevel. This enables you to get an even, single bevel
around the entire profile from the left to the right wing.
When changing the shape of a gouge you need to remove quite a lot of metal. Therefore,
press with your hand or thumb on the tool to increase the grinding pressure. Grind one
side at the time. This is easier as you do not need swing the tool from side to side. Finish
the grinding with a full swing over the entire bevel. Do not spend too long on the same
spot on the grindstone, as it will leave grooves on the stone. Instead, grind on new spots
so that you use the whole width of the stone.
By this technique the remaining grooves will not be too pronounced. They will reduce with
future grindings of straight edges. If you immediately require a flat surface of the stone,
you can true it with the Diamond Truing Tool ADV-50D.
Check your grinding frequently so that the gouge acquires an even shape. Grind more on
the spots where it is needed. Your hands decide the final evenness and shape of the
bevel. Remember that once you have created your desired fingernail shape, this can be
kept forever and you will always benefit from the time spent on the initial grinding
Honing and polishing the bevel to a finer finish will make the sharpness more durable.
Also use the jig for this operation and you are sure that everytime you are honing at exactly
the same shape as the grinding and you do not risk rounding off the very tip of the edge.
Note the jig setting (JS) and the protrusion (P) on a Recipe Label (which comes with the
jig) and place the label on the ferrule. Now you have the data for this gouge and you can
quickly repeat the exact same shape on all future re-sharpenings. Also note the approx.
edge angle. This information is however not used for the settings.
Page 60

Instructions. Universal Gouge Jig, SVD-180.
62
Decrease the grinding pressure
as you complete the shape and
finish the grinding (now sharpening) with a full swing over the
entire bevel.
Grind the other side. Again use
the whole width of the stone to
wear the stone evenly.
Check frequently to ensure that
you are grinding evenly. Grind
more where it is needed.
Hone and polish the bevel on the large, standard leather honing
wheel. Set the Universal Support so that the honing angle is the
same as the grinding angle. Use the bevel colouring method,
described on the next page. Hone away the burr and polish the
bevels to a mirror finish.
Keep the tool in the jig and hone
and polish the inside on the
Profiled Leather Honing Wheel
LA-100.
Put the label on the ferrule and
you can repeat the same setting
when re-sharpening.
Note the jig setting (JS) and the protrusion (P) on a recipe
label. Use the special permanent pen, which comes with the jig.
Also note the approx. edge angle (a).
Honing
Grind more here
Both wings now
symmetrical
Documentation of the shape
The shape of the gouge is determined by the edge angle (a) and the jig setting (JS), as
explained on the line drawings on page 58. Note these data on the recipe label, which
comes with the jig.
Now you can exactly replicate this shape at future re-sharpenings.
Page 61

Instructions. Universal Gouge Jig, SVD-180.
63
Re-sharpening an existing profile
Re-sharpening an existing profile is done quickly with the SVD-180 Jig. As you have
noted the data for the grinding on the Recipe Label on the ferrule, you can easily repeat
the exact shape at the re-sharpening. Since all the time you sharpen on the right spot on
the bevel, only a fraction of the steel is removed. You only need to touch up the edge with
one or two passes over the bevel. The sharpening takes just 15 - 30 seconds.
You can use two different methods to set exactly to the existing edge angle, either the
“bevel colouring method” (A) or the “wooden piece method” (B). This setting is
important and you should therefore use one of these methods since you will save sharpening time and remove less steel, if you set the edge angle precisely.
A. The bevel colouring method
You colour the bevel with a marker so that you can easily observe where the sharpening
will take place. You make the adjustments with the Universal Support until the grindstone
hits the entire length of the bevel.
This setting method including the mounting of the gouge in the jig takes about one
minute.
However the fastest method is the wooden distance piece method described on the
next page.
Colour the entire bevel with a
marker.
Check in the centre of the gouge
where the sharpening will take
place by rotating the grindstone
by hand.
Here the stone is hitting the heel
of the bevel. The Universal Support needs a small adjustment
away from the stone.
Mount the gouge in the jig with
the same protrusion (P)
Set the jig with the same setting
(JS) as noted on the label.
Protrusion Measure
Check that the disc aligns the
gouge properly.
P
Wrong setting
Page 62

Instructions. Universal Gouge Jig, SVD-180.
64
This is the correct setting. The
stone hits the full length of the
bevel. The sharpening will now
exactly follow the shape of the
entire bevel profile.
Sharpen. Swing the jig from
side to side and sharpen with a
light pressure until the colouring
has disappeared on the entire
bevel.
Mount the gouge in the jig with
the same protrusion (P)
Place the prepared wooden distance piece between the Universal Support and the grindstone,
and set the Universal Support
accordingly.
Protrusion Measure
Check that the disc aligns the
gouge properly.
P
B. The wooden distance piece method
If you do not utilise the possibility of varying the jig setting (from 0 – 5), you can use the
wooden distance piece method, which is simpler and faster. Then you use a fixed jig
setting (e g No 2).
You only need to position the Universal Support as at the previous sharpening to achieve
exactly the same shape and edge angle. This is easily done with a wooden distance piece
placed between the Universal Support and the grindstone. This wooden distance piece
needs to be made previously at the last sharpening of the gouge.
The wooden distance piece method is recommended if you do production turning or you
frequently re-sharpen a gouge to the same specification.
This method takes just 15 seconds including mounting the tool in the jig.
Correct setting
Universal
Support
Note
The wooden distance piece method assumes that the stone diameter has not changed too much
since the last sharpening. However, the difference in the result is only theoretical and hardly noticeable. For each 10 mm (3/8") decrease of the stone diameter the edge angle will decrease max 1°.
If after a period of time the stone diameter has decreased more than you can allow, you can use the
method A to achieve exactly the same edge angle, or you can make a new wooden piece to fit the
smaller stone diameter.
Page 63

Instructions. Universal Gouge Jig, SVD-180.
65
• If you use two favourite jig settings, you can have two jigs, both with a specific and fixed setting,
which will save you time.
Sharpen
Swing the jig from side to side and sharpen with light pressure.
Since you exactly repeat both the existing edge angle and the
existing fingernail profile, the sharpening is done in less than 30
seconds.
• You can shape the wooden piece to fit more than one gouge.
Then note their edge angles.
Tips
Hone and polish the bevel on the large, standard leather honing
wheel. Set the Universal Support so that the honing angle is the
same as the grinding angle. Use the bevel colouring method.
Hone away the burr and polish the bevel to a mirror finish.
Keep the tool in the jig and hone
and polish the inside on the
Profiled Leather Honing Wheel
LA-100.
Honing
Page 64

Instructions. Universal Gouge Jig, SVD-180.
66
N.B.
The edge angle, which is measured at the tip, remains the same on all of the examples.
2
1
3
You can round off the heel by
moving the stop ring (4) and the
sleeve (2) backwards. A scale
on the jig shows the extent of the
movement.
You can also move the Universal
Support closer towards the
grindstone. This gives you a
more pronounced secondary
bevel.
The methods described will give you these alternative shapes. The
size of the secondary bevel and the degree of rounding off can be
made according to your requirements.
Now grind the heel of the bevel
by pressing the jig towards the
grindstone so that the stop ring
(4) is in touch with the sleeve (2).
If you want a smooth convex
bevel without a step, you slide
the jig continuously back and
forth between the two outer
positions during the grinding
operation.
Rounding off the heel
Some turners prefer to round off the heel of the bevel so that it does not leave scratches
in the wood surface. The jig is designed so that you can move the tool towards the stone
and grind the heel. The heel can be ground either as a flat secondary bevel or rounded off
by sliding the jig back and forth during grinding.
If you want a more pronounced secondary bevel, you move the Universal Support a little
towards the grindstone.
ab
c
bca
Secondary bevel
Page 65
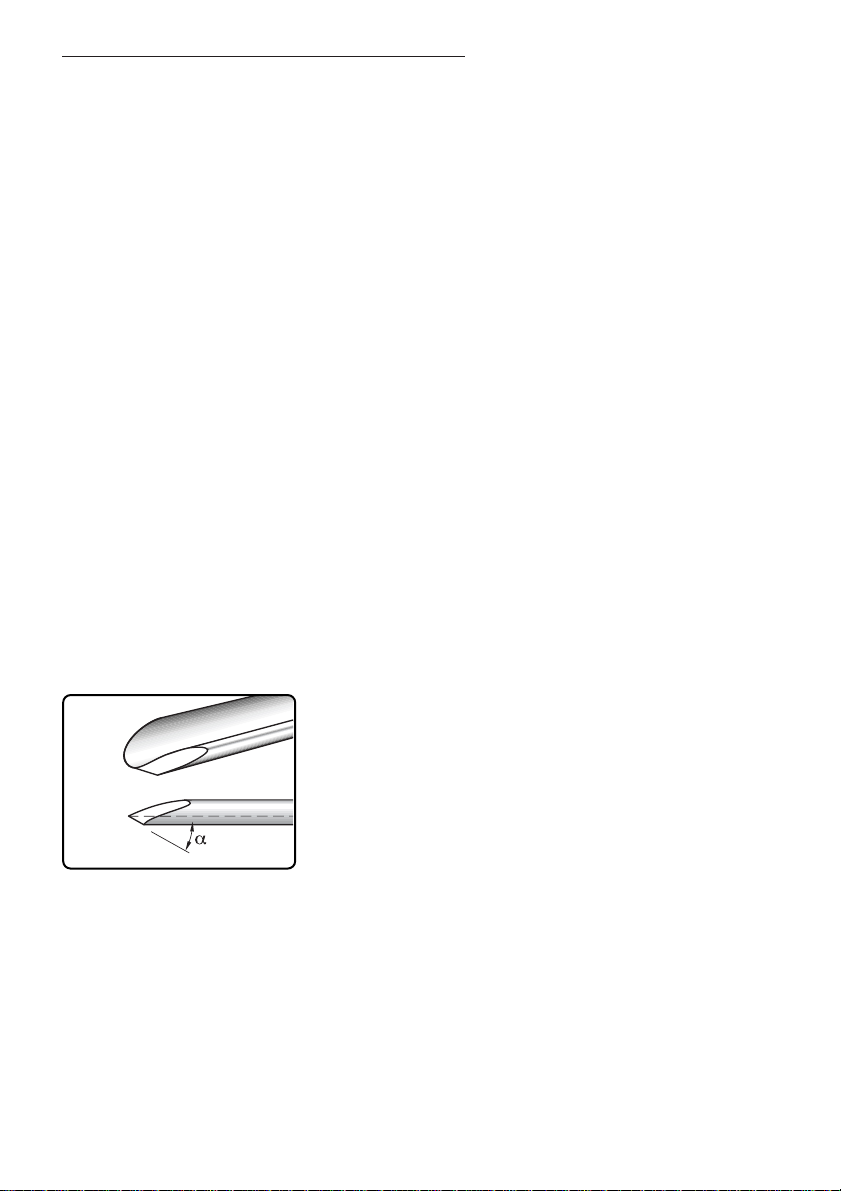
Instructions. Universal Gouge Jig, SVD-180.
67
Spindle gouges
Spindle gouges are ground, sharpened and honed in the same way as bowl gouges. The
edge angle is usually 25° to 35° and a jig setting on 3 will give a suitable finger nail profile.
This 20 mm (3/4
") spindle gouge
is ground with jig setting 3. The
edge angle (
a
) is 30°.
Benefits of proper honing
The advantages of honing the bevels to a finer surface are well known and are used for
plane irons, wood chisels, knives and woodcarving tools. This technique is equally valid
for woodturning tools but some turners do not pay the same attention to the honing as
cabinet makers and woodcarvers.
With the TORMEK method, the sharpening is fully controlled as well as the honing. You
only need a fine touch-up of the edge since you always sharpen and hone to exactly the
same shape and at exactly the same edge angle.
The whole operation – setting, sharpening and honing – takes only a few minutes and is
therefore time well invested.
These are the benefits of a properly honed and polished edge:
• The gouge cuts more easily.
• The edge stays sharp longer.
• Less friction against the wood and less heat development.
• Leaves a finer surface on the wood.
• Less time for sharpening and more time for turning.
Page 66

Instructions. Universal Gouge Jig, SVD-180.
68
Carving Gouges
Carving gouges are straight, curved or spoon
shaped. They can also be back bent, down
bent or tapered.
The jig can be set to compensate for any
radius on the curve so that the grinding takes
place evenly across the edge, so creating a
constant edge angle from the centre to the
sides of the gouge.
Unlike turning gouges, carving gouges
should not be ground with side bevels. The
edge should form a straight line viewed from
above and the corners must be sharp.
Shaping the edge
Shape the edge by resting the
tool on the Universal Support
placed horizontally and close to
the stone.
The edge plane angle (
g
)
should be approx. 20°. Please
see page 21.
Flatten and smooth the blunted
edge with the fine side of the
TORMEK Stone Grader, SP-650.
The principle
Use the technique as described in the chapter Grinding techniques for carving gouges
and V-tools on page 20.
Edge angle
As described in the above chapter on page 24, the choice of edge angle is very important
for a carving gouge
The method of setting the jig for a certain angle depends on whether you want to replicate
an existing edge angle or if you want to put a new edge angle on your tool.
When replicating an existing edge angle, you should use the bevel colouring method,
which is described on page 38. If you want to put a new edge angle to your tool, you can
either set the angle by eye or you can use the Pro AngleMaster, page 40.
Page 67

Instructions. Universal Gouge Jig, SVD-180.
69
Put the jig on the Universal
Support and swing it to one side.
Set the jig so that the plane of
the edge is approx. parallel to
the axis of the stone.
Now the jig is set to suit the
curve of the gouge. The edge
angle will be equal across the
edge. If the thickness of the steel
is even, the bevel length will also
be equal along the edge.
Setting the edge angle
Set the edge angle by adjusting the Universal Support.
When replicating an existing angle, use the bevel colouring
method.
When setting a new angle you can use the Pro AngleMaster.
Setting the Jig
Mount the gouge in the jig protruding approx. 100 mm (4").
The stop ring (4) must be locked
close to the sleeve (2).
Tip:
If the shank has a convex upper
side, you should grind it flat to
make sure that the tool does not
turn in the jig.
42
•
•
P
Now you have a line of light,
which is your guide as to where
to grind.
Line of light
Tip:
When cutting steep bowls
using a curved or a down
bent gouge, the edge plane
angle can be decreased.
Here it is 0°
90°
Page 68

Instructions. Universal Gouge Jig, SVD-180.
70
Grinding
Line of light
Always grind where the line of
light is the thickest while swinging the tool.
Check frequently where the
grinding takes place. Grind until
you get an even and thin line of
light.
Grade the grindstone for fine
sharpening with the fine side of
the Stone Grader SP-650.
Continue sharpening. Check the
result frequently.
Remove the burr on the leather honing wheels to observe the line
of light more clearly. The tool is left mounted in the jig.
Sharpen again. Now with a very
light pressure. Check frequently
so that you do not over-sharpen.
Stop sharpening immediately
when the line of light disappears, which is a sure sign
that the edge is sharp.
Be careful when you grind at the
sides of the gouge so you do not
round off the corners. Woodcarving tools should have sharp
corners!
Important!
It is very easy to be misled by the burr and mistake the burr for the line of light! Therefore
you must remove the burr frequently during the finishing of the grinding operation, so you
clearly can watch the progress of a gradually thinner line of light.
Page 69

Instructions. Universal Gouge Jig, SVD-180.
71
It is very easy to over-sharpen the edge at the end of the sharpening. If this happens, you need to reshape the edge and start again
from the beginning.
N.B.
If the edge needs further honing or sharpening on some spots, you
can continue with the same setting.
When you are satisfied with the result, you remove the tool from
the jig after having measured and noted the protrusion (P) and
the jig setting. Please see the next page.
Leave the tool in the jig and test
the sharpness by pushing the
edge across the fibres in a piece
of wood. The edge should cut
easily and leave a smooth surface without tearing the fibres.
P
Hone and polish the bevel. Set the Universal Support so that the
honing angle is the same as the grinding angle. Use the bevel
colouring method. Hone away the burr and polish the bevel to a
mirror finish.
Keep the tool in the jig and hone
and polish the inside on the
Profiled Leather Honing Wheel
LA-100.
Honing
Testing the sharpness
Page 70
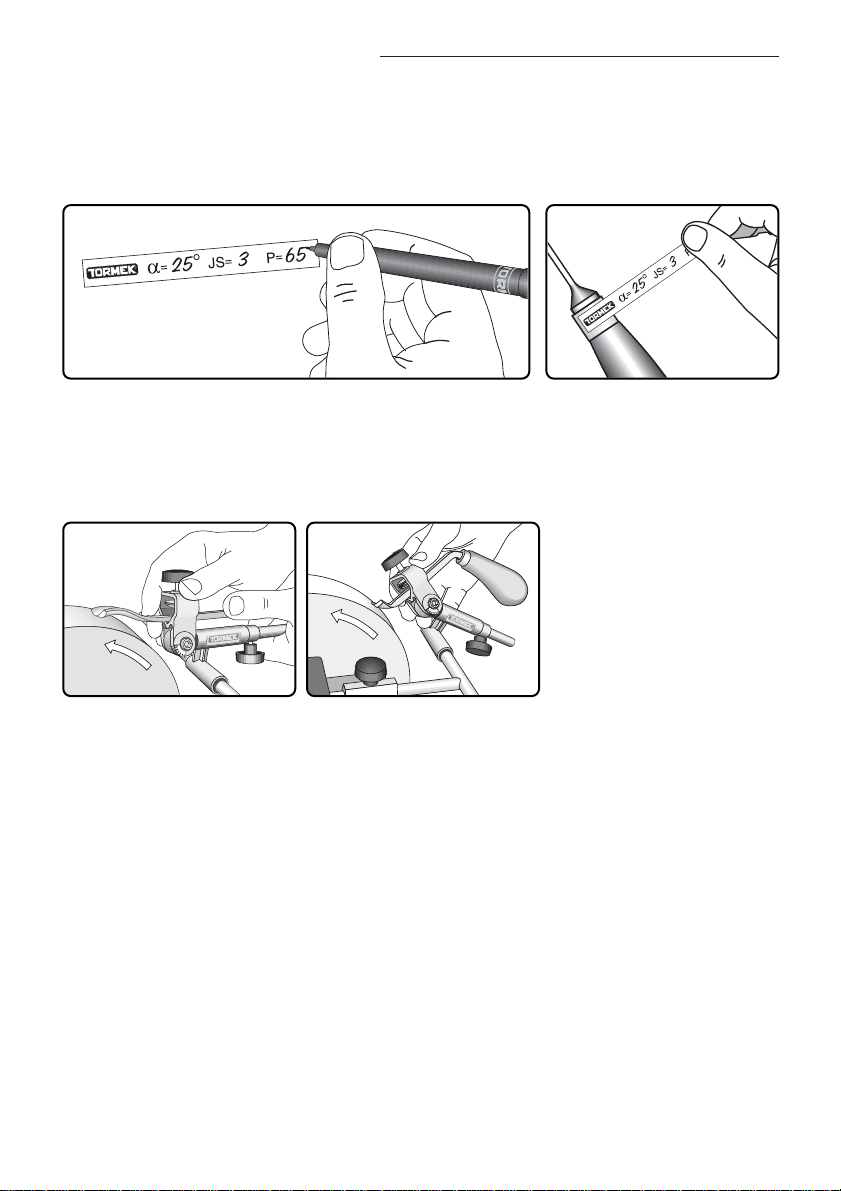
Instructions. Universal Gouge Jig, SVD-180.
72
Documentation of the shape
The shape of the gouge is determined by the edge angle (a) and the jig setting (JS).
Note these data on the recipe label, which comes with the jig.
Now you can exactly replicate this shape at future re-sharpenings.
Note the jig setting (JS) and the protrusion (P) on the label. Use
only the special pen which comes with the jig. Also note the
approx. edge angle, (a).
Attach the label to the ferrule
and you are assured that you
have the same data at future
sharpenings.
Backbent and downbent gouges
A back bent gouge is ground
with the jig setting 0.
You can also grind a down bent
gouge. The jig is set as shown
on page 69.
Page 71
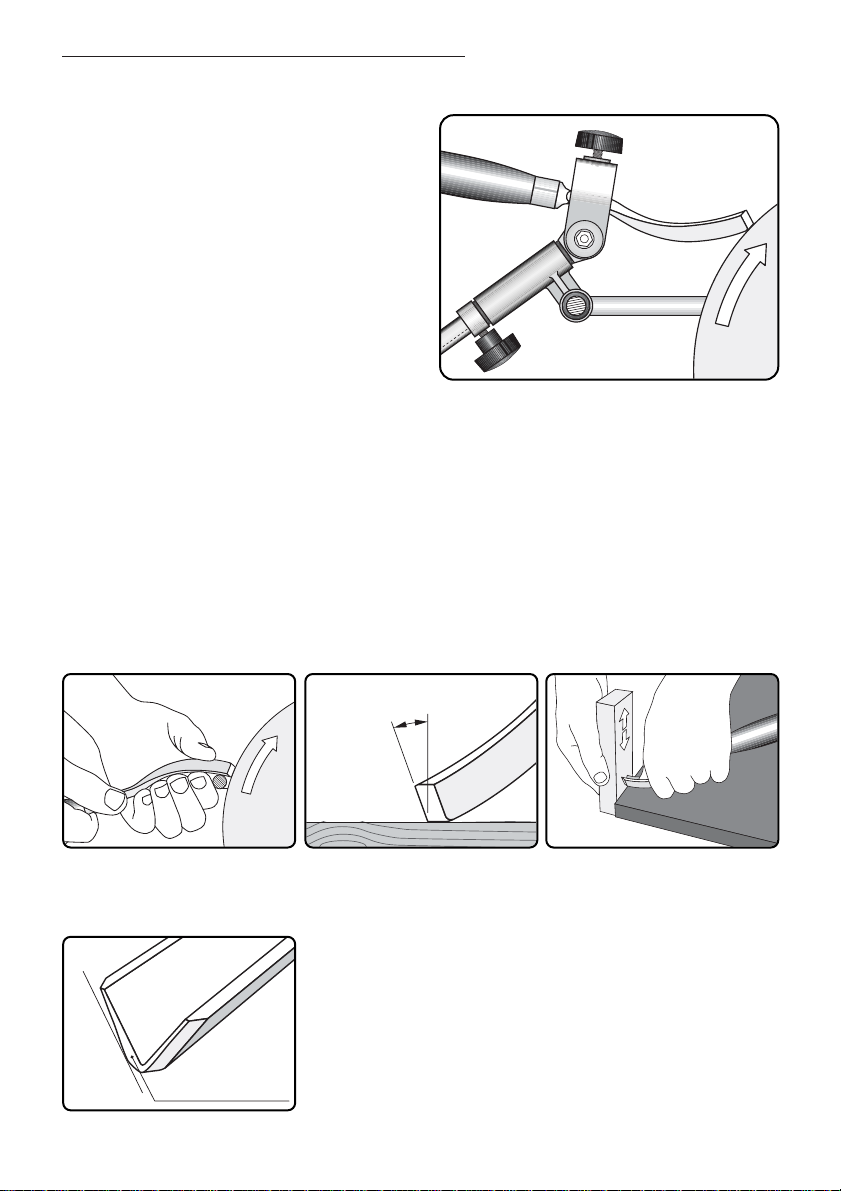
Instructions. Universal Gouge Jig, SVD-180.
73
Shaping the edge
Shape the edge. Rest the tool
on the Universal Support positioned horizontally.
The edge plane angle (
g
)
should be approx. 20°. Please
see page 21.
Flatten and smooth the blunt
edge with the fine side of the
TORMEK Stone Grader, SP-650.
Line of light
Now you have a line of light,
which is your guide as to where
to grind.
g
These tools are considered the most difficult
to grind. The reason is that it has two edges
joined with a radius.
However, with the method described here,
you will also manage to achieve a sharp and
correctly shaped edge on these tools.
The principle is the same as for carving
gouges, i.e. you first give the tool its right
shape and then let the line of light guide you
as to where to grind.
V tools
The principle
Use the technique as described in the chapter Grinding techniques for carving gouges
and V-tools on page 20.
Edge angle
As described in the above chapter on page 24, the choice of edge angle is very important
for a carving gouge
The method of setting the jig for a certain angle depends on whether you want to replicate
an existing edge angle or if you want to put a new edge angle on your tool.
Page 72

Instructions. Universal Gouge Jig, SVD-180.
74
Now the jig is set to suit the
shape of the tool, the edge angle
will be uniform.
Put the jig on the Universal
Support and turn it so one wing
lies flat on the grindstone. Set
the jig so that the edge is
approximately parallel to the
axis of the stone.
Setting the Jig
Mount the tool in the jig protruding approx. 100 mm (4").
The stop ring (4) must be locked
close to the sleeve (2).
42
•
•
P
Control the grinding pressure
with your thumb and control
where the grinding takes place
by gently turning the tool with
your hand.
Check frequently where the
grinding is taking place. Only
grind where the line of light is
the thickest.
Do not slide the tool sideways.
Keep it on the same spot on the
grindstone for the best control.
Setting the edge angle
Set the edge angle by adjusting the Universal Support.
When replicating an existing angle, use the bevel colouring
method.
When setting a new angle you can use the Pro AngleMaster.
Grinding
Rest your hands on the Universal Support and you get a good control.
Page 73

Instructions. Universal Gouge Jig, SVD-180.
75
Stop sharpening immediately
when the line of light disappears,
which is a sign that the edge is
sharp.
Now sharpen again with a very
light pressure. Check frequently
so that you do not over-sharpen.
Remove the burr on the leather
honing wheels so that you can
better observe the line of light.
Continue sharpening one wing
at a time and then the keel.
Check the results frequently.
Grade the grindstone for fine
sharpening with the fine side of
the Stone Grader SP-650.
Then grind the keel. Turn the
tool from side to side to equalise
the grinding towards the wings.
Now grind the other wing in the
same way.
Grind until you get an even and
thin line of light.
Important!
It is very easy to be misled by the burr and mistake the burr for the line of light! Therefore
you must remove the burr frequently during the finishing of the grinding operation, so you
clearly can watch the progress of a gradually thinning line of light.
Page 74
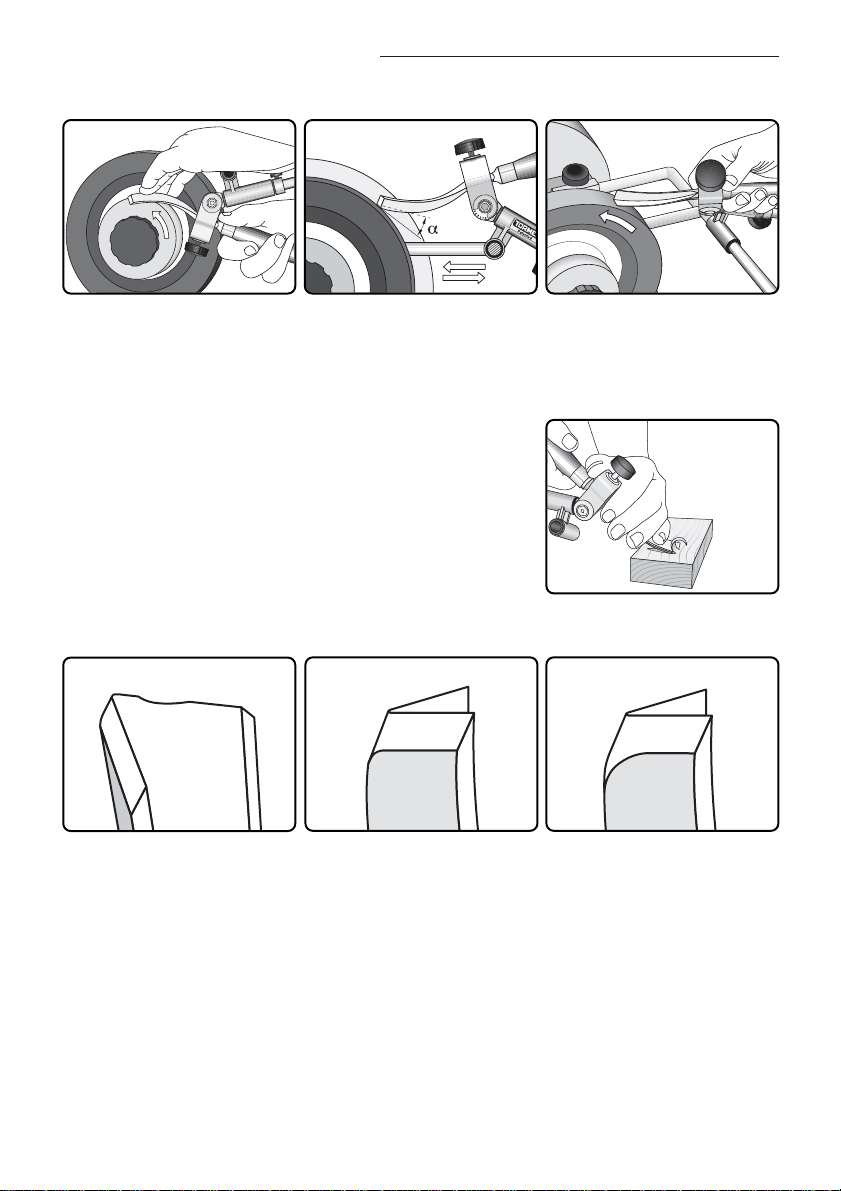
Instructions. Universal Gouge Jig, SVD-180.
76
Hone and polish the bevels. Set the Universal Support so that the
honing angle is the same as the grinding angle. Use the bevel
colouring method. Hone away the burr and polish the bevels to a
mirror finish.
Honing
Keep the tool in the jig and hone
and polish the inside on the
Profiled Leather Honing wheel
LA-100.
It is easy to over-grind the edge
at the end of the grinding. If this
happens, you need to reshape
the edge and start again from
the beginning.
N.B.
This is now how the tool should
appear. The keel is slightly
longer than the bevel of the
wings since the steel is thicker
in the centre.
The tool cuts more easily if you
round the keel. Move the Universal Support slightly towards the
grindstone and grind gently while
swinging the tool from side to
side.
Tip:
Testing the sharpness
Keep the tool in the jig and test the sharpness by pushing the
edge across the fibres in a piece of wood. The edge should cut
easily and leave a smooth surface without tearing the fibres.
If the edge needs further honing, you can continue with the same
setting. When you are satisfied with the result, you remove the
tool from the jig.
Page 75

Instructions. Universal Gouge Jig, SVD-180.
77
Uneven thickness of the steel
Uneven thickness
Even thickness
If the steel thickness varies, the length of the bevel will also vary
despite the fact that the edge angle is the same. This has no influence on the function of the tool, as it depends on the edge angle.
A V tool with an even steel thickness has the same bevel length on
the whole wing.
Page 76

Instructions. Multi Jig, SVS-50.
78
Multi Jig, SVS-50
Suitable for:
Turning tools
• Square and skew chisels
with straight or curved edges.
• Parting tools
• Beading tools
• Roughing gouges
Carving tools
• Gouges, 25 - 50 mm (1" - 2").
Straight shanked or tapered.
• Square and skew chisels
Max tool width 50 mm (2").
Design
This patented jig consists of a housing (1) and two interchangeable seats – one closed,
(2) and one open, (3). The seats can swivel and can be locked at any skew angle
between 0° and 45°.
Skew chisels have symmetrical bevels on both sides. With this jig you mount the tool only
once for grinding both the bevels. By turning the jig upside down you can grind both of the
bevels symmetrically.
Positioning
of the machine
Grinding direction:
away from the edge.
2
5
1
6
4
3
•
•
•
Page 77

Instructions. Multi Jig, SVS-50.
79
Grinding direction
Grinding away from the edge with Universal Support placed horizontally is recommended.
This gives you following advantages:
• With the lighter grinding pressure you can more easily control the operation. Especially
advantageous when grinding small tools.
• As no water flows over the edge, it is easier to see where the grinding takes place.
• The rotation of the stone pulls the jig towards the Universal Support.
• No risk of vibration.
The closed seat is for skew
chisels. The tool is fixed with the
side screw (4). The top screw
(5) is not used.
The open seat is designed for tools which have the edge square
across the shank. The tool is fixed with the top screw in the housing (5).
As the seat can be turned, it can also be used for short skew chisels (page 93).
The closed seat has been developed for the precision sharpening of turning skew chis-
els with an oval or square section and with curved or straight edges. Since the chisel is
mounted in the centre of the seat, the bevels are ground to exactly the same shape. The
turning skew chisel is mounted with a side screw (4). Tool size 13 mm (
1
/2") to 35 mm
(13/8").
It is also suitable for carving skew chisels longer than approx 110 mm (4
3
/4").
The open seat, where the tool is fixed with a top screw (5), is used for tools which have
the edge ground square across the shank, such as parting tools, roughing gouges and
wide carving gouges.
Both seats are mounted with a bottom screw (6), which also locks the chosen skew angle.
A scale on each seat shows the skew angle.
4 5
•
6
•
5 5
•
6
•
6
•
•
Page 78

Instructions. Multi Jig, SVS-50.
80
Turning tools
The tools come from the manufacturers with skew angles
(d) from 15° to 30°. The section is either a rectangle with
plane surfaces or oval with convex surfaces.
You can grind your chisel either with the existing skew
angle or you can shape it to a new skew angle of your
own choice.
Mount the tool in the jig protruding (P) approx. 75 mm (3") and
lock it with the side screw (4).
Mark a line across the stone
guided by the Universal Support.
Use a water proof pen if the
stone is wet.
Put the tool on the Universal
Support and turn it until the
bevel is parallel to the line.
Tighten the bottom screw (6).
Lock the position with the bottom screw (6).
Mount the tool in the jig protruding (P) approx. 75 mm (3") and
lock it with the sidescrew (4).
Setting the existing skew angle
Setting a new skew angle
The closed seat is used.
Turning skew chisels.
4
P
6
4
P
A scale on the seat enables you
to set the desired skew angle.
d
d
Page 79
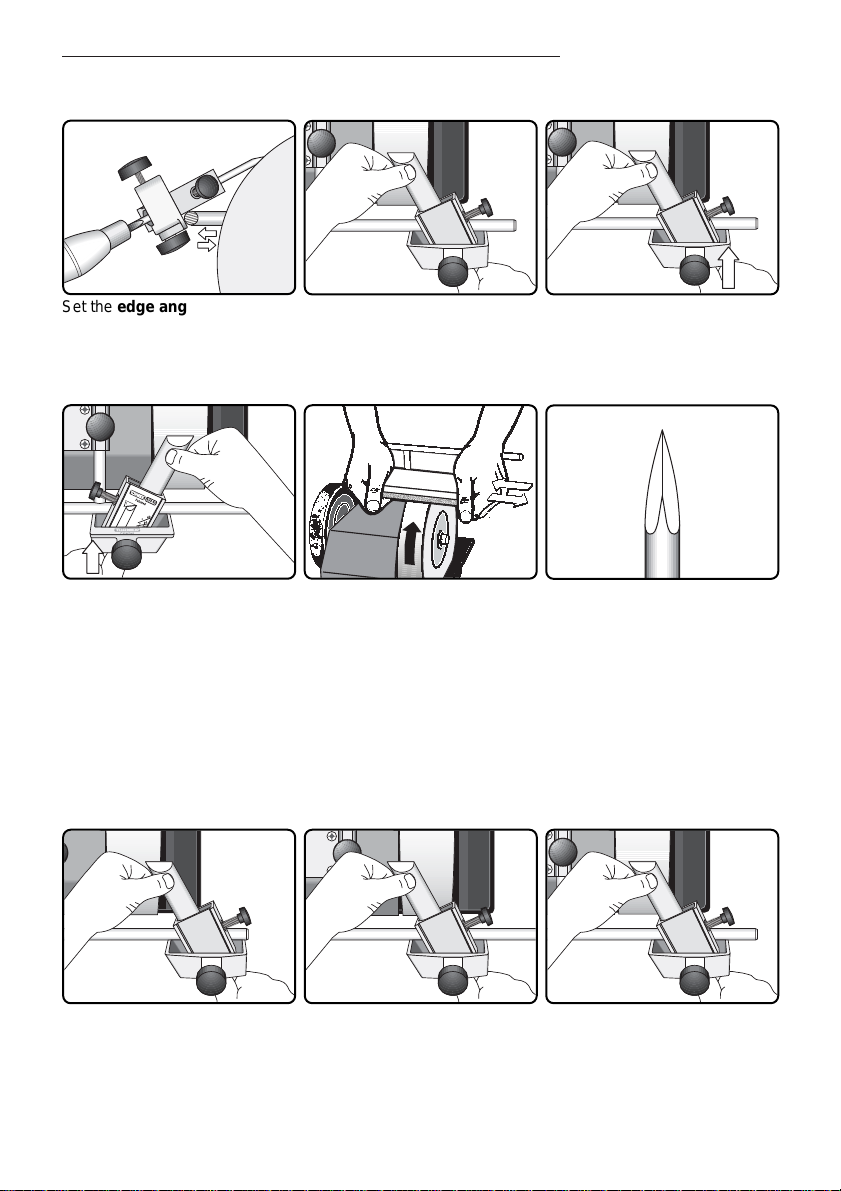
Instructions. Multi Jig, SVS-50.
81
Set the edge angle by adjusting
the Universal Support. Use the
bevel colouring method (page
38) to exactly replicate the origi-
nal angle.
Lift the tool and then move it
sideways during the grinding.
Do not slide the tool. Press with
your thumb close to the edge for
best control.
When the first side is ground,
then turn the tool around – the
tool is still mounted in the jig –
and grind the other side. Apply
pressure on the handle side.
Grind until the bevels on both
sides are symmetrical.
If necessary grind the first side
again.
Grinding
Apply forward pressure on the
handle side to compensate for
the force of the stone against
the tool.
Activate the grindstone during
the grinding process with the
coarse side of the Stone Grader
SP-650 to make it work to the
maximum efficiency.
Tip:
Important
Set the edge angle exactly, so that you do not need to grind away more steel than necessary.
When shaping a wide chisel, you can increase the efficiency of the
stone by grinding half the width at a time. Then the grinding surface is decreased and the grinding pressure will correspondingly
increase, which makes the stone grind faster. Please see the
chapter Grinding pressure.
Complete the sharpening with
the entire bevel on the stone. Lift
the tool and then move it sideways to compensate for possible
unevenness on the grindstone.
Page 80

Instructions. Multi Jig, SVS-50.
82
Skew chisel with a curve
You can put a curve on the edge by letting the jig turn on the corner closest to the tip. Set
the skew angle larger than the existing one on the tool by adding 10° - 15°.
The grinding process is faster on a curved edge because the grinding area is smaller
resulting a higher grinding pressure. (Please see page no 16).
For a chisel with a skew angle
of 25°, you set the jig (JS) on
35° - 40°.
Pivote the jig on the corner closest to the tip and let the grindstone
shape the curve. Watch that you grind evenly. Slide the jig sideways so you use the whole width of the stone.
Turn the jig around and grind the
other side.
The shape of the curve is determined by the amount of grinding
you do at the sides.
Grind until the bevels on both sides are symmetrical. If necessary
grind the first side again.
25°
40°
d
You must not pivote on the square side of the jig (B) otherwise the edge angle moves down the
grindstone and the desired edge angle is lost.
Note the jig setting (JS) and the
protrusion (P) on the label. You
can also note the edge angle
(
a
).
Attach the label to the ferrule
and you are assured that you
have the same data at future
sharpenings.
Page 81

Instructions. Multi Jig, SVS-50.
83
The edge angle (a) should be between 25° and 35°. Your
choice depends on the hardness of the wood.
Edge angle
Honing
Hone the bevels on the leather honing wheel. Move the Universal Support to the honing
wheel side and hone with the tool still mounted in the jig.
Set the Universal Support so
you get the same honing angle
as the grinding angle. Use the
bevel colouring method.
Hone both sides alternately until the burr is removed and the
bevels are polished to a mirror finsish.
Grinding time
When you grind a new chisel for the first time to your preferred skew angle and shape,
quite a bit of material might need to be removed. This work can take 10 - 15 minutes
depending on the size of tool and how much you are changing the shape. The time spent
on shaping is well invested, because you will benefit during the entire life of the
tool.
Since you use the same jig setting, protrusion and edge angle, re-sharpening takes just
a couple of minutes including setting and honing as the edge only needs a slight touching up.
Life time of the tool
The life time of a skew chisel shaped and sharpened in this way is dramatically prolonged
compared to a tool dry ground without a jig on a high speed grinder. This is because the
sharpness stays longer and that you only touch up the edge at each sharpening, since
you can exactly replicate the original shape.
a
Page 82
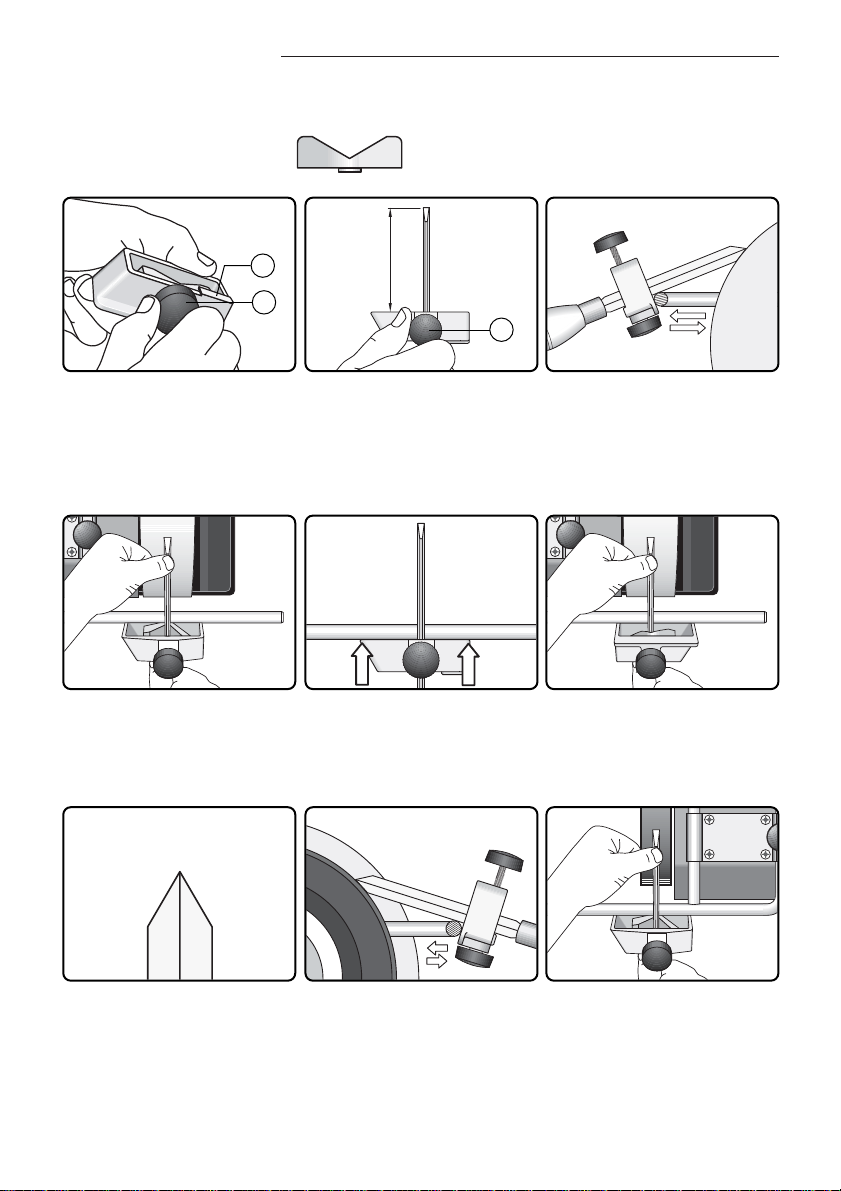
Instructions. Multi Jig, SVS-50.
84
Grind until the bevels are symmetrical. If necessary grind the
first side again
Honing. Move the Universal Support to the honing wheel side and
hone the bevels with the tool still mounted in the jig.
Set the Universal Support so that you get the same honing angle
as the grinding angle. Use the bevel colouring method.
Press with your fingers close to
the edge for best control while
your right hand ensures that the
tool is vertical.
Ensure that the entire flange of
the jig is in contact with the Universal Support
When the first side is ground
then turn the tool around – it is
still mounted in the jig – and
grind the other side.
Lock the seat with the bottom
screw (6) in the straight position
(0°). The seat should touch the
stop (7).
Mount the tool protruding (P)
approx. 100 mm (4") and lock it
with the top screw (5).
Set the edge angle by adjusting
the Universal Support. When
replicating an existing angle,
use the bevel colouring
method, (page 38).
Parting and Beading Tools
The open seat is used
5
6
7
•
•
•
P
Page 83

Instructions. Multi Jig, SVS-50.
85
Lock the seat with the bottom
screw (6) in the straight position
(0°). The seat should touch the
stop (7).
Mount the gouge protruding (P)
approx. 100 mm (4") and lock it
with the top screw (5).
Set the edge angle by adjusting
the Universal Support. When
replicating an existing angle,
use the bevel colouring
method, (page 38).
Roll the gouge on the Universal
Support while you slide it across
the stone so that the stone
wears evenly.
Ensure that the entire flange of
the jig is in contact with the Universal Support.
Grind until you can feel the burr
along the entire edge.
Roughing Gouges
The edge angle should be
between 30° and 45° depending
upon the hardness of the wood.
Edge angle
Honing
Move the Universal Support to the leather honing wheel. Hone and
polish the bevel with the tool still mounted in the jig. Set the Universal Support so that you have the same honing angle as the
grinding angle. Use the bevel colouring method.
The open seat is used
6
7
•
•
5
•
P
Page 84

Instructions. Multi Jig, SVS-50.
86
Shape the edge by resting the
tool on the Universal Support
placed horizontally and close to
the stone.
Flatten and smooth the blunt
edge with the fine side of the
TORMEK Stone Grader,
SP-650.
Now you have a line of light,
which is your guide on where to
grind.
Carving tools
Carving gouges with a straight shank
Shaping the edge
The open seat is used
The principle
Use the technique as described in the chapter Grinding techniques for carving gouges
and V-tools on page 20.
Edge angle
As described in the above chapter on page 24, the choice of edge angle is very important
for a carving gouge
The method of setting the jig for a certain angle depends on whether you want to replicate
an existing edge angle or if you want to put a new edge angle on your tool.
When replicating an existing edge angle, you should use the bevel colouring method,
which is described on page 38. If you want to put a new edge angle to your tool, you can
either set the angle by eye or you can use the Pro AngleMaster, page 40.
Line of light
Page 85

Instructions. Multi Jig, SVS-50.
87
Always grind where the line of
light is thickest whilst rolling the
tool on the Universal Support.
Ensure that the entire flange of
the jig is in contact with the
Universal Support.
Check frequently where the
grinding is taking place. Grind
until you have a thin and even
line of light.
Grade the grindstone for fine
sharpening with the fine side of
the Stone Grader SP-650.
Continue grinding. Check the
result frequently.
Remove the burr on the leather
honing wheels so that you can
more clearly observe the line of
light.
Grinding
Line of light
Lock the seat with the bottom
screw (6) in the straight position,
(0°). The seat should touch the
stop (7).
Mount the gouge protruding (P)
approx. 100 mm (4") and lock it
with the top screw (5).
Set the edge angle by adjusting
the Universal Support. When
replicating an existing angle,
use the bevel colouring
method.
Mounting the tool and setting the jig
6
7
•
•
5
•
P
Page 86

Instructions. Multi Jig, SVS-50.
88
Now sharpen again with a very
light pressure. Check frequently
to ensure that you do not overgrind.
Stop sharpening immediately
when the line of light disappears, which is a sign that the
edge is sharp.
Testing the sharpness
Keep the tool mounted in the jig and test the sharpness.
Push the edge across the fibres in a piece of wood. The edge should cut easily and leave
a smooth surface without tearing the fibres.
Since the tool is still mounted in the jig and the Universal Support is left in its position, you
can if necessary easily go back and continue the honing.
Hone and polish the bevel. Set the Universal Support so that the
honing angle is the same as the grinding angle. Use the bevel
colouring method. Hone away the burr and polish the bevel to a
mirror finish.
Honing
Keep the tool in the jig and hone
and polish the inside on the
Profiled Leather Honing Wheel
LA-100.
Important!
It is very easy to be misled by the burr and mistake the burr for the line of light! Therefore
you must remove the burr frequently during the finishing of the grinding operation, so you
clearly can watch the progress of a gradually thinning line of light.
Page 87

Instructions. Multi Jig, SVS-50.
89
It is easy to over-sharpen the
edge at the end of the process.
If this happens, you need to
reshape the edge and start
again from the beginning.
Be careful when you grind at the
sides of the tool so that you do
not round off the corners.
Woodcarving tools should have
sharp corners!
Remarks:
Page 88
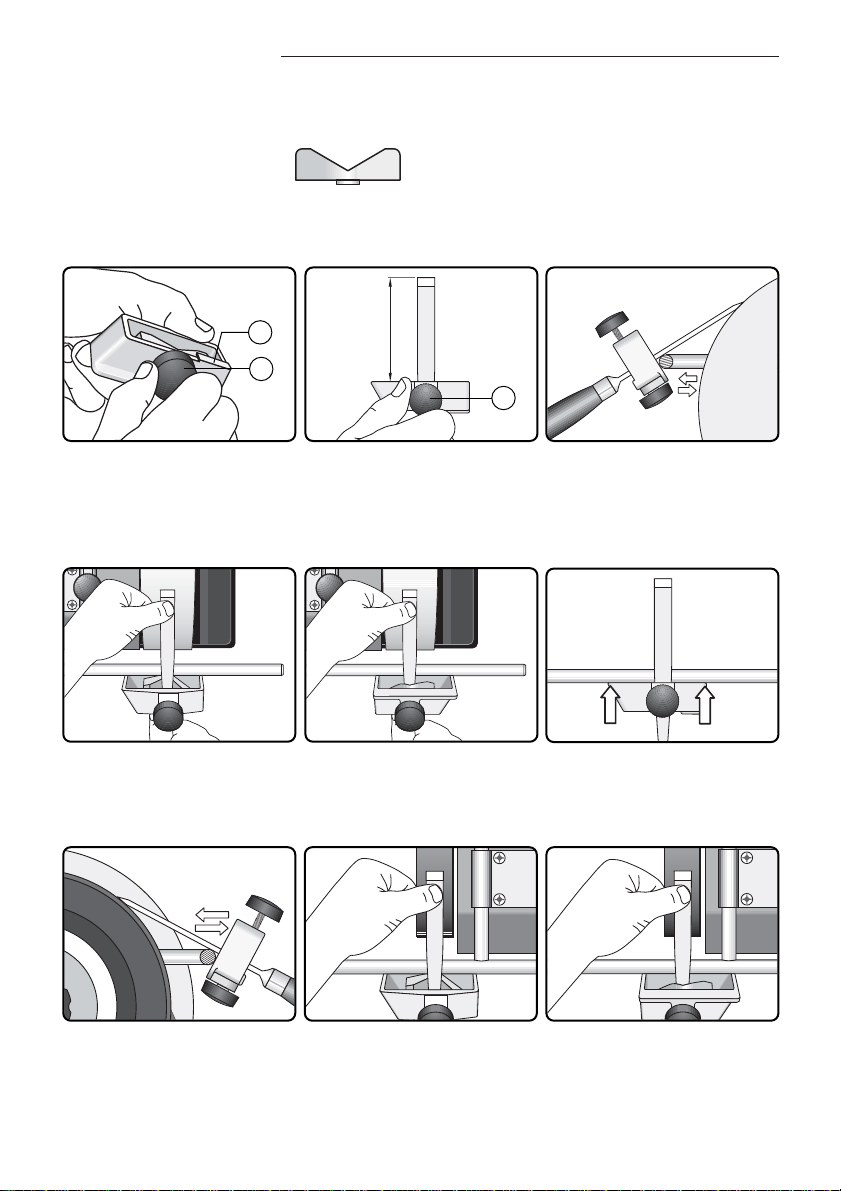
Instructions. Multi Jig, SVS-50.
90
Lock the seat with the bottom
screw (6) in the straight position
(0°). The seat should touch the
stop (7).
Mount the chisel protruding (P)
min 75 mm (3"). Lock with the
top screw (5).
Set the edge angle by adjusting
the Universal Support. When
replicating an existing angle,
use the bevel colouring
method.
Sharpen the first side. Press with your thumb close to the edge for
best control. Lift the tool and then move it sideways so that the
stone wears equally. When a burr has developed on the entire
edge, turn the jig around and sharpen the other side.
Square carving chisels
The open seat is used
Honing. Keep the tool in the jig and move to the leather honing wheel. Set the Universal Support so
that the honing angle is the same as the grinding angle. Use the bevel colouring method. Hone
away the burr and polish the bevels to a mirror finish.
The min length of blade for this jig is approx 100 mm (4") at 25° edge angle. For shorter
blades, down to 75 mm (3"), you use the SVS-32 jig. Please see page 94.
6
7
•
•
5
•
P
Ensure that the entire flange of
the jig is in contact with the
Universal Support.
Page 89
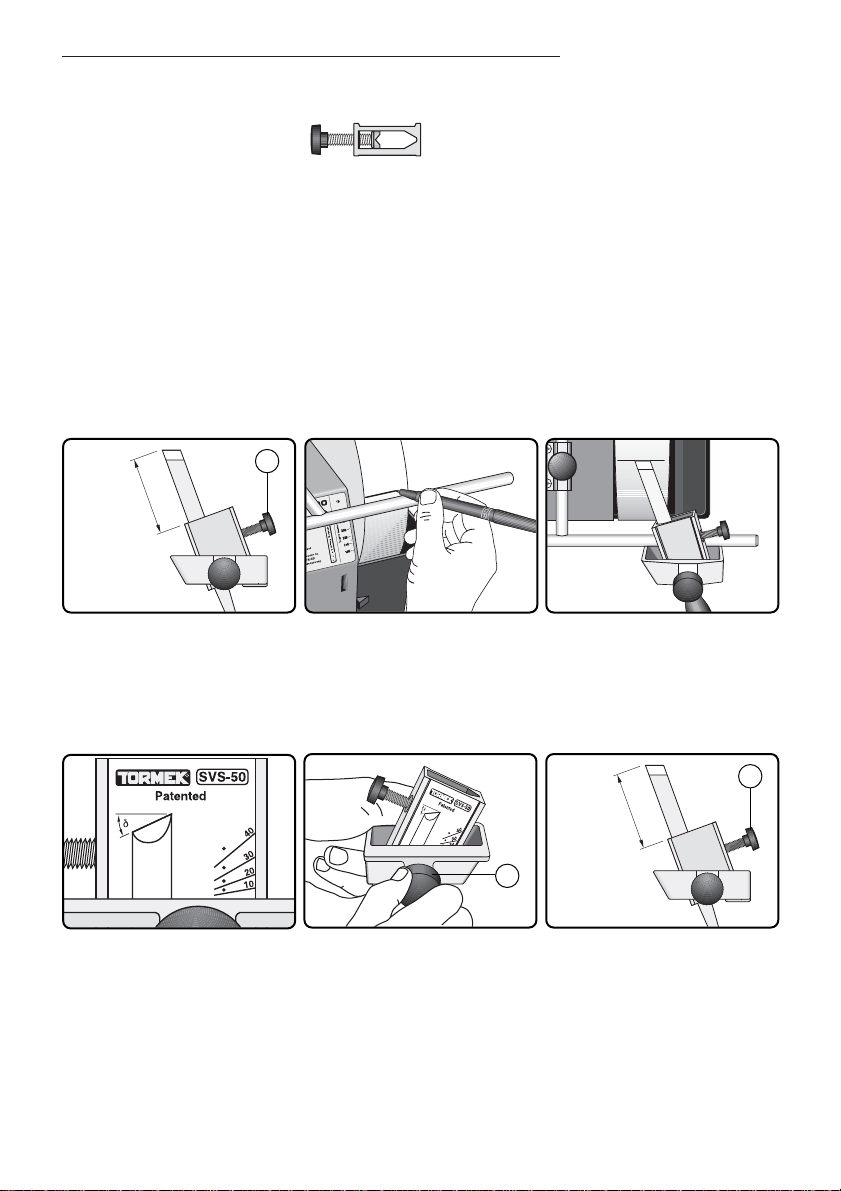
Instructions. Multi Jig, SVS-50.
91
Carving skew chisels
The closed seat is used
Mark a line across the stone
guided by the Universal Support.
Use a water proof pen if the
stone is wet or a pencil.
Put the tool on the Universal
Support and turn it until the
bevel is parallel to the line.
Tighten the bottom screw (6).
Setting the existing skew angle
Setting a new skew angle
These tools are manufactured with a skew angle (d) of approx. 25°. You can sharpen your
chisel either with the existing skew angle or you can shape it to a new skew angle of
your choice.
For using this jig the chisel must have a certain min. length, which depends on the edge
angle and the skew angle. At a 25° edge angle and a 25° skew angle the min length of
blade is approx. 105 mm (4
1
/8").
The shape of the shank must also be able to be locked in the seat, otherwise use the
open seat, (page 93).
Lock the position with the bottom screw (6).
6
A scale on the seat enables you
to set the desired skew angle.
Mount the tool protruding (P)
50 - 75 mm (2 - 3") and lock it
with the side screw (4).
4
P
Mount the tool protruding (P)
50 - 75 mm (2 - 3") and lock it
with the side screw (4).
4
P
Page 90

Instructions. Multi Jig, SVS-50.
92
Grind the first side. Press with your thumb close to the edge for
the best control. Lift the tool and then move it sideways.
When a burr has developed on the entire edge, turn the jig around
and grind the other side.
5
Grinding
Grindstone condition
Usually carving chisels only need fine sharpening. Therefore you normally grade the grindstone to a finer grit with
the Stone Grader SP-650. Please see page 122.
When you need to shape the chisel, you use the normal
fast grinding condition of the grindstone.
Setting the edge angle
Set the edge angle by adjusting the Universal Support.
When replicating an existing angle, use the bevel colouring
method, (page 38).
When setting a new angle you can use the Pro AngleMaster,
(page 40).
Page 91
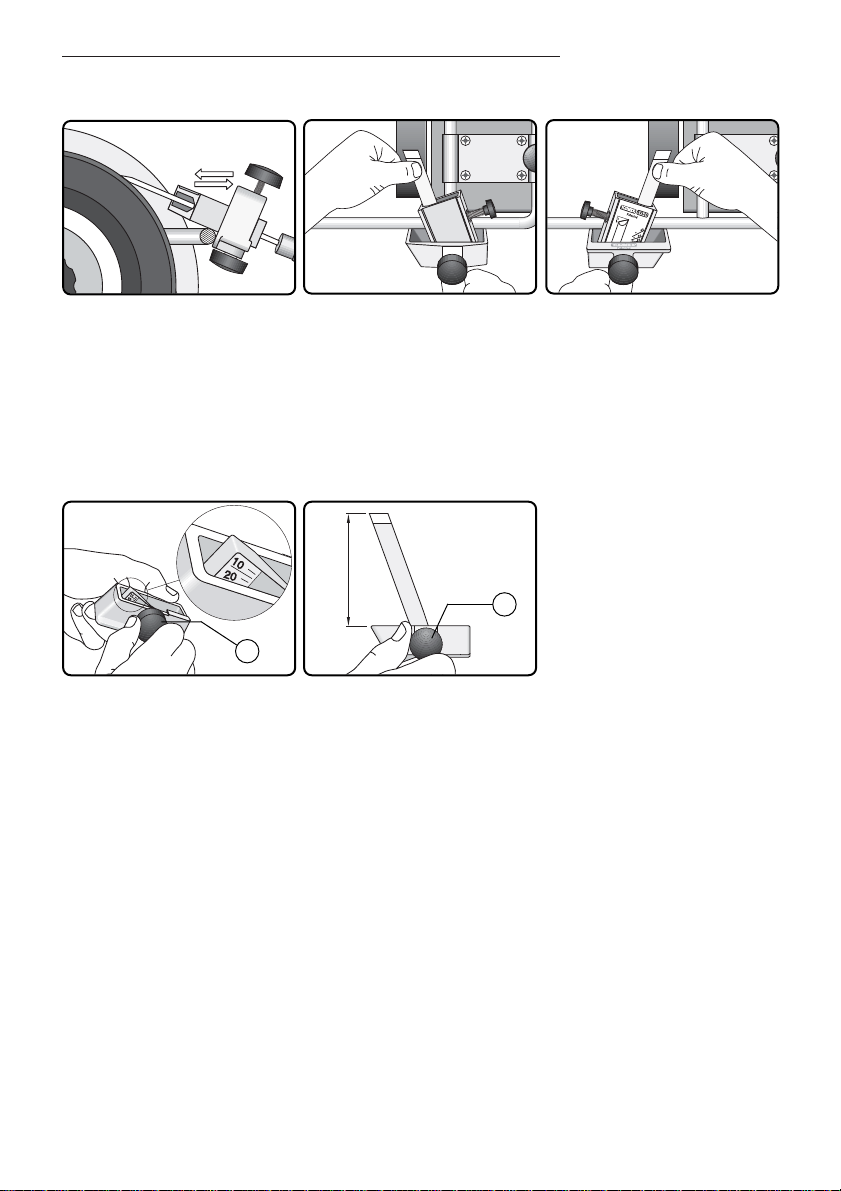
Instructions. Multi Jig, SVS-50.
93
Honing
Keep the tool in the jig and move to the leather honing wheel. Set the Universal Support so that the
honing angle is the same as the grinding angle. Use the bevel colouring method. Hone away the
burr and polish the bevels to a mirror finish.
Set the desired skew angle and
lock the position with the bottom
screw (6).
Mount the tool in the jig protruding approx. 100 mm (4") and
lock it with the top screw (5).
N.B.
If the shank is too tapered, round or otherwise not suitable to allow a proper mounting in
the closed seat, you can use the open seat.
6
5
•
P
Page 92
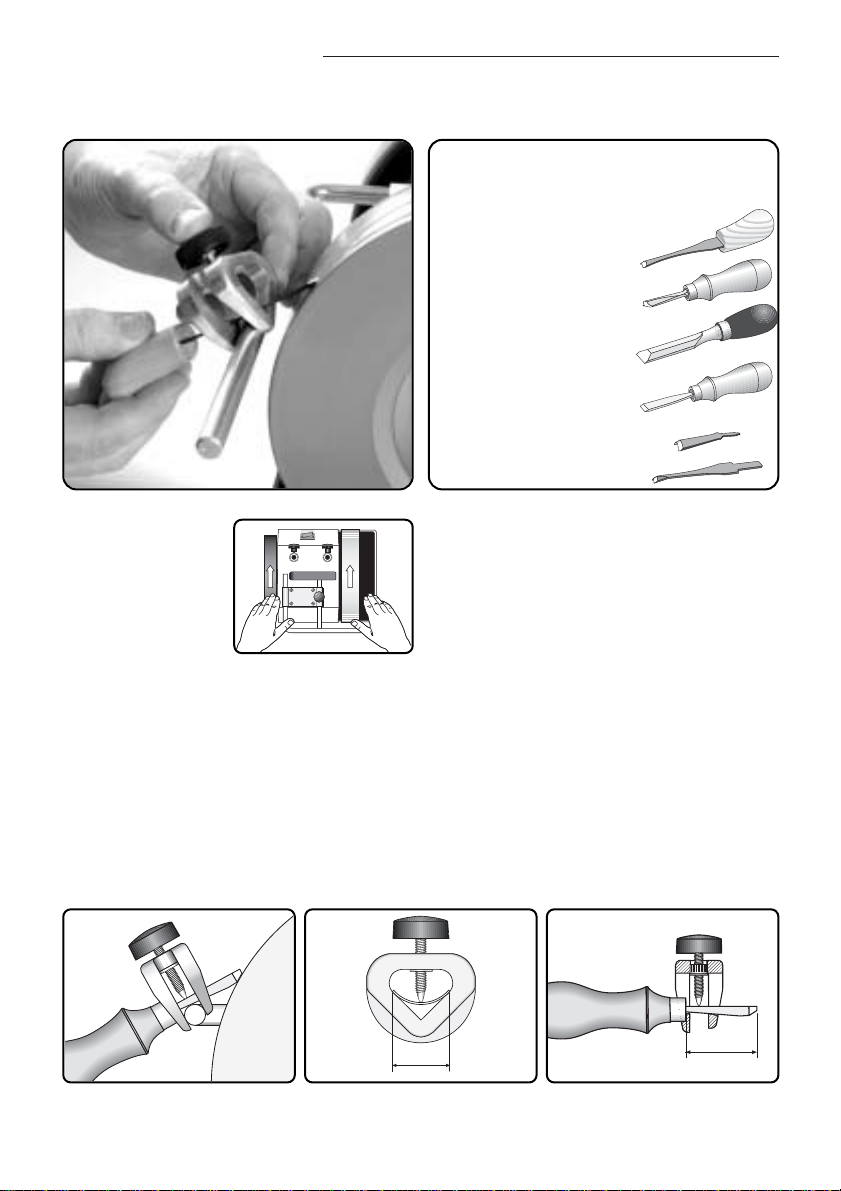
94
Instructions. Short Tool Jig, SVS-32.
Short Tool Jig, SVS-32
Design
This patented jig was developed for short woodcarving tools, butt chisels and tools for
power carvers. The jig has two parallel flanges running on both sides of the Universal
Support.
The technique achieved with this design ensures that at all times the jig – even when
rotated – holds the tool square to the grindstone. This is a great advantage, as you can
continously concentrate on how the edge touches the grindstone or the honing wheel
without having to worry whether the jig is square to the stone.
Positioning
of the machine
Grinding direction:
away from the edge.
Suitable for:
Carving tools with
a straight shank
• Straight gouges
• Straight V tools
• Short wood chisels
• Square carving chisels
• Gouges and V tools for
reciprocating power
carvers
Max tool width 32 mm (1
1
/4
").
Min length of tool 45 mm (1
3
/4
") at 20° edge
angle.
Tools with a curved shank you grind with the
SVD-180 jig and gouges wider than 32 mm
(1
1
/4") you grind with the SVS-50 jig.
32 mm
1
1
/4"
45 mm
1
3
/4"
Page 93

95
Instructions. Short Tool Jig, SVS-32.
Carving gouges
Grinding/sharpening/honing or just honing?
As mentioned in the chapter Grinding techniques for carving gouges and V tools on
page 20, you should question whether you should grind the tool or you should go directly
to the honing wheel. This question is especially valid when coping with small and delicate
tools, for which this jig is designed. The small size of the tool, which can be as small as
3 mm (1/8"), also enables the honing wheel to remove small amounts of steel and thus
substitute the grinding.
The following instruction describes the whole process for achieving a sharp edge on a
tool, which has become so blunt that it needs re-grinding. The instruction is also valid for
tools, upon which you want to put a new shape and for tools upon which you want to
change the edge angle.
A tool which is only slightly dull and which has the right shape and edge angle, you
should not grind, but go directly to the honing process (page 97).
Shape the edge by resting the
tool on the Universal Support
placed horizontally and close to
the stone.
Now you have a line of light,
which is your guide as to where
to grind.
The edge plane angle (g)
should be approx. 20°.
(Page 21).
Flatten and smooth the blunt
edge with the fine side of the
TORMEK Stone Grader, SP-650.
Shaping the edge
Page 94

96
Instructions. Short Tool Jig, SVS-32.
Edge angle
As described in the chapter Grinding techniques for carving gouges and V tools on
page 24, the choice of edge angle is very important for a carving tool.
The way of setting the edge angle depends on if you want to replicate an existing edge
angle or if you want to put a new edge angle on your tool.
When replicating an existing edge angle, you should use the bevel colouring method,
(page 38). If you want to put a new edge angle to your tool, you can either set the angle
by eye or you can use the Pro AngleMaster, page 40.
Setting a new edge angle can be done by eye or you can set to a
pre-determined edge angle using the Pro AngleMaster (page 40).
When replicating the existing
edge angle you should use the
bevel colouring method.
Always grind where the line of light is the thickest, while rolling
the tool on the Universal Support. Check frequently where the
grinding takes place. Grind until you get an even and thin line of
light.
Grade the grindstone for fine
grinding with the fine side of the
Stone Grader SP-650.
Grinding
When you have put the right shape on the tool and set the edge angle, it is time for grinding.
Use the line of light method described on page 20.
Page 95

97
Instructions. Short Tool Jig, SVS-32.
Wrong setting. The wheel is hitting the heel of the bevel. Adjust
the Universal Support away
from the wheel.
Grind again. Now with a very
light pressure. Check frequently
so that you do not over grind on
one spot.
Stop grinding immediately when
the line of light disappears!
This is the sign that the edge is
sharp.
Be careful when you grind at the
sides of the gouge, so you do
not round off the corners.
Important!
It is very easy to be misled by the burr and mistake the burr for the line of light! Therefore
you must remove the burr frequently during the finishing of the grinding operation, so you
clearly can watch the progress of a gradually thinning line of light.
Honing
It is important that you hone with the same edge angle as used during the grinding. This is
done by setting the universal support carefully using the bevel colouring method.
Remove the burr free-hand on
the leather honing wheel to
observe the line of light more
clearly. The tool is left mounted
in the jig.
Continue grinding. Check the
result frequently so you do not
over grind on a spot.
Colour the bevel with a marker and mount the tool in the jig. Set
the Universal Support so that the honing wheel touches the entire
length of the bevel. Check with the honing wheel running.
Page 96

98
Instructions. Short Tool Jig, SVS-32.
Prepare both the honing wheels
with honing compound. Please
see page 124.
Wrong setting. The wheel is hitting the tip of the edge. Adjust
the Universal Support towards
the wheel.
Sharpen/hone the edge. Roll the
tool on the Universal Support
and apply pressure on the tool
near the edge.
Move the jig sideways so you
work on the whole width of the
leather honing wheel and avoid
uneven wear on the leather.
Remove the tool from the jig and
hone the inside free hand on the
leather honing wheel.
V tools
In the chapter of SVD-180 on page 73 it is described how to grind and hone V tools. This
principle is the same when using the SVS-32 jig.
Correct setting. The honing
wheel hits the full length of the
bevel.
Page 97

99
Instructions. Short Tool Jig, SVS-32.
Setting the existing edge angle.
Adjust the Universal Support
so the entire bevel touches the
grindstone. Use the bevel
colouring method.
Setting a new edge angle.
This can be done by eye or you
can, as shown here, set the jig to
a pre-determined edge angle
using the AngleMaster WM-200.
Short wood chisels
Grinding a wood chisel is much easier than grinding a gouge or V tool, since a wood chisel has a single and straight edge. Before grinding, check that the edge is square across
the edge. If not, make the edge square on the grindstone resting the tool on the Universal
Support positioned close to the grind stone.
When grinding a new wood chisel for the first time, check that the back is flat and is free
from manufacturing grooves. If necessary, flatten and smoothen it on the outside of the
grindstone (page 45) and then hone it on the leather honing wheel.
Setting the edge angle
Adjusting the Universal Support back and forth sets the edge angle. You can either grind
the chisel at the existing edge angle or you can choose a new edge angle.
Edge angle
Wood chisels are usually ground with a 25° edge angle (a).
If you work delicate details with a wood chisel in soft wood,
you can decrease the edge angle down to 20°.
If you work in hard wood and when using a mallet, you
must increase the edge angle to 30° or even larger.
a
a
a
Page 98

100
Instructions. Short Tool Jig, SVS-32.
Hone the back free hand. Watch
that you do not round the tip.
Hold the tool so it is a tangent to
the wheel.
Keep the tool in the jig and move to the leather honing wheel. Set
the Universal Support so that the honing angle is the same as the
grinding angle. Use the bevel colouring method.
Hone away the burr and polish the bevels to a mirror finish.
A square carving chisel.
Grinding
Press with your thumb close to the edge for best control. You also
control with your hand on the handle that the edge is presented
correctly to the grindstone and not turned. Check frequently so that
you achieve a symmetric edge. Do not slide the jig sideways, but
instead lift it when you move it to another spot on the grindstone.
Honing
Square carving chisels
These have symmetrical bevels on both sides. This jig copes with tools down to a blade
length of approx 60 mm (2 3/8") at 25° edge angle.
As the jig cannot be turned upside down (as the SVS-50 jig), you need to de-mount the
tool, turn it 180° and re-mount it in the jig.
Let the tool handle touch the jig during each mounting and you will get the same setting
and symmetrical bevels.
Let the tool handle touch the jig
at both the mountings.
Page 99

101
Instructions. Tool Rest, SVD-110.
Tool Rest, SVD-110
The Horizontal Base XB-100 for
the Universal Support is required.
In the patented TORLOCK
design, the sides of the tapered
bore touch the round bar – not
the bottom. This means that the
locking action increases by as
much as 250 %!
Design
This Tool Rest is ideal for the grinding of turning scrapers
and special tools for woodcarving, e.g. large scorps and
inshaves.
It has a generous surface, 90 x 110 mm (3
1
/2" x 4 1/4"),
which permits a safe and steady positioning of the tool
towards the stone.
The bore is made with a special wedge shape, which
increases the locking force by 250 %. You can lock the
Tool Rest instantly at the chosen angle. This unique
design, TORLOCK, is patented by TORMEK.
Positioning
of the machine
Grinding direction:
away from or towards
the edge.
Suitable for:
• Turning scrapers
Round nose
Square end
Curved
Side cut
• Carving scorps
• Carving inshaves
• Screw drivers
Page 100

102
Instructions. Tool Rest, SVD-110.
Turning scrapers
Scrapers normally come from the manufacturers with an edge angle between 70° and
80°. Some turners prefer a much smaller angle and they re-grind their tools to a 60° edge
angle or even smaller.
Scrapers are best ground towards the edge with the Universal Support in the vertical
position. The rotation of the grindstone helps to press the tool onto the Tool Rest.
At steeper edge angles there is a risk of vibration when grinding towards the edge. If you
want to keep the original large edge angle, you should grind away from the edge with the
Universal Support placed in the Horizontal Base XB-100. Round off the heel of the bevel
and you will reduce the risk that the tool will be pulled up by the stone.
Vertically for edge angles up to approx. 60°. Horizontally for edge angles
larger than approx. 60°.
Recommended positioning of the Universal Support
Keep the burr or ticket the edge?
A scraper removes the wood by scraping instead of cutting unlike all other tools. A
scraping action is a tough treatment of the wood. The fibres are pulled out of the wood
leaving a rough surface, which therefore needs a lot of sanding. Often people do not hone
away the burr as it works as a kind of cutting edge on the top of the large edge so causing
the tool to “almost cut”.
The burr, which is left from dry grinding at high speed, consists of a sintered (melted)
mixture of steel waste and abrasives from the grinding wheel as well as the steel which
has been pushed upwards by the grinding wheel. The sintered mixture will soon be worn
away when you start turning. What is left is the residual edge and this cuts the wood.
You could argue that the burr changes the action of the scraper causing it to work as a
cutting tool.
However the burr is very uneven and coarse and it is obvious that it cannot be durable.
You therefore need frequent re-grindings to make new burrs. This is a drawback as it
takes time from your turning and it shortens the life time of your tool. Another drawback is
that the particles removed from the burr, i.e. the mixture of steel and abrasives, can get
stuck in the wood and cause further wear of the edge.
 Loading...