

Page 1

The User’s Manual
Personal Video Recorder
TF5000PVR
TF5500PVR
-Personal Video Recorder
Please read this User s Manual carefully.
The menu structure and specification can be changed without noti
ce.
Page 2

TABLE OF CONTENTS
TABLE OF CONTENTS
INTRODUCTION............................................................................................................. 6G
CONTENTS .................................................................................................................... 6G
FEATURES ..................................................................................................................... 7G
FRONT/ REAR PANELS................................................................................................. 8G
REMOTE CONTROL UNIT(RCU) ................................................................................. 10G
INSTALLATION (Connection) ....................................................................................... 13G
Connection to TV, VCR and Hi-Fi ............................................................................. 13G
Connection to the Antenna. ...................................................................................... 14G
Connection to the other Satellite Receiver................................................................ 15G
GETTING STARTED..................................................................................................... 16G
MENU OPERATIONS ................................................................................................... 17G
System Setting.......................................................................................................... 18G
Time Setting ......................................................................................................... 18G
Timer Setting ........................................................................................................ 19G
Parental Control.................................................................................................... 21G
Language Setting ................................................................................................. 22G
A/V Output Setting................................................................................................ 23G
OSD Transparency............................................................................................... 25G
Info Box Display Time........................................................................................... 25G
Info Box Position................................................................................................... 25G
Time Shifting......................................................................................................... 25G
Organizing Channels ................................................................................................ 26G
Organizing Favorites................................................................................................. 28G
Recording ................................................................................................................. 29G
Installation................................................................................................................. 30G
LNB Setting .......................................................................................................... 31G
Channel Search.................................................................................................... 33G
Services Copy ...................................................................................................... 35G
Motorized DiSEqC 1.2 .......................................................................................... 36G
USALS Setting...................................................................................................... 37G
Factory Setting ..................................................................................................... 39G
Format Hard Disk ................................................................................................. 40G
Transfer Firmware ................................................................................................ 40G
Firmware Upgrade................................................................................................ 41G
Information................................................................................................................ 42G
IRD Status ............................................................................................................ 42G
Calendar............................................................................................................... 42G
Common Interface .................................................................................................... 43G
Game ........................................................................................................................ 43G
ExBlock ................................................................................................................ 43G
Bomb Hexa........................................................................................................... 44G
Pac Man ............................................................................................................... 44G
2
Page 3

TABLE OF CONTENTS
FUNCTION GUIDE ....................................................................................................... 45
Channel List.............................................................................................................. 45G
Information Box......................................................................................................... 46G
EPG (Electronic Program Guide).............................................................................. 47G
Subtitle...................................................................................................................... 47G
Teletext ..................................................................................................................... 47G
Sound Track.............................................................................................................. 48G
Multifeed ................................................................................................................... 48G
Time Shifting............................................................................................................. 48G
Recording while Time Shifting................................................................................... 49G
Recording, Checking and Editing the reserved delayed recording............................ 50G
Immediate Recording by RECORD button ........................................................... 50G
Immediate Recording by Menu Selection ............................................................. 51G
Delayed Recording ............................................................................................... 52G
Recording by EPG................................................................................................ 53G
Playback a Recorded Service................................................................................... 54G
Stop .......................................................................................................................... 55G
Pausing..................................................................................................................... 55G
Slow Motion Playback............................................................................................... 56G
Fast Motion Playback................................................................................................ 56G
Fast Forwarding and Rewinding ............................................................................... 56G
Reverse Playback ..................................................................................................... 56G
Bookmark.................................................................................................................. 57G
Recording The Descrambled Live Service................................................................ 58G
Descrambling Recorded Services............................................................................. 58G
Repeated Playback mode......................................................................................... 59G
Copying from Recorded Services ............................................................................. 59G
Cut Out / Save Selected Region ............................................................................... 60G
Time Shifting while Recording................................................................................... 61G
Zapping while Recording .......................................................................................... 61G
Picture In Picture (PIP) ............................................................................................. 61G
Dual Recording ......................................................................................................... 62G
File List ..................................................................................................................... 62G
Recorded Services List......................................................................................... 63G
MP3 File List......................................................................................................... 64G
Program File List .................................................................................................. 65G
Progress Icon............................................................................................................ 66G
SOFTWARE UPGRADE AND PC INTERFACE............................................................ 67G
Software Upgrade..................................................................................................... 67G
File download and upload via USB ........................................................................... 67G
MENU MAP................................................................................................................... 69G
SPECIFICATIONS ........................................................................................................ 72G
G
3
Page 4

WARNING
Please read the following recommended safety precautions carefully for
your safety.
MAINS SUPPLY : 90-250V AC 50/60 Hz.
OVERLOADING : Do not overload wall outlets, extension cords or adapters as
these can result in fire or electrical shock.
LIQUIDS : Keep liquids away from the PVR. The apparatus shall not be
exposed to dripping or splashing and that no objects filled with liquids,
such as vases, shall be placed on the apparatus.
FLAME SOURCES : Do not place naked flame sources, such as lighted
candles, on the PVR or near the PVR.
SMALL OBJECTS : Coins or other small objects must be kept away from the
PVR as they can fall through the ventilation slots of the PVR and cause
serious damage.
CLEANING : Disconnect the PVR from the wall socket before cleaning it. Use
a dry cloth lightly dampened(no solvents) to clean the exterior of the
PVR.
VENTILATION : Do not block the PVR’s ventilation slots. Ensure that a free
airflow is maintained around the PVR.
Never stand the PVR on soft furnishings or carpets. Do not use or
store the PVR where it is exposed to direct sunlight or near a heater.
Never stack other electronic equipment on top of the PVR.
ATTACHMENTS : Do not use any attachments that are not recommended as
these may cause hazards or damage the equipment.
CONNECTION TO THE SATELLITE DISH LNB : Disconnect the PVR from the mains
before connecting or disconnecting the cable from the satellite dish. Failure to
do so can damage the LNB.
SERVICING : Do not attempt to service this product by yourself. Do not remove
the cover. Refer all serving to qualified service agents.
4
Page 5
WARNING
panying
g
LIGHTNING : For protection we recommend that you connect the PVR via an
external surge protection device. Disconnect the antenna cable from
PVR during lighting storms.
EARTHING : The antenna cable must be earthed.
LOCATION : Locate the PVR indoor place properly to prevent lightening,
raining and direct sunlight. Do not allow the PVR to be exposed to
hot, cold or humid conditions.
RESPONSIBILITY : Do not use the PVR and its contents for illegal purpose.
We are not responsible for any kind of illegal use.
Do not use the PVR to backup important data. It can be deleted.
We are not responsible for any kind of problems caused by TAP
application programs.
CAUTION
RISK ELECTRIC SHOCK
DO NOT OPEN
This symbol indicates “dangerous voltage”
inside the product that presents a risk of
electric shock or personal injury.
CAUTION : TO REDUCE THE RISK OF FIRE OR ELECTRIC SHOCK,
DO NOT EXPOSE THIS APPLIANCE TO RAIN OR MOISTURE.
This symbol indicates
important instructions
!
accom
!
the product.
Warnin
Please do not insert metal or alien substance into the slots for the Modules and
Cards.
In doing so can cause damage to the PVR and reduce its life span.
5
Page 6

INTRODUCTION
INTRODUCTION
Thank you for purchasing the Personal Video Recorder (PVR).
This PVR is fully compliant with the international DVB standard and thus transmits
digital images, sounds, information guides and teletext directly to your TV through the
satellite broadcasting.
Now you can comfortably see and receive digitally transmitted music, news, movie and
sports satellite broadcasts in your office or at your home. The PVR records and plays
back satellite broadcasts. You can enjoy interesting games embedded in PVR.
In the Channel Search section, both the automatic channel search method and the
manual search mode are provided. Also it supports DiSEqC 1.0, 1.1, 1.2 and
USALS(DiSEqC 1.3), enabling you to move your antenna in order to focus preferred
satellite. You can save up to 5000 TV and Radio channels and work around with the
Favorite, Lock, Delete, Move and Sort functions.
The menu is very modern and supports multiple languages. All functions can be carried
out using the remote control and some of the functions can also be carried out using the
front panel. The PVR is easy to use and adaptable for future advances. Please be
aware that new software may change the functions of the PVR.
If you have any difficulties concerning the operation of your PVR, please refer to the
relevant section of this manual, including the ‘Troubleshooting’. This Manual will provide
you with useful information on using the PVR.
CONTENTS
Please ensure that the following items are included with the PVR.
1) Remote control unit
2) Batteries (size AAA)
3) User’s Guide (this document)
6
Page 7

FEATURES
FEATURES
- 2 Common Interfaces for CONAX, CRYPTOWORKS, IRDETO, NAGRAVISION,
SECA & VIACCESS
- MPEG-2 Digital and fully DVB compliant
- 2 Tuners
- 5000 channels (TV and Radio) programmable
- Channel switching time less than 1 second
- Channel list editing
- Favorite channel list editing
- True-color On-screen Display (OSD)
- Full Picture In Graphic (PIG) function
- Electronic Program Guide (EPG) for on screen channel information
- Subtitle supported
- Teletext supported by VBI insertion and software emulation
- Parental lock facility by channel and program event
- Firmware and Channel information transfer from receiver to receiver
- Exciting games embedded
- S/PDIF for digital audio or Dolby AC-3 bitstream output
- Recording capacity : 44 hours for 4Mbps stream with 80GB HDD
- Powerful trick mode supported
- Playback of the selected region repeatedly
- Dual Decoding(PIP)
- Dual Recording and Playback simultaneously
- Time-shifting
- Dual recording simultaneously
- USB 2.0 supported for fast PC interface
- MP3 (MPEG-1 Layer 3) decoding
- DiSEqC 1.0, 1.1, 1.2 and USALS(DiSEqC 1.3)
- Conax conditional access ……………………………………………….. TF5500PVR only
7
Page 8
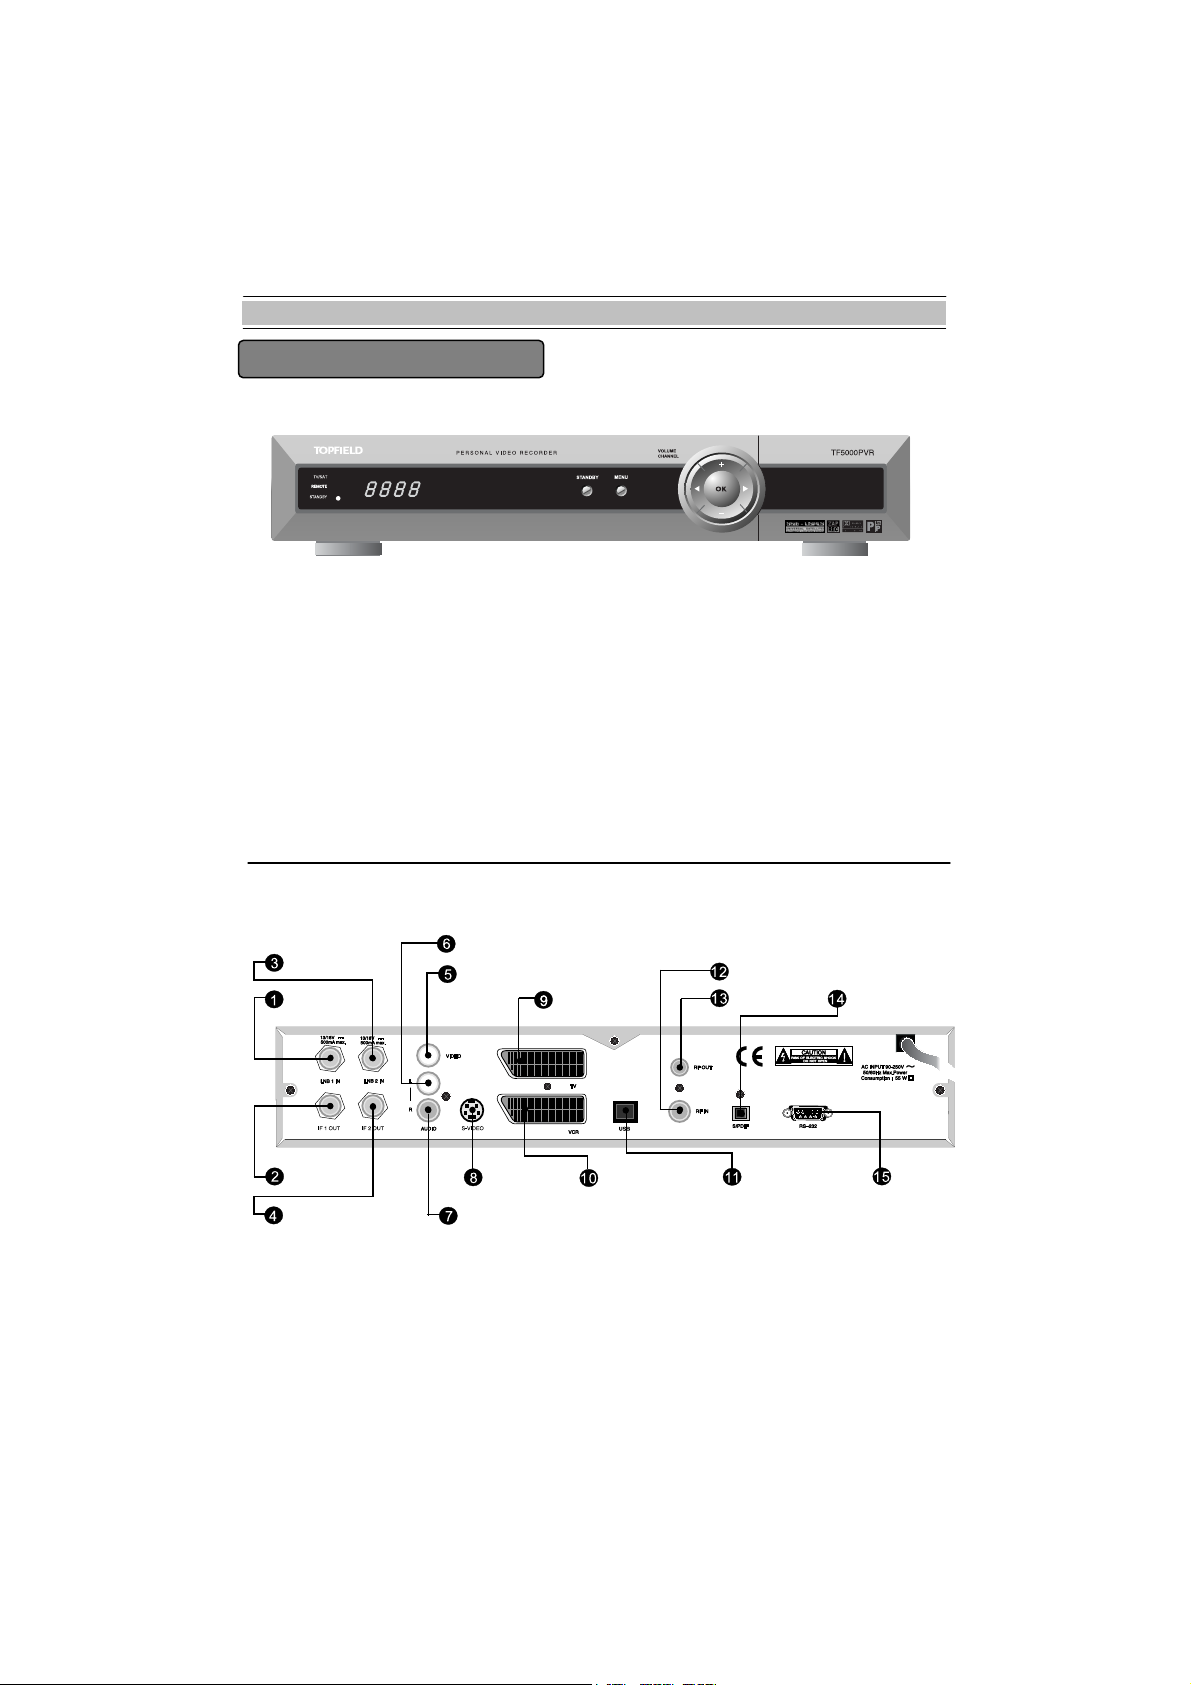
FRONT/ REAR PANELS
FRONT/ REAR PANELS
1)FRONT PANEL
-POWER
The power button of PVR (ON / Stand by )
-LED
TV/STB
REMOTE
STAND BY
-DISPLAY
During the STANDBY mode, the current
time is displayed.
When the power is ON, the current status is
displayed(TV/Radio/Menu).
2)REAR PANEL
LNB 2 IN
LNB 1 IN
AUDIO-LEFT OUTPUT
VIDEO OUTPUT
TV SCART
-CHANNEL
Change the channels
-VOLUME
Change audio volume level
-MENU
Display the Menu on screen.
-OK
Display channel List on screen.
Select an item in the menu.
RF IN
RF OUT
S/PDIF
IF 1 OUT
IF 2 OUT
8
S-VIDEO
AUDIO-RIGHT OUTPUT
VCR SCART
USB
RS232
Page 9

FRONT/ REAR PANELS
.G LNB 1 IN
z Connect the satellite antenna cable
.G IF 1 Out
z Use it to connect to another STB or LNB 2 IN
.G LNB 2 IN
z Connect the satellite antenna cable
எ.G IF 2 Out
z Use it to connect to another STB
ஏ.G VIDEO OUTPUT
z Video output. (YELLOW)
ஐ.G AUDIO-LEFT OUTPUT
z Audio output. (WHITE)
.G AUDIO-RIGHT OUTPUT
z Audio output. (RED)
ஒ.G S-VIDEO
z S-Video output. Connect the S-Video input of your TV.
ஓ.G TV SCART
z Connect the TV SCART
ஊGGGGGGG.G VCR SCART
z Connect the VCR SCART
GGGGGGG.G USB port
z Connect USB port of PC
GGGGGGG.G RF IN
z Connect the TV antenna
GGGGGGGG.G RF OUT
z Connect the TV RF IN
எGGGGGGGG.G S/PDIF
z Optical output for Digital Audio
ஏGGGG UG RS232
z Upgrade the PVR data & software
9
Page 10
REMOTE CONTROL UNIT(RCU)
REMOTE CONTROL UNIT(RCU)
.GG POWER Button ( )
z Switch the PVR between Operation and Standby mode.
.GGGMUTE Button ( )
z Enable / Disable the Audio.
.GG UHF Button ( )
z Display and alter the UHF setting in
menu.
எ.GG TV/STB Button ( )
z Change the terrestrial TV and STB
mode.
ஏ.GG SLEEP Button ( )
z Display the sleep time. At the sleep time,
the power is automatically turned OFF
and the PVR goes to the STANDBY
mode.
ஐ.GG Numeric Buttons ( ~ )
z Select the TV or Radio service channels
and menu options.
.GGGRECALL Button ( )
z Select the previously viewed channel.
ஒ.GGGINFO Button ( )
z Display the program information box on
the Screen and remove it.
z Display the extended event information
when the information box is displayed.
ஓ.GGGGUIDE Button ( )
z Display the EPG on screen
z Remove EPG when EPG is displaye
ஊ.GG TV/ Radio Button ( )
z Select the TV/Radio mode.
.GG MENU Button ( )
z Display the Menu on screen or return to previous menu from submenu.
when available.
d.
10
Page 11

REMOTE CONTROL UNIT(RCU)
.GG SOUND Button ( )
z Select Sound Track and LEFT / RIGHT / MONO / STEREO sound.
z Select the multifeed channel if multifeed is available.
.GG V+/V- Buttons ( )
z Adjust the volume (Increase / Decrease).
z Change the value of the selected item in Menu.
எ.GG P+/P- Buttons ( )
z Service up or down through the available services.
z Move the selection bar in Menu.
ஏ.GG OK Button ( )
z Display Channel List on screen.
z Select an item in the menu.
ஐ.GG FAV Button ( )
z Display the favorite channel list.
.GG SUBTITLE Button ( )
z Activate the subtitle selection window. Select the subtitle language in the list.
ஒ.G EXIT Button ( )
z Return to the previous menu and the screen.
ஓ.G TELETEXT Button ( )
z Enable the teletext with software emulation.
ஊ.G Button
z Fast rewind when the progress bar is displayed.
z Start reverse playback.
z Change the speed of reverse playback.
.G Button
z Display the progress bar of time shifting or playback when no progress bar is
displayed.
z Start playback with normal speed.
z Return to normal speed from trick mode.
.G Button
z Start fast forward or fast motion playback.
z Change the speed of forward playback.
.G Button
z Start slow motion playback.
z Change the speed of slow motion playback.
11
Page 12

REMOTE CONTROL UNIT(RCU)
எGGGGG. GButton
z Stop time shifting, playback or recording.
ஏGGGGG.G Button
z Start recording.
ஐGGGGG.G Button
z Pause the playback and live picture.
GGGGG.G Button
z Move the position of Sub-picture at the PIP by counter clockwise.
ஒGGGGG.G Button
z Move the position of Sub-picture at the PIP by clockwise.
ஓGGGGG.G ( ) Button
z Exchange main-picture with sub-picture at the PIP.
z Display the satellite list at normal picture and at service list.
ஊGGGGG.G (Red) Button
z Enable, Resize and Disable the Sub-picture.
GGG.G Button
z Make a bookmark while playback or time shift.
GGGGG.G Button
z Go to the bookmarked position.
GGGGG.G Button
z Go to backward by 10 seconds per each pressing of this button.
எGGGGG.G Button
z Display file list. (Recorded service list, MP3 file list, Application file list)
ஏGGGG.G ( )Button
z Select the period for repeated playback or cut out.
z Display the channel list of Sub-picture.
z Select a play mode in MP3 play.
* 0 Button
z Change 4:3 Center Extract -> 4:3 Center box -> 16:9 Full srceen.
* Buttons
Above buttons is a kind of function key. So, the function in each OSD Screen can be
referred in each instruction message in help window.
12
Page 13
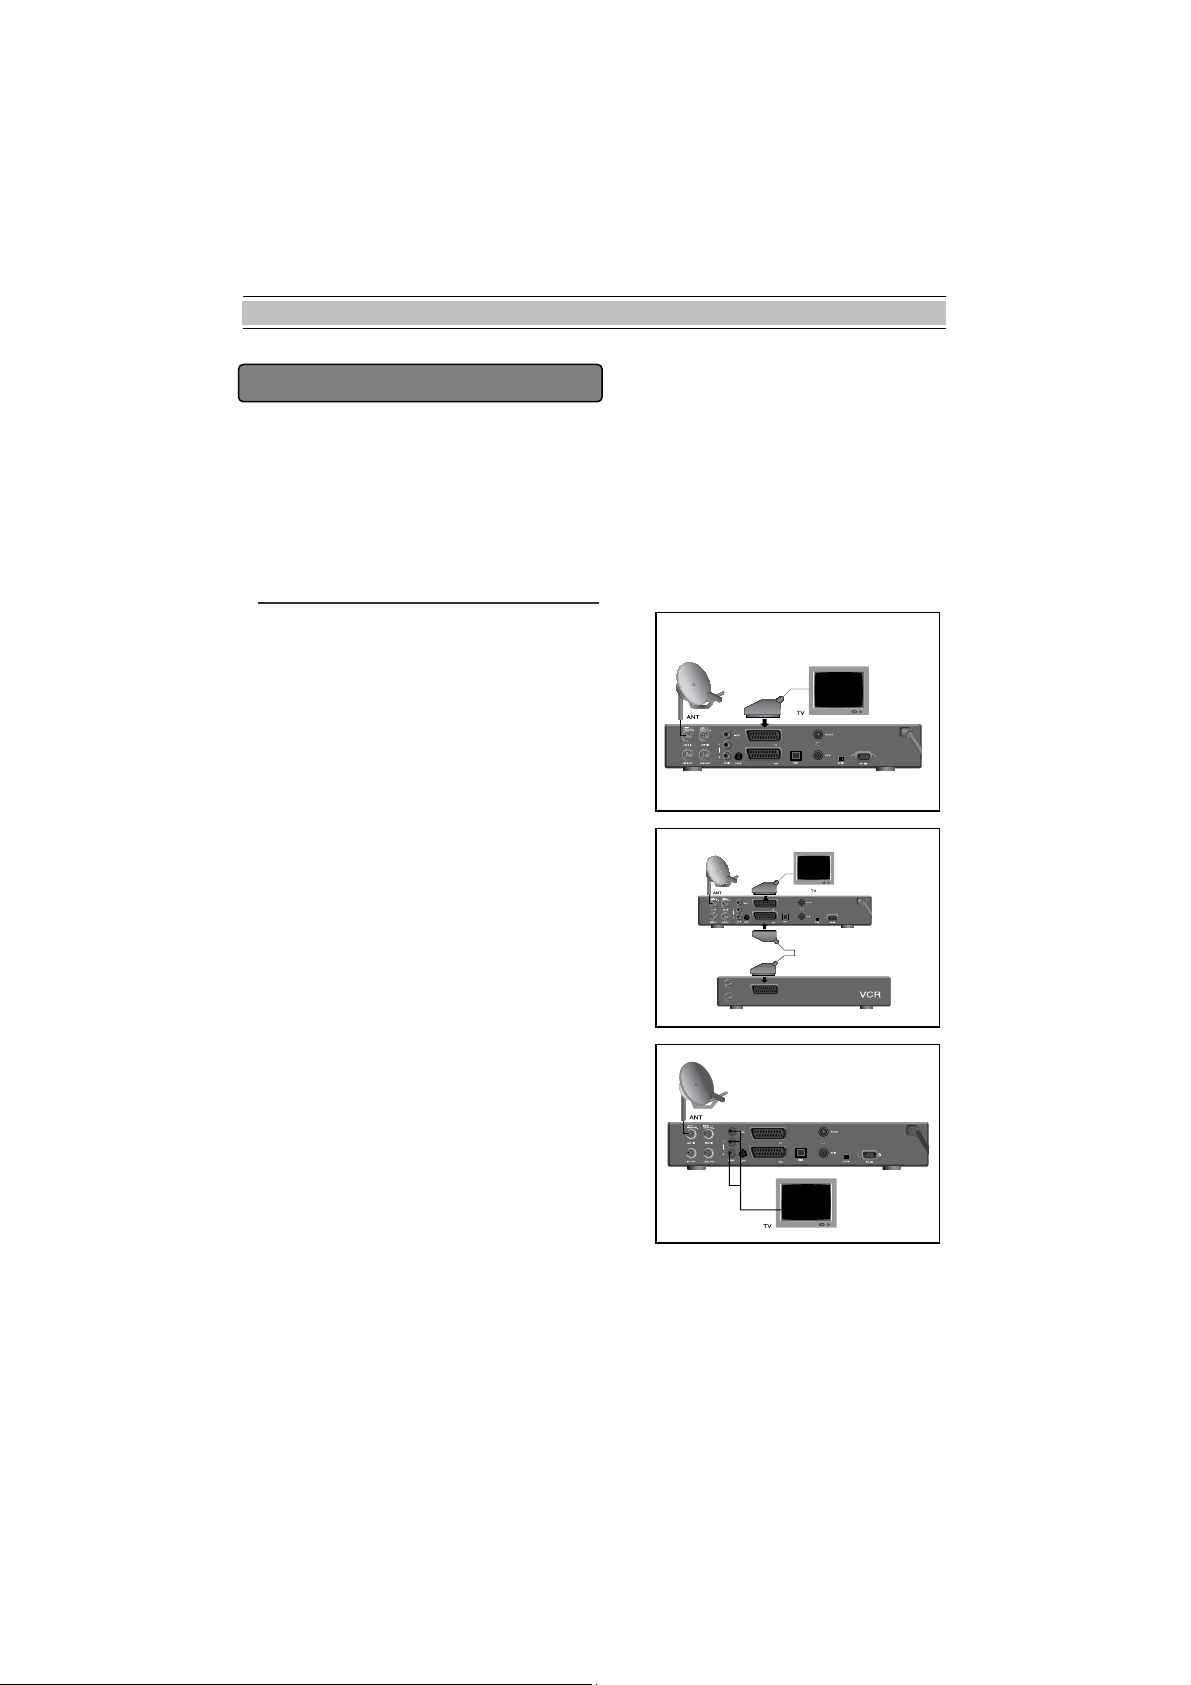
INSTALLATION (Connection)
INSTALLATION (Connection)
First, connect both the satellite antenna and the TV to the PVR.
z There are some of the most common ways to connect the equipment in this manual.
z There are several ways of connecting the PVR to the existing Audio/TV system.
We recommend one of the following setups.
z If you have problems with your connections and need help, contact your dealer or
service provider.
Connection to TV, VCR and Hi-Fi
1) Connection to the TV with the SCART Cable.
Connect one end of the SCART cable to the
TV SCART socket on the PVR and the other
end to a SCART socket on the TV.
2) Connection to the VCR with a SCART Cable.
Connect one end of the SCART cable to the
VCR SCART socket on the PVR and the
other end to a SCART socket on the VCR.
3) Connection to the TV with the CINCH Cable.
Connect one end (3 connectors) of the
CINCH cable to the AUDIO-RIGHT (red),
AUDIO-LEFT (white) and the VIDEO output
(yellow) socket on the PVR.
Connect the other end (3 connectors) to the
AUDIO-RIGHT (red), AUDIO-LEFT(white)
and the VIDEO input (yellow) socket on the
TV or Hi-Fi.
13
Page 14
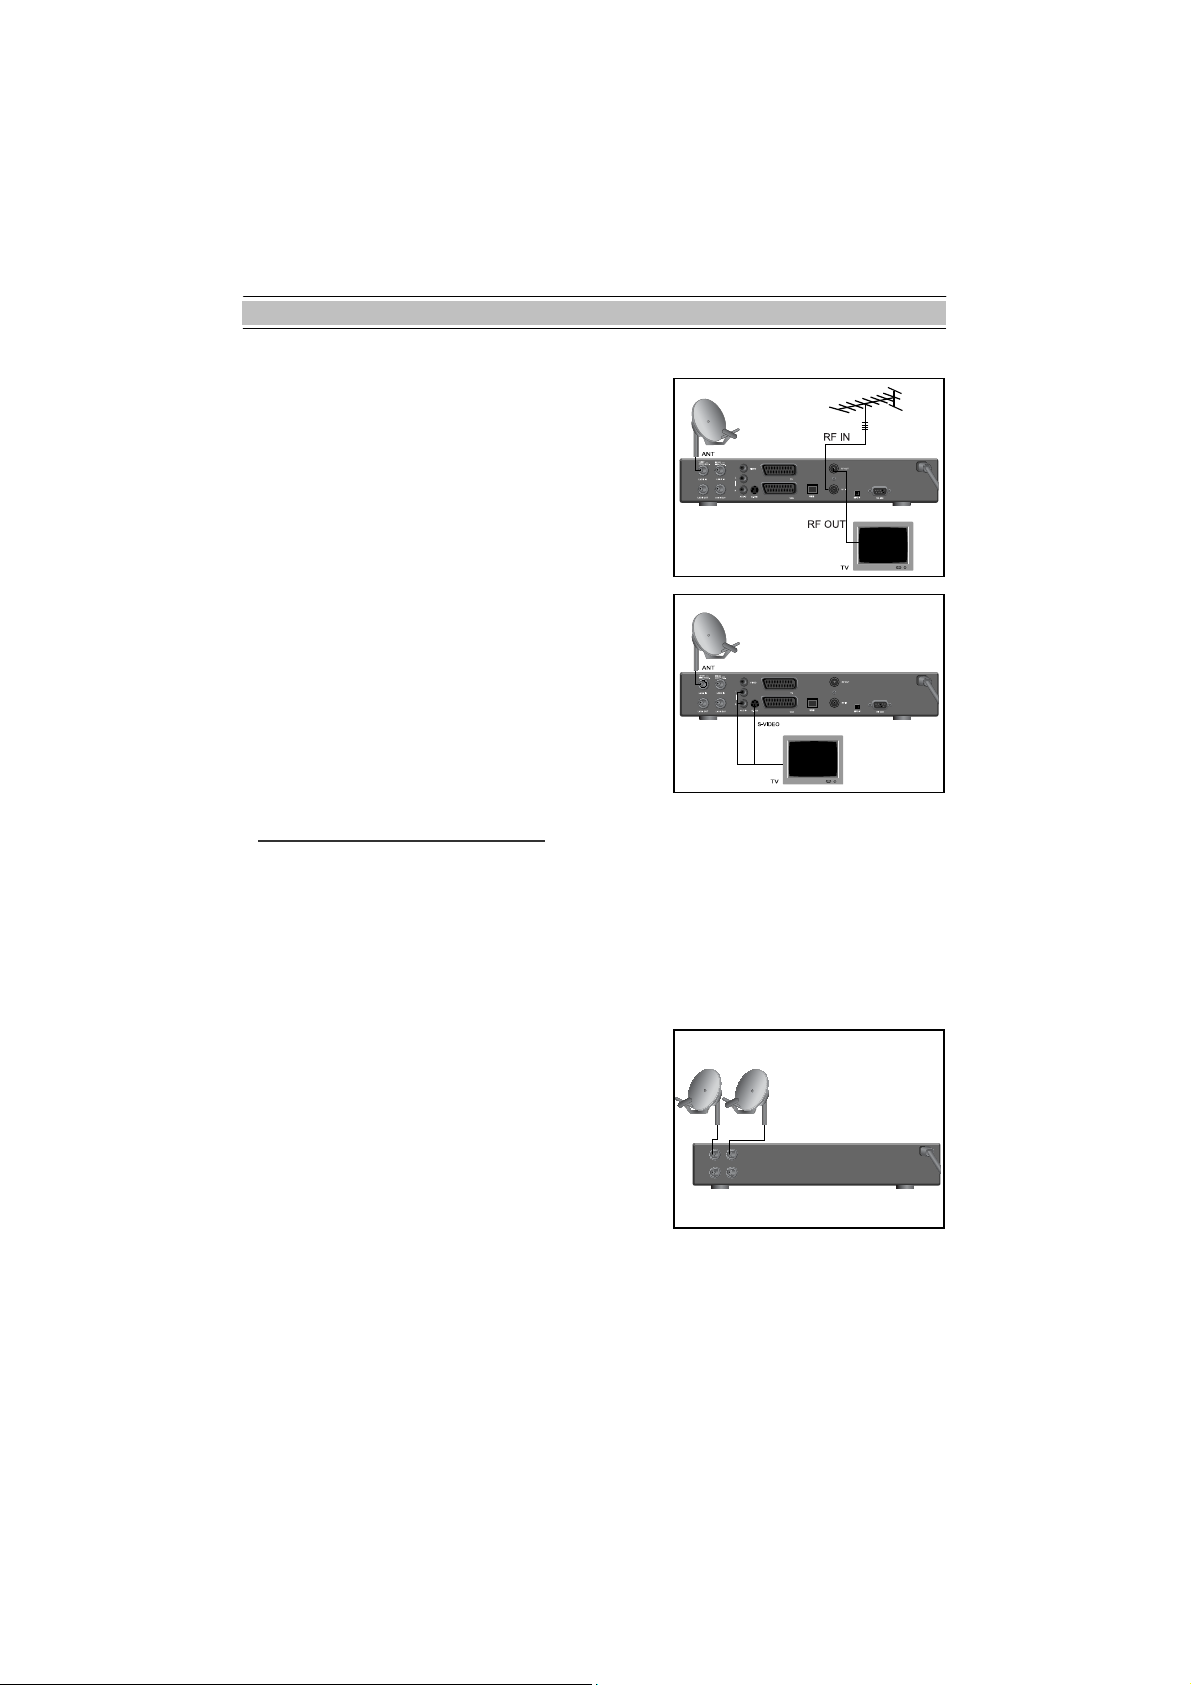
INSTALLATION (Connection)
4) Connection to the TV using the RF cable.
Connect a terrestrial antenna to RF IN socket on
the PVR.
Connect one end of the RF cable to the RF OUT
socket on the PVR.
Connect the other end to the ANT IN socket on
the TV.
5) Connection to the TV using the S-VIDEO.
Connect one end of the S-VIDEO cable to the S-
VIDEO socket on the PVR and the other end to a
S-VIDEO socket on the TV.
Connection to the Antenna.
We recommend one of the following installation diagrams because of the LNB
specifications for selecting RF signal band by DC voltage and 22Khz tone.
If the PVR is installed with separated connection type, there is no restriction for zapping
while recording.
1) Installing the PVR with two separated Antennas.
The Connection Type in LNB setting menu
should be set to Separated.
14
Page 15
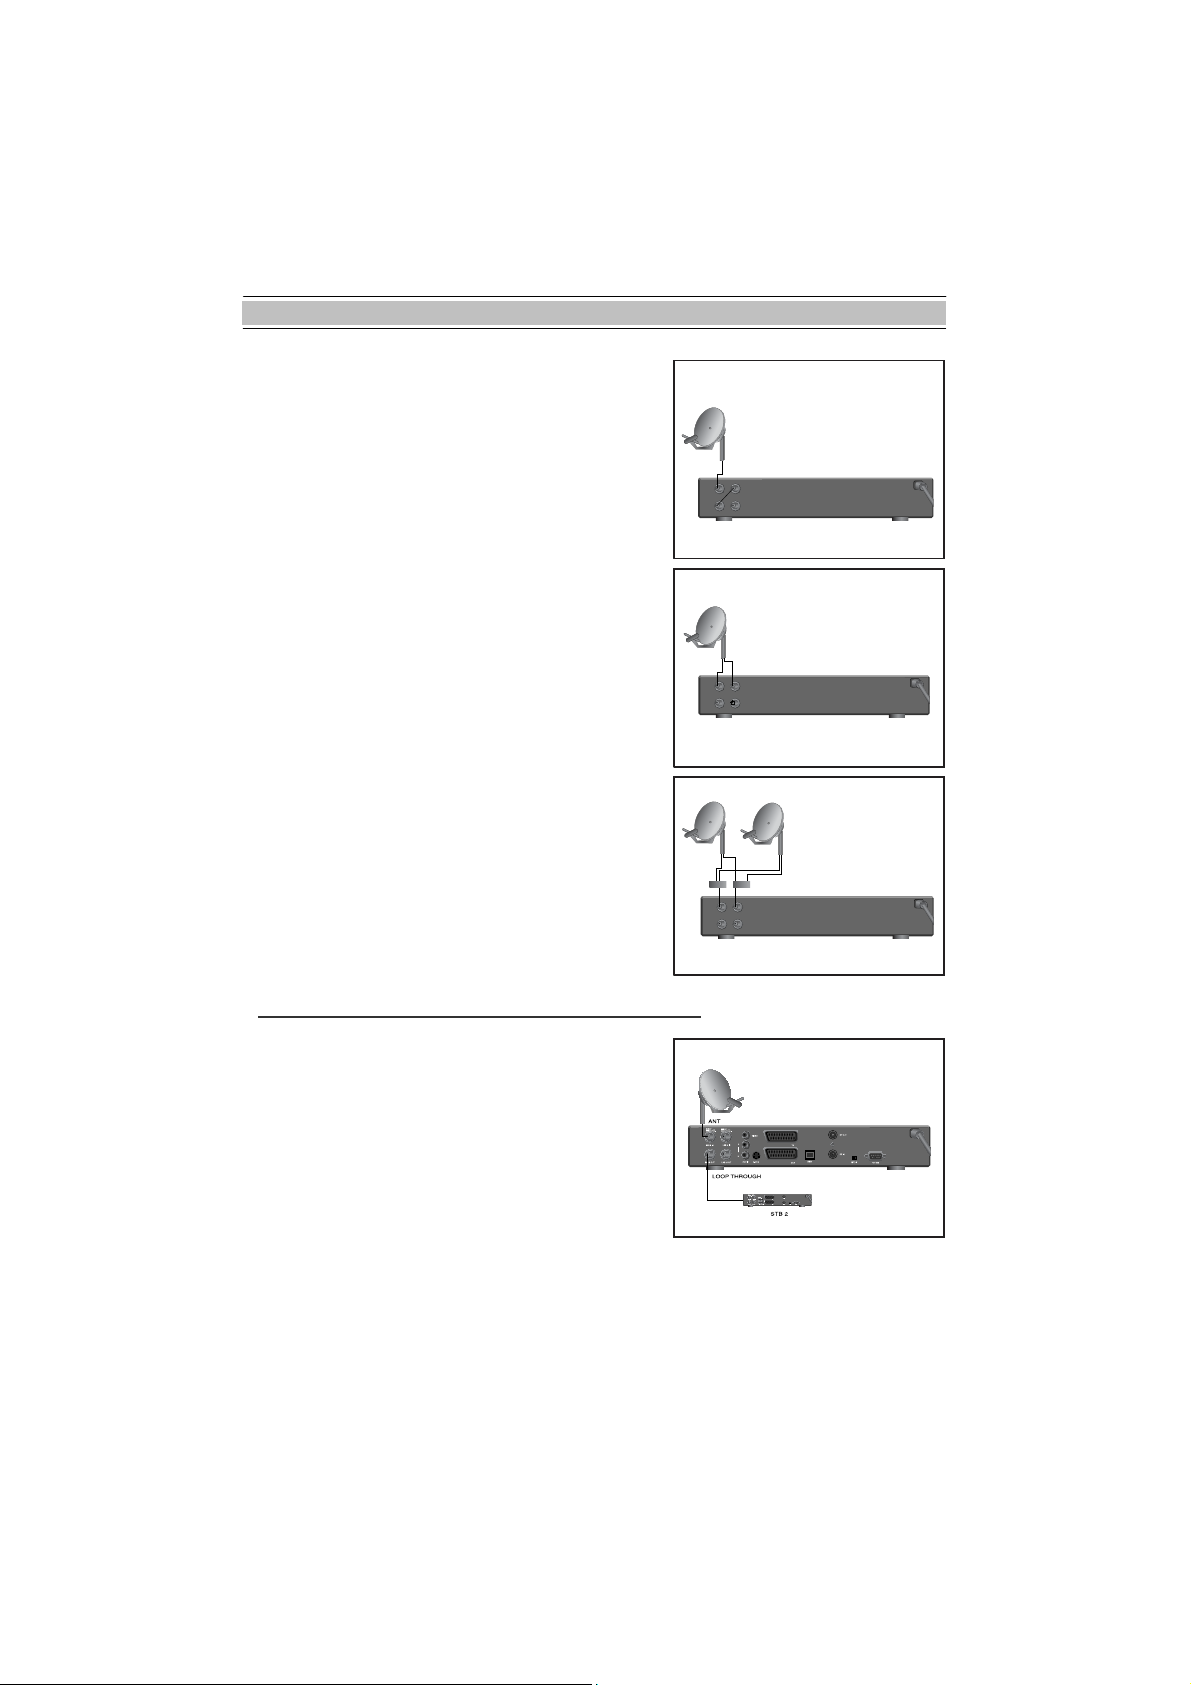
INSTALLATION (Connection)
2) Installing the PVR with one Antenna.
The Connection Type in LNB setting menu
should be set to Loop Through.
Tuner 1 and 2 can receive the RF signal of the
same polarity and the same band.
3) Installing the PVR with Twin LNB Antenna.
The Connection Type in LNB setting menu
should be set to Separated.
4) Installing the PVR with two separated Twin
LNB Antennas and DiSEqC switches.
The Connection Type in LNB setting menu
should be set to Separated.
Connection to the other Satellite Receiver.
Connect the satellite antenna cable to the LNB IN
socket on the PVR. With other connector, connect
the IF OUT socket on the PVR and the LNB IN
socket of the other PVR or STB.
* Remarks
LNB power will not be bypassed from IF OUT to
LNB IN. Only IF signal will be bypassed to IF OUT
from LNB IN.
15
Page 16

GETTING STARTED
GETTING STARTED
Press the Power button to operate the PVR from the STANDBY mode. Now, the
Info Box will appear for a given time and disappear. By pressing button, the Info
Box will remain on the screen. The display time of the Info Box is adjustable in the
System Setting menu of the Main menu.
IMPORTANT: Before taking charge of your new PVR, some important technical
settings are essential.
- First, press the MENU ( ) button on the RCU to make the Main Menu appear.
- Go to the LNB Setting item in the Installation menu and press OK button.
- Choose the right parameters for Satellite Name, Tuner Select, Connection Type,
LNB Frequency, LNB Power, 22KHz, DiSEqC 1.1 and DiSEqC 1.0.
- Set the Motorized DiSEqC1.2 and the USALS items according to your antenna, LNB
and satellite settings. If the right Satellite Name and LNB Frequency were not found in
the list, call the dealer for satellite information.
- Then, press OK button at Channel Search item and go to the Channel Search menu.
- Set the Search Mode to the Auto. (Manual , Advanced or SMATV Search)
- Select the Start Search... item and press ok button.
- The search procedure will take a while. Press ok button when the searching process
is finished to confirm and save the new channel list.
- For further information, please refer to the LNB Setting part of MENU OPERATIONS
in this manual.
16
Page 17

MENU OPERATIONS
MENU OPERATIONS
Now this chapter assumes that the PVR system has been installed correctly, meaning:
• The satellite antenna for the PVR has been installed, connected to the PVR.
• The PVR is connected to the TV.
• The RCU has batteries and ready to control the PVR.
If the PVR has not been installed or connected properly, please refer to the
INSTALLATION menu on this manual.
Many of the functions of the PVR are available from the Main Menu. Press button
to open it.
* Conditional Access is valid only in TF5500PVR.
17
Page 18

MENU OPERATIONS
System Setting
Time Setting
The exact local current time can be adjusted by using the GMT, the Time Offset and
the Mode sub menus.
A. Mode
By using , buttons, you can select on of the Auto/Manual mode. The Auto
mode updates the time settings automatically by the GMT received from the broadcast
and the Time Offset you have inserted. The Auto mode is recommended.
18
Page 19

MENU OPERATIONS
B. Local Time
The Local Time is adjustable only when the Mode is in the Manual mode. Adjust the
current time, if necessary, by using the numeric buttons and , buttons.
C. GMT
GMT is referred to the standard time of Greenwich. It cannot be changed.
D. Time Offset
The current time of the local area can be inserted. In another words, insert the time
difference of the local time zone from the GMT. For example, if the local area is Seoul
(the time difference from the GMT is 9), insert 9:00. The time is adjustable by using ,
buttons, 15 minutes at a time.
Timer Setting
To insert new entry of Timer Setting, press (Red) Button. Press button to edit
the entry, and press (Green) button to delete the selected entry.
There are Record ON and OFF modes in Timer Setting.
19
Page 20

MENU OPERATIONS
OK
01 21 FASHION TV 08/03-Wed 11:39 30Min OT R
02
Service Number
70 DWtv 07/02-Mon 13:00 60Min WL
Mode
Service Name
Reseved Date and
Time to Start
Duration
Record
recording
A. Record ON : This function is used for the delayed recording to the HDD of PVR.
- Type : Select TV or Radio by pressing V- , V+ button.
- Satellite :Press OK button to display the satellite list. Select a satellite that includes
the channel to be recorded.
- Service : Select the service to be reserved for recording by pressing OK button.
- Tuner Select : Select Tuner1 or Tuner2 by pressing V- , V+ buttons.
- Mode : By using V- , V+ buttons, select one among One Time, Everyday, Every
Weekend, Weekly, and Every Weekday.
- Date : Select the recording start date by pressing V- , V+ buttons.
- Start Time : Select the recording start time. , V+ buttons and 0 – 9 buttons
are available.
- Duration : Select the recording duration by pressing V- , V+ buttons.
- File Name : To change file name as you want, press O button. The keyboard will
appear.
- OK : To confirm the setting for the reserved recording, press OK button.
B. Record OFF: It is a useful function for reserved recording to a VCR or for wakeup
function like VCR Timer. If the Record item is set to Off, the PVR wake up and play it
by the reserved conditions, but does not record it to the HDD of PVR.
For details, refer to the explanation of Record ON.
20
Page 21

MENU OPERATIONS
Parental Control
Password to various menus can be configured. The PIN Code box will automatically
appear when this menu is selected. The default PIN Code is 0000.
A. Censorship
The Censorship item blocks programs according to each specific setting.
Use , buttons to select the items below.
No Block : Access to everyone.
Total Block : Access to no one without PIN code.
If the channel is limitation free, the block function will not work.
4~18(age): Inaccessible for viewers within each minimum age limit if a maturing rating
of the event is same or lower than the age limit.
In case of inaccessible, the PVR asks the PIN Code and check the age limit.
B. Change PIN Code
Go to the Change PIN Code item to configure new PIN Code. Press button, then a
box will appear on the screen. Enter the PIN code by using the numeric buttons on your
RCU.
21
Page 22

MENU OPERATIONS
C. Access Control
The Access Control menu controls access to following items: Time Setting,
Language Setting, A/V Output Setting, Organizing Favorites, Installation and IRD
Lock. Press , buttons to Locked / Unlocked the access. Locked means
controlling the access to the specific menus with the PIN Code system. The default PIN
Code is 0000.
Language Setting
There are many languages available for the menu.
22
Page 23

MENU OPERATIONS
A. Menu Language
It is an item for changing the language of the Main menu.
Select the language that the menus will be shown in.
* The supported language can be changed without any notice.
B. Subtitle Language
It is an item for changing the language of the subtitle.
As long as the services support it, the subtitle language is changeable by pressing
button on your RCU.
* The supported language can be changed without any notice.
C. Audio Language
It is an item for changing the language of the Audio.
If more than one audio language is transmitted, you may select one language among
the languages transmitted by pressing button.
* The supported language can be changed without any notice.
A/V Output Setting
The PVR has many A/V Outputs. Control this menu properly according to external
components connected to the PVR. Configurations concerning Audio and Video can be
made here.
A. TV Type
Select your TV standard. For automatic PAL/NTSC selection, set it to Multi.
B. Video Output
Select the mode of Video output among RGB, S-Video, YUV and CVBS on TV SCART
by using , buttons.
23
Page 24

MENU OPERATIONS
C. VCR SCART Type
Select the VCR SCART type either Standard or External A/V. In case of External A/V,
the source of TV SCART Output will be selected between VCR SCART input and
internal AV by pressing button on the RCU. In case of Standard, it will be done
automatically by the SCART functionality.
D. TV Aspect Ratio
Select your TV screen format. Select 4:3 or 16:9 mode by using , buttons.
E. 16:9 Display Format
If you have a TV set with the 4:3 picture format and transmission is in 16:9, you can
select the display format. Select the Letter Box or Center extract by using ,
buttons.
F. Sound Mode
It allows you to configure the sound mode. Select the Stereo, Mono, Left and Right
mode by using , buttons. The Sound mode is configurable later on by using
button on your RCU.
G. RF Output
When the PVR is connected to the TV by an RF cable, you may need to select the
correct TV standard system. Select the PAL G, PAL I, PAL K, NTSC M mode by using
, buttons.
H. RF Channel
Select a RF channel by using , buttons. The default RF channel is CH36.
When you change the RF channel number, you must also change to the same value
on the TV. If you do not, there will be no picture and sound.
24
Page 25

MENU OPERATIONS
OSD Transparency
Adjust the OSD transparency of all the menus. The available levels are ranging from 0%
to 50%.
Info Box Display Time
Adjust the time-out of the Info Box. Set the period of time that the Info Box is displayed
on screen. The adjustable time is 0 to 30 seconds, No info box and Never Hide.
Info Box Position
Adjust the position of the Info Box. It allows you to change the position by using ,
buttons.
Time Shifting
To enable the time shifting function, select Enable.
If the Time Shifting is enabled, the PVR records the current channel in live. And, you
can take advantage of the time shifting function.
To disable time shifting function, select Disable. If you don’t want to use time shifting
function or reduce the power consumption, let the time shifting disable .
25
Page 26

MENU OPERATIONS
Organizing Channels
This menu can be used to rename, reorder, lock, hide and delete TV Services.
A. Browse
Press OK button. Now, browsing through the Organizing Channels is possible.
Press assigned buttons on the help message.
B. Rename
Use P+ , P- buttons to select Rename item and press OK button to move the cursor to
the Channel List. Press button to display keyboard, and rename the channel. After
renaming it, be sure to save it by pressing button at Save item.
C. Move
You can reorder and move the service to the preferred position. Mark the desired
channel to move and press button. Use , buttons to choose the Move mode.
D. Lock
You can restrain and lock the services. From here, locking (and later unlocking)
channels in any of the lists is possible e.g. in order to prevent children from watching it.
If a locked service is selected, you should enter the PIN code in order to enjoy it.
26
Page 27

MENU OPERATIONS
E. Skip
You can hide and skip the services. In order to unlock the skip function, press
button on the skipped channel. The skipped channels will not be visible on the channel
list.
F. Delete
Press button to delete channels. The delete function differs from the skip function
as it deletes the channel completely. Whereas, the skip function just makes the channel
invisible.
NOTE: Deleted channels are permanently deleted. The only way to recover them
is to perform a new channel search.
G. Sort
You can sort and rearrange the channel list.
27
Page 28

MENU OPERATIONS
Organizing Favorites
This mode is helpful in adding and deleting services to and from the favorite group.
Under the menu Organizing Favorites, there are three different modes:
Fav List , Fav CHs and TV or Radio Ch List.
On the Fav List mode, four standard lists are selected as the default menus: News,
Sports, Movie and Music. Up to 30 lists including these lists can be added and
renamed. When deleting a service, select a service in the Fav CHs section and press
the assigned button on the help message.
To add services into Favorites, locate the cursor to the desired service in Ch List and
press OK button. To delete a service from Favorites, locate the cursor to the service in
Fav CHs and press button.
28
Page 29

MENU OPERATIONS
Recording
To record the service you want, you have to set the following options. You can record
the service immediately. To reserve a recording, you have to use Timer Setting
function in System Setting at Main menu. You can go to the Timer Setting menu
directly by selecting Timer Setting item in this menu, too.
A. Record NO.
Two services can be recorded simultaneously. You can distinguish between the two
records by this Recording NO. Press , button to select Record NO.1 or 2.
B. Service
Press button to display the service list. Select a channel to be recorded.
C. Mode
There are two recording modes.
To record the selected service immediately, select the Quick mode.
To record current event including the data in the time shifting buffer, select Current
Event mode. The Current Event mode is valid only when the event information of the
channel exists.
29
Page 30

MENU OPERATIONS
D. Duration
To change the duration of the recording time, press or button.
E. File Name
To change the file name of the service to be recorded, press button at this item.
You can change the file name by keyboard on screen.
F. Start
To start recording immediately, press button at this item. For reservation you may
use Timer Setting in System Setting menu.
G. Stop
To stop recording immediately, press button at this item.
H. Timer Setting
Press button at this item to go to the Timer Setting menu directly.
Installation
30
Page 31

MENU OPERATIONS
LNB Setting
The Low Noise Block down Converter (LNB) amplifies the signal received by the
satellite dish and lowers the frequency of the signal. The signal is then fed from the LNB
at the dish via cable to the PVR.
For the LNB Setting, move the cursor to Installation item and press OK button.
Then, move the cursor to the LNB Setting item and press OK button.
A. Satellite Name
Press OK button to display the Satellite List. The list of Satellite is put in alphabetical
order. Select one of the preprogrammed satellites that corresponds to the direction of
the antenna. If the desired satellite name is not in the list, then select Other.
B. Tuner Select
Select a tuner for channel searching from the selected satellite.
C. Connection Type
If two tuners share one LNB, select Loop Through. If a service is being recoded, the
other tuner can receive only the signal of the same band and polarity as being recorded
in this configuration.
If the tuners are connected to separated LNBs (or Dual LNB), select Separated. There
is no restriction as in the Loop Through configuration.
D. LNB Frequency
Select the L.O. Frequency of the LNB. The LNB Frequency of 5150, 9750, 10600,
10750, 11475, 9750/10600 or 9750/10700 can be selected by V- or V+ button.
Also you can insert LNB frequency by using Numeric key on the RCU.
E. LNB Power
Select LNB power On to output the LNB voltage.
F. 22 KHz
If you are using a 22 KHz tone switch box, make 22 KHz tone switch enable or disable
to select LNB or antenna.
31
Page 32

MENU OPERATIONS
NOTE: If the LNB Frequency is set to Universal LNB (9750/10600 or 9750/10700), it
is not possible to set 22KHz because high or low band is selected by
22KHz.
G. DiSEqC 1.1
The PVR is designed to be DiSEqC 1.1 compatible. This allows multiple antennas to be
connected to the PVR at the same time. If you are using two or more fixed antennas or
LNBs, then it is recommended to use a DiSEqC 1.1 switch.
If you use a DiSEqC 1.1 switch only, it is possible to connect up to 4 antennas.
Set the DiSEqC 1.0 to Disable and select an item in DiSEqC1.1.
If you use a DiSEqC1.1 switch and DiSEqC1.0 switches, it is possible to connect up to
16 antennas. Connect the DiSEqC1.1 switch to the LNB input and connect the
DiSEqC1.0 switches to the DiSEqC1.1 switch.
Set the DiSEqC1.1 item and DiSEqC1.0 item according to the antenna configuration.
For example, set DiSEqC1.1 to 2 of 4 and DiSEqC1.0 to 3 of 4 to select A7.
32
Page 33

MENU OPERATIONS
H. DiSEqC 1.0
The PVR is designed to be DiSEqC 1.0 compatible. This allows multiple antennas to be
connected to the PVR at the same time. If you are using two or more fixed antennas or
LNBs, then it is recommended to use a DiSEqC 1.0 switch.
Select one of 1 of DiSEqC to 4 of DiSEqC, Mini A, Mini B or Disable according to the
option or the configuration of DiSEqC switch box or antenna.
I. Channel Search
To go to Channel Search menu directly from LNB Setting menu, press OK button at
this item.
Channel Search
A. Satellite Name
Press OK button to display the Satellite List Box. The list of Satellite is put in
alphabetical order. Select one of the preprogrammed satellites that correspond to the
direction of the antenna. If the desired satellite name is not in the list, then select Other.
B. Search Mode
There are 4 search modes, There are 4 search modes, Auto, Manual, Advanced and
SMATV. The Auto mode enables you to search using the information the PVR has. On
the other hand, you may need to know in advance the frequencies and the symbol rates
33
Page 34

MENU OPERATIONS
before using the Manual mode. On the Advanced mode, enter the Audio PID, Video
PID or the PCR PID. The SMATV mode is used to special purposes on satellite master
antenna TV system.
C. Frequency
Select or enter the Transponder’s Frequency by using the numeric buttons on your RCU.
D. Symbol Rate
Enter the Transponder’s Symbol Rate by using the numeric buttons on your RCU.
E. Polarization
Choose the type of polarization, either the Horizontal or the Vertical.
F. Network Search
This Network Search item can be used if the Search mode is set to Manual or Auto. If
the Network Search item is set to On and the NIT (Network Information Table) is
available, the Transponder’s information can be found.
G. PID
This item is valid when the Search Mode is set to Advanced only.
Press OK button to enter Video, Audio and PCR PID’s.
1) Video PID
Insert the Video PID by using the numeric buttons on your RCU.
2) Audio PID
Insert the Audio PID by using the numeric buttons on your RCU.
3) PCR PID
Insert the PCR PID by using the numeric buttons on your RCU.
4) SAVE
To ensure the above Video, Audio and PCR PID change, press OK button at this
item.
H. FTA/Scrambled
Choose your favorable channels you want to search among FTA only, CAS only and
FTA+CAS.
34
Page 35

MENU OPERATIONS
I. Tuner Select
Select a tuner for channel searching from the selected channel.
J. Start Search...
To start the searching process, press OK button at this item.
To stop the searching process on the way, press either the button or the
button. This menu will be shown as long as the PVR is searching for channels. All
channels found will be listed in two columns on the screen with TV channels in one
column and Radio channels in the other. Please note that the search procedure may
take a few minutes.
When the search procedure is completed, the screen will show how many TV and Radio
channels have been found. Press OK button to save the channels.
K. LNB Setting
To go to LNB Setting menu directly from Channel Search menu, press OK button at
this item.
Services Copy
In this menu, you can copy the existing channels between Tuner 1 and Tuner 2.
A. Tuner 1 to Tuner 2
35
Page 36

MENU OPERATIONS
Copy the service list of Tuner 1 to that of Tuner 2.
B. Tuner 2 to Tuner 1
Copy the service list of Tuner 2 to that of Tuner 1.
C. All
Add the service lists of Tuner 1 and Tuner 2 and save it to service list of Tuner 1 and
that of Tuner 2.
Motorized DiSEqC 1.2
If you have DiSEqC 1.2 motorized system, then you can use the DiSEqC 1.2 functions.
A. Satellite Name
Select a satellite name that will be used to identify a motor position.
B. Tuner Select
Select a tuner that is connected with DiSEqC 1.2 system.
C. Transponder
Select the transponder to catch the strong signal. Select the TP from TP list box to get
the strong signal.
36
Page 37

MENU OPERATIONS
D. LNB Setting
Please refer to LNB setting of this chapter.
E. Motorized DiSEqC1.2
Select Enable or Disable. If you are using DiSEqC1.2 antenna, set to Enable.
F. DiSEqC Command Mode
Change the current mode between User and Installer modes.
-User: This mode is used to fine-tune the position of the motor for better reception.
-Installer: This mode is used to search for the position of a satellite manually.
G. Movement: In case of User mode, the movement is adjustable by fine-tuning.
In case of Installer mode, the movement is adjustable by East , West going command.
H . Motor Control
- Goto : Move the motor to the stored position of the selected satellite.
- Store : Store the current position of the motor for the selected satellite.
* The followings are available only at the Installer mode.
- Recalculate : Recalculate the position of the Stab Rotor motor.
- Goto Ref : Go to reference.
- Limit E , Limit W : Set the limits of East and West position.
- Limit Off : Remove the limitation.
- Reset : Reset all the stored position of the motor relative to the “0” position
I . Channel Search
After saving the DiSEqC configuration at the highest signal quality, press OK button to
start channel searching of the selected satellite.
USALS Setting
USALS is very convenient motorized DiSEqC system that supports DiSEqC 1.3
command and also can get the satellite position automatically if you know your
geographical location. Basically, the listed satellites have its Longitude and therefore the
angle of the satellite can be calculated without problem.
If you have USALS motorized system, then you can use the USALS as followings.
37
Page 38

MENU OPERATIONS
A. Tuner Select
Select a tuner that is connected with USALS system.
B. Motorized DiSEqC1.3
Select Enable or Disable. If you are using DiSEqC1.3 switch, set to Enable.
C. Satellite Name
Select a satellite that will be used to identify a motor system.
D. Satellite Angle
It is the longitude of the selected satellite and it can be set automatically in case of
selecting a satellite name. You can use numeric keys of RCU to enter the angle. East or
West will be selected by V- , V+ button.
E. My Longitude
It means the longitude of your location. You can select the angle, East and West by ,
V+ or numeric button.
F. My Latitude
It means the latitude of your location. You can select the angle, South or North by V- ,
V+ or numeric button.
38
Page 39

MENU OPERATIONS
G. Reference Position
Go to Reference position (Ø°)
H. Move : After searching the position you want by Goto the position item, you can
tune the antenna to go to the exact position by this item. V- , V+ button moves the
antenna to anti-clockwise and clockwise respectively.
I. Transponder : Selects the Transponder to catch the strong signal.
J. Goto the position
After setting the Longitude, Latitude and the longitude of the selected satellite, this
menu is used when you want to move the desired direction (position) of the dish saved
before. Its moving limit is ±65°.
Factory Setting
All the stored data can be reset just like it was manufactured. The factory setting has
two steps. The first is to reset the channel data and other system configurations except
Motorized DiSEqC1.2 setting. The second is to reset the parameters of Motorized
DiSEqC 1.2.
39
Page 40

MENU OPERATIONS
Format Hard Disk
To format the HDD in PVR, Press OK button at this Item.
Formatting Hard Disk will delete all the data and the files recorded in HDD permanently.
If a new HDD is installed, it should be formatted because the file structure of PVR is
different from others.
You can not use the Time shifting, Recording and playback functions with an
unformatted HDD.
Transfer Firmware
A. Transfer Program to Other IRD
It is used to transfer PVR firmware to other PVR for upgrading the PVR.
Notes: Please proceed this menu with connecting the PVR of same model and
same specification.
B. Transfer Data to Other IRD
It is used to transfer PVR Data such as service information to other PVR for upgrading
the PVR.
Notes: Please proceed this menu with connecting the PVR of same model and
same specification.
40
Page 41

MENU OPERATIONS
Firmware Upgrade
At this menu, you can download the latest PVR software from Satellite.
The TP details are as bellows.
Astra
FREQUENCY : 12603 MHz
S / R : 22000 KS/s
Polarity : Horizontal
PID : 347
Hotbird 4
FREQUENCY : 12673 MHz
S / R : 27500 KS/s
Polarity : Vertical
PID : 730
For OTA (Over - The - Air Upgrade), it takes around several minutes to download
software from the Satellite.
To start OTA, press OK button at Start item.
For better service, the satellite and TP can be added or changed. You can get the
information at www.i-topfield.com
41
Page 42

MENU OPERATIONS
Information
You can check the IRD(PVR) version and refer the calendar.
IRD Status
Check the PVR’s system information here. It shows the System ID, Loader Version,
Device Version, Application Version and Last Update.
Calendar
Press V- or V+ button to select the year. Press or button to select the month.
42
Page 43

MENU OPERATIONS
Common Interface
The menu differs according to each inserted CAM. If the module has not been installed
yet, the phrase Not Installed will be indicated.
Game
ExBlock
43
Page 44

MENU OPERATIONS
Bomb Hexa
Pac Man
44
Page 45

FUNCTION GUIDE
FUNCTION GUIDE
Channel List
Press ok button to see the Channel List. The Channel List displays as follows.
• Service provider. (It can be displayed by pressing button.)
• Channel List by T1 (Tuner 1) or T2 (Tuner 2).
• Scrambled Mark by .
By using WB (White) button in the Channel List, you can use the functions as follows.
• RB (Red) button: Display the channel List of Tuner 1 or Turner 2.
• GB (Green) button: Sort the channel List by Alphabetic.
* The sorted channel list will be displayed in the channel list menu only.
• YB (Yellow) button: Search the channel list by Alphabetic.
• BB (Blue) button: Display the options. You can use this options by pressing V+ , Vor OK button.
- Satellite : Displays the channel list by satellite.
- Tuner : Selects among Tuner 1, Tuner 2 and all Tuner.
- Show Provider : Displays the channels by service provider.
- Sorting : Selects among Default, Alphabetic, FTA~CAS, CAS~FTA, Provider and
Fav~NO Fav.
- Rename: Renames the marked channel.
- Lock : Makes the marked channel Unlocked or Locked.
- Delete : Deletes the marked channel.
- Add to FAV : Adds the marked channel to the FAV List
45
Page 46

FUNCTION GUIDE
Information Box
Press info button on the RCU to see the program information. The Information box
displays as follows:
. Channel Number
. Channel Name
. Detailed Program Information
. Signal Level and Quality
. Tuner Information
. Information of subtitle and / or teletext
. Parental Lock
You can hide the Information Box
by pressing info button.
G
hUGsGG
Service Name Satellite/TP Info Signal Strength
Service
Number
Event Name
Event Description Start Time ~ End Time / Dolby / Multifeed
Time
Information
CAS,
Subtitle,
Teletext
Parental
Lock
Mark
You can see the Current/Next event by pressing V- / V+ button in the information box.
To control the volume in the information box, you have to press V- / V+ button two times
without interval.
If EPG is available on programs, by using + , V- buttons, you can see the EPG. You
can see extended information of the event by pressing button once more.
iUGwG
G
46
File Name Satellite/TP Info Progress Bar
Event Name
Event Description Duration / Dolby / Multifeed
Time
Information
CAS,Subtitle,
Teletext
Page 47

FUNCTION GUIDE
jUGtwZG
G
Title Bitrate Progress Bar
Artist Time Information
Album Duration
EPG (Electronic Program Guide)
To display the information about currently
being broadcasted as well as those that will
be broadcasted next, press button on
the remote control unit.
If EPG is available on programs, you will see
the detailed description of the programs,
start/end time and programs schedules etc.
, buttons will be used to move program and to see next program schedules.
, buttons will be used to switch the channel.
button makes the reservation for the next program.
button shows extended information of the event.
button will change the contents of EPG between TV and Radio services.
F1 (Red) button switches the EPG from Single Service to Multi Service and in
opposition.
Subtitle
You can choose a language of subtitle using button on the RCU.
If the broadcaster provides subtitles, you can see symbol in the Information Box.
Teletext
If the broadcaster supports teletext, you can see symbol in the Information Box.
There are VBI insertion mode and software emulation mode in teletext. In the VBI
insertion mode, which is always on, you can watch the teletext with your TV using the
RCU of your TV. To watch teletext with VBI insertion, your TV must support teletext.
47
Page 48

FUNCTION GUIDE
In the software emulation mode, you can watch the teletext even though your TV does
not support teletext. You can watch the teletext using the RCU of PVR.
Press Teletext ( ) button to watch the teletext with software emulation mode.
Press button once more or EXIT ( ) button to escape from teletext.
Sound Track
You can choose a language of soundtrack by
pressing button when a broadcaster
supports various languages of soundtrack.
Also, it is possible to choose a mode among
Stereo, Mono, Left and Right using ,
buttons. button is used for multifeed
function, too. If the multifeed is available in
current service,
Multifeed Track will be displayed first. You can change the display to Sound Track
selection menu by pressing button once more.
Multifeed
If multifeed is available in the channel, Multifeed Icon ( ) will appear at the right side
of the Information box. If available, the Multifeed Track and Sound Track are toggled by
button. It is possible to choose one of the multifeed channel.
Time Shifting
48
Page 49

FUNCTION GUIDE
1. To use Time Shifting function, the Time Shifting option should be enabled.
To find the Time Shifting option menu, follow the steps below.
Main Menu System Setting Time Shifting Enable
2. Press button to display Time Shifting progress bar. You have to press
button once more to display Time Shifting progress bar during Trick mode. (such as
Fast Forward, Reverse Playback, Slow motion)
3. To go to the desired playback position, press , button or , button.
This function is valid while the Time Shifting progress bar is displayed.
4. To remove the Time Shifting progress bar at once, press , or button.
5. To go to the live video, press button.
6. To start Instant Time Shifting, press button. The start position of the playback
goes 10 seconds back per each pressing of button.
Recording while Time Shifting
1. Press button to display Time Shifting progress bar.
2. To go to the desired position, , button or , button.
3. Press button to start recording.
4. The recording will be started from the selected position.
5. Press button to stop Time Shifting.
6. Press button once more to stop recording.
Caution : If the recording time is less than about 1 minute, the recorded file will not be
saved.
49
Page 50

FUNCTION GUIDE
Recording, Checking and Editing the reserved delayed recording
To record services, refer to the following steps. There are four kinds of recording
references.
Caution : If the recording time is less than about 1 minute, the recorded file will not be
saved.
Immediate Recording by RECORD button
A. Recording
Press rec button to record the service you are watching. To specify the stop time, go to
Recording menu and modify Duration item. To go to the Recording menu, press rec
button once more or go to Recording item of Main Menu.
B. Checking and modification
A Recording Icon ( ) will be displayed on the upper rightmost of the TV screen for
several seconds if the recording is initiated. Press info button to see the Recording
Icon.
To check and modify the recording options, go to Recording menu.
C. Stop
Press button and select the service to stop the Recording by confirming OK
button. If only one service is being recorded, it is possible to stop the recording by
pressing button twice.
50
Page 51

FUNCTION GUIDE
Immediate Recording by Menu Selection
* Precaution (Dual Recording)
Before starting recording on the Menu, you have to select one of the record NO.
There are Record NO.1 and 2 to distinguish between the two records for dual
recording. In case of one channel is recorded at Record NO.1, only Duration and
Stop item of Recording menu will be enabled. But, all the sub-menu of Record
NO.2 will be enabled.
A. Recording
To go to Recording menu, press button and select Recording item by pressing
OK button. Select the options that you want to record with. Select Start item and press
OK button. For detailed information, refer to the explanation of Recording menu in
Menu operations.
B. Checking and modification
A Recording Icon ( ) will be displayed on the upper rightmost of the TV screen for
several seconds if the recording is initiated.
To check and modify the recording options, go to Recording menu.
C. Stop
Press button and select the service to be stop the Recording by pressing OK
button.
Otherwise, go to Recording menu and press OK button at item.
51
Page 52

FUNCTION GUIDE
Delayed Recording
A. Record
Go to System Setting menu and press OK button at the Timer Setting item. At Timer
Setting, press F1(Red) button to insert a new recording entry. Set the options that you
want to record with by using V- or V+ button. For detailed information, refer to the
explanation of Timer Setting menu in Menu operations.
B. Checking and modification
To check the delayed recording options, go to Timer Setting menu. You can change
the options there.
C. Cancel
To cancel the delayed recording, go to Timer Setting menu. Press F2 (Green) button
and confirm with OK button at Cancel item.
52
Page 53

FUNCTION GUIDE
Recording by EPG
A. Record
Press button to display EPG. Select a service that you want to record, and press
button. Instead of rec button, two times pressing of OK button is valid for
delayed recording.
The Recording mark ( ) will be displayed by pressing OK button two times.
For reference, if you press button one time, you can reserve the event, which means
switching to the reserved event automatically at the event time.
This button toggles CANCEL successively.
B. Checking and modification
Press button to display EPG. The reserved services for delayed recording will be
marked with a Recording mark ( ) or Reserved Event mark ( ).
C. Cancel
Press button to display EPG. To cancel a reservation of delayed recording, select
the service you want to cancel and press button again. Instead of button,
button is valid by toggling. The Recording mark ( ) will disappear.
53
Page 54

FUNCTION GUIDE
Playback a Recorded Service
1. Press list button to display the recorded service list.
2. You can use several useful editing functions at Recorded Services menu as
followings.
A. New Folder : Press (Green) button to make new folder.
B. Move to Folder : Press (Yellow) button to move the Service to a folder.
C. Option : By pressing (Blue) button, you can use optional functions such as
- Sorting by Alphabetic, Size, Time.
- Rename
- Lock
D. Delete File : Press button to delete the recorded service.
E. Event Info : Press button to display extended event information.
3. Select a recorded service at the list.
4. Press OK button to start playback.
5. Press ply button to display Time Shifting progress bar. You have to press ply
button once more to display Time Shifting progress bar during Trick mode. (such as
Fast Forward, Reverse Playback, Slow motion)
6. To go to the desired playback position, press , button or V- , button.
This function is valid while the progress bar is displayed.
7. If you enter the position by percent with numeric button of RCU, the playback position
will be moved to the point. This function is valid while the progress bar is not displayed.
54
Page 55

FUNCTION GUIDE
* Successive Playback of Services
Press F1 (Red) button to number the services among the recorded services list and
press or ply button to playback the multi-services in sequence automatically.
This function is very convenient for you to descramble the pay TV service with proper
CAM module and smart card. You can descramble the scramble services and copy it
while you are not using this PVR.
* MP3 and TAP
Press , buttons at recorded service list to go to MP3 files and program
files(TAP).
Stop
1.This function is available for playback.
2.To stop playback, press button.
3.You can stop the recording in the recorded service list, too. To stop the recording,
press button at the selected recording file.
Pausing
To pause the live picture or playback, press button.
Press button again or button to quit pausing.
1. Pause from live video
If the PAUSE is kept more than 10 seconds with enabled Time Shifting mode, the live
picture is changed to time-shifted playback. The video continues from the paused image
when resumed from PAUSE.
2.Pause from Time Shifting
The video continues from the paused image when resumed from PAUSE.
3. Pause from Playback
The video continues from the paused image when resumed from PAUSE.
55
Page 56

FUNCTION GUIDE
Slow Motion Playback
1. To playback in slow motion (without sound), press the button.
2. Slow motion speed can be adjusted by pressing the button repeatedly.
3. There are 3 steps (1/2, 1/4, 1/8) in slow motion playback.
4. Press button to resume playback with normal speed.
5. The slow motion function is available for the playback and the time-shifted playback.
Fast Motion Playback
1. If there is a Time Shifting or Playback progress bar, remove the progress bar by
pressing button.
2. Press button for fast motion playback. To change the playback speed, press
button repeatedly.
3. There are 3 steps (2, 4, 6) in fast motion playback.
4. Press button to resume playback with normal speed.
5. The fast motion function is available for the playback and the time-shifted playback.
Fast Forwarding and Rewinding
1. Press button to display Time Shifting or Playback progress bar.
2. To go to the desired playback position, press button or button. This
function is valid while the progress bar is displayed.
3. To remove the progress bar at once, press button.
Reverse Playback
1. If there is a Time Shifting or Playback progress bar, remove the progress bar by
pressing button.
2. Press button for reverse playback. To change the playback speed, press
button repeatedly.
3. There are 3 steps (1,2,3) in reverse playback.
4. Press button to resume playback with normal speed.
5. The reverse playback function is available for the playback and the time-shifted
playback.
x3
56
Page 57

FUNCTION GUIDE
Bookmark
You can jump to a position directly by bookmark function in playback and time-shifted
playback. To search positions very quickly and easily, use bookmarks.
It is impossible to use the bookmark in the following conditions.
- Timeshifting is disabled and you are watching live picture.
- You are recording 2 services, and you are watching the other sevice.
1. Add a bookmark
To add a bookmark, press BOOKMARK ( ) button at the position you want to add it.
You can make the bookmark at maximum 64 positions.
2. Go to a bookmark
Press GO TO BOOKMARK ( ) button to jump to the next bookmark. Then, the
PVR plays from the book marked position.
3. Delete a bookmark
To remove a bookmark, you have to display the progress bar by pressing button.
Select the bookmarked position by GO TO BOOKMARK( ) button and press
BOOKMARK ( ) button.
4. 30 seconds forward
If there is no preset bookmark, the PVR plays every 30 seconds forward by pressing
GO TO BOOKMARK ( ) button.
57
Page 58

FUNCTION GUIDE
Recording The Descrambled Live Service
1. Select the live picture you want to record. Descramble the service with a proper CAM
and smart card. The live service should be decoded well with the proper CAM and
smart card.
2. Start recording according to the recording procedure.
3. During recording, don’t change the channel neither try the time shifting function.
Caution : If there is any disturbance such as channel changing or time shifting during
recording, the recorded file will be changed to the scrambled format from this
position. If the recording time is less than about 1 minute, the recorded file will
not be saved.
Descrambling Recorded Services
1. Select and playback a service you want to descramble. Descramble the service with
a proper CAM and smart card. The playback service should be decoded well with the
proper CAM and smart card.
2. Press button to display Playback progress bar.
3. To go to the desired position, press button or button.
4. Start playback and the picture should be descrambled with a proper CAM and smart
card. The fast/slow motion descrambling is possible by fast/slow motion playback.
5. Start recording by RECORD ( ) button.
6. The video displayed on TV will be recorded.
7. Press STOP ( ) button to stop recording.
8. Press STOP ( ) button again to stop playback.
9. You can playback the multi-service(Pay TV) in sequence. For detailed explanation,
refer to Playback a Recorded service.
Caution : If the descrambling time is less than about 1 minute, the recorded file will not
be saved.
58
Page 59

FUNCTION GUIDE
Repeated Playback mode
The repeated Playback mode works only in playback mode. It does not work in time
shifting mode. There are two repeated Playback modes.
1. Repeating the whole selected service.
a. Start playback a recorded service.
b. Press button without the progress bar to repeat the whole selected service.
c. Press button once more to cancel the repeating playback.
2. Repeating the selected region.
a. Start playback a recorded service.
b. Press button to display Playback progress bar.
c. To specify one end of region, press the button with the progress bar.
d. Move the cursor by pressing (or ) or (or ) button.
e. To specify the other end of region, press the button once more. The color of
the selected region will be changed to green.
f. Press button once more to cancel the repeating playback.
Copying from Recorded Services
59
Page 60

FUNCTION GUIDE
1. Select and playback a service to copy.
2. Press button to display Playback progress bar.
3. To go to the desired position, press button or button.
4. Start playback the recorded video you want to copy. The fast/slow motion copying is
possible by fast/slow motion playback.
5. Start copying by button.
6. The video displayed on TV will be copied.
7. Press button to stop copying.
8. Press button again to stop playback.
Caution : If the copying time is less than about 1 minute, copying will not be done
successfully. It is recommended not to change the playbck speed.
Cut Out / Save Selected Region
1. Start playback a recorded service.
2. Press button to display Playback progress bar.
3. To specify one end of region, press the l button with the progress bar.
4. Move the cursor by pressing (or ) or (or ) button.
5. Press chk button to cut or save the selected region. Then, a message box appears.
6. To cut out selected region, press the button at cut item in the message box.
7. To save the selected region, press O button at save item in the message box.
60
Page 61

FUNCTION GUIDE
Time Shifting while Recording
During single recording, Time Shifting is possible. But, if you are recording 2 services at
the same time, Time Shifting is possible only in the recorded channel.
Zapping while Recording
For the tuner being recorded with, all the channels in the same Channel can be selected.
For the other tuner, all the scanned channels can be selected.
Picture In Picture (PIP)
1. Press (Red) button to display PIP. Press (Red) button repeatedly to change
the size of sub-picture or to remove the sub-picture.
2. At PIP screen, press ( ) button to exchange main-picture with sub-picture.
Remarks: It is not possible to exchange main-picture with sub-picture when a recorded
service is in playback in main-picture and a live service plays in sub-picture.
3. Press or button to move the position of sub-picture.
4. To display the service list of main-picture, press button. You can select a
service in the service list.
To display the service list of sub-picture, press ( ) button.
5. If the both of main and sub-picture are scrambled, only the main-picture will be played.
61
Page 62

FUNCTION GUIDE
)
r
r
Dual Recording
1. Press button to start Recording.
2. You can use the Time-shifting function while recording another service. It is possible
to record two services at the same time, too.
3. To record the 2nd service, press button at the service you want to record.
4. You can check the status of recordings in the recorded service list. To check it, move
the cursor to the file that is being recorded.
You can stop the recording there, too. To stop the recording, press button at the
selected recording file.
5.It is possible to stop the recording in the live picture. To do it, press button and
press button after selecting the recording by , button.
File List
The file list has 3 lists. They are Recorded Services, MP3 and Program Files. The
lists are selected by , buttons. The File list is displayed by pressing
button.
File List ( Recorded Services / MP3 / Program Files
22/08 File Name 1
1
File name
Date of Recording
Recording Numbe
Information of selected file
Information of HDD
Selection Numbe
Scrambled Icon
Lock Icon
Help Messages
62
Page 63

FUNCTION GUIDE
Recorded Services List
The file list is displayed by pressing button. The file list of Recorded Services
can be selected by , buttons from other list.
1. You can see the file number, file name, date of recording, information of scramble,
locking, Service name, event information, file size, HDD information, etc.
2. Folder
A new folder can be made by pressing (Green) button. The new folder will be
named as GROUP #. The name can be changed by option (Blue) button.
The keyboard will be displayed if you select the Rename there.
3. Move
Press (Yellow) button after selecting a file you want to move. The lists of Folders
will appear. You can select a folder you want.
4.Delete
Press (White) button after selecting a file you want to delete. You have to
confirm it to delete at confirmation box.
5. Sorting, Rename, Lock
Press (Blue) button to display option list. You can sort, rename and lock the
selected file or folder. If a file is locked here, the Lock icon will appear in the file list.
6. Icons
Scarmbled Icon
Icon (color) Description
$ (Yellow) Scrambled
$ (Yellow/Green) Partially Scrambled
$ (Green) Decrambled
None Non-scrambled (FTA)
Lock Icon ( )
It means that the file is locked. To play the files you have to enter the PIN code.
7. Playback
To playback the selected file, press button or button.
8. Successive Playback of Services
63
Page 64

FUNCTION GUIDE
Press (Red) button to number the services among the recorded services list and
press or button to playback the multi-services in sequence automatically.
This function is very convenient for you to descramble the pay TV service with proper
CAM module and smart card. You can descramble the scramble services and copy it
while you are not using this PVR.
9. Successive copy of Services
Select the services you want to copy by pressing (Red). You can start copying by
pressing button.
10. Event information
If there was Event information when the service was recorded, you can see the
information by pressing button.
MP3 File List
The file list is displayed by pressing button. The file list of MP3 files can be
selected by r , buttons from other list.
1. You can download the MP3 files via USB from PC using Altair.exe.( You can get it
from www.topfield.co.kr) The list of MP3 files will be displayed here.
2. Folder
A new folder can be made by pressing (Green) button. The new folder will be
named as GROUP #. The name can be changed by option (Blue) button.
The keyboard will be displayed if you select the Rename there.
3. Move
Press F3 (Yellow) button after selecting a file you want to move. The lists of Folders
will appear. You can select a folder you want.
4.Delete
Press (White) button after selecting a file you want to delete. You have to
confirm it to delete at confirmation box.
5. Sorting, Rename
Press (Blue) button to display option list. You can sort, rename the selected file
or folder.
6. Play
To play the selected file, press button or button.
64
Page 65

FUNCTION GUIDE
7. Successive Playback of MP3 files
Press F1 (Red) button to number the files among the file list and press OK or ply
button to play the files in sequence automatically.
8. Play by folder
To play the files in specific folder, select a folder and press button.
9. Select Play mode
To select a play mode of MP3, press (white) button. There are normal, repeat
one and repeat all modes.
Program File List
The file list is displayed by pressing button. The file list of Program files can be
selected by , buttons from other list.
1. You can download the TAP(Topfield Application Program) via USB from PC using
Altair.exe.( You can get it from www.topfiled.co.kr). The list of the TAP will be
displayed.
2. Folder
A new folder can be made by pressing (Green) button. The new folder will be
named as GROUP #. The name can be changed by option (Blue) button.
The keyboard will be displayed if you select the Rename there.
3. Move
Press F3 (Yellow) button after selecting a file you want to move. The lists of Folders
will appear. You can select a folder you want.
4. Delete
Press (White) button after selecting a file you want to delete. You have to
confirm it to delete at confirmation box.
5. Sorting, Rename
Press (Blue) button to display option list. You can sort and rename the selected
file or folder.
6. Run
To run the selected file, press OK button.
7. Auto Run
If you want a program runs automatically when the PVR starts up, move the program
to the Auto Start folder.
65
Page 66

FUNCTION GUIDE
If you are pressing the button when the PVR starts up, the program in the Auto
Run folder will not run. Remove the program from the Auto Run folder if you do not
want to auto run.
Progress Icon
There will be Icons during Playback, Time Shifting, Recording and Copying. They will be
displayed for a seconds. To display it again, press button.
Icon (color) Description
Recording.
- Small Circle in the large circle means the current service you
are watching is being recorded.
Circle (Red)
e (Green)
- The number in the large circle means recording number.
And, the service being recorded is not the service you are
watching.
- The outer circle mean displays the rate of progress.
Playback.
- The figure in the circle shows you the playback speed.
- The outer circle displays the rate of progress.
Copying.
Circle (Red)
66
- The character C in the circle means copying.
- The outer circle displays the rate of progress.
Page 67

SOFTWARE UPGRADE AND PC INTERFACE
SOFTWARE UPGRADE AND PC INTERFACE
Software Upgrade
The PVR has stable and convenience software to use. But, to improve the PVR the new
software of the PVR may be released.
Whenever a problem is found or functions are added or modified, the software in the
PVR has to be upgraded to enjoy better function.
The latest news, software, utility, driver, product and manual will be found at Topfield
website http://www.i-topfield.com
There are some methods to download the new software.
(a) PVR to PVR download via RS232C
It is possible to download the firmware or channel data from PVR to another PVR.
(b) PC to PVR download via RS232C
You need the TFD-down.exe to download the software.
Start download at PC and turn on the PVR.
(c) PC to PVR download USB
You need to the TFDN_USB.exe to download the software.
Start download at PC and turn on the PVR.
(d) OTA
You can download the latest PVR software from Satellite by OTA. To upgrade your
PVR by OTA, you should receive the signal from Hotbird or Astra.
The satellite and TP can be added or changed. You can get the information at
www.i-topfield.com
For more information, refer to the transfer firmware chapter of Menu Operations.
File download and upload via USB
You can upload or download the TAP(Topfield Application Program), MP3 and the
recorded services to or from your PC. You need to the Altair.exe to enjoy it.
67
Page 68

SOFTWARE UPGRADE AND PC INTERFACE
You can download the TFD-down.exe, TFDN_USB.exe, Altair.exe at Topfield website
http://www.i-topfield.com
The TAP application can be developed and used by users. The users can make their
own functions by TAP. Topfield does not confirm the TAP developed by users, and
does not have any responsibility.
68
Page 69

MENU MAP
MENU MAP
System Setting
Time Setting
Timer Setting
Parental Control
Language Setting
A/V Output Setting
OSD Transparency
Info Box Display Time
Info Box Position
Time Shifting
Mode
Local Time
GMT
Time Offset
Censorship
Change PIN Code
Access Control
Menu Language
Subtitle Language
Audio Language
TV Type
Video Output
VCR SCART Type
TV Aspect Ratio
16:9 Display Format
Sound Mode
RF Output
RF Channel
Time Setting
Language Setting
A/V Output Setting
Organizing Services
Organizing Favorites
Installation
IRD Lock
Organizing Channels
Organizing Favorites
69
Page 70

MENU MAP
Record No.
Satellite
Service
Mode
Recording
Duration
File Name
Start
Stop
Timer Setting
LNB Setting
Installation
Channel Search
Services Copy
Motorized DiSEqC 1.2
70
Satellite Name
Tuner Select
Connection Type
LNB Frequency
LNB Power
22Khz
DiSEqC 1.1
DiSEqC 1.0
Channel Search
Satellite Name
Search Mode
Frequency
Symbol Rate
Polarization
Network Search
PID
FTA/Scrambled
Tuner Select
Start Search…
LNB Setting
Satellite Name
Tuner Select
Transponder
LNB Setting
Motorized DiSEqC 1.2
DiSEqC Command Mode
Movement
Motor Control
Channel Search
Page 71

Installation
USALS Setting
Factory Setting
Format Hard Disk
Tuner Select
Motorized DiSEqC 1.3
Satellite Name
Satellite Angle
My Longitude
My Latitude
Reference Position
Move
Transponder
Goto the position
Transfer Firmware
Firmware Upgrade
Information
Conditional Access (TF5500PVR only)
Common Interface
Game
IRD Status
Calendar
Slot 1
Slot 2
Exblock
Bomb Hexa
Pac Man
Transfer Program to Other IRD
Transfer Data to Other IRD
Satellite Name
Frequency
Symbol Rate
Polarization
PID
Tuner Select
Start
71
Page 72

SPECIFICATIONS
SPECIFICATIONS
Tuner & Service Decoder
Item Specification
2 Tuners Decoding & recording(or decoding)
Input/Loop through Connector 75 ,IEC 169-24, Female
Frequency Range 950 ~ 2150MHz
Signal Level Input -65 ~ -25dBm
LNB Power & Polarisation
22KHz Tone
DiSEqC Control V1.0/1.1/1.2/1.3(USALS) compatible
Modulation QPSK
Input Symbol Rate 1 ~ 45MS/s
MPEG Transport Stream A/V Decoding
Item Specification
Transport Stream ISO/IEC 13818-1 MPEG-2
Profile Level 2 x MPEG-2 MP@ML (PIP)
Aspect Ratio 4:3, 16:9, Pan & scan, Letterbox
Video Resolution 720 x 576
Audio Decoding MPEG-1 Layer 1, 2 & 3
Main System
Item Specification
Main Processor MIPS
Memory
HDD 80GB, 120/160GB(optional)
Front Panel & RCU
Item Specification
7 Keys CH-/+, VOL-/+, MENU, OK, STANDBY
4-digit 7-segment LEDs (TF5000PVR) Service number or Time display
VFD (TF5500PVR) Service name and other information display
3 LEDs TV/SAT, REMOTE, STANDBY
RCU 46 Keys
Ω
Vertical:+13.5VDC
Horizontal:+18VDC
Current:Max. 500mA
Overload protection
Frequency:22±1KHz
Amplitude:0.6±0.2V
Flash-ROM: 2MB
RAM: 64MB
EEPROM: 2Kb
72
Page 73

SPECIFICATIONS
Conditional Access Interface
Item Specification
PCMCIA
2 slots
DVB Common Interface Standard
A/V & Data In/Out
Item Specification
TV-SCART
VCR-SCART
S-VIDEO Video S-VIDEO output
RCA A/V
S/PDIF Digital audio or Dolby AC-3 bitstream output
RS-232C
USB USB2.0 Device
Video CVBS/S-VIDEO/RGB/YUV output
Audio L/R output
Video CVBS output, Audio L/R output
Video CVBS/S-VIDEO/RGB input bypass
Audio L/R input bypass
Video CVBS output
Audio L/R output
9 pin D-sub type
Transfer rate 115.2Kbps
RF-Modulator
Item Specification
RF-Connector 75 , IEC 169-2, Female/Male
Output Service CH21 ~ 69 (PAL)/CH3,4,14~83(NTSC)
TV standard PAL G/I/K NTSC-M selectable by Menu
Ω
Power Supply
Item Specification
Input Voltage 90 ~ 250VAC, 50/60Hz
Type SMPS
Power Consumption Running: Max. 22W, Standby: 8W
Protection Separate internal fuse.
Physical Specification
Item Specification
Size(W x H x D) 340 x 60 x 265 mm
Weight(Net) 3.3Kg
*
Specifications and functions may be changed for
improvement without notice in advance.
73
Page 74

www.i - t opfiel d . c om
110T-F2513-205-0
rev.2
 Loading...