

Page 1
SKYR@CER WBR 7201n
WIRELESS ROUTER
Quick Installation Guide / Snelstartgids / Guide d'installation
rapide / Kurzanleitung installation / Guía de instalación rápida /
Guia de instalação rápida / Skrócona instrukcja instalacji
v 1.0
Page 2

This product is in compliance with the essential requirements and other
relevant provisions of the R&TTE directive 89/336/EEC.
The Declaration of conformity can be found on:
http://www.topcom.net/support/cedeclarations.php
UK The features described in this manual are published with reservation to
modifications.
NL De in deze handleiding beschreven mogelijkheden worden gepubliceerd onder
voorbehoud van wijzigingen.
FR Les possibilités décrites dans ce manuel sont publiées sous réserve de
modifications.
DE Die in dieser Bedienungsanleitung umschriebenen Möglichkeiten, werden
vorbehaltlich Änderungen publiziert.
ES Las características descritas en este manual pueden ser objeto de futuras
modificaciones.
PT As características descritas neste manual são publicadas sob reserva de
modificação.
PL Waciwoci opisane w niniejszej instrukcji obsugi s publikowane z
zatrzeeniem prawa wprowadzenia zmian.
SK Vlastnosti popísané v tejto príruke sú publikované s vyhradeným právom na
zmenu
UK The CE symbol indicates that the unit complies with the essential requirements of
the R&TTE directive.
NL Het toestel voldoet aan de basiseisen van de R&TTE-richtlijn. Dit wordt bevestigd
door de CE-markering.
FR La conformité de l’appareil avec les exigences fondamentales de la directive
européenne R&TTE relative aux terminaux, est confirmée par le label CE.
DE Die Übereinstimmung des Gerätes mit den grundlegenden Anforderungen der
R&TTE-Richtlinie ist durch das CE-Kennzeichen bestätigt.
ES El sello CE corrobora la conformidad del equipo con los requerimientos básicos
de la directiva R&TTE.
PT O símbolo CE indica que esta unidade cumpre com os requisitos essenciais da
directiva R&TTE.
PL Symbol CE oznacza, e urzdzenie spenia istotne wymogi dyrektywy R&TTE.
SK Symbol CE oznauje, že jednotka súhlasí s hlavnými požiadavkami R&TTE
smernice.
For use in all EU countries, Switzerland, Norway, Turkey and Russia.
For France, the output power is restricted if used outdoor and in the range 2454-2483,5 Mhz.
For Italy, depending on the usage, a general authorization may be required.
Page 3

English ......................................................... 1
1 Connect your router................................................................................................1
2 Setup the Broadband Router................................................................................. 2
3 Check the Internet Connection Status.................................................................. 9
4 Setup the Wireless Network.................................................................................10
4.1 WPS............................................................................................................................... 10
4.2 Setup the (E)SSID......................................................................................................... 10
4.3 Set the wireless Encryption ........................................................................................ 11
5 Warranty................................................................................................................. 13
5.1 Warranty period............................................................................................................ 13
5.2 Warranty handling........................................................................................................ 13
5.3 Warranty exclusions.................................................................................................... 13
6 Disposal of the device (environment).................................................................13
7 Cleaning.................................................................................................................14
Nederlands................................................. 15
1 Uw router aansluiten............................................................................................. 15
2 De breedbandrouter instellen.............................................................................. 16
3 Controleer de status van de internetverbinding................................................23
4 Het draadloos netwerk instellen..........................................................................24
4.1 WPS............................................................................................................................... 24
4.2 (E)SSID instellen .......................................................................................................... 25
4.3 De draadloze encryptie instellen ................................................................................ 25
5 Garantie.................................................................................................................. 27
5.1 Garantietermijn............................................................................................................. 27
5.2 Afwikkeling van garantieclaims.................................................................................. 27
5.3 Garantiebeperkingen................................................................................................... 27
6 Afvoeren van het toestel (milieu)......................................................................... 28
7 Reinigen................................................................................................................. 28
Français...................................................... 29
1 Connexion de votre routeur................................................................................. 29
2 Configuration du routeur large bande ................................................................30
3 Contrôle de l'état de la connexion Internet ........................................................ 37
4 Configuration du réseau sans fil......................................................................... 39
4.1 WPS............................................................................................................................... 39
4.2 Configurer le (E)SSID................................................................................................... 39
4.3 Définir le cryptage de la liaison sans fil..................................................................... 40
5 Garantie.................................................................................................................. 41
5.1 Période de garantie...................................................................................................... 41
5.2 Mise en uvre de la garantie....................................................................................... 42
5.3 Exclusions de garantie................................................................................................ 42
6 Mise au rebut de l'appareil (environnement)...................................................... 42
7 Nettoyage...............................................................................................................42
I
Page 4

Deutsch ...................................................... 43
1 Anschluss Ihres Routers...................................................................................... 43
2 Konfiguration des Breitband-Routers................................................................. 44
3 Prüfen des Internetverbindungsstatus............................................................... 51
4 Konfiguration des drahtlosen Netzwerks........................................................... 52
4.1 WPS............................................................................................................................... 52
4.2 Konfigurieren der (E)SSID........................................................................................... 53
4.3 Einstellen der drahtlosen Verschlüsselung .............................................................. 54
5 Garantie.................................................................................................................. 55
5.1 Garantiezeit................................................................................................................... 55
5.2 Abwicklung des Garantiefalls..................................................................................... 55
5.3 Garantieausschlüsse................................................................................................... 56
6 Entsorgung des Geräts (Umweltschutz)............................................................. 56
7 Reinigung............................................................................................................... 56
Espaol ...................................................... 57
1 Conexión del router..............................................................................................57
2 Configuración del router de banda ancha..........................................................58
3 Comprobación del estado de la conexión a Internet......................................... 65
4 Configuración de la red inalámbrica................................................................... 66
4.1 WPS............................................................................................................................... 66
4.2 Configuración del (E)SSID .......................................................................................... 67
4.3 Configuración del cifrado inalámbrico ...................................................................... 67
5 Garantía.................................................................................................................. 69
5.1 Período de garantía...................................................................................................... 69
5.2 Tratamiento de la garantía .......................................................................................... 69
5.3 Limitaciones de la garantía......................................................................................... 69
6 Eliminación del dispositivo (medio ambiente)................................................... 70
7 Limpieza.................................................................................................................70
Portugus................................................... 71
1 Ligue o router........................................................................................................71
2 Configure o Router de Banda Larga ................................................................... 72
3 Verifique o estado da ligaço Internet.............................................................. 79
4 Configure o Router Wireless................................................................................80
4.1 WPS............................................................................................................................... 80
4.2 Configure o (E)SSID..................................................................................................... 81
4.3 Configure a Encriptaço da rede wireless................................................................. 81
5 Garantia.................................................................................................................. 83
5.1 Período de garantia...................................................................................................... 83
5.2 Accionamento da garantia .......................................................................................... 83
5.3 Excluses de garantia ................................................................................................. 83
6 Eliminaço do dispositivo (ambiente)................................................................. 84
7 Limpeza..................................................................................................................84
II
Page 5

Polski.......................................................... 85
1 Podczenie routera..............................................................................................85
2 Konfiguracja szerokopasmowego routera ......................................................... 86
3 Sprawd status poczenia z internetem ............................................................93
4 Konfiguracja sieci bezprzewodowej.................................................................... 94
4.1 WPS............................................................................................................................... 94
4.2 Konfiguracja (E)SSID................................................................................................... 94
4.3 Wczanie szyfrowania komunikacji bezprzewodowej............................................. 95
5 Gwarancja..............................................................................................................96
5.1 Okres gwarancji ........................................................................................................... 96
5.2 Obsuga gwarancji....................................................................................................... 97
5.3 Wyjtki od gwarancji.................................................................................................... 97
6 Usuwanie urzdzenia (rodowisko) ....................................................................97
7 Czyszczenie...........................................................................................................97
Slovensky................................................... 98
1 Pripojte svoj router............................................................................................... 98
2 Nastavenie pre širokopásmový Broadband Router........................................... 99
3 Skontrolujte Štatút internetového pripojenia................................................... 106
4 Nastavenie Bezdrôtovej siete ............................................................................ 107
4.1 WPS............................................................................................................................. 107
4.2 Nastavenie (E)SSID.................................................................................................... 107
4.3 Nastavte bezdrôtové Kódovanie............................................................................... 108
5 Záruka .................................................................................................................. 109
5.1 Záruná doba.............................................................................................................. 109
5.2 Manipulácia so zárukou............................................................................................. 110
5.3 Odopretie záruky........................................................................................................ 110
6 Likvidácia zariadenia (životné prostredie)........................................................ 110
7 istenie ................................................................................................................ 110
III
Page 6

Page 7
English
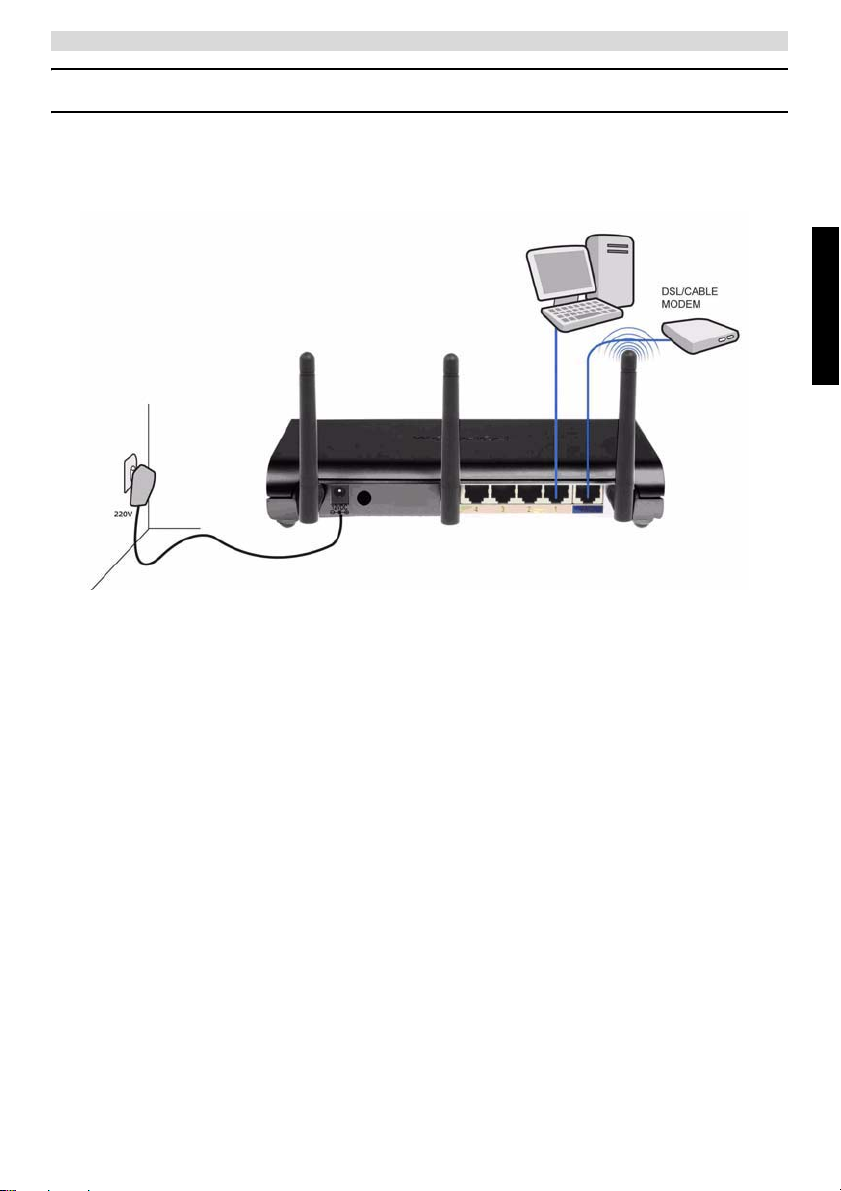
Connect your router
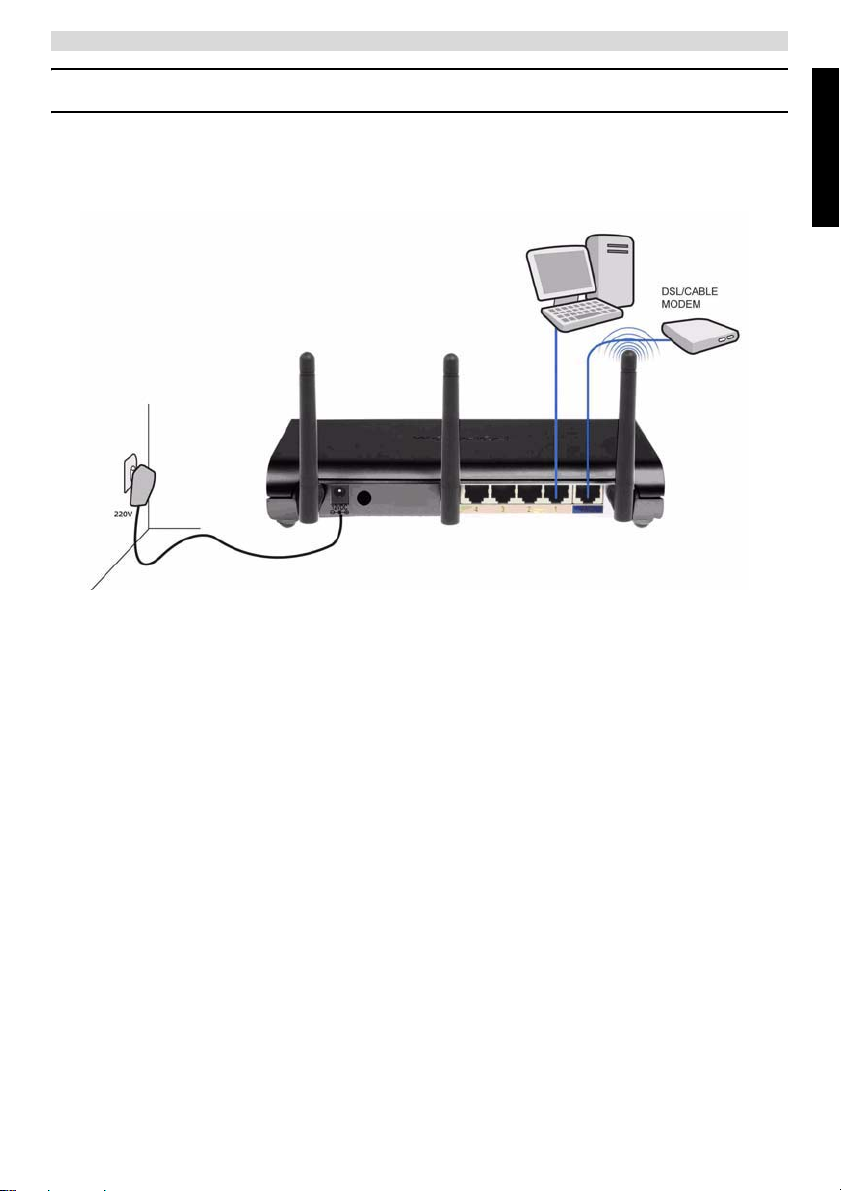
1 Connect your router
Please connect your router according to the diagram below.
• POWER: The power port is to connect the 12V DC power adapter.
J The power LED on the front panel will go ON when the power adapter is connected.
• WAN: The WAN port is to connect your Cable/DSL modem. The link LED in the front
panel will indicate that the ADSL line is connected.
J The WAN LED will go ON if the network Ethernet cable is properly connected.
• Ports 1- 4: This is to connect up to 4 pc's or other network devices.
J The LAN LED's will indicate the connection status.
• Reset/WPS Button:
J To load default settings, press the reset button and hold it for at least 20 seconds. It
will load the factory default settings for the device. Do not press the reset button
unless you want to clear the current settings.
J To start the WPS (Wi-Fi Protected Setup), press the key for about 4 seconds.
ENGLISH
1
Page 8
Setup the Broadband Router
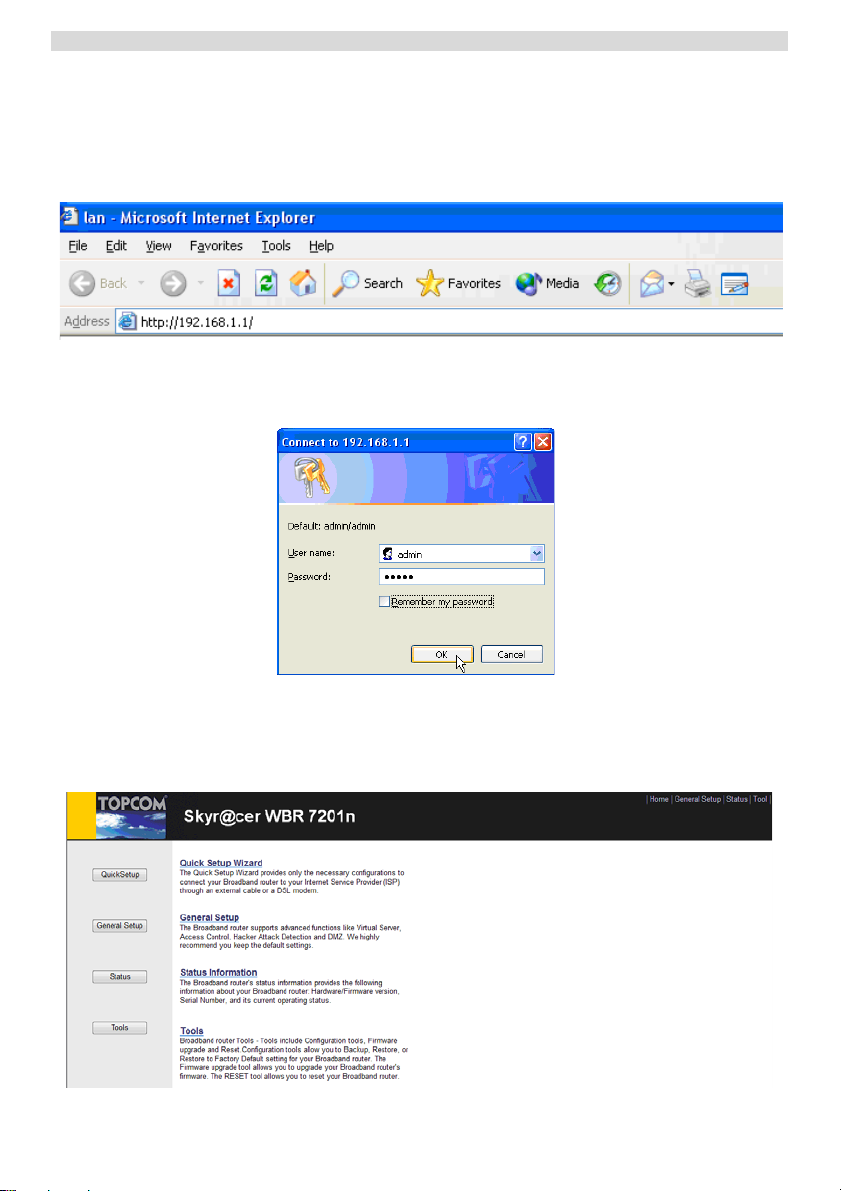
2 Setup the Broadband Router
It is strongly recommended to configure your router by use of a wired connection. So,
please connect your computer to one of the Ethernet ports of the router by use of an
Ethernet cable.
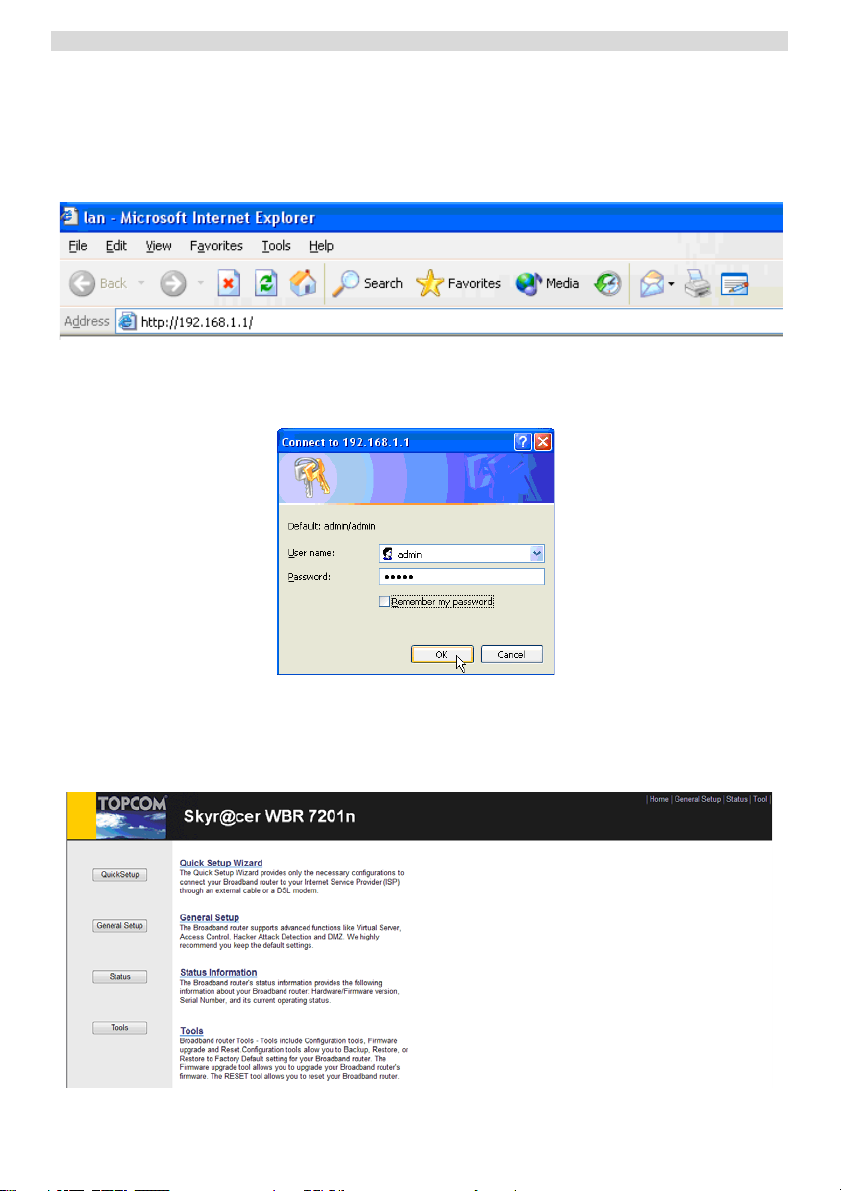
J Open the Internet Explorer and type 192.168.1.1 in the URL Address bar.
- Internet Explorer URL Address bar -
Now the login screen will appear.
J Enter the username and password.
- Login screen -
By default the username is admin and the password is admin.
J Click OK to proceed.
Now you enter the web management of your Wireless Router
- Wireless Router Web management page -
2
Page 9
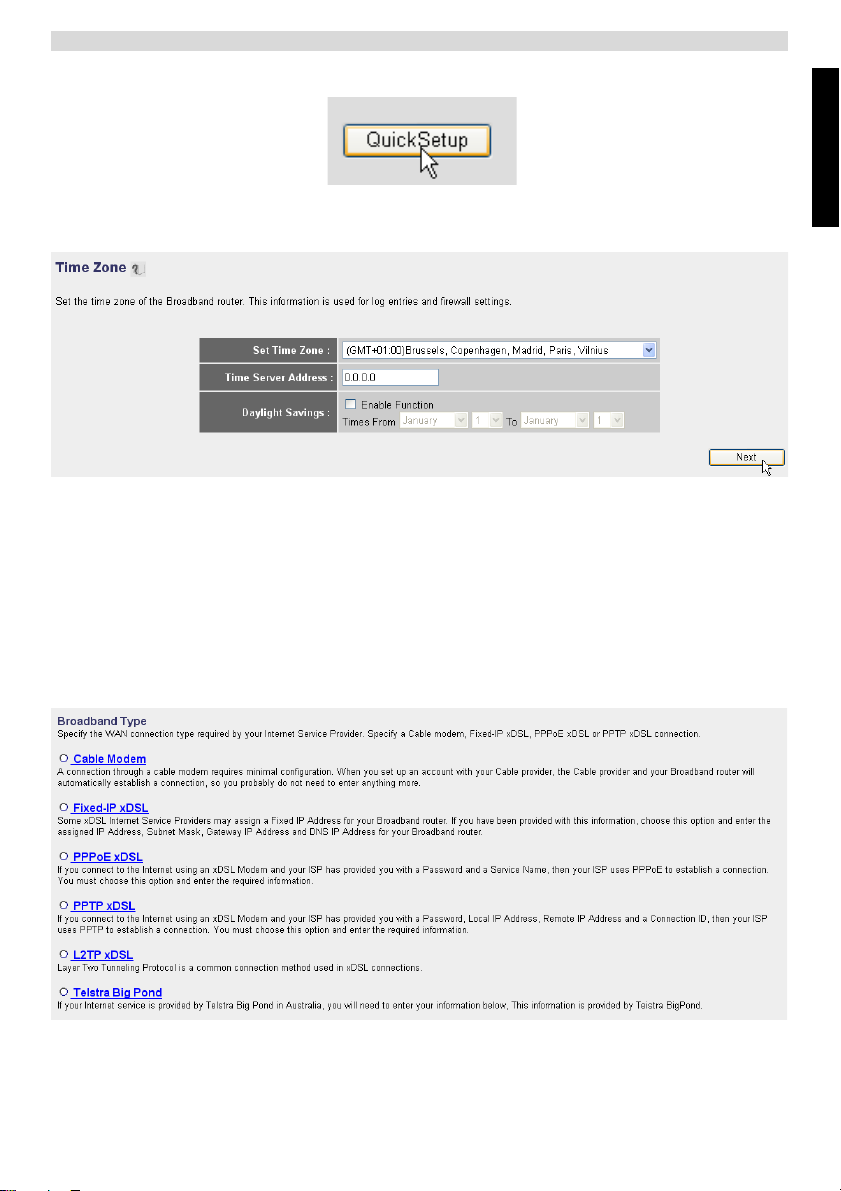
J Choose Quick Setup Wizard to start the configuration.
J In the next screen you can set the Time Zone.
- Time Zone settings -
1
Set Time Zone: Please select your region.
2 Time Server Address: You can enter the IP address of your preferred
Time Server or you can leave the default setting.
3 Daylight Savings: Here you can Enable the Daylight Savings. Please
enter the start and end date of the Daylight Savings.
J Click Next to proceed.
Setup the Broadband Router
ENGLISH
- Broadband connection type -
J Now choose your Broadband Connection Type:
3
Page 10
Setup the Broadband Router
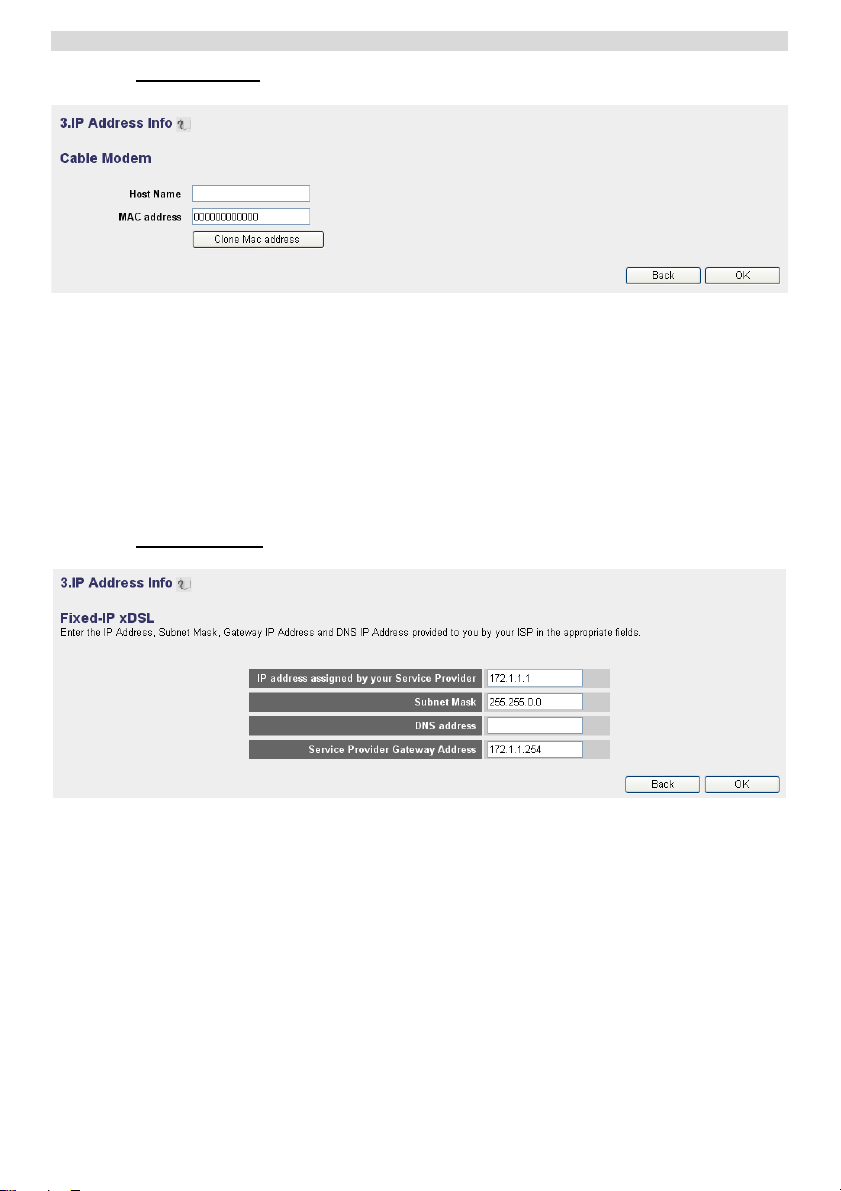
o Cable modem: Used for cable modem connections.
1
2 MAC Address: Some Cable Internet Providers will keep the Mac
JClick OK to proceed.
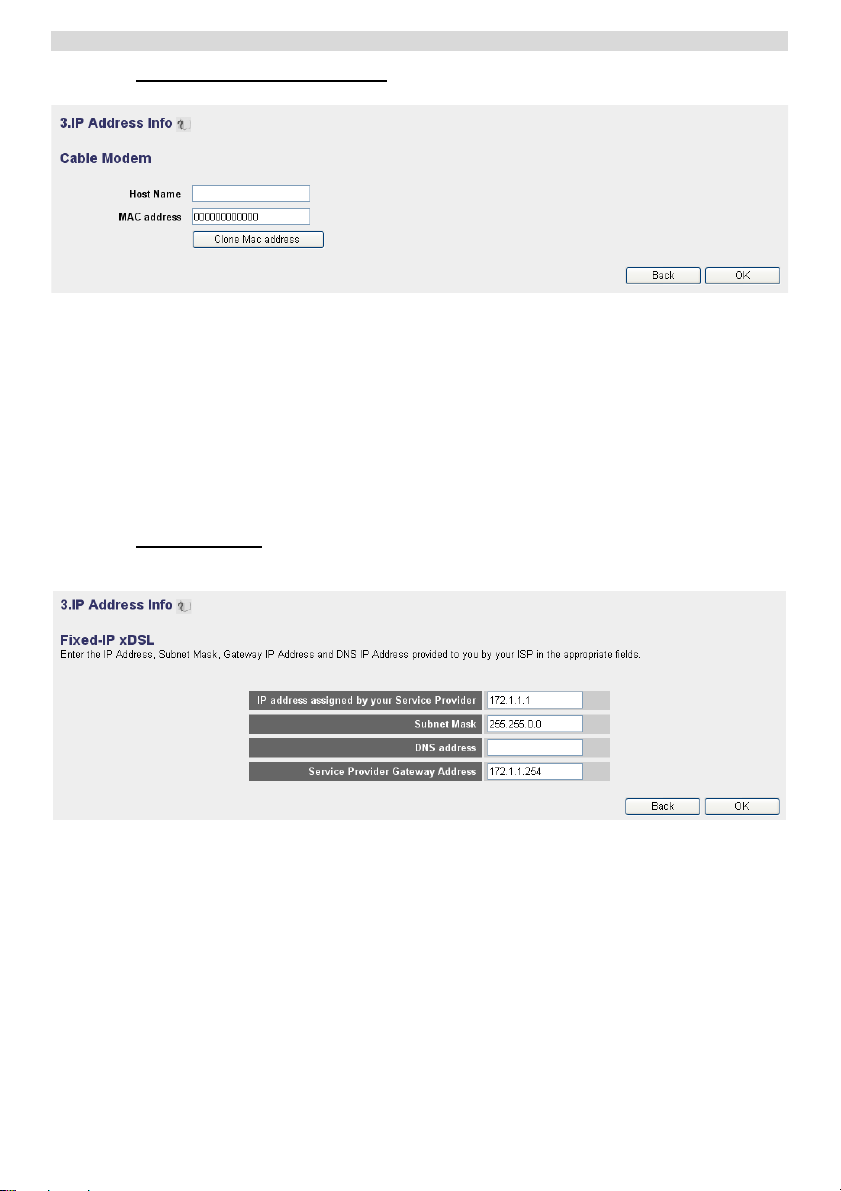
o Fixed-IP xDSL: Used for cable modem or DSL bridge with fixed IP address.
- IP Address info for Cable Modem -
Host Name: Enter your Host Name if necessary.
address of your computer in their server. In this case you should clone
the Mac address of your computer.
JClick Clone Mac Address to copy your computers Mac address into
the router.
- IP Address info for Fixed-IP xDSL -
IP Address assigned by your Service Provider: Please enter the fixed
1
WAN IP address.
2 Subnet Mask: Enter the Subnet Mask.
3 DNS Address : Enter the DNS address.
4 Service Provider Gateway Address: Enter the Gateway IP address.
JClick OK to proceed.
4
Page 11
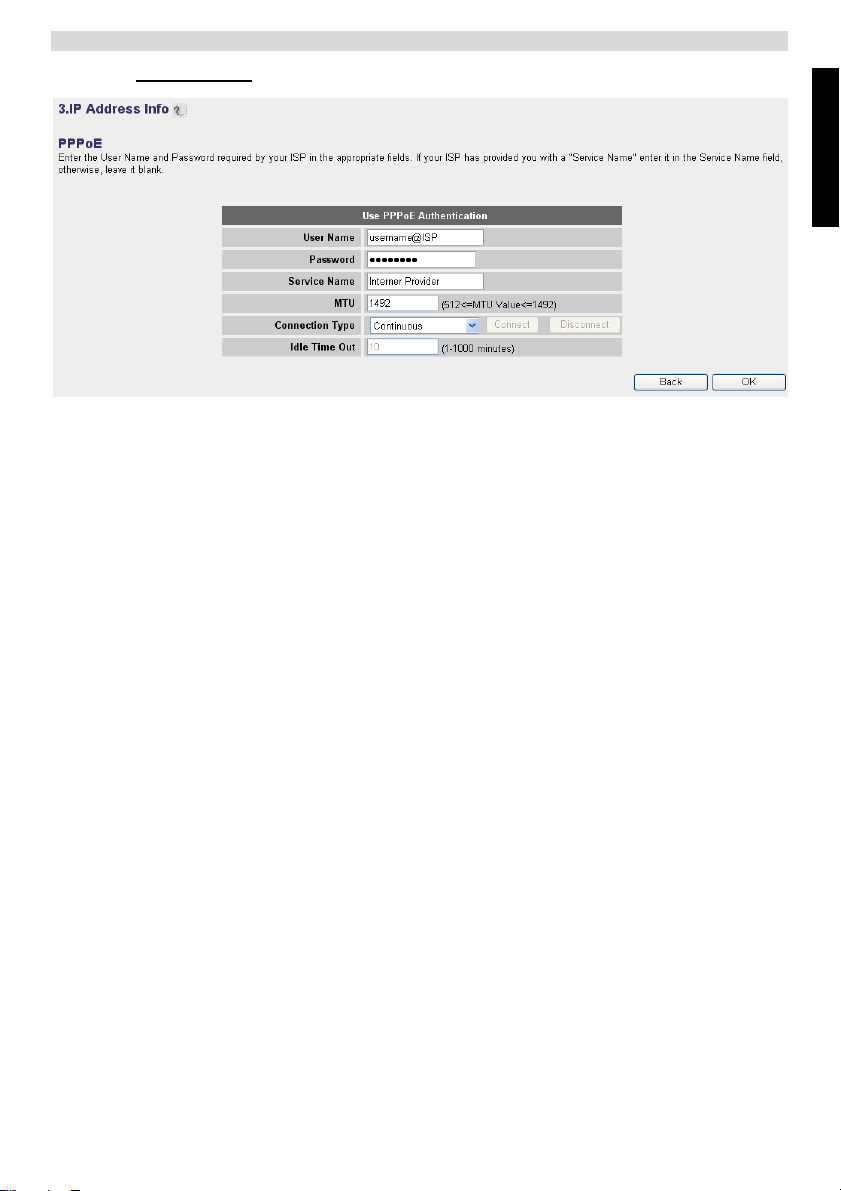
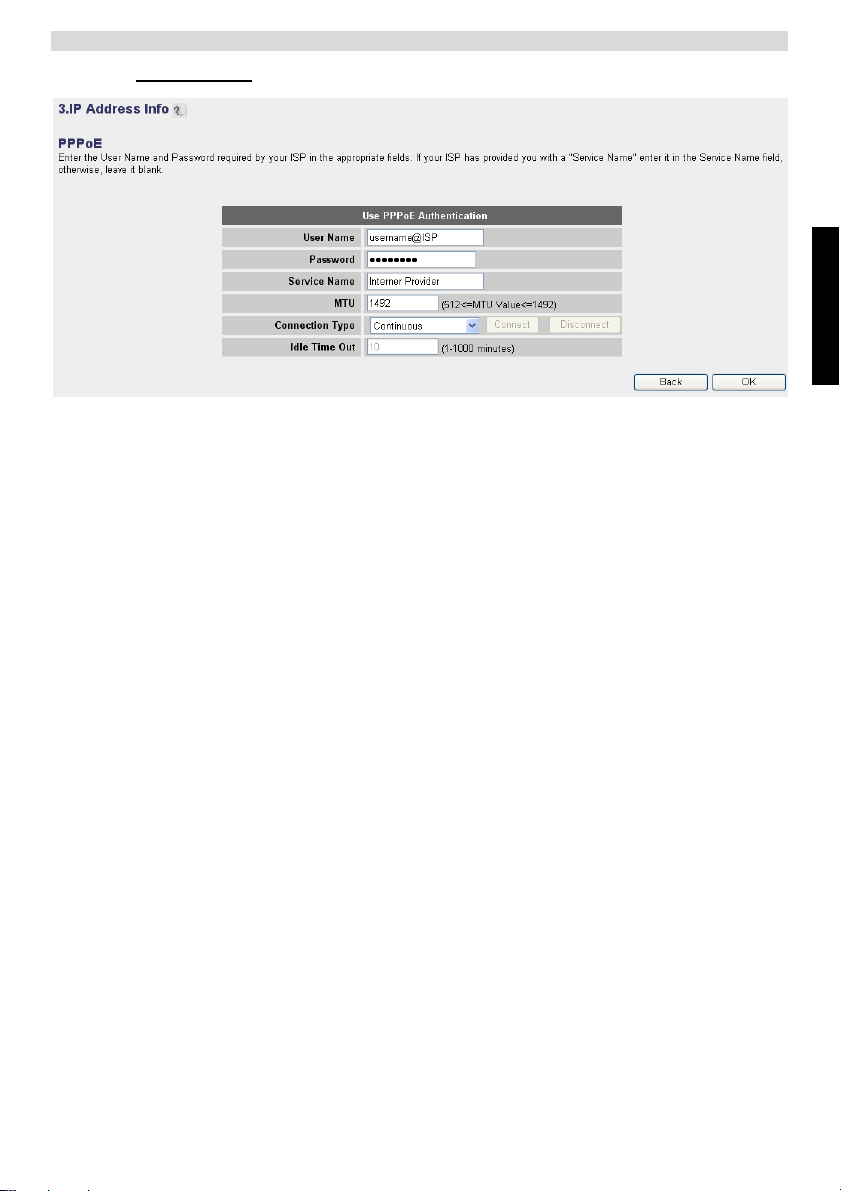
o PPPoE xDSL: Used for DSL bridge with PPPoE connection.
- IP Address info for PPPoE xDSL -
1
Username: Enter your PPPoE username.
2 Password: Enter your password.
3 Service Name: Enter the service name (for example the name of your
Internet Provider).
4 MTU: Enter the MTU size. (If the size is not specified by your Internet
Provider, please leave the default value at 1492.)
5 Connection type:
• Continuous: The PPP-connection will always be active.
• Connect on Demand: The PPP-connection will establish when a
computer is accessing the Internet. The PPP connection will
disconnect when there is no more Internet traffic during the Idle
Time (minutes), entered in the field below.
• Manual: The PPP connection is established / disconnected
manually by clicking Connect / Disconnect.
JClick OK to proceed.
Setup the Broadband Router
ENGLISH
5
Page 12
Setup the Broadband Router
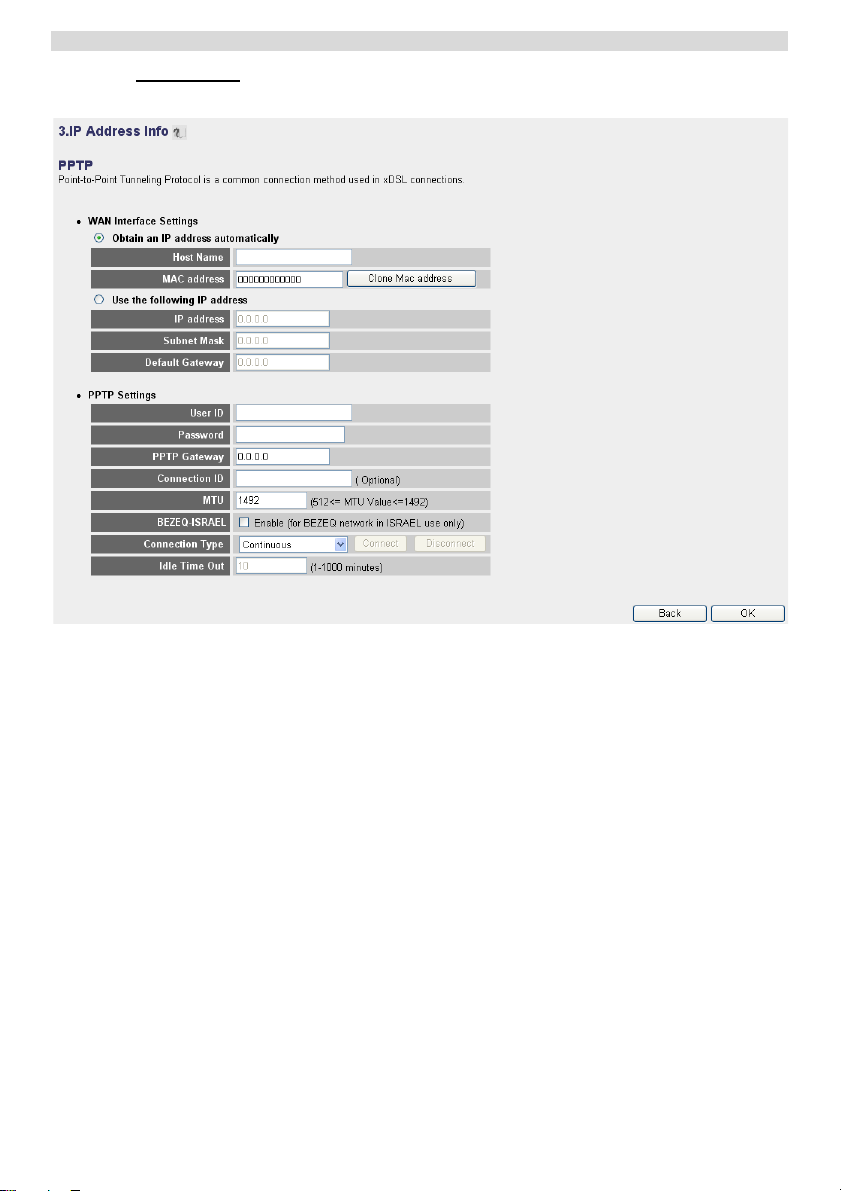
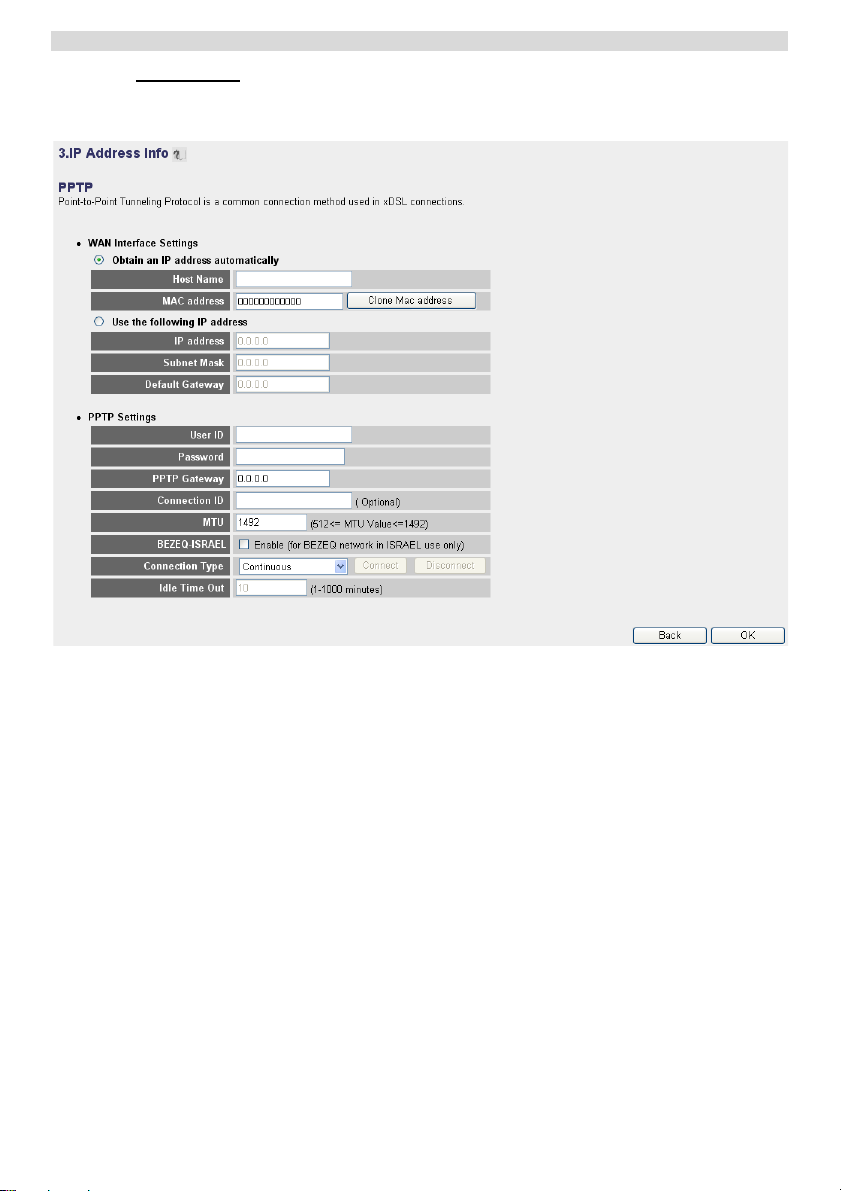
o PPTP xDSL: used for cable modem or DSL bridge with PPTP connection. PPTP
can also be used when the router is connected to another LAN network.
- IP Address info for PPTP xDSL -
•
WAN connection: DHCP client or Fixed IP address
• Obtain an IP address automatically:
1 Host Name: Enter your Host Name if necessary.
2 MAC Address: Some Cable Internet Providers will keep the MAC
address of your computer in their server. In this case you should clone
the Mac address of your computer. Click Clone Mac Address to copy
your computers Mac address into the router.
• Use the following IP address:
1 IP address: Please enter the fixed IP address.
2 Subnet Mask: Enter the Subnet mask.
3 Default Gateway: Enter the Gateway IP address.
• PPTP Settings:
1 User ID: Enter the PPTP username.
2 Password: Enter the PPTP password.
3 PPTP Gateway: Enter the Gateway.
6
Page 13
4 Connection ID: Enter the Connection ID when necessary.
5 MTU: Enter the MTU size. (If the size is not specified, please leave the
default value at 1492.)
6 BEZEQ-ISRAEL: Only for Israel.
7 Connection Type:
• Continuous: The PPP-connection will always be active.
• Connect on Demand: The PPP-connection will establish when a
computer is accessing the Internet. The PPP connection will
disconnect when there is no more Internet traffic during the Idle
Time (minutes), entered in the field below.
• Manual: The PPP connection is established / disconnected
manually by clicking Connect / Disconnect.
JClick OK to proceed.
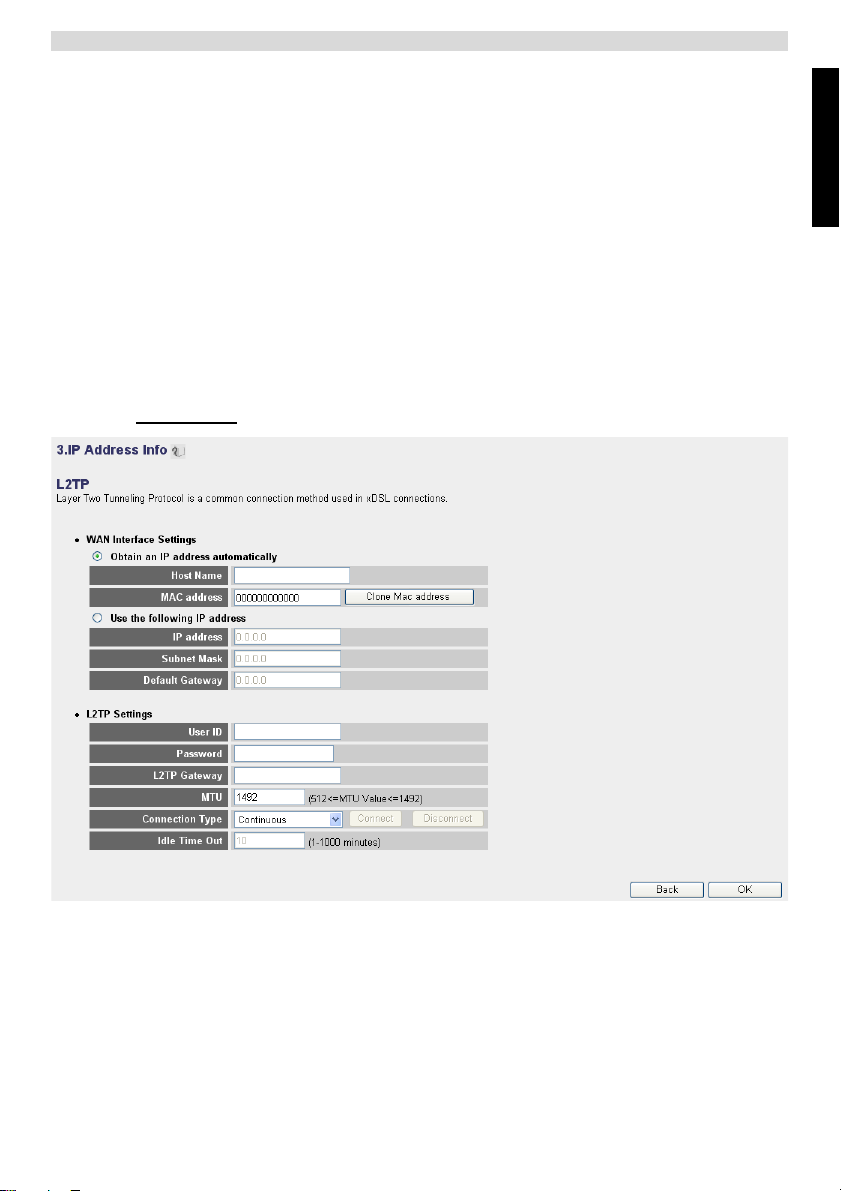
o L2TP xDSL: Used for cable modems with L2TP connection.
Setup the Broadband Router
ENGLISH
- IP Address info for L2TP xDSL -
•
WAN connection: DHCP client or Fixed IP address
• Obtain an IP address automatically:
1 Host Name: Enter your Host Name if necessary.
2 MAC Address: Some Cable Internet Providers will keep the MAC
address of your computer in their server. In this case you should clone
the Mac address of your computer. Click Clone Mac Address to copy
your computers Mac address into the router.
7
Page 14
Setup the Broadband Router
• Use the following IP address:
1 IP address: Please enter the fixed IP address.
2 Subnet Mask: Enter the Subnet mask.
3 Default Gateway: Enter the Gateway IP address.
• L2TP Settings:
1 User ID: Enter the L2TP username.
2 Password: Enter the L2TP password.
3 L2TP Gateway: Enter the Gateway.
4 Connection ID: Enter the Connection ID when necessary.
5 MTU: Enter the MTU size. (If the size is not specified, please leave the
6 Connection Type:
JClick OK to proceed.
default value at 1492.)
• Continuous: The PPP-connection will always be active.
• Connect on Demand: The PPP-connection will establish when a
computer is accessing the Internet. The PPP connection will
disconnect when there is no more Internet traffic during the Idle
Time (minutes), entered in the field below.
• Manual: The PPP connection is established / disconnected
manually by clicking Connect / Disconnect.
o Telstra Big Pond: not for Europe.
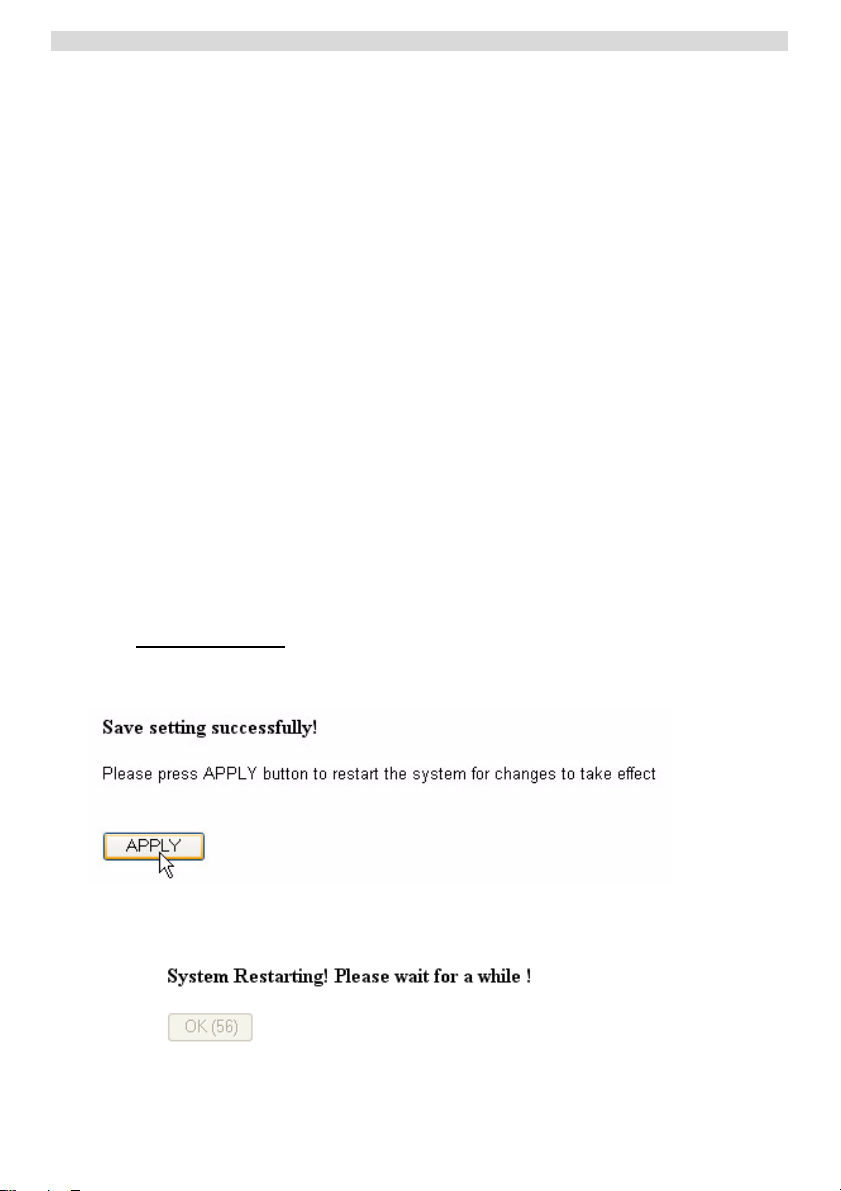
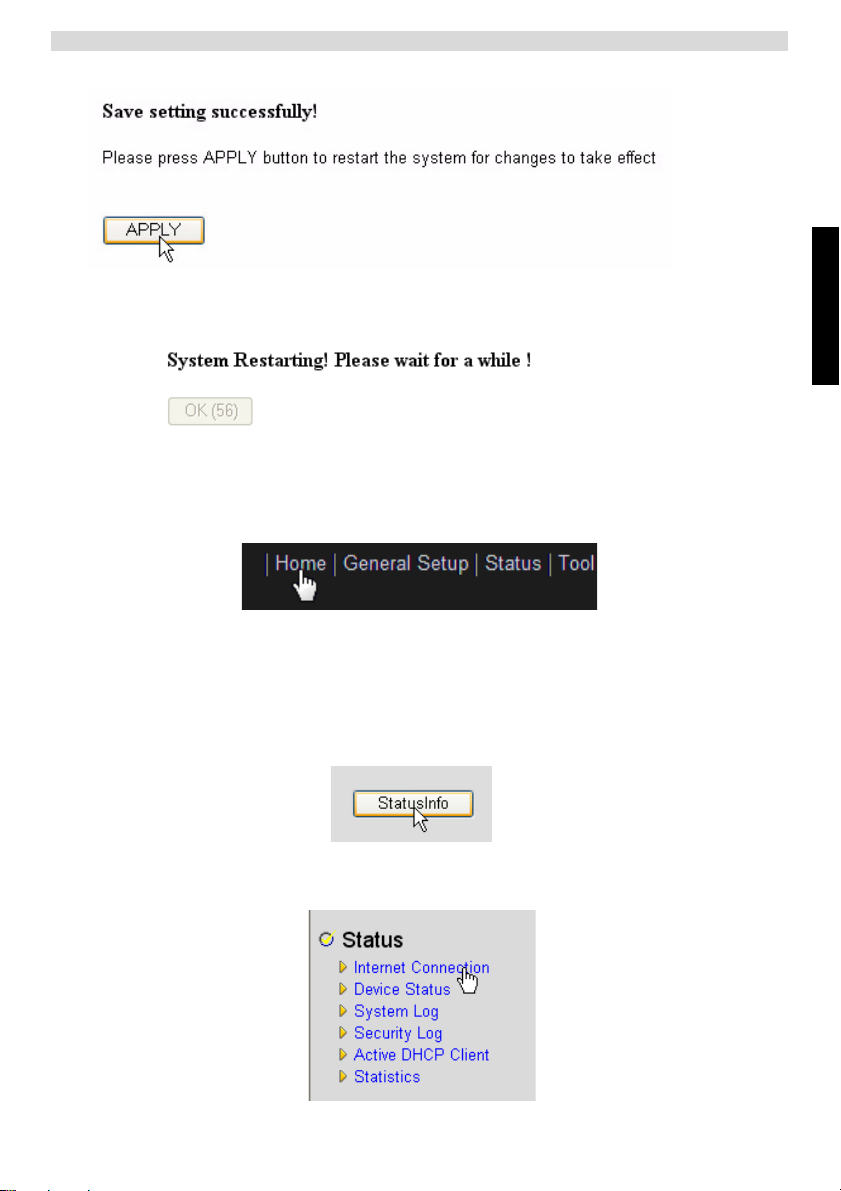
Now the quick setup wizard is finished.
J Click Apply to finish.
The router will reboot now. This will take about 60 seconds.
J Click OK when the reboot sequence is done.
8
Page 15

Check the Internet Connection Status
Return to the home page by clicking HOME in the right top of the screen.
3 Check the Internet Connection Status
The WAN connection can be checked in the Status Info screen on the router Web page.
Now click Internet Connection.
ENGLISH
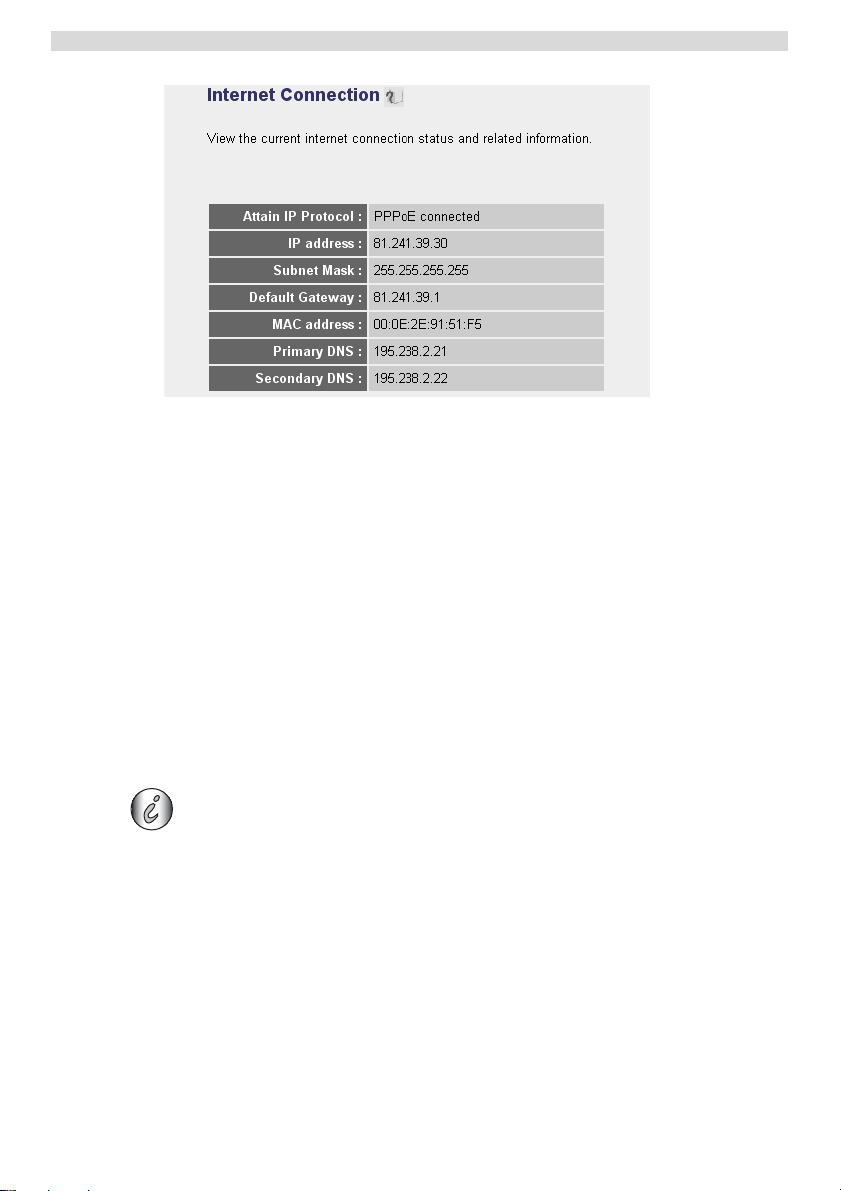
- Internet Connection Status -
J All information about the Internet connection will be visible: WAN IP address,
Gateway, DNS servers, ..
9
Page 16
Setup the Wireless Network
4 Setup the Wireless Network
4.1 WPS
The Skyr@cer WBR 7201n supports the Wi-Fi Protected Setup (WPS) feature.
The WPS can send the wireless encryption settings from the router automatically to the
WPS-enabled wireless client (for example Skyr@cer USB 4201n).
This means that you don't need to enter the encryption settings in your WPS-enabled
wireless adapter if you want to connect to your router. Just press the WPS key from the
router, then press the WPS key on the wireless adapter and the secured connection will
be established after a few seconds.
If you don't setup the router wireless encryption settings, the WPS will
automatically create a very sophisticated encryption key (WPA-PSK) for you.
If you want to use non-WPS Wireless client adapter it is recommended to setup
the wireless encryption manually.
For the automatic WPS setup you don't need to go through sections 4.2 and 4.3 below.
4.2 Setup the (E)SSID
J Click General Setup and go to Wireless > Basic Settings
>
- Wireless Settings page -
1
Choose the wireless Mode: Access Point (AP) is default.
10
>
Page 17
Setup the Wireless Network
2 Enter the Wireless Network name (ESSID). By default it will be
“Topcom_” + six last digits of the MAC address.
You can find the MAC address at the bottom label of the router.
3 There are 13 available radio channels. You are free to select one of
these channels.
If you have more than one wireless router or access point in your
home or office, make sure not to use the same channel.
J Click Apply to confirm.
4.3 Set the wireless Encryption
Topcom strongly recommends to enable encryption. This is the only way to
prevent that unwanted users access your wireless network.
Three encryption settings are available: WEP 64bit, WEP 128bit and WPA(2).
J Choose Security Settings to access the encryption menu.
By default the encryption is disabled. In this screen you can select your type of
encryption.
ENGLISH
11
Page 18
Setup the Wireless Network
In the example below 64-bit WEP Encryption is set.
- Security Settings page -
1
Encryption: Choose WEP
2 Key Length: 64-bit. Now enter your WEP key: You are free to invent a
code (for example 12345abcde). Please make sure to use the same key
in your wireless adapter installed in your Wireless computer or laptop.
Please write down this key and hide it from unauthorised users.
3 For 64-bit encryption 10 hexadecimal digits should be entered.
For 128-bit encryption 26 hexadecimal digits should be entered.
Following characters are valid to be as hexadecimal:
0, 1, 2, 3, 4, 5, 6, 7, 8, 9
a, b, c, d, e, f
A, B, C, D, E, F
JClick SAVE to save the settings.
JClick Apply to confirm.
12
Page 19

5 Warranty
5.1 Warranty period
The Topcom units have a 24-month warranty period. The warranty period starts on the
day the new unit is purchased. The warranty on batteries is limited to 6 months after
purchase. Consumables or defects causing a negligible effect on operation or value of
the equipment are not covered.
The warranty has to be proven by presentation of the original purchase receipt, on which
the date of purchase and the unit-model are indicated.
5.2 Warranty handling
A faulty unit needs to be returned to a Topcom service centre including a valid purchase
note.
If the unit develops a fault during the warranty period, Topcom or its officially appointed
service centre will repair any defects caused by material or manufacturing faults free of
charge.
Topcom will at its discretion fulfil its warranty obligations by either repairing or exchanging
the faulty units or parts of the faulty units. In case of replacement, colour and model can
be different from the original purchased unit.
The initial purchase date shall determine the start of the warranty period. The warranty
period is not extended if the unit is exchanged or repaired by Topcom or its appointed
service centres.
5.3 Warranty exclusions
Damage or defects caused by incorrect treatment or operation and damage resulting
from use of non-original parts or accessories not recommended by Topcom are not
covered by the warranty.
Topcom cordless phones are designed to work with rechargeable batteries only. The
damage caused by the use of non-rechargeable batteries is not covered under warranty.
The warranty does not cover damage caused by outside factors, such as lightning, water
and fire, nor any damage caused during transportation.
No warranty can be claimed if the serial number on the units has been changed, removed
or rendered illegible.
Any warranty claims will be invalid if the unit has been repaired, altered or modified by the
buyer or by unqualified, non-officially appointed Topcom service centres.
Warranty
ENGLISH
6 Disposal of the device (environment)
At the end of the product lifecycle, you should not throw this product into the
normal household garbage but bring the product to a collection point for the
recycling of electrical and electronic equipments. The symbol on the product,
user guide and/or box indicate this.
Some of the product materials can be re-used if you bring them to a recycling
point. By re-using some parts or raw materials from used products you make an important
contribution to the protection of the environment. Please contact your local authorities in
case you need more information on the collection points in your area.
13
Page 20

Cleaning
7 Cleaning
Clean the telephone with a slightly damp cloth or with an anti-static cloth. Never use
cleaning agents or abrasive solvents.
14
Page 21
Nederlands
1 Uw router aansluiten
Sluit uw router aan volgens onderstaande tekening.
• STROOM: Sluit de 12 V DC stroomadapter aan op de stroompoort.
J De power LED op het frontpaneel begint te branden wanneer de stroomadapter is
aangesloten.
• WAN: In de WAN-poort steekt u uw kabel/DSL-modem. De link LED op het
frontpaneel geeft aan dat de ADSL-lijn aangesloten is.
J De WAN LED gaat AAN als de ethernetkabel van het netwerk op de juiste manier
is aangesloten.
• Poorten 1- 4: Hierop kunnen maximaal 4 pc's of andere netwerktoestellen
aangesloten worden.
J De LAN LEDs geven de status van de verbinding aan.
• Reset/WPS-toets:
J Druk op de reset-toets en houd hem gedurende minstens 20 seconden ingedrukt om
de standaardinstellingen te laden. De standaardfabrieksinstellingen van het toestel
worden geladen. Druk niet op de reset-toets tenzij u de huidige gegevens wilt
wissen.
J Om de WPS (Wi-Fi Protected Setup) te starten, drukt u 4 seconden op de toets.
Uw router aansluiten
NEDERLANDS
15
Page 22
De breedbandrouter instellen
2 De breedbandrouter instellen
Wij raden u met klem aan om tijdens de configuratie van de router een kabelverbinding
te gebruiken. Maak een verbinding tussen uw computer en een van de ethernetpoorten
van de router met een ethernetkabel.
J Open Internet Explorer en typ 192.168.1.1 in de URL-adresbalk.
– Internet Explorer URL-adresbalk –
Nu verschijnt het aanmeldingsscherm.
J Voer de gebruikersnaam en het wachtwoord in.
– Aanmeldingsscherm –
Standaard is de gebruikersnaam admin en het wachtwoord admin.
J Klik op OK om verder te gaan.
Voer nu de webmanagementpagina van uw draadloze router in
– Webmanagementpagina draadloze router –
16
Page 23
De breedbandrouter instellen
J Selecteer Quick Setup Wizard (snelle setupwizard) om de configuratie te starten.
J Op het volgende scherm kunt u de Time Zone (tijdzone) instellen.
– Instellingen tijdzone –
1
Set Time Zone (tijdzone instellen): Selecteer uw regio.
2 Time Server Address (adres tijdserver): U kunt het IP-adres invoeren
van de tijdserver die uw voorkeur heeft, of u kunt de standaardinstelling
laten staan.
3 Daylight Savings (zomertijd): Hier kunt u de zomertijd aanvinken. Voer
de begin- en einddatum van de zomertijd in.
J Klik op Next (volgende) om verder te gaan.
NEDERLANDS
– Type breedbandverbinding –
J Kies nu uw Broadband Connection Type (type breedbandverbinding):
17
Page 24
De breedbandrouter instellen
o Cable modem (kabelmodem): Wordt gebruikt om kabelmodems aan te sluiten.
1
2 MAC Address: Sommige kabelinternetproviders bewaren het Mac-
JKlik op OK om verder te gaan.
o Fixed-IP xDSL: Wordt gebruikt voor een kabelmodem of DSL-bridge met een vast
IP-adres.
– IP-adresinfo voor kabelmodem –
Host Name: Voer indien nodig de hostnaam in.
adres van uw computer op hun server. In dit geval moet u het Mac-adres
van uw computer kopiëren.
JKlik op Clone Mac Address om het Mac-adres van uw computer naar
de router te kopiëren.
– IP-adresinfo voor vast IP xDSL –
IP Address assigned by your Service Provider (IP-adres toegekend
1
door uw serviceprovider): Voer het vaste WAN IP-adres in.
2 Subnet Mask: Voer het subnetmasker in.
3 DNS Address: Voer het DNS-adres in.
4 Service Provider Gateway Address: Voer het Gateway IP-adres in.
JKlik op OK om verder te gaan.
18
Page 25
De breedbandrouter instellen
o PPPoE xDSL: Wordt gebruikt voor DSL-bridge met PPPoE-verbinding.
– IP-adresinfo voor PPPoE xDSL –
1
Username (gebruikersnaam): Voer uw PPPoE-gebruikersnaam in.
2 Password (wachtwoord): Voer uw wachtwoord in.
3 Service Name: Voer de servicenaam in (bijvoorbeeld de naam van uw
internetprovider).
4 MTU: Voer de MTU-waarde in. (Laat de standaardwaarde op 1492
staan als deze waarde niet door uw internetprovider wordt
gespecificeerd.)
5 Connection type (type verbinding):
• Continuous (continu): De PPP-verbinding is altijd actief.
• Connect on Demand (verbinden op verzoek): De PPP-
verbinding wordt tot stand gebracht wanneer een computer
verbinding maakt met het internet. De PPP-verbinding wordt
verbroken wanneer er geen internetverkeer is gedurende de Idle
Time (tijd zonder activiteit) (minuten) die in het veld eronder
staat vermeld.
• Manual (handmatig): De PPP-verbinding wordt handmatig tot
stand gebracht / verbroken door te klikken op Connect /
Disconnect (Verbinden/Verbreken).
JKlik op OK om verder te gaan.
NEDERLANDS
19
Page 26
De breedbandrouter instellen
o PPTP xDSL: Wordt gebruikt voor een kabelmodel of DSL-bridge met PPTP-
verbinding. PPTP kan ook worden gebruikt wanneer de router is aangesloten op
een ander LAN-netwerk.
– IP-adresinfo voor PPTP xDSL –
•
WAN-verbinding: DHCP-cliënt of vast IP-adres.
• Obtain an IP address automatically (automatisch een IP-adres
verkrijgen):
1 Host Name: Voer indien nodig de hostnaam in.
2 MAC Address: Sommige kabelinternetproviders bewaren het MAC-
adres van uw computer op hun server. In dit geval moet u het Mac-adres
van uw computer kopiëren. Klik op Clone Mac Address om het Macadres van uw computer naar de router te kopiëren.
• Use the following IP address (Gebruik het volgende IP-adres):
1 IP address: Voer het vaste IP-adres in.
2 Subnet Mask:Voer het subnetmasker in.
3 Default Gateway (standaard Gateway): Voer het Gateway IP-adres in.
• PPTP Settings (PPTP-instellingen):
1 User ID: Voer de PPTP-gebruikersnaam in.
20
Page 27

De breedbandrouter instellen
2 Password (wachtwoord): Voer het PPTP-wachtwoord in.
3 PPTP Gateway: Voer de Gateway in.
4 Connection ID: Voer de ID van de verbinding in, indien nodig.
5 MTU: Voer de MTU-waarde in. (Laat de standaardwaarde op 1492
staan als deze waarde niet wordt gespecificeerd.)
6 BEZEQ-ISRAEL: Alleen voor Israël.
7 Connection Type (type verbinding):
• Continuous (continu): De PPP-verbinding is altijd actief.
• Connect on Demand (verbinden op verzoek): De PPP-
verbinding wordt tot stand gebracht wanneer een computer
verbinding maakt met het internet. De PPP-verbinding wordt
verbroken wanneer er geen internetverkeer is gedurende de Idle
Time (tijd zonder activiteit) (minuten) die in het veld eronder
staat vermeld.
• Manual (handmatig): De PPP-verbinding wordt handmatig tot
stand gebracht / verbroken door te klikken op Connect /
Disconnect (Verbinden/Verbreken).
JKlik op OK om verder te gaan.
o L2TP xDSL: Wordt gebruikt voor kabelmodems met L2TP-verbinding.
NEDERLANDS
– IP-adresinfo voor L2TP xDSL –
21
Page 28

De breedbandrouter instellen
• WAN-verbinding: DHCP-cliënt of vast IP-adres.
• Obtain an IP address automatically (automatisch een IP-adres
verkrijgen):
1 Host Name: Voer indien nodig de hostnaam in.
2 MAC Address: Sommige kabelinternetproviders bewaren het MAC-
• Use the following IP address (Gebruik het volgende IP-adres):
1 IP address: Voer het vaste IP-adres in.
2 Subnet Mask:Voer het subnetmasker in.
3 Default Gateway (standaard Gateway): Voer het Gateway IP-adres in.
• L2TP Settings (L2TP-instellingen):
1 User ID: Voer de L2TP-gebruikersnaam in.
2 Password (wachtwoord): Voer het L2TP-wachtwoord in.
3 L2TP Gateway: Voer de Gateway in.
4 Connection ID: Voer de ID van de verbinding in, indien nodig.
5 MTU: Voer de MTU-waarde in. (Laat de standaardwaarde op 1492
6 Connection Type (type verbinding):
JKlik op OK om verder te gaan.
adres van uw computer op hun server. In dit geval moet u het Mac-adres
van uw computer kopiëren. Klik op Clone Mac Address om het Macadres van uw computer naar de router te kopiëren.
staan als deze waarde niet wordt gespecificeerd.)
• Continuous (continu): De PPP-verbinding is altijd actief.
• Connect on Demand (verbinden op verzoek): De PPP-
verbinding wordt tot stand gebracht wanneer een computer
verbinding maakt met het internet. De PPP-verbinding wordt
verbroken wanneer er geen internetverkeer is gedurende de Idle
Time (tijd zonder activiteit) (minuten) die in het veld eronder
staat vermeld.
• Manual (handmatig): De PPP-verbinding wordt handmatig tot
stand gebracht / verbroken door te klikken op Connect /
Disconnect (Verbinden/Verbreken).
o Telstra Big Pond: niet voor Europa.
22
Page 29
Controleer de status van de internetverbinding.
Nu is de snelle setupwizard voltooid.
J Klik op Apply (toepassen) om te eindigen.
De router zal nu opnieuw opstarten. Dit duurt ongeveer 60 seconden.
J Klik op OK als de opstartcyclus klaar is.
Ga terug naar de homepagina door te klikken op HOME rechts bovenaan in het scherm.
NEDERLANDS
3 Controleer de status van de internetverbinding.
De WAN-verbinding kan gecontroleerd worden op het scherm Status Info op de
webpagina van de router.
Klik nu op Internet Connection (internetverbinding).
23
Page 30
Het draadloos netwerk instellen
– Status internetverbinding –
J Alle informatie over de internetverbinding wordt zichtbaar: WAN IP-adres, Gateway,
DNS-servers ...
4 Het draadloos netwerk instellen
4.1 WPS
De Skyr@cer WBR 7201n ondersteunt de Wi-Fi Protected Setup (WPS)-functie.
WPS stuurt de draadloze encryptie-instellingen automatisch van de router naar de
draadloze cliënt die WPS ondersteunt (bijvoorbeeld Skyr@cer USB 4201n).
Dit betekent dat u de encryptie-instellingen niet hoeft in te voeren in uw draadloze adapter
met WPS-functie als u verbinding wilt maken met uw router. Druk op de WPS-toets van
de router, dan op de WPS-toets van de draadloze adapter en de beveiligde verbinding
komt binnen enkele seconden tot stand.
Als u de draadloze encryptie-instellingen van de router niet instelt, maakt WPS
automatisch een ingewikkelde encryptiesleutel (WPA-PSK) voor u aan.
Als u een draadloze cliënt adapter zonder WPS-functie gebruikt, raden wij u aan
om de draadloze encryptie handmatig in te stellen.
Voor de automatische WPS-setup kunt u hoofdstuk 4.2 en 4.3 hieronder overslaan.
24
Page 31

Het draadloos netwerk instellen
4.2 (E)SSID instellen
J Klik op General Setup (algemene setup) en ga naar Wireless (draadloos) >
Basic Settings (basisinstellingen)
>
– Pagina draadloze instellingen –
Selecteer de draadloze modus: Acces Point (AP) (toegangspunt) is
1
standaard.
2 Voer de naam van het draadloze netwerk in (ESSID). Standaard is dit
“Topcom_” + zes laatste cijfers van het MAC-adres.
U kunt het MAC-adres vinden op het etiket op de onderkant van de
router.
3 Er zijn 13 radiokanalen beschikbaar. Het maakt niet uit welk kanaal u
kiest.
Als u meer dan één draadloze router of toegangspunt hebt thuis of
op kantoor, zorg er dan voor dat u niet hetzelfde kanaal gebruikt.
>
NEDERLANDS
J Klik op Apply (toepassen) om te bevestigen.
4.3 De draadloze encryptie instellen
Topcom raadt ten zeerste aan om encryptie te activeren. Dit is de enige manier
om te voorkomen dat ongewenste gebruikers toegang hebben tot uw draadloos
netwerk.
Er zijn drie encryptie-instellingen beschikbaar: WEP 64bit, WEP 128bit en WPA(2).
25
Page 32

Het draadloos netwerk instellen
J Selecteer Security Settings (veiligheidsinstellingen) om toegang te krijgen tot
het encryptiemenu.
Standaard is encryptie niet geactiveerd. In dit scherm kunt u uw eigen type encryptie
selecteren.
In onderstaand voorbeeld is 64-bit WEP-encryptie ingesteld.
– Pagina draadloze instellingen –
1
Encryption (encryptie): Selecteer WEP
2 Key Length (sleutellengte): 64-bit. Nu voert u de WEP-sleutel in: Het
staat u vrij om zelf een code te bedenken (bijvoorbeeld 12345abcde).
Zorg ervoor dat u dezelfde sleutel gebruikt in de draadloze adapter van
uw draadloze computer of laptop.
Noteer deze sleutel en geef hem niet aan onbevoegde gebruikers.
3 Voor 64-bit encryptie moeten 10 hexadecimale tekens ingevoerd
worden.
26
Page 33

Voor 128-bit encryptie moeten 26 hexadecimale tekens ingevoerd
worden.
De volgende tekens zijn geldige hexadecimale tekens:
0, 1, 2, 3, 4, 5, 6, 7, 8, 9
a, b, c, d, e, f
A, B, C, D, E, F
JKlik op SAVE om de instellingen op te slaan.
JKlik op Apply (toepassen) om te bevestigen.
5 Garantie
5.1 Garantietermijn
De Topcom-toestellen hebben een garantietermijn van 24 maanden. De garantietermijn
gaat in op de dag waarop het nieuwe toestel wordt aangeschaft. De garantie op de
batterijen is beperkt tot 6 maanden na aankoop. Verbruiksartikelen en defecten die een
verwaarloosbaar effect hebben op de werking of waarde van het toestel worden niet
gedekt door de garantie.
De garantie moet worden bewezen door het kunnen voorleggen van de originele
aankoopbon waarop de aankoopdatum en het toestelmodel staan aangegeven.
5.2 Afwikkeling van garantieclaims
Een defect toestel moet worden geretourneerd aan het onderhoudscentrum van Topcom,
samen met een geldige aankoopbon.
Als het toestel defect raakt tijdens de garantietermijn, zal Topcom of een van haar
officieel aangewezen servicecentra defecten ingevolge materiaal- of fabricagefouten
kosteloos repareren.
Topcom zal naar eigen inzicht voldoen aan haar garantieverplichtingen door de defecte
toestellen, of onderdelen ervan, te repareren of te vervangen. In het geval van vervanging
kunnen de kleur en het model verschillend zijn van het oorspronkelijk aangeschafte
toestel.
De oorspronkelijke aankoopdatum bepaalt wanneer de garantietermijn ingaat. De
garantietermijn wordt niet verlengd als het toestel wordt vervangen of gerepareerd door
Topcom of een van haar aangewezen servicecentra.
Garantie
NEDERLANDS
5.3 Garantiebeperkingen
Schade of defecten als gevolg van een onjuiste behandeling of onjuist gebruik en schade
als gevolg van het gebruik van niet-originele onderdelen of accessoires die niet worden
aanbevolen door Topcom, vallen buiten de garantie.
De draadloze telefoons van Topcom zijn alleen geschikt voor gebruik met oplaadbare
batterijen. De schade door het gebruik van normale, niet-oplaadbare batterijen valt buiten
de garantie.
27
Page 34

Afvoeren van het toestel (milieu)
De garantie dekt geen schade te wijten aan externe factoren, zoals bliksem, water en
brand, noch enige tijdens transport veroorzaakte schade.
Er kan geen aanspraak worden gemaakt op garantie als het serienummer op de
toestellen is veranderd, verwijderd of onleesbaar gemaakt.
Alle garantieclaims zullen ongeldig worden wanneer het toestel wordt gerepareerd,
veranderd of aangepast door de koper of door onbevoegde, niet officieel door Topcom
erkende onderhoudscentra.
6 Afvoeren van het toestel (milieu)
Na afloop van de levenscyclus van het product mag u het niet met het
normale huishoudelijke afval weggooien, maar moet u het naar een
inzamelpunt brengen voor recycling van elektrische en elektronische
apparatuur. Dit wordt aangeduid door het symbool op het product, in de
handleiding en/of op de verpakking.
Sommige materialen waaruit het product is vervaardigd kunnen worden hergebruikt als
u ze naar een inzamelpunt brengt. Door onderdelen of grondstoffen van gebruikte
producten te hergebruiken, levert u een belangrijke bijdrage aan de bescherming van het
milieu. Wend u tot de plaatselijke overheid voor meer informatie over de inzamelpunten
bij u in de buurt.
7Reinigen
Reinig de telefoon met een vochtige doek of met een antistatische doek. Gebruik nooit
reinigingsmiddelen of agressieve oplosmiddelen.
28
Page 35

Connexion de votre routeur
Français
1 Connexion de votre routeur
Connectez votre routeur conformément au schéma ci-dessous.
• POWER (Alimentation) : Le port d'alimentation sert à connecter l'adaptateur secteur
12 V CC.
J Le voyant d'alimentation DEL sur le panneau avant s'ALLUME lorsque
l'adaptateur secteur est branché.
• WAN : Le port WAN sert à connecter votre modem ADSL/câble. Le voyant de liaison
LINK sur le panneau avant indique que la ligne ADSL est connectée.
J Le voyant WAN s'ALLUME si le câble réseau Ethernet est correctement branché.
• Ports 1- 4 : Ceux-ci servent à connecter jusqu'à 4 ordinateurs ou autres périphériques
en réseau.
J Les voyants LAN indiquent l'état de la connexion.
• Bouton de réinitialisation/WPS :
J Pour recharger les paramètres par défaut, maintenez le bouton de réinitialisation
enfoncé pendant au moins 20 secondes. Ceci rétablira les paramètres d'usine par
défaut de votre appareil. N'appuyez pas sur le bouton de réinitialisation tant que
vous ne souhaitez pas effacer les paramètres actuels.
J Pour démarrer le WPS (Wi-Fi Protected Setup), maintenez la touche enfoncée
pendant environ 4 secondes.
FRANç AIS
29
Page 36

Configuration du routeur large bande
2 Configuration du routeur large bande
Nous vous recommandons fortement de configurer votre routeur en utilisant une
connexion câblée. Ainsi, veuillez connecter votre ordinateur à l'un des ports Ethernet du
routeur en utilisant un câble Ethernet.
J Ouvrez Internet Explorer et saisissez 192.168.1.1 dans la barre d'adresses URL.
- Barre d'adresses URL d'Internet Explorer -
À présent, l'écran de connexion s'affiche.
J Saisissez le nom d'utilisateur et le mot de passe.
- Écran de connexion -
Par défaut, le nom d'utilisateur est admin et le mot de passe est admin.
J Cliquez sur OK pour continuer.
Vous accédez désormais à la page de gestion de réseau basée sur le Web de votre
routeur sans fil
- Page de gestion de réseau basée sur le Web du router sans fil -
30
Page 37

Configuration du routeur large bande
J Choisissez l'Assistant de configuration rapide Quick Setup pour lancer la
configuration.
J L'écran suivant vous permet de choisir votre Fuseau horaire.
- Paramètres de fuseau horaire -
1
Set Time Zone (Régler le fuseau horaire) : Veuillez sélectionner votre
région
2 Time Server Address (Adresse du serveur d'horaires) : Vous pouvez
entrer l'adresse IP de votre serveur d'horaires préféré ou vous pouvez
laisser le réglage par défaut.
3 Daylight Savings (Horaire d'été) : C'est ici que vous pouvez activer
l'horaire d'été. Veuillez entrer la date de début et la date de fin des
horaires d'été.
J Cliquez sur Next (Suivant) pour continuer.
FRANç AIS
- Type de connexion large bande -
31
Page 38

Configuration du routeur large bande
J Choisissez votre Type de connexion large bande :
o Modem câble : Utilisé pour les connexions via un modem câble.
- Infos d'adresse IP pour Modem câble -
Host Name (Nom d'hôte) : Entrez votre Nom d'hôte, si nécessaire.
1
2 MAC Address (Adresse MAC) : Certains fournisseurs d'accès Internet
par le câble conserveront l'adresse Mac de votre ordinateur dans leur
serveur. Dans ce cas, vous devriez cloner l'adresse Mac de votre
ordinateur.
JCliquez sur Clone Mac Address (Cloner adresse Mac) pour copier
l'adresse Mac de votre ordinateur dans le routeur.
JCliquez sur OK pour continuer.
o xDSL à IP fixe : Utilisé pour un modem câble ou un pont DSL avec une adresse IP
fixe.
- Infos d'adresse IP pour xDSL à adresse IP fixe -
IP address assigned by your Service Provider (Adresse IP attribuée
1
par votre fournisseur de services) : Veuillez entrer l'adresse IP du
WAN fixe.
2 Subnet Mask (Masque de sous-réseau) : Entrez le masque de sous-
réseau.
3 DNS Address (Adresse du DNS) : Entrez l'adresse du DNS.
4 Service Provider Gateway Address (Adresse de passerelle du
fournisseur de services) : Entrez l'adresse IP de la passerelle.
32
Page 39

Configuration du routeur large bande
JCliquez sur OK pour continuer.
o xDSL PPPoE : Utilisé pour un pont DSL avec une connexion PPPoE.
- Infos d'adresse IP pour xDSL PPPoE -
Username (Nom d'utilisateur) : Entrez votre nom d'utilisateur PPPoE.
1
2 Password (Mot de passe) : Entrez votre mot de passe.
3 Service Name (Nom du service) : Entrez le nom du service (par
exemple le nom de votre fournisseur d'accès à Internet).
4 MTU (UTM) : Entrez la taille d'UTM. (si la taille n'est pas spécifiée par
votre fournisseur d'accès à Internet, laissez la valeur par défaut sur
1492)
5 Connection type (Type de connexion) :
• Continuous (Continue) : La connexion PPP sera toujours active.
• Connect on Demand (Connexion à la demande) : La
connexion PPP sera établie lorsqu'un ordinateur accède à
Internet. La connexion PPP est interrompue lorsqu'il n'y a plus de
trafic Internet pendant la durée d'inactivité (minutes) saisie dans
le champ ci-dessous.
• Manual (Manuelle) : La connexion PPP est établie/interrompue
manuellement en cliquant sur Connect / Disconnect (Connecter/
Déconnecter).
JCliquez sur OK pour continuer.
FRANç AIS
33
Page 40

Configuration du routeur large bande
o xDSL PPTP : utilisé pour un modem câble ou un pont DSL avec une connexion
PPTP. PPTP peut également être utilisé lorsque le routeur est connecté à un autre
réseau LAN.
- Infos d'adresse IP pour xDSL PPTP -
•
Connexion WAN : Client DHCP ou adresse IP fixe
• Obtenir une adresse IP automatiquement :
1 Host Name (Nom d'hôte) : Entrez votre Nom d'hôte, si nécessaire.
2 MAC Address (Adresse MAC) : Certains fournisseurs d'accès Internet
par le câble conserveront l'adresse MAC de votre ordinateur dans leur
serveur. Dans ce cas, vous devriez cloner l'adresse Mac de votre
ordinateur. Cliquez sur Clone Mac Address (Cloner adresse Mac) pour
copier l'adresse Mac de votre ordinateur dans le routeur.
• Utiliser l'adresse IP suivante :
1 IP address (Adresse IP) : Veuillez entrer l'adresse IP fixe.
2 Subnet Mask (Masque de sous-réseau) :Entrez le masque de sous-
réseau.
3 Default Gateway (Passerelle par défaut) : Entrez l'adresse IP de la
passerelle.
34
Page 41

Configuration du routeur large bande
• Paramètres PPTP :
1 User ID (ID utilisateur) : Entrez le nom d'utilisateur du PPTP.
2 Password (Mot de passe) : Entrez le mot de passe du PPTP.
3 PPTP Gateway (Passerelle PPTP) : Entrez la passerelle.
4 Connection ID (ID de connexion) : Entrez l'ID de connexion, si
nécessaire.
5 MTU (UTM) : Entrez la taille d'UTM. (si la taille n'est pas spécifiée par
votre fournisseur d'accès à Internet, laissez la valeur par défaut sur
1492.)
6 BEZEQ-ISRAEL : Uniquement pour Israël.
7 Connection Type (Type de connexion) :
• Continuous (Continue) : La connexion PPP sera toujours active.
• Connect on Demand (Connexion à la demande) : La
connexion PPP sera établie lorsqu'un ordinateur accède à
Internet. La connexion PPP est interrompue lorsqu'il n'y a plus de
trafic Internet pendant la durée d'inactivité (minutes) saisie dans
le champ ci-dessous.
• Manual (Manuelle) : La connexion PPP est établie/interrompue
manuellement en cliquant sur Connect / Disconnect (Connecter/
Déconnecter).
JCliquez sur OK pour continuer.
o xDSL L2TP : Utilisé pour les modems câbles à connexion L2TP.
FRANç AIS
- Infos d'adresse IP pour xDSL L2TP -
35
Page 42

Configuration du routeur large bande
• Connexion WAN : Client DHCP ou adresse IP fixe
• Obtenir une adresse IP automatiquement :
1 Host Name (Nom d'hôte) : Entrez votre Nom d'hôte, si nécessaire.
2 MAC Address (Adresse MAC) : Certains fournisseurs d'accès Internet
par le câble conserveront l'adresse MAC de votre ordinateur dans leur
serveur. Dans ce cas, vous devriez cloner l'adresse Mac de votre
ordinateur. Cliquez sur Clone Mac Address (Cloner adresse Mac) pour
copier l'adresse Mac de votre ordinateur dans le routeur.
• Utiliser l'adresse IP suivante :
1 IP address (Adresse IP) : Veuillez entrer l'adresse IP fixe.
2 Subnet Mask (Masque de sous-réseau) :Entrez le masque de sous-
réseau.
3 Default Gateway (Passerelle par défaut) : Entrez l'adresse IP de la
passerelle.
• Paramètres L2TP :
1 User ID (ID utilisateur) : Entrez le nom d'utilisateur du L2TP.
2 Password (Mot de passe) : Entrez le mot de passe du L2TP.
3 L2TP Gateway (Passerelle L2TP) : Entrez la passerelle.
4 Connection ID (ID de connexion) : Entrez l'ID de connexion, si
nécessaire.
5 MTU (UTM) : Entrez la taille d'UTM. (si la taille n'est pas spécifiée par
votre fournisseur d'accès à Internet, laissez la valeur par défaut sur
1492.)
6 Connection Type (Type de connexion) :
JCliquez sur OK pour continuer.
• Continuous (Continue) : La connexion PPP sera toujours active.
• Connect on Demand (Connexion à la demande) : La
connexion PPP sera établie lorsqu'un ordinateur accède à
Internet. La connexion PPP est interrompue lorsqu'il n'y a plus de
trafic Internet pendant la durée d'inactivité (minutes) saisie dans
le champ ci-dessous.
• Manual (Manuelle) : La connexion PPP est établie/interrompue
manuellement en cliquant sur Connect / Disconnect (Connecter/
Déconnecter).
o Telstra BigPond : pas pour l'Europe.
36
Page 43

Contrôle de l'état de la connexion Internet
À présent, l'assistant de configuration rapide est terminé.
J Cliquez sur Apply (Appliquer) pour terminer.
Le routeur va redémarrer maintenant. Cela prendra environ 60 secondes.
J Cliquez sur OK lorsque la séquence de redémarrage est effectuée.
Retournez sur la page d'accueil en cliquant sur HOME (Accueil) dans l'angle supérieur
droit de l'écran.
FRANç AIS
3 Contrôle de l'état de la connexion Internet
La connexion WAN peut être contrôlée sur l'écran d'Infos d'état sur la page de gestion
de réseau basée sur le Web du router sans fil.
37
Page 44

Contrôle de l'état de la connexion Internet
Cliquez sur Internet Connection.
- État de la connexion Internet -
J Toutes les informations sur la connexion Internet seront visibles : adresse IP WAN,
passerelle, serveurs DNS...
38
Page 45

Configuration du réseau sans fil
4 Configuration du réseau sans fil
4.1 WPS
Le Skyr@cer WBR 7201n est compatible avec la fonction Wi-Fi Protected Setup (WPS).
Le WPS peut envoyer automatiquement les paramètres de cryptage sans fil du routeur
au client sans fil WPS (par exemple le Skyr@cer USB 4201n).
En d'autres termes, vous ne devez pas saisir vos paramètres de cryptage dans votre
adaptateur sans fil WPS si vous voulez vous connecter au routeur. Il suffit d'enfoncer la
touche WPS du routeur, ensuite celle de l'adaptateur sans fil et la connexion sécurisée
sera établie après quelques secondes.
Si vous ne paramétrez pas le cryptage sans fil du routeur, le WPS générera
automatiquement une clé de cryptage très compliquée (WPA-PSK) pour vous.
Si vous n'employez pas d'adaptateur client sans fil WPS, il est recommandé de
paramétrer le cryptage sans fil manuellement.
Pour la configuration automatique du WPS, vous ne devez pas tenir compte des sections
4.2 et 4.3 ci-dessous.
4.2 Configurer le (E)SSID
J Cliquez sur General Setup et accédez aux Wireless > Basic Settings
FRANç AIS
>
- page Paramètres sans fil -
Choisissez le Mode sans fil : Le point d'accès (PA) est celui par défaut.
1
>
39
Page 46

Configuration du réseau sans fil
2 Entrez le nom du réseau sans fil (ESSID). Par défaut, ce sera
“Topcom_” + les six derniers chiffres de l'adresse du MAC.
Vous trouverez l'adresse MAC sur l'étiquette collée à l'arrière du
routeur.
3 Vous disposez de 13 canaux radio. Vous êtes libre de sélectionner l'un
de ces canaux.
Si vous possédez plusieurs routeurs sans fil ou points d'accès
dans votre domicile ou sur votre lieu de travail, assurez-vous de ne
pas utiliser le même canal.
J Cliquez sur Apply (Appliquer) pour confirmer.
4.3 Définir le cryptage de la liaison sans fil
Topcom recommande fortement d'activer le cryptage. Cette précaution est la
seule façon d'empêcher des intrus d'accéder à votre réseau sans fil.
Trois paramètres de cryptage sont disponibles : WEP 64 bits, WEP 128 bits et WPA(2)
J Sélectionnez Security Settings (Paramètres de sécurité) pour accéder au menu de
cryptage.
Par défaut, le cryptage est désactivé. Sur cet écran, vous pouvez sélectionner votre type
de cryptage.
40
Page 47

Dans l'exemple ci-dessous, le cryptage WEP 64-bits est défini.
- page Paramètres de sécurité -
1
Encryption (Cryptage) : Sélectionnez WEP
2 Key Length (Longueur de la clé) : 64 bits. Saisissez à présent votre
clé WEP : Vous pouvez librement inventer un code (par exemple
12345abcde). Assurez-vous d'utiliser la même clé que dans l'adaptateur
sans fil installé sur votre ordinateur portable ou votre ordinateur de
bureau sans fil.
Veuillez saisir cette clé et la masquer des utilisateurs non autorisés.
3 Pour le cryptage 64 bits, 10 chiffres hexadécimaux doivent être saisis.
Pour le cryptage 128 bits, 26 chiffres hexadécimaux doivent être saisis.
Garantie
FRANç AIS
Les caractères suivants sont des hexadécimaux valides :
0, 1, 2, 3, 4, 5, 6, 7, 8, 9
a, b, c, d, e, f
A, B, C, D, E, F
JCliquez sur SAVE pour enregistrer les paramètres.
JCliquez sur Apply (Appliquer) pour confirmer.
5 Garantie
5.1 Période de garantie
Les appareils Topcom bénéficient d'une période de garantie de 24 mois. La période de
garantie prend effet le jour de l'achat du nouvel appareil. La garantie sur les piles est
limitée à 6 mois à compter de l'achat. Les accessoires et les défauts qui ont un effet
négligeable sur le fonctionnement ou la valeur de l'appareil ne sont pas couverts.
La garantie s'applique uniquement sur présentation du récépissé d'achat original sur
lequel figurent la date de l'achat et le modèle de l'appareil.
41
Page 48

Mise au rebut de l'appareil (environnement)
5.2 Mise en œuvre de la garantie
Tout appareil défectueux doit être retourné à un centre de service après-vente Topcom
accompagné d'un justificatif d'achat valable.
En cas de panne pendant la période de garantie, Topcom ou son centre de service aprèsvente officiel réparera gratuitement les dysfonctionnements dus à un vice de matière ou
de fabrication.
Topcom assurera, à sa seule discrétion, ses obligations en matière de garantie en
réparant ou en remplaçant les appareils ou les pièces défectueux. En cas de
remplacement, la couleur et le modèle peuvent être différents de ceux de l'appareil
acheté initialement.
La date d'achat initiale détermine le début de la période de garantie. La période de
garantie n'est pas prolongée si l'appareil est remplacé ou réparé par Topcom ou par l'un
de ses centres de service après-vente officiels.
5.3 Exclusions de garantie
Les dommages et les pannes dus à un mauvais traitement ou à une utilisation incorrecte
et les dommages résultant de l'utilisation de pièces et d'accessoires non recommandés
par Topcom ne sont pas couverts par la garantie.
Les téléphones sans fil Topcom ont été conçus pour fonctionner avec des piles
rechargeables uniquement. Les dommages causés par l'utilisation de piles non
rechargeables ne sont pas couverts par la garantie.
La garantie ne couvre pas les dommages causés par des éléments extérieurs tels que la
foudre, l'eau et le feu ni les dommages provoqués par le transport.
Aucune garantie ne pourra être invoquée si le numéro de série indiqué sur les appareils
a été modifié, supprimé ou rendu illisible.
Aucune garantie ne peut non plus être invoquée si l'appareil a été réparé ou modifié par
l'acheteur ou par des techniciens non qualifiés et non agréés par Topcom.
6 Mise au rebut de l'appareil (environnement)
Au terme du cycle de vie de ce produit, ne le jetez pas avec les déchets
ménagers ordinaires mais déposez-le dans un point de collecte pour le
recyclage des équipements électriques et électroniques. Le symbole indiqué
sur ce produit, sur le mode d'emploi et/ou sur la boîte est là pour vous le
rappeler.
Certains matériaux qui composent le produit peuvent être réutilisés s'ils sont déposés
dans un point de recyclage. En réutilisant certaines pièces ou matières premières de
produits usagés, vous contribuez fortement à la protection de l'environnement. Pour toute
information supplémentaire sur les points de collecte dans votre région, contactez les
autorités locales.
7Nettoyage
Nettoyez le téléphone à l'aide d'un chiffon légèrement humide ou antistatique. N'utilisez
jamais de détergents ou de solvants abrasifs.
42
Page 49

Anschluss Ihres Routers
Deutsch
1 Anschluss Ihres Routers
Schließen Sie Ihren Router gemäß dem nachstehenden Diagramm an.
• POWER: Schließen Sie das 12-V-Netzgerät an den Netzanschluss an.
J Die Betriebs-LED an der Vorderseite leuchtet auf, wenn das Netzgerät
angeschlossen ist.
• WAN: Schließen Sie das Kabel-/DSL-Modem an den WAN-Anschluss an. Die
Verbindungs-LED an der Vorderseite zeigt an, dass eine Verbindung zur ADSLLeitung besteht.
J Die WAN-LED leuchtet auf, wenn das Netzwerk-Ethernet-Kabel ordnungsgemäß
angeschlossen ist.
• Anschlüsse 1 - 4: An diese Anschlüsse können weitere Computer oder andere
Netzwerkgeräte angeschlossen werden.
J Die LAN-LEDs zeigen den Verbindungsstatus an.
• Reset-/WPS-Taste:
J Halten Sie die Reset-Taste mindestens 20 Sekunden lang gedrückt, um die
Standardeinstellungen wiederherzustellen. Drücken Sie die Reset-Taste nur, wenn
Sie die aktuellen Einstellungen löschen möchten.
J Um das WPS (Wi-Fi Protected Setup) zu starten, halten Sie die Taste etwa vier
Sekunden lang gedrückt.
DEUTSCH
43
Page 50

Konfiguration des Breitband-Routers
2 Konfiguration des Breitband-Routers
Es wird angeraten, Ihren Router über eine Kabelverbindung zu konfigurieren. Schließen
Sie also Ihren Computer über ein Ethernet-Kabel an einen der Ethernet-Anschlüsse des
Routers an.
J Öffnen Sie den Internet Explorer, und geben Sie 192.168.1.1 in die URL-
Adressleiste ein.
- Internet Explorer URL-Adressleiste -
Anschließend wird der Anmeldebildschirm eingeblendet.
J Geben Sie den Benutzernamen und das Kennwort ein.
- Anmeldebildschirm -
Standardmäßig wird als Benutzername admin und als Kennwort admin angezeigt.
J Klicken Sie auf OK, um fortzufahren.
Nun wird die Web-Managementseite Ihres drahtlosen Routers angezeigt.
- Web-Managementseite des drahtlosen Routers -
44
Page 51

Konfiguration des Breitband-Routers
J Wählen Sie den Quick Setup Wizard, um die Konfiguration zu beginnen.
J Im nächsten Bildschirm können Sie die Zeitzone (Time Zone) einstellen.
- Einstellungen für die Zeitzone -
1
Set Time Zone (Zeitzone einstellen): Wählen Sie Ihre Region aus.
2 Time Server Address (Zeitserver-Adresse): Sie können die IP-
Adresse Ihres bevorzugten Zeitservers eingeben oder die
Standardeinstellung beibehalten.
3 Daylight Savings (Zeitumstellung): Hier können Sie die
Zeitumstellung für die Sommerzeit aktivieren. Geben Sie das Anfangsund Enddatum der Sommerzeit ein.
J Klicken Sie auf Next (Weiter).
DEUTSCH
- Breitbandanschlusstyp -
J Wählen Sie Ihren Breitbandanschlusstyp:
45
Page 52

Konfiguration des Breitband-Routers
o Kabelmodem: Wird bei Anschluss eines Kabelmodems verwendet.
1
Host Name (Hostname): Geben Sie ggf. Ihren Hostnamen ein.
2 MAC Address (MAC-Adresse): Einige Kabel-Internetanbieter
speichern die MAC-Adresse Ihres Computers auf ihrem Server. In
diesem Fall müssen Sie die MAC-Adresse Ihres Computers klonen.
JKlicken Sie auf Clone Mac Address (MAC-Adresse klonen), um die
MAC-Adresse Ihres Computers in den Router zu kopieren.
JKlicken Sie auf OK, um fortzufahren.
o Feste IP xDSL: Wird bei einem Kabelmodem oder einer DSL-Bridge mit fester IP-
Adresse verwendet.
- IP-Adresse für Kabelmodem -
- IP-Adresse für feste IP xDSL -
IP address assigned by your Service Provider (Von Ihrem
1
Serviceprovider vergebene IP-Adresse): Geben Sie die feste WANIP-Adresse ein.
2 Subnet Mask (Subnetz-Maske): Geben Sie die Subnetz-Maske ein.
3 DNS Address (DNS-Adresse): Geben Sie die DNS-Adresse ein.
4 Service Provider Gateway Address (Serviceprovider-Gateway-
Adresse): Geben Sie die Gateway-IP-Adresse ein.
JKlicken Sie auf OK, um fortzufahren.
46
Page 53

Konfiguration des Breitband-Routers
o PPPoE xDSL: Wird für DSL-Bridge mit PPPoE-Verbindung verwendet.
- IP-Adresse für PPPoE xDSL -
1
Username (Benutzername): Geben Sie Ihren PPPoE-Benutzernamen
ein.
2 Password (Kennwort): Geben Sie Ihr Kennwort ein.
3 Service Name (Servicename): Geben Sie den Servicenamen ein (z. B.
den Namen Ihres Internet-Providers).
4 MTU: Geben Sie die MTU-Größe ein. Wenn die Größe von Ihrem
Internet-Provider nicht angegeben wird, übernehmen Sie die
Standardeinstellung von 1492.
5 Connection type (Verbindungsart):
• Continuous (Kontinuierlich): Die PPP-Verbindung ist immer
aktiv.
• Connect on Demand (Automatische Verbindung): Die PPP-
Verbindung wird hergestellt, wenn über einen Computer auf das
Internet zugriffen wird. Die PPP-Verbindung wird getrennt, wenn
während der Idle Time (Leerlaufzeit in Minuten), die im Feld
unten eingegeben wird, nicht mehr auf das Internet zugegriffen
wird.
• Manual (Manuell): Die PPP-Verbindung wird durch Klicken auf
Connect/Disconnect (Verbinden/Trennen) manuell hergestellt
bzw. getrennt.
JKlicken Sie auf OK, um fortzufahren.
DEUTSCH
47
Page 54

Konfiguration des Breitband-Routers
o PPTP xDSL: Wird für Kabelmodem oder DSL-Bridge mit PPTP-Verbindung
verwendet. PPTP kann ebenfalls verwendet werden, wenn der Router mit einem
anderen LAN-Netzwerk verbunden wird.
- IP-Adresse für PPTP xDSL -
•
WAN-Verbindung: DHCP-Client oder feste IP-Adresse
• Obtain an IP address automatically (Automatisch eine IP-Adresse
erhalten):
1 Host Name (Hostname): Geben Sie ggf. Ihren Hostnamen ein.
2 MAC Address (MAC-Adresse): Einige Kabel-Internetanbieter
speichern die MAC-Adresse Ihres Computers auf ihrem Server. In
diesem Fall müssen Sie die MAC-Adresse Ihres Computers klonen.
Klicken Sie auf Clone Mac Address (MAC-Adresse klonen), um die
MAC-Adresse Ihres Computers in den Router zu kopieren.
• Use the following IP address (Die folgende IP-Adresse verwenden):
1 IP address (IP-Adresse): Geben Sie die feste IP-Adresse ein.
2 Subnet Mask (Subnetz-Maske): Geben Sie die Subnetz-Maske ein.
3 Default Gateway (Standard-Gateway): Geben Sie die Gateway-IP-
Adresse ein.
48
Page 55

Konfiguration des Breitband-Routers
• PPTP Settings (PPTP-Einstellungen):
1 User ID (Benutzer-ID): Geben Sie Ihren PPTP-Benutzernamen ein.
2 Password (Kennwort): Geben Sie das PPTP-Kennwort ein.
3 PPTP Gateway (PPTP-Gateway): Geben Sie den Gateway ein.
4 Connection ID (Verbindungs-ID): Geben Sie ggf. die Verbindungs-ID
ein.
5 MTU: Geben Sie die MTU-Größe ein. Wenn die Größe nicht angegeben
wird, übernehmen Sie die Standardeinstellung von 1492.
6 BEZEQ-ISRAEL: Nur für Israel.
7 Connection Type (Verbindungsart):
• Continuous (Kontinuierlich): Die PPP-Verbindung ist immer
aktiv.
• Connect on Demand (Automatische Verbindung): Die PPP-
Verbindung wird hergestellt, wenn über einen Computer auf das
Internet zugriffen wird. Die PPP-Verbindung wird getrennt, wenn
während der Idle Time (Leerlaufzeit, Minuten), die im Feld unten
eingegeben wird, nicht mehr auf das Internet zugegriffen wird.
• Manual (Manuell): Die PPP-Verbindung wird durch Klicken auf
Connect/Disconnect (Verbinden/Trennen) manuell hergestellt
bzw. getrennt.
JKlicken Sie auf OK, um fortzufahren.
o L2TP xDSL: Wird für Kabelmodems mit L2TP-Anschluss verwendet.
- IP-Adresse für L2TP xDSL -
DEUTSCH
49
Page 56

Konfiguration des Breitband-Routers
• WAN-Verbindung: DHCP-Client oder feste IP-Adresse
• Obtain an IP address automatically (Automatisch eine IP-Adresse
erhalten):
1 Host Name (Hostname): Geben Sie ggf. Ihren Hostnamen ein.
2 MAC Address (MAC-Adresse): Einige Kabel-Internetanbieter
speichern die MAC-Adresse Ihres Computers auf ihrem Server. In
diesem Fall müssen Sie die MAC-Adresse Ihres Computers klonen.
Klicken Sie auf Clone Mac Address (MAC-Adresse klonen), um die
MAC-Adresse Ihres Computers in den Router zu kopieren.
• Use the following IP address (Die folgende IP-Adresse verwenden):
1 IP address (IP-Adresse): Geben Sie die feste IP-Adresse ein.
2 Subnet Mask (Subnetz-Maske): Geben Sie die Subnetz-Maske ein.
3 Default Gateway (Standard-Gateway): Geben Sie die Gateway-IP-
Adresse ein.
• L2TP Settings (L2TP-Einstellungen):
1 User ID (Benutzer-ID): Geben Sie Ihren L2TP-Benutzernamen ein.
2 Password (Kennwort): Geben Sie das L2TP-Kennwort ein.
3 L2TP Gateway (L2TP-Gateway): Geben Sie den Gateway ein.
4 Connection ID (Verbindungs-ID): Geben Sie ggf. die Verbindungs-ID
ein.
5 MTU: Geben Sie die MTU-Größe ein. Wenn die Größe nicht angegeben
wird, übernehmen Sie die Standardeinstellung von 1492.
6 Connection Type (Verbindungsart):
JKlicken Sie auf OK, um fortzufahren.
• Continuous (Kontinuierlich): Die PPP-Verbindung ist immer
aktiv.
• Connect on Demand (Automatische Verbindung): Die PPP-
Verbindung wird hergestellt, wenn über einen Computer auf das
Internet zugriffen wird. Die PPP-Verbindung wird getrennt, wenn
während der Idle Time (Leerlaufzeit, Minuten), die im Feld unten
eingegeben wird, nicht mehr auf das Internet zugegriffen wird.
• Manual (Manuell): Die PPP-Verbindung wird durch Klicken auf
Connect/Disconnect (Verbinden/Trennen) manuell hergestellt
bzw. getrennt.
o Telstra Big Pond: Nicht für Europa.
50
Page 57

Prüfen des Internetverbindungsstatus
Der Quick Setup Wizard ist jetzt abgeschlossen.
J Klicken Sie abschließend auf Apply (Übernehmen).
Der Router wird jetzt neu starten. Dies dauert ca. 60 Sekunden.
J Klicken Sie auf OK, wenn die Neustartsequenz beendet ist.
Kehren Sie durch Klicken auf HOME oben rechts am Bildschirm zur Homepage zurück.
3 Prüfen des Internetverbindungsstatus
Die WAN-Verbindung kann auf dem Bildschirm Status Info (Informationen zum Status)
auf der Web-Managementseite des drahtlosen Routers geprüft werden.
Klicken Sie auf Internet Connection (Internetverbindung).
DEUTSCH
51
Page 58

Konfiguration des drahtlosen Netzwerks
- Internetverbindungsstatus -
J Alle Informationen über die Internetverbindung werden angezeigt: WAN-IP-
Adresse, Gateway, DNS-Server usw.
4 Konfiguration des drahtlosen Netzwerks
4.1 WPS
Wi-Fi Protected Setup (WPS) wird vom Skyr@cer WBR 7201n unterstützt.
Über das WPS können drahtlose Verschlüsselungseinstellungen automatisch vom
Router an WPS-fähige drahtlose Clients gesendet werden (z. B. Skyr@cer USB 4201n).
Das bedeutet, dass Sie die Verschlüsselungseinstellungen nicht mehr in Ihren WPSfähigen drahtlosen Adapter eingeben müssen, wenn Sie sich mit Ihrem Router
verbinden. Drücken Sie einfach die WPS-Taste am Router und danach die WPS-Taste
am drahtlosen Adapter. Die gesicherte Verbindung wird dann nach wenigen Sekunden
hergestellt.
Wenn Sie die Verschlüsselungseinstellungen für den drahtlosen Router nicht
vornehmen, erstellt das WPS für Sie automatisch einen anspruchsvollen
Verschlüsselungs-Key (WSP-PSK).
Falls Sie den drahtlos Client-Adapter ohne WPS verwenden möchten, sollten
Sie die Drahtlosverschlüsselung manuell vornehmen.
Für das automatische Setup des WSP können Sie die unten in 4.2 und 4.3
beschriebenen Schritte auslassen.
52
Page 59

Konfiguration des drahtlosen Netzwerks
4.2 Konfigurieren der (E)SSID
J Klicken Sie auf General Setup (Allgemeines Setup) und gehen Sie zu den
Wireless(Drahtlos) > Basic Settings (Basiseinstellungen).
>
- Seite „Drahtlose Einstellungen“ -
Wählen Sie die drahtlos Mode (Modus): Werkseinstellung ist Access
1
Point (AP).
2 Geben Sie den Namen des drahtlosen Netzwerks (ESSID) ein. Die
Werkseinstellung ist “Topcom_” + die letzten sechs Ziffern der MACAdresse.
Die MAC-Adresse finden Sie auf der Unterseite des Routers.
>
DEUTSCH
3 Es stehen 13 Funkkanäle zur Verfügung. Sie können einen beliebigen
Kanal wählen.
Wenn Sie mehr als einen drahtlosen Router oder Zugangspunkt in
Ihrem Haus oder Büro haben, müssen Sie sicherstellen, dass Sie
einen anderen Kanal verwenden.
J Klicken Sie auf Apply (Übernehmen), um die Einstellung zu bestätigen.
53
Page 60

Konfiguration des drahtlosen Netzwerks
4.3 Einstellen der drahtlosen Verschlüsselung
Topcom rät dringend, die Verschlüsselung zu aktivieren. Dies ist die einzige
Möglichkeit, unerwünschten Benutzern den Zugang zu Ihrem drahtlosen
Netzwerk zu verweigern.
Es stehen drei Verschlüsselungseinstellungen zur Verfügung: WEP 64 Bit, WEP 128 Bit
und WPA(2)
J Wählen Sie Security Settings (Sicherheitseinstellungen), um das
Verschlüsselungsmenü zu öffnen.
Die Verschlüsselung ist standardmäßig deaktiviert. In diesem Bildschirm können Sie den
gewünschten Verschlüsselungstyp auswählen.
Im nachstehenden Beispiel ist die Verschlüsselung WEP 64-Bit eingestellt.
- Seite „Sicherheitseinstellungen“ -
1
Encryption (Verschlüsselung): Wählen Sie WEP.
54
Page 61

2 Key Length (Schlüssellänge): 64-Bit Geben Sie jetzt Ihren WEP-
Schlüssel ein: Sie können einen Code frei erfinden (z. B. 12345abcde).
Stellen Sie sicher, dass Sie den gleichen Schlüssel in Ihrem drahtlosen
Adapter verwendet, der in Ihrem drahtlosen Computer oder Laptop
installiert ist.
Notieren Sie diesen Schlüssel, und bewahren Sie ihn unzugänglich für
unbefugte Benutzer auf.
3 Für die 64-Bit-Verschlüsselung sollten 10 hexadezimale Ziffern
verwendet werden.
Für die 128-Bit-Verschlüsselung sollten 26 hexadezimale Ziffern
verwendet werden.
Die folgenden Zeichen sind als hexadezimaler Code zulässig:
0, 1, 2, 3, 4, 5, 6, 7, 8, 9
a, b, c, d, e, f
A, B, C, D, E, F
JKlicken Sie auf SAVE, um die Einstellungen zu speichern.
JKlicken Sie auf Apply (Übernehmen), um die Einstellung zu bestätigen.
5 Garantie
5.1 Garantiezeit
Topcom Geräte haben eine 24-monatige Garantiezeit. Die Garantiezeit beginnt an dem
Tag, an dem das neue Gerät erworben wurde. Die Garantie für Batterien ist auf 6 Monate
nach Erwerb begrenzt. Verschleißteile oder Mängel, die den Wert oder die
Gebrauchstauglichkeit des Geräts nur unerheblich beeinflussen, sind von der Garantie
ausgeschlossen.
Der Garantieanspruch muss durch den Originalkaufbeleg, auf dem das Kaufdatum und
das Gerätemodell ersichtlich sind, nachgewiesen werden.
Garantie
DEUTSCH
5.2 Abwicklung des Garantiefalls
Senden Sie das fehlerhafte Gerät mit dem gültigen Kaufbeleg an ein Topcom ServiceZentrum.
Tritt ein Gerätefehler innerhalb der Garantiezeit auf, übernimmt Topcom oder ein
autorisiertes Service-Zentrum unentgeltlich die Reparatur jedes durch einen Materialoder Herstellungsfehler aufgetretenen Defekts.
Topcom wird nach eigenem Ermessen die Garantieansprüche mittels Reparatur oder
Austausch des fehlerhaften Geräts oder von Teilen des fehlerhaften Geräts erfüllen. Bei
einem Austausch können Farbe und Modell vom eigentlich erworbenen Gerät
abweichen.
Das ursprüngliche Kaufdatum bestimmt den Beginn der Garantiezeit. Die Garantiezeit
verlängert sich nicht, wenn das Gerät von Topcom oder einem seiner autorisierten
Service-Zentren ausgetauscht oder repariert wird.
55
Page 62

Entsorgung des Geräts (Umweltschutz)
5.3 Garantieausschlüsse
Schäden oder Mängel, die durch unsachgemäße Handhabung oder Betrieb verursacht
werden sowie Defekte, die durch die Verwendung von Nicht-Originalteilen oder die
Verwendung von nicht von Topcom empfohlenem Zubehör entstehen, werden nicht von
der Garantie abgedeckt.
Schnurlose Telefone von Topcom wurden so konstruiert, dass sie ausschließlich mit
wiederaufladbaren Batterien funktionieren. Ein durch nicht-wiederaufladbare Batterien
verursachter Schaden fällt nicht unter die Garantieleistung.
Die Garantie deckt keine Schäden ab, die durch äußere Einflüsse entstanden sind, wie
z. B. Blitzeinschlag, Wasser, Brände oder auch jegliche Transportschäden.
Wenn die Seriennummer des Geräts verändert, entfernt oder unleserlich gemacht wurde,
kann keine Garantie in Anspruch genommen werden.
Alle Garantieansprüche erlöschen, wenn das Gerät durch den Käufer oder durch
unqualifizierte und nicht offiziell anerkannte Topcom Service-Zentren repariert, verändert
oder umgebaut wurde.
6 Entsorgung des Geräts (Umweltschutz)
Am Ende der Nutzungsdauer des Produkts darf das Gerät nicht im normalen
Hausmüll entsorgt werden. Bringen Sie es zu einer Sammelstelle zur
Aufbereitung elektrischer und elektronischer Geräte. Das Symbol am
Produkt, in der Bedienungsanleitung und/oder Verpackung zeigt dies an.
Einige der Materialien des Produkts können wieder verwendet werden,
wenn Sie das Gerät in einer Aufbereitungsstelle abgeben. Mit der Wiederverwertung
einiger Teile oder Rohmaterialien aus gebrauchten Produkten leisten Sie einen wichtigen
Beitrag zum Umweltschutz. Wenden Sie sich bitte an Ihre örtlichen Behörden, wenn Sie
weitere Informationen über Sammelstellen in Ihrer Umgebung benötigen.
7 Reinigung
Reinigen Sie das Telefon mit einem leicht feuchten Lappen oder mit einem antistatischen
Tuch. Verwenden Sie niemals Reinigungs- oder Scheuermittel.
56
Page 63

Conexión del router
Español
1 Conexión del router
Conecte el router de acuerdo con el siguiente diagrama.
• ALIMENTACIó N: el puerto de alimentación sirve para conectar el adaptador de
alimentación de 12 V CC.
J El LED de alimentación situado en el panel frontal se encenderá siempre que el
adaptador de alimentación esté conectado.
• WAN: el puerto WAN sirve para conectar el módem de cable / DSL. El LED de enlace
situado en el panel frontal indica si existe conexión con la línea ADSL.
J El LED de WAN se encenderá si el cable de red Ethernet se encuentra conectado
correctamente.
• Puertos 1-4: estos puertos le permitirán conectar hasta 4 PC u otros dispositivos de
red.
J Los LED de LAN indican el estado de la conexión.
• Botón de reinicio / WPS:
J Para cargar la configuración predeterminada, mantenga pulsado el botón de reinicio
durante al menos 20 segundos. De este modo, se cargarán los parámetros
predeterminados de fábrica para el dispositivo. No pulse el botón de reinicio a
menos que desee borrar la configuración actual.
J Para iniciar el proceso WPS (Wi-Fi Protected Setup, configuración Wi-Fi protegida),
pulse el botón durante unos 4 segundos.
ESPAñOL
57
Page 64

Configuración del router de banda ancha
2 Configuración del router de banda ancha
Se recomienda encarecidamente configurar el router utilizando una conexión de cable.
Conecte su equipo a uno de los puertos Ethernet del router utilizando un cable Ethernet.
J Inicie el explorador Internet Explorer y escriba 192.168.1.1 en la barra de
direcciones URL.
- Barra de direcciones URL de Internet Explorer -
Aparecerá la pantalla de inicio de sesión.
J Introduzca el nombre de usuario y la contraseña.
- Pantalla de inicio de sesión -
De manera predeterminada, el nombre de usuario es admin y la contraseña es admin.
J Haga clic en «OK» («Aceptar») para continuar.
Ahora accederá a la página de administración web de su router inalámbrico.
- Página de administración web del router inalámbrico -
58
Page 65

Configuración del router de banda ancha
J Seleccione el asistente «Quick Setup» («Configuración rápida») para iniciar la
configuración.
J En la pantalla siguiente aparecerá la sección «Time Zone» («Zona horaria»).
- Configuración de la zona horaria -
1
Set Time Zone (Establecer la zona horaria): seleccione su región.
2 Time Server Address (Dirección del servidor de hora): puede
introducir la dirección IP de su servidor de hora preferido o dejar la
configuración predeterminada.
3 Daylight Savings (Horario de verano): aquí puede activar el horario de
verano. Introduzca las fechas de inicio y fin del horario de verano.
J Haga clic en «Next» («Siguiente») para continuar.
- Tipo de conexión de banda ancha -
J Seleccione su tipo de conexión de banda ancha:
ESPAñOL
59
Page 66

Configuración del router de banda ancha
o Cable modem (Módem de cable): se utiliza en conexiones con módem de cable.
- Información de la dirección IP del módem de cable -
1
Host Name (Nombre de equipo): introduzca su nombre de equipo, si
es necesario.
2 MAC Address (Dirección MAC): algunos proveedores de servicios de
Internet por cable almacenan en su servidor la dirección MAC de los
equipos de sus clientes. En este caso, deberá clonar la dirección Mac
de su equipo.
JHaga clic en «Clone Mac Address» («Clonar la dirección MAC») para
copiar la dirección MAC de su equipo en el router.
JHaga clic en «OK» para continuar.
o Fixed-IP xDSL (xDSL con IP fija): se utiliza con módems de cable o puentes DSL
con dirección IP fija.
- Información de la dirección IP para xDSL con IP fija -
1
IP address assigned by your Service Provider (Dirección IP
asignada por su proveedor de servicios): introduzca la dirección IP
WAN fija.
2 Subnet Mask (Máscara de subred): introduzca la máscara de subred.
3 DNS Address (Dirección DNS): introduzca la dirección de su servidor
DNS.
4 Service Provider Gateway Address (Dirección de la pasarela del
proveedor de servicios): introduzca la dirección IP de la pasarela.
JHaga clic en «OK» para continuar.
60
Page 67

Configuración del router de banda ancha
o PPPoE xDSL (xDSL PPPoE): se utiliza en puentes DSL con conexión PPPoE.
- Información de la dirección IP para xDSL PPPoE -
1
Username (Nombre de usuario): introduzca su nombre de usuario
para PPPoE.
2 Password (Contraseña): introduzca la contraseña.
3 Service Name (Nombre del servicio): introduzca el nombre del
servicio (por ejemplo, el nombre de su proveedor de Internet).
4 MTU: introduzca el tamaño de MTU (si su proveedor de Internet no
especifica el tamaño, conserve el valor predeterminado de 1492).
5 Connection type (Tipo de conexión):
• Continuous (Continua): la conexión PPP siempre estará activa.
• Connect on Demand (Conexión previa petición): la conexión
PPP se establecerá cuando el equipo acceda a Internet. La
conexión PPP se desconectará si no existe tráfico de Internet
durante el tiempo especificado en el parámetro «Idle Time Out»
(«Tiempo de inactividad»), introducido en el campo siguiente (en
minutos).
• Manual: la conexión PPP se puede establecer / desconectar de
forma manual haciendo clic en «Connect / Disconnect»
(«Conectar / Desconectar»).
JHaga clic en «OK» para continuar.
ESPAñOL
61
Page 68

Configuración del router de banda ancha
o PPTP xDSL (xDSL PPTP): se utiliza en módems de cable o puentes DSL con
conexión PPTP. PPTP también se puede utilizar si el router está conectado a otra
red LAN.
- Información de la dirección IP para xDSL PPTP -
•
Conexión WAN: cliente DHCP o dirección IP fija.
• Obtain an IP address automatically (Obtener automáticamente una
dirección IP):
1 Host Name: introduzca su nombre de equipo, si es necesario.
2 MAC Address: algunos proveedores de servicios de Internet por cable
almacenan en su servidor la dirección MAC de los equipos de sus
clientes. En este caso, deberá clonar la dirección Mac de su equipo.
Haga clic en «Clone Mac Address» para copiar la dirección MAC de su
equipo en el router.
• Use the following IP address (Utilizar la siguiente dirección IP):
1 IP address (Dirección IP): introduzca la dirección IP fija.
2 Subnet Mask: introduzca la máscara de subred.
3 Default Gateway (Pasarela predeterminada): introduzca la dirección
IP de la pasarela.
62
Page 69

Configuración del router de banda ancha
• PPTP Settings (Configuración PPTP):
1 User ID (ID de usuario): introduzca el nombre de usuario PPTP.
2 Password: introduzca la contraseña PPTP.
3 PPTP Gateway (Pasarela PPTP): introduzca la pasarela.
4 Connection ID (ID de conexión): introduzca la ID de conexión, si es
necesario.
5 MTU: introduzca el tamaño de MTU (si no se especifica el tamaño,
conserve el valor predeterminado de 1492).
6 BEZEQ-ISRAEL: solo para Israel.
7 Connection type:
• Continuous: la conexión PPP siempre estará activa.
• Connect on Demand: la conexión PPP se establecerá cuando el
equipo acceda a Internet. La conexión PPP se desconectará si no
existe tráfico de Internet durante el tiempo especificado en el
parámetro «Idle Time Out», introducido en el campo siguiente
(en minutos).
• Manual: la conexión PPP se puede establecer / desconectar de
forma manual haciendo clic en «Connect / Disconnect».
JHaga clic en «OK» para continuar.
o L2TP xDSL (xDSL L2TP): se utiliza en módems de cable con conexión L2TP.
- Información de la dirección IP para xDSL L2TP -
Conexión WAN: cliente DHCP o dirección IP fija.
•
ESPAñOL
63
Page 70

Configuración del router de banda ancha
• Obtain an IP address automatically:
1 Host Name: introduzca su nombre de equipo, si es necesario.
2 MAC Address: algunos proveedores de servicios de Internet por cable
almacenan en su servidor la dirección MAC de los equipos de sus
clientes. En este caso, deberá clonar la dirección Mac de su equipo.
Haga clic en «Clone Mac Address» para copiar la dirección MAC de su
equipo en el router.
• Use the following IP address:
1 IP address: introduzca la dirección IP fija.
2 Subnet Mask: introduzca la máscara de subred.
3 Default Gateway: introduzca la dirección IP de la pasarela.
• L2TP Settings (Configuración L2TP):
1 User ID: introduzca el nombre de usuario L2TP.
2 Password: introduzca la contraseña L2TP.
3 L2TP Gateway (Pasarela L2TP): introduzca la pasarela.
4 Connection ID: introduzca la ID de conexión, si es necesario.
5 MTU: introduzca el tamaño de MTU (si no se especifica el tamaño,
conserve el valor predeterminado de 1492).
6 Connection type:
• Continuous: la conexión PPP siempre estará activa.
• Connect on Demand: la conexión PPP se establecerá cuando el
equipo acceda a Internet. La conexión PPP se desconectará si no
existe tráfico de Internet durante el tiempo especificado en el
parámetro «Idle Time Out», introducido en el campo siguiente
(en minutos).
• Manual: la conexión PPP se puede establecer / desconectar de
forma manual haciendo clic en «Connect / Disconnect».
JHaga clic en «OK» para continuar.
o Telstra Big Pond: no válido para Europa.
El asistente de configuración rápida ha finalizado.
64
Page 71

Comprobación del estado de la conexión a Internet
J Haga clic en «Apply» («Aplicar») para finalizar.
En este momento, el router se reiniciará. Esta operación durará unos 60 segundos.
J Haga clic en «OK» una vez finalizada la secuencia de reinicio.
Vuelva a la página principal haciendo clic en «HOME» («PRINCIPAL») en la esquina
superior derecha de la pantalla.
3 Comprobación del estado de la conexión a Internet
La conexión WAN puede comprobarse en la pantalla «Status Info» («Información de
estado»), en la página de administración web del router inalámbrico.
Haga clic en «Internet Connection» («Conexión a Internet»).
ESPAñOL
65
Page 72

Configuración de la red inalámbrica
- Estado de la conexión a Internet -
J Aquí podrá ver toda la información sobre su conexión a Internet: la dirección IP
WAN, la pasarela, los servidor DNS, etc.
4 Configuración de la red inalámbrica
4.1 WPS
El Skyr@cer WBR 7201n permite la opción WPS (Wi-Fi Protected Setup, configuración
Wi-Fi protegida).
La opción WPS permite enviar automáticamente la configuración del cifrado inalámbrico
desde el router a un cliente inalámbrico con función WPS (por ejemplo, el Skyr@cer USB
4201n).
Por lo tanto, no es necesario introducir la configuración del cifrado en el adaptador
inalámbrico con función WPS si desea conectarlo al router. Solo tiene que pulsar el botón
«WPS» del router y luego pulsar el botón «WPS» del adaptador inalámbrico y la
conexión protegida se establecerá al cabo de unos segundos.
Si no configura el cifrado inalámbrico del router, la función WPS creará
automáticamente un cifrado muy sofisticado (WPA-PSK).
Si desea utilizar un adaptador de cliente inalámbrico sin opción WPS, es
recomendable configurar el cifrado inalámbrico manualmente.
Para configurar la función WPS automáticamente, no hace falta que lleve a cabo los
siguientes pasos (4.2 y 4.3).
66
Page 73

Configuración de la red inalámbrica
4.2 Configuración del (E)SSID
J Haga clic en «General Setup» («Configuración general») y pulse «Wireless»
(«Inalámbrica») > «Basic Settings» («Configuración básica»).
>
- Página de configuración inalámbrica -
Elija el modo inalámbrico en «Mode» («Modo»): la opción
1
predeterminada es «Access Point» (AP) («Punto de acceso»).
2 Introduzca el nombre de la red inalámbrica en «ESSID». De manera
predeterminada, es «Topcom_» + los últimos seis dígitos de la
dirección MAC.
La dirección MAC se encuentra en la etiqueta de la parte inferior
del router.
3 Existen 13 canales de radio disponibles. Puede seleccionar cualquiera
de estos canales.
Si dispone de más de un router inalámbrico o punto de acceso en
su hogar u oficina, asegúrese de no utilizar el mismo canal.
>
ESPAñOL
J Haga clic en «Apply» para confirmar.
4.3 Configuración del cifrado inalámbrico
Topcom recomienda encarecidamente activar el cifrado. Es la única forma de
evitar que usuarios indeseados puedan acceder a su red inalámbrica.
Hay tres tipos de cifrado disponibles: WEP de 64 bits, WEP de 128 bits y WPA (2).
67
Page 74

Configuración de la red inalámbrica
J Seleccione la opción «Security Settings» («Configuración de seguridad») para
acceder al menú de cifrado.
De forma predeterminada, el cifrado estará desactivado. En esta pantalla, podrá
seleccionar el tipo de cifrado que desee.
En el ejemplo siguiente, el cifrado activo es «WEP 64 bit».
- Página de configuración de seguridad -
1
Encryption (Cifrado): seleccione «WEP».
2 Key Length (Longitud de clave):«64-bit» («64 bits»). A continuación
introduzca la clave WEP: puede inventar un código (por ejemplo,
12345abcde). Asegúrese de utilizar la misma clave que en su adaptador
inalámbrico instalado en su equipo u ordenador portátil.
Escriba la clave y ocúltela a los usuarios sin autorización.
3 Si el cifrado es de 64 bits, deben introducirse 10 dígitos hexadecimales.
68
Page 75

Si el cifrado es de 128 bits, deben introducirse 26 dígitos
hexadecimales.
Los siguientes caracteres se pueden utilizar como dígitos
hexadecimales:
0, 1, 2, 3, 4, 5, 6, 7, 8, 9
a, b, c, d, e, f
A, B, C, D, E, F
JHaga clic en «SAVE» («GUARDAR») para guardar la configuración.
JHaga clic en «Apply» para confirmar.
5 Garantía
5.1 Período de garantía
Las unidades de Topcom tienen un período de garantía de 24 meses. El período de
garantía entra en vigor el día en que se adquiere la nueva unidad. La garantía de las
baterías está limitada a 6 meses desde la compra. La garantía no cubre los consumibles ni
los defectos que tengan un efecto insignificante en el funcionamiento o en el valor del
equipo.
La garantía debe demostrarse presentando el comprobante original de compra, en el que
constarán la fecha de la compra y el modelo de la unidad.
5.2 Tratamiento de la garantía
La unidad defectuosa deberá devolverse al centro de servicio de Topcom junto con un
comprobante de compra válido.
Si la unidad tiene una avería durante el período de garantía, Topcom o su centro de servicio
oficial repararán sin cargo alguno cualquier avería causada por defectos de material o
fabricación.
Topcom, a su discreción, cumplirá sus obligaciones de garantía reparando o sustituyendo
las unidades defectuosas o las piezas de las unidades defectuosas. En caso de sustitución,
el color y el modelo pueden variar respecto a los de la unidad adquirida inicialmente.
La fecha de compra inicial determinará el comienzo del período de garantía. Este no se
ampliará si Topcom o sus centros de servicio autorizados cambian o reparan la unidad.
Garantía
ESPAñOL
5.3 Limitaciones de la garantía
Los daños o defectos causados por tratamiento o manejo incorrectos y los daños
resultantes del uso de piezas o accesorios no originales no recomendados por Topcom no
están cubiertos por la garantía.
Los teléfonos inalámbricos Topcom están diseñados para funcionar solo con baterías
recargables. Los daños provocados por el uso de pilas no recargables no están cubiertos
por la garantía.
La garantía no cubre los daños ocasionados por factores externos tales como relámpagos,
agua o fuego, como tampoco los daños causados durante el transporte.
La garantía no será válida si el número de serie de las unidades se cambia, se elimina o
resulta ilegible.
69
Page 76

Eliminación del dispositivo (medio ambiente)
Cualquier reclamación de la garantía se invalidará si la unidad ha sido reparada, alterada o
modificada por el comprador o algún centro de servicio no cualificado o no designado
oficialmente por Topcom.
6 Eliminación del dispositivo (medio ambiente)
Al final de su vida útil este producto no debe ser desechado en un contenedor
normal, sino en un punto de recogida destinado al reciclaje de equipos
eléctricos y electrónicos. Así lo indica el símbolo en el producto, en el manual
de usuario y/o en la caja.
Si usted los lleva a un punto de reciclaje, algunos de los materiales del
producto podrán reutilizarse. La reutilización de algunas de las piezas o materias primas de
estos productos supone una importante contribución a la protección del medio ambiente. Si
necesita más información sobre los puntos de reciclaje existentes en su zona, póngase en
contacto con las autoridades locales correspondientes.
7Limpieza
Limpie el teléfono con un trapo ligeramente humedecido o con un trapo antiestático. No
use nunca agentes limpiadores ni disolventes abrasivos.
70
Page 77

Português
1 Ligue o router
Ligue o router de acordo com o diagrama apresentado em baixo.
• ALIMENTAçã O: A porta de alimentação serve para ligar o adaptador de alimentação
eléctrica de 12V CC.
J O LED indicador de corrente no painel frontal acender-se-á quando o adaptador
de alimentação eléctrica for ligado.
• WAN: A porta WAN serve para ligar o modem Cabo/DSL. O LED de ligação no painel
frontal irá indicar que a linha ADSL está ligada.
J O LED de WAN acender-se-á se o cabo Ethernet de rede estiver ligado
correctamente.
• Portas 1- 4 : Permitem ligar até 4 PCs ou outros dispositivos de rede.
J Os LED de LAN indicarão os estado da ligação.
• Botão Reiniciar/WPS:
J Para carregar as definições por defeito, prima o botão de reiniciar (reset) e
mantenha-o premido durante pelo menos 20 segundos. Assim serão carregadas as
definições assumidas de fábrica do dispositivo. Não prima o botão reset (reiniciar)
a não ser que pretenda eliminar as definições actuais.
J Para iniciar a configuração WPS (Wi-Fi Protected Setup), prima o botão durante
cerca de 4 segundos.
Ligue o router
PORTUGUêS
71
Page 78

Configure o Router de Banda Larga
2 Configure o Router de Banda Larga
Recomenda-se fortemente que configure o router utilizando uma ligação de fio. Assim,
ligue o computador a uma das portas Ethernet do router utilizando um cabo Ethernet.
J Abra o Internet Explorer e escreva 192.168.1.1 na barra de endereço URL.
- barra de endereço URL do Internet Explorer -
Aparece o ecrã de início de sessão.
J Introduza o nome de utilizador e a palavra-passe.
- Ecrã de início de sessão -
Por predefinição, o nome de utilizador é admin e a palavra-passe é admin.
J Clique em OK para continuar.
Entrará na página de gestão de rede do seu Router Wireless.
- Página de gestão de rede do Router Wireless -
72
Page 79

Configure o Router de Banda Larga
J Escolha Quick Setup (instalação rápida) para iniciar a configuração.
J No ecrã seguinte poderá configurar o fuso horário: Time Zone.
- Configurações de Fuso Horário -
1
Set Time Zone: Seleccione a sua região
2 Time Server Address: Aqui é possível introduzir o endereço IP do seu
servidor de hora preferido, ou pode deixar o valor predefinido
3 Daylight Savings: Aqui é possível Activar a Hora de Verão (marcando
a caixa 'Enable Function'). Introduza a data de início e de fim da Hora de
Verão.
J Clique em Next (seguinte) para continuar.
- Tipo de ligação de banda larga -
J Escolha o tipo de ligação de banda larga, Broadband Connection Type:
PORTUGUêS
73
Page 80

Configure o Router de Banda Larga
o Cable modem: Usado para ligações de modem de cabo.
- Informação de endereço IP para Modem de Cabo -
1
Host Name: Se necessário, introduza o Nome do Anfitrião.
2 MAC Address: Alguns Fornecedores de Serviço de Internet por Cabo
guardam o endereço MAC do seu computador no seu servidor. Nesse
caso, deve clonar o endereço Mac do seu computador.
JClique em Clone Mac Address (clonar endereço MAC) para copiar o
endereço Mac do computador para o router.
JClique em OK para continuar.
o Fixed-IP xDSL: Usado para modem de cabo ou ponte DSL com endereço IP fixo.
- Informação de endereço IP para xDSL de IP Fixo -
IP address assigned by your Service Provider: Introduza o endereço
1
de IP fixo da WAN atribuído pelo Fornecedor de Serviços.
2 Subnet Mask: Introduza a Máscara de rede (subnet mask).
3 DNS Address : Introduza o endereço DNS.
4 Service Provider Gateway Address: Introduza o endereço IP do
Gateway.
JClique em OK para continuar.
74
Page 81

Configure o Router de Banda Larga
o PPPoE xDSL: Usado para ponte DSL com ligação PPPoE.
- Informação de endereço IP para PPPoE xDSL -
1
Username: Introduza o seu nome de utilizador PPPoE.
2 Password: Introduza a sua palavra-passe.
3 Service Name: Introduza o nome do serviço (por exemplo, o nome do
seu Fornecedor de Serviço de Internet).
4 MTU: Introduza o tamanho MTU. (se o tamanho não for especificado
pelo seu Fornecedor de Serviços de Internet, deixe o valor predefinido
de 1492)
5 Connection type:
• Continuous: (contínua) a ligação PPP estará sempre activa.
• Connect on Demand: (ligar a pedido) a ligação PPP será
estabelecida quando um computador acede à Internet. A ligação
PPP será desligada quando não houver mais tráfego de Internet
durante o Idle Time (tempo de espera, em minutos), introduzido
no campo abaixo.
• Manual: A ligação PPP será estabelecida / desligada
manualmente clicando em Connect / Disconnect (ligar /
desligar).
JClique em OK para continuar.
PORTUGUêS
75
Page 82

Configure o Router de Banda Larga
o PPTP xDSL: usado para modem de cabo ou ponte DSL com ligação PPTP. PPTP
também pode ser usado quando o router está ligado a outra rede LAN.
- Informação de endereço IP para PPTP xDSL -
•
WAN connection: (definições de interface WAN) para cliente DHCP ou
Endereço IP Fixo
• Obtain an IP address automatically (Obter um endereço IP
automaticamente):
1 Host Name: Se necessário, introduza o Nome do Anfitrião.
2 MAC Address: Alguns Fornecedores de Serviço de Internet por Cabo
guardam o endereço MAC do seu computador no seu servidor. Nesse
caso, deve clonar o endereço Mac do seu computador. Clique em Clone
Mac Address (clonar endereço MAC) para copiar o endereço Mac do
computador para o router.
• Use the following IP address (Use o seguinte endereço IP):
1 IP address: Introduza o endereço de IP fixo.
2 Subnet Mask: Introduza a Máscara de rede.
3 Default Gateway: Introduza o endereço IP do Gateway.
• PPTP Settings (Definições PPTP):
1 User ID: Introduza o seu nome de utilizador PPTP.
76
Page 83

Configure o Router de Banda Larga
2 Password: Introduza a palavra-passe PPTP.
3 PPTP Gateway:Introduza o Gateway.
4 Connection ID: Se necessário, introduza o ID da Ligação.
5 MTU: Introduza o tamanho MTU. (se o tamanho não for especificado
pelo seu Fornecedor de Serviços de Internet, deixe o valor predefinido
de 1492)
6 BEZEQ-ISRAEL: Apenas para Israel.
7 Connection Type:
• Continuous: (contínua) a ligação PPP estará sempre activa.
• Connect on Demand: (ligar a pedido) a ligação PPP será
estabelecida quando um computador acede à Internet. A ligação
PPP será desligada quando não houver mais tráfego de Internet
durante o Idle Time (tempo de espera, em minutos), introduzido
no campo abaixo.
• Manual: A ligação PPP será estabelecida / desligada
manualmente clicando em Connect / Disconnect (ligar /
desligar).
JClique em OK para continuar.
o L2TP xDSL: usado para ligações de modem de cabo com ligação L2TP.
- Informação de endereço IP para L2TP xDSL -
PORTUGUêS
77
Page 84

Configure o Router de Banda Larga
• WAN connection: (definições de interface WAN) para cliente DHCP ou
Endereço IP Fixo
• Obtain an IP address automatically (Obter um endereço IP
automaticamente):
1 Host Name: Se necessário, introduza o Nome do Anfitrião.
2 MAC Address: Alguns Fornecedores de Serviço de Internet por Cabo
guardam o endereço MAC do seu computador no seu servidor. Nesse
caso, deve clonar o endereço Mac do seu computador. Clique em Clone
Mac Address (clonar endereço MAC) para copiar o endereço Mac do
computador para o router.
• Use the following IP address (Use o seguinte endereço IP):
1 IP address: Introduza o endereço de IP fixo.
2 Subnet Mask: Introduza a Máscara de rede.
3 Default Gateway: Introduza o endereço IP do Gateway.
• L2TP Settings (Definições de L2TP):
1 User ID: Introduza o seu nome de utilizador L2TP.
2 Password: Introduza a palavra-passe L2TP.
3 L2TP Gateway:Introduza o Gateway.
4 Connection ID: Se necessário, introduza o ID da Ligação.
5 MTU: Introduza o tamanho MTU. (se o tamanho não for especificado
pelo seu Fornecedor de Serviços de Internet, deixe o valor predefinido
de 1492)
6 Connection Type:
JClique em OK para continuar.
• Continuous: (contínua) a ligação PPP estará sempre activa.
• Connect on Demand: (ligar a pedido) a ligação PPP será
estabelecida quando um computador acede à Internet. A ligação
PPP será desligada quando não houver mais tráfego de Internet
durante o Idle Time (tempo de espera, em minutos), introduzido
no campo abaixo.
• Manual: A ligação PPP será estabelecida / desligada
manualmente clicando em Connect / Disconnect (ligar /
desligar).
o Telstra Big Pond: não aplicável na Europa.
78
Page 85

Verifique o estado da ligação à Internet
O assistente de instalação rápida está terminado.
J Clique em Apply (Aplicar) para terminar.
O router irá ser reiniciado. Esta operação irá demorar cerca de 60 segundos.
J Clique em OK quando a sequência de reinício estiver concluída.
Volte à página principal clicando em HOME no canto superior direito do ecrã.
3 Verifique o estado da ligação à Internet
TA ligação WAN pode ser verificada no ecrã de informação de estado Status Info na
página de gestão da Web do Router Wireless.
Clique em Internet Connection (Ligação à Internet).
PORTUGUêS
79
Page 86

Configure o Router Wireless
- Estado da Ligação à Internet -
J Toda a informação sobre a ligação à Internet será visível: Endereço de IP WAN,
Gateway, Servidores DNS, ...
4 Configure o Router Wireless
4.1 WPS
O Skyr@cer WBR 7201n suporta a função Wi-Fi Protected Setup (WPS).
A WPS pode enviar a configuração da encriptação wireless do router automaticamente
para o cliente wireless com a função WPS activada (por exemplo, Skyr@cer USB
4201n).
Isto significa que não necessita de introduzir a configuração de encriptação no seu
adaptador wireless com a função WPS activada quando pretende estabelecer uma
ligação ao seu router. Basta premir o botão WPS no seu router e depois premir o botão
WPS no adaptador wireless para estabelecer uma ligação segura numa questão de
segundos.
Se não configurar a encriptação do router wireless, o WPS criará
automaticamente uma chave de encriptação sofisticada (WPA-PSK) para si.
Se quiser utilizar um adaptador de cliente wireless não WPS, recomenda-se que
configure a encriptação wireless manualmente.
Para uma configuração automática WPS não necessita de executar os procedimentos
das secções 4.2 e 4.3 em baixo.
80
Page 87

Configure o Router Wireless
4.2 Configure o (E)SSID
J Clique em General Setup (configuração geral), marque Wireless > Basic Settings
(configuração básica)
>
- Página de Definições de Rede Wireless -
Escolha o modo wireless Mode: AP (Acces Point) é o predefinido.
1
2 Introduza o Nome da Rede Wireless (ESSID). O nome assumido de
origem é “Topcom_” + os últimos seis dígitos do endereço MAC.
Pode encontrar o endereço MAC no rótulo inferior do router.
3 Estão disponíveis 13 canais de rádio. Pode escolher um desses canais.
Se possuir mais de um router wireless ou ponto de acesso em
casa ou no escritório, assegure-se de que estes não utilizam o
mesmo canal.
>
J Clique em Apply (Aplicar) para confirmar.
4.3 Configure a Encriptação da rede wireless
A Topcom recomenda fortemente que active a encriptação. Esta é a única forma
de impedir que utilizadores não desejados acedam à rede wireless.
Estão disponíveis três definições de encriptação: WEP 64bit, WEP 128bit e WPA(2)
PORTUGUêS
81
Page 88

Configure o Router Wireless
J Escolha Security Settings (Definições de Segurança) para aceder ao menu de
encriptação.
Por predefinição, a encriptação está desactivada. Neste ecrã, pode seleccionar o tipo de
encriptação.
No exemplo apresentado abaixo está definida a encriptação WEP 64-bit.
- Página de Definições de Segurança -
1
Encryption: (Encriptação) Seleccione WEP
2 Key Length: 64-bit. Introduza a sua chave WEP: Pode inventar o seu
próprio código (por exemplo, o código 12345abcde). Certifique-se de
que usa a mesma chave no adaptador de rede wireless instalado no seu
computador ou no seu computador portátil wireless.
Anote esta chave e esconda-a de utilizadores não autorizados.
3 Para uma encriptação de 64 bits deverá indicar 10 dígitos
hexadecimais.
82
Page 89

Para uma encriptação de 128 bits deverá indicar 26 dígitos
hexadecimais.
Os seguintes caracteres são válidos como hexadecimais:
0, 1, 2, 3, 4, 5, 6, 7, 8, 9
a, b, c, d, e, f
A, B, C, D, E, F
JClique em SAVE (guardar) para gravar as definições.
JClique em Apply (Aplicar) para confirmar.
5 Garantia
5.1 Período de garantia
As unidades Topcom têm um período de garantia de 24 meses. O período de garantia
tem início no dia da aquisição da nova unidade. A garantia das pilhas está limitada a 6
meses após a compra. Consumíveis ou defeitos que causem um efeito negligenciável no
funcionamento ou no valor do equipamento não são abrangidos.
A garantia tem de ser acompanhada pela apresentação de prova de compra original, na
qual figurem a data de compra e o modelo da unidade.
5.2 Accionamento da garantia
Uma unidade com defeito tem de ser devolvida a um centro de serviços da Topcom
juntamente com uma nota de compra válida.
Se a unidade tiver uma falha durante o período de garantia, a Topcom ou um centro de
serviços oficialmente por ela designado procederá, de forma gratuita, à reparação de
quaisquer defeitos originados por falhas do material ou no processo de fabrico.
A Topcom cumprirá livremente as suas obrigações respeitando a garantia, quer através
da reparação quer através da troca das unidades com defeito ou de partes das mesmas.
No caso de substituição, a cor e o modelo poderão ser diferentes da unidade adquirida
originalmente.
A data de aquisição original determinará o início do período de garantia. O período de
garantia não é alargado se a unidade for trocada ou reparada pela Topcom ou por
centros de serviços por ela designados.
Garantia
5.3 Exclusões de garantia
Danos ou defeitos causados pelo tratamento ou funcionamento incorrectos e danos
resultantes de utilização de peças não originais ou acessórios não recomendados pela
Topcom não são abrangidos pela garantia.
Os telefones sem fios da Topcom são concebidos para funcionar apenas com pilhas
recarregáveis. Os danos causados pela utilização de pilhas não recarregáveis não são
abrangidos pela garantia.
A garantia não cobre danos causados por factores externos, como relâmpagos, água e
fogo, nem quaisquer danos causados durante o transporte.
A garantia também não poderá ser accionada se o número de série existente nas
unidades tiver sido alterado, removido ou se estiver ilegível.
83
PORTUGUêS
Page 90

Eliminação do dispositivo (ambiente)
Qualquer accionamento da garantia será inválido se a unidade tiver sido reparada,
alterada ou modificada pelo comprador ou por centros de serviço não qualificados e não
designados oficialmente pela Topcom.
6 Eliminação do dispositivo (ambiente)
Quando o ciclo de vida do produto chega ao fim, não deve eliminar este
produto juntamente com os resíduos domésticos. Deve levá-lo a um ponto
de recolha de equipamentos eléctricos e electrónicos. O símbolo presente
no produto, no manual do utilizador e/ou na caixa dá essa indicação.
Alguns dos materiais do produto podem ser reutilizados se os colocar num
ponto de reciclagem. Ao reutilizar algumas das partes ou das matérias-primas dos
produtos utilizados, contribui de forma importante para a protecção do meio ambiente.
Contacte as autoridades locais se necessitar de mais informações sobre os pontos de
recolha existentes na sua área.
7Limpeza
Limpe a unidade com um pano ligeiramente húmido ou com um pano anti-estático.
Nunca utilize produtos de limpeza nem solventes abrasivos.
84
Page 91

Polski
Podczenie routera
1 Podczenie routera
Podcz router zgodnie z poniszym schematem.
• POWER: Gniazdo zasilania – naley podczy zasilacz 12 V DC.
J Kontrolka LED zasilania znajdujca si na przednim panelu bdzie wieci si,
gdy podczony jest zasilacz.
• WAN: Gniazdo WAN suy do podczenia modemu kablowego/DSL. Kontrolka
poczenia LED znajdujca si na przednim panelu bdzie sygnalizowa podczenie
linii ADSL.
J Kontrolka WAN LED zapali si, gdy kabel ethernetowy zostanie prawidowo
podczony.
• Porty 1- 4: Tutaj mona podczy do 4 komputerów lub innych urzdze sieciowych.
J Kontrolki LAN LED bd podaway status poczenia.
• Przycisk Reset/WPS:
J Aby przywróci ustawienia fabryczne, nacinij przycisk reset i przytrzymaj go przez
co najmniej 20 sekund. Zostan zaadowane ustawienia fabryczne urzdzenia.
Prosimy nie naciska tego przycisku, jeeli nie chcesz wykasowa aktualnych
ustawie.
J Aby uruchomi proces WPS (Wi-Fi Protected Setup – Chroniona Konfiguracja Sieci
Bezprzewodowej), przytrzymaj przycisk przez ok. 4 sekundy.
POLSKI
85
Page 92

Konfiguracja szerokopasmowego routera
2 Konfiguracja szerokopasmowego routera
Zaleca si, aby konfiguracji routera dokonywa poprzez poczenie kablowe. Prosz
podczy komputer do jednego z portów ethernetowych routera przy pomocy
dostarczonego kabla.
J Otwórz Internet Explorer i wpisz 192.168.1.1 w polu adresowym.
- pole adresowe URL przegldarki Internet Explorer -
Pojawi si ekran logowania.
J Wprowad nazw uytkownika i haso.
- ekran logowania -
Domyln nazw uytkownika jest admin oraz haso admin.
J Kliknij OK, aby przej dalej.
Wywietlona zostanie strona zarzdzania routera bezprzewodowego
- strona zarzdzania routera bezprzewodowego -
86
Page 93

Konfiguracja szerokopasmowego routera
J Aby rozpocz konfiguracj, uruchom kreatora Quick Setup.
J Na nastpnym ekranie, za pomoc ustawienia Time Zone, mona ustawi stref
czasow.
- ustawienia strefy czasowej -
1
Set Time Zone: Wybierz swój region.
2 Time Server Address: Mona tutaj wpisa adres IP serwera czasu lub
pozostawi ustawienie domylne.
3 Daylight Savings:Tutaj mona wczy zmian czasu na zimowy/letni.
Prosz wpisa daty zmiany czasu.
J Kliknij Next, aby przej dalej.
POLSKI
- Typ poczenia szerokopasmowego -
J W ustawieniu Broadband Connection Type wybierz swój typ poczenia
szerokopasmowego:
87
Page 94

Konfiguracja szerokopasmowego routera
o Cable modem: Dla pocze poprzez modem kablowy.
- Informacja o adresie IP dla modemu kablowego -
1
Host Name:Jeeli to konieczne, wpisz swoj nazw hosta.
2 MAC Address: Niektórzy dostawcy internetu kablowego trzymaj na
swoim serwerze adres Mac twojego komputera. W takim wypadku
naley sklonowa adres MAC swojego komputera.
JKliknij Clone Mac Address, aby skopiowa adres MAC swojego
komputera do routera.
JKliknij OK, aby przej dalej.
o Fixed-IP xDSL: Dla modemu kablowego lub DSL ze staym adresem IP.
- Informacja o adresie IP dla Fixed-IP xDSL -
IP Address assigned by your Service Provider: Prosz wprowadzi
1
stay adres IP WAN
2 Subnet Mask: Wpisz mask podsieci.
3 DNS Address : Wpisz adres serwera DNS.
4 Service Provider Gateway Address: Wpisz adres IP bramki
dostpowej.
JKliknij OK, aby przej dalej.
88
Page 95

Konfiguracja szerokopasmowego routera
o PPPoE xDSL: Dla mostka DSL z poczeniem PPPoE.
- Informacja o adresie IP dla PPPoE xDSL -
1
Username: Wprowad nazw uytkownika PPPoE.
2 Password: Wprowad swoje haso.
3 Service Name: Wpisz nazw usugi (na przykad nazw dostawcy usug
internetowych).
4 MTU: Wprowad rozmiar MTU. (jeeli wielko nie jest podana przez
dostawc, pozostaw domyln warto 1492).
5 Connection type:
• Continuous: Poczenie PPP bdzie zawsze aktywne.
• Connect on Demand: Poczenie PPP bdzie ustanawiane, gdy
komputer chce si poczy z internetem. Poczenie PPP
zostanie zakoczone, jeeli nie ma aktywnoci przez okrelony w
polu poniej czas Idle Time (w minutach).
• Manual: Poczenie PPP jest rozpoczynane/zakaczane rcznie
przez kliknicie Connect/Disconnect.
JKliknij OK, aby przej dalej.
POLSKI
89
Page 96

Konfiguracja szerokopasmowego routera
o PPTP xDSL: Dla modemu kablowego lub mostka DSL z z poczeniem PPTP.
PPTP moe by take uywane, gdy router jest podczony do innej sieci LAN.
- Informacja o adresie IP dla PPTP xDSL -
•
Poczenie WAN:Klient DHCP dla staego adresu IP
• Obtain an IP address automatically:
1 Host Name:Jeeli to konieczne, wpisz swoj nazw hosta.
2 MAC Address: Niektórzy dostawcy internetu kablowego trzymaj na
swoim serwerze adres MAC twojego komputera. W takim wypadku
naley sklonowa adres MAC swojego komputera. Kliknij Clone Mac
Address, aby skopiowa adres MAC swojego komputera do routera.
• Use the following IP address:
1 IP address: Prosz wprowadzi stay adres IP.
2 Subnet Mask:Wpisz mask podsieci.
3 Default Gateway: Wpisz adres IP bramki dostpowej.
• PPTP Settings:
1 User ID: Wprowad nazw uytkownika PPTP.
2 Password: Wprowad haso PPTP.
3 PPTP Gateway:Wpisz nazw bramki.
90
Page 97

Konfiguracja szerokopasmowego routera
4 Connection ID:Jeeli to konieczne, wprowad nazw ID poczenia.
5 MTU: Wprowad rozmiar MTU. (jeeli wielko nie zostaa podana,
pozostaw domyln warto 1492.)
6 BEZEQ-ISRAEL: Tylko dla Izraela.
7 Connection type:
• Continuous: Poczenie PPP bdzie zawsze aktywne.
• Connect on Demand: Poczenie PPP bdzie ustanawiane, gdy
komputer chce si poczy z internetem. Poczenie PPP
zostanie zakoczone, jeeli nie ma aktywnoci przez okrelony w
polu poniej czas Idle Time (w minutach).
• Manual: Poczenie PPP jest rozpoczynane/zakaczane rcznie
przez kliknicie Connect/Disconnect.
JKliknij OK, aby przej dalej.
o L2TP xDSL: Dla modemów kablowych z poczeniem L2TP.
POLSKI
- Informacja o adresie IP dla L2TP xDSL -
•
Poczenie WAN:Klient DHCP dla staego adresu IP
• Obtain an IP address automatically:
1 Host Name:Jeeli to konieczne, wpisz swoj nazw hosta.
2 MAC Address: Niektórzy dostawcy internetu kablowego trzymaj na
swoim serwerze adres MAC twojego komputera. W takim wypadku
naley sklonowa adres MAC swojego komputera. Kliknij Clone Mac
Address, aby skopiowa adres MAC swojego komputera do routera.
91
Page 98

Konfiguracja szerokopasmowego routera
• Use the following IP address:
1 IP address: Prosz wprowadzi stay adres IP.
2 Subnet Mask:Wpisz mask podsieci.
3 Default Gateway: Wpisz adres IP bramki dostpowej.
• L2TP Settings:
1 User ID: Wprowad nazw uytkownika L2TP.
2 Password: Wprowad haso L2TP.
3 L2TP Gateway:Wpisz nazw bramki.
4 Connection ID:Jeeli to konieczne, wprowad nazw ID poczenia.
5 MTU: Wprowad rozmiar MTU. (jeeli wielko nie zostaa podana,
pozostaw domyln warto 1492).
6 Connection type:
• Continuous: Poczenie PPP bdzie zawsze aktywne.
• Connect on Demand: Poczenie PPP bdzie ustanawiane, gdy
komputer chce si poczy z internetem. Poczenie PPP
zostanie zakoczone, jeeli nie ma aktywnoci przez okrelony w
polu poniej czas Idle Time (w minutach).
• Manual: Poczenie PPP jest rozpoczynane/zakaczane rcznie
przez kliknicie Connect/Disconnect.
JKliknij OK, aby przej dalej.
o Telstra Big Pond: nie dla Europy.
Kreator szybkiej konfiguracji zakoczy prac.
J Kliknij Apply, aby zakoczy.
Router zostanie teraz ponownie uruchomiony. Potrwa to okoo 60 sekund.
J Kliknij OK, gdy sekwencja ponownego uruchamiania zostanie zakoczona.
92
Page 99

Sprawd status poczenia z internetem
Powró do strony gównej, naciskajc przycisk HOME znajdujcy si w prawym górnym
rogu ekranu.
3 Sprawd status poczenia z internetem
Poczenie WAN mona sprawdzi przy pomocy opcji Status Info na stronie
zarzdzania routerem.
Kliknij Internet Connection.
POLSKI
- Status poczenia z internetem -
J Pojawi si wszystkie informacje dotyczce poczenia z internetem: Adres IP
WAN, bramka, serwery DNS, ...
93
Page 100

Konfiguracja sieci bezprzewodowej
4 Konfiguracja sieci bezprzewodowej
4.1 WPS
Urzdzenie Skyr@cer WBR 7201n obsuguje funkcj chronionej konfiguracji sieci
bezprzewodowej (WPS).
Funkcja WPS pozwala na automatyczne wysyanie zaszyfrowanych ustawie sieci
bezprzewodowej z routera do klienta bezprzewodowego obsugujcego WPS (np.
Skyr@cer USB 4201n).
Oznacza to, e podczas podczania do routera nie ma koniecznoci wprowadzania
ustawie szyfrowania w adapterze bezprzewodowym z obsug WPS. Wystarczy
nacisn przycisk WPS na routerze, a nastpnie na adapterze bezprzewodowym, po
czym po kilku sekundach nawizane zostanie bezpieczne poczenie.
Jeli ustawienia szyfrowania na routerze nie zostan skonfigurowane, funkcja
WPS automatycznie utworzy zoony klucz szyfrowania (WPA-PSK).
W celu korzystania z klienta bezprzewodowego nieobsugujcego WPS, zaleca
si przeprowadzenie rcznej konfiguracji szyfrowania.
W przypadku automatycznej konfiguracji WPS mona pomin ponisze sekcje 4.2 i 4.3.
4.2 Konfiguracja (E)SSID
J Kliknij General Setup, wybierz opcj Wireless > Basic Settings
>
- Strona ustawie bezprzewodowych -
Wybierz tryb pracy bezprzewodowej (ustawienie Mode): Ustawienie
1
domylne to punkt dostpowy (AP).
94
>
 Loading...