

Page 1

Skyr@cer PC Card 3011
Quick Installation Guide
U8006178
Page 2

Table of Contents
ENGLISH ..................................................................................1
INSTALLATION......................................................................2
INSTALL THE DEVICE .............................................................2
INSTALL THE DRIVER............................................................. 2
In Windows 98 .......................................................2
In Windows ME .....................................................3
In Windows 2000 ...................................................3
In Windows XP ......................................................4
Verify...................................................................... 4
INSTALL THE UTILITY ............................................................5
NETWORK CONNECTION ..................................................6
IN WINDOWS 98/ME..............................................................6
IN WINDOWS 2000/XP........................................................... 8
CONFIGURATION ...............................................................11
ACCESSING THE CONFIGURATION UTILITY .........................11
Config Tab............................................................12
Page 3

Advanced Config Tab ..........................................15
Status Tab .............................................................19
Statistics Tab ........................................................20
About Tab.............................................................21
Exit Tab ................................................................21
Warranty ...............................................................22
DEUTSCH...............................................................................23
INSTALLATION....................................................................24
INSTALLIERUNG DES GERÄTS ..............................................24
INSTALLIERUNG DES TREIBERS ...........................................24
Für Windows 98 ...................................................24
Für Windows ME .................................................25
Für Windows 2000...............................................26
Für Windows XP..................................................27
Überprüfung .........................................................27
INSTALLIERUNG DES DIENSTPROGRAMMS ..........................28
NETZWERK VERBINDUNG ..............................................29
FÜR WINDOWS 98/ME.........................................................29
FÜR WINDOWS 2000/XP...................................................... 32
Page 4

KONFIGURATION ...............................................................36
ANWENDUNG DES KONFIGURATIONS-DIENSTPROGRAMMS36
Konfig Seite.......................................................... 38
Erweiterte Konfig Seite ........................................41
Status Seite ...........................................................45
Statistik Seite........................................................46
Übersicht Seite .....................................................47
Exit Seite ..............................................................47
Topcom Garantie..................................................48
NEDERLANDS....................................................................... 49
INSTALLATIE.......................................................................50
HET APPARAAT INSTALLEREN ............................................ 50
HET STUURPROGRAMMA INSTALLEREN..............................50
In Windows 98 .....................................................50
In Windows ME ...................................................51
In Windows 2000 .................................................51
In Windows XP ....................................................52
Verifiëren.............................................................. 52
Page 5

H
ET HULP- OF CONFIGURATIE-PROGRAMMA INSTALLEREN
.............................................................................................53
NETWERK CONNECTIE....................................................55
IN WINDOWS 98/ME............................................................55
IN WINDOWS 2000/XP......................................................... 57
CONFIGURATIE................................................................... 61
HET HULP- OF CONFIGURATIE-PROGRAMMA......................61
Het Config-Tab..................................................... 63
Het Geavanceerde Config-Tab.............................65
Het Status-Tab......................................................69
Het Statistics-Tab .................................................70
Het About-Tab...................................................... 71
Het Exit-Tab .........................................................71
De garantie van Topcom ......................................72
ESPAÑOL ...............................................................................73
INSTALACIÓN......................................................................74
INSTALACIÓN DEL DISPOSITIVO...........................................74
INSTALACIÓN DEL CONTROLADOR ......................................74
Page 6

En Windows 98 ....................................................74
En Windows ME ..................................................75
En Windows 2000 ................................................75
En Windows XP ...................................................76
Verificar................................................................ 77
INSTALACIÓN DEL UTILITARIO ............................................ 77
CONEXIÓN DE RED ............................................................79
EN WINDOWS 98/ME...........................................................79
EN WINDOWS 2000/XP........................................................ 81
CONFIGURACIÓN ...............................................................85
ACCEDER A LA CONFIGURACIÓN DEL UTILITARIO............... 85
Lengüeta Config.:.................................................87
Lengüeta Config. avanzada..................................89
Lengüeta de estado ...............................................93
Lengüeta Estadísticas ...........................................94
Lengüeta Acerca de..............................................95
Salir.......................................................................95
GARANTIA .........................................................96
FRANÇAIS.............................................................................. 97
Page 7

INSTALLATION....................................................................98
INSTALLATION DU DISPOSITIF.............................................. 98
INSTALLATION DU PILOTE.................................................... 98
Pour Windows 98 .................................................98
Pour Windows ME...............................................99
Pour Windows 2000...........................................100
Pour Windows XP..............................................100
Vérifier ...............................................................101
INSTALLER L’UTILITAIRE ...................................................101
CONNEXION DU RÉSEAU ...............................................103
POUR WINDOWS 98/ME ....................................................103
POUR WINDOWS 2000/XP .................................................105
CONFIGURATION .............................................................109
ACCES A L'UTILITAIRE DE CONFIGURATION ......................109
Onglet Config. ....................................................111
Onglet Config. Avancée .....................................113
Onglet État.......................................................... 117
Onglet Statistiques.............................................. 118
Onglet À propos de.............................................119
Page 8

Onglet Sortir .......................................................119
Garantie de Topcom ...........................................120
SVENSKA .............................................................................121
INSTALLATION..................................................................122
INSTALLERA ENHETEN .......................................................122
INSTALLERA DRIVRUTINEN................................................ 122
I Windows 98 .....................................................122
I Windows ME ...................................................123
I Windows 2000 .................................................123
I Windows XP ....................................................124
Verifiera.............................................................. 124
INSTALLERA VERKTYGET ..................................................125
NÄTVERKSANSLUTNING ...............................................126
I WINDOWS 98/ME ............................................................126
I WINDOWS 2000/XP .........................................................128
KONFIGURATION .............................................................132
ÖPPNA KONFIGURATIONSVERKTYGET............................... 132
Konfig flik ..........................................................134
Page 9

Avancerad Konfig flik........................................136
Status flik............................................................ 140
Statistik flik ........................................................141
Om flik................................................................142
Avsluta flik .........................................................142
garanti .................................................................143
DANSK ..................................................................................144
INSTALLATION..................................................................145
INSTALLER ENHEDEN .........................................................145
INSTALLER DRIVEREN........................................................145
I Windows 98 .....................................................145
I Windows ME ...................................................146
I Windows 2000 .................................................146
I Windows XP ....................................................147
Bekræft ...............................................................147
INSTALLER VÆRKTØJET .....................................................148
NETVÆRKSTILSLUTNING.............................................149
I WINDOWS 98/ME ............................................................149
I WINDOWS 2000/XP .........................................................151
Page 10

KONFIGURATION .............................................................155
ÅBNING AF KONFIGURATIONSVÆRKTØJET........................155
Konfig fane.........................................................156
Avanceret Konfig fane .......................................159
Statusfane ...........................................................163
Statestikfane .......................................................164
Om fane ..............................................................165
Afslut fane ..........................................................165
Garanti ................................................................166
Page 11

ENGLISH
The CE symbol indicates that the unit
complies with the essential requirements
of the R&TTE directive.
- 1 -
Page 12

INSTALLATION
Caution: Do not insert the Wireless PC Card
into your computer until the procedures in
“Install the Driver & Utility” has been
performed.
Install the Device
1. Locate the CardBus slot of your system.
2. Align the Wireless PC Card in the CardBus
slot. Push evenly and slowly until it is seated.
3. Once the device has been connected to your
computer, Windows will detect the new
hardware and then automatically copy all of
the files needed for networking.
Install the Driver
In Windows 98
1. In Add New Hardware Wizard, click Next.
2. Select Search for the best driver for your
device (Recommended). Click Next.
3. Insert the supplied CD-ROM into the
CD-ROM drive. Select Specify a location:
and click Browse to provide the appropriate
path (e.g. D:\WIN98). Click Next.
- 2 -
Page 13

4. Click Next, Windows will copy all the
necessary files to your system.
5. If you are asked to insert Windows 98
CD-ROM, please do so. Click OK.
6. Click Finish to complete the installation.
7. When Windows prompts you to restart your
computer, click Yes.
In Windows ME
1. Select Specify the location of the driver
(Advanced), click Next.
2. Insert the supplied CD-ROM into the
CD-ROM drive. Select Search for the best
driver for your device (Recommended) and
click Browse to provide the appropriate path
(e.g. D:\WINME.) Click Next.
3. Click Next, Windows will copy all the
necessary files to your system.
4. Click Finish to complete the installation.
5. When Windows prompts you to restart your
computer, click Yes.
In Windows 2000
1. In Found New Hardware Wizard, click
Next.
2. In Install Hardware Device Drivers, select
Search for a suitable driver for my device
(recommended), click Next.
3. Insert the supplied CD-ROM into the
CD-ROM drive. Select Specify a location,
click Next.
- 3 -
Page 14

4. Click Browse to provide the appropriate path
(e.g. D:\WIN2000). Click OK.
5. Click Next, Windows will copy all the
necessary files to your system.
6. In Digital Signature Not Found window,
click Yes to continue.
Click Finish to complete the installation.
In Windows XP
1. Select Install from a list or specific location
(Advanced) and click Next.
2. Insert the supplied CD-ROM into the
CD-ROM drive. Select Include this location
in the search: and click Browse to provide
the appropriate path (e.g. D:\WINXP). Click
Next.
3. Click Continue Anyway to proceed.
Windows will copy all the necessary files to
your system.
4. Click Finish to complete the installation.
Verify
To verify if the device exists in your computer and
is enabled, go to Start Æ Settings Æ Control
Panel Æ System (Æ Hardware) Æ Device
Manager. Expand the Network adapters
category. If the 802.11b Wireless LAN CardBus
(Mini-) PCI NIC is listed here, it means that your
device is properly installed and enabled.
- 4 -
Page 15

Install the Utility
1. Insert the supplied CD-ROM into the
CD-ROM drive. Double click on Setup.exe
to install the Wireless LAN Utility.
2. When the Welcome screen appears, click
Next to continue.
3. In License Agreement, click Yes to accept
the terms.
4. Click Finish to complete the installation.
- 5 -
Page 16

NETWORK CONNECTION
Once the driver has been installed, you must make
some changes to your network settings.
In Windows 98/ME
1. Go to Start Æ Settings Æ Control Panel Æ
Network.
2. Make sure that the following components are
installed.
y 802.11b Wireless LAN CardBus (Mini-)
PCI NIC
y IPX/SPX-compatible Protocol
y NetBEUI
y TCP/IP
If any components are missing, click on the Add
button to add them in. All the protocols and
clients required and listed above are provided by
Microsoft.
3. After clicking Add, highlight the component
you need, click Add.
- 6 -
Page 17
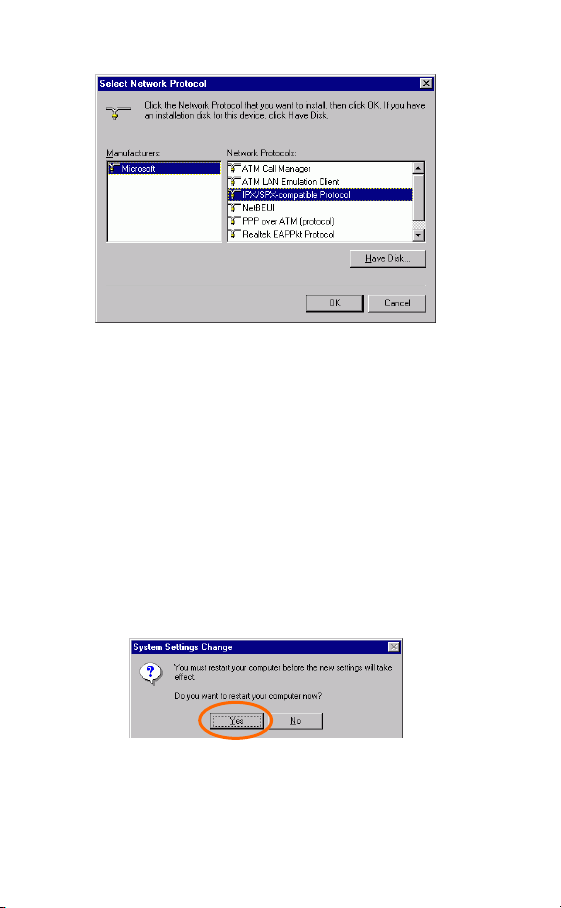
4. Highlight Microsoft, and then double click on
the item you want to add. Click OK.
5. For making your computer visible on the
network, enable the File and Print Sharing.
6. Click the Identification tab. Make up a name
that is unique from the other computers'
names on the network. Type the name of your
workgroup, which should be the same used by
all of the other PCs on the network.
7. Click the Access Control tab. Make sure that
“Share-level access control” is selected. If
connecting to a Netware server, share level
can be set to “User-level access control.”
8. When finished, restart your computer to
activate the new device.
9. Once the computer has restarted and Windows
has booted up, a Logon window will appear
- 7 -
Page 18
and require you to enter a username and
password. Make up a username and password
and click OK. Do not click the Cancel button,
or you won’t be able to log onto the network.
10. Double-click the Network Neighborhood
icon on the windows desktop, and you should
see the names of the other PCs on the
network.
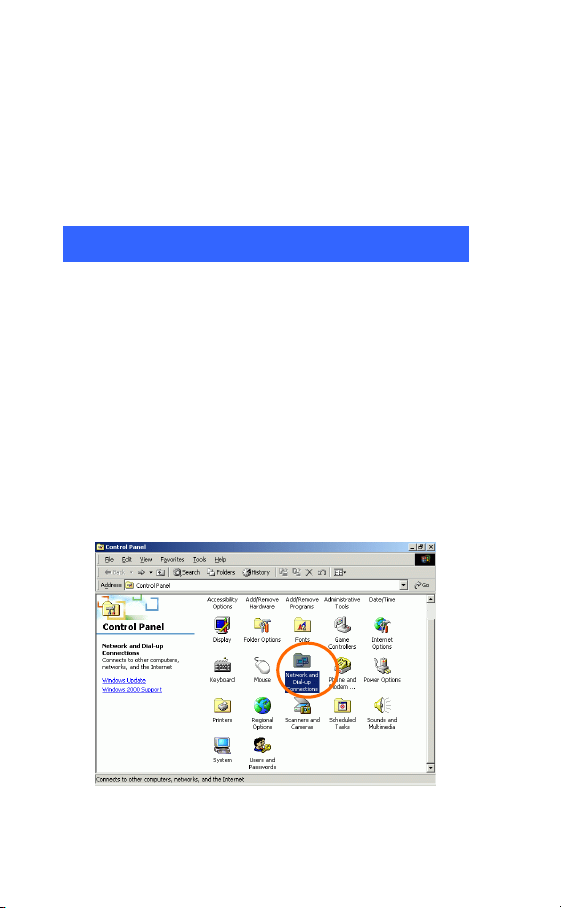
In Windows 2000/XP
1. (In Windows 2000)
Go to StartÆ Settings Æ Control Panel Æ
Network and Dial-up Connections Æ
Local Area Connection Æ Properties.
(In Windows XP)
Go to Start Æ Control Panel Æ Network
Connections Æ Wireless Network
Connection Enabled 802.11b Wireless
LAN CardBus (Mini-) PCI NIC Æ
Properties.
- 8 -
Page 19
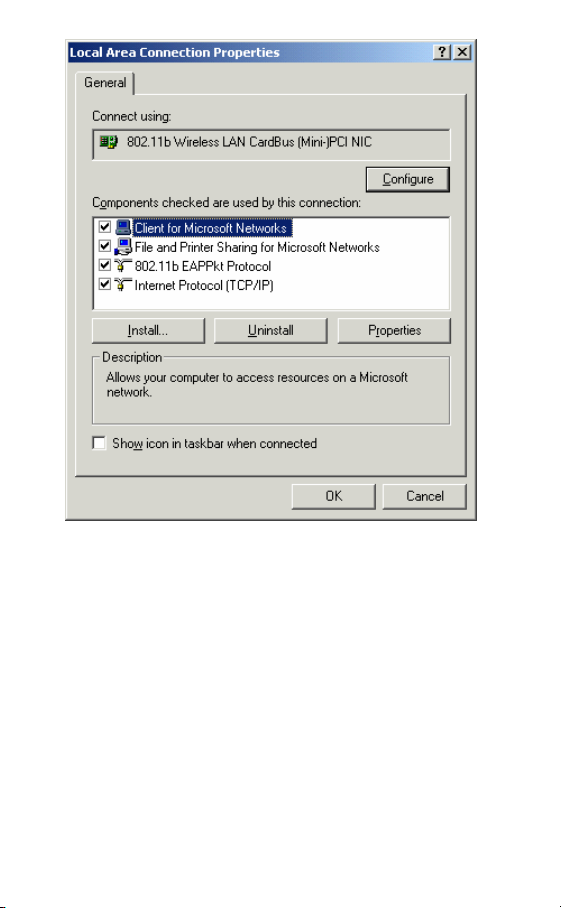
2. Make sure that you have all the following
components installed.
Client for Microsoft Networks
NWLink NetBIOS
802.11b EAPPkt Protocol
Internet Protocol (TCP/IP)
3. If any components are missing, click on the
Install… button to select the
Client/Service/Protocol required. After
- 9 -
Page 20
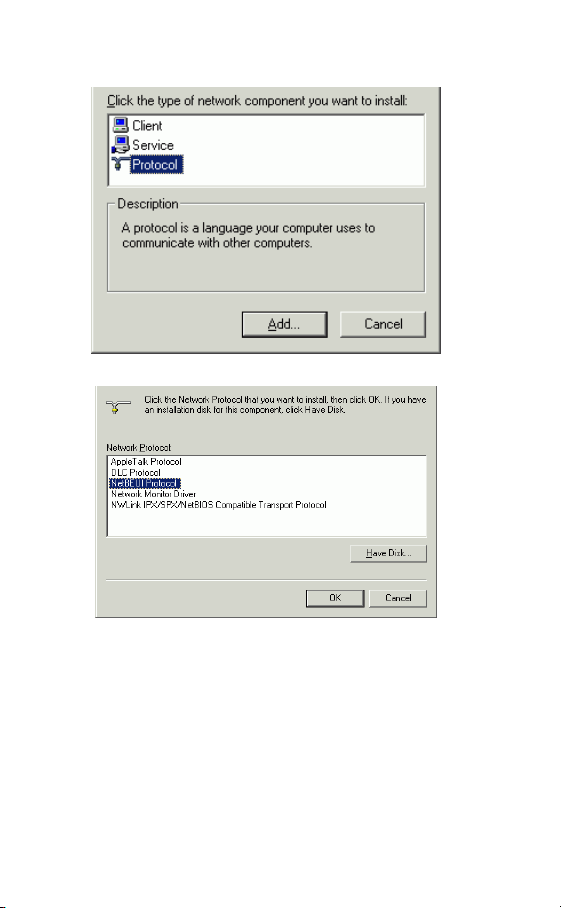
selecting the component you need, click
Add… to add it in.
4. For making your computer visible on the
network, make sure you have installed File
and Printer Sharing for Microsoft
Networks.
5. When finished, you must restart your
computer to complete the installation.
- 10 -
Page 21

CONFIGURATION
After successful installation of the Wireless PC
Card’s Driver and Utility, a Network Status icon
will display in the system tray. Meanwhile, a
Utility Shortcut icon
desktop.
will appear on the
Accessing the Configuration Utility
Double-click on to open the Configuration
Utility.
Click Advanced to enter the Configuration
Window.
- 11 -
Page 22

All settings are categorized into 6 Tabs:
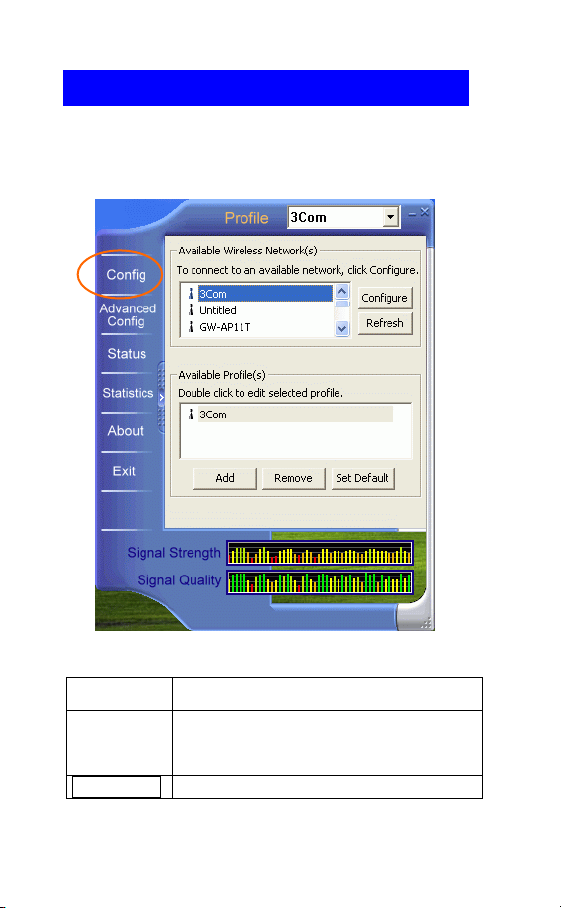
Config Tab
The Config tab allows you to configure WEP
encryption and add/remove Profile(s).
- 12 -
Page 23
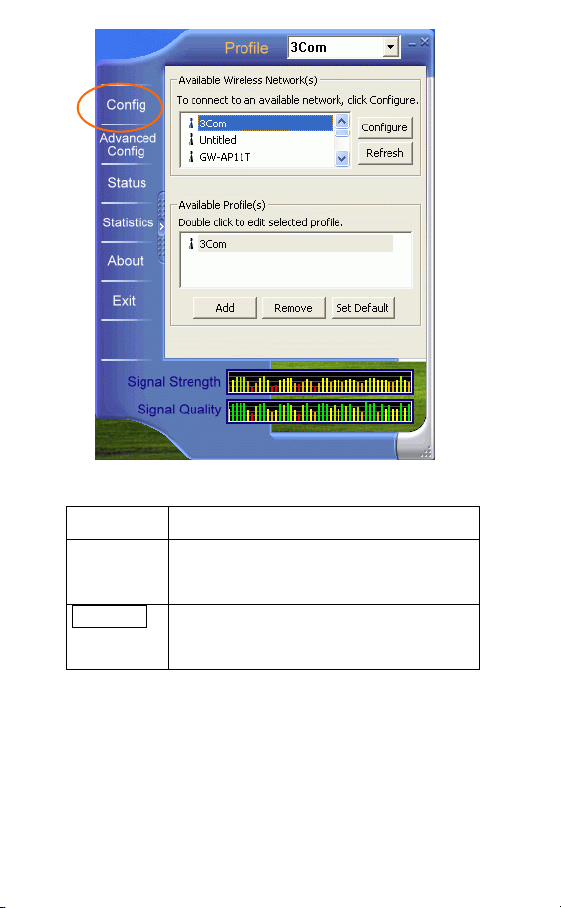
Item Description
Available
Wireless
Network(s)
Configure Highlight an available network, click
Displays all available networks.
Configure to set up WEP encryption (see
diagram below).
- 13 -
Page 24
Refresh Click the button to refresh and search for
all available networks.
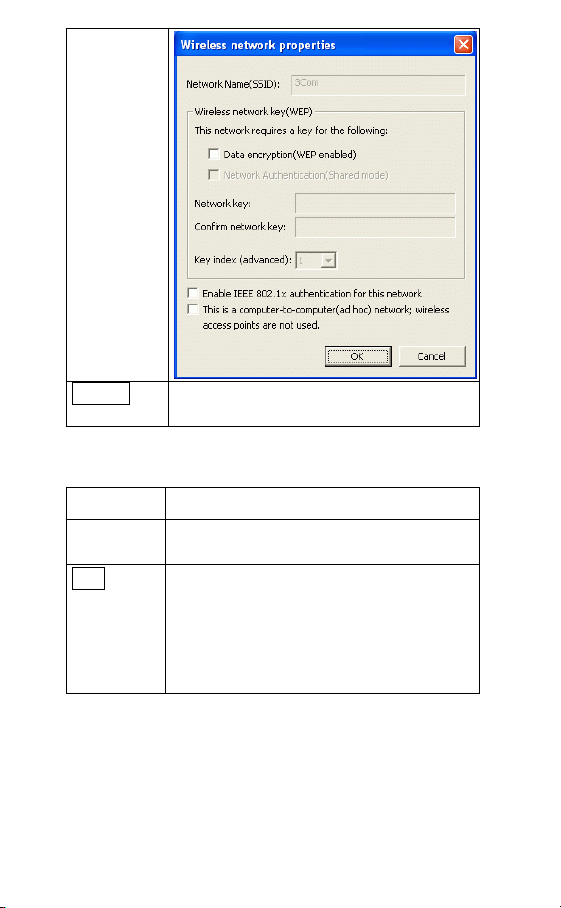
Item Description
Available
Profile(s)
Add
Displays all available profiles.
Click the button and the Wireless
Network Properties window will appear.
In the Network Name (SSID) field, enter
your desired network name listed in the
above Available Wireless Network(s)
box, and click OK.
- 14 -
Page 25

Remove
Set Default
Highlight the unwanted profile listed in
the Available profile(s) box, and click the
button to remove it.
Highlight a profile, click the button to set
it as a default profile.
Advanced Config Tab
The Advanced Config Tab allows you to change
advanced configuration settings, such as the Ad
Hoc default channel, Power Save and Radio
Off.
- 15 -
Page 26
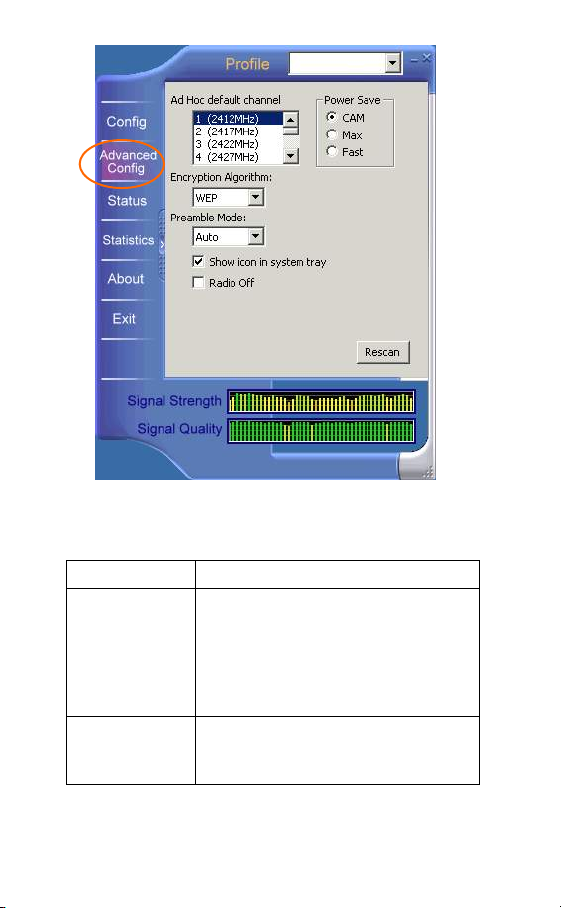
Item Description
Ad Hoc default
channel
Power Save ~
CAM
(Constantly
Select the appropriate channel from
the list provided to correspond with
your network settings. All devices in
the wireless LAN must be configured
to share the same radio channel in
order to function properly.
Keeps the PC card powered up
continuously so there is little lag in
message response time.
- 16 -
Page 27

Awake Mode)
Consumes the most power but offers
the highest throughput. Is
recommended for desktop computers
and devices that use AC power.
~ Max (Power
Save Mode)
Causes the access point to buffer
incoming messages for the client
adapter, which wakes up periodically
and polls the access point to see if any
buffered messages are waiting for it.
The PC card can request each
message and then go back to sleep.
Conserves the most power but offers
the lowest throughput. Is
recommended for devices which
power consumption is the ultimate
concern (such as small
battery-powered devices).
~ Fast (Power
Save Mode)
Switched between PSP mode and
CAM mode, depending on network
traffic. This mode switched to CAM
when retrieving a large number of
packets and switches back to PSP
after the packets have been retrieved.
It is recommended when power
consumption is a concern but you
need greater throughput than that
allowed by Max PSP.
Encryption
Algorithm
WEP (Wired Equivalent Privacy)
AES (Advanced Encryption Standard)
TKIP (Temporal Key Integrity
Protocol)
encryption can be used to ensure the
security of your wireless network.
Preamble A preamble is a signal used in
wireless environment to synchronize
- 17 -
Page 28

Mode the transmitting timing including
~ Auto
~ Long
~ Short
Show icon in
System Tray
Radio Off Check/Uncheck this box to
Rescan Searches for all available networks.
Synchronization and Start frame
delimiter. (Note: Please check the
setting of AP first.)
Select Auto for the USB adapter to
select the Preamble type
automatically depending on the
Access Point Preamble type.
In a "noisy" network environment, the
Preamble Type should be set to Long
Preamble.
The Short Preamble is intended for
applications where minimum
overhead and maximum performance
is desired. In a "noisy" network
environment, the performance would
be decreased.
Check this box to show icon in system
tray.
disable/enable the radio module
function of the Wireless PC Card.
Click this button to rescan and issue
an updated list of all available sites.
- 18 -
Page 29
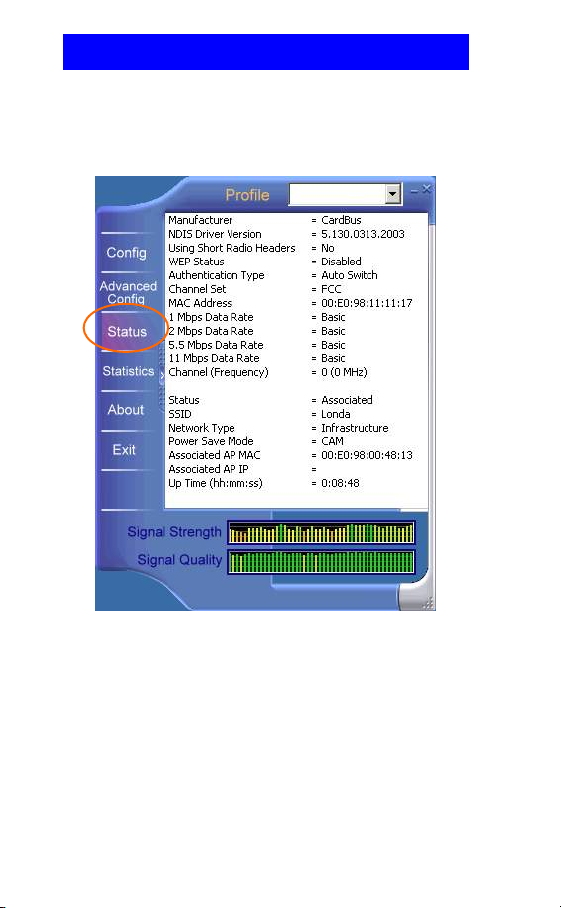
Status Tab
The Status Tab displays basic link information,
including Channel Set, MAC Address, Network
Type and Power Save Mode.
- 19 -
Page 30
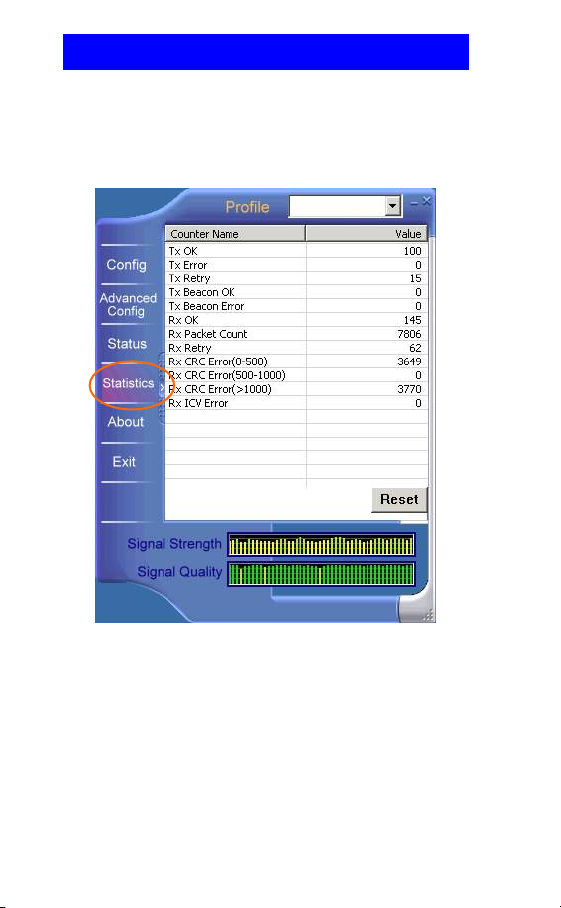
Statistics Tab
The Statistics tab shows the available statistic
information. Press Reset button to renew this list
of statistics.
- 20 -
Page 31

About Tab
Click on the About tab to view basic version
information about the Configuration Utility.
Exit Tab
Click on the Exit tab to exit the application.
- 21 -
Page 32

Warranty
• This equipment comes with a 24-month warranty.
The warranty will be honoured on presentation of
the original bill or receipt, provided the date of
purchase and the unit type are indicated.
• During the time of the warranty Topcom will
repair free of charge any defects caused by
material or manufacturing faults. Topcom will at
its own discretion fulfil its warranty obligations by
either repairing or exchanging the faulty
equipment.
• Any warranty claims will be invalidated as a result
of intervention by the buyer or unqualified third
parties.
• Damage caused by inexpert treatment or operation,
and damage resulting from the use of non-original
parts or accessories not recommended by Topcom
is not covered by the warranty.
• The warranty does not cover damage caused by
outside factors, such as lightning, water and fire,
nor does it apply if the unit numbers on the
equipment have been changed, removed or
rendered illegible.
Note: Please do not forget to enclose your receipt if
you return the equipment.
- 22 -
Page 33

DEUTSCH
Die Übereinstimmung des Gerätes mit den
grundlegenden Anforderungen der
R&TTE-Directive ist durch das CE-Kennzeichen
bestätigt.
802.11b PC-Karte für einen drahtlosen
CardBus
Kurzanleitung für die Installation
- 23 -
Page 34

INSTALLATION
Achtung: Stecken Sie die Drahtlose
PC-Karte erst in Ihren Computer, nachdem die
Arbeitsprozesse in “Treiber installieren &
Dienstprogramm” vollständig durchgeführt
wurden.
Installierung des Geräts
1. Lokalisieren Sie den Steckplatz des CardBus
an Ihrem System. Stecken Sie die drahtlose
PC Karte gerade in den CardBus Steckplatz.
Drücken Sie gleichmäßig und langsam bis die
Karte feststeckt.
2. Sobald das Gerät an Ihrem Computer
angeschlossen ist, erkennt Windows die neue
Hardware, und kopiert automatisch alle für
das Netzwerk benötigten Dateien.
Installierung des Treibers
Für Windows 98
1. In Add New Hardware Wizard (Neuen
Hardware-Assistenten hinzufügen) klicken
Sie auf Next(Nächste).
2. Wählen Sie Search for the best driver for
your device (Recommended). (Den besten
Treiber für Ihr Gerät suchen )
- 24 -
Page 35

(Empfehlung), und klicken Sie auf Next
(Nächste).
3. Legen Sie die gelieferte CD-ROM in das
CD-ROM Laufwerk ein. Wählen Sie Specify
a location (Speicherstelle bestimmen): und
klicken Sie auf Browse (Durchsuchen), um
den geeigneten Pfad festzulegen. (z.B.
D:\WIN98). Klicken Sie auf Next (Nächste).
4. Klicken Sie auf Next(Nächste), und Windows
wird alle nötigen Dateien auf Ihr System
kopieren.
5. Wenn Sie aufgefordert werden, die Windows
98 CD-ROM einzulegen, tun Sie das bitte.
Klicken Sie auf OK.
6. Klicken Sie auf Finish(Beenden), um die
Installation zu Ende zu führen.
7. Wenn Windows Sie auffordert, Ihren
Computer neu zu starten, klicken Sie auf Yes
(Ja).
Für Windows ME
1. Wählen Sie Specify the location of the
driver (Advanced)-(Die Speicherstelle des
Treibers bestimmen) (Erweitert). Klicken
Sie auf Next(Nächste).
2. Legen Sie die gelieferte CD-ROM in das
CD-ROM Laufwerk ein. Wählen Sie Search
for the best driver for your device
(Recommended).-(Den besten Treiber für
Ihr Gerät suchen (Empfehlung), und
klicken Sie auf Browse (Durchsuchen), um
den geeigneten Pfad festzulegen. (z.B.
- 25 -
Page 36

D:\WINME). Klicken Sie auf Next
(Nächste).
3. Klicken Sie auf Next(Nächste), und Windows
wird alle nötigen Dateien auf Ihr System
kopieren.
4. Klicken Sie auf Finish (Beenden), um die
Installation zu Ende zu führen.
5. Wenn Windows Sie auffordert, Ihren
Computer neu zu starten, klicken Sie auf Yes
(Ja).
Für Windows 2000
1. In Found New Hardware Wizard (Neuer
Hardware-Assistent gefunden) klicken Sie
auf Next(Nächste).
2. Wählen Sie in Installierung eines
Hardware-Geräts Search for a suitable
driver for my device (recommended)(Einen geeigneten Treiber für mein Gerät
suchen (Empfehlung), und klicken Sie auf
Next (Nächste).
3. Legen Sie die gelieferte CD-ROM in das
CD-ROM Laufwerk ein. Wählen Sie Specify
a location(Speicherstelle bestimmen), und
klicken Sie auf Next (Nächste).
4. Klicken Sie auf Browse(Durchsuchen), um
den geeigneten Pfad festzulegen. (z.B.
D:\WIN2000). Klicken Sie auf OK.
5. Klicken Sie auf Next(Nächste), und Windows
wird alle nötigen Dateien auf Ihr System
kopieren.
6. Klicken Sie im Dialogfenster Digital
Signature Not Found (Es wurde keine
- 26 -
Page 37

Digital-Unterschrift gefunden) auf Yes (Ja),
um die Installation fortzusetzen. Klicken Sie
auf Finish(Beenden), um die Installation zu
Ende zu führen.
Für Windows XP
1. Wählen Sie Install from a list or specific
location (Advanced) (Die Installierung von
einer Liste oder einer bestimmten
Speicherstelle aus durchführen) (Erweitert)
und klicken Sie auf Next (Nächste).
2. Legen Sie die gelieferte CD-ROM in das
CD-ROM Laufwerk ein. Wählen Sie Include
this location in the search (Bei der Suche
diese Speicherstelle mit einbeziehen): und
klicken Sie auf Browse (Durchsuchen), um
den geeigneten Pfad festzulegen. (z.B.
D:\WINXP). Klicken Sie auf Next(Nächste).
3. Klicken Sie auf Continue Anyway
(Fortfahren), um die Installierung
fortzusetzen. Windows wird alle nötigen
Dateien auf Ihr System kopieren.
4. Klicken Sie auf Finish (Beenden), um die
Installation zu Ende zu führen.
Überprüfung
Um zu überprüfen, ob das Gerät in Ihrem
Computer existiert und freigegeben wurde,
wechseln Sie zu Start Æ Settings (Einstellungen)
Æ Control Panel (Bedienungskonsole)Æ
System (Æ Hardware) Æ Device Manager
(Gerätverwalter). Expandieren Sie die Gruppe
- 27 -
Page 38

der Netzwerk Adapter. Wenn die 802.11b
Wireless LAN CardBus (Mini-) PCI NIC hier
aufgelistet ist, heiβt das, dass Ihr Gerät korrekt
installiert und freigegeben wurde.
Installierung des Dienstprogramms
1. Legen Sie die gelieferte CD-ROM in das
CD-ROM Laufwerk ein. Doppelklicken Sie
auf Setup.exe, um das Wireless LAN Utility
(Drahtlose LAN Dienstprogramm) zu
installieren.
2. Wenn der welcome (Begrüßung) Bildschirm
erscheint, klicken Sie auf Next (Nächste), um
fortzufahren.
3. In License Agreement (Lizenz Vertrag),
klicken Sie auf Yes (Ja), um Ihr
Einverständnis zu den Klauseln abzugeben.
4. Klicken Sie auf Finish (Beenden), um die
Installierung zu Ende zu führen.
- 28 -
Page 39

NETZWERK VERBINDUNG
Nachdem der Treiber installiert wurde, müssen
Sie einige Veränderungen an Ihren
Netzwerk-Einstellungen durchführen.
Für Windows 98/ME
1. Wechseln Sie zu Start Æ Settings
(Einstellungen) Æ Control Panel
(Bedienungskonsole) Æ Network
(Netzwerk).
2. Versichern Sie sich, dass die folgenden
Komponenten installiert sind.
y 802.11b Wireless LAN CardBus (Mini-)
PCI NIC
y IPX/SPX-compatible Protocol
y NetBEUI
y TCP/IP
Falls eines dieser Elemente fehlen sollte, klicken
sie auf die Add (Hinzufügen) Schaltfläche, und
fügen Sie das fehlende Element hinzu. Alle oben
geforderten und aufgelisteten Protokolle und
Kunden werden von Microsoft geliefert.
3. Nachdem Sie auf Add (Hinzufügen) geklickt
haben, markieren Sie das fehlende Element,
und klicken Sie auf Add (Hinzufügen).
- 29 -
Page 40

4. Markieren Sie Microsoft, und doppelklicken
Sie das Element, das Sie hinzufügen möchten.
Klicken Sie auf OK.
5. Um Ihren Computer auf dem Netzwerk
sichtbar zu machen, geben Sie File and Print
Sharing (Gemeinsamer Datei- und
Druckerzugriff) frei.
6. Klicken Sie auf die Identification
(Identifikation) Seite. Bestimmen Sie einen
Namen, der sich von den anderen
Computernamen des Netzwerks
unterscheidet. Tippen Sie den Namen Ihrer
Arbeitsgruppe ein, der von allen anderen
- 30 -
Page 41

Computern des Netzwerks benutzt werden
sollte.
7. Klicken Sie auf die SeiteAccess Control
(Zugriffskontrolle). Versichern Sie sich,
dass “Share-level access
control”(“Zugriffskontrolle des
Beteiligungslevels”) bestimmt wurde. Wenn
Sie sich an einen Netzwerk-Server
anschließen, kann das Beteiligungslevel als
“User-level access
control.”(“Zugriffskontrolle des
Benutzerlevels”) eingestellt werden.
8. Starten Sie nach Beendigung Ihren Computer
neu an, um das neue Gerät zu aktivieren.
9. Nachdem der Computer neu gestartet wurde,
und Windows gebootet wurde, wird ein
Logon (Anmeldung) Fenster erscheinen, und
Sie auffordern, einen Benutzernamen und ein
Kennwort einzugeben. Bestimmen Sie einen
Benutzernamen und ein Kennwort, und
klicken Sie auf OK. Klicken Sie nicht auf die
Cancel (Abbrechen) Schaltfläche, da Sie
sich in diesem Fall nicht am Netzwerk
anmelden könnten.
10. Doppelklicken Sie auf das Network
Neighborhood (Netzwerk Nachbarschaft)
Piktogramm auf dem Windows Desktop, und
- 31 -
Page 42

Sie sollten die Namen der anderen, am Netz
angeschlossenen Computer, sehen können.
Für Windows 2000/XP
1. (Für Windows 2000)
Wechseln Sie zu StartÆ
Settings(Einstellungen) Æ Control Panel
(Bedienungskonsole) Æ Network and
Dial-up Connections (Netzwerk und
Einwahl Anschlüsse) Æ Local Area
Connection (Lokaler Anschluss) Æ
Properties (Eigenschaften).
(Für Windows XP)
Wechseln Sie zu Start Æ Control Panel
(Bedienungskonsole) Æ Network
Connections (Netzanschlüsse) Æ Wireless
Network Connection Enabled 802.11b
Wireless CardBus PC Card (Der drahtlose
Netzanschluss gab die 802.11b PC-Karte
des drahtlosen CardBus frei)Æ Properties
(Eigenschaften).
- 32 -
Page 43

- 33 -
Page 44

2. Versichern Sie sich, dass die folgenden
Komponenten alle installiert sind.
Client for Microsoft Networks (Kunde für
Microsoft Netzwerke)
NWLink NetBIOS
802.11b EAPPkt Protocol (Protokoll)
Internet Protocol (TCP/IP) (Internet
Protokoll)
3. Falls ein Element fehlen sollte, klicken Sie auf
die Install… (Installieren...) Schaltfläche,
um die geforderten Client/Service/Protocol
(Kunde/Service/Protokoll) Komponenten
einzugeben. Nachdem Sie das fehlende
Element bestimmt haben, klicken Sie auf
Add… (Hinzufügen), um es hinzuzufügen.
- 34 -
Page 45

4. Um Ihren Computer auf dem Netzwerk
sichtbar zu machen, versichern Sie sich, File
and Printer Sharing for Microsoft
Networks (Gemeinsamer Datei und
Drucker Zugriff für Microsoft Netzwerke)
installiert zu haben.
5. Danach müssen Sie Ihren Computer neu
starten, um die Installierung zu Ende zu
führen.
- 35 -
Page 46

KONFIGURATION
Nach der erfolgreichen Installierung des
drahtlosen PC-Karten Treibers und des
Dienstprogramms, wird ein Network Status
(Netzwerk Status) Piktogramm
System Tray erscheinen. Auf dem Desktop wird
ein Utility Shortcut
(Dienstprogramm-Schnelltasten) Piktogramm
erscheinen.
auf dem
Anwendung des
Konfigurations-Dienstprogramms
Doppelklicken Sie auf , um das
Konfigurations-Dienstprogramm zu öffnen.
Klicken Sie auf Advanced (Erweitert), um zu
dem Konfigurationsfenster zu wechseln.
- 36 -
Page 47

Die Einstellungen werden in 6 Seiten aufgeteilt:
- 37 -
Page 48

Konfig Seite
Die Config (Konfig) Seite erlaubt Ihnen WEP
Verschlüsselung einzustellen und Profil(e)
hinzuzufügen/zu löschen.
Begriff Beschreibung
Verfügbare(s)
drahtlose(s)
Netzwerk(e)
Konfigurieren Markieren Sie ein verfügbares
Zeigt alle verfügbaren Netzwerke an.
- 38 -
Page 49

Netzwerk, klicken Sie auf
Konfigurieren, um die WEP
Verschlüsselung einzustellen. (Siehe
Diagramm unten).
Auffrischen Klicken Sie auf dieses Schaltfeld, um
aufzufrischen, und alle verfügbaren
Netzwerke durchzusuchen.
Begriff Beschreibung
Verfügbare(s)
Profil(e)
Hinzufügen
Zeigt alle verfügbaren Profile an.
Klicken Sie auf dieses Schaltfeld, und es
wird das Dialogfenster Wireless
Network Properties (Eigenschaften des
drahtlosen Netzwerks) erscheinen. In
dem Textfeld Network Name
(Netzwerk Name) (SSID) geben Sie den
- 39 -
Page 50

Netzwerk Namen ein, den Sie von der
obigen Liste Available Wireless
Network(s)(Verfügbare Drahtlose
Netzwerke) ausgewählt haben, und
klicken Sie auf OK.
Entfernen
Standard
Einstellung
Markieren Sie das unerwünschte Profil,
das in dem Feld Available
Profile(s)(verfügbare(s) Profil(e))
aufgelistet ist, und klicken Sie auf diese
Schaltfläche, um es zu entfernen.
Markieren Sie ein Profil, und klicken Sie
auf diese Schaltfläche, um es als
Standardprofil zu bestimmen.
- 40 -
Page 51

Erweiterte Konfig Seite
Die Advanced Config (erweiterte Konfig) Seite
erlaubt Ihnen erweiterte
Konfigurationseinstellungen zu ändern, z.B. den
Ad Hoc default channel (Ad Hoc
Standardkanal), Power Save (Energie Sparer)
und Radio Off (Funk ausgeschaltet).
Begriff Beschreibung
Ad Hoc
Standardkanal
Bestimmen Sie von der angebotenen
Liste den geeigneten Kanal, der Ihren
Netzwerk Einstellungen entspricht.
Alle Geräte der drahtlosen LAN
müssen für denselben Funkkanal
konfiguriert werden, um korrekt zu
- 41 -
Page 52

funktionieren.
Energie Sparer
~ CAM
(Constantly
Awake Mode)
Fortlaufend
Wach-Modus
~ Max (Power
Save Mode)
(Energie Spar
Modus)
~ Fast (Power
Save Mode)
(Energie Spar
Modus)
Hält die PC-Karte fortlaufend
angeschaltet, sodass bis zur
Botschaftserwiderung nur eine
geringe Zeitdifferenz besteht.
Dieser Modus hat einen hohen
Energieverbrauch, bietet aber die
höchste Durchsatzrate. Er wird für
Desktop Computer und für Geräte,
die Wechselstrom benutzen,
empfohlen.
Der Access-Pointe puffert die, für die
Kundenadapter hereinkommenden
Botschaften. Der wacht von Zeit zu
Zeit auf, und fragt die Access-Pointe
ab, ob gepufferte Botschaften warten.
Die PC-Karte kann jede Botschaft
abrufen, und danach wieder
abschalten.
Spart am meisten Energie, bietet aber
die geringste Durchsatzrate. Er wird
für Geräte empfohlen, bei denen der
Energieverbrauch von höchstem
Interesse ist (z.B. kleine
Batteriebetriebene Geräte).
Schaltet je nach Netzwerkverkehr
vom PSP Modus auf den CAM
Modus um. Dieser Modus schaltet auf
CAM um, wenn eine große
Paketanzahl eingeholt werden muss,
und, nachdem die Pakete eingeholt
wurden, schaltet er wieder auf PSP
zurück.
Er wird empfohlen, wenn der
Energieverbrauch ein Problem ist, Sie
aber eine höhere Durchsatzrate
- 42 -
Page 53

benötigen, als die, die mit Max PSP
angeboten wird.
Verschlüsselun
gs Algorithmus
WEP (Wired Equivalent Privacy)
AES (Advanced Encryption Standard)
TKIP (Temporal Key Integrity
Protocol)
Die Benutzung der Verschlüsselung
erhöht die Sicherheit ihres drahtlosen
Netzwerks.
Preamble
Mode
(Preamble
Modus)
Die Präambel ist ein Signal, das bei
drahtlosen Anlagen benutzt wird, um
die Übertragungszeit zu
synchronisieren, einschließlich
Synchronisation and Start Rahmen
Delimiter. (Beachten: Bitte
überprüfen Sie zuerst die
AP-Einstellung.)
~ Auto
Wählen Sie Auto, sodass der USB
Adapter den Präambel Typ je nach
Access Point Präambel Typ,
automatisch bestimmt.
~ Long
Bei einer "geräuschvollen"
Netzumgebung sollte der Präambel
Typ auf Long Präambel (Lang-
Präambel) eingestellt werden.
~ Short
Die Short Präambel (Kurz-
Präambel) wird empfohlen, wenn
minimaler Overhead und maximaler
Datendurchsatz erwünschenswert
sind. Bei einer "geräuschvollen"
Netzumgebung, wird mit dieser
Option die Leistung verringert.
Das
Piktogramm im
Überprüfen Sie dieses
Kontrollkästchen, sodass das
- 43 -
Page 54

System Menü
anzeigen
Funk
Ausgeschaltet
Rescan Sucht nach allen verfügbaren
Piktogramm im System Menü
angezeigt wird.
Markieren/Demarkieren Sie dieses
Kontrollkästchen, um die Funkmodul
Funktion der Drahtlosen PC-Karte
freizugeben/zu sperren.
Netzwerken. Klicken Sie auf diese
Schaltfläche, um erneut zu scannen
und eine aktualisierte Liste aller
verfügbaren Seiten zu erstellen.
- 44 -
Page 55

Status Seite
Der Status Seite zeigt wesentliche Link
Information an, einschließlich Channel
Set(Kanal Einstellung), MAC Adresse,
Network Type (Netzwerk Typ) und Power Save
Mode (Energie Spar Modus).
- 45 -
Page 56

Statistik Seite
Die Statistics (Statistik) Seite zeigt die
verfügbare Statistische Information. Drücken Sie
die Reset Schaltfläche, um diese Statistikliste zu
erneuern.
- 46 -
Page 57

Übersicht Seite
Klicken Sie die About (Übersicht) Seite an, um
wesentliche Information über das Configuration
Utility (Konfigurations-Dienstprogramm) dieser
Version zu erhalten.
Exit Seite
Klicken Sie die Exit (Verlassen) Seite an, um diese
Anwendung zu verlassen.
- 47 -
Page 58

Topcom Garantie
• Die Garantiezeit beträgt 24 Monate. Die Garantie
wird auf Grund der Vorlage der Originalrechnung
bzw.Zahlungsbestätigung, welche das Datum des
Kaufes sowie die Geräte-Typ zu tragen hat,
gewährt.
• Während der Garantiezeit behebt Topcom
unentgeltlich alle Mängel, die auf Material- oder
Herstellungsfehler beruhen. Topcom leistet nach
eigener Wahl Garantie durch Repartur oder durch
Austausch des defekten Gerätes.
• Der Garantieanspruch erlischt bei Eingriffen durch
Käufer oder unbefugte Dritte.
• Schäden, die durch unsachgemäße Behandlung
oder Bedienung auftreten, bzw. die entstehen
durch die Verwendung von Ersatzteilen und
Zubehör, die nicht Original oder von Topcom
empfohlenen sind, fallen nicht unter die
Garantieleistung.
• Die Garantie wird nicht gewährt, wenn Schäden
durch äußere Einflüsse: Blitz, Wasser, Feuer u. ä
entstanden sind oder die Geräte-Nummer am Gerät
geändert, gelöscht oder unleserlich gemacht
wurde.
Achtung: Vergessen Sie bei einem Zurückschicken
ihres Gerätes nicht Ihren Kaufbeleg beizufügen.
- 48 -
Page 59

NEDERLANDS
Het toestel voldoet aan de basiseisen van de
R&TTE-richtlijn. Dit wordt bevestigd door de
CE-markering.
Snelle InstallatieGids
- 49 -
Page 60

INSTALLATIE
Voorzichtig: Steek de Draadloze PC Kaart
niet in Uw computer voordat U de procedures
zoals beschreven in “Het Hulp- of
Configuratie-programma Installeren” heeft
doorlopen.
Het Apparaat Installeren
1. Lokaliseer het CardBus slot van Uw systeem.
2. Lijn de Draadloze PC Kaart op met het
CardBus slot. Druk evenredig aan totdat het
goed ingestoken is.
3. Als het apparaat goed ingestoken is, zal
Windows het automatisch detecteren en zal
automatisch alle benodigde bestanden
kopiëren.
Het Stuurprogramma Installeren
In Windows 98
1. In de Nieuwe Hardware Toevoegen Wizard,
klik Volgende.
2. Selecteer Zoek het beste stuurprogramma
voor Uw Apparaat (aanbevolen) Klik
Volgende.
3. Steek de meegeleverde CD-ROM in de
CD-ROM speler. Selecteer Een locatie
- 50 -
Page 61

aangeven: en klik Zoeken om het pad aan te
geven (bijv. D:\WIN98). Klik Volgende.
4. Klik Volgende, Windows zal alle benodigde
bestanden naar Uw systeem kopiëren.
5. Indien U wordt gevraagd de Windows 98 in
de CD-ROM speler te steken, doe dat dan.
Klik. OK.
6. Klik Einde om de installatie te completeren.
7. Wanneer Windows U vraagt het systeem te
herstarten, klik Ja.
In Windows ME
1. Selecteer De locatie van het stuurprogramma
aangeven (geavanceerd), klik Volgende.
2. Steek de meegeleverde CD-ROM in de
CD-ROM speler. Selecteer Het beste
stuurprogramma voor Uw apparaat
zoeken (aanbevolen) en klik Zoeken om het
juiste pad aan te geven (bijv. D:\WINME.)
Klik Volgende.
3. Klik Volgende, Windows zal alle benodigde
bestanden naar Uw systeem kopiëren.
4. Klik Einde om de installatie te completeren.
5. Wanneer Windows U vraagt het systeem te
herstarten, klik Ja.
In Windows 2000
1. In de Nieuwe Hardware Gevonden Wizard,
klik Volgende.
2. In Hardware stuurprogramma’s
installeren, selecteer Zoeken naar een
- 51 -
Page 62

geschikt stuurprogramma voor mijn
apparaat (aanbevolen) klik Volgende.
3. Steek de meegeleverde CD-ROM in de
CD-ROM speler. Selecteer Een locatie
aangeven, klik Volgende.
4. Klik Zoeken om het juiste pad aan te geven
(bijv. D:\WIN2000). Klik OK.
5. Klik Volgende, Windows zal alle benodigde
bestanden naar Uw systeem kopiëren
systeem.
6. In het Digitale Handtekening Niet
Gevonden venster, klik Ja om te vervolgen.
Klik Einde om de installatie te completeren.
In Windows XP
1. Selecteer Installeren vanuit een lijst of
specifieke locatie (geavanceerd) en klik
Volgende.
2. Steek de meegeleverde CD-ROM in de
CD-ROM speler. Selecteer Zoek ook in deze
locatie: en klik Zoeken om het juiste pad aan
te geven (bijv. D:\WINXP). Klik Volgende.
3. Klik Vervolgen om te vervolgen. Windows
zal alle benodigde bestanden naar Uw
systeem kopiëren.
4. Klik Einde om de installatie te completeren.
Verifiëren
Om te verifiëren dat het apparaat in Uw systeem is
opgenomen en daadwerkelijk is ingeschakeld, ga
- 52 -
Page 63

naar Start Menu Æ Instellingen Æ Controle
Paneel Æ Systeem (Æ Hardware) Æ Apparaat
Beheer. Klap de Netwerk adapters categorie uit.
Als de 802.11b Wireless LAN CardBus (Mini-)
PCI NIC in deze lijst voorkomt, betekent dat Uw
apparaat deugdelijk is geïnstalleerd en
ingeschakeld.
Het Hulp- of Configuratie-programma
Installeren
1. Steek de meegeleverde CD-ROM in de
CD-ROM speler. Dubbelklik op Setup.exe
om het Draadloze LAN Hulp-programma
te installeren.
2. Wanneer het Welkom scherm verschijnt, klik
Volgende om te vervolgen.
3. In de Licentie Overeenkomst, klik Ja om de
voorwaarden te accepteren.
4. Klik Einde om de installatie te completeren.
- 53 -
Page 64

- 54 -
Page 65

NETWERK CONNECTIE
Als het stuurprogramma eenmaal is geïnstalleerd,
dient U enkele aanpassingen te maken in Uw
netwerk-instellingen.
In Windows 98/ME
1. Ga naar Start Menu Æ Instellingen Æ
Controle Paneel Æ Netwerk.
2. Vergewis U ervan dat de volgende
componenten zijn geïnstalleerd:
y 802.11b Wireless LAN CardBus (Mini-)
PCI NIC
y IPX/SPX-compatible Protocol
y NetBEUI
y TCP/IP
Indien U iets mist, klik op de Toevoegen knop om
ze toe te voegen. Alle protocollen en cliënt zoals
hierboven beschreven worden door Microsoft
geleverd.
3. Nadat U Toevoegen heeft geklikt, markeer het
benodigde component en klik Toevoegen.
- 55 -
Page 66

4. Markeer Microsoft, en dubbelklik dan op het
item dat U wilt toevoegen. Klik OK.
5. Om Uw computer zichtbaar te maken op het
netwerk, schakel Bestands- en
printer-deling in.
6. Klik op het Identificatie tab. Verzin een naam
die uniek is op Uw netwerk. Voer de naam
van Uw werkgroep in waar alle computers in
Uw netwerk toe behoren.
7. Klik het Toegangs-controle tab. Vergewist U
ervan dat “Gemeenschap-niveau
toegangs-controle” is geselecteerd. Wanneer
U een Netware server wilt benaderen, kan dit
- 56 -
Page 67

omgeschakeld worden naar
“Gebruikers-niveau toegangs-controle.”
8. Wanneer U gereed bent, herstart dan Uw
computer om het apparaat te activeren met
deze nieuwe instellingen.
9. Wanneer Uw computer opnieuw opstart, toont
Windows U een Aanloggen venster dat U
vraagt een gebruikersnaam en wachtwoord in
te voeren. Verzin iets en klik OK. Klik niet op
Annuleren, anders bent U niet in staat op het
netwerk aan te loggen.
10. Dubbelklik op het Netwerk Omgeving icoon
op het bureaublad, en U kunt de namen zien
van de andere PC’s op Uw netwerk.
In Windows 2000/XP
1. (In Windows 2000)
Ga naar Start Menu Æ Instellingen Æ
Controle Paneel Æ Netwerk- en Inbel
Connecties Æ Lokale Netwerk Verbinding
Æ Eigenschappen.
(In Windows XP)
Ga naar Start Menu Æ Controle Paneel Æ
Netwerk Connecties Æ Draadloze
Netwerk Connectie Ingeschakeld 802.11b
- 57 -
Page 68

Draadloze CardBus PC Kaart Æ
Eigenschappen.
- 58 -
Page 69

2. Vergewist U ervan dat de volgende
componenten zijn geïnstalleerd:
Cliënt voor Microsoft Netwerken
NWLink NetBIOS
802.11b EAPPkt Protocol
Internet Protocol (TCP/IP)
3. Indien U iets mist, klik op de Installeren…
knop om de benodigde
Cliënt/Service/Protocol te installeren. Nadat
- 59 -
Page 70

U de benodigde component heeft
geselecteerd, klik op Toevoegen… om het in
te voegen.
4. Om Uw computer zichtbaar te maken op het
netwerk, verzekert U zich ervan dat U
Bestands- en printer-deling voor Microsoft
Netwerken heeft geïnstalleerd.
5. Wanneer U klaar bent, dient U Uw computer
te herstarten om de installatie te completeren.
- 60 -
Page 71

CONFIGURATIE
Na succesvolle installatie van het Draadloze PC
Kaart-stuurprogramma en hulp-programma, zal
een Netwerk-Status icoon zichtbaar zijn in
de systeembalk. Eveneens zal een Hulp- of
configuratie-programma snelkoppeling-ikoon
zich op Uw bureaublad bevinden.
Het Hulp- of Configuratie-programma
Dubbelklik op om dit programma te starten.
Klik Geavanceerd om het configuratie-venster te
tonen.
- 61 -
Page 72

Alle instellingen zijn in 6 tabs ingedeeld:
- 62 -
Page 73
Het Config-Tab
Het Config-tab stelt U in staat WEP-encryptie (=
versleuteling) te configureren en Profielen toe te
voegen / verwijderen.
Item Beschrijving
Beschikbar
e Draadloze
Netwerken
Configurere Markeer een beschikbaar netwerk, klik
Toont alle beschikbare netwerken.
- 63 -
Page 74

n Configureren om WEP-encryptie op te
zetten (zie onderstaand diagram).
Verversen Klik hier om te zoeken naar beschikbare
netwerken.
Item Beschrijving
Beschikbar
e Profielen
Toevoegen
Toont alle beschikbare profielen.
Klik hier en het Draadloze Netwerk
Eigenschappen venster zal zich tonen. In
het Netwerk Naam (SSID) veld, voer de
gewenste netwerk-naam gekozen uit de
Beschikbare Draadloze Netwerken lijst,
en klik OK.
- 64 -
Page 75

Verwijderen
Stel in als
Standaard
Markeer een ongewenst profiel in de the
Beschikbare Profielen lijst, en klik deze
knop om die te verwijderen.
Markeer een profiel en stel het in als de
standaard-profiel.
Het Geavanceerde Config-Tab
Het Geavanceerde Config-tab stelt U in staat
geavanceerde configuratie-instellingen te
wijzigen, zoals het Ad Hoc Standaad-Kanaal,
Energie-Besparing en Radio Uit.
- 65 -
Page 76

Item Beschrijving
Ad Hoc
standaard-kanaa
l
Energie
Besparing ~
Constant
Wakker Modus
(CAM)
~ Maximale Zorgt dat het toegangspunt
Selecteert het juiste kanaal uit de
lijst die correspondeert met Uw
netwerk-intesllingen. Alle
apparaten in het draadloze LAN
moeten zijn geconfigureerd om
hetzelfde radio-kanaal te delen
voor juist functioneren.
Houdt de PC kaart continu onder
spanning zodat er geen
tijdsvertraging optreedt.
Consumeert de meeste energie
maar staat de meeste doorvoer toe.
Aanbevolen voor desktops en
andere apparaten die aan het
lichtnet zijn aangesloten.
- 66 -
Page 77

Energie
BesparingsModus (Max
PSP)
inkomende berichten voor de cliënt
adapter buffert, die periodiek
ontwaakt en het toegangspunt test
of er berichten wachten op
doorvoer. De PC card kan dan ieder
bericht ontvangen en weer
inslapen.
Bespaart de meeste energie maar
levert de laagste doorvoer.
Aanbevolen voor apparaten voor
welke energie de grootste zorg is
(zoals kleine batterij-gevoede
apparaten).
~ Snelle Energie
BesparingsModus (Fast
PSP)
Schakelt tussen PSP modus en
CAM modus, afhankelijk van het
netwerk-verkeer. Deze modus
schakelt naar CAM wanneer er veel
pakketjes moeten worden
doorgevoerd en schakelt terug naar
PSP nadat deze zijn doorgevoerd.
Aanbevolen wanneer
energie-verbruik een zorg is maar
een grotere doorvoer dan bij Max
PSP nodig is.
Encryptie
Algoritme
WEP (Wired Equivalent Privacy)
AES (Advanced Encryption
Standard)
TKIP (Temporal Key Integrity
Protocol)
encryptie (versleuteling) kan
gebruikt worden om de veiligheid
van Uw draadloze netwerk te
bewerkstelligen.
Inleidings-Modus In een draadloze omgeving kan een
inleidings-signaal gebruikt worden
- 67 -
Page 78

om de send-strattijd inclusief
synchronisatie met het start-frame.
(Let op: Controleer eerst de
instelling van AP.)
~ Auto
~ Lang
~ Kort
Toon ikoon in
Systeembalk
Radio Uit Aanvinken om de radio-module
Opnieuw Zoeken Zoekt voor alle beschikbare
Selecteer Auto als U wilt dat de
USB-adapter automatisch het
inleidings-type selecteert
afhankelijk van het inleidings-type
van het toeganspunt.
In een “rumoerige”
netwerk-omgevingkan het
inleidingstype het best op Lang
gezet worden.
De Korte Inleiding is bedoeld
voor applicaties waar minimale
overhead en maximale prestatie is
vereist. In een “rumoerige”
netwerk-omgeving zal de prestatie
verninderen.
Aanvinken om een ikoon in Uw
systeembalk te zien.
van Uw Draadloze PC Card in te
schakelen.
netwerken en werkt de lijst bij met
beschikbare sites.
- 68 -
Page 79

Het Status-Tab
Het Status-Tab toont elementaire link- informatie,
inclusief Kanaalinstelling, MAC Adres,
Netwerk-Type en Energie Besparings-Modus.
- 69 -
Page 80

Het Statistics-Tab
Het Statistics-tab toont de beschikbare statistische
informatie. Klik Verversen om deze informatie te
verversen.
- 70 -
Page 81

Het About-Tab
Klik op het About-tab om elementaire informatie over
het hulp- of configuratie-programma te zien.
Het Exit-Tab
Klik op het Exit-tab om de applicatie te verlaten.
- 71 -
Page 82

De garantie van Topcom
• De garantieperiode bedraagt 24 maanden. De garantie
wordt verleend na voorlegging van de originele factuur
of betalingsbevestiging waarop de datum van aankoop en
het toesteltype staan vermeld.
• Gedurende de garantieperiode verhelpt Topcom
kostenloos alle defecten die te wijten zijn aan materiaalof productiefouten. Topcom kan, naar keuze, het defecte
toestel ofwel herstellen ofwel vervangen.
• De garantieclaim vervalt bij ingrepen door de koper of
onbevoegde derden.
• Schade te wijten aan onoordeelkundige behandeling of
bediening of aan het gebruik van wisselstukken en
accessoires die niet origineel of door Topcom aanbevolen
zijn, valt niet onder de garantie.
• Niet gedekt door de garantie is schade ten gevolge van
externe invloedfactoren: bliksem, water, brand e.d. of
wanneer het toestelnummer op het toestel werd gewijzigd,
verwijderd of onleesbaar gemaakt.
Opgelet: Als u uw toestel terugstuurt, vergeet uw
aankoopbewijs niet mee te sturen.
- 72 -
Page 83

ESPAÑOL
El sello CE corrobora la conformidad del equipo
con los requerimientos básicos de la directiva
R&TTE.
Tarjeta inalámbrica para PC Cardbus de
802.11b
Guía de instalación rápida
- 73 -
Page 84

INSTALACIÓN
Precaución: No inserte la Tarjeta inalámbrica
de PC en su computadora hasta que los
procedimientos indicados en "Instalar el
controlador y el utilitario" se hayan realizado.
Instalación del dispositivo
1. Localice la ranura CardBus de su sistema.
2. Alinee la tarjeta de PC inalámbrica en la
ranura de CardBus. Empuje de forma lenta y
pareja hasta que calce.
3. Una vez que el dispositivo esté conectado con
su computadora, Windows detectará el nuevo
hardware y luego copiará automáticamente
todos los archivos que se necesiten para la
conexión de redes.
Instalación del controlador
En Windows 98
1. En el Asistente para agregar nuevo
hardware, pulse Siguiente.
2. Seleccione Buscar el mejor controlador
para su dispositivo (Recomendado). Pulse
Siguiente
3. Inserte el CD-ROM provisto en la unidad de
CD-ROM. Seleccione Especificar una
ubicación: y pulse Examinar para
- 74 -
Page 85

proporcionar la ruta de acceso apropiada (por
ej. D:\WIN98). Pulse Siguiente.
4. Pulse Siguiente, Windows copiará a su
sistema todos los archivos necesarios.
5. Si se le pide que inserte el CD-ROM de
Windows 98, hágalo. Pulse OK.
6. Pulse Terminar para completar la
instalación.
7. Cuando Windows le solicite que reinicie su
computadora, pulse Sí.
En Windows ME
1. Seleccione Especificar la ubicación del
controlador (Avanzado), pulse Siguiente.
2. Inserte el CD-ROM provisto en la unidad de
CD-ROM. Seleccione Buscar el mejor
controlador para su dispositivo
(Recomendado) y pulse Examinar para
proporcionar la ruta de acceso apropiada (por
ej. D:\WINME.) Pulse Siguiente.
3. Pulse Siguiente, Windows copiará a su
sistema todos los archivos necesarios.
4. Pulse Terminar para completar la
instalación.
5. Cuando Windows le solicite que reinicie su
computadora, pulse Sí.
En Windows 2000
1. En el Asistente para nuevo hardware
encontrado, pulse Siguiente.
2. En Instalar los controladores de dispositivo
de hardware, seleccione Buscar un
- 75 -
Page 86

controlador adecuado para mi dispositivo
(Recomendado), pulse Siguiente.
3. Inserte el CD-ROM provisto en la unidad de
CD-ROM. Seleccione Especificar una
ubicación, pulse Siguiente.
4. Pulse Examinar para proporcionar la ruta de
acceso apropiada (por ej. D:\WIN2000).
Pulse OK.
5. Pulse Siguiente, Windows copiará a su
sistema todos los archivos necesarios.
6. En la ventana Firma digital no encontrada,
pulse Sí para continuar.
Pulse Terminar para completar la instalación.
En Windows XP
1. Seleccione Instalar desde una lista o desde
una ubicación determinada (Avanzado) y
pulse Siguiente.
2. Inserte el CD-ROM provisto en la unidad de
CD-ROM. Seleccione Incluir esta
ubicación en la búsqueda: y pulse
Examinar para proporcionar la ruta de
acceso apropiada (por ej. D:\WINXP).
Pulse Siguiente
3. Pulse Continuar de todas maneras para
proseguir. Windows copiará a su sistema
todos los archivos necesarios.
4. Pulse Terminar para completar la
instalación.
- 76 -
Page 87

Verificar
Para verificar si el dispositivo existe en su
computadora y si está activado, vaya a Inicio Æ
Configuración Æ Panel de Control Æ Sistema
(Æ Hardware) Æ Administrador de
dispositivos. Expanda la categoría Adaptadores
de red. Si la 802.11b Wireless LAN CardBus
(Mini-) PCI NIC figura en esta lista, quiere decir
que su dispositivo está instalado correctamente y
activado.
11.
Instalación del utilitario
1. Inserte el CD-ROM provisto en la unidad de
CD-ROM. Pulse dos veces en Setup.exe para
instalar el Utilitario inalámbrico LAN.
2. Cuando la pantalla Bienvenido aparezca,
pulse Siguiente para continuar.
3. En Acuerdo de Licencia, pulse Sí para
aceptar los términos.
4. Pulse Terminar para completar la
instalación.
- 77 -
Page 88

- 78 -
Page 89

CONEXIÓN DE RED
Una vez que el controlador esté instalado, debe
hacer algunos cambios en las configuraciones de
red.
En Windows 98/ME
1. Vaya a Inicio Æ Configuración Æ Panel de
Æ Red.
2. Asegúrese de que los siguientes componentes
estén instalados.
y 802.11b Wireless LAN CardBus (Mini-)
y IPX/SPX-compatible Protocol
y NetBEUI
y TCP/IP
Si alguno de los componentes no se encuentra,
pulse del botón Agregar para incluirlo. Todos los
protocolos y clientes requeridos y enumerados
anteriormente están provistos por Microsoft.
3. Luego de haber pulsado Agregar, marque el
componente que necesita, y pulse Agregar.
PCI NIC
- 79 -
Page 90

4. Marque Microsoft, y luego pulse dos veces en
el elemento que desea agregar. Pulse OK.
5. Para hacer que su computadora sea visible en
la red, active Compartir archivo e
impresora.
6. Pulse en la lengüeta Identificación. Coloque
un nombre que sea único entre los otros
nombres de computadoras en la red. Escriba
el nombre de su grupo de trabajo, que debe ser
igual al usado por todas las otras PC en la red.
7. Pulse en la lengüeta Control de acceso.
Compruebe que esté seleccionado “Control
compartido del nivel de acceso”. Si se
conecta con un servidor de Netware, el nivel
- 80 -
Page 91

compartido puede ser configurado como
“Control del usuario del nivel de acceso”
8. Cuando termine, reinicie su computadora para
activar el nuevo dispositivo.
9. Una vez que la computadora se reinicie y que
Windows haya arrancado, una ventana de
Inicio de sesión aparecerá y le solicitará que
ingrese su nombre de usuario y contraseña.
Coloque un nombre de usuario y una
contraseña y pulse OK. No pulse el botón
Cancelar, de otro modo no podrá registrarse
en la red.
10. Pulse doblemente en el icono Entorno de red
en la ventana del escritorio, y verá los
nombres de las otras PC que están en la red.
En Windows 2000/XP
1. (En Windows 2000)
Vaya a InicioÆ Configuración Æ Panel de
control Æ Conexiones de red y de Acceso
telefónico Æ Conexión de área local Æ
Propiedades
(En Windows XP)
Vaya a Inicio Æ Panel de Control Æ
Conexiones de red Æ Conexión de red
inalámbrica habilitada Tarjeta
- 81 -
Page 92

inalámbrica para PC CardBbus de
802.11b Æ Propiedades.
- 82 -
Page 93

2. Compruebe que tiene todos los componentes
siguientes instalados.
Cliente de Microsoft Networks
NWLink NetBIOS
Protocolo 802.11b EAPPkt
Protocolo de Internet (TCP/IP)
3. Si falta alguno de los componentes, pulse el
botón Instalar... para seleccionar el
Cliente/Servicio/Protocolo requerido. Luego
- 83 -
Page 94

de seleccionar el componente que necesita,
pulse Agregar... para incluirlo.
4. Para hacer visible su computadora en la red,
compruebe que ha instalado Archivo e
impresora compartidos para Microsoft
Networks.
5. Cuando termine, debe reiniciar su
computadora para completar la instalación.
- 84 -
Page 95

CONFIGURACIÓN
Luego de la correcta instalación del controlador y
utilitario de la Tarjeta de PC inalámbrica, un icono
de Estado de Red
del sistema. Mientras tanto, un icono de Acceso
directo al utilitario
escritorio.
aparecerá en la bandeja
aparecerá en el
Acceder a la configuración del
utilitario
Pulse dos veces en para abrir la
Configuración del utilitario.
Pulse Avanzada para ingresar a la Ventana de
configuración.
- 85 -
Page 96

Todos los ajustes se categorizan en 6 lengüetas:
- 86 -
Page 97

Lengüeta Config.:
La lengüeta Config. le permite configurar el
encriptado WEP y agregar/quitar perfil(es).
Elemento Descripción
Red(es)
inalámbrica(s
)
disponible(s)
Configurar Marque una red disponible, pulse
Muestra todas las redes disponibles.
- 87 -
Page 98

Configurar para establecer encriptado
WEP (ver diagrama debajo)
Actualizar Pulse el botón para actualizar y buscar
todas las redes disponibles.
Elemento Descripción
Perfil(es)
disponible(es
)
Agregar
Muestra todos los perfiles disponibles.
Pulse el botón y aparecerá la ventana
Propiedades de red inalámbrica. En el
campo Nombre de red (SSID), ingrese el
nombre de la red que desea entre los
nombres enumerados en el cuadro
superior Red(es) inalámbrica(s)
disponible(s), y pulse OK.
- 88 -
Page 99

Eliminar
Configurar
preestablecido
Marque el perfil no deseado enumerado
en el cuadro Perfil(es) disponible(s), y
pulse el botón para eliminarlo.
Marque un perfil, pulse el botón para
configurarlo como perfil preestablecido.
Lengüeta Config. avanzada
La lengüeta Config. Avanzada le permite
cambiar los parámetros avanzados de
configuración, tales como Canal ad hoc
preestablecido, Ahorro de energía y Radio
apagada.
- 89 -
Page 100

Elemento Descripción
Canal ad hoc
preestablecido
Ahorro de
energía ~
Modo de alerta
constante
(CAM)
Seleccione el canal apropiado en la
lista provista para que corresponda
con sus configuraciones de red.
Todos los dispositivos en la LAN
inalámbrica deben ser configurados
compartiendo el mismo canal de radio
para que funcionen correctamente.
Mantiene la tarjeta PC activada
continuamente de este modo el
retraso en el tiempo de respuesta del
mensaje es breve.
Consume más energía pero ofrece el
rendimiento más elevado en la
capacidad de procesamiento. Se
recomienda para computadoras de
escritorio y dispositivos que usan
- 90 -
 Loading...