

Page 1

UK The features described in this manual are published with reservation to modifications.
NL De in deze handleiding beschreven mogelijkheden worden gepubliceerd onder voorbehoud van wijzigingen.
FR Les possibilités décrites dans ce manuel sont publiées sous réserve de modifications.
DE Die in dieser Bedienungsanleitung umschriebenen Möglichkeiten, werden vorbehaltlich Änderungen publiziert.
ES Las características descritas en este manual pueden ser objeto de futuras modificaciones.
SE Funktionerna i denna bruksanvisning publiceras med reservation för ändringar.
PT As características descritas neste manual são publicadas sob reserva de modificação.
Topcom Twintalker 5010
®
Twintalker 5010
V 1.0 - 10/11
User guide
Handleiding
Manuel d’utilisateur
Bedienungsanleitung
Manual de usuario
Bruksanvisning
Manual do utilizador
UK The CE symbol indicates that the unit complies with the essential requirements of the R&TTE directive.
NL Het toestel voldoet aan de basiseisen van de R&TTE-richtlijn. Dit wordt bevestigd door de CE-markering.
FR La conformité de l’appareil avec les exigences fondamentales de la directive européenne R&TTE relative aux terminaux,
est confirmée par le label CE.
DE Die Übereinstimmung des Gerätes mit den grundlegenden Anforderungen der R&TTE-Directive ist durch das
CE-Kennzeichen bestätigt.
ES El sello CE corrobora la conformidad del equipo con los requerimientos básicos de la directiva R&TTE.
SE CE-märket bekräftar att apparaten uppfyller de grundläggande kraven i R&TTE direktivet.
PT O símbolo CE indica que esta unidade cumpre com os requisitos essenciais da directiva R&TTE.
Page 2
Topcom Twintalker 5010
2 noitartsullI1 noitartsullI
15
14
13
12
11
10
9
8
7
1
2
3
4
5
6
VOX
16
23
17
18
19
20
2122
Page 3
Topcom Twintalker 5010 3
Topcom Twintalker 5010
ENGLISH
1 Introduction
Thank you for purchasing the Twintalker 5010. It’s a long range, low powered radio
communication device with a range of maximum 10 Km. It has no running costs other
than the minimal cost of re-charging the batteries.
TheTwintalker operates on 8 channels.
2 Intended purpose
It can be used for recreational purposes. For example: to keep in contact during
travelling with 2 or more cars, biking, skiing. It can be used to keep in contact with your
children when they are playing outside, etc...
3CE Mark
The CE symbol on the unit, user guide and gift box indicates that the unit complies
with the essential requirements of the R&TTE directive 1995/5/EC.
4 Safety instructions
4.1 General
Please read carefully through the following information concerning safety and proper
use. Make yourself familiar with all functions of the device. Keep this manual in a safe
place for future use.
4.2 Burning injuries
• If the cover of the antenna is damaged, do not touch because when an antenna
comes in contact with the skin, a minor burn may result when transmitting.
• Batteries can cause property damage such as burns if conductive material such
as jewellery, keys or beaded chains touches exposed terminals. The material
may complete an electrical circuit (short circuit) and become quite hot. Exercise
care in handling any charged battery, particularly when placing it inside a pocket,
purse or other container with metal objects.
4.3 Injuries
• Do not place your device in the area over an air bag or in the air bag deployment
area. Air bags inflate with great force. If a PMR is placed in the bag deployment
area and the air bag inflates, the communicator may be propelled with great
force and cause serious injury to the occupants of the vehicle.
• Keep the PMR at least 15 centimetres away from a pacemaker.
• Turn your PMR off as soon as interference is taking place with medical
equipment.
4.4 Danger of explosion
• Do not replace batteries in a potentially explosive atmosphere. Contact sparking
may occur while installing or removing batteries and cause an explosion.
• Turn your PMR off when in any area with a potentially explosive atmosphere.
Sparks in such areas could cause an explosion or fire resulting in bodily injury or
even death.
• Never throw batteries in fire as they may explode.
4.5 Poisoning danger
• Keep batteries away from small children.
4.6 Legal
• In some countries it is prohibited to use your PMR while driving a vehicle. In this
case leave the road before using the device.
• Turn your PMR off when on board an aircraft when instructed to do so. Any use
of the PMR must be in accordance with airline regulations or crew instructions.
• Turn your PMR off in any facilities where posted notices instruct you to do so.
Hospitals or health care facilities may be using equipment that is sensitive to
external RF energy.
• Replacing or modifying the antenna may affect the PMR radio specifications and
violate the CE regulations. Unauthorised antennas could also damage the radio.
4.7 Notes
• Do not touch the antenna while transmitting, it could affect the range.
• Remove the batteries if the device is not going to be used for a long period.
5 Cleaning and maintenance
• To clean the unit, wipe with a soft cloth dampened with water. Don’t use a
cleaner or solvents on the unit; they can damage the case and leak inside,
causing permanent damage.
• Battery contacts may be wiped with a dry lint-free cloth.
• If the unit gets wet, turn it off and remove the batteries immediately. Dry the
battery compartment with a soft cloth to minimize potential water damage.
Leave the cover off the battery compartment overnight or until completely dry.
Do not use the unit until completely dry.
6 Using a PMR device
To communicate between PMR devices they need to be set all on the same channel
and CTCSS code and within receiving range (up to max. 10 km in open field). Since
Areas with potentially explosive atmospheres are often, but not
always, clearly marked. They include fuelling areas such as below
deck on boats, fuel or chemical transfer or storage facilities; areas
where the air contains chemicals or particles, such as grain, dust
or metal powders; and any other area where you would normally be
advised to turn off your vehicle engine.
Page 4
4 Topcom Twintalker 5010
Topcom Twintalker 5010
these devices use free frequency bands (channels), all devices in operation share
these channels(total 8 channels). Therefore, privacy is not gusaranteed. Anybody
with a PMR set to your channel can overhear the conversation. If you want to
communicate (transmitting a voice signal) you need to press the PTT-button .
Once this button pressed, the device will go into transmit mode and you can speak
into the microphone. All other PMR devices in range , on the same channel and in
standby mode (not transmitting) will hear your message. You need to wait until the
other party stops transmitting before you can reply to the message. At the end of each
transmission the unit will send a beep if the roger beep is enable (see chapter 13.15).
To reply, just press the PTT-button
and speak into the microphone.
7 Included in the package
• 2 x Twintalker 5010
• 2 x Belt clip
• 1 x Duo charger
• 1 x Power adapter
• 2 x NiMH (3 x AAA) battery pack
• ECO User guide
8 Getting started
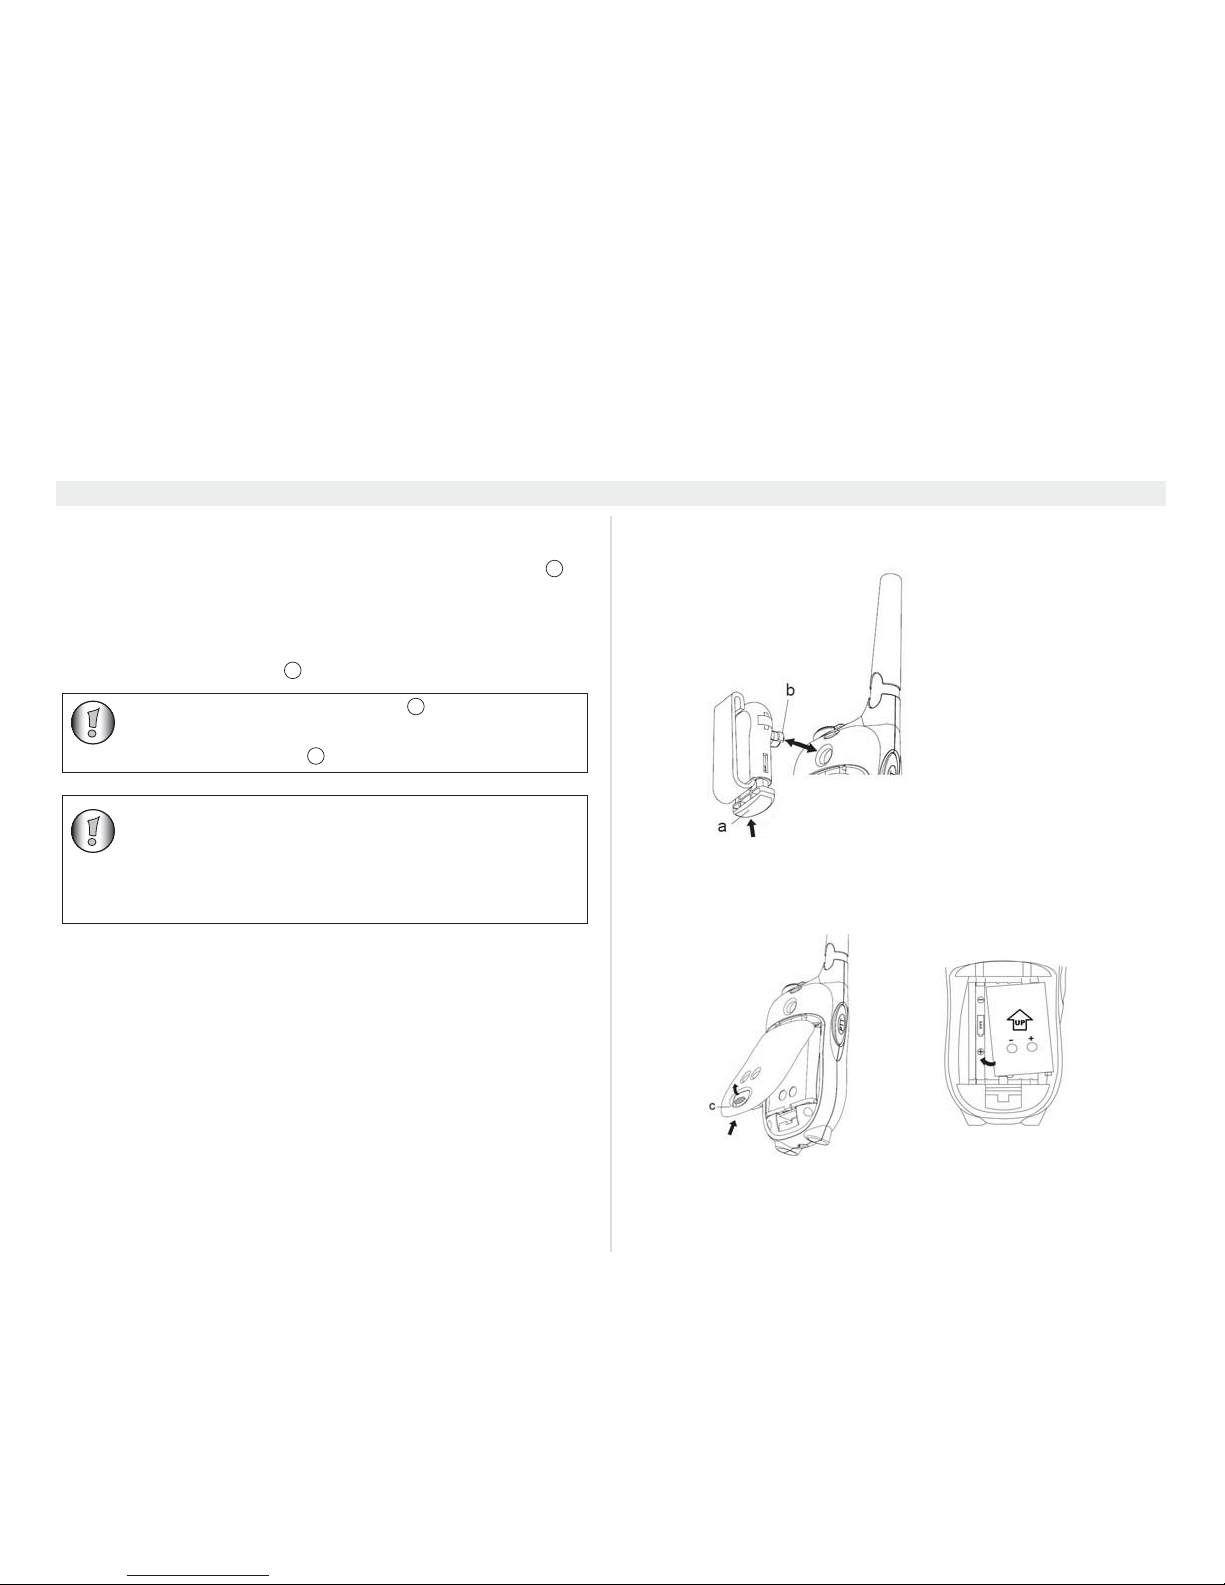
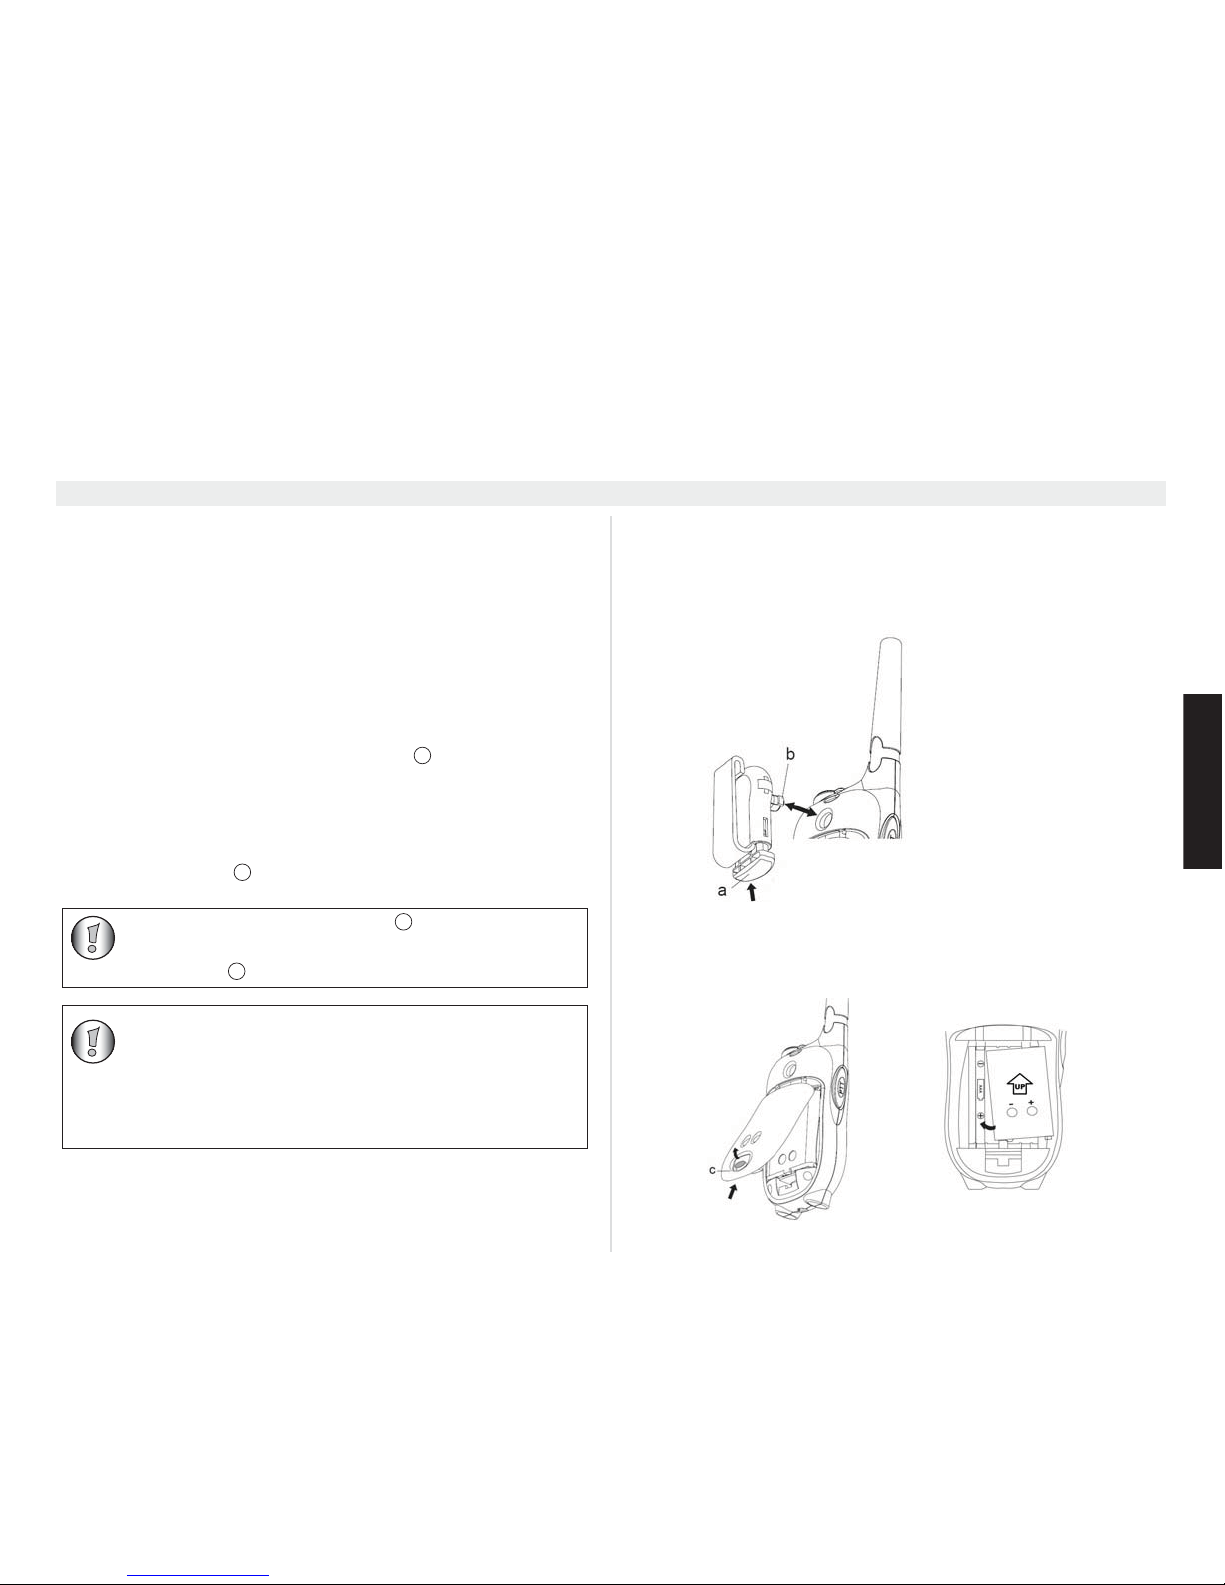
8.1 Installing/removing the belt clip
1. To install the belt clip, align the pin with the hole in the backside. Gently push
until it clicks into position.
2. To remove the belt clip from the unit, push the belt clip (a), while pulling the
clip away from the unit (b).
8.2 Battery installation
1. Remove the belt clip (see chapter 8.1).
2. Pull the battery cover tab (c) and gently remove the battery cover.
3. Install the rechargeable battery pack following the polarity as shown. The
metal contacts should face outwards from the radio to connect on the battery
12
12
If 2 or more users press the PTT-button at the same time the
receiver will receive only the stongest signal and the other
signal(s) will be supressed. Therefore you should only transmit a
signal (press PTT-button
) when the channel is free.
12
12
The range of radio waves is strongly affected by obstacles such as
buildings, concrete/metal structures, the unevenness of the
landscape, woodland, plants, … This implies that the range
between two or more PMR's may in some extreme cases be
restricted to a maximum of a few tens of meters. You will soon
notice that PMR works best when there is a minimum of obstacles
between users.
Page 5
Topcom Twintalker 5010 5
Topcom Twintalker 5010
ENGLISH
door. Or install 3 ‘AAA’ alkaline or rechargeable batteries following the polarity
as shown.
4. Re-install the battery cover and belt clip (see chapter 8.1).
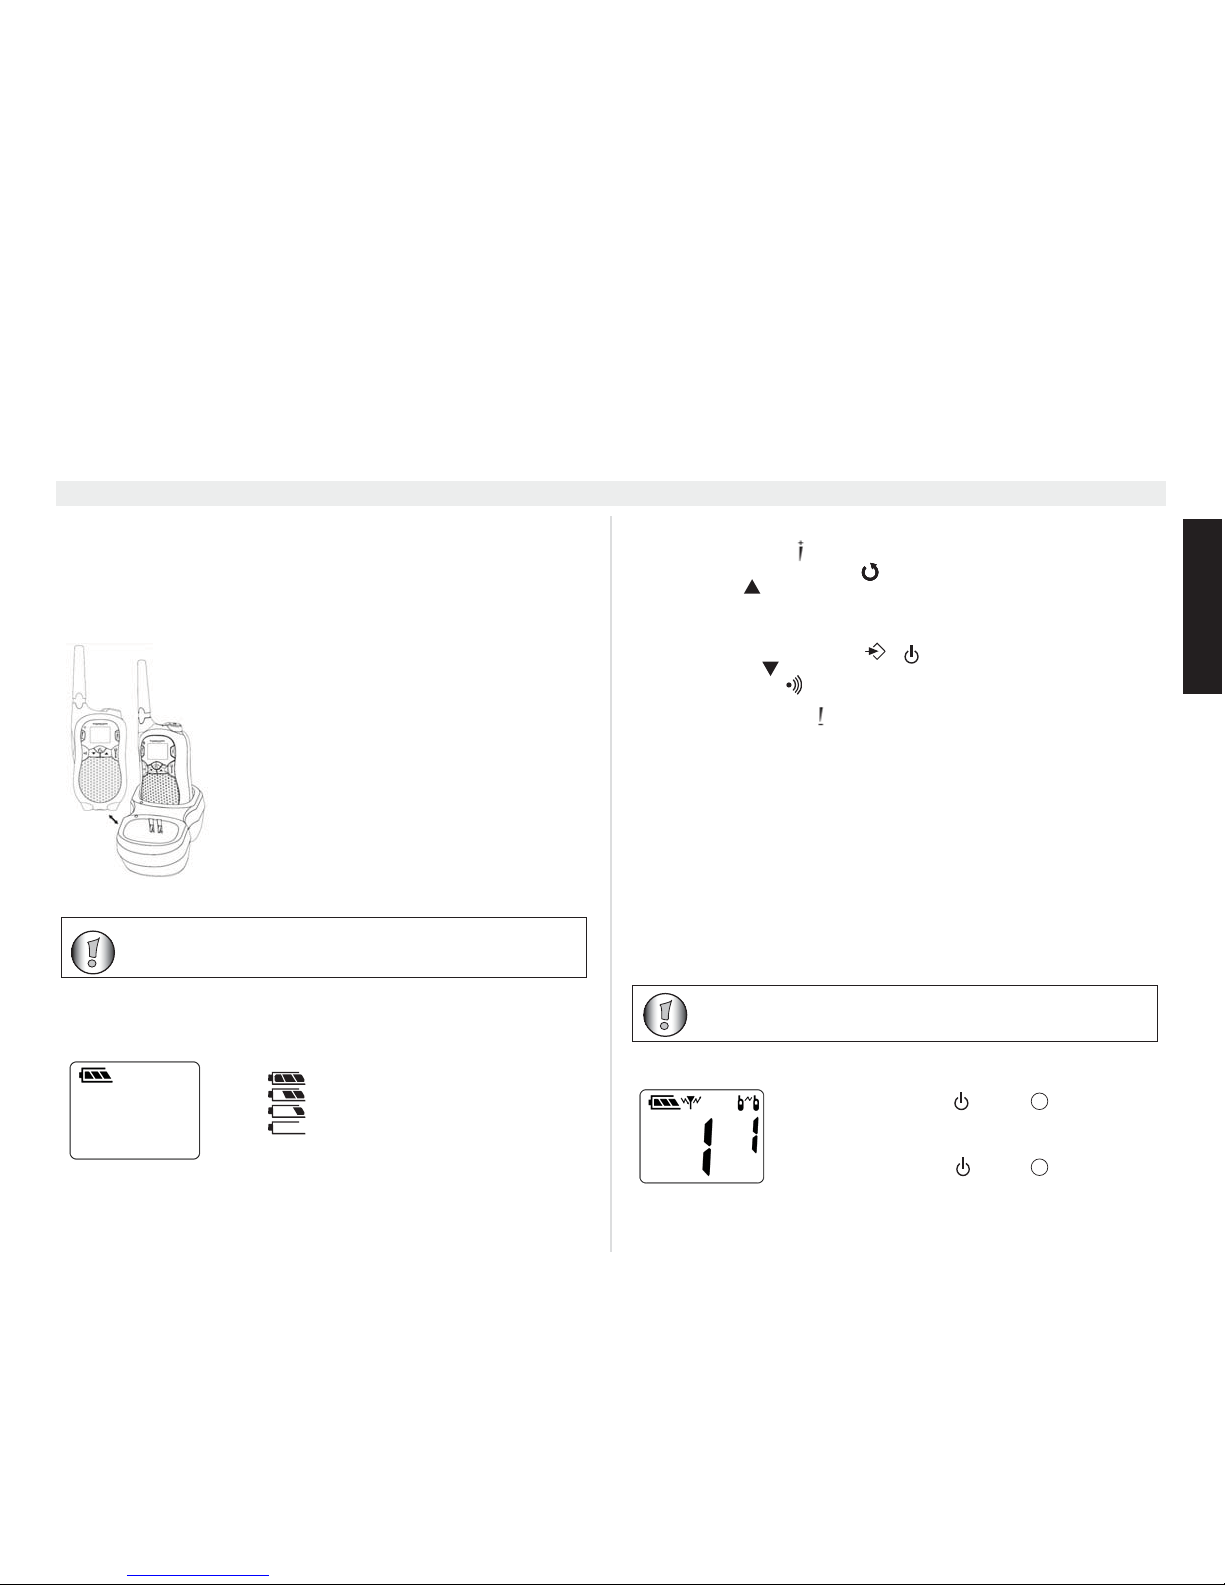
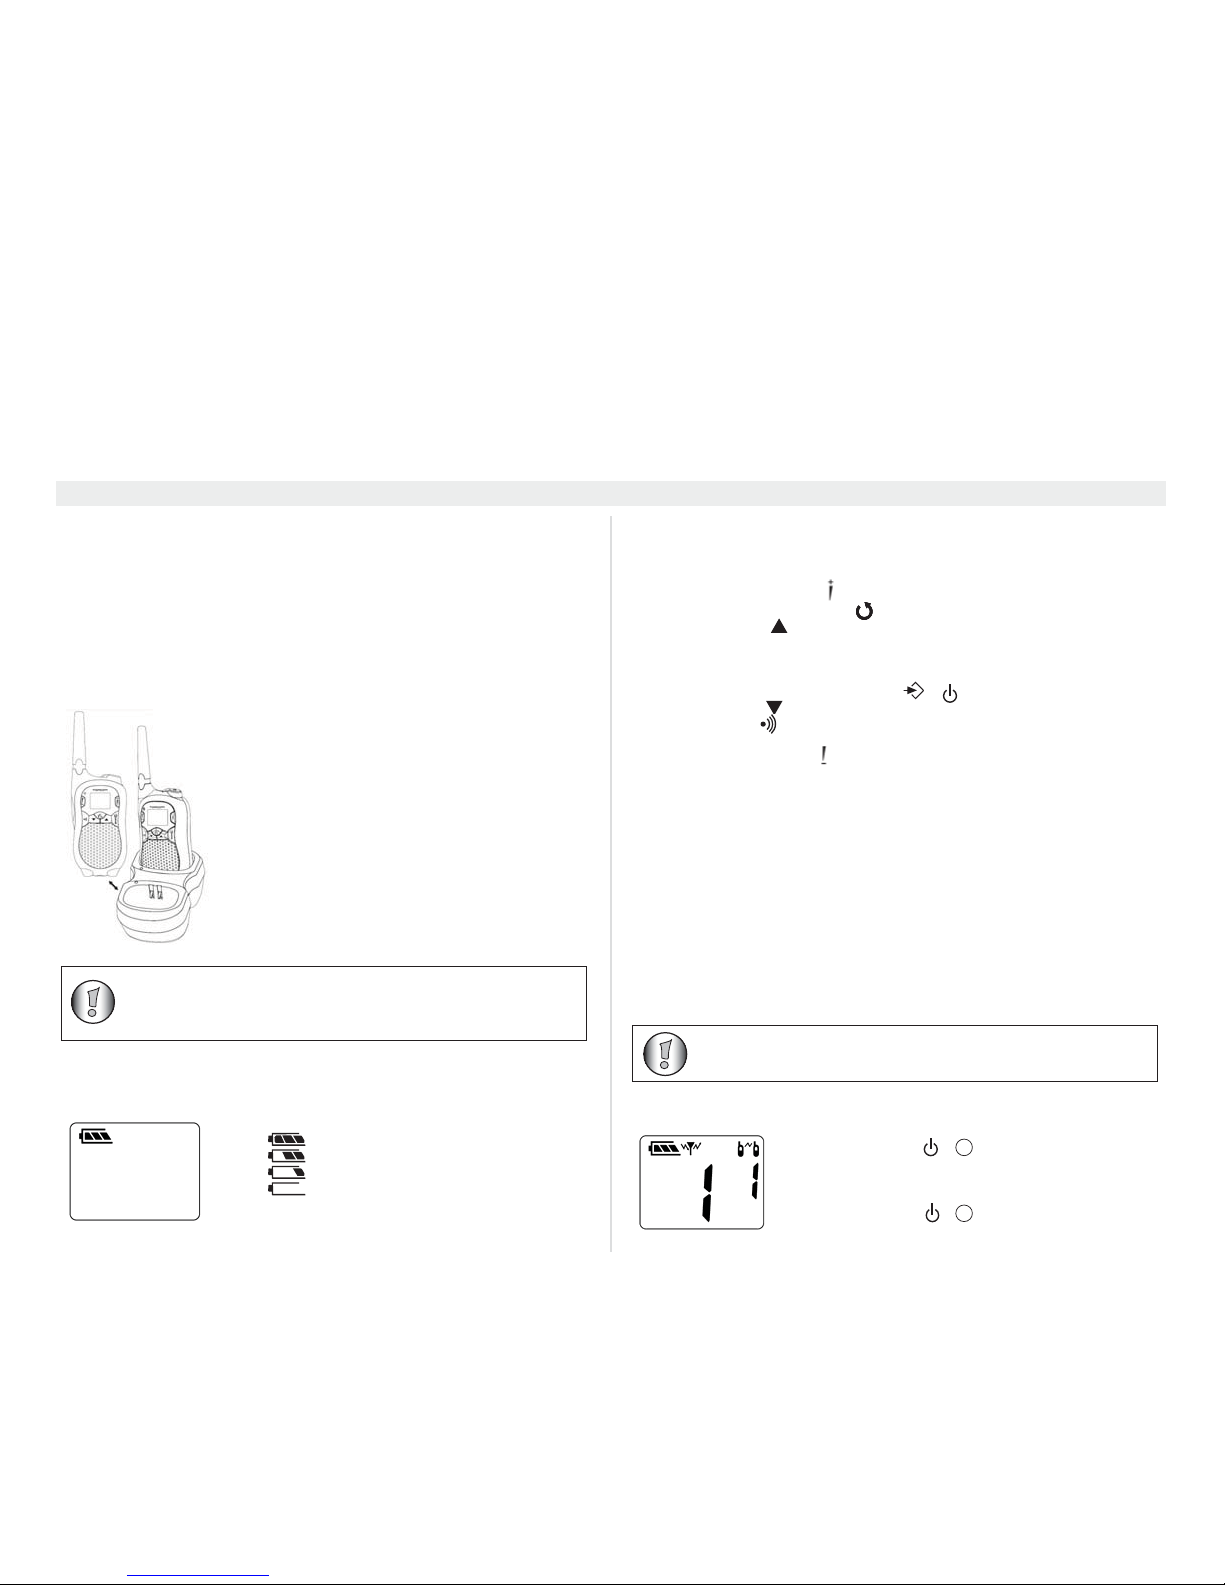
9 Charging batteries
When NiMh battery packs are installed, the desktop charger provides drop-in charging
convenience.
1.Put the desktop charger on a flat surface.
2.Plug the supplied adapter into the electric socket. Pay
attention to the mentioned voltage and compare this with
the indications of the power supply. Connect the low
tension plug at the end of the cable with the connector
at
the backside of the desktop charger.
3.Put the PMR in the charger as indicated.
4.The charging LED will turn on if it’s properly inserted
and charging.
It will take about 12 to 14 hours to fully charge the
batteries. There is no indication on the display when the
batteries are being charged.
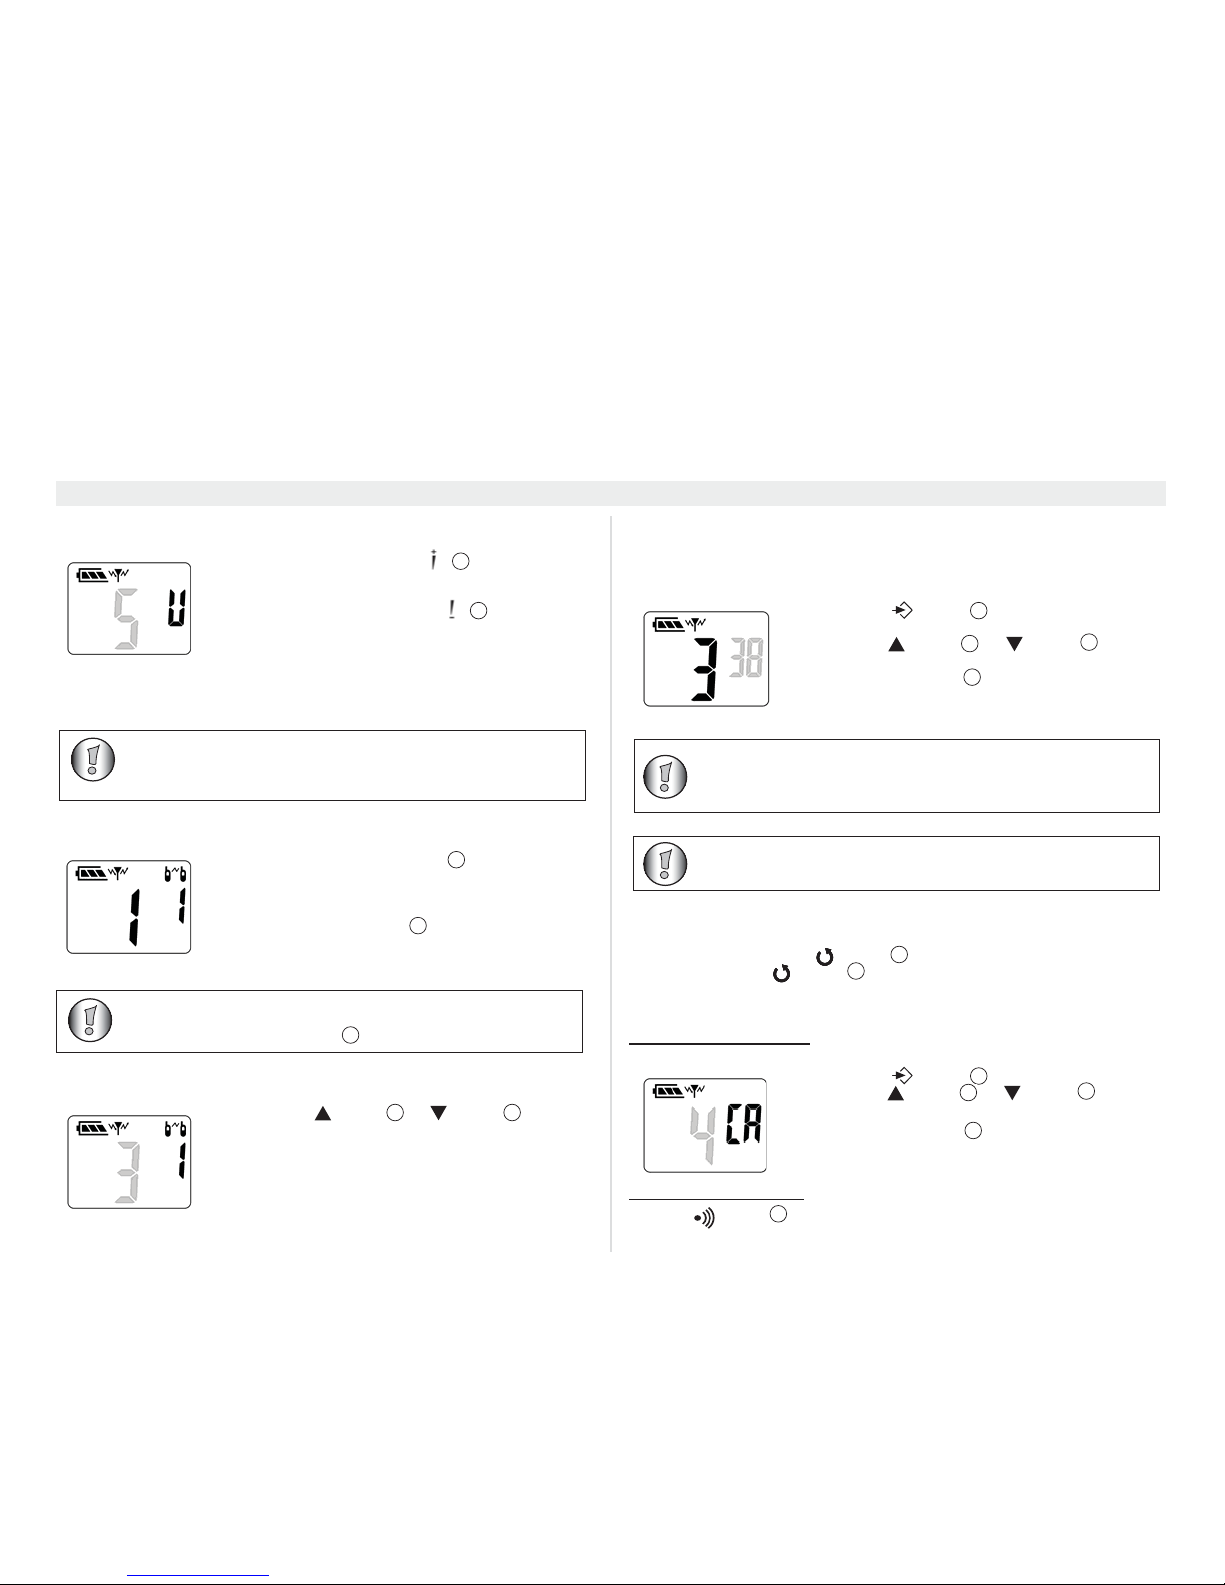
10 Battery charge level
The battery charge level is indicated by the number of squares present inside the
battery icon on the LCD display.
• Battery full
• Battery 2/3 charged
• Battery 1/3 charged
• Battery empty
When the battery charge level is low, a beep will be
heard.
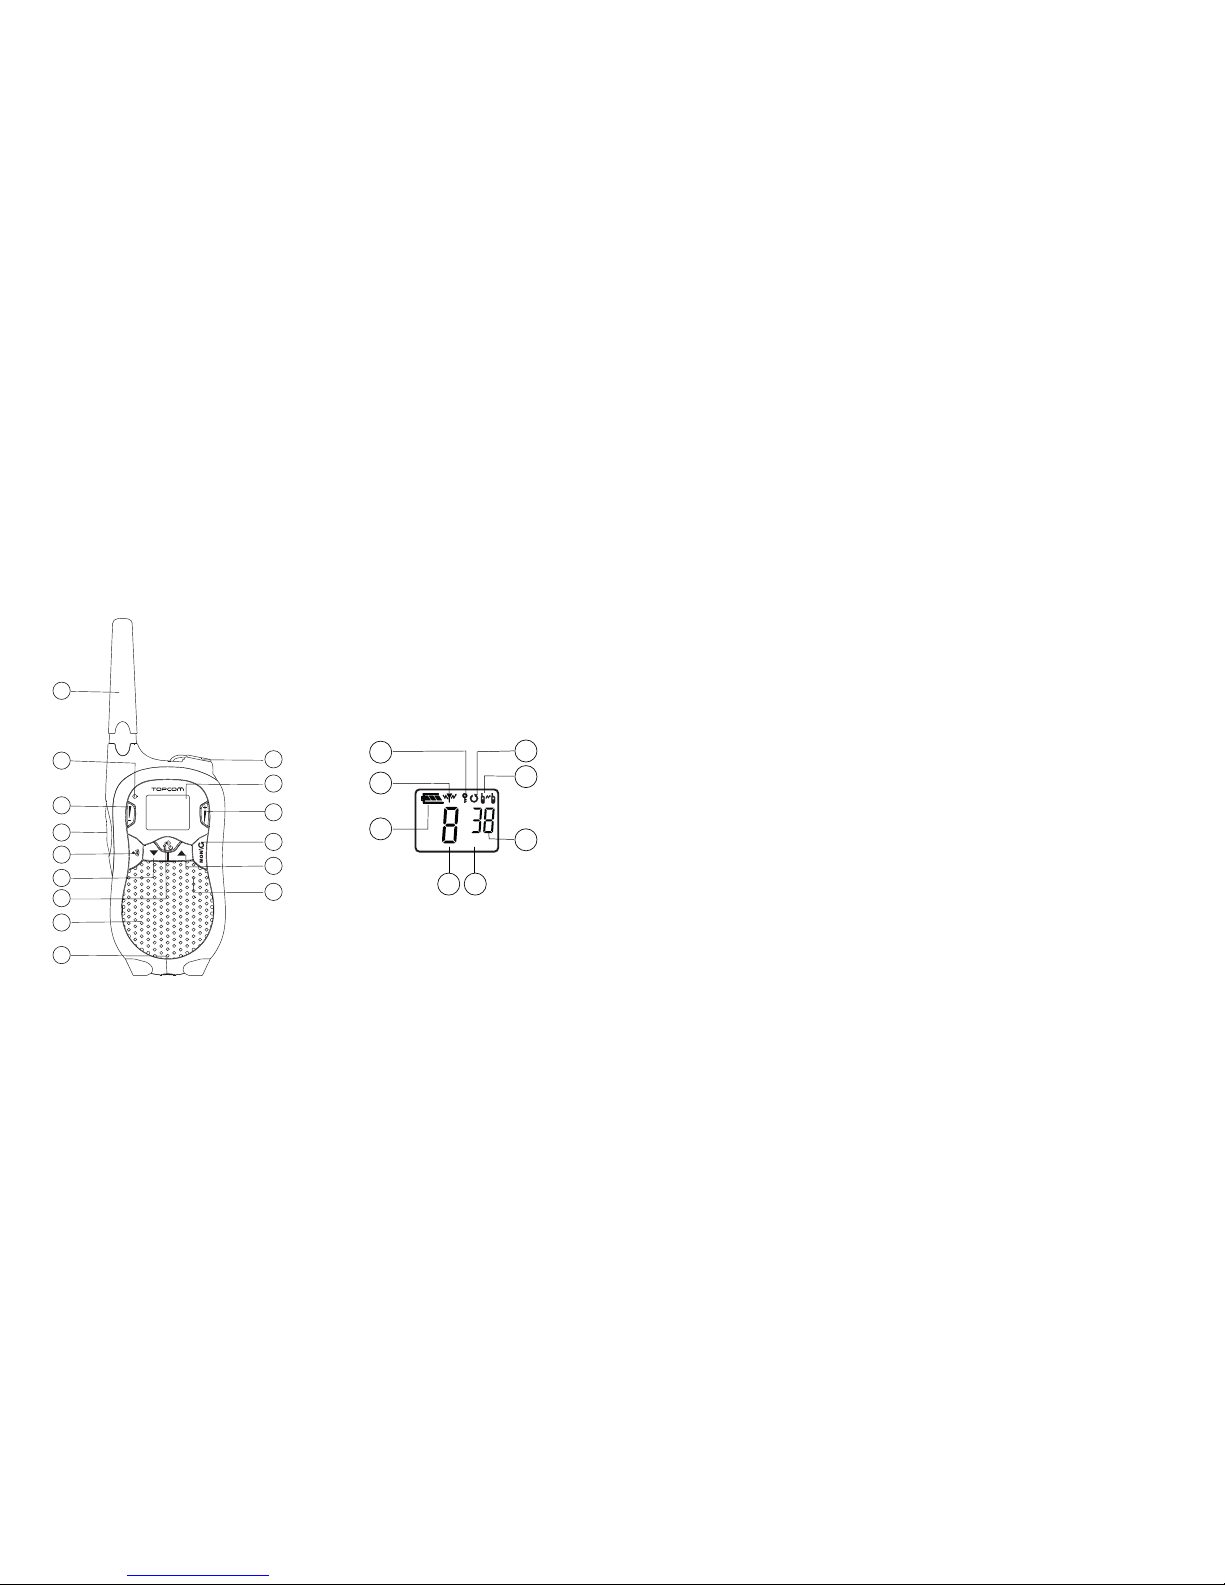
11 Description
See folded cover page - illustration 1
1. Earpiece connector
2. LCD display
3. Volume up button
4. Monitor / scan button MON /
5. Up button
6. Microphone
7. Optional power supply connector
8. Speaker
9. Menu / on-off / unlock button /
10. Down button
11. Call button
12. Push to talk button PTT
13. Volume down button
14. Power / transmission LED
15. Antenna
12 LCD display information
See folded cover page - illustration 2
16. Antenna icon
17. Key lock icon
18. Scan icon
19. Roger beep icon
20. CTCSS code
21. VOX indication
22. Channel number
23. Battery charge level indication
13 Using the Twintalker 5010
13.1 Turning the unit on/off
The device can also operate with 3 x AAA NiMh batteries or with 3
x AAA Alkaline batteries.
3 x AAA Alkaline batteries cannot be charged with the charger.
+
+
+
+
To turn on:
• Press and hold the -button for 3 seconds.
The unit will “beep” and the LCD display will display
the current channel.
To switch off:
• Press and hold the -button for 3 seconds.
The unit will “beep” and the LCD display will turn
blank..
If the segments and icons of the displays are shown in light grey
in this user guide, it indicates that they are blinking and/or
selectable.
9
9
Page 6
6 Topcom Twintalker 5010
Topcom Twintalker 5010
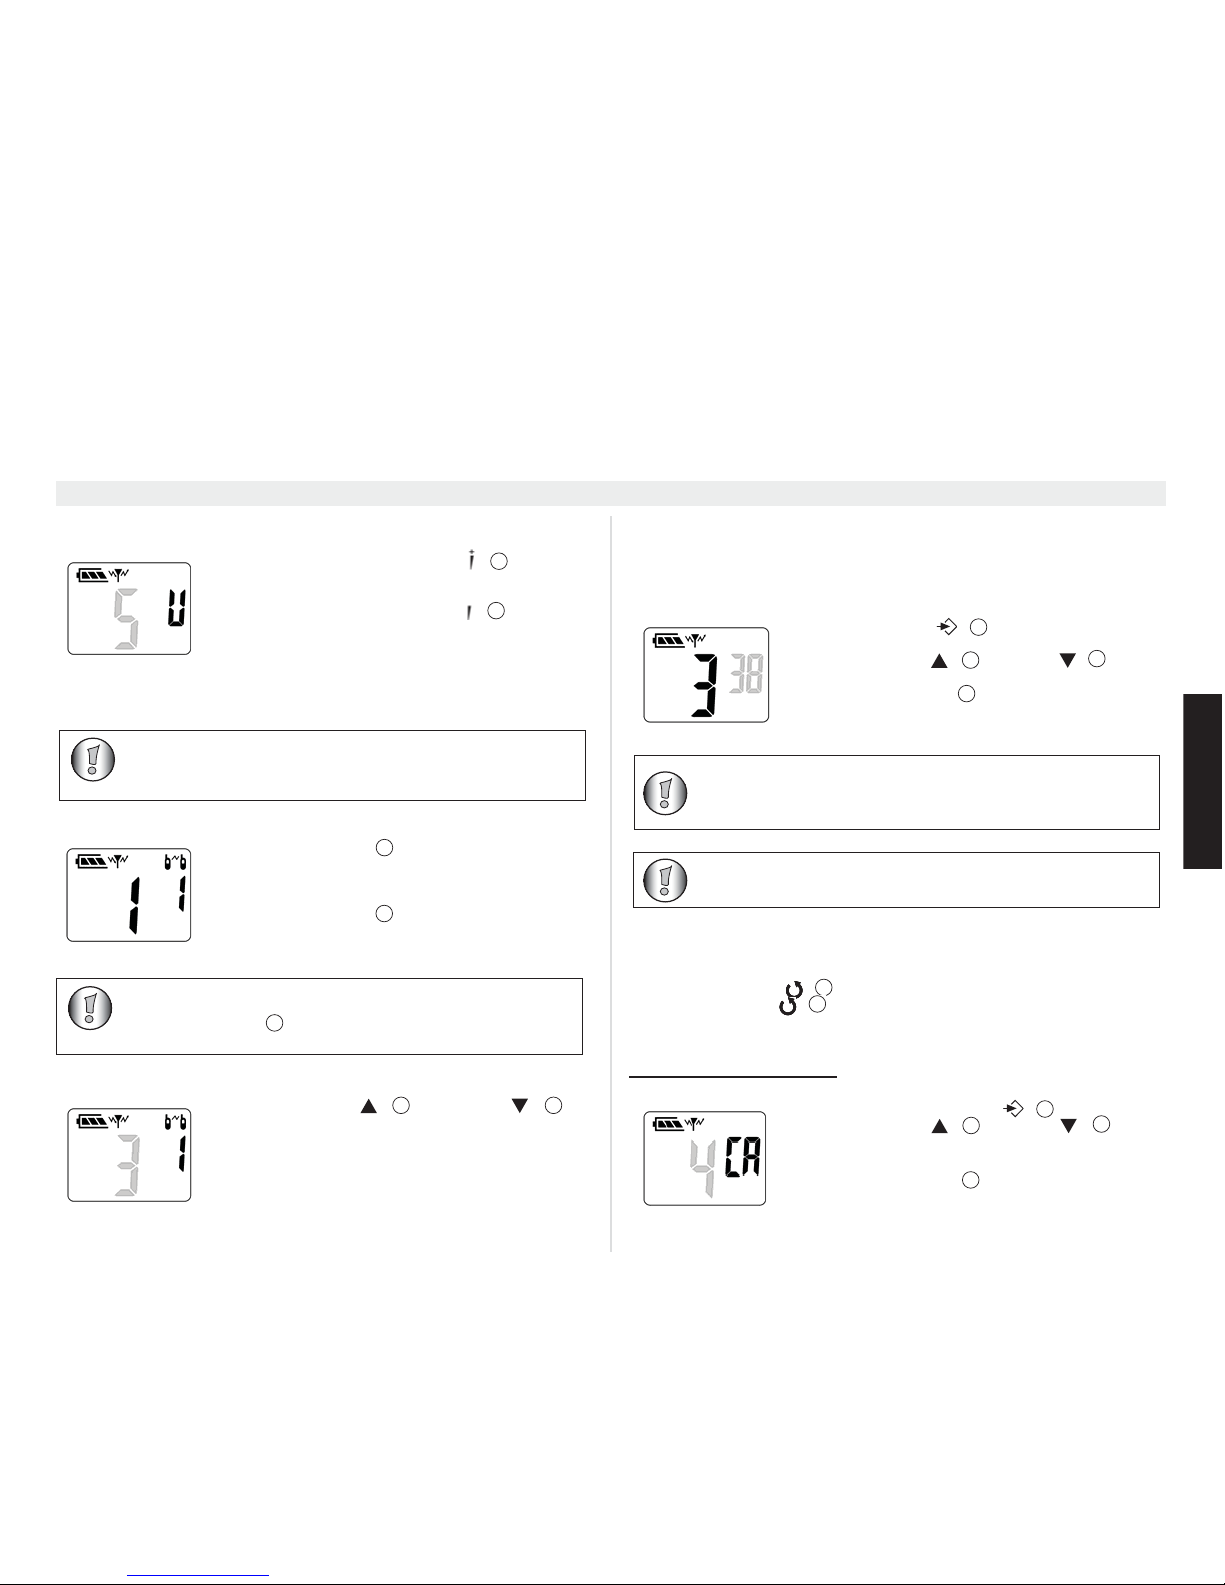
13.2 Adjusting speaker volume
There are 15 levels of speaker volume
13.3 Receiving a signal
The unit is continuously in the receive mode when the unit is switched on and not
transmitting.
13.4 Transmitting a signal
13.5 Changing channels
13.6 CTCSS (Continuous Tone Coded Squelch System)
The 2 digit CTCSS code corresponds to a specific tone frequency the radio emits.
Two users, with the same channel and CTCSS set can hear one another. They will
not be able to hear anyone else on the channel unless the other radios have the same
exact CTCSS code enabled. The Twintalker 5010 has 38 CTCSS codes available.
13.7 Monitor
You can use the monitor feature to check for weaker signals in the current channel.
• Press and hold the
MON\ -button to activate channel monitoring.
• Release the
MON\ -button to stop monitoring.
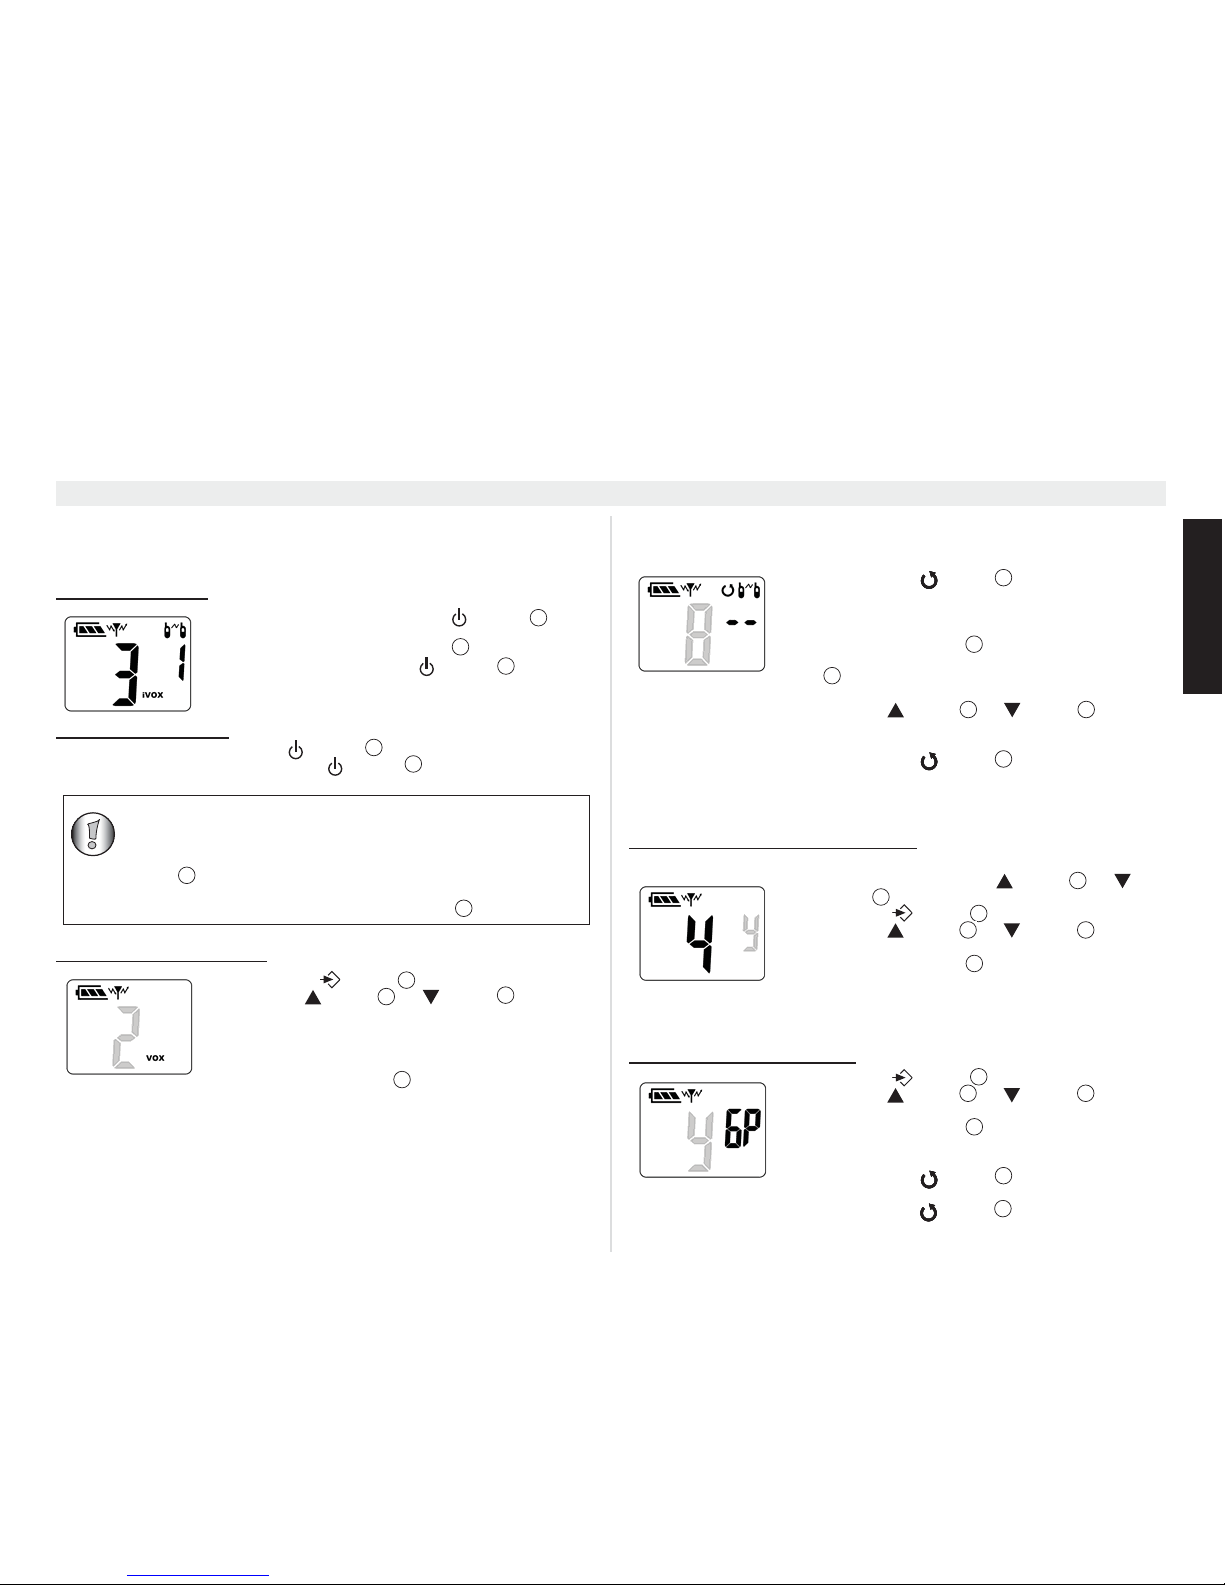
13.8 Call tones
A call tone alerts other users that you want to start talking to.
13.8.1 Setting the call tone
The Twintalker 5010 has 10 call tones
13.8.2 Sending a call tone
Press the button briefly. The call tone will be transmitted on the set channel.
• Press the volume up button in stand-by-mode
to increase the speaker volume. The volume level is
displayed.
• Press the volume down button to decrease the
speaker volume.
• Press and hold the PTT-button to transmit. The TX
LED will be on.
• Hold the unit in a vertical position with the microphone
10 cm from the mouth and speak into the microphone.
• Release the PTT-button when you want to stop
transmitting.
• Press the -button or -button to change
the channel.
3
13
In order for other people to receive your transmission, they must
also be on the same channel and have set the same CTCSS code.
(See chapter 13.5 and 13.6)
12
12
To check the channel activity use the monitor function (see chapter
13.7). The maximum transmitting time is limited to 1 minute.
Release and press PTT-button
to restart transmitting.
12
5
10
• Press the -button , the current CTCSS code
flashes on the display.
• Press the -button
or -button to
change to another code.
• Press the PTT-button
to confirm and return to
stand-by mode.
• Press the -button two times.
• Press the -button or -button to change
to another call tone. Select ‘0’ to disable the call tones.
• Press the PTT-button to confirm and return to
stand-by mode.
9
5
10
12
• It is recommended to set a CTCSS code for each channel.
This way you will have minimum interference from other
users on the same channel.
• To disable CTCSS code, set the code to ‘0’.
If no button is pressed within 5 seconds during setting, the unit
will return to standby.
4
4
9
5
10
12
11
Page 7
Topcom Twintalker 5010 7
Topcom Twintalker 5010
ENGLISH
13.9 iVOX Selection
The PMR is capable of intelligent voice activated (iVOX) transmission. In iVOX mode,
the radio will transmit a signal when it is activated by your voice. iVOX operation is not
recommended if you plan to use your radio in a noisy or windy environment.
13.9.1 Activating iVOX
13.9.2 De-activating iVOX
• Switch off the PMR (press the -button for three seconds).
• Switch on the PMR again (press the -button for three seconds). The
iVOX icon will be gone.
13.9.3
Adjusting the iVOX level
13.10 Channel scan
Channel scan performs searches for active signals in an endless loop from channel 1
to 8 including the CTCSS codes..
13.11 Multi channel scan (group scan)
It is possible to scan only a specific group of channels only.
13.11.1 Selecting the group scan channels
Each channel can be programmed as a member of this group.
13.11.2 Activating the group scan
• Switch off the PMR (press the -button for
three seconds)
• Press-and-hold the PTT-button
while switching on
the PMR by pressing the -button for three
seconds
• The iVOX-icon appears
• Press the -button
three times.
• Use the -button or -button to set the
desired level.
1 - High ambient noise
2 - Normal ambient noise
3 - Low ambient noise
• Press the PTT-button
to confirm and return to
stand-by mode.
9
12
9
9
9
• When you use the PMR with the optional earpiece (see
chapter 14), the iVOX function will be disabled as soon as
you plug in the earpiece connector.
• iVOX mode will be disabled when you press the PTT-button
.
The iVOX-icon will blink while disabled.
To enable iVOX again, press the PTT-button
briefly.
12
12
9
5
10
12
• Press the MON\ -button briefly to activate
channel scan. The channel scan icon is displayed.
• When an active signal (one of 8 channels with CTCSS
code) is detected, you will hear the conversation.
Press the PTT-button
to start communicating over
the active channel. If you don’t press the PTT-button
, channel scan will resume after 5 seconds if there
is no more activity.
• Press the -button
or -button to bypass
the current channel and continue to search for another
active channel.
• Press the
MON\ -button briefly to deactivate
channel scan.
• Select a channel using the -button or button .
• Press the -button six times.
• Press the -button
or -button to enable
(Y) or disable (-).
• Press the PTT-button
to confirm and return to
stand-by mode.
Repeat this action for each channel you want to add or
remove from the group scan.
• Press the -button seven times.
• Press the -button or -button to enable
(Y) or disable (-).
• Press the PTT-button
to confirm and return to
stand-by mode.
• Press the
MON\ -button briefly to start the
group scan. The channel scan icon is displayed.
• Press the
MON\ -button briefly again to stop
the group scan.
4
12
12
5
10
4
5
10
9
5
10
12
9
5
10
12
4
4
Page 8
8 Topcom Twintalker 5010
Topcom Twintalker 5010
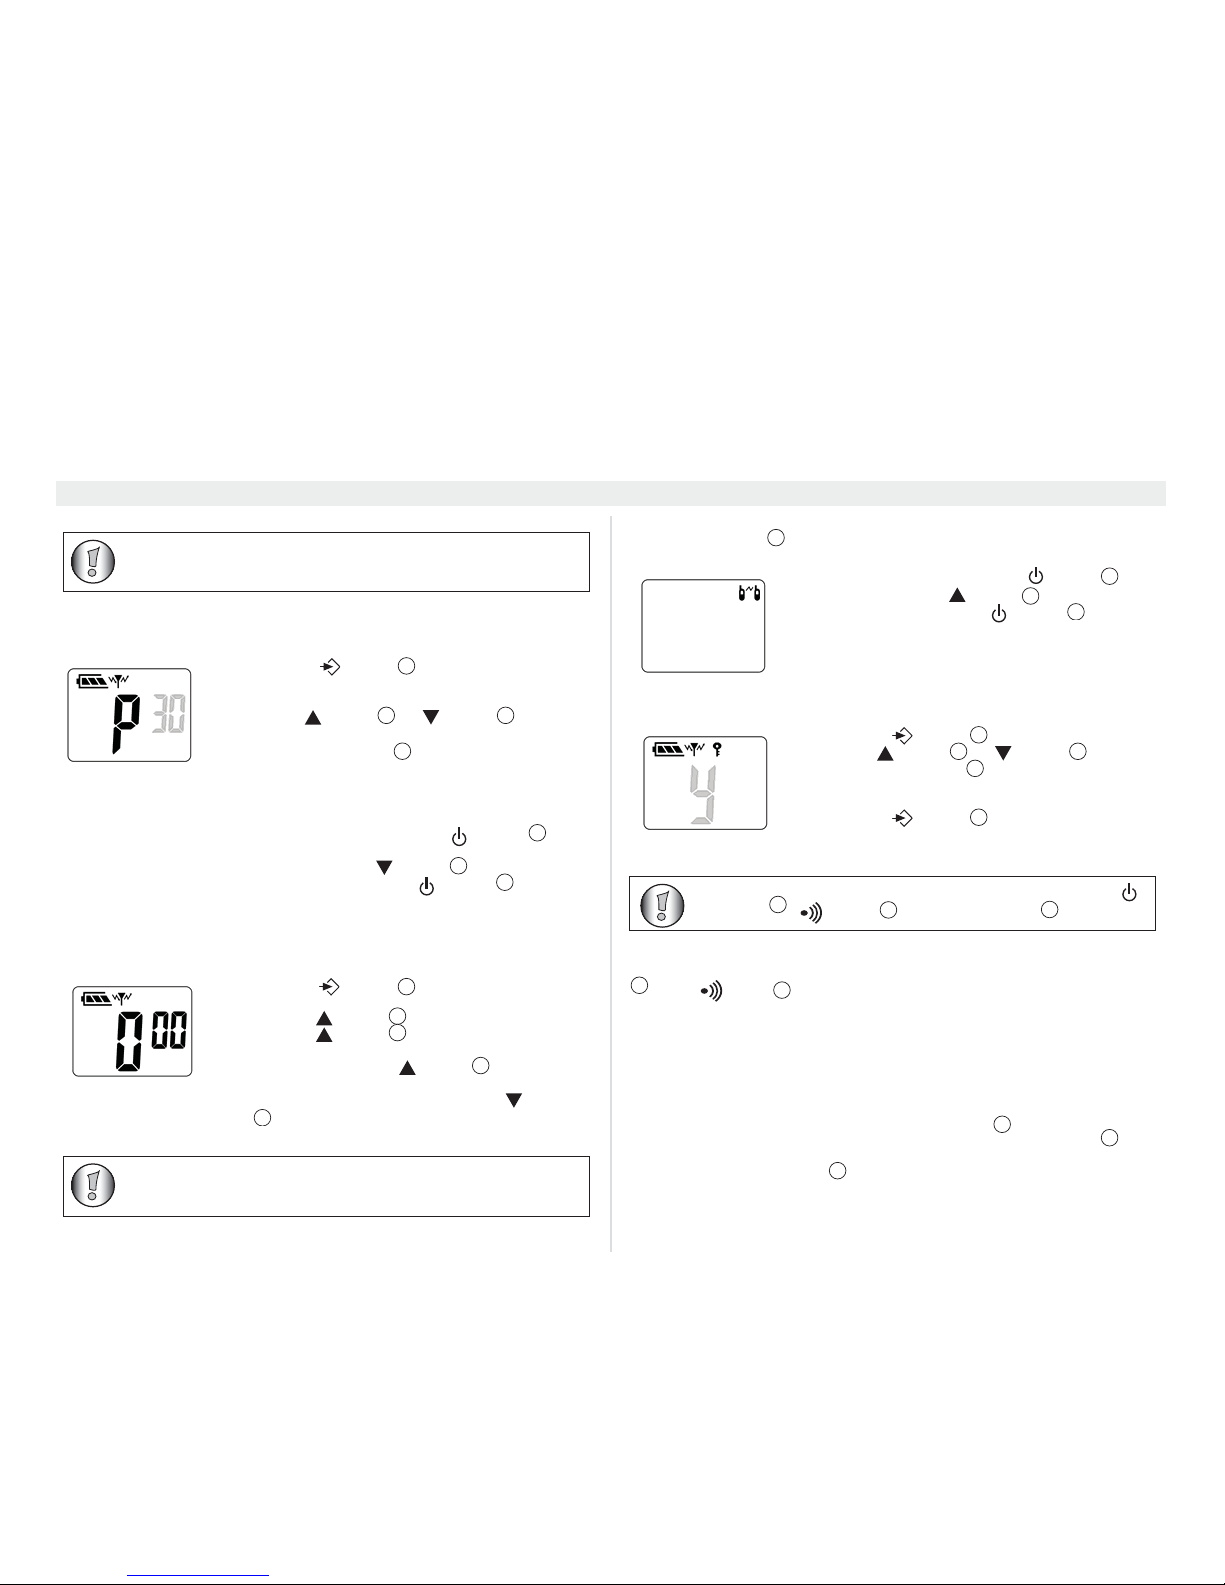
13.12 Automatic power off (APO)
To save energy, you can activate the automatic power off function. In case you forgot
to power off the unit, it will switch off automatically after the set time.
13.13 Key tone on/off
When a button is pressed, the unit will beep briefly.
13.14 Stopwatch
The Twintalker 5010 has a stopwatch function (mm:ss).
13.15 Roger beep on/off
After the PTT-button is released, the unit will send out a roger beep to confirm
that you have stopped talking.
13.16 Key lock
13.17 Display back light
To activate the backlight of the LCD display, press any button except the PTT-button
or the button
The LCD backlight will light up for 5 seconds.
14 Earpiece connection
The Twintalker 5010 can be used with an optional earpiece.
The connector is located under the protective rubber cover on the top of the unit.
To attach the earpiece, remove the rubber flap to expose the connector.
Insert the earpiece plug into the connector (2,5mm jack) .
The small button on the earpiece has the same function as the PTT-button
on the
unit.
When you use the PTT-button
from the Earpiece, you must also use the
microphone from the earpiece wire.
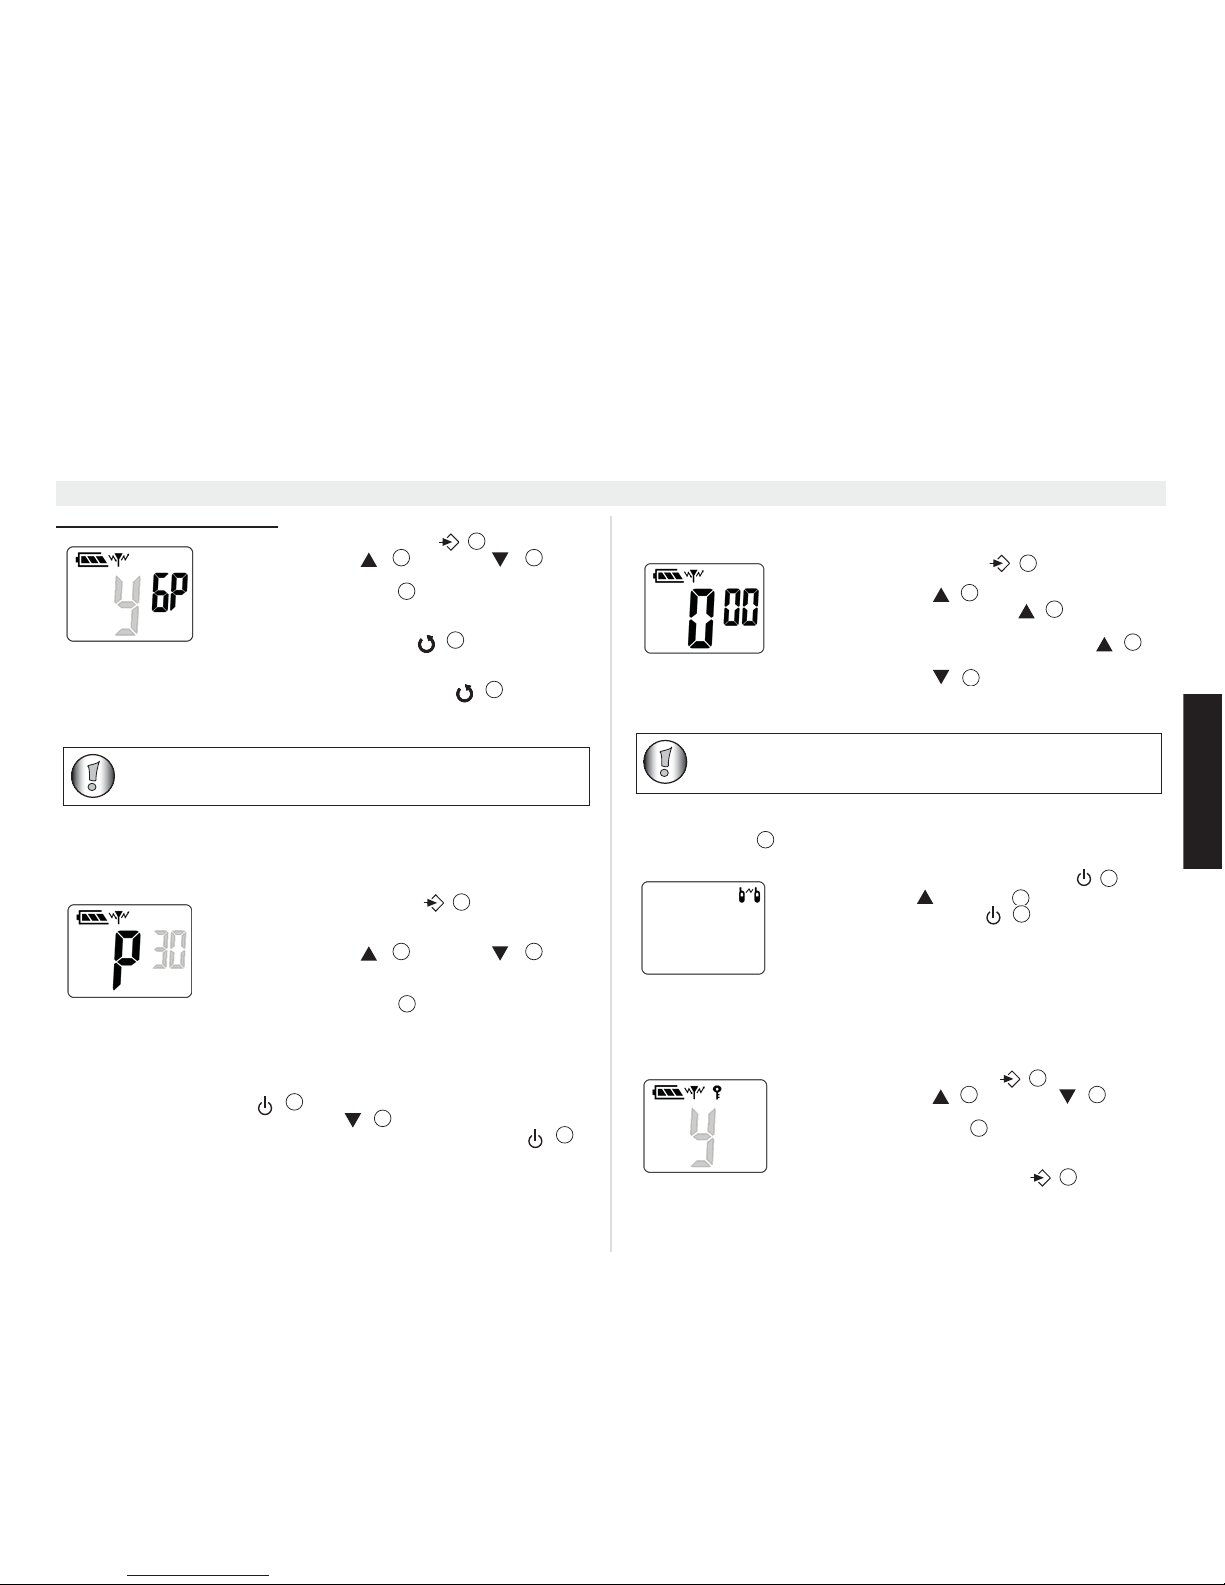
• Press the -button
four times, the current
power off time flashes on the display. (0, 30, 60 or 90
minutes).
• Use the -button
or -button to change
the time. Select ‘0’ to disable the APO feature.
• Press the PTT-button
to confirm and return to
stand-by mode.
• Switch off the PMR (press the -button for
three seconds).
• Press-and-hold the -button
while switching on
the PMR by pressing the -button for three
seconds.
• The key tone will be switched.
• Press the -button
five times. The counter is
displayed.
• Press the -button
to start counting.
• Press the -button again to stop counting and
see the lap time. The counter continues in the
background. Press the -button
to proceed
counting.
• When the counter is stopped, press the -button
to reset the counter.
When group scan is enabled, the stand-by channel will always be
included during the group scan.
9
5
10
12
9
10
9
9
5
5
5
10
After selecting this function, and also after resetting the counter,
the measurement should be started within 5 seconds. If not, the
device shall return to stand-by.
• Switch off the PMR (press the -button )
• Press-and-hold the -button while switching on
the PMR by pressing the -button
.
• The roger beep function will be switched on or off.
• If the roger beep icon appears in the display, it means
that this function is on.
• Press the -button eight times.
• Use the -button or -button to select Y.
• Press the PTT-button to confirm and return to
stand-by mode.
• Press the -button for four seconds to disable
the key lock.
12
9
5
9
9
5
10
12
9
The Button Lock is not valid for the monitor function, the button , -button and the PTT-button
.
9
11
12
12
11
1
12
12
Page 9
Topcom Twintalker 5010 9
Topcom Twintalker 5010
ENGLISH
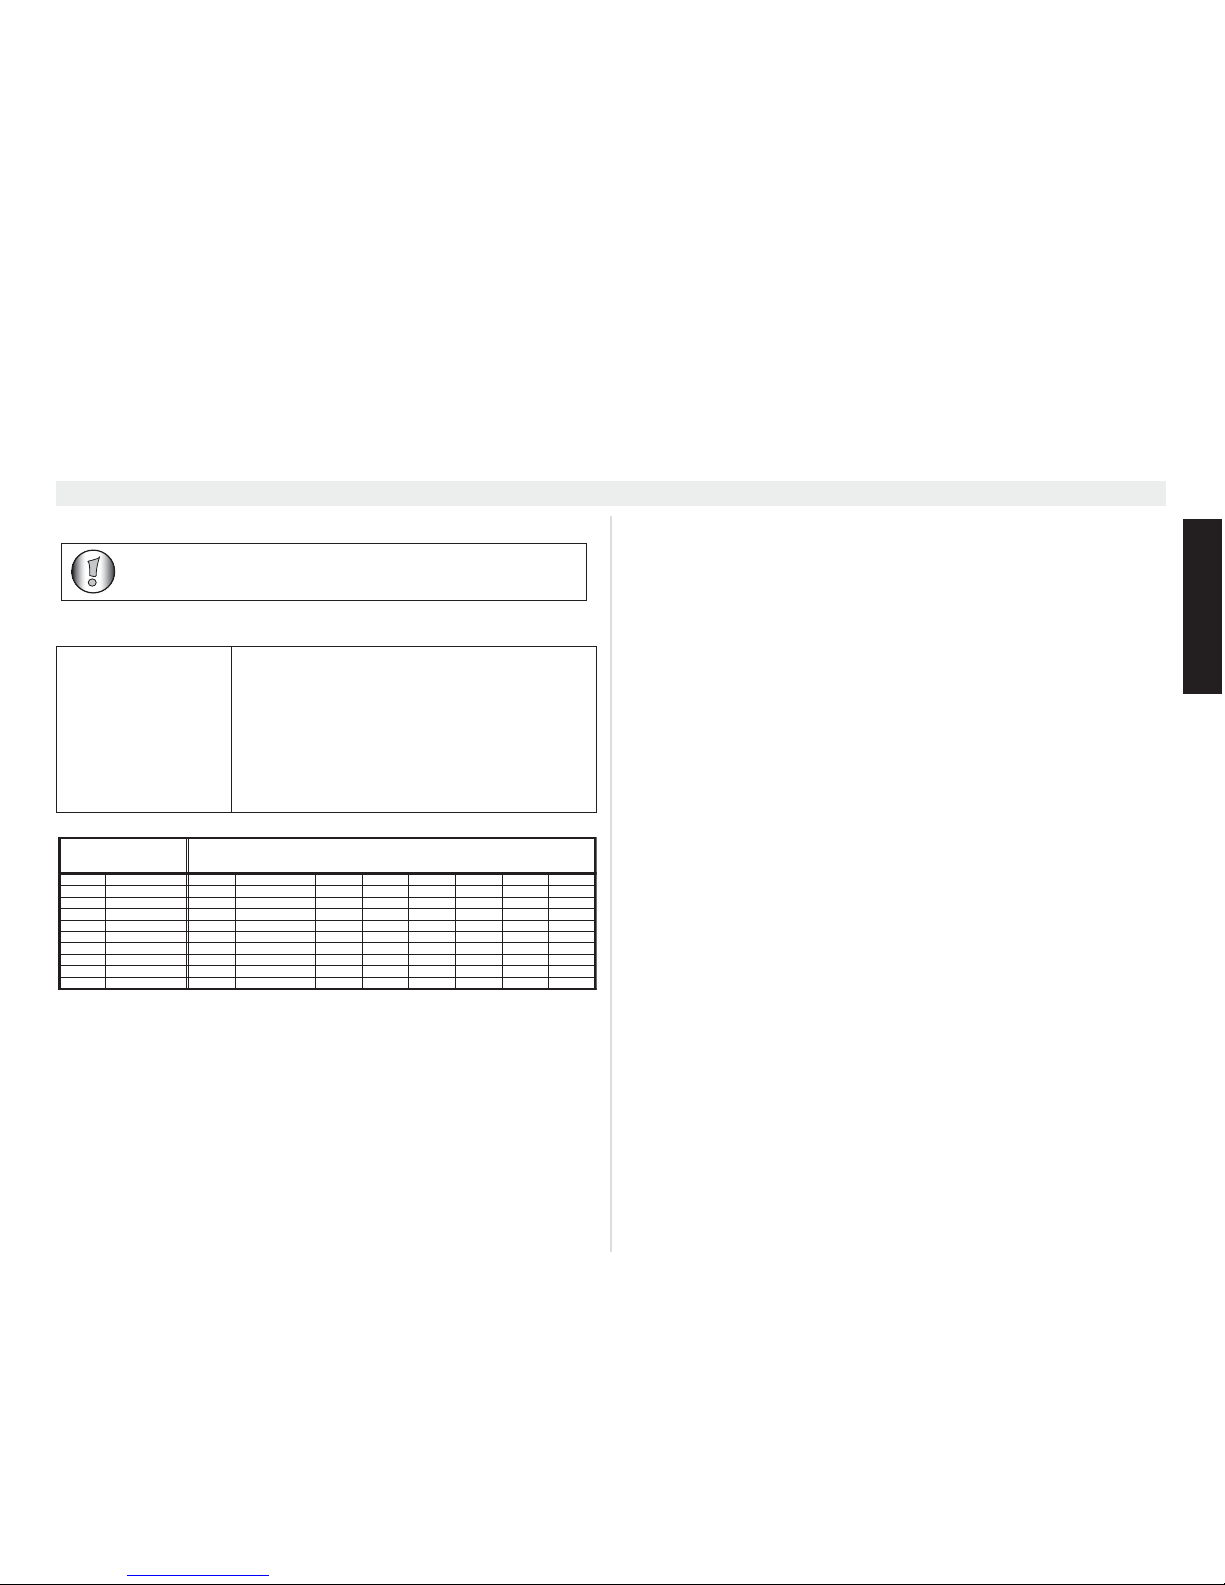
15 Technical specifications
Channels
Sub-code
Frequency
Range
Batteries
Transmission power
Modulation type
Channel spacing
Duo charger adapter
8
CTCSS 38
446.00625MHz - 446.09375 MHz
Up to 10 Km (open field)
3 x AAA Alkaline or NiMH rechargeable
< 500mW ERP
FM - F3E
12,5 kHz
Input : 230V AC / 50Hz - Output : 9V AC / 200mA
Do not connect earpieces from a different model. This may damage
your device.
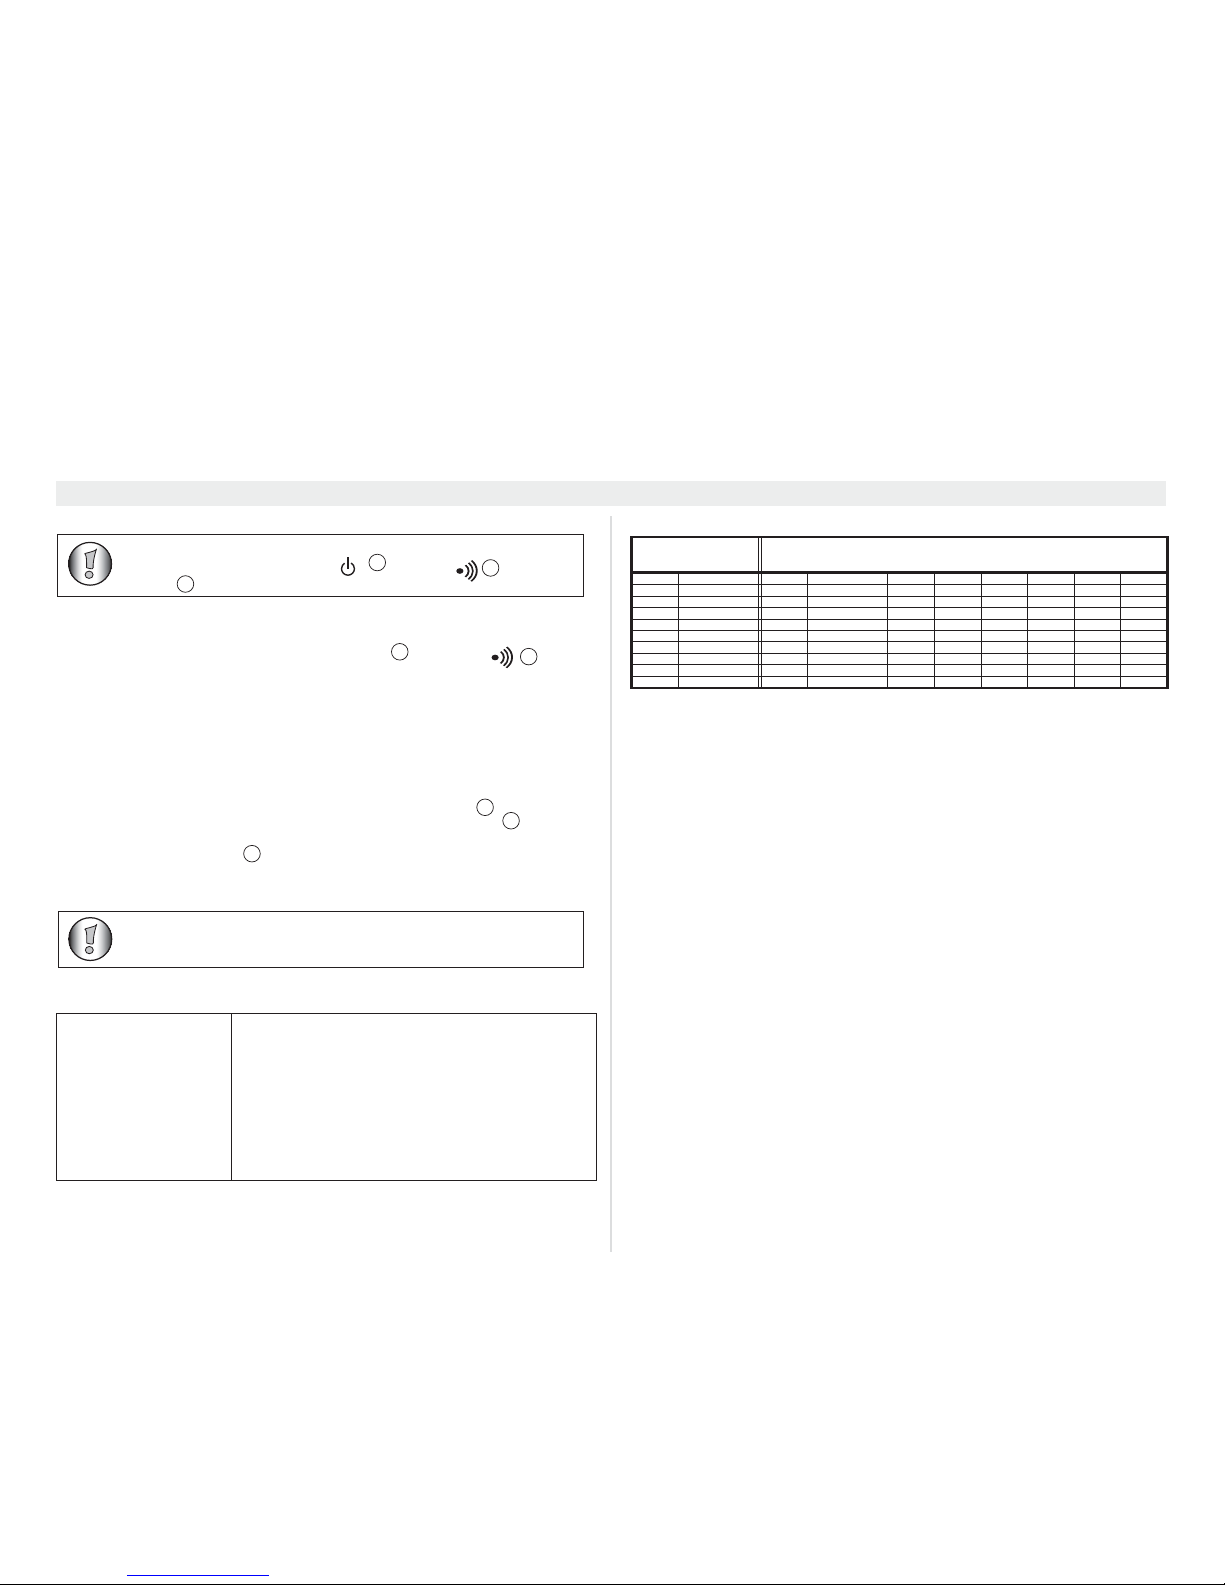
Channel Frequency Chart: CTCSS Code Chart
Channel Frequency (MHz
)
Code Frequency (Hz) Code Freq. (Hz) Code Freq. (Hz) Code Freq. (Hz)
1 446,00625 0 Disabled 10 94,8 20 131,8 30 186,2
2 446,01875 1 67,0 11 97,4 21 136,5 31 192,8
3 446,03125 2 71,9 12 100,0 22 141,3 32 203,5
4 446,04375 3 74,4 13 103,5 23 146,2 33 210,7
5 446,05625 4 77,0 14 107,2 24 151,4 34 218,1
6 446,06875 5 79,7 15 110,9 25 156,7 35 225,7
7 446,08125 6 82,5 16 114,8 26 162,2 36 233,6
8 446,09375 7 85,4 17 118,8 27 167,9 37 241,8
8 88,5 18 123,0 28 173,8 38 250,3
9 91,5 19 127,3 29 179,9
Page 10
10 Topcom Twintalker 5010
Topcom Twintalker 5010
1 Inleiding
Hartelijk dank voor het aanschaffen van de Twintalker 5010. Dit is een
radiocommunicatieapparaat met een groot bereik van maximaal 10 km en een
laag vermogen. Er zijn geen gebruikskosten, op de minimale kosten na van het
opladen van de batterijen.
De Twintalker werkt met 8 kanalen.
2 Gebruiksdoel
Dit toestel kan voor verschillende recreatiedoeleinden worden gebruikt. Bijvoorbeeld:
om contact te houden wanneer u op reis bent in 2 of meer voertuigen of tijdens het
fietsen of skiën. Ook kunt u hiermee contact houden met uw kinderen, bijvoorbeeld
wanneer zij buiten spelen.
3 CE-markering
De CE-markering op het toestel, de handleiding en de verpakking geeft aan dat het
toestel voldoet aan de basiseisen van de R&TTE-richtlijn 1995/5/EG.
4 Veiligheidsinstructies
4.1 Algemeen
Lees de onderstaande informatie over veiligheid en een correct gebruik zorgvuldig
door. Leer alle functies van het toestel goed kennen. Bewaar deze handleiding op een
veilige plaats voor later gebruik.
4.2 Brandwonden
• Raak de antenne niet aan als de afdekking van de antenne is beschadigd, want
als een antenne bij het zenden in contact komt met de huid, kan dit leiden tot
kleine brandwonden.
• Batterijen kunnen schade aan eigendommen veroorzaken, zoals brandplekken
die ontstaan als geleidend materiaal zoals sieraden, sleutels of armbanden
contact maakt met de blootliggende aansluitingen. Het materiaal kan een
elektrisch circuit sluiten (kortsluiting) en erg heet worden. Hanteer opgeladen
batterijen met zorg, vooral als u deze in een zak, tas of andere houder met
metalen voorwerpen plaatst.
4.3 Letsels
• Plaats het toestel niet boven een airbag of in de buurt van de plaats waar de
airbag zich opblaast. Airbags worden met veel kracht opgeblazen. Als een PMR
zich in de radius van de airbag bevindt op het moment dat deze wordt
geactiveerd, kan het toestel met grote kracht worden weggeslingerd, waardoor
de inzittenden van het voertuig ernstig gewond kunnen raken.
• Houd de PMR ten minste 15 centimeter verwijderd van een pacemaker.
• Schakel uw PMR onmiddellijk uit in geval van interferentie met
medische apparatuur.
4.4 Explosiegevaar
• Vervang de batterijen niet in een omgeving waar explosiegevaar bestaat. Bij het
plaatsen of verwijderen van de batterijen kunnen contactvonken ontstaan, die
een explosie kunnen veroorzaken.
• Schakel uw PMR uit wanneer u zich bevindt in een omgeving waar
explosiegevaar bestaat. Vonken kunnen in een dergelijke omgeving brand of
een explosie veroorzaken, met lichamelijk letsel of zelfs de dood tot gevolg.
• Gooi batterijen nooit in vuur, aangezien ze dan kunnen ontploffen.
4.5 Vergiftigingsgevaar
• Houd de batterijen uit de buurt van kinderen.
4.6 Regelgeving
• In bepaalde landen is het verboden om onder het rijden uw PMR te gebruiken.
Ga in dit geval aan de kant staan voordat u het toestel gebruikt.
• Schakel uw PMR uit aan boord van een vliegtuig wanneer u hierom wordt
verzocht. Gebruik van de PMR dient in overeenstemming te zijn met de
voorschriften van de luchtvaartmaatschappij of de instructies van
de bemanning.
• Schakel uw PMR uit op plaatsen waar waarschuwingsbordjes u vragen dit te
doen. Ziekenhuizen of gezondheidscentra kunnen apparaten gebruiken die
gevoelig zijn voor radiofrequentiesignalen van buitenaf.
• Het vervangen of aanpassen van de antenne kan de PMR-radiospecificaties
beïnvloeden en inbreuk maken op de CE-voorschriften. Niet-goedgekeurde
antennes kunnen de radio ook beschadigen.
4.7 Opmerkingen
• Raak de antenne niet aan tijdens het zenden; dit kan het bereik beïnvloeden.
• Verwijder de batterijen als u het toestel langere tijd niet gebruikt.
5 Reiniging en onderhoud
• Reinig het toestel met een vochtige doek. Gebruik hiervoor alleen water.
Gebruik geen reinigings- of oplosmiddelen op het toestel; deze kunnen de
behuizing beschadigen en naar binnen lekken, wat kan leiden tot
blijvende beschadigingen.
Omgevingen waar explosiegevaar bestaat, worden vaak, maar niet
altijd, duidelijk aangegeven. Hieronder vallen brandstoftankruimtes, zoals onderdeks op schepen, overslag- of opslagplaatsen
voor brandstof of chemicaliën, omgevingen waar de lucht
chemicaliën of deeltjes bevat, zoals graan-, stof- of metaaldeeltjes,
en elke andere omgeving waar u gewoonlijk wordt geadviseerd de
motor van uw voertuig uit te schakelen.
Page 11
Topcom Twintalker 5010 11
Topcom Twintalker 5010
NEDERLANDS
• Gebruik een droge, pluisvrije doek om de batterijcontacten te reinigen.
• Wanneer het toestel nat is geworden, moet u het meteen uitschakelen en de
batterijen verwijderen. Droog het batterijvak met een zachte doek om mogelijke
waterschade tot een minimum te beperken. Laat het batterijvak een nacht lang
open of totdat het volledig droog is. Gebruik het toestel niet voordat het weer
volledig droog is.
6 Een PMR-toestel gebruiken
U kunt met andere PMR-toestellen communiceren als deze allemaal op hetzelfde
kanaal zijn afgestemd en zich binnen het ontvangstbereik bevinden (tot max. 10 km
in open veld). Aangezien deze toestellen vrij toegankelijke frequentiebanden
gebruiken (kanalen), delen alle werkende toestellen dezelfde kanalen (8 kanalen
in totaal). Privacy is daarom niet gegarandeerd. Iedereen met een PMR die op
uw kanaal is afgestemd, kan het gesprek afluisteren. Als u wilt communiceren
(een spraaksignaal uitzenden), drukt u op de toets PTT .
Zodra deze toets wordt ingedrukt, wordt de zendmodus van het toestel ingeschakeld
en kunt u in de microfoon spreken. Alle andere PMR-toestellen binnen het
uitzendbereik, die op hetzelfde kanaal staan afgestemd en in de stand-bymodus (niet
zenden) staan, kunnen uw bericht horen. U moet wachten totdat uw gesprekspartner
stopt met zenden voordat u kunt antwoorden. Na het zenden laat het toestel een
geluidssignaal horen als het Roger-signaal is ingeschakeld (zie hoofdstuk 13.15).
U hoeft alleen de toets PTT
in te drukken en in de microfoon te spreken om
te antwoorden.
7 De verpakking bevat
• 2 x Twintalker 5010
• 2 x riemclip
• 1 x dubbele oplader
• 1 x stroomadapter
• 2 x NiMH-batterijen (3 x AAA)
• ECO-gebruikershandleiding
8 Om te beginnen
8.1 De riemclip installeren/verwijderen
1. Lijn de pin uit met het gat aan de achterzijde om de riemclip te installeren.
Duw voorzichtig op de pin totdat deze in positie klikt.
2. Duw op de riemclip (a) terwijl u de clip van het toestel (b) af trekt om
de riemclip van het toestel te verwijderen
8.2 Batterij plaatsen
12
12
Als 2 of meer gebruikers de toets PTT tegelijkertijd indrukken,
ontvangt de ontvanger alleen het sterkste signaal en worden alle
andere signalen geblokkeerd. Zend daarom alleen uit (door op
de toets PTT
te drukken) als het kanaal vrij is.
12
12
Het bereik van de radiogolven wordt sterk beïnvloed door
obstakels als gebouwen, betonnen/metalen constructies, de
onregelmatigheid van het landschap, bossen, planten ...
Dat houdt in dat het bereik tussen twee of meerdere PMR's in
sommige extreme gevallen tot een maximum van enkele tientallen
meters kan worden beperkt. U zult gauw merken dat de PMR het
beste werkt wanneer er een minimum aan obstakels tussen de
gebruikers is.
Page 12
12 Topcom Twintalker 5010
Topcom Twintalker 5010
1. De riemclip verwijderen (zie hoofdstuk 8.1).
2. Trek aan het lipje van het batterijdeksel (c) en verwijder het deksel voorzichtig.
3. Plaats de oplaadbare batterijset met de aangegeven polariteit. De metalen
contactpunten moeten vanaf de radio naar buiten wijzen om contact te maken
met het batterijdeksel. Of plaats 3 "AAA" alkaline- of oplaadbare batterijen
volgens de getoonde polariteit.
4. Breng het batterijdeksel en de riemclip weer aan (zie hoofdstuk 8.1).
9 Batterijen opladen
Als de NiMH-batterijsets zijn geplaatst, kunt u het toestel gemakkelijk opladen door
het in de bureaulader te plaatsen.
1.Plaats de bureaulader op een vlak oppervlak.
2.Steek de bijgeleverde adapter in het stopcontact.
Let op de vermelde spanning en vergelijk deze met de
indicaties van het elektriciteitsnet. Sluit de
laagspanningsstekker op het uiteinde van de kabel aan
op de connector
aan de achterzijde van de bureaulader.
3.Plaats de PMR in de lader zoals aangegeven.
4.Het laadlampje gaat branden als het toestel juist is
geplaatst en aan het laden is.
Het duurt ongeveer 12 tot 14 uur voordat de batterijen
volledig zijn opgeladen. Er staat geen indicatie op de
display dat de batterijen worden opgeladen.
10 Laadniveau van de batterijen
Het laadniveau van de batterijen wordt aangegeven door het aantal vierkantjes in het
batterijpictogram op de lcd-display.
• Batterij vol
• Batterij 2/3 geladen
• Batterij 1/3 geladen
• Batterij leeg
Er klinkt een geluidssignaal als de batterijen bijna leeg
zijn.
11 Omschrijving
Zie flap van het voorblad - afbeelding 1
1. Connector van oortelefoon
2. Lcd-display
3. Toets Volume omhoog
4. Toets Monitor / scan MON /
5. Toets Omhoog
6. Microfoon
7. Optionele stroomconnector
8. Luidspreker
9. Toets Menu / aan-uit / deblokkeren /
10. Toets Omlaag
11. Oproeptoets
12. Toets Push to talk PTT
13. Toets Volume omlaag
14. Lampje aan-uit / overdracht
15. Antenne
12 Informatie lcd-display
Zie flap van het voorblad - afbeelding 2
16. Pictogram Antenne
17. Pictogram Toetsenvergrendeling
18. Pictogram Scannen
19. Pictogram Roger-pieptoon
20. CTCSS-code
21. VOX-indicatie
22. Kanaalnummer
23. Indicator laadniveau batterijen
13 De Twintalker 5010 gebruiken
13.1 Het toestel in- en uitschakelen
Het toestel kan ook werken met 3 AAA NiMH-batterijen of met
3 AAA alkalinebatterijen.
3 AAA alkalinebatterijen kunnen niet met de lader
worden opgeladen.
+
+
+
+
Inschakelen:
• Houd de toets 3 seconden ingedrukt.
Het toestel gaat "piepen" en de lcd-display geeft het
huidige kanaal weer.
Uitschakelen:
• Houd de toets 3 seconden ingedrukt. Het
toestel gaat "piepen" en de lcd-display wordt zwart.
Wanneer de segmenten en pictogrammen van de displays in deze
handleiding in lichtgrijs worden weergegeven, geeft dit aan dat ze
knipperen en/of kunnen worden geselecteerd.
9
9
Page 13
Topcom Twintalker 5010 13
Topcom Twintalker 5010
NEDERLANDS
13.2 Luidsprekervolume instellen
Het luidsprekervolume heeft 15 niveaus
13.3 Een signaal ontvangen
Het toestel staat voortdurend in de ontvangstmodus wanneer het is ingeschakeld en
niet aan het zenden is.
13.4 Een signaal zenden
13.5 Van kanaal veranderen
13.6 CTCSS (Continuous Tone Coded Squelch System)
De 2-cijferige CTCSS-code komt overeen met een specifieke toonfrequentie die de
radio uitzendt. Twee gebruikers die hetzelfde kanaal en dezelfde CTCSS-code
hebben ingesteld, kunnen elkaar horen. Ze kunnen niemand anders op het kanaal
horen, behalve als andere radio's precies dezelfde CTCSS-code hebben ingesteld.
De Twintalker 5010 beschikt over 38 CTCSS-codes.
13.7 Monitor
U kunt de monitorfunctie gebruiken om op het huidige kanaal te zoeken naar
zwakkere signalen.
• Houd de toets
MON\ ingedrukt om kanaalbewaking in te schakelen.
• Laat de toets
MON\ los om de bewakingsfunctie te stoppen.
13.8 Oproeptonen
Met een oproeptoon laat u andere gebruikers weten dat u wilt praten.
13.8.1 De oproeptoon instellen
De Twintalker 5010 is voorzien van 10 oproeptonen.
• Druk op de toets Volume omhoog in de standbymodus om het luidsprekervolume te verhogen. Het
volumeniveau wordt weergegeven.
• Druk op de toets Volume omlaag om het
volumeniveau te verlagen.
• Houd de toets PTT ingedrukt om te zenden. Het
TX-lampje gaat branden.
• Houd het toestel verticaal met de microfoon op 10 cm
afstand van uw mond en spreek in de microfoon.
• Laat de toets PTT los als u wilt stoppen met
zenden.
• Druk op de toets of op de toets om
van kanaal te veranderen.
3
13
Andere mensen die uw signaal willen ontvangen, moeten op
hetzelfde kanaal zitten en dezelfde CTCSS-code hebben ingesteld
als u. (zie hoofdstuk 13.5 en 13.6)
12
12
Gebruik de monitorfunctie om de kanaalactiviteit te controleren
(zie hoofdstuk 13.7). De maximale zendtijd is beperkt tot 1 minuut.
Houd de toets PTT
kort ingedrukt om verder te gaan met
zenden.
12
5
10
• Druk op de toets ; de huidige CTCSS-code
knippert op de display.
• Druk op de toets
of de toets om een
andere code in te stellen.
• Druk op de toets PTT
om te bevestigen en terug te
keren naar de stand-bymodus.
• Druk twee keer op de toets .
• Druk op de toets of de toets om een
andere oproeptoon in te stellen. Selecteer "0" om alle
oproeptonen uit te schakelen.
• Druk op de toets PTT om te bevestigen en terug te
keren naar de stand-bymodus.
9
5
10
12
• We raden u aan een CTCSS-code voor elk kanaal in te
stellen. Dan hebt u minimale interferentie van andere
gebruikers op hetzelfde kanaal.
• Stel de code in op "0" om de CTCSS-code uit te schakelen.
Als er binnen 5 seconden geen toets wordt ingedrukt, keert het
toestel terug naar de stand-bymodus.
4
4
9
5
10
12
Page 14

14 Topcom Twintalker 5010
Topcom Twintalker 5010
13.8.2 Een oproeptoon zenden
Druk kort op de toets . De oproeptoon wordt op het ingestelde kanaal
uitgezonden.
13.9 iVOX-selectie
De PMR is in staat intelligent spraakgestuurd (iVOX) te zenden. In de iVOX-modus
zendt het toestel een signaal uit wanneer het door uw stem wordt geactiveerd. iVOXspraaksturing kan beter niet worden gebruikt in een lawaaierige of winderige
omgeving.
13.9.1 iVOX activeren
13.9.2 iVOX deactiveren
• Schakel de PMR uit (druk drie seconden op de toets )
• Schakel de PMR weer in (druk drie seconden op de toets ). Het
pictogram iVOX is verdwenen.
13.9.3 Het iVOX-niveau instellen
13.10 Kanaalscan
De functie kanaalscan zoekt in een eindeloze lus naar actieve signalen, waaronder
CTCSS-codes, op kanaal 1 tot en met 8..
13.11 Multikanaalscan (groepsscan)
U kunt ook alleen in een specifieke groep kanalen scannen.
13.11.1 De kanalen voor de groepsscan selecteren
Elk kanaal kan worden geprogrammeerd als lid van deze groep.
• Schakel de PMR uit (druk drie seconden op de toets
)
• Houd de toets PTT ingedrukt
terwijl u de PMR
inschakelt door de toets drie seconden
ingedrukt te houden
• Het pictogram iVOX verdwijnt
• Druk drie keer op de toets
.
• Gebruik de toets of de toets om het
gewenste niveau in te stellen.
1 - Veel omgevingsgeluid
2 - Normaal omgevingsgeluid
3 - Weinig omgevingsgeluid
• Druk op de toets PTT
om te bevestigen en terug
te keren naar de stand-bymodus.
11
9
12
9
9
9
• Bij gebruik van de PMR met de optionele oortelefoon
(zie hoofdstuk 14) wordt de iVOX-functie uitgeschakeld
zodra u de connector van de oortelefoon insteekt.
• De VOX-modus wordt uitgeschakeld als u op de toets
PTT drukt.
Het pictogram voor iVOX knippert bij uitschakelen.
Als u iVOX weer wilt inschakelen, druk dan kort op de toets
PTT
.
12
12
9
5
10
12
• Druk kort op de toets MON\ om de
kanaalscanfunctie te activeren. Het pictogram voor
kanaalscan wordt weergegeven.
• Als er een actief signaal (een van de 8 kanalen met
CTCSS-code) wordt gevonden, hoort u het gesprek.
Druk op de toets PTT om via het actieve kanaal te
praten. Als u niet op de toets PTT drukt, start de
functie kanaalscan na 5 seconden opnieuw als er niets
gebeurt.
• Druk op de toets
of op de toets om
het huidige kanaal te omzeilen en verder te gaan met
het zoeken naar een ander actief kanaal.
• Druk kort op de toets
MON\ om de kanaalscan
te deactiveren.
• Selecteer een kanaal met de toets of de toets
.
• Druk zes keer op de toets .
• Druk op de toets
of de toets voor
inschakelen (Y) of uitschakelen (-).
• Druk op de toets PTT
om te bevestigen en terug
te keren naar de stand-bymodus.
Herhaal deze actie voor elk kanaal dat u wilt toevoegen aan
of verwijderen uit de groepsscan.
4
12
12
5
10
4
5
10
9
5
10
12
Page 15
Topcom Twintalker 5010 15
Topcom Twintalker 5010
NEDERLANDS
13.11.2 De groepsscan activeren
13.12 Automatisch uitschakelen (APO)
U kunt de functie Automatisch uitschakelen activeren om energie te besparen.
Wanneer u vergeten bent om het toestel uit te schakelen, wordt het na de ingestelde
tijd automatisch uitgeschakeld.
13.13 Toetstoon in-/uitschakelen
U hoort een korte pieptoon bij het indrukken van een toets.
13.14 Stopwatch
De Twintalker 5010 is voorzien van een stopwatchfunctie (mm:ss).
13.15 Roger-pieptoon in-/uitschakelen
Als u de toets PTT hebt losgelaten, zendt het toestel een Roger-pieptoon uit om
te bevestigen dat u klaar bent met praten.
13.16 Toetsvergrendeling
• Druk zeven keer op de toets .
• Druk op de toets of de toets voor
inschakelen (Y) of uitschakelen (-).
• Druk op de toets PTT om te bevestigen en terug
te keren naar de stand-bymodus.
• Druk kort op de toets
MON\ om de groepsscan
te starten. Het pictogram voor kanaalscan wordt
weergegeven.
• Druk weer kort op de toets
MON\ om de
groepsscan te stoppen.
• Druk vier keer op de toets ; de huidige
uitschakeltijd knippert op de display. (0, 30, 60 of
90 minuten).
• Gebruik de toets
of de toets om de
tijd aan te passen. Selecteer "0" om de APO-functie uit
te schakelen.
• Druk op de toets PTT om te bevestigen en terug
te keren naar de stand-bymodus.
• Schakel de PMR uit (druk drie seconden op de toets
).
• Houd de toets ingedrukt terwijl u de PMR
inschakelt door drie seconden op de toets
te drukken.
• De toetstoon wordt gewijzigd.
9
5
10
12
4
4
Als de groepsscan is ingeschakeld, wordt het stand-bykanaal altijd
opgenomen in de groepsscan.
9
5
10
12
9
10
9
• Druk vijf keer op de toets . De teller wordt
weergegeven.
• Druk op de toets om te beginnen met tellen.
• Druk nog een keer op de toets om te stoppen
met tellen en de rondetijd te bekijken. De teller blijft
tellen op de achtergrond. Druk op de toets
om verder te gaan met tellen.
• Druk op de toets om de teller te resetten als
deze is gestopt.
• Schakel de PMR uit (druk op de toets )
• Houd de toets ingedrukt terwijl u de PMR
inschakelt door de toets
drie seconden
ingedrukt te houden.
• De functie voor de Roger-pieptoon wordt inof uitgeschakeld.
• Als het pictogram voor de Roger-pieptoon op de
display wordt weergegeven, is deze functie
ingeschakeld.
• Druk acht keer op de toets
.
• Gebruik de toets of de toets om Y te
selecteren.
• Druk op de toets PTT om te bevestigen en terug
te keren naar de stand-bymodus.
• Druk vier seconden op de toets om de
toetsvergrendeling uit te schakelen.
9
5
5
5
10
De meting moet binnen 5 seconden worden gestart nadat deze
functie is geselecteerd of nadat de teller is gereset. Zo niet, dan
gaat het toestel weer naar stand-by.
12
9
5
9
9
5
10
12
9
Page 16
16 Topcom Twintalker 5010
Topcom Twintalker 5010
13.17 Achtergrondverlichting display
U kunt de achtergrondverlichting van de lcd-display activeren door op een
willekeurige toets te drukken, behalve de toets PTT of de toets .
De lcd-achtergrondverlichting gaat 5 seconden branden.
14 Een oortelefoon aansluiten
De Twintalker 5010 kan met een optionele oortelefoon worden gebruikt.
De aansluiting bevindt zich onder het rubberen beschermflapje boven op het toestel .
Verwijder het rubberen beschermkapje om de aansluiting vrij te maken om de
oortelefoon aan te sluiten.
Steek de juiste stekker in de aansluiting (stekkerbus van 2,5 mm) .
De kleine toets op de oortelefoon heeft dezelfde functie als de toets
op
het toestel.
Bij gebruik van de toets PTT op de oortelefoon moet u ook de microfoon op de
oortelefoon gebruiken.
15 Technische specificaties
Kanalen
Subcode
Frequentie
Bereik
Batterijen
Transmissievermogen
Modulatietype
Kanaalinterval
Dubbele laadadapter
8
CTCSS 38
446,00625 MHz – 446,09375 MHz
Tot 10 km (open veld)
3 x AAA alkaline of NiMH oplaadbaar
< 500 mW ERP
FM - F3E
12,5 kHz
Ingang: 230 V AC / 50 Hz - Uitgang: 9 V AC / 200 mA
De toetsvergrendeling is niet van toepassing op de
bewakingsfunctie, de toets , de toets en de toets
PTT
.
9
11
12
12
11
1
12
12
Sluit geen oortelefoons aan van een ander model. Dit kan uw toestel
beschadigen.
Channel Frequency Chart: CTCSS Code Chart
Channel Frequency (MHz
)
Code Frequency (Hz) Code Freq. (Hz) Code Freq. (Hz) Code Freq. (Hz)
1 446,00625 0 Disabled 10 94,8 20 131,8 30 186,2
2 446,01875 1 67,0 11 97,4 21 136,5 31 192,8
3 446,03125 2 71,9 12 100,0 22 141,3 32 203,5
4 446,04375 3 74,4 13 103,5 23 146,2 33 210,7
5 446,05625 4 77,0 14 107,2 24 151,4 34 218,1
6 446,06875 5 79,7 15 110,9 25 156,7 35 225,7
7 446,08125 6 82,5 16 114,8 26 162,2 36 233,6
8 446,09375 7 85,4 17 118,8 27 167,9 37 241,8
8 88,5 18 123,0 28 173,8 38 250,3
9 91,5 19 127,3 29 179,9
Page 17

Topcom Twintalker 5010 17
Topcom Twintalker 5010
FRANÇAIS
1 Introduction
Merci d'avoir acheté le Twintalker 5010. Il s'agit d'un appareil de communication radio
de faible puissance avec une portée maximum de 10 km. Son coût de fonctionnement
se limite au rechargement des piles.
Le Twintalker fonctionne sur 8 canaux.
2 Usage
Cet appareil s'utilise également dans le cadre privé. Exemple : pour maintenir le
contact lors d'un voyage à plusieurs voitures, au cours de randonnées en deux-roues
ou à ski. Vous pouvez également l'utiliser pour communiquer avec vos enfants
lorsqu'ils jouent dehors, etc.
3Marque CE
Le symbole CE qui figure sur le produit, sur le mode d'emploi et sur la boîte indique
que l'appareil est conforme aux recommandations essentielles de la directive R&TTE
1995/5/CE.
4 Instructions de sécurité
4.1 Généralités
Veuillez lire attentivement les instructions suivantes relatives à la sécurité et à
l'utilisation correcte du produit. Familiarisez-vous avec toutes les fonctions de
l'appareil. Conservez ce manuel en lieu sûr pour pouvoir le consulter ultérieurement.
4.2 Risques de brûlure
• Ne touchez pas l'antenne si son couvercle est endommagé, car un contact avec
la peau risque de provoquer des brûlures bénignes lors de la transmission.
• Les piles peuvent causer des dommages matériels tels que des brûlures si des
matériaux conducteurs (bijoux, clés ou chaînettes) entrent en contact avec les
bornes dénudées. Le matériau peut provoquer un court-circuit et devenir très
chaud. Les piles chargées doivent être manipulées avec précaution,
particulièrement lorsque vous les mettez dans une poche, un sac ou un autre
récipient contenant des objets métalliques.
4.3 Blessures
• Ne placez pas votre appareil dans la zone située au dessus d'un airbag ni dans
la zone de déploiement de ce dernier. Les airbags se gonflant avec une très
grande force, si un talkie-walkie est placé dans leur zone de déploiement, ce
dernier peut être propulsé et blesser gravement les occupants du véhicule.
• Gardez une distance minimum de 15 centimètres entre le talkie-walkie et un
stimulateur cardiaque.
• Désactivez votre talkie-walkie dès qu'une interférence se produit avec l'appareil
médical.
4.4 Risque d'explosion
• Ne remplacez pas les piles dans une atmosphère présentant des risques de
déflagration. L'installation et le retrait des piles peuvent provoquer des étincelles
de contact susceptibles d'entraîner une explosion.
• Désactivez votre talkie-walkie lorsque vous vous trouvez dans une atmosphère
présentant des risques de déflagration. Si des étincelles se produisent, cela
peut provoquer une explosion ou un incendie entraînant des blessures
corporelles, voire la mort.
• Ne jetez jamais les piles au feu car elles risquent d'exploser.
4.5 Risques d'empoisonnement
• Gardez les piles hors de portée des enfants.
4.6 Mention légale
• Dans certains pays, il vous est interdit d'utiliser un talkie-walkie au volant d'un
véhicule. Dans ce cas, arrêtez-vous avant d'utiliser l'appareil.
• À bord d'un avion, désactivez votre appareil dès que le personnel vous le
demande. L'utilisation du talkie-walkie doit se faire conformément aux
réglementations de la compagnie aérienne ou aux instructions de l'équipage.
• Désactivez votre talkie-walkie dans tous les lieux où des affiches interdisent son
utilisation. Les hôpitaux et les établissements de soins peuvent utiliser des
équipements sensibles à l'énergie radioélectrique extérieure.
• Le remplacement ou la modification de l'antenne peut affecter les
caractéristiques radio du talkie-walkie et enfreindre les réglementations CE. Les
antennes non autorisées peuvent également endommager l'équipement radio.
4.7 Remarques
• Ne touchez pas l'antenne lors de la transmission, car cela peut avoir une
incidence sur la portée.
• Retirez les piles si vous n'utilisez pas l'appareil pendant un long moment.
5 Nettoyage et maintenance
• Pour nettoyer l'appareil, utilisez un chiffon doux humidifié avec de l'eau.
N'utilisez ni produit nettoyant, ni solvant. Ils risqueraient, en effet,
Les zones qui présentent des risques de déflagration sont
généralement signalées, mais ce n'est pas toujours le cas. Il s'agit
des zones d'alimentation en carburant telles que le premier pont
d'un bateau, des installations de transfert ou de stockage de
carburant ou de produits chimiques, des zones dont l'air contient
des produits chimiques ou des particules comme des grains, de la
poussière ou du métal pulvérisé, et de toute autre zone dans
laquelle il vous est demandé de couper le moteur de votre véhicule.
Page 18

18 Topcom Twintalker 5010
Topcom Twintalker 5010
d'endommager le boîtier, de pénétrer à l'intérieur de l'appareil et de provoquer
des dommages irréversibles.
• Pour nettoyer le contact des piles, utilisez un tissu sec non pelucheux.
• Si l'appareil entre en contact avec de l'eau, éteignez-le immédiatement et retirez
les piles. Séchez le compartiment à piles à l'aide d'un chiffon doux pour réduire
les risques de dégradation. Laissez le couvercle du compartiment ouvert toute
la nuit ou jusqu'à ce que l'appareil soit totalement sec. Attendez que l'appareil
soit entièrement sec avant de le réutiliser.
6 Utilisation d'un talkie-walkie
Pour que des talkies-walkies puissent communiquer entre eux, ils doivent utiliser le
même canal et le même code CTCSS et la portée de réception doit être respectée
(maximum de 10 km en terrain dégagé). Ces appareils utilisant des bandes de
fréquences libres (canaux), tous les appareils en fonctionnement partagent ces
canaux (8 au total). La confidentialité n'est donc pas assurée. Toute personne qui
dispose d'un talkie-walkie utilisant votre canal est susceptible d'écouter votre
conversation. Pour communiquer (transmettre un signal vocal), appuyez sur la touche
PTT .
L'appareil passe alors en mode de transmission et vous pouvez parler dans le micro.
Les personnes qui utilisent d'autres talkies-walkies couverts par la portée, utilisant le
même canal et se trouvant en mode veille (pas en cours de transmission) entendent
votre message. Pour que vous puissiez répondre au message, vous devez attendre
que votre interlocuteur arrête de transmettre. À la fin de chaque transmission,
l'appareil émet un bip si le Roger Beep est activé (voir chapitre 13.15). Pour répondre,
il vous suffit d'appuyer sur la touche PTT
et de parler dans le microphone.
7 Inclus dans l'emballage
• 2 Twintalker 5010
• 2 clips de ceinture
• 1 chargeur double
• 1 adaptateur secteur
• 2 blocs de piles NiMH (3 x AAA)
• Mode d'emploi ECO
8 Avant de commencer
8.1 Installer / retirer le clip de ceinture
1. Pour installer le clip de ceinture, alignez la broche sur le trou situé à l'arrière.
Poussez doucement jusqu'à ce qu'il se clipse en position.
2. Pour retirer le clip de ceinture, poussez dessus (a) tout en l'écartant
de l'unité (b).
5
12
Si plusieurs utilisateurs appuient simultanément sur la touche PTT
, c'est le signal le plus puissant qui est détecté par le récepteur
et les autres signaux sont supprimés. C'est pourquoi vous ne
devez transmettre de signal (touche PTT
) que lorsque le canal
est libre.
12
12
La gamme des ondes radio est fortement affectée par des
obstacles, tels que bâtiments, structures en béton/métal, paysages
accidentés, zones boisées, plantes, etc. Cela implique que la
portée entre plusieurs talkies-walkies peut, dans certains cas
extrêmes, être réduite à un maximum de quelques dizaines de
mètres. Vous constaterez rapidement que les talkies-walkies
fonctionnent mieux lorsque peu d'obstacles se trouvent entre
les utilisateurs.
Page 19

Topcom Twintalker 5010 19
Topcom Twintalker 5010
FRANÇAIS
8.2 Installation des piles
1. Retirez le clip de ceinture (voir chapitre 8.1).
2. Poussez l'onglet (c) sur le couvercle du compartiment à piles et retirez le
couvercle.
3. Installez la batterie rechargeable en respectant la polarité illustrée ci-contre.
Les contacts métalliques doivent être placés vers l'extérieur de l'unité afin de
pouvoir être branchés sur le couvercle du compartiment à piles. Ou installez
3 piles "AAA" alcalines ou rechargeables en respectant la polarité illustrée.
4. Réinstallez le couvercle du compartiment à piles et le clip de ceinture (voir
chapitre 8.1).
9 Chargement des batteries
Une fois les blocs de piles NiMh installés, il est possible de charger l'unité en toute
simplicité à l'aide du chargeur de bureau.
1.Placez le chargeur de bureau sur une surface plane.
2.Insérez l'adaptateur fourni dans la prise de courant.
Vérifiez le voltage indiqué et comparez-le à celui de
l'alimentation. Branchez la fiche à basse tension située à
l'extrémité du câble sur le connecteur
situé à l'arrière du
chargeur de bureau.
3.Placez le talkie-walkie sur le chargeur, tel qu'illustré.
4.Le voyant de chargement s'allume si l'appareil est
correctement inséré et qu'il se charge.
Le temps de charge total des piles dure entre 12 et 14
heures. Aucune indication ne s'affiche à l'écran pour
signaler que les piles sont en cours de chargement.
10 Niveau de charge des piles
Le niveau de charge des piles est représenté par le nombre de barres affiché par
l'icône de la pile sur l'écran LCD.
• Piles totalement chargées
• Piles chargées à 2/3
• Piles chargées à 1/3
• Piles déchargées
Lorsque le niveau de charge des piles est bas,
un bip est émis.
11 Description
Voir l'illustration 1 sur le rabat de la couverture
1. Connecteur pour écouteur
2. Écran LCD
3. Touche d'augmentation du volume
4. Touche de surveillance / balayage MON /
5. Touche « Haut »
6. Micro
7. Connecteur d'alimentation optionnel
8. Haut-parleur
9. Touche de menu / Marche/Arrêt / déverrouillage /
10. Touche « Bas »
11. Touche Appel
12. Touche Parole PTT
13. Touche de diminution du volume
14. Voyant d'alimentation / de transmission
15. Antenne
L'appareil peut également fonctionner à l'aide de 3 piles NiMh AAA
ou 3 piles alcalines AAA.
Les 3 piles alcalines AAA ne peuvent pas être rechargées à l'aide
du chargeur.
+
+
+
+
Page 20

20 Topcom Twintalker 5010
Topcom Twintalker 5010
12 Informations apparaissant sur l'écran LCD
Voir l'illustration 2 sur le rabat de la couverture
16. Icône d'antenne
17. Icône de verrouillage de touche
18. Icône de balayage
19. Icône Roger Beep
20. Code CTCSS
21. Indication VOX
22. Numéro de canal
23. Indication du niveau de charge des piles
13 Utilisation du Twintalker 5010
13.1 Activation et désactivation de l'appareil
13.2 Réglage du volume du haut-parleur
Il y a 15 niveaux de volume du haut-parleur
13.3 Réception d'un signal
Lorsque l'appareil est activé et qu'il n'est pas en mode de transmission, il est en
permanence en mode de réception.
13.4 Transmission d'un signal
13.5 Changement de canal
13.6 CTCSS (Continuous Tone Coded Squelch System, ou système
de squelch à tonalités codées)
Le code CTCSS à deux chiffres correspond à une fréquence de tonalités spécifique
émise par l'équipement radio. Deux personnes qui utilisent le même canal et le même
CTCSS peuvent s'entendre. Elles ne peuvent entendre d'autres personnes sur ce
canal que si les autres équipements radio ont un code CTCSS absolument identique.
Le Twintalker 5010 dispose de 38 codes CTCSS.
Pour activer le récepteur :
• Appuyez sur la touche et maintenez-la
enfoncée pendant 3 secondes. L'appareil émettra un
« bip » et l'écran LCD affichera le canal actuel.
Pour désactiver le récepteur :
• Appuyez sur la touche et maintenez-la
enfoncée pendant 3 secondes. L'appareil émettra un
« bip » et l'écran LCD s'éteindra.
• Appuyez sur la touche d'augmentation de volume
en mode de veille pour augmenter le volume du
haut-parleur. Le niveau de volume s'affiche.
• Appuyez sur la touche de diminution de volume
pour baisser le volume du haut-parleur.
Si les segments et les icônes affichés sont indiqués en gris clair
dans ce manuel d'utilisation, cela signifie qu'ils clignotent et/ou
peuvent être sélectionnés.
9
9
3
13
Pour que d'autres personnes reçoivent votre transmission, elles
doivent également utiliser le même canal et le même code CTCSS.
(Voir chapitres 13.5 et 13.6)
• Appuyez sur la touche PTT et maintenez-la
enfoncée pour transmettre un signal. Le voyant TX est
allumé.
• Tenez l'appareil à la verticale, placez le micro à 10 cm
de votre bouche et parlez.
• Relâchez la touche PTT
lorsque vous voulez
interrompre la transmission.
• Appuyez sur la touche ou pour
changer de canal.
• Appuyez sur la touche , le code CTCSS
actuel clignote sur l'écran.
• Appuyez sur la touche
ou pour changer
de code.
• Appuyez sur la touche PTT pour confirmer votre
sélection et revenir en mode de veille.
12
12
Pour vérifier l'activité du canal, utilisez la fonction de surveillance
(voir chapitre 13.7). La durée maximum de transmission est limitée
à 1 minute. Relâchez et appuyez sur la touche PTT
pour
redémarrer la transmission.
12
5
10
9
10
12
• Il est recommandé de régler un code CTCSS pour chaque
canal. Vous pourrez ainsi limiter les interférences
provenant d'autres utilisateurs utilisant le même canal.
• Pour désactiver le code CTCSS, définissez le code sur 0.
Page 21

Topcom Twintalker 5010 21
Topcom Twintalker 5010
FRANÇAIS
13.7 Surveillance
La fonction de surveillance permet de détecter les signaux faibles du canal actuel.
• Appuyez sur la touche
MON\ et maintenez-la enfoncée pour activer la
surveillance des canaux.
• Relâchez la touche
MON\ pour arrêter la surveillance.
13.8 Tonalités d'appel
Une tonalité d'appel signale aux autres utilisateurs que vous voulez parler.
13.8.1 Réglage de la tonalité d'appel
Le Twintalker 5010 dispose de 10 tonalités d'appel
13.8.2 Envoi d'une tonalité d'appel
Appuyez brièvement sur la touche . La tonalité d'appel est transmise sur
le canal sélectionné.
13.9 Sélection du mode iVOX
Le talkie-walkie est capable de transmettre en mode vocal intelligent (iVOX). En mode
iVOX, l'équipement radio transmet un signal lorsqu'il est activé par votre voix.
Le fonctionnement en mode iVOX n'est pas recommandé lorsque vous utilisez
l'équipement radio dans un environnement bruyant ou venteux.
13.9.1 Activation du mode iVOX
13.9.2 Désactivation du mode iVOX
• Éteignez le talkie-walkie (appuyez sur le bouton pendant 3 secondes).
• Rallumez le talkie-walkie (appuyez sur le bouton pendant 3
secondes). L'icône iVOX disparaît.
13.9.3 Réglage du niveau du mode iVOX
13.10 Balayage des canaux
Le balayage des canaux recherche les signaux actifs dans une boucle sans fin sur les
canaux 1 à 8, y compris les codes CTCSS..
• Appuyez deux fois sur la touche .
• Appuyez sur la touche ou pour
changer de tonalité d'appel. Sélectionnez ‘0’ pour
désactiver les tonalités d'appel.
• Appuyez sur la touche PTT pour confirmer votre
sélection et revenir en mode de veille.
• Éteignez le talkie-walkie (appuyez sur le bouton
pendant 3 secondes)
• Appuyez sur la touche PTT
et maintenez-la
enfoncée lorsque vous allumez le talkie-walkie en
appuyant sur la touche pendant trois
secondes
• L'icône iVOX apparaît
Si vous n'appuyez sur aucune touche pendant 5 secondes lors
du réglage, l'appareil revient en mode de veille.
4
4
9
5
10
12
11
9
12
9
• Appuyez trois fois sur la touche .
• Utilisez la touche ou pour régler le
niveau de votre choix.
1 - Bruit ambiant élevé
2 - Bruit ambiant normal
3 - Bruit ambiant faible
• Appuyez sur la touche PTT
pour confirmer votre
sélection et revenir en mode de veille.
• Appuyez brièvement sur la touche
MON\ pour
activer le balayage des canaux. L'icône de balayage
des canaux s'affiche.
• Lorsqu'un signal actif (l'un des 8 canaux avec code
CTCSS) est détecté, vous entendez la conversation.
Appuyez sur la touche PTT
pour commencer la
conversation sur le canal actif. Si vous n'appuyez pas
sur la touche PTT , le balayage des canaux
reprend après 5 secondes en l'absence d'activité.
• Appuyez sur la touche
ou pour
ignorer le canal actuel et continuer à rechercher un
autre canal actif.
• Appuyez brièvement sur la touche
MON\ pour
désactiver le balayage des canaux.
9
9
• Lorsque vous utilisez l'écouteur en option du talkie-walkie
(voir chapitre 14), la fonction iVOX est désactivée aussitôt
le connecteur de l'écouteur branché.
• Le mode iVOX est désactivé lorsque vous appuyez sur la
touche PTT
.
L'icône iVOX clignote lorsque ce mode est désactivé.
Pour le réactiver, appuyez brièvement sur la touche PTT
.
12
12
9
5
10
12
4
12
12
5
10
4
Page 22

22 Topcom Twintalker 5010
Topcom Twintalker 5010
13.11 Balayage multicanaux (balayage par groupe)
Il est possible de n'appliquer le balayage qu'à un groupe spécifique de canaux.
13.11.1 Choix des canaux du balayage par groupe
Chaque canal peut être programmé en tant que membre de ce groupe.
13.11.2 Activation du balayage par groupe
13.12 Arrêt automatique (APO)
Pour économiser de l'énergie, vous pouvez activer la fonction Arrêt automatique.
Si vous oubliez de désactiver l'appareil, il s'éteindra automatiquement au bout du
temps défini.
13.13 Activation/désactivation de la tonalité des touches
Lorsque vous appuyez sur une touche, l'appareil émet un bip court.
13.14 Chronomètre
Le Twintalker 5010 inclut une fonction de chronomètre (mm:ss).
• Sélectionnez un canal à l'aide de la touche
ou .
• Appuyez six fois sur la touche .
• Appuyez sur la touche
ou pour
activer (Y) ou désactiver (-).
• Appuyez sur la touche PTT
pour confirmer votre
sélection et revenir en mode de veille.
Répétez cette procédure pour chaque canal que vous
souhaitez ajouter au balayage par groupe ou supprimer de
celui-ci.
• Appuyez sept fois sur la touche .
• Appuyez sur la touche
ou pour
activer (Y) ou désactiver (-).
• Appuyez sur la touche PTT
pour confirmer votre
sélection et revenir en mode de veille.
• Appuyez brièvement sur la touche
MON\ pour
démarrer le balayage par groupe. L'icône de balayage
des canaux s'affiche.
• Appuyez à nouveau brièvement sur la touche
MON\ pour arrêter le balayage par groupe.
5
10
9
5
10
12
9
5
10
12
4
4
Lorsque le balayage par groupe est activé, le canal en veille est
toujours inclus dans le balayage par groupe.
• Appuyez quatre fois sur la touche , la durée
pour l'arrêt automatique actuelle clignote sur l'écran.
(0, 30, 60 ou 90 minutes).
• Utilisez la touche ou pour changer
de durée. Sélectionnez ‘0’ pour désactiver la fonction
APO.
• Appuyez sur la touche PTT
pour confirmer votre
sélection et revenir en mode de veille.
• Éteignez le talkie-walkie (appuyez sur le bouton
pendant 3 secondes).
• Appuyez sur la touche
et maintenez-la
enfoncée lorsque vous allumez le talkie-walkie en
appuyant sur la touche pendant trois
secondes.
• La tonalité des touches est alors activée.
• Appuyez cinq fois sur la touche . Le compteur
s'affiche.
• Appuyez sur la touche
pour commencer le
comptage.
• Appuyez à nouveau sur la touche
pour
arrêter le comptage et afficher le temps. Le compteur
continue en arrière-plan. Appuyez sur la touche
pour poursuivre le comptage.
• Lorsque le compteur est arrêté, appuyez sur la touche
pour réinitialiser le compteur.
9
5
10
12
9
10
9
9
5
5
5
10
Après avoir sélectionné cette fonction et réinitialisé le compteur, la
mesure doit être lancée dans les 5 secondes. Dans le cas contraire,
l'appareil revient en mode de veille.
Page 23

Topcom Twintalker 5010 23
Topcom Twintalker 5010
FRANÇAIS
13.15 Activation/désactivation du Roger Beep
Lorsque vous avez relâché la touche PTT , l'appareil envoie un Roger Beep pour
confirmer que vous avez cessé de parler.
13.16 Verrouillage du clavier
13.17 Écran rétroéclairé
Pour activer le rétroéclairage sur l'écran LCD, appuyez sur n'importe quelle touche,
sauf la touche PTT ou
L'écran rétroéclairé s'allume pendant 5 secondes.
14 Connexion de l'écouteur
Le Twintalker 5010 peut être utilisé avec un écouteur en option.
Le connecteur se trouve sous le capot protecteur en caoutchouc situé sur la partie
supérieure de l'appareil.
Pour attacher l'écouteur, retirez le rabat en caoutchouc pour exposer le connecteur.
Insérez la fiche de l'écouteur dans le connecteur (prise 2,5 mm) .
La petite touche de l'écouteur a la même fonction que la touche PTT de l'appareil.
Lorsque vous utilisez la touche PTT de l'écouteur, vous devez également utiliser
le micro du fil de l'écouteur.
15 Caractéristiques techniques
• Éteignez le talkie-walkie (appuyez sur le bouton
)
• Appuyez sur la touche et maintenez-la
enfoncée lorsque vous allumez le talkie-walkie en
appuyant sur la touche
.
• La fonction Roger Beep est alors activée ou
désactivée.
• Si l'icône Roger Beep apparaît à l'écran, cela signifie
que cette fonction est activée.
• Appuyez huit fois sur la touche .
• Utilisez la touche
ou pour
sélectionner Y.
• Appuyez sur la touche PTT
pour confirmer votre
sélection et revenir en mode de veille.
• Appuyez sur la touche pendant
quatre secondes afin de désactiver le verrouillage
du clavier.
12
9
5
9
9
5
10
12
9
Le verrouillage des touches n'est pas valide pour la fonction de
surveillance, les touches , et PTT
.
9
11
12
12
11
1
12
Canaux
Sous-code
Fréquence
Portée
Piles
Puissance d'émission
Type de modulation
Espacement des canaux
Adaptateur pour
chargeur double
8
CTCSS 38
446,00625 MHz - 446,09375 MHz
Jusqu'à 10 km (en terrain dégagé)
3 piles alcalines AAA ou NiMh rechargeables
ERP < 500 mW
FM - F3E
12,5 kHz
Entrée : 230 V CA / 50 Hz - Sortie : 9 V CA / 200 mA
12
Ne branchez pas les écouteurs d'un autre modèle. Vous risqueriez
d'endommager l'appareil.
Channel Frequency Chart: CTCSS Code Chart
Channel Frequency (MHz
)
Code Frequency (Hz) Code Freq. (Hz) Code Freq. (Hz) Code Freq. (Hz)
1 446,00625 0 Disabled 10 94,8 20 131,8 30 186,2
2 446,01875 1 67,0 11 97,4 21 136,5 31 192,8
3 446,03125 2 71,9 12 100,0 22 141,3 32 203,5
4 446,04375 3 74,4 13 103,5 23 146,2 33 210,7
5 446,05625 4 77,0 14 107,2 24 151,4 34 218,1
6 446,06875 5 79,7 15 110,9 25 156,7 35 225,7
7 446,08125 6 82,5 16 114,8 26 162,2 36 233,6
8 446,09375 7 85,4 17 118,8 27 167,9 37 241,8
8 88,5 18 123,0 28 173,8 38 250,3
9 91,5 19 127,3 29 179,9
Page 24

24 Topcom Twintalker 5010
Topcom Twintalker 5010
1Einführung
Vielen Dank, dass Sie sich für das Twintalker 5010 entschieden haben. Es ist
ein Sprechfunkgerät für große Entfernungen mit einer Reichweite bis zu 10 km.
Es verursacht keine laufenden Betriebskosten außer den geringfügigen Kosten
für das Aufladen der Akkus.
Der Twintalker verwendet 8 Kanäle.
2 Verwendungszweck
Das Gerät kann für Freizeitzwecke verwendet werden, zum Beispiel: Um bei einem
Ausflug in einer Gruppe mit 2 oder mehreren Fahrzeugen, Radfahrern oder Skiläufern
untereinander Verbindung zu halten. Es kann auch eingesetzt werden, um mit Ihren
Kindern in Kontakt zu bleiben, wenn sie draußen spielen usw.
3 CE-Kennzeichnung
Das CE-Zeichen auf dem Gerät, der Verpackung und in der Bedienungsanleitung
gibt an, dass das Gerät allen wesentlichen Anforderungen der R&TTE-Richtlinie
1995/5/EG entspricht.
4 Sicherheitshinweise
4.1 Allgemeines
Bitte lesen Sie die folgenden Informationen für den sicheren und ordnungsgemäßen
Gebrauch aufmerksam durch. Machen Sie sich mit allen Funktionen des Geräts
vertraut. Bewahren Sie diese Bedienungsanleitung zur späteren Verwendung
sicher auf.
4.2 Verbrennungsgefahr
• Berühren Sie die Antenne nicht, wenn der Antennenschutz beschädigt ist.
Eine Berührung der Antenne mit der Haut kann bei einer Übertragung zu
einer geringfügigen Verbrennung führen.
• Batterien können Sachschäden, wie z. B. Verbrennungen verursachen, wenn
leitende Materialien, z. B. Schmuck, Schlüssel oder Ketten mit freiliegenden
Polen in Berührung kommen. Derartige Materialien können unter Umständen
einen elektrischen Stromkreis schließen (Kurzschluss) und dadurch
entsprechend heiß werden. Seien Sie achtsam im Umgang mit Akkus und
Batterien, insbesondere wenn Sie diese in einer Tasche, einem Geldbeutel oder
einem anderen Behälter mit metallenen Objekten aufbewahren.
4.3 Verletzungsgefahr
• Legen Sie Ihr Gerät nicht in den Bereich über einem Airbag oder in den
Airbagauslösebereich. Airbags blasen sich mit großer Wucht auf. Wenn sich
das Funkgerät im Airbagauslösebereich befindet und der Airbag auslöst, kann
es sein, dass das Funkgerät mit großer Wucht durch das Auto geschleudert wird
und dabei Insassen des Fahrzeugs verletzt.
• Halten Sie mit dem Sprechfunkgerät einen Abstand von mindestens 15 cm zu
einem Herzschrittmacher ein.
• Schalten Sie Ihr Sprechfunkgerät sofort aus, sobald eine Interferenz mit
medizinischen Geräten auftritt.
4.4 Explosionsgefahr
• Tauschen Sie die Batterien/Akkus niemals in potenziell explosionsgefährdeten
Bereichen aus. Während des Einsetzens oder Entfernens der Batterien/Akkus
kann es zu einem Funkenschlag kommen, der eine Explosion auslöst.
• Schalten Sie Ihr Sprechfunkgerät aus, wenn Sie sich in einem
explosionsgefährdeten Bereich befinden. Ein Funkenschlag in solchen
Bereichen kann eine Explosion oder einen Brand verursachen, was zu
Verletzungen und sogar zum Tod führen kann.
• Werfen Sie Batterien/Akkus niemals ins Feuer, da sie explodieren könnten.
4.5 Vergiftungsgefahr
• Halten Sie Batterien/Akkus außer Reichweite von kleinen Kindern.
4.6 Vorschriften
• In einigen Ländern ist es verboten, Ihr Sprechfunkgerät während des Steuerns
eines Fahrzeugs zu benutzen. Halten Sie Ihr Fahrzeug in diesen Fällen neben
der Straße an, bevor Sie das Sprechfunkgerät benutzen.
• Schalten Sie Ihr Sprechfunkgerät aus, wenn Sie sich an Bord eines Flugzeugs
befinden und entsprechende Anweisungen erhalten. Die Benutzung des Geräts
muss entsprechend den Bestimmungen der Fluglinie und den Anweisungen der
Besatzung erfolgen.
• Schalten Sie Ihr Gerät überall dort aus, wo Aushänge es von Ihnen verlangen.
Krankenhäuser und Gesundheitseinrichtungen verwenden möglicherweise
Geräte, die empfindlich auf externe Radiofrequenzen reagieren.
• Das Ersetzen oder Verändern der Antenne kann die Gerätespezifizierung
verändern und die CE-Bestimmungen verletzen. Nicht genehmigte Antennen
können außerdem das Funkgerät beschädigen.
Explosionsgefährdete Bereiche sind oft, aber nicht immer
eindeutig ausgewiesen. Dazu zählen Tankbereiche, wie z. B. unter
Deck auf Schiffen, Kraftstoff- oder Chemikalienüberführungen oder
Aufbewahrungsbereiche; Bereiche, in denen die Luft Chemikalien
oder Teilchen enthält, wie z. B. Getreide, Staub oder Metallpulver;
alle anderen Bereiche, in denen Sie normalerweise angewiesen
werden, Ihren Kraftfahrzeugmotor abzuschalten.
Page 25

Topcom Twintalker 5010 25
Topcom Twintalker 5010
DEUTSCH
4.7 Hinweise
• Berühren Sie die Antenne während einer Übertragung nicht, da dadurch die
Reichweite beeinflusst werden kann.
• Entfernen Sie die Batterien/Akkus, wenn Sie das Gerät längere Zeit
nicht verwenden.
5 Reinigung und Wartung
• Reinigen Sie das Gerät, indem Sie es mit einem weichen, feuchten Tuch
abwischen. Verwenden Sie keine Reinigungs- oder Lösungsmittel für das Gerät.
Diese können das Gehäuse beschädigen und ins Innere gelangen, was zu
dauerhaften Schäden führen kann.
• Die Batteriekontakte können mit einem trockenen, flusenfreien Tuch
abgewischt werden.
• Sollte das Gerät einmal nass werden, schalten Sie es aus und entfernen Sie
sofort die Batterien/Akkus. Trocknen Sie das Batteriefach mit einem weichen
Tuch, um den potenziellen Wasserschaden zu minimieren. Lassen Sie das
Batteriefach über Nacht geöffnet, oder bis es vollständig getrocknet ist.
Benutzen Sie das Gerät erst, wenn es vollständig getrocknet ist.
6 Betrieb eines Sprechfunkgeräts
Um über Sprechfunkgeräte kommunizieren zu können, müssen alle auf den gleichen
Kanal und CTCSS-Code eingestellt sein und sich innerhalb der Empfangsreichweite
befinden (bis max. 10 km im Freien). Da diese Geräte freie Kanäle verwenden, teilen
sich alle in Betrieb befindlichen Geräte diese Kanäle (insgesamt 8 Kanäle). Daher ist
eine Privatsphäre nicht garantiert. Jede Person mit einem Sprechfunkgerät, das auf
Ihren Kanal eingestellt ist, kann Ihr Gespräch mithören. Möchten Sie kommunizieren
(Erzeugen einer Sprechverbindung), drücken Sie die PTT-Taste .
Sobald diese Taste gedrückt ist, schaltet sich das Gerät in den Sendemodus und Sie
können in das Mikrofon sprechen. Alle Sprechfunkgeräte innerhalb der Reichweite,
die auf denselben Kanal eingestellt sind und sich im Standby-Modus befinden (nicht
im Sendemodus), hören Ihre Nachricht. Zum Antworten müssen Sie abwarten, bis die
andere Seite mit dem Sprechen fertig ist. Wenn der Quittungston aktiviert ist
(siehe Kapitel 13.15), sendet das Gerät am Ende jeder Übertragung einen Ton.
Zum Antworten drücken Sie einfach die PTT-Taste
und sprechen in das Mikrofon
7 Packungsinhalt
• 2 x Twintalker 5010
• 2 x Gürtelclip
• 1 x Duo-Ladegerät
• 1 x Netzteil
• 2 x NiMH (3 x AAA) Akkupack
• ECO-Bedienungsanleitung
8 Erste Schritte
8.1 Befestigen / Lösen des Gürtelclips
1. Um den Gürtelclip zu befestigen, legen Sie Stift und Loch auf der
Rückseite aneinander. Drücken Sie vorsichtig, bis der Clip einrastet.
2. Um den Gürtelclip vom Gerät zu entfernen, drücken Sie den Gürtelclip
(a) und ziehen Sie ihn vom Gerät (b) ab.
12
12
Drücken zwei oder mehr Benutzer die PTT-Taste gleichzeitig,
so wird der Empfänger nur das stärkste Signal empfangen. Alle
anderen Signale werden unterdrückt. Daher sollten Sie nur ein
Signal übertragen (die PTT-Taste
drücken), wenn der Kanal
frei ist.
12
12
Die Reichweite der Funkwellen wird stark durch Hindernisse wie
beispielsweise Gebäude, Beton- und Metallstrukturen,
Unebenheiten in der Landschaft, Bewaldungen, Bepflanzungen
usw. beeinflusst. Das bedeutet, dass die Reichweite zwischen zwei
oder mehreren Sprechfunkgeräten in einigen extremen Fällen auf
einige Dutzend Meter beschränkt sein kann. Sie werden schnell
feststellen, dass ein Sprechfunkgerät am besten funktioniert, wenn
zwischen den Benutzern nur wenige Hindernisse vorhanden sind.
Page 26

26 Topcom Twintalker 5010
Topcom Twintalker 5010
8.2 Einlegen von Batterie/Akku
1. Entfernen Sie den Gürtelhalter (siehe Kapitel 8.1).
2. Ziehen Sie an der Klappe der Batteriefachabdeckung (c) und entfernen
Sie vorsichtig die Batteriefachabdeckung.
3. Legen Sie den wiederaufladbaren Akkupack ein. Achten Sie dabei auf die
angegebene Polarität. Stellen Sie sicher, dass die Metallkontakte nach außen
zeigen, um einen Kontakt zur Batterieabdeckung herzustellen. Oder legen
Sie die 3 „AAA“-Alkalibatterien oder Akkus ein. Achten Sie dabei auf die
angegebene Polarität.
4. Befestigen Sie die Batteriefachabdeckung und den Gürtelclip wieder
(siehe Kapitel 8.1).
9 Batterien/Akkus aufladen
Wenn Sie NiMh-Akkupacks installieren, können Sie das Gerät einfach zum Aufladen
auf die Ladestation stellen.
1.Stellen Sie das Ladegerät auf eine ebene Oberfläche.
2.Stecken Sie das mitgelieferte Netzteil in die
Steckdose. Beachten Sie die angegebene Spannung
und vergleichen Sie diese mit den Netzteil-Anzeigen.
Verbinden Sie den Niederspannungsstecker am
Kabelende mit dem Anschluss auf der Rückseite der
Tischladestation.
3.Stellen Sie das Sprechfunkgerät wie dargestellt in das
Ladegerät.
4.Die Lade-LED leuchtet auf, wenn das Gerät richtig
eingelegt ist und aufgeladen wird.
Es dauert ungefähr 12 bis 14 Stunden, bis die Akkus vollständig geladen sind.
Auf dem Display wird nicht angezeigt, wenn die Akkus aufgeladen werden.
10 Batterie-/Akkustand
Der Batterieladezustand wird durch die Anzahl der Quadrate im Batteriesymbol im
LCD-Display angezeigt.
• Batterie/Akku voll
• Batterie / Akku 2/3 voll
• Batterie / Akku 1/3 voll
• Batterie / Akku leer
Wenn der Batterieladezustand niedrig ist, ertönt
ein Signalton.
11 Beschreibung
Siehe Abbildung 1 auf der ausklappbaren Umschlagseite
1. Kopfhörer-Anschluss
2. LCD-Display
3. Lautstärke lauter
4. Monitor- / Scan-Taste MON /
5. Nach-oben-Taste
6. Mikrofon
7. Optionaler Stromversorgungsanschluss
8. Lautsprecher
9. Menü- / Ein-Aus- / Entsperr-Taste /
10. Nach-unten-Taste
11. Ruftaste
12. Sprechtaste PTT
13. Lautstärke leiser
14. Strom- / Sendebereitschafts-LED
15. Antenne
12 Informationen zum LCD-Display
Siehe Abbildung 2 auf der ausklappbaren Umschlagseite
16. Antennen-Symbol
17. Tastensperre-Symbol
18. Scan-Symbol
Das Gerät kann auch mit 3 AAA-NiMh-Akkus oder mit
3 AAA-Alkalibatterien betrieben werden.
Die 3 AAA-Alkalibatterien können nicht mit dem Ladegerät
aufgeladen werden.
+
+
+
+
Page 27

Topcom Twintalker 5010 27
Topcom Twintalker 5010
DEUTSCH
19. Roger-Signalton
20. CTCSS-Code
21. VOX-Anzeige
22. Kanal
23. Batteriestandsanzeige
13 Betrieb des Twintalker 5010
13.1 Taschenlampe ein- / ausschalten
13.2 Einstellen der Lautsprecherlautstärke
Die Lautstärke des Lautsprechers ist in 15 Stufen einstellbar
13.3 Empfangen von Signalen
Das Gerät befindet sich immer im Empfangsmodus, wenn es eingeschaltet ist und
nicht sendet.
13.4 Senden eines Signals
13.5 Wechseln des Kanals
13.6 CTCSS (Continuous Tone Coded Squelch System)
Der 2-stellige CTCSS-Code entspricht einer speziellen Tonfrequenz, welches das
Funkgerät überträgt. Zwei Benutzer, die Ihre Geräte auf den gleichen Kanal und den
gleichen CTCSS-Code eingestellt haben, können einander hören. Sie können
niemand anderen hören, es sei denn, die anderen Funkgeräte sind ebenfalls auf
genau den gleichen CTCSS-Code eingestellt. Der Twintalker 5010 verfügt über 38
CTCSS-Codes.
Gerät einschalten:
• Halten Sie die -Taste 3 Sekunden lang
gedrückt. Sie hören einen Signalton und im
LCD-Display erscheint der aktuelle Kanal.
Gerät ausschalten:
• Halten Sie die -Taste 3 Sekunden lang
gedrückt. Sie hören einen Signalton und das
LCD-Display zeigt nichts mehr an.
• Drücken Sie die Taste "Lauter" im StandbyModus, um die Lautstärke zu erhöhen. Der Lautstärke
wird angezeigt.
• Drücken Sie die Taste „Lautstärke leiser“
,
um die Lautsprecherlautstärke zu verringern.
Blinkende und/oder auswählbare Segmente und Symbole
der Displayanzeige werden in dieser Bedienungsanleitung
hellgrau dargestellt.
9
9
3
13
Damit andere Personen Ihre Übertragung empfangen können,
müssen sie ihre Geräte auf denselben Kanal und CTCSS-Code
eingestellt haben. (Siehe Kapitel 13.5 und 13.6)
• Halten Sie zum Senden die PTT-Taste gedrückt.
Die TX-LED leuchtet.
• Halten Sie das Gerät in einer senkrechten Position mit
dem Mikrofon 10 cm vor dem Mund. Sprechen Sie in
das Mikrofon.
• Lassen Sie die PTT-Taste los, wenn Sie die
Durchsage beenden möchten.
• Drücken Sie die -Taste oder die -Taste
, um den Kanal zu wechseln.
• Drücken Sie die -Taste , der aktuelle CTCSSCode blinkt im Display.
• Drücken Sie die -Taste
oder die -Taste
, um den Code zu ändern.
• Drücken Sie die PTT-Taste , um die Einstellung zu
bestätigen und in den Standby-Modus
zurückzukehren.
12
12
Prüfen Sie die Kanalverfügbarkeit mithilfe der
Überwachungsfunktion (siehe Kapitel 13.7). Die maximale
Sendezeit ist auf 1 Minute beschränkt. Lassen Sie die PTT-Taste
los und drücken Sie sie erneut, um weiterzusenden.
12
5
10
9
5
10
12
Page 28

28 Topcom Twintalker 5010
Topcom Twintalker 5010
13.7 Überwachung
Mit der Überwachungsfunktion können Sie schwächere Signale im aktuellen
Kanal suchen.
• Halten Sie die
MON\ -Taste gedrückt, um die Kanalüberwachung
zu aktivieren.
• Lassen Sie die
MON\ -Taste los, um die Überwachung zu beenden.
13.8 Ruftöne
Ein Rufton weist andere Benutzer darauf hin, dass Sie eine Durchsage beginnen
möchten.
13.8.1 Einstellen des Ruftons
Der Twintalker 5010 verfügt über 10 Ruftöne
13.8.2 Senden eines Ruftons
Drücken Sie kurz die -Taste . Der Rufton wird über den eingestellten
Kanal gesendet.
13.9 iVOX-Auswahl
Das Sprechfunkgerät ist für intelligente sprachaktivierte (iVOX) Übertragungen
geeignet. Im iVOX-Modus sendet das Funkgerät ein Signal, wenn es von Ihrer
Stimme aktiviert wird. Der iVOX-Betrieb ist nicht empfehlenswert, wenn Sie Ihr
Funkgerät in einer lauten oder windigen Umgebung verwenden möchten.
13.9.1 iVOX aktivieren
13.9.2 iVOX deaktivieren
• Das Sprechfunkgerät ausschalten (halten Sie die -Taste drei
Sekunden lang gedrückt).
• Das Sprechfunkgerät wieder einschalten (halten Sie die -Taste drei
Sekunden lang gedrückt). Das iVOX-Symbol wird nicht mehr angezeigt.
13.9.3 iVOX-Stufe einstellen
13.10 Kanal-Scan
Die Funktion Kanal-Scan sucht in einer Endlosschleife in den Kanälen 1 bis 8 und den
CTCSS-Codes nach aktiven Signalen..
• Drücken Sie die -Taste zweimal.
• Drücken Sie die -Taste oder die -Taste
, um den Rufton zu wechseln. Wählen Sie „0“,
um die Ruftöne zu deaktivieren.
• Drücken Sie die PTT-Taste
, um die Einstellung zu
bestätigen und in den Standby-Modus
zurückzukehren.
• Wir empfehlen Ihnen, einen CTCSS-Code für jeden Kanal
einzustellen. Auf diese Weise werden Sie so wenig wie
möglich durch Störungen von anderen Benutzern auf
demselben Kanal beeinträchtigt.
• Zum Deaktivieren des CTCSS-Codes stellen Sie den Code
auf „0“.
Wenn beim Einstellen 5 Sekunden lang keine Taste betätigt wird,
kehrt das Gerät in den Standby-Modus zurück.
4
4
9
5
10
12
11
• Das Sprechfunkgerät ausschalten (halten Sie die
-Taste drei Sekunden lang gedrückt)
• Halten Sie die PTT-Taste gedrückt, während Sie
das Sprechfunkgerät einschalten, indem Sie die Taste drei Sekunden lang gedrückt halten
• Es erscheint das iVOX-Symbol
• Drücken Sie die -Taste
dreimal.
• Verwenden Sie die -Taste oder die -Taste
, um die gewünschte Stufe einzustellen.
1 - Hohes Maß an Umgebungsgeräuschen
2 - Normales Maß an Umgebungsgeräuschen
3 - Geringes Maß an Umgebungsgeräuschen
• Drücken Sie die PTT-Taste
, um die Einstellung zu
bestätigen und in den Standby-Modus
zurückzukehren.
• Drücken Sie kurz die
MON\ -Taste , um die
Funktion Kanal-Scan zu aktivieren. Das Kanal-ScanSymbol erscheint im Display.
• Wird ein aktives Signal (in einem der 8 Kanäle)
gefunden, hören Sie das Gespräch. Drücken Sie die
PTT-Taste
, um das Gespräch über den aktiven
9
12
9
9
9
• Wenn Sie das Sprechfunkgerät mit dem optionalen
Kopfhörer verwenden (siehe Kapitel 14), wird die iVOXFunktion deaktiviert, sobald Sie den Kopfhörer in den dafür
vorgesehenen Anschluss einstöpseln.
• Der iVOX-Modus wird deaktiviert, wenn Sie die PTT-Taste
drücken.
Das iVOX-Symbol blinkt im deaktivierten Zustand.
Um iVOX wieder zu aktivieren, kurz die PTT-Taste drücken.
12
12
9
5
10
12
4
12
Page 29

Topcom Twintalker 5010 29
Topcom Twintalker 5010
DEUTSCH
13.11 Multikanal-Scan (Gruppen-Scan)
Es ist möglich, lediglich eine bestimmte Gruppe von Kanälen zu scannen.
13.11.1 Die Kanäle für den Gruppen-Scan auswählen
Jeder Kanal kann als ein Mitglied dieser Gruppe programmiert werden.
13.11.2 Gruppen-Scan aktivieren
13.12 Automatische Abschaltung (APO)
Um Energie zu sparen, können Sie die Funktion Automatische Abschaltung
aktivieren. Wenn Sie vergessen haben, das Gerät auszuschalten, wird es sich nach
der voreingestellten Zeitdauer automatisch ausschalten.
13.13 Tastenton ein / aus
Wenn eine Taste gedrückt wird, hören Sie einen kurzen Ton.
13.14 Stoppuhr
Der Twintalker 5010 verfügt über eine Stoppuhr-Funktion (mm:ss)
Kanal zu führen. Wenn Sie die PTT-Taste nicht
drücken, beginnt der Kanal-Scan erneut nach 5
Sekunden, falls es keine weiteren Aktivitäten gibt.
• Drücken Sie die -Taste oder die -Taste
, um den aktuellen Kanal zu überspringen und
weiter nach einem anderen aktiven Kanal zu suchen.
• Drücken Sie kurz die
MON\ -Taste , um die
Funktion Kanal-Scan zu deaktivieren.
• Wählen Sie mit der -Taste oder der -Taste
einen Kanal aus.
• Drücken Sie die -Taste sechsmal.
• Drücken Sie die -Taste
oder die -Taste
, um (Y) zu aktivieren oder (-) zu deaktivieren.
• Drücken Sie die PTT-Taste , um die Einstellung
zu bestätigen und in den Standby-Modus
zurückzukehren.
Wiederholen Sie diesen Vorgang für jeden Kanal, den
Sie dem Gruppen-Scan hinzufügen oder aus dem
Gruppen-Scan entfernen möchten.
• Drücken Sie die -Taste siebenmal.
• Drücken Sie die -Taste
oder die -Taste
, um (Y) zu aktivieren oder (-) zu deaktivieren.
• Drücken Sie die PTT-Taste , um die Einstellung
zu bestätigen und in den Standby-Modus
zurückzukehren.
• Drücken Sie kurz die
MON\ -Taste , um die
Funktion Gruppen-Scan zu aktivieren. Das KanalScan-Symbol erscheint im Display.
• Drücken Sie erneut kurz die
MON\ -Taste , um
die Funktion Gruppen-Scan zu deaktivieren.
12
5
10
4
5
10
9
5
10
12
9
5
10
12
4
4
Wenn Gruppen-Scan aktiviert ist, wird der Standby-Kanal beim
Gruppen-Scan immer mit eingeschlossen.
• Drücken Sie die -Taste viermal. Die aktuelle
Ausschaltzeit blinkt im Display. (0, 30, 60 oder 90
Minuten).
• Verwenden Sie die -Taste
oder die -Taste
, um die Zeitdauer zu ändern. Wählen Sie „0”, um
die Funktion Automatische Abschaltung zu
deaktivieren.
• Drücken Sie die PTT-Taste
, um die Einstellung zu
bestätigen und in den Standby-Modus
zurückzukehren.
• Das Sprechfunkgerät ausschalten (halten Sie die
-Taste drei Sekunden lang gedrückt).
• Halten Sie die PTT -Taste
gedrückt, während
Sie das Sprechfunkgerät einschalten, indem Sie die
-Taste drei Sekunden lang gedrückt halten.
• Der Tastenton wird entsprechend ein- / ausgeschaltet.
• Drücken Sie die -Taste
fünfmal. Der Zähler
wird angezeigt.
• Drücken Sie die -Taste
, um die Zeit zu
messen.
• Drücken Sie die -Taste erneut, um die
Zeitmessung anzuhalten und die Zeit abzulesen. Die
Zeitmessung läuft im Hintergrund weiter. Drücken Sie
die -Taste
, um die Zeitmessung fortzuführen.
• Wenn der Zähler stoppt, drücken Sie die -Taste
, um den Zähler zurückzusetzen.
9
5
10
12
9
10
9
9
5
5
5
10
Nachdem Sie diese Funktion ausgewählt und nachdem Sie auch
den Zähler zurückgestellt haben, sollte mit der Messung innerhalb
von 5 Sekunden begonnen werden. Andernfalls kehrt das Gerät in
den Standby-Modus zurück.
Page 30

30 Topcom Twintalker 5010
Topcom Twintalker 5010
13.15 Quittungston ein- / ausschalten
Wenn Sie die PTT-Taste loslassen, sendet das Gerät einen Quittungston,
wenn Sie das Gespräch beendet haben.
13.16 Tastatursperre
13.17 Display-Hintergrundbeleuchtung
Drücken Sie zum Aktivieren der Hintergrundbeleuchtung des LCD-Displays eine
beliebige Taste außer der PTT-Taste oder der -Taste .
Die Displaybeleuchtung leuchtet 5 Sekunden.
14 Anschluss des Kopfhörers
Der Twintalker 5010 kann mit einem optionalen Kopfhörer verwendet werden.
Der Anschluss befindet sich unter der Gummischutzabdeckung oben auf dem Gerät .
Zum Anschließen des Kopfhörers müssen Sie die Gummilasche des Anschlusses
entfernen.
Stecken Sie den Kopfhörerstecker in den Anschluss (2,5 mm Buchse) .
Die kleine Taste am Kopfhörer hat dieselbe Funktion wie die PTT-Taste am
Gerät.
Wenn Sie die PTT-Taste
am Kopfhörer verwenden, müssen Sie auch in das
Mikrofon des Kopfhörers sprechen.
15 Technische Daten
• Das Sprechfunkgerät ausschalten (halten Sie die
-Taste gedrückt)
• Halten Sie die -Taste gedrückt, während Sie
das Sprechfunkgerät einschalten, indem Sie die Taste drücken.
• Die Quittungston-Funktion wird ein- oder
ausgeschaltet.
• Wird das Quittungston-Symbol im Display angezeigt,
heißt das, dass die Funktion aktiviert ist.
• Drücken Sie die -Taste achtmal.
• Verwenden Sie die -Taste
oder die -Taste
, um Y auszuwählen.
• Drücken Sie die PTT-Taste , um die Einstellung
zu bestätigen und in den Standby-Modus
zurückzukehren.
• Halten Sie die -Taste vier Sekunden lang
gedrückt, um die Tastatursperre zu deaktivieren.
12
9
5
9
9
5
10
12
9
Die Tastatursperre ist nicht für die Überwachungsfunktion, die
-Taste , -Taste und die PTT-Taste gültig.
9
11
12
12
11
1
Kanäle
Subcode
Frequenz
Reichweite
Batterien
Sendeleistung
Modulationstyp
Kanalabstand
Netzteil Duo-Ladegerät
8
CTCSS 38
446,00625 MHz - 446,09375 MHz
Bis zu 10 km (im Freien)
3 x AAA Batterien oder NiMH Akkupack
< 500 mW ERP
FM - F3E
12,5 kHz
Eingang: 230 V WS / 50 Hz - Ausgang: 9 V WS / 200
mA
12
12
Schließen Sie keine Kopfhörer von anderen Modellen an.
Ihr Gerät könnte beschädigt werden.
Channel Frequency Chart: CTCSS Code Chart
Channel Frequency (MHz
)
Code Frequency (Hz) Code Freq. (Hz) Code Freq. (Hz) Code Freq. (Hz)
1 446,00625 0 Disabled 10 94,8 20 131,8 30 186,2
2 446,01875 1 67,0 11 97,4 21 136,5 31 192,8
3 446,03125 2 71,9 12 100,0 22 141,3 32 203,5
4 446,04375 3 74,4 13 103,5 23 146,2 33 210,7
5 446,05625 4 77,0 14 107,2 24 151,4 34 218,1
6 446,06875 5 79,7 15 110,9 25 156,7 35 225,7
7 446,08125 6 82,5 16 114,8 26 162,2 36 233,6
8 446,09375 7 85,4 17 118,8 27 167,9 37 241,8
8 88,5 18 123,0 28 173,8 38 250,3
9 91,5 19 127,3 29 179,9
Page 31

Topcom Twintalker 5010 31
Topcom Twintalker 5010
ESPAÑOL
1 Introducción
Gracias por adquirir la unidad Twintalker 5010. Se trata de un aparato de
radiocomunicación de baja potencia y largo alcance de máximo 10 km. No tiene más
costes de funcionamiento que los costes mínimos de recarga de las pilas.
El Twintalker funciona en 8 canales.
2 Finalidad
Puede utilizarse con fines recreativos. Por ejemplo: para mantener la comunicación
si se viaja en dos o más coches, si se viaja en bicicleta o si se practica esquí. Puede
emplearse para mantenerse en contacto con los niños mientras juegan en el exterior,
etcétera.
3 Marca CE
El símbolo CE de la unidad, el manual de usuario y la caja corroboran la conformidad
del equipo con los requisitos básicos de la directiva 1995/5/CE sobre equipos
radioeléctricos y equipos terminales de telecomunicación (ER+ETT).
4 Instrucciones de seguridad
4.1 General
Lea atentamente la siguiente información acerca de la seguridad y el uso apropiado.
Familiarícese con todas las funciones del aparato. Guarde este manual en un lugar
seguro para futuras consultas.
4.2 Quemaduras
• No toque la antena si se daña la tapa; si una antena entra en contacto con la
piel durante una transmisión, puede provocar una pequeña quemadura.
• Las pilas pueden ocasionar daños, como quemaduras, si los terminales
expuestos entran en contacto con cualquier material conductor como joyas,
llaves o cadenas, ya que el material puede cerrar un circuito eléctrico (provocar
un cortocircuito) y calentarse bastante. Tenga cuidado al manipular pilas
cargadas, sobre todo si las introduce con otros objetos metálicos en un bolsillo,
un bolso u otro lugar.
4.3 Lesiones
• No coloque el dispositivo sobre un airbag ni en su radio de acción. Los airbags
se inflan con mucha fuerza. Si se coloca un PMR en el radio de acción de un
airbag y este se infla, el comunicador puede salir propulsado con gran fuerza y
causar lesiones graves a los ocupantes del vehículo.
• Mantenga el PMR a al menos 15 centímetros de un marcapasos.
• Apague el aparato en cuanto se produzcan interferencias con cualquier
equipo médico.
4.4 Riesgo de explosión
• No sustituya las pilas en un ambiente potencialmente explosivo. Durante la
instalación o la retirada de las pilas pueden producirse chispas y causar una
explosión.
• Apague el PMR siempre que se esté en una zona con un ambiente
potencialmente explosivo. Las chispas en esas zonas pueden provocar
explosiones o incendios que pueden causar lesiones corporales e incluso la
muerte.
• No tire nunca las pilas al fuego, pueden explotar.
4.5 Riesgo de envenenamiento
• Mantenga las pilas fuera del alcance de los niños.
4.6 Cuestiones legales
• En algunos países, está prohibido utilizar el PMR mientras se conduce. Si es el
caso, deje de conducir antes de utilizar el aparato.
• Apague la unidad en los aviones, cuando se le solicite. Cualquier uso de ella
debe cumplir las normas de la línea aérea o las instrucciones de la tripulación.
• Apague la unidad en cualquier instalación en la que se le solicite mediante
avisos. Los hospitales o centros sanitarios pueden usar equipos sensibles a la
energía externa de RF.
• La sustitución o la modificación de la antena pueden afectar a las
especificaciones del PMR e infringir la normativa de la CE. Las antenas no
autorizadas también pueden dañar la radio.
4.7 Notas
• No toque la antena durante la transmisión, podría afectar al alcance.
• Quite las pilas si no se va a utilizar el dispositivo durante mucho tiempo.
5 Limpieza y mantenimiento
• Limpie la unidad con un paño suave humedecido. No utilice productos de
limpieza ni disolventes, ya que podrían dañar la carcasa, filtrarse y causar
daños permanentes.
• Limpie los contactos de las pilas con un paño seco sin hilachas.
Aunque no siempre es así, las zonas con ambientes
potencialmente explosivos suelen estar claramente marcadas.
Entre ellas, se cuentan las zonas de repostaje como las situadas
bajo cubierta en los barcos y las instalaciones de almacenamiento
o transferencia de sustancias químicas o combustible, las zonas en
las que el aire contiene sustancias químicas o partículas como
grano, polvo o polvo metálico y cualquier otra zona en la que suela
recomendarse apagar el motor de los vehículos.
Page 32

32 Topcom Twintalker 5010
Topcom Twintalker 5010
• Si la unidad se moja, apáguela y retire las pilas de inmediato. Seque el
compartimiento de las pilas con un paño suave para reducir al mínimo los
posibles daños causados por el agua. Deje el compartimiento de las pilas sin la
tapa hasta el día siguiente o hasta que se seque por completo. No vuelva a usar
la unidad hasta que esté totalmente seca.
6 Uso de un dispositivo PMR
Para que la comunicación entre dispositivos PMR sea posible, éstos deben estar en
el mismo canal y código CTCSS, y dentro del alcance (máximo 10 km en campo
abierto). Dado que utilizan bandas de frecuencias libres (canales), todos los
dispositivos activos comparten estos canales (8 en total). Por lo tanto, la privacidad
no está garantizada. Cualquier persona con un PMR en el mismo canal puede
escuchar cualquier conversación transmitida a través de él. Si desea comunicarse
(transmitir una señal de voz), debe pulsar la tecla PTT .
Una vez pulsado este botón, el dispositivo pasará al modo de transmisión y se podrá
hablar a través del micrófono. Todos los demás dispositivos PMR que se encuentren
dentro del alcance, en el mismo canal y en el modo de espera (sin transmitir) oirán el
mensaje. Para poder responder a un mensaje, hay que esperar a que la otra parte
deje de transmitir. Al final de cada transmisión, la unidad emitirá un pitido si está
activado el pitido Roger de «corto y cambio» (véase apartado 13,15). Para responder,
sólo hay que presionar el botón PTT
y hablar a través del micrófono.
7 Contenido del paquete
• 2 Twintalker 5010
• 2 clips para el cinturón
• 1 cargador dúo
• 1 adaptador de corriente
• 2 pilas NiMH (3 x AAA)
• Manual de usuario ECO
8 Introducción
8.1 Retirada e instalación del clip del cinturón
1. Para instalar el clip del cinturón, coloque la patilla a la altura del agujero
situado en la parte posterior. Presione con cuidado hasta que encaje bien
(hace clic).
2. Para extraer de la unidad el clip del cinturón, empuje el clip (a) mientras lo
aleja de la unidad (b).
8.2 Instalación de las pilas
1. Retire el clip del cinturón (consulte el capítulo 8.1).
2. Tire de la lengüeta de la tapa de las pilas (c) y retire con cuidado
la tapa de las pilas.
12
12
Si dos o más usuarios presionan el botón PTT a la vez, el
receptor recibirá solo la señal más fuerte y las otras señales se
suprimirán. Por lo tanto, solo se debe transmitir una señal
(presionar el botón PTT
) cuando el canal está libre.
12
12
El alcance de las ondas de radio se verá fuertemente afectado por
obstáculos, como edificios, estructuras metálicas o de hormigón,
árboles, plantas, la irregularidad del terreno, etcétera. Esto implica
que, en algunos casos extremos, el alcance entre dos o más
dispositivos PMR puede verse restringido a unas pocas decenas
de metros. Enseguida se percatará de que el dispositivo PMR
funciona mejor cuando hay un mínimo de obstáculos entre los
usuarios.
Page 33

Topcom Twintalker 5010 33
Topcom Twintalker 5010
ESPAÑOL
3. Instale el paquete de pilas recargables según la polaridad indicada.
Los contactos metálicos deben mirar hacia fuera de la radio para conectarse
con la tapa de las pilas. O introducir tres pilas alcalinas AAA o recargables
según la polaridad indicada.
4. Vuelva a instalar la tapa de las pilas y el clip del cinturón
(véase el apartado 8.1).
9 Carga de las pilas
Una vez instalado el paquete de pilas NiMh, el cargador de sobremesa permite
cargarlas cómodamente.
1.Coloque el cargador de sobremesa sobre una
superficie plana.
2.Conecte el adaptador suministrado a la toma de
corriente. Preste atención al voltaje mencionado y
compárelo con las indicaciones de suministro eléctrico.
Conecte el conector de baja tensión que hay al final del
cable al conector
situado en la parte posterior del
cargador de sobremesa.
3.Coloque el PMR en el cargador tal como se indica.
4.Si están bien insertadas y cargándose, el LED de
carga se encenderá.
Las pilas tardarán entre 12 y 14 horas en cargarse por
completo. La pantalla no muestra ninguna indicación
cuando se están cargando las pilas.
10 Nivel de carga de la batería
El nivel de carga de las pilas está indicado por el número de rectángulos presentes
en el interior del icono de la pila en la pantalla LCD.
• Pilas cargadas
• 2/3 de la carga
• 1/3 de la carga
• Sin carga
Cuando el nivel de carga de las pilas esté bajo, sonará
un pitido.
11 Descripción
Consulte la imagen 1 de la página doblada de la portada.
1. Conector de auriculares
2. Pantalla LCD
3. Botón de subir volumen
4. Tecla de rastreo / barrido MON /
5. Botón de subir
6. Micrófono
7. Conector de alimentación opcional
8. Altavoz
9. Botón de menú / encendido-apagado / desbloqueo /
10. Botón de bajar
11. Botón de llamar
12. Pulse el botón PTT para hablar
13. Botón de bajar volumen
14. LED de alimentación / transmisión
15. Antena
12 Información de la pantalla LCD
Consulte la imagen 2 de la página doblada de la portada.
16. Icono de la antena
17. Icono de bloqueo del teclado
18. Icono de barrido
19. Icono de pitido Roger
20. Código CTCSS
21. Indicación VOX
22. Número de canal
23. Indicador de nivel de carga de las pilas
El aparato también funciona con 3 pilas AAA NiMh o con 3 pilas
AAA alcalinas.
Las 3 pilas AAA alcalinas no se pueden cargar con el cargador.
+
+
+
+
Page 34

34 Topcom Twintalker 5010
Topcom Twintalker 5010
13 Uso del Twintalker 5010
13.1 Encendido y apagado de la unidad
13.2 Ajuste del volumen del altavoz
Hay 15 niveles de volumen del altavoz.
13.3 Recepción de una señal
Cuando está encendida pero sin transmitir, la unidad se encuentra en modo
de recepción.
13.4 Transmisión de una señal
13.5 Cambio de canales
13.6 CTCSS (sistema silenciador controlado por tono continuo)
El código CTCSS de dos dígitos corresponde a una frecuencia concreta de tonos
emitida por la radio. Dos usuarios con el mismo canal y el mismo CTCSS pueden
oírse entre ellos. No podrán oír a nadie más en ese canal, a menos que haya otras
radios con el mismo código CTCSS habilitado. El Twintalker 5010 dispone de 38
códigos CTCSS.
Para encender:
• Mantenga pulsada la tecla durante 3
segundos. El aparato emitirá un pitido y la pantalla
LCD mostrará el canal actual.
Para apagar:
• Mantenga pulsada la tecla durante 3
segundos. El aparato emitirá un pitido y la pantalla
LCD se apagará.
• Pulse el botón de subir volumen
en el modo
de espera para aumentar el volumen del altavoz. Se
mostrará el nivel del volumen.
• Pulse el botón de bajar volumen
para reducir
el volumen del altavoz.
• Mantenga pulsado el botón PTT para transmitir.
Se encenderá la pantalla TX LED.
• Mantenga la unidad en posición vertical con el
micrófono a 10 cm de la boca y hable a través de él.
• Suelte el botón PTT
cuando quiera dejar de
transmitir.
En este manual de usuario, si los segmentos e iconos de las
pantallas aparecen en gris claro, significa que están parpadeando
o se pueden seleccionar.
9
9
3
13
Para que otras personas puedan recibir una transmisión, deben
encontrarse en el mismo canal y tener el mismo código CTCSS que
el emisor (véanse los apartados 13.5 y 13.6).
12
12
• Pulse el botón o el botón para
cambiar el canal.
• Presione el botón . El código CTCSS actual
parpadea en la pantalla.
• Pulse el botón o el botón para
cambiar a otro código.
• Pulse el botón PTT para confirmar y regresar al
modo en espera.
Para comprobar la actividad que hay en el canal, utilice la función
de supervisión (véase el apartado 13.7). El tiempo máximo de
transmisión está restringido a 1 minuto. Suelte y vuelva a pulsar el
botón PTT para empezar a transmitir de nuevo.
12
5
10
9
5
10
12
• Se recomienda establecer un código CTCSS para cada
canal. Así se reducirán al mínimo las interferencias de otros
usuarios en el mismo canal.
• Para desactivar el código CTCSS, establezca el código
en «0».
Si no se pulsa ningún botón en 5 segundos mientras se está
configurando, la unidad volverá al modo de espera.
Page 35

Topcom Twintalker 5010 35
Topcom Twintalker 5010
ESPAÑOL
13.7 Rastreo
La función de rastreo se puede utilizar para buscar señales más débiles en el canal
activo.
• Mantenga pulsada la tecla
MON\ para activar la función de supervisión
de canales.
• Suelte el botón
MON\ para dejar de supervisar los canales.
13.8 Tonos de llamada
El tono de llamada avisa a otros usuarios de su deseo de hablar.
13.8.1 Configuración del tono de llamada
El Twintalker 5010 tiene 10 tonos de llamada.
13.8.2 Envío de un tono de llamada
Pulse brevemente el botón . El tono de llamada se transmitirá en el canal
establecido.
13.9 Selección de iVOX
El PMR admite la transmisión activada por voz inteligente (iVOX). En el modo iVOX,
la radio transmitirá una señal cuando se active con su voz. No se recomienda el uso
de este modo en entornos ruidosos o con viento.
13.9.1 Activación de iVOX
13.9.2 Desactivación de iVOX
• Desactive el PMR (pulse el botón durante tres segundos).
• Active de nuevo el PMR (pulse el botón durante tres segundos).
Desaparecerá el icono iVOX.
13.9.3 Ajuste del nivel iVOX
13.10 Barrido de canal
El barrido de canal busca señales activas en un bucle continuo desde el canal
1 al 8 incluidos los códigos CTCSS..
• Pulse el botón
dos veces.
• Pulse el botón o el botón para
cambiar a otro tono de llamada. Seleccione «0» para
desactivar los tonos de llamada.
• Pulse el botón PTT
para confirmar y regresar al
modo en espera.
• Desactive el PMR (pulse el botón durante
tres segundos)
• Mantenga pulsado el botón PTT
mientras activa
el PMR pulsando el botón durante tres
segundos
• Aparecerá el icono iVOX
4
4
9
5
10
12
11
9
12
9
9
9
• Pulse el botón tres veces.
• Utilice el botón o el botón para
establecer el nivel deseado.
1 - Sonido ambiente elevado
2 - Sonido ambiente normal
3 - Sonido ambiente bajo
• Pulse el botón PTT
para confirmar y regresar
al modo en espera.
• Presione brevemente el botón
MON\ para
activar el barrido de canal. Aparece el icono de barrido
de canal.
• Cuando se detecte una señal activa (uno de 8 canales
con código CTCSS), escuchará la conversación. Pulse
el botón PTT
para comenzar la comunicación en
el canal activo. Si transcurridos 5 segundos no ha
presionado el botón PTT , el barrido de canal se
reanudará.
• Presione el botón
o el botón para
saltarse el canal actual y continuar buscando otro
canal activo.
• Presione brevemente el botón
MON\ para
activar el barrido de canal.
• Al utilizar el PMR con el auricular opcional (véase el
apartado 14), la función iVOX quedará desactivada en
cuanto se acople el conector del auricular.
• El modo iVOX se desactiva al presionar el botón PTT .
El icono iVOX parpadeará mientras esté desactivado.
Para activar iVOX de nuevo, pulse brevemente el botón PTT
.
12
12
9
5
10
12
4
12
12
5
10
4
Page 36

36 Topcom Twintalker 5010
Topcom Twintalker 5010
13.11 Barrido de canal múltiple (barrido de grupo)
Es posible realizar un barrido de solo un grupo específico de canales.
13.11.1 Selección de los canales del barrido de grupo
Cada canal se puede programar como miembro de este grupo.
13.11.2 Activación del barrido de grupo
13.12 Desactivación automática (APO)
Para ahorrar energía, se puede activar la función de desactivación automática. Si se
le olvida desactivar la unidad, se desactivará automáticamente transcurrido el tiempo
establecido.
13.13 Activación y desactivación del tono de las teclas
Al pulsar un botón la unidad emitirá un breve pitido.
13.14 Cronómetro
El Twintalker 5010 incorpora una función de cronómetro (mm:ss).
• Seleccione un canal mediante el botón
o el botón .
• Pulse el botón seis veces.
• Pulse el botón
o el botón para
activar (Y) o desactivar (-).
• Pulse el botón PTT
para confirmar y regresar
al modo en espera.
Repita esta acción para cada canal que quiera añadir
o eliminar del barrido de grupo.
• Pulse el botón siete veces.
• Pulse el botón
o el botón para
activar (Y) o desactivar (-).
• Pulse el botón PTT
para confirmar y regresar al
modo en espera.
• Presione brevemente el botón
MON\ para
activar el barrido de grupo. Aparece el icono de
barrido de canal.
• Presione brevemente el botón
MON\ para
detener el barrido de grupo.
5
10
9
5
10
12
9
5
10
12
4
4
Cuando está activado el barrido de grupo, el canal en modo
de espera siempre se incluirá en el barrido de grupo.
• Presione el botón cuatro veces. El tiempo
actual de desactivación parpadea en la pantalla. (0,
30, 60 o 90 minutos).
• Pulse el botón o el botón para
cambiar el tiempo. Seleccione «0» para desactivar la
función APO.
• Pulse el botón PTT
para confirmar y regresar al
modo en espera.
• Desactive el PMR (pulse el botón durante
tres segundos).
• Mantenga pulsado el botón
mientras activa
el PMR pulsando el botón durante tres
segundos.
• Se activará el tono de las teclas.
• Pulse el botón
5 veces. Aparece el
contador.
• Presione el botón
para empezar a contar.
• Presione de nuevo el botón para dejar de
contar y ver el tiempo transcurrido. El contador
continúa en segundo plano. Presione el botón
para seguir contando.
• Cuando el contador se detenga, presione el botón
para reiniciar el contador.
9
5
10
12
9
10
9
9
5
5
5
10
Al seleccionar esta función, y también cuando al reiniciar el
contador, hay que empezar a contar antes de que transcurran 5
segundos. De lo contrario, el aparato regresará al modo en espera.
Page 37

Topcom Twintalker 5010 37
Topcom Twintalker 5010
ESPAÑOL
13.15 Activación y desactivación del pitido Roger
Una vez soltado el botón PTT , la unidad enviará un pitido Roger para confirmar
que se ha dejado de hablar.
13.16 Bloqueo del teclado
13.17 Retroiluminación de la pantalla
Para activar la retroiluminación de la pantalla LCD, pulse cualquier botón excepto el
botón PTT o el botón .
La retroiluminación de la pantalla se activará durante 5 segundos.
14 Conector de auriculares
El Twintalker 5010 se puede utilizar con el auricular opcional.
El conector está situado bajo la cubierta protectora de goma de la parte superior
del aparato.
Para acoplar el auricular, retire la cubierta de goma para acceder al conector.
Introduzca la clavija del auricular en el conector (toma de 2,5 mm) .
El pequeño botón del auricular tiene la misma función que el botón PTT de
la unidad.
Al utilizar el botón PTT del auricular, hay que utilizar también el micrófono
del cable del auricular.
15 Especificaciones técnicas
• Desactive el PMR (pulse el botón )
• Mantenga pulsado el botón mientras activa el
PMR pulsando el botón
.
• La función de pitido Roger se activará o desactivará.
• Si el icono de pitido Roger aparece en la pantalla,
significa que la función está activa.
• Pulse el botón ocho veces.
• Utilice el botón o el botón para
seleccionar Y.
• Pulse el botón PTT
para confirmar y regresar al
modo en espera.
• Pulse el botón durante cuatro segundos para
desactivar el bloqueo.
12
9
5
9
9
5
10
12
9
El bloqueo de teclado no es válido para la función de
supervisión, el botón , el botón y el botón
PTT
.
9
11
12
12
11
1
12
12
Canales
Subcódigo
Frecuencia
Alcance
Pilas
Potencia de transmisión
Tipo de modulación
Separación de canales
Adaptador para cargador dúo
8
38 CTCSS
446,00625-446,09375 MHz
Hasta 10 km en campo abierto
3 x alcalinas AAA o recargables NiMH
< 500 mW ERP
FM - F3E
12,5 kHz
Entrada: 230 V CA / 50 Hz.
Salida: 9 V CA / 200mA
No conecte auriculares de un modelo distinto. Podría causar daños
al dispositivo.
Channel Frequency Chart: CTCSS Code Chart
Channel Frequency (MHz
)
Code Frequency (Hz) Code Freq. (Hz) Code Freq. (Hz) Code Freq. (Hz)
1 446,00625 0 Disabled 10 94,8 20 131,8 30 186,2
2 446,01875 1 67,0 11 97,4 21 136,5 31 192,8
3 446,03125 2 71,9 12 100,0 22 141,3 32 203,5
4 446,04375 3 74,4 13 103,5 23 146,2 33 210,7
5 446,05625 4 77,0 14 107,2 24 151,4 34 218,1
6 446,06875 5 79,7 15 110,9 25 156,7 35 225,7
7 446,08125 6 82,5 16 114,8 26 162,2 36 233,6
8 446,09375 7 85,4 17 118,8 27 167,9 37 241,8
8 88,5 18 123,0 28 173,8 38 250,3
9 91,5 19 127,3 29 179,9
Page 38

38 Topcom Twintalker 5010
Topcom Twintalker 5010
1 Inledning
Tack för ditt köp av Twintalker 5010. Det är en lågförbrukande
radiokommunikationsapparat för långdistans med en räckvidd på maximalt 1 mil. Den
har inga andra driftkostnader än de minimala kostnaderna för att ladda batterierna.
Twintalker fungerar på 8 kanaler.
2 Avsedd användning
Den kan användas i olika fritidssammanhang. Exempel: för att hålla kontakt under
resa med två eller fler bilar, vid cykling och skidåkning. Du kan använda den för att
hålla kontakt med dina barn när de är ute och leker etc.
3 CE-märkning
CE-märkningen på apparaten, bruksanvisningen och förpackningen anger att
enheten uppfyller de grundläggande kraven i R&TTE-direktivet 1995/5/EC.
4 Säkerhetsanvisningar
4.1 Allmän information
Läs noga igenom den följande informationen om säkerhet och korrekt användning.
Bekanta dig med enhetens alla funktioner. Spara bruksanvisningen på ett säkert ställe
för framtida behov.
4.2 Brännskador
• Rör inte antennens hölje om det skadats, eftersom en antenn som kommer i
kontakt med huden kan orsaka en mindre brännskada vid sändning.
• Batterier kan orsaka materiella skador såsom brännskador om ledande material
som t.ex. smycken, nycklar eller pärlkedjor kommer i kontakt med exponerade
poler. Materialet kan fullborda en elektrisk krets (kortslutas) och bli väldigt varmt.
Var försiktig när du hanterar laddade batterier, speciellt när du lägger dem i en
ficka, väska eller någon annan behållare med metallföremål.
4.3 Skador
• Placera inte apparaten över en krockkudde eller i krockkuddens
expansionsområde. Krockkuddar blåses upp med stor kraft. Om en PMR
placeras i airbagens utvecklingsområde och denna utvecklas, kan
kommunikationsradion slungas iväg med stor kraft och orsaka allvarliga skador
på fordonets passagerare.
• Håll PMR minst 15 centimeter borta ifrån en pacemaker.
• Stäng av din PMR så snart störningar på medicinsk utrustning äger rum.
4.4 Risk för explosion
• Byt inte batterier i en potentiellt explosionsfarlig miljö. Det kan bildas
kontaktgnistor när du sätter i eller tar ut batterierna, vilket i sin tur kan orsaka
en explosion.
• Stäng av din PMR i områden med potentiellt explosionsfarlig miljö. Gnistor i
sådana områden kan orsaka en explosion eller brand som kan orsaka
kroppsskada eller dödsfall.
• Släng aldrig batterier i öppen eld eftersom de kan explodera.
4.5 Förgiftningsfara
• Förvara batterierna utom räckhåll för små barn.
4.6 Bestämmelser
• I vissa länder är det förbjudet att använda PMR-apparater vid bilkörning.
Lämna i så fall vägen innan du använder enheten.
• Stäng av din PMR ombord på flyg när du uppmanas att göra det. All användning
av PMR måste vara i enlighet med flygföreskrifter eller besättningens
instruktioner.
• Stäng av din PMR i alla utrymmen där instruktioner finns uppsatta att göra det.
Sjukhus eller vårdinrättningar kan använda utrustning som är känslig för extern
RF-energi.
• Utbyte eller modifiering av antennen kan påverka PMR-radions specifikationer
och bryta mot CE-lagstiftningen. Otillåtna antenner kan också skada radion.
4.7 OBS!
• Rör inte antennen vid sändning eftersom det kan påverka räckvidden.
• Ta ut batterierna om du inte ska använda enheten under en längre tid.
5 Rengöring och underhåll
• Rengör enheten genom att torka av med en mjuk trasa fuktad med vatten.
Använd inte rengörings- eller lösningsmedel på enheten. De kan skada höljet
och läcka in och därmed orsaka permanent skada.
• Batterikontakterna kan torkas av med en torr, luddfri trasa.
• Stäng av enheten om den blir våt och ta genast ut batterierna. Torka
batterifacket med en mjuk trasa för att minimera eventuella vattenskador.
Lämna luckan till batterifacket öppen under natten eller tills enheten är helt torr.
Använd inte enheten förrän den är helt torr.
Områden med potentiellt explosionsfarlig miljö är ofta, men inte
alltid, tydligt markerade. Dessa inkluderar tankningsutrymmen
under däck på båtar, överförings- eller förvaringsutrymmen för
bränsle eller kemikalier, utrymmen där luften innehåller kemikalier
eller partiklar som grus-, damm- eller metallstoft, och andra sådana
utrymmen där du normalt skulle uppmanas att stänga av din
fordonsmotor.
Page 39

Topcom Twintalker 5010 39
Topcom Twintalker 5010
SVENSKA
6 Användning av en PMR-apparat
För att kommunicera mellan PMR-apparater måste alla vara inställda på samma
kanal och CTCSS-kod och inom samma mottagningsområde (upp till max. 10 km i
öppen terräng). Eftersom dessa apparater använder fria frekvensband (kanaler),
delar alla apparater i drift dessa kanaler (totalt 8 kanaler). Därför garanteras ingen
sekretess. Alla med en PMR inställd på din kanal kan lyssna på konversationen. Om
du vill kommunicera (sända en röstsignal) måste du trycka på PTT-knappen .
När knappen tryckts in, går apparaten in i sändningsläge och du kan tala i mikrofonen.
Alla andra PMR-apparater i området, på samma kanal och i vänteläge (inte
sändande) kan höra ditt meddelande. Du måste vänta tills den andra parten slutar
sända innan du kan svara på meddelandet. Vid slutet av varje sändning skickar
apparaten en ljudsignal om Roger-pipet är aktivt (se kapitel 13,15). För att svara, tryck
bara på PTT-knappen
och tala in i mikrofonen.
7 Förpackningens innehåll
• 2 x Twintalker 5010
• 2 x Bältesklämma
• 1 x Duo-laddare
• 1 x Strömadapter
• 2 x NiMH (3 x AAA) batteripack
• ECO Bruksanvisning
8 Förberedelser
8.1 Sätt i/ta av bälteshållaren
1. För att sätta i bälteshållaren, rikta in bulten med hålet på baksidan.
Tryck försiktigt tills den klickar på plats.
2. För att ta bort bälteshållaren från apparaten, tryck på bälteshållaren (a)
samtidigt som du drar bort den från apparaten (b)
8.2 Batteriinstallation
1. Ta bort bältesklämman (Se avsnitt 8.1).
2. Dra försiktigt i batteriluckans flik (c) och avlägsna försiktigt batteriluckan.
3. Placera det laddningsbara batteripacket enligt de angivna polerna.
Metallkontakterna ska vara vända utåt från radion för att ansluta till
batteriluckan. Du kan också installera 3 alkaliska AAA-batterier eller
laddningsbara batterier med polerna enligt bilden.
12
12
Om 2 eller fler användare trycker på PTT-knappen samtidigt tar
mottagaren bara emot den starkaste signalen och den andra
signalen/de andra signalerna undertrycks. Därför ska du bara
sända en signal (tryck på PTT- knappen
) när kanalen är fri.
12
12
Räckvidden för radiovågor påverkas kraftigt av hinder som
byggnader, betong-/metallkonstruktioner, kuperat landskap,
skogsområden, växtlighet osv. Detta innebär att räckvidden mellan
två eller flera PMR-apparater i vissa extrema fall kan begränsas till
maximalt några tiotal meter. Du kommer snart att upptäcka att PMR
fungerar som bäst när det finns så få hinder som möjligt
mellan användarna.
Page 40

40 Topcom Twintalker 5010
Topcom Twintalker 5010
4. Sätt tillbaka batteriluckan och bältesklämman (se avsnitt 8.1).
9 Laddning av batterier
När NiMh-batteripack sätts i, ger skrivbordsladdaren en enkel drop-in laddning.
1.Placera skrivbordsladdaren på ett plant underlag.
2.Koppla den medföljande adaptern till det elektriska
urtaget. Var uppmärksam på den angivna voltstyrkan
och jämför denna med indikationerna på
nätanslutningen. Anslut lågspänningskontakten
i sladdens ände till kontakten
på
skrivbordsladdarens baksida.
3.Placera PMR i laddaren såsom anges.
4.Laddningslysdioden tänds om allt är riktigt isatt och
laddning pågår.
Det tar ca. 12 till 14 timmar att ladda batterierna helt
Det finns ingen indikation i teckenfönstret när
batterierna laddas.
10 Batteriernas laddningsnivå
Batteriets laddningsnivå representeras av det antal rutor som visas inuti
batteriikonen på LCD-skärmen.
• Batteri fullt
• Batteri 2/3 laddat
• Batteri 1/3 laddat
• Batteri tomt
När batteriets laddningsnivå är lågt, hörs ett pip.
11 Beskrivning
Se det utvikbara omslagsbladet - bild 1
1. Kontakt för hörlurar
2. LCD-skärm
3. Volym upp-knapp
4. Knappen övervaka/sökMON /
5. Upp-knapp
6. Mikrofon
7. Anslutning för strömförsörjning (tillval)
8. Högtalare
9. Knappen meny- / på-av/lås upp /
10. Ned-knapp
11. Uppringningsknapp
12. Tryck för att prata-knapp PTT
13. Volym ned-knapp
14. Ström / sändningsindikator (lysdiod)
15. Antenn
12 Information på LCD-skärmen
Se det utvikbara omslagsbladet - bild 2
16. Antennikon
17. Knapplåsikon
18. Sökikon
19. Symbol för Rogerpip ("uppfattat"-pip)
20. CTCSS-kod
21. VOX-indikering
22. Kanalnummer
23. Indikation som anger batteriets laddningsnivå
13 Användning av Twintalker 5010
13.1 Slå på/av enheten (on/off)
Apparaten kan också fungera med 3 x AAA NiMh-batterier eller
med 3 x alkaliska AAA-batterier.
3 x alkaliska AAA-batterier kan inte laddas i laddaren.
+
+
+
+
Slå på:
• Håll -knappen intryckt i 3 sekunder.
Apparaten ”piper” och LCD-displayen visar den
nuvarande kanalen.
Slå av:
• Håll -knappen intryckt i 3 sekunder.
Apparaten ”piper” och LCD-displayen släcks.
Om text och ikoner på displayen är markerade med ljusgrått i
denna bruksanvisning, innebär det att de blinkar och/eller är
valbara.
9
9
Page 41

Topcom Twintalker 5010 41
Topcom Twintalker 5010
SVENSKA
13.2 Justera högtalarvolymen
Det finns 15 högtalarvolymlägen
13.3 Ta emot en signal
Enheten är hela tiden i mottagarläge när apparaten är påslagen och inte sänder.
13.4 Sända en signal
13.5 Byta kanal
13.6 CTCSS (Continuous Tone Coded Squelch System)
Den tvåsiffriga koden motsvarar den specifika tonfrekvens som radion utsänder. Två
användare med samma kanal- och CTCSS-inställning kan höra varandra. De kommer
inte att kunna höra någon annan på kanalen om inte exakt samma CTCSS-kod
har aktiverats på de andra apparaterna. Twintalker 5010 har 38 CTCSS-koder
tillgängliga.
13.7 Kanalövervakning
Du kan använda övervakningsfunktionen för att kontrollera svagare signaler på den
aktuella kanalen.
• Tryck och håll
MON\ -knappen intryckt för att aktivera
kanalövervakningen.
• Släpp
MON\ -knappen för att upphöra med övervakningen.
13.8 Uppringningstoner
En rington larmar andra användare att du vill påbörja samtal.
13.8.1 Ställa in ringsignalen
Twintalker 5010 har 10 ringtoner
• Tryck på volym upp-knappen i vänteläge för
att höja högtalarvolymen. Volymnivån visas.
• Tryck på knappen volym ned för att minska
högtalarvolymen.
• Håll PTT-knappen intryckt för att sända.
TX-lysdoiden kommer att vara på.
• Håll apparaten i vertikalt läge med mikrofonen
10 cm från munnen och tala in i mikrofonen.
•Släpp PTT- knappen
när du vill sluta sända.
• Tryck på -knappen eller -knappen för
att byta kanal.
3
13
För att andra personer ska kunna ta emot din sändning, måste de
också vara på samma kanal och ha ställt in samma CTCSS-kod.
(Se avsnitt 13.5 och 13.6)
12
12
Använd övervakningsfunktionen för att kontrollera
kanalaktiviteten (se avsnitt 13.7). Den maximala sändningstiden är
begränsad till 1 minut. Släpp och tryck på PTT- knappen
för att
sända igen.
12
5
10
• Tryck på -knappen och den nuvarande
CTCSS-koden blinkar i teckenfönstret.
• Tryck på -knappen
eller -knappen för
att byta till en annan kod.
•Tryck på PTT- knappen
för att bekräfta och återgå
till vänteläge.
• Tryck på -knappen två gånger.
• Tryck på -knappen eller -knappen för
att byta till en annan ringsignal. Välj ‘0’ för att
avaktivera ringtonerna.
• Tryck på PTT- knappen för att bekräfta och återgå
till vänteläge.
9
5
10
12
• Det rekommenderas att en CTCSS-kod för varje kanal ställs
in. På så vis har du minimal störning från andra användare
på samma kanal.
• Ställ in koden ”0” för att avaktivera CTCSS-koden.
Om ingen knapp trycks in inom 5 sekunder under inställningen,
återgår apparaten till vänteläge.
4
4
9
5
10
12
Page 42

42 Topcom Twintalker 5010
Topcom Twintalker 5010
13.8.2 Sända en ringsignal
Tryck lätt på -knappen . Ringtonen sänds på den inställda kanalen.
13.9 iVOX-val
PMR har möjlighet till röstaktiverad (iVOX)-sändning. I iVOX-läge sänder radion en
signal när den aktiveras av din röst. iVOX-läget rekommenderas inte om du använder
radion i en bullrig eller blåsig miljö.
13.9.1 Aktivera iVOX
13.9.2 Avaktivera iVOX
• Slå av PMR (håll -knappen intryckt i tre sekunder).
• Slå på PMR igen (håll -knappen intryckt i tre sekunder). iVOX-ikonen
försvinner.
13.9.3 Justera iVOX-nivån
13.10 Kanalsökning
Kanalsökningen utför sökningar efter aktiva signaler i en oändlig slinga från kanal 1 till
8 inklusive CTCSS-koder..
13.11 Flerkanalsökning (gruppsökning)
Du kan söka bara en specifik kanalgrupp.
13.11.1 Välja sökning av kanalgrupp
Varje kanal kan programmeras som en del av denna grupp.
13.11.2 Aktivera gruppsökningen
• Slå av PMR (håll -knappen intryckt i
tre sekunder)
• Tryck och håll in PTT-knappen
medan du slår
på PMR genom att trycka på -knappen
i 3 sekunder.
• iVOX ikonen visas
• Tryck på -knappen
3 gånger.
• Använd -knappen eller -knappen för
att ställa in den önskade nivån.
1 - Hög omgivande ljudnivå
2 - Normal omgivande ljudnivå
3 - Låg omgivande ljudnivå
• Tryck på PTT- knappen
för att bekräfta och återgå
till vänteläge.
11
9
12
9
9
9
• När du använder din PMR med tillvalet hörlurar (se avsnitt
14), avaktiveras iVOX-funktionen så snart som du ansluter
hörtelefonen till kontakten.
• iVOX-läget avaktiveras när du trycker på PTT -knappen
.
iVOX-ikonen blinkar när den är avaktiverad.
För att avaktivera iVOX igen, tryck lätt på PTT-knappen
.
12
12
9
5
10
12
• Tryck lätt på MON\ -knappen för att aktivera
kanalsökning. Kanalsökningsikonen visas.
• När en aktiv signal (en av 8 kanaler med CTCSS-kod)
hittas, hör du konversationen. Tryck på PTT-knappen
för att börja kommunicera över den aktiva kanalen.
Om du inte trycker på PTT-knappen , fortsätter
kanalsökningen efter 5 sekunder om det inte finns
någon aktivitet.
• Tryck på -knappen
eller - knappen för
att gå förbi den nuvarande kanalen och fortsätta
sökningen efter en annan aktiv kanal.
• Tryck lätt på
MON\ -knappen för att avaktivera
kanalsökning.
• Välj en kanal med -knappen eller -knappen
.
• Tryck på -knappen 6 gånger.
• Tryck på -knappen
eller - knappen för
att aktivera (Y) eller inaktivera (-).
•Tryck på PTT-knappen
för att bekräfta och återgå
till vänteläge.
Upprepa denna åtgärd för varje kanal som du vill lägga till
eller ta bort från gruppsökningen.
• Tryck på -knappen 7 gånger.
• Tryck på -knappen eller -knappen för
att aktivera (Y) eller inaktivera (-).
•Tryck på PTT-knappen
för att bekräfta och återgå
till vänteläge.
• Tryck lätt på
MON\ -knappen för att påbörja
gruppsökningen. Kanalsökningsikonen visas.
• Tryck lätt på
MON\ -knappen igen för att
stoppa gruppsökningen.
4
12
12
5
10
4
5
10
9
5
10
12
9
5
10
12
4
4
Page 43

Topcom Twintalker 5010 43
Topcom Twintalker 5010
SVENSKA
13.12 Automatisk avstängning (APO)
För att spara energi kan du aktivera den automatiska avstängningsfunktionen. Om du
glömmer att stänga av apparaten, stängs den automatiskt av efter en fastställd tid.
13.13 Knappton på/av
När en knapp trycks in, avger enheten ett kort pip.
13.14 Stoppur
Twintalker 5010 har en stoppursfunktion (mm:ss).
13.15 Rogerpip på/av
Efter att PTT-knappen släppts, sänder apparaten ut ett roger-pip för att bekräfta
att du upphört att prata.
13.16 Knapplås
13.17 Visa bakgrundsbelysning
För att aktivera bakljuset på LCD-displayen, tryck på vilken knapp som helst utom
PTT- knappen eller -knappen
LCD-belysningen tänds i upp till 5 sekunder.
14 Anslutning för hörlurar
Twintalker 5010 kan användas med valfri hörlur.
Uttaget finns placerat under skyddshöljet på ovansidan av apparaten.
För att ansluta hörlurarna, avlägsna gummiklaffen för att exponera uttaget.
Sätt i hörlurskontakten i uttaget (2,5 mm-kontakt) .
Den lilla knappen på hörlurarna har samma funktion som PTT-knappen
på apparaten
När du använder hörlurarnas PTT- knapp , måste du också använda mikrofonen
från hörlurarnas sladd.
• Tryck på -knappen fyra gånger. Den
nuvarande tiden för ström-av blinkar i teckenfönstret.
(0, 30, 60 eller 90 minuter).
• Använd -knappen
eller -knappen för
att ändra tid. Välj ‘0’ för att avaktivera APO-funktionen.
• Tryck på PTT-knappen
för att bekräfta och återgå
till vänteläge.
• Slå av PMR (håll -knappen intryckt i
tre sekunder).
• Håll in -knappen
medan du slår på PMR
genom att trycka på -knappen i 3 sekunder.
• Knapptonen kopplas om.
• Tryck på -knappen
5 gånger.
Räkneverket visas.
• Tryck på -knappen
för att starta räkningen.
• Tryck på -knappen igen för att stoppa
räkningen och se den förflutna tiden. Räknaren
fortsätter i bakgrunden. Tryck på -knappen
för
att fortsätta räkningen.
• När räknaren stoppats, tryck på -knappen för
att återställa räknaren.
När gruppsökningen är aktiverad finns väntelägeskanalen med
under gruppsökningen.
9
5
10
12
9
10
9
9
5
5
5
10
Efter att denna inställning valts och efter att räknaren återställts,
bör mätningen startas inom 5 sekunder. Om detta inte görs, ska
apparaten återgå till vänteläge.
• Slå av PMR (håll -knappen )
• Tryck och håll in -knappen medan du slår på
PMR genom att trycka på -knappen
.
• Rogerpipfunktionen kan slås på och av.
• Om rogerpipikonen visas i displayen betyder det att
denna funktion är på.
• Tryck på -knappen åtta gånger.
• Använd -knappen eller -knappen
för att välja Y.
• Tryck på PTT-knappen för att bekräfta och återgå
till vänteläge.
• Håll -knappen intryckt i 3 sekunder för att
avaktivera knapplåset.
12
9
5
9
9
5
10
12
9
Knapplåset är inte giltigt för övervakningsfunktionen, knappen , -knappen och PTT- knappen
.
9
11
12
12
11
1
12
12
Anslut aldrig hörlurar från en annan modell. Det kan skada
din apparat.
Page 44

44 Topcom Twintalker 5010
Topcom Twintalker 5010
15 Tekniska specifikationer
Kanaler
Underkod
Frekvens
Räckvidd
Batterier
Sändningseffekt
Moduleringstyp
Kanaldelning
Dubbelladdare adapter
8
CTCSS 38
446,00625MHz - 446.09375 MHz
Upp till 1 mil (öppen terräng)
3 x AAA alkaliska eller NiMH laddningsbara
< 500 mW ERP
FM - F3E
12,5 kHz
In: 230 V AC/50 Hz – Ut: 9V AC/200mA
Channel Frequency Chart: CTCSS Code Chart
Channel Frequency (MHz
)
Code Frequency (Hz) Code Freq. (Hz) Code Freq. (Hz) Code Freq. (Hz)
1 446,00625 0 Disabled 10 94,8 20 131,8 30 186,2
2 446,01875 1 67,0 11 97,4 21 136,5 31 192,8
3 446,03125 2 71,9 12 100,0 22 141,3 32 203,5
4 446,04375 3 74,4 13 103,5 23 146,2 33 210,7
5 446,05625 4 77,0 14 107,2 24 151,4 34 218,1
6 446,06875 5 79,7 15 110,9 25 156,7 35 225,7
7 446,08125 6 82,5 16 114,8 26 162,2 36 233,6
8 446,09375 7 85,4 17 118,8 27 167,9 37 241,8
8 88,5 18 123,0 28 173,8 38 250,3
9 91,5 19 127,3 29 179,9
Page 45

Topcom Twintalker 5010 45
Topcom Twintalker 5010
PORTUGUÊS
1 Introdução
Agradecemos a sua aquisição do Twintalker 5010. Este é um dispositivo de
comunicação rádio de longo alcance e baixo consumo, que permite a comunicação
com um alcance máximo de 10 Km. O seu único custo é limitado ao recarregamento
das pilhas.
O Twintalker funciona em 8 canais.
2 Utilização prevista
Pode ser utilizado para fins recreativos. Por exemplo: para manter em contacto 2
ou mais carros, ciclistas ou esquiadores durante uma viagem ou percurso.
Pode ser utilizado para se manter em contacto com as crianças enquanto elas
brincam no exterior, etc...
3 Marca CE
O símbolo CE na unidade, guia do utilizador e caixa de oferta indica que a unidade
se encontra em conformidade com os requisitos essenciais da directiva R&TTE 1995/
5/CE.
4 Instruções de segurança
4.1 Geral
Leia atentamente as seguintes informações acerca da segurança e da utilização
correcta do dispositivo. Familiarize-se com todas as funções do dispositivo. Conserve
este manual em lugar seguro para utilização futura.
4.2 Queimaduras
• Se a cobertura da antena estiver danificada, não lhe toque, pois se a antena
entrar em contacto com a pele durante a transmissão pode causar uma
queimadura ligeira.
• As pilhas podem causar danos em objectos, tal como queimaduras, caso os
materiais condutores, como jóias, chaves ou colares entrem em contacto com
os terminais. O material poderá completar o circuito eléctrico (curto circuito) e
pode aquecer bastante. Tome cuidado ao manusear qualquer pilha carregada,
em particular ao colocá-la num bolso, bolsa ou outro contentor que possa conter
objectos metálicos.
4.3 Lesões
• Não coloque o dispositivo na zona por cima de um air bag nem na área de
acção do air bag. Os air bags são insuflados com muita força. Se um PMR
for colocado na área de acção do air bag e este for activado, o comunicador
pode ser projectado com muita força e causar lesões graves nos ocupantes
do veículo.
• Mantenha o PMR a pelo menos 15 centímetros de um pacemaker.
• Desligue o PMR imediatamente se este causar interferência em qualquer
equipamento médico.
4.4 Perigo de explosão
• Não substitua as pilhas na presença de qualquer atmosfera potencialmente
explosiva. Pode libertar-se uma faísca do pólo ao colocar ou ao retirar as pilhas
e provocar uma explosão.
• Desligue o PMR quando se encontrar em áreas com uma atmosfera
potencialmente explosiva. Faíscas nestas áreas podem provocar uma explosão
ou um incêndio, resultando em lesões físicas ou mesmo na morte.
• Nunca coloque pilhas no fogo, pois podem explodir.
4.5 Perigo de envenenamento
• Mantenha as pilhas afastadas de crianças pequenas.
4.6 Restrições legais
• Nalguns países é proibido utilizar o PMR durante a condução de um veículo.
Neste caso, é aconselhável sair da estrada antes de utilizar o dispositivo.
• Desligue o PMR a bordo de aviões quando for instruído a fazê-lo. Qualquer
utilização da unidade deve estar em conformidade com os regulamentos da
linha aérea e as instruções da tripulação.
• Desligue o PMR em quaisquer instalações onde existam avisos de que deve
fazê-lo. Os hospitais e unidades de saúde poderão conter equipamento
sensível a energia RF externa.
• A substituição ou a modificação da antena poderão afectar as especificações
de PMR e violar os regulamentos CE. Antenas não autorizadas poderão
igualmente danificar o rádio.
4.7 Notas
• Não toque na antena enquanto o dispositivo estiver em transmissão, pois
poderá afectar o alcance.
• Remova as pilhas se não pretender utilizar o dispositivo durante um longo
período de tempo.
Áreas com atmosferas potencialmente explosivas estão
frequentemente marcadas de forma clara, mas nem sempre. Estas
incluem áreas de armazenamento de combustível como o porão de
embarcações, instalações de armazenamento ou transferência de
combustível ou de produtos químicos; áreas onde o ar contém
substâncias químicas ou partículas, como poeiras de cereais, pó ou
metais; e quaisquer outras áreas em que normalmente seria
recomendável desligar o motor do seu veículo.
Page 46

46 Topcom Twintalker 5010
Topcom Twintalker 5010
5 Limpeza e manutenção
• Para limpar a unidade, passe com um pano macio humedecido com água.
Não utilize agentes de limpeza ou solventes na unidade, pois podem danificar a
caixa e penetrar no interior do dispositivo, causando danos permanentes.
• Os contactos das pilhas podem ser limpos com um pano seco que não liberte
partículas.
• Caso a unidade se molhe, desligue-a e retire imediatamente as pilhas. Seque
o compartimento das pilhas com um pano macio de modo a minimizar os danos
potenciais causados pela água. Deixe o compartimento das pilhas aberto
durante a noite ou até estar completamente seco. Não utilize a unidade até
estar completamente seca.
6 Utilizar um dispositivo PMR
Para que seja possível estabelecer comunicação entre dispositivos PMR, estes têm
de estar definidos para o mesmo canal e código CTCSS e encontrar-se dentro do
alcance de recepção (até a um máx. de 10 km em campo aberto). Dado que estes
dispositivos utilizam bandas de frequência livre (canais), todos os dispositivos ligados
partilham estes canais (total de 8 canais). Assim, a privacidade não é garantida.
Qualquer pessoa que disponha de um conjunto PMR definido para o mesmo canal
poderá ouvir a conversa. Quando quiser comunicar (transmitir um sinal de voz) prima
o botão PTT .
Uma vez premido este botão, o dispositivo entra em modo de transmissão e pode
falar para o microfone. Todos os outros dispositivos PMR na área de alcance,
definidos para o mesmo sinal e em modo de espera (que não estejam em modo de
transmissão), ouvirão a sua mensagem. É necessário esperar até que um outro
dispositivo acabe a transmissão para poder responder à mensagem. No final de cada
transmissão, a unidade enviará um sinal sonoro se a função de sinal de fim de
comunicação estiver activada (ver capítulo 13.15). Para responder, simplesmente
prima o botão PTT
e fale para o microfone.
7 Esta embalagem inclui
• 2 x Twintalker 5010
• 2 x Clipe de cinto
• 1 x Carregador Duo
• 1 x Transformador
• 2 x Conjuntos de pilhas NiMH (3 x AAA)
• Manual do utilizador ECO
8 Iniciar
8.1 Instalar / Remover o clipe de cinto
1. Para colocar o clipe de cinto, alinhe o pino com o furo na parte de trás.
Empurre suavemente até encaixar na posição com um clique.
2. Para retirar o clipe de cinto da unidade, empurre o clipe de cinto (a)
ao mesmo tempo que puxa o clipe, separando-o da unidade (b).
8.2 Colocação da pilha
12
12
Caso 2 ou mais utilizadores primam o botão PTT ao mesmo
tempo, o receptor receberá apenas o sinal mais forte e os restantes
sinais serão suprimidos. Assim, deve transmitir um sinal (premir o
botão PTT ) apenas quando o canal está desimpedido.
12
12
O alcance das ondas de rádio é fortemente afectado por
obstáculos, tais como edifícios, estruturas de metal/betão, os
acidentes da paisagem, bosques, plantas, ... Isto quer dizer que,
nalguns casos, o alcance entre dois ou mais PMR pode ser
reduzido a um máximo de algumas dezenas de metros.
Rapidamente verificará que os PMR funcionam melhor quando
existe um número mínimo de obstáculos entre os utilizadores.
Page 47

Topcom Twintalker 5010 47
Topcom Twintalker 5010
PORTUGUÊS
1. Retire o clipe de cinto (ver capítulo 8.1).
2. Puxe a patilha da tampa do compartimento das pilhas (c) e retire a tampa
cuidadosamente.
3. Instale o conjunto de pilhas recarregáveis respeitando a polaridade tal como
indicado. Os contactos metálicos devem ficar voltados para fora do rádio,
de modo a estabelecerem ligação com a tampa do compartimento das pilhas.
Ou coloque 3 pilhas alcalinas ou recarregáveis 'AAA' respeitando
a polaridade tal como indicado.
4. Volte a colocar a tampa do compartimento das pilhas e o clipe de cinto
(ver capítulo 8.1).
9 Carregamento das pilhas
Quando o conjunto das pilhas NiMh está instalado, o carregador de mesa
proporciona a possibilidade de carregamento.
1.Coloque o carregador de mesa sobre uma superfície
plana.
2.Ligue o transformador fornecido à tomada eléctrica.
Preste atenção à tensão indicada e compare-a com as
características da fonte de alimentação eléctrica. Ligue
a ficha de baixa tensão na extremidade do fio ao
conector
na parte de trás do carregador de mesa.
3.Coloque o PMR no carregador da forma indicada.
4.O LED indicador de carregamento acende-se quando
o dispositivo está inserido da forma adequada e em
carregamento.
Levará cerca de 12 a 14 horas até que as pilhas estejam
totalmente carregadas. Não existe indicação no visor de
que as pilhas estão a ser carregadas.
10 Nível de carregamento das pilhas
O nível de carga das pilhas é indicado pelo número de quadrados presentes no
interior do ícone de pilhas no visor LCD.
• Pilha carregada
• Pilhas a 2/3 de carga
• Pilhas a 1/3 de carga
• Pilhas descarregadas
Quando a carga das pilhas é fraca, ouve-se um sinal sonoro.
11 Descrição
Ver folha de rosto dobrada - ilustração 1
1. Conector do auricular
2. Visor LCD
3. Botão Aumentar o volume
4. Botão Monitorizar / Procurar Canais MON /
5. Botão Para Cima
6. Microfone
7. Conector opcional de alimentação
8. Altifalante
9. Botão Menu / Ligar-Desligar / Desbloquear /
10. Botão Para Baixo
11. Botão de Chamada
12. Botão Premir para Falar PTT
13. Botão Diminuir o Volume
14. LED Ligado / Transmissão LED
15. Antena
12 Informação apresentada no visor LCD
Ver folha de rosto dobrada - ilustração 2
16. Ícone de Antena
17. Ícone de Bloqueio do Teclado
18. Ícone Procura
19. Ícone Sinal de Fim de Comunicação
20. Código CTCSS
21. Indicação VOX
22. Número do canal
23. Indicação do estado de carregamento das pilhas
13 Utilizar o Twintalker 5010
13.1 Ligar e desligar a unidade
O dispositivo também pode funcionar com 3 pilhas NiMh tipo
AAA ou com 3 pilhas alcalinas tipo AAA.
3 pilhas alcalinas tipo AAA não podem ser carregadas com
o carregador.
+
+
+
+
Para ligar:
• Prima e mantenha premido o botão durante
3 segundos. A unidade emitirá um sinal sonoro e o
visor LCD apresentará o canal activo.
Para desligar:
• Prima e mantenha premido o botão durante
3 segundos. A unidade emitirá um sinal sonoro e o
visor LCD ficará vazio.
Se os segmentos e ícones dos visores forem mostrados em
cinzento claro neste manual do utilizador, significa que estão
intermitentes e/ou podem ser seleccionados.
9
9
Page 48

48 Topcom Twintalker 5010
Topcom Twintalker 5010
13.2 Ajustar o volume do altifalante
O altifalante tem 15 níveis de volume
13.3 Receber um sinal
A unidade encontra-se continuamente em modo de recepção enquanto está ligada e
não está a transmitir.
13.4 Transmitir um sinal
13.5 Mudar de canal
13.6 CTCSS (Sistema Silenciador Controlado por Tonalidades)
O código CTCSS de dois dígitos corresponde a uma frequência específica de
tonalidades emitidas pelo rádio. Dois utilizadores que utilizem o mesmo canal e o
mesmo código CTCSS podem ouvir-se um ao outro. Não conseguirão ouvir mais
ninguém no canal, a não ser que os outros rádios utilizem exactamente o mesmo
código CTCSS. O Twintalker 5010 tem disponíveis 38 códigos CTCSS.
13.7 Monitorização
Pode utilizar a função de monitorização para procurar sinais mais fracos no
canal activo.
• Prima e mantenha premido o botão
MON\ para activar a monitorização
do canal.
• Solte o botão
MON\ para interromper a monitorização.
13.8 Sinais de chamada
Um sinal de chamada alerta os outros utilizadores de que pretende começar a falar.
13.8.1 Definir o sinal de chamada
O Twintalker 5010 tem disponíveis 10 sinais de chamada.
• Prima o botão Aumentar o Volume em
modo de espera para aumentar o volume de som.
É mostrado o nível de volume.
• Prima o botão Diminuir o Volume para baixar
o volume.
• Prima e mantenha premido o botão PTT
para
transmitir. O LED TX estará aceso.
• Mantenha a unidade numa posição vertical, com o
microfone a 10 cm da boca, e fale directamente para
o microfone.
• Solte o botão PTT
quando quiser parar de
transmitir.
• Prima o botão ou o botão para mudar
de canal.
3
13
Para que os outros recebam a sua transmissão, têm de estar
no mesmo canal e ter definido o mesmo código CTCSS.
(ver capítulos 13.5 e 13.6)
12
12
Para verificar a actividade do canal, utilize a função de
monitorização (ver capítulo 13.7). O tempo de transmissão máximo
está limitado a 1 minuto. Solte e volte a premir o botão PTT
para
reiniciar a transmissão.
12
5
10
• Prima o botão ; o código CTCSS actual
aparece intermitente no visor.
• Prima o botão
ou o botão para mudar
para outro código.
• Prima o botão PTT para confirmar e regressar ao
modo de espera.
• Prima o botão
duas vezes.
• Prima o botão ou o botão para mudar
para outro sinal de chamada. Seleccione ‘0’ para
desactivar os sinais de chamada.
• Prima o botão PTT para confirmar e regressar
ao modo de espera.
9
5
10
12
• Recomenda-se a definição de um código CTCSS para cada
canal. Assim, terá o mínimo de interferência de outros
utilizadores no mesmo canal.
• Para desactivar o código CTCSS, defina o código como ‘0’.
Se nenhum botão for premido no espaço de 5 segundos durante
a configuração, a unidade regressa ao modo de espera.
4
4
9
5
10
12
Page 49

Topcom Twintalker 5010 49
Topcom Twintalker 5010
PORTUGUÊS
13.8.2 Enviar um sinal de chamada
Prima brevemente o botão . O sinal de chamada é transmitido no canal
definido.
13.9 Selecção de iVOX
A transmissão inteligente do PMR pode ser activada por voz (iVOX). No modo iVOX,
o rádio transmite um sinal quando é activado pela sua voz. A operação com iVOX não
é recomendada se planeia utilizar o rádio em ambientes ruidosos ou ventosos.
13.9.1 Activar iVOX
13.9.2 Desactivar o iVOX
• Desligue o PMR (prima o botão durante três segundos).
• Ligue novamente o PMR (prima o botão durante três segundos).
O ícone iVOX desaparece.
13.9.3 Ajustar o nível de iVOX
13.10 Procura de canais
A procura de canais procura sinais activos em contínuo, do canal 1 ao 8, incluindo os
códigos CTCSS..
13.11 Procura de canais múltiplos (procura de grupo)
É possível procurar exclusivamente um grupo específico de canais.
13.11.1 Seleccionar os canais do grupo de procura
Todos os canais podem ser programados como elementos deste grupo.
• Desligue o PMR (prima o botão durante três
segundos)
• Prima e mantenha premido o botão PTT enquanto
liga o PMR premindo o botão durante três
segundos
• É apresentado o ícone iVOX
• Prima o botão
três vezes.
• Utilize o botão ou o botão para definir
o nível pretendido.
1 - Nível alto de ruído ambiente
2 - Nível normal de ruído ambiente
3 - Nível baixo de ruído ambiente
• Prima o botão PTT
para confirmar e regressar ao
modo de espera.
11
9
12
9
9
9
• Quando utiliza o PMR com o auricular opcional (ver capítulo
14), a função iVOX é desactivada assim que liga o conector
do auricular.
• O modo iVOX será desactivado quando premir o botão PTT
.
O ícone iVOX fica intermitente quando este modo se encontra
desactivado.
Para activar novamente o iVOX, prima brevemente o botão PTT
.
12
12
9
5
10
12
• Prima brevemente o botão MON\ para activar a
procura de canais. É apresentado o ícone de procura
de canais.
• Quando for detectado um sinal activo (um dos 8
canais com código CTCSS), ouvirá a conversa. Prima
o botão PTT
para começar a comunicar através
do canal activo. Se não premir o botão PTT , a
procura de canais recomeça ao fim de 5 segundos,
caso não haja mais actividade.
• Prima o botão
ou o botão para ignorar
o canal actual e continuar a procurar outro canal
activo.
• Prima brevemente o botão
MON\ para
desactivar a procura de canais.
• Seleccione um canal utilizando o botão ou o
botão .
• Prima o botão seis vezes.
• Prima o botão
ou o botão para activar
(Y) ou desactivar (-).
• Prima o botão PTT
para confirmar e regressar ao
modo de espera.
Repita esta acção para cada canal que pretenda adicionar
ou remover do grupo de procura.
4
12
12
5
10
4
5
10
9
5
10
12
Page 50

50 Topcom Twintalker 5010
Topcom Twintalker 5010
13.11.2 Activar a procura de grupo
13.12 Desligar automático (APO)
Para poupar energia, pode activar a função Desligar Automático. No caso de se
esquecer de desligar a unidade, esta desliga-se automaticamente após o intervalo de
tempo definido.
13.13 Ligar/Desligar Tons de teclado
Quando um botão é premido, a unidade emite um ligeiro sinal sonoro.
13.14 Cronómetro
O Twintalker 5010 integra a função de cronómetro (mm:ss).
13.15 Ligar/Desligar sinal de fim de comunicação
Depois de soltar o botão PTT , a unidade emite um sinal de fim de comunicação
para confirmar que parou de falar.
13.16 Bloqueio do teclado
• Prima o botão sete vezes.
• Prima o botão ou o botão para activar
(Y) ou desactivar (-).
• Prima o botão PTT para confirmar e regressar ao
modo de espera.
• Prima brevemente o botão
MON\ para activar
a procura de grupo. É apresentado o ícone de procura
de canais.
• Prima brevemente o botão
MON\ novamente
para interromper a procura de grupo.
• Prima quatro vezes o botão ; o tempo de
espera para desligar actual aparece intermitente no
visor. (0, 30, 60 ou 90 minutos).
• Utilize o botão
ou o botão para alterar
o tempo. Seleccione ‘0’ para desactivar a função APO.
• Prima o botão PTT
para confirmar e regressar ao
modo de espera.
• Desligue o PMR (prima o botão durante três
segundos).
• Prima e mantenha premido o botão enquanto
liga o PMR premindo o botão durante três
segundos.
• O tom de teclado é activado/desactivado.
9
5
10
12
4
4
Quando a procura de grupo está activa, o canal em modo de espera
será sempre incluído durante a procura de grupo.
9
5
10
12
9
10
9
• Prima o botão cinco vezes. É mostrado o
contador.
• Prima o botão para começar a contar.
• Prima novamente o botão para parar a
contagem e ver o tempo intermédio. O contador
continua a funcionar em segundo plano. Prima o
botão
para continuar a contar.
• Quando o contador é parado, prima o botão
para repor o contador a zero.
• Desligue o PMR (prima o botão )
• Prima e mantenha premido o botão enquanto
liga o PMR premindo o botão
.
• A função de sinal de fim de comunização é ligada ou
desligada.
• Se o ícone de sinal de fim de comunização for
apresentado, a função está activa.
• Prima o botão oito vezes.
• Utilize o botão ou o botão para
seleccionar Y.
• Prima o botão PTT
para confirmar e regressar
ao modo de espera.
• Prima o botão durante quatro segundos para
desactivar o bloqueio do teclado.
9
5
5
5
10
Depois de seleccionar esta função e depois de repor o contador a
zero, a cronometragem deve ser iniciada num prazo de 5 segundos.
Caso contrário, o dispositivo regressa ao modo de espera.
12
9
5
9
9
5
10
12
9
Page 51

Topcom Twintalker 5010 51
Topcom Twintalker 5010
PORTUGUÊS
13.17 Luz de fundo do visor
Para activar a luz de fundo do visor LCD, prima qualquer botão excepto o botão
PTT ou o botão
A luz de fundo do visor LCD acende-se durante 5 segundos.
14 Ligar o auricular
O Twintalker 5010 pode ser utilizado com o auricular opcional.
O conector encontra-se por baixo da tampa de protecção de borracha no topo da
unidade .
Para ligar o auricular, retire a patilha de borracha de modo a expor o conector.
Insira a ficha do auricular no conector (jaque de 2,5 mm) .
O pequeno botão no auricular tem a mesma função que o botão PTT na unidade.
Ao utilizar o botão PTT no auricular, tem de utilizar também o microfone existente
no fio do auricular.
15 Especificações técnicas
O Bloqueio do Teclado não é válido para a função de
monitorização, o botão , o botão e o botão
PTT
.
9
11
12
12
11
1
12
12
Não ligue auriculares de um modelo diferente. Isso pode danificar o
dispositivo.
Canais
Subcódigo
Frequência
Alcance
Pilhas
Poder de transmissão
Tipo de modulação
Espaçamento de canais
Transformador Duo
Charger
8
CTCSS 38
446.00625MHz - 446.09375 MHz
Até 10 Km (campo aberto)
3 x pilhas AAA alcalinas ou NiMh recarregáveis
< 500mW ERP
FM - F3E
12,5 kHz
Entrada: 230V AC / 50Hz - Saída : 9V AC / 200mA
Channel Frequency Chart: CTCSS Code Chart
Channel Frequency (MHz
)
Code Frequency (Hz) Code Freq. (Hz) Code Freq. (Hz) Code Freq. (Hz)
1 446,00625 0 Disabled 10 94,8 20 131,8 30 186,2
2 446,01875 1 67,0 11 97,4 21 136,5 31 192,8
3 446,03125 2 71,9 12 100,0 22 141,3 32 203,5
4 446,04375 3 74,4 13 103,5 23 146,2 33 210,7
5 446,05625 4 77,0 14 107,2 24 151,4 34 218,1
6 446,06875 5 79,7 15 110,9 25 156,7 35 225,7
7 446,08125 6 82,5 16 114,8 26 162,2 36 233,6
8 446,09375 7 85,4 17 118,8 27 167,9 37 241,8
8 88,5 18 123,0 28 173,8 38 250,3
9 91,5 19 127,3 29 179,9
Page 52

Visit our website
www.topcom.net
 Loading...