

Page 1

BUTLER OUTDOOR 2010
TWIN/TRIPLE
USER GUIDE
HANDLEIDING
MANUEL D’UTILISATEUR
BEDIENUNGSANLEITUNG
MANUAL DE USUARIO
V 1.0 - 12/10
Page 2

Important
To use ‘Caller ID’ (display caller), this service has to be activated on your
phone line. Normally you need a separate subscription from your
telephone company to activate this function. If you don’t have the Caller ID
function on your phone line, the incoming telephone numbers will NOT be
shown on the display of your telephone.
Belangrijk
Om de ‘Nummerweergave’ te kunnen gebruiken, moet deze dienst
geactiveerd zijn op uw telefoonlijn. Om deze dienst te activeren, hebt U
hiervoor meestal een apart abonnement van uw telefoonmaatschappij
nodig. Indien U geen nummerweergavefunctie hebt op uw telefoonlijn,
zullen de inkomende telefoonnummers NIET op de display van uw toestel
verschijnen.
Important
Pour utiliser la fonction ‘Caller ID/Clip’ (affichage de l’appelant), ce service
doit être activé sur votre ligne téléphonique. Généralement, vous avez
besoin d’un abonnement séparé de votre compagnie de téléphone pour
activer cette fonction. Si vous n’avez pas la fonction ‘Caller ID - Affichage
Appelant’ sur votre ligne téléphonique, les numéros de téléphone entrants
n’apparaîtront PAS sur l’écran de votre téléphone.
Wichtig
Zur Verwendung der ‘Rufnummernanzeige’ muss dieser Dienst erst für
Ihre Telefonleitung freigegeben werden. Zur Aktivierung dieser
Dienstleistung benötigen Sie meistens ein separates Abonnement Ihrer
Telefongesellschaft.Wenn Sie für Ihre Telefonleitung keine
Rufnummernanzeigefunktion haben, erscheinen die eingehenden
Telefonnummern NICHT im Display Ihres Gerätes.
Importante
Para poder usar la función “Identificación de llamadas,este servicio tiene
que estar dado de alta en su línea telefónica. Normalmente es necesario
abonarse a dicho serviciopara que la compañía telefónica active esta
función. Si su línea telefónica no dispone de la funciónIdentificación de
llamadas, la pantalla del aparato no mostrará los números de teléfono de
las llamadas entrantes.
Page 3

1
8
3
2
5
6
7
4
9
11
15
10
12
13
14
16
17
18
19
Page 4

UK To be connected to the public analogue telephone network.
NL Geschikt voor aansluiting op het openbare analoog
telefoonnetwerk.
F Il est destiné à être raccordé au réseau de télécommunication
public.
D Kompatibel für den analogen Telefonanschluss.
ES Conexión a la red telefónica analógica
This product is in compliance with the essential requirements
and other relevant provisions of the R&TTE directive 1999/5/EC.
The Declaration of conformity can be found on:
http://www.topcom.net/support/cedeclarations.php
UK The features described in this manual are published with
reservation to modifications.
NL De in deze handleiding beschreven mogelijkheden worden
gepubliceerd onder voorbehoud van wijzigingen.
F Les possibilités décrites dans ce manuel sont publiées sous
réserve de modifications.
D Die in dieser Bedienungsanleitung umschriebenen Möglichkeiten,
werden vorbehaltlich Änderungen publiziert.
ES Las características descritas en este manual pueden ser objeto de
futuras modificaciones.
UK The CE symbol indicates that the unit complies with the essential
requirements of the R&TTE directive.
NL Het toestel voldoet aan de basiseisen van de R&TTE-richtlijn. Dit
wordt bevestigd door de CE-markering.
F La conformité de l’appareil avec les exigences fondamentales de
la directive européenne R&TTE relative aux terminaux, est
confirmée par le label CE.
D Die Übereinstimmung des Gerätes mit den grundlegenden
Anforderungen der R&TTE-Directive ist durch das CE-Kennzeichen bestätigt.
ES El sello CE corrobora la conformidad del equipo con los
requerimientos básicos de la directiva R&TTE.
Page 5
Butler Outdoor 2010 - Twin - Triple General information
1 General information
This user guide contains all the information you need to install, set
up and operate your device. It also contains information and
important notes for your safety and help in the event of problems.
1.1 The product: Butler Outdoor 2010
The product name "Twin" describes a variant consisting
of a base station with cordless handset plus an additional
charging station with an additional cordless handset
(= Twin). ‘Triple’ version has 2 additional charging
stations & handsets.
This product has been manufactured in accordance with the
uniform digital standard for cordless telephones (DECT). DECT
technology features a high level of security against interception as
well as high-quality digital transmission. This telephone is intended
for various applications, for example on a network of base stations
and cordless handsets that make up a complete PBX: up to 5
cordless handsets can be operated on one base station. Internal
calls can be made between any two cordless handsets. Up to 6
repeaters can be registered to the base to extend the distance
range.
If available on your line, caller ID services from your telephone
service provider are possible on this telephone. If you use these
services, the caller's telephone number is shown in the telephone
display.
To use "Caller ID", this feature must first be enabled for
your telephone line. Contact your telephone service
provider for information about activating this feature. If this
feature is not enabled, the numbers from which incoming
calls originate will NOT be shown in the telephone display.
1.2 Copyright
This document is protected by copyright.
All rights, including those of total or partial photomechanical
reproduction, duplication and distribution by means of particular
processes (such as data processing, data carriers and data
networks), and substantive and technical changes, are reserved.
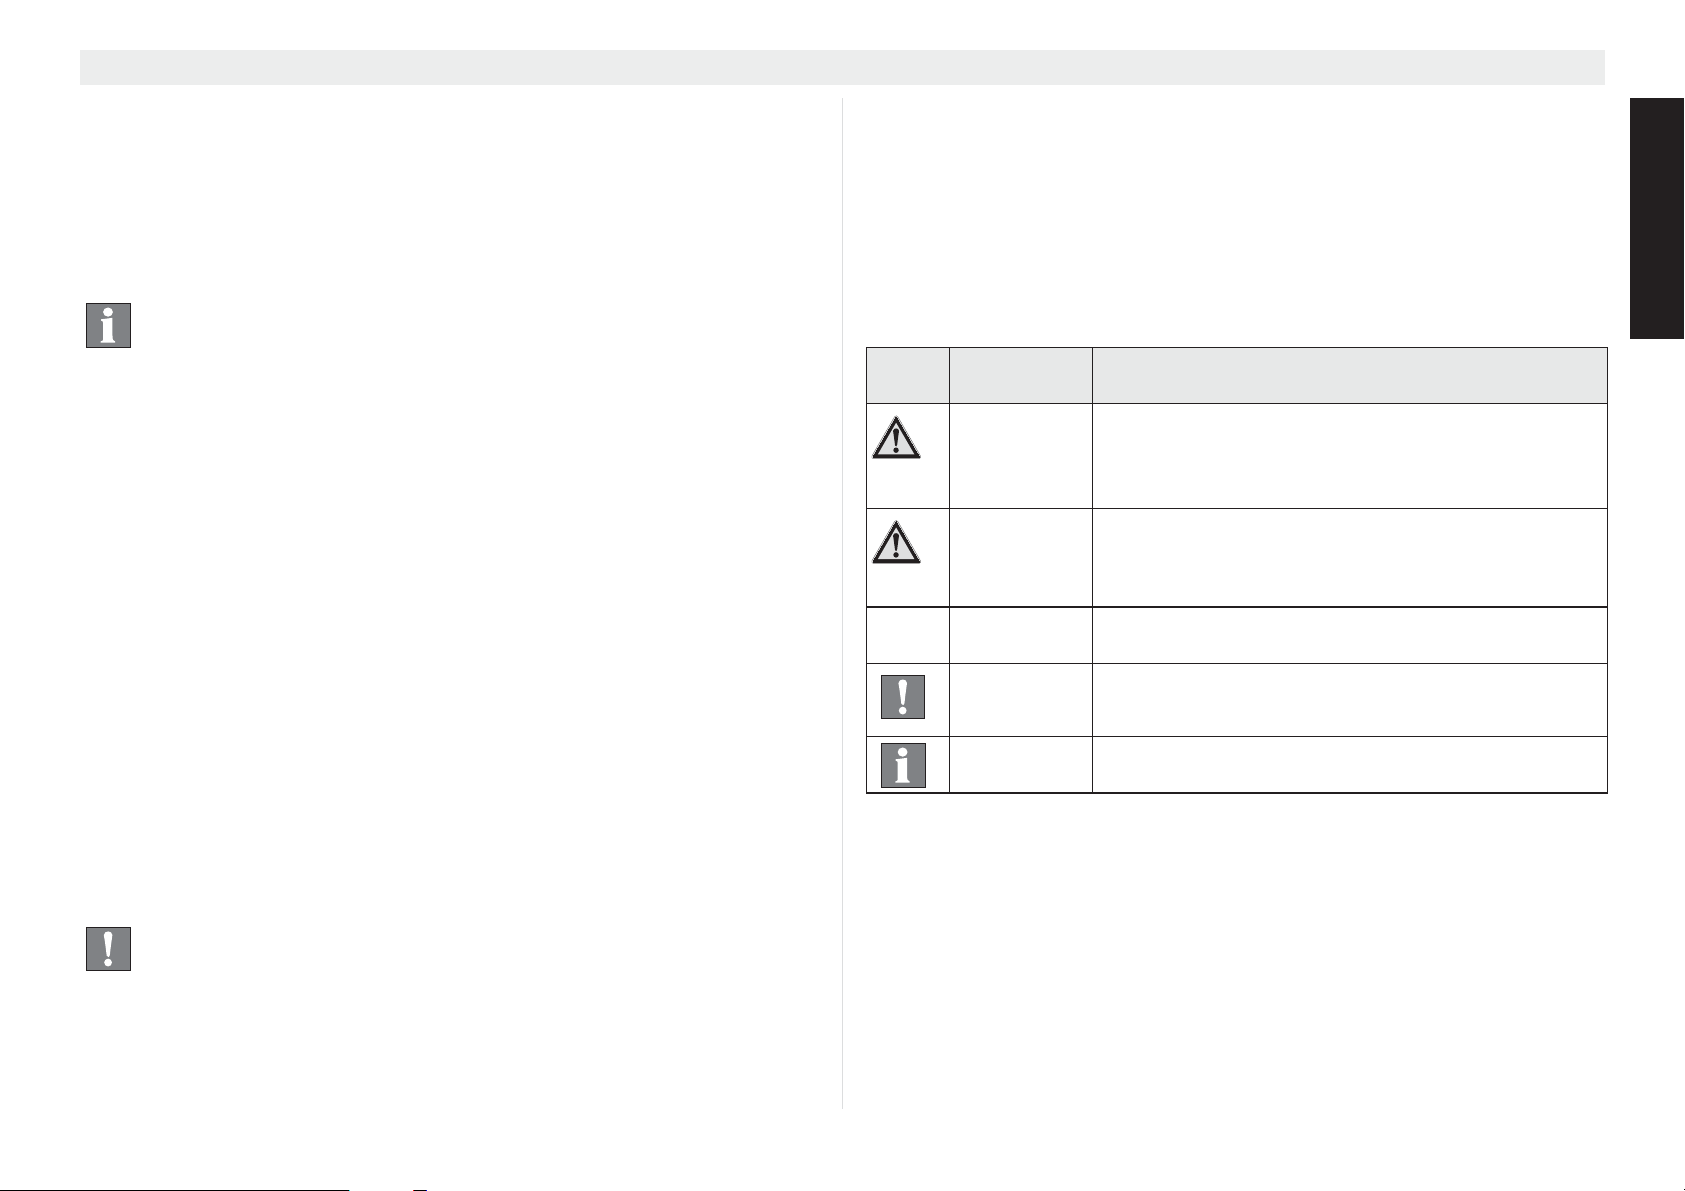
1.3 Signal words and symbols
Symb Signal
Warning
Caution
none
Caution
Important
Info, tip
Meaning
Warning of risk of potential serious injury or
death if you fail to comply with this
information.
Warning of risk of potential minor injury if you
fail to comply with this information.
Risk of material or environmental damage.
This provides important information about the
function.
General information or particular tips.
1.4 Intended use
This product is intended for making telephone calls via a fixed line
within a telephone network. The pre-requisite for proper use of the
phone is professional installation taking account of the information
in this user guide.
Any other use is deemed improper and is not permitted.
Any modifications or conversions by the user that are not
described in this user guide, are deemed improper and are not
permitted.
ENGLISH
5
Page 6

General information Butler Outdoor 2010 - Twin - Triple
1.5 Safety notes
The following basic safety notes must always be taken into
account when using electrical devices.
Carefully read the following safety notes and details on the correct
use of the device. Familiarise yourself with all the functions of the
device. Keep this user guide in a safe place near the device and
pass it on to another user if necessary. Do not pass the telephone
on to third parties without the user guide.
Electrical risks:
Risk of injury or death due to electrical current!
In the event of danger, disconnect the device from the
230 V mains immediately.
• Do not use the device if the mains adapter, cable or device are
damaged. Take care not to drop the device as it could be
damaged.
• The voltage within the device is at hazardous levels. Never
open the casing or insert object through the ventilation slot.
• Prevent liquids penetrating the device. If this should occur,
unplug the mains adapter from the power socket and the
telephone cable connector from the wall socket.
• Also unplug the mains adapter from the power socket and the
telephone cable connector from the wall socket if faults occur
during operation and before cleaning the device.
• Do not touch the charger and plug connectors with sharp or
metal objects.
• Do not modify or repair the device. The device or cable should
only be repaired by a specialist in the service centre. Repairs
that are not carried out properly can cause significant risks to
the user.
• Children frequently underestimate the dangers of handling
electrical devices. Never allow children near electrical devices
unsupervised.
• Do not use the device in humid areas (e.g. bathroom) or very
dusty areas.
• Devices connected to the mains may be damaged during
thunderstorms. Therefore always unplug the device in a
thunderstorm.
• The mains adapter must be completely removed from the
socket to disconnect the device fully from the power supply.
Always pull the plug and never the cable.
• Check cables regularly for damage, protect them against hot
surfaces and other hazards, unwind them fully, lay them so
that nobody can trip over them and do not constrict them.
Fire risks:
Risk of injury or death due to fire!
Do not expose the device to excessive heat and
disconnect it from the 230 V mains supply immediately in
the event of danger.
The heat generated inside the device may cause a fault or a fire in
the device. Therefore do not expose this device to extreme
temperatures:
– Avoid direct sunlight and heat;
– Do not cover the ventilation slot on the device.
Risk of explosion:
Risk of injury due to explosion!
Exercise particular caution with batteries (disposable and
rechargeable).
• Never throw disposable or rechargeable batteries into fire.
6
Page 7
Butler Outdoor 2010 - Twin - Triple General information
• Do not operate the device in an environment with a risk of
explosions!
Risk of poisoning:
Risk of injury due to poisoning!
Exercise particular caution in respect of children.
• Keep disposable and rechargeable batteries out of the reach
of children.
Risk of suffocation:
Risk of injury due to suffocation!
Exercise particular caution in respect of children.
• Keep packaging films out of the reach of children.
• Consider possible risks to children (strangulation) if you use
extension cables.
Faults:
Possible risk of injury due to faults in the device!
Exercise particular caution with medical electrical
devices.
• The function of medical electrical devices may be affected by
electromagnetic radiation from your device. Therefore make
sure that the device is installed and operated sufficiently far
away from medical electrical devices.
The same applies to implanted medical devices such as
pacemakers.
• The cordless handset may cause an unpleasant buzz in
hearing aids so keep it sufficiently far away from hearing aids.
Possible damage:
Possible damage to the device!
Read the information in this user guide.
• Only use the supplied main adapters. Do not use any thirdparty adapters as the rechargeable batteries could be
damaged.
• The socket for connecting the mains adapter must be near the
device and easily accessible.
• Do not place the handset in any charging cradle without the
battery installed and the battery cover securely in place.
• Only use the supplied rechargeable batteries. When they
need to be replaced, use rechargeable batteries of the same
type. Make sure the batteries are inserted the right way round
(information can be found in the battery compartment on the
device). Never use ordinary disposable batteries!
As this device cannot be used in the event of a power
failure, use a telephone that is not dependent on the
mains power supply for any emergency calls e.g. a
mobile phone.
1.6 Notes on low-radiation operation
This cordless telephone (compliant with the DECT standard)
facilitates low-radiation operation (ECO mode).
During a call, the handset reduces the radio output depending on
the distance from the base station. When no call is being
conducted, the handset reduces the radio output to a minimum.
The device also supports low-radiation operation because the
base station reduces the radio output to practically zero if only one
cordless handset is registered to the base station and it is sitting
on the base station to charge. However, the base station does not
reduce the radio output if two or more handsets are registered.
ENGLISH
7
Page 8

Installation Butler Outdoor 2010 - Twin - Triple
This does not mean that normal DECT radiation is harmful to
health. Rather, low-radiation operation avoids any unnecessary
radiation exposure.
Set up the base station in a location where you do not spend much
time, for example in the hallway. Avoid setting it up in your or your
children's bedrooms or the lounge.
2Installation
Make sure the batteries are charged before using your
telephone for the first time, otherwise the device will not
operate optimally.
3
2
Take account of the safety notes about the environment
and circumstances of the installation and location! Do not
commission the device in an environment with a risk of
explosions!
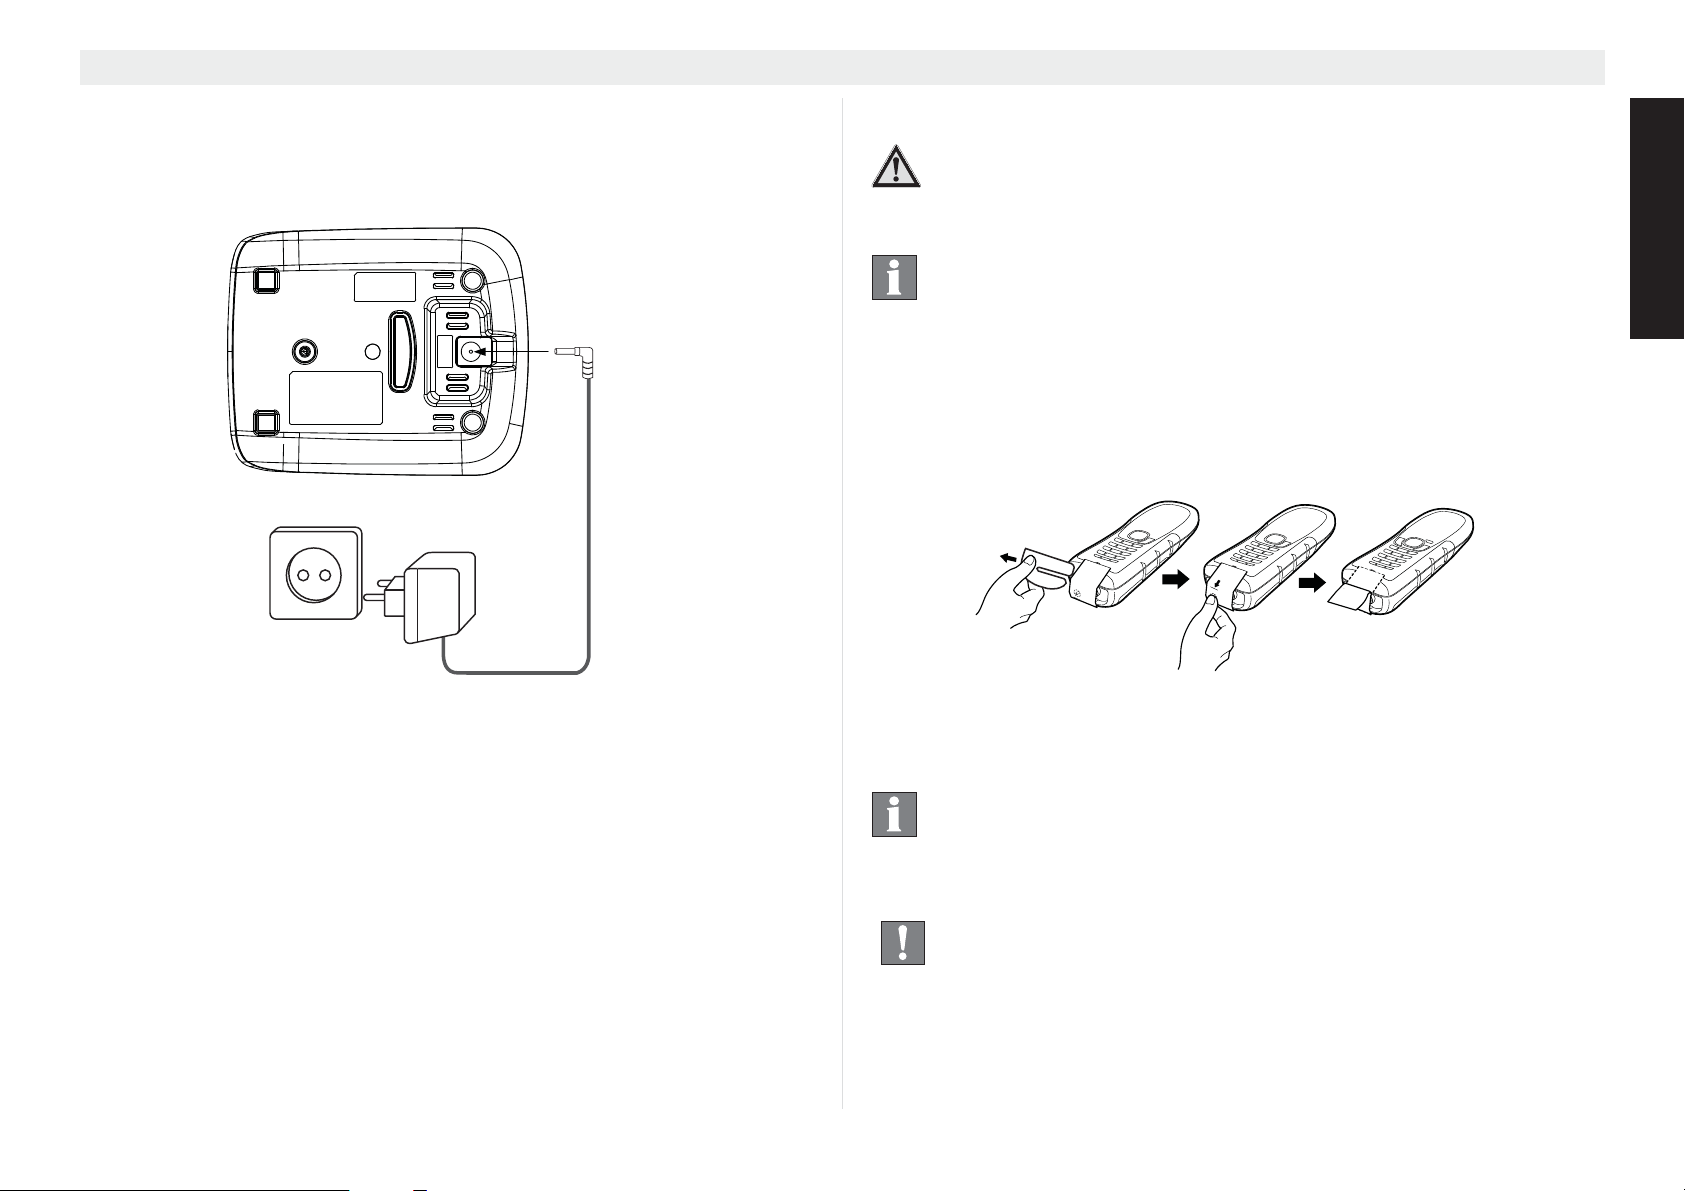
2.1 Commissioning the base station
Perform the following steps:
• Plug the mains adapter into a 230 V socket. Plug the
connector into the adapter jack on the bottom of the base
station.
• Connect the telephone jack on the bottom of the base station
to the telephone socket using the supplied telephone cable.
4
1. Telephone wall socket
2. Telephone cable
3. Bottom of the base station
4. Mains adapter cable
1
8
Page 9
Butler Outdoor 2010 - Twin - Triple Installation
2.2 Charger (only Twin or triple version)
Perform the following steps:
Plug the mains adapter into a 230 V socket. Plug the connector into
the adapter jack on the bottom of the charging station.
1
2
2.3 Handset activation
Risk of injury due to explosion!
Only use the supplied rechargeable batteries type
(BT-800 2,4V DC).
No need to install the batteries!!
The batteries are already inside the handset. A switch at
the bottom of the handset has disconnect the battery to
avoid discharging. You first have to press this swith to
connect the battery.
1. Remove the cardboard spacer.
2. Press the activation pin according to the direction on the label.
ENGLISH
1. Bottom of the charging station
2. Mains adapter cable
• After activation it takes about 10 seconds before the display
turns on.
3. Remove the label ones the handset is activated.
Save the activation pin in case you want to change the
activation status later (for example when the handset will
not be used for a long time)
Replace the handset in the base station or charging
station after use to prevent the battery fully discharging.
The batteries are designed for permanent charging.
9
Page 10
Controls and menu structure Butler Outdoor 2010 - Twin - Triple
19
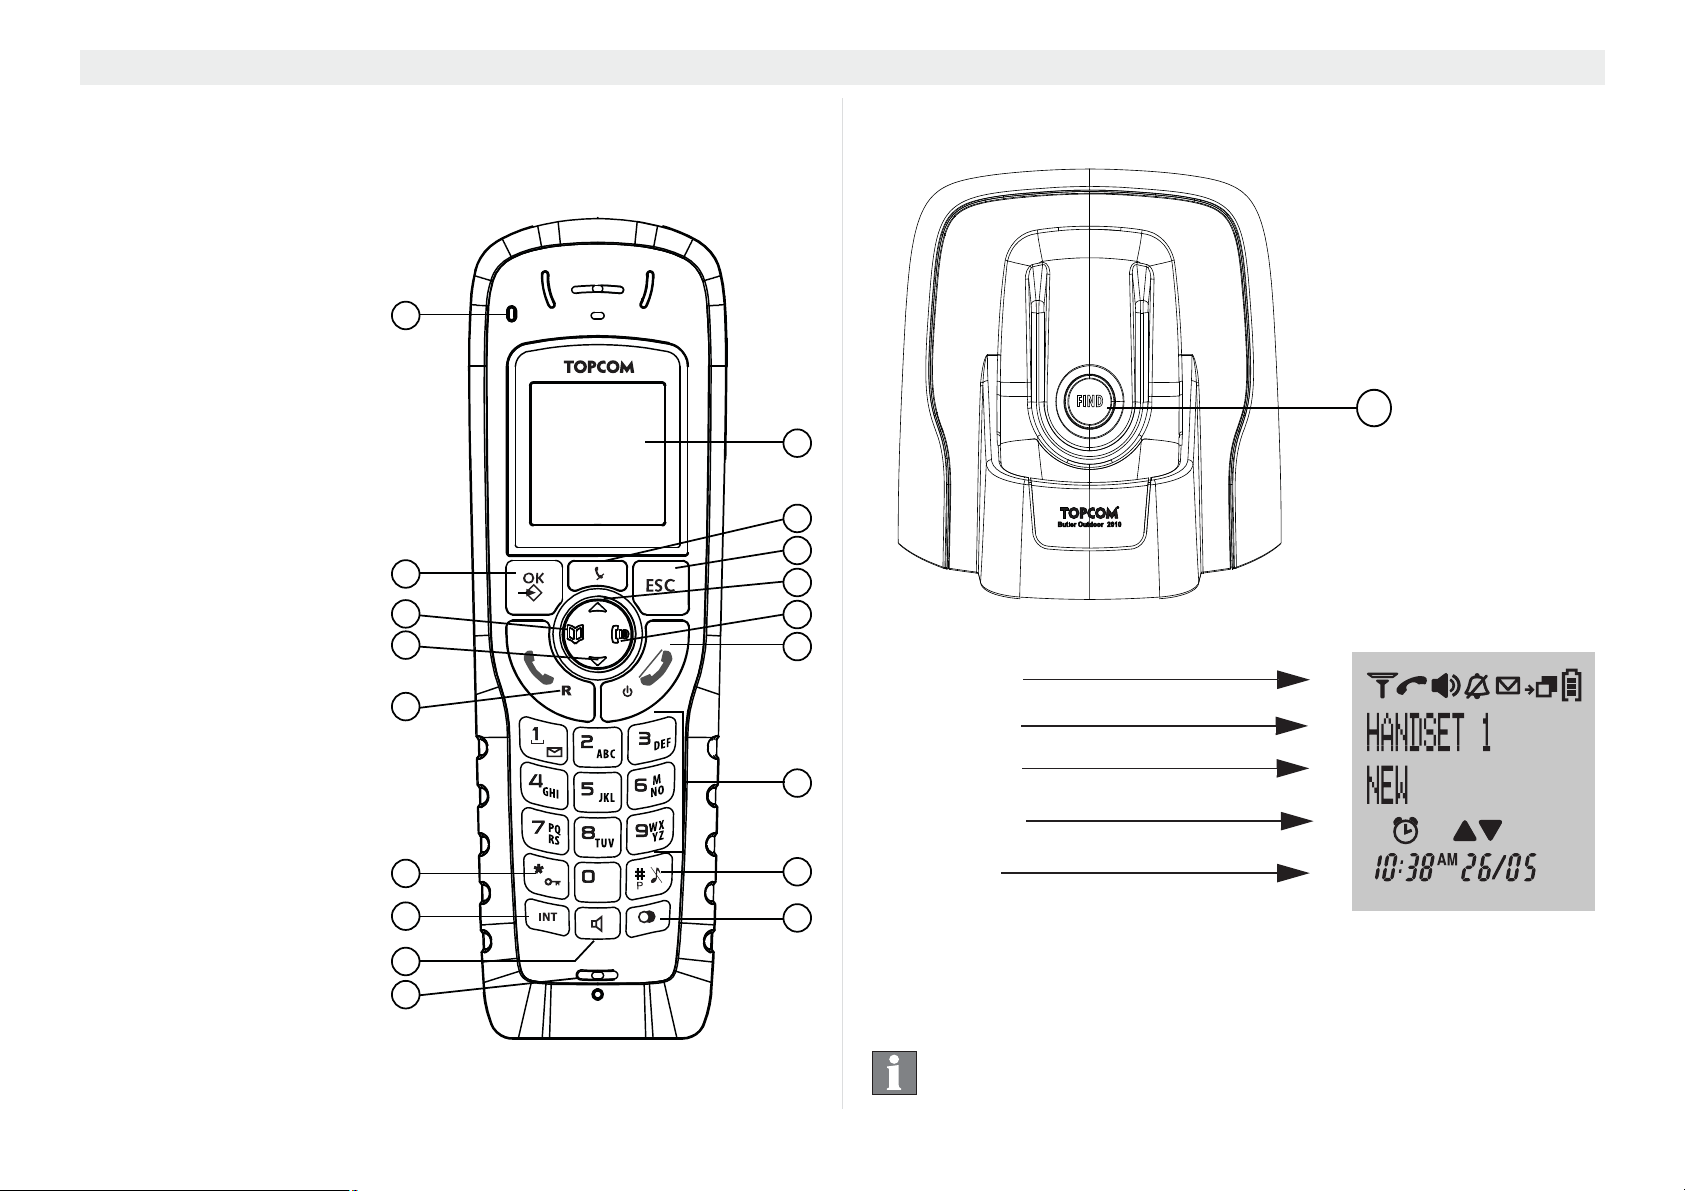
3 Controls and menu structure
3.1 Keys / displays / LED’s
Handset
1. Display
2. Mute key
3. Escape key
4. Up key
5. Right key / call list key
6. Hang-up / on/off key
7. Alphanumeric keys
8. Ringer off / pause key
9. Redial key
10. Microphone
11. Handsfree key
12. Internal key
13. Keypad lock key
14. Answer call / flash key
15. Down key
16. Left key / phonebook
17. Menu / OK key
18. Event LED
18
17
16
15
14
Base station
19. Paging key
1
2
3
4
5
6
7
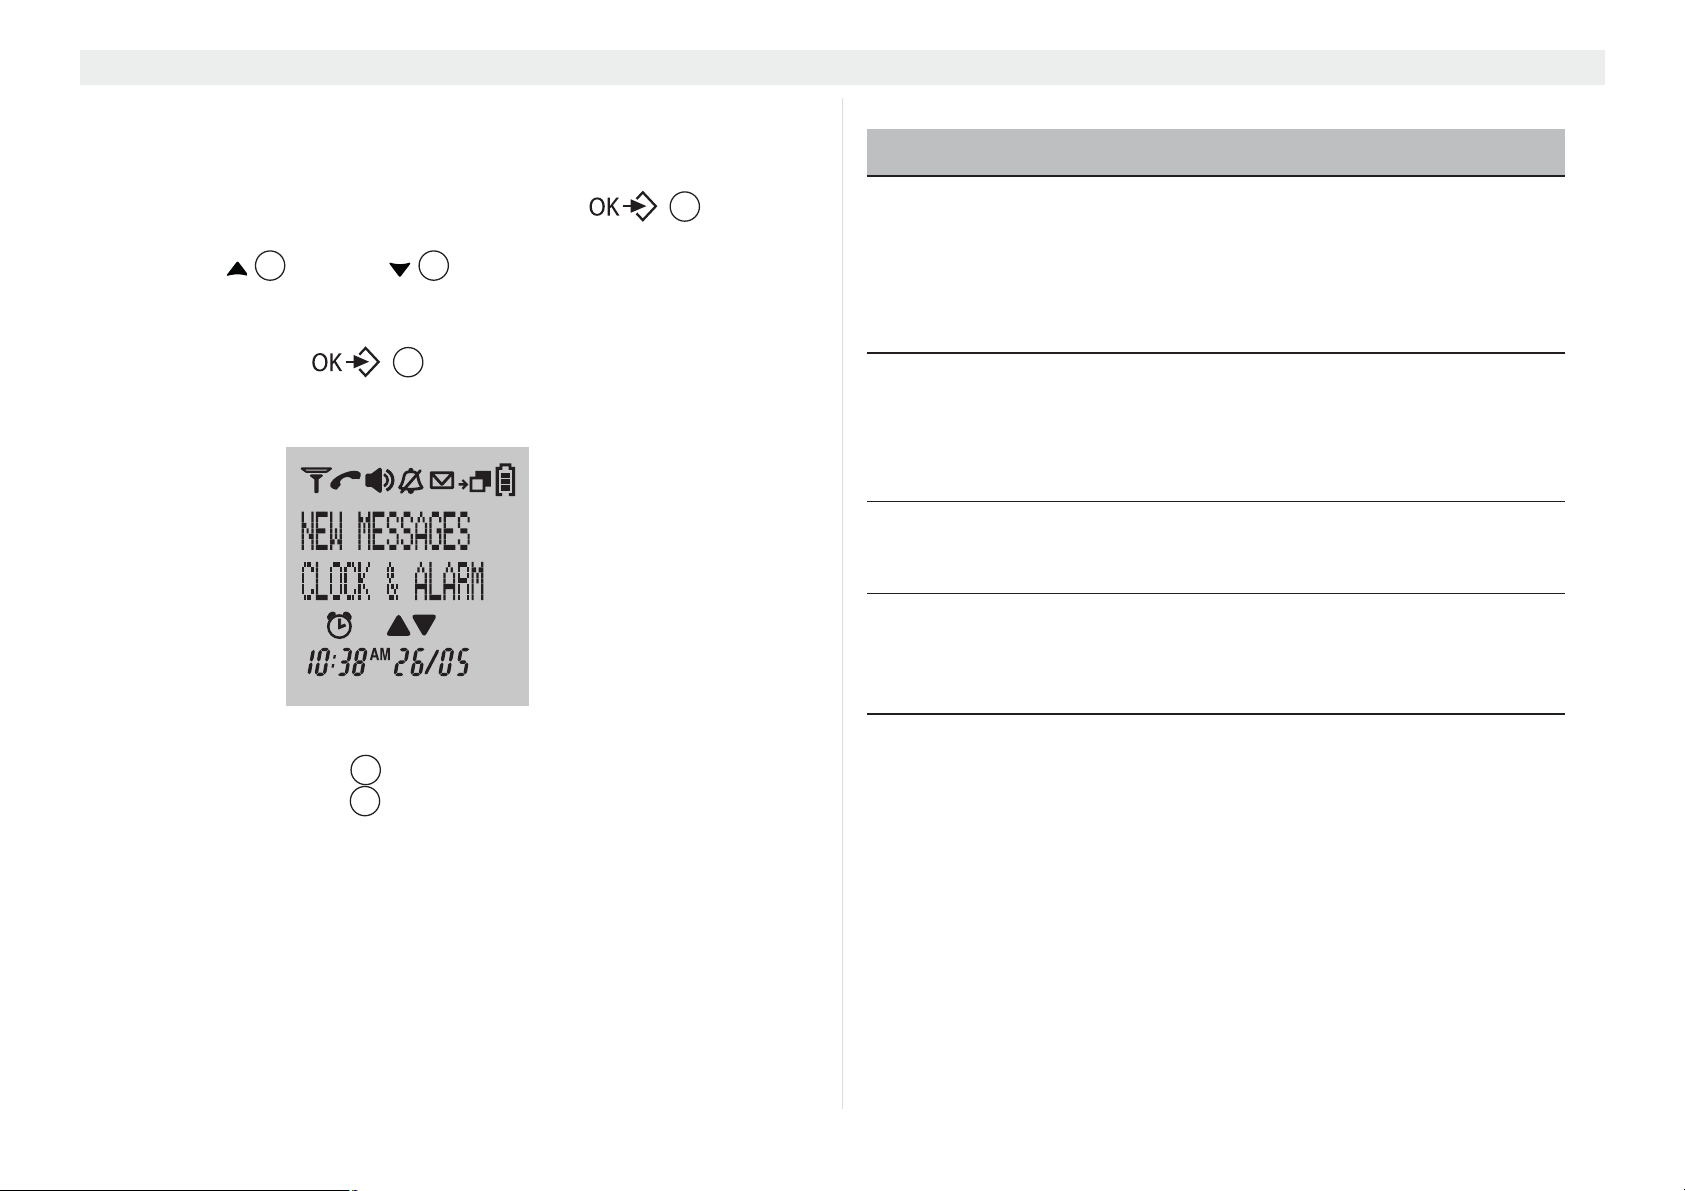
3.2 Display (LCD)
Symbol line
1st text line
2nd text line
Symbol line
10
13
12
11
10
8
9
Time/date
The first text line shows the handset name and handset number.
The second text line will show new event messages
(‘VOICEMAIL’, ‘NEW CALL’, and ‘MEMORY FULL’).
The handset display has a protective film which must be
removed during commissioning.
Page 11
Butler Outdoor 2010 - Twin - Triple Controls and menu structure
Battery display:
• The batteries are fully charged.
• The batteries are 66% full.
• The batteries are only 33% full.
• The batteries are almost flat. If the battery is almost flat,
the battery symbol in the display flashes.
During charging, the will scroll. When the battery is
fully charged, the scrolling will stop.
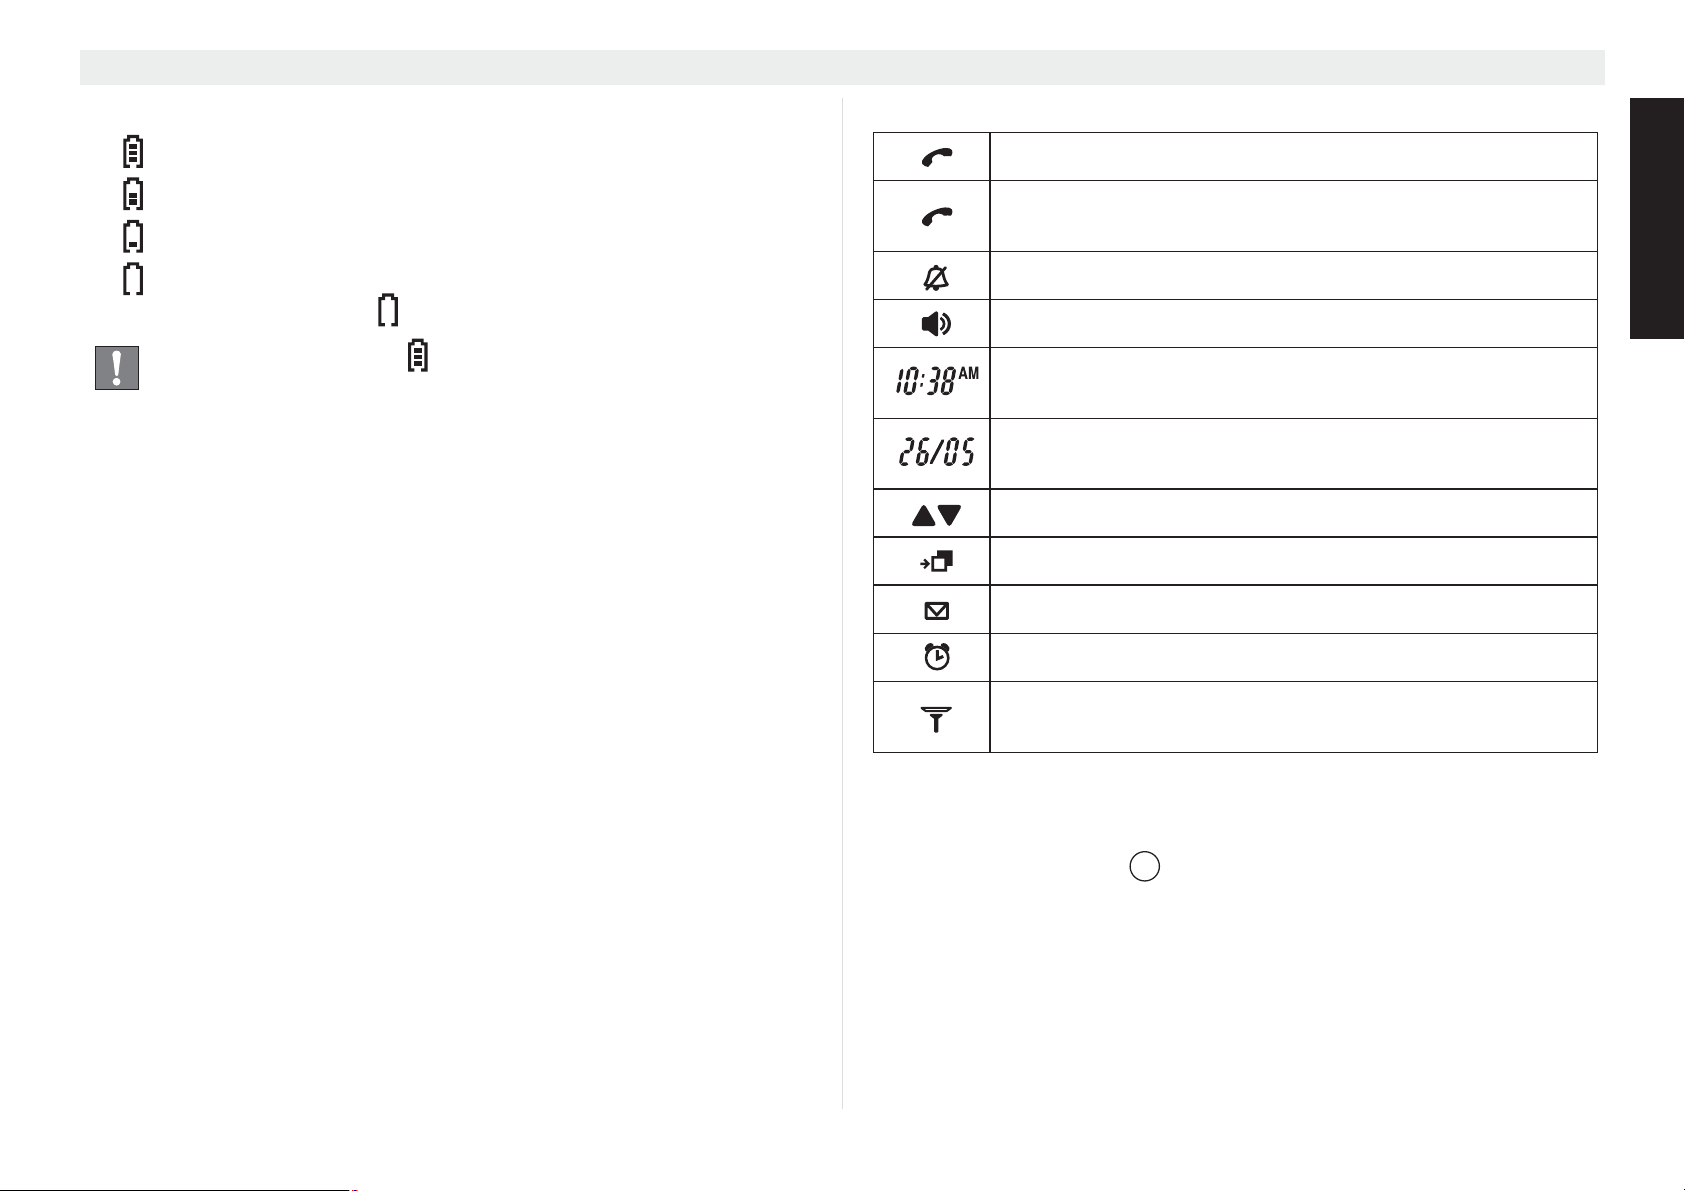
3.3 Symbols
In communication (off-hook).
- During communication (steady);
- Flashing during ringing.
Handset ring tone off.
Hands free function enabled.
Time: actual time in standby. Received call time in
call list or during playback messages.
Date: actual date in standby. Received call date in
call list or during playback messages.
Direction to other menu options.
Calls list entries(*).
New mailbox message.
Alarm activated.
ENGLISH
Aerial symbol: within range (permanent display) out of range (flashing).
(*) If caller ID is activated for your telephone line.
3.4 Event LED
The front handset LED at the upper left indicates the following:
• Blinking fast: incoming call.
• Blinking slow: intercom call or paging.
• Blinking every 2 seconds: there are new event message in
handset (see second text line on the display).
18
11
Page 12
Controls and menu structure Butler Outdoor 2010 - Twin - Triple
3.5 Menu structure
The handset has an easy-to-use menu structure. Every menu
opens a list of options.
To open the main menu, press the menu key when the
handset is on and in standby mode.
Press the up or down key to scroll through to the menu
4 15
option you want. The instructions in this user guide show the key
symbols and the position number on the device overview. Then
press the menu key again to open other options or to
17
confirm the setting that is displayed.
17
3.6 Menu overview
Menu Sub-menu options
HS SETTINGS HANDSET NAME
HANDSET TONES
LANGUAGE
AUTO ANSWER
AUTO HANGUP
VOICEMAIL
CLOCK & ALARM SET DATE&TIME
SET FORMAT
ALARM
ALARM TONE
AUTO CLOCK ADJ
BS SETTINGS PIN CODE
CONFERENCE
RESET
LINE SETTINGS COUNTRY
RECALL TIME (*)
FIRST RING
DIAL MODE (*)
Exit menu or go up a menu level
Press escape key ESC to go to the previous menu option.
You can press the ESC key at any time to cancel and return to
3
3
standby mode. If you do not press any key for 30 seconds, the
handset automatically reverts to standby mode.
12
REGISTRATION REGISTER
UNREGISTER
(*) Some menus are not shown depending on the country you have
set (see “8.1 Set country”).
Page 13
Butler Outdoor 2010 - Twin - Triple Handset - settings and operation
4 Handset - settings and operation
The steps below show the key and display symbols and
the position numbers on the device overview.
Possible danger due to faults in the device!
Follow the safety notes.
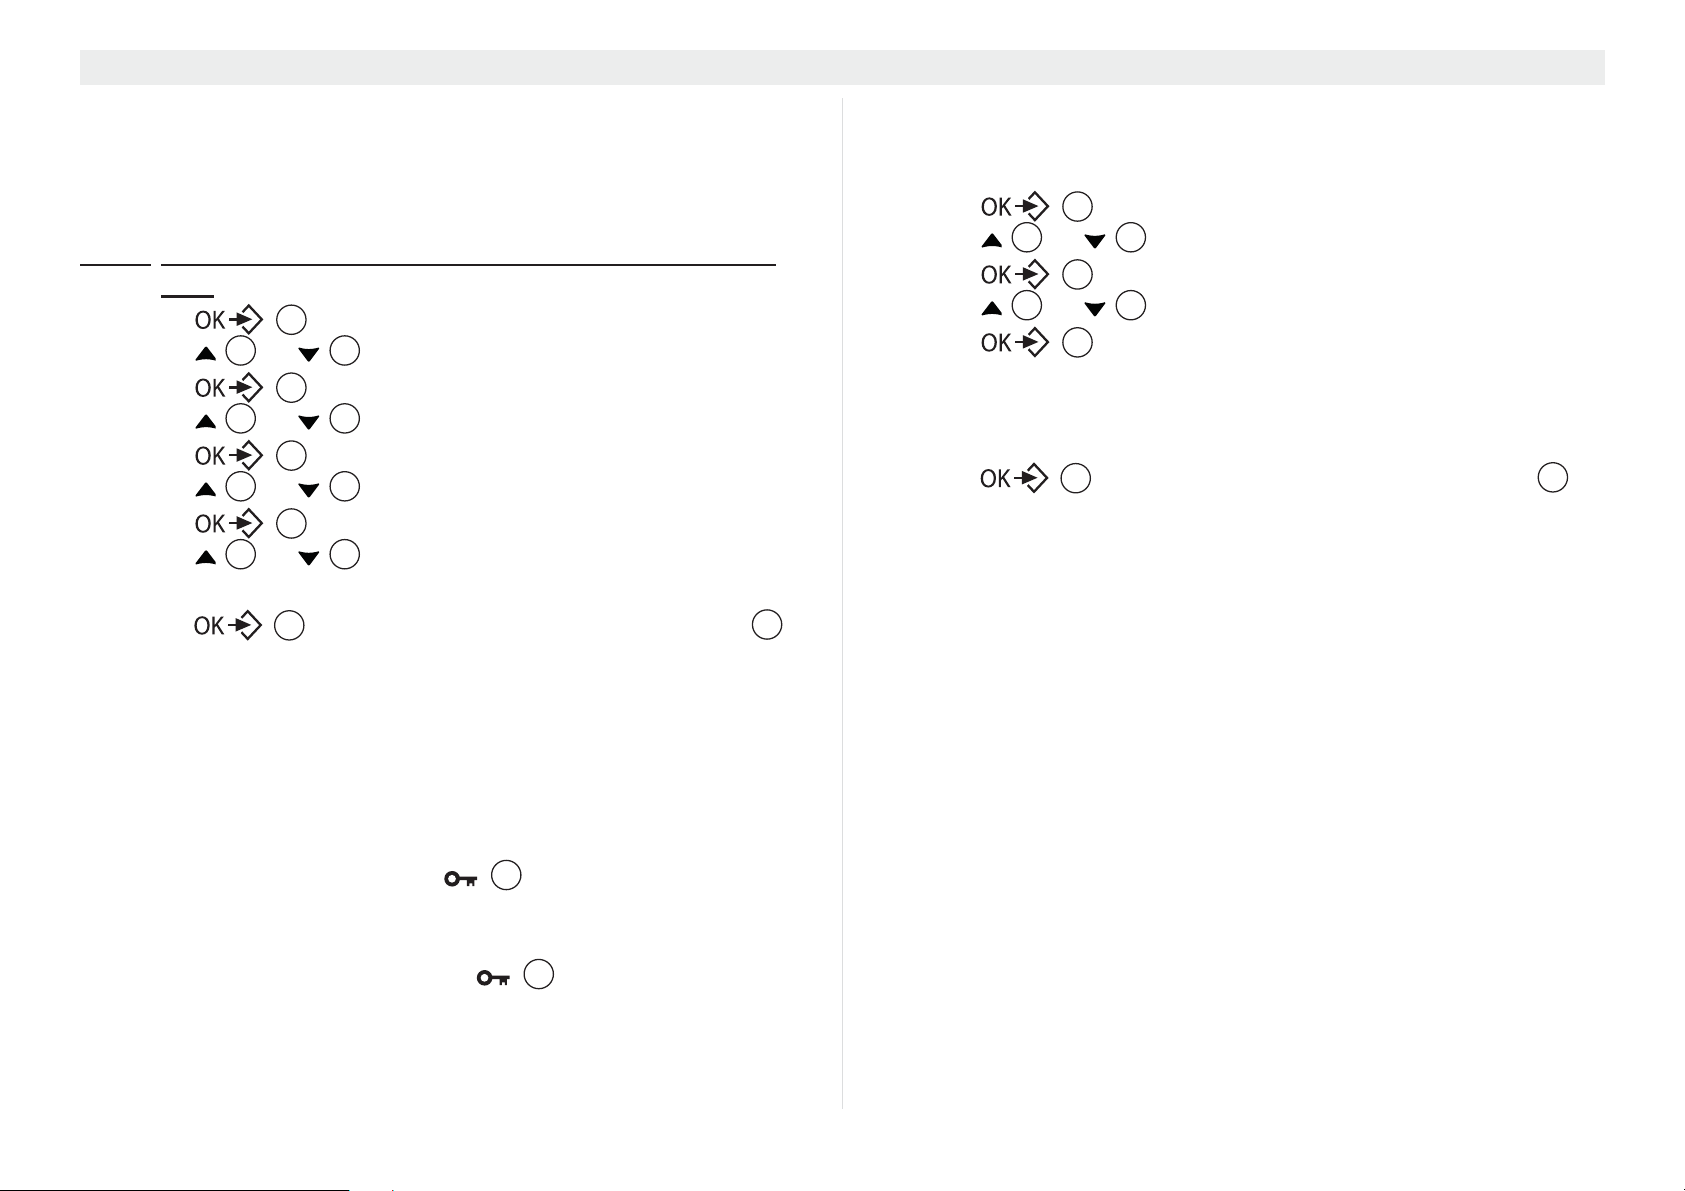
4.1 Powering up (Set up mode)
At the first insertion of the battery, activation of the handset or after
a reset operation, the handset shall enter the set up mode. The
user should select the country for various country dependent
settings:
1. ‘WELCOME’ is shown for the first seconds followed by the
country setting menu. Press to confirm.
2. ‘Country’ is shown on the display.
3. Use or to select the country.
4. Press to confirm.
5. Press again to confirm or press the escape key
ESC to go back.
6. Use or to select the language
7. Press to confirm.
4 15
17
17
3
4 15
17
8. Enter the date and press to confirm.
9. Enter the time and press to confirm.
17
17
17
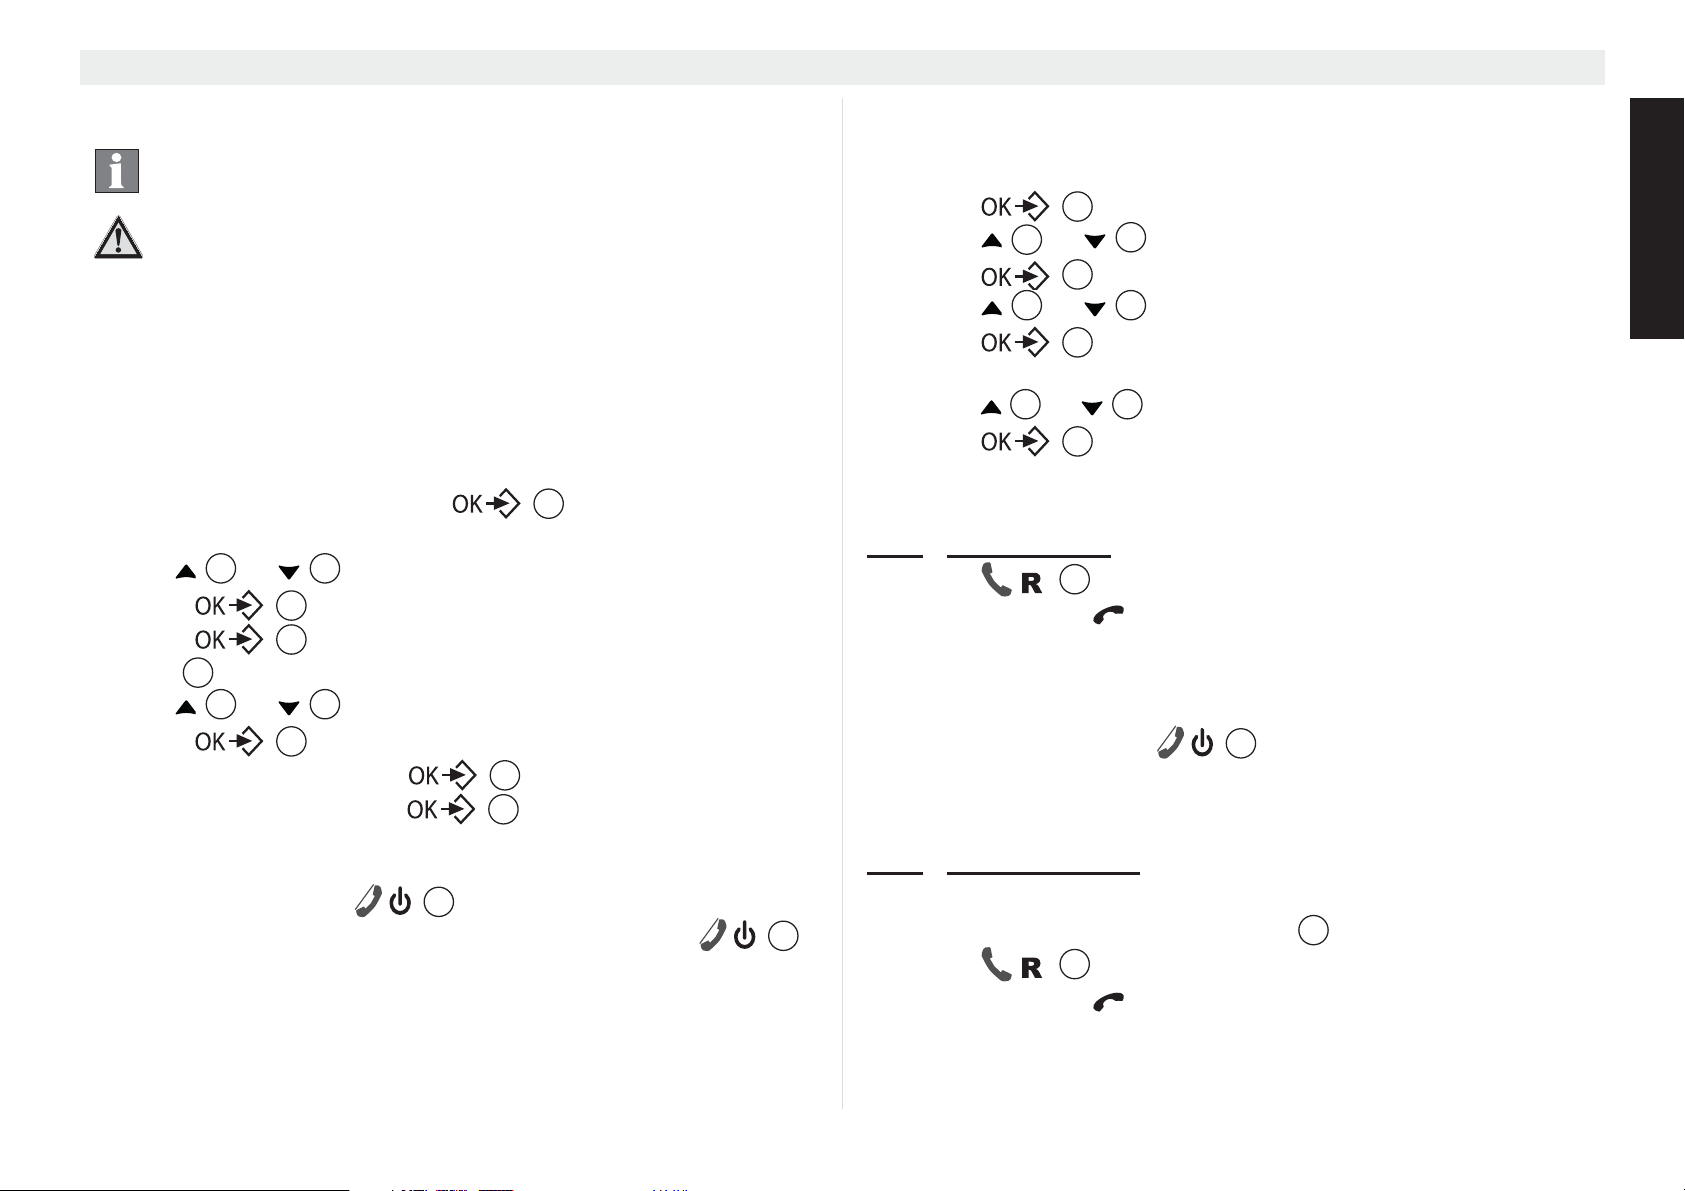
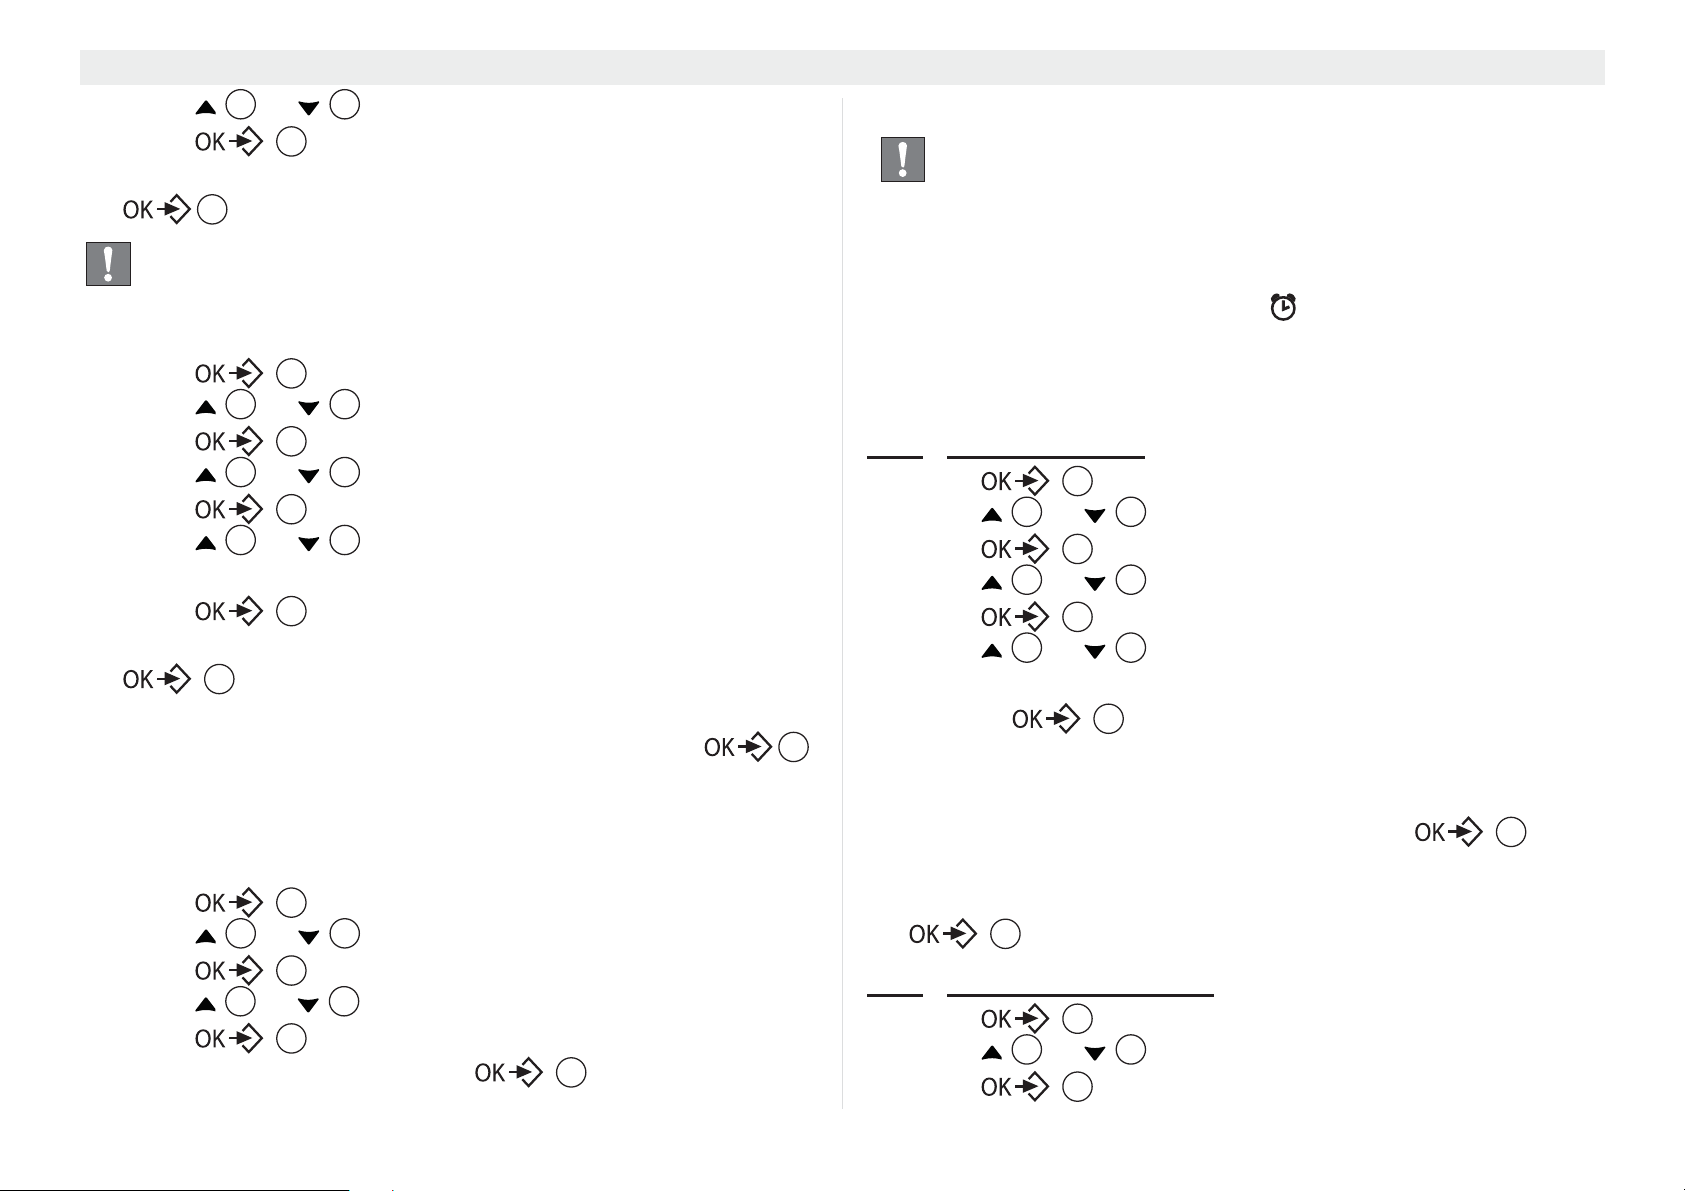
4.3 Menu language selection
The telephone has 14 menu languages, to set the language,
proceed as follows:
1. Press .
2. Press or repeatedly, select ‘HS SETTINGS’.
3. Press to confirm.
4. Press or repeatedly, select ‘LANGUAGE’.
5. Press to confirm.
17
4
4 15
15
17
17
• The language setting appears in the display
6. Press or repeatedly, select the desired language.
• Press to confirm.
4 15
17
4.4 Making calls
4.4.1 External calls
1. Press .
• The call symbol appears in the display.
2. When you hear the dialling tone, dial the telephone number
you want.
• The number appears in the display and is dialled.
3. To end the call, press or (if auto hang-up is set on,
see “4.25 Auto hang-up”) replace the handset on the base
station or charging station.
14
6
ENGLISH
4.2 Switching the handset on/off
1. Press the on/off key until the display turn on.
2. To switch off the handset, hold down the on/off key
for more than 5 seconds until the device switches off.
6
6
4.4.2
Call preparation
1. Enter the telephone number you want to call.
2. To correct the number, press ESC .
3. Press .
14
3
• The call symbol appears in the display.
• The telephone number is automatically dialled.
13
Page 14
Handset - settings and operation Butler Outdoor 2010 - Twin - Triple
4
15
14
4. To end the call, press or (if auto hang-up is set on,
6
see “4.25 Auto hang-up”) replace the handset on the base
station or charging station.
4.4.3
1. Press .
2. Press .
Redial the last number called
9
14
• The last number you called is automatically dialled.
4.4.4
1. Press .
Redial one of the last 10 numbers called
9
• The last number you called appears in first position in the
display.
2. Use or to select the telephone number you want.
3. Press the answer call key .
4 15
14
• The telephone number in the display is automatically dialled.
4. To end the call, press or (if auto hang-up is set on,
6
see “4.25 Auto hang-up”) replace the handset on the base
station or charging station.
4.4.5
Calling a number in the phone book
The telephone has a phone book in which you can save telephone
number with names (see also section “6 Phone book”). To dial a
number from the phone book:
1. Press .
16
• The first number in the phone book appears in the display.
2. Press or repeatedly to select the number you
want, or enter the first character of the name and scroll further.
3. Press the answer call key .
• The telephone number in the display is automatically dialled.
4. To end the call, press or (if auto hang-up is set on,
6
see “4.25 Auto hang-up”) replace the handset on the base
station or charging station.
4.5 Answering a call
The handset starts to ring during an incoming external or internal
call.
• All registered handsets ring when there is an incoming call.
• The call symbol
flashes in the display.
• The caller's number appears in the display if you have caller
ID (CLIP). Contact your telephone line provider for more
information. The caller's name is also shown in the display if:
– the number is stored with the name in the phone book;
– the network transmits the name along with the phone
number.
1. You have the following options for answering a call:
– Press to answer the call.
14
– Pick up the handset from the base station or charging
station (function only possible if auto talk has been
activated, see “4.24 Auto talk”).
• During the call, the symbol , the transmitted caller number
and name are shown for 10 seconds, then the call duration is
shown in the display.
2. To end the call, press or (if auto hang-up is set on,
6
see “4.25 Auto hang-up”) replace the handset on the base
station or charging station.
4.6 The calls list
When you receive a call, the caller's number, the date and time
appear on the handset display. If the name is stored in the phone
book, this is also shown. You need to have the "caller ID" (CLIP)
14
Page 15

Butler Outdoor 2010 - Twin - Triple Handset - settings and operation
feature activated by your telephone line provider for a call to be
entered in the calls list.
The "caller ID" (CLIP) feature is only available if it is
activated for your line. Contact your telephone line
provider for additional information.
Incoming calls are stored in a calls list (max. 30 numbers). When
the memory is full, new calls automatically overwrite the oldest
number in the list. The upper symbol flashes in the display
when there are new unanswered calls in the calls list and ‘NEW
CALLS’ is shown in the centre of the display next to the
symbol. If the calls list is empty and you press , ‘LIST
5
EMPTY’ appears in the display.
4.6.1
1. Press briefly to view the newest entry.
Viewing entries in the calls list
5
• The number of the latest caller is displayed in the top line. If
the caller's name is entered in the phone book, this is shown in
the second line. If there is no entry and the caller's number
also was not transmitted, ‘UNKNOWN’ is displayed.
The date and time at which each call was received are
displayed at the bottom line.
Press or to view other entries in the list.
If you do not press any of the or keys for 30
4 15
4 15
seconds, the telephone automatically reverts to standby
mode.
4.6.3
1. Press to enter the calls list.
2. Use or to select the telephone number you want.
3. Press .
4. Press or repeatedly, select ‘COPY TO PB’.
5. Press to confirm.
Saving a number from the calls list to the phone book
5
4
4
15
17
15
17
•‘ENTER NAME’ appears on the display.
6. Enter the name using the alphanumeric keys. If the name has
been transmitted by the line provider, you can adapt this or
modify it.
7. Press .
17
• The telephone number is displayed.
8. Amend the telephone number if necessary and press
again to save the entry in the phone book.
17
9. The telephone reverts to the calls list.
4.6.4
Deleting numbers from the calls list
Deleting a call
1. Press to open the calls list.
2. Use or to select the telephone number you want.
3. Press .
4. Press or repeatedly, select ‘DELETE’.
5. Press to confirm.
6. Press again to confirm.
5
4 15
17
4
17
17
15
• The call is deleted and the next call appears in the display.
ENGLISH
4.6.2
1. Press to open the calls list.
2. Use or to select the telephone number you want.
3. Press when the number appears in the display.
Calling a number in the calls list
5
4 15
14
• The telephone number is automatically dialled.
Deleting all calls
1. Press to open the calls list.
2. Use or to select the telephone number you want.
3. Press .
4. Press or repeatedly, select ‘DELETE ALL’.
5
4 15
17
4
15
15
Page 16

Handset - settings and operation Butler Outdoor 2010 - Twin - Triple
17
5. Press twice to confirm.
• All calls will be deleted.
Only old calls will be deleted. New calls that have not
been viewed or were unanswered will also be deleted.
17
4.7 Redial options
When you scroll through the redial memory (see section “4.4.4
Redial one of the last 10 numbers called”), you have the following
options:
If the number you want is shown in the display, press the OK key
and select from the following options with or
17
:
15
•‘COPY TO PB’: saves the number in the phone book.
Press to confirm. Enter a name (see also section
“6.1 Save a new entry in the phone book by the phonebook
menu”) and press .
Edit the number and press again.
•‘DELETE’: deletes an entry in the redial list.
Press twice to confirm.
•‘DELETE ALL’: deletes all entries in the redial memory. Press
twice to confirm.
17
17
17
17
4
The batteries discharge more quickly if you use hands
free mode for a long time!
4.9 Out of range
If the handset is out of range of the base station:
•‘SEARCHING’ appears in the display and the symbol
flashes in the display.
1. Move closer to the base station or repeater/charger.
2. The symbol stops flashing and is displayed permanently.
• This means you are back within range of the base station.
If the out of range warning tone is activated (see “4.20
Switching the range warning tone on/off”) you will hear a
warning beep before going out of range.
4.10 Setting the loudspeaker volume
Press or during the call to adjust the loudspeaker
volume. You can choose between 5 different settings. The default
setting is level “3”:
4 15
The volume is adjusted in the same way in hands free
mode.
4.8 Activate / deactivate hands free mode
This function allows you to make a call without having to hold the
handset in your hand.
11
1. Press
2. Press
If you want to change the volume while in hands free
mode, press or several times.
16
during a call to activate hands free mode.
11
again to deactivate hands free mode.
4 15
4.11 Call duration display
The call duration is shown in the display during an external call:
A display of ‘10:40’ means: 10 minutes and 40 seconds.
The call duration is shown in the display for another 8 seconds
after the call is ended.
4.12 Mute
Press the mute key to deactivate the microphone during a
call. You can now speak freely without the party on the other end
2
Page 17

Butler Outdoor 2010 - Twin - Triple Handset - settings and operation
3
3
4
15
4
15
4
15
8
of the line being able to hear you. The mute key must be
2
pressed again to reactivate the microphone.
4.13 Pause key (dialling pause)
If you want to insert a dialling pause while dialling a telephone
number, press the pause key P for 3 seconds at the
8
appropriate point in the number until a P appears in the display.
If you then dial this number (or select it for redial), the dialling
pause (approx. 3 seconds) is automatically dialled too.
4.14 Finding the handset from the base station
(paging)
If you cannot find the handset, briefly press the paging key
on the base station. All handsets registered on the base station
ring which allows them to be located. Press any key on the handset
to stop it ringing.
19
4.15 Using the alphanumeric keypad
Use the alphanumeric keypad to enter a text. Press the
appropriate alphanumeric key to select a letter. For example, if you
press the ‘5’ numeric key, the letter ‘J’ appears in the display first.
Press the key repeatedly to enter other characters assigned to this
key.
Press the ‘2’ key once to select the letter ‘A’. If you want to enter
‘A’ and ‘B’ in succession, first press the ‘2’ key once to select the
letter ‘A’. Then wait for a second to move to the second character,
then press key ‘2’ twice to enter ‘B’. You can use the escape key
ESC to delete letters that have been entered incorrectly. The
character before the cursor is deleted. All characters in an entered
sequence can be deleted at once by pressing and holding the
escape key ESC for 2 seconds.
Use the left or right key to move the cursor. Use the
8
# key to toggle between upper and lower case letters.
16 5
4.16 Setting the ringer volume on the handset
You can set the ringer volume for incoming calls (internal or
external) to 6 levels (levels 1 to 5 and ‘OFF’).
If you select ‘OFF’, the symbol appears in the display. The
handset does not ring when there is an incoming call. level "5" is
the highest. (The default setting on the telephone is level "3".)
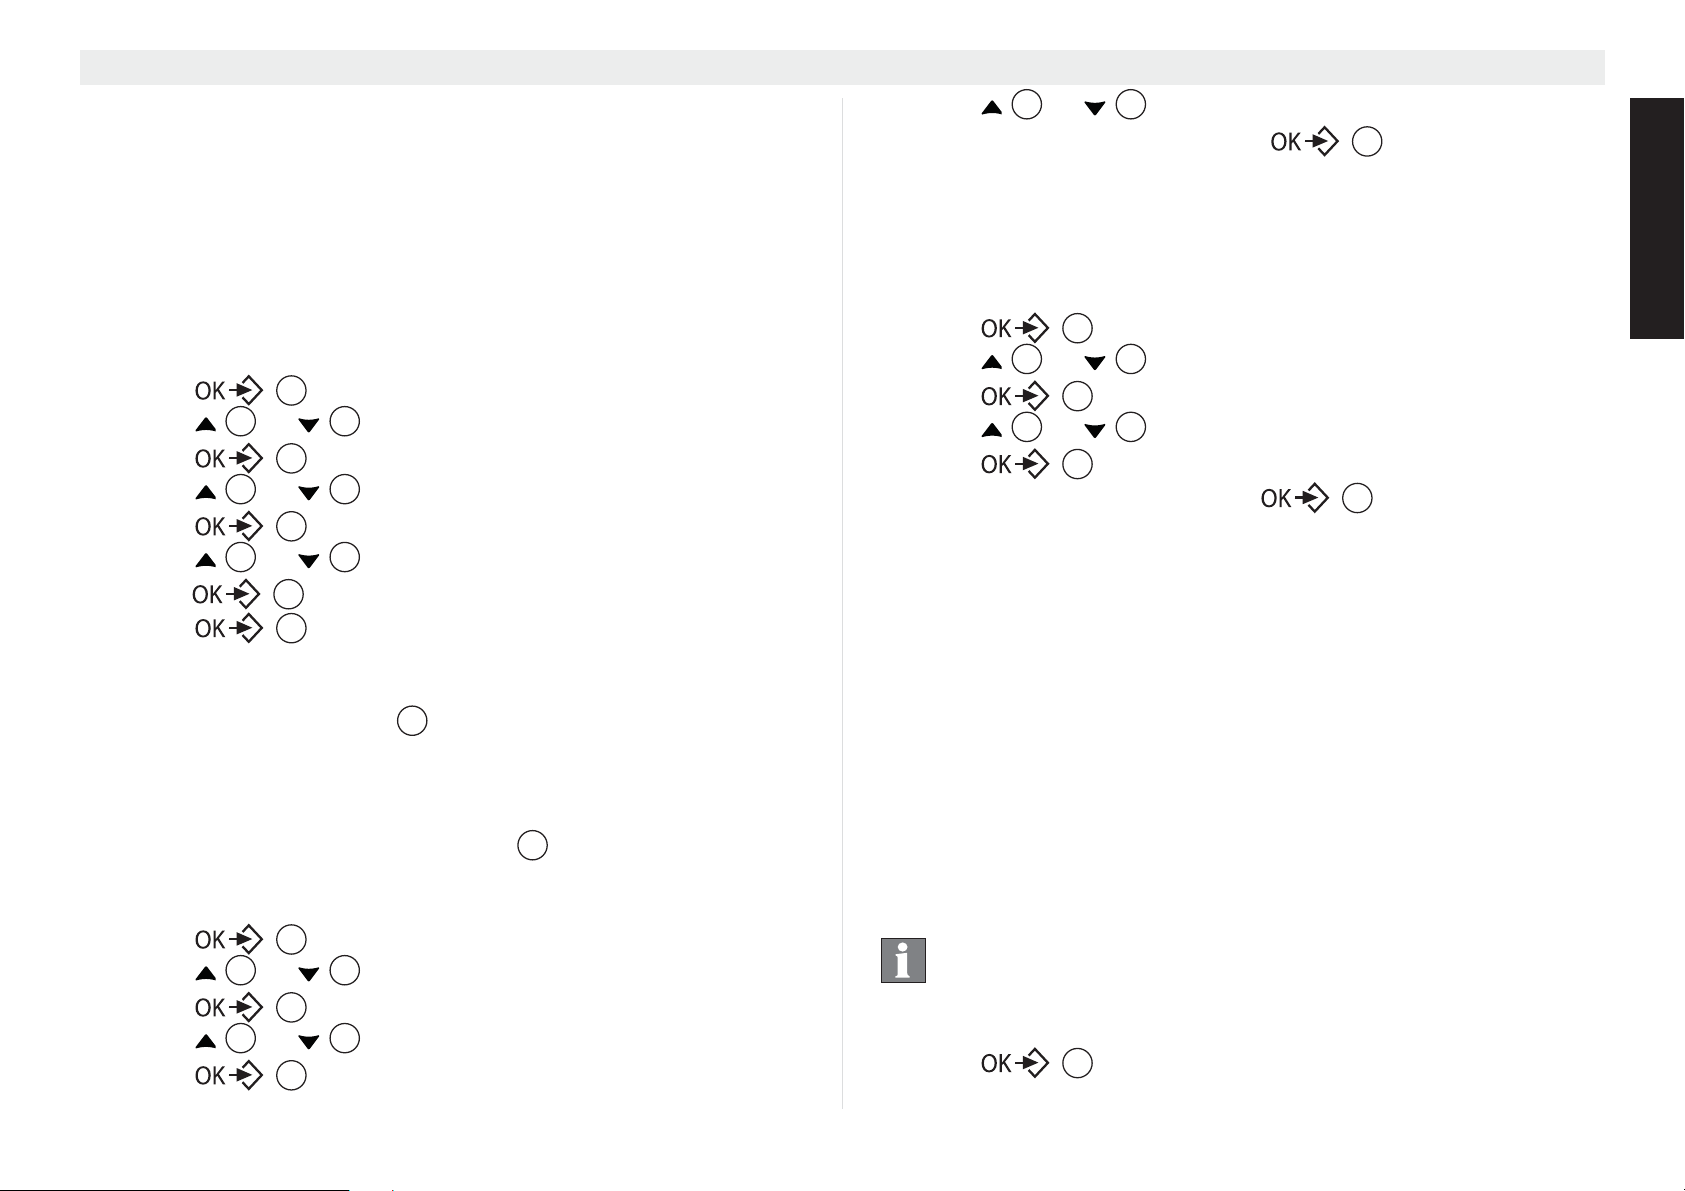
4.16.1
1. Press .
2. Press or repeatedly, select ‘HS SETTINGS’.
3. Press to confirm.
4. Press or repeatedly, select ‘HANDSET TONES’.
5. Press to confirm.
6. Press or repeatedly, select ‘RING VOLUME’.
7. Press to confirm.
• The current volume is displayed and can be heard.
8. Press or
9. Press to confirm your selection or press ESC to
Setting the ringer volume for internal and external
calls (0-5)
17
17
17
17
4 15
repeatedly to select the ringer volume
you want.
17
exit the menu without saving.
To turn off the handset ringer permanently, press and
hold for approx. 3 seconds. The symbol
8
appear in the display. To reactivate the ringer, press and
hold again for 3 seconds.
3
ENGLISH
17
Page 18
Handset - settings and operation Butler Outdoor 2010 - Twin - Triple
13
4.17 Setting the ring tone on the handset
You can change the ring tone for an incoming call (internal or
external). The device has 7 different ring tones to choose from (1-7).
The default ring tone setting for internal and external calls is 1.
4.17.1
1. Press .
2. Press or repeatedly, select ‘HS SETTINGS’.
3. Press to confirm.
4. Press or repeatedly, select ‘HANDSET TONES’.
5. Press to confirm.
6. Press or repeatedly, select ‘RING TONES’.
7. Press to confirm.
8. Press or
9. Press
Setting the ring tone for internal and external calls
(1-7)
17
4 15
17
4 15
17
4 15
17
4 15
want.
17
exit the menu without saving.
repeatedly to select the ring tone you
to confirm your selection or press ESC to
3
4.18 Setting the keypad lock
You can lock the keypad to prevent accidental inputs. However,
you can still answer incoming calls even when the keypad is
locked.
Activating / deactivating the keypad lock:
1. Activate: press and hold the key for approx. 3
seconds.
•‘KEY LOCKED’ appears in the display.
2. Deactivate: Press and hold the key for approx. 3
seconds to unlock the keypad.
13
4.19 Switching the keypad beep on/off
You can set the handset so that a beep is generated whenever you
press a key.
1. Press
2. Press or repeatedly, select ‘HANDSET TONES’.
3. Press to confirm.
4. Press or repeatedly, select ‘KEY BEEP’.
5. Press to confirm.
6. Select:
–‘ON’: switches the keypad beep on;
–‘OFF’: switches the keypad beep off.
7. Press to confirm your selection or press ESC to
exit the menu without saving the setting.
4 15
4 15
17
17
17
17
twice.
4.20 Switching the range warning tone on/off
You can set the handset so that a beep is generated whenever you
are almost out of the base range during communication. When you
hear this beep you have to move closer to the base again (see also
“4.9 Out of range”).
To turn this on/off you have to follow above procedure (see “4.19
Switching the keypad beep on/off”) but select ‘RANGE TONE’
instead of ‘KEY BEEP’.
4.21 Switching the battery low warning tone on/off
You can set the handset so that a beep is generated when the
battery is almost empty. To turn this on/off you have to follow
above procedure (see “4.19 Switching the keypad beep on/off”) but
select ‘BATTERY TONE’ instead of ‘KEY BEEP’.
3
18
Page 19

Butler Outdoor 2010 - Twin - Triple Time and alarm functions
17
17
4.22 Switching the charge tone on/off
You can set the handset so that a beep is generated whenever you
place the handset inside the base or charger.
To turn this on/off you have to follow above procedure (see “4.19
Switching the keypad beep on/off”) but select ‘CHARGE TONE’
instead of ‘KEY BEEP’.
4.23 Changing the handset name
Proceed as follows to change the handset name that is shown in
the display in standby mode:
3
17
17
17
twice.
1. Press
2. Press or repeatedly, select ‘HANDSET NAME’.
3. Press to confirm.
4. Press ESC repeatedly to delete the letters in succession
and use the alphanumeric keypad to enter a new name.
5. Press to set the new handset name.
4 15
4.24 Auto talk
When the handset is in the base station and receives an incoming
call, the call is answered automatically when the handset is
removed from the base station or charger. You can choose
whether or not this function should be activated.
1. Press
2. Press or repeatedly, select ‘AUTO ANSWER’.
3. Press to confirm.
4. Select ‘ON’ or ‘OFF’ and press to confirm.
4 15
17
17
twice.
17
4.25 Auto hang-up
will switch to handsfree speaker when placed inside base or
charger. You can choose whether or not this function should be
activated.
1. Press
2. Press or repeatedly, select ‘AUTO HANGUP’.
3. Press to confirm.
4. Select ‘ON’ or ‘OFF’ and press to confirm.
4 15
twice.
17
17
17
4.26 Voicemail dial key number
By pressing the voicemail key for 3 seconds the phone dials the
pre-programmed number. You can use this to dial for example
your voice mailbox.
To program this number:
1. Press
2. Press or repeatedly, select ‘VOICEMAIL’.
3. Press to confirm.
4. Enter the voicemail number from your provider and press
4 15
to confirm.
17
twice.
17
17
5 Time and alarm functions
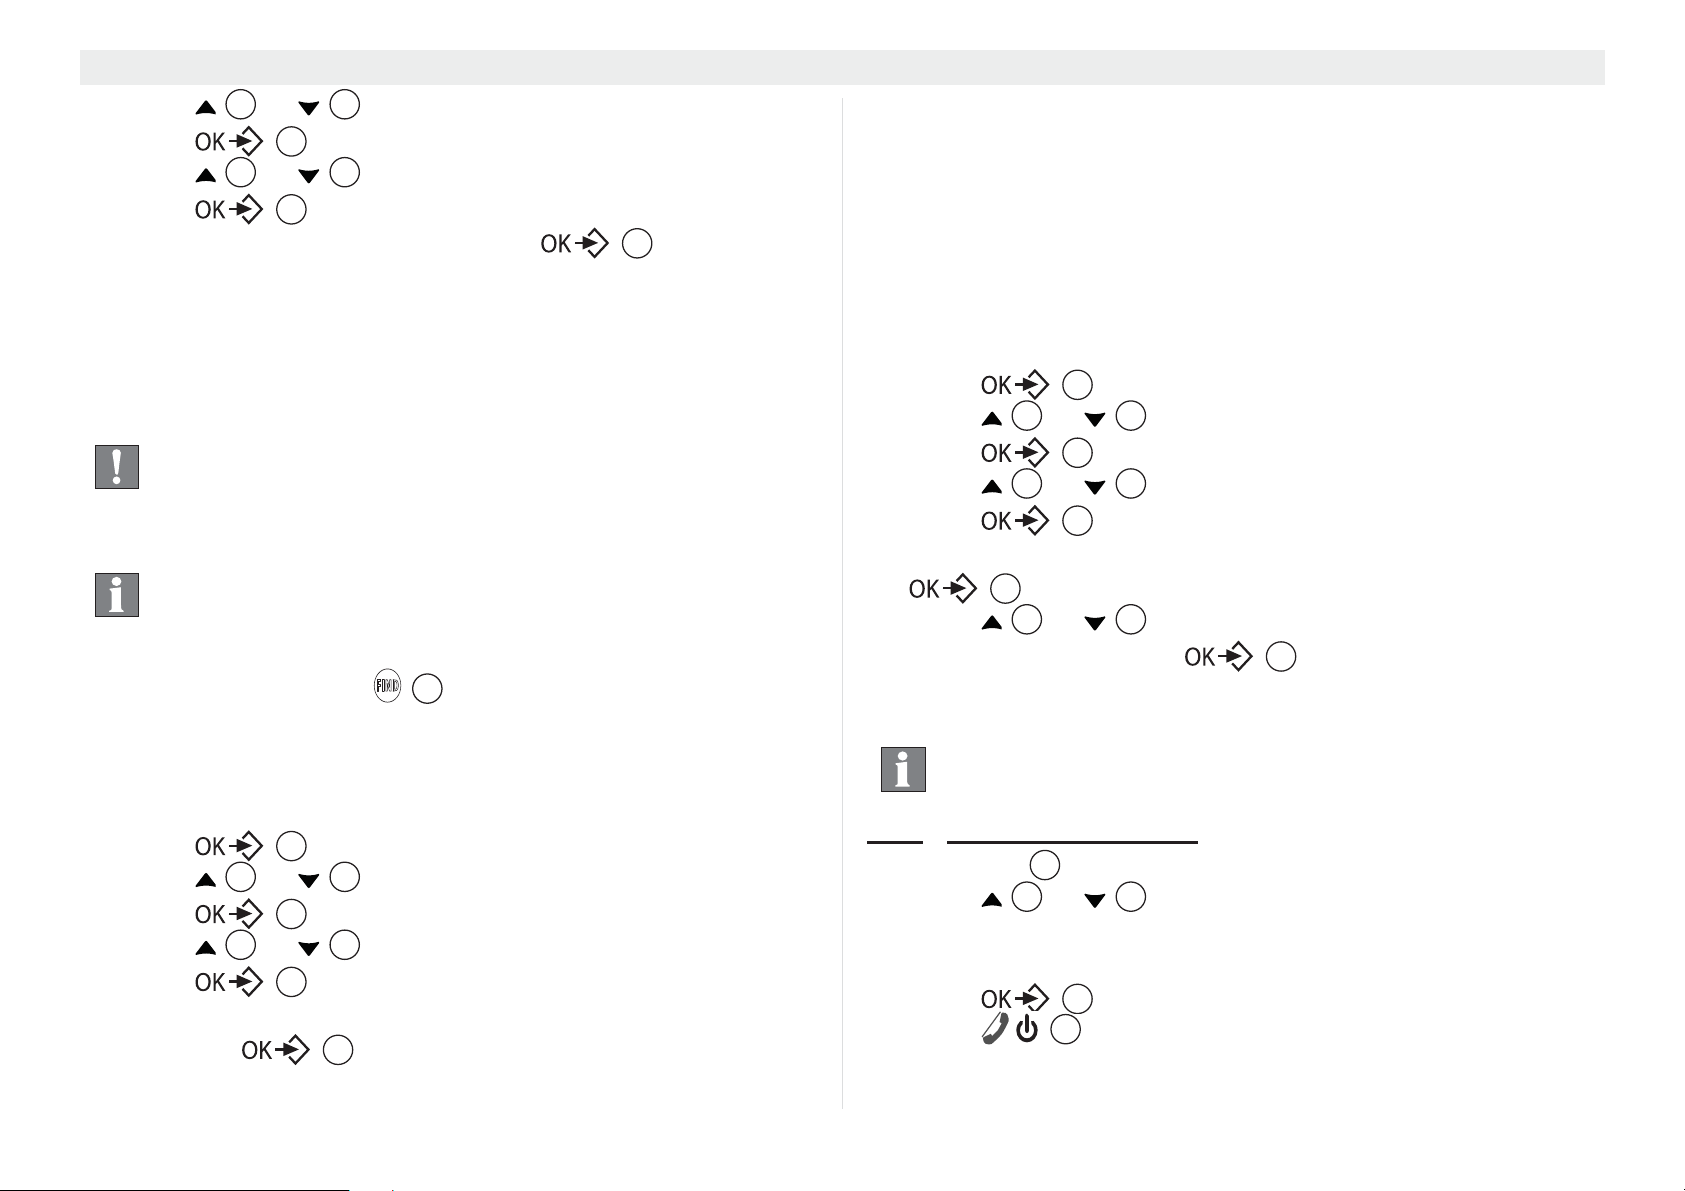
5.1 Setting the date and time
If caller ID (CLIP) is activated on your telephone line and
the provider transmits the date and time, the clock is set
automatically when an incoming call is received. Unless
you turn this function off (see below “5.3 Auto clock
adjust”). When you have set the date/time of a handset,
all handsets of that base station will adopt these settings.
ENGLISH
When the handset is in communication, the call is ended when
handset is placed inside the base station or charger when auto
hang-up is on. If auto hang-up is off during talk mode, the handset
1. Press .
2. Press or repeatedly, select ‘CLOCK & ALARM’.
3. Press to confirm.
4 15
19
Page 20
Time and alarm functions Butler Outdoor 2010 - Twin - Triple
17
17
17
17
4. Press or repeatedly, select ‘SET DATE&TIME’.
5. Press to confirm.
4 15
17
6. Enter the day and month as two digits each and press
.
17
The date and time will not be lost in the event of a base
station power failure.
5.2 Selecting the date/time format
1. Press .
2. Press or repeatedly, select ‘CLOCK & ALARM’.
3. Press to confirm.
4. Press or repeatedly, select ‘SET FORMAT’.
5. Press to confirm.
6. Press or repeatedly, select ‘TIME FORMAT’ or
‘DATE FORMAT’.
7. Press to confirm.
8. Select the time format (12-hour or 24-hour clock) and press
17
or
Select the date format (DD/MM or MM/DD) and press .
17
4 15
17
4 15
17
4 15
17
17
5.3 Auto clock adjust
When this function is turned on the date and time will be updated
by the callerID data received. This can be turned off as followed:
1. Press .
2. Press or repeatedly, select ‘CLOCK & ALARM’.
3. Press to confirm.
4. Press or repeatedly, select ‘AUTO CLOCK ADJ’.
5. Press to confirm.
6. Select ‘ON’ or ‘OFF’ and press to confirm.
17
4 15
17
4 15
17
17
5.4 The alarm function
Set the date and time before using this function so that
the alarm sounds at the correct time.
You can set various alarms for handsets registered on the base
station. The alarm only sounds on the handset and not on the base
station or any other handset.
If an alarm is set, the alarm symbol appears in the display in
standby mode.
When the alarm time is reached the handset will ring for 1 minute.
To stop the alarm tone, press any key on the handset.
5.4.1
1. Press .
2. Press or repeatedly, select ‘CLOCK & ALARM’.
3. Press to confirm.
4. Press or repeatedly, select ‘ALARM’.
5. Press to confirm.
6. Press or multiple times and select one of the 3
7. Enter the alarm time as four digits and press to
8. To deactivate the alarm function, select ‘OFF’ and confirm with
5.4.2
1. Press .
2. Press or repeatedly, select ‘CLOCK & ALARM’.
3. Press to confirm.
Setting an alarm
17
4 15
17
4 15
17
4 15
possible settings: ‘ONCE’, ‘DAILY’, or ‘OFF’. Confirm by
pressing . If you select ‘ONCE’ or ‘DAILY’, the
17
following appears in the display:
SET TIME
07:00
confirm your input.
.
Setting the alarm tone
4 15
20
Page 21

Butler Outdoor 2010 - Twin - Triple Phone book
17
4. Press or repeatedly, select ‘ALARM TONE’.
5. Press to confirm.
6. Press or multiple times and select one of the 7
alarm tones.
7. Press to confirm.
4 15
17
4 15
17
6 Phone book
You can store 200 numbers (up to 24 digits long) with an
associated name (up to 12 characters long) in the phone book.
6.1 Save a new entry in the phone book by the
phonebook menu
1. Press .
2. To add a new entry, press the menu key and select
‘NEW ENTRY’ with .
•‘ENTER NAME’ appears in the display. Enter the name using
the alphanumeric keys.
3. Press and enter the telephone number.
4. Press to store the entry in the phonebook or press
ESC
6.2 Save a new entry in the phone book by on-hook
dial mode
When you enter a telephone number is standby, and you press
afterwards the menu key you can store the number
direct into the phonebook:
1. In standby enter the telephone number you want to store.
2. Press .
•‘ENTER NAME’ appears in the display. Enter the name using
the alphanumeric keys.
3. Press and edit if necessary the telephone number.
16
17
17
17
3
to cancel without saving the entry.
17
17
17
4. Press to store the entry in the phonebook or press
ESC
3
to cancel without saving the entry.
17
6.3 Finding and calling a number in the phone book
1. Press .
2. Enter the initial letters of the name using the alphanumeric
keys.
• The first name in the list with these letters appears in the
display.
3. Press or repeatedly
numbers in the phone book.
4. Call the subscriber found: the desired number is highlighted.
Press .
16
4 15
14
to scroll through the other
6.4 Editing a phone book entry
1. Press .
2. Enter the initial letters of the name.
• The first name in the list with these letters appears in the
display.
3. Press or
numbers in the phone book.
4. Press when the number appears in the display.
5. Press or
6. Press to confirm.
7. Press ESC to delete the individual letters and use the
alphanumeric keypad to enter the correct name.
8. Press .
9. Press ESC to delete each individual digit, then use the
alphanumeric keys to enter the correct telephone number.
10. Press
16
4 15
17
4 15
17
3
17
3
to save the changes you have entered.
17
repeatedly to scroll through the other
repeatedly, select ‘EDIT ENTRY’.
ENGLISH
21
Page 22

Base station settings Butler Outdoor 2010 - Twin - Triple
17
41517
4
15
17
17
17
17
4
15
17
4
15
17
17
6.5 Deleting one entry or all entries
1. Press .
2. Use the alphanumeric keypad to enter the initial letters of the
name and/or use or to scroll to the desired entry.
3. Press when the number appears in the display.
4. Press or
‘DELETE ALL’.
5. Press to confirm.
6. Press to confirm again or the escape key ESC
to cancel.
16
17
4 15
17
17
4 15
repeatedly, select ‘DELETE’ or
3
7 Base station settings
7.1 Changing the PIN code (system PIN code)
Some functions are only available if you know the PIN code for the
base station.
The PIN code comprises 4 digits and the default code is '0000'.
Proceed as follows to change the preset PIN code or to enter a
new PIN code.
1. Press .
2. Press or repeatedly, select ‘BS SETTINGS’.
3. Press to confirm.
• Press or repeatedly, select ‘PIN CODE’.
4. Press and enter the old PIN code.
5. Press . If an incorrect PIN code is entered,
‘WRONG PIN!’ appears in the display. If you have entered the
correct PIN code, you are prompted to enter a new PIN code.
Enter the new system PIN and press .
7.2 Easy conference mode
When this function is enabled you can easily set up a conference
between 2 handsets and the external line. When one handset is in
communication with the external line, the second handset only has
to go off-hook to be in conference (communication with the 1st
handset and external line). To turn this function on or off:
1. Press .
2. Press or repeatedly, select ‘BS SETTINGS’.
3. Press to confirm.
4. Press or repeatedly, select ‘CONFERENCE’
5. Press to confirm.
6. Select ‘ON’ or ‘OFF’ and press to confirm.
17
4 15
17
4 15
17
17
When this function is turned off you can still set up a
conference call as described in “9.3.5 Conference calls
(two internal handsets and an external caller)”
7.3 Reset
All personal settings, call log and redial list entries will be deleted.
And all handsets and base settings will return to factory default
settings.
Phonebook list will not be deleted after reset.
1. Press .
2. Press or repeatedly, select ‘BS SETTINGS’.
3. Press to confirm.
4. Press or repeatedly, select ‘RESET’
5. Press to confirm.
Press again to confirm.
The phone will return to set up mode (see “4.1 Powering up (Set
up mode)”).
22
Page 23
Butler Outdoor 2010 - Twin - Triple Line settings
4
15
4
15
8 Line settings
8.1 Set country
There are various country depending settings and by setting the
country these parameters are set correspondingly. Each
parameter can be set separately also. Some settings like dial
mode cannot be set if there are no different options in the set
country.
To set the country version:
1. Press .
2. Press or repeatedly, select ‘LINE SETTINGS’.
3. Press to confirm.
4. Press or repeatedly, select ‘COUNTRY’
5. Press to confirm.
6. Press or repeatedly to select the country and
press to confirm.
7. Press again to confirm.
8.2 The flash key (R)
You can use the flash key R to use or activate certain services
on your external calls, such as “call waiting” (providing your
telephone line provider offers this feature). The flash key is also
used for internal recall or for connecting a call when operating the
telephone on a PABX. The flash key R causes a brief
interruption in the line. You can set this interruption time to short,
medium or long.
1. Press .
2. Press or repeatedly, select ‘LINE SETTINGS’.
3. Press to confirm.
4. Press or repeatedly, select ‘RECALL TIME’.
5. Press to confirm.
17
4 15
17
17
17
17
14
14
17
4 15
17
4 15
17
6. Press or repeatedly to select ‘SHORT’,
‘MEDIUM’ or ‘LONG’ and press to confirm.
4 15
17
8.3 First ring
When you receive a new voice mail waiting indication (VMWI) (see
“9.4 Voicemail display”) you may hear a short ring. If you want to
avoid this you can change the first ring setting to off.
1. Press .
2. Press or repeatedly, select ‘LINE SETTINGS’.
3. Press to confirm.
4. Press or repeatedly, select ‘FIRST RING’
5. Press to confirm.
6. Select ‘ON’ or ‘OFF’ and press to confirm.
17
4 15
17
4 15
17
17
8.4 Setting the dialling mode
There are two different dialling modes that can be used when
making calls:
• DTMF = dual tone multiple frequency, or tone dialling (today's
modern dialling mode)
• Pulse dialling (in older devices)
Modern devices are equipped with both functions which can be
changed depending on the application. DTMF is required for
programming or control functions, for example, if the device is
operated on a PBX. If pulse dialling is used, malfunctions can
occur on PBXs during normal operation because the system
interprets the pulse dialling signals incorrectly.
This menu is only available in some countries, depending
on which country you have set (see “8.1 Set country”).
Changing the dialling mode:
1. Press .
17
ENGLISH
23
Page 24
Additional handsets and base stations Butler Outdoor 2010 - Twin - Triple
4
15
2. Press or repeatedly, select ‘LINE SETTINGS’.
3. Press to confirm.
4. Press or repeatedly, select ‘DIAL MODE’
5. Press to confirm.
6. Select ‘TONE’ or ‘PULSE’ and press to confirm.
4 15
17
4 15
17
17
9 Additional handsets and base stations
Up to 5 handsets can be registered to one base station. Additional
handset must be registered to the base unit before use. Handsets
of a bundled model are already registered to the base.
You can also register handsets of the Ultra range (like
the Ultra S1200C)!
9.1 Registering an additional handset
This is only necessary if you have de-registered a
handset or bought a new separate handset. You don’t
have to register handsets of a bundle!
Hold down the paging key on the base station for more than
5 seconds .
Registration mode on the base station is now activated for approx.
1 minutes. You must perform the following steps to register a
handset:
1. Press .
2. Press or repeatedly, select ‘REGISTRATION’.
3. Press to confirm.
4. Press or repeatedly, select ‘REGISTER’.
5. Press to confirm.
17
4 15
17
4 15
17
6. Enter the base station PIN code (system PIN, default 0000)
and press .
17
19
• The handset will now search for the base station and register
when it has found it. Following successful registration, the
display shows standby mode and the handset name and
number.
9.2 De-registering a handset
It is possible to de-register a handset from a base station. You
should do this, for example, if a handset is damaged and needs to
be replaced.
1. Press .
2. Press or repeatedly, select ‘REGISTRATION’.
3. Press to confirm.
4. Press or repeatedly, select ‘UNREGISTER’.
5. Press to confirm.
17
4 15
17
4 15
17
6. Enter the system PIN (base station PIN code) and press
.
17
7. Press or repeatedly to select the handset to be
de-registered and press to de-register.
4 15
17
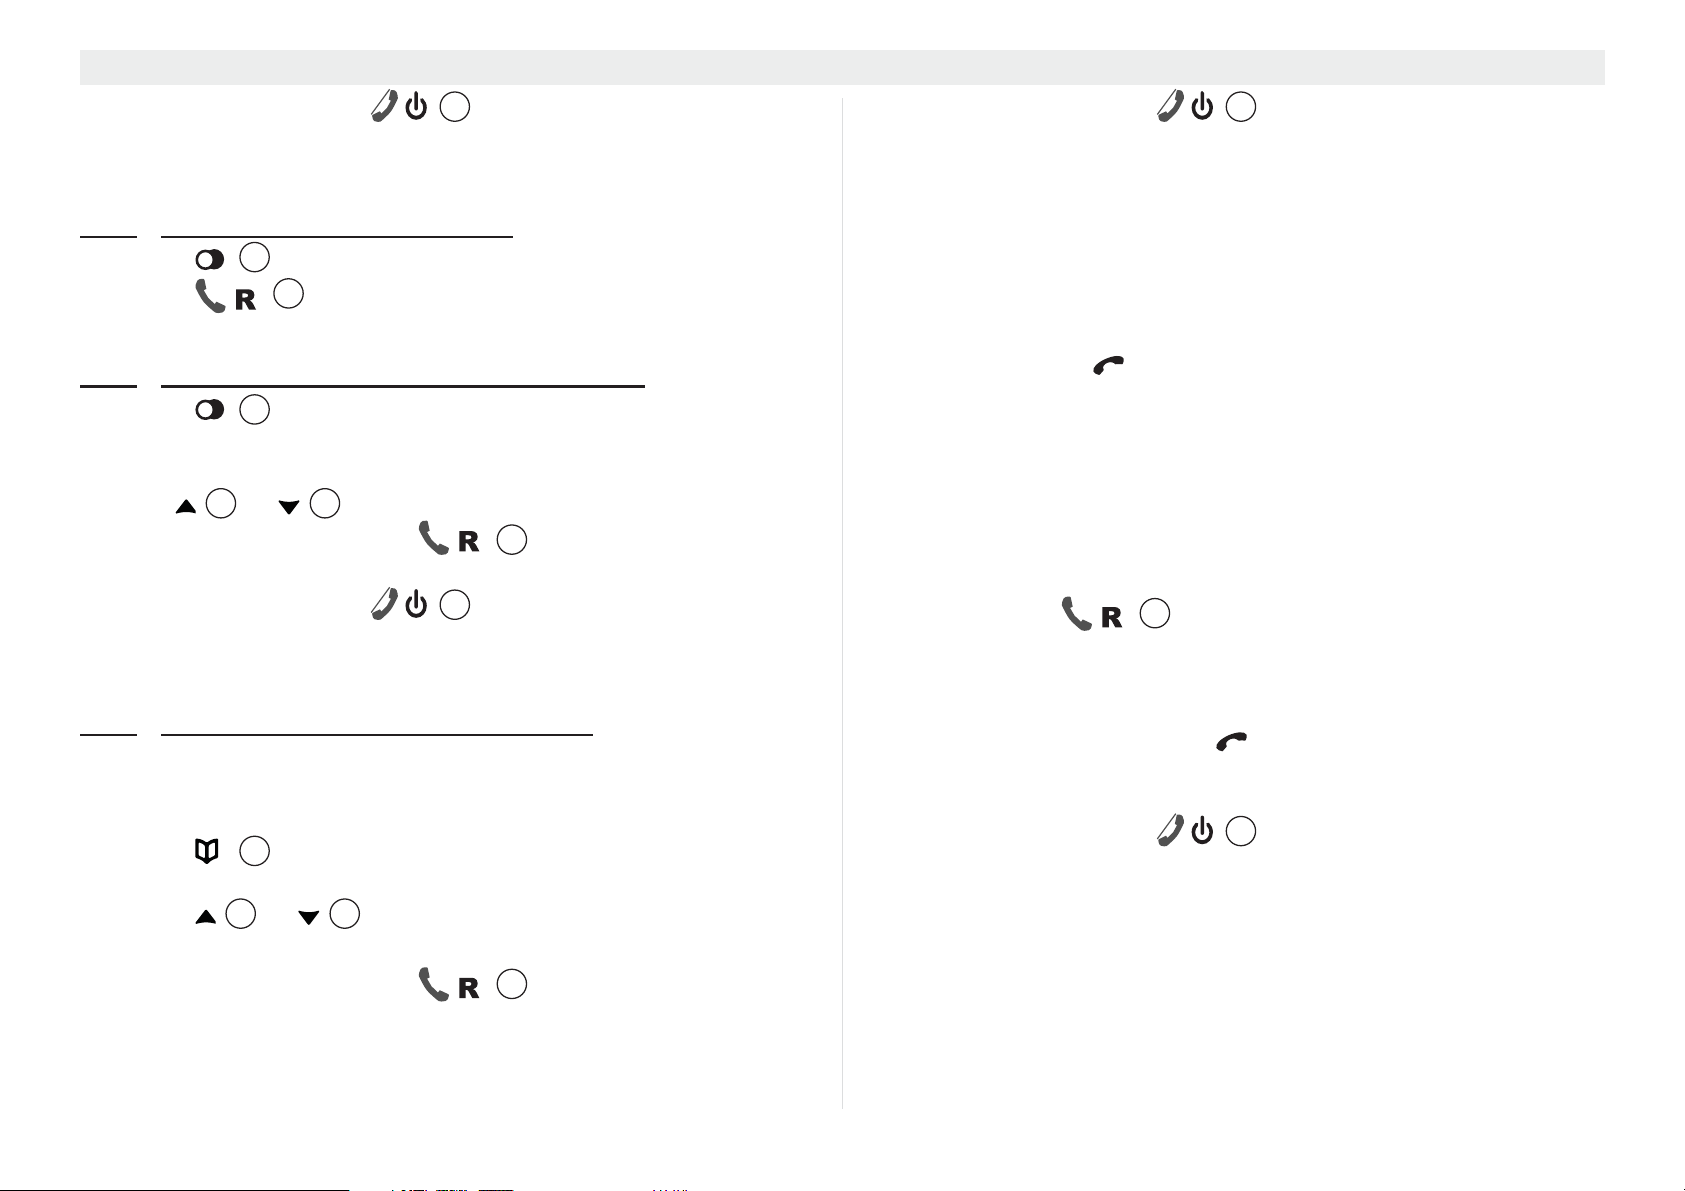
9.3 Using multiple handsets
These functions are only possible if more than one
handset is registered to the base station.
9.3.1 Call another handset
1. Press INT .
2. Press or repeatedly and select the handset you
want to call.
•Select ‘ALL HANDSETS’ to call all handsets.
• Press to call the selected handset(s).
3. Press to hang up at the end of your call.
12
17
6
24
Page 25

Butler Outdoor 2010 - Twin - Triple Additional handsets and base stations
17
9.3.2 Answering an internal call
•‘CALLING FROM HANDSET X’ appears in the display.
1. Press to answer the internal call.
14
OR
1. Lift the handset off its base station (if auto talk is selected, see
section “4.24 Auto talk”).
• The handset number of the calling handset appear in the
display during the call.
2. Press to hang up at the end of your call.
9.3.3
Answering an external call during an internal call
6
If you receive an external call during an internal call, you will hear
the call waiting tone (double beep) in both handsets involved in the
internal call.
1. Press .
6
• The internal call is ended.
2. Press .
14
• You have now answered the external call.
9.3.4
Forwarding a call to another handset
• You have an external caller on the line.
1. Press INT .
2. Press or repeatedly and select the handset you
12
4 15
want to call.
•Select ‘ALL HANDSETS’ to call all handsets.
• Press to call the selected handset(s). If the called
handset answers and you can conduct an internal call.
3. Press to connect the external caller to the called
6
handset.
OR
• The internal called party does not answer.
4. Press INT’
12
again to talk to the external caller again.
9.3.5
Conference calls (two internal handsets and an
external caller)
You can conduct a phone call with an internal and an external party
at the same time.
1. Press INT .
2. Press or repeatedly and select the handset you
12
4 15
want to call.
•Select ‘ALL HANDSETS’ to call all handsets.
3. Press to call the selected handset(s). If the called
17
handset answers and you can conduct an internal call.
4. Press and hold the INT key until you see ‘CONFERENCE’ on
the screen
• You are now connected to an external and an internal party
and can talk to both of them at the same time (conference
call).
If you have turned on the Conference function (see “7.2
Easy conference mode”) you can also make a
conference call by just going off-hook on the second
handset when 1st handset is in communication with the
external line.
9.4 Voicemail display
This display only works if you have enabled the voicemail or
telephone message service and your line provider transmits this
information along with the caller ID!
When you receive a new message in your voicemail box, the
symbol appears in the display. The symbol disappears when
you have listened to your message.
To listen your messages you have to dial a certain number, this
number can be programmed under key ‘1’ (see “4.26 Voicemail
dial key number”).
ENGLISH
25
Page 26

Abbreviations and technical terms Butler Outdoor 2010 - Twin - Triple
10 Abbreviations and technical terms
CLIP
Calling Line Identification Presentation, display of the caller's
telephone number on the called party's display.
DECT
Digital Enhanced Cordless Telecommunication; European
telecommunications standard for digital cordless telephones.
ECO mode
Economic Mode; in DECT telephony this is low-radiation
operation.
Flash key
Effects a brief line interruption that is used to activated features
such as toggling or call forwarding. On PBXs, the flash or R key is
used for internal recall.
GFSK
Gaussian Frequency Shift Keying; digital modulation method to
reduce crosstalk problems in telephony.
INT
Internal subscriber. Other handset or extensions within a PBX.
Paging
Base station search function. When the paging key is
pressed, all registered handsets ring.
PIN
Personal Identification Number.
R key
Recall key (see flash key).
Stand by
“Idle” status of a device without being completely switched off.
Twin
Designation for a device unit with two identical devices e.g. two
handsets.
Dialling pause
You may need a dialling pause when operating your telephone on
a PBX, for example, if the latter does not correctly identify the
number dialled to access an external line (e.g. the "0"). In this case
you can insert a pause after the number to access an external line
is dialled.
19
Pulse mode
Obsolete analogue dialling mode ("clattering" dialling noises).
LCD
Liquid Crystal Display.
LED
Light Emitting Diode.
DTMF
Dual Tone Multiple Frequency; modern, digital dialling mode.
26
Page 27

Butler Outdoor 2010 - Twin - Triple Troubleshootin
Symptom Possible cause Solution
Display remains dark. Battery pack not activated. See “2.3 Handset activation” how to activate the battery.
Batteries not charged. Charge the batteries.
Handset is switched off. Switch on the handset (see “4.2 Switching the handset
on/off”).
No power. Check that the devices has the correct power supply.
No sound. Telephone cable incorrectly connected or
defective.
Check the connection of the telephone cable (see “2.1
Commissioning the base station”).
The line is engaged by a different handset. Wait until the other handset hangs up.
The symbol is flashing. Handset is out of range. Move closer to the base station with the handset.
The base station has no power. Check the power connection to the base station.
The handset is not registered to the base
station.
Register the handset to the base station (see “9.1
Registering an additional handset”).
The base station or handset
does not ring.
The ringer volume is off or too low. Set the ringer volume (see “4.16 Setting the ringer
volume on the handset”.
No connection despite good
sound quality.
The dialling mode is incorrect. Check the dialling mode (see “8.4 Setting the dialling
mode”).
Calls cannot be forwarded on a
PBX.
The flash time is too short. Set the device to a long flash time (see “8.2 The flash
key (R)”).
Telephone does not respond
when keys are pressed.
Programming error. Remove the batteries and then insert them again after
1 minute.
11 Troubleshootin
Risk of injury or death due to electrical current!
In the event of danger, disconnect the device from the 230 V mains immediately.
ENGLISH
27
Page 28

Servicing Butler Outdoor 2010 - Twin - Triple
Do not modify or repair the device. The device or cable should only
be repaired by a specialist in the service centre. Repairs that are
not carried out properly can cause significant risks to the user.
12 Servicing
12.1 Maintenance
The device is maintenance-free. Occasionally check the condition
of the batteries and replace them with new batteries of the same
type if performance is impaired or if they are beginning to leak.
Danger of chemical burns!
Wear protective gloves to remove flat rechargeable
batteries.
if the base/charger station comes into contact with liquid,
immidiatly disconnect the device from the power supply and dry it
out carefully. Check its operation after 2-3 days. Send it into the
service centre if it is defective.
12.2 Cleaning
Risk of electric shock or short circuit from contact with
components that conduct electricity.
Prevent liquids penetrating the device. If this should
occur, unplug the mains adapter from the power socket
and the telephone cable connector from the wall socket
and remove the batteries.
Do the same if the device, cable or mains adapter are
damaged: avoid direct contact with liquids and disconnect
the device from the 230 V mains immediately.
Clean the telephone with a damp cloth that has been dipped in
lukewarm water or an anti-static cloth. Never use cleaning agents
or abrasives.
12.3 Decommissioning, storage
To decommission the device temporarily, disconnect the
telephone cable from the wall socket and from the telephone jack
on the base station. Unplug the base station and handset mains
adapters from the 230 V sockets.
Remove the batteries from the handsets. If the telephone is
decommissioned for a long time, replace the rechargeable
batteries with new ones of the same type when the phone is
recommissioned.
Store the devices and rechargeable batteries in a dry place that is
not too warm.
12.4 Disposal (environmental protection)
The device and rechargeable batteries must not be
disposed of in normal household refuse at the end of
their service life. This is indicated by this symbol on the
product and/or on the packaging. Take the device to a
collection point for recycling electrical and electronic
devices. Some of the materials in the product can be
recycled there. You can help the environment by recycling some
parts or raw materials from used products.
Also dispose of packaging materials in an environmentally friendly
way. Contact your local authority for more information on collection
points in your area.
28
Page 29

Butler Outdoor 2010 - Twin - Triple Technical data
13 Technical data
Telephony standards: DECT
Frequency range: 1880 MHz to 1900 MHz
Number of channels: 120 duplex channels
Modulation: GFSK
Encoding speed: 32 kbit/s
Emissions: 10 mW (average output per channel)
Range: 300 m in open terrain
Max. 50 m in buildings
Power supply base station: Input: 100 - 230 V~/50 Hz
Output: 6V /500 mA
Power supply charging
station: Input: 100 - 230 V~/50 Hz
Output: 9V /210 mA
Handset, batteries: (NiMH) rechargeable battery pack,
2,4 V/500 mAh (BT-800)
Handset, battery life: 168 hours in standby mode
Talk time: 10 hours
Charging time: 15 hours
Dialling mode: DTMF (dual tone multiple frequency)
Pulse dialling
Flash time: 100 ms, 300 and 600 ms
Temperature (operation): +5 °C to +45 °C
Temperature (storage): 0 °C to 70 °C
Dust and waterproof: IPX7
(Handset only)
Dimensions (height x width x depth):
– Base station: 100 mm x 116 mm x 85 mm
– Handset: 174 mm x 54 mm x 35 mm
– Charging station: 52 mm x 92 mm x 78 mm
Weight:
– Handset incl. battery pack: 126 g
– Base station incl. mains adapter 213 g
– Charging/station incl. mains adapter 130g
Maximum power consumption:
– Base station and handset: 2.25 W
– Charging/repeater station and handset: 1.25 W
14 Topcom Warranty
14.1 Warranty period
The Topcom units have a 24-month warranty period. The warranty
period starts on the day the new unit is purchased. There is no
warranty on standard or rechargeable batteries (AA/AAA type).
Consumables or defects causing a negligible effect on operation or
value of the equipment are not covered.
The warranty has to be proven by presentation of the original or
copy of the purchase receipt, on which the date of purchase and
the unit-model are indicated.
14.2 Warranty handling
A faulty unit needs to be returned to a Topcom service centre
including a valid purchase note.
If the unit develops a fault during the warranty period, Topcom or
its officially appointed service centre will repair any defects caused
by material or manufacturing faults free of charge, by either
repairing or exchanging the faulty units or parts of the faulty units.
In case of replacement, colour and model can be different from the
original purchased unit.
The initial purchase date shall determine the start of the warranty
period. The warranty period is not extended if the unit is
exchanged or repaired by Topcom or its appointed service centre.
ENGLISH
29
Page 30

Topcom Warranty Butler Outdoor 2010 - Twin - Triple
14.3 Warranty exclusions
Damage or defects caused by incorrect treatment or operation and
damage resulting from use of non-original parts or accessories are
not covered by the warranty.
The warranty does not cover damage caused by outside factors,
such as lightning, water and fire, nor any damage caused during
transportation.
No warranty can be claimed if the serial number on the units has
been changed, removed or rendered illegible.
Any warranty claims will be invalid if the unit has been repaired,
altered or modified by the buyer.
This appliance may only be used with rechargeable batteries. If
you want to replace the originally included batteries, please check
whether the batteries you use are suitable and rechargeable.
Alkaline batteries may under NO circumstances be used in the
handsets.
If you use Alkaline batteries and place the handset on the basis,
the batteries will heat up and may explode. Any damage which
may be caused cannot be recovered from the manufacturer and
the damage thus caused to the appliance is not covered by the
warranty conditions. Any repairs will be charged to you.
30
Page 31

Butler Outdoor 2010 - Twin - Triple
NEDERLANDS
1 Algemene informatie
Deze gebruikershandleiding bevat alle informatie die u nodig hebt
voor de installatie, het instellen en de bediening van uw toestel.
Daarnaast bevat de handleiding informatie en belangrijke
opmerkingen voor uw veiligheid en hulp bij problemen.
1.1 Het product: Butler Outdoor 2010
De productnaam ‘Twin’ beschrijft een uitvoering die
bestaat uit een basisstation met draadloze handset plus
een extra laadstation en een extra draadloze handset
(= Twin).
Dit product is geproduceerd in overeenstemming met de uniforme
digitale standaards voor draadloze telefoons (DECT). DECTtechnologie wordt gekenmerkt door een zeer goede beveiliging
tegen afluisteren en een kwalitatief zeer goede digitale overdracht.
Deze telefoon is bedoeld voor verschillende toepassingen,
bijvoorbeeld voor gebruik in een netwerk met een PBX met
basisstations en draadloze handsets: er kunnen maximaal 5
draadloze handsets worden bediend met één basisstation. Er
kunnen interne oproepen tussen twee draadloze handsets worden
gemaakt. Er kunnen tot 6 repeaters worden aangemeld bij het
basisstation om het bereik te vergroten. Als de functie
nummerweergave van uw telefoonmaatschappij beschikbaar is op
uw lijn, kunt u die functie met deze telefoon gebruiken. Als u deze
diensten gebruikt, wordt het telefoonnummer van de beller op de
telefoondisplay weergegeven.
U kunt nummerweergave alleen gebruiken als de functie
voor uw telefoonlijn is ingeschakeld. Neem contact op met
uw telefoonmaatschappij voor informatie over het
activeren van deze functie. Als deze functie niet is
ingeschakeld, worden de nummers bij inkomende
oproepen NIET op de telefoondisplay weergegeven.
1.2 Copyright
Dit document is auteursrechtelijk beschermd.
Alle rechten, inclusief het recht op volledige of gedeeltelijke
fotomechanische reproductie, kopiëren en verspreiding via
bepaalde processen (zoals gegevensverwerking,
gegevensdragers en gegevensnetwerken), en wezenlijke en
technische wijzigingen zijn voorbehouden.
1.3 Signaalwoorden en -symbolen
Symb Signaalwoor
Waarschuwing
Voorzichtig
geen
Voorzichtig
Belangrijk
Info, tip
Betekenis
Waarschuwing voor het risico van mogelijk
ernstig of zelfs dodelijk letsel als u zich niet
aan deze informatie houdt.
Waarschuwing voor het risico van mogelijk
licht letsel als u zich niet aan deze
informatie houdt.
Risico van schade aan materiaal of de
omgeving.
Dit geeft belangrijke informatie over de
functie.
Algemene informatie of specifieke tips.
1.4 Gebruiksbestemming
Dit product is bedoeld voor het bellen via een vaste lijn binnen een
telefoonnetwerk. Een essentiële voorwaarde voor het juiste
gebruik van de telefoon is installatie door een professional, waarbij
rekening wordt gehouden met de informatie in deze
gebruikershandleiding.
Elk andere gebruik wordt als verkeerd beschouwd en is niet
toegestaan.
31
Page 32

Algemene informatie Butler Outdoor 2010 - Twin - Triple
Elke aanpassing of omzetting door de gebruiker, die niet in deze
gebruikershandleiding wordt beschreven, wordt als verkeerd
beschouwd en is niet toegestaan.
1.5 Veiligheidsvoorschriften
De volgende basisvoorschriften moeten altijd in acht genomen
worden tijdens het gebruik van elektrische apparaten.
Lees de volgende veiligheidsvoorschriften en informatie over het
juiste gebruik van het toestel aandachtig door. Stel u op de hoogte
van alle functies van het toestel. Bewaar deze
gebruikershandleiding op een veilige plek bij het toestel en
overhandig de gebruiksaanwijzing waar nodig aan een andere
gebruiker. Geef de telefoon niet zonder de gebruikershandleiding
aan anderen.
Elektrische risico's:
Kans op letsel of de dood door elektrische stroom!
Koppel het toestel in gevaarlijke situaties meteen los van
de 230 V-voeding.
• Gebruik dit toestel niet als de netadapter, de kabel of het
toestel beschadigd is. Laat het toestel niet vallen omdat het
hierdoor beschadigd kan raken.
• De voltage in het toestel is hoog en gevaarlijk. Open de
behuizing nooit en stop geen voorwerpen in de
ventilatieopening.
• Zorg ervoor dat er geen vloeistoffen in het toestel
binnendringen. Als dit gebeurt, haalt u de netstroomadapter
uit de aansluiting en de stekker van de telefoonkabel uit het
stopcontact.
• Haal ook de netstroomadapter uit het stopcontact en de
stekker van de telefoonkabel uit de wandcontactdoos als er
zich storingen voordoen tijdens het gebruik van de telefoon en
voordat u het toestel schoonmaakt.
32
• Raak de contactpunten van de lader en de stekker niet aan
met scherpe of metalen voorwerpen.
• U mag het toestel niet aanpassen of repareren. Het toestel en
de kabel mogen enkel door specialisten van het
onderhoudscentrum gerepareerd worden. Reparaties die niet
juist uitgevoerd zijn, kunnen aanzienlijke gevaren opleveren
voor de gebruiker.
• Kinderen onderschatten vaak de gevaren van het bedienen
van elektrische toestellen. Laat kinderen niet zonder toezicht
in de buurt van elektrische toestellen.
• Gebruik het toestel niet in vochtige (zoals de badkamer) of erg
stoffige ruimten.
• Toestellen die aangesloten zijn op het elektriciteitsnet, kunnen
door onweer beschadigd raken. Haal daarom altijd de stekker
uit het stopcontact als het onweert.
• Om het toestel volledig van het elektriciteitsnet te ontkoppelen,
moet de stekker uit het stopcontact gehaald worden. Trek
hierbij altijd aan de stekker zelf en nooit aan de kabel.
• Controleer kabels regelmatig op schade, bescherm ze tegen
hete oppervlakken en andere gevaren, wikkel ze volledig af,
leg ze zodanig dat er niemand over kan struikelen en snoer ze
niet in.
Brandgevaar:
Kans op letsel of de dood door brand!
Stel het toestel niet bloot aan te hoge temperaturen en
koppel het toestel bij gevaar onmiddellijk los van de
230 V-netstroom.
De warmte die zich in het toestel opbouwt, kan leiden tot een
defect of brand in het toestel. Stel dit toestel daarom niet bloot aan
extreem hoge temperaturen:
– Vermijd direct zonlicht en hitte.
– Dek de ventilatieopening op het toestel niet af.
Page 33

Butler Outdoor 2010 - Twin - Triple
NEDERLANDS
Explosiegevaar:
Risico van letsel door explosie!
Wees zeer voorzichtig met batterijen (zowel wegwerpals oplaadbare batterijen).
• Gooi de oplaadbare of wegwerpbatterijen nooit in open vuur.
• Gebruik het toestel niet in een omgeving waar de kans op
ontploffing bestaat!
Vergiftigingsgevaar:
Risico van letsel door vergiftiging!
Wees vooral zeer voorzichtig met kinderen.
• Houd oplaadbare en wegwerpbatterijen uit de buurt van
kinderen.
Gevaar voor verstikking:
Risico van letsel door verstikking!
Wees vooral zeer voorzichtig met kinderen.
• Houd verpakkingsmaterialen buiten het bereik van kinderen.
• Let op mogelijke risico's voor kinderen (verstikking) als u
verlengkabels gebruikt.
Fouten:
Mogelijk risico van letsel door fouten in het toestel!
Wees zeer voorzichtig met medische elektrische
apparaten.
• De draadloze handset kan een vervelend gezoem in
hoorapparaten veroorzaken, dus houd de handset ver genoeg
uit de buurt van hoorapparaten.
Mogelijke schade:
Mogelijke schade aan het toestel!
Lees de informatie in deze gebruikershandleiding.
• Gebruik alleen de meegeleverde netstroomadapter. Gebruik
geen adapters van derden, anders kunnen de oplaadbare
batterijen beschadigd raken.
• Het stopcontact voor de netadapter moet zich in de buurt van
het toestel bevinden en gemakkelijk toegankelijk zijn.
• Gebruik alleen de meegeleverde oplaadbare batterijen. Als de
batterijen moeten worden vervangen, gebruik dan oplaadbare
batterijen van hetzelfde type. Zorg ervoor dat de batterijen op
de juiste manier worden geplaatst (zie de informatie op het
batterijvak op het toestel). Gebruik nooit gewone
wegwerpbatterijen!
Dit toestel kan niet worden gebruikt bij een
stroomstoring; gebruik daarom in noodgevallen een
telefoon die niet afhankelijk is van het elektriciteitsnet,
zoals een mobiele telefoon.
• Plaats de handset niet in een oplaadstandaard zonder dat de
batterij is geplaatst en het batterijdeksel stevig op zijn plaats zit.
• De werking van medische elektrische apparaten kan worden
beïnvloed door de elektromagnetische straling van uw toestel.
Zorg daarom dat het toestel wordt geïnstalleerd en bediend op
voldoende afstand van medische elektrische apparaten.
Hetzelfde geldt voor geïmplanteerde medische apparaten,
zoals pacemakers.
1.6 Opmerkingen bij lagestralingswerking
Deze draadloze telefoon (conform de DECT-norm)
vergemakkelijkt de lagestralingswerking (ECO-modus).
Tijdens een gesprek verlaagt de handset het stralingsvermogen al
naargelang de afstand vanaf het basisstation. Als er geen oproep
wordt gemaakt, verlaagt de handset het stralingsvermogen tot het
minimum.
33
Page 34

Installatie Butler Outdoor 2010 - Twin - Triple
Het toestel ondersteunt de lagestralingswerking ook omdat het
basisstation het stralingsvermogen tot bijna nul verlaagt als er
slechts één handset bij het basisstation is aangemeld en de
handset voor opladen in het basisstation staat. Het basisstation
verlaagt het stralingsvermogen echter niet indien er twee of meer
handsets zijn aangemeld.
Dit betekent niet dat de normale DECT-straling schadelijk is voor
de gezondheid. De lagestralingswerking vermijdt juist onnodige
blootstelling aan straling.
Het basisstation verlaagt het stralingsvermogen niet in de
geleverde configuratie als een Twin-set! Plaats het basisstation op
een plaats waar u niet veel tijd doorbrengt, bijvoorbeeld in de gang.
Plaats het basisstation niet in uw slaapkamer, in de slaapkamer
van uw kinderen of in de woonkamer.
2Installatie
Zorg dat de batterijen zijn opgeladen voordat u de
telefoon voor het eerst gebruikt, anders werkt het toestel
niet optimaal.
Houd rekening met de veiligheidsvoorschriften over de
omgeving en omstandigheden voor de installatie en
locatie! Gebruik het toestel niet in een omgeving waar de
kans op ontploffing bestaat!
2.1 Het basisstation in gebruik nemen
Voer de volgende stappen uit:
• Steek de netstroomadapter in een stopcontact van 230 V.
Steek de stekker in de adapteraansluiting aan de onderkant
van het basisstation.
• Sluit de telefoonaansluiting op de onderkant van het
basisstation aan op de telefoonaansluiting met de
meegeleverde telefoonkabel.
3
1
4
1. Wandcontactdoos telefoonaansluiting
2. Telefoonkabel
3. Onderkant van het basisstation
4. Kabel van de netstroomadapter
2
2.2 Het laadstation in gebruik nemen (Enkel Twin of
Triple versie)
Voer de volgende stappen uit:
34
Page 35

Butler Outdoor 2010 - Twin - Triple
NEDERLANDS
Steek de netstroomadapter in een stopcontact van 230 V.
Steek de stekker in de adapteraansluiting aan de onderkant
van het laadstation.
1
2
1. Onderkant van het laadstation
2. Kabel van de netstroomadapter
2.3 De handset activeren
Risico van letsel door explosie!
Gebruik alleen het type oplaadbare batterij dat is
meegeleverd
(BT-800 2,4 V DC).
De batterijen hoeven niet te worden geplaatst!!
De batterijen zijn al in de handset geplaatst. Een
schakelaar op de onderkant van de handset heeft de
batterij losgekoppeld om te voorkomen dat hij leeg raakt.
U moet eerst op deze schakelaar drukken om de batterij
aan te sluiten.
1. Verwijder het kartonnen afstandsstuk.
2. Druk de activeringspen in de richting die op het etiket wordt
aangegeven.
• Na het activeren duurt het ongeveer 10 seconden voordat de
display wordt ingeschakeld.
3. Verwijder het etiket als de handset is geactiveerd.
Bewaar de activeringspen voor het geval u de
activeringsstatus later wilt wijzigen (bijvoorbeeld als de
handset langere tijd niet wordt gebruikt)
35
Page 36

Bedieningen en menustructuur Butler Outdoor 2010 - Twin - Triple
19
3 Bedieningen en menustructuur
3.1 Toetsen / displays / Leds
Handset
1. Display
2. Toets antwoordapparaat
/ microfoon uit
3. Toets Escape
4. Toets Omhoog
5. Toets rechts / toets
oproeplijst
6. Toets ophangen / aan-uit
7. Alfanumerieke toetsen
8. Toets belgeluid uit /
pauze
9. Nummerherhalingstoets
10. Microfoon
11. Toets Handenvrij
12. Toets intern
13. Toets voor
toetsenbordvergrendelin
g
14. Toets oproep
beantwoorden / Flash
15. Toets Omlaag
16. Toets links /
telefoonboek
17. Toets Menu / OK
18. Led gebeurtenis
18
17
16
15
14
13
12
11
10
Basisstation
19. Paging toets
1
2
3
4
5
6
3.2 Display (LCD)
Regel met symbolen
1e tekstregel
7
2e tekstregel
8
9
Regel met symbolen
Tijd/datum en berichtenteller
Op de eerste tekstregel staan de naam en het nummer van de
handset. Als de handset achter een repeater in stand-by staat,
wordt ‘*’ na het handsetnummer weergegeven.
Op de tweede tekstregel staan berichten voor nieuwe
gebeurtenissen (‘NW.VM.BERICHT’ (NEW VOICE MAIL),
36
Page 37

Butler Outdoor 2010 - Twin - Triple
NEDERLANDS
‘NIEUW OPROEP’ (NEW CALL) en ‘GEHEUGEN VOL!’
(MEMORY FULL!)).
De handsetdisplay heeft een beschermlaag die moet
worden verwijderd voordat de handset in gebruik
wordt genomen.
Batterijdisplay:
• De batterijen zijn volledig opgeladen.
• De batterijen zijn voor 66% opgeladen.
• De batterijen zijn slechts voor 33% opgeladen.
• De batterijen zijn bijna leeg. Als de batterij bijna leeg is,
knippert het batterijsymbool op de display.
Tijdens het opladen beweegt . Als de batterij volledig
is opgeladen, stopt het bewegen.
3.3 Symbolen
Tijdens een gesprek (de telefoon is al opgenomen).
- Tijdens een gesprek (continu branden).
- Knipperen tijdens belgeluid.
Beltoon handset uit.
Handenvrije modus ingeschakeld.
Tijd: werkelijke tijd in stand-by. Tijd van ontvangen
oproep in oproeplijst of tijdens het afspelen van
berichten.
Datum: werkelijke datum in stand-by. Datum van
ontvangen oproep in oproeplijst of tijdens het afspelen
van berichten.
Naar andere menuopties.
Invoeren oproeplijst(*).
Nieuw bericht in de mailbox.
Alarm geactiveerd.
Antennesymbool: binnen bereik (permanente
weergave) - buiten bereik (knipperen).
(*) Als nummerweergave is geactiveerd voor uw telefoonlijn.
3.4 Led gebeurtenis
De voorste led van de handset linksboven geeft het volgende
aan:
• Snel knipperend: inkomende oproep.
• Langzaam knipperend: intercomgesprek of paging.
18
37
Page 38

Bedieningen en menustructuur Butler Outdoor 2010 - Twin - Triple
• Elke 2 seconden knipperen: er zijn nieuwe
gebeurtenisberichten in de handset (zie tweede tekstregel op
de display).
3.5 Menustructuur
De handset heeft een eenvoudige menustructuur. Elk menu bevat
een aantal opties.
Als u het hoofdmenu wilt openen, drukt u op de menutoets
terwijl de handset is ingeschakeld en in de stand-bymodus
17
staat.
Druk op de toets omhoog of omlaag om naar de
gewenste menuoptie te gaan. Bij de instructies in deze
gebruikershandleiding staan de toetssymbolen en het
positienummer op het overzicht van het toestel. Druk daarna nog
een keer op de menutoets om andere opties te openen
of om de weergegeven instelling te bevestigen.
4 15
17
3.6 Menuoverzicht
Menu Opties submenu's
HS. INSTEL. HANDSETNAAM
HANDSET TONEN
TAAL
AUTO.ANTW.
AUT. OPHANGEN
VOICEMAIL
KLOK & ALARM DATUM&TIJD
FORMAAT INSTEL
ALARM
ALARMMELODIE
AUTO TIJD
BS. INSTEL. PIN CODE
CONFERENTIE
RESETTEN
LIJN INSTEL. LAND
FLASHDUUR (*)
1STE BELTOON
KIESMODUS (*)
Sluit het menu af of ga naar een hoger menuniveau
Druk op de toets ESC om naar de vorige menuoptie te gaan.
U kunt altijd op de toets ESC drukken om een handeling
3
3
te annuleren en terug naar de stand-bymodus te gaan. Als u
20 seconden lang niet op een toets drukt, gaat de handset
terug naar de stand-bymodus.
38
AANMELDEN AANMELDEN
AFMELDEN
(*) Sommige menu's worden niet weergegeven, dat is afhankelijk
van het land dat u hebt ingesteld (zie “8.1 Land instellen”).
Page 39

Butler Outdoor 2010 - Twin - Triple
NEDERLANDS
17
17
17
3
17
17
6
4
15
4 Handset – instellingen en gebruik
In de onderstaande stappen worden de symbolen voor
toetsen en display, en de positienummers in het
Mogelijk gevaar door storingen in het toestel!
Volg de veiligheidsvoorschriften.
4.1 Inschakelen (modus voor instellen)
Als u de batterij voor het eerst plaatst of een reset hebt uitgevoerd,
gaat de handset in de modus voor instellen. De gebruiker moet het
land selecteren voor verschillende specifieke instellingen per land:
1. ‘
WELKOM
weergegeven, gevolgd door het instellingenmenu voor het land.
2. Druk op .
3. Druk op of om het land te selecteren.
4. Druk op om te bevestigen.
5. Druk nog een keer op om te bevestigen of druk op
de toets ESC om terug te gaan.
6. Gebruik of om de taal te selecteren
7. Druk op om te bevestigen.
8. Voer de datum in en druk op om te bevestigen.
9. Voer de tijd in en druk op om te bevestigen.
4.2 De handset aan- en uitzetten
1. Druk op de aan/uit-toets totdat de display wordt
ingeschakeld.
2. Als u de handset wilt uitschakelen, houdt u de aan/uit-toets
wordt uitgeschakeld.
’ (WELCOME) wordt enkele seconden
4 15
4 15
17
6
langer dan 5 seconden ingedrukt, totdat het toestel
4.3 Menu voor taal selecteren
De telefoon heeft 14 menutalen. U kunt de gewenste taal als volgt
instellen:
1. Druk op .
2. Druk herhaaldelijk op of en selecteer
17
4
15
‘HS. INSTEL.’ (HS SETTINGS).
3. Druk op om te bevestigen.
4. Druk herhaaldelijk op of en selecteer ‘TAAL’
17
4 15
(LANGUAGE).
5. Druk op om te bevestigen.
17
• De taalinstelling wordt op de display weergegeven:
6. Druk herhaaldelijk op of en selecteer de
gewenste taal.
• Druk op om te bevestigen.
17
4.4 Oproepen maken
4.4.1 Externe oproep
1. Druk op .
• Het oproepsymbool verschijnt op de display.
2. Als u de kiestoon hoort, kunt u het gewenste telefoonnummer
invoeren.
• Het nummer wordt op de display weergegeven en wordt
gekozen.
3. U kunt de oproep beëindigen door op te drukken of
(zie “4.25 Automatisch ophangen” als automatisch ophangen
is ingeschakeld) door de handset weer in het basis- of
laadstation te plaatsen.
14
6
39
Page 40

Handset – instellingen en gebruik Butler Outdoor 2010 - Twin - Triple
9
6
4.4.2 Voorbereiding voor oproepen
1. Voer het telefoonnummer in dat u wilt bellen.
2. U kunt het nummer corrigeren door op ESC te drukken.
3. Druk op .
14
3
• Het oproepsymbool verschijnt op de display.
• Het telefoonnummer wordt automatisch gekozen.
4. U kunt de oproep beëindigen door op te drukken of
6
(zie “4.25 Automatisch ophangen” als automatisch ophangen
is ingeschakeld) door de handset weer in het basis- of
laadstation te plaatsen.
4.4.3 Het laatst gekozen nummer herhalen
1. Druk op .
2. Druk op .
14
• Het laatst gekozen nummer wordt automatisch gebeld.
4.4.4 Een van de laatste 10 gebelde nummers opnieuw
bellen
1. Druk op .
9
• Het laatste nummer dat u hebt gebeld, wordt op de eerste
positie op de display weergegeven
2. Gebruik of om het gewenste telefoonnummer te
4 15
selecteren.
3. Druk op de antwoordtoets .
14
• Het telefoonnummer op de display wordt automatisch
gekozen.
4. U kunt de oproep beëindigen door op te drukken of
(zie “4.25 Automatisch ophangen” als automatisch ophangen
is ingeschakeld) door de handset weer in het basis- of
laadstation te plaatsen.
4.4.5 Een oproep maken naar een nummer uit het
telefoonboek
De telefoon heeft een telefoonboek waarin u telefoonnummers met
namen kunt opslaan (zie ook “6 Telefoonboek”). Een nummer uit
het telefoonboek kiezen:
1. Druk op .
16
• Het eerste nummer in het telefoonboek wordt op de display
weergegeven.
2. Druk herhaaldelijk op of om het gewenste
4 15
nummer te selecteren of voer het eerste teken van de naam in
en blader verder.
3. Druk op de antwoordtoets .
14
• Het telefoonnummer op de display wordt automatisch
gekozen.
4. U kunt de oproep beëindigen door op te drukken of
6
(zie “4.25 Automatisch ophangen” als automatisch ophangen
is ingeschakeld) door de handset weer in het basis- of
laadstation te plaatsen.
4.5 Een oproep beantwoorden
De handset rinkelt bij een inkomende externe of interne oproep.
• Alle aangemelde handsets rinkelen bij een inkomende oproep.
• Het oproepsymbool
• Het nummer van de beller wordt op de display aangegeven,
als u nummerweergave hebt. Neem contact op met uw
telefoonmaatschappij voor meer informatie. De naam van de
beller wordt ook in de volgende gevallen op de display
weergegeven:
– het nummer is met naam opgeslagen in het
telefoonboek;
– het netwerk verstuurt de naam samen met het
telefoonnummer.
knippert op de display.
40
Page 41

Butler Outdoor 2010 - Twin - Triple
NEDERLANDS
5
4
1. U hebt de volgende opties voor het beantwoorden van een
oproep:
– Druk op om de oproep te beantwoorden.
14
– Pak de handset uit het basisstation of laadstation
(functie alleen mogelijk als automatisch aannemen is
geactiveerd, zie “4.24 Automatisch aannemen”).
• Tijdens de oproep worden het symbool , het verzonden
nummer en de naam van de beller 10 seconden
weergegeven, daarna wordt de gespreksduur op de display
weergegeven.
2. U kunt de oproep beëindigen door op te drukken of
6
(zie “4.25 Automatisch ophangen” als automatisch ophangen
is ingeschakeld) door de handset weer in het basis- of
laadstation te plaatsen.
4.6 De oproeplijst
Als u een oproep ontvangt, worden het telefoonnummer van de
beller, de datum en de tijd van de oproep op de display van de
handset weergegeven. Als de naam is opgeslagen in het
telefoonboek, wordt die ook weergegeven. De functie
nummerweergave moet door uw telefoonmaatschappij zijn
geactiveerd, zo niet wordt een oproep niet in de oproeplijst
opgeslagen.
De functie 'nummerweergave' (CLIP) is alleen
beschikbaar als die voor uw telefoonlijn is geactiveerd.
Neem contact op met uw telefoonmaatschappij voor
meer informatie.
Inkomende oproepen worden opgeslagen in een oproeplijst (max.
30 nummers). Als het geheugen vol is, vervangen nieuwe
oproepen automatisch het oudste nummer in de lijst. Het bovenste
symbool knippert op de display als er nieuwe onbeantwoorde
oproepen in de oproeplijst staan en ‘NWE OPROEPEN’
(NEW CALLS) wordt midden op de display naast het symbool
weergegeven. Wanneer de oproeplijst leeg is en u op
5
drukt, wordt ‘LIJST LEEG’ (LIST EMPTY) op de display
weergegeven.
4.6.1 Invoeren in de oproeplijst bekijken
1. Druk kort op om de nieuwe invoer te bekijken.
5
• Het nummer van de laatste beller wordt op de bovenste regel
weergegeven. Als de naam van de beller in het telefoonboek
staat, wordt de naam op de tweede regel weergegeven. Als er
geen invoer is en het nummer van de beller ook niet werd
verzonden, wordt ‘ONBEKEND’ (UNKNOWN) weergegeven.
De datum en tijd waarop elke oproep werd ontvangen, worden
op de onderste regel weergegeven.
Druk op om andere invoeren in de lijst te bekijken.
Als u 35 seconden lang niet op de toetsen of
5
4 15
drukt, gaat de telefoon automatisch terug naar stand-by.
4.6.2 Een nummer uit de oproeplijst bellen
1. Druk op om de oproeplijst te openen.
2. Gebruik of om het gewenste telefoonnummer te
5
4 15
selecteren.
3. Druk op als het nummer op de display wordt
14
weergegeven.
• Het telefoonnummer wordt automatisch gekozen.
4.6.3 Een nummer uit de oproeplijst in het telefoonboek
opslaan
1. Druk op om de oproeplijst te openen.
2. Gebruik of om het gewenste telefoonnummer
15
te selecteren.
41
Page 42

Handset – instellingen en gebruik Butler Outdoor 2010 - Twin - Triple
4
15
17
15
17
17
17
3. Druk op .
4. Druk herhaaldelijk op of en selecteer
17
4
15
‘KOP. TELEFOONB’ (COPY TO PB).
5. Druk op om te bevestigen.
17
•‘NAAM INVOEREN’ (ENTER NAME) wordt op de display
weergegeven.
6. Voer de naam in met de alfanumerieke toetsen. Als de naam
door de telefoonmaatschappij is verzonden, kunt u de naam
aanpassen.
7. Druk op .
17
• Het telefoonnummer wordt weergegeven.
8. Pas het telefoonnummer waar nodig aan en druk nog een keer
op
om de invoer in het telefoonboek op te slaan.
17
9. De telefoon gaat terug naar de oproeplijst.
4.6.4 Nummers uit de oproeplijst wissen
Een oproep wissen
1. Druk op om de oproeplijst te openen.
5
2. Gebruik of om het gewenste telefoonnummer te
selecteren.
3. Druk op .
4. Druk herhaaldelijk op of en selecteer ‘WISSEN’
4
(DELETE).
5. Druk op om te bevestigen.
6. Druk nog een keer op om te bevestigen.
• De oproep wordt gewist en de volgende oproep wordt op de
display weergegeven.
Alle oproepen wissen
1. Druk op om de oproeplijst te openen.
2. Gebruik of om het gewenste telefoonnummer te
5
4 15
selecteren.
3. Druk op .
4. Druk herhaaldelijk op of en selecteer ‘ALLES
17
4
15
WISSEN’ (DELETE ALL).
5. Druk twee keer op om te bevestigen.
17
• Alle oproepen worden gewist.
Nieuwe oproepen die nog niet zijn bekeken of die
onbeantwoord zijn, worden ook verwijderd.
4.7 Opties voor nummerherhaling
Wanneer u door het geheugen voor nummerherhaling bladert (zie
“4.4.4 Een van de laatste 10 gebelde nummers opnieuw bellen”),
hebt u de volgende opties:
Als het gewenste nummer op de display wordt weergegeven, druk
dan op de toets OK en selecteer een van de volgende
opties met of :
4
•‘KOP. TELEFOONB’ (COPY TO PB): het nummer wordt in het
telefoonboek opgeslagen.
Druk op om te bevestigen. Voer een naam in (zie
17
ook “6.1 Een nieuwe invoer in het telefoonboek via het
telefoonboekmenu opslaan”) en druk op .
Bewerk het nummer en druk nog een keer op .
•‘WISSEN' (DELETE): een invoer in de nummerherhalingslijst
wordt gewist.
Druk twee keer op om te bevestigen.
•‘ALLES WISSEN’ (DELETE ALL): alle invoeren in het
geheugen voor nummerherhaling worden gewist. Druk twee
keer op om te bevestigen.
17
17
15
17
17
42
Page 43

Butler Outdoor 2010 - Twin - Triple
NEDERLANDS
14
4.8 De handenvrije modus activeren/deactiveren
Met deze functie kunt u bellen zonder dat u de handset in uw hand
hoeft te houden.
14
1. Druk op
modus te activeren.
2. Druk nog een keer op om de handenvrije modus uit
te schakelen.
Als u het volume wilt aanpassen in de handenvrije
modus, drukt u meerdere keren op of .
De batterijen raken sneller leeg als u de handenvrije
modus langere tijd gebruikt!
tijdens een oproep om de handenvrije
4 15
4.9 Buiten bereik
Als de handset buiten bereik van het basisstation komt:
•‘ZOEKEN...’ (SEARCHING...) wordt op de display
weergegeven en het symbool knippert op de display.
1. Ga dichter bij het basisstation of de repeater/oplader staan.
2. Het symbool stopt met knipperen en wordt continu
weergegeven.
• Dit betekent dat u weer binnen bereik van het basisstation
bent.
Als het geluidssignaal voor buiten bereik wordt
geactiveerd (zie “4.20 Het geluidssignaal voor buiten
bereik in-/uitschakelen”), hoort u een pieptoon voordat u
buiten bereik bent.
4.10 Het volume van de luidspreker instellen
Druk tijdens de oproep op of om het volume van de
luidspreker aan te passen. U kunt uit 5 verschillende instellingen
kiezen. Het standaardniveau is niveau '3':
Het volume kan in de handenvrije modus op dezelfde
manier worden aangepast.
4 15
4.11 Weergave van de gespreksduur
De gespreksduur wordt tijdens een externe oproep op de display
weergegeven:
Als er ‘01:10:40’ wordt weergegeven, betekent dit: 1 uur,
10 minuten en 40 seconden.
De gespreksduur wordt nog 8 seconden nadat de oproep is
beëindigd op de display weergegeven.
4.12 Geluid uit
Druk op de toets microfoon uit om de microfoon tijdens een
oproep uit te schakelen. U kunt nu vrij praten zonder dat de
persoon aan de andere kant van de lijn u kan horen. Druk nog een
keer op de toets microfoon uit
schakelen.
2
2
om de microfoon weer in te
4.13 Toets Pauze (pauze bij kiezen)
Als u een pauze bij het kiezen van een telefoonnummer wilt
invoegen, druk dan gedurende 2 seconden op de toets Pauze
8
P op het betreffende punt in het nummer totdat P op de display
wordt weergegeven.
Als u daarna dit nummer kiest (of via nummerherhaling opnieuw
kiest), wordt de pauze bij kiezen (ongeveer 3 seconden) ook
gekozen.
43
Page 44

Handset – instellingen en gebruik Butler Outdoor 2010 - Twin - Triple
16
5
4
15
4.14 De handset via het basisstation zoeken (paging)
Als u de handset niet kunt vinden, drukt u kort op de toets Paging
22
op het basisstation. Alle handsets die bij het basisstation
zijn aangemeld, gaan rinkelen, zodat u ze kunt vinden. Druk op
een willekeurige toets op de handset om het rinkelen te stoppen.
4.15 Het alfanumerieke toetsenbord gebruiken
U kunt met het alfanumerieke toetsenbord tekst invoeren. Druk op
de relevante alfanumerieke toets om een letter te selecteren.
Voorbeeld: wanneer u op de numerieke toets '5' drukt, verschijnt
eerst de letter 'J' op de display. Druk herhaaldelijk op de toets om
andere tekens van de toets in te voeren.
Druk één keer op de toets ‘2’ om de letter ‘A’ te selecteren. Als u
‘A’ en daarna meteen ‘B’ wilt invoeren, drukt u eerst op de toets ‘2’
om de letter ‘A’ te selecteren. Wacht daarna een seconde om naar
het tweede teken te gaan en druk twee keer op de toets '2' om 'B'
in te voeren. U kunt de toets ESC gebruiken om verkeerd
ingevoerde letters te wissen. Hierbij wordt het teken links van de
cursor gewist. Alle tekens in een ingevoerde volgorde kunnen
tegelijkertijd worden gewist door de toets ESC 2 seconden
ingedrukt te houden.
Gebruik de toets links of rechts om de cursor te
verplaatsen. Gebruik de toets # om te wisselen tussen
hoofdletters en kleine letters.
3
3
8
4.16.1 Het belvolume voor interne en externe oproepen
instellen (0-5)
1. Druk op .
2. Druk herhaaldelijk op of en selecteer ‘HS.
17
4 15
INSTEL.’ (HS SETTINGS).
3. Druk op om te bevestigen.
4. Druk herhaaldelijk op of en selecteer ‘HANDSET
17
4 15
TONEN’ (HANDSET TONES).
5. Druk op om te bevestigen.
6. Druk herhaaldelijk op of en selecteer ‘BELTOON
17
4 15
VOLUME’ (RING VOLUME).
7. Druk op om te bevestigen.
17
• Het huidige volume wordt weergegeven en is hoorbaar.
8. Druk herhaaldelijk op of
om het gewenste
volume voor de beltoon te selecteren.
9. Druk op om uw keuze te bevestigen of druk op ESC
3
om het menu zonder opslaan af te sluiten.
17
Als u het belgeluid van de handset permanent wilt
uitschakelen, moet u ongeveer 3 seconden
8
ingedrukt houden. Het symbool wordt op de display
weergegeven. Als u het belgeluid weer wilt inschakelen,
houd weer 3 seconden ingedrukt.
8
4.16 Het belvolume op de handset instellen
U kunt het belvolume voor inkomende oproepen (intern of extern)
instellen op 6 niveaus (niveau 1 tot en met 5 en ‘UIT’ (OFF)).
Als u het niveau ‘UIT’ (OFF) selecteert, wordt het symbool op
de display weergegeven. De handset rinkelt niet als er een
4.17 De beltoon op de handset instellen
U kunt de beltoon voor een inkomende oproep (intern of
wijzigen. Het toestel heeft 7 verschillende beltonen (1-7).
standaardinstelling voor de beltoon voor interne en externe
oproepen is 1.
extern)
De
inkomende oproep wordt ontvangen. Niveau '5' is het hoogste
niveau. (De standaardinstelling voor de telefoon is niveau '3'.)
44
Page 45

Butler Outdoor 2010 - Twin - Triple
NEDERLANDS
13
4.17.1 De beltoon voor interne en externe oproepen instellen
(1-7)
1. Druk op
2. Druk herhaaldelijk op of en selecteer
‘HS. INSTEL.’ (HS SETTINGS).
3. Druk op om te bevestigen.
4. Druk herhaaldelijk op of en selecteer
‘HANDSET TONEN’ (HANDSET TONES).
5. Druk op om te bevestigen.
6. Druk herhaaldelijk op of en selecteer
‘BELTONEN’ (RING TONES).
7. Druk op om te bevestigen.
8. Druk herhaaldelijk op of
selecteren.
9. Druk op
ESC om het menu zonder opslaan af te sluiten.
3
.
17
4 15
17
4 15
17
4 15
17
4 15
om uw keuze te bevestigen of druk op
17
om de beltoon te
4.18 De toetsenbordvergrendeling instellen
U kunt het toetsenbord vergrendelen om te voorkomen dat u per
ongeluk toetsen indrukt. U kunt inkomende oproepen nog altijd
beantwoorden, ook als het toetsenbord is vergrendeld.
De toetsenbordvergrendeling in-/uitschakelen:
1. Inschakelen: houd de toets ongeveer 3 seconden
ingedrukt.
•‘TOETSEN GEBL.’ (KEYS LOCKED) wordt op de display
weergegeven.
2. Uitschakelen: Houd de toets ongeveer 3 seconden
ingedrukt om het toetsenbord te ontgrendelen.
13
4.19 Toetstonen in-/uitschakelen
U kunt de handset zodanig instellen dat u een piep hoort als u op
een toets drukt.
1. Druk twee keer op
2. Druk herhaaldelijk op of en selecteer ‘HANDSET
TONEN’ (HANDSET TONES).
3. Druk op om te bevestigen.
4. Druk herhaaldelijk op of en selecteer ‘TOETS
TONEN’ (KEY BEEP).
5. Druk op om te bevestigen.
6. Selecteer:
–‘AAN’ (ON): de toetstonen worden ingeschakeld;
–‘UIT’ (OFF): de toetstonen worden uitgeschakeld.
7. Druk op om uw keuze te bevestigen of druk op
ESC om het menu af te sluiten zonder de instelling op te
slaan.
3
17
17
17
.
17
4 15
4 15
4.20 Het geluidssignaal voor buiten bereik in-/
uitschakelen
U kunt de handset zo instellen dat u een pieptoon hoort als u
tijdens een gesprek bijna buiten bereik bent. Als u deze pieptoon
hoort, moet u dichter bij het basisstation gaan staan (zie ook “4.9
Buiten bereik”).
U kunt deze functie in-/uitschakelen aan de hand van de
bovenstaande procedure (zie “4.19 Toetstonen in-/uitschakelen”)
maar selecteer dan ‘SIGNL.ZWAK’ (RANGE TONE) in plaats van
‘TOETS TONEN’ (KEY BEEP).
45
Page 46

Handset – instellingen en gebruik Butler Outdoor 2010 - Twin - Triple
17
4.21 De waarschuwing voor batterij bijna leeg in-/
uitschakelen
U kunt de handset zo instellen dat u een pieptoon hoort als de
batterij bijna leeg is. U kunt deze functie in-/uitschakelen aan de
hand van de bovenstaande procedure (zie “4.19 Toetstonen in-/
uitschakelen”), maar selecteer dan ‘BATTERIJ LAAG’ (BATTERY
TONE) in plaats van ‘TOETS TONEN’ (KEY BEEP).
4.22 Het geluidssignaal bij opladen in-/uitschakelen
U kunt de handset zo instellen dat er een pieptoon klinkt als u de
handset in het basisstation of de lader plaatst.
U kunt deze functie in-/uitschakelen aan de hand van de
bovenstaande procedure (zie “4.19 Toetstonen in-/uitschakelen”),
maar selecteer dan ‘LAADT TOON’ (CHARGE TONE) in plaats
van ‘TOETS TONEN’ (KEY BEEP).
4.23 De naam van de handset wijzigen
Ga als volgt te werk om de handsetnaam te veranderen die in
stand-by op de display wordt weergegeven:
1. Druk twee keer op
2. Druk herhaaldelijk op of en selecteer
‘HANDSETNAAM’ (HANDSET NAME).
3. Druk op om te bevestigen.
4. Druk herhaaldelijk op ESC om letters achter elkaar te
wissen en gebruik het alfanumerieke toetsenbord om een
nieuwe naam in te voeren.
5. Druk op om de nieuwe handsetnaam in te stellen.
17
17
.
17
4 15
3
4.24 Automatisch aannemen
Wanneer de handset in het basisstation staat en er wordt een
inkomende oproep ontvangen, dan wordt de oproep automatisch
beantwoord als de handset uit het basisstation of de oplader wordt
gepakt. U kunt zelf kiezen of deze functie moet worden in- of
uitgeschakeld.
1. Druk twee keer op
2. Druk herhaaldelijk op of en selecteer
‘AUTO.ANTW’ (AUTO ANSWER).
3. Druk op om te bevestigen.
4. Selecteer ‘AAN’ (ON) of ‘UIT’ (OFF) en druk op om
te bevestigen.
17
.
17
4 15
17
4.25 Automatisch ophangen
Als er een oproep met de handset wordt gevoerd, wordt het
gesprek beëindigd als de handset in het basisstation of de oplader
wordt geplaatst, mits automatisch ophangen is ingeschakeld. Als
automatisch ophangen tijdens de spreekmodus is uitgeschakeld,
schakelt de handset over op de handenvrije luidspreker als de
handset in het basisstation of de oplader wordt geplaatst. U kunt
zelf kiezen of deze functie moet worden in- of uitgeschakeld.
1. Druk twee keer op
2. Druk herhaaldelijk op of en selecteer
‘AUT.OPHANGEN’ (AUTO HANG-UP).
3. Druk op om te bevestigen.
4. Selecteer ‘AAN’ (ON) of ‘UIT’ (OFF) en druk op
om te bevestigen.
17
.
17
4 15
17
4.26 Nummer voor bellen van voicemail
Als u de toets voor de voicemail 3 seconden ingedrukt houdt,
belt de telefoon het voorgeprogrammeerde nummer. U kunt dit
bijvoorbeeld gebruiken om uw mailbox te bellen.
Dit nummer programmeren:
1. Druk twee keer op
.
46
Page 47

Butler Outdoor 2010 - Twin - Triple
NEDERLANDS
17
4
15174
15
17
17
2. Druk herhaaldelijk op of en selecteer
4 15
‘VOICEMAIL’ (VOICEMAIL).
3. Druk op om te bevestigen.
17
4. Voer het voicemailnummer van uw telefoonmaatschappij in en
druk op om te bevestigen.
17
5 Functies voor tijd en alarm
5.1 Dag en tijd instellen
Wanneer nummerweergave (CLIP) op uw telefoonlijn is
geactiveerd en de telefoonmaatschappij de datum en tijd
verstuurt, wordt de klok automatisch ingesteld wanneer
er een oproep binnenkomt. U kunt deze functie ook
uitschakelen (zie hieronder “5.3 Automatische instelling
van de klok”). Als u de datum/tijd van een handset hebt
ingesteld, nemen alle handsets van dat basisstation
dezelfde instellingen aan.
1. Druk op .
2. Druk herhaaldelijk op of en selecteer
‘KLOK & ALARM’ (CLOCK & ALARM).
3. Druk op om te bevestigen.
4. Druk herhaaldelijk op of en selecteer
‘DATUM&TIJD’ (SET DATE&TIME).
5. Druk op om te bevestigen.
6. Voer de dag en maand allebei in als twee cijfers en druk op
.
17
De datum en tijd worden niet gewist bij een stroomstoring
in het basisstation.
5.2 Het formaat voor datum/tijd selecteren
17
4 15
17
4 15
17
2. Druk herhaaldelijk op of en selecteer
4 15
‘KLOK & ALARM’ (CLOCK & ALARM).
3. Druk op om te bevestigen.
4. Druk herhaaldelijk op of en selecteer
17
4 15
‘FORMAAT INSTEL’ (SET FORMAT).
5. Druk op om te bevestigen.
6. Druk herhaaldelijk op of en selecteer
17
4 15
‘TIJDSFORMAAT’ (TIME FORMAT) of ‘DATUMFORMAAT’
(DATE FORMAT).
7. Druk op om te bevestigen.
17
8. Selecteer het tijdsformaat (12 uur of 24 uur) en druk op
17
of
Selecteer het datumformaat (DD/MM of MM/DD) en druk
op .
17
5.3 Automatische instelling van de klok
Als deze functie is ingeschakeld, worden de datum en de tijd
bijgewerkt met behulp van gegevens die bij nummerweergave
worden ontvangen. De functie kan als volgt worden uitgeschakeld:
1. Druk op .
2. Druk herhaaldelijk op of en selecteer
‘KLOK & ALARM’ (CLOCK & ALARM).
3. Druk op om te bevestigen.
4. Druk herhaaldelijk op of en selecteer
‘AUTO TIJD’ (AUTO CLOCK ADJ).
5. Druk op om te bevestigen.
6. Selecteer ‘AAN’ (ON) of ‘UIT’ (OFF) en druk op om
te bevestigen.
1. Druk op .
17
47
Page 48

Telefoonboek Butler Outdoor 2010 - Twin - Triple
4
15
4
15
17
4
15
17
17
17
5.4 De alarmfunctie
Stel de datum en de tijd in voordat u deze functie
gebruikt zodat het alarm op de juiste tijd wordt
geactiveerd.
U kunt meerdere alarmen instellen voor de handsets die bij het
basisstation zijn aangemeld. Het alarm wordt alleen op de handset
geactiveerd, niet op het basisstation of andere handsets.
Als er een alarm is ingesteld, wordt het symbool voor alarm in
stand-by op de display weergegeven.
Als de alarmtijd wordt bereikt, rinkelt de handset 1 minuut lang. U
kunt het alarm stoppen door op een willekeurige toets op de
handset te drukken.
5.4.1 Een alarm instellen
1. Druk op .
2. Druk herhaaldelijk op of en selecteer ‘KLOK &
ALARM’ (CLOCK & ALARM).
3. Druk op om te bevestigen.
4. Druk herhaaldelijk op of en selecteer ‘ALARM’
(ALARM).
5. Druk op om te bevestigen.
6. Druk meerdere keren op of en selecteer een van
de 3 mogelijke instellingen: ‘EENMALIG AAN’ (ONCE),
‘DAGELIJKS AAN’ (DAILY) of ‘UIT’ (OFF). Bevestig door op
te drukken. Als u ‘EENMALIG AAN’ (ONCE) of
‘DAGELIJKS AAN’ (DAILY) selecteert, wordt het volgende op
de display weergegeven:
7. Voer de alarmtijd als vier cijfers in en druk op
om te bevestigen.
17
17
TIJD INSTELL. (SET TIME)
07:00
17
8. U kunt de alarmfunctie uitschakelen door ‘UIT’ (OFF) te
selecteren en met te bevestigen.
17
5.4.2 De alarmmelodie instellen
1. Druk op .
2. Druk herhaaldelijk op of en selecteer ‘KLOK &
17
4 15
ALARM’ (CLOCK & ALARM).
3. Druk op om te bevestigen.
4. Druk herhaaldelijk op of en selecteer
17
4 15
‘ALARMMELODIE’ (ALARM TONE).
5. Druk op om te bevestigen.
6. Druk meerdere keren op of en selecteer een van
17
4 15
de 7 alarmmelodieën:
7. Druk op om te bevestigen.
17
6 Telefoonboek
U kunt 200 nummers (van maximaal 24 cijfers) met een
bijbehorende naam (van maximaal 12 tekens) in het telefoonboek
opslaan.
6.1 Een nieuwe invoer in het telefoonboek via het
telefoonboekmenu opslaan
1. Druk op .
2. Als u een nieuwe invoer wilt toevoegen, druk op de menutoets
en selecteer ‘NWE GEGEVENS’ (NEW ENTRY)
met .
•‘NAAM INVOEREN’ (ENTER NAME) wordt op de display
weergegeven. Voer de naam in met de alfanumerieke toetsen.
3. Druk op en voer het telefoonnummer in.
16
17
48
Page 49

Butler Outdoor 2010 - Twin - Triple
NEDERLANDS
4. Druk op om de invoer in het telefoonboek op te
slaan of druk op ESC
op te slaan.
17
3
om te annuleren zonder de invoer
6.2 Een nieuwe invoer in het telefoonboek via de
kiesmethode ophangen opslaan
Als u een telefoonnummer in stand-by hebt ingevoerd en u drukt
daarna op de menutoets , dan kunt u het nummer direct
in het telefoonboek opslaan.
1. Voer het telefoonnummer dat u wilt opslaan in stand-by in.
2. Druk op .
•‘NAAM INVOEREN’ (ENTER NAME) wordt op de display
weergegeven. Voer de naam in met de alfanumerieke toetsen.
3. Druk op en bewerk waar nodig het
telefoonnummer.
4. Druk op om de invoer in het telefoonboek op te
slaan of druk op ESC
op te slaan.
17
17
17
3
17
om te annuleren zonder de invoer
6.3 Een nummer in het telefoonboek zoeken en
bellen
6.4 Een invoer in het telefoonboek bewerken
1. Druk op .
2. Voer de eerste letters van de naam in.
• De eerste naam in de lijst met deze letters wordt op de display
weergegeven.
3. Druk herhaaldelijk op of
in het telefoonboek te bekijken.
4. Druk op als het nummer op de display wordt
weergegeven.
5. Druk herhaaldelijk op of
GEGEV.’ (EDIT ENTRY).
6. Druk op om te bevestigen.
7. Druk op ESC om afzonderlijke letters te wissen en gebruik
het alfanumerieke toetsenbord om de juiste naam in te
voeren.
8. Druk op .
9. Druk op ESC om elke afzonderlijke letter te wissen en
gebruik het alfanumerieke toetsenbord om het juiste
telefoonnummer in te voeren.
10. Druk op
16
4 15
17
4 15
17
3
17
3
om de wijzigingen op te slaan.
17
om de andere nummers
en selecteer ‘BEWERK
1. Druk op .
2. Voer de eerste letters van de naam met de alfanumerieke
toetsen in.
• De eerste naam in de lijst met deze letters wordt op de display
weergegeven.
3. Druk herhaaldelijk op of
in het telefoonboek te bekijken.
4. Bel de gevonden abonnee: het gewenste nummer is
gemarkeerd. Druk op .
16
4 15
14
om de andere nummers
6.5 Eén of alle ingevoerde invoeren wissen
1. Druk op .
2. Gebruik het alfanumerieke toetsenbord om de eerste letters
van de naam in te voeren en/of gebruik of om
naar de gewenste invoer te gaan.
3. Druk op als het nummer op de display wordt
weergegeven.
4. Druk herhaaldelijk op of
(DELETE) of ‘ALLES WISSEN’ (DELETE ALL).
16
17
4 15
4 15
en selecteer ‘WISSEN’
49
Page 50

Instellingen van het basisstation Butler Outdoor 2010 - Twin - Triple
5. Druk op om te bevestigen.
6. Druk op om weer te bevestigen of op de toets ESC
3
om te annuleren.
17
17
7 Instellingen van het basisstation
7.1 De pincode wijzigen (pincode van het systeem)
Bepaalde functies zijn alleen beschikbaar als u de pincode van het
basisstation kent.
De pincode bestaat uit 4 cijfers en de standaardcode is '0000'. Ga
als volgt te werk om de ingestelde pincode te veranderen of om
een nieuwe pincode in te voeren:
1. Druk op .
2. Druk herhaaldelijk op of en selecteer ‘BS.
INSTEL.’ (BS SETTINGS).
3. Druk op om te bevestigen.
• Druk herhaaldelijk op of en selecteer ‘PIN CODE’
(PIN CODE).
4. Druk op en voer de oude pincode in.
5. Druk op . Als er een verkeerde pincode wordt
ingevoerd, wordt ‘VERKEERDE PIN!’ (WRONG PIN!) op de
display weergegeven. Als u de juiste pincode hebt ingevoerd,
wordt u gevraagd een nieuwe pincode in te voeren. Voer een
nieuwe pincode voor het systeem in en druk op .
7.2 Eenvoudige conferentiemodus
Als deze functie is ingeschakeld, kunt u een conferentiegesprek
tussen 2 handsets en de externe lijn voeren. Terwijl één handset
in gesprek is met de externe lijn, hoeft de tweede handset alleen
te worden opgenomen voor een conferentiegesprek (gesprek met
de 1e handset en de externe lijn). Deze functie in- of uitschakelen:
17
4 15
17
4 15
17
17
17
1. Druk op .
2. Druk herhaaldelijk op of en selecteer ‘BS.
17
4 15
INSTEL.’ (BS SETTINGS).
3. Druk op om te bevestigen.
4. Druk herhaaldelijk op of en selecteer
17
4 15
‘CONFERENTIE’ (CONFERENCE).
5. Druk op om te bevestigen.
6. Selecteer ‘AAN’ (ON) of ‘UIT’ (OFF) en druk op om
17
17
te bevestigen.
Als deze functie is uitgeschakeld, kunt u alsnog een
conferentiegesprek voeren zoals beschreven in “9.3.5
Conferentiegesprek (twee interne handsets en één
externe beller)”
7.3 Resetten
Alle persoonlijke instellingen, oproeplog en invoeren voor
nummerherhaling worden verwijderd. Alle handsets en
basisstations gaan terug naar de fabrieksinstellingen.
De telefoonboeklijst en de nieuwe berichten op het
antwoordapparaat worden na het resetten niet verwijderd.
1. Druk op .
2. Druk herhaaldelijk op of en selecteer
‘BS. INSTEL.’ (BS SETTINGS).
3. Druk op om te bevestigen.
4. Druk herhaaldelijk op of en selecteer
‘RESETTEN’ (RESET).
5. Druk op om te bevestigen.
17
4 15
17
4 15
17
50
Page 51

Butler Outdoor 2010 - Twin - Triple
NEDERLANDS
4
15
4
15
17
4
15
17
17
4
Druk nog een keer op om te bevestigen.
17
De telefoon gaat terug naar de instelmodus
(zie “4.1 Inschakelen (modus voor instellen)”).
8 Lijninstellingen
8.1 Land instellen
Er zijn verschillende landafhankelijke instellingen en bij het
instellen van het land worden de parameters voor het betreffende
land ingesteld. Elke parameter kan ook apart worden ingesteld.
Sommige instellingen, zoals de flashtijd en kiesmodus, kunnen
niet worden ingesteld als er geen andere opties voor het
ingestelde land zijn.
De landversie instellen:
1. Druk op .
2. Druk herhaaldelijk op of en selecteer
‘LIJN INSTEL.’ (LINE SETTINGS).
3. Druk op om te bevestigen.
4. Druk herhaaldelijk op of en selecteer
‘LAND’ (COUNTRY).
5. Druk op om te bevestigen.
6. Druk herhaaldelijk op of om het land te
selecteren en druk op om te bevestigen.
7. Druk opnieuw op om te bevestigen.
8.2 De Flash-toets (R)
U kunt de Flash-toets R gebruiken om bepaalde diensten voor
uw externe oproepen te gebruiken of te activeren, zoals 'tweede
oproep' (mits uw telefoonmaatschappij deze dienst levert). De
Flash-toets wordt ook gebruikt voor interne oproepen of voor het
verbinden van een oproep bij gebruik van de telefoon op een
17
17
PABX. De Flash-toets R zorgt voor een korte onderbreking op
4
de lijn. U kunt deze onderbrekingstijd op kort, gemiddeld of lang
instellen.
Dit menu is alleen in bepaalde landen beschikbaar,
afhankelijk van het land dat u hebt ingesteld (zie “8.1
Land instellen”).
1. Druk op .
2. Druk herhaaldelijk op of en selecteer ‘LIJN
17
4 15
INSTEL.’ (LINE SETTINGS).
3. Druk op om te bevestigen.
4. Druk herhaaldelijk op of en selecteer
17
4 15
‘FLASHDUUR’ (RECALL TIME).
5. Druk op om te bevestigen.
6. Druk herhaaldelijk op of om ‘KORT’ (SHORT),
17
4 15
‘MIDDEL’ (MEDIUM) of ‘LANG’ (LONG) te selecteren en druk
op om te bevestigen.
17
8.3 Eerste beltoon
Als u een nieuwe VMWI (indicatie nieuwe voicemail) ontvangt (zie
“9.4 Display voicemail”), hoort u mogelijk een korte beltoon. Als u
dat niet wilt, kunt u de instellingen voor de eerste beltoon
uitschakelen.
1. Druk op .
2. Druk herhaaldelijk op of en selecteer
‘LIJN INSTEL.’ (LINE SETTINGS).
3. Druk op om te bevestigen.
4. Druk herhaaldelijk op of en selecteer
‘1STE BELTOON’ (FIRST RING).
5. Druk op om te bevestigen.
17
4 15
17
4 15
17
51
Page 52

Extra handsets en basisstations Butler Outdoor 2010 - Twin - Triple
4
15
17
4
15
17
17
6. Selecteer ‘AAN’ (ON) of ‘UIT’ (OFF) en druk op
17
om te bevestigen.
8.4 De kiesmodus instellen
Er zijn twee verschillende kiesmodi die bij het maken van
oproepen kunnen worden gebruikt:
• DTMF = dual tone multiple frequency of toonkiezen (moderne
kiesmodus van tegenwoordig)
• Pulskiezen (in oudere toestellen)
Moderne toestellen zijn voorzien van beide functies, die afhankelijk
van de toepassing kunnen worden ingesteld. DTMF is nodig voor
programmerings- en regelfuncties, bijvoorbeeld als het toestel via
een PBX werkt. Als toonkiezen wordt gebruikt, kunnen er zich bij
normaal gebruik storingen voordoen in een PBX omdat het
systeem de signalen voor toonkiezen verkeerd interpreteert.
Dit menu is alleen in bepaalde landen beschikbaar,
afhankelijk van het land dat u hebt ingesteld (zie “8.1
Land instellen”).
De kiesmodus veranderen:
1. Druk op .
2. Druk herhaaldelijk op of en selecteer ‘LIJN
INSTEL.’ (LINE SETTINGS).
3. Druk op om te bevestigen.
4. Druk herhaaldelijk op of en selecteer
‘KIESMODUS’ (DIAL MODE).
5. Druk op om te bevestigen.
6. Selecteer ‘TOON’ (TONE) of ‘PULS’ (PULSE) en druk op
om te bevestigen.
17
17
4 15
17
4 15
17
9 Extra handsets en basisstations
Er kunnen tot 5 handsets bij één basisstation worden aangemeld.
U moet extra handsets eerst bij het basistoestel aanmelden
voordat u ze kunt gebruiken. Handsets van een gebundeld model
zijn al bij het basisstation aangemeld.
U kan ook handsets aanmelden van de Ultra serie (zoals
de Ultra S1200C)!
9.1 Een extra handset aanmelden
Dit is alleen nodig als u een handset hebt afgemeld of als
u een nieuwe aparte handset hebt gekocht. U hoeft
handsets van een bundel niet aan te melden!
Houd de toets Paging op het basisstation langer dan
5 seconden ingedrukt.
De aanmeldmodus op het basisstation is nu ongeveer 3 minuten
actief. U moet de volgende stappen uitvoeren om een handset aan
te melden:
1. Druk op .
17
2. Druk herhaaldelijk op of en selecteer
‘AANMELDEN’ (REGISTRATION).
3. Druk op om te bevestigen.
4. Druk herhaaldelijk op of en selecteer
‘AANMELDEN’ (REGISTER).
5. Druk op om te bevestigen.
6. Voer de pincode van het basisstation in (pincode systeem;
standaard 0000) en druk op .
• De handset zoekt het basisstation en meldt zich aan als het
basisstation is gevonden. Als de aanmelding is gelukt, staat
de stand-bymodus, samen met de naam en het nummer van
de handset, op de display.
22
52
Page 53

Butler Outdoor 2010 - Twin - Triple
NEDERLANDS
4
15
17
17
9.2 Een handset afmelden
U kunt een handset afmelden bij een basisstation. Dat is
bijvoorbeeld nodig als een handset is beschadigd en moet worden
vervangen.
1. Druk op .
2. Druk herhaaldelijk op of en selecteer
17
4 15
‘AANMELDEN’ (REGISTRATION).
3. Druk op om te bevestigen.
4. Druk herhaaldelijk op of en selecteer
17
4 15
‘AFMELDEN’ (UNREGISTER).
5. Druk op om te bevestigen.
17
6. Voer de pincode van het systeem (pincode basisstation) in en
druk op .
17
7. Druk herhaaldelijk op of om de handset te
selecteren die u wilt afmelden en druk op voor
17
afmelden.
9.3 Meerdere handsets gebruiken
Deze functies zijn alleen mogelijk wanneer meer dan één
handset op het basisstation is aangemeld.
9.3.2 Een interne oproep beantwoorden
•‘OPROEP: HANDSET X’ (CALLING FROM HANDSET X)
wordt op de display weergegeven.
1. Druk op om de interne oproep te beantwoorden.
14
OF
1. Pak de handset van het basisstation (als automatisch
aannemen is geselecteerd, zie “4.24 Automatisch
aannemen”).
• Het handsetnummer van de bellende handset wordt tijdens de
oproep op de display weergegeven.
2. Druk op om na het gesprek op te hangen.
6
9.3.3 Een externe oproep tijdens een interne oproep
beantwoorden
Als u tijdens een interne oproep een externe oproep ontvangt, dan
hoort u een wachttoon (dubbele piep) op de twee handsets die
voor de interne oproep worden gebruikt.
1. Druk op .
6
• De interne oproep wordt beëindigd.
2. Druk op .
14
• U hebt de externe oproep nu beantwoord.
9.3.1 Een andere handset bellen
1. Druk op INT .
2. Druk herhaaldelijk op of en selecteer de handset
12
4 15
die u wilt bellen.
• Selecteer ‘ALLE HANDSETS’ (ALL HANDSETS) om alle
handsets te bellen.
• Druk op om de geselecteerde handset(s) te bellen.
3. Druk op om na het gesprek op te hangen.
6
9.3.4 Een oproep doorverbinden naar een andere handset
• U hebt een externe beller aan de lijn.
1. Druk op INT .
2. Druk herhaaldelijk op of en selecteer de handset
12
4 15
die u wilt bellen.
• Selecteer ‘ALLE HANDSETS’ (ALL HANDSETS) om alle
handsets te bellen.
• Druk op om de geselecteerde handset(s) te bellen.
Als de gebelde handset antwoordt, kunt u een intern gesprek
voeren.
53
Page 54

Afkortingen en technische begrippen Butler Outdoor 2010 - Twin - Triple
4
15
12
6
12
om weer met de externe beller
17
3. Druk op om de externe beller te verbinden met de
gebelde handset.
OF
• De intern gebelde persoon antwoordt niet.
4. Druk nog een keer op INT’
te praten.
9.3.5 Conferentiegesprek (twee interne handsets en één
externe beller)
U kunt een telefoongesprek tegelijkertijd met een interne en een
externe beller voeren.
1. Druk op INT .
2. Druk herhaaldelijk op of en selecteer de handset
die u wilt bellen.
• Selecteer ‘ALLE HANDSETS’ (ALL HANDSETS) om alle
handsets te bellen.
3. Druk op om de geselecteerde handset(s) te bellen.
Als de gebelde handset antwoordt, kunt u een intern gesprek
voeren.
4. Houd de toets INT ingedrukt totdat u ‘CONFERENTIE’
(CONFERENCE) op het scherm ziet
• U bent nu verbonden met een externe en een interne beller,
en u kunt met allebei tegelijkertijd praten (conferentiegesprek).
Als de conferentiefunctie is ingeschakeld (zie “7.2
Eenvoudige conferentiemodus”), kunt u ook een
conferentiegesprek voeren door de tweede handset van
het station op te nemen terwijl de eerste handset in
gesprek is met de externe lijn.
9.4 Display voicemail
Deze display werkt alleen als de voicemail of berichtenservice is
ingeschakeld en uw telefoonmaatschappij deze informatie samen
met de nummerweergave verstuurt!
Als u een nieuw bericht in uw voicemailbox ontvangt, wordt het
symbool op de display weergegeven. Het symbool verdwijnt
als u het bericht hebt beluisterd.
Als u naar uw berichten wilt luisteren, moet u een bepaald nummer
bellen. Dit nummer kan worden geprogrammeerd onder toets '1'
(zie “4.26 Nummer voor bellen van voicemail”).
10 Afkortingen en technische begrippen
CLIP
Calling Line Identification Presentation, weergave van het
telefoonnummer van de beller op de display van de gebelde
persoon.
DECT
Digital Enhanced Cordless Telecommunication; Europese norm
voor telecommunicatie voor digitale draadloze telefoons.
ECO-modus
Economic Mode; in DECT-telefonie is dit de lagestralingswerking.
Toets Flash
Hiermee wordt een korte onderbreking van de lijn voor
geactiveerde functies, zoals wisselgesprek of doorschakelen,
uitgevoerd. Bij PBX wordt de toets Flash of R voor interne
oproepen gebruikt.
GFSK
Gaussian Frequency Shift Keying; digitale modulatiemethode om
overspraakproblemen in telefonie te beperken.
54
Page 55

Butler Outdoor 2010 - Twin - Triple
NEDERLANDS
INT
Internal subscriber. Een andere handset of extra toestellen binnen
een PBX.
Pulsmodus
Verouderde analoge kiesmodus.
LCD
Liquid Crystal Display.
Led
Light Emitting Diode.
DTMF
Dual Tone Multiple Frequency; moderne, digitale kiesmodus.
Meldtekst
Uitgaand bericht op een antwoordapparaat.
Oproepen
Zoekfunctie op het basisstation. Als de toets Paging
22
wordt ingedrukt, rinkelen alle aangemelde handsets.
Pin
Persoonlijk identificatienummer.
nummer niet goed identificeert bij toegang tot een externe lijn
(bijvoorbeeld de 0). In dat geval kunt u een pauze na het nummer
invoegen voor toegang tot een externe lijn.
Toets R
Toets voor nummerherhaling (zie toets Flash).
Stand-by
Ruststand van een toestel waarbij het niet volledig is
uitgeschakeld.
Twin
Aanduiding voor een toesteleenheid met twee identieke
apparaten, bijvoorbeeld twee handsets.
Pauze bij kiezen
Soms hebt u een pauze bij het kiezen nodig bij gebruik van uw
telefoon op een PBX, bijvoorbeeld als die laatste het gekozen
55
Page 56

Probleemoplossing Butler Outdoor 2010 - Twin - Triple
Symptoom Mogelijke oorzaak Oplossing
Display blijft donker. Batterijen verkeerd geplaatst. Controleer de stekker van de batterij .
Batterijen niet opgeladen. Laad de batterijen op.
Handset is uitgeschakeld. Schakel de handset in (zie “4.2 De handset aan- en
uitzetten”).
Geen stroom. Controleer of het toestel van de juiste voeding wordt voorzien.
Controleer of de handset is geactiveerd (Zie “2.3 De handset
activeren”).
Geen geluid. Telefoonkabel verkeerd aangesloten of defect. Controleer de aansluiting van de telefoonkabel (zie “2.1 Het
basisstation in gebruik nemen”).
De lijn wordt gebruikt door een andere
handset.
Wacht totdat de andere handset het gesprek heeft beëindigd.
Het -symbool knippert. Handset is buiten bereik. Ga dichter bij het basisstation staan met de handset.
Het basisstation krijgt geen stroom. Controleer de aansluiting van de stroomkabel bij het
basisstation.
De handset is niet aangemeld bij het
basisstation.
Meld de handset aan bij het basisstation (zie “9.1 Een extra
handset aanmelden”).
Het basisstation of de handset
rinkelt niet.
Het beltoonvolume staat uit of is te laag. Stel het belvolume in (zie “4.16 Het belvolume op de handset
instellen”.
Geen verbinding ondanks goede
geluidskwaliteit.
De kiesmodus is verkeerd. Controleer de kiesmodus (zie “8.4 De kiesmodus instellen”).
Oproepen kunnen niet worden
doorverbonden op een PBX.
De flashtijd is te kort. Stel een langere flashtijd voor het toestel in (zie “8.2 De Flash-
toets (R)”).
Telefoon reageert niet als toetsen
worden ingedrukt.
Programmeerfout. Verwijder de batterijen en plaats ze opnieuw na 1 minuut.
11 Probleemoplossing
Kans op letsel of de dood door elektrische stroom!
Koppel het toestel in gevaarlijke situaties meteen los van de 230 V-voeding.
56
Page 57

Butler Outdoor 2010 - Twin - Triple
NEDERLANDS
U mag het toestel niet aanpassen of repareren. Het toestel en de
kabel mogen enkel door specialisten van het onderhoudscentrum
gerepareerd worden. Reparaties die niet juist uitgevoerd zijn,
kunnen aanzienlijke gevaren opleveren voor de gebruiker.
12 Service
12.1 Onderhoud
Het toestel is onderhoudsvrij. Controleer regelmatig de toestand
van de batterijen en vervang ze door nieuwe batterijen van
hetzelfde type als de werking van het toestel vermindert of als de
batterijen beginnen te lekken.
Gevaar van chemische brandwonden!
Draag veiligheidshandschoenen om lege, oplaadbare
batterijen te verwijderen.
Als het toestel in contact komt met vloeistof, verwijder de batterijen
dan onmiddellijk en koppel het toestel los van de voeding
(basisstation) en droog het zorgvuldig. Controleer de werking na
2-3 dagen. Stuur het naar het servicecentrum als het defect is.
12.2 Reiniging
Risico van elektrische schok of kortsluiting door aanraking
van onderdelen die elektriciteit geleiden.
Zorg ervoor dat er geen vloeistoffen in het toestel
binnendringen. Als dit gebeurt, haalt u de
netstroomadapter uit het stopcontact en de stekker van
de telefoonkabel uit de wandcontactdoos en verwijdert u
de batterijen.
Doe hetzelfde als het toestel, de kabel of de
netstroomadapter is beschadigd: vermijd direct contact
met vloeistoffen en koppel het toestel onmiddellijk los van
de 230 V-netstroom.
Reinig de telefoon met een doek die met lauw water is bevochtigd
of een antistatische doek. Gebruik nooit reinigingsmiddelen of
schuurmiddelen.
12.3 Buiten gebruik stellen, opslag
Als u het toestel tijdelijk buiten gebruik wilt nemen, haalt u de
telefoonkabel uit de wandcontactdoos en uit de telefoonaansluiting
op het basisstation. Haal de stroomadapters van het basisstation
en de handset uit de 230 V-contacten.
Verwijder de batterijen uit de handsets. Als de telefoon langere tijd
buiten gebruik is geweest, moet u de oplaadbare batterijen
vervangen door nieuwe batterijen van hetzelfde type als de
telefoon weer in gebruik wordt genomen.
Berg de toestellen en de oplaadbare batterijen op een droge, niet
te warme plek op.
57
Page 58

Technische gegevens Butler Outdoor 2010 - Twin - Triple
12.4 Afvoeren (milieubescherming)
Als u het toestel en de oplaadbare batterijen weggooit,
mag u ze niet met het normale huishoudelijke afval
meegeven. Dit wordt aangegeven door dit symbool op
het product en/of de verpakking. Breng het toestel naar
een inzamelpunt voor recyclage van elektrische en
elektronische apparatuur. Sommige materialen in het
product kunnen daar worden gerecycled. U draagt bij aan de
bescherming van het milieu door onderdelen of grondstoffen van
gebruikte producten te hergebruiken.
Gooi ook verpakkingsmaterialen op een milieuvriendelijke manier
weg. Wend u tot uw plaatselijke overheid voor meer informatie
over de inzamelpunten in uw buurt.
13 Technische gegevens
Telefonienormen: DECT
Frequentiebereik: 1880 MHz tot 1900 MHz
Aantal kanalen: 120 duplexkanalen
Modulatie: GFSK
Codeersnelheid: 32 kbit/s
Emissies: 10 mW (gemiddeld vermogen
per kanaal)
Bereik: 300 m op open terrein
Max. 50 m in gebouwen
Voeding basisstation: ingang: 100 - 230 V~/50 Hz
Vermogen: 6 V=/500 mA
Voeding oplader: Ingang: 100 - 230 V~/50 Hz
Vermogen: 9 V=/210 mA
Handset, batterijen: (NiMH) oplaadbare batterijen,
2,4 V/500 mAh (BT-800)
Handset, levensduur batterij:168 uur in stand-by
Spreektijd: 10 uur
Laadtijd: 15 uur
Belmodus: DTMF (dual tone multiple frequency)
Pulskiezen
Flashtijd: 100 ms, 300 en 600 ms
Temperatuur (in gebruik): +5 °C tot +45 °C
Temperatuur (opslag): 0 °C tot 70 °C
Stof en spatwaterdicht: IPX7
(Enkel de Handset)
58
Afmetingen (hoogte x breedte x diepte):
– Basisstation: 100 mm x 116 mm x 85 mm
– Handset: 175 mm x 52 mm x 35 mm
– Laadstation: 52 mm x 92 mm x78 mm
Gewicht:
Page 59

Butler Outdoor 2010 - Twin - Triple
NEDERLANDS
– Handset incl. batterijen en riemclip: 212g
– Basisstation, incl. netstroomadapter 213 g
– Laadstation, incl. netstroomadapter 198 g
Maximaal stroomverbruik:
– Basisstation en handset: 2,25 W
– Laad-/repeaterstation en handset: 1,25 W
14 Topcom-garantie
14.1 Garantieperiode
Op de Topcom-toestellen wordt een garantie van 24 maanden
verleend. De garantieperiode gaat in op de dag waarop het nieuwe
toestel werd gekocht. Er is geen garantie op standaard- of
oplaadbare batterijen (type AA/AAA). Kleine onderdelen of
defecten die een verwaarloosbaar effect hebben op de werking of
waarde van het toestel, zijn niet gedekt door de garantie.
De garantie moet worden aangetoond door overlegging van het
originele aankoopbewijs of een kopie waarop de aankoopdatum
en het toesteltype staan vermeld.
14.2 Afwikkeling van garantieclaims
Een defect toestel moet, samen met een geldig aankoopbewijs en
een ingevulde serviceretourkaart, worden teruggestuurd naar een
Topcom-servicedienst.
Als het toestel tijdens de garantieperiode een defect vertoont, zal
Topcom of een door Topcom geautoriseerde servicedienst
eventuele defecten die te wijten zijn aan materiaal- of
productiefouten gratis repareren door het defecte toestel of
onderdelen ervan te repareren of te vervangen. Wanneer het
toestel wordt vervangen, kunnen de kleur en het model afwijken
van het oorspronkelijk gekochte toestel.
De oorspronkelijke aankoopdatum is bepalend voor het begin van
de garantieperiode. De garantieperiode wordt niet verlengd als het
toestel wordt vervangen of gerepareerd door Topcom of een door
Topcom geautoriseerd servicecentrum.
14.3 Garantiebeperkingen
Schade of defecten die te wijten zijn aan onjuist gebruik of
bediening en schade die te wijten is aan het gebruik van nietoriginele onderdelen of accessoires worden niet gedekt door de
garantie.
De garantie dekt geen schade die te wijten is aan externe factoren,
zoals bliksem, water en brand, noch enige transportschade.
Er kan geen aanspraak worden gemaakt op de garantie als het
serienummer op het toestel gewijzigd, verwijderd of onleesbaar
gemaakt is.
Garantieclaims zijn ongeldig wanneer het toestel door de koper
werd gerepareerd, gewijzigd of aangepast.
Dit apparaat mag alleen worden gebruikt met oplaadbare
batterijen. Als u de oorspronkelijk bijgeleverde batterijen wilt
vervangen, let dan goed op of de batterijen die u gaat gebruiken
geschikt zijn en oplaadbaar zijn. Gebruik in GEEN geval
alkalinebatterijen in de handsets.
Als u alkalinebatterijen gebruikt en de handset op het basisstation
plaatst, worden deze batterijen opgewarmd en kunnen ze
exploderen. Mogelijke schade die zo wordt veroorzaakt kan niet
worden geclaimd bij de fabrikant. De hierdoor veroorzaakte
schade aan het apparaat valt niet onder de garantievoorwaarden.
Eventuele reparaties worden in dat geval aan u in rekening
gebracht.
59
Page 60

Informations générales Butler Outdoor 2010 - Twin - Triple
1 Informations générales
Ce manuel d'utilisation contient toutes les informations
nécessaires à l'installation, au paramétrage et au fonctionnement
de votre appareil. Il contient également des informations et
remarques importantes pour votre sécurité et la résolution de
pannes éventuelles.
1.1 Le produit : Butler Outdoor 2010
Le nom du produit 'Twin' décrit une variante composée
d'une station de base avec combiné sans fil plus une
station de charge avec combiné sans fil supplémentaire
(= Twin).
Ce produit a été fabriqué selon la norme numérique standard pour
les téléphones sans fil (DECT). La technologie DECT est
caractérisée par un haut niveau de sécurité contre les
interceptions, ainsi que par une transmission numérique de haute
qualité. Ce téléphone est conçu pour différentes applications. Par
exemple, sur un réseau de stations de base et de combinés sans
fil formant un commutateur privé complet, vous pouvez utiliser
jusqu'à 5 combinés sans fil sur une seule station de base. Vous
pouvez passer des appels internes entre deux combinés sans fil.
Vous pouvez enregistrer jusqu'à 6 répéteurs sur la base pour
élargir la portée de celle-ci.
Si votre ligne vous le permet, les services d'identification de
l'appelant fournis par votre opérateur téléphonique sont possibles
sur ce téléphone. Si vous utilisez ces services, le numéro de
téléphone de l'appelant s'affiche sur l'écran du téléphone.
La fonction 'Identification de l'appelant' (Caller ID) doit
d'abord être activée sur votre ligne téléphonique.
Contactez votre opérateur pour plus d'informations
concernant l'activation de cette fonction. Si cette fonction
n'est pas activée, les numéros des appels entrants
n'apparaîtront pas sur l'écran du téléphone.
1.2 Copyright
Ce document est protégé par copyright.
Tous droits, y compris de reproduction, duplication et distribution
photomécaniques, totales ou partielles, par le biais de procédés
particuliers (tels que traitement de données, supports de données
et réseaux de données) et de modifications réelles et techniques,
sont réservés.
1.3 Indications et icônes
Icône Indication Signification
Avertissement d'un risque de blessure
grave ou de mort en cas de non-respect
de cette information.
Avertissement d'un risque de blessure
légère en cas de non-respect de cette
information.
Risque de dommage matériel ou
environnemental.
Information importante concernant cette
fonction.
Aucune
Attention !
Attention
Attention
Important
60
Info,
conseil
Information générale ou conseils
particuliers.
Page 61

Butler Outdoor 2010 - Twin - Triple
1.4 Usage prévu
Ce produit est conçu pour passer des appels téléphoniques via
une ligne fixe sur un réseau téléphonique. La condition requise
pour une utilisation correcte du téléphone est une installation
professionnelle qui tienne compte des informations contenues
dans ce manuel d'utilisation.
Toute autre utilisation est considérée comme incorrecte et
interdite.
Toute modification ou conversion par l'utilisateur, non décrite dans
ce manuel d'utilisation, est considérée comme incorrecte et
interdite.
1.5 Conseils de sécurité
Les conseils de base suivants en matière de sécurité doivent
toujours être respectés avant d’utiliser un appareil électrique.
Veuillez lire attentivement les conseils de sécurité et informations
sur l'utilisation correcte de l'appareil. Familiarisez-vous avec toutes
les fonctions de l'appareil. Conservez ce manuel d'utilisation en
lieu sûr, à proximité de l'appareil et, au besoin, confiez-le à un
autre utilisateur. Ne cédez pas le téléphone à un tiers sans son
manuel d'utilisation.
Risques électriques :
Risque de blessure ou de mort lié au courant
électrique !
En cas de danger, débranchez immédiatement l'appareil
de la prise d'alimentation de 230 V.
• N'utilisez pas l'appareil si l'adaptateur secteur, le câble ou
l'appareil est endommagé. Veillez à ne pas laisser tomber
l'appareil au risque de l'endommager.
• La tension à l'intérieur de l'appareil est dangereuse. N’ouvrez
jamais le boîtier et n’insérez aucun objet dans la fente de
ventilation.
• Empêchez les liquides de pénétrer dans l'appareil. Le cas
échéant, débranchez l'adaptateur secteur de la prise
d'alimentation et le connecteur du câble téléphonique de la
prise murale.
• Débranchez également l'adaptateur secteur de la prise
d'alimentation et le connecteur du câble téléphonique de la
prise murale en cas d'anomalie pendant l'utilisation ou avant
le nettoyage de l'appareil.
• Ne touchez pas le chargeur ni les connecteurs de la fiche
avec des objets pointus ou métalliques.
• Ne modifiez pas et ne réparez pas l'appareil. L'appareil et le
câble doivent être réparés exclusivement par un spécialiste du
service après-vente. Les réparations qui ne sont pas
effectuées correctement peuvent exposer l'utilisateur à des
risques importants.
• Les enfants sous-estiment souvent les dangers associés à la
manipulation d'équipements électriques. Ne laissez jamais
des enfants sans surveillance s'approcher d'appareils
électriques.
• N'utilisez pas l'appareil dans des endroits humides (salle de
bains, par ex.) ou très poussiéreux.
• Les appareils connectés au secteur peuvent être
endommagés en cas d'orage. Par conséquent, débranchez
toujours l'appareil pendant un orage.
• Pour déconnecter totalement l’appareil de l’alimentation
électrique, retirez l'adaptateur secteur de la prise murale. Tirez
toujours sur la fiche, jamais sur le câble.
• Vérifiez régulièrement les câbles, protégez-les des surfaces
chaudes et autres dangers, déroulez-les complètement,
FRANÇAIS
61
Page 62

Informations générales Butler Outdoor 2010 - Twin - Triple
disposez-les de manière à ce que personne ne puisse
trébucher sur ceux-ci et ne les coincez pas.
Risques d'incendie :
Risque de blessure ou de mort lié à un incendie !
N'exposez pas l'appareil à une chaleur excessive et
débranchez-le immédiatement de la prise d'alimentation
secteur en cas de danger.
La chaleur produite à l'intérieur de l'appareil peut provoquer une
panne ou un feu dans l'appareil. Par conséquent, n’exposez pas
cet appareil à des températures extrêmes :
– évitez de l'exposer à la lumière directe du soleil et à la
chaleur ;
– ne couvrez pas la fente de ventilation de l'appareil.
Risque d'explosion :
Risque de blessure lié à une explosion !
Usez d'une extrême prudence en cas d'utilisation de
batteries (jetables ou rechargeables).
• Ne jetez jamais les batteries jetables ou rechargeables dans
le feu.
• Ne faites pas fonctionner l'appareil dans un environnement
exposé à des risques d'explosion !
Risques d'empoisonnement :
Risque de blessure lié à un empoisonnement !
Usez d'une extrême prudence envers les enfants.
• Gardez les batteries jetables et rechargeables hors de portée
des enfants.
Risque de suffocation :
Risque de blessure lié à une suffocation !
Usez d'une extrême prudence envers les enfants.
• Gardez les films d'emballage hors de portée des enfants.
• Prenez en considération les risques éventuels encourus par
les enfants (strangulation) en cas d'utilisation d'allonges.
Problèmes :
Risque de blessure lié à des problèmes de l'appareil !
Usez d'une extrême prudence en cas d'utilisation de
dispositifs médicaux électriques.
• Le fonctionnement de dispositifs médicaux électriques peut
être affecté par le rayonnement électromagnétique émis par
votre appareil. Par conséquent, veillez à ce que l'appareil soit
installé et fonctionne suffisamment loin de tout dispositif
médical électrique.
Cette recommandation s'applique également aux dispositifs
médicaux implantés, tels que stimulateurs cardiaques.
• Le combiné sans fil peut provoquer un bourdonnement
désagréable dans les prothèses auditives. Maintenez-le donc
suffisamment éloigné de celles-ci.
Dommages éventuels :
Dommages éventuels à l’appareil !
Lisez les informations contenues dans ce manuel
• Utilisez uniquement l'adaptateur secteur fourni. N'utilisez pas
d'adaptateurs d'autres fabricants car vous pourriez
endommager les batteries rechargeables.
• La prise servant à connecter l'adaptateur secteur doit être
proche de l'appareil et facilement accessible.
62
Page 63

Butler Outdoor 2010 - Twin - Triple
• N'utilisez que les batteries rechargeables fournies. Si celles-ci
doivent être remplacées, utilisez des batteries rechargeables
du même type. Veillez à positionner correctement les batteries
(pour cela, consultez les informations contenues dans le
compartiment des piles de l'appareil). N'utilisez jamais de
batteries ordinaires jetables !
Cet appareil est inutilisable en cas de coupure de
courant. Le cas échéant, utilisez un téléphone ne
fonctionnant pas sur l'alimentation secteur pour tout
appel urgent, un téléphone mobile par exemple.
• Ne placez pas le combiné sur un support de charge si celui-ci
n'est pas pourvu de sa batterie et si le couvercle n'est pas
correctement fermé.
1.6 Remarques concernant le fonctionnement à
faible rayonnement
Ce téléphone sans fil (conforme à la norme DECT) permet un
fonctionnement à faible rayonnement (mode ECO).
Lors d'un appel, le combiné réduit la sortie radio en fonction de sa
distance par rapport à la station de base ou au répéteur. En
l'absence d'appel, le combiné réduit la sortie radio au minimum.
L'appareil permet également un fonctionnement à faible
rayonnement, étant donné que la station de base réduit quasiment
à néant la sortie radio, si seul un combiné sans fil est enregistré et
repose sur la station de base pour être rechargé. Toutefois, la
station de base ne réduit pas la sortie radio si plusieurs combinés
sont enregistrés.
Cela ne signifie pas pour autant que le rayonnement DECT normal
est nocif pour la santé. Un fonctionnement à faible rayonnement
évite plutôt une exposition inutile aux rayonnements.
La station de base ne réduit pas la sortie radio dans la
configuration Twin fournie ! Installez la station de base dans un
endroit où vous ne passez pas beaucoup de temps, dans un hall
d'entrée par exemple. Évitez de le placer dans une chambre ou
dans le salon.
2Installation
Veillez à ce que les batteries soient chargées avant
d'utiliser votre téléphone pour la première fois. Sans
quoi, il pourrait ne pas fonctionner de manière optimale.
Tenez compte des conseils de sécurité lorsque vous
choisissez l'environnement et les circonstances de
l'installation et de la localisation de votre appareil ! Ne
faites pas fonctionner l'appareil dans un environnement
2.1 Mise en service de la station de base
Effectuez les étapes suivantes :
• Branchez la fiche principale dans une prise 230 V. Branchez le
connecteur à la prise de l'adaptateur située sous la station de
base.
• Connectez la prise de téléphone située au bas de la station de
base et le connecteur de téléphone à l'aide du câble
téléphonique fourni.
FRANÇAIS
63
Page 64

Installation Butler Outdoor 2010 - Twin - Triple
2.2 Mise en service de la station de charge (Twin et
Triple)
Effectuez les étapes suivantes :
Branchez la fiche principale dans une prise 230 V. Branchez le
connecteur dans la prise de l'adaptateur à l'arrière de la station
3
1
de charge.
1
4
1. Prise téléphonique murale
2. Câble téléphonique
3. Dessous de la station de base
4. Câble adaptateur principal
2
2
1. Arrière de la station de charge
2. Câble adaptateur principal
64
Page 65

Butler Outdoor 2010 - Twin - Triple
2.3 Activation du combiné OUTDOOR
Risque de blessure lié à une explosion !
N'utilisez que les batteries rechargeables fournies ou d'un
même type (BT-800 2,4 V CC).
Il n'est pas nécessaire d'installer les batteries !
Les batteries sont déjà installées dans le combiné. Un
bouton à l'arrière du combiné a déconnecté la batterie
pour éviter toute décharge. Vous devez d'abord appuyer
sur ce bouton pour connecter la batterie.
1. Enlevez l'espaceur en carton.
2. Appuyez sur la fiche d'activation dans le sens de l'étiquette.
• Après l'activation, l'écran s'allume après 10 secondes environ.
3. Enlevez l'étiquette une fois que le combiné est activé.
Conservez la fiche d'activation pour le cas où vous
souhaiteriez modifier ultérieurement le statut d'activation
(par exemple si le combiné n'est pas utilisé pendant une
période prolongée).
3 Commandes et structure du menu
3.1 Touches/Écrans/Voyants
Combiné
1. Écran
2. Touches Répondeur/
Muet
3. Touche Échappement
4. Touche Haut
5. Touche Droite/Liste
d'appels
6. Touche Fin d'appel/
Marche-Arrêt
7. Touches
alphanumériques
8. Touche Désactivation
sonnerie/Pause
9. Touche Rappel
10. Micro
11. Touche Mains-libres
12. Touche Interne
13. Touche de verrouillage
du clavier
14. Touche Réponse/Flash
15. Touche Bas
16. Touche Gauche/
Répertoire
17. Touche Menu/OK
18. Voyant Événement
18
17
16
15
14
13
12
11
10
1
2
3
4
5
6
7
8
9
FRANÇAIS
65
Page 66

Commandes et structure du menu Butler Outdoor 2010 - Twin - Triple
19
Station de base
19. Touche Recherche
3.2 Écran (LCD)
La seconde ligne de texte indique les nouveaux messages
d'événements (‘NOUV.MSG.VOCAL’ (NEW VOICE MAIL),
‘NOUVEL APPEL’ (NEW CALL) et ‘MEMOIRE PLEINE’
(MEMORY FULL)).
L'écran du combiné est pourvu d'un film de protection qui
doit être retiré lors de la mise en service.
Affichage de l'état des batteries :
• Les batteries sont à pleine charge.
• Les batteries sont à 66 % de charge.
• Les batteries ne sont qu'à 33 % de charge.
• Les batteries sont quasiment épuisées. Si les batteries
sont quasiment épuisées, le symbole clignote sur
l'écran
Pendant la charge, le symbole défile. Lorsque les
batteries sont entièrement chargées, le défilement
s'arrête.
Ligne de symboles
1re ligne de texte
2e ligne de texte
Ligne de symboles
Heure/date et compteur
de messages
La première ligne de texte indique le nom et le numéro du
combiné. Si le combiné se trouve derrière un répéteur en mode de
veille, le symbole ‘*’ apparaît après le numéro du combiné.
66
Page 67

Butler Outdoor 2010 - Twin - Triple
3.3 Symboles
En communication (prise d'appel)
- Pendant une communication (fixe) ;
- Clignotant pendant la sonnerie.
Sonnerie du combiné désactivée.
Fonction Mains-libres activée.
Heure : heure actuelle, en mode de veille. Heure de
réception de l'appel, dans la liste d'appels ou lors de
la lecture de messages.
Date : date actuelle, en mode de veille. Date de
réception de l'appel, dans la liste d'appels ou lors de
la lecture de messages.
Flèches de direction vers d'autres options du menu.
Entrées de la liste d'appels (*).
Nouveau message vocal.
• Clignotement toutes les 2 secondes : un nouveau message
d'événement sur le combiné (voir deuxième ligne de texte à
l'écran).
3.5 Structure du menu
Le combiné intègre une structure de menu très conviviale. Chaque
menu aboutit à une série d'options.
Pour accéder au menu principal, appuyez sur la touche Menu
lorsque le combiné est allumé et en mode de veille.
17
Appuyez sur la touche Haut ou sur la touche Bas pour
faire défiler le menu et sélectionner l'option souhaitée. Les
instructions contenues dans ce manuel d'utilisation indiquent les
symboles des touches et leur numéro sur le schéma de l'appareil.
Appuyez de nouveau sur la touche Menu pour accéder
à d'autres options ou pour valider le réglage affiché.
4 15
17
Réveil activé.
Icône de l'antenne : dans la portée (affichage fixe) hors de portée (clignotant).
(*) Si le service d'identification de l'appelant est activé sur votre
ligne téléphonique.
3.4 Voyant Événement
Le voyant frontal du combiné situé dans le coin supérieur
gauche indique :
• Clignotement rapide : un appel entrant.
• Clignotement lent : un appel en interphone ou une recherche.
18
Sortie du menu ou retour à un niveau de menu précédent
Appuyez sur la touche d'échappement ESC pour revenir à
3
l'option de menu précédente.
Vous pouvez utiliser à tout moment la touche ESC pour
3
annuler une action et revenir en mode de veille. Si vous n'appuyez
sur aucune touche pendant 20 secondes, le combiné repasse
automatiquement en mode de veille.
67
FRANÇAIS
Page 68

Combiné - Configuration et fonctionnement Butler Outdoor 2010 - Twin - Triple
17
17
17
3
3.6 Organisation des menus
Menu Options des sous-menus
CONF.COMBINE NOM DU COMBINE
MELODIES COMB.
LANGUE
REP.AUTO.
RACCROCH. AUTO
MSG. VOCALE
HORLOGE&REVEIL DATE ET HEURE
CHOISIR FORMAT
REVEIL
MELODIE REVEIL
REGL HORL AUTO
CONFIG BASE CODE PIN
CONFERENCE
REINITIALISER
CONFIG. LIGNE PAYS
DUREE RAPPEL (*)
1ERE SONNERIE
MODE NUMEROT. (*)
ANNONCER SOUSCRIRE
DESOUSCRIRE
(*) En fonction du pays sélectionné, certains menus sont masqués
(voir “8.1 Paramétrage du pays”).
4 Combiné - Configuration et
fonctionnement
Les instructions suivantes indiquent les symboles des
touches et de l'afficheur, ainsi que leur numéro sur le
Risque lié à des problèmes de l'appareil !
Respectez les conseils de sécurité.
4.1 Mise sous tension (Mode Configuration)
Lors de la première insertion des piles ou après une réinitialisation,
le combiné passe en mode Configuration. L'utilisateur doit
sélectionner son pays pour différents réglages dépendant
de celui-ci :
1. ‘BIENVENUE’ (WELCOME) s'affiche pendant les premières
secondes, suivi du menu de configuration du pays.
2. Appuyez sur .
3. Utilisez la touche ou pour sélectionner votre
pays.
4. Appuyez sur pour confirmer.
5. Appuyez de nouveau sur pour confirmer ou sur la
touche d'échappement ESC pour revenir en arrière.
6. Utilisez la touche ou pour sélectionner votre
langue.
7. Appuyez sur pour confirmer.
8. Saisissez la date et appuyez sur pour confirmer.
9. Saisissez l'heure et appuyez sur pour confirmer.
4 15
4 15
17
17
17
4.2 Mise en/hors service du combiné
1. Appuyez sur la touche Marche/Arrêt jusqu'à ce que
l'écran s'allume.
68
6
Page 69

Butler Outdoor 2010 - Twin - Triple
9
4
15
2. Pour désactiver le combiné, appuyez sur la touche Marche/
Arrêt et maintenez-la enfoncée pendant plus de
6
5 secondes jusqu'à ce que l'appareil s'éteigne.
4.3 Sélection de la langue du menu
Ce téléphone propose 14 langues de menu. Pour configurer la
langue, procédez comme suit :
1. Appuyez sur .
2. Appuyez plusieurs fois sur ou et sélectionnez
17
4
15
‘CONF.COMBINE’ (HS SETTINGS).
3. Appuyez sur pour confirmer.
4. Appuyez plusieurs fois sur ou et sélectionnez
17
4 15
‘LANGUE’ (LANGUAGE).
5. Appuyez sur pour confirmer.
17
• Le paramétrage de la langue apparaît à l'écran.
6. Appuyez plusieurs fois sur ou et sélectionnez la
4 15
langue désirée.
• Appuyez sur pour confirmer.
17
4.4 Composition d'un appel
4.4.1 Appel externe
1. Appuyez sur .
• Le symbole d'appel apparaît à l'écran.
2. Lorsque vous entendez la tonalité, composez le numéro
désiré.
• Le numéro apparaît à l'écran et est composé.
3. Pour terminer l'appel, appuyez sur ou (si la fonction
de fin d'appel automatique est activée, voir “4.25 Fin d'appel
automatique”) replacez le combiné sur la station de base ou
de charge.
14
6
4.4.2 Préparation d'un appel
1. Composez le numéro de téléphone que vous souhaitez appeler.
2. Pour corriger le numéro, appuyez sur ESC .
3. Appuyez sur .
14
3
• Le symbole d'appel apparaît à l'écran.
• Le numéro de téléphone est composé automatiquement.
4. Pour terminer l'appel, appuyez sur ou (si la fonction
6
de fin d'appel automatique est activée, voir “4.25 Fin d'appel
automatique”) replacez le combiné sur la station de base ou
de charge.
4.4.3 Recomposition du dernier numéro appelé
1. Appuyez sur .
2. Appuyez sur .
14
• Le dernier numéro appelé est composé automatiquement.
4.4.4 Recomposez l'un des 10 derniers numéros appelés.
1. Appuyez sur .
9
• Le dernier numéro appelé apparaît en première position sur
l'écran.
2. Appuyez sur ou et sélectionnez le numéro de
téléphone désiré.
3. Appuyez sur la touche Répondre .
14
• Le numéro de téléphone à l'écran est automatiquement
composé.
4. Pour terminer l'appel, appuyez sur ou (si la fonction
6
de fin d'appel automatique est activée, voir “4.25 Fin d'appel
automatique”) replacez le combiné sur la station de base ou
de charge.
FRANÇAIS
69
Page 70

Combiné - Configuration et fonctionnement Butler Outdoor 2010 - Twin - Triple
4.4.5 Appel d'un numéro du répertoire
Le téléphone comporte un répertoire dans lequel vous pouvez
mémoriser des numéros de téléphone et les noms correspondants
(voir également “6 Répertoire”). Pour composer un numéro à partir
du répertoire :
1. Appuyez sur .
16
• Le premier numéro du répertoire s'affiche à l'écran.
2. Appuyez plusieurs fois sur ou et sélectionnez le
4 15
numéro désiré ou saisissez le premier caractère du nom et
faites défiler la liste.
3. Appuyez sur la touche Répondre .
14
• Le numéro de téléphone à l'écran est automatiquement
composé.
4. Pour terminer l'appel, appuyez sur ou (si la fonction
6
de fin d'appel automatique est activée, voir “4.25 Fin d'appel
automatique”) replacez le combiné sur la station de base ou
de charge.
4.5 Prise d'un appel
Le combiné se met à sonner lors d'un appel entrant externe ou
interne.
• Tous les combinés enregistrés sonnent lors d'un appel
entrant.
• Le symbole d'appel
• Le numéro de l'appelant s'affiche à l'écran si vous bénéficiez
du service de présentation du numéro (CLIP). Contactez votre
opérateur téléphonique pour en savoir davantage. Le nom de
l'appelant s'affiche également si :
– le numéro est mémorisé avec le nom dans le
répertoire ;
clignote sur l'écran.
– le réseau transmet le nom en même temps que le
numéro de téléphone.
1. Pour prendre un appel, vous disposez des options suivantes :
– Appuyez sur pour prendre l'appel.
14
– Décrochez le combiné de la station de base ou de
charge (uniquement possible si la fonction de
décrochage automatique a été activée, voir “4.24
Décrochage automatique”).
• Lors d'un appel, le symbole , le numéro et le nom de
l'appelant (le cas échéant) s'affichent pendant 10 secondes,
puis la durée d'appel apparaît sur l'écran.
2. Pour terminer l'appel, appuyez sur ou (si la fonction
6
de fin d'appel automatique est activée, voir “4.25 Fin d'appel
automatique”) replacez le combiné sur la station de base ou
de charge.
4.6 Liste d'appels
Lorsque vous recevez un appel, le numéro de l'appelant s'affiche
sur l'écran du combiné, ainsi que la date et l'heure de l'appel. S'il
est mémorisé dans le répertoire, le nom associé s'affiche
également. La fonction d'identification de l'appelant (CLIP) doit
être activée auprès de votre opérateur téléphonique pour qu'un
appel soit saisi dans la liste d'appels.
La fonction d'identification de l'appelant (CLIP) n'est
disponible que si elle est activée sur votre ligne.
Contactez votre opérateur téléphonique pour de plus
amples informations.
Les appels entrants sont mémorisés dans une liste d'appels (max.
30 numéros). Quand la mémoire est pleine, les nouveaux appels
remplacent automatiquement les plus anciens numéros de la liste.
Le symbole du dessus clignote lorsque la liste d'appels
70
Page 71

Butler Outdoor 2010 - Twin - Triple
5
4
contient de nouveaux appels sans réponse et ‘NOUV. APPELS’
(NEW CALLS) apparaît au centre de l'écran, à côté du symbole
. Si la liste d'appels est vide et que vous appuyez sur ,
5
‘LISTE VIDE’ (LIST EMPTY) s'affiche à l'écran.
4.6.1 Affichage des entrées de la liste d'appels
1. Appuyez brièvement sur pour afficher la dernière
5
entrée.
• Le numéro du dernier appelant s'affiche sur la 1ère ligne. S'il
est mémorisé dans le répertoire, le nom associé s'affiche sur
la 2ème ligne. S'il n'y a aucune entrée et que le numéro de
l'appelant n'a pas été transmis, ‘INCONNU’ (UNKNOWN)
apparaît à l'écran.
La date et l'heure de réception de chaque appel apparaissent
sur la ligne inférieure.
Appuyez sur pour afficher d'autres entrées de la liste.
Si vous n'appuyez pas sur ou dans les
5
4 15
35 secondes, le téléphone repasse automatiquement
en mode de veille.
4.6.2 Appel d'un numéro de la liste d'appels
1. Appuyez sur pour ouvrir la liste d'appels.
2. Appuyez sur ou et sélectionnez le numéro de
5
4 15
téléphone désiré.
3. Appuyez sur lorsque le numéro apparaît à l'écran.
14
• Le numéro de téléphone est composé automatiquement.
4.6.3 Mémorisation d'un numéro de la liste d'appels dans
le répertoire
1. Appuyez sur pour entrer dans la liste d'appels.
2. Appuyez sur ou et sélectionnez le numéro de
15
téléphone désiré.
3. Appuyez sur .
4. Appuyez plusieurs fois sur ou et sélectionnez
17
4
15
‘COP. DANS REP.’ (COPY TO PB).
5. Appuyez sur pour confirmer.
17
•‘ENTRER NOM’ (ENTER NAME) s'affiche à l'écran.
6. Saisissez le nom à l'aide des touches alphanumériques. Si le
nom a été transmis par l'opérateur téléphonique, vous pouvez
l'adapter ou le modifier.
7. Appuyez sur .
17
• Le numéro de téléphone s'affiche.
8. Modifiez le numéro de téléphone si nécessaire et appuyez de
nouveau sur
pour sauvegarder l'entrée dans le
17
répertoire.
9. Le téléphone revient à la liste d'appels.
4.6.4 Suppression de numéros de la liste d'appels
Suppression d'un appel
1. Appuyez sur pour ouvrir la liste d'appels.
2. Appuyez sur ou et sélectionnez le numéro de
5
4 15
téléphone désiré.
3. Appuyez sur .
4. Appuyez plusieurs fois sur ou et sélectionnez
17
4
15
‘SUPPRIMER’ (DELETE).
5. Appuyez sur pour confirmer.
6. Appuyez de nouveau sur pour confirmer.
17
17
• L'appel est supprimé et l'appel suivant s'affiche à l'écran.
Suppression de tous les appels
1. Appuyez sur pour ouvrir la liste d'appels.
2. Appuyez sur ou et sélectionnez le numéro de
5
4 15
téléphone désiré.
FRANÇAIS
71
Page 72

Combiné - Configuration et fonctionnement Butler Outdoor 2010 - Twin - Triple
17
3. Appuyez sur .
4. Appuyez plusieurs fois sur ou et sélectionnez
17
4
15
‘SUPPRIMER TOUT’ (DELETE ALL).
5. Appuyez deux fois sur pour confirmer.
17
• Tous les appels sont supprimés.
Les nouveaux appels n'ayant pas été affichés ou restés
sans réponse sont également supprimés.
4.7 Options de rappel
Lorsque vous parcourez la mémoire de rappel (voir “4.4.4
Recomposez l'un des 10 derniers numéros appelés.”), vous
disposez des options suivantes :
Lorsque le numéro souhaité est affiché à l'écran, appuyez sur la
touche OK et sélectionnez avec les touches et
l'une des options suivantes :
15
17
•‘COP. DANS REP.’ (COPY TO PB) : pour sauvegarder le
numéro dans le répertoire.
Appuyez sur la touche pour confirmer. Saisissez un
17
nom (voir également “6.1 Mémorisation d'une nouvelle entrée
dans le répertoire par le menu Répertoire”) et appuyez sur
.
Corrigez le numéro et appuyez de nouveau sur .
•‘SUPPRIMER’ (DELETE) : pour supprimer une entrée de la
liste des derniers numéros composés.
Appuyez deux fois sur pour confirmer.
17
•‘SUPPRIMER TOUT’ (DELETE ALL) : pour supprimer toutes
les entrées de la liste des derniers numéros composés.
Appuyez deux fois sur pour confirmer.
17
4
17
4.8 Activation/désactivation du mode Mains-libres
Cette fonction vous permet de passer un appel sans avoir à tenir
le combiné.
14
1. Appuyez sur
lors d'un appel pour activer le mode
Mains-libres
2. Appuyez de nouveau sur pour désactiver le mode
14
Mains-libres
Si vous souhaitez modifier le volume en mode Mainslibres, appuyez plusieurs fois sur ou .
4 15
Les batteries se déchargent plus rapidement si vous
utilisez le mode Mains-libres pendant une période
prolongée !
4.9 Hors de portée
Si le combiné est hors de portée de la station de base :
•‘CHERCHE...' (SEARCHING) apparaît et le symbole
clignote sur l'écran.
1. Rapprochez le combiné de la station de base ou du répéteur/
chargeur.
2. Le symbole arrête de clignoter et s'affiche fixement.
• Cela signifie que vous êtes de nouveau à portée de la station
de base.
Si la tonalité d'avertissement Hors de portée est activée
(voir “4.20 Activation/désactivation de la tonalité
d'avertissement Hors de portée”), vous entendez un bip
d'avertissement avant d'être hors de portée.
72
Page 73

Butler Outdoor 2010 - Twin - Triple
16
5
4.10 Réglage du volume du haut-parleur
Appuyez sur ou lors d'un appel pour modifier le
volume du haut-parleur. Vous pouvez choisir parmi 5 réglages
différents. Le réglage par défaut est le niveau '3'.
Le volume se règle de la même façon en mode
Mains-libres.
4 15
4.11 Affichage de la durée d'appel
Pendant un appel externe, la durée de l'appel s'affiche sur l'écran :
L'indication ‘01:10:40’ signifie : 1 heure, 10 minutes et
40 secondes.
Après la fin d'un appel, la durée de l'appel s'affiche encore sur
l'écran pendant 8 secondes.
4.12 Mute (Muet)
Appuyez sur la touche Muet pour désactiver le microphone
pendant un appel. Vous pouvez alors parler librement sans que
votre interlocuteur ne vous entende. Appuyez de nouveau sur la
2
touche Muet
pour réactiver le microphone.
2
4.13 Touche Pause (pause dans la composition)
Si vous souhaitez insérer une pause lors de la composition d'un
numéro de téléphone, appuyez sur la touche Pause P pendant
2 secondes à la position adéquate dans le numéro jusqu'à ce que
'P' apparaisse à l'écran.
Lorsque vous composez (ou recomposez) ce numéro, une pause
(d'approximativement 3 secondes) est automatiquement insérée.
8
4.14 Recherche du combiné à partir de la station de
base (Paging)
Si vous avez égaré le combiné, appuyez brièvement sur la touche
Paging de la station de base. Tous les combinés
22
enregistrés sur la station de base se mettent à sonner, ce qui vous
permet de les localiser. Appuyez sur une touche quelconque du
combiné pour arrêter la sonnerie.
4.15 Utilisation du clavier alphanumérique
Utilisez le clavier alphanumérique pour saisir du texte. Appuyez
sur la touche alphanumérique adéquate pour sélectionner une
lettre. Par exemple, si vous appuyez sur la touche numérique '5',
la lettre 'J' apparaît tout d'abord à l'écran. Appuyez plusieurs fois
sur cette touche pour saisir d'autres caractères associés à cette
touche.
Appuyez une fois sur la touche ‘2’ pour sélectionner la lettre ‘A’.
Si vous souhaitez saisir successivement ‘A' puis ‘B’, appuyez tout
d'abord une fois sur la touche ‘2’ pour sélectionner la lettre ‘A’.
Attendez ensuite une seconde pour déplacer le curseur sur le
deuxième caractère et appuyez ensuite deux fois sur la touche
‘2’ pour saisir la lettre ‘B’. Vous pouvez utiliser la touche
d'échappement ESC pour supprimer des lettres saisies
erronément. Le caractère placé juste devant le curseur est
supprimé. Tous les caractères d'une seule séquence peuvent être
supprimés en une fois si vous appuyez et maintenez la touche
d'échappement ESC enfoncée pendant 2 secondes.
Appuyez sur les touches Gauche et Droite pour
déplacer le curseur. Utilisez la touche # pour basculer entre les
lettres majuscules et minuscules.
3
3
8
4.16 Réglage du volume de sonnerie sur le combiné
Vous pouvez régler le volume de sonnerie des appels entrants
(internes ou externes) sur l'un des 6 niveaux possibles (de 1 à 5 et
‘DESACTIVE’ (OFF)).
Si vous sélectionnez ‘DESACTIVE’ (OFF), le symbole s'affiche
à l'écran. Le combiné ne sonne plus lors d'un appel entrant.
FRANÇAIS
73
Page 74

Combiné - Configuration et fonctionnement Butler Outdoor 2010 - Twin - Triple
13
Le niveau '5' est le plus élevé. (Par défaut, le téléphone est
réglé sur le niveau '3'.)
4.16.1 Réglage du volume de sonnerie pour des appels
internes et externes (0-5)
1. Appuyez sur .
2. Appuyez plusieurs fois sur ou et sélectionnez
‘CONF.COMBINE’ (HS SETTINGS).
3. Appuyez sur pour confirmer.
4. Appuyez plusieurs fois sur ou et sélectionnez
‘MELODIES COMB.’ (HANDSET TONES).
5. Appuyez sur pour confirmer.
6. Appuyez plusieurs fois sur ou et sélectionnez
‘VOL. SONNERIE’ (RING VOLUME).
7. Appuyez sur pour confirmer.
• Le volume actuel est affiché et diffusé.
8. Appuyez plusieurs fois sur ou
volume de sonnerie désiré.
9. Appuyez sur pour valider votre sélection ou
appuyez sur ESC pour quitter ce menu sans enregistrer.
17
4 15
17
4 15
17
4 15
17
4 15
17
3
et sélectionnez le
défaut, la sonnerie pour les appels internes et externes est réglée
sur 1.
4.17.1 Réglage de la sonnerie pour les appels internes et
externes
(1-7)
1. Appuyez sur
2. Appuyez plusieurs fois sur ou et sélectionnez
‘CONF.COMBINE’ (HS SETTINGS).
3. Appuyez sur pour confirmer.
4. Appuyez plusieurs fois sur ou et sélectionnez
‘MELODIES COMB.’ (HANDSET TONES).
5. Appuyez sur pour confirmer.
6. Appuyez plusieurs fois sur ou et sélectionnez
‘SONNERIES’ (RING TONES).
7. Appuyez sur pour confirmer.
8. Appuyez plusieurs fois sur ou
la sonnerie désirée.
9. Appuyez sur
ESC pour quitter ce menu sans enregistrer.
3
.
17
4 15
17
4 15
17
4 15
17
4 15
pour confirmer votre sélection ou sur
17
et sélectionnez
Pour désactiver la sonnerie du combiné de manière
permanente, appuyez sur la touche et maintenezla enfoncée pendant approximativement 3 secondes.
Le symbole apparaît à l'écran. Pour réactiver la
sonnerie, appuyez de nouveau sur la touche et
maintenez-la enfoncée pendant 3 secondes.
8
8
4.17 Réglage de la sonnerie sur le combiné
Vous pouvez modifier la sonnerie pour un appel entrant (interne ou
externe). L'appareil propose un choix de 7 sonneries (1-7).
74
Par
4.18 Verrouillage du clavier
Vous pouvez verrouiller le clavier pour éviter toute saisie
accidentelle. Vous pouvez toutefois toujours répondre aux appels
entrants, même si le clavier est verrouillé.
Activation/désactivation du verrouillage du clavier :
1. Activer : Appuyez sur la touche et maintenez-la
enfoncée pendant approximativement 3 secondes.
•‘CLAVIER BLOQUE’ (KEY LOCKED) apparaît à l'écran.
Page 75

Butler Outdoor 2010 - Twin - Triple
2. Désactiver : Appuyez sur la touche et maintenez-la
enfoncée pendant approximativement 3 secondes pour
débloquer le clavier.
13
4.19 Activation/désactivation du Bip Touches
Vous pouvez régler le combiné pour qu'il émette un bip à chaque
pression de touche.
1. Appuyez deux fois sur
2. Appuyez plusieurs fois sur ou et sélectionnez
‘MELODIES COMB.’ (HANDSET TONES).
3. Appuyez sur pour confirmer.
4. Appuyez plusieurs fois sur ou et sélectionnez
‘BIP TOUCHES’ (KEY BEEP).
5. Appuyez sur pour confirmer.
6. Sélectionnez :
–‘ACTIVE’ (ON) : pour activer le Bip Touches ;
–‘DESACTIVE’ (OFF) : pour désactiver le Bip Touches.
7. Appuyez sur pour confirmer votre sélection ou sur
ESC pour quitter ce menu sans enregistrer le réglage.
3
17
17
17
.
17
4 15
4 15
4.20 Activation/désactivation de la tonalité
d'avertissement Hors de portée
Vous pouvez régler le combiné pour qu'il émette un bip lorsque
vous êtes presque hors de portée de la base pendant une
communication. Lorsque vous entendez ce bip, vous devez vous
rapprocher de la base (voir également “4.9 Hors de portée”).
Pour activer/désactiver cette fonction, suivez la procédure cidessus (voir “4.19 Activation/désactivation du Bip Touches”), mais
sélectionnez ‘SIGN. FAIBLE’ (RANGE TONE) au lieu de ‘BIP
TOUCHES’ (KEY BEEP).
4.21 Activation/désactivation de la tonalité
d'avertissement de batterie faible
Vous pouvez régler le combiné pour qu'il émette un bip lorsque la
batterie est quasiment épuisée. Pour activer/désactiver cette
fonction, suivez la procédure ci-dessus (voir “4.19 Activation/
désactivation du Bip Touches”), mais sélectionnez ‘SIGN.
BATTERIE’ (BATTERY TONE) au lieu de ‘BIP TOUCHES’ (KEY
BEEP).
4.22 Activation/désactivation de la tonalité de charge
Vous pouvez régler le combiné pour qu'il émette un bip lorsque
vous placez le combiné sur la base ou le chargeur.
Pour activer/désactiver cette fonction, suivez la procédure cidessus (voir “4.19 Activation/désactivation du Bip Touches”), mais
sélectionnez ‘SIGN. CHARGE’ (CHARGE TONE) au lieu de ‘BIP
TOUCHES’ (KEY BEEP).
4.23 Modification du nom du combiné
Pour modifier le nom du combiné indiqué à l'écran en mode de
veille, procédez comme suit :
1. Appuyez deux fois sur
2. Appuyez plusieurs fois sur ou et sélectionnez
‘NOM DU COMBINE’ (HANDSET NAME).
3. Appuyez sur pour confirmer.
4. Appuyez plusieurs fois sur ESC pour supprimer chaque
lettre successivement et utilisez le clavier alphanumérique
pour saisir un nouveau nom.
5. Appuyez sur pour valider le nouveau nom du
combiné.
17
17
.
17
4 15
3
FRANÇAIS
75
Page 76

Fonctions d'heure et de réveil Butler Outdoor 2010 - Twin - Triple
4.24 Décrochage automatique
Lorsque le combiné est sur la station de base et reçoit un appel
entrant, le téléphone prend automatiquement la ligne dès qu'il est
retiré de la station de base ou du chargeur. Vous pouvez choisir
d'activer ou non cette fonction.
1. Appuyez deux fois sur
2. Appuyez plusieurs fois sur ou et sélectionnez
‘REP.AUTO.’ (AUTO ANSWER).
3. Appuyez sur pour confirmer.
4. Sélectionnez ‘ACTIVE’ (ON) ou ‘DESACTIVE’ (OFF) et
appuyez sur pour confirmer.
17
17
.
17
4 15
4.25 Fin d'appel automatique
En communication, l'appel se termine lorsque le combiné est
replacé sur la station de base ou le chargeur si la fonction de fin
d'appel automatique est activée. Si la fonction de fin d'appel
automatique est désactivée en mode décroché, le combiné passe
en mode haut-parleur mains-libres lorsqu'il est placé sur la base ou
le chargeur. Vous pouvez choisir d'activer ou non cette fonction.
1. Appuyez deux fois sur
2. Appuyez plusieurs fois sur ou et sélectionnez
‘RACCROCH. AUTO’ (AUTO HANGUP).
3. Appuyez sur pour confirmer.
4. Sélectionnez ‘ACTIVE’ (ON) ou ‘DESACTIVE’ (OFF) et
appuyez sur pour confirmer.
17
17
.
17
4 15
utiliser cette fonction pour composer, par exemple, le numéro de
votre boîte vocale.
Pour programmer ce numéro :
1. Appuyez deux fois sur
2. Appuyez plusieurs fois sur ou et sélectionnez
‘MSG. VOCALE’ (VOICEMAIL).
3. Appuyez sur pour confirmer.
4. Saisissez le numéro de la boîte vocale de votre opérateur et
appuyez sur pour confirmer.
17
17
.
17
4 15
5 Fonctions d'heure et de réveil
5.1 Réglage de la date et de l'heure
Si le service d'identification de l'appelant (CLIP) est
activé sur votre ligne téléphonique et que l'opérateur
transmet la date et l'heure, votre horloge se règle
automatiquement lors d'un appel entrant. Vous pouvez
également désactiver cette fonction (voir “5.3 Réglage
automatique de l'horloge”). Une fois la date et l'heure
d'un combiné réglées, tous les combinés de cette station
de base adoptent ces réglages.
4.26 Touche de composition du numéro de la boîte
vocale
Appuyez sur la touche Boîte vocale pendant 3 secondes. Le
téléphone compose le numéro préprogrammé. Vous pouvez
76
Page 77

Butler Outdoor 2010 - Twin - Triple
1. Appuyez sur .
2. Appuyez plusieurs fois sur ou et sélectionnez
17
4 15
‘HORLOGE&REVEIL’ (CLOCK & ALARM).
3. Appuyez sur pour confirmer.
4. Appuyez plusieurs fois sur ou pour sélectionner
17
4 15
‘DATE ET HEURE’ (SET DATE&TIME).
5. Appuyez sur pour confirmer.
17
6. Saisissez le jour et le mois, chacun en deux chiffres,
et appuyez sur .
17
La date et l'heure ne sont pas perdues en cas de
coupure de courant de la station de base.
5.2 Sélection du format de la date et de l'heure
1. Appuyez sur .
2. Appuyez plusieurs fois sur ou et sélectionnez
‘HORLOGE&REVEIL’ (CLOCK & ALARM).
3. Appuyez sur pour confirmer.
4. Appuyez plusieurs fois sur ou et sélectionnez
‘CHOISIR FORMAT’ (SET FORMAT).
5. Appuyez sur pour confirmer.
6. Appuyez plusieurs fois sur ou et sélectionnez
‘FORMAT HEURE’ (TIME FORMAT) ou ‘FORMAT DATE’
(DATE FORMAT).
7. Appuyez sur pour confirmer.
8. Sélectionnez le format de l'heure (12 ou 24 heures) et
appuyez sur
ou
Sélectionnez le format de la date (JJ-MM ou MM-JJ) et appuyez
sur .
17
17
4 15
17
4 15
17
4 15
17
17
5.3 Réglage automatique de l'horloge
Lorsque cette fonction est activée, la date et l'heure sont mises à
jour par les données d'identification de l'appelant reçues. Cette
fonction peut être désactivée comme suit :
1. Appuyez sur .
2. Appuyez plusieurs fois sur ou et sélectionnez
17
4 15
‘HORLOGE&REVEIL’ (CLOCK & ALARM).
3. Appuyez sur pour confirmer.
4. Appuyez plusieurs fois sur ou et sélectionnez
17
4 15
‘REGL HORL AUTO’ (AUTO CLOCK ADJ).
5. Appuyez sur pour confirmer.
17
6. Sélectionnez ‘ACTIVE’ (ON) ou ‘DESACTIVE’ (OFF) et
appuyez sur pour confirmer.
17
5.4 Fonction de réveil
Réglez la date et l'heure avant d'utiliser cette fonction
pour que l'alarme déclenche à l'heure correcte.
Vous pouvez régler différentes alarmes pour chaque combiné
enregistré sur la station de base. Le réveil ne sonne que sur le
combiné concerné, pas sur la station de base ni sur un autre
combiné.
Si une alarme est activée, le symbole Alarme apparaît à l'écran
en mode de veille.
À l'heure du réveil, le combiné sonne pendant 1 minute. Pour
arrêter l'alarme, appuyez sur n'importe quelle touche du combiné.
5.4.1 Réglage d'une alarme
1. Appuyez sur .
2. Appuyez plusieurs fois sur ou et sélectionnez
‘HORLOGE&REVEIL’ (CLOCK & ALARM).
3. Appuyez sur pour confirmer.
17
4 15
17
FRANÇAIS
77
Page 78

Répertoire Butler Outdoor 2010 - Twin - Triple
4
15
17
4
15
17
4
15
17
17
4. Appuyez plusieurs fois sur ou pour sélectionner
4 15
‘REVEIL’ (ALARM).
5. Appuyez sur pour confirmer.
6. Appuyez plusieurs fois sur ou et sélectionnez l'un
17
4 15
des 3 réglages possibles : ‘UNE FOIS’ (ONCE), ‘TS LES
JOURS’ (DAILY) ou ‘DESACTIVE’ (OFF). Confirmez en
appuyant sur . Si vous sélectionnez ‘UNE FOIS’
17
(ONCE) ou ‘TS LES JOURS’ (DAILY), les indications
suivantes apparaissent à l'écran :
REGLER HEURE (SET TIME)
07:00
7. Saisissez l'heure de réveil en quatre chiffres et appuyez sur
pour confirmer votre entrée.
17
8. Pour désactiver la fonction Alarme, sélectionnez
‘DESACTIVE’ (OFF) et validez avec .
17
5.4.2 Réglage de la mélodie du réveil
1. Appuyez sur .
17
2. Appuyez plusieurs fois sur ou et sélectionnez
‘HORLOGE&REVEIL’ (CLOCK & ALARM).
3. Appuyez sur pour confirmer.
4. Appuyez plusieurs fois sur ou et sélectionnez
‘MELODIE REVEIL’ (ALARM TONE).
5. Appuyez sur pour confirmer.
6. Appuyez plusieurs fois sur ou et sélectionnez
l'une des 7 mélodies de réveil.
7. Appuyez sur pour confirmer.
6 Répertoire
Vous pouvez mémoriser 200 numéros (de 24 chiffres maximum) et
les associer à un nom (de 12 caractères maximum) dans le
répertoire.
6.1 Mémorisation d'une nouvelle entrée dans le
répertoire par le menu Répertoire
17
16
17
17
3
pour annuler sans sauvegarder
17
17
1. Appuyez sur .
2. Pour ajouter une nouvelle entrée, appuyez sur la touche Menu
et sélectionnez ‘NOUV. ENTREE’ (NEW ENTRY)
17
avec .
•‘ENTRER NOM’ (ENTER NAME) s'affiche à l'écran. Saisissez
le nom à l'aide des touches alphanumériques.
3. Appuyez sur et saisissez le numéro de téléphone.
4. Appuyez sur pour mémoriser l'entrée dans le
répertoire ou sur ESC
celle-ci.
6.2 Mémorisation d'une nouvelle entrée dans le
répertoire par le mode Composition en mode
raccroché
Lorsque vous saisissez un numéro de téléphone en mode de veille
et que vous appuyez ensuite sur la touche Menu , vous
pouvez mémoriser ce numéro directement dans le répertoire :
1. En mode de veille, composez le numéro de téléphone que
vous souhaitez enregistrer.
2. Appuyez sur .
•‘ENTRER NOM’ (ENTER NAME) s'affiche à l'écran. Saisissez
le nom à l'aide des touches alphanumériques.
3. Appuyez sur et modifiez le numéro de téléphone si
nécessaire.
78
Page 79

Butler Outdoor 2010 - Twin - Triple
4. Appuyez sur pour mémoriser l'entrée dans le
répertoire ou sur ESC
celle-ci.
17
3
pour annuler sans sauvegarder
6.3 Recherche et appel d'un numéro du répertoire
1. Appuyez sur .
2. Saisissez les premières lettres du nom à l'aide des touches
alphanumériques.
• Le premier nom de la liste commençant par ces lettres
s'affiche à l'écran.
3. Appuyez plusieurs fois sur ou
les autres numéros du répertoire.
4. Appel de l'abonné trouvé : Le numéro désiré est mis en
surbrillance. Appuyez sur .
16
4 15
14
pour faire défiler
6.4 Modification d'une entrée du répertoire
1. Appuyez sur .
2. Saisissez les premières lettres du nom.
• Le premier nom de la liste commençant par ces lettres
s'affiche à l'écran.
3. Appuyez plusieurs fois sur ou
les autres numéros du répertoire.
4. Appuyez sur lorsque le numéro apparaît à l'écran.
5. Appuyez plusieurs fois sur ou
‘MODIFIER ENTR.’ (EDIT ENTRY).
6. Appuyez sur pour confirmer.
7. Appuyez sur ESC pour supprimer chaque lettre
individuellement et utilisez le clavier alphanumérique pour
saisir le nom correct.
8. Appuyez sur .
16
4 15
17
4 15
17
3
17
pour faire défiler
et sélectionnez
9. Appuyez sur ESC pour supprimer chaque chiffre
individuellement et utilisez le clavier alphanumérique pour
saisir le numéro de téléphone correct.
10. Appuyez sur
apportées.
3
pour enregistrer les modifications
17
6.5 Suppression d'une ou de toutes les entrées
1. Appuyez sur .
2. Utilisez le clavier alphanumérique pour saisir les premières
lettres du nom et/ou utilisez ou pour atteindre
l'entrée désirée.
3. Appuyez sur lorsque le numéro apparaît à l'écran.
4. Appuyez plusieurs fois sur ou
‘SUPPRIMER’ (DELETE) ou ‘SUPPRIMER TOUT’
(DELETE ALL).
5. Appuyez sur pour confirmer.
6. Appuyez de nouveau sur pour confirmer ou sur
la touche d'échappement ESC pour annuler.
16
17
17
4 15
4 15
17
3
et sélectionnez
7 Réglages de la station de base
7.1 Modification du code PIN (code PIN système)
Certaines fonctions ne sont accessibles qu'aux utilisateurs
connaissant le code PIN de la station de base.
Le code PIN comporte 4 chiffres et est réglé, par défaut, sur '0000'.
Procédez comme suit pour modifier le code PIN prédéfini ou saisir
un nouveau code PIN.
1. Appuyez sur .
2. Appuyez plusieurs fois sur ou et sélectionnez
‘CONFIG BASE’ (BS SETTINGS).
17
4 15
FRANÇAIS
79
Page 80

Paramétrage de la ligne Butler Outdoor 2010 - Twin - Triple
3. Appuyez sur pour confirmer.
• Appuyez plusieurs fois sur ou et sélectionnez
17
4 15
‘CODE PIN’ (PIN CODE).
4. Appuyez sur et saisissez l'ancien code PIN.
5. Appuyez sur . Si le code PIN saisi est incorrect,
17
17
l'écran affiche ‘ERREUR PIN !’ (WRONG PIN!). Si vous avez
saisi le code PIN correct, vous êtes invité à saisir un nouveau
code PIN. Saisissez le nouveau code PIN système et appuyez
sur .
17
7.2 Mode Conférence simple
Lorsque cette fonction est activée, vous pouvez facilement établir
une conférence entre 2 combinés et la ligne externe. Lorsqu'un
combiné est en communication avec la ligne externe, il suffit de
décrocher le second combiné pour établir une conférence
(communication avec le 1er combiné et la ligne externe). Pour
activer ou désactiver cette fonction :
1. Appuyez sur .
2. Appuyez plusieurs fois sur ou et sélectionnez
‘CONFIG BASE’ (BS SETTINGS).
3. Appuyez sur pour confirmer.
4. Appuyez plusieurs fois sur ou et sélectionnez
‘CONFERENCE’ (CONFERENCE).
5. Appuyez sur pour confirmer.
6. Sélectionnez ‘ACTIVE’ (ON) ou ‘DESACTIVE’ (OFF) et
appuyez sur pour confirmer.
Lorsque cette fonction est désactivée, vous pouvez
toujours établir une conférence, tel que décrit à la section
“9.3.5 Conférence téléphonique (deux combinés internes
et un correspondant externe)”.
17
4 15
17
4 15
17
17
7.3 Réinitialisation
Tous les réglages personnels, ainsi que les entrées du journal des
appels et de la liste des derniers numéros composés sont
supprimés. De même, tous les réglages des combinés et de la
base reviennent aux paramètres par défaut.
La liste du répertoire et les nouveaux messages du
répondeur ne sont pas supprimés après une
réinitialisation.
1. Appuyez sur .
2. Appuyez plusieurs fois sur ou et sélectionnez
17
4 15
‘CONFIG BASE’ (BS SETTINGS).
3. Appuyez sur pour confirmer.
4. Appuyez plusieurs fois sur ou et sélectionnez
17
4 15
‘REINITIALISER’ (RESET).
5. Appuyez sur pour confirmer.
Appuyez de nouveau sur pour confirmer.
17
17
Le téléphone repasse en mode Configuration (voir “4.1 Mise sous
tension (Mode Configuration)”).
8 Paramétrage de la ligne
8.1 Paramétrage du pays
Plusieurs réglages dépendent du pays et, en configurant celui-ci,
ces paramètres sont adaptés en conséquence. Chaque paramètre
peut également être réglé séparément. Certains paramètres, tels
que le laps de temps et le mode d'appel, ne peuvent être réglés si
les différentes options n'existent pas pour le pays sélectionné.
Pour définir la version du pays :
1. Appuyez sur .
17
80
Page 81

Butler Outdoor 2010 - Twin - Triple
17
4
15
17
17
2. Appuyez plusieurs fois sur ou et sélectionnez
4 15
‘CONFIG. LIGNE’ (LINE SETTINGS).
3. Appuyez sur pour confirmer.
4. Appuyez plusieurs fois sur ou et sélectionnez
17
4 15
‘PAYS’ (COUNTRY).
5. Appuyez sur pour confirmer.
6. Appuyez plusieurs fois sur ou pour sélectionner
votre pays et appuyez sur pour confirmer.
7. Appuyez de nouveau sur pour confirmer.
17
4 15
17
17
8.2 Touche flash (R)
La touche Flash R vous permet d'utiliser ou d'activer certains
services sur votre ligne extérieure, tels que "appel en attente" (si
ce service est proposé par votre opérateur téléphonique). La
touche Flash est également utilisée pour effectuer un rappel
interne ou pour transférer un appel lorsque vous utilisez le
téléphone sur un PABX. La touche Flash R produit une brève
interruption de la ligne. Vous pouvez régler le temps de cette
interruption sur court, sur moyen ou sur long.
Ce menu n'est disponible que dans certains pays, en
fonction du pays que vous avez sélectionné (voir “8.1
Paramétrage du pays”).
1. Appuyez sur .
2. Appuyez plusieurs fois sur ou et sélectionnez
‘CONFIG. LIGNE’ (LINE SETTINGS).
3. Appuyez sur pour confirmer.
4. Appuyez plusieurs fois sur ou et sélectionnez
‘DUREE RAPPEL’ (RECALL TIME).
5. Appuyez sur pour confirmer.
4
4
4 15
6. Appuyez plusieurs fois sur ou pour sélectionner
4 15
‘COURT’ (SHORT), ‘MOYEN’ (MEDIUM) ou ‘LONG’ (LONG)
et appuyez ensuite sur pour confirmer.
17
8.3 1ère sonnerie
Lorsque vous recevez une indication de nouveau message vocal
en attente (voir “9.4 Écran Boîte vocale”), vous pouvez entendre
une sonnerie brève. Si vous le souhaitez, vous pouvez désactiver
la première sonnerie.
1. Appuyez sur .
2. Appuyez plusieurs fois sur ou et sélectionnez
17
4 15
‘CONFIG. LIGNE’ (LINE SETTINGS).
3. Appuyez sur pour confirmer.
4. Appuyez plusieurs fois sur ou et sélectionnez
17
4 15
‘1ERE SONNERIE’ (FIRST RING).
5. Appuyez sur pour confirmer.
17
6. Sélectionnez ‘ACTIVE’ (ON) ou ‘DESACTIVE’ (OFF) et
appuyez sur pour confirmer.
17
8.4 Réglage du mode de composition
Deux modes de numérotation peuvent être utilisés lorsque vous
passez des appels :
• DTMF = multifréquence à deux tonalités ou numérotation à
tonalités (mode de composition actuelle)
• Composition à impulsions (sur les appareils plus anciens)
Les appareils modernes sont équipés des deux fonctions qui
peuvent être modifiées en fonction de l'application. Le mode
DTMF est nécessaire pour des fonctions de programmation ou de
commande, par exemple si l'appareil fonctionne sur un
commutateur privé. En mode de composition à impulsions, des
dysfonctionnements peuvent survenir sur un commutateur privé
FRANÇAIS
81
Page 82

Combinés et stations de base supplémentaires Butler Outdoor 2010 - Twin - Triple
17
en fonctionnement normal, parce que le système interprète mal les
signaux de composition à impulsions.
Ce menu n'est disponible que dans certains pays, en
fonction du pays que vous avez sélectionné (voir “8.1
Paramétrage du pays”).
Modification du mode de composition :
1. Appuyez sur .
2. Appuyez plusieurs fois sur ou et sélectionnez
17
4 15
‘CONFIG. LIGNE’ (LINE SETTINGS).
3. Appuyez sur pour confirmer.
4. Appuyez plusieurs fois sur ou et sélectionnez
17
4 15
‘MODE NUMEROT.’ (DIAL MODE).
5. Appuyez sur pour confirmer.
17
6. Sélectionnez ‘FREQ. VOCALES’ (TONE) ou ‘NUM.
DECIMALE’ (PULSE) et appuyez sur pour
17
confirmer.
9 Combinés et stations de base
supplémentaires
Vous pouvez enregistrer jusqu'à 5 combinés sur une seule station
de base. Un combiné supplémentaire doit être enregistré sur
l'unité de base avant utilisation. Les combinés d'un ensemble sont
déjà enregistrés sur la base.
Ou-ci les combinés de la gamme Ultra (tels que Ultra
S1200C) peuvent être enregistrés !
9.1 Enregistrement d'un combiné supplémentaire
Cette opération n'est nécessaire que si vous avez
désenregistré un combiné ou si vous en avez acheté un
nouveau séparément. Vous ne devez pas enregistrer les
combinés d'un ensemble !
Maintenez la touche Paging de la station de base enfoncée
22
pendant plus de 5 secondes. Le mode d'enregistrement sur la
station de base s'active pendant approximativement 3 minutes.
Pour enregistrer un combiné, procédez comme suit :
1. Appuyez sur .
2. Appuyez plusieurs fois sur ou et sélectionnez
17
4 15
‘ANNONCER’ (REGISTRATION).
3. Appuyez sur pour confirmer.
4. Appuyez plusieurs fois sur ou pour sélectionner
17
4 15
‘SOUSCRIRE’ (REGISTER).
5. Appuyez sur pour confirmer.
17
6. Saisissez le code PIN de la station de base (code PIN du
système, par défaut '0000') et appuyez sur .
17
• Le combiné recherche la station de base et s'enregistre
lorsqu'il l'a trouvée. Une fois l'enregistrement terminé, l'écran
indique le mode de veille, ainsi que le nom et le numéro du
combiné.
9.2 Suppression d'un combiné
Il est possible supprimer un combiné d'une station de base. Cette
opération peut être nécessaire, par exemple, si un combiné est
endommagé et doit être remplacé.
1. Appuyez sur .
2. Appuyez plusieurs fois sur ou et sélectionnez
‘ANNONCER’ (REGISTRATION).
4 15
82
Page 83

Butler Outdoor 2010 - Twin - Triple
17
6
3. Appuyez sur pour confirmer.
4. Appuyez plusieurs fois sur ou et sélectionnez
17
4 15
‘DESOUSCRIRE’ (UNREGISTER).
5. Appuyez sur pour confirmer.
17
6. Saisissez le code PIN du système (code PIN de la station de
base) et appuyez sur .
7. Appuyez plusieurs fois sur ou pour sélectionner
le combiné à supprimer et appuyez sur pour le
17
4 15
17
supprimer.
9.3 Gestion de plusieurs combinés
Ces fonctions ne sont disponibles que si plusieurs
combinés sont enregistrés sur la station de base.
9.3.1 Appel d'un autre combiné
1. Appuyez sur INT .
2. Appuyez plusieurs fois sur ou et sélectionnez le
combiné que vous souhaitez appeler.
• Sélectionnez ‘TOUS COMBINES’ (ALL HANDSETS) pour
appeler tous les combinés.
• Appuyez sur pour appeler le(s) combiné(s)
sélectionné(s).
3. Appuyez sur pour raccrocher à la fin de votre appel.
9.3.2 Réception d'un appel interne
•‘APPEL DU COMBINE X’ (CALLING FROM HANDSET X)
apparaît à l'écran.
1. Appuyez sur pour prendre l'appel interne.
OU
12
4 15
17
6
14
1. Retirez le combiné de sa station de base (si vous avez activé
la fonction de décrochage automatique, voir “4.24 Décrochage
automatique”).
• Pendant l'appel, le numéro de combiné de l'appelant s'affiche
à l'écran.
2. Appuyez sur pour raccrocher à la fin de votre appel.
6
9.3.3 Réception d'un appel externe pendant une
communication interne
Si vous recevez un appel externe pendant une communication
interne, vous entendez une tonalité d'appel en attente (double bip)
sur les deux combinés en communication interne.
1. Appuyez sur .
6
• L'appel interne est terminé.
2. Appuyez sur .
14
• Vous répondez alors à l'appel externe.
9.3.4 Transfert d'un appel vers un autre combiné
• Vous êtes en ligne avec un correspondant externe.
1. Appuyez sur INT .
2. Appuyez plusieurs fois sur ou et sélectionnez le
12
4 15
combiné que vous souhaitez appeler.
• Sélectionnez ‘TOUS COMBINES’ (ALL HANDSETS) pour
appeler tous les combinés.
• Appuyez sur pour appeler le(s) combiné(s)
sélectionné(s). Si le combiné appelé répond, vous pouvez
tenir une conversation interne.
3. Appuyez sur pour transférer l'appelant externe sur le
combiné appelé.
OU
• Le correspondant interne appelé ne répond pas.
FRANÇAIS
83
Page 84

Abréviations et termes techniques Butler Outdoor 2010 - Twin - Triple
4. Appuyez de nouveau sur INT’ pour reprendre l'appel
externe.
9.3.5 Conférence téléphonique (deux combinés internes et
un correspondant externe)
Vous pouvez tenir une conversation téléphonique en même temps
avec un correspondant interne et avec un correspond externe.
1. Appuyez sur INT .
2. Appuyez plusieurs fois sur ou et sélectionnez le
combiné que vous souhaitez appeler.
• Sélectionnez ‘TOUS COMBINES’ (ALL HANDSETS) pour
appeler tous les combinés.
3. Appuyez sur pour appeler le(s) combiné(s)
sélectionné(s). Si le combiné appelé répond, vous pouvez
tenir une conversation interne.
4. Appuyez sur la touche INT et maintenez-la enfoncée jusqu'à
ce que ‘CONFERENCE’ (CONFERENCE) apparaisse à
l'écran
• Vous êtes désormais en communication avec le
correspondant interne et le correspondant externe et vous
pouvez leur parler en même temps (conférence téléphonique).
Si vous avez activé la fonction Conférence (voir “7.2
Mode Conférence simple”), vous pouvez également
entrer en conférence en décrochant simplement le
second combiné lorsque le 1er combiné est en
communication avec la ligne externe.
12
17
12
4 15
9.4 Écran Boîte vocale
Cet écran ne fonctionne que si vous avez activé un service de
messagerie vocale ou téléphonique et si votre opérateur transmet
cette information en même temps que l'identification de l'appelant.
Lorsque vous recevez un nouveau message dans votre boîte
vocale, le symbole s'affiche à l'écran. Le symbole disparaît
dès que vous avez écouté votre message.
Pour écouter vos messages, vous devez composer un certain
numéro. Ce numéro peut être programmé sous la touche ‘1’ (voir
“4.26 Touche de composition du numéro de la boîte vocale”).
10 Abréviations et termes techniques
CLIP
Calling Line Identification Presentation (présentation
d'identification de la ligne appelante) ; affiche le numéro de
téléphone de l'appelant sur l'écran du poste appelé.
DECT
Digital Enhanced Cordless Telecommunication
(télécommunications numériques européennes sans fil) ; norme
européenne de télécommunications pour les téléphones
numériques sans fil.
Mode ECO
Mode économique ; fonctionnement à faible rayonnement en
téléphonie DECT.
Touche Flash
Provoque une brève coupure de la ligne en vue d'activer des
fonction, telles que le basculement ou le transfert d'appels. Sur des
commutateurs privés, la touche Flash ou R est utilisée pour des
rappels internes.
GFSK
Gaussian Frequency Shift Keying (codage par modulation de
fréquence avec filtrage gaussien) ; méthode de modulation
numérique pour réduction des problèmes d'interférences en
téléphonie.
84
Page 85

Butler Outdoor 2010 - Twin - Triple
INT
Abonné interne. Autres combinés ou extensions sur un
commutateur privé.
Mode Tonalité
Mode de composition analogique obsolète (bruits de composition
à "craquement").
LCD
Liquid Crystal Display (écran à cristaux liquides).
LED
Light Emitting Diode (diode électroluminescente)
DTMF
Dual Tone Multiple Frequency (multifréquence à deux tonalités) ;
mode de composition numérique moderne.
OGM
Outgoing message (message d'accueil) sur un répondeur.
Paging
Fonction de recherche sur la station de base. Si vous appuyez sur
la touche Paging , tous les combinés enregistrés se mettent
22
à sonner.
Twin
Désignation d'une unité composée de deux appareils identiques,
par exemple deux combinés.
Pause dans la composition
Une pause dans la composition peut s'avérer nécessaire lorsque
vous faites fonctionner votre téléphone sur un commutateur privé,
par exemple si ce dernier n'identifie pas correctement le numéro
composé pour accéder à une ligne externe (par exemple, le '0'). Le
cas échéant, vous pouvez insérer une pause après la composition
d'un numéro pour accéder à une ligne externe.
PIN
Personal Identification Number (numéro d'identification
personnel).
Touche R
Touche Rappel (voir Touche Flash).
Veille
État “d'inactivité” d'un appareil sans qu'il ne soit totalement
désactivé.
FRANÇAIS
85
Page 86

Dépannage Butler Outdoor 2010 - Twin - Triple
Symptôme Cause possible Solution
L'écran reste sombre. Le bloc de batteries est mal positionné. Vérifiez le connecteur du bloc de batteries.
Les batteries ne sont pas chargées. Chargez les batteries.
Le combiné est éteint. Allumez le combiné (voir “4.2 Mise en/hors service du
combiné”).
Pas d'alimentation Vérifiez que les appareils sont correctement alimentés.
Vérifiez que le combiné est activé. Voir “2.3 Activation du
combiné OUTDOOR”.
Pas de son Le câble téléphonique est mal raccordé ou
défectueux.
Vérifiez la connexion du câble téléphonique (voir “2.1 Mise
en service de la station de base”).
La ligne est occupée par un autre combiné. Attendez que l'autre combiné soit raccroché.
Le symbole clignote. Le combiné est hors de portée. Rapprochez le combiné de la station de base.
La station de base n'est pas alimentée. Vérifiez le raccordement électrique de la station de base.
Le combiné n'est pas enregistré sur la
station de base.
Enregistrez le combiné sur la station de base (voir “9.1
Enregistrement d'un combiné supplémentaire”).
La station de base ou le combiné
ne sonne pas.
Le volume de la sonnerie est désactivé ou
trop faible.
Réglez le volume de la sonnerie (voir “4.16 Réglage du
volume de sonnerie sur le combiné”.
Aucune connexion malgré une
bonne qualité sonore.
Le mode de composition est incorrect. Vérifiez le mode de composition (voir “8.4 Réglage du
mode de composition”).
Des appels ne peuvent être
transférés sur un commutateur
privé.
Le flash est trop bref. Réglez l'appareil sur un flash long (voir “8.2 Touche flash
(R)”).
Le téléphone ne réagit pas lorsque
vous appuyez sur les touches.
Erreur de programmation Retirez les batteries et attendez 1 minute avant de les
remettre en place.
11 Dépannage
Risque de blessure ou de mort lié au courant électrique !
En cas de danger, débranchez immédiatement l'appareil de la prise d'alimentation de 230 V.
86
Page 87

Butler Outdoor 2010 - Twin - Triple
Ne modifiez pas et ne réparez pas l'appareil. L'appareil et le câble
doivent être réparés exclusivement par un spécialiste du service
après-vente. Les réparations qui ne sont pas effectuées
correctement peuvent exposer l'utilisateur à des risques
importants.
12 Entretien
12.1 Maintenance
L'appareil ne nécessite aucune maintenance. Vérifiez
occasionnellement l'état des batteries et remplacez-les par des
nouvelles du même type si leur autonomie diminue ou si elles
commencent à couler.
Danger de brûlures chimiques !
Portez des gants de protection pour retirer des batteries
rechargeables épuisées.
Si l'appareil entre en contact avec un liquide, retirez
immédiatement les batteries, débranchez l'appareil de
l'alimentation (station de base) et séchez-le soigneusement.
Vérifiez son fonctionnement après 2 à 3 jours. Retournez-le à un
centre de service après-vente s'il est défectueux.
12.2 Nettoyage
Risque de choc électrique ou de court-circuit lié à un
contact avec des composants conducteurs.
Empêchez les liquides de pénétrer dans l'appareil. Le cas
échéant, débranchez l'adaptateur secteur de la prise
d'alimentation et le connecteur du câble téléphonique de
la prise murale et retirez les batteries.
Il en va de même si l'appareil, le câble ou l'adaptateur
secteur est endommagé : évitez tout contact direct avec
des liquides et débranchez immédiatement l'appareil de
la prise d'alimentation de 230 V.
Nettoyez le téléphone à l'aide d'un chiffon humide, trempé dans de
l'eau tiède, ou antistatique. N'utilisez jamais de détergents ni de
produits abrasifs.
12.3 Mise hors service, rangement
Pour mettre temporairement l'appareil hors service, débranchez le
câble téléphonique de la prise murale et de la prise téléphonique
sur la station de base. Débranchez la station de base et les
adaptateurs secteur des prises de 230 V.
Retirez les batteries des combinés. Si le téléphone est mis hors
service pendant une période prolongée, remplacez les batteries
rechargeables par des nouvelles du même type à la remise en
service de celui-ci.
Rangez les appareils et les batteries rechargeables dans un
endroit sec et pas trop chaud.
FRANÇAIS
87
Page 88

Caractéristiques techniques Butler Outdoor 2010 - Twin - Triple
12.4 Mise au rebut (protection environnementale)
En fin de vie, l'appareil et les batteries rechargeables ne
doivent pas être jetés avec les déchets ménagers
normaux. Le symbole indiqué sur le produit et/ou sur
l'emballage vous le rappelle. Portez-le dans un point de
collecte des appareils électriques et électroniques en
vue de leur recyclage. Certains matériaux de cet
appareil peuvent y être recyclés. Vous pouvez protéger
l'environnement en recyclant certaines pièces ou matières
premières provenant de produits usagés.
Évacuez également les matériaux d'emballage de manière
écologique. Pour toute information supplémentaire sur les points
de collecte de votre région, contactez les autorités locales.
13 Caractéristiques techniques
Normes téléphoniques : DECT
Plage de fréquence : 1880 MHz à 1900 MHz
Nombre de canaux : 120 canaux duplex
Modulation : GFSK
Vitesse d'encodage : 32 kbit/s
Émissions : 10 mW (sortie moyenne par canal)
Portée : 300 m sans obstacle
50 m max. à l'intérieur
Alimentation de la station
de base : Entrée : 100 - 230 V~/50 Hz
Sortie: 6V=/500mA
Alimentation de charge
Station: Entrée : 100 - 230 V~/50 Hz
Sortie: 9V=/210mA
Combiné, batteries : bloc de batteries rechargeables
(NiMH),
2,4 V/500 mAh (BT-800)
Combiné, autonomie
des batteries : 168 heures en mode de veille
Temps de conversation : 10 heures
Temps de charge : 15 heures
Mode de numérotation : DTMF (multifréquence
à deux tonalités)
Composition à impulsions
Temps "flash" : 100 ms, 300 et 600 ms
Température
(en fonctionnement): +5 °C à +45 °C
Température (en stockage): 0 °C à 70 °C
Humidité relative
(en fonctionnement) : IPX7 (Seulement Combiné)
88
Page 89

Butler Outdoor 2010 - Twin - Triple
Dimensions (hauteur x largeur x profondeur) :
– Station de base : 100 mm x 116 mm x 85 mm
– Combiné : 175 mm x 52 mm x 35 mm
– Station de charge: 52 mm x 926 mm x 78 mm
Poids :
– Combiné Outdoor avec bloc de batteries et clip de
ceinture : 212 g
– Station de base avec adaptateur secteur : 213 g
Consommation électrique maximale :
– Station de base et combiné : 2,25 W
– Station de charge et combiné : 1,25 W
14 Garantie Topcom
14.1 Période de garantie
Les appareils Topcom bénéficient d'une période de garantie de
24 mois. Celle-ci prend effet le jour de l'achat du nouvel appareil.
Il n'y a aucune garantie sur les piles standard ou rechargeables (de
type AA/AAA). Les accessoires et les défauts ayant un effet
négligeable sur le fonctionnement ou la valeur de l'appareil ne sont
pas couverts.
La garantie s'applique uniquement sur présentation de l'original ou
d'une copie de la facture sur laquelle figurent la date de l'achat et
le modèle de l'appareil.
14.2 Mise en œuvre de la garantie
Tout appareil défectueux doit être retourné à un centre de service
après-vente Topcom, accompagné d'un ticket d'achat valable et
d'une fiche de service dûment complétée.
En cas de panne pendant la période de garantie, Topcom ou son
centre de service après-vente officiel réparera gratuitement les
dysfonctionnements dus à un vice de matière ou de fabrication, en
réparant ou en remplaçant les appareils ou les pièces défectueux.
En cas de remplacement, la couleur et le modèle peuvent être
différents de ceux de l'appareil acheté initialement.
La date d'achat initiale détermine le début de la période de
garantie. Cette dernière n'est pas prolongée si l'appareil est
remplacé ou réparé par Topcom ou son centre de service aprèsvente officiel.
14.3 Exclusions de garantie
Les dommages et pannes causés par un mauvais traitement ou
une utilisation incorrecte ou résultant de l'utilisation de pièces et
d'accessoires non originaux ne sont pas couverts par la garantie.
La garantie ne couvre pas les dégâts causés par des éléments
extérieurs, tels que la foudre, l'eau et le feu, ni les dégâts encourus
pendant le transport.
Aucune garantie ne pourra être invoquée si le numéro de série
indiqué sur l'appareil a été modifié, supprimé ou rendu illisible.
De même, aucune garantie ne pourra être sollicitée si l'appareil a
été réparé ou modifié par l'acheteur.
Cet appareil doit être utilisé avec des piles rechargeables
uniquement. Si vous voulez remplacer les piles fournies avec
l'appareil, veuillez vérifier que les piles que vous utilisez sont
adaptées et rechargeables. N'utilisez PAS de piles alcalines dans
les combinés.
Si vous utilisez des piles alcalines et que vous placez le combiné
sur la base, les piles vont chauffer et risquent d'exploser. Le
fabricant ne sera pas tenu responsable des dommages provoqués
et ceux causés sur l'appareil ne seront pas pris en charge par la
garantie. Toutes les réparations seront à vos frais.
FRANÇAIS
89
Page 90

Allgemeine Informationen Butler Outdoor 2010 Twin-Triple
1 Allgemeine Informationen
In dieser Bedienungsanleitung finden Sie alle wichtigen
Informationen zur Installation, Einstellung und Bedienung Ihres
Gerätes. Außerdem erhalten Sie Informationen und wichtige
Hinweise zu Ihrer Sicherheit sowie Hilfe bei Problemen.
1.1 Das Produkt: Butler Outdoor 2010
Der Produktname „Twin” bezieht sich auf ein Modell
bestehend aus einer Basisstation mit schnurlosem
Mobilteil und einer zusätzlichen Ladestation mit
zusätzlichem schnurlosen Mobilteil (= Twin).
Dieses Produkt wurde in Übereinstimmung mit dem einheitlichen
digitalen Standard für schnurlose Telefone (DECT) hergestellt. Die
DECT-Technologie zeichnet sich durch hohe Abhörsicherheit
sowie qualitativ hochwertige digitale Übertragung aus. Dieses
Telefon ist für zahlreiche Anwendungsmöglichkeiten geeignet,
beispielsweise in einem Netzwerk von Basisstationen und
schnurlosen Mobilteilen, die in einem PBX-System verbunden
sind: Sie können an einer Basisstation bis zu 5 schnurlose
Mobilteile anmelden. Zwischen zwei schnurlosen Mobilteilen sind
interne Anrufe möglich. Um die Reichweite zu vergrößern, lassen
sich bis zu sechs Repeater an der Basisstation anmelden.
Falls bei Ihrem Anbieter verfügbar, ist dieses Gerät für
Anruferkennung geeignet. Bei dieser Funktion wird die Nummer
des Anrufers auf dem Display angezeigt.
1.2 Urheberrecht
Dieses Dokument ist urheberrechtlich geschützt.
Alle Rechte, einschließlich die der gesamten oder teilweisen
fotomechanischen Wiedergabe, Vervielfältigung und Verbreitung
mittels bestimmter Verfahren (wie Datenverarbeitung, Datenträger
und Datennetzwerke) sowie inhaltlicher und technischer
Änderungen, bleiben vorbehalten.
1.3 Meldungen und Symbole
Symbol Meldung Bedeutung
Schwere oder lebensgefährliche
Verletzungen drohen, wenn Sie die
Anweisung nicht befolgen.
Verletzungen drohen, wenn Sie die
Anweisung nicht befolgen.
Material- oder Umweltschäden drohen.
Wichtige Informationen über die Funktion.
Allgemeine Informationen oder spezielle
Tipps.
kein
Symbol
Achtung
Vorsicht
Vorsicht
Wichtig
Info,
Tipp
1.4 Bestimmungsgemäße Verwendung
90
Um die Anruferkennung nutzen zu können, muss diese
Funktion für Ihren Telefonanschluss verfügbar sein.
Nähere Informationen dazu erhalten Sie bei Ihrem
Netzbetreiber. Ist diese Funktion nicht aktiviert,
erscheinen die Nummern der Anrufer nicht auf dem
Display.
Dieses Gerät ist für Festnetz-Telefongespräche innerhalb eines
Telefonnetzes bestimmt. Voraussetzung für die
bestimmungsgemäße Verwendung des Telefons ist die
sachgerechte Installation unter Beachtung der Hinweise dieser
Bedienungsanleitung.
Page 91

Butler Outdoor 2010 Twin-Triple
Jede andere Verwendung ist nicht bestimmungsgemäß und somit
unzulässig.
Eigenmächtige Veränderungen oder Umbauten, die nicht in dieser
Bedienungsanleitung beschrieben werden, sind unzulässig.
1.5 Sicherheitshinweise
Beim Gebrauch von elektrischen Geräten müssen stets die
folgenden Sicherheitshinweise berücksichtigt werden.
Lesen Sie die folgenden Sicherheitshinweise und Angaben zur
korrekten Verwendung des Geräts sorgfältig durch. Machen Sie
sich mit allen Funktionen des Geräts vertraut. Bewahren Sie diese
Bedienungsanleitung sorgfältig in der Nähe des Gerätes auf und
geben Sie sie, wenn nötig, an andere Benutzer weiter. Geben Sie
das Telefon nur zusammen mit der Bedienungsanleitung an Dritte
weiter.
Elektrische Gefahren:
Verletzungs- bzw. Lebensgefahr durch elektrischen
Strom!
Bei einem Risiko das Gerät sofort vom 230-VStromnetz trennen.
• Das Gerät darf nicht verwendet werden, wenn Netzadapter,
Kabel oder Gerät beschädigt sind. Achten Sie darauf, dass
das Gerät nicht herunterfällt, da es dabei beschädigt werden
könnte.
• Die Spannung innerhalb des Geräts liegt in einem
gefährlichen Bereich. Niemals das Gehäuse öffnen oder
Gegenstände durch die Belüftungsschlitze einführen.
• Es dürfen keine Flüssigkeiten in das Gerät eindringen.
Andernfalls sofort Netzteil aus der Steckdose und
Telefonkabel aus der Telefondose ziehen.
• Bei Betriebsstörungen und vor dem Reinigen des Gerätes
müssen ebenfalls der Netzstecker und der Telefonstecker
gezogen werden.
• Die Lade- und Steckerkontakte nicht mit spitzen oder
metallischen Gegenständen berühren.
• Keine Änderungen oder Reparaturen am Gerät vornehmen.
Gerät und Kabel dürfen ausschließlich von einem Fachmann
im Service-Zentrum repariert werden. Unsachgemäß
durchgeführte Reparaturen können den Benutzer in Gefahr
bringen!
• Kinder unterschätzen häufig die Gefahren beim Umgang mit
Elektrogeräten. Kinder niemals mit elektrischen Geräten
unbeaufsichtigt lassen.
• Das Gerät nicht an feuchten Orten (z. B. Badezimmer) oder
an sehr staubigen Orten benutzen.
• Bei einem Gewitter können am Stromnetz angeschlossene
Geräte durch Blitzeinschlag beschädigt werden. Deshalb
sollte bei Gewittern stets der Netzstecker aus der Steckdose
gezogen werden.
• Um das Gerät vollständig von der Stromversorgung zu
trennen, muss der Netzadapter ganz aus der Steckdose
DEUTSCH
91
Page 92

Allgemeine Informationen Butler Outdoor 2010 Twin-Triple
gezogen werden. Dabei immer am Stecker und niemals am
Kabel ziehen.
• Kabel regelmäßig auf eventuelle Schäden prüfen, vor heißen
Oberflächen oder anderen Gefahrenquellen schützen,
vollständig abwickeln sowie stolper- und klemmfrei verlegen.
Brandgefahren:
Verletzungs- bzw. Lebensgefahr durch Feuer!
Setzen Sie das Gerät nicht übermäßiger Hitze aus und
ziehen Sie bei Gefahr sofort den Netzstecker.
Die im Gerät erzeugte Wärme kann eine Störung oder einen Brand
hervorrufen. Daher darf das Gerät keinen extremen Temperaturen
ausgesetzt werden:
– Direkte Sonneneinstrahlung und Hitze vermeiden.
– Lüftungsschlitze des Gerätes nicht verdecken.
Explosionsgefahr:
Verletzungsgefahr durch Explosionen!
Besondere Vorsicht im Umgang mit Batterien und
Akkus üben.
Erstickungsgefahr:
Verletzungsgefahr durch Ersticken!
Besonders auf Kinder achten.
• Verpackungsfolien von Kindern fernhalten.
• Bei Kabelverlegung mögliche Gefahren für Kinder bedenken
(Strangulieren).
Störungen:
Mögliche Verletzungsgefahr durch Gerätestörungen!
Besonders auf medizintechnische Geräte achten.
• Medizintechnische Geräte können durch elektromagnetische
Strahlung Ihres Gerätes in ihrer Funktion beeinträchtigt
werden. Das Gerät daher in ausreichendem Abstand zu
medizintechnischen Geräten installieren und betreiben.
Das gilt auch für implantierte medizinische Geräte, z. B.
Herzschrittmacher.
• Das schnurlose Mobilteil kann in Hörhilfen ein störendes
Summgeräusch hervorrufen. Gerät in ausreichendem Abstand
betreiben.
• Werfen Sie Batterien und Akkus niemals ins Feuer.
• Gerät nicht in explosionsgefährdeter Umgebung in Betrieb
nehmen!
Vergiftungsgefahr:
Verletzungsgefahr durch Vergiftung!
Besonders auf Kinder achten.
• Bewahren Sie Batterien und Akkus außerhalb der Reichweite
von Kindern auf.
92
Mögliche Beschädigungen:
Beschädigungen am Gerät möglich!
Informationen in dieser Bedienungsanleitung
• Verwenden Sie nur das im Lieferumfang enthaltene Netzteil.
Netzadapter anderer Hersteller können die Akkus
beschädigen.
• Schließen Sie das Gerät an eine nahe gelegene und leicht
zugängliche Steckdose an.
• Nur die mitgelieferten Akkus verwenden. Müssen diese
ersetzt werden, Akkus des gleichen Typs verwenden.
Überprüfen Sie, ob die Akkus korrekt eingelegt sind
Page 93

Butler Outdoor 2010 Twin-Triple
(wie am Akkufach des Geräts angezeigt). Niemals normale
Einwegbatterien verwenden.
Dieses Gerät kann bei Stromausfall nicht benutzt
werden. Verwenden Sie in diesem Fall ein Telefon, das
nicht an das Stromnetz angeschlossen ist, z. B. ein
Mobiltelefon.
• Mobilteile nicht ohne eingesetzte Akkus und mit offenem
Akkufach in die Ladestation einsetzen.
1.6 Anmerkungen zum strahlungsarmen Betrieb
Dieses schnurlose Telefon (in Übereinstimmung mit dem DECTStandard) unterstützt den strahlungsarmen Betrieb (ECO-Modus).
Während eines Gesprächs verringert das Mobilteil die Strahlung
abhängig von dem Abstand zur Basisstation. Wird nicht telefoniert,
verringert das Mobilteil die Strahlung auf ein Minimum.
Das Gerät unterstützt den strahlungsarmen Betrieb außerdem
dadurch, dass die Basisstation die Strahlung praktisch auf Null
reduziert, wenn ein schnurloses Mobilteil an der Basisstation
angemeldet ist und dieses Mobilteil auf der Basisstation
aufgeladen wird. Die Basisstation verringert die Strahlung nicht,
wenn zwei oder mehr Mobilteile angemeldet sind.
Das bedeutet nicht, dass die normale DECT-Strahlung
gesundheitsschädigend ist. Strahlungsarmer Betrieb bedeutet nur,
dass unnötige Strahlung vermieden wird.
Strahlungsarmer Betrieb ist in der Lieferkonfiguration als Twin-Set
nicht möglich! Die Basisstation sollte in einem Raum aufgestellt
werden, in dem Sie nicht viel Zeit verbringen, z. B. im Flur. Stellen
Sie die Basisstation nicht im Wohn- oder Schlafbereich auf.
2Installation
Stellen Sie sicher, dass die Akkus geladen sind, bevor
Sie das Telefon in Betrieb nehmen. Anderenfalls ist die
Funktion des Geräts beeinträchtigt.
Beachten Sie die Sicherheitshinweise zur Umgebung und
zu Gegebenheiten des Aufstellortes sowie zur
Installation! Gerät nicht in explosionsgefährdeter
Umgebung in Betrieb nehmen!
2.1 Inbetriebnahme der Basisstation
Gehen Sie bitte folgendermaßen vor:
• Schließen Sie das Netzteil an eine 230-V-Steckdose an.
Stecken Sie den Netzteilstecker in die entsprechende
Anschlussbuchse an der Unterseite der Basisstation.
DEUTSCH
93
Page 94

Installation Butler Outdoor 2010 Twin-Triple
• Verbinden Sie das mitgelieferte Telefonkabel mit der TelefonAnschlussbuchse an der Unterseite der Basisstation und mit
der Telefonwandanschlussdose.
3
1
4
2
1. Telefonwandanschluss
2. Telefonkabel
3. Unterseite der Basisstation
4. Netzadapterkabel
2.2 Inbetriebnahme der Ladestation
Gehen Sie bitte folgendermaßen vor:
Schließen Sie das Netzteil an eine 230-V-Steckdose an. Stecken
Sie den Netzteilstecker in die entsprechende Anschlussbuchse an
der Unterseite der Ladestation.
1
2
1. Unterseite der Ladestation
2. Netzadapterkabel
94
Page 95

Butler Outdoor 2010 Twin-Triple
2.3 Aktivierung des Mobilteils
Verletzungsgefahr durch Explosionen!
Nur die mitgelieferten Akkus oder Akkus der gleichen Art
verwenden. (BT-800 2,4 V DC).
Es müssen keine Akkus eingelegt werden!
Ein Akku befindet sich bereits im Mobilteil. Damit sich der
Akku nicht entlädt, wurde er durch einen Schalter an der
Unterseite des Mobilteils deaktiviert. Drücken Sie
zunächst diesen Schalter, um den Akku zu aktivieren.
1. Entfernen Sie den Abstandhalter aus Pappe.
2. Drücken Sie den Aktivierungsstift in die auf dem Etikett
angegebene Richtung.
• Das Display schaltet sich ca. 10 Sekunden nach der
Aktivierung ein.
• Entfernen Sie das Etikett, sobald das Mobilteil aktiviert ist.
Bewahren Sie die Aktivierungs-PIN auf, falls Sie das
Mobilteil später einmal deaktivieren möchten (zum
Beispiel wenn es längere Zeit nicht benutzt wird).
3 Bedienelemente und Menüstruktur
3.1 Tasten/Displays/LEDs
Mobilteil
1. Display
2. Anrufbeantworter/
Stummschalttaste
3. Esc-Taste
4. Nach-oben-Taste
5. Nach-rechts-Taste/
Anrufliste
6. Auflegen/EIN-/
AUS-Taste
7. Alphanumerische
Ta st en
8. Rufton-aus-Taste/
Pause
9. Wahlwiederholung
10. Mikrofon
11. Freisprechtaste
12. Interner Anruf
13. Tastatursperre
14. Gespräch
annehmen/Flash
15. Nach-unten-Taste
16. Nach-links-Taste/
Telefonbuch
17. Menü/OK
18. Ereigni-LED
18
17
16
15
14
13
12
11
10
1
2
3
4
5
6
7
8
9
DEUTSCH
95
Page 96

Bedienelemente und Menüstruktur Butler Outdoor 2010 Twin-Triple
19
Basisstaton
19. Paging-Taste
3.2 LCD-Display
Symbolzeile
In der zweiten Textzeile erscheinen neue Ereignismeldungen
(„NEUE NACHRICHT” (NEW VOICE MAIL), „NEUER ANRUF”
(NEW CALL) und „SPEICHER VOLL” (MEMORY FULL)).
Auf dem Mobilteil befindet sich ein Schutzfilm, der bei der
Inbetriebnahme entfernt werden muss.
Akkuanzeige:
• Der Akku ist voll aufgeladen.
• Der Akku ist zu 66 % aufgeladen.
• Der Akku ist nur zu 33 % aufgeladen.
• Der Akku ist fast leer. Ist der Akku fast leer, blinkt im
Display das Akku-Symbol .
Der Ladevorgang wird mit dem Symbol dargestellt.
Nach Ende des Vorgangs wird volle Akkuladung
angezeigt.
1. Textzeile
2. Textzeile
Symbolzeile
Uhrzeit/Datum & Nachrichtenzähler
In der ersten Textzeile werden der Name und die Nummer des
Mobilteils angezeigt. Ist das Mobilteil hinter einen Repeater im
Standby-Modus geschaltet, wird hinter der Nummer des Mobilteils
ein Stern ‘*’ angezeigt.
96
Page 97

Butler Outdoor 2010 Twin-Triple
3.3 Symbole
Laufendes Gespräch
- Leuchtet während eines Gesprächs;
- Blinkt, wenn das Telefon klingelt.
Mobilteil-Rufton lautlos
Freisprechfunktion aktiviert
Zeit: aktuelle Uhrzeit im Standby-Modus. Der
Zeitpunkt der eingegangenen Anrufe ist in der
Anrufliste oder den AB-Nachrichten vermerkt.
Datum: aktuelles Datum im Standby-Modus. Das
Datum der eingegangenen Anrufe ist in der
Anrufliste oder den AB-Nachrichten vermerkt.
Weiter zu anderen Menüoptionen
Einträge in der Anrufliste(*)
Neue Nachricht in der Mailbox.
• Langsames Blinken: Interner Anruf oder Paging (Suche nach
Mobilteil)
• Blinkt alle 2 Sekunden: Neue Ereignismeldungen am Mobilteil
(siehe zweite Textzeile auf dem Display).
3.5 Menüstruktur
Das Mobilteil verfügt über eine bedienerfreundliche Menüstruktur.
Jedes Menü öffnet eine Liste mit Optionen.
Um das Hauptmenü aufzurufen, drücken Sie die Menütaste
, wenn das Mobilteil eingeschaltet ist und sich im Standby-
17
Modus befindet.
Drücken Sie die Nach-oben-Taste oder die Nach-untenTaste , um zur gewünschten Menüoption zu blättern. In der
15
Geräteübersicht dieser Bedienungsanleitung werden die Symbole
der Tasten sowie die jeweilige Positionsnummer gezeigt. Drücken
Sie anschließend erneut die Menütaste , um weitere
Optionen aufzurufen oder die angezeigte Einstellung
zu bestätigen.
4
17
Alarm aktiviert
Antennensymbol: innerhalb der Reichweite
(leuchtet ständig) – außerhalb der Reichweite
(blinkt)
(*) Nur wenn die Anruferkennung für Ihren Telefonanschluss
aktiviert ist.
3.4 Ereignis-LED
Die LED links oben auf der Vorderseite des Mobilteils zeigt
Folgendes an:
• Schnelles Blinken: Eingehender Anruf.
18
Menü verlassen oder eine Menüebene zurückgehen
Um zur vorherigen Menüoption zu gelangen, drücken Sie die
ESC-Taste .
3
DEUTSCH
97
Page 98

Einstellung und Bedienung des Mobilteils Butler Outdoor 2010 Twin-Triple
Zum Abbrechen und Zurückkehren in den Standby-Modus können
Sie jederzeit die ESC-Taste drücken. Wenn Sie 20 Sekunden
3
lang keine Taste drücken, kehrt das Mobilteil automatisch in den
Standby-Modus zurück.
3.6 Menü-Übersicht
Menü Auswahloptionen
MOBILT EINST MOBILTEIL NAME
MOBILTEIL TÖNE
SPRACHE
AUTO ANTWORT
AUTO. AUFLEGEN
SPRACHBOX
UHR & WECKER DATUM&ZEIT
FORMAT EINST.
WECKER
WECKTON
EINST AUTO-UHR
BASIS EINST PIN-CODE
KONFERENZ
ZURÜCKSETZEN
LEITUNGS-EINST. LAND
FLASHZEIT (*)
1. RUFTON
WAHLVERFAHREN (*)
ANMELDEN ANMELDEN
ABMELDEN
4 Einstellung und Bedienung des Mobilteils
In den folgenden Schritten werden die Symbole der
Tasten und des Displays sowie die jeweilige
Mögliche Verletzungsgefahr durch Gerätestörungen!
Beachten Sie die Sicherheitsanweisungen.
4.1 Einschalten (Setup-Modus)
Nach dem erstmaligen Einlegen des Akkus oder nach einem
Zurücksetzen der Einstellungen befindet sich das Mobilteil im
Setup-Modus. Wählen Sie Ihr jeweiliges Land aus, um
verschiedene länderspezifische Einstellungen vornehmen zu
können:
1. ‘Zunächst erscheint für einige Sekunden die Anzeige
„WILLKOMMEN” (WELCOME), gefolgt vom Menü für die
Ländereinstellung.
2. Drücken Sie .
3. Drücken Sie oder , um das Land auszuwählen.
4. Bestätigen Sie mit .
5. Bestätigen Sie erneut mit oder drücken Sie die
Escape-Taste ESC , um zum Menü zurückzukehren.
6. Drücken Sie oder , um die Sprache auszuwählen.
7. Bestätigen Sie mit .
8. Geben Sie das Datum ein und bestätigen Sie mit .
9. Geben Sie die Uhrzeit ein und bestätigen Sie mit .
17
4 15
17
17
3
4 15
17
17
17
(*) In manchen Landeseinstellungen werden bestimmte Optionen
nicht angezeigt (siehe “8.1 Land einstellen”).
98
4.2 Mobilteil ein- und ausschalten
1. Drücken Sie die EIN-/AUS-Taste , bis das Display
erscheint.
6
Page 99

Butler Outdoor 2010 Twin-Triple
9
6
2. Um das Mobilteil auszuschalten, halten Sie die EIN-/AUSTaste mind. 5 Sekunden lang gedrückt, bis sich das
6
Gerät ausschaltet.
4.3 Auswahl der Menüsprache
Das Telefon verfügt über 14 verschiedene Menüsprachen. Zur
Einstellung Ihrer Menüsprache gehen Sie bitte folgendermaßen vor:
1. Drücken Sie .
2. Drücken Sie mehrmals oder und wählen Sie
17
4
15
„MOBILT EINST” (HS SETTINGS).
3. Bestätigen Sie mit .
4. Drücken Sie mehrmals oder und wählen Sie
17
4 15
„SPRACHE” (LANGUAGE).
5. Bestätigen Sie mit .
17
• Das Spracheinstellungsmenü erscheint auf dem Display.
6. Drücken Sie mehrmals oder , um die gewünschte
4 15
Sprache auszuwählen.
• Bestätigen Sie mit .
17
4.4 Anrufen
4.4.1 Externe Anrufe
1. Drücken Sie .
• Das Anrufsymbol erscheint auf dem Display.
2. Wenn Sie den Wählton hören, wählen Sie die gewünschte
Rufnummer.
• Die Rufnummer erscheint auf dem Display und wird gewählt.
3. Um das Gespräch zu beenden, drücken Sie oder
stellen Sie das Mobilteil wieder in die Basis- oder Ladestation,
falls automatisches Auflegen eingestellt ist (siehe “4.25
Automatisches Auflegen”).
14
6
4.4.2 Wahlvorbereitung
1. Geben Sie die Telefonnummer ein, die Sie anrufen möchten.
2. Mit ESC können Sie Ihre Eingabe korrigieren.
3. Drücken Sie .
3
14
• Das Anrufsymbol erscheint im Display.
• Die Telefonnummer wird automatisch gewählt.
4. Um das Gespräch zu beenden, drücken Sie oder
6
stellen Sie das Mobilteil wieder in die Basis- oder Ladestation,
falls automatisches Auflegen eingestellt ist (siehe “4.25
Automatisches Auflegen”).
4.4.3 Letzte Telefonnummer erneut wählen
1. Drücken Sie .
2. Drücken Sie .
14
• Die zuletzt angerufene Telefonnummer wird automatisch
gewählt.
4.4.4 Eine der letzten 10 Telefonnummern erneut wählen
1. Drücken Sie .
9
• Die zuletzt gewählte Nummer erscheint an erster Stelle auf
dem Display.
2. Drücken Sie oder , um die gewünschte Nummer
4 15
auszuwählen.
3. Drücken Sie die Anruftaste .
14
• Die Rufnummer erscheint auf dem Display und wird
automatisch gewählt.
4. Um das Gespräch zu beenden, drücken Sie oder
stellen Sie das Mobilteil wieder in die Basis- oder Ladestation,
falls automatisches Auflegen eingestellt ist (siehe “4.25
Automatisches Auflegen”).
DEUTSCH
99
Page 100

Einstellung und Bedienung des Mobilteils Butler Outdoor 2010 Twin-Triple
4.4.5 Eine Nummer aus dem Telefonbuch anrufen
Dieses Telefon verfügt über ein Telefonbuch, in dem Sie
Telefonnummern mit den zugehörigen Namen abspeichern
können (siehe Abschnitt “6 Telefonbuch”). So rufen Sie eine
programmierte Nummer aus dem Telefonbuch an:
1. Drücken Sie .
16
• Die erste Nummer aus dem Telefonbuch erscheint auf dem
Display.
2. Drücken Sie oder , um die gewünschte Nummer
4 15
auszuwählen. Sie können auch den Anfangsbuchstaben des
Namens eingeben und weiterblättern.
3. Drücken Sie die Anruftaste .
14
• Die Rufnummer erscheint auf dem Display und wird
automatisch gewählt.
4. Um das Gespräch zu beenden, drücken Sie oder
6
stellen Sie das Mobilteil wieder in die Basis- oder Ladestation,
falls automatisches Auflegen eingestellt ist (siehe “4.25
Automatisches Auflegen”).
– die Nummer zusammen mit dem Namen im
Telefonbuch gespeichert ist;
– das Netzwerk den Namen zusammen mit der
Telefonnummer überträgt.
1. Zur Annahme eines Anrufs haben Sie folgende Optionen:
– Drücken Sie , um den Anruf anzunehmen.
14
– Nehmen Sie das Mobilteil aus der Basis- oder
Ladestation (Funktion nur möglich, wenn die
automatische Annahme aktiviert wurde, siehe
“4.24 Automatische Annahme”).
• Während des Gesprächs erscheinen 10 Sekunden lang das
Symbol , die übermittelte Rufnummer sowie der Name des
Anrufers auf dem Display, anschließend wird die
Gesprächsdauer angezeigt.
2. Um das Gespräch zu beenden, drücken Sie oder
6
stellen Sie das Mobilteil wieder in die Basis- oder Ladestation,
falls automatisches Auflegen eingestellt ist (siehe “4.25
Automatisches Auflegen”).
4.5 Einen Anruf annehmen
Bei einem eingehenden externen oder internen Anruf beginnt das
Mobilteil zu klingeln.
• Alle angemeldeten Mobilteile klingeln bei einem eingehenden
Anruf.
• Das Anrufsymbol
• Die Rufnummer des Anrufers erscheint auf dem Display,
sofern Sie über Anruferkennung (CLIP) verfügen. Für weitere
Informationen setzen Sie sich bitte mit Ihrem Netzbetreiber in
Verbindung. Ferner wird der Name des Anrufers auf dem
Display angezeigt, wenn:
100
blinkt auf dem Display.
4.6 Anrufliste
Wenn Sie einen Anruf erhalten, erscheinen die Telefonnummer
des Anrufers sowie Datum und Uhrzeit im Display des Mobilteils.
Ist der Name im Telefonbuch gespeichert, wird er ebenfalls
angezeigt. Damit die Anrufe in der Anrufliste gespeichert werden,
muss die Anruferkennung (CLIP) von Ihrem Netzbetreiber aktiviert
sein.
Die Anruferkennung (CLIP) ist nur verfügbar, wenn sie
für Ihren Telefonanschluss aktiviert ist. Für weitere
Informationen setzen Sie sich bitte mit Ihrem
Netzbetreiber in Verbindung.
 Loading...