

Page 1
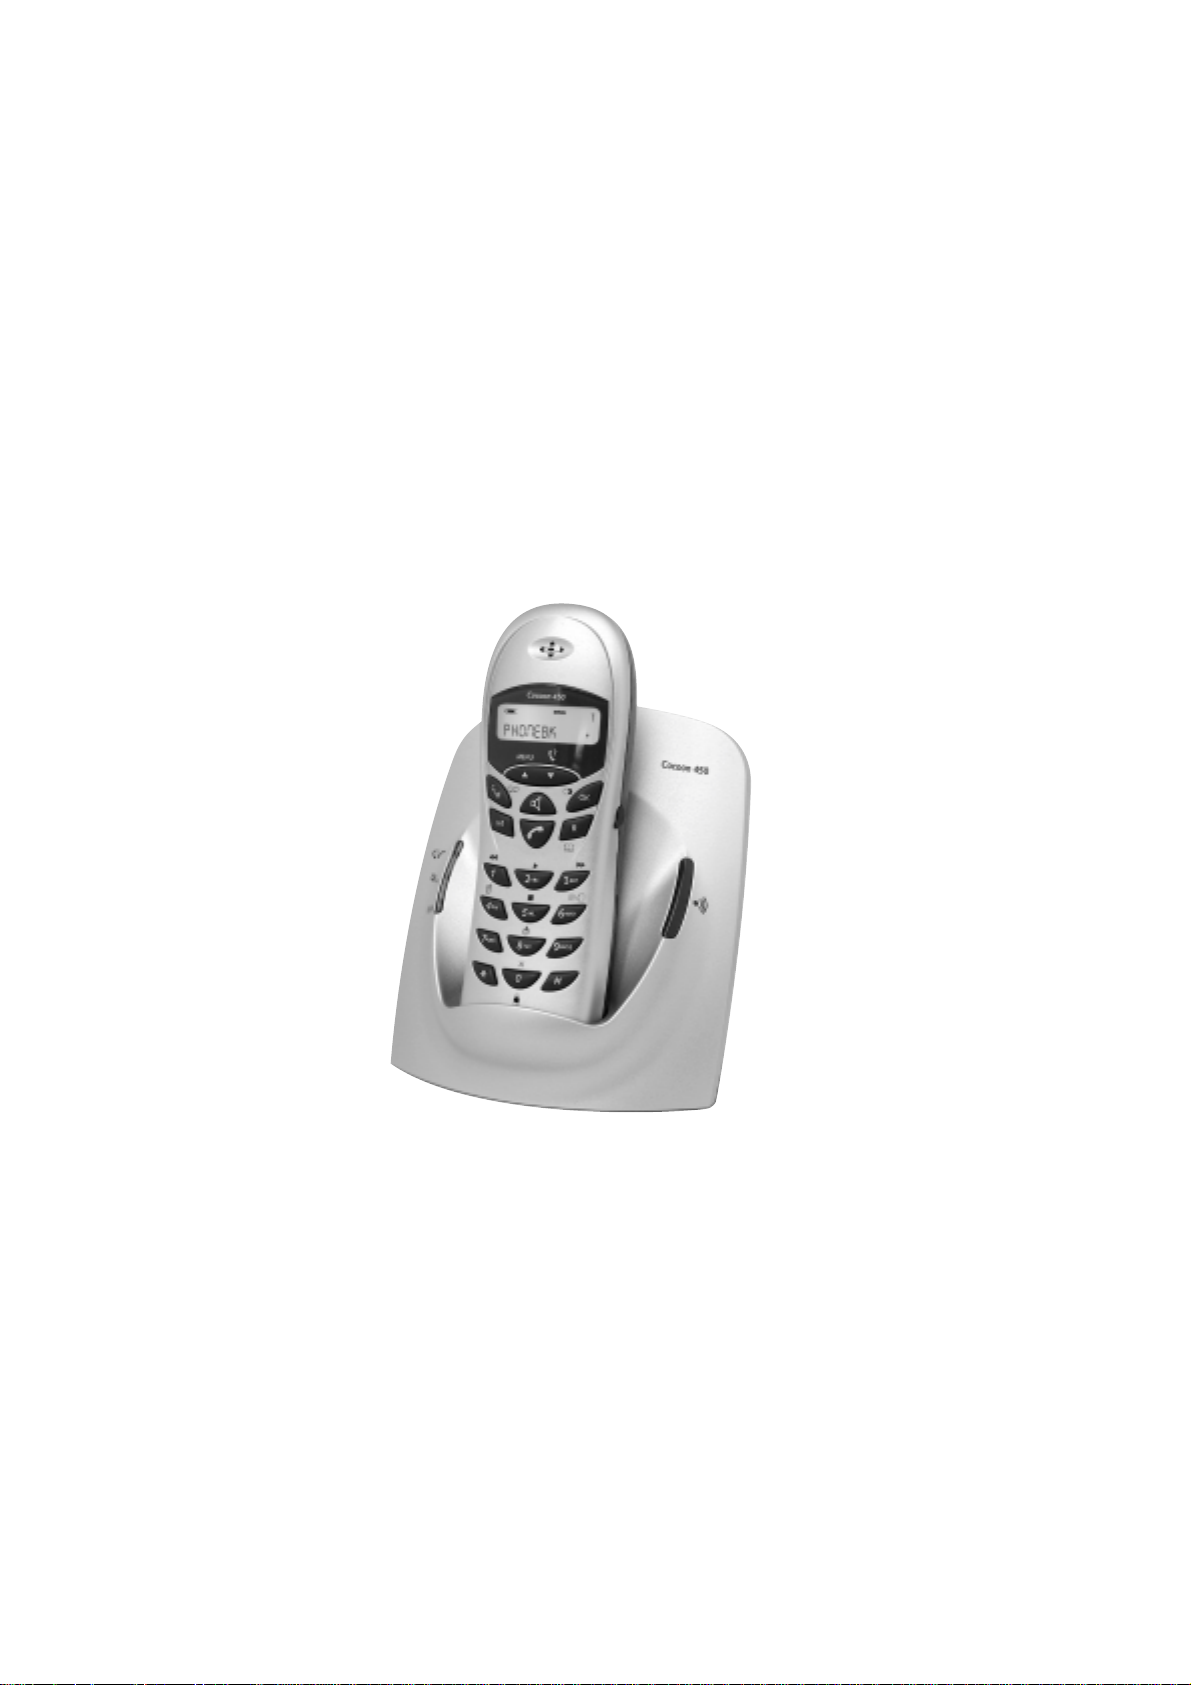
Cocoon 450
USER GUIDE
HANDLEIDING
MODE D’EMPLOI
BEDIENUNGSANLEITUNG
Page 2

To use ‘Caller ID’ (display caller), this service has to be activated on your phone line. Normally you need a
separate subscription from your telephone company to activate this function. If you don’t have the Caller ID
function on your phone line, the incoming telephone numbers will NOT be shown on the display of your
Om de ‘Nummerweergave’ te kunnen gebruiken, moet deze dienst geactiveerd zijn op uw telefoonlijn. Om
deze dienst te activeren, hebt U hiervoor meestal een apart abonnement van uw telefoonmaatschappij nodig.
Indien U geen nummerweergavefunctie hebt op uw telefoonlijn, zullen de inkomende telefoonnummers NIET
Pour utiliser la fonction ‘Caller ID/Clip’ (affichage de l’appelant), ce service doit être activé sur votre ligne
téléphonique. Généralement, vous avez besoin d’un abonnement séparé de votre compagnie de téléphone
pour activer cette fonction. Si vous n’avez pas la fonction ‘Caller ID - Affichage Appelant’ sur votre ligne
téléphonique, les numéros de téléphone entrants n’apparaîtront PAS sur l’écran de votre téléphone.
Zur Verwendung der ‘Rufnummernanzeige’ muss dieser Dienst erst für Ihre Telefonleitung freigegeben
werden. Zur Aktivierung dieser Dienstleistung benötigen Sie meistens ein separates Abonnement Ihrer
Telefongesellschaft.Wenn Sie für Ihre Telefonleitung keine Rufnummernanzeigefunktion haben, erscheinen
GB The features described in this manual are published with reservation to modifications.
NL De in deze handleiding beschreven mogelijkheden worden gepubliceerd onder
voorbehoud van wijzigingen.
F Les possibilités décrites dans ce manuel sont publiées sous réserve de modifications.
D Die in dieser Bedienungsanleitung umschriebenen Möglichkeiten, werden vorbehaltlich
Änderungen publiziert.
die eingehenden Telefonnummern NICHT im Display Ihres Gerätes.
op de display van uw toestel verschijnen.
!! Important !!
telephone.
!! Belangrijk !!
!! Important !!
!! Wichtig!!
Cocoon 450
Page 3
Cocoon 450
Page 4

ENGLISH
1. DESCRIPTION OF TELEPHONE 6
1.1. HANDSET/BASE COCOON 450 6
1.2. DISPLAY 7
1.2.1. Standby display 7
2. TELEPHONE INSTALLATION 8
2.1. CONNECTIONS 8
2.2. RECHARGABLE BATTERIES 9
2.3. BELT CLIP 10
3. USING THE TELEPHONE 11
3.1. HANDSET ON/OFF 11
3.2. RECEIVING A CALL 11
3.3. MAKING AN EXTERNAL CALL 11
3.4. MAKING AN INTERNAL CALL 11
3.5. HANDSFREE MODE 11
3.6. INTERNAL CALL TRANSFER 12
3.7. CONFERENCE CALL 12
3.8. DISPLAY OF CALL DURATION 12
3.9. MICROPHONE MUTE 12
3.10. PAUSE KEY 12
3.11. CALLER IDENTIFICATION 12
3.11.1. Call waiting caller ID 13
3.11.2. Call List 13
3.11.3. Storing a number from the Call List into the Phonebook 13
3.11.4. Delete all entries in the Call List 13
3.11.5. Voice mail indication 13
3.12. REDIAL THE LAST 10 NUMBERS CALLED 14
3.13. CALLING FROM THE PHONEBOOK 14
3.14. USING THE ALPHANUMERICAL KEYPAD 14
3.15. USING THE MENU 15
4. PERSONALISATION 15
4.1. ADJUSTING SPEAKER VOLUME 15
4.1.1. Speaker volume during call 15
4.2. ADJUSTING RING VOLUME 15
4.2.1. Handset ring 15
4.2.2. Base ring 15
4.3. CHOOSING THE RING MELODY 16
4.3.1. Base melody 16
4.3.2. Handset melody, external call 16
4.3.3. Handset melody, internal call 16
4.4. ACTIVATION / DEACTIVATION OF BEEPS 16
4.4.1. Key pressed beeptone on/off 17
4.4.2. Low battery 17
4.4.3. Handset out of range 17
4.4.4. Confirmation tones 17
4.5. HANDSET NAME 17
4.6. CHOOSING MENU LANGUAGE 17
4.7. CHOOSING THE CONFIDENTIAL CODE FOR THE BASE 18
4.8. SETTING THE DIALLING MODE 18
4.9. AUTOMATIC ANSWER 18
4.10. CALL DURATION TIMER ON/OFF 19
4.11. RETURN TO DEFAULT ADJUSTMENT PARAMETERS 19
Cocoon 450 4
Page 5

ENGLISH
5. ADVANCED FUNCTIONS 19
5.1. PHONEBOOK 19
5.1.1. Add an entry into the Phonebook 20
5.1.2. Modify a name or number 20
5.1.3. Deleting an entry 20
5.2. VIP RINGING MELODY 21
5.3. LOCATING A HANDSET FROM THE BASE 21
5.4. CALL BARRING 21
5.5. LOCKING THE KEYPAD 21
5.5.1. Activating the keypad lock 22
5.5.2. Deactivating the keypad lock 22
5.6. HEADSET CONNECTION 22
6. MANAGING MULTIPLE HANDSETS 22
6.1. SETTING UP AN ADDITIONAL HANDSET 22
6.1.1. If your additional handset is a Cocoon 400/450 22
6.1.2. If your handset is another model 23
6.2. REMOVING A HANDSET 23
6.3. SETTING UP A HANDSET ON ANOTHER BASE 23
6.4. SELECTING A BASE 23
6.5. ROOM MONITORING 24
7. ANSWERING MACHINE 24
7.1. KEYS HANDSET 24
7.2. SETTINGS 24
7.2.1. Setting the base speaker volume 25
7.2.2. Recording and playback outgoing messages (OGM 1 or OGM 2) 25
7.2.3.Selecting an outgoing message (OGM 1 or OGM 2) 25
7.2.4. Turning Answering Machine On/Off 25
7.2.5. Setting Number of Rings 26
7.2.6. Setting SOS code and filtering 26
7.2.7. Programming the VIP Code 27
7.3. OPERATION 27
7.3.1. Recording a Memo 28
7.3.2. Playback/delete of Incoming Messages and Memo 28
7.3.3. Deleting all messages 28
7.4. REMOTE OPERATION 28
7.4.1. To enter the remote operation 28
7.4.2. Remote turn On 29
7.5. ANSWERING MACHINE SHORTCUTS SUMMERY 29
8. TROUBLE SHOOTING 30
9. GUARANTEE 31
10. TECHNICAL CHARACTERISTICS 31
5 Cocoon 450
Page 6
ENGLISH
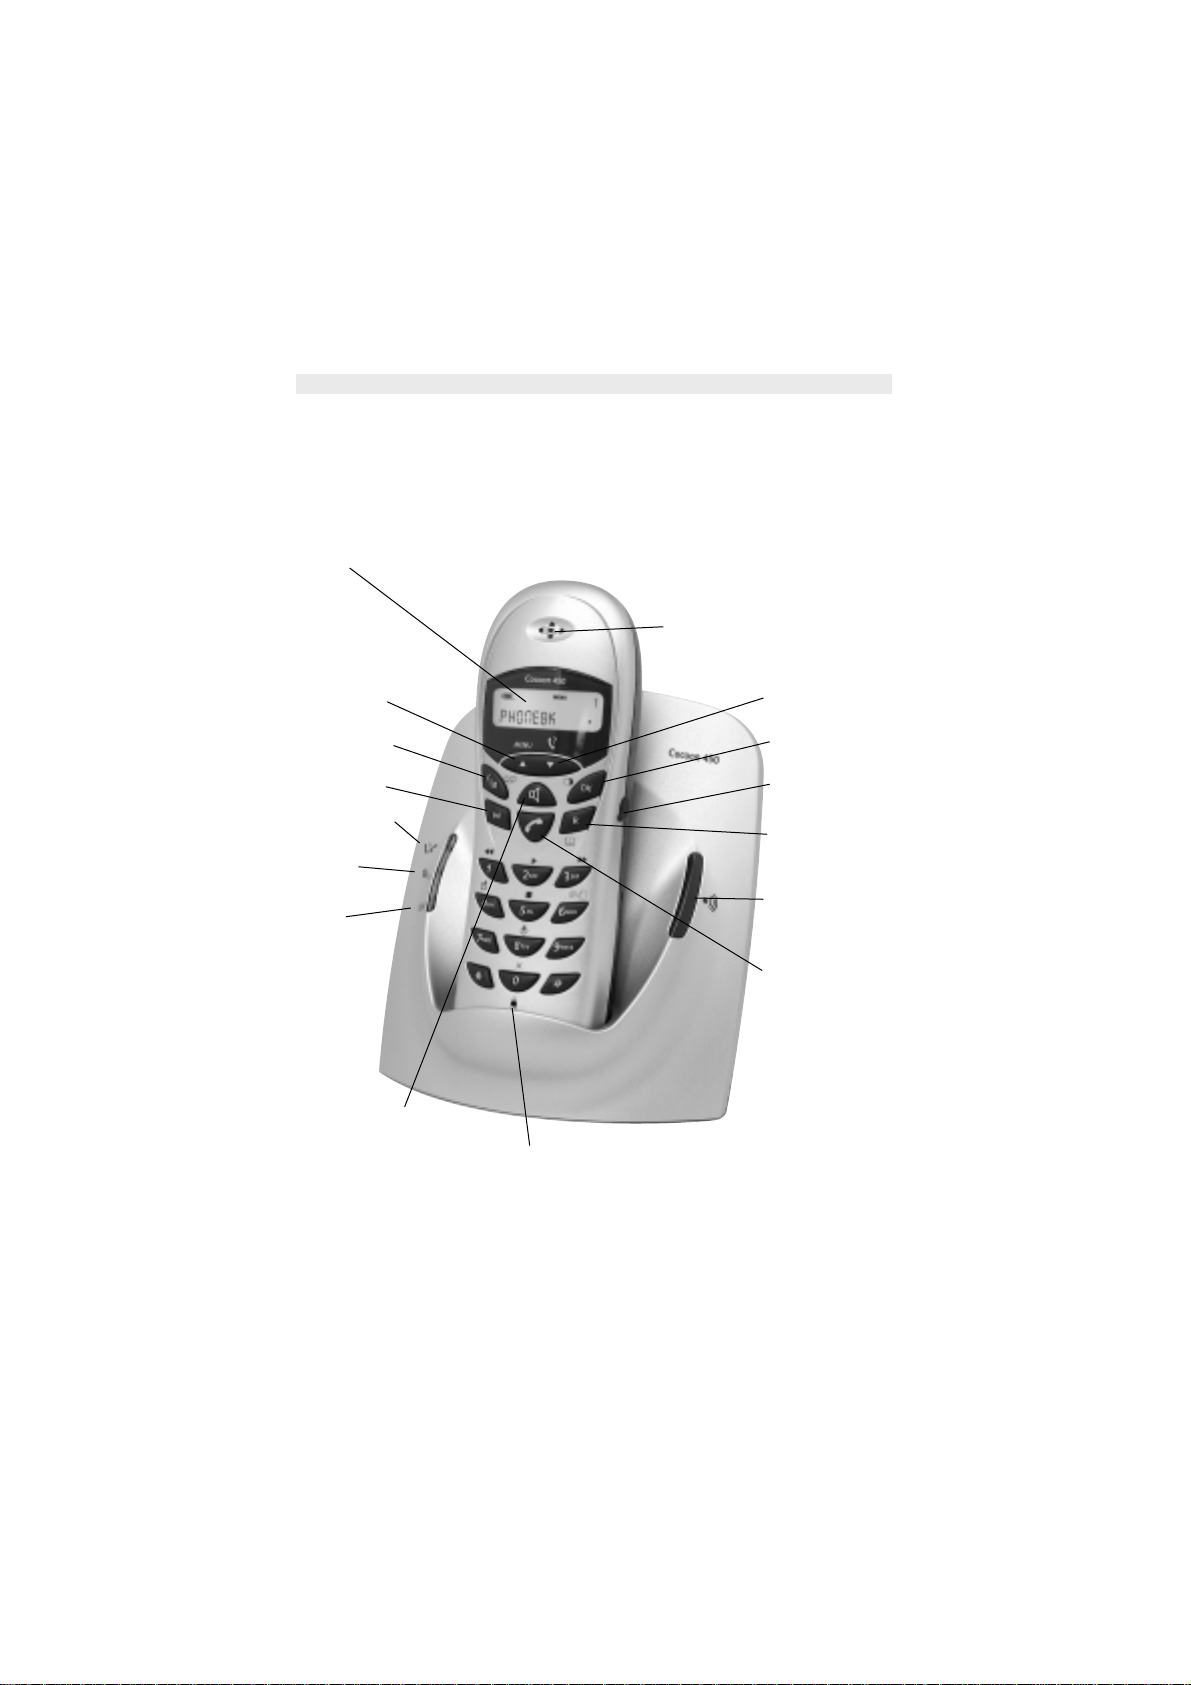
1. DESCRIPTION OF TELEPHONE
1.1. HANDSET/BASE COCOON 450
Display
Earpiece
Up arrow/
Menu Key
Mute/Escape key
Internal Call
External line/
New call indication
Incoming
call indicator
Charging
indicator
Handsfree key
Down/Call log key
Redial/OK
Power ON/OFF
Headset
connector
Recall
(Flash)-key/
Phonebook
Paging key
Subscription key
(press and hold)
Line-key
Microphone
Cocoon 450 6
Page 7

ENGLISH
1.2. DISPLAY
Battery Phone CID Keypad lock Menu Mute Signal
Left scroll
External/
internal call
Each operation has an associated icon
Icon: Meaning:
You are online
EXT You are in external communication
INT You are in internal communication
New message in your voice mail
You are consulting your address book.
MENU You are in the menu.
Rechargeable battery level indicator
Handset keypad locked.
The antenna indicates the quality of reception.
or Indicates that the displayed number is longer than the screen (12 digits)
or Possible scroll direction in the menu
Microphone is muted
Handset ringer volume OFF
Caller identification available /new numbers in Call List
1 segment: weak, 2 segments: low, 3 segments: medium,
4 segments: full. The segments scroll during battery recharging
The antenna flashes when the handset is not registered to the base.
message
Right scroll
Ringer on/offPhonebookNew
indicator
Standby display
1.2.1.
In standby mode, the display shows the handset name and the handset number:
C450 1
7 Cocoon 450
Page 8
ENGLISH
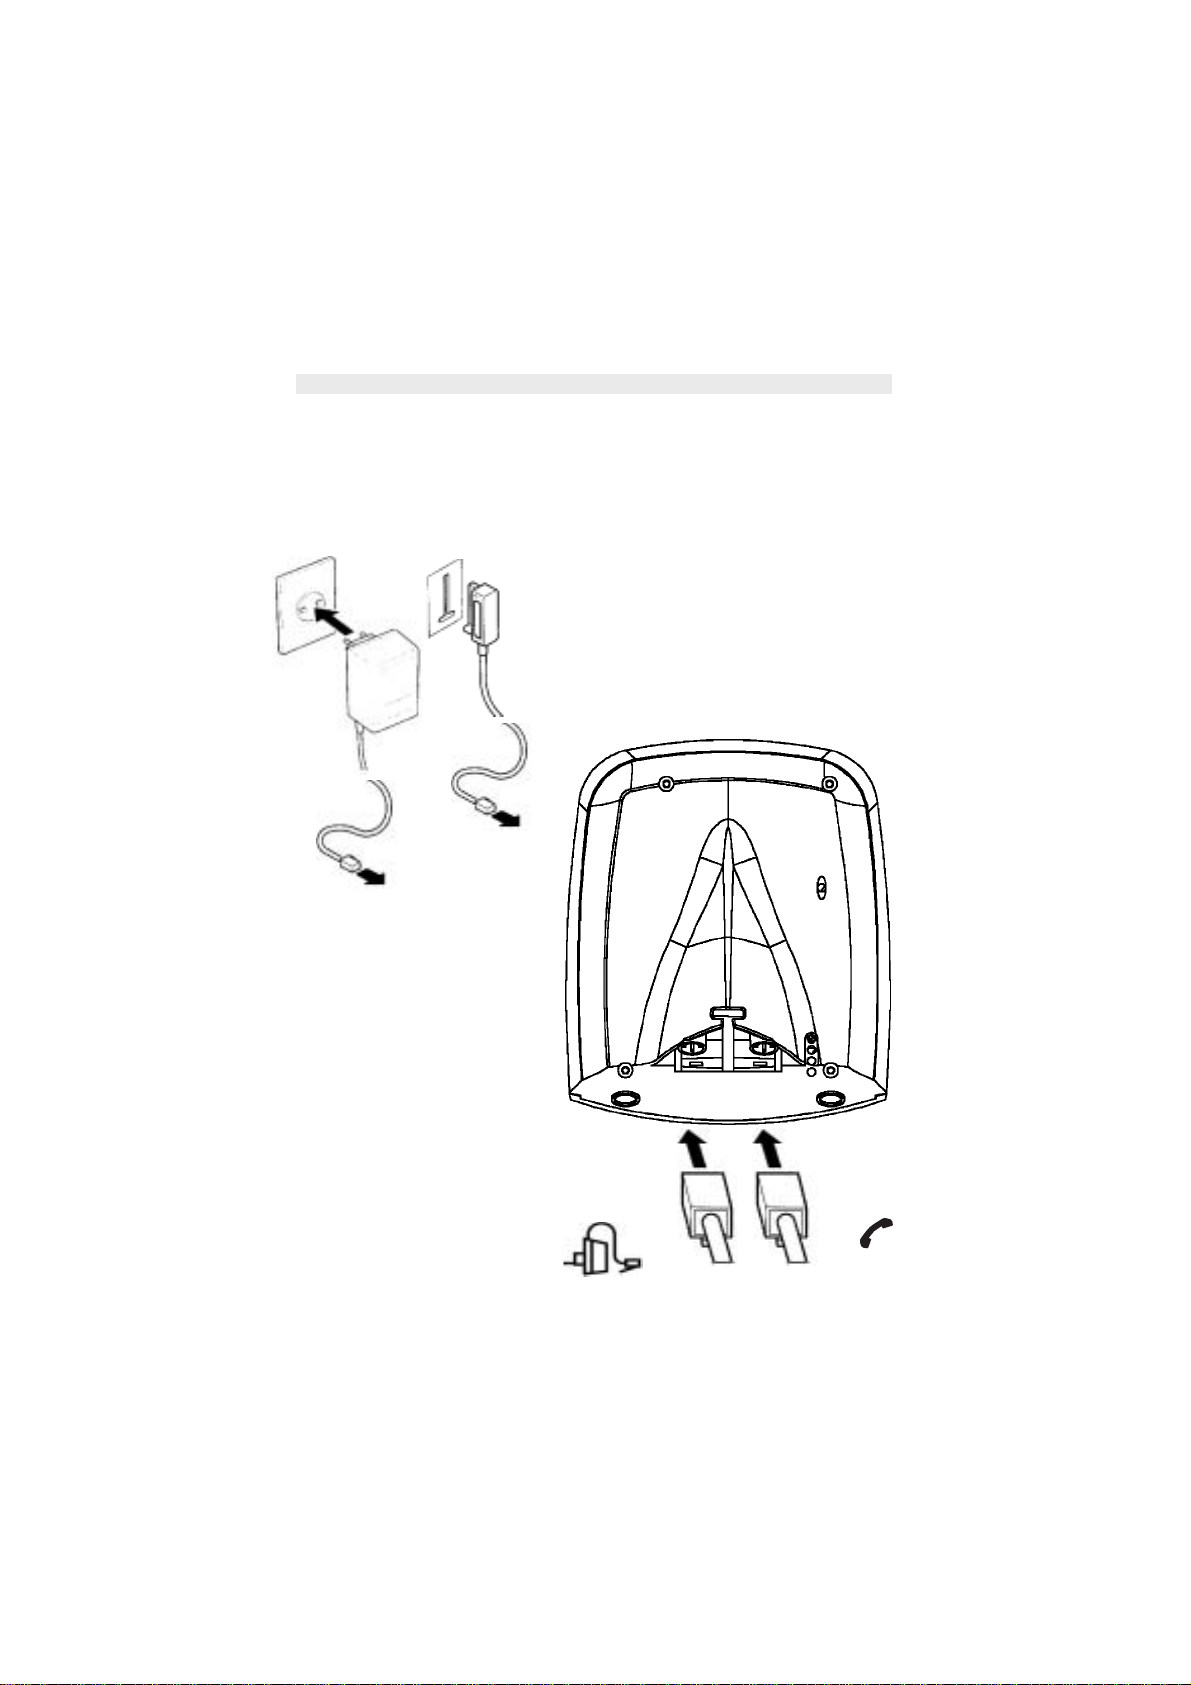
2. TELEPHONE INST ALLA TION
2.1. CONNECTIONS
Power cable
Back view of base
Telephone Line
Cocoon 450 8
Page 9
ENGLISH
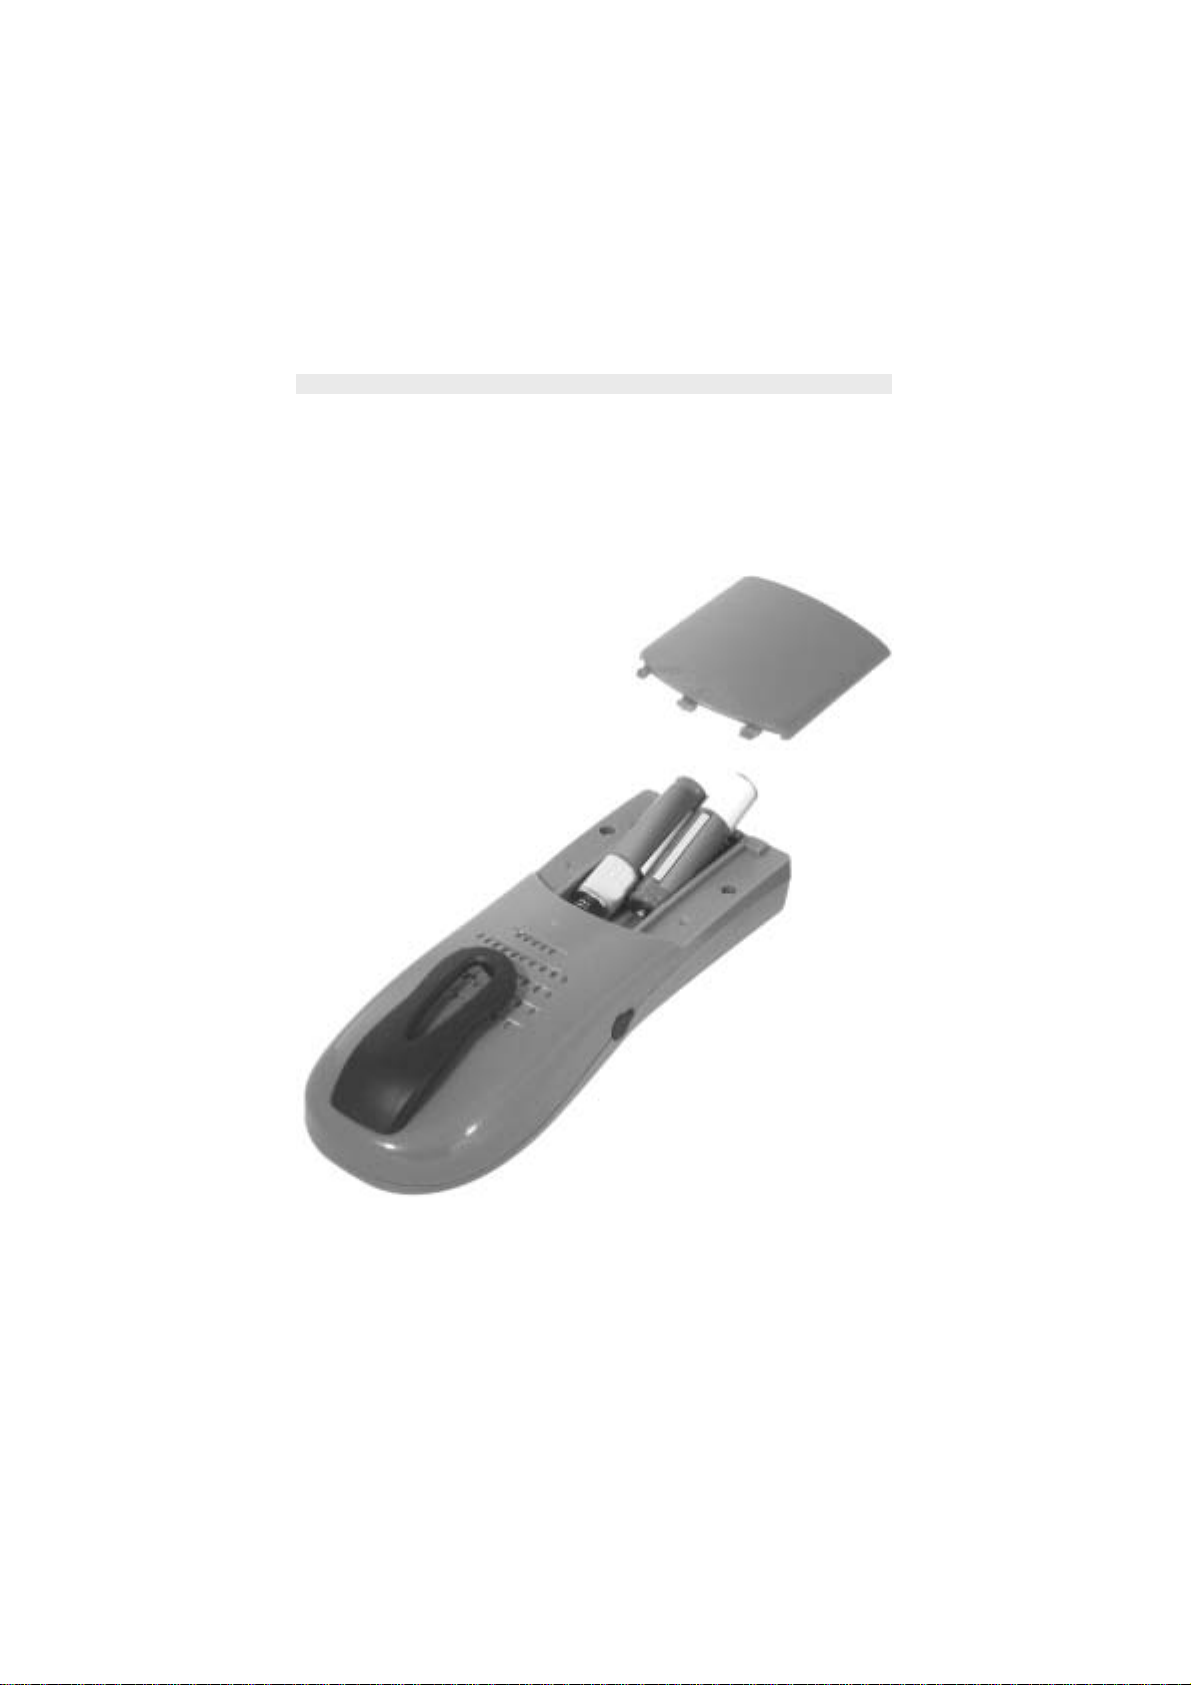
2.2. RECHARGABLE BATTERIES
Before you use your Cocoon 450 for the first time, you must first make sure that the batteries are
charged for 6-8 hours. The telephone will not work optimally if not properly charged.
To change or insert a rechargeable battery:
1. Slide the cover towards the bottom and then lift it up.
2. Insert the batteries respecting the (+ and -) polarity .
3. Replace the battery cover
Cover
Rechargeable Batteries
back view of handset
Note: The maximum working time of the batteries is approx. 150 hours and the maximum
talk time is 12 hours! In the course of time the batteries will start to drain faster. The
batteries must be replaced. Y ou can buy ne w batteries from an y DIY outlet (2 rechar geable
batteries, type AAA NiMH)!
9 Cocoon 450
Page 10
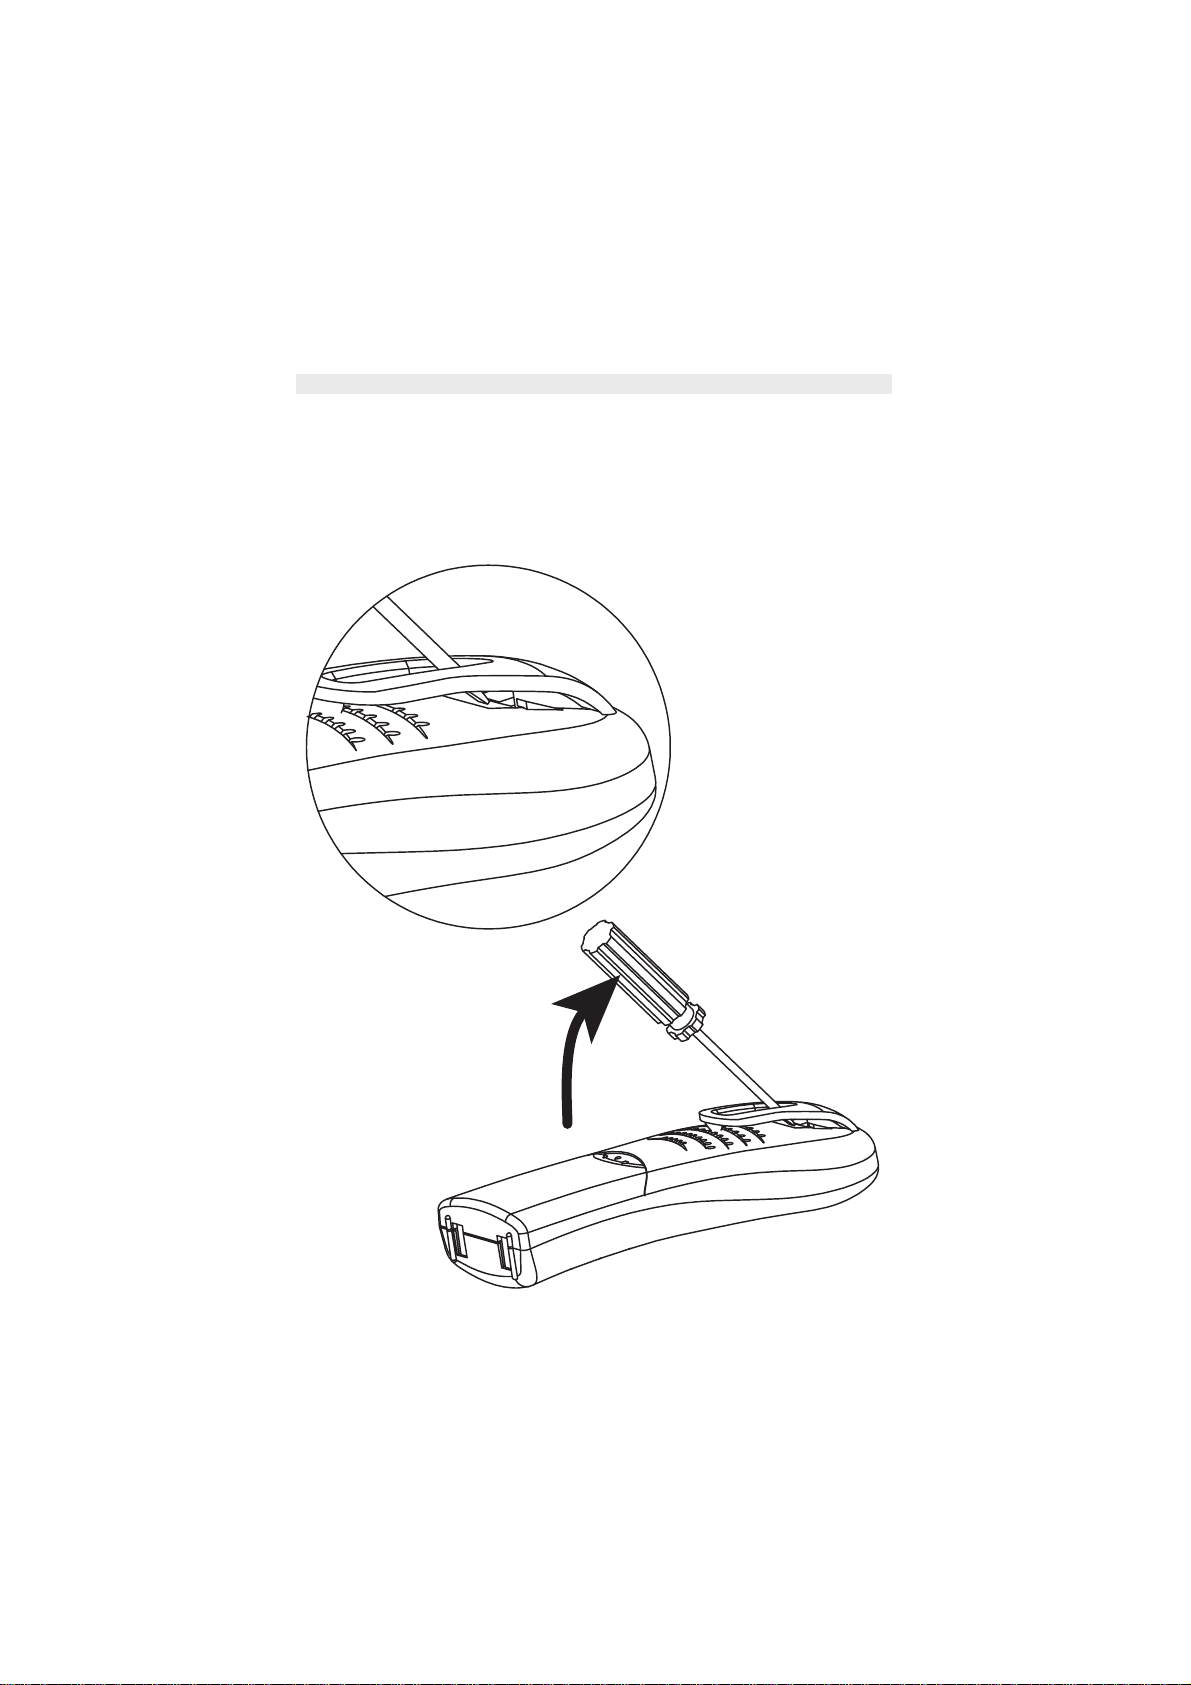
2.3. BELT CLIP
The belt clip can be removed and placed as described on the following drawings:
ENGLISH
Cocoon 450 10
Page 11

ENGLISH
3. USING THE TELEPHONE
3.1. HANDSET ON/OFF
• Turn ON handset: Press OK key for 2s. The handset will search the base.
• Turn OFF handset: Press OK key for 2s. The display will go OFF.
3.2. RECEIVING A CALL
When receiving an external call, all handsets including the base unit will ring. The EXT icon will
appear on the display and the LED will flash on the base.
When the handset rings, press to answer. You are then connected to your
correspondent. If the handset is lying on the base when the telephone rings, you just need to pick
up the handset to answer the call (if the option autoanswer is set to ON: See 4.9. Automatic
answer).
If you press when the telephone rings, you pick up the line and automatically change to
handsfree mode.
3.3. MAKING AN EXTERNAL CALL
Normal n
1. Press .
2. Enter telephone number.
Bloc
1. Dial your correspondent’s number.
2. Press .
To correct a number use the key to delete an entered digit.
3.4. MAKING AN INTERNAL CALL
Only possible when more than one handset is registered to the base!!
Normal n
1. Press INT.
2. Enter the number of the internal handset (1 to 5).
Pren
1. Enter the number of the internal handset (1 to 5).
2. Press INT.
3.5. HANDSFREE MODE
You can converse with your correspondent without picking up the handset.
To activate or deactivate the handsfree mode, press the key during a call.
To adjust the volume, refer to the chapter “ Personalisation “- adjusting speaker volume.
umeration:
k dialling:
umeration:
umération:
11 Cocoon 450
Page 12

ENGLISH
3.6. INTERNAL CALL TRANSFER
Only possible when more than one handset is registered to the base!!
When you want to transfer an external call to another handset:
1. During a conversation press INT.
2. Select the number of the internal handset, the external caller is put on hold.
3. When the other handset picks up, press to hang up and transfer the call.
If the internal corespondent does not pick-up, press INT again to reconnect to the external caller.
3.7. CONFERENCE CALL
Only possible when more than one handset is registered to the base!!
You can converse simultaneously with an internal and external correspondent .
When you are on line with an external correspondent:
1. Press INT.
2. Enter the number of the internal handset that you want to call.
3. When the internal correspondent picks up, press and hold #.
4. If the internal correspondent does not answer, press INT again to reconnect to the external
correspondent.
3.8. DISPLAY OF CALL DURATION
The communication duration is displayed after 10 seconds, in minutes - seconds: “00-15”. During
the call you can still see the dialled number by pressing the MENU key for 2 seconds.
At the end of each call, the duration of communication is displayed for 5 seconds.
You can turn the timer ON or OFF (see 4.10 Call duration timer ON/OFF)
3.9. MICROPHONE MUTE
It is possible to mute the microphone during a conversation.
Press during the conversation, the microphone is then deactivated, you can talk freely without
being heard by the calling party.
The -icon is displayed.
Press again to return to normal mode.
3.10. PAUSE KEY
When you press and hold the digit, a pause will be added after the digit. A ‘P’ will be shown on
the display.
3.11. CALLER IDENTIFICATION
Caller identification is only available if you are subscribed to this service with your telephone
operator.
When you receive an external call, the caller’s identity will appear on the display as soon as the
telephone rings.
You can therefore choose whether or not to answer the call.
If the network allows it, or if the name of the caller is in the address book, the
caller is identified by his or her name.
The caller’s identity is replaced by the conversation duration after 15 seconds of communication.
Cocoon 450 12
Page 13

ENGLISH
Call waiting caller ID
3.11.1.
If you have a subscription to the call waiting caller ID service (please consult your telephone
service provider for details about the service), your phone will display and store the caller ID
information during the telephone conversation.
When you hear the call waiting tones, you can see the 2nd caller’s telephone
number on the display for about 5 seconds.
Call List
3.11.2.
Your telephone keeps a list in memory of the last 30 calls received. This function is only available
if your are subscribed to the caller ID information. The correspondents that have called are
identified by their telephone number or name in the same way as in caller identification.
The presence of new calls received and unanswered is indicated by the flashing icon on the
display and the flashing LED on the base. To consult the Call List:
1. Press . If there are no calls in the list ‘EMPTY’ will appear.
2. Scroll through the calls using the Up or Down arrows. The caller’s name will be shown
if the name is sent by the network or is stored in the Phonebook. If you are at the end of the
list you will hear a beep tone.
3. If you press OK a few times to see the sequence: Name, number, date&time**
4. Pressing OK again will give you the option to delete this entry. Press OK to delete this entry,
or to return to the previous menu.
5. To call back a correspondent, simply press the key when their telephone number or name
is displayed.
If a caller is in the Phonebook, they are identified by their name in the Call List.
** ONL Y WHEN THE NETWORK SENDS THE TIME/DATE T OGETHER WITH THE
TELEPHONE NUMBER!!! On some networks with caller ID, time and date will not be
displayed.
Storing a number from the Call List into the Phonebook
3.11.3.
When you scroll through the Call List, you can store a number into the Phonebook by pressing the
Phonebook key . ‘CONFIRM’ will appear. Press OK to confirm or to return.
If you want to store the number with a name (in case the number in the Call List is without name)
or with a different name, you have to go to the Phonebook menu and choose edit (see 5.1
Phonebook).
Delete all entries in the Call List
3.11.4.
You can delete all entries in the Call List:
1. Press MENU.
2. Press the Down key a few times until ‘HANDSET’ is shown. Press OK.
3. Press the Down key a few times until ‘DEL CID’ is shown.
4. Press OK. ‘CONFIRM’ is shown.
5. Press OK to delete all entries, or to cancel the delete operation.
Voice mail indication
3.11.5.
This function only works if you have the voice mail or phone mail service and if the network sends
this indication along with the FSK caller ID (CLIP) information!
When you receive a new message in your voice mail system, the icon will appear on the
display. Once you have listened to your message, the icon will disappear.
13 Cocoon 450
Page 14

ENGLISH
3.12. REDIAL THE LAST 10 NUMBERS CALLED
Your telephone keeps a list of the 10 last calls (of 20 digits) you have made in memory. The
correspondents that called are identified by their telephone number or by their name if they appear
in the Phonebook.
To consult the redial list:
1. Press .
2. Scroll through the calls with the Up and Down arrows.
3. To call by the selected correspondent, simply press when their telephone number or name
is displayed.
Note: When the name is displayed, you can see the number by pressing the OK key!
Pressing OK again will give you the option to delete this entry from the redial list.
Press OK to confirm or to cancel.
3.13. CALLING FROM THE PHONEBOOK
To call a correspondent whose name you have saved in the Phonebook:
1. Press to enter the Phonebook.
2. Press the first letter of the name. The first name that starts with this letter will be displayed.
3. Go through the list of names with the and keys. The list scrolls in alphabetical order. If
there is an entry without name, ‘ ‘ is shown!
4. Press to dial the number of the correspondent whose name is displayed.
To see the number before dialing, carry out steps 1 to 3 from before and press OK. The number
then appears.
3.14. USING THE ALPHANUMERICAL KEYPAD
With your telephone you can also enter alphanumeric characters. This is useful for entering a
name into the Phonebook, giving a name to a handset, …
To select a letter, press the corresponding key as many times as is necessary. For example to
select an ‘A’, press ‘2’ once, to select a ‘B’, press ‘2’ twice and so on. To select ‘A’ and then B
consecutively, select ‘A’, wait until the cursor moves to the next character, then press ‘2’ twice.
To select a space, press 1.
To select a dash, press ‘1’ twice
The keypad characters are as follows:
Key First Second Third Fourth Fifth
1 space - 1
2 ABC2
3DEF3
4GHI 4
5JKL5
6MNO6
7PQRS7
8TUV8
9WXYZ9
00
press press press press press
Cocoon 450 14
Page 15

ENGLISH
3.15. USING THE MENU
A wide range of telephone functions are accessible through a user-friendly menu.
1. To enter the menu, press MENU.
2. Scroll through the selections using the and keys, the selections scroll in a loop ( you
return to the first after the last). The arrows on the right of the display indicate that there are
other possible selections to scroll through.
3. To validate a selection, press OK.
4. To return to the previous menu, press .
4. PERSONALISATION
4.1. ADJUSTING SPEAKER VOLUME
There are two ways to set the speaker volume:
4.1.1.
Speaker volume during call
During conversation, press the or key to change the volume accordingly
(1-5). Press OK to confirm.
Note: The handsfree volume is also adjusted together with the receiver in the handset
as described above!
4.2. ADJUSTING RING VOLUME
Handset ring
4.2.1.
You can adjust the ring volume during a incoming call by pressing the Up or Down keys.
The default ring volume can be set as follows:
1. Enter the menu by pressing Menu.
2. Select Handset using the and keys.
3. Press OK.
4. Select VOLUME using the and keys.
5. Press OK.
6. Select the desired volume OFF or 1 to 5).
7. Press OK to confirm or to return to the previous menu.
Note: Every setting is confirmed at the end by a double or single long beep. A double
bleep confirms the validation of your choice.
A long bleep signifies that the modification has not been taken into account.
Base ring
4.2.2.
1. Enter the menu by pressing MENU.
2. Select BASE.
3. Press OK.
4. Select UNPROTEC.
5. Press OK.
6. Select VOLUME.
7. Press OK.
8. Select the desired volume (OFF or 1 to 5) by means of the Up and Down keys.
9. Press OK to confirm or to return to the previous menu.
Note: A double bleep confirms the validation of your choice.
A long bleep that the modification has not been taken into account.
15 Cocoon 450
Page 16

ENGLISH
4.3. CHOOSING THE RING MELODY
The base and each handset can ring with a different melody.
The handsets can ring with a different melody according to whether the incoming call is internal
or external.
Base melody
4.3.1.
1. Enter the menu by pressing MENU.
2. Select BASE.
3. Press OK.
4. Select UNPROTEC.
5. Press OK.
6. Select MELODIES.
7. Press OK.
8. Select the melody of your choice (1 to 10).
9. Press OK to confirm or to return to the previous menu.
Note: A double bleep confirms the validation of your choice.
A long bleep signifies that the modification has not been taken into account.
Handset melody, external call
4.3.2.
1. Enter the menu by pressing MENU.
2. Select HANDSET.
3. Press OK.
4. Select EXT RING.
5. Press OK.
6. Select the melody of your choice (1 to 10).
7. Press OK to confirm or to return to the previous menu.
Note: A double bleep confirms the validation of your choice.
A long bleep signifies that the modification has not been taken into account.
Handset melody, internal call
4.3.3.
1. Enter the menu by pressing MENU.
2. Select HANDSET.
3. Press OK.
4. Select INT RING.
5. Press OK.
6. Select the melody of your choice (1 to 10).
7. Press OK to confirm or to return to the previous menu.
Note: A double bleep confirms the validation of your choice.
A long bleep signifies that the modification has not been taken into account.
4.4. ACTIVATION / DEACTIVATION OF BEEPS
The handsets can emit beeptones when a key is pressed, when the batteries are low, when the
handset is out of range and when a setting/choice is made.
Cocoon 450 16
Page 17

ENGLISH
Key pressed beeptone on/off
4.4.1.
1. Enter the menu by pressing MENU.
2. Select HANDSET.
3. Press OK.
4. Select TONES.
5. Press OK.
6. Select KEY.
7. Press OK.
8. Select ON to activate or OFF to deactivate.
9. Press OK to confirm.
Note: A double bleep confirms the validation of your choice.
A long bleep signifies that the modification has not been taken into account.
Low battery
4.4.2.
Proceed as before, but select at point 6 "LOW BATT" instead of "KEYTONE".
4.4.3.
Handset out of range
Proceed as before, but select at point 6 "RANGE" instead of “KEYTONE".
4.4.4.
Confirmation tones
Proceed as before, but select at point 6 "CONFIRM" instead of “KEYTONE".
4.5. HANDSET NAME
This function allows you to personalise each handset.
1. Enter the menu by pressing MENU.
2. Select HANDSET.
3. Press OK.
4. Select LABEL.
5. Press OK.
6. Enter the name.
7. Press OK to validate.
Note: A double bleep confirms the validation of your choice.
A long bleep signifies that the modification has not been taken into account.
While entering the name, press to delete a character and press and hold to exit the menu
without taking any modifications into account.
4.6. CHOOSING MENU LANGUAGE
You can choose two languages (see language table on the packing box):
1. Enter the menu by pressing MENU.
2. Select LANGUAGE.
3. Press OK.
4. Select the language of your choice by means of the and keys.
5. Press OK to validate.
Note: A double bleep confirms the validation of your choice.
A long bleep signifies that the modification has not been taken into account.
17 Cocoon 450
Page 18

ENGLISH
4.7. CHOOSING THE CONFIDENTIAL CODE FOR THE BASE
Certain functions are only available to users who know the PIN code. By default this PIN code =
0000.
To change the PIN code:
1. Enter the menu by pressing MENU.
2. Select BASE.
3. Press OK.
4. Select PIN PROT.
5. Press OK.
6. Enter PIN code (0000).
7. Press OK.
8. Select PIN CODE.
9. Press OK.
10. Enter the new 4 digit confidential code.
11. Press OK.
12. Enter the new confidential code a second time.
13. Press OK to validate.
Note: A double bleep confirms the validation of your choice.
A long bleep signifies that the modification has not been taken into account.
4.8. SETTING THE DIALLING MODE
There are two types of dialling mode:
• DTMF/Tone dialling (the most common)
• Pulse dialling (for older installations)
T
o change the mode of numeration:
1. Enter the menu by pressing MENU.
2. Select BASE.
3. Press OK.
4. Select PIN PROT.
5. Press OK.
6. Enter PIN code (0000).
7. Press OK.
8. Select DIALMODE.
9. Press OK.
10. Select TONE or PULSE.
11. Press OK to validate.
Note: A double bleep confirms the validation of your choice.
A long bleep signifies that the modification has not been taken into account.
4.9. AUTOMATIC ANSWER
When there is a incoming call and the handset in lying on the base, the phone automatically takes
the line when lifted. This is the default setting, but can be set OFF:
1. Enter the menu by pressing MENU.
2. Select HANDSET.
3. Press OK.
4. Select AUTO ANS.
5. Select ON (for automatic answer) or OFF.
6. PRESS OK.
Cocoon 450 18
Page 19

ENGLISH
4.10. CALL DURATION TIMER ON/OFF
1. Enter the menu by pressing MENU.
2. Select HANDSET.
3. Press OK.
4. Select TIMER.
5. Press OK.
6. Select ON or OFF by means of the Up and Down keys.
7. Press OK.
4.11. RETURN TO DEFAULT ADJUSTMENT PARAMETERS
If you can no longer deactivate certain undesirable functions, it is still possible to
return to the original telephone configuration. This is the configuration which was installed when
you first received the telephone:
Handset Base
Ring volume: 5 Ring volume: 5
Ext. Melody: 1 Melody:1
Int. Melody: 5 Call Barring: OFF for all Handsets
Monitor: OFF PIN Code: 0000
Timer: ON VIP CODE: 000
Tones: All ON SOS CODE: 111
Auto Answer: ON
Base selection: Auto
Keypad lock: OFF
Phonebook: No change
Call log: Empty
Handset Volume: 3
To return to default adjustments:
1. Enter the menu by pressing MENU.
2. Select BASE.
3. Press OK.
4. Select PIN PROT.
5. Press OK.
6. Enter PIN-code (0000).
7. Press OK.
8. Select DEFAULT.
9. Press OK.
10. Press OK to validate or to skip back.
Note: A double bleep confirms the validation of your choice.
A long bleep signifies that the modification has not been taken into account.
5. ADVANCED FUNCTIONS
5.1. PHONEBOOK
The Phonebook allows you to memorise the telephone numbers of 40 correspondents. You can
enter names up to 8 characters and numbers up to 18 digits.
To call a correspondent whose number you have memorised, refer to section 3.13. Calling from
the Phonebook.
To enter alphanumerical characters, refer to section 3.14 Using the alphanumerical keypad.
19 Cocoon 450
Page 20

ENGLISH
Add an entry into the Phonebook
5.1.1.
1. Enter the menu by pressing MENU.
2. Select PHONEBK.
3. Press OK.
4. Select STORE.
5. Press OK.
6. Enter the new name.
7. Press OK to validate.
8. Enter the new telephone number.
9. Press OK to validate.
Note: A double bleep confirms the validation of your choice.
A long bleep signifies that the modification has not been taken into account.
Modify a name or number
5.1.2.
In order to modify a number in the Phonebook:
1. Enter the menu by pressing MENU.
2. Select PHONEBK.
3. Press OK.
4. Select EDIT.
5. Press OK.
6. Move through the list of names with the and keys. The list scrolls in alphabetical order.
7. Press OK when you find the name to modify.
8. Use the key to go back and enter the new name.
9. Press OK to validate.
10. Enter the new telephone number.
11. Press OK to validate.
Note:A double bleep confirms the validation of your choice.
A long bleep signifies that the modification has not been taken into account.
Deleting an entry
5.1.3.
To delete an entry:
1. Enter the menu by pressing MENU.
2. Select PHONEBK.
3. Press OK.
4. Select DELETE.
5. Press OK.
6. Move through the list of names using the and keys the list scrolls in alphabetical order.
7. Press OK when you find the name you wish to delete.
8. The phone number is displayed, press OK.
9. CONFIRM appears, press OK to confirm or to stop.
Note: A double bleep confirms the validation of your choice.
A long bleep signifies that the modification has not been taken into account.
Cocoon 450 20
Page 21

ENGLISH
5.2. VIP RINGING MELODY
You can link special ring melodies to specified callers in the Phonebook. When an incoming call
is listed in the Phonebook, the handset will ring with the melody
specified to this caller.
To link a certain melody to an entry in the phonebook you must have the service callerID!!!
1. Enter the menu by pressing MENU.
2. Select PHONEBK.
3. Press OK.
4. Press the Up key a few times until MELODY appears.
5. Press OK.
6. Select the name you want to attach a melody to and press OK.
7. Use the Up and Down key to select a melody and press OK.
5.3. LOCATING A HANDSET FROM THE BASE
When the Paging button on the base is pressed, all the handsets will ring. This ringing will help
you locate a lost handset. By simply pressing one of the handset keys the ringing stops.
5.4. CALL BARRING
The following call barring options can be selected per handset:
OFF: All calls are allowed
INTERNAL: All external calls are barred
LOCAL: International and national calls are barred except local calls, the
NATIONAL: International calls are barred (starting with 00)
CUSTOM: Pre-defined number is barred
o select call barring:
T
1. Enter the menu by pressing MENU.
2. Select BASE.
3. Press OK.
4. Select PIN PROT.
5. PRESS OK.
6. Enter PIN-code (0000).
7. Press OK.
8. Select CALL BAR.
9. Press OK.
10. Select the handset (1-5).
11. Press OK.
12. Select OFF, INTERNAL, LOCAL, NATIONAL, or CUSTOM. For OFF, INTERNAL, LOCAL,
and NATIONAL, press OK.
• For LOCAL, press OK to read the PREFIX. Enter the prefix used for local
numbers (numbers dialled with this prefix will not be barred!).
• For CUSTOM, press OK to read BAR. Enter the desired first digits of the
telephone number which must be barred. For example ‘0’: all numbers
starting with ‘0’ will be barred!
13 To exit CALL BAR mode, press .
user can define prefix for local numbers
5.5. LOCKING THE KEYPAD
Locking the keypad prevents you from dialling a number accidentally. This can be useful when
small children are around.
When the keypad is locked, only the MENU key is available, all the others are
locked.
21 Cocoon 450
Page 22

ENGLISH
Activating the keypad lock
5.5.1.
1. Enter the menu by pressing MENU.
2. Select KEY LOCK.
3. Press OK.
4. Select ON.
5. Press OK to validate.
Note: A double bleep confirms the validation of your choice.
A long bleep signifies that the modification has not been taken into account.
Deactivating the keypad lock
5.5.2.
1. Enter the menu by pressing MENU.
2. Select KEY LOCK.
3. Press OK.
4. Select OFF.
5. Press OK to validate.
Note: A double bleep confirms the validation of your choice.
A long bleep signifies that the modification has not been taken into account.
5.6. HEADSET CONNECTION
You can connect a headset with a 3 pole jack plug of 2,5mm on the right side of the handset. When
the headset is connected, you can only hear and talk through the headset. The headset
microphone can still be muted by the Mute key. The handsfree speaker can still be activated by
pressing the handsfree key .
6. MANAGING MULTIPLE HANDSETS
6.1. SETTING UP AN ADDITIONAL HANDSET
You can subscribe more handsets to the base if they have the DECT GAP protocol.
The base can support a maximum of 5 handsets. If you already have 5 handsets, and you wish
to change one of them, you must first delete one handset, then subscribe a new one.
1. Put the base into registration mode, by pressing and holding the Paging key on the base
for 6 seconds.
2. The base will then emit a bleep. It is now ready to be associated with a new handset, during
the 90 seconds after pressing the button only.
If your additional handset is a Cocoon 400/450
6.1.1.
3. Enter the menu by pressing MENU.
4. Select REGISTER.
5. Press OK.
6. Enter the base number for this handset, (from 1 to 4). The flashing numbers are the numbers
already used for other bases.
7. Enter the PIN code for the base (0000 by default).
8. If the handset has located the base, it will display the base identification number. Validate the
base association by pressing OK or invalidate by pressing .
9. If the handset does not locate the base, it will return to the previous configuration after a few
seconds. Try again by changing the base number and check that you are not in an
environment where there is interference.
Cocoon 450 22
Page 23

ENGLISH
If your handset is another model
6.1.2.
After starting the registration procedure on the base, refer to the handset manual to find out how
to register the handset. The handset must be GAP compatible.
The icon and the text "NOT REG" flashes on the display when the handset is not associated
with the base.
When a handset is associated with a base, it is attributed a handset number by the base. It is the
number displayed on the handset behind the name and must be used for internal calls.
6.2. REMOVING A HANDSET
You can remove a handset from a base to allow another handset to be registered:
1. Enter the menu by pressing MENU.
2. Select BASE.
3. Press OK.
4. Select PIN PROT.
5. PRESS OK.
6. Enter PIN-code (0000).
7. Press OK.
8. Select DEL HS.
9. Press OK.
10. Select the handset to be cancelled.
11. Press OK to validate.
12. CONFIRM will appear. Press OK again to confirm or to return.
Note: A double bleep confirms the validation of your choice.
A long bleep signifies that the modification has not been taken into account.
6.3. SETTING UP A HANDSET ON ANOTHER BASE
You wish to use a Cocoon 450 handset with a base of another model. The base must be GAP
compatible.
1. To put the base in registration mode, refer to the base user manual.
2. Carry out operations 3 to 9 from paragraph “6.1. Setting up an additional handset”.
Each handset attributes a number from 1 to 4 the base it is associated with. By default this
number is 1.
6.4. SELECTING A BASE
The handsets can be registered to up to 4 bases simultaneously.
To change the base, select "B SELECT" in the menu. Select the base option:
AUTO: To choose the best base
FIXED: Choose a particular base. The handset will not search for another
PREFER: Start with searching a particular base first and then the others whengoing out of
And press OK.
When selecting FIXED or PREFER, the display shows ‘BS1 2 3 4’. The current registered base
will blink. Press 1-4 to select the base.
If you select ‘AUTO’ the handset will automatically search for another base when you are out of
range!
base when going out of range.
range.
23 Cocoon 450
Page 24

ENGLISH
6.5. ROOM MONITORING
When more than one handset is registered, one of the handsets can be used as a (baby) monitor
device.
To activate this function:
1. Enter the menu by pressing MENU.
2. Select MONITOR.
3. Press OK.
4. Select ON.
5. Press OK.
The display will show Monitor (blinking) on the handset when room monitoring is activated.
Another handset can call this handset (internally), which will activate the microphone on this
handset. That way, you can monitor every sound in that room.
Note: The handset in monitor mode will not ring when an external call comes in.
To deactivate this function:
1. Enter the menu by pressing MENU.
2. MONITOR is shown.
3. Press OK.
4. Select OFF.
5. Press OK.
7. ANSWERING MACHINE
The Cocoon 450 has a built-in digital answering machine with a recording capacity of 9 minutes
and 20 messages. This answering machine can only be controlled by the supplied handset (not
by other multi handsets). The answering machine can be operated remotely and features the
possibility of recording two outgoing messages (Message 1 and Message 2).
Note: All messages and settings are stored on Flash-Memory and will not be erased
during power failure.
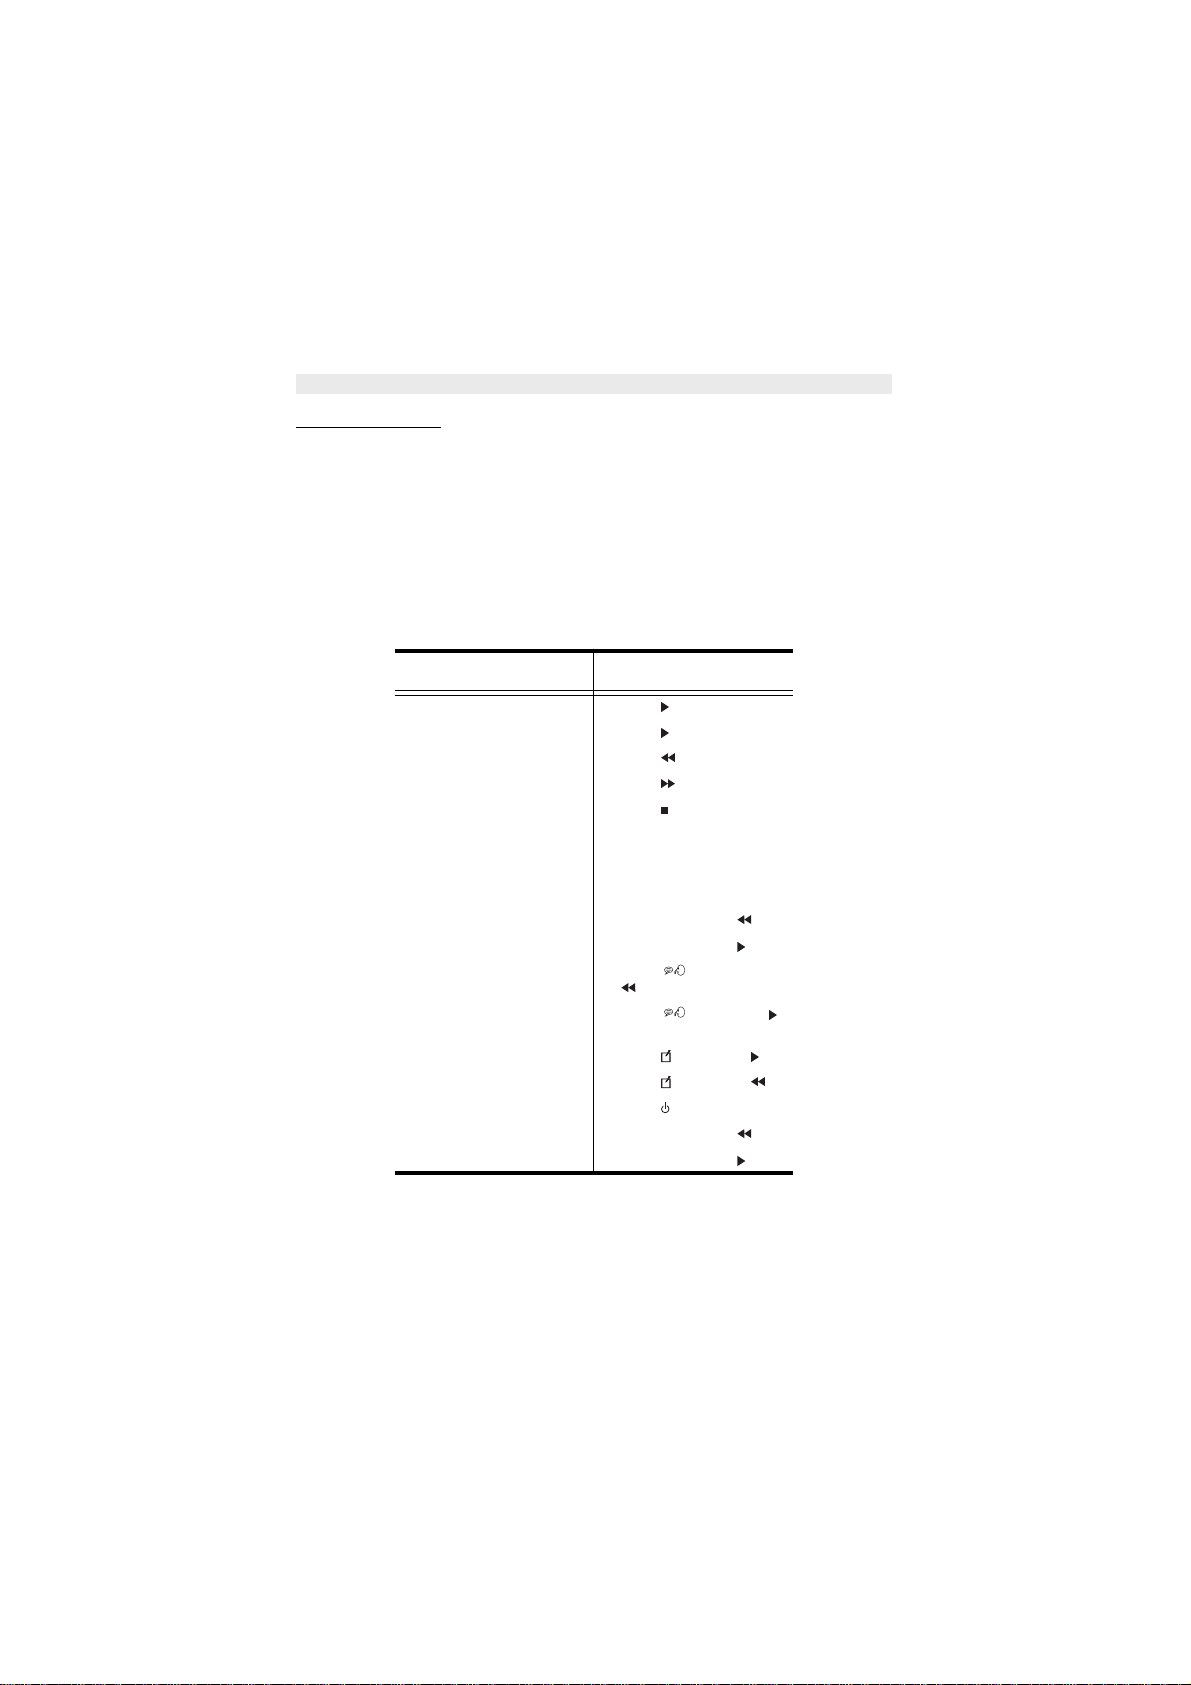
7.1. KEYS HANDSET
Play
Stop
Skip Back
Skip Forward
Answer ON/OFF
Memo
7.2. SETTINGS
Two outgoing messages can be recorded (OGM1 and OGM2).
• Outgoing message 1 for the answering function and the possibility for callers to leave a
message. The maximum recording time is 30 seconds
• Outgoing message 2 for the answering function without allowing callers to leav e a messages
on the machine (answer only). The maximum recording time is 60 seconds
You can only operate the answering machine by going into the answering machine menu:
• Press to enter the answering menu
• Press ‘C’ to leave the answering menu
Cocoon 450 24
Delete X
Outgoing message
Answering mode key
Page 25

ENGLISH
Setting the base speaker volume
7.2.1.
To change the volume during playback of incoming or outgoing messages, press to increase
or to decrease.
Recording and playback outgoing messages (OGM 1 or OGM 2)
7.2.2.
To record an outgoing message:
• Press to enter the answering menu
• Press ‘9’ and then:
- ‘1’ to record OGM 1
- ‘2’ to record OGM 2
• Press the stop key to end the recording. The recorded message will be played. Press
to stop the playback.
To play the recorded messages when you are in the answering menu:
• Press ‘6’ and then:
-‘1’ to play OGM 1
- ‘2’ to play OGM 2
• Press the stop key to end the playback
7.2.3.Selecting an outgoing messa
If the memory is full, only outgoing message 2 can be selected (only answering
without recording).
• Press to enter the answering menu
• Press ‘7’ and then:
- ‘1’ to set OGM 1 (answer and recording mode)
‘AR MODE 1’ will be shown on the display
- ‘2’ to set OGM 2 (Answer only mode)
‘AR MODE 2’ will be shown on the display
Turning Answering Machine On/Off
7.2.4.
If the answering machine is On, the LED on the base will light up contiously and the machine
will automatically pick up the line after a number of rings (See “7.2.5. Setting Number of Rings” on
page 26.).
If the answering machine is OFF, the LED on the base will go off.
• Press to enter the answering menu
• Press to switch ON the answ ering machine. ‘TAD ON’ will be shown and the LED will
lit on the base
• Press to switch OFF the answering machine. ‘TAD OFF’ will be shown and the LED
on the base will go off
Even if the answering machine is turned off, it will automatically pick up the line after 10 - 15 rings
to enable remote activation (See “7.4. Remote Operation” on page 28.).
Note: Answering machine cannot be activated if no OGM is recorded.
ge (OGM 1 or OGM 2)
25 Cocoon 450
Page 26

ENGLISH
Setting Number of Rings
7.2.5.
The number of rings after which the answering machine will answer calls can be set from 2 – 7
and Economy (Toll saver). The default setting is in economy mode. In economy mode the
machine will answer after 4 rings if there are no new messages, and after 2 rings if there are new
messages. If there are no new messages and you call your machine to check your messages
remotely (See “7.4. Remote Operation” on page 28.), you can hang up after the 2nd ring. You do
not need to pay connection fees and you know that you do not have any new messages.
• Press MENU
• Press up or down a few times until ‘TAD MENU’ appears
• Press OK
• Press up or down a few times until ‘RG DELAY’ appears
• Press OK
• Press up or down a few times until the desired number of rings is set
• Press OK to confirm settings
• Press ‘c’ to exit ‘TAD MENU’
Setting SOS code and filtering
7.2.6.
The SOS code is used to stop the call filter for a short period so that the base station starts to ring
during 8 seconds. The following filter options can be set on the telephone:
OFF: No filter function active
HEAR AR: This mode enables all calls to be heard through the loudspeaker of handset 1
SILEN AR: All calls are immidiatly transfert to the answering machine without any ring
VIPFUNC1: All calls are immidiatly transfert to the answering machine without any ring
VIPFUNC2: All calls will be answered by the answering machine after the ring delay, except
a. Programming the SOS code
• Press MENU
• Press up or down a few times until ‘TAD MENU’ appears
• Press OK
• Press up or down a few times until ‘SOS CODE’ appears
• Press OK
• Enter the current code (default = ‘111’)
• Press OK
• Enter the new code and press OK
• Enter again the new code for confirmation and press OK
(Call screening). The loudspeaker is switched ON during outgoing- and
incoming message playback/recording. The other handsets cannot receive
calls.
delay. Callers can enter the SOS code starting with ‘*’ to override this function.
The base will start to ring for 8 seconds.
delay, except when a number comes in which match with a number from the
phonebook.
the one number from the phonebook. Callers can enter the SOS code starting
with ‘*’ to override this function. The base will start to ring for 8 seconds.
Cocoon 450 26
Page 27

ENGLISH
b. Setting the filter options
• Press MENU
• Press up or down a few times until ‘TAD MENU’ appears
• Press OK
• Press up or down a few times until ‘VIP PRIO’ appears
• Press OK
• The current selected filter option will be shown
• Press up or down a few times until the desired filtering option is shown on the displa y
(See above for the different filter options)
• Press OK
• If VIPFUNC1 or VIPFUNC2 is selected the numbers stored in the phonebook will apear on
the display. Select the telephone number which has to be linked with this option and press
OK
Note: Activating the room monitor function (See “6.5. ROOM MONITORING” on
page 24.) will overide the call screening function (HEAR AR). To activate the call
screening function, the room monitor function must be turned off.
Programming the VIP Code
7.2.7.
The VIP code is a 3-digit code used to operate the machine remotely (See “7.4. Remote
Operation” on page 28.).The VIP code is set to '000' by default.
• Press MENU
• Press up or down a few times until ‘TAD MENU’ appears
• Press OK
• Press up or down a few times until ‘PIN CODE’ appears
• Press OK
• Enter the current PIN code (default = ‘000’)
• Press OK
• Enter the new pin code and press OK
• Enter again the new pin for confirmation and press OK
Note: The SOS and VIP code cannot be the same because both can be entered during
OGM playback!!!
7.3. OPERATION
If a call is received and the answering machine is turned on, the answering machine will
automatically answer the call after the set number of rings.
If outgoing message 1 has been selected, after the outgoing message, a beep will be heard and
the caller can leave a message (max. 2 minutes).
If outgoing message 2 has been selected, after the beep, the line will automatically be
disconnected. The caller does not have the possibility to leave a message.
When there are messages, the amount of messages will be shown on the display. When there
are new messages, the -icon will blink on the base and the envelope -icon will appears on
the display.
Note: If, during recording, nothing is said for 8 seconds, the line will be automatically
disconnected.
27 Cocoon 450
Page 28

ENGLISH
Recording a Memo
7.3.1.
A memo is considered as an incoming message that can be picked up later by the user. The max.
recording time for a memo is 2 minutes.
• Press to enter the answering menu
• Press ‘4’ and then ’2’ to start the recording. Start speaking after the beep
• Press ‘5’ to end the recording
Note: You can only record one memo message!!
Playback/delete of Incoming Messages and Memo
7.3.2.
• Press to enter the answering menu
• Press to play all the messages and memos.
• During playback, you can:
•go to the previous message by pressing
•stop playback by pressing
•interrupt playback by pressing again. Press again to restart playback
•go to the next message by pressing
•Deleting the current played message by pressing ‘0’ X
During playback the display will show:
•‘PLAYMEMO’ during playback memo message
•‘Message #’ during message playback when no callerID information is received
•telephone number and date/time when callerID is received. You can switch between date/
time* and telephone number by pressing the OK key
* only when the network sends the time/date together with the telephone number!!!
On some networks with callerID, time and date will not be displayed.
Deleting all messages
7.3.3.
All messages including new messages can be deleted at once by:
• Press to enter the answering menu
• Press ‘9’ followed by ‘0’ X to delete all messages
•‘CONFIRM’ will appear on the display. Press OK to confirm or ‘C’ to cancel.
7.4. REMOTE OPERATION
The answering machine can be operated remotely using a touch-tone phone (DTMF tone
selection system).
To enter the remote operation
7.4.1.
• Call your machine
• The answering machine picks up the line, press ‘*’ when you hear the outgoing message
playback followed by the VIP code (default 000)
• If the VIP code is incorrect you will hear the outgoing message again. You have two more
attempts to enter the correct code. If the 3rd attempt is also wrong, the line will be
disconnected
• If the VIP code is entered correctly you will hear 2 beeps. You can now operate the
answering machine by pressing the corresponding keys. All remote operations have the
same key combination as operated on the Cocoon 450 handset during answering menu
(See “7.5. Ans w ering machine shortcuts summery” on page 29.). If there are messages, the
messages will be played automatically
Cocoon 450 28
Page 29
ENGLISH
7.4.2. Remote turn On
If the answering machine is switched off, you can turn it on remotely:
• Call your machine
• The answering machine picks up the line after 10-15 rings. Enter the VIP code (default 000)
when you hear 2 beeps
• If the VIP code is entered correctly you will hear the outgoing message. The answering
machine is now turned on
• The machine can now be controled remotely during OGM playback. As soon as the
playback stops, the line will be disconnected
7.5. ANSWERING MACHINE SHORTCUTS SUMMERY
When entering remote operation you can controle the answering machine with the same key
combinations as during normal operation:
Feature Shortcut for answering
Play messages Press ‘2’
Repeat current message Press ‘2’
Jump to previous message Press ‘1’
Jump to next message Press ‘3’
Stop Press ‘5’
Delete the current message
while the message is being
played
Delete all messages Press ‘9’ and then ‘0’ X
Record OGM1 Press ‘9’ and then ‘1’
Record OGM2 Press ‘9’ and then ‘2’
Play OGM1 Press ‘6’ and then
Play OGM2 Press ‘6’ and then ‘2’
mode and remote controle
Press ‘0’ X
‘1’
Record a memo Press ‘4’ and then ‘2’
Play a memo Press ‘4’ and then ‘1’
Answering machine On/Off Press ‘8’
Set answer-record mode Press ‘7’ and then ‘1’
Set answer-only mode Press ‘7’ and then ‘2’
29 Cocoon 450
Page 30

ENGLISH
8. TR OUBLE SHOOTING
Symptom Possible cause Solution
No display Batteries uncharged Check the position of the
Handset turned OFF Turn ON the handset
No tone Telephone cord badly
connected
The line is occupied by another
handset
batteries
Recharge the batteries
Check the telephone cord
connection
Wait until the other handset
hangs up
The icon flashes Handset out of range Bring the handset closer to the
The base has no power supply Check the mains connection
The handset is not registered
to the base
Base or handset do not ring The ringing volume is zero or
Tone is good, but there is no
communicaton
Telephone does not react to
pressing the keys
Flash (R) Key does not work Wrong Flash time Call Hotline to change the flash
low
The dialling mode is wrong Adjust the dialling mode
Manipulation error Remove the batteries and but
Keypad lock ON Turn OFF the Keypad Lock
base
to the base
Register the handset to the
base
Adjust the ringing volume
(pulse/tone)
them back in place
time
Cocoon 450 30
Page 31

ENGLISH
9. GUARANTEE
• This equipment comes with a 36-month warranty. The warranty will be honoured on
presentation of the original bill or receipt, provided the date of purchase and the unit type are
indicated.
• During the time of the warranty Topcom will repair free of charge any defects caused by
material or manufacturing faults. Topcom will at its own discretion fulfil its warranty
obligations by either repairing or exchanging the faulty equipment.
• Any warranty claims will be invalidated as a result of intervention by the buyer or unqualified
third parties.
• Damage caused by inexpert treatment or operation, and damage resulting from the use of
non-original parts or accessories not recommended by Topcom is not covered by the
warranty.
• The warranty does not cover damage caused by outside factors, such as lightning, water and
fire, nor does it apply if the unit numbers on the equipment have been changed, removed or
rendered illegible.
Note: Please do not forget to enclose your receipt if you return the equipment.
10. TECHNICAL CHARACTERISTICS
•Standard: DECT (Digital Enhanced Cordless Telecommunications)
• Frequency range: 1880 MHZ to 1900 MHz
• Number of channels: 120 duplex channels
• Modulation: GFSK
• Speech coding: 32 kbit/s
• Emission power: 10 mW ( average power per channel )
• Range: 300 m in open space /50 m maximum inhouse
• Base power supply: 220 V / 50 Hz for the base
• Handset Batteries: 2 rechargeable batteries AAA, NiMh 600mAh
• Handset autonomy: 150 hours in standby
• Talk time: 12 hours
• Charging time: 6-8 hours
• Normal conditions of use: +5 °C to +45 °C
•Dialling mode: Pulse / Tone
GAP (Generic Access Profile)
31 Cocoon 450
Page 32

NEDERLANDS
1. BESCHRIJVING VAN DE TELEFOON 34
1.1. HANDSET EN BASISTOESTEL VAN DE COCOON 450 34
1.2. DISPLAY 35
1.2.1. Standby-scherm 35
2. TELEFOONINSTALLATIE 36
2.1. AANSLUITINGEN 36
2.2. HERLAADBARE BATTERIJEN 37
2.3. RIEMCLIP 38
3. DE TELEFOON GEBRUIKEN 39
3.1. HANDSET AAN/UIT 39
3.2. OPROEPEN ONTVANGEN 39
3.3. EEN EXTERNE OPROEP 39
3.4. EEN INTERNE OPROEP (INT) 39
3.5. HANDENVRIJE MODUS 39
3.6. INTERNE OPROEP DOORSCHAKELEN 40
3.7. CONFERENTIEGESPREK 40
3.8. VERMELDING VAN DE GESPREKSDUUR 40
3.9. MICROFOON UITSCHAKELEN (MUTE) 40
3.10. PAUZE-TOETS 40
3.11. IDENTIFICATIE VAN DE BELLER 41
3.11.1. Nummerweergave tweede oproep 41
3.11.2. Call List 41
3.11.3. Een nummer van de oproeplijst in het Telefoonboek opslaan. 41
3.11.4. De Oproeplijst volledig wissen 42
3.11.5. Voice mail indicatie 42
3.12. HERKIES-GEHEUGEN 42
3.13. BELLEN VANUIT HET TELEFOONBOEK 42
3.14. HET ALFANUMERIEKE KLAVIER GEBRUIKEN 42
3.15. HET MENU GEBRUIKEN 43
4. PERSONALISERING 43
4.1. LUIDSPREKERVOLUME AANPASSEN 43
4.1.1. Luidsprekervolume tijdens oproep 43
4.2. BELVOLUME AANPASSEN 44
4.2.1. Belvolume van de handset 44
4.2.2. Belvolume van het basistoestel 44
4.3. BELMELODIE KIEZEN 44
4.3.1. Belmelodie van het basistoestel 44
4.3.2. Belmelodie handset, externe oproep 45
4.3.3. Belmelodie handset, interne oproep 45
4.4. BIEPTONEN ACTIVEREN/DEACTIVEREN 45
4.4.1. Bieptoon bij indrukken van toets aan- en uitzetten 45
4.4.2. Batterij bijna leeg 45
4.4.3. Handset te ver van basistoestel (buiten bereik) 45
4.4.4. Bevestigingstonen 46
4.5. NAAM VAN DE HANDSET WIJZIGEN 46
4.6. MENUTAAL KIEZEN 46
4.7. DE PIN-CODE WIJZIGEN 46
4.8. DE KIESMODUS INSTELLEN 47
4.9. AUTOMATISCH OPNEMEN 47
4.10. WEERGAVE GESPREKSDUUR ON/OFF (TIMER) 47
4.11. RESET 47
Cocoon 450 32
Page 33

NEDERLANDS
5. GEAVANCEERDE FUNCTIES 48
5.1. TELEFOONBOEK 48
5.1.1. Een correspondent toevoegen aan het telefoonboek 49
5.1.2. Een naam of nummer wijzigen 49
5.1.3. Een correspondent wissen 49
5.2. VIP BELMELODIE 50
5.3. EEN INTERN TOESTEL ZOEKEN VIA HET BASISTOESTEL 50
5.4. NUMMERVERGRENDELING 50
5.5. KLAVIERVERGRENDELING 51
5.5.1. Activating the keypad lock 51
5.5.2. Deactivating the keypad lock 51
5.6. AANSLUITING KOPTELEFOON 51
6. GEBRUIK VAN MEERDERE HANDSETS 51
6.1. EEN BIJKOMENDE HANDSET REGISTREREN 51
6.1.1. Als de bijkomende handset een Cocoon 400/450 is 52
6.1.2. Uw handset is een ander model 52
6.2. EEN HANDSET VERWIJDEREN 52
6.3. EEN HANDSET INSTALLEREN OP EEN ANDER BASISTOESTEL 52
6.4. EEN BASISTOESTEL SELECTEREN 53
6.5. BEWAKINGSFUNCTIE 53
7. ANTWOORDAPPARAAT 53
7.1. TOETSEN HANDSET 54
7.2. INSTELLINGEN 54
7.2.1. Handset luidspreker volume instellen 54
7.2.2. Opnemen en weergeven van uitgaande boodschappen (Meldtekst 1 of Meldtekst 2) 54
7.2.3. UItgaande boodschap selecteren (Meldtekst 1 of Meldtekst 2) 54
7.2.4. Antwoordapparaat aan/uit schakelen 55
7.2.5. Beltonen instellen 55
7.2.6. SOS code en filter optie 56
7.2.7. VIP-code programmeren 57
7.3. BEDIENING 57
7.3.1. Opname memo boodschap 57
7.3.2. Weergave/wissen van boodschappen en memo 58
7.3.3. wissen van alle boodschappen 58
7.4. BEDIENING VANOP AFSTAND 58
7.4.1. Bediening vanop afstand starten 58
7.4.2. Antwoordapparaat aanschakelen vanop afstand 59
7.5. ANTWOORDAPPARAAT FUNCTIES IN HET KORT 59
8.PROBLEMEN VERHELPEN 60
9. GARANTIE 61
10. TECHNISCHE KENMERKEN 61
33 Cocoon 450
Page 34

1. BESCHRIJVING VAN DE TELEFOON
1.1. HANDSET EN BASISTOESTEL VAN DE COCOON 450
Display
Luidspreker
NEDERLANDS
Toets Omhoog/
Menu
Mute/Escape-toets
Interne Oproep
Buitenlijn-/
Nieuwe Oproepindicator
Inkomende
oproep indicator
Laadindicator
Handenvrijtoets
Toets Omlaag/
Oproeplijst
Herkies/OK
Aan/uit
Aansluiting
koptelefoon
Flash-toets/
Telefoonboek
Paging-toets
Registratietoets
(ingedrukt houden)
Lijn-toets
Microfoon
Cocoon 450 34
Page 35

NEDERLANDS
1.2. DISPLAY
Batterij Telefoon Clip Vergrendeling
Naar links
bewegen
Externe/
interne
oproep
Voor elke functie is er een bijhorend pictogram
Pictogram: Betekenis:
In verbinding
EXT Er vindt een externe oproep plaats
INT Er vindt een interne oproep plaats
Nieuwe boodschap ontvangen in uw voice mail
Het Telefoonboek openen
MENU U bevindt zich in het menu
Laadniveau van de herlaadbare batterijen:
1 segment: zwak , 2 segmenten: laag , 3 segmenten: medium, 4 segmenten: vol
Tijdens het laden ziet u het aantal blokjes toenemen en verdwijnen, waarna deze
beweging wordt herhaald.
Klaviervergrendeling geactiveerd
De antenne toont de kwaliteit van de ontvangst.
De antenne knippert als de handset niet is aangemeld op de basis
or Geeft aan dat het getoonde nummer langer is dan het scherm (12 cijfers)
or Possible scroll direction in the menu
Mogelijke bladerrichting in het menu
Beltoon handset OFF
Oproepidentificatie mogelijk / nieuwe nummers in de Oproeplijst
boodschap
klavier
Menu Mute Bereik-
Beltoon on/offTelefoonboekNieuwe
indicator
Naar rechts
bewegen
Standby-scherm
1.2.1.
In de standby-modus toont het scherm de naam en het nummer van de handset:
C450 1
35 Cocoon 450
Page 36

2. TELEFOONINST ALLA TIE
2.1. AANSLUITINGEN
NEDERLANDS
onderaanzicht van het
basistoestel
Stroomkabel
Cocoon 450 36
Telefoonkabel
Page 37

NEDERLANDS
2.2. HERLAADBARE BATTERIJEN
Vooraleer u uw Cocoon 450 de eerste keer gebruikt, moet u ervoor zorgen dat de batterijen 6 à 8
uur zijn opgeladen. Het telefoontoestel zal niet optimaal functioneren als het niet voldoende werd
opgeladen.
Een oplaadbare batterij vervangen of plaatsen:
1. Schuif het kapje naar beneden en til het op.
2. Plaats de batterijen en houd daarbij rekening met de polariteit (+ en -).
3. Plaats het kapje terug.
Oplaadbare batterijen
achteraanzicht van de
handset
Kapje
Opmerking: De batterijen gaan telkens zo'n 150 uur mee en de gesprekstijd is maximaal
12 uur. Na verloop van tijd raken de batterijen sneller leeg. De batterijen moeten dan
worden
vervangen. Nieuwe batterijen kunt u kopen bij elke doe-het-zelf-zaak (twee herlaadbare
batterijen, type AAA NiMH).
37 Cocoon 450
Page 38

2.3. RIEMCLIP
De riemclip kan u als volgt verwijderen en plaatsen:
NEDERLANDS
Cocoon 450 38
Page 39

NEDERLANDS
3. DE TELEFOON GEBRUIKEN
3.1. HANDSET AAN/UIT
• De handset inschakelen (ON): OK-toets twee seconden lang indrukken. De handset zoekt
het basistoestel.
• De handset uitschakelen (OFF): OK-toets twee seconden lang indrukken. Het display gaat
uit.
3.2. OPROEPEN ONTVANGEN
Bij ontvangst van een externe oproep, rinkelen zowel alle handsets als de basis. Het EXTsymbool verschijnt op de display en de -LED knippert op de basis. Als de handset belt, druk
dan op om de oproep te beantwoorden. U bent nu verbonden met de persoon aan de andere
kant van de lijn. Als de handset in het basistoestel staat op het moment dat de telefoon rinkelt,
hoeft u enkel de handset uit het basistoestel te nemen om de oproep te beantwoorden (als de
optie automatisch beantwoorden ingeschakeld werd: zie 4.9 Automatisch opnemen).
Als u op drukt wanneer de telefoon rinkelt, neemt u op en wordt er automatisch
overgeschakeld op de handenvrij-modus.
3.3. EEN EXTERNE OPROEP
Normale nummering:
1. Druk op .
2. Telefoonnummer ingeven.
en:
Blokkiez
1. Druk het nummer van uw correspondent.
2. Druk op .
Als u een nummer wilt corrigeren, gebruik dan de toets om een ingevoerd
cijfer te wissen.
3.4. EEN INTERNE OPROEP (INT)
Alleen mogelijk als meer dan één handset werd geregistreerd op het basistoestel!
Normale n
1. Druk op de INT-toets.
2. Voer het nummer van het interne toestel in (1 tot 5).
Blokkiez
1. Voer het nummer van het interne toestel in (1 tot 5) .
2. Druk op de INT-toets.
3.5. HANDENVRIJE MODUS
U kunt met uw correspondent praten zonder de handset op te nemen.
Om de handenvrij-modus te activeren of te deactiveren, drukt u tijdens een oproep op de toets.
Voor het aanpassen van het volume wordt verwezen naar het hoofdstuk “Personaliseren“ - het
luidsprekervolume aanpassen.
ummering:
en:
39 Cocoon 450
Page 40

NEDERLANDS
3.6. INTERNE OPROEP DOORSCHAKELEN
nterne gesprekken zijn enkel mogelijk als meer dan één handset werd
geregistreerd op het basistoestel.
Een externe oproep doorschakelen naar een andere handset:
1. Druk op INT tijdens een gesprek.
2. Selecteer het nummer van het interne toestel, de externe beller wordt in de "wachtstand"
geplaatst.
3. Als het andere interne toestel reageert, drukt u op om de oproep door te schakelen.‘
Als de interne correspondent niet opneemt, druk dan opnieuw op INT om terug te schakelen naar
de externe beller.
3.7. CONFERENTIEGESPREK
Conferentiegesprekken zijn enkel mogelijk als meer dan één handset werd geregistreerd op het
basistoestel.
U kunt gelijktijdig met een interne en een externe correspondent spreken.
U bent in gesprek met een externe correspondent:
1. Druk op INT.
2. Voer het nummer in van de interne telefoon die u wilt oproepen.
3. Zodra de interne correspondent opneemt, # indrukken en vasthouden (2 sec.).
4. Als de interne correspondent de oproep niet beantwoordt, druk dan nogmaals op INT om
weer over te schakelen naar de externe correspondent die aan de lijn is.
3.8. VERMELDING VAN DE GESPREKSDUUR
De gespreksduur wordt getoond na 10 seconden (eerst de minuten, dan de seconden): “00-20”.
Tijdens een gesprek kan u het gevormde nummer nog steeds zien door 2 seconden op de MENUtoets te drukken.
Aan het einde van elk gesprek wordt de totale gespreksduur getoond gedurende vijf seconden. U
kan de gespreksduur (timer) aan- of uitschakelen (zie 4.10 Weergave gespreksduur ON/OFF
(timer)).
3.9. MICROFOON UITSCHAKELEN (MUTE)
Het is mogelijk om de microfoon tijdens een gesprek uit te schakelen.
Druk op tijdens het gesprek. De microfoon wordt gedeactiveerd en u kunt vrij spreken zonder
dat de persoon aan de andere kant van de lijn u kan horen.
U krijgt het -symbool te zien.
Druk op om terug te keren naar de normale modus.
3.10. PAUZE-TOETS
Als u een cijfertoets ingedrukt houdt, wordt een pauze achter dit cijfer toegevoegd. De letter ‘P’
verschijnt op de display.
Cocoon 450 40
Page 41

NEDERLANDS
3.11.IDENTIFICATIE VAN DE BELLER
De belleridentificatie is enkel beschikbaar als u bij uw telefoonmaatschappij een abonnement
heeft op deze dienst.
Als u een externe oproep ontvangt, verschijnt het nummer van de beller op het scherm wanneer
de telefoon rinkelt.
Als het netwerk ook de naam verstuurt of als de naam van de beller in het Telefoonboek is
opgenomen, zal de beller worden geïdentificeerd aan de hand van zijn of haar naam.
Eerst wordt de identiteit van de beller getoond, na 15 seconden krijgt u de gespreksduur te zien.
Nummerweergave tweede oproep
3.11.1.
Als u een abonnement hebt op de dienst Nummerweergave Tweede Oproep (raadpleeg hiervoor
uw telefoonmaatschappij) en u ontvangt een tweede oproep terwijl u reeds in gesprek bent, dan
verschijnt het nummer van de tweede oproeper op de display. Als u een aankloptoon hoort,
verschijnt het telefoonnummer van de
tweede oproeper gedurende 5 seconden op de display.
Call List
3.11.2.
Uw telefoon houdt een lijst bij in het geheugen van de laatste 30 ontvangen oproepen. Deze
functie is alleen beschikbaar wanneer u een abonnement nam op de dienst voor
belleridentificatie. De correspondenten die hebben gebeld, worden geïdentificeerd aan de hand
van hun telefoonnummer of hun naam, op dezelfde manier zoals dat bij het
belleridentificatiesysteem gebeurt.
Als er nieuwe/onbeantwoorde oproepen zijn, dan wordt dit in het scherm aangeduid door het
knipperende pictogram en het knipperende -LED op de basis. De lijst van de oproepen
raadpleegt u als volgt:
1. Druk op . Als de lijst geen oproepen bevat, krijgt u ‘EMPTY’ (LEEG) te zien.
2. De oproepen kunt u doorbladeren met behulp van de pijltjestoetsen of . De namen van
de bellers worden getoond als de naam door het netwerk werd doorgestuurd of in het
telefoonboek is opgeslagen. Als u het einde van de lijst heeft bereikt, krijgt u een bieptoon te
horen.
3. Druk enkele keren op OK om de volgorde te zien: Naam, nummer, datum&uur** .
4. Als u nogmaals op OK drukt, krijgt u de mogelijkheid de ingave te wissen. Druk op OK om de
ingave te wissen of op om terug te keren naar het vorige menu.
5. Om een correspondent terug te bellen, drukt u gewoon op de -toets als hun
telefoonnummer of naam op het scherm verschijnen.
Als een beller in het Telefoonboek is opgenomen, wordt hij geïdentificeerd aan de hand van zijn
naam in de lijst van onbeantwoorde oproepen.
** ALLEEN WANNEER HET NETWERK HET TIJDSTIP/DATUM SAMEN MET HET
TELEFOONNUMMER VERSTUURT! Bij sommige netwerken met ID van de beller,
krijgt u geen tijdstip en datum te zien.
Een nummer van de oproeplijst in het Telefoonboek opslaan.
3.11.3.
Als u de Oproeplijst doorloopt,kan u een nummer in het Telefoonboek opslaan door op de
Telefoonboektoets te drukken. ‘CONFIRM’ verschijnt op de display. Druk op OK ter
bevestiging of op om terug te keren.
Als u het nummer met een naam wil opslaan (in geval het nummer zonder naam in de Oproeplijst
staat) of met een andere andere naam, ga dan naar het Telefoonboek-menu en kies EDIT (zie
5.1 Telefoonboek).
41 Cocoon 450
Page 42

NEDERLANDS
3.11.4. De Oproeplijst volledig wissen
U kan de Oproeplijst volledig leeg maken:
1. Druk op MENU.
2. Druk enkele keren op de Omlaagtoets tot ‘HANDSET’ op de display verschijnt. Druk op
OK.
3. Druk enkele keren op de Omlaagtoets tot ‘DEL CID’ (WIS CID) op de display verschijnt.
4. Druk op OK. ‘CONFIRM’ verschijnt op de display.
5. Druk op OK om de lijst volledig leeg te maken of op om deze operatie te annuleren.
Voice mail indicatie
3.11.5.
Deze functie werkt enkel als u beschikt over de Voice Mail of Phone Mail dienst, en als het netwerk
deze indicatie doorstuurt samen met de Caller-ID/CLIP informatie!
Als u een nieuwe boodschap ontvangen hebt in uw Voice Mail systeem, zal het
‘’-icoon op de display verschijnen. Nadat u uw boodschappen beluisterd hebt, zal het ‘ ’-icoon
verdwijnen.
3.12. HERKIES-GEHEUGEN
Uw telefoon houdt een lijst bij van de 10 laatste oproepen (van telkens 20 cijfers) die u deed. Als
ze opgenomen zijn in het Telefoonboek, worden de gebelde
correspondenten geïdentificeerd aan de hand van hun telefoonnummer of hun naam.
De herkies-lijst opent u als volgt:
1. Druk op .
2. U kunt de oproepen doorbladeren met behulp van de pijltjestoetsen en .
3. Om de geselecteerde correspondent op te bellen, drukt u gewoon op zodra hun
telefoonnummer of naam wordt getoond.
Opmerking: Als de naam wordt getoond, kunt u heen en weer schakelen tussen de
naam en het nummer met behulp van de OK-toets. Als u nogmaals op OK drukt, krijgt
u de mogelijkheid deze ingave uit de Herkieslijst te wissen. Druk op OK ter
bevestiging of op om terug te keren!
3.13. BELLEN VANUIT HET TELEFOONBOEK
Een correspondent bellen wiens naam u in het Telefoonboek heeft opgeslagen, doet u als volgt:
1. Druk op om het Telefoonboek te openen.
2. Voer de eerste letter van de naam in. De eerste naam die begint met deze letter of met de
dichtstbijzijnde letter van het alfabet wordt nu getoond.
3. Doorloop de lijst met behulp van de toetsen en . De lijst wordt weergegeven in
alfabetische volgorde. Bij een nummer zonder naam, verschijnt ‘ ‘ op de display!
4. Druk op om het nummer te kiezen van de correspondent wiens naam wordt getoond.
Om het nummer te zien vooraleer u de oproep daadwerkelijk doet, voert u de vermelde stappen
1 tot 3 uit en drukt u op OK. Nu verschijnt het nummer. Met behulp van de toets kunt u het
wijzigen vooraleer u belt.
3.14. HET ALFANUMERIEKE KLAVIER GEBRUIKEN
Met uw telefoon kunt u ook alfanumerieke karakters invoeren. Dat is nuttig om een naam in te
voeren, om een intern toestel een naam te geven, …
Om een letter te selecteren drukt u het vereiste aantal keren op de bijhorende toets. Om
bijvoorbeeld een 'A' te selecteren, drukt eenmaal op '2', om een 'B' te selecteren drukt u tweemaal
op '2', enz. Om achtereenvolgens een 'A' en een 'B' te selecteren, wacht u tot de cursor na het
invoeren van de 'A' naar het volgende karakter springt. Daarna drukt u opnieuw op '2'.
Om een spatie te selecteren drukt u op '1'.
Cocoon 450 42
Page 43

NEDERLANDS
Om een streepje te selecteren drukt u tweemaal op '1'.
De karakters van het toetsenbord zijn als volgt:
Toets 1x 2x 3x 4x 5x
1 spatie - 1
2 ABC2
3DEF3
4GHI 4
5JKL5
6MNO6
7PQRS7
8TUV8
9WXYZ9
00
drukken drukken drukken drukken drukken
3.15. HET MENU GEBRUIKEN
Dankzij een gebruiksvriendelijk menu heeft u toegang tot een groot aantal
telefoonfuncties.
1. Om het menu te openen, drukt u op MENU.
2. Doorloop de selectiemogelijkheden met de toetsen en . Zodra u de laatste heeft bereikt,
springt het menu weer naar de eerste. De pijltjes rechts in het scherm geven aan dat er
verschillende selecties zijn waar u kan doorheeN bladeren.
3. Druk op OK om een selectie te bevestigen.
4. Om terug te keren naar het vorige menu drukt u op .
4. PERSONALISERING
4.1. LUIDSPREKERVOLUME AANPASSEN
Er zijn twee manieren om het luidsprekervolume in te stellen:
Luidsprekervolume tijdens oproep
4.1.1.
Druk tijdens het gesprek op de toets of om het volume aan te passen. Druk op OK ter
bevestiging.
Opmerking: Het volume v oor het handen vrij bellen met de Cocoon 450 wor den samen
aangepast met dat van de handset zoals hierboven is uiteengezet.
43 Cocoon 450
Page 44

NEDERLANDS
4.2. BELVOLUME AANPASSEN
4.2.1. Belvolume van de handset
U kan het belvolume tijdens een inkomende oproep aanpassen door op de Omhoog- of
Omlaagtoetsen te drukken. Het belvolume kan als volgt
ingesteld worden.
1. Open het menu met een druk op MENU.
2. Selecteer HANDSET.
3. Druk op OK.
4. Selecteer VOLUME.
5. Druk op OK.
6. Selecteer het gewenste volume (OFF of van 1 tot 5) met behulp van de Omhoog- en
Omlaagtoetsen .
7. Druk op OK om te bevestigen of op om terug te keren naar het vorige menu.
Opmerking: Bij elke programmatie hoort u aan het einde een enkele of dubbele lange
bieptoon. Een dubbele bieptoon geeft aan dat uw keuze is aanvaard.
Een lange bieptoon geeft aan dat met de wijziging geen rekening werd gehouden.
Belvolume van het basistoestel
4.2.2.
1. Open het menu met een druk op MENU.
2. Selecteer BASE (BASIS).
3. Druk op OK.
4. Selecteer UNPROTEC (ONBEVEIL).
5. Druk op OK.
6. Select VOLUME.
7. Selecteer het gewenste volume (OFF of van 1 tot 5) met behulp van de Omhoog- en
Omlaagtoetsen .
8. Druk op OK om te bevestigen of op om terug te keren naar het vorige menu.
Opmerking: Bij elke programmatie hoort u aan het einde een enkele of dubbele lange
bieptoon. Een dubbele bieptoon geeft aan dat uw keuze is aanvaard.
Een lange bieptoon geeft aan dat met de wijziging geen rekening werd gehouden.
4.3. BELMELODIE KIEZEN
Het basistoestel en de handsets kunnen allen een andere melodie hebben.
De handsets kunnen een verschillende melodie hebben al naargelang de ingaande oproep intern
of extern is.
Belmelodie van het basistoestel
4.3.1.
1. Open het menu met een druk op MENU.
2. Selecteer BASE (BASIS).
3. Druk op OK.
4. Selecteer UNPROTEC (ONBEVEIL).
5. Druk op OK.
6. Selecteer MELODIES (MELODIE).
7. Druk op OK.
8. Selecteer een melodie (1 tot 10).
9. Druk op OK om te bevestigen of op om terug te keren naar het vorige menu.
Opmerking: Bij elke programmatie hoort u aan het einde een enkele of dubbele lange
bieptoon. Een dubbele bieptoon geeft aan dat uw keuze is aanvaard.
Een lange bieptoon geeft aan dat met de wijziging geen rekening werd gehouden.
Cocoon 450 44
Page 45

NEDERLANDS
4.3.2. Belmelodie handset, externe oproep
1. Open het menu met een druk op MENU.
2. Selecteer HANDSET.
3. Druk op OK.
4. Selecteer EXT RING (EXT BEL).
5. Druk op OK.
6. Selecteer een melodie (1 tot 10).
7. Druk op OK om te bevestigen of op om terug te keren naar het vorige menu.
Opmerking: Bij elke programmatie hoort u aan het einde een enkele of dubbele lange
bieptoon. Een dubbele bieptoon geeft aan dat uw keuze is aanvaard.
Een lange bieptoon geeft aan dat met de wijziging geen rekening werd gehouden.
Belmelodie handset, interne oproep
4.3.3.
1. Open het menu met een druk op MENU.
2. Selecteer HANDSET.
3. Druk op OK.
4. Selecteer INT RING (INT BEL).
5. Druk op OK.
6. Selecteer een melodie (1 tot 10).
7. Druk op OK om te bevestigen of op om terug te keren naar het vorige menu.
Opmerking: Bij elke programmatie hoort u aan het einde een enkele of dubbele lange
bieptoon. Een dubbele bieptoon geeft aan dat uw keuze is aanvaard.
Een lange bieptoon geeft aan dat met de wijziging geen rekening werd gehouden.
4.4. BIEPTONEN ACTIVEREN/DEACTIVEREN
De handsets kunnen een bieptoon laten horen als een toets wordt ingedrukt,
wanneer de batterijen bijna leeg zijn en als het toestel te ver van het basistoestel is verwijderd.
Bieptoon bij indrukken van toets aan- en uitzetten
4.4.1.
1. Open het menu met een druk op MENU.
2. Selecteer HANDSET.
3. Druk op OK.
4. Selecteer TONES (TOON).
5. Druk op OK
6. Selecteer KEY (TOETSTN).
7. Druk op OK.
8. Selecteer ON om de bieptoon in te schakelen, OFF om hem uit te schakelen.
9. Druk op OK om te bevestigen.
Opmerking: Bij elke programmatie hoort u aan het einde een enkele of dubbele lange
bieptoon. Een dubbele bieptoon geeft aan dat uw keuze is aanvaard.
Een lange bieptoon geeft aan dat met de wijziging geen rekening werd gehouden.
Batterij bijna leeg
4.4.2.
Ga te werk zoals hierboven wordt uiteengezet maar selecteer bij punt 6 "LOW BATT" (BATTERIJ)
in plaats van "KEYTONE" (TOETSTN).
Handset te ver van basistoestel (buiten bereik)
4.4.3.
Ga te werk zoals hierboven wordt uiteengezet maar selecteer bij punt 6 "RANGE" (BEREIK) in
plaats van "KEYTONE" (TOETSTN).
45 Cocoon 450
Page 46

NEDERLANDS
4.4.4. Bevestigingstonen
Ga te werk zoals hierboven wordt uiteengezet, maar selecteer bij punt 6
"CONFIRM" in plaats van “KEYTONE" (TOETSTN).
4.5. NAAM VAN DE HANDSET WIJZIGEN
Met deze functie kunt u elke handset personaliseren.
1. Open het menu met een druk op MENU.
2. Selecteer HANDSET.
3. Druk op OK.
4. Selecteer LABEL (NAAM).
5. Druk op OK.
6. Voer de naam in.
7. Druk op OK om te bevestigen.
Opmerking: Bij elke programmatie hoort u aan het einde een enkele of dubbele lange
bieptoon. Een dubbele bieptoon geeft aan dat uw keuze is aanvaard.
Een lange bieptoon geeft aan dat met de wijziging geen rekening werd gehouden.
Bij het invoeren van de naam drukt u op om een karakter te wissen of houdt u ingedrukt om
het menu te verlaten zonder enige wijzigingen aan te brengen.
4.6. MENUTAAL KIEZEN
U kan kiezen tussen twee talen (zie talentabel op de verpakking):
1. Open het menu met een druk op MENU.
2. Selecteer LANGUAGE (TAAL).
3. Druk op OK.
4. Selecteer de taal met behulp van de toetsen en .
5. Druk op OK.
Opmerking: Een dubbele bieptoon geeft aan dat uw keuze is aanvaard.
Een lange bieptoon geeft aan dat met de wijziging geen rekening werd gehouden.
4.7. DE PIN-CODE WIJZIGEN
Sommige functies zijn enkel beschikbaar voor gebruikers die de PIN-code kennen. Deze PINcode is standaard 0000.
De PIN-code wijzigen:
1. Open het menu met een druk op MENU.
2. Selecteer BASE (BASIS).
3. Druk op OK.
4. Selecteer pin PROT (PIN BEV).
5. Druk op OK.
6. Geef de PIN-code in (0000)..
7. Druk op OK.
8. Selecteer PIN CODE.
9. Druk op OK.
10. Geef de PIN-code in (0000)
11. Druk op OK.
12. Voer de nieuwe PIN-code een tweede keer in.
13. Druk op OK om te bevestigen.
Opmerking: Bij elke programmatie hoort u aan het einde een enkele of dubbele lange
bieptoon. Een dubbele bieptoon geeft aan dat uw keuze is aanvaard.
Een lange bieptoon geeft aan dat met de wijziging geen rekening werd gehouden.
Cocoon 450 46
Page 47

NEDERLANDS
4.8. DE KIESMODUS INSTELLEN
Er zijn twee kiesmodi:
• DTMF/toonsysteem (het meest gebruikelijke)
• Pulssysteem (bij oudere installaties)
De kiesmodus wijzig
1. Open het menu met een druk op MENU.
2. Selecteer BASE (BASIS).
3. Druk op OK.
4. Selecteer PIN PROT (PIN BEV).
5. Druk op OK.
6. Geef de PIN-code in (0000).
7. Druk op OK.
8. Selecteer DIAL MODE (KIESMOD).
9. Druk op OK
10. Selecteer TONE (TOON) of PULSE (PULS).
11. Druk op OK om te bevestigen.
Opmerking: Een dubbele bieptoon geeft aan dat uw keuze is aanvaard.
Een lange bieptoon geeft aan dat met de wijziging geen rekening werd gehouden.
en:
4.9. AUTOMATISCH OPNEMEN
Als een ingaande oproep plaatsvindt en de handset zich op het basistoestel bevindt, zal de
telefoon automatisch de oproep beantwoorden als de handset uit de basis wordt genomen. Dit is
de standaardinstelling, die u echter kunt uitschakelen (OFF):
1. Open het menu met een druk op MENU.
2. Selecteer HANDSET.
3. Druk op OK.
4. Selecteer AUTO ANS (AUTO OPN).
5. Selecteer ON (AAN) (voor automatisch beantwoorden) of OFF (UIT).
6. Druk op OK.
4.10. WEERGAVE GESPREKSDUUR ON/OFF (TIMER)
1. Open het menu met een druk op MENU.
2. Selecteer HANDSET.
3. Druk op OK.
4. Selecteer TIMER.
5. Druk op OK.
6. Selecteer ON (AAN) of OFF (UIT) met behulp van de Omhoog- of Omlaag- toetsen.
7. Druk op OK.
4.11. RESET
U heeft de mogelijkheid om de telefoon weer om te schakelen naar de oorspronkelijke
standaardconfiguratie. Dat is de configuratie die reeds was geïnstalleerd toen u de telefoon in
gebruik nam.
47 Cocoon 450
Page 48

NEDERLANDS
Handset Basis
Belvolume: 5 Belvolume: 5
Ext. Melodie: 1 Melodie:1
Int. Melodie: 5 Nummervergrendeling: OFF voor alle handsets
Monitor: OFF PIN-Code: 0000
Timer: ON VIP CODE: 000
Klaviertonen: allemaal ON SOS CODE: 111
Auto Answer: ON
Selectie Basis: Auto
Klaviervergrendeling: OFF
Telefoonboek: Geen verandering
Oproeplijst: Leeg
Handset Volume: 3
Terugkeren naar de standaardinstellingen doet u als volgt:
1. Open het menu met een druk op MENU.
2. Selecteer BASE (BASIS).
3. Druk op OK.
4. Selecteer PIN PROT (PIN BEV).
5. Druk op OK.
6. Geef de PIN-code in (0000).
7. Druk op OK.
8. Selecteer DEFAULT.
9. Druk op OK.
10. Druk op OK om te bevestigen of om terug te keren.
Opmerking: Bij elke programmatie hoort u aan het einde een enkele of dubbele lange
bieptoon. Een dubbele bieptoon geeft aan dat uw keuze is aanvaard.
Een lange bieptoon geeft aan dat met de wijziging geen rekening werd gehouden.
5. GEAVANCEERDE FUNCTIES
5.1. TELEFOONBOEK
Met behulp van het Telefoonboek kunnen 40 telefoonnummers en namen worden opgeslagen. U
kunt namen invoeren die tot 8 karakters lang zijn. Nummers mogen max. 18 cijfers lang zijn.
Om een correspondent op te bellen die in het Telefoonboek is opgeslagen, wordt verwezen naar
hoofdstuk 3.13. Bellen vanuit het Telefoonboek.
Om alfanumerieke karakters in te voeren verwijzen we naar hoofdstuk 3.14. Het Alfanumerieke
klavier gebruiken.
Cocoon 450 48
Page 49

NEDERLANDS
5.1.1. Een correspondent toevoegen aan het telefoonboek
1. Open het menu met een druk op MENU.
2. Selecteer PHONEBK (TEL BOEK).
3. Druk op OK.
4. Selecteer STORE (OPSLAAN).
5. Druk op OK.
6. Voer de naam in.
7. Druk OK om te bevestigen.
8. Voer het telefoonnummer in.
9. Druk op OK om te bevestigen.
Opmerking: Bij elke programmatie hoort u aan het einde een enkele of dubbele lange
bieptoon. Een dubbele bieptoon geeft aan dat uw keuze is aanvaard.
Een lange bieptoon geeft aan dat met de wijziging geen rekening werd gehouden.
Een naam of nummer wijzigen
5.1.2.
Een nummer in het telefoonboek wijzigen:
1. Open het menu met een druk op MENU.
2. Selecteer PHONEBK (TEL BOEK).
3. Druk op OK.
4. Selecteer EDIT.
5. Druk op OK.
6. Doorloop de namenlijst met behulp van de toetsen en . De lijst wordt
weergegeven in alfabetische volgorde.
7. Druk op OK als u de naam heeft gevonden die u wil wijzigen.
8. Gebruik de toets om terug te gaan en de nieuwe naam in te voeren.
9. Druk op OK om te bevestigen.
10. Voer het nieuwe telefoonnummer in.
11. Druk op OK om te bevestigen.
Opmerking: Bij elke programmatie hoort u aan het einde een enkele of dubbele lange
bieptoon. Een dubbele bieptoon geeft aan dat uw keuze is aanvaard.
Een lange bieptoon geeft aan dat met de wijziging geen rekening werd gehouden.
Een correspondent wissen
5.1.3.
Correspondenten wissen:
1. Open het menu met een druk op MENU.
2. Selecteer PHONEBK (TEL BOEK).
3. Druk op OK.
4. Selecteer DELETE (WISSEN).
5. Druk op OK.
6. Doorloop de namenlijst met behulp van behulp van de toetsen en . De lijst wordt
weergegeven in alfabetische volgorde.
7. Druk op OK als u de naam heeft gevonden die u wil wissen.
8. Het telefoonnummer wordt getoond. Druk op OK.
9. CONFIRM verschijnt. Druk op OK om te bevestigen of op om het wissen te stoppen.
Opmerking: Bij elke programmatie hoort u aan het einde een enkele of dubbele lange
bieptoon. Een dubbele bieptoon geeft aan dat uw keuze is aanvaard.
Een lange bieptoon geeft aan dat met de wijziging geen rekening werd gehouden.
49 Cocoon 450
Page 50

NEDERLANDS
5.2. VIP BELMELODIE
U kan speciale belmelodieën linken aan bepaalde nummers in het Telefoonboek. Zodra u een
oproep krijgt van een oproeper die in het Telefoonboek vermeld staat, hoort u de belmelodie die
u voor deze oproeper gespecifieerd hebt.
Om een bepaalde melodie aan een Telefoonboek-nummer te linken, moet u de dienst
nummerweergave (Caller ID-clip) hebben:
1. Open het menu met een druk op MENU.
2. Selecteer PHONEBK (TEL BOEK).
3. Druk op OK.
4. Druk enkele keren op de Omhoogtoets tot MELODY (MELODIE) verschijnt.
5. Druk op OK.
6. Selecteer de naam waaraan u een melodie wil linken en druk op OK.
7. Gebruik de Omhoog- en Omlaag- toetsen om een melodie te selecteren en druk op OK.
5.3. EEN INTERN TOESTEL ZOEKEN VIA HET BASISTOESTEL
Als de Paging-toets op het basistoestel wordt ingedrukt, beginnen alle handsets te rinkelen.
Dankzij het belsignaal kunt u de verloren handset lokaliseren. U stopt het belsignaal door op een
van de toetsen van de handset te drukken.
5.4. NUMMERVERGRENDELING
De volgende opties kunnen per handset geselecteerd worden:
OFF (UIT): Alle oproepen zijn toegelaten.
INTERNAL (INTERN): Alle externe oproepen zijn vergrendeld.
LOCAL (LOKAAL): Internationale en nationale oproepen zijn vergrendeld, enkel
NATIONAL: Internationale oproepen zijn vergrendeld (beginnende met 00).
CUSTOM: Een op voorhand gedefinieerd nummer is vergrendeld.
ummervergrendeling in te stellen, doet u het volgende:
Om n
1. Open het menu met een druk op MENU.
2. Selecteer BASE (BASIS).
3. Druk op OK.
4. Selecteer PIN PROT (PIN BEV).
5. Druk op OK.
6. Geef de PIN-code in (0000).
7. Druk op OK.
8. Selecteer CALL BAR (BARRING).
9. Druk op OK.
10. Selecteer de handset (1-5).
11. Druk op OK.
12. Selecteer OFF (UIT), INTERNAL (INTERN), LOCAL (LOKAAL), NATIONAL, of CUSTOM.
Voor OFF (UIT), INTERNAL (INTERN), LOCAL (LOKAAL), en NATIONAL, druk op OK.
- Voor LOCAL (LOKAAL), druk op OK voor de PREFIX. Geef het prefix-nummer
in voor plaatselijke nummers (nummers met deze prefix worden niet vergrendeld!).
- Voor CUSTOM, druk op OK en BAR (BARRING). verschijnt. Geef de eerste
cijfers van het telefoonnummer in dat u wil vergrendelen. Bvb. ‘0’: alle nummers
13. Om CALL BAR (BARRING) te verlaten, druk op .
beginnende met ‘0’ zijn vergrendeld!
lokale oproepen zijn toegelaten, de gebruiker kan de prefix
voor de lokale oproepen specifiëren.
Cocoon 450 50
Page 51

NEDERLANDS
5.5. KLAVIERVERGRENDELING
Als u het klavier vergrendelt, kan u niet per ongeluk een nummer vormen. Dit kan
handig zijn als er kinderen in de buurt zijn.
Als het klavier vergrendeld is, kan u enkel nog de MENU -toets gebruiken, alle
andere toetsen zijn vergrendeld.
Activating the keypad lock
5.5.1.
1. Open het menu met een druk op MENU.
2. Selecteer KEY LOCK (TOETSBL).
3. Druk op OK.
4. Selecteer ON (AAN).
5. Druk op OK ter bevestiging.
Opmerking: Een dubbele bieptoon bevestigt uw keuze.
Een lange bieptoon betekent dat de aanpassing niet uitgevoerd werd.
Deactivating the keypad lock
5.5.2.
1. Open het menu met een druk op MENU.
2. Selecteer KEY LOCK (TOETSBL).
3. Druk op OK.
4. Selecteer OFF (UIT).
5. Druk op OK ter bevestiging.
Opmerking: Een dubbele bieptoon bevestigt uw keuze.
Een lange bieptoon betekent dat de aanpassing niet uitgevoerd werd.
5.6. AANSLUITING KOPTELEFOON
U kan een koptelefoon met een 3-polige pack plug van 2,5mm aansluiten aan de
rechterkant van de handset. Als de koptelefoon is aangesloten, kan u enkel via de koptelefoon
spreken en luisteren. De microfoon van de koptelefoon kan uitgeschakeld worden met de Mutetoets . De handenvrij luidspreker kan nog steeds geactiveerd worden door op de Handenvrijtoets te drukken.
6. GEBRUIK VAN MEERDERE HANDSETS
6.1. EEN BIJKOMENDE HANDSET REGISTREREN
U kan nieuwe handsets toevoegen aan het basistoestel op voorwaarde dat deze handsets met
het DECT-GAP-protocol werken.
Het basistoestel kan maximaal met vijf handsets werken. Als u reeds vijf handsets heeft en u er
meer wilt toevoegen of een toestel wilt vervangen, moet u eerst een handset wissen en het
nieuwe vervolgens toevoegen.
Om een handset te kunnen registreren, moet het basistoestel eerst in de speciale
registratiemodus worden gezet:
Eerst zet u het basistoestel in de registratiemodus, daarna start u de procedure bij de nieuwe
handset:
1. Houd de Paging-toets van het basistoestel 6 seconden lang ingedrukt.
2. Het basistoestel geeft dan een pieptoon. Het basistoestel is nu klaar om een
nieuwe handset te registreren. Na het indrukken van de knop heeft u 90
seconden tijd om een nieuwe handset te registreren.
51 Cocoon 450
Page 52

NEDERLANDS
6.1.1. Als de bijkomende handset een Cocoon 400/450 is
3. Open het menu met een druk op MENU.
4. Selecteer RegisteR (AANMELD).
5. Druk op OK.
6. Voer het nummer van een basistoestel in (1 tot 4). Nummers die knipperen zijn reeds in
gebruik op andere DECT-basistoestellen.
7. Voer de PIN-code van het basistoestel in (standaard: 0000).
8. Als de handset het basistoestel heeft gelokaliseerd, wordt het identificatienummer van het
basistoestel getoond. De registratie bij het basistoestel bevestigt u met een druk op OK.
Stoppen is mogelijk met een druk op de toets .
9. Als de handset het basistoestel niet lokaliseert, keert het na enkele seconden automatisch
terug naar de standbymodus. Probeer het nogmaals door het nummer van het basistoestel
te wijzigen en te controleren of er zich in de omgeving geen interferentiebronnen bevinden.
Ga dichter bij het basistoestel staan.
Uw handset is een ander model
6.1.2.
Nadat u de registratieprocedure heeft gestart bij het basisstation, registreert u de handset (zie in
de handleiding van de handset). De handset moet GAP-compatibel zijn.
Het pictogram en de tekst "NOT SUB" (NT AANGE) knipperen in het scherm als de handset
niet op het basistoestel is geregistreerd.
Als een handset op een basistoestel wordt geregistreerd, kent het basistoestel een handset
nummer toe. Dit nummer verschijnt op de handset na de naam en moet worden gebruik voor
interne oproepen.
6.2. EEN HANDSET VERWIJDEREN
U kunt een handset verwijderen van een basistoestel om een andere handset te registreren.
1. Open het menu met een druk op MENU.
2. Selecteer BASE (BASIS).
3. Druk op OK
4. Selecteer PIN PROT (PIN BEV).
5. Druk op OK.
6. Geef de PIN-code in (0000).
7. Druk op OK.
8. Selecteer DEL HS (HS AFM).
9 Druk op OK.
10. Selecteer de te verwijderen handset.
11. Druk op OK om te bevestigen.
12. CONFIRM verschijnt op de display. Druk nogmaals op OK ter bevestiging of op
om terug te keren.
6.3. EEN HANDSET INSTALLEREN OP EEN ANDER BASISTOESTEL
Wanneer u een Cocoon 450 handset wil gebruiken met het
basistoestel van een ander model, moet het basistoestel GAP-compatibel zijn.
1. Zie de gebruikershandleiding van het basistoestel voor het activeren van de
registratiemodus.
2. Voer de stappen 3 tot 9 uit die in de paragraaf “6.1 Een bijkomende handset registreren”
worden beschreven.
Cocoon 450 52
Page 53

NEDERLANDS
6.4. EEN BASISTOESTEL SELECTEREN
De handsets kunnen bij maximaal vier basistoestellen geregistreerd zijn.
Om de basis te veranderen, selecteer "B SELECT"(SELECT B) in het menu. Selecteer een optie:
AUTO: Om de beste basis te kiezen
FIXED (VAST): Om een bepaalde basis te kiezen. De handset kiest geen
PREFER (VOORKEUR): Begint eerst met het zoeken naar een bepaalde basis en
En druk op OK.
Als u FIXED (VAST) of PREFER (VOORKEUR) kiest, verschijnt ‘BS1 2 3 4’ op de display. De
huidig geregistreerde basis zal knipperen. Druk op 1-4 om een basis te selecteren.
Als u 'Auto' selecteert, zal de handset automatisch naar een ander basistoestel zoeken als u uit
het zendbereik bent.
andere basis als hij buiten bereik komt.
dan naar andere beschikbare basissen als hij buiten bereik
komt.
6.5. BEWAKINGSFUNCTIE
Als meer dan 1 handset is geregistreerd, kan één van de handsets als bewakingstoetsel (baby)
gebruikt worden.
Om deze functie te activeren:
1. Open het menu met een druk op MENU.
2. Selecteer MONITOR.
3. Druk op OK.
4. Selecteer ON (AAN).
5. Druk op OK.
Als de bewakingsfunctie is geactiveerd, verschijnt “Monitor” (knippert) op de
display van de handset. Een andere handset kan deze handset oproepen (intern), waardoor de
microfoon in de handset geactiveerd wordt. Op deze manier kan u elk geluid horen in de
desbetreffende kamer.
Opmerking: De handset in bewakings-modus zal niet rinkelen bij een inkomende
externe oproep.
1. Open het menu met een druk op MENU.
2. MONITOR verschijnt.
3. Druk op OK.
4. Selecteer OFF (UIT).
5. Druk op OK.
7. ANTWOORDAPPARAAT
De Cocoon 450 heeft een ingebouwd digitaal antwoordapparaat met een opname capaciteit van
9 minuten en kan maximaal 20 boodschappen bewaren. Het antwoordapparaat gedeelte kan
enkel bediend worden via de bijgeleverde handset (niet door andere multi handsets). Het
antwoordapparaat kan volledig bediend worden vanop afstand en heeft de mogelijkheid om twee
uitgaande boodschappen (Meldtekst 1 en Meldtekst 2) op te slaan.
Opm: Alle boodschappen en instellingen blijven bewaard en worden niet gewist
tijdens stroomonderbreking.
53 Cocoon 450
Page 54

NEDERLANDS
7.1. TOETSEN HANDSET
1. Afspelen boodschappen
2. Stop toets
3. Boodschap teruggaan
4. Boodschap overslaan
5. Antwoordapparaat Aan/Uit
6. Memoboodschap
7. Wistoets X
8. Meldtekst toets
9. Antwoordapparaat menu toets
7.2. INSTELLINGEN
Er kunnen 2 meldteksten opgenomen worden (Meldtekst 1 en Meldtekst 2).
• Meldtekst 1 voor de antwoordfunctie met inspreekmogelijkheid. De maximale opname tijd is
30 seconden.
• Meldtekst 2 voor de antwoordfunctie zonder inspreekmogelijkheid, het antwoordapparaat
neemt geen boodschappen op. De maximum opname tijd is 60 seconden.
Het antwoordapparaat kan bediend worden door in het antwoordapparaat menu te gaan:
•Druk om in het antwoordapparaat menu te gaan
•Druk ‘C’ om het antwoordapparaat menu te verlaten
Handset luidspreker volume instellen
7.2.1.
Om het luidspreker volume tijdens weergave meldtekst of inkomende boodschap in te stellen
drukt u op om het te verhogen of op om het te verlagen.
Opnemen en weergeven van uitgaande boodschappen (Meldtekst 1 of Meldtekst 2)
7.2.2.
Om een uitgaande boodschap op te nemen:
•Druk voor het antwoordapparaat menu te openen
•Druk op ‘9’ gevolgd door:
•- ‘1’ om meldtekst 1 op te nemen
•- ‘2’ om meldtekst 2 op te nemen
•Druk op de Stop toets om de opname te beëindigen. De opgenomen meldtekst zal ter
kontrole worden weergegeven. Druk opnieuw op de Stop -toets om de weergave te
beëindigen.
Om de meldteksten te controleren wanneer u in het antwoordapparaat menu bent:
•Druk op ‘6’ gevolgd door:
•Druk op de stop toets om de weergave te beëindigen
UItgaande boodschap selecteren (Meldtekst 1 of Meldtekst 2)
7.2.3.
Wanneer het geheugen vol is, is enkel Meldtekst 2 selecteerbaar (Beantwoorden
zonder registratie).
- ‘1’ om meldtekst 1 weer te geven
- ‘2’ om meldtekst 2 weer te geven
• Druk voor het antwoordapparaat menu te openen
• Druk ‘7’ gevolgd door:
- ‘1’ voor meldtekst 1 (antwoorden met registratie mogelijkheid)
‘NORMAAL’(AR MODE 1) verschijnt op het display
- ‘2’ voor meldtekst 2 (antwoorden zonder registratie
mogelijkheid) ‘ANS ONLY’(AR MODE 2) verschijnt op het display
Cocoon 450 54
Page 55

NEDERLANDS
7.2.4. Antwoordapparaat aan/uit schakelen
Als het antwoordapparaat is aangeschakeld, gaat de LED op de basis continu aan en zal
het toestel automatisch de lijn beantwoorden na het aantal ingestelde beltonen (Zie “7.2.5.
Beltonen instellen” op pagina 55).
Indien het antwoordapparaat is uitgeschakeld zal de LED op de basis uit zijn.
•Druk voor het antwoordapparaat menu te openen
•Druk om het antwoordapparaat aan te schakelen. ‘ANTW AAN‘(TAD ON) verschijnt op
het scherm en de LED op de basis licht op
•Druk om het antwoordapparaat uit te schakelen. ‘ANTW UIT’(TAD OFF) verschijnt op het
scherm en de LED op de basis zal uit gaan
Ook al staat het antwoordapparaat uit, toch zal het toestel na 10-15 beltonen automatisch de lijn
nemen om het aanschakelen vanop afstand te kunnen uitvoeren (Zie “7.4. Bediening vanop
afstand” op pagina 58).
Opm.: Het antwoordapparaat kan niet geactiveerd worden indien geen meldtekst is
opgenomen.
Beltonen instellen
7.2.5.
Het aantal beltonen waarna het antwoordapparaat de oproep zal beantwoorden kan ingesteld
worden van 2 - 7 en TS (toll saver). De standaard instelling is toll saver. In toll saver modus zal
het toestel de lijn antwoorden na 4 beltonen als er geen nieuwe boodschappen zijn, en na 2
beltonen als er nieuwe boodschappen zijn. Als er geen nieuwe boodschappen zijn en u belt naar
het toestel om vanop afstand uw boodschappen op te vragen (Zie “7.4. Bediening v anop afstand”
op pagina 58), kan u al na de 2de beltoon inhaken. U hoeft geen verbindingskosten te betalen en
u weet dat er geen nieuwe boodschappen zijn.
•Druk op de MENU toets
•Druk op de of -toets een aantal maal tot ‘BEANTW’(TAD MENU) verschijnt
•Druk OK
•Druk op de of -toets een aantal maal tot ‘BELVERTR’(RG DELAY) verschijnt
•Druk OK
•Druk op de of -toets een aantal maal tot het gewenste aantal beltonen verschijnt
•Druk op OK om de instelling te confirmeren
•Druk ‘C’ om het ‘BEANTW’(TAD MENU) menu te verlaten
55 Cocoon 450
Page 56

NEDERLANDS
7.2.6. SOS code en filter optie
De SOS Code wordt gebruikt om de filter optie tijdelijk te onderbreken zodat de basis gedurende
8 seconden zal bellen. De volgende filters kunnen worden ingesteld:
UIT(OFF): Er is geen filter actief
MEELUIST(HEAR AR): Deze filter zal de handset luidspreker aanschakelen gedurende
VIPFUNK1(SILEN AR): Alle oproepen worden onmiddellijk beantwoord (doorgeschakeld
VIPFUNK2(VIPFUNC1): Alle oproepen worden onmiddellijk beantwoord (doorgeschakeld
VIPFUNK3(VIPFUNC2): Alle oproepen worden beantwoord na het aantal ingestelde
a. SOS Code programmeren
•Druk op de MENU toets
•Druk op de of -toets een aantal maal tot ‘BEANTW’(TAD MENU) verschijnt
•Druk OK
•Druk op de of -toets een aantal maal tot ‘SOS CODE’verschijnt
•Druk OK
• Geeft de huidige code in (standaard = ‘111’)
•Druk op OK
• Geeft de nieuwe code in en druk op OK
• Geef opnieuw de nieuwe code in ter confirmatie en druk op OK
b. Filter optie instellen
•Druk op de MENU toets
•Druk op de of -toets een aantal maal tot ‘BEANTW’(TAD MENU) verschijnt
•Druk OK
•Druk op de of -toets een aantal maal tot ‘VIP PRIO’ verschijnt
•Druk OK
• De huidige filter optie zal worden weergegeven
•Druk op de of -toets een aantal maal tot de gewenste filter optie wordt weergegeven
(Zie hierboven voor de verschillende opties)
•Druk OK
•Indien ‘VIPFUNCK2’ of ‘VIPFUNCK3’ geselecteerd is zullen de telefoonboek nummer
worden weergegeven. Selecteer met behulp van de of -toetsen het gewenste nummer
dat met deze filter moet worden geassocieerd en druk op OK
Opm: Indien de Bewakingsfunctie (zie 6.5 Bewakingsfunctie) geactiveerd is zal de
Meeluisterfunctie (HEAR AR) niet werken. Om de meeluisterfunctie te activeren moet
de bewakingsfunctie uitgeschakeld zijn.
uitgaande en inkomende boodschap (meeluisterfunctie). De
andere handsets kunnen de oproep niet horen.
naar het antwoordapparaat). De oproeper kan de SOS Code
ingeven beginnend met ‘*’ om de basis toch gedurende 8
seconden te laten rinkelen.
naar het antwoordapparaat) behalve wanneer het
oproepnummer overeenstemt met het nummer in de
telefoonboek. De oproeper kan de SOS Code ingeven
beginnend met ‘*’ om de basis toch gedurende 8 seconden te
laten rinkelen.
beltonen, behalve wanneer het oproepnummer overeenstemt
met het nummer in de telefoonboek. De oproeper kan de SOS
Code ingeven beginnend met ‘*’ om de basis toch gedurende
8 seconden te laten rinkelen.
Cocoon 450 56
Page 57

NEDERLANDS
7.2.7. VIP-code programmeren
De VIP-code is een 3-cijferige code die gebruikt wordt om het toestel vanop afstand te bedienen
(Zie “7.4. Bediening vanop afstand” op pagina 58). Standaard staat de VIP-code op ‘000’
•Druk op de MENU toets
•Druk op de of -toets een aantal maal tot ‘BEANTW’(TAD MENU) verschijnt
•Druk OK
•Druk op de of -toets een aantal maal tot ‘PIN CODE’(PIN CODE) verschijnt
•Druk OK
• Geeft de huidige code in (standaard = ‘000’)
•Druk op OK
• Geeft de nieuwe code in en druk op OK
• Geef opnieuw de nieuwe code in ter confirmatie en druk op OK
Opm: De SOS- en VIP code kunnen niet hetzelfde zijn daar beide kunnen worden
gebruikt tijdens de weergave van de uitgaande boodschap!!!
7.3. BEDIENING
Als een oproep binnenkomt en het antwoordapparaat is aangeschakeld, zal, na het aantal
ingestelde beltonen, het antwoordapparaat automatisch de lijn beantwoorden.
Indien Meldtekst 1 is geselecteerd, zal deze worden afgespeeld. Na de meldtekst zal er een
biepsignaal te horen zijn en kan de opbeller een boodschap inspreken (van max. 2 minuten).
Indien Meldtekst 2 is geselecteerd, zal deze worden afgespeeld. Na de bieptoon zal de lijn
automatisch verbroken worden! Er is geen mogelijkheid om een boodschap in te spreken!
Wanneer er boodschappen zijn zal het aantal boodschappen worden weergegeven op het scherm. Wanneer er nieuwe boodschappen zijn zal de LED op de basis knipperen en het
icoon verschijnen op het display.
Opm: Indien, tijdens de opname, 8 sec. niets wordt gezegd, wordt de verbinding
automatisch verbroken!
Opname memo boodschap
7.3.1.
Een memo wordt aanzien als een inkomende boodschap die later opgevraagd kan worden door
de gebruiker. De max. opnameduur van een memo is 2 minuten.
•Druk om in het antwoordapparaat menu te gaan
•Druk ‘4’ gevolgd door ’2’ om de opname te starten. Spreek uw boodschap in na de biep
•Druk ‘5’ om de opname te beëindigen
Opm: Er kan maar één memo boodschap opgenomen worden!!
57 Cocoon 450
Page 58

NEDERLANDS
7.3.2. Weergave/wissen van boodschappen en memo
• Druk voor het antwoordapparaat menu teopenen
• Druk om de boodschappen en memo weer te geven
•Tijdens weergave kan u:
•naar de vorige boodschap gaan door op de -toets te drukken
•de weergave stoppen via de Stop-toets
•de weergave onderbreken door opnieuw op te drukken. Druk opnieuw om de
weergave verder te zetten
•naar de volgende boodschap gaan door op de -toets te drukken
•wissen van de huidige boodschap door op de Wis-toets X te drukken
Tijdens weergave kan u het volgende zien op het display:
•‘MEMO AFS’(PLAYMEMO) tijdens memo boodschap weergave
•‘BOODSCH #’(Message #) tijdens boodschap weergave
•Telefoonnummer + datum/tijd* indien nummerweergave (CallerID) informatie is ontvangen.
U kan tussen telefoonnummer en datum/tijd* weergave wisselen door op de OK toets te
drukken
* Alleen wanneer het netwerk het tijdstip/datum samen met het telefoonnummer
verstuurt!!! Bij sommige netwerken met ID van de beller, krijgt u geen tijdstip en
datum te zien.
wissen van alle boodschappen
7.3.3.
Alle boodschappen (ook nieuwe onbeluisterde boodschappen) + memo boodschap kunnen
volledig gewist worden:
•Drukvoor het antwoordapparaat menu teopenen
•Druk ‘9’ gevolgd door ‘0’ X om alle boodschappen te wissen
•‘CONFIRM’ Verschijnt op het display. Druk OK om alles te wissen of ‘C’ om het wissen te
stoppen
7.4. BEDIENING VANOP AFSTAND
Het antwoordapparaat kan slechts vanop afstand bediend worden via een telefoon met
druktoetsen (DTMF toonkiessysteem).
Bediening vanop afstand starten
7.4.1.
• Bel naar uw toestel
• Het antwoordapparaat neemt de oproep aan. Druk tijdens de weergave van de uitgaande
boodschap op de ‘*’-toets gevolgd door de VIP code (standaard 000)
•Indien de VIP code niet correct is ingegeven hoort u de meldtekst opnieuw . U heeft nu 2x de
mogelijkheid om opnieuw de ‘*’ + VIP code juist in te geven. Indien de 3x mislukt is zal de
lijn verbroken worden
•Indien de VIP code correct is ingegeven hoort u 2 biep tonen. U kan nu uw
antwoordapparaat volledig vanop afstand bedienen via dezelfde toetscombinaties als
hierboven beschreven wanneer u zich in het antwoordapparaat menu bevind (Zie “7.5.
Antwoordapparaat functies in het kort” op pagina 59). Indien er boodschappen zijn zullen
deze automatisch worden weergegeven.
Cocoon 450 58
Page 59

NEDERLANDS
7.4.2. Antwoordapparaat aanschakelen vanop afstand
Indien het antwoordapparaat is uitgeschakeld, kan u het ook weer aanschakelen vanop afstand:
• Bel naar uw toestel
• Het antwoordapparaat neemt de oproep aan na 10-15 beltonen. Geef de VIP code is
(standaard 000) wanneer u 2 bieptonen hoort
•Indien de VIP code juist is ingegeven zal u de meldtekst horen. Het antwoordapparaat is nu
aangeschakeld
• Het antwoordapparaat kan nu vanop afstand bediend worden tijdens de weergave van de
meldtekst. Van zodra de meldtekst is weergegeven, en u heeft geen verdere opdracht
uitgevoerd, zal de lijn automatisch verbroken worden.
7.5. ANTWOORDAPPARAAT FUNCTIES IN HET KORT
Tijdens bediening vanop afstand kan men met dezelfde toetscombinaties het antwoordapparaat
bedienen als tijdens antwoordapparaat menu ‘BEANTW’(ANS MA C) op de Cocoon 450 handset.
Functie Toets combinaties in
Weergave boodschappen Druk ‘2’
Boodschap opnieuw
weergeven na pauze
Vorige boodschap weergeven Druk ‘1’
Volgende boodschap
weergeven
Stoppen Druk ‘5’
Wissen huidige boodschap Druk ‘0’ X
Alle boodschappen wissen Druk ‘9’ en ‘0’ X
Opnemen meldtekst 1 Druk ‘9’ en ‘1’
Opnemen meldtekst 2 Druk ‘9’ en ‘2’
Meldtekst 1 weergeven Druk ‘6’ en ‘1’
Meldtekst 2 weergeven Druk ‘6’ en ‘2’
Antwoordapparaat menu
en bediening vanop
afstand
Druk ‘2’
Druk ‘3’
Opnemen memo Druk ‘4’ en ‘2’
Memo weergeven Druk ‘4’ en ‘1’
Antwoordapparaat aan/uit Druk ‘8’
Meldtekst 1 selecteren Druk ‘7’ en ‘1’
Meldtekst 2 selecteren Druk ‘7’ en ‘2’
59 Cocoon 450
Page 60

NEDERLANDS
8.PROBLEMEN VERHELPEN
Symptoom Mogelijke oorzaak Oplossing
Geen scherm Batterijen niet opgeladen Controleer de positie van de
Handset uitgeschakeld (OFF) Handset inschakelen (ON)
Geen kiestoon Telefoonkabel verkeerd
Het pictogram knippert Handset buiten bereik Breng de handset dichter bij
Het basistoestel of de handset
geven geen belsignaal
Er is kiestoon, maar men kan
geen nummer vormen
De telefoon reageert niet op
toetsindrukken
Flash (R)-toets werkt niet Verkeerde flashtijd Bel het hotline nummer om de
aangesloten
De lijn wordt gebruikt door een
andere handset
Het basistoestel krijgt geen
stroom
De handset is niet
geregistreerd bij het
basistoestel
Er is geen belsignaal of de
beltoon is nauwelijks hoorbaar
Verkeerd kiessysteem Kiessysteem aanpassen (puls/
Manipulatiefout Verwijder de batterijen en
Klaviervergrendeling AAN Schakel de
batterijen
Herlaad de batterijen
Controleer de aansluiting van
de telefoonkabel
Wacht tot de andere handset
het gesprek beëindigt
het basistoestel
Controleer de netaansluiting
van het basistoestel
Registreer de handset bij het
basistoestel
Belvolume aanpassen
toon)
plaats ze weer in het toestel
klaviervergrendeling uit
flashtijd in te stellen
Cocoon 450 60
Page 61

NEDERLANDS
9. GARANTIE
• De garantieperiode bedraagt 36 maanden. De garantie wordt verleend na voorlegging van
de originele factuur of betalingsbewijs waarop de datum van aankoop en het toesteltype
staan vermeld.
• Gedurende de garantieperiode verhelpt Topcom kostenloos alle defecten die te wijten zijn
aan materiaal- of productiefouten. Topcom kan, naar keuze, het defecte toestel ofwel
herstellen ofwel vervangen.
• De garantie vervalt bij ingrepen door de koper of onbevoegde derden.
• Schade te wijten aan onoordeelkundige behandeling, bediening of aan het gebruik van
wisselstukken en accessoires die niet origineel of door Topcom aanbevolen zijn, valt niet
onder de garantie.
•Niet gedekt door de garantie is schade ten gevolge van externe invloedfactoren: bliksem,
water, brand e.d. of wanneer het toestelnummer op het toestel werd gewijzigd, verwijderd of
onleesbaar gemaakt.
Opgelet: Als u uw toestel terugstuurt, vergeet uw aankoopbewijs niet mee te sturen.
10. T ECHNISCHE KENMERKEN
•Standaard: DECT (Digital Enhanced Cordless
• Frequentieband: 1880 MHZ tot 1900 MHz
• Aantal kanalen: 120 duplexkanalen
• Modulatie: GFSK
• Codering: 32 kbit/s
• Zendvermogen: 10 mW (gemiddeld vermogen per kanaal)
• Bereik: 300 m in openlucht / max. 50 mbinnenshuis
• Voeding basistoestel: 220 V / 50 Hz (basistoestel)
• Handsetbatterijen: 2 oplaadbare batterijen AAA, NiMh 600mAh
• Autonomie basistoestel: 150 uur in standby
• Gesprekstijd: 12 uur
• Laadduur: 6-8 uur
• Normale gebruiksomstandigheden: +5 °C tot +45 °C
•Kiessysteem: Puls / toon
Telecommunications)
GAP (Generic Access Profile)
61 Cocoon 450
Page 62

FRANÇAIS
1. DESCRIPTION OF TELEPHONE 64
1.1. HANDSET/BASE COCOON 450 64
1.2. ECRAN 65
1.2.1 Affichage en stand-by 65
2. INSTALLATION DU TELEPHONE 66
2.1. CONNEXIONS 66
2.2. PILES RECHARGEABLES 67
2.3. CLIP CEINTURE 68
3. UTILISATION DU TELEPHONE 69
3.1. COMBINE ON/OFF 69
3.2. RECEVOIR UN APPEL 69
3.3. APPEL EXTERNE 69
3.4. APPEL INTERNE 69
3.5. MODE MAINS-LIBRES 69
3.6. TRANSFERT INTERNE D'UN APPEL 70
3.7. APPEL DU TYPE CONFÉRENCE 70
3.8. AFFICHAGE DE LA DUREE DE L'APPEL 70
3.9. COUPURE DU SON DU MICROPHONE 70
3.10. TOUCHE PAUSE 70
3.11. IDENTIFICATION DE L'APPELANT 70
3.11.1. Affichage du 2ième appel entrant 71
3.11.2. Liste des Appels 71
3.11.3. Sauvegarder un numéro de la Liste des Appels dans le Répertoire 71
3.11.4. Effacer toutes les entrées de la Liste des Appels 71
3.11.5. Indication voice mail 72
3.12. MEMOIRE DE RECOMPOSITION DE NUMEROS 72
3.13. APPELER DEPUIS LE REPERTOIRE TELEPHONIQUE 72
3.14. UTILISATION DU CLAVIER ALPHANUMÉRIQUE 72
3.15. UTILISATION DU MENU 73
4. PERSONNALISATION 73
4.1. REGLAGE DU VOLUME DU HAUT-PARLEUR 73
4.1.1 Volume du haut-parleur en cours d’appel 73
4.2. REGLAGE DU VOLUME DE LA SONNERIE 74
4.2.1. Sonnerie du combiné 74
4.2.2.Sonnerie de la base 74
4.3. CHOIX DE LA MELODIE DE LA SONNERIE 74
4.3.1. Mélodie de la base 74
4.3.2. Mélodie du combiné, appel externe 75
4.3.3. Mélodie du combiné, appel interne 75
4.4. ACTIVATION / DESACTIVATION DES BIPS 75
4.4.1. Bip sonore ‘touche activée’ on/off 75
4.4.2. Piles faibles 75
4.4.3. Combiné hors de portée 75
4.4.4. Confirmations des tones 76
4.5. DESIGNATION DES COMBINES 76
4.6. CHOIX DE LA LANGUE DU MENU 76
4.7. MODIFIER LE CODE PIN 76
4.8. REGLAGE DU MODE DE COMPOSITION DES NUMEROS 77
4.9. REPONDEUR AUTOMATIQUE 77
4.10. AFFICHAGE DE LA DUREE DE LA COMMUNICATION ON/OFF (TIMER) 77
4.11. REMISE A ZERO 77
Cocoon 450 62
Page 63

FRANÇAIS
5. FONCTIONS DE POINTE 78
5.1. REPERTOIRE TELEPHONIQUE 78
5.1.1. Ajouter une entrée dans le répertoire téléphonique 79
5.1.2.Modifier un nom ou un numéro 79
5.1.3. Effacer une entrée 79
5.2. MÉLODIE D’APPEL VIP 80
5.3. RECHERCHER UN COMBINE A PARTIR D'UNE BASE 80
5.4. VERROUILLAGE D’APPELS 80
5.5. VERROUILLAGE DU CLAVIER 81
5.5.1. Activation du verrouillage 81
5.5.2. Désactivation du verrouillage 81
5.6. CONNEXION D’UN CASQUE 82
6. GESTION DE PLUSIEURS COMBINES 82
6.1. INSTALLER UN COMBINE SUPPLEMENTAIRE 82
6.1.1. Si votre combiné supplémenteire est un Cocoon 400/450 82
6.1.2. Si votre combiné est d’un autre modèle 82
6.2. ELIMINER UN COMBINE 83
6.3. INSTALLER UN COMBINE SUR UNE AUTRE BASE 83
6.4. SELECTIONNER UNE BASE 83
6.5. SURVEILLANCE DE PIÈCE 84
7. REPONDEUR AUTOMATIQUE 84
7.1. TOUCHES COMBINE 84
7.2. PARAMETRES 85
7.2.1. Régler le volume du haut-parleur de la base 85
7.2.2. Enregistrer et lire les messages sortants (OGM 1 ou OGM 2) 85
7.2.3. Sélectionner un message sortant (OGM 1 ou OGM 2) 85
7.2.4. Éteindre / Allumer le répondeur automatique 86
7.2.5. Régler le nombre de sonneries 86
7.2.6. Régler le code SOS et le filtrage 87
7.2.7. Programmer le code VIP 88
7.3. FONCTIONNEMENT 88
7.3.1. Enregistrer un mémo 88
7.3.2. Lire/Effacer les messages entrants et le mémo 89
7.3.3. Effacer tous les messages 89
7.4. COMMANDE À DISTANCE 89
7.4.1.Pour passer en commande à distance 89
7.4.2. Allumer à distance 90
7.5. RACCOURCIS DU REPONDEUR AUTOMATIQUE 91
8. DETECTION DE PANNES 92
9. GARANTIE 93
10. CARACTERISTIQUES TECHNIQUES 93
63 Cocoon 450
Page 64

1. DESCRIPTION OF TELEPHONE
1.1. HANDSET/BASE COCOON 450
Ecran
FRANÇAIS
Flèche 'Monter'
Flèche Menu
Coupure de son/
Touche 'Quitter'
Appel interne
Ligne externe/
indication
nouvel appel
Indicateur
appel entrant
Indicateur
de charge
Touche
mains-libres
Microphone
Ecouteur
Flèche 'Descendre'
Touche
'Enregistrement
appel'
Reformer/OK
Courant ON/OFF
Connexion
casque
Rappel
Touche Flash/
Répertoire
téléphonique
Touche 'Appel'
Installation
souscription
(activer et
maintenir)
Touche 'Ligne’
Cocoon 450 64
Page 65

FRANÇAIS
1.2. ECRAN
Batterie Téléphone Identification
appelant
Aller à
gauche
Appel
externe/
interne
Chaque opération est associée à une icône.
Icône: Signification:
Vous avez decroché la ligne.
EXT Vous avez une communication externe.
INT Vous avez une communication interne.
Nouveau message dans votre boîte vocal.
Vous ouvrez votre répertoire téléphonique.
MENU Vous êtes dans le menu.
Indicateur de niveau de la pile rechargeable.
1 segment: faible, 2 segments: bas, 3 segments: moyen, 4 segments: bon.
Les segments se déroulent pendant le chargement de la pile.
Clavier du combiné verrouillé.
L'antenne indique la qualité de la réception.
L'antenne clignote lorsque le combiné n'est pas enregistré dans la base.
ou Indique que le numéro affiché dépasse la largeur de l'écran (12 caractères).
ou Directions de défilement possibles dans le menu.
Microphone est désactivé.
Volume de la sonnerie du combiné désactivé (OFF).
Identification appelant disponible/nouveaux numéros dans la Liste des appels.
message
Verrouillage
clavier
Menu Coupure
microphone
Sonnerie ON/OFFRépertoireNouveau
Indicateur
réception
Aller à droite
signal
chage en stand-by
1.2.1 Affi
En mode stand-by, l'écran affiche le nom du combiné et le numéro du combiné:
C450 HS1
65 Cocoon 450
Page 66

2. INSTALLATION DU TELEPHONE
2.1. CONNEXIONS
Face inférieure de la base
FRANÇAIS
Câble de courant
Cocoon 450 66
Câble du téléphone
Page 67

FRANÇAIS
2.2. PILES RECHARGEABLES
Avant d'utiliser votre Cocoon 450 pour la première fois, vous devez vous assurer que les piles ont
été chargées pendant 6-8 heures. Le téléphone ne fonctionnera pas de façon optimale si les piles
ne sont pas correctement chargées.
Pour changer ou insérer les piles rechargeables:
1. Faites glisser le couvercle vers le bas et soulevez-le ensuite.
2. Insérez les piles en respectant la polarité (+ et -)
3. Replacez le couvercle à piles.
Piles rechargeables
Le combiné vu de dos
.
Couvercle
Remarque: la durée d'utilisation maximale des piles est d'environ 150 heures et la durée
maximale de communication est de 12 heures! Au fil du temps, les piles se déchargeront
plus rapidement. Les piles doivent alors être remplacées. Vous pouvez acheter les piles
dans n'importe quel magasin de bricolage (2 piles rechargeables du type AAA NiMH)!
67 Cocoon 450
Page 68

2.3. CLIP CEINTURE
Vous pouvez placer et enlever le clip ceinture comme suit:
FRANÇAIS
Cocoon 450 68
Page 69

FRANÇAIS
3. UTILISATION DU TELEPHONE
3.1. COMBINE ON/OFF
• Brancher le combiné MARCHE (ON): appuyez sur la touche OK pendant
2 secondes. Le combiné recherchera sa base.
• Débrancher le combine ARRET (OFF): appuyez sur la touche OK pendant
2 secondes. L'écran s'éteindra.
3.2. RECEVOIR UN APPEL
Lorsque vous recevez un appel externe, tous les combinés et la base sonneront.
Le symbol ‘EXT’ apparaîtra sur l’écran et l’indicateur (LED) clignotera sur la base. Lorsque
le combiné sonne, vous appuyez sur la touche pour répondre. Vous êtes alors en
communication avec votre correspondant. Si le combiné est posé sur la base lorsque le téléphone
sonne, vous devez simplement décrocher le combiné pour répondre (si l'option 'Répondeur
automatique' est activée: voir 4.10 Répondeur automatique).
Si vous appuyez sur la touche lorsque le téléphone sonne, vous décrochez la ligne et vous
passez automatiquement en mode 'Mains libres' (uniquement la
version Cocoon 450).
3.3. APPEL EXTERNE
NUMEROTATION NORMALE:
1. Appuyez sur la touche .
2. Introduisez le numéro de téléphone.
OTATION BLOQUEE:
NUMER
1. Composez le numéro de votre correspondant.
2. Appuyez sur la touche .
Pour corriger un numéro, utilisez la touche pour effacer un caractère
enregistré.
3.4. APPEL INTERNE
Uniquement possible lorsque plus d'un combiné est enregistré dans la base!!
OTATION NORMALE:
NUMER
1. Appuyez sur la touche INT.
2. Introduisez le numéro du combiné interne (1 à 5).
PRE-NUMER
1. Introduisez le numéro du combiné interne (1 à 5).
2. Appuyez sur la touche INT.
3.5. MODE MAINS-LIBRES
Vous pouvez avoir une conversation avec votre correspondant sans décrocher le combiné.
Pour activer ou désactiver le mode 'Mains-libres', appuyez sur la touche pendant l'appel.
Pour régler le volume, référez-vous au chapitre "Personnalisation "- réglage du volume du hautparleur.
OTATION:
69 Cocoon 450
Page 70

FRANÇAIS
3.6. TRANSFERT INTERNE D'UN APPEL
Uniquement possible lorsque plus d'un combiné est enregistré dans la base!!
Lorsque vous voulez transférer un appel externe vers un autre combiné:
1. Au cours d'une conversation, vous appuyez sur la touche INT.
2. Sélectionnez le numéro du combiné interne pendant que l'appelant externe est en attente.
3. Lorsque l'autre combiné décroche, appuyez sur la touche pour raccrocher et transférer
ainsi l'appel.
Si le correspondant interne ne décroche pas, appuyez sur la touche INT et
reconnectez-vous avec l'appelant externe qui est en ligne.
3.7. APPEL DU TYPE CONFÉRENCE
Uniquement possible lorsque plus d'un combiné est enregistré dans la base!!
Vous pouvez tenir une conversation simultanée avec un correspondant interne et un
correspondant externe.
Lorsque vous êtes en ligne avec un correspondant externe:
1. Appuyez sur la touche INT.
2. Introduisez le numéro du combiné interne que vous voulez appeler.
3. Lorsque le correspondant interne décroche, appuyez sur et maintenez la
touche #.
4. Si le correspondant interne ne décroche pas, appuyez à nouveau sur la touche INT et
reconnectez-vous avec l'appelant externe qui est en ligne.
3.8. AFFICHAGE DE LA DUREE DE L'APPEL
La durée de l'appel est affichée après 10 secondes, exprimée en minutes &
secondes: "00-15”. Pendant la communication vous pouvez encore voir le numéro composé en
appuyant sur la touche MENU pendant 2 secondes..
A la fin de chaque appel, la durée totale de l'appel est affichée pendant 5 secondes.
Vous pouvez activer (ON) ou désactiver (OFF) le timer (voir 4.10 Affichage de la duree de la
communication on/off)
3.9. COUPURE DU SON DU MICROPHONE
Il est possible de couper le son du microphone pendant une conversation.
Appuyez sur la touche en cours de conversation, le microphone est alors
désactivé et vous pouvez parler librement sans être entendu par l'appelant.
Le symbol affiche " ".
Appuyez une nouvelle fois sur la touche pour revenir au mode normal.
3.10. TOUCHE PA USE
Si vous maintenez enfoncée une touche numérique, une pause est ajoutée derrière ce chiffre. La
lettre ‘P’ apparaît à l’écran.
3.11. IDENTIFICATION DE L'APPELANT
L'identification de l'appelant n'est disponible que si vous avez souscrit un abonnement en ce sens
auprès de votre opérateur téléphonique.
Lorsque vous recevez un appel externe, le numéro de l'appelant s'affichera sur
l'écran pendant que le téléphone sonne.
Si le réseau le transmet, ou si le nom de l'appelant se trouve dans le répertoire téléphonique,
l'appelant sera identifié par son nom.
L'identité de l'appelant est remplacée par la durée de l'appel après 15 secondes de
communication.
Cocoon 450 70
Page 71

FRANÇAIS
3.11.1. Affichage du 2ième appel entrant
Si vous êtes abonné au service Affichage 2ième Appel Entrant (consultez votre compagnie de
téléphone) et vous recevez un deuxième appel externe quand vous êtes déjà en ligne avec un
autre appelant, le numéro de téléphone du deuxième appelant apparaît sur l’écran.
Lorsque vous entendez une tonalité d’appel, le numéro de téléphone du deuxième appelant
s’affiche pendant 5 secondes sur l’écran.
Liste des Appels
3.11.2.
Votre téléphone conserve en mémoire la liste des 30 derniers appels reçus. Cette fonction n'est
disponible que si vous avez souscrit un abonnement pour la fonction 'Caller ID'. Les
correspondants qui ont appelé sont identifiés par leur numéro de téléphone et leur nom de la
même façon que pour la fonction 'Caller ID'.
La présence de nouveaux appels ou d'appels auxquels il n'a pas été répondu est indiquée par le
clignotement de l'icône sur l'écran et l’indicateur (LED)
clignotant sur la base. Pour consulter la liste des appels:
1. Appuyez sur la touche . S'il n'y a pas d'appels dans la liste, l'écran affichera 'VIDE’
(EMPTY).
2. Parcourez les appels à l'aide des touches ou . Les noms des appelants
seront affichés s'ils ont été envoyés par le réseau ou s'ils sont stockés dans le répertoire
téléphonique. En atteignant la fin de la liste, vous percevrez un bip sonore.
3 Appuyez plusieurs fois sur OK pour voir la séquence: Nom, numéro, date&heure**
4 Vous pouvez effacer cette entrée en appuyant ‘OK’ de nouveau. Appuyez OK pour effacer
cette entrée ou sur pour retourner au menu précédent.
5. Pour rappeler un correspondant, appuyez simplement sur la touche lorsque son numéro
de téléphone ou son nom est affiché à l'écran.
Si l'appelant est dans le Répertoire téléphonique, il est identifié par son nom dans la liste des
appels.
** UNIQUEMENT LORSQUE LE RESEAU TRANSMET L'HEURE/LA DATE EN MEME
TEMPS QUE LE NUMERO DE TELEPHONE!!! Aucune heure, ni date ne seront
affichées dans le cas d'une fonction 'Caller ID' en DTMF.
Sauvegarder un numéro de la Liste des Appels dans le Répertoire
3.11.3.
Lorsque vous parcourez la Liste des Appels, vous pouvez sauvegarder un numéro dans le
Répertoire en appuyant sur la touche Répertoire . ‘CONFIRME’
(CONFIRM) s’affiche à l’écran. Appuyez sur OK pour confirmer ou sur pour retourner.
Si vous voulez sauvegarder le numéro avec un nom (si le numéro dans la Liste des Appels est
sans nom) ou avec un autre nom, choisissez ‘MODIFIER’ (EDIT) dans le menu du Répertoire (voir
5.1 Address book)
Effacer toutes les entrées de la Liste des Appels
3.11.4.
Vous pouvez effacer toutes les entrées de la liste des appels:
1. Appuyez sur la touche MENU.
2. Appuyez plusieurs fois sur la touche Descendre jusqu’à l’affichage de
‘COMBINE’ (HANDSET) sur l’écran. Appuyez sur OK.
3. Appuyez plusieurs fois sur la touche Descendre jusqu’à l’affichage de
‘EFF CID’ (DEL CID) sur l’écran.
4. Appuyez sur OK. ‘CONFIRME’ (CONFIRM) s’affiche.
5. Appuyez sur la touche OK pour effacer toutes les entrées ou la touche pour annuler
l’opération d’effacement.You can delete all entries in the Call List:
71 Cocoon 450
Page 72

FRANÇAIS
3.11.5. Indication voice mail
Vous ne pouvez utiliser cette fonction que si vous disposez du service Voice mail ou Phone mail
et si le réseau transmet cette indication en même temps que les
informations concernant le code Caller ID (Affichage Appelant/Clip) ! Si vous avez reçu un
nouveau message dans votre système de Voice mail, l’écran affichera
l’icône ‘’. Lorsque vous aurez écouté vos messages, l’icône ‘ ’ disparaîtra.
3.12. MEMOIRE DE RECOMPOSITION DE NUMEROS
Votre téléphone conserve une liste des 10 derniers appels (de 20 caractères) que vous avez
effectués; les correspondants sont identifiés par leur numéro de
téléphone ou leur nom s'ils apparaissent dans le Répertoire téléphonique.
Pour consulter la liste de recomposition des numéros:
1. Appuyez sur la touche .
2. Parcourez les appels avec les touches et .
3. Pour appeler le correspondant sélectionné, appuyez simplement sur la touche lorsque le
numéro de téléphone ou le nom est affiché.
Remarque: Lorsque le nom est affiché, vous pouvez voir le numéro de téléphone en
appuyant sur la touche OK! Lorsque vous appuyez de nouveau sur la touche OK,
vous pouvez effacer cette entrée de la liste. Appuyez sur OK pour confirmer ou sur
pour annuler!
3.13. APPELER DEPUIS LE REPERTOIRE TELEPHONIQUE
Pour appeler un correspondant dont le nom est conservé dans le Répertoire
téléphonique:
1. Appuyez sur la touche pour avoir accès au Répertoire téléphonique.
2. Introduisez la première lettre du nom. Le premier nom commençant par cette lettre ou la
prochaine lettre de l'alphabet apparaîtra à l'écran.
3. Parcourez la liste de noms avec les touches et . La liste est parcourue dans l'ordre
alphabétique. S’il y a une entrée sans nom, s’affiche!
4. Appuyez sur la touche pour composer le numéro du correspondant dont le nom est
affiché.
3.14. UTILISATION DU CLAVIER ALPHANUMÉRIQUE
Votre téléphone vous permet également d'introduire des caractères
alphanumériques. Cette fonction est utile pour introduire un nom dans le
répertoire téléphonique, donner un nom à un combiné,...
Pour sélectionner une lettre, appuyez sur la touche correspondante autant de fois que nécessaire.
Par exemple: pour sélectionner un 'A', vous appuyez une seule fois sur la touche '2', pour
sélectionner un 'B', vous appuyez deux fois sur la touche '2' et ainsi de suite. Pour composer
successivement un 'A' et un 'B', sélectionnez 'A', attendez que le curseur se soit déplacé vers le
caractère suivant et appuyez deux fois sur la touche '2'.
Pour sélectionner un espace, appuyez sur la touche '1'.
Pour sélectionner un trait, appuyez deux fois sur la touche '1'.
Cocoon 450 72
Page 73

FRANÇAIS
Les caractères du clavier se présentent comme suit:
Premier Second Troisième Quatrième Cinquième
1 espace - 1
2 ABC2
3DEF3
4GHI 4
5JKL5
6MNO6
7PQRS7
8TUV8
9WXYZ9
00
appui appui appui appui appui
3.15. UTILISATION DU MENU
Une vaste gamme de fonctions téléphoniques est accessible par un menu très facile à manipuler.
1.Pour avoir accès au menu, appuyez sur la touche MENU.
2.Parcourez les sélections avec les touches et . Les sélections défilent en
boucle (vous revenez à la première fonction après la dernière). Les flèches à
droite de l'écran indiquent qu'il existe d'autres sélections possibles à parcourir.
3.Pour valider une sélection, appuyez sur la touche OK.
4.Pour revenir au menu précédent, appuyez sur la touche .
4. PERSONNALISATION
4.1. REGLAGE DU VOLUME DU HAUT-PARLEUR
Il existe deux façons de régler le volume du haut-parleur:
Volume du haut-parleur en cours d’appel
4.1.1
Pendant la conversation, vous appuyez sur les touches et pour modifier le volume dans
un sens ou dans l'autre. Appuyez sur OK pour confirmer.‘
Remarque: Le volume 'Mains libres' peut également être réglé au niveau du combiné
comme décrit plus haut!
73 Cocoon 450
Page 74

FRANÇAIS
4.2. REGLAGE DU VOLUME DE LA SONNERIE
4.2.1. Sonnerie du combiné
Vous pouvez modifier le volume de la sonnerie en appuyant sur la touche Monter ou
Descendre Vous pouvez régler le volume de la sonnerie comme suit:
1. Entrez dans le menu en appuyant sur la touche MENU.
2. Sélectionnez COMBINE (HANDSET).
3. Appuyez sur la touche OK.
4. Sélectionnez VOLUME.
5. Appuyez sur la touche OK.
6. Sélectionnez le volume souhaité (OFF ou 1 à 5) avec les touches et .
7. Appuyez sur la touche OK pour confirmer ou pour revenir au menu
précédent
Remarque: Toute programmation est confirmée à la fin par un double bip ou par un
seul bip prolongé. Un double bip confirme la validation de votre choix. Un bip
prolongé signifie que la modification n'a pas été prise en compte.
4.2.2.Sonnerie de la base
1. Entrez dans le menu en appuyant sur la touche MENU.
2. Sélectionnez BASE.
3. Appuyez sur la touche OK.
4. Sélectionnez ‘NON PROT’ (UNPROTEC).
5. Appuyez sur la touche OK.
6. Sélectionnez volume.
7. Sélectionnez le volume souhaité (OFF ou 1 à 5) en utilisant les touches Monter et
Descendre .
8. Appuyez sur la touche OK pour confirmer ou pour revenir au menu
précédent.
Remarque: Toute programmation est confirmée à la fin par un double bip ou par un
seul bip prolongé. Un double bip confirme la validation de votre choix. Un bip
prolongé signifie que la modification n'a pas été prise en compte.
4.3. CHOIX DE LA MELODIE DE LA SONNERIE
La base et chaque combiné peuvent être réglés en vue de reproduire une mélodie différente.
Les combinés peuvent également reproduire une mélodie différente selon s'il s'agit d'un appel
interne ou externe.
Mélodie de la base
4.3.1.
1. Entrez dans le menu en appuyant sur la touche MENU.
2. Sélectionnez BASE.
3. Appuyez sur la touche OK.
4. Sélectionnez ‘NON PROT’ (UNPROTEC).
5. Appuyez sur la touche OK.
6. Sélectionnez ‘MELODIE’ (mElodies).
7. Appuyez sur la touche OK.
8. Sélectionnez la mélodie de votre choix (1 à 10).
9. Appuyez sur la touche OK pour confirmer ou pour revenir au menu
précédent.
Remarque: Toute programmation est confirmée à la fin par un double bip ou par un
seul bip prolongé. Un double bip confirme la validation de votre choix. Un bip
prolongé signifie que la modification n'a pas été prise en compte.
Cocoon 450 74
Page 75

FRANÇAIS
4.3.2. Mélodie du combiné, appel externe
1. Entrez dans le menu en appuyant sur la touche MENU.
2. Sélectionnez COMBINE (HANDSET).
3. Appuyez sur la touche OK.
4. Sélectionnez SON EXT (EXT RING).
5. Appuyez sur la touche OK.
6. Sélectionnez la mélodie souhaitée (1 à 10).
7. Appuyez sur la touche OK pour confirmer ou pour revenir au menu
précédent.
Remarque: Toute programmation est confirmée à la fin par un double bip ou par un
seul bip prolongé. Un double bip confirme la validation de votre choix. Un bip
prolongé signifie que la modification n'a pas été prise en compte.
Mélodie du combiné, appel interne
4.3.3.
1. Entrez dans le menu en appuyant sur la touche MENU.
2. Sélectionnez COMBINE (HANDSET).
3. Appuyez sur la touche OK
4. Sélectionnez SON INT (INT RING).
5. Appuyez sur la touche OK.
6. Sélectionnez la mélodie de votre choix (1 à 10).
7. Appuyez sur la touche OK pour confirmer ou pour revenir au menu
précédent.
Remarque: Toute programmation est confirmée à la fin par un double bip ou par un
seul bip prolongé. Un double bip confirme la validation de votre choix. Un bip
prolongé signifie que la modification n'a pas été prise en compte.
4.4. ACTIVATION / DESACTIVATION DES BIPS
Le combiné peut émettre un bip quand une touche est activée, lorsque les piles sont faibles ou
lorsque le combiné est hors de portée.
Bip sonore ‘touche activée’ on/off
4.4.1.
1. Entrez dans le menu en appuyant sur la touche MENU.
2. Sélectionnez COMBINE (HANDSET).
3. Appuyez sur la touche OK.
4. Sélectionnez BIPS (TONES).
5. Appuyez sur la touche OK.
6. Sélectionnez TOUCHE (KEYTONE).
7. Appuyez sur la touche OK.
8. Sélectionnez MARCHE (ON) pour activer, (ARRET) OFF pour désactiver
9. Appuyez sur la touche OK pour confirmer.
Remarque: Toute programmation est confirmée à la fin par un double bip ou par un
seul bip prolongé. Un double bip confirme la validation de votre choix. Un bip
prolongé signifie que la modification n'a pas été prise en compte.
Piles faibles
4.4.2.
Procédez comme ci-dessus, mais sélectionnez BATT BAS (LOW BATT) au point 6 au lieu de
TOUCHE (KEYTONE).
Combiné hors de portée
4.4.3.
Procédez comme ci-dessus, mais sélectionnez H-PORTEE (RANGE) au point 6 au lieu de
TOUCHE (KEYTONE).
75 Cocoon 450
Page 76

FRANÇAIS
4.4.4. Confirmations des tones
Procédez comme ci-dessus, mais sélectionnez CONFIRME (CONFIRM) au point 6 au lieu de
TOUCHE (KEYTONE).
4.5. DESIGNATION DES COMBINES
Cette fonction vous permet de personnaliser chaque combiné.
1. Entrez dans le menu en appuyant sur la touche MENU.
2. Sélectionnez COMBINE (HANDSET).
3. Appuyez sur la touche OK.
4. Sélectionnez NOM (LABEL).
5. Appuyez sur la touche OK.
6. Introduisez le nom.
7. Appuyez sur la touche OK pour valider.
Remarque: Toute programmation est confirmée à la fin par un double bip ou par un
seul bip prolongé. Un double bip confirme la validation de votre choix. Un bip
prolongé signifie que la modification n'a pas été prise en compte.
Pendant que vous introduisez le nom, vous pouvez appuyer la touche pour effacer un
caractère et appuyez sur & maintenir la touche pour quitter le menu sans prendre en compte
une quelconque modification.
4.6. CHOIX DE LA LANGUE DU MENU
1. Entrez dans le menu en appuyant sur la touche MENU.
2. Sélectionnez LANGUE (LANGUAGE).
3. Appuyez sur la touche OK.
4. Sélectionnez la langue de votre choix avec les touches et .
5. Appuyez sur la touche OK pour valider.
Remarque: Un double bip confirme la validation de votre choix. Un bip prolongé
signifie que la modification n'a pas été prise en compte.
4.7. MODIFIER LE CODE PIN
Certaines fonctions ne sont disponibles qu'aux utilisateurs informés du code PIN. Par défaut, ce
code PIN = 0000.
Pour modifier le code PIN:
1. Entrez dans le menu en appuyant sur la touche MENU.
2. Sélectionnez BASE.
3. Appuyez sur OK.
4. Sélectionnez PIN PROT.
5. Appuyez sur OK.
6 Entrez le code PIN (0000).
7 Appuyez sur OK.
8. Sélectionnez CODE PIN (PIN CODE).
9. Appuyez sur OK.
10 Introduisez le nouveau code PIN à 4 chiffres.
11. Appuyez sur OK.
12. Introduisez une deuxième fois le nouveau code PIN.
13. Appuyez sur la touche OK pour valider.
Remarque: Toute programmation est confirmée à la fin par un double bip ou par un
seul bip prolongé. Un double bip confirme la validation de votre choix. Un bip
prolongé signifie que la modification n'a pas été prise en compte.
Cocoon 450 76
Page 77

FRANÇAIS
4.8. REGLAGE DU MODE DE COMPOSITION DES NUMEROS
Il existe deux types de composition des numéros:
• DTMF/composition par tonalité (le mode le plus commun)
• Composition par pulsations (pour les installations plus anciennes)
our modifier le mode de composition des numéros:
P
1. Entrez dans le menu en appuyant sur la touche MENU.
2. Sélectionnez BASE.
3. Appuyez sur la touche OK.
4. Sélectionnez PIN PROT.
5. Appuyez sur la touche OK.
6. Entrez le code PIN (0000).
7. Appuyez sur la touche OK.
8. Sélectionnez MODE APP (DIALMODE).
9. Appuyez sur la touche OK.
10. Sélectionnez TONALITE (TONE) ou IMPULS (PULSE).
11. Appuyez sur la touche OK pour valider.
Remarque:Un double bip confirme la validation de votre choix. Un bip prolongé
signifie que la modification n'a pas été prise en compte.
4.9. REPONDEUR AUTOMATIQUE
Si le combiné est posé sur la base lors d'un appel entrant, le téléphone prend
automatiquement la ligne. Ceci est un réglage par défaut, mais vous pouvez le désactiver:
1. Entrez dans le menu en appuyant sur la touche MENU.
2 Sélectionnez COMBINE (HANDSET).
3 Appuyez sur la touche OK.
4 Sélectionnez DEC AUTO (AUTO ANS).
5 Sélectionnez MARCHE (ON) pour une réponse automatique ou ARRET (OFF).
6 Appuyez sur la touche OK.
4.10. AFFICHAGE DE LA DUREE DE LA COMMUNICATION ON/OFF (TIMER)
1. Entrez dans le menu en appuyant sur la touche MENU.
2. Sélectionnez ‘COMBINE’ (HANDSET).
3. Appuyez sur OK.
4. Sélectionnez TIMER.
5. Appuyez sur OK.
6. Sélectionnez MARCHE (ON) ou ARRET (OFF) en utilisant les touches Monter et
Descendre .
7. Appuyez sur OK.
4.11. REMISE A ZERO
Il est toujours possible de revenir à la configuration d'origine par défaut. Il s'agit de la configuration
telle qu'elle était prévue lors de la livraison du téléphone.
77 Cocoon 450
Page 78

FRANÇAIS
Combiné Base
Volume de sonnerie: 5 Volume de sonnerie: 5
Mélodie ext.: 1 Mélodie:1
Mélodie int.: 5 Verrouillage des appels: OFF pour tous les
Monitor: OFF combinés
Timer: ON Code PIN: 0000
Tons: Tous sur ON CODE VIP: 000
Auto Answer: ON CODE SOS: 111
Sélection de la base: Auto
Verrouillage clavier: OFF
Répertoire: Pas de changement
Liste des Appels: Vide
Volume du combiné: 3
Pour revenir aux réglages par défaut:
1. Entrez dans le menu en appuyant sur la touche MENU.
2. Sélectionnez BASE.
3. Appuyez sur la touche OK.
4. Sélectionnez PIN PROT.
5. Appuyez sur la touche OK.
6. Entrez le code PIN (0000).
7. Appuyez sur la touche OK.
8. Sélectionnez ‘RESET’ (DEFAULT).
9. Appuyez sur la touche OK.
10. Appuyez sur la touche OK pour valider ou pour retourner
Remarque: Toute programmation est confirmée à la fin par un double bip ou par un
seul bip prolongé. Un double bip confirme la validation de votre choix. Un bip
prolongé signifie que la modification n'a pas été prise en compte.
5. FONCTIONS DE POINTE
5.1. REPERTOIRE TELEPHONIQUE
Le répertoire téléphonique vous permet de mémoriser 40 numéros de téléphone et noms. Vous
pouvez introduire des noms de 8 caractères maximum et des numéros de 18 chiffres maximum.
Pour appeler un correspondant dont le numéro est stocké dans le répertoire
téléphonique, référez-vous à la section 3.13 Appeler depuis le répertoire
téléphonique.
Pour introduire des caractères alphanumériques, référez-vous à la section 3.14 Utilisation du
clavier alphanumérique.
Cocoon 450 78
Page 79

FRANÇAIS
5.1.1. Ajouter une entrée dans le répertoire téléphonique
1. Entrez dans le menu en appuyant sur la touche MENU.
2. Sélectionnez REPERTOI (PHONEBK).
3. Appuyez sur la touche OK.
4. Sélectionnez SAUVEGAR (STORE).
5. Appuyez sur la touche OK.
6. Introduisez le nom.
7. Appuyez sur la touche OK pour valider.
8. Introduisez le numéro de téléphone.
9. Appuyez sur la touche OK pour valider.
Remarque: Toute programmation est confirmée à la fin par un double bip ou par un
seul bip prolongé. Un double bip confirme la validation de votre choix. Un bip
prolongé signifie que la modification n'a pas été prise en compte.
5.1.2.Modifi
Pour modifier un nom ou un numéro dans le répertoire téléphonique:
1. Entrez dans le menu en appuyant sur la touche MENU.
2. Sélectionnez REPERTOI (PHONEBK).
3. Appuyez sur la touche OK.
4. Sélectionnez MODIFIER (EDIT).
5. Appuyez sur la touche OK.
6. Déplacez-vous dans la liste de noms avec les touches et . La liste défile
7. Appuyez sur la touche OK lorsque vous trouvez le nom à modifier.
8. Utilisez la touche pour reculer et introduisez le nouveau nom.
9. Appuyez sur la touche OK pour valider.
10. Introduisez le nouveau numéro de téléphone.
11. Appuyez sur la touche OK pour valider.
Remarque: Toute programmation est confirmée à la fin par un double bip ou par un
seul bip prolongé. Un double bip confirme la validation de votre choix. Un bip
prolongé signifie que la modification n'a pas été prise en compte.
5.1.3.
Pour effacer une entrée:
1. Entrez dans le menu en appuyant sur la touche MENU.
2. Sélectionnez REPERTOI (PHONEBK).
3. Appuyez sur la touche OK.
4. Sélectionnez EFFACER (DELETE).
5. Appuyez sur la touche OK.
6. Déplacez-vous dans la liste des noms avec les touches et . La liste défile dans l'ordre
7. Appuyez sur la touche OK dès que vous avez trouvé le nom que vous voulez effacer.
8. Le numéro de téléphone est affiché, appuyez sur la touche OK.
9. L'écran affiche ‘CONFIRME’ (CONFIRM), appuyez sur la touche OK pour
Remarque: Toute programmation est confirmée à la fin par un double bip ou par un
seul bip prolongé. Un double bip confirme la validation de votre choix. Un bip
prolongé signifie que la modification n'a pas été prise en compte.
er un nom ou un numéro
dans l'ordre alphabétique.
Effacer une entrée
alphabétique.
confirmer ou pour interrompre l'opération.
79 Cocoon 450
Page 80

FRANÇAIS
5.2. MÉLODIE D’APPEL VIP
Vous pouvez attribuer des mélodies d’appel spéciales à certains numéros du Répertoire. Dès
que vous recevez un appel d’un appelant mentionné dans le répertoire, vous entendez la mélodie
d’appel que vous avez spécifiée pour cet appelant.
Pour attribuer une certaine mélodie à une entrée de votre répertoire, vous
devez disposer du service d'identification de l'appelant !!!
Procédez comme suit pour attribuer une certaine mélodie à un numéro de téléphone du
Répertoire :
1. Entrez dans le menu en appuyant sur la touche MENU.
2. Sélectionnez REPERTOI (PHONEBK).
3. Appuyez sur OK.
4. Appuyez plusieurs fois sur la touche Monter Å jusqu’à l’affichage de ‘MELODIE’
(MELODY) sur l’écran.
5. Appuyez sur OK.
6. Sélectionnez un nom auquel vous voulez attacher une mélodie et appuyez sur OK.
7. Utilisez les touches Monter et Descendre pour sélectionner une mélodie et appuyez
sur OK.
5.3. RECHERCHER UN COMBINE A PARTIR D'UNE BASE
Si vous appuyez sur la touche 'Appel' sur la base, tous les combinés se mettront à sonner.
Cette sonnerie vous aidera à localiser un combiné égaré. La sonnerie est interrompue en
appuyant sur simplement l'une des touches du combiné.
5.4. V ERROUILLAGE D’APPELS
Les options suivantes peuvent être sélectionnées par combiné :
ARRET (OFF): Tous les appels sont autorisés
APP INT (INTERNAL): Tous les appels externes sont verrouillés
LOCAL: Les appels internationaux et nationaux sont verrouillés ; seuls
NATIONAL: Les appels internationaux sont verrouillés (commençant par 00)
SPECIAL (CUSTOM): Un numéro de téléphone défini à l’avance est verrouillé
les appels locaux sont autorisés ; l’utilisateur est en mesure
de spécifier le préfixe pour les appels locaux.
Cocoon 450 80
Page 81

FRANÇAIS
Pour activer le verrouillage:
1. Entrez dans le menu en appuyant sur la touche MENU.
2. Sélectionnez BASE.
3. Appuyez sur OK.
4. Sélectionnez VERR APPEL (PIN PROT).
5. Appuyez sur OK.
6. Entrez le code PIN (0000).
7. Appuyez sur OK.
8. Sélectionnez CALL BAR.
9. Appuyez sur OK.
10. Sélectionnez le combiné (1-5).
11. Appuyez sur OK.
12. Sélectionnez ARRET (OFF), APP INT (INTERNAL), LOCAL, NATIONAL, ou SPECIAL
(CUSTOM). Pour ARRET (OFF), APP INT (INTERNAL), LOCAL, et NATIONAL,
appuyez sur OK.
-Pour LOCAL, appuyez sur OK pour le PREFIX. Entrez le préfixe utilisé pour
des numéros locaux (numéros composés avec ce préfixe ne seront pas
verrouillés!)
-Pour SPECIAL (CUSTOM), appuyez sur OK pour lire VERR APP (BAR). Entrez les
premiers chiffres du numéro de téléphone qui doivent être verrouillés, par ex.
‘0’: tous les numéros commençant avec ‘0’ seront verrouillés!
13. Pour quitter le mode ‘VERR APPEL’ (CALL BAR), appuyez sur .
5.5. VERROUILLAGE DU CLAVIER
Lorsque le clavier est verrouillé, il est impossible de former un numéro par accident. Cela peut se
révéler utile lorsque des enfants sont dans les parages.
Lorsque le clavier est verrouillé, seule la touche MENU peut encore être utilisée ; toutes les autres
touches sont verrouillées.
Activation du verrouillage
5.5.1.
1. Entrez dans le menu en appuyant sur la touche MENU.
2. Sélectionnez VERR CLAV (KEY LOCK).
3. Appuyez sur OK.
4. Sélectionnez MARCHE (ON).
5. Appuyez sur OK pour confirmer.
Remarque: Un double bip confirme votre choix.
Un long bip signifie que l’adaptation n’a pas été effectuée.
Désactivation du verrouillage
5.5.2.
1. Entrez dans le menu en appuyant sur la touche MENU.
2. Sélectionnez VERR CLAV (KEY LOCK) .
3. Appuyez sur OK.
4. Sélectionnez ARRET (OFF).
5. Appuyez sur OK pour confirmer.
Remarque: Un double bip confirme votre choix.
Un long bip signifie que l’adaptation n’a pas été effectuée.
81 Cocoon 450
Page 82

FRANÇAIS
5.6. CONNEXION D’UN CASQUE
Vous pouvez raccorder le casque à l’aide d’une fiche jack à trois pôles de 2,5mm sur le côté droit
du combiné. Lorsque le casque est raccordé, vous pouvez uniquement parler et entendre par le
biais du casque. Le microphone du casque peut être désactivé à l’aide de la touche Mute . Le
haut-parleur mains-libres peut encore être activé en appuyant sur la touche mains-libres .
6. GESTION DE PLUSIEURS COMBINES
6.1. INSTALLER UN COMBINE SUPPLEMENTAIRE
Vous pouvez enregistrer de nouveaux combinés dans la base si ces combinés
soutiennent le protocole DECT GAP.
La base peut soutenir un maximum de 5 combinés. Si vous disposez déjà de 5 combinés et si
vous souhaitez ajouter ou remplacer un combiné, vous devrez
d'abord effacer un combiné avant d'associer le nouveau combiné à la base.
1. Appuyez sur et maintenez la touché sur la base pendant 6 secondes.
2. La base émettra alors un bip. La base est maintenant prête pour l'enregistrement d'un
nouveau combiné. Vous disposez de 90 secondes après avoir activé le
bouton pour enregistrer un nouveau combiné.
Pour enregistrer un combiné, la base doit être placée en mode d'enregistrement
Après avoir placé la base en mode d'enregistrement, vous lancez la procédure sur le nouveau
combiné:
Si votre combiné supplémenteire est un Cocoon 400/450
6.1.1.
3. Entrez dans le menu en appuyant sur la touche MENU.
4. Sélectionnez ENREGIST (REGISTER).
5. Appuyez sur la touche OK.
6. Introduisez un numéro de base (de 1 à 4). Les numéros clignotants sont déjà utilisés par
d'autres bases DECT.
7. Introduisez le code PIN de la base (0000 par défaut).
8. Dès que le combiné aura localisé la base, il affichera le numéro d'identification de la base.
Validez l'enregistrement de la base en appuyant sur la touche OK ou interrompez l'opération
en appuyant sur la touche .
9. Si le combiné ne localise pas la base, il retournera en mode stand-by après quelques
secondes. Essayez encore une fois en modifiant le numéro de la base et en vérifiant si vous
ne vous trouvez pas dans un environnement générant des interférences. Rapprochez-vous
de la base.
Si votre combiné est d’un autre modèle
6.1.2.
Après avoir lancé la procédure d'enregistrement sur la base, référez-vous au mode d'emploi du
combiné pour découvrir comment vous devez l'enregistrer. Le combiné doit être compatible avec
le protocole GAP.
L'icône v et le texte "NON ENRE’ (NOT SUB) clignotent sur l'écran lorsque le combiné n'a pas été
associé à la base.
Lorsqu'un combiné a été associé à une base, il se voit attribuer un numéro de
combiné par la base. C'est ce numéro qui est affiché sur le combiné derrière le nom et qu'on devra
utiliser pour les appels internes.
Cocoon 450 82
Page 83

FRANÇAIS
6.2. ELIMINER UN COMBINE
Vous pouvez éliminer un combiné d'une base pour permettre à un autre combiné d'être
enregistré:
1. Entrez dans le menu en appuyant sur la touche MENU.
2. Sélectionnez BASE.
3. Appuyez sur la touche OK.
4. Sélectionnez PIN PROT.
5. Appuyez sur la touche OK.
6. Entrez le code PIN (0000).
7. Appuyez sur la touche OK.
8. Sélectionnez SUP COMB (DEL HS).
9. Appuyez sur OK.
10. Select the handset to be cancelled.
11. Appuyez sur la touche OK.
12. CONFIRME (CONFIRM) apparaîtra. Appuyez de nouveau sur OK pour
confirmer ou sur pour retourner.
13. CONFIRM will appear. Press OK again to confirm or to return.
Remarque: Toute programmation est confirmée à la fin par un double bip ou par un
seul bip prolongé. Un double bip confirme la validation de votre choix. Un bip
prolongé signifie que la modification n'a pas été prise en compte.
6.3. INSTALLER UN COMBINE SUR UNE AUTRE BASE
Si vous voulez utiliser un Cocoon 450 avec une base d'un autre modèle, cette base doit être
compatible avec le protocole GAP.
1. Pour placer la base en mode d'enregistrement, référez-vous au mode d'emploi de la base.
2. Effectuez les opérations 3 à 9 du paragraphe “6.1. Installer un combiné supplémentaire”.
6.4. SELECTIONNER UNE BASE
Les combinés peuvent être enregistrés simultanément sur 4 bases.
Pour changer la base, sélectionnez ‘SEL BASE’ (B SELECT) dans le menu. Sélectionnez une
option :
AUTO : pour sélectionner la meilleure base.
FIXE (FIXED) : pour sélectionner une certaine base. Le combiné ne choisit aucune
PREFER : commence d’abord à chercher une base spécifiée et recherche
Et appuyez sur OK.
Si vous sélectionnez ‘FIXE” (FIXED) ou PREFER, ‘BS1 2 3 4’ apparaît à l’écran. La base
actuellement enregistrée se met à clignoter. Appuyez sur les touches 1-4 pour
sélectionner une base.
Si vous sélectionnez 'Auto', le combiné cherchera automatiquement une autre base dès que vous
êtes hors de portée!
autre base lorsque vous êtes hors de portée.
ensuite les autres bases disponibles lorsque vous êtes hors de portée.
83 Cocoon 450
Page 84

FRANÇAIS
6.5. SURVEILLANCE DE PIÈCE
Si plus d’un combiné est enregistré, un des combinés peut être utilisé comme appareil de
surveillance (bébé).
Pour activer cette fonction:
1. Entrez dans le menu en appuyant sur la touche MENU.
2. Sélectionnez ‘SURVEILL’ (MONITOR).
3. Appuyez sur OK.
4. Sélectionnez ‘MARCHE’ (ON).
5. Appuyez sur OK.
Lorsque l’option surveillance de pièce est activée, ‘SURVEILL’ (Monitor) (clignote) apparaît à
l’écran du combiné. Un autre combiné peut appeler ce combiné (interne), activant ainsi le
microphone du combiné. De cette manière, vous êtes en mesure d’entendre tous les bruits dans
la pièce concernée.
Remarque : Le combiné en mode monitor ne sonnera pas en cas d’appel entrant
externe.
Pour désactiver cette fonction:
1. Entrez dans le menu en appuyant sur la touche MENU.
2. ‘SURVEILL’ (MONITOR) apparaît sur l’écran.
3. Appuyez sur OK.
4. Sélectionnez ARRET (OFF).
5. Appuyez sur OK.
7. REPONDEUR AUTOMATIQUE
Le Cocoon 450 dispose d’un répondeur automatique numérique intégré avec une capacité
d’enregistrement de 9 minutes et de 20 messages. Ce répondeur automatique peut uniquement
être contrôlé par le combiné fourni (pas par d’autres multi combinés). Le répondeur automatique
peut être commandé à distance et offre la possibilité d’enregistrer deux messages sortants
(Message 1 et Message 2).
Note : Tous les messages et paramètres sont sauvegardés dans une mémoire Flash
et seront effacés en cas de panne de courant.
7.1. TOUCHES COMBINE
Lecture
Stop
Arrière
Avant
Réponse ON/OFF
Mémo
Effacer X
Message sortant
Touche de mode réponse
Cocoon 450 84
Page 85

FRANÇAIS
7.2. PARAMETRES
Deux messages sortants peuvent être enregistrés (OGM1 et OGM2).
Le message sortant 1 pour la fonction réponse et la possibilité pour les appelants de laisser un
message. Le temps d’enregistrement maximum est de 30 secondes.
Le message sortant 2 pour la fonction réponse sans donner aux appelants la possibilité de laisser
un message sur le répondeur automatique (réponse uniquement). Le temps d’enregistrement
maximum est de 60 secondes.
Il est uniquement possible de commander le répondeur automatique en entrant dans le menu du
répondeur automatique :
Appuyez sur pour entrer dans le menu du répondeur automatique
Appuyez sur ’C’ pour quitter le menu du répondeur automatique.
Régler le volume du haut-parleur de la base
7.2.1.
Pour modifier le volume pendant la lecture des messages entrants ou sortants, appuyez sur
pour augmenter ou sur pour diminuer.
Enregistrer et lire les messages sortants (OGM 1 ou OGM 2)
7.2.2.
Pour enregistrer un message sortant :
Appuyez sur pour entrer dans le menu du répondeur automatique.
Appuyez sur ’9’ et ensuite sur :
- ’1’ pour enregistrer l’OGM 1
- ’2’ pour enregistrer l’OGM 2
Appuyez sur la touche stop pour mettre un terme à l’enregistrement. Le message enregistré
sera lu. Appuyez sur pour arrêter la lecture.
Pour lire les messages enregistrés lorsque vous êtes dans le menu du répondeur automatique :
Appuyez sur ’6’ et ensuite sur :
- ’1’ pour lire l’OGM 1
- ’2’ pour lire l’OGM 2
Appuyez sur la touche pour arrêter la lecture.
Sélectionner un message sortant (OGM 1 ou OGM 2)
7.2.3.
Lorsque la mémoire est pleine, seul le message sortant 2 peut être sélectionné
(uniquement la réponse sans enregistrement).
• Appuyez sur pour entrer dans le menu du répondeur automatique.
• Appuyez sur ’7’ et ensuite sur :
- ’1’ pour sélectionner OGM 1 (mode de réponse et d’enregistrement)
‘MOD 1 RE’ (AR MODE 1) s’affiche à l’écran
- ’2’ pour sélectionner OGM 2 (mode réponse uniquement) ‘MOD 2 RE’ (AR MODE 2)
s’affiche à l’écran
85 Cocoon 450
Page 86

FRANÇAIS
7.2.4. Éteindre / Allumer le répondeur automatique
Lorsque le répondeur automatique est allumé, la DEL de la base s’allume de façon continue
et le répondeur automatique décroche automatiquement la ligne après un certain nombre de
sonneries (“7.2.5. Régler le nombre de sonneries”).
Lorsque le répondeur automatique est éteint, la DEL de la base s’éteint.
• Appuyez sur pour entrer dans le menu du répondeur automatique.
• Appuyez sur pour allumer le répondeur automatique. ‘REP MAR’ (TAD ON)s’affiche et la
DEL s’allume sur la base.
• Appuyez sur pour éteindre le répondeur automatique. ‘REP ARR’ (TAD OFF) s’affiche et
la DEL de la base s’éteint.
Même lorsque le répondeur automatique est éteint, il décroche automatiquement après 10 - 15
sonneries pour permettre l’activation à distance (“7.4. Commande à distance”).
Note : Le répondeur automatique ne peut être activé si aucun message sortant n’est
enregistré.
Régler le nombre de sonneries
7.2.5.
Le nombre de sonneries après lesquelles le répondeur automatique doit répondre peut être réglé
de 2 à 7 et sur Economy (Toll saver). Le réglage par défaut est en mode Economy. En mode
Economy, le répondeur automatique répond après quatre sonneries s’il n’y a pas de nouveaux
messages et après 2 sonneries s’il y a des nouveaux messages. S’il n’y a pas de nouveaux
messages et que vous appelez votre répondeur automatique pour vérifier à distance la présence
de messages (“7.4. Commande à distance”), vous pouvez raccrocher après la deuxième
sonnerie. Vous ne devez donc pas payer de frais de connexion et vous savez que vous n’avez
pas de nouveaux messages.
• Appuyez sur MENU .
• Appuyez sur up ou sur down quelques fois jusqu’à ce que ‘REPOND’ (TAD MENU)
apparaisse.
• Appuyez sur OK.
• Appuyez sur up ou sur down quelques fois jusqu’à ce que ‘RET SON’ (RG DELAY)
apparaisse.
• Appuyez sur OK.
• Appuyez sur up ou sur down quelques fois jusqu’à ce que le nombre désiré de
sonneries soit réglé.
• Appuyez sur OK pour confirmer les réglages.
• Appuyez sur ’c’ pour quitter le ‘REPOND’ (TAD MENU).
Cocoon 450 86
Page 87

FRANÇAIS
7.2.6. Régler le code SOS et le filtrage
Le code SOS est utilisé pour arrêter le filtre d’appels pour une brève période de sorte que la
station de base commence à sonner pendant 8 secondes. Les options de filtre suivantes peuvent
être réglées sur le téléphone :
‘ARRET’ (OFF): Aucune fonction de filtre active.
‘FILTERHP’ (HEAR AR): Ce mode permet d’entendre tous les appels à travers le haut-parleur
‘SILTOT’ (SILEN AR): Tous les appels sont immédiatement transférés au répondeur
‘FONCVIP1’ (VIPFUNC1): Tous les appels sont immédiatement transférés au répondeur
‘FONCVIP2’ (VIPFUNC2): Le répondeur automatique répond à tous les appels après le délai de
a. Programmer le code SOS
• Appuyez sur MENU
• Appuyez sur up ou sur down quelques fois jusqu’à ce que ‘REPOND’ (TAD MENU)
apparaisse.
• Appuyez sur OK.
• Appuyez sur up ou sur down quelques fois jusqu’à ce que ‘CODE SOS’ (SOS CODE)
apparaisse.
• Appuyez sur OK.
• Entrez le code actuel (défaut = ’111’).
• Appuyez sur OK.
• Entrez le nouveau code et appuyez sur OK.
• Entrez à nouveau le nouveau code à titre de confirmation et appuyez sur OK.
b. Régler les options de filtre
• Appuyez sur MENU .
• Appuyez sur up ou sur down quelques fois jusqu’à ce que ‘REPOND’ (TAD MENU)
apparaisse.
• Appuyez sur OK.
• Appuyez sur up ou sur down quelques fois jusqu’à ce que ‘CODE SOS’ (SOS CODE)
apparaisse.
• Appuyez sur OK.
•L’option de filtre actuellement sélectionnée est affichée.
• Appuyez sur up ou sur down quelque fois jusqu’à ce que le filtre désiré s’affiche à
l’écran (Voir ci-dessus pour les différentes options de filtre).
• Appuyez sur OK.
•Si ‘FONCVIP1’ (VIPFUNC1) ou ‘FONCVIP2’ (VIPFUNC2) est selectionné, les numéros
enregistrés dans le répertoire apparaîtront à l’écran.Sélectionnez le numéro de répertoire
devant être lié à cette option et appuyez sur OK.
Note : Activer la fonctionde contrôle de pièce (Voir 6.5. Surveillance de pièce)
supplantera la fonction de call screening (HEAR AR). Pour activer la fonction de call
screening, la fonction de contrôle de pièce doit être désactivée.
du combiné 1 (Call screening). Le haut-parleur est allumé pendant la
lecture / l’enregistrement des messages sortants et entrants. Les
autres combinés ne peuvent recevoir aucun appel.
automatique sans délai de sonneries. Les appelants peuvent entrer
le code SOS en commençant par ’*’ pour passer outre cette fonction.
La base commence à sonner pendant 8 secondes.
automatique sans aucun délai de sonnerie, sauf quand un numéro
entrant correspond à un numéro du répertoire téléphonique.
sonnerie, excepté le numéro du répertoire. Les appelants peuvent
entrer le code SOS en commençant par ’*’ pour passer outre cette
fonction. La station de base commence à sonner pendant 8
secondes.
87 Cocoon 450
Page 88

FRANÇAIS
7.2.7. Programmer le code VIP
Le code VIP est un code à trois chiffres utilisé pour commander la machine à distance (“7.4.
Commande à distance”). Le code VIP par défaut est le '000'.
• Appuyez sur MENU .
• Appuyez sur up ou sur down quelques fois jusqu’à ce que ‘REPOND’ (TAD MENU)
apparaisse.
• Appuyez sur OK.
• Appuyez sur up ou sur down quelques fois jusqu’à ce que ’CODE PIN’ (PIN CODE)
apparaisse.
• Appuyez sur OK.
• Entrez le code PIN actuel (défaut = ’000’).
• Appuyez sur OK.
• Entrez le nouveau code pin et appuyez sur OK.
• Entrez le nouveau code pin à titre de confirmation et appuyez sur OK.
Note : Les codes SOS et VIP ne peuvent être les mêmes parce que les deux peuvent
être saisis pendant la lecture de l’OGM!!!
7.3. FONCTIONNEMENT
En cas d’appel lorsque le répondeur automatique est allumé, le répondeur automatique répond
automatiquement à l’appel après un nombre présélectionné de sonneries.
Si le message sortant 1 a été sélectionné, l’appareil émet un bip après la lecture du message
sortant et l’appelant peut laisser un message (max. 2 minutes).
Si le message sortant 2 a été sélectionné, la ligne sera automatiquement coupée après le bip.
L’appelant n’a pas la possibilité de laisser un message.
Lorsqu'il y a des messages, le nombre de messages est indiqué à l'écran.
Lorsqu'il y a des nouveaux messages, l'icône clignote sur la base et l'icône enveloppe
apparaît à l'écran.
Note : Si, durant l’enregistrement, rien n’est dit pendant 8 secondes, la ligne se
coupe automatiquement.
Enregistrer un mémo
7.3.1.
Un mémo est considéré comme un message entrant pouvant être entendu ultérieurement par
l’utilisateur. Le temps d’enregistrement max. pour un mémo est de 2 minutes.
• Appuyez sur pour entrer dans le menu du répondeur automatique.
• Appuyez sur ’4’ et ensuite sur ’2’ pour lancer l’enregistrement. Commencez à parler
après le bip.
• Appuyez sur ’5’ pour arrêter l’enregistrement.
Note : Vous ne pouvez enregistrer qu’un seul message mémo !!
Cocoon 450 88
Page 89

FRANÇAIS
7.3.2. Lire/Effacer les messages entrants et le mémo
• Appuyez sur pour entrer dans le menu du répondeur automatique.
• Appuyez sur pour lire tous les messages et mémos.
•Pendant la lecture, vous pouvez :
Pendant la lecture, l’écran affiche :
‘EC MEMO’ (PLAYMEMO) pendant la lecture du message mémo.
’Message #’ (Message #) pendant la lecture des messages quand aucune information
d’identification de l’appelant n’a été reçue.
Le numéro de téléphone et la date/heure lorsque l’identification de l’appelant a été reçue. Vous
pouvez basculer entre la date/heure* et le numéro de téléphone en appuyant sur la touche OK.
* uniquement lorsque le réseau envoie la date et l’heure a vec le numér o de téléphone
!!! Sur certains réseaux avec callerID, la date et l’heure ne seront pas affichées.
Effacer tous les messages
7.3.3.
Tous les messages, y compris les nouveaux, peuvent être effacés d’un coup en :
appuyant sur pour entrer dans le menu du répondeur automatique
Appuyant sur ’9’ suivi de ’0’ X pour effacer tous les messages.
’CONFIRME’ (CONFIRM) apparaît à l’écran.Appuyez sur OK pour confirmer ou sur ’C’ pour
annuler.
• aller au message précédant en appuyant sur
• arrêter la lecture en appuyant sur
• interrompre la lecture en appuyant à nouveau sur . Appuyer à nouveau sur
pour recommencer la lecture.
• aller au message suivant en appuyant sur
• Effacer le message en train d’être lu en appuyant sur ’0’ X.
7.4. COMMANDE À DISTANCE
Le répondeur automatique peut être commandé à distance en utilisant un téléphone à touches à
tonalités (système de sélection à tonalité DTMF).
our passer en commande à distance
7.4.1.P
• Appelez votre répondeur automatique.
• Le répondeur automatique décroche la ligne, appuyez sur ’*’ suivi du code VIP (défaut 000)
lorsque vous entendez le message sortant.
•Si le code VIP est incorrect, vous entendrez à nouveau le message sortant. Vous disposez
de deux autres essais pour entrer le code correct. Si le troisième essai est également
incorrect, la ligne sera coupée.
•Si le code VIP entré est correct, vous entendez deux 2 bips. Vous avez maintenant la
possibilité de commander le répondeur automatique en appuyant sur les touches
correspondantes. Toutes les opérations à distance ont la même combinaison de touches
que sur le combiné Cocoon 450 dans le menu du répondeur automatique (“7.5. Raccourcis
du repondeur automatique”). S’il y a des messages, les messages seront lus
automatiquement.
89 Cocoon 450
Page 90

FRANÇAIS
7.4.2. Allumer à distance
Lorsque le répondeur automatique est éteint, vous avez la possibilité de l’allumer à distance :
• Appelez votre répondeur automatique.
• Le répondeur automatique décroche après 10 à 15 sonneries. Entrez le code VIP (défaut
000) lorsque vous entendez deux bips.
•Si le code VIP entré est correct, vous entendez le message sortant. Le répondeur
automatique est maintenant allumé.
• Le répondeur automatique peut maintenant être contrôlé à distance durant la lecture de
l’OGM. Dès que la lecture s’arrête, la ligne est coupée.
Cocoon 450 90
Page 91

FRANÇAIS
7.5. RACCOURCIS DU REPONDEUR AUTOMATIQUE
Lorsque vous passez en mode de contrôle à distance, vous avez la possibilité de contrôler le
répondeur automatique avec les mêmes combinaisons de touches qu’en mode de
fonctionnement normal :
Caractéristique Raccourcis pour le mode
Lire les messages Appuyez sur ’2’
Répéter le message actuel Appuyez sur ’2’
Passer au message
précédent
Passer au message suivant Appuyez sur ’3’
Stop Appuyez sur ’5’
Effacer le message actuel
pendant que le message est
lu
Effacer tous les messages Appuyez sur ’9’ et ensuite
Enregistrer l’OGM1 Appuyez sur ’9’ et ensuite
Enregistrer l’OGM2 Appuyez sur ’9’ et ensuite
Lire l’OGM1 Appuyez sur ’6’ et
Lire l’OGM2 Appuyez sur ’6’ et
réponse et le contrôle à
distance
Appuyez sur ’1’
Appuyez sur ’0’ X
sur ’0’ X
sur ’1’
sur ’2’
ensuite sur ’1’
ensuite sur ’2’
Enregistrer un mémo Appuyez sur ’4’ et ensuite
Lire un mémo Appuyez sur ’4’ et ensuite
Allumer / éteindre le
répondeur automatique On/
Off
Passer en mode réponseenregistrement
Passer en mode réponse
uniquement
91 Cocoon 450
sur ’2’
sur ’1’
Appuyez sur ’8’
Appuyez sur ’7’ et ensuite
sur ’1’
Appuyez sur ’7’ et ensuite
sur ’2’
Page 92

FRANÇAIS
8. DETECTION DE PANNES
Symptôme Cause possible Solution
Pas d'écran Piles non-chargées Vérifiez la position des piles.
Rechargez les piles.
combiné sur ARRET (OFF) Branchez le combiné
Pas de tonalité Câble téléphonique mal con-
L'icône clignote
La base ou le combiné ne
sonne pas
La tonalité est bonne, mais il
n'y
a pas de communication
Le téléphone ne réagit pas à
l'activation des touches
Touche Flash R ne marche
pas.
necté
La ligne est occupée par un
autre combiné
combiné hors de portée Rapprochez le combiné de la
La base ne reçoit pas de
courant
Le combiné n'est pas enregistré dans la base
Le volume de la sonnerie est
coupé ou faible
Le mode de composition du
numéro est incorrect
Erreur de manipulation Enlevez les piles et remettez-
Verrouillage du cla vier A CTIVE Désactivez le verrouillage du
Temps flash incorrect Appelez le service technique
MARCHE
(ON).
Vérifiez la connexion du câble
téléphonique.
Attendez que l'autre combiné
raccroche.
base.
Vérifiez les connexions élec-
triques à la base.
Procédez à l'enregistrement
du combiné dans la base.
Réglez le volume de la son-
nerie.
Réglez le mode de composi-
tion du numéro (pulsation/tonalité).
les en place.
clavier.
pour changer le temps flash
Cocoon 450 92
Page 93

FRANÇAIS
9. GARANTIE
• La durée de la garantie est de 36 mois. La garantie est assurée sous présentation de la
facture originale ou d'une preuve de paiement mentionnant la date d'achat ainsi que le type
d'appareil.
• Topcom prend en charge pendant la durée de la garantie toutes les défaillances issues de
défauts des matériaux ou de défauts de fabrication. Topcom décide s'il souhaite remplacer
ou réparer l'appareil défectueux sous garantie.
• La garantie prend fin lors de toute intervention de l'acheteur ou de tout tiers non-habilité.
• Des dégâts découlant d'une utilisation inappropriée, par exemple l'utilisation de pièces de
rechange ou d'accessoires n'étant pas d'origine où n'étant pas recommandés par Topcom,
ne peuvent faire l'objet de recours à la garantie.
• La garantie ne couvre pas les dommages dus à des phénomènes extérieurs: foudre, eau,
feu, etc. ou tout évènement qui aurait modifié, effacé ou rendu illisible le numéro de série.
Attention: N'oubliez pas de joindre une preuve d'achat à l'envoi de votre appareil.
10. CARACTERISTIQUES TECHNIQUES
•Standard: DECT (Digital Enhanced Cordless
• Gamme de fréquences: 1880 MHZ à 1900 MHz
• Nombre de canaux: 120 canaux duplex
• Modulation: GFSK
• Encodage de la parole: 32 kbit/s
• Puissance d'émission: 10 mW (puissance moyenne par canal)
• Portée: 300 m dans un espace ouvert /50 m maximum à
•Alimentation électrique de la base: 220 V / 50 Hz pour la base
•Piles pour le combiné: 2 piles rechargeables AAA, NiMh 600mAh
• Autonomie du combiné: 150 heures en stand-by
• Temps de conversation: 12 heures
• Durée de charge: 6-8 heures
• Conditions normales d'utilisation: +5 °C à +45 °C
• Mode de composition du numéro: pulsation/tonalité (IWV/MFV)
Telecommunications)
GAP (Generic Access Profile)
l'intérieur de la maison
93 Cocoon 450
Page 94

DEUTSCH
1. BESCHREIBUNG DES TELEFONS 96
1.1. HANDGERÄT/BASISSTATION COCOON 450 96
1.2. DISPLAY 97
1.2.1. Stand-by-Display 97
2. INSTALLATION DES TELEFONS 98
2.1. ANSCHLÜSSE 98
2.2. WIEDERAUFLADBARE BATTERIEN 99
2.3. GÜRTELKLIPP 100
3. VERWENDUNG DES TELEFONS 101
3.1. HANDGERÄT AN/AUS 101
3.2. EINEN ANRUF ANNEHMEN 101
3.3. EXTERN TELEFONIEREN 101
3.4. INTERN TELEFONIEREN 101
3.5. FREISPRECHMODUS 101
3.6. INTERNES WEITERLEITEN EINES EXTERNEN ANRUFS 102
3.7. KONFERENZSCHALTUNG 102
3.8. ANZEIGE DER GESPRÄCHSDAUER 102
3.9. STUMMSCHALTUNG (MUTE) 102
3.10. PAUSENTASTE 102
3.11. RUFNUMMERNANZEIGE 103
3.11.1. Rufnummernanzeige zweiter anruf 103
3.11.2. Anrufliste 103
3.11.3. Eine Nummer der Anrufliste im Telefonbuch speichern 104
3.11.4. Alle Einträge der Anrufliste löschen 104
3.11.5. Voice mail Anzeige. 104
3.12. WAHLWIEDERHOLUNGSSPEICHER 104
3.13. EINE NUMMER AUS DEM TELEFONBUCH ANRUFEN 104
3.14. VERWENDUNG DER ALPHANUMERISCHEN TASTATUR 105
3.15. VERWENDUNG DES MENÜS 105
4. PERSÖNLICHE EINSTELLUNGEN 105
4.1. EINSTELLUNG DER LAUTSPRECHERLAUTSTÄRKE 105
4.1.1. Lautsprecherlautstärke während eines Anrufs 105
4.2. Einstellen der Klingellautstärke 106
4.2.1. Klingeln des Handgeräte 106
4.2.2. Klingeln der Basisstation 106
4.3. AUSWAHL DER KLINGELMELODIE 106
4.3.1. Melodie der Basisstation 107
4.3.2. Melodie des Handgeräte, externer Anruf 107
4.3.3. Melodie des Handgeräte, interner Anruf 107
4.4. AKTIVIEREN/DEAKTIVIEREN VON PIEPTÖNEN 108
4.4.1. Tastenton AN/AUS 108
4.4.2. Batterie fast leer 108
4.4.3. Handgerät außer Reichweite 108
4.4.4. Bestätigungstône 108
4.5. HANDGERÄT EINEN NAMEN GEBEN 108
4.6. WAHL DER MENÜSPRACHE 109
4.7. DEN PIN-CODE ÄNDERN 109
4.8. DEN WÄHLMODUS EINSTELLEN 109
4.9. AUTOMATISCHES ANNEHMEN 110
4.10. GESPRÄCHSDAUERANZEIGE ON/OFF 110
4.11. RESET 110
Cocoon 450 94
Page 95

DEUTSCH
5. WEITERE FUNKTIONEN 111
5.1. TELEFONBUCH 111
5.1.1. Einen Eintrag ins Telefonbuch einfügen 112
5.1.2. Einen Namen oder eine Nummer ändern 112
5.1.3. Einen Eintrag löschen 113
5.2. VIP KLINGELMELODIE 113
5.3. HANDGERÄT VON DER BASISSTATION AUS SUCHEN (PAGING) 113
5.4. SPERREN VON ANRUFEN 113
5.5. TASTENVERRIEGELUNG 114
5.5.1. ANSCHALTUNG DER TASTENVERRIEGELUNG 114
5.5.2. Deactivating the keypad lock 114
5.6. HEADSET CONNECTION 115
6. MEHRERE HANDGERÄTE VERWALTEN 115
6.1. EIN ZUSÄTZLICHES HANDGERÄT EINSTELLEN 115
6.1.1. Wenn Ihr zusätzliches Handgerät ein Cocoon 400/450 115
6.1.2. Wenn Ihr Handgerät ein anderes Modell ist 116
6.2. HANDGERÄT ENTFERNEN 116
6.3. HANDGERÄT AN EINER ANDEREN BASISSTATION ANMELDEN 116
6.4. BASISSTATION AUSWÄHLEN 116
6.5. ZIMMERÜBERWACHUNG 117
7. ANRUFBEANTWORTER 117
7.1. TASTEN HANDSET 117
7.2. EINSTELLUNGEN 118
7.2.1. Einstellen der Lautsprecherlautstärke der Basis 118
7.2.2. Aufzeichnung und Wiedergabe von Ansagetexten (Ansagetext 1 oder Ansagetext 2) 118
7.2.3. Einen Ansagetext selektieren (Ansagetext 1 oder Ansagetext 2) 118
7.2.4. Den Anrufbeantworter An-/Ausschalten 119
7.2.5; Einstellen der Anzahl Klingelzeichen 119
7.2.6. Einstellen des SOS-Codes und der Filterfunktion 120
7.2.7. Den VIP-Code programmieren 121
7.3. BEDIENUNG 121
7.3.1. Ein Memo aufzeichnen 121
7.3.2. Eingehende Nachrichten und Memos abspielen/löschen 122
7.3.3. Alle Nachrichten löschen 122
7.4. FERNBEDIENUNG 122
7.4.1. Zum Bedienen aus der Ferne 122
7.4.2. Anschalten aus der Ferne 123
7.5. ZUSAMMENFASSUNG DER SCHNELLZUGRIFFSFUNKTIONEN ZUM
ANRUFBEANTWORTER 124
8. PROBLEMLÖSUNG 125
9. GARANTIE 126
10. TECHNISCHE EIGENSCHAFTEN 126
95 Cocoon 450
Page 96

1. BESCHREIBUNG DES TELEFONS
1.1. HANDGERÄT/BASISSTATION COCOON 450
Display
Hörmuschel
DEUTSCH
Nach-oben-Taste/
Menu Taste
Mute(Stummschaltung)
Escape-Taste
Interner Anruf
Anzeige
Amtsleitung/ Neuer
Anruf
Anzeige
eingehender
Anruf
LadeAnzeige
Handsfree key
Nach-unten-Taste/
Anrufliste-Taste
Wahlwiederholungs
-Taste AN/AUS
Anschluß
Kopfhörer
Recall
Telefonbuch
Paging-Taste
Anmelden
Handgerät
(betätigen und
gedrückt halten)
Verbindungs-Taste
Mikrofon
Cocoon 450 96
Page 97

DEUTSCH
1.2. DISPLAY
Batterie Telefon Rufnummern-
anzeige
Nach links
bewegen
Anruf
Zu jeder Funktion gehört ein Symbol
Symbol: Bedeutung:
Sie sind in Verbindung
EXT Sie führen ein externes Gespräch
INT Sie führen ein internes Gespräch
Neue Nachricht in Ihrer Voice Mail erhalten
Sie öffnen Ihr Telefonbuch
MENU Sie befinden sich im Menü
Anzeige wiederaufladbare Batterien1 Abschnitt: schwach, 2 Abschnitte: starker,
3 Abschnitte: mittel, 4 Abschnitte: voll
Die Abschnitte blinken beim Aufladen
Tastatur des Handgeräte verriegelt
Die Antenne zeigt die Qualität des Empfangs an.
Die Antenne blinkt, wenn das Handgerät bei der Basisstation
nicht angemeldet ist oder Außerhalb des Bereich ist
oder Zeigt an, dass die angezeigte Nummer länger als der Bildschirm ist (12 Ziffern)
oder Mögliche Scroll-Richtung im Menü
Mikrofon nicht aktiviert
Ruftonlautstärke Handgerät nicht aktiviert
Identifikation Anrufer verfügbar/ neue Nummern in der Anrufliste
Tasten-
verriegelung
Menü Stumm-
schaltung
TelefonbuchNeuer AnrufExterner/ interner
Bereich-
anzeige
Nach rechts
bewegen
Ruftonlautstärke
ON/OFF
Stand-by-Display
1.2.1.
Im Stand-by-Modus zeigt das Handgerät die Bezeichnung und die Nummer des Handgeräte an:
C450 HS1
97 Cocoon 450
Page 98

2. INSTALLATION DES TELEFONS
2.1. ANSCHLÜSSE
Unterseite der Basisstation
DEUTSCH
Stromkabel
Cocoon 450 98
Telefonkabel
Page 99

DEUTSCH
2.2. WIEDERAUFLADBARE BATTERIEN
Bevor Sie Ihr Cocoon 450 zum ersten Mal verwenden, müssen Sie erst dafür
sorgen, dass die Batterien 6-8 Stunden lang aufgeladen werden. Wenn Sie das nicht tun,
funktioniert das Gerät nicht optimal.
Zum Austausch oder Einlegen der wiederaufladbaren Batterien:
1. Schieben Sie die Abdeckung nach unten und heben Sie sie dann an.
2. Legen Sie die Batterien ein. Achten Sie auf die Polarität (+ und -).
3. Schließen Sie das Batteriefach wieder.
wiederaufladbare Batterien
Rückseite des Handgeräts
Batterieabdeckung
Beachten Sie: Die maximale Funktionszeit der Batterien ist ungefähr 150 Stunden und die
maximale Sprechdauer ist 12 Stunden! Mit der Zeit werden die Batterien schneller leer
sein. Die Batterien müssen dann ersetzt werden. Sie können in jedem Elektrogeschäft
neue Batterien kaufen (2 wiederaufladbare Batterien, Typ AAA NiMH)!
99 Cocoon 450
Page 100

2.3. GÜRTELKLIPP
Der Gürtelklipp kann wie folgt entfernt und plaziert werden:
DEUTSCH
Cocoon 450 100
 Loading...