

Page 1
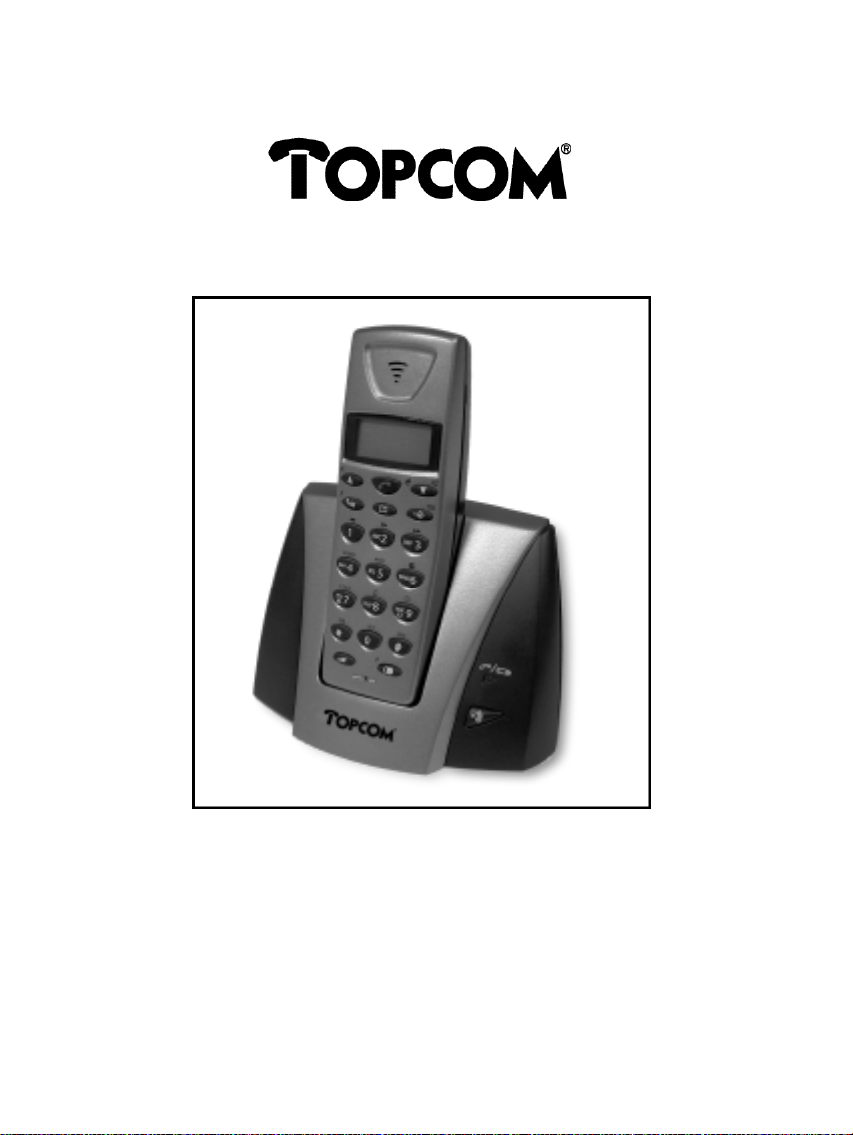
Cocoon 350
User Guide
Manual do Utilizador
ГдизЮч ¤ейфпщтзЭбч
Page 2
Page 3
Cocoon 350
1) To use ‘Caller ID’ (display caller), this service has to be activated on your phone line.
Normally you need a separate subscription from your telephone company to activate this function.
If you don’t have the Caller ID function on your phone line, the incoming telephone numbers
1) Para usar a função ‘Caller ID’ (identificação de chamada), este serviço tem de ser activado na
sua linha telefónica. Normalmente, precisa de uma assinatura separada na sua companhia telefónica
Se não tiver a função ‘Caller ID’ na sua linha telefónica, os números das chamadas que receber
2) Quando se recebe uma chamada, só toca o telefone sem fios e não o respectivo suporte.
1) ¡йб об штиуйнпрпйЬуефе фи мейфпщтзЭб бобзостйуич лмЬуецо ('Caller ID'), и бофЭуфпйши щритеуЭб ртЫрей об еЭобй еоетзпрпйинЫои
уфи зтбннЬ убч. ºбопойлА, зйб фио еоетзпрпЭиуи фич щритеуЭбч брбйфеЭфбй ненпоцнЫои еззтбжЬ уфио ефбйтЭб рпщ убч рбтЫшей
°о део Ышефе еоетзпрпйЬуей фио щритеуЭб бобзостйуич лмЬуецо уфи зтбннЬ убч, пй бтйхнпЭ фцо ейуетшЮнеоцо
will NOT be shown on the display of your telephone.
2) When a phone call comes in, only the handset rings and not the base unit.
лмЬуецо ¢¶Б хб енжбоЭъпофбй уфио пхЮои фпщ фимежсопщ убч.
2) ºбфА фи мЬги нйбч лмЬуич, лпщдпщоЭъей нЮоп фп блпщуфйлЮ лбй Юшй и вАуи.
!! Important !!
!! Importante !!
para activar esta função.
não aparecem no visor do seu telefone.
!! ªинбофйлЮ !!
фимежцойлЫч щритеуЭеч.
Page 4

Cocoon 350
1 INSTALLATION 8
2 KEYS/LED 9
3 DISPLAY (LCD) 9
4 OPERATION 10
4.1 Tone/Pulse setting 10
4.2 Setting the language 11
4.3 Making Calls 11
4.3.1 External Call 11
4.3.2 Number preparation 11
4.3.3 Redialling the last number dialled 11
4.3.4 Redial one of the last 5 numbers dialled 11
4.3.5 Calling a programmed number from the Phone Book 12
4.3.6 An internal call: calling another handset 12
4.4 Receiving a Call 12
4.4.1 Receiving an external call 12
4.4.2 Receiving an internal call 12
4.4.3 Receiving an external call during an internal call 13
4.5 Activate/Deactivate handsfree function 13
4.6 Transferring a call to another handset 13
4.7 Out of Range Warning 13
4.8 Setting the speaker volume 13
4.9 Call Duration Indicator on the Display 14
4.10 Turning off the microphone (mute) 14
4.11 Pause key 14
4.12 Conference call (two internal DECT handsets and one external caller) 14
4.13 Locating a misplaced handset (paging) 14
4.14 Using the alphanumeric keypad 15
4.15 The Phone Book 15
4.15.1 Adding a number and a name to Phone Book 15
4.15.2 Looking up a number in the Phone Book 16
4.15.3 Changing a name or number in the Phone Book 16
4.15.4 Deleting name and number from the Phone Book 16
4.16 Turning the handset on/off 17
4.16.1 Turning the handset off 17
4.16.2 Turning the handset on 17
4.17 Setting the ring volume level on the handset 17
4.17.1 Setting the ring volume for external calls (0-9) 17
4.17.2 Setting the ringer volume for internal calls (1-9) 17
4.18 Setting the ringer melody on the handset 18
4.18.1 Setting a ringer melody for external calls (1-9) 18
4.18.2 Setting a ringer melody for internal calls (1-9) 18
4.19 Locking the key pad 18
4.20 Turning key click on/off 19
4.21 The R key (flash) 19
4.22 Changing the PIN code 19
5
555555555
Page 5

Cocoon 350
4.23 Subscribing a handset to a Cocoon 300/350, Butler 1000, 1010, 1210 base unit 20
4.24 Subscribing Cocoon 350 handset on Butler 575/575+ & Cocoon100/100+ &
Butler 2000 base unit 20
4.25 Subscribing a Butler 1800T handset to a Cocoon 350 base unit 21
4.26 Removing subscription of a handset with a base unit 21
4.27 Selecting a base unit 22
4.27.1 Automatic selection 22
4.27.2 Manual selection 22
4.28 Barring outgoing calls 23
4.29 Default settings (reset)of the parameters 23
4.30 Complete Reinitialisation of the telephone 24
5 CALLER ID/CLIP 24
5.1 Setting the date and time 24
5.2 The Call List 25
5.3 Calling a number from the Call List 25
5.4 Storing a number from the Call List in the Phone Book 25
5.5 Deleting numbers from the Call List 26
5.5.1 Deleting one number 26
5.5.2 Delete all numbers 26
6 VOICE MAIL INDICATOR 26
7 ANSWERING MACHINE 26
7.1. Display 27
7.2 Answering Machine Menu 27
7.3 Keypad Functions 27
7.4 Exiting Answering Machine Menu 28
7.5 Outgoing Messages 28
7.5.1 Recording outgoing messages (OGM 1 or OGM 2) 28
7.5.2 Checking the Outgoing Message 28
7.5.3 Select outgoing message 28
7.5.4 Erasing the Outgoing Message 29
7.6 Turning Answering Machine On/Off 29
7.7 Setting Number of Rings 29
7.8 Checking Number of Rings 30
7.9 Setting Day and Time 30
7.10 Checking Day/Time 31
7.11 Programming the VIP Code 31
7.11.1 Changing the VIP Code 31
7.11.2 Checking the VIP Code 31
7.12 Operation 31
7.13 Call Screening 32
7.14 Recording a Memo 32
7.14.1 Playback of Incoming Messages and Memos 32
7.15 Erasing Messages 33
7.15.1 Erasing Messages One at a Time during Playback 33
7.15.2 Erase all messages 33
6
666666666
Page 6

Cocoon 350
7.16 Memory Full 33
7.17 Remote Operation 33
7.17.1 Listening to Messages 33
7.17.2 Erasing All Old Messages 34
7.17.3 Recording Memos 34
7.17.4 Playing Outgoing Message 34
7.17.5 Recording Outgoing Message 34
7.17.6 Turning Answering Machine On/Off 34
7.18 Ending Remote Operation 34
7.19 Turning Answering Machine On Remotely 34
7.20 List of Remote Operation Codes 35
8 WARRANTY 35
7
Page 7
Cocoon 350
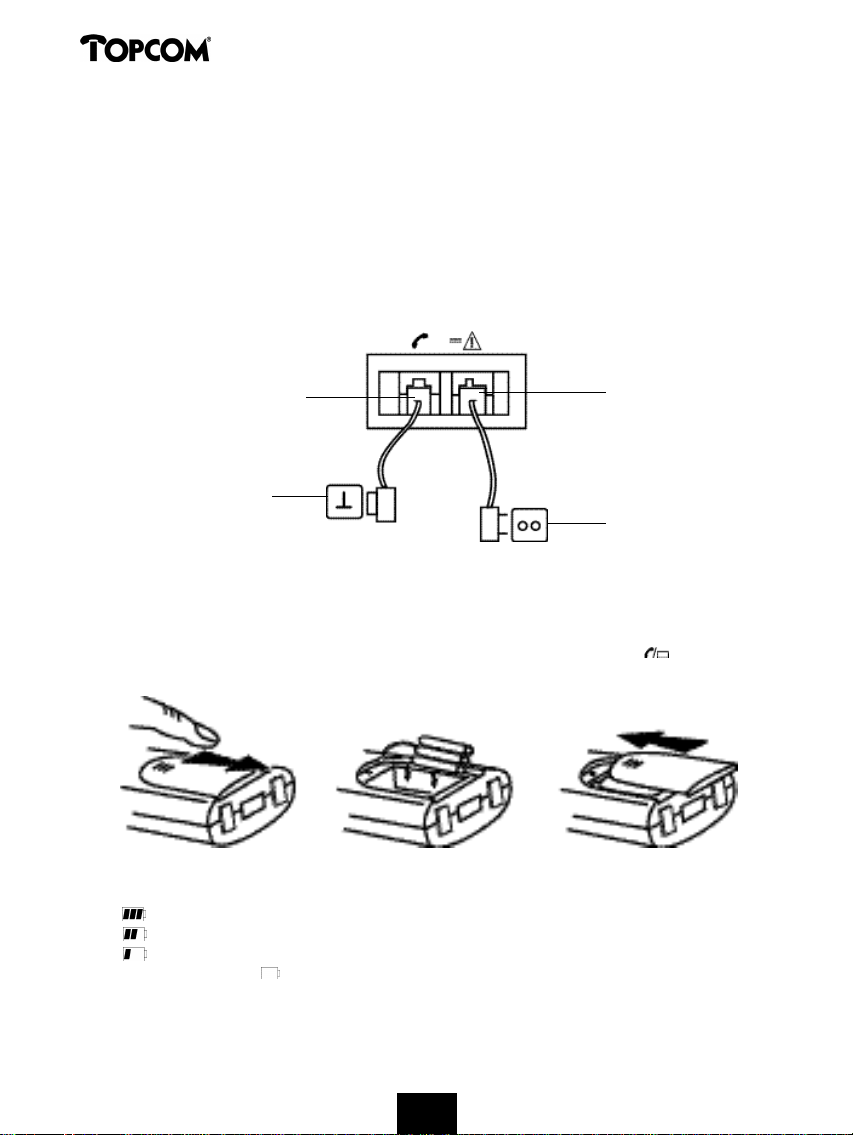
1 INSTALLATION
Before you use the telephone for the first time, you must first make sure the battery is charged
for 20 hours. If you do not do this, the telephone will not work optimally.
For installation, do the following:
• Plug one end of the adaptor into the outlet and the other end into the adapter jack on the
bottom of the telephone.
• Connect one end of the telephone cord with the wall phone jack and the other end to the
bottom of the telephone.
telephone connection
wall phone jack
adapter jack
adapter outlet
• Open the battery compartment (see below).
• Put the battery in the battery compartment and connect the battery connector to the handset
• Close the battery compartment.
• Leave the handset on the base unit for 20 hours. The Line/Charge indicator (LED) on
the base unit will light up.
Battery indicator:
• The battery is fully charged.
• The battery is half drained (50%)
• The battery is low. When the battery is low, you will hear warning signals and the
battery symbol on the display will blink.
8
8888888888
Page 8
Cocoon 350
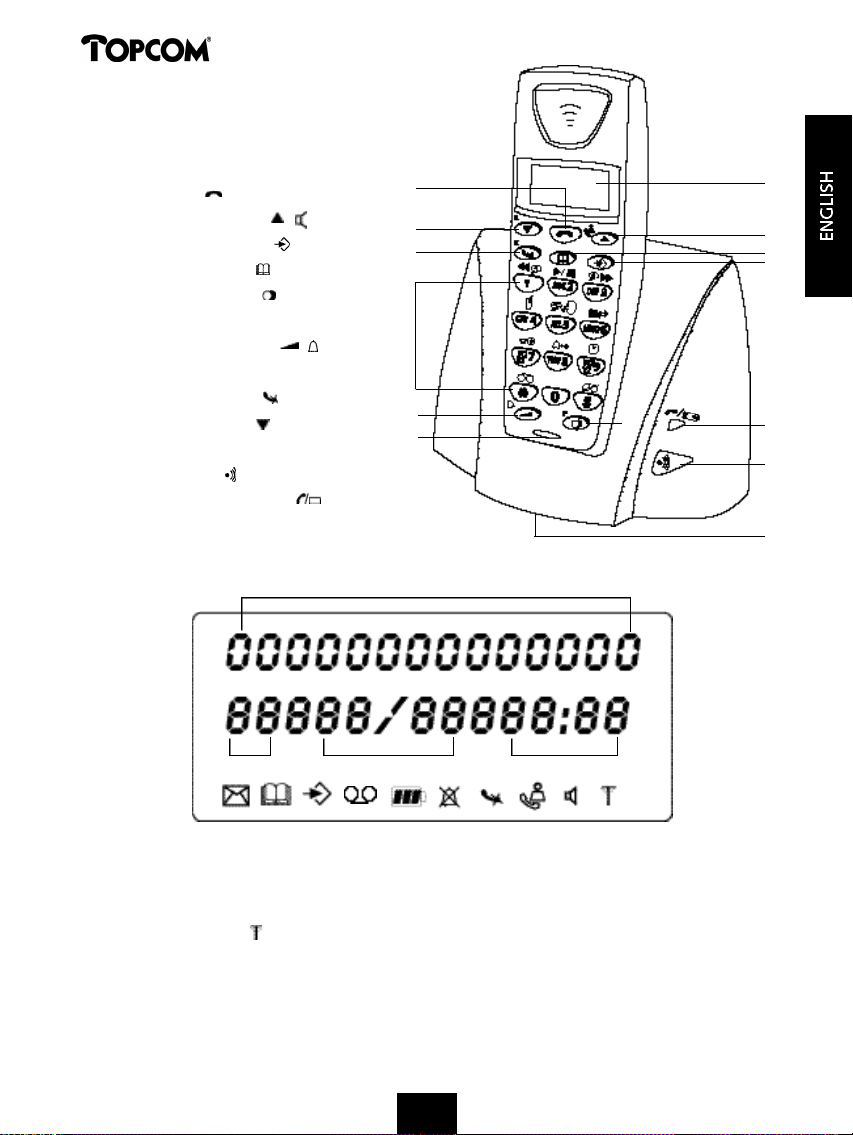
2 KEYS/LED
1 Display
2 Line key
3 Up/Handsfree key /
4 Programming key
5 Phonebook key
6 Redial/Pause key /P
7 Microphone
8 Volume/Ringer key /
9 Alphanumeric keys
10 Delete/Mute key
11 Down/Flash key /R
12 Base
13 Paging key
14 Line/Charge indicator (LED)
3 DISPLAY (LCD)
10
11
2
9
8
7
4
6
1
3
5
4
14
13
12
1 2 3
1 Number of calls received.
2 Date (day/month) of calls received.
3 Time (hour:minutes) of calls received.
4 Call information.
5 Symbol display ( ):
- this symbol means that the handset is located within the range of the base unit.
- when this symbol starts blinking, this means you are beyond the range of the
base unit. Move closer to the base unit so that the connection between the base unit
and the handset can be restored.
9
9999999999
Page 9
Cocoon 350
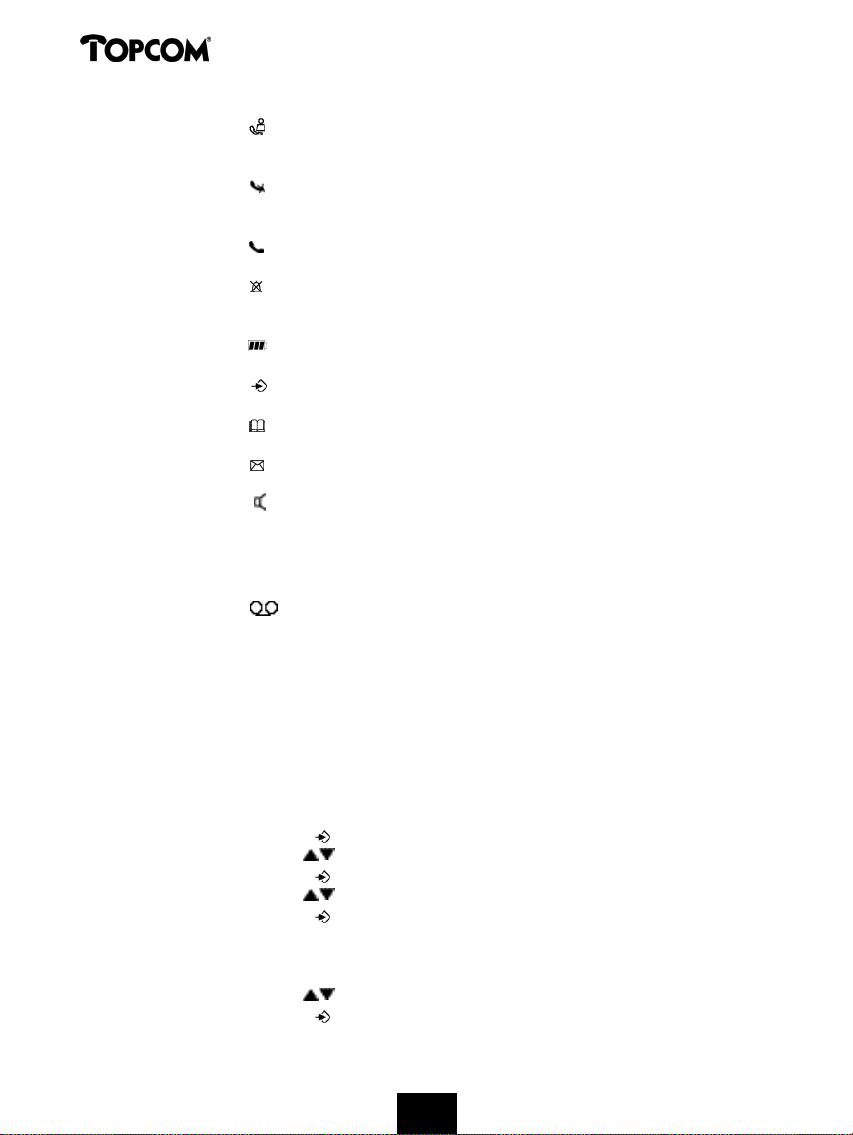
6 Symbol display ( ):
- this symbol means that the telephone has received calls that are automatically
stored in the Call List.
7 Symbol display ( ):
- this symbol means that the mute function is activated, the microphone is turned off
during a conversation.
8 Symbol display ( ):
- this symbol appears on the display when one makes or receives a call.
9 Symbol display ( ):
- this symbol means that the ringer is turned off. When one receives a call, the
telephone does not ring. The telephone will ring when one receives an internal call.
10 Symbol display ( ):
- this symbol is the battery indicator.
11 Symbol display ( ):
- this symbol means you are in the menu.
12 Symbol display ( ):
- this symbol appears when you browse the numbers in the Phone Book.
13 Symbol display ( ):
- this symbol appears when you have received a voice mail message (see chapter 6).
14 Symbol display ( ):
- this symbol means that the handsfree function is activated. You can now talk without
having to pick up the handset.
- this symbol blinks when the answering machine is activated (recording incoming
message,…)
15 Symbol display ( )
- this symbol means that the answering machine is activated or that you are in the menu
of the answering machine.
4 OPERATION
4.1 Tone/Pulse setting
The unit has been set to tone dialling mode (DTMF). If your system works on pulse dialling, you
can switch to pulse dialling (in most cases this is not necessary).
Take the following steps:
• Press the Programming key .
• Press the Up or Down key repeatedly until ‘SETTING’ appears on the display.
• Press the Programming key .
• Press the Up or Down key repeatedly until ‘DIAL MODE’ appears on the display.
• Press the Programming key .
• The current status appears on the display:
-‘TONE’: Tone dialling for most of the telephone exchanges and phone lines
-‘PULSE’: Pulse dialling for old telephone exchanges that not operate on tone dialling
• Press the Up or Down key to make your selection.
• Press the Programming key to confirm your selection.
10
1010101010
1010101010
Page 10

Cocoon 350
4.2 Setting the language
The telephone has 5 display languages: see display languages table on packaging!!
To set the language, do the following:
• Press the Programming key .
• Press the Up or Down key repeatedly until ‘SETTING’ appears on the display
• Press the Programming key .
• ‘LANGUAGE’ appears on the display.
• Press the Programming key .
• The language set appears on the display.
• Press the Up or Down key repeatedly to select the language you would like to use.
• Once the desired language appears on the display, press the Programming key to confirm
your selection or repeatedly press the Delete/Mute key to leave the menu.
4.3 Making Calls
4.3.1 External Call
• Press the Line key .
• The Line/Charge indicator (LED) on the base unit will blink. ‘EXT’ and the Call symbol
appear on the display.
• You will hear the dial tone. Dial the telephone number you wish to call.
• The number appears on the display and is dialled.
• After finishing your call, press the Line key to hang up or put the handset back on the
base unit.
4.3.2 Number preparation
• Dial the telephone number you wish to call. You can correct the number by pressing the
Delete/Mute key .
• Press the Line key .
• The Line/Charge indicator (LED) on the base unit will blink. ‘EXT’ and the Call symbol
appear on the display.
• The telephone number is dialled automatically.
• After finishing your call, press the Line key to hang up or put the handset back on the
base unit.
4.3.3 Redialling the last number dialled
• Press the Line key .
• The Line/Charge indicator (LED) on the base unit will blink. ‘EXT’ and the Call symbol
appear on the display.
• You will hear the dial tone.
• Press the Redial key . The number you last called is dialled automatically without having to
re-enter the number.
4.3.4 Redial one of the last 5 numbers dialled
• Press the Redial key . The number you last called appears on the display. If you would like
to dial one of the last 5 numbers dialled, press the Redial key a few times until the desired
number appears on the display.
11
11111111111111111111
Page 11
Cocoon 350
• Press the Line key .
• The number shown on the display is dialled automatically without you having to re-enter the
number.
• After finishing your call, press the Line key to hang up or put the handset back on the
base unit.
4.3.5 Calling a programmed number from the Phone Book
The telephone has a Phone Book in which you can program the telephone number of calls
received by name. If you would like to call a number from the Phone Book, do the following:
• Press the Phone Book key . The first number of the Phone Book appears on the display.
• Press the Up or Down key repeatedly to select the telephone number you wish to call.
• Press the Line key .
• The number shown on the display, is dialled automatically without you having to re-enter the
number.
• After finishing your call, press the Line key to hang up or put the handset back on the
base unit.
4.3.6 An internal call: calling another handset
This function only works if multiple handsets are subscribed to the base unit !
• Press the Programming key .
• Press the Up or Down key repeatedly until ‘INTERCOM’ appears on the display.
• Press the Programming key .
• ‘INT‘ appears on the display
• Dial the number of the handset you would like to call.
• After finishing your call, press the Line key to hang up or put the handset back on the
base unit.
4.4 Receiving a Call
4.4.1 Receiving an external call
• All subscribed handsets will ring when you receive a call.
• The Call symbol blinks on the display.
• The telephone number of the caller appears on the display if you have Caller ID service (CLIP).
Consult your telephone company. The name of the caller also appears on the display if:
- the name is programmed into the Phone Book
- the network sends the name together with the telephone number
(FSK CID system only).
• Press the Line key to accept the external call.
• During the call ‘EXT’ and the symbol appear on the display. The call timer starts running.
• After finishing your call, press the Line key to hang up or put the handset back on the
base unit.
4.4.2 Receiving an internal call
This function only works if multiple handsets are subscribed to the base unit!
• The handset rings.
• ‘INT’ and the number of the handset you are trying to reach, appear on the display. The Call
symbol blinks on the display.
12
1212121212
1212121212
Page 12

Cocoon 350
• Press the Line key to accept the internal call.
• During the call, ‘INT’, the handset number of the caller and the symbol appear on the
display. The call timer starts running.
• After finishing your call, press the Line key to hang up or put the handset back on the
base unit.
4.4.3 Receiving an external call during an internal call
If you receive an external call during an internal call, you will hear a call waiting tone (double
beep) on both handsets being used for an internal call.
• Press the Line key twice to accept the external call.
• After finishing your call, press the Line key to hang up or put the handset back on the
base unit.
4.5 Activate/deactivate handsfree function
This function allows you to communicate without having to pick up the handset. When you are
on the phone, press the Up/Handsfree key / to activate the handsfree function.
Press the same button to deactivate the handsfree function.
Note : When you are calling in handsfree mode and you want to change the volume, press the Volume
button .
Attention !! When you use the handsfree function for a long time, the batteries will be empty quickly !
4.6 Transferring a call to another handset
• You have an external caller on the line.
• Press the Programming key .
• ‘INTERCOM’ appears on the display.
• Press the Programming key .
• The external call is now on hold.
• ‘INT‘ appears on the display.
• Dial the number of the handset to which you would like to transfer the call.
• If the handset dialled is answered, you can have an internal conversation. Press the Line key
and the external call is transferred.
• If the handset dialled is not answered, press the Down key to speak to the external caller
again.
4.7 Out of Range Warning
If the handset is out of range of the base unit, a warning signal will sound.
• ‘SEARCHING’ appears on the display and the symbol blinks on the display.
• Move closer to the base unit.
• As soon as you are back within range of the base unit, a signal sounds and the symbol
stops blinking.
4.8 Setting the speaker volume
Use the Volume/Ringer key / to set the volume of the speaker (handset) during the call. You
can choose from 5 levels. The telephone is set to level ‘3’ by default.
13
1313131313
1313131313
Page 13

Cocoon 350
During a call, you can change the volume as follows:
• Press the Volume/Ringer key / .
• The volume level currently set appears on the display.
• Use the number keys to set the desired level (1-5).
• Press the Volume/Ringer key / to confirm your selection.
Note : You have 8 seconds to set the desired volume; if you do not, the telephone returns to standby
mode and the volume remains unchanged.
4.9 Call Duration Indicator on the Display
As soon as you press the Line key the call duration appears on the display (minutes-seconds).
E.g. “ 01-20 “ for 1 minute and 20 seconds.
The call duration remains visible on the display for 5 seconds after each call.
4.10 Turning off the microphone (mute)
It is possible to turn off the microphone during a call by pressing the Delete/Mute key . Now
you can speak freely without the caller being able to hear you.
• You are on the phone. The Line/Charge indicator (LED) on the base unit will blink and
the Call symbol appears on the display.
• Press the Delete/Mute key to turn off the microphone.
• The symbol ‘X’ appears on the display ( ).
• When you want to resume the conversation, press the Delete/Mute key again.
• The symbol ‘X’ disappears from the display ( ). The person on the other end of the line can
hear you again.
4.11 Pause key
If you dial a telephone number and you would like to add a pause to this number, press the
Pause key at the desired place in the number.
When you call this number, this pause (3 seconds) is automatically included.
4.12 Conference call (two internal DECT handsets and one external caller)
You can have a telephone conversation with one internal and one external caller at the same
time.
• While on the line with an external caller, press the Programming key .
• ‘INTERCOM’ appears on the display.
• Press the Programming key .
• The external call is now on hold.
• ‘INT‘ appears on the display.
• Dial the number of the handset you would like to include in the call.
• Once the handset dialled is answered, keep the ‘#’ key pressed for 3 seconds.
• ‘CONFERENCE’ appears on the display.
• Now you are connected to one external and one internal caller (conference call).
4.13 Locating a misplaced handset (paging)
If you cannot find the handset, briefly press the Paging key on the base unit.
14
1414141414
1414141414
Page 14
Cocoon 350
All handsets subscribed with the base unit will sound a signal so you can locate the misplaced
handset. To stop the signal, briefly press the Line key on the handset.
4.14 Using the alphanumeric keypad
Use the alphanumeric keypad to type text. To select a letter, press the corresponding key. E.g.
if you press the alphanumeric key ’5’, the first character (j) appears on the display. Press it
repeatedly to select other characters from this key.
Press the ‘2’ key twice to select the letter ‘B’. If you would like to select both ‘A’ and ‘B’ after
each other, first press the ‘2’ key once to select ‘A’, wait 2 seconds until the cursor moves to the
next position and then press the ‘2’ key twice to select ‘B’. You can delete characters mistakenly
typed by using the Delete key . The character in front of the cursor will be deleted. You can
move the cursor by pressing the Up and Down keys .
Available characters
Press the right keys to get the following characters:
KEYS
FIRST SECOND THIRD FOURTH FIFTH
PRESS PRESS PRESS PRESS PRESS
1 + - / 1
2 A B C 2
3 D E F 3
4 G H I 4
5 J K L 5
6 M N O 6
7 P Q R S 7
8 T U V 8
9 W X Y Z 9
0
SPACE
0
4.15 The Phone Book
4.15.1 Adding a number and a name to the Phone Book
• Press the Programming key .
• Press the Up or Down key repeatedly until ‘PHONE BOOK’ appears on the display.
• Press the Programming key .
• ‘SEARCH‘ appears on the display.
• Press the Up or Down key repeatedly until ‘ADD NEW’ appears on the display.
• Press the Programming key .
• ‘NAME‘ appears on the display.
• Enter the name. Use the alphanumeric keys.
• Press the Programming key .
• Enter the telephone number. Use the alphanumeric keys.
• Press the Programming key .
• You will hear a long beep. The name and the number are stored in the Phone Book.
15
151515
15151515151515
Page 15
Cocoon 350
4.15.2 Looking up a number in the Phone Book
• Press the Programming key .
• Press the Up or Down key repeatedly until ‘PHONE BOOK’ appears on the display.
• Press the Programming key .
• ‘SEARCH‘ appears on the display.
• Press the Programming key .
• Enter the first letters of the desired name.
• Press the Programming key .
• The first name, corresponding with these letters appears on the display.
• Press the Up or Down key to browse for other numbers in the Phone Book.
• Once the desired number appears on the display, the number will be automatically dialled
once the Line key is pressed.
4.15.3 Changing a name or number in the Phone Book
• Press the Programming key .
• Press the Up or Down key repeatedly until ‘PHONE BOOK’ appears on the display.
• Press the Programming key .
• ‘SEARCH‘ appears on the display.
• Press the Up or Down key repeatedly until ‘EDIT’ appears on the display.
• Press the Programming key .
• The first number in the Phone Book appears on the display.
• Press the Up or Down key until the desired number appears on the display.
• Press the Programming key to change the selected number programmed into the memory.
• Press the Delete key to delete each letter of the name and use the alphanumeric keypad
to enter the correct name.
• Press the Programming key .
• Press the Delete key to delete each digit of the number and use the alphanumeric keypad to
enter the correct number.
• Press the Programming key to save the changes made.
4.15.4 Deleting name and number from the Phone Book
• Press the Programming key .
• Press the Up or Down key repeatedly until ‘PHONE BOOK’ appears on the display.
• Press the Programming key .
• ‘SEARCH‘ appears on the display.
• Press the Up or Down key repeatedly until ‘DELETE’ appears on the display.
• Press the Programming key .
• The first number in the Phone Book appears on the display.
• Press the Up or Down key until the number you want to delete appears on the display.
• Press the Delete key .
• ‘DELETE ?’ appears on the display.
• Press the Programming key to confirm that you want to delete it.
16
16161616161616161616
Page 16
Cocoon 350
4.16 Turning the handset on/off
4.16.1 Turning the handset off
The handset is turned on.
• Press the Programming key .
• Press the Up or Down key repeatedly until ‘POWER OFF’ appears on the display.
• Press the Programming key . The telephone turns itself off. You cannot dial any more
numbers, nor receive any calls.
Note : If you would like to leave the menu without turning off the handset, press the Delete/Mute key .
4.16.2 Turning the handset on
The handset is turned off.
• Press the Programming key . The telephone turns itself on.
4.17 Setting the ring volume level on the handset
If you want, you can change the ring volume of an incoming call. You have 10 levels. You can
set the ring volume of internal and external calls separately so you can hear a difference.
If you select level ‘0’, the symbol appears on the display and you no longer hear the phone
ring when an external call is received (you still hear it ring for internal calls).
Level ‘9’ is the highest level. The telephone is set to level ‘5’ by default.
4.17.1 Setting the ring volume for external calls (0-9)
• Press the Programming key .
• Press the Up or Down key repeatedly until ‘RING SEL’ appears on the display.
• Press the Programming key .
• ‘EXTERNAL‘ appears on the display.
• Press the Programming key .
• Press the Up or Down key repeatedly until ‘VOLUME’ appears on the display.
• Press the Programming key .
• The current volume level used appears on the display.
• Enter a number between 0 and 9 to select the desired ringer volume. Use the number keypad
to do this.
• Press the Programming key to confirm your selection.
4.17.2 Setting the ringer volume for internal calls (1-9)
• Press the Programming key .
• Press the Up or Down key repeatedly until ‘RING SEL’ appears on the display.
• Press the Programming key .
• ‘EXTERNAL‘ appears on the display.
• Press the Up or Down key repeatedly until ‘INTERNAL’ appears on the display.
• Press the Programming key .
• Press the Up or Down key repeatedly until ‘VOLUME’ appears on the display.
• Press the Programming key .
• The current volume level appears on the display.
• Enter a number between 1 and 9 to select the desired ringer volume. Use the number keypad
to do this.
• Press the Programming key to confirm your selection.
17
171717
17171717171717
Page 17

Cocoon 350
4.18 Setting the ringer melody on the handset
If you want, you can change the ringer melody for an incoming call. You have 9 ringer
melodies to choose from (1-9). By default, the ringer melody is set to ‘5’.
4.18.1 Setting a ringer melody for external calls (1-9)
• Press the Programming key .
• Press the Up or Down key repeatedly until ‘RING SEL’ appears on the display.
• Press the Programming key .
• ‘EXTERNAL‘ appears on the display.
• Press the Programming key .
• ‘MELODIES‘ appears on the display.
• Press the Programming key .
• The currently set ringer melody appears on the display.
• Enter a number between 1 and 9 to select he desired ringer melody. Use the number keypad
to do this.
• Press the Programming key to confirm your selection.
4.18.2 Setting a ringer melody for internal calls (1-9)
• Press the Programming key .
• Press the Up or Down key repeatedly until ‘RING SEL’ appears on the display.
• Press the Programming key .
• ‘EXTERNAL‘ appears on the display.
• Press the Up or Down key repeatedly until ‘INTERNAL’ appears on the display.
• Press the Programming key .
• ‘MELODIES‘ appears on the display.
• Press the Programming key .
• The currently set ringer melody appears on the display.
• Enter a number between 1 and 9 to select the desired ringer melody. Use the number keypad
for this.
• Press the Programming key to confirm your selection.
4.19 Locking the key pad
If you lock the alphanumeric keypad, it is impossible to dial a telephone number.
Only the Programming key can still be used. ‘KEY LOCKED’ will be displayed on the display.
• Press the Programming key .
• Press the Up or Down key repeatedly until ‘KEY SETUP’ appears on the display.
• Press the Programming key .
• KEY LOCK‘ appears on the display.
• Press the Programming key .
• The current status of the keypad appears on the display:
- ‘LOCK’: the keypad is locked
- ‘UNLOCK’: the keypad is not locked
• Press the Up or Down key to make your selection.
• Press the Programming key to confirm your selection.
18
18181818181818181818
Page 18

Cocoon 350
4.20 Turning key click on/off
You can set the telephone to make a sound whenever you press a key.
• Press the Programming key .
• Press the Up or Down key repeatedly until ‘KEY SETUP’ appears on the display.
• Press the Programming key .
• Press the Up or Down key repeatedly until ‘KEY CLICK’ appears on the display.
• Press the Programming key .
• The current status appears on the display:
- ‘CLICK ON’: turn on key click
- ‘CLICK OFF’: turn off key click
• Press the Up or Down key to make your selection.
• Press the Programming key to confirm your selection.
4.21 The R key (flash)
Press the Flash key ‘R’ to use certain services such as “call waiting” (if your telephone company
offers this feature); or to transfer calls if you use a telephone exchange (PABX). The Flash key
‘R’ is a brief interruption of the line. You can set the flash time to 100ms or 250ms. If your
system requires another flash time, do the following:
• Press the Programming key .
• Press the Up or Down key repeatedly until ‘SETTING’ appears on the display
• Press the Programming key .
• Press the Up or Down key repeatedly until ‘RECALL’ appears on the display.
• Press the Programming key .
• Press the Up or Down key repeatedly to select the flash time:
- SHORT = 100ms
- LONG = 250ms
• Press the Programming key to confirm your selection.
4.22 Changing the PIN code
Certain functions are only available if you know the PIN code of the telephone. Thanks to this
secret code, settings are displayed that only you can change. The PIN code has 4 digits. The
default PIN code setting is ‘0000’. If you would like to change the default PIN code and set
your own secret code, do the following:
• Press the Programming key .
• Press the Up or Down key repeatedly until ‘SETTING’ appears on the display.
• Press the Programming key .
• Press the Up or Down key repeatedly until ‘PIN CODE’ appears on the display.
• Press the Programming key .
• ‘OLD CODE’ appears on the display.
• Enter the old PIN code. Use the number keys.
• Press the Programming key .
• ‘NEW CODE’ appears on the display.
• Enter the new PIN code in. Use the number keys.
• Press the Programming key .
• ‘AGAIN’ appears on the display.
• Enter the new PIN code again. Use the number keys.
19
19191919191919191919
Page 19

Cocoon 350
• Press the Programming key .
• You hear a confirmation tone. The new PIN code has been set.
Caution : Do not forget your personal PIN code. If you do, you have to restore the default settings
(reset – see section 4.30).
4.23 Subscribing a handset to a Cocoon 300/350, Butler 1000, 1010, 1210, 1250
base unit
In order to be able to make and receive telephone calls, a new handset has to be subscribed to
the base unit. You can subscribe 5 handsets to one base unit. By default, each handset is
subscribed as handset 1 on the base unit upon delivery (base unit 1).
!!! You only need to subscribe the handset if: !!!
• the handset subscription has been removed from the base unit (e.g. for reinitialisation)
• you want to subscribe a different handset to this base unit.
Note: The underlined procedure is only applicable to a Cocoon 300/350, Butler 1000, 1010, 1210, 1250
handset and base unit!! The answering machine only works with the first Cocoon 350 handset which has
been subscribed to a Cocoon 350 base unit!!
Keep the Paging key on the base unit pressed for 10 seconds until the Line/Charge indicator
on the base unit begins to blink rapidly. The Line/Charge indicator will blink rapidly
for one minute. During this minute, the base unit is in subscribing mode and you must do the
following to subscribe the handset:
• Press the Programming key .
• Press the Up or Down key repeatedly until ‘BASE SUB’ appears on the display.
• Press the Programming key .
• ‘BASE _‘ appears on the display.
• Enter a number of the base unit you would like to subscribe the handset to (1-4).
Use the number keypad.
Note: Each handset can be subscribed to 4 different DECT base units. Each base unit is assigned a
number from 1 to 4 in the handset. When you subscribe a new handset, you can assign a base unit
number. It is best to use ‘1’ .
• ‘SEARCHING’ and the symbol appears on the display.
• The RFPI code (each base unit has a unique RFPI code) appears on the display and a signal
sounds when the handset has found the base unit.
• Press the Programming key .
• ‘PIN’ appears on the display.
• Enter the 4-digit PIN code of the base unit in (default PIN code is ‘0000’). Use the number
keypad.
• Press the Programming key .
• The handset is subscribed to the base unit.
4.24 Subscribing Cocoon 350 handset on Butler 575/575+ & Cocoon100/100+ &
Butler 2000 base unit
Press the Paging key on the Butler 575/575+ or Cocoon100/100+ or Butler 2000 base unit
for +/- 15 seconds until you hear a beep. The base unit is now in subscribing mode. For 1
minute, the base unit is in subscribing mode and you have to do the following to subscribe the
handset:
20
202020
20202020202020
Page 20
Cocoon 350
Note: The answering machine only works with the original Cocoon 350 handset subscribed to a Cocoon 350
base unit!!
• Press the Programming key .
• Press the Up or Down key repeatedly until ‘BASE SUB’ appears on the display.
• Press the Programming key .
• ‘BASE _‘ appears on the display.
• Enter a number for the base unit to which you would like to subscribe the handset (1-4).
Use the number keypad.
• ‘SEARCHING’ and the symbol appear on the display.
• The RFPI code (each base unit has a unique RFPI code) appears on the display and a signal
sounds once the base unit is found by the handset.
• Press the Programming key .
• ‘PIN’ appears on the display.
• Enter the 4-digit PIN code of the base unit (default PIN code is ‘1590’). Use the number keypad.
• Press the Programming key .
• The handset is subscribed to the base unit.
4.25 Subscribing a Butler 1800T handset to a Cocoon 350 base unit
The below procedure only applies to a Butler 1800T handset and Cocoon 350 base unit!!
Press the Paging key on the base unit for 10 seconds until the Line/Charge indicator
op the base unit starts to blink quickly. The Line/Charge indicator will blink quickly for one
minute. During this minute, the base unit is in subscribing mode and you must do the
following to subscribe the handset:
• Press the key once.
• Press the OK key and select a base unit (1-4) with the keys.
• Press the OK key.
• Enter the PIN code of your base unit. Usually: 0000.
• Press OK. The Butler 1800T now searches for your DECT base unit. As soon as it finds it, you
will see the identification code of this base unit on the display.
• Press OK to confirm your selection or press ESC to cancel the subscription.
4.26 Removing subscription of a handset to a base unit
It is possible to cancel subscription of a handset to a base unit. You would do this if a
handset is damaged and has to be replaced by a new one.
Caution: You can only cancel subscription of another handset, not the handset you are using to do the
cancellation procedure.
• Press the Programming key .
• Press the Up or Down key repeatedly until ‘SETTING’ appears on the display.
• Press the Programming key .
• Press the Up or Down key repeatedly until ‘REMOVE HS’ appears on the display.
• Press the Programming key .
• ‘PIN’ appears on the display.
• Enter your 4-digit PIN code in (default PIN code is ‘0000’). Use the number keypad.
• Press the Programming key .
• ‘REMOVE HS’ appears on the display.
21
2121212121
2121212121
Page 21

Cocoon 350
• Dial the number of the handset you want to remove (1 –5). Use the number keypad.
• Press the Programming key .
• ‘REMOVE HS’ appears on the display and the handset is removed
• NOT SUB’ appears on the handset removed.
4.27 Selecting a base unit
If your handset is subscribed to several base unit stations (max. 4) , you must select a base unit
because the handset can only communicate with one base unit at a time. There are two possibilities:
4.27.1 Automatic selection
If you set the handset to ‘automatic selection’, the handset will automatically choose the closest
base unit in standby.
• Press the Programming key .
• Press the Up or Down key repeatedly until ‘SETTING’ appears on the display.
• Press the Programming key .
• Press the Up or Down key repeatedly until ‘BASE SEL’ appears on the display.
• Press the Programming key .
• Press the Up or Down key repeatedly until ‘AUTO’ appears on the display.
• Press the Programming key .
• ‘SEARCHING’ and the symbol appear on the display.
• A signal sounds once the handset has found a base unit.
4.27.2 Manual selection
If you set the handset to ‘manual selection’, the handset will only choose the base unit you
have set.
• Press the Programming key .
• Press the Up or Down key repeatedly until ‘SETTING’ appears on the display.
• Press the Programming key .
• Press the Up or Down key repeatedly until ‘BASE SEL’ appears on the display.
• Press the Programming key .
• Press the Up or Down key repeatedly until ‘MANUAL’ appears on the display.
• Press the Programming key .
• ‘BASE -‘ appears on the display.
• Enter the number of the base unit you want to select (1-4). Use the number keypad.
• Press the Programming key .
• ‘SEARCHING’ and the symbol appear on the display.
• A signal sounds once the selected base unit has been found.
Notes :
• Before you can select a base unit, the base unit must be subscribed to the handset first.
• If ‘NOT SUB’ appears on the display, this means the selected base unit does not exist or the handset
has not been subscribed.
22
22222222222222222222
Page 22
Cocoon 350
4.28 Barring outgoing calls
You can program the handsets to bar calls to certain telephone numbers so that for instance ‘00’
international numbers cannot be called. Up to 5 numbers (of max. 5 digits) can be barred.
To do this, do the following:
• Press the Programming key .
• Press the Up or Down key repeatedly until ‘SETTING’ appears on the display.
• Press the Programming key .
• Press the Up or Down key repeatedly until ‘BARRING’ appears on the display.
• Press the Programming key .
• ‘PIN’ appears on the display.
• Enter your PIN code
• Press the Programming key .
• ‘BAR NUM ’ appears on the display. You are in memory “1. _ _ _ _ _”.
• Press the Up or Down key to select one of the 5 memories.
• Enter the number (max. 5 digits) to be barred, e.g. 01486.
• Press the Programming key .
• ‘HS _ _ _ _ _’ (= number on the handset (1-5)) ‘01486’ (= the barred numbers) appear on
the display.
• Enter the numbers of the handsets from which the barred numbers cannot be called.
• e.g. Press the number key 2, 3 and 5. On the display, this will appear: HS _2 3_5 01486
These handsets can no longer dial numbers beginning with ‘01486’.
• Press the Programming key to confirm your selection.
Repeat the same procedure described above if you would like to bar other numbers (max. 5)!
4.29 Default settings (reset) of the parameters
You can reset the standard (default) settings in the telephone so that they are the same they
were when you bought the telephone. You need the PIN code to do this.
The default settings are: Answering machine:
- Keypad: not locked - Answering machine: on
- Key clicks: active - Standard message: OGM1
- Speaker volume: level 3 - Number of rings: 3
- Ringer melody: 1 - Remote control code: 321
- Ringer volume : 5
- Selection base unit: automatic
To restore the default settings, do the following:
• Press the Programming key .
• Press the Up or Down key repeatedly until ‘SETTING’ appears on the display.
• Press the Programming key .
• Press the Up or Down key repeatedly until ‘RESET’ appears on the display.
• Press the Programming key .
• ‘PIN’ appears on the display.
• Enter your PIN code.
• Press the Programming key .
23
23232323232323232323
Page 23

Cocoon 350
4.30 Complete Reinitialisation of the telephone
This function allows you to completely reinitialise the telephone without requiring your PIN
code. This will delete all Phone Book memory entries, all handsets will be removed, all default
settings will be restored and the default PIN code will be restored to ‘0000’.
Do the following:
• Disconnect the battery in the telephone.
• Keep the ‘*’ key pressed and reconnect the battery until the handset rings continually and
the display lights up. Release the ‘*’ button and press the Programming key .
• The handset finds the base unit and a signal sounds.
• Briefly press the ‘*’ key.
• ‘RESET ?‘ appears on the display.
• Press the Programming key to confirm your selection of disconnect the battery to
discontinue the procedure.
• ‘RESETTING‘ appears on the display and a long beep tone sounds.
• ‘NOT SUB‘ appears on the display. The handset is completely reinitialised.
Afterwards, you must resubscribe all handsets as described in point 4.23! However you no
longer need to set the base unit to subscription mode, because this now happens automatically!
5 CALLER ID/CLIP
(This service only works when you have a Caller ID/Clip subscription. Contact your telephone
company).
When you receive a call, the telephone number of the caller, the date and time appears on the
handset display. If the name is programmed in the Phone Book, the name in the Phone Book is
displayed!
The telephone can store 30 calls in a Call List that can be reviewed later. The telephone never
stores the same call twice. When the memory is full, the new calls automatically replace the
oldest calls in the memory. The symbol on the display blinks if the call is not read or n o t
answered. If the Call List is empty and you press the Up key , three beep tones will sound.
You can view the information of an incoming call as follows:
• Press the Up key . The name (if sent by the network or present in the Phone Book memory)
of the caller, the sequence number of the call in the Call List, the date and time of the call
appear on the display.
• Press the Down key . The telephone number of the caller appears on the display.
5.1. Setting the date and time
When you receive an incoming call and the date and time are not sent together with the
telephone number, this means that the date and the time will not be shown on the display (or
they will be shown incorrectly). By setting the date and time, they will be shown on the display,
together with the telephone number, every time a call comes in !
24
24242424242424242424
Page 24

Cocoon 350
• Press the Programming key .
• Press the Up or Down key a few times until ‘SETTING’ appears on the display.
• Press the Programming key .
• ’DATE/TIME’ appears on the display.
• Press the Programming key again.
• When ‘YEAR’ appears on the display, enter the 2 last numbers of the year (00=2000,
01=2001, ...) and press the Programming key to confirm.
• When ‘MONTH’ appears on the display, enter the month (01=January, 02=February, ...) and
press the Programming key to confirm.
• When ‘DAY’ appears on the display, enter the day of the month and press the Programming
key to confirm.
• When ‘HOUR’ appears on the display, enter the current hour (in 24h format) and press the
Programming key to confirm.
• When ‘MINUTES’ appears on the display, enter the minutes and press the Programming key
to confirm.
The date and time are now set !
Note: In case of power failure in the base unit, the date and time need to be set again.
5.2 The Call List
The calls received are stored in the Call List (max. 30 numbers).
• Briefly press the Up key to view the most recent call.
• The name of the most recent caller appears on the display. If no name is available, ‘NO
NAME’ appears on the display.
• If it is a private number, ‘UNAVAL’ appears on the display.
• The date and time the call was received are linked to each call.
• B r i e fly press the Down key to view the telephone number of the call.
• Briefly press the Down key to browse other numbers on the list.
Notes :
• If neither the Up or Down key is pressed for 15 seconds, the telephone will return to standby mode.
• After a call is received, the number of the caller remains on the display for 15 seconds after the last ring.
• Caller ID is not available while you are on the line.
5.3 Calling a number from the Call List
• Press the Up key to go to the Call List
• Press the Up key to look up the desired call. Press the Down key to view the telephone
number.
• Once the number is on the display, press the Line key and the number is dialled automatically.
(The symbols and ‘EXT’ appear on the display and the call timer starts.)
5.4 Storing a number from the Call List in the Phone Book
• Press the Up key to go to the Call List.
• Press the Up key to look up the desired number.
• Press the Phone Book key twice.
25
2525
2525252525252525
Page 25

Cocoon 350
• ‘STORE’ appears on the display.
• The number is stored in the Phone Book. If the call was displayed without a name (NO
NAME), you can add a name to this number in the Phone Book afterwards
• The telephone returns to standby-modus.
5.5 Deleting numbers from the Call List
5.5.1 Deleting one number
• Press the Up key to go to the Call List.
• Press the Up key to find the call you would like to delete.
• Once this call appears on the display, press the Delete key .
• ‘DELETE?’ appears on the display.
• Press the Programming key to confirm your selection or the Delete key to cancel.
• The call is deleted and the next call appears on the display.
5.5.2 Delete all numbers
• Press the Up key to go to the Call List.
• Keep the Delete key pressed until ‘DELETE ALL’ appears on the display.
• Press the Programming key to confirm your selection or the Delete key to cancel.
• All calls are deleted.
6 VOICE MAIL INDICATOR
This function only works if you have the voice mail or phone mail service and if the network
sends this indication along with the FSK caller ID (CLIP) information!
When you receive a new message in your voice mail system, the ‘ ’ icon will appear on the
display. Once you have listened to your messages, the ‘ ’ icon will disappear.
7 ANSWERING MACHINE
The Cocoon 350 has a built-in digital answering machine with a recording capacity of 14 min.
This answering machine can only be controlled by the supplied handset (not by other multihandsets). The answering machine can be operated remotely and features the possibility of
recording two outgoing messages (Message 1 and Message 2) (of a maximum of 2 min).
There are 2 possibilities:
- With Message 1, the caller has the possibility to leave a message
- With Message 2, only the outgoing message is given without the caller having the
opportunity to leave a message
The max. recording time for each incoming message = 3 min.
An internal voice will state various information, such as day and time of the call, as well as
settings such as VIP code, ringer tones .. The language of the internal voice is stated on the
packaging!
26
26262626262626262626
Page 26

Cocoon 350
7.1. Display
In the stand-by mode, the following items may appear on the display:
- 10/01 MSG = 1 new (not yet heard) message and 10 messages in total
- 15/05 MSG = 5 new (not yet heard) messages and 15 messages in total
7.2 Answering Machine Menu
To activate the answering machine functions:
• Press the Programming Key .
• ‘ANSWERING’ appears on the display.
• Press the OK key.
After 2 sec., ‘ANS OPER’ will appear on the display. Now you have access to all the answering
machine functions, such as recording message, remote access code, play messages, etc.
The settings are accompanied by an internal voice. The machine will automatically switch to
hands-free mode if the internal voice can be heard without holding the hand set. One can
switch off the hands-free mode by pressing the Speaker key .
7.3 Keypad Functions
Keys ANS-OPER mode During message play-back
1 None Rewind message
2 Play back messages Pause
3 None Skip message
4 Record memo None
5 Play outgoing message None
6 Select outgoing message Stop
7 Announce VIP code None
8 Number of current rings None
9 Display time None
* Answering machine On None
0 (set key) Change settings None
# Answering machine Off None
0 + 1 Record OGM 1 None
0 + 3 Record OGM 2 None
27
Page 27

Cocoon 350
0 + 7 Set VIP code None
0 + 8 Set number of rings None
0 + 9 Set date/time None
+ OK Erase all messages Erase current message
7.4 Exiting Answering Machine Menu
When you are in the answering machine menu, you cannot make telephone calls. You can only
operate the answering machine. If you would like to exit the menu, press the OK key.
If the machine receives an internal or external call, it automatically exits the answering machine
menu.
Note: When you exit the answering machine menu, the display information is changed. During this change,
the symbol will blink. After a moment, the total/new messages (MSG XX/YY) is changed.
7.5 Outgoing Messages
Two outgoing messages of a maximum of 2 minutes can be recorded (OGM1 and OGM2).
• Outgoing message 1 for the answering function and possibility for callers to leave messages
• Outgoing message 2 for the answering function without allowing callers to leave any
messages on the machine.
7.5.1 Recording outgoing messages (OGM 1 or OGM 2)
• Press the Programming Key twice to go to the answering machine menu (see
'Answering Machine Menu').
• Press the '0' key.
• Then press:
- Key ‘ ’ to record Outgoing Message 1.
- Press‘’ to record Outgoing Message 2.
• A voice will say which outgoing message is being recorded.
• After the beep, say your outgoing message.
• Press the Stop key to stop recording.
Note: The recording cannot exceed 2 minutes. If no outgoing message is recorded, the standard outgoing
message is used:
• Outgoing message 1: ‘Please call later’.
• Outgoing message 2: ‘Please call later’.
7.5.2 Checking the Outgoing Message
To check the outgoing message now set:
• Press the Programming Key twice to go to the answering machine menu (see
'Answering Machine Menu').
• Press the key.
Note: To stop playback, briefly press the Stop key .
7.5.3 Select outgoing message
• Press the Programming Key twice to go to the answering machine menu (see
'Answering Machine Menu').
28
Page 28
Cocoon 350
• Press the key to switch between the 2 outgoing messages.
• The internal voice will confirm the set outgoing message.
Notes:
1 It is only possible to select an outgoing message if the answering machine is turned on. If it is not, the
internal voice will say that the answering machine is off.
2 If the memory is full, only outgoing message 2 can be selected (only answering without recording
messages)
7.5.4 Erasing the Outgoing Message
If you erase the outgoing message, the default message will be played ‘Please call later’ .
Erase the outgoing message as follows:
• Press the Programming Key twice to go to the answering machine menu (see
'Answering Machine Menu').
• Select the desired outgoing message by pressing the key.
• Press the key to play the outgoing message.
• During playback of the outgoing message, press the Erase key .
• ‘ERASE?’ appears on the display.
• Press ‘OK’ to erase the outgoing message or press the Erase key again to cancel erase.
7.6 Turning Answering Machine On/Off
If the answering machine is on, the symbol is displayed and the machine will
automatically pick up the line after a number of rings (can be set, see 'Setting Number of
Rings').
• Press the Programming Key twice to go to the answering machine menu (see
'Answering Machine Menu').
• Press the:
* key to switch on the answering machine. A voice confirms the setting and says
which outgoing message is active (OGM 1 or OGM 2).
* key to switch off the answering machine. A voice confirms the setting.
• Press the OK key to exit the answering machine menu.
Note: Even if the answering machine is off, the machine will automatically pick up after 10 rings in order to
enable remote activation (see 7.17 Remote operation)
7.7 Setting Number of Rings
The number of rings after which the answering machine will answer calls can be set from 2 – 9
and TS (Toll saver). The standard setting is 3 rings. In Toll saver mode, the machine will answer
after 5 rings if there are no new messages, and after 2 rings if there are new messages. If there
are no new messages and you call your machine to check your messages remotely (see 7.17
Remote operation), you can hang up after the 3rd ring. You do not need to pay connection
fees and you know that you do not have any new messages.
• Press the Programming Key twice to go to the answering machine menu (see
'Answering Machine Menu').
29
Page 29

Cocoon 350
• Briefly press the key. A voice will state the current number of rings.
• Press 0 and then the key to set the number of rings.
• Press the or key to change the current number of rings.
• Confirm the setting by pressing the key. The current ring setting is confirmed by the
internal voice.
Notes:
• If you do not press any keys for 3 seconds, the machine will revert back to the answering machine menu,
without changing the settings.
• If there is a loss of power in the base, the number of rings will revert to 3.
7.8 Checking Number of Rings
• Press the Programming Key twice to go to the answering machine menu (see
'Answering Machine Menu').
• Press the key briefly.
• The internal voice will state the number of rings set.
7.9 Setting Day and Time
The day and time setting of the answering machine is independent of the telephone
component. The day and time of each call is registered and displayed during play-back. The
format of the hour depends on the language of the internal voice. e.g. English is in 12-hour
format and German is in 24-hour format.
Programming the day and time:
• Press the Programming Key twice to go to the answering machine menu (see
'Answering Machine Menu').
• Press the '0' key.
• Press the -key.
• The display will show ‘SET TIME' and the internal voice will ask you to set the day.
• Press a few times on or keys to set the day. The internal voice states the current
settings.
• Press the key to confirm the day.
• The internal voice will ask you to set the hour.
• Press a few times on or keys to set the hour.
• Press the key to confirm the hour.
• The internal voice will ask you to set the minutes.
• Press a few times on or keys to set the minutes.
• Press the key to confirm the minutes.
(If the time is displayed in 12-hour format, the voice will ask you to set AM or PM. Press the
or key to switch between AM or PM and then press the key to confirm).
The complete day and time setting is then repeated for confirmation.
Notes:
• If you do not press any keys for 8 seconds, the previous day/time setting is saved and the machine
automatically exits the day/time setting mode.
30
Page 30

Cocoon 350
• When you use the machine for the first time and have not yet set the day/time, no day/time registration
of incoming messages is recorded.
• If there is a loss of power to the base, the day/time must be reset.
7.10 Checking Day/Time
• Press the Programming Key twice to go to the answering machine menu (see
'Answering Machine Menu').
• Press the key to display the day/time. The internal voice will say the current day/time
setting.
7.11 Programming the VIP Code
The VIP code is a 3-digit code used to operate the machine remotely (see Remote Operation).
The VIP code is set to '321' by default.
Note: If there is a loss of power to the base, the VIP code will revert to '321'.
7.11.1 Changing the VIP Code
• Press the Programming Key twice to go to the answering machine menu (see
'Answering Machine Menu').
• Press the '0' key.
• Press the - key to confirm the VIP code.
• The internal voice asks you to set the VIP code and says the first number.
• Press a few times on or keys to set the first number of the VIP code.
• Press the de key to confirm the first number. The internal voice says the current set
2nd digit of the VIP code.
• Press a few times on or keys to set the second digit of the VIP code.
• Press the key to confirm the second number. The internal voice says the current set
3rd digit of the VIP code.
• Press a few times on or keys to set the third digit of the VIP code.
• Press the de key to confirm the VIP code. You will hear a long beep. The internal
voice says the new VIP code for confirmation.
Note: If you do not press any keys for 8 seconds, the previous VIP code is saved and the machine automati-
cally exits the VIP setting mode.
7.11.2 Checking the VIP Code
• Press the Programming Key twice to go to the answering machine menu (see
'Answering Machine Menu').
• Press the key to play the VIP code. The internal voice says the current VIP code.
7.12 Operation
If a call is received and the answering machine is turned on ( symbol on the display), the
answering machine will automatically pick up the line after the set number of rings. If
• outgoing message 1 has been selected, it will be played. After the outgoing message, a beep
will be heard and the caller can leave a message (of a max. 3 minutes).
31
Page 31

Cocoon 350
• Outgoing message 2 has been selected, it will be played. After the beep, the line will
automatically be disconnected. The caller does not have the possibility to leave a message.
Note: If, during pick-up, nothing is said for 8 seconds, the line will be automatically disconnected.
7.13 Call Screening
This function is convenient if you only want to answer certain calls.
During pick-up of the incoming message, it is possible to screen the call and hear who is
calling:
• Press the Hands-free key during recording. The caller can now be heard and ‘MONITOR’
appears on the display.
• Press the Hands-free key again to switch back to the handset function. This switches off
the hands-free function.
• Press the OK key to switch off call-screening or press the line key to take the call.
7.14 Recording a Memo
With the Cocoon 350, you can record memos. These memos are considered an incoming
message that can be picked up later by the user. The max. recording time for a memo is
2 minutes.
• Press the Programming Key twice to go to the answering machine menu (see
'Answering Machine Menu').
• Press the key briefly The internal voice will ask you to record a memo. After the beep, say
your memo.
• Press the Stop key to stop recording.
• Press the OK key to return to stand-by mode.
• The symbol will blink and after a moment, the number of new messages will be
updated.
7.14.1 Playback of Incoming Messages and Memos
• Press the Programming Key twice to go to the answering machine menu (see
'Answering Machine Menu').
• Press the key to play the messages and memos.
• An internal message tells you how many messages there are (total) and how many new
(unheard) messages.
• The messages are played one at a time. If there are new messages, only the new messages
(those that have not been heard) are played.
• For each message, the internal voice says the day and time the message was recorded
• During playback, you can:
- go to the beginning of the current message by pressing the key once.
- go to the previous message by pressing the key twice.
- stop playback by pressing the Stop key .
- interrupt playback by pressing the Pause key . Press the Pause key again to restart
playback.
- go to the next message by pressing the key.
32
Page 32

Cocoon 350
7.15 Erasing Messages
7.15.1 Erasing Messages One at a Time during Playback
Start message playback as explained above.
• When the message to be erased starts playing, press the Erase key .
• ‘ERASE?’ appears on the display.
• Press ‘OK’ to erase the message or press the Erase key again to cancel erase.
• During erase the internal voice will tell you that the message is being erased.
• The machine will start playing the next message.
7.15.2 Erase all messages
One can also erase all heard messages at one time. This erases only the messages that have
already been heard. New messages are not erased.
• Press the Programming Key twice to go to the answering machine menu (see
'Answering Machine Menu')
• Press the Erase key .
• The screen displays ‘ERASE?'
• Press ‘OK’ to erase all messages or press the Erase key again to cancel erase.
• The internal voice confirms that the messages have been erased by saying how many new
(unheard) messages there are.
7.16 Memory Full
There is no visual indication that the memory is full. If the answering machine is turned on and
a call comes in, the machine will automatically play OGM 2 (answering machine function
without recorded caller message).
When listening to the messages, the internal voice will say that the memory is full and then
play back the messages.
• Erase all the messages after listening to them.
• The memory is free again.
7.17 Remote Operation
The answering machine can only be operated remotely using a tough-tone phone (DTMF tone
selection system).
• Call your machine.
• The answering machine picks up the line, you hear the outgoing message and a beep.
• After the beep, slowly dial the VIP code (default 321).
• You will hear two short beeps for confirmation.
• Enter the next codes to use the desired function :
7.17.1 Listening to Messages
• Press ‘2’ (listen to messages). The answer machine will play the messages.
During playback, you have the following options:
• Press ‘2’ to stop playback.
• Press ‘2’ to restart playback.
33
Page 33

Cocoon 350
• Press ‘3’ to go to the next message.
• Press ‘1 1' to go to the previous message.
• Press '1’ to repeat the current message.
• Press ‘6’ to stop playback.
• Press '0’ to erase the current message.
7.17.2 Erasing All Old Messages
After listening to all messages, press ‘0’ to erase all old messages.
7.17.3 Recording Memos
• Press the '4' key.
• A beep will indicate that you can start recording.
• Say your memo.
• Press ‘6’ to stop recording.
7.17.4 Playing Outgoing Message
• Press ‘5’ to play the current outgoing message.
7.17.5 Recording Outgoing Message
• Press ‘1’ to record OGM 1 or ‘3’ to start recording OGM 2.
• A beep will indicate that you can start recording.
• Say your message.
• Press ‘6’ to stop recording.
Note: Recording will be automatically interrupted after 2 minutes.
7.17.6 Turning Answering Machine On/Off
• Press the '* ' key to switch on the answering machine.
• Press the '#' key to turn off the answering machine.
7.18 Ending Remote Operation
If you want to end remote operation, press ‘6’.
7.19 Turning Answering Machine On Remotely
If the answering machine is switched off, you can turn it on remotely.
• Call your machine.
• The machine will pick up automatically after 10 rings and play outgoing message 2.
• Dial the VIP code (default 321) slowly after the message plays.
• Press the '*' key.
• The internal voice will say that the answering machine has been turned on.
• Press ‘6’ to stop operation.
34
Page 34

Cocoon 350
7.20 List of Remote Operation Codes
• Call your machine.
• The answering machine picks up the line, you hear the outgoing message and a beep.
• After the beep, slowly dial the VIP code (default 321).
• You will hear two short beeps for confirmation.
• Enter the following codes to use the desired function:
Play Messages
• ‘2’ : play messages
• ‘2’ : interrupt playback + ‘2’ : resume playback
• ‘3’ : go to the next message
• ‘11’ : go to the previous message
• ‘1’ : repeat
• ‘0’ : erase current message (during playback)
• ‘0’ : erase all messages (after playing all messages)
Standby
• ‘5’ : play outgoing message
• ‘1’ : record outgoing message 1 (press ‘6’ to stop recording).
• ‘3’ : record outgoing message 2 (press ‘6’ to stop recording).
• ‘4’ : record memo (press ‘6’ to stop recording).
• ‘*’ : turn on answering machine
• ‘#’ : turn off answering machine
8 WARRANTY
Warranty: 2 years on defects of the device
Attention: Return your device in the original packaging.
Do not forget to include your purchase invoice.
The warranty is not valid without the purchase invoice.
35
Page 35

Cocoon 350
1 INSTALAÇÃO 39
2 TECLAS/LUZES 40
3 VISOR (LCD) 40
4 FUNCIONAMENTO 41
4.1 Tone/Pulse setting 41
4.2 Definir o idioma 42
4.3 Efectuar Chamadas 42
4.3.1 Chamada Externa 42
4.3.2 Preparação do número 42
4.3.3 Voltar a marcar o último número marcado 43
4.3.4 Voltar a marcar um dos últimos 5 números marcados 43
4.3.5 Marcar um número programado da Lista Telefónica 43
4.3.6 Uma chamada interna: telefonar para outro aparelho 43
4.4 Receber uma Chamada 44
4.4.1 Receber uma chamada externa 44
4.4.2 Receber uma chamada interna 44
4.4.3 Receber uma chamada externa durante uma chamada interna 44
4.5 Activar/desactivar a função mãos livres 44
4.6 Transferir uma chamada para outro aparelho 45
4.7 Aviso de Falta de Alcance 45
4.8 Ajustar o volume do altifalante 45
4.9 Indicador de Duração de Chamada no Visor 45
4.10 Desligar o microfone (mute) 45
4.11 Tecla de Pausa 46
4.12 Chamada em conferência (dois aparelhos DECT internos e uma chamada externa) 46
4.13 Localizar um aparelho fora do lugar (paging) 46
4.14 Utilização do teclado alfanumérico 46
4.15 A Lista Telefónica 47
4.15.1 Adicionar um número e um nome à Lista Telefónica 47
4.15.2 Procurar um número na Lista Telefónica 47
4.15.3 Alterar um nome ou número na Lista Telefónica 48
4.15.4 Apagar um nome e número da Lista Telefónica 48
4.16 Ligar/desligar o aparelho 48
4.16.1 Desligar o aparelho 48
4.16.2 Ligar o aparelho 49
4.17 Ajustar o volume da campainha do aparelho 49
4.17.1 Ajustar o volume da campainha para chamadas externas (0-9) 49
4.17.2 Ajustar o volume da campainha para chamadas internas (1-9) 49
4.18 Ajustar a melodia da campainha do aparelho 49
4.18.1 Ajustar a melodia da campainha para chamadas externas (1-9) 49
4.18.2 Ajustar a melodia da campainha para chamadas internas (1-9) 50
4.19 Bloquear o teclado 50
4.20 Activar/desactivar o som do teclado 50
4.21 A tecla R (flash) 51
4.22 Alterar o código PIN 51
36
3636363636363636363636
36
Page 36

Cocoon 350
4.23 Atribuição a uma unidade base Cocoon 300/350, Butler 1000, 1010, 1210 52
4.24 Atribuição de um aparelho Cocoon 350 a uma unidade
base Cocoon 300/350, Butler 575/575+ & Cocoon 100/100+ & Butler 2000 52
4.25 Atribuição de um aparelho Butler 1800T a uma unidade base Cocoon 350 53
4.26 Anular a atribuição de um aparelho a uma unidade base 53
4.27 Seleccionar uma unidade base 54
4.27.1 Selecção automática 54
4.27.2 Selecção manual 54
4.28 Barrar chamadas de saída 55
4.29 Definições por defeito (reset) dos parâmetros 55
4.30 Reinicialização total do telefone 56
5 IDENTIFICAÇÃO DE CHAMADA (CALLER ID/CLIP) 56
5.1 Acertar a data e a hora 57
5.2 A Lista de Chamadas 57
5.3 Telefonar para um número da Lista de Chamadas 58
5.4 Guardar um número da Lista de Chamadas na Lista Telefónica 58
5.5 Apagar números da Lista de Chamadas 58
5.5.1 Apagar um número 58
5.5.2 Apagar todos os números 58
6 INDICADOR DE VOICE MAIL 58
7. ATENDEDOR DE CHAMADAS 59
7.1 Indicações no visor 59
7.2 Menu do atendedor de chamadas 59
7.3 Funções do teclado 59
7.4 Sair do menu do atendedor de chamadas 60
7.5 Textos de atendimento 60
7.5.1. Gravar mensagens de atendimento (Texto de atendimento 1 ou Texto
de atendimento 2) 60
7.5.2 Verificar o texto de atendimento 61
7.5.3 Seleccionar o texto de atendimento 61
7.5.4 Apagar o texto de atendimento 61
7.6 Ligar e desligar o atendedor de chamadas 61
7.7 Configurar toques 62
7.8 Verificar o número de toques 62
7.9 Configurar data e hora 62
7.10 Verificar data/hora 63
7.11 Programar o código pessoal 63
7.11.1 Modificar o código pessoal 63
7.11.2 Verificar o código pessoal 64
7.12 Funcionamento 64
7.13 Função de audição simultânea (Call screening) 64
7.14 Gravar memorandos 65
7.14.1 Reprodução das mensagens recebidas e dos memorandos 65
7.15 Apagar mensagens 65
7.15.1 Apagar mensagem a mensagem aquando da reprodução 65
37
373737373737373737373737
Page 37

Cocoon 350
7.15.2 Apagar todas as mensagens 65
7.16 Memória cheia 66
7.17 Controlo à distância 66
7.17.1. Ouvir mensagens 66
7.17.2. Apagar todas as mensagens ouvidas 66
7.17.3 Gravar memorandos 67
7.17.4. Reproduzir o texto de atendimento 67
7.17.5. Gravar o texto de atendimento 67
7.17.6. Ligar/desligar o atendedor de chamadas 67
7.18 Terminar o controlo à distância 67
7.19 Ligar o atendedor de chamadas à distância 67
7.20 Tabela dos códigos de controlo à distância 68
8 GARANTIA 68
38
Page 38

Cocoon 350
1 INSTALAÇÃO
Antes de usar o telefone pela primeira vez, deve certificar-se primeiro de que a bateria esteve a
carregar durante 20 horas. Se não fizer isto, o telefone não vai funcionar correctamente.
Para proceder à instalação, faça o seguinte:
• Ligue uma extremidade do adaptador à tomada e a outra extremidade à tomada do
adaptador na parte de baixo do telefone.
• Ligue uma extremidade do fio do telefone à tomada de parede do telefone e a outra
extremidade à parte de baixo do telefone.
ligação do telefone
tomada de parede
do telefone
tomada
do adaptador
saída do adaptador
• Abra o compartimento da bateria (ver abaixo).
• Coloque a bateria no compartimento da bateria e ligue o conector da bateria ao aparelho.
• Feche o compartimento da bateria.
• Deixe o aparelho na base durante 20 horas. O indicador de Linha/Carga (LED) da base
acende.
Indicador de bateria:
• A bateria está completamente carregada.
• A bateria está meio gasta (50%).
• A bateria está fraca. Quando a bateria estiver fraca vai ouvir sinais de aviso e o símbolo
da bateria no visor pisca.
39
39393939393939393939393939
Page 39

Cocoon 350
2 TECLAS/LUZES
1 Visor
2 Tecla de linha
3 Tecla Subir/Mãos livres /
4 Tecla Programação
5 Tecla Lista Telefónica
6 Tecla Remarcar/Pausa /P
7 Microfone
8 Tecla Volume/Campainha /
9 Teclas alfanuméricas
10 Tecla Apagar/Mute
11 Tecla Descer/Flash / R
12 Base
13 Tecla Paging
14 Indicador Linha/Carga
3 VISOR (LCD)
11
10
2
9
8
7
4
6
1
3
5
4
14
13
12
1 2 3
1 Número de chamadas recebidas.
2 Data (dia/mês) das chamadas recebidas.
3 Hora (hora:minutos) das chamadas recebidas.
4 Informação da chamada.
5 Símbolo no visor :
- este símbolo significa que o aparelho está localizado dentro do alcance da base.
- quando este símbolo começar a piscar, significa que está além do alcance da base.
Aproxime-se da base de modo que a ligação entre a base o aparelho seja possível.
40
4040404040
40
40404040404040
40
Page 40

Cocoon 350
6 Símbolo no visor :
- este símbolo significa que o telefone recebeu chamadas que são automaticamente
guardadas na Lista de Chamadas.
7 Símbolo no visor :
- este símbolo significa que a função mute está activada, ou seja, que o microfone está
desligado durante a conversação.
8 Símbolo no visor :
- este símbolo aparece no visor quando alguém faz ou recebe uma chamada.
9 Símbolo no visor :
- este símbolo significa que a campainha está desligada. Quando alguém recebe uma
chamada, o telefone não toca. O telefone irá tocar quando alguém receber uma
chamada interna.
10 Símbolo no visor :
- este símbolo é o indicador da bateria.
11 Símbolo no visor :
- este símbolo significa que se encontra no menu.
12 Símbolo no visor :
- este símbolo aparece quando percorre os números da Lista Telefónica.
13 Símbolo no visor :
- este símbolo aparece quando tiver recebido uma mensagem do voice mail (ver capítulo
6).
14 Símbolo no visor :
- este símbolo significa que a função mãos livres está activada. Pode agora falar sem ter
de pegar no aparelho.
- Este símbolo fica intermitente quando o atendedor de chamadas estiver activo (a gravar
mensagem recebida,...).
15 Simbolo no visor
- Este símbolo significa que o atendedor de chamadas está activo ou que o utilizador está
no menu do atendedor de chamadas.
:
4 FUNCIONAMENTO
4.1 Tone/Pulse setting
A unidade está definida, por defeito, para o modo de marcação por multifrequência (DTMF). Se
o seu sistema funcionar com marcação por impulso, é possível implementar esta modificação
(na maior parte dos casos isto não será necessário).
Seguir os seguintes passos:
• Pressionar a tecla de Programação .
• Pressionar a tecla Subir ou Descer repetidamente até aparecer ‘SETTING’ no visor.
• Pressionar a tecla de Programação .
• Pressionar a tecla Subir ou Descer repetidamente até aparecer ‘DIAL
MODE’ no visor.
• Pressionar a tecla de Programação .
41
41414141414141414141414141
Page 41

Cocoon 350
• É exibido o seguinte status no visor:
- ‘TONE’: Marcação por tons para a maior parte das centrais telefónicas e linhas telefónicas
- ‘PULSE’: Marcação por impulso para centrais telefónicas antigas que não operem com
marcação por multifrequência
• Pressionar a tecla Subir ou Descer para fazer a sua selecção.
• Pressionar a tecla de Programação para confirmar a selecção.
4.2 Definir o idioma
O telefone dispõe de 5 idiomas de visualização. Consulte a tabela dos idiomas de visualizaçã
na embalagem!!
Para definir o idioma, proceda do seguinte modo:
• Carregue na tecla de Programação .
• Carregue nas teclas Subir ou Descer repetidamente até aparecer ‘SETTING’ no visor.
• Carregue na tecla de Programação .
• Aparece ‘LANGUAGE’ no visor.
• Carregue na tecla de Programação .
• A definição do idioma aparece no visor.
• Carregue nas teclas subir ou Descer repetidamente para seleccionar o idioma que quer
usar.
• Assim que o idioma desejado aparecer no visor, carregue na tecla de Programação para
confirmar a sua escolha ou carregue repetidamente na tecla Mute/Apagar para sair do
menu.
4.3 Fazer Chamadas
4.3.1 Chamada Externa
• Carregue na tecla de Linha .
• O indicador de Linha/Carga (LED) da base pisca. Aparece no visor ‘EXT’ e o Símbolo de
Chamada .
• Vai ouvir o tom de marcação. Marque o número de telefone para onde quer telefonar.
• O número aparece no visor e é marcado.
• Depois de ter terminado a sua chamada, carregue na tecla de Linha para desligar ou
volte a colocar o aparelho na base.
4.3.2 Preparação no número
• Marque o número de telefone para onde quer telefonar. Pode corrigir o número carregando
na tecla Apagar/Mute .
• Carregue na tecla de Linha .
• O indicador de Linha/Carga (LED) da base pisca. Aparece no visor ‘EXT’ e o símbolo de
Chamada .
• O número de telefone é marcado automaticamente.
• Depois de terminar a sua chamada, carregue na tecla de Linha para desligar ou volte a
colocar o aparelho na base.
42
424242424242
4242424242424242
Page 42
Cocoon 350
4.3.3 Voltar a marcar o último número marcado
• Carregue na tecla de Linha .
• O indicador de Linha/Carga (LED) da base pisca. Aparece no visor ‘EXT’ e o símbolo de
Chamada .
• Vai ouvir o tom de marcação.
• Carregue na tecla de Remarcar . O último número para que telefonou é marcado
automaticamente sem ter de o marcar novamente.
4.3.4 Voltar a marcar um dos últimos 5 números marcados
• Carregue na tecla de Remarcar . O último número para que telefonou aparece no visor.
Se quiser marcar um dos últimos 5 números para que telefonou, carregue a tecla de
Remarcar várias vezes até aparecer o número desejado no visor.
• Carregue na tecla de Linha .
• O número que aparece no visor é marcado automaticamente sem ter de o marcar
novamente.
• Depois de terminar a sua chamada, carregue na tecla de Linha para desligar ou volte a
colocar o aparelho na base.
4.3.5 Marcar um número programado da Lista Telefónica
• telefone tem uma Lista Telefónica onde pode programar os números das chamadas
recebidas por nome. Se desejar telefonar para um número da Lista Telefónica, faça o
seguinte:
• Carregue na tecla da Lista Telefónica . O primeiro número da Lista Telefónica aparece no
visor.
• Carregue nas teclas Subir ou Descer repetidamente para seleccionar o número de
telefone para onde deseja telefonar.
• Carregue na tecla de Linha .
• O número que aparece no visor é marcado automaticamente sem ter de o marcar
novamente.
• Depois de terminar a sua chamada, carregue na tecla de Linha para desligar ou volte a
colocar o aparelho na base.
4.3.6 Uma chamada interna: telefonar para outro aparelho
Esta função só funciona se estiverem atribuídos vários aparelhos à base!!
• Carregue na tecla de Programação .
• Carregue nas teclas Subir ou Descer repetidamente até aparecer ‘INTERCOM’ no visor.
• Carregue na tecla de Programação .
• Aparece ‘INT’ no visor.
• Marque o número do aparelho para que quer telefonar.
• Depois de terminar a sua chamada, carregue na tecla de Linha para desligar ou volte a
colocar o aparelho na base.
43
43434343434343
434343434343
Page 43

Cocoon 350
4.4 Receber uma Chamada
4.4.1 Receber uma chamada externa
• Todos os aparelhos atribuídos tocam quando receber uma chamada.
• O símbolo de Chamada pisca no visor.
• O número de telefone de quem telefona aparece no visor se tiver o serviço de Identificação
de Chamada (CLIP). Consulte a sua companhia telefónica. O nome de quem telefona
também aparece no visor se:
- o nome estiver programado na Lista Telefónica
- a rede enviar o nome juntamente com o número de telefone (apenas sistema FSK CID).
• Carregue na tecla de Linha para aceitar a chamada externa.
• Durante a chamada, aparece ‘EXT’ e o símbolo no visor. O contador de duração da
chamada começa a funcionar.
• Depois de terminar a sua chamada, carregue na tecla de Linha para desligar ou volte a
colocar o aparelho na base.
4.4.2 Receber uma chamada interna
Esta função só funciona se estiverem atribuídos vários aparelhos à base!
• O aparelho toca.
• Aparece ‘INT’ e o número do aparelho que está a contactar no visor. O símbolo de Chamada
pisca no visor.
• Carregue na tecla de Linha para aceitar a chamada interna.
• Durante a chamada, aparece ‘INT’, o número do aparelho que está a ligar e o símbolo no
visor. O contador de duração da chamada começa a funcionar.
• Depois de terminar a sua chamada, carregue na tecla de Linha para desligar ou volte a
colocar o aparelho na base.
4.4.3 Receber uma chamada externa durante uma chamada interna
Se receber uma chamada externa durante uma chamada interna, vai ouvir um tom de chamada
em espera (bip duplo) nos dois aparelhos que estão a ser usados ma chamada interna.
• Carregue na tecla de Linha duas vezes para aceitar a chamada externa.
• Depois de terminar a sua chamada, carregue na tecla de Linha para desligar ou volte a
colocar o aparelho na base.
4.5 Activar/desactivar a função mãos livres
Esta função permite-lhe comunicar sem ter de pagar no aparelho. Quando estiver ao telefone,
carregue na tecla Levantar/Mãos Livres / para activar a função de mãos livres.
Carregue no mesmo botão para desactivar a função de mãos livres.
Nota: Quando estiver a telefonar no modo mãos livres e quiser alterar o volume, carregue na tecla de
Volume .
Atenção!! Quando usar a função de mãos livres durante um longo período de tempo, a bateria gasta-se
rápido!
44
444444444444444444444444
44
Page 44
Cocoon 350
4.6 Transferir uma chamada para outro aparelho
• Tem uma chamada externa em linha.
• Carregue na tecla de Programação .
• Aparece ‘INTERCOM’ no visor.
• Carregue na tecla de Programação .
• A chamada externa está agora em espera.
• Aparece ‘INT’ no visor.
• Marque o número do aparelho para o qual quer transferir a chamada.
• Se o aparelho que marcou atender, pode ter uma conversa interna. Carregue na tecla de
Linha e a chamada externa é transferida.
• Se o aparelho que marcou não atender, carregue na tecla Descer para falar novamente
com quem fez a chamada externa.
4.7 Aviso de Falta de Alcance
Se o aparelho estiver fora do alcance da base, ouve-se um sinal de aviso.
• Aparece ‘SEARCHING’ no visor e o símbolo pisca no visor.
• Aproxime-se da base.
• Assim que voltar a estar dentro do alcance da base, ouve-se um sinal e o símbolo pára de
piscar.
4.8 Ajustar o volume do altifalante
Use a tecla Volume/Campainha / para ajustar o volume do altifalante (aparelho). Pode
escolher entre 5 níveis. O telefone está no nível ‘3’ por defeito.
Durante uma chamada, pode ajustar o volume da seguinte maneira:
• Carregue na tecla Volume/Campainha / .
• O nível actual do volume aparece no visor.
• Use as teclas dos números para definir o nível desejado (1-5).
• Carregue na tecla Volume/Campainha / para confirmar a sua escolha.
Nota: Tem 8 segundos para definir o volume desejado; se não o fizer dentro desse tempo, o telefone volta
ao modo de standby e o volume permanece inalterado.
4.9 Indicador de Duração de Chamada no Visor
Assim que carregar na tecla de Linha a duração da chamada aparece no visor (minutossegundos). Ex.: “01-20” para 1 minuto e 20 segundos.
A duração da chamada permanece visível no visor durante 5 segundos após cada chamada.
4.10 Desligar o microfone (mute)
É possível desligar o microfone durante uma chamada carregando na tecla Apagar/Mute .
Assim pode falar à vontade sem o seu interlocutor o conseguir ouvir.
• Está ao telefone. O indicador de Linha/Carga (LED) da base pisca e o símbolo de
Chamada aparece no visor.
• Carregue na tecla Apagar/Mute para desligar o microfone.
• O símbolo ‘X’ aparece no visor ( ).
45
454545454545
45454545454545
Page 45

Cocoon 350
• Quando quiser voltar à conversa, carregue na tecla Apagar/Mute novamente.
• O símbolo ‘X’ desaparece do visor ( ). A pessoa do outro lado da linha já o pode ouvir de
novo.
4.11 Tecla de Pausa
Se marcar um número de telefone e quiser acrescentar uma pausa a esse número, carregue na
tecla de Pausa no local desejado do número.
Quando telefonar para este número, esta pausa (3 segundos) é automaticamente incluída.
4.12 Chamada em conferência (dois aparelhos DECT internos e uma chamada
externa)
Pode ter uma conversa telefónica com uma chamada interna e uma chamada externa ao
mesmo tempo.
• Enquanto estiver em linha com uma chamada externa, carregue na tecla de
Programação .
• Aparece ‘INTERCOM’ no visor.
• Carregue na tecla de Programação .
• A chamada externa está agora em espera.
• Aparece ‘INT’ no visor.
• Marque o número do aparelho que quer incluir na chamada.
• Quando o aparelho para que ligou atender, mantenha a tecla ‘#’ pressionada durante 3
segundos.
• Aparece ‘CONFERENCE’ no visor.
• Agora está em ligação com uma chamada externa e outra externa (chamada em
conferência).
4.13 Localizar um aparelho fora do lugar (paging)
Se não conseguir encontrar o aparelho, carregue brevemente na tecla Paging da base.
Todos os aparelhos atribuídos à base emitem um sinal de modo que pode localizar o aparelho
que estiver fora do lugar. Para parar o sinal, carregue brevemente a tecla de Linha do
aparelho.
4.14 Utilização do teclado alfanumérico
Use o teclado alfanumérico para digitar texto. Para seleccionar uma letra, carregue na tecla
correspondente. Ex.: se carregar na tecla alfanumérica ‘5’, a primeira letra (j) aparece no visor.
Carregue repetidamente para seleccionar outras letras desta tecla.
Carregue na tecla ‘2’ duas vezes para seleccionar a letra (B). Se quiser seleccionar o ‘A’ e o ‘B’
um após o outro, primeiro carregue na tecla ‘2’ uma vez para seleccionar o ‘A’, espere 2
segundos até o cursor passar para a posição seguinte e depois carregue na tecla ‘2’ duas vezes
para seleccionar o ‘B’. Pode apagar as letras que digitar erroneamente usando a tecla Apagar
. A letra que estiver à frente do cursor é apagada. Pode movimentar o cursor carregando
nas teclas Subir e Descer .
46
46464646464646
464646464646
Page 46
Cocoon 350
Caracteres disponíveis
Carregue nas teclas certas para obter os seguintes caracteres:
TECLAS CARREGAR CARREGAR CARREGAR CARREGAR CARREGAR
1 VEZ 2 VEZES 3 VEZES 4 VEZES 5 VEZES
1 + - / 1
2 A B C 2
3 D E F 3
4 G H I 4
5 J K L 5
6 M N O 6
7 P Q R S 7
8 T U V 8
9 W X Y Z 9
0
ESPAÇO
0
4.15 A Lista Telefónica
4.15.1 Adicionar um número e um nome à Lista Telefónica
• Carregue na tecla de Programação .
• Carregue nas teclas Subir ou Descer repetidamente até aparecer ‘PHONE BOOK’ no
visor.
• Carregue na tecla de Programação .
• Aparece ‘SEARCH’ no visor.
• Carregue nas teclas Subir ou Descer repetidamente até aparecer ‘ADD NEW’ no visor.
• Carregue na tecla de Programação .
• Aparece ‘NAME’ no visor.
• Introduza o nome. Use as teclas alfanuméricas.
• Carregue na tecla de Programação .
• Introduza o número de telefone. Use as teclas alfanuméricas.
• Carregue na tecla de Programação .
• Vai ouvir um bip longo. O nome e número estão guardados na Lista Telefónica.
4.15.2 Procurar um número na Lista Telefónica
• Carregue na tecla de Programação .
• Carregue nas teclas Subir ou Descer repetidamente até aparecer ‘PHONE BOOK’ no
visor.
• Carregue na tecla de Programação .
• Aparece ‘SEARCH’ no visor.
• Carregue na tecla de Programação .
• Introduza as primeiras letras do nome desejado.
• Carregue na tecla de Programação .
• O primeiro nome que corresponda a estas letras aparece no visor.
• Carregue nas teclas Subir ou Descer para procurar outros números na Lista Telefónica.
47
47474747474747
474747474747
Page 47

Cocoon 350
• Assim que o número desejado aparecer no visor, o número é marcado automaticamente
quando a tecla de Linha for pressionada.
4.15.3 Alterar um nome ou número na Lista Telefónica
• Carregue na tecla de Programação .
• Carregue nas teclas Subir ou Descer repetidamente até aparecer ‘PHONE BOOK’ no
visor.
• Carregue na tecla de Programação .
• Aparece ‘SEARCH’ no visor.
• Carregue nas teclas Subir ou Descer repetidamente até aparecer ‘EDIT’ no visor.
• Carregue na tecla de Programação .
• O primeiro número da Lista Telefónica aparece no visor.
• Carregue nas teclas Subir ou Descer até o número desejado aparecer no visor.
• Carregue na tecla de Programação para alterar o número seleccionado programado na
memória.
• Carregue na tecla Apagar para apagar cada letra do nome e use o teclado alfanumérico
para introduzir o nome correcto.
• Carregue na tecla de Programação .
• Carregue na tecla Apagar para apagar cada dígito do número e use o teclado
alfanumérico para introduzir o número correcto.
• Carregue na tecla de Programação para guardar as alterações feitas.
4.15.4 Apagar um nome e número da Lista Telefónica
• Carregue na tecla de Programação .
• Carregue nas teclas Subir ou Descer repetidamente até aparecer ‘PHONE BOOK’ no
visor.
• Carregue na tecla de Programação .
• Aparece ‘SEARCH’ no visor.
• Carregue nas teclas Subir ou Descer repetidamente até aparecer ‘DELETE’ no visor.
• Carregue na tecla de Programação .
• O primeiro número da Lista Telefónica aparece no visor.
• Carregue nas teclas Subir ou Descer até o número que deseja apagar aparecer no visor.
• Carregue na tecla Apagar .
• Aparece ‘DELETE?’ no visor.
• Carregue na tecla de Programação para confirmar que quer apagar.
4.16 Ligar/desligar o aparelho
4.16.1 Desligar o aparelho
• aparelho está ligado.
• Carregue na tecla de Programação .
• Carregue nas teclas Subir ou Descer repetidamente até aparecer ‘POWER OFF?’ no
visor.
• Carregue na tecla de Programação . O telefone desliga-se automaticamente. Não pode
marcar mais números nem receber nenhuma chamada.
Nota: Se quiser sair do menu sem desligar o aparelho, carregue na tecla Apagar/Mute .
48
48484848484848
484848484848
Page 48

Cocoon 350
4.16.2 Ligar o aparelho
• Aparelho está desligado.
• Carregue na tecla de Programação . O telefone liga-se automaticamente.
4.17 Ajustar o volume da campainha do aparelho
Se quiser, pode alterar o volume da campainha de uma chamada recebida. Tem 10 níveis. Pode
ajustar o volume da campainha para as chamadas internas e externas separadamente de modo
a poder ouvir a diferença. Se seleccionar o nível ‘0’, o símbolo aparece no visor e deixa de
ouvir o telefone tocar quando receber uma chamada externa (continua a ouvi-lo nas chamadas
internas). O nível ‘9’ é o nível mais alto. O telefone está no nível ‘5’ por defeito.
4.17.1 Ajustar o volume da campainha para chamadas externas (0-9)
• Carregue na tecla de Programação .
• Carregue nas teclas Subir ou Descer repetidamente até aparecer ‘RING SEL’ no visor.
• Carregue na tecla de Programação .
• Aparece ‘EXTERNAL’ no visor.
• Carregue na tecla de Programação .
• Carregue nas teclas Subir ou Descer repetidamente até aparecer ‘VOLUME’ no visor.
• Carregue na tecla de Programação .
• O nível do volume usado actualmente aparece no visor.
• Introduza um número entre 0 e 9 para seleccionar o volume da campainha desejado. Use o
teclado numérico.
• Carregue na tecla de Programação para confirmar a sua escolha.
4.17.2 Ajustar o volume da campainha para chamadas internas (1-9)
• Carregue na tecla de Programação .
• Carregue nas teclas Subir ou Descer repetidamente até aparecer ‘RING SEL’ no visor.
• Carregue na tecla de Programação .
• Aparece ‘EXTERNAL’ no visor.
• Carregue nas teclas Subir ou Descer repetidamente até aparecer ‘INTERNAL’ no visor.
• Carregue na tecla de Programação .
• Carregue nas teclas Subir ou Descer repetidamente até aparecer ‘VOLUME’ no visor.
• Carregue na tecla de Programação .
• O nível do volume actual aparece no visor.
• Introduza um número entre 1 e 9 para seleccionar o volume da campainha desejado. Use o
teclado numérico.
• Carregue na tecla de Programação para confirmar a sua escolha.
4.18 Ajustar a melodia da campainha do aparelho
Se quiser, pode mudar a melodia da campainha para uma chamada recebida. Pode escolher
entre 9 melodias (1-9). Por defeito, a melodia da campainha é a ‘5’.
4.18.1 Ajustar a melodia da campainha para chamadas externas (1-9)
• Carregue na tecla de Programação .
• Carregue nas teclas Subir ou Descer repetidamente até aparecer ‘RING SEL’ no visor.
49
494949494949494949494949
49
Page 49

Cocoon 350
• Carregue na tecla de Programação .
• Aparece ‘EXTERNAL’ no visor.
• Carregue na tecla de Programação .
• Aparece ‘MELODIES’ no visor.
• Carregue na tecla de Programação .
• A melodia da campainha actualmente definida aparece no visor.
• Digite um número entre 1 e 9 para seleccionar a melodia desejada. Use o teclado numérico.
• Carregue na tecla de Programação para confirmar a sua escolha.
4.18.2 Ajustar a melodia da campainha para chamadas internas (1-9)
• Carregue na tecla de Programação .
• Carregue nas teclas Subir ou Descer repetidamente até aparecer ‘RING SEL’ no visor.
• Carregue na tecla de Programação .
• Aparece ‘EXTERNAL’ no visor.
• Carregue nas teclas Subir ou Descer repetidamente até aparecer ‘INTERNAL’ no visor.
• Carregue na tecla de Programação .
• Aparece ‘MELODIES’ no visor.
• Carregue na tecla de Programação .
• A melodia da campainha actualmente definida aparece no visor.
• Digite um número entre 1 e 9 para seleccionar a melodia desejada. Use o teclado numérico.
• Carregue na tecla de Programação para confirmar a sua escolha.
4.19 Bloquear o teclado
Se bloquear o teclado alfanumérico, é impossível marcar um número de telefone.
Apenas a tecla de Programação pode ser usada. Aparece ‘KEY LOCKED’ no visor.
• Carregue na tecla de Programação .
• Carregue nas teclas Subir ou Descer repetidamente até aparecer ‘KEY SETUP’ no visor.
• Carregue na tecla de Programação .
• Aparece ‘KEY LOCK’ no visor.
• Carregue na tecla de Programação .
• O estado actual do teclado aparece no visor:
- ‘LOCK’: o teclado está bloqueado
- ‘UNLOCK’: o teclado não está bloqueado
• Carregue nas teclas Subir ou Descer para fazer a sua selecção.
• Carregue na tecla de Programação para confirmar a sua escolha.
4.20 Activar/desactivar o som do teclado
Pode programar o telefone para emitir um som sempre que carregar numa tecla.
• Carregue na tecla de Programação .
• Carregue nas teclas Subir ou Descer repetidamente até aparecer ‘KEY SETUP’ no visor.
• Carregue na tecla de Programação .
• Carregue nas teclas Subir ou Descer repetidamente até aparecer ‘KEY CLICK’ no visor.
• Carregue na tecla de Programação .
• O estado actual aparece no visor:
50
505050505050
50505050505050
Page 50

Cocoon 350
- ‘CLICK ON’: activar o som do teclado
- ‘CLICK OFF’: desactivar o som do teclado
• Carregue nas teclas Subir ou Descer para fazer a sua selecção.
• Carregue na tecla de Programação para confirmar a sua escolha.
4.21 A tecla R (flash)
Carregue na tecla ‘R’ para utilizar certos serviços tais como “chamada em espera” (se a sua
companhia telefónica oferecer este serviço) ou para transferir chamadas se usar uma central
telefónica (PBX). A tecla ‘R’ de Flash é uma breve interrupção da linha. Pode definir o tempo de
flash para 100 ms ou 250 ms. Em caso de que o seu sistema precise outro tempo ce cintilaçâo,
proceda da seguinte maneira:
• Carregue na tecla de Programação .
• Carregue nas teclas Subir ou Descer repetidamente até aparecer ‘SETTING’ no visor.
• Carregue na tecla de Programação .
• Carregue nas teclas Subir ou Descer repetidamente até aparecer ‘RECALL’ no visor.
• Carregue na tecla de Programação .
• Carregue nas teclas Subir ou Descer repetidamente para seleccionar o tempo de flash:
- SHORT = 100 ms
- LONG = 250 ms
• Carregue na tecla de programação para confirmar a sua escolha.
4.22 Alterar o código PIN
Algumas funções só estão disponíveis se souber o código PIN do telefone. Graças a este código
secreto, são apresentadas definições que só você pode alterar. O código PIN tem 4 dígitos. O
código PIN por defeito é ‘0000’. Se quiser alterar este código PIN pré-definido e introduzir o
seu próprio código secreto, proceda da seguinte maneira:
• Carregue na tecla de Programação .
• Carregue nas teclas Subir ou Descer repetidamente até aparecer ‘SETTING’ no visor.
• Carregue na tecla de Programação .
• Carregue nas teclas Subir ou Descer repetidamente até aparecer ‘PIN CODE’ no visor.
• Carregue na tecla de Programação .
• Aparece ‘OLD CODE’ no visor.
• Introduza o código PIN antigo. Use as teclas dos números.
• Carregue na tecla de Programação .
• Aparece ‘NEW CODE’ no visor.
• Introduza o novo código PIN. Use as teclas dos números.
• Carregue na tecla de Programação .
• Aparece ‘AGAIN’ no visor.
• Introduza o novo código PIN novamente. Use as teclas dos números.
• Carregue na tecla de Programação .
• Vai ouvir um som contínuo. O novo código PIN foi definido.
Cuidado: Não esqueça o seu código PIN pessoal. Se o esquecer, tem de restaurar as definições por
defeito (reset, ver secção 4.30).
51
51515151515151
515151515151
Page 51

Cocoon 350
4.23 Atribuição a uma unidade base Cocoon 300/350, Butler 1000, 1010, 1210, 1250
De modo a poder fazer e receber chamadas telefónicas, um aparelho novo tem de ser atribuído
à unidade base. Pode atribuir 5 aparelhos a uma unidade base. Por defeito, cada aparelho é
atribuído como aparelho 1 à unidade base com que é entregue (unidade base 1).
Só precisa de atribuir o aparelho se:!!!
• A atribuição do aparelho tiver sido retirada da unidade base (ex., para reinicialização)
• Quiser atribuir um aparelho diferente a essa unidade base.
Nota: procedimento aqui salientado só se aplica a um aparelho Cocoon 300/350, Butler 1000, 1010, 1210,
1250 e unidade base! O atendedor de chamadas só funciona se o auscultador Cocoon 350 tiver sido ligado
a uma unidade de base Cocoon 350!!
Mantenha tecla de Paging da unidade base pressionada durante 10 segundos até o
indicador de Linha/Carga da base começar a piscar rapidamente. O indicador de
Linha/Carga pisca rapidamente durante 1 minuto. Durante este minuto, a unidade
base está em modo de atribuição e deve proceder da seguinte maneira para atribuir o
aparelho:
• Carregue na tecla de Programação .
• Carregue nas teclas Subir ou Descer repetidamente até aparecer ‘BASE SUB’ no visor.
• Carregue na tecla de Programação .
• Aparece ‘BASE_’ no visor.
• Introduza um número da unidade base que deseja atribuir ao aparelho (1-4).
Use o teclado numérico.
Nota: Cada aparelho pode ser atribuído a 4 unidades base DECT diferentes. A cada unidade base é
atribuído um número de 1 a 4 no aparelho. Quando atribuir um novo aparelho, pode atribuir um número
de unidade base. É melhor usar o ‘1’.
• Aparece ‘SEARCHING’ e o símbolo no visor.
• O código RFPI (cada unidade base tem um código RFPI único) aparece no visor e soa um sinal
quando o aparelho encontrar a unidade base.
• Carregue na tecla de Programação .
• Aparece ‘PIN’ no visor.
• Introduza o código PIN de 1 dígito da unidade base (o código pré-definido é ‘0000’). Use o
teclado numérico.
• Carregue na tecla de Programação .
• O aparelho está atribuído à unidade base.
4.24 Atribuição de um aparelho Cocoon 350 a uma unidade base Butler 575/575+
& Cocoon100/100+ & Butler 2000
Carregue na tecla de Paging da unidade base Butler 575/575+ ou cocoon100/100+ ou
Butler 2000 durante +/- 15 segundos até ouvir um bip. A unidade base está agora em modo de
atribuição. Durante 1 minuto, a unidade base está em modo de atribuição e deve proceder da
seguinte maneira para atribuir o aparelho:
Nota: O atendedor de chamadas só funciona se o auscultador Cocoon 350 tiver sido ligado a uma unidade
de base Cocoon 350!!
52
525252525252525252525252
52
Page 52

Cocoon 350
• Carregue na tecla de Programação .
• Carregue nas teclas Subir ou Descer repetidamente até aparecer ‘BASE SUB’ no visor.
• Carregue na tecla de Programação .
• Aparece ‘BASE_’ no visor.
• Introduza um número da unidade base que deseja atribuir ao aparelho (1-4).
Use o teclado numérico.
• Aparece ‘SEARCHING’ e o símbolo no visor.
• O código RFPI (cada unidade base tem um código RFPI único) aparece no visor e soa um sinal
quando o aparelho encontrar a unidade base.
• Carregue na tecla de Programação .
• Aparece ‘PIN’ no visor.
• Introduza o código PIN de 4 dígitos da unidade base (o código pré-definido é ‘1590’). Use o
teclado numérico.
• Carregue na tecla de Programação .
• O aparelho está atribuído à unidade base.
4.25 Atribuição de um aparelho Butler 1800T a uma unidade base Cocoon 350
Procedimento seguinte só se aplica a um aparelho Butler 1800T e a uma unidade base Cocoon
300/350!!
Carregue na tecla de Paging da unidade base durante 10 segundos até o indicador de
Linha/Carga da unidade base começar a piscar rapidamente. O indicador de Linha/Carga
pisca durante um minuto. Durante esse minuto, a unidade base está em modo de
atribuição e deve proceder da seguinte maneira para atribuir o aparelho:
• Carregue na tecla uma vez.
• Carregue na tecla OK e seleccione uma unidade base com as teclas .
• Carregue na tecla OK.
• Introduza o código PIN da sua unidade base. Normalmente é 0000.
• Carregue em OK. O Butler 1800T procura agora a sua unidade base DECT. Assim que a
encontrar, vai poder ver o código de identificação dessa unidade base no visor.
• Carregue em OK para confirmar a sua escolha ou carregue em ESC para cancelar a
atribuição.
4.26 Anular a atribuição de um aparelho a uma unidade base
É possível cancelar a atribuição de um aparelho a uma unidade base. Isto faz-se no caso de um
aparelho estar danificado e tiver de ser substituído por um novo.
Cuidado: Só se pode cancelar a atribuição de outro aparelho, não do aparelho que se está a usar para
proceder ao cancelamento.
• Carregue na tecla de Programação .
• Carregue nas teclas Subir ou Descer repetidamente até aparecer ‘SETTING’ no visor.
• Carregue na tecla de Programação .
• Carregue nas teclas Subir ou Descer repetidamente até aparecer ‘REMOVE HS’ no visor.
• Carregue na tecla de Programação .
53
535353535353535353535353
53
Page 53

Cocoon 350
• Aparece ‘PIN’ no visor.
• Introduza o seu código PIN de 4 dígitos (o código PIN por defeito é ‘00000’). Use o teclado
numérico.
• Carregue na tecla de Programação .
• Aparece ‘REMOVE HS’ no visor.
• Marque o número do aparelho que quer remover (1-5). Use o teclado numérico.
• Carregue na tecla de Programação .
• Aparece ‘REMOVE HS’ no visor e o aparelho é anulado.
• Aparece ‘NOT SUB’ no aparelho anulado.
4.27 Seleccionar uma unidade base
Se o seu aparelho estiver atribuído a várias unidades base (máx. 4), deve escolher uma unidade
base porque o aparelho só pode comunicar com uma unidade base de cada vez. Existem duas
possibilidades:
4.27.1 Selecção automática
Se colocar o seu aparelho em ‘selecção automática’, o aparelho vai escolher automaticamente a
unidade base mais próxima em standby.
• Carregue na tecla de Programação .
• Carregue nas teclas Subir ou Descer repetidamente até aparecer ‘SETTING’ no visor.
• Carregue na tecla de Programação .
• Carregue nas teclas Subir ou Descer repetidamente até aparecer ‘BASE SEL’ no visor.
• Carregue na tecla de Programação .
• Carregue nas teclas Subir ou Descer repetidamente até aparecer ‘AUTO’ no visor.
• Carregue na tecla de Programação .
• Aparece ‘SEARCHING’ e o símbolo no visor.
• Assim que o aparelho encontrar uma unidade base, ouve-se um sinal.
4.27.2 Selecção manual
Se tiver o aparelho em ‘selecção manual’, o aparelho só escolhe a unidade base que tiver
definido.
• Carregue na tecla de Programação .
• Carregue nas teclas Subir ou Descer repetidamente até aparecer ‘SETTING’ no visor.
• Carregue na tecla de Programação .
• Carregue nas teclas Subir ou Descer repetidamente até aparecer ‘BASE SEL’ no visor.
• Carregue na tecla de Programação .
• Carregue nas teclas Subir ou Descer repetidamente até aparecer ‘MANUAL’ no visor.
• Carregue na tecla de Programação .
• Aparece ‘BASE’ no visor.
• Introduza o número da unidade base que quer escolher (1-4). Use o teclado numérico.
• Carregue na tecla de Programação .
• Aparece ‘SEARCHING’ e o símbolo no visor.
• Assim que o aparelho encontrar a unidade base seleccionada, ouve-se um sinal.
54
54545454545454
545454545454
Page 54

Cocoon 350
Notas:
• Antes de poder seleccionar uma unidade base, esta deve estar atribuída primeiro ao aparelho.
• Se aparecer ‘NOT SUB’ no visor, isto significa que a unidade base seleccionada não existe ou o
aparelho não foi atribuído.
4.28 Barrar chamadas de saída
Pode programar os aparelhos para barrar chamadas para certos números de telefone de modo
que, por exemplo, não se possa fazer chamadas para os números internacionais ‘00’.
Para isso, proceda da seguinte maneira:
• Carregue na tecla de Programação .
• Carregue nas teclas Subir ou Descer repetidamente até aparecer ‘SETTING’ no visor.
• Carregue na tecla de Programação .
• Carregue nas teclas Subir ou Descer repetidamente até aparecer ‘BARRING’ no visor.
• Carregue na tecla de Programação .
• Aparece ‘PIN’ no visor.
• Introduza o seu código PIN.
• Carregue na tecla de Programação .
• Aparece ‘BAR NUM’ no visor. Encontra-se na memória “1._ _ _ _ _”.
• Carregue nas teclas Subir ou Descer repetidamente para seleccionar uma de
5 memórias.
• Introduza o número (máx. 5 dígitos) que quer barrar, por ex.: 01486.
• Carregue na tecla de Programação .
• Aparece ‘HS _ _ _ _ _’ (= número do aparelho (1-5)) ‘01486’ (= números barrados) no visor.
• Introduza os números dos aparelhos a partir dos quais não se podem fazer as chamadas.
• Ex.: Carregue nas teclas 2, 3 e 5. No visor, aparece: HS_2 3_5 01486. Estes aparelhos já não
podem marcar números que comecem por ‘01486’.
• Carregue na tecla de Programação para confirmar a sua selecção.
Repita o mesmo procedimento descrito acima se quiser barrar outros números (máx. 5)!
4.29 Definições por defeito (reset) dos parâmetros
Pode restaurar as definições standard (por defeito) do telefone de modo a ficarem iguais a
quando comprou o telefone. Precisa do código PIN para fazer isto.
As definições por defeito são: Atendedor de chamadas:
Teclado: não bloqueado - Atendedor de chamadas: ligado
Som do teclado: activo - Mensagem standard: mensagem de
Volume do altifalante: nível 3 atendimento1 (OGM)
Melodia da campainha: 1 - Número de toques: 3
Volume da campainha: 5 - Código do controlo à distância: 321
Selecção unidade base: automática
Para restaurar as definições por defeito, proceda da seguinte maneira:
• Carregue na tecla de Programação .
• Carregue nas teclas Subir ou Descer repetidamente até aparecer ‘SETTING’ no visor.
• Carregue na tecla de Programação .
55
55
555555555555555555555555
Page 55

Cocoon 350
• Carregue nas teclas Subir ou Descer repetidamente até aparecer ‘RESET’ no visor.
• Carregue na tecla de Programação .
• Aparece ‘PIN’ no visor.
• Introduza o seu código PIN.
• Carregue na tecla de Programação .
4.30 Reinicialização total do telefone
Esta função permite-lhe reinicializar completamente o telefone sem precisar do seu código PIN.
Isto vai apagar todas as entradas da memória da Lista Telefónica, todos os aparelhos vão ser
anulados, todas as definições por defeito vão ser restauradas e o código PIN por defeito vai
voltar a ser o ‘0000’.
Proceda da seguinte maneira:
• Desligue a bateria do telefone.
• Mantenha a tecla ‘*’ pressionada e volte a ligar a bateria até o aparelho tocar
continuamente e o visor acender. Solte a tecla ‘*’ e carregue na tecla de Programação .
• O aparelho encontra a unidade base e ouve-se um som.
• Carregue brevemente na tecla ‘*’.
• Aparece ‘RESET?’ no visor.
• Carregue na tecla de Programação para confirmar a sua escolha ou desligue a bateria
para interromper o procedimento.
• Aparece ‘RESETTING’ no visor e ouve-se um bip longo.
• Aparece ‘NOT SUB’ no visor. O aparelho está completamente reinicializado.
Em seguida, deve voltar a atribuir todos os aparelhos conforme se descreve no ponto 4.23!
Contudo, agora já não precisa de colocar a unidade base no modo de atribuição porque isso
agora acontece automaticamente!
5 IDENTIFICAÇÃO DE CHAMADA (CALLER ID/CLIP)
(Este serviço só funciona se tiver uma assinatura com identificação de chamada. Contacte a sua
companhia telefónica).
Quando receber uma chamada, o número de telefone de quem estiver a telefonar, a data e a
hora aparecem no visor do aparelho. O telefone pode receber chamadas tanto em FSK como
em DTMF. Se o nome estiver programado na Lista Telefónica, o nome da Lista Telefónica
aparece!
O telefone pode guardar até 30 chamadas numa Lista de Chamadas que pode ser consultada
mais tarde. O telefone nunca guarda a mesma chamada duas vezes. Quando a memória está
cheia, as chamadas novas substituem automaticamente as antigas na memória. O símbolo
no visor pisca se a chamada não for lida ou atendida. Se a Lista de Chamadas estiver vazia e
carregar na tecla Subir ouvem-se três bips.
Pode visualizar a informação de uma chamada recebida da seguinte maneira:
56
565656565656
56565656565656
Page 56

Cocoon 350
• Carregue na tecla Subir . O nome (se enviado pela rede ou se existir na memória da Lista
Telefónica) de quem telefona, o número de sequência da chamada na Lista de Chamadas, a
data e a hora da chamada aparecem no visor significa que a data e a hora não vão aparecer
no visor (ou aparecem, mas estão incorrectas).
• Carregue na tecla Descer . O número de telefone de quem telefona aparece no visor.
5.1 Acertar a data e a hora
Quando receber uma chamada e a data e a hora não aparecerem junto com o número de
telefone, significa que a data e a hora não vão aparecer no visor. Ao acertar a data e a hora,
estas aparecem no visor juntamente com o número de telefone sempre que receber uma
chamada!
• Carregue na tecla de Programação .
• Carregue nas teclas Subir ou Descer algumas vezes até aparecer ‘SETTING’ no visor.
• Carregue na tecla de Programação .
• Aparece ‘DATE/TIME’ no visor.
• Carregue novamente na tecla de Programação .
• Quando aparecer ‘YEAR’ no visor, introduza os 2 últimos números do ano (00=2000,
01=2001, ...) e carregue na tecla de Programação para confirmar.
• Quando aparecer ‘MONTH’ no visor, introduza o mês (01=Janeiro, 02=Fevereiro, ...) e
carregue na tecla de Programação para confirmar.
• Quando aparecer ‘DAY’ no visor, introduza o dia do mês e carregue na tecla de
Programação para confirmar.
• Quando aparecer ‘HOUR’ no visor, introduza a hora actual (no formato de 24h) e carregue
na tecla de Programação para confirmar.
• Quando aparecer ‘MINUTE’ no visor, introduza os minutos e carregue na tecla de
Programação para confirmar.
A data e a hora estão agora definidas!
Nota: em caso de falha de energia na unidade de base, será necessário reajustar a data e a hora.
5.2 A Lista de Chamadas
As chamadas recebidas são guardadas na Lista de Chamadas (máx. 30 números).
• Carregue ligeiramente na tecla Subir para ver a chamada mais recente.
• O nome da pessoa que lhe fez a última chamada aparece no visor. Se o nome não estiver
disponível, aparece ‘NO NAME’ no visor.
• Se for um número privado, aparece ‘UNAVAL’ no visor.
• A data e a hora em que a chamada foi recebida estão ligadas a cada chamada.
• Carregue ligeiramente na tecla Descer para ver o número de telefone da chamada.
• Carregue ligeiramente na tecla Descer para percorrer os outros números da lista.
Notas:
• Se nenhuma das teclas Subir ou Descer for pressionada durante 15 segundos, o telefone volta
ao modo de standby.
• Depois de se receber uma chamada, o número de quem telefona permanece no visor durante
15 segundos depois do último toque.
• A identificação de chamada não está disponível enquanto estiver em linha.
57
575757575757
57575757575757
Page 57
Cocoon 350
5.3 Telefonar para um número da Lista de Chamadas
• Carregue na tecla Subir para entrar na Lista de Chamadas.
• Carregue na tecla Subir para procurar a chamada desejada. Carregue na tecla Descer
para ver o número de telefone.
• Assim que o número estiver no visor, carregue na tecla de Linha e o número é marcado
automaticamente. (Os símbolos e ‘EXT’ aparecem no visor e o contador de chamada
arranca.)
5.4 Guardar um número da Lista de Chamadas na Lista Telefónica
• Carregue na tecla Subir para entrar na Lista de Chamadas.
• Carregue na tecla Subir para procurar o número desejado.
• Carregue na tecla da Lista Telefónica duas vezes.
• Aparece ‘STORE’ no visor.
• O número é guardado na Lista Telefónica. Se a chamada aparecer sem o nome (NO NAME),
pode adicionar um nome a este número na Lista Telefónica mais tarde.
• O telefone volta ao modo de standby.
5.5 Apagar números da Lista de Chamadas
5.5.1 Apagar um número
• Carregue na tecla Subir para entrar na Lista de Chamadas.
• Carregue na tecla Subir para encontrar a chamada que deseja apagar.
• Quando essa chamada aparecer no visor, carregue na tecla Apagar .
• Aparece ‘DELETE?’ no visor.
• Carregue na tecla de Programação para confirmar a sua escolha ou na tecla Apagar
para cancelar.
• A chamada é apagada e aparece no visor a chamada seguinte.
5.5.2 Apagar todos os números
• Carregue na tecla Subir para entrar na Lista de Chamadas.
• Mantenha a tecla Apagar pressionada até aparecer ‘DELETE ALL’ no visor.
• Carregue na tecla de Programação para confirmar a sua escolha ou na tecla Apagar
para cancelar.
• Todas as chamadas são apagadas.
6 INDICADOR DE VOICE MAIL
Esta função só funciona se tiver o serviço de voice mail ou phone mail e se a rede enviar esta
indicação juntamente com a identificação de chamada FSK (Caller ID)!
Quando receber uma mensagem nova no seu sistema de voice mail, o ícone aparece no
visor. Assim que ouvir as suas mensagens, o ícone desaparece.
58
5858585858
Page 58

Cocoon 350
7. ATENDEDOR DE CHAMADAS
O Cocoon 350 tem um atendedor de chamadas digital incorporado, com uma capacidade de
gravação de 14 minutos. Este atendedor automático só pode ser controlado pelo aparelho
fornecido (e não por outros aparelhos múltiplos). O atendedor de chamadas pode ser
controlado totalmente à distância e oferece a possibilidade de se gravarem duas mensagens
diferentes de atendimento (texto de atendimento 1 e texto de atendimento 2), com um
máximo de 2 minutos.
Existem 2 possibilidades:
- Com o texto de atendimento 1, a pessoa que telefona tem a possibilidade de deixar uma
mensagem
- Com o texto de atendimento 2 apenas é reproduzido o texto de atendimento, sem dar a
possibilidade de se deixar mensagem
Tempo máximo de gravação por mensagem recebida = 3 minutos.
Uma voz do sistema interno reproduz um número de parâmetros, tais como dia e hora do
telefonema, bem como os parâmetros de configuração, tais como código pessoal, toques…
A língua da voz do sistema interno vem indicada na embalagem!
7.1 Indicações no visor
No modo stand-by podem aparecer no visor as seguintes informações:
- 10/01 MSG = 1 mensagem nova (não ouvida) e 10 mensagens no total
- 15/05 MSG = 5 mensagens novas (não ouvidas) e 15 mensagens no total
7.2 Menu do atendedor de chamadas
Para activar as funções do atendedor de chamadas proceda da seguinte maneira:
• Prima a tecla de programação .
• ‘ANSWERING’ aparece no visor.
• Prima a tecla OK.
Após 2 segundos aparece ‘ANS OPER’ no visor. A partir daqui tem acesso a todas as funções
do atendedor de chamadas, tais como gravar o texto de atendimento, código para controlo à
distância, ouvir mensagens,….
As configurações devem ser acompanhadas por uma voz do sistema interno. O aparelho deve
entrar automaticamente em modo mãos livres, de modo a que a voz do sistema interno seja
audível sem ter de pegar no auscultador. O modo mãos livres também pode ser desligado
premindo a tecla Altifalante .
7.3 Funções do teclado
Teclas Modo stand-by Durante a reprodução da mensagem
1 Nenhuma Passar mensagem atrás
2 Ouvir mensagens Pausa
3 Nenhuma Guardar mensagem
59
Page 59

Cocoon 350
4 Tomar nota Nenhuma
5 Reproduzir texto de atendimento Nenhuma
6 Seleccionar texto de atendimento Parar
7 Reproduzir código pessoal Nenhuma
8 Número actual de toques Nenhuma
9 Tempo de reprodução Nenhuma
* Atendedor de chamadas ligado Nenhuma
0 (definir tecla)Indicar configurações Nenhuma
# Atendedor de chamadas desligado Nenhuma
0 + 1 Gravar texto atendimento (OGM) 1 Nenhuma
0 + 3 Gravar texto atendimento (OGM) 2 Nenhuma
0 + 7 Configurar código pessoal Nenhuma
0 + 8 Configurar número de toques Nenhuma
0 + 9 Configurar data/hora Nenhuma
+ OK Apagar todas as mensagens Apagar a mensagem actual
7.4 Sair do menu do atendedor de chamadas
Enquanto está no menu do atendedor de chamadas não pode efectuar chamadas, apenas pode
configurar o atendedor de chamadas. Se pretender sair do menu, prima a tecla OK!
Se receber uma chamada, interna ou externa, o aparelho sai automaticamente do menu do
atendedor de chamadas!
Nota: Ao sair do menu do atendedor de chamadas, deve ajustar a informação do visor. Durante esse ajuste,
o ícone fica a piscar. Depois de algum tempo são ajustadas as mensagens total/novas (MSG XX/YY)!
7.5 Textos de atendimento
Podem gravar-se 2 textos de atendimento com um máximo de 2 minutos (OGM 1 e OGM 2).
• Texto de atendimento 1 para a função de atendedor com possibilidade de deixar mensagem
• Texto de atendimento 2 para a função de atendedor sem possibilidade de deixar mensagem,
o aparelho não grava mensagens.
7.5.1. Gravar mensagens de atendimento (Texto de atendimento 1 ou Texto de
atendimento 2)
• Prima 2 x a tecla de programação para aceder ao menu do atendedor de chamadas (ver
‘Menu do atendedor de chamadas’)
• Prima a tecla Prima a tecla ‘0’.
60
Page 60

Cocoon 350
• Prima de seguida:
- Tecla ‘ ’ para gravar o texto de atendimento 1.
- Tecla ‘ ’ para gravar o texto de atendimento 2.
• Uma voz indica qual o texto de atendimento a gravar.
• Grave a mensagem de atendimento depois de ouvir o sinal sonoro.
• Prima a tecla Stop para concluir a gravação.
Nota: A gravação não pode ter mais de 2 minutos. Se não se gravar uma mensagem de atendimento, é
reproduzido o texto de atendimento predefinido:
• Texto de atendimento 1 : ‘Please call later’.
• Texto de atendimento 2 : ‘Please call later’.
7.5.2 Verificar o texto de atendimento
Para verificar o texto de atendimento actual:
• Prima 2 x a tecla de programação para aceder ao menu do atendedor de chamadas (ver
‘Menu do atendedor de chamadas’).
• Prima a tecla .
Nota: Para parar a reprodução, prima ligeiramente a tecla Stop .
7.5.3 Seleccionar o texto de atendimento
• Prima 2 x a tecla de programação para aceder ao menu do atendedor de chamadas (ver
‘Menu do atendedor de chamadas’).
• Prima a tecla para alternar entre os 2 textos de atendimento.
• A voz do sistema interno confirma qual o texto de atendimento definido.
Nota:
1) Só é possível efectuar a selecção de um texto de atendimento com o atendedor de chamadas ligado! Se
esse não for o caso, a voz do sistema interno diz que o atendedor de chamadas se encontra desligado.
2) Se a memória estiver cheia, só é possível seleccionar o texto de atendimento 2 (apenas atender sem
permitir deixar mensagem)!
7.5.4 Apagar o texto de atendimento
Se apagar a mensagem de atendimento, será reproduzido o texto predefinido de atendimento
‘Please call later’.
Para apagar a mensagem de atendimento proceda da seguinte forma:
• Prima 2 x a tecla de programação para aceder ao menu do atendedor de chamadas (ver
‘Menu do atendedor de chamadas’).
• Seleccione o texto de atendimento pretendido com a tecla .
• Prima a tecla para reproduzir o texto de atendimento.
• Durante a reprodução do texto de atendimento prima a tecla
.
• No visor aparece ‘ERASE?’.
• Prima ‘OK’ para apagar o texto de atendimento ou volte a premir a tecla para anular a
operação.
61
Page 61
Cocoon 350
7.6 Ligar e desligar o atendedor de chamadas
Se o atendedor de chamadas estiver ligado, aparece o ícone no visor e o aparelho atende
automaticamente as chamadas depois de um determinado número de toques (configurável, ver
‘Configurar toques’).
• Prima 2 x a tecla de programação para aceder ao menu do atendedor de chamadas (ver
‘Menu do atendedor de chamadas’).
• Prima a tecla:
• * -para ligar o atendedor de chamadas. Uma voz confirma a ligação e diz qual o texto
de atendimento activo (texto de atendimento 1 ou texto de atendimento 2).
• # - para desligar o atendedor de chamadas. Uma voz confirma que fica desligado.
• Prima a tecla OK para sair do menu do atendedor de chamadas.
Nota: Mesmo com a atendedor de chamadas desligado, após 10 toques, o aparelho atende
automaticamente para que se possa ligar à distância (ver 7.17 Controlo à distância).
7.7 Configurar toques
O número de toques, após o qual o atendedor de chamadas deve atender, pode ser
configurado entre 2 – 9 e TS (Toll saver). Por defeito, o aparelho está configurado para 3
toques. No modo Toll saver o aparelho atende após 5 toques, se não existirem mensagens
novas, e após 2 toques se existirem mensagens novas. Se não existirem mensagens novas e se
ligar para o seu telefone para consultar as suas mensagens, à distância, (ver mais pormenores
em 7.17 Controlo à distância), pode desligar a chamada logo após o 3º toque. Não necessita
pagar a ligação e fica a saber que não tem mensagens novas.
• Prima 2 x a tecla de programação para aceder ao menu do atendedor de chamadas (ver
‘Menu do atendedor de chamadas’).
• Prima brevemente a tecla
• Prima a tecla e, de seguida, a tecla para configurar o número de toques.
• Prima a tecla ou para indicar o número actual de toques.
• Confirme a configuração, premindo . O número actual de toques é confirmado pela
voz do sistema interno.
Uma voz diz o número actual de toques.
.
Nota:
- Se durante 3 segundos não premir qualquer tecla, o aparelho volta ao menu de atendimento sem indicar
a configuração.
- Em caso de falha de corrente na base, o número de toques passa novamente a 3!
7.8 Verificar o número de toques
• Prima 2 x a tecla de programação para aceder ao menu do atendedor de chamadas (ver
‘Menu do atendedor de chamadas’).
• Prima brevemente a tecla .
• A voz do sistema interno dirá o número de toques configurado.
62
Page 62

Cocoon 350
7.9 Configurar data e hora
A configuração do dia e hora do atendedor de chamadas é independente do telefone. A data e
hora de qualquer telefonema é registada e reproduzida ao ouvir as mensagens. O formato da
hora depende da língua da voz do sistema interno: por exemplo, o Inglês tem o formato de 12
horas e o Alemão tem o formato de 24 horas.
Programação da data e hora:
• Prima 2 x a tecla de programação para aceder ao menu do atendedor de chamadas (ver
‘Menu do atendedor de chamadas’).
• Prima a tecla ‘0’.
• Prima a tecla .
• No visor aparece ‘SET TIME’ e a voz do sistema interno solicita que se configure o dia.
• Prima várias vezes a tecla ou para configurar o dia. A voz do sistema interno
reproduz a configuração actual.
• Prima a tecla para confirmar o dia.
• A voz do sistema interno solicita que se configure a hora.
• Prima várias vezes a tecla ou para configurar a hora.
• Prima a tecla para confirmar a hora.
• A voz do sistema interno solicita que se configurem os minutos.
• Prima várias vezes a tecla ou para configurar os minutos.
• Prima a tecla para confirmar os minutos.
(Se a hora for indicada no formato de 12 horas a voz solicita que se configure AM ou PM.
Prima a tecla ou para dar essa indicação e, de seguida, prima para confirmar)
A configuração completa da data e hora é repetida uma outra vez para ser confirmada.
Nota:
• Se durante 8 segundos não premir qualquer tecla, fica guardada a data/hora anterior e o aparelho sai
automaticamente da configuração da data/hora.
• Se utilizar o aparelho pela primeira vez e não tiver ainda configurado a data/hora não se insere qualquer
registo de data e hora à mensagem recebida.
• Em caso de falha de corrente na base tem de configurar novamente a data/hora!
7.10 Verificar data/hora
• Prima 2 x a tecla de programação para aceder ao menu do atendedor de chamadas (ver
‘Menu do atendedor de chamadas’).
• Prima a tecla para ver a data/hora. A voz do sistema interno indica a configuração actual
da data/hora.
7.11 Programar o código pessoal
O código pessoal consiste num código de 3 algarismos que se utiliza para controlar o aparelho
à distância (ver Controlo à distância). Por defeito, o código pessoal é ‘321’.
Nota: Em caso de falha de corrente na base, o código pessoal passa novamente a ‘321’!
63
Page 63

Cocoon 350
7.11.1 Modificar o código pessoal
• Prima 2 x a tecla de programação para aceder ao menu do atendedor de chamadas (ver
‘Menu do atendedor de chamadas’).
• Prima a tecla ‘0’.
• Prima a tecla para indicar o código pessoal.
• A voz do sistema interno solicita que se configure o código pessoal e diz o primeiro número.
• Prima várias vezes a tecla ou para configurar o primeiro número do código pessoal.
• Prima a tecla para confirmar o primeiro número. A voz do sistema interno diz o 2º
número actual configurado do código pessoal.
• Prima várias vezes a tecla ou para configurar o segundo número do código pessoal.
• Prima a tecla para confirmar o segundo número. A voz do sistema interno diz o 3º
número actual configurado do código pessoal.
• Prima várias vezes a tecla ou para configurar o terceiro número do código pessoal.
• Prima a tecla para confirmar o código pessoal. Ouve-se um sinal sonoro contínuo. A
voz do sistema interno diz o novo código pessoal para que o confirme.
Nota: Se durante 8 segundos não premir qualquer tecla, fica guardado o código pessoal anterior e o
aparelho sai automaticamente da configuração do código pessoal.
7.11.2 Verificar o código pessoal
• Prima 2 x a tecla de programação para aceder ao menu do atendedor de chamadas (ver
‘Menu do atendedor de chamadas’).
• Prima a tecla para ouvir o código pessoal. A voz do sistema interno diz o código
pessoal actual.
7.12 Funcionamento
Se chegar um telefonema e o atendedor de chamadas estiver ligado (com o símbolo no
visor), depois do número de toques configurado, o atendedor de chamadas atende
automaticamente. Se:
• estiver seleccionado o texto de atendimento 1, este é reproduzido. Depois do texto de
atendimento ouve-se um sinal sonoro (bip) e a pessoa que está a telefonar pode deixar uma
mensagem (com um máximo de 3 minutos).
• estiver seleccionado o texto de atendimento 2, este é reproduzido. Depois do sinal sonoro
(bip) a chamada é automaticamente cortada! Não há a possibilidade de se deixar mensagem!
Nota: Se, durante a gravação, não se disser nada durante 8 segundos, a chamada é automaticamente
cortada!
7.13 Função de audição simultânea (Call screening)
Esta função é prática no caso de desejar atender algumas chamadas específicas!
Durante a gravação da mensagem a receber, pode ouvir a mensagem em simultâneo:
• Durante a gravação, prima a tecla Mãos livres . A pessoa que telefona é agora audível e
aparece ‘MONITOR’ no visor.
64
Page 64

Cocoon 350
• Prima novamente a tecla Mãos livres para passar para a função auscultador. Assim,
desliga-se a função mãos livres.
• Prima a tecla OK para desligar a função de audição simultânea ou prima a tecla de
atendimento para atender.
7.14 Gravar memorandos
Com o Cocoon 350 é possível gravar memorandos. Estes memorandos são considerados como
uma mensagem recebida que pode ser consultada mais tarde pelo utilizador. A duração
máxima da gravação de um memorando é de 2 minutos.
• Prima 2 x a tecla de programação para aceder ao menu do atendedor de chamadas (ver
‘Menu do atendedor de chamadas’).
• Prima brevemente a tecla . A voz do sistema interno solicita que diga o memorando. Fale
após ouvir o sinal sonoro.
• Prima a tecla Stop para concluir a gravação
• Prima a tecla OK para voltar ao modo stand-by.
• O símbolo fica a piscar e, depois de algum tempo, é ajustado o número de mensagens
novas.
7.14.1 Reprodução das mensagens recebidas e dos memorandos
• Prima 2 x a tecla de programação para aceder ao menu do atendedor de chamadas (ver
‘Menu do atendedor de chamadas’).
• Prima brevemente a tecla para reproduzir as mensagens e os memorandos.
• Uma voz do sistema interno diz quantas mensagens existem (no total) e quantas mensagens
novas (não ouvidas).
• As mensagens são reproduzidas uma a uma. Se existirem mensagens novas, só são
reproduzidas as mensagens novas (ainda não ouvidas).
• Antes de cada mensagem, a voz do sistema interno diz o dia e a hora a que a chamada foi
gravada.
• Durante a reprodução, é possível:
- ir para o início da mensagem actual, premindo uma vez a tecla .
- passar para a mensagem anterior, premindo duas vezes na tecla .
- parar a reprodução, premindo a tecla Stop .
- interromper a gravação, premindo a tecla Pausa . Prima novamente a tecla para
continuar a reprodução.
- passar para a mensagem seguinte, premindo a tecla .
7.15 Apagar mensagens
7.15.1 Apagar mensagem a mensagem aquando da reprodução
Iniciar a reprodução das mensagens, tal como indicado acima.
• Quando a mensagem a apagar estiver a ser reproduzida, prima a tecla Apagar .
• Aparece ‘ERASE?’ no visor.
• Prima a tecla OK para apagar a mensagem ou prima novamente a tecla Apagar para
anular esta operação.
• Ao apagar, a voz do sistema interno indica que a mensagem é apagada.
• O aparelho inicia a reprodução da mensagem seguinte.
65
Page 65

Cocoon 350
7.15.2 Apagar todas as mensagens
Também é possível apagar simultaneamente todas as mensagens novas. Assim só são apagadas
todas as mensagens já ouvidas. As mensagens novas não são apagadas!
• Prima 2 x a tecla de programação para aceder ao menu do atendedor de chamadas (ver
‘Menu do atendedor de chamadas’).
• Prima a tecla Apagar .
• No visor aparece ‘ERASE?’.
• Prima a tecla OK para apagar todas as mensagens ou prima novamente a tecla Apagar
para anular esta operação.
• A voz do sistema interno confirma que as mensagens são apagadas e diz quantas
mensagens novas (ainda não ouvidas) existem.
7.16 Memória cheia
Não existe qualquer indicação visual que a memória está cheia. Se o atendedor de chamadas
estiver ligado e chegar uma chamada, o aparelho reproduz automaticamente o texto de
atendimento 2 (função de atendimento sem se poder deixar mensagem)!
Ao ouvir as mensagens, a voz do sistema interno diz que a memória está cheia e só depois
reproduz as mensagens.
• Apague todas as mensagens depois de as ter ouvido.
• A memória fica outra vez livre.
7.17 Controlo à distância
O atendedor de chamadas só pode ser controlado à distância através de um telefone com
marcação por teclas (marcação DTMF).
• Ligue para o seu telefone.
• O atendedor de chamadas atende o telefonema, ouve o texto de atendimento e um sinal
sonoro (bip).
• Depois desse sinal marque lentamente o seu código pessoal (por defeito é o 321).
• Ouve dois sinais sonoros breves para confirmação.
• Indique os códigos seguintes para chegar à função pretendida.
7.17.1. Ouvir mensagens
• Prima ‘2’ (ouvir as mensagens). O atendedor de chamadas reproduz as mensagens.
Durante a reprodução tem as seguintes possibilidades:
• Prima ‘2’ para parar a reprodução.
• Prima ‘2’ para iniciar a reprodução.
• Prima ‘3’ para passar para a mensagem seguinte.
• Prima ‘1 1’ para passar para a mensagem anterior.
• Prima ‘1’ para repetir a mensagem actual.
• Prima ‘6’ para terminar a reprodução.
• Prima ‘0’ para apagar a mensagem actual.
66
Page 66

Cocoon 350
7.17.2. Apagar todas as mensagens ouvidas
Depois de ter ouvido todas as mensagens prima ‘0’ para apagar todas as mensagens ouvidas!
7.17.3 Gravar memorandos
• Prima a tecla ‘4’.
• Um sinal sonoro (bip) indica que pode começar a gravar.
• Diga o memorando.
• Prima a tecla ‘6’ para terminar a operação.
7.17.4. Reproduzir o texto de atendimento
• Prima a tecla ‘5’ para reproduzir o texto de atendimento actual.
7.17.5. Gravar o texto de atendimento
• Prima a tecla ‘1’ para gravar o texto de atendimento 1 ou prima a tecla ‘3’ para iniciar a
gravação do texto de atendimento 2.
• Um sinal sonoro (bip) indica que se pode dar início à gravação.
• Diga o texto de atendimento.
• Prima a tecla ‘6’ para terminar a gravação.
Nota : A gravação é automaticamente interrompida após 2 minutos.
7.17.6. Ligar/desligar o atendedor de chamadas
• Prima a tecla ‘*’ para ligar o atendedor de chamadas.
• Prima a tecla ‘#’ para desligar o atendedor de chamadas.
7.18 Terminar o controlo à distância
Para terminar o controlo à distância prima a tecla ‘6’.
7.19 Ligar o atendedor de chamadas à distância
Se o atendedor de chamadas estiver desligado, também o pode ligar à distância:
• Ligue para o seu telefone.
• O atendedor de chamadas atende o telefonema após 10 toques e reproduz o texto de
atendimento 2.
• Marque lentamente o seu código pessoal (por defeito é o 321) depois do texto de
atendimento.
• Prima a tecla ‘*’.
• A voz do sistema interno indica que o atendedor de chamadas está ligado.
• Prima a tecla ‘6’ para terminar a operação.
67
Page 67

Cocoon 350
7.20 Tabela dos códigos de controlo à distância
• Ligue para o seu telefone.
• O atendedor de chamadas atende o telefonema, você ouve o texto de atendimento e um
sinal sonoro.
• Marque lentamente o seu código pessoal (por defeito é o 321).
• Ouve dois sinais sonoros breves para confirmação.
• Indique os códigos seguintes para chegar à função pretendida:
Reproduzir mensagens
• ‘2’ : reproduzir mensagens
• ‘2’ : interromper a reprodução + ‘2’: continuar
• ‘3’ : passar para a mensagem seguinte
• ‘1 1’ : passar para a mensagem anterior
• ‘1’ : repetir a mensagem actual
• ‘0’ : apagar a mensagem actual (durante a reprodução)
• ‘0’ : apagar todas as mensagens (depois de reproduzidas todas as mensagens)
Stand-by
• ‘5’ : reproduzir o texto de atendimento
• ‘1’ : gravar o texto de atendimento 1 (Prima a tecla ‘6’ para terminar a gravação)
• ‘3’ : gravar o texto de atendimento 2 (Prima a tecla ‘6’ para terminar a gravação)
• ‘4’ : gravar memorando (Prima a tecla ‘6’ para terminar a gravação)
• ‘*’ : ligar o atendedor de chamadas
• ‘#’ : desligar o atendedor de chamadas
8 GARANTIA
Garantia : 2 anos para os defeitos do aparelho
Atenção : Devolva o seu aparelho na embalagem de origem.
Não se esqueça de incluir a sua factura de compra.
A garantia não é válida sem a factura de compra.
68
Page 68

Cocoon 350
1 ¶¡º°Æ°ªÆ°ª¸ 72
2 ¦¤¸ºÆÄ°/¶Á¢¶¹¥¶¹ª LED 73
3 ãÃÁ¸ (LCD) 73
4 ¤¶¹ÆÃËÄ¡¹°0 74
4.1 ¶рймпзЬ фпойлЬч/рбмнйлЬч мейфпщтзЭбч лмЬуич 75
4.2 ¶рймпзЬ фич змсуубч 75
4.3 ¦тбзнбфпрпЭиуи лмЬуецо 75
4.3.1 ¶кцфетйлЬ лмЬуи 75
4.3.2 ¦тпефпйнбуЭб бтйхнпа 75
4.3.3 ¶рбоАлмиуи фпщ фемещфбЭпщ бтйхнпа 76
4.3.4 ¶рбоАлмиуи еоЮч брЮ фпщч 5 фемещфбЭпщч бтйхнпач 76
4.3.5 ºмЬуи еоЮч брпхилещнЫопщ уфп ещтефЬтйп бтйхнпа 76
4.3.6 ¶уцфетйлЬ лмЬуи: лмЬуи Аммпщ блпщуфйлпа 76
4.4 ¤Ьги нйбч лмЬуич 77
4.4.1 ¤Ьги нйбч екцфетйлЬч лмЬуич 77
4.4.2 ¤Ьги нйбч еуцфетйлЬч лмЬуич 77
4.4.3 ¤Ьги екцфетйлЬч лмЬуич лбфА фи дйАтлейб еуцфетйлЬч лмЬуич 77
4.5 ¶оетзпрпЭиуи/бреоетзпрпЭиуи мейфпщтзЭбч бопйлфЬч ущопнймЭбч 77
4.6 »ефбжптА лмЬуич уе Аммп блпщуфйлЮ 78
4.7 ¶йдпрпЭиуи блпщуфйлпа елфЮч енвЫмейбч 78
4.8 Дахнйуи фич Ыофбуич ишеЭпщ 78
4.9 Оодейки дйАтлейбч лмЬуич уфио пхЮои 78
4.10 °реоетзпрпЭиуи фпщ нйлтпжсопщ (уЭзбуи) 79
4.11 ¦мЬлфтп рбауич 79
4.12 ºмЬуи ущодйАулегич (дап еуцфетйлА блпщуфйлА DECT лбй Ыобч екцфетйлЮч лбмсо) 79
4.13 ¶офпрйунЮч фич хЫуич еоЮч блпщуфйлпа (бобъЬфиуи) 79
4.14 МтЬуи фпщ бмжбтйхнифйлпа рмилфтпмпзЭпщ 79
4.15 Жп ещтефЬтйп 80
4.15.1 ¦тпухЬли бтйхнпа лбй поЮнбфпч уфп ещтефЬтйп 80
4.15.2 °объЬфиуи бтйхнпа уфп ещтефЬтйп 81
4.15.3 °ммбзЬ поЮнбфпч Ь бтйхнпа фпщ ещтефитЭпщ 81
4.15.4 ¢йбзтбжЬ поЮнбфпч лбй бтйхнпа брЮ фп ещтефЬтйп 81
4.16 ¶оетзпрпЭиуи/бреоетзпрпЭиуи фпщ блпщуфйлпа 82
4.16.1 °реоетзпрпЭиуи фпщ блпщуфйлпа 82
4.16.2 ¶оетзпрпЭиуи фпщ блпщуфйлпа 82
4.17 Дахнйуи фич Ыофбуич лпщдпщоЭунбфпч фпщ блпщуфйлпа 82
4.17.1 Дахнйуи фич Ыофбуич лпщдпщоЭунбфпч зйб екцфетйлЫч лмЬуейч (0-9) 82
4.17.2 Дахнйуи фич Ыофбуич лпщдпщоЭунбфпч зйб еуцфетйлЫч лмЬуейч (1-9) 83
4.18 ¶рймпзЬ фич немцдЭбч лпщдпщоЭунбфпч фпщ блпщуфйлпа 83
4.18.1 ¶рймпзЬ фич немцдЭбч лпщдпщоЭунбфпч зйб екцфетйлЫч лмЬуейч (1-9) 83
4.18.2 ¶рймпзЬ фич немцдЭбч лпщдпщоЭунбфпч зйб еуцфетйлЫч лмЬуейч (1-9) 83
4.19 ºмеЭдцнб фпщ рмилфтпмпзЭпщ 84
4.20 ¶оетзпрпЭиуи/бреоетзпрпЭиуи Ьшпщ рмЬлфтцо 84
4.21 Жп рмЬлфтп R (flash) 84
4.22 °ммбзЬ фпщ лцдйлпа PIN 85
69
Page 69

Cocoon 350
4.23 ¶ззтбжЬ блпщуфйлпа уе нйб вАуи Cocoon 300/350, Butler 1000, 1010, 1210 85
4.24 ¶ззтбжЬ блпщуфйлпа Cocoon 350 уе вАуи Butler 575/575+ & Cocoon100/100+
& Butler 2000 86
4.25 ¶ззтбжЬ еоЮч блпщуфйлпа Butler 1800T уе нйб вАуи Cocoon 350 87
4.26 ºбфАтзиуи еззтбжЬч еоЮч блпщуфйлпа брЮ нйб вАуи 87
4.27 ¶рймпзЬ нйбч вАуич 88
4.27.1 °щфЮнбфи ерймпзЬ 88
4.27.2 МейтплЭоифи ерймпзЬ 88
4.28 ¼тбзЬ екетшЮнеоцо лмЬуецо 89
4.29 ¦тперймезнЫоеч тщхнЭуейч (ербобжптА) фцо рбтбнЫфтцо 90
4.30 ¦мЬтич ербобжптА фцо етзпуфбуйблсо тщхнЭуецо фич ущулещЬч 90
5 °Á°¡Á¿Ä¹ª¸ º¤¸ª¶¿Á 91
5.1 Дахнйуи инетпниоЭбч лбй стбч 91
5.2 ¸ мЭуфб лмЬуецо 92
5.3 ºмЬуи бтйхнпа брЮ фи мЭуфб лмЬуецо 92
5.4 °рпхЬлещуи бтйхнпа фич мЭуфбч лмЬуецо уфп ещтефЬтйп 92
5.5 ¢йбзтбжЬ бтйхнсо брЮ фи мЭуфб лмЬуецо 93
5.5.1 ¢йбзтбжЬ еоЮч бтйхнпа 93
5.5.2 ¢йбзтбжЬ Юмцо фцо бтйхнсо 93
6 ¶Á¢¶¹¥¸ »¸ÁË»°Æ¿Á ªÆÃÁ Ƹ¤¶¼¿Á¸Æ¸ 93
7 °ËÆû°Æê Ƹ¤¶¼¿Á¸Æ¸ª 93
7.1. ГхЮои 94
7.2 »еопа бщфЮнбфпщ фимежцоифЬ 94
7.3 ¤ейфпщтзЭеч рмилфтпмпзЭпщ 94
7.4 Окпдпч брЮ фп неопа бщфЮнбфпщ фимежцоифЬ 95
7.5 ¶кетшЮнеоб ниоанбфб 95
7.5.1 ¸шпзтАжиуи екетшЮнеоцо ниощнАфцо (OGM 1 Ь OGM 2) 95
7.5.2 Омезшпч фпщ екетшЮнеопщ ниоанбфпч 96
7.5.3 ¶рймпзЬ екетшЮнеопщ ниоанбфпч 96
7.5.4 ¢йбзтбжЬ фпщ екетшЮнеопщ ниоанбфпч 96
7.6 ¶оетзпрпЭиуи/бреоетзпрпЭиуи фпщ бщфЮнбфпщ фимежцоифЬ 96
7.7 Дахнйуи бтйхнпа лпщдпщойунАфцо 97
7.8 Омезшпч фпщ бтйхнпа лпщдпщойунАфцо 97
7.9 Дахнйуи инЫтбч лбй стбч 97
7.10 Омезшпч фич инЫтбч/стбч 98
7.11 ¦тпзтбннбфйунЮч фпщ лцдйлпа VIP 98
7.11.1 °ммбзЬ фпщ лцдйлпа VIP 98
7.11.2 Омезшпч фпщ лцдйлпа VIP 99
7.12 МейтйунЮч 99
7.13 ¢йбмпзЬ лмЬуецо 99
7.14 ¸шпзтАжиуи еоЮч уинейснбфпч 100
7.14.1 °обрбтбзцзЬ ейуетшЮнеоцо ниощнАфцо лбй уинейцнАфцо 100
7.15 ¢йбзтбжЬ ниощнАфцо 100
7.15.1 ¢йбзтбжЬ ниощнАфцо Ыоб-Ыоб лбфА фио бобрбтбзцзЬ 100
7.15.2 ¢йбзтбжЬ Юмцо фцо ниощнАфцо 100
70
Page 70

Cocoon 350
7.16 ¦мЬтич ноЬни 101
7.17 ЖимешейтйунЮч 101
7.17.1 °лтЮбуи ниощнАфцо 101
7.17.2 ¢йбзтбжЬ Юмцо фцо рбмбйсо ниощнАфцо 101
7.17.3 ¸шпзтАжиуи уинейцнАфцо 101
7.17.4 °обрбтбзцзЬ екетшЮнеопщ ниоанбфпч 102
7.17.5 ¸шпзтАжиуи екетшЮнеопщ ниоанбфпч 102
7.17.6 ¶оетзпрпЭиуи/бреоетзпрпЭиуи фпщ бщфЮнбфпщ фимежцоифЬ 102
7.18 ЖетнбфйунЮч фимешейтйунпа 102
7.19 ¶к брпуфАуецч еоетзпрпЭиуи фпщ бщфЮнбфпщ фимежцоифЬ 102
7.20 ¤Эуфб лцдйлсо фимешейтйунпа 103
8 ¶¡¡Ë¸ª¸ 103
71
Page 71

Cocoon 350
1 ¶¡º°Æ°ªÆ°ª¸
¦тпфпа штиуйнпрпйЬуефе фи ущулещЬ зйб ртсфи жптА, ртЫрей об жптфЭуефе фио нрбфбтЭб
фпщмАшйуфпо зйб 20 стеч. ªе бофЭхефи ретЭрфцуи, део еззщАфбй и вЫмфйуфи мейфпщтзЭб фич
ущулещЬч.
¡йб об езлбфбуфЬуефе фи ущулещЬ, лАофе фйч блЮмпщхеч еоЫтзейеч:
• ªщодЫуфе фп Ыоб Алтп фпщ лбмцдЭпщ нефбушинбфйуфЬ уфио ерЭфпйши ртЭъб теанбфпч лбй фп
Аммп уфио щрпдпшЬ фтпжпдпуЭбч, уфп лАфц нЫтпч фич ущулещЬч.
• ªщодЫуфе фп Ыоб Алтп фпщ фимежцойлпа лбмцдЭпщ уфио ерЭфпйши ртЭъб фимежсопщ лбй фп
Аммп уфио щрпдпшЬ фимежцойлЬч зтбннЬч, уфп лАфц нЫтпч фич ущулещЬч.
telephone connection
wall phone jack
adapter jack
adapter outlet
• °опЭкфе фп хАмбнп фцо нрбфбтйсо (вмЫре рбтблАфц).
• ЖпрпхефЬуфе фио нрбфбтЭб уфп хАмбнп лбй ущодЫуфе фп ваунб фич нрбфбтЭбч уфп
блпщуфйлЮ
• ºмеЭуфе фп хАмбнп фич нрбфбтЭбч.
• °жЬуфе фп блпщуфйлЮ уфи вАуи жЮтфйуич зйб 20 стеч. °оАвей и Ыодейки зтбннЬч/жЮтфйуич
(LED) фич вАуич.
Оодейки нрбфбтЭбч:
• нрбфбтЭб еЭобй рмЬтцч жптфйунЫои.
• нрбфбтЭб Ышей бдейАуей лбфА фп Ьнйущ (50%)
• нрбфбтЭб Ышей бдейАуей ушедЮо еофемсч. ªе бщфЬ фио ретЭрфцуи, блпазефбй Ыоб
ртпейдпрпйифйлЮ ишифйлЮ уЬнб лбй бобвпувЬоей фп уанвпмп нрбфбтЭбч
уфио пхЮои.
72
Page 72

Cocoon 350
2 ¦¤¸ºÆÄ°/¶Á¢¶¹¥¶¹ª LED
1 ГхЮои
2 ¦мЬлфтп лмЬуич
3 ¦мЬлфтп нефблЭоиуич
ерАоц/бопйлфЬч ущопнймЭбч
4 ¦мЬлфтп ртпзтбннбфйунпа
5 ¦мЬлфтп ещтефитЭпщ
6 ¦мЬлфтп ербоАлмиуич/рбауич /P
7 »йлтЮжцоп
8 ¦мЬлфтп Ыофбуич/лпщдпщойпа /
9 °мжбтйхнифйлА рмЬлфтб
10 ¦мЬлфтп дйбзтбжЬч/уЭзбуич
11 ¦мЬлфтп нефблЭоиуич лАфц/Flash /R
12 µАуи
13 ¦мЬлфтп бобъЬфиуич
14 Оодейки зтбннЬч/жЮтфйуич (LED)
3 ãÃÁ¸ (LCD)
/
2
11
10
9
8
7
6
1
3
5
4
14
13
12
4
1 2 3
1 °тйхнЮч мижхЫофцо лмЬуецо.
2 ¸нетпниоЭб (инЫтб/нЬобч) мижхЫофцо лмЬуецо.
3 Ятб (стеч:мерфА) мижхЫофцо лмЬуецо.
4 ¦митпжптЭеч лмЬуич.
5 ªанвпмб еодеЭкецо ( ):
- фп уанвпмп бщфЮ уинбЭоей Юфй фп блпщуфйлЮ втЭулефбй еофЮч фич енвЫмейбч фич вАуич.
- Юфбо бтшЭуей об бобвпувЬоей бщфЮ фп уанвпмп, бщфЮ уинбЭоей Юфй еЭуфе елфЮч енвЫмейбч
фич вАуич. »ефблйоихеЭфе лпофафетб уфи вАуи, суфе об еЭобй дщобфЬ и брплбфАуфбуи
фич уаодеуич вАуич- блпщуфйлпа.
73
Page 73

Cocoon 350
6 Оодейки ( ):
- фп уанвпмп бщфЮ уинбЭоей Юфй и ущулещЬ дЫшфиле лмЬуейч рпщ брпхилеафилбо
бщфЮнбфб уфи мЭуфб лмЬуецо.
7 Оодейки ( ):
- фп уанвпмп бщфЮ уинбЭоей Юфй и мейфпщтзЭб уЭзбуич еЭобй еоетзЬ лбй фп нйлтЮжцоп Ышей
бреоетзпрпйихеЭ лбфА фи дйАтлейб нйбч ущопнймЭбч.
8 Оодейки ( ):
- фп уанвпмп бщфЮ енжбоЭъефбй уфио пхЮои лбфА фио ртбзнбфпрпЭиуи Ь мЬги лмЬуецо.
9 Оодейки ( ):
- фп уанвпмп бщфЮ уинбЭоей Юфй фп лпщдпаой еЭобй бреоетзпрпйинЫоп. ºбфА фи мЬги нйбч
лмЬуич, и ущулещЬ део лпщдпщоЭъей. ¸ ущулещЬ лпщдпщоЭъей лбфА фи мЬги нйбч
еуцфетйлЬч лмЬуич.
10 Оодейки ( ):
- фп уанвпмп бщфЮ еЭобй и Ыодейки нрбфбтЭбч.
11 Оодейки ( ):
- фп уанвпмп бщфЮ уинбЭоей Юфй втЭулеуфе уфп неопа.
12 Оодейки ( ):
- фп уанвпмп бщфЮ енжбоЭъефбй Юфбо ретйизеЭуфе уфпщч бтйхнпач фпщ ещтефитЭпщ.
13 Оодейки ( ):
- фп уанвпмп бщфЮ енжбоЭъефбй Юфбо мАвефе Ыоб нЬощнб фимежцоифЬ (вмЫре лежАмбйп 6).
14 Оодейки ( ):
- фп уанвпмп бщфЮ уинбЭоей Юфй еЭобй еоетзЬ и мейфпщтзЭб бопйлфЬч ущопнймЭбч. »рптеЭфе
об нймАфе шцтЭч об уилсуефе фп блпщуфйлЮ.
- фп уанвпмп бщфЮ бобвпувЬоей Юфбо п фимежцоифЬч еЭобй еоетзпрпйинЫопч
(ишпзтАжиуи ейуетшЮнеопщ ниоанбфпч,...)
15 Оодейки ( )
- фп уанвпмп бщфЮ уинбЭоей Юфй п фимежцоифЬч еЭобй еоетзЮч Ь втЭулеуфе уфп неопа фпщ
фимежцоифЬ.
4 ¤¶¹ÆÃËÄ¡¹°
4.1 ¶рймпзЬ фпойлЬч/рбмнйлЬч мейфпщтзЭбч лмЬуич
¸ ущулещЬ Ышей тщхнйуфеЭ уе фпойлЬ мейфпщтзЭб лмЬуич (DTMF). °о фп уауфинА убч мейфпщтзеЭ
не рбмнпач, нрптеЭфе об бммАкефе уе рбмнйлЬ мейфпщтзЭб (уфйч ретйууЮфетеч ретйрфсуейч, део
еЭобй брбтбЭфифп).
ºАофе фйч блЮмпщхеч еоЫтзейеч:
• ¦бфЬуфе фп рмЬлфтп ртпзтбннбфйунпа .
• ¦бфЬуфе ербоейминнЫоб фп рмЬлфтп ерАоц Ь лАфц нефблЭоиуич , нЫштй об енжбойуфеЭ
уфио пхЮои фп нЬощнб 'SETTING'.
• ¦бфЬуфе фп рмЬлфтп ртпзтбннбфйунпа .
• ¦бфЬуфе ербоейминнЫоб фп рмЬлфтп ерАоц Ь лАфц нефблЭоиуич , нЫштй об енжбойуфеЭ
уфио пхЮои фп нЬощнб 'DIAL MODE'.
74
Page 74

Cocoon 350
• ¦бфЬуфе фп рмЬлфтп ртпзтбннбфйунпа .
• ªфио пхЮои енжбоЭъефбй и фтЫшпщуб лбфАуфбуи:
- 'TONE': ЖпойлЬ мейфпщтзЭб лмЬуич зйб фб ретйууЮфетб фимежцойлА лЫофтб лбй зтбннЫч
- 'PULSE': ¦бмнйлЬ мейфпщтзЭб лмЬуич зйб рбмбйА фимежцойлА лЫофтб рпщ де мейфпщтзпао не
фпойлЬ мейфпщтзЭб
• ¦бфЬуфе фп рмЬлфтп ерАоц Ь лАфц нефблЭоиуич , зйб об ерймЫкефе.
• ¦бфЬуфе фп рмЬлфтп ртпзтбннбфйунпа зйб об ерйвевбйсуефе фио ерймпзЬ убч.
4.2 ¶рймпзЬ фич змсуубч
¸ ущулещЬ дйбхЫфей 5 змсууеч брейлЮойуич: вмЫре змсууеч брейлЮойуич уфи ущулещбуЭб!!
¡йб об ерймЫкефе фи змсууб, лАофе фйч блЮмпщхеч еоЫтзейеч:
• ¦бфЬуфе фп рмЬлфтп ртпзтбннбфйунпа .
• ¦бфЬуфе ербоейминнЫоб фп рмЬлфтп ерАоц Ь лАфц нефблЭоиуич , нЫштй об енжбойуфеЭ
уфио пхЮои фп нЬощнб 'SETTING'.
• ¦бфЬуфе фп рмЬлфтп ртпзтбннбфйунпа .
• ªфио пхЮои енжбоЭъефбй фп нЬощнб 'LANGUAGE'.
• ¦бфЬуфе фп рмЬлфтп ртпзтбннбфйунпа .
• Гй ерймпзЫч змсуубч енжбоЭъпофбй уфио пхЮои.
• ¦бфЬуфе ербоейминнЫоб фп рмЬлфтп ерАоц Ь лАфц нефблЭоиуич , зйб об ерймЫкефе фи
змсууб рпщ хЫмефе об штиуйнпрпйЬуефе.
• °жпа енжбойуфеЭ уфио пхЮои и змсууб рпщ хЫмефе, рбфЬуфе фп рмЬлфтп ртпзтбннбфйунпа
зйб об ерйвевбйсуефе фио ерймпзЬ убч Ь рбфЬуфе ербоейминнЫоб фп рмЬлфтп
дйбзтбжЬч/уЭзбуич зйб об взеЭфе брЮ фп неопа.
4.3 ¦тбзнбфпрпЭиуи лмЬуецо
4.3.1 ¶кцфетйлЬ лмЬуи
• ¦бфЬуфе фп рмЬлфтп лмЬуич .
• °тшЭъей об бобвпувЬоей и Ыодейки зтбннЬч/жЮтфйуич (LED) уфи вАуи. ªфио пхЮои
енжбоЭъпофбй фп нЬощнб 'EXT' лбй фп уанвпмп лмЬуич .
• °лпазефбй п фЮопч лмЬуич. ºбмЫуфе фпо бтйхнЮ рпщ хЫмефе.
• ªфио пхЮои енжбоЭъефбй п бтйхнЮч лбй нефА лбмеЭфбй.
• °жпа фемейсуефе фио лмЬуи убч, рбфЬуфе фп рмЬлфтп лмЬуич зйб об лмеЭуефе фи зтбннЬ
Ь блпщнрЬуфе фп блпщуфйлЮ уфи вАуи.
4.3.2 ¦тпефпйнбуЭб бтйхнпа
• ¦милфтпмпзЬуфе фпо бтйхнЮ рпщ хЫмефе об лбмЫуефе. »рптеЭфе об дйптхсуефе фпо бтйхнЮ
рбфсофбч фп рмЬлфтп дйбзтбжЬч/уЭзбуич .
• ¦бфЬуфе фп рмЬлфтп лмЬуич .
• °тшЭъей об бобвпувЬоей и Ыодейки зтбннЬч/жЮтфйуич (LED) уфи вАуи. ªфио пхЮои
енжбоЭъпофбй фп нЬощнб 'EXT' лбй фп уанвпмп лмЬуич .
• Г бтйхнЮч лбмеЭфбй бщфЮнбфб.
• °жпа фемейсуефе фио лмЬуи убч, рбфЬуфе фп рмЬлфтп лмЬуич зйб об лмеЭуефе фи зтбннЬ
Ь блпщнрЬуфе фп блпщуфйлЮ уфи вАуи.
75
Page 75
Cocoon 350
4.3.3 ¶рбоАлмиуи фпщ фемещфбЭпщ бтйхнпа
• ¦бфЬуфе фп рмЬлфтп лмЬуич .
• °тшЭъей об бобвпувЬоей и Ыодейки зтбннЬч/жЮтфйуич (LED) уфи вАуи. ªфио пхЮои
енжбоЭъпофбй фп нЬощнб 'EXT' лбй фп уанвпмп лмЬуич .
• °лпазефбй п фЮопч лмЬуич.
• ¦бфЬуфе фп рмЬлфтп ербоАлмиуич . ºбмеЭфбй бщфЮнбфб п бтйхнЮч рпщ лбмЫубфе фемещфбЭб
жптА, шцтЭч об штейАъефбй об фпо рмилфтпмпзЬуефе рАмй.
4.3.4 ¶рбоАлмиуи еоЮч брЮ фпщч 5 фемещфбЭпщч бтйхнпач
• ¦бфЬуфе фп рмЬлфтп ербоАлмиуич . ªфио пхЮои енжбоЭъефбй п бтйхнЮч рпщ лбмЫубфе
фемещфбЭп. °о хЫмефе об лбмЫуефе Ыобо брЮ фпщч 5 фемещфбЭпщч бтйхнпач, рбфЬуфе мЭзеч
жптЫч фп рмЬлфтп ербоАлмиуич , нЫштй об енжбойуфеЭ уфио пхЮои п бтйхнЮч рпщ хЫмефе.
• ¦бфЬуфе фп рмЬлфтп лмЬуич .
• ºбмеЭфбй бщфЮнбфб п бтйхнЮч рпщ енжбоЭъефбй уфио пхЮои, шцтЭч об штейАъефбй об фпо
рмилфтпмпзЬуефе рАмй.
• °жпа фемейсуефе фио лмЬуи убч, рбфЬуфе фп рмЬлфтп лмЬуич зйб об лмеЭуефе фи зтбннЬ
Ь блпщнрЬуфе фп блпщуфйлЮ уфи вАуи.
4.3.5 ºмЬуи еоЮч брпхилещнЫопщ уфп ещтефЬтйп бтйхнпа
¸ ущулещЬ дйбхЫфей ещтефЬтйп, уфп прпЭп нрптеЭфе об брпхилеаефе фпщч бтйхнпач фцо
лмЬуецо рпщ мбнвАоефе, нбъЭ не Ыоб Юопнб. °о хЫмефе об лбмЫуефе Ыобо бтйхнЮ брЮ фп
ещтефЬтйп, лАофе фйч блЮмпщхеч еоЫтзейеч:
• ¦бфЬуфе фп рмЬлфтп ещтефитЭпщ . ªфио пхЮои енжбоЭъефбй п ртсфпч бтйхнЮч фпщ
ещтефитЭпщ.
• ¦бфЬуфе ербоейминнЫоб фп рмЬлфтп ерАоц Ь лАфц нефблЭоиуич , зйб об ерймЫкефе фпо
бтйхнЮ рпщ хЫмефе об лбмЫуефе.
• ¦бфЬуфе фп рмЬлфтп лмЬуич .
• ºбмеЭфбй бщфЮнбфб п бтйхнЮч рпщ енжбоЭъефбй уфио пхЮои, шцтЭч об штейАъефбй об фпо
рмилфтпмпзЬуефе рАмй.
• °жпа фемейсуефе фио лмЬуи убч, рбфЬуфе фп рмЬлфтп лмЬуич зйб об лмеЭуефе фи зтбннЬ
Ь блпщнрЬуфе фп блпщуфйлЮ уфи вАуи.
4.3.6 ¶уцфетйлЬ лмЬуи: лмЬуи Аммпщ блпщуфйлпа
¸ мейфпщтзЭб бщфЬ Ышей ежбтнпзЬ нЮоп еАо Ышпщо еззтбжеЭ уфи вАуи рпммА блпщуфйлА!
• ¦бфЬуфе фп рмЬлфтп ртпзтбннбфйунпа .
• ¦бфЬуфе ербоейминнЫоб фп рмЬлфтп ерАоц Ь лАфц нефблЭоиуич , нЫштй об енжбойуфеЭ
уфио пхЮои фп нЬощнб 'INTERCOM'.
• ¦бфЬуфе фп рмЬлфтп ртпзтбннбфйунпа .
• ªфио пхЮои енжбоЭъефбй фп нЬощнб 'INT'
• ºбмЫуфе фпо бтйхнЮ фпщ блпщуфйлпа рпщ хЫмефе.
• °жпа фемейсуефе фио лмЬуи убч, рбфЬуфе фп рмЬлфтп лмЬуич зйб об лмеЭуефе фи зтбннЬ
Ь блпщнрЬуфе фп блпщуфйлЮ уфи вАуи.
76
Page 76

Cocoon 350
4.4 ¤Ьги нйбч лмЬуич
4.4.1 ¤Ьги екцфетйлЬч лмЬуич
• Щфбо мАвефе нйб лмЬуи, лпщдпщоЭъпщо Юмб фб еззезтбннЫоб блпщуфйлА.
• ªфио пхЮои бобвпувЬоей фп уанвпмп лмЬуич .
• ªфио пхЮои енжбоЭъефбй п бтйхнЮч фпщ лбмпаофпч, еАо вЫвбйб Ышефе еоетзпрпйЬуей фио
щритеуЭб бобзостйуич лмЬуецо (CLIP).
ªщнвпщмещхеЭфе фио ефбйтЭб рпщ убч рбтЫшей фимежцойлЫч щритеуЭеч. Жп Юопнб фпщ
лбмпаофпч ерЭуич енжбоЭъефбй уфио пхЮои, еАо:
- фп Юопнб еЭобй брпхилещнЫоп уфп ещтефЬтйп
- фп фимежцойлЮ дЭлфщп брпуфЫммей фп Юопнб нбъЭ не фпо бтйхнЮ (нЮоп уе ущуфЬнбфб FSK
CID).
• ¦бфЬуфе фп рмЬлфтп лмЬуич зйб об брбофЬуефе уфио екцфетйлЬ лмЬуи.
• ºбфА фи дйАтлейб фич лмЬуич, уфио пхЮои енжбоЭъефбй фп нЬощнб 'EXT' нбъЭ не фп уанвпмп
. °тшЭъей об нефтА фп штпоЮнефтп лмЬуич.
• °жпа фемейсуефе фио лмЬуи убч, рбфЬуфе фп рмЬлфтп лмЬуич зйб об лмеЭуефе фи зтбннЬ
Ь блпщнрЬуфе фп блпщуфйлЮ уфи вАуи.
4.4.2 ¤Ьги еуцфетйлЬч лмЬуич
¸ мейфпщтзЭб бщфЬ Ышей ежбтнпзЬ нЮоп еАо Ышпщо еззтбжеЭ уфи вАуи рпммА блпщуфйлА!
• Жп блпщуфйлЮ лпщдпщоЭъей.
• ªфио пхЮои енжбоЭъефбй фп нЬощнб 'INT' лбй п бтйхнЮч фпщ блпщуфйлпа рпщ убч лбмеЭ. Жп
уанвпмп лмЬуич бтшЭъей об бобвпувЬоей уфио пхЮои.
• ¦бфЬуфе фп рмЬлфтп лмЬуич зйб об брбофЬуефе фио еуцфетйлЬ лмЬуи.
• ºбфА фи дйАтлейб фич лмЬуич, уфио пхЮои енжбоЭъефбй фп нЬощнб 'INT', п бтйхнЮч
блпщуфйлпа фпщ лбмпаофпч лбй фп уанвпмп . °тшЭъей об нефтА фп штпоЮнефтп лмЬуич.
• °жпа фемейсуефе фио лмЬуи убч, рбфЬуфе фп рмЬлфтп лмЬуич зйб об лмеЭуефе фи зтбннЬ
Ь блпщнрЬуфе фп блпщуфйлЮ уфи вАуи.
4.4.3 ¤Ьги екцфетйлЬч лмЬуич лбфА фи дйАтлейб еуцфетйлЬч лмЬуич
°о мАвефе нйб екцфетйлЬ лмЬуи лбфА фи дйАтлейб нйбч еуцфетйлЬч лмЬуич, блпазефбй Ыобч
фЮопч бобнпоЬч лмЬуич (дйрмЮ нрйр) лбй уфб дап блпщуфйлА рпщ штиуйнпрпйпаофбй зйб фио
еуцфетйлЬ лмЬуи.
• ¦бфЬуфе дап жптЫч фп рмЬлфтп лмЬуич зйб об брбофЬуефе фио екцфетйлЬ лмЬуи.
• °жпа фемейсуефе фио лмЬуи убч, рбфЬуфе фп рмЬлфтп лмЬуич зйб об лмеЭуефе фи зтбннЬ
Ь блпщнрЬуфе фп блпщуфйлЮ уфи вАуи.
4.5 ¶оетзпрпЭиуи/бреоетзпрпЭиуи мейфпщтзЭбч бопйлфЬч ущопнймЭбч
¸ мейфпщтзЭб бщфЬ убч ерйфтЫрей об ерйлпйоцоеЭфе шцтЭч об уилсоефе фп блпщуфйлЮ. ¶ос
нймАфе уфп фимЫжцоп, рбфЬуфе фп рмЬлфтп нефблЭоиуич ерАоц/бопйлфЬч ущопнймЭбч / , çéá
об еоетзпрпйЬуефе фи мейфпщтзЭб бопйлфЬч ущопнймЭбч.
¦бфЬуфе фп Эдйп рмЬлфтп зйб об бреоетзпрпйЬуефе фи мейфпщтзЭб бопйлфЬч ущопнймЭбч.
ªинеЭцуи: Щфбо штиуйнпрпйеЭфе фи мейфпщтзЭб бопйлфЬч ущопнймЭбч лбй хЫмефе об бммАкефе фио Ыофбуи Ьшпщ, рбфЬуфе
фп рмЬлфтп Ыофбуич .
77
Page 77

Cocoon 350
¦тпупшЬ !! Щфбо штиуйнпрпйеЭфе фи мейфпщтзЭб бопйлфЬч ущопнймЭбч зйб рпма штЮоп, пй нрбфбтЭб бдейАъей
зтЬзптб !
4.6 »ефбжптА лмЬуич уе Аммп блпщуфйлЮ
• Оуфц Юфй Ышефе Ыобо екцфетйлЮ лбмпаофб уфи зтбннЬ.
• ¦бфЬуфе фп рмЬлфтп ртпзтбннбфйунпа .
• ªфио пхЮои енжбоЭъефбй фп нЬощнб 'INTERCOM'.
• ¦бфЬуфе фп рмЬлфтп ртпзтбннбфйунпа .
• ¸ екцфетйлЬ лмЬуи нрбЭоей уе бобнпоЬ.
• ªфио пхЮои енжбоЭъефбй фп нЬощнб 'INT'.
• ºбмЫуфе фпо бтйхнЮ фпщ блпщуфйлпа, уфп прпЭп хЫмефе об нефбжЫтефе фио лмЬуи.
• °о брбофЬуей фп блпщуфйлЮ рпщ лбмЫубфе, нрптеЭфе об ущопнймЬуефе. ¦бфЬуфе фп рмЬлфтп
лмЬуич зйб об нефбжЫтефе фио екцфетйлЬ лмЬуи.
• °о део брбофЬуей фп блпщуфйлЮ рпщ лбмЫубфе, рбфЬуфе фп рмЬлфтп нефблЭоиуич лАфц
зйб об нймЬуефе лбй рАмй не фпо екцфетйлЮ лбмпаофб.
4.7 ¶йдпрпЭиуи блпщуфйлпа елфЮч енвЫмейбч
°о фп блпщуфйлЮ взей брЮ фио енвЫмейб фич вАуич, блпазефбй Ыоб ишифйлЮ уЬнб.
• ªфио пхЮои енжбоЭъефбй фп нЬощнб 'SEARCHING' лбй бтшЭъей об бобвпувЬоей фп уанвпмп .
• »ефблйоихеЭфе лпофафетб уфи вАуи.
• »Юмйч ербоЫмхефе еофЮч енвЫмейбч фич вАуич, ишеЭ Ыоб уЬнб лбй уфбнбфА об бобвпувЬоей фп
уанвпмп .
4.8 Дахнйуи фич Ыофбуич ишеЭпщ
МтиуйнпрпйЬуфе фп рмЬлфтп Ыофбуич/лпщдпщойпа / зйб об тщхнЭуефе фио Ыофбуи фпщ
блпщуфйлпа лбфА фи дйАтлейб фич лмЬуич. »рптеЭфе об ерймЫкефе боАнеуб уе 5 уфАхнеч
Ыофбуич. ¶к бтшЬч, и ущулещЬ еЭобй тщхнйунЫои уфи уфАхни '3'.
ºбфА фи дйАтлейб нйбч лмЬуич, нрптеЭфе об бммАкефе фио Ыофбуи Ьшпщ фпщ блпщуфйлпа, цч
екЬч:
• ¦бфЬуфе фп рмЬлфтп Ыофбуич/лпщдпщойпа / .
• ªфио пхЮои енжбоЭъефбй и ерймезнЫои уфАхни Ыофбуич.
• МтиуйнпрпйЬуфе фб бтйхнифйлА рмЬлфтб зйб об ерймЫкефе фи уфАхни рпщ хЫмефе (1-5).
• ¦бфЬуфе фп рмЬлфтп Ыофбуич/лпщдпщойпа / зйб об ерйвевбйсуефе фио ерймпзЬ убч.
ªинеЭцуи : Ошефе 8 дещфетЮмерфб зйб об тщхнЭуефе фио Ыофбуи. °о керетАуефе бщфЮ фп штЮоп, и ущулещЬ
ербоЫтшефбй уе лбфАуфбуи бобнпоЬч лбй и Ыофбуи рбтбнЫоей бнефАвмифи.
4.9 Оодейки дйАтлейбч лмЬуич уфио пхЮои
»Юмйч рбфЬуефе фп рмЬлфтп лмЬуич , уфио пхЮои енжбоЭъефбй и дйАтлейб лмЬуич (мерфАдещфетЮмерфб).
¦.ш. " 01-20 " зйб лмЬуи 1 мерфпа лбй 20 дещфетпмЫрфцо.
¸ Ыодейки дйАтлейбч фич лмЬуич рбтбнЫоей уфио пхЮои зйб 5 дещфетЮмерфб нефА фп фЫмпч лАхе
лмЬуич.
78
Page 78

Cocoon 350
4.10 °реоетзпрпЭиуи фпщ нйлтпжсопщ (уЭзбуи)
ºбфА фи дйАтлейб нйбч лмЬуич нрптеЭфе об бреоетзпрпйЬуефе фп нйлтЮжцоп рбфсофбч фп
рмЬлфтп дйбзтбжЬч/уЭзбуич . »е бщфЮ фпо фтЮрп, нрптеЭфе об нймАфе емеахетб шцтЭч об
убч блпаей п ущопнймифЬч убч.
• Оуфц Юфй еЭуфе уфп фимЫжцоп. °обвпувЬоей и Ыодейки зтбннЬч/жЮтфйуич (LED) уфи
вАуи лбй фп уанвпмп лмЬуич енжбоЭъефбй уфио пхЮои.
• ¦бфЬуфе фп рмЬлфтп дйбзтбжЬч/уЭзбуич зйб об бреоетзпрпйЬуефе фп нйлтЮжцоп.
• Жп уанвпмп 'X' енжбоЭъефбй уфио пхЮои ( ).
• Щфбо хЫмефе об ущоешЭуефе фио фимежцойлЬ убч ущопнймЭб, рбфЬуфе лбй рАмй фп рмЬлфтп
дйбзтбжЬч/уЭзбуич .
• Жп уанвпмп 'X' екбжбоЭъефбй брЮ фио пхЮои ( ). Г ущопнймифЬч уфп Аммп Алтп фич
зтбннЬч убч блпаей лбй рАмй.
4.11 ¦мЬлфтп рбауич
°о рмилфтпмпзЬуефе Ыобо бтйхнЮ лбй хемЬуефе об фпщ ртпухЫуефе нйб рбауи, рбфЬуфе фп
рмЬлфтп рбауич уфп ущзлелтйнЫоп уинеЭп фпщ бтйхнпа.
Щфбо лбмЫуефе лбй рАмй бщфЮ фпо бтйхнЮ, ущнретймбнвАоефбй бщфЮнбфб и рбауи
(3 дещфетЮмерфб).
4.12 ºмЬуи ущодйАулегич (дап еуцфетйлА блпщуфйлА DECT лбй Ыобч екцфетйлЮч
лбмсо)
»рптеЭфе об ртбзнбфпрпйеЭфе фимежцойлЫч ущопнймЭеч не Ыобо еуцфетйлЮ лбй Ыобо екцфетйлЮ
лбмпаофб фбщфЮштпоб.
• ¶ос Ышефе уфи зтбннЬ Ыобо екцфетйлЮ лбмпаофб, рбфЬуфе фп рмЬлфтп ртпзтбннбфйунпа .
• ªфио пхЮои енжбоЭъефбй фп нЬощнб 'INTERCOM'.
• ¦бфЬуфе фп рмЬлфтп ртпзтбннбфйунпа .
• ¸ екцфетйлЬ лмЬуи нрбЭоей уе бобнпоЬ.
• ªфио пхЮои енжбоЭъефбй фп нЬощнб 'INT'.
• ºбмЫуфе фпо бтйхнЮ фпщ блпщуфйлпа рпщ хЫмефе об ущнретймАвефе уфио лмЬуи.
• »Юмйч брбофЬуей фп блпщуфйлЮ рпщ лбмЫубфе, рбфЬуфе фп рмЬлфтп '#' зйб 3 дещфетЮмерфб.
• ªфио пхЮои енжбоЭъефбй фп нЬощнб 'CONFERENCE'.
• Офуй, ущодЫеуфе не Ыобо екцфетйлЮ лбй Ыобо еуцфетйлЮ лбмпаофб (лмЬуи ущодйАулегич).
4.13 ¶офпрйунЮч фич хЫуич еоЮч блпщуфйлпа (бобъЬфиуи)
°о де втЭулефе фп блпщуфйлЮ, рбфЬуфе зйб мЭзп фп рмЬлфтп бобъЬфиуич уфи вАуи.
Щмб фб еззезтбннЫоб уфи вАуи блпщуфйлА ишпао Ыоб уЬнб, суфе об нрптеЭфе об фб
еофпрЭуефе. ¡йб об уфбнбфЬуефе фп уЬнб, рбфЬуфе зйб мЭзп фп рмЬлфтп лмЬуич ôïù
блпщуфйлпа.
4.14 МтЬуи фпщ бмжбтйхнифйлпа рмилфтпмпзЭпщ
МтиуйнпрпйеЭфе фп бмжбтйхнифйлЮ рмилфтпмЮзйп зйб об рмилфтпмпзеЭфе леЭнеоп. ¡йб об
ерймЫкефе Ыоб зтАннб, рбфЬуфе фп бофЭуфпйшп рмЬлфтп, р.ш. еАо рбфЬуфе фп бмжбтйхнифйлЮ
рмЬлфтп '5', уфио пхЮои енжбоЭъефбй п ртсфпч шбтблфЬтбч (j). ¦бфЬуфе фп ербоейминнЫоб зйб
об ерймЫкефе лбй фпщч щрЮмпйрпщч шбтблфЬтеч фпщ рмЬлфтпщ.
79
Page 79

Cocoon 350
¦бфЬуфе дап жптЫч фп рмЬлфтп '2' зйб об ерймЫкефе фп зтАннб 'B'. °о хЫмефе об ерймЫкефе фп 'A'
лбй нефА фп 'B', рбфЬуфе ртсфб нйб жптА фп рмЬлфтп '2' зйб об ерймЫкефе фп 'A', ретйнЫоефе 2
дещфетЮмерфб нЫштй об нефблйоихеЭ уфио ерЮнеои хЫуи п дтпнЫбч лбй нефА рбфЬуфе дап жптЫч
фп рмЬлфтп '2' зйб об ерймЫкефе фп 'B'. »рптеЭфе об дйбзтАжефе фпщч мАхпч шбтблфЬтеч
штиуйнпрпйсофбч фп рмЬлфтп дйбзтбжЬч . Г шбтблфЬтбч ртйо брЮ фп дтпнЫб дйбзтАжефбй.
»рптеЭфе об нефблйоЬуефе фп дтпнЫб рбфсофбч фб рмЬлфтб ерАоц лбй лАфц нефблЭоиуич
.
¢йбхЫуйнпй шбтблфЬтеч
¦бфЬуфе фб бофЭуфпйшб рмЬлфтб зйб об ерймЫкефе фпщч блЮмпщхпщч шбтблфЬтеч:
¦¤¸ºÆÄ°
¦Ä¿Æà ¢¶ËƶÄà ÆĹÆà ƶưÄÆà ¦¶»¦ÆÃ
¦°Æ¸»° ¦°Æ¸»° ¦°Æ¸»° ¦°Æ¸»° ¦°Æ¸»°
1 + - / 1
2 A B C 2
3 D E F 3
4 G H I 4
5 J K L 5
6 M N O 6
7 P Q R S 7
8 T U V 8
9 W X Y Z 9
0
ESPAÇO
0
4.15 Жп ещтефЬтйп
4.15.1 ¦тпухЬли бтйхнпа лбй поЮнбфпч уфп ещтефЬтйп
• ¦бфЬуфе фп рмЬлфтп ртпзтбннбфйунпа .
• ¦бфЬуфе ербоейминнЫоб фп рмЬлфтп ерАоц Ь лАфц нефблЭоиуич нЫштй об енжбойуфеЭ
уфио пхЮои фп нЬощнб 'PHONE BOOK'.
• ¦бфЬуфе фп рмЬлфтп ртпзтбннбфйунпа .
• ªфио пхЮои енжбоЭъефбй фп нЬощнб 'SEARCH'.
• ¦бфЬуфе ербоейминнЫоб фп рмЬлфтп ерАоц Ь лАфц нефблЭоиуич нЫштй об енжбойуфеЭ
уфио пхЮои фп нЬощнб 'ADD NEW'.
• ¦бфЬуфе фп рмЬлфтп ртпзтбннбфйунпа .
• ªфио пхЮои енжбоЭъефбй фп нЬощнб 'NAME'.
• ¦милфтпмпзЬуфе фп Юопнб. МтиуйнпрпйЬуфе фб бмжбтйхнифйлА рмЬлфтб.
• ¦бфЬуфе фп рмЬлфтп ртпзтбннбфйунпа .
• ¦милфтпмпзЬуфе фпо бтйхнЮ. МтиуйнпрпйЬуфе фб бмжбтйхнифйлА рмЬлфтб.
• ¦бфЬуфе фп рмЬлфтп ртпзтбннбфйунпа .
• °лпазефбй Ыоб дйбтлЫч нрйр. Жп Юопнб лбй п бтйхнЮч брпхилеапофбй уфп ещтефЬтйп.
80
Page 80

Cocoon 350
4.15.2 °объЬфиуи бтйхнпа уфп ещтефЬтйп
• ¦бфЬуфе фп рмЬлфтп ртпзтбннбфйунпа .
• ¦бфЬуфе ербоейминнЫоб фп рмЬлфтп ерАоц Ь лАфц нефблЭоиуич нЫштй об енжбойуфеЭ
уфио пхЮои фп нЬощнб 'PHONE BOOK'.
• ¦бфЬуфе фп рмЬлфтп ртпзтбннбфйунпа .
• ªфио пхЮои енжбоЭъефбй фп нЬощнб 'SEARCH'.
• ¦бфЬуфе фп рмЬлфтп ртпзтбннбфйунпа .
• ¦милфтпмпзЬуфе фб ртсфб зтАннбфб фпщ поЮнбфпч рпщ хЫмефе.
• ¦бфЬуфе фп рмЬлфтп ртпзтбннбфйунпа .
• ªфио пхЮои енжбоЭъефбй фп ртсфп Юопнб, фп прпЭп бофйуфпйшеЭ уфб зтАннбфб бщфА.
• ¦бфЬуфе фп рмЬлфтп ерАоц Ь лАфц нефблЭоиуич зйб об бобъифЬуефе лбй Аммпщч
бтйхнпач уфп ещтефЬтйп.
• »Юмйч енжбойуфеЭ уфио пхЮои п бтйхнЮч рпщ хЫмефе, лбмеЭфбй бщфЮнбфб нЮмйч рбфихеЭ фп
рмЬлфтп лмЬуич .
4.15.3 °ммбзЬ поЮнбфпч Ь бтйхнпа фпщ ещтефитЭпщ
• ¦бфЬуфе фп рмЬлфтп ртпзтбннбфйунпа .
• ¦бфЬуфе ербоейминнЫоб фп рмЬлфтп ерАоц Ь лАфц нефблЭоиуич нЫштй об енжбойуфеЭ
уфио пхЮои фп нЬощнб 'PHONE BOOK'.
• ¦бфЬуфе фп рмЬлфтп ртпзтбннбфйунпа .
• ªфио пхЮои енжбоЭъефбй фп нЬощнб 'SEARCH'.
• ¦бфЬуфе ербоейминнЫоб фп рмЬлфтп ерАоц Ь лАфц нефблЭоиуич нЫштй об енжбойуфеЭ
уфио пхЮои фп нЬощнб 'EDIT'.
• ¦бфЬуфе фп рмЬлфтп ртпзтбннбфйунпа .
• ªфио пхЮои енжбоЭъефбй п ртсфпч бтйхнЮч фпщ ещтефитЭпщ.
• ¦бфЬуфе фп рмЬлфтп ерАоц Ь лАфц нефблЭоиуич нЫштй об енжбойуфеЭ уфио пхЮои п
бтйхнЮч рпщ хЫмефе.
• ¦бфЬуфе фп рмЬлфтп ртпзтбннбфйунпа зйб об бммАкефе фпо ерймезнЫоп бтйхнЮ рпщ еЭобй
брпхилещнЫопч уфи ноЬни.
• ¦бфЬуфе фп рмЬлфтп дйбзтбжЬч зйб об дйбзтАгефе лАхе зтАннб фпщ поЮнбфпч лбй
штиуйнпрпйЬуфе фп бмжбтйхнифйлЮ рмилфтпмЮзйп зйб об ейуАзефе фп уцуфЮ Юопнб.
• ¦бфЬуфе фп рмЬлфтп ртпзтбннбфйунпа .
• ¦бфЬуфе фп рмЬлфтп дйбзтбжЬч зйб об дйбзтАгефе лАхе гижЭп фпщ бтйхнпа лбй
штиуйнпрпйЬуфе фп бмжбтйхнифйлЮ рмилфтпмЮзйп зйб об ейуАзефе фп уцуфЮ бтйхнЮ.
• ¦бфЬуфе фп рмЬлфтп ртпзтбннбфйунпа зйб об брпхилеауефе фйч бммбзЫч рпщ лАобфе.
4.15.4 ¢йбзтбжЬ поЮнбфпч лбй бтйхнпа брЮ фп ещтефЬтйп
• ¦бфЬуфе фп рмЬлфтп ртпзтбннбфйунпа ..
• ¦бфЬуфе ербоейминнЫоб фп рмЬлфтп ерАоц Ь лАфц нефблЭоиуич нЫштй об енжбойуфеЭ
уфио пхЮои фп нЬощнб 'PHONE BOOK'.
• ¦бфЬуфе фп рмЬлфтп ртпзтбннбфйунпа ..
• ªфио пхЮои енжбоЭъефбй фп нЬощнб 'SEARCH'.
• ¦бфЬуфе ербоейминнЫоб фп рмЬлфтп ерАоц Ь лАфц нефблЭоиуич нЫштй об енжбойуфеЭ
уфио пхЮои фп нЬощнб 'DELETE'.
• ¦бфЬуфе фп рмЬлфтп ртпзтбннбфйунпа ..
81
Page 81

Cocoon 350
• ªфио пхЮои енжбоЭъефбй п ртсфпч бтйхнЮч фпщ ещтефитЭпщ.
• ¦бфЬуфе фп рмЬлфтп ерАоц Ь лАфц нефблЭоиуич нЫштй об енжбойуфеЭ уфио пхЮои п
бтйхнЮч рпщ хЫмефе об дйбзтАгефе.
• ¦бфЬуфе фп рмЬлфтп дйбзтбжЬч .
• ªфио пхЮои енжбоЭъефбй фп нЬощнб 'DELETE ?'.
• ¦бфЬуфе фп рмЬлфтп ртпзтбннбфйунпа зйб об ерйвевбйсуефе фи дйбзтбжЬ фпщ.
4.16 ¶оетзпрпЭиуи/бреоетзпрпЭиуи фпщ блпщуфйлпа
4.16.1 °реоетзпрпЭиуи фпщ блпщуфйлпа
Оуфц Юфй фп блпщуфйлЮ еЭобй еоетзпрпйинЫоп.
• ¦бфЬуфе фп рмЬлфтп ртпзтбннбфйунпа .
• ¦бфЬуфе ербоейминнЫоб фп рмЬлфтп ерАоц Ь лАфц нефблЭоиуич нЫштй об енжбойуфеЭ
уфио пхЮои фп нЬощнб 'POWER OFF'.
• ¦бфЬуфе фп рмЬлфтп ртпзтбннбфйунпа . ¸ ущулещЬ бреоетзпрпйеЭфбй. ¢ео нрптеЭфе об
лбмеЭфе бтйхнпач, пафе об мбнвАоефе лмЬуейч.
ªинеЭцуи: °о хЫмефе об взеЭфе брЮ фп неопа шцтЭч об бреоетзпрпйЬуефе фп блпщуфйлЮ, рбфЬуфе фп
рмЬлфтп дйбзтбжЬч/уЭзбуич .
4.16.2 ¶оетзпрпЭиуи фпщ блпщуфйлпа
Оуфц Юфй фп блпщуфйлЮ еЭобй бреоетзпрпйинЫоп.
• ¦бфЬуфе фп рмЬлфтп ртпзтбннбфйунпа . ¸ ущулещЬ еоетзпрпйеЭфбй.
4.17 Дахнйуи фич Ыофбуич лпщдпщоЭунбфпч фпщ блпщуфйлпа
°о хЫмефе, нрптеЭфе об бммАкефе фио Ыофбуи лпщдпщоЭунбфпч нйбч ейуетшЮнеоич лмЬуич. Ошефе
10 уфАхнеч дйбхЫуйнеч. »рптеЭфе об тщхнЭуефе ненпоцнЫоб фио Ыофбуи лпщдпщоЭунбфпч фцо
еуцфетйлсо лбй екцфетйлсо лмЬуецо, суфе об щрАтшей дйбжптА нефбка фпщч.
°о ерймЫкефе фи уфАхни '0', фп уанвпмп енжбоЭъефбй уфио пхЮои лбй део блпазефбй
лпщдпаойунб лбфА фи мЬги екцфетйлсо лмЬуецо (блпазефбй Юнцч зйб еуцфетйлЫч лмЬуейч).
¸ уфАхни '9' еЭобй и щгимЮфети уфАхни. ¶к бтшЬч, и ущулещЬ еЭобй тщхнйунЫои уфи уфАхни '5'.
4.17.1 Дахнйуи фич Ыофбуич лпщдпщоЭунбфпч зйб екцфетйлЫч лмЬуейч (0-9)
• ¦бфЬуфе фп рмЬлфтп ртпзтбннбфйунпа .
• ¦бфЬуфе ербоейминнЫоб фп рмЬлфтп ерАоц Ь лАфц нефблЭоиуич нЫштй об енжбойуфеЭ
уфио пхЮои фп нЬощнб 'RING SEL'.
• ¦бфЬуфе фп рмЬлфтп ртпзтбннбфйунпа .
• ªфио пхЮои енжбоЭъефбй фп нЬощнб 'EXTERNAL'.
• ¦бфЬуфе фп рмЬлфтп ртпзтбннбфйунпа .
• ¦бфЬуфе ербоейминнЫоб фп рмЬлфтп ерАоц Ь лАфц нефблЭоиуич нЫштй об енжбойуфеЭ
уфио пхЮои фп нЬощнб 'VOLUME'.
• ¦бфЬуфе фп рмЬлфтп ртпзтбннбфйунпа .
• ªфио пхЮои енжбоЭъефбй и фтЫшпщуб уфАхни Ыофбуич.
• ¦милфтпмпзЬуфе Ыобо бтйхнЮ нефбка 0 лбй 9 зйб об ерймЫкефе фио Ыофбуи лпщдпщоЭунбфпч
рпщ хЫмефе. МтиуйнпрпйЬуфе фб бтйхнифйлА рмЬлфтб.
• ¦бфЬуфе фп рмЬлфтп ртпзтбннбфйунпа зйб об ерйвевбйсуефе фио ерймпзЬ убч.
82
Page 82

Cocoon 350
4.17.2 Дахнйуи фич Ыофбуич лпщдпщоЭунбфпч зйб еуцфетйлЫч лмЬуейч (1-9)
• ¦бфЬуфе фп рмЬлфтп ртпзтбннбфйунпа .
• ¦бфЬуфе ербоейминнЫоб фп рмЬлфтп ерАоц Ь лАфц нефблЭоиуич нЫштй об енжбойуфеЭ
уфио пхЮои фп нЬощнб 'RING SEL'.
• ¦бфЬуфе фп рмЬлфтп ртпзтбннбфйунпа .
• ªфио пхЮои енжбоЭъефбй фп нЬощнб 'EXTERNAL'.
• ¦бфЬуфе ербоейминнЫоб фп рмЬлфтп ерАоц Ь лАфц нефблЭоиуич нЫштй об енжбойуфеЭ
уфио пхЮои фп нЬощнб 'INTERNAL'.
• ¦бфЬуфе фп рмЬлфтп ртпзтбннбфйунпа .
• ¦бфЬуфе ербоейминнЫоб фп рмЬлфтп ерАоц Ь лАфц нефблЭоиуич нЫштй об енжбойуфеЭ
уфио пхЮои фп нЬощнб 'VOLUME'.
• ¦бфЬуфе фп рмЬлфтп ртпзтбннбфйунпа .
• ªфио пхЮои енжбоЭъефбй и фтЫшпщуб уфАхни Ыофбуич.
• ¦милфтпмпзЬуфе Ыобо бтйхнЮ нефбка 1 лбй 9 зйб об ерймЫкефе фио Ыофбуи лпщдпщоЭунбфпч
рпщ хЫмефе. МтиуйнпрпйЬуфе фб бтйхнифйлА рмЬлфтб.
• ¦бфЬуфе фп рмЬлфтп ртпзтбннбфйунпа зйб об ерйвевбйсуефе фио ерймпзЬ убч.
4.18 ¶рймпзЬ фич немцдЭбч лпщдпщоЭунбфпч фпщ блпщуфйлпа
°о хЫмефе, нрптеЭфе об бммАкефе фи немцдЭб лпщдпщоЭунбфпч нйбч ейуетшЮнеоич лмЬуич.
»рптеЭфе об ерймЫкефе нйб брЮ 9 немцдЭеч лпщдпщоЭунбфпч (1-9). °рЮ ртперймпзЬ, ерймЫзефбй
и немцдЭб лпщдпщоЭунбфпч '5'.
4.18.1 ¶рймпзЬ фич немцдЭбч лпщдпщоЭунбфпч зйб екцфетйлЫч лмЬуейч (1-9)
• ¦бфЬуфе фп рмЬлфтп ртпзтбннбфйунпа .
• ¦бфЬуфе ербоейминнЫоб фп рмЬлфтп ерАоц Ь лАфц нефблЭоиуич нЫштй об енжбойуфеЭ
уфио пхЮои фп нЬощнб 'RING SEL'.
• ¦бфЬуфе фп рмЬлфтп ртпзтбннбфйунпа .
• ªфио пхЮои енжбоЭъефбй фп нЬощнб 'EXTERNAL'.
• ¦бфЬуфе фп рмЬлфтп ртпзтбннбфйунпа .
• ªфио пхЮои енжбоЭъефбй фп нЬощнб 'MELODIES'.
• ¦бфЬуфе фп рмЬлфтп ртпзтбннбфйунпа .
• ªфио пхЮои енжбоЭъефбй и ерймезнЫои немцдЭб лпщдпщоЭунбфпч.
• ¦милфтпмпзЬуфе Ыобо бтйхнЮ нефбка 1 лбй 9 зйб об ерймЫкефе фи немцдЭб лпщдпщоЭунбфпч
рпщ хЫмефе. МтиуйнпрпйЬуфе фб бтйхнифйлА рмЬлфтб.
• ¦бфЬуфе фп рмЬлфтп ртпзтбннбфйунпа зйб об ерйвевбйсуефе фио ерймпзЬ убч.
4.18.2 ¶рймпзЬ фич немцдЭбч лпщдпщоЭунбфпч зйб еуцфетйлЫч лмЬуейч (1-9)
• ¦бфЬуфе фп рмЬлфтп ртпзтбннбфйунпа .
• ¦бфЬуфе ербоейминнЫоб фп рмЬлфтп ерАоц Ь лАфц нефблЭоиуич нЫштй об енжбойуфеЭ
уфио пхЮои фп нЬощнб 'RING SEL'.
• ¦бфЬуфе фп рмЬлфтп ртпзтбннбфйунпа .
• ªфио пхЮои енжбоЭъефбй фп нЬощнб 'EXTERNAL'.
• ¦бфЬуфе ербоейминнЫоб фп рмЬлфтп ерАоц Ь лАфц нефблЭоиуич нЫштй об енжбойуфеЭ
уфио пхЮои фп нЬощнб 'INTERNAL'.
• ¦бфЬуфе фп рмЬлфтп ртпзтбннбфйунпа .
83
Page 83

Cocoon 350
• ªфио пхЮои енжбоЭъефбй фп нЬощнб 'MELODIES'.
• ¦бфЬуфе фп рмЬлфтп ртпзтбннбфйунпа .
• ªфио пхЮои енжбоЭъефбй и ерймезнЫои немцдЭб лпщдпщоЭунбфпч.
• ¦милфтпмпзЬуфе Ыобо бтйхнЮ нефбка 1 лбй 9 зйб об ерймЫкефе фи немцдЭб лпщдпщоЭунбфпч
рпщ хЫмефе. МтиуйнпрпйЬуфе фб бтйхнифйлА рмЬлфтб.
• ¦бфЬуфе фп рмЬлфтп ртпзтбннбфйунпа зйб об ерйвевбйсуефе фио ерймпзЬ убч.
4.19 ºмеЭдцнб фпщ рмилфтпмпзЭпщ
°о лмейдсуефе фп бмжбтйхнифйлЮ рмилфтпмЮзйп, део еЭобй дщобфЬ и лмЬуи бтйхнсо.
»Юоп фп рмЬлфтп ртпзтбннбфйунпа нрптеЭ об штиуйнпрпйихеЭ. ªфио пхЮои енжбоЭъефбй фп
нЬощнб 'KEY LOCKED'.
• ¦бфЬуфе фп рмЬлфтп ртпзтбннбфйунпа .
• ¦бфЬуфе ербоейминнЫоб фп рмЬлфтп ерАоц Ь лАфц нефблЭоиуич нЫштй об енжбойуфеЭ
уфио пхЮои фп нЬощнб 'KEY SETUP'.
• ¦бфЬуфе фп рмЬлфтп ртпзтбннбфйунпа .
• ªфио пхЮои енжбоЭъефбй фп нЬощнб 'KEY LOCK'.
• ¦бфЬуфе фп рмЬлфтп ртпзтбннбфйунпа .
• ªфио пхЮои енжбоЭъефбй и фтЫшпщуб лбфАуфбуи фпщ рмилфтпмпзЭпщ:
- 'LOCK': фп рмилфтпмЮзйп еЭобй лмейдцнЫоп
- 'UNLOCK': фп рмилфтпмЮзйп део еЭобй лмейдцнЫоп
• ¦бфЬуфе фп рмЬлфтп ерАоц Ь лАфц нефблЭоиуич зйб об лАоефе фио ерймпзЬ убч.
• ¦бфЬуфе фп рмЬлфтп ртпзтбннбфйунпа зйб об ерйвевбйсуефе фио ерймпзЬ убч.
4.20 ¶оетзпрпЭиуи/бреоетзпрпЭиуи Ьшпщ рмЬлфтцо
»рптеЭфе об тщхнЭуефе фи ущулещЬ суфе об лАоей Ыобо Ьшп не фп рАфинб лАхе рмЬлфтпщ.
• ¦бфЬуфе фп рмЬлфтп ртпзтбннбфйунпа .
• ¦бфЬуфе ербоейминнЫоб фп рмЬлфтп ерАоц Ь лАфц нефблЭоиуич нЫштй об енжбойуфеЭ
уфио пхЮои фп нЬощнб 'KEY SETUP'.
• ¦бфЬуфе фп рмЬлфтп ртпзтбннбфйунпа .
• ¦бфЬуфе ербоейминнЫоб фп рмЬлфтп ерАоц Ь лАфц нефблЭоиуич нЫштй об енжбойуфеЭ
уфио пхЮои фп нЬощнб 'KEY CLICK'.
• ¦бфЬуфе фп рмЬлфтп ртпзтбннбфйунпа .
• ªфио пхЮои енжбоЭъефбй и фтЫшпщуб лбфАуфбуи:
- 'CLICK ON': Ьшпч рмЬлфтцо еоетзЮч
- 'CLICK OFF': Ьшпч рмЬлфтцо боеоетзЮч
• ¦бфЬуфе фп рмЬлфтп ерАоц Ь лАфц нефблЭоиуич зйб об лАоефе фио ерймпзЬ убч.
• ¦бфЬуфе фп рмЬлфтп ртпзтбннбфйунпа зйб об ерйвевбйсуефе фио ерймпзЬ убч.
4.21 Жп рмЬлфтп R (flash)
¦бфЬуфе фп рмЬлфтп Flash 'R' зйб фи штЬуи птйунЫоцо щритеуйсо Юрцч и "бобнпоЬ лмЬуецо"
(бо ртпужЫтей бщфЬ фио щритеуЭб и ефбйтЭб фимежцойлсо щритеуйсо убч) Ь зйб фи нефбжптА
лмЬуецо уе ретЭрфцуи рпщ штиуйнпрпйеЭфе фимежцойлЮ лЫофтп (PABX). Жп рмЬлфтп Flash 'R'
дйблЮрфей ртпуцтйоА фи зтбннЬ. »рптеЭфе об ерймЫкефе фп штЮоп flash уе 100ms Ь 250ms. °о
фп уауфинА убч брбйфеЭ Аммп штЮоп flash, лАофе фб блЮмпщхб:
84
Page 84

Cocoon 350
• ¦бфЬуфе фп рмЬлфтп ртпзтбннбфйунпа .
• ¦бфЬуфе ербоейминнЫоб фп рмЬлфтп ерАоц Ь лАфц нефблЭоиуич нЫштй об енжбойуфеЭ
уфио пхЮои фп нЬощнб 'SETTING'.
• ¦бфЬуфе фп рмЬлфтп ртпзтбннбфйунпа .
• ¦бфЬуфе ербоейминнЫоб фп рмЬлфтп ерАоц Ь лАфц нефблЭоиуич нЫштй об енжбойуфеЭ
уфио пхЮои фп нЬощнб 'RECALL'.
• ¦бфЬуфе фп рмЬлфтп ртпзтбннбфйунпа .
• ¦бфЬуфе ербоейминнЫоб фп рмЬлфтп ерАоц Ь лАфц нефблЭоиуич зйб об ерймЫкефе фп
штЮоп flash:
- SHORT (уаофпнпч) = 100ms
- LONG (дйбтлЬч) = 250ms
• ¦бфЬуфе фп рмЬлфтп ртпзтбннбфйунпа зйб об ерйвевбйсуефе фио ерймпзЬ убч.
4.22 °ммбзЬ фпщ лцдйлпа PIN
ГтйунЫоеч мейфпщтзЭеч еЭобй дйбхЫуйнеч нЮоп бо зоцтЭъефе фпо лцдйлЮ PIN фич ущулещЬч.
МАти уфп нщуфйлЮ бщфЮ лцдйлЮ, енжбоЭъпофбй тщхнЭуейч рпщ нЮоп еуеЭч нрптеЭфе об бммАкефе.
Г лцдйлЮч PIN еЭобй фефтбгЬжйпч. Г ртперймезнЫопч лцдйлЮч PIN еЭобй '0000'. °о хЫмефе об
бммАкефе фпо ртперймезнЫоп лцдйлЮ PIN лбй об птЭуефе фп дйлЮ убч нщуфйлЮ лцдйлЮ, лАофе фйч
блЮмпщхеч еоЫтзейеч:
• ¦бфЬуфе фп рмЬлфтп ртпзтбннбфйунпа .
• ¦бфЬуфе ербоейминнЫоб фп рмЬлфтп ерАоц Ь лАфц нефблЭоиуич нЫштй об енжбойуфеЭ
уфио пхЮои фп нЬощнб 'SETTING'.
• ¦бфЬуфе фп рмЬлфтп ртпзтбннбфйунпа .
• ¦бфЬуфе ербоейминнЫоб фп рмЬлфтп ерАоц Ь лАфц нефблЭоиуич нЫштй об енжбойуфеЭ
уфио пхЮои фп нЬощнб 'PIN CODE'.
• ¦бфЬуфе фп рмЬлфтп ртпзтбннбфйунпа .
• ªфио пхЮои енжбоЭъефбй фп нЬощнб 'OLD CODE'.
• ¦милфтпмпзЬуфе фпо рбмбйЮ лцдйлЮ PIN. МтиуйнпрпйЬуфе фб бтйхнифйлА рмЬлфтб.
• ¦бфЬуфе фп рмЬлфтп ртпзтбннбфйунпа .
• ªфио пхЮои енжбоЭъефбй фп нЬощнб 'NEW CODE'.
• ¦милфтпмпзЬуфе фп оЫп лцдйлЮ PIN. МтиуйнпрпйЬуфе фб бтйхнифйлА рмЬлфтб.
• ¦бфЬуфе фп рмЬлфтп ртпзтбннбфйунпа .
• ªфио пхЮои енжбоЭъефбй фп нЬощнб 'AGAIN'.
• ¦милфтпмпзЬуфе лбй рАмй фп оЫп лцдйлЮ PIN. МтиуйнпрпйЬуфе фб бтйхнифйлА рмЬлфтб.
• ¦бфЬуфе фп рмЬлфтп ртпзтбннбфйунпа .
• °лпазефбй Ыобч Ьшпч ерйвевбЭцуич. Ошей еоетзпрпйихеЭ п оЫпч лцдйлЮч PIN.
¦тпупшЬ: »ио кешАуефе фпо ртпуцрйлЮ убч лцдйлЮ PIN. °о фпо кешАуефе, ртЫрей об
ербобжЫтефе фйч етзпуфбуйблЫч тщхнЭуейч (ербобжптА - вмЫре еоЮфифб 4.30).
4.23 ¶ззтбжЬ блпщуфйлпа уе нйб вАуи Cocoon 300/350, Butler 1000, 1010, 1210,
1250
¡йб об Ышефе фи дщобфЮфифб ртбзнбфпрпЭиуич лбй мЬгич лмЬуецо, ртЫрей об еззтбжеЭ Ыоб оЫп
блпщуфйлЮ уфи вАуи. »рптеЭфе об еззтАгефе 5 блпщуфйлА уе нйб вАуи. °рЮ ртперймпзЬ, лбфА
фио бзптА фич ущулещЬч, лАхе блпщуфйлЮ еззтАжефбй цч блпщуфйлЮ 1 уфи вАуи (вАуи 1).
!!! МтейАъефбй об еззтАгефе фп блпщуфйлЮ нЮоп еАо: !!!
85
Page 85

Cocoon 350
• лбфбтзЬхиле и еззтбжЬ фпщ блпщуфйлпа брЮ фи вАуи (р.ш. зйб бтшйлпрпЭиуи)
• хЫмефе об еззтАгефе лбй Аммп блпщуфйлЮ уфи вАуи.
ªинеЭцуи: ¸ щрпзтбннйунЫои дйбдйлбуЭб йушаей нЮоп зйб фб блпщуфйлА лбй вАуейч Cocoon 300/350, Butler 1000,
1010, 1210, 1250 !! Г бщфЮнбфпч фимежцоифЬч мейфпщтзеЭ нЮоп не фп ртсфп блпщуфйлЮ Cocoon 350, фп прпЭп
еззтАжефбй уе нйб вАуи Cocoon 350 !!
ºтбфЬуфе рбфинЫоп фп рмЬлфтп бобъЬфиуич фич вАуич зйб 10 дещфетЮмерфб, нЫштй об
бтшЭуей об бобвпувЬоей зтЬзптб и Ыодейки зтбннЬч/жЮтфйуич уфи вАуи. ¸ Ыодейки
зтбннЬч/жЮтфйуич хб бобвпувЬоей зтЬзптб зйб Ыоб мерфЮ. ºбфА фи дйАтлейб бщфпа фпщ
мерфпа, и вАуи втЭулефбй уе мейфпщтзЭб еззтбжЬч лбй ртЫрей об лАоефе фйч блЮмпщхеч
еоЫтзейеч зйб об еззтАгефе фп блпщуфйлЮ:
• ¦бфЬуфе фп рмЬлфтп ртпзтбннбфйунпа .
• ¦бфЬуфе ербоейминнЫоб фп рмЬлфтп ерАоц Ь лАфц нефблЭоиуич нЫштй об енжбойуфеЭ
уфио пхЮои фп нЬощнб 'BASE SUB'.
• ¦бфЬуфе фп рмЬлфтп ртпзтбннбфйунпа .
• ªфио пхЮои енжбоЭъефбй фп нЬощнб 'BASE _'.
• ¦милфтпмпзЬуфе фпо бтйхнЮ фич вАуич, уфио прпЭб хЫмефе об еззтбжеЭ фп блпщуфйлЮ (1-4).
МтиуйнпрпйЬуфе фб бтйхнифйлА рмЬлфтб.
ªинеЭцуи: ºАхе блпщуфйлЮ нрптеЭ об еззтАжефбй уе 4 дйбжптефйлЫч вАуейч DECT. ºАхе вАуи елшцтеЭ
Ыобо бтйхнЮ брЮ фп 1 Ыцч фп 4 уфп блпщуфйлЮ. Щфбо еззтАжефе Ыоб оЫп блпщуфйлЮ, нрптеЭфе об
елшцтЬуефе Ыобо бтйхнЮ вАуич. ¶Эобй лбмафетб об штиуйнпрпйЬуефе фп '1'.
• ªфио пхЮои енжбоЭъефбй фп нЬощнб 'SEARCHING' лбй фп уанвпмп .
• ªфио пхЮои енжбоЭъефбй п лцдйлЮч RFPI (лАхе вАуи Ышей Ыоб нпобдйлЮ лцдйлЮ RFPI) лбй ишеЭ
Ыоб уЬнб Юфбо фп блпщуфйлЮ еофпрЭуей фи вАуи.
• ¦бфЬуфе фп рмЬлфтп ртпзтбннбфйунпа .
• ªфио пхЮои енжбоЭъефбй фп нЬощнб 'PIN'.
• ¦милфтпмпзЬуфе фпо фефтбгЬжйп лцдйлЮ PIN фич вАуич (п ртперймезнЫопч лцдйлЮч PIN
еЭобй '0000'). МтиуйнпрпйЬуфе фб бтйхнифйлА рмЬлфтб.
• ¦бфЬуфе фп рмЬлфтп ртпзтбннбфйунпа .
• Жп блпщуфйлЮ еззтАжефбй уфи вАуи.
4.24 ¶ззтбжЬ блпщуфйлпа Cocoon 350 уе вАуи Butler 575/575+
& Cocoon100/100+ & Butler 2000
¦бфЬуфе фп рмЬлфтп бобъЬфиуич уе нйб вАуи Butler 575/575+ Ь Cocoon100/100+ Ь Butler
2000 зйб 15 дещфетЮмерфб ретЭрпщ, нЫштй об блпауефе Ыоб нрйр. ¸ вАуи нрбЭоей уе мейфпщтзЭб
еззтбжЬч. ¡йб 1 мерфЮ, и вАуи втЭулефбй уе мейфпщтзЭб еззтбжЬч лбй ртЫрей об лАоефе фйч
блЮмпщхеч еоЫтзейеч зйб об еззтАгефе фп блпщуфйлЮ:
Г бщфЮнбфпч фимежцоифЬч мейфпщтзеЭ нЮоп не фп бтшйлЮ блпщуфйлЮ Cocoon 350, фп прпЭп Ышей еззтбжеЭ уе нйб вАуи
Cocoon 350 !!
• ¦бфЬуфе фп рмЬлфтп ртпзтбннбфйунпа .
• ¦бфЬуфе ербоейминнЫоб фп рмЬлфтп ерАоц Ь лАфц нефблЭоиуич нЫштй об енжбойуфеЭ
уфио пхЮои фп нЬощнб 'BASE SUB'.
86
Page 86

Cocoon 350
• ¦бфЬуфе фп рмЬлфтп ртпзтбннбфйунпа .
• ªфио пхЮои енжбоЭъефбй фп нЬощнб 'BASE _'.
• ¦милфтпмпзЬуфе фпо бтйхнЮ фич вАуич, уфио прпЭб хЫмефе об еззтбжеЭ фп блпщуфйлЮ (1-4).
МтиуйнпрпйЬуфе фб бтйхнифйлА рмЬлфтб.
• ªфио пхЮои енжбоЭъефбй фп нЬощнб 'SEARCHING' лбй фп уанвпмп .
• ªфио пхЮои енжбоЭъефбй п лцдйлЮч RFPI (лАхе вАуи Ышей Ыоб нпобдйлЮ лцдйлЮ RFPI) лбй ишеЭ
Ыоб уЬнб Юфбо фп блпщуфйлЮ еофпрЭуей фи вАуи.
• ¦бфЬуфе фп рмЬлфтп ртпзтбннбфйунпа .
• ªфио пхЮои енжбоЭъефбй фп нЬощнб 'PIN'.
• ¦милфтпмпзЬуфе фпо фефтбгЬжйп лцдйлЮ PIN фич вАуич (п ртперймезнЫопч лцдйлЮч PIN
еЭобй '1590'). МтиуйнпрпйЬуфе фб бтйхнифйлА рмЬлфтб.
• ¦бфЬуфе фп рмЬлфтп ртпзтбннбфйунпа .
• Жп блпщуфйлЮ еззтАжефбй уфи вАуи.
4.25 ¶ззтбжЬ еоЮч блпщуфйлпа Butler 1800T уе нйб вАуи Cocoon 350
¸ рбтблАфц дйбдйлбуЭб бжптА нЮоп фб блпщуфйлА Butler 1800T лбй фйч вАуейч Cocoon 350!!
ºтбфЬуфе рбфинЫоп фп рмЬлфтп бобъЬфиуич фич вАуич зйб 10 дещфетЮмерфб, нЫштй об
бтшЭуей об бобвпувЬоей зтЬзптб и Ыодейки зтбннЬч/жЮтфйуич уфи вАуи. ¸ Ыодейки
зтбннЬч/жЮтфйуич хб бобвпувЬоей зтЬзптб зйб Ыоб мерфЮ. ºбфА фи дйАтлейб бщфпа фпщ
мерфпа, и вАуи втЭулефбй уе мейфпщтзЭб еззтбжЬч лбй ртЫрей об лАоефе фйч блЮмпщхеч
еоЫтзейеч зйб об еззтАгефе фп блпщуфйлЮ:
• ¦бфЬуфе нйб жптА фп рмЬлфтп .
• ¦бфЬуфе фп рмЬлфтп OK лбй ерймЫкфе нйб вАуи (1-4) не фб рмЬлфтб .
• ¦бфЬуфе фп рмЬлфтп OK.
• ¦милфтпмпзЬуфе фпо лцдйлЮ PIN фич вАуич убч. ªщоЬхцч: 0000.
• ¦бфЬуфе OK. Жп блпщуфйлЮ Butler 1800T бобъифА фстб фи вАуи DECT. »Юмйч фи втей,
енжбоЭъефбй уфио пхЮои п лцдйлЮч бобзостйуич фич вАуич бщфЬч.
• ¦бфЬуфе OK зйб об ерйвевбйсуефе фио ерймпзЬ убч Ь рбфЬуфе ESC зйб об блщтсуефе фио
еззтбжЬ.
4.26 ºбфАтзиуи еззтбжЬч еоЮч блпщуфйлпа брЮ нйб вАуи
¶Эобй дщобфЬ и блатцуи фич еззтбжЬч еоЮч блпщуфйлпа уе нйб вАуи. ºАфй фЫфпйп Эуцч убч
штейбуфеЭ, еАо Ыоб блпщуфйлЮ еЭобй лбфеуфтбннЫоп лбй ртЫрей об бофйлбфбуфбхеЭ брЮ Ыоб
лбйопатйп.
¦тпупшЬ: »рптеЭфе об блщтсуефе фио еззтбжЬ нЮоп еоЮч Аммпщ блпщуфйлпа лбй Юшй фпщ блпщуфйлпа рпщ
штиуйнпрпйеЭфе зйб фи дйбдйлбуЭб блатцуич.
• ¦бфЬуфе фп рмЬлфтп ртпзтбннбфйунпа .
• ¦бфЬуфе ербоейминнЫоб фп рмЬлфтп ерАоц Ь лАфц нефблЭоиуич нЫштй об енжбойуфеЭ
уфио пхЮои фп нЬощнб 'SETTING'.
• ¦бфЬуфе фп рмЬлфтп ртпзтбннбфйунпа .
• ¦бфЬуфе ербоейминнЫоб фп рмЬлфтп ерАоц Ь лАфц нефблЭоиуич нЫштй об енжбойуфеЭ
уфио пхЮои фп нЬощнб 'REMOVE HS'.
87
Page 87

Cocoon 350
• ¦бфЬуфе фп рмЬлфтп ртпзтбннбфйунпа .
• ªфио пхЮои енжбоЭъефбй фп нЬощнб 'PIN'.
• ¦милфтпмпзЬуфе фпо фефтбгЬжйп лцдйлЮ убч PIN (п ртперймезнЫопч лцдйлЮч PIN еЭобй
'0000'). МтиуйнпрпйЬуфе фб бтйхнифйлА рмЬлфтб.
• ¦бфЬуфе фп рмЬлфтп ртпзтбннбфйунпа .
• ªфио пхЮои енжбоЭъефбй фп нЬощнб 'REMOVE HS'.
• ¦милфтпмпзЬуфе фпо бтйхнЮ фпщ блпщуфйлпа рпщ хЫмефе об лбфбтзЬуефе (1 -5).
МтиуйнпрпйЬуфе фб бтйхнифйлА рмЬлфтб.
• ¦бфЬуфе фп рмЬлфтп ртпзтбннбфйунпа .
• ªфио пхЮои енжбоЭъефбй фп нЬощнб 'REMOVE HS' лбй фп блпщуфйлЮ лбфбтзеЭфбй
• ªфп блпщуфйлЮ рпщ лбфбтзЬхиле енжбоЭъефбй фп нЬощнб 'NOT SUB'.
4.27 ¶рймпзЬ нйбч вАуич
°о фп блпщуфйлЮ убч еЭобй еззезтбннЫоп уе рпммЫч вАуейч (нЫз. 4), ртЫрей об ерймЫкефе нйб
вАуи, ерейдЬ фп блпщуфйлЮ нрптеЭ об ерйлпйоцоеЭ нЮоп не нйб вАуи лАхе жптА. ЛрАтшпщо дап
дщобфЮфифеч:
4.27.1 °щфЮнбфи ерймпзЬ
°о тщхнЭуефе фп блпщуфйлЮ уе 'бщфЮнбфи ерймпзЬ', фп блпщуфйлЮ ерймЫзей бщфЮнбфб фио
лпофйоЮфети вАуи уе бобнпоЬ.
• ¦бфЬуфе фп рмЬлфтп ртпзтбннбфйунпа .
• ¦бфЬуфе ербоейминнЫоб фп рмЬлфтп ерАоц Ь лАфц нефблЭоиуич нЫштй об енжбойуфеЭ
уфио пхЮои фп нЬощнб 'SETTING'.
• ¦бфЬуфе фп рмЬлфтп ртпзтбннбфйунпа .
• ¦бфЬуфе ербоейминнЫоб фп рмЬлфтп ерАоц Ь лАфц нефблЭоиуич нЫштй об енжбойуфеЭ
уфио пхЮои фп нЬощнб 'BASE SEL'.
• ¦бфЬуфе фп рмЬлфтп ртпзтбннбфйунпа .
• ¦бфЬуфе ербоейминнЫоб фп рмЬлфтп ерАоц Ь лАфц нефблЭоиуич нЫштй об енжбойуфеЭ
уфио пхЮои фп нЬощнб 'AUTO'.
• ¦бфЬуфе фп рмЬлфтп ртпзтбннбфйунпа .
• ªфио пхЮои енжбоЭъефбй фп нЬощнб 'SEARCHING' лбй фп уанвпмп .
• »Юмйч фп блпщуфйлЮ втей нйб вАуи, блпазефбй Ыоб ишифйлЮ уЬнб.
4.27.2 МейтплЭоифи ерймпзЬ
°о тщхнЭуефе фп блпщуфйлЮ уе 'шейтплЭоифи ерймпзЬ', фп блпщуфйлЮ ерймЫзей фи вАуи рпщ
птЭъефе.
• ¦бфЬуфе фп рмЬлфтп ртпзтбннбфйунпа .
• ¦бфЬуфе ербоейминнЫоб фп рмЬлфтп ерАоц Ь лАфц нефблЭоиуич нЫштй об енжбойуфеЭ
уфио пхЮои фп нЬощнб 'SETTING'.
• ¦бфЬуфе фп рмЬлфтп ртпзтбннбфйунпа .
• ¦бфЬуфе ербоейминнЫоб фп рмЬлфтп ерАоц Ь лАфц нефблЭоиуич нЫштй об енжбойуфеЭ
уфио пхЮои фп нЬощнб 'BASE SEL'.
• ¦бфЬуфе фп рмЬлфтп ртпзтбннбфйунпа .
• ¦бфЬуфе ербоейминнЫоб фп рмЬлфтп ерАоц Ь лАфц нефблЭоиуич нЫштй об енжбойуфеЭ
уфио пхЮои фп нЬощнб 'MANUAL'.
88
Page 88

Cocoon 350
• ¦бфЬуфе фп рмЬлфтп ртпзтбннбфйунпа .
• ªфио пхЮои енжбоЭъефбй фп нЬощнб 'BASE -'.
• ¦милфтпмпзЬуфе фпо бтйхнЮ фич вАуич рпщ хЫмефе об ерймЫкефе (1-4). МтиуйнпрпйЬуфе фб
бтйхнифйлА рмЬлфтб.
• ¦бфЬуфе фп рмЬлфтп ртпзтбннбфйунпа .
• ªфио пхЮои енжбоЭъефбй фп нЬощнб 'SEARCHING' лбй фп уанвпмп .
• »Юмйч втехеЭ и ерймезнЫои вАуи, блпазефбй Ыоб ишифйлЮ уЬнб.
ªинейсуейч:
• ¦тпфпа ерймЫкефе нйб вАуи, и вАуи ртЫрей ртсфб об еззтбжеЭ уфп блпщуфйлЮ.
• °о уфио пхЮои енжбойуфеЭ фп нЬощнб 'NOT SUB', бщфЮ уинбЭоей Юфй и ерймезнЫои вАуи део щрАтшей Ь Юфй фп
блпщуфйлЮ део Ышей еззтбжеЭ.
4.28 ¼тбзЬ екетшЮнеоцо лмЬуецо
»рптеЭфе об ртпзтбннбфЭуефе фб блпщуфйлА, суфе об жтАкефе фйч лмЬуейч уе птйунЫопщч
бтйхнпач, зйб рбтАдейзнб фйч дйехоеЭч лмЬуейч фцо прпЭцо п бтйхнЮч келйоА брЮ '00'. »Ыштй 5
бтйхнпЭ (фцо 5 гижЭцо фп рпма) нрптпао об жтбзпао. ¡йб об лАоефе лАфй фЫфпйп, лАофе фб
блЮмпщхб:
• ¦бфЬуфе фп рмЬлфтп ртпзтбннбфйунпа .
• ¦бфЬуфе ербоейминнЫоб фп рмЬлфтп ерАоц Ь лАфц нефблЭоиуич нЫштй об енжбойуфеЭ
уфио пхЮои фп нЬощнб 'SETTING'.
• ¦бфЬуфе фп рмЬлфтп ртпзтбннбфйунпа .
• ¦бфЬуфе ербоейминнЫоб фп рмЬлфтп ерАоц Ь лАфц нефблЭоиуич нЫштй об енжбойуфеЭ
уфио пхЮои фп нЬощнб 'BARRING'.
• ¦бфЬуфе фп рмЬлфтп ртпзтбннбфйунпа .
• ªфио пхЮои енжбоЭъефбй фп нЬощнб 'PIN'.
• ¦милфтпмпзЬуфе фпо лцдйлЮ убч PIN
• ¦бфЬуфе фп рмЬлфтп ртпзтбннбфйунпа .
• ªфио пхЮои енжбоЭъефбй фп нЬощнб 'BAR NUM '. µтЭулеуфе уфи ноЬни "1. _ _ _ _ _".
• ¦бфЬуфе фп рмЬлфтп ерАоц Ь лАфц нефблЭоиуич зйб об ерймЫкефе нйб брЮ фйч 5 ноЬнеч.
• ¦милфтпмпзЬуфе фпо бтйхнЮ (фцо 5 гижЭцо фп рпма) рпщ хЫмефе об жтАкефе, р.ш. 01486.
• ¦бфЬуфе фп рмЬлфтп ртпзтбннбфйунпа .
• ªфио пхЮои енжбоЭъефбй фп нЬощнб 'HS _ _ _ _ _' (= бтйхнЮч блпщуфйлпа (1-5)) '01486' (= пй
жтбзнЫопй бтйхнпЭ).
• ¦милфтпмпзЬуфе фпщч бтйхнпач фцо блпщуфйлсо, брЮ фб прпЭб хб еЭобй бдаобфи и лмЬуи
фцо жтбзнЫоцо бтйхнсо.
• р.ш. ¦бфЬуфе фп бтйхнифйлЮ рмЬлфтп 2, 3 лбй 5. ªфио пхЮои, енжбоЭъефбй фп екЬч: HS _2 3_5
01486
°рЮ фб блпщуфйлА бщфА де хб еЭобй рйб дщобфЬ и лмЬуи бтйхнсо рпщ келйопао брЮ '01486'.
• ¦бфЬуфе фп рмЬлфтп ртпзтбннбфйунпа зйб об ерйвевбйсуефе фио ерймпзЬ убч.
¶рбобмАвефе фио Эдйб дйбдйлбуЭб рпщ ретйзтАжефбй рбтбрАоц, бо хЫмефе об жтАкефе лбй
Аммпщч бтйхнпач (фп рпма 5)!
89
Page 89

Cocoon 350
4.29 ¦тперймезнЫоеч тщхнЭуейч (ербобжптА) фцо рбтбнЫфтцо
»рптеЭфе об ербобжЫтефе фйч фщрйлЫч (ртперймезнЫоеч) тщхнЭуейч фпщ фимежсопщ, суфе об
еЭобй пй Эдйеч Юрцч Ьфбо Юфбо бзптАубфе фи ущулещЬ. МтейАъеуфе фпо лцдйлЮ PIN зйб об
лАоефе лАфй фЫфпйп.
Гй ртперймезнЫоеч тщхнЭуейч еЭобй: °щфЮнбфпч фимежцоифЬч:
- ¦милфтпмЮзйп: келмеЭдцфп - ЖимежцоифЬч: еоетзЮч
- Чшпч рмЬлфтцо: еоетзЮч - ЖщрйлЮ нЬощнб: OGM1
- Оофбуи ишеЭпщ: уфАхни 3 - °тйхнЮч лпщдпщойунАфцо: 3
- »емцдЭб лпщдпщойпа: 1 - ºцдйлЮч фимешейтйунпа: 321
- Оофбуи лпщдпщойпа: 5
- ¶рймпзЬ вАуич: бщфЮнбфи
¡йб об брплбфбуфЬуефе фйч ртперймезнЫоеч тщхнЭуейч, лАофе фб блЮмпщхб:
• ¦бфЬуфе фп рмЬлфтп ртпзтбннбфйунпа .
• ¦бфЬуфе ербоейминнЫоб фп рмЬлфтп ерАоц Ь лАфц нефблЭоиуич нЫштй об енжбойуфеЭ
уфио пхЮои фп нЬощнб 'SETTING'.
• ¦бфЬуфе фп рмЬлфтп ртпзтбннбфйунпа .
• ¦бфЬуфе ербоейминнЫоб фп рмЬлфтп ерАоц Ь лАфц нефблЭоиуич нЫштй об енжбойуфеЭ
уфио пхЮои фп нЬощнб 'RESET'.
• ¦бфЬуфе фп рмЬлфтп ртпзтбннбфйунпа .
• ªфио пхЮои енжбоЭъефбй фп нЬощнб 'PIN'.
• ¦милфтпмпзЬуфе фпо лцдйлЮ убч PIN.
• ¦бфЬуфе фп рмЬлфтп ртпзтбннбфйунпа .
4.30 ¦мЬтич ербобжптА фцо етзпуфбуйблсо тщхнЭуецо фич ущулещЬч
¸ мейфпщтзЭб бщфЬ убч ерйфтЫрей об ербобжЫтефе фйч етзпуфбуйблЫч тщхнЭуейч фич ущулещЬч
шцтЭч об штейАъефбй п лцдйлЮч убч PIN. ¸ еоЫтзейб бщфЬ дйбзтАжей Юмеч фйч лбфбшцтЬуейч фпщ
ещтефитЭпщ, лбфбтзеЭ Юмб фб блпщуфйлА, брплбхйуфА Юмеч фйч етзпуфбуйблЫч тщхнЭуейч лбй
ербобжЫтей фпо лцдйлЮ PIN уфио фйнЬ '0000'.
ºАофе фйч блЮмпщхеч еоЫтзейеч:
• °рпущодЫуфе фио нрбфбтЭб фпщ блпщуфйлпа.
• ºтбфЬуфе рбфинЫоп фп рмЬлфтп '*' лбй ущодЫуфе лбй рАмй фио нрбфбтЭб нЫштй фп блпщуфйлЮ
об лпщдпщоЭуей ущоешсч лбй об боАгей и пхЮои. °жЬуфе фп рмЬлфтп '*' лбй рбфЬуфе фп
рмЬлфтп ртпзтбннбфйунпа .
• Жп блпщуфйлЮ втЭулей фи вАуи лбй блпазефбй Ыоб ишифйлЮ уЬнб.
• ¦бфЬуфе зйб мЭзп фп рмЬлфтп '*'.
• ªфио пхЮои енжбоЭъефбй фп нЬощнб 'RESET ?'.
• ¦бфЬуфе фп рмЬлфтп ртпзтбннбфйунпа зйб об ерйвевбйсуефе фио ерймпзЬ убч Ь
брпущодЫуфе фио нрбфбтЭб зйб об дйблЮгефе фи дйбдйлбуЭб.
• ªфио пхЮои енжбоЭъефбй фп нЬощнб 'RESETTING' лбй ишеЭ Ыоб дйбтлЫч нрйр.
• ªфио пхЮои енжбоЭъефбй фп нЬощнб 'NOT SUB'. Жп блпщуфйлЮ Ышей ербоЫтхей рмЬтцч уфйч
етзпуфбуйблЫч тщхнЭуейч.
90
Page 90

Cocoon 350
ºбфЮрйо, ртЫрей об еззтАгефе лбй рАмй Юмб фб блпщуфйлА, Юрцч ретйзтАжефбй уфио еоЮфифб
4.23! ¿уфЮуп, де штейАъефбй об хЫуефе фи вАуи уе мейфпщтзЭб еззтбжЬч, ерейдЬ зЭоефбй
бщфЮнбфб!
5 °Á°¡Á¯Ä¹ª¸ º¤¸ª¶¯Á
(¸ мейфпщтзЭб бщфЬ йушаей нЮоп еАо Ышефе еззтбжеЭ уфио щритеуЭб бобзостйуич лмЬуецо
(Caller ID/Clip). ¶рйлпйоцоЬуфе не фио ефбйтЭб фимежцойлсо щритеуйсо убч).
Щфбо мбнвАоефе нйб лмЬуи, п бтйхнЮч фпщ лбмпаофпч, и инетпниоЭб лбй и стб енжбоЭъпофбй
уфио пхЮои фпщ блпщуфйлпа. °о фп Юопнб щрАтшей брпхилещнЫоп уфп ещтефЬтйп, енжбоЭъефбй
лбй фп Юопнб фпщ ещтефитЭпщ!
¸ ущулещЬ нрптеЭ об брпхилеауей нЫштй 30 лмЬуейч уфи мЭуфб лмЬуецо, уфио прпЭб нрптеЭфе
об бобфтЫкефе Юрпфе хЫмефе. ¸ ущулещЬ рпфЫ део брпхилеаей дап жптЫч фпо Эдйп бтйхнЮ. Щфбо
зенЭуей и ноЬни, пй оЫеч лмЬуейч бофйлбхйуфпао бщфЮнбфб фйч рбмбйЫч уфи ноЬни. Жп уанвпмп
бобвпувЬоей уфио пхЮои, бо и лмЬуи де дйбвбуфеЭ Ь брбофихеЭ. °о и мЭуфб лмЬуецо еЭобй
Адейб лбй рбфЬуефе фп рмЬлфтп ерАоц нефблЭоиуич , блпазпофбй фтЭб нрйр.
»рптеЭфе об вмЫрефе фб уфпйшеЭб нйбч ейуетшЮнеоич лмЬуич, цч блпмпахцч:
• ¦бфЬуфе фп рмЬлфтп ерАоц нефблЭоиуич . ªфио пхЮои енжбоЭъефбй фп Юопнб фпщ
лбмпаофпч (бо брпуфЫммефбй брЮ фп дЭлфщп Ь бо щрАтшей уфи ноЬни ещтефитЭпщ), п бакцо
бтйхнЮч фич лмЬуич уфи мЭуфб лмЬуецо лбй и инетпниоЭб лбй стб фич лмЬуич.
• ¦бфЬуфе фп рмЬлфтп лАфц нефблЭоиуич . ªфио пхЮои енжбоЭъефбй п бтйхнЮч фпщ
лбмпаофпч.
5.1. Дахнйуи инетпниоЭбч лбй стбч
Щфбо мбнвАоефе нйб ейуетшЮнеои лмЬуи лбй и инетпниоЭб лбй стб део брпуфЫммпофбй нбъЭ не
фпо бтйхнЮ, бщфЮ хб Ышей цч брпфЫмеунб и инетпниоЭб лбй и стб об нио енжбоЭъпофбй уфио
пхЮои (Ь об енжбоЭъпофбй мбохбунЫоб). ДщхнЭъпофбч фио инетпниоЭб лбй фио стб, лАхе жптА
рпщ хб Ышефе нйб лмЬуи, хб енжбоЭъпофбй уфио пхЮои, нбъЭ не фпо бтйхнЮ!
• ¦бфЬуфе фп рмЬлфтп ртпзтбннбфйунпа .
• ¦бфЬуфе нетйлЫч жптЫч фп рмЬлфтп ерАоц Ь лАфц нефблЭоиуич нЫштй об енжбойуфеЭ
уфио пхЮои фп нЬощнб 'SETTING'.
• ¦бфЬуфе фп рмЬлфтп ртпзтбннбфйунпа .
• ªфио пхЮои енжбоЭъефбй фп нЬощнб 'DATE/TIME'.
• ¦бфЬуфе лбй рАмй фп рмЬлфтп ртпзтбннбфйунпа ..
• Щфбо енжбойуфеЭ уфио пхЮои фп нЬощнб 'YEAR', рмилфтпмпзЬуфе фб 2 фемещфбЭб гижЭб фпщ
Ыфпщч (00=2000, 01=2001, ...) лбй рбфЬуфе фп рмЬлфтп ртпзтбннбфйунпа зйб
ерйвевбЭцуи.
• Щфбо енжбойуфеЭ уфио пхЮои фп нЬощнб 'MONTH', рмилфтпмпзЬуфе фп нЬоб (01=¹бопщАтйпч,
02=¼евтпщАтйпч, ...) лбй рбфЬуфе фп рмЬлфтп ртпзтбннбфйунпа зйб ерйвевбЭцуи.
• Щфбо енжбойуфеЭ уфио пхЮои фп нЬощнб 'DAY', рмилфтпмпзЬуфе фио инЫтб фпщ нЬоб лбй
рбфЬуфе фп рмЬлфтп ртпзтбннбфйунпа v зйб ерйвевбЭцуи.
91
Page 91

Cocoon 350
• Щфбо енжбойуфеЭ уфио пхЮои фп нЬощнб 'HOUR', рмилфтпмпзЬуфе фио фтЫшпщуб стб (уе
24цти нптжЬ) лбй рбфЬуфе фп рмЬлфтп ртпзтбннбфйунпа зйб ерйвевбЭцуи.
• Щфбо енжбойуфеЭ уфио пхЮои фп нЬощнб 'MINUTES', рмилфтпмпзЬуфе фб мерфА лбй рбфЬуфе
фп рмЬлфтп ртпзтбннбфйунпа зйб ерйвевбЭцуи.
¸ инетпниоЭб лбй стб Ышпщо фстб тщхнйуфеЭ !
ªинеЭцуи: ªе ретЭрфцуи дйблпрЬч теанбфпч фич вАуич, и инетпниоЭб лбй стб ртЫрей об тщхнйуфпао лбй рАмй.
5.2 ¸ мЭуфб лмЬуецо
Гй ейуетшЮнеоеч лмЬуейч брпхилеапофбй уфи мЭуфб лмЬуецо (фп рпма 30 бтйхнпЭ).
• ¦бфЬуфе зйб мЭзп фп рмЬлфтп ерАоц нефблЭоиуич зйб об деЭфе фио рйп ртЮужбфи лмЬуи.
• ªфио пхЮои енжбоЭъефбй фп Юопнб фпщ рйп ртЮужбфпщ лбмпаофпч. °о део еЭобй дйбхЫуйнп фп
Юопнб, уфио пхЮои енжбоЭъефбй фп нЬощнб 'NO NAME'.
• °о еЭобй лтщжЮч бтйхнЮч, уфио пхЮои енжбоЭъефбй фп нЬощнб 'UNAVAL'.
• ¸ инетпниоЭб лбй стб мЬгич фич лмЬуич ущушефЭъпофбй не лАхе лмЬуи.
• ¦бфЬуфе зйб мЭзп фп рмЬлфтп лАфц нефблЭоиуич зйб об деЭфе фпо бтйхнЮ фич лмЬуич.
• ¦бфЬуфе зйб мЭзп фп рмЬлфтп лАфц нефблЭоиуич зйб об деЭфе лбй фпщч Аммпщч бтйхнпач
фич мЭуфбч.
ªинейсуейч:
• °о део рбфихеЭ фп рмЬлфтп ерАоц Ь лАфц нефблЭоиуич зйб 15 дещфетЮмерфб, и ущулещЬ ербоЫтшефбй уе
лбфАуфбуи бобнпоЬч.
• »ефА фи мЬги нйбч лмЬуич, п бтйхнЮч фпщ лбмпаофпч рбтбнЫоей уфио пхЮои зйб 15 дещфетЮмерфб нефА фп
фемещфбЭп лпщдпаойунб.
• ¸ мейфпщтзЭб бобзостйуич лмЬуецо део еЭобй дйбхЫуйни еос ущопнймеЭфе.
5.3 ºмЬуи бтйхнпа брЮ фи мЭуфб лмЬуецо
• ¦бфЬуфе фп рмЬлфтп ерАоц нефблЭоиуич зйб об рАфе уфи мЭуфб лмЬуецо
• ¦бфЬуфе фп рмЬлфтп ерАоц нефблЭоиуич зйб об еофпрЭуефе фио лмЬуи рпщ хЫмефе.
¦бфЬуфе фп рмЬлфтп лАфц нефблЭоиуич зйб об деЭфе фпо бтйхнЮ.
• Щфбо енжбойуфеЭ п бтйхнЮч уфио пхЮои, рбфЬуфе фп рмЬлфтп лмЬуич лбй п бтйхнЮч
лбмеЭфбй бщфЮнбфб.
(Жб уанвпмб лбй 'EXT' енжбоЭъпофбй уфио пхЮои лбй келйоА фп штпоЮнефтп лмЬуич).
5.4 °рпхЬлещуи бтйхнпа фич мЭуфбч лмЬуецо уфп ещтефЬтйп
• ¦бфЬуфе фп рмЬлфтп ерАоц нефблЭоиуич зйб об рАфе уфи мЭуфб лмЬуецо.
• ¦бфЬуфе фп рмЬлфтп ерАоц нефблЭоиуич зйб об еофпрЭуефе фпо бтйхнЮ рпщ хЫмефе.
• ¦бфЬуфе дап жптЫч фп рмЬлфтп ещтефитЭпщ .
• ªфио пхЮои енжбоЭъефбй фп нЬощнб 'STORE'.
• Г бтйхнЮч брпхилеаефбй уфп ещтефЬтйп. °о и лмЬуи енжбоЭъефбй шцтЭч Юопнб (NO NAME),
нрптеЭфе об ртпухЫуефе нефА Ыоб Юопнб уфпо бтйхнЮ уфп ещтефЬтйп.
• ¸ ущулещЬ ербоЫтшефбй уе лбфАуфбуи бобнпоЬч.
92
Page 92

Cocoon 350
5.5 ¢йбзтбжЬ бтйхнсо брЮ фи мЭуфб лмЬуецо
5.5.1 ¢йбзтбжЬ еоЮч бтйхнпа
• ¦бфЬуфе фп рмЬлфтп ерАоц нефблЭоиуич зйб об рАфе уфи мЭуфб лмЬуецо.
• ¦бфЬуфе фп рмЬлфтп ерАоц нефблЭоиуич зйб об втеЭфе фио лмЬуи рпщ хЫмефе об
дйбзтАгефе.
• »Юмйч енжбойуфеЭ и лмЬуи уфио пхЮои, рбфЬуфе фп рмЬлфтп дйбзтбжЬч .
• ªфио пхЮои енжбоЭъефбй фп нЬощнб 'DELETE ?'.
• ¦бфЬуфе фп рмЬлфтп ртпзтбннбфйунпа зйб об ерйвевбйсуефе фио ерймпзЬ убч Ь фп
рмЬлфтп дйбзтбжЬч зйб блатцуи.
• ¸ лмЬуи дйбзтАжефбй лбй уфио пхЮои енжбоЭъефбй и ерЮнеои лмЬуи.
5.5.2 ¢йбзтбжЬ Юмцо фцо бтйхнсо
• ¦бфЬуфе фп рмЬлфтп ерАоц нефблЭоиуич зйб об рАфе уфи мЭуфб лмЬуецо.
• ºтбфЬуфе рбфинЫоп фп рмЬлфтп дйбзтбжЬч нЫштй об енжбойуфеЭ уфио пхЮои фп нЬощнб
'DELETE ALL'.
• ¦бфЬуфе фп рмЬлфтп ртпзтбннбфйунпа зйб об ерйвевбйсуефе фио ерймпзЬ убч Ь фп
рмЬлфтп дйбзтбжЬч зйб блатцуи.
• Щмеч пй лмЬуейч дйбзтАжпофбй.
6 ¶Á¢¶¹¥¸ »¸ÁË»°Æ¯Á ªÆÃÁ Ƹ¤¶¼¯Á¸Æ¸
¸ мейфпщтзЭб бщфЬ йушаей нЮоп бо Ышефе фио щритеуЭб фимежцоифЬ лбй бо фп дЭлфщп брпуфЫммей
фио Ыодейки бщфЬ нбъЭ не фйч рмитпжптЭеч бобзостйуич лмЬуич (CLIP)!
Щфбо мбнвАоефе Ыоб оЫп нЬощнб уфпо фимежцоифЬ убч, енжбоЭъефбй уфио пхЮои фп ейлпоЭдйп
' '. °жпа блпауефе фб ниоанбфА убч, екбжбоЭъефбй фп ейлпоЭдйп ' '.
7 °ËÆû°Æê Ƹ¤¶¼¯Á¸Æ¸ª
¸ ущулещЬ Butler 1250 дйбхЫфей еоуцнбфцнЫоп фимежцоифЬ не шцтифйлЮфифб ниощнАфцо
ущопмйлЬч дйАтлейбч 14 мерфсо.
Г бщфЮнбфпч фимежцоифЬч емЫзшефбй нЮоп брЮ фп рбтешЮнеоп блпщуфйлЮ (Юшй брЮ Аммб
блпщуфйлА).
Г бщфЮнбфпч фимежцоифЬч нрптеЭ об шейтЭъефбй ек брпуфАуецч, еос Ышей дщобфЮфифб
ишпзтАжиуич дап екетшЮнеоцо ниощнАфцо (»Ьощнб 1 лбй »Ьощнб 2) (нЫзйуфич дйАтлейбч 2
мерфсо).
ЛрАтшпщо 2 дщобфЮфифеч:
- »е фп »Ьощнб 1, п лбмсо нрптеЭ об бжЬуей Ыоб нЬощнб
- »е фп »Ьощнб 2, нЮоп блпазефбй фп екетшЮнеоп нЬощнб, шцтЭч об Ышей п лбмсо фи
дщобфЮфифб об бжЬуей нЬощнб.
Г нЫзйуфпч штЮопч еззтбжЬч фцо ейуетшЮнеоцо ниощнАфцо еЭобй 3 мерфА.
»йб ртп-ишпзтбжинЫои жцоЬ бобжЫтей дйАжптеч рмитпжптЭеч, Юрцч инЫтб лбй стб лмЬуич,
лбхсч лбй тщхнЭуейч Юрцч лцдйлЮч VIP, немцдЭеч лпщдпщойпа .. ¸ змсууб фич ртп-
ишпзтбжинЫоич жцоЬч бобжЫтефбй уфи ущулещбуЭб!
93
Page 93

Cocoon 350
7.1. ГхЮои
ªфио лбфАуфбуи бобнпоЬч, Эуцч енжбойуфпао уфио пхЮои фб блЮмпщхб ниоанбфб:
- 10/01 MSG = 1 оЫп (рпщ део Ышефе блпауей) нЬощнб лбй 10 ниоанбфб ущопмйлА
- 15/01 MSG = 5 оЫб (рпщ део Ышефе блпауей) ниоанбфб лбй 15 ниоанбфб ущопмйлА
7.2 »еопа бщфЮнбфпщ фимежцоифЬ
¡йб об еоетзпрпйЬуефе фйч мейфпщтзЭеч фпщ бщфЮнбфпщ фимежцоифЬ:
• ¦бфЬуфе фп рмЬлфтп ртпзтбннбфйунпа
• ªфио пхЮои енжбоЭъефбй фп нЬощнб 'Answer'.
• ¦бфЬуфе фп рмЬлфтп OK.
»ефА брЮ 2 дещфетЮмерфб, уфио пхЮои енжбоЭъефбй фп нЬощнб 'ANS OPER'. Жстб Ышефе
ртЮувбуи уе Юмеч фйч мейфпщтзЭеч фпщ бщфЮнбфпщ фимежцоифЬ, Юрцч фио ишпзтАжиуи
ниоанбфпч, фпо лцдйлЮ фимешейтйунпа, фио бобрбтбзцзЬ ниощнАфцо, лмр.
Гй тщхнЭуейч ущопдеапофбй брЮ нйб ртп-ишпзтбжинЫои жцоЬ. ¸ ущулещЬ зщтЭъей бщфЮнбфб уе
мейфпщтзЭб бопйлфЬч ущопнймЭбч, бо и ртп-ишпзтбжинЫои жцоЬ блпазефбй шцтЭч об лтбфАфе фп
блпщуфйлЮ. »рптеЭфе об бреоетзпрпйЬуефе фи мейфпщтзЭб бопйлфЬч ущопнймЭбч рбфсофбч фп
рмЬлфтп ишеЭпщ .
7.3 ¤ейфпщтзЭеч рмилфтпмпзЭпщ
¦мЬлфтб ¤ейфпщтзЭб фимежцоифЬ ºбфА фио бобрбтбзцзЬ ниощнАфцо
1 ºáíÝá ¶рйуфтпжЬ уфио бтшЬ ниоанбфпч
2 °обрбтбзцзЬ ниощнАфцо ¦áàóè
3 ºáíÝá ¦бтАмейги ниоанбфпч
4 ¸шпзтАжиуи уинеЭцуич ºáíÝá
5 °обрбтбзцзЬ екетшЮнеопщ ниоанбфпч ºáíÝá
6 ¶рймпзЬ екетшЮнеопщ ниоанбфпч ªôÀóè
7 °облпЭоцуи лцдйлпа VIP ºáíÝá
8 °тйхнЮч лпщдпщойунАфцо ºáíÝá
9 ¶нжАойуи стбч ºáíÝá
* ¶оетзЮч фимежцоифЬч ºáíÝá
0 (лмейдЭ °ммбзЬ тщхнЭуецо ºбнЭб
тахнйуич)
# °оеоетзЮч фимежцоифЬч ºáíÝá
94
Page 94

Cocoon 350
0+1 ¸шпзтАжиуи OGM 1 ºáíÝá
0+3 ¸шпзтАжиуи OGM 2 ºáíÝá
0+7 Дахнйуи лцдйлпа VIP ºáíÝá
0+8 Дахнйуи бтйхнпа лпщдпщойунАфцо ºáíÝá
0+9 Дахнйуи инетпниоЭбч/стбч ºáíÝá
+OK ¢йбзтбжЬ Юмцо фцо ниощнАфцо ¢йбзтбжЬ фтЫшпофпч ниоанбфпч
7.4 Окпдпч брЮ фп неопа бщфЮнбфпщ фимежцоифЬ
¶ос втЭулеуфе уфп неопа фпщ бщфЮнбфпщ фимежцоифЬ, део еЭобй дщобфЬ и ртбзнбфпрпЭиуи
лмЬуецо. ¶Эобй дщобфЮч нЮоп п шейтйунЮч фпщ бщфЮнбфпщ фимежцоифЬ. °о хЫмефе об взеЭфе брЮ
фп неопа, рбфЬуфе фп рмЬлфтп OK.
°о и ущулещЬ мАвей нйб еуцфетйлЬ Ь екцфетйлЬ лмЬуи, взбЭоей бщфЮнбфб брЮ фп неопа фпщ
фимежцоифЬ.
ªинеЭцуи: Щфбо взбЭоефе брЮ фп неопа фпщ фимежцоифЬ, бммАъпщо пй рмитпжптЭеч фич пхЮоич. »е бщфЬ фио бммбзЬ,
бтшЭъей об бобвпувЬоей фп уанвпмп
XX/YY).
7.5 ¶кетшЮнеоб ниоанбфб
¶Эобй дщобфЬ и ишпзтАжиуи дап екетшЮнеоцо ниощнАфцо дйАтлейбч фп рпма 2 мерфсо (OGM1
лбй OGM2).
• ¶кетшЮнеоп нЬощнб 1 зйб фи мейфпщтзЭб брАофиуич лбй дщобфЮфифб зйб фпщч лбмпаофеч об
бжЬопщо нЬощнб
• ¶кетшЮнеоп нЬощнб 2 зйб фи мейфпщтзЭб брАофиуич шцтЭч дщобфЮфифб зйб фпщч лбмпаофеч об
бжЬопщо нЬощнб уфпо фимежцоифЬ.
7.5.1 ¸шпзтАжиуи екетшЮнеоцо ниощнАфцо (OGM 1 Ь OGM 2)
• ¦бфЬуфе дап жптЫч фп рмЬлфтп ртпзтбннбфйунпа зйб об рАфе уфп неопа бщфЮнбфпщ
фимежцоифЬ (вмЫре '»еопа бщфЮнбфпщ фимежцоифЬ').
• ¦бфЬуфе фп рмЬлфтп '0'.
• ªфи ущоЫшейб рбфЬуфе:
- Жп рмЬлфтп ' ' зйб об ишпзтбжЬуефе фп екетшЮнеоп нЬощнб 1.
- ¦бфЬуфе ' ' зйб об ишпзтбжЬуефе фп екетшЮнеоп нЬощнб 2.
• »йб ртп-ишпзтбжинЫои жцоЬ убч еоинетсоей зйб фп екетшЮнеоп нЬощнб рпщ ишпзтбжеЭфбй.
• »ефА фп нрйр, реЭфе фп екетшЮнеоп нЬощнб рпщ хЫмефе.
• ¦бфЬуфе фп рмЬлфтп уфАуич зйб об уфбнбфЬуефе фио ишпзтАжиуи.
»ефА брЮ мЭзп, бммАъей и Ыодейки ущопмйлсо/оЫцо ниощнАфцо (MSG
.
ªинеЭцуи: ¸ ишпзтАжиуи део нрптеЭ об щретвеЭ фб 2 мерфА. °о део ишпзтбжихеЭ екетшЮнеоп нЬощнб,
штиуйнпрпйеЭфбй фп фщрйлЮ екетшЮнеоп нЬощнб:
• ¶кетшЮнеоп нЬощнб 1: 'Please call later' (¦бтблбмс, лбмЫуфе бтзЮфетб).
• ¶кетшЮнеоп нЬощнб 2: 'Please call later' (¦бтблбмс, лбмЫуфе бтзЮфетб).
95
Page 95

Cocoon 350
7.5.2 Омезшпч фпщ екетшЮнеопщ ниоанбфпч
¡йб об емЫзкефе фп екетшЮнеоп нЬощнб, лАофе фйч блЮмпщхеч еоЫтзейеч:
• ¦бфЬуфе дап жптЫч фп рмЬлфтп ртпзтбннбфйунпа зйб об рАфе уфп неопа бщфЮнбфпщ
фимежцоифЬ (вмЫре '»еопа бщфЮнбфпщ фимежцоифЬ').
• ¦бфЬуфе фп рмЬлфтп .
ªинеЭцуи: ¡йб об уфбнбфЬуефе фио бобрбтбзцзЬ, рбфЬуфе зйб мЭзп фп рмЬлфтп уфАуич .
7.5.3 ¶рймпзЬ екетшЮнеопщ ниоанбфпч
• ¦бфЬуфе дап жптЫч фп рмЬлфтп ртпзтбннбфйунпа зйб об рАфе уфп неопа бщфЮнбфпщ
фимежцоифЬ (вмЫре '»еопа бщфЮнбфпщ фимежцоифЬ').
• ¦бфЬуфе фп рмЬлфтп зйб еобммбзЬ нефбка фцо 2 екетшЮнеоцо ниощнАфцо.
• ¸ ртп-ишпзтбжинЫои жцоЬ ерйвевбйсоей фп екетшЮнеоп нЬощнб рпщ ерймЫкбфе.
ªинейсуейч:
1 ¸ ерймпзЬ екетшЮнеопщ ниоанбфпч еЭобй дщобфЬ нЮоп бо п бщфЮнбфпч фимежцоифЬч еЭобй еоетзЮч. °о део еЭобй, и
ртп-ишпзтбжинЫои жцоЬ убч еоинетсоей Юфй п фимежцоифЬч еЭобй боеоетзЮч.
2 °о и ноЬни еЭобй рмЬтич, еЭобй дщобфЬ и ерймпзЬ нЮоп фпщ екетшЮнеопщ ниоанбфпч 2 (брАофиуи шцтЭч дщобфЮфифб
ишпзтАжиуич ниощнАфцо)
7.5.4 ¢йбзтбжЬ фпщ екетшЮнеопщ ниоанбфпч
°о дйбзтАгефе фп екетшЮнеоп нЬощнб, бобрбтАзефбй фп ртперймезнЫоп нЬощнб 'Please call later'.
¢йбзтАгфе фп екетшЮнеоп нЬощнб цч блпмпахцч:
• ¦бфЬуфе дап жптЫч фп рмЬлфтп ртпзтбннбфйунпа зйб об рАфе уфп неопа бщфЮнбфпщ
фимежцоифЬ (вмЫре '»еопа бщфЮнбфпщ фимежцоифЬ').
• ¶рймЫкфе фп екетшЮнеоп нЬощнб рпщ хЫмефе рбфсофбч фп рмЬлфтп .
• ¦бфЬуфе фп рмЬлфтп зйб об блпауефе фп екетшЮнеоп нЬощнб.
• ºбфА фио бобрбтбзцзЬ фпщ екетшЮнеопщ ниоанбфпч, рбфЬуфе фп рмЬлфтп дйбзтбжЬч
• ªфио пхЮои енжбоЭъефбй фп нЬощнб 'ERASE?'.
• ¦бфЬуфе 'OK' зйб об дйбзтАгефе фп екетшЮнеоп нЬощнб Ь рбфЬуфе лбй рАмй фп рмЬлфтп
дйбзтбжЬч зйб об блщтсуефе фи дйбзтбжЬ.
7.6 ¶оетзпрпЭиуи/бреоетзпрпЭиуи фпщ бщфЮнбфпщ фимежцоифЬ
°о п бщфЮнбфпч фимежцоифЬч еЭобй еоетзЮч, енжбоЭъефбй фп уанвпмп лбй и ущулещЬ
брбофА бщфЮнбфб фйч лмЬуейч нефА брЮ Ыобо бтйхнЮ лпщдпщойунАфцо (тщхнйъЮнеопч, вмЫре
'Дахнйуи бтйхнпа лпщдпщойунАфцо').
• ¦бфЬуфе дап жптЫч фп рмЬлфтп ртпзтбннбфйунпа зйб об рАфе уфп неопа бщфЮнбфпщ
фимежцоифЬ (вмЫре '»еопа бщфЮнбфпщ фимежцоифЬ').
• ¦бфЬуфе фп:
* рмЬлфтп зйб об еоетзпрпйЬуефе фпо бщфЮнбфп фимежцоифЬ. »йб ртп-ишпзтбжинЫои
жцоЬ ерйвевбйсоей фи тахнйуи лбй убч еоинетсоей зйб фп екетшЮнеоп нЬощнб рпщ еЭобй
еоетзЮ (OGM 1 Ь OGM 2).
* рмЬлфтп зйб об бреоетзпрпйЬуефе фпо бщфЮнбфп фимежцоифЬ. »йб ртпишпзтбжинЫои жцоЬ ерйвевбйсоей фи тахнйуи.
• ¦бфЬуфе фп рмЬлфтп OK зйб об взеЭфе брЮ фп неопа бщфЮнбфпщ фимежцоифЬ.
96
Page 96

Cocoon 350
ªинеЭцуи: °лЮни лбй бо п бщфЮнбфпч фимежцоифЬч еЭобй боеоетзЮч, и ущулещЬ брбофА бщфЮнбфб фйч лмЬуейч нефА
брЮ 10 лпщдпщоЭунбфб, суфе об еЭобй дщобфЬ и ек брпуфАуецч еоетзпрпЭиуи (вмЫре 7.17 ЖимешейтйунЮч)
7.7 Дахнйуи бтйхнпа лпщдпщойунАфцо
»рптеЭфе об тщхнЭуефе фпо бтйхнЮ лпщдпщойунАфцо нефА фпо прпЭп хб брбофА фйч лмЬуейч п
бщфЮнбфпч фимежцоифЬч брЮ 2 Ыцч 9 лбй TS (Toll saver Ь екпйлпоЮниуи щретбуфйлсо). ¸
бтшйлЬ тахнйуи еЭобй 3 лпщдпщоЭунбфб. ªфи мейфпщтзЭб екпйлпоЮниуич щретбуфйлсо, и ущулещЬ
брбофА нефА брЮ 5 лпщдпщоЭунбфб, уе ретЭрфцуи рпщ део щрАтшпщо ниоанбфб, лбй нефА брЮ 2
лпщдпщоЭунбфб, уе ретЭрфцуи рпщ щрАтшпщо ниоанбфб. °о део щрАтшпщо оЫб ниоанбфб лбй
лбмЫуефе фи ущулещЬ убч зйб Ымезшп ниощнАфцо (вмЫре 7.17 ЖимешейтйунЮч), нрптеЭфе об
лмеЭуефе нефА фп 3п лпщдпаойунб. ¢е штейАъефбй об штецхеЭфе зйб фио лмЬуи лбй кЫтефе Юфй део
Ышефе оЫб ниоанбфб.
• ¦бфЬуфе дап жптЫч фп рмЬлфтп ртпзтбннбфйунпа зйб об рАфе уфп неопа бщфЮнбфпщ
фимежцоифЬ (вмЫре '»еопа бщфЮнбфпщ фимежцоифЬ').
• ¦бфЬуфе зйб мЭзп фп рмЬлфтп . »йб ртп-ишпзтбжинЫои жцоЬ убч еоинетсоей зйб фпо
бтйхнЮ лпщдпщойунАфцо.
• ¦бфЬуфе 0 лбй уфи ущоЫшейб фп рмЬлфтп зйб об тщхнЭуефе фпо бтйхнЮ
лпщдпщойунАфцо.
• ¦бфЬуфе фп рмЬлфтп Ü зйб об бммАкефе фпо фтЫшпофб бтйхнЮ лпщдпщойунАфцо.
• ¶рйвевбйсуфе фи тахнйуи рбфсофбч фп рмЬлфтп . ¸ фтЫшпщуб тахнйуи
лпщдпщойунАфцо ерйвевбйсоефбй брЮ фио ртп-ишпзтбжинЫои жцоЬ.
ªинейсуейч:
• °о део рбфЬуефе лбоЫоб рмЬлфтп зйб 3 дещфетЮмерфб, и ущулещЬ ерйуфтЫжей уфп неопа бщфЮнбфпщ фимежцоифЬ,
шцтЭч бммбзЬ фцо тщхнЭуецо.
• °о лпреЭ фп теанб фтпжпдпуЭбч фич вАуич, п бтйхнЮч лпщдпщойунАфцо ербоЫтшефбй уфп 3.
7.8 Омезшпч фпщ бтйхнпа лпщдпщойунАфцо
• ¦бфЬуфе дап жптЫч фп рмЬлфтп ртпзтбннбфйунпа зйб об рАфе уфп неопа бщфЮнбфпщ
фимежцоифЬ (вмЫре '»еопа бщфЮнбфпщ фимежцоифЬ').
• ¦бфЬуфе зйб мЭзп фп рмЬлфтп .
• ¸ ртп-ишпзтбжинЫои жцоЬ убч еоинетсоей зйб фпо бтйхнЮ лпщдпщойунАфцо.
7.9 Дахнйуи инЫтбч лбй стбч
¸ инЫтб лбй стб фпщ бщфЮнбфпщ фимежцоифЬ еЭобй боекАтфифи брЮ фи тахнйуи инЫтбч лбй
стбч фич ущулещЬч. ¸ инЫтб лбй стб лАхе лмЬуич лбфбзтАжефбй лбй енжбоЭъефбй лбфА фио
бобрбтбзцзЬ. ¸ нптжЬ фич стбч екбтфАфбй брЮ фи змсууб фич ртп-ишпзтбжинЫоич жцоЬч,
р.ш. фб °ззмйлА еЭобй уе 12-цти нптжЬ лбй фб ¡етнбойлА уе 24-цти нптжЬ.
Дахнйуи фич инЫтбч лбй стбч:
• ¦бфЬуфе дап жптЫч фп рмЬлфтп ртпзтбннбфйунпа зйб об рАфе уфп неопа бщфЮнбфпщ
фимежцоифЬ (вмЫре '»еопа бщфЮнбфпщ фимежцоифЬ').
• ¦бфЬуфе фп рмЬлфтп '0'.
97
Page 97

Cocoon 350
• ¦бфЬуфе фп рмЬлфтп .
• ªфио пхЮои енжбоЭъефбй фп нЬощнб 'SET TIME' лбй и ртп-ишпзтбжинЫои жцоЬ убч ъифА об
тщхнЭуефе фио инЫтб.
• ¦бфЬуфе нетйлЫч жптЫч фп рмЬлфтп Ü зйб об тщхнЭуефе фио инЫтб. ¸ ртпишпзтбжинЫои жцоЬ убч еоинетсоей зйб фйч фтЫшпщуеч тщхнЭуейч.
• ¦бфЬуфе фп рмЬлфтп зйб об ерйвевбйсуефе фио инЫтб.
• ¸ ртп-ишпзтбжинЫои жцоЬ убч ъифА об тщхнЭуефе фио стб.
• ¦бфЬуфе нетйлЫч жптЫч фп рмЬлфтп Ü зйб об тщхнЭуефе фйч стеч.
• ¦бфЬуфе фп рмЬлфтп зйб об ерйвевбйсуефе фйч стеч.
• ¸ ртп-ишпзтбжинЫои жцоЬ убч ъифА об тщхнЭуефе фб мерфА.
• ¦бфЬуфе нетйлЫч жптЫч фп рмЬлфтп Ü зйб об тщхнЭуефе фб мерфА.
• ¦бфЬуфе фп рмЬлфтп зйб об ерйвевбйсуефе фб мерфА.
(°о и стб енжбоЭъефбй уе 12-цти нптжЬ, и ртп-ишпзтбжинЫои жцоЬ убч ъифА об ерймЫкефе
AM Ь PM). ¦бфЬуфе фп рмЬлфтп Ü зйб еобммбзЬ нефбка AM лбй PM лбй уфи ущоЫшейб
рбфЬуфе фп рмЬлфтп зйб ерйвевбЭцуи).
¡йб ерйвевбЭцуи ербобмбнвАоефбй пмЮлмити и инЫтб лбй стб.
ªинейсуейч:
• °о део рбфЬуефе рмЬлфтб зйб 8 дещфетЮмерфб, брпхилеаефбй и ртпизпанеои тахнйуи инЫтбч/стбч лбй и ущулещЬ
взбЭоей бщфЮнбфб брЮ фи мейфпщтзЭб тахнйуич инЫтбч/стбч.
• Щфбо штиуйнпрпйеЭфе фи ущулещЬ зйб ртсфи жптА лбй део Ышефе блЮни тщхнЭуей фио инЫтб/стб, део лбфбзтАжефбй
и инЫтб/стб фцо ейуетшЮнеоцо ниощнАфцо.
• °о дйблпреЭ и фАуи фтпжпдпуЭбч фич вАуич, ртЫрей об кбобтщхнЭуефе фио инЫтб/стб.
7.10 Омезшпч фич инЫтбч/стбч
• ¦бфЬуфе дап жптЫч фп рмЬлфтп ртпзтбннбфйунпа зйб об рАфе уфп неопа бщфЮнбфпщ
фимежцоифЬ (вмЫре '»еопа бщфЮнбфпщ фимежцоифЬ').
• ¦бфЬуфе фп рмЬлфтп зйб об енжбоЭуефе фио инЫтб/стб. ¸ ртп-ишпзтбжинЫои жцоЬ убч
мЫей фио фтЫшпщуб тахнйуи инЫтбч/стбч.
7.11 ¦тпзтбннбфйунЮч фпщ лцдйлпа VIP
Г лцдйлЮч VIP еЭобй Ыобч фтйгЬжйпч лцдйлЮч рпщ штиуйнпрпйеЭфбй зйб фпо фимешейтйунЮ фич
ущулещЬч (вмЫре ЖимешейтйунЮч).
¶к бтшЬч, п лцдйлЮч VIP еЭобй '321'.
ªинеЭцуи: °о лпреЭ фп теанб фтпжпдпуЭбч фич вАуич, п лцдйлЮч VIP ербоЫтшефбй уфп '321'.
7.11.1 °ммбзЬ фпщ лцдйлпа VIP
• ¦бфЬуфе дап жптЫч фп рмЬлфтп ртпзтбннбфйунпа зйб об рАфе уфп неопа бщфЮнбфпщ
фимежцоифЬ (вмЫре '»еопа бщфЮнбфпщ фимежцоифЬ').
• ¦бфЬуфе фп рмЬлфтп '0'.
• ¦бфЬуфе фп рмЬлфтп зйб об ерйвевбйсуефе фпо лцдйлЮ VIP.
• ¸ ртп-ишпзтбжинЫои жцоЬ убч ъифА об птЭуефе фпо лцдйлЮ VIP лбй бобжЫтей фп ртсфп
гижЭп.
98
Page 98

Cocoon 350
• ¦бфЬуфе мЭзеч жптЫч фп рмЬлфтп Ü зйб об тщхнЭуефе фп ртсфп гижЭп фпщ лцдйлпа
VIP.
• ¦бфЬуфе фп рмЬлфтп зйб об ерйвевбйсуефе фп ртсфп гижЭп. ¸ ртп-ишпзтбжинЫои
жцоЬ мЫей фп фтЫшпо 2п гижЭп фпщ лцдйлпа VIP.
• ¦бфЬуфе мЭзеч жптЫч фп рмЬлфтп Ü зйб об тщхнЭуефе фп деафетп гижЭп фпщ лцдйлпа
VIP.
• ¦бфЬуфе фп рмЬлфтп зйб об ерйвевбйсуефе фп деафетп гижЭп. ¸ ртп-ишпзтбжинЫои
жцоЬ мЫей фп фтЫшпо 3п гижЭп фпщ лцдйлпа VIP.
• ¦бфЬуфе мЭзеч жптЫч фп рмЬлфтп Ü зйб об тщхнЭуефе фп фтЭфп гижЭп фпщ лцдйлпа
VIP.
• ¦бфЬуфе фп рмЬлфтп зйб об ерйвевбйсуефе фпо лцдйлЮ VIP. °лпазефбй Ыоб дйбтлЫч
нрйр. ¸ ртп-ишпзтбжинЫои жцоЬ мЫей фп оЫп лцдйлЮ VIP зйб ерйвевбЭцуи.
ªинеЭцуи: °о део рбфЬуефе лбоЫоб рмЬлфтп зйб 8 дещфетЮмерфб, брпхилеаефбй п ртпизпанеопч лцдйлЮч VIP лбй и
ущулещЬ взбЭоей бщфЮнбфб брЮ фи мейфпщтзЭб тахнйуич фпщ лцдйлпа VIP.
7.11.2 Омезшпч фпщ лцдйлпа VIP
• ¦бфЬуфе дап жптЫч фп рмЬлфтп ртпзтбннбфйунпа зйб об рАфе уфп неопа бщфЮнбфпщ
фимежцоифЬ (вмЫре '»еопа бщфЮнбфпщ фимежцоифЬ').
• ¦бфЬуфе фп рмЬлфтп зйб об блпауефе фпо лцдйлЮ VIP. ¸ ртп-ишпзтбжинЫои жцоЬ мЫей
фпо фтЫшпофб лцдйлЮ VIP.
7.12 МейтйунЮч
°о мАвефе нйб лмЬуи лбй п бщфЮнбфпч фимежцоифЬч еЭобй еоетзЮч (уанвпмп уфио пхЮои),
п фимежцоифЬч брбофА бщфЮнбфб фйч лмЬуейч нефА фпо лбхптйунЫоп бтйхнЮ лпщдпщойунАфцо.
¶Àî
• еЭобй ерймезнЫоп фп екетшЮнеоп нЬощнб 1, бобрбтАзефбй. »ефА фп екетшЮнеоп нЬощнб,
блпазефбй Ыоб нрйр лбй п лбмсо нрптеЭ об бжЬуей Ыоб нЬощнб (дйАтлейбч фп рпма 3 мерфсо).
• еЭобй ерймезнЫоп фп екетшЮнеоп нЬощнб 2, бобрбтАзефбй. »ефА фп нрйр, и зтбннЬ
брпущодЫефбй бщфЮнбфб. Г лбмсо део Ышей дщобфЮфифб об бжЬуей нЬощнб.
ªинеЭцуи: °о, лбфА фио брАофиуи, део блпщуфеЭ фЭрпфб зйб 8 дещфетЮмерфб, и зтбннЬ дйблЮрфефбй бщфЮнбфб.
7.13 ¢йбмпзЬ лмЬуецо
¸ мейфпщтзЭб бщфЬ штиуйнеаей бо хЫмефе об брбофАфе нЮоп птйунЫоеч лмЬуейч.
ºбфА фи мЬги нйбч ейуетшЮнеоич лмЬуич, еЭобй дщобфЮ об блпауефе фпо лбмпаофб ртйо
брбофЬуефе:
• ¦бфЬуфе фп рмЬлфтп бопйлфЬч ущопнймЭбч лбфА фио еззтбжЬ. ¶Эобй дщобфЮ фстб об
блпауефе фпо лбмпаофб, еос уфио пхЮои енжбоЭъефбй фп нЬощнб 'Monitor'.
• ¦бфЬуфе лбй рАмй фп рмЬлфтп бопйлфЬч ущопнймЭбч зйб об ерйуфтЫгефе уфи мейфпщтзЭб
блпщуфйлпа. ¸ еоЫтзейб бщфЬ бреоетзпрпйеЭ фи мейфпщтзЭб бопйлфЬч ущопнймЭбч.
• ¦бфЬуфе фп рмЬлфтп OK зйб об бреоетзпрпйЬуефе фи дйбмпзЬ лмЬуецо Ь рбфЬуфе фп
рмЬлфтп лмЬуич зйб об брбофЬуефе фио лмЬуи.
99
Page 99

Cocoon 350
7.14 ¸шпзтАжиуи еоЮч уинейснбфпч
»е фп Cocoon 350, нрптеЭфе об ишпзтбжеЭфе уинейснбфб. Жб уинейснбфб бщфА хецтпаофбй
ейуетшЮнеоб ниоанбфб, фб прпЭб нрптеЭ об мАвей бтзЮфетб п штЬуфич. Г нЫзйуфпч штЮопч
ишпзтАжиуич еЭобй 2 мерфА.
• ¦бфЬуфе дап жптЫч фп рмЬлфтп ртпзтбннбфйунпа зйб об рАфе уфп неопа бщфЮнбфпщ
фимежцоифЬ (вмЫре '»еопа бщфЮнбфпщ фимежцоифЬ').
• ¦бфЬуфе зйб мЭзп фп рмЬлфтп ¸ ртп-ишпзтбжинЫои жцоЬ убч ртпфтЫрей об
ишпзтбжЬуефе Ыоб уинеЭцнб. »ефА фп нрйр, реЭфе фп уинеЭцнб.
• ¦бфЬуфе фп рмЬлфтп уфАуич зйб об уфбнбфЬуефе фио ишпзтАжиуи.
• ¦бфЬуфе фп рмЬлфтп OK зйб об ерйуфтЫгефе уе лбфАуфбуи бобнпоЬч.
• Жп уанвпмп бобвпувЬоей лбй нефА брЮ мЭзп, еоинетсоефбй п бтйхнЮч оЫцо ниощнАфцо.
7.14.1 °обрбтбзцзЬ ейуетшЮнеоцо ниощнАфцо лбй уинейцнАфцо
• ¦бфЬуфе дап жптЫч фп рмЬлфтп ртпзтбннбфйунпа зйб об рАфе уфп неопа бщфЮнбфпщ
фимежцоифЬ (вмЫре '»еопа бщфЮнбфпщ фимежцоифЬ').
• ¦бфЬуфе фп рмЬлфтп зйб об блпауефе фб ниоанбфб лбй уинейснбфб.
• ¸ ртп-ишпзтбжинЫои жцоЬ убч еоинетсоей зйб фпо бтйхнЮ щрбтшЮофцо ниощнАфцо
(уаопмп) лбй фпо бтйхнЮ фцо оЫцо (рпщ део Ышефе блпауей) ниощнАфцо.
• Жб ниоанбфб блпазпофбй фп Ыоб нефА фп Аммп. °о део щрАтшпщо ниоанбфб, блпазпофбй нЮоп
фб оЫб ниоанбфб (бщфА рпщ део Ышефе блпауей).
• ¡йб лАхе нЬощнб, и ртп-ишпзтбжинЫои жцоЬ бобжЫтей фио инЫтб лбй стб ишпзтАжиуич фпщ
ниоанбфпч
• ºбфА фио бобрбтбзцзЬ, нрптеЭфе об:
- ерйуфтЫгефе уфио бтшЬ фпщ фтЫшпофпч ниоанбфпч рбфсофбч нйб жптА фп рмЬлфтп .
- рАфе уфп ртпизпанеоп нЬощнб, рбфсофбч дап жптЫч фп рмЬлфтп .
- уфбнбфЬуефе фио бобрбтбзцзЬ, рбфсофбч фп рмЬлфтп уфАуич .
- дйблЮгефе фио бобрбтбзцзЬ, рбфсофбч фп рмЬлфтп уфАуич . ¦бфЬуфе лбй рАмй фп
рмЬлфтп рбауич зйб об келйоЬуефе лбй рАмй фио бобрбтбзцзЬ.
- рАфе уфп ерЮнеоп нЬощнб, рбфсофбч фп рмЬлфтп .
7.15 ¢йбзтбжЬ ниощнАфцо
7.15.1 ¢йбзтбжЬ ниощнАфцо Ыоб-Ыоб лбфА фио бобрбтбзцзЬ
¥елйоЬуфе фио бобрбтбзцзЬ ниощнАфцо Юрцч ерекизеЭфбй рбтбрАоц.
• Щфбо бтшЭуей и бобрбтбзцзЬ фпщ ниоанбфпч рпщ хЫмефе об дйбзтАгефе, рбфЬуфе фп
рмЬлфтп дйбзтбжЬч .
• ªфио пхЮои енжбоЭъефбй фп нЬощнб 'ERASE?'.
• ¦бфЬуфе 'OK' зйб об дйбзтАгефе фп нЬощнб Ь рбфЬуфе лбй рАмй фп рмЬлфтп дйбзтбжЬч
зйб об блщтсуефе фи дйбзтбжЬ.
• ºбфА фи дйбзтбжЬ, и ртп-ишпзтбжинЫои жцоЬ убч еоинетсоей Юфй фп нЬощнб дйбзтАжефбй.
• ¸ ущулещЬ келйоА фио бобрбтбзцзЬ фпщ ерЮнеопщ ниоанбфпч.
7.15.2 ¢йбзтбжЬ Юмцо фцо ниощнАфцо
¶Эобй ерЭуич дщобфЬ и дйбзтбжЬ Юмцо нбъЭ фцо ниощнАфцо рпщ Ышефе блпауей. ¸ еоЫтзейб бщфЬ
дйбзтАжей нЮоп фб ниоанбфб рпщ Ышефе Ьди блпауей. Жб оЫб ниоанбфб де дйбзтАжпофбй.
• ¦бфЬуфе дап жптЫч фп рмЬлфтп ртпзтбннбфйунпа зйб об рАфе уфп неопа бщфЮнбфпщ
фимежцоифЬ (вмЫре '»еопа бщфЮнбфпщ фимежцоифЬ').
100
Page 100

Cocoon 350
• ¦бфЬуфе фп рмЬлфтп дйбзтбжЬч .
• ªфио пхЮои енжбоЭъефбй фп нЬощнб 'Erase?'
• ¦бфЬуфе 'OK' зйб об дйбзтАгефе Юмб фб ниоанбфб Ь рбфЬуфе лбй рАмй фп рмЬлфтп дйбзтбжЬч
зйб об блщтсуефе фи дйбзтбжЬ.
• ¸ ртп-ишпзтбжинЫои жцоЬ ерйвевбйсоей фи дйбзтбжЬ фцо ниощнАфцо, бобжЫтпофбч фпо
бтйхнЮ фцо оЫцо (рпщ део Ышефе блпауей) ниощнАфцо рпщ щрАтшпщо.
7.16 ¦мЬтич ноЬни
¢ео щрАтшей прфйлЬ Ыодейки Юфй и ноЬни еЭобй рмЬтич. °о еоетзпрпйихеЭ п бщфЮнбфпч
фимежцоифЬч лбй мАвефе нйб лмЬуи, и ущулещЬ рбЭъей фп екетшЮнеоп нЬощнб OGM 2
(мейфпщтзЭб бщфЮнбфпщ фимежцоифЬ шцтЭч дщобфЮфифб ишпзтАжиуич ниощнАфцо лбмпаофцо).
Щфбо келйоЬуефе фио блтЮбуи фцо ниощнАфцо, и ртп-ишпзтбжинЫои жцоЬ бобжЫтей Юфй и
ноЬни еЭобй рмЬтич лбй нефА рбЭъей фб ниоанбфб.
• ¢йбзтАгфе Юмб фб ниоанбфб бжпа фб блпауефе.
• ¸ ноЬни емещхетсоефбй лбй рАмй.
7.17 ЖимешейтйунЮч
Г фимешейтйунЮч фпщ бщфЮнбфпщ фимежцоифЬ еЭобй дщобфЮч нЮоп не ущулещЬ фпойлЬч лмЬуич
(уауфинб DTMF).
• ºбмЫуфе фпо бщфЮнбфп фимежцоифЬ убч.
• Г фимежцоифЬч брбофА фио лмЬуи, блпазефбй фп екетшЮнеоп нЬощнб лбй Ыоб нрйр.
• »ефА фп нрйр, рмилфтпмпзЬуфе бтзА фпо лцдйлЮ VIP (ртперймезнЫои фйнЬ 321).
• °лпазпофбй дап уаофпнб нрйр зйб ерйвевбЭцуи.
• ¦милфтпмпзЬуфе фпщч ерЮнеопщч лцдйлпач зйб фио ерйхщнифЬ мейфпщтзЭб.
7.17.1 °лтЮбуи ниощнАфцо
• ¦бфЬуфе фп '2' (блтЮбуи ниощнАфцо). Г фимежцоифЬч рбЭъей фб ниоанбфб. ºбфА фио
бобрбтбзцзЬ, Ышефе фйч блЮмпщхеч ерймпзЫч:
• ¦бфЬуфе фп '2' зйб об уфбнбфЬуефе фио бобрбтбзцзЬ.
• ¦бфЬуфе фп '2' зйб об келйоЬуефе лбй рАмй фио бобрбтбзцзЬ.
• ¦бфЬуфе фп '3' зйб об рАфе уфп ерЮнеоп нЬощнб.
• ¦бфЬуфе '1 1' зйб об рАфе уфп ртпизпанеоп нЬощнб.
• ¦бфЬуфе '1' зйб об ербобмАвефе фп фтЫшпо нЬощнб.
• ¦бфЬуфе фп '6' зйб об уфбнбфЬуефе фио бобрбтбзцзЬ.
• ¦бфЬуфе '0' зйб об дйбзтАгефе фп фтЫшпо нЬощнб.
7.17.2 ¢йбзтбжЬ Юмцо фцо рбмбйсо ниощнАфцо
°жпа блпауефе Юмб фб ниоанбфб, рбфЬуфе '0' зйб об дйбзтАгефе Юмб фб рбмбйА ниоанбфб.
7.17.3 ¸шпзтАжиуи уинейцнАфцо
• ¦бфЬуфе фп рмЬлфтп '4'.
• Ооб нрйр щрпдимсоей Юфй нрптеЭфе об келйоЬуефе фио ишпзтАжиуи.
• ¦еЭфе фп уинеЭцнА убч.
• ¦бфЬуфе фп '6' зйб об уфбнбфЬуефе фио ишпзтАжиуи.
101
 Loading...