

Page 1
COCOON 115
BEDIENUNGSANLEITUNG
USER GUIDE
HANDLEIDING
MODE D’EMPLOI
Page 2

!! Important !!
To use ‘Caller ID’ (display caller), this service has to be activated on your phone line. Normally you need a
separate subscription from your telephone company to activate this function. If you don’t have the Caller ID
function on your phone line, the incoming telephone numbers will NOT be shown on the display of your
telephone.
!! Belangrijk !!
Om de ‘Nummerweergave’ te kunnen gebruiken, moet deze dienst geactiveerd zijn op uw telefoonlijn.
Om deze dienst te activeren, hebt U hiervoor meestal een apart abonnement van uw telefoonmaatschappij
nodig. Indien U geen nummerweergavefunctie hebt op uw telefoonlijn, zullen de inkomende
telefoonnummers NIET op de display van uw toestel verschijnen.
!! Important !!
Pour utiliser la fonction ‘Caller ID/Clip’ (affichage de l’appelant), ce service doit être activé sur votre ligne
téléphonique. Généralement, vous avez besoin d’un abonnement séparé de votre compagnie de téléphone
pour activer cette fonction. Si vous n’avez pas la fonction ‘Caller ID - Affichage Appelant’ sur votre ligne
téléphonique, les numéros de téléphone entrants n’apparaîtront PAS sur l’écran de votre téléphone.
!! Wichtig!!
Zur Verwendung der ‘Rufnummernanzeige’ muss dieser Dienst erst für Ihre Telefonleitung freigegeben
werden. Zur Aktivierung dieser Dienstleistung benötigen Sie meistens ein separates Abonnement Ihrer
Telefongesellschaft.Wenn Sie für Ihre Telefonleitung keine Rufnummernanzeigefunktion haben, erscheinen
die eingehenden Telefonnummern NICHT im Display Ihres Gerätes.
GB The features described in this manual are published with reservation to modifications.
NL De in deze handleiding beschreven mogelijkheden worden gepubliceerd onder voorbehoud
van wijzigingen.
F Les possibilités décrites dans ce manuel sont publiées sous réserve de modifications.
D Die in dieser Bedienungsanleitung umschriebenen Möglichkeiten, werden vorbehaltlich
Änderungen publiziert.
Page 3

COCOON 115 3
1 BUTTONS 4
2DISPLAY 5
3INSTALLATION 6
4 BATTERY EMPTY INDICATION 6
5 OPERATION TELEPHONE 7
5.1 OUTGOING CALLS 7
5.1.1 Making a phone call 7
5.1.2 Call setup with dial preparation 7
5.2 INCOMING CALLS 7
5.3 LAST NUMBER REDIAL 7
5.4 PROGRAMMING MEMORY NUMBERS 7
5.5 CALLING A MEMORY NUMBER 7
5.6 MUTE FUNCTION 8
5.7 SETTING THE VOLUME 8
5.8 PAGING 8
5.9 KEYPAD LOCK 8
5.10 OUT OF RANGE WARNING 8
5.11 FLASH BUTTON (R) 8
5.11.1 Setting the Flash time 8
5.12 ACTIVATE/DEACTIVATE KEY TONES 9
5.13 SETTING THE RING MELODY 9
5.14 AUTOMATIC ANSWERING 9
5.15 DEFAULT SETTINGS (RESET) 9
5.16 SETTING THE PAUSE LENGTH 9
5.17 15 MINUTES CONVERSATION TIMER 10
5.18 HEADSET CONNECTION 10
6 CALLER-ID FUNCTION (CLIP) 10
6.1 NEW CALLS 10
6.2 CONSULTING THE CALL LIST 10
6.3 CALLING A NUMBER FROM THE CALL LIST 10
6.4 ERASING A NUMBER FROM THE CALL LIST 10
6.5 COPY FROM CALL LIST TO MEMORY 11
7WARRANTY 11
8TROUBLESHOOTING 11
9 TECHNICAL DATA 12
ENGLISH
ENGLISH
Page 4

4COCOON 115
1 BUTTONS
1 Numerical buttons
2Line button
3 Redial/Pause button /P
4Flash button R
5Memory button
6 Paging button (to retrieve the handset)
7Mute button
8 Set button
9ON-hook button
10 Line/New call indication (LED)
11 Charge indicator (LED)
12 Power indicator (LED)
13 Call list button
14 Headset connection
14
13
Cocoon 115
2
4
R
/P
9
3
10
1
1
4
7
*
2
5
8
0
8
3
6
11
9
12
#
6
Cocoon 115
7
5
Page 5
COCOON 115 5
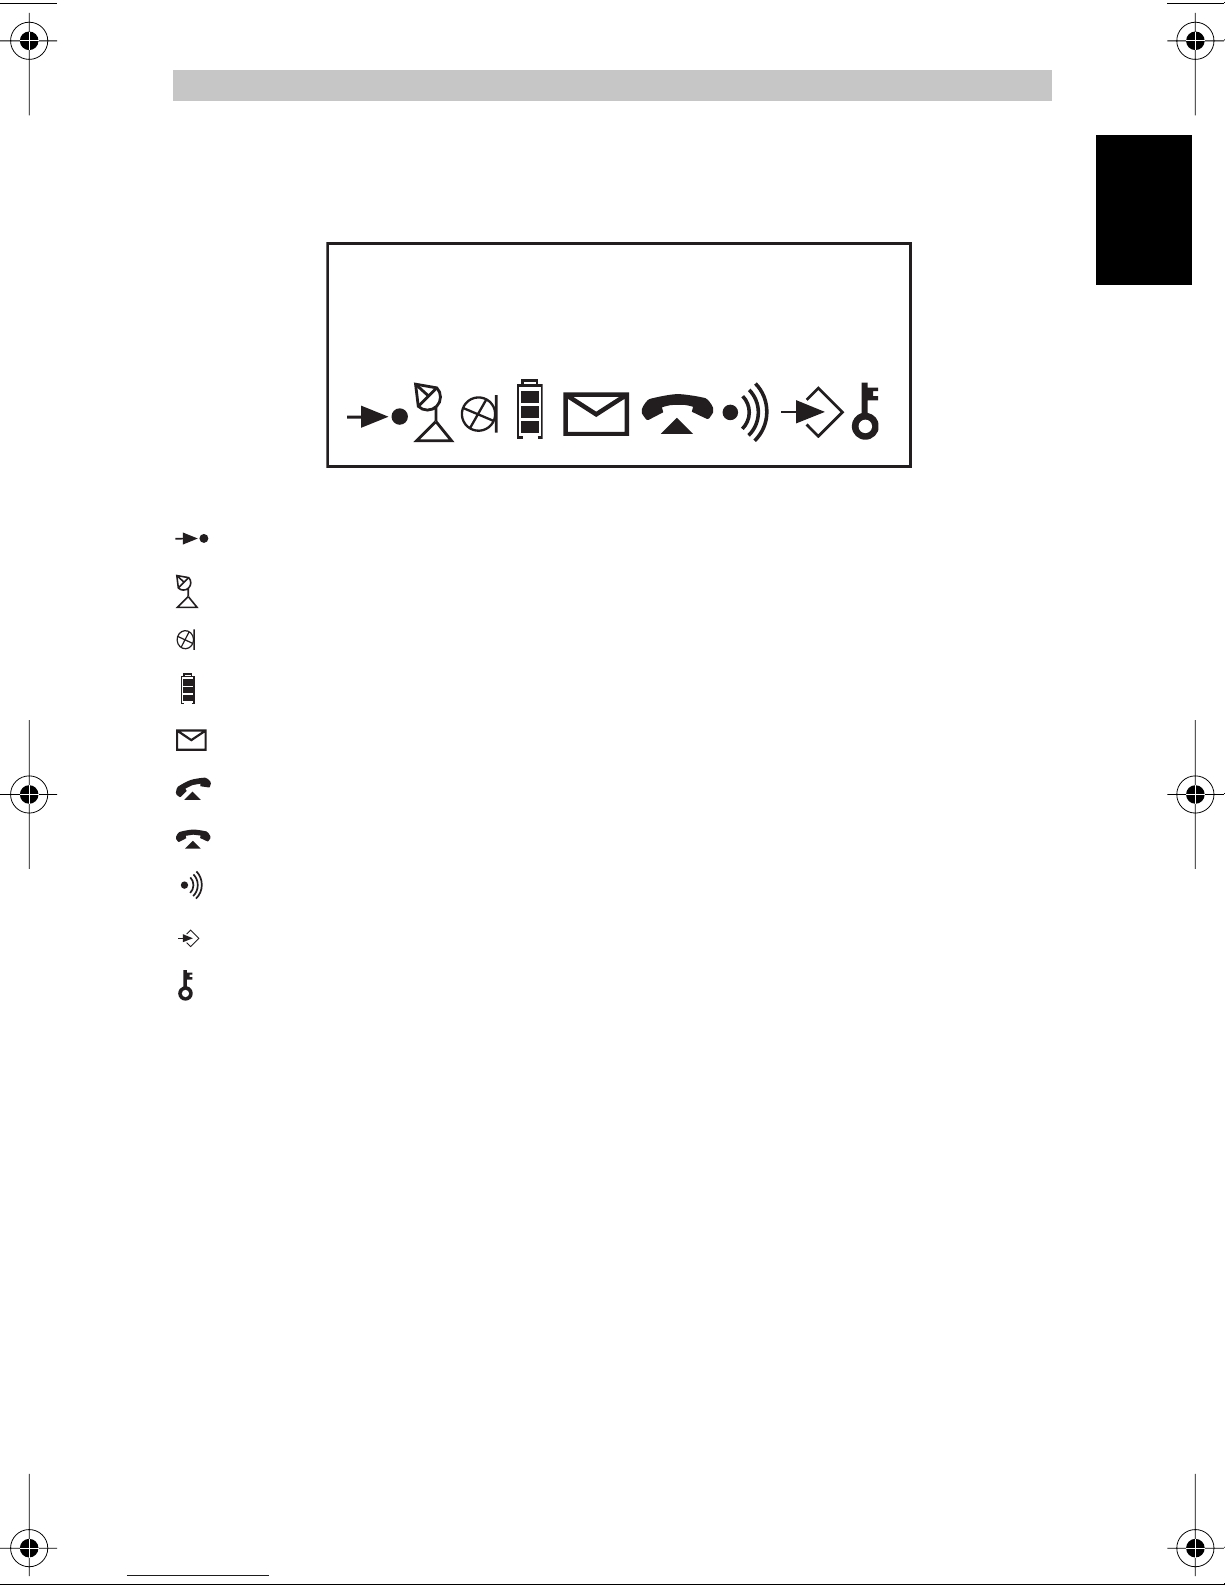
2DISPLAY
88888888888888
Memory icon
RF link indicator: When RF link between handset and base is established
Handset microphone mute indicator
ENGLISH
ENGLISH
Battery level indicator
Unanswered call indicator
Off-hook indication
On-hook indication
Base paging indication
Program mode indication
Keypad lock indication
Page 6
6COCOON 115
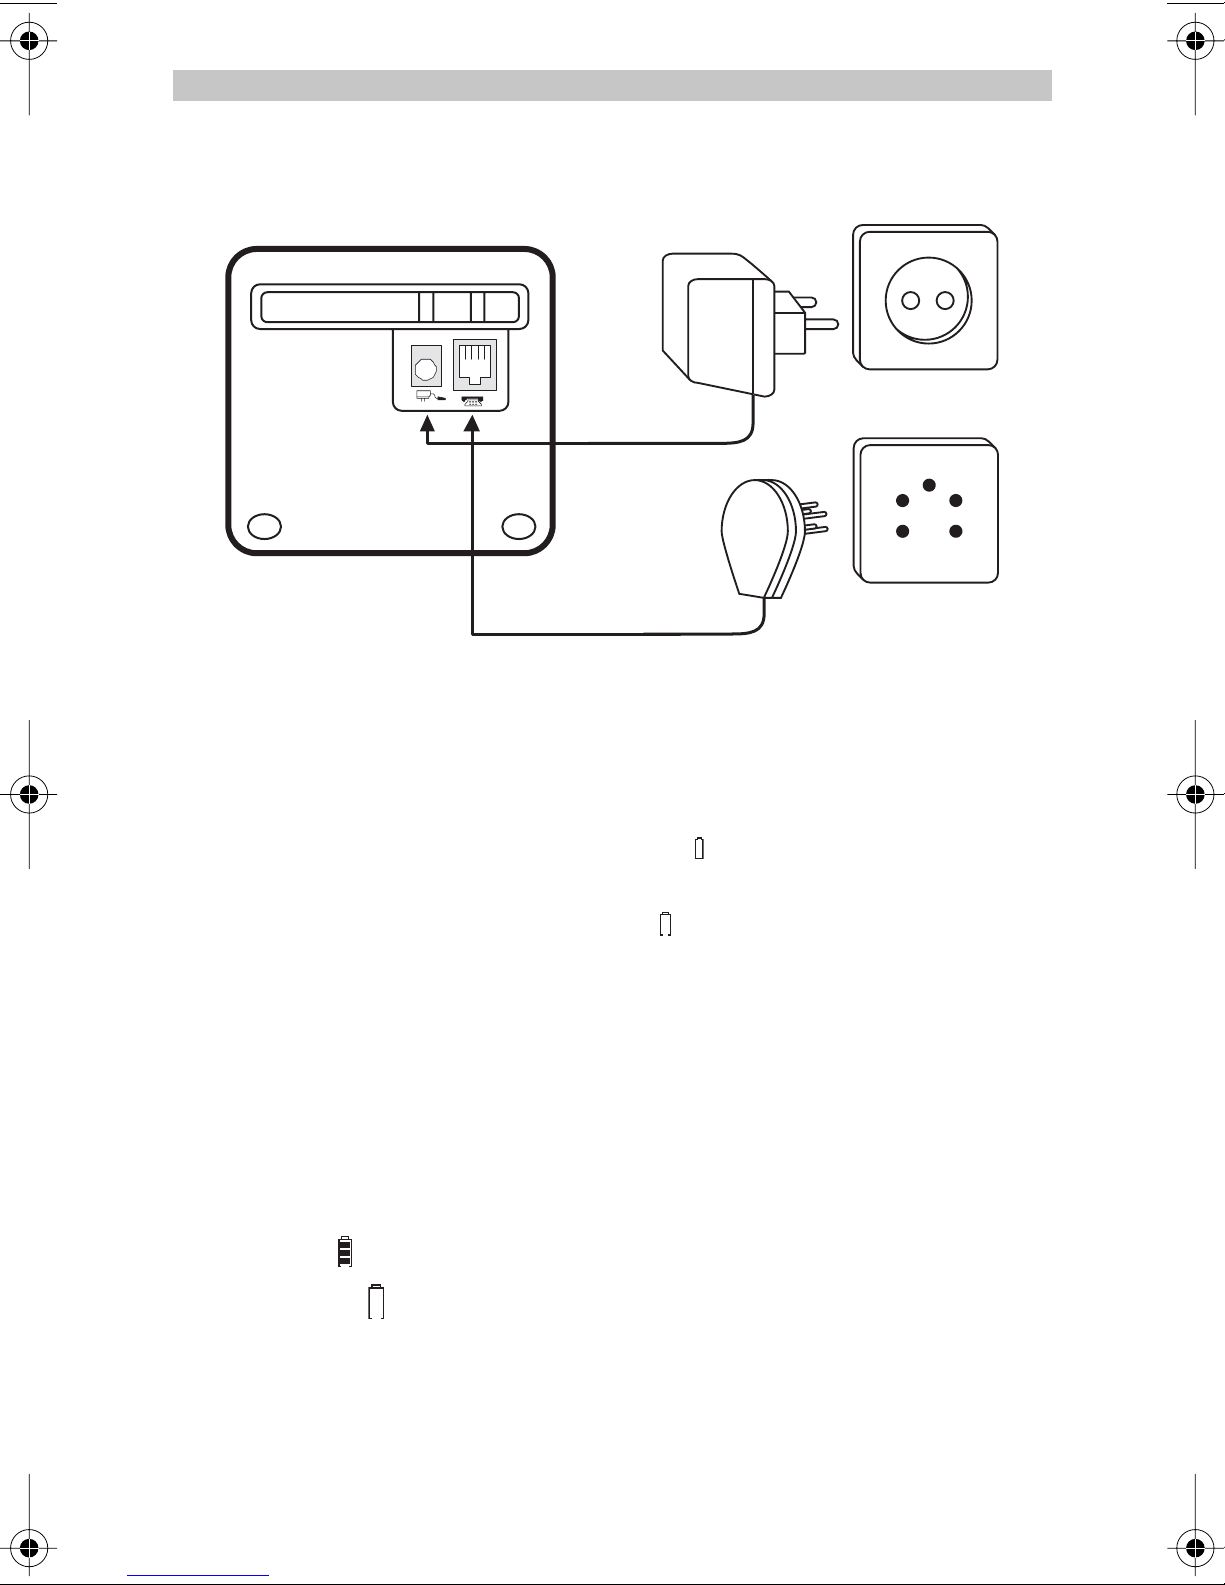
3INSTALLATION
•Plug one end of the phone cable into the phone unit and the other end into the telephone
line wall socket.
• Connect the small plug of the AC adaptor to the phone and the other end of the adapter
cable to the electric socket.
• Insert 3 rechargeable batteries (AAA) inside the battery compartment of the handset.
Put the handset on the base unit. The orange Charge LED will burn. Charge the handset
for a period of 24 hours before using the handset for the first time. To extend the battery life
time, decharge the batteries completely from time to time. As soon as the handset emits a
warning tone every 5 seconds and the battery icon blinks on the display, you have to put it
back on the base unit.
4 BATTERY EMPTY INDICATION
When the battery is empty, the handset no longer carries out operations. When a battery is
completely empty and you have put the handset on the base unit for a short period of time,
the Battery symbol will appear to be fully charged but this is actually not the case. The battery
capacity will decrease rapidly. We advise you to put the handset on the base unit for the entire
night so that it can be recharged thoroughly.
•Full battery
• Empty battery
When you are in the middle of a conversation and the battery is almost empty, the handset
will emit a warning signal ones. Place the handset on the base unit to charge (the keypad
upwards).
Page 7
COCOON 115 7
5 OPERATION TELEPHONE
5.1 Outgoing calls
5.1.1 Making a phone call
• Press the Line button . You will hear the dial tone.
• Enter the desired telephone number.
• Press the ON-hook button when you want to terminate the call.
5.1.2 Call setup with dial preparation
• Enter the desired telephone number. An incorrect number can be corrected by means of
the Mute button . When you haven’t pressed a button for 20 seconds, the number
you’ve already entered will disappear and the handset returns to stand-by mode.
• Press the Line button . The number will be dialled automatically.
• Press the ON-hook button when you want to terminate the call.
5.2 Incoming calls
•When a call comes in, only the handset will start to ring. The PHONE symbol blinks
on the display and the Line indication (LED) will blink on the base.
• Press the Line button to answer the incoming call.
•When you pick up the handset from the base unit you are immediately connected to the
caller. You do not need to press the Line button . This function has to be programmed
before it can be used (see 5.14 Automatic answering).
5.3 Last number redial
• Press the Redial button . The last number dialled appears on the display.
• Press the Line button . The number will be dialled automatically.
• Press the On-hook button when you want to terminate the call.
ENGLISH
ENGLISH
5.4 Programming memory numbers
You can program 10 indirect numbers (of max. 24 digits) in the phone’s memory.
• Press the Set button , followed by the Memory button .
• Enter the memory location (0-9).
• Enter the telephone number you wish to save on this memory location.
• Press the Memory button . You will hear a confirmation tone.
Remarks:
•All memory numbers will be erased when the default settings have been reset
(see 5.15 Default settings).
/P
• If you wish to insert a pause, press the Redial button
you want a pause (see also ‘5.16 Setting the pause length’).
on the location where
5.5 Calling a memory number
• Press the Line button .
• Press the Memory button , followed by the number of the memory location (0-9).
•The memory number will be dialled automatically.
• Press the On-hook button when you want to terminate the call.
5.6 Mute function
It is possible to deactivate the microphone during a conversation. Now you can speak openly
without being heard by your correspondent.
Page 8
8COCOON 115
• Press the Mute button during a conversation. The microphone will
be deactivated. The MUTE symbol appears on the display.
• Press the Mute button again when you want to continue the conversation.
5.7 Setting the volume
During a conversation you can set the volume by pressing the Line button . The indication
‘Loud Hi/Lo’ appears on the display.
5.8 Paging
When you press the Paging button on the base unit, the handset emits a ringing signal for
25 seconds. This signal helps you find a lost handset. The symbol blinks on the base
unit. The message “BASE PAGE” appears on the display.
5.9 Keypad lock
When the keypad is locked, the keypad buttons can no longer be pressed, except for the Set
button .
• Press the Set button .
• Press numerical button ‘7’.
• Press:
‘1’ to lock the keypad and press the Memory button to confirm. The icon and
‘unHold=49’ are shown on the display.
‘2’ to unlock the keypad and press the Memory button button to confirm.
Remark: You can temporarily release the keypad lock by pressing ‘4’ and ‘9’. The
keypad lock is automatically active again when the keypad is idle for 10 seconds.
Default setting: no keypad lock.
5.10 Out of range warning
When the handset is out of the working range of the base unit during a conversation,
the unit will emit a warning signal every two seconds to warn the user that he has to move
closer towards the base unit. If the user is not in the working range of the base unit within
10 seconds, the connection will be broken.
5.11 Flash button (R)
When you press the R button, also called flash or recall, the unit generates a line interruption
(of 100 ms). It gives you the possibility to use the special services of your telephone provider
and/or to transfer calls when you have a telephone exchange.
5.11.1 Setting the Flash time
• Press the Set button .
• Press ‘2’
•The actual flash time is shown on the display.
• Press:
‘1’ = 100ms
‘2’ = 115ms
‘3’ = 270ms
‘4’ = 600ms
• Press the Memory button to confirm.
Page 9

COCOON 115 9
5.12 Activate/deactivate key tones
• Press the Set button .
• Press numerical button ‘4’.
• Press numerical button ‘1’ to activate or ‘2’ to deactivate this function.
• Press the Memory button . The unit emits a confirmation tone.
Default setting: key tones activated.
5.13 Setting the ring melody
• Press the Set button .
• Press numerical button ‘5’.
• Select the desired ring melody (1-4). Select ‘5’ to turn the ring volume off.
• Press the Memory button . The unit emits a confirmation tone.
Default setting: ring melody 1
5.14 Automatic answering
It is possible to program the unit in such a way that, when you receive a call, you only have
to pick up the handset to connect directly to the external caller. It is no longer necessary to
press the Line button first to accept the call.
• Press the Set button .
• Press numerical button ‘0’.
• Press numerical button ‘1’ to activate or ‘2’ deactivate this function.
• Press the Memory button . The unit emits a confirmation tone.
Default setting: off
ENGLISH
ENGLISH
Note: When a call comes in and the handset is not lying on the base unit, you always
have to press the Line button
to accept the call, even when the function
‘Automatic answering’ is activated.
5.15 Default settings (Reset)
If you want to reset the default settings of the unit, please take the following steps:
• Press the Set button .
• Press numerical button ‘1’.
• Press numerical button ‘1’ if you want to reset the default settings, or press ‘2’ to cancel
• Press the Memory button . The unit emits a confirmation tone.
Note: When you reset the default settings, all memory-, call list, redial numbers will
be erased:
Flash time 100ms
Pause time 3s
Key tones ON
Ring melody 1
15 minute timer OFF
Auto answer OFF
5.16 Setting the pause length
• Press the Set button .
• Press numerical button ‘3’.
• Press ‘1’ for 3 seconds or ‘2’ for 6 seconds pause time
• Press the Memory button . The unit emits a confirmation tone
Page 10
10 COCOON 115
5.17 15 Minutes conversation timer
To avoid that you would forget to end a conversation or that you accidentally press the line
button without having a conversation, you have the possibility to activate a 15 minutes
conversation timer. This warns you after 15 minutes of conversation by means of beeps (last
30 seconds). To continue your conversation and to avoid the connection from being broken
automatically, press a numerical button (0-9) as soon as you hear the first beeps.
To activate/deactivate this function:
• Press the Set button .
• Press numerical button ‘9’.
• Press numerical button ‘1’ to activate or ‘2’ deactivate this function.
• Press the Memory button . The unit emits a confirmation tone.
Default setting: off
5.18 Headset connection
You can connect a headset with a 3 pole jack plug of 2,5mm on the right side of the handset.
When the headset is connected, you can only hear and talk through the headset. The headset
microphone can still be muted by the Mute key.
6 CALLER-ID FUNCTION (CLIP)
The Cocoon 115 displays the telephone numbers of incoming calls. This function is only
possible if you are subscribed to a telephone operator that provides this service. Contact your
telephone provider for more information. When you receive a call, the numbers are saved in
a call list. This list can hold 12 telephone numbers (each of max. 16 digits).
6.1 New calls
When you’ve received a new unanswered call, the CLIP symbol appears on the display.
6.2 Consulting the Call list
When you consult the Call list, you will notice that the list always starts with the last call
received.
• Press the button
•The number of new calls (ne) and the total number of calls (tot) appear on the display.
• Use numerical buttons ’1’ or ‘3’ to scroll through the list.
•When you reach the beginning of the Call list, ‘END OF CID’ is shown on the display.
•When you reach the end of the Call list, ‘HEAD OF CID’ is shown on the display.
•When the telephone number is longer than the available space on the display, ‘-’ appears
at the end of the telephone number. Press button ‘2’ to see the remainder of the number.
The CID sequence number will also be shown [x].
• You can leave the Call list by pressing the button
6.3 Calling a number from the Call list
• Scroll through the Call list until the desired number is shown on the display.
• Press the Line button . The number will be dialled automatically.
6.4 Erasing a number from the Call list
(a) Erasing one telephone number
• Scroll through the Call list until the desired number is shown on the display.
Page 11
COCOON 115 11
• Press the Mute button twice to erase the number.
(b) Erasing the complete Call list
• Enter the Call list.
• Press the Mute button for 1 second. ‘Erase All?’ appears on the display.
• Press the Mute button once again to erase the complete list.
6.5 Copy from Call list to memory
• Scroll through the Call list until the desired number is shown on the display.
• Press the Memory button and enter the memory location (0-9)
7WARRANTY
•This equipment comes with a 24-month warranty. The warranty will be honoured on
presentation of the original bill or receipt, provided the date of purchase and the unit type
are indicated.
• During the time of the warranty Topcom will repair free of charge any defects caused by
material or manufacturing faults. Topcom will at its own discretion fulfil its warranty
obligations by either repairing or exchanging the faulty equipment.
• Any warranty claims will be invalidated as a result of intervention by the buyer or
unqualified third parties.
• Damage caused by inexpert treatment or operation, and damage resulting from the use
of non-original parts or accessories not recommended by Topcom is not covered by the
warranty.
•The warranty does not cover damage caused by outside factors, such as lightning, water
and fire, nor does it apply if the unit numbers on the equipment have been changed,
removed or rendered illegible.
ENGLISH
ENGLISH
Note: Please do not forget to enclose your receipt if you return the equipment.
8TROUBLESHOOTING
Problem Possible cause Solution
No Display Batteries not charged Check the position of the
batteries
Re-charge the batteries
No dialling tone Telephone cable not properly
connected
Handset does not ring Volume set to ‘OFF’ Adjust the volume
Communication is
disconnected after 15
minutes
Volume of conversation
partner too low
15 minute timer is ON Switch off the 15 minute
Check the connection of the
telephone cable
times or press any key during
the warning beeps
Adjust the volume during the
conversation by pressing the
line button
Page 12

12 COCOON 115
9 TECHNICAL DATA
Range: max. 300 m in open space
max. 50 m in buildings
Dialling options: DTMF (tone)
Batteries: 3 x 1.2V, 600 mAh AAA Type NiMh rechargeable
Max. stand-by time: approx. 72 hours
Max. talk time: 5 hours
Ambient temperature: +5 °C to +45 °C
Permitted relative air humidity: 25 to 85 %
Power supply base adapter: 220/230V , 50 Hz
Page 13

COCOON 115 13
xx
ENGLISH
ENGLISH
Page 14

14 COCOON 115
1 TOETSEN 15
2DISPLAY 16
3INSTALLATIE 17
4 LEGE BATTERIJ-INDICATIE 17
5 WERKING TELEFOON 18
5.1 UITGAANDE GESPREKKEN 18
5.1.1 Telefoneren 18
5.1.2 Blokkiezen 18
5.2 INKOMENDE OPROEPEN 18
5.3 NUMMERHERHALING 18
5.4 GEHEUGENNUMMERS PROGRAMMEREN 18
5.5 EEN GEHEUGENNUMMER OPROEPEN 18
5.6 TIJDELIJKE UITSCHAKELING VAN DE MICROFOON 19
5.7 VOLUME REGELEN 19
5.8 PAGING 19
5.9 KLAVIERVERGRENDELING 19
5.10 BUITEN BEREIK-WAARSCHUWING 19
5.11 FLASHTOETS (R) 19
5.11.1 Flash-tijd instellen 19
5.12 KLAVIERTONEN ACTIVEREN/DEACTIVEREN 20
5.13 BELMELODIE INSTELLEN 20
5.14 AUTOMATISCH OPNEMEN 20
5.15 STANDAARDWAARDEN (RESET) 20
5.16 PAUZETIJD INSTELLEN 20
5.17 WAARSCHUWING 15 MINUTEN GESPREKSDUUR 21
5.18 HOOFDTELEFOON AANSLUITING 21
6 NUMMERWEERGAVE (CLIP-CALLER ID) 21
6.1 NIEUWE OPROEPEN. 21
6.2 RAADPLEGEN VAN DE OPROEPLIJST 21
6.3 OPROEPEN VAN EEN NUMMER UIT DE OPROEPLIJST 21
6.4 TELEFOONNUMMERS UIT DE OPROEPLIJST WISSEN 22
6.5 EEN NUMMER VAN DE OPROEPLIJST OPSLAAN IN HET
GEHEUGEN 22
7GARANTIE 22
8 PROBLEMEN VERHELPEN 23
9 TECHNISCHE GEGEVENS 23
Page 15
COCOON 115 15
1TOETSEN
1Cijfertoetsen
2Lijntoets
3 Herkies-/Pauzetoets /P
4Flashtoets R
5Geheugentoets
6 Paging-toets (om de handset te zoeken)
7Mute-toets
8 Programmeertoets
9Inhaaktoets
10 Lijn-/Nieuwe oproep indicator (LED)
11 Laad-indicator (LED)
12 Stroom-indicator (LED)
13 Oproeplijsttoets
14 Hoofdtelefoon aansluiting
14
ENGLISH
NEDERLANDS
13
Cocoon 115
2
4
R
/P
9
3
10
1
1
4
7
*
2
5
8
0
8
3
6
11
9
12
#
6
Cocoon 115
7
5
Page 16

16 COCOON 115
2DISPLAY
88888888888888
Geheugenicoon
RF communicatie link indicator. Verschijnt wanneer er communicatie is tussen
handset en basis.
Microfoon uit indicator
Batterij capaciteitindicator
Onbeantwoorde oproep indicator
Afhaak indicator
Inhaak indicator
Basis oproep (paging) icoon
Programmeer indicator
Toetsen geblokkeerd
Page 17

COCOON 115 17
3INSTALLATIE
ENGLISH
NEDERLANDS
•Sluit de connector van het telefoonsnoer aan op het telefoontoestel en steek het andere
uiteinde in de wandcontactdoos van het telefoonnet.
•Steek de kleine stekker van de AC-adapter in het toestel en het andere uiteinde in het
stopcontact.
•Steek de 3 oplaadbare batterijen (AAA) in de batterijruimte onderaan de handset.
Leg de handset op het basisstation. De oranje Laad-indicator zal branden.
Laad de handset gedurende 24 uur op alvorens de handset voor het eerst te gebruiken. Om
de levensduur van de batterijen te verlengen, dient men de batterijen regelmatig volledig te
ontladen.
Zodra de handset iedere 5 seconden een waarschuwingstoon laat horen en het
batterijsymbool knippert op het scherm, dient u deze terug op de lader te leggen.
4 LEGE BATTERIJ-INDICATIE
Als de batterij leeg is, kan de handset niet meer gebruikt worden. Als een batterij volledig leeg
is en u hebt deze even op de basis gelegd om op te laden, geeft het Batterijsymbool aan dat
de batterij weer helemaal opgeladen is. Dit is echter niet het geval. De capaciteit zal snel
dalen.
Het is aan te raden de handset gedurende een hele nacht op de basis te leggen om grondig
te kunnen opladen.
• Volle batterij
• Lege batterij
Als u in gesprek bent en de batterij is bijna leeg, weerklinkt éénmaal een
waarschuwingssignaal. Beëindig uw gesprek en leg de handset op de basis om op te laden
(klavier naar boven).
Page 18

18 COCOON 115
5 WERKING TELEFOON
5.1 Uitgaande gesprekken
5.1.1 Telefoneren
• Druk op de Lijntoets . U hoort de kiestoon.
• Voer het gewenste telefoonnummer in.
• Druk op de Inhaaktoets om, na het gesprek, de verbinding te verbreken.
5.1.2 Blokkiezen
•Geef het gewenste telefoonnummer in. Foutieve ingaven kunnen gecorrigeerd worden
met behulp van de Mute-toets . Als u gedurende 20 seconden op geen enkele toets
drukt, verdwijnt het reeds ingegeven nummer en keert de handset terug naar standbymodus.
• Druk op de Lijntoets . Het nummer wordt gevormd.
• Druk op de Inhaaktoets om, na het gesprek, de verbinding te verbreken.
5.2 Inkomende oproepen
•Als er een oproep binnenkomt, rinkelt enkel de handset.
Het TELEFOON-symbool knippert op de display en de Lijn-/Nieuwe oproep
indicator (LED) knippert op de basis
• Druk op de Lijntoets om de oproep te beantwoorden.
•Als de handset op de basis ligt en u neemt de hoorn op, bent u onmiddellijk in verbinding
met de oproeper. U hoeft de Lijntoets niet meer te drukken. Deze functie dient echter
wel geprogrammeerd te worden ( zie 5.14 Automatisch opnemen).
5.3 Nummerherhaling
• Druk op de Herkiestoets . Het laatst gevormde nummer verschijnt op de display.
• Druk op de Lijntoets . Het nummer wordt automatisch gevormd.
• Druk op de Inhaaktoets om, na het gesprek, de verbinding te verbreken.
5.4 Geheugennummers programmeren
In het geheugen kunnen 10 indirecte nummers (van max 24 cijfers) geprogrammeerd
worden.
• Druk op de Programmeertoets , gevolgd door de Geheugentoets.
•Geef het geheugenplaatsnummer (0-9) in.
•Geef het telefoonnummer in dat u op deze geheugenplaats wil bewaren.
• Druk op de Geheugentoets . Er weerklinkt een bevestigingstoon.
Opmerkingen:
•Alle geheugennummers worden gewist als de standaardwaarden terug ingesteld
worden (zie 5.15).
/P
•Wenst u een pauze in te voegen, druk dan op de Herkiestoets
waar u de pauze wenst (zie ook ‘5.16 Pauzetijd instellen’)
op de plaats
5.5 Een geheugennummer oproepen
• Druk op de Lijntoets .
• Druk op de Geheugentoets gevolgd door het geheugenplaatsnummer (0-9).
• Het geheugennummer wordt automatisch gevormd
• Druk op de Inhaaktoets om, na het gesprek, de verbinding te verbreken.
Page 19

COCOON 115 19
5.6 Tijdelijke uitschakeling van de microfoon
Het is mogelijk de microfoon tijdens een gesprek uit te schakelen. Dan kan u vrij spreken
zonder dat de beller u kan horen.
• Druk, tijdens een gesprek, op de Mute-toets . De microfoon wordt
gedeactiveerd. Op de display verschijnt het Microfoon Uit symbool .
• Druk opnieuw op de Mute-toets om het gesprek te hervatten.
5.7 Volume regelen
Tijdens een gesprek kan u het volume regelen door de Lijntoets te drukken. Op de
display verschijnt de volgende indicatie: ‘Loud Hi’ of ‘Loud Lo’.
5.8 Paging
Als u op de Paging-toets van het basisstation drukt, begint de handset gedurende 1 minuut
te rinkelen. Deze beltoon helpt u een verloren handset terug te vinden. Het symbool
knippert op de basis. De boodschap “BASE PAGE” verschijnt op de display.
5.9 Klaviervergrendeling
Als het klavier vergrendeld is, kan geen enkele toets ingedrukt worden behalve de
Programmeertoets .
• Druk op de Programmeertoets .
• Druk op cijfertoets ‘7’.
• Druk:
‘1’ om het klavier te vergrendelen en druk de Geheugentoets om te bevestigen.
Het ikoon en ‘unHold=49’ verschijnt op het display.
‘2’ om het klavier te ontgrendelen en druk de Geheugentoets om te bevestigen.
ENGLISH
NEDERLANDS
Opmerking: U kan het klavier tijdelijk ontgrendelen door ‘4’ en ‘9’ te drukken.
Het klavier wordt automatisch terug actief wanneer gedurende 10 seconden geen
toets wordt ingedrukt.
Standaard programmatie: geen vergrendeling.
5.10 Buiten Bereik-waarschuwing
Als de handset zich, tijdens een gesprek, buiten het bereik van de basis bevindt, weerklinkt,
elke twee seconden, een kort waarschuwingssignaal om de gebruiker te waarschuwen dat
hij zich dichter naar de basis moet begeven. Bevindt de gebruiker zich niet, binnen de 10
seconden, binnen het bereik van de basis, wordt de lijn automatisch verbroken.
5.11 Flashtoets (R)
Als u drukt op de R-toets, ook wel flash of recall genoemd, dan genereert het toestel een
lijnonderbreking (van 100 ms). Deze laat u toe gebruik te maken van speciale diensten die
door uw telefoonmaatschappij worden aangeboden en/of gesprekken door te verbinden op
een binnenhuiscentrale.
5.11.1 Flash-tijd instellen
• Druk op de Programmeertoets .
• Druk op de R-toets.
• De huidige flash-tijd verschijnt op de display.
• Druk
‘1’ = 100ms
‘2’ = 115ms
‘3’ = 270ms
‘4’ = 600ms
• Druk op de Geheugentoets ter bevestiging.
Page 20

20 COCOON 115
5.12 Klaviertonen activeren/deactiveren
• Druk op de Programmeertoets .
• Druk op cijfertoets ‘4’.
• Druk op cijfertoets ‘1’ om de klaviertonen aan te zetten, of ‘2’ om ze uit te zetten
• Druk op de Geheugentoets . Er weerklinkt een bevestigingstoon.
Standaard programmatie: aan
5.13 Belmelodie instellen
• Druk op de Programmeertoets .
• Druk op cijfertoets ‘5’.
• Selecteer de gewenste belmelodie (1-4). Druk ‘5’ om het bellen uit te schakelen.
• Druk op de Geheugentoets . Er weerklinkt een bevestigingstoon.
Standaard programmatie: belmelodie 1
5.14 Automatisch opnemen
U hebt de mogelijkheid het toestel zodanig te programmeren dat, als er een oproep
binnenkomt, u enkel de handset van het basisstation hoeft op te nemen en u bent
automatisch in verbinding met de oproeper. U hoeft de Lijntoets niet meer te drukken om
de oproep aan te nemen.
• Druk op de Programmeertoets .
• Druk op cijfertoets ‘0’.
• Druk op cijfertoets ‘1’ om de functie te activeren of ‘2’ om de functie te desactiveren
• Druk op de Geheugentoets . Er weerklinkt een bevestigingstoon.
Standaard programmatie: uit
Opmerking: Als u een oproep ontvangt en de handset ligt niet op de basis, dan moet
u altijd op de Lijntoets
drukken om de oproep aan te nemen, zelfs als u de functie
‘Automatisch Opnemen’ hebt geactiveerd.
5.15 Standaardwaarden (Reset)
Als u de standaardwaarden van het toestel wil herinstellen, doet u het volgende:
• Druk op de Programmeertoets .
• Druk op cijfertoets ‘1’.
• Druk op cijfertoets ‘1’ indien u de standaardwaarden wenst terug te zetten, of druk ‘2’
om het ongedaan te maken.
• Druk op de Geheugentoets . Er weerklinkt een bevestigingstoon.
Opmerking: Wanneer u de standaardwaarden heeft ingesteld, zal alle
geheugennummers, oproeplijst en herkiesnummer gewist worden:
Flash tijd 100ms
Pauze tijd 3s
Klaviertonen Aan
Belmelodie 1
15 Minuten gespreksduur Uit
Automatisch opnemen Uit
5.16 Pauzetijd instellen
• Druk op de Programmeertoets .
• Druk op cijfertoets ‘3’.
• Druk ‘1’ voor 3 seconden of ‘2’ voor 6 seconden pauzetijd
• Druk op de Geheugentoets . Er weerklinkt een bevestigingstoon.
Page 21

COCOON 115 21
5.17 Waarschuwing 15 minuten gespreksduur
Om te vermijden dat u zou vergeten een gesprek te beëindigen of per ongeluk de lijntoets
ingedrukt zou hebben zonder een gesprek te voeren, beschikt u over de mogelijkheid een
gespreksduurteller te activeren. Hierbij wordt u na 15 minuten gesprek gewaarschuwd door
middel van 10 bieptonen. Om uw gesprek verder te zetten en om te vermijden dat de
verbinding automatisch wordt verbroken, dient u na het horen van de eerste bieptonen een
numerieke toets (0-9) in te drukken.
Om deze functie te activeren/desactiveren, gaat u als volgt te werk:
• Druk op de Programmeertoets .
• Druk op cijfertoets ‘9’.
• Druk op de cijfertoets ‘1’ om deze functie te activeren, of ‘2’ om deze functie te
desactiveren.
• Druk op de Geheugentoets . Er weerklinkt een bevestigingstoon.
Standaard programmatie: uit
5.18 Hoofdtelefoon aansluiting
U kan een koptelefoon met 3-polige jack plug van 2,5mm aansluiten aan de rechterkant
van de handset. Als de koptelefoon is aangesloten, kan u enkel via de koptelefoon
spreken en luisteren. De microfoon van de koptelefoon kan uitgeschakeld worden met
de Mute-toets .
ENGLISH
NEDERLANDS
6 NUMMERWEERGAVE (CLIP-CALLER ID)
De Cocoon 115 geeft het telefoonnummer weer bij inkomende oproepen. Deze functie is
echter enkel mogelijk als deze dienst door uw telefoonmaatschappij wordt aangeboden en
als u op deze dienst geabonneerd bent. Neem hiervoor contact op met uw
telefoonmaatschappij. Als u een oproep hebt ontvangen, worden de nummers bewaard in
een oproeplijst. In deze lijst kunnen 12 nummers (van elk max. 16 digits) bewaard worden.
6.1 Nieuwe oproepen.
Als u een nieuwe, onbeantwoorde oproep hebt ontvangen, verschijnt het Clip-symbool
op de display.
6.2 Raadplegen van de oproeplijst
Bij het raadplegen van de oproeplijst, begint de lijst steeds met de laatst binnengekomen
oproep.
• Druk op de -toets .
• Het aantal nieuwe (ne) en het totaal aantal oproepen (tot) verschijnen op de display.
•Gebruik de toetsen ’1’ of ‘3’ om de lijst te doorlopen.
• Het begin van de oproeplijst wordt weergegeven met ‘END OF CID’
• Het einde van de oproeplijst wordt weergegeven met ‘HEAD OF CID’
•Als het nummer groter is dan de display kan weergeven, verschijnt ‘-’
aan het einde van het telefoonnummer. Druk op de ‘2’-toets om de rest van het
telefoonnummer te zien. De possitie van het telefoonnummer in de oproeplijst [x] zal ook
getoond worden.
•U kan de oproeplijst verlaten door op de -toets te drukken.
6.3 Oproepen van een nummer uit de oproeplijst
• Doorloop de lijst tot het gewenste nummer op de display verschijnt.
• Druk op de Lijntoets . Het nummer wordt automatisch gevormd.
Page 22

22 COCOON 115
6.4 Telefoonnummers uit de oproeplijst wissen
(a) Een telefoonnummer wissen
• Doorloop de lijst tot het gewenste nummer op de display verschijnt.
• Druk tweemaal kort op de Mute-toets om het nummer te wissen.
(b) De volledige oproeplijst wissen.
•Ga in de oproeplijst.
• Druk 2 seconden op de Mute-toets . ‘Erase All?’ verschijnt op de display.
• Druk nogmaals op de Mute-toets om de hele lijst te wissen.
6.5 Een nummer van de oproeplijst opslaan in het geheugen
• Doorloop de lijst tot het gewenste nummer op de display verschijnt.
• Druk op de Geheugentoets gevolgd door de geheugenplaats (0-9)
7GARANTIE
• De garantieperiode bedraagt 24 maanden. De garantie wordt verleend na voorlegging
van de originele factuur of betalingsbevestiging waarop de datum van aankoop en het
toesteltype staan vermeld.
•Gedurende de garantieperiode verhelpt Topcom kostenloos alle defecten die te wijten
zijn aan materiaal- of productiefouten. Topcom kan, naar keuze, het defecte toestel
ofwel herstellen ofwel vervangen.
• De garantieclaim vervalt bij ingrepen door de koper of onbevoegde derden.
• Schade te wijten aan onoordeelkundige behandeling of bediening of aan het gebruik van
wisselstukken en accessoires die niet origineel of door Topcom aanbevolen zijn, valt niet
onder de garantie.
•Niet gedekt door de garantie is schade ten gevolge van externe invloedfactoren:
bliksem, water, brand e.d. of wanneer het toestelnummer op het toestel werd gewijzigd,
verwijderd of onleesbaar gemaakt.
Opgelet: Als u uw toestel terugstuurt, vergeet uw aankoopbewijs niet mee te sturen.
Page 23

COCOON 115 23
8 PROBLEMEN VERHELPEN
Problem Possible cause Solution
Geen scherm Batterijen niet opgeladen Controleer de positie van de
batterijen.
Herlaad de batterijen
Geen kiestoon Telefoonkabel slecht
aangesloten
Handset belt niet Volume staat op ‘OFF’ Pas het volume aan
Communicatie is verbroken
na 15 minuten
Volume van de
gesprekspartner is te laag
Waarschuwing 15-minuten
gespreksduur staat aan
Controleer de aansluiting van
de telefoonkabel
Schakel de 15-minuten
gespreksduur waarschuwing
uit of druk een willekeurige
toets in tijdens de
waarschuwingssignalen
Regel het volume tijdens het
gesprek door op de programmeertoets te drukken
9 TECHNISCHE GEGEVENS
Reikwijdte: max. 300 m in open ruimte
max. 50 m in gebouwen
Kiessysteem: DTMF (toonkiezen)
Batterijen 3 x 1.2V, 600 mAh AAA Type NiMh
oplaadbaar
Max. autonomie: ca. 72 uren
Max. gespreksduur: 5 uren
Omgevingstemperatuur: +5 °C tot +45 °C
Toegelaten relatieve luchtvochtigheid: 25 tot 85 %
Netspanning adapter basisstation: 220/230V, 50 H
ENGLISH
NEDERLANDS
Page 24

24 COCOON 115
1 TOUCHES 25
2 ÉCRAN 26
3INSTALLATION 27
4INDICATION BATTERIE EPUISÉE 27
5 FONCTIONNEMENT TÉLÉPHONE 28
5.1 APPELS SORTANTS 28
5.1.1 Téléphoner 28
5.1.2 Sélection en bloc 28
5.2 APPELS ENTRANTS 28
5.3 RÉPÉTITION DU DERNIER NUMÉRO COMPOSÉ 28
5.4 PROGRAMMER DES NUMÉROS MÉMOIRES 28
5.5 APPELER UN NUMÉRO MÉMOIRE 28
5.6 COUPURE DU MICRO (MUTE) 29
5.7 RÉGLER LE VOLUME 29
5.8 PAGING 29
5.9 VERROUILLAGE DU CLAVIER 29
5.10 SIGNAL D’AVERTISSEMENT HORS-PORTÉE 29
5.11 TOUCHE FLASH (R) 29
5.11.1 Régler le temps Flash 29
5.12 ACTIVER/DÉSACTIVER LES TONALITÉS DU CLAVIER 30
5.13 RÉGLER LA MÉLODIE DE SONNERIE 30
5.14 DÉCROCHER AUTOMATIQUEMENT 30
5.15 LES VALEURS STANDARD (RESET) 30
5.16 RÉGLER LA LONGUEUR DE LA PAUSE 31
5.17 AVERTISSEMENT 15 MINUTES DE CONVERSATION 31
5.18 CONNEXION CASQUE 31
6AFFICHAGE DU NUMÉRO (CLIP-CALLER ID) 31
6.1 NOUVEAUX APPELS 31
6.2 CONSULTER LA LISTE D’APPELS 31
6.3 APPELER UN NUMÉRO DE LA LISTE D’APPELS 32
6.4 EFFACER DES NUMÉROS DE TÉLÉPHONE
DE LA LISTE D’APPELS 32
6.5 COPIER DANS LA MÉMOIRE DEPUIS LA LISTE D’APPELS 32
7GARANTIE 32
8RÉSOLUTION DE PROBLÈMES 33
9DONNÉES TECHNIQUES 33
Page 25

COCOON 115 25
1TOUCHES
1Touches numériques
2Touche de Ligne
3Touche Rappel (du dernier numéro composé)/Pause /P
4Touche Flash R
5Touche Mémoire
6Touche Paging (pour chercher le combiné)
7Touche Mute
8Touche de Programmation
9Touche Off
10 Indicateur Ligne/Nouveaux appels (DEL)
11 Indicateur de Charge (DEL)
12 Indicateur de courant (DEL)
13 Touche ’Enregistrement appel’
14 Connexion casque
14
ENGLISH
FRANÇAIS
1
8
2
4
Cocoon 115
R
1
4
7
*
13
9
3
/P
10
2
5
8
0
3
6
11
9
12
#
6
Cocoon 115
7
5
Page 26

26 COCOON 115
2 ÉCRAN
88888888888888
Icône mémoire
Indicateur liaison RF : Lorsque la liaison RF est établie entre le combiné et la base
Indicateur de coupure du microphone du combiné
Indicateur du niveau de batterie
Indicateur appel en absence
Indication Off-hook
Indication On-hook
Indication d’appel de la base
Indication de mode programme
Indication de verrouillage du clavier
Page 27

COCOON 115 27
3INSTALLATION
ENGLISH
FRANÇAIS
Raccordez le connecteur du fil téléphonique au téléphone et enfoncez l'autre bout dans la
boîte de contact murale du réseau téléphonique.
Introduisez la petite fiche de l'adaptateur AC dans l'appareil et branchez l'autre bout sur une
prise.Introduisez les 3 batteries AAA rechargeables dans le compartiment à batterie en bas
du combiné.
Déposez le combiné sur le poste de base. L'indicateur de charge orange s'allume.
Lors de la première utilisation il est recommandé de charger le combiné pendant 24 heures.
Pour prolonger la durée de vie des batteries, celles-ci doivent être régulièrement épuisées
complètement. Dès que le combiné émet un signal d'avertissement toutes les 5 secondes
et l’icône de la batterie clignote à l’écran , il faut le replacer sur le chargeur.
4INDICATION BATTERIE EPUISÉE
Lorsque la batterie est épuisée, le combiné n'exécute plus d'opérations. Lorsqu'une batterie
est complètement épuisée et que vous avez déposé le combiné un moment sur le poste de
base pour le recharger, le symbole Batterie indique que la batterie est de nouveau
complètement chargée. Ceci n'est cependant pas le cas. La capacité baissera rapidement.
Il est conseillé de laisser le combiné toute une nuit sur le poste de base pour que la batterie
soit complètement rechargée.
• Batterie chargée
• Batterie épuisée
Lorsque la batterie est presque épuisée et que vous êtes en communication, vous entendez
une fois un signal d'avertissement. Déposez le combiné sur le poste de base pour recharger
la batterie (le clavier vers le haut).
Page 28

28 COCOON 115
5 FONCTIONNEMENT TÉLÉPHONE
5.1 Appels sortants
5.1.1 Téléphoner
• Appuyez sur la touche de Ligne . Vous entendez la tonalité.
• Composez le numéro de téléphone désiré.
• Appuyez sur la touche OFF , après la conversation, pour couper la communication.
5.1.2 Sélection en bloc
• Composez le numéro de téléphone désiré. Vous pouvez encore corriger le numéro en
vous servant de la touche Mute . Quand vous n’appuyez pas de touche pendant 20
secondes, le numéro vous avez déjà composé disparaît et le combiné retourne au mode
d’attente.
• Appuyez sur la touche de Ligne . Le numéro sera composé.
• Appuyez sur la touche OFF , après la conversation, pour couper la communication.
5.2 Appels entrants
Lorsqu’on reçoit un appel entrant, seulement le combiné se met à sonner. Le symbole
TELEPHONE clignote à l’écran et l’indication de ligne (LED) clignote sur la base .
• Appuyez sur la touche de Ligne pour pouvoir répondre à l’appel.
•Quand le combiné se trouve sur le poste de base et vous décrochez, vous êtes
immédiatement en communcation avec l’appelant. Il n’est plus nécessaire d’appuyer
sur la touche de Ligne . Cette fonction doit être programmée (5.14 Décrocher
automatiquement).
5.3 Répétition du dernier numéro composé
• Appuyez sur la touche Rappel . Le dernier numéro composé apparaît à l’écran.
• Appuyez sur la touche de Ligne . Le numéro sera composé automatiquement.
• Appuyez sur la touche OFF , après la conversation, pour couper la communication.
5.4 Programmer des numéros mémoires
Vous pouvez programmer 10 numéros en mémoire indirects (de 24 chiffres au max.) dans
la mémoire.
• Appuyez sur la touche de Programmation et ensuite sur la touche Mémoire .
• Appuyez sur le numéro de la place mémoire (0-9).
• Composez le numéro de téléphone vous voulez programmer sur cette place mémoire.
• Appuyez sur la touche Mémoire . Vous entendez un signal de confirmation.
Remarques:
• Quand vous réinstallez les valeurs standard de l’appareil, tous les numéros
mémoires seront effacés (voir 5.15).
/P
• Quand vous voulez insérer une pause, appuyez sur la touche Rappel
la place où vous voulez insérer cette pause (voir également ’5.16 Régler la
pause’).
sur
5.5 Appeler un numéro mémoire
• Appuyez sur la touche de Ligne .
• Appuyez sur la touche Mémoire et le numéro de la place mémoire (0-9).
• Le numéro mémoire sera composé automatiquement.
• Appuyez sur la touche OFF , après la conversation, pour couper la communication.
Page 29

COCOON 115 29
5.6 Coupure du micro (Mute)
Il est possible de désactiver le microphone pendant une communication. De cette façon vous
pouvez parler librement, sans que celui qui appelle vous entende.
•Quand vous êtes en communication, appuyez sur la touche Mute . Le microphone
est désactivé. Le symbole Mute apparaît à l’écran.
•Si vous voulez continuer votre communication, appuyez de nouveau sur la touche
Mute .
5.7 Régler le volume
Pendant une conversation vous pouvez régler le volume en appuyant sur la touche de
Ligne . L’indication ’Loud Hi/Lo’ apparaît sur l’écran.
5.8 Paging
Quand vous appuyez sur la touche Paging du poste de base, le combiné commence à
sonner pendant 1 minute. Cette sonnerie vous aide de retrouver un combiné perdu. Le
symbole clignote sur le poste de base. Le message "BASE PAGE" apparaît à l’écran.
5.9 Verrouillage du clavier
Quand le clavier est verrouillé, on ne peut plus appuyer des touches, sauf la touche de
Programmation .
• Appuyez sur la touche de Programmation .
• Appuyez sur touche numérique ’7’.
• Appuyez:
’1’ pour verrouiller le clavier et appuyez sur le bouton Memory pour confirmer. Le
symbole et ’unHold=49’ sont affichés à l’écran.
’2’ pour déverrouiller le clavier et appuyez sur le bouton Memory pour confirmer.
ENGLISH
FRANÇAIS
Remarque: Vous pouvez relâcher temporairement le verrouillage du clavier en appuyant sur ’4’ et ’9’. Le verrouillage du clavier est automatiquement réactivé
lorsque le clavier est inutilisé pendant 10 secondes.
Programmation standard: pas de verrouillage.
5.10 Signal d’avertissement Hors-Portée
Si le combiné se trouve, pendant une communication, hors de portée du poste de base, vous
entendez, tous les 2 secondes, un signal d’avertissement court pour avertir l’utilisateur qu’il
doit se rapprocher au poste de base. Si l’utilisateur ne se trouve pas dans la portée du poste
de base dans les 10 secondes, la ligne sera coupée automatiquement.
5.11 Touche Flash (R)
Quand vous appuyez sur la touche R, aussi appelée flash ou recall,
l’appareil génère une rupture calibrée de la ligne (de 100 ms). Elle permet l’utilisation des
services spéciaux de votre compagnie téléphonique et / ou de transférer des appels si vous
avez un central téléphonique.
5.11.1 Régler le temps Flash
• Appuyez sur la touche de Programmation .
• Appuyez sur la touche ’2’.
• Le temps flash actuel apparaît sur l’écran.
• Appuyez:
’1’ = 100ms
’2’ = 115ms
Page 30

30 COCOON 115
’3’ = 270ms
’4’ = 600ms
• Appuyez sur la touche Mémoire pour confirmer.
5.12 Activer/désactiver les tonalités du clavier
• Appuyez sur la touche de Programmation .
• Appuyez sur touche numérique ’4’.
• Appuyez de nouveau sur touche numérique ’1’ pour activer ou ’2’ pour désactiver la
fonction.
• Appuyez sur la touche Mémoire . Vous entendez un signal de confirmation.
Programmation standard: fonction activée
5.13 Régler la mélodie de sonnerie
• Appuyez sur la touche de Programmation .
• Appuyez sur touche numérique ’5’.
• Sélectionnez la mélodie de sonnerie désirée (1-4). Sélectionnez ’5’ pour désactiver la
mélodie de sonnerie.
• Appuyez sur la touche Mémoire . Vous entendez un signal de confirmation.
Programmation standard: mélodie de sonnerie 1
5.14 Décrocher automatiquement
Vous avez la possibilité de programmer la fonction ’Décrocher auto-matiquement’ ce qui veut
dire que, quand vous recevez un appel, vous prenez automatiquement la ligne dès que vous
décrochez.
• Appuyez sur la touche de Programmation .
• Appuyez sur touche numérique ’0’.
• Appuyez sur touche numérique ’1’ pour activer ou ’2’ pour désactiver la fonction.
• Appuyez sur la touche Mémoire . Vous entendez un signal de confirmation.
Programmation standard: fonction désactivée
Remarque: Quand vous recevez un appel et le combiné n’est pas sur le poste de
base, on doit d’abord appuyer sur la touche de Ligne
pour accepter l’appel,
même si on a programmé la fonction ’Décrocher automatiquement’.
5.15 Les valeurs standard (Reset)
Si vous voulez réinstaller les valeurs standard de l’appareil, procédez comme suit:
• Appuyez sur la touche de Programmation .
• Appuyez sur touche numérique ’1’.
• Appuyez sur touche numérique ’1’ si vous souhaitez réinitialiser les paramètres par
défaut, ou appuyez sur ’2’ pour annuler .
• Appuyez sur la touche Mémoire . Vous entendez un signal de confirmation.
Note: Lorsque vous réinitialisez les paramètres par défaut, la mémoire, les liste
d’appels, les numéros de rappel seronteffacés :
Temps Flash 100ms
Temps de pause 3s
Tonalités des touches ON
Mélodie de sonnerie 1
Timer de 15 minutes OFF
Réponse automatique OFF
Page 31

COCOON 115 31
5.16 Régler la longueur de la pause
• Appuyez sur la touche de Programmation .
• Appuyez sur touche numérique ’3’.
• Appuyez sur ’1’ pour 3 secondes ou sur ’2’ pour 6 secondes de pause
• Appuyez sur la touche Mémoire . Vous entendez un signal de confirmation.
5.17 Avertissement 15 minutes de conversation
Pour éviter d’oublier de terminer une conversation ou d’appuyer sur la touche de ligne sans
faire une conversation, vous disposez de la possibilité d’activer un compteur de durée de
conversation. Celui donne un avertissement quand vous êtes en communication pendant
plus de 15 minutes. Pour continuer votre conversation et pour éviter que la communication
soit coupée automatiquement, vous devez appuyer sur une touche numérique (0-9) après
que vous entendez les premières tonalités.
Pour activer / désactiver cette fonction :
• Appuyez sur la touche de Programmation .
• Appuyez sur touche numérique ’9’.
• Appuyez sur touche numérique ’1’ pour activer ou ’2’ pour désactiver la fonction.
• Appuyez sur la touche Mémoire . Vous entendez un signal de confirmation.
Programmation standard: fonction désactivée
5.18 Connexion casque
ENGLISH
FRANÇAIS
Vous pouvez raccorder le casque à l’aide d’une .che jack à trois pôles de 2,5mm sur le côté
droit du combiné. Lorsque le casque est raccordé, vous pouvez uniquement parler et
entendre par le biais du casque. Le microphone du casque peut être désactivé à l’aide de la
touche Mute .
6AFFICHAGE DU NUMÉRO (CLIP-CALLER ID)
Le Cocoon 115 montre les numéros de téléphone quand il reçoit des appels entrants. Cette
fonction ne fonctionne cependant que lorsque ce service est offert par votre compagnie de
téléphonie et lorsque vous êtes abonné à ce service. Prenez contact avec votre compagnie
téléphonique.
Quand vous avez reçu un appel, l’appareil garde le numéro dans une liste d’appels.
L’appareil peut garder 12 numéros (de 16 chiffres au maximum) dans la liste d’appels.
6.1 Nouveaux appels
Quand vous avez reçu un nouvel appel sans réponse , le symbole CLIPapparaît à l’écran.
6.2 Consulter la liste d’appels
Quand on consulte la liste d’appels, la liste commence toujours avec l’appel on a reçu
dernièrement.
• Appuyez sur la touche .
• Le nombre de nouveaux (ne) et le nombre total d’appels (tot) s’affichent à l’écran.
•Utilisez les touches ’1’ ou ’3’ pour parcourir la liste d’appels.
• Le début de la liste d’appels est indiqué par ’END OF CID’
• La fin de la liste d’appels est indiquée par ’HEAD OF CID’
•Quand le numéro de téléphone est plus long que l’écran, vous voyez ’-’ à l’écran à la fin
du numéro de téléphone . Appuyez ’2’ pour voir le reste du numéro. Le numéro d’ordre
CID sera également affiché [x]
• Vous pouvez quitter la liste d’appels en appuyant sur la touche .
Page 32
32 COCOON 115
6.3 Appeler un numéro de la liste d’appels
• Parcourez la liste d’appels jusqu’à l’affichage du numéro désiré à l’écran.
• Appuyez sur la touche de Ligne . Le numéro sera composé automatiquement.
6.4 Effacer des numéros de téléphone de la liste d’appels
(a) Effacer un numéro de téléphone
• Parcourez la liste d’appels jusqu’à l’affichage du numéro désiré à l’écran.
• Appuyez 2 fois brièvement sur la touche Mute pour effacer le numéro.
(b) Effacer tous les numéros de la liste d’appels.
•Allez dans la liste d’appels.
• Appuyez pendant 1 seconde sur la touche Mute . ’Erase All?’ apparaît à l’écran.
• Appuyez encore une fois sur la touche Mute pour effacer tous les numéros de la liste
d’appels.
6.5 Copier dans la mémoire depuis la liste d’appels
• Parcourez la liste d’appels jusqu’à ce que le numéro désiré apparaisse à l’écran.
• Appuyez sur le bouton Memory et introduisez l’emplacement de mémoire (0-9)
7GARANTIE
• La durée de la garantie est de 24 mois. La garantie est assurée sous présentation de la
facture originale ou d'une preuve de paiement mentionnant la date d'achat ainsi que le
type d'appareil.
• Topcom prend en charge pendant la durée de la garantie toutes les défaillances issues
de défauts des matériaux ou de défauts de fabrication. Topcom décide seul s'il souhaite
remplacer ou réparer l'appareil défectueux sous garantie.
• La garantie prend fin lors de toute intervention de l'acheteur ou de tout tiers non-habilité.
• Des dégâts découlant d'une utilisation inappropriée, par exemple l'utilisation de pièces
de rechange ou d'accessoires n'étant pas d'origine où n'étant pas recommandés par
Topcom, ne peuvent faire l'objet de recours à la garantie.
• La garantie ne couvre pas les dommages dus à des phénomènes extérieurs: foudre,
eau, feu, etc. ou tout évènement qui aurait modifié, effacé ou rendu illisible le numéro de
série.
Attention: N'oubliez pas de joindre une preuve d'achat à l'envoi de votre appareil.
Page 33

COCOON 115 33
8RÉSOLUTION DE PROBLÈMES
Problème Cause possible Solution
Aucun affichage Les batteries ne sont pas
chargées
Pas de tonalité Le câble de téléphone est
mal raccordé
Le combiné ne sonne pas Le volume est sur ’OFF’ Adaptez le volume
La communication est
déconnectée après 15
minutes
Le volume de l’interlocuteur
est trop faible
Le timer de 15 minutes est ONDésactivez le timer de 15
Contrôlez la position des
batteries
Chargez à nouveau les
batteries
Contrôlez la connexion du
câble de téléphone
minutes ou appuyez sur une
touche pendant les bips
d’avertissement
Réglez le volume pendant
la conversation en appuyant
sur la touche programmable
9DONNÉES TECHNIQUES
Portée: max. 300 m en zone dégagée
max. 50 m à l'intérieur d'immeubles
Composition du numéro: DTMF (tonalité)
Batteries: 3 x 1.2V, 600 mAh AAA de type NiMh rechargeables
Autonomie max. en Stand-by: env. 72 heures
Durée max. de communication: 5 heures
Température de l'environnement: +5 ˚C à +45 ˚C
Humidité relative de l'air autorisée: 25 à 85 %
Tension d’adaptateur: 220/230V, 50 Hz
ENGLISH
FRANÇAIS
Page 34

34 COCOON 115
1TASTEN 35
2DISPLAY 36
3INSTALLATION 37
4 BATTERIE LEER-ANZEIGE 37
5BETRIEB TELEFON 38
5.1 TELEFONIEREN 38
5.1.1 Normaler Verbindungsaufbau 38
5.1.2 Telefonieren mit Wahlvorbereitung 38
5.2 EINEN ANRUF ENTGEGENNEHMEN 38
5.3 WAHLWIEDERHOLUNG 38
5.4 KURZWAHLNUMMERN PROGRAMMIEREN 38
5.5 EINE KURZWAHLNUMMER ANRUFEN 38
5.6 STUMMSCHALTEN DES MIKROFONS (MUTE) 39
5.7 LAUTSTÄRKE EINSTELLEN 39
5.8 PAGING 39
5.9 TASTENSPERRE 39
5.10 WARNUNG "AUßER REICHWEITE" 39
5.11 FLASHTASTE (R) 39
5.11.1 Die Flashzeit einstellen 39
5.12 TASTENTON EIN-/AUSSCHALTEN 40
5.13 KLINGELMELODIE EINSTELLEN 40
5.14 AUTOMATISCHE ANRUFANNAHME 40
5.15 GRUNDEINSTELLUNGEN (RESET) 40
5.16 EINSTELLEN DER PAUSENLÄNGE 41
5.17 GESPRÄCHSZEITBEGRENZUNG EIN-/AUSSCHALTEN 41
5.18 ANSCHLUSS KOPFHÖRER 41
6 RUFNUMMERNÜBERMITTLUNG (CLIP-CALLER ID) 41
6.1 NEUE ANRUFE 41
6.2 DIE ANRUFLISTE KONSULTIEREN 41
6.3 WÄHLEN EINER RUFNUMMER AUS DER ANRUFLISTE 42
6.4 LÖSCHEN 42
6.5 VON DER ANRUFLISTE IN DEN SPEICHER KOPIEREN 42
7GARANTIE 42
8PROBLEMBESEITIGUNG 43
9 TECHNISCHE DATEN 43
Page 35

COCOON 115 35
1TASTEN
1 Wähltasten
2 Leitungstaste
3 Wahlwiederholungs-/Pausentaste /P
4 Flashtaste R
5 Speichertaste
6 Paging-Taste (um das Mobilteil zu suchen)
7 Mikrofonstummschaltungstaste
8 Programmiertaste
9 Aus-Taste
10 Leitungs-/New call-anzeige (LED)
11 Ladeanzeige (LED)
12 Stromanzeige (LED)
13 Anrufliste-Taste
14 Kopfhörerverbindung
14
DEUTSCH
DEUTSCH
13
Cocoon 115
2
4
R
/P
9
3
10
1
1
4
7
*
2
5
8
0
8
3
6
11
9
12
#
6
Cocoon 115
7
5
Page 36

36 COCOON 115
2 DISPLAY
88888888888888
Speichersymbol
RF Verbindungsanzeige:Wenn die RF-Verbindung zwischen dem Mobilteil und der
Basiseinheit hergestellt ist
Mikrofon nicht aktiviert
Anzeige wiederaufladbare Batterien
Identifikation neue Nummern in der Anrufliste
Anzeige Abheben
Anzeige Auflegen
Paging Anzeige
Programmier-Modus
Tastatur des Handgeräte verriegelt
Page 37

COCOON 115 37
3INSTALLATION
•Stecken Sie einen Stecker der Telefonschnur an der Basisstation ein.
Den anderen Stecker stecken Sie in die Telefonanschlussdose.
•Stecken Sie den kleinen Stecker des Netzadapters AC an der Basisstation ein. Das
Netzteil stecken Sie in eine Steckdose.
• Legen Sie die 3 aufladbaren Batterien (AAA) in das Batteriefach an der Unterseite des
Mobilteils.
Legen Sie das Mobilteil in die Basisstation. Die orange Ladeanzeige leuchtet. Laden Sie
das Mobilteil 24 Stunden auf, bevor Sie es in Betrieb nehmen.
Die Batterien haben eine längere Lebensdauer, wenn Sie in regelmäßigen Abständen
vollständig entladen werden. Sobald das Mobilteil einen Warnton abgibt alle 5 Sekunden
abgibt und das Batteriesymbol im Disklay blinkt, müssen Sie es wieder in die Ladeschale
legen.
4 BATTERIE LEER-ANZEIGE
Wenn die Batterien leer sind, ist das Mobilteil nicht mehr aktiv. Wenn die Batterien völlig leer
sind und Sie das Mobilteil nur kurz zum Laden auf die Basisstation legen, zeigt die
Ladezustandsanzeige wieder vollständig aufgeladene Batterien an. Dies ist jedoch nicht der
Fall. Die Kapazität wird schnell sinken. Wir empfehlen, das Mobilteil eine Nacht auf der
Basisstation aufzuladen.
• Batterie voll
DEUTSCH
DEUTSCH
• Batterie leer
Wenn Sie gerade ein Gespräch führen und die Batterien fast leer sind, hören Sie einen
Warnton. Legen Sie das Mobilteil zum Laden auf die Basisstation (die Tastatur nach oben).
Page 38

38 COCOON 115
5BETRIEB TELEFON
5.1 Telefonieren
5.1.1 Normaler Verbindungsaufbau
• Betätigen Sie die Leitungstaste . Sie hören das Freizeichen.
•Wählen Sie die gewünschte Nummer.
• Betätigen Sie, nach dem Gespräch, die Aus Taste um die Verbindung zu beenden.
5.1.2 Telefonieren mit Wahlvorbereitung
•Wählen Sie die gewünschte Nummer. Fehlerhafte Eingaben können mit der
Mikrofonstummschaltungstaste korrigiert werden. Wenn mehr als 20 Sekunden
zwischen zwei Eingaben liegen, verschwindet die bereits eingegebene Nummer und
wechselt das Mobilteil wieder in den Standby-Modus.
• Betätigen Sie die Leitungstaste . Die Nummer wird gewählt.
• Betätigen Sie, nach dem Gespräch, die Aus Teste um die Verbindung zu beenden.
5.2 Einen Anruf entgegennehmen
Bei einem eingehenden Anruf klingelt nur das Mobilteil. Das TELEFON-Symbol blinkt
auf dem Display und die Verbindungsanzeige (LED) blinkt an der Basiseinheit.
• Betätigen Sie die Leitungstaste , um den Anruf entgegenzunehmen.
• Bei einem eingehenden Anruf brauchen Sie das Mobilteil nur aus der Ladeschale zu
nehmen, um die Verbindung mit dem Anrufer herzustellen. Das Betätigen der
Leitungstaste ist nicht erforderlich.
Diese Funktion muss eingestellt werden (siehe 5.14 Automatische Anrufannahme).
5.3 Wahlwiederholung
• Betätigen Sie die Wahlwiederholungstaste . Die zuletzt gewählte Nummer erscheint
auf dem Display.
• Betätigen Sie die Leitungstaste . Die Nummer wird automatisch gewählt.
• Betätigen Sie, nach dem Gespräch, die Aus Taste um die Verbindung zu beenden.
5.4 Kurzwahlnummern programmieren
Sie können maximal 10 indirekten Nummern (jeweils max. 24-stellig) speichern.
• Betätigen Sie die Programmiertaste und dann die Speichertaste .
• Betätigen Sie die Nummer der Speicherstelle (0-9).
•Geben Sie die Rufnummer ein die Sie auf dieser Stelle bewahren wollen.
• Betätigen Sie die Speichertaste . Sie hören einen Quittungston.
Bemerkungen :
•Wenn das Gerät zurückgesetzt wird, werden auch die gespeicherten Ruf-
nummern gelöscht (siehe 5.15).
•Wenn Sie eine Pause einfügen möchten, betätigen Sie an der gewünschten
/P
Stelle die Wahlwiederholungstaste
Pausenlänge’).
(siehe auch ’5.16 Einstellen der
5.5 Eine Kurzwahlnummer anrufen
• Betätigen Sie die Leitungstaste .
• Betätigen Sie die Speichertaste und die Nummer der Speicherstelle (0-9).
•Die Kurzwahlnummer wird automatisch gewählt.
• Betätigen Sie, nach dem Gespräch, die Aus Taste um die Verbindung zu beenden.
Page 39

COCOON 115 39
5.6 Stummschalten des Mikrofons (Mute)
Wenn Sie, während eines Gespräches, etwas mit einem dritten Person besprechen wollen,
und Sie wollen nicht daß Ihr Gesprächspartner etwas darüber hört, betätigen Sie die
Mikrofonstummschaltungstaste .
• Betätigen Sie, während eines Gespräches, die Mikrofonstummschaltungstaste .
Das Mikrofon wird ausgeschaltet. Auf dem Display erscheint das MUTE-Symbol .
•Wenn Sie das Gespräch weitersetzen wollen, betätigen Sie nochmals die
Mikrofonstummschaltungstaste .
5.7 Lautstärke einstellen
Während eines Gesprächs, können Sie die Lautstärke einstellen mit der Leitungstaste .
Auf dem Display erscheint folgende Anzeige : ’Loud Hi/Lo’.
5.8 Paging
Wenn Sie die Paging-Taste betätigen, ertönt ca. 1 Minute der Rufton des Mobilteils. So
finden Sie ein verlorenes Mobilteil schnell wieder. Das Symbol auf der Basisstation
blinkt. Die Meldung "BASE PAGE" erscheint auf dem Display.
5.9 Tastensperre
Wenn die Tastensperre aktiviert ist, kann nur die Programmiertaste betätigt werden.
• Betätigen Sie die Programmiertaste .
• Betätigen Sie die Wähltaste ’7’.
• Betätigen:
’1’ zum Verriegeln der Tastatur und drücken Sie die Speichertaste zum bestätigen.
Das -Symbol und ’unHold=49’ erscheinen im Display.
’2’ zum Entriegeln der Tastatur und drücken Sie die Speichertaste als Bestätigung.
DEUTSCH
DEUTSCH
Anmerkung: Sie können die Tastenverrieglung vorübergehend aufheben, indem Sie
’4’ und ’9’ drücken. Die Tastenverrieglung ist automatisch wieder aktiv, wenn die
Tastatur 10 Sekunden lang inaktiv ist.
Grundeinstellungen (default setting) : kleine Tastensperre.
5.10 Warnung "Außer Reichweite"
Wenn sich das Mobilteil während eines Gesprächs außerhalb der Reichweite der
Basisstation befindet, hört der Benutzer im 2-Sekunden-Takt einen kurzen Warnton, der ihn
dazu auffordert, näher an die Basisstation heranzugehen. Wenn der Benutzer nicht innerhalb
von 10 Sekunden in den Empfangsbereich der Basisstation zurückkehrt, wird die Verbindung
automatisch abgebrochen.
5.11 Flashtaste (R)
Die R-Taste, auch Flash- oder Recall-Taste genannt, erzeugt bei Betätigung eine
Verbindungsunterbrechung (von 100 Ms), die es Ihnen ermöglicht, vom Netz-betreiber
bereitgestellte Dienste zu nutzen und/oder Gespräche in der hauseigenen Telefonanlage
weiterzuschalten.
5.11.1 Die Flashzeit einstellen
• Betätigen Sie die Programmiertaste .
• Betätigen Sie ’2’.
•Die jetzige Flashzeit erscheint auf dem Display.
• Betätigen:
’1’ = 100ms
’2’ = 115ms
Page 40

40 COCOON 115
’3’ = 270ms
’4’ = 600ms
• Betätigen Sie die Speichertaste zur Bestätigung.
5.12 Tastenton ein-/ausschalten
• Betätigen Sie die Programmiertaste .
• Betätigen Sie die Wähltaste ’4’.
• Betätigen Sie die Wähltaste ’1’ um die Funktion einzuschalten oder ’2’ um die Funktion
auszuschalten.
• Betätigen Sie die Speichertaste . Sie hören einen Quittungston.
Grundeinstellungen (default setting) : eingeschaltet
5.13 Klingelmelodie einstellen
• Betätigen Sie die Programmiertaste .
• Betätigen Sie die Wähltaste ’5’.
•Wählen Sie die gewünschte Melodie (1-4). Selektieren Sie ’5’ um die Klingellautstärke
auszuschalten
• Betätigen Sie die Speichertaste . Sie hören einen Quittungston.
Grundeinstellungen (default setting) : Klingelmelodie 1
5.14 Automatische Anrufannahme
Wenn Sie diese Funktion aktivieren, wird die Verbindung mit einem anrufenden Teilnehmer
automatisch hergestellt, wenn Sie das Mobilteil aus der Ladeschale nehmen. Sie brauchen
den Anruf nicht mehr durch Betätigen der Leitungstaste entgegenzunehmen.
• Betätigen Sie die Programmiertaste .
• Betätigen Sie die Wähltaste ’0’.
• Betätigen Sie die Wähltaste ’1’ um die Funktion einzuschalten oder ’2’ um die Funktion
auszuschalten.
• Betätigen Sie die Speichertaste . Sie hören einen Quittungston.
Grundeinstellungen (default setting) : aus
Hinweis : Wenn Sie einen Anruf entgegennehmen und das Mobilteil liegt nicht auf der
Basisstation, müssen Sie immer die Leitungstaste betätigen, auch wenn Sie die
Funktion ’Automatische Anrufannahme’ eingeschaltet haben.
5.15 Grundeinstellungen (Reset)
Um die Grundeinstellungen des Geräts wiederherzustellen, gehen Sie wie folgt vor :
• Betätigen Sie die Programmiertaste .
• Betätigen Sie die Wähltaste ’1’.
• Bestimmen Sie mit der Wähltaste ’1’, wenn Sie die Standardeinstellungen wieder
einstellen möchten oder drücken Sie ’2’ zum Beenden.
• Betätigen Sie die Speichertaste . Sie hören einen Quittungston.
Note: Wenn Sie die Standardeinstellungen wieder einstellen, werden alle
Eintragungen im Speicher, in der Anrufliste und die Wahlwiederholungsnummern gelöscht:
Flash-Zeit 100ms
Pausenzeit 3s
Tastentöne AN
Klingelmelodie 1
15 Minuten Zeitanzeige AUS
Automatischer Anrufbeantworter AUS
Page 41

COCOON 115 41
5.16 Einstellen der Pausenlänge
• Betätigen Sie die Programmiertaste .
• Betätigen Sie die Wähltaste ’3’.
• Drücken Sie ’1’ für eine 3 Sekunden lange Pause oder ’2’ für eine 6 Sekunden lange
Pause
• Betätigen Sie die Speichertaste . Sie hören einen Quittungston.
5.17 Gesprächszeitbegrenzung ein-/ausschalten
Um zu vermeiden daß Sie vergessen ein Gespräch zu beenden oder versehentlich die
Leitungstaste eingedrückt haben ohne ein Gespräch zu führen, verfügen Sie über die
Möglichkeit die Gesprächszeitbegrenzung zu aktivieren. Sie hören dann nach 15 Minuten
Gespräch 10 Pieptöne. Um Ihr Gespräch weiterzusetzen und um zu vermeiden daß die
Verbindung automatisch beendet wird, müssen sie beim Hören der ersten Pieptönen eine
beliebige Taste (0-9) drücken.
Um diese Funktion zu aktivieren, gehen Sie wie folgt vor:
• Betätigen Sie die Programmiertaste .
• Betätigen Sie die Wähltaste ’9’.
• Drücken Sie die numerische Taste ’1’ zum Aktivieren oder ’2’ zu Deaktivieren dieser
Funktion.
• Betätigen Sie die Speichertaste . Sie hören einen Quittungston.
Grundeinstellungen : aus
5.18 Anschluss Kopfhörer
DEUTSCH
DEUTSCH
Sie können einen Kopfhörer mit einem 3-poligen Stecker von 2,5mm an der rechten Seite
des Handsets anschließen. Wenn der Kopfhörer angeschlossen ist, können Sie nur über den
Kopfhörer sprechen und hören. Das Mikrofon des Kopfhörers kann mit der Mute- Taste
ausgeschaltet werden.
6 RUFNUMMERNÜBERMITTLUNG (CLIP-CALLER ID)
Der Cocoon 115 zeigt die Rufnummer des anrufenden Teilnehmers an. Die
Rufnummernanzeige ist jedoch nur verfügbar, wenn sie von Ihrem Netz-betreiber unterstützt
wird und Sie diesen Dienst beauftragt haben. Weitere Informationen zu diesem Dienst
erhalten Sie von Ihrem Netzbetreiber. Wenn Sie einen Anruf entgegengenommen haben,
werden die Rufnummern in einer Anrufliste gespeichert. In dieser Liste können 12
Rufnummern (max. 16-stellig) gespeichert werden.
6.1 Neue Anrufe
Wenn Sie einen neuen nicht angenommenen Anruf empfangen haben, wird das Clip-Symbol
auf dem Display angezeigt.
6.2 Die Anrufliste konsultieren
Wenn Sie die Anrufliste öffnen, sehen Sie die zuletzt eingegangene Rufnummer.
• Betätigen Sie die -taste .
•Die Anzahl der neuen (ne) Anrufe sowie die Gesamtzahl der Anrufe (total) erscheinen
auf dem Display.
•Mit den Tasten ’1’ oder ’’3’ können Sie in der Liste blättern.
• Der Anfang der Anrufliste wird mit ’END OF CID’ angegeben.
• Das Ende der Anrufliste wird mit ’HEAD OF CID’ angegeben.
Page 42

42 COCOON 115
•Wenn das Display zu klein ist, um die Nummer vollständig anzuzeigen, erscheint ein ’-’
am Ende der Telefonnummer.Betätigen Sie die Taste ’2’, um den Rest der Rufnummer
anzuzeigen. Auch die laufende CID-Nummer wird angezeigt [x].
• Um die Anrufliste zu verlassen, betätigen Sie die -taste.
6.3 Wählen einer Rufnummer aus der Anrufliste
•Blättern Sie in der Liste, bis die gewünschte Rufnummer auf dem Display erscheint.
• Betätigen Sie die Leitungstaste . Die Rufnummer wird automatisch gewählt.
6.4 Löschen
(a) Eine Rufnummer der Anrufliste löschen
•Blättern Sie in der Liste, bis die gewünschte Rufnummer auf dem Display erscheint.
• Betätigen Sie zweimal kurz die Mikrofonstummschaltungstaste um die Nummer zu
löschen.
(b) Die ganze Anrufliste löschen
•Gehen Sie in die Anrufliste.
• Betätigen Sie 1 Sek. die Mikrofonstummschaltungstaste . ’Erase All?’ erscheint auf
dem Display.
• Betätigen Sie erneut die Mikrofonstummschaltungstaste um die ganze Anrufliste zu
löschen.
6.5 Von der Anrufliste in den Speicher kopieren
• Durchlaufen Sie die Anrufliste, bis die gewünschte Nummer im Display erscheint.
• Drücken Sie die Speichertaste und geben Sie den Speicherplatz ein (0-9)
7GARANTIE
•Die Garantiezeit beträgt 24 Monate. Die Garantie wird auf Grund der Vorlage der
Originalrechnung bzw.Zahlungsbestätigung, welche das Datum des Kaufes sowie die
Geräte-Typ zu tragen hat, gewährt.
•Während der Garantiezeit behebt Topcom unentgeltlich alle Mängel, die auf Material-
oder Herstellungsfehler beruhen. Topcom leistet nach eigener Wahl Garantie durch
Repartur oder durch Austausch des defekten Gerätes.
• Der Garantieanspruch erlischt bei Eingriffen durch Käufer oder unbefugte Dritte.
• Schäden, die durch unsachgemäße Behandlung oder Bedienung auftreten, bzw. die
entstehen durch die Verwendung von Ersatzteilen und Zubehör, die nicht Original oder
von Topcom empfohlenen sind, fallen nicht unter die Garantieleistung.
•Die Garantie wird nicht gewährt, wenn Schäden durch äußere Einflüsse: Blitz, Wasser,
Feuer u. ä entstanden sind oder die Geräte-Nummer am Gerät geändert, gelöscht oder
unleserlich gemacht wurde.
Achtung: Vergessen Sie bei einem Zurückschicken ihres Gerätes nicht Ihren
Kaufbeleg beizufügen.
Page 43

COCOON 115 43
8PROBLEMBESEITIGUNG
Problem Mögliche Ursache Lösung
Kein Display Batterien nicht aufgeladen Kontrollieren Sie die Position
der Batterien
Laden Sie die Batterien
wieder auf
Kein Freizeichen Telefonkabel schlecht
angeschlossen
Handset klingelt nicht Lautstärke steht auf "OFF" Passen Sie die Lautstärke an
Gespräch wird nach
15 Minuten beendet
Lautstärke der
Gesprächspartner ist zu
gering
15 Minuten-Timer ist AN Schalten Sie den 15-
Kontrollieren Sie den
Anschluss des Telefonkabels
Minuten-Timer aus oder
drücken Sie während der
Warntöne eine beliebige
Taste
Regeln Sie die Lautstärke
während des Gesprächs
durch Betätigen der
Leitungstaste
9TECHNISCHE DATEN
Reichweite: max. 300 m im freien Gelände
max. 50 m in Gebäuden
Wählverfahren: MFV (Ton)
Batterien: 3 x 1.2V, 600 mAh AAA Typ NiMh wiederaufladbar
Max. Standby-Zeit: ca 72 Stunden
Max. Gesprächszeit: 5 Stunden
Umgebungstemperatur: +5 ˚C bis +45 ˚C
Zulässige relative Luftfeuchtigkeit: 25 bis 85 %
Stromversorgung Basisstation: 220/230V , 50 Hz
DEUTSCH
DEUTSCH
Page 44

Page 45

Page 46

Page 47

Page 48

U8006031
 Loading...