

Page 1

Clipphone 40
GEBRUIKSAANWIJZING
MODE D’EMPLOI
OPERATING GUIDE
BEDIENUNGSANLEITUNG
Page 2

Wij feliciteren u met de aankoop van uw Clipphone 40 !
Alvorens uw Clipphone 40 te installeren, gelieve uw telefoonmaatschappij
te contacteren voor een CLIP-abonnement (weergave oproeper).
Zonder het CLIP-abonnement functioneert de nummerweergavefunctie niet !
Nous vous félicitons de l’achat de votre Clipphone 40 !
Avant d’installer votre Clipphone 40, veuillez contacter votre compagnie téléphonique
afin d’obtenir un abonnement CLIP (indication de l’appelant).
Sans l’abonnement CLIP, la fonction clip ne fonctionne pas !
Congratulations with your Clipphone 40 !
Before installing your Clipphone 40, please contact your telephone
provider to obtain the CLIP subscription (display caller).
Without this subscription, the clip function does not work !
Herzlichen Glückwunsch zum Kauf des Clipphone 40 !
Bevor Sie den Clipphone 40 installieren, müssen Sie bei Ihrem Netzbetreiber
Ohne Rufnummernübermittlung funktioniert die Clip-Funktion des Geräts nicht !
die Funktion Rufnummernübermittlung (CLIP) beantragen.
BESTE KLANT,
!! Belangrijk !!
CHERE CLIENTE, CHER CLIENT,
!! Important !!
DEAR CUSTOMER,
!! Important !!
LIEBE KUNDIN, LIEBER KUNDE,
!! Wichtig !!
©COPYRIGHT
Page 3

Clipphone 40
1 INSTALLATIE 4
2 TOETSEN 4
3 WERKING TELEFOON 5
3.1 Telefoneren 5
3.2 Datum en tijd instellen. 5
3.3 Instellen van het zonenummer (Area code) 5
3.4 Flash (R) 5
3.5 Herkiezen 6
3.6 Geheugennummers 6
3.6.1 Een geheugennummer programmeren 6
3.6.2 Een geheugennummer oproepen 6
3.6.3 Direct geheugennummer M1 oproepen 6
3.7 LCD contrast instellen 6
4 WERKING NUMMERWEERGAVE (CALLER-ID) 7
4.1 Oproepen ontvangen en bewaren 7
4.2 Boodschapindicaties 7
4.3 Controleren en wissen van oproepen 7
4.3.1 Controleren 7
4.3.2 Een oproep wissen 7
4.3.3 Alle oproepen wissen 8
4.4 Een oproepnummer terugbellen 8
4.5 Voice Mail indicatie (Message Waiting) (enkel FSK) 8
5 GARANTIE 8
3
Page 4
Clipphone 40
1 INSTALLATIE
• Verbind het uiteinde van de telefoonlijn met de wandcontactdoos van het telefoonnet.
• Steek 3 batterijen (AAA) in de batterijruimte om het
toestel in werking te stellen.
Als u batterijen installeert, moet de telefoonlijn
ontkoppeld zijn.
Om de batterijen te installeren, gaat u als volgt te werk :
• Druk voorzichtig op het batterijdeksel en schuif het
langzaam naar beneden.
• Steek drie 1,5V (AAA) batterijen in de batterijruimte.
• Sluit de batterijruimte.
Opmerkingen :
• Als het “Lege Batterij”-symbool ( ) op de display verschijnt,
dienen de batterijen vervangen te worden.
• Met de bijgeleverde houder kan u het toestel aan de muur
bevestigen.
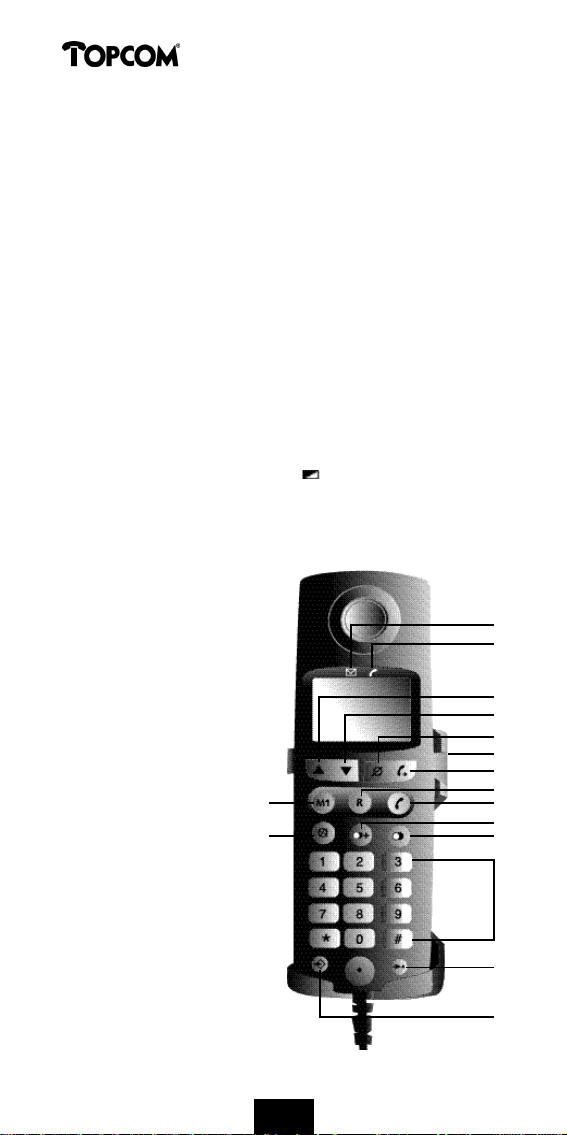
2 TOETSEN
1 Programmeertoets
2 Geheugentoets
3 Omhoog-toets
4 Omlaag-toets
5 Direct Geheugen M1
6 Oproeplijst-toets
7 Lijntoets
8 Herkiestoets
9 Flashtoets
10 Wistoets
11 Cijfertoetsen
12 Terugbeltoets
13 Mute-toets
14 Boodschap-
indicator (LED)
15 In Gebruik-
indicator (LED)
16 Houder
5
13
14
15
3
4
10
16
12
9
7
6
8
11
2
1
4
Page 5

Clipphone 40
3 WERKING TELEFOON
3.1 Telefoneren
• Druk op de Lijntoets. U hoort de kiestoon. De ‘In
Gebruik-indicator licht op.
• Vorm het gewenste telefoonnummer.
• Druk opnieuw op de Lijntoets om, na het gesprek, de
verbinding te verbreken.
U kan ook eerst het telefoonnummer vormen en daarna
op de Lijntoets drukken. U hebt zo de mogelijkheid een
foutieve ingave te wissen met behulp van de Wistoets.
3.2 Datum en tijd instellen
• D ruk 3x op de Wistoets tot ‘SET’ op de display verschijnt.
• Druk op de Omhoogtoets.
• Het uur op de display begint te knipperen.
• Geef het uur in met behulp van de Omhoog- en
Omlaagtoets.
• Bevestig de instelling met de Wistoets.
• De minuten beginnen te knipperen.
• Herhaal dezelfde stappen voor het instellen van de
minuten, de maand en de dag.
Na instelling van de maand gaat het toestel over naar de
volgende instelling : Instellen van het zonenummer.
3.3 Instellen van het zonenummer (Area code)
Opmerking: Als u, telkens als u telefoneert binnen uw eigen zone,
het zonenummer moet vormen, dan mag u geen zonenummer
toevoegen.
• Selecteer het eerste cijfer van het zonenummer met
behulp van de Omhoog- en Omlaagtoets.
• Bevestig het cijfer door het drukken op de Wistoets.
• Herhaal dit voor de twee volgende cijfers.
• Als de juiste cijfers zijn geselecteerd, druk op de
Wistoets ter bevestiging.
3.4 Flash (R)
D ruk op de Flashtoets om bepaalde diensten te activeren,
zoals “2de oproep” (indien deze functie door uw telefoonmaatschappij aangeboden wordt); of om oproepen door te
verbinden wanneer u gebruik maakt van een binnenhuis-
centrale (PA B X ) .
5
Page 6

Clipphone 40
3.5 Herkiezen
• Als u het laatst gevormde nummer opnieuw wenst op te
roepen, drukt u op de Herkiestoets zodra u de hoorn
van de haak neemt. Het telefoonnummer wordt automatisch gevormd.
• Druk op de Oproeplijst-toets om de 8 laatst gevormde
nummers weer te geven.
• Als u een nummer hebt geselecteerd, druk op de
Lijntoets en het nummer wordt automatisch gevormd.
3.6 Geheugennummers
U kan 11 telefoonnummers (van max. 16 cijfers) programmeren in het geheugen onder de geheugenplaatsen 0..9
en directe geheugentoets M1.
3.6.1 Een geheugennummer programmeren
• Druk op de Programmeertoets.
• Geef het telefoonnummer in.
• Druk opnieuw op de Programmeertoets.
• D ruk op de gewenste geheugenplaats 0..9 (cijfertoetsen)
of M1 (direct geheugen). Het nummer is gepro g r a m m e e rd .
3.6.2. Een geheugennummer oproepen
• Druk op de Lijntoets gevolgd door de Geheugentoets.
• Druk vervolgens op het nummer van de geheugenplaats
(0-9).
• Het geprogrammeerde nummer wordt automatisch
gevormd.
Opmerking : U kan ook eerst het geheugennummer oproepen
alvorens de Lijntoets te drukken.
3.6.3. Direct geheugennummer M1 oproepen
• Druk op M1 gevolgd door de Lijntoets.
• Het geprogrammeerde nummer wordt automatisch
gevormd.
3.7 LCD contrast instellen
• D ruk 3x op de Wistoets tot ‘SET’ op de display verschijnt.
• Druk op de Omlaagtoets.
• Het geselecteerde LCD-contrast verschijnt op de display.
• Selecteer het gewenste display-contrast met behulp van
de Omhoog- of Omlaagtoets.
• Bevestig deze instelling met de Wistoets.
6
Page 7

Clipphone 40
4 WERKING NUMMERWEERGAVE (CALLER-ID)
4.1 Oproepen ontvangen en bewaren
De Clipphone 40 ontvangt een oproep en geeft informatie
weer die door de plaatselijke telefoonprovider wordt doorgestuurd.
Deze informatie bestaat uit het telefoonnummer van de
oproeper, de datum en het uur (raadpleeg uw telefoonmaatschappij voor de activatie).
Het toestel kan 99 oproepen bewaren die later overlopen
kunnen worden. Het toestel bewaart nooit tweemaal
dezelfde oproep. Als het geheugen vol is, vervangen de
nieuwe oproepen automatisch de oudste in het geheugen.
4.2 Boodschapindicaties
De volgende boodschappen geven aan in welke toestand
het toestel zich bevindt :
NEW Er bevinden zich nieuwe boodschappen in het
geheugen.
--P-- De oproeper heeft een privénummer waardoor er
geen informatie op de display verschijnt.
--O-- De oproepinformatie werd onderbroken tijdens
verzending van de gegevens.
REP De oproeper heeft meermaals opgeroepen.
De batterij is bijna leeg.
U hebt een boodschap ontvangen op uw mailbox.
4.3 Controleren en wissen van oproepen
Zodra het toestel nieuwe oproepen ontvangt, knippert het
symbool ‘NEW’ op de display tot alle boodschappen zijn
gecontroleerd. Het aantal boodschappen dat bewaard
wordt, blijft op de display vermeld.
4.3.1 Controleren
• Druk op de Omhoogtoets om naar de volgende oproep
te gaan.
• D ruk op de Omlaagtoets om de vorige oproep te bekijken.
4.3.2 Een oproep wissen
• Druk op de Omhoogtoets om naar de gewenste oproep
te gaan.
• Druk 2x kort op de Wistoets om de oproep op de display
te wissen.
7
Page 8

Clipphone 40
4.3.3 Alle oproepen wissen
• Druk de Omhoogtoets zodat een oproep uit de oproep-
lijst op het scherm verschijnt.
• Houd de Wistoets gedurende 3 seconden ingedrukt.
• De oproeplijst wordt volledig gewist.
4.4 Een oproepnummer terugbellen
• Druk op de Omhoog- of Omlaagtoets om het gewenste
nummer te zoeken in de oproeplijst.
• Druk op de Terugbeltoets. Het telefoonnummer wordt
automatisch gevormd.
4.5 Voice Mail indicatie (Message Waiting)
(enkel FSK)
Als u, via uw telefoonmaatschappij, beschikt over het Voice
Mail-systeem dat de functie ‘boodschap indicatie’ ondersteunt, dan verschijnt ’ ’ op de display als de oproeper
een boodschap heeft achtergelaten in uw persoonlijke
mailbox.
Zodra u deze boodschap ontvangen hebt, verdwijnt deze
tekst van de display.
Opmerking : Deze functie is enkel mogelijk als men geabonneerd
is op deze dienst en als deze functie ondersteund wordt door uw
telefoonmaatschappij.
5 GARANTIE
Garantie :
1 jaar. Contacteer uw dealer.
Opgelet :
Vergeet uw aankoopbewijs niet bij uw toestel te steken.
8
Page 9

Clipphone 40
1 INSTALLATION 10
2 TOUCHES 10
3 FONCTIONNEMENT TELEPHONE 11
3.1 Téléphoner 11
3.2 Régler la date et l’heure 11
3.3 Régler le numéro zonal 11
3.4 Flash (R) 11
3.5 Répétition du dernier numéro composé 12
3.6 Numéros mémoire 12
3.6.1 Programmer un numéro mémoire 12
3.6.2 Appeler un numéro mémoire 12
3.6.3 Appeler numéro mémoire direct M1 12
3.7 Régler le contrast LCD 12
4 FONCTIONNEMENT AFFICHAGE DU NUMERO
DE L’APPELANT (CALLER-ID) 13
4.1 Recevoir et conserver des appels 13
4.2 Indications messages 13
4.3 Contrôler et effacer des messages 13
4.3.1 Contrôler 13
4.3.2 Effacer un seul appel 13
4.3.3 Effacer tous les appels 13
4.4 Appeler un numéro de la liste des appels 14
4.5 Affichage Voice Mail (Message Waiting) 14
(seulement FSK)
5 GARANTIE 14
9
Page 10

Clipphone 40
1 INSTALLATION
• Connectez le bout du câble téléphonique à la prise de
contact murale du réseau téléphonique.
• Placez 3 batteries (AAA) dans le compartiment à batterie
afin d’activer l’appareil.
Quand vous installez les batteries, il est nécessaire de
débrancher la ligne téléphonique.
Pour installer les batteries, procedez comme suit :
• Appuyez prudemment sur le couvercle du compartiment
à batterie et abaissez-le lentement.
• Placez 3 batteries 1,5V (AAA) dans le compartiment à
batterie.
• Fermez le compartiment à batterie.
Remarques :
• Quand le symbole “Batterie vide” ( ) apparaît à l’écran, il est
nécessaire de remplacer les batteries.
• Utilisez le support fourni pour monter l’appareil au mur.
2 TOUCHES
1 Touche de
Programmation
2 Touche Mémoire
3 Touche Monter
4 Touche Descendre
5 Touche Mémoire M1
6 Touche Liste des appels
7 Touche de Ligne
8 Touche Répétition
(du dernier
numéro composé)
9 Touche Flash
10 Touche Effacer
11 Touches numériques
12 Touche Rappel
13 Touche Mute
14 Indicateur
‘Appel’ (LED)
15 Indicateur
‘En Usage’ (LED)
16 Support
5
13
10
14
15
3
4
10
16
12
9
7
6
8
11
2
1
Page 11

Clipphone 40
3 FONCTIONNEMENT TELEPHONE
3.1 Téléphoner
• Appuyez sur la touche de Ligne. Vouz entendez la
tonalité. L’indicateur ‘En Usage’ (LED) s’allume.
• Composez le numéro de téléphone désiré.
• Appuyez de nouveau sur la touche de Ligne, après la
conversation, pour couper la communication.
Il est aussi possible de composer le numéro et d’appuyez
après sur la touche de Ligne. De cette façon vous pouvez
corriger le numéro à l’aide de la touche Effacer.
3.2 Régler la date et l’heure
• Appuyez 3 fois sur la touche Effacer jusqu’à l’affichage
de ‘SET’ à l’écran.
• Appuyez sur la touche Monter.
• L’indication de l’heure à l’écran commence à clignoter.
• Introduisez l’heure en vous servant des touches Monter
et Descendre.
• Confirmez ce réglage en appuyant la touche Effacer.
• L’indication des minutes commence à clignoter.
• Répétez les mêmes étapes pour le réglage des minutes,
du mois et du jour.
• Après le réglage du mois l’appareil passe au réglage
suivant : Régler le numéro zonal.
3.3 Régler le numéro zonal
Remarque : Si vous devez composer votre numéro zonal dans
votre propre zone chaque fois que vous appelez, n’ajoutez pas de
numéro zonal.
• Sélectionnez le premier chiffre du numéro zonal en
utilisant les touches Monter et Descendre.
• Confirmez le chiffre en appuyant sur la touche Effacer.
• Répétez ces étapes pour les 2 chiffres suivants.
• Quand vous avez sélectionné le chiffres voulus, appuyez
sur la touche Effacer pour confirmer.
3.4 Flash (R)
Appuyez sur la touche Flash afin d’activer certains services
comme “2ième appel” (si ce service est fourni par votre
compagnie téléphonique); ou pour transférer des appels si
vous utilisez un central téléphonique (PABX).
11
Page 12

Clipphone 40
3.5 Répétition du dernier numéro composé
• Quand vous voulez rappeler le dernier numéro composé,
appuyez sur la touche Répétition dès que vous décrochez.
Le numéro sera composé automatiquement.
• Appuyez sur la touche Liste des Appels quand vous voulez
voir les 8 derniers numéros composés.
• Quand vous avez sélectionné un numéro, appuyez sur la
touche de Ligne et ce numéro sera composé automatiquem e n t .
3.6 Numéros mémoire
Vous pouvez programmer 11 numéros de téléphone (de 16
chiffres au maximum) dans la mémoire sous les places de
mémoire 0..9 et la touche mémoire M1.
3.6.1 Programmer un numéro mémoire
• Appuyez sur la touche de Programmation.
• Composez le numéro de téléphone.
• Appuyez de nouveau sur la touche de Programmation.
• Appuyez sur la place mémoire désirée 0..9 (touches
numériques) ou M1. Le numéro est programmé.
3.6.2 Appeler un numéro mémoire
• Appuyez sur la touche de Ligne et après sur la touche
Mémoire.
• Appuyez ensuite sur le numéro de la place mémoire (0-9).
• Le numéro de téléphone programmé sera composé
automatiquement.
Remarque : Vous pouvez aussi d’abord chercher le numéro
mémoire avant d’appuyer sur la touche de Ligne.
3.6.3 Appeler le numéro mémoire M1
• Appuyez sur la touche M1 et après sur la touche de Ligne.
• Le numéro de téléphone programmé sera composé
automatiquement.
3.7 Régler le contrast LCD
• Appuyez 3 fois sur la touche Effacer jusqu’à l’affichage
de ‘SET’ à l’écran.
• Appuyez sur la touche Descendre.
• Le contrast LCD sélectionné apparaît à l’écran.
• Sélectionnez le contrast LCD voulu en utilisant les touches
Monter ou Descendre
• Confirmez ce réglage en appuyant sur la touche Effacer.
12
Page 13

Clipphone 40
4 FONCTIONNEMENT AFFICHAGE DU NUMERO
DE L’APPELANT (CALLER-ID)
4.1 Recevoir et conserver des appels
Le Clipphone 40 reçoit un appel et passe l’information
envoyée par la compagnie téléphonique locale. Cette infor-
mation consiste en le numéro de téléphone de l’appelant,
la date et l’heure (consultez votre compagnie téléphonique
pour l’activation).
L’appareil peut mémoriser 99 appels qu’on peut parcourir
plus tard. L’appareil ne garde jamais deux fois le même
appel. Quand la mémoire est pleine, les nouveaux appels
remplacent automatiquement les vieux dans la mémoire.
4.2 Indications messages
Les messages suivants montrent l’état de l’appareil :
NEW Il y a de nouveaux messages dans la mémoire.
--P-- L’appelant ne veut pas que son numéro apparaisse
à l’écran (numéro privé).
--O-- L’information de l’appel est interrompue pendant
l’envoi des données.
REP L’appelant a appelé plusieurs fois.
La batterie est presque vide.
Vous avez reçu un message dans votre boîte vocale.
4.3 Contrôler et effacer des messages
Dès qu’on a reçu de nouveaux messages, le symbole ‘ N E W ’
clignote à l’écran jusqu’au moment on a contrôlé tous les
messages. Le nombre de messages, qu’on a conservé, re s t e
a ffiché à l’écran
4.3.1 Contrôler
• Appuyez sur la touche Monter pour aller à l’appel suivant.
• Appuyez sur la touche Descendre pour voir l’appel
précédent.
4.3.2 Effacer un seul appel
• Appuyez sur la touche Monter pour aller à l’appel désiré.
• Appuyez 2 fois brièvement sur la touche Effacer pour
effacer l’appel à l’écran.
4.3.3 Effacer tous les appels
• Appuyez sur la touche Monter jusqu’à l’affichage d’un
appel de la liste des appels à l’écran.
13
Page 14

Clipphone 40
• Maintenez enfoncée la touche Effacer pendant 3 secondes.
• La liste des appels sera effacée complètement.
4.4 Rappeler un numéro de la liste des appels
• Appuyez sur la touche Monter ou Descendre pour chercher
le numéro désiré dans la liste des appels.
• Appuyez sur la touche Rappel. Le numéro de téléphone
sera composé automatiquement.
4.5 Affichage Voice Mail (Message Waiting)
(seulement FSK)
Quand vous, via votre compagnie téléphonique, dispose
d’un système Voice Mail qui soutient la fonction ‘affichage
message’, le symbole ’ ’ apparaît à l’écran quand l’appelant
a laissé un message dans votre boîte vocale personnelle.
Dès que vous avez reçu ce message, l’information à l’écran
disparaît.
Remarque : Cette fonction est seulement possible quand vous avez
pris un abonnement de ce service et si ce service est fourni par
votre compagnie téléphonique.
5 GARANTIE
Garantie :
1 an. Contactez votre revendeur.
Attention :
En retournant votre appareil endommagé, n’oubliez pas d’y
ajouter votre facture d’achat.
14
Page 15

Clipphone 40
1 INSTALLATION 16
2 BUTTONS 16
3 OPERATION TELEPHONE 17
3.1 Making a phone call 17
3.2 Setting the date and time 17
3.3 Setting the area code 17
3.4 Flash (R) 17
3.5 Last number redial 18
3.6 Memory numbers 18
3.6.1 Programming a memory number 18
3.6.2 Calling a memory number 18
3.6.3 Calling direct memory number M1 18
3.7 Setting the LCD contrast 18
4 OPERATION CALLER-ID 19
4.1 Checking and receiving phone calls 19
4.2 Message indications 19
4.3 Checking and erasing calls 19
4.3.1 Checking telephone calls 19
4.3.2 Erasing one call 19
4.3.3 Erasing all calls 19
4.4 Calling back a number from the Call list 20
4.5 Voice Mail indication (Message Waiting) 20
(FSK only)
5 WARRANTY 20
15
Page 16

Clipphone 40
1 INSTALLATION
• Plug the end of the phone cable into the telephone line
wall socket.
• Put 3 batteries (AAA) inside the battery compartment to
activate the telephone.
When you install the batteries, the telephone line has to
be disconnected.
To insert the batteries, take the following steps:
• Carefully press the cover of the battery compartment
and slide it slowly downwards.
• Put three 1,5V (AAA) batteries inside the battery
compartment.
• Close the battery compartment.
Note :
• When the “Battery empty” symbol ( ) appears on the display,
the batteries need to be replaced by new ones.
• The supplied holder can be used to attach the unit to the wall.
2 BUTTONS
1 Set button
2 Memory button
3 Up button
4 Down button
5 Memory button M1
6 Call list button
7 Line button
8 Redial button
9 Flash button
10 Erase button
11 Numerical buttons
12 Recall button
13 Mute button
14 ‘Call’
indicator (LED)
15 ‘In Use’
indicator (LED)
16 Holder
5
13
16
14
15
3
4
10
16
12
9
7
6
8
11
2
1
Page 17

Clipphone 40
3 OPERATION TELEPHONE
3.1 Making a phone call
• Press the Line button. You will hear the dial tone.
The ‘In Use’ indicator (LED) starts to burn.
• Dial the desired telephone number.
• Press the Line button again, after the conversation, to
end the communication.
It is also possible to dial the telephone number first and
then press the Line button. This gives you the opportunity
to erase wrongly entered digits by pressing the Erase button.
3.2 Setting the date and time
• Press the Erase button 3 times until ‘SET’ is shown on
the display.
• Press the Up button.
• The hour indication on the display starts to blink.
• Enter the hour by means of the Up and Down buttons.
• Confirm the setting by pressing the Erase button
• The minute indication starts to blink.
• Repeat these steps to set the minutes, the month and
the day.
After having set the month, the unit will go to the next
setting : Setting the area code.
3.3 Setting the area code
Note : When you have to dial your own area code when making a
phone call to another number in your area, you should not add the
area code.
• Select the first digit of the area code using the Up and
Down buttons.
• Confirm this digit by pressing the Erase button.
• Repeat the same steps to set the other two digits.
• When the correct digits have been selected, press the
Erase button to confirm.
3.4 Flash (R)
Press the Flash button to activate certain services as ‘Call
Waiting’ (if this service is provided by your telephone company); or to transfer phone calls when you are using a
telephone exchange (PABX).
17
Page 18

Clipphone 40
3.5 Last number redial
• When you want to call back the last dialled telephone
n u m b e r, press the Redial button as soon as you have
picked up the re c e i v e r. The number will be redialled
a u t o m a t i c a l l y.
• Press the Call list button if you want to look at the 8 last
dialled telephone numbers.
• When you have selected a number, press the Line button
and it will be dialled automatically.
3.6 Memory numbers
You can program 11 telephone numbers (of max. 16 digits)
in the memory under the memory locations 0-9 and direct
memory button M1.
3.6.1 Programming a memory number
• Press the Set button.
• Enter the telephone number.
• Press the Set button again.
• P ress the desired memory location 0-9 (numerical buttons)
or M1 (direct memory). The number is pro g r a m m e d .
3.6.2 Calling a memory number
• Press the Line button followed by the Memory button.
• Press the number of the memory location (0-9).
• The programmed telephone number will be dialled
automatically.
3.6.3 Calling direct memory number M1
• Press M1 followed by the Line button.
• The programmed telephone number will be dialled
automatically.
Note : You can also first look up the memory number before
pressing the Line button.
3.7 Setting the LCD contrast
• Press the Erase button 3 times until ‘SET’ is shown on
the display.
• Press the Down button.
• The selected LCD contrast is shown on the display.
• Select the desired contrast level by pressing the Up or
Down button.
• Confirm this setting by pressing the Erase button.
18
Page 19

Clipphone 40
4 OPERATION CALLER-ID
4.1 Checking and receiving phone calls
The Clipphone 40 receives a call and shows the inform a t i o n
sent by the local telephone pro v i d e r. This information consists
of the caller’s telephone number, the date and the time
(consult your telephone company for the activation).
The phone can save 99 calls which can be reviewed later. It
never saves the same call twice. When the memory is full, the
old calls will be replaced by the new ones in the memory.
4.2 Message indications
The following messages show the status of the phone :
NEW The unit has received new messages in the
memory.
--P-- The caller has a private number and therefore the
information is not visible on the display.
--O-- The clip information was interrupted during
transmission of the data.
REP The caller has called more than once.
The battery is almost empty.
You received a message in your mailbox.
4.3 Checking and erasing calls
As soon as the phone receives new phone calls, the ‘NEW’
symbol starts to blink on the display until all messages have
been checked. The number of messages that are being
kept, remain visible on the display.
4.3.1 Checking telephone calls
• Press the Up button to go to the next call
• Press the Down button to look at the previous call.
4.3.2 Erasing one call
• Press the Up button to go to the desired call.
• Press the Erase button twice briefly to erase the call.
4.3.3 Erasing all calls
• Press the Up button so that a call from the Call list is
shown on the display.
• Press and hold the Erase button for 3 seconds.
• The call list is completely erased.
19
Page 20

Clipphone 40
4.4 Calling back a number from the Call list
• Press the Up or Down button to look up the desired
telephone number in the Call list.
• Press the Recall button. The telephone number will be
dialled automatically.
4.5 Voice Mail indication (Message Waiting)
(FSK only)
When you obtained the Voice Mail system from your
telephone provider that supports the function ‘Message
Indication’, the symbol ’ ’ appears on the display when a
caller has left a message in your personal mailbox. As soon as
you have received the message the display text disappears.
Remark : This function is only possible when you have a subscription
to this service and when this service is supported by your telephone
p ro v i d e r.
5 WARRANTY
Warranty :
1 year. Contact your dealer.
Attention :
Do not forget to include your purchase invoice when you
return the defect device.
20
Page 21

Clipphone 40
1 INSTALLATION 22
2 TASTEN 22
3 BETRIEB TELEFON 23
3.1 Telefonieren 23
3.2 Datum und Uhrzeit einstellen 23
3.3 Ortsnetzkennzahl einstellen 23
3.4 Flash (R) 23
3.5 Wahlwiederholung 24
3.6 Kurzwahlnummern 24
3.6.1 Eine Kurzwahlnummer programmieren 24
3.6.2 Eine Kurzwahlnummer anrufen 24
3.6.3 Kurzwahlnummer M1 anrufen 24
3.7 LCD Kontrast einstellen 24
4 BETRIEB RUFNUMMERNÜBERMITTLUNG
(CLIP/CALLER-ID) 25
4.1 Anrufe empfangen und aufbewahren 25
4.2 Spezielle Nachrichten 25
4.3 Anrufe überprüfen und löschen 25
4.3.1 Überprüfen 25
4.3.2 Einen Anruf löschen 25
4.3.3 Alle Anrufe löschen 26
4.4 Eine Rufnummer der Anrufliste zurückrufen 26
4.5 Voice Mail Anzeige (Message Waiting) (Nur FSK) 26
5 GARANTIE 26
21
Page 22

Clipphone 40
1 INSTALLATION
• Schließen Sie das Telefonkabel an die Telefonanschlussdose
a n .
• Legen Sie 3 Akkus (AAA) ein um das Gerät anzuschalten.
Wenn Sie die Akkus einlegen, müssen Sie zuerst das
Telefonkabel entkoppeln.
Um die Akkus zu installieren, geht man wie folgt vor:
• Drücken Sie vorsichtig den Deckel des Akkufachs und
schieben Sie ihn langsam nach unten.
• Legen Sie drei 1,5V (AAA) Akkus ein.
• Schließen Sie das Akkufach.
Bemerkungen :
• Wenn das “Batterie leer”-Symbol ( ) auf dem Display erscheint,
müssen Sie die Akkus ersetzen.
• Mit dem mitgelieferten Halter können Sie das Gerät an der
Mauer befestigen.
2 TASTEN
1 Programmiertaste
2 Speichertaste
3 Nach Oben-Taste
4 Nach Unten-Taste
5 Kurzwahltaste M1
6 Anrufliste-Taste
7 Leitungstaste
8 Wahlwieder-
holungstaste
9 Flashtaste
10 Löschtaste
11 Wähltasten
12 Rückruftaste
13 Mikrofonstumm-
schaltungstaste
14 ‘Anruf’-
Anzeige (LED)
15 ‘In Gebrauch’-
Anzeige (LED)
16 Halter
5
13
22
14
15
3
4
10
16
12
9
7
6
8
11
2
1
Page 23

Clipphone 40
3 BETRIEB TELEFON
3.1 Telefonieren
• Betätigen Sie die Leitungstaste. Sie hören das Freizeichen.
Die ‘In Gebrauch’-Anzeige (LED) brennt.
• Wählen Sie die gewünschte Nummer.
• Betätigen Sie erneut die Leitungstaste um, nach dem
Gespräch, die Verbindung zu beenden.
Es ist auch möglich zuerst die Telefonnummer einzugeben
und dann die Leitungstaste zu drücken. So können Sie
falsche Eingaben mit der Löschtaste löschen.
3.2 Datum und Uhrzeit einstellen
• Betätigen Sie dreimal die Löschtaste bis ‘SET’ auf dem
Display angezeigt wird.
• Betätigen Sie die Nach Oben-Taste.
• Die Stunde-Anzeige blinkt auf dem Display.
• Geben Sie die Stunde mit Hilfe der Nach Oben- und
Nach Unten-Tasten ein.
• Bestätigen Sie die Einstellung mit der Löschtaste.
• Die Minuten-Anzeige fängt an zu blinken.
• Wiederholen Sie diese Einstellung für die Minuten, den
Monat und den Tag.
• Jetzt geht das Gerät zur nächsten Einstellung :
Ortsnetzkennzahl einstellen.
3.3 Ortsnetzkennzahl einstellen
Bemerkung : Wenn Sie in Ihrem eigenen Ort die Ortsnetzkennzahl
wählen müssen jedes Mal Sie anrufen, dürfen Sie keine Ortsnetzkennzahl hinzufügen.
• Geben Sie die erste Ziffer der Ortsnetzkennzahl mit Hilfe
der Nach Oben und Nach Unten Tasten ein.
• Betätigen Sie die Löschtaste um diese Ziffer zu bestätigen.
• Wiederholen Sie diese Schritte für die zwei nächsten
Ziffern.
• Wenn die richtige Ziffern eingegeben sind, betätigen Sie
die Löschtaste zur Bestätigung.
3.4 Flash (R)
Drücken Sie die Flashtaste um bestimmte Dienste zu akti-
vieren wie z.B. Call Waiting (aber nur wenn Ihr Fernsprechbetrieb diese Funktion anbietet); oder um Anrufe durch-
zustellen wenn Sie eine Telefonanlage (PABX) benutzen.
23
Page 24

Clipphone 40
3.5 Wahlwiederholung
• Wenn Sie die zuletzt gewählte Nummer rückrufen wollen,
müssen Sie die Wa h l w i e d e rholungstaste betätigen sobald
Sie den Hörer abheben. Die Telefonnummer wird automatisch gewählt.
• Betätigen Sie die Anrufliste-Taste wenn Sie die 8 zuletzt
gewählte Nummern auf dem Display ansehen wollen.
• Wenn Sie eine Nummer gewählt haben, müssen Sie nur
die Leitungstaste betätigen und die Nummer wird automatisch gewählt.
3.6 Kurzwahlnummern
Sie haben die Möglichkeit 11 Telefonnummern (von max.
16 Ziffern) im Speicher unter den Speicherstellen 0..9 und
Kurzwahltaste M1 zu programmieren.
3.6.1 Eine Kurzwahlnummer programmieren
• Betätigen Sie die Programmiertaste.
• Geben Sie die Telefonnummer ein.
• Betätigen Sie erneut die Programmiertaste.
• Betätigen Sie die Nummer der Speicherstelle 0..9
(Wähltasten) oder M1. Die Nummer is programmiert.
3.6.2 Eine Kurzwahlnummer anrufen
• Drücken Sie zuerst die Leitungstaste und dann die
Speichertaste.
• Betätigen Sie die Nummer der Speicherstelle (0-9)
• Die programmierte Nummer wird automatisch gewählt.
3.6.3 Kurzwahlnummer M1 anrufen
• Drücken Sie zuerst M1 und dann die Leitungstaste.
• Die programmierte Nummer wird automatisch gewählt.
Bemerkung : Sie können auch zuerst die Kurzwahlnummer suchen
and dann die Leitungstaste betätigen.
3.7 LCD Kontrast einstellen
• Betätigen Sie dreimal die Löschtaste bis ‘SET’ auf dem
Display angezeigt wird.
• Betätigen Sie die Nach Unten-Taste.
• Der gewählte LCD Kontrast wird angezeigt.
• Wählen Sie den gewünschten Kontrast mit der Nach
Oben- oder Nach Unten-Taste
• Bestätigen Sie diese Einstellung mit der Löschtaste.
24
Page 25

Clipphone 40
4 BETRIEB RUFNUMMERNÜBERMITTLUNG
(CLIP/CALLER-ID)
4.1 Anrufe empfangen und aufbewahren
Das Clipphone 40 Telefon empfängt einen Anruf und zeigt
Information die den Fernsprechbetrieb weiterschickt. Diese
Information ist die Telefonnummer des Anrufers, das
Datum und die Uhrzeit (konsultieren Sie den Fernsprech-
betrieb für die Aktivierung).
Das Gerät kann 99 Anrufe aufbewahren die man später
ansehen kann. Das Gerät bewahrt nie zweimal denselben
Anruf.
Wenn der Speicher voll ist, werden die alten Anrufe automatisch durch die neuen Anrufe ersetzt.
4.2 Spezielle Nachrichten
Die folgenden Nachrichten zeigen den Zustand des Geräts:
NEW Das Gerät hat neue Nachrichten im Speicher
empfangen.
--P-- Der Anrufer hat eine Privatnummer und deswegen
empfängt man keine Information auf dem Display.
--O-- Die Anrufinformation ist unterbrochen worden
während der Sendung der Daten.
REP Der Anrufer hat schon mehrmals angerufen.
Der Akku ist fast leer.
Sie haben eine Nachricht in Ihrem Mailbox
empfangen.
4.3 Anrufe überprüfen und löschen
Wenn Sie neue Anrufe haben, blinkt auf dem Display die
Meldung ‘N E W’ bis alle überprüft sind. Die Anzahl von auf-
b e w a h rten Nachrichten, bleibt auf dem Display darg e s t e l l t .
4.3.1 Überprüfen
• Betätigen Sie die Nach Oben-Taste um zum nächsten
Anruf zu gehen.
• Betätigen Sie die Nach Unten-Taste um den vorigen
Anruf anzusehen.
4.3.2 Einen Anruf löschen
• Betätigen Sie die Nach Oben-Taste um zum gewünschten
A n ruf zu gehen.
• Betätigen Sie zweimal kurz die Löschtaste um den Anruf
auf dem Display zu löschen.
25
Page 26

Clipphone 40
4.3.3 Alle Anrufe löschen
• Betätigen Sie die Nach Oben-Taste damit ein Anruf der
Anrufliste auf dem Display erscheint.
• Halten Sie die Löschtaste 3 Sekunden gedrückt.
• Die Anrufliste wird total gelöscht.
4.4 Eine Rufnummer der Anrufliste zurückrufen
• Betätigen Sie die Nach Oben- oder Nach Unten-Taste um
die gewünschte Nummer in der Anrufliste zu suchen.
• Betätigen Sie Rückruftaste. Die Telefonnummer wird
automatisch gewählt.
4.5 Voice Mail Anzeige (Message Waiting)
(nur FSK)
Wenn Sie, via Ihr Fernsprechbetrieb, verfügen über das
Voice Mail-System das die Funktion ‘Anzeige Nachricht’
unterstützt, dann erscheint das Symbol ’ ’ auf dem
Display when der Anrufer eine Nachricht in Ihre persönliche
Mailbox hinterlassen hat. So bald Sie diese Nachricht
empfangen haben, verschwindet der Displaytext.
Bemerkung : Diese Funktion ist nur möglich wenn man ein
Abonnement hat und wenn Ihr Fernsprechbetrieb diese Funktion
unterstützt.
5 GARANTIE
Garantie :
1 Jahr. Erkundigen Sie sich bei Ihrem Händler.
Achtung :
Vergessen Sie bei einem Zurückschicken Ihres Gerätes
nicht, Ihren Kaufbeleg beizufügen.
26
Page 27

Page 28

www.topcom.be
 Loading...