

Page 1
®
BUTLER E600
TWIN/TRIPLE/QUATTRO
SHORT USER GUIDE / BEKNOPTE HANDLEIDING
NOTICE D'UTILISATION / KURZANLEITUNG
GUÍA DEL USUARIO ABREVIADA / KORT ANVÄNDARHANDBOK
KORT BRUGERVEJLEDNING / KORT BRUKERVEILEDNING
GUIA RESUMIDO DO UTILIZADOR
Σύντομος Οδηγος Χρήστη / KRÓTKA INSTRUKCJA OBSŁUGI
V 1.0 - 05/12
Page 2

Important
To use ‘Caller ID’ (display caller), this service has to be activated on your phone line. Normally you
need a separate subscription from your telephone company to activate this function. If you don’t have
the Caller ID function on your phone line, the incoming telephone numbers will NOT be shown on the
display of your telephone.
Belangrijk
Om de ‘Nummerweergave’ te kunnen gebruiken, moet deze dienst geactiveerd
zijn op uw telefoonlijn. Om deze dienst te activeren, hebt U hiervoor meestal een apart abonnement
van uw telefoonmaatschappij nodig. Indien U geen nummerweergavefunctie hebt op uw telefoonlijn,
zullen de inkomende telefoonnummers NIET op
de display van uw toestel verschijnen.
Important
Pour utiliser la fonction ‘Caller ID/Clip’ (affichage de l’appelant), ce service doit être activé sur votre
ligne téléphonique. Généralement, vous avez besoin d’un abonnement séparé de votre compagnie de
téléphone pour activer cette fonction. Si vous n’avez pas la fonction
‘Caller ID - Affichage Appelant’ sur votre ligne téléphonique, les numéros de téléphone entrants
n’apparaîtront PAS sur l’écran de votre téléphone.
Wichtig
Zur Verwendung der ‘Rufnummernanzeige’ muss dieser Dienst erst für Ihre Telefonleitung freigege-
ben werden. Zur Aktivierung dieser Dienstleistung benötigen Sie meistens ein separates Abonnement
Ihrer Telefongesellschaft.Wenn Sie für Ihre Telefonleitung keine Rufnummernanzeigefunktion haben,
erscheinen die eingehenden
Telefonnummern NICHT im Display Ihres Gerätes.
Importante
Para poder usar la función “Identificación de llamadas,este servicio tiene que estar dado de alta en su
línea telefónica. Normalmente es necesario abonarse a dicho serviciopara que la compañía telefónica
active esta función. Si su línea telefónica no dispone de la funciónIdentificación de llamadas, la pan
-
talla del aparato no mostrará los números de teléfono de las llamadas entrantes.
Viktigt
För att använda funktionen "nummervisning" måste tjänsten vara aktiverad för din telefonlinje. Nor-
malt behöver du ett separat abonnemang från ditt telefonbolag för att kunna aktivera funktionen. Om
nummervisningsfunktionen inte finns för din telefonlinje kommer inkommande telefonnummer INTE
visas på din telefons display.
Vigtigt
For at kunne anvende "Caller ID" (gengivelse af opkalderens nummer) skal denne tjeneste først akti-
veres på Deres telefonlinie. For at aktivere denne tjeneste har De normalt brug for et separat
abonnemenet fra Deres telefonselskab.Hvis De ikke råder over en
Caller ID-anordning på Deres telefonlinie, vises opkalderens telefonnummer IKKE på displayet på
Deres apparat.
Viktig
Før du kan bruke funksjonen "Hvem ringer" må denne service aktiveres på din telefonlinje. Kontakt
din teleoperatør for å abonnere på "Hvem ringer".Dersom du ikke har funksjonen "Hvem ringer" på di
n telefonlinje, vil IKKE telefonnummeret til anropet som kommer
inn vises på skjermen.
Page 3

Importante
Para utilizar a função "ID Chamador" (visualizar Chamador), este serviço terá de ser activado na sua
linha telefónica. Normalmente necessita de subscrever este serviço, à parte, com o seu operador de
telecomunicações, para poder activar esta função. Se não tiver contratado este serviço a função ID do
Chamador não estará disponível e por isso os números de telefone das chamadas entrantes não
aparecerão no seu telefone.
Σημαντικό
Για να χρησιμοποιήσετε την υπηρεσία αναγνώρισης κλήσεων, πρέπει η υπηρεσία αυτή να έχει
ενεργοποιηθεί στην τηλεφωνική γραμμή σας. Για να ενεργοποιήσετε αυτή τη λειτουργία πρέπει
κανονικά να εγγραφείτε ξεχωριστά στην εταιρία παροχής τηλεφωνικών υπηρεσιών σας. Εάν δεν έχετε
ενεργοποιήσει στη γραμμή σας την υπηρεσία αναγνώρισης κλήσεων, ΔΕ θα εμφανίζονται οι αριθμοί
των εισερχόμενων κλήσεων στην οθόνη του τηλεφώνου σας.
Uwaga
Aby urządzenie prezentowało numer przychodzący, niezbędna jest usługa prezentacji numeru. Usługę
tę należy aktywować u lokalnego operatora telekomunikacyjnego. Jeżeli usługa prezentacji numeru nie
jest włączona, numery przychodzących połączeń nie będą prezentowane.
UK To be connected to the public analogue telephone network.
NL Geschikt voor aansluiting op het openbare analoog geschakelde telefoonnetwerk.
F Il est destiné à être raccordé au réseau de télécommunication public.
D Kompatibel für den analogen telefonanschluss.
ES Conexión a la red telefónica analógica
S For anslutning til det analoga nätverket.
DK Tilsluttes til det analoge telefonfastnet.
N Tilkoples analog telefon nettverk..
PT As características descritas neste manual são publicadas sob reserva de modificação.
GR Πρέπει να συνδεθεί σε ένα δημόσιο αναλογικό τηλεφωνικό δίκτυο.
PL Do podłączenia do publicznej analogowej sieci telefonicznej.
UK The features described in this manual are published with reservation to modifications.
NL De in deze handleiding beschreven mogelijkheden worden gepubliceerd onder voorbehoud
van wijzigingen.
F Les possibilités décrites dans ce manuel sont publiées sous réserve de modifications.
D Die in dieser Bedienungsanleitung umschriebenen Möglichkeiten, werden vorbehaltlich
Änderungen publiziert.
ES Las características descritas en este manual pueden ser objeto de futuras modificaciones.
S Funktionerna i denna bruksanvisning publiceras med reservation för ändringar.
DK Vi forbeholder os retten til ændringer af de specifikationer, der er beskrevet i denne brugsan-
visning.
N Funksjoner beskrevet i denne manualen kan endres uten nærmere informasjon.
PT Para efectuar a ligação com a rede pública analógica.
GR Οι λειτουργίες που περιγράφονται στο παρόν εγχειρίδιο, δημοσιεύονται με επιφύλαξη τυχόν
τροποποιήσεων.
PL Właściwości opisane w niniejszej instrukcji obsługi są publikowane z zatrzeżeniem prawa
wprowadzenia zmian.
Page 4

This product is in compliance with the essential requirements and other
relevant provisions of the R&TTE directive 1999/5/EC.
The Declaration of conformity can be found on:
http://www.TRISTAR.eu
UK The CE symbol indicates that the unit complies with the essential requirements of the R&TTE
directive.
NL Het toestel voldoet aan de basiseisen van de R&TTE-richtlijn. Dit wordt bevestigd door de
CE-markering.
FLa conformité de l’appareil avec les exigences fondamentales de la directive européenne
R&TTE relative aux terminaux, est confirmée par le label CE.
D Die Übereinstimmung des Gerätes mit den grundlegenden Anforderungen der R&TTE-Direc-
tive ist durch das CE-Kennzeichen bestätigt.
ES El sello CE corrobora la conformidad del equipo con los requerimientos básicos de la direc-
tiva R&TTE.
S CE-märket bekräftar att apparaten uppfyller de grundläggande kraven i R&TTE direktivet.
DK CE-mærkningen bekræfter, at produktet er i overensstemmelse med kravene i Rådets teleter-
minaldirektiv.
SF CE-merkingen dokumenterer at apparatet er i samsvar med de grunnleggende kravene til EU-
direktivet for aktivt telekommunikasjonsutstyr.
PT O símbolo CE indica que esta unidade cumpre com os requisitos essenciais da directiva
R&TTE.
GR Το σύμβολο CE δείχνει ότι η μονάδα συμμορφώνεται με τις βασικές απαιτήσειςτης οδηγίας
R&TTE.
PL Symbol CE oznacza, że urządzenie spełnia istotne wymogi dyrektywy R&TTE.
Page 5
English
5
Getting started
English
1 Getting started
Thank you for purchasing this product. This product has been designed and assembled with utmost
care for you and the environment. Because we at TRISTAR like to think of the future of our planet
and our children, we aim to do our best to help saving the environment. This is why we decided to
reduce the number of pages of our user guides and product manuals. If you keep in mind that it takes
up to 24 trees to produce 1 ton of paper, publishing product manuals in 21 languages
costs our planet a lot of trees. In this short manual provided with your device you can
find a brief explanation of how to install and use your device.
If you would still like to discover all the features of your new device, please visit our
website (www.tristar.eu) where you can download the complete user manual in your
language. By doing this TRISTAR hopes to do its share to make our planet a better place,
but we can only succeed with your help!
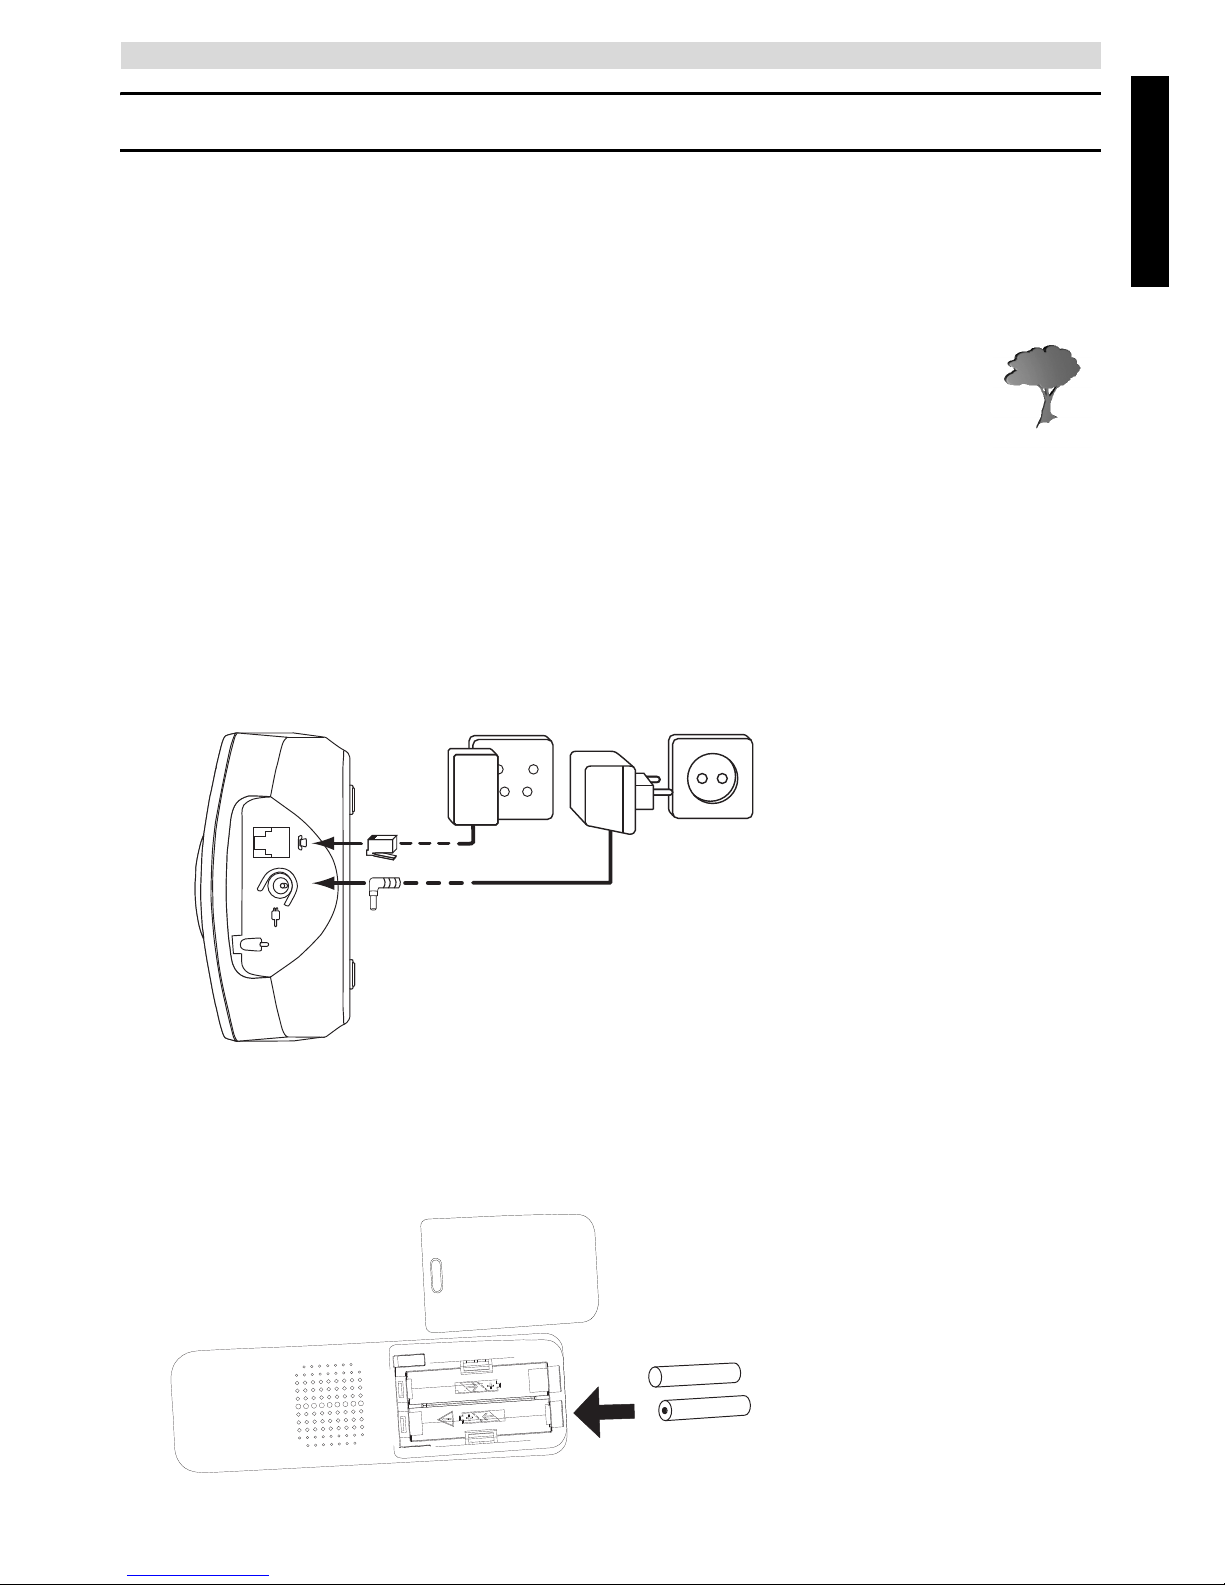
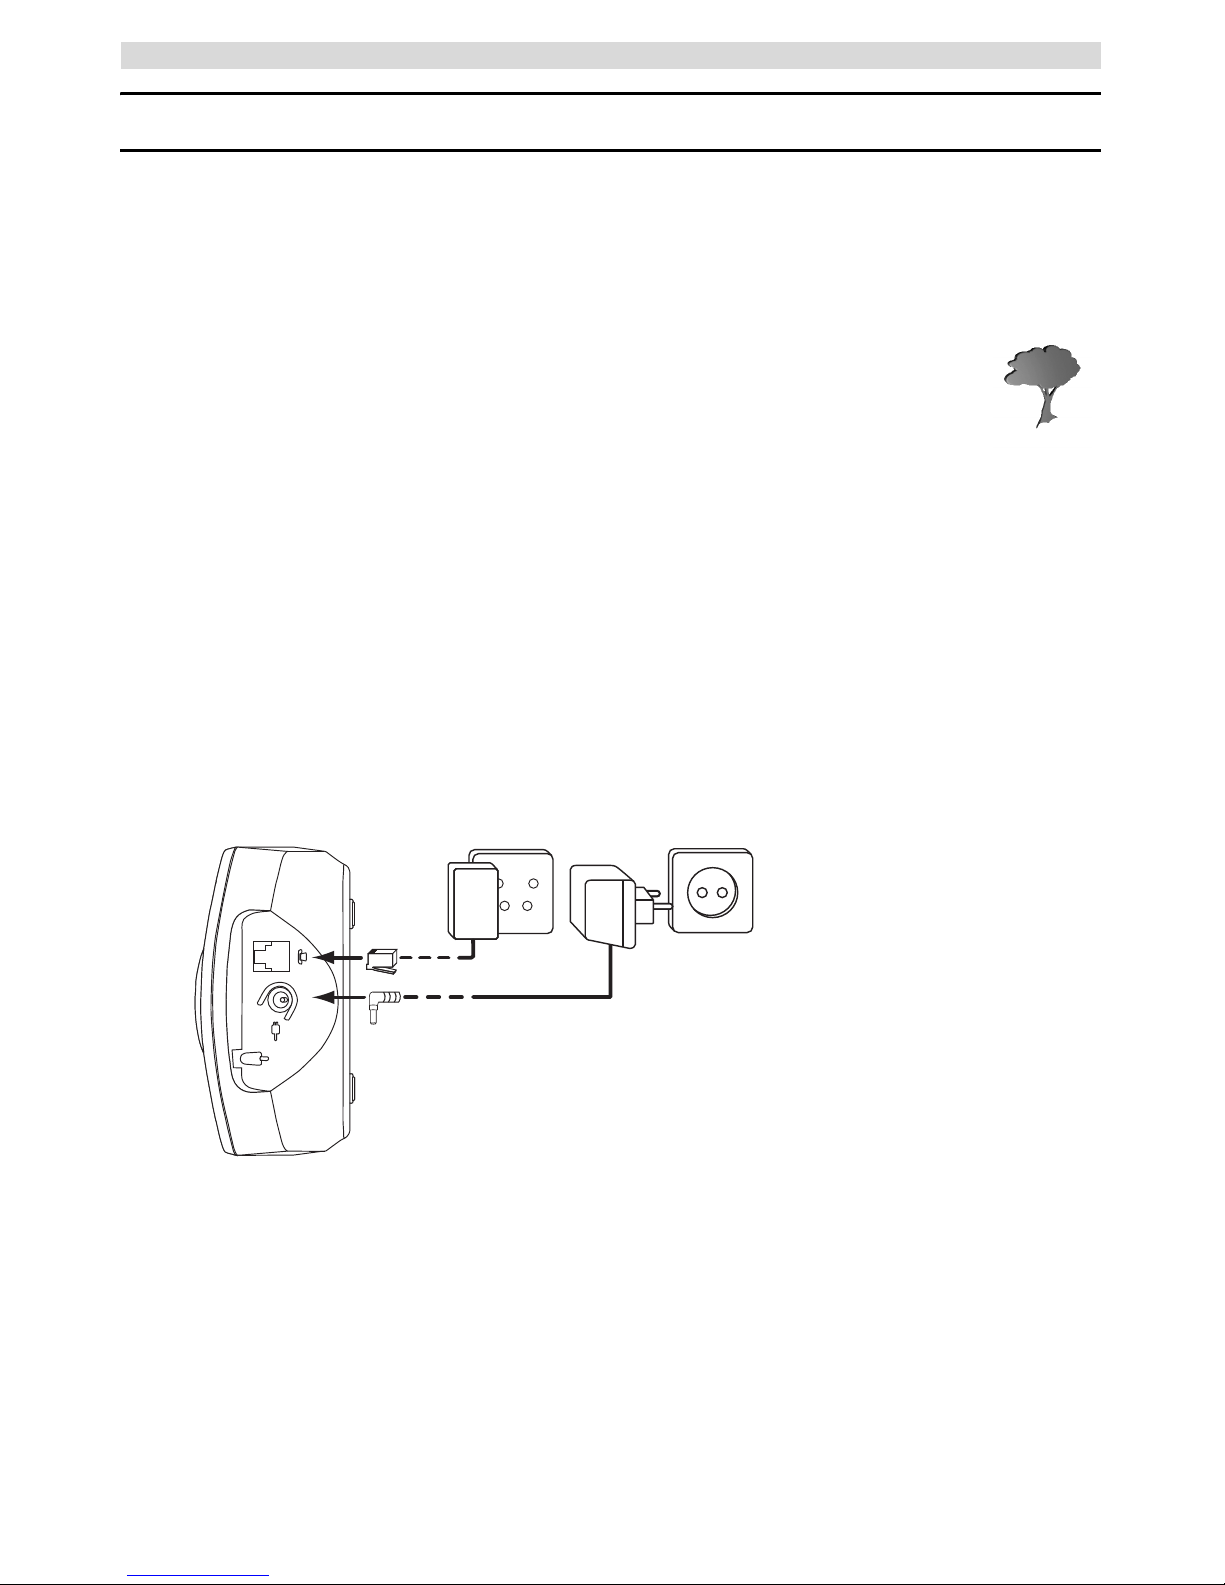
1.1 Installing the base
For installation, do the following:
1 Plug one end of the adaptor into the outlet and the other end into the adaptor jack on the back of
the base.
2 Connect one end of the telephone cord with the wall phone jack and the other end to the bottom
of the base.
3 Put the telephone- and AC power line cord in the base guides as shown on picture 1A.
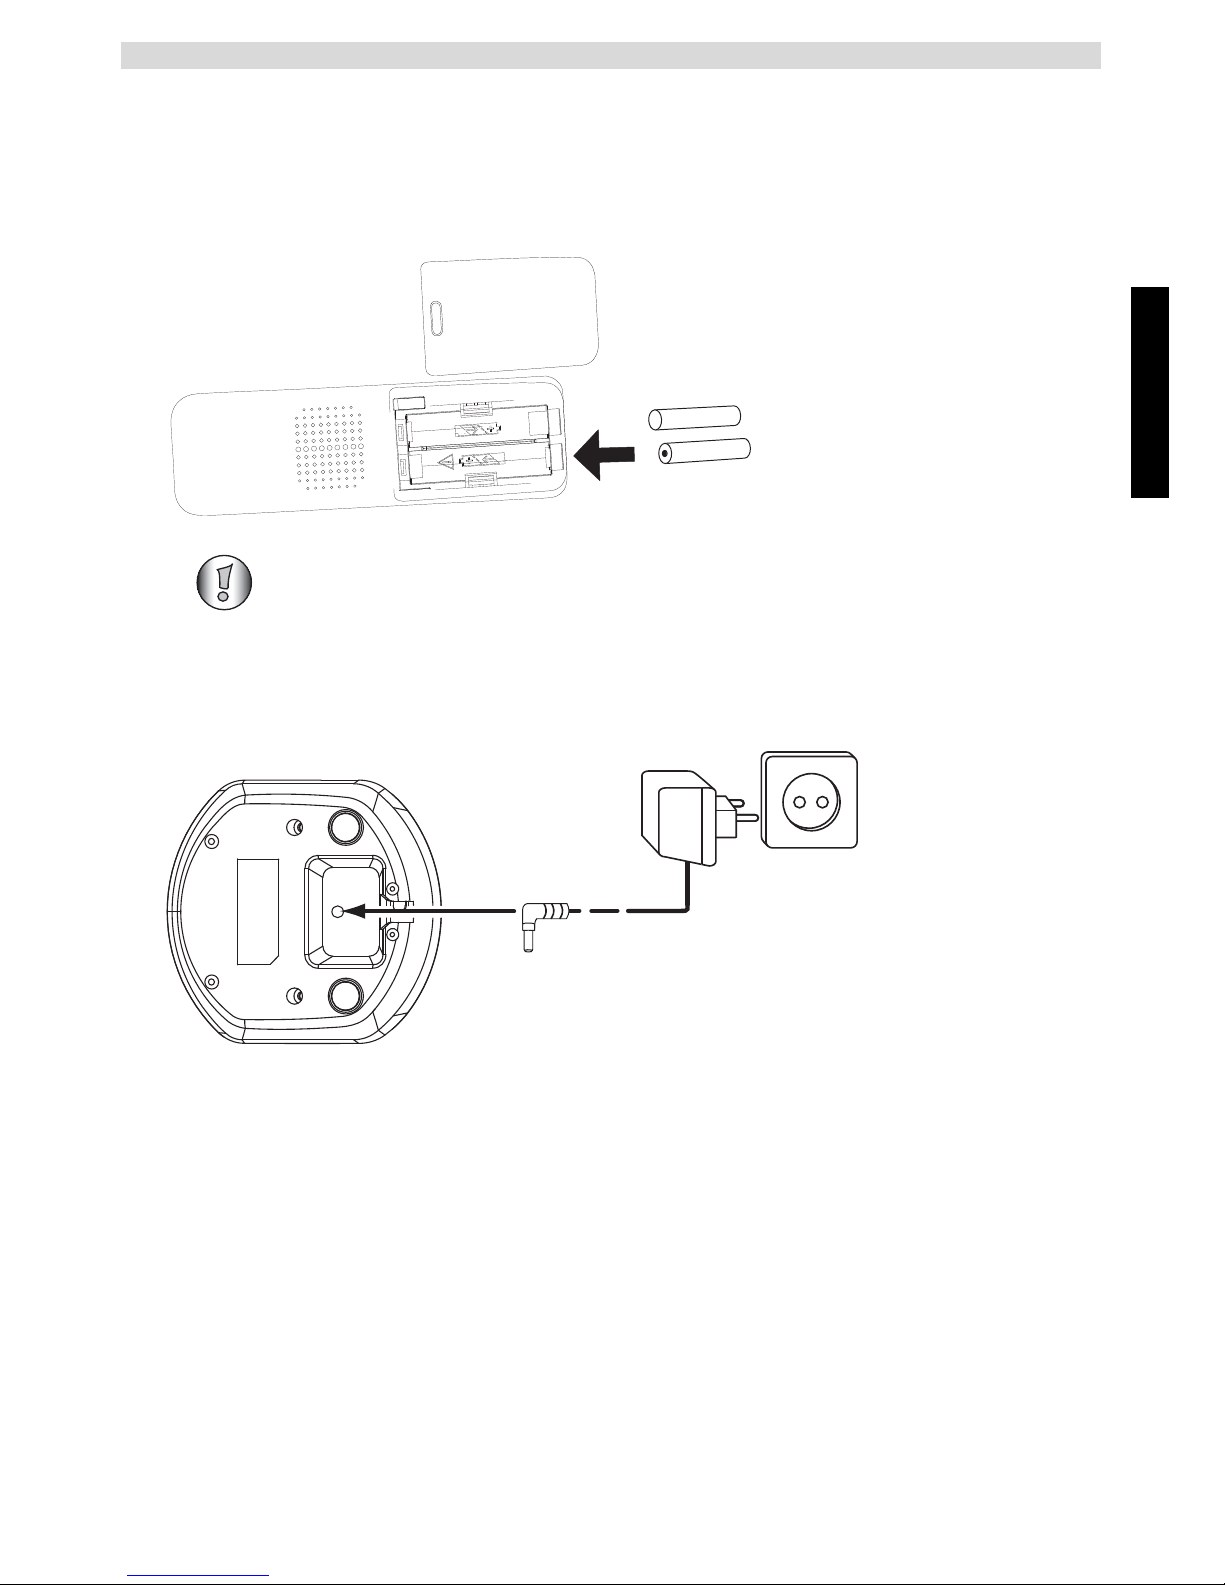
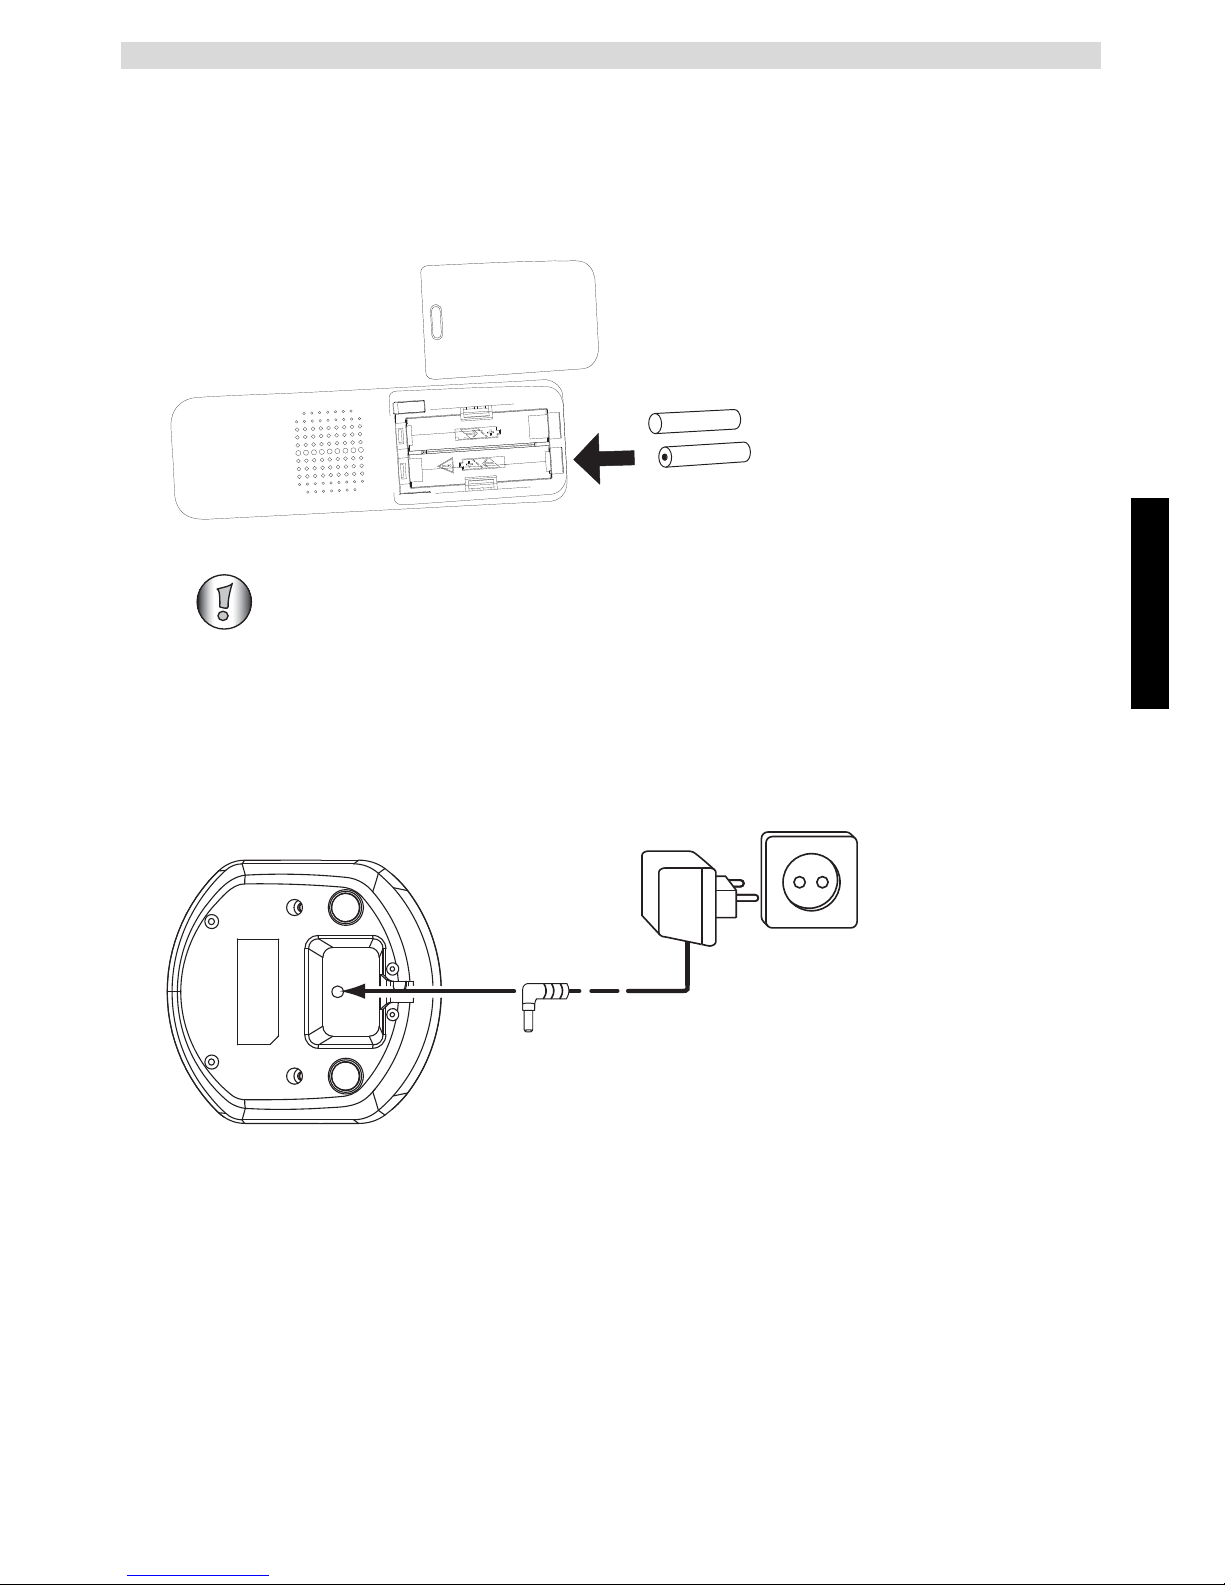
1.2 Installing the handset
1 Open the battery compartment as shown on picture 1B.
2 Insert the batteries respecting the polarity (+ and -).
3 Close the battery compartment.
4 Leave the handset on the base unit for 20 hours.
A
B
C
- 1A Back view of base A. Power cable
B. Telephone wall outlet
C. Telephone cord
+
-
-
+
A
B
- 1B Back view of handset A. Cover
B. Rechargeable batteries
Page 6
6
Getting started
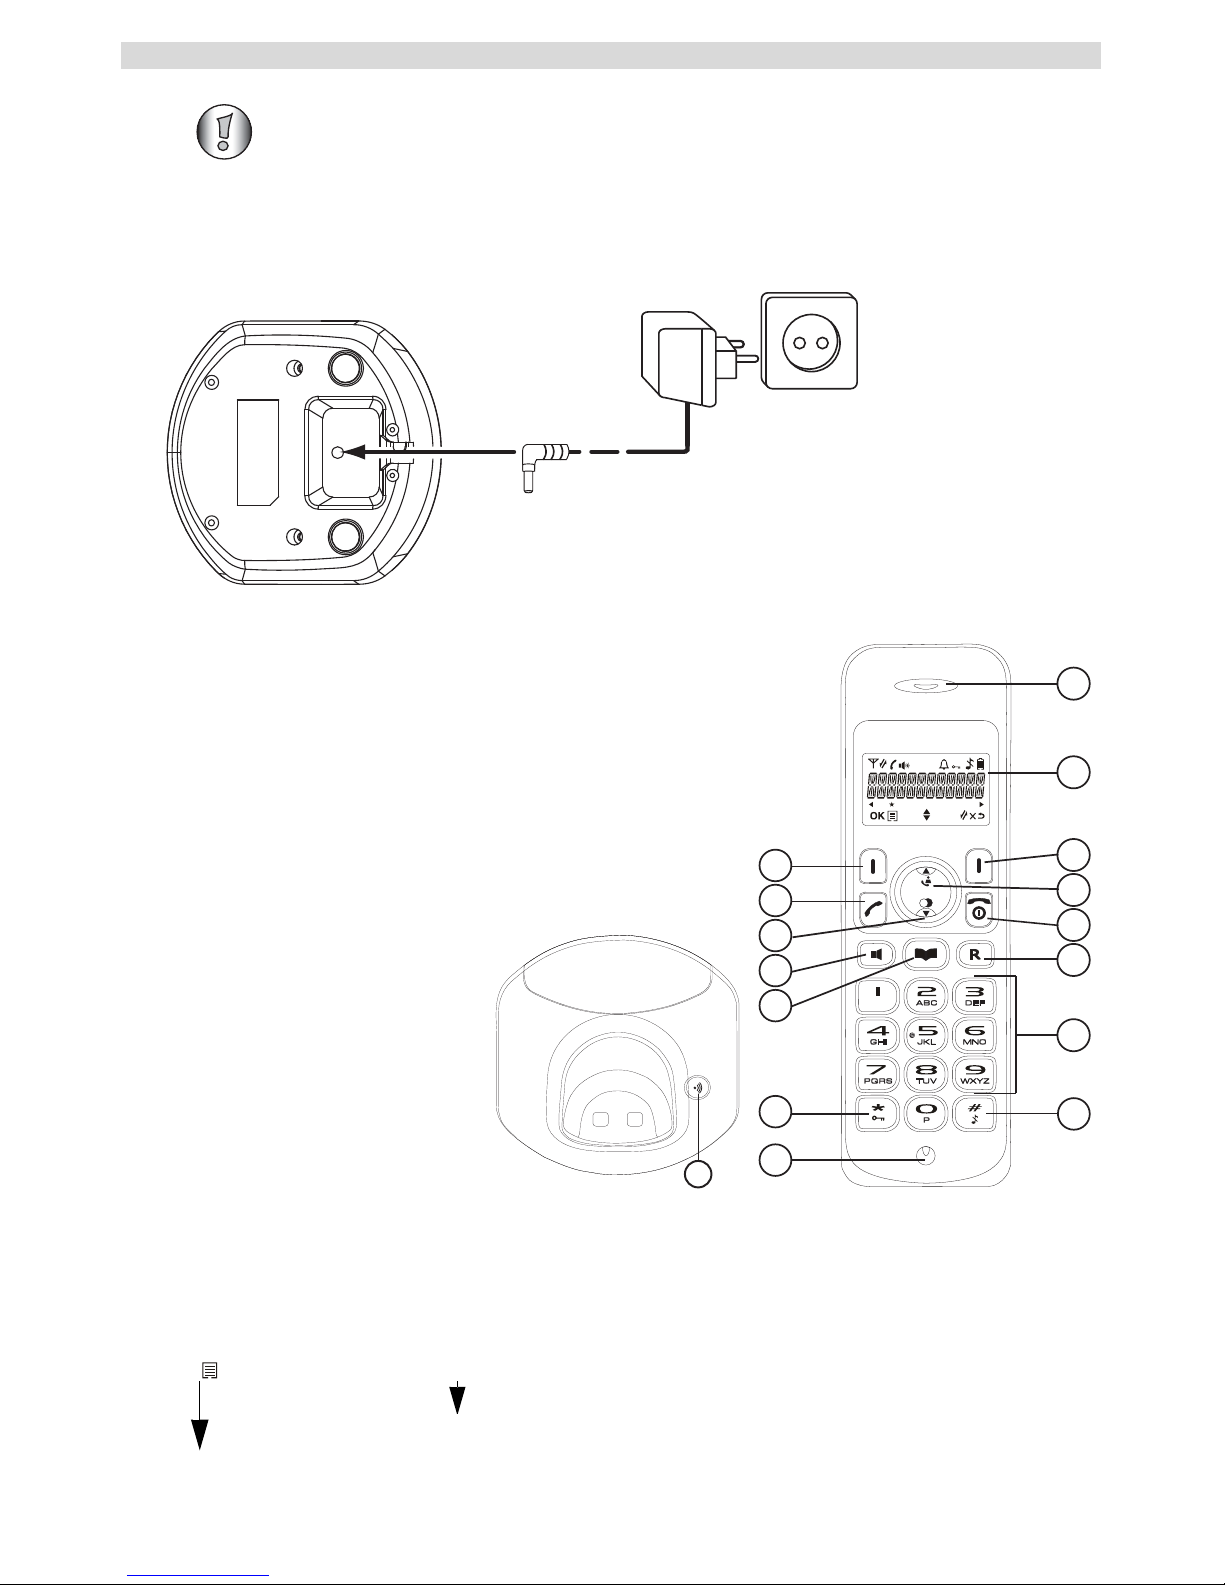
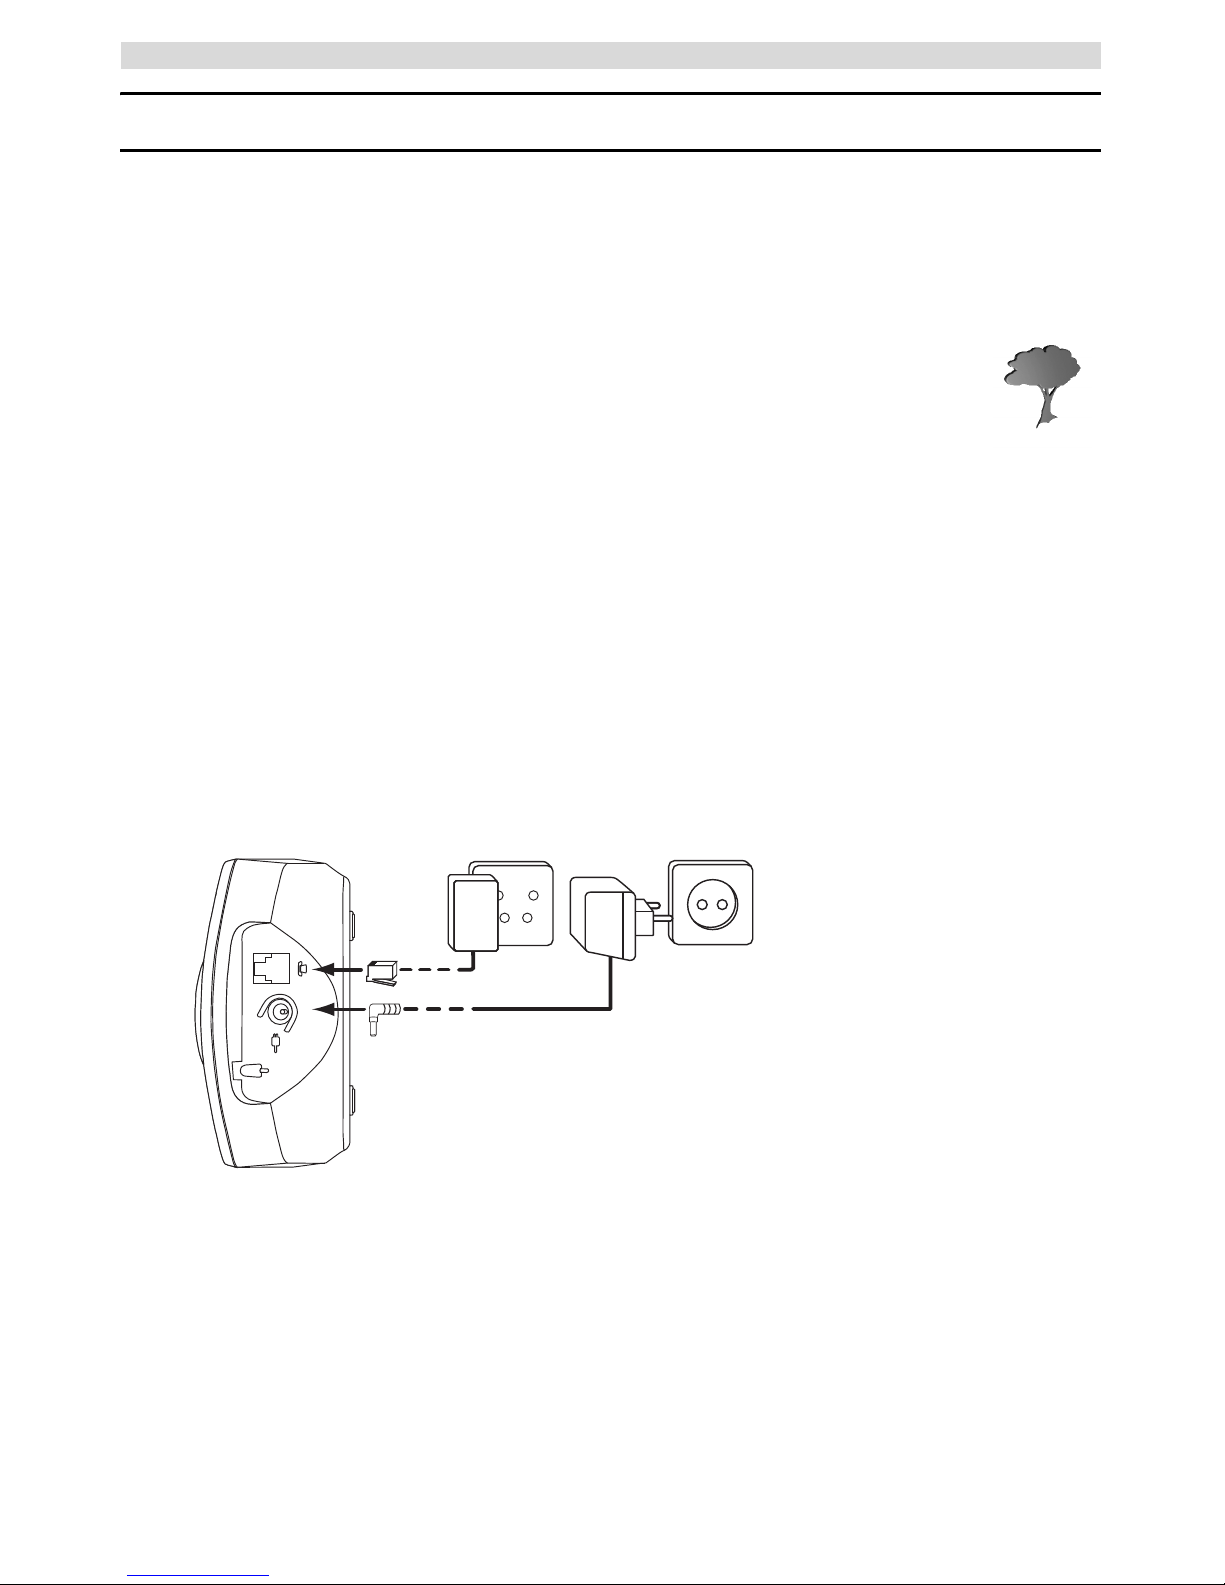
1.3 Installing the charger (Only for Butler E600 Twin/Triple/Quattro)
1 Plug one end of the adaptor in the power outlet and the other end into the adaptor jack at the
bottom of the charger.
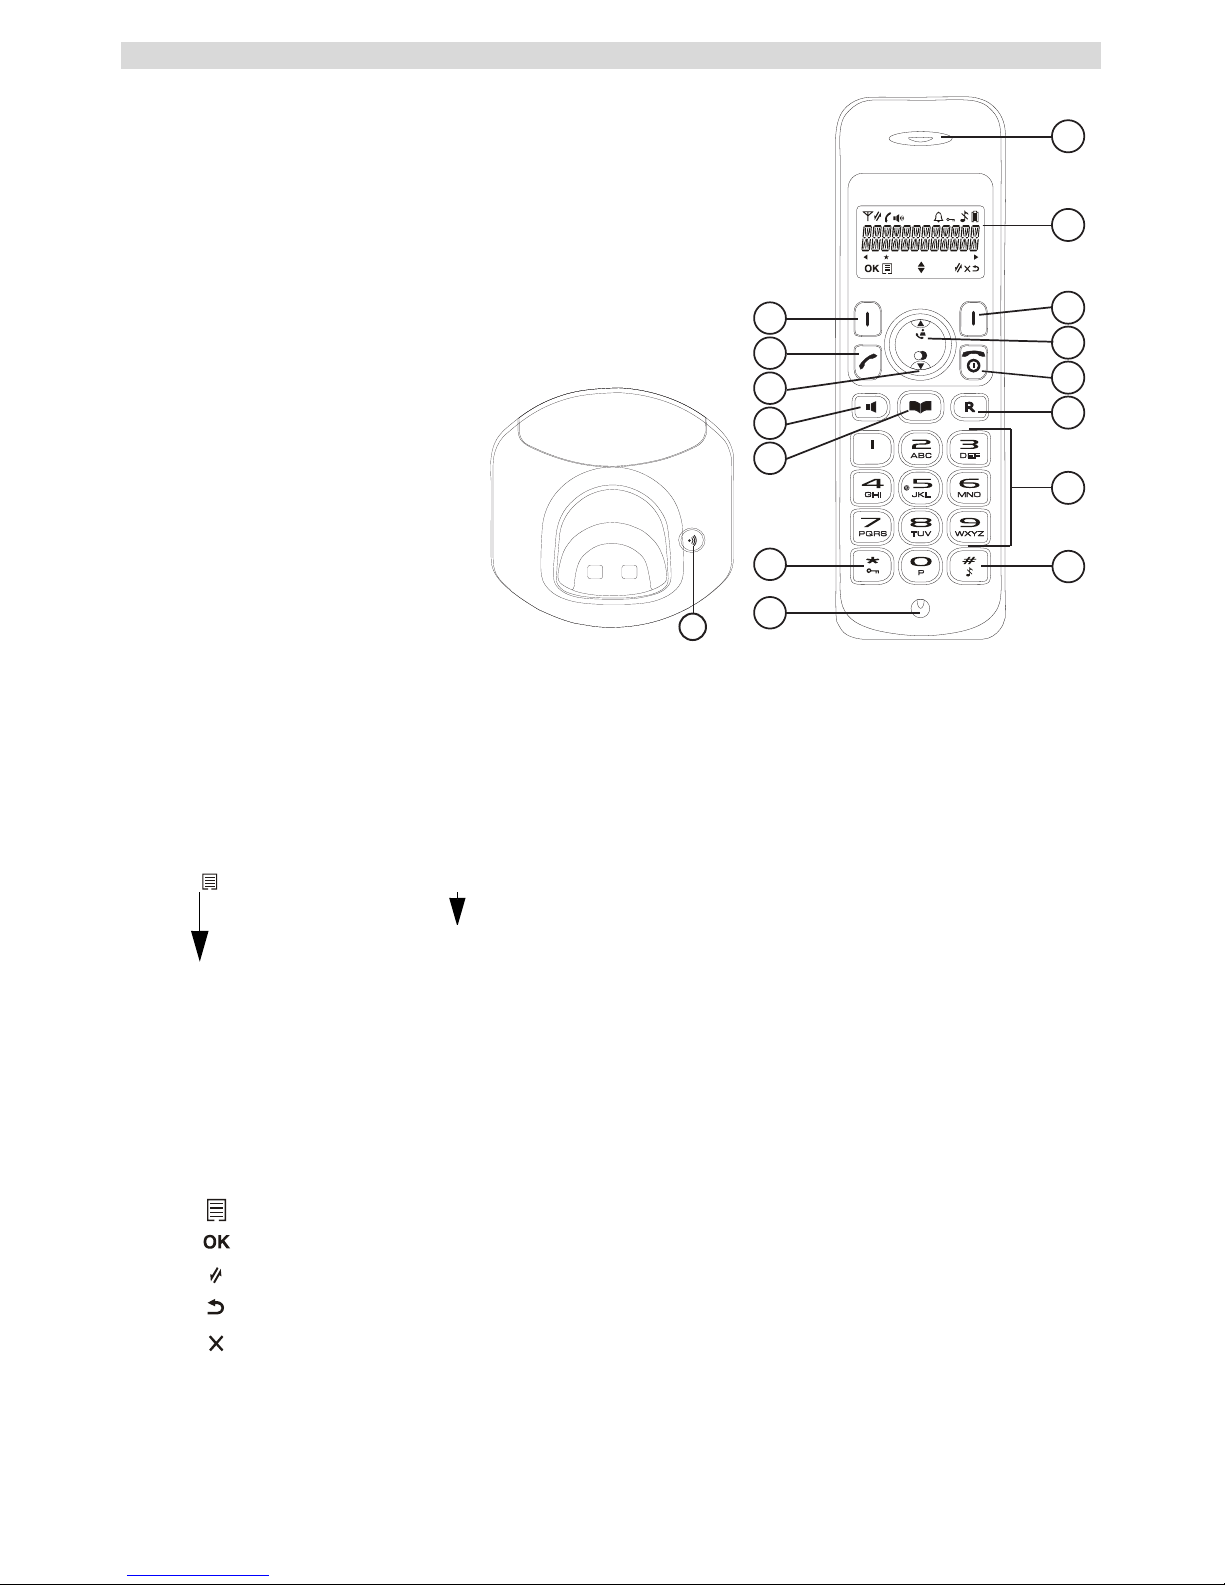
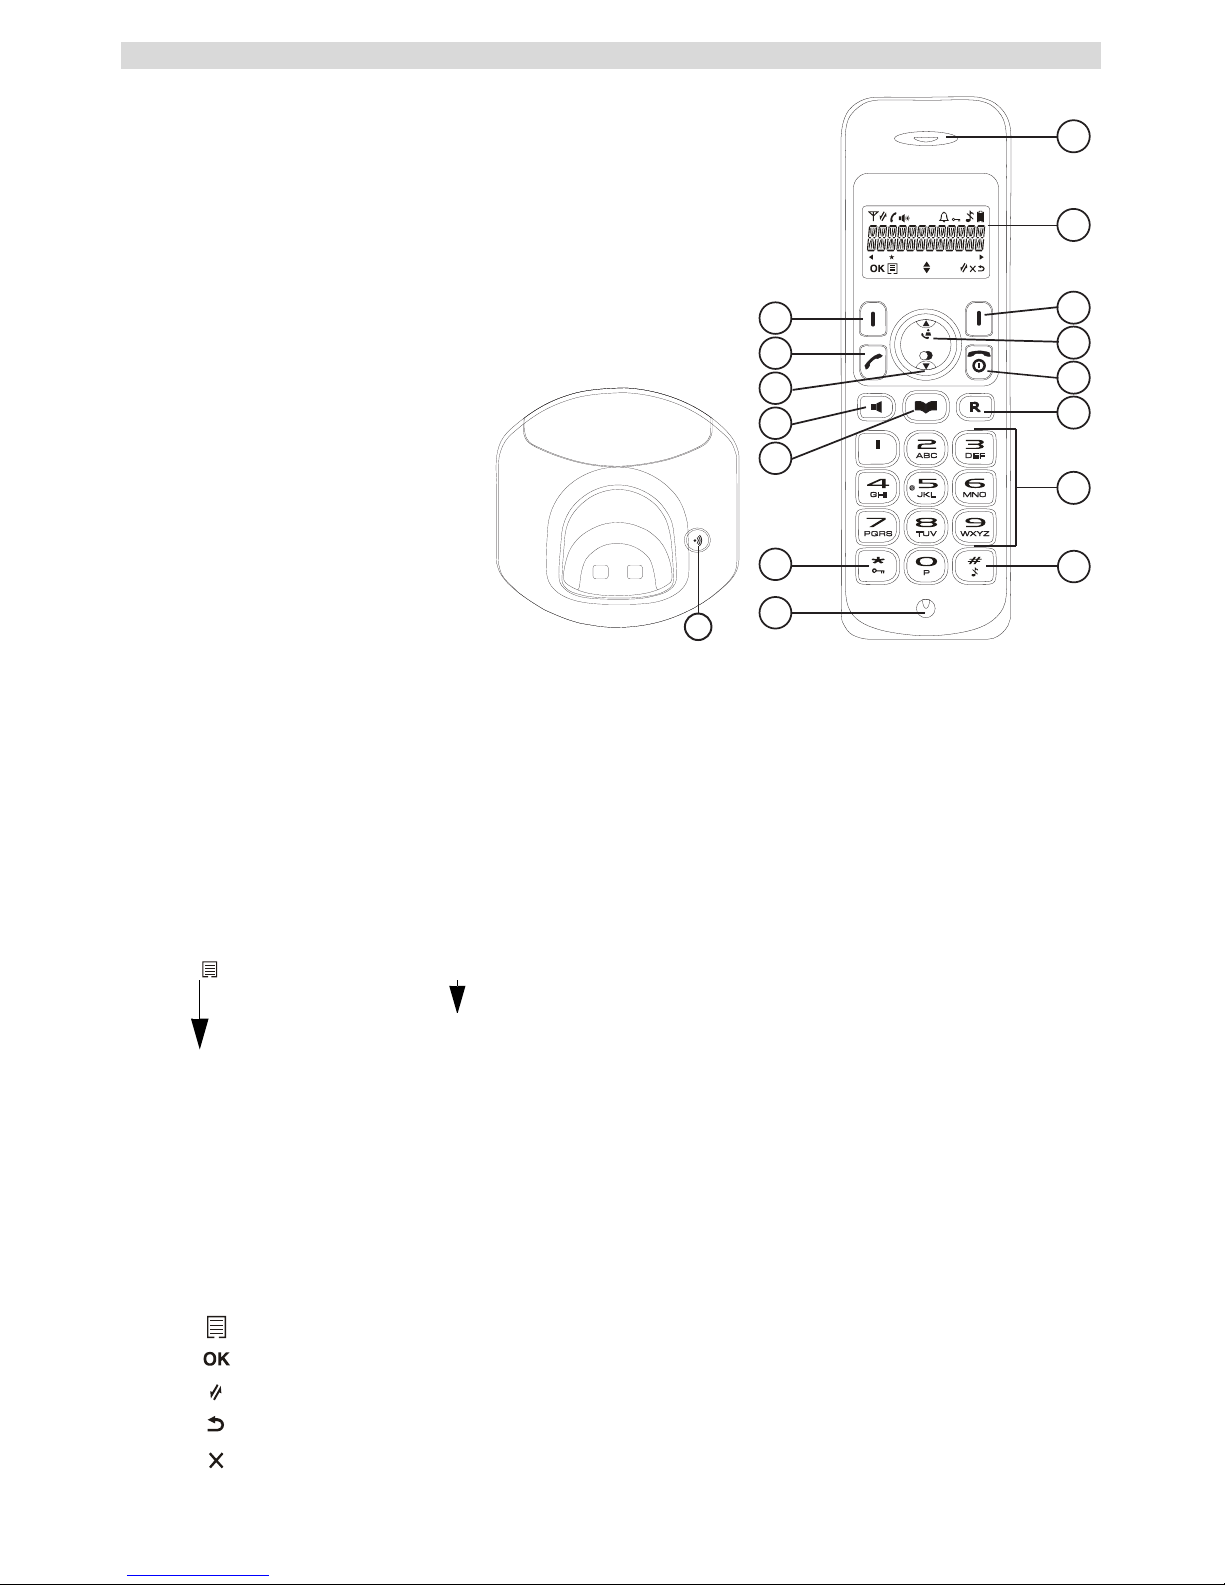
1.4 Keys/LED’s
1
3
4
5
6
7
2
8
11
10
9
12
13
14
15
- 1D Handset -
16
- 1E Base -
Handset
1. Earpiece speaker
2. Display
3. Right menu key
4. Up / call log key
5. Power on-off / on-hook key
6. Flash key
7. Alphanumeric keys
8. Ringer on-off
9. Microphone
10. Keypad lock key
11. Phonebook key
12. Handsfree key
13. Down / redial key
14. Off-hook key
15. Left menu key
Base
16. Paging key
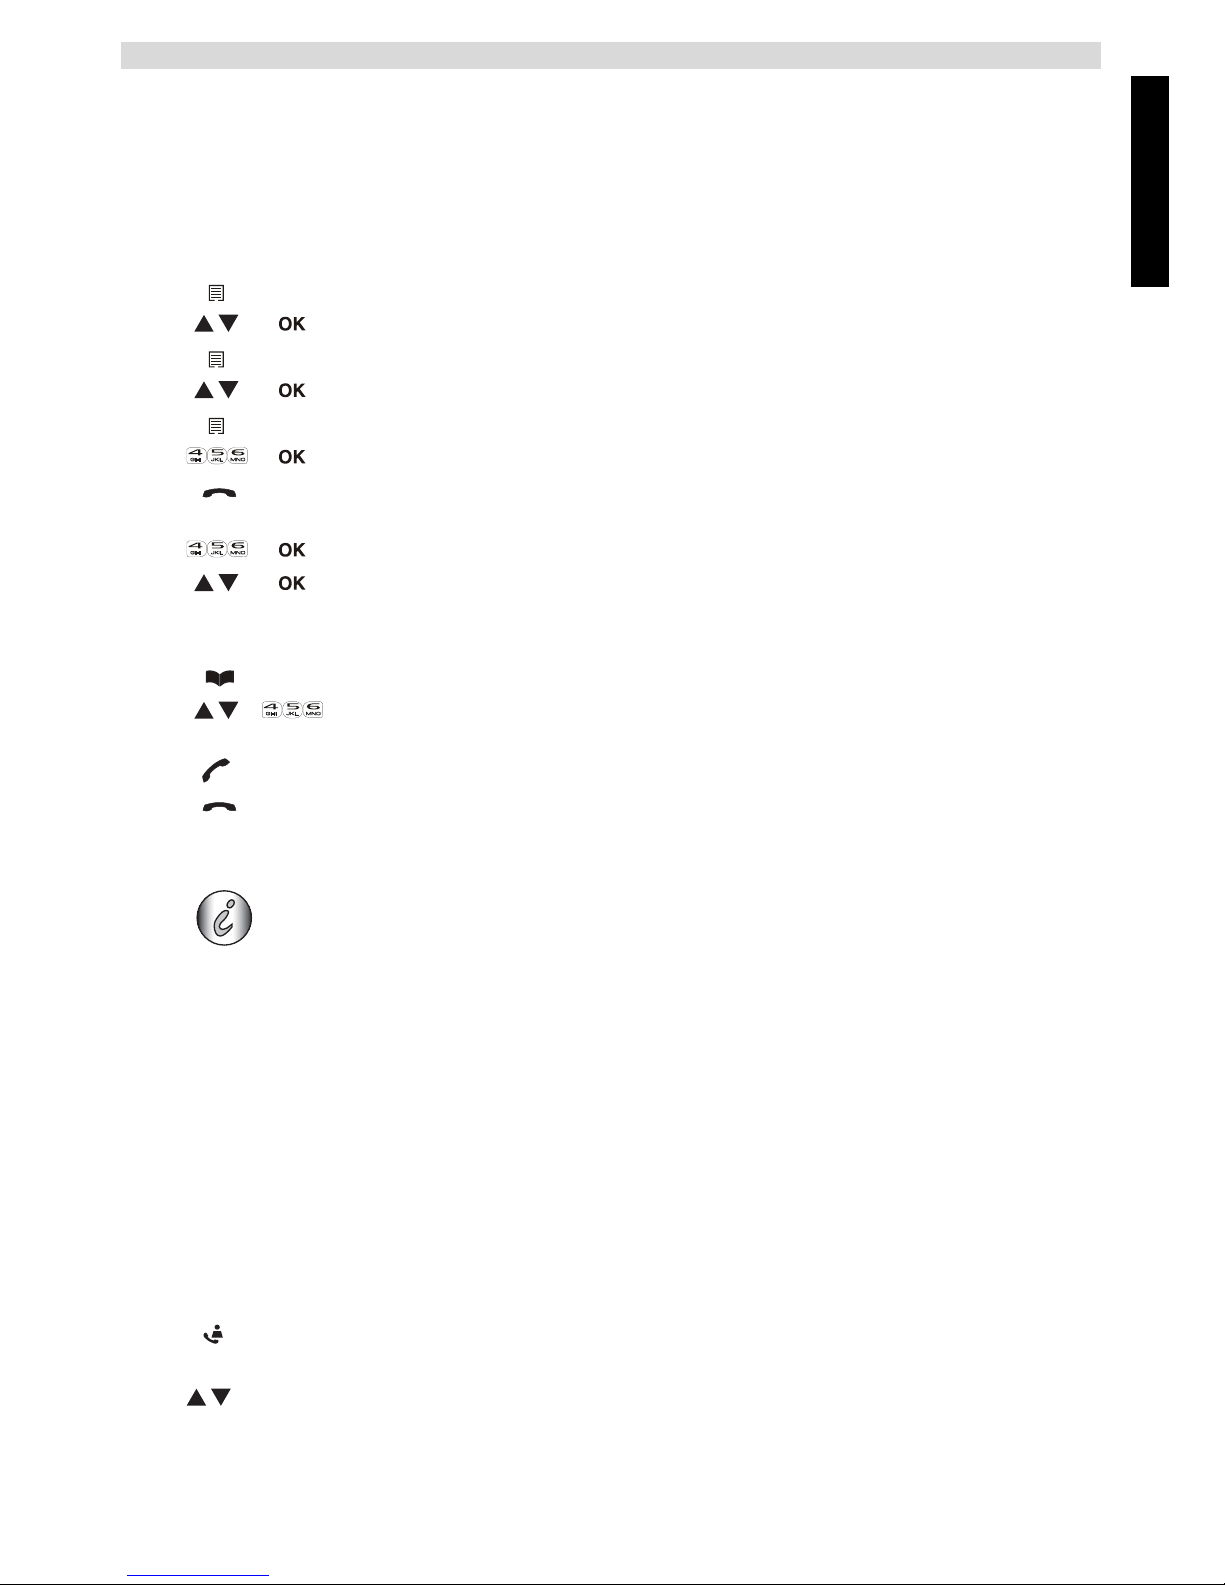
1.5 How to use this user guide
In this user guide, following method is used to clarify the instructions:
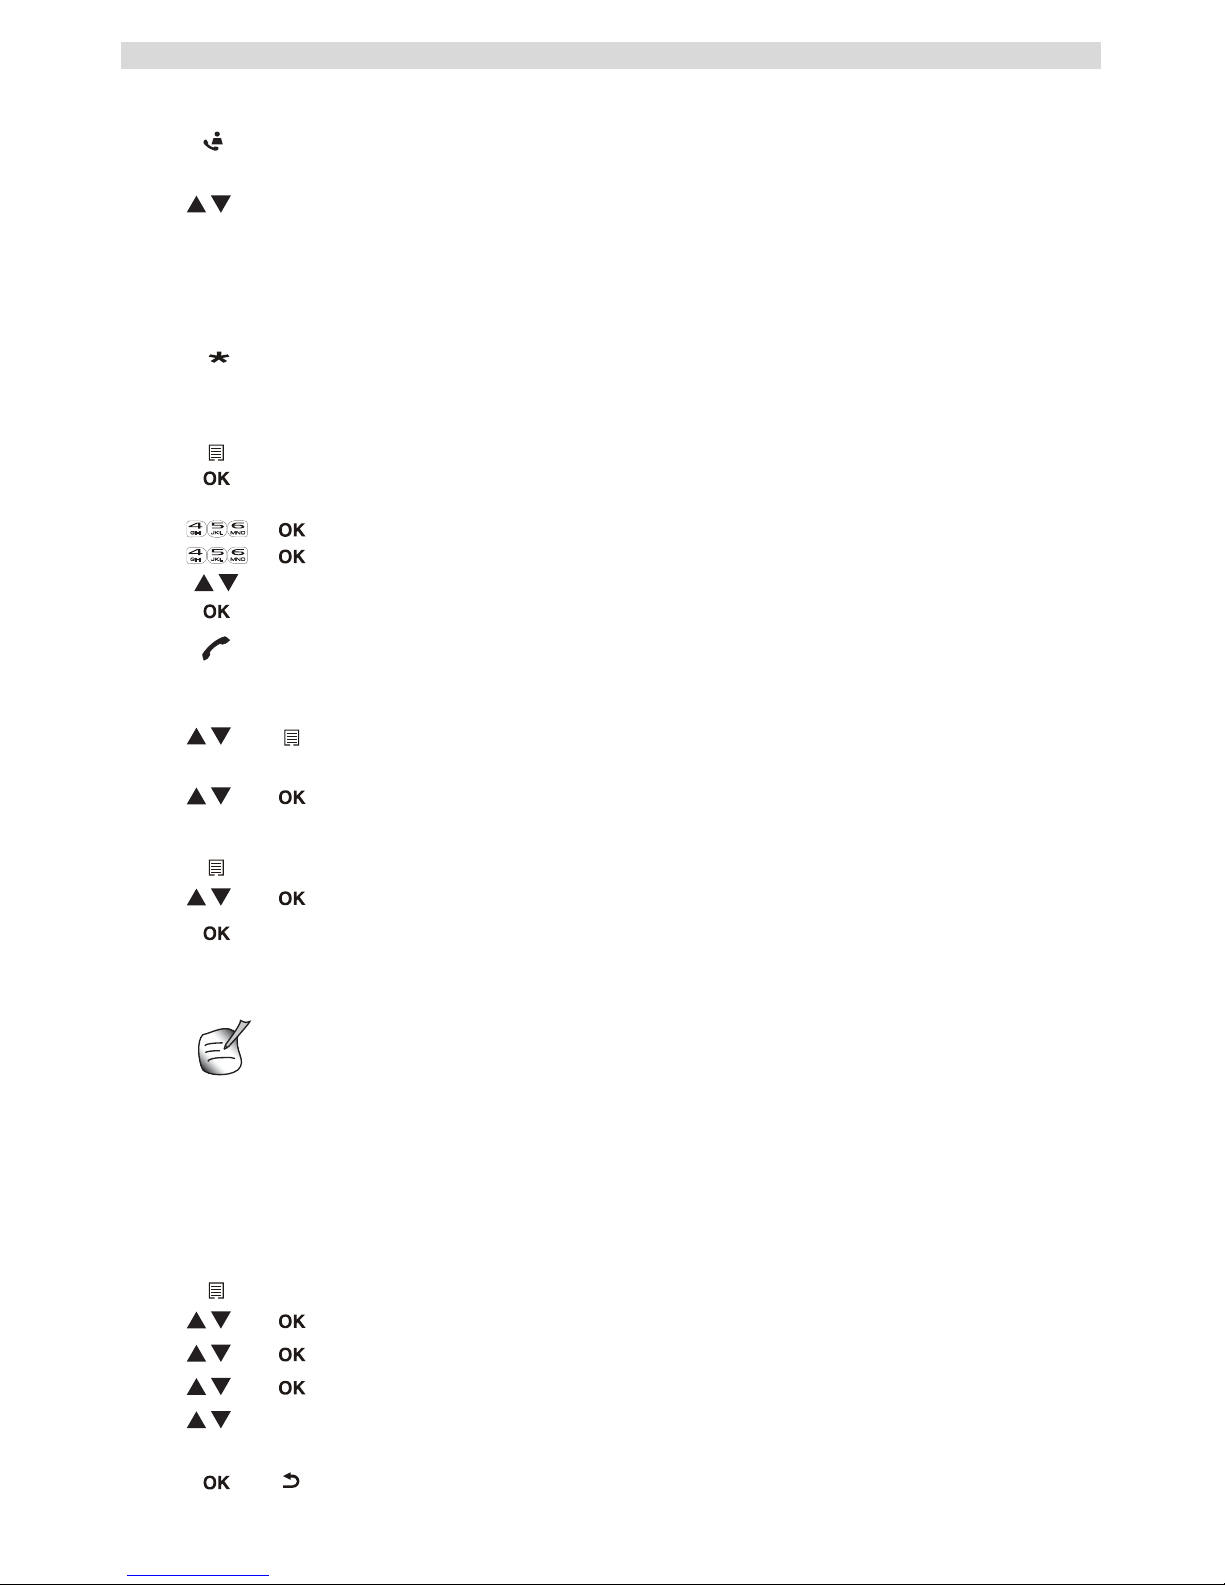
Key to press.
Before you use the telephone for the first time, you must first make sure the battery
is charged for 20 hours. If you do not do this, the telephone will not work optimally.
Text....... “DISPLAY”.
Text that appears on the display of the phone is shown in the right column
between quotation marks.
A
- 1C Charger A. Adaptor with power cable
Page 7
English
7
Using the telephone
1.6 Navigating the menu
The Butler E600 has a menu system which is easy to use. Each menu leads to a list of options.
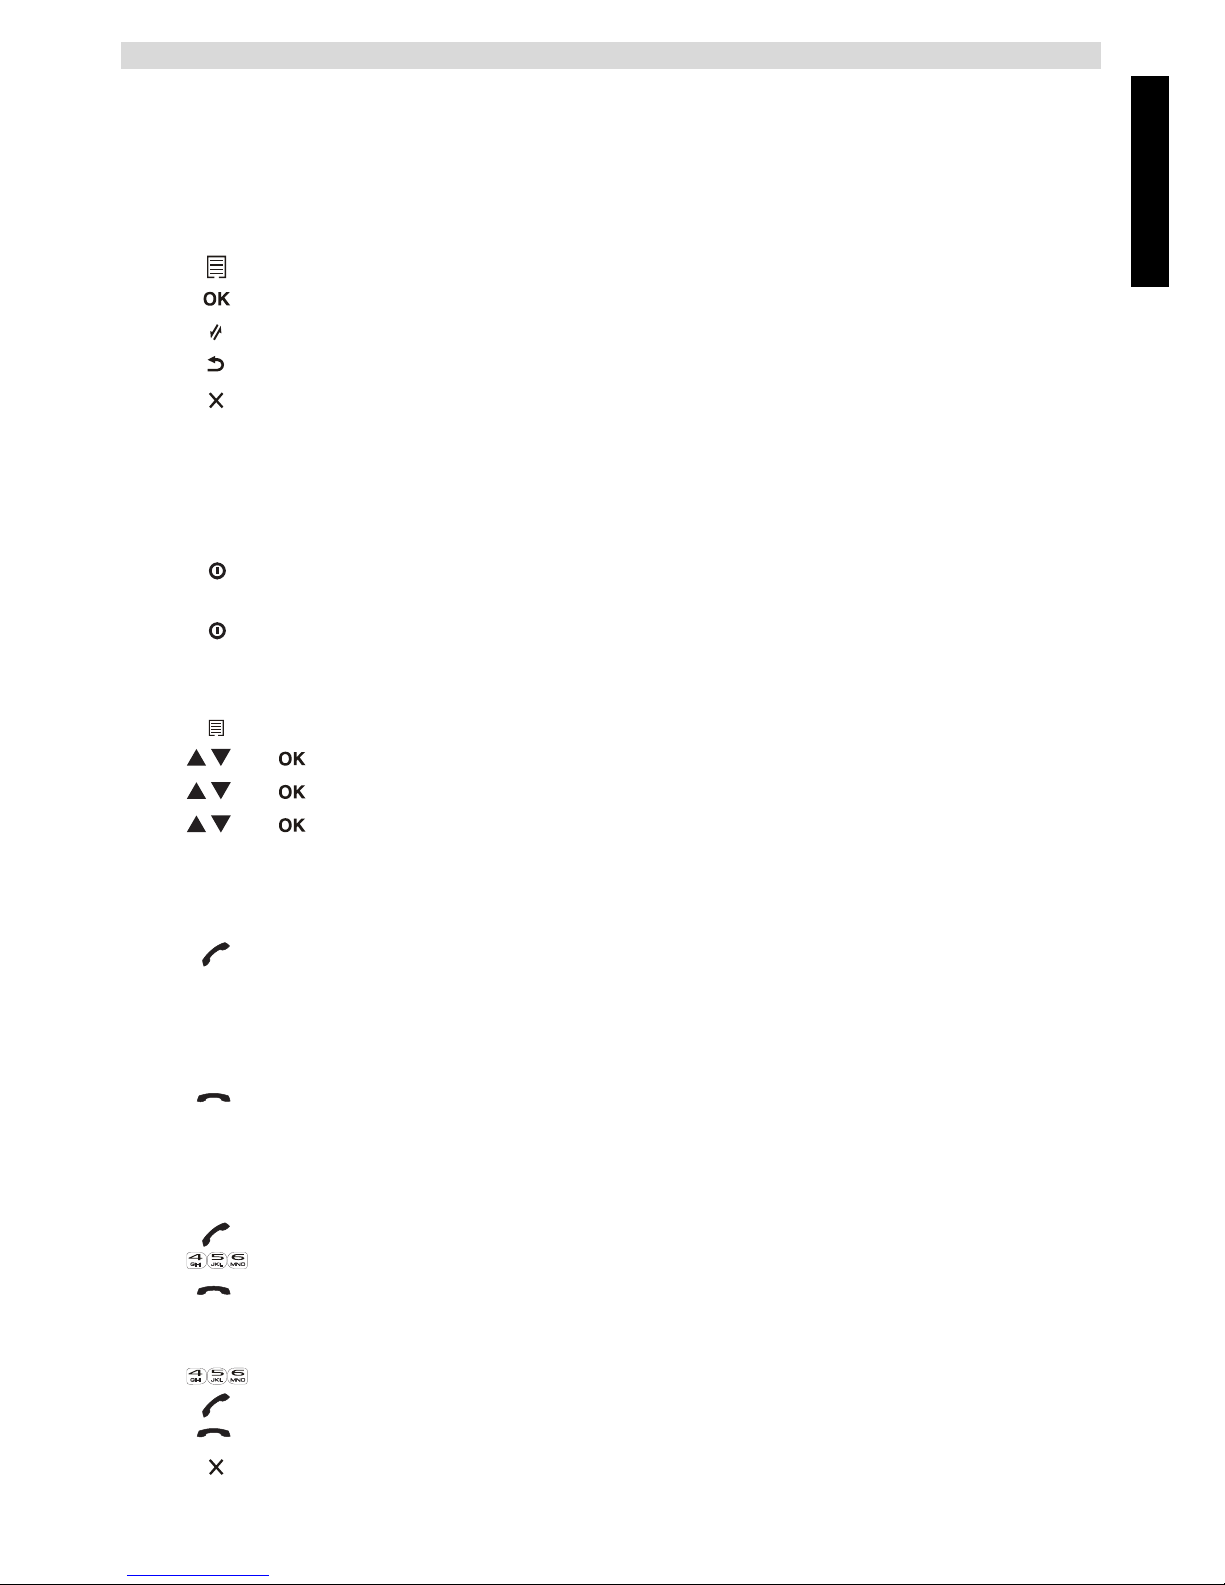
Display menu keys:
Display menu keys are located directly under the display (3) (15). The functions of these keys
change depending on the operation mode. The functions are described below:
2 Using the telephone
2.1 Switching the handset on/off
2.2 Changing the menu language
2.3 Receiving a telephone call
To take the call:
2.4 Making an external telephone call
Direct dialing
Pre-dialing
1 To open the menu or to select more menu options.
2 To confirm the current selection.
3 To make an internal call with other handsets.
4 To go back in the menu selection or to cancel the current operation.
5 To clear a character or stop the alarm. Or to mute/unmute the microphone
during call.
1 Press and hold the on/off key on the handset for 3 seconds. The handset will
search the base.
2 Press and hold the on/off key for 6 seconds. The display will go off.
1 Enter the menu by pressing the left menu key (15).
2 Select “HS SETTINGS” and confirm.
3 Select “LANGUAGE” and confirm.
4 Select a language and confirm.
1 Press the off-hook key.
OR
Lift the handset off its base if you have activated “Automatic answer”.
(See “5.3 Automatic answer”)
You are connected to your correspondent.
2 Press the on-hook key to hang up or put the handset back on the base.
1 Press the off-hook key to start the call.
2 Dial the telephone number.
3 Press the on-hook key to hang up or put the handset back on the base.
1 Dial the telephone number.
2 Press the off-hook key to start the call.
3 Press the on-hook key to hang up or put the handset back on the base.
4 To correct a number use the delete key to delete an entered digit.
Page 8

8
Using the telephone
2.5 Making an internal telephone call
2.6 Internal call transfer
Transfer an external call to another handset.
2.7 Speaker volume during call
2.8 Microphone mute
It is possible to mute the microphone during a conversation.
2.9 Redial memory
You can redial up to 5 of the last numbers called.
2.10 Using the alphanumerical keypad
With your telephone, you can also enter alphanumeric characters. This is useful for entering a name
into the phonebook, giving a name to the handset, ...
To select a letter, press the corresponding key as many times as necessary. For example, to select
an ‘A’, press ‘2’ once. To select a ‘B’, press ‘2’ twice and so on. To select ‘A’ and then ‘B’
consecutively, press ‘2’ once, wait until the cursor moves on to the next character, then press ‘2’
twice.
1 Press the right menu key.
2 Enter the number of the internal handset (1 to 5).
3 Press the on-hook key to hang up or put the handset back on the base.
1 Press the left menu key during conversation.
2 Select “INTERCOM” and press OK.
3 Enter the number of the internal handset (1 to 5), the external caller is put
on hold.
4 When the other handset picks up, press the on-hook key to hang up and
transfer the call.
If the internal correspondent does not pick-up, press the on-hook key again to
reconnect to the external caller on line.
5 Press the on-hook key to hang up or put the handset back on the base.
1 During a conversation, press the up or down key to change the volume
accordingly.
1 Press the right menu key. You can talk freely without being heard by the
calling party.
“MUTED” is displayed.
2 Press the right menu key again to return to normal mode.
1 Press the redial key.
2 Select a number. If the number is in the phonebook, the name will be
shown.
3 Press the off-hook key to start the call.
4 Press the on-hook key to return to standby.
Press ‘1’ to select a space.
Press right menu key to delete a character.
Page 9
English
9
Phonebook
3 Phonebook
Each handset can store up to 30 telephone numbers and names. Names can be up to 12 characters
long and numbers up to 24 digits.
To enter alphanumerical characters, refer to the section “2.10 Using the alphanumerical keypad”.
3.1 To add an entry into the phonebook
Press on-hook key to exit the menu without taking any modifications into
account.
3.2 To dial an entry from the phonebook
4 Caller Identification
When you receive an external call, the telephone number of the caller appears on the handset
display. The telephone can receive calls in both FSK and DTMF. You can also see his or her name
if it is transmitted by the network. If the name is programmed in the phonebook, the name in the
phonebook is displayed!
The telephone can store 30 calls in a call list (received and missed calls) that can be reviewed later.
This function is only available if your are subscribed to the caller ID information.
When the memory is full, the new calls automatically replace the oldest calls in the memory.
To consult the list of calls:
1 E
nter the menu.
2 Select “PHO
NEBOOK” and confirm.
3 Pre
ss menu.
4 Select “ADD” and confirm.
5 Press menu.
6 Enter
the name and confirm.
7 Enter
the number and confirm.
8 Select a ring melody (1-8) and
confirm.
1 Press the phonebook key.
2 Sel
ect a name or enter the first letter of the name. (The list scrolls in
alphabetical order.)
3 Press the off-hook key to start the call.
4 Press the on-hook key to hang up or put the handset back on the base.
This service only works when you have a Caller ID/Clip subscription. Please contact your telephone company.
The caller identity is replaced by the call duration after 15 seconds in
communication.
1 Press the call log key.
If there are no calls in the list “EMPTY” will appear.
2 Scroll through the calls. The callers names will be shown if the name is send
by the network or is stored in the phonebook. If you are at the end of the list
you will hear a beep tone.
When * is shown at the centre of the bottom line, the call is unanswered.
Page 10

10
Personalize the handset
You can delete each entry separately:
To delete all entries at ones:
5 Personalize the handset
5.1 Adjusting the ring volume
Handset ring volume internal/external calls
The handset ring volume for internal or external calls cannot be set separately. You can choose
from High, mid, low and “OFF”.
5.2 Choosing the ring melody
Each handset can ring with a different melody. The handsets can ring with a different melody
according to whether the call is internal or external. You can choose from 8 different ringer
melodies:
3 Press the ‘*’ key to see the telephone number.
If the telephone number is longer than 12 digits, press the ‘#’ key again to see
the complete number.
4 Press the left menu key to add this entry to the phonebook if it’s not already
stored. Press OK when “ADD TO PB” is shown on the display.
Enter or modify the name and press OK.
Enter or modify the telephone number and press OK.
Select the melody (1-8) which will be heard when this number is calling.
Press OK, the entry will be stored in the phonebook.
5 Press the off-hook key to call back a correspondent, when his telephone
number or name is displayed.
1 Scroll to the call you want to delete and press the left menu key.
2 Select “DELETE” and press OK.
1 When you are in the call list press the left menu key.
2 Select “DELETE ALL” and press OK.
3 Press OK again to confirm.
Every programmation is confirmed at the end by a double or single long beep. A
double beep confirms the validation of your choice.
1 Enter the menu by pressing the left menu key.
2 Select “HS SETTINGS” and confirm.
3 Select “RING SETUP” and confirm.
4 Select “RING VOLUME” and confirm.
5 Select a volume (HIGH, MID, LOW or “OFF”).
6 Confirm or return to the previous menu.
1 Enter the menu by pressing the left menu key.
2 Select “HS SETTINGS” and confirm.
3 Select “RING SETUP” and confirm.
4 Select “INT RING” to change the internal melody or “EXT RING” to
change the external melody and confirm.
5 Select a melody (1 to 8).
6 Press the OK key to confirm or return to the previous menu.
#
Page 11

English
11
Personalize the handset
5.3 Automatic answer
When there is a incoming call and the handset is on the base, the phone automatically takes the line
when lifted. This is the default setting, but can be set off:
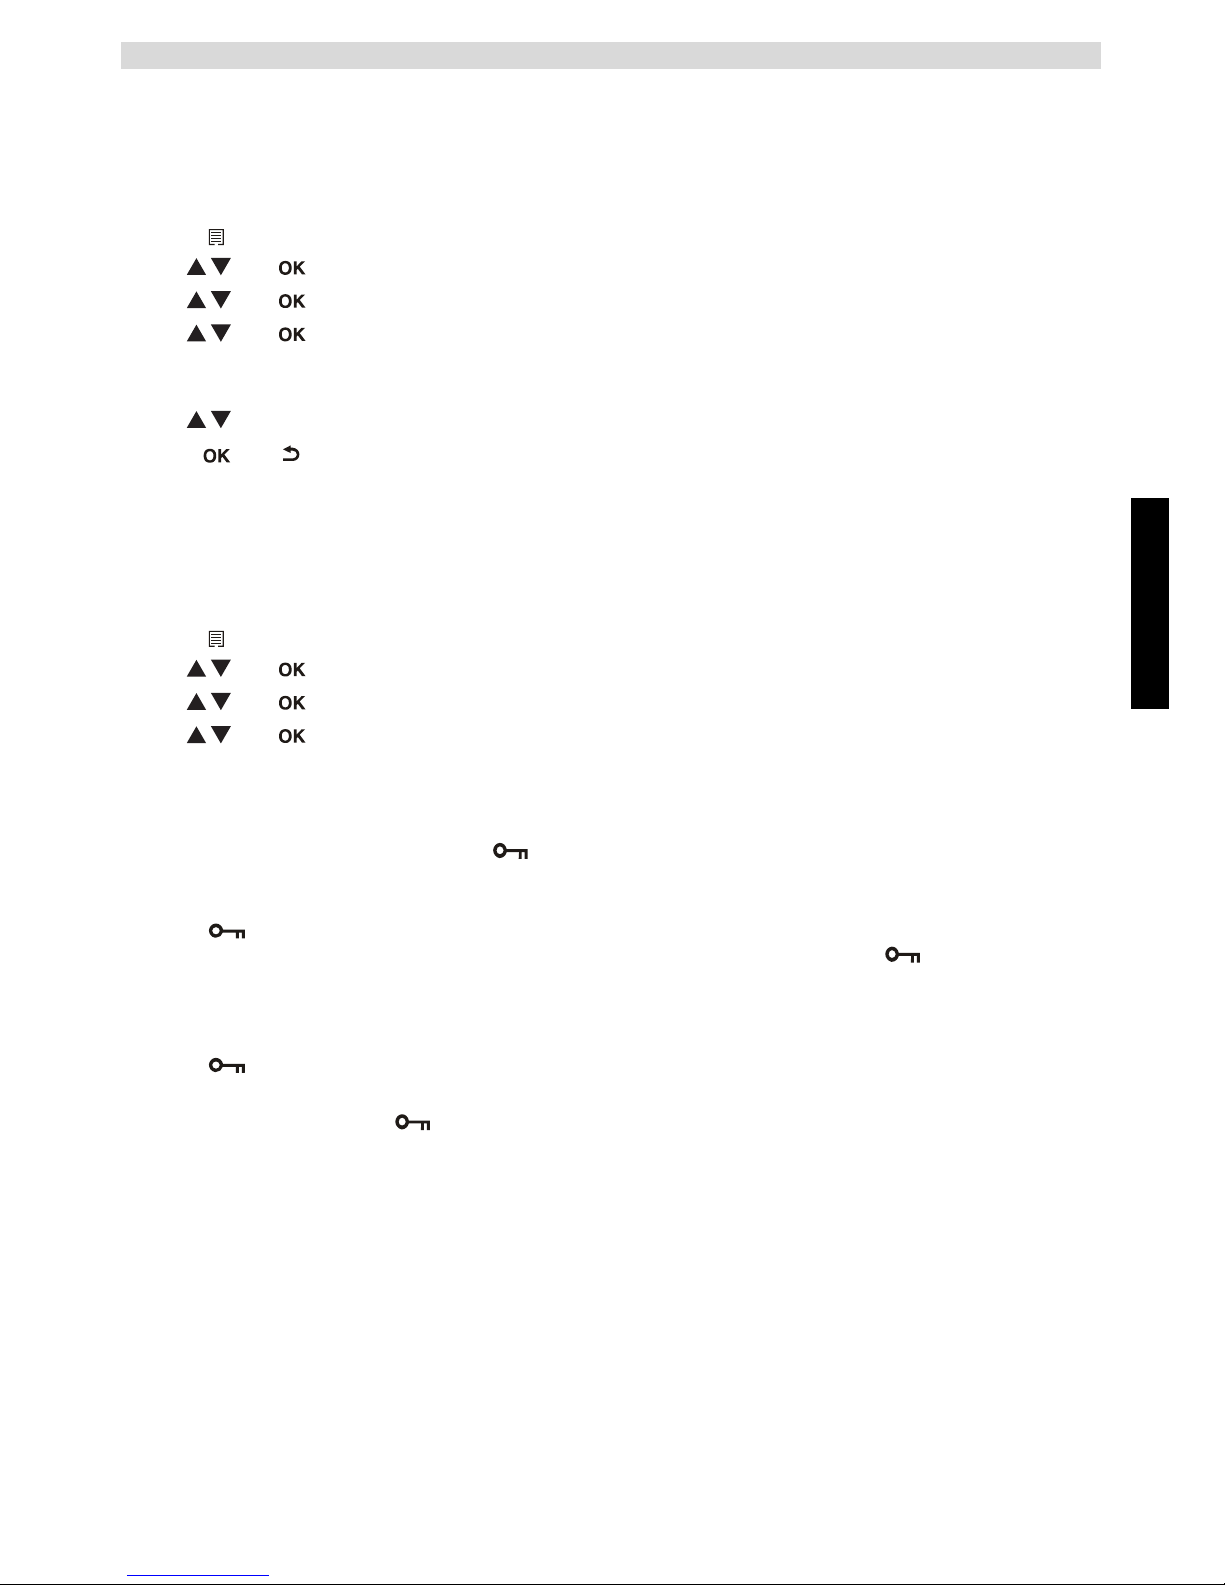
5.4 Keypad lock
The keypad can be locked so that no settings can be changed or no telephone number can be dialed.
The -icon will appear on the screen when keypad is locked.
Locking the keypad
Unlock the keypad
1 Enter the menu by pressing the left menu key.
2 Select “HS SETTINGS” and confirm.
3 Select “AUTO ANSWER” and confirm.
4 Select “ON” to activate or “OFF” to deactivate and confirm.
1 Press and hold the keypad lock key for 3 seconds. The keypad will be
locked. “ “ Will appear on the screen.
1 Press and hold the keypad lock key for 3 seconds.
2 “ “ Will disappear from the screen.
Page 12
12
Aan de slag
Nederlands
1Aan de slag
Hartelijk dank voor de aankoop van dit toestel. Dit product is met uiterste zorg voor u en het milieu
ontworpen en gemonteerd. Bij TRISTAR zijn we begaan met de toekomst van onze planeet en onze
kinderen, en daarom doen we ons uiterste best om het milieu te sparen. We hebben om die reden
besloten het aantal pagina's van onze gebruikershandleidingen en producthandleidingen
te beperken. Er zijn namelijk wel 24 bomen nodig om 1 ton papier te produceren. Dat
betekent dat er heel wat bomen worden gekapt om onze producthandleidingen in 21
talen uit te geven. In deze korte handleiding die bij uw toestel wordt geleverd, wordt kort
uitgelegd hoe u uw toestel moet installeren en gebruiken.
Als u alle eigenschappen van uw nieuwe toestel wilt ontdekken, raden wij u aan om naar onze
website te gaan (www.tristar.eu); daar kunt u de volledige gebruikershandleiding in uw taal
downloaden. Op deze manier hoopt TRISTAR zijn bijdrage aan een betere planeet te leveren,
maar dat kan alleen met uw hulp!
1.1 Het basisstation installeren
Volg voor installatie de volgende stappen:
1 Steek de stroomstekker van de adapter in het stopcontact en de stroomplug in de aansluiting aan
de onderkant van het basisstation.
2 Steek de telefoonstekker in het telefoonstopcontact en de telefoonplug in de connector aan de
onderkant van het basisstation.
3 Steek de telefoon- en stroomkabel in de aansluitingen van het basisstation, zoals weergegeven
in afbeelding 1A.
A
B
C
- 1A Onderaanzicht van het
basisstation -
A. Stroomkabel
B. Telefoonstopcontact
C. Telefoonkabel
Page 13
Nederlands
13
Aan de slag
1.2 De handset installeren
1 Open het batterijvak zoals weergegeven in afbeelding 1B.
2 Plaats de batterijen en let daarbij op de polariteit (+ en -).
3 Sluit het batterijvak.
4 Laat de handset 20 uur in het basisstation staan.
1.3 De lader installeren (alleen voor Butler E600 Twin/Triple/Quattro)
1 Steek één uiteinde van de adapter in het stopcontact en het andere uiteinde in de
adapteraansluiting op de onderkant van de lader.
Voordat u de telefoon voor het eerst gebruikt, moet u controleren of de batterij 20
uur is opgeladen. De telefoon zal niet optimaal werken als u dit niet doet.
+
-
-
+
A
B
- 1B Onderaanzicht van de
handset -
A. Deksel
B. Oplaadbare batterijen
A
- 1C Lader A. Adapter met stroomkabel
Page 14
14
Aan de slag
1.4 Toetsen / LED’s
1
3
4
5
6
7
2
8
11
10
9
12
13
14
15
- 1D Handset -
16
- 1E Basisstation -
Handset
1. Luidspreker
2. Display
3. Rechtermenutoets
4. Toets Omhoog / Oproeplog
5. Toets Aan-Uit / Opleggen
6. Toets Flash
7. Alfanumerieke toetsen
8. Beltoon aan/uit
9. Microfoon
10. Toets voor
toetsenbordvergrendeling
11. Toets Telefoonboek
12. Toets Handenvrij
13. Toets Omlaag /
Nummerherhaling
14. Toets Opnemen
15. Linkermenutoets
Basisstation
16. Toets Paging
1.5 Deze gebruikshandleiding gebruiken
In deze gebruikshandleiding is de volgende methode gebruikt om de instructies te verduidelijken:
In te drukken toets.
1.6 Door het menu bladeren
De Butler E600 heeft een gebruiksvriendelijk menusysteem. Elk menu toont een lijst met opties.
Displaymenutoetsen:
De displaymenutoetsen staan onder de display (3) (15). De functies van deze toetsen veranderen
naargelang de gebruiksmodus. De functies worden hierna beschreven:
Tekst....... “DISPLAY”.
De tekst die verschijnt op de display van de telefoon wordt tussen
aanhalingstekens getoond in de rechterkolom.
1 Het menu openen of meer menuopties selecteren.
2 De huidige selectie bevestigen.
3 Een interne oproep met andere handsets maken.
4 Terug naar de menuselectie of de huidige handeling annuleren.
5 Een teken wissen of het alarm stoppen. Of de microfoon tijdens een oproep
dempen/dempen opheffen.
Page 15

Nederlands
15
De telefoon gebruiken
2 De telefoon gebruiken
2.1 De handset aan- en afzetten
2.2 De menutaal veranderen
2.3 Een oproep ontvangen
Om de oproep aan te nemen:
2.4 Een externe oproep doen
Direct kiezen
Voorkiezen
2.5 Een interne oproep doen
1 Houd de aan/uit-toets op de handset 3 seconden ingedrukt. De handset zoekt
nu het basisstation.
2 Houd de aan/uit-toets 6 seconden ingedrukt. De display wordt
uitgeschakeld.
1 Open het menu door op de linkermenutoets (15) te drukken.
2 Selecteer "HANDSET INST" (HS SETTINGS) en bevestig.
3 Kies "TAAL" (LANGUAGE) en bevestig.
4 Kies een taal en bevestig.
1 Druk op de opnemen-toets.
OF
Neem de handset van het basisstation als u de functie "Automatisch
antwoorden" hebt geactiveerd.
(Zie “5.3 Automatisch antwoorden”)
U bent verbonden met de beller.
2 Druk op de opleggen-toets om de oproep te beëindigen of zet de handset
terug op het basisstation.
1 Druk op de opnemen-toets om het nummer te bellen.
2 Voer het telefoonnummer in.
3 Druk op de opleggen-toets om de oproep te beëindigen of zet de handset
terug op het basisstation.
1 Voer het telefoonnummer in.
2 Druk op de opnemen-toets om het nummer te bellen.
3 Druk op de opleggen-toets om de oproep te beëindigen of zet de handset
terug op het basisstation.
4 Om een nummer te corrigeren gebruikt u de wissen-toets om een ingevoerd
cijfer te wissen.
1 Druk op de rechtermenutoets.
2 Voer het nummer van de interne handset in (1 tot 5).
3 Druk op de opleggen-toets om de oproep te beëindigen of zet de handset
terug op het basisstation.
Page 16

16
De telefoon gebruiken
2.6 Een interne oproep doorschakelen
Een externe oproep naar een andere handset doorschakelen.
2.7 Luidsprekervolume tijdens het gesprek
2.8 Microfoon uitschakelen
Het is mogelijk om de microfoon tijdens een gesprek uit te schakelen.
2.9 Nummerherhalingsgeheugen
U kunt maximaal 5 van de laatste oproepen terugbellen.
2.10 Het alfanumerieke toetsenbord gebruiken
Met uw telefoon kunt u ook alfanumerieke tekens invoeren. Dit is handig om een naam in het
telefoonboek te zetten, een naam te geven aan de handset enz.
Om een letter te selecteren, drukt u zo vaak als nodig op de bijbehorende toets. Bijvoorbeeld: druk
één keer op "2" om "A" te kiezen. Druk twee keer op "2" om "B" te kiezen enz. Om de letter "A" en
daarna de "B" te kiezen, druk eenmaal op "2", wacht totdat de cursor naar het volgende teken gaat
en druk dan tweemaal op "2".
1 Druk op de linkermenutoets tijdens het gesprek.
2 Selecteer "INTERN" (INTERCOM) en druk op OK.
3 Voer het nummer van de interne handset in (1 tot 5). De externe beller wordt
nu in de wacht geplaatst.
4 Wanneer de andere handset opneemt, druk dan op de opleggen-toets om op
te hangen en de oproep door te schakelen.
Wanneer de interne beller niet opneemt, drukt u opnieuw op de opleggen-toets
om de externe beller aan de lijn te krijgen.
5 Druk op de opleggen-toets om de oproep te beëindigen of zet de handset
terug op het basisstation.
1 Tijdens het gesprek drukt u op de omhoog/omlaag-toets om het volume aan
te passen.
1 Druk op de rechtermenutoets. U kunt vrijuit spreken zonder dat de beller u
hoort.
Op de display verschijnt "DEMPEN" (MUTED).
2 Druk opnieuw op de rechtermenutoets om terug te keren naar de normale
modus.
1 Druk op de nummerherhalingstoets.
2 Kies een nummer. Als het nummer in het telefoonboek staat, wordt de naam
weergegeven.
3 Druk op de opnemen-toets om het nummer te bellen.
4 Druk op de opleggen-toets om terug te keren naar de stand-bymodus.
Druk op "1" om een spatie te kiezen.
Druk op de rechtermenutoets om een teken te wissen.
Page 17
Nederlands
17
Telefoonboek
3 Telefoonboek
Elke handset kan tot 30 telefoonnummers en namen opslaan. Namen kunnen 12 tekens en nummers
24 cijfers lang zijn.
Zie “2.10 Het alfanumerieke toetsenbord gebruiken” voor het invoeren van alfanumerieke tekens.
3.1 Een nummer aan het telefoonboek toevoegen
Druk op de opleggen-toets en verlaat het menu zonder de wijzigingen op te
slaan.
3.2 Een nummer uit het telefoonboek bellen
4 Nummerweergave beller
Wanneer u een externe oproep ontvangt, verschijnt het nummer van de beller op de display van de
handset. De telefoon kan oproepen in zowel FSK als DTMF ontvangen. U kunt ook de naam van de
beller zien als die door het netwerk wordt verzonden. Als de naam in het telefoonboek is
geprogrammeerd, wordt de naam uit het telefoonboek weergegeven!
De telefoon kan 30 oproepen opslaan in een oproeplijst (ontvangen en gemiste oproepen), die later
bekeken kunnen worden. Deze functie is alleen beschikbaar wanneer u geabonneerd bent op een
dienst voor nummerweergave.
Als het geheugen vol is, vervangen de nieuwe oproepen automatisch de oudste oproepen in het
geheugen.
1 Kie
s het menu.
2 Kies
"TELEF.BOEK" (PHONEBOOK) en bevestig.
3 Druk op men
u.
4 Kies
"TOEVOEGEN" (ADD) en bevestig.
5 Druk op men
u.
6 Voer
de naam in en bevestig.
7 Voer
het nummer in en bevestig.
8 Ki
es een belmelodie (1-8) en bevestig.
1 Druk op de telefo
onboek-toets.
2 Kies een naam of voer de e
erste letter van de naam in. (De lijst staat in
alfabetische volgorde.)
3 Druk op de opnemen-toets om het nummer te bellen.
4 Druk op de opleggen-toets om de oproep te beëindigen of zet de handset
terug op het basisstation.
Deze dienst werkt alleen als u bent geabonneerd op een dienst met
nummerherkenning van de oproeper (CLIP). Neem hiervoor contact op met uw
telefoonmaatschappij.
Na 15 seconden verbinding wordt de naam van de beller vervangen door de
gespreksduur.
Page 18
18
De handset personaliseren
De oproeplijst raadplegen:
U kunt elk nummer afzonderlijk verwijderen:
Om alle items gelijktijdig te wissen:
5 De handset personaliseren
5.1 Het belvolume aanpassen
Belvolume van de handset voor interne/externe oproepen
U kunt het belvolume niet afzonderlijk voor interne of externe oproepen instellen. U kunt kiezen
uit de belvolumeniveaus HOOG, MID, LAAG en "UIT" (OFF).
1 Druk op de oproeplog-toets.
Wanneer er geen oproepen zijn, verschijnt in de lijst "LEEG" (EMPTY).
2 Doorloop de oproepen. De namen van de bellers worden getoond wanneer
de naam door het netwerk wordt doorgestuurd of in het telefoonboek is
opgeslagen. Wanneer u aan het eind van de lijst komt, hoort u een pieptoon.
Wann ee r * in het midden van de onderste regel wordt weergegeven, is de
oproep onbeantwoord.
3 Druk op de *-toets om het telefoonnummer te zien.
Wanneer het telefoonnummer uit meer dan 12 cijfers bestaat, drukt u opnieuw
op de #-toets om het volledige nummer te zien.
4 Druk op de linkermenutoets om het eventueel nieuwe nummer aan het
telefoonboek toe te voegen. Druk op OK wanneer "TOEV. AAN TB"
(ADD TO PB) op de display verschijnt.
Voer de naam in of wijzig hem en druk op OK.
Voer het telefoonnummer in of wijzig het en druk op OK.
Kies de melodie (1-8) die moet klinken als u door dit nummer wordt gebeld.
Druk op OK; het nummer wordt in het telefoonboek opgeslagen.
5 Druk op de opnemen-toets om iemand terug te bellen, wanneer het
telefoonnummer of de naam wordt getoond.
1 Blader naar de oproep die u wilt verwijderen en druk op de linkermenutoets.
2 Selecteer "WISSEN" (DELETE) en druk op OK.
1 Druk in de oproeplijst op de linkermenutoets.
2 Selecteer "ALLES WISSEN" (DELETE ALL) en druk op OK.
3 Druk opnieuw op OK om te bevestigen.
Elke programmering wordt aan het einde bevestigd door een dubbele of een enkele
lange pieptoon. Een dubbele pieptoon geeft de bevestiging van uw keuze aan.
1 Open het menu door op de linkermenutoets te drukken.
2 Selecteer "HANDSET INST" (HS SETTINGS) en bevestig.
3 Kies "BEL INSTEL." (RING SETUP) en bevestig.
4 Selecteer "BELVOLUME" (RING VOLUME) en bevestig.
5 Kies een volumeniveau HOOG, MID, LAAG of "UIT" (HIGH, MID,
LOW, "OFF").
6 Bevestig of keer terug naar het vorige menu.
#
Page 19
Nederlands
19
De handset personaliseren
5.2 Een beltoon kiezen
Er kan voor elke handset een andere melodie worden ingesteld. U kunt de handset ook zodanig
instellen dat er voor interne of externe oproepen een andere beltoon wordt gebruikt. U kunt kiezen
uit 8 verschillende beltonen:
5.3 Automatisch antwoorden
Wanneer er een oproep wordt ontvangen en de handset staat in het basisstation, dan neemt de
telefoon automatisch op wanneer u de handset pakt. Dit is de standaardinstelling, maar u kunt dit
ook uitschakelen:
5.4 Toetsenbordvergrendeling
Het toetsenbord kan worden vergrendeld zodat er geen instellingen kunnen worden gewijzigd en
geen telefoonnummers kunnen worden ingevoerd. Wanneer het toetsenbord vergrendeld is,
verschijnt het pictogram .
Het toetsenbord vergrendelen
Het toetsenbord ontgrendelen.
1 Open het menu door op de linkermenutoets te drukken.
2 Selecteer "HANDSET INST" (HS SETTINGS) en bevestig.
3 Kies "BEL INSTEL." (RING SETUP) en bevestig.
4 Kies "INTERN. BEL" (INT RING) om de interne beltoon of
"EXTERN. BEL" (EXT RING) om de externe beltoon te wijzigen en
bevestig.
5 Kies een beltoon (1 tot 8).
6 Druk op de OK-toets om te bevestigen of naar het vorige menu terug te
keren.
1 Open het menu door op de linkermenutoets te drukken.
2 Selecteer "HANDSET INST" (HS SETTINGS) en bevestig.
3 Kies "AUTOM.ANTW" (AUTO ANSWER) en bevestig.
4 Kies "AAN" (ON) om in te schakelen of "UIT" (OFF) om uit te schakelen
en bevestig.
1 Houd de toets voor toetsenbordvergrendeling 3 seconden ingedrukt. Het
toetsenbord wordt vergrendeld. “ ” Verschijnt op het scherm.
1 Houd de toets voor toetsenbordvergrendeling 3 seconden ingedrukt.
2 “ ” Verdwijnt van het scherm.
Page 20
20
Avant de commencer
Français
1 Avant de commencer
Nous vous remercions d'avoir choisi ce produit. Cet appareil a été conçu et monté avec le plus grand
soin pour répondre à vos besoins et dans le respect de l'environnement. Soucieux de l'avenir de notre
planète et de nos enfants, nous tentons de faire le maximum pour préserver l'environnement. C'est
la raison pour laquelle nous avons réduit le nombre de pages de nos manuels d'utilisation
et de nos guides de produits. Si l'on considère qu'il faut jusqu'à 24 arbres pour produire
1 tonne de papier, la publication de guides de produits en 21 langues coûte à notre
planète de nombreux arbres. Dans ce petit manuel fourni avec votre appareil, vous
trouverez un résumé du mode d'installation et d'utilisation de celui-ci.
Toutefois, si vous souhaitez découvrir toutes les fonctionnalités de votre nouvel appareil, vous
pouvez visiter notre site web (www.tristar.eu) et télécharger le manuel d'utilisation complet dans
votre langue. De cette manière, TRISTAR espère contribuer à la préservation de notre planète, mais
nous ne pouvons y arriver sans votre aide
!
1.1 Installation de la base
Pour installer la base, procédez comme suit :
1 Branchez une extrémité de l'adaptateur sur la prise de courant et l'autre extrémité sur la prise
d'adaptateur située à l'arrière de la base.
2 Branchez une extrémité du câble téléphonique sur la prise téléphonique murale et l'autre
extrémité sur la prise située sous la base.
3 Placez le câble téléphonique et le câble d'alimentation CA dans les guides de la base comme
indiqué sur la figure 1A.
A
B
C
- 1A Vue arrière de la base A. Câble d'alimentation
B. Prise murale du téléphone
C. Câble téléphonique
Page 21
Français
21
Avant de commencer
1.2 Installation du combiné
1 Ouvrez le compartiment à piles comme illustré sur la figure 1B.
2 Insérez les piles en respectant les polarités (+ et –).
3 Refermez le compartiment à piles.
4 Laissez le combiné sur la base pendant 20 heures.
1.3 Installation du chargeur
(Uniquement pour les modèles Butler E600 Twin/Triple/Quattro)
1 Branchez une extrémité de l'adaptateur sur la prise de courant et l'autre extrémité sur la prise
d'adaptateur située sous le chargeur.
Avant la première utilisation du téléphone, assurez-vous au préalable que les piles
ont chargé pendant 20 heures. Dans le cas contraire, le téléphone ne fonctionnera
pas de manière optimale.
+
-
-
+
A
B
-1B Vue arrière du combiné A. Couvercle
B. Piles rechargeables
A
- 1C Chargeur A. Adaptateur avec câble
d'alimentation
Page 22
22
Avant de commencer
1.4 Touches/voyants
1
3
4
5
6
7
2
8
11
10
9
12
13
14
15
- 1D Combiné -
16
- 1E Base -
Combiné
1. Écouteur
2. Écran
3. Touche contextuelle droite
4. Touche Haut/
Journal des appels
5. Touche Marche-Arrêt/
Fin d'appel
6. Touche Flash
7. Touches alphanumériques
8. Activation/Désactivation
de la sonnerie
9. Micro
10. Touche de verrouillage du
clavier
11. Touche Répertoire
12. Touche Mains-libres
13. Touche Bas/Recomposition
14. Touche Prise d'appel
15. Touche contextuelle
gauche
Base
16. Touche Recherche
1.5 Comment utiliser ce mode d'emploi ?
Ce mode d'emploi adopte les règles suivantes pour clarifier les instructions :
Touche à enfoncer.
1.6 Navigation dans les menus
Le Butler E600 intègre un système de menus très convivial. Chaque menu aboutit à une série
d'options.
Touches contextuelles à l'écran :
Les touches contextuelles à l'écran se situent juste en dessous de l'écran (3) (15). Les fonctions de
ces touches varient suivant le mode de fonctionnement. Ces fonctions sont décrites ci-dessous :
Texte....... « ÉCRAN » (DISPLAY).
Le texte qui s'affiche sur l'écran du téléphone est indiqué dans la colonne de
droite entre guillemets.
1 Ouverture du menu ou sélection d'autres options du menu.
2 Confirmation de la sélection en cours.
3 Appel interne d'autres combinés.
4 Retour à la sélection des menus ou annulation de la fonction en cours.
5 Suppression d'un caractère ou arrêt de l'alarme. Ou désactivation/activation
du micro pendant un appel.
Page 23

Français
23
Utilisation du téléphone
2 Utilisation du téléphone
2.1 Mise en/hors service du combiné
2.2 Modification de la langue des menus
2.3 Réception d'un appel
Pour prendre l'appel :
2.4 Passer un appel téléphonique externe
Composition directe
Précomposition
2.5 Passer un appel téléphonique interne
1 Appuyez sur la touche Marche/Arrêt du combiné et maintenez-la enfoncée
pendant 3 secondes. Le combiné se met à chercher la base.
2 Appuyez sur la touche Marche/Arrêt et maintenez-la enfoncée pendant 6
secondes. L'écran s'éteint.
1 Accédez au le menu en appuyant sur la touche contextuelle gauche (15).
2 Sélectionnez « REGL. COMB » (HS SETTINGS) et validez.
3 Sélectionnez « LANGUE » (LANGUAGE) et validez.
4 Sélectionnez la langue de votre choix et validez.
1 Appuyez sur la touche Prise d'appel.
OU
Retirez le combiné de sa base si vous avez activé la fonction « REPONSE
AUTO » (AUTO ANSWER).
(Se reporter à “5.3 Réponse automatique”)
Vous êtes en communication avec votre correspondant.
2 Appuyez sur la touche Fin d'appel pour raccrocher ou replacez le combiné
sur sa base.
1 Appuyez sur la touche Prise d'appel pour lancer l'appel.
2 Composez le numéro de téléphone.
3 Appuyez sur la touche Fin d'appel pour raccrocher ou replacez le combiné
sur sa base.
1 Composez le numéro de téléphone.
2 Appuyez sur la touche Prise d'appel pour lancer l'appel.
3 Appuyez sur la touche Fin d'appel pour raccrocher ou replacez le combiné
sur sa base.
4 Pour corriger un numéro, utilisez la touche Effacer pour effacer un chiffre
erroné.
1 Appuyez sur la touche contextuelle droite.
2 Saisissez le numéro du combiné interne (entre 1 et 5).
3 Appuyez sur la touche Fin d'appel pour raccrocher ou replacez le combiné
sur sa base.
Page 24

24
Utilisation du téléphone
2.6 Transfert d'appel interne
Transfert d'un appel externe vers un autre combiné
2.7 Volume du haut-parleur pendant un appel
2.8 Désactivation du micro
Il est possible de désactiver le micro pendant une conversation.
2.9 Mémoire de rappel
Vous pouvez recomposer un numéro quelconque parmi les 5 derniers numéros appelés.
2.10 Utilisation du clavier alphanumérique
Vous pouvez également saisir des caractères alphanumériques sur votre téléphone. Cette fonction
peut vous servir pour ajouter un nom dans le répertoire, attribuer un nom au combiné, etc.
Pour sélectionner une lettre, appuyez sur la touche correspondante autant de fois que nécessaire. Par
exemple, pour sélectionner « A », appuyez une fois sur « 2 ». Pour écrire un « B », appuyez deux
fois sur « 2 », etc. Pour écrire « A » puis « B » consécutivement, appuyez une fois sur « 2 »,
attendez que le curseur avance d'une position, puis appuyez deux fois sur « 2 ».
1 Appuyez sur la touche contextuelle gauche pendant la conversation.
2 Sélectionnez « INTERCOM » (INTERCOM) et appuyez sur OK.
3 Sélectionnez le numéro du combiné interne (1 à 5), l'appelant externe est
mis en attente.
4 Dès que l'autre combiné prend l'appel, appuyez sur la touche de fin d'appel
pour raccrocher de votre côté et transférer l'appel.
Si le correspondant interne ne décroche pas, appuyez de nouveau sur la touche
Fin d'appel pour reprendre la conversation avec l'appelant externe en ligne.
5 Appuyez sur la touche Fin d'appel pour raccrocher ou replacez le combiné
sur sa base.
1 Au cours d'une conversation, appuyez sur la touche haut ou bas pour
modifier le volume en conséquence.
1 Appuyez sur la touche contextuelle droite. Vous pouvez parler librement
sans être entendu par l'appelant.
« MUET » (MUTED) s'affiche.
2 Appuyez de nouveau sur la touche contextuelle droite pour repasser en
mode normal.
1 Appuyez sur la touche Recomposition.
2 Sélectionnez un numéro. Si le numéro est dans le répertoire, le nom associé
s'affichera.
3 Appuyez sur la touche Prise d'appel pour lancer l'appel.
4 Appuyez sur la touche de fin d'appel pour revenir au mode de veille.
Appuyez sur « 1 » pour insérer un espace.
Appuyez sur la touche contextuelle droite pour effacer un caractère.
Page 25

Français
25
Répertoire
3 Répertoire
Chaque combiné peut mémoriser jusqu'à 30 noms et numéros. Les noms peuvent comprendre
jusqu'à 12 caractères et les numéros, jusqu'à 24 chiffres.
Pour saisir des caractères alphanumériques, reportez-vous à la section “2.10 Utilisation du clavier
alphanumérique”.
3.1 Pour ajouter une entrée dans le répertoire
Appuyez sur la touche Fin d'appel pour sortir du menu sans prendre en compte
les modifications.
3.2 Pour composer une entrée à partir du répertoire
4 Identification de l'appelant
Quand vous recevez un appel externe, le numéro de téléphone de l'appelant s'affiche sur l'écran du
combiné. Le téléphone peut recevoir des appels de type FSK et DTMF. Vous pouvez aussi voir le
nom de l'appelant s'il est transmis par le réseau. Si le nom est programmé dans le répertoire, c'est le
nom du répertoire qui s'affiche.
Le téléphone peut mémoriser 30 appels (reçus et manqués) dans une liste d'appels que vous pouvez
consulter ultérieurement. Cette fonction n'est disponible que si vous avez demandé la fonction
d'identification de l'appelant.
Quand la mémoire est pleine, les nouveaux appels remplacent automatiquement les plus anciens
appels conservés en mémoire.
1 Accédez au
menu.
2 Sélection
nez « REPERTOIRE » (PHONEBOOK) et validez.
3 Appuyez sur
la touche Menu.
4 Sélectionnez
« AJOUTER » (ADD) et validez.
5 Appuyez sur
la touche Menu.
6 Saisissez un
nom et validez.
7 Saisissez le
numéro et validez.
8 Sé
lectionnez une mélodie (1-8) et validez.
1 Appuyez sur la touche Répertoire.
2 Sélection
nez un nom ou saisissez la première lettre du nom. (La liste défile
dans l'ordre alphabétique.)
3 Appuyez sur la touche Prise d'appel pour lancer l'appel.
4 Appuyez sur la touche Fin d'appel pour raccrocher ou replacez le combiné
sur sa base.
Cette fonction n'est disponible que si vous avez souscrit au service de présentation
du numéro. Au besoin, veuillez prendre contact avec votre compagnie de téléphone.
L'identité de l'appelant est remplacée par la durée de l'appel après 15 secondes
de communication.
Page 26
26
Personnalisation du combiné
Pour consulter la liste d'appels :
Vous pouvez effacer chaque entrée séparément :
Pour supprimer toutes les entrées en même temps :
5 Personnalisation du combiné
5.1 Réglage du volume de la sonnerie
Volume de sonnerie du combiné pour les appels internes/externes
Le volume de sonnerie du combiné ne peut être réglé distinctement pour les appels externes et
internes. Vous pouvez choisir parmi « HAUTE » (HIGH), « MEDIUM » (MEDIUM),
« BASSE » (LOW) et « OFF ».
1 Appuyez sur la touche Journal des appels.
Si la liste ne contient aucun appel, « VIDE » (EMPTY) s'affiche à l'écran.
2 Parcourez la liste des appels. Le nom des appelants sera indiqué si celui-ci
a été envoyé par le réseau ou a été mémorisé dans le répertoire. Si vous
atteignez la fin de la liste, un signal sonore retentit.
Le symbole « * » au centre de la ligne inférieure indique que l'appel est resté
sans réponse.
3 Appuyez sur la touche « * » pour afficher le numéro de téléphone.
Si le numéro de téléphone compte plus de 12 chiffres, appuyez de nouveau sur
la touche « # » pour voir le numéro complet.
4 Appuyez sur la touche contextuelle gauche pour ajouter cette entrée dans le
répertoire si elle n'y est pas déjà mémorisée. Appuyez sur OK quand
« AJOUTER » (ADD TO PB) s'affiche sur l'écran.
Saisissez ou modifiez le nom et appuyez sur OK.
Saisissez ou modifiez le numéro de téléphone et appuyez sur OK.
Sélectionnez la mélodie (1 à 8) qui sera diffusée lors d'un appel de ce
numéro. Appuyez sur OK. L'entrée est mémorisée dans le répertoire.
5 Appuyez sur la touche de prise d'appel pour rappeler un correspondant,
lorsque son numéro de téléphone ou son nom s'affiche.
1 Faites défiler jusqu'à l'appel que vous voulez effacer et appuyez sur la
touche contextuelle gauche.
2 Sélectionnez « SUPPRIMER » (DELETE) et appuyez sur OK.
1 Dans la liste d'appels, appuyez sur la touche contextuelle gauche.
2 Sélectionnez « SUPPRIM. TOUT » (DELETE ALL) et appuyez sur OK.
3 Appuyez de nouveau sur OK pour valider.
Chaque programmation est confirmée à la fin par un double bip sonore ou un
simple bip prolongé. Un double bip sonore confirme la validation de votre choix.
1 Entrez dans le menu en appuyant sur la touche contextuelle gauche.
2 Sélectionnez « REGL. COMB » (HS SETTINGS) et validez.
3 Sélectionnez « SONNERIE » (RING SETUP) et validez.
4 Sélectionnez « VOL. SONNERIE » (RING VOLUME) et validez.
5 Sélectionnez un niveau de volume pour la sonnerie (« HAUTE » (HIGH),
« MEDIUM » (MEDIUM), « BASSE » (LOW) ou « OFF »).
6 Validez ou revenez au menu précédent.
#
Page 27
Français
27
Personnalisation du combiné
5.2 Choix de la mélodie de la sonnerie
Chaque combiné peut émettre une mélodie différente. Les combinés peuvent sonner avec une
mélodie différente selon que l'appel est interne ou externe. Vous pouvez choisir parmi 8 mélodies
de sonnerie différentes :
5.3 Réponse automatique
Lorsque vous recevez un appel entrant et que le combiné est sur la base, le téléphone prend
automatiquement la ligne dès qu'il est soulevé. Cette fonctionnalité est activée par défaut mais elle
peut être désactivée :
5.4 Verrouillage du clavier
Le clavier peut être verrouillé de façon à empêcher toute modification des paramètres et toute
composition d'un numéro. L'icône s'affiche sur l'écran quand le clavier est verrouillé.
Verrouillage du clavier
Déverrouillage du clavier
1 Entrez dans le menu en appuyant sur la touche contextuelle gauche.
2 Sélectionnez « REGL. COMB » (HS SETTINGS) et validez.
3 Sélectionnez « SONNERIE » (RING SETUP) et validez.
4 Sélectionnez « SONNERIE INT » (INT RING) pour modifier la mélodie
interne ou « SONNERIE EXT » (EXT RING) pour modifier la mélodie
externe et validez.
5 Sélectionnez une mélodie (1 à 8).
6 Appuyez sur OK pour confirmer ou pour revenir au menu précédent.
1 Entrez dans le menu en appuyant sur la touche contextuelle gauche.
2 Sélectionnez « REGL. COMB » (HS SETTINGS) et validez.
3 Sélectionnez « REPONSE AUTO » (AUTO ANSWER) et validez.
4 Sélectionnez « ON » pour activer ou « OFF » pour désactiver et validez.
1 Appuyez sur la touche de verrouillage du clavier et maintenez-la enfoncée
pendant 3 secondes. Le clavier est alors verrouillé. « » s'affiche à
l'écran.
1 Appuyez sur la touche de verrouillage du clavier et maintenez-la enfoncée
pendant 3 secondes.
2 « » disparaît de l'écran.
Page 28

28
Erste Schritte
Deutsch
1 Erste Schritte
Vielen Dank, dass Sie sich zum Kauf dieses Produkts von TRISTAR entschieden haben. Dieses
Produkt wurde mit der höchsten Sorgfalt für Sie und die Umwelt entwickelt und hergestellt. Da wir
uns bei TRISTAR über die Zukunft unseres Planeten und unserer Kinder Gedanken machen, tun wir
unser Bestes, um die Umwelt zu schützen. Daher haben wir uns entschieden, die
Seitenzahl unserer Bedienungsanleitungen und Produkthandbücher zu reduzieren.
Wenn Sie bedenken, dass bis zu 24 Bäume für 1 Tonne Papier gefällt werden müssen,
dann kostet ein Produkthandbuch in 21 Sprachen unseren Planeten eine Menge Holz. In
dem kurzen Handbuch, das Ihrem Gerät beiliegt, finden Sie eine kurze Anleitung zur
Installation und Bedienung Ihres Gerätes.
Wenn Sie gerne mehr über die Funktionen Ihres neuen Gerätes erfahren möchten, besuchen Sie uns
bitte im Internet (www.tristar.eu). Dort können Sie die vollständige Bedienungsanleitung in Ihrer
Sprache herunterladen. Auf diese Weise hofft TRISTAR, einen Beitrag zu leisten, unseren Planeten
zu schützen und unsere Welt zu verbessern,
aber dazu brauchen wir Ihre Hilfe!
1.1 Basisstation installieren
Zur Installation gehen Sie folgendermaßen vor:
1 Verbinden Sie das eine Ende des Netzadapters mit der Steckdose und das andere Ende mit der
Adapterbuchse auf der Rückseite der Basisstation.
2 Verbinden Sie das eine Ende des Telefonkabels mit dem Telefonwandanschluss und das andere
Ende mit dem Anschluss auf der Unterseite der Basisstation.
3 Befestigen Sie das Telefon- und das Netzkabel wie in Abbildung 1A dargestellt.
1.2 Mobilteil installieren
1 Öffnen Sie das Batteriefach wie in Abbildung 1B dargestellt.
2 Legen Sie die Batterien/Akkus ein. Achten Sie dabei auf die Polarität (+ und -).
3 Schließen Sie das Batteriefach.
4 Lassen Sie das Mobilteil 20 Stunden in der Basisstation.
A
B
C
- 1A Rückseite der Basisstation A. Netzkabel
B. Telefonwandanschluss
C. Telefonkabel
Page 29

Deutsch
29
Erste Schritte
1.3 Ladegerät installieren (nur bei Butler E600 Twin/Triple/Quattro)
1 Verbinden Sie das eine Ende des Netzadapters mit der Steckdose und das andere Ende mit der
Adapterbuchse auf der Unterseite des Ladegerätes.
1.4 Tasten / LEDs
1
3
4
5
6
7
2
8
11
10
9
12
13
14
15
- 1D Mobilteil -
16
- 1E Basisstation -
Mobilteil
1. Hörer, Lautsprecher
2. Display
3. Rechte Menütaste
4. Taste für Nach-oben/Anrufliste
5. Ein- und Ausschalten /
Auflegen-Taste
6. Flash-Taste
7. Alphanumerische Tasten
8. Rufton ein - aus
9. Mikrofon
10. Tastatursperre
11. Telefonbuch
12. Freisprechtaste
13. Nach-unten-Taste /
Wahlwiederholungs-Taste
14. Taste für Gespräch annehmen
15. Linke Menütaste
Basisstation
16. Paging-Taste
Bevor Sie das Telefon zum ersten Mal benutzen, stellen Sie sicher, dass die Akkus 20
Stunden aufgeladen wurden. Andernfalls funktioniert das Telefon nicht optimal.
+
-
-
+
A
B
- 1B Rückseite des Mobilteils A. Abdeckung
B. Akkus
A
- 1D Ladegerät A. Netzadapter mit
Stromkabel
Page 30

30
Benutzen des Telefons
1.5 Zum Gebrauch dieser Bedienungsanleitung
In dieser Bedienungsanleitung werden die einzelnen Bedienschritte folgendermaßen verdeutlicht:
Zu drückende Taste.
1.6 Durch das Menü navigieren
Das Butler E600 verfügt über ein leicht zu bedienendes Menü-System. Jeder Menüpunkt besteht aus
einer Reihe von Unterpunkten.
Display-Menütasten:
Die Display-Menütasten befinden sich direkt unter dem Display (3) (15). Die Funktion dieser
Tasten ändert sich je nach Betriebsmodus. Nachfolgend werden die Funktionen beschrieben:
2 Benutzen des Telefons
2.1 Mobilteil ein- und ausschalten
2.2 Menüsprache ändern
2.3 Einen Anruf annehmen
Gehen Sie folgendermaßen vor, um den Anruf anzunehmen:
Text ....... „ANZEIGE“ (Display).
Der Text, der im Display des Telefons erscheint, ist in der rechten Spalte in
Anführungszeichen dargestellt.
1 Um das Menü zu öffnen oder um zu weiteren Menüoptionen zu gelangen
2 Um die aktuelle Auswahl zu bestätigen
3 Um einen internen Anruf zu einem anderen Mobilteil zu tätigen
4 Um im Menü zurückzugehen oder um die aktuelle Operation abzubrechen.
5 Um das Zeichen zu löschen oder um den Alarm zu beenden; oder um
während eines Gesprächs das Mikrofon aus- und wieder einzuschalten.
1 Halten Sie die Ein-/Aus-Taste des Mobilteils 3 Sekunden lang gedrückt.
Das Mobilteil sucht die Basisstation.
2 Halten Sie die Ein-/Aus-Taste 6 Sekunden lang gedrückt. Die Anzeige
erlischt.
1 Drücken Sie die linke Menütaste (15), um ins Menü zu gelangen.
2 Wählen Sie „MT-EINSTEL.“ (HS SETTINGS) und bestätigen Sie die
Auswahl.
3 Wählen Sie „SPRACHE“ (LANGUAGE) und bestätigen Sie.
4 Wählen Sie die gewünschte Sprache und bestätigen Sie die Auswahl.
1 Drücken Sie die Taste für Gespräch annehmen.
ODER
Nehmen Sie das Mobilteil von der Basisstation, wenn Sie die
„Automatische Annahme“ aktiviert haben.
(Siehe “5.3 Automatische Gesprächsannahme”)
Sie sind mit Ihrem Gesprächspartner verbunden.
2 Drücken Sie die Auflegen-Taste oder stellen Sie das Mobilteil in die
Basisstation, um das Gespräch zu beenden.
Page 31

Deutsch
31
Benutzen des Telefons
2.4 Einen externen Anruf tätigen
Direkt wählen
Vorwählen
2.5 Einen internen Anruf tätigen
2.6 Interne Anrufweiterleitung
Ein externes Gespräch an ein anderes Mobilteil weiterleiten.
2.7 Lautstärke während eines Anrufs einstellen
2.8 Mikrofon stummschalten
Sie können das Mikrofon während eines Gesprächs stummschalten.
1 Drücken Sie die Taste für Gespräch annehmen, um das Gespräch zu
beginnen.
2 Geben Sie die Telefonnummer ein.
3 Drücken Sie die Auflegen-Taste oder stellen Sie das Mobilteil in die
Basisstation, um das Gespräch zu beenden.
1 Geben Sie die Telefonnummer ein.
2 Drücken Sie die Taste für Gespräch annehmen, um das Gespräch zu
beginnen.
3 Drücken Sie die Auflegen-Taste oder stellen Sie das Mobilteil in die
Basisstation, um das Gespräch zu beenden.
4 Um eine Nummer zu korrigieren, löschen Sie die eingegebenen Ziffern mit
der Löschen-Taste.
1 Drücken Sie die rechte Menütaste.
2 Geben Sie die interne Nummer des gewünschten Mobilteils ein (1 bis 5).
3 Drücken Sie die Auflegen-Taste oder stellen Sie das Mobilteil in die
Basisstation, um das Gespräch zu beenden.
1 Drücken Sie während eines Gesprächs die linke Menütaste.
2 Wählen Sie „LÖSCHEN“ (DELETE) und drücken Sie OK.
3 Geben Sie die interne Nummer des gewünschten Mobilteils ein (1 bis 5), der
externe Anruf wird gehalten.
4 Wird das Gespräch am anderen Mobilteil angenommen, drücken Sie die
Auflegen-Taste, um aufzulegen, und das Gespräch weiterzuleiten.
Nimmt der interne Gesprächspartner den Anruf nicht an, drücken Sie die
Auflegen-Taste erneut, um den externen Anruf zurückzuholen.
5 Drücken Sie die Auflegen-Taste oder stellen Sie das Mobilteil in die
Basisstation, um das Gespräch zu beenden.
1 Drücken Sie während eines Gesprächs die Nach-oben- oder Nach-unten-
Taste, um die Lautstärke entsprechend einzustellen.
1 Drücken Sie die rechte Menütaste. Nun können Sie sprechen, ohne von
Ihrem Gesprächspartner am Telefon gehört zu werden.
„STUMM“ (MUTED) wird angezeigt.
2 Drücken Sie erneut die rechte Menütaste, um das Mikrofon wieder zu
aktivieren.
Page 32

32
Telefonbuch
2.9 Wahlwiederholung
Sie können die letzten 5 gewählten Nummern erneut wählen.
2.10 Die alphanumerischen Tasten verwenden
Sie können mit Ihrem Telefon auch alphanumerische Zeichen eingeben. Dies ist nützlich für die
Eingabe von Namen in das Telefonbuch, zum Benennen des Mobilteils, ...
Zur Auswahl eines Buchstabens drücken Sie die entsprechende Taste so oft wie nötig. Drücken Sie
z. B. für den Buchstaben 'A' einmal die Taste '2'. Für den Buchstaben 'B' drücken Sie zweimal die
Taste '2' usw. Um die Buchstaben 'A' und 'B' hintereinander einzugeben, drücken Sie einmal die
Taste '2', warten Sie, bis der Cursor zur nächsten Stelle springt, und drücken Sie dann zweimal die
Taste '2'.
3 Telefonbuch
Jedes Mobilteil kann bis zu 30 Namen und Telefonnummern speichern. Namen können bis zu 12
Zeichen und Telefonnummern können bis zu 24 Ziffern lang sein.
Wie Sie alphanumerische Zeichen eingeben, erfahren Sie im Abschnitt “2.10 Die alphanumerischen
Tasten verwenden”.
3.1 Um einen Eintrag im Telefonbuch hinzuzufügen
Drücken Sie die Auflegen-Taste, um das Menü ohne Änderungen zu verlassen.
3.2 Um einen Eintrag aus dem Telefonbuch anzurufen
1 Drücken Sie die Wahlwiederholungstaste.
2 Wählen Sie eine Nummer. Wenn die Nummer im Telefonbuch gespeichert
ist, wird der Name angezeigt.
3 Drücken Sie die Taste für Gespräch annehmen, um das Gespräch zu
beginnen.
4 Drücken Sie die Auflegen-Taste, um in den Standby-Modus
zurückzukehren.
Drücken Sie die Taste '1', um eine Leerstelle einzufügen.
Drücken Sie die rechte Menütaste, um ein Zeichen zu löschen.
1 Rufen Sie das
Menü auf.
2 Wählen Sie „TELEFONBUCH“ (PHONEBOOK) und bestätig
en Sie.
3 Wählen Sie „EINTRAG NEU“ (ADD)
und bestätigen Sie.
4 Drücken Sie die
Menütaste.
5 Geben Sie den Namen ein
und bestätigen Sie.
6 Geben Sie die Nummer ein und bestätigen Sie.
7 Wählen Sie eine Ruftonmelodie (1
- 8) und bestätigen Sie.
1 Drücken Sie die Telefonbuch-Taste.
2 W
ählen Sie einen Namen oder geben Sie den ersten Buchstaben des
Namens ein. (Die Liste wird in alphabetischer Reihenfolge durchblättert.)
3 Drücken Sie die Taste für Gespräch annehmen, um das Gespräch zu
beginnen.
4 Drücken Sie die Auflegen-Taste oder stellen Sie das Mobilteil in die
Basisstation, um das Gespräch zu beenden.
Page 33

Deutsch
33
Anruferkennung
4 Anruferkennung
Wenn Sie einen externen Anruf erhalten, wird die Telefonnummer des Anrufers im Display des
Mobilteils angezeigt. Das Telefon kann Anrufe im FSK- und DTMF-Modus empfangen. Sie können
auch den Namen sehen, wenn dieser übertragen wird. Wenn der Name im Telefonbuch gespeichert
ist, wird dieser Name auf dem Display angezeigt.
Das Telefon kann 30 Anrufe in der Anrufliste (entgegengenommene und entgangene Anrufe)
speichern, die Sie später anzeigen lassen können. Diese Funktion ist nur verfügbar, wenn Sie für den
Dienst Anruferkennung angemeldet sind.
Wenn der Speicher voll ist, überschreiben neue Anrufe automatisch die ältesten Einträge im
Speicher.
Zum Aufrufen der Anrufliste:
Sie können jeden Eintrag einzeln löschen:
Dieser Dienst muss von Ihrem Telefonnetzanbieter aktiviert werden. Bitte setzen Sie
sich mit Ihrem Netzanbieter in Verbindung.
Die Telefonnummer des Anrufers wird 15 Sekunden lang angezeigt, danach
erscheint die Gesprächsdauer im Display.
1 Drücken Sie die Taste Anrufliste.
Sind keine Anrufe in der Liste, so erscheint „LEER“ (EMPTY).
2 Durchsuchen der Liste. Die Namen der Anrufer werden angezeigt, wenn
der Name über das Netz übertragen wird oder wenn er im Telefonbuch
gespeichert ist. Sind Sie am Ende der Liste angekommen, ertönt ein
Signalton.
Wenn in der Mitte der Linie unten ein * angezeigt wird, dann bedeutet das,
dass der Anruf nicht angenommen wurde.
3 Drücken Sie die ‘*’-Taste, um die Telefonnummer anzuzeigen.
Ist die Telefonnummer länger als 12 Ziffern, drücken Sie die ‘#’-Taste erneut,
um die vollständige Nummer anzuzeigen.
4 Drücken Sie die linke Menütaste, um diesen Eintrag dem Telefonbuch
hinzuzufügen, falls er noch nicht gespeichert wurde. Drücken Sie OK,
wenn „NR.SPEICHERN“ (ADD TO PB) angezeigt wird.
Geben Sie den Namen ein oder ändern Sie ihn und drücken Sie OK.
Geben Sie die die Telefonnummer ein oder bearbeiten Sie diese und
drücken Sie dann OK.
Wählen Sie die Ruftonmelodie (1-8), die erklingen soll, wenn von dieser
Nummer ein Anruf eingeht. Drücken Sie OK, dann wird der Eintrag im
Telefonbuch gespeichert.
5 Drücken Sie die Taste für Gespräch annehmen, um den Anrufer
zurückzurufen, wenn dessen Telefonnummer oder Name angezeigt wird.
1 Blättern Sie zu dem Anruf, den Sie löschen wollen, und drücken Sie die
linke Menütaste.
2 Wählen Sie „LÖSCHEN“ (DELETE) und drücken Sie OK.
#
Page 34

34
Mobilteil individuell anpassen
Um alle Einträge auf einmal zu löschen:
5 Mobilteil individuell anpassen
5.1 Ruftonlautstärke einstellen
Ruftonlautstärke des Mobilteils für interne / externe Anrufe
Die Ruftonlautstärke des Mobilteils kann für interne und externe Anrufe nicht separat
eingestellt werden. Sie können unter folgenden Einstellungen wählen: Hoch, Mittel,
Niedrig und „AUS“ (OFF).
5.2 Ruftonmelodie wählen
Jedes Mobilteil kann zur Anrufsignalisierung eine andere Ruftonmelodie verwenden. Die
Mobilteile können mit verschiedenen Melodien klingeln, je nachdem, ob es sich um einen internen
oder externen Anruf handelt. Sie können 8 verschiedene Ruftonmelodien wählen:
1 Wenn Sie in der Anrufliste sind, die linke Menütaste drücken.
2 Wählen Sie „ALLE LÖSCHEN“ (DELETE ALL) und drücken Sie OK.
3 Zum Bestätigen erneut OK drücken.
Jede Programmierung wird am Ende mit einem doppelten oder einfachen langen
Signalton bestätigt. Ein doppelter Signalton bestätigt Ihre Einstellung.
1 Drücken Sie die linke Menütaste, um ins Menü zu gelangen.
2 Wählen Sie „MT-EINSTEL.“ (HS SETTINGS) und bestätigen Sie die
Auswahl.
3 Wählen Sie „TONRUF“ (RING SETUP) und bestätigen Sie.
4 Wählen Sie „TONRUFLAUTST“ (RING VOLUME) und bestätigen Sie.
5 Sie können unter den folgenden Einstellungen auswählen: HOCH (HIGH),
MITTEL (MID), NIEDRIG (LOW) oder „AUS“ (OFF).
6 Bestätigen Sie oder kehren Sie zum vorherigen Menüpunkt zurück.
1 Drücken Sie die linke Menütaste, um ins Menü zu gelangen.
2 Wählen Sie „MT-EINSTEL.“ (HS SETTINGS) und bestätigen Sie die
Auswahl.
3 Wählen Sie „TONRUF“ (RING SETUP) und bestätigen Sie.
4 Wählen Sie „INTERN“ (INT. RING), um die Melodie für interne Anrufe
zu ändern, oder wählen Sie „EXTERN“ (EXT. RING), um die Melodie für
externe Anrufe zu ändern. Bestätigen Sie.
5 Wählen Sie eine Melodie (1 bis 8).
6 Drücken Sie die OK-Taste zum Bestätigen oder kehren Sie zum vorherigen
Menüpunkt zurück.
Page 35

Deutsch
35
Mobilteil individuell anpassen
5.3 Automatische Gesprächsannahme
Steht das Mobilteil bei einem ankommenden Anruf auf der Basisstation, so wird das Gespräch
automatisch angenommen, sobald das Mobilteil von der Basisstation abgehoben wird. Diese
Funktion ist voreingestellt, kann jedoch geändert werden:
5.4 Tastatursperre
Die Tastatur kann gesperrt werden, so dass keine Einstellungen geändert und keine Telefonnummer
gewählt werden kann. Das Symbol erscheint im Display, wenn die Tastatur gesperrt ist.
Tastatur sperren
Tastatur entsperren
1 Drücken Sie die linke Menütaste, um ins Menü zu gelangen.
2 Wählen Sie „MT-EINSTEL.“ (HS SETTINGS) und bestätigen Sie die
Auswahl.
3 Wählen Sie „AUTO-ANTWORT“ (AUTO ANSWER) und bestätigen Sie.
4 Wählen Sie „EIN“ (ON) zum Aktivieren oder „AUS“ (OFF) zum
Deaktivieren und bestätigen Sie.
1 Halten Sie die Taste Tastatursperre 3 Sekunden lang gedrückt. Die Tastatur
wird gesperrt. „ “ wird auf dem Display angezeigt.
1 Halten Sie die Taste für Tastatursperre 3 Sekunden lang gedrückt.
2 Das Symbol „ “ wird nicht mehr angezeigt.
Page 36

36
Introducción
Español
1 Introducción
Gracias por adquirir este producto de TRISTAR. Este producto ha sido diseñado y montado
teniendo el máximo cuidado para con usted y el medio ambiente. En TRISTAR, nos gusta pensar
en el futuro de nuestro planeta y nuestros hijos, por lo que hacemos lo que está en nuestras manos
para ayudar a conservar el medio ambiente. Por esta razón, hemos decidido reducir el
número de páginas de nuestras guías del usuario, así como de nuestros manuales de
producto. Si tenemos en cuenta que se requieren hasta 24 árboles para producir 1
tonelada de papel, publicar manuales de producto en 21 idiomas constituye un precio
elevado para nuestro planeta. En este pequeño manual que se le facilita junto con su
dispositivo de TRISTAR, podrá encontrar una breve descripción de cómo instalarlo y utilizarlo.
No obstante, si desea conocer todas las características de su nuevo dispositivo de TRISTAR, visite
nuestra página web (www.tristar.eu), donde podrá descargar el manual del usuario completo en su
idioma. Con ello, TRISTAR espera contribuir a convertir este mundo en un lugar mejor,
lo cual solo será posible con su ayuda.
1.1 Instalación de la base
Para la instalación, haga lo siguiente:
1 Conecte un extremo del adaptador a la toma y el otro extremo a la conexión del adaptador de la
parte trasera de la base.
2 Conecte un extremo del cable telefónico a la toma telefónica de pared y el otro extremo a la parte
inferior de la base.
3 Coloque el cable telefónico y el cable de alimentación de CA en las guías de la base, tal y como
se muestra en la imagen 1A.
A
B
C
- 1A Vista trasera de la base A. Cable de alimentación
B. Toma telefónica de pared
C. Cable telefónico
Page 37

Español
37
Introducción
1.2 Instalación del terminal
1 Abra el compartimiento de las pilas, tal y como se muestra en la imagen 1B.
2 Inserte las pilas respetando la polaridad (+ y -).
3 Cierre el compartimiento de las pilas.
4 Deje el terminal en la unidad base durante 20 horas.
1.3 Instalación del cargador
(solo para el Butler E600 Doble / Triple / Cuádruple)
1 Conecte un extremo del adaptador a la toma de corriente y el otro a la conexión del adaptador
de la parte inferior del cargador.
Antes de utilizar el teléfono por primera vez, debe asegurarse de que las pilas han
estado cargándose durante 20 horas. De lo contrario, el teléfono no funcionará
correctamente.
+
-
-
+
A
B
- 1B Vista trasera del terminal A. Tapa
B. Pilas recargables
A
- 1C Cargador A. Adaptador con cable de
alimentación
Page 38

38
Introducción
1.4 Teclas / LED
1
3
4
5
6
7
2
8
11
10
9
12
13
14
15
- 1D Terminal -
16
- 1E Base -
Ter min al
1. Altavoz del auricular
2. Pantalla
3. Tecla de menú derecha
4. Tecla Arriba / Registro de
llamadas
5. Tecla de encendido-
apagado / Colgar
6. Tecla de flash
7. Teclas alfanuméricas
8. Encendido / Apagado de
timbre
9. Micrófono
10. Tecla de bloqueo de teclado
11. Tecla Agenda
12. Tecla de manos libres
13. Tecla Abajo / Rellamada
14. Tecla Descolgar
15. Tecla de menú izquierda
Base
16. Tecla Búsqueda
1.5 Uso del manual del usuario
En este manual del usuario, se utiliza el siguiente método para aclarar las instrucciones:
Tecla que debe pulsarse.
1.6 Navegación por el menú
El teléfono Butler E600 cuenta con un sistema de menús muy fácil de usar. Cada uno de los menús
lleva a una lista de opciones.
Teclas de menú de pantalla:
Las teclas de menú de pantalla están situadas directamente debajo de la pantalla (3) (15). Las
funciones de estas teclas cambian según el modo de funcionamiento. Las funciones se describen a
continuación:
Texto....... «PANTALLA» (DISPLAY).
El texto que aparece en la pantalla del teléfono se muestra en la columna de la
derecha entre comillas.
1 Para abrir el menú o seleccionar varias opciones de menú.
2 Para confirmar la selección actual.
3 Para realizar una llamada interna con otros terminales.
4 Para retroceder en la selección de menú o cancelar el funcionamiento
actual.
5 Para borrar un carácter o desactivar la alarma. Asimismo, para deshabilitar
/ habilitar el micrófono durante una llamada.
Page 39

Español
39
Uso del teléfono
2 Uso del teléfono
2.1 Activación / desactivación del terminal
2.2 Cambio del idioma de los menús
2.3 Recepción de una llamada telefónica
Para contestar a la llamada:
2.4 Realización de una llamada telefónica externa
Marcación directa
Premarcación
2.5 Realización de una llamada telefónica interna
1 Mantenga pulsada la tecla Encendido / Apagado del terminal durante 3
segundos. El terminal buscará la base.
2 Mantenga presionada la tecla Activar / Desactivar durante 6 segundos. La
pantalla se apagará.
1 Acceda al menú pulsando la tecla de menú izquierda (15).
2 Seleccione «CONF AURIC» (HS SETTINGS) y confirme la selección.
3 Seleccione «IDIOMA» (LANGUAGE) y confirme la selección.
4 Seleccione un idioma y confirme la selección.
1 Pulse la tecla Descolgar.
O
Saque el terminal de la base si ha activado la opción «CONT AUTOM»
(AUTO ANSWER)
(véase “5.3 Contestación automática”).
Ya puede comunicarse con el interlocutor.
2 Pulse la tecla Colgar para finalizar la llamada o coloque el terminal otra vez
en la base.
1 Pulse la tecla Descolgar para iniciar la llamada.
2 Marque el número de teléfono.
3 Pulse la tecla Colgar para finalizar la llamada o coloque el terminal otra vez
en la base.
1 Marque el número de teléfono.
2 Pulse la tecla Descolgar para iniciar la llamada.
3 Pulse la tecla Colgar para finalizar la llamada o coloque el terminal otra vez
en la base.
4 Para corregir un número utilice la tecla Borrar para borrar el dígito
introducido.
1 Pulse la tecla de menú derecha.
2 Introduzca el número del terminal interno (del 1 al 5).
3 Pulse la tecla Colgar para finalizar la llamada o coloque el terminal otra vez
en la base.
Page 40

40
Uso del teléfono
2.6 Transferencia interna de una llamada
Transferir una llamada externa a otro terminal
2.7 Volumen del altavoz durante la llamada
2.8 Micrófono silenciado
Cabe la posibilidad de silenciar el micrófono durante una conversación.
2.9 Memoria de rellamada
Puede volver a marcar, como máximo, los 5 últimos números a los que haya llamado.
2.10 Uso de las teclas alfanuméricas
Con su teléfono, también puede introducir caracteres alfanuméricos. Esto resulta útil a la hora de
introducir un nombre en la agenda, dar un nombre al terminal, etcétera.
Para seleccionar una letra, pulse la tecla correspondiente las veces que sea necesario. Por ejemplo,
para seleccionar la «A», pulse «2» una vez. Para seleccionar la «B», pulse «2» dos veces, y así
sucesivamente. Para seleccionar «A» y «B» consecutivamente, pulse «2» una vez, espere a que el
cursor se desplace al siguiente carácter y pulse «2» dos veces.
1 Pulse la tecla de menú izquierda durante la conversación.
2 Seleccione «INTERCOM» (INTERCOM) y pulse OK.
3 Introduzca el número del terminal interno (del 1 al 5); la llamada externa se
pondrá en espera.
4 Cuando el usuario del otro terminal descuelgue, pulse la tecla Colgar para
colgar y transferir la llamada.
Si el interlocutor interno no descuelga, vuelva a pulsar la tecla Colgar para
volver a comunicar con el interlocutor externo en línea.
5 Pulse la tecla Colgar para finalizar la llamada o coloque el terminal otra vez
en la base.
1 En el transcurso de una conversación, pulse la tecla Arriba o Abajo para
subir o bajar el volumen.
1 Pulse la tecla de menú derecha. Puede hablar libremente sin que le oiga la
persona que llama.
Se mostrará «MUDO» (MUTE).
2 Vuelva a pulsar la tecla de menú derecha para regresar al modo normal.
1 Pulse la tecla Rellamada.
2 Seleccione un número. Si el número está en la agenda, aparecerá el nombre.
3 Pulse la tecla Descolgar para iniciar la llamada.
4 Pulse la tecla Colgar para regresar al modo de espera.
Para seleccionar un espacio, pulse «1».
Pulse la tecla de menú derecha para eliminar un carácter.
Page 41

Español
41
Agenda (Phonebook)
3 Agenda (Phonebook)
Cada terminal puede almacenar hasta 30 nombres y números de teléfono. Los nombres pueden tener
un máximo de 12 caracteres, y los números pueden contener hasta 24 dígitos.
Para introducir caracteres alfanuméricos, consulte la sección “2.10 Uso de las teclas alfanuméricas”.
3.1 Grabación de una entrada en la agenda
Pulse la tecla Colgar para salir del menú sin guardar ninguna modificación.
3.2 Marcación de una entrada de la agenda
4 Identificación de llamadas
Cuando reciba una llamada externa, el número de teléfono de la persona que llama aparecerá en la
pantalla del terminal. El teléfono puede recibir llamadas tanto en FSK como en DTMF. También
puede ver el nombre de la persona que le llama si la red lo transmite. Si el nombre está programado
en la agenda, aparecerá el nombre que figura en ella.
El teléfono puede guardar 30 llamadas en una lista de llamadas (recibidas y perdidas) que puede
visualizar más tarde. Esta función solo está disponible si ha contratado el servicio de identificación
de llamadas.
Cuando la memoria está llena, las llamadas nuevas sustituyen automáticamente a las antiguas en la
memoria.
Para consultar la lista de llamadas:
1 Acceda al menú.
2 Seleccione «AG
ENDA» (PHONEBOOK) y confirme la selección.
3 Pulse el
botón de menú.
4 Seleccio
ne «AGREGAR» (ADD) y confirme la selección.
5 Pulse el
botón de menú.
6 Escriba
el nombre y confírmelo.
7 Escriba
el número y confírmelo.
8 Seleccio
ne una melodía de timbre (1-8) y confirme la selección.
1 Presione la tecla de agenda.
2 Seleccio
ne un nombre o introduzca la primera letra de este (la lista está en
orden alfabético).
3 Pulse la tecla Descolgar para iniciar la llamada.
4 Pulse la tecla Colgar para finalizar la llamada o coloque el terminal otra vez
en la base.
Este servicio solo funciona si ha contratado el servicio de identificación de
llamadas. Para ello, póngase en contacto con su compañía telefónica.
La visualización de la identificación de la llamada se sustituye por la de la
duración de la llamada al cabo de 15 segundos de comunicación.
1 Presione la tecla de registro de llamadas.
Si no hay llamadas en la lista, aparecerá «VACÍO» (EMPTY).
Page 42

42
Personalización del terminal
Puede borrar cada entrada por separado:
Para eliminar todas las entradas a la vez:
5 Personalización del terminal
5.1 Ajuste del volumen del timbre
Volumen del timbre del terminal para llamadas internas / externas
El volumen del timbre del terminal para llamadas internas o externas no puede ajustarse por
separado. Puede elegir entre Alto, Medio, Bajo y «DESACTIVAR» (OFF).
2 Desplácese por las llamadas. Los nombres de las personas que llaman se
mostrarán si los envía la red o están guardados en la agenda. Si alcanza el
final de la lista, oirá un pitido.
Si aparece * en el centro de la línea inferior, no se ha respondido a la llamada.
3 Pulse la tecla «*» para ver el número de teléfono.
Si el número de teléfono tiene más de 12 dígitos, vuelva a pulsar la tecla «#»
para ver el número completo.
4 Pulse la tecla de menú izquierda para agregar esta entrada a la agenda, si
aún no está almacenada. Pulse OK cuando se muestre «AÑADIR A» (ADD
TO PB) en la pantalla.
Introduzca o modifique el nombre y pulse OK.
Introduzca o modifique el número de teléfono y pulse OK.
Seleccione la melodía (1-8) que se oirá al llamar este número.
Pulse OK: la entrada se guardará en la agenda.
5 Pulse la tecla Descolgar para devolver la llamada a un interlocutor, cuando
se muestren su nombre o número de teléfono.
1 Desplácese a la llamada que desea eliminar y pulse la tecla de menú
izquierda.
2 Seleccione «BORRAR» (DELETE) y pulse OK.
1 Cuando se encuentre en la lista de llamadas, pulse la tecla de menú
izquierda.
2 Seleccione «BORRAR TODO» (DELETE ALL) y pulse OK.
3 Pulse OK de nuevo para confirmar.
Cada programación se confirma mediante un pitido largo o un pitido doble. Un
pitido doble confirma la validación de su elección.
1 Acceda al menú pulsando la tecla de menú izquierda.
2 Seleccione «CONF PORT» (HS SETTINGS) y confirme la selección.
3 Seleccione «CONF TIMBRE» (RING SETUP) y confirme la selección.
4 Seleccione «VOL TIMBRE» (RING VOLUME) y confirme la selección.
5 Seleccione un volumen (ALTO, MEDIO, BAJO o «APAGADO» [OFF]).
6 Confirme la selección o regrese al menú anterior.
#
Page 43

Español
43
Personalización del terminal
5.2 Selección de la melodía del timbre
Cada terminal puede emitir un timbre con una melodía distinta. Los terminales pueden sonar con
una melodía diferente según se trate de una llamada interna o externa. Puede elegir entre 8 melodías
diferentes:
5.3 Contestación automática
Cuando hay una llamada entrante y el terminal se encuentra en la base, este se conecta a la línea de
forma automática cuando se separa de la base. Esta es la opción predeterminada, pero puede
desactivarla:
5.4 Bloqueo del teclado
El teclado puede bloquearse para que no se modifique ninguna opción ni se marque ningún número
involuntariamente. Cuando se bloquee el teclado, aparecerá el icono en la pantalla.
Bloqueo del teclado
Desbloqueo del teclado
1 Acceda al menú pulsando la tecla de menú izquierda.
2 Seleccione «CONF PORT» (HS SETTINGS) y confirme la selección.
3 Seleccione «CONF TIMBRE» (RING SETUP) y confirme la selección.
4 Seleccione «TIMBRE INT» (INT RING) para cambiar la melodía interna o
«TIMBRE EXT» (EXT RING) para cambiar la melodía externa y confirme
la selección.
5 Seleccione una melodía (de 1 a 8).
6 Pulse la tecla OK para confirmar la selección o regrese al menú anterior.
1 Acceda al menú pulsando la tecla de menú izquierda.
2 Seleccione «CONF PORT» (HS SETTINGS) y confirme la selección.
3 Seleccione «CONT AUTOM» (AUTO ANSWER) y confirme la selección.
4 Seleccione «ACTIVAR» (ON) para activar o «DESACTIVAR» (OFF)
para desactivar y confirme la selección.
1 Mantenga pulsada la tecla de bloqueo del teclado durante 3 segundos. Se
bloqueará el teclado. “Aparecerá en la pantalla « ».
1 Mantenga pulsada la tecla de bloqueo del teclado durante 3 segundos.
2 « » desaparecerá de la pantalla.
Page 44

44
Förberedelser
Svenska
1 Förberedelser
Tack för att du köpt den här produkten. Denna produkt har utformats och monterats med största
omsorg om dig och om miljön. Eftersom vi på TRISTAR är måna om vår planets framtid och våra
barn strävar vi efter att göra vårt bästa för att hjälpa till att rädda miljön. Det är därför vi har beslutat
att minska antalet sidor i våra bruksanvisningar och produkthandböcker. Om du tänker på att det
behövs upp till 24 träd för att tillverka ett ton papper kostar det vår planet en hel del träd
för att publicera produkthandböcker på 21 språk. I denna korta bruksanvisning som
följer med din enhet hittar du en kort beskrivning av hur du installerar och använder din
enhet. Om du ändå vill upptäcka alla funktioner i din nya enhet kan du besöka vår
webbplats (www.tristar.eu) där du kan ladda ner den fullständiga användarhandboken på
ditt språk. TRISTAR hoppas på detta sätt dra vårt strå till stacken för att göra vår planet till en bättre
plats, men vi kan bara lyckas med din hjälp!
1.1 Installera basenheten
Gör så här för att installera:
1 Sätt i ena änden av adaptern i eluttaget och den andra i adapterjacket på baksidan av basenheten.
2 Anslut ena änden av telefonsladden till väggtelefonjacket och den andra änden till basenhetens
nedre del.
3 Sätt i telefon- och elsladden i basenheten såsom visas i bild 1A.
1.2 Installera handenheten
1 Öppna batterifacket såsom visas på bild 1B.
2 Sätt i batterierna med hänsyn till polariteten (+ och -).
3 Stäng batterifacket.
4 Låt handenheten stå i basenheten i 20 timmar.
A
B
C
- 1A Basenhetens baksida A. Nätsladd
B. Telefonjack
C. Telefonsladd
+
-
-
+
A
B
- 1B Handenhetens baksida A. Lock
B. Laddningsbara batterier
Page 45

Svenska
45
Förberedelser
1.3 Installera laddaren (endast för Butler E600 Twin/Triple/Quattro)
1 Sätt i ena änden av adaptern i eluttaget och den andra i adapterjacket längst ner på laddaren.
1.4 Knappar/Dioder
1
3
4
5
6
7
2
8
11
10
9
12
13
14
15
- 1D Handenhet -
16
- 1E Bas -
Handenhet
1. Högtalare
2. Display
3. Höger menyknapp
4. Knappen Upp/samtalslogg
5. Knappen strömbrytare/lur
på
6. Pausknapp
7. Knappsats (alfanumerisk)
8. Ringsignal till/från
9. Mikrofon
10. Knapplås
11. Telefonbok
12. Handsfree
13. Ner-/
återuppringningsknapp
14. Lur av-knapp
15. Vänster menyknapp
Basenhet
16. Sök
Innan du använder telefonen första gången måste batteriet laddas i 20 timmar. Om
du inte gör detta kommer telefonen inte att fungera optimalt.
A
- 1C Laddare A. Adapter med strömkabel
Page 46

46
Använda telefonen
1.5 Så här används bruksanvisningen
I den här bruksanvisningen används följande metod för att förtydliga instruktionerna:
Knapp som ska tryckas ned.
1.6 Navigera i menyn
Butler E600 har ett menysystem som är enkelt att använda. Varje meny leder till en lista med
alternativ.
Displaymenyknappar:
Displaymenyknapparna sitter precis nedanför displayen (3) (15). Funktionerna för de här
knapparna ändras beroende på användningsläget. Funktionerna beskrivs nedan:
2 Använda telefonen
2.1 Sätta på och stänga av handenheten
2.2 Byta menyspråk
2.3 Ta emot ett telefonsamtal
Svara på samtalet:
Text....... "DISPLAY".
Text som visas i telefonens display visas i den högra kolumnen mellan
citattecken.
1 För att öppna menyn eller för att välja fler menyalternativ.
2 För att bekräfta aktuellt val.
3 För att ringa ett internt samtal med andra handenheter.
4 För att gå bakåt i menyvalet eller för att avbryta den aktuella åtgärden.
5 För att radera ett tecken eller stoppa larmet. Eller för att stänga av/slå på
mikrofonen under samtal.
1 Tryck på och håll ned av-/påknappen på handenheten i 3 sekunder.
Handenheten börjar nu att söka efter basenheten.
2 Tryck på och håll ned av-/påknappen i 6 sekunder. Displayen stängs av.
1 Öppna menyn genom att trycka på den vänstra menyknappen (15).
2 Välj "HS SETTINGS" och bekräfta.
3 Välj "LANGUAGE" och bekräfta.
4 Välj ett språk och bekräfta.
1 Tryck på lur av-knappen.
OR
Lyft handenheten från basenheten om du har aktiverat "Automatic answer".
(Se “5.3 Autosvar”)
Samtalet är uppkopplat.
2 Tryck på lur på-knappen för att lägga på eller sätt tillbaka handenheten i
basenheten.
Page 47

Svenska
47
Använda telefonen
2.4 Ringa ett externt telefonsamtal
Ringa direkt
Föruppringning
2.5 Ringa ett internt telefonsamtal
2.6 Intern samtalsöverföring
Överföra ett externt samtal till en annan handenhet.
2.7 Högtalarvolym under samtal
2.8 Stänga av mikrofonen
Det går att stänga av mikrofonen under ett samtal.
1 Tryck på lur av-knappen för att starta samtalet.
2 Slå telefonnumret.
3 Tryck på lur på-knappen för att lägga på eller sätt tillbaka handenheten i
basenheten.
1 Slå telefonnumret.
2 Tryck på lur av-knappen för att starta samtalet.
3 Tryck på lur på-knappen för att lägga på eller sätt tillbaka handenheten i
basenheten.
4 Använd raderingsknappen för att korrigera en inmatad siffra.
1 Tryck på den högra menyknappen.
2 Ange det interna numret till den handenhet du vill ringa till (1-5).
3 Tryck på lur på-knappen för att lägga på eller sätt tillbaka handenheten i
basenheten.
1 Tryck på den vänstra menyknappen under samtalet.
2 Välj "INTERCOM" och tryck på OK.
3 Ange det interna numret till den handenhet du vill ringa till (1-5). Det
interna samtalet parkeras.
4 När den andra handenheten svarar, trycker du på lurknappen för att avsluta
och överföra samtalet.
Om den interna samtalspartnern inte svarar, trycker du på lur på-knappen igen
för att koppla tillbaka till det externa samtalet.
5 Tryck på lur på-knappen för att lägga på eller sätt tillbaka handenheten i
basenheten.
1 Tryck på upp-/nedknappen för att ändra volym under telefonsamtalet.
1 Tryck på den högra menyknappen. Du kan tala fritt utan att personen i andra
änden hör dig.
"MUTED" visas.
2 Tryck på den högra menyknappen igen för att återgå till normalt läge.
Page 48

48
Telefonbok
2.9 Återuppringningsminne
Du kan återuppringa upp till 5 av de sist slagna numren.
2.10 Använda den alfanumeriska knappsatsen
Med din telefon kan du även ange alfanumeriska tecken. Det är användbart för att ange ett namn i
telefonboken, namnge handenheten, ...
Du väljer en bokstav genom att trycka på motsvarande knapp så många gånger som behövs. Om du
till exempel vill skriva ”A” trycker du på ”2” en gång. Om du vill skriva ”B” trycker du på ”2” två
gånger och så vidare. Om du vill skriva ”A” och därefter ”B” efter varandra, trycker du på ”2” en
gång och väntar tills markören flyttar till nästa tecken. Tryck sedan på ”2” två gånger.
3Telefonbok
Varje handenhet kan lagra upp till 30 namn och telefonnummer. Namn kan vara upp till 12 tecken
långa och nummer upp till 24 siffror.
Mer information om hur du skriver in alfanumeriska tecken finns i avsnitt “2.10 Använda den
alfanumeriska knappsatsen”.
3.1 Lägga till en post i telefonboken
Tryck på lur på-knappen för att lämna menyn utan att spara ändringar.
3.2 Ringa upp en post i telefonboken
1 T
ryck på återuppringningsknappen.
2 Välj ett nummer. Om numret finns i telefonboken visas namnet.
3 Tryck på lur av-knappen för att starta samtalet.
4 Tryck på lur på-knappen för att återgå till vänteläge.
Tryck ”1” för att välja en plats.
Tryck på den högra menyknappen för att ta bort ett tecken.
1 Öppna menyn
.
2 Välj "P
HONEBOOK" och bekräfta.
3 T
ryck meny.
4 Välj "ADD" och bekr
äfta.
5 T
ryck meny.
6 Ange
namnet och bekräfta.
7 Ange numret och bekräfta.
8 Välj en ringmelodi (1-8) och
bekräfta.
1 Tryck på telefonboksknappen.
2 Välj
ett namn eller ange den första bokstaven i namnet. (Listan rullar i
alfabetisk ordning.)
3 Tryck på lur av-knappen för att starta samtalet.
4 Tryck på lur på-knappen för att lägga på eller sätt tillbaka handenheten i
basenheten.
Page 49

Svenska
49
Nummerpresentation
4 Nummerpresentation
När du tar emot ett externt samtal visas det uppringande telefonnumret på handenhetens display.
Telefonen kan ta emot samtal i både FSK och DTMF. Du kan också se uppringarens namn om det
överförs av nätverket. Om namnet är inprogrammerat i telefonboken visas det namnet!
Telefonen lagrar upp till 30 samtal i en samtalslista (mottagna och missade samtal) som kan gås
igenom senare. Den här funktionen är endast tillgänglig om du abonnerar på en
nummerpresentationstjänst.
När minnet är fullt ersätter nya samtal automatiskt de gamla i minnet.
Så här öppnar du samtalslistan:
Du kan ta bort varje post separat:
Ta bort alla kontakter på en gång:
Den här tjänsten fungerar bara om du abonnerar på tjänsten nummerpresentation.
Kontakta ditt telefonbolag.
Nummerpresentationen ersätts med samtalstiden efter att samtalet pågått i 15
sekunder.
1 Tryck på samtalslisteknappen.
Om listan är tom visas "EMPTY".
2 Bläddra igenom samtalen. Namnet visas om det har skickats från nätverket
eller sparats i telefonboken. Vid den sista posten hörs en pipton.
När * visas mitt på raden längst ner är samtalet obesvarat.
3 Tryck på "*"-knappen om du vill se telefonnumret.
Om telefonnumret är längre än 12 siffror trycker du på "#"-knappen igen för
att se det fullständiga numret.
4 Tryck på den vänstra meny-knappen för att lägga till denna post i
telefonboken om den inte redan finns där: Tryck på OKnär "ADD TO PB"
visas på displayen.
Ange eller ändra namnet och tryck på OK.
Ange eller ändra telefonnumret och tryck på OK.
Välj en melodi (1-8) som ska höras när detta nummer ringer. Tryck på OK,
posten sparas i telefonboken.
5 Tryck på lurknappen för att ringa tillbaka när telefonnumret eller namnet
visas.
1 Bläddra till samtalet du vill radera och tryck på den vänstra menyknappen.
2 Välj "DELETE" och tryck på OK.
1 När du är i samtalslistan trycker du på den vänstra menyknappen.
2 Välj "DELETE ALL" och tryck på OK.
3 Tryck på OK igen för att bekräfta.
#
Page 50

50
Göra inställningar för handenheten
5 Göra inställningar för handenheten
5.1 Justera ringvolymen
Ringvolymen på interna/externa samtal i handenheten
Ringvolymen på interna/externa samtal kan inte ställas in separat. Du kan välja mellan hög,
medium, låg och "OFF".
5.2 Välja ringmelodi
Varje handenhet kan ringa med olika melodier. Handenheterna kan ringa med olika melodier
beroende på om samtalet internt eller externt. Du kan välja mellan 8 olika ringmelodier:
5.3 Autosvar
När det kommer ett inkommande samtal och handenheten är i basenheten, går telefonen automatiskt
ut på linjen när den lyfts. Detta är standardinställningen men den kan stängas av:
5.4 Knappsatslås
Knappsatsen kan låsas så att inga inställningar kan ändras och inga telefonnummer kan slås. Ikonen
visas på skärmen när knappsatsen är låst.
Låsa knappsatsen
Låsa upp knappsatsen
Varje programmering bekräftas i slutet av ett dubbelt eller enkelt långt pip. Ett
dubbelt pip bekräftar ditt val.
1 Öppna menyn genom att trycka på den vänstra menyknappen.
2 Välj "HS SETTINGS" och bekräfta.
3 Välj "RING SETUP" och bekräfta.
4 Välj “RING VOLUME” och bekräfta.
5 Välj en ringstyrka (MAX, MEDIUM, MIN eller "OFF").
6 Bekräfta eller återgå till föregående meny.
1 Öppna menyn genom att trycka på den vänstra menyknappen.
2 Välj "HS SETTINGS" och bekräfta.
3 Välj "RING SETUP" och bekräfta.
4 Välj "INT RING" för att ändra den interna melodin eller "EXT RING" för
att ändra den externa melodin och bekräfta.
5 Välj en melodi (1 till 8).
6 Bekräfta med OK eller återgå till föregående meny.
1 Öppna menyn genom att trycka på den vänstra menyknappen.
2 Välj "HS SETTINGS" och bekräfta.
3 Välj "AUTO ANSWER" och bekräfta.
4 Välj "ON" för att aktivera eller "OFF" för att inaktivera och bekräfta.
1 Tryck på och håll ned knapplås-knappen i 3 sekunder. Knappsatsen låses.
“ ” visas på displayen.
1 Tryck på och håll ned knapplåsknappen i 3 sekunder.
2 “ “ försvinner från skärmen.
Page 51

Dansk
51
Sådan kommer du i gang
Dansk
1 Sådan kommer du i gang
Tak, fordi du valgte dette produkt. Dette produkt er udviklet og samlet med den størst mulige
omtanke for dig og for miljøet. Da vi her hos TRISTAR tænker på vores børns og planetens fremtid,
gør vi vores bedste for at skåne miljøet. Dette er grunden til, at vi har besluttet at reducere antallet
af sider i vores brugervejledninger og produktmanualer. Hvis man tænker på, at der skal op til 24
træer til for at producere 1 ton papir, koster udgivelsen af produktmanualer på 21 sprog
planeten en masse træer. I denne korte vejledning, der følger med din enhed, finder du
en kort forklaring på, hvordan du installerer og bruger din enhed.
Hvis du alligevel skulle have lyst til at lære mere om alle funktionerne på din nye enhed,
kan du besøge vores websted (www.tristar.eu), hvor du kan downloade en komplet
brugervejledning på dit sprog. På denne måde håber TRISTAR på at kunne bidrage til at gøre vores
planet til et bedre sted, men det kan vi kun med din hjælp!
1.1 Sådan installeres basen
Gør følgende for at tilslutte telefonen:
1 Sæt den ene ende af adapteren i stikket og den anden i adapterstikket bag på basen.
2 Sæt den ene ende af telefonledningen i telefonstikket i væggen og den anden ende i bunden af
basen.
3 Sæt telefon- og vekselstrømsledningen i basen som vist på billede 1A.
1.2 Sådan installeres håndsættet
1 Åbn batterirummet som vist på billede 1B.
2 Isæt batterierne i henhold til den viste polaritet (+ og -).
3 Luk batterirummet.
4 Lad håndsættet stå i basen i 20 timer.
A
B
C
- 1A Basen set bagfra A. Strømledning
B. Telefonstik i væggen
C. Telefonledning
+
-
-
+
A
B
- 1B Håndsættet set bagfra A. Dæksel
B. Genopladelige batterier
Page 52

52
Sådan kommer du i gang
1.3 Installation af opladeren (gælder kun Butler E600 Twin/Triple/Quattro)
1 Indsæt den ene ende af adapteren i netstikket og den anden i adapterstikket i bunden af
opladeren.
1.4 Taster/lysdioder
1
3
4
5
6
7
2
8
11
10
9
12
13
14
15
- 1D Håndsæt -
16
- 1E Base -
Håndsæt
1. Håndsætshøjttaler
2. Display
3. Højre menutast
4. Op/Opkaldsliste-tast
5. Tænd/Sluk-/Læg på-tast
6. Blinktasten
7. Alfanumeriske taster
8. Ringelyd til/fra
9. Mikrofon
10. Tastaturlås-tast
11. Telefonbogstast
12. Håndfri tast
13. Ned/Genopkaldstast
14. Rør løftet-tast
15. Venstre menutast
Telefonbaseenhed
16. Håndsætsøgetast
1.5 Sådan anvendes brugervejledningen
I denne brugervejledning er følgende metode anvendt for at gøre anvisningerne klarere:
Tast, der skal trykkes på.
Før du bruger telefonen første gang, skal du sikre dig, at batteriet er blevet opladt i
20 timer. Hvis du ikke sørger for dette, vil telefonen ikke fungere optimalt.
Tekst....... “DISPLAY”.
Tekst, der vises i telefonens display, står i højre kolonne i anførselstegn.
A
- 1C Oplader A. Adapter med netkabel
Page 53

Dansk
53
Anvendelse af telefonen
1.6 Navigering i menuen
Butler E600-telefonen har et menusystem, der er nemt at bruge. Hver menu fører til en liste med
funktioner.
Displaymenutaster: Displaymenutaster er anbragt lige under displayet (3) (15). Disse tasters
funktion afhænger af betjeningstilstanden. Funktionerne beskrives nedenfor:
2 Anvendelse af telefonen
2.1 Sådan sættes håndsættet på on/off
2.2 Ændring af menusproget
2.3 Modtagelse af et telefonopkald
Sådan besvares opkaldet:
2.4 Sådan foretager du et eksternt opkald
Direkte opkald
Forudindtastning
1 Åbning af menuen eller valg af flere menupunkter.
2 Bekræftelse af det aktuelle valg.
3 Internt opkald med andre håndsæt.
4 Tilbage til menuvalget eller annullering af den aktuelle funktion.
5 Sletning af et tegn eller stop af alarm. Eller deaktivering/aktivering af
mikrofonen under et opkald.
1 Tryk på on/off-tasten på håndsættet i 3 sekunder. Håndsættet vil søge efter
basen.
2 Tryk på on/off-tasten, og hold den nede i 6 sekunder. Displayet slukkes.
1 Åbn menuen ved at trykke på venstre menutast (15).
2 Vælg "HS SETTINGS", og bekræft.
3 Væg “LANGUAGE”, og bekræft.
4 Vælg et sprog, og bekræft.
1 Tryk på Rør løftet-tasten.
ELLER
Løft håndsættet fra basen, hvis "Automatisk svar" er aktiveret.
(Se “5.3 Autosvar”)
Du har forbindelse til den kaldte.
2 Tryk på Læg på-tasten for at afslutte samtalen, eller sæt håndsættet tilbage
i basen.
1 Tryk på Rør løftet-tasten for at ringe op.
2 Indtast telefonnummeret.
3 Tryk på Læg på-tasten for at afslutte samtalen, eller sæt håndsættet tilbage
i basen.
1 Indtast telefonnummeret.
2 Tryk på Rør løftet-tasten for at ringe op.
3 Tryk på Læg på-tasten for at afslutte samtalen, eller sæt håndsættet tilbage
i basen.
4 Et nummer rettes ved at slette et indtastet ciffer med slettetasten.
Page 54

54
Anvendelse af telefonen
2.5 Sådan foretager du et Internt opkald
2.6 Viderestilling af interne opkald
Viderestilling af et eksternt opkald til et andet håndsæt.
2.7 Højttalervolumen under opkald
2.8 Sluk mikrofon
Der er mulighed for at deaktivere mikrofonen under en samtale.
2.9 Genopkaldshukommelse
Du kan genkalde op til 5 af de sidst kaldte numre.
2.10 Sådan bruges det alfanumeriske tastatur
Du kan også indtaste alfanumeriske tegn med din telefon. Dette er nyttigt, hvis du vil indtaste et
navn i telefonbogen, give håndsættet et navn, ...
Hvis du vil vælge et bogstav, skal du trykke på den tilsvarende tast så mange gange som nødvendigt.
Hvis du f.eks. vil skrive et 'A', skal du trykke én gang på '2'. For at skrive et 'B', skal du trykke to
gange på '2' osv. For at skrive 'A' og 'B' efter hinanden skal du trykke én gang på '2', vente, indtil
markøren flytter sig til det næste tegn, og derefter trykke to gange på '2'.
1 Tryk på højre menutast.
2 Indtast nummeret på det interne håndsæt (1 til 5).
3 Tryk på Læg på-tasten for at afslutte samtalen, eller sæt håndsættet tilbage
i basen.
1 Tryk på venstre menutast under en samtale.
2 Vælg "INTERCOM", og tryk på OK.
3 Indtast nummeret på det interne håndsæt (1 til 5); den, der ringer udefra,
sættes på vent.
4 Når det andet håndsæt løftes, viderestilles opkaldet ved, at du trykker på
Læg på-tasten.
Hvis den, du har ringet op internt, ikke svarer, tager du opkaldet tilbage og
vender tilbage til det eksterne opkald ved at trykke på Læg på-tasten igen.
5 Tryk på Læg på-tasten for at afslutte samtalen, eller sæt håndsættet tilbage
i basen.
1 Du kan ændre lydstyrken under en samtale ved at trykke på op- eller ned-
tasten.
1 Tryk på højre menutast. Du kan tale frit uden at blive hørt af den, du har på
linjen.
Displayet viser "MUTED".
2 Tryk på højre menutast igen, når du vil vende tilbage til normal tilstand.
1 Tryk på genopkaldstasten.
2 Vælg et nummer. Hvis nummeret findes i telefonbogen, vises navnet.
3 Tryk på Rør løftet-tasten for at ringe op.
4 Tryk på Læg på-tasten for at vende tilbage til standby.
Tryk på '1' for at indsætte et mellemrum.
Tryk på højre menutast, hvis du vil slette et tegn.
Page 55

Dansk
55
Telefonbog
3Telefonbog
Hvert håndsæt har plads til op til 30 telefonnumre og navne. Navne kan være på op til 12 tegn og
numre op til 24 cifre.
Se afsnit “2.10 Sådan bruges det alfanumeriske tastatur” om indtastning af alfanumeriske tegn.
3.1 Sådan tilføjes en kontakt i telefonbogen
Tryk på Læg på-tasten, hvis du vil forlade menuen uden at gemme dine
ændringer.
3.2 Sådan ringer du til en kontakt fra telefonbogen
4 Nummerviser
Når du modtager et eksternt opkald, viser displayet på håndsættet nummeret på den, der har
foretaget opkaldet. Telefonen kan modtage opkald i både FSK og DTMF. Du kan også se
opkalderens navn, hvis dette transmitteres af netværket. Hvis navnet er programmeret ind i
telefonbogen, vises navnet i telefonbogen!
Telefonen kan gemme 30 opkald i opkaldslisten (modtagne og ubesvarede opkald), som kan
gennemses senere. Denne funktion er kun til rådighed, hvis du abonnerer på nummervisning.
Når hukommelsen er fuld, erstatter nye opkald automatisk de ældste opkald i hukommelsen.
Sådan bruger du opkaldslisten:
1 Gå ti
l menuen.
2 Vælg "PHONEBOOK",
og bekræft.
3 T
ryk på menu.
4 Vælg
"ADD", og bekræft.
5 T
ryk på menu.
6 Indtast det
ønskede navn, og bekræft.
7 Indtast og bekræ
ft nummeret.
8 Vælg
en ringemelodi (1-8), og bekræft.
1 T
ryk på telefonbogstasten.
2 Vælg et
navn, eller indtast det første bogstav i et navn. (De står på listen i
alfabetisk norden, når der bladres.)
3 Tryk på Rør løftet-tasten for at ringe op.
4 Tryk på Læg på-tasten for at afslutte samtalen, eller sæt håndsættet tilbage
i basen.
Denne tjeneste fungerer kun, hvis du har et nummerviser/Clip-abonnement. Kontakt
venligst dit teleselskab.
Opkaldsidentiteten afløses af opkaldets varighed 15 sekunder inde i samtalen.
1 Tryk på opkaldsliste-tasten.
Hvis der ingen opkald er på listen, viser displayet "EMPTY".
2 Bladr igennem opkaldene. De opkaldende personers navne vises, hvis de
sendes af netværket eller er gemt i telefonbogen. Hvis du har nået
slutningen af listen, hører du en biplyd.
Når * vises midt på nederste linje, er opkaldet ubesvaret.
Page 56

56
Foretag personlige indstillinger af håndsættet
Du kan slette hver kontakt separat:
Sådan slettes alle opkald:
5 Foretag personlige indstillinger af håndsættet
5.1 Justering af ringestyrke
Håndsættets ringestyrke ved interne/eksterne opkald
Håndsættets ringestyrke for interne eller eksterne opkald kan ikke indstilles separat. Du kan vælge
imellem Maks, Midt, Lav samt "OFF".
5.2 Valg af ringemelodi
Hvert håndsæt kan ringe med forskellige melodier. Håndsættene kan ringe med forskellig melodi
afhængigt af, om opkaldet er internt eller eksternt. Du kan vælge imellem 8 forskellige
ringemelodier:
3 Tryk på ‘*’-tasten, hvis du vil se telefonnummeret.
Hvis telefonnummeret er længere end 12 cifre, skal du trykke på ‘#’-tasten
igen, hvis du vil se hele nummeret.
4 Tryk på venstre menutast, hvis du vil gemme denne kontakt i telefonbogen,
og den ikke allerede står der. Tryk på OK, når “ADD TO PB” vises i
displayet.
Indtast eller rediger navnet, og tast OK:
Indtast eller rediger telefonnummeret, og tast OK.
Vælg den melodi (1-8), som du vil afspille, når dette nummer ringer. Tryk
på OK, og kontakten vil blive gemt i telefonbogen.
5 Tryk på rør løftet-tasten, hvis du vil foretage et opkald til en kontakt, når
den pågældendes nummer og navn vises.
1 Rul ned til det opkald, du ønsker at slette, og tryk på venstre menutast.
2 Vælg "DELETE", og tryk på OK.
1 Når du er i opkaldslisten, skal du trykke på venstre menutast.
2 Vælg “DELETE ALL” og tryk på OK.
3 Tryk på OK igen for at bekræfte.
Hver enkelt programmering bekræftes med en dobbelttone eller en enkelt, lang
tone, når den er afsluttet. En dobbelttone bekræfter, at dit valg er gyldigt.
1 Åbn menuen ved at trykke på venstre menutast.
2 Vælg "HS SETTINGS", og bekræft.
3 Vælg "RING SETUP", og bekræft.
4 Vælg “RING VOLUME” og bekræft.
5 Vælg en volumen (HIGH, MID, LOW eller “OFF”).
6 Bekræft, eller vend tilbage til den foregående menu.
1 Åbn menuen ved at trykke på venstre menutast.
2 Vælg "HS SETTINGS", og bekræft.
3 Vælg "RING SETUP", og bekræft.
#
Page 57

Dansk
57
Foretag personlige indstillinger af håndsættet
5.3 Autosvar
Når der kommer et indgående opkald, og håndsættet sidder på basen, tager telefonen automatisk
linjen, når det løftes. Dette er standardopsætningen, men den kan ændres:
5.4 Tastaturlås
Tastaturet kan låses, således at indstillingerne ikke kan ændres, og der ikke kan foretages opkald.
-ikonet vises på skærmen, når tastaturet er låst.
Sådan låses tastaturet
Sådan låses tastaturet op
4 Vælg “INT RING”, hvis du vil ændre melodien for internt opkald, eller
“EXT RING”, hvis du vil ændre melodien for eksternt opkald, og bekræft.
5 Vælg en melodi (1 til 8).
6 Tryk på OK-tasten for at bekræfte eller vende tilbage til den foregående
menu.
1 Åbn menuen ved at trykke på venstre menutast.
2 Vælg "HS SETTINGS", og bekræft.
3 Vælg "AUTO ANSWER", og bekræft.
4 Vælg “ON” for at aktivere eller “OFF” for at deaktivere, og bekræft.
1 Tryk og hold på tastaturlåstasten i 3 sekunder. Tastaturet er nu låst. “ "
vises i displayet.
1 Tryk og hold på tastaturlås-tasten i 3 sekunder.
2 “ “ forsvinder fra displayet.
Page 58

58
Komme i gang
Norsk
1Komme i gang
Takk for at du valgte dette produktet fra TRISTAR. Dette produktet er konstruert og montert med
omtanke for deg og for miljøet. Fordi vi i TRISTAR tenker på fremtiden for miljøet og for våre barn,
prøver vi å gjøre vårt beste for å verne miljøet. Derfor har vi besluttet å redusere antall sider i våre
brukerveiledninger og produktmanualer. Med tanke på at det kreves opptil 24 trær for å fremstille
1 tonn papir, går det mange trær tapt hvis vi skal publisere produktmanualer på 21 språk.
I denne korte manualen som følger med ditt produkt finner du en kort forklaring av
hvordan du installerer og bruker apparatet.
Hvis du vil vite mer om alle funksjonene og egenskapene til det nye TRISTARapparatet, går du til vårt webområde (www.tristar.eu), der du kan laste ned den
fullstendige brukerveiledningen på ditt eget språk. Ved å gjøre dette håper TRISTAR å
kunne gi sitt bidrag for å gjøre planeten til et bedre sted, men vi kan bare lykkes med din hjelp!
1.1 Installere baseenheten
Installer på følgende måte:
1 Sett den ene enden av adapteren i stikkontakten og den andre enden i adapterkontakten bak på
baseenheten.
2 Koble den ene enden av telefonledningen til telefonkontakten i veggen, og den andre enden på
undersiden av baseenheten.
3 Koble telefonledningen og AC-strømledningen til kontaktene i baseenheten som vist i
illustrasjon 1A.
1.2 Installere håndsettet
1 Åpne batteridekselet som vist i illustrasjon 1B.
2 Sett inn batteriene med polene (+ og -) riktig vei.
3 Lukk batterirommet.
4 La håndsettet stå i baseenheten i 20 timer.
A
B
C
- 1A Baksiden av baseenheten A. Strømledning
B. Vegguttak for telefon
C. Telefonledning
+
-
-
+
A
B
- 1B Håndsettet sett bakfra A. Forside
B. Oppladbare batterier
Page 59

Norsk
59
Komme i gang
1.3 Installere laderen (kun for Butler E600 Twin/Triple/Quattro)
1 Plugg den ene enden av adapteren inn i en stikkontakt, og den andre enden i adapterkontakten
på undersiden av laderen.
1.4 Taster/indikatorer
1
3
4
5
6
7
2
8
11
10
9
12
13
14
15
- 1D Håndsett -
16
- 1E Baseenhet -
Håndsett
1. Høyttaler
2. Display
3. Høyre menytast
4. Ned-/samtaleloggtast
5. Av-på-/ legg på-tast
6. Flash-tast
7. Alfanumeriske taster
8. Ringesignal på/av
9. Mikrofon
10. Tastelåstast
11. Telefonbok-tast
12. Håndfritast
13. Ned- / repetisjonstast
14. Løft av--tast
15. Venstre menytast
Baseenhet
16. Søkeknapp
1.5 Slik bruker du denne veiledningen
I denne veiledningen brukes følgende metode for å klargjøre instruksjonene:
Tastetrykk.
Før du bruker telefonen første gang, må du forsikre deg om at batteriet har blitt
ladet i 20 timer. Hvis du ikke gjør dette, vil ikke telefonen fungere optimalt.
Tekst....... "DISPLAY".
Tekst som vises på displayet på telefonen, vises i høyre kolonne mellom
anførselstegn.
A
- 1C Lader A. Adapter med strømkabel
Page 60

60
Bruke telefonen
1.6 Navigere i menyen
Menysystemet til Butler E600 er enkelt å bruke. Hver meny fører til en liste over alternativer.
Displaymenytaster:
Displaymenytastene er plassert like under displayet (3) (15). Funksjonen til disse tastene endres,
avhengig av hvordan telefonen brukes. Funksjonene er beskrevet nedenfor:
2 Bruke telefonen
2.1 Slå håndsettet på/av
2.2 Endre menyspråket
2.3 Motta en telefonsamtale
Besvare anropet:
2.4 Foreta et eksternt anrop
Direkteoppringning
Forhåndsvalg
1 Åpne menyen for å velge flere menyalternativer.
2 Bekrefte gjeldende valg.
3 Ringe opp internt til andre håndsett.
4 Gå tilbake i menyvalget eller avbryt gjeldende handling.
5 Slette et tegn eller stoppe alarmen. Eller dempe/oppheve demping av
mikrofonen under en samtale.
1 Trykk inn på/av-knappen på baseenheten og hold den inne i 3 sekunder.
Håndsettet søker etter baseenheten.
2 Trykk på/av-tasten og hold den inne i 6 sekunder. Displayet slås av.
1 Åpne menyen ved å trykke venstre menytast (15).
2 Velg "HS SETTINGS" og bekreft.
3 Velg "LANGUAGE" og bekreft.
4 Velg ønsket språk og bekreft.
1 Trykk på løft av-tasten.
ELLER
Løft håndsettet opp fra baseenheten hvis du har aktivert "Autosvar".
(Se “5.3 Autosvar”)
Du har nå forbindelse med den som ringer.
2 Trykk på legg på-tasten eller sett håndsettet i baseenheten for å legge på.
1 Trykk på løft av-tasten for å foreta anropet.
2 Tast telefonnummeret.
3 Trykk på legg på-tasten eller sett håndsettet i baseenheten for å legge på.
1 Tast telefonnummeret.
2 Trykk på løft av-tasten for å foreta anropet.
3 Trykk på legg på-tasten eller sett håndsettet i baseenheten for å legge på.
4 Du korrigerer et nummer ved bruke slett-tasten for å slette et inntastet siffer
Page 61

Norsk
61
Bruke telefonen
2.5 Foreta et internt anrop
2.6 Overføre internt anrop
Overføre en ekstern samtale til et annet håndsett.
2.7 Høyttalervolum under samtale
2.8 Dempe mikrofonen
Det er mulig å dempe mikrofonen under samtale.
2.9 Repetisjonsminne
Du kan repetere de 5 siste oppringte numrene.
2.10 Bruke det alfanumeriske tastaturet
Du kan også taste inn alfanumeriske tegn på denne telefonen. Dette er nyttig hvis du vil angi et navn
i telefonboken eller gi navn til et håndsett.
Trykk den aktuelle tasten så mange ganger som nødvendig for å velge en bokstav. Hvis du for
eksempel vil velge en "A", trykker du én gang på "2". For "B" trykker du to ganger på "2", osv. Hvis
du vil velge "A" og deretter "B", trykker du én gang på "2", venter til markøren beveger seg til neste
tegn, og trykker deretter to ganger på "2".
1 Trykk høyre menytast.
2 Tast inn nummeret til det interne håndsettet (1 til 5)
3 Trykk på legg på-tasten eller sett håndsettet i baseenheten for å legge på.
1 Trykk venstre menytast under en samtale.
2 Velg "INTERCOM" og trykk OK.
3 Tast nummeret til det interne håndsettet (1 til 5). Det eksterne anropet settes
på vent.
4 Når det andre håndsettet løftes av, trykker du legg på-tasten for å legge på
og overføre samtalen.
Hvis den interne samtalepartneren ikke tar telefonen, trykker du legg på-tasten
en gang til for å koble til det eksterne anropet igjen.
5 Trykk på legg på-tasten eller sett håndsettet i baseenheten for å legge på.
1 Trykk tastene opp- eller ned-tasten under en samtale for å endre volumet
tilsvarende.
1 Trykk høyre menytast. Du kan snakke fritt uten at samtalepartneren hører
deg.
"MUTED" vises på displayet.
2 Trykk høyre menytast igjen for å gå tilbake til normal modus.
1 Trykk på Repetisjons-tasten.
2 Velg et nummer. Hvis nummeret finnes i telefonboken vises navnet.
3 Trykk på løft av-tasten for å foreta anropet.
4 Trykk på legg på-tasten for å gå tilbake til beredskapsmodus.
Trykk på "1" for å velge mellomrom.
Trykk høyre menytast for å slette et tegn.
Page 62

62
Telefonbok
3Telefonbok
Du kan lagre opptil 30 navn og telefonnumre på hvert håndsett. Navnene kan inneholde opptil 12
tegn, og numrene opptil 24 siffer.
Se hvordan du taster inn alfanumeriske tegn i avsnitt “2.10 Bruke det alfanumeriske tastaturet”.
3.1 Legge til en oppføring i telefonboken
Trykk legg på-tasten for å gå ut av menyen uten å lagre endringene.
3.2 Ringe opp en oppføring i kontaktlisten
4Hvem ringer
Når du mottar et eksternt anrop, vises telefonnummeret til den som ringer, på displayet på
håndsettet. Telefonen kan motta samtaler i både FSK- og DTMF-format. Du kan også se navnet til
den som ringer, hvis dette overføres via nettverket. Hvis navnet er lagret i telefonboken, vises
navnet fra telefonboken!
Telefonen kan lagre 30 oppringninger i samtalelisten (mottatte og tapte), slik at du kan se gjennom
dem senere. Denne funksjonen er bare tilgjengelig hvis du abonnerer på nummervisning.
Når minnet er fullt, vil nye samtaler automatisk erstatte de eldste oppringningene i minnet.
Hente frem anropslisten:
1 Åpne menyen.
2 Velg "PHONEBOOK" og
bekreft.
3 T
rykk menytasten.
4 Velg "ADD" og
bekreft.
5 T
rykk menytasten.
6 Tast inn navn
et og bekreft.
7 Tast inn nummeret og bekreft.
8 Velg en
ringetone (1-8) og bekreft.
1 Trykk telefonbok-tasten.
2 Velg et
navn eller tast inn den første bokstaven i navnet. (Listen vises i
alfabetisk rekkefølge.)
3 Trykk på løft av-tasten for å foreta anropet.
4 Trykk på legg på-tasten eller sett håndsettet i baseenheten for å legge på.
Denne tjenesten fungerer bare hvis telefonabonnementet har en Hvem ringerfunksjon. Kontakt telefonselskapet.
Identiteten til den som ringer, erstattes av samtalevarigheten etter at samtalen
har vart i 15 sekunder.
1 Trykk på anropsloggtasten.
Hvis det ikke er noen anrop i listen, vises "EMPTY".
2 Bla gjennom anropene. Navnene til de som har ringt, vises hvis navnet er
sendt av nettverket eller lagret i telefonboken. Du hører en pipetone når du
har nådd slutten av listen.
Hvis * vises midt på nederste linje, er anropet ubesvart.
3 Trykk "*"-tasten for å se telefonnummeret.
Page 63

Norsk
63
Tilpasse håndsettet
Du kan slette hver oppføring separat:
Slette alle oppføringer på én gang:
5 Tilpasse håndsettet
5.1 Justere ringevolumet
Håndsettets ringevolum for interne/eksterne anrop
Håndsettets ringevolum for interne og eksterne anrop kan ikke stilles inn hver for seg. Du kan
velge mellom Maks, Medium, Lav og "OFF".
5.2 Velge ringetone
Hvert håndsett kan ringe med forskjellige ringetoner. Håndsettene kan ha forskjellig ringetone
avhengig av om anropet er internt eller eksternt. Du kan velge mellom 8 ulike ringetoner:
Hvis telefonnummeret har mer enn 12 sifre, trykker du "#"- tasten en gang til
for å se hele nummeret.
4 Trykk venstre menytast for å legge denne oppføringen til i telefonboken,
hvis den ikke allerede er lagret. Trykk OK når "ADD TO PB" vises på
displayet.
Tast inn eller endre navnet, og trykk OK.
Tast inn eller endre telefonnummeret, og trykk OK.
Velg ringetonen (1-8) som skal brukes når dette nummeret ringer. Trykk
OK, for å lagre oppføringen i telefonboken.
5 Trykk løft av-tasten for å ringe opp en mottaker når telefonnummeret eller
navnet vises.
1 Bla ned til anropet du vil slette, og trykk venstre menytast.
2 Velg "DELETE" og trykk OK.
1 Trykk venstre menytast når du er i anropslisten.
2 Velg "DELETE ALL" og trykk OK.
3 Trykk OK igjen for å bekrefte.
Hver tilpasning bekreftes med en dobbel eller enkel, lang pipetone når den er utført.
En dobbel pipetone bekrefter at du har foretatt et gyldig valg.
1 Åpne menyen ved å trykke venstre menytast.
2 Velg "HS SETTINGS" og bekreft.
3 Velg "RING SETUP" og bekreft.
4 Velg "RING VOLUME" og bekreft.
5 Velg et volum (HIGH, MID, LOW eller "OFF").
6 Bekreft eller gå tilbake til forrige meny.
1 Åpne menyen ved å trykke venstre menytast.
2 Velg "HS SETTINGS" og bekreft.
3 Velg "RING SETUP" og bekreft.
4 Velg "INT. RING" for å endre den interne ringetonen, eller "EXT RING"
for å endre den eksterne ringetonen, og bekreft.
5 Velg en ringetone (1 til 8).
6 Trykk OK-tasten for å bekrefte, eller gå tilbake til forrige meny.
#
Page 64

64
Tilpasse håndsettet
5.3 Autosvar
Telefonen besvarer automatisk innkommende samtaler når håndsettet blir løftet fra baseenheten.
Dette er standardinnstillingen, men du slå den av:
5.4 Tastelås
Tastaturet kan låses slik at innstillingene ikke kan endres og det ikke kan slås telefonnumre. ikonet vises på displayet når tastaturet er låst.
Låse tastaturet
Låse opp tastaturet
1 Åpne menyen ved å trykke venstre menytast.
2 Velg "HS SETTINGS" og bekreft.
3 Velg "AUTO ANSWER" og bekreft.
4 Velg "ON" for å aktivere eller "OFF" for å deaktivere, og bekreft.
1 Trykk og hold inne låsetasten i 3 sekunder. Tastaturet blir låst. “ " vises
på skjermen.
1 Trykk og hold inne låsetasten i 3 sekunder.
2 “ " forsvinner fra skjermen.
Page 65

Português
65
Iniciar
Português
1Iniciar
Obrigado por ter adquirido este produto TRISTAR. Este produto foi concebido e montado com o
maior cuidado a pensar em si e no ambiente. Porque na TRISTAR gostamos de pensar no futuro do
nosso planeta e das nossas crianças, tentamos fazer o nosso melhor para ajudar a salvar o ambiente.
Por isso, decidimos reduzir o número de páginas dos nossos manuais de utilizador e dos produtos.
Se tiver em conta que são precisas até 24 árvores para produzir uma tonelada de papel,
publicar manuais em 21 línguas custa ao nosso planeta muitas árvores. Neste pequeno
manual que lhe é fornecido com o seu aparelho TRISTAR pode encontrar uma
explicação breve sobre como instalar e usar o seu aparelho TRISTAR.
Se quiser descobrir todas as características do seu novo aparelho TRISTAR, por favor
visite o nosso website (www.tristar.eu) onde pode fazer o download do manual do
utilizador completo na sua língua. Ao tomar esta iniciativa, a TRISTAR espera dar o seu contributo
para tornar o nosso planeta melhor, mas só podemos fazê-lo com a sua ajuda!
1.1 Instalar a base
Efectue o seguinte procedimento para instalação:
1 Ligue uma extremidade do transformador à tomada e a outra à ficha do transformador na parte
de trás da base.
2 Ligue uma extremidade do fio do telefone à ficha do telefone na parede e a outra extremidade à
entrada na parte inferior da base.
3 Coloque o fio do telefone e o fio eléctrico AC nas guias da base tal como indicado na
imagem 1A.
1.2 Instalar o telefone portátil
1 Abra o compartimento das pilhas como apresentado na imagem 1B.
2 Coloque as pilhas respeitando a polaridade (+ e -).
3 Feche o compartimento das pilhas.
4 Mantenha o telefone portátil na unidade de base durante 20 horas.
A
B
C
- 1A Vista posterior da base A. Fio eléctrico
B. Tomada telefónica de parede
C. Fio do telefone
+
-
-
+
A
B
- 1B Vista posterior do telefone portátil A. Tampa
B. Pilhas recarregáveis
Page 66

66
Iniciar
1.3 Instalar o carregador (Apenas para Butler E600 Twin/Triple/Quattro)
1 Ligue uma extremidade do adaptador à tomada eléctrica e a outra extremidade ao conector na
parte de baixo do carregador.
1.4 Teclas/LEDs
1
3
4
5
6
7
2
8
11
10
9
12
13
14
15
- 1D Telefone Portátil -
16
- 1E Base -
Telefone portátil
1. Altifalante
2. Visor
3. Tecla de menu direita
4. Tecla para cima /
registo de chamadas
5. Tecla ligar-desligar /
telefone pousado
6. Tecla Flash
7. Teclas alfanuméricas
8. Toque Activado/Desactivado
9. Microfone
10. Tecla de bloqueio do teclado
11. Tecla da Lista Telefónica
12. Tecla Mãos-livres
13. Tecla para baixo / remarcação
14. Tecla telefone levantado
15. Tecla de menu esquerda
Base
16. Tecla Paging (busca)
1.5 Como utilizar este manual do utilizador
Neste manual do utilizador é utilizado o seguinte método para clarificar as instruções:
Tecla a premir .
Antes de utilizar o telefone pela primeira vez, deve certificar-se de que as pilhas
foram carregadas durante 20 horas. Se não o fizer, o telefone não funcionará
correctamente.
Texto....... “DISPLAY”.
O texto que aparece no visor do telefone é apresentado na coluna da direita
entre aspas.
A
- 1C Carregador A. Transformador com fio eléctrico
Page 67

Português
67
Utilizar o telefone
1.6 Navegar no menu
O Butler E600 tem um sistema de menus fácil de utilizar. Cada menu conduz a uma lista de opções.
Teclas do menu:
As teclas de menu estão localizadas imediatamente abaixo do visor (3) (15). A função destas teclas
muda consoante o modo de operação. As funções encontram-se descritas em baixo:
2 Utilizar o telefone
2.1 Ligar e desligar o telefone portátil
2.2 Alterar o idioma do menu
2.3 Receber uma chamada telefónica
Atender a chamada:
2.4 Fazer uma chamada telefónica externa
Marcação directa
Pré-marcação
1 Para ir para o menu ou para seleccionar mais opções de menu.
2 Para confirmar a selecção corrente.
3 Para fazer uma chamada interna para outros telefones portáteis.
4 Para retroceder na selecção de menu ou para cancelar a operação corrente.
5 Para apagar um caracter ou para parar o alarme. Ou para colocar o telefone
em silêncio/modo normal durante uma chamada.
1 Prima e mantenha premida a tecla ligar/desligar durante 3 segundos. O
telefone portátil procura a base.
2 Prima e mantenha premida a tecla de ligar/desligar durante 6 segundos. O
visor desliga.
1 Entre no menu premindo a tecla de menu da esquerda (15).
2 Seleccione “HS SETTINGS” e confirme.
3 Seleccione “LANGUAGE” e confirme.
4 Seleccione um idioma e confirme.
1 Prima a tecla Levantado.
OU Retire o telefone portátil da base se a função de atendimento
automático “AUTOMATIC ANSWER” estiver activada.
(Consulte “5.3 Resposta automática”)
É estabelecida a ligação com o correspondente.
2 Prima a tecla Pousado para desligar o telefone ou volte a colocar o terminal
na base.
1 Prima a tecla Levantado para iniciar a chamada.
2 Marque o número de telefone.
3 Prima a tecla Pousado para desligar o telefone ou volte a colocar o terminal
na base.
1 Marque o número de telefone.
2 Prima a tecla Levantado para iniciar a chamada.
3 Prima a tecla Pousado para desligar o telefone ou volte a colocar o telefone
portátil na base.
Page 68

68
Utilizar o telefone
2.5 Fazer uma chamada telefónica interna
2.6 Transferência de chamada interna
Transferir uma chamada externa para outro telefone portátil.
2.7 Volume do altifalante durante a chamada
2.8 Microfone em silêncio
É possível silenciar o microfone durante uma conversa.
2.9 Memória de remarcação
Pode remarcar um dos últimos 5 números marcados.
2.10 Utilizar o teclado alfanumérico
Com o seu telefone também é possível introduzir caracteres alfanuméricos. Isto é útil para introduzir
um nome na lista de telefones, dar um nome ao telefone portátil,…
Para seleccionar uma letra, prima a tecla correspondente tantas vezes quantas for necessário. Por
exemplo, para seleccionar um ‘A’, prima ‘2’ uma vez. Para seleccionar um ‘B’ , prima ‘2’ duas
vezes, etc. Para seleccionar ‘A’ e, em seguida, ‘B’ consecutivamente, seleccione ‘2’ uma vez, espere
até que o cursor avance para o carácter seguinte e, em seguida, prima ‘2’ duas vezes.
4 Para corrigir um número, utilize a tecla Eliminar para apagar um dígito
introduzido
1 Prima a tecla de menu da direita.
2 Introduza o número do telefone portátil interno (1 a 5)
3 Prima a tecla Pousado para desligar o telefone ou volte a colocar o telefone
portátil na base.
1 Prima a tecla de menu da esquerda, durante a conversa.
2 Seleccione “INTERCOM” e prima OK.
3 Introduza o número do telefone portátil interno (1 a 5), o autor da chamada
externa é colocado em espera.
4 Quando o outro telefone portátil atender, prima a tecla Pousado para
desligar e transferir a chamada.
Se o correspondente interno não atender, prima novamente a tecla Pousado
para retomar a chamada externa em linha.
5 Prima a tecla Pousado para desligar o telefone ou volte a colocar o telefone
portátil na base.
1 Durante a conversa, prima a tecla para cima ou para baixo para mudar o
volume em conformidade.
1 Prima a tecla de menu da direita. Desta forma, pode falar livremente sem
que a pessoa do outro lado da linha o ouça.
É apresentado “MUTED”.
2 Prima a tecla menu da direita novamente para regressar ao modo normal.
1 Prima a tecla de remarcação.
2 Seleccione um número. Se o número existir na lista de telefones, será
apresentado o nome.
3 Prima a tecla Levantado para iniciar a chamada.
4 Prima a tecla Pousado para voltar ao modo de espera.
Page 69

Português
69
Lista telefónica
3 Lista telefónica
Cada telefone portátil pode armazenar até 30 números de telefone e nomes correspondentes Os
nomes podem ter até 12 caracteres e os números até 24 dígitos.
Para introduzir caracteres alfanuméricos, consulte a secção “2.10 Utilizar o teclado alfanumérico”.
3.1 Adicionar uma entrada à lista telefónica
Prima a tecla Pousado para sair do menu sem efectuar quaisquer modificações.
3.2 Marcar um número a partir da lista telefónica
4 Identificação do autor da chamada
Ao receber uma chamada externa, o número do autor da chamada surge no visor quando o telefone
portátil toca. O telefone pode receber chamadas em FSK e DTMF. Pode ainda ver o nome do autor
da chamada se este for transmitido pela rede. Se o nome estiver programado na agenda telefónica,
o nome que consta na agenda telefónica é apresentado!
O telefone pode armazenar até 30 chamadas numa Lista de Chamadas (atendidas e não atendidas)
que poderão ser consultadas posteriormente. Esta função só está disponível se tiver subscrito a
informação de ID do autor da chamada.
Quando a memória está cheia, as novas chamadas substituem automaticamente as chamadas mais
antigas na memória.
Prima ‘1’ para seleccionar um espaço.
Prima a tecla de menu da direita para apagar um carácter.
1 Entre no menu.
2 Seleccione “PHON
EBOOK” e confirme.
3 Prim
a menu.
4 Seleccione “ADD” e confirme.
5 Prima menu.
6 Introduza o
nome e confirme.
7 Introduza o número e confirme.
8 Seleccio
ne uma melodia de toque (1 a 8) e confirme.
1 Prima a tecla da lista telefónica.
2 Seleccio
ne um nome ou introduza a primeira letra do nome. (A lista é
percorrida por ordem alfabética.)
3 Prima a tecla Levantado para iniciar a chamada.
4 Prima a tecla Pousado para desligar o telefone ou volte a colocar o telefone
portátil na base.
Este serviço só funcionará se tiver uma subscrição de CLIP/ID de Autor de
Chamada. Contacte o seu fornecedor de serviços de telecomunicações.
A identidade do autor da chamada é substituída pela duração da chamada
passados 15 segundos de comunicação.
Page 70

70
Personalizar o telefone portátil
Para consultar a lista de chamadas:
É possível apagar cada entrada separadamente:
Para apagar todas as entradas:
5 Personalizar o telefone portátil
5.1 Ajustar o volume do toque
Volume de toque do telefone portátil para chamadas internas/externas
O volume de toque do telefone portátil para chamadas internas ou externas pode ser configurado
separadamente. Pode escolher entre o volume do toque Alto, médio, baixo e “OFF”.
1 Prima a tecla de registo de chamadas.
Se não existirem chamadas na lista, é apresentado “EMPTY”.
2 Percorra as chamadas. São apresentados os nomes dos autores das
chamadas, se o nome for enviado pela rede ou se estiver guardado na lista
telefónica. Quando chegar ao fim da lista, soará um tom de aviso.
Quando * é apresentado ao centro da linha de baixo, a chamada não foi
atendida.
3 Prima a tecla ‘*’ para ver o número de telefone.
Se o número de telefone tiver mais de 12 dígitos, prima novamente a tecla ‘#’
para ver o número completo.
4 Prima a tecla de menu da esquerda para adicionar esta entrada à lista
telefónica, se ainda não tiver sido guardada. Prima OK quando “ADD TO
PB” for apresentado no visor.
Introduza ou modifique o nome e prima OK.
Introduza ou modifique o número de telefone e prima OK.
Seleccione a melodia (1-8) que será ouvida quando este número de telefone
estiver a chamar. Prima OK, a entrada será guardada na agenda telefónica
5 Para telefonar a um correspondente, basta premir a tecla Levantado quando
o número de telefone ou o nome forem apresentados.
1 Percorra a lista até à chamada que pretende apagar e prima a tecla de menu
da esquerda.
2 Seleccione “DELETE” e prima OK.
1 Se estiver na lista de chamadas, prima a tecla de menu da esquerda.
2 Seleccione “DELETE ALL” e prima OK.
3 Prima OK novamente para confirmar.
Cada programação é confirmada no final com um tom de aviso duplo ou longo. Um
tom duplo confirma que a sua escolha foi validada.
1 Entre no menu premindo a tecla de menu da esquerda.
2 Seleccione “HS SETTINGS” e confirme.
3 Seleccione “RING SETUP” e confirme.
4 Seleccione “RING VOLUME” e confirme.
5 Seleccione um volume HIGH, MID, LOW ou “VOLUME OFF”.
6 Confirme ou volte ao menu anterior.
#
Page 71

Português
71
Personalizar o telefone portátil
5.2 Definir a melodia do toque
Cada telefone portátil pode tocar com uma melodia diferente. Os telefones portáteis podem tocar
com uma melodia diferente conforme a chamada é interna ou externa. É possível escolher entre 8
melodias de toque diferentes:
5.3 Resposta automática
Quando se recebe uma chamada e o telefone portátil está na base, o telefone atende
automaticamente quando este é levantado. Esta é a predefinição, que pode ser desligada:
5.4 Bloqueio do teclado
O teclado pode ser bloqueado para que não seja possível modificar as configurações nem possam
ser marcados números de telefone. O ícone é apresentado no visor quando o teclado está
bloqueado.
Bloquear o teclado
Desbloquear o teclado
1 Entre no menu premindo a tecla de menu da esquerda.
2 Seleccione “HS SETTINGS” e confirme.
3 Seleccione “RING SETUP” e confirme.
4 Seleccione “INT. RING” para alterar a melodia interna ou “EXT. RING”
para alterar a melodia externa e confirme.
5 Seleccione uma melodia (1 a 8).
6 Prima a tecla OK para confirmar ou voltar ao menu anterior.
1 Entre no menu premindo a tecla de menu da esquerda.
2 Seleccione “HS SETTINGS” e confirme.
3 Seleccione “AUTO ANSWER ” e confirme.
4 Seleccione “ON” para activar ou “OFF” para desactivar e confirme.
1 Prima e mantenha premida a tecla de bloqueio de teclado durante 3
segundos. O teclado será bloqueado. “ “ é apresentado no visor.
1 Prima e mantenha premida a tecla de bloqueio de teclado durante 3
segundos.
2 “ “ desaparece do visor.
Page 72

72
Τα πρώτα βήματα
Ελληνικά
1 Τα πρώτα βήματα
Σας ευχαριστούμε που αγοράσατε αυτό το προϊόν TRISTAR. Αυτό το προϊόν έχει σχεδιαστεί και
συναρμολογηθεί με πολύ μεγάλο σεβασμό προς το περιβάλλον και τις ανάγκες σας. Επειδή εμείς
στην TRISTAR θέλουμε να σκεφτόμαστε το μέλλον του πλανήτη μας και των παιδιών μας, στόχος
μας είναι να κάνουμε ό,τι καλύτερο μπορούμε για να
συμβάλουμε στη διαφύλαξη του
περιβάλλοντος. Για το λόγο αυτό αποφασίσαμε να μειώσουμε τον αριθμό των σελίδων
στους οδηγούς χρήσης και τα εγχειρίδια των προϊόντων μας. Εάν λάβετε υπόψη σας ότι
χρειάζονται έως 24 δέντρα για την παραγωγή ενός τόνου χαρτιού, η έκδοση εγχειριδίων
προϊόντων σε 21 γλώσσες κοστίζει στον πλανήτη μας πολλά
δέντρα. Στο παρόν
περιεκτικό εγχειρίδιο που παρέχεται μαζί με τη συσκευή TRISTAR, μπορείτε να βρείτε μια
σύντομη περιγραφή για τον τρόπο εγκατάστασης και χρήσης της συσκευής σας TRISTAR.
Εάν θέλετε να εξερευνήσετε όλες τις λειτουργίες της νέας σας συσκευής TRISTAR, επισκεφθείτε
την τοποθεσία μας στο web (www.tristar.eu), από την οποία μπορείτε να κάνετε λήψη του πλήρους
εγχειριδίου χρήσης στη γλώσσα σας. Η TRISTAR ελπίζει ότι αυτή θα είναι η δική της συνεισφορά
στο να γίνει ο πλανήτης μας ένα καλύτερο μέρος,
αλλά για να το πετύχει αυτό χρειάζεται οπωσδήποτε τη βοήθειά σας!
1.1 Εγκατάσταση της βάσης
Για να εγκαταστήσετε τη βάση κάντε τα εξής:
1 Συνδέστε το φις του τροφοδοτικού στην πρίζα και το βύσμα στην αντίστοιχη υποδοχή στο πίσω
μέρος της βάσης.
2 Συνδέστε το ένα βύσμα του καλωδίου του τηλεφώνου στην πρίζα τηλεφωνικής γραμμής και το
άλλο στο κάτω μέρος της βάσης.
3 Τοποθετήστε το καλώδιο
τηλεφώνου και το καλώδιο ρεύματος στους οδηγούς της βάσης όπως
φαίνεται στην εικόνα 1A.
A
B
C
- 1A Πίσω όψη βάσης -
A. Καλώδιο ρεύματος
B. Πρίζα τηλεφώνου
C. Καλώδιο τηλεφώνου
Page 73

Ελληνικά
73
Τα πρώτα βήματα
1.2 Εγκατάσταση του ακουστικού
1 Ανοίξτε την υποδοχή μπαταριών όπως φαίνεται στην εικόνα 1Β.
2 Τοποθετήστε τις μπαταρίες προσέχοντας την πολικότητα (+ και -).
3 Τοποθετήστε ξανά το καπάκι στην υποδοχή μπαταριών.
4 Αφήστε το ακουστικό στη μονάδα βάσης για 20 ώρες.
1.3 Εγκατάσταση του φορτιστή (μόνο για το Butler E600 Twin/Triple/Quattro)
1 Συνδέστε το φις του τροφοδοτικού στην πρίζα και το βύσμα του στην αντίστοιχη υποδοχή στο
κάτω μέρος του φορτιστή.
Πριν χρησιμοποιήσετε το τηλέφωνο για πρώτη φορά, πρέπει να φορτίσετε την
μπαταρία για 20 ώρες. Διαφορετικά, επηρεάζεται αρνητικά η λειτουργία του
τηλεφώνου.
+
-
-
+
A
B
- 1B Πίσω όψη ακουστικού -
A. Κάλυμμα
B. Επαναφορτιζόμενες μπαταρίες
A
- 1C Φορτιστής -
A. Τροφοδοτικό με καλώδιο
ρεύματος
Page 74

74
Τα πρώτα βήματα
1.4 Πλήκτρα/Ενδεικτικές λυχνίες (LED)
Ακουστικό
1. Μεγάφωνο ακουστικού
2. Οθόνη
3. Δεξί πλήκτρο μενού
4. Πλήκτρο πάνω /
καταγραφής κλήσεων
5. Πλήκτρο ενεργοποίησης-
απενεργοποίησης /
πραγματοποίησης κλήσης
6. Πλήκτρο Flash
7. Αλφαριθμητικά πλήκτρα
8. Ενεργοποίηση/
απενεργοποίηση
κουδουνίσματος
9. Μικρόφωνο
10. Πλήκτρο κλειδώματος
πληκτρολογίου
11. Πλήκτρο ευρετηρίου
12. Πλήκτρο ανοιχτής συνομιλίας
13. Πλήκτρο κάτω / επανάκλησης
14. Πλήκτρο τερματισμού κλήσης
15. Αριστερό πλήκτρο μενού
Βάση
16. Πλήκτρο αναζήτησης
1.5 Τρόπος χρήσης του οδηγού χρήσης
Στον παρόντα οδηγό χρήσης, χρησιμοποιείται η ακόλουθη μέθοδος για την αποσαφήνιση των
οδηγιών:
Πλήκτρο που πρέπει να πατήσετε.
1.6 Περιήγηση στο μενού
Το Butler E600 διαθέτει ένα εύχρηστο σύστημα μενού. Κάθε μενού οδηγεί σε μια λίστα επιλογών.
Πλήκτρα μενού οθόνης: Τα πλήκτρα μενού οθόνης βρίσκονται ακριβώς κάτω από την οθόνη (3)
(15). Οι λειτουργίες αυτών των πλήκτρων αλλάζουν ανάλογα με την κατάσταση λειτουργίας. Οι
λειτουργίες τους περιγράφονται παρακάτω:
Κείμενο....... “DISPLAY”.
Το κείμενο που εμφανίζεται στην οθόνη του τηλεφώνου εμφανίζεται στη δεξιά
στήλη εντός εισαγωγικών.
1 Άνοιγμα του μενού ή επιλογή περισσότερων επιλογών μενού.
2 Επιβεβαίωση της τρέχουσας επιλογής.
3 Πραγματοποίηση εσωτερικής κλήσης με άλλα ακουστικά.
4 ΕΠιστροφή στην επιλογή μενού ή ακύρωση της τρέχουσας λειτουργίας.
5 Σβήσιμο ενός χαρακτήρα ή διακοπή της ειδοποίησης. Ή σίγαση/ αναίρεση
σίγασης του μικροφώνου κατά
τη διάρκεια μιας κλήσης.
1
3
4
5
6
7
2
8
11
10
9
12
13
14
15
- 1D Ακουστικό -
16
- 1E Βάση -
Page 75

Ελληνικά
75
Χρήση του τηλεφώνου
2 Χρήση του τηλεφώνου
2.1 Ενεργοποίηση/Απενεργοποίηση ακουστικού
2.2 Αλλαγή της γλώσσας μενού
2.3 Λήψη τηλεφωνικής κλήσης
Για να απαντήσετε στην κλήση:
2.4 Πραγματοποίηση εξωτερικής κλήσης
Άμεση κλήση
Προκαθορισμένη κλήση
2.5 Πραγματοποίηση εσωτερικής κλήσης
1 Πατήστε και κρατήστε πατημένο το πλήκτρο ενεργοποίησης/
απενεργοποίησης στο ακουστικό επί 3 δευτερόλεπτα. Τότε, το ακουστικό
θα αναζητήσει τη βάση.
2 Πατήστε και κρατήστε πατημένο το πλήκτρο ενεργοποίησης/
απενεργοποίησης για 6 δευτερόλεπτα. Τότε, η οθόνη θα σβήσει.
1 Πατήστε το αριστερό πλήκτρο μενού (15) για να εισέλθετε στο μενού.
2 Επιλέξτε “HS SETTINGS” και επιβεβαιώστε.
3 Επιλέξτε “LANGUAGE” και επιβεβαιώστε.
4 Επιλέξτε μια γλώσσα και επιβεβαιώστε.
1 Πατήστε το πλήκτρο πραγματοποίησης κλήσης.
Ή
Εάν είναι ενεργοποιημένη η επιλογή “Automatic answer” (Αυτόματη
ομιλία), απλώς σηκώστε το ακουστικό από τη βάση.
(Ανατρέ ξ τε στην ενότητα “5.3 Αυτόματη απάντηση”.)
Τότε, θα συνδεθείτε με τον καλούντα.
2 Πατήστε το πλήκτρο τερματισμού κλήσης για να κλείσετε το τηλέφωνο ή
τοποθετήστε ξανά το ακουστικό στη βάση.
1 Για να ξεκινήσετε την κλήση, πατήστε το πλήκτρο πραγματοποίησης
κλήσης.
2 Πληκτρολογήστε τον αριθμό τηλεφώνου.
3 Πατήστε το πλήκτρο τερματισμού κλήσης για να κλείσετε το τηλέφωνο ή
τοποθετήστε ξανά το ακουστικό στη βάση.
1 Πληκτρολογήστε τον αριθμό τηλεφώνου.
2 Για να ξεκινήσετε την κλήση, πατήστε το πλήκτρο πραγματοποίησης
κλήσης.
3 Πατήστε το πλήκτρο τερματισμού κλήσης για να κλείσετε το τηλέφωνο ή
τοποθετήστε ξανά το ακουστικό στη βάση.
4 Για να διορθώσετε έναν αριθμό, χρησιμοποιήστε το πλήκτρο διαγραφής για
να διαγράψετε ένα ψηφίο που έχετε πληκτρολογήσει.
1 Πατήστε το δεξί πλήκτρο μενού.
2 Πληκτρολογήστε τον αριθμό του ακουστικού που θέλετε να καλέσετε
(1 έως 5).
3 Πατήστε το πλήκτρο τερματισμού κλήσης για να κλείσετε το τηλέφωνο ή
τοποθετήστε ξανά το ακουστικό στη βάση.
Page 76

76
Χρήση του τηλεφώνου
2.6 Μεταβίβαση εξωτερικής κλήσης από ένα ακουστικό σε άλλο
Μεταβίβαση εξωτερικής κλήσης σε άλλο ακουστικό.
2.7 Ένταση ήχου στο ακουστικό κατά τη διάρκεια μιας κλήσης
2.8 Σίγαση μικροφώνου
Μπορείτε να απενεργοποιήσετε το μικρόφωνο κατά τη διάρκεια μιας συνομιλίας.
2.9 Μνήμη επανακλήσεων
Μπορείτε να επαναλάβετε την κλήση των τελευταίων 5 αριθμών που καλέσατε.
2.10 Χρήση του αλφαριθμητικού πληκτρολογίου
Στο τηλέφωνό σας μπορείτε επίσης να πληκτρολογήσετε αλφαριθμητικούς χαρακτήρες. Η
δυνατότητα αυτή είναι χρήσιμη για την καταχώριση ενός ονόματος στο ευρετήριο, την
αντιστοίχιση ενός ονόματος στο ακουστικό, ...
Για να επιλέξετε ένα γράμμα, πατήστε το αντίστοιχο πλήκτρο όσες φορές χρειάζεται. Για
παράδειγμα, για να επιλέξετε το γράμμα ‘A’, πατήστε το πλήκτρο ‘2’ μια φορά
. Για να επιλέξετε
το γράμμα ‘B’, πατήστε το πλήκτρο ‘2’ δύο φορές και ούτω καθ' εξής. Για να επιλέξετε το γράμμα
‘A’ και στη συνέχεια το γράμμα ‘B’, πατήστε το πλήκτρο ‘2’ μια φορά, περιμένετε μέχρι να
μετακινηθεί ο δρομέας στον επόμενο χαρακτήρα και στη συνέχεια πατήστε το πλήκτρο ‘2’ δυο
φορές.
1 Πατήστε το αριστερό
πλήκτρο μενού διάρκεια της συνδιάλεξης.
2 Επιλέξτε “INTERCOM” και κατόπιν πατήστε το πλήκτρο ΟΚ.
3 Πληκτρολογήστε τον αριθμό του ακουστικού που θέλετε να καλέσετε
(1 έως 5). Τότε, ο εξωτερικός καλών θα τεθεί σε αναμονή.
4 Μόλις απαντήσει το άλλο ακουστικό, πατήστε το πλήκτρο τερματισμού
κλήσης για να μεταβιβάσετε την κλήση.
Εάν το εσωτερικό ακουστικό δεν απαντήσει, πατήστε ξανά το πλήκτρο
τερματισμού κλήσης για να επανασυνδεθείτε με τον εξωτερικό καλούντα που
βρίσκεται στη γραμμή.
5 Πατήστε το πλήκτρο τερματισμού κλήσης για να κλείσετε το τηλέφωνο ή
τοποθετήστε ξανά το ακουστικό στη βάση.
1 Κατά τη διάρκεια μιας συνδιάλεξης, πατήστε το κουμπί πάνω ή κάτω για να
αλλάξετε την ένταση ήχου, αντίστοιχα..
1 Πατήστε το δεξί πλήκτρο μενού. Τότε, μπορείτε να μιλήσετε ελεύθερα,
χωρίς να μπορεί να σας ακούσει ο καλών.
Στην οθόνη, θα εμφανίζεται η ένδειξη “MUTED”.
2 Πατήστε ξανά το δεξί κουμπί μενού για
να επιστρέψετε σε κανονική
κατάσταση λειτουργίας.
1 Πατήστε το πλήκτρο επανάκλησης.
2 Επιλέξτε έναν αριθμό. Εάν ο αριθμός είναι καταχωρημένος στο ευρετήριο,
θα εμφανιστεί το όνομα.
3 Για να ξεκινήσετε την κλήση, πατήστε το πλήκτρο πραγματοποίησης
κλήσης.
4 Πατήστε το πλήκτρο πραγματοποίησης κλήσης για να επιστρέψετε στην
κατάσταση αναμονής.
Πιέστε το πλήκτρο ‘1’ για να επιλέξετε ένα κενό.
Πατήστε το δεξί πλήκτρο μενού, για να διαγράψετε έναν χαρακτήρα.
Page 77

Ελληνικά
77
Eυρετήριο
3Eυρετήριο
Σε κάθε ακουστικό, μπορείτε να αποθηκεύσετε έως 30 ονόματα και αριθμούς. Τα ονόματα μπορούν
να έχουν μήκος έως 12 χαρακτήρες και οι αριθμοί έως 24 ψηφία.
Για να εισαγάγετε αλφαριθμητικούς χαρακτήρες, ανατρέξτε στην ενότητα “2.10 Χρήση του
αλφαριθμητικού πληκτρολογίου”.
3.1 Για να προσθέσετε μια καταχώρηση στο ευρετήριο
Για να απορρίψετε όλες τις αλλαγές που τυχόν κάνατε και να βγείτε από το
μενού, πα
τήστε το πλήκτρο τερματισμού κλήσης.
3.2 Για να καλέσετε μια καταχώρηση από το ευρετήριο
4 Αναγνώριση καλούντος
Μόλις δεχθείτε μια εξωτερική κλήση, στην οθόνη του ακουστικού εμφανίζεται ο αριθμός
τηλεφώνου του καλούντος. Το τηλέφωνο μπορεί να λάβει κλήσεις σε σύστημα FSK και DTMF.
Ενδέχεται να εμφανίζεται και το όνομα του καλούντος, εάν αυτό μεταδίδεται από το δίκτυο
τηλεφωνίας. Εάν ο αριθμός είναι καταχωρημένος στο ευρετήριο, εμφανίζεται το όνομα που έχει
καταχωρηθεί στο ευρετήριο!
Το τη
λέφωνο έχει δυνατότητα αποθήκευσης 30 κλήσεων σε μια λίστα κλήσεων (εισερχόμενων και
αναπάντητων), την οποία μπορείτε να προβάλετε αργότερα. Η λειτουργία αυτή είναι διαθέσιμη
μόνον εφ' όσον είστε συνδρομητής της υπηρεσίας αναγνώρισης καλούντος.
Όταν η μνήμη είναι πλήρης, οι νέες κλήσεις αντικαθιστούν αυτόματα τις παλιότερες κλήσεις στη
μνήμη.
1 Ει
σέλθετε στο μενού.
2 Επ
ιλέξτε “PHONEBOOK” και επιβεβαιώστε.
3 Πατήστε το πλ
ήκτρο μενού.
4 Επ
ιλέξτε “ADD” και επιβεβαιώστε.
5 Πατήστε το πλ
ήκτρο μενού.
6 Πληκτρολογή
στε το όνομα και επιβεβαιώστε.
7 Πληκτρολογή
στε τον αριθμό και επιβεβαιώστε.
8 Επ
ιλέξτε μια μελωδία κουδουνίσματος (1-8) και επιβεβαιώστε.
1 Πατήστε το πλήκτρο ευρετηρίου.
2 Επ
ιλέξτε ένα όνομα ή πληκτρολογήστε το πρώτο γράμμα του ονόματος. (Η
λίστα είναι ταξινομημένη κατά αλφαβητική σειρά.)
3 Για να ξεκινήσετε την κλήση, πατήστε το πλήκτρο πραγματοποίησης
κλήσης.
4 Πατήστε το πλήκτρο τερματισμού κλήσης για να κλείσετε το τηλέφωνο ή
τοποθετήστε ξανά το ακουστικό στη βάση.
Η υπηρεσία λειτουργεί μόνο εάν η συνδρομή σας υποστηρίζει την αναγνώριση
ταυτότητας καλούντος. Επικοινωνήστε με την εταιρία παροχής υπηρεσιών τηλεφωνίας.
Η ταυτότητα του καλούντος αντικαθίσταται από τη διάρκεια της κλήσης, μετά
από 15 δευτερόλεπτα συνδιάλεξης.
Page 78

78
Προσαρμογή του ακουστικού
Για να προβάλετε τη λίστα κλήσεων:
Μπορείτε να διαγράψετε κάθε καταχώρηση ξεχωριστά:
Για να διαγράψετε όλες τις καταχωρήσεις μαζί:
5 Προσαρμογή του ακουστικού
5.1 ΡΥΘΜΙΣΗ ΤΗΣ ΕΝΤΑΣΗΣ ΚΟΥΔΟΥΝΙΣΜΑΤΟΣ
Ένταση κουδουνίσματος στο ακουστικό για εσωτερικές/εξωτερικές κλήσεις
Η ένταση κουδουνίσματος στο ακουστικό δεν ρυθμίζεται ξεχωριστά για τις εσωτερικές και τις
εξωτερικές κλήσεις. Μπορείτε να επιλέξετε ανάμεσα στις ρυθμίσεις “High”, "Mid”, “Low”
και “OFF”.
1 Πατήστε το πλήκτρο καταγραφής κλήσεων.
Εάν δεν υπάρχουν κλήσεις στη λίστα, στην οθόνη θα εμφανιστεί η ένδειξη
“EMPTY”.
2 Μετακινηθείτε μέσα στη λίστα. Τα ονόματα των καλούντων θα
εμφανίζονται, εφ' όσον αυτά έχουν μεταδοθεί από το δίκτυο τηλεφωνίας ή
είναι ήδη αποθηκευμένα στο ευρετήριο. Μόλις φτάσετε στο τέλος της
λίστας, θα ακουστεί ένα "μπιπ".
Εάν εμφανίζεται ένας αστερίσκος * στο κέντρο της κάτω γραμμής, η
συγκεκριμένη κλήση είναι αναπάντητη.
3 Πατήστε το
πλήκτρο ‘*’ για να προβάλετε τον αριθμό τηλεφώνου.
Εάν ο αριθμός τηλεφώνου είναι μεγαλύτερος από 12 ψηφία, πατήστε ξανά το
πλήκτρο ‘#’ για να δείτε ολόκληρο τον αριθμό στην οθόνη.
4 Πατήστε το αριστερό πλήκτρο μενού για να προσθέσετε τη συγκεκριμένη
καταχώρηση στο ευρετήριο, εάν δεν είναι ήδη αποθηκευμένη. Πατήστε το
πλήκτρο OK, μόλις
εμφανιστεί στην οθόνη η ένδειξη “ADD TO PB”.
Πληκτρολογήστε ή τροποποιήστε το όνομα και κατόπιν πατήστε το
πλήκτρο OK.
Πληκτρολογήστε ή τροποποιήστε τον αριθμό τηλεφώνου και κατόπιν
πατήστε το πλήκτρο OK.
Επιλέξτε τη μελωδία κουδουνίσματος (1-8) την οποία θέλετε να ακούγεται
όταν σας καλεί ο συγκεκριμένος αριθμός. Πατήστε το πλήκτρο OK. Τότε,
η καταχώρηση θα αποθηκευτεί
στο ευρετήριο.
5 Πατήστε το πλήκτρο πραγματοποίησης κλήσης για να καλέσετε έναν
συνδρομητή, του οποίου το όνομα ή ο αριθμός τηλεφώνου εμφανίζεται
στην οθόνη.
1 Μετακινηθείτε στην κλήση που θέλετε να διαγράψετε και κατόπιν πατήστε
το αριστερό πλήκτρο μενού.
2 Επιλέξτε “DELETE” και κατόπιν πατήστε το πλήκτρο ΟΚ.
1 Ενώ βρίσκεστε μέσα στη
λίστα κλήσεων, πατήστε το αριστερό πλήκτρο
μενού.
2 Επιλέξτε “DELETE ALL” και κατόπιν πατήστε το πλήκτρο ΟΚ.
3 Πατήστε ξανά το πλήκτρο ΟΚ για επιβεβαίωση.
Κάθε προγραμματισμός επιβεβαιώνεται στο τέλος από ένα διπλό ή μονό "μπιπ". Το
διπλό "μπιπ" επιβεβαιώνει την εγκυρότητα της επιλογής σας.
#
Page 79

Ελληνικά
79
Προσαρμογή του ακουστικού
5.2 Επιλογή της μελωδίας κουδουνίσματος
Κάθε ακουστικό μπορεί να κουδουνίζει με διαφορετική μελωδία. Τα ακουστικά μπορούν επίσης να
κουδουνίζουν με διαφορετική μελωδία, ανάλογα με το αν η κλήση είναι εσωτερική ή εξωτερική.
Μπορείτε να επιλέξετε ανάμεσα σε 8 διαφορετικές μελωδίες κουδουνίσματος.
5.3 Αυτόματη απάντηση
Εάν, κατά τη λήψη μιας εισερχόμενης κλήσης, το ακουστικό είναι τοποθετημένο στη βάση,
μπορείτε να απαντήσετε αυτόματα στην κλήση σηκώνοντας το ακουστικό. Αυτή είναι η
προεπιλεγμένη ρύθμιση, ωστόσο μπορείτε να απενεργοποιήσετε τη λειτουργία αυτή:
5.4 Κλείδωμα πληκτρολογίου
Μπορείτε να κλειδώσετε το πληκτρολόγιο, για να μην μπορούν να αλλάξουν ρυθμίσεις ή να κληθεί
κάποιος αριθμός τηλεφώνου. Όταν το πληκτρολόγιο είναι κλειδωμένο, στην οθόνη εμφανίζεται το
εικονίδιο .
Κλείδωμα του πληκτρολογίου
Ξεκλείδωμα του πληκτρολογίου
1 Πατήστε το αριστερό πλήκτρο μενού για να εισέλθετε στο μενού.
2 Επιλέξτε “HS SETTINGS” και επιβεβαιώστε.
3 Επιλέξτε “RING SETUP” και επιβεβαιώστε.
4 Επιλέξτε “RING VOLUME” και επιβεβαιώστε.
5 Επιλέξτε μια ρύθμιση έντασης (HIGH, MID, LOW ή OFF).
6 Επιβεβαιώστε ή επιστρέψτε στο προηγούμενο μενού.
1 Πατήστε το αριστερό πλήκτρο μενού για να εισέλθετε στο μενού.
2 Επιλέξτε “HS SETTINGS” και επιβεβαιώστε.
3 Επιλέξτε “RING SETUP” και επιβεβαιώστε.
4 Επιλέξτε “INT RING” για να αλλάξετε τη μελωδία για τις εσωτερικές
κλήσεις ή “EXT RING” για να αλλάξετε τη μελωδία για
τις εξωτερικές
κλήσεις και κατόπιν επιβεβαιώστε.
5 Επιλέξτε μια μελωδία (1 έως 8).
6 Πατήστε το πλήκτρο OK για επιβεβαίωση ή επιστρέψτε στο προηγούμενο
μενού.
1 Πατήστε το αριστερό πλήκτρο μενού για να εισέλθετε στο μενού.
2 Επιλέξτε “HS SETTINGS” και επιβεβαιώστε.
3 Επιλέξτε “AUTO ANSWER” και επιβεβαιώστε.
4 Επιλέξτε “ON” για να την ενεργοποιήσετε ή “OFF” για να την
απενεργοποιήσετε και κατόπιν
επιβεβαιώστε.
1 Πατήστε και κρατήστε πατημένο το πλήκτρο κλειδώματος πληκτρολογίου
για 3 δευτερόλεπτα. Τό τε, το πληκτρολόγιο θα κλειδωθεί. Τότε, στην οθόνη
θα εμφανιστεί η ένδειξη “”.
1 Πατήστε και κρατήστε πατημένο το πλήκτρο κλειδώματος πληκτρολογίου
για 3 δευτερόλεπτα.
2 Τότε η ένδειξη “” θα εξαφανιστεί από την οθόνη.
Page 80

80
Rozpoczęcie pracy
Polski
1Rozpoczęcie pracy
Dziękujemy za zakup niniejszego produktu firmy TRISTAR. Produkt ten został zaprojektowany i
wykonany z największą troską o użytkownika oraz środowisko. Ponieważ w TRISTAR często
myślimy o przyszłości naszej planety oraz o naszych dzieciach, naszym celem jest zrobić wszystko,
aby pomóc ratować środowisko naturalne. Dlatego zdecydowaliśmy o zmniejszeniu ilości stron
naszych przewodników dla użytkownika oraz instrukcji obsługi. Jeżeli weźmiemy pod
uwagę, że na wyprodukowanie 1 tony papieru potrzebne są około 24 drzewa,
wydrukowanie podręcznika w 21 językach będzie kosztować życie wielu drzew
rosnących na naszej planecie. W tym krótkim podręczniku dostarczonym z urządzeniem
firmy TRISTAR można znaleźć zwięzłe wyjaśnienie dotyczące jego instalacji oraz
użytkowania.
Jeżeli chcesz dowiedzieć się więcej o wszystkich funkcjach swojego nowego urządzenia firmy
TRISTAR, prosimy odwiedzić naszą stronę internetową (www.tristar.eu), gdzie można pobrać
kompletną instrukcję obsługi w swoim języku. Dzięki temu w TRISTAR mamy nadzieję, że
przyczynimy się do stworzenia z naszej planety lepszego miejsca do życia, ale całkowity sukces
odniesiemy tylko z Waszą pomocą!
1.1 Instalacja aparatu bazowego
Aby zainstalować, należy:
1 Podłączyć wtyczkę zasilacza do gniazda elektrycznego, a wtyczkę na drugim końcu przewodu
do złącza na spodzie aparatu bazowego.
2 Podłączyć jeden koniec kabla telefonicznego do gniazdka telefonicznego w ścianie, a drugi do
gniazdka na spodzie aparatu bazowego.
3 Ułożyć przewód telefoniczny i zasilający w rowkach prowadzących na spodzie aparatu
bazowego, tak jak pokazano na rysunku 1A.
A
B
C
- 1A Aparat bazowy, widok z tyłu -
A. Przewód zasilający
B. Gniazdko telefoniczne
C. Kabel telefoniczny
Page 81

Polski
81
Rozpoczęcie pracy
1.2 Instalacja słuchawki
1 Otworzyć komorę akumulatorów, jak pokazano na rysunku 1B.
2 Włożyć akumulatory zgodnie z polaryzacją (+ i –).
3 Zamknąć komorę baterii.
4 Pozostawić słuchawkę na aparacie bazowym na 20 godzin.
1.3 Instalacja ładowarki (tylko dla Butler E600 Twin/Triple/Quattro)
1 Podłączyć wtyczkę zasilacza do gniazdka elektrycznego, a wtyczkę na drugim końcu przewodu
do złącza znajdującego się na spodzie aparatu bazowego.
Przed pierwszym użyciem telefonu należy upewnić się, że akumulatory były ładowane
przez 20 godzin. W przeciwnym razie telefon nie będzie działał optymalnie.
+
-
-
+
A
B
- 1B Słuchawka, widok z tyłu A. Pokrywa
B. Akumulatorki
A
- 1C ładowarka A. Zasilacz z kablem zasilania
Page 82

82
Rozpoczęcie pracy
1.4 Klawisze/Diody LED
Słuchawka
1. Głośnik
2. Wyświetlacz
3. Prawy przycisk menu
4. Klawisz w górę/
Dziennik połączeń
5. Klawisz zasilania /
kończenia rozmowy
6. Klawisz Flash
7. Klawisze alfanumeryczne
8. Wł./wył. dzwonka
9. Mikrofon
10. Klawisz blokady klawiatury
11. Klawisz książki telefonicznej
12. Klawisz funkcji
głośnomówiącej
13. W dół /
ponowne wybieranie numeru
14. Klawisz tryb rozmowy
15. Lewy klawisz menu
Stacja bazowa
16. Klawisz przywoływania
1.5 Jak korzystać z niniejszej instrukcji
W tej instrukcji użyto następującego sposobu oznaczania poleceń:
Klawisz do wciśnięcia.
1.6 Poruszanie się po menu
Telefon Butler E600 posiada łatwy w obsłudze system menu. Każde menu zawiera listę opcji.
Klawisze menu: Klawisze menu znajdują się bezpośrednio pod wyświetlaczem (3) (15). Funkcja
tych 2 klawiszy zmienia się w zależności od trybu obsługi. Funkcje te opisane są poniżej:
Tekst....... „DISPLAY”.
Tekst, który pojawia się na wyświetlaczu telefonu pokazuje się w prawej
kolumnie ujęty w cudzysłów.
1 Otwieranie menu lub wybór dodatkowych opcji.
2 Potwierdzenie aktualnego wyboru.
3 Wykonywanie połączeń wewnętrznych z innymi słuchawkami.
4 Przejście wstecz w menu lub anulowanie aktualnych operacji.
5 Anulowanie znaków lub zatrzymanie alarmu. Lub wyciszenie/włączenie
mikrofonu podczas rozmowy.
1
3
4
5
6
7
2
8
11
10
9
12
13
14
15
- 1D słuchawka -
16
- 1E stacja bazowa -
Page 83

Polski
83
Używanie telefonu
2Używanie telefonu
2.1 Włączanie/wyłączanie słuchawki
2.2 Zmiana języka menu
2.3 Odbieranie połączenia telefonicznego
Aby odebrać połączenie:
2.4 Wykonywanie zewnętrznych połączeń telefonicznych
Wybieranie bezpośrednie
Wybieranie wstępne
2.5 Wykonywanie wewnętrznych połączeń telefonicznych
1 Wciśnij i przytrzymaj przez 3 sekundy klawisz wł./wył. słuchawki.
Słuchawka będzie szukać bazy.
2 Wciśnij i przytrzymaj klawisz wł./wył. przez 6 sekund. Wyświetlacz
wyłączy się.
1 Wej dź do menu przez naciśnięcie lewego przycisku menu (15).
2 Wybierz opcję „HS SETTINGS” i potwierdź.
3 Wybierz menu „LANGUAGE” i potwierdź.
4 Wybierz język i potwierdź.
1 Wciśnij klawisz podniesienia słuchawki.
LUB
Podnieś słuchawkę z aparatu bazowego, jeśli jest włączona opcja
„Automatyczne odbieranie". (Patrz “5.3 Automatyczne odbieranie”)
Zostaniesz połączony z rozmówcą.
2 Naciśnij klawisz odkładania słuchawki lub połóż słuchawkę z powrotem na
bazie.
1 Naciśnij klawisz podnoszenia słuchawki, aby rozpocząć dzwonienie.
2 Wybierz numer telefonu.
3 Naciśnij klawisz odkładania słuchawki lub połóż słuchawkę z powrotem na
bazie.
1 Wybierz numer telefonu.
2 Naciśnij klawisz podnoszenia słuchawki, aby rozpocząć dzwonienie.
3 Naciśnij klawisz odkładania słuchawki lub połóż s
łuchawkę z powrotem na
bazie.
4 Do poprawienia numeru użyj klawisza kasowania, aby usunąć
wprowadzoną cyfrę.
1 Naciśnij prawy klawisz menu.
2 Wprowadź numer słuchawki (1 do 5).
3 Naciśnij klawisz odkładania słuchawki lub połóż słuchawkę z powrotem na
bazie.
Page 84

84
Używanie telefonu
2.6 Przekierowanie rozmowy wewnętrznej
Przekazywanie połączenia zewnętrznego do innej słuchawki.
2.7 Głośność podczas rozmowy
2.8 Wyłączenie mikrofonu
Można wyłączyć mikrofon podczas rozmowy.
2.9 Pamięć ponownego wybierania
Można oddzwonić do 5 ostatnio wybieranych numerów.
2.10 Używanie klawiatury alfanumerycznej
Na tym telefonie można również wprowadzać znaki alfanumeryczne. Jest to użyteczne przy
wprowadzaniu nazwisk do książki telefonicznej, podawaniu nazwy słuchawki itp.
Aby wybrać literę, należy wcisnąć odpowiedni klawisz tyle razy, ile to konieczne. Na przykład, aby
wybrać „A”, wciśnij klawisz „2”jeden raz. Aby wybrać „B”, wciśnij klawisz „2” dwa razy itd.
Aby wybrać „A”, a następnie „B”, wciśnij „2” jeden raz, odczekaj, aż kursor przesunie się do
następnego znaku, wtedy wciśnij klawisz „2” dwa razy.
1 Wciśnij lewy klawisz menu w trakcie rozmowy.
2 Wybierz opcję „INTERCOM” i potwierdź.
3 Wprowadź numer słuchawki (1 do 5), zewnętrzny rozmówca zostanie
przełączony w tryb oczekiwania.
4 Gdy inna słuchawka zostanie podniesiona, wciśnij klawisz odkładania
słuchawki, aby zawiesić i przekierować połączenie.
Jeśli wewnętrzny rozmówca nie odbiera połączenia, wciśnij ponownie klawisz
odkładania s
łuchawki, aby przywrócić połączenie zewnętrzne.
5 Naciśnij klawisz odkładania słuchawki lub połóż słuchawkę z powrotem na
bazie.
1 W trakcie rozmowy wciśnij klawisz ze strzałką w górę lub w dół, aby
odpowiednio zmienić głośność.
1 Naciśnij prawy klawisz menu. Można rozmawiać swobodnie i nie być
słyszanym przez rozmówcę telefonicznego.
Wyświetla się „MUTED”.
2 Powtórnie wciśnij prawy klawisz menu, aby powrócić do zwykłego trybu.
1 Naciśnij klawisz ponownego wybierania.
2 Wybierz numer. Jeśli numer jest w książce telefonicznej, zostanie
wyświetlone nazwisko.
3 Naciśnij klawisz podnoszenia słuchawki, aby rozpocząć dzwonienie.
4 Naciśnij klawisz odkładania słuchawki, aby wrócić do stanu czuwania.
Naciśnij klawisz „1”, aby wybrać spację.
Wciśnij prawy klawisz menu, aby usunąć znak.
Page 85

Polski
85
Książka telefoniczna
3Książka telefoniczna
W każdej słuchawce można zapisać do 30 numerów telefonów i nazwisk. Nazwiska mogą zawierać
do 12 znaków, a numery do 24 cyfr.
Wprowadzanie znaków alfanumerycznych, patrz rozdział “2.10 Używanie klawiatury
alfanumerycznej”.
3.1 Dodawanie wpisu do książki telefonicznej
Wciśnij klawisz odkładania słuchawki, aby wyjść z menu bez
zmodyfikowania danych.
3.2 Dzwonienie przy wykorzystaniu wpisu w książce telefonicznej
4 Identyfikacja rozmówcy
Podczas odbierania połączenia zewnętrznego numer telefonu dzwoniącego pokazuje się na
wyświetlaczu słuchawki. Telefon odbiera połączenia w obu trybach: FSK i DTMF. Numer można
zobaczyć także wtedy, gdy połączenie odbywa się przez sieć. Jeśli nazwisko jest zapisane w książce
telefonicznej, jest także wyświetlane na wyświetlaczu!
Telefon może przechować na liście połączeń 30 połączeń (odebranych i nieodebranych), które
można wyświetlić później. Ta funkcja jest dostępna tylko wtedy, gdy u operatora jest zamówiona
usługa identyfikacji rozmówcy.
Gdy pamięć jest pełna, nowe połączenia automatycznie zastępują najstarsze przechowywane w
pamięci.
Sprawdzanie listy połączeń:
1 We
jdź do menu.
2 Wybierz menu „PHONEBOOK”
i potwierdź.
3 Naciśnij pr
zycisk menu.
4 Wybierz „ADD” i potwierdź.
5 Naciśnij przycisk menu.
6 Wprowa
dź nazwisko i potwierdź.
7 Wprowa
dź numer i potwierdź.
8 Wybierz melodię dzwonk
a (1-8) i potwierdź.
1 Wciśnij klawisz książki telefonicznej.
2 Wybierz nazwisko lu
b wprowadź pierwszą literę nazwiska. (elementy listy
przewijają się w kolejności alfabetycznej).
3 Naciśnij klawisz podnoszenia słuchawki, aby rozpocząć dzwonienie.
4 Naciśnij klawisz odkładania słuchawki lub połóż słuchawkę z powrotem na
bazie.
Ta us ługa jest dostępna jedynie wtedy, gdy jest zamówiona u operatora
telefonicznego. Proszę skontaktować się z odpowiednim operatorem telefonicznym.
Identyfikacja rozmówcy jest po 15 sekundach połączenia zastępowana czasem
trwania rozmowy.
1 Wciśnij klawisz listy połączeń.
Jeśli nie było żadnych połączeń, na liście wyświetli się „EMPTY”.
Page 86

86
Personalizacja słuchawki
Każdy wpis można skasować osobno:
Aby skasować wszystkie wpisy jednocześnie:
5 Personalizacja słuchawki
5.1 Regulacja głośności dzwonka
Głośność dzwonka słuchawki dla połączeń wewnętrznych/zewnętrznych
Głośność dzwonka słuchawki dla połączeń wewnętrznych i zewnętrznych nie może być ustawiana
oddzielnie. Można wybrać spośród poziomów wysoki, średni, niski lub „OFF”.
2 Przewijaj listę połączeń. Nazwiska dzwoniących pokażą się, jeśli były
wysłane przez sieć lub są zapisane w książce telefonicznej. Jeśli osiągniesz
koniec listy, usłyszysz krótki dźwięk.
Jeżeli w środku dolnej lini wyświetlany jest znak *, oznacza to że połączenie
nie zostało odebrane.
3 Wciśnij klawisz ‘*’, aby zobaczyć numer telefonu.
Jeśli numer telefonu jest dłuższy niż 12 cyfr, wciśnij ponownie klawisz ‘#’,
aby zobaczyć numer w całości.
4 Wciśnij lewy klawisz menu, aby dodać wpis do książki telefonicznej, jeśli
numer nie był jeszcze zapisany. Wciśnij OK, jeśli na wyświetlaczu jest
pokazane „ADD TO PB”.
Wprowadź lub zmodyfikuj nazwisko i wciśnij OK.
Wprowadź lub zmodyfikuj numer telefonu i wciśnij OK.
Wybierz melodię (1-8), którą będzie słuchać podczas gdy połączenia
przychodzącego od danego numeru. Naciśnij OK,, a wpis zostanie
zapamiętany w książce telefonicznej.
5 Wciśnij klawisz podnoszenia słuchawki, aby oddzwonić do rozmówcy, gdy
jest wyświetlony numer telefonu lub nazwisko.
1 Przewiń do połączenia, które zamierzasz skasować
i naciśnij lewy klawisz
menu.
2 Wybierz opcję „DELETE” i potwierdź.
1 W trybie listy połączeń nacisnąć lewy przycisk menu.
2 Wybierz opcję „DELETE ALL” i naciśnij OK.
3 Naciśnij ponownie OK, aby potwierdzić.
Każde zaprogramowane ustawienie jest potwierdzane przez podwójny lub
pojedynczy długi dźwięk. Podwójny dźwięk potwierdza dokonanie wyboru.
1 Wej dź do menu przez naciśnięcie lewego przycisku menu.
2 Wybierz opcję „HS SETTINGS” i potwierdź.
3 Wybierz menu „RING SETUP” i potwierdź.
4 Wybierz „RING VOLUME” i potwierdź.
5 Wybierz głośność (HIGH, MID, LOW lub „OFF”).
6 Potwierdź lub wróć do poprzedniego menu.
#
Page 87

Polski
87
Personalizacja słuchawki
5.2 Wybieranie melodii dzwonka
Każda słuchawka może dzwonić z inną melodią. Słuchawki mogą odtwarzać różne melodie, w
zależności od tego, czy połączenie jest wewnętrzne, czy zewnętrzne. Można wybierać spośród 8
różnych melodii dzwonka:
5.3 Automatyczne odbieranie
Jeśli nadejdzie połączenie w czasie, gdy słuchawka jest w aparacie bazowym, połączenie zostanie
automatycznie odebrane w momencie podniesienia słuchawki. Jest to ustawienie domyślne, ale
można je wyłączyć:
5.4 Blokowanie klawiatury
Klawiatura może zostać zablokowana, co spowoduje, że nie będzie można zmieniać żadnych
ustawień i wybierać numerów. Gdy klawiatura zostanie zablokowana, na wyświetlaczu pojawi się
ikona .
Blokowanie klawiatury
Odblokowanie klawiatury
1 Wej dź do menu przez naciśnięcie lewego przycisku menu.
2 Wybierz opcję „HS SETTINGS” i potwierdź.
3 Wybierz menu „RING SETUP” i potwierdź.
4 Wybierz „INT RING”, aby zmienić melodię dla połączeń wewnętrznych
lub „EXT RING”, aby zmienić melodię dla połączeń zewnętrznych, i
potwierdź.
5 Wybierz melodię dzwonka (1 do 8).
6 Wciśnij klawisz OK, aby potwierdzić lub wróć do poprzedniego menu.
1 Wej dź do menu przez naciśnięcie lewego przycisku menu.
2 Wybierz opcję „HS SETTINGS” i potwierdź.
3 Wybierz „AUTO ANSWER” i potwierdź
.
4 Wybierz „ON”, aby włączyć, lub „OFF”, aby wyłączyć, i potwierdź.
1 Naciśnij i ptrzytrzymaj klawisz blokowania klawiatur przez 3 sekundy.
Klawiatura zostanie zablokowana. „Na wyświetlaczu pokaże się: “
1 Naciśnij i przytrzymaj klawisz blokowania klawiatur przez 3 sekundy.
2 „Z wyświetlacza zniknie: “
Page 88

Page 89

Page 90

Page 91

Page 92

®
BUTLER E600
visit our website
www.tristar.eu
MD18100327-eco
 Loading...