

Page 1

TomTom App for Android
Reference Guide
Page 2

Contents
Getting started 5
Start TomTom App for Android ....................................................................................................... 5
Updating your TomTom App for Android ........................................................................................ 5
Map updates .................................................................................................................................. 5
GPS reception ............................................................................................................................... 6
Planning a route 7
Planning a route ............................................................................................................................. 7
Route summary............................................................................................................................ 10
Route information ......................................................................................................................... 11
Other Drive to options .................................................................................................................. 12
Using your contacts...................................................................................................................... 13
Change route ............................................................................................................................... 14
Planning a route in advance ......................................................................................................... 14
Driving View 15
The Driving View .......................................................................................................................... 15
Moving around in the Driving View ............................................................................................... 16
Returning to the Driving View ....................................................................................................... 16
Setting the volume ....................................................................................................................... 16
Quick access toolbar .................................................................................................................... 16
Map settings ................................................................................................................................ 17
Advanced Lane Guidance 18
About Advanced Lane Guidance .................................................................................................. 18
Changing your route 19
Making changes to your route ...................................................................................................... 19
Clear route ................................................................................................................................... 19
Avoid roadblock ........................................................................................................................... 19
Calculate alternative ..................................................................................................................... 19
Travel via... .................................................................................................................................. 20
Avoid part of route ........................................................................................................................ 20
Recalculate route ......................................................................................................................... 21
Avoid an incident or minimise delays ............................................................................................ 21
Settings 22
Settings ....................................................................................................................................... 22
Change home location ................................................................................................................. 22
Manage Favourites ...................................................................................................................... 22
Driving safety ............................................................................................................................... 22
Driving View ................................................................................................................................. 23
Voices .......................................................................................................................................... 23
Distance units .............................................................................................................................. 24
Map colours ................................................................................................................................. 24
Car symbol .................................................................................................................................. 24
Route planning ............................................................................................................................. 24
2
Page 3

Advanced settings ........................................................................................................................ 25
TomTom services ........................................................................................................................ 25
About ........................................................................................................................................... 26
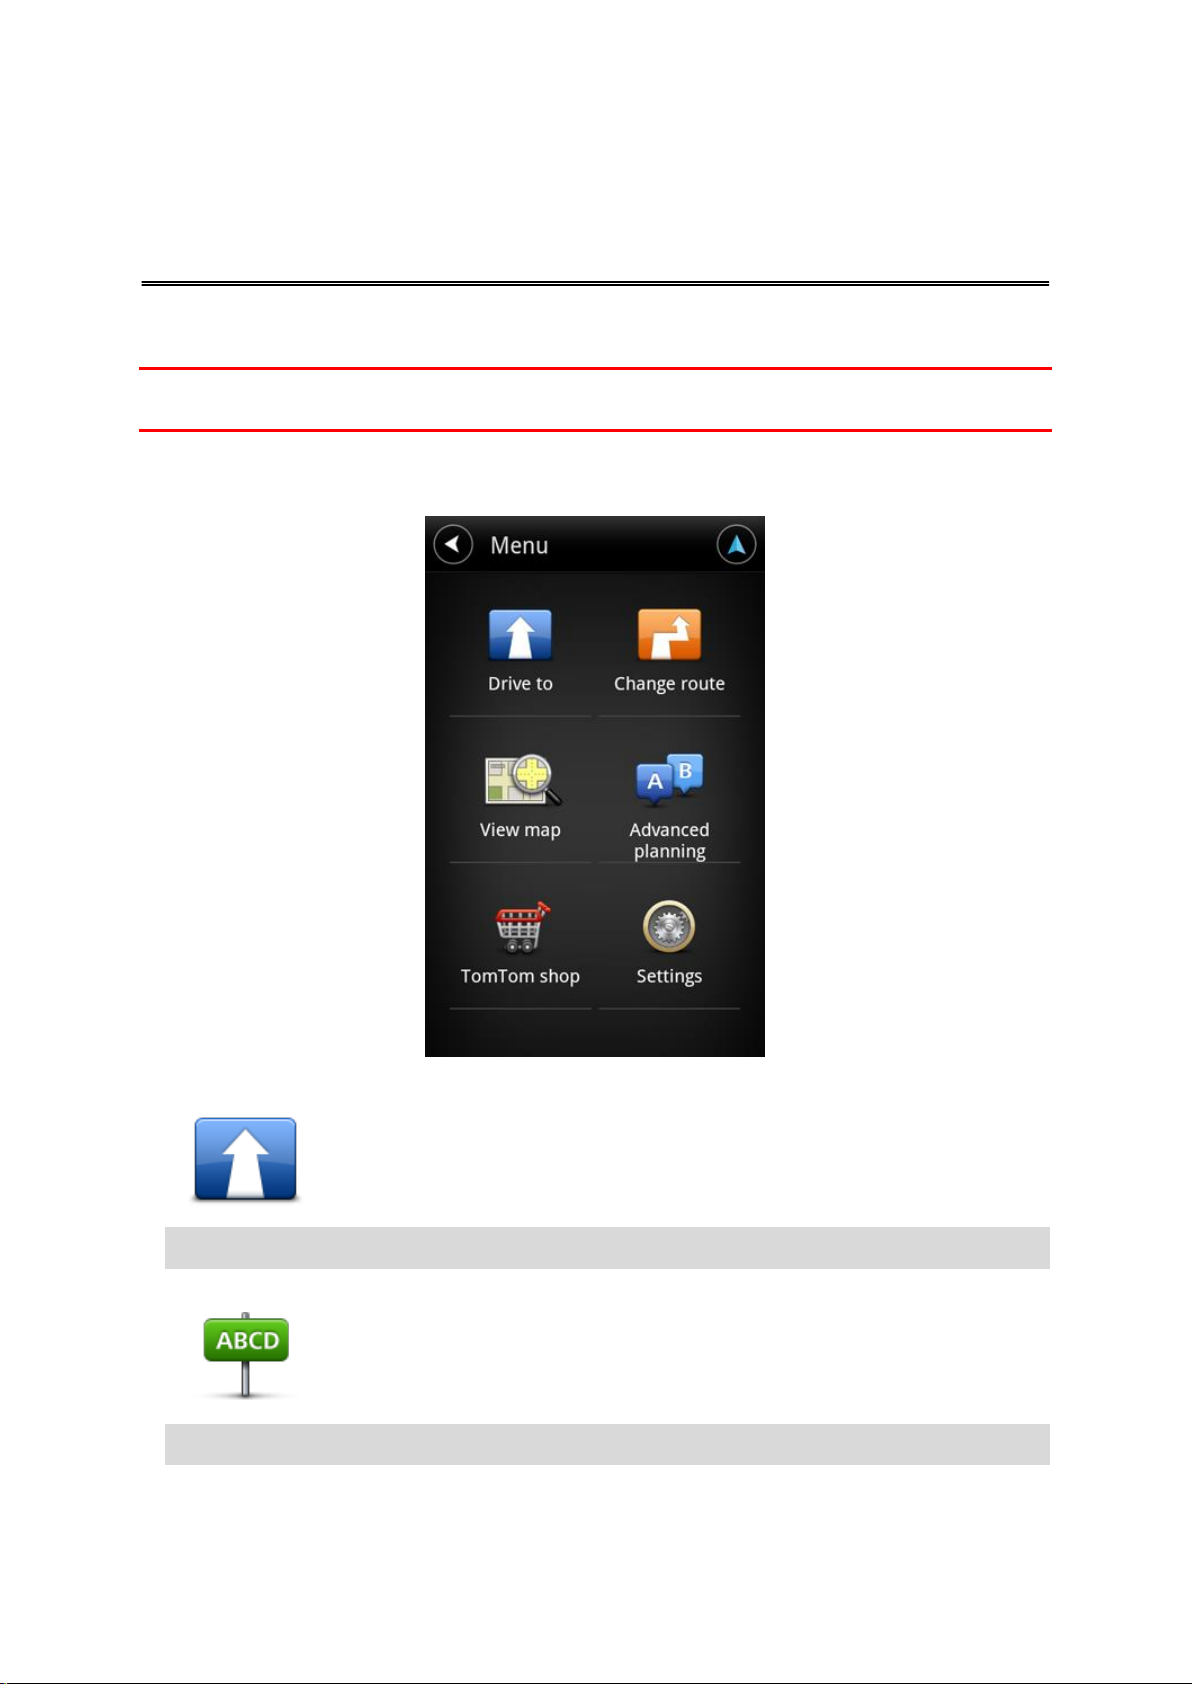
Main menu 27
The Main menu ............................................................................................................................ 27
Drive to menu .............................................................................................................................. 28
Return to Driving view .................................................................................................................. 29
View map 30
Viewing a map ............................................................................................................................. 30
Selecting items on the map .......................................................................................................... 30
Points of Interest (POIs) 32
About POIs .................................................................................................................................. 32
Driving to a POI............................................................................................................................ 32
Finding a POI on the map ............................................................................................................ 34
Showing POIs on the map ............................................................................................................ 35
Selecting which POIs to show on the map .................................................................................... 35
Favourites 36
About Favourites .......................................................................................................................... 36
Creating a Favourite ..................................................................................................................... 36
Using a Favourite ................................................................ ................................ ......................... 37
Changing the name of a Favourite................................................................................................ 37
Deleting a Favourite ..................................................................................................................... 38
Traffic Information 39
About TomTom Traffic.................................................................................................................. 39
Regional availability ..................................................................................................................... 39
Using traffic information................................................................................................................ 40
Connection to TomTom Traffic ..................................................................................................... 42
Checking traffic incidents in your area .......................................................................................... 42
Traffic incidents ............................................................................................................................ 43
Buying a new TomTom Traffic service .......................................................................................... 44
Checking your TomTom service ................................................................................................... 44
Renewing your TomTom Traffic service ....................................................................................... 44
Speed Cameras 45
About Speed Cameras ................................................................................................................. 45
Regional availability ..................................................................................................................... 45
Connection to Speed Cameras..................................................................................................... 45
Types of speed cameras and safety-related features .................................................................... 46
Report a speed camera ................................................................................................................ 47
Remove a speed camera ............................................................................................................. 47
Settings for Speed Cameras alerts ............................................................................................... 47
Buying a new Speed Cameras service ......................................................................................... 47
Checking your TomTom service ................................................................................................... 48
Renewing your Speed Cameras service ....................................................................................... 48
3
Page 4

Danger Zones 49
About Danger Zones .................................................................................................................... 49
Regional availability ..................................................................................................................... 50
Connection to Danger Zones ........................................................................................................ 50
Danger Zone warning ................................................................................................................... 50
Report a risk zone ........................................................................................................................ 50
Settings for Danger Zones alerts .................................................................................................. 50
Buying a new Danger Zones service ............................................................................................ 51
Checking your TomTom service ................................................................................................... 51
Renewing your Danger Zones service .......................................................................................... 51
Searching with Local Search 52
About Local Search ...................................................................................................................... 52
Using Local Search to search ....................................................................................................... 52
Addendum 54
Copyright notices 56
4
Page 5

Start TomTom App for Android
TomTom
Tap this button on your Android device to start TomTom App.
Getting started
The language used for buttons and menus in TomTom App is the same as the language you selected
in your Android device settings. If you change the language you must restart TomTom App to see the
new language.
TomTom App shows the Driving View.
When you start TomTom App and a map update is available you are asked if you want to download
the new map.
Starting for the first time
When you start TomTom App for the first time, you see the following screens:
Legal notice - You must read and agree to the Legal notice to be able to use TomTom App.
Map updates - You are asked if you want to download a new map. Tap Download to download
the map, or Exit to exit the app.
Voice Download - If your TomTom App supports advanced voices in your language you are given
the option to download an advanced voice.
Starting after a reset
When you start TomTom App after a reset, you see the following screens:
Legal notice - You must read and agree to the Legal notice to be able to use TomTom App.
Sharing your information
When you use a TomTom LIVE service such as Traffic or Local search, we ask you to share information about you and your device. The first time you use a LIVE service please read the details about
how each service uses your information. Tap Yes to allow your information to be shared. If you don't
agree to share your information the service will not work.
Updating your TomTom App for Android
If you have an old version of TomTom App on your Android device, you must update to the latest
version of TomTom App before continuing to read this guide.
To download and update your Android device with the latest version of TomTom App, go to the
Google Play Store.
Map updates
When you start TomTom App and a map update is available you are asked if you want to download
the new map.
5
Page 6

Tap Download to download the map.
Important: A map is a large file that can take a long time to download. To prevent high data charges
we advise you to download a map using a WiFi connection.
Tap Skip version to continue using the old map. You can choose to download the next map release
when it is available.
Tap Ask me later to be informed about the current map update when you next start TomTom App.
When the download is complete tap Start TomTom Navigation.
GPS reception
When you first start TomTom App, it may need a few minutes to find your GPS position and show your
current location on the map. Make sure you have GPS activated on your device.
To make sure you have good GPS reception, you should use your device outdoors. Large objects
such as tall buildings can sometimes interfere with reception.
Important: TomTom App cannot give you route instructions until it has received location data.
If your device has no GPS reception, TomTom App uses positioning information from WiFi networks or
mobile phone towers. This information is used for route planning and to determine your approximate
location.
6
Page 7
Planning a route
Planning a route
Important: In the interest of safety and to reduce distractions while you are driving, you should always
plan a route before you start driving.
To plan a route with TomTom App, do the following:
1. Tap the screen to open the Main menu.
2. Tap Drive to.
Tip: When you use TomTom App for the first time you are asked to choose a country.
3. Tap Address.
Tip: If you want to change the country, state or region, tap the flag before you select a city.
4. Start to type the name of the town you want to go to.
7
Page 8
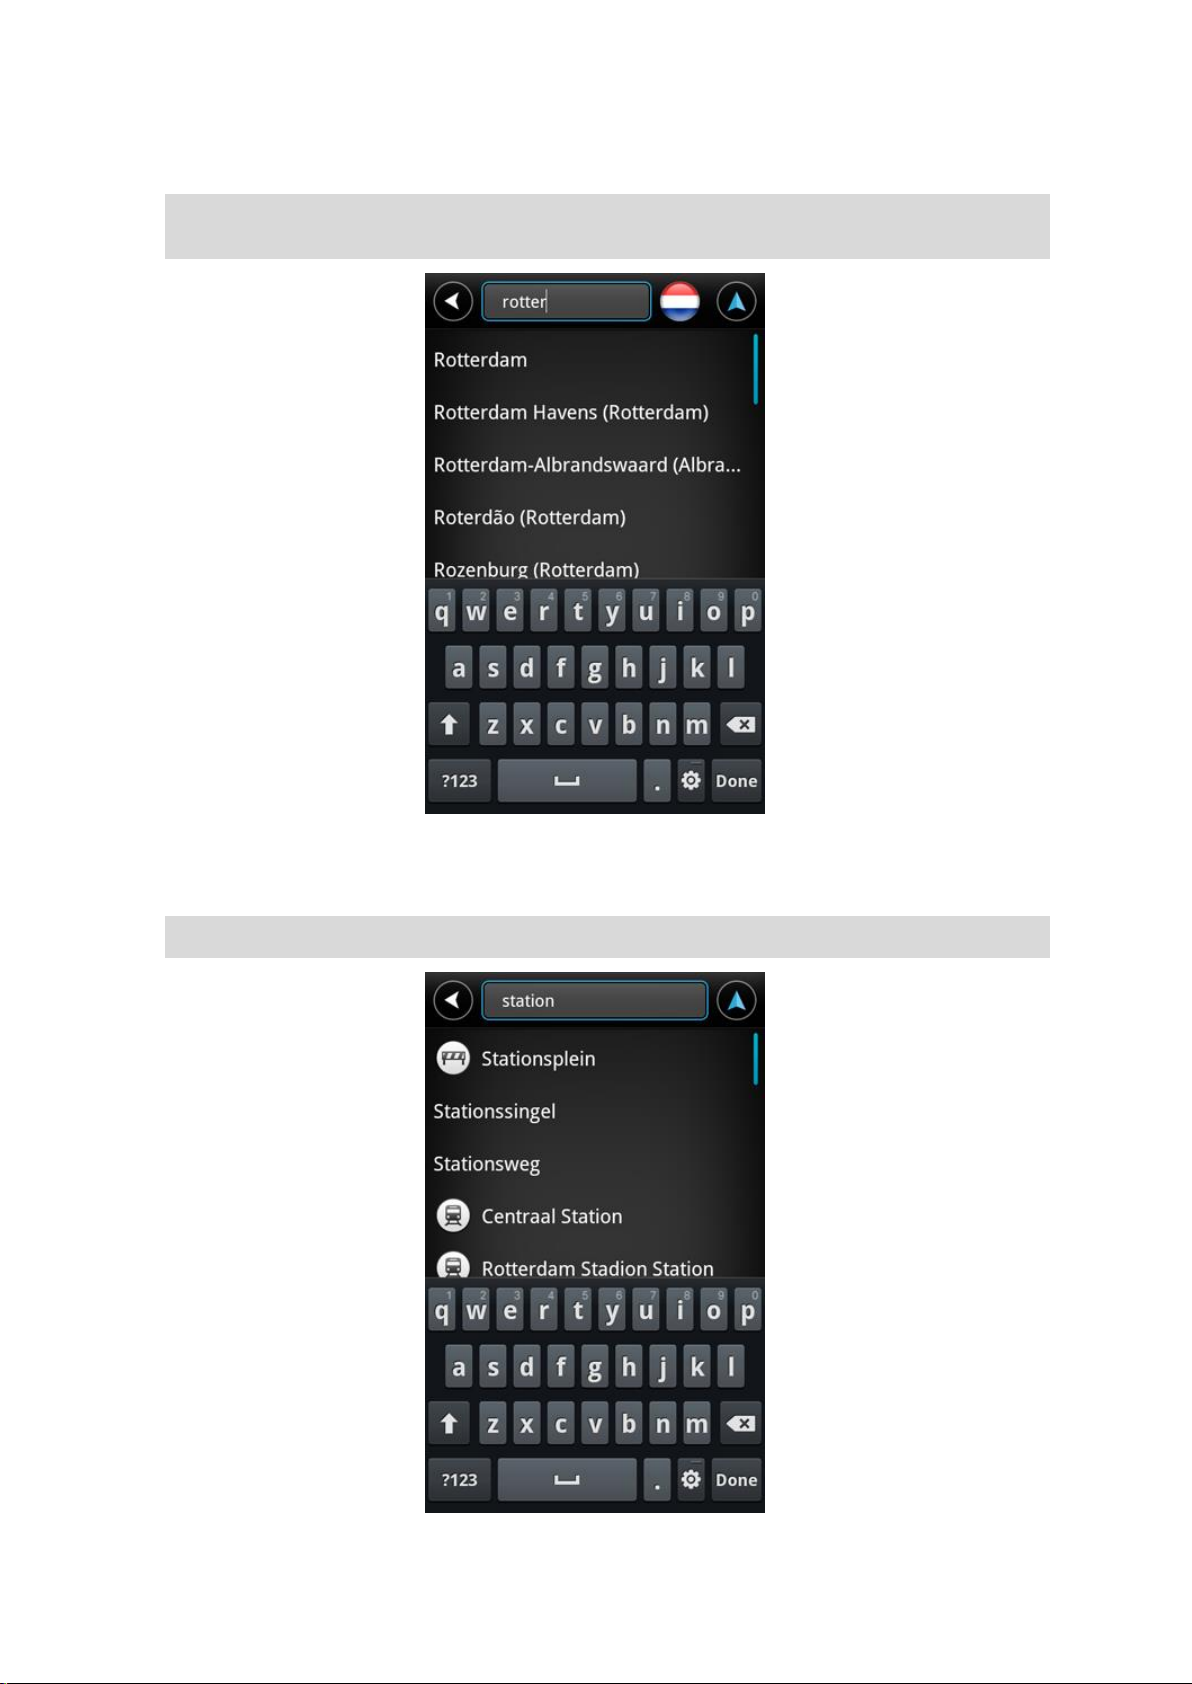
As you type, the names of the towns that match what you have typed are shown. When your destination appears in the list, tap the name of the town to set the destination.
Tip: You can also type in the postcode of your destination. First select the country, then select
the postcode from the list shown to display a list of streets in that postcode.
5. Start to type the name of the street.
Just as for place names, the names of the streets that match what you have typed are shown.
When your destination appears in the list, tap the name of the street to set the destination.
Tip: Hide the keyboard so you can see more results on the screen.
8
Page 9
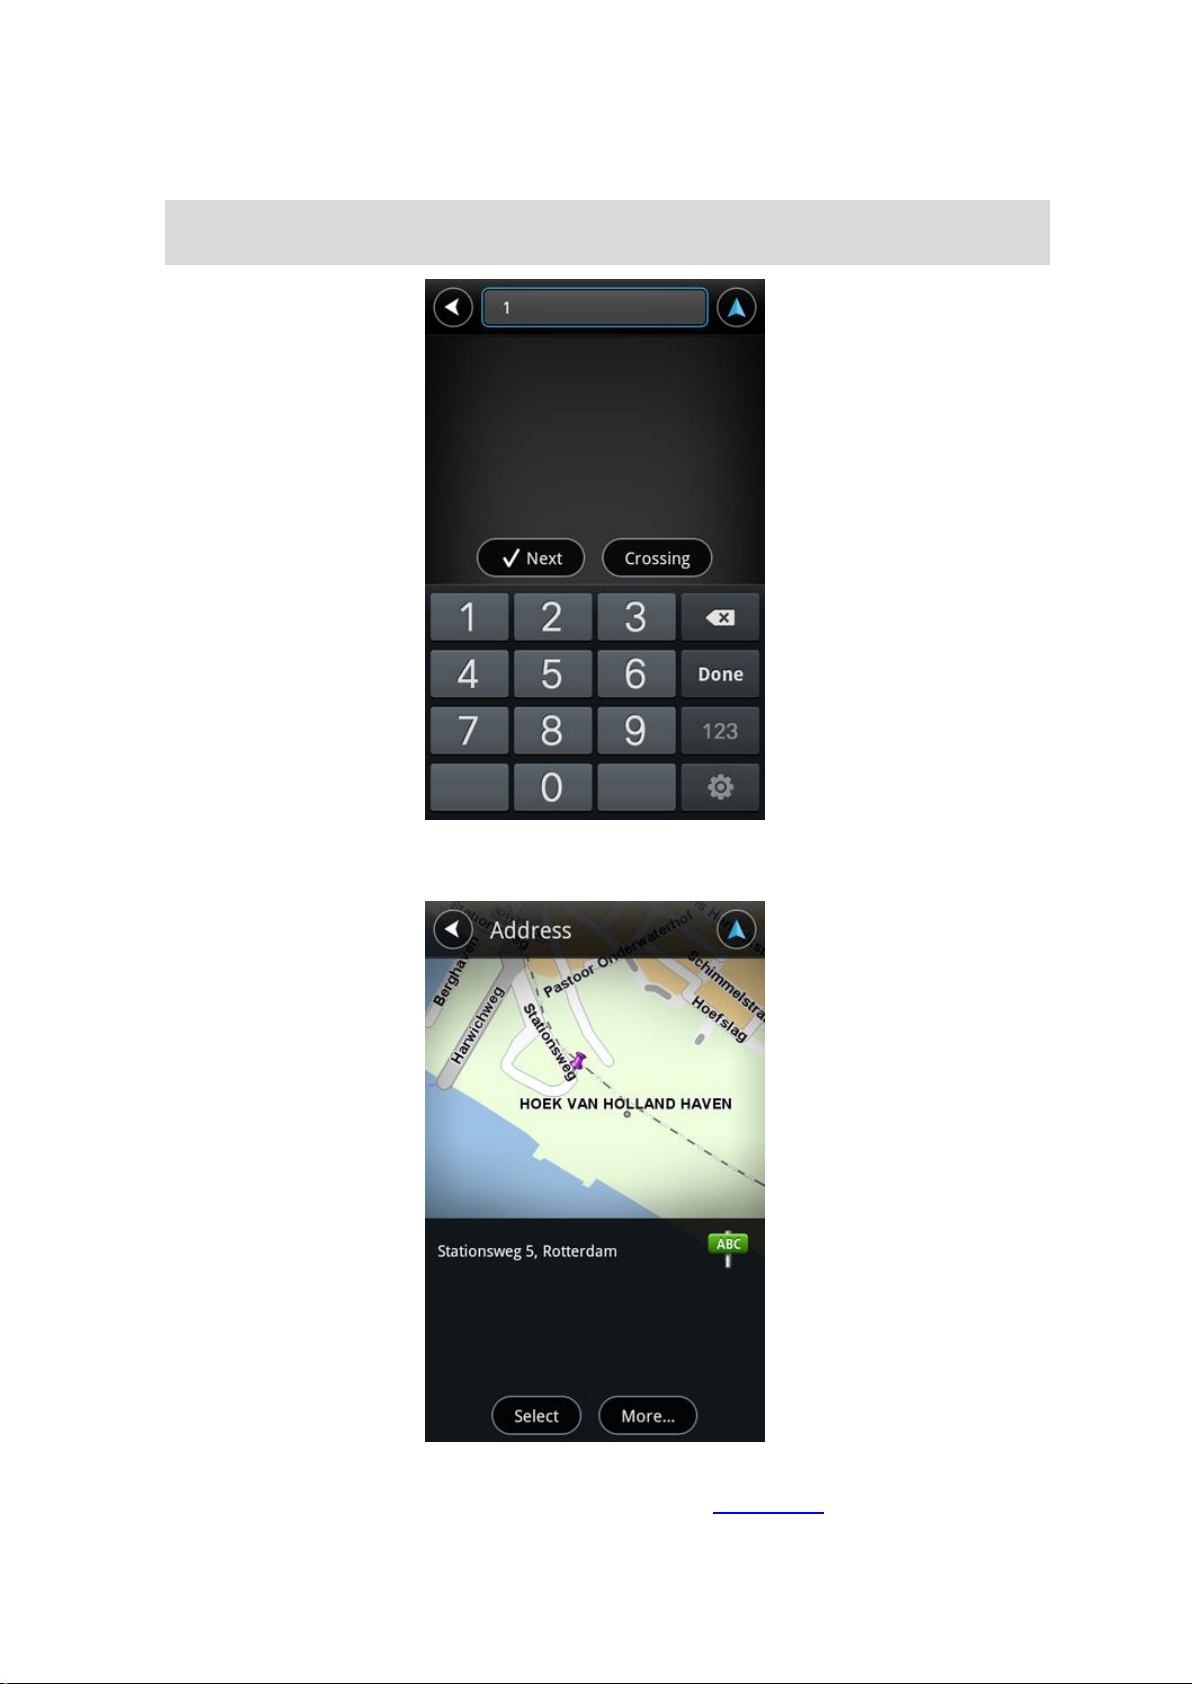
6. Enter the house number and then tap Next.
You can also select the point where two streets meet by tapping Crossing.
Tip: Depending on your device, you might have to hide the keyboard so you can see the Next
and Crossing buttons.
7. The destination is shown. Tap Select to accept the destination, or tap the back arrow to change
the destination.
8. The route is calculated and shown.
By default, the fastest route is planned. You can change the type of route used for planning.
9
Page 10
If IQ Routes is available on your map, this information is used to plan the best possible route taking into account the real average speeds measured on the roads.
9. Tap Go!
TomTom App starts to guide you to your destination using spoken instructions and on-screen di-
rections.
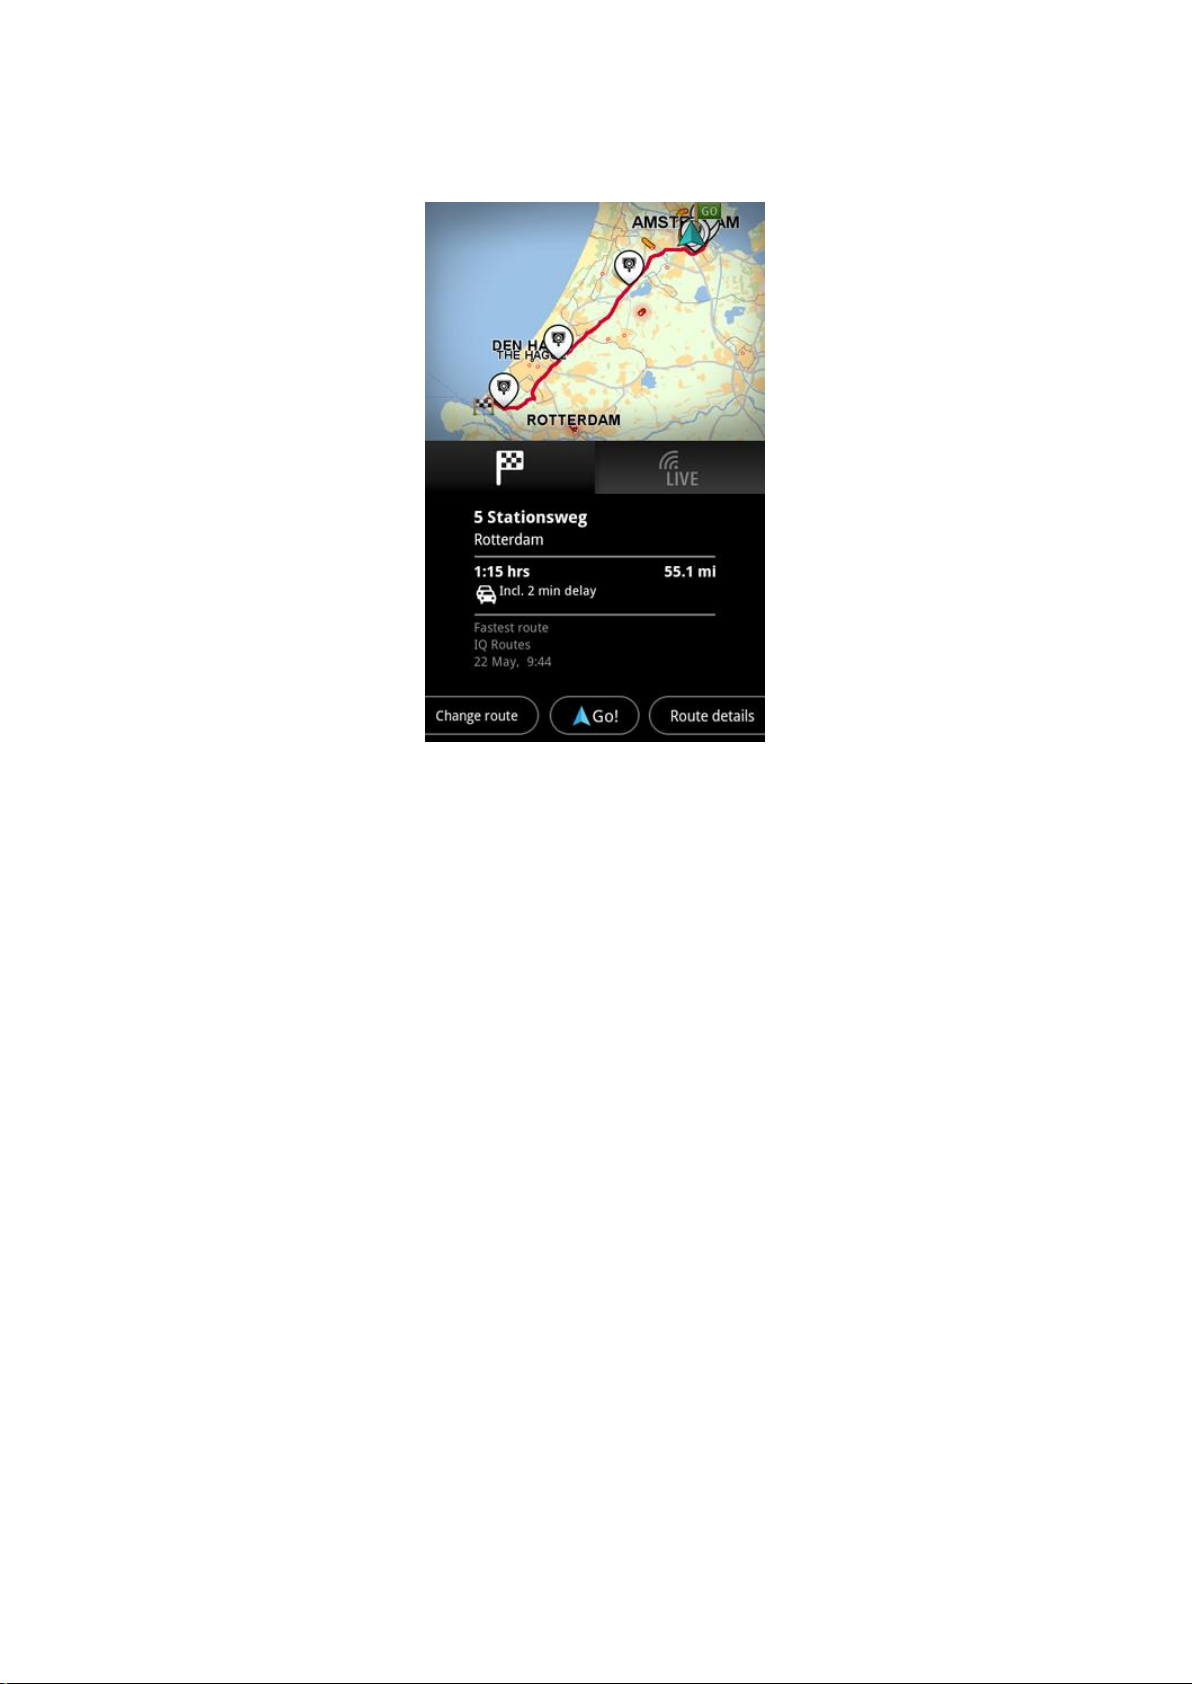
Route summary
After you plan a route, a summary of the route is shown.
The route summary shows an overview of your route on the map and the estimated travel time
including delays caused by busy roads. If you have the TomTom Traffic service, the estimated travel
time includes delays due to traffic incidents on your route.
10
Page 11
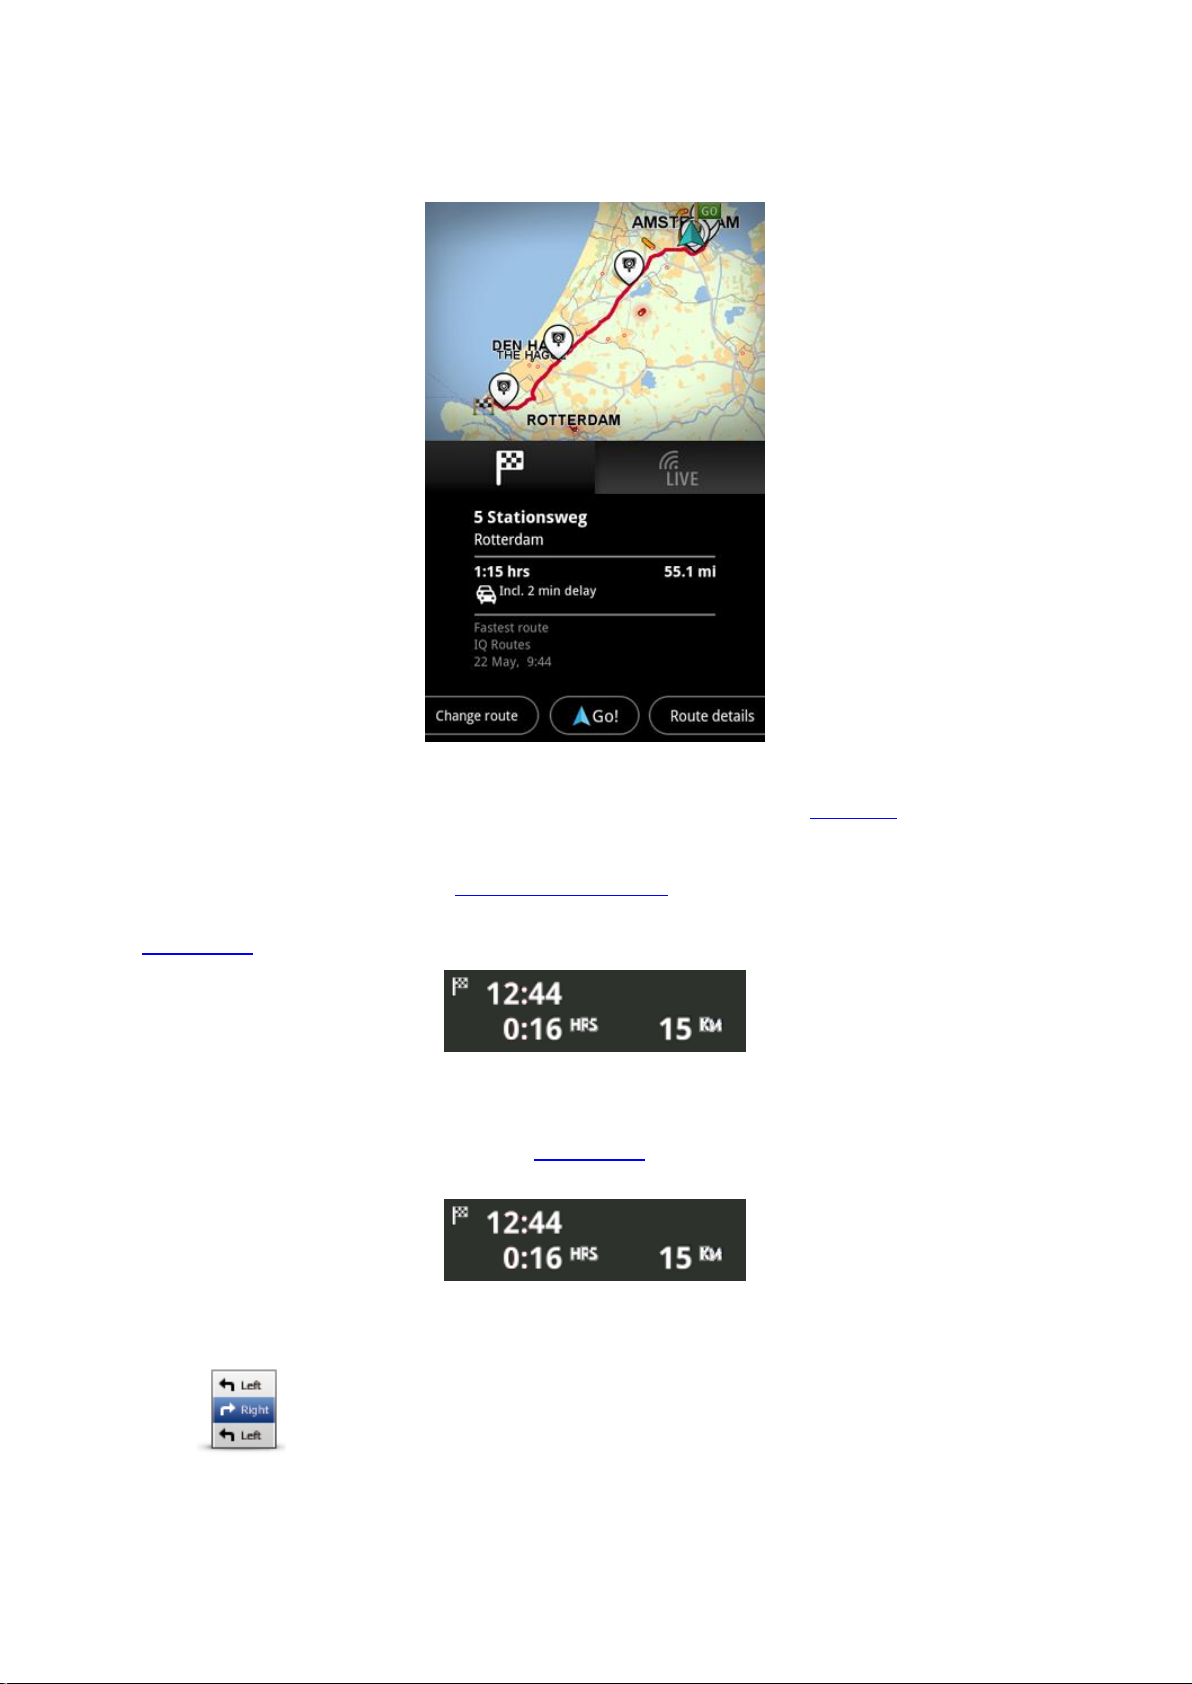
Tap the flag to show route details. If you have Traffic, tap the LIVE button to show traffic and speed
Show route in-
structions
Tap this button for a list of all the turn instructions on the route.
cameras on your route.
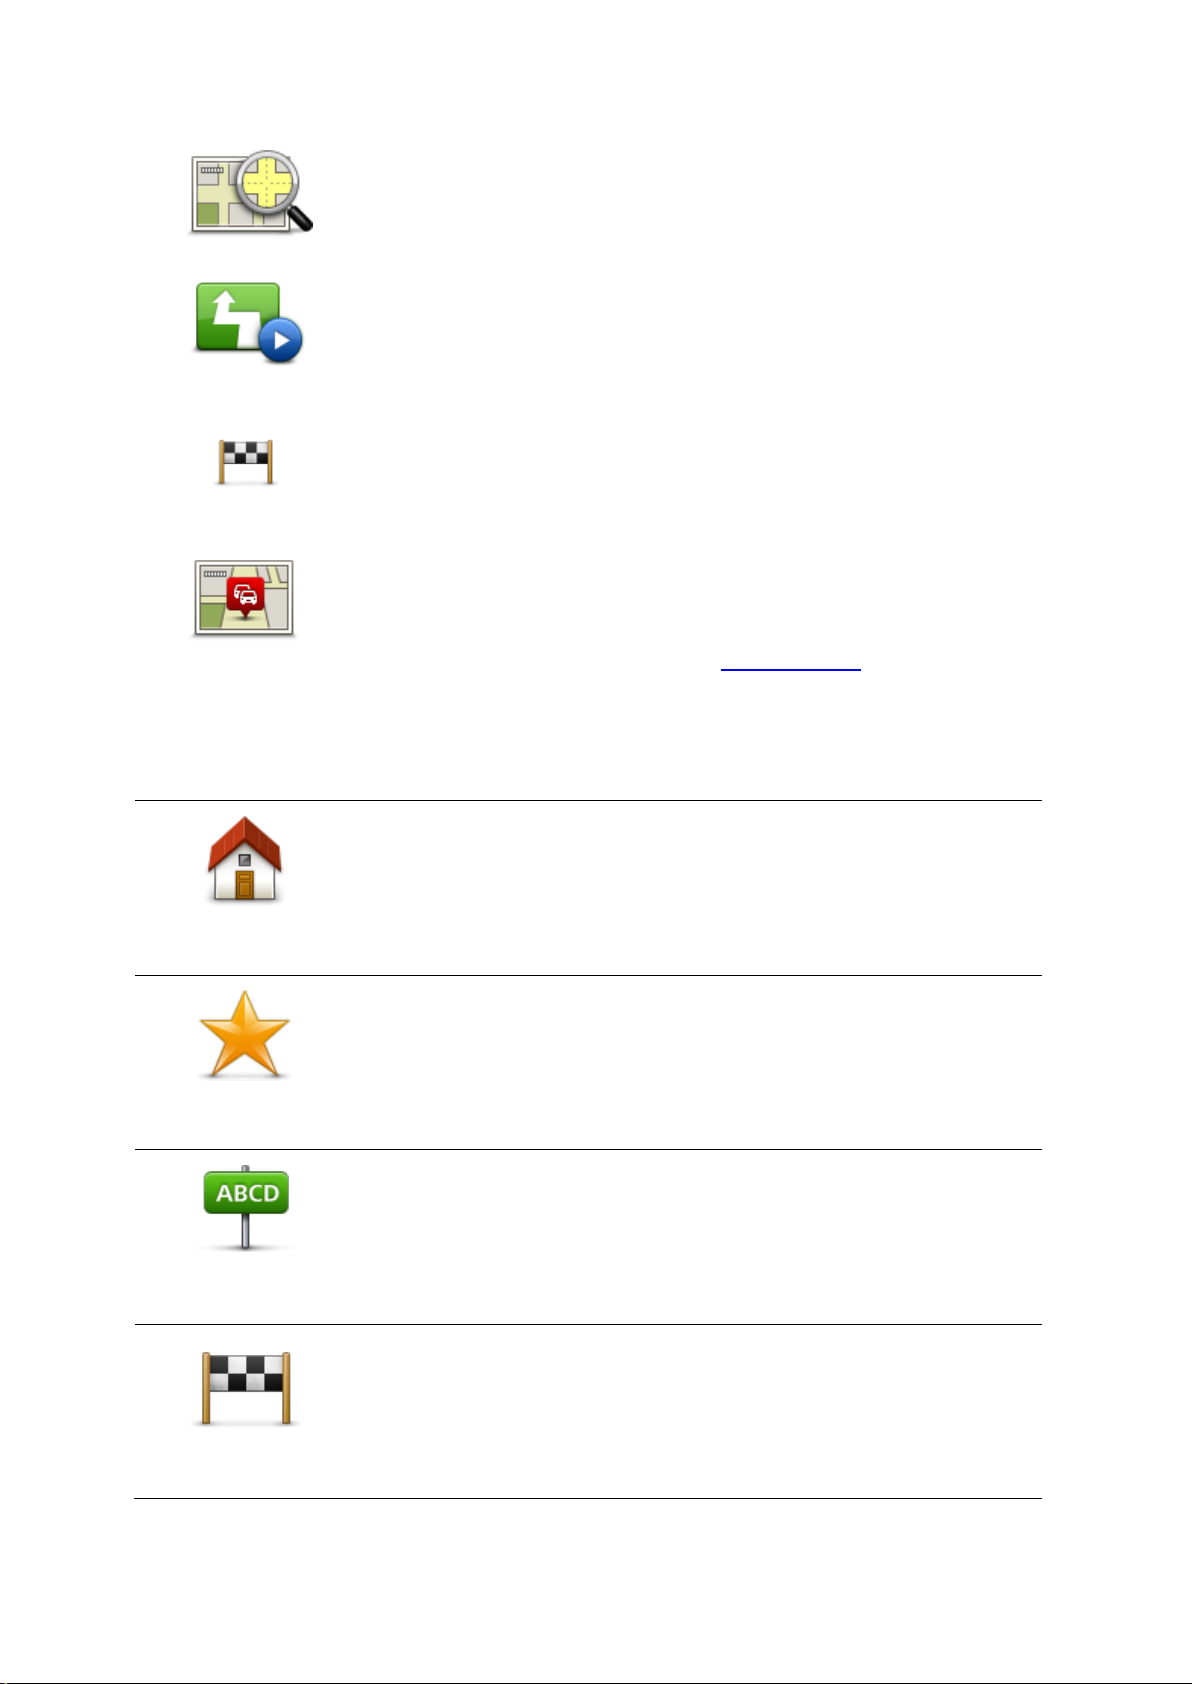
The bottom of the summary screen shows the following options:
Tap Change route to open the Change route menu. Here you can add Travel via stops and
change your route.
Tap Go! to start route guidance.
Tap Route details to open the Route information menu.
You can view the route summary at any time by tapping the arrival time panel on the right of the
Driving View.
Route information
Tap the arrival time panel on the right of the Driving View at any time to show the Route Information
screen.
Tap Route details on the Route Information screen to show the Route information menu. You see the
following options:
11
Page 12
Show map of route
Tap this button to see an overview of the route using the Map Browser.
Show route
demo
Tap the Show route demo button to watch a demo of the journey. To stop
a demo, tap the screen, then tap Yes.
Show
destination
Tap this button to see a preview of your destination. Tap More... to show
more information about the location, to search for parking nearby or to add
the location to your Favourites.
Show traffic
on route
Tap this button to see the traffic incidents on your route. Tap the left and
right arrows to browse the incidents. Tap Avoid to plan a new route avoiding an incident. You can choose the new route or return to the previous
route.
This feature is only available if you have TomTom Traffic.
Home
Tap this button to plan a route to your Home location.
To set your Home location, tap Change home location in the Settings
menu.
Favourite
Tap this button to select a favourite to drive to.
To add a favourite, tap Manage favourites in the Settings menu.
Address
Tap this button to enter an address or a postcode as your destination.
Recent destination
Tap this button to select your destination from a list of places you have
recently used as destinations. These also include your Travel via stops.
Other Drive to options
When you tap Drive to in the Main menu, you can select your destination in the following ways:
12
Page 13
Local Search
Tap this button to open the search menu. You can search near your location, in a city, near your destination or at another location, then navigate to
the location of one of the search results.
Point of Interest
Tap this button to navigate to a Point of Interest (POI).
Point on map
Tap this button to select a point on the map as your destination using the
Map Browser.
Contact
Tap this button to select a person from your address book. You can only
navigate to your contact when the contact has an address.
Latitude Longitude
Tap this button to enter the map coordinates of a location on the map as
your destination.
Using your contacts
You can select an address from your contacts list in you device to drive to. The address must be
complete and in the correct order. TomTom App can be open or closed when you select the address.
1. Open your device's Contacts list and find the contact you want to drive to.
2. Tap and hold the contact's address.
The device's Options menu opens.
3. Select Map address from the Options menu.
4. Select the TomTom App for the area where the address is located.
5. TomTom App opens and the route is calculated and shown.
By default, the fastest route is planned. You can change the type of route used for planning.
If IQ Routes is available on your map, this information is used to plan the best possible route tak-
ing into account the real average speeds measured on the roads.
6. Tap Go!
TomTom App starts to guide you to your destination using spoken instructions and on-screen di-
rections.
13
Page 14

Change route
Once you have planned a route, you may want to change something about the route, without changing
your destination. You may want to change the route for one or more of the following reasons:
You can see a roadblock or a line of traffic ahead.
You want to travel via a particular location to pick someone up, stop for lunch or fill up with petrol.
You want to avoid a difficult junction or a busy narrow street.
Planning a route in advance
You can use TomTom App to plan a route in advance by selecting your starting point and your destination.
You can use advanced route planning to check a route or the time it will take.
To plan a route in advance, do the following:
1. Tap the screen to open the Main menu.
2. Tap Advanced planning.
3. Select the starting point for your journey in the same way that you would select your destination.
4. Set the destination for your journey.
5. Choose the type of route that should be planned.
Fastest route - the route which takes the least time.
Eco route - the most fuel-efficient route.
Shortest route - the shortest distance between the locations you set. This may not be the
quickest route, especially if the shortest route is through a town or city.
Avoid motorways - a route which avoids motorways.
Walking route - a route designed for making the journey on foot.
Bicycle route - a route designed for making the journey on a bicycle.
Limited speed - a route for a vehicle which can only be driven at a limited speed. You have to
specify the maximum speed.
6. Choose the date and time you want to start the journey you are planning. You can set the time in 5
minute intervals.
TomTom App uses IQ Routes to work out the best possible route at that time, using the real average speeds measured on roads. In this way you can compare how long a journey takes at different times of day, or on different days of the week.
7. Tap Done. TomTom App plans the route between the two locations you selected.
8. Tap Go! to return to the Driving View.
9. If you want to see a demonstration of your route, tap Route details on the Route summary
screen, then tap Show route demo.
14
Page 15
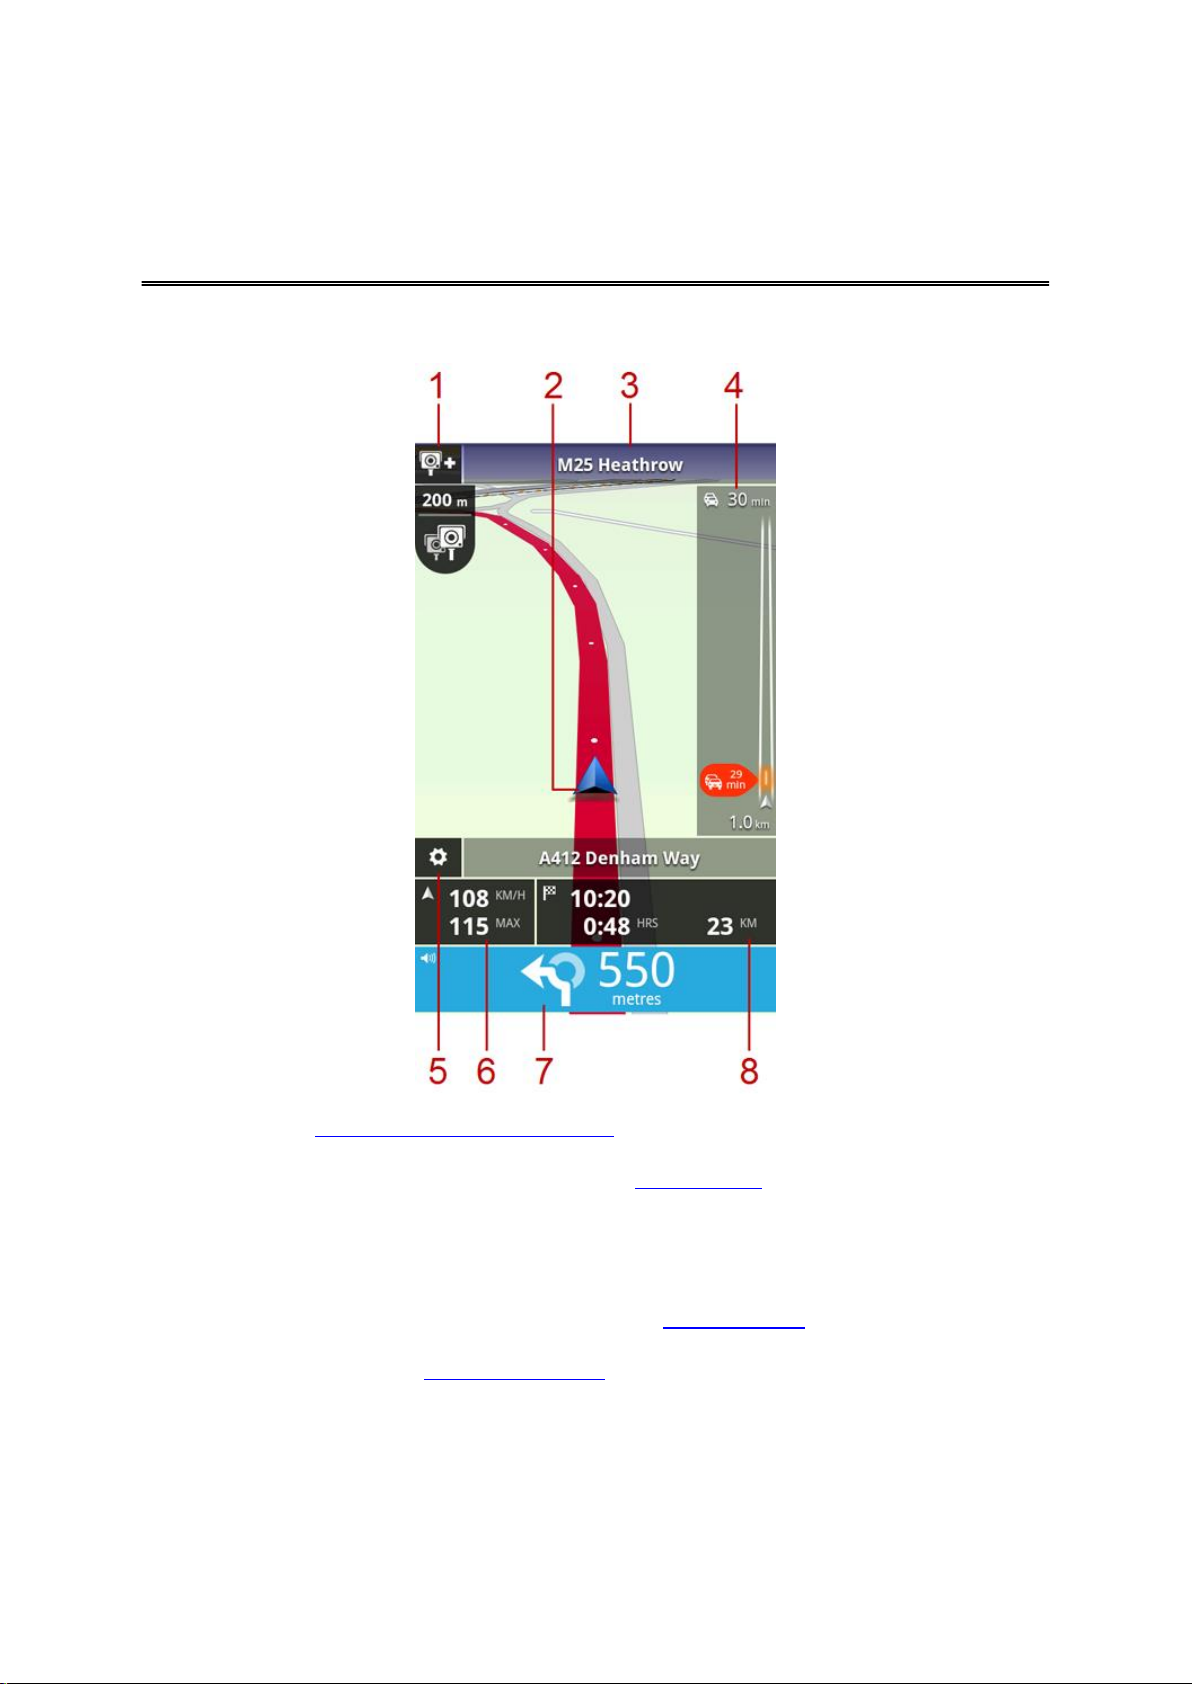
The Driving View
Driving View
1. If you have the TomTom Speed Cameras service the speed cameras report button appears here,
and speed camera notifications appear below.
In France, the Speed Cameras service is known as Danger Zones. The Risk Zone report button
appears here, and the danger zone alert appears below.
2. Your current position.
3. The name of the next street on your route.
4. Traffic sidebar. Tap the sidebar to see details of traffic incidents on your route.
The traffic sidebar is only shown if your device has the TomTom Traffic service. Traffic information
is not available in all countries or regions.
5. Tap this button to show the quick access toolbar.
6. Your current speed and, if known, the speed limit at your current location. If you exceed the speed
limit this area appears red.
7. Driving instruction for the road ahead and the distance to your next turning.
Tap this area to open the volume control and to repeat the previous instruction.
8. The remaining distance of your journey, the remaining journey time and the estimated arrival time.
15
Page 16

Tap this area to open the route summary screen.
Tap this button to use a 2D map in the Driving View.
If the 2D map is being used, this button changes to a 2D symbol. Tap the
button again to use the 3D map.
Tap this button to switch off voice guidance. You will no longer hear spoken
route instructions but you will still hear information such as traffic information
and warnings.
If the voice is muted, this button changes to Enable Voice. Tap the button
again to turn voice instructions back on.
When voice instructions are disabled, the voice disabled indicator is shown
in the driving instructions panel.
Tap this button to use night colours on the menus and maps. If night colours
are being used, this button changes to a moon symbol. Tap the button again
to switch back to day colours.
Moving around in the Driving View
When you plan a new route, you are shown the Driving View together with detailed information about
your current location.
Tap the centre of the screen at any time to open the Main menu.
Zoom by placing your fingers on the screen and pinching them together and stretching them apart.
Returning to the Driving View
To return to the Driving View at any time tap the return arrow in the top right corner of the screen:
To return to the previous screen tap the back arrow in the top left of the screen:
Setting the volume
Tap the driving instruction panel to show the volume control.
Move the slider from left to right to increase the volume for both music and voices at the same time.
Move the slider all the way to the left to mute all sounds from TomTom App. When the sound is muted,
the mute sound indicator is shown in the driving instruction panel.
Quick access toolbar
Tap the quick access toolbar button to display the following options:
16
Page 17

Map settings
You can change the way the map looks and behaves as you drive, and change what you see on the
map.
17
Page 18

About Advanced Lane Guidance
Advanced Lane Guidance
TomTom App helps you prepare for motorway exits and junctions by showing you which lane you
should be in.
Note: Advanced Lane Guidance is not available for all junctions or in all countries.
For some exits and junctions, an image shows the lane you should be in. To turn the images off,
switch Show lane guidance images off in the Advanced Settings menu.
For other exits and junctions, TomTom App shows the lane you should take in the driving instruction
panel.
18
Page 19

Making changes to your route
Change route
You can open the route options as follows:
Tap Change route in the Main menu.
Tip: Change route is only available when you have planned a route.
Tap Change route on the Route Summary screen after you plan a
route.
Tap the distance panel on the right side of the Driving View to open the
Route Summary screen, then tap Change route.
Clear route
Tap this button to clear the currently planned route.
Avoid roadblock
Tap this button if you can see a roadblock or a line of traffic ahead. You
then have to choose how much of the route ahead you want to avoid.
Choose from the different options available. TomTom App recalculates your
route avoiding the section of the route for the distance you selected.
Don’t forget that once a new route is calculated, you may have to turn off
the road you are on very soon.
If the roadblock suddenly clears, tap Recalculate route to return to your
original route.
Calculate alterna-
tive
Tap this button to calculate an alternative to the current route.
Apart from the roads near your current position and near your destination, a
new route is calculated using totally different roads to reach your destination. This is an easy way of planning a different route to the same destination.
TomTom App looks for another route from your current location to your
destination. When a route has been calculated you can tap Alternative
route to use the new route, or tap Previous route to use the original route.
If you decide later that you would prefer to use the original route after all,
use Recalculate route.
Changing your route
You can change the route using the route options.
Clear route
Avoid roadblock
Calculate alternative
19
Page 20

Travel via...
Travel via...
Tap this button to change your route so that it passes a particular location,
perhaps to pick someone up on the way. You can add up to four extra stops
along your route.
When have not yet entered a stop, the Travel via... menu opens.
When you have already entered a stop, the list of stops is shown. Tap Add
to open the Travel via... menu.
Choose the stop in the same way as you choose a destination. This means
you can select from all the same options that are offered when you choose
a destination, for example Address, Favourite, Point of Interest or Point
on map.
When you have added a stop it is shown in the Travel Via list.
If you want to change a stop tap it to open the information screen, which
shows the following options:
Move up
Tap this button to move the stop up in the list.
Move down
Tap this button to move the stop down in the list.
Switch on / Switch
off notification
Switch on notification to get a voice message saying you are near the stop.
Delete
Tap this button to delete the stop.
When you have added Travel Via stops, tap the Done button at the top of
the Travel Via screen. TomTom App calculates a new route to your destination that passes through the stops you chose. A flag appears in the Driving
View at each of your Travel Via stops. Unlike at your final destination,
TomTom App only gives a sound alert when you reach a Travel Via stop.
Avoid part of route
Tap this button to avoid a part of the route. Use this button if you see that
your route includes a road or junction you don’t like, or which is well-known
for traffic problems.
You then choose the road you want to avoid from a list of the roads on your
route.
Tap Done. TomTom App calculates a new route to your destination that passes the stops you chose.
Tap Go! to start driving. A flag appears in the Driving View at each of your Travel Via stops and you
get a voice message saying that you are near the stop.
Avoid part of route
20
Page 21

Recalculate route
Recalculate
route
Tap this button to recalculate the route using your existing route settings
and Traffic.
Avoid an incident or minimise delays
You can avoid a traffic incident or minimise a delay by recalculating your route based on the latest
traffic information. These features are only available if you have TomTom Traffic.
Tap the Traffic area on the Driving View to show the Delay on route summary screen.
To avoid a traffic incident tap Avoid. A route is calculated that avoids the incident. You can choose the
new route or return to the previous route.
Tap Minimise delays to re-plan your route based on the latest traffic information. You can choose the
new route or return to the previous route.
21
Page 22

Settings
Change home
location
Tap this button to set or change your home location. Select the address for
your home location in the same way that you select a destination.
Your home location can be somewhere you often visit, such as your office.
This feature provides an easy way to navigate there by tapping the Home
button in the Drive to menu.
Manage favourites
Tap this button to go to Favourites where you can add to, edit and delete
your Favourites.
In TomTom App without TomTom Shop you can find this button on the Main
menu.
Driving safety
Tap this button to set the following warnings for places on your route.
Driving near a place of worship.
Driving near a school.
Driving near a college or university.
Settings
To change the way TomTom App looks and behaves, tap Settings in the Main menu.
Change home location
Manage Favourites
Driving safety
Warn for schools and places of worship - Adjust this setting to warn you when you are driving
near a place of worship, a school, a college or a university. The warning is not given when you are
driving on a motorway, or between the hours of 20.00 and 06.00. The following icons appear in the
Driving View:
22
Page 23

Warn when driving faster than allowed - Adjust this setting to warn you when you are driving
Driving View
Tap this button to set the information that is shown on the map in the Driving
View. The following options are available:
Voices
Tap this option to select the voice used for instructions. You can choose
from three different kinds of voices.
above the speed limit.
You can select a warning alert sound for each warning.
Driving View
Show point of interest
This setting lets you choose which POIs are shown on the map. Tap Next to choose to show POIs in
2D and 3D driving views and maps.
2D map rotation
You can choose to fix the 2D map in place with north at the top of the screen, or to rotate the 2D map
so that your current direction is always at the top of the screen.
Show street names on map
When this setting is on, street names are shown on the map.
Show next street name
When this setting is on, the next street name or number on your route is shown in the Driving View.
Show current street name
When this setting is on, the current street name or number on your route is shown in the Driving View.
Auto-Zoom in 2D and 3D modes
Auto-Zoom automatically adjusts the area of the map and level of detail shown in the Driving View.
Switch off Auto-zoom to manually control the use of zoom in the Driving View.
Voices
Voice selection
Tap a voice to select it.
When you select a voice, a sample of that voice is played.
A basic voice reads the driving instructions but does not read the street names, road numbers or
signs.
An advanced voice gives driving instructions and pronounces street names, signs and status
messages. You can only use an advanced voice that is in the language your device uses. You
must select an advanced voice to be able to select the following options:
Read aloud road numbers
Read aloud street names
Read aloud foreign street names
Read aloud traffic information
23
Page 24

Distance units
Distance units
Tap this button to choose to use either Kilometres or Miles for all distances
and speeds.
Map colours
Tap this button to change the map colours.
Car symbol
Tap Car symbol to select the car symbol that shows your current location in
the Driving View.
Route planning
Adjust the Route planning settings to set how routes are planned.
Map colours
Tap Change day colours to select a day colour scheme consisting of bright colours.
Tap Change night colours to select a night colour scheme consisting of darker colours.
Auto switch automatically changes between day and night colours depending on the time of day.
Car symbol
Route planning
Route type
Adjust this option to set the type of route that will be planned when you plan a new route.
You can select the following types of route:
Always ask me - if you select this option, you are always asked to select the type of route that
should be planned.
Fastest route - the fastest route to your destination.
Shortest route - the shortest route to your destination. This may take much longer than the
fastest route.
Eco route - always plan the most fuel-efficient route.
Walking route - this type of route is optimised for walking.
Bicycle route - this type of route is optimised for bicycles.
Avoid motorways - this type of route avoids all motorways.
Limited speed - if you select this type of route, you must enter a maximum speed for your vehicle.
The route planned takes this restriction into account.
You can set how each of the following road types is handled when a new route is planned:
Toll roads
Ferry crossings
Carpool lanes
24
Page 25

Unpaved roads
Advanced settings
Tap Advanced settings to adjust the following settings:
TomTom services
Tap this button to set the options for TomTom services.
You can set the following actions to be taken for each type of road:
Ask - when the route is planned, you have to select how to handle these roads when they occur
on your route.
Always - the type of road is always avoided automatically.
Never - the type of road is never avoided automatically.
Advanced settings
Show lane guidance images
Adjust this setting to switch lane images on and off.
Lane images help you prepare for motorway exits and junctions by showing you which lane you should
be in.
Note: Lane guidance is only available when your device is in the landscape position.
Plan IQ Routes
Adjust this setting to switch IQ Routes on and off.
IQ Routes is used when you plan a route. Your route is calculated using information about the real
average speeds measured on roads, so your route may change depending on the time of day and day
of the week.
Note: IQ Routes information is not available for all regions. For more information on IQ Routes, go
to tomtom.com/iqroutes.
Auto hide route summary after 10 seconds
Switch this setting on to automatically close the route summary screen after 10 seconds.
Show location previews
Switch this setting on to show a preview of your destination location before going to the route summary screen.
TomTom services
Data services
Adjust this setting to switch the Traffic and Speed Cameras or Danger Zones services on and off.
Traffic incidents are shown on the traffic sidebar and in the Browse Map screen, and traffic delays are
taken into account when you plan a new route.
25
Page 26

TomTom Safety Cameras or Danger Zones updates the locations and speed limits of fixed cameras or
About
Tap About for information about the application and map version as well as
details about licences, copyright, information sharing, and legal information.
danger zones, and provides live updates for mobile camera or risk zone locations.
Information sharing
Adjust this setting to switch Information sharing on and off. If you turn off information sharing you will
have enhanced privacy but you will not be able to use services that require you to share your data.
When you turn on Information sharing you must read and agree to the Legal notice to be able to use
the TomTom services.
Speed cameras/Risk zones report button
Adjust this setting to show or hide the speed camera or risk zones reporting button in the Driving View.
Speed cameras alerts
Tap this setting to choose which speed cameras and safety-related features you are warned about on
your route.
Note: This setting is not used for danger zones.
Alert sound
This setting lets you choose a sound for the Speed Cameras or Danger Zones warning.
Auto-switch if a faster route is found
Adjust this setting to choose what action to take if a faster route is found. You can choose to be asked
which route to take, to always take the faster route, or never to take the faster route.
About
Check for updates
Tap this button to check for map updates for TomTom App.
Reset to defaults
Tap this button to reset TomTom App to the default settings. You lose your settings and saved locations. If you have purchased TomTom services you have to log in to the TomTom shop to start those
services again.
26
Page 27

The Main menu
Drive to
Tap this button to start planning a route.
Change route
Tap this button to change your route or clear your route.
Note: This button is active only if a route is planned.
View map
Tap this button to browse the map in the same way as you might look at a
traditional paper map.
Advanced
planning
Tap this button to plan a route in advance, selecting your starting point and
your destination.
TomTom shop
Tap this button to go to the TomTom Shop to purchase a range of TomTom
services.
Note: This button only appears if your version of TomTom App supports
TomTom services.
If you have a TomTom service, you can tap this button to log in to the
TomTom shop to start your TomTom services and view your service status.
Manage favourites
Tap this button to go to Favourites where you can add to, edit and delete
your Favourites.
Note: This button only appears in the Main menu if your version of
TomTom App does not support TomTom services. If you have TomTom
services you can find this button in the Settings menu.
Main menu
When you start TomTom App without having earlier planned a route, the Main menu is shown.
To open the Main menu from the Driving View, tap the screen.
The following buttons are available in the Main menu:
27
Page 28

Settings
Tap this button to change how TomTom App behaves.
Home
Tap this button to plan a route to your Home location.
To set your Home location, tap Change home location in the Settings
menu.
Favourite
Tap this button to select a favourite to drive to.
To add a favourite, tap Manage favourites in the Settings menu.
Address
Tap this button to enter an address or a postcode as your destination.
Recent destination
Tap this button to select your destination from a list of places you have
recently used as destinations. These also include your Travel via stops.
Local Search
Tap this button to open the search menu. You can search near your location, in a city, near your destination or at another location, then navigate to
the location of one of the search results.
Point of Interest
Tap this button to navigate to a Point of Interest (POI).
Drive to menu
When you tap Drive to in the Main menu, you can select your destination in the following ways:
28
Page 29

Point on map
Tap this button to select a point on the map as your destination using the
Map Browser.
Contact
Tap this button to select a person from your address book. You can only
navigate to your contact when the contact has an address.
Latitude Longitude
Tap this button to enter the map coordinates of a location on the map as
your destination.
Return to Driving view
Many menus and screens have a quick access button to return you to the Driving View without having
to step back through menus. The button appears in the top right corner of the screen.
29
Page 30

Viewing a map
View map
Tap View map in the Main menu to open the map browser. Using the map viewer you can view the
map in the same way as you might look at a traditional paper map.
You can move around the map by using your finger to drag the map across the screen.
Zoom in and out by pinching your fingers together and apart on the screen. You can also zoom in by
tapping the screen twice with one finger.
Tap Details to choose what to show on the map:
Traffic information - when you have Traffic this shows traffic delays in the area.
Names - shows street and other names.
Points of Interest (POIs) - shows points of interest.
Favourites - shows your Favourites.
Satellite images - shows a satellite image when zoomed out instead of a street map.
You can select and find a location on the map, then drive to that location.
Selecting items on the map
You can select a location on the map in the following ways:
Tap the map to place the cursor at the location you tap.
Tap a POI on the map.
Tap Find and search for a location on the map. Choose the location in the same way as you
choose a destination. This means you can select from all the same options that are offered when
you choose a destination, for example Address, Favourite, Point of Interest or Point on map.
Details of a location are shown, along with an arrow.
Tap the location to use the cursor position. You can choose from the following options:
30
Page 31

31
Drive there
Tap this button to plan a route from your current location to the cursor
position.
Travel via...
Tap this button to travel via the cursor position on the route that is currently
planned. This option is only active if you have already planned a route.
Add to favourites
Tap this button to add the cursor position as a Favourite. You can choose to
give the favourite a name or you can use the suggested name.
Find POI nearby
Tap this button to search for POIs near the location.
Centre on map
Tap this button to move the map so that the cursor position is in the centre
of the screen. The map zooms in on the cursor position.
View location
details
Shows the details of the location you selected. Tap More... to show more
information about the POI, to search for parking nearby or to add the
location to your favourites.
Page 32

About POIs
POI near you
Tap this button to choose from a list of POIs near to your current
location.
POI near Home
Tap this button to choose from a list of POIs near to your Home location.
Points of Interest (POIs)
Points of Interest or POIs are useful places on the map.
Here are some examples:
Restaurants
Hotels
Museums
Parking garages
Petrol stations
There are several places where you can use POIs in TomTom App:
Selecting a POI as your destination when planning a route.
Calling a POI from the map browser.
Selecting which POIs to show on the map.
Driving to a POI
You can select a POI as your destination or as a Travel via location.
When calling a POI or driving to a POI, select the POI in the following way:
1. Tap the screen to show the Main menu.
2. If you want to navigate to a POI, tap Drive to then tap Point of Interest.
3. If you have already planned a route and want to add a POI as a Travel via location, tap Change
route on the Route Summary. Tap Travel via... then tap Point of Interest.
4. Narrow your choice of POIs by selecting the area where the POI is located.
The following options are available:
32
Page 33

POI in city
Tap this button to find a POI in a particular town or city.
POI along route
Tap this button to find a POI along your planned route.
POI near
destination
Tap this button to find a POI near your planned destination.
POI is on your route
POI is close to your route
POI is fairly close to your route.
The following options are available when a route is already planned:
5. If you selected POI in City, type the name of the town you want to visit and select the town when
it appears in the list.
6. Select the category of POI.
Tap Search POI to search for a POI by name. All POIs in all categories are searched.
Tap the category of the POI, if it is shown.
Tap Other categories to choose from the complete list of categories. Select the category from the
list.
7. From the list of POIs shown, select the POI you want to navigate to.
The list below explains the distances listed next to each POI:
POI near you - Distance from your current location
POI in city - Distance from the city centre
POI near Home - Distance from your Home location
POI along route - Distance from your current location
POI near destination - Distance from your destination.
If you have planned a route, a symbol is also shown next to each POI:
33
Page 34

After you select a POI, detailed information such as the phone number and a short description is
Drive there
Tap this button to plan a route from your current location to the cursor
position.
Travel via...
Tap this button to travel via the cursor position on the route that is
currently planned. This option is only active if you have already planned
a route.
Add to favourites
Tap this button to add the cursor position as a Favourite. You can
choose to give the favourite a name or you can use the suggested
name.
Find POI nearby
Tap this button to search for POIs near the location.
Centre on map
Tap this button to move the map so that the cursor position is in the
centre of the screen. The map zooms in on the cursor position.
View location
details
Shows the details of the location you selected. Tap More... to show
more information about the POI, to search for parking nearby or to add
the location to your favourites.
shown.
8. Tap Done to confirm you want to plan a route to this POI.
9. Tap Go!
TomTom App starts to guide you to your destination using spoken instructions and on-screen di-
rections.
Finding a POI on the map
You can find a POI using the Map Browser then contact the POI or navigate to it.
1. Tap the screen to show the Main menu.
2. Tap View map.
Make sure Points of Interest are selected in the Details page. You can also select which POIs to
show on the map.
3. Find a POI on the map.
You can tap Find then Point of Interest to find POIs along your route or in a city, and zoom in
and move the map.
4. Select a POI symbol then tap the POI name panel to display the POI menu.
The following options are available:
34
Page 35

Showing POIs on the map
POIs can be shown on the map in the Driving View and in the Map browser.
To show POIs in the Driving View, do the following:
1. Tap Settings in the Main menu.
2. Tap Driving view.
3. Tap Show point of interest.
To show POIs on the map in the Map Browser, do the following:
1. Tap View map in the Main menu.
2. Tap the Details button.
3. Tap Points of Interest (POIs) to show POIs on the map.
Selecting which POIs to show on the map
You can select the categories of POIs that are shown, for example, petrol stations, restaurants and
hotels.
To change the POI categories shown in the Driving View, do the following:
1. Tap Settings in the Main menu.
2. Tap Driving view.
3. Tap Show point of interest.
4. Select which POIs you want to be shown on the map. Tap Next.
5. Select if you want to show POIs on 2D and 3D views. Tap Done.
To change the POI categories that are shown in the Map Browser, do the following:
1. Tap View map in the Main menu.
2. Tap the Details button.
3. Tap Points of Interest (POIs) to show POIs on the map.
4. Tap Choose POIs.
5. Select which POIs you want to be shown on the map. Tap Done two times to return to the map.
35
Page 36

About Favourites
Home
Tap this button to add your Home location as a favourite.
To set your Home location, tap Change home location in the Settings
menu.
Address
Tap this button to enter an address as a favourite. To use a postcode,
tap the Postcode button at the top of the screen to display the Postcode screen.
Recent destination
Tap this button to show a list of your recent destinations. These also
include your Travel via stops. Tap a recent destination to add it as a
favourite.
Local search
Tap this button to open the search menu. You can search near your
location, in a city, near your destination or at another location, then use
a found location as a favourite.
Favourites
Favourites provide an easy way to select a location without the need to enter the address. They do not
need to be favourite places, they can simply be seen as a collection of useful addresses.
Creating a Favourite
You can create a Favourite from one of the following locations in TomTom App:
From the Manage Favourites menu in the Settings menu.
From a location selected on the Map browser.
1. To create a Favourite using the Manage Favourites menu, tap the Add button.
The Add as Favourite menu appears showing the buttons listed below.
2. Give your Favourite a name that is easy to remember. TomTom App will always suggest a name.
If you want to enter your own name, delete the suggested name and enter a new one. You can
always change the name later.
3. Tap Next to save the Favourite.
36
Page 37

Point of Interest
Tap this button use a Point of Interest (POI) as a favourite.
My current loca-
tion
Tap this button to use your current location as a favourite.
Point on map
Tap this button to select a point on the map as a favourite using the
Map browser.
Contact
Tap this button to select a person in your phone book contacts as a
favourite. You can only use a contact when the contact has an address.
Latitude Longitude
Tap this button to enter the map coordinates of a location on the map as
a favourite.
Using a Favourite
You can use a Favourite as a way of navigating to a place without having to enter the address. To
navigate to a Favourite, do the following:
1. Tap the screen to show the Main menu.
2. Tap Drive to.
3. Tap Favourite.
4. Select a Favourite from the list.
TomTom App calculates the route for you.
5. Tap Go!
TomTom App starts to guide you to your destination using spoken instructions and on-screen di-
rections.
Changing the name of a Favourite
To change the name of a Favourite, do the following:
1. Tap the screen to show the Main menu.
37
Page 38

2. Tap Settings.
3. Tap Manage favourites.
4. Tap the Favourite you want to rename.
The information screen opens.
5. Tap Rename, then enter the new name for the Favourite.
6. Tap Next.
The Favourite is renamed.
Deleting a Favourite
Delete a Favourite as follows:
1. Tap the screen to show the Main menu.
2. Tap Settings.
3. Tap Manage favourites.
4. Tap the Favourite you want to delete.
The information screen opens.
5. Tap the Delete button. Tap Yes to confirm you want to delete it.
38
Page 39

About TomTom Traffic
Traffic Information
TomTom Traffic is a unique TomTom service providing real-time traffic information. Using the latest
traffic information in combination with IQ Routes, TomTom Traffic helps you plan the optimum route to
your destination.
Important: To use TomTom Traffic, you need a continuous data connection (GPRS, EDGE, UMTS or
CDMA). Your mobile operator may charge you for using a wireless data connection.
TomTom App regularly receives information about the changing traffic conditions. If traffic jams or
other incidents are found on your route, TomTom App can replan your route to minimise any travel
delays.
Tip: TomTom App automatically downloads traffic updates and may incur mobile roaming charges
when travelling abroad.
To prevent this, tap Settings in the Main menu, then tap TomTom services. Tap the Data ser-
vices button to switch off the service.
Regional availability
Note: You can use TomTom services when travelling abroad, but when planning a route you need
to consider that not all services are available in all countries.
39
Page 40

Using traffic information
The total delay caused by traffic incidents on your route is shown at the top
of the traffic bar.
The central section of the traffic bar shows individual traffic incidents in the
order they occur on your route.
The bottom of the traffic bar represents your current location.
The distance to the first traffic incident is shown at the bottom of the traffic
bar.
To improve visibility on the traffic bar, some minor incidents may not be
shown.
The traffic bar shows all the major traffic incidents as they occur on your route. Glowing dots show
where the incidents are located on the route.
The total delay caused by traffic incidents on your route is shown using different colours on the traffic
bar:
No colour - No traffic incidents on your route
Yellow - There is heavy traffic on your route
Orange - There is slow traffic on your route
Red - There is stationary traffic on your route.
40
Page 41

Getting more information about an incident
When a traffic incident is shown on the map, the starting point of the incident is indicated with a traffic
symbol.
The traffic bar also shows information such as road works, and the delay caused by these incidents.
Tap the traffic bar to view more information about the incident.
Tap the left and right arrow buttons to view separate incidents in the order they occur on your route.
To avoid a traffic incident tap Avoid. A route is calculated that avoids the incident. You can choose the
new route or return to the previous route.
41
Page 42

Tap Minimise delays to re-plan your route based on the latest traffic information. You can choose the
This symbol in the traffic bar indicates that the service is not currently
receiving Traffic updates from the TomTom server.
new route or return to the previous route.
Note: It might not always be possible to find a new route if you are close to the incident.
Taking the fastest route
TomTom App constantly looks for changes in the traffic on your route and checks if there is a faster
route to your destination. If a faster route is found, either that route is automatically taken or you are
asked if you want to use the faster route. You can change this setting in the Settings menu.
Connection to TomTom Traffic
Your Traffic service is constantly being updated unless the connection to the TomTom server is lost.
Your Traffic service may not be receiving updates due to one or more of the following reasons:
Your service has expired.
Data services is switched off in TomTom services in the Settings menu.
The service is not available in your area.
Checking traffic incidents in your area
For an overview of traffic incidents in your area and to view the details, do the following:
1. Tap View map in the Main menu.
The map is shown.
2. Tap the Details button
3. Tap Traffic information to turn it on. Tap Done.
The map shows traffic incidents.
Tip: You can move around the map by using your finger to drag the map across the screen.
Zoom in and out by pinching your fingers together and apart on the screen. You can also zoom in
by tapping the screen twice with one finger.
4. Tap on a traffic incident for detailed information. You can scroll through the traffic incidents using
the scroll buttons.
42
Page 43

Traffic incidents
Accident
Road works
One or more lanes closed
Road closed
Traffic incident
Traffic jam
Fog
Rain
Wind
Ice
Traffic incidents and warnings are shown on the map, in the Driving View and on the traffic bar.
There are two types of incident and warning signs:
Symbols shown in a red circle are traffic incidents. TomTom App can replan your route to avoid
new incidents.
Symbols shown in a red triangle are weather-related. TomTom App is unable to replan your route
to avoid these warnings.
Traffic incident symbols:
Weather-related symbols:
43
Page 44

Snow
Buying a new TomTom Traffic service
To buy a new service, do the following:
1. Start TomTom App.
2. Tap TomTom shop in the Main menu to open the TomTom shop.
3. Choose a service from the list of TomTom Traffic services.
4. Create a new TomTom account or login to your existing TomTom account.
Tip: If you already own a TomTom navigation device, then we recommend that you open a new
TomTom account for your device using a different email address.
For more information on MyTomTom accounts, go to tomtom.com/getstarted.
Your purchase is completed in the Google Play store. If payment is successful, TomTom Traffic starts
within a few minutes on your TomTom App.
Checking your TomTom service
You can check the status of your service at any time, by tapping TomTom shop in the Main menu,
then tapping My TomTom services.
Renewing your TomTom Traffic service
You can renew your TomTom Traffic service after it has expired or extend it before it reaches its expiry
date.
To renew an expired service, do the following:
1. Start TomTom App.
2. Tap TomTom shop in the Main menu to open the TomTom shop.
3. Choose the service you want to renew.
4. Login to your existing TomTom account.
Tip: For more information on MyTomTom accounts, go to tomtom.com/getstarted.
Your purchase is completed in the Google Play store. If payment is successful, TomTom Traffic starts
within a few minutes on your TomTom App.
44
Page 45

About Speed Cameras
This symbol in the Driving View indicates that the service is not currently
receiving Speed Cameras updates from the TomTom server.
Speed Cameras
The Speed Cameras service shows you information about fixed and mobile speed cameras, average
speed cameras, traffic control cameras and dangerous road features along your route. The information
shown by the Speed Cameras service is continually updated by TomTom users and frequently sent to
your TomTom App so you always have the latest information for your route. You can also add or
remove speed cameras.
Important: To use Speed Cameras you need a continuous data connection (GPRS, EDGE, UMTS or
CDMA). Your mobile operator may charge you for using a wireless data connection. To stop the
Speed Cameras service updating, tap Settings in the Main menu, then tap TomTom services, tap
the Data services button to switch off the service.
Regional availability
Note: You can use TomTom services when travelling abroad, but when planning a route you need
to consider that not all services are available in all countries.
Connection to Speed Cameras
Your Speed Cameras service is constantly being updated unless the connection to the TomTom
server is lost.
45
Page 46

Your Speed Cameras service may not be receiving updates due to one or more of the following
Alert symbol
Route symbol
Description
Fixed location speed camera.
Mobile speed camera.
TomTom App remembers mobile speed cameras
for three hours after you report them.
Traffic light camera.
This can be a camera with or without speed
detection.
Average speed cameras.
This warning stays visible while you are driving in
the average speed zone. If you drive at or below
the speed limit no warning sound is given. If you
drive above the speed limit you hear a warning
sound.
Restricted-road safety camera.
These cameras check for vehicles that use re-
stricted roads, for example a road that is not
permitted to be used during rush hour.
reasons:
Your service has expired.
Data services is switched off in TomTom services in the Settings menu.
The service is not available in your area.
Types of speed cameras and safety-related features
The Speed Cameras service shows you warnings in the Driving View when there is a speed-camera
or safety-related feature on your driving route. You are warned that a speed camera is on your route
15 seconds before you reach it. You can select the safety-related features you want to be warned
about in Alerts.
When you receive a warning, an alert symbol appears in the top left corner of the Driving View, and a
small symbol appears on your driving route. Where the speed limit is relevant it is shown in the alert
symbol. The distance to the feature is shown at the top of the alert symbol.
The alert symbol has a green background border when you are driving at or slower than the speed
limit, and a red background border when you are driving faster than the speed limit.
Speed Cameras warns of the following types of cameras and safety-related road features:
46
Page 47

Other cameras.
Mobile camera hotspot.
These are areas in which there have been many
reports of mobile speed cameras being used.
Accident blackspot.
These are areas where there have been many
accidents.
Ungated level crossing.
Tap this symbol to report a speed camera. The message Thank you is
shown at the top of the screen. The location is reported to TomTom and
shared with other TomTom App Speed Cameras users.
The speed camera symbol changes to this symbol when you are near a
speed camera. Tap the symbol to remove a mobile speed camera. You can
remove a speed camera until 5 seconds after you have passed its location.
The removal is reported to TomTom and shared with other TomTom App
Speed Cameras users.
Report a speed camera
Note: A reported speed camera stays in TomTom App for three hours.
Remove a speed camera
Settings for Speed Cameras alerts
The Speed Cameras Alert settings let you turn the Speed Cameras alert on or off, and let you select
the alert sound.
1. Tap Settings In the Main menu.
2. Tap TomTom services.
3. Tap Speed cameras report button to turn speed camera alerts on or off.
4. Tap Speed cameras alerts and select which speed cameras and safety-related items you want to
receive a warning for.
5. Tap Sound and choose a sound for the alert.
Buying a new Speed Cameras service
To buy a new service, do the following:
1. Start TomTom App.
47
Page 48

2. Tap TomTom shop in the Main menu to open the TomTom shop.
3. Tap Speed Cameras.
4. Choose a service from the list of Speed cameras services.
5. Create a new TomTom account or login to your existing TomTom account.
Tip: If you already own a TomTom navigation device, then we recommend that you open a new
TomTom account for your device using a different email address.
For more information on MyTomTom accounts, go to tomtom.com/getstarted.
Your purchase is completed in the Google Play store. If payment is successful, Speed Cameras starts
within a few minutes on your TomTom App.
Checking your TomTom service
You can check the status of your service at any time, by tapping TomTom shop in the Main menu,
then tapping My TomTom services.
Renewing your Speed Cameras service
You can renew your Speed Cameras service after it has expired or extend it before it reaches its
expiry date.
To renew an expired service, do the following:
1. Start TomTom App.
2. Tap TomTom shop in the Main menu to open the TomTom shop.
3. Choose the service you want to renew.
4. Login to your existing TomTom account.
Tip: For more information on MyTomTom accounts, go to tomtom.com/getstarted.
Your purchase is completed in the Google Play store.
48
Page 49

About Danger Zones
Danger Zones
TomTom Danger Zones warns you about danger zones and risk zones on your route when you are in
France. Danger zones and risk zones are only shown if you have a map of France, or your map
includes France and you are in France.
Since 3rd January 2012, it has been illegal to receive warnings about the position of fixed or mobile
speed cameras when you are driving in France. To be compliant with this change in French law,
speed camera locations are no longer reported but instead areas of danger are indicated as danger
zones and risk zones.
A danger zone is a zone specified by French law. A risk zone is a temporary danger zone reported by
users. TomTom Danger Zones warns you about both danger zones and risk zones in the same way.
Danger zones and risk zones may or may not contain one or more speed cameras or a range of other
driving hazards:
Specific speed camera locations are not available and a danger zone icon is shown as you
approach the zone.
The minimum length of the zone depends on the road type and is 300 m for roads in built-up
areas, 2000 m (2 km) for secondary roads and 4000 m (4 km) for motorways.
If two danger zones are close to each other, the warnings can be merged into a single longer
zone.
Information about the location of zones is continually updated by TomTom and other users and
frequently sent to your TomTom App so that you always have the latest information. You can also
contribute by reporting new risk zone locations.
49
Page 50

Note: You cannot remove a danger zone or a risk zone.
This symbol in the Driving View indicates that the service is not currently
receiving Danger Zones updates from the TomTom server.
When you are approaching a zone, a zone alert symbol appears in the
Driving View, a small symbol appears on your driving route, and you hear a
warning sound. The distance to the zone is shown above the zone alert
symbol.
If you enter a temporary risk zone and do not receive a warning you can
report it by tapping the Risk Zone report button in the top left corner of the
Driving View. Your report is sent to TomTom and, once validated, shared
with all TomTom Danger Zone subscribers.
Regional availability
Note: You can use TomTom services when travelling abroad, but when planning a route you need
to consider that not all services are available in all countries.
Connection to Danger Zones
Your Danger Zones service is constantly being updated unless the connection to the TomTom server
is lost.
Your Danger Zones service may not be receiving updates due to one or more of the following reasons:
Your service has expired.
Data services is switched off in TomTom services in the Settings menu.
The service is not available in your area.
Danger Zone warning
The warning sound you hear depends on whether you are currently exceeding the speed limit or not.
Report a risk zone
Note: All temporary zones that are reported appear as Risk Zones when you are driving.
A reported temporary risk zone stays in the TomTom Danger Zones app for three hours.
If a new temporary risk zone is reported directly before or after an existing risk or danger zone, then
the new zone is added to the existing zone.
If enough subscribers report a new zone, that zone may become a danger zone and be available for
all subscribers.
Settings for Danger Zones alerts
The Danger Zones alert settings let you turn the Danger Zones alert on or off, and select the alert
sound.
1. Tap Settings In the Main menu.
2. Tap TomTom services.
3. Tap Danger Zones report button to turn dangers zones alerts on or off.
4. Tap Danger Zones alert sound and choose a sound for the alert.
50
Page 51

Buying a new Danger Zones service
To buy a new service, do the following:
1. Start TomTom App.
2. Tap TomTom shop in the Main menu to open the TomTom shop.
3. Tap Danger Zones.
4. Choose a service from the list of Danger Zones services.
5. Create a new TomTom account or login to your existing TomTom account.
Tip: If you already own a TomTom navigation device, then we recommend that you open a new
TomTom account for your device using a different email address.
For more information on MyTomTom accounts, go to tomtom.com/getstarted.
Your purchase is completed in the Google Play store. If payment is successful, Danger Zones starts
within a few minutes on your TomTom App.
Checking your TomTom service
You can check the status of your service at any time, by tapping TomTom shop in the Main menu,
then tapping My TomTom services.
Renewing your Danger Zones service
You can renew your Danger Zones service after it has expired or extend it before it reaches its expiry
date.
To renew an expired service, do the following:
1. Start TomTom App.
2. Tap TomTom shop in the Main menu to open the TomTom shop.
3. Choose the service you want to renew.
4. Login to your existing TomTom account.
Tip: For more information on MyTomTom accounts, go to tomtom.com/getstarted.
Your purchase is completed in the Google Play store.
51
Page 52

About Local Search
Local Search
Local Search lets you search for shops and businesses and plan a route to
the store or office location.
Search near you
Tap this button to search near your current location.
Search in city
Tap this button to search in a particular city.
Search near
destination
This button appears when you have planned a route. Tap this button to
search near your destination.
Search near
another location
Tap this button to search in another location and plan a route to the location.
Searching with Local Search
The last place you searched for appears as an icon in the Local search menu.
Local search has the following search options:
Note: Local search requires a WiFi network or a wireless data connection (GPRS, EDGE, UMTS or
CDMA). Your mobile operator may charge you for using a wireless data connection. Using Local
Search when travelling abroad may cost you more than when you use the service at home.
Using Local Search to search
To use Local Search to plan a route, do the following:
In this example, you will search for a restaurant near to your current location.
1. Tap the screen to open the Main menu, then tap Drive to.
2. Tap Local Search.
3. Tap Search near you.
4. Type ’restaurant’, then tap Next.
52
Page 53

The locations that match your search are shown in a list.
5. Tap one of the locations in the list.
The location and route is shown on the map together with the address, a rating, phone number
and additional information.
6. Tap Go!
TomTom App starts to guide you to your destination using spoken instructions and on-screen di-
rections.
53
Page 54

Important Safety Notices and Warnings
Addendum
Global Positioning System
The Global Positioning System (GPS) is a satellite-based system that provides location and timing
information around the globe. GPS is operated and controlled under the sole responsibility of the
Government of the United States of America which is responsible for its availability and accuracy. Any
changes in GPS availability and accuracy, or in environmental conditions, may impact the operation of
this app. TomTom does not accept any liability for the availability and accuracy of GPS.
Use with care
Use of TomTom products while driving still means that you need to drive with due care and attention.
Safety advice
Safety messages
Please read and take note of the following important safety advice:
Check your tyre pressure regularly.
Service your vehicle regularly.
Medication can affect your riding or driving ability.
Always use seat belts if available.
Before setting off on a motorbike, fasten your helmet correctly.
If riding a motorbike, always wear protective clothing and equipment.
When riding a motorbike, be extra vigilant and always ride defensively.
Don’t drink and drive.
Most accidents happen less than 5 km from home.
Obey the rules of the road.
Always use your turn indicators.
Every 2 hours, take a break for at least 10 minutes.
Keep your seat belts on.
Keep a safe distance from the vehicle in front.
Aircraft and hospitals
Use of devices with an antenna is prohibited on most aircraft, in many hospitals and in many other
locations. This app must not be used in these environments.
SPECIAL NOTE REGARDING DRIVING IN CALIFORNIA AND MINNESOTA
California Vehicle Code Section 26708 "Material Obstructing or Reducing Driver's View" permits
mounting of a navigation device on the windshield as follows: "A portable Global Positioning System
(GPS), which may be mounted in a seven-inch square in the lower corner of the windshield farthest
removed from the driver or in a five-inch square in the lower corner of the windshield nearest to the
driver and outside of an airbag deployment zone, if the system is used only for door-to-door navigation
while the motor vehicle is being operated." Drivers in California should not use a suction mount on
their side or rear windows.
Note: This section of the California Vehicle Code applies to anyone driving in California, not just
California residents.
54
Page 55

Minnesota State Legislature Statutes Section 169.71, subdivision 1, section 2 provides that "A person
shall not drive or operate with any objects suspended between the driver and the windshield other
than sun visors and rearview mirrors and electronic toll collection devices."
Note: this Minnesota Stature applies to anyone driving in Minnesota, not just Minnesota residents.
TomTom Inc. bears no responsibility for any fines, penalties or damage that may be incurred by
disregarding this notice. While driving in any state with windshield mounting restrictions, TomTom
recommends the use of the supplied Adhesive Mounting Disk or its Alternative Mounting Kit, which
includes multiple options for mounting TomTom devices on the dashboard and the air vents. See
tomtom.com for more information about these mounting options.
This document
Great care was taken in preparing this document. Constant product development may mean that some
information is not entirely up to date. The information in this document is subject to change without
notice.
TomTom shall not be liable for technical or editorial errors or omissions contained herein, nor for
incidental or consequential damages resulting from the performance or use of this document. This
document contains information protected by copyright. No part of this document may be photocopied
or reproduced in any form without prior written consent from TomTom N.V.
55
Page 56

© 2013 TomTom. All rights reserved. TomTom and the "two hands" logo are registered trademarks of
Copyright notices
TomTom N.V. or one of its subsidiaries. Please see tomtom.com/legal for limited warranty and end
user licence agreements applying to this product.
© 2013 TomTom. All rights reserved. This material is proprietary and the subject of copyright protection and/or database rights protection and/or other intellectual property rights owned by TomTom or its
suppliers. The use of this material is subject to the terms of a licence agreement. Any unauthorised
copying or disclosure of this material will lead to criminal and civil liabilities.
Ordnance Survey © Crown Copyright Licence number 100026920.
Data Source © 2013 TomTom
All rights reserved.
Some images are taken from NASA’s Earth Observatory.
The purpose of NASA's Earth Observatory is to provide a freely-accessible publication on the Internet
where the public can obtain new satellite imagery and scientific information about our home planet.
The focus is on Earth’s climate and environmental change: earthobservatory.nasa.gov
The software included in this product contains copyrighted software that is licensed under the GPL. A
copy of that licence can be viewed in the Licence section. You can obtain the complete corresponding
source code from us for a period of three years after our last shipment of this product. For more
information, visit tomtom.com/gpl or contact your local TomTom customer support team via
tomtom.com/support. Upon request, we will send you a CD with the corresponding source code.
Linotype, Frutiger and Univers are trademarks of Linotype GmbH registered in the U.S. Patent and
Trademark Office and may be registered in certain other jurisdictions.
MHei is a trademark of The Monotype Corporation and may be registered in certain jurisdictions.
56
 Loading...