

Page 1
TM
FOOD PROCESSOR
OWNER'S MANUAL
Model RRFP1A/T
Page 2

IMPORTANT SAFEGUARDS
When using electrical appliances, basic safety precautions should always
be followed, including the following:
1. Read all instructions.
2. To protect against risk of electrical shock, do not put cord, plug, or
appliance in water or other liquid.
3. Close supervision is necessary when any appliance is used by or near
children.
4. Unplug from outlet when not in use, before putting on or taking off
parts, and before cleaning.
5. Avoid contacting moving parts.
6. Do not operate any appliance with a damaged cord or plug or after
the appliance malfunctions, or is dropped or damaged in any manner.
Contact Consumer Service for examination, repair or electrical or
mechanical adjustment.
7. The use of attachments not recommended or sold by the manufacturer may cause fire, electric shock or injury.
8. Do not use outdoors.
9. Do not let cord hang over edge of table or counter.
10. Do not let cord contact hot surface, including the stove.
11. Keep hands and utensils away from moving blades or discs while processing food to reduce the risk of severe injury to persons or damage
to the Food Processor. A scraper may be used, but must be used
only when the Food Processor is not running.
12. Blades are sharp. Handle carefully.
13. To reduce the risk of injury, never place cutting blade or discs on base
without first putting bowl properly in place.
14. Be certain Cover is securely locked in place before operating appliance.
15. Never feed food by hand. Always use food pusher.
16. Do not attempt to defeat the cover interlock mechanism.
SAVE THESE INSTRUCTIONS
FOR HOUSEHOLD USE ONLY.
2 23
Page 3

Additional Important Safeguards
1. All users of this appliance must read and understand this Owner's
Manual before operating or cleaning this appliance.
2. The cord to this appliance should be plugged into a 120V AC electrical outlet only.
3. Do not leave this appliance unattended during use.
4. If this appliance begins to malfunction during use, immediately turn the
unit OFF and unplug the cord. Do not use or attempt to repair the
malfunctioning appliance.
5. If this appliance falls or accidentally becomes immersed in water,
unplug it immediately. Do not reach into the water! Do not use this
appliance after it has fallen into or becomes immersed in water.
6. To reduce the risk of injury to persons or property, never use this appliance in an unstable position.
7. Do not use this appliance for other than its intended use.
Polarized Plug
This appliance has a polarized plug (one blade is wider than the other). To
reduce the risk of electric shock, this plug is intended to fit into a polarized
outlet only one way. If the plug does not fit fully in the outlet, reverse the
plug. If it still does not fit, contact a qualified electrician. Do not attempt to
modify the plug in any way.
Electric Power
If the electrical circuit is overloaded with other appliances, your appliance
may not operate. It should be operated on a separate electrical circuit from
other appliances.
Plasticizer Warning
CAUTION: To prevent Plasticizers from migrating from the finish of the
countertop or tabletop or other furniture, place NON-PLASTIC coasters
or placemats between the appliance and the finish of the countertop or
tabletop.
Failure to do so may cause the finish to darken, permanent blemishes may occur or stains can appear.
322
Page 4
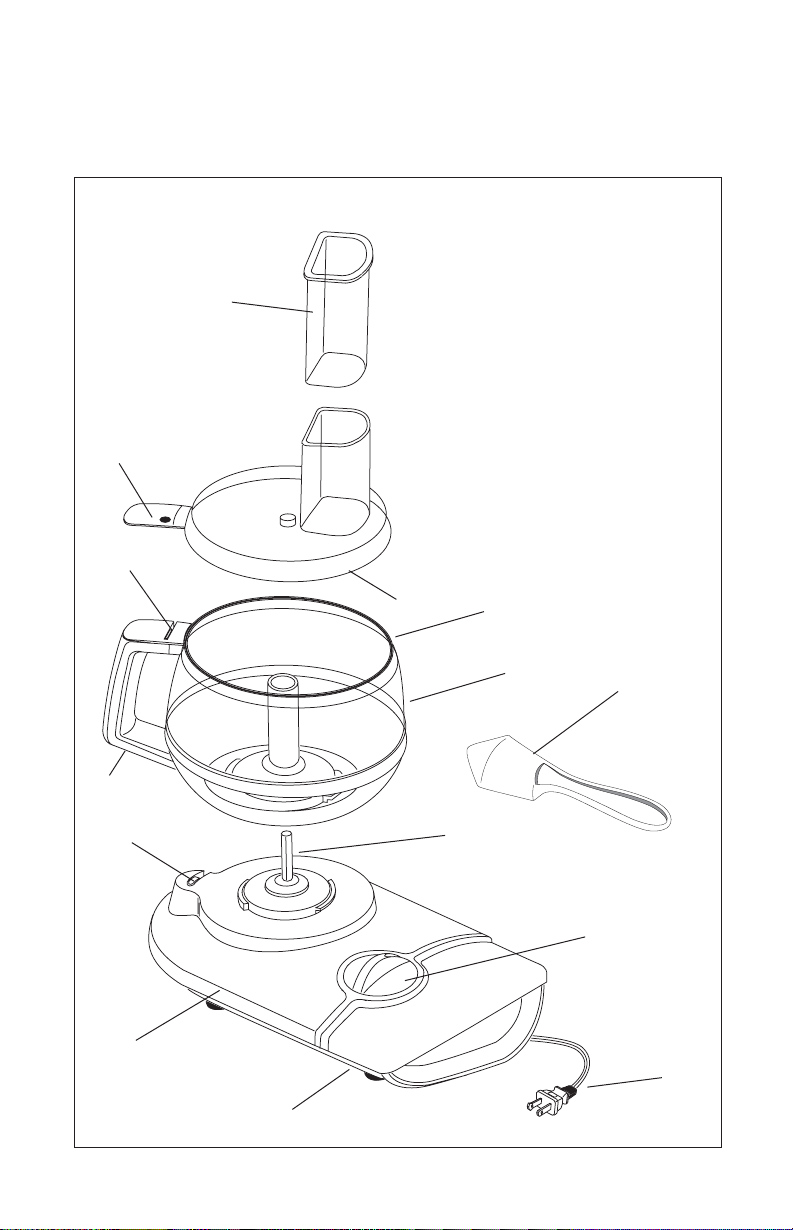
Getting to Know Your Rachael Ray
RRFP1A/T Food Processor
1. Food Processor Power Base
2. Interlock Mechanism, Lower
3. Handle
4. Interlock Mechanism, Upper
6
5
4
5. Locking Extension
6. Food Pusher (P/N 71163)
7. Cover with Feed Chute
(P/N 71162)
8. Rubber Seal Ring (P/N 71201)
9. Processing Bowl (P/N 71161)
10. Drive Shaft
11. Speed Control Dial
12. Cord
13. Cord Storage (not shown)
14. Spatula (P/N 71164)
7
3
2
1
13
4 21
10
8
9
14
11
12
Page 5
Getting to Know Your
P
0FF
1
2
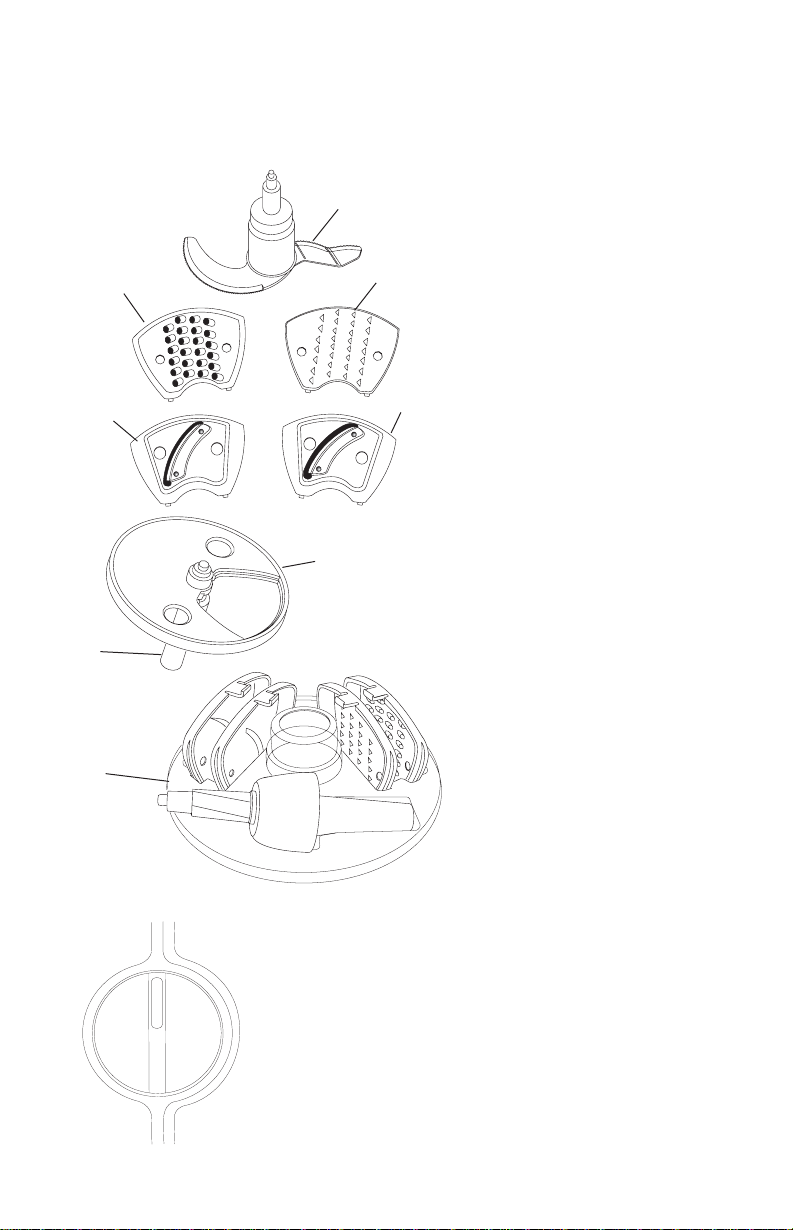
RRFP1A/T Attachments
1. Chopping Blade
1
2
4
3
5
6
7
8
CONTROL DIAL
with Indicator
Light
(P/N 71165) Stainless
steel blade designed for
cutting and kneading.
2. COARSE Shredding
Blade 'C' (P/N 71167)
Stainless steel shredding
blade.
3. Cheese Grating Blade
'CHEESE' (P/N 71198)
Stainless steel blade
designed to finely grate
fresh cheese.
4. THIN Slicing Blade 'F'
(P/N 71168) Stainless
steel slicing blade.
5. THICK Slicing Blade 'C'
(P/N 71169) Stainless
steel slicing blade.
6. Blade Holder
(P/N 71170) Designed to
hold a Shredding or
Slicing or Cheese Blade,
with finger holes.
7. Blade Holder Stem (P/N
71183) Fits over Drive
Shaft to support Blade
Holder.
8. Storage Tray
(P/N 71199) (Shown with
attachments in place)
Holds 4 unused Blades
and Blade Holder Stem.
P - Pulse
OFF
1 - Low Speed
2 - High Speed
5
Page 6
Before First Use
WARNING: Blade Attachments are very sharp. Use extreme care
when handling Blades. Failure to do so can result in personal
injury.
1. Carefully unpack the Food Processor. The Storage Tray is packed with
4 Blades and the Blade Holder Stem. Wash the Processing Bowl,
Cover with Feed Chute, Food Pusher, Spatula and all Attachments in
warm soapy water. Rinse and dry thoroughly.
2. Wipe the Food Processor Power Base
with a soft, moistened cloth. Never
immerse the Food Processor
Power Base in water or any other
liquid.
3. Store spare Blades and Blade Holder
Stem in Storage Stand (see illustration)
and keep nearby for easy accessibility.
Assembly Instructions
1. Before assembling the Food Processor
ensure that the Cord is unplugged.
2. Place the Food Processor Power Base
facing you on a dry, level surface.
3. Make sure the Rubber Seal Ring is in
position, flat and not twisted, in the
upper groove along the top of the
Processing Bowl.
4. Place the Processing Bowl onto the
Power Base. The Bowl will only sit correctly when the handle is positioned to
the left at the ten o'clock position.
5. Turn the Processing Bowl counter
clockwise to engage the locking tabs
and the Power Base Interlock
Mechanism.
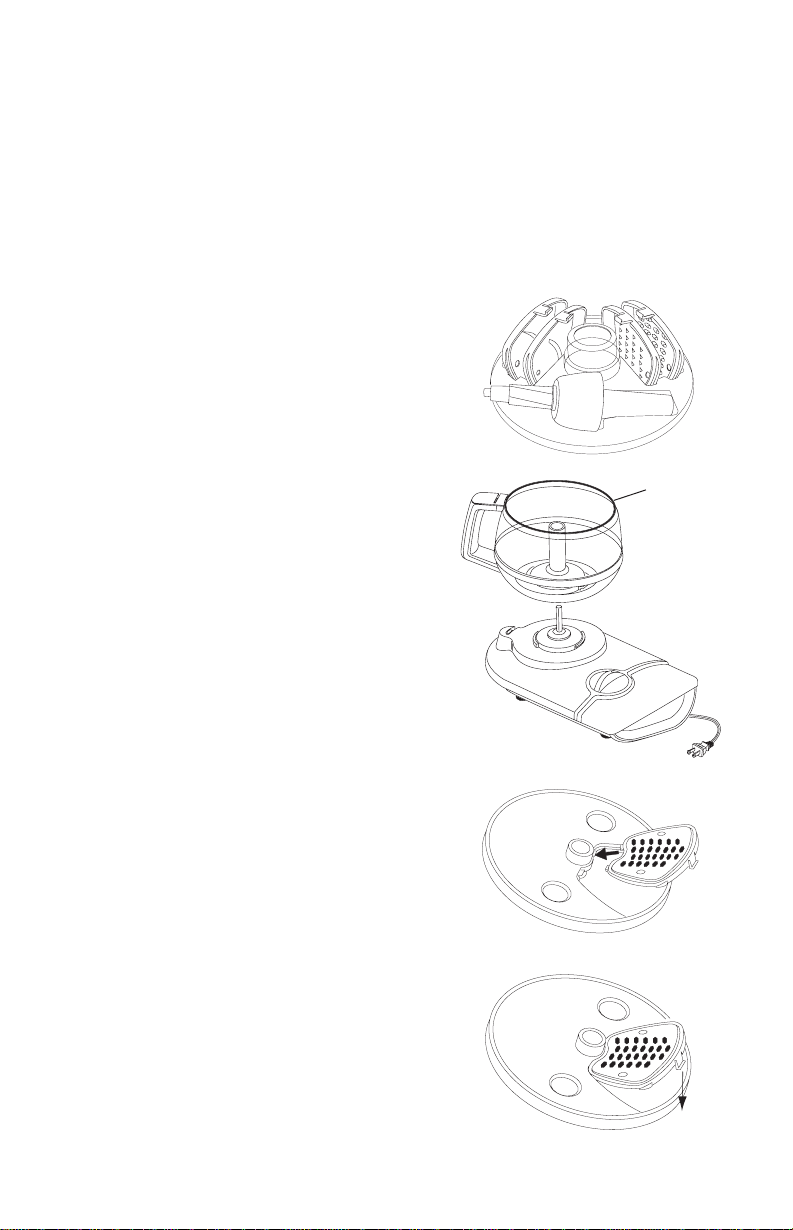
6. Determine which processing blade is to
be used; Chopping, Shredding, Slicing.
or Grating. If shredding, slicing or grating, insert the appropriate blade into
the top side of the Blade Holder, making sure it snaps in place. See illustration.
Rubber
Seal
Ring
6 19
Page 7
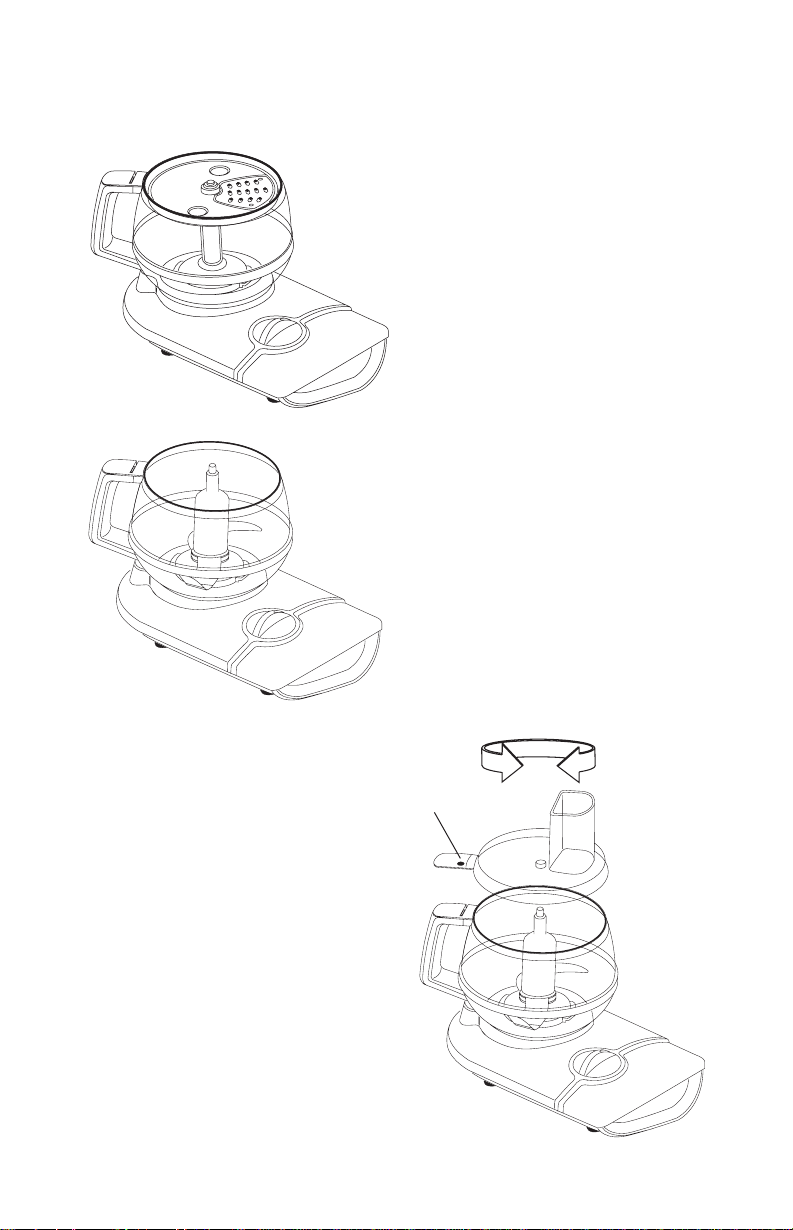
Assembly Instructions (Cont.)
Note: If the Processing Bowl
and the Cover are not correctly assembled, the Upper and
Lower Safety Interlock
Mechanism will not be closed
and the Food Processor will
not function.
7. To chop foods, fit the Chopping
Blade over the Drive Shaft. To
slice, shred or grate cheese, use
the Blade Holder Assembly (with
the proper Blade Attachment).
To use the Blade Holder, first slip
the Blade Holder Stem over the
Drive Shaft. Using the finger
holes, attach the Blade Holder
(sharp cutting edge up) to the
Blade Holder Stem. .
8. Place the Cover on the
Processing Bowl with the locking extension at approximately
the nine o'clock position. Rotate
the Cover counter clockwise to
engage the locking tabs and the
Upper Interlock Mechanism in
the Processing Bowl handle.
Note: If the Lid is difficult to
assemble, make sure the Rubber
Seal Ring fits flat and not twisted, in the upper groove along
the top of the Processing Bowl.
Remove Ring and reattach if
necessary.
Locking
Extension
9. Insert the Food Pusher in the
Feed Tube on the Cover.
10. Make sure the Speed Control
knob is in the OFF position,
then plug the Cord into a
120V AC power outlet.
11. The Food Processor is now
ready to begin use.
7
Page 8

Instructions for Use
Slicing, Shredding and Grating
CAUTION: Always unplug Food Processor from outlet before
installing or removing attachments.
CAUTION: Use extreme care when handling the Slicing,
Shredding or Grating Blades. Do not touch the cutting edges with
your fingers. The cutting edges are very sharp and can cause
injury if touched.
1. Make sure the unit is unplugged. Remove Storage Tray from the
Processing Bowl as outlined in the BEFORE FIRST USE section of
this Owner's Manual. Keep the Storage Tray out of the way, where it
cannot be tipped over and make sure the Tray and all Blades are out
of the reach of children. Attach the Processing Bowl to the Power
Base. See ASSEMBLY INSTRUCTIONS for details.
2. Insert a Slicing, Shredding or Grating Blade into the Blade Holder. See
Assembly Instructions for specific details.
3. Insert the Blade Holder and Stem in the Processing Bowl over the
Drive Shaft.
4. Place the Cover on the Processing Bowl with the locking extension at
approximately the nine o'clock position. Turn the Cover counter clockwise to engage the locking tabs and the Upper Interlock Mechanism
in the Processing Bowl handle.
Note: If the Lid is difficult to assemble, make sure the Rubber
Seal Ring fits flat and not twisted, in the upper groove along
the top of the Processing Bowl. Remove Ring and reattach if
necessary.
Note: If the Processing Bowl and the Cover are not correctly
assembled, the Upper and Lower Safety Interlock Mechanism
will not be closed and the Food Processor will not function.
5. Make sure unit is in the OFF position; then plug the Food Processor
into a 120V AC electrical outlet.
6. Remove the Food Pusher and insert the food to be processed into
the Feed Chute (see Food Processing Hints for food preparation
details). Turn the Speed Control Dial to desired speed; the Indicator
Light will come on. Use even, constant pressure on the Food Pusher
to feed food into the Feed Chute. If processing slows or seems
labored, increase the Speed Control Dial from 1 to 2 or turn to OFF
and select the Pulse setting. Note: Do not use excessive force or you
will damage the Food Processor.
Caution: Never use fingers or other utensils to push food down
the Feed Chute. Always use the Food Pusher.
8 17
Page 9

Slicing, Shredding and Grating Continued
7. When finished processing, move the Speed Control Dial to OFF, the
Indicator Light will go off, and unplug the unit.
Note: This Food Processor is equipped with an automatic
brake that will stop the rotation of the Blade within seconds.
Although this automatic brake provides an additional measure
of safety, make sure that the Blade has completely stopped
before you remove the Cover or unplug the unit.
8. Turn the Cover clockwise to disengage the locking tabs and lift the
Cover from the Processing Bowl.
9. Carefully lift the Blade Holder Assembly from the Processing Bowl
using the finger holes. Remove the Blade Holder Stem.
10. Turn the Processing Bowl handle clockwise to disengage the locking
tabs and lift the bowl from the Power Base.
11. Remove contents from the Processing Bowl and the Blade Holder
Assembly with the Spatula.
Chopping
CAUTION: Always unplug Food Processor from outlet before
installing or removing attachments.
CAUTION: Use extreme care when handling the Chopping Blade.
Do not touch the cutting edges with your fingers. The cutting
edges are very sharp and can cause injury if touched.
1. Make sure the unit is unplugged. Attach the Processing Bowl to the
Power Base. See Assembly Instructions for details.
2. Insert the Chopping Blade in the Processing Bowl over the Drive
Shaft.
3. Place up to 7 1/2 cups of the food to be chopped into the Processing
Bowl (see Food Processing Hints for food preparation details).
4. Place the Cover on the Processing Bowl with the locking extension at
approximately the nine o'clock position. Turn the Cover counter clockwise to engage the locking tabs and the Upper Interlock Mechanism
in the Processing Bowl handle.
Note: If the Lid is difficult to assemble, make sure the Rubber
Seal Ring fits flat and not twisted, in the upper groove along
the top of the Processing Bowl. Remove Ring and reattach if
necessary.
Note: If the Processing Bowl and the Cover are not correctly
assembled, the Upper and Lower Safety Interlock Mechanism
will not be closed and the Food Processor will not function.
916
Page 10

Instructions for Use (Cont)
Chopping Continued
5. Make sure unit is in the OFF position; then plug the Food Processor
into a 120V AC electrical outlet.
6. Turn the Speed Control Dial to the desired speed setting.The Indicator
Light will come on. If processing slows or seems labored, increase the
Speed Control Dial from 1 to 2 or turn to OFF and select the Pulse
setting. Additional ingredients may be added through the Feed Chute
while processing.
Caution: Never use fingers or other utensils to push food down
the Feed Chute. Always use the Food Pusher.
7. When finished processing, move the Speed Control Dial to OFF, the
Indicator Light will go off, and unplug the unit.
Note: This Food Processor is equipped with an automatic
brake that will stop the rotation of the Blade within seconds.
Although this automatic brake provides an additional measure
of safety, make sure that the Blade has completely stopped
before you remove the Cover or unplug the unit.
8. Turn the Cover clockwise to disengage the locking tabs and lift the
Cover from the Processing Bowl.
9. Carefully lift the Chopping Blade from the Processing Bowl.
10. Turn the Processing Bowl handle clockwise to disengage the locking
tabs and lift the bowl from the Power Base.
11. Remove contents from the Processing Bowl and the Chopping Blade
with the Spatula.
10
Page 11

Slicing, Shredding and Chopping Guide
SLICING BLADE - Cut food to fit Chute, use Speed 1
FOOD BLADE
Apple Thick
Cabbage/Lettuce Thick
Carrots Thick or Thin
Celery Thick or Thin
Cucumber Thick or Thin
Mushrooms Thick or Thin
Onions Thick or Thin
Peppers Thick or Thin
Potatoes Thick or Thin
Summer Squash Thick or Thin
SHREDDING/GRATING BLADES - Cut food to fit Chute,
use Speed 1
FOOD BLADE
Apple Coarse
Carrots Coarse
Cheese, hard
Parmesan, Romano Grating
Cheese, soft or semi-soft
Cheddar, mozzarella, Swiss Coarse
Summer Squash Coarse
CHOPPING BLADE - Push food from sides of bowl with
spatula when necessary
FOOD
Apple Pulse
Bread 1 or 2
Cabbage 1 or 2
Carrots 1 or 2
Celery Pulse
Crackers 1 or 2
Eggs, hard boiled Pulse
Garlic Pulse
Mushrooms Pulse
Onions Pulse
Parsley or other Herbs 1 or 2
Peppers Pulse
Potatoes Pulse
Walnuts Pulse
SPEED
11
Page 12

Food Processing Hints
• Chopping - For best results, cut or tear food into pieces approxi-
mately equal in size before processing. The finished results will be
more uniform. Consistent processing results are achieved if the container has 2 to 7 1/2 cups of fruits or vegetables.
• Mincing - Pre-cooked meat into cubes approximately 1-inch square.
• Fruits and Vegetables - Before processing fruits and vegetables,
clean and cut into 1-inch pieces.
• Mixing - Quantities that can be processed within the Processing Bowl
will vary depending upon the density of the ingredients being used.
• Adding Ingredients - Liquid ingredients may be added while the
processor is operating by pouring through the Feed Tube in the Cover.
• Using the Feed Tube - The most important factor for successful slic-
ing and shredding is the way in which the food is packed into the
Feed Tube. The Feed Tube should always be packed firmly to allow
each piece of food to support the others. There will always be a small
portion of food left unprocessed between the Food Pusher and the
Blade.
Caution: Never use fingers or other utensils to push food down the
Feed Chute. Always use the Food Pusher.
• Slicing, Shredding and Grating - Cut all ingredients to a size that
fits comfortably into the Feed Tube. Pack the Feed Tube and, while
holding food steady and upright with the Food Pusher, press down
evenly until all ingredients are sliced or shredded. Do not use excessive force or you may damage the Food Processor.
Long Slices: Pack food items horizontally in Feed Tube.
Short Slices: Pack food items vertically in Feed Tube.
Grating: For best results remember that softer foods such as cheese
(Cheddar, mozzarella or Swiss) should be well chilled before processing. Harder foods such as Parmesan or Romano cheese should be at
room temperature before processing. Note: When grating Parmesan
cheese do not apply excessive pressure to the Food Pusher.
12
Page 13

User Maintenance Instructions
This appliance requires little maintenance. It contains no user-serviceable
parts. Any servicing requiring disassembly must be performed by a qualified appliance repair technician.
Cleaning Instructions
CAUTION: The Blades are sharp! Handle with care! Use extreme
care when handling the Blades. Do not touch the Blades with your
fingers. The Blades are very sharp and can cause injury if touched.
CAUTION: Never place Processor Power Base in water or any
other liquid.
1. Always unplug the unit before cleaning. Make sure the Chopping
Blade or Blade Holder Assembly has completely stopped before any
disassembly.
2. Remove all attachments.
3. Wash the Processor Bowl with Rubber Seal Ring, Lid with Feed
Chute, Food Pusher, Blade Holder, Blade Holder Stem,
Slicing/Shredding/Grating Blades, Chopping Blade and Spatula in
warm soapy water. Removable parts may also be cleaned in the dishwasher. Load parts on the top rack away from the dishwasher heating
coil.
4. Never immerse the Processor Power Base in water or any
other liquid. If necessary, wipe exterior surface with a soft, damp
cloth or sponge and dry thoroughly.
Storage Instructions
1. Pack the Storage Tray. Fit the Blade
Holder Stem down into the recessed
area of the Tray. The unused Blades fit
easily into any of the 4 storage areas
(see illustration).
2. Make sure the Rubber Seal Ring fits
flat and not twisted, in the upper
groove along the top of the Processing Bowl. Place the Processing
Bowl in position on the Power Base. Grasping the Storage Trays center hub, lower the packed Storage Tray into the Bowl. Replace the Lid
and lock before storing.
3. Push the cord into the Cord Storage area located on the underside of
the appliance. Never wrap the cord around the appliance. The appliance should be stored in a clean, dry place.
13
Storage Tray with Attachments
Page 14

Recipes (Cont.)
This recipe has been specially
TM
created by Rachael Ray for
this appliance.
BASIL-TARRAGON PESTO
For 2 pounds of pasta, such as fettuccine
2 bunches, about 2 cups, fresh basil leaves
1/2 cup tarragon leaves stripped from stems, about 5 - 6 sprigs
4 small cloves of garlic, popped from skins
6 tablespoons pine nuts, a handful
1/4 pound, about 1 cup, grated Parmigiano Reggiano cheese, a couple
handfuls
The zest of 2 lemons
2 splashes of water, about 2 tablespoons
1/2 cup EVOO - extra virgin olive oil, eyeball it
Coarse salt and fresh black pepper, to your taste
Place the basil, tarragon, garlic, pine nuts, cheese and lemon juice in
processor and pulse grind to a fine chop. Add a couple splashes of water
and turn processor on. Stream the EVOO into the processor to form a
thick sauce. Season sauce with salt and pepper to taste and scrape into
a large shallow serving bowl.
Cook the pasta in salted boiling water. Drain pasta and add hot pasta to
sauce. Toss to coat evenly and adjust seasoning. Serve immediately.
Yield: 8 servings or 1 1/4 cups
14
Page 15

This recipe has been specially
TM
created by Rachael Ray for
this appliance.
CLASSIC BASIL, PARSLEY AND SPINACH-WALNUT
PESTOS
Each pesto recipe will provide enough sauce for 2 pounds of pasta, or
freeze some and have it next week.
Method for each recipe:
•Toast pine nuts (pignoli), walnuts or sesame seeds until golden brown
before using them. (Buy nuts a handful at a time from the bulk bins.)
•Heat oil and garlic in small pan on low heat or in microwave, 30 sec-
onds on high, before using.
• Pulse all ingredients in processor until paste forms.
• Serve over hot pasta, but never heat the pestos themselves. Pestos
should be used at room temperature.
CLASSIC BASIL PESTO
1 cup EVOO - extra virgin olive oil
4 cloves garlic, popped from skin and cut in half
1/2 pound, about 2 3/4 cups, grated Parmigiano Reggiano cheese,
a couple of handfuls
6 ounces pine nuts (a handful)
2 bunches basil, about 80 to 100 leaves or 2 cups
PARSLEY PESTO
1 cup EVOO - extra virgin olive oil
4 cloves garlic, popped from skin and cut in half
1/2 pound, about 2 3/4 cups, grated Parmigiano Reggiano or Romano
cheese, a couple of handfuls
6 ounces walnut pieces (a handful)
2 bunches fresh flat-leaf parsley, tops ripped away from stems
SPINACH-WALNUT PESTO
1 cup EVOO - extra virgin olive oil
4 cloves garlic, popped from skin and cut in half
2 cups fresh spinach leaves, packed down, or 1 cup drained, defrosted
frozen chopped spinach
6 ounces walnut pieces (a handful)
4 pinches ground nutmeg
1/2 pound, about 2 3/4 cups, grated Parmigiano Reggiano or Romano
cheese, a couple of handfuls
15
Page 16

Recipes (Cont.)
This recipe has been specially
TM
created by Rachael Ray for
this appliance.
TEX-MEX WHITE BEAN DIP
3 cans (14 ounces) white kidney or cannelloni beans, drained
3 cloves garlic, popped away from skin
6-9 tablespoons fresh cilantro, a couple of handfuls of leaves
4 1/2 teaspoons ground cumin, a palm full
2 tablespoons hot sauce, such as Tabasco®, eyeball it
3 splashes of water, about 3 tablespoons
Coarse salt and fresh black pepper, to your taste
Corn tortilla chips, yellow or blue, any variety and salsa of your choice
Place the beans, garlic, cilantro, cumin, and Tabasco®in processor.
Process the beans until smooth on speed 2. If dip is too thick, add water
a splash at a time and reprocess. Season the dip with salt and pepper to
taste. Serve with chips and salsa.
Yield: 3 1/2 cups
MUFFALETTA SANDWICH RELISH
Spread this on your favorite sub or Italian sandwich - WOW!
20 large pitted green olives with pimientos, drained about 1 cup
1 (16 ounce) jar, Giardiniera, Italian pickled vegetable salad, drained
(Giardiniera is a pickled veggie mixture of cauliflower, carrots, celery and
hot peppers)
A handful of flat-leaf parsley leaves
A handful of fresh basil leaves
The zest of 1 lemon and juice of 1/2 lemon
Place all the ingredients in processor and Pulse to form a finely chopped
relish. Transfer to a small container and keep on hand for spreading on
your favorite sandwiches.
Yield: 2 cups
Page 17

This recipe has been specially
TM
created by Rachael Ray for
this appliance.
ITALIAN ROASTED RED PEPPER HUMMUS
2 (14 ounces) cans chick peas (garbanzo beans), drained
4 roasted red peppers, or 1 (15 ounce) jar roasted bell peppers, drain and
pat dry
2 sprigs fresh rosemary leaves stripped from stems
2 cloves garlic, cracked away from skin
4 pinches of crushed red pepper flakes
2 splashes of water, about 2 tablespoons
4-6 tablespoons EVOO - extra virgin olive oil, eyeball it
Salt and pepper, to taste
Specialty potato chips, sesame melba rounds, or toasted bread rounds
for dipping
Place chick peas, red peppers, rosemary, garlic, and red pepper flakes in
processor and grind on Speed 2 into a thick paste. Add water a splash at
a time and reprocess. While processor is on, stream in EVOO to form a
smooth dip. Season the dip with salt and pepper, to your taste. Transfer
dip to a small bowl and serve with dippers of choice.
Yield: 4 cups
Page 18

Recipes (Cont.)
This recipe has been specially
TM
created by Rachael Ray for
this appliance.
GREEN WRAPS WITH WHITE BEAN HUMMUS
2 (15 ounce) cans cannelloni beans, drained and rinsed
4 stems fresh rosemary, leaves stripped from stem
2 cloves garlic, popped from skin
3-4 tablespoons EVOO - extra virgin olive oil, eyeball it
Black pepper, to your taste
4 firm vine-ripened tomatoes, thinly sliced
1/2 seedless cucumber, thinly sliced
1/2 red onion, thinly sliced
A couple handfuls pitted Kalamata olives
A couple of handfuls chopped fresh flat-leaf parsley
1/2 pound mixed greens
2 lemons
EVOO - extra virgin olive oil
Coarse salt, to taste
1/2 pound feta cheese, crumbled
8 large pita breads, or flour tortilla wraps, or flavored wraps
Combine beans, rosemary, garlic, EVOO, and black pepper in processor.
Pulse until mixture is smooth.
Combine tomatoes, cucumber, onion, olives, parsley, greens, and the
juice of lemons in a bowl. Drizzle with olive oil, and sprinkle with salt.
Combine well.
Warm pitas or wraps in microwave oven or on a griddle pan. Spread with
a generous dose of white bean hummus. Top with a layer of Greek salad
mixture. Sprinkle with Feta cheese crumbles and roll. Wrap lower half of
wraps with foil or waxed paper to keep it together while you eat your way
down. Keep a paper towel in your hand as you eat to catch any drips.
Batches of white bean spread are also a terrific dip for specialty chips,
celery, or bread sticks.
Yield: 8 wraps
18
Page 19

SPINACH DIP
1 (10 ounce) package, defrosted frozen chopped spinach
1 (8-ounce) can sliced water chestnuts, drained
2 cloves garlic
1 cup plain yogurt
2 bunches green onions, cut in 1-inch pieces
1 cup sour cream
2 teaspoons salt
1 teaspoon dried tarragon leaves
1/2 teaspoon dry mustard
1/2 teaspoon pepper
Place all of the ingredients into the Food Processor with the Chopping
Blade. Chop on Speed 2 until blended. Remove from the Bowl, cover and
refrigerate for 2 hours to enhance flavor.
Yield: 4 cups
CRAB DIP
1 (8 ounce) container lump crab meat
1 medium cucumber peeled, cut in half and seeded, cut in 1-inch pieces
11 ounces cream cheese, softened
1/3 cup mayonnaise
2 teaspoons chili sauce
2 teaspoons Worcestershire sauce
1/8 teaspoon sugar
3/4 teaspoon Old Bay seasoning
Salt and pepper to taste
Add all ingredients to the Food Processor with the Chopping Blade. Pulse
until ingredients are chopped and mixed. Remove from the Bowl, cover
and refrigerate for 2 hours to enhance flavor.
Yield: 4 cups
PIMENTO CHEESE SPREAD
1 (16 ounces) block Cheddar cheese
1 (4 ounce) jar pimentos, drained
2 cups salad dressing
Use the Coarse Shredding Blade to shred the cheese then remove from
the bowl. Place the Chopping Blade into the Bowl and add the pimentos,
salad dressing and cheese. Process the mixture on Speed 1 until blended. Remove from the Bowl, cover and refrigerate for 2 hours.
Yield: 4 cups
Page 20

Recipes (Cont.)
P
0FF
1
2
FRESH SALSA
10 Roma tomatoes, quartered and seeds removed
1 medium jalapeno pepper, halved and seeds removed
1 large onion, cut into 1-inch cubes
1/2 cup packed fresh cilantro leaves stripped from the stems
1 teaspoon cider vinegar
1 teaspoon salt
1/2 teaspoon black pepper
Place all of the ingredients into the Food Processor with the Chopping
Blade. Pulse until coarsely chopped. Remove from the Bowl, cover and
refrigerate for 2 hours.
Yield: 3 cups
PEANUT BUTTER
12 ounces cocktail party peanuts
3 tablespoons honey
1/2 teaspoon cinnamon
Place all of the ingredients into the Food Processor with the Chopping
Blade. Chop on Speed 2 until smooth. Remove from the Bowl and serve.
Store in the refrigerator to keep fresh.
Yield: 1 1/2 cups
20
Page 21

BRUSCHETTA
Topping:
8 Roma tomatoes, quartered and seeds removed
1/4 cup packed fresh basil leaves, about 15
1/2 medium onion, cut into 1 inch cubes
3 cloves garlic
2 tablespoons olive oil
1 teaspoon red wine vinegar
1/2 teaspoon salt
1/4 teaspoon black pepper
Bread:
1 loaf French Baguette or crusty Italian bread cut diagonally in 1/2 inch
slices
2 teaspoons garlic salt
3/4 cup olive oil
Place all of the topping ingredients into the Food Processor with the
Chopping Blade. Pulse until coarsely chopped. Remove from the Bowl to
serve on warm grilled bread.
Mix together olive oil and garlic salt. Brush both sides of the sliced bread
with the oil mixture. Lightly brown both sides of the bread. Top warm
bread with Bruschetta and serve.
Yield: 3 cups bruschetta
Page 22

Recipes (Cont.)
MEATBALLS
1 pound tenderized stew meat
1 slice bread, tear in 1-inch pieces
1 small onion, cut in 1-inch pieces
1 clove garlic
1 egg
1/2 teaspoon dried thyme
Salt and pepper to taste
1/2 cup all-purpose flour
Place all of the ingredients, except flour, into the Food Processor with the
Chopping Blade. Chop on Speed 2 until meat is ground and ingredients
are mixed together. DO NOT over process.
Shape into 2-inch meatballs and coat with flour. Heat oil in skillet and
cook meatballs until done.
Yield: 12 meatballs
MACARONI SALAD
3 cups uncooked elbow macaroni
1 tablespoon vegetable oil
1/2 onion, cut in 1-inch cubes
2 stalks celery, cut in 1-inch pieces
1 carrot, cut in 1-inch pieces
1/2 green pepper, cut in 1-inch pieces
3 hard-boiled eggs, cut in half
DRESSING:
1 1/3 cups sugar
1/2 cup vinegar
2 eggs
1 1/2 teaspoons salt
1 cup salad dressing
1 1/2 teaspoons prepared mustard
1 (5 1/3-ounce) can evaporated milk
Cook macaroni, drain and stir in oil. Place the onion, celery, carrot, green
pepper and hard-boiled eggs into the Food Processor with the Chopping
Blade. Pulse the food until coarsely chopped, stir into the cooked macaroni.
To make dressing, combine sugar, vinegar, eggs and salt. Bring to a boil
over medium heat, stirring frequently. Cool and stir in rest of dressing
ingredients. Pour over macaroni mixture, refrigerate several hours.
Yield: 12 servings
Page 23

LIMITED ONE-YEAR WARRANTY
Warranty Coverage: This product is warranted to be free from defects in materials
or workmanship for a period of one (1) year from the original purchase date. This
product warranty is extended only to the original consumer purchaser of the product and is not transferable. For a period of one (1) year from the date of original
purchase of the product, our Repair Center will, at its option, either (1) repair the
product or (2) replace the product with a reconditioned comparable model. These
remedies are the purchaser's exclusive remedies under this warranty.
Warranty Service: To obtain warranty service, you must call our warranty service
number at 1-800-233-9054 for return instructions on how to deliver the product, in
either the original packaging or packaging affording an equal degree of protection
to the Repair Center specified below. You must enclose a copy of your sales
receipt or other proof of purchase to demonstrate eligibility for warranty coverage.
To return the appliance, ship to: To contact us, please write to, call, or email:
ATTN: Repair Center Consumer Relations Department
708 South Missouri Street PO Box 7366
Macon, MO 63552 USA Columbia MO 65205-7366 USA
1-800-233-9054
E-mail:
consumer_relations@toastmaster.com
What Is Not Covered: This warranty does not cover damage resulting from misuse, accident, commercial use, improper service or any other damage caused by
anything other than defects in material or workmanship during ordinary consumer
use. This warranty is invalid if the serial number has been altered or removed from
the product. This warranty is valid only in the United States and Canada.
LIMITATION ON DAMAGES: THERE SHALL BE NO LIABILITY FOR ANY INCIDENTAL OR CONSEQUENTIAL DAMAGES FOR BREACH OF ANY EXPRESS OR IMPLIED
WARRANTY OR CONDITION ON THIS PRODUCT.
DURATION OF IMPLIED WARRANTIES: EXCEPT TO THE EXTENT PROHIBITED BY
APPLICABLE LAW, ALL IMPLIED WARRANTIES AND CONDITIONS, INCLUDING,
WITHOUT LIMITATION, IMPLIED WARRANTIES AND CONDITIONS OF MERCHANTABILITY AND FITNESS FOR A PARTICULAR PURPOSE OR USE ON THIS
PRODUCT ARE LIMITED IN DURATION TO THE DURATION OF THIS WARRANTY.
Some jurisdictions do not allow the exclusion or limitation of incidental or consequential damages, or allow limitations on how long an implied warranty lasts, so
the above limitations or exclusions may not apply to you. This warranty gives you
specific legal rights and you may have other rights under the laws of your jurisdiction.
For more information on our products, visit our website: www.maxim-toastmaster.com
Page 24

Hope you love using this and the other kitchen appliances
in my line. I love to cook – as long as it's fast, fun and simple!
These cool kitchen helpers will make it easy to cook a great
meal – from start to finish – in 30 minutes. And they'll look
awesome on your counter!
If you get satisfaction out of treating your family and friends
to foods made with your own two hands, then get in the
kitchen and have a blast! Try new flavors, tastes – experiment!
And forget about those measuring cups and spoons – just
eyeball it! If I can do it, you can too! Go for it!
Rachael Ray
All recipes (so indicated) Copyright © 2006, by Rachael Ray. All Rights Reserved.
Used by Permission.
Printed in China 5/06
© 2006 Maxim®/Toastmaster®Inc. P/N 61721A
 Loading...