

Page 1

READ AND SAVE THESE INSTRUCTIONS
Stand Mixer
Use and Care Guide
Models 1771/1772
WARNING: A risk of fire and electrical shock exists in all electrical appliances and
may cause personal injury or death. Please follow all safety instructions.
• 350-WATT MOTOR HANDLES DENSE MIXTURES
• INCLUDES LARGE AND SMALL MIXING BOWLS
•
POWER BOOST BUTTON FOR PEAK PERFORMANCE
• SOFT TECH™ ERGONOMIC CONTROLS
• AUTOMATIC CORD REEL
•
EJECTOR BUTTON
Page 2

2
IMPORTANT SAFEGUARDS
When using electrical appliances, basic safety precautions should always
be followed to reduce the risk of fire, electric shock and injury to persons,
including the following:
• Read all instructions before using the mixer.
• This mixer is not for use by children.
• Close supervision is necessar y when mixer is used near children.
• Do not operate mixer unattended.
• Unplug from outlet when not in use, before putting on or taking off parts
and before cleaning.
• To disconnect, switch off, then remove plug from power supply.
• Do not operate a damaged mixer. Do not operate with a damaged cord
or plug or after the mixer malfunctions, or has been dropped or
damaged in any manner. Return mixer to the nearest authorized
service facility for examination, repair or mechanical adjustment.
• Do not immerse body of mixer, cord or plug in water or other liquid. See
instructions for cleaning.
• Do not use outdoors or when standing in damp area.
• Do not use mixer for other than intended use.
• Do not let cord hang over edge of table or counter or touch hot
surfaces.
• Do not place mixer or cord on or near any hot surface, including a gas
or electric burner or in a heated oven.
• Use accessory attachments only if recommended by Toastmaster Inc.
• Do not contact moving parts. Keep hands, hair, clothing, as well as
spatulas and other utensils away from beaters during operation.
• Remove beaters, dough hooks or whisk from mixer before washing
them.
SAVE THESE INSTRUCTIONS
CAUTION: A short power supply cord is provided to reduce the risk of
personal injury resulting from becoming entangled in or tripping over a
longer cord. Extension cords are available from local hardware stores and
may be used if care is exercised in their use. If an extension cord is
required, special care and caution is necessary. Also the cord must be:
(1) marked with an electrical rating of 125 V and at least 13 A, 1625 W,
(2) arranged so that it will not drape over the countertop or tabletop where
it can be pulled on by children or tripped over accidentally and (3) a
3-wire grounded type cord.
POLARIZED PLUG: This appliance has a polarized plug, (one blade is wider
than the other). As a safety feature to reduce the risk of electrical shock, this
plug is intended to fit in a polarized outlet only one way. If the plug does
not fit fully in the outlet, reverse the plug. If it still does not fit, contact a
qualified electrician. Do not attempt to defeat this safety feature.
Page 3
ELECTRIC POWER: If the electric circuit is overloaded with other appliances,
your appliance may not operate properly. It should be operated on a
separate electrical circuit from other appliances.
THIS PRODUCT IS FOR HOUSEHOLD USE ONLY
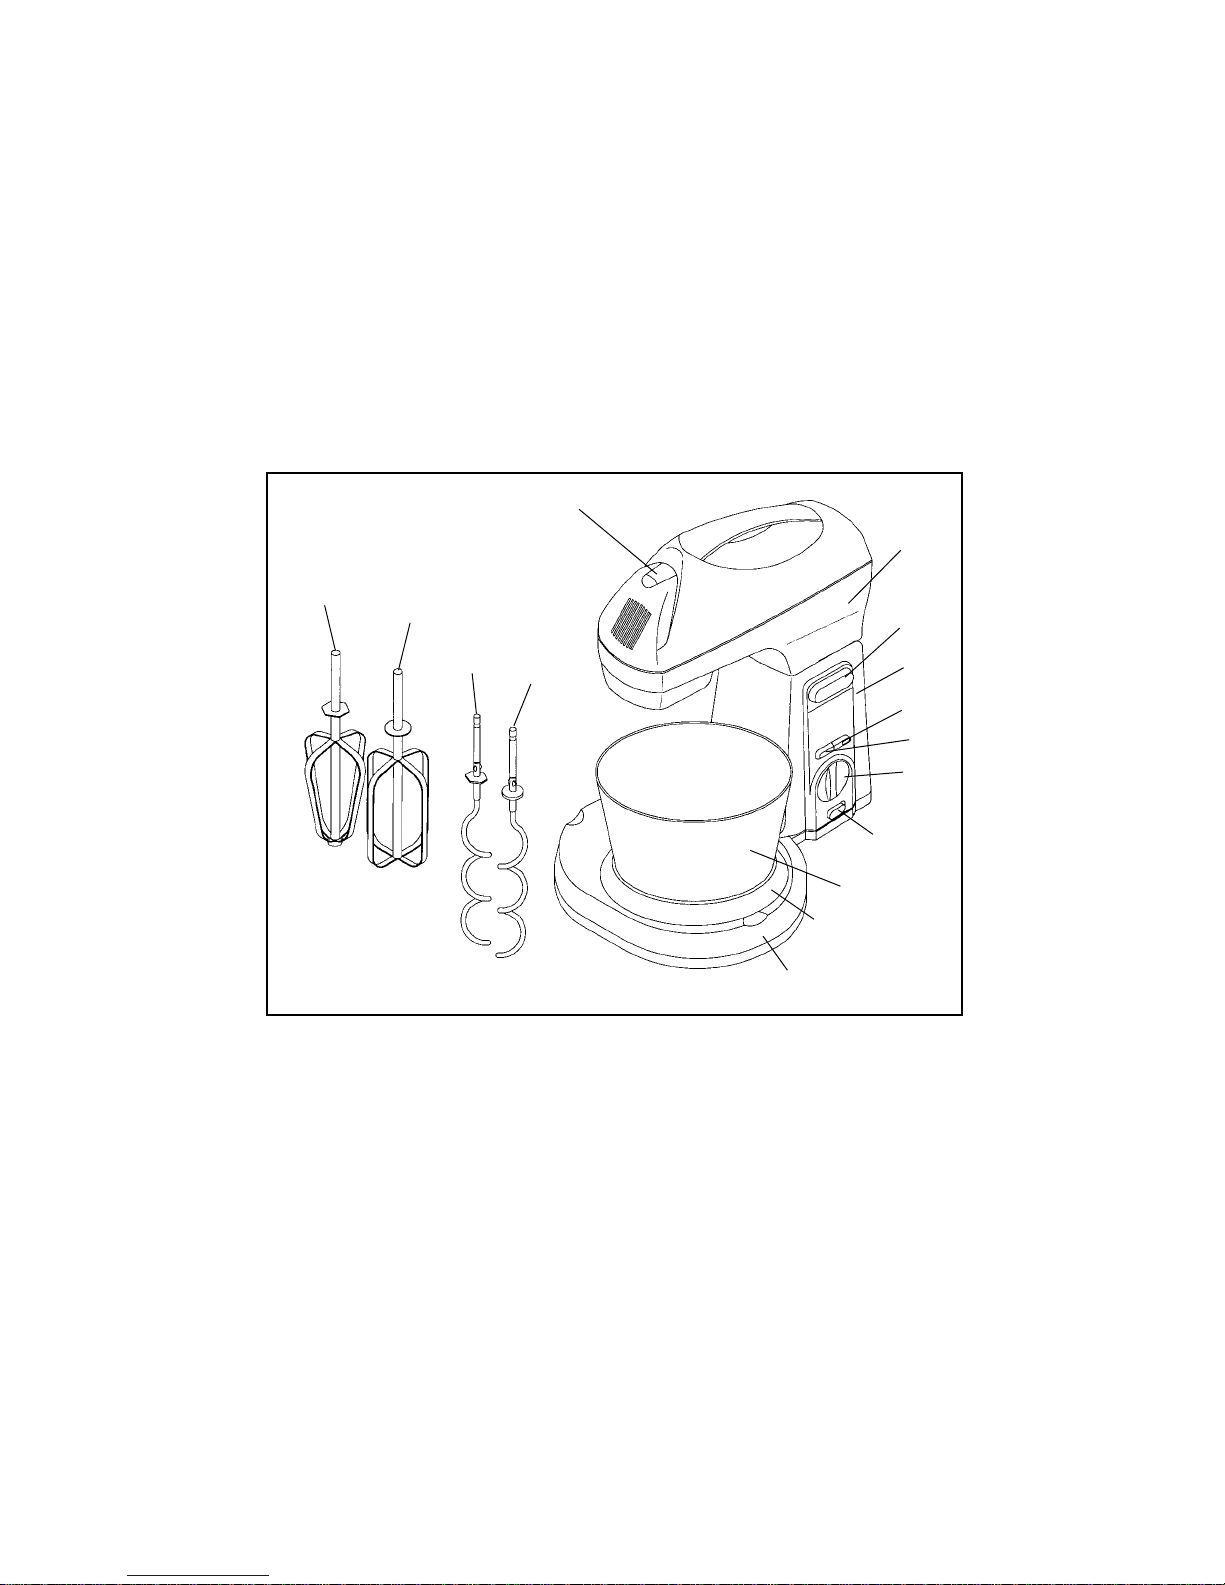
GETTING TO KNOW YOUR ELECTRONIC STAND MIXER
3
1
13a
13b
11
10
9
8
7
6
5
4
3
2
12a
12b
1. Eject Button
2. Mixer Head
3. Release Button
4. Mixer Body
5. Power Light
6. Turbo Button
7. Variable Speed Control
8. ON/OFF Power Switch
9. Mixing Bowl
10. Turntable
11. Base
12. a) Dough hook with hexagon
collar
b) Dough hook with round
collar
13. a) Round beater with hexagon
collar
b) Square beater with round collar
FIGURE 1
Page 4
4
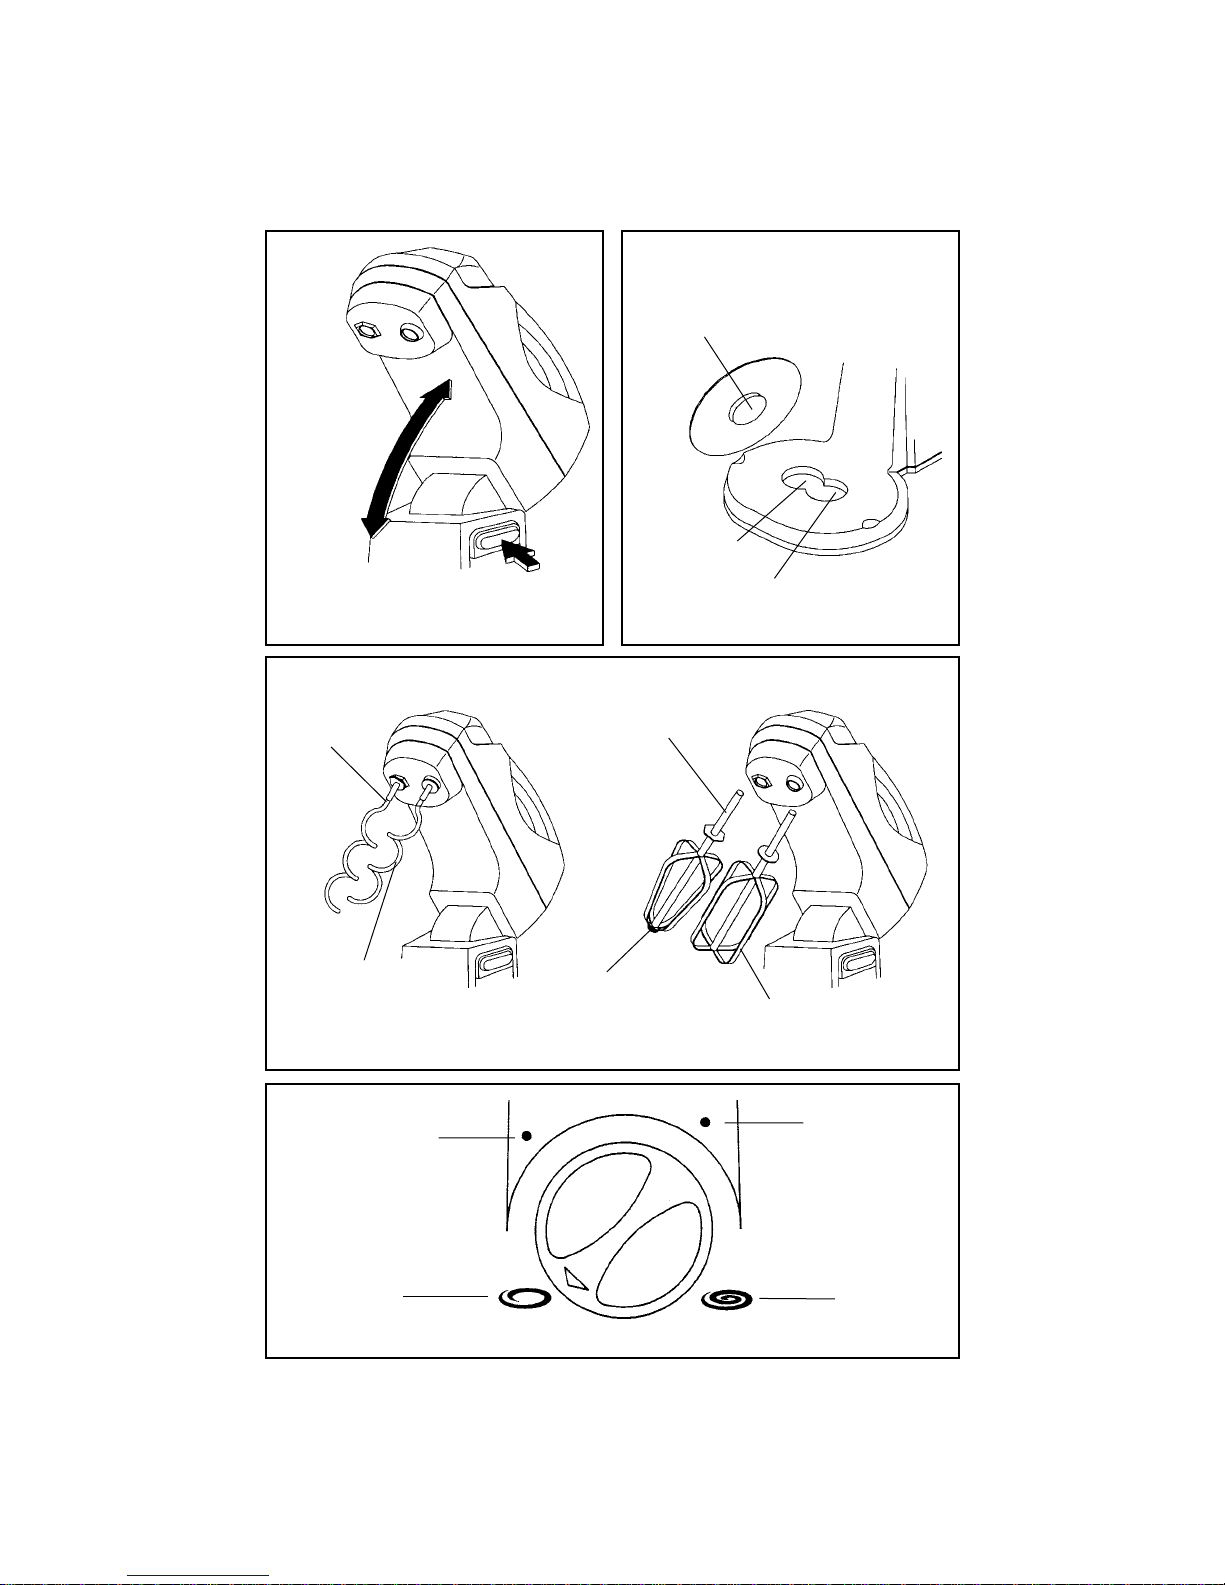
Knob (bottom side of turntable)
Raising or
Lowering
the Mixer
Head
Press Release
Button
Small Bowl
Large Bowl
Dough Hook
with
Hexagon
Collar
Dough Hook
with
Round Collar
Medium Low
Round Beater
with
Hexagon Collar
Nylon Button
Square Beater
with Round Collar
Minimum
Medium High
Maximum
FIGURE 2
FIGURE 3
FIGURE 4
FIGURE 5
Page 5

5
BEFORE USING YOUR ELECTRONIC STAND MIXER
Fill out warranty information that follows limited warranty in this book.
Read all instructions carefully before using your stand mixer. We
recommend that you become familiar with this appliance and its
attachments before using, see Figures 1-5.
The maximum capacity of the large mixing bowl is 4 quarts; the small
mixing bowl is 1
3
⁄4-2 quarts.
Wash the beaters, dough hooks, whisk and bowls in warm soapy water.
Rinse and dry thoroughly.
USE OF ATTACHMENTS
MIXING GUIDE
Beaters Use for blending and beating mixes.
Use for dough, pie crust, pasta dough and blending
large amounts of dry ingredients together.
Dough Hooks
Use for whipping, egg whites, egg yolks, sauce,
souffle, mousse, meringue and salad dressing.
Wire Whisk
Icon
•
Speed
Minimum
Action
Stir/Fold
Use when stirring liquid
ingredients or when a gentle
action is needed to moisten dry
ingredients.
Use when folding two portions
of a recipe together, like beating
an egg white into a batter.
Mixing Procedure
Medium
Low
Mix
Knead
Use when mixing dry ingredients
and liquid ingredients together
alternately in a recipe or use
when recipe calls for kneading
until the dough is a dough ball.
Page 6

6
HOW TO USE YOUR ELECTRONIC STAND MIXER
1. Place stand mixer on a large secure surface and slide power switch to
OFF position. Make sure the surface is clean and dry so the feet will
hold the unit securely in place.
2. Press and hold the release button and pivot the mixer head upwards,
see FIGURE 2. When the mixer head is securely in position you will
hear a click. Do not attempt to pivot the mixer head without first
pressing the release button. This could damage the mixer.
3. Place turntable onto mixer platform by placing knob into the large or
small bowl slot opening, depending on which bowl is used, see
FIGURE 3.
4. Insert stem of beater/dough hook with the hexagon collar into the
hexagon opening on the underside of the mixing head, see FIGURE 4.
Turn slightly if needed to lock into place.
5. Insert stem of the beater/dough hook with the round collar into the
round opening on the underside of the mixing head. Turn slightly if
needed to lock into place.
NOTE: The beaters/dough hooks must be inserted into the correct
opening as they are not interchangeable. It is also necessary to insert
the beater/dough hook with the hexagon collar first. Never use a
beater with a dough hook as this may damage the unit and may void
your warranty.
NOTE: If using the whisk, place stem of whisk into round opening on the
underside of the mixing head.
6. Place appropriate mixing bowl onto the turntable.
7. With beaters or dough hooks properly in place, grasp handle on motor
head, press the release button and slowly lower the mixer head
downward until it locks into place.
8. Pull out the retractable cord to the desired length and plug into 120 V
~ 60 Hz outlet. Turn the variable speed control to the minimum
position. Slide the power switch to the ON position. The power light will
come on.
Icon
•
Speed
Medium
High
Action
Blend/Beat/
Cream
Use when creaming sugar and
butter together.
Mixing Procedure
Maximum Whip
Burst of
Power
Use to obtain the maximum
power level from any speed
setting for tough mixing tasks.
Turbo
Button
Use when preparing a frosting
from a recipe or a package.
Use to whip whipping cream
or potatoes.
Use when beating egg whites.
Page 7

7
NOTE: Always start mixing on the minimum speed. The operating
speed increases as the variable speed control is moved from
minimum to maximum speed, see FIGURE 5. Select the desired
speed. Refer to mixing guide on page 5 for further information.
9. T urn the mixer speed to the minimum position and the power switch
to OFF position before attempting to scrape sides or bottom of mixing
bowl.
NOTE: DO NOT scrape sides or bottom of mixing bowl while mixer is
in operation.
10. The Turbo button may be used at any speed setting to obtain the
maximum power lever for tough mixing tasks.
11. Once all ingredients have reached the desired consistency, turn the dial
to the minimum position and slide the power switch to the OFF
position. The power light will go off.
12. Unplug from outlet. Gently pull on the cord and release to fully retract
it back into the mixer base. Press and hold the release button while
raising the mixing head.
13. Press the eject button and remove the beaters, dough hooks or whisk.
Gently scrape excess batter from beaters or dough hooks with a rubber or plastic spatula. Do not strike beaters or dough hooks against
mixing bowl to remove excess batter. This could damage the mixer
parts.
14. Carefully remove mixing bowl from turntable. Pour ingredients from
bowl into desired container. Use only a rubber or plastic spatula to
remove batter from mixing bowl.
CARE AND CLEANING
1. Unplug stand mixer and gently pull on the cord and release to fully
retract the cord in the mixer base.
2. The mixing bowls, beaters, dough hooks and whisk may be washed
in the dishwasher.
3. Wipe the stand mixer and turntable with a damp cloth. Do not use any
abrasive cleaning materials. Never immerse or clean under
running water.
HELPFUL HINTS FOR BREAD AND DOUGH
BREAD DOUGH BALL: Necessary For A Successful Loaf of Bread
The amount of bread flour called for in each recipe is to be used as a guide.
We have found it may vary slightly because different climates and seasons
result in a wide variety of humidity levels. Watch the dough as you add the
last 1 - 1
1
⁄2cups of flour. A good dough ball should be round, smoothtextured, soft and slightly tacky to the touch. If it does not form a ball and
is more like a batter, add flour until it reaches the appropriate consistency.
Page 8

8
MIXING & KNEADING: The Gluten Development Stage
Place ingredients in bowl, except last 1 - 1
1
⁄2cups flour. Use the dough hook
at the beginning of the mixing stage to start the gluten development. Then
gradually add enough of the remaining flour to make a soft dough. The
dough should clean the sides of the bowl and form a soft ball around the
dough hook.
When adding wheat bran, wheat germ, bulgur or cracked wheat to a
bread recipe, leave the dough as moist as possible, because these
ingredients absorb liquid and tend to produce a drier loaf. Reduce the
amount of kneading to avoid cutting the gluten strands with the sharp edges
of these grains.
A recipe with a high percent of whole wheat flour may require a shorter
kneading time than a recipe with white flour. The rough texture of the bran
can be damaging to developing gluten.
DOUGH STRETCH TEST: Testing For Developed Gluten
After approximately 10 minutes of kneading, stop the mixer and check the
gluten development by performing the dough stretch test. Remove a small
piece of dough about the size of a small egg. Holding the dough up,
carefully stretch it into a flat circle with your fingers. When the dough is
properly developed, the structure will be smooth and stretchy; light should
pass through the stretched dough. If the stretched dough breaks, it needs a
few more minutes of kneading. The total time for kneading is
approximately 10 minutes.
YEAST: The Number One Ingredient
We used Red Star
®
Active Dry Yeast when we were developing the bread
recipes. A
1
⁄4ounce package of Red Star Yeast contains approximately
2
1
⁄4level teaspoons of yeast. When the yeast is exposed to oxygen,
moisture or warmth, the activity of it deteriorates. Therefore, we recommend
storing yeast in an airtight container and refrigerating or freezing it.
Measure out the amount you need and allow it to come to room
temperature before using — this takes about 15 minutes.
If you have any doubt regarding the activity of the yeast, you may use the
following test to determine its strength.
To test for one package (2
1
⁄4teaspoons) of Red Star Active Dry Yeast, use a
liquid measuring cup and fill it to the
1
⁄2cup level with 110°-115°F/43°-46°C
water . Stir in 1 teaspoon granulated sugar and 1 package (2
1
⁄4teaspoons) Red
Star Active Dry Yeast. Leave your stirring spoon in the cup. Set a timer for
10 minutes. As the yeast absorbs liquid, it will begin to activate and rise to the
surface. If at the end of the 10 minutes the yeast has multiplied to the 1 cup
mark, it is very active. The yeast mixture may be used in a recipe that calls for
Page 9

21⁄4teaspoons or more of yeast. Remember to adjust your recipe for the 1⁄2cup
of water and 2
1
⁄4teaspoons of yeast used in the test. The sugar does not need
to be adjusted. Add this mixture with the liquids in the recipe.
FLOUR: Bread Flour Is Essential For Bread
Use bread flour in yeast bread recipes. Bread flour is a white flour that is a
blend of hard, high-protein wheats and has greater gluten strength and
protein content than all-purpose flour. It is available at most grocery stores.
Protein varies from 12-14 percent.
Pre-sifting or sifting the flour is not necessary with yeast bread. First stir,
then spoon into a dry measuring cup and level off.
The amount of flour called for in a yeast bread recipe is meant as a guide.
Dough is affected by heat, humidity, sugar, and altitude. If too much flour
is used, the bread may be very heavy and stiff. If too little is used, the bread
will not hold up and a low-volume bread will result.
FAT: Dough Enhancer And Conditioner
You may substitute in equal proportions solid shortening, real butter, or
margarine. Light and whipped margarines do not work well.
LIQUIDS: Activate The Yeast And Bind The Dough
It is important that the liquid temperature is 120°-130°F/49°-54°C. When
higher temperatures are used, the yeast activates too quickly and the
dough becomes too warm.
RISING DOUGH: Optimum Temperature of Room 80°-85°F/27°-29°C
Rising times will vary due to recipe, temperature and humidity level of your
kitchen. Rising is the most essential feature in bread making. After the
dough comes out of the mixer, the dough ferments and rises before
punching and resting. The gluten becomes pliable and elastic with a soft,
smooth quality. Fermentation conditions gluten, develops flavor and
leavens the product.
Dough has doubled in bulk when an indentation remains after the tip of a
finger is pressed lightly and quickly into the dough. If the indentation
springs back, cover and let rise a few more minutes and check again. After
punching down and dividing dough, cover and let rest 10 minutes. Resting
allows the gluten to relax and makes handling easier . Then shape the dough
as desired.
Sometimes a second dough rising is beneficial especially for whole grain or
100% whole wheat bread. Let the dough rise once, punch down, let rise
again, punch down, let rest 10 minutes and shape.
9
Page 10

STORING AND FREEZING BAKED BREADS AND ROLLS
Refrigeration or temperatures under 70°F/21°C will cause breads to stale
(firm) quickly. They can, however, be frozen for several months. When
freezing breads and rolls, cool them before wrapping in plastic wrap. Place
them in a plastic bag and seal it. When thawing, partially open the
wrapping to allow the moisture to escape gradually. Do not remove ice
crystals from the wrap during the thawing process. The bread will absorb
some of this moisture as it thaws.
FREEZING DOUGH
Form the dough into the desired shape and immediately freeze for one hour
to harden. Remove from the freezer and wrap in plastic wrap. Next, place
it in a plastic bag and seal. Dough can be kept in the freezer for up to four
weeks. Thaw the dough in a plastic bag in the refrigerator overnight or for
several hours. Unwrap and place on baking pan. Cover and let stand in a
warm, draft-free place until double the original size. Because the dough is
not room temperature, you will find it takes longer than usual to rise. Bake
according to recipe instruction.
BAKING AND COOLING
When baking sweet breads or braids, it may be necessary to tent the top
of the bread with foil for the last 5-10 minutes. To tent, place a piece of foil,
shiny side up, over the loaf. This will avoid over browning while the bread
continues baking.
Cool baked bread in a draft-free area. To prevent soggy crust, cool on
racks. Wait 20 minutes before cutting hot bread.
SHAPING DOUGH AND ROLLS
When shaping and rolling out dough, it is extremely important not to add
additional flour to the working surface. Instead, if dough appears to be
slightly sticky when shaping, lightly spray your hands or working surface
with a non-stick vegetable spray or coat with vegetable shortening.
Cloverleaf Rolls - Shape into
1
⁄2inch balls. Place 3 balls in each muffin tin
and let rise until double in size.
Crisscross Rolls - Shape into balls, setting two aside. Combine the two balls
and roll into a
1
⁄8inch thick square. Cut strips 1⁄8-inch wide and 2-inches
long. Place one strip across the top of each roll. Repeat this process,
placing the second strip in the opposite direction across the top of each roll.
T raditional Rolls - Shape into dough balls. For “pull apart” rolls, place dough balls
with sides touching. For individual rolls, place dough balls 2 inches apart.
10
Page 11

Doughs and Breads
BASIC WHITE DOUGH
2 Loaves or 18 rolls
Temperature: 350°F/177°C
Bake Time: 25-30 minutes
Insert dough hooks and mix together all dry ingredients except 1 cup of
flour on medium low for 30 seconds.
Heat water to 120°-130°F/49°-54°C. Continue mixing on Medium Low
and add egg. Drizzle liquid slowly into dry mixture until mixed,
2-3 minutes. Continue to mix another 2-3 minutes. Gradually add the
remaining flour to form a soft, slightly tacky dough ball, mixing for
3-5 minutes. Add shortening and mix for 3-4 minutes. Continue kneading
for another 10 minutes. Perform dough stretch test.
Spray large bowl with a non-stick spray. Place dough in bowl and turn to
coat on all sides. Cover and let rise in warm place 1 hour or until double
in size. Punch down dough, cover and allow to rest 10 minutes to make the
dough easier to handle.
Choose one of the following procedures to finish baking.
BREAD LOAVES
Temperature: 350°F/177°C
Bake Time: 25-30 minutes
Divide into 2 pieces and roll each into 1 12 x 7 inch rectangle. Roll up
tightly, starting with narrow edge. Seal with fingertips as you roll.
Place in 2 greased 9 x 5-inch baking pans. Cover and let rise in a warm
place 1 hour or until double in size. Bake as directed.
DINNER ROLLS
Temperature: 350°F/177°C
Bake Time: 25-30 minutes
Divide into 18 smooth 2-inch round rolls. Place in 1 greased 9 x 13-inch
baking pan. Cover and let rise in a warm place 1 hour or until double in
size. Bake as directed.
11
4-41⁄4cupsbread flour
1
⁄4tsp salt
1
⁄2cup sugar
3
1
⁄2tsp active dry yeast
1
1
⁄4cups water
1egg
1
⁄4cup shortening, room
temperature
Page 12

21⁄2-3 cups bread flour
1 tsp salt
2 tsp sugar
1 tsp dry Italian seasoning
11⁄2tsp active dry yeast
1 cup water
1
⁄3cup olive oil
12
CINNAMON ROLLS
Topping
18 rolls
Glaze
18 rolls
Temperature: 350°F/177°C
Bake Time: 20-25 minutes
Combine sugar and cinnamon, set aside.
Roll dough into a 15 x 18 inch rectangle on a lightly floured surface. Spread
melted butter over dough. Sprinkle with sugar-cinnamon mixture, raisins and nuts.
Roll up tightly, jelly-roll style, starting with the longest side and cutting into
1-inch slices. Place in 2 greased 9 x 13-inch baking pans. Cover and let
rise in a warm place 1 hour or until double in size. Bake as directed.
Mix glaze ingredients until smooth and drizzle over top of baked
cinnamon rolls.
FOCCACIA BREAD
3
⁄4cup butter, melted
1
⁄2cup sugar
3 TBL cinnamon
1
⁄2cup raisins
1
⁄2cup walnuts
1
⁄2cup powdered sugar
3 TBL milk
1
⁄2tsp vanilla extract
Temperature: 400°F/205°C
Bake Time: 15-20 minutes
Insert dough hooks and mix all dry ingredients together except 1 cup of
flour on Medium Low for 30 seconds.
Heat water and oil to 120°-130°F/49°-54°C. Continue mixing on Medium
Low and drizzle liquid slowly into dry mixture until mixed, 2-3 minutes.
Continue to mix another 2-3 minutes. Gradually add the remaining flour to
form a soft, slightly tacky, dough ball for 2-4 minutes. Continue
kneading for another 10 minutes. Perform the dough stretch test.
Page 13

13
Heat olive oil and stir in oregano and garlic. Remove from heat immediately.
Spoon mixture over dough. Sprinkle with remaining ingredients. Bake as
directed.
GREEK STYLE TOPPING
Spray large bowl with a non-stick spray. Place dough in bowl and turn to coat
on all sides. Cover and let rise in warm place 1 hour or until double in size.
Press dough evenly into a 9 x 13-inch greased pan. Make indentations in
the dough using your fingertips.
Cover and let rise in a warm place for 20 minutes or until double in size.
Prepare a topping, Garlic-Cheese or Greek Style, while the dough is rising.
GARLIC-CHEESE TOPPING
1
⁄4cup olive oil
1
1
⁄2tsp oregano leaves,
dried
1
⁄4cup garlic, coarsely chopped
1
⁄3cup Parmesan cheese, grated
1
⁄4tsp salt
1
⁄4cup olive oil
1
1
⁄2tsp oregano leaves,
dried
1 cup onion, thinly sliced
1
⁄3cup Feta cheese, crumbled
1
⁄4cup black olives,
sliced-drained
1
⁄4tsp salt
Glaze
3-3
1
⁄2cups bread flour
1 tsp salt
1 TBL sugar
21⁄2tsp active dry yeast
1
1
⁄2cups water
1 TBL water
1
⁄2tsp salt
Heat olive oil, add onions and cook until soft but not brown, 5 minutes.
Spoon mixture over dough. Sprinkle with remaining ingredients. Bake as
directed.
FRENCH BREAD
Dough
Temperature: 400°F/205°C
Bake Time: 20-25 minutes
Insert dough hooks and mix together all dry ingredients except 1-1
1
⁄2cups
of flour on Medium Low speed.
Page 14

14
Heat water to 120°-130°F/49°-54°C. Continue mixing on Medium Low
and drizzle water slowly into dry mixture until mixed, 2-3 minutes.
Continue to mix another 2-3 minutes.
Gradually add the remaining flour to form a soft, slightly tacky, dough ball
for 2-4 minutes. Continue kneading for another 10 minutes. Perform dough
stretch test. Spray large bowl with a non-stick spray. Place dough in bowl
and turn to coat on all sides. Cover and let rise in warm place 1 hour or
until double in size.
Punch down dough, cover and allow to rest 10 minutes to make the dough
eas ier to handle. Place dough on a lightly floured surface. Roll up tightly,
starting with widest edge. Seal with fingertips as you roll.
Place the loaf on a greased baking sheet, cover and let rise in a warm place
45 minutes or until double in size. Cut three diagonal slashes across top of
the loaf with a knife. Combine the glaze ingredients and brush the loaf
generously. Bake as directed.
3-3
1
⁄2cups bread flour
1 tsp salt
2 TBL sugar
1
⁄8tsp white pepper
1 TBL active dry yeast
1
1
⁄4cups water
1 TBL oil
1 egg yolk
1 egg white 1 TBL water
SOFT PRETZEL DOUGH
16 pretzels
Dough
Glaze
kosher salt sesame seeds
Topping
Temperature: 350°F/176°C
Bake Time: 15-20 minutes
Insert dough hooks and mix together all dry ingredients except 1 cup of
flour on Medium Low for 30 seconds.
Heat water and oil to 120°-130°F/49°-54°C. Continue mixing on Medium
Low and drizzle water slowly into dry mixture until mixed,
2-3 minutes. Continue to mix for 2-3 minutes. Add egg yolk. Continue to
mix for 2 minutes. Gradually add the remaining flour to form a soft,
slightly tacky, dough ball; mix for 2-4 minutes. Continue kneading for
another 10 minutes. Perform dough stretch test.
Page 15

4-41⁄2cupsbread flour
1 tsp salt
2 TBL sugar
2 tsp active dry yeast
1
2
⁄3cups water
2 TBL oil
Spray large bowl with a non-stick spray. Place dough in bowl and turn to
coat on all sides. Cover and let rise in warm place 1 hour or until double
in size.
Punch down dough, cover and allow to rest 10 minutes to make the dough
easier to handle. Cut dough into pieces on a lightly floured
surface. Roll each piece into a 16-inch rope. Cross the ends of the rope to
make a loop; twist the crossed ends once and fold across the loop.
Place on a greased baking sheet 1
1
⁄2inches apart. Brush with glaze and
sprinkle with topping.
PIZZA CRUST
2 thick crusts or 3 thin crusts
15
Temperature: 425°F/218°C
Bake Time: 15-20 minutes
Insert dough hooks and mix together all dry ingredients except 1 cup of
flour on medium low for 30 seconds.
Heat water and oil to 120-°-130°F/49°-54°C. Continue mixing on Medium
Low and drizzle water slowly into dry mixture until mixed,
2-3 minutes. Continue to mix for another 2-3 minutes.
Gradually add the remaining flour to form a soft, slightly tacky , dough ball,
2-4 minutes. Continue kneading for another 10 minutes. Perform dough
stretch test.
Spray large bowl with a non-stick spray. Place dough in bowl and turn to
coat on all sides. Cover and let rise in warm place 1 hour or until double
in size.
While dough is rising, prepare pizza sauce and toppings.
Punch down dough, divide equally per selected crust. Cover and allow to
rest 10 minutes to make the dough easier to handle. Press dough evenly into
greased 12-inch pizza pans. Spread each crust with pizza sauce and
sprinkle with toppings.
Page 16

SERVICE INFORMATION
Please refer to warranty statement to determine if in-warranty service
applies. This appliance must be serviced by a Toastmaster authorized
service center. Unauthorized service will void warranty. Consult your phone
directory under “Appliances-Household-Small-Ser vice and Repair,” or call
1-800-947-3744 in the U.S. and Canada, 52-5-397-2848 in Mexico.
If an authorized service center is not available locally, your appliance may
be returned postage prepaid to our National Service Center at the address
shown on the back of this book.
Products must be adequately protected to avoid shipping damage.
Surround your appliance with three inches of protective padding and
include a copy of your dated sales receipt and a note explaining the
problem you have experienced. We recommend insuring your package.
No CODs accepted.
Pizza Sauce
3 pizzas
2 TBL olive oil
1 cup onion,
chopped
1 8-oz can tomato
sauce
1 14-oz can tomatoes,
chopped
1
⁄2tsp oregano
1
⁄2tsp basil
1
⁄8tsp garlic powder
1
⁄2tsp salt
1 tsp ground pepper
Heat oil over medium heat and sauté onions until transparent. Stir in remaining
ingredients, cover and simmer for 45 minutes, stirring occasionally. Spread
1 cup of sauce over pizza dough.
16
1 small zucchini, sliced
1 medium onion, sliced
2 cloves garlic,
chopped
1 green pepper,
chopped
1 red pepper, sliced
1 cup mushrooms, sliced
1
⁄2cup green olives, sliced
1 cup mozzarella cheese,
grated
Vegetarian Pizza Toppings
2 pizzas
Sprinkle toppings over sauce and bake as directed.
Heat olive oil and stir in oregano and garlic. Remove from heat immediately.
Spoon mixture over dough. Sprinkle with remaining ingredients. Bake as
directed.
Page 17

17
LIMITED ONE-YEAR GUARANTEE
Toastmaster Inc. warrants this product, to original purchaser, for one year from purchase date to be free of defects in material
and workmanship.
This warranty is the only written or express warranty given by Toastmaster Inc. This warranty gives you specific legal rights. You
may have other rights which vary from state to state. ANY OTHER RIGHT WHICH YOU MAY HAVE, INCLUDING ANY IMPLIED
WARRANTY OF MERCHANTABILITY OR FITNESS FOR A PARTICULAR PURPOSE IS LIMITED IN DURATION TO THE DURATION OF
THIS WARRANTY.
Defective product may be brought or sent (freight prepaid) to an authorized service center listed in the phone book, or to Service
Department, Toastmaster Inc., 1409 E. Morgan Street, Boonville, Mo. 65233, for free repair or replacement at our option.
Your remedy does not include: cost of inconvenience, damage due to product failure, transportation damages, misuse, abuse, accident or the like, or commercial use. IN NO EVENT SHALL TOASTMASTER INC. BE LIABLE FOR INCIDENTAL OR CONSEQUENTIAL
DAMAGES.
Some states do not allow limitations on how long an implied warranty lasts, or allow the exclusion or limitation of incidental
or consequential damages, so the above limitations or exclusions may not apply to you.
For information, write Consumer Claims Manager, at the Boonville address. Send name, address, zip, telephone area code and
daytime number, model, serial number, and purchase date.
KEEP DATED SALES RECEIPT FOR WARRANTY SERVICE.
Keep this booklet. Record the following for reference:
Date purchased
Model number
Date code (stamped on bottom)
EVERYBODY EATS. It’s a fact of life.
But sometimes preparing
meals can become a chore.
That’s why TOASTMASTER has been invited
into millions of kitchens just like yours
so we can HELP YOU MASTER your
mixing, baking, grilling, toasting,
brewing, heating and serving
tasks WITH EASE AND STYLE.
The TOASTMASTER name stands for a
CELEBRATION of INNOVATION designed
to serve your life and keep you
COOKIN’ IN STYLE.
Page 18

LISEZ ET CONSERVEZ CES INSTRUCTIONS
Mixeur Electrique
Guide d’utilisation et d’entretien - Modèles 1771/1772
AVERTISSEMENT : Tout appareil électrique présente un risque d’incendie et
d’électrocution pouvant provoquer des blessures graves ou mortelles. Veuillez
observer toutes les mesures de sécurité.
MESURES DE SECURITE
IMPORTANTES
Afin de réduire les risques d’incendie, d’électrocution et de blessures
pendant l’utilisation de tout appareil électroménager, toujours observer les
précautions élémentaires de sécurité, y compris les suivantes :
• Lire l’ensemble des instructions avant d’utiliser l’appareil.
• Ce mixeur ne doit pas être utilisé par des enfants.
• Se montrer particulièrement vigilant lorsque le mixeur est utilisé à
proximité d’enfants.
• Ne pas laisser le mixeur sans surveillance en cours de fonctionnement.
• Débranchez l’appareil lorsque vous ne l’utilisez pas, pour retirer ou
assembler des pièces et avant de le nettoyer.
• Pour déconnecter, éteindre l'appareil, puis retirer la fiche de la prise de
courant.
18
• MOTEUR 350 WATTS S’ACCOMMODE DES MELANGES
LES PLUS COMPACTS
• COMPREND DES BOLS MELANGEURS DE PETITE ET DE GRANDE
TAILLE
• BOUTON TURBO POUR UNE PERFORMANCE OPTIMUM
• BOUTONS DE COMMANDE ERGONOMIQUES SOFT TECH™
• REMBOBINAGE DU CORDON AUTOMATIQUE
• BOUTON “EJECT”
Page 19

• Ne pas se servir d’un appareil endommagé. Ne pas se ser vir d’un appareil
dont le cordon ou la fiche est endommagé(e), d’un appareil qui ne
fonctionne pas correctement, qui est tombé ou a été endommagé d’une
quelconque manière. Envoyer l’appareil au centre de réparation agréé le plus
proche pour qu’il soit examiné, réparé ou réglé pour tout problème électrique
ou mécanique.
• Ne pas immerger le mixeur, le cordon, ou la fiche dans de l’eau ou tout autre
liquide. Se référer aux instructions de nettoyage.
• Ne pas utiliser à l’extérieur ni lorsque l’on se tient dans un endroit humide.
• Ne pas se servir du mixeur pour un usage autre que celui pour lequel il est
conçu.
• Ne pas laisser le cordon pendre du bord d’une table ou d’un plan de travail,
ni toucher des surfaces chaudes.
• Ne pas placer l’appareil sur ou près d’une cuisinière à gaz ou électrique, ni
dans un four chaud.
• N’utiliser que les accessoires recommandés par Toastmaster Inc.
• Ne pas toucher les pièces mobiles. Ne pas approcher les mains, cheveux,
vêtements, ainsi que les spatules et autres ustensiles de cuisine des
batteurs durant le fonctionnement de l’appareil.
• Retirer les batteurs, les crochets à pâte ou la spatule du mixeur avant de les
nettoyer.
CONSERVEZ
CES INSTRUCTIONS
ATTENTION : Le cordon d’alimentation fourni est court afin de réduire les
risques de blessures qui pourraient survenir si l’on s’emmêlait ou trébuchait sur
un cordon plus long. Vous pouvez utiliser des rallonges, disponibles dans les
quincailleries, en prenant les précautions qui s’imposent. Si une rallonge est
nécessaire, veuillez faire très attention lors de son utilisation. De plus, le cordon
d’alimentation doit : (1) présenter des caractéristiques nominales d’au moins 13
A., 125 V., 1625 W, (2) être disposé de façon à ne pas retomber du plan de
travail ou de la table où des enfants pourraient tirer dessus et
trébucher par mégarde et (3) avoir un cordon à trois fils, et connecté à la terre.
FICHE POLARISEE : Cet appareil est équipé d’une fiche polarisée
(l’une des lames est plus large que l’autre). Cette précaution est destinée à
réduire les risques d’électrocution ; la fiche ne peut être branchée dans une
prise que dans un sens. Si la fiche ne peut pas être insérée à fond dans la prise,
retournez-la. Si elle ne peut toujours pas être branchée, consultez un électricien
qualifié. Ne pas essayer de modifier ce dispositif de sécurité.
ALIMENTATION ELECTRIQUE : Si le circuit électrique est surchargé par
d’autres appareils, l’appareil peut ne pas fonctionner correctement. Dans la
mesure du possible, il doit être branché sur un circuit électrique séparé de celui
des autres appareils.
19
Page 20

1. Bouton d’éjection
2. Tête du Mixeur
3. Bouton de désenclenchement
4. Corps du Mixeur
5. Voyant lumineux
6. Bouton Turbo
7. Commande de Vitesse Variable
8. Interrupteur de
MARCHE/ARRET
9. Bol
10. Plaque Tournante
11. Base
12. a) Crochet à pâte à collier
hexagonal
b) Crochet à pâte à collier rond
13. a) Batteur rond à collier
hexagonal
b) Batteur carré à collier rond
CE PRODUIT EST DESTINE EXCLUSIVEMENT A UN USAGE MENAGER
CARACTERISTIQUES DU MIXEUR ELECTRONIQUE
1
13a
13b
11
10
9
8
7
6
5
4
3
2
12a
12b
FIGURE 1
20
Page 21

Lever et
abaisser
la tête du
mixeur
Appuyez sur le bouton
de désenclenchement
FIGURE 2
Bouton
(partie inférieure de la
plaque tournante)
Petit Bol
Grand Bol
FIGURE 3
Crochet à pâte
à collier
hexagonal
Crochet à pâte
à collier rond
Batteur rond à
collier hexagonal
Bouton en Nylon
Batteur carré à
collier rond
FIGURE 4
21
Moyen Faible
Minimum
Moyen Fort
Maximum
FIGURE 5
Page 22

AVANT D’UTILISER VOTRE MIXEUR ELECTRIQUE
Veuillez remplir les informations de garantie qui suivent le chapitre intitulé
Garantie Limitée de ce livret.
V euillez lire attentivement toutes les instructions avant d’utiliser votre mixeur . Nous
vous recommandons d’apprendre les différentes fonctions de l’appareil et de ses
accessoires avant de vous en servir (Consulter Figures 1-5).
La capacité maximale du grand bol est de 4 litres ; celle du petit bol est de
1,6-1,8 litres.
Lavez les batteurs, les crochets à pâte, le fouet et les bols dans de l’eau
chaude savonneuse. Rincez et essuyez.
UTILISATION DES ACCESSOIRES
22
GUIDE DE MIXAGE
Batteurs Utilisés pour mélanger et battre des préparations.
Utilisés pour la pâte à tarte, la pâte à pizza et le
mélange de grandes quantités d’ingrédients secs.
Crochets
à pâte
Utilisé pour fouetter, pour les blancs d’œufs, les
jaunes d’œufs, les sauces, les soufflets, les mousses,
les meringues et les sauces vinaigrettes.
Fouet
Icône
•
Vitesse
Minimum
Action
Mélanger
/incorporer
Utilisez cette vitesse lors du
mixage d’ingrédients liquides ou
pour mélanger et humidifier des
ingrédients secs avec précaution.
Utilisez cette vitesse pour
mélanger deux portions d’une
recette, comme par exemple
incorporer des blancs d’œufs
dans une pâte.
Procédure de Mixage
Moyen
Faible
Mixage
Pétrissage
Utilisez cette vitesse lorsque vous
mélangez des ingrédients secs et
des ingrédients humides ou
utilisez cette vitesse lorsque la
recette exige un pétrissage
jusqu’à ce que la pâte forme
une boule.
Page 23

COMMENT UTILISER VOTRE MIXEUR
1. Placez le mixeur sur une grande surface stable, et faites glisser
l’interrupteur sur la position OFF. Assurez-vous que la surface soit propre et
sèche, de manière à ce que les pieds maintiennent bien l’appareil en place.
2. Maintenir le bouton de désenclenchement enfoncé et faire pivoter la tête
du mixeur vers le haut (voir Figure 2). Une fois la tête du mixeur bien
en place, vous entendrez un déclic. N’essayez pas de faire pivoter la tête du
mixeur sans avoir auparavant appuyé sur le bouton de désenclenchement ;
vous risqueriez d’endommager l’appareil.
3. Placez la plaque tournante sur la base du mixeur en plaçant le bouton
dans la fente du petit bol ou du grand bol en fonction du bol utilisé
(voir Figure 3).
4. Insérez la tige du batteur/crochet à pâte à collier hexagonal dans
l’ouverture hexagonale située sous la tête du mixeur (Voir Figure 4).
Tournez-la légèrement pour la verrouiller en place, si nécessaire.
5. Insérez la tige du batteur/crochet à pâte à collier rond dans
l’ouverture ronde, sur la partie inférieure de la tête du mixeur (Voir
Figure 4). Tournez-la légèrement pour la verrouiller en place, si nécessaire.
REMARQUE : Les batteurs/crochets à pâte doivent être insérés dans la
bonne ouverture, car ils ne sont pas interchangeables. Il est également
nécessaire d’insérer le batteur/crochet à pâte à collier hexagonal en
premier. Ne jamais utiliser un batteur et un crochet à pâte en même
temps; ceci endommagerait l’appareil et annulerait la garantie.
REMARQUE : Si vous utilisez le fouet, placez la tige du fouet dans
l’ouverture ronde, située sous la tête du mixeur.
6. Placez le bol approprié sur la plaque tournante.
7. Les batteurs ou crochets à pâte correctement mis en place, saisissez la
poignée située sur la tête du moteur, appuyez sur le bouton de
désenclenchement et abaissez doucement la tête du mixeur jusqu’à ce
qu’elle se mette en place et qu’un déclic se fasse entendre.
23
Icône
•
Vitesse
Moyen
Fort
Action
Mélanger
/battre de
la crème
Utilisez cette vitesse pour travailler
le beurre et le sucre en pâte lisse.
Procédure de Mixage
Maximum
Fouetter
Turbo
Utilisez cette option pour les
taches difficiles afin d’obtenir
le maximum de puissance, à
n’importe quelle vitesse.
Bouton
Turbo
Utilisez cette vitesse lors de la
préparation d’un glaçage d’une
recette ou d’une préparation
instantanée. Pour fouetter de la
crème ou des pommes de terre.
Pour battre des blancs en neige.
Page 24

8. Tirez sur le cordon rétractable pour obtenir la longueur désirée,
et branchez-le dans une prise de courant 120V ~ 60 Hz. Tournez la
commande de vitesse variable sur la position minimum . Faites
glisser l’interrupteur sur la position “ON”. Le voyant lumineux s’allume.
REMARQUE : Commencez toujours à mixer en position minimum. La
vitesse de fonctionnement augmente à mesure que la commande de
vitesse variable est déplacée du minimum au maximum
(voir figure 5). Sélectionnez la vitesse désirée. Consultez le guide
de mixage, page 22-23, pour plus amples renseignements.
9. Tournez la vitesse du mixeur sur la position minimum et placez
l’interrupteur sur la position “OFF” avant de tenter de racler les côtés
ou le fond du bol.
REMARQUE : NE PAS racler les côtés ou le fond du bol lorsque le
mixeur est en marche.
10. Vous pouvez utiliser le bouton turbo à n’importe quelle vitesse,
lorsqu’une puissance maximum est requise pour les gros travaux.
11. Une fois que tous les ingrédients ont atteint la consistance désirée,
tournez le bouton sur la position minimum et faites glisser l’interrupteur
de marche/arrêt sur la position “OFF”. Le voyant lumineux s’éteint.
12. Débranchez l’appareil. Tirez doucement sur le cordon et faites en sorte
qu’il se replace complètement dans la base du mixeur. Maintenir le
bouton de désenclenchement enfoncé tout en soulevant la tête de mixage.
13. Appuyez sur le bouton d’éjection et retirez les batteurs, les crochets à
pâte ou le fouet. Otez soigneusement l’excès de pâte présent sur les
batteurs ou les crochets à pâte à l’aide d’une spatule en caoutchouc ou
en plastique. Ne pas tapoter les batteurs ou les crochets à pâte contre
le bol dans le but de se débarrasser de l’excès de pâte. Ceci pourrait
les endommager.
14. Retirez soigneusement le bol de la plaque tournante. Versez les
ingrédients dans le récipient désiré. Utilisez uniquement une spatule en
caoutchouc ou en plastique pour enlever la pâte du bol.
ENTRETIEN ET NETTOYAGE
1. Débranchez le mixeur, et tirez doucement sur le cordon pour faire en
sorte qu’il se replace complètement dans la base du mixeur.
2. Les bols, batteurs, crochets à pâte et le fouet peuvent passer au
lave-vaisselle.
3. Nettoyez le mixeur et la plaque tournante à l’aide d’un torchon
humide. Ne pas utiliser de produits nettoyants abrasifs. Ne jamais
immerger le mixeur dans l’eau, ni le laver sous l’eau du robinet.
CONSEILS UTILES POUR LE PAIN ET LA PATE
BOULE DE PATE A PAIN : Nécessaire pour une miche de pain réussie
La quantité de farine de boulanger indiquée dans les recettes n’est fournie
qu’à titre indicatif. Nous nous sommes aperçus que cette quantité pouvait
varier légèrement en fonction du climat et de la saison qui peuvent
24
Page 25

entraîner des niveaux d’humidité différents. Observez bien la pâte lorsque
vous ajoutez la dernière tasse/tasse et demie de farine. Une bonne boule
de pâte devrait être ronde, lisse, douce et légèrement collante au toucher.
Si votre pâte ne se forme pas en boule et ressemble plus à de la pâte à
crêpe, ajoutez de la farine jusqu’à ce qu’elle atteigne la consistance
désirée.
MIXAGE ET PETRISSAGE : L’étape de développement du gluten
Placez les ingrédients dans un bol, excepté 1 tasse/1 tasse
1
⁄2de farine.
Utilisez le crochet à pâte en début du mixage pour amorcer le
développement du gluten. Ajoutez ensuite une quantité suffisante de la farine
restante pour former une boule lisse. La boule ne devrait pas accrocher aux
côtés du bol et devrait former une boule lisse autour du crochet.
Lorsque vous ajoutez du son ou des germes de blé, du boulgour ou du blé
concassé dans une recette, gardez la pâte aussi humide que possible, car ces
ingrédients absorbent les liquides et tendent à produire une miche plus sèche.
Généralement, une recette à forte teneur en farine de blé entier nécessite
une durée de pétrissage plus courte qu’une recette à base de farine
ordinaire. La texture rude du son peut avoir un effet négatif sur le
développement du gluten.
TEST D’ETANCHEITE DE LA PATE : Comment tester le développement
du gluten
Après environ 10 minutes de pétrissage, arrêtez le mixeur et vérifiez le
développement du gluten en effectuant le test d’élasticité de la pâte. Retirez
un petit morceau de pâte de la taille d’un petit œuf. Etalez-la délicatement
à la main pour former un cercle plat. Lorsque la pâte est
correctement développée, sa structure est lisse et élastique ; la lumière doit
pouvoir passer à travers la pâte étirée. Si la pâte étirée se brise, cela
signifie que quelques minutes de pétrissage supplémentaires sont
nécessaires. La durée totale du pétrissage est d’environ 10 minutes.
LA LEVURE : L’ingrédient Numéro 1
Nous avons utilisé de la levure active sèche Red Star
®
lors du développe-
ment de nos recettes de pain. Un sachet de 11 g de levure Red Star
®
contient environ 2 c. à café 1⁄4rases de levure. Lorsque la levure est exposée
à l’oxygène, à l’humidité ou à la chaleur, son activité se détériore. Nous
vous recommandons donc de conserver votre levure dans un
récipient hermétique, au réfrigérateur ou au congélateur. Mesurez la
quantité dont vous avez besoin, et laissez-la revenir à température
ambiante avant de l’utiliser — ceci prend environ 15 minutes.
Si vous avez des doutes quant à l’activité de la levure, vous pouvez
effectuer le test suivant afin de vérifier sa puissance.
25
Page 26

Pour tester un sachet (2 c. à café 1⁄4) de levure sèche active Red Star®, utilisez
un verre gradué et remplissez-le d’
1
⁄2tasse d’eau à 43°-46°C. Ajoutez
1 cuillère à café de sucre semoule et 1 sachet (2 c. à café
1
⁄4) de
levure sèche active Red Star
®
, puis remuez. Laissez votre cuillère dans le verre
gradué. Réglez la minuterie sur 10 minutes. A mesure que la levure absorbe
le liquide, elle commencera à devenir active et à remonter à la
surface. Si au bout des 10 minutes la levure s’est développée et a atteint la
marque `1 tasse’, cela veut dire qu’elle est très active. Ce mélange à base de
levure peut être utilisé dans une recette exigeant 2 c. à café
1
⁄4de levure ou
plus. N’oubliez pas d’ajuster votre recette afin de prendre en compte la
demi-tasse d’eau et les 2 c. à café
1
⁄4de levure utilisées durant le test. La
quantité de sucre n’a pas besoin d’être ajustée. Ajoutez ce mélange aux
ingrédients liquides de la recette.
LA FARINE : La farine de pain est essentielle pour obtenir un bon pain
Utilisez de la farine de boulanger dans les recettes de pain comportant de
la levure. La farine de boulanger est une farine blanche faite à partir de
blés durs et à haute teneur en protéines ; elle a une plus forte teneur en
gluten et en protéines que la farine courante. Vous la trouverez dans la
plupart des épiceries. La teneur en protéines varie entre 12 et 14 pour cent.
Il n’est pas nécessaire de tamiser la farine lorsque vous effectuez une recette
de pain comportant de la levure. Commencer par mélanger puis la placer
dans un verre gradué à l’aide d’une cuillière avant d’égaliser.
La quantité de farine indiquée dans les recettes n’est fournie qu’à titre indicatif.
La chaleur, l’humidité, le sucre et l’altitude ont tous une influence sur la pâte. Si
vous utilisez une quantité trop importante de farine, le pain sera très lourd et
dur. Si vous n’en utilisez pas assez, le pain ne se tiendra pas et ne prendra pas
de volume.
LA GRAISSE : Rehausseur d'arôme et agent de conditionnement de la pâte
Vous pouvez substituer en proportions égales la matière grasse, le beurre
ou la margarine. Les margarines allégées et fouettées ne conviennent pas à
la préparation du pain.
LES LIQUIDES : Activent la levure et lient la pâte
Il est très important que la température du liquide soit comprise entre 49°C
et 54°C. Lorsqu’on utilise des liquides à température plus élevée, la levure
s’active trop rapidement et la pâte devient trop chaude.
FAIRE LEVER LA PATE : Température ambiante optimale : 27°-29°C
Les durées de levée varieront en fonction de la recette, de la température et du
niveau d’humidité de votre cuisine. La levée constitue l’aspect le plus important
de la préparation du pain. Une fois la pâte sortie du mixeur, elle se met à
fermenter et à lever avant de se crever et de reposer.
26
Page 27

Le gluten devient pliable et élastique, ce qui rend la pâte douce et lisse. La
fermentation conditionne le gluten, développe l’arôme et permet à la miche
de pain de lever.
La pâte a doublé de volume lorsqu’une légère et rapide pression du bout
du doigt laisse une empreinte. Si la pression du doigt ne laisse pas de
marque, couvrez la pâte et laissez-la lever quelques minutes
supplémentaires, puis vérifiez à nouveau. Après avoir crevé la pâte et
l’avoir divisée en morceaux, recouvrez-la et laissez-la reposer 10 minutes.
Le repos permet au gluten de se détendre et facilite la manipulation de la
pâte. Modelez ensuite la pâte comme vous le souhaitez.
Il arrive qu’une seconde levée de la pâte s’avère bénéfique, surtout dans le
cas de pains complets ou 100% au blé entier. Laissez la pâte lever une
première fois puis la crever. La laisser à nouveau lever puis la crever une
seconde fois avant de la laisser reposer 10 minutes et de la façonner.
CONSERVATION ET CONGELATION DES PAINS ET DES PETITS PAINS
CUITS
La réfrigération, ou des températures inférieures à 21°C, font rassir (durcir) les
pains très rapidement. Toutefois, vous pouvez les congeler pendant plusieurs
mois. Lorsque vous congelez des pains ou des petits pains, laissez-les refroidir
avant de les emballer dans du plastique. Placez-les dans un sac plastique et
fermez le sac hermétiquement. Lorsque vous les décongelez, ouvrez en partie
l’emballage afin de permettre à l’humidité de s’évaporer graduellement. Ne
retirez pas les cristaux de glace de l’emballage durant la décongélation. Le pain
absorbera une partie de cette humidité à mesure qu’il décongèle.
CONGELATION DE LA PATE
Modelez la pâte comme vous le souhaitez et placez-la immédiatement au
congélateur pendant une heure afin qu’elle durcisse. Retirez-la du congélateur
et emballez-la dans du plastique. Placez-la ensuite dans un sac
plastique et fermez hermétiquement. La pâte peut être conservée au
congélateur pendant une durée de quatre semaines au plus. Faites
décongeler la pâte dans un sac plastique au réfrigérateur pendant la nuit ou
durant plusieurs heures. Retirez-la du sac plastique et placez-la sur une plaque
de cuisson. Recouvrez et laissez reposer dans un lieu chaud et sans courant
d’air, jusqu’à ce que la pâte ait doublé de volume. La pâte n’étant pas à
température ambiante, vous vous rendrez compte qu’il lui faut plus longtemps
pour lever. Faites cuire selon les indications données dans la recette.
CUISSON ET REFROIDISSEMENT
Lorsque vous faites cuire des pains sucrés ou des tresses, il peut s’avérer
utile de recouvrir la surface du pain de papier aluminium pendant les 5 à
10 dernières minutes. Pour cela, placez une feuille de papier aluminium sur
la miche de pain, côté brillant vers le haut. Ceci empêchera que la miche
ne roussisse trop lors de la dernière phase de cuisson.
27
Page 28

Pour faire refroidir un pain cuit, placez-le dans un endroit sans courant
d’air. Pour empêcher que la croûte ne devienne pâteuse, faites refroidir le
pain sur la plaque de cuisson. Attendez 20 minutes avant de découper un
pain cuit.
FAÇONNER LE PAIN ET LES PETITS PAINS
Lorsque vous façonnez la pâte et que vous l’étaler au rouleau, il est
extrêmement important de ne pas ajouter de farine sur la surface de
travail. Au lieu de cela, si la pâte vous semble être légèrement collante,
vaporisez vos mains ou la surface de travail à l’aide d’un vaporisateur de
graisse végétale anthiadhérente ou utilisez de la matière grasse végétale.
Petits pains en feuilles de trèfle – Roulez la pâte en boules d’1 cm à 1,5 cm.
Placez 3 boules dans chaque moule à muffin et laissez lever jusqu’à ce que
la pâte ait doublé de volume.
Petits pains croisés - Roulez la pâte en boules, et laissez-en deux de côté.
Combinez ces deux boules et étalez-les pour former un carré de 3 mm
d’épaisseur . Découpez des lamelles de 3mm de large et de 5 cm de long. Placez
une lamelle sur chaque boule. Répétez la procédure, en plaçant la seconde
lamelle dans la direction opposée, sur chaque boule de pâte.
Petits pains traditionnels - Roulez la pâte en boules. Pour des petits pains faciles
à détacher, placez les boules de pâte de manière à ce que les bords se touchent.
Pour des pains individuels, placez les boules de pâte à 5 cm les unes des autres.
Pâtes et Pains
PATE ORDINAIRE
2 miches ou 18 petits pains
4-4
1
⁄4tasses de farine de
boulanger
1
⁄4de c. à café de sel
1
⁄2tasse de sucre
3 c. à café
1
⁄2levure sèche active
1 tasse
1
⁄
4
d’eau
1 œuf
1
⁄4de tasse de matière grasse à
température ambiante
Température : 177°C
Durée de cuisson : 25-30 minutes
Insérez les crochets à pâte et mélangez les ingrédients secs, excepté 1 tasse
de farine, sur “Moyen-Faible” pendant 30 secondes.
Chauffez l’eau à 49°-54°C. Continuez à mixer sur “Moyen-Faible” et
ajoutez l’œuf. Ajoutez le liquide petit à petit jusqu’à ce qu’il soit bien
incorporé (environ 2-3 minutes). Continuez à mixer pendant 2 à 3 minutes.
28
Page 29

Ajoutez petit à petit la farine restante et mixez pendant 3 à 5 minutes pour
former une boule de pâte lisse et légèrement collante. Ajoutez la matière
grasse et mixez pendant 3 à 4 minutes. Continuez de pétrir pendant encore
10 minutes. Effectuez le test d’élasticité de la pâte.
Vaporisez de la matière grasse antiadhrente dans un grand bol. Placez la pâte
dans le bol et retournez-là afin qu’elle soit entièrement recouverte de matière
grasse. Recouvrez et laissez lever dans un lieu chaud pendant 1 heure ou jusqu’à
ce que la pâte ait doublé de volume.
Crever la pâte, recouvrez-la et laissez-la reposer 10 minutes de manière à
ce qu’elle devienne plus malléable.
Choisissez l’une des méthodes suivantes pour terminer la cuisson.
MICHES DE PAIN
Température : 177°C
Durée de cuisson : 25-30 minutes
Divisez la pâte en deux morceaux et étalez-les au rouleau de manière à
former deux rectangles de 30 x 17 cm. Enroulez la pâte en serrant bien et
en commençant par le côté étroit. Scellez la pâte du bout des doigts à
mesure que vous l’enroulez.
Placez la pâte dans deux moules beurrés de 22 x 12 cm. Recouvrez et laissez
lever dans un lieu chaud pendant 1 heure ou jusqu’à ce que la pâte ait
doublé de volume. Faites cuire suivant les instructions.
PETITS PAINS
Température : 177°C
Durée de cuisson : 25-30 minutes
Divisez la pâte en 18 petits pains lisses de 5 cm. Placez la pâte dans un moule
à cuisson beurré de 22 x 32 cm. Recouvrez et laissez lever dans un lieu chaud
pendant 1 heure ou jusqu’à ce que la pâte ait doublé de volume. Faites cuire
suivant les instructions.
PETITS PAINS A LA CANNELLE
Garniture
18 petits pains
3
⁄4de tasse de beurre fondu
1
⁄2tasse de sucre
3 c. à soupe de cannelle
1
⁄2tasse de raisins secs
1
⁄2tasse de noix
29
Page 30

1
⁄2tasse de sucre en poudre
3 c. à soupe de lait
1
⁄2c. à café d’extrait de vanille
Glaçage
18 petits pains
2
1
⁄2-3 tasses de farine de
boulanger
1 c. à café de sel
2 c. à café de sucre
1 c. à café d’herbes italiennes
déshydratées
1 c. à café 1⁄
2
de levure sèche
active
1 tasse d’eau
1
⁄3de tasse d’huile d’olive
PAIN FOCCACIA
Température : 177°C
Durée de cuisson : 20-25 minutes
Mélangez le sucre et la cannelle. Laissez de côté.
Etalez la pâte en un rectangle de 37 x 45 cm sur une surface légèrement
farinée. Etalez le beurre fondu sur la pâte. Saupoudrez le mélange sucre/
cannelle, les raisins secs et les noix. Enroulez la pâte assez serrée, comme pour
un gâteau roulé, en partant du côté le plus long, puis coupez en tranches de
2,5 cm de large. Placez les morceaux dans 2 moules à cuisson de 22 x 32 cm.
Recouvrez et laissez lever dans un lieu chaud pendant 1 heure ou jusqu’à ce que
la pâte ait doublé de volume. Faites cuire suivant les instructions.
Mixez les ingrédients du glaçage jusqu’à obtention d’un mélange
onctueux, et laissez couler un filet de glaçage sur les petits pains à la
cannelle cuits.
Température : 205°C
Durée de cuisson : 15-20 minutes
Insérez les crochets à pâte et mélangez les ingrédients secs, excepté 1 tasse de
farine, sur “Moyen-Faible” pendant 30 secondes.
Faites chauffer l’eau et l’huile à 49°-54°C. Continuez à mixer sur
“Moyen/Faible” et ajoutez lentement le liquide aux ingrédients secs jusqu’à
l’obtention d’un mélange homogène (environ 2-3 mn).
Continuez à mélanger pendant 2-3 mn. Ajoutez petit à petit la farine
restante et mixez pendant 2 à 4 mn de manière à former une boule de pâte
douce et légèrement collante. Continuez de pétrir pendant encore 10 mn.
Effectuez le test d’élasticité de la pâte.
Vaporisez de la matière grasse antiadhérente dans un grand bol. Placez la
pâte dans le bol et retournez-là afin de la recouvrir entièrement.
30
Page 31

Recouvrez et laissez lever dans un lieu chaud pendant 1 h. ou jusqu’à ce
que la pâte ait doublé de volume. Placer la pâte dans un moule beurré de
22 x 32 cm en appuyant. Faites des marques dans la pâte du bout des doigts.
Recouvrez et laissez lever dans un lieu chaud pendant 20 minutes ou
jusqu’à ce que la pâte ait doublé de volume. Préparez la garniture,
Ail/Fromage ou Style Grec, pendant que la pâte lève.
GARNITURE AIL/FROMAGE
1
⁄4de tasse d’huile d’olive
1 c. à café
1
⁄
2
de feuilles
d’origan
déshydratées
1
⁄4de tasse d’ail grossièrement
haché
1
⁄3de tasse de Parmesan râpé
1
⁄4de c. à café de sel
Faites chauffer l’huile et ajoutez l’origan et l’ail. Retirez du feu immédiatement.
Placez le mélange sur la pâte à l’aide d’une cuillère. Saupoudrez les ingrédients
restants sur la pâte. Faites cuire suivant les instructions.
GARNITURE ‘STYLE GREC’
1
⁄4de tasse d’huile d’olive
1 c. à café
1
⁄
2
de feuilles
d’origan
déshydratées
1 tasse d’oignon finement
haché
1
⁄3de tasse de Feta coupée en
petits morceaux
1
⁄4de tasse d’olives noires,
égouttées et
découpées
1
⁄4de c. à café de sel
3-3 tasses
1
⁄
2
de farine de
boulanger
1 c. à café de sel
1 c. à soupe de sucre
2 c. à café 1⁄2de levure sèche
active
1 tasse
1
⁄
2
d’eau
1 c. à soupe d’eau
1
⁄2c. à café de sel
Faites chauffer l’huile d’olive, ajoutez les oignons et faites-les revenir jusqu’à ce
qu’il soient cuits mais non dorés (environ 5 mn).
Placez le mélange sur la pâte à l’aide d’une cuillère. Saupoudrez les
ingrédients restants sur la pâte. Faites cuire suivant les instructions.
PAIN FRANÇAIS
Pâte
Glaçage
31
Page 32

Température : 205°C
Durée de cuisson : 20-25 minutes
Insérez les crochets à pâte et mélangez les ingrédients secs, excepté 1 tasse/1tasse
1
⁄2de farine, sur “Moyen-Faible”. Faites chauffer l’eau à 49°-54°C. Continuez à
mixer sur ‘Moyen-Faible” et ajoutez lentement l’eau aux ingrédients secs jusqu’à
l’obtention d’un mélange homogène. Continuez à mélanger pendant 2-3 mn.
Ajoutez petit à petit la farine restante et mixez pendant 2 à 4 minutes de manière
à former une boule de pâte douce et légèrement collante. Continuez de pétrir
pendant encore 10 minutes. Effectuez le test d’élasticité de la pâte. Vaporisez de
la matière grasse antiadhérente dans un grand bol. Placez la pâte dans le bol et
retournez-la afin de la recouvrir entièrement. Recouvrez et laissez lever dans un
lieu chaud pendant 1 heure ou jusqu’à ce que la pâte ait doublé de volume.
Crever la pâte, recouvrez-la et laissez-la reposer 10 minutes de manière à
ce que la pâte devienne plus malléable. Placez la pâte sur une surface
légèrement farinée. Enroulez-la en serrant bien et en commençant par le
côté le plus large. Scellez la pâte du bout des doigts à mesure que vous l’enroulez.
Placez la miche de pâte sur une plaque de cuisson beurrée, recouvrez et
laissez lever dans un lieu chaud pendant 45 minutes, ou jusqu’à ce que la pâte
ait doublé de volume. Faites trois entailles en diagonales sur la surface du pain,
à l’aide d’un couteau. Mélangez les ingrédients du glaçage et étalez ce dernier
sur la pâte à l’aide d’un pinceau à pâtisserie. Faites cuire suivant les instructions
fournies.
PATE A BRETZELS
16 bretzels
Pâte
3-3 tasses
1
⁄
2
de farine de
boulanger
1 c. à café de sel
2 c. à soupe de sucre
1
⁄8de c. à café de poivre blanc
1 c. à soupe de levure sèche
active
1
1
⁄4tasses d’eau
1 c. à soupe d’huile
1 de jaune d’œuf
1 de blanc d’œuf 1 c. à soupe d’eau
Glaçage
Garniture
Sel kascher
Graines de sésame
Température : 176°C
Durée de cuisson : 15-20 minutes
32
Page 33

Insérez les crochets à pâte et mélangez les ingrédients secs, excepté 1 tasse
de farine, sur “Moyen-Faible” pendant 30 secondes.
Faites chauffer l’eau et l’huile à 49°-54°C. Continuez à mixer sur “MoyenFaible” et ajoutez lentement l’eau aux ingrédients secs jusqu’ à l’obtention d’un
mélange homogène (environ 2-3 minutes). Continuez à mixer pendant
2-3 minutes. Ajoutez le jaune d’œuf. Continuez à mixer pendant
2 minutes. Ajoutez petit à petit la farine restante et mixez pendant 2 à 4 mn
de manière à former une boule de pâte lisse et légèrement collante. Continuez
de pétrir pendant encore 10 minutes. Effectuez le test d’élasticité de la pâte.
Vaporisez de la matière grasse antiadhérente dans un grand bol. Placez la
pâte dans le bol et la retourner de manière à la recouvrir entièrement.
Recouvrez et laissez lever dans un lieu chaud pendant 1 heure ou jusqu’à
ce que la pâte ait doublé de volume.
Crever la pâte, la recouvrir et la laisser reposer 10 minutes de manière à
ce qu’elle devienne malléable. Découpez la pâte en morceaux, sur une
surface légèrement farinée. Rouler chaque morceau pour former des
cordons de 40 cm de long. Rejoignez les extrémités des cordons pour
former une boucle. Repliez les extrémités croisées sur la boucle. Placez les
morceaux de pâte sur une plaque de cuisson à 3,5 cm les uns des autres.
Glacez à l’aide d’un pinceau de pâtisserie et saupoudrez de garniture.
PATE A PIZZA
2 pâtes épaisses ou 3 pâtes fines
4-4 tasses
1
⁄
2
de farine de
boulanger
1 c. à café de sel
2 c. à soupe de sucre
2 c. à café de levure sèche
active
1 tasse
2
⁄
3
d’eau
2 c. à soupe d’huile
Température : 218°C
Durée de cuisson : 15-20 minutes
Insérez les crochets à pâte et mélangez les ingrédients secs, excepté 1 tasse
de farine, sur “Moyen-Faible” pendant 30 secondes.
Faites chauffer l’eau et l’huile à 49°-54°C. Continuez à mixer sur “MoyenFaible” et ajoutez lentement l’eau aux ingrédients secs jusqu’à l’obtention
d’un mélange homogène (environ 2-3 mn). Continuez à mixer
pendant 2-3 minutes.
Ajoutez petit à petit la farine restante et mixez pendant 2 à 4 mn de manière à
former une boule de pâte lisse et légèrement collante. Continuez de pétrir
pendant encore 10 mn. Effectuez le test d’élasticité de la pâte.
33
Page 34

V aporisez de la matière grasse antiadhérente dans un grand bol. Placez la pâte
dans le bol et la retourner de manière à la recouvrir entièrement. Recouvrez et
laissez lever dans un lieu chaud pendant 1 heure ou jusqu’à ce que la pâte ait
doublé de volume.
Pendant que la pâte lève, préparez la sauce et la garniture.
Crever la pâte, divisez-la de manière égale selon le nombre de pâtes que
vous désirez obtenir. Recouvrez et laissez reposer 10 minutes de manière à
ce qu’elle devienne plus malléable. Etendre la pâte dans des moules à
pizza de 30 cm en appuyant. Etalez la sauce sur chaque pizza et
saupoudrez de garniture.
Sauce à pizza
3 pizzas
2 c. à soupe d’huile d’olive
1 tasse d’oignon coupé
en dés
1 boîte de 236 ml sauce tomate
1 boîte de 396 g tomates en
morceaux
1
⁄2c. à café d’origan
1
⁄2c. à café de basilic
1
⁄8de c. à café d e poud re d’ ail
1
⁄2c. à café de sel
1 c. à café de poivre moulu
1 petite courgette
découpée en tranches
1 oignon moyen,
coupé en dés
2 gousse d’ail, hachée
1 poivron rouge
émincé
1 poivron vert
émincé
1 tasse de champignons
émincés
1
⁄2tasse d’olives vertes
émincées
1 tasse de mozzarella
râpée
Faites chauffer l’huile à feu moyen et faites blondir les oignons. Ajoutez le
reste des ingrédients, recouvrez et laissez mijoter pendant 45 minutes, en
remuant de temps à autres. Etalez 1 tasse de sauce sur la pâte à pizza.
Garniture végétarienne
2 pizzas
Saupoudrez la garniture sur la sauce et faites cuire suivant les instructions.
34
Page 35

GARANTIE LIMITEE D’UN AN
Toastmaster Inc. garantit ce produit, à l’acheteur initial, contre tous les défauts de matériaux et de fabrication pour une durée
d’un an à compter de la date d’achat.
Cette garantie reste la seule garantie écrite ou expresse donnée par Toastmaster Inc. Cette garantie vous donne des droits légaux
spécifiques. Il se peut que vous ayez d’autres droits qui peuvent varier d’un état à l’autre. TOUT AUTRE DROIT QUE VOUS POURRIEZ AVOIR, Y COMPRIS TOUTE GARANTIE TACITE CONCERNANT LA COMMERCIALISATION OU L’ADEQUATION DU PRODUIT
A UN USAGE PARTICULIER, EST LIMITE A LA DUREE DE CETTE GARANTIE.
Tout produit défectueux doit être rapporté ou renvoyé (en port payé) à un centre de service après-vente agréé dont vous trouverez les coordonnées dans l’annuaire téléphonique ou au Service Après-Vente, Toastmaster Inc., 1409 E. Morgan Street, Boonville,
Mo. 65233, pour une réparation ou un remplacement gratuit selon notre choix.
Votre recours ne comprend pas : les dommages pour le désagrément causé, les dommages dus à une défaillance du produit, les
dommages de transport, les usages abusifs, les accidents ou autre ou encore l’utilisation dans un but commercial. EN AUCUN CAS,
TOASTMASTER INC. NE PEUT ETRE TENU RESPONSABLE DES DOMMAGES ACCIDENTELS OU CONSECUTIFS.
Certains états n’autorisent pas les limitations de durée concernant la garantie tacite ou autorisent l’exclusion ou la limitation des
dommages accidentels ou consécutifs ; il se peut donc que les limitations et exclusions mentionnées ci-dessus ne vous concernent pas.
Pour toute information, écrivez au Directeur des Réclamations Clientèle à l’adresse de Boonville. Précisez vos nom, adresse, code
postal, indicatif téléphonique et un numéro de téléphone où l’on peut vous joindre dans la journée ainsi que le modèle, le numéro de
série et la date d’achat du produit.
Nous mangeons tous. Ceci est chose acquise.
Pourtant, il arrive que la préparation du repas se
transforme en corvée.
C’est la raison pour laquelle TOASTMASTER est
convié dans des millions de cuisines semblables à la
vôtre afin de VOUS AIDER A MAITRISER le travail de
préparation et de cuisson, les rôtis, grillades
et plats mijotés, ainsi que le réchauffage
et service de vos mets
En GRANDE CLASSE ET SANS EFFORT INUTILE.
La marque TOASTMASTER est synonyme de
CELEBRATION DE L’INNOVATION conçue
pour vous servir et vous permettre de continuer à
CUISINER EN GRANDE CLASSE.
GARDEZ LE TICKET DE CAISSE DATE POUR TOUTE REPARATION SOUS
GARANTIE.
Conservez ce livret. Notez les renseignements suivants pour référence ultérieure :
Date d’achat
Numéro du modèle
Code de date (estampillé sur le dessous de l’appareil)
35
Page 36

LEA Y GUARDE ESTAS INSTRUCCIONES
ADVERTENCIA: Todos los electrodomésticos presentan el riesgo de incendio
y de electrocución con la capacidad de provocar lesiones importantes o
incluso la muerte. Por favor siga todas las instrucciones de seguridad.
Batidora de Base
Guía de Uso y Cuidados - Modelos 1771/1772
• MOTOR DE 350 WATTS CON CAPACIDAD PARA BATIR MEZCLAS
ESPESAS
• INCLUYE UN TAZON GRANDE Y UNO PEQUEÑO
• BOTON INTENSIFICADOR DE POTENCIA PARA UN MAXIMO
DESEMPEÑO
• CENTRAL ERGONOMICA SOFT TECH™
• ENROLLADOR DE CABLE ELECTRICO
• BOTON DE EXPULSADO
MEDIDAS DE SEGURIDAD
IMPORTANTES
Cuando utilice artefactos eléctricos, siempre siga las precauciones básicas
de seguridad, para reducir el riesgo de incendio, electrocuciones y lesiones
a personas, incluyendo las siguientes:
• Lea todas las instrucciones antes de usar la batidora.
• Esta batidora no debe ser utilizada por niños.
• Es necesario ejercer una estricta supervisión cuando use la batidora
cerca de los niños.
• No deje la batidora desatendida cuando la esté usando.
• Desconecte el artefacto cuando no lo utilice o antes de colocarle o
quitarle piezas y antes de limpiarlo.
• Para desconectar, apague el artefacto, a continuación extraiga el
enchufe de la corriente eléctrica.
36
Page 37

• No utilice una batidora dañada. No la utilice con un cable o enchufe
dañado o después que la batidora funcione incorrectamente, o si se ha
dejado caer o se ha dañado de alguna manera. Devuelva la batidora al
centro de servicio autorizado más cercano para su inspección, reparación
o ajuste eléctrico o mecánico.
• No sumerja la batidora, el cordón o el enchufe en agua u otro líquido.
Vea las instrucciones de limpieza.
• No se utilice en exteriores o en áreas húmedas.
• No utilice la batidora para otro uso que el especificado.
• No permita que cuelgue el cable sobre el borde de la mesa o mostrador
ni que toque superficies calientes.
• No coloque ni el electrodoméstico ni el cable de alimentación cerca de
una superficie caliente, incluyendo un quemador eléctrico o de gas o
dentro de un horno caliente.
• Utilice accesorios solamente si son recomendados por Toastmaster Inc.
• Evite el contacto con piezas móviles. Mantenga las manos, el pelo, la
ropa, las espátulas y otros utensilios alejados de las aspas durante la
operación.
• Quite las aspas, los ganchos para amasar o el batidor de la batidora
antes de lavarlos.
GUARDE ESTAS
INSTRUCCIONES
PRECAUCION: Se incluye un cable eléctrico corto para reducir el riesgo de
lesiones personales, resultantes de tropezar o enredarse con un cable eléctrico
demasiado largo. En caso de que necesite un cable eléctrico más largo, puede
conseguir cables de extensión en las ferreterías de su localidad, y pueden ser
usados si se ejercen las precauciones debidas. Si se requiere utilizar un cable
de extensión, es necesario tomar especial cuidado y atención. Además, el cable
deberá: (1) estar marcado con una clasificación eléctrica de 125 V, y por lo
menos 13 A y 1.625 W (2) colóquelo de tal manera que no cuelgue del
mostrador o de la mesa donde lo esté usando para evitar que los niños lo halen
o accidentalmente sea causa de tropiezo.
ENCHUFE POLARIZADO: Este electrodoméstico posee un enchufe polarizado
(una de sus patas es más ancha que la otra). Como una medida de seguridad
para reducir el riesgo de descargas eléctricas, éste enchufe ha sido diseñado
para conectar solamente de una manera en un tomacorriente polarizado. Si el
enchufe no conecta completamente en el tomacorriente, inviértalo. Si aún no
conecta bien, consulte con un electricista calificado. No intente alterar esta
medida de seguridad.
37
Page 38

ESTE PRODUCTO ES SOLAMENTE PARA USO DOMESTICO
CONOCIENDO SU BATIDORA ELECTRONICA DE BASE
1
13a
13b
11
10
9
8
7
6
5
4
3
2
12a
12b
FIGURA 1
1. Botón de EXPULSADO
2. Cabeza de la Batidora
3. Botón de Desenganche
4. Cuerpo de la Batidora
5. Luz Indicadora
6. Botón de Turbo
7. Dial de Control de
Velocidad Variable
8. Interruptor “ON/OFF”
(ENCENDIDO/APAGADO)
9. Tazón Mezclador
10. Plataforma Giratoria
11. Base
12. a) Gancho para amasar
con cuello hexagonal
b) Gancho para amasar
con cuello redondo
13. a) Aspa redonda con
cuello hexagonal
b) Aspa cuadrada con
cuello redondo
38
Page 39

Subir o
Bajar la
Cabeza de
la Batidora
Presione el Botón
de Desenganche
FIGURA 2
Protuberancia (parte inferior de la
plataforma giratoria)
Tazón
Pequeño
Tazón Grande
FIGURA 3
Gancho para Amasar
con Cuello Hexagonal
Gancho para Amasar
con Cuello Redondo
Aspa Redonda con
Cuello Hexagonal
Punta de Nilón
Aspa Cuadrada con Cuello
Redondo
FIGURA 4
39
Page 40

Media-Baja
Mínimo
Media-Alta
Máximo
FIGURA 5
ANTES DE USAR SU BATIDORA ELECTRONICA DE BASE
Llene la información de la garantía que se presenta a continuación de la
garantía limitada en este manual.
Lea todas las instrucciones cuidadosamente antes de usar su batidora de
base. Le recomendamos que se familiarice con este artefacto y sus
accesorios antes de usarlo, vea las Figuras 1-5.
La capacidad máxima del tazón grande es de 4 litros, la del tazón
pequeño es de 1,6-1,8 litros.
Lave las aspas, ganchos para amasar, el batidor y los tazones en agua
tibia jabonosa. Enjuague y seque completamente.
40
Icono Velocidad
Minimum
Función
Revolver/
Incorporar
Use cuando revuelva ingredientes
líquidos o cuando una función
ligera es necesaria para
humedecer ingredientes secos.
Use cuando incorpore
porciones de una receta juntas,
como batir una clara de huevo
en un batido.
Procedimiento de Mezclado
UTILIZACION DE ACCESORIOS
Aspas Use para mezclar y batir mezclas.
Use para masa, masa para pay, pasta y para mezclar
grandes cantidades de ingredientes secos.
Gancho para
Amasar
Use para batir, claras de huevo, yemas, salsa, suflé,
mousse, merengue y aderezos para ensalada.
Batidor de
Alambre
GUIA DE MEZCLADO
Page 41

COMO USAR SU BATIDORA ELECTRONICA DE BASE
1. Coloque la batidora de base en una superficie amplia y segura, coloque el
interruptor en la posición de “OFF” (AP AGADO). Asegúrese que la superficie
esté limpia y seca para que las patas aseguren y mantengan la unidad en su
lugar .
2. Presione y sostenga el botón de desenganche y gire la cabeza de la
batidora hacia arriba, vea la FIG. 2. Cuando la cabeza de la batidora
esté asegurada en su posición, usted escuchará un click. No trate de girar la
cabeza de la batidora sin antes presionar el botón de desenganche. Esto
podría dañar la batidora.
3. Coloque la base giratoria en la plataforma colocando la protuberancia
en la ranura del tazón grande o pequeño, dependiendo del tazón que
use, vea la FIG. 3.
4. Inserte la barra del aspa/gancho para amasar con el cuello hexagonal en
el orificio hexagonal de la parte inferior de la cabeza de la batidora, ver la
FIG. 4. Gire ligeramente si necesita asegurarlo en su lugar.
5. Inserte la barra del aspa/gancho para amasar con el cuello redondo en el
orificio redondo de la parte inferior de la cabeza de la batidora. Gire
ligeramente si necesita asegurarlo en su lugar.
41
•
•
Media-
Baja
Media-
Alta
Máximo
Botón
Turbo
Intensifica
la potencia
Use para obtener el nivel más
alto en poder de cualquier
ajuste de velocidad para tareas
difíciles de mezclado.
Mezclar/
Batir
Batir a
punto de
Merengue
Use cuando prepare betún de
una receta o un paquete.
Use para batir crema o para
batir papas. Use cuando bata
claras de huevo.
Use cuando bata azúcar y
mantequilla juntas a punto de
crema.
Mezclar
Amasar
Use cuando mezcle ingredientes
secos e ingredientes líquidos
juntos, alternativamente en una
receta o use cuando la receta
necesite amasarse hasta que
quede una bola bien amasada.
Icono Velocidad Función Procedimiento de Mezclado
Page 42

NOTA: Las aspas/ganchos para amasar deben insertarse en los orificios
correspondientes puesto que no son intercambiables. También es necesario
insertar primero el aspa/gancho para amasar con el cuello hexagonal.
Nunca use juntos un aspa y un gancho para amasar porque podría dañar
la unidad y podría anular la garantía.
NOTA: Si usa el batidor de alambre, coloque la barra del batidor en el
orificio redondo en la parte inferior de la cabeza de la batidora.
6. Coloque el tazón de mezclado apropiado en la plataforma giratoria.
7. Con las aspas o ganchos para amasar propiamente en su lugar, agarre el
asa de la cabeza del motor, presione el botón de desenganche y baje
lentamente la cabeza de la batidora hasta que se asegure en su lugar.
8. Jale el cable retractable a la medida deseada y enchufe en una toma de
corriente de 120V ~ 60 Hz. Gire el dial de control de velocidad variable
hasta la posición mínima . Coloque el interruptor en la posición de
“ON” (ENCENDIDO). La luz indicadora se encenderá.
NOTA: Siempre empiece a mezclar en la posición mínima. La velocidad
de función se incrementa al mover el control de velocidad desde la
minima a la máxima , vea la FIG. 5. Seleccione la velocidad
deseada. Consulte la guía de mezclado, en la página 40-41, para más
información.
9. Gire la velocidad de la batidora a la posición mínima y el interruptor
a la posición de “OFF” (APAGADO) antes de tratar de raspar los lados o
el fondo del tazón de mezclado.
NOTA: NO raspe los lados o el fondo del tazón de mezclado mientras la
batidora esté en funcionamiento.
10. El Botón de Turbo puede ser usado en cualquier ajuste de velocidad para
obtener un nivel de poder máximo para tareas difíciles de mezclado.
11. Una vez que los ingredientes hayan alcanzado la consistencia deseada,
gire el dial a la posición mínima y coloque el interruptor en la
posición de “OFF” (APAGADO). La luz indicadora se apagará.
12. Desconecte la batidora del tomacorriente. Jale el cable suavemente y
suéltelo para que se regrese por completo a la base de la batidora.
Presione y sostenga el botón de desenganche mientras eleva la cabeza
de la batidora.
13. Presione el botón de desenganche y retire las aspas, los ganchos para
amasar o el batidor de alambre. Con cuidado raspe o quite el exceso de
batido de las aspas o ganchos para amasar con una espátula de hule o
plástico. No golpee las aspas o ganchos para amasar contra el tazón de
mezclado para quitar el exceso de batido. Esto podría dañar las partes de
la batidora.
14. Cuidadosamente retire el tazón de mezclado de la plataforma giratoria.
Ponga los ingredientes del tazón en el recipiente deseado. Use solamente
una espátula de hule o plástico para quitar el batido del tazón.
42
Page 43

LIMPIEZA Y CUIDADO
1. Desenchufe la batidora de base y jale el cable suavemente y suéltelo
para que se regrese por completo a la base de la batidora.
2. Los tazones de mezclado, las aspas, los ganchos para amasar y el
batidor de alambre pueden ser lavados en un lavaplatos.
3. Limpie la batidora de base y la plataforma giratoria con un trapo
húmedo. No use ningún material limpiador abrasivo. Nunca sumerja o
limpie bajo agua corriente.
SUGERENCIAS UTILES PARA PAN Y MASA
MASA PARA PAN: Necesaria para una Hogaza de Pan Bien Horneada
La cantidad de harina para pan requerida en cada receta debe ser usada
como guía. Hemos descubierto que puede variar ligeramente porque los
diferentes climas y estaciones dan como consecuencia una amplia
variedad de niveles de humedad. Cuide la masa mientras añade la última
1-1
1
⁄2taza de harina. Una bola de masa bien amasada tiene que estar
redonda, con una textura lisa, suave y levemente pegajosa al tacto. Si no
tiene la forma de una bola y tiene la apariencia de batido, agregue
harina hasta que alcance la consistencia deseada.
MEZCLADO Y AMASADO: Etapa de Elaboración del Gluten
Coloque los ingredientes en el tazón, excepto la ultima 1-1
1
⁄2de harina. Use
el gancho para amasar al comienzo de la etapa de mezclado para
comenzar la elaboración del gluten. Después agregue gradualmente
suficiente cantidad de la harina restante para hacer una masa suave. La
masa debe limpiar los lados del tazón y formar una bola blanda alrededor
de los ganchos para amasar.
Cuando añada salvado de trigo, germen de trigo, bulgur o trigo
resquebrajado a una receta de pan, deje la masa lo mas húmeda posible
porque estos ingredientes tienden a hacer la hogaza de pan más reseca.
Reduzca la cantidad de amasado para evitar cortar las hebras del gluten
con las orillas ásperas de estos granos.
Una receta con un alto porcentaje de harina integral puede requerir un
tiempo más corto de amasado que una receta de harina blanca. La
textura áspera del salvado puede dañar la elaboración del gluten.
PRUEBA DE ELASTICIDAD DE LA MASA: Comprobación del Elaborado del
Gluten
Después de aproximadamente 10 minutos de amasado, pare la batidora y
verifique la elaboración del gluten realizando la prueba de elasticidad de la
masa. Retire un trozo pequeño de masa, aproximadamente del tamaño de un
huevo. Sosteniendo la masa en el aire, cuidadosamente estírela formando un
círculo plano con sus dedos. Cuando la masa esté propiamente elaborada, su
43
Page 44

textura deberá estar lisa y elástica; la luz debe pasar a través de la masa
estirada. Si la masa estirada se rompe, necesita unos minutos más de amasado.
El tiempo total de amasado debe ser aproximadamente 10 minutos.
LEVADURA: El Ingrediente Número Uno
Nosotros usamos levadura en polvo Red Star
®
para la elaboración de estas
recetas de pan. Un paquete de 7 g de levadura en polvo Red Star
®
contiene
aproximadamente 2
1
⁄4de cucharadas de levadura regular. Cuando la levadura
es expuesta al oxígeno, humedad o calor, su actividad se deteriora. Es por eso
que recomendamos guardar la levadura en un recipiente hermético y refrigerarla o congelarla. Mida la cantidad que necesita y espere a que obtenga la
temperatura ambiente antes de usarla — tomará aproximadamente 15 minutos.
Si tiene algunas dudas sobre la actividad de la levadura, puede llevar a
cabo las siguientes pruebas para determinar su fuerza. Para hacer la
prueba con un paquete (2
1
⁄4de cucharadas) de levadura en polvo Red
Star
®
, use una taza de medidas líquidas y llene hasta el nivel de 1⁄2taza con
agua caliente de 43°-46°C. Revuelva 1 cucharadita de azúcar
gra-nulada y 1 paquete (2
1
⁄4de cucharadas) de levadura en polvo Red
Star
®
. Deje la cuchara en la taza. Coloque un cronómetro a 10 minutos.
Conforme la levadura absorba el líquido, empezará a activarse y a
evantarse a la superficie. Si al final de los 10 minutos la levadura se ha
multiplicado hasta la marca de 1 taza, está muy activa. La mezcla puede
ser usada en una receta que requiera 2
1
⁄4de cucharadas de levadura o
más. Recuerde adaptar la receta a la
1
⁄2taza de agua y 21⁄4de cucharadas
de levadura usadas en esta prueba. El azúcar no tiene que ser adaptada.
Agregue esta mezcla con los líquidos de la receta.
HARINA: La Harina para Pan es Esencial para la Preparación del Pan
Use harina para pan en recetas para panes con levadura. La harina para
pan es harina blanca que se compone de una mezcla de trigos duros, con
proteína que tienen un contenido más alto de gluten y proteína que la
harina para todos los usos. La puede conseguir en la mayoría de las
tiendas de abarrote. La proteína varía de 12-14 por ciento.
Precerner o cerner la harina no es necesario con el pan de levadura.
Primero revuelva, después vacíela en una taza de medidas secas y nivele.
La cantidad de harina requerida en una receta de pan con levadura debe
ser usada como guía. La masa es afectada por el calor, humedad, azúcar
y altitud. Si usa mucha harina, el pan puede quedar muy duro y tieso. Si
se usa muy poca, el pan no se alzará y resultará un pan de muy poco
volumen.
44
Page 45

MANTECA: Realzador y Acondicionador de Masa
Puede sustituir en proporciones iguales manteca vegetal sólida,
mantequilla o margarina. Margarinas de dieta o batidas no funcionan bien.
LIQUIDOS: Activan la Levadura y Unen la Masa
Es importante que la temperatura del líquido esté entre 49°-54°C. Cuando
se usan temperaturas más altas, la levadura se activa muy rápido y la masa
se calienta demasiado.
ALZADO DE LA MASA: Optima Temperatura Ambiente 27°-29°C
El tiempo de alzado variará dependiendo de la receta, la temperatura y el
nivel de humedad de su cocina. El alzado es la parte más esencial en la
elaboración del pan. Después de que la masa ha sido sacada de la
batidora, la masa se fermenta y se alza antes de golpearla y dejarla
reposar. El gluten se hace flexible y elástico con una característica suave y
lisa. La fermentación acondiciona el gluten, mejora el sabor y alza el
producto.
La masa se habrá duplicado en tamaño cuando permanezca un orificio
después de insertar ligera y rápidamente la punta del dedo en la masa.
Si el orificio se borra, cúbrala y déjela alzarse unos minutos más y vuelva
a verificar. Después de golpear y dividir la masa, cúbrala y déjela reposar
10 minutos. El reposo permite que el gluten se suavice y hace que se
maneje más fácil. Después dé a la masa la forma deseada.
Algunas veces un segundo alzamiento de la masa es beneficioso,
especialmente para el pan integral o 100% de trigo. Deje la masa alzarse
una vez, golpee contra la mesa, deje alzar nuevamente, vuelva a golpear,
deje reposar nuevamente y dé forma.
GUARDADO Y CONGELACION DE PANES Y PANECILLOS HORNEADOS
La refrigeración o temperatura por debajo de 21°C causará que los panes
se endurezcan rápido. No obstante, se pueden congelar por varios meses.
Cuando congele los panes y panecillos, déjelos enfriar antes de
envolverlos en plástico. Colóquelos en una bolsa plástica y séllela. Cuando
los descongele, abra parcialmente la envoltura para que deje escapar la
humedad gradualmente. No quite los cristales de hielo de la envoltura
durante el proceso de descongelación. El pan absorberá alguna de esta
húmedad mientras se descongela.
CONGELACION DE LA MASA
Dé la forma deseada a la masa y congele inmediatamente durante una hora
para que se endurezca. Saque del congelador y envuelva en plástico.
Luego, colóquela en una bolsa plástica y séllela. La masa puede permanecer
en el congelador hasta por cuatro semanas. Descongele la masa en una
bolsa plástica en el refrigerador durante la noche o durante varias horas.
Desenvuelva y coloque en un molde para hornear. Cubra y deje reposar en
45
Page 46

un lugar tibio, sin mucha ventilación hasta que duplique su tamaño
original. Porque la masa no está a temperatura ambiente, usted se dará
cuenta que le tomará más tiempo alzarse. Hornee de acuerdo a las
instrucciones de la receta.
HORNEADO Y ENFRIAMIENTO
Cuando hornee panes dulces o panes trenzados, puede ser necesario que
cubra el pan con papel aluminio durante los últimos 5-10 minutos. Para
cubrir el pan, coloque un pedazo de papel aluminio con el lado brilloso
hacia arriba, sobre la hogaza de pan. Esto evitara que el pan se dore
demasiado mientras continua horneándose.
Coloque el pan horneado en un lugar sin mucha ventilación. Para
prevenir una corteza remojada, deje enfriar en las rejillas. Espere
20 minutos antes de cortar el pan caliente.
DANDOLE FORMA A LA MASA Y PANECILLOS
Cuando le dé forma y enrolle la masa, es extremadamente importante el
no añadir harina a la superficie de amasado. En cambio, si la masa parece
estar un poco pegajosa cuando le esté dando forma, rocíe ligeramente sus
manos o la superficie de amasado con un rociador antiadherente para
cocinar o cubra con manteca vegetal.
Panecillos en Forma de Trébol - Forme en bolitas de 1,3 cm. Coloque
3 bolitas en cada molde para bollos y deje alzar hasta que dupliquen su
tamaño.
Panecillos Entrelazados - Forme en bolitas, poniendo dos aparte. Combine
las dos bolitas y extiéndalas formando cuadrados de 3 ml de grosor. Corte
tiras de 3 ml de ancho y 5 cm de largo. Coloque una tira sobre cada
panecillo. Repita el mismo procedimiento, colocando la segunda tira en la
posición opuesta sobre cada panecillo.
Panecillos Tradicionales - Forme en bolitas de masa. Para panecillos “que
se puedan desprender”, coloque las bolas de masa pegadas de los lados.
Para panecillos individuales, coloque las bolas con 5 cm de distancia.
46
Page 47

Masas y Panes
MASA BLANCA BASICA
2 Hogazas o 18 panecillos
4-41⁄4de tazas de harina para
pan
1
⁄4de cdita de sal
1
⁄2taza de azúcar
3
1
⁄2cdita de levadura
en polvo
1
1
⁄4de taza de agua
1 huevo
1
⁄4de taza de manteca
vegetal,
temperatura
ambiente
Temperatura: 350°F/177°C
Tiempo de Horneado: 25-30 minutos
Inserte los ganchos de amasar y mezcle todos los ingredientes secos
excepto 1 taza de harina en velocidad “Medium Low” (Media-Baja)
durante 30 segundos.
Caliente el agua a 120°-130°F/49°-54°C. Continúe mezclando en velocidad
“Medium Low” (Media-Baja) y añada el huevo. Rocíe el lîquido lentamente a la
mezcla seca hasta que se mezcle, de 2-3 minutos. Continúe mezclando otros
2-3 minutos. Gradualmente agregue el harina restante para formar una bola
suave y ligeramente pegajosa, mezclando durante 3-5 minutos. Agregue la
manteca vegetal y mezcle durante 3-4 minutos. Continúe amasando durante otros
10 minutos. Realice la prueba de elasticidad de la masa.
Rocíe el tazón grande con un rociador antiadherente para cocinar. Coloque la
masa en el tazón y gire para que se cubra por todos los lados. Cubra y deje
alzarse en un lugar tibio, durante 1 hora o hasta que duplique su tamaño.
Golpee la masa, cubra y deje reposar 10 minutos para hacer la masa más
manejable.
Seleccione uno de los procedimientos para terminar el horneado.
HOGAZAS DE PAN
Temperatura: 350°F/177°C
Tiempo de Horneado: 25-30 minutos
Divida en 2 partes y extienda cada una en rectángulos de 30 x 18 cm.
Enrolle muy bien, empezando por la orilla más angosta. Selle con las
yemas de los dedos conforme vaya enredándolos.
Coloque en un molde para hornear de 22 x 12 cm, engrasado. Cubra y
deje alzarse en un lugar tibio durante 1 hora o hasta que duplique su
tamaño. Hornee como se indica.
47
Page 48

3
⁄4de taza mantequilla,
derretida
1
⁄2taza de azúcar
3 cdas de canela
1
⁄2taza de pasas
1
⁄2taza de nueces
1
⁄2taza de azúcar glass
3 cdas. de leche
1
⁄2cdita de extracto de
vainilla
2
1
⁄2-3 tazas de harina
para pan
1 cdita de sal
2 cdita de azúcar
1 cdita de condimento
italiano seco
11⁄2cdita de levadura
en polvo
1 taza de agua
1
⁄3de taza de aceite de oliva
ROLLITOS DE CANELA
Cubierta
18 rollitos
Glaseado
18 rollitos
Temperatura: 350°F/177°C
Tiempo de Horneado: 20-25 minutos
Combine el azúcar y la canela, déjelas a un lado.
Extienda la masa en rectángulos de 38 x 45 cm en una superficie
ligeramente enharinada. Unte la mantequilla derretida sobre la masa.
Espolvoree con la mezcla de azúcar y canela, con pasas y nueces.
Enrolle muy bien, empezando con el lado más largo y cortando en
rebanadas de 2,5 cm de grosor. Coloque en 2 moldes para hornear de
22 x 33 cm, engrasados. Cubra y deje alzarse en un lugar tibio durante
1 hora o hasta que duplique su tamaño. Hornee como se indica.
Mezcle los ingredientes del glaseado hasta que esté uniforme y úntelo
encima de los rollitos horneados.
PAN “FOCCACIA”
PANECILLOS
Temperatura: 350°F/177°C
Tiempo de Horneado: 25-30 minutos
Divida en 18 panecitos redondos de 5 cm. Coloque en un molde para hornear
de 22 x 33 cm, engrasado. Cubra y deje alzarse en un lugar tibio durante 1 hora
o hasta que duplique su tamaño. Hornee como se indica.
48
Page 49

Temperatura: 400°F/205°C
Tiempo de Horneado: 15-20 minutos
Inserte los ganchos de amasar y mezcle todos los ingredientes secos
excepto 1 taza de harina, en velocidad “Medium-Low” (Media-Baja)
durante 30 segundos.
Caliente el agua y aceite a 120°-130°F/49°-54°C. Continúe mezclando en
velocidad “Medium Low” (Media-Baja) y vierta el líquido lentamente a la
mezcla seca hasta que se mezcle por completo, de 2-3 minutos. Continúe
mezclando otros 2-3 minutos. Gradualmente agregue la harina restante
para formar una bola suave y ligeramente pegajosa, durante
2-4 minutos. Continúe amasando durante otros 10 minutos. Realice la
prueba de elasticidad de la masa.
Rocíe el tazón grande con un rociador antiadherente para cocinar. Coloque la
masa en el tazón y gire para que se cubra por todos los lados. Cubra y deje
alzarse en un lugar tibio, durante 1 hora o hasta que duplique su tamaño.
Coloque uniformemente la masa en un molde para hornear engrasado de
22 x 33 cm. Extienda y haga indentaciones en la masa usando las yemas de
los dedos.
Cubra y deje alzarse en un lugar tibio durante 20 minutos o hasta que
duplique su tamaño. Prepare una cubierta, de Ajo y Queso o Estilo Griego
mientras la masa se alza.
CUBIERTA DE AJO Y QUESO
Caliente el aceite de oliva y agregue el orégano y ajo. Retire del fuego
inmediatamente.
Vierta la mezcla sobre la masa. Espolvoree el resto de los ingredientes.
Hornee como se indica.
CUBIERTA ESTILO GRIEGO
1
⁄4de taza de aceite de oliva
1
1
⁄2cdita. de orégano seco
1
⁄4de taza de ajo, picado en
trozos grandes
1
⁄3de taza de queso
Parmesano,
rallado
1
⁄4de cdita de sal
1
⁄4de taza de aceite de oliva
1
1
⁄2cdita de orégano seco
1 taza de cebolla, rebana-
da finamente
1
⁄3de taza de queso “Feta”,
desmoronado
1
⁄4de taza de aceitunas
negras, rebanadas
y escurridas
1
⁄4de cdita de sal
49
Page 50

Caliente el aceite de oliva, agregue la cebolla y cocine hasta que se
ablanden, pero sin que se doren, como 5 minutos.
Vierta la mezcla sobre la masa. Espolvoree el resto de los ingredientes.
Hornee como se indica.
PAN FRANCES
Masa
3-3
1
⁄2tazas de harina para pan
1 cdita. de sal
1 cda de azúcar
21⁄2cdita de levadura en polvo
1
1
⁄2taza de agua
1 cda. de agua
1
⁄2cdita de sal
Temperatura: 400°F/205°C
Tiempo de Horneado: 20-25 minutos
Inserte los ganchos de amasar y mezcle todos los ingredientes secos
excepto 1-1
1
⁄2taza de harina, en velocidad “Medium-Low” (Media-Baja).
Caliente el agua a 120°-130°F/49°-54°C. Continúe mezclando en
velocidad “Medium Low” (Media-Baja) y vierta el agua lentamente a la
mezcla seca hasta que se mezcle, de 2-3 minutos. Continúe mezclando
otros 2-3 minutos.
Gradualmente agregue la harina restante para formar una bola suave y
ligeramente pegajosa, durante 2-4 minutos. Continúe amasando durante
otros 10 minutos. Realice la prueba de elasticidad de la masa. Rocíe el
tazón grande con un rociador antiadherente para cocinar. Coloque la
masa en el tazón y gire para que se cubra por todos los lados. Cubra y
deje alzarse en un lugar tibio, durante 1 hora o hasta que duplique su
tamaño.
Golpee la masa, cubra y deje reposar 10 minutos para hacer la masa más
manejable. Coloque la masa en una superficie ligeramente enharinada.
Enrolle muy bien, empezando por la orilla más ancha. Selle con las yemas
de los dedos conforme vaya enrollando.
Coloque la hogaza en una bandeja para hornear engrasada, cubra y deje
alzarse en un lugar tibio durante 45 minutos o hasta que doble el tamaño.
Haga tres cortes diagonales por encima de la hogaza con un cuchillo.
Combine los ingredientes del glaseado y úntelo abundantemente en la
hogaza. Hornee como se indica.
Glaseado
50
Page 51

MASA PARA “PRETZELS” SUAVES
16 “pretzels”
Masa
Glaseado
Cubierta
3-3
1
⁄2tazas de harina para pan
1 cdita de sal
2 cdas de azúcar
1
⁄8de cdita de pimienta blanca
1 cda de levadura en polvo
1
1
⁄4de taza de agua
1 cda de aceite
1 yema de huevo
1 clara de huevo 1 cda de agua
sal judía (granos gruesos) ajonjolí
Temperatura: 350°F/176°C
Tiempo de Horneado: 15-20 minutos
Inserte los ganchos de amasar y mezcle todos los ingredientes secos
excepto 1 taza de harina, en velocidad “Medium-Low” (Media-Baja)
durante 30 segundos.
Caliente el agua y aceite a 120°-130°F/49°-54°C. Continúe mezclando en
velocidad “Medium Low” (Media-Baja) y vierta el agua lentamente a la
mezcla seca hasta que se mezcle por completo, de 2-3 minutos. Continúe
mezclando durante otros 2-3 minutos. Agregue la yema de huevo. Continúe
mezclando durante otros 2-3 minutos. Gradualmente agregue la harina
restante para formar una bola suave y ligeramente pegajosa, mezcle durante
2-4 minutos. Continúe amasando durante otros 10 minutos. Realice la prueba
de elasticidad de la masa.
Rocíe el tazón grande con un rociador antiadherente para cocinar.
Coloque la masa en el tazón y de vuelta para que se cubra por todos los
lados. Cubra y deje alzarse en un lugar tibio, durante 1 hora o hasta que
duplique su tamaño.
Golpee la masa, cubra y deje reposar 10 minutos para hacer la masa más
manejable. Corte la masa en tiras sobre una superficie ligeramente
enharinada. Enrolle cada pieza formando una cuerda de 40 cm de largo.
Cruce las puntas de cada cuerda para formar una curva, tuerza las
puntas cruzadas una vez y doble sobre la curva.
Colóquelas en una bandeja para hornear engrasada con una distancia de
3,8 cm. Untelas con el glaseado y espolvoree con la cubierta.
51
Page 52

MASA PARA PIZZA
2 bases gruesas o 3 bases delgadas
4-4
1
⁄2tazas de harina para
pan
1 cdita de sal
2 cdas de azúcar
2 cditas de levadura en
polvo
1
2
⁄3de taza de agua
2 cdas de aceite
2 cdas de aceite de oliva
1 de taza de cebolla
picada
1 lata de
226 g/236 ml de salsa de tomate
1 lata de 396 g de tomates,
cortados
1
⁄2cdita de orégano
1
⁄2cdita de albahaca
1
⁄8de cdita de ajo en polvo
1
⁄2cdita de sal
1 cdita de pimienta
molida
Temperatura: 425°F/218°C
Tiempo de Horneado: 15-20 minutos
Inserte los ganchos de amasar y mezcle todos los ingredientes secos
excepto 1 taza de harina en velocidad “Medium-Low” (media-baja)
durante 30 segundos.
Caliente el agua y aceite a 120-130°F/49°-54°C. Continúe mezclando en
velocidad “Medium Low” (Media-Baja) y vierta el agua lentamente a la
mezcla seca hasta que se mezcle por completo, de 2-3 minutos. Continúe
mezclando otros 2-3 minutos.
Gradualmente agregue el harina restante para formar una bola suave y
ligeramente pegajosa, de 2-4 minutos. Continúe amasando durante otros
10 minutos. Realice la prueba de elasticidad de la masa.
Rocíe el tazón grande con un rociador antiadherente para cocinar.
Coloque la masa en el tazón y dé vuelta para que se cubra por todos los
lados. Cubra y deje alzarse en un lugar tibio, durante 1 hora o hasta que
duplique su tamaño.
Mientras la masa se alza, prepare la salsa para pizza y los ingredientes
de la cubierta.
Golpee la masa, divídala en partes iguales según la base elegida. Cubra y
deje reposar 10 minutos para hacer la masa más manejable. Coloque la
masa uniformemente en un molde para pizza engrasado. Extienda la salsa
sobre cada base de pizza y espolvoree con los ingredientes de la cubierta.
Salsa para Pizza
3 pizzas
52
Page 53

Caliente el aceite en temperatura media y sofría las cebollas hasta que
estén trasparentes. Agregue los ingredientes restantes, cubra y hierva
durante 45 minutos, revolviendo ocasionalmente. Vierta 1 taza de salsa
sobre la masa de la pizza.
Cubierta de Pizza Vegetariana
2 pizzas
1 calabacita pequeña, en
rebanadas
1 cebolla mediana,
rebanada
2 dientes de ajo,
picados
1 pimiento verde,
picado
1 pimiento rojo,
en rodajas
1 taza de champiñones,
rebanados
1
⁄2taza de aceitunas
verdes,
rebanadas
1 taza de queso
mozzarella, rallado
Esparza los ingredientes de la cubierta sobre la salsa y hornee como se indica.
INFORMACION DE SERVICIO
Por favor, consulte la declaración de garantía para determinar si está vigente la
garantía de servicio. Este aparato debe ser reparado por un
centro de servicio autorizado de Toastmaster. Los trabajos hechos por
personas no autorizadas anularán la garantía. Consulte su guía telefónica bajo
“Electrodomésticos Pequeños - Servicio y Reparación”, o llame al
1-800-947-3744 en los Estados Unidos y Canadá, 52-5-397-2848 en México.
En caso de que no haya un centro de servicio autorizado local, puede
devolver el aparato mediante envío prepagado al Centro Nacional de
Servicio (National Service Center) a la dirección que se indica en la última
página de este folleto.
Los productos deben estar debidamente protegidos para evitar daños durante
el envío. Envuelva su electrodoméstico con tres pulgadas de material amortiguador protector, incluya también una copia de la factura de venta fechada
y una nota explicando el problema en cuestión. Aconsejamos
certificar el paquete. No se aceptan envíos contra reembolso.
53
Page 54

GARANTIA LIMITADA DE
UN AÑO
Toastmaster Inc. Garantiza al consumidor original durante un periodo de un año a partir de la fecha de compra que el
producto no posee ningún defecto ni en el material ni en su fabricación.
Esta garantía es la única garantía escrita o expresa otorgada por Toastmaster Inc. Esta garantía proporciona al comprador derechos
legales específicos. Puede que el consumidor disponga de otros derechos que varían de estado a estado. CUALQUIER OTRO DERECHO DEL
QUE PUEDA DISPONER, INCLUYENDO CUALQUIER GARANTIA IMPLICITA DE COMERCIALIZACION O DE ADECUACION PARA UN FIN
PARTICULAR, ESTA LIMITADA A LA DURACION DE ESTA GARANTIA.
El producto defectuoso se puede llevar o enviar (flete pre-pagado) a un centro de servicio técnico autorizado que aparezca en una
guía telefónica o al Departamento de Servicio Técnico, Toastmaster Inc, 1409 E, Morgan Street, Boonville, Mo. 65233, para su reparación
gratuita o substitución dependiendo de nuestro criterio.
Su remedio no incluye: costo de las incomodidades, daños provocados por el fallo del producto, daños en el transporte,
utilización incorrecta, accidentes o similares ó el uso comercial. EN NINGUN CASO TOASTMASTER INC. SERA RESPONSABLE POR
DAÑOS IMPREVISTOS O EMERGENTES.
Algunos estados no permiten limitaciones en la duración de una garantía implícita, ni permiten la exclusión o limitación de daños
imprevistos o emergentes, de manera que puede que las limitaciones que aparecen arriba no sean válidas en su caso.
Para obtener más información, escriba al Director de Reclamaciones del Consumidor, enviando la carta a la dirección de Boonville.
Envíe el nombre, dirección, código postal, prefijo telefónico y número de teléfono en el que esté disponible durante el día, modelo,
número de serie y fecha de compra.
54
CONSERVE EL RECIBO DE VENTAS FECHADO PARA EL SERVICIO
TECNICO CUBIERTO POR LA GARANTIA.
Mantenga este folleto. Apunte lo siguiente como referencia:
Fecha de compra
Número del Modelo
Código de la Fecha (impreso en el fondo)
Page 55

ESPECIFICACIONES TECNICAS
Potencia Nominal (Watts) 336 W
Tension de Alimentacion o Tension Nominal (Volts) 127 V ~
Frencuencia de Operacion o Frecuencia Nominal (Hertz) 60 Hz
TODO EL MUNDO COME. Es un hecho ineludible.
Pero algunas veces el preparar
comidas puede volverse una tarea.
Es por eso que TOASTMASTER ha sido invitado
a millones de cocinas como la suya
para poder AYUDARLE A DOMINAR sus
tareas de mezclar, hornear, asar, tostar,
preparar, calentar y servir
CON FACILIDAD Y ESTILO.
La marca TOASTMASTER representa una
CELEBRACION de la INNOVACION diseñada
para servirle y mantenerle
COCINANDO CON ESTILO.
55
Page 56

National Service Center
1409 E. Morgan Street
Boonville, Missouri 65233
In USA and Canada call:
Consumer Service 1-800-947-3744
Consumer Parts 1-800-947-3745
Hours: 8:00 a.m. - 5:30 p.m. CST
Aux É.-U. et au Canada, veuillez appeler
Service consommateur : 1-800-947-3744
Piéces détachées consommateur : 1-800-947-3745
Heures ouvrables : 8 h - 5 h 30 Heure Centrale
En México - 52-5-397-2848
Horario: 8:00 a.m. hasta 5:30 p.m., hora del Centro
Toastmaster de México, SA de CV
Cerrada de Recursos
Hidráulicos Numero 6
La Loma Industrial
Tlalnepantla de Baz, C.P. 54060
Estado de México
PART NO. 33754P01
© 2000 Toastmaster Inc.
A Subsidiary of Salton, Inc.
Subsidiaire de Salton, Inc.
A una Subsidiaria de Salton, Inc.
 Loading...