


READ AND SAVE THESE INSTRUCTIONS
Use and Care Guide
and Cookbook
Models 1143S and 1193
?? QUESTIONS ??
Before Contacting Your Retailer Call
TOLL-FREE 1-800-947-3744
and talk to one of Toastmaster’s Experts.
WARNING: A risk of fire and electrical shock exists in all electrical appliances and may cause personal injury or death. Please follow all safety instructions.

Dear Toastmaster Customer;
Welcome to the Toastmaster family. We’re sure you’ll find your new Breadmaker’s Hearth to be a rewarding and tasty experience.
Please be sure to take the time to read the Use and Care Guide carefully and completely. You will find that using the oven feature on this oven is no different than using your full size con - ventional oven. The end result will be exactly the same.
The brightly colored display panel is easy to use. Try pushing the buttons, thereby familiariz - ing yourself with the Breadmaker’s Hearth. Once you’ve done this, not only will you feel comfortable with the machine, you will also be on your way to successful baking.
Your new Toastmaster oven has a variety of conveniences and enables you to save counter space by having a breadmaker, toaster and countertop oven in one compact appliance. The Breadmaker’s Hearth does it all!
Toastmaster welcomes your comments and discoveries! Please write to us at the following address:
The Test Kitchen
Toastmaster Inc.
1801 North Stadium Boulevard
Columbia, MO 65202
Thank you for deciding to join the Toastmaster family. We look forward to being a part of your kitchen for many years to come. Happy cooking!
Sincerely,
Marilyn Wise
Manager
Consumer Education and Product Testing
P.S.
As an added bonus, our Consumer Relations Representatives are also available to help you. These representatives have undergone extensive and ongoing training with our entire line of products. Many of them are proud owners of Toastmaster products themselves. You will find them to be a knowledgeable and friendly resource. Please feel free to contact them by:
Telephone: 1-800-947-3744
Mail: Toastmaster Inc.
Consumer Relations
1801 North Stadium Boulevard
Columbia, Missouri 65202
Electronic mail: consumer_relations@toastmaster.com
- 2 -

TABLE OF CONTENTS
IMPORTANT SAFEGUARDS ................................................................................................................ |
4 |
BEFORE YOUR FIRST USE .................................................................................................................. |
5 |
POWER OUTAGE ... |
5 |
BREADMAKER’S HEARTH INTRODUCTION |
|
Parts and Accessories ........................................................................................................................ |
6 |
Control Panel ....... |
7 |
OVEN FUNCTION |
|
Programming Preheat Bake, Bake and Broil ...................................................................................... |
8 |
Programming Defrost ........................................................................................................................ |
10 |
Programming Keep Warm ................................................................................................................ |
10 |
TOAST FUNCTION |
|
Programming Toast ............................................................................................................................ |
11 |
Programming Top Brown .................................................................................................................. |
11 |
BREADMAKER FUNCTIONS |
|
Program Select ... |
12 |
Program Specifications ...................................................................................................................... |
13 |
Ingredients ......... |
14 |
Programming Breadmaker ................................................................................................................ |
20 |
RECIPES |
|
Bread ................. |
23 |
Day Old Bread ... |
29 |
Dough ................. |
30 |
Mixing ................. |
42 |
Cake & Quick Bread .......................................................................................................................... |
45 |
Broil ..................... |
|
Bake ................... |
|
CLEANING INSTRUCTIONS .............................................................................................................. |
54 |
BEFORE CALLING FOR SERVICE .................................................................................................. |
55 |
Bread and Dough Questions and Answers ...................................................................................... |
55 |
Checklist for Bread and Dough .......................................................................................................... |
56 |
Service Information ............................................................................................................................ |
58 |
SPECIFICATIONS .............................................................................................................................. |
58 |
RECIPE INDEX ... |
59 |
- 3 -

IMPORTANT SAFEGUARDS
When using electrical appliances, basic safety precautions should always be followed to reduce the risk of fire, electric shock and injury to persons, including the following:
•Read all instructions before using appliance.
•Do not immerse cord, plug or appliance in water or other liquid (see instructions for cleaning).
•Do not touch hot surfaces. Always use oven mitts when handling the hot bread pan and handle or bread. Always use handle with bread pan.
•Close supervision is necessary when this appliance is used near children.
•This appliance is not for use by children.
•Unplug from outlet when not in use and before cleaning.Press STOP button before unplugging.Allow to cool before attaching or removing parts while cleaning.
•To unplug with the unit switched off, grip the plug and pull out from the wall outlet. Never pull on the cord.
•Do not contact moving parts. Do not insert hand into bread pan during operation.
•Do not operate a damaged appliance. Do not operate with a damaged cord or plug or after the appliance malfunctions, or has been dropped or damaged in any manner. Return appliance to the nearest authorized service facility for examination, repair, electrical or mechanical adjustment.
•Use accessory attachments only if recommended by Toastmaster Inc.
•Do not use outdoors or while standing in damp area.
•Do not use appliance for other than intended use.
•Do not let cord hang over edge of table or counter or touch hot surfaces.
•Do not place appliance or cord on or near any hot surface, including a gas or electric burner or heated oven.
•Do not leave appliance unattended while broiling or toasting.
•Do not clean with metal scouring pads. Pieces can break off the pad and touch electrical parts.
•When using this appliance, provide at least 4 inches air space above and on all sides for air circulation. Do not use on surfaces where heat may cause a problem.
•Extreme caution must be used when moving an appliance containing hot oil or other hot liquids.
•Use extreme caution when removing tray or disposing of hot grease.
•A fire may occur if this appliance touches or is covered by flammable material, including curtains, draperies, walls, etc., when in operation.
•Do not store any materials other than the manufacturer’s recommended accessories in this appliance when not in use.
•Do not cover the mixer cover or any part of the oven with metal foil.This will cause overheating of the oven.
•Extreme caution should be exercised when using containers constructed of other than metal.
•Do not place any flammable material such as paper, cardboard, plastic, etc., next to, on top of, or in the oven.
•When broiling, the bake/broil tray and toast/broil rack must be used.
•Oversized foods or utensils must not be inserted into the oven.
SAVE THESE INSTRUCTIONS
THIS PRODUCT IS FOR HOUSEHOLD USE ONLY.
CAUTION: A short power supply cord is provided to reduce the risk of personal injury resulting from becoming entangled in or tripping over a longer cord. Extension cords are available from local hardware stores and may be used if care is exercised in their use. If an extension cord is required, special care and caution is necessary. Also the cord must be: (1) marked with an electrical rating of 125 V, and at least 13 A., 1625 W., and (2) the cord must be arranged so that it will not drape over the countertop or tabletop where it can be pulled on by children or tripped over accidentally.
ELECTRIC POWER: If electric circuit is overloaded with other appliances, your Breadmaker’s Hearth may not operate properly. The Breadmaker’s Hearth should be operated on a separate electrical circuit from other operating appliances.
POLARIZED PLUG: This appliance has a polarized plug, (one blade is wider than the other). As a safety feature to reduce the risk of electrical shock, this plug is intended to fit in a polarized outlet only one way. If the plug does not fit fully in the outlet, reverse the plug.If it still does not fit, contact a qualified electrician.Do not attempt to defeat this safety feature.
- 4 -

BEFORE YOUR FIRST USE
Carefully unpack the Breadmaker’s Hearth Automatic Breadmaker and Cook’s Oven removing all packaging materials.To remove any dust that may have accumulated during packaging, wash the bread pan, kneading blade, bake/broil pan, wire rack and mixer cover. Do not immerse bread pan (see cleaning instructions).Wipe the outside of the machine with a damp cloth.Do not use harsh or abrasive cleaners on any part of the machine.
Place on a dry, stable surface away from burners and away from areas where cooking grease or water may splatter onto it.
Plug into a 120 V ~ 60 Hz outlet.
IMPORTANT SAFETY TIPS
•The oven cavity, mixer cover, kneading blade, bread pan handle, bake/broil pan, wire rack and food will be very hot after use. Use oven mitts.
•Unplug unit and allow to cool before cleaning. Remove any flour, bread crumbs or other materials from the inside the oven using a damp sponge, cloth or a small, portable vacuum cleaner.
•The breadmaker will bake up to a 2 pound loaf of bread. Do not put a larger quantity of ingredients into the bread pan than recommended. If you do so, the bread may not mix or bake correctly and the breadmaker may be damaged.The maximum amount of flour to be used in recipes other than the ones included in this recipe book is as follows:
BAKE settings — approximately 4 cups
Cakes and prepackaged bread mixes — 4 cups
MIXING and DOUGH setting — 4 2/3 cups
•Handle hot bread pan with care using pot holders or oven mitts. Remove the bread pan by pulling straight out using the bread pan handle.
•Anytime the door is opened during a breadmaker program and it is in a kneading process, the mixing mechanism will pulse three times.Wait for this to finish before removing the bread pan.
POWER OUTAGE
During the bread programs if the machine loses power before the second rise, you can try starting the machine at the beginning of the program again. Refer to Program Specifications chart. This may not always produce an acceptable loaf. If you are not sure when the outage occurred, remove the dough ball from the bread pan and place in an oven-safe baking container. Allow to double in size and place in a preheated 350°F/177°C oven for 30-45 minutes or until done. The bread should sound hollow when tapped on the top of the loaf when it is done.
If the bread has already begun to bake when the outage occurs, you must begin with new ingredients.
- 5 -
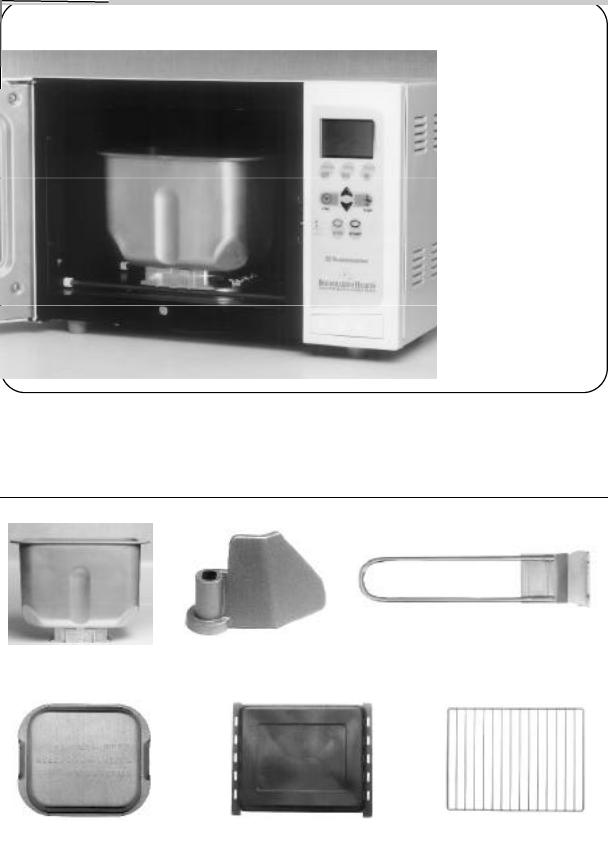
BREADMAKER’S HEARTH INTRODUCTION
n Parts and Accessories
CONTROL
PANEL
DOOR RELEASE
PUSH TO OPEN
SLIDE BREAD PAN UNDER RAILS FOR
BREADMAKER FUNCTION
Accessories
BREADMAKER
Bread Pan |
Kneading Blade |
Bread Pan Handle |
TOASTER-OVEN-BROILER
Mixer Cover |
Bake/Broil Pan |
Wire Rack |
- 6 -

n Control Panel
DISPLAY WINDOW
Indicates program in process and amount of time left for completion of program. Indicates display signals (see page 56).
BREAD FUNCTION BUTTON
Press to select breadmaker programs.
TIME
Press to select timer before using arrow keys to adjust. Must be set to BAKE, BROIL, or to delay start BREAD.
STOP
Press for more than 2 seconds during use to cancel a program.
OPERATION light will be on to show unit is in operation.
 COMPLETE operation light will flash continually when program is complete. When door is opened the light will turn off.
DOOR RELEASE
Press to open door.
OVEN FUNCTION BUTTON
Press to select PREHEAT BAKE, BAKE or BROIL programs.
TOAST FUNCTION BUTTON
Press to select 4 or 2 slices toast programs.
TEMP
Press to display temperature for PREHEAT BAKE, BAKE or BROIL.
ARROW KEYS
Press to adjust temperature for PREHEAT BAKE or BAKE. Or, press to adjust color of TOAST.
PUSH TO OPEN
When a Breadmaker’s Hearth is packaged for shipment, a clear plastic film is placed over the control panel as protection.This film may either be removed or left on. You may choose to leave it on, but it will come off with use.
PROGRAM |
If you want to cancel the selected program, press the STOP pad and hold it |
CANCEL |
down for more than 2 seconds at any time during the program. |
|
|
- 7 -

n Bake/Broil Pan, Wire Rack and Bread Pan
For best results use pan to bake, defrost, top brown, keep warm and to minimize clean up due to spills.
When toasting, place bread directly onto wire rack. Place into oven position #2.The mixer cover must be used.
When baking, you may either use the bake pan or wire rack and your own pan. Place into oven position #2 unless more height is required and then place into position #1.The mixer cover must be used.
When broiling, both the broil pan and the wire rack must be used. Place into oven position # 2 or #3 depending on thickness of food. The mixer cover must be used.
When using breadmaker programs remove mixer cover. Place kneading blade in bread pan. Slide bread pan under rails in bottom of oven with the FRONT ▼ pointing towards the door. Always use the bread pan handle and oven mitts to remove the bread pan.
POSITION 3
POSITION 2
POSITION 1
CAUTION: APPLIANCE SURFACES ARE HOT DURING AND AFTER USE.
CAUTION: Always wear protective, insulated oven mitts on hands when touching hot oven or hot dishes and food, or when inserting or removing rack, pans or baking dishes.
NOTE: THE MIXER COVER MUST BE PLACED OVER THE MIXER MECHANISM WHEN THIS FUNCTION IS USED.
- 8 -

OVEN FUNCTION
n Oven Function
The BAKE and BROIL programs of your new oven have the versatility to bake, broil, defrost and keep foods warm. The oven has an adjustable thermostat with temperatures ranging from 100°F up to 500°F which allows you to prepare your favorite recipes according to package or recipe directions. The bake program has a 4 hour timer and the broil program a 1 hour timer.The OPERATION light on the control panel will be on while the unit is operating. The OPERATION light will flash continually when program is COMPLETE and when the door is opened the light will turn off.
Ovenware manufacturers do not recommend using see through glass containers or lids in this oven. Glass-ceramic baking containers may be used. Do not use oven roasting bags in this oven, as they may come in contact with the heating elements.
n Programming PREHEAT BAKE, BAKE and BROIL
1.Place mixer cover over mixer mechanism. Plug unit into a 120 V ~ 60 Hz outlet.
2.Press OVEN button to select an oven program. If pressed once, the PREHEAT BAKE program is selected. If pressed twice, the BAKE program is selected. If pressed three times, the BROIL program is selected.
3.When any oven program is chosen, the clock will appear in the window first. Set the bake time by pressing the UP or DOWN ARROW to move to the desired time.To move the time along more quickly, hold the arrow and it will advance in 10 minute intervals. When using the PREHEAT BAKE program, the time will not begin to count down until the oven goes into the BAKE program. If you prefer, you may program your time after the preheat is complete and when you place your food into the oven.
4.Press the TEMP button.The default temperature for the PREHEAT BAKE and BAKE functions is 300°F (this will show in the display window). To change the temperature for PREHEAT BAKE and BAKE, press the UP or DOWN ARROW to move to the desired temperature. The temperature will go up or down by 5°F at a time. The preset temperature for the BROIL function is 500°F (this can not be adjusted). Preheating the oven is not necessary for BROIL.
5.If you are using the PREHEAT BAKE program, when the desired temperature has been chosen, press START. Once the oven has reached its pre-selected temperature, it will beep and the temperature will flash in the display window. The OPERATION light will be on.
6.Open the door and place your food in the oven and press START. PREHEAT BAKE will change to BAKE.The OPERATION light will come on and the time counter will begin to count down.The colons in the time counter will flash. If you don’t open the door and place your food in the oven right away, it will continue to maintain the preheat temperature for up to 30 minutes. If you have not opened the door within this time, the oven will turn off automatically.
-9 -

7.The unit will beep 3 times and the OPERATION light will flash continually to indicate the program is COMPLETE.When the door is opened the light will turn off.
8.Unplug and allow to cool completely before cleaning.
HINTS FOR BAKE AND BROIL
•If no time is selected and the START button is pressed, the unit will beep 5 times to indicate that no time has been selected. Unit will not bake or broil unless a time is selected.
•The time and temperature (BAKE only) can be changed at any time during the BAKE or BROIL functions. Press the UP ARROW to increase the time. Press the DOWN ARROW to decrease the time.
•Press the STOP button at any time to stop the unit.
•The oven will PAUSE for up to 10 minutes when the door is opened. If longer than 10 minutes it will turn off.
n Programming DEFROST
DO NOT USE THIS METHOD FOR MEAT, POULTRY OR FISH.
To defrost using your Breadmaker’s Hearth follow the BAKE instructions setting the thermostat at 150°F. Defrost will take approximately 1/3 of the time recommended on the package for defrosting at room temperature. Once completed, serve or bake according to directions.
HINTS FOR DEFROST
•Do not cover food.
•Brush frozen dough with oil to prevent drying out during DEFROST, remove and preheat oven before baking.
n Programming KEEP WARM
To keep food warm using your Breadmaker’s Hearth follow the BAKE instructions setting the thermostat at 150°F.
HINTS FOR KEEP WARM
•Use for short periods of time after food is cooked.
•To heat frozen foods, see instructions for defrost.
- 10 -
TOAST FUNCTION
The toaster function has programs to toast 4 or 2 slices.The TOAST function may also be used to top brown foods.
n Programming TOAST
1.Place mixer cover over mixer mechanism. Plug into a 120 V ~ 60 Hz outlet.
2.Press the TOAST button once, the 4 slice program will be displayed. If pressed again, the 2 slice program will be selected.
3.To select a desired toast color, press the UP or DOWN ARROW.The medium default setting is in the display window. Press the UP ARROW to move to a darker setting. Press the DOWN ARROW to move to a lighter setting.
4.Press the START button.The OPERATION light will come on and the oven will begin the toasting process. Three dashes and a flashing colon will appear in the display window. Once the oven determines the time necessary to toast the bread to the selected level of doneness, the dashes will change to minutes and/or seconds and begin to count down.
5.Condensation may build up on the inside of the glass door, but will evaporate during toasting.The average first program times will range from 4 - 8 1/2 minutes depending on the color chosen. Because the oven cavity is already heated the average second and additional program times will range from 2 - 6 minutes depending on the color chosen.
6.The unit will beep 3 times and the OPERATION light will flash continually when the TOAST function is COMPLETE.When door is opened the light will turn off.
7.Unplug and allow to cool completely before cleaning.
NOTE: If you wish to toast again immediately after the first program, the second and all additional programs will take less time since the oven cavity is heated. No adjustment of the color control is necessary to toast the same color. Color adjustment is only necessary if you would like the toast to be a lighter or darker shade.
HINTS FOR TOAST
•Use the 4 SLICES setting to toast 3 or 4 slices of bread. Use the 2 SLICES setting to toast 1 or 2 slices of bread.
•Follow toaster food directions.
•Frozen and heavy bread require a darker setting (e.g. bagels and English muffins).
•Remove crumbs after each use.
n Programming TOP BROWN
To top brown foods, follow the toasting instructions above but place the food on a baking pan.
HINT FOR TOP BROWN
•Top brown may be used to top brown bagels, English muffins or to melt cheese on sandwiches or casseroles.
-11 -

BREADMAKER FUNCTION
- 12 -
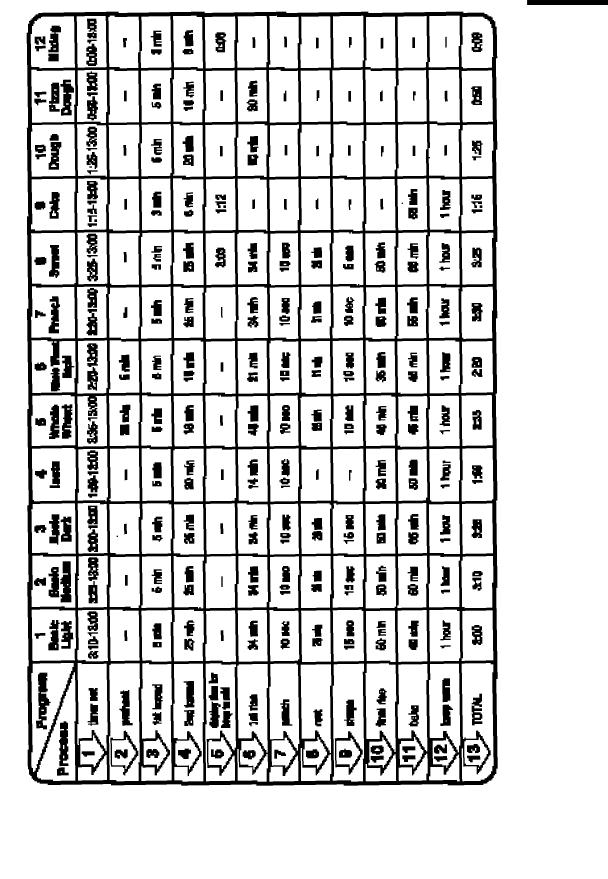
n Breadmaker Program Specifications
- 13 -
INGREDIENTS
We recommend that you read the following information before you shop for your ingredients.Your breadmaker will bake up to a 2 pound loaf of fresh bread containing approximately 4 cups of flour. All ingredients except liquids must be at room temperature and liquids should be approximately 80°F/27°C (baby bottle temperature). Always place the ingredients in the bread pan in the order listed in the recipe: liquids, dry ingredients and then yeast. Some ingredient amounts are the same for different size loaves.
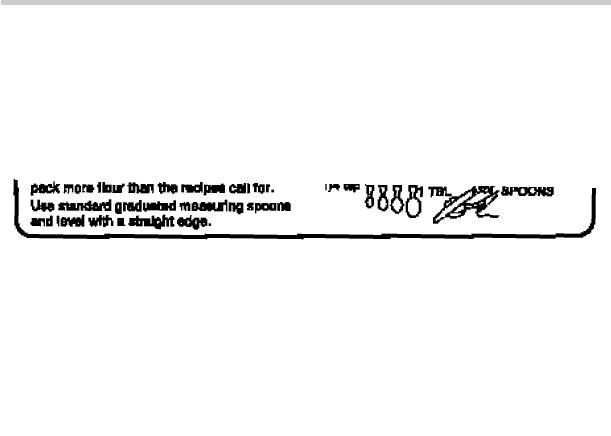
n Measuring: The Correct Way
Be sure to measure accurately for success. Mis-measuring, even slightly, can make a big difference in your results. Measure each ingredient precisely before placing it into the bread pan
n Measurement/Conversion Chart
1 1/2 tsp = 1/2 TBL
3 tsp = 1 TBL 1/2 TBL = 1 1/2 tsp
2 TBL = 1/8 cup
4 TBL = 1/4 cup
5 TBL + 1 tsp = 1/3 cup
8 TBL = 1/2 cup
12 TBL = 3/4 cup
16 TBL = 1 cup
3/8 cup = 1/4 cup + 2 TBL 5/8 cup = 1/2 cup + 2 TBL 7/8 cup = 3/4 cup + 2 TBL
n Dough Ball: Necessary for a Successful Loaf of Bread
We have found that liquid amounts called for in a recipe may need to be adjusted slightly because different climates and seasons result in a wide variety of humidity levels.You may want to check the dough ball half way through the first kneading program. At this point, the ball should be round, smoothtextured, soft and slightly tacky to the touch. If it does not form a ball and is more like a batter, add 1 tablespoon of flour at a time until it reaches the appropriate consistency. On the other hand, if the mixture is too dry to form a ball or forms more than one ball, add 1 teaspoon of water and allow it to absorb. Add more water if necessary. Provided you have used all of the ingredients specified in the recipe, measured the ingredients properly, and have a “good”dough ball, you should achieve a successful loaf of bread.
nYeast: The Number One Ingredient for Yeast Breads and Dough
We used RED STAR® Active Dry Yeast when we developed all of the bread recipes. However, RED STAR® QUICK-RISE Yeast may also be used. We found that we did not have to vary the amount used when we substituted one for the other.When using bread machine yeast, follow the package instructions.
- 14 -

A 1/4 ounce package of RED STAR® yeast contains approximately 2 1/4 level teaspoons of yeast.When the yeast is exposed to oxygen, moisture or warmth, the activity of it deteriorates. Therefore, we recommend storing yeast in an airtight container and refrigerating or freezing it. Measure out the amount you need and allow it to come to room temperature before using it — this takes about 15 minutes .
If you have any doubt regarding the activity of the yeast, you may use one of the following tests to determine its strength. Each test calls for a different amount of yeast as a base ingredient. This gives you more bread choices once the test is complete.
To test for one package (2 1/4 teaspoons) of RED STAR® Active Dry or QUICK RISE Yeast, use a liquid measuring cup and fill to the 1/2 cup level with 110°F/27°C-115°F/46°C water. Stir in 1 teaspoon granulated sugar and 1 package (2 1/4 teaspoons) RED STAR® Active Dry or QUICK RISE Yeast. Leave your stirring spoon in the cup. Set a timer for 10 minutes. As the yeast absorbs liquid, it will begin to activate and rise to the surface. If at the end of the 10 minutes the yeast has multiplied to the 1 cup mark, it is very active. The yeast mixture may be used in your Toastmaster® Breadmaker in a recipe that calls for 2 1/4 teaspoons of yeast. Remember to adjust your recipe for the 1/2 cup of water and 2 1/4 teaspoons of yeast used in the test.The sugar does not need to be adjusted.
To test for 1 1/2 teaspoons of RED STAR® Active Dry or QUICK RISE Yeast, use a liquid measuring cup and fill to the 1/4 cup level with 110°F/27°C-115°F/46°C water. Stir in 1 teaspoon granulated sugar and 1 1/2 teaspoons RED STAR® Active Dry or QUICK RISE Yeast. Leave your stirring spoon in the cup. Set a timer for 10 minutes. As the yeast absorbs liquid, it will begin to activate and rise to the surface. If at the end of the 10 minutes the yeast has multiplied to the 1/2 cup mark, it is very active. The yeast mixture may be used in your Toastmaster® Breadmaker in a recipe that calls for 1 1/2 teaspoons or more of yeast. Remember to adjust your recipe for the 1/4 cup of water and 1 1/2 teaspoons of yeast used in the test.The sugar does not need to be adjusted.
n Flour: Bread Flour is Essential for Yeast Breads and Doughs
All types of flour are affected by many factors, such as milling grades, moisture content, length of storage and manufacturing processes. Adjustments to the recipes may need to be made to compensate for climatic changes in different regions to ensure an excellent loaf.
Bread flour is a definite necessity. Milled from hard winter or spring wheat, it has a higher protein content that makes it more durable than all-purpose flour. The protein, when mixed with liquid, becomes gluten. When kneaded, gluten becomes elastic and gives the bread better structure. In contrast, all-purpose flour, milled from a combination of soft and hard wheat, becomes elastic too easily for use in a breadmaker and quickly loses its ability to stretch well. As a result, bread made from all-purpose flour will be small and dense. Several well-known mills now market bread flour. It is labeled bread flour on the package and is available at grocery stores.
Wheat is the only grain that contains the type of protein that becomes elastic when kneaded. Other flours, such as rye, barley, oats, soy, rice and buckwheat, add flavor and fiber to breads but do not add structure to the dough.Therefore, wheat flour is essential as a base when making bread.
Vital Wheat Gluten is produced by processing white flour one more step. White flour contains both protein and starch, and mills now can remove most of the starch leaving only the protein (gluten).When gluten is added to recipes containing whole grain flours, it improves the volume and shape of the loaf significantly. Many grocery stores stock gluten in the flour section. Health food and nutrition centers also carry this item.
Flour is best kept in an airtight container. If you are storing the flour for a long period of time, you may want to keep it in the freezer as the refrigerator tends to dry it out.Whole grain wheat flours, which have a higher oil content, will become rancid much more quickly than white flour and should always be kept in the freezer. Be sure, however, to allow all flours to return to room temperature before placing in the machine.
- 15 -

n All-Purpose Flour: Essential for General Baking
All-purpose flour is the finely ground endosperm of the wheat kernel separated from the bran and germ during the milling process. All-purpose flour is made from hard winter wheat or a combination of soft and hard wheats from which the home baker can make a complete range of acceptable bread products — cake, cookies and pastries, etc.The majority of all-purpose flour has iron and B-vitamins added in amounts equal to or exceeding that in the whole wheat flour.
n Semolina Flour: Preferred Flour for Pasta
Semolina is the coarsely ground endosperm of durum wheat. High in protein, it is used to make high quality pasta products. All-purpose flour may be substituted for Semolina flour in our pasta recipes.
n Cracked Wheat: Adds a Nutty Flavor
Cracked wheat is the whole kernel broken into small pieces, but is not precooked. It can be added to baked goods for a nutty flavor and crunchy texture.
n Wheat Germ: Adds Extra Nutrition
The germ of the wheat kernel is often added to baked goods and casseroles to improve the nutritional value and give a nutty, crunchy texture. The protein quality of wheat germ is comparable to that of milk. It contains about 10% fat, so should be stored in the refrigerator.You may add up to 2 tablespoons per 2 pound loaf of bread or per casserole.
n Butter or Margarine: Adds Flavor
Real butter has a wonderful rich flavor that margarine will never match. Nevertheless, in all recipes calling for butter, margarine can be substituted. Do not use reduced-fat or fat-free products.
n Fat: Dough Enhancer and Conditioner
Our bread and dough recipes call for vegetable oil.You may substitute in equal proportions solid shortening, real butter or margarine. Divide them into small pieces and make sure they are at room temperature before placing in the pan. We have found no noticeable difference in flavor but the crust may be crispier with real butter. Margarine tends to make the crust a little tougher. Light and whipped margarines do not work well.
n Liquids: Activate the Yeast and Bind the Dough
When we use the term liquid, we are referring to all wet ingredients used in the recipe. When yeast is used in a breadmaker, it is very important that the liquid temperature is 80°F/27°C (baby bottle temperature). With this temperature, the yeast activates gradually to accommodate the program of the machine. When higher temperatures are used, the yeast activates too quickly and the dough becomes too warm.
Eggs are also considered part of the total liquid amount. Eggs should be at room temperature. When removing them from the refrigerator, place them in a bowl of warm water for 15 minutes to take off the chill before use.
n Cinnamon And Garlic: Not True Friends of Yeast
Previously, cinnamon and sugar were sprinkled on dough before it was rolled up jelly-roll fashion. Adding it to the dough in a breadmaker, however, presents a problem. Cinnamon reacts with bread dough just as a meat tenderizer reacts with meat. It breaks down the structure. Although it smells wonderful as it is baking, the flavor is dissipated in the baking process. DO NOT ADD MORE THAN LISTED IN THE
RECIPE.
- 16 -

Garlic inhibits yeast activity. Again, do not add more than the quantity listed in the recipe. For more garlic flavor, use a spread for the bread rather than adding it to the dough.
n Salt: Regulates Yeast Activity
Salt is necessary to control the activity of yeast, disciplining it to work slowly and steadily. Without salt, yeast acts too rapidly. Salt also strengthens the structure of the dough. If too little or no salt is used, the bread will rise rapidly and then fall. The texture will also be coarse and/or uneven.
n Sugar: Food for Yeast
Sugar is the favorite food of yeast, but too much sugar will cause the yeast to over react. The loaf of bread will be small and dense. Dried fruits also contribute sugar to the bread dough. Use granulated sugar unless otherwise directed. When brown sugar is called for, pack it down when measuring. We do not recommend adding any more than is specified in each recipe. In addition, we do not recommend the use of artificial sweeteners because the yeast cannot react with them.
n Leavening Agents
Baking powder and baking soda are both leavening agents that help batter rise, resulting in a lighter dessert. Some recipes call for both.
n Fat: Real Extracts and Artificial/Imitation Flavors
Real extracts are made by dissolving the essential oils of ingredients, such as almonds, oranges, lemons and vanilla bean, in an alcohol base. Real extract has a stronger, richer taste than artificial/imitation flavoring and one can be substituted for the other in equal amounts.
n Substitutes
In our test kitchen, we experimented with some ingredient substitutions. We are passing on to you the only substitutions we have found to be acceptable. However, we do caution you that your results may vary significantly from ours. If you would like to try other substitutions, there are several helpful hint books available from retail stores to assist you. However, we cannot guarantee their results.
MILK
Coffee creamer, non-dairy creamer or dry buttermilk may be substituted for dry milk in equal proportions. Liquid milk (80°F/27°C) may be substituted for water in equal proportions.The dry milk may then be eliminated altogether.The loaf will be slightly smaller.
SUGAR
Honey may be substituted for sugar in equal proportions; reduce the liquid by the same amount. Brown sugar may be substituted for white sugar in equal proportions.Yeast NEEDS sugar; NO artificial sweetener should be used.
SALT
Salt-free recipes are not successful.
Dietetically sodium free (less than 5 mg sodium per serving) or low salt (less than 1/2 the sodium of table salt) may be used in equal amounts. The bread will be coarser.
EGGS
Liquid egg substitutes may be used as directed on the carton.
Two egg whites may be substituted for one whole egg.
REMEMBER, all egg products must be at room temperature.
- 17 -

n Fruits and Vegetables
When adding fruits or vegetables to recipes, do not exceed the amount listed.These products, if used in excessive amounts, may inhibit the rising of the bread.
n Nuts
Nuts are interchangeable and optional in all recipes — almonds, w alnuts, cashews or pecans.You decide. Substitute in equal amounts.
n Using the Delay Timer
If you are going to use the delay timer, make sure the yeast is added last, on top of the flour and away from all liquids.This will keep the yeast from activating until the machine starts to mix.
n Bread Mixes And Other Recipe Books
Use mixes labeled for up to 2 pound loaves. For best results, use the BASIC LIGHT program. Even though we offer a wide variety of recipes for bread and dough, you may be looking for one that we have not included in our recipe book. Breadmaker helpful hints and recipe books are available at book and retail stores. They offer a wide variety of recipes. For best results use a1 1/2 lb (3 cups) or 2 lb (4 cups) recipe to fill the Breadmaker’s Hearth pan. Refer to Breadmaker Program Specifications for the best bread program to use for other recipes. Minor adjustments may be necessary for best results.
n High Altitude
BREAD AND DOUGHS
High elevations may make dough rise faster.We recommend that you try the recipe as it is printed first. If you find the results are unsuccessful, decrease your yeast 1/4 teaspoon at a time.You may also have to increase the water; start with 2 tablespoons and increase it if necessary. The addition of gluten will help the structure of the bread.The recommended amount is 1 teaspoon per cup of flour.
GENERAL BAKING (Cakes, Quick Bread, Etc.)
You may have to make adjustments in recipes if you live above 3,000 feet. Try smaller amounts first, then make any necessary adjustment the next time you bake. Use these guidelines only IF these ingredients are in the recipe.
increase water or milk |
1-4 TBL |
decrease baking powder |
1/8-1/4 tsp |
decrease sugar |
1-3 TBL |
baking soda may require a slight reduction
At 6,000-6,500 feet, the following adjustments are recommended IF these ingredients are in the recipes:
increase water or milk |
1 TBL |
decrease baking powder |
1/4 tsp |
decrease sugar |
2 TBL |
baking soda may require a slight reduction
n Freezing Baked Breads and Rolls
When freezing breads and rolls, cool them before wrapping in plastic wrap. Place them in a plastic bag and seal it. Bread may be frozen for up to six weeks. When you thaw, partially open the wrapping to allow the moisture to escape gradually for best results.
- 18 -
 Loading...