

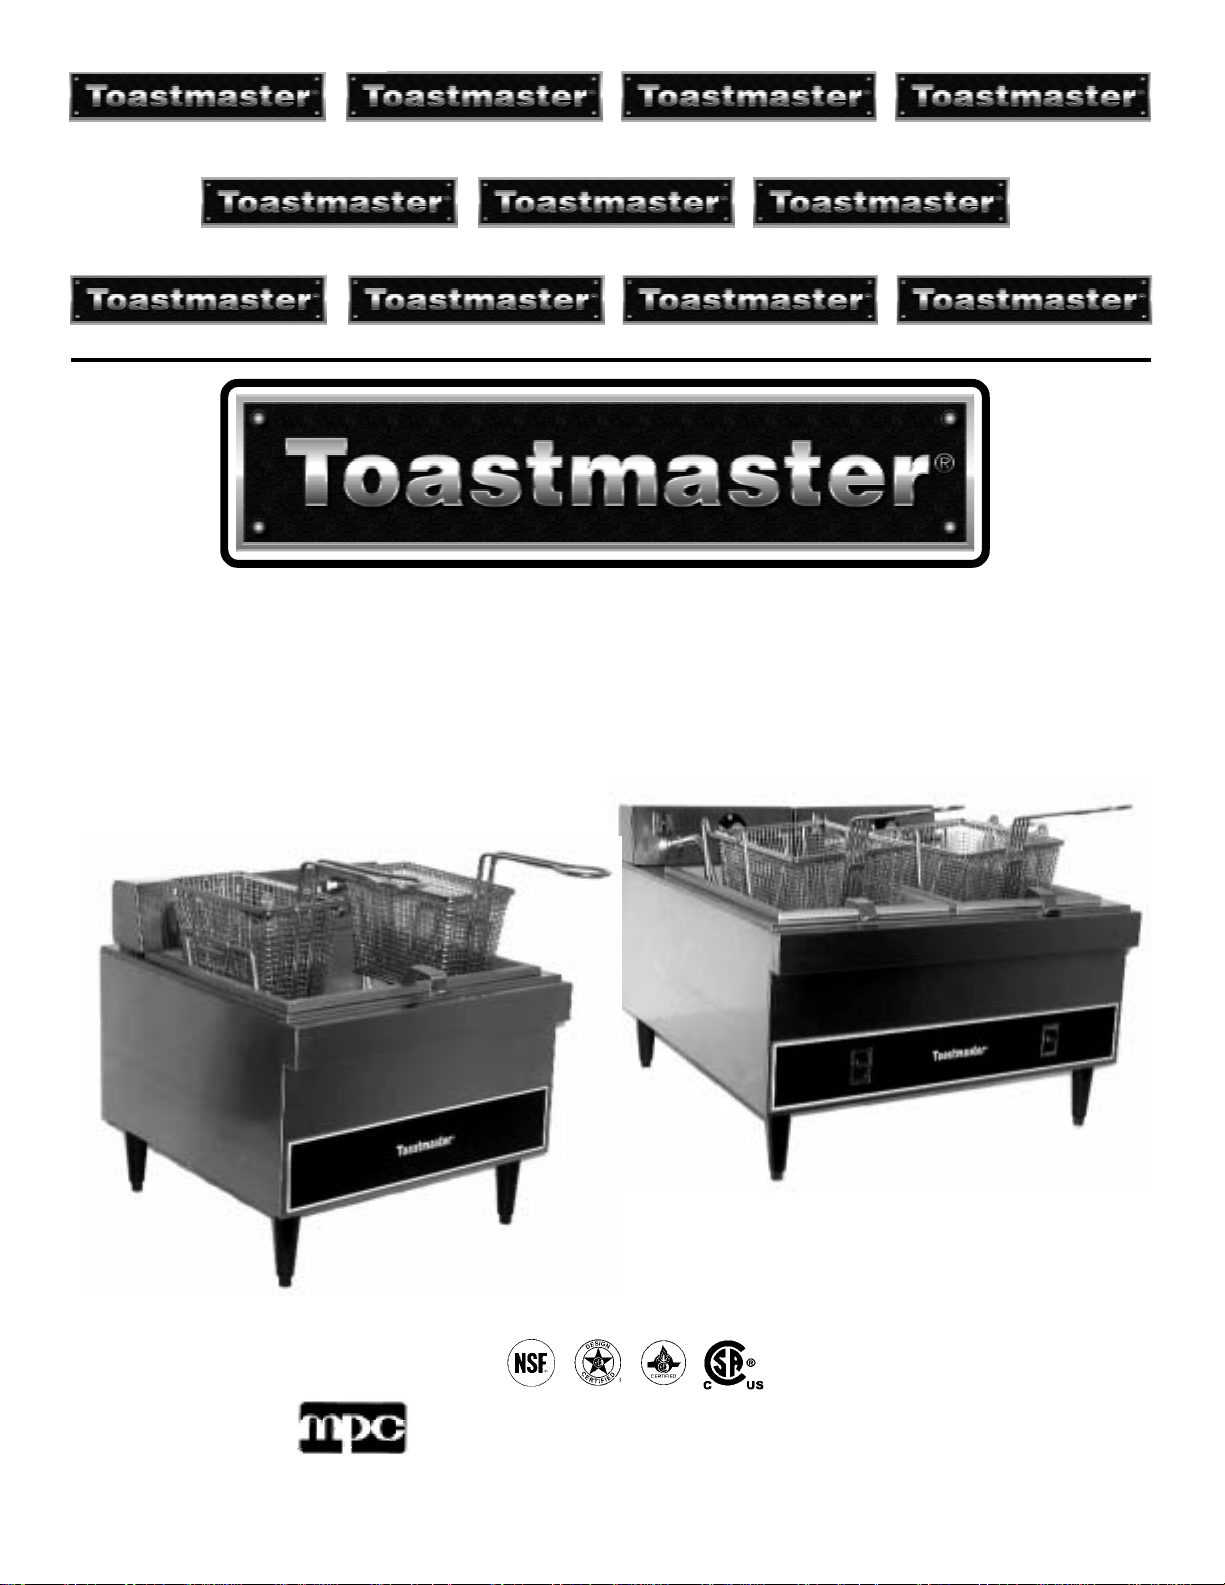
COUNTERTOP FRYERS
COUNTERTOP FRYERS
MODELS 1427 & 1439
INSTALLATION - OPERATION - MAINTENANCE
Model TECF 1439
Model TECF 1427
Middleby Philippines Corporation
113 Technology Ave., Laguna Technopark Inc., Binan, Laguna, Philippines 4024
Phone (632) 5208170 - Fax (632) 5208191 - www.middleby.com
~
MANUAL CF0105-1427-1439

COUNTERTOP FRYERS
COUNTERTOP FRYERS
Congratulations! You have purchased one of the finest pieces of heavy-duty commercial cooking
equipment on the market.
You will find that your new equipment, like all Toastmaster equipment, has been designed and manufactured
to meet the toughest standards in the industry. Each piece of toastmaster equipment is carefully engineered
and designs are verified through laboratory tests and field installations. With proper care and field maintenance,
you will experience years of reliable, trouble-free operation. For best results, read this manual carefully.
RETAIN THIS MANUAL FOR FUTURE REFERENCE.
This manual is for Toastmaster Free-Standing, Floor Model, Countertop Fryers
Table of Contents
SECTION I
Description...............................................................................................................................
Specifications & Drawings........................................................................................................
Notes........................................................................................................................................
SECTION II
Installation................................................................................................................................
SECTION III
Operation.................................................................................................................................
Notes........................................................................................................................................
SECTION IV
Parts List..................................................................................................................................
Notes........................................................................................................................................
SECTION V
Schematics..............................................................................................................................
Read these instructions carefully before attempting installation. Installation and initial startup should be performed
by a qualified installer. Unless the installation instructions for this product are followed by a qualified service
technician (a person experienced in and knowledgeable with the installation of commercial gas an/or electric
cooking equipment) then the terms and conditions on the Manufacturer’s Limited Warranty will be rendered void
and no warranty of any kind shall apply.
1-3
4-7
8
9-12
13-19
20
21-25
26
27-29
In the event you have questions concerning the installation, use, care, or service of the product, write to:
MIDDLEBY COOKING SYSTEM
Philippine Factory : 113 Technology Ave., Laguna Technopark, Binan
Laguna, Philippines, 4024 * Tel. Nos. (632) 520-8170 to 79 Fax No.: (632) 520-8191
USA Factory : 1400 Toastmaster Drive, Elgin, IL 60120 Tel. (847) 741-3300
~

COUNTERTOP FRYERS
This manual covers Models 1427 & 1439
FRY KETTLES ARE:
• Electrically heated
• Heated by Immersion type heating elements
• Thermostatic controlled
FEATURES:
• Fry Kettles features stainless steel front, sides and top.
• Equipped with 4” high adjustable legs.
• A one-piece stainless steel deep drawn shortening container(vessel).
• Furnished with welded mesh basket.
• Swing up heating elements for burn free pyrolytic cleaning.
• Overheat temperature limiting thermostat and signal light.
Toastmaster
Figure 1-1
®
1

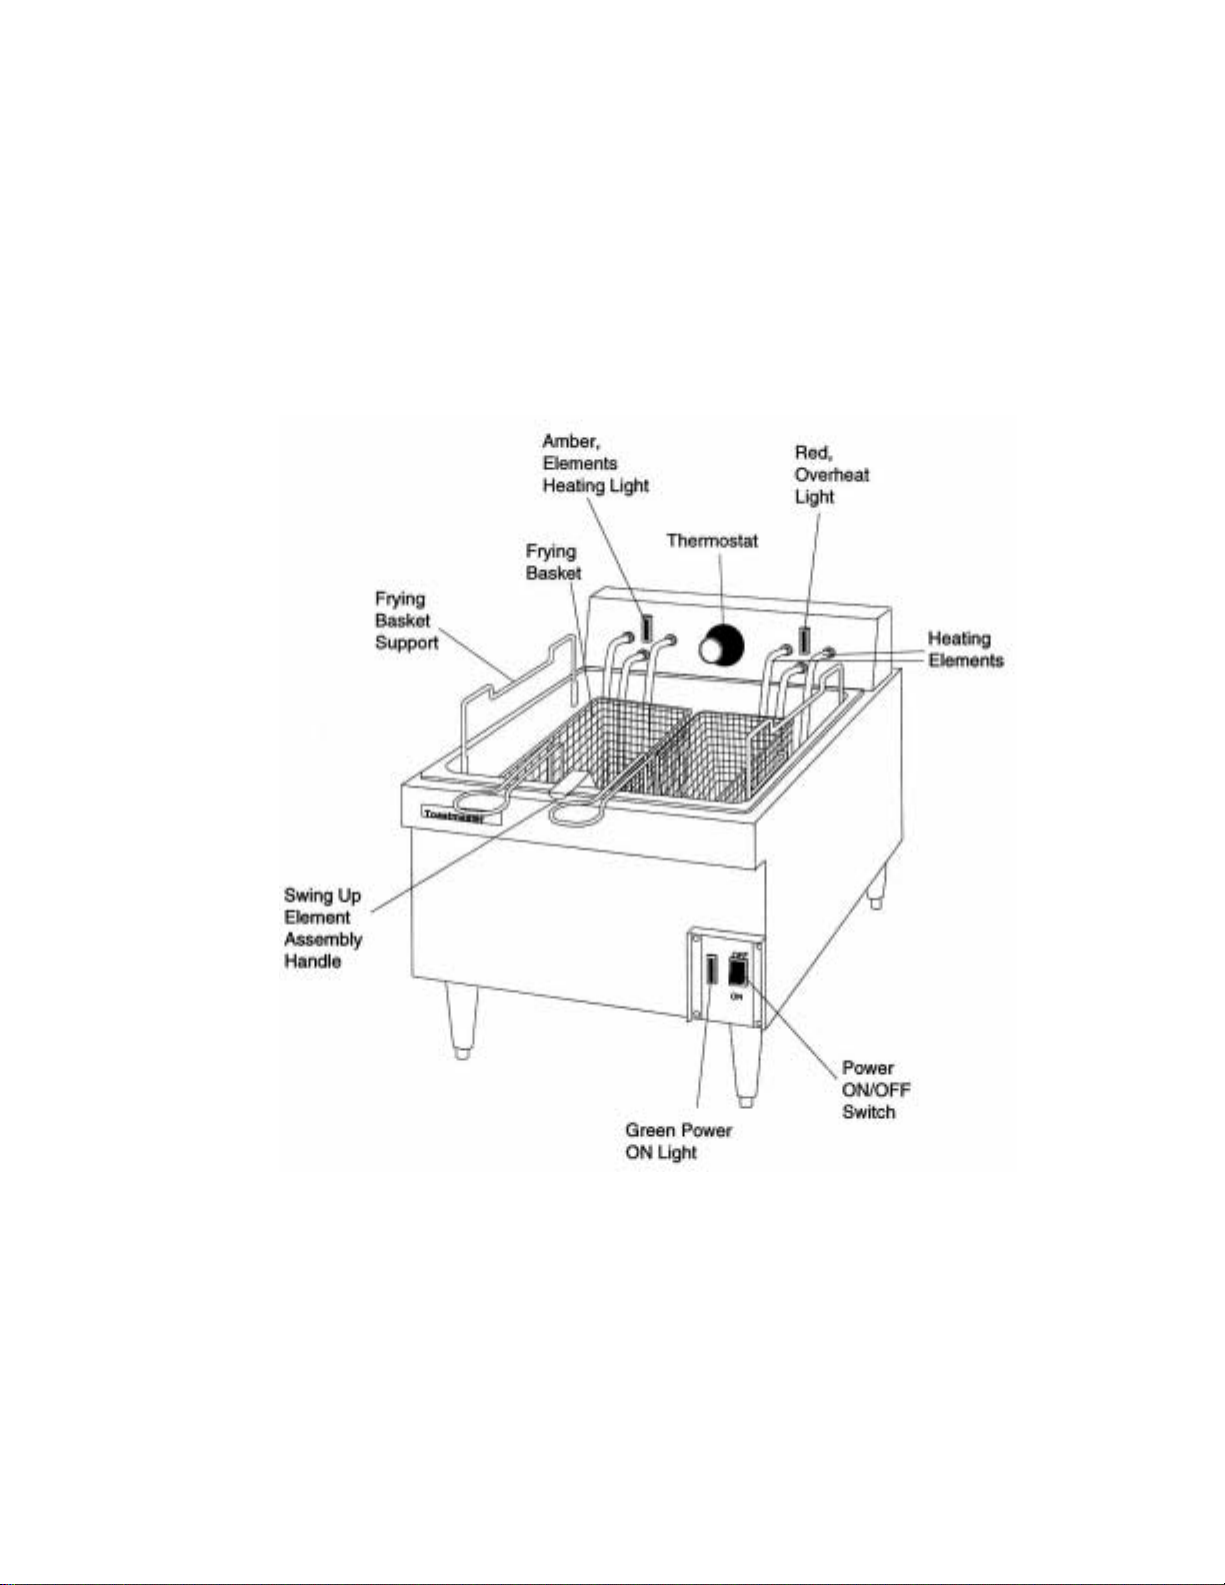
SECTION 1 - DESCRIPTION
Component Location & Function. Refer to Figure 1-2.
Toastmaster fry kettles are deep fryers designed to efficiently fry a wide variety of food products by immersion into heated
liquified shortening.
Power “ON/OFF” Switch located at front of fryer and equipped with a green signal light.
Thermostat is adjustable from 250°F to 400°F (121.1°C to 204.4°C) with a positive “OFF” setting. An amber signal
light cycles with the heating elements.
Temperature Limiting Thermostat senses overheated conditions. A red signal light illuminates when the temperature
limiting thermostat senses an overheated condition and electric current to the heating element is interrupted. The
fryer must not be operated under these conditions. The reset button for the auxiliary thermostat is located at the back
of the control housing. When the shortening has cooled to a safe temperature, the reset button may be pushed in,
and the heating elements will be re-energized. To maintain safety, use a non-metallic or non-conducting stick to reset
the thermostat.
Heating Elements heat the shortening in the container to the set temperatures. The shortening heats progressively
from the bottom and all four sides creating turbulence and thoroughly mixing the hot shortening. This results in even
temperature distribution in the frying zone above the heating elements. A comparatively undisturbed cold zone below
the heating elements is used to collect carbonized food particles.
COUNTERTOP FRYERS
Swing Up Element Assembly Handle is used to lift the element assembly out of the shortening.
CAUTION:
Do not lift the heating assembly out of the shortening
when power switch is on.
Shortening Container is the vessel which contains the shortening and the frying baskets.
Frying Baskets hold the food product during frying.
Basket Support used to hand basket from, to allow excess shortening to drain off.
2
Toastmaster
®
COUNTERTOP FRYERS
SECTION 1 - DESCRIPTION
Toastmaster
®
3

SECTION 1 - DESCRIPTION
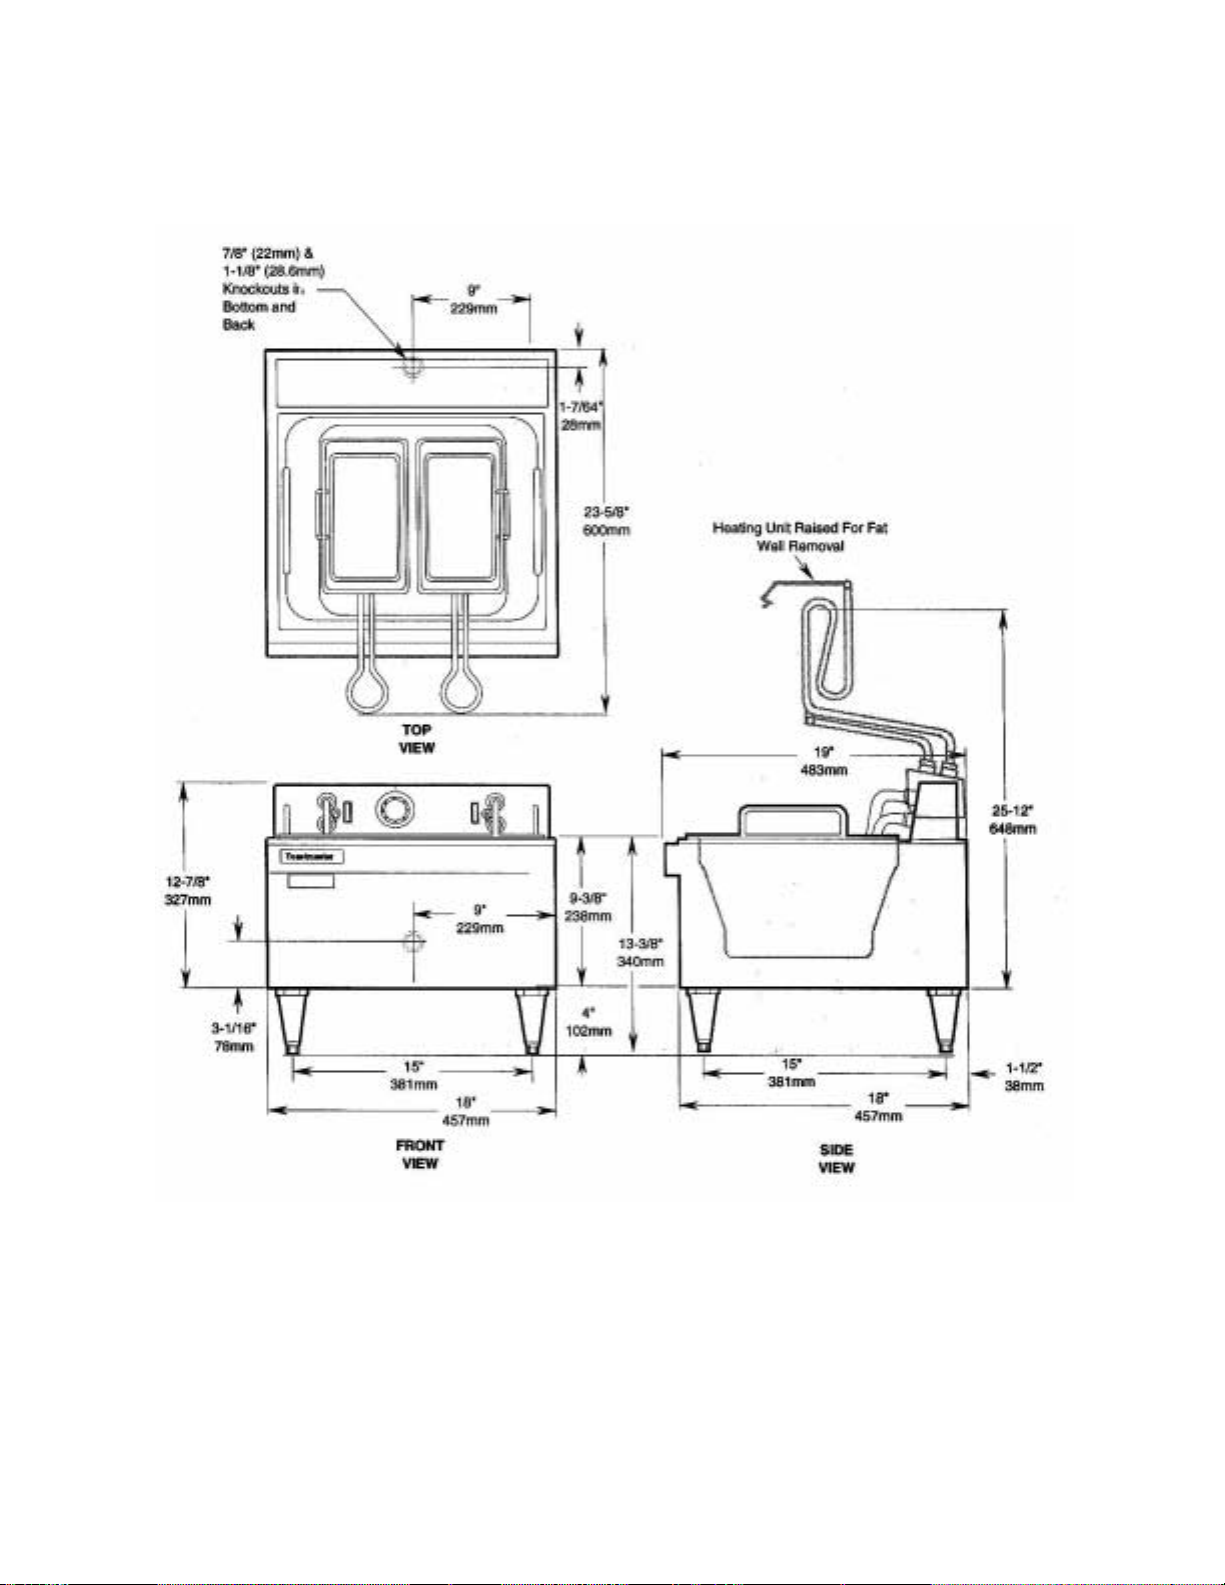
Model 1427 Specifications
Overall Dimensions: ............................18" (457 mm) Wide x
.............................................................19" (483 mm) Deep x
.............................................................13-3/8" (340 mm) High
Installed Weight: ................................. 33 lb. (14.9 kg)
Shipping Weight: .................................40 lb. (18.1 kg)
Exterior Finish: ....................................Stainless Steel Front, Sides and Top
Shortening Container (Vessel): ........... One-Piece Deep Drawn Stainless Steel,
.............................................................15 Ib Shortening Capacity
Construction: .......................................Formed and Welded Steel
Thermostat: ........................................ Adjustable from 250°F to 400°F (121.1 °C to 204.4°C)
Model 1427 Electrical Specifications
COUNTERTOP FRYERS
3 PHASE LOADING NOMINAL AMPS PER LINE WIRE MINIMUM SUPPLY WIRE
TOTAL kW PER PHASE 3 PHASE 1 PHASE SIZE (AWG)
VOLTS kW X-Y Y-Z X-Z X Y Z TOTAL 1 PHASE 3 PHASE
208V 4.5 -- -- -- -- -- -- 21.6 8 - 240V 6.0 -- -- -- -- -- -- 25.0 8 --
Note: All supply wire, to be rated 600V, 90°C
Optional Accessories:
• Extra Stainless Steel Fat Well - 1427W
• Fat Well Cover, Stainless - 1427TC
• Full Size Basket, Right - 1427BR
• Half Size Basket, Left - 1427BL
• Full Size Basket, 1427BF
• 4L4-4” Satin Nickel Finish Legs
4
Toastmaster
®
COUNTERTOP FRYERS
SECTION 1 - DESCRIPTION
Toastmaster
Figure 1-5
Model 1427 Dimension Drawing
®
5

SECTION 1 - DESCRIPTION
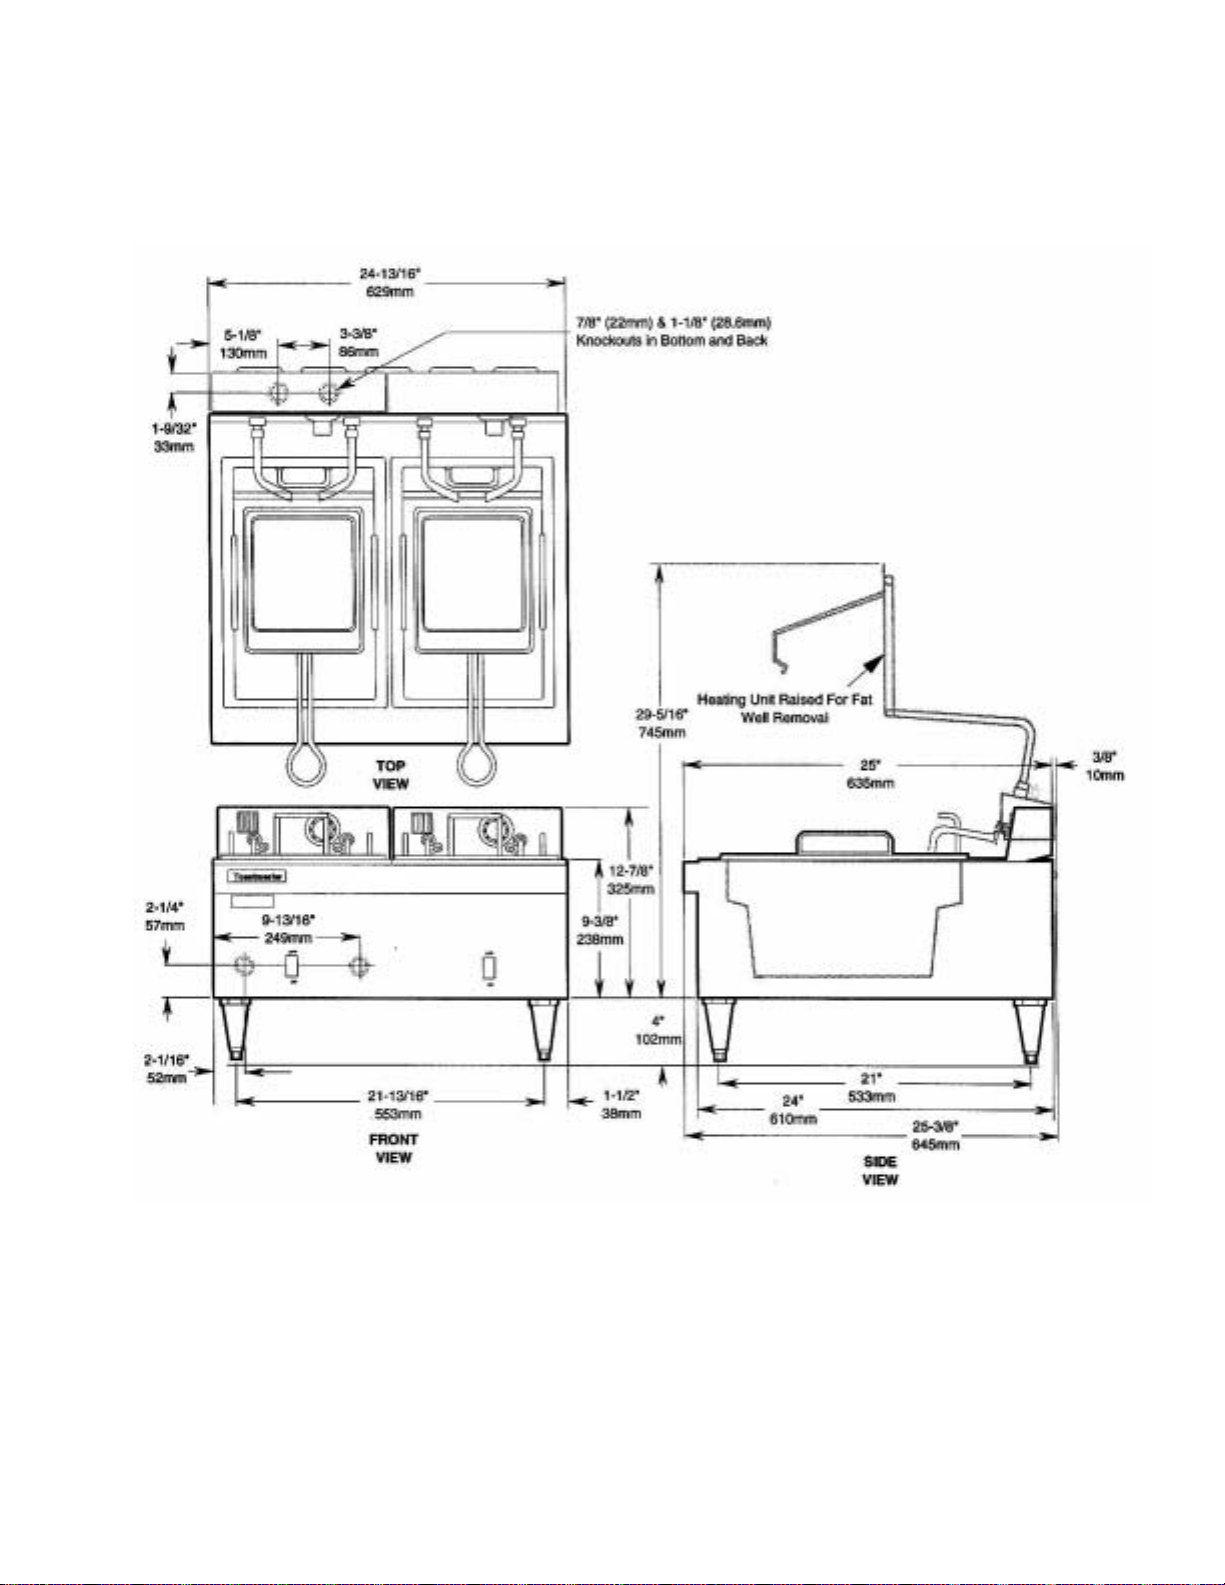
Model 1439 Specifications
Overall Dimensions: ............................24" (610 mm) Wide x
.............................................................25" (635mm) Deep x
.............................................................13-3/8" (340 mm) High
Installed Weight: ................................. 85 lb. (38.5 kg)
Shipping Weight: .................................95 lb. (43.0 kg)
Exterior Finish: ....................................Stainless Steel Front, Sides and Top
Shortening Container (Vessel): ........... One-Piece Deep Drawn Stainless Steel,
.............................................................30 Ib Shortening Capacity (2-15lb Fat Wells)
Construction: .......................................Formed and Welded Steel
Thermostat: ........................................ Adjustable from 250°F to 400°F (121.1 °C to 204.4°C)
Model 1439 Electrical Specifications
COUNTERTOP FRYERS
3 PHASE LOADING NOMINAL AMPS PER LINE WIRE MINIMUM SUPPLY WIRE
TOTAL kW PER PHASE 3 PHASE 1 PHASE SIZE (AWG)
VOLTS kW X-Y Y-Z X-Z X Y Z TOTAL 1 PHASE 3 PHASE
208V 11.4 5.7 -- 5.7 47.5 27.4 27.4 -- -- 4
240V 11.4 5.7 -- 5.7 41.2 23.8 23.8 47.5 4 6
480V 11.4 5.7 -- 5.7 20.6 11.9 11.9 23.8 10 10
Note: All supply wire, to be rated 600V, 90°C
Optional Accessories:
• Extra Stainless Fat Well - 1408W
• Full Size Basket, Right - ACBF1439
• 4 Wire, 3’ Cord with Plug, NEMA Standard 15-50P - C1550
6
Toastmaster
®
COUNTERTOP FRYERS
SECTION 1 - DESCRIPTION
Toastmaster
Figure 1-8
Model 1439 Dimension Drawing
®
7

SECTION 1 - DESCRIPTION
COUNTERTOP FRYERS
NOTES:
8
Toastmaster
®

COUNTERTOP FRYERS
A.Inspect for Shipping Damage
All shipping containers should be examined for damage before and during unloading. This equipment was carefully
inspected and packaged at the factory. The freight carrier has assumed responsibility for its safe transit and delivery.
If equipment is received in damaged condition, either apparent or concealed, a claim must be made with the
delivering carrier.
1. Apparent Damage or Loss - If damage or loss is apparent it must be noted on the freight bill or express receipt
at the time of delivery, and it must be signed by the carrier’s agent (driver). If this is not done, the carrier may
refuse the claim. The carrier will supply the necessary claim forms.
2.Concealed Damage or Loss - If damage or loss is NOT apparent until after equipment is unpacked, a request for
inspection of concealed damage must be made with carrier within 15 days. The carrier will make an inspection
and will supply necessary claim forms. Be certain to retain all contents plus external and internal packaging
materials for inspection.
B. Unpacking Fry Kettle
1. Open carton and remove it from around fry kettle, then remove the empty carton from the area.
2. Remove all tape from unit.
C. Installation
1. Mounting the legs.
a. Place a drop cloth on the work surface and place the fry kettle on its side.
b. Locate legs in plastic bag and screw them into the threaded holes in the bottom of the fry kettle. Hand tighten
the legs only.
The adjustable legs are used to level the fry kettle when final installation is complete.
2. Electrical Connection
Commercial electric deep fryers are intended for installation in accordance with NEC (National Electrical Code).
NFPA70.
Fryers must be properly grounded and electrically connected to a suitable branch circuit over current protective
device.
For supply connections use copper wire, sized in accordance with NEC and suitable for 90°C.
a. Extend conduit (flexible or rigid) and supply lines to knockout(s) provided in the fry kettle.
Refer to Figure 2-1 for location of knockout(s). Refer to schematic section for wiring and electrical data.
b. Set the fry kettle on its side as shown in Figure 2-1. Remove 2 bottom panels and then remove the shortening
container as shown in Figure 2-1.
Toastmaster
®
9

SECTION 2 - INSTALLATION
Caution: Certain models cannot be wired for single phase at certain voltages as shown in the specifications and
wire schematics in this manual.
c. Remove access cover of electrical compartment (Refer to Figure 2-1). Connect power supply to terminal block.
The fryer is wired for 3 phase. To wire for single phase, refer to the proper model wiring schematic in section 5 of
this manual.
COUNTERTOP FRYERS
10
Figure 2-1
Toastmaster
®

COUNTERTOP FRYERS
NOTE: If afire extinguishing system is to be connected to the fry kettle complete Step d. If no fire extinguisher
system is to be connected proceed directly to Step e.
d. The fry kettle is provided with an auxiliary circuit terminal block (AT1 & AT2) located adjacent to the main
terminal block provided for power supply connections (See Figure 2-1 and the Electrical Schematics).
To connect the Fire Extinguishing System, follow the steps listed below:
(1.) If the fryer has already been connected to Power Supply, TURN THE POWER OFF AT THE
CIRCUIT BREAKER PANEL.
(2.) Remove the jumper wire provided on the Auxiliary Circuit Terminal Block (AT1 to AT2).
(3.) Use knockout located adjacent to the auxiliary circuit terminal block to connect 1/2" trade size
conduit carrying two wires from the fire extinguishing system.
(4.) Make connections according to Figure 2-2 or Figure 2-3, depending upon the following:
(a.) Follow Figure 2-2 if Switch ‘S’ has the electrical ratings:
150VA, 1 Amp, 250 Volt for 208V or 240V rated fryer or
150VA, 1 Amp, 480 Volt for 480V rated fryer.
SECTION 2 - INSTALLATION
(b.) Follow Figure 2-3 if Switch ‘S’ is rated at lower voltage than the voltage of the fryer, or if voltage
is present at switch when not connected to the fryer.
Toastmaster
®
11

SECTION 2 - INSTALLATION
e. Check that all connections are tight.
f. Reassemble fry kettle and turn the circuit breaker ON.
3. Installation Check.
a. Place disconnect switch in “On” position, energizing the fry kettle. Turn thermostat dial to 250°F (121.1 °C)
for five seconds; return to “Off” position.
b. Let a few drops of water or solid shortening fall on heating elements to make sure they are heating.
COUNTERTOP FRYERS
CAUTION:
Do not touch heating elements.
c. Shortening container and heating elements must be thoroughly cleaned before placing the fryer in
operation and cooking. Refer to Cleaning in the Operation Section.
12
Toastmaster
®

COUNTERTOP FRYERS
Never stick fingers or any body parts into hot shortening.
A. Location of Controls
The following information provides a basic description of the fry kettle components, their location and the function they
perform.
CAUTION:
Bodily injury will result.
Toastmaster
Figure 3-1
®
13

SECTION 3 - OPERATION
B. Function of Controls
COUNTERTOP FRYERS
1. Power “ON/OFF” Switch
2. Power Switch Green Light
3. Thermostat Knob
(121.1°C) and the maximum set point is 400°F (204.4°C). The knob has an “OFF” position.
4. “Heating” Signal Amber Light
5. “Ove
C. Operating Tips
1. De-energize deep fryer at the end of each day’s operation.
is used to turn power to the heating elements “ON” or “OFF”.
is lit when the power is “On”.
is used to set the temperature to your requirements. The minimum set point is 250°F
is lit when the thermostat calls for heat and the elements are heating.
rheat” Signal Red Light illuminates when the heating elements are overheated.
WARNING:
KEEP THE SHORTENING LEVEL
ABOVE THE HEATING ELEMENTS.
Failure to do this will result in overheating
of the element sheaths and possible
flash fire if shortening is splashed.
2. Do not leave deep fryer in operation without an attendant.
3. Turn thermostat dial down to 250°F (121.1 °C) or turn off during idle periods.
4. As the shortening is being used, it is wearing out, consequently, the flash point (the temperature at which fire
may result by overheating of the shortening) becomes lower. Replace old shortening with new when:
• it begins bubbling excessively without food immersed,
• it tastes of foreign flavors, or
• gummy film collects on fry baskets.
5. Keep the exterior of the fry kettle clean of splashed grease.
6. Swing-up element assembly contains all heating elements and temperature controls. Do not lift heating
element assembly out of the shortening when the power switch is on Turn the thermostat dial to “OFF” before
lifting the heating elements out of the shortening.
The element assembly may be lifted and held out of the shortening by engaging the support bar against
the stop pins. Refer to Figure 3-3.
CAUTION:
Do not drop the heating elements into the fry pot.
Lower slowly so as to prevent splatter of hot shortening.
14
7. Shortening expansion is approximately 15% of capacity from room temperature to 400°F (204.4°C).
Toastmaster
®

COUNTERTOP FRYERS
D. Preparation for Operation
1. Choose a Shortening.
Choose a shortening made especially for commercial deep frying. The investment in good quality shortening
will be rewarded with a long time use and fried foods of high standards. Shortening
for frying should be bland in taste so it will not impart off flavors to foods. It is essential that the
shortening selected have a high smoke point, well above the recommended frying temperatures.
When the shortening reaches its smoking point, it begins to break down and becomes indigestible. Even
with normal use, the composition of shortening changes and the smoking point becomes
lower as it is used. Generally, hydrogenated fats, because of their high smoke point and resistance
to break down, are considered ideal for deep frying. There are a number of reputable concerns
packing shortening of this type who guarantee the smoke point of their product to be well above
400°F (204.4°C).
2. Be sure the power ON/OFF switch and the thermostat dial are at the “OFF” position.
3. Check that shortening drain valve is closed as shown in Figure 3-1.
4. Fill the cooking vessel with specified amount of shortening. Refer to Specification Chart.
WARNING: If solid shortening is used, pack tightly around heating elements. Turn power switch to ON and
set thermostat dial to 250°F (121.1 °C) until the elements are immersed in the melted shortening. Do not start
fryer from cold (OFF) to high temperatures above 250°F (121.1 °C), because heating element sheath
temperature rises continually while elements are energized, resulting in scorched shortening and hastened
fat breakdown.
SECTION 3 - OPERATION
E. Daily Operation
1. Turn the main power disconnect switch ON.
2. Turn the power switch ON. Refer to Figure 3-1.
3. Turn the thermostat control knob to the desired temperature. Allow the fry kettle to preheat until
the “Heating” Signal Light goes out. The “Heating” Signal Light will cycle on and off as the fry kettle heats.
4. To shutdown, turn thermostat dial OFF and then turn Power Switch OFF. When the “OFF” mode is depressed,
the green signal light should go out, which serves as a daily test of both operating and safety circuit contactors.
The green light remaining on after the “OFF” switch is depressed indicates contactor failure.
5. Turn main disconnect switch OFF.
NOTE: Shortening Daily Usage-
• At least once a day, cool a small amount of shortening and taste to see if it has picked up any foreign flavors.
If so, discard shortening load, clean shortening container and refill with fresh shortening.
• Revitalize Shortening.
Shortening begins to break down from the first time it is used, however, the life of good shortening may be
prolonged by the following. At least once a day, replace 15% of shortening in use with fresh shortening (the
difference between “FULL” and “ADD FAT” marks represents approximately 15% of shortening capacity of
4 1/2 pounds when shortening is hot). At all times KEEP SHORTENING LEVEL ABOVE THE TOP
HEATING ELEMENT.
Toastmaster
®
15

SECTION 3 - OPERATION
F. Deep Frying Guidelines
1. Whenever possible, drain and dry foods before frying. Excessively moist foods break down shortening, hydrolyzing
fat, thus releasing fatty acids. Such fats will soon begin to smoke and its frying value is decreased considerably.
COUNTERTOP FRYERS
CAUTION:
Do not use water around hot shortening.
The water will cause bubbling and splattering
which can cause bodily injury.
CAUTION
Do not stick body parts in hot shortening.
Extreme injury will result.
CAUTION:
Do not place items in deep fryer in such a way
as to splash shortening. Injury will result.
2. Save frying time by slowly lowering the basket into the shortening immediately after the amber signal light goes out.
At this time the shortening is at the peak of the temperature cycle.
3. Load baskets uniformly and lower loaded baskets slowly into the shortening to prevent splattering the shortening.
4. Allow foods to cook until done and/or a short extended time for extra browning.
5. Small foods such as potatoes, oysters, onion rings, etc., are more uniformly browned if the basket is lifted and shaken
several times during frying. This prevents their sticking together or to the basket.
6. Pastry enclosed foods should be kept submerged during frying.
7. Doughnuts, fritters and other foods that rise to the surface of the shortening during frying should be turned over only
once.
8. When breaded foods are prepared, strain shortening frequently.
9. To speed food service during rush hours, such foods as thick chops, chicken and potatoes may be partially cooked in
advance at a temperature of 325°F (162.8°C). For proper browning, complete frying at a higher temperature.
10. When finished cooking food, hang basket on support to allow excess shortening to drain off. Serve food while piping
hot.
11. Do not salt food directly over shortening. Salt or seasoning is another break down catalyst that shortens
shortening life.
16
Toastmaster
®

COUNTERTOP FRYERS
G. Cleaning
1. To Prolong Fat Life Strain the Shortening and Clean the Shortening Container (vessel).
Your Toastmaster fry kettle and the shortening used in it will give longer, more profitable service if the following
instructions are observed.
a. Turn the thermostat dial to OFF position.
b. Turn power switch OFF.
c. Turn main disconnect switch “OFF”.
d. IMPORTANT: Allow the shortening to cool.
CAUTION:
Never clean the
shortening
when it is hot.
Let the shortening
cool sufficiently
before any draining
or cleaning
procedures are
followed.
SECTION 3 - OPERATION
e. Grasping the
swing up handle
raise and hold the
heating elements
halfway up and allow
to drain a few
seconds as shown in
Figure 3- 2. Then
raise the elements
upright and be sure
the locking barhas
automatically locked
in place before
releasing handle as
shown in Figure 3-3.
Toastmaster
®
17

SECTION 3 - OPERATION
f. Remove any large food particles from the cooking vessel using a slotted spoon or spatula.
g. Tie 2 or 3 thicknesses of cheesecloth over the top of an empty bucket, leaving a pocket at the center.
CAUTION: Do not use plastic or glass bucket. Bucket must be large enough to hold all of the shortening.
CAUTION: Be sure shortening has cooled. Do not remove or clean hot shortening.
h. Remove shortening from fryer vessel and streain it through cheesecloth and into bucket.
I. Wash out shortening container (vessel) with soap and water or use a high grade fry pot cleaner. Rinse thoroughly
with clear water and wipe dry. WARNING: This step is very important. A very small amount of soap left in
the shortening container can ruin the shortening load. Any water remaining in the shortening container
willcause violent boiling and sputtering when shortening is hot.
j. Refill shortening vessel, refer to “D. Preparation For Operation” in this section.
2. Pyrolytic Cleaning of the Heating Elements
If considerable carbon has collected on the heating elements, it can be burned off by operating the unit with a dry
shortening container at a temperature setting of 250°F (121.1 °C) for a few minutes. The deep fryer will automatically
shut down, which will also serve as a test of your high limit shut down. Turn thermostat dial back to “OFF”, then brush
off loose carbon and clean the shortening container.
COUNTERTOP FRYERS
3. Cleaning Exterior Surfaces.
Keep all surfaces of the fry kettle free of splashed shortening or other foreign particles by washing with hot water and
soap. Rinse and wipe off excess water. Polish with a dry, soft cloth. This simple treatment not only keeps the fry kettle
free of dirt and sparkling, but eliminates the danger of shortening accumulation forming hard to remove stains if left
too long.
H. IN CASE OF FIRE
FIRST - Contact the local fire department.
SECOND - De-energize fryer at disconnect switch. This will cut off power to the heating elements and allow the shortening
to cool thus reducing the flash point temperature and making it easier to stop the fire.
THIRD - Immediately cover the shortening container with the fryer cover and/or heavy non-flammable blanket
or canvas. This will cut off oxygen to the fire.
FOURTH - Spray the fire extinguisher over the blanket or cover to seal off additional oxygen thus smothering the fire.
IMPORTANT: Do not remove the blanket or cover until the fire department arrives. The shortening may re-ignite.
CAUTION:
Do not attempt to fight a grease fire by spraying
the fire extinguisher directly on the burning shortening.
The force will cause the burning shortening to be sprayed
on adjoining equipment making it difficult to contain the fire.
2
Only use a fire extinguisher filled with C0
or Halon for flammable
liquids and oils and suitable for electric powered equipment.
Do not use water or water based extinguisher on a grease fire.
THIS IS HIGH VOLTAGE EQUIPMENT - BE SURE MAIN DISCONNECT IS “OFF” BEFORE PROCEEDING.
18
Toastmaster
®

COUNTERTOP FRYERS
I. Popular Recipes
TYPE INGREDIENTS MEASURE DIRECTIONS
Breaded Seasoned Flour 6 cups Blot moisture from food portions.
Foods Eggs 1 each Dredge in seasoned flour. Dip in egg
wash. Dredge in fine crumbs. Repeat
Bread crumbs approx. last two steps for thicker crust. NOTE:
cracker crumbs 1 pound for For liquid in egg wash use milk or half
or cornmeal 50 portions milk & half water. If condensed milk is
used, always mix half & half with water.
Milk gives best color, water a tenderer
crust. Fine cracker crumbs or cornmeal
give lighter color than bread crumbs.
Batter Eggs 6 each Sift dry ingredients together. Combine
for Fowl Milk 3 cups with milk, beaten eggs & shortening.
or Fish Flour 4 cups NOTE: Liquid may be half milk, half water
Salt 2 teaspoons or condensed milk & water. Other seaBaking Powder 1 tablespoon sonings may be added - pepper, onion,
Shortening 4 tablespoons salt, etc. Keep your batter at room temp-
erature & make small batches frequently.
SECTION 3 - OPERATION
Breaded Leg of Veal 2-3/4 pounds Cut veal slices into size approximately
Veal Cut 1/4" thick four ounces each. With point of knife
Cutlets Flour 1/4 pound sever all connecting membranes at one
(12 Salt 1/2 teaspoon inch intervals. This is important to pre-
portions) Eggs 2 each vent curling. Dredge in seasoned flour &
Milk 1/4 cup bread crumbs. (See breading directions) Bread
Crumbs 1/4 pound Fry in shortening at 365°F (184.8°C) for 4 to
5 minutes.
Fried Chicken Clean & split chicken in half. Wash & dry.
Chicken 1-1/2 pound fryers 7-1/2 pounds Roll thoroughly in seasoned flour. Fry in
(10 Salt 1 teaspoon shortening at 350°F (176.5°C) for 12 to
portions) Flour 1/2 pound 15 minutes.
Fried Clams 5 dozen Blend flour and seasonings. Stir in milk
Clams Flour 2 cups and beat in eggs. Dry clams and dip in
or Salt 3/4 teaspoon batter. Fry in shortening at 365°F
Oysters Other seasonings to taste (184.8°C) for 2 or 3 minutes.
(10 half Milk 3 cups
dozen Eggs 3 each
portions)
Toastmaster
®
19

SECTION 3 - OPERATION
COUNTERTOP FRYERS
NOTES :
20
Toastmaster
®

COUNTERTOP FRYERS
Toastmaster
®
21

SECTION 4 - PARTS LIST
COUNTERTOP FRYER 1427
COUNTERTOP FRYERS
1
3 4
2
5 6
7 8
10
11 12
9
13 14 15
17
22
16
Toastmaster
®

COUNTERTOP FRYERS
COUNTERTOP FRYER 1427
Key Part Number Qty. Description
1 TA710E8749 1 KNOB, TSTAT 250-400F
2 T1427B8701 1 THERMOSTAT, FRYER 200-400F
3 T1414B8707 1 THERMOSTAT, LIMIT CONTROL
4 1000730 1 W IRESE T 1427
5 T3001127 1 CORDSET, (6-30) 250V 30A
6 T14A2E28 1 HEATER, 240V 300W #1
7 T14A2E29 1 HEATER, 240V 300W #2
8 T1421B8705 7 CAPPILARY TUBE CLIP
9 T1456A8759 4 ADAPTOR, TUBE NUT (HEATER)
10 T1456A8739 1 BLOCK,TERMINAL
11 T1411D8709 2 GROMMET, CAPILLAR Y TUBE
12 8613783 1 WE LL, FRYER
13 T14A2S21 1 BASKET, TWIN RH
14 T14A2S22 1 BASKET, TWIN LT
15 1000106 2 LIGHT, PILOT 1/3 250, AMBER
16 S1172857 1 LEGS SET OF 4/CMS,2001
17 1800242 1 POLYPANEL, FRYER 1427
SECTION 4 - PARTS LIST
Toastmaster
®
23

SECTION 4 - PARTS LIST
COUNTERTOP FRYER 1439
1 1 3 4 5
COUNTERTOP FRYERS
6
8
9
7
11 12 13
15 16 17
10
14
24
Toastmaster
®

COUNTERTOP FRYERS
COUNTERTOP FRYER 1439
Key Part Number Qty. Description
1 TA710E8749 2 KNOB, TSTAT 250-400F
2 T1421B8703 2 THERMOSTAT, FRYER 200-400F
3 T1414B8707 2 THERMOSTAT, LIMIT CONTROL
4 T1456A8739 1 BLOCK,TERMINAL
5 1000705 1 BLOCK,TERM BLK-RAW
6 T3001778 2 HEATER, 240V 5700W
7 T1421B8705 7 CAPPILARY TUBE CLIP
8 T14A2E29 4 ADAPTOR, TUBE NUT (HEATER)
9 1000731 1 WIRESET 1439
10 T3000639 4 CONTACTOR,208/240V COIL
11 8613784 2 WELL, FRYER
12 T3100112 2 BASKET, RH - 1439
13 T19A1S145 1 SWITCH, ROCKER SPST ON-OFF
14 1000106 6 LIGHT, PILOT 1/3 250, AMBER
15 T1411D8709 4 GROMMET, CAPILLARY TUBE
16 S1172857 1 LEGS SET OF 4/CMS,2001
17 1800215 1 POLYPANEL, FRYER 1439
SECTION 4 - PARTS LIST
Toastmaster
®
25

SECTION 4 - PARTS LIST
COUNTERTOP FRYERS
NOTES :
26
Toastmaster
®

COUNTERTOP FRYERS
Toastmaster
®
27

COUNTERTOP FRYERS
28
Toastmaster
®

COUNTERTOP FRYERS
SECTION 5 - SCHEMATICS
Toastmaster
®
29

COUNTERTOP FRYERS
COUNTERTOP FRYERS
MODELS 1427 & 1439
A product with the Toastmaster name incorporates the best in durability and low maintenance. We
all recognize, however, that replacement parts and occasional professional service may be necessary to extend the useful life of this unit. When service is needed, contact a Toastmaster Authorized Service Agency, or your dealer. To avoid confusion, always refer to the model number. Serial
number, and type of your unit.
Middleby Philippines Corporation
113 Technology Ave., Laguna Technopark Inc., Binan, Laguna, Philippines 4024
Phone (632) 5208170 - Fax (632) 5208191 - www.middleby.com
~
MANUAL CF0105-1427-1439
 Loading...