


READ AND SAVE THESE INSTRUCTIONS
Bread Box™ Bread Maker
Use and Care Guide
Models 1195
?? QUESTIONS ??
Before Contacting Your Retailer Call
TOLL-FREE 1-800-947-3744
and talk to one of Toastmaster’s
Bread Box™ Experts.
WARNING: A risk of fire and electrical shock exists in all electrical appliances and may cause personal injury or death. Please follow all safety instructions.

IMPORTANT SAFEGUARDS
When using electrical appliances, basic safety precautions should always be followed to reduce the risk of fire, electric shock and injury to persons, including the following:
•Read all instructions before using the appliance.
•To protect against electrical shock do not immerse cord, plug, or appliance in water or other liquid, see instructions for cleaning.
•Do not touch hot surfaces. Always use oven mitts when handling the hot bread pan or bread.
•This appliance not for use by children.
•Unplug the unit from outlet when not in use and before cleaning. Allow to cool before attaching or removing parts.
•Avoid touching moving parts.
•Do not operate the appliance with a damaged cord or plug or after the appliance malfunctions, or has been dropped or damaged in any manner. Return the appliance to the nearest author ized service center for examination, repair, electrical or mechanical adjustment.
•Do not use outdoors.
•Do not let cord hang over edge of the table or counter or touch hot surfaces.
•Do not place on or near hot gas or electric burner, or in a heated oven.
•To disconnect, grip the plug and pull out from the wall outlet. Never pull on the cord.
•Do not use the appliance for other than the intended use.
•This product is intended for household use only.
•Use accessory attachments only if recommended by Toastmaster Inc.
SAVE THESE INSTRUCTIONS
Caution: A short power supply cord is provided to reduce the risk of personal injury resulting from becoming entangled in or tripping over a longer cord. Extension cords are available from local hardware stores and may be used if care is exercised in their use. If an extension cord is required, special care and caution is necessary. Also, the cord must be (1) marked with an electrical rating of 125 V., and at least 13 A., 1625 W., and (2) the cord must be arranged so that it will not drape over the countertop or tabletop where it can be pulled on by children or tripped over accidentally.
ELECTRIC POWER: If electric circuit is overloaded with other appliances, your breadmaker may not operate properly. BREADMAKER should be operated on a separate electrical circuit from other operating appliances.
POLARIZED PLUG: This appliance has a polarized plug (one blade is wider than the other) as a safety feature to reduce the risk of electric shock, this plug is intended to fit in a polarized outlet only one way. If the plug does not fit fully in the outlet, reverse the plug.If it still does not fit, contact a qualified electrician. Do not attempt to defeat this safety feature.
2
BEFORE YOUR FIRST USE
Carefully unpack the breadmaker and remove all packaging materials.To remove any dust that may have accumulated during packaging, wipe the bread pan, kneading blade and the outside of the breadmaker with a clean, damp cloth.Do not use harsh or abrasive cleaners on any part of the breadmaker.
Warning: Do not immerse the cord, plug, bread pan or base in water or other liquid.Do not use metal scouring pads on any part or parts of the breadmaker because pieces of the pad may break off and touch electrical parts, creating a risk of electric shock.
Place the bread machine on a dry, stable surface away from burners and away from areas where cooking grease or water may splatter onto it.
After placing the bread pan in the breadmaker, move unit toward back of counter, away from the edge.
Plug the breadmaker into a 120 volt 60 Hz AC only outlet.
IMPORTANT SAFETY TIPS
•Keep the breadmaker out of the reach of infants and children, especially while it is hot.If any control pads are accidentally touched, the operation may stop.
•Place the breadmaker at least 2 inches away from any walls.
•Do not cover the breadmaker with towels or any other material because steam would not be
able to escape. This could cause the lid to warp or change color.
•Do not remove the bread pan or insert your hand into the bread pan during operation.If you need to remove the bread pan before operation is complete, first press the STOP pad to stop operation of the breadmaker.
•Unplug unit and allow to cool. Remove any flour, bread crumbs or other materials from the inside of the inner case using a damp sponge or cloth or a small, portable vacuum cleaner.
•Do not put a larger quantity of ingredients into the bread pan than recommended.If you do so, the bread may not mix or bake correctly and the breadmaker may be damaged. The maximum amount of flour to be used for the BAKE settings is 42⁄3 cups. The maximum amount of packaged bread machine bread mixes is 4 cups. The maximum amount for DOUGH setting is 42⁄3 cups flour.
•Handle the bread pan with care. Remove the bread pan by pulling straight up on the handle. Do not turn or shake the bread pan while taking it out.If the bread pan is damaged or bent, the temperature sensor won’t work properly. Handle hot bread pan using pot holders or oven mitts.
3
TABLE OF CONTENTS |
|
IMPORTANT SAFEGUARDS . . . . . . . . . . . . . . . . . . . . . . . . . . . . . . . . . |
. . . 2 |
BEFORE YOUR FIRST USE . . . . . . . . . . . . . . . . . . . . . . . . . . . . . . . . . . |
. . . 3 |
IMPORTANT SAFETY TIPS . . . . . . . . . . . . . . . . . . . . . . . . . . . . . . . . . . |
. . . 3 |
WELCOME TO THE TOASTMASTER BREAD BOX . . . . . . . . . . . . . . . . |
. . . 5 |
MAJOR FEATURES . . . . . . . . . . . . . . . . . . . . . . . . . . . . . . . . . . . . . . . . |
. . . 5 |
NAMES AND FUNCTIONS OF PARTS . . . . . . . . . . . . . . . . . . . . . . . . . . |
. . . 6 |
CONTROL PANEL NAMES AND OPERATION . . . . . . . . . . . . . . . . . . . . |
. . . 7 |
HOWYOUR BREADMAKER WORKS . . . . . . . . . . . . . . . . . . . . . . . . . . . |
. 8-9 |
HOW TO USE YOUR BREADMAKER . . . . . . . . . . . . . . . . . . . . . . . . . . |
10-12 |
A. BAKE SETTINGS – IMMEDIATE START . . . . . . . . . . . . . . . . . . |
13-14 |
CUTTING AND STORING BREAD LOVES . . . . . . . . . . . . . . . . . |
. . 14 |
B. DOUGH SETTING – IMMEDIATE START . . . . . . . . . . . . . . . . . . |
. . 15 |
C. BAKE AND DOUGH SETTINGS – DELAYED FINISH . . . . . . . . |
15-16 |
D. BUTTER CHURN . . . . . . . . . . . . . . . . . . . . . . . . . . . . . . . . . . . . |
. . 23 |
BREAD AND DOUGH INGREDIENTS . . . . . . . . . . . . . . . . . . . . . . . . . . |
17-22 |
TROUBLESHOOTING GUIDES . . . . . . . . . . . . . . . . . . . . . . . . . . . . . . . |
24-26 |
PROPER CARE AND CLEANING . . . . . . . . . . . . . . . . . . . . . . . . . . . . . . |
. . 26 |
COMMONLY ASKED QUESTIONS . . . . . . . . . . . . . . . . . . . . . . . . . . . . . |
. . 27 |
SPECIFICATIONS . . . . . . . . . . . . . . . . . . . . . . . . . . . . . . . . . . . . . . . . . |
. . 28 |
LIMITED WARRANTY . . . . . . . . . . . . . . . . . . . . . . . . . . . . . . . . . . . . . . . |
. . 29 |
4
WELCOME TO THE TOASTMASTER BREAD BOX
Thank you for purchasing your newTOASTMASTER BREAD AND BUTTER MAKER.Your new breadmaker is an exciting appliance because it mixes, kneads and bakes the bread by itself. All you need to do is measure and add the ingredients in the correct order.You can also use the butter churn feature to churn fresh butter from cream in minutes.
Please try several loaves of bread from the accompanying Recipe Book to familiarize yourself with the breadmaker, specific breadmaker recipes, and the shape and quality of loaves your breadmaker will make. We recommend White Bread, 100% Whole Wheat Bread, Sticky Breakfast Rolls and Honey Butter, to give you some experience with the different settings.
A few things you should know:
•The method of using yeast and the order of adding ingredients to the breadmaker and different from yeast bread recipes made from scratch.
•The shape of the loaves is different from traditional bread loves. See directions for Cutting and Storing Bread Loaves on page 14.
•Accurate measuring of ingredients is very important for best results.
•After you try several loaves of bread from the recipes provided, only then should you begin to make any adjustments in the recipe ingredients or try to adapt a favorite family recipe. The more experience you have with the exact ingredient proportions, the more successful you will be when you experiment yourself.
Please take time to read the use and care information that follows as well as the information in the Recipe Book that accompanies your breadmaker. By following this information, we feel that you will be thoroughly satisfied, and will enjoy high-quality, delicious fresh bread for years to come !
Major Features
•Three loaf sizes: 1 pound, 11⁄2 pounds, and 2 pounds
•Remember 1 lb.and 11⁄2 lb. recipes or mixes will not fill the bread pan when finished. This is common.
•Butter churn.
•Eight bread settings for versatility.
•Dough setting.
•Simple operation for ease of use.
•Delayed finish function.
•Additional ingredients buzzer.
•Automatic keep warm function.
•Glass window for viewing each stage of the selected setting.
5
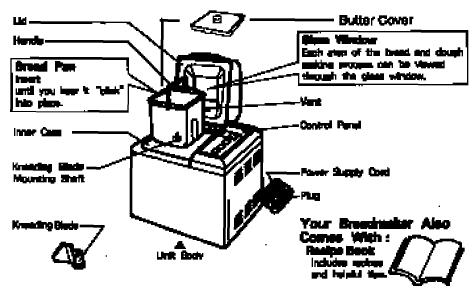
NAMES AND FUNCTIONS OF PARTS
When a bread maker is packaged for shipment, a clear plastic film is placed over the control panel as a form of protection.This film may be removed or left on when you begin using your breadmaker. If you do leave it on, it will come off with use.
6

CONTROL PANEL NAMES AND OPERATION
Be sure to press the pad until a beep is heard.
7

8
KNEAD
During the first knead, the dough ingredients are mixed together for a few minutes with the kneading blade pulsing on/off. During all knead stages, the dough is manipulated continuously. Kneading develops the gluten (elastic substance developed from protein when wheat flour is combined with liquid) that gives yeast bread its characteristic cellular structure.
PRE-HEAT
For WHOLE WHEAT settings, preheat period occurs at the beginning of the setting to allow time for the liquid to moisten the whole wheat flour and for the breadmaker’s inner case to warm.
RISE
The dough is left alone to rise.
PUNCH
Releases gas (carbon dioxide) that has built up in the dough.
SHAPE
The dough is shaped into a smooth, round ball.
FINAL RISE
The dough is left to rise and the bread is formed for baking.
BAKE
The buzzer sounds three times when baking is completed.
KEEP WARM
The inner case is kept warm automatically to prevent the bread from getting soggy.
BUTTER CHURN
The kneading blade churns the heavy whipping cream into butter. The heating element does not warm the inner case .
9
HOW TO USE YOUR BREADMAKER
The breadmaker can be programmed to perform various functions. The BAKE settings make bread from start to finish.The DOUGH setting makes dough for a variety of recipes, but you must shape it yourself, then bake it in a regular oven. For the Delayed Finish feature, the breadmaker can be programmed to make bread or dough while you are at work or asleep. For the BUTTER CHURN setting, pour in heavy whipping cream and 30 minutes later you have fresh butter.
Before Baking (Use for All Settings)
All of the settings are programmed by first following steps 1 through 9 (pages 10 through 12). Then, depending on the setting desired, refer to BAKE SETTINGSImmediate Start (page 13) DOUGH SETTINGImmediate Start (page 15), or BAKE and DOUGH SETTINGS-Delayed Finish (pages 15 and 16) to complete the process.
1.Choose a recipe from the Toastmaster Recipe Book. Read it thoroughly before you begin to bake.
2.Before adding ingredients, remove the bread pan by pulling the handle straight up. (Adding ingredients outside the breadmaker eliminates the possibility of accidentally spilling ingredients directly into the inner case.).
Attach the kneading blade onto the mounting shaft by lining up the flat sides then pushing the kneading blade down onto the mounting shaft.
•Be sure all parts are clean and free of crumbs or other food.
•If the kneading blade is not placed correctly, kneading may be affected.
3.Select fresh, high-quality ingredients, and use them in proper proportion. Even small adjustments in the type or amount of ingredients can affect the quality of the bread.
•For BAKE settings, the maximum amount of flour is 42⁄3 cups.
•For DOUGH setting, the maximum amount of flour is 42⁄3 cups.
•For packaged bread machine bread mixes, be sure that the amount of mix is not more than 4 cups. If the amount of mix is more, measure out 4 cups and adjust the yeast and water accordingly.
10
 Loading...