

READ AND SAVE THESE INSTRU C T I O N S
Bread Make r
Use and Care Guide
Recipe Book
Model 1172X
WA R N I N G : A risk of fire and electrical shock exists in all electrical appliances
and may cause personal injury or death. Please fo l l ow all safety instructions.
?? QUESTIONS ??
B e fore Contacting Your Retailer Call
TOLL-FREE 1-800-947-3744
and talk to one of To a s t m a s t e r ’s Expert s.

TABLE OF CONTENTS
IMPORTANT SAFEGUARDS . . . . . . . . . . . . . . . . . . . . . . . . . . . . . . . . . . . . . . . . . . . . . . . . . 3
BEFORE YOUR FIRST USE . . . . . . . . . . . . . . . . . . . . . . . . . . . . . . . . . . . . . . . . . . . . . . . . . . 4
n POWER OUTAGE . . . . . . . . . . . . . . . . . . . . . . . . . . . . . . . . . . . . . . . . . . . . . . . . . . . . . . . . 4
BREAD MAKER INTRODUCTION . . . . . . . . . . . . . . . . . . . . . . . . . . . . . . . . . . . . . . . . . . . . . . 5
n PARTS . . . . . . . . . . . . . . . . . . . . . . . . . . . . . . . . . . . . . . . . . . . . . . . . . . . . . . . . . . . . . . . . 5
n CONTROL PANEL . . . . . . . . . . . . . . . . . . . . . . . . . . . . . . . . . . . . . . . . . . . . . . . . . . . . . . . . 6
n FEATURES . . . . . . . . . . . . . . . . . . . . . . . . . . . . . . . . . . . . . . . . . . . . . . . . . . . . . . . . . . . . . 7
n PROGRAM SPECIFICATIONS . . . . . . . . . . . . . . . . . . . . . . . . . . . . . . . . . . . . . . . . . . . . . . 8
HELPFUL HINTS FOR BREAD AND DOUGH . . . . . . . . . . . . . . . . . . . . . . . . . . . . . . . . . . . . . 9
n MEASURING . . . . . . . . . . . . . . . . . . . . . . . . . . . . . . . . . . . . . . . . . . . . . . . . . . . . . . . . . . . 9
n DOUGH BALL . . . . . . . . . . . . . . . . . . . . . . . . . . . . . . . . . . . . . . . . . . . . . . . . . . . . . . . . . . . 9
n INGREDIENTS . . . . . . . . . . . . . . . . . . . . . . . . . . . . . . . . . . . . . . . . . . . . . . . . . . . . . . . . . 10
n SUBSTITUTES . . . . . . . . . . . . . . . . . . . . . . . . . . . . . . . . . . . . . . . . . . . . . . . . . . . . . . . . . 11
n BREAD MIXES AND OTHER COOK BOOKS . . . . . . . . . . . . . . . . . . . . . . . . . . . . . . . . . . 12
n HIGH ALTITUDE . . . . . . . . . . . . . . . . . . . . . . . . . . . . . . . . . . . . . . . . . . . . . . . . . . . . . . . . 12
n FREEZING BAKED BREAD . . . . . . . . . . . . . . . . . . . . . . . . . . . . . . . . . . . . . . . . . . . . . . . 12
n FREEZING DOUGH . . . . . . . . . . . . . . . . . . . . . . . . . . . . . . . . . . . . . . . . . . . . . . . . . . . . . . 12
PROGRAMMING . . . . . . . . . . . . . . . . . . . . . . . . . . . . . . . . . . . . . . . . . . . . . . . . . . . . . . . . . . 13
n PROGRAMMING BREAD MAKER PROGRAMS . . . . . . . . . . . . . . . . . . . . . . . . . . . . . . . . 13
n PROGRAMMING DELAY TIMER . . . . . . . . . . . . . . . . . . . . . . . . . . . . . . . . . . . . . . . . . . . . 15
RECIPES . . . . . . . . . . . . . . . . . . . . . . . . . . . . . . . . . . . . . . . . . . . . . . . . . . . . . . . . . . . . . . . . 16
n BREADS . . . . . . . . . . . . . . . . . . . . . . . . . . . . . . . . . . . . . . . . . . . . . . . . . . . . . . . . . . . . . . 16
n FAST BAKE™ BREADS . . . . . . . . . . . . . . . . . . . . . . . . . . . . . . . . . . . . . . . . . . . . . . . . . . . 33
n DAY OLD BREAD . . . . . . . . . . . . . . . . . . . . . . . . . . . . . . . . . . . . . . . . . . . . . . . . . . . . . . . 38
n DOUGHS . . . . . . . . . . . . . . . . . . . . . . . . . . . . . . . . . . . . . . . . . . . . . . . . . . . . . . . . . . . . . . 39
CLEANING AND STORING . . . . . . . . . . . . . . . . . . . . . . . . . . . . . . . . . . . . . . . . . . . . . . . . . . 55
BEFORE CALLING FOR SERVICE . . . . . . . . . . . . . . . . . . . . . . . . . . . . . . . . . . . . . . . . . . . . 56
n QUESTIONS AND ANSWERS . . . . . . . . . . . . . . . . . . . . . . . . . . . . . . . . . . . . . . . . . . . . . . 56
n CHECK LIST . . . . . . . . . . . . . . . . . . . . . . . . . . . . . . . . . . . . . . . . . . . . . . . . . . . . . . . . . . . 57
n SERVICE INFORMATION . . . . . . . . . . . . . . . . . . . . . . . . . . . . . . . . . . . . . . . . . . . . . . . . . . 59
SPECIFICATIONS . . . . . . . . . . . . . . . . . . . . . . . . . . . . . . . . . . . . . . . . . . . . . . . . . . . . . . . . . 59
RECIPE INDEX . . . . . . . . . . . . . . . . . . . . . . . . . . . . . . . . . . . . . . . . . . . . . . . . . . . . . . . . . . . 63
- 2 -

I M P O RTANT SAFEGUA R D S
When using electrical appliances, basic safety precautions should always be fo l l owed to reduce the
risk of fire, electric shock and injury to persons, including the fo l l ow i n g :
1 . Read all instructions before using this appliance.
2 . Do not immerse cord, plug, or appliance in water or other liquid (see instructions for cleaning).
3 . Do not touch hot surfa c e s. A l ways use oven mitts when handling the hot bread pan or bread.
4 . Close supervision is necessary when this appliance is used near children.
5 . This appliance is not for use by children. Keep out of reach of children.
6 . Unplug from outlet when not in use and before cleaning. A l l ow to cool before attaching or remov-
ing part s.
7 . Avoid touching moving part s.Do not remove the bread pan or insert hand into the bread pan dur-
ing opera t i o n . Stop pad must be pressed if bread pan is to be removed before completion.
8 . Do not operate the appliance with a damaged cord or plug, or after the appliance malfunctions,
or has been dropped or damaged in any manner. R e t u rn appliance to the nearest authori zed service facility for examination, repair, electrical or mechanical adjustment.
9 . Do not use outdoors or while standing in damp area.
1 0 . Do not let cord hang over edge of table or counter or touch hot surfa c e s.
1 1 . Do not place on or near hot gas or electric bu rner or in a heated ove n .
1 2 . To unplug with unit switched off, grip the plug and pull out from the wall outlet. N ever pull on the
c o r d .
1 3 . Do not use appliance for other than intended use.
1 4 . Use accessory attachments only if recommended by Toastmaster Inc.
1 5 . Do not clean with metal scouring pads. Pieces can break off the pad and touch electrical part s.
1 6 . Bread machine must be placed at least 4 inches (10.2 cm) from walls and edge of counter.
1 7 . Do not cover bread machine with anything which would prevent the steam from escaping.T h i s
m ay cause wa rp a g e, discoloration, malfunction or even fire.
S AVE THESE INSTRU C T I O N S
C AU T I O N : A short power supply cord is provided to reduce the risk of personal injury resulting from
becoming entangled in or tripping over a longer cord. Extension cords are ava i l a ble from local hardware stores and may be used if care is exercised in their use.If an extension cord is required, special
care and caution is necessary.Also the cord must be:(1) marked with an electrical rating of 125 V, and
at least 13 A., 1625 W., and (2) the cord must be arranged so that it will not drape over the countertop or tabletop where it can be pulled on by children or tripped over accidentally.
ELECTRIC POW E R : If electric circuit is ove rloaded with other appliances, your bread machine may
not operate properl y.The bread machine should be operated on a separate electrical circuit from other
o p e rating appliances.
POLARIZED PLUG:This appliance has a polari zed plug (one blade is wider than the other).As a safety feature to reduce the risk of electrical shock, this plug is intended to fit in a polari zed outlet only one
way. If the plug does not fit fully in the outlet, reverse the plug. If it still does not fit, contact a qualified
e l e c t ri c i a n . Do not attempt to defeat this safety fe a t u r e.
THIS PRODUCT IS FOR HOUSEHOLD USE ONLY.
- 3 -

BEFORE YOUR FIRST USE
U n p a ck and clean bread make r; see CLEANING AND STO R I N G .
Place the bread maker on a dry, stable surface away from bu rners and away from areas where cook-
ing grease or water may splatter onto it. Avoid placing it where it may tip over during use. Place it on
the back of a counter top.
The bread maker will bake up to a 2 pound loaf of bread. Do not put a larger quantity of ingr e d i e n t s
into the bread pan than recommended.If you do so, the bread may not mix or bake correctly and the
bread maker may be damaged.The approximate maximum amount of flour to be used is as fo l l ow s :
Bread progra m s — 4 cups
DOUGH setting — 4 2/3 cups
n P OWER OUTAG E
D u ring the bread programs if the bread maker loses power before the bake process, you can try starting the bread maker at the beginning of the cycle again for all programs except fast bake. If using
dough program, you may also try starting it at the beginning of the program again.This may not alway s
produce an acceptable loaf. If you are not sure when the outage occurred, r e m ove the dough ball
f rom the bread pan and place in an ove n - s a fe baking container. A l l ow to double in size and place in
a preheated 350°F/177°C oven for 30-45 minutes or until done.The bread should sound hollow when
tapped on the top of the loaf when it is done.
If you are using the fast bake program or if the bread has already begun to bake when the outage
o c c u r s, you must begin with new ingr e d i e n t s.
- 4 -
BREAD MAKER INTRO D U C T I O N
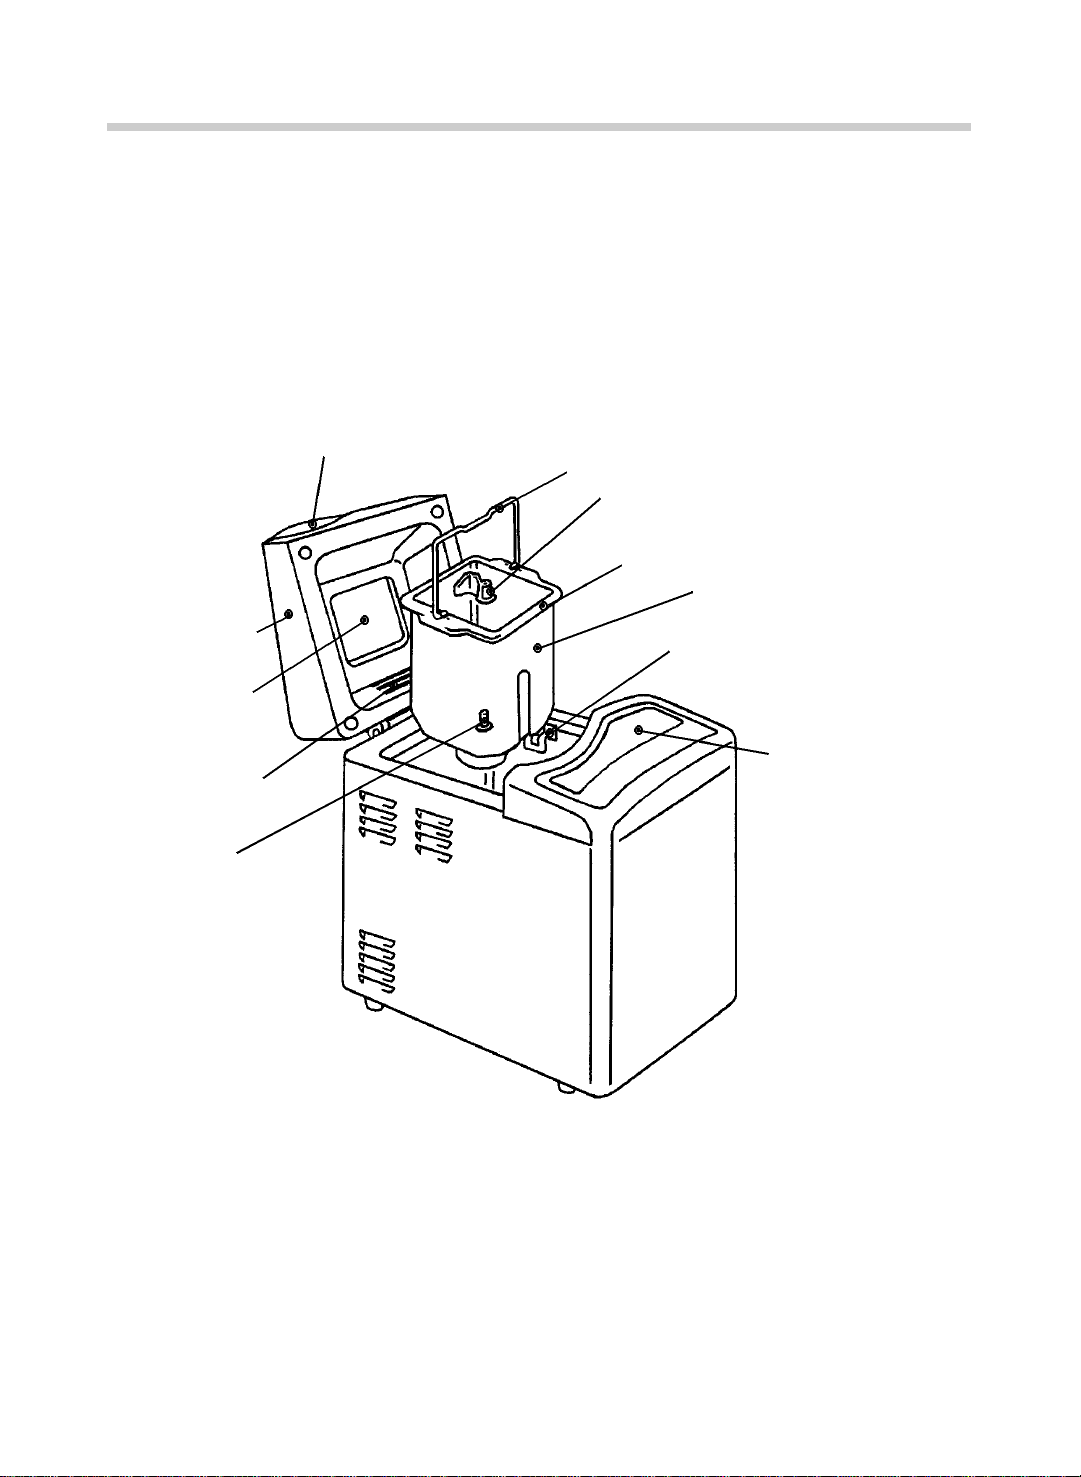
n PA RT S
L i d
V i ew i n g
W i n d ow
Air Exhaust
Shaft
(Rotates the
kneading
blade)
H a n d l e
Bread Pan Handle
Kneading Blade
(Flat side dow n )
Front
Bread Pa n
Bread Pan Clip
C o n t rol Pa n e l
- 5 -
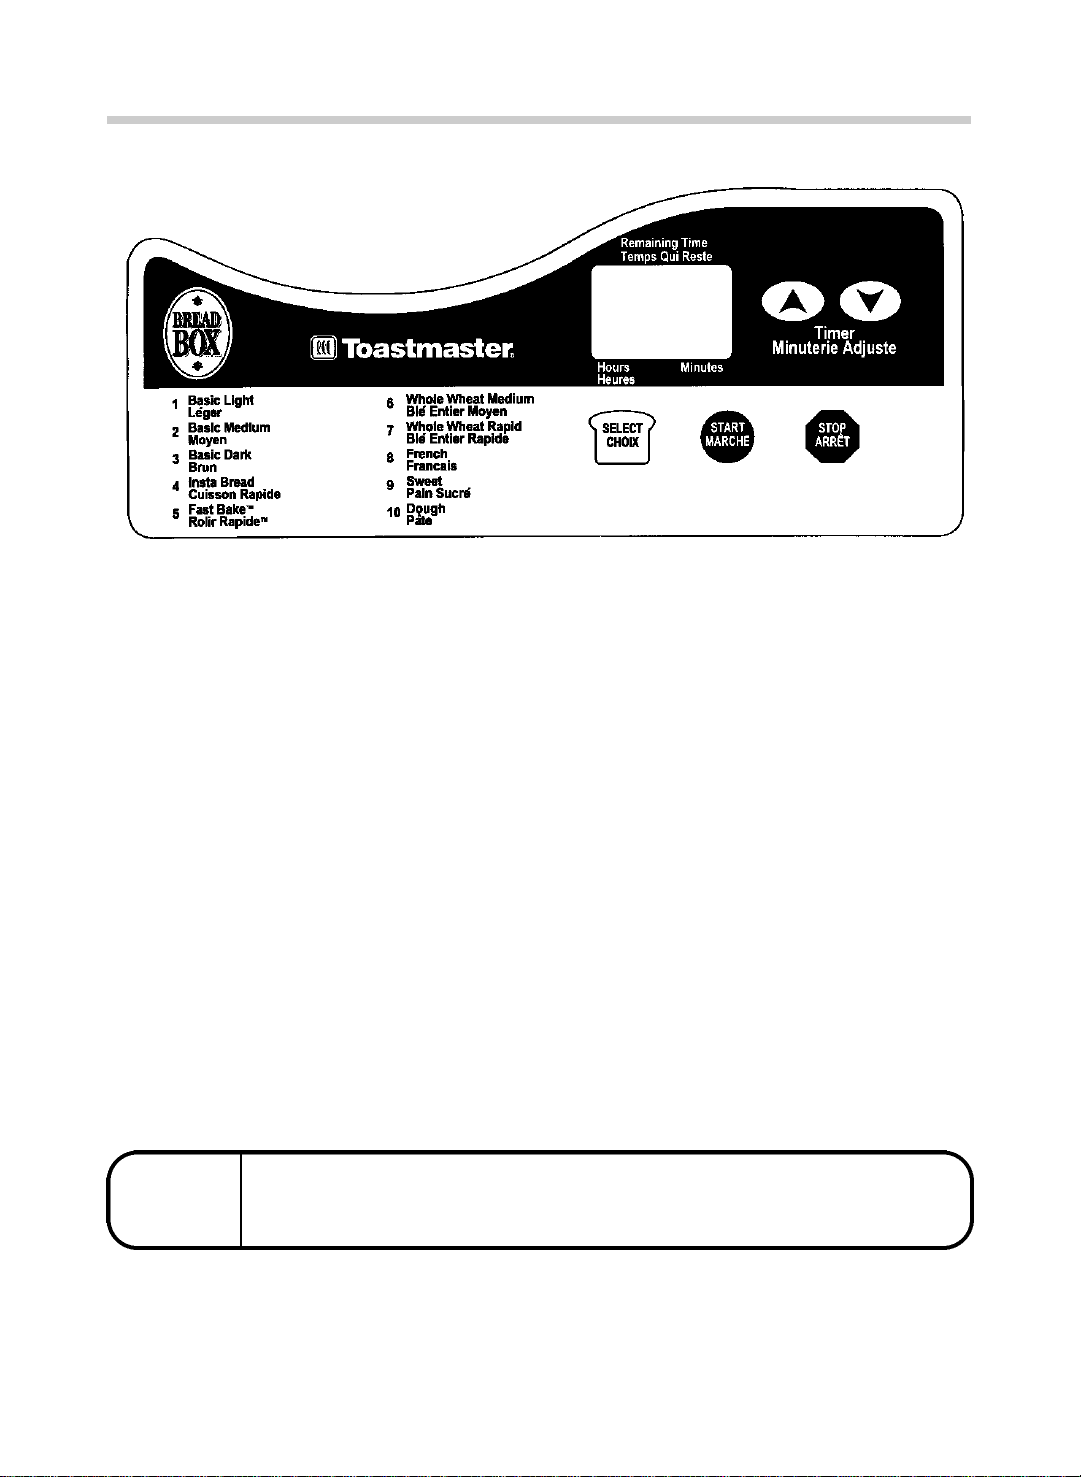
n C O N T ROL PA N E L
T I M E R
After progra m
has been
selected, press
timer arrows to
d e l ay progra m .
The time will
a d vance by 10
m i nute interva l s.P r e s s
S TA RT and
the colon will
bl i n k .
When a bread maker is packaged for shipment, a clear plastic film is placed over the control panel
as protection; carefully peel it off.
D I S P L AY
W I N D OW
Indicates the
number of program, amount
of time left fo r
c o m p l e t i o n ,
and display
s i g n a l s.
S E L E C T
Press to
select the
p r o gra m .
S TA RT
After selecting
the progra m
and timer (if
needed), press
to start the
p r o gram or
timer count
d ow n .
S TO P
Press fo r
more than 2
s e c o n d s
d u ring the
cycle to
cancel a
p r o gra m .
P RO G R A M
C A N C E L
P ROGRAM SELECT RECALL
If you have started your bread and are not sure which program you have selected, you may recall this
i n fo rm a t i o n . Press the SELECT pad at any t i m e.The number of the program will appear in the display
w i n d ow. Press the SELECT pad again to return to amount of time left for completion of progra m .
If you want to cancel the selected program, press the STOP pad and hold it
d own for more than 2 seconds at any time during the cycle.
- 6 -

n F E AT U R E S
P ROGRAM SELECT
The control panel will let you choose different progra m s.
The Basic, Fast Bake and Sweet programs contain an audible signal to add additional ingr e d ients (i.e., ra i s i n s, nuts) or to check the dough ball.
• Basic . . . . . . . . . . . . . . . . . . . . . . . . . . . . . . . . . . . . . . . . . . . . . . . . . . . . . . . . . . . . . . Use this program for basic bread recipes.Yo u
m ay choose light, medium or dark crust color.
1 , 2 , 3
• Insta. . . . . . . . . . . . . . . . . . . . . . . . . . . . . . . . . . . . . . . . . . . . . . . . . . . . . . . . . . . . . . . . M a ke bread in under two hours by using this
4
• Fast Bake. . . . . . . . . . . . . . . . . . . . . . . . . . . . . . . . . . . . . . . . . . . . . . . . . . . . . . . . M a ke bread in less than one hour by using
5
Use for most prepackaged bread mixe s.
p r o gram on recipes indicated with a 4 in the
Bread Recipe Index .Simply omit the amount
of active dry yeast called for in the recipe and
use the larger amount of active dry yeast listed for Insta Program instead.The bread may
be shorter and more dense.
this progra m . Simply use the special instru c-
tions and recipes found in the Fast Bake
Bread section of this recipe book.
• Whole Wheat Medium. . . . . . . . . . . . . . . . . . . . . . . . . . . . . . . . . . . . If a recipe contains more than 50% whole
wheat flour or when instructed in the recipe,
6
• Whole Wheat Rapid . . . . . . . . . . . . . . . . . . . . . . . . . . . . . . . . . . . . . . S ave time on recipes indicated with a 7 in
7
• French . . . . . . . . . . . . . . . . . . . . . . . . . . . . . . . . . . . . . . . . . . . . . . . . . . . . . . . . . . . . This program is best suited for breads low in
8
• Sweet. . . . . . . . . . . . . . . . . . . . . . . . . . . . . . . . . . . . . . . . . . . . . . . . . . . . . . . . . . . . . . This program wo rks best if a recipe is high in
use this progra m . D u ring the first 5 minu t e s,
the bread maker is preheating prior to first
k n e a d .
the Bread Recipe Index by using this progra m .Simply omit the amount of active dry
yeast called for in the recipe and use the larger amount of active dry yeast listed for W h o l e
Wheat Rapid Program instead.
fat and sugar, which results in a crisp cru s t
and coarse, chewy interi o r.
s u g a r, fat, eggs or cheese.
9
• Dough . . . . . . . . . . . . . . . . . . . . . . . . . . . . . . . . . . . . . . . . . . . . . . . . . . . . . . . . . . . . This program is used to prepare dough fo r
making bread or rolls which are shaped
1 0
b e fore baking in a conventional ove n .
- 7 -

n P ROGRAM SPECIFICAT I O N S
P ro c e s s
1
2
3
4
5
6
7
8
9
1 0
P ro g r a m
d e l ay timer
p r e h e a t — — — — — 5 min — — — —
1st knead 3 min 3 min 3 min 3 min 2 min 4 min 4 min 3 min 3 min 3 min
2nd knead 27 min 27 min 27 min 27 min 9 min 22 min 22 min 27 min 27 min 27 min
d i s p l ay time
for beep*
1st ri s e 70 min 70 min 70 min 44 min 16 min 50 min 18 min 38 min 33 min 70 min
p u n c h 20 sec 20 sec 20 sec — — 15 sec 10 sec 20 sec 20 sec —
2nd ri s e 70 min 70 min 70 min — — 26 min 15 min 28 min 28 min —
p u n c h — — — — — 3 sec 3 sec 20 sec 20 sec —
3rd ri s e — — — — — 68 min 54 min 64 min 69 min —
1 2 3 4 5 6 7 8 9 10
B a s i c
L i g h t
3 : 5 0 - 1 2 : 0 0 4 : 0 0 - 1 2 : 0 0 4 : 1 0 - 1 2 : 0 0 2 : 0 9 - 1 1 : 5 9 — 4 : 0 0 - 1 2 : 0 0 3 : 0 0 - 1 2 : 0 0 4 : 0 0 - 1 2 : 0 0 3 : 4 0 - 1 2 : 0 0 1 : 5 0 - 1 2 : 0 0
B a s i c
M e d i u m
3 : 1 6 3 : 2 6 3 : 3 6 — : 5 3 — — — 3 : 0 6 —
B a s i c
D a r k
I n s t a
Fa s t
B a k e
W h o l e
W h e a t
M e d i u m
W h o l e
W h e a t
R a p i d
F r e n ch
S w e e t
D o u g h
1 1
b a ke 50 min 60 min 70 min 45 min 32 min 55 min 55 min 70 min 50 min —
1 2
hold wa rm 1 hour 1 hour 1 hour 1 hour — 1 hour 1 hour 1 hour 1 hour —
1 3
e n d 0 : 0 0 0 : 0 0 0 : 0 0 0 : 0 0 0 : 0 0 0 : 0 0 0 : 0 0 0 : 0 0 0 : 0 0 0 : 0 0
TOTA L 3 : 4 0 3 : 5 0 4 : 0 0 1 : 5 9 : 5 9 3 : 5 0 2 : 5 0 3 : 5 0 3 : 3 0 1 : 4 0
*Display time for beep tells you when to add additional ingredients, i.e. raisins or nuts, in
specialty breads or to check the dough ball and scrape ingredients from the sides of the pan.
The beeper sounds when baking is complete. If you want to serve bread that has just been
baked, press STOP pad and remove.You may remove the bread or leave it in the bread
maker. If left, it will automatically be kept warm for up to 1 hour during the hold warm process
on all bake cycles except Fast Bake. The display window will show 0:00, and the colon will
flash. At the end of the keep warm, the colon will stop flashing and the display will read 0:00.
- 8 -
HELPFUL HINTS FOR BREAD AND DOUGH
We recommend that you read the following information before you shop for your ingredients.Your bread
maker will bake up to a 2 pound loaf of fresh bread containing approximately 4 cups of flour. All ingredients except liquids must be at room temperature and liquids should be approximately 80°F/27°C (baby
bottle temperature).When preparing bread for the Fast Bake program, all liquid temperatures must be
110°-115°F/43°-46°C.Always place the ingredients in the bread pan in the order listed in the recipe: liquids, dry ingredients and then yeast. Some ingredient amounts are the same for different size loaves.
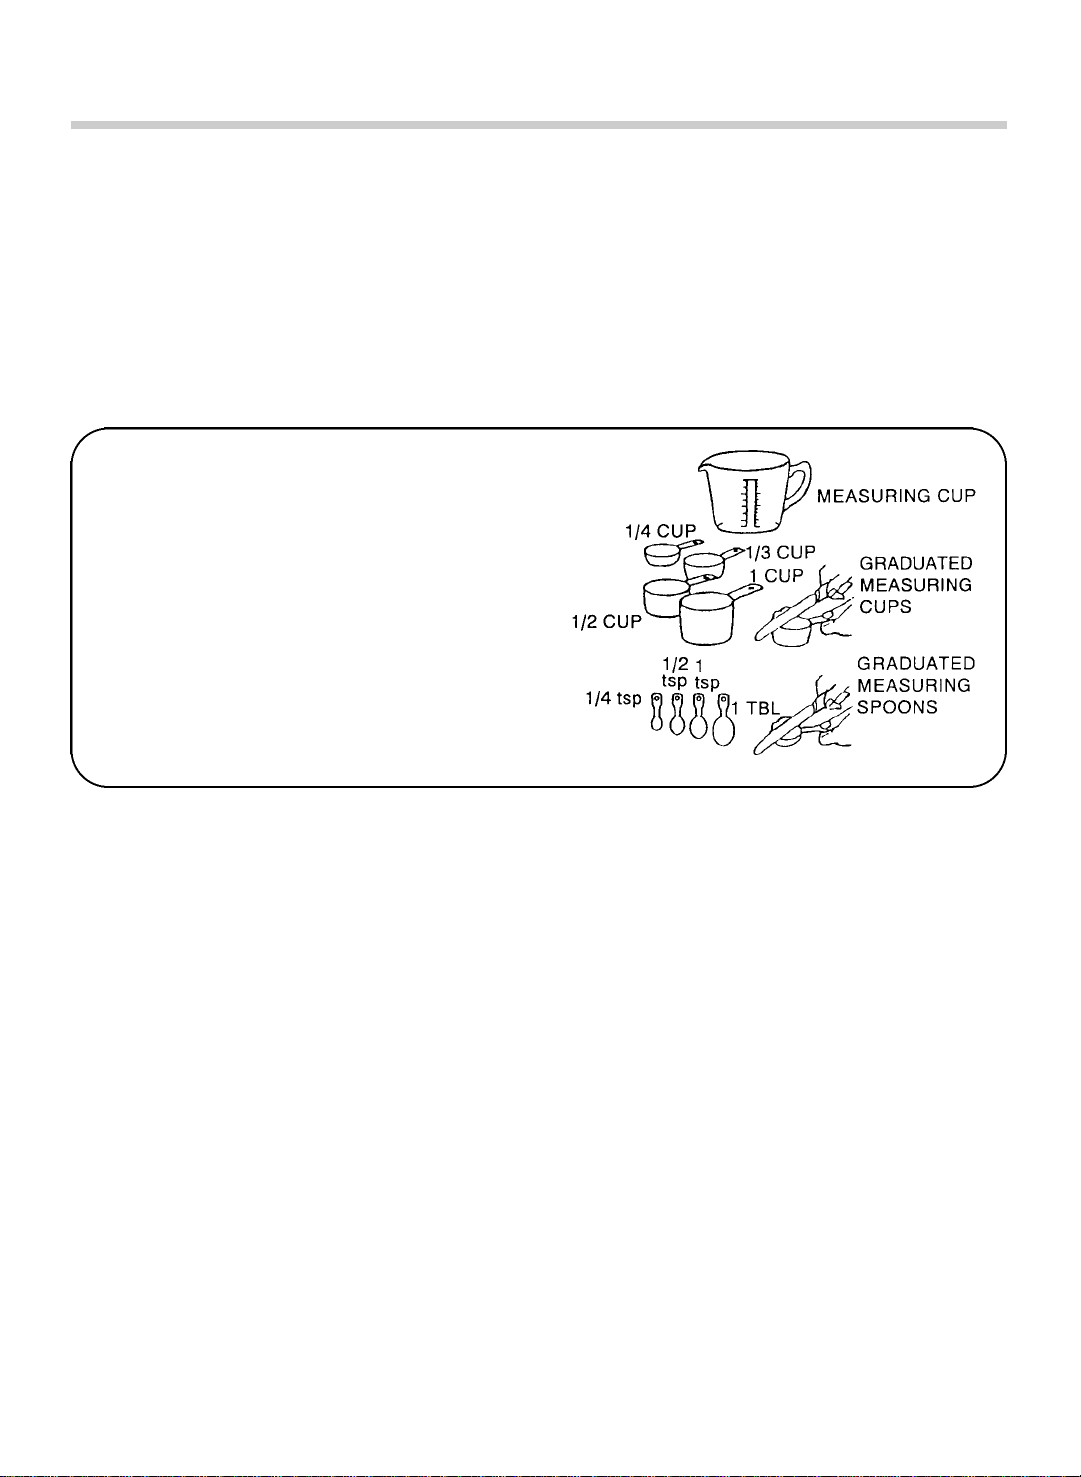
n M E A S U R I N G :THE CORRECT WAY
Be sure to measure accurately for success. Mis-measuring, even slightly, can make a big difference in
your results.
When you are measuring liquids, use a clear
glass or plastic liquid measuring cup.To ensure
accuracy, set the measuring cup on the counter
top and read the measurement at eye level.
To measure your flour, spoon it lightly into a
standard dry ingredient measuring cup and level
it with a straight edge. Also, do not shake the
cup or tap it on the counter top.Do not scoop
the flour with the measuring cup as this tends to
pack more flour than the recipes call for.
Use standard measuring spoons and level with
a straight edge.
Me a s u r e m e n t / C o nv e rsion Chart
1 1/2 tsp = 1/2 T B L 8 T B L = 1/2 cup
3 tsp = 1 T B L 12 T B L = 3/4 cup
1/2 T B L = 1 1/2 tsp 16 T B L = 1 cup
2 T B L = 1/8 cup 3/8 cup = 1/4 cup + 2 T B L
4 T B L = 1/4 cup 5/8 cup = 1/2 cup + 2 T B L
5 TBL + 1 tsp = 1/3 cup 7/8 cup = 3/4 cup + 2 T B L
n DOUGH BA L L :N E C E S S A RY FOR A SUCCESSFUL LOAF OF BREAD
We have found that liquid amounts called for in a recipe may need to be adjusted slightly because diffe rent climates and seasons result in a wide va riety of humidity leve l s.You should check the dough ball at
the beep during the kneading process, see program specifications. At this point, the ball should be round,
s m o o t h - t extured, soft and slightly tacky to the touch.When touched it will leave a little dough on your fing e r.Push down any dough or flour that may be on the sides of the pan. If it does not fo rm a ball and is
more like a batter, add 1 tablespoon of flour at a time until it reaches the appropriate consistency. On the
other hand, if the mixture is too dry to fo rm a ball, fo rms more than one ball, or is a ball but not soft and
slightly tack y, add 1 teaspoon of water and allow it to absorb.Add more water if necessary. P r ovided yo u
h ave used all of the ingredients specified in the recipe, measured the ingredients properl y, and have a
" g o o d ” dough ball, you should achieve a successful load of bread.
When preparing bread in the Fast Bake program, the dough ball will be a ve ry soft, loose ball with a
smooth texture and will be sticky to the touch.When touched it will leave dough on your finger.
9

n I N G R E D I E N T S : READ BEFORE SHOPPING
Ye a s t :The Number One Ingredient
For all programs except fast bake we used RED STA R®A c t i ve Dry Yeast when we developed the bread
r e c i p e s.H oweve r, RED STA R®QUICK•RISE™ Yeast may also be used. We found that we did not have to
va ry the amount used when we substituted one for the other.When using bread machine yeast, fo l l ow the
p a ckage instru c t i o n s.
When developing the fast bake program, we found that Quick • R i s e, Bread Machine or Instant Active Dry
Yeast must be used.T h ey may be substituted in equal amounts.You will find that this program requires
more yeast than other progra m s.
RED STAR QUICK•RISE yeast must be used for all gluten-free recipes.
A 1/4 ounce package of RED STAR yeast contains approximately 2 1/4 level teaspoons of ye a s t .W h e n
the yeast is exposed to oxygen, moisture or wa rmth, the activity of it deteri o ra t e s.T h e r e fo r e, we recommend storing yeast in an airtight container and refri g e rating for up to 6 weeks or freezing it for up to 6
m o n t h s.Measure out the amount you need and allow it to come to room temperature before using it —
this takes about 15 minu t e s.
If you have any doubt regarding the activity of the yeast, you may use one of the fo l l owing tests to determine its strength. Each test calls for a different amount of yeast as a base ingr e d i e n t .This gives you more
bread choices once the test is complete.The yeast mixture should not be used for the fast bake progra m .
To test for one package (2 1/4 teaspoons) of RED STAR Active Dry or QUICK•RISE Yeast, use a liquid
m e a s u ring cup and fill to the 1/2 cup level with 110°-115°F/43°-46°C wa t e r.Stir in 1 teaspoon gra nu l a t e d
sugar and 1 package (2 1/4 teaspoons) RED STAR Active Dry or QUICK•RISE Ye a s t . L e ave your stirri n g
spoon in the cup. Set a timer for 10 minu t e s. As the yeast absorbs liquid, it will begin to activate and ri s e
to the surfa c e.If at the end of the 10 minutes the yeast has multiplied to the 1 cup mark, it is ve ry active.
The yeast mixture may be used in your To a s t m a s t e rbread maker in a recipe that calls for 2 1/4 teaspoons
of ye a s t . Remember to adjust your recipe for the 1/2 cup of water and 2 1/4 teaspoons of yeast used in
the test.The sugar does not need to be adjusted.To test for 1 1/2 teaspoons of RED STAR Active Dry or
QUICK•RISE Yeast, use a liquid measuring cup and fill to the 1/4 cup level with 110°-115°F/43°-46°C
wa t e r. Stir in 1 teaspoon gra nulated sugar and 1 1/2 teaspoons RED STAR Active Dry or QU I C K • R I S E
Ye a s t . L e ave your stirring spoon in the cup. Set a timer for 10 minu t e s.As the yeast absorbs liquid, it will
begin to activate and rise to the surfa c e.If at the end of the 10 minutes the yeast has multiplied to the 1/2
cup mark, it is ve ry active.The yeast mixture may be used in your Toastmaster bread maker in a recipe
that calls for 1 1/2 teaspoons or more of ye a s t . Remember to adjust your recipe for the 1/4 cup of wa t e r
and 1 1/2 teaspoons of yeast used in the test.The sugar does not need to be adjusted.
F l o u r : Bread Flour is Essential for Bread
All types of flour are affected by many fa c t o r s, such as milling gra d e s, moisture content, length of stora g e
and manu fa c t u ring processes. Adjustments to the recipes may need to be made to compensate for climactic changes in different regions to ensure an excellent loaf.
Bread flour is a definite necessity. Milled from hard winter or spring wheat, it has a higher protein content
that makes it more dura ble than all-purpose flour.The protein, when mixed with liquid, becomes gluten.
When kneaded, gluten becomes elastic and gives the bread better stru c t u r e. In contrast, all-purpose flour,
milled from a combination of soft and hard wheat, becomes elastic too easily for use in a bread make r
and quickly loses its ability to stretch we l l . As a result, bread made from all-purpose flour will be smaller
and more dense.S eve ral we l l - k n own mills now market bread flour. It is labeled bread flour on the package and is ava i l a ble at gr o c e ry stores.
Wheat is the only grain that contains the type of protein that becomes elastic when kneaded. Other flours,
such as rye, barl ey, oats, soy, rice and bu ckwheat, add flavor and fiber to breads but do not add stru c t u r e
to the dough.T h e r e fo r e, wheat flour is essential as a base when making bread.
Vital Wheat Gluten is produced by processing white flour one more step.White flour contains both protein
and starch, and mills now can remove most of the starch leaving only the protein (gluten).When gluten is
added to recipes containing whole grain flours, it improves the volume and shape of the loaf significantly.
M a ny gr o c e ry stores stock gluten in the flour section.Health food and nu t rition centers also carry this
i t e m .
10

Flour is best kept in an airtight container.If you are storing the flour for a long period of time, you may
want to keep it in the freezer as the refri g e rator tends to dry it out.Whole grain wheat flours, which have a
higher oil content, will become rancid much more quickly than white flour and should always be kept in
the freeze r. Be sure, howeve r, to allow all flours to return to room temperature before placing in the bread
m a ke r.
Fa t : Dough Enhancer and Conditioner
Our recipes were developed using ve g e t a ble oil.You may use any type of oil or substitute in equal proportions solid shortening or real butter (divide them into small pieces).We have found no noticeable diffe rence in flavor but the crust may be more crisp with real bu t t e r.We do not recommend the use of marg a rine as it tends to make the crust tough.
L i q u i d s : A c t i vate the Yeast and Bind the Dough
When we use the term liquid, we are refe r ring to all wet ingredients used in the recipe.For all progra m s
except fast bake, it is ve ry important that the liquid temperature is 80°F/27°C.With this water tempera t u r e,
the yeast activates gradually to accommodate these progra m s.
When preparing bread using the fast bake program, all liquid temperatures must be 110°-115°F/43°-46°C.
The wa rmer temperature is necessary for the yeast to activate quickly to accommodate this specially
designed progra m .
Eggs are also considered part of the total liquid amount. Eggs should be at room tempera t u r e.W h e n
r e m oving them from the refri g e ra t o r, place whole uncra cked eggs in a bowl of wa rm water for 15 minu t e s
to take off the chill before use.
Cinnamon and Garlic: Not True Friends of Ye a s t
P r ev i o u s l y, cinnamon and sugar were sprinkled on dough before it was rolled up jelly-roll fa s h i o n .A d d i n g
cinnamon and garlic to the dough in a bread make r, howeve r, presents a probl e m . Cinnamon reacts with
bread dough just as a meat tenderi zer reacts with meat. It breaks down the stru c t u r e. Although it smells
wonderful as it is baking, the flavor is dissipated in the baking process.DO NOT ADD MORE THAN LISTED IN THE RECIPE.For more flavo r, use them as a spread for the bread rather than adding to the
d o u g h .
Fruits and Ve ge t a bl e s : A dd Flavor and Nutrition
When adding fruits or ve g e t a bles to recipes, do not exceed the amount listed.These products, if used in
ex c e s s i ve amounts, may inhibit the rising of the bread.
S a l t : Regulates Yeast Activity
Salt is necessary to control the activity of yeast, disciplining it to wo rk slowly and steadily. Without salt,
yeast acts too ra p i d l y.Salt also strengthens the structure of the dough.If too little or no salt is used, the
bread will rise rapidly and then fa l l .The texture will also be more coarse and/or uneve n .
S u g a r : Food for Ye a s t
Sugar is the favo rite food of yeast, but too much sugar will cause the yeast to ove r - r e a c t .The loaf of
bread will be small and dense.D ried fruits also contri bute sugar to the bread dough. We do not recommend adding any more than is specified in each recipe.In addition, we do not recommend the use of art ificial sweeteners because the yeast cannot react with them.
n S U B S T I T U T E S
In our test kitchen, we ex p e rimented with these ingredient substitutions.We do caution you that yo u r
results may va ry significantly from ours.If you would like to try other substitutions, there are seve ral helpful hint books ava i l a ble from retail stores to assist yo u . H oweve r, we cannot guarantee their results.
E gg s
Liquid egg substitutes may be used as directed on the cart o n .
Two egg whites may be substituted for one whole egg.
REMEMBER, all egg products must be at room tempera t u r e.
M i l k
11

C o f fee creamer, non-dairy creamer or dry bu t t e rmilk may be substituted for dry milk in equal proport i o n s.
Liquid milk 80°F/27°C may be substituted for water in equal proportions for all bread programs except fa s t
b a ke.The dry milk may then be eliminated all together.The loaf will be slightly smaller.
S a l t
Salt-free recipes are not successful. Dietetically sodium free (less than 5 mg sodium per serving) or low
salt (less than 1/2 the sodium of table salt) may be used in equal amounts.The bread will be more coarse.
S u g a r
H o n ey may be substituted for sugar in equal proport i o n s ; reduce the liquid by the same amount. B r ow n
sugar may be substituted for white sugar in equal proport i o n s.Yeast needs sugar — no artificial swe e t e n e r
should be used.
Ye a s t
We used RED STAR Yeast to develop our recipes.H oweve r, any brand may be used.
R e fer to yeast ingredient section for other yeast substitutes.
n BREAD MIXES AND OTHER COOK BOOKS
Use mixes labeled for up to 2 pound loave s.For best results, use the basic courses.E ven though we offe r
a wide va riety of recipes for bread and dough, you may be looking for one that we have not included in
our recipe book.Bread maker helpful hints and recipe books are ava i l a ble at book and retail stores.T h ey
o f fer a wide va riety of recipes. R e fer to features section of this book for the best bread program to use fo r
other recipes.Minor adjustments may be necessary for best results.
n HIGH ALT I T U D E
High elevations may make dough rise fa s t e r.We recommend that you try the recipe as it is printed first.
The dough ball should be round, smooth-textured, soft and slightly tacky to the touch. If you find the
results are unsuccessful, decrease your yeast 1/4 teaspoon at a time. You may also have to increase the
liquid because of the drier air; s t a rt with 1 tablespoon and increase it if necessary. The addition of gluten
will help the structure of the bread.The recommended amount is 1 teaspoon per cup of flour unless specified otherwise in the recipe.
n FREEZING BAKED BREAD
When freezing bread and rolls, cool them before wrapping in plastic wra p.Place them in a plastic bag and
seal it. Bread may be frozen for up to six we e k s.When you thaw, partially open the wrapping to allow the
moisture to escape gradually for best results.
n FREEZING DOUGH
At the end of the dough program, you may remove the dough and freeze it for baking at a later time.Fo rm
the dough into the desired shape and immediately freeze for one hour to harden. R e m ove from the freezer and wrap in plastic wra p.N ext, place it in a plastic bag and seal. Dough can be kept in the freezer fo r
up to four we e k s.T h aw the dough in plastic bag in the refri g e rator ove rnight or for seve ral hours. U n w ra p
and place on baking container. C over and let stand in wa rm, draft free place until double the original size.
Because the dough is not room tempera t u r e, you will find it takes longer than usual to ri s e. B a ke according to recipe instru c t i o n s.
If additional assistance is needed, ex p e rt help is ava i l a ble from To a s t m a s t e r®(1-800-947-3744) or
f rom RED STA R®YEAST & PRODUCTS (1-800-445-4746).
12

P RO G R A M M I N G
n P ROGRAMMING BREAD MAKER PRO G R A M S
The fo l l owing are the general steps for using the bread make r. Depending on the program or recipe
you choose, some steps may not apply or there may be additional steps. R e fer to the Bread, Fa s t
B a ke and Dough sections.
Add all ingredients to the pan in the order listed.
The fast bake program does not have a delay fe a t u r e.
The illustrations in this instruction manual are for info rmation purposes only. You may find your bread
m a ker looks different, howeve r, the steps for operation are the same.
1
3
Open the lid and remove the
bread pan by pulling stra i g h t
u p, using the handle.
Place all ingredients in bread
pan in the order listed.
Mount the kneading blade on
2
the shaft, flat side dow n .
I n s e rt bread pan with the
4
word FRONT facing the front
of the bread maker and push
d own on rim until it snaps securely into
p l a c e. Fold handle dow n .
Y E A S T
D RY INGREDIENTS
L I QU I D S
If the pan does not snap securely into
place, remove bread pan. Wearing oven
mitts, place fingers behind bread pan
clips and gently pull away from oven
wall. Insert bread pan again.
- 13 -

5
6
Close the lid. Plug into 120 V
~ 60 Hz outlet. The display
indicator will light up.
Select progra m .The smaller
s i ze recipes and bread mixe s
will not fill the bread pan when
f i n i s h e d .
Press STA RT. The time left fo r
7
the program to be
finished is disp l aye d .The timer will count
d ow n .The Basic, Sweet and
Fast Bake programs will
beep to add additional
i n gredients during the
second knead and/or check the dough
b a l l . Opening lid will not stop kneading.
Add ingredients quickly and evenly ove r
d o u g h . At this time also check the
dough ball and use a ru bber spatula to
s c rape any ingredients from the sides of
the pan. Close lid to prevent heat loss.
N OT E : If using the Fast Bake program or
d e l ay timer, add all of the ingredients at
the beginning.The ingredients will be
chopped into smaller pieces.
S TA RT
The beeper will sound when
8
bread is done. Press STO P
and remove the bread pan
using oven mitts. If you do not stop the
unit and remove the bread, it will
automtically go into the hold wa rm
process on all bread cycles except Fa s t
B a ke.Your bread will be kept wa rm fo r
one hour and then the bread maker will
shut off.For best results, remove bread
immediately after the bake process is
c o m p l e t e.At the end of Fast Bake, 0:00
is in the display window.
- 14 -
Tu rn the bread pan upside dow n
9
and shake to release the bread.
Place the bread
u p right on a wire ra ck
to cool 20 minu t e s
b e fore cutting.T h i s
a l l ows the steam to
e s c a p e. Be sure to
r e m ove the kneading
blade from the bread.
C AU T I O N :
• The bread pan, kneading bl a d e, and
bread will be ve ry hot.
• A l ways unplug after use.
N OT E :The unit must be allowed to cool
d own between each use.
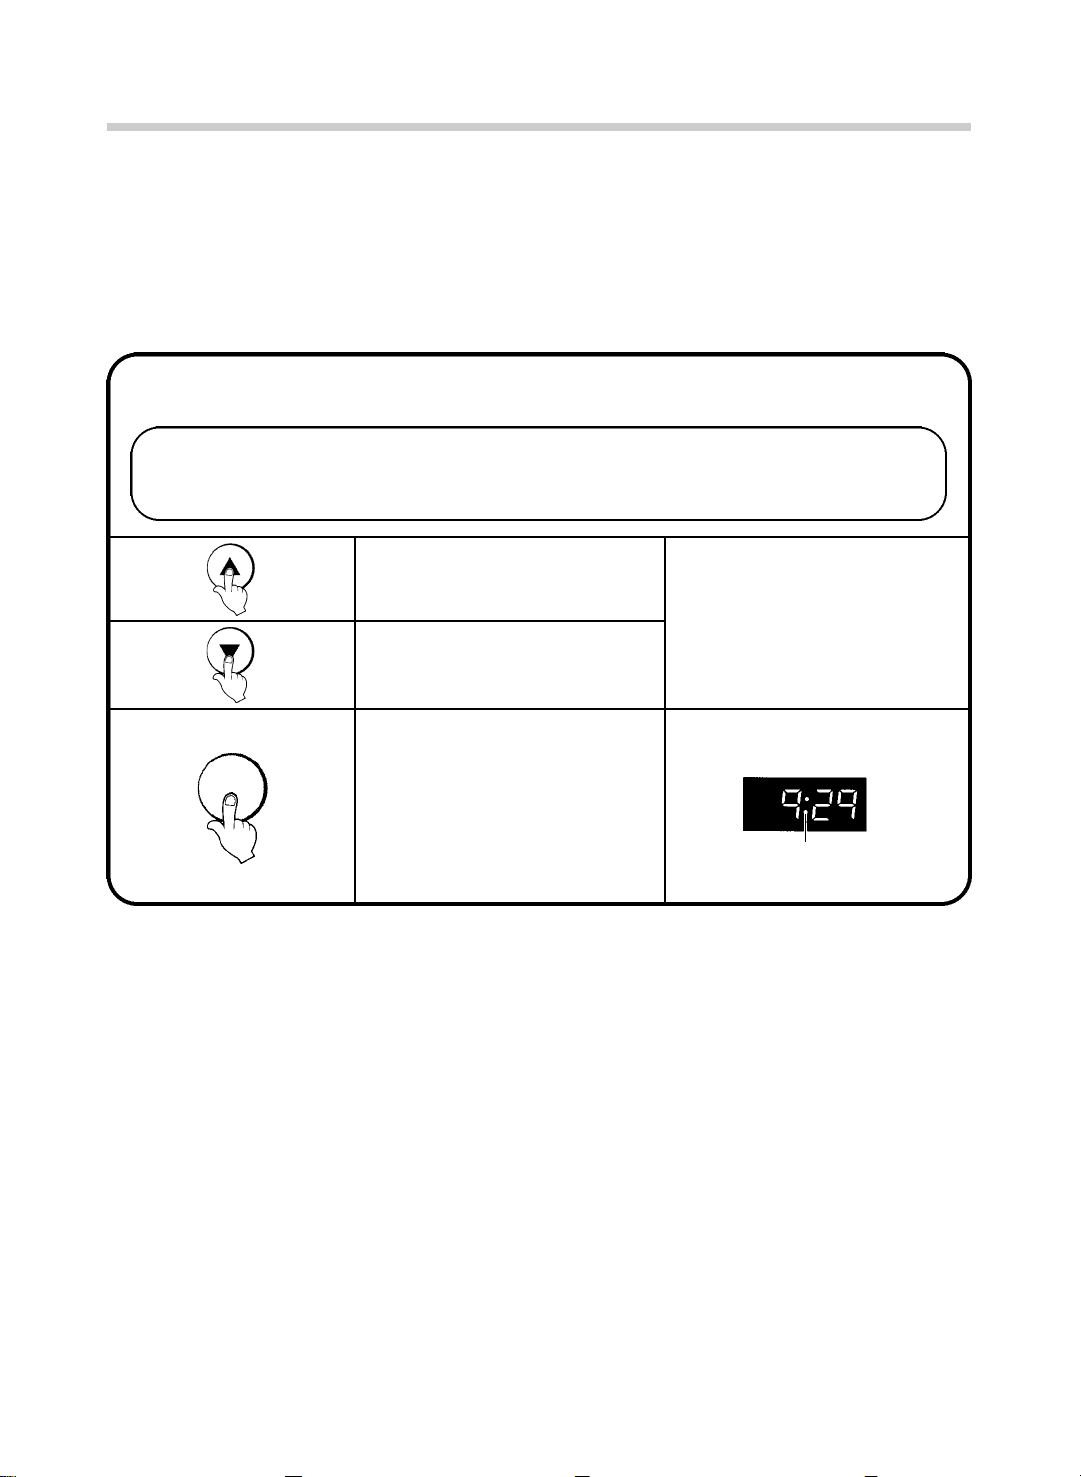
n P ROGRAMMING DELAY T I M E R
The delayed timer can be set to delay bread making up to 12 hours. At the selected time, delicious bread will be ready. The delay wo rks for all programs except Fast Bake.
Add all ingredients to the bread pan in the order listed. It is critical to add the yeast last, on top of
the flour, and away from the liquid.This will keep the yeast from activating until the bread make r
s t a rts to mix.
Select the progra m . B e fore pressing STA RT, set the timer for the amount of time you want to
wait before the bread is done.
E X A M P L E : It is 9:00 p. m . n ow.The bread is to be ready at 6:30 a.m. the next morn i n g .
Set the timer for 9:30, because there are 9 hours and 30 minutes between 9:00 p. m . a n d
6:30 a.m.
S TA RT
1 . When pressed, the time will
a d vance in 10 minute increm e n t s.
2 . When constant pressure is
applied to the pad, the time
will advance quick l y.
3 . Press the STA RT pad.T h e
timer is set, and the colon
bl i n k s.After one minu t e,
9:29 is displayed, and the
timer continues to count
d own in 1 minute increm e n t s.
N OT E :The bread maker will
s t a rt when the timer has
counted down to the start time
for the program to begin.
Colon will bl i n k
- 15 -

R E C I P E S
n
BREAD . . . AS EASY AS 1 - 2 - 3
1 . Add ingredients to the bread pan in the order listed. R e fer to Helpful Hints for Bread and Dough
for measuring info rm a t i o n .Place the bread pan in the bread make r.
2 . Close the lid. Select the bread program and press STA RT.
3 . When finished baking, remove bread pan from the bread make r.I nve rt and shake to remove the
l o a f. A l l ow loaf to cool standing upright on a wire ra ck before slicing.
FOOD GUIDE PYRAMID
A Guide To Daily Food Choices
K E Y
● Fat (naturally occurring and added)
▼ Sugars (added)
Fa t s, Oils & Sweets
G r o u p
USE SPA R I N G LY
Milk, Yo g u rt, & Cheese
G r o u p
2-3 SERV I N G S
Ve g e t a ble Group
3-5
S E RV I N G S
Meat, Po u l t ry, Fish, Dry
B e a n s, Eggs, & Nuts
G r o u p
2-3 SERV I N G S
Fruit Group
2-4 SERV I N G S
Bread, Cereal,
Rice & Pa s t a
G r o u p
6 - 1 1
S E RV I N G S
Bread, cereal, pasta, cra ckers and other grain foods are low in fat and full of energy. The Food Guide
P y ramid says we should eat 6-11 servings daily — more than any other food gr o u p.One half-inch
slice of bread is approximately two serv i n g s.
- 16 -

n
B R E A D
We suggest starting your bread baking with this White Bread Recipe.Fo l l ow each step carefully.
These steps have been written to eliminate the most common errors in bread maker baking and may
be helpful for any recipe.
WHITE BREAD
1 pound 2 pounds
water 80°F/27°C 1/2 cup + 3 T B L 1 cup + 5 T B L
o i l 4 tsp 2 T B L
s u g a r 1 1/2 T B L 2 T B L
s a l t 1 tsp 2 tsp
d ry milk 1 T B L 2 T B L
bread flour 2 1/4 cups 4 cups
a c t i ve dry ye a s t 1 tsp 1 1/4 tsp
P ro g r a m 1 1
Insta Program 4 ye a s t : 2 tsp 2 1/4 tsp
Method
1. Remove the bread pan from the bread maker. Attach the kneading blade onto the shaft. Make
sure all ingredients, except water, are at room temperature.
2. Use a liquid measuring cup to measure the water (80°F/27°C/baby bottle temperature) and pour
into the bread pan.
3. Use a measuring spoon to measure the oil and add to the bread pan.
4. Use a measuring spoon to measure the sugar, salt and dry milk; level off with the straight edge
of a knife and add to the bread pan.
5. Lightly spoon bread flour into a dry measuring cup;level off with the straight edge of a knife and
add to the bread pan.
6. Carefully measure yeast with a measuring spoon; level off with the straight edge of a knife and
add to the bread pan. If using delay timer, make sure yeast is on top of bread flour, away from
liquids.
7. Place the bread pan (FRONT marking forward) into the bread maker.Push down on rim until it
snaps securely into place. Close the lid.
8. Select Basic Light program and set timer to delay, or press START for immediate start.
9. At the beep during the kneading process (3:16), check the dough ball.It should be slightly tacky
to the touch. Add more water or flour if necessary; see DOUGH BALL. At this time, push down
any dough or flour that may be on the sides of the pan.
10. When the beeper sounds the bread has finished baking and the hold warm process will start.
The display window will read 0:00, and the colon will flash.
11. Press stop and use oven mitts to carefully remove the bread pan at any time during the hold
warm process.
CAUTION:THE BREAD PAN, KNEADING BLADE AND BREAD WILL BE VERY HOT.
USE OVEN MITTS.
12. Turn bread pan upside down and shake several times to release the bread. Do not use metal
utensils inside the bread pan or bread maker. Remove the kneading blade and allow loaf to cool
standing upright on wire rack approximately 20 minutes before cutting.
13. If bread loaf does not easily release from pan, allow it to sit on a heat resistant surface 5 minutes, then remove.When the bread has completely cooled, approximately 1 hour, store in an air
tight container.
14. UNPLUG UNIT BEFORE CLEANING. DO NOT IMMERSE THE BREAD PAN IN WATER. See
CLEANING AND STORING.
- 17 -

FRENCH BREAD
1 pound 2 pounds
water 80°F/27°C 3/4 cup + 2 T B L 1 cup + 7 T B L
o i l 1 T B L 2 T B L
s u g a r 1 tsp 2 tsp
s a l t 3/4 tsp 1 1/2 tsp
bread flour 2 1/4 cups 4 1/3 cups
a c t i ve dry ye a s t 1 1/2 tsp 2 tsp
P ro g r a m 8 8
Insta Program 4 ye a s t : 2 1/2 tsp 3 tsp
FAT FREE WHITE BREAD
1 pound 2 pounds
water 80°F/27°C 1/2 cup + 3 T B L 1 cup + 5 T B L
a p p l e s a u c e * 4 tsp 2 T B L
s u g a r 1 1/2 T B L 2 T B L
s a l t 1 tsp 2 tsp
d ry milk 1 T B L 2 T B L
bread flour 2 1/4 cups 4 cups
a c t i ve dry ye a s t 1 tsp 1 1/4 tsp
P ro g r a m 1 1
Insta Program 4 ye a s t :
* a ny va ri e t y
N o t e : Substituting applesauce for oil in other recipes may not produce good results.
2 tsp 2 1/4 tsp
MAPLE BREAD
1 pound 2 pounds
water 80°F/27°C 3/4 cup 1 cup
o i l 2 1/2 T B L 1/4 cup
maple syru p 1/4 cup 1/3 cup
maple flavo ri n g 1/4 tsp 1/2 tsp
s a l t 1 tsp 2 tsp
bread flour 2 cups 3 cups
d ry oatmeal, quick or regular 1/2 cup 1 cup
wa l nu t s 1/2 cup 3/4 cup
a c t i ve dry ye a s t 1 1/2 tsp 1 3/4 tsp
P ro g r a m 2 2
- 18 -

EGG BREAD
1 pound 2 pounds
egg(s) room temperature plus 1 2
enough water 80°F/27°C to equal 3/4 cup 1 1/4 cups
o i l 2 T B L 1/4 cup
s u g a r 4 tsp 3 T B L
s a l t 1 1/2 tsp 1 T B L
d ry milk 2 T B L 1/4 cup
bread flour 2 cups 4 cups
a c t i ve dry ye a s t 1 1/2 tsp 2 3/4 tsp
P ro g r a m 2 2
BUTTERMILK BREAD
1 pound 2 pounds
cultured bu t t e rmilk 80°F/27°C 3/4 cup 1 1/2 cups
o i l 2 T B L 1/4 cup
h o n ey 2 T B L 1/4 cup
s a l t 1 tsp 2 tsp
baking soda 1/4 tsp 1/2 tsp
bread flour 2 1/2 cups 4 1/4 cups
a c t i ve dry ye a s t * 1 1/4 tsp 1 1/4 tsp
P ro g r a m 1 1
* yeast amounts are correct
MILK BREAD
1 pound 2 pounds
milk 80°F/27°C 3/4 cup 1 1/4 cups + 2 T B L
o i l 1 T B L 3 T B L
s u g a r 1 1/4 tsp 2 tsp
s a l t 1 1/4 tsp 2 tsp
bread flour 2 cups 4 cups
a c t i ve dry ye a s t 1 1/4 tsp 1 3/4 tsp
P ro g r a m 1 1
- 19 -

SOURDOUGH STA RT E R
a c t i ve dry ye a s t 2 1/4 tsp
water 110°F/43°C 2 cups
bread flour 3 1/2 cups
s u g a r 1 T B L
In a 4 quart glass container, dissolve yeast in water 110°F/43°C; let stand 5 minu t e s, add flour and
s u g a r.Stir with plastic or wooden spoon until bl e n d e d .Mixture will be thick ; remaining lumps will diss o l ve during fe rmentation process.C over loosely with plastic wrap and let stand in wa rm place for 5
d ay s, stirring 3 times a day.The starter will “ rise and fa l l ” d u ring the fe rmentation period and become
thinner as it stands. A temperature of 80°-85°F/27°-30°C is best for the sour flavor to deve l o p. A n
ideal place is on the counter next to your ra n g e.When the starter is developed, it is bu bbly and may
h ave a ye l l ow liquid layer on top; stir before using. It may be used for baking or placed in the refri g e rator to use later, cover loosely.
To use start e r, measure the amount specified in the recipe.When refri g e rated, let container of start e r
come to room temperature before measuring — about 4 hours. If baking in the morning, leave the
s t a rter out ove rn i g h t .
Replenish with 1 cup flour, 2/3 cup wa rm water 110°F/43°C and 1 teaspoon sugar. Stir until bl e n d e d ;
some lumps may remain. C over loosely and let stand in wa rm place for 10 to 12 hours or ove rn i g h t .
The starter will rise and become bu bbl y. S t i r, then place in refri g e rator to store.
Stir in 1 teaspoon sugar to keep it active if the starter is not used eve ry we e k .
SOURDOUGH BREAD
1 pound 2 pounds
water 80°F/27°C 1/2 cup + 1 T B L 3/4 cup + 2 T B L
s t a rt e r * 3/4 cup 1 1/4 cups
s u g a r 2 tsp 4 tsp
s a l t 1 1/2 tsp 2 1/2 tsp
bread flour 2 1/4 cups 4 cups
a c t i ve dry ye a s t 1 1/2 tsp 1 T B L
P ro g r a m 1 1
*Only use starter recipe above.
- 20 -

CINNAMON RAISIN BREAD
1 pound 1 1/2 pounds
water 80°F/27°C 3/4 cup + 2 T B L 1 cup + 2 T B L
o i l 1 T B L 4 tsp
b r own sugar 1 1/2 T B L 2 1/2 T B L
s a l t 1 tsp 1 1/2 tsp
d ry milk 1 T B L 1 1/2 T B L
bread flour 2 1/4 cups 3 cups
a c t i ve dry ye a s t 1 1/2 tsp 2 1/2 tsp
P ro g r a m 9 9
A dd at the beep:
c i n n a m o n 1/2 tsp 3/4 tsp
ra i s i n s 1/3 cup 1/2 cup
wa l nu t s 1/3 cup 1/2 cup
BANANA GRANOLA BREAD
1 pound 2 pounds
water 80°F/27°C 3/4 cup 1 1/4 cups + 3 T B L
o i l 2 T B L 5 T B L
h o n ey 2 T B L 3 T B L
banana flavo ri n g 1/2 tsp 1 tsp
s a l t 1/2 tsp 2 tsp
d ry milk 2 T B L 3 T B L
bread flour 2 1/4 cups 4 1/4 cups
banana chips, dri e d 1/3 cup 1/2 cup
granola cereal 2/3 cup 1 cup
a c t i ve dry ye a s t * 1 1/2 tsp 1 1/2 tsp
P ro g r a m 9 9
* yeast amounts are correct
- 21 -

DRIED FRUIT BREAD
1 pound 1 1/2 pounds
water 80°F/27°C 3/4 cup 1 cup + 2 T B L
o i l 2 T B L 3 T B L
b r own sugar 1 1/2 T B L 2 1/2 T B L
s a l t 1 tsp 1 1/2 tsp
d ry milk 1 T B L 1 1/2 T B L
bread flour 2 1/4 cups 3 cups
a c t i ve dry ye a s t 1 1/2 tsp 2 1/2 tsp
P ro g r a m 9 9
A dd at the beep:
d ried fru i t 1/2 cup 3/4 cup
nu t m e g 1/2 tsp 1 tsp
H O L I DAY BREAD
1 1/2 pounds
water 80°F/27°C 1/4 cup
milk 80°F/27°C 3/4 cup
o i l 2 T B L
s u g a r 1/4 cup
s a l t 1 tsp
bread flour 3 cups
a c t i ve dry ye a s t 2 3/4 tsp
P ro g r a m 9
A dd at the beep:
candied fru i t 1/2 cup
wa l nu t s 1/2 cup
HONEY GRANOLA BREAD
1 pound 2 pounds
water 80°F/27°C 3/4 cup 1 cup + 6 T B L
o i l 2 T B L 5 T B L
h o n ey 2 T B L 2 1/2 T B L
s a l t 1/2 tsp 2 tsp
d ry milk 2 T B L 3 T B L
bread flour 2 1/4 cups 4 1/4 cups
granola cereal 2/3 cup 1 cup
a c t i ve dry ye a s t 1 1/4 tsp 1 1/2 tsp
P ro g r a m 1 1
Insta Program 4 ye a s t :
2 1/4 tsp 2 1/2 tsp
- 22 -

P E ACH BREAD
1 pound 2 pounds
a p ricot nectar 5 T B L 3/4 cup
peach yo g u rt 80°F/27°C 3 T B L 5 T B L
c a r r o t s, shredded 5 T B L 3/4 cup
o i l 2 tsp 4 tsp
h o n ey 1 1/2 T B L 2 1/2 T B L
s a l t 3/4 tsp 1 1/4 tsp
bread flour 2 cups 4 cups
a c t i ve dry ye a s t 1 1/4 tsp 1 3/4 tsp
P ro g r a m 1 1
S OY ALMOND FRUIT BREAD
1 1/2 pounds
water 80°F/27°C 1 cup + 2 T B L
o i l 3 T B L
almond ex t ra c t 1/2 tsp
s u g a r 2 1/2 T B L
s a l t 1 1/2 tsp
d ry milk 1 1/2 T B L
bread flour 2 1/2 cups
s oy flour 1/2 cup
a c t i ve dry ye a s t 2 1/2 tsp
P ro g r a m 9
A dd at the beep:
d ried mixed fruit, diced 1/2 cup
a l m o n d s, slive r e d 2 T B L
- 23 -

S OY CINNAMON RAISIN BREAD
1 1/2 pounds
water 80°F/27°C 1 cup + 2 T B L
o i l 2 T B L
s u g a r 2 T B L
s a l t 1 tsp
d ry milk 1/4 cup
bread flour 2 1/2 cups
s oy flour 1/2 cup
a c t i ve dry ye a s t 1 1/2 tsp
P ro g r a m 9
A dd at the beep:
c i n n a m o n 1 tsp
ra i s i n s 1/2 cup
S OY HERB BREAD
1 1/2 pounds
water 80°F/27°C 1 cup + 2 T B L
o i l 2 T B L
s u g a r 3 T B L
s a l t 1 1/2 tsp
d ry milk 1 T B L
d ried dill we e d 1 tsp
g a rlic salt 1/2 tsp
d ry mu s t a r d 1/2 tsp
d ried basil 1/4 tsp
d ried oregano 1/4 tsp
bread flour 2 3/4 cups
s oy flour 1/2 cup
a c t i ve dry ye a s t 1 1/2 tsp
P ro g r a m 1
- 24 -

TRAIL MIX BREAD
1 pound 2 pounds
water 80°F/27°C 3/4 cup + 1 T B L 1 cup + 1 T B L
o i l 2 1/2 T B L 5 T B L
h o n ey 2 T B L 3 T B L
s a l t 1 tsp 2 tsp
bread flour 2 cups 4 1/4 cups
a c t i ve dry ye a s t 1 3/4 tsp 2 tsp
P ro g r a m 1 2
A dd at the beep:
raisins and nut trail mix 1/2 cup 3/4 cup
B L O O DY MARY BREAD
1 pound 2 pounds
water 80°F/27°C* 1/4 cup 1/4 cup
bloody mary mix 80°F/27°C 1/2 cup 1 cup
o i l 1 T B L 3 T B L
h o n ey 1 T B L 3 T B L
s a l t 1/2 tsp 1 tsp
bread flour 2 cups 4 cups
d ried parsley 1 T B L 3 T B L
green onion tops, chopped 1 T B L 3 T B L
a c t i ve dry ye a s t 1 1/2 tsp 1 3/4 tsp
P ro g r a m 1 2
* water amounts are correct
- 25 -

CHEESE ONION BREAD
1 pound 2 pounds
water 80°F/27°C 3/4 cup 1 1/4 cups
s u g a r 2 T B L 3 T B L
s a l t 1/2 tsp 1 1/2 tsp
bread flour 2 1/4 cups 4 1/4 cups
shredded cheese 1/2 cup 3/4 cup
d ried onion 1 T B L 2 T B L
a c t i ve dry ye a s t 1 tsp 1 1/4 tsp
P ro g r a m 1 2
BANANA BREAD
1 pound 1 1/2 pounds
egg room temperature plus 1 1
enough water 80°F/27°C to equal 1/2 cup + 3 T B L 3/4 cup + 3 T B L
o i l 4 tsp 2 T B L
banana cake mix* 2/3 cup 1 cup
bread flour 1 3/4 cups 2 2/3 cups
g l u t e n 2 tsp 1 T B L
a c t i ve dry ye a s t 1 1/2 tsp 2 tsp
P ro g r a m 1 1
*or any other va riety of cake mix for flavor va ri a t i o n
CORN BREAD
1 pound 1 1/2 pounds
egg room temperature plus 1 1
enough water 80°F/27°C to equal 3/4 cup + 1 T B L 1 cup
o i l 2 T B L 3 T B L
h o n ey 2 T B L 3 T B L
s a l t 1 tsp 1 1/2 tsp
d ry milk 1 T B L 2 T B L
bread flour 2 cups 3 cups
c o rn meal 1/4 cup 1/3 cup
a c t i ve dry ye a s t 1 1/2 tsp 2 1/4 tsp
P ro g r a m 1 1
- 26 -

DILL BREAD
1 pound 2 pounds
egg(s) room temperature plus 1 3
enough plain yo g u rt 80°F/27°C to equal 3/4 cup 1 1/2 cups
o i l 1 T B L 7 tsp
s u g a r 4 tsp 3 T B L
s a l t 1 1/2 tsp 3 1/4 tsp
bread flour 2 cups 4 cups
d ried dill we e d 1 1/2 tsp 1 1/2 T B L
d ried minced onion 2 tsp 4 1/2 tsp
a c t i ve dry ye a s t 1 1/2 tsp 2 1/4 tsp
P ro g r a m 1 1
JALAPEÑO BREAD
1 pound 1 1/2 pounds
water 80°F/27°C 1/2 cup 2/3 cup
o i l 1 1/2 T B L 2 T B L
whole ke rnel corn, canned — 1/2 cup 3/4 cup
well dra i n e d
jalapeño peppers, sliced— 2 T B L 3 T B L
well dra i n e d
s u g a r 1 T B L 2 T B L
s a l t 1/2 tsp 1 tsp
bread flour 2 cups 3 cups
c o rn meal 1/3 cup 1/2 cup
fresh cilantro 2 tsp 1 T B L
a c t i ve dry ye a s t 1 1/2 tsp 2 tsp
Insta Pro g r a m
4
4
I TALIAN HERB BREAD
1 pound 2 pounds
water 80°F/27°C 3/4 cup + 2 T B L 1 cup + 3 T B L
o i l 4 tsp 2 T B L
s u g a r 1 T B L 3 T B L
s a l t 1 tsp 2 tsp
d ry milk 1 T B L 2 T B L
bread flour 2 1/4 cups 4 cups
d ried Italian seasoning 1 tsp 1 T B L
a c t i ve dry ye a s t * 1 1/4 tsp 1 1/4 tsp
P ro g r a m 1 1
Insta Program 4 ye a s t * : 2 1/4 tsp 2 1/4 tsp
* yeast amounts are correct
- 27 -

P OTATO BREAD
1 pound 2 pounds
egg(s) room temperature plus 1 2
enough water 80°F/27°C to equal 3/4 cup 1 1/2 cups + 1 T B L
o i l 2 T B L 3 T B L
s u g a r 4 tsp 2 T B L
s a l t 1 tsp 2 tsp
d ry milk 2 T B L 1/4 cup
white pepper 1/8 tsp 1/4 tsp
potato bu d s 1/4 cup 1/2 cup
green onion tops, chopped 1 T B L 2 T B L
bread flour 2 cups + 2 T B L 4 cups
a c t i ve dry ye a s t 1 1/2 tsp 1 T B L
Insta Pro g r a m :
44
PIZZA BREAD
1 pound 2 pounds
water 80°F/27°C 3/4 cup + 2 T B L 1 cup + 3 T B L
o i l 4 tsp 2 T B L
s u g a r 1 T B L 3 T B L
s a l t 1 tsp 2 tsp
d ry milk 1 T B L 2 T B L
bread flour 2 1/4 cups 4 cups
d ried pizza seasoning 2 1/4 tsp 1 1/2 T B L
a c t i ve dry ye a s t * 1 1/4 tsp 1 1/4 tsp
P ro g r a m 1 1
* yeast amounts are correct
WHOLE W H E AT BREAD
1 pound 2 pounds
water 80°F/27°C 3/4 cup + 3 T B L 1 cup + 6 T B L
o i l 2 T B L 3 T B L
b r own sugar 1/4 cup 6 T B L
s a l t 1 1/2 tsp 2 1/4 tsp
d ry milk 2 T B L 3 T B L
whole wheat flour 2 3/4 cups 4 cups
a c t i ve dry ye a s t 2 1/4 tsp 1 T B L
P ro g r a m 6 6
Whole Wheat Rapid Program 7 ye a s t :
2 3/4 tsp 3 1/2 tsp
- 28 -

SESAME SEED BREAD
1 1/2 pounds 2 pounds
egg room temperature plus 1 1
enough water 80°F/27°C to equal 1 cup 1 cup + 2 T B L
o i l 2 T B L 3 T B L
h o n ey 1 T B L 2 T B L
s u g a r 2 tsp 1 T B L
s a l t 1 tsp 1 1/2 tsp
bread flour 2 1/2 cups 2 3/4 cups
whole wheat flour 1/2 cup 1 cup
sesame seeds 2 T B L 2 1/2 T B L
cumin seeds 1/4 tsp 1/2 tsp
s u n f l ower seeds 1 1/2 T B L 2 T B L
a c t i ve dry ye a s t 1 1/2 tsp 2 tsp
P ro g r a m 9 9
Whole Wheat Rapid Program 7 ye a s t :
2 tsp 2 1/2 tsp
WHITE W H E AT BREAD
1 pound 2 pounds
water 80°F/27°C 3/4 cup 1 1/4 cups + 2 T B L
o i l 1 T B L 2 T B L
s u g a r 2 T B L 3 T B L
s a l t 1 tsp 2 tsp
d ry milk 1 T B L 2 T B L
bread flour 1 3/4 cups 3 1/2 cups
whole wheat flour 1/4 cup 1/2 cup
a c t i ve dry ye a s t 1 tsp 1 1/2 tsp
P ro g r a m 6 6
Whole Wheat Rapid Program 7 ye a s t :
1 1/2 tsp 2 tsp
- 29 -

DA I RY WHOLE W H E AT BREAD
1 1/2 pounds 2 pounds
water 80°F/27°C 5 T B L 1/4 cup
milk 80°F/27°C 1/2 cup 3/4 cups
cottage cheese 80°F/27°C 1/4 cup 1/3 cup
o i l 2 T B L 1/4 cup
h o n ey 1 1/2 T B L 1/4 cup
s a l t * 1 1/2 tsp 1 1/2 tsp
whole wheat flour 1 cup 1 1/4 cups
bread flour 2 cups 2 3/4 cups
a c t i ve dry ye a s t 1 1/4 tsp 1 3/4 tsp
P ro g r a m 6 6
Whole Wheat Rapid Program 7 ye a s t :
*salt amounts are correct
1 3/4 tsp 2 1/4 tsp
WHOLE W H E AT CINNAMON RAISIN WALNUT BREAD
1 pound 2 pounds
egg white(s) room temperature plus 1 2
enough water 80°F/27°C to equal 3/4 cup 1 1/4 cups
o i l 1 1/2 T B L 2 1/2 T B L
m o l a s s e s 2 T B L 1/4 cup
s a l t 1 tsp 2 tsp
whole wheat flour 2 cups 4 cups
a c t i ve dry ye a s t 1 1/2 tsp 1 T B L
P ro g r a m 9 9
A dd at the beep:
c i n n a m o n 3/4 tsp 1 1/4 tsp
ra i s i n s 1/2 cup 3/4 cup
wa l nu t s 1/2 cup 3/4 cup
- 30 -

PUMPERNICKEL BREAD
1 pound 2 pounds
egg(s) room temperature plus 1 2
enough water 80°F/27°C to equal 3/4 cup + 2 T B L 1 cup + 6 T B L
o i l 1 T B L 2 T B L
h o n ey 2 T B L 1/4 cup
d ry milk 1 T B L 3 T B L
s a l t 1 tsp 2 tsp
bread flour 1 cup 2 cups
whole wheat flour 1/2 cup 1 cup
rye flour 1/2 cup 1 cup
c a raway seeds 1 T B L 3 T B L
instant coffee gra nu l e s 1 tsp 1 T B L
cocoa pow d e r 2 T B L 1/4 cup
a c t i ve dry ye a s t 1 1/2 tsp 2 3/4 tsp
P ro g r a m 6 6
C A R AWAY RYE BREAD
1 pound 2 pounds
egg(s) room temperature plus 1 2
enough water 80°F/27°C to equal 3/4 cup + 2 T B L 1 cup + 5 T B L
o i l 1 T B L 2 T B L
h o n ey 2 T B L 1/4 cup
d ry milk 1 T B L 3 T B L
s a l t 1 tsp 2 tsp
bread flour 1 cup 2 1/4 cups
whole wheat flour 1/2 cup 1 cup
rye flour 1/2 cup 1 cup
c a raway seeds 1 T B L 3 T B L
a c t i ve dry ye a s t 1 1/2 tsp 2 3/4 tsp
P ro g r a m 6 6
- 31 -

S U N F L OWER SEED BREAD
1 pound 2 pounds
water 80°F/27°C 3/4 cup + 2 T B L 1 1/4 cups
o i l 2 T B L 3 T B L
h o n ey 1 T B L 3 T B L
s a l t 1 tsp 2 tsp
bread flour 2 1/3 cups 4 cups
s u n f l ower seeds 1/3 cup 3/4 cup
a c t i ve dry ye a s t * 1 tsp 1 tsp
P ro g r a m 9 9
* yeast amounts are correct
ONION RYE BREAD
1 pound 2 pounds
egg(s) room temperature plus 1 2
enough water 80°F/27°C to equal 3/4 cup + 2 T B L 1 cup + 5 T B L
o i l 1 T B L 2 T B L
h o n ey 2 T B L 1/4 cup
d ry milk 1 T B L 3 T B L
s a l t 1 tsp 2 tsp
bread flour 1 cup 2 1/4 cups
whole wheat flour 1/2 cup 1 cup
rye flour 1/2 cup 1 cup
c a raway seeds 1 T B L 3 T B L
d e hy d rated onions 2 T B L 1/4 cup
a c t i ve dry ye a s t 1 1/2 tsp 2 3/4 tsp
P ro g r a m 6 6
- 32 -

n
FAST BAKE BREAD .. .
AS EASY AS 1 - 2 - 3
The Fast Bake program, with hotter rise and bake temperatures, is convenient for baking a hot
fresh loaf of bread in under an hour.The longer bread programs, with lower rise and bake temperatures, will bake a taller more developed loaf of bread. And remember, you can always use
the delay feature for the longer programs.
1. Add ingredients to the bread pan in the order listed. Refer to Helpful Hints for Bread and
Dough for measuring information. Place the bread pan in the bread maker.
2. Close the lid. Select the Fast Bake program, and press START.
3. When finished baking, remove bread pan from the bread maker.Invert and shake to remove
the loaf. Allow loaf to cool standing upright on a wire rack before slicing.
FAST BAKE PROGRAM HINTS
• Water temperatures must be 110°-115°F/43°-46°C.
• Larger amounts of Quick•Rise™, RapidRise™, Bread Machine or Instant Active Dry yeast must
be used.They may be substituted in equal amounts.
• The dough ball for the fast bake program should be a very soft, sticky to the touch, loose ball
with a smooth texture. Do not add extra flour.
• Check the dough ball at the beep, and if necessary, use a rubber spatula to push any flour or
dough from the sides of the bread pan down into the dough ball.
• As a result of the increased temperatures during the rise and bake process, the loaf of bread
produced from this program may have a dark crisp crust with a split on the top side of the
loaf.
3 3

FAST BAKE BREADS
We suggest starting your fast bake bread baking with this White Bread Recipe. Refer to Helpful
Hints for Bread and Dough for measuring information. Follow each step carefully, noticing the
water temperatures must be 110°-115°F/43°-46°C and that Quick•Rise, RapidRise, Bread
Machine or Instant Active Dry yeast must be used.
WHITE BREAD
1 pound 1.5 pounds 2 pounds
water 110°-115°F/43°-46°C 1 cup 1 1/4 cups 1 1/2 cups + 3 T B L
o i l 4 tsp 2 1/2 T B L 1/4 cup
s u g a r 4 tsp 2 T B L 3 T B L
s a l t 1 tsp 1 1/2 tsp 2 tsp
d ry milk 1 T B L 1 1/2 T B L 2 T B L
bread flour 2 1/4 cups 3 cups 4 cups
q u i ck • rise ye a s t 3 1/2 tsp 5 1/2 tsp 6 3/4 tsp
P RO G R A M 5 5 5
Method
1. Remove the bread pan from the bread maker. Attach the kneading blade onto the shaft.
Have all ingredients ready. Make sure all ingredients, except water, are at room temperature.
2. Use a liquid measuring cup to measure the water (110°-115°F/43°-46°C) and pour into the
bread pan.
3. Use a measuring spoon to measure the oil and add to the bread pan.
4. Use a measuring spoon to measure the sugar, salt and dry milk; level off with the straight
edge of a knife and add to the bread pan.
5. Lightly spoon bread flour into a dry measuring cup; level off with the straight edge of a
knife and add to the bread pan.
6. Carefully measure Quick•Rise yeast with a measuring spoon; level off with the straight
edge of a knife and add to the bread pan.
7. Place the bread pan into the bread maker.Push down on rim until it snaps into place.
Close the lid.
8. Select Fast Bake program and press Start.
9. At the beep during the kneading process (:53), check the dough ball.It should be sticky to
the touch. At this time, push down any dough or flour that may be on the sides of the pan.
10. When the beeper sounds the bread has finished baking.
11. Use oven mitts to carefully remove the bread pan.
CAUTION: THE OVEN CAVITY, BREAD PAN, KNEADING BLADE AND BREAD WILL BE
VERY HOT. USE OVEN MITTS.
12. Turn bread pan upside down and shake several times to release the bread.Do not use
metal utensils inside the bread pan or bread maker.Remove the kneading blade and allow
loaf to cool standing upright on wire rack approximately 20 minutes before cutting.
13. When the bread has completely cooled, approximately 1 hour, store in an air tight container.
14. UNPLUG UNIT BEFORE CLEANING.DO NOT IMMERSE THE BREAD PAN IN WATER,
see CLEANING AND STORING.
- 34 -

WHITE W H E AT BREAD
1 pound 2 pounds
water (110°-115°F/43°-46°C) 3/4 cup + 3 T B L 1 1/2 cups + 3 T B L
o i l 1 T B L 3 T B L
s u g a r 3 T B L 1/4 cup
s a l t 1 tsp 2 tsp
d ry milk 1 T B L 2 T B L
bread flour 1 3/4 cups 3 1/2 cups
whole wheat flour* 1/2 cup 1/2 cup
q u i ck • rise ye a s t 4 1/2 tsp 6 tsp
P ro g r a m 5 5
*whole wheat flour amounts are correct
FRENCH BREAD
1 pound 2 pounds
water (110°-115°F/43°-46°C) 3/4 cup + 3 T B L 1 1/2 cups + 2 T B L
o i l 1 T B L 3 T B L
s u g a r 2 1/2 tsp 1 1/2 T B L
s a l t 3/4 tsp 1 1/2 tsp
bread flour 2 1/4 cups 4 1/3 cups
q u i ck • rise ye a s t 3 1/2 tsp 6 tsp
P ro g r a m 5 5
I TALIAN BREAD
1 pound 2 pounds
water (110°-115°F/43°-46°C) 1 cup + 1 T B L 1 1/2 cups + 1 T B L
o i l 4 tsp 2 T B L
s u g a r 2 T B L 1/4 cup
s a l t 1 tsp 2 tsp
d ry milk 1 T B L 2 T B L
d ried Italian seasoning 1 1/2 tsp 1 T B L
bread flour 2 1/4 cups 4 cups
q u i ck • rise ye a s t 4 1/2 tsp 6 3/4 tsp
P ro g r a m 5 5
- 35 -

HONEY GRANOLA BREAD
2 pounds
water (110°-115°F/43°-46°C) 1 1/2 cups + 1 T B L
o i l 6 T B L
h o n ey 2 1/2 T B L
s a l t 2 tsp
d ry milk 3 T B L
bread flour 4 1/4 cups
granola cereal 1 cup
q u i ck • rise ye a s t 6 3/4 tsp
P ro g r a m 5
CINNAMON RAISIN BREAD
1 pound 1 1/2 pounds
water (110°-115°F/43°-46°C) 1 cup + 1 T B L 1 1/4 cups + 1 T B L
o i l 1 T B L 7 tsp
b r own sugar 2 1/2 T B L 3 1/2 T B L
s a l t 1 tsp 1 1/2 tsp
d ry milk 1 T B L 1 1/2 T B L
bread flour 2 1/4 cups 3 1/2 cups
c i n n a m o n 3/4 tsp 1 tsp
ra i s i n s 1/3 cup 1/2 cup
wa l nu t s 1/3 cup 1/2 cup
q u i ck • rise ye a s t 4 1/2 tsp 6 3/4 tsp
P ro g r a m 5 5
- 36 -

FAT FREE BREAD
1 pound 2 pounds
water (110°-115°F/43°-46°C) 1 cup 1 1/2 cups
a p p l e s a u c e 4 tsp 2 T B L
s u g a r 2 1/2 T B L 3 T B L
s a l t 1 tsp 2 tsp
d ry milk 1 T B L 2 T B L
bread flour 2 1/4 cups 4 cups + 2 T B L
q u i ck • rise ye a s t 4 1/2 tsp 6 3/4 tsp
P ro g r a m 5 5
P E P P E RONI PIZZA BREAD
1 pound 2 pounds
water (110°-115°F/43°-46°C) 3/4 cup + 3 T B L 1 1/2 cups + 2 T B L
o i l 1 T B L 3 T B L
pepperoni, thinly sliced 1/2 cup 1 cup
Pa rmesan cheese, gra t e d 2 T B L 1/4 cup
s u g a r 2 1/2 tsp 1 1/2 T B L
s a l t 3/4 tsp 1 1/2 tsp
bread flour 2 1/4 cups 4 1/3 cups
d ried pizza seasoning 1 1/2 tsp 1 T B L
q u i ck • rise ye a s t 3 1/2 tsp 6 tsp
P ro g r a m 5 5
P OTATO BREAD
1 pound 2 pounds
water (110°-115°F/43°-46°C) 3/4 cup + 3 T B L 1 1/4 cups + 3 T B L
o i l * 3 T B L 3 T B L
s u g a r 4 tsp 2 T B L
s a l t 1 tsp 2 tsp
d ry milk 2 T B L 1/4 cup
white pepper 1/8 tsp 1/4 tsp
instant potato bu d s 1/4 cup 1/2 cup
green onion tops, chopped 1 T B L 2 T B L
bread flour 2 cups 4 cups
q u i ck • rise ye a s t 4 1/2 tsp 6 3/4 tsp
P ro g r a m 5 5
* oil amounts are correct
- 37 -

n
DAY OLD BREAD RECIPES
BREADED PINEAPPLE
c h u n ked pineapple 1 15-oz can
c o rn s t a r c h 2 T B L
s u g a r 1/2 cup
bu t t e r 1/4 cup
white bread, 1 inch cubes 2 cups
D rain pineapple, reserve juice. Add enough water to juice to equal 1 cup. Mix cornstarch and sugar,
add juice and butter and heat until thick . Pour over pineapple and bread, toss lightly to mix. B a ke at
350°F/177°C for 30 minu t e s.
BREAD PUDDING
white bread, 1 inch cubes 1 1/2 cups
vanilla cook & serve pudding & pie filling 1 3-oz box
c i n n a m o n 1 tsp
milk, liquid 2 cups
Mix all ingredients in a microwave - s a fe one quart casserole.Cook uncovered in microwave on high
for 7 minutes or until boiling — stir occasionally during the last half of cooking. O r, bake in oven at
350°F/177°C for 30 minutes — stir halfway through cooking time. S e rve wa rm or cold.
C RUNCHY BREAD SNAC K S
bread, sliced 1/2 inch thick 8 slices
bu t t e r, melted 1/4 cup
d ry seasoning mix* 4 tsp
*Use any o n e of the fo l l ow i n g : d ried spaghetti sauce seasoning, ranch dressing, Italian herb seasoning,
or garlic pow d e r, or garlic salt. Amounts may be adjusted to your taste.
Melt butter and add seasoning. Place bread on baking container and lightly brush with butter mixt u r e. B a ke at 350°F/177°C 10-15 minutes or until brow n . A l l ow to cool. Break into bite size pieces.
- 38 -

n
DOUGHS . . . AS EASY AS 1 - 2 - 3
1. Add ingredients to the bread pan in the order listed. Refer to Helpful Hints for Bread and Dough for
measuring information. Place the bread pan in the bread maker.
2. Close the lid. Select Dough program and press START.
3. Remove the dough from the bread pan when the beeper sounds.Follow shaping and baking instructions.
• If you allow the dough to remain in the bread maker after the cycle is complete, it may over rise and
damage the machine.
• Rising times for dough after it is shaped and placed in a baking pan will vary due to recipe, temperature and humidity level of your kitchen.The optimum temperature of the room for rising is 80°85°F/27°-29°C.Rising is the most essential feature in bread making. After the dough comes out of the
bread maker, the dough ferments and rises before punching and resting.The gluten becomes pliable
and elastic with a soft, smooth quality. Fermentation conditions gluten, develops flavor and leavens
the product.
Dough has doubled in bulk when an indentation remains after the tip of a finger is pressed lightly and
quickly into the dough.If the indentation springs back, cover and let rise a few more minutes and
check again. After punching down and dividing dough, cover and let rest 10 minutes.Resting allows
the gluten to relax and makes handling easier.Then shape the dough as desired.
Sometimes a double rising is beneficial especially for whole grain or 100% whole wheat bread. Let
the dough rise once, punch down, let rise again, punch down, let rest 10 minutes and shape.
Crust Treatments (use only with dough pro g r a m )
Always allow optimum rising of shaped dough.Use a pastry brush to apply glaze. Bake as directed.
Egg Yolk Glaze — For a shiny golden crust, mix 1 slightly beaten egg or egg yolk with 1 tablespoon
water or milk.
Egg White Glaze — For a shiny, chewy crust, mix 1 slightly beaten egg white with 1 tablespoon water.
L i g h t ly Floured
Sprinkle enough flour onto work area so that the dough can be handled without sticking.
Shaping Rolls
Cloverleaf Rolls — Shape into 1/2 inch balls. Place 3 balls in each greased muffin tin and let rise until
double in size.
Crisscross Rolls — Shape into balls.Combine two of the balls and roll into a 1/8 inch thick square. Cut
strips 1/8 inch wide and place one strip across the top of each ball. Repeat this process, placing the
second strip in the opposite direction across the top of each ball.
Traditional Rolls — Shape into balls. For “pull apart” rolls, place dough balls with sides touching in a
baking pan. For “individual” rolls place dough balls 2 inches apart on a baking sheet.
Pan Sizes For Traditional Pull-Apart Rolls —
For a 1 lb. (9 rolls) recipe, use an 8 x 8 inch baking pan.
For a 1.5 lb. (18 rolls) recipe, use two 8 x 8 inch baking pans.
For a 2 lb. (24 rolls) recipe, use a 9 x 13 inch baking pan.
39

DINNER ROLL DOUGH
1 pound 2 pounds
9 ro l l s 24 ro l l s
egg room temperature plus 1 1
enough water 80°F/27°C to equal 3/4 cup + 3 T B L 1 1/2 cups + 3 T B L
o i l 2 T B L 1/4 cup
s u g a r 1/4 cup 1/2 cup
s a l t 1/4 tsp 1/2 tsp
bread flour 2 1/4 cups 4 1/4 cups
a c t i ve dry ye a s t 2 1/4 tsp 3 1/2 tsp
P ro g r a m 1 0 1 0
Method
1. Remove the bread pan from the bread maker. Attach the kneading blade onto the shaft. Make sure
all ingredients, except water, are at room temperature.
2. Place whole uncracked eggs in a bowl of warm water for 15 minutes to bring to room temperature.
To measure egg plus enough liquid to equal — after warming eggs, remove from shell and place in
a liquid measuring cup. Slowly add warm (80°F/27°C/baby bottle temperature) liquid to measuring
cup until it reaches the desired measurement.
3. Use a measuring spoon to measure the oil and add to the bread pan.
4. Use a measuring spoon to measure the sugar and salt; level off with the straight edge of a knife
and add to the bread pan.
5. Lightly spoon bread flour into a dry measuring cup, level off with the straight edge of a knife and
add to the bread pan.
6. Carefully measure yeast with a measuring spoon; level off with the straight edge of a knife and add
to the bread pan.
7. Place the bread pan into the bread maker. Press down on rim until it snaps into place.Close lid.
8. Select Dough program and set Timer to delay or press START.
9. During the second kneading process, check the dough ball. It should be slightly tacky to the touch.
At this time push down any dough or flour that may be on the sides of the pan.
10. When the beeper sounds, the dough is finished.Use oven mitts to carefully remove the bread pan.
CAUTION: THE OVEN CAVITY, BREAD PAN, KNEADING BLADE AND BREAD WILL BE VERY HOT.
USE OVEN MITTS.
11. Turn bread pan upside down and shake several times to remove the dough. Do not use metal uten-
sils inside the bread pan or bread maker.
12. Place on a lightly floured surface. Divide into pieces and shape.
13. Place in a greased baking pan. Cover and let rise in a warm place for 1 hour or until double in size.
14. Bake at 350°F/177°C for 20-30 minutes, or until done.
15. UNPLUG UNIT BEFORE CLEANING. DO NOT IMMERSE THE BREAD PAN IN WATER, see
CLEANING & STORING.
40

F O C ACCIA DOUGH
1 1/2 pounds
1 loaf
water 80°F/27°C 1 cup
o l i ve oil 1/3 cup
s u g a r 2 tsp
s a l t 1 tsp
bread flour 3 cups
a c t i ve dry ye a s t 1 1/2 tsp
P ro g r a m 1 0
A dd at the beep:
d ried Italian seasoning 1 tsp
Garlic-Cheese To p p i n g
o l i ve oil 1/4 cup
d ried oregano 1 1/2 tsp
g a rl i c, coarsely chopped 1/3 cup
Pa rmesan cheese, gra t e d 1/3 cup
s a l t 1/4 tsp
Greek Style To p p i n g
o l i ve oil 1/4 cup
onion, thin sliced 1 cup
d ried oregano 1 1/2 tsp
Feta cheese, cru m bl e d 1/3 cup
bl a ck olive s, sliced and dra i n e d 1/4 cup
s a l t 1/4 tsp
Method
1. With oiled hands, evenly press dough into a greased 9 x 13 inch pan.Using your fingertips, make
indentations in the dough.
2. C over and let rise in a wa rm place for 30 minutes or until almost double in size. While the dough
is ri s i n g , select the topping and prepare.
3. In a skillet, heat olive oil.
For garlic-cheese topping — stir in oregano and garlic then immediately remove from heat.
For Greek topping — add onions and cook until onions are soft but not brown, approximately 5
minutes.
4. Use fingers to press dimples into dough again.Spoon topping mixture evenly over dough. Sprinkle
with remaining ingredients.
5. Bake at 400°F/205°C for 20 minutes or until done.
41

W H E AT DINNER ROLL DOUGH
1 pound 2 pounds
9 ro l l s 24 ro l l s
water 80°F/27°C 3/4 cup 1 1/2 cups
o i l 1 T B L 2 T B L
b r own sugar 2 T B L 1/4 cup
s a l t 1/2 tsp 1 tsp
d ry milk 1 T B L 2 T B L
bread flour 1 1/4 cups 2 1/2 cups
whole wheat flour 1 cup 2 cups
a c t i ve dry ye a s t 1 1/2 tsp 2 tsp
P ro g r a m 1 0 1 0
Method
1. Place on a lightly floured surface. Divide into pieces and shape.
2. Place in a greased baking pan. Cover and let rise in a warm place for 1 hour or until double in size.
3. Bake at 350°F/177°C for 25-30 minutes, or until done.
BUTTERMILK ROLL DOUGH
1 pound 1.5 pounds
9 ro l l s 18 ro l l s
cultured bu t t e rmilk, liquid 80°F/27°C 1 cup 1 1/2 cups
o i l 3 T B L 1/4 cup
h o n ey 1 1/2 T B L 2 T B L
s a l t 1 tsp 1 1/2 tsp
bread flour 3/4 cup 1 1/4 cups
whole wheat flour 1 1/3 cups 2 cups
wheat germ 1/3 cup 1/2 cup
baking soda 1/4 tsp 1/4 tsp
a c t i ve dry ye a s t 1 3/4 tsp 2 tsp
P ro g r a m 1 0 1 0
To p p i n g
melted bu t t e r 2 T B L 3 T B L
Method
1. Place on a lightly floured surface. Divide into pieces and shape.
2. Place in a greased baking pan. Cover and let rise in a warm place for 1 hour or until double in size.
Brush with melted butter.
3. Bake at 350°F/177°C for 15-20 minutes, or until done.
42

FRENCH BREAD DOUGH
(Italian Loaf, French Rolls and French Twists)
1 1/2 pounds
1 loaf
water 80°F/27°C 1 1/4 cups
s u g a r 1 T B L
s a l t 1 tsp
bread flour 3 1/2 cups
a c t i ve dry ye a s t 1 T B L
P ro g r a m 1 0
G l a ze
wa t e r 2 T B L
s a l t 1/2 tsp
Method
1. Place on a lightly floured surface. Roll into a 12 x 18 rectangle. Starting with the longest side, roll
up tightly, pressing the seams to seal and tapering each end.
2. Place the loaf on a greased baking sheet, cover and let rise in a warm place for 40 minutes or until
double in size.
3. With a knife, cut three diagonal slashes across top of the loaf. Combine the glaze ingredients;
brush the loaf.
4. Bake at 400°F/205°C for 20 to 25 minutes, or until done.
Va r i a t i o n s
ITALIAN LOAF
Method
1. Use recipe above.Place on a lightly floured surface and shape the dough into one large round ball.
2. Place the loaf on a greased baking sheet, cover and let rise in a warm place for 40 minutes or until
double in size.
3. With a knife, cut three diagonal slashes across top of the loaf. Combine the glaze ingredients;
brush over loaf. Sprinkle loaf with sesame seeds, poppy seeds, car away seeds or cracked wheat.
4. Bake at 400°F/205°C for 20 to 25 minutes or until done.
FRENCH ROLLS
Method
1. Use recipe above. Place on a lightly floured surface and divide dough into 12 pieces . Pinch the
ends of each roll and taper slightly.
2. Place the loaves on a greased baking sheet, cover and let rise in a warm place for 40 minutes or
until double in size.
3. With a knife, cut diagonal slashes across top of the loaf. Combine the glaze ingredients and brush
over loaves.
4. Bake at 400°F/205°C for 15 to 20 minutes or until done.
FRENCH TWISTS
Method
1. Use recipe above.Place on a lightly floured surface and divide into 18 pieces. Roll into 14 inch
ropes.
2. Fold each rope in half and twist, starting at fold.
3. Place on greased baking sheet and brush with 1/3 cup of melted butter.Cover and let rise in a
warm place until double in size.
4. Brush with glaze.
5. Bake at 400°F/205°C for 12 to 15 minutes or until done.
43

CHEEZY GARLIC ROLL DOUGH
1 1/2 pounds 2 pounds
18 ro l l s 24 ro l l s
egg room temperature plus 1 1
enough water 80°F/27°C to equal 1 cup 1 1/3 cups
o i l 2 T B L 3 T B L
s u g a r 1/3 cup 1/2 cup
s a l t 1 tsp 1 1/2 tsp
bread flour 3 1/2 cups 4 1/2 cups
a c t i ve dry ye a s t 1 1/4 tsp 2 tsp
P ro g r a m 1 0 1 0
To p p i n g
Pa rmesan cheese 1/3 cup 2/3 cup
g a rl i c, minced 1 1/2 T B L 2 T B L
bu t t e r, melted 3 T B L 1/4 cup
Method
1. Place on a lightly floured surface. Divide into pieces and shape.
2. Combine cheese and garlic. Dip pieces in melted butter and then in cheese-garlic mixture . Place
coated side up in a greased baking pan, drizzle any remaining topping over rolls.
3. Cover and let rise in a warm place 1 hour or until double in size.
4. Bake at 325°F/163°C for 35-40 minutes, or until done.
P I TA POCKET DOUGH
1 1/2 pounds
20 pita pock e t s
water 80°F/27°C 1 1/3 cups
o l i ve oil 8 tsp
s u g a r 4 tsp
s a l t 1 1/4 tsp
bread flour 2 cups
whole wheat flour 1 1/3 cups
a c t i ve dry ye a s t 2 1/2 tsp
P ro g r a m 1 0
Method
1. Place on a lightly floured surface. Divide into 10 pieces and shape each piece into a smooth ball.
2. Place 5 balls on a large baking sheet. Place the remaining five balls on another baking sheet. Let
rise about 20 minutes. With fingertips flatten each ball into a 6 inch circle.
3. Bake at 500°F/260°C for 5 minutes until puffed and tops begin to brown.
4. Cut each half to form 2 pockets.
44

REFRESHING ROLL DOUGH
1 1/2 pounds 2 pounds
18 ro l l s 24 ro l l s
water 80°F/27°C 1 cup 1 1/2 cups
o i l 1/4 cup 1/3 cup
b r own sugar 1/3 cup 1/2 cup
s a l t 1 tsp 1 1/2 tsp
bread flour 3 1/2 cups 4 1/2 cups
a c t i ve dry ye a s t 1 1/2 tsp 2 tsp
P ro g r a m 1 0 1 0
To p p i n g
o range peel, gra t e d 2 T B L 1/4 cup
s u g a r 1/2 cup 3/4 cup
bu t t e r, melted 1/2 cup 3/4 cup
Method
1. Place on a lightly floured surface. Divide into pieces and shape.
2. Combine orange peel and sugar. Dip pieces in melted butter and then in orange peel-sugar mix-
ture.
3. Place coated side up in greased baking pan. Drizzle any remaining topping over rolls. Cover and let
rise in a warm place 1 hour or until double in size.
4. Bake at 350°F/177°C for 20-30 minutes, or until done. Serve warm.
45

CHALLAH BRAID DOUGH
1 pound 2 pounds
r e g u l a r l a rge
egg(s) room temperature plus 1 2
enough water 80°F/27°C to equal 3/4 cup 1 1/2 cups
o i l 2 T B L 1/4 cup
s u g a r 1 1/2 T B L 2 T B L
s a l t 1 tsp 2 tsp
bread flour 2 cups 4 1/2 cups
a c t i ve dry ye a s t 1 tsp 2 tsp
P ro g r a m 1 0 1 0
G l a ze
egg yolk(s), beaten 1 2
wa t e r 1 T B L 2 T B L
To p p i n g
p o p py seeds 1 tsp 1 1/2 T B L
Method
1. Place on a lightly floured surface. Divide into thirds, making 3 (10 inch long for regular, 13 inch long
for large) ropes with tapered ends. Pinch ropes together at one end, braid together.Pinch together
at other end and secure braid.
2. Transfer braided dough to greased baking sheet; cover and let rise in a warm place for 1 hour or
until double in size.
3. Combine glaze ingredients and brush onto braid. Sprinkle with poppy seeds and bake at
350°F/177°C for 25 minutes, or until done.
46

WHOLE W H E AT PIZZA CRUST DOUGH
1 pound
1 thick or 2 thin crusts
water 80°F/27°C 1 cup
o i l 2 T B L
s u g a r 1 T B L
s a l t 1 tsp
whole wheat flour 1 cup
bread flour 1 1/2 cups
a c t i ve dry ye a s t 2 1/4 tsp
P ro g r a m 1 0
Method
1. Place on a lightly floured surface. Divide in half and press onto a 12 inch pizza pan, raising edges.
Sprinkle each pan with 1 tablespoon of cornmeal if desired. Generously prick dough with a fork.
For one 12 inch thick crust do not divide.
2. Bake 400°F/205°C for 10-12 minutes or until edges of crust begin to turn a light golden brown.
Remove, add toppings and return to oven to bake an additional 15-20 minutes.
PIZZA CRUST DOUGH
1 pound 2 pounds
1 thick or 2 thin crusts 2 thick or 4 thin crusts
water 80°F/27°C 3/4 cup 1 1/2 cups + 3 T B L
o i l 1 T B L 2 T B L
s u g a r 1 T B L 2 T B L
s a l t 1/2 tsp 1 tsp
d ry milk 1 T B L 2 T B L
bread flour 2 1/4 cups 4 1/2 cups
a c t i ve dry ye a s t 1 tsp 2 tsp
P ro g r a m 1 0 1 0
Method
1. Place on a lightly floured surface. Divide and press onto a 12 inch pizza pan, raising edges .
2. Spread pizza sauce over the dough and sprinkle with toppings.
3. Bake 425°F/218°C for 20 minutes or until crust is golden brown around edges.
47

BAGEL DOUGH
1 1/2 pounds
8 bage l s
water 80°F/27°C 1 cup
s u g a r 1 1/2 T B L
s a l t 1 tsp
bread flour 3 cups
a c t i ve dry ye a s t 2 1/4 tsp
P ro g r a m 1 0
G l a ze
egg, beaten 1
Toppings (optional)
sesame seeds, poppy seeds, cra cked wheat, wheat flakes or dried onion flake s
BANANA W H E AT BAGEL DOUGH
1 1/2 pounds
12 bage l s
egg room temperature plus 1
enough water 80°F/27°C to equal 1 cup
o i l 2 T B L
h o n ey 1 T B L
s a l t 1 1/2 tsp
banana, mashed 1/2 cup
whole wheat flour 2 1/2 cups
bread flour 1 cup
a c t i ve dry ye a s t 2 1/4 tsp
P ro g r a m 1 0
G l a ze
egg white, beaten 1
wa t e r 1 T B L
Toppings (optional)
p o p py seeds, sesame seeds
Bagel Recipes Method
1. Place on a lightly floured surface. Divide into pieces. Roll each in a smooth ball, making a hole in
the center of each with thumbs.Gently pull to make a one-inch hole.
2. Place on a greased baking sheet. Cover and let rise in a warm place for 30 minutes or until double
in size.
3. In a 3-quart saucepan, bring to a boil 2 quarts water and 2 tablespoons sugar. Place a few bagels
at a time in boiling water.Simmer 3 minutes turning once. Remove with slotted spoon and put back
on greased baking sheet.
4. Brush with egg and sprinkle with choice of toppings. Bake at 400°F/205°C for 20-25 minutes or
until done; cool on a wire rack.
48

ALMOND CHERRY COFFEE CAKE DOUGH
1 1/2 pounds
1 coffee cake
water 80°F/27°C 1 cup
o i l 1 T B L
s u g a r 1 1/2 T B L
s a l t 3/4 tsp
d ry milk 1 T B L
bread flour 3 1/4 cups
a c t i ve dry ye a s t 1 1/2 tsp
P ro g r a m 1 0
F i l l i n g
cream cheese, room tempera t u r e 8 oz
s u g a r 2 T B L
m a raschino cherri e s, chopped 1/2 cup
milk, liquid 1 T B L
almond ex t ra c t 1/2 tsp
G l a ze
p owdered sugar 1/2 cup
sour cream 1 T B L
milk, liquid 1-2 T B L
sliced almonds, to decora t e 2 T B L
m a raschino cherri e s, quartered, to decora t e 2 T B L
Method
1. Place on a lightly floured surface. Roll into a 15 x 10 inch rectangle. Combine filling ingredients and
spread over dough within 1/2 inch of edges.Starting with longest side, roll dough up tightly, pressing edges to seal.
2. Place roll, seam-side down, on a greased baking sheet and join the ends to form a ring; pinch to
seal.With a knife, make cuts 1 1/2 inches apart from the outside edge to within one inch of the
inside edge.Turn each section on its side so filling shows.
3. Cover and let rise in a warm place 1 hour or until almost double in size.
4. Uncover and bake at 375°F/190°C for 20-25 minutes or until done.
5. Combine the first three glaze ingredients, adding only enough milk for drizzling consistency. Drizzle
over the warm coffee cake. Decorate with almonds and cherries. Serve warm.
49

CINNAMON ROLL DOUGH
1 1/2 pounds 2 pounds
18 ro l l s 24 ro l l s
egg room temperatuare plus 1 1
enough water 80°F/27°C to equal 1 cup 1 1/2 cups
o i l 1/4 cup 1/3 cup
s u g a r 1/3 cup 1/2 cup
s a l t 1 tsp 1 1/2 tsp
bread flour 3 1/2 cups 4 1/2 cups
a c t i ve dry ye a s t 1 1/2 tsp 2 tsp
P ro g r a m 1 0 1 0
A dd at the beep:
wa l nu t s, chopped (optional) 1/2 cup 2/3 cup
raisins (optional) 1/2 cup 2/3 cup
F i l l i n g
bu t t e r, softened 1/3 cup 1/2 cup
s u g a r 1/3 cup 1/2 cup
c i n n a m o n 2 T B L 3 T B L
G l a ze
p owdered sugar 1/2 cup 2/3 cup
milk, liquid 3 T B L 1/4 cup
va n i l l a 1/4 tsp 1/2 tsp
Method
1. Place on a lightly floured surface, roll dough into a 12 x 18 inch rectangle for 18 rolls, (12 x 24 inch
rectangle for 24 rolls) and spread with butter.Combine remaining filling ingredients and sprinkle
over butter. Roll up tightly, jelly-roll style, starting with the longest side and cut into one inch slices.
2. Place in greased baking pans and let stand in a warm place for 1 hour or until double in size.
3. Bake at 350°F/177°C for 25-30 minutes or until done.
4. Mix glaze ingredients until smooth and drizzle over top.
50

STICKY BREAKFAST ROLL DOUGH
1 1/2 pounds 2 pounds
18 ro l l s 24 ro l l s
egg(s) room temperature plus 1 2
enough water 80°F/27°C to equal 1 cup + 2 T B L 1 1/2 cups
o i l 1/4 cup 1/3 cup
s u g a r 1/3 cup 1/2 cup
s a l t 1 tsp 1 1/2 tsp
bread flour 3 1/2 cups 4 1/2 cups
a c t i ve dry ye a s t 1 1/2 tsp 2 tsp
P ro g r a m 1 0 1 0
A dd at the beep:
wa l nuts or pecans, chopped 1/2 cup 2/3 cup
F i l l i n g
bu t t e r, softened 1/2 cup 2/3 cup
s u g a r 1/3 cup 1/2 cup
c i n n a m o n 1 T B L 1 1/2 T B L
To p p i n g
bu t t e r, melted 3/4 cup 1 cup
b r own sugar 3/4 cup 1 cup
Method
1. Place on a lightly floured surface, roll dough into a 12 x 18 inch rectangle for 18 rolls (12 x 24 inch
rectangle for 24 rolls) and spread with butter.Combine remaining filling ingredients and sprinkle
over dough. Roll up tightly, jelly-roll style, starting with the longest side and cut into one inch slices.
2. Combine topping mixture and spread into baking pan.Place slices on mixture and let rise in a
warm place for 1 hour or until double in size.
3. Bake at 350°F/177°C for 35 minutes or until done.Invert onto a heat-proof tray.
51

SOFT PRETZEL DOUGH
1 1/2 pounds
16 pretze l s
water 80°F/27°C 1 1/4 cups
egg yolk, room tempera t u r e 1
o i l 1 T B L
s u g a r 2 T B L
s a l t 1 tsp
white pepper 1/8 tsp
bread flour 3 1/2 cups
a c t i ve dry ye a s t 1 T B L
P ro g r a m 1 0
G l a ze
egg white 1
wa t e r 1 T B L
Toppings (optional)
kosher salt 1 T B L
sesame seeds 1 T B L
Method
1. Place dough on a lightly floured surface and cut into pieces. Roll each piece into a 16 inch rope.
Cross the ends of the rope to make a loop; twist the crossed ends once and fold across the loop.
2. Place on a greased baking sheet 1 1/2 inches apart. Brush with glaze and sprinkle with topping.
Let rise until double in size, about 30 minutes. Bake at 375°F/190°C for 15-20 minutes or until
done.
Variation
PEPPERONI PRETZEL DOUGH
Method
1. Add 1 cup thin sliced pepperoni and 2 tablespoons Parmesan cheese to dough ingredients.
2. Follow method above for completion.
52

CREAMED SOUP BREAD BOWL DOUGH
2 pounds
4 bow l s
eggs room temperature plus 2
enough water 80°F/27°C to equal 1 cup + 5 T B L
o i l 2 T B L
h o n ey 1/4 cup
d ry milk 3 T B L
s a l t 2 tsp
bread flour 2 1/4 cups
whole wheat flour 1 cup
rye flour 1 cup
c a raway seeds 3 T B L
d e hy d rated onions 1/4 cup
a c t i ve dry ye a s t 2 3/4 tsp
P ro g r a m 1 0
N o t e :A ny 2 pound bread or dough recipe may be used; mix on dough progra m .
Method
1. Place dough on a lightly floured surface and divide into 4 equal pieces. Shape into 4 smooth round
balls and place on a greased baking sheet.
2. Cover and let rise in a warm place for 1 hour or until double in size.
3. Bake at 350°F/177°C for 25-30 minutes or until done.Allow to cool completely on a wire rack.
4. With a serrated knife, remove the top 1 inch of each bread bowl.Remove the center, leaving a shell
of 1/2 inch on both sides and bottom.
5. Fill with approximately 1 cup of creamed soup (non-creamed soup will soak through the bread bowl
too easily.) Cut removed bread into 1 inch pieces and serve with soup.
53

PA RTY DIP BREAD BOWL DOUGH
1 1/2 pounds
1 bow l
water 80°F/27°C 1 1/4 cups
s u g a r 1 T B L
s a l t 1 tsp
bread flour 3 1/2 cups
a c t i ve dry ye a s t 1 T B L
P ro g r a m 1 0
N o t e : A ny 1 1/2 pound dough or bread recipe may be used; mix on dough progra m .
Method
1. Place dough on a lightly floured surface. Shape into a large smooth round ball and place on a
greased baking sheet.
2. Cover and let rise in a warm place for 1 hour or until double in size.
3. Bake at 350°F/177°C for 30-40 minutes or until done. Allow to cool completely on a wire rack.
4. With a serrated knife, remove the top 1-2 inches of the bowl.Remove the center, leaving a shell of
1/2 inch on both sides and bottom.
5. Fill with 3 cups of dip. Cut removed bread into 1 inch pieces and serve with dip.
Shredded Beef Dip
dried beef, chopped 5 oz
cream cheese, softened 2-8 oz pkg
sour cream 1/2 cup
green onions, chopped 6
Accent®seasoning 2 1/2 tsp
Worcestershire®sauce to taste
Mix and chill before serving.
Makes 3 cups.
Shrimp Dip
canned shrimp,
drained and mashed 2 small cans
cream cheese, softened 8 oz pkg
mayonnaise 1 cup
green onions, chopped 3
Mix and chill before serving.
Makes 3 cups.
54

CLEANING & STO R I N G
ALWAYS UNPLUG THE UNIT AND ALLOW TO COOL COMPLETELY BEFORE CLEANING.
CAREFULLY UNP ACK THE BREAD MAKER AND REMOVE ALL PACKAGING MATERIALS .
A ny service requiring disassembly, other than the cleaning described below, must be
p e r formed by an authorized service representative. U n a u t h o r i zed service will void yo u r
w a r r a n t y.
C L E A N I N G
CLEAN-UP OF BREAD MAC H I N E
1 . Unplug and allow to cool before cleaning.
2 . R e m ove bread pan from inside the bread machine.
3 . Clean ex t e rior and interior of bread machine with a damp cloth and plastic scouring pad if
n e c e s s a ry. Do not rub too hard as the surface may be scra t c h e d .
4 . To clean the glass in the lid, use a glass cleaner or mild detergent and a damp cloth or plas-
tic scouring pad. Do not use an abra s i ve cleaner or pad as they might scratch the glass.
5 . Rinse with a damp cloth and dry thoroughly.
CLEAN-UP OF BREAD PAN AND KNEADING BLADE
DO NOT IMMERSE PAN OR WASH IN DISHWA S H E R
1 . A l l ow to cool before cleaning.
2 . Fill with hot soapy water and remove kneading bl a d e. If necessary to remove the kneading
blade from the bread pan, allow the soapy water to remain in the pan for up to 30 minu t e s
(longer times may damage the non-stick surfa c e ) . It is not necessary to remove the kneading
blade for cleaning. But if you wish to, it must be removed after each use otherwise it will
become ve ry difficult to remove.
3 . Wash bread pan and kneading blade with a nylon bristle bru s h . Do not use steel wool, abra-
s i ve cleaners, or metal utensils on the bread pan or kneading blade as they will damage the
n o n - s t i ck surfa c e. N o rmal wear is to be ex p e c t e d . The non-stick may discolor over time and
in no way affects perfo rm a n c e.
S TO R I N G
• All remova ble parts should be thoroughly cleaned and dri e d .
• Store with lid closed and bread pan with kneading blade inside.
5 5

BEFORE CALLING FOR SERV I C E
n QUESTIONS AND ANSWERS
1
2
3
4
Q u e s t i o n s
W hy does the height and shape of
bread differ in each loaf?
The bread has an unu s u a l
a r o m a .W hy ?
The kneading blade comes out
with the bread.
The bread has a floured corn e r.
A n sw e rs
The height and shape of bread may diffe r
depending on the ingr e d i e n t s, room
t e m p e rature and length of the timer cycle.
A l s o, accurate measurement of ingr e d i e n t s
is essential to make delicious bread.
Stale ingredients or too much yeast may
h ave been used. A l ways use fresh ingr e d ie n t s.A c c u rate measurements are essential
to make delicious bread.
This can happen as the kneading blade is
d e t a c h a bl e. Use a non-metal utensil to
r e m ove it.
C a u t i o n : The kneading blade will be hot.
Sometimes flour in the corner of the pan
m ay not have been completely
kneaded into the dough. S c rape the flour off
the loaf with a spatula.
5
6
7
W hy can the timer not be set fo r
more than 12 hours?
Can ingredients be halved or
d o u bl e d ?
Can fresh milk be used in place of
d ry milk?
Longer delay times could alter the baking
r e s u l t s.
N o.If there is too little in the bread pan,
the kneading blade cannot knead we l l
e n o u g h . If there is too much, bread swe l l s
out of the bread pan.
Ye s, for all programs except fast bake. B e
sure to deduct the same measurement of
water to equal liquid substitution
( 8 0 ° F / 2 7 ° C ) . Fresh milk is not recommended
when using the timer, because it may spoil
while sitting in the bread pan.
5 6
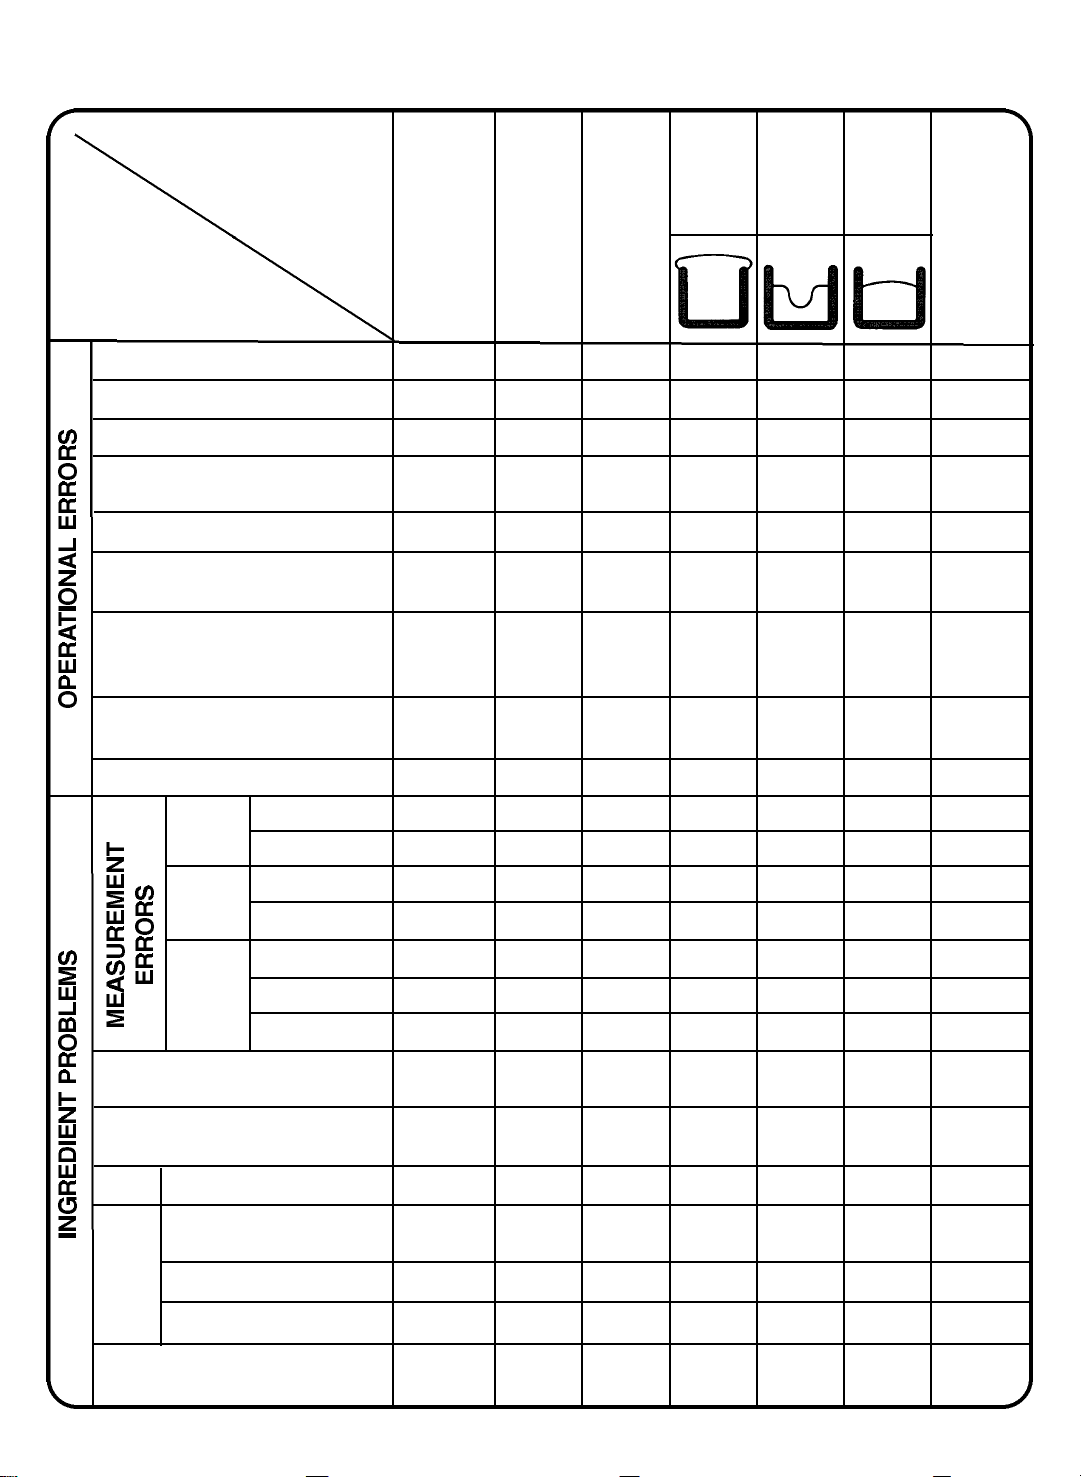
n CHECK LIST
BAKING RESULT S :
Please check the fo l l ow i n g :
1 . U n p l u g g e d / p ower outage
2 .
O ven area is too hot (display H I or EO1)
3 . D i s p l ay reads EO3, EO5, EO8
4 . I n gredients spilled on heating
e l e m e n t
5 . Top lid was open during baking
6 . Bread left in bread pan too long
after progra m
7 . Bread sliced just after baking
(Steam was not allowed to
e s c a p e )
8 . Whole Wheat Medium progra m
c h o s e n
B r e a d
m a c h i n e
does not
o p e ra t e /
i n gr e d i e n t s
not mixing
O
O
O
O
S m o ke
e m i t t e d
f r o m
s t e a m
ve n t /
bu rn i n g
s m e l l
O
Sides of
b r e a d
c o l l a p s e /
bottom is
d a m p
O
B r e a d
rises too
mu c h /
c o a r s e
t ex t u r e
Bread fa l l s /
c o a r s e
t ex t u r e
S h o rt &
d e n s e
t ex t u r e
O
S l i c e s
u n even &
s t i ck y
O
9 . Kneading blade not installed
1 0 . Not enough
Wa t e r
1 1 . Too mu c h
1 2 . Not enough
F l o u r
1 3 . Too mu c h
1 4 . No ye a s t
Ye a s t
1 7 . No sugar, molasses or honey
1 8 . I n gredients used other than
r e c o m m e n d e d
F l o u r
Ye a s t
1 9 . Wrong type of flour used
2 0 . Yeast touched wa t e r
b e fore kneading
2 1 . Old yeast used
2 2 . Wrong type of yeast used
1 5 . Not enough
1 6 . Too mu c h
O
OO O
O
O O
O O
O
O
O
O
O
O
O
O
O
O
2 3 . Te m p e rature of water either too
hot or too cold
O
5 7

S u gge s t i o n s
The fo l l owing suggestions have a corresponding number found on the check list. Be sure to read
b o t h .
1 . Plug into 120 V ~ 60 Hz outlet. R e fer to power outage instru c t i o n s.
2 . Open lid, remove bread pan and allow to cool.
3 . Needs serv i c e.
4 . Wait until program is complete; unplug, allow to cool and clean.
5 . Only open lid during kneading process to check dough ball or to add ingr e d i e n t s.
6 . R e m ove bread as soon as program is done and place on wire ra ck .
7 . A l l ow to cool approximately 20 minu t e s.
8 . P r o gram begins with 5 minute preheat.
9 . Put kneading blade on the shaft of bread pan.
10 - 13. C h e ck the dough ball at the beep or halfway through the 1st kneading cycle.
It should be round, smooth-textured, soft and slightly tacky to the touch. ( Fast bake dough
ball will be sticky to the touch).
If more like a batter, add 1 TBL flour. A l l ow to mix; add more if necessary.
If too dry add 1 tsp wa t e r. A l l ow to absorb; add more if necessary.
1 4 . Fo l l ow recipe.
1 5 . Increase by 1/4 tsp.
1 6 . Decrease by 1/4 tsp.
1 7 . A rtificial sugar substitutes not recommended.
1 8 . Fo l l ow recipe or substitution recommendations.
1 9 . Flours cannot be substituted.
2 0 . Place yeast on top of flour away from liquids.
2 1 . M a ke sure yeast is fresh and room tempera t u r e.
2 2 .
For all programs except Fast Bake, use active dry / rapid or quick in equal amounts.Fo l l ow
bread machine yeast directions.See fast bake section for details.
2 3 .
Water should be 80°F/27°C for all programs except Fast Bake which should be 110°-115°F/
4 3 ° - 4 6 ° C.
5 8

n
S E RVICE INFORMAT I O N
Please refer to wa r ranty statement to determine if in-wa r ranty service applies.
This appliance must be serviced by a Toastmaster authori zed service center.U n a u t h o ri zed service will
void wa r ra n t y. Consult your phone directory under “ A p p l i a n c e s - H o u s e h o l d - S m a l l - S e rvice and Repair”,
or call 1-800-947-3744 in the U. S. and Canada.
If an authori zed service center is not ava i l a ble locally, your appliance may be returned postage prepaid
to our National Service Center at the address shown in the wa r ranty statement. Products must be
a d e q u a t e l y protected to avoid shipping damage. Surround your appliance with three inches of
p r o t e c t i ve padding and include a note explaining the problem you have ex p e ri e n c e d .We recommend
i n s u ring your pack a g e.No C. O. D.shipments accepted.
S P E C I F I C AT I O N S
Power supply 120 V ~ 60 Hz
Powe r
C o n s u m p t i o n
Dimension (WxDxH) 8 7/8" x 14" x 13 1/4"
We i g h t A p p r ox . 16 lbs.
H e a t e r 4 3 0 W
Kneading Motor 1 0 0 W
5 9

N OT E S
6 0

N OT E S
6 1

N OT E S
6 2

RECIPE INDEX
B R E A D S
B a n a n a. . . . . . . . . . . . . . . . . . . . . . . . . . . . . . . . . . . . . . . . . . . . . . . . . . . . . . . . 2 6
Banana Gra n o l a. . . . . . . . . . . . . . . . . . . . . . . . . . . . . . . . . . . . . . . . . . 2 1
Bloody Mary . . . . . . . . . . . . . . . . . . . . . . . . . . . . . . . . . . . . . . . . . . . . . . . . 2 5
B u t t e rm i l k . . . . . . . . . . . . . . . . . . . . . . . . . . . . . . . . . . . . . . . . . . . . . . . . . . . . 1 9
C a raway Rye . . . . . . . . . . . . . . . . . . . . . . . . . . . . . . . . . . . . . . . . . . . . . . 3 1
Cheese Onion . . . . . . . . . . . . . . . . . . . . . . . . . . . . . . . . . . . . . . . . . . . . 2 6
Cinnamon Raisin . . . . . . . . . . . . . . . . . . . . . . . . . . . . . . . . . . . . . . . . 2 1
C o rn . . . . . . . . . . . . . . . . . . . . . . . . . . . . . . . . . . . . . . . . . . . . . . . . . . . . . . . . . . . . 2 6
D a i ry Whole Wheat — . . . . . . . . . . . . . . . . . . . . . . . . . . . . 3 0
D i l l. . . . . . . . . . . . . . . . . . . . . . . . . . . . . . . . . . . . . . . . . . . . . . . . . . . . . . . . . . . . . . . . 2 7
D ried Fru i t. . . . . . . . . . . . . . . . . . . . . . . . . . . . . . . . . . . . . . . . . . . . . . . . . . . . 2 2
E g g. . . . . . . . . . . . . . . . . . . . . . . . . . . . . . . . . . . . . . . . . . . . . . . . . . . . . . . . . . . . . . 1 9
Fat Free White — . . . . . . . . . . . . . . . . . . . . . . . . . . . . . . . . . . 1 8
French — . . . . . . . . . . . . . . . . . . . . . . . . . . . . . . . . . . . . . . . . . . . . . . . . 1 8
H o l i d ay . . . . . . . . . . . . . . . . . . . . . . . . . . . . . . . . . . . . . . . . . . . . . . . . . . . . . . . . 2 2
H o n ey Granola — . . . . . . . . . . . . . . . . . . . . . . . . . . . . . . . . . . 2 2
Italian Herb — . . . . . . . . . . . . . . . . . . . . . . . . . . . . . . . . . . . . . . 2 7
Jalapeño — . . . . . . . . . . . . . . . . . . . . . . . . . . . . . . . . . . . . . . . . . . 2 7
M a p l e . . . . . . . . . . . . . . . . . . . . . . . . . . . . . . . . . . . . . . . . . . . . . . . . . . . . . . . . . . 1 8
M i l k. . . . . . . . . . . . . . . . . . . . . . . . . . . . . . . . . . . . . . . . . . . . . . . . . . . . . . . . . . . . . . 1 9
Onion Rye. . . . . . . . . . . . . . . . . . . . . . . . . . . . . . . . . . . . . . . . . . . . . . . . . . . . 3 2
Pe a c h . . . . . . . . . . . . . . . . . . . . . . . . . . . . . . . . . . . . . . . . . . . . . . . . . . . . . . . . . . 2 3
P i z z a. . . . . . . . . . . . . . . . . . . . . . . . . . . . . . . . . . . . . . . . . . . . . . . . . . . . . . . . . . . . 2 8
Potato — . . . . . . . . . . . . . . . . . . . . . . . . . . . . . . . . . . . . . . . . . . . . . . . . 2 8
P u m p e rn i cke l . . . . . . . . . . . . . . . . . . . . . . . . . . . . . . . . . . . . . . . . . . . . . . 3 1
Sesame Seed — . . . . . . . . . . . . . . . . . . . . . . . . . . . . . . . . . . 2 9
S o u r d o u g h . . . . . . . . . . . . . . . . . . . . . . . . . . . . . . . . . . . . . . . . . . . . . . . . . . 2 0
Sourdough Start e r . . . . . . . . . . . . . . . . . . . . . . . . . . . . . . . . . . . . . . 2 0
S oy Almond Fru i t . . . . . . . . . . . . . . . . . . . . . . . . . . . . . . . . . . . . . . . . 2 3
S oy Cinnamon Raisin. . . . . . . . . . . . . . . . . . . . . . . . . . . . . . . . . . 2 4
S oy Herb. . . . . . . . . . . . . . . . . . . . . . . . . . . . . . . . . . . . . . . . . . . . . . . . . . . . . . 2 4
S u n f l ower Seed . . . . . . . . . . . . . . . . . . . . . . . . . . . . . . . . . . . . . . . . . . 3 2
Trail Mix . . . . . . . . . . . . . . . . . . . . . . . . . . . . . . . . . . . . . . . . . . . . . . . . . . . . . . 2 5
White — . . . . . . . . . . . . . . . . . . . . . . . . . . . . . . . . . . . . . . . . . . . . . . . . . . 1 7
White Wheat — . . . . . . . . . . . . . . . . . . . . . . . . . . . . . . . . . . . . . . 2 9
Whole Wheat — . . . . . . . . . . . . . . . . . . . . . . . . . . . . . . . . . . . . . . 2 8
Whole Wheat Cinnamon Raisin Wa l nu t. . . . . . 3 0
4
4
4
4
4
7
4
4
7
7
7
DAY OLD BREAD USES
Bread Pudding . . . . . . . . . . . . . . . . . . . . . . . . . . . . . . . . . . . . . . . . . . . . 3 8
Breaded Pineapple. . . . . . . . . . . . . . . . . . . . . . . . . . . . . . . . . . . . . . 3 8
C ru n c hy Bread Snack s. . . . . . . . . . . . . . . . . . . . . . . . . . . . . . . . 3 8
D O U G H S
A l m o n d - C h e r ry Coffee Cake . . . . . . . . . . . . . . . . . . . . . . 4 9
B a g e l s. . . . . . . . . . . . . . . . . . . . . . . . . . . . . . . . . . . . . . . . . . . . . . . . . . . . . . . . . . 4 8
Banana Wheat Bagels . . . . . . . . . . . . . . . . . . . . . . . . . . . . . . . . 4 8
B u t t e rmilk Rolls . . . . . . . . . . . . . . . . . . . . . . . . . . . . . . . . . . . . . . . . . . 4 2
Challah Bra i d . . . . . . . . . . . . . . . . . . . . . . . . . . . . . . . . . . . . . . . . . . . . . . 4 6
Cinnamon Rolls . . . . . . . . . . . . . . . . . . . . . . . . . . . . . . . . . . . . . . . . . . 5 0
Cheezy Garlic Rolls . . . . . . . . . . . . . . . . . . . . . . . . . . . . . . . . . . . . 4 4
Creamed Soup Bread Bow l . . . . . . . . . . . . . . . . . . . . . . . . 5 3
Dinner Rolls . . . . . . . . . . . . . . . . . . . . . . . . . . . . . . . . . . . . . . . . . . . . . . . . 4 0
Focaccia Bread. . . . . . . . . . . . . . . . . . . . . . . . . . . . . . . . . . . . . . . . . . . . 3 9
French Bread . . . . . . . . . . . . . . . . . . . . . . . . . . . . . . . . . . . . . . . . . . . . . . 4 3
French Rolls . . . . . . . . . . . . . . . . . . . . . . . . . . . . . . . . . . . . . . . . . . . . . . . . 4 3
French Tw i s t s . . . . . . . . . . . . . . . . . . . . . . . . . . . . . . . . . . . . . . . . . . . . . . 4 3
Italian Loaf . . . . . . . . . . . . . . . . . . . . . . . . . . . . . . . . . . . . . . . . . . . . . . . . . . 4 3
Pa rty Dip Bread Bow l. . . . . . . . . . . . . . . . . . . . . . . . . . . . . . . . . . 5 4
Pepperoni Pretze l s. . . . . . . . . . . . . . . . . . . . . . . . . . . . . . . . . . . . . . 5 2
Pita Po cke t s . . . . . . . . . . . . . . . . . . . . . . . . . . . . . . . . . . . . . . . . . . . . . . . . 4 4
Pizza Cru s t. . . . . . . . . . . . . . . . . . . . . . . . . . . . . . . . . . . . . . . . . . . . . . . . . . 4 7
Refreshing Rolls. . . . . . . . . . . . . . . . . . . . . . . . . . . . . . . . . . . . . . . . . . 4 5
Soft Pretze l s. . . . . . . . . . . . . . . . . . . . . . . . . . . . . . . . . . . . . . . . . . . . . . . . 5 2
S t i cky Breakfast Rolls. . . . . . . . . . . . . . . . . . . . . . . . . . . . . . . . . . 5 1
Wheat Dinner Rolls . . . . . . . . . . . . . . . . . . . . . . . . . . . . . . . . . . . . 4 2
Whole Wheat Pizza Cru s t . . . . . . . . . . . . . . . . . . . . . . . . . . 4 7
FAST BAKE BREADS
Cinnamon Raisin . . . . . . . . . . . . . . . . . . . . . . . . . . . . . . . . . . . . . . . . 3 6
Fat Fr e e . . . . . . . . . . . . . . . . . . . . . . . . . . . . . . . . . . . . . . . . . . . . . . . . . . . . . . 3 7
Fr e n c h. . . . . . . . . . . . . . . . . . . . . . . . . . . . . . . . . . . . . . . . . . . . . . . . . . . . . . . . . . 3 5
H o n ey Gra n o l a . . . . . . . . . . . . . . . . . . . . . . . . . . . . . . . . . . . . . . . . . . . . 3 6
I t a l i a n . . . . . . . . . . . . . . . . . . . . . . . . . . . . . . . . . . . . . . . . . . . . . . . . . . . . . . . . . . 3 5
Pepperoni Pizza . . . . . . . . . . . . . . . . . . . . . . . . . . . . . . . . . . . . . . . . . . 3 7
Po t a t o. . . . . . . . . . . . . . . . . . . . . . . . . . . . . . . . . . . . . . . . . . . . . . . . . . . . . . . . . . 3 7
W h i t e . . . . . . . . . . . . . . . . . . . . . . . . . . . . . . . . . . . . . . . . . . . . . . . . . . . . . . . . . . 3 4
White W h e a t. . . . . . . . . . . . . . . . . . . . . . . . . . . . . . . . . . . . . . . . . . . . . . . . 3 5
6 3

ONE YEAR LIMITED WA R R A N T Y
Toastmaster Inc. wa r rants this product, to original purchaser, for one year from purchase date
to be free of defects in material and wo rk m a n s h i p.
This wa r ranty is the only written or express wa r ranty given by Toastmaster Inc.This wa r ranty give s
you specific legal ri g h t s. You may have other rights which va ry from state to state. ANY OT H E R
RIGHT WHICH YOU MAY HAVE, INCLUDING ANY IMPLIED WARRANTY OF MERCHANTA B I LITY OR FITNESS FOR A PA RTICULAR PURPOSE IS LIMITED IN DURATION TO THE DURATION OF THIS WA R R A N T Y.
D e fe c t i ve product may be brought or sent (freight prepaid) to an authori zed service center listed
in the phone book, or to Service Department, Toastmaster Inc., 708 South MIssouri St., Macon
MO 63552, for free repair or replacement at our option.
Your remedy does not include: cost of inconve n i e n c e, damage due to product fa i l u r e, tra n s p o rt ation damages, misuse, abu s e, accident or the like, or commercial use. IN NO EVENT SHALL
TOASTMASTER INC.BE LIABLE FOR INCIDENTAL OR CONSEQUENTIAL DA M AG E S.
Some states do not allow limitations on how long an implied wa r ranty lasts, or allow the ex c l u s i o n
or limitation of incidental or consequential damages, so the above limitations or exclusions may
not apply to yo u .
For info rmation, write Consumer Claims Manager, at the Macon address. Send name, address,
z i p, telephone area code and daytime nu m b e r, model, serial nu m b e r, and purchase date.
KEEP DATED SALES RECEIPT FOR WARRANTY SERV I C E .
Keep this booklet. Record the fo l l owing for refe r e n c e :
Date purchased_ _ _ _ _ _ _ _ _ _ _ _ _ _ _ _ _ _ _ _ _ _ _ _ _ _ _ _ _ _ _ _ _ _ _ _ _ _ _ _ _ _ _ _ _ _ _ _ _ _ _ _
Model nu m b e r _ _ _ _ _ _ _ _ _ _ _ _ _ _ _ _ _ _ _ _ _ _ _ _ _ _ _ _ _ _ _ _ _ _ _ _ _ _ _ _ _ _ _ _ _ _ _ _ _ _ _ _
National Service Center
708 South Missouri St., Macon, MO 63552
In USA and Canada call:
Consumer Service 1-800-947-3744
Consumer Pa rts 1-800-947-3745
H o u r s : 8:00 a.m.- 4:30 p. m .C S T
PA RT NO. 3 3 4 0 9 P 0 1
 Loading...