

Page 1
READ AND SAVE THESE INSTRUCTIONS
Corner Bakery Bread and Dessert Maker
Use and Care Guide
Models 1170S and 1183
WARNING: A risk of fire and electrical shock exists in all electrical appliances
and may cause personal injury or death.Please follow all safety instructions.
?? QUESTIONS ??
Before Contacting Your Retailer Call
TOLL-FREE 1-800-947-3744
and talk to one of Toastmaster’s Experts.
P/No.:3828FB3108E
Page 2

TABLE OF CONTENTS
IMPORTANT SAFEGUARDS . . . . . . . . . . . . . . . . . . . . . . . . . . . . . . . . . . . . . . . . . . . . . . . . . . . . 3
BEFORE YOUR FIRST USE . . . . . . . . . . . . . . . . . . . . . . . . . . . . . . . . . . . . . . . . . . . . . . . . . . . . 4
CORNER BAKERY BREAD AND DESSERT MAKER INTRODUCTION
Parts and Accessories . . . . . . . . . . . . . . . . . . . . . . . . . . . . . . . . . . . . . . . . . . . . . . . . . . . . . . 5
Control Panel . . . . . . . . . . . . . . . . . . . . . . . . . . . . . . . . . . . . . . . . . . . . . . . . . . . . . . . . . . . . . 6
Basic Features . . . . . . . . . . . . . . . . . . . . . . . . . . . . . . . . . . . . . . . . . . . . . . . . . . . . . . . . . . . . 7
Program Specifications . . . . . . . . . . . . . . . . . . . . . . . . . . . . . . . . . . . . . . . . . . . . . . . . . . . . . . 8
BREAD AND DOUGH
Programming . . . . . . . . . . . . . . . . . . . . . . . . . . . . . . . . . . . . . . . . . . . . . . . . . . . . . . . . . . . . . 9
Helpful Hints and Recipes . . . . . . . . . . . . . . . . . . . . . . . . . . . . . . . . . . . . Refer to Recipe Book
BUTTER
Programming . . . . . . . . . . . . . . . . . . . . . . . . . . . . . . . . . . . . . . . . . . . . . . . . . . . . . . . . . . . . 12
Helpful Hints and Recipes . . . . . . . . . . . . . . . . . . . . . . . . . . . . . . . . . . . . Refer to Recipe Book
DESSERT
Programming . . . . . . . . . . . . . . . . . . . . . . . . . . . . . . . . . . . . . . . . . . . . . . . . . . . . . . . . . . . . 14
Helpful Hints and Recipes . . . . . . . . . . . . . . . . . . . . . . . . . . . . . . . . . . . . Refer to Recipe Book
CLEANING INSTRUCTIONS . . . . . . . . . . . . . . . . . . . . . . . . . . . . . . . . . . . . . . . . . . . . . . . . . . . 16
BEFORE CALLING FOR SERVICE . . . . . . . . . . . . . . . . . . . . . . . . . . . . . . . . . . . . . . . . . . . . . . 17
Bread and Dough Questions and Answers . . . . . . . . . . . . . . . . . . . . . . . . . . . . . . . . . . . . . . 17
Checklist for Bread . . . . . . . . . . . . . . . . . . . . . . . . . . . . . . . . . . . . . . . . . . . . . . . . . . . . . . . . 18
Dessert Questions and Answers . . . . . . . . . . . . . . . . . . . . . . . . . . . . . . . . . . . . . . . . . . . . . . 20
Service Information . . . . . . . . . . . . . . . . . . . . . . . . . . . . . . . . . . . . . . . . . . . . . . . . . . . . . . . . 21
SPECIFICATIONS . . . . . . . . . . . . . . . . . . . . . . . . . . . . . . . . . . . . . . . . . . . . . . . . . . . . . . . . . . . 21
- 2 -
Page 3

IMPORTANT SAFEGUARDS
When using electrical appliances, basic safety precautions should always be followed to reduce the
risk of fire, electric shock and injury to persons, including the following:
1 . Read all instructions before using this appliance.
2 . To protect against electric shock do not immerse cord, plug, or appliance in water or other
liquid (see instructions for cleaning).
3. Do not touch hot surfaces. Always use oven mitts when handling the hot pan, dessert or bread.
4 . Close supervision is necessary when this appliance is used near children.
5 . This appliance is not for use by children. Keep out of reach of children.
6 . Unplug from outlet when not in use and before cleaning. A l l ow to cool before attaching or
r e m oving part s.
7 . Avoid touching moving part s. Do not insert hand into the pan during opera t i o n .
8 . Do not operate the appliance with a damaged cord or plug, or after the appliance malfunctions,
or has been dropped or damaged in any manner. R e t u rn appliance to the nearest authori ze d
s e rvice facility for examination, repair, electrical or mechanical adjustment.
9 . Do not use outdoors or while standing in damp area.
1 0 . Do not let cord hang over edge of table or counter or touch hot surfa c e s.
1 1 . Do not place on or near hot gas or electric bu rner or in a heated ove n .
1 2 . To unplug with unit switched off, grip the plug and pull out from the wall outlet. N ever pull on
the cord.
1 3 . Do not use appliance for other than intended use.
1 4 . This product is intended for household use only.
1 5 . Use of accessory attachments not recommended by Toastmaster Inc. m ay cause injuri e s.
1 6 . Do not clean with metal scouring pads. Pieces can break off the pad and touch electrical parts,
creating a risk of electrical shock.
1 7 . Bread and Dessert Maker must be placed at least 4 inches (10.2 cm) from walls and edge of
c o u n t e r.
1 8 . Do not cover Bread and Dessert Maker with anything which would prevent the steam
e s c a p i n g . This may cause wa rp a g e, discoloration, malfunction or even fire.
SAVE THESE INSTRUCTIONS
THIS PRODUCT FOR HOUSEHOLD USE ONLY.
CAUTION:A short power supply cord is provided to reduce the risk of personal injury resulting from
becoming entangled in or tripping over a longer cord. Extension cords are ava i l a ble from local
h a r d wa r e stores and may be used if care is exercised in their use. If an extension cord is required,
special care and caution is necessary.Also the cord must be: (1) marked with an electrical rating of
125 V, and at least 13 A., 1625 W., and (2) the cord must be arranged so that it will not drape over the
countertop or tabletop where it can be pulled on by children or tripped over accidentally.
ELECTRIC POWER: If electric circuit is overloaded with other appliances, your Bread and Desser t
Maker may not operate properly. The Bread and Dessert Maker should be operated on a separate
electrical circuit from other operating appliances.
POLARIZED PLUG: This appliance has a polarized plug, (one blade is wider than the other). As a
safety feature to reduce the risk of electrical shock, this plug is intended to fit in a polarized outlet only
one way. If the plug does not fit fully in the outlet, reverse the plug. If it still does not fit, contact a
q u a l i f i e d electrician.Do not attempt to defeat this safety feature.
- 3 -
Page 4

BEFORE YOUR FIRST USE
Carefully unpack the Bread and Dessert Maker removing all packaging materials.To remove any dust
that may have accumulated during packaging, wash the pan, kneading blade, lid and cup. Do not
immerse pan. (See cleaning instruction on page 16.) Wipe the outside of the machine with a damp
cloth.Do not use harsh or abrasive cleaners on any part of the Bread and Dessert Maker.
Place the Bread and Dessert Maker on a dry, stable surface away from burners and away from areas
where cooking grease or water may splatter onto it.
Plug the Bread and Dessert Maker into a 120 V - 60 Hz outlet.
IMPORTANT SAFETY TIPS
• Unplug unit and allow to cool before cleaning.Remove any flour, bread crumbs or other materials
from the inside of the inner case using a damp sponge, cloth or a small, portable vacuum cleaner.
• The bread maker will bake up to a 2 pound loaf of bread.Do not put a larger quantity of ingredients
into the pan than recommended.If you do so, the bread may not mix or bake correctly and the bread
maker may be damaged.The maximum amount of flour to be used is as follows:
BAKE settings - approximately 4 cups
Prepackaged bread mixes - 4 cups
DOUGH setting - 4 2/3 cups
• The dessert recipes have been developed specifically for the Toastmaster” Bread and Dessert
Maker.We do not recommend using more or less ingredients than specified in each recipe.
• Handle hot pan with care using pot holders or oven mitts. R e m ove the pan by pulling straight up
on the handle. Do not turn or shake the pan while taking it out.If the pan is damaged or bent, the
temperature sensor will not work properly.
POWER OUTAGE
D u ring the bread programs if the machine loses power before the second r i s e, you can try start i n g
the machine at the beginning of the cycle again.This may not always produce an acceptable loaf. I f
you are not sure when the outage occurred, r e m ove the dough ball from the pan and place in an
ove n-s a fe baking container. A l l ow to double in size and place in a preheated 350°F/177°C oven fo r
3 0-45 minutes or until done.The bread should sound hollow when tapped on the top of the loaf when
it is done.
If the bread has already begun to bake when the outage occurs, you must begin with new ingredients.
Should a power outage occur during the dessert program, provided it has not begun to bake, you can
try starting the program from the beginning.This may not always produce an acceptable result.
- 4 -
Page 5
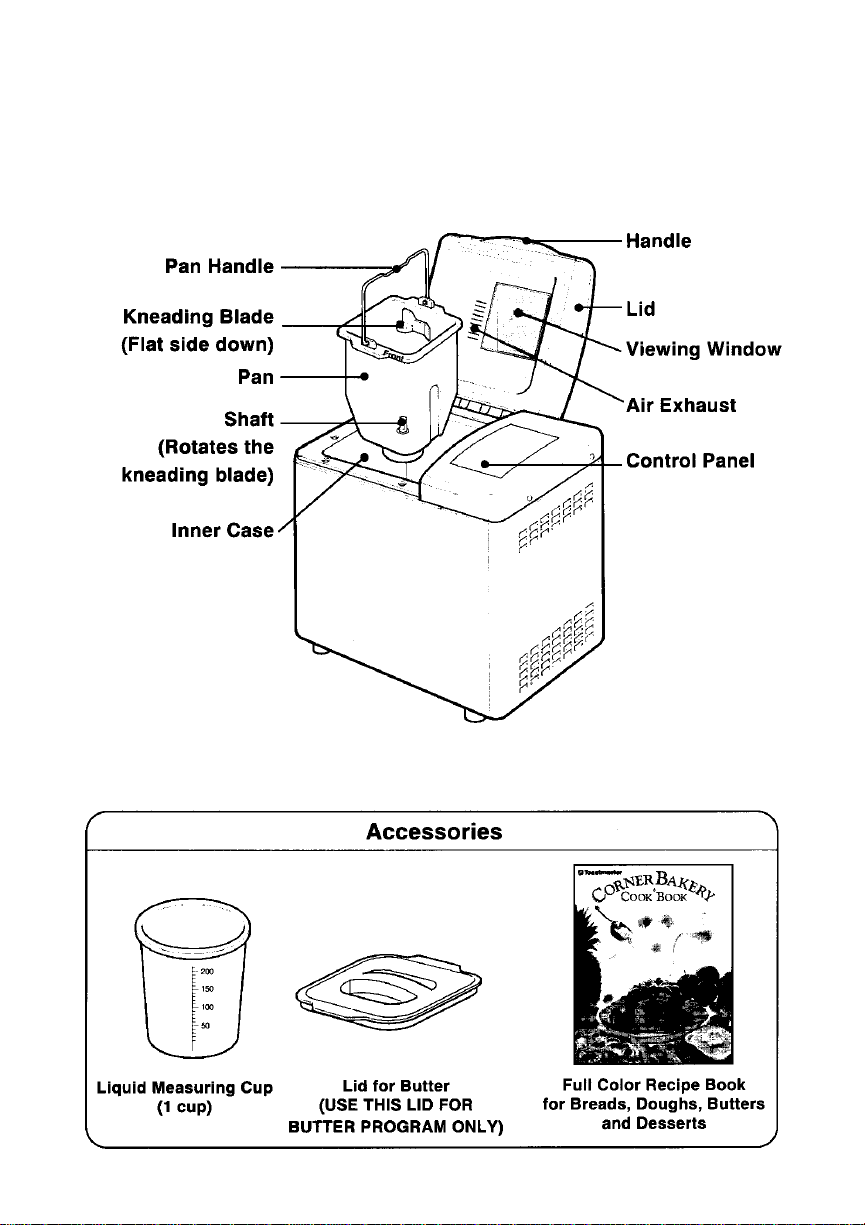
BREAD AND DESSERT MAKER INTRODUCTION
n Parts and Accessories
- 5 -
Page 6
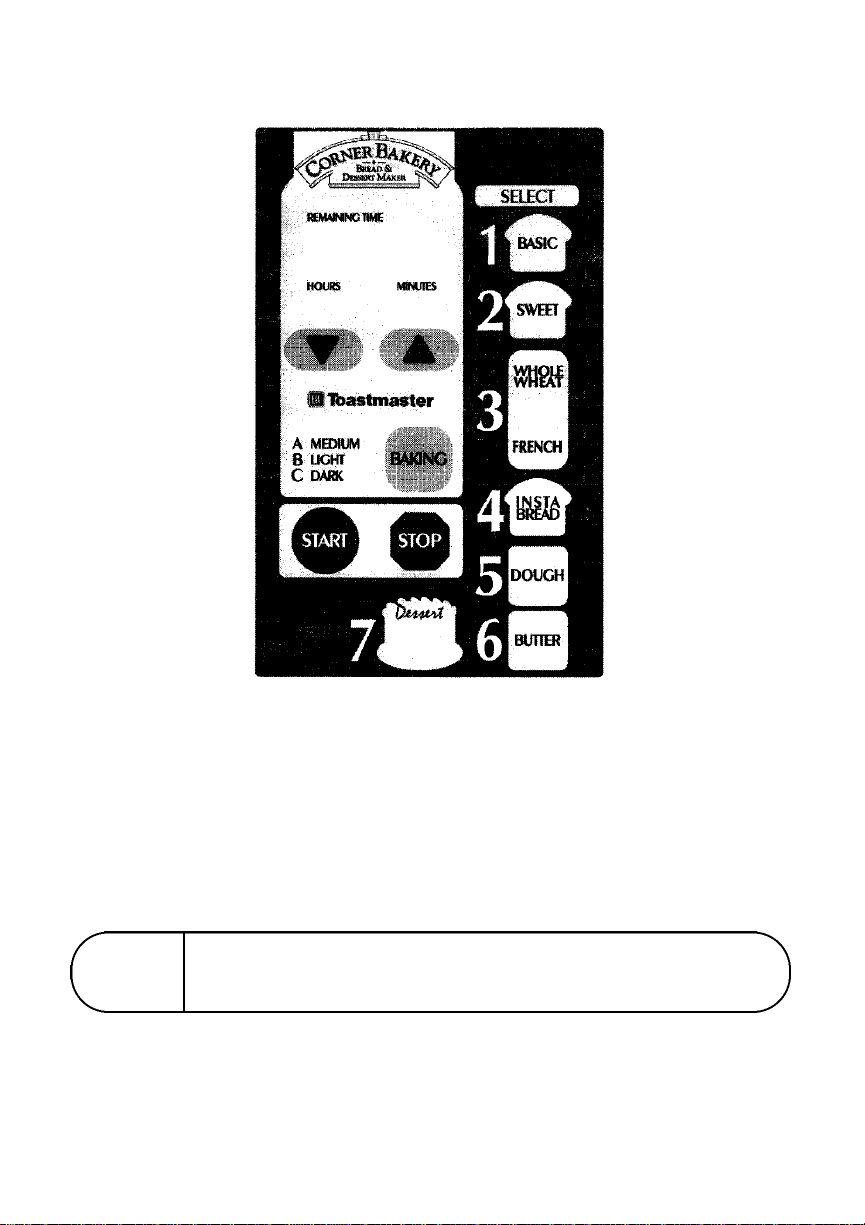
n Control Panel
TIMER
Press TIMER pad to
delay program.The
time will advance in
10 minute intervals
from 4:10 to 13:00
hours.This timer
cannot be used on
Butter or Dessert
programs.
DELAY TIMER
INDICATOR
After setting the
delay timer for bread
or dough only, press
the START pad.The
colon will blink.
DISPLAY WINDOW
Indicates the number
of program, crust
color (if making
bread), and amount
of time left for
completion of
program.Indicates
display signals. (See
page 9 for bread or dough
programs, page 12 for butter
program and page 14 for
dessert program).
PROGRAM SELECT
Press name of
program until correct
number is displayed.
START
After selecting the
program, the baking
control and timer (if
needed), press to
start the program or
timer count down.
STOP
Press for more than 2
seconds during the
cycle to cancel a
program.
BAKING CONTROL
Press to select dark,
medium or light crust
for bread programs
only. Use light crust
for breads high in
sugar.
When a Bread and Dessert Maker is packaged for shipment, a clear plastic film is placed over the
c o n t r o l panel as protection.This film may either be removed or left on. You may choose to leave it on,
but it will come off with use.
PROGRAM
CANCEL
P ROGRAM SELECT RECALL
If you have started the Bread and Dessert Maker and are not sure which program you have
selected, you may recall this info rm a t i o n . Press and hold the start pad at any t i m e.The number of
the program and the crust color selection (if making bread) will appear in the display window.
If you want to cancel the selected program, press the STOP pad and hold it dow n
for more than 2 seconds at any time during the cycle.
- 6 -
Page 7
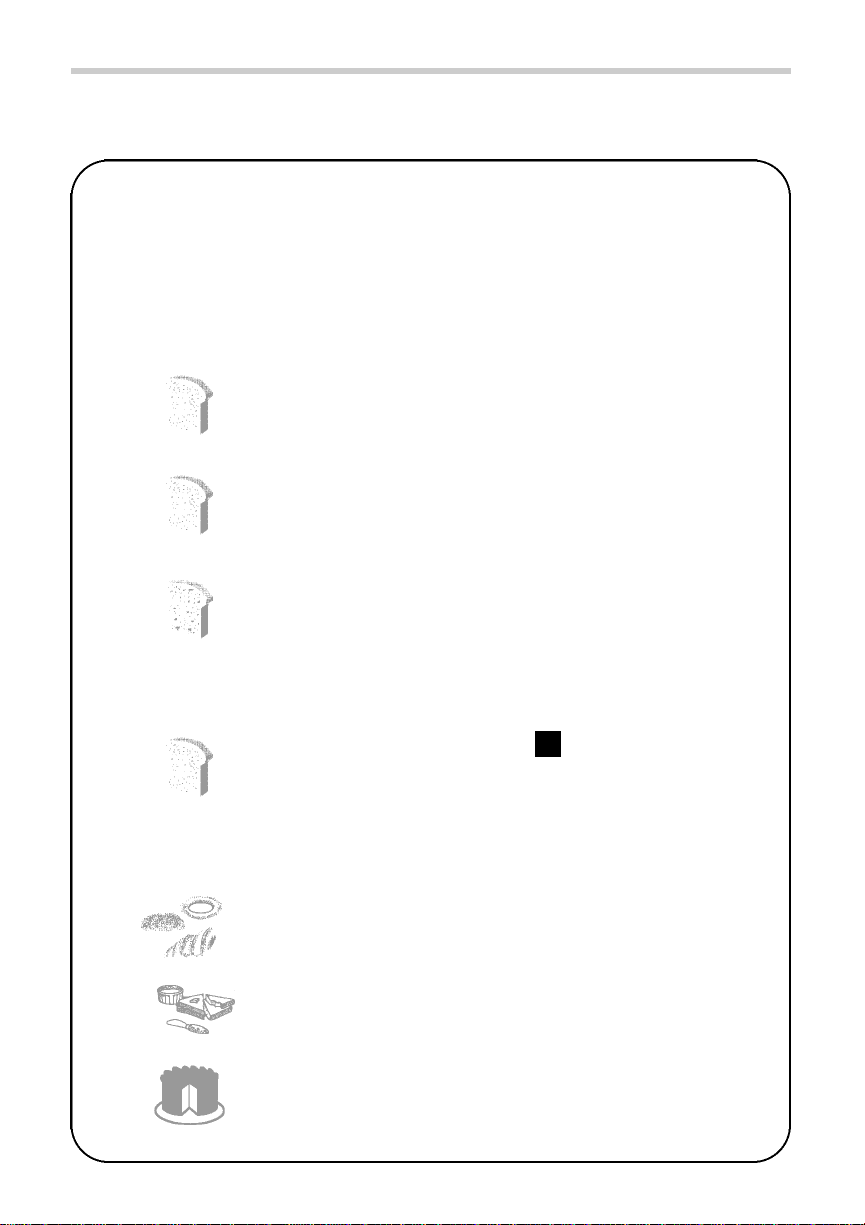
n Basic Features
PROGRAM SELECT
All Toastmaster
The Dessert program contains an audible signal to check for proper mixing. The Sweet,
Whole Wheat/French, Insta and Dessert programs contain an audible signal to add additional ingredients (i.e., raisins, nuts).Refer to program specification page 8.
• Basic . . . . . . . . . . . . . . . . . . . . . . . . Use this program for basic bread recipes.
recipes tell you what program to select for each recipe.
TM
1
• Sweet . . . . . . . . . . . . . . . . . . . . . . . . This program works best if a recipe is high in
sugar, fat, eggs or cheese.
2
• Whole Wheat/French . . . . . . . . . . . . If a recipe contains more than 50% whole
wheat flour or is low in fat and sugar, use this
3
• Insta . . . . . . . . . . . . . . . . . . . . . . . . . Save time by using this program on recipes
4
program.To start the program you may press
either French or Whole Wheat name, they
both start the same program.During the first
20 minutes, the bread machine is preheating
prior to first knead.
indicated with a 4 in the Bread Index of the
recipe book.Simply omit the amount of active
dry yeast called for in the recipe and use the
larger amount of active dry yeast listed for the
Insta program instead.This program works
best for all prepackaged bread mixes.
• Dough . . . . . . . . . . . . . . . . . . . . . . . This program is used to prepare dough for
making bread or rolls which are shaped before
5
• Butter Churn . . . . . . . . . . . . . . . . . . The kneading blade churns the heavy whipping
6
• Dessert . . . . . . . . . . . . . . . . . . . . . . . This program will mix and bake/cook cakes,
baking in a conventional oven.
cream for 30 minutes. The heating element
does not warm the inner case.
cheesecakes, pie fillings/puddings and fudge.
7
- 7 -
Page 8
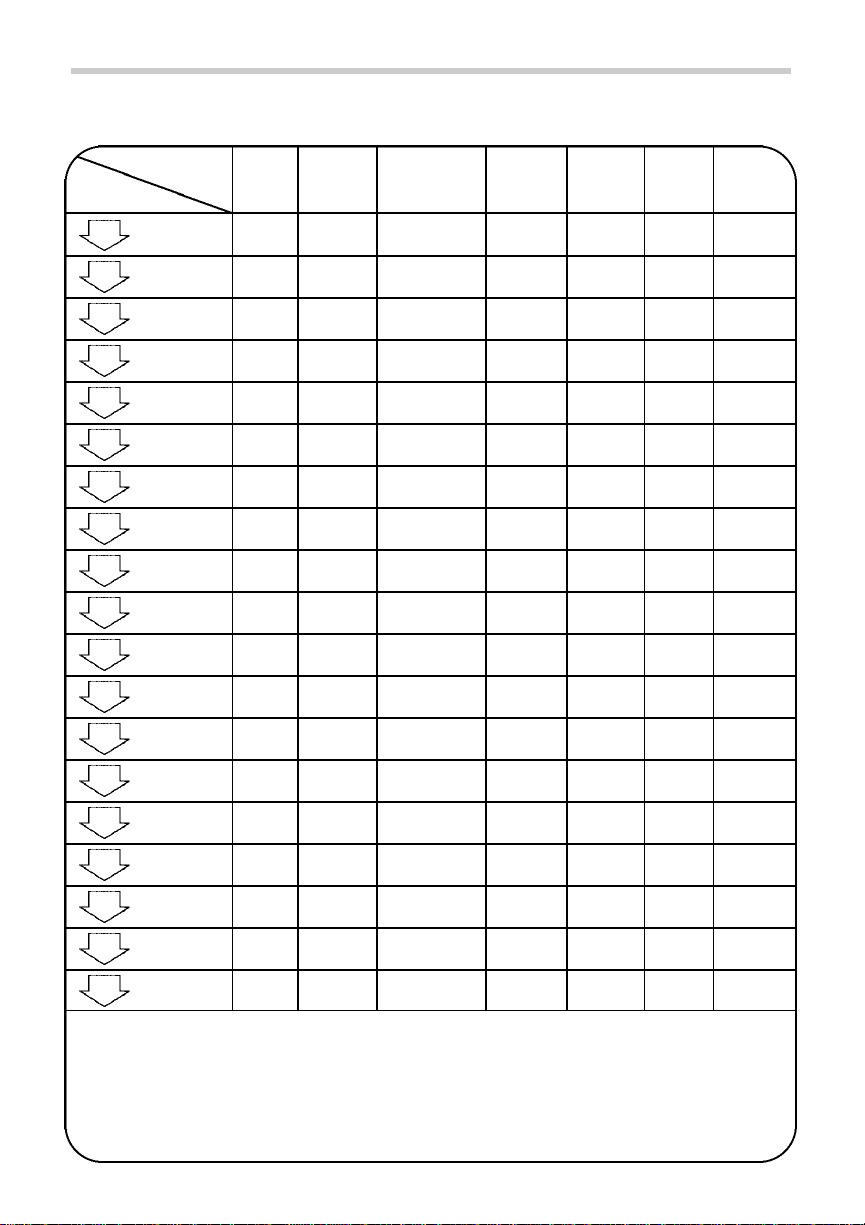
n Program Specifications
Program 1 2 3 4 5 6 7
Process
1
delay timer 4:10-13:00 4:10-13:00 4:10-13:00 4:10-13:00 4:10-13:00 — —
preheat — — 20 min — — — —
2
mix 2 min 2 min 2 min 2 min 2 min — 2 min
3
1st knead 5 min 5 min 11 min 5 min 4 min — 13 min
4
display time
5
for beep to stir*
rest 5 min 5 min 50 min 5 min 5 min — 25 min
6
2nd knead 12 min 12 min 12 min 7 min 12 min — —
7
display time
8
for beep to add**
1st rise 40 min 40 min 20 min 13 min 40 min — —
9
punch 4 sec 4 sec 4 sec 4 sec 4 sec — —
10
2nd rise 26 min 26 min 15 min — — — —
11
punch 4 sec 4 sec 4 sec — — — —
12
3rd rise 60 min 60 min 40 min 52 min — — —
13
Basic Sweet Insta Dough Butter Dessert
— — — — — — 1:48
— 3:25 2:34 1:45 — — 1:20
Whole Wheat/
French
bake/cook 50 min 50 min 50 min 35 min — — 55 min
14
cool 20 min 20 min 20 min — — — 20 min
15
churn — — — — — 30 min —
16
end end end end end end end end
17
TOTAL 3:40 3:40 4:00 1:59 1:03 :30 1:55
18
hold warm 3 hours 3 hours 3 hours 3 hours — — —
19
*The Dessert program will beep 2 times when the display reads 1:48 as a reminder to stir the ingredients. At 1:20 it will beep 4 times to add
ingredients.When baking/cooking is complete it will beep 8 times and the display will read 0:00.Remove and follow recipe directions for
cooling.
**The Sweet, Whole Wheat/French, Insta and Dessert programs will beep to tell you when to add additional ingredients, i.e.raisins or nuts,
in specialty breads or when to stir or add ingredients in desserts.
The beeper sounds 4 times when bread baking is complete. Cooling then begins on all cycles except the Insta progr am which immediately
goes into the hold warm process.If you want to serve bread that has just been baked, press STOP pad and remove.When the cooling
process is complete, the beeper sounds 8 times and [:H] is displayed.You may remove the bread or leave it in the bread machine. If left, it
will automatically be kept warm for up to 3 hours during the hold warm process on all bread cycles.
- 8 -
Page 9
PROGRAMMING
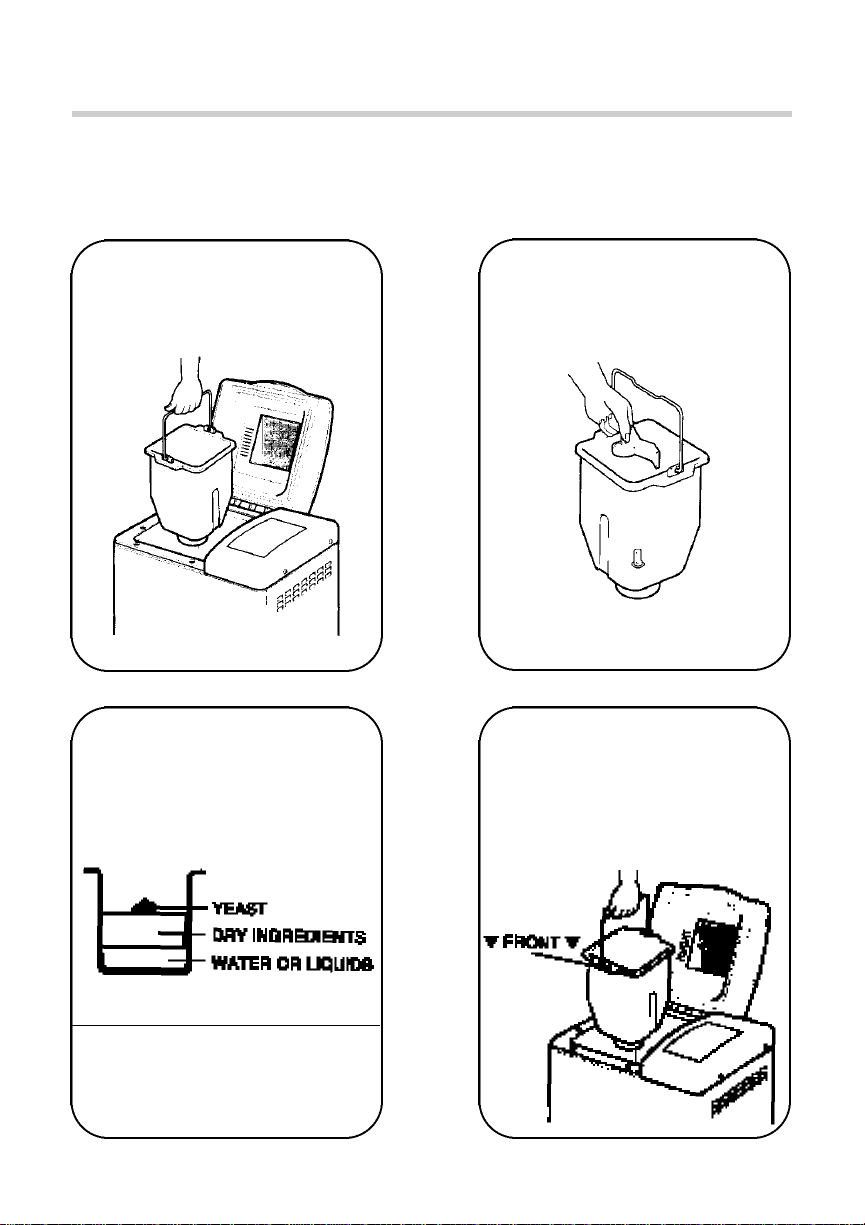
n Programming Bread Or Dough
USE PLASTIC LID FOR BUTTER PROGRAM ONLY.
Open the lid and remove the
pan by pulling straight up,
1
using the handle.
Place all ingredients in pan
3
in the order listed.
Mount the kneading blade on
2
the shaft, flat side down.
Insert pan until it fits securely
into bottom of bread maker with
4
the Ä FRONT Ä marking
fa c i n g the front of the bread
maker.This will provide a
more even airflow during
baking/cooking.
NOTE: When using the timer, add
the yeast last on top of the flour and
away from the liquid.This is critical
for good results
- 9 -
Page 10

Close the lid.Plug
into 120 V ~ 60 Hz
5
outlet.The display
indicator will light up.
Select program and
baking control.
6
The Baking Control function is
used to select the bread crust
color.It can be baked medium,
light or dark. It is not necessary
to press the control when
medium is desired.
The unit must be allowed to cool
down between each use.
Press START.The time left
for the program
7
to be finished is
displayed and
counts down.
All bread
programs
except Basic
will beep to add
additional ingredients during
the second knead.Opening
lid will not stop kneading.
Add ingredients quickly and
evenly over dough.Quickly
close lid to prevent heat loss.
If using the delay timer, add all of the
ingredients at the beginning.The
ingredients will be chopped into
smaller pieces.
The beeper will sound 8
times when bread is done.
8
Press STOP and remove the
pan using oven mitts.
- 10 -
Turn the pan upside down and
shake the pan to release the
9
bread.
Place the bread
upright on a wire
rack to cool
approximately 20
minutes before
cutting.This allows
the steam to
escape. Be sure to
remove the kneading blade from the
bread.
CAUTION:
• The pan, kneading blade, and
bread will be very hot.
• Always unplug after use.
Page 11
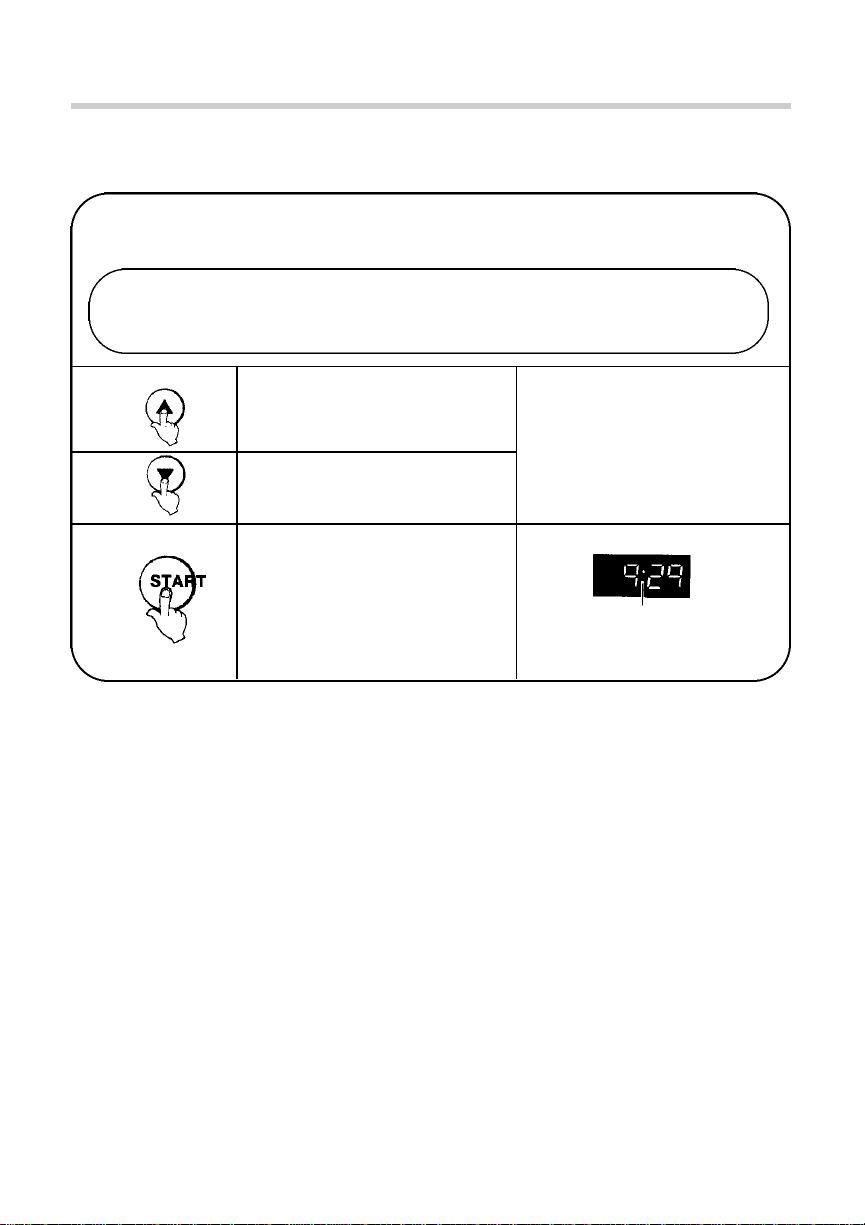
n Programming The Delay Timer For Bread or Dough
Set the program and bread crust color.Before pressing START, set the timer for however
long you want to wait before the bread is DONE: 4:10 to 13 hours.
EXAMPLE: It is 9:00 p.m.now.The bread is to be ready at 6:30 a.m.the next
morning.Set the timer for 9:30, because there are 9 hours and 30 minutes between
9:00 p.m. and 6:30 a.m.
1. When pressed, the time
will advance in 10 minute
increments.
2. When constant pressure is
applied to the pad, the time
will advance quickly.
3. Press the START pad.The
timer is set, and the colon
blinks.After one minute,
9:29 is displayed, and the
timer continues to count
down in 1 minute
increments.
NOTE: The bread maker will
start when the timer reaches
the time of the program
selected.
Colon will blink
- 11 -
Page 12

PROGRAMMING BUTTER
n Programming Butter
The butter program DOES NOT have a delay feature.
USE PLASTIC LID FOR BUTTER PROGRAM ONLY.
Open the lid and remove the
1
pan by pulling straight up,
using the handle.
Place heavy whipping cream
in pan.Put butter lid on. USE
3
THE PLASTIC LID FOR
BUTTER PROGRAM ONLY.
Mount the kneading blade on
the shaft, flat side down.
2
Insert pan until it fits securely
into bottom of bread maker with
4
the Ä FRONT Ä marking
fa c i n g the front of the bread
maker.This will provide a
more even airflow.
- 12 -
Page 13

Close the lid.Plug into 120 V
5
~ 60 Hz outlet.The display
indicator will light up.
Select butter program
6
Press START.The time left
7
for the program
to be finished is
displayed and
counts down.
The beeper will sound 8
times when bread is done.
8
Press STOP and remove the
pan.
- 13 -
Without removing butter lid,
tilt the pan, pouring the
9
buttermilk off the butter.
Remove butter from pan using
a rubber or plastic spatula.
CAUTION:
• Always unplug after use.
Page 14

PROGRAMMING DESSERT
n Programming Dessert
The dessert program DOES NOT have a delay feature.
USE PLASTIC LID FOR BUTTER PROGRAM ONLY.
Open the lid and remove the
1
pan by pulling straight up,
using the handle.
Place all ingredients in the
pan in the order listed.No
3
mixing of ingredients
outside the machine is
necessary.
Mount the kneading blade on
the shaft, flat side down.
2
Insert pan until it fits securely
into bottom of bread maker with
4
the Ä FRONT Ä marking
fa c i n g the front of the bread
maker.This will provide a
more even airflow during
baking/cooking.
- 14 -
Page 15
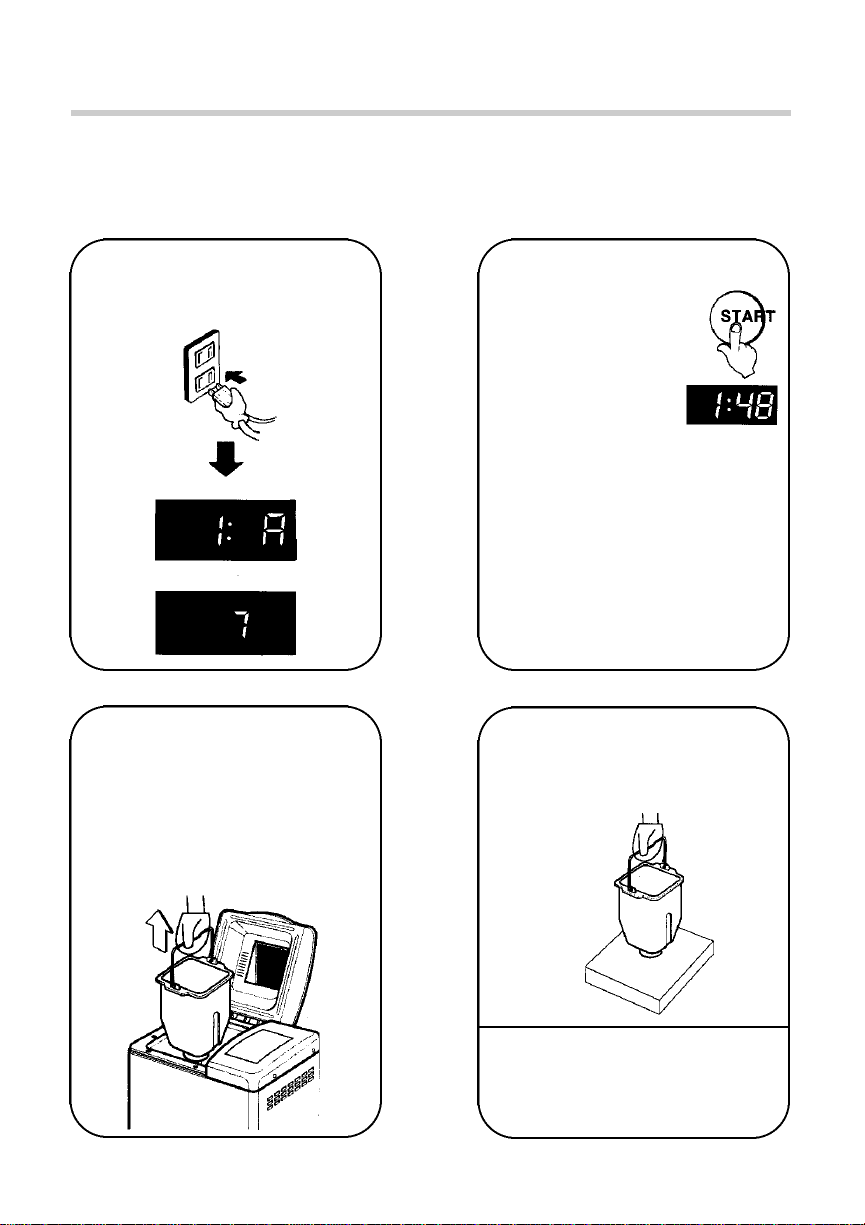
Close the lid. Plug into 120 V
5
~ 60 Hz outlet.The display
indicator will light up.
Select dessert program.
6
Press START.The time left for
the program to be
7
finished is
displayed and
counts down.
When the display
reads 1:48 the
machine will beep
2 times. At this
time take a spatula and scrape
the dry ingredients from the top
sides and bottom corners of the
pan into the wet mixture. When
the display reads 1:20 the
machine will beep 4 times to
add additional ingredients
before it begins to bake. Add
ingredients quickly and evenly
over batter.Quickly close lid to
prevent heat loss.
The beeper will sound 8 times
when dessert is done.Press
8
STOP and remove the pan
using oven mitts for all
desserts except cheesecakes.
See special instructions for
cheesecakes in the recipe
book.
- 15 -
Place the pan on a heat
resistant surface.Refer to
9
recipe book for cooling and
removing instructions.
CAUTION:
• The pan, kneading blade, and
dessert will be very hot.
• Always unplug after use.
Page 16

CLEANING INSTRUCTIONS
CLEANING (Always unplug unit)
ANY SERVICING REQUIRING DISASSEMBLY, OTHER THAN THE CLEANING DESCRIBED
BELOW, MUST BE PERFORMED BY AN AUTHORIZED SERVICE REPRESENTATIVE.
UNAUTHORIZED SERVICE WILL VOID YOUR WARRANTY.
• Avoid using any cleaning agents other
than dish detergent.
• Do not use steel wool or other abrasive
materials.
• Do not wash any parts in the dishwasher
• To clean, fill the pan with hot soapy water
and allow it to soak for up to 30 minutes.
Wash it with a nylon bristle brush or cloth
and dry thoroughly.
• DO NOT IMMERSE the pan in water.
• Do not place pan in conventional oven.
• Wipe the shaft with a soft cloth or sponge
to prevent damage to the seal packing.
Allow to dry before storing the pan inside
the Bread and Dessert Maker.
• For best results, remove the kneading
blade after each use for cleaning.If you
do not it will become very difficult to
remove.
• To remove, fill the pan with hot soapy
water and allow it to soak for up to 30
minutes.Wash it with a nylon bristle
brush or cloth and dry thoroughly.
• Wipe the exterior with a damp dishcloth
after each use.
• Do not immerse the appliance in or
splash with water.
• After using, cool and wipe out the oven
interior with a damp dishcloth or plastic
scouring pad.
• Do not use metal utensils inside the pan.
They will damage the non-stick coating. If
the bread sticks to the lid, use a plastic
pancake turner to clean.
NOTE: The non-stick coating may change
color over time.This is caused by moisture
and steam and in no way affects
performance.
STORING
• Be sure the Bread and Dessert Maker is completely cooled before storing.
• All removable parts should be thoroughly cleaned and dried.
• Store with lid closed.
- 16 -
Page 17

BEFORE CALLING FOR SERVICE
n Bread and Dough Questions and Answers
Questions
Why does the height and shape of
1
bread differ in each loaf?
The bread has an unusual
2
aroma.Why?
The kneading blade comes out
3
with the bread.
The bread has a floured corner.
4
Answers
The height and shape of bread may differ
depending on the ingredients, room
temperature and length of the timer cycle.
Also accurate measurement of ingredients
is essential to make delicious bread.
Stale ingredients or too much yeast may
have been used. Always use fresh
ingredients.Accurate measurements are
essential to make delicious bread.
This can happen as the kneading blade is
detachable.Use a non-metal utensil to
remove it.
Caution: The kneading blade will be hot.
Sometimes flour in the corner of the pan
may not have been completely kneaded
into the dough.Scrape it off with a spatula.
Why can the timer not be set for
5
more than 13 hours?
Can ingredients be halved or
6
doubled?
Can fresh milk be used in place
7
of dry milk?
Longer delay times could alter the baking
results.
No.If there is too little in the pan, the
kneading blade cannot knead well enough.
If there is too much, bread swells out of the
pan.
Yes, Be sure to deduct the same
measurement of water to equal liquid
substitution.Fresh milk is not
recommended when using the timer,
because it may spoil while sitting in the
pan.
- 17 -
Page 18

Checklist for Bread
BAKING RESULTS:
Please check the following:
1. Unplugged/power outage
2. Oven area is too hot (display H I)
3. Display reads ER3
4. Ingredients spilled on heating
element
5. Top lid was open during baking
6. Bread left in pan too long after
program
7. Bread sliced just after baking
(Steam was not allowed to
escape)
8. French or Whole Wheat program
chosen
9. Kneading blade not installed
10. Not enough
Water
Flour
Yeast
17. No sugar, molasses or
18. Ingredients used other than
recommended
19. Wrong type of flour used
Flour
20. Yeast touched water
Yeast
21. Old yeast used
22. Wrong type of yeast used
23. Temperature of water either too
hot or too cold
11. Too much
12. Not enough
13. Too much
14. No yeast
15. Not enough
16. Too much
honey
before kneading
Bread Smoke Sides of Bread Bread Short & Slices
maker emitted bread rises too falls/ dense uneven &
does not from collapse/ much/ coarse texture sticky
operate/ steam bottom is coarse texture
ingredients vent/ damp texture
not mixing burning
smell
j
j
j
j
j
j
j
j
j
j
j j
j
j
j
j
j j
j
j j
j
j
j
j
j
j
j
- 18 -
Page 19

n Suggestions
The following suggestions have a corresponding number found on the checklist. Be sure to
read both.
1. Plug into 120 V ~ 60 Hz outlet.Refer to page 4 for power outage instruction.
2. Open lid, remove pan and allow to cool.
3. Needs service.
4. Wait until program is complete; unplug, allow to cool and clean.
5. Only open lid during kneading process to check dough ball or to add ingredients.
6. Remove bread as soon as program is done and place on wire rack.
7. Allow to cool approximately 20 minutes
8. Programs begin with 20 minute preheat.
9. Put kneading blade on the shaft of pan.
10 - 13. Check the dough ball halfway through the 1st kneading cycle.
It should be round, smooth-textured, soft and slightly tacky to the touch.
If more like a batter, add 1 TBL flour. Allow to mix; add more if necessary.
If too dry add 1 tsp water.Allow to absorb;add more if necessary.
14. Follow recipe.
15. Increase by 1/4 tsp.
16. Decrease by 1/4 tsp.
17. Sugar substitutes not recommended
18. Follow recipe of substitution recommendations.
19. Flours cannot be substituted.
20. Place yeast on top of flour away from liquids.
21. Make sure yeast is fresh and room temperature.
22. Use active dry / rapid or quick in equal amounts.Fo l l ow bread machine yeast directions.
23. Water should be 80°F/27°C.
- 19 -
Page 20

BEFORE CALLING FOR SERVICE
n Dessert Questions and Answers
Questions
Why does the height and shape of
1
the desserts vary?
The kneading blade comes out
2
with the dessert.
The dessert has a floured
3
corner.
Can the timer be used?
4
Can ingredients be halved or
doubled?
5
Answers
The height and shape of desserts may
differ depending on the ingredients.
Accurate measurement of ingredients is
essential to make delicious dessert.
This can happen as the kneading blade is
detachable. Use a non-metal utensil to
remove it.
Be sure and stir the dessert when it
beeps 2 times at 1:48.
No, the ingredients will not mix and bake
properly. Most of the recipes have
perishable ingredients and you must stir
the ingredients at 1:48.
No.If there is too little in the pan, the
kneading blade cannot mix well enough.
If there is too much, the Bread & Dessert
Maker will not cook properly.
Can fresh milk be used in
6
place of dry milk?
Do I have to use egg replacement
7
in the eggs filling and pudding?
Yes, Be sure to deduct the same
measurement of water to equal liquid
substitution.
Yes, egg replacement must be used
because eggs will curdle when making
these recipes.
- 20 -
Page 21

SERVICE INFORMATION
Please refer to warranty statement to determine if in-warranty service applies.
This appliance must be serviced by a Toastmaster authorized service center.Unauthorized service will
void warranty. Consult your phone directory under “Appliances- Household-Small Service and Repair”,
or call 1-800-947-3744.
If an authorized service center is not available locally, your appliance may be returned postage prepaid to our National Service Center at the address shown in the warranty statement. Products must
be adequately protected to avoid shipping damage.Surround your appliance with three inches of protective padding and include a note explaining the problem you have experienced. We recommend
insuring your package. No C.O.D. shipments accepted.
SPECIFICATIONS
Power
Consumption
Dimension (WxDxH)
Power Supply
Kneading Motor
Weight
Heater
120 V ~ 60 Hz
550W
100W
13 3/4” x 10 1/4” x 13”
Approx.16 lbs.
- 21 -
Page 22

NOTES
Page 23

NOTES
Page 24

ONE YEAR LIMITED WARRANTY
Toastmaster Inc. warrants this product, to original purchaser, for one year from purchase
date to be free of defects in material and workmanship.
This wa r ranty is the only written or express wa r ranty given by Toastmaster Inc.This wa r ra n t y
gives you specific legal rights.You may have other rights which vary from state to state.ANY
OTHER RIGHT WHICH YOU MAY HAVE, INCLUDING ANY IMPLIED WARRANTY OF
M E R C H A N TA B I L I T Y OR FITNESS FOR A PA RTICULAR PURPOSE IS LIMITED IN
D U R AT I O N TO THE DURATION OF THIS WARRANTY.
Defective product may be brought or sent (freight prepaid) to an authorized service center
listed in the phone book, or to Service Department, Toastmaster Inc., 708 South
Mis souri St., Macon MO 63552 for free repair or replacement at our option.
Your remedy does not include: cost of inconve n i e n c e, damage due to product fa i l u r e,
t ra n s p o rt a t i o n damages, misuse, abuse, accident or the like, or commercial use. IN NO
EVENT SHALL TOASTMASTER INC. BE LIABLE FOR INCIDENTAL OR CONSEQUENTIAL
DAMAGES.
Some states do not allow limitations on how long an implied wa r ranty lasts, or allow the
ex c l u s i o n or limitation of incidental or consequential damages, so the above limitations or
exclusions may not apply to you.
For information, write Consumer Claims Manager, at the Macon address. Send name,
address, zip, telephone area code and daytime number, model, serial number, and purchase
date.
KEEP DATED SALES RECEIPT FOR WARRANTY SERVICE.
Keep this booklet. Record the following for reference:
Date purchased
Model number
National Service Center
708 South Missouri St., Macon, MO 63552
In USA and Canada call:
Consumer Service
Consumer Parts 1-800-947-3745
Hours:8:00
a.m. - 4:30 p.m.CST PART NO. 31348P0I
1-800-947-3744
 Loading...