

Page 1
12-Speed Blender
Chopper Combo
USE AND CARE GUIDE
MODELS 1135 AND 1135CAN
Page 2

READ AND SAVE
THESE INSTRUCTIONS
WARNING: A risk of fire and electrical shock exists in all electrical
appliances and may cause personal injury or death. Please follow all
safety instructions.
IMPORTANT SAFEGUARDS
When using electrical appliances, basic safety precautions should
always be followed including the following:
◆ Read all instructions before using appliance.
◆ To protect against electrical shock, do not immerse motor housing,
gear box, cord or plug in water or other liquids.
◆ Do not allow children to use this appliance.
◆ Close supervision is necessary when this appliance is used near
children.
◆ Unplug from outlet when not in use. Unplug and allow to cool
before putting on or taking off parts and before cleaning.
◆ Avoid contact with moving parts.
◆ Do not operate this appliance with a damaged cord or plug or if
the appliance should malfunction, or has been dropped or
damaged in any manner. Contact Consumer Relations for return
authorization, examination, repair or electrical or mechanical
adjustment.
◆ Do not use outdoors or when standing in a damp area.
◆ Do not let cord hang over edge of table or counter, or touch hot
surfaces, including the stove.
◆ Keep hands, hair, clothing as well as utensils out of glass blending
jar while blending to reduce the risk of severe injury to persons or
damage to the blender.
◆ Keep hands and utensils away from the chopper blades while
chopping food to reduce the risk of severe injury to persons or
damage to the food chopper.
◆ A scraper may be used but only when Blender or Chopper is not
running.
◆ Blades are sharp. Handle carefully.
◆ To avoid the risk of injury, never place chopper blades or blade
assembly on motor housing without chopper bowl or glass
blending jar properly attached.
1.
Page 3

◆ Always operate blender with cover in place.
◆ The use of attachments, including canning jars, not recommended
or sold by Toastmaster, may cause fires, electrical shock or injury.
◆ When processing hot liquids, remove measuring cup from the
two-piece cover.
◆ Never add to chopper bowl while appliance is operating.
◆ Chopper bowl or glass blending jar must be properly in place
before operating appliance.
◆ Make sure chopper blades have come to a complete stop before
removing chopper lid.
◆ Be certain chopper lid is securely locked into place before
operating appliance.
◆ Do not attempt to defeat the lid interlock mechanism.
◆ Be sure to insert or remove chopper blades by using chopper hub
to avoid injury.
SAVE THESE INSTRUCTIONS
CAUTION: A short power supply cord is provided to reduce the risk
of personal injury resulting from becoming entangled in or tripping
over a longer cord. Extension cords are available from local hardware
stores and may be used if care is exercised in their use. If an
extension cord is required, special care and caution is necessary. Also
the cord must be (1) marked with an electrical rating of 125 V. and at
least 10 A., 1250 W., and (2) the cord must be arranged so that it will
not drape over the countertop or tabletop where it can be pulled on by
children or tripped over accidentally.
POLARIZED PLUG: This appliance has a polarized plug, (one blade
is wider than the other). As a safety feature to reduce the risk of
electrical shock, this plug is intended to fit in a polarized outlet only
one way. If the plug does not fit fully in the outlet, reverse the plug. If
it still does not fit, contact a qualified electrician. Do not attempt to
defeat this safety feature.
ELECTRIC POWER: If the electric circuit is overloaded with other
appliances, your appliance may not operate properly. It should be
operated on a separate electrical circuit from other appliances.
This product is for household use only.
12-Speed Blender Chopper Combo Use and Care Guide
2.
Page 4
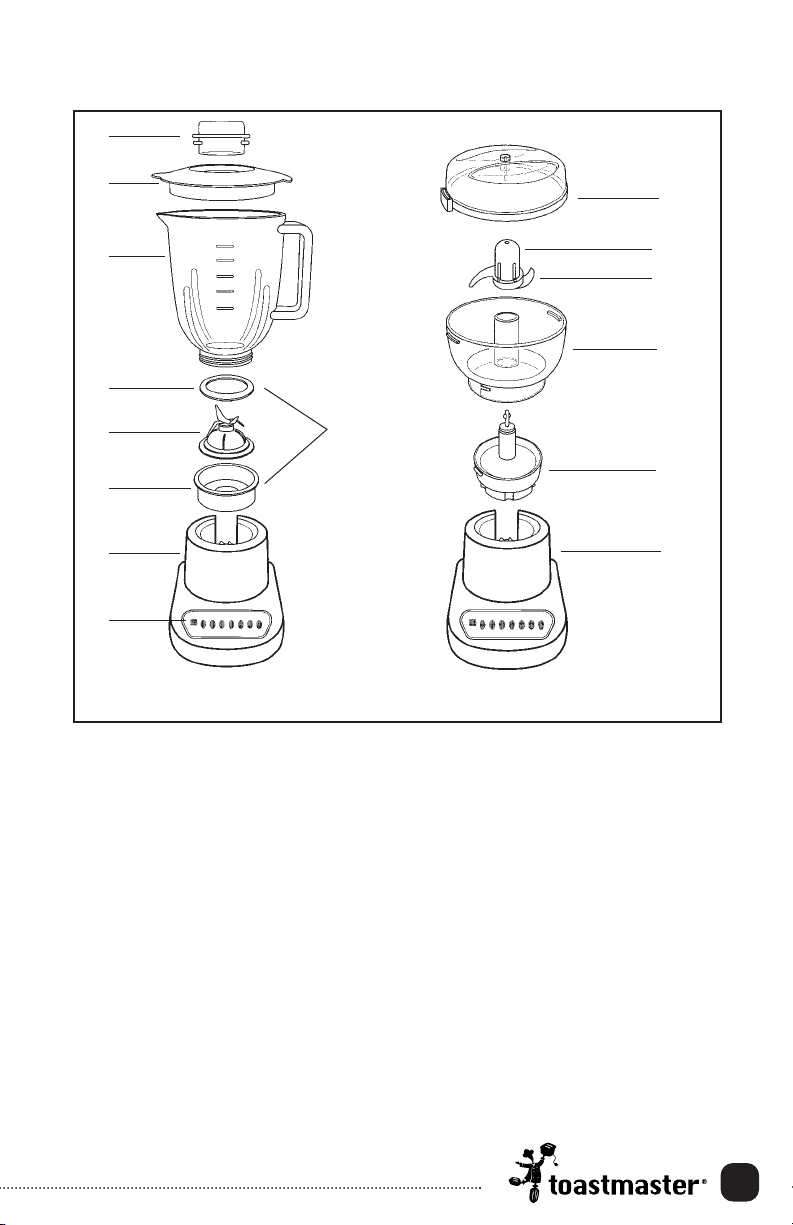
This product may vary slightly from illustration.
1
2
3
4
5
6
1
7
8
FIGURE 1 - BLENDER
1. Measuring Cup
(P/N 70659)
2. Cover (P/N 70660)
3. Glass Blending Jar
(P/N 70661)
4. Gasket
(P/N 70662)
5. Stainless Steel Blades
(P/N 70663)
6. Collar (P/N 70664)
10
11
12
13
9
14
7
FIGURE 2 - CHOPPER
7. Motor Housing
8. 12-speed Control Panel
9. Blade Assembly
10. Chopper Lid (P/N 70788)
11. Chopper Hub
12. Chopper Blades
(P/N 70789)
13. Chopper Bowl
(P/N 70790)
14. Gear Box (P/N 70791)
3.
Page 5
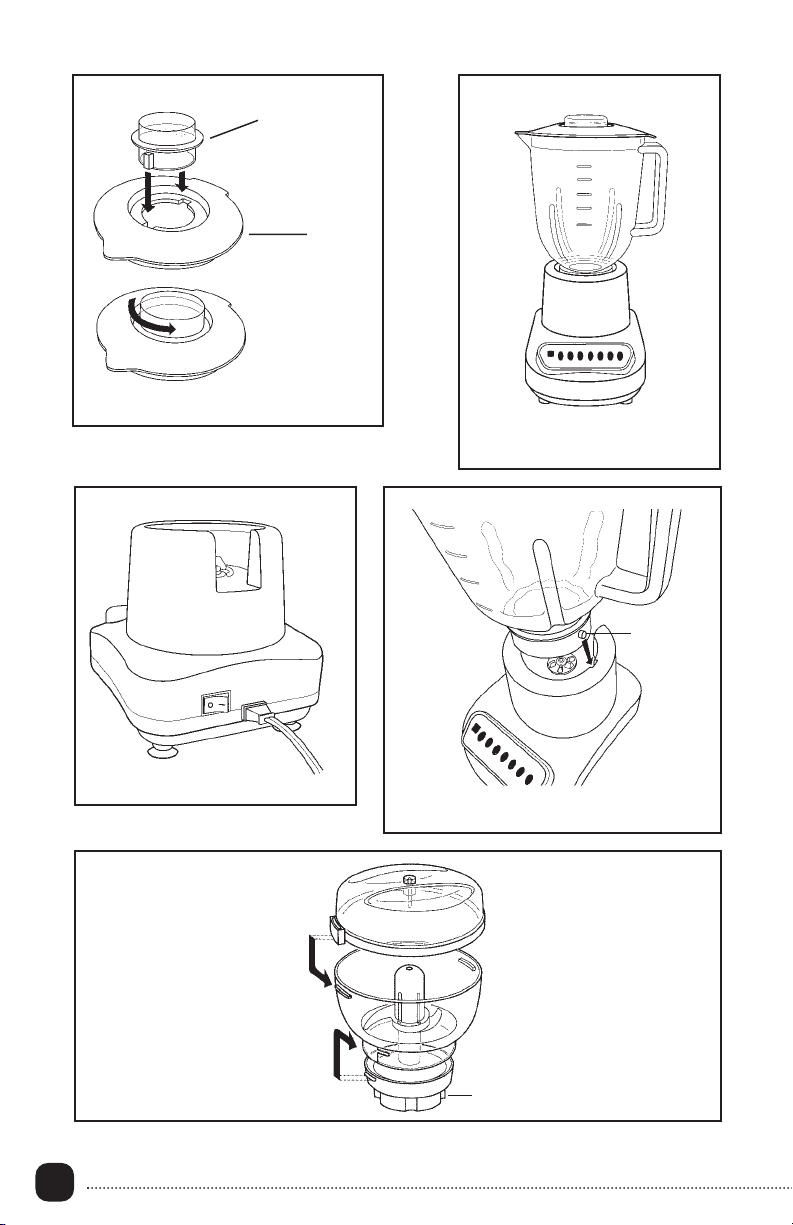
Measuring
Cup
Cover
FIGURE 3 COVER ASSEMBLY
FIGURE 4
Tab
FIGURE 5
FIGURE 7 CHOPPER ASSEMBLY
12-Speed Blender Chopper Combo Use and Care Guide
4.
FIGURE 6
Tabs
Page 6

Using Your Blender
1. Before using your blender for the first time, wash blender
components (1 thru 6) and chopper components (10 thru 12).
Wash components as required after each use.
CAUTION: BLADES ARE SHARP. HANDLE CAREFULLY.
CAUTION: NEVER PLACE BLENDER MOTOR HOUSING OF
APPLIANCE IN WATER OR OTHER LIQUIDS.
2. Place blender motor housing on a dry level surface.
3. Make sure the ON/OFF Switch located at the back of the motor
housing is turned to the OFF position (O), see Figure 5.
4. Invert glass blending jar onto level countertop and assemble
cutting assembly onto bottom of the glass blending jar, making
sure components are securely tightened into place, see Figure 1.
5. Insert glass blending jar aligning the grooves and tabs on collar
until it fits securely into the blender motor housing, see Figure 4.
6. Place food into glass blending jar and cover with cover assembly,
see Figure 3. Always hold onto glass blending jar while blending.
CAUTION: DO NOT ATTEMPT TO OPERATE WITHOUT
COLLAR, BLADES, GASKET, GLASS BLENDING JAR AND COVER
PROPERLY IN PLACE.
7. Plug into 120 V ~ 60 Hz AC outlet.
8. To start the blender, press the ON/OFF switch located at the back of
the blender motor housing to the ON position (I), see Figure 5.
NOTE: Whenever the blender is switched on, the LOW button
indicator light will be on.
LOW
HIGH
ICE CRUSH
AERATE
WHIP LIQUEFYBEAT
SHAKEMIX
SPREAD GRATESTIR CHOPSTOP
BLEND
PUREEPULSE/
FIGURE 8
5.
Page 7

Using Your Blender (cont.)
9. Refer to Figure 8. LOW SPEED MODE (SPEEDS 1-6): Press the
LOW button and the LOW indicator light will come on. Press
and release the desired speed (STIR, AERATE, CHOP, SHRED,
GRATE or BLEND). The light of the selected speed will come
on. You may select another low speed by pressing a different
speed button. The blender will continue to operate until you
press the STOP button. The STOP button is also the PULSE and
the ICE CRUSH (HIGH SPEED mode) button.
HIGH SPEED MODE (SPEEDS 7-12): Press the HIGH button and
the HIGH indicator light will come on. Press and release the desired
speed (MIX, WHIP, SHAKE, BEAT, PUREE or LIQUEFY). The light
of the selected speed will come on. You may select another high
speed by pressing a different speed button. The blender will continue
to operate until you press the STOP button.
NOTE: To change from a high speed to a low speed or from a
low speed to a high speed, press the STOP button, then choose
the LOW or HIGH speed and follow directions in step #9.
PULSE: Press the HIGH button and the HIGH indicator light will
come on. Quickly press and release or press and hold the PULSE
button for the desired length of time. To stop the blender, release
the PULSE/STOP button.
NOTE: DO NOT use the PULSE feature on LOW speed. Always
use the PULSE feature on HIGH SPEED.
CAUTION: Keep hands and utensils out of the glass blending jar
while blending to prevent the possibilities of severe injury to
persons or damage to the unit. A spatula may be used but must
only be used when the unit is not running.
10. Press the STOP button to stop blender action.
11. Press the ON/OFF switch to the OFF position (O).
12. Unplug the appliance before removing the glass blending jar.
13. Grasp glass blending jar handle and lift glass blending jar off of
the blender motor housing. Remove cover assembly. Pour
processed food out of the glass blending jar. Unscrew collar
from glass blending jar and carefully remove blade assembly.
CAUTION: BLADES ARE SHARP. HANDLE CAREFULLY.
12-Speed Blender Chopper Combo Use and Care Guide
6.
Page 8

Hot Ingredients
NOTE: When processing hot foods, always remove the measuring cup
from the cover before beginning.
To prevent excessive heat expansion, remove measuring cup from
cover before adding hot ingredients.
Crushing Ice
1. Follow steps 2-5 in USING YOUR BLENDER.
2. Fill glass blending jar with 2 cups of ice cubes.
3. Place cover assembly on glass blending jar.
4. Press the HIGH SPEED button.
5. Press the ICE CRUSH button. Ice can be crushed by continuous
operation or by pulsing the ICE CRUSH button until desired
consistency is reached.
6. When finished, press STOP button and turn ON/OFF switch to
OFF position (O). Unplug appliance.
7. Remove glass blending jar from blender motor housing.
Operating Instructions: Chopper
IMPORTANT
◆ Always unplug before disassembling.
◆ The blades are very sharp; avoid touching them.
◆ Keep the appliance out of children’s reach.
◆ Never immerse the gearbox into water or any other liquid.
◆ The gears inside the chopper are lubricated. Do not re-oil.
◆ The chopper does its work in seconds. NEVER USE IT FOR
EXTENDED PERIODS.
◆ If food collects against the sides of the chopper bowl while
operating, switch off, unplug, take off the chopper lid and adjust
the food towards the blades with a spatula.
◆ The chopper attachment is NOT suitable for chopping hard
spices, coffee beans, ice cubes or rice.
◆ It is recommended that the glass blending jar should be used for
mixing liquids.
7.
Page 9

How to Use: Chopper
1. Place the motor housing on a dry level surface.
2. Make sure the ON/OFF Switch located at the back of the motor
housing is turned to the OFF position (O), see Figure 5.
3. Insert the gear box in the motor housing aligning the tabs with
the grooves until it fits securely.
4. Place the chopper bowl on the gear box. Align the tabs with the
grooves and turn counterclockwise until it locks into place.
5. Place the chopper blades into the chopper bowl.
CAUTION: BLADES ARE SHARP. HANDLE CAREFULLY.
6. Add the ingredients to the chopper bowl. Re-cut the larger parts
of foods into pieces of 1”-2”.
7. Put the chopper lid on the chopper bowl, push down and turn
until locked, see Figure 7. Make sure the chopper lid fits as shown
on Figure 7. If the appliance shakes initially due to unequal
distribution of the food in the chopper bowl, put your hand on
the chopper lid.
8. When you have finished processing the food, switch off the motor,
unplug and detach the chopper lid by turning. Remove the
chopper bowl from the gear box motor housing before emptying
the chopper bowl.
Do
◆ Always place liquid ingredients into the glass blending jar first,
unless recipe directs otherwise.
◆ Most foods require only seconds, not minutes, to process.
◆ Blend small amounts of solid food at a time for best results.
◆ Break or cut food into uniform 1”-2” size pieces and hard fibrous
food into uniform 1⁄2” pieces before processing. This will allow the
food to drop down around the blades for faster, more thorough
chopping action.
◆ Always place chopper lid on chopper bowl before turning chopper
on to prevent splattering.
◆ To add foods while blender is operating, remove small clear lid
insert on lid and slowly add ingredients.
12-Speed Blender Chopper Combo Use and Care Guide
8.
Page 10

Do (cont.)
◆ The removable lid insert may be used as a 2 oz. measuring device.
◆ Always remove bones, pits, hard shells, seeds, and cores before
processing to avoid damaging the unit.
◆ If food sticks to sides of chopper bowl and blending action stops,
turn the unit off, unplug, remove the chopper lid and carefully
push food down using a rubber spatula. Remove spatula, replace
chopper lid and continue chopping.
◆ If motor labors while processing, increase to higher speed or
remove part of contents and blend in small batches.
Do Not
For Chopper:
CAUTION: DO NOT ATTEMPT TO OPERATE WITHOUT GEAR
BOX, CHOPPER BOWL, CHOPPER BLADES AND CHOPPER LID
PROPERLY IN PLACE.
◆ Do not attempt to process extremely hard food which is difficult to
cut with a kitchen knife.
◆ Do not fill the glass blending jar with food above the 5 cup level.
◆ Do not store foods in the blender glass blending jar or chopper bowl.
◆ Do not attempt to use the blender to mash potatoes, whip egg
whites or cream, grind raw meat, knead heavy doughs, or extract
juices from fruits and vegetables.
◆ Do not remove blender glass blending jar from motor housing or
replace it until motor has stopped.
◆ Do not remove cover assembly while processing. Use removable
measuring cup on cover to add ingredients.
For Blender:
CAUTION: DO NOT ATTEMPT TO OPERATE WITHOUT
COLLAR, BLADES, GASKET, GLASS BLENDING JAR AND COVER
PROPERLY IN PLACE.
9.
Page 11

Care And Cleaning: Blender
1. Press the ON/OFF switch to the OFF position (O) and unplug
the appliance.
2. Grasp glass blending jar handle and lift glass blending jar from the
blender motor housing. Rinse with water to remove any large food
particles that may have accumulated in the glass blending jar.
3. Insert glass blending jar aligning the notches and grooves on
collar until it fits securely into the blender motor housing.
4. Add 11⁄2cups warm, soapy water to the glass blending jar and
cover with the cover assembly.
5. Plug into 120 V ~ 60 Hz AC outlet. Press the ON/OFF switch to
the ON position (I).
6. Press the HIGH button and then press the LIQUEFY button for a
few seconds.
7. Press the STOP button to stop the cleaning process. Turn the
ON/OFF switch to the OFF position (O) and unplug the
appliance.
8. Grasp glass blending jar handle and lift glass blending jar off of
the blender motor housing. Remove cover and assembly and
rinse glass blending jar with water. Repeat steps 1-7 as necessary.
9. Unscrew collar from glass blending jar and remove blade assembly.
CAUTION: BLADES ARE SHARP. HANDLE CAREFULLY.
CAUTION: NEVER PLACE BLENDER MOTOR HOUSING OR
GEAR BOX IN WATER OR OTHER LIQUIDS.
10. Immediately after each use, disassemble measuring cup, cover
assembly and blade assembly. Carefully wash all parts in warm soapy
water. Rinse and dry thoroughly. Do not wash parts in dishwasher.
11. Do not use a harsh abrasive on any part of the blender.
12. Clean the exterior of blender motor housing with a soft damp
cloth and dry.
13. Reassemble blade assembly onto glass blending jar. Place onto
blender motor housing with lid assembly. Spin dry on LIQUEFY
for 10 seconds. Remove cover assembly and store glass blending
jar inverted on motor housing, see Figure 9.
12-Speed Blender Chopper Combo Use and Care Guide
10.
Page 12

FIGURE 9
Care And Cleaning: Chopper
1. Press the ON/OFF switch to the OFF position (O) and unplug the
appliance.
2. Turn the chopper bowl clockwise and lift up off of gear box.
3. Turn the chopper lid clockwise and remove. Pull the chopper
blades off.
CAUTION: BLADES ARE SHARP. HANDLE CAREFULLY.
4. Carefully wash the chopper lid, chopper bowl and chopper blades
in warm soapy water. Rinse and dry thoroughly. Do not wash parts
in dishwasher.
CAUTION: DO NOT IMMERSE GEAR BOX IN WATER OR
OTHER LIQUIDS.
Maintenance Instructions
This appliance requires little maintenance. It contains no user serviceable
parts. Do not try to repair it yourself. Any servicing requiring disassembly
other than the above cleaning must be performed by a qualified
appliance repair technician. Failure to follow this instruction may result in
a fire, electrical shock or injury to persons.
11.
Page 13

Blending Guide
Your blender features a variable speed control. While you may select
any speed, the following list will help you determine where to set the
control for various items.
SPEEDS FOODS MIXING PROCEDURES
STIR Pancake Batter
Add liquid, eggs, then enough mix for
15 small pancakes. Stir 5 seconds. Stop
and scrape sides. Stir 5 seconds more
until large lumps disappear.
STIR Sauces
AERATE Frozen Juice
CHOP Chocolate Bars
CHOP Cookies
CHOP Crackers
CHOP Chips & Cereal
CHOP
Fruit and
Vegetables
Add liquids then solids to glass blending
jar. Stir until desired consistency.
Add one 6 oz. can frozen juice, then
water. Aerate 15 seconds or until
blended.
Break 2 ounces into 1” pieces and
chop 30-60 seconds or until desired
consistency.
Break into 1” pieces and place up to
1 cup of food into glass blending jar.
Chop until desired consistency.
Place up to 8 crackers in 2” squares
into glass blending jar. Chop until
desired consistency.
Place up to 1 cup in glass blending jar
and chop until desired consistency.
Add up to 1 cup of food cut into 1⁄2”
and 1 cup water or other liquid to glass
blending jar. Chop 5 seconds or until
desired consistency. Drain.
(To chop dry, use PULSE).
CHOP Nuts
12-Speed Blender Chopper Combo Use and Care Guide
12.
Place up to 1 cup into glass blending
jar and chop until desired consistency
(or use PULSE).
Page 14

SPEEDS FOODS MIXING PROCEDURES
CHOP Coffee Beans Add up to
1
⁄2cup beans. Chop
45-90 seconds or until desired
consistency.
SHRED Bread Tear 1 slice of bread into 6 pieces. Add
to glass blending jar. Shred for
5 seconds or until desired texture.
SHRED Cabbage Coarsely dice cabbage and place up to
5 cups into glass blending jar, fill with
water. Shred for 5 seconds or until
desired consistency. Drain thoroughly.
GRATE Cheese-soft Cut cheese into 1⁄2” cubes and place up
to 1 cup into glass blending jar. Grate
5-10 seconds or until desired
consistency.
1
GRATE Cheese-hard Cut cheese into
⁄2” cubes and place up
to 1⁄2cup into glass blending jar. Grate
5-10 seconds or until desired
consistency.
GRATE Orange/Lemon
Peel
Grate 5-10 seconds or until desired
consistency.
BLEND Salad Dressing Add liquids then solids to glass blending
jar. Blend until desired consistency.
BLEND Frozen Drinks Place up to 2 cups of liquid then solid
food into glass blending jar. Blend
5-10 seconds then quickly drop 5-10 ice
cubes, one at a time, through the
measuring cup. Immediately replace
measuring cup after each addition of ice
cubes to prevent splattering.
MIX Creamed Soups
Reconstituted
Add liquid, then soup. Mix 5 seconds
or until smooth.
WHIP Powdered Milk Add water, then dry milk. Whip
15 seconds.
SHAKE Shakes/Malts Add milk, flavoring and ice cream.
Shake 15 seconds.
13.
Page 15

SPEEDS FOODS MIXING PROCEDURES
BEAT Instant Pudding Add milk then mix. Beat
30 seconds or until smooth.
PUREE Fruit Cut fruit into
1
⁄2” cubes and place up to
1 cup into glass blending jar. Add 1⁄2cup
liquid. Puree 45-60 seconds or until
desired consistency.
PUREE Baby Food
Vegetables
Cut into 1” pieces, simmer until tender,
cool. Add 1⁄2cup liquid and up to 1 cup
cut-up food. Puree until desired
texture.
LIQUEFY Fruit Toppings Slightly thaw a 10 oz. package of frozen
fruit. Place in a glass blending jar and
liquefy until desired consistency.
Chopping Guide
Food Maximum Approx. Preparation
Quantity Operation
Time (seconds)
Carrots 3-
Apple 3-
Cheese 1 oz. 15-20 Seconds Cut into
1
⁄2 oz. 15-20 Seconds Peel, cut into 3⁄4” Pieces
1
⁄2 oz. 15-20 Seconds Peel and core, cut into 3⁄4”
3
⁄4” pieces
Eggs 2 5-10 Seconds Hard-boiled and peeled,
cut into quarters.
1
Meats 3-
⁄2oz. 5-20 Seconds Cut into 1⁄2” pieces.
(raw Raw meat will take slightly
or cooked) longer to process than
cooked meat.
Walnuts 1-
3
⁄4oz. 10-15 Seconds Use halved or broken nuts.
Scrape down sides of bowl
to ensure even processing.
1
Onions 3-
⁄2oz. 10-15 Seconds Peel, cut into quarters.
Parsley A Few 10 Seconds To ensure successful
results, sprigs it is essential the bowl and
parsley are completely dry.
Remove any stalks.
12-Speed Blender Chopper Combo Use and Care Guide
14.
Page 16

RECIPES
BEVERAGES
Place all the ingredients in the glass blending jar in the order listed.
Cover and BLEND until smooth, from 15-60 seconds. Serve
immediately. Each recipe makes 2-4 servings.
CRANAPPLE COCKTAIL
1
1
⁄2cups cold cranapple juice
2 TBL lemon juice
8-10 ice cubes, added one at a
time
BANANA SMOOTHEE
2 cups cold milk
2 ripe bananas
1
⁄4tsp cinnamon
8-10 ice cubes, added one at a
time
MOCHA FRAPPE
11⁄2cups cold milk
2 tsp instant coffee
1
⁄4tsp cinnamon
1
⁄2pint chocolate frozen yogurt
FRUIT SHAKE
1 cup ice cream
1 cup cold milk
1 cup frozen strawberries
(slightly thawed)
3 TBL powdered sugar
CHOCOLATE MILK SHAKE
2 cups cold milk
1
⁄4cup chocolate syrup
11⁄2cups vanilla or chocolate ice
cream
PINEAPPLE JUICE
1 can (5
1
⁄4oz.) crushed
pineapple w/juice
1 cup cold milk
2 drops maple extract
8-10 ice cubes, added one at a
time
YOGURT PEACH SHAKE
1 cup frozen sliced peaches
w/juice (slightly thawed)
1 cup yogurt
1 TBL powdered sugar
sprinkle of cinnamon
CRANBERRY REFRESHER
1 cup cold cranberry juice
1 cup cold milk
2 TBL powdered sugar
1
⁄4tsp vanilla
ORANGE FROSTY
1 can (6 oz.) frozen orange
juice concentrate
1 cup cold water
1 cup cold milk
1
⁄2cup sugar
1 tsp vanilla
8-10 ice cubes, added one at a
time
15.
Page 17

MARINADES
Place all ingredients into glass blending jar in order listed. MIX
for 30 seconds. Coat meat, chicken or fish with mixture. Marinate in
refrigerator at least 30 minutes.
(Quantities will marinate 1-11⁄2pounds of meat.)
RED WINE
(Use with beef and lamb)
1
⁄4cup red wine vinegar
2 TBL vegetable oil
1 TBL Dijon mustard
1 clove garlic
1
⁄2tsp dried Italian seasoning
1
⁄8tsp pepper, coarsely ground
CURRY YOGURT
(Use with chicken, lamb and
pork)
1
⁄3cup plain yogurt
2 TBL lemon juice
1 TBL vegetable oil
2 cloves garlic
1
⁄2tsp curry powder
1
⁄8tsp crushed red pepper
LEMON ORIENTAL
(Use with chicken and fish)
1
⁄4cup lemon juice
1 TBL soy sauce
1 TBL vegetable oil
1
⁄4onion, cut into pieces
1
⁄4tsp ground ginger
1
⁄8tsp crushed red pepper
SPICY HERB
(Use with any type of meat)
1
⁄4cup dry wine
1
⁄4cup vegetable oil
1 TBL lemon juice
1
⁄4tsp Tabasco®pepper sauce
1
⁄4onion, cut into pieces
1 clove garlic
1
⁄8tsp dried basil leaves
1
⁄8cup dry mustard
SZECHWAN
(Use with any type of meat)
1
⁄4cup soy sauce
3 TBL dry sherry
1
⁄4TBL sesame oil
2 TBL sugar
2 TBL corn starch
MEXICALI
(Use with any type of meat)
1
⁄2cup prepared salsa
2 TBL lime juice
1 TBL vegetable oil
2 TBL cilantro
12-Speed Blender Chopper Combo Use and Care Guide
16.
Page 18

SPREADS
ITALIAN ANTIPASTO
SPREAD
1 large garlic clove, peeled
1
3
⁄
cup packed Italian parsley
or basil leaves
1
⁄2 cup pitted drained calamata
olives
1
⁄4 cup drained sun dried
tomatoes packed in oil
1 tablespoon oil from sun
dried tomatoes or olive oil
1
⁄4 teaspoon dried red pepper
flakes
1
⁄4cup grated Parmesan Cheese
Place garlic in chopper bowl.
Cover and process at “HIGH”
Speed (8) until finely chopped.
Add parsley; process until
coarsely chopped. Add olives,
sun dried tomatoes, oil and
pepper flakes; process until
coarsely chopped. Add cheese;
pulse at “LOW” Speed (1) just
until combined. Use
immediately or cover and
refrigerate up to 1 week before
serving as a spread for toasted
Italian bread or bagel chips, a
dip for crisp bread sticks or
combined with olive oil and
additional cheese as a sauce for
hot cooked pasta.
Makes about
3
⁄4cup.
CURRIED CREAM CHEESE
SPREAD
2 tablespoons cilantro leaves
1 green onion, cut into chunks
1 thin slice fresh ginger root
1 package (8 ounces) regular
or light cream cheese, at
room temperature, cut into
quarters
1
⁄3cup bottled mango chutney
1 teaspoon curry powder
1
⁄4 teaspoon cayenne pepper
Place cilantro, green onion and
ginger in chopper bowl. Cover
and process at “HIGH” Speed
(8) until finely chopped. Add
remaining ingredients; cover
and process until well blended.
Use immediately or cover and
chill up to 1 week before
serving as a spread for pita
chips or crackers or slices of
pear or apples. To serve as a
dip, stir in 2 tablespoons milk.
Serve with crisp bread sticks or
vegetable dippers.
Makes about 1-1⁄3cups spread.
17.
Page 19

SOUPS
VEGETABLE CREAM SOUP
1
⁄4cup margarine
1 cup cauliflower, cut into
pieces
1 cup broccoli, cut into pieces
1
⁄4cup carrots, cut into pieces
1
⁄4cup onion, cut into pieces
1 cup cold milk
1
⁄2cup chicken broth
1 cup cream
Melt butter in pan and saute
vegetables until tender. Cool.
Place milk, broth and vegetable
mixture in glass blending jar.
Cover and MIX for 30-40
seconds or until smooth. Pour
mixture back into pan, stir in
cream and heat to simmer,
stirring occasionally. Makes
3-4 servings.
CUCUMBER VICHYSSOISE
2 cups cucumber, cut into
pieces
1
⁄2cup onion, cut into pieces
2 cups chicken broth
1
⁄2tsp mustard
salt and pepper to taste
1 cup cold evaporated skim
milk
Place vegetables, broth and
seasonings in a pan. Cover and
simmer 5 minutes or until
tender. Cool.
CUCUMBER VICHYSSOISE
(Cont.)
Place mixture into glass
blending jar. Cover and MIX for
30 seconds or until smooth.
Chill thoroughly. When ready
to serve, stir in milk. Makes
3-4 servings.
STEWED TOMATO SOUP
1 cup water
2 beef bouillon cubes
11⁄2cups V-8®juice
1 can (14 oz.) stewed tomatoes
Place ingredients into glass
blending jar in order listed.
Cover and MIX for 30 seconds.
Heat to a boil, stirring
occasionally. Makes 3-4 servings.
GARDEN TOMATO SOUP
2 tsp corn starch
1
⁄2cup yogurt
1 TBL lime juice
11⁄2tsp sugar
1 green onion w/tops
3 medium tomatoes, quartered
salt and pepper to taste
Place ingredients into glass
blending jar in order listed.
Cover and MIX for
30-45 seconds, or until smooth.
Scrape sides if necessary.
12-Speed Blender Chopper Combo Use and Care Guide
18.
Heat to a boil, stirring
occasionally. Makes 3-4 servings.
Page 20

LIMITED ONE-YEAR WARRANTY
Warranty Coverage: This product is warranted to be free from defects in
materials or workmanship for a period of one (1) year from the original
purchase date. This product warranty is extended only to the original
consumer purchaser of the product and is not transferable. For a period of
one (1) year from the date of original purchase of the product, our Repair
Center will, at its option, either (1) repair the product or (2) replace the
product with a reconditioned comparable model. These remedies are the
purchaser's exclusive remedies under this warranty.
Warranty Service: To obtain warranty service, you must call our warranty
service number at 1-800-233-9054 for return instructions on how to deliver
the product, in either the original packaging or packaging affording an
equal degree of protection to the Repair Center specified below. You must
enclose a copy of your sales receipt or other proof of purchase to
demonstrate eligibility for warranty coverage.
To return the appliance , ship to:
ATTN: Repair Center
708 South Missouri Street
Macon, MO 63552 USA
What Is Not Covered: This warranty does not cover damage resulting
from misuse, accident, commercial use, improper service or any other
damage caused by anything other than defects in material or workmanship
during ordinary consumer use. This warranty is invalid if the serial number
has been altered or removed from the product. This warranty is valid only
in the United States and Canada.
LIMITATION ON DAMAGES: THERE SHALL BE NO LIABILITY FOR ANY
INCIDENTAL OR CONSEQUENTIAL DAMAGES FOR BREACH OF ANY
EXPRESS OR IMPLIED WARRANTY OR CONDITION ON THIS
PRODUCT.
To contact us, please write to, call, or email:
Consumer Relations Department
PO Box 7366
Columbia MO 65205-7366 USA
1-800-233-9054
E-mail:
consumer_relations@toastmaster.com
DURATION OF IMPLIED WARRANTIES: EXCEPT TO THE EXTENT
PROHIBITED BY APPLICABLE LAW, ALL IMPLIED WARRANTIES AND
CONDITIONS, INCLUDING, WITHOUT LIMITATION, IMPLIED
WARRANTIES AND CONDITIONS OF MERCHANTABILITY AND
FITNESS FOR A PARTICULAR PURPOSE OR USE ON THIS PRODUCT
ARE LIMITED IN DURATION TO THE DURATION OF THIS WARRANTY.
Some jurisdictions do not allow the exclusion or limitation of incidental or
consequential damages, or allow limitations on how long an implied
warranty lasts, so the above limitations or exclusions may not apply to you.
This warranty gives you specific legal rights and you may have other rights
under the laws of your jurisdiction.
For more information on our products, visit our website: www.maxim-toastmaster.com.
19.
Page 21

Keep Dated Sales Receipts for Warranty Service.
Keep this booklet. Record the following for reference:
Date purchased _______________________________________________
Model number _______________________________________________
Date code (stamped on bottom)________________________________
EVERYBODY EATS. It’s a fact of life.
But sometimes preparing
meals can become a chore.
That’s why TOASTMASTER has been invited
into millions of kitchens just like yours
so we can HELP YOU MASTER your
mixing, baking, grilling, toasting,
brewing, heating and serving
tasks WITH EASE AND STYLE.
The TOASTMASTER name stands for a
CELEBRATION of INNOVATION designed
to serve your life and keep you
COOKIN’ IN STYLE.
12-Speed Blender Chopper Combo Use and Care Guide
20.
Page 22

?
• 400-watt powerful motor
• 12 speeds and pulse
• Ice crusher function
• 2-cup chopper bowl
•2 oz. measuring cup
in blender cover
• Durable 48 oz. glass blending jar
• Stainless steel blades
Questions
Call toll free 1-800-947-3744
Monday– Friday, 8:00 a.m.- 5:30 p.m. CST
www.maxim-toastmaster.com
1135 AND 1135CAN
 Loading...