

Tippmann 98 CUSTOM DOUBLE TRIGGER KIT, CUSTOM PRO DOUBLE TRIGGER KIT, 98 CUSTOM, 98 CUSTOM PRO Installation Instructions Manual
98 CUSTOM
& CUSTOM PRO
TM
TM
DOUBLE TRIGGER
KIT INSTALLATION
TIPPMANN
TM
98 CUSTOM & CUSTOM PRO
Double Trigger Kit PN.98C-DT
KIT INCLUDES
1 - Double Trigger
1 - Double Trigger Guard
INSTRUCTIONS
WARNING
DO NOT FIELD STRIP OR OTHERWISE DISASSEMBLE THIS MARKER WHILE IT IS PRESSURIZED WITH AIR. DISASSEMBLING
THE RECEIVER WHILE UNDER AIR PRESSURE WILL CAUSE PERSONAL INJURY &/OR DAMAGE TO THE MARKER. REMOVE
AIR SUPPLY CYLINDER OR CARTRIDGE BEFORE DOING ANY DISASSEMBLY. DO NOT OPERATE THIS MARKER WITH
PARTS MISSING OR DAMAGED. IF DURING THE COURSE OF THIS INSTALLATION, A PART IS LOST OR FOUND TO BE
DAMAGED, OBT AIN A REPLACEMENT P ART BEFORE CONTINUING REASSEMBL Y . EYE PROTECTION DESIGNED FOR P AINTBALL
USE MUST BE WORN A T ALL TIMES WHEN HANDLING THIS MARKER BY THE USER AND ANY PERSON WITHIN RANGE.
READ EACH STEP COMPLETEL Y BEFORE PERFORMING STEP
STEP 1: Prepare Marker for SAFE DISASSEMBLY before beginning disassembly.
To do so, you must: (1-unload your marker; (2-remove air source; (3-discharge stored air (4-uncock marker before further disassembly.
❏ 1) Unload your marker: first remove the hopper. Then, point your marker in a safe direction and fire several times to be sure
there are no balls left in the feeder or lodged in the chamber.
❏ 2) Remove tank: To remove a charged air cylinder, turn the cylinder approximately 3/4 of a turn counterclockwise or out. This
allows the tank pin valve to close so that no air will enter the marker. Point the marker in a safe direction and fire the remaining
air in the marker by pulling the trigger until the marker stops firing. (This may take 4-5 shots)
• If your marker keeps firing after you have turned the tank 3/4 of a turn, the tank pin valve has not closed yet and you may have
to turn the tank counterclockwise a little further.
• If you turn the tank 3/4 of a turn and it begins to leak before you pull the trigger you have turned it too far and may have
damaged the tank o-ring.
❏ 3) After air tank is removed, point & fire the marker in a safe direction until stored air is completely discharged.
❏ 4) Put marker in the uncocked position: hold the bolt cocking handle back - then pull the trigger and release handle forward
to un-cock the marker.
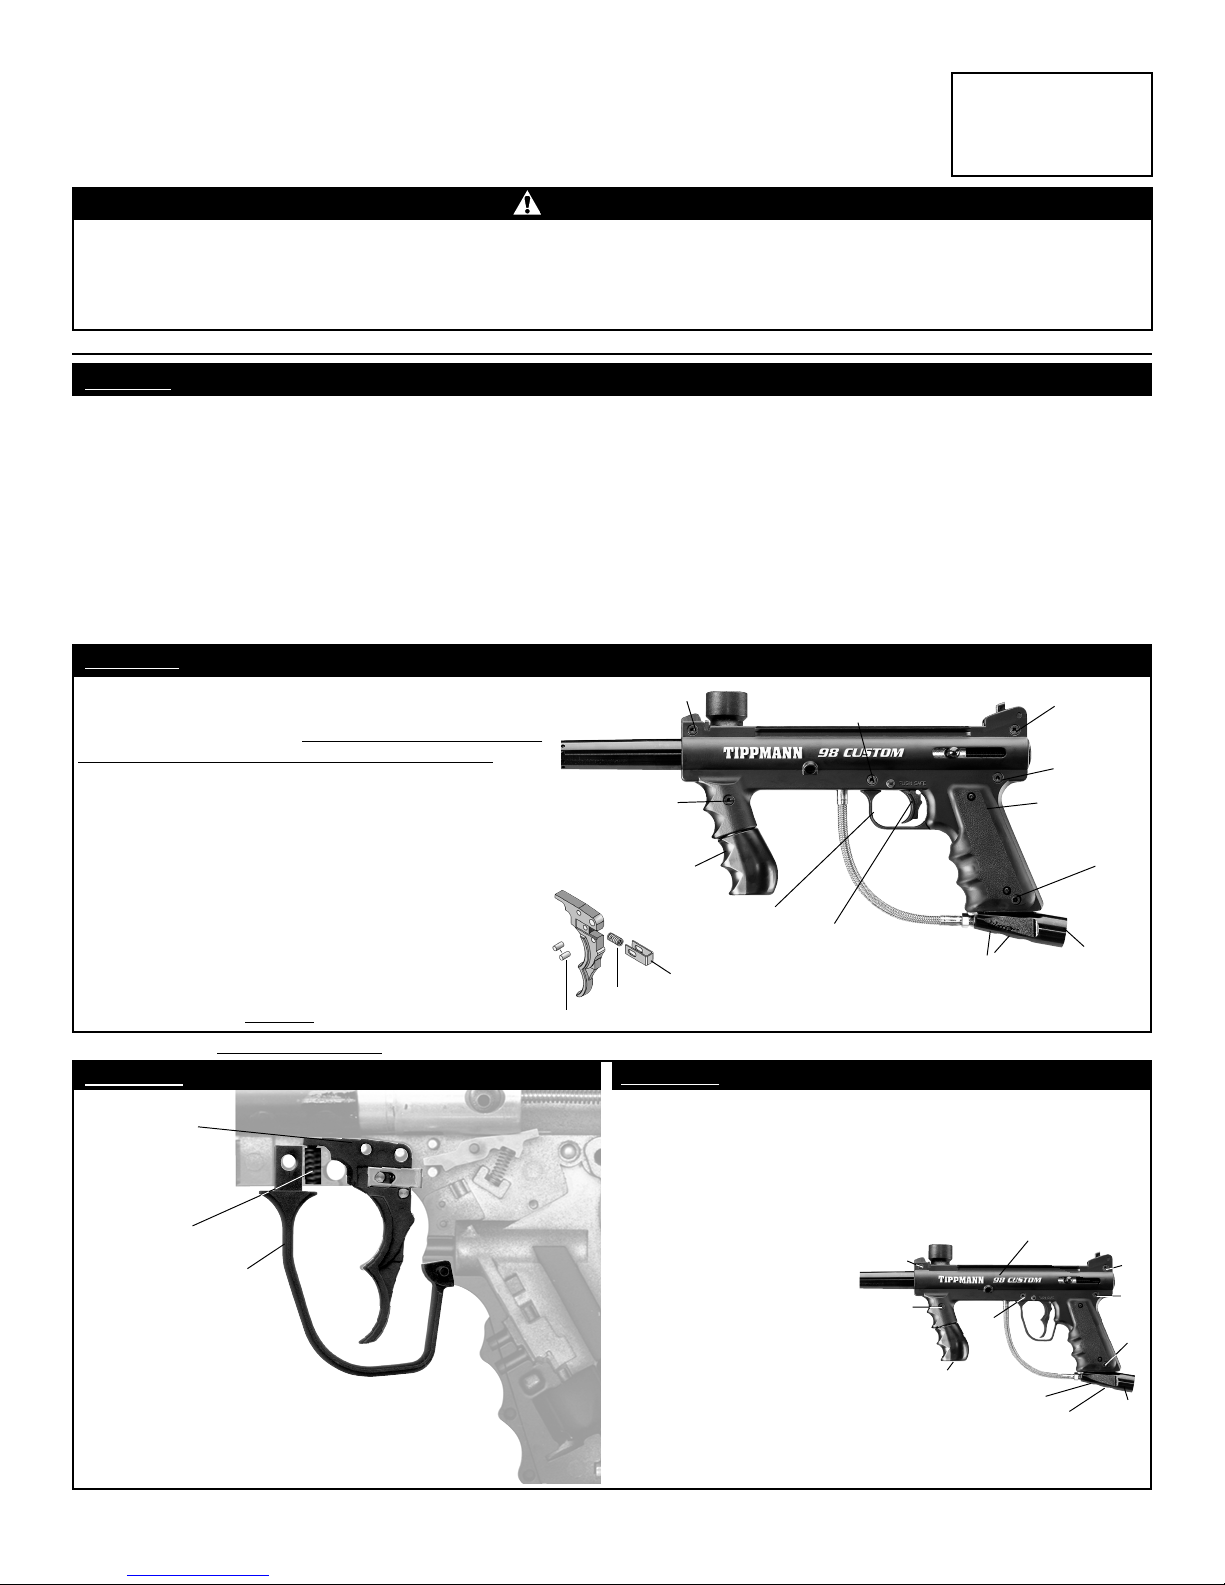
STEP 2: Prepare Marker for Double Trigger & Trigger Guard installation
Set up a table with plenty of space to work. You will
need one 1/8 " allen wrench included with your marker.
Disassemble the marker:
marker in the uncocked position as per step one,
❏ 1) Remove the barrel.
❏ 2) Remove 2 tank adapter screws (#2).
❏ 3) Loosen all 6 receiver bolts(#6) holding marker
together with 1/8" Allen wrench). Note: Front Grip comes
off - At reassembly, longest bolt goes in front grip (#3).
❏ 4) Carefully lift left receiver half off marker.
❏ 5) Remove old trigger guard.
❏ 6) Remove old trigger and trigger spring.
NOTE: If installing in Custom Pro with E-Trigger,
you must remove: the double trigger return slide;
the slide spring, and the 2 Return Slide Pins
before installing in
TIME SAVER: It is Not necessary to remove any other parts to install the new double trigger and trigger guard.
With Air Source removed &
STEP 3.
Return Slide Spring
Return Slide Pins
STEP 3: Install Double Trigger & Guard
❏ 1) Place new
double trigger
into position on
two dowel pins
in right receiver.
❏ 2) Insert
trigger spring
❏ 3) Insert new
double trigger guard
into right
receiver half.
❏ 4) Double
check that
all parts
are in place.
You are now ready to reassemble
two receiver halves.
2955 ADAMS CENTER ROAD • FORT WAYNE, IN 46803 • 260/749-6022 • 800/533-4831 • FAX: 260/749-6619 • INTERNET: www.tippmann.com
❏ 1) Double check that all other parts: Front Sight, Front Site
Pin, Front Sight Spring, Ball Latch, Front Bolt, Linkage Arm,
Rear Bolt, Drive Spring & Guide Pin, Buffer O-ring, End Cap,
Rear Sight and Tank Adapter Nuts are in place.
❏ 2) INSTALL LEFT RECEIVER HALF:
Make sure parts are in position properly and carefully install
left receiver half. Make sure
halves fit flush.
❏ 3) Insert 5 short receiver
bolts at #1 and for ease of
installation tighten the bolt
over the trigger first.
❏ 4) Insert Front grip (insert long
receiver bolt to hold grip at #2).
❏ 5) Tighten 6 receiver bolts (#1).
❏ 6) Attach tank adapter with two
tank adapter bolts Note: Short bolt goes in
at (#3), Long bolt goes in at (#4).
❏ 7) Reinstall barrel. Installation is complete.
➌
➌
➌
➌
Left
➌
Front
Grip
Old Trigger
Guard
Return Slide
Old Trigger
❷
❹
Receiver
Half
Adapter
STEP 4: Reassemble Receiver Halves
Left Receiver Half
➊
➋
Front
Grip
➊
➌
➍
Form# TP04204 Rev 06/22/2005
➌
Tank
➊
➊
➊
Tank
Adapter
 Loading...