

Page 1

035-095000 7.17.17
Register your product at www.timex.com
Enregistrez votre produit sur www.timex.com
Registre su producto en www.timex.com
Registre o seu produto no site www.timex.com
Registrare il prodotto all’indirizzo www.timex.com
Registrieren Sie Ihr Produkt bei www.timex.com
Registreer uw product bij www.timex.com
请在www.timex.com上注册您的产品
www.timex.com にて製品をご登録ください
Зарегистрируйте свое изделие на сайте www.timex.com
TIMEX KIDS (ANALOG)
USER GUIDE…..……..……..……..… 1
MODE D’EMPLOI …..……..……..… 3
GUÍA DEL USUARIO ..……..……..… 5
GUIA DO USUÁRIO ..……..……..… 7
GUIDA DELL’UTENTE.……..……..… 9
BENUTZERHANDBUCH …..……..… 11
GEBRUIKERSHANDLEIDING …..… 13
用户指南 ..……..……..……..……..… 15
ユ ー ザ ガ イド …..……..……..……..… 17
ИНСТРУКЦИЯ ПО ЭКСПЛУАТАЦИИ ..… 19
3901_INS17
Page 2

EXTENDED WARRANTY
Available in U.S. only. Extend your warranty for an additional 4 years
from date of purchase for $5. You can pay with AMEX, Discover, Visa or
MasterCard by calling 1 800-448-4639 during normal business hours.
Payment must be made within 30 days of purchase. Name, address,
telephone number, purchase date, and 5-digit model number required. You
can also mail a check for $5 to: Timex Extended Warranty, P.O. Box 1676,
Dept. EF, Little Rock, AR 72203.
Please read instructions carefully to understand how to operate your Timex
watch. Your model may not have all of the features described in this booklet.
Register your product at www.timex.com
ENGLISH 035-095000
REVISED 7.17.17
®
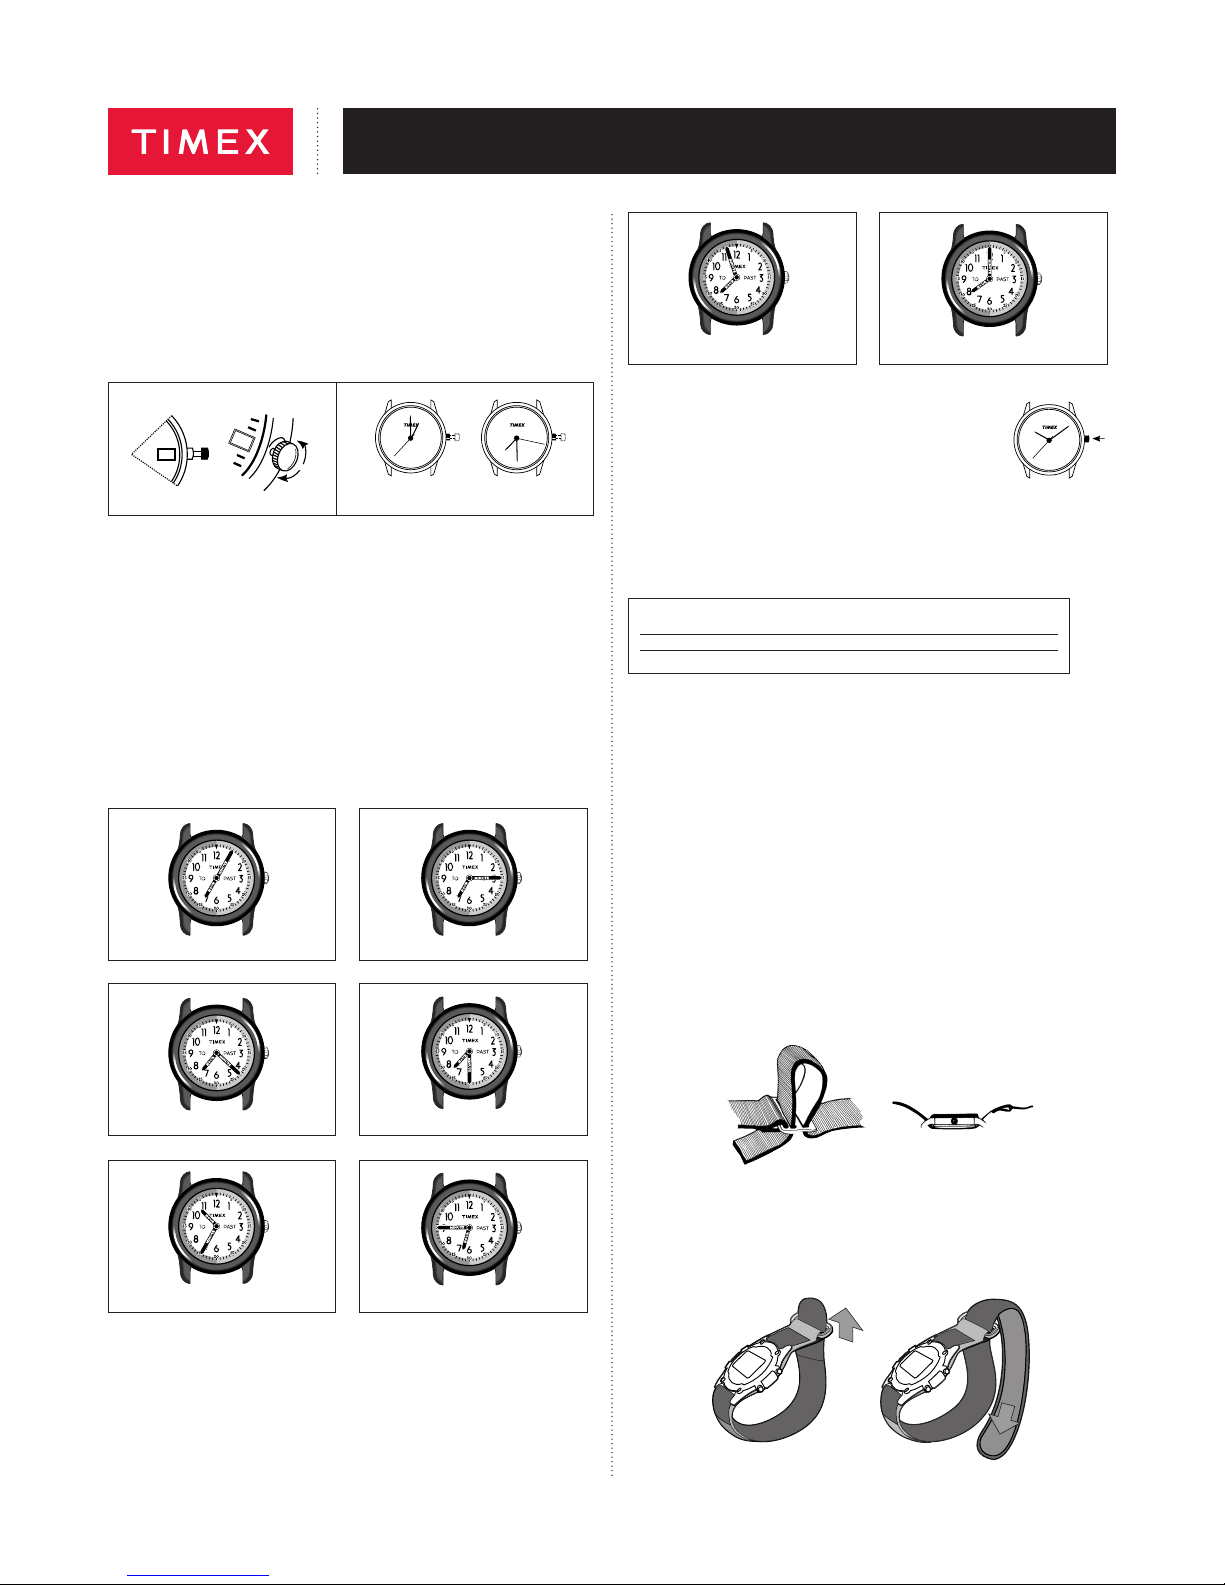
The time is 3 minutes TO 8 The time is 8 o’clock
START WATCH
Important: Set date first! Remove guard from crown and push in.
SET DATE (feature available on selected styles)
I
I
I
I
I
I
14
14
QUARTZ
I
I
I
I
I
I
I
I
I
I
I
I
QUARTZ
I
I
I
I
I
I
I
I
1:00 am 7:30 pm
Pull crown to “OUT” position and turn CLOCKWISE until date changes
(approx. 1:00 a.m.). Then turn COUNTERCLOCKWISE to 7:30 p.m. Repeat
until correct date appears. Adjust date when month has less than 31 days.
SET TIME
Pull crown all the way out and turn to correct time. Push crown in to restart.
Watches with date: Note correct time of day (A.M. or P.M.) for proper date
function.
HOW TO TELL TIME
In order to tell time, you must remember some important facts.
• The hour hand points to the hour numbers. The hour numbers are the
large numbers.
• The minute hand points to the minute numbers. The minute numbers are
the small numbers.
INDIGLO® NIGHT LIGHT
Press crown to activate light. Electroluminescent technology used in the INDIGLO
watch face at night and in low light conditions. Available
on selected styles.
®
night-light illuminates entire
I
I
I
I
QUARTZ
I
I
I
I
I
I
I
I
WATER RESISTANCE
If your watch is water-resistant, meter marking or (O) is indicated.
Water-Resistance Depth p.s.i.a. * Water Pressure Below Surface
30m/98ft 60
50m/164ft 86
100m/328ft 160
*pounds per square inch absolute
WARNING: TO MAINTAIN WATER-RESISTANCE, DO NOT PRESS ANY
BUTTONS UNDER WATER.
1. Watch is water-resistant only as long as lens, push buttons and case
remain intact.
2. Watch is not a diver watch and should not be used for diving.
3. Rinse watch with fresh water after exposure to salt water.
4. Shock-resistance will be indicated on watch face or caseback. Watches
are designed to pass ISO test for shock-resistance. However, care should
be taken to avoid damaging crystal/lens.
ELASTIC WRAP
Each Timex Kids watch has an adjustable, stretch fabric, washable strap. To
adjust the strap:
1. Place end of elastic strap up through first buckle opening and then down
through second buckle opening.
2. Adjust strap to desired length.
The time is 5 minutes PAST 7 The time is 15 minutes PAST 7
The time is 22 minutes PAST 7 The time is 30 minutes PAST 7
The time is 25 minutes to 11 The time is 15 minutes to 7
FAST WRAP STRAP
Some watches have FAST WRAP straps. To adjust the strap:
1. Slide end of strap through D-ring.
2. Pull tight to adjust and fasten for snug and comfortable fit.
1
Page 3
Register your product at www.timex.com
ENGLISH 035-095000
REVISED 7.17.17
BATTERY
Timex strongly recommends the watch battery be replaced by retailer
or jeweler.
• Batteries are to be inserted with correct polarity
• Non-rechargeable batteries are not to be recharged
• Exhausted batteries are to be removed from the toy
• The supply terminals are not to be short-circuited
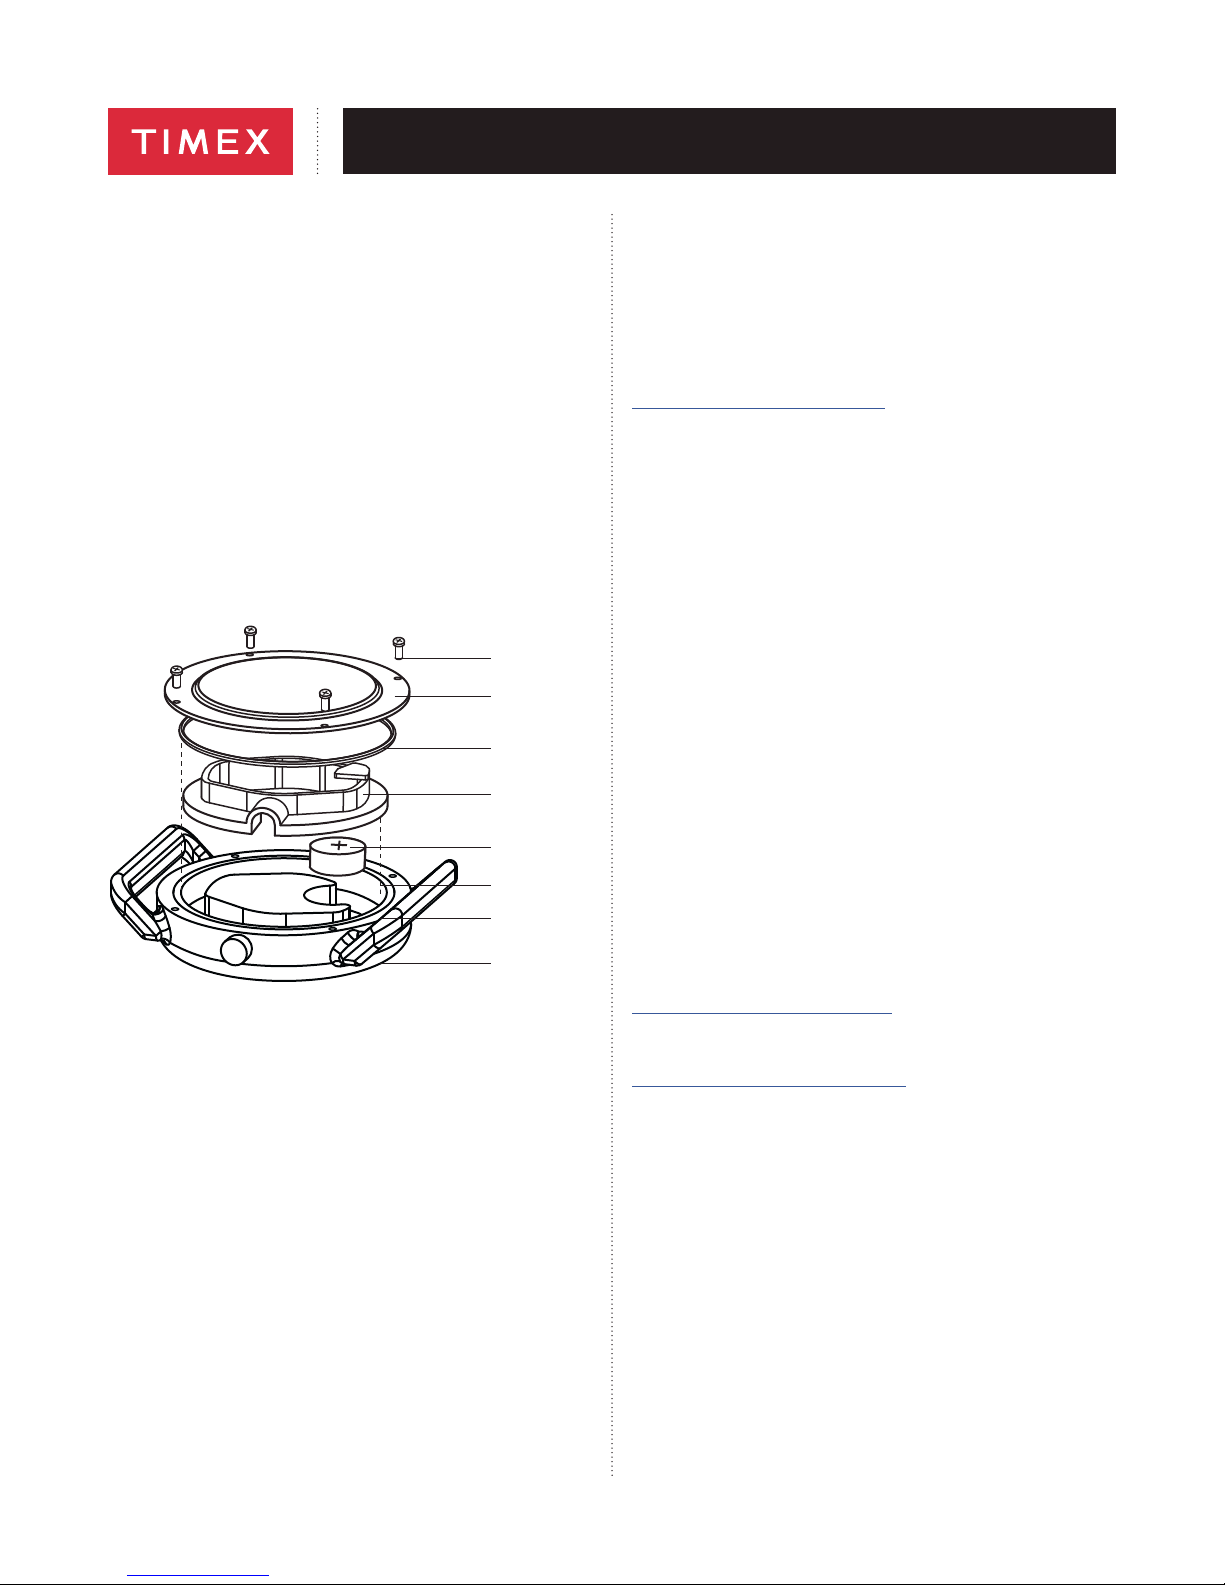
To replace battery:
• Remove 4 screws, caseback and Movement Cover making sure the
O-Ring stays in the Case O-Ring groove.
• Carefully remove Battery and replace with SR625SW making sure the
Positive (+) side is facing up.
• Before placing Movement Cover into position make sure watch is
functioning.
• Before placing Caseback in position, check to make sure O-Ring is in the
Case O-Ring Groove.
• Align Caseback holes to Watch Case screw holes.
• Insert (4) screws in holes and tighten.
DO NOT DISPOSE OF BATTERY IN FIRE. DO NOT RECHARGE. KEEP
LOOSE BATTERIES AWAY FROM CHILDREN.
(4) Screws
Caseback
O-Ring
Movement
Cover
Battery Positive
(+) Side Up
Screw Holes
O-Ring Groove
Watch Case
TIMEX WORRY-FREE REPLACEMENT PLAN
(UNITED STATES)
TIMEX understands that kids often lose things, even their most prized
possessions. That is why your new watch is covered by the exclusive
TIMEX WORRY-FREE REPLACEMENT PLAN. If your new watch is lost,
TIMEX will replace it with the same style (or similar if your style is not
available) at a reduced price for up to one year from the original date
of purchase, with no questions asked.
For details on how to take advantage of the Timex Worry-Free
Replacement Plan and its cost, go to:
http://www.timex.com/kids-warranty.html
TIMEX WORRY-FREE REPLACEMENT PLAN
(CANADA)
Timex understands that kids often lose things, even their most prized
possessions. That is why your new watch is covered by the exclusive
TIMEX WORRY-FREE REPLACEMENT PLAN. If your new watch is lost,
TIMEX will replace it with the same style (or similar if your style is not
available) at the price below for up to one year from the original date of
purchase, with no questions asked. Simply send (1) a cheque or money
order for the replacement price below made payable to TIMEX CANADA
INC (please include 7% GST, applicable provincial sales tax and $3.00
shipping and handling), (2) proof of purchase, and (3) the five digit style
number or a complete description of the watch to:
WORRY-FREE REPLACEMENT PLAN
TIMEX GROUP USA, INC.
P.O. Box 1676
Little Rock, AR 72203
USA
Replacement price: CDN$10 for Timex Kids Watches
TIMEX WORRY-FREE REPLACEMENT PLAN
(UNITED KINGDOM)
TIMEX understands that kids often lose things, even their most prized
possessions. That is why your new watch is covered by the exclusive
TIMEX WORRY-FREE REPLACEMENT PLAN. If your new watch is lost,
TIMEX will replace it with the same style (or similar if your style is not
available) at a reduced price for up to one year from the original date of
purchase, with no questions asked.
For details on how to take advantage of the Timex Worry-Free
Replacement Plan and its cost, go to:
http://www.timex.co.uk/kids-warranty.html
TIMEX INTERNATIONAL WARRANTY
http://www.timex.com/productWarranty.html
©2017 Timex Group USA, Inc. TIMEX is a registered trademarks of Timex
Group USA, Inc.
2
Page 4
Enregistrez votre produit sur www.timex.com
FRANÇAIS 035-095000
RÉVISION DU 17.07.2017
Veuillez lire les instructions attentivement pour bien comprendre le
fonctionnement de votre montre Timex
ne présente pas toutes les fonctions décrites dans le dépliant.
®
. Il est possible que ce modèle
MISE EN MARCHE DE LA MONTRE
Important : Régler la date d’abord ! Retirer le capot de protection de la
couronne et enfoncer celle-ci.
RÈGLAGE DE LA DATE
(fonction disponible sur certains styles)
I
I
I
I
I
I
14
14
QUARTZ
I
I
I
I
I
I
I
I
I
I
I
I
QUARTZ
I
I
I
I
I
I
I
I
1:00 am 7:30 pm
Tirer la couronne en position « SORTIE » et tourner DANS LE SENS
HORAIRE jusqu’à ce que la date change (vers. 1 h 00). Puis tourner DANS
LE SENS ANTI-HORAIRE jusqu’à 19h30. Répéter jusqu’à ce que la date
correcte s’affiche. Régler la date pour les mois comptant moins de 31 jours.
RÉGLAGE DE L’HEURE
Tirer la couronne complètement et tourner jusqu’à afficher l’heure exacte.
Enfoncer la couronne pour redémarrer. Montres affichant la date : Tenir
compte de l’heure (AM ou PM) afin de régler la date correctement.
COMMENT LIRE L’HEURE
Pour lire l’heure, il faut maîtriser les concepts de base suivants.
• L’aiguille des heures indique les chiffres qui correspondent à l’heure. Les
chiffres des heures sont les grands chiffres.
• L’aiguille des minutes indique les chiffres qui correspondent aux minutes.
Les chiffres des minutes sont les petits chiffres.
Il est 7 h et 5 min. Il est 7 h et 15 min.
Il est 8 h moins 3 min. Il est 8 h moins 3 min.
VEILLEUSE INDIGLO
Appuyer sur la couronne pour activer l’éclairage. La
technologie électroluminescente utilisée dans la veilleuse
®
INDIGLO
la nuit et dans des conditions de faible éclairage.
Fonction disponible sur certains modèles.
permet d’illuminer tout le cadran de la montre
®
I
I
I
I
QUARTZ
I
I
I
I
I
I
I
I
ÉTANCHÉITÉ
Si la montre est étanche, la profondeur maximale ou le symbole (O)
est indiqué.
Profondeur d'étanchéité p.s.i.a. * Pression de l’eau sous la surface
30 mètres/98 pieds 60
50 mètres/164 pieds 86
100 mètres/328 pieds 160
*livres par pouce carré (abs.)
ATTENTION : POUR PRÉSERVER L’ÉTANCHÉITÉ, NE PAS ENFONCER
LES BOUTONS SOUS L’EAU.
1. La montre est étanche aussi longtemps que le verre, les boutons
et le boîtier sont intacts.
2. La montre n’est pas conçue pour la plongée. Ne pas l’utiliser dans ces
conditions.
3. Rincer à l'eau douce après tout contact avec l'eau de mer.
4. La résistance aux chocs est indiquée sur le cadran de la montre ou au
dos du boîtier. Les montres sont conçues pour se conformer à l'essai
de choc ISO. Toutefois, prendre garde à éviter d'endommager le verre/
cristal.
EMBALLAGE ÉLASTIQUE
Les montres pour enfants Timex comportent un bracelet ajustable en tissu
extensible lavable. Pour ajuster le bracelet :
1. Passer l’extrémité du bracelet élastique à travers la première ouverture
de la boucle du bas vers le haut, puis, du haut vers le bas, à travers la
seconde ouverture.
2. Ajuster le bracelet à la longueur souhaitée.
Il est 7 h et 15 min. Il est 7 h et 30 min.
Il est 11 h moins 25 min. Il est 7 h moins 15 min.
BRACELET FAST WRAP
Certaines montres ont des bracelets FAST WRAP. Pour ajuster le bracelet :
1. Faire glisser l’extrémité du bracelet à travers l’anneau en D.
2. Serrer le bracelet pour l’ajuster et le fixer afin d’obtenir un bon ajustement.
3
Page 5
Enregistrez votre produit sur www.timex.com
FRANÇAIS 035-095000
RÉVISION DU 17.07.2017
PILE
Timex recommande fortement de faire changer la pile de la montre par un
horloger ou un bijoutier.
• La polarité des piles doit être respectée
• Les piles non rechargeables ne doivent pas être rechargées
• Les piles épuisées doivent être retirées de la pile
• Les bornes d’alimentation ne doivent pas être court-circuitées
Remplacement des piles :
• Retirer les 4 vis, le dos du boîtier et le Cache du mouvement en vérifiant
que l’anneau en O reste dans la rainure sur le boîtier qui est destinée à
l’anneau en O.
• Retirer doucement la pile et la remplacer avec une pile SR625SW en
vérifiant que le côté Positif (+) est orienté vers le haut.
• Avant de remettre le Cache du mouvement en position, vérifier que la
montre fonctionne.
• Avant de remettre le Dos du boîtier en position, vérifier que l’anneau en
O se trouve bien dans la rainure en O du boîtier.
• Aligner les trous du Dos du boîtier avec les Trous de vis.
• Insérer les (4) vis dans les trous et serrer.
NE PAS JETER LA PILE AU FEU. NE PAS RECHARGER LA PILE. GARDER
LES PILES HORS DE LA PORTÉE DES ENFANTS.
(4) Vis
Dos du boîtier
Anneau en O
Cache du
mouvement
Pile avec son
côté positif (+)
orienté vers
le haut
Trous de vis
Rainure de
l’anneau en O
Boîtier
de la montre
PLAN DE REMPLACEMENT ZÉRO SOUCI DE TIMEX
(VALABLE AU CANADA)
Timex comprend que les enfants perdent souvent des objets, même leurs
biens les plus précieux. Voici pourquoi votre nouvelle montre est couverte
par le PLAN DE REMPLACEMENT ZÉRO SOUCI DE TIMEX. Si vous perdez
votre nouvelle montre, TIMEX la remplacera avec une montre du même style
(ou d’un style similaire si le vôtre n est pas disponible) au prix indiqué
ci-après pendant jusqu’à un an après la date d’achat initiale sans
explication. Il suffit d’envoyer (1) un chèque ou un mandat du prix de
remplacement indiqué ci-après à l’ordre de TIMEX CANADA INC (veuillez
inclure la TPS de 7% et toute taxe de vente provinciale applicable ainsi que
3 CAD pour couvrir l’expédition et la manutention), (2) la preuve d’achat,
et (3) le numéro de style à cinq chiffres ou une description complète de la
montre à :
WORRY-FREE REPLACEMENT PLAN
TIMEX GROUP USA, INC.
P.O. Box 1676
Little Rock, AR 72203 USA
Prix de remplacement : 10 CAD pour les montres Timex pour enfants
GARANTIE INTERNATIONALE TIMEX
http://www.timex.com/productWarranty.html
©2017 Timex Group USA, Inc. TIMEX est une marque déposée de Timex
Group USA, Inc.
4
Page 6

Lee atentamente las instrucciones para saber cómo funciona tu reloj Timex®.
Puede que tu modelo no tenga todas las funciones descritas en este folleto.
INICIAR EL RELOJ
Importante: ¡ajusta la hora primero! Quita el protector de la corona y pulsa
hacia dentro.
AJUSTAR LA HORA
(función disponible en ciertos estilos)
Registra tu producto en www.timex.com
ESPAÑOL 035-095000
REVISADO EL 17.7.17
Son las 8 horas menos 3 minutos Son las 8 en punto
I
I
I
I
I
I
14
14
QUARTZ
I
I
I
I
I
I
I
I
I
I
I
I
QUARTZ
I
I
I
I
I
I
I
I
1:00 am 7:30 pm
Tira de la corona hasta la posición “AFUERA” y gírala en sentido DE LAS
MANECILLAS hasta que cambie la fecha (aprox. a la 1:00 a.m.). Luego
gírala en sentido CONTRARIO AL DE LAS MANECILLAS hasta las 7:30 p.m.
Repite el procedimiento hasta que aparezca la fecha correcta. Ajusta la
fecha cuando el mes tenga menos de 31 días.
FIJAR LA HORA
Para buscar la hora, tira completamente hacia fuera de la corona. Empuja
la corona hacia dentro para reiniciar. Relojes con fecha: para ver la fecha
correcta, elige “A.M.” o “P.M.” según corresponda al momento.
CÓMO VER LA HORA
Para ver la hora, debes recordar algunas cosas importantes.
• La manecilla de la hora apuntan a los números de hora. Los números de
hora son los números grandes.
• La manecilla de los minutos apuntan a los números de minutos. Los
números de minutos son los números pequeños.
Son las 7 horas y 5 minutos Son las 7 horas y 15 minutos
LUZ NOCTURNA INDIGLO
Pulsa la corona para activar la luz. La tecnología
electroluminiscente utilizada en la luz nocturna
®
INDIGLO
y en condiciones de poca luz. Disponible en ciertos
estilos.
ilumina toda la esfera del reloj por la noche
®
I
I
I
I
QUARTZ
I
I
I
I
I
I
I
I
RESISTENCIA AL AGUA
Si tu reloj es resistente al agua, se indicarán los metros o (O).
Profundidad de resistencia al agua p.s.i.a. * Presión bajo la superficie
del agua
30 m/98 pies 60
50 m/164 pies 86
100 m/328 pies 160
*libras por pulgada cuadrada absoluta
ADVERTENCIA: PARA MANTENER LA RESISTENCIA AL AGUA, NO
PULSES NINGÚN BOTÓN DEBAJO DEL AGUA.
1. El reloj es resistente al agua solamente mientras el cristal, los botones
y la caja permanezcan intactos.
2. El reloj no es apropiado para hacer submarinismo y no debería usarse
para ello.
3. Enjuaga el reloj con agua dulce después de haber estado expuesto al
agua salada.
4. La resistencia a los golpes estará indicada en la esfera del reloj o en
la parte posterior de la caja. Los relojes están diseñados para pasar
la prueba ISO de resistencia a los golpes. Sin embargo, se debe tener
cuidado para evitar dañar el cristal o la lente.
CORREA ELÁSTICA
Cada reloj infantil Timex Kids tiene una correa elástica ajustable que se
puede lavar. Para ajustar la correa:
1. Introduce el extremo de la correa hacia arriba por la primera abertura de
la hebilla y luego hacia abajo por la segunda.
2. Ajusta la correa a la longitud deseada.
Son las 7 horas y 22 minutos Son las 7 horas y 30 minutos
Son las 11 horas menos 25 minutos
Son las 7 horas menos 15 minutos
CORREA RÁPIDA FAST WRAP
Algunos relojes cuentan con una correa FAST WRAP. Para ajustar la correa:
1. Desliza el extremo de la correa por el anillo en D.
2. Tensa para ajustarla y fíjala cuando se sienta cómoda y bien apretada.
5
Page 7
Registra tu producto en www.timex.com
ESPAÑOL 035-095000
REVISADO EL 17.7.17
PILA
Timex recomienda encarecidamente hacer que la pila del reloj sea
sustituida en un comercio o joyería.
• Hay que insertar las pilas con la polaridad correcta
• Las pilas no recargables no se pueden volver a cargar
• Hay que sacar las pilas agotadas del juguete
• No hay que cortocircuitar los terminales de alimentación
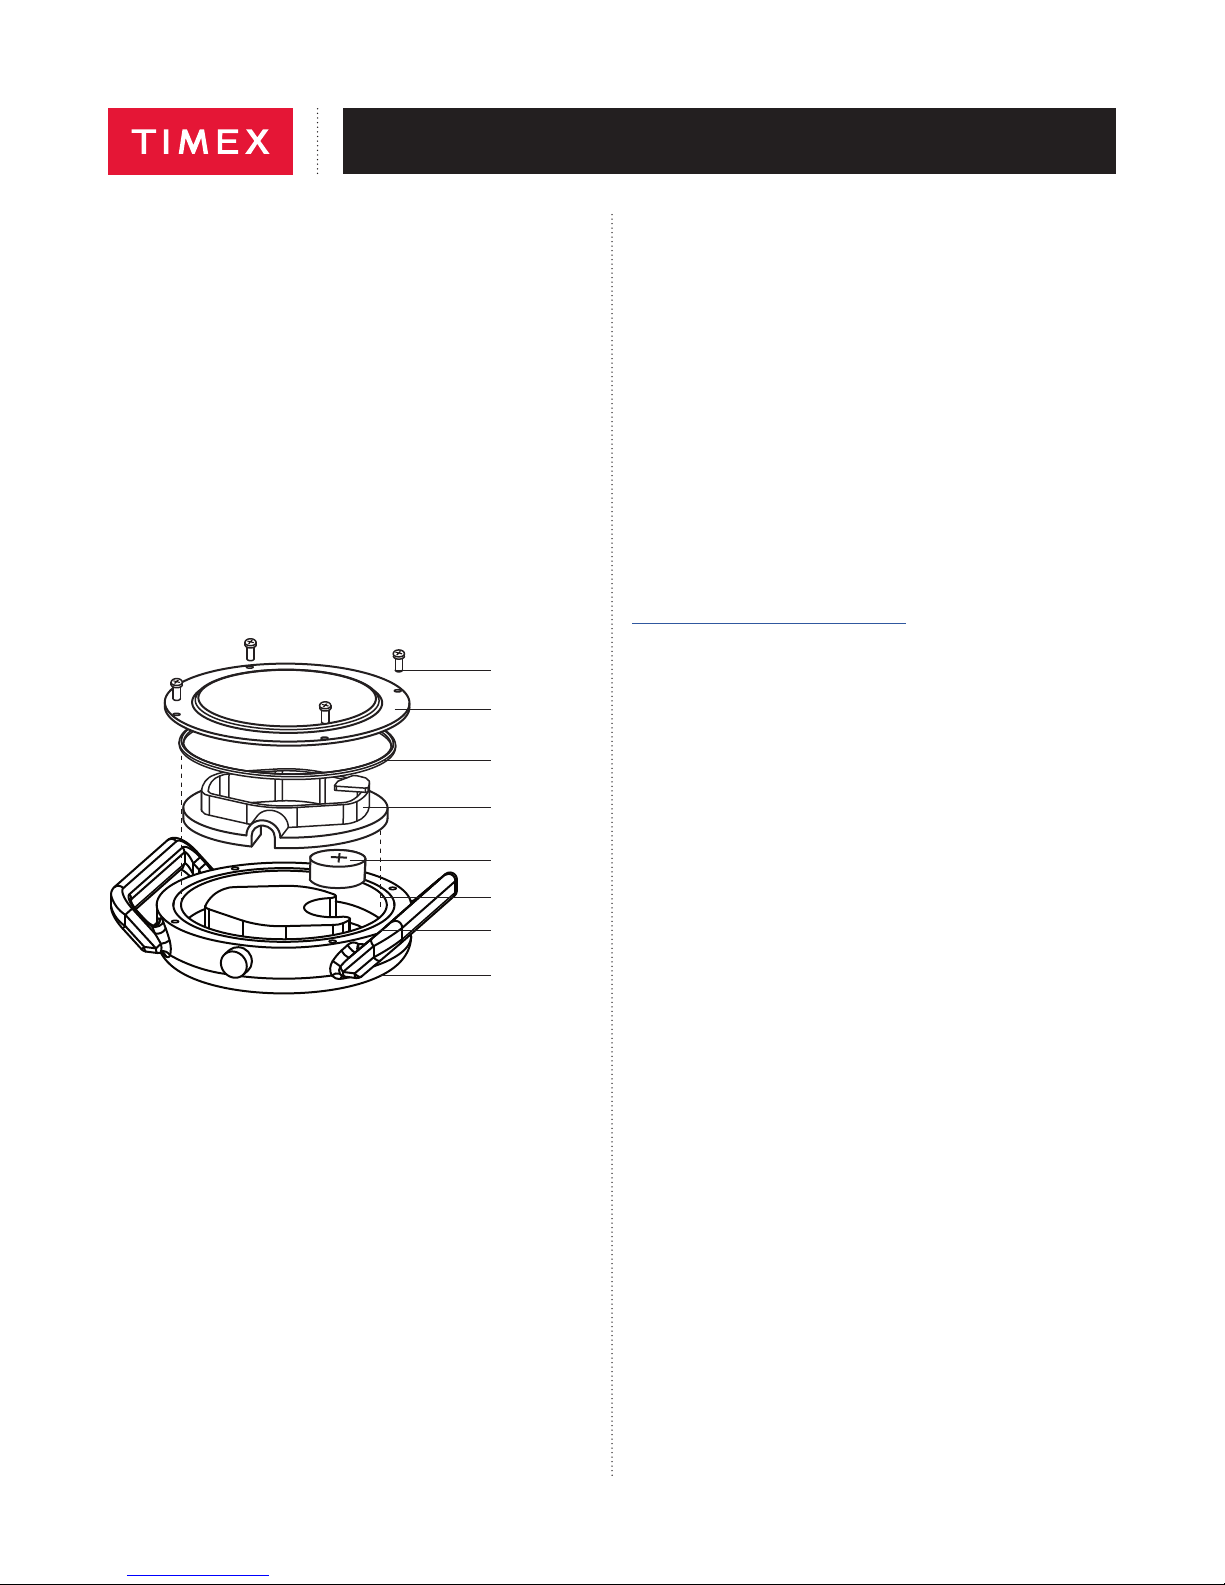
Para cambiar la pila:
• Retira 4 tornillos, la parte de atrás de la caja y la cubierta del
movimiento, asegurándote de que la junta tórica permanezca
en la ranura de junta tórica de la caja.
• Saca con cuidado la pila y cámbiala por una SR625SW, asegurándote
de que el lado positivo (+) está boca arriba.
• Antes de poner la cubierta del movimiento en su posición, asegúrate
de que el reloj funciona.
• Antes de poner la parte de atrás de la caja en su posición, asegúrate
de que la junta tórica esté en la ranura de junta tórica de la caja.
• Alinea los orificios de la parte de atrás de la caja con los orificios
de tornillo de la caja del reloj.
• Inserta (4) tornillos en los orificios y aprieta.
NO ARROJES LA PILA AL FUEGO. NO LA RECARGUES. MANTÉN LAS
PILAS SUELTAS FUERA DEL ALCANCE DE LOS NIÑOS.
(4) Tornillos
Parte de
atrás de la
caja
Junta tórica
GARANTÍA INTERNACIONAL DE TIMEX
http://www.timex.com/productWarranty.html
©2017 Timex Group USA, Inc. TIMEX es una marca registrada de Timex
Group USA, Inc.
Cubierta del
movimiento
Lado positivo (+)
boca arriba
Orificios de
tornillo
Ranura de junta
tórica
Caja del reloj
6
Page 8

Leia atentamente as instruções para saber como utilizar o seu relógio
®
Timex
. É possível que o seu modelo não possua todos os recursos
descritos neste folheto.
INICIAR O RELÓGIO
Importante: Ajuste primeiro a data! Remova o protetor da coroa
e pressione-a para dentro.
AJUSTAR DATA
(recurso disponível em estilos selecionados)
Registre o seu produto no site www.timex.com
PORTUGUÊS 035-095000
REVISADO EM 17/7/17
A hora é 3 minutos PARA AS 8 A hora é 8 horas
I
I
I
I
I
I
14
14
QUARTZ
I
I
I
I
I
I
I
I
I
I
I
I
QUARTZ
I
I
I
I
I
I
I
I
1:00 am 7:30 pm
Puxe a coroa para a posição “OUT” (fora) e gire no SENTIDO HORÁRIO até
que a data mude (aproximadamente 1h00). Em seguida, gire no SENTIDO
ANTI-HORÁRIO para 19h30. Repita até aparecer a data correta. Ajuste
a data quando o mês tiver menos que 31 dias.
AJUSTAR HORA
Puxe a coroa ao máximo para fora e gire-a até obter a hora correta.
Pressione a coroa para reiniciar. Relógios com data: Observe a hora correta
(A.M [dia] ou P.M. [noite]) do dia para permitir um adequado funcionamento
da data.
COMO INFORMAR A HORA
Para informar a hora, é preciso saber algumas informações importantes.
• O ponteiro da hora aponta para os números da hora. Os números da hora
são os números grandes.
• O ponteiro do minuto aponta para os números do minuto. Os números do
minuto são os números pequenos.
A hora é 5 minutos DEPOIS DAS 7 A hora é 15 minutos DEPOIS DAS 7
LUZ NOTURNA INDIGLO®
Pressione a coroa para ativar a luz. A tecnologia
eletroluminescente utilizada na luz noturna INDIGLO
ilumina toda a face do relógio à noite e em condições
de pouca luz. Disponível em estilos selecionados.
®
I
I
I
I
QUARTZ
I
I
I
I
I
I
I
I
RESISTÊNCIA À ÁGUA
Se o relógio for resistente à água, haverá uma indicação de profundidade
em metros ou (O).
Profundidade da resistência à água p.s.i.a. * Pressão da água abaixo
da superfície
30 metros/98 pés 60
50 metros/164 pés 86
100 metros/328 pés 160
*pressão absoluta em libras por polegada quadrada
ADVERTÊNCIA: PARA MANTER A RESISTÊNCIA À ÁGUA, NÃO
PRESSIONE NENHUM BOTÃO QUANDO ESTIVER EMBAIXO D’ÁGUA.
1. Essa resistência à água continuará invariável enquanto o cristal, os
botões e a caixa permanecerem intactos.
2. Este não é um relógio de mergulho e, por isso, não deve ser utilizado
para essa atividade.
3. Enxágue o relógio com água depois de tê-lo exposto à água salgada.
4. A resistência a choques será indicada na face ou na caixa traseira
do relógio. Os relógios são fabricados para passarem na prova de
resistência a choques da ISO. Contudo, deve-se ter cuidado para não
danificar o cristal/lentes.
PULSEIRA DE ELÁSTICO
Todo relógio Timex Kids possui uma pulseira de tecido elástico que pode
ser ajustada e lavada. Para ajustar a pulseira:
1. Coloque a ponta da pulseira de elástico até o primeiro orifício e depois
pela abertura do segundo orifício.
2. Ajuste a pulseira no comprimento desejado.
A hora é 22 minutos DEPOIS DAS 7 A hora é 30 minutos DEPOIS DAS 7
A hora é 25 minutos PARA AS 11 A hora é 15 minutos PARA AS 7
PULSEIRA “FAST WRAP”
Alguns relógios possuem pulseiras tipo FAST WRAP. Para ajustar a pulseira:
1. Deslize a ponta da pulseira através do elo D.
2. Puxe bem para ajustar e prenda para proporcionar um encaixe apertado
e confortável.
7
Page 9

Registre o seu produto no site www.timex.com
PORTUGUÊS 035-095000
REVISADO EM 17/7/17
BATERIA
A Timex recomenda que a bateria do relógio seja trocada por um
revendedor ou joalheiro.
• As baterias devem ser inseridas com a polaridade correta.
• Baterias não recarregáveis não devem ser recarregadas.
• Baterias gastas devem ser removidas do relógio.
• Os terminais de alimentação não devem entrar em curto-circuito.
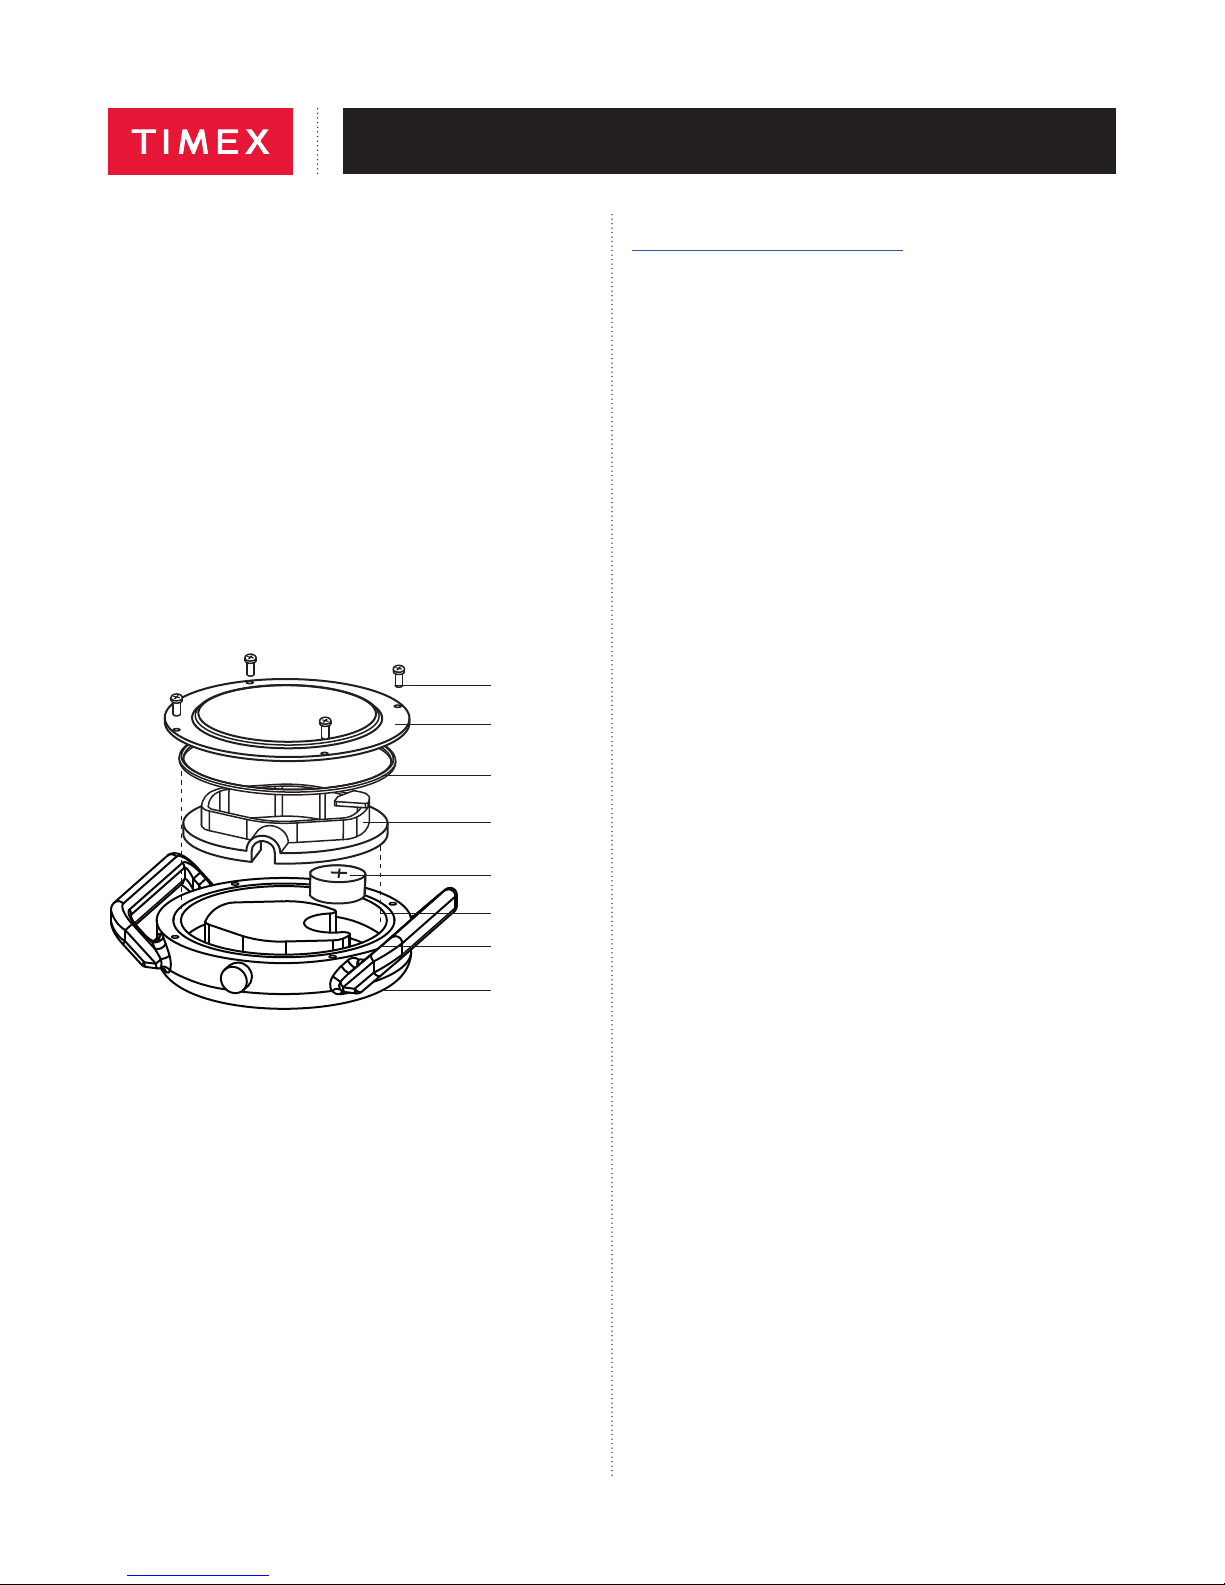
Para trocar a bateria:
• Remova os 4 parafusos, a caixa traseira e a tampa do movimento,
certificando-se de que o elo “O” esteja na ranhura do elo “O” da caixa.
• Remova cuidadosamente a bateria e troque-a pela SR625SW,
certificando-se de que o lado positivo (+) fique voltado para cima.
• Antes de colocar a tampa do movimento de volta no lugar, certifique-se
de que o relógio esteja funcionando.
• Antes de colocar a caixa traseira de volta no lugar, certifique-se de que
o elo “O” esteja na ranhura do elo “O” da caixa.
• Alinhe os orifícios da caixa traseira com os orifícios dos parafusos da
caixa do relógio.
• Insira os (4) parafusos nos orifícios e aperte-os.
NÃO DESCARTE A BATERIA NO FOGO. NÃO RECARREGUE A BATERIA.
MANTENHA AS BATERIAS SOLTAS FORA DO ALCANCE DAS CRIANÇAS.
(4) parafusos
Caixa traseira
Elo “O”
Tampa do
movimento
Lado positivo (+)
da bateria
para cima
Orifícios dos
parafusos
Ranhura
do elo “O”
Caixa do relógio
GARANTIA INTERNACIONAL TIMEX
http://www.timex.com/productWarranty.html
© 2017 Timex Group USA, Inc. TIMEX é uma marca comercial registrada da
Timex Group USA, Inc.
8
Page 10

Registrare il prodotto all’indirizzo www.timex.com
ITALIANO 035-095000
REVISIONE 17.7.17
Leggere attentamente le istruzioni per comprendere il funzionamento
dell’orologio Timex
di tutte le funzioni descritte in questo opuscolo.
®
. Il modello in dotazione potrebbe non disporre
AVVIAMENTO DELL’OROLOGIO
Importante: impostare la data prima di tutto! Rimuovere la protezione dalla
corona e premere la corona all’interno.
SET DATE (funzione disponibile in stili selezionati)
I
I
I
I
I
I
14
14
QUARTZ
I
I
I
I
I
I
I
I
I
I
I
I
QUARTZ
I
I
I
I
I
I
I
I
1:00 am 7:30 pm
Estrarre la corona in posizione “FUORI” e girarla in senso ORARIO fino
a ottenere il cambio della data (in corrispondenza, all’incirca, dell’una
di mattina). Quindi girare in senso ANTIORARIO sulle ore 7:30 p.m. Ripetere
fino a ottenere la data giusta. Regolare la data quando il mese ha meno
di 31 giorni.
IMPOSTAZIONE DELL’ORA
Estrarre completamente la corona e ruotarla per ottenere l’ora giusta.
Spingere la corona all’interno per riavviare. Orologi con data: notare l’ora
del giorno corretta (A.M./mattina o P.M./pomeriggio) per consentire il corretto
funzionamento della data.
COME LEGGERE L’ORA
Per poter leggere l’ora, è necessario ricordare alcuni fatti importanti.
• La lancetta delle ore punta verso i numeri delle ore. I numeri delle ore
sono i numeri grandi.
• La lancetta dei minuti punta verso i numeri dei minuti. I numeri dei minuti
sono i numeri piccoli.
Sono le 7 e 5 Sono le 7 e un quarto
Sono le 8 meno 3 minuti Sono le 8
LUCE NOTTURNA INDIGLO
Premere la corona per attivare l’illuminazione. La
tecnologia elettroluminescente utilizzata per la
luce notturna INDIGLO
dell’orologio di notte e in condizioni di scarsa luminosità.
Disponibile in stili selezionati.
®
illumina l’intero quadrante
®
I
I
I
I
QUARTZ
I
I
I
I
I
I
I
I
RESISTENZA ALL’ACQUA
Se l’orologio è resistente all’acqua, presenta il numero dei metri
di resistenza o il contrassegno (O).
Profondità di immersione p.s.i.a. * Pressione dell'acqua sotto
la superficie
30 m/98 piedi 60
50 m/164 piedi 86
100 m/328 piedi 160
*libbre per pollice quadrato assolute
AVVERTENZA: PER SALVAGUARDARE LA RESISTENZA ALL’ACQUA
DELL’OROLOGIO, NON PREMERE ALCUN PULSANTE SOTT’ACQUA.
1. L’orologio è resistente all’acqua solo finché la lente, i pulsanti e la cassa
restano intatti.
2. L’orologio non è un orologio subacqueo e non va usato per le immersioni.
3. Risciacquare l’orologio con acqua dolce dopo l’esposizione all’acqua
marina.
4. La resistenza agli urti è indicata sul quadrante o sul retro della cassa
dell’orologio. Gli orologi sono progettati in modo da superare il test ISO
di resistenza agli urti. Fare tuttavia attenzione per evitare danni al
cristallo/alla lente.
CINTURINO ELASTICO
Tutti gli orologi Timex Kids possiedono un cinturino regolabile, in tessuto
stretch, lavabile. Per regolare la fascetta:
1. Inserire l’estremità del cinturino elastico attraverso la prima apertura della
fibbia, e quindi attraverso la seconda apertura della fibbia.
2. Regolare il cinturino alla lunghezza desiderata.
Sono le 7 e 22 Sono le 7 e 30
Sono le 11 meno 25 minuti Sono le 7 meno un quarto
FASCETTA FAST WRAP
Alcuni orologi possiedono fascette FAST WRAP. Per regolare la fascetta:
1. Inserire l’estremità della fascetta attraverso l’anello a D.
2. Tirare saldamente per regolare e fissare, in modo da ottenere una
vestibilità aderente e confortevole.
9
Page 11

Registrare il prodotto all’indirizzo www.timex.com
ITALIANO 035-095000
REVISIONE 17.7.17
BATTERIA
Timex raccomanda espressamente di fare sostituire la batteria
dell’orologio dal dettagliante o dal gioielliere.
• Le batterie devono essere inserite con la polarità corretta
• Non ricaricare le batterie non ricaricabili
• Rimuovere le batterie scariche dal giocattolo
• Non cortocircuitare i terminali di alimentazione
Per sostituire la batteria:
• Rimuovere le 4 viti, il retro della cassa e la copertura del movimento
assicurandosi di lasciare l’O-ring nell’apposita scanalatura della cassa.
• Rimuovere cautamente la batteria e sostituirla con SR625SW,
assicurandosi che il lato positivo (+) sia rivolto verso l’alto.
• Prima di riposizionare la copertura del movimento, assicurarsi che
l’orologio funzioni.
• Prima di riportare in posizione il retro della cassa, assicurarsi che l’O-ring
si trovi nell’apposita scanalatura della cassa.
• Allineare i fori del retro della cassa ai fori della cassa dell’orologio.
• Inserire le (4) viti nei fori e serrare.
NON GETTARE LE BATTERIE NEL FUOCO. NON RICARICARLE. TENERE
LE BATTERIE SFUSE LONTANO DAI BAMBINI.
(4) viti
Retro della
cassa
O-ring
Copertura del
movimento
Batteria con lato
positivo (+) verso
l’alto
Fori delle viti
Scanalatura
per l’O-ring
Cassa
dell’orologio
GARANZIA INTERNAZIONALE TIMEX
http://www.timex.com/productWarranty.html
©2017 Timex Group USA, Inc. TIMEX è un marchio commerciale registrato
di Timex Group USA, Inc.
10
Page 12

Bitte lesen Sie die Gebrauchsanweisung für Ihre Timex® Uhr genau durch.
Ihr Modell verfügt eventuell nicht über alle der hier aufgeführten Funktionen.
UHR EINSTELLEN
Wichtig: Datum zuerst einstellen! Kronenschutz entfernen und Krone
hineindrücken.
DATUM EINSTELLEN
(Funktion bei manchen Modellen vorhanden)
Registrieren Sie Ihr Produkt auf www.timex.com
DEUTSCH 035-095000
ÜBERARBEITET AM: 17.07.17
Es ist 3 Minuten VOR 8 Es ist 8 Uhr
I
I
I
I
I
I
14
14
QUARTZ
I
I
I
I
I
I
I
I
I
I
I
I
QUARTZ
I
I
I
I
I
I
I
I
1:00 am 7:30 pm
Krone herausziehen und IM UHRZEIGERSINN drehen, bis sich das Datum
ändert (ca. 1 Uhr morgens). Dann GEGEN den UHRZEIGERSINN 19.30 Uhr
(7:30 p.m.) einstellen. Wiederholen, bis das korrekte Datum erscheint. Datum
bei Monaten mit weniger als 31 Tagen anpassen.
UHRZEIT EINSTELLEN
Die Krone vollständig herausziehen und aktuelle Uhrzeit einstellen. Zum
Neustart der Uhr Krone hineindrücken. Uhren mit Datum: Beachten Sie
die Tageszeit [A.M. (vormittags) oder P.M. (nachmittags)] für richtige
Datumseinstellung.
ZEIT ABLESEN
Um die Zeit ablesen zu können, müssen Sie folgende Faktoren
berücksichtigen.
• Der Stundenzeiger zeigt die Stunden an. Die Stunden werden mit großen
Zahlen angezeigt.
• Der Minutenzeiger zeigt die Minuten an. Die Minuten werden mit kleinen
Zahlen angezeigt.
Es ist 5 Minuten NACH 7 Es ist 15 Minuten NACH 7
INDIGLO® ZIFFERBLATTBELEUCHTUNG
Krone drücken, um Zifferblatt zu beleuchten. Die für die
®
INDIGLO
Elektroleuchttechnik (U.S. Patente 4.527.096 und
4.775.964) beleuchtet das gesamte Zifferblatt bei Nacht
und schlechten Lichtverhältnissen. Bei ausgewählten
Modellen erhältlich.
Zifferblattbeleuchtung eingesetzte, patentierte
I
I
I
I
QUARTZ
I
I
I
I
I
I
I
I
WASSERBESTÄNDIGKEIT
Wasserdichte Uhren sind mit Tiefenangabe in Metern oder mit (O)
gekennzeichnet.
Streckendatenkeit/Tiefe p.s.i.a. * Wasserdruck
30 m 60
50 m 86
100 m 160
*pounds per square inch absolute
ACHTUNG: UM WASSERBESTÄNDIGKEIT ZU BEWAHREN, UNTER
WASSER KEINE KNÖPFE DRÜCKEN.
1. Die Uhr ist nur wasserdicht, solange Glas, Knöpfe und Gehäuse intakt
sind.
2. Dies ist keine Taucheruhr und sie sollte nicht zum Tauchen benutzt
werden.
3. Nach Kontakt mit Salzwasser Uhr mit klarem Wasser abspülen.
4. Stoßfestigkeit ist auf Zifferblatt oder Gehäuserückseite angegeben. Die
Uhren entsprechen den ISO-Anforderungen für Stoßfestigkeit. Es sollte
jedoch darauf geachtet werden, das Glas nicht zu beschädigen.
ELASTISCHES TEXTILARMBAND
Jede Timex Kids Uhr verfügt über ein verstellbares, elastisches und
waschbares Armband. Armband anpassen:
1. Ende des elastischen Armbands zunächst durch die erste, dann durch
die zweite Schnallenöffnung führen.
2. Die gewünschte Länge einstellen.
Es ist 22 Minuten NACH 7 Es ist 30 Minuten NACH 7
Es ist 25 Minuten VOR 11 Es ist 15 Minuten VOR 7
FAST-WRAP-ARMBAND
Manche Uhren verfügen über FAST-WRAP-ARMBÄNDER. Armband
anpassen:
1. Ende des Armbands durch den D-Ring führen.
2. Festziehen, um das Armband einzustellen bis ein anliegender und
angenehmer Sitz erreicht wird.
11
Page 13

Registrieren Sie Ihr Produkt auf www.timex.com
DEUTSCH 035-095000
ÜBERARBEITET AM: 17.07.17
BATTERIE
Timex empfiehlt eindringlich den Austausch der Batterie durch einen
Einzelhändler oder einen Juwelier.
• Batterien sind mit der richtigen Polung einzulegen
• Nicht wieder aufladbare Batterien können nicht aufgeladen werden
• Leere Batterien sind vom Spielzeug zu entfernen
• Die Ladeterminals sind nicht kurz zu schließen
Batterie auswechseln:
• Vier Schrauben, Gehäuserückseite und Zifferblattabdeckung entfernen
und sicherstellen, dass der O-Ring in der O-Ring-Rille des Gehäuses
bleibt.
• Batterie vorsichtig entfernen und durch SR625SW austauschen, wobei
Sie sicherzustellen ist, dass die Positiv (+) Seite nach oben zeigt.
• Vergewissern Sie sich vor der Platzierung der Gehäuserückseite, dass
sich der O-Ring in der O-Ring-Rille des Gehäuses befindet.
• Überprüfen Sie, ob sich der O-Ring in der O-Ring-Rille des Gehäuses
befindet, bevor Sie die Gehäuserückseite wieder anbringen.
• Richten Sie die Löcher der Gehäuserückseite aus, sodass sie mit den
Schraubenlöchern des Gehäuses übereinstimmen.
• Führen Sie (4) Schrauben in die Löcher ein und ziehen Sie sie fest.
BATTERIE NICHT INS FEUER WERFEN. SIE IST NICHT AUFLADBAR.
BATTERIEN VON KINDERN FERNHALTEN.
(4) Schrauben
Gehäuseboden
O-Ring
TIMEX – INTERNATIONALE GARANTIE
http://www.timex.com/productWarranty.html
©2017 Timex Group USA, Inc. TIMEX ist ein eingetragenes Markenzeichen
der Timex Group USA, Inc.
Werkdeckel
Batterie (+)
Seite oben
Schraubenlöcher
O-Ring-Rille
Uhrgehäuse
12
Page 14

Lees de instructies goed door zodat u weet hoe u uw Timex® horloge moet
bedienen. Het is mogelijk dat uw model niet alle functies heeft die in dit
boekje worden beschreven.
HORLOGE STARTEN
Belangrijk: Stel eerst de datum in! Verwijder de beschermer van de kroon en
druk hem in.
DATUM INSTELLEN
(deze functie is beschikbaar op bepaalde typen)
Registreer uw product bij www.timex.com
NEDERLANDS 035-095000
HERZIEN 17/07/17
Het is 3 VOOR 8 Het is 8 uur
I
I
I
I
I
I
14
14
QUARTZ
I
I
I
I
I
I
I
I
I
I
I
I
QUARTZ
I
I
I
I
I
I
I
I
1.00 am 19.30 pm
Trek de kroon naar de “UITGETROKKEN” stand en draai hem MET DE KLOK
MEE totdat de datum verandert [(ca. 1.00 uur (1:00 am)]. Draai hem dan
TEGEN DE KLOK IN tot 19.30 uur (7.30 pm). Herhaal dit tot de juiste datum
verschijnt. Stel de datum bij wanneer de maand minder dan 31 dagen heeft.
TIJD INSTELLEN
Trek de kroon helemaal naar buiten en draai hem tot de juiste tijd.
Druk de kroon naar binnen om opnieuw te starten. Horloges met datum:
De correcte tijd (A.M. of P.M. oftewel ochtend of middag) is nodig voor
de juiste datumfunctie.
ZIEN HOE LAAT HET IS
Om te zien hoe laat het is, moet u enkele belangrijke feiten onthouden.
• De uurwijzer wijst naar de uurgetallen. De uurgetallen zijn de grote
getallen.
• De minuutwijzer wijst naar de minuutgetallen. De minuutgetallen zijn de
kleine getallen.
Het is 5 OVER 7 Het is kwart OVER 7
INDIGLO® NACHTVERLICHTING
Druk op de kroon om het licht in te schakelen.
De in de INDIGLO
elektroluminescentietechnologie verlicht het gehele
horloge ‘s nachts en wanneer er weinig licht is.
Beschikbaar op bepaalde typen.
®
nachtverlichting gebruikte
I
I
I
I
QUARTZ
I
I
I
I
I
I
I
I
WATERBESTENDIGHEID
Als het horloge waterbestendig is, wordt de metermarkering of (O)
aangegeven.
Waterbestendige diepte p.s.i.a. * Waterdruk onder oppervlak
30 m/98 ft 60
50 m/164 ft 86
100 m/328 ft 160
*lb per vierkante inch absoluut
WAARSCHUWING: OM HET HORLOGE WATERBESTENDIG TE HOUDEN
MAG U ONDER WATER OP GEEN ENKELE KNOP DRUKKEN.
1. Het horloge is alleen waterbestendig zo lang het glas, de drukknoppen
en de kast intact blijven.
2. Het horloge is geen duikershorloge en mag niet voor duiken worden
gebruikt.
3. Spoel het horloge met zoet water af nadat het aan zout water is
blootgesteld.
4. De schokbestendigheid wordt op de wijzerplaat of de achterkant van
de kast aangegeven. De horloges zijn zodanig ontworpen dat ze aan de
ISO-test voor schokvastheid voldoen. Beschadiging van het horlogeglas
moet echter worden vermeden.
ELASTISCH BANDJE
Elk Timex Kids horloge heeft een verstelbaar, wasbaar bandje van rekbaar
textiel. Het bandje bijstellen:
1. Breng het einde van het elastische bandje omhoog door de eerste
opening van de gesp en dan naar beneden door de tweede opening
van de gesp.
2. Stel het bandje op de gewenste lengte af.
Het is 8 VOOR half 8 Het is half 8
Het is 5 OVER half 11 Het is kwart VOOR 7
FAST WRAP BANDJE
Sommige horloges hebben een FAST WRAP bandje. Het bandje bijstellen:
1. Schuif het einde van het bandje door de D-ring.
2. Trek het strak tot het comfortabel zit en zet het vast.
13
Page 15

Registreer uw product bij www.timex.com
NEDERLANDS 035-095000
HERZIEN 17/07/17
BATTERIJ
Timex raadt ten sterkste aan om de horlogebatterij door een winkelier of
juwelier te laten vervangen.
• Batterijen moeten met de juiste polariteit worden ingebracht
• Niet-oplaadbare batterijen mogen niet worden opgeladen
• Lege batterijen moeten uit het speelgoed worden verwijderd
• De polen mogen niet worden kortgesloten
Batterij vervangen:
• Verwijder 4 schroeven, de achterkant van de kast en het
mechaniekdeksel. Let er daarbij op dat de O-ring in de O-ringgroef
van de kast blijft.
• Verwijder de batterij voorzichtig en vervang hem door een SR625SW.
Let er daarbij op dat de pluskant (+) omhoog wijst.
• Controleer of het horloge loopt voordat u het mechaniekdeksel op zijn
plaats brengt.
• Controleer of de O-ring in de O-ringgroef van de kast zit voordat u
de achterkant van de kast weer aanbrengt.
• Breng de gaten in de achterkant van de kast in lijn met schroefgaten van
de horlogekast.
• Steek (4) schroeven in de gaten en draai ze vast.
DE BATTERIJ NIET IN HET VUUR WEGGOOIEN. NIET OPLADEN. LOSSE
BATTERIJEN UIT DE BUURT VAN KINDEREN HOUDEN.
(4) Schroeven
Achterkant
kast
O-ring
INTERNATIONALE GARANTIE VAN TIMEX
http://www.timex.com/productWarranty.html
©2017 Timex Group USA, Inc. TIMEX is een gedeponeerd handelsmerk van
Timex Group USA, Inc.
Mechaniekdeksel
Pluskant (+)
batterij omhoog
Schroefgaten
O-ringgroef
Horlogekast
14
Page 16

请仔细阅读本说明,以了解 Timex® 手表的操作方法。您购买的型号可能没有
本手册描述的所有功能。
启用手表
重要说明:请首先设置日期! 揭掉表冠上的保护罩并将表冠推入。
设置日期(选中的样式可用的功能)
中文 035-095000
请在www.timex.com上注册您的产品
修订 7.17.17
I
I
I
I
I
I
14
14
QUARTZ
I
I
I
I
I
I
I
I
I
I
I
I
QUARTZ
I
I
I
I
I
I
I
I
1:00 am 7:30 pm
将表冠拉至“外部”位置,并沿顺时针方向旋转,直到日期发生变动(大约
1:00 a.m.)。然后沿逆时针方向转动调至7:30 p.m。反复旋转,直到显示正确
的日期。月份不足31天时,请相应地调整日期。
设置时间
将表冠全部拔出,然后转动调至正确的时间。将表冠按回,重新启动计时。
有日期显示功能的手表:请注意调准时间(A.M.或P.M.)以便正常使用日期
功能。
如何显示时间
要显示时间,您必须记住一些重要的事实。
• 小时针指向小时数字。小时数字是大数字。
• 分钟针指向分钟数字。分钟数字是小数字。
时间是7点过5分 时间是7点过15分
时间是8点差3分 时间是8点
INDIGLO®夜间照明灯
按下表冠打开照明灯。INDIGLO® 夜间照明采用了电致发
光技术,可在夜间和低光度环境下照亮整个表盘。选中的
样式可用。
I
I
I
I
QUARTZ
I
I
I
I
I
I
I
I
防水功能
您的手表如果具有防水性能,则会显示米数刻度或(O)。
防水深度 p.s.i.a.* 水面以下水压
30 米/98 英尺 60
50 米/164 英尺 86
100 米/328 英尺 160
* 按磅每平方英寸计算的压力绝对值
警告:为保持防水性能,请勿在水中按任何键钮。
1. 只有在镜面、键钮和表壳完好无损的情况下,本表才能保持防水性能。
2. 本表非潜水用手表,不宜在潜水时使用。
3. 接触盐水后,请用清水冲洗。
4. 表盘或表壳背面会注明防震性能。本表的防震设计通过了 ISO 国际标准测
试。但应注意避免损坏晶体/镜面。
弹性表带
每个Timex Kids手表都有可调、弹力、可洗表带。要调整表带:
1. 将塑料表带的一端穿过首个表扣开口,然后向下穿过第二个表扣开口。
2. 将表带调整到理想长度。
时间是7点过22分 时间是7点过30分
时间是11点差25分 时间是7点差15分
FAST WRAP表带
一些手表带FAST WRAP表带。要调整表带:
1. 将表带一端穿过D环。
2. 拉紧进行调整并扣好,保证舒适的佩戴。
15
Page 17

中文 035-095000
请在www.timex.com上注册您的产品
修订 7.17.17
电池
Timex强烈建议由零售商店或钟表店来更换手表电池。
• 以正确的极性插入电池
• 不得对不可充电的电池充电
• 从玩具中取出用完的电池
• 不得对接线端子短路
要更换电池:
• 拆下4个螺丝、表壳背面和移动盖,确保O型圈留在盖O型圈凹槽内。
• 小心取下电池并使用SR625SW更换,确保正 (+) 极朝上。
• 将移动盖放入到位之前,确保手表正常运行。
• 在将表壳背面固定到位之前,检查O型圈处于外壳O型圈凹槽内。
• 将表壳背面孔与表盘螺丝孔对齐。
• 将 (4) 螺丝插入孔内,拧紧。
切勿将电池弃置于火内。请勿为电池充电。切勿让儿童接触拆下的电池。
(4) 螺丝
表壳背面
O型圈
移动盖
电池正 (+) 极朝上
螺丝孔
TIMEX 国际保修规定
http://www.timex.com/productWarranty.html
©2017 Timex Group USA, Inc. TIMEX是Timex Group USA, Inc.的注册商标。
O型圈凹槽
手表盖
16
Page 18

使用説明書をよくお読みになり、Timex®時計の操作方法をご理解ください。モデル
によっては記載されているすべての機能が備わっていない場合があります。
腕時 計のスタート
重要: 日付を最初に設定してください!リューズのガードをはずして押します。
日付の設定(日付機能のあるモデル)
日本語 035-095000
www.timex.com にて製品をご登録ください
改定日 7.17.17
I
I
I
I
I
I
14
14
QUARTZ
I
I
I
I
I
I
I
I
I
I
I
I
QUARTZ
I
I
I
I
I
I
I
I
1:00 am 7:30 pm
リューズを「外側」の位置まで引いて、日付が変わるまで時計回りに回します
(1:00 a.m. のあたり)。その後、反時計回りに回して 7:30 p.m. にします 。
日数が31日未満の月は日付を調整してください。
時刻の設定
リューズをもっとも外側まで引いて回し、正しい時刻に合わせます。リューズを押して
リスタートします。日付機能のある種類: 日付を正しく読むには、現在時刻(A.M.また
はP.M.) を ご 参 照くだ さい 。
時刻の読み方
時刻の正しい読み方は以下の通りになります。
• 時針は時間の数字を指します。大きい数字は時間の数字になります。
• 分針は分の数字を指します。小さい数字は分の数字になります。
現在時刻は 7時5分 現在時刻は 7時5分
現在時刻は 8時3分前 現在時刻は 8時
INDIGLO® ナ イト ラ イト
リュ ー ズ を 押 す と ナ イト ラ イトが 点 灯 しま す 。INDIGLO® ナ イト
ライトに使用されている電子発光技術によって、夜間や暗い場
所で腕時計の文字盤全体が明るくなります。設定された種類
のみにご 利 用 できます。
I
I
I
I
QUARTZ
I
I
I
I
I
I
I
I
耐水機能
腕時計に耐水性がある場合は、メートルのマーク、または(O) が表記され
ています。
防水水深 p.s.i.a.* 水圧
30m/98ft 60
50m/164ft 86
100m/328ft 160
*重量ポンド毎平方インチ絶対圧
警告: 防水性を維持するためには、水中ではどのボタンも押さないでください。
1. 腕時計はレンズ、プッシュボタン、ケースがそのままの状態の場合でのみ耐水性が
ありま す 。
2. 時計はダイバーウォッチではありませんので潜水には使用しないでください。
3. 腕時計に塩水がかかった場合は真水ですすいでください。
4. 耐衝撃性は腕時計の文字盤、またはケース裏に表記されています。腕時計は
ISO の耐衝撃性試験に合格するよう設計されていますが、クリスタル/レンズが損
傷しないよう十分注意してください。
ゴ ム ストラップ
Timexキッズ ウォッチ に は 洗 える ストレッチ 生 地 の 調 整 ストラップ が 付い てい ま す 。
ストラップの調整:
1. ストラップの先端をバックルの先の穴に通してから後の穴に通します。
2. ストラップを好みの長さに調整します。
現在時刻は 7時22分 現在時刻は 7時30分
現在時刻は 11時25分前 現在時刻は 7時15分前
ファスト スト ラップ
ファストストラップ付の腕時計もあります。ストラップの調整:
1. ストラップ を Dリング に 通し ま す 。
2. ス ト ラ ッ プ を 引 い て 、体 に ぴ っ た り フ ィ ッ ト す る よ う 調 整 し ま す 。
17
Page 19

日本語 035-095000
www.timex.com にて製品をご登録ください
改定日 7.17.17
電池
Timexは、腕時計の電池は小売店や宝石店に交換してもらうことを強く推奨し
ます。
• 電 池 は正し い 向 き で 入 れ てください
• 充電不可の電池は充電しないでください
• 切 れ た 電 池は本 体から取り出してください
• 電源の端子はショートしないでください
電池の交換:
• OリングはケースのOリ ン グ 溝 に と ど ま る よ う 、ネ ジ を 4個外して からケース の 裏と
ム ー ブ メ ン ト カ バ ー を 取 り 出 し ま す 。
• 電 池をゆっくりと取り出し、新しい SR625SW電池を(+の電 極が上に 向いている
よ う )入 れ ま す 。
• 腕時計は機能していることを確認し、ムーブメントカバーを正しい位置に置き
ます。
• OリングはケースのOリング溝 に入っていることを 確 認し、ケースの 裏を正しい 位
置 に 置 き ま す 。
• ケースの裏の穴と腕時計のネジ穴を合わせます。
• ネ ジ( 4個 ) を 穴 に 入 れ て 、締 め ま す 。
電池を焼却しないでください。再充電しないでください。外した電池はお子様の手
の 届 か な い ところ に 保 管 してくだ さい 。
ネジ ( 4個)
ケースの 裏
Oリン グ
ムー ブ メント
カバー
TIMEX 国際保証書
http://www.timex.com/productWarranty.html
©2017 Timex Group USA, Inc. TIMEX は、Timex Group USA, Inc. の登録商
標です。
電池の+電極は上に
ネジ穴
Oリン グ 溝
腕時計のケース
18
Page 20

Пожалуйста, внимательно прочитайте инструкцию по эксплуатации, чтобы понять,
как правильно пользоваться часами Timex®. Те или иные функции, описанные в
настоящем буклете, в вашей модели могут отсутствовать.
ЗАПУСК ЧАСОВ
Важно: Сначала установите дату! Удалите защиту с заводной головки и задвиньте
головку.
УСТАНОВКА ДАТЫ
(функция доступна в некоторых моделях)
I
I
I
I
I
I
14
14
QUARTZ
I
I
I
I
I
I
I
I
I
I
I
I
QUARTZ
I
I
I
I
I
I
I
I
01:00 am 07:30 pm
Зарегистрируйте свое изделие на сайте www.timex.com
РУССКИЙ 035-095000
Время без 3 минут 8 часов Время 8 часов
НОЧНАЯ ПОДСВЕТКА INDIGLO
Нажмите на заводную головку для включения подсветки.
Электролюминесцентная технология, используемая в ночной
подсветке INDIGLO®, освещает весь циферблат часов в
ночное время и в условиях слабой освещенности. Доступно
в некоторых моделях.
®
ПЕРЕСМОТРЕНО 17.7.17
I
I
I
I
QUARTZ
I
I
I
I
I
I
I
I
Выдвините заводную головку и поворачивайте ПО ЧАСОВОЙ СТРЕЛКЕ до тех
пор, пока не сменится дата (приблиз. на 01:00). Затем поверните головку ПРОТИВ
ЧАСОВОЙ СТРЕЛКИ на 07:30 после полудня (19:30). Повторяйте до тех пор, пока не
выставится правильная дата. В дальнейшем корректировка даты потребуется, если
в месяце меньше 31 дня.
УСТАНОВКА ВРЕМЕНИ
Выдвините заводную головку в крайнее положение и, поворачивая, установите
время. Задвиньте заводную головку до упора для перезапуска часов. Часы с
окошком даты: В целях обеспечения смены даты должным образом обратите
внимание на время дня на часах (до полудня или после полудня).
ОПРЕДЕЛЕНИЕ ВРЕМЕНИ ПО ЧАСАМ
Чтобы определить время, необходимо помнить следующие важные факты.
• Часовая стрелка указывает на часы. Крупные цифры- это часы.
• Минутная стрелка указывает на минуты. Мелкие цифры- это минуты.
Время 7 часов, 5 минут Время 7 часов, 15 минут
ВОДОНЕПРОНИЦАЕМОСТЬ
О водостойкости ваших часов свидетельствует метровая отметка или значок
(O).
Глубина водонепроницаемости p.s.i.a. * Давление воды ниже поверхности
30м/98футов 60
50м/164 фута 86
100м/328футов 160
*абсолютное давление в фунтах на кв. дюйм
ПРЕДУПРЕЖДЕНИЕ: ДЛЯ СОХРАНЕНИЯ ВОДОНЕПРОНИЦАЕМОСТИ, НЕ
НАЖИМАЙТЕ КНОПКИ ПОД ВОДОЙ.
1. Часы сохраняют водонепроницаемость только до тех пор, пока стекло
циферблата, кнопки и корпус остаются неповрежденными.
2. Часы не являются водолазными и не предназначены для ныряния.
3. После контакта с морской водой часы следует ополоснуть пресной водой.
4. Противоударные модели имеют соответствующую маркировку на
циферблате или задней крышке. Такие часы отвечают требованиям MOC
по противоударности. Тем не менее, следует избегать повреждения стекла
циферблата.
ЭЛАСТИЧНЫЙ РЕМЕШОК
Часы Timex Kids снабжены ремешком с регулируемой длиной, изготовленным
из эластичной моющейся ткани. Регулировка длины ремешка:
1. Протяните конец эластичного ремешка вверх через первое отверстие пряжки,
а затем вниз через второе отверстие пряжки.
2. Отрегулируйте желаемую длину ремешка.
Время 7 часов, 22 минуты Время 7 часов, 30 минут
Время без 25 минут 11 часов Время без 15 минут 7 часов
РЕМЕШОК БЫСТРОГО ЗАСТЕГИВАНИЯ
Некоторые модели снабжены ремешками БЫСТРОГО ЗАСТЕГИВАНИЯ. Регулировка
длины ремешка:
1. Протяните конец ремешка через D-образную пряжку.
2. Затяните так, чтобы ремешок плотно, но удобно прилегал, и застегните.
19
Page 21

Зарегистрируйте свое изделие на сайте www.timex.com
РУССКИЙ 035-095000
ПЕРЕСМОТРЕНО 17.7.17
БАТАРЕЙКА
Для замены батарейки фирма Timex настоятельно рекомендует
обращаться к розничному продавцу или ювелиру.
• При установке батарейки необходимо соблюдать правильную полярность.
• Обычные батарейки подзаряжать запрещается
• Разряженные батарейки подлежат удалению из изделия
• Клеммы питания не должны быть закорочены
Замена батарейки:
• Открутите 4 винтика, снимите заднюю крышку и крышку механизма, следя за
тем, чтобы уплотнительное кольцо оставалось в канавке под уплотнительное
кольцо.
• Осторожно извлеките батарейку и установите новую модели SR625SW
положительной (+) стороной вверх.
• Прежде чем вернуть крышку механизма на место, убедитесь в том, что часы
идут.
• Прежде чем закрыть заднюю крышку, убедитесь в том, что уплотнительное
кольцо находится в канавке под уплотнительное кольцо.
• Сровняйте отверстия на задней крышке с отверстиями для винтиков на
корпусе часов.
• Вставьте (4) винтика в отверстия и закрутите.
НЕ БРОСАЙТЕ БАТАРЕЙКУ В ОГОНЬ. НЕ ПОДЗАРЯЖАЙТЕ БАТАРЕЙКУ.
ХРАНИТЕ РАСПАКОВАННЫЕ БАТАРЕЙКИ ВНЕ ДОСЯГАЕМОСТИ ДЕТЕЙ.
Винтики (4)
Задняя
крышка
Уплотнительное
кольцо
МЕЖДУНАРОДНАЯ ГАРАНТИЯ TIMEX
http://www.timex.com/productWarranty.html
©2017 Timex Group USA, Inc. TIMEX является зарегистрированным товарным
знаком фирмы Timex Group USA, Inc.
Крышка
механизма
Батарейка
положительной
стороной (+)
вверх
Отверстия для
винтиков
Канавка под
уплотнительное
кольцо
Корпус часов
20
 Loading...