

Page 1

• Fly-back Chrono Compass • Linear Chronograph • World Time
™
• Boussole Chrono avec Fly-back • Chronographe linéaire
• Heure Mondiale • Boussole • Marée Température et Boussole
• Altimètre • Profondeur • Yacht Racer avec Date Parfaite • 3GMT
• Altímetro • Profundidad • Yacht Racer con Fecha perfecta • 3GMT
Perpetual Calendar • Fly-back Chronograph
• Compass • Tide Temp and Compass Altimeter • Depth
• Hora mundial • Brújula • Marea temperatura y brújula
• Yacht Racer with Perfect Date • 3GMT
Calendrier Perpétuel • Chronographe avec Fly-back
Calendario Perpetuo • Cronógrafo Fly-back
• Brújula y Cronógrafo Fly-back • Cronógrafo lineal
W273 NA 355-095012
Page 2

English .............................. Page 1
Français ............................ page 105
Español ............................. página 219
Page 3

TIMEX® WATCHES
Congratulations on purchasing your TIMEX® INTELLIGENT
™
watch. Please read these instructions carefully
QUARTZ
to understand how to operate your Timex watch.
Your watch may not have all of the features described in
this booklet.
For more information, and to register your
product please visit:
www.timex.com
1
Page 4

TABLE OF CONTENTS
How to Start Your Watch .................................................... 5
Water and Shock Resistance ............................................. 6
®
Night-Light ............................................................ 8
Indiglo
Date and Time Setting ........................................................ 9
Perpetual Calendar .......................................................... 11
Fly-Back Chronograph ...................................................... 14
Fly-back Chronograph Compass ...................................... 20
Linear Chronograph ........................................................ 32
World time ....................................................................... 38
Compass........................................................................... 45
2
Tide Temp and Compass ..................................................52
Altimeter .......................................................................... 61
Depth ................................................................................ 69
Yacht Racer ...................................................................... 74
3GMT ................................................................................ 83
Tachymeter Function ....................................................... 89
Slide-Rule Bezel Function ................................................ 90
How to Adjust Bracelet .................................................... 95
Bracelet Link Removal ...................................................... 97
Battery .............................................................................. 98
Warranty ........................................................................... 99
3
Page 5

®
Welcome to the world of Timex
Intelligent Quartz
analogue technology. Intelligent Quartz technology
brings the power of a micro-processor to the reliability
and accuracy of quartz analogue timekeeping. With Timex
Intelligent Quartz watches, the technology is written into
the design, delivering a new level of dial complication.
Uses up to three additional independent hands to display
an array of information, normally only available in digital
watches, in a traditional analogue format.
™
technology, the future of quartz
watches with
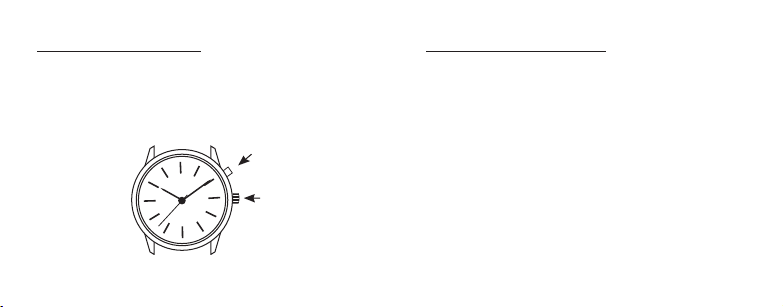
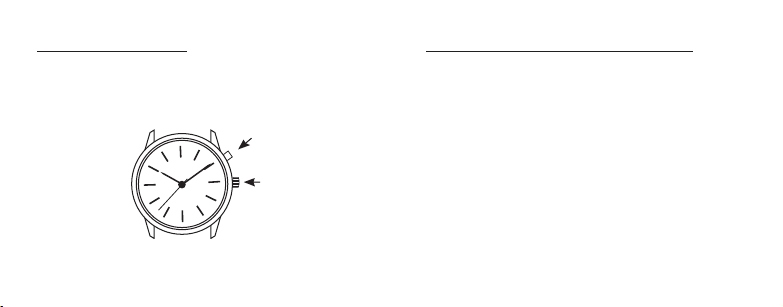
HOW TO START YOUR WATCH
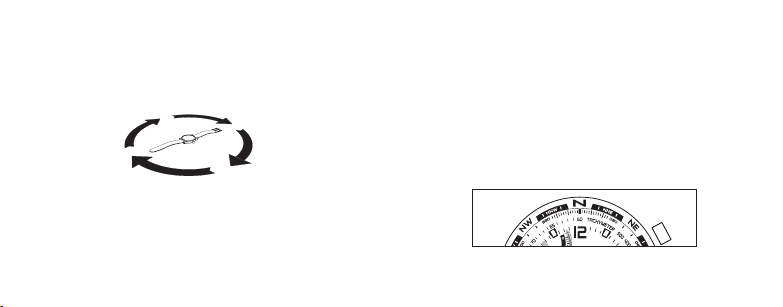
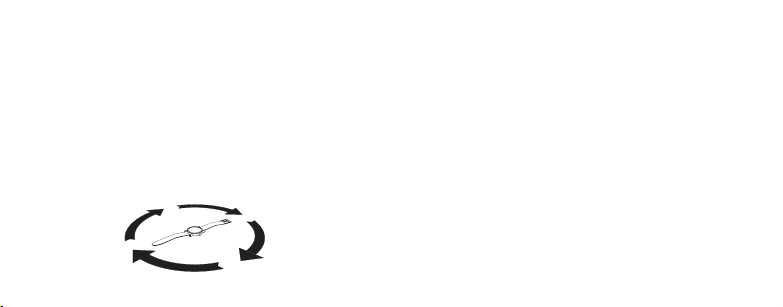
(Does not apply to Perpetual Calendar models.) To start
your watch remove the plastic guard from under the
crown, then press the crown in against the case.
Some watches require the setting crown to be screwed
in. If your watch case has a protrusion with screw
threads, the crown must be screwed in after setting the
watch.
To screw in, push the crown firmly against the threaded
protrusion and hold in while turning the crown clockwise.
Continue to screw in the crown until it is tight. You will
need to unscrew the crown (counter-clockwise) before
pulling it out the next time you want to set your watch.
4
5
Page 6

WATER AND SHOCK RESISTANCE
If your watch is water-resistant, meter marking (WR_M)
is indicated.
Water-Resistance Depth p.s.i.a.* Water Pressure
30m/98ft 60
50m/164ft 86
100m/328ft 160
200m/656ft 284
Below Surface
WARNING: TO MAINTAIN WATER-RESISTANCE, DO
NOT PRESS ANY BUTTONS UNDER WATER UNLESS
YOUR WATCH IS INDICATED AS 200 METER WATERRESISTANT. NEVER PULL OUT THE CROWN WHILE
UNDER WATER.
1. Watch is water-resistant only as long as crystal, crown
and case remain intact.
2. Watch is not a certified Diver’s watch.
3. Rinse watch with fresh water after exposure to salt
water.
4. Shock-resistance will be indicated on the watch face
or caseback. Watches are designed to pass ISO test for
shock-resistance. However, care should be taken to
avoid damaging the crystal.
6
7
Page 7
INDIGLO® NIGHT-LIGHT
Press button or crown to activate light.
Electroluminescent technology used in the INDIGLO
night-light illuminates the watch face at night and in low
light conditions.
OR
8
®
DATE AND TIME SETTING
NOTE: The watch crown has three positions: closed,
middle and outer. To familiarize yourself with the
difference between the various positions extend the
crown to its outer position and then push the crown very
lightly until you feel it click into the middle position.
To set the date and time:
Time
Pull the crown to its outer position and turn it until the
correct time is shown. Ensure AM/PM setting is correct by
verifying that the date changes at midnight, not noon.
Date (Does not apply to Perpetual Calendar)
Pull the crown to its middle position and turn it until the
correct date appears in the date window. Note: The date
changes between 10 pm and 2 am. Do not change the
9
Page 8
date during this timeframe. Doing so could damage the
watch movement.
Push crown to closed position after setting date/time. The
second hand will begin moving.
NOTE: For months with fewer than 31 days, the date will
need to be adjusted.
10
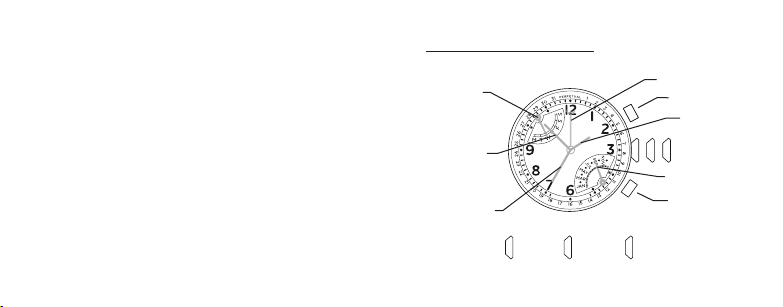
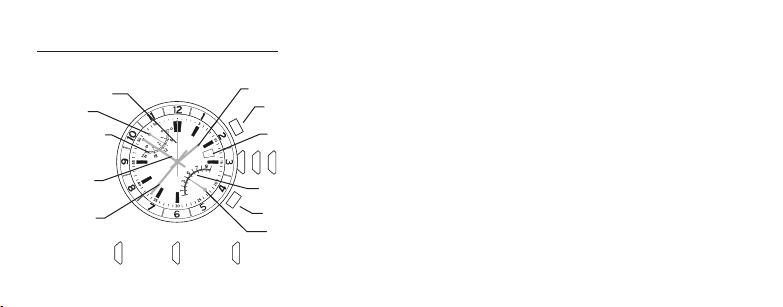
PERPETUAL CALENDAR
OVERVIEW
DAY HAND
MINUTE HAND
SECOND HAND
CLOSED
POSITION
MIDDLE
POSITION
1 2
A
1 2
B
OUTER
3
POSITION
DATE HAND
BUTTON A
(RECESSED)
HOUR HAND
CROWN
3
MONTH HAND
BUTTON B
(RECESSED)
11
Page 9

INTRODUCTION
With your watch’s perpetual calendar feature, the
date does not need adjustment until 2100. The watch
automatically accounts for short months and leap years,
always showing the correct day and date. The day and date
were preset at the Timex factory. You only need to adjust
the time. The watch has two recessed push buttons for
use by Timex Service Center to set the day and date after
battery replacement. They have no use otherwise.
LEAP YEAR OFFSET
To maintain the correct date, the watch includes a setting
for the current leap year offset. This setting is made at the
Timex factory or after battery replacement and cannot be
changed, only viewed.
To view the offset, pull the crown to its middle position.
The date hand shows the offset: 1 = 1 year after leap
year; 2 = 2 years after leap year; 3 = 3 years after leap
year; 4 = leap year. Push the crown in when done and
the hands resume their normal display of day, month,
and date.
12
13
Page 10
FLY-BACK CHRONOGRAPH
OVERVIEW
4TH CENTER HAND
UPPER HAND
CHRONO HOURS
2ND TIME ZONE
MINUTE HAND
SECOND HAND
14
CLOSED
1 2
POSITION
MIDDLE
POSITION
23
HOUR HAND
BUTTON A
AA
DATE WINDOW
1 2
3
CHRONO MINUTES SCALE
B
BUTTON B
LOWER HAND
OUTER
3
POSITION
CROWN
4TH CENTER HAND ADJUSTMENT
To readjust a misaligned 4th center hand:
1. Pull the crown to its outer position. The upper and
lower hands reset to the ends of their sweeps
automatically.
2. 4th center hand should point to 12 o’clock. If within
5 seconds of pulling the crown to its outer position the
4th center hand does not point to 12 o’clock, press
Button A or B to move the hand counterclockwise or
clockwise until it points to 12 o’clock.
3. Push crown to closed position when finished.
15
Page 11

SECOND TIME ZONE
The upper hand shows the time for the second time zone.
Note that the scale is
24-hours, with midnight
at either end and noon in
the middle. Most often,
time zones differ in hour
increments. In such
cases, the minute value
of the second time zone
will be the same as that
displayed by the watch’s
minute hand.
TO SET THE SECOND TIME ZONE:
1. Pull crown to its middle position. The upper hand
AA
23
1 2
B
shows the second time zone time and the 4th center
hand shows the minutes.
2. Assuming that the second time zone time has the
same minutes value as the first time zone, the 4th
center hand should be aligned with the minute hand. If
the hands are not aligned, or if your second time zone
3
is a different minute within the hour, press Button B
to move the 4th center hand forward until it is in the
desired position.
3. Press Button A to move the upper hand forward in
one-hour increments until it reaches desired second
time zone hour. To move the hand quickly, press and
hold Button A.
4. Push the crown in when finished.
16
17
Page 12

FLY-BACK CHRONOGRAPH
The watch provides a 4-hour fly-back chronograph.
1. To start, press Button A (START/STOP).
The 4th center hand shows the seconds with 1/5
second resolution. The lower hand shows the last
digit of the minutes, counting up to ten and repeating.
The upper hand shows the total time, including hours
and minutes, with divisions every ten minutes. The
chronograph counts up to four hours before stopping
automatically.
2. To stop, press Button A (START/STOP) again. All hands
stop moving.
3. To resume, press Button A (START/STOP) again.
4. To reset the fly-back chronograph to zero position,
press Button B (FLY-BACK/RESET).
When the chronograph is reset, all hands move to
zero position. After another eight seconds, the watch
resumes normal display of the second time zone.
5. To reset and/or restart the fly-back chronograph while
it is running, press and hold Button B (FLY-BACK/
RESET). Release it when you wish to restart.
18
19
Page 13
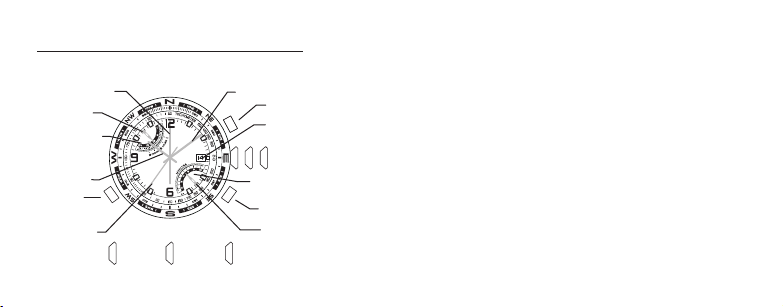
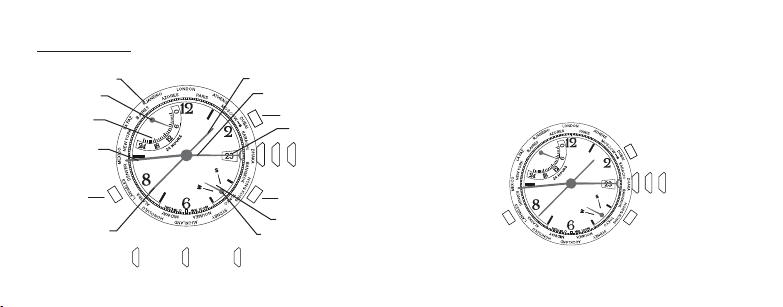
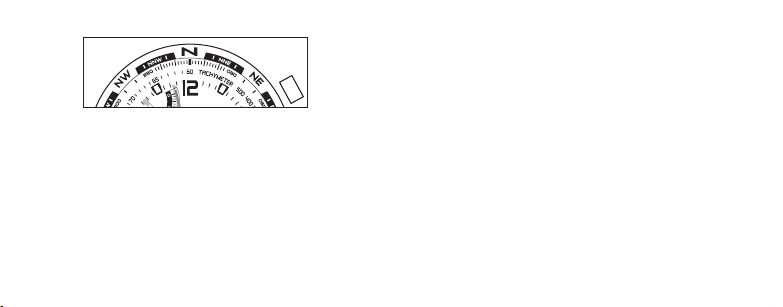
FLY-BACK CHRONOGRAPH COMPASS
OVERVIEW
4TH CENTER HAND
UPPER HAND
CHRONO HOURS
2ND TIME ZONE
HOUR HAND
BUTTON C
SECOND HAND
20
C
CLOSED
1 2
POSITION
MIDDLE
POSITION
MINUTE HAND
BUTTON A
DATE WINDOW
A
1 2
3
CHRONO MINUTES SCALE
B
BUTTON B
LOWER HAND
OUTER
3
POSITION
CROWN
INDICATOR HAND (4TH CENTER HAND) ADJUSTMENT
To readjust a misaligned indicator hand:
1. Pull the crown to its outer position. The upper and
lower hands reset to the ends of their sweeps
automatically.
2. The 4th center hand should point to 12 o’clock. If it
does not within 5 seconds of pulling the crown to
its outer position, press A or B to move the hand
counterclockwise or clockwise, respectively, until it
points to 12 o’clock.
3. Push the crown in when done.
21
Page 14

SECOND TIME ZONE
The upper hand normally shows the time for the second
time zone. Note that the scale is 24 hours, with midnight
at either end and noon in the middle.
To set the second time zone time:
1. Pull the crown to its
middle position. The
upper hand shows
the second time zone
time in military hours
and the 4th center
hand shows the
minutes.
22
C
A
1 2
B
2. Press B to move the 4th center hand forward. Hold the
button to move the hand quickly. The upper and 4th
center hands move together; as the 4th center hand
makes one revolution, the upper hand moves one
hour. Assuming that the second time zone time has
the same minutes value as your fi rst time zone, the
4th center and minute hands should be aligned.
3. Press A to move the upper hand forward in one-hour
increments. Hold the button to move the hand quickly.
3
4. Push the crown in when fi nished.
The second time zone time can alternatively be used to
display your home time on a 24-hour format, if you prefer.
When setting the second time in this manner, ensure
that the hour/minute display corresponds to the 24-hour
display by verifying that the date changes at midnight,
not noon.
23
Page 15

FLY-BACK CHRONOGRAPH
The watch provides a 4-hour fl y-back chronograph.
1. To start, press A (START/STOP). The 4th center hand
shows the seconds with 1/5-second resolution and
the lower hand shows
the last digit of the
minutes, counting up
to ten and repeating.
The upper hand shows
the total time, including hours and minutes,
with divisions every
ten minutes. The chronograph counts up
to four hours before
stopping automatically.
24
C
A
1 2
B
2. To stop, press A again (START/STOP). All hands freeze.
3. To resume, press A (START/STOP) again, or to reset the
chronograph to zero, press B (FLY-BACK/RESET).
When the chronograph is reset, all hands move to
zero. After eight seconds, the watch resumes the
normal display of the second time zone time.
4. You may also reset and/or restart the chronograph
while it is running. To do so, press and hold B (FLY-
3
BACK/RESET) to zero the chronograph and release it
when you wish to restart. You do not have to wait for
all hands to reach zero before releasing the button;
the timing will start internally from the button release.
This “fl y-back” feature allows you to measure lap time.
The compass may be used while the chronograph is
running without interfering with its operation. See
COMPASS OPERATION.
25
Page 16

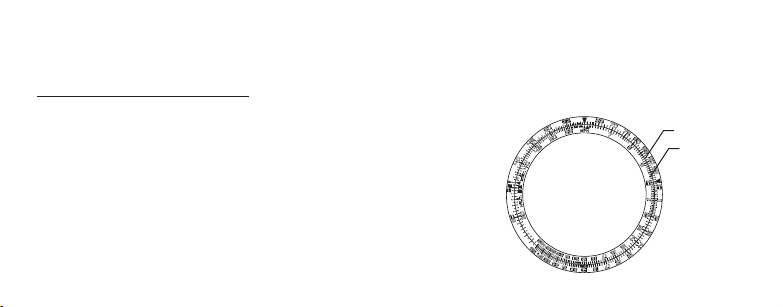
COMPASS CALIBRATION
Before use, the compass must be calibrated.
Since a compass uses the earth’s magnetic field, you
must be aware of large metallic objects, such as vehicles
or bridges, or objects that give off electromagnetic
radiation, such as televisions or computers, which
could affect the magnetic field around the watch. If the
compass is calibrated near such objects, it will only
work properly in that same location. If the compass
is calibrated away from such objects, it will not work
properly near them. For best results, calibrate in the area
of intended use.
In calibrating and taking headings, it is important, as with
all compasses, to keep the compass level. Calibrating or
taking a heading when the watch is not level can result
in large errors. Also avoid areas that may exhibit higher
26
than normal concentrations of hard and soft iron, as they
may cause inaccurate headings. Whenever a heading is
suspect, recalibrate.
Do not store the watch near any source of magnetism,
such as a computer, appliance, or television, as the
watch can take on a magnetic charge, yielding inaccurate
headings. Typical accuracy of wrist-worn instruments is
within +/- 10 degrees.
To calibrate the compass:
1. Pull the crown to its middle position and wait for the
indicator hands to stop moving.
2. Keep the watch level or place it on a level surface (if
the band interferes, place the watch on an inverted
cup). The watch may be face down, but take care to
protect the watch face.
27
Page 17
3. Press C (COMPASS) to begin. The 4th center hand
rotates two revolutions to remind you to rotate the
watch. While level, SLOWLY rotate the watch two
revolutions, taking at least 15 seconds per revolution.
4. When done, press C (COMPASS), keeping the watch
level. The 4th center hand moves back and forth to
acknowledge the end of calibration and then moves to
the current magnetic declination setting.
28
5. If you do not wish to set the magnetic declination,
push the crown in. Otherwise, to have watch
automatically compensate for the declination angle,
turn the compass ring until north is at 12 o’clock.
6. Press A or B to move the 4th center hand west (-)
or east (+), respectively, to point to your location’s
declination angle using the declination scale. Hold a
button to move the hand quickly. See the fi gure below
for an example.
7. Push the crown in when done.
A
Magnetic declination set to -14° (14°W)
29
Page 18

COMPASS OPERATION
Normally, the compass is inactive, with the 4th center
hand pointing to 12 o’clock or showing the chronograph
seconds.
While holding the watch level, press C (COMPASS) to
activate the compass. The compass hand moves to
point north. If the watch is turned, the 4th center hand
will continue to move, always pointing north. After 20
seconds, the compass will automatically turn off and the
4th center hand will return to its normal operation. This
conserves battery life. Press C (COMPASS) at any time to
keep the compass on for another 20 seconds.
The compass may be activated while the chronograph is
in use. The 4th center hand merely switches operation
temporarily. The upper and lower hands continue to show
the chronograph time and all chronograph functions are
30
available through buttons A (START/STOP) and B (FLYBACK/RESET).
NOTE: During compass operation, the second hand
moves in two-second increments. Also, when the
compass is activated, the upper and lower hands may
shift position slightly, returning to their proper positions
when the compass is deactivated. This operation is
normal and yields the most accurate compass reading.
31
Page 19

LINEAR CHRONOGRAPH
OVERVIEW
4TH CENTER HAND
LINEAR
HAND
MINUTE
HAND
SECOND HAND
HOUR HAND
A
1
2
B
LOWER HAND
BUTTON A
DATE WINDOW
3
CROWN
BUTTON B
LINEAR AND 4TH CENTER HAND ADJUSTMENT
To readjust a misaligned 4th center hand:
1. Pull the crown to its outer position. The lower hand
resets to the end of its sweep automatically.
2. 4th center hand should point to 12 o’clock. If within
5 seconds of pulling the crown to its outer position the
4th center hand does not point to 12 o’clock, press
Button A to move the hand clockwise until it points to
12 o’clock.
3. If the chronograph has been reset and the linear hand
is not pointing to zero, press and hold Button B for
5 seconds to engage a full calibration of the linear
indicator, which will take up to 32 seconds to perform.
4. Push crown to closed position when finished.
32
33
Page 20

SECOND TIME ZONE
The lower hand
shows the time for
the second time zone.
Note that the scale
is 24-hours, with
midnight at either
end and noon in the
middle. Most often,
time zones differ in
hour increments.
In such cases, the
minute value of the second time zone will be the same as
that displayed by the watch’s minute hand.
34
A
1
2
B
TO SET THE SECOND TIME ZONE:
1. Pull crown to its middle position. The lower hand
shows the second time zone time and the 4th center
hand shows the minutes.
2. Assuming that the second time zone time has the
3
same minutes value as the first time zone, the 4th
center hand should be aligned with the minute hand. If
the hands are not aligned, or if your second time zone
is a different minute within the hour, press Button B
to move the 4th center hand forward until it is in the
desired position.
3. Press Button A to move the lower hand forward in
one-hour increments until it reaches desired second
time zone hour. To move the hand quickly, press and
hold Button A.
4. Push the crown in when finished.
35
Page 21

LINEAR CHRONOGRAPH
The watch provides a 4-hour split chronograph.
1. To start, press Button A (START/STOP). The 4th center
hand shows the seconds with 1/5 second resolution.
The linear hand shows the minutes, counting up to
thirty and repeating. The lower hand shows the total
time, including hours and minutes, with divisions every
ten minutes. The chronograph counts up to four hours
before stopping automatically.
2. To stop, press Button A (START/STOP) again. All hands
stop moving.
3. To reset the chronograph to zero position, press Button B (SPLIT/RESET).
When the chronograph is reset, all hands move to zero
position. After another eight seconds, the watch resumes
normal display of the second time zone. While the
chronograph is running, you may take a split time. Press
Button B (SPLIT/RESET) and all hands will stop while the
chronograph continues to run. Press Button B (SPLIT/
RESET) again to resume the display of the running
chronograph elapsed time.
36
37
Page 22
WORLD TIME
OVERVIEW
24 CITIES
UPPER HAND
WORLD TIME
SCALE
MINUTE HAND
BUTTON C
SECOND HAND
38
C
CLOSED
1 2
POSITION
MIDDLE
POSITION
B
OUTER
3
POSITION
HOUR HAND
A
4TH CENTER HAND
BUTTON A
DATE WINDOW
CROWN
BUTTON B
SEASON SCALE
LOWER HAND
TO SET THE WORLD TIME:
1. Pull the crown to its middle position. The center hand
shows the world time zone city and the upper hand
shows the time in that city.
A
1 2 3
C
B
39
Page 23

2. Press A or B to move the center hand to the city that
represents your home time zone. Hold a button to
move the hand quickly. Any city may be used.
3. Pull the crown to its outer position. The city selector
hand will revert back to the 12:00 position as indicated
in INDICATOR HAND ADJUSTMENT. After a five second
pause, the upper hand will show the world time (the
time in the city selected in previous step), the center
hand shows the minutes of the world time, and the
lower hand shows the season (see SEASON SETTING).
IMPORTANT: Do not manipulate any of the pushers
or the crown until the center hand has completed its
adjustment. (Approximately 10 seconds after crown is
pulled to its outer position).
4. If the displayed season is not correct for the home
time zone, press C to change it. If the home time zone
observes daylight savings time, the upper hand will
move by one hour.
5. Press A or B to move the time backward or forward,
respectively, to set the world time zone to be the
same as the home time zone. Hold a button to change
the time quickly. The hands move together; as the
center hand makes one revolution, the upper hand
moves one hour. After setting, the center and minute
hands should be aligned.
6. Push the crown in when finished.
40
41
Page 24

INDICATOR HAND (4TH CENTER HAND) ADJUSTMENT
To readjust a misaligned indicator hand:
1. Pull the crown to its outer position. The upper and
lower hands reset to the ends of their sweeps,
automatically.
2. The 4th center hand should point to 12 o’clock. If it
does not within 5 seconds of pulling the crown to
its outer position, press A or B to move the hand
counterclockwise or clockwise, respectively, until it
points to 12 o’clock.
3. Push the crown in when finished.
NOTE: If no button is pressed for five seconds after the
hands stop, the watch proceeds to the world time setting
operation (see WORLD TIME SETTING).
CITY TIME DISPLAY
Press A or B to
move the center
hand backward or
forward, respectively, and select a
city. The upper hand
moves to show the
time in the selected
city. Note that the
scale is 24 hours, with midnight at either end and noon
in the middle.
SEASON SETTING
The season setting allows the watch to compensate for
daylight savings time (also called “summer time”).
C
A
1 2 3
B
42
43
Page 25
The watch provides one setting to represent the two periods all cities that observe daylight savings time have. For
the watch, the period of daylight savings time is SUMMER
and the period of standard time is WINTER.
When the season in one city is set to SUMMER, all cities in
the same hemisphere are automatically set to SUMMER,
while all cities in the other hemisphere are automatically
set to WINTER. The watch knows which cities are in each
hemisphere.
Press C to change the season in the selected city.
COMPASS
OVERVIEW
DECLINATION SCALE
COMPASS HAND
(NORTH END IS RED
POINTED/LONGER)
A (COMPASS)
CROWN
B
MIDDLE
I
14
I
14
I
CENTER
CROWN
SET DATE
OUT
I
SET TIME
44
45
Page 26

COMPASS HAND ADJUSTMENT
Pull CROWN all the way out. Compass hand should point
to 12 o’clock. If it does not, press either A or B to move
compass hand until it points to 12 o’clock. Hold button to
move hand fast. Push CENTER CROWN in when done and
recalibrate compass.
COMPASS CALIBRATION
Before use, the compass must be calibrated.
Since a compass uses the earth’s magnetic field, you
must be aware of large metallic objects, such as vehicles
or bridges, or objects that give off electromagnetic
radiation, such as televisions or computers, which
could affect the magnetic field around the watch. If the
compass is calibrated near such objects, it will only
work properly in that same location. If the compass
is calibrated away from such objects, it will not work
46
properly near them. For best results, calibrate in the area
of intended use.
In calibrating and taking headings, it is important, as with
all compasses, to keep the compass level. Calibrating or
taking a heading when the watch is not level can result
in large errors. Also avoid areas that may exhibit higher
than normal concentrations of hard and soft iron, as they
may cause inaccurate headings. Whenever a heading is
suspect, recalibrate.
Do not store the watch near any source of magnetism,
such as a computer, appliance, or television, as the
watch can take on a magnetic charge, yielding inaccurate
headings. Typical accuracy of wrist-worn instruments is
within +/- 10 degrees.
47
Page 27
To calibrate the compass:
1. Pull the crown to its middle position and wait for the
indicator hands to stop moving.
2. Keep the watch level or place it on a level surface (if
the band interferes, place the watch on an inverted
cup). The watch may be face down, but take care to
protect the watch face.
3. Press A or B to begin. The 4th center hand rotates two
revolutions to remind you to rotate the watch. While
level, SLOWLY rotate the watch two revolutions, taking
at least 15 seconds per revolution.
4. When done, press A or B, keeping the watch level. The
4th center hand moves back and forth to acknowledge
the end of calibration and then moves to the current
magnetic declination setting.
5. If you do not wish to set the magnetic declination,
push the crown in. Otherwise, to have watch
automatically compensate for the declination angle,
turn the compass ring until north is at 12 o’clock.
6. Press A or B to move the 4th center hand west (-)
or east (+), respectively, to point to your location’s
declination angle using the declination scale. Hold a
button to move the hand quickly. See the figure on
next page for an example.
7. Push the crown in when done.
48
49
Page 28
A
Magnetic declination set to -14° (14°W)
COMPASS OPERATION
Normally, the compass is inactive, with the 4th center
hand pointing to 12 o’clock or showing the chronograph
seconds.
While holding the watch level, press A or B to activate
the compass. The compass hand moves to point north.
If the watch is turned, the 4th center hand will continue
to move, always pointing north. After 20 seconds, the
50
compass will automatically turn off and the 4th center
hand will return to its normal operation. This conserves
battery life. Press A or B at any time to keep the compass
on for another 20 seconds.
NOTE: During compass operation, the second hand
moves in two-second increments.
51
Page 29
TIDE TEMP AND COMPASS
OVERVIEW
DECLINATION
SCALE
INDICATOR
HAND
C (COMPASS)
TURNING
COMPASS
RING
52
DATE
TEMPERATURE SCALE
A (TEMP)
MIDDLE-SET DATE
OUTER-SET TIME
CROWN
B (TIDE)
TIDE SCALE
INDICATOR HAND ADJUSTMENT
Pull crown all the way out. Indicator hand should point
to 12 o’clock. If it does not, press either TIDE or TEMP
push button to move hand until it points to 12 o’clock.
TIDE and TEMP push buttons move hand clockwise and
counterclockwise, respectively. Hold push button to move
hand fast. Push crown in when done.
TIDE/TEMPERATURE SELECTION
Indicator hand shows either tide or temperature constantly. When temperature is shown, press TIDE push button
to select tide clock. Hand moves to low tide and then to
current tide. When tide is shown, press TEMP push button
to select thermometer. Hand moves to beginning of thermometer scale and then to current temperature.
53
Page 30

THERMOMETER
When worn on wrist, thermometer reading is affected by
body heat. For more accurate readings, remove watch
and put in shade for at least several minutes.
Watch can measure water temperature also, if submerged. Be sure to select temperature display before
placing watch in water, as buttons should not be pressed
when watch is underwater.
Thermometer readings are taken every minute, more
frequently, if temperature is changing.
TIDE CLOCK
For tide clock, indicator hand always rotates clockwise, so
tide is rising when hand is pointing left and falling when
pointing right. Number of hours to next high/low tide is
shown on tide scale.
54
Tides are influenced by sun position and shape of shoreline, so tide clock cannot precisely give times of high and
low tides. Periodic adjustment may be necessary.
To set tide clock, pull crown to MIDDLE position. Press either
TIDE or TEMP push button to move hand to current tide.
TIDE and TEMP push buttons move hand clockwise and
counterclockwise, respectively. Push crown in when done.
COMPASS CALIBRATION
Before use, the compass must be calibrated.
Since a compass uses the earth’s magnetic field, you
must be aware of large metallic objects, such as vehicles
or bridges, or objects that give off electromagnetic
radiation, such as televisions or computers, which
could affect the magnetic field around the watch. If the
compass is calibrated near such objects, it will only
55
Page 31
work properly in that same location. If the compass
is calibrated away from such objects, it will not work
properly near them. For best results, calibrate in the area
of intended use.
In calibrating and taking headings, it is important, as with
all compasses, to keep the compass level. Calibrating or
taking a heading when the watch is not level can result
in large errors. Also avoid areas that may exhibit higher
than normal concentrations of hard and soft iron, as they
may cause inaccurate headings. Whenever a heading is
suspect, recalibrate.
Do not store the watch near any source of magnetism,
such as a computer, appliance, or television, as the
watch can take on a magnetic charge, yielding inaccurate
headings. Typical accuracy of wrist-worn instruments is
within +/- 10 degrees.
56
To calibrate the compass:
1. Pull the crown to its middle position and wait for the
indicator hands to stop moving.
2. Keep the watch level or place it on a level surface (if
the band interferes, place the watch on an inverted
cup). The watch may be face down, but take care to
protect the watch face.
3. Press C (COMPASS) to begin. The 4th center hand
rotates two revolutions to remind you to rotate the
watch. While level, SLOWLY rotate the watch two
revolutions, taking at least 15 seconds per revolution.
57
Page 32

4. When done, press C (COMPASS), keeping the watch
level. The 4th center hand moves back and forth to
acknowledge the end of calibration and then moves to
the current magnetic declination setting.
5. If you do not wish to set the magnetic declination,
push the crown in. Otherwise, to have watch
automatically compensate for the declination angle,
turn the compass ring until north is at 12 o’clock.
6. Press A or B to move the 4th center hand west (-)
or east (+), respectively, to point to your location’s
declination angle using the declination scale. Hold a
button to move the hand quickly. See the fi gure on
next page for an example.
7. Push the crown in when done.
58
A
Magnetic declination set to -14° (14°W)
COMPASS OPERATION
Normally, the compass is inactive, with the 4th center
hand pointing to 12 o’clock or showing the chronograph
seconds.
While holding the watch level, press C (COMPASS) to
activate the compass. The compass hand moves to
point north. If the watch is turned, the 4th center hand
will continue to move, always pointing north. After 20
59
Page 33

seconds, the compass will automatically turn off and the
4th center hand will return to its normal operation. This
conserves battery life. Press C (COMPASS) at any time to
keep the compass on for another 20 seconds.
NOTE: During compass operation, the second hand
moves in two-second increments.
ALTIMETER
OVERVIEW
ALIMETER
SCALE
(HUNDREDS)
UPPER
RETROGRADE
(THOUSANDS)
BUTTON C
(UNITS)
BUTTON A
(MAXIMUM
ALTITUDE)
CROWN
LOWER RETROGRADE
(UNITS)
BUTTON B
(MINIMUM ALTITUDE)
60
61
Page 34

INDICATOR HAND (4TH CENTER HAND) ADJUSTMENT
Pull crown all the way out. The upper and lower retrograde hands reset to the start of their scales automatically. Indicator hand (4th center hand) should point to 12
o’clock. If it does not, press either A and/or B button to
move hand until it points to 12 o’clock. A and B buttons
move hand clockwise and counterclockwise, respectively.
Hold button to move hand fast. Push crown in when done.
ALTIMETER CALIBRATION
Before use, the altimeter must be calibrated.
Since an altimeter uses pressure to determine the altitude
and pressure varies from place to place, it is important to
set the altimeter to a known reference altitude value, or
to a standard reference altitude of a given place. Sudden
changes in pressure due to changes in weather can cause
your altimeter reading to be off by +-100m (328 ft), even
62
if your location has not changed. Recalibrate to a known
altitude when drastic pressure changes occur.
To calibrate the altimeter:
1. Pull the crown to its middle position and wait for the
indicator hands to stop moving.
2. If the altimeter was OFF at the moment of crown
pulling, the lower retrograde hand will point to the unit
selected the last time the altimeter was used, otherwise the lower retrograde hand points to the current
selected unit in altitude display. The 4th center hand
and upper retrograde hand should point to the current
altitude.
3. Press A or B to move the 4th center hand counterclockwise or clockwise, respectively, until it points
to the desired calibration altitude. Holding A or B
63
Page 35

will move the center hand more rapidly. The upper
retrograde hand moves relative to the altitude value
displayed by the 4th center hand.
4. Push crown in when done.
ALTIMETER ON/OFF
To turn the altimeter on, press C. The lower retrograde
hand points to METERS. Using the markings on the top
ring, the 4th center hand shows the current altitude’s
hundreds and tens value with divisions every ten
METERS/FEET. The upper retrograde hand shows the current altitude’s thousands value with divisions every one
thousand METERS/FEET.
64
To change the unit from METERS to FEET, press C a
second time. To change the unit from FEET to METERS,
press C twice (altimeter is turned off first then turned
back on with the unit in METERS).
Example : Altitude=2310 m Example : Altitude=7580 ft
65
Page 36

To turn the altimeter off with the current unit set to
FEET, press C. To turn the altimeter off with the unit set
to METERS, press C twice (lower hand goes to FEET first
before going to the OFF position).
The watch will automatically turn the altimeter off
60 minutes after activation.
ALTIMETER MIN/MAX ALTITUDE RECALL
To view the maximum recorded altitude, press A. The
lower retrograde hand shows the unit of measure that
the maximum altitude was recorded in if the altimeter
was OFF at the moment of button press, otherwise
it will show the maximum altitude using the current
selected unit. The 4th center hand shows the maximum
altitude’s hundreds and tens value with divisions every
ten METERS/FEET. The upper retrograde hand shows the
66
maximum altitude’s thousands value with divisions every
one thousand METERS/FEET.
The maximum recorded altitude is displayed for ten
seconds. To extend the display duration for another ten
seconds, press A before the previous ten second duration
expires.
To change the unit from METERS to FEET or FEET to
METERS, press C.
To view the minimum recorded altitude, press B. The
lower retrograde hand shows the unit of measure that
the minimum altitude was recorded in if the altimeter
was OFF at the moment of button press, otherwise
it will show the minimum altitude using the current
selected unit. The 4th center hand shows the minimum
altitude’s hundreds and tens value with divisions every
67
Page 37

ten METERS/FEET. The upper retrograde hand shows the
minimum altitude’s thousands value with divisions every
one thousand METERS/FEET.
The minimum recorded altitude is displayed for ten
seconds. To extend the display duration for another ten
seconds, press B before the previous ten second duration
expires To change the unit from METERS to FEET or FEET
to METERS, press C.
68
DEPTH
OVERVIEW
CENTER HAND
OFF INDICATOR
Note: The center and lower hands will automatically
calibrate when you move the crown to position 3 to set
the time.
3
BUTTON A
AA
1
232
2
B
BUTTON B
LOWER HAND
CROWN
3
3
69
Page 38

TEMPERATURE
The temperature sensor is always on and will take a
reading at least once every 60 seconds. The temperature
is indicated by the lower hand and accompanying scale.
When worn on wrist, temperature reading is affected by
body heat. For more accurate readings, remove watch
from wrist.
DEPTH SENSOR ON/OFF
The sensor is normally off, and must be turned on
manually prior to submersion. Push and release button B
to turn the sensor on. The 4th center hand will move from
the OFF (6 o’clock) position to the 12 o’clock position
and begin to take readings at least once every 5 seconds.
As the depth increases, the 4th center hand will point to
the actual depth as indicated on the depth scale. If the
readings remain in the range of 0 to 2 meters (0-6 feet)
70
for 5 minutes, the sensor will automatically turn off. To
turn the sensor off manually, press and hold button B
for 2 seconds. The 4th center hand will move to the OFF
(6 o’clock) position.
RECALL MAXIMUM DEPTH/MINIMUM TEMPERATURE
After coming to the surface, unscrew the crown and pull
to the middle position. The center and lower hands will
move to display the maximum depth value and the minimum temperature value, respectively, recorded during the
most recent descent. When the depth sensor is activated
again, the memory will be cleared.
If the watch has not yet been used, then the center and
lower hands shall move to display 0 meters/feet and
0ºC/32 ºF, respectively. The crown must be screwed back
in prior to use/submersion.
71
Page 39

BATTERY LEVEL DETECTION
The watch determines the battery level status and
provides the user with a visual indication corresponding
to the current battery level. The battery level status is
classified as Normal Level, Battery Low Level, and Replace
Battery Level, with each level indicated by the movement
of the second hand.
For the Normal Level status, the second hand shall move one
hand position every one second, which is its normal operation.
When the watch is in Battery Low Level status, the second
hand shall only move at 2-second intervals and shall
move by two hand positions. It is recommended that the
user replace the battery when the watch is at Battery Low
Level status.
When the watch is in Replace Battery Level status, the
second hand shall only move at 5-second intervals and
shall move by five hand positions. At this point, depth
sensor can not be activated, and the user must replace
the battery immediately.
72
73
Page 40

YACHT RACER
PERFECT DATE
SCALE
UPPER
HAND
4TH
CENTER
HAND
C
MINUTE HAND
SECOND HAND
74
A
B
2 31
LOWER HAND
HOUR HAND
CROWN
PERFECT DATE
With your watch’s Perfect Date feature, the date does
not need adjustment until 2060. The watch automatically
accounts for short months and leap years, and will always
display the correct date upon demand. The date was preset at the Timex factory. You only need to adjust the time.
The 4th center hand will display the date when the crown
is pushed. The hand will travel to the position of the current date as shown on the top ring of the case. The hand
will pause for you to be able to read the date and then
return back to the 12 o’clock resting position. Please note
that the Perfect Date function will only operate in the
Time mode. When the battery is depleted and is replaced,
the Perfect Date function must be recalibrated. When the
battery requires replacement, it is highly recommended
the watch be sent to a Timex service center, where the
75
Page 41

battery will be replaced and the Perfect Date function will
be recalibrated to the current date for the location where
the watch is to be returned.
4TH CENTER HAND ADJUSTMENT
To readjust a misaligned 4th center hand:
1. Pull the crown out to position 3. The upper and lower
hands reset to the ends of their sweeps automatically.
2. Within 10 seconds of pulling the crown to position 3,
the 4th center hand should point to 12 o’clock, if it
does not point to 12 o’clock, press button A or B to
move the hand counterclockwise or clockwise until
it points to 12 o’clock. Pressing and holding button A
or B will make the hand move at a fast rate. Please
note: after 5 seconds without action with the crown
in position 3, the 4th center hand will move to display
the current date.
76
3. Push crown in to position 1 when finished.
MODE SELECTION
Press button C to advance the upper hand to the desired
function.
TIME:
Displays the current time only (Perfect Date function will
operate only in the Time mode).
YACHT RACE TIMER 5:
The countdown timer will start at 5 minutes and begin the
chronograph once it reaches zero.
YACHT RACE TIMER 3:
The countdown timer will start at 3 minutes and begin the
chronograph once it reaches zero.
77
Page 42

YACHT RACE TIMER 1:
The countdown timer will start at 1 minute and begin the
chronograph once it reaches zero.
CHRONO:
The chronograph will operate without the countdown
timer.
YACHT RACE TIMER OPERATION
The watch provides a 5, 3 or 1 minute countdown timer.
Once the countdown timer reaches zero a one hour
chronograph will automatically start.
1. Press button C until the upper hand displays the
desired 5, 3, or 1 minute Yacht Race Timer mode.
2. To start, press button A (START/STOP). The 4th center
hand displays the seconds counting down and the
lower hand shows the minutes, counting down.
78
(Please note: buttons B and C are disabled while the
countdown timer is in operation).
3. To stop, press button A (START/STOP) which will stop
the countdown process. (Please note: button C is
disabled until the countdown timer is reset).
4. To reset, press and hold button B (SPLIT/RESET) for
2 seconds, which will reset the countdown timer back
to the originally selected 5, 3 or 1 minute duration.
In the normal operation of the Yacht Race Timer, once
the countdown timer has reached zero, the chronograph
will automatically start. There is also an audible alert as
the countdown timer reaches each minute mark as well
as when the final minute reaches the last 5 seconds and
begins the chronograph function. The chronograph will
cycle through the 30-minute sequence twice, for a total
maximum time of one hour.
79
Page 43

CHRONOGRAPH OPERATION
The watch provides a one hour chronograph which may
be operated independently from the Yacht Race Timer.
1. Press button C until the upper hand is at the beginning
of the 30-minute chronograph scale.
2. To start, press button A (START/STOP). The 4th center
hand displays the seconds counting up; the lower hand
shows the minutes, counting up in a 5-minute scale
and the upper hand shows the half hour counting up in
a 30-minute scale. Each time the lower hand reaches
the five minute mark, it will return to the zero position
while the upper hand will continue to advance through
the 30 minute scale. (Please note: button C is disabled
while the chronograph is in operation).
3. To take a split time, press button B (SPLIT/RESET).
The upper, lower, and 4th center hands will hold their
positions for you to note the split (lap) time. The chronograph is still maintaining the timing sequence while
the hands are stopped. To release the hands, press
button B (SPLIT/RESET) and the hands will quickly
catch up to display the total elapsed time.
4. To stop, press button A (START/STOP) which will stop
the chronograph. (Please note: button C is disabled
while the chronograph is stopped until the chronograph is reset).
5. To reset, press and hold button B (SPLIT/RESET) for
3 seconds, which will reset the chronograph back to
the beginning of the 30-minute scale.
80
81
Page 44

In normal operation the Chronograph will cycle through
the 30-minute sequence twice for a total maximum of
one hour. Once this hour has elapsed, the upper hand
will remain on the 30 minute marker and the lower hand
will return to zero. The chronograph function will need
to be reset prior to using the chronograph function again
or before changing to a different mode. (Please note:
button A is disabled when the maximum one hour time
has elapsed and will not function until the chronograph
has been reset by pressing and holding button B for 3
seconds).
82
3GMT
INNER RING /
NUMERALS
(24-HOUR FORMAT)
MINUTE
HAND
SECOND
HAND
HOUR HAND
A
CROWN
2 31
ROTATING TOP RING
(24-HOUR FORMAT)
4TH CENTER HAND
83
Page 45

3 TIME ZONE FUNCTION
Your watch has the ability to display three time zones:
1. Hour and Minute hands: Displays the time in a standard 12 hour format. Please note: The date displayed
in the date window is linked to the time displayed by
these two hands.
2. 4th center hand and inner ring: Displays the time in a
24-hour format.
3. 4th center hand and case rotating top ring: Displays
the time in a 24-hour format.
4TH CENTER HAND ADJUSTMENT
To readjust a misaligned 4th center hand:
1. Pull the crown out to position 3.
2. 4th center hand should point to 12 o’clock. If within
5 seconds of pulling the crown to position 3 the 4th
84
center hand does not point to 12 o’clock, press button
A to move the hand clockwise until it points to 12
o’clock. Pressing and holding button A will make the
hand move at a fast rate.
3. Push crown in to position 1 when finished.
4TH CENTER HAND CALIBRATION
The 4th center hand is calibrated at the Timex factory to
reflect the standard minutes within the hour as defined
by Universal Time Coordinated. Globally a majority of
locations use the standard minutes. If the location you are
using for the 2nd and 3rd time zone uses the standard
minutes, the 4th center hand does not require recalibration. Only if you wish to have the second and third time
zones to reflect locations that do not follow the standard
minute, the instructions to recalibrate the 4th center hand
are as follows:
85
Page 46

1. Pull the crown out to position 3. The 4th center hand
will point to 12 o’clock.
2. Rotate the crown to position the minute hand in the
correct position within the hour required for the location you are wishing to use for the 2nd and 3rd time
zones.
3. Push the crown in to position 2. The 4th center hand
will point to its currently calibrated position of the
minutes within the hour.
4. Push button A to move the 4th center hand clockwise
until it aligns with the minute hand. Pressing and holding button A will make the hand move at a fast rate.
5. Pull the crown out to position 3. The 4th center hand
will point to 12 o’clock.
6. Rotate the crown to position hour and minute hands
to the correct time.
86
7. Push crown in to position 1 when finished.
Please note: The 4th center hand will track the time using
the current calibration of the minutes within the hour.
Time zones 2 and 3 both utilize the 4th center hand and
therefore the locations being tracked in time zones 2 and
3 must both utilize the same minutes within the hour for
these time zones to be displayed properly.
SETTING THE 4TH CENTER HAND (TIME ZONE II)
Note the current time in the location you wish to track
as the 2nd time zone. Press button A until the 4th center
hand is pointing to that time on the inner ring. (Please
note: this scale is a 24-hour format). The 4th center hand
will advance 30 minutes each time button A is pressed.
Pressing and holding button A will make the hand move at
a fast rate. This will set the 2nd time zone on the watch.
87
Page 47

SETTING THE CASE ROTATING TOP RING
(TIME ZONE III)
The 3rd time zone is set by using the existing setting of
the 4th center hand and adjusting the case rotating top
ring to the desired time of the 3rd time zone. (Please note:
this scale is a 24-hour format). The top ring has 72 positions. To advance the top ring one hour you will advance
it three positions (3 “clicks”). Note the current time in the
location you wish to track as the 3rd time zone. Rotate
the case top ring counter clockwise to position the correct hour marker for that time with the 4th center hand.
88
TACHYMETER FUNCTION
(not all models)
The tachymeter will only determine speeds greater than
60 units per hour using this method; slower speeds can
be measured by decreasing the unit of measurement.
The function performed by a tachymeter is independent
of the unit of distance (e.g. statute miles, nautical miles,
kilometers, meters etc.) as long as the same unit of length
is used for all calculations.
1. Determine the start and finish markers for your
pre-determined distance.
2. Start the chronograph once the target for speed
measurement passes the start marker.
3. Stop the chronograph once the target for speed
measurement passes the finish marker.
89
Page 48
4. The chronograph second hand is compared to the
tachymeter markings to determine the target’s speed.
SLIDE-RULE BEZEL FUNCTION
The slide rule function of the top ring operates by rotating
the outer ring. The inner ring does not move. The outer
ring is always related to “distance” or “speed”, or any
data that varies with time. The inner ring only notes units
of time.
Outer Ring
On the outer ring, the figure “10” represents factors or
multiples of 10, such as 0.1, 1.0, 10, or 100.
Inner Ring
On the inner ring, “MPH” (mile per hour) refers to “speed
index”. This index is used to calculate the speed involving
any data per hour. On the inner ring, “STAT” (statute miles)
and “NAUT” (nautical miles) are for conversion of distance
units.
OUTER RING
INNER RING
90
91
Page 49

The following examples serve as a guide of how to use
the slide rule.
SPEED CALCULATION:
What speed is required to go 10 nautical miles in
15 minutes?
Known Factors: Distance: 10 nautical miles Time:
15 minutes
• Align “10” arrow on the outer ring with “15” on the
inner ring.
• The speed required can be found directly above the
“MPH” marking on the inner ring.
The answer: 40 nautical miles per hour
Time Calculation: How long will it take to go 10 nauti-
cal miles at a speed of 40 miles per hour?
92
Known Factors: Speed: 40 miles per hour Distance:
10 nautical miles
• Align “40” on the outer ring with the mark “MPH”
marking on the inner ring.
• The time required can be found directly below the “10”
arrow on the outer ring, which is “15” on the inner ring.
The answer: 15 minutes
DISTANCE CALCULATION:
How far can you travel at 40 miles per hour for
15 minutes?
Known Factors: Speed: 40 nautical miles per hour Time:
15 minutes
• Align “40” on the outer ring directly above the mark
“MPH” on the inner ring.
93
Page 50

• The distance travelled can be obtained above the “15”
marker on the inner ring. The number indicated on the
outer ring is “10”.
The answer: The distance travelled is 10 nautical
miles.
UNIT CONVERSION:
To convert distance from nautical miles to statute miles
and kilometers.
Known Factor: Distance to convert is 10 nautical miles
• Align the “10” arrow on the outer ring above the
“NAUT” on the inner ring. The conversion in statute
miles (11.5) is found above the inner ring “STAT” marking, and the conversion to kilometers (18.5) is found
above the inner ring “MPH” marking.
94
HOW TO ADJUST BRACELET
(Variations of the following bracelet sections apply to all
watch models).
SLIDING CLASP BRACELET
1. Open locking plate.
2. Move clasp to desired
bracelet length.
3. Exert pressure while
holding locking plate and
slide clasp back and forth until it engages in grooves
on underside of bracelet.
4. Press locking plate down until it snaps closed. Clasp
can be damaged if excessive force is used.
95
Page 51

FOLDOVER CLASP BRACELET
1. Find spring bar that connects bracelet to clasp.
2. Using a pointed tool, push in spring bar and gently
twist bracelet to disengage.
3. Determine wrist size, then insert spring bar in correct
bottom hole.
4. Push down on spring bar, align with top hole and
release to lock in place.
BRACELET LINK REMOVAL
REMOVING LINKS:
1. Place bracelet upright and insert pointed tool in
opening of link.
2. Push pin forcefully in direction of arrow until link is
detached (pins are designed to be difficult to remove).
3. Repeat until desired number of links are removed.
RE-ASSEMBLY:
1. Rejoin bracelet parts.
2. Push pin back into link in opposite direction of arrow.
3. Press pin down securely into bracelet until it is flush.
96
97
Page 52

BATTERY
The battery should provide 4-6 years of normal watch use.
The actual battery life may vary depending on actual use.
When the battery needs to be changed, we recommend
that only TIMEX replace it. Your watch will need to be
recalibrated to correct time and date after changing the
battery. To return your watch to Timex use a pre-paid
shipper. To obtain a pre-paid shipper please call 1-800448-4639 or visit the retailer where you purchased your
watch or go to www.Timex.com. Please include the
following with your watch to cover postage and handling
(this is not a repair charge); a U.S.$8.00 check or money
order in the U.S.; a CAN$7.00 cheque or money order
in Canada; In other countries Timex will charge you for
postage and handling.
98
NEVER INCLUDE A SPECIAL WATCHBAND OR ANY
OTHER ARTICLE OF PERSONAL VALUE IN YOUR
SHIPMENT.
DO NOT DISPOSE OF BATTERY IN FIRE. DO NOT
RECHARGE. KEEP LOOSE BATTERIES AWAY FROM
CHILDREN.
TIMEX INTERNATIONAL WARRANTY
Your TIMEX® watch is warranted against manufacturing
defects by Timex Group USA, Inc. for a period of ONE
YEAR from the original purchase date. Timex and its
worldwide affiliates will honor this International Warranty.
Please note that Timex may, at its option, repair your
watch by installing new or thoroughly reconditioned and
inspected components or replace it with an identical or
similar model. IMPORTANT — PLEASE NOTE THAT THIS
99
Page 53

WARRANTY DOES NOT COVER DEFECTS OR DAMAGES
TO YOUR WATCH:
1. after the warranty period expires;
2. if the watch was not originally purchased from an
authorized Timex retailer;
3. from repair services not performed by Timex;
4. from accidents, tampering or abuse; and
5. lens or crystal, strap or band, watch case, attachments
or battery. Timex may charge you for replacing any of
these parts.
THIS WARRANTY AND THE REMEDIES CONTAINED HEREIN
ARE EXCLUSIVE AND IN LIEU OF ALL OTHER WARRANTIES,
EXPRESS OR IMPLIED, INCLUDING ANY IMPLIED
WARRANTY OF MERCHANTABILITY OR FITNESS FOR
PARTICULAR PURPOSE. TIMEX IS NOT LIABLE FOR ANY
100
SPECIAL, INCIDENTAL OR CONSEQUENTIAL DAMAGES.
Some countries and states do not allow limitations
on implied warranties and do not allow exclusions or
limitations on damages, so these limitations may not
apply to you. This warranty gives you specific legal rights
and you may also have other rights, which vary from
country to country and state to state.
To obtain warranty service, please return your watch to
Timex, one of its affiliates or the Timex retailer where
the watch was purchased, together with a completed
original Watch Repair Coupon or, in the U.S. and Canada
only, the completed original Watch Repair Coupon or
a written statement identifying your name, address,
telephone number and date and place of purchase. Please
include the following with your watch to cover postage
and handling (this is not a repair charge): a US$ 8.00
101
Page 54

check or money order in the U.S.; a CAN$7.00 cheque or
money order in Canada; and a UK£3.50 cheque or money
order in the U.K. In other countries, Timex will charge
you for postage and handling. NEVER INCLUDE A SPECIAL
WATCHBAND OR ANY OTHER ARTICLE OF PERSONAL
VALUE IN YOUR SHIPMENT.
For the U.S., please call 1-800-448-4639 for additional
warranty information. For Canada, call 1-800-263-0981.
For Brazil, call +55 11 5572 9733. For Mexico, call 01-80001-060-00. For Central America, the Caribbean, Bermuda
and the Bahamas, call (501) 370-5775 (U.S.). For Asia,
call 852-2815-0091. For the U.K., call 44 020 8687 9620.
For France, call 03 81 63 42 51 (10 a.m. - 12 Noon). For
Germany/Austria, call 43 662 88921 30. For the Middle
East and Africa, call 971-4-310850.
EXTENDED WARRANTY
Available in U.S. only. Extend your warranty for an
additional 4 years from date of purchase for $5. You can
pay with AMEX, Discover, Visa or MasterCard by calling
1 800-448-4639 during normal business hours. Payment
must be made within 30 days of purchase. Name, address,
telephone number, purchase date, and 5-digit model
number required. You can also mail a check for $5 to:
Timex Extended Warranty, P.O. Box 1676, Dept. EF,
Little Rock, AR 72203.
©2014 Timex Group USA, Inc. TIMEX, INDIGLO and INTELLIGENT
QUARTZ are trademarks of Timex Group B.V. and its subsidiaries.
102
103
Page 55

Félicitations pour votre achat d’une montre Timex®
INTELLIGENT QUARTZ
ment pour bien comprendre le fonctionnement de votre
montre Timex.
Il est possible que ce modèle ne présente pas toutes les
fonctions décrites dans le dépliant.
™
. Lire les instructions attentive-
MONTRES TIMEX
®
Pour de plus amples renseignements et pour enregistrer
le produit, visiter le site :
www.timex.com
105
Page 56

SOMMAIRE
Comment mettre la montre en marche ........................ 109
Résistance aux chocs et à l’eau .................................... 110
Veilleuse Indiglo
Réglage de la date et de l’heure .................................... 113
Calendrier perpétuel ...................................................... 115
Chronographe avec Fly-Back ......................................... 118
Boussole chrono avec Fly-Back ..................................... 124
Chronographe Linéaire................................................... 138
Heure mondiale ............................................................. 144
Boussole ......................................................................... 151
106
®
.......................................................... 112
Marée Température et Boussole ................................... 158
Altimètre ........................................................................ 168
Profondeur ..................................................................... 177
Yacht Racer .................................................................... 182
3GMT .............................................................................. 193
Fonction Tachymètre ..................................................... 200
Fonction Règle à Calcul de la Bague d’Encadrement .... 202
Comment ajuster le bracelet ......................................... 207
Démontage de maillons du bracelet .............................. 209
Pile .................................................................................. 210
Garantie .......................................................................... 212
107
Page 57

®
Bienvenue dans l’univers des montres Timex
la technologie Intelligent Quartz
quartz du futur. La technologie Timex Intelligent Quartz
combine la puissance d’un microprocesseur à la fiabilité
et la précision des montres à quartz analogiques. Avec
les montres Timex Intelligent Quartz, la technologie est
inscrite dans le design, offrant un degré de complexité du
cadran sans précédent. Jusqu’à trois aiguilles indépendantes additionnelles sont utilisées pour afficher, sous
un format analogique traditionnel, tout un ensemble de
données habituellement disponibles uniquement sur les
montres numériques.
™
, la technologie à
avec
COMMENT METTRE LA MONTRE
EN MARCHE
(Ne concerne pas les modèles à calendrier perpétuel.)
Pour mettre la montre en marche, retirer la bague de
protection en plastique située sous la couronne, puis
enfoncer la couronne vers le boîtier.
Si le boîtier présente un bouton fileté, la couronne doit
être vissée après le réglage de la montre.
Pour visser, enfoncer fermement la couronne sur le
bouton fileté et la maintenir enfoncée tout en la faisant
tourner dans le sens horaire. Continuer à visser la
couronne jusqu’à ce qu’elle soit bien serrée. Il faudra
dévisser la couronne (dans le sens anti-horaire) avant de
la tirer la prochaine fois que la montre doit être réglée.
108
109
Page 58

RÉSISTANCE AUX CHOCS ET À L’EAU
Si la montre est étanche, la profondeur maximale (WR_M)
est indiquée.
Profondeur d’étanchéité p.s.i.a.* Pression de l’eau
30m/98pi 60
50m/164pi 86
100m/328pi 160
200m/656pi 284
sous la surface
ATTENTION : POUR PRÉSERVER L’ÉTANCHÉITÉ, NE
PAS ENFONCER LES BOUTONS SOUS L’EAU, SAUF SUR
LES MODÈLES ÉTANCHES JUSQU’À 200 MÈTRES. NE
JAMAIS TIRER LA COURONNE ALORS QUE LA MONTRE
EST SOUS L’EAU.
1. La montre est étanche aussi longtemps que le verre,
les couronnes et le boîtier sont intacts.
2. La montre n’est pas conçue pour la plongée.
3. Rincer à l’eau douce après tout contact avec l’eau
de mer.
4. La résistance aux chocs est indiquée sur la face de la
montre ou le dos du boîtier. Les montres sont conçues
pour se conformer à l’essai de choc ISO. Toutefois,
prendre garde à éviter d’endommager le verre.
110
111
Page 59
VEILLEUSE INDIGLO®
Appuyez sur le bouton ou la couronne pour activer
l’éclairage. La technologie électroluminescente utilisée
dans la veilleuse INDIGLO
de la montre la nuit et dans des conditions de faible
éclairage.
®
permet d’illuminer le cadran
OU
RÉGLAGE DE LA DATE ET DE L’HEURE
REMARQUE : La couronne de montre possède 3
positions : enfoncée, intermédiaire et extrême. Pour
vous familiariser avec les différentes positions, tirez la
couronne en position extrême et poussez-la doucement
jusqu’à ce qu’elle se place en position intermédiaire par
un clic.
Pour régler la date et l’heure :
Heure
Tirez complètement la couronne et tournez jusqu’à
afficher l’heure exacte. Assurez-vous que le réglage
matin/soir (AM/PM) est correct en vérifiant que la date
change à minuit et non à midi.
112
113
Page 60

Date (Ne concerne pas les modèles
à calendrier perpétuel)
Tirez la couronne en position intermédiaire puis tournez
jusqu’à apparition de la date courante dans le dateur.
Remarque : La date change entre 10 pm (22h00) et 2 am
(2h00). Ne changez pas la date pendant ce laps de temps.
Ceci aurait pour effet d’endommager le mouvement de
la montre.
Enfoncez la couronne après avoir réglé l’heure. L’aiguille
des secondes commencera à se déplacer.
REMARQUE : Pour les mois de moins de 31 jours, la date
devra être modifiée.
114
CALENDRIER PERPÉTUEL
VUE D’ENSEMBLE
AIGUILLE
DES JOURS
AIGUILLE
DES MINUTES
AIGUILLE
DES SECONDES
1 2
POSITION
ENFONCÉE
POSITION
INTERMÉDIAIRE
A
1 2
B
POSITION
3
EXTRÊME
AIGUILLE DE LA DATE
BOUTON A
(ENCASTRÉ)
AIGUILLE
DES HEURES
COURONNE
3
AIGUILLE DES MOIS
BOUTON B
(ENCASTRÉ)
115
Page 61

INTRODUCTION
Grâce au calendrier perpétuel, la date ne nécessite aucun
réglage jusqu’en 2100. La montre tient automatiquement compte des mois courts et des années bissextiles
et affiche toujours le jour et la date corrects. Le jour
et la date ont été préréglés à l’usine Timex. Il ne reste
qu’à régler l’heure. La montre possède également deux
boutons poussoirs encastrés permettant au centre
de services Timex de régler le jour et la date après
remplacement de la pile. Autrement ils ne servent à rien.
PRISE EN COMPTE DES ANNÉES BISSEXTILES
Afin de se maintenir à la bonne date, la montre comprend
un réglage permettant de tenir compte de l’année
bissextile courante. Ce réglage est effectué à l’usine
Timex ou après le remplacement de la pile et ne peut être
modifié mais seulement affiché.
Pour l’afficher, tirez la couronne en position intermédiaire.
L’aiguille de date affiche le réglage : 1 = 1 an après une
année bissextile; 2 = 2 ans après une année bissextile;
3 = 3 ans après une année bissextile; 4 = l’année bissextile.
Enfoncer la couronne pour valider ; les aiguilles retournent
à leur affichage habituel du jour, du mois et de la date.
116
117
Page 62
CHRONOGRAPHE AVEC FLY-BACK
VUE D’ENSEMBLE
4ÈME AIGUILLE
CENTRALE
AIGUILLE
SUPÉRIEURE
HEURES CHRONO
DEUXIÈME FUSEAU
HORAIRE
AIGUILLE
DES MINUTES
AIGUILLE
DES SECONDES
118
POSITION
1 2
ENFONCÉE
POSITION
INTERMÉDIAIRE
23
AIGUILLE DES HEURES
AA
1 2
MINUTES DU
CHRONOGRAPHE
B
POSITION
3
EXTRÊME
BOUTON A
DATEUR
COURONNE
3
BOUTON B
AIGUILLE INFÉRIEURE
RÉGLAGE DE LA 4ÈME AIGUILLE CENTRALE
Pour réaligner la 4ème aiguille centrale :
1. Tirez complètement la couronne. Les aiguilles
supérieure et inférieure se règlent automatiquement
en allant se placer en bout de trajectoire.
2. La 4ème aiguille centrale doit indiquer 12 heures. Si
ça n’est pas le cas au bout de 5 secondes, appuyez
sur A ou B pour faire avancer l’aiguille respectivement
dans le sens anti-horaire ou dans le sens horaire
jusqu’à ce qu’elle indique 12 heures.
3. Enfoncez la couronne pour valider.
119
Page 63

SECOND FUSEAU HORAIRE
L’aiguille supérieure indique l’heure pour le second fuseau
horaire. Notez qu’il s’agit d’une échelle sur 24 heures,
minuit se situant à chacune de ses extrémités
et midi au milieu. Le plus
souvent, les fuseaux
horaires varient par
intervalles d’heure. Dans
ce cas, la valeur des
minutes correspondra à
celle affichée par l’aiguille
des minutes de la montre.
120
AA
23
1 2
B
POUR RÉGLER LE SECOND FUSEAU HORAIRE :
1. Tirez la couronne en position intermédiaire. L’aiguille
supérieure indique l’heure du second fuseau horaire et
la 4ème aiguille centrale indique les minutes.
2. Si la valeur des minutes du second fuseau horaire est
indentique à celle de votre fuseau horaire, l’aiguille
3
des minutes et la 4ème aiguille centrale doivent être
alignées. Si les aiguilles ne sont pas alignées, ou si
le second fuseau horaire diffère en minute, appuyez
sur le bouton B pour faire avancer la 4ème aiguille
centrale à la position désirée.
3. Appuyez sur le bouton A pour faire avancer l’aiguille
supérieure par intervalles d’une heure jusqu’à ce
qu’elle atteigne l’heure désirée dans le second fuseau
horaire. Pour faire avancer l’aiguille rapidement,
appuyez et tenez enfoncé le bouton A.
121
Page 64

4. Enfoncez la couronne pour valider.
CHRONOGRAPHE AVEC FLY-BACK OU RETOUR
À LA VOLÉE
La montre comporte un chronographe avec fly-back ou
retour à la volée de 4 heures.
1. Pour démarrer, appuyez sur le bouton A
(START/STOP [Démarrage/Arrêt]).
La 4ème aiguille centrale indique les secondes
avec une résolution d’1/5 de seconde. L’aiguille
inférieure indique le dernier chiffre des minutes,
en comptant jusqu’à 10 et en répétant l’opération.
L’aiguille supérieure indique le temps total, heures et
minutes, avec des divisions toutes les dix minutes. Le
chronographe fonctionne jusqu’à quatre heures avant
de s’arrêter automatiquement.
122
2. Pour l’arrêter, appuyez de nouveau sur le bouton A
(START/STOP [Démarrage/Arrêt]). Toutes les aiguilles
s’arrêtent.
3. Pour redémarrer, appuyez de nouveau sur le bouton A
(START/STOP [Démarrage/Arrêt]).
4. Pour remettre à zéro la fonction fly-back du
chronographe, appuyez sur le bouton B (FLY-BACK/
RESET [Remise à zéro]).
Lors de la remise à zéro du chronographe, toutes les
aiguilles se placent sur zéro. Après huit secondes, la
montre reprend l’affichage normal du second fuseau
horaire.
5. Pour remettre à zéro et/ou redémarrer le chronographe
avec fonction fly-back, appuyez sur le bouton B
(FLY-BACK/RESET [Remise à zéro]). Relâchez-le quand
vous voulez redémarrer.
123
Page 65

BOUSSOLE CHRONO AVEC FLY-BACK
VUE D’ENSEMBLE
4ÈME AIGUILLE
CENTRALE
AIGUILLE
SUPÉRIEURE
CHRONO HEURES
DEUXIÈME FUSEAU
HORAIRE
AIGUILLE
DES HEURES
BOUTON C
AIGUILLE
DES SECONDES
124
C
POSITION
1 2
ENFONCÉE
POSITION
INTERMÉDIAIRE
AIGUILLE DES MINUTES
BOUTON A
DATEUR
A
COURONNE
1 2
3
MINUTES DU
CHRONOGRAPHE
B
BOUTON B
AIGUILLE
INFÉRIEURE
POSITION
3
EXTRÊME
RÉGLAGE DE L’AIGUILLE INDICATRICE
(4ÈME AIGUILLE CENTRALE)
POUR RÉALIGNER UNE AIGUILLE INDICATRICE :
1. Tirez complètement la couronne. Les aiguilles
supérieure et inférieure se règlent automatiquement
en allant se placer en bout de trajectoire.
2. La 4ème aiguille centrale doit indiquer 12 heures. Si ce
n’est pas le cas au bout de 5 secondes, appuyez sur A
ou B pour faire avancer l’aiguille respectivement dans
le sens anti-horaire ou dans le sens horaire jusqu’à ce
qu’elle indique 12 heures.
3. Enfoncez la couronne pour valider.
125
Page 66

SECOND FUSEAU HORAIRE
L’aiguille supérieure indique normalement l’heure pour le
second fuseau horaire. Noter qu’il s’agit d’une échelle sur
24 heures, minuit se situant à chacune de ses extrémités
et midi au milieu.
Pour régler le second fuseau horaire :
1. Tirez la couronne en
position intermédiaire. L’aiguille
supérieure indique
l’heure du second
fuseau horaire et la
4ème aiguille centrale
indique les minutes.
126
C
A
1 2
B
2. Appuyez sur B pour faire avancer la 4ème aiguille
centrale. Maintenez le bouton enfoncé pour déplacer
l’aiguille rapidement. L’aiguille supérieure et la 4ème
aiguille centrale se déplacent ensemble, l’aiguille
supérieure se déplaçant d’une heure lorsque la 4ème
aiguille centrale effectue un tour. Si la valeur des
minutes du second fuseau horaire est indentique à
votre fuseau horaire, l’aiguille des minutes et la 4ème
aiguille centrale doivent être alignées.
3. Appuyez sur A pour déplacer l’aiguille supérieure
3
vers l’avant par intervalles d’une heure. Maintenez le
bouton enfoncé pour déplacer l’aiguille rapidement.
4. Enfoncez la couronne pour valider.
Il est tout à fait possible d’utiliser alternativement le
second fuseau horaire pour indiquer l’heure de votre
fuseau horaire sur une échelle de 24 heures. Si vous
127
Page 67

utilisez le second fuseau horaire de cette manière,
assurez-vous que l’affi chage heure/minute correspond
bien à l’affi chage sur 24 heures en vérifi ant que la date
change à minuit et non à midi.
CHRONOGRAPHE AVEC FLY-BACK
OU RETOUR À LA VOLÉE
La montre comporte un chronographe avec fl y-back ou retour à la volée de 4 heures.
1. Pour démarrer, appuyez
sur A (START/STOP
[Démarrage/Arrêt]).
L’aiguille centrale
indique les secondes
avec une résolution de
1/5 seconde et l’aiguille
inférieure indique le
128
C
A
1 2
B
dernier chiffre des minutes, en comptant jusqu’à dix
puis en répétant l’opération. L’aiguille supérieure
indique le temps total, heures et minutes, avec des
divisions toutes les dix minutes. Le chronographe
fonctionne jusqu’à quatre heures avant de s’arrêter
automatiquement.
2. Pour arrêter, appuyez à nouveau sur A (START/STOP
[Démarrage/Arrêt]). Toutes les aiguilles s’arrêtent alors.
3. Pour reprendre le chronométrage, appuyez à nouveau
sur A (START/STOP [Démarrage/Arrêt]), ou, pour
remettre le chronographe à zéro, appuyez sur B (FLY-
3
BACK/RESET OU RETOUR À LA VOLÉE/RESET). Lors de
la remise à zéro du chronographe, toutes les aiguilles
se placent sur zéro. Après huit secondes, la montre
reprend l’affi chage normal du second fuseau horaire.
129
Page 68

4. Vous pouvez également remettre à zéro et/ou
redémarrer le chronographe lorsqu’il est en marche.
Pour cela, appuyez et maintenez enfoncé le bouton
B (FLY-BACK/RESET OU RETOUR À LA VOLÉE/RESET)
pour remettre le chronographe à zéro et relâchezle lorsque vous désirez redémarrer. Il n’est pas
nécessaire d’attendre que toutes les aiguilles aient
atteint la position zéro avant de relâcher le bouton ;
le chronométrage commence de manière interne dès
que le bouton est relâché. Cette fonction « fly-back
» (rattrapante) vous permet de mesurer un temps
intermédiaire.
Il est possible d’utiliser la boussole en même temps
que le chronographe sans affecter le fonctionnement
de ce dernier. Se reporter à FONCTIONNEMENT DE LA
BOUSSOLE.
130
ÉTALONNAGE DE LA BOUSSOLE
La boussole doit être étalonnée avant utilisation.
Une boussole utilise le champ magnétique terrestre ;
par conséquent, il importe d’éviter d’être à proximité de
grands objets métalliques (automobiles, ponts, etc.) ou
autres objets produisant un rayonnement électromagnétique, tels que téléviseurs ou ordinateurs, susceptible
d’affecter le champ magnétique autour de la montre. Si la
boussole est étalonnée à proximité de tels objets, elle ne
fonctionnera correctement qu’à cet endroit. Si la boussole
est étalonnée loin de tels objets, elle ne fonctionnera pas
correctement près d’eux. Pour de meilleurs résultats,
étalonner à l’endroit où elle sera utilisée.
Lors de l’étalonnage et des relevés d’orientation,
il importe, comme avec toutes les boussoles, de
maintenir la montre dans un plan horizontal. Procéder
131
Page 69

à l’étalonnage ou à des relevés d’orientation alors que
la montre n’est pas en position horizontale peut aboutir
à d’importantes erreurs. Veillez également à éviter les
endroits susceptibles de présenter des concentrations
de fer de roche ou industriel supérieures à la normale,
dont l’effet pourrait produire des mesures inexactes. En
présence de toute mesure suspecte, effectuer un nouvel
étalonnage.
Veiller à ne pas ranger la montre à proximité d’une
quelconque source magnétique (ordinateurs, appareils
électriques, téléviseurs) car cela pourrait l’aimanter et
fausser les mesures ultérieures. La précision typique des
montres-boussoles est de +/- 10 degrés.
Pour étalonner la boussole :
1. Tirez la couronne en position intermédiaire et attendez
l’arrêt des aiguilles indicatrices.
132
2. Tenez la montre en position horizontale ou posez-la
sur une surface plane (si le bracelet gêne, poser la
montre sur une tasse retournée). La montre peut être
posée à l’envers à condition d’en protéger le cadran.
3. Appuyez sur C (COMPASS [Boussole]) pour commencer. L’aiguille centrale effectue deux tours complets
pour vous rappeler de faire pivoter la montre. Tenir
la montre à plat et effectuer LENTEMENT deux tours
complets, en comptant 15 secondes environ par tour.
133
Page 70

4. Ensuite, appuyez sur C (COMPASS [Boussole]), en
maintenant la montre en position horizontale. L’aiguille
centrale oscille pour confi rmer que l’étalonnage est
terminé et se déplace ensuite pour le réglage de la
déclinaison magnétique du moment.
5. Si vous ne désirez pas régler l’angle de déclinaison,
enfoncer la couronne. Dans le cas contraire, pour que
la boussole compense automatiquement l’angle de
déclinaison, faire tourner la lunette de la boussole
jusqu’à ce que le nord soit à 12 heures.
6. Appuyez sur A ou B pour déplacer l’aiguille centrale
respectivement vers l’ouest (-) ou vers l’est (+) afi n
d’indiquer l’angle de déclinaison de l’endroit où vous
vous trouvez à l’aide de l’échelle de déclinaison.
Maintenir le bouton enfoncé pour déplacer l’aiguille
rapidement. Voir l’exemple sur la fi gure ci-dessous.
134
7. Enfoncer la couronne pour valider.
A
Déclinaison magnétique réglée sur -14° (14°W)
FONCTIONNEMENT DE LA BOUSSOLE
Normalement, la boussole est inactive et l’aiguille
centrale pointe sur 12 heures ou indique les secondes du
chronographe.
Tout en maintenant la montre en position horizontale,
appuyez sur C (COMPASS [Boussole]) pour activer la
boussole. L’aiguille se déplace et pointe vers le nord. Si on
tourne la montre, l’aiguille centrale se déplace, pointant
toujours vers le nord. Après 20 secondes, la boussole
135
Page 71

s’arrête automatiquement et l’aiguille centrale reprend
son fonctionnement habituel. Ceci permet de prolonger
la durée de vie de la pile. Appuyez sur C (COMPASS
[Boussole]) à tout moment pour maintenir la boussole
activée pendant 20 secondes de plus.
Il est possible d’activer la boussole alors que le chronographe est en train de fonctionner. Le fonctionnement de
la 4ème aiguille centrale s’en trouve alors simplement
modifié de manière temporaire. Les aiguilles supérieure et
inférieure continuent d’indiquer le temps chronométré et
toutes les fonctions du chronographe restent accessibles
à l’aide des boutons A (START/STOP [Démarrage/Arrêt]) et
B (FLY-BACK/RESET OU RETOUR À LA VOLÉE/RESET).
REMARQUE : Au cours de l’utilisation de la boussole, la
trotteuse se déplace par intervalles de deux secondes.
Lorsque la boussole est activée, il se peut aussi que les
aiguilles inférieure et supérieure changent légèrement de
position pour revenir en position initiale après désactivation de la boussole. Ceci est normal et permet d’obtenir
les meilleurs relevés d’orientation.
136
137
Page 72

CHRONOGRAPHE LINÉAIRE
VUE D’ENSEMBLE
4ÈME AIGUILLE
CENTRALE
AIGUILLE
LINÉAIRE
AIGUILLE DES
MINUTES
AIGUILLE DES
SECONDES
138
AIGUILLES DES HEURES
BOUTON A
A
DATEUR
COURONNE
1
2
3
B
BOUTON B
AIGUILLE INFÉRIEURE
RÉGLAGE DE L’AIGUILLE LINÉAIRE ET DE LA 4ÈME
AIGUILLE CENTRALE
Pour réaligner la 4ème aiguille centrale :
1. Tirez complètement la couronne. L’aiguille inférieure
se règle automatiquement en allant se placer en bout
de trajectoire.
2. La 4ème aiguille centrale doit indiquer 12 heures. Si ça
n’est pas le cas au bout de 5 secondes, appuyez sur
A pour faire avancer l’aiguille respectivement dans le
sens horaire jusqu’à ce qu’elle indique 12 heures.
3. Si le chronographe a été réinitialisé et que l’aiguille
linéaire n’indique pas zéro, appuyez sur le bouton B
et maintenez-le enfoncé pour lancer un étalonnage
complet de l’indicateur linéaire, ce qui prendra jusqu’à
32 secondes à exécuter.
4. Enfoncez la couronne pour valider.
139
Page 73

SECOND FUSEAU HORAIRE
L’aiguille inférieure
indique l’heure pour le
second fuseau horaire.
Notez qu’il s’agit d’une
échelle sur 24 heures,
minuit se situant
à chacune de ses
extrémités et midi au
milieu. Le plus souvent,
les fuseaux horaires
varient par intervalles
d’heure. Dans ce cas,
la valeur des minutes correspondra à celle affichée par
l’aiguille des minutes de la montre.
140
A
1
B
RÉGLAGE DU SECOND FUSEAU HORAIRE :
1. Tirez la couronne en position intermédiaire. L’aiguille
inférieure indique l’heure du second fuseau horaire et
la 4ème aiguille centrale indique les minutes.
2. Si la valeur des minutes du second fuseau horaire
2
3
est identique à celle de votre fuseau horaire, l’aiguille
des minutes et la 4ème aiguille centrale doivent être
alignées. Si les aiguilles ne sont pas alignées, ou si
le second fuseau horaire diffère en minute, appuyez
sur le bouton B pour faire avancer la 4ème aiguille
centrale à la position désirée.
3. Appuyez sur le bouton A pour faire avancer l’aiguille
inférieure par intervalles d’une heure jusqu’à ce
qu’elle atteigne l’heure désirée dans le second fuseau
horaire. Pour faire avancer l’aiguille rapidement,
appuyez et tenez enfoncé le bouton A.
141
Page 74

4. Enfoncez la couronne pour valider.
CHRONOGRAPHE LINÉAIRE
La montre comporte un chronographe multi-cadrans avec
indicateur 4 heures.
1. Pour démarrer, appuyez sur le bouton A (START/
STOP [Démarrage/Arrêt]). La 4ème aiguille centrale
indique les secondes avec une résolution d’1/5
de seconde. L’aiguille linéaire indique les minutes,
en comptant jusqu’à trente et en recommençant.
L’aiguille inférieure indique le temps total, heures et
minutes, avec des divisions toutes les dix minutes. Le
chronographe fonctionne jusqu’à quatre heures avant
de s’arrêter automatiquement.
2. Pour l’arrêter, appuyez de nouveau sur le bouton A
(START/STOP [Démarrage/Arrêt]). Toutes les aiguilles
s’arrêtent.
142
3. Pour remettre le chronographe à zéro, appuyez sur le
bouton B (SPLIT/RESET [Temps intermédiaire/Remise à
zéro]).
Lors de la remise à zéro du chronographe, toutes les
aiguilles se placent sur zéro. Après huit secondes, la
montre reprend l’affichage normal du second fuseau
horaire. Pendant que le chronographe fonctionne, il est
possible de prendre un temps intermédiaire. Appuyez
sur le Bouton B (SPLIT/RESET [Temps intermédiaire/
Remise à zéro]) et toutes les aiguilles s’arrêteront
tandis que le chronographe continue de fonctionner.
Appuyez à nouveau sur le Bouton B (SPLIT/RESET [Temps
intermédiaire/Remise à zéro]) pour reprendre l’affichage
du temps écoulé sur le chronographe en marche.
143
Page 75
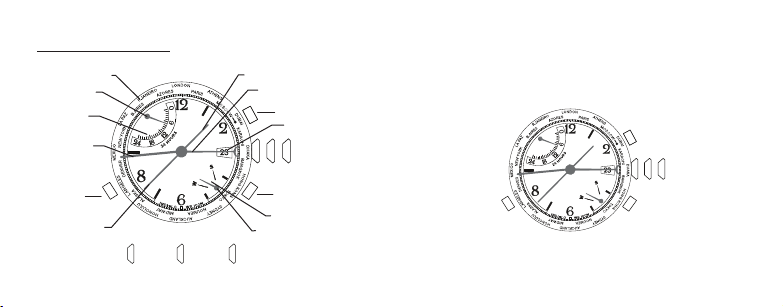
HEURE MONDIALE
VUE D’ENSEMBLE
24 VILLES
AIGUILLE
SUPÉRIEURE
HEURE
MONDIALE
AIGUILLE
DES MINUTES
AIGUILLE
DES SECONDES
C
1 2
POSITION
ENFONCÉE
BOUTON C
144
POSITION
INTERMÉDIAIRE
AIGUILLE DES HEURES
4ÈME AIGUILLE
CENTRALE
BOUTON A
A
B
BOUTON B
SAISONS
AIGUILLE INFÉRIEURE
POSITION
3
EXTRÊME
DATEUR
COURONNE
POUR RÉGLER L’HEURE MONDIALE :
1. Tirez la couronne en position intermédiaire. L’aiguille
centrale indique la ville située dans le fuseau horaire
mondial et l’aiguille supérieure indique l’heure dans
cette ville.
A
1 2 3
C
B
145
Page 76

2. Appuyez sur A ou B pour déplacer l’aiguille centrale et
indiquer la ville correspondant à votre fuseau horaire.
Maintenez le bouton enfoncé pour déplacer l’aiguille
rapidement. N’importe quelle ville peut être choisie.
3. Tirer complètement la couronne. L’aiguille centrale
retournera à la position 12h00, comme indiqué dans
RÉGLAGE DES AIGUILLES INDICATRICES. Après cinq
secondes, l’aiguille supérieure indique l’heure locale
(c’est à dire l’heure qu’il est dans la ville sélectionnée
à l’étape précédente), l’aiguille centrale indique les
minutes de l’heure locale et l’aiguille inférieure indique
la saison (voir RÉGLAGE DES SAISONS). IMPORTANT :
Ne pas manipuler les boutons-poussoirs ou la couronne jusqu’à ce que l’aiguille centrale ait complété
son ajustement. (Environ 10 secondes après avoir
complètement tiré la couronne.)
146
4. Si la saison affichée n’est pas celle correspondant au
fuseau horaire local, appuyez sur C pour la modifier.
Si le fuseau horaire local observe le passage à l’heure
d’été, l’aiguille supérieure se déplacera d’une heure.
5. Appuyez sur A ou B pour respectivement reculer ou
avancer l’heure afin de régler l’heure dans le fuseau
horaire local. Maintenir le bouton enfoncé pour
régler l’heure rapidement. Les aiguilles se déplacent
ensemble ; l’aiguille supérieure se déplace d’une
heure lorsque l’aiguille centrale effectue un tour. Après
le réglage, l’aiguille centrale et l’aiguille des minutes
doivent être alignées.
6. Enfoncez la couronne pour valider.
147
Page 77

RÉGLAGE DE L’AIGUILLE INDICATRICE
(4ÈME AIGUILLE CENTRALE)
Pour réaligner une aiguille indicatrice :
1. Tirez complètement la couronne. Les aiguilles supérieure et inférieure se règlent automatiquement en
allant se placer en bout de trajectoire.
2. La 4ème aiguille centrale doit indiquer 12 heures. Si ce
n’est pas le cas au bout de 5 secondes, appuyez sur A
ou B pour faire avancer l’aiguille respectivement dans
le sens anti-horaire ou dans le sens horaire jusqu’à ce
qu’elle indique 12 heures.
3. Enfoncez la couronne pour valider.
REMARQUE : Si aucun bouton n’est enfoncé dans les
cinq secondes suivant l’arrêt des aiguilles, la montre
procède au réglage du temps mondial (se reporter à
RÉGLAGE DE L’HEURE MONDIALE).
148
L’HEURE DANS UNE VILLE SÉLECTIONNÉE
Appuyez sur A ou B pour
déplacer l’aiguille centrale
respectivement vers
l’arrière ou vers l’avant
et sélectionner une ville.
L’aiguille supérieure se
déplace pour indiquer
l’heure dans la ville
sélectionnée. Noter qu’il
s’agit d’une échelle sur
24 heures, minuit se situant à chacune de ses extrémités
et midi au milieu.
RÉGLAGE DES SAISONS
Le réglage des saisons permet à la montre de tenir
compte du passage à l’heure d’été.
C
A
1 2 3
B
149
Page 78
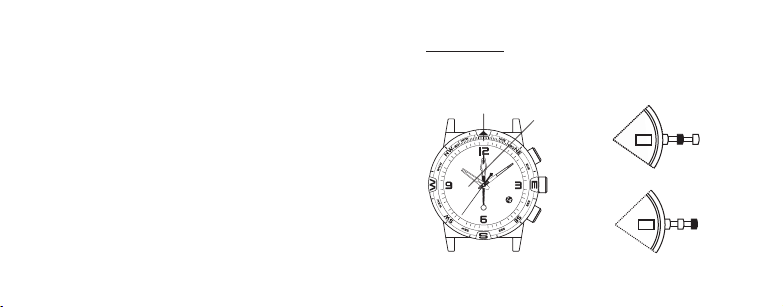
La montre gère cela à l’aide d’un réglage signalant les
deux périodes concernées par le changement d’heure
dans toutes les villes. Pour la montre, la période correspondant à l’heure d’été est SUMMER et la période
correspondant à l’heure d’hiver est WINTER.
Lorsque, pour une ville, la saison est réglée sur SUMMER (été), toutes les villes se trouvant dans le même
hémisphère sont automatiquement réglées sur SUMMER
tandis que toutes les villes situées dans l’autre hémisphère sont automatiquement réglées sur WINTER (hiver).
La montre connaît la situation des villes dans chaque
hémisphère.
Appuyez sur C pour changer de saison.
150
BOUSSOLE
VUE D’ENSEMBLE
ÉCHELLE DE DÉCLINAISON
AIGUILLE DE LA
BOUSSOLE
(L’EXTRÉMITÉ NORD
EST ROUGE
POINTUE / PLUS
LONGUE)
B (COMPASS
[BOUSSOLE])
COURONNE
B
CENTRE
I
COURONNE
14
14
CENTRALE
I
RÉGLAGE
DE LA DATE
EXTRÉMITÉ
I
I
RÉGLAGE
DE L’HEURE
151
Page 79

RÉGLAGE DE L’AIGUILLE DE LA BOUSSOLE
Tirez la COURONNE complètement. L’aiguille de la boussole devrait indiquer 12 heures. Sinon, appuyez sur A ou
B pour faire avancer l’aiguille jusqu’à ce qu’elle indique
12 heures. Tenez le bouton enfoncé pour la faire avancer
rapidement. Enfoncez la COURONNE CENTRALE pour
valider et refaire l’étalonnage.
ÉTALONNAGE DE LA BOUSSOLE
La boussole doit être étalonnée avant utilisation.
Une boussole utilise le champ magnétique terrestre ;
par conséquent, il importe d’éviter d’être à proximité de
grands objets métalliques (automobiles, ponts, etc.) ou
autres objets produisant un rayonnement électromagnétique, tels que téléviseurs ou ordinateurs, susceptible
d’affecter le champ magnétique autour de la montre. Si la
boussole est étalonnée à proximité de tels objets, elle ne
152
fonctionnera correctement qu’à cet endroit. Si la boussole
est étalonnée loin de tels objets, elle ne fonctionnera pas
correctement près d’eux. Pour de meilleurs résultats,
étalonner à l’endroit où elle sera utilisée.
Lors de l’étalonnage et des relevés d’orientation, il importe, comme avec toutes les boussoles, de maintenir la
montre dans un plan horizontal. Procéder à l’étalonnage
ou à des relevés d’orientation alors que la montre n’est
pas en position horizontale peut aboutir à d’importantes
erreurs. Veiller également à éviter les endroits susceptibles de présenter des concentrations de fer de roche ou
industriel supérieures à la normale, dont l’effet pourrait
produire des mesures inexactes. En présence de toute
mesure suspecte, effectuer un nouvel étalonnage.
Veiller à ne pas ranger la montre à proximité d’une
quelconque source magnétique (ordinateurs, appareils
153
Page 80

électriques, téléviseurs) car cela pourrait l’aimanter et
fausser les mesures ultérieures. La précision typique des
montres-boussoles est de +/- 10 degrés.
Pour étalonner la boussole :
1. Tirez la couronne en position intermédiaire et attendez
l’arrêt des aiguilles indicatrices.
2. Tenez la montre en position horizontale ou posez-la
sur une surface plane (si le bracelet gêne, poser la
montre sur une tasse retournée). La montre peut être
posée à l’envers à condition d’en protéger le cadran.
3. Appuyez sur A ou B pour commencer. La 4ème aiguille
centrale effectue deux tours complets pour vous
rappeler de faire pivoter la montre. Tenir la montre à
plat et effectuer LENTEMENT deux tours complets, en
comptant au moins 15 secondes par tour.
154
4. Ensuite, appuyez sur A ou B, en maintenant la montre
en position horizontale. La 4ème aiguille centrale
oscille pour confirmer que l’étalonnage est terminé et
se déplace ensuite pour le réglage de la déclinaison
magnétique du moment.
5. Si vous ne désirez pas régler l’angle de déclinaison,
enfoncez la couronne. Dans le cas contraire, pour que
la boussole compense automatiquement l’angle de
déclinaison, faites tourner la lunette de la boussole
jusqu’à ce que le nord soit à 12 heures.
155
Page 81

6. Appuyez sur A ou B pour déplacer la 4ème aiguille
centrale respectivement vers l’ouest (-) ou vers l’est
(+) afi n d’indiquer l’angle de déclinaison de l’endroit où
vous vous trouvez à l’aide de l’échelle de déclinaison.
Maintenez le bouton enfoncé pour déplacer l’aiguille
rapidement. Voir l’exemple sur la fi gure à la page
suivante.
7. Enfoncez la couronne pour valider.
A
Déclinaison magnétique réglée sur -14° (14°W)
156
FONCTIONNEMENT DE LA BOUSSOLE
Normalement, la boussole est inactive et la 4ème aiguille
centrale pointe sur 12 heures ou indique les secondes du
chronographe.
Tout en maintenant la montre en position horizontale,
appuyez sur A ou B pour activer la boussole. L’aiguille se déplace et pointe vers le nord. Si on tourne la montre, la 4ème
aiguille centrale se déplace, pointant toujours vers le nord.
Après 20 secondes, la boussole s’arrête automatiquement
et la 4ème aiguille centrale reprend son fonctionnement
habituel. Ceci permet de prolonger la durée de vie de la pile.
Appuyez sur A ou B à tout moment pour maintenir la boussole activée pendant 20 secondes de plus.
REMARQUE : Au cours de l’utilisation de la boussole, la
trotteuse se déplace par intervalles de deux secondes.
157
Page 82

MARÉE TEMPÉRATURE ET BOUSSOLE
VUE D’ENSEMBLE
ÉCHELLE DE
ÉCHELLE DE
DÉCLINAISON
AIGUILLE DE
L’INDICATEUR
C (COMPASS
BAGUE ROTATIVE
DE LA BOUSSOLE
158
[BOUSSOLE])
DATE
TEMPÉRATURE
A (TEMPÉRATURE)
CENTRE-RÉGLAGE
DE LA DATE
COURONNE
B (MARÉE)
ÉCHELLE DES
MARÉES
SORTIERÉGLAGE
DE L’HEURE
RÉGLAGE DE L’AIGUILLE DE L’INDICATEUR
Tirez la couronne complètement. L’aiguille indicatrice
devrait indiquer 12 heures. Sinon, appuyez sur le bouton
poussoir MARÉE ou TEMPÉRATURE pour faire avancer
l’aiguille jusqu’à ce qu’elle indique 12 heures. Les boutons
poussoirs pour MARÉE et TEMPÉRATURE font avancer
respectivement l’aiguille dans le sens des aiguilles d’une
montre et inversement. Tenir le bouton poussoir enfoncé
pour la faire avancer rapidement. Enfoncez la couronne
pour valider.
SÉLECTIONNER MARÉE/TEMPÉRATURE
L’aiguille de l’indicateur montre en permanence soit la
marée, soit la température. Lorsque la température est
indiquée, appuyez sur le bouton poussoir MARÉE pour
sélectionner l’heure des marées. L’aiguille indique d’abord
la marée basse puis la marée actuelle. Lorsque la marée
159
Page 83

est indiquée, appuyez sur le bouton poussoir TEMPÉRATURE pour sélectionner le thermomètre. L’aiguille se place
au début de l’échelle des températures et indique ensuite
la température courante.
THERMOMÈTRE
Lorsque la montre est portée au poignet, la mesure par
le thermomètre est influencée par la chaleur corporelle.
Pour obtenir des mesures plus précises, enlever la montre
et la placer à l’ombre pendant quelques minutes.
La montre peut également mesurer la température de
l’eau si elle y est plongée. Veiller à sélectionner l’affichage
de la température avant de placer la montre dans l’eau car
les boutons ne doivent pas être enfoncés sous l’eau.
Les mesures par le thermomètre sont prises toutes les
minutes, et plus fréquemment encore si la température
est en train de changer.
160
HEURE DES MARÉES
Dans ce mode, l’aiguille de l’indicateur se déplace
toujours dans le sens des aiguilles d’une montre. Ainsi,
la marée est montante lorsque l’aiguille pointe vers la
gauche et descendante lorsque l’aiguille pointe vers la
droite. Le nombre d’heures jusqu’à la prochaine marée
haute/basse est indiqué sur l’échelle des marées.
Les marées étant aussi influencées par la position du soleil et la forme du littoral, la montre peut ne pas indiquer
les heures exactes des marées hautes et basses. Des
ajustements périodiques peuvent être nécessaires.
Pour étalonner le mode heure des marées, tirer la
couronne en position CENTRE. Appuyez sur le bouton
poussoir MARÉE ou TEMPÉRATURE pour placer l’aiguille
sur la marée actuelle. Les boutons poussoirs pour MARÉE
et TEMPÉRATURE font avancer respectivement l’aiguille
161
Page 84

dans le sens des aiguilles d’une montre et inversement.
Enfoncez la couronne pour valider.
ÉTALONNAGE DE LA BOUSSOLE
La boussole doit être étalonnée avant utilisation.
Une boussole utilise le champ magnétique terrestre ;
par conséquent, il importe d’éviter d’être à proximité de
grands objets métalliques (automobiles, ponts, etc.) ou
autres objets produisant un rayonnement électromagnétique, tels que téléviseurs ou ordinateurs, susceptible
d’affecter le champ magnétique autour de la montre. Si la
boussole est étalonnée à proximité de tels objets, elle ne
fonctionnera correctement qu’à cet endroit. Si la boussole
est étalonnée loin de tels objets, elle ne fonctionnera pas
correctement près d’eux. Pour de meilleurs résultats,
étalonner à l’endroit où elle sera utilisée.
162
Lors de l’étalonnage et des relevés d’orientation, il importe, comme avec toutes les boussoles, de maintenir la
montre dans un plan horizontal. Procéder à l’étalonnage
ou à des relevés d’orientation alors que la montre n’est
pas en position horizontale peut aboutir à d’importantes
erreurs. Veillez également à éviter les endroits susceptibles de présenter des concentrations de fer de roche ou
industriel supérieures à la normale, dont l’effet pourrait
produire des mesures inexactes. En présence de toute
mesure suspecte, effectuer un nouvel étalonnage.
Veiller à ne pas ranger la montre à proximité d’une
quelconque source magnétique (ordinateurs, appareils
électriques, téléviseurs) car cela pourrait l’aimanter et
fausser les mesures ultérieures. La précision typique des
montres-boussoles est de +/- 10 degrés.
163
Page 85

Pour étalonner la boussole :
1. Tirez la couronne en position intermédiaire et attendez
l’arrêt des aiguilles indicatrices.
2. Tenez la montre en position horizontale ou posez-la
sur une surface plane (si le bracelet gêne, poser la
montre sur une tasse retournée). La montre peut être
posée à l’envers à condition d’en protéger le cadran.
3. Appuyez sur C (COMPASS [Boussole]) pour commencer. La 4ème aiguille centrale effectue deux
tours complets pour vous rappeler de faire pivoter
la montre. Tenir la montre à plat et effectuer LENTEMENT deux tours complets, en comptant au moins 15
secondes par tour.
164
4. Ensuite, appuyez sur C (COMPASS [Boussole]), en
maintenant la montre en position horizontale. La
4ème aiguille centrale oscille pour confirmer que
l’étalonnage est terminé et se déplace ensuite pour le
réglage de la déclinaison magnétique du moment.
5. Si vous ne désirez pas régler l’angle de déclinaison,
enfoncez la couronne. Dans le cas contraire, pour que
la boussole compense automatiquement l’angle de
déclinaison, faites tourner la lunette de la boussole
jusqu’à ce que le nord soit à 12 heures.
165
Page 86

6. Appuyez sur A ou B pour déplacer la 4ème aiguille
centrale respectivement vers l’ouest (-) ou vers l’est
(+) afi n d’indiquer l’angle de déclinaison de l’endroit où
vous vous trouvez à l’aide de l’échelle de déclinaison.
Maintenez le bouton enfoncé pour déplacer l’aiguille
rapidement. Voir l’exemple sur la fi gure à la page
suivante.
7. Enfoncez la couronne pour valider.
A
Déclinaison magnétique réglée sur -14° (14°W)
166
FONCTIONNEMENT DE LA BOUSSOLE
Normalement, la boussole est inactive et la 4ème aiguille
centrale pointe sur 12 heures ou indique les secondes du
chronographe.
Tout en maintenant la montre en position horizontale,
appuyez sur C (COMPASS [Boussole]) pour activer la
boussole. L’aiguille se déplace et pointe vers le nord. Si
on tourne la montre, la 4ème aiguille centrale se déplace,
pointant toujours vers le nord. Après 20 secondes, la
boussole s’arrête automatiquement et la 4ème aiguille
centrale reprend son fonctionnement habituel. Ceci permet de prolonger la durée de vie de la pile. Appuyez sur
C (COMPASS [Boussole]) à tout moment pour maintenir la
boussole activée pendant 20 secondes de plus.
REMARQUE : Au cours de l’utilisation de la boussole, la
trotteuse se déplace par intervalles de deux secondes.
167
Page 87

ALTIMÈTRE
VUE D’ENSEMBLE
ÉCHELLE
D’ALTIMÈTRE
(CENTAINES)
AIGUILLE
RÉTROGRADE
SUPÉRIEURE
(MILLIERS)
BOUTON C
(UNITÉS)
168
BOUTON A
(ALTITUDE MAXIMALE)
AIGUILLE
RÉTROGRADE
INFÉRIEURE (UNITÉS)
BOUTON B
(ALTITUDE MINIMALE)
COURONNE
RÉGLAGE DE L’AIGUILLE INDICATRICE
(4ÈME AIGUILLE CENTRALE)
Tirez la couronne complètement. Les aiguilles rétrogrades
supérieure et inférieure se règlent automatiquement en
allant se placer en début de trajectoire. L’aiguille indicatrice (4ème aiguille centrale) doit indiquer 12 heures.
Sinon, appuyez sur les boutons A et ou B pour faire
avancer l’aiguille jusqu’à ce qu’elle indique 12 heures. Les
boutons A et B font avancer respectivement l’aiguille dans
le sens horaire et inversement. Tenez le bouton enfoncé
pour la faire avancer rapidement. Enfoncez la couronne
pour valider.
ÉTALONNAGE DE L’ALTIMÈTRE
L’altimètre doit être étalonné avant son utilisation.
Sachant qu’un altimètre se base sur la pression atmo-
sphérique pour déterminer l’altitude et que la pression
169
Page 88

atmosphérique varie d’un point à un autre, il est très
important de régler l’altimètre par rapport à une valeur
d’altitude de référence connue ou par rapport à l’altitude
de référence standard d’un point donné. Les brusques
changements de la pression atmosphérique peuvent
fausser les informations de votre altimètre de + ou
- 100 m (328 pieds) même si vous êtes resté au même
endroit. Si possible, étalonnez à nouveau sur une altitude
connue quand un changement radical a eu lieu.
Étalonnage de l’altimètre :
1. Tirez la couronne en position intermédiaire et attendez
l’arrêt des aiguilles indicatrices.
2. Si l’altimètre était désactivé au moment où vous
avez tiré la couronne, l’aiguille rétrograde inférieure
indiquera l’unité sélectionnée la dernière fois que
170
l’altimètre a été utilisé. Autrement, l’aiguille rétrograde
inférieure indiquera l’unité sélectionnée dans le mode
d’affichage de l’altitude. La 4ème aiguille centrale et
l’aiguille rétrograde supérieure devraient indiquer
l’altitude exacte.
3. Appuyez sur A ou B pour faire avancer l’aiguille
respectivement dans le sens anti-horaire ou inversement, jusqu’à ce qu’elle indique la bonne altitude à
étalonner. Tenez enfoncé A ou B pour faire avancer
l’aiguille centrale plus rapidement. L’aiguille rétrograde
supérieure se déplace par rapport à la valeur de
l’altitude affichée par la 4ème aiguille centrale.
4. Enfoncez la couronne pour valider.
171
Page 89
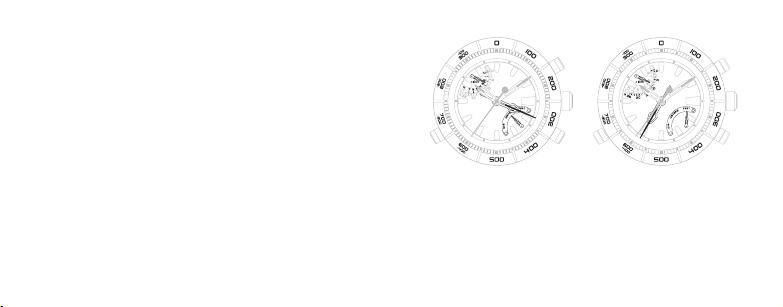
ACTIVATION/DÉSACTIVATION DE L’ALTIMÈTRE
Pour activer l’altimètre, appuyez sur C. L’aiguille
rétrograde inférieure indique MÈTRES. La 4ème aiguille
centrale indique sur l’anneau externe les valeurs de
l’altitude courante en centaines et en dizaines avec des
divisions tous les dix MÈTRES/PIEDS. L’aiguille rétrograde
supérieure indique les valeurs de l’altitude courante en
milliers avec des divisions tous les mille MÈTRES/PIEDS.
Pour changer les unités et passer des MÈTRES aux PIEDS,
appuyez sur C une deuxième fois. Pour passer des PIEDS
aux MÈTRES, appuyez deux fois sur C (l’altimètre est tout
d’abord désactivé, puis activé avec les unités affichées
en MÈTRES).
172
Exemple : Altitude = 2310 m Exemple : Altitude = 7580 pieds
Pour désactiver l’altimètre avec les unités réglées sur
PIEDS, appuyez sur C. Pour désactiver l’altimètre avec
les unités réglées sur MÈTRES, appuyez deux fois sur C
(l’aiguille inférieure indique tout d’abord PIEDS avant la
désactivation).
173
Page 90

La montre désactive automatiquement l’altimètre au bout
de 60 minutes.
RAPPEL DES ALTITUDES MIN/MAX
Pour afficher l’altitude maximale enregistrée, appuyez
sur A. L’aiguille rétrograde inférieure indique l’unité de
mesure dans laquelle l’altitude maximale a été enregistrée si l’altimètre était désactivé au moment où le bouton
est enfoncé. Autrement, l’altitude maximale sera indiquée
dans l’unité de mesure courante sélectionnée. La 4ème
aiguille centrale indique les valeurs de l’altitude maximale
en centaines et en dizaines avec des divisions tous les dix
MÈTRES/PIEDS. L’aiguille rétrograde supérieure indique
les valeurs de l’altitude maximale en milliers avec des
divisions tous les mille MÈTRES/PIEDS.
L’altitude maximale enregistrée s’affiche pendant dix
secondes. Pour prolonger l’affichage de dix secondes,
174
appuyez sur A avant l’expiration des dix premières
secondes.
Pour changer les unités et passer des MÈTRES aux PIEDS,
ou des PIEDS aux MÈTRES, appuyez sur C.
Pour afficher l’altitude minimale enregistrée, appuyez
sur B. L’aiguille rétrograde inférieure indique l’unité de
mesure dans laquelle l’altitude minimale a été enregistrée
si l’altimètre était désactivé au moment où le bouton
est pressé. Autrement, l’altitude minimale sera indiquée
dans l’unité de mesure courante sélectionnée. La 4ème
aiguille centrale indique les valeurs de l’altitude minimale
en centaines et en dizaines avec des divisions tous les dix
MÈTRES/PIEDS. L’aiguille rétrograde supérieure indique
les valeurs de l’altitude minimale en milliers avec des
divisions tous les mille MÈTRES/PIEDS.
175
Page 91

L’altitude minimale enregistrée s’affi che pendant dix
secondes. Pour prolonger l’affi chage de dix secondes,
appuyez sur B avant l’expiration des dix premières
secondes. Pour changer les unités et passer des MÈTRES
aux PIEDS ou des PIEDS aux MÈTRES, appuyez sur C.
PROFONDEUR
VUE D’ENSEMBLE
AIGUILLE
CENTRALE
AA
BOUTON A
176
3
B
INDICATEUR OFF
Remarque : Les aiguilles centrale et inférieure
s’étalonnent automatiquement lorsque la couronne est
placée en position 3 pour le réglage de l’heure.
AIGUILLE INFÉRIEURE
1
232
2
BOUTON B
3
3
COURONNE
177
Page 92

TEMPÉRATURE
Le capteur de température est toujours en marche et
prendra la température au moins une fois toutes les
60 secondes. La température est indiquée par l’aiguille
inférieure et l’échelle qui l’accompagne.
Lorsque la montre est portée au poignet, la mesure de
température est influencée par la chaleur corporelle. Pour
obtenir des mesures plus précises, retirez la montre de
votre poignet.
MARCHE/ARRÊT DU CAPTEUR DE PROFONDEUR
Le capteur est normalement à l’arrêt et doit être mis en
marche manuellement avant la submersion. Appuyez et
relâchez le bouton B pour mettre en marche le capteur.
La 4ème aiguille centrale passera de la position OFF (6
heures) à la position 12 heures et commencera à prendre
des mesures au moins une fois toutes les 5 secondes.
178
En augmentant la profondeur, la 4ème aiguille centrale
indiquera la profondeur actuelle comme indiqué sur
l’échelle de profondeur. Si la lecture reste dans les limites
de 0 à 2 mètres (0-6 pieds) pendant 5 minutes, le capteur
s’arrêtera automatiquement. Pour arrêter le capteur
manuellement, appuyez et tenez enfoncé le bouton B
pendant 2 secondes. La 4ème aiguille centrale passera en
position OFF (6 heures).
RAPPEL DE PROFONDEUR MAXIMALE / TEMPÉRATURE
MINIMALE
Après être remonté à la surface, dévissez la couronne et
mettez-la en position intermédiaire. Les aiguilles centrales
et inférieures se déplaceront pour indiquer respectivement la valeur maximale de profondeur et la valeur
minimale de température enregistrées durant la descente
179
Page 93

la plus récente. Lorsque le capteur de profondeur est
réactivé, la mémoire sera effacée.
Si la montre n’a jamais été utilisée auparavant, les aiguilles
centrales et inférieures indiqueront respectivement
0 mètre / pied et 0º C / 32 ºF. La couronne doit être
revissée avant l’utilisation / submersion.
DÉTECTION DU NIVEAU DE PILE
La montre détermine le niveau de pile et propose à
l’utilisateur un indicateur visuel correspond au niveau
de pile actuel. L’état du niveau de pile est classifié en
niveau normal, niveau de décharge de la pile et niveau de
remplacement de la pile, avec chaque niveau indiqué par
le mouvement de la seconde aiguille.
180
Pour l’état de niveau normal, la seconde aiguille se
déplace d’une seconde à chaque mouvement correspondant à un fonctionnement normal.
Lorsque la montre est en état de niveau de décharge de
la pile, la seconde aiguille se déplace à intervalles de
2 secondes, et se déplace de 2 secondes à chaque
mouvement. Il est recommandé de remplacer la pile
lorsque la montre est en état de niveau de décharge de
la pile.
Lorsque la montre est en état de niveau de remplacement
de la pile, la seconde aiguille se déplace à intervalles
de 5 secondes, et se déplace de 5 secondes à chaque
mouvement. À ce stade, le détecteur de profondeur ne
peut être activé et l’utilisateur doit remplacer la pile immédiatement.
181
Page 94
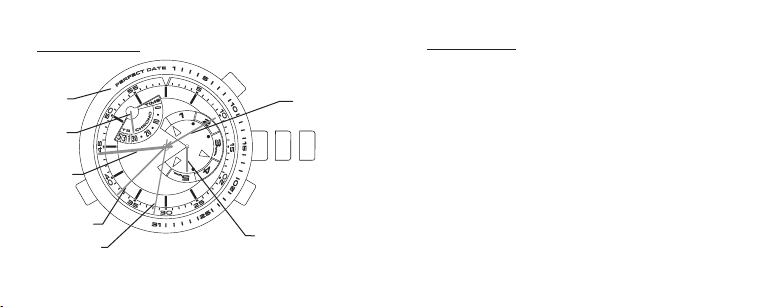
YACHT RACER
ÉCHELLE DATE
PARFAITE
AIGUILLE
SUPÉRIEUR(E)
4ÈME
AIGUILLE
CENTRALE
C
AIGUILLE
DES MINUTES
AIGUILLE
DES SECONDES
182
A
B
AIGUILLE INFÉRIEURE
2 31
AIGUILLE
DES HEURES
COURONNE
DATE PARFAITE
Avec la fonction Date Parfaite de votre montre, la date ne
nécessitera aucun ajustement avant 2060. Cette montre
prend automatiquement en compte les mois raccourcis
et les années bissextiles, et affichera ainsi toujours la
date correcte sur demande. La date a été préréglée à
l’usine Timex. Il ne reste qu’à régler l’heure. La 4ème
aiguille centrale affichera la date lorsque la couronne est
enfoncée. L’aiguille se repositionnera de façon à afficher
la date en cours sur la bague supérieure du boîtier.
L’aiguille effectuera une courte pause le temps de vous
permettre de consulter la date avant de retourner à sa
position normale de 12 heures. À noter que la fonction
Date Parfaite ne marche qu’en mode Heure. Lorsque la
pile est épuisée et remplacée, la fonction Date Parfaite
doit être calibrée à nouveau. Lorsqu’il est nécessaire
183
Page 95

de remplacer la pile, il est vivement conseillé d’envoyer
la montre à un centre de service Timex, où la pile sera
remplacée et la fonction Date Parfaite sera calibrée
à nouveau jusqu’à ce qu’elle affiche la date en cours
correcte par rapport à l’endroit auquel elle doit être
renvoyée.
RÉGLAGE DE LA 4ÈME AIGUILLE CENTRALE
Pour réaligner la 4ème aiguille centrale :
1. Tirez la couronne en position 3. Les aiguilles
supérieure et inférieure se règlent automatiquement
en allant se placer en bout de trajectoire.
2. Au bout de 10 secondes après avoir tiré la couronne
en position 3, la 4ème aiguille centrale devrait
indiquer 12 heures. Si cela n’est pas le cas, appuyez
sur le bouton A ou B pour faire avancer l’aiguille
184
respectivement dans le sens anti-horaire ou dans le
sens horaire jusqu’à ce qu’elle indique 12 heures.
Maintenez le bouton A ou B enfoncé afin de faire
avancer l’aiguille plus vite. À noter qu’au bout de
5 secondes d’inactivité lorsque la couronne est en
position 3, la 4ème aiguille centrale se repositionnera
de façon à afficher la date en cours.
3. Après avoir terminé, enfoncez la couronne en position 1.
SÉLECTION DU MODE
Enfoncez le bouton C pour faire avancer l’aiguille
supérieure jusqu’à la fonction souhaitée.
HEURE :
Affiche uniquement l’heure en cours (la fonction Date
Parfaite ne marche qu’en mode Heure).
185
Page 96

COURSE DE YACHT MINUTERIE 5:
Le compte à rebours commencera à 5 minutes et
enclenchera le chronographe lorsqu’il atteint zéro.
COURSE DE YACHT MINUTERIE 3:
Le compte à rebours commencera à 3 minutes et
enclenchera le chronographe lorsqu’il atteint zéro.
COURSE DE YACHT MINUTERIE 1:
Le compte à rebours commencera à 1 minute et
enclenchera le chronographe lorsqu’il atteint zéro.
CHRONO :
Le chronographe se mettra en marche sans le compte
à rebours.
186
UTILISATION DE LA MINUTERIE COURSE DE YACHT
Cette montre met à votre disposition des comptes à
rebours de 5, 3 ou 1 minute. Lorsque le compte à rebours
atteint zéro un chronographe d’une heure s’enclenche
automatiquement.
1. Maintenez le bouton C enfoncé jusqu’à ce que
l’aiguille supérieure affiche un compte à rebours
de 5, 3 ou 1 minute en mode Minuterie pour Course
de Yacht.
2. Pour démarrer, appuyez sur le bouton A (START/STOP
[Démarrage/Arrêt]). La 4ème aiguille centrale affiche
le compte à rebours en terme de secondes, tandis
que l’aiguille inférieure l’affiche en terme de minutes.
(À noter que les boutons B et C restent désactivés
lorsque le compte à rebours est enclenché.)
187
Page 97

3. Pour arrêter le compte à rebours, appuyez le bouton
A (START/STOP [Démarrage/Arrêt]). (À noter que le
bouton C reste désactivé lorsque le compte à rebours
est enclenché.)
4. Pour enclencher le compte à rebours à nouveau,
enfoncez le bouton B (SPLIT/RESET [Temps
intermédiaire/Réinitialisation]) pendant 2 secondes,
ce qui renvoie au compte à rebours de 5, 3 ou
1 minute sélectionné au préalable.
Au cours d’une utilisation normale de la Minuterie Course
de Yacht, lorsque le compte à rebours atteint zéro, le
chronographe s’enclenche automatiquement. On entend
également une sonnerie toutes les minutes ainsi que
lorsqu’il reste 5 secondes à la dernière minute du compte
à rebours précédant l’enclenchement de la fonction
chronographe. Le chronographe effectue la séquence
188
de 30 minutes deux fois, pour une durée totale et
maximum d’une heure.
L’UTILISATION DU CHRONOGRAPHE
Cette montre est dotée d’un chronographe d’une heure
dont il est possible de se servir indépendamment de la
Minuterie Course de Yacht.
1. Enfoncez le bouton C jusqu’à ce que l’aiguille
supérieure se positionne au début de l’échelle
tachymétrique de 30 minutes du chronographe.
2. Pour démarrer, appuyez sur le bouton A (START/STOP
[Démarrage/Arrêt]). La 4ème aiguille centrale affiche le
décompte des secondes; l’aiguille inférieure affiche le
décompte des minutes sur une échelle de 5 minutes
et l’aiguille supérieure affiche le décompte des demiheures sur une échelle de 30 minutes. Toutes les cinq
189
Page 98

minutes, l’aiguille inférieure retourne à la position zéro
tandis que l’aiguille supérieure continue d’avancer
sur une échelle de 30 minutes. (À noter que le bouton
C reste désactivé lorsque le compte à rebours est
enclenché.)
3. Pour consulter un temps intermédiaire, appuyez
sur le bouton B (SPLIT/RESET [Temps intermédiaire/
Réinitialisation]). Les aiguilles supérieure et inférieure
ainsi que la 4ème aiguille centrale restent figées le
temps que vous notiez le temps intermédiaire. Le
compte à rebours du chronographe continue même
lorsque les aiguilles sont figées. Pour remettre les
aiguilles en marche, appuyez le bouton B (SPLIT/RESET
[Temps intermédiaire/Réinitialisation]). Les aiguilles
rattrapent leur retard rapidement pour afficher le
temps total écoulé.
190
4. Pour arrêter le chronographe, appuyez le bouton
A (START/STOP [Démarrage/Arrêt]). (À noter que le
bouton C reste désactivé lorsque le chronographe
est arrêté, et se réactive lorsque le chronographe est
réinitialisé.)
5. Pour réinitialiser, enfoncez le bouton B (SPLIT/RESET
[Temps intermédiaire/Réinitialisation]) pendant
3 secondes, ce qui renvoie au compte à rebours
de 30 minutes.
Au cours d’une utilisation normale, le chronographe
effectue cette séquence de 30 minutes deux fois, pour
une durée totale et maximum d’une heure. Lorsque cette
période d’une heure s’est découlée, l’aiguille supérieure
reste sur le repère 30 minutes tandis que l’aiguille
inférieure retourne à zéro. La fonction chronographe doit
191
Page 99

être réinitialisée avant de l’utiliser à nouveau ou avant de
changer de mode. (À noter que le bouton A est désactivé
lorsque la période maximale d’une heure s’est découlée,
et ne fonctionnera plus tant que le chronographe n’ait
pas été réinitialisé en enfonçant le bouton B pendant 3
secondes.)
192
3GMT
BAGUE INFÉRIEURE/
CHIFFRES
(FORMAT 24 HEURES)
AIGUILLE
DES
MINUTES
AIGUILLE
DES
SECONDES
AIGUILLE DES
HEURES
A
COURONNE
2 31
BAGUE SUPÉRIEURE
À ROTATION
(FORMAT 24 HEURES)
4ÈME AIGUILLE CENTRALE
193
Page 100

FONCTION 3 FUSEAUX HORAIRES
Votre montre peut indiquer l’heure dans trois fuseaux
horaires :
1. Les aiguilles des heures et des minutes : Affichage de
l’heure en format normal de 12 heures. Remarque :
La date affichée dans la fenêtre de date est liée à
l’heure indiquée par ces deux aiguilles.
2. La 4ème aiguille centrale et la bague intérieure :
Affichage de l’heure en format 24 heures.
3. La 4ème aiguille centrale et la bague supérieure à
rotation : Affichage de l’heure en format 24 heures.
RÉGLAGE DE LA 4ÈME AIGUILLE CENTRALE
Pour ajuster la 4ème aiguille centrale lorsqu’elle
est mal alignée :
1. Tirez la couronne en position 3.
2. La 4ème aiguille centrale doit indiquer 12 heures. Si
au bout de 5 secondes après avoir mis la couronne
en position 3 la 4ème aiguille centrale n’indique pas
12 heures, appuyez sur le bouton A pour faire avancer
l’aiguille dans le sens horaire jusqu’à ce qu’elle indique
12 heures. Maintenez le bouton A enfoncé afin de faire
avancer l’aiguille plus vite.
3. Après avoir terminé, enfoncez la couronne en
position 1.
194
195
 Loading...