

Page 1

TECHNICAL FEATURES
1 2 digital gearshift levers
2 2 progressive analog gas
and brake levers
3 Action buttons
4 D-pad
5 Select button
6 Start button
7 Mode selection button
- PC:2/3 Axis
- PS2:On/Off
8 Mode LED
9 PC/PS2 selection switch
10 Analog pedal set
11 Pedal connector
12 Pedal receptor
13 Console connector
14 USB connector
15 Table clamp
16 Clamp screw
User Manual
1/4
Page 2

INSTALLING THE WHEEL
Fixing the wheel in place
1. Place the wheel on a table or other flat surface.
2. Place the clamp screw (16) in the table clamp (15) and then screw the clamping unit into the hole on
the underside of the wheel until firmly fixed in place. Do not turn the screw too tightly, as you risk
damaging the clamping unit and/or the table.
Connecting the pedal set
1. Connect the pedal connector (11) to the pedal receptor (12).
Connecting the wheel
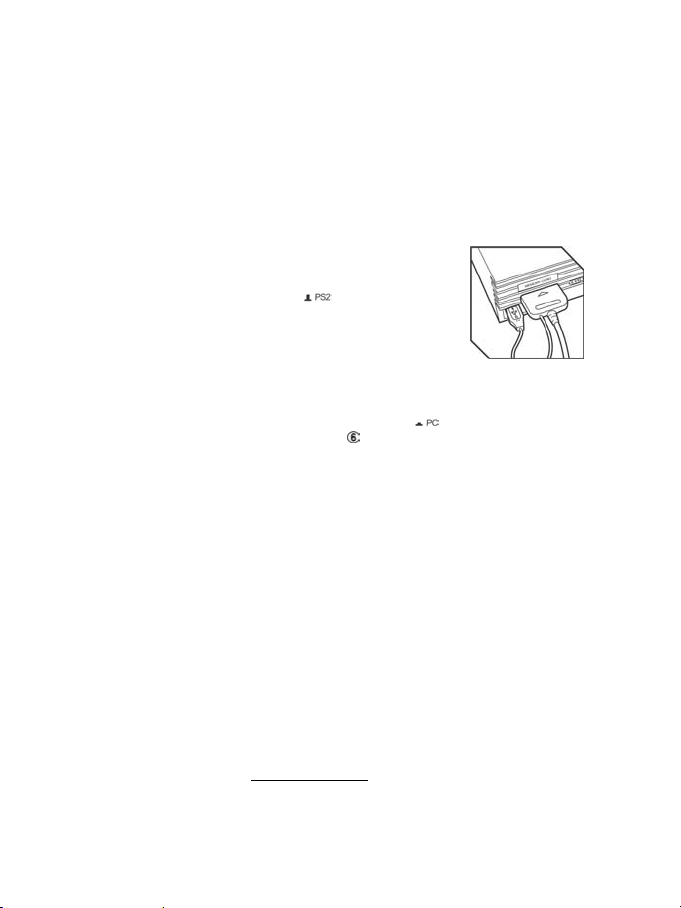
(a) For PS2
1. Switch off your console before connecting the wheel.
2. Connect the console connector (13) to port 1 of your
console and connect the USB connector (14) to the
upper USB port.
3. Place the PC/PS2 selection switch (9) on PS2 (
)
4. Switch your console back on.
5. Once your racing game has loaded, turn your wheel on by pressing the PS2:On/Off button (7). The
wheel’s Mode LED (8) glows red. You are now ready to play!
(b) USB installation for PC
The USB connector allows you to hot-plug your wheel into your computer. First, place the PC/PS2 switch
in the PC position (
Start your computer up and plug the USB connector into one of the USB ports located at the back of your
computer. Windows 98/Me/2000/XP will then automatically detect the new peripheral device.
Note: if you are connecting a USB peripheral device for the first time, Windows may ask you for the
Windows CD-ROM during installation in order to install the required system files.
Note: if you are using a USB hub, your hub must use an independent power supply for your Enzo 2-in-1
wheel to operate properly.
• Under Windows 98: the Add New Hardware Wizard will find the appropriate drivers for you. Simply
click on Next and then follow the on-screen instructions to complete the installation.
• Under Windows Me/2000/XP: installation of the drivers is carried out automatically.
Selecting “Separate” (3-axis) OR “Combined” (2-axis) acceleration/braking mode (PC only)
)
By default, the Enzo 2-in-1 wheel’s acceleration/braking controls operate in “combined” 2-axis mode (red
diode), i.e. with brake and gas pedals operating on the same axis. An increasing number of newgeneration racing games offer “separate” (3-axis” support, which can be activated in the game’s controller
options section. 3-axis support considerably improves driving precision in races.
To activate this mode on your Enzo 2-in-1 wheel, you must download the patch named Wheelpatch.exe
from the www.thrustmaster.com website (select Support, then Download). After installing the patch on
your PC, simply press the PC:2/3 Axis button (7) on your wheel. The Mode LED will turn to green.
When playing games that do not provide 3-axis mode support, you must revert to the standard 2-axis
mode (otherwise, your wheel may not function correctly when playing).
2/4
Page 3

Note: If you can’t recall whether you have installed the patch on your computer or not, you can check this
by verifying the name of your controller in the Windows Control Panel > Game Controllers section:
- If the patch hasn’t been installed, your Enzo 2-in-1 wheel will appear as “Enzo PC-PS2 RW”
- If the patch has been installed, your Enzo 2-in-1 wheel will appear as “Thrustmaster Enzo PC-PS2 Racing
Wheel”.
Enabling/disabling vibration (PS2 only)
Access your racing game’s controller options, and select “Vibration on” or “Vibration off”.
Note: Vibration function is not available on PC!
Wheel sensitivity (PS2 only)
“High sensitivity” is the default setting for your wheel (i.e. no “dead zone” when the wheel is centered). To
set your wheel to “low sensitivity” (i.e. with a “dead zone” located at the wheel’s central position), press the
Select (5) and Start (6) buttons simultaneously (the Mode LED glows green). To revert to the “high
sensitivity” setting, repeat the operations above (the Mode LED glows red).
Mapping (PS2 only)
Disconnecting the pedals
The Enzo 2-in-1 wheel allows you to play without using the pedals – the two analog levers will then be
allocated to accelerator and brake controls.
- PS2: Disconnect the pedals then simply press the PS2:On/Off button in order to reset the wheel.
- PC: First disconnect the pedals, then connect the wheel to your PC’s USB connector.
PC TROUBLESHOOTING
My wheel is not detected by my computer
- Unplug the USB connector and then plug it back in again.
My wheel is detected by my computer but doesn’t work in the game
- Access your game’s options to configure your wheel. Please refer to your game’s manual for further
information.
My wheel doesn’t work correctly or appears to be incorrectly calibrated:
- Exit the game, then disconnect your wheel for your PC’s USB connector and plug it back in again.
Note: Do not turn your wheel or press any of its buttons after reconnecting it to your PC!)
- Install the patch named Wheelpatch.exe on your PC and try to reconfigure your wheel in your game’s
Controller options (if your wheel’s 3-axis mode seems incompatible, try activating the 2-axis mode).
FAQs, tips and drivers available at www.thrustmaster.com
3/4
Page 4

TECHNICAL SUPPORT
If you encounter a problem with your product, please go to http://ts.thrustmaster.com and click Technical Support. From
there you will be able to access various utilities (Frequently Asked Questions (FAQ), the latest versions of drivers and
software) that may help to resolve your problem. If the problem persists, you can contact the Thrustmaster products
technical support service (“Technical Support”):
By email:
In order to take advantage of technical support by email, you must first register online. The information you provide will help
the agents to resolve your problem more quickly. Click Registration on the left-hand side of the Technical Support page
and follow the on-screen instructions. If you have already registered, fill in the Username and Password fields and then
click Login.
By telephone:
United Kingdom 020 7216 0047 price of a national phone call, Monday to Friday, from 12PM to 10PM
United States /
Canada
514-279-9911
price of a long distance phone call, Monday to Friday,
from 7AM to 5PM (Eastern time)
Australia 1902 262 514 $1.98/min, Monday to Friday from 9AM to 6PM
Denmark 82 33 28 58 price of a national phone call, Monday to Friday from 1PM to 10PM
Finland 09 81 71 01 54 price of a national phone call, Monday to Friday from 2PM to 11PM
Norway 23 50 01 16 price of a national phone call, Monday to Friday from 1PM to 10PM
Sweden 08-51992032 price of a national phone call, Monday to Friday from 1PM to 11PM
WARRANTY INFORMATION
Worldwide, Guillemot Corporation S.A. (“Guillemot”) warrants to the consumer that this Thrustmaster product will be free from material defects and
manufacturing flaws for a period of two (2) years from the original date of purchase. Should the product appear to be defective during the warranty
period, immediately contact Technical Support, who will indicate the procedure to follow. If the defect is confirmed, the product must be returned to
its place of purchase (or any other location indicated by Technical Support).
Within the context of this warranty, the consumer’s defective product will, at Technical Support’s option, be either repaired or replaced. Where
authorized by applicable law, the full liability of Guillemot and its subsidiaries (including for indirect damages) is limited to the repair or replacement
of the Thrustmaster product. The consumer’s legal rights with respect to legislation applicable to the sale of consumer goods are not affected by this
warranty.
This warranty shall not apply: (1) if the product has been modified, opened, altered, or has suffered damage as a result of inappropriate or abusive
use, negligence, an accident, normal wear, or any other cause not related to a material defect or manufacturing flaw; (2) in the event of failure to
comply with the instructions provided by Technical Support; (3) to software not published by Guillemot, said software being subject to a specific
warranty provided by its publisher.
Additional warranty provisions
In the United States of America and in Canada, this warranty is limited to the product’s internal mechanism and external housing. Any applicable
implied warranties, including warranties of merchantability and fitness for a particular purpose, are hereby limited to two (2) years from the date of
purchase and are subject to the conditions set forth in this limited warranty. In no event shall Guillemot Corporation S.A. or its affiliates be liable for
consequential or incidental damage resulting from the breach of any express or implied warranties. Some States/Provinces do not allow limitation on
how long an implied warranty lasts or exclusion or limitation of incidental/consequential damages, so the above limitation may not apply to you. This
warranty gives you specific legal rights, and you may also have other legal rights which vary from State to State or Province to Province.
COPYRIGHT
© 2004 Guillemot Corporation S.A. All rights reserved. Thrustmaster® is a registered trademark of Guillemot Corporation S.A. Ferrari® is a registered
trademark of Ferrari Idea S.p.A. Microsoft® Windows® is a registered trademark of Microsoft Corporation in the United States and/or other countries.
PlayStation® is a registered trademark of Sony Computer Entertainment Inc. All other trademarks and brand names are hereby acknowledged and are
property of their respective owners. Illustrations not binding. Contents, designs and specifications are subject to change without notice and may vary from
one country to another.
4/4
Page 5

CARACTÉRISTIQUES TECHNIQUES
1 2 leviers de vitesses digitaux
2 2 leviers analogiques pour
accélération et freinage
progressifs
3 Boutons d’action
4 Croix multi-directionnelle
5 Bouton Select
6 Bouton Start
7 Bouton de sélection du mode
- PC:2/3 Axis
- PS2:On/Off
8 Diode Mode
9 Commutateur PC/PS2
Manuel de l’utilisateur
10 Pédalier analogique
11 Connecteur du volant vers pédalier
12 Connecteur pédalier vers volant
13 Connecteur console
14 Connecteur USB
15 Système de fixation à la table
16 Vis de fixationw
1/4
Page 6
INSTALLATION DU VOLANT
Fixer le volant
1. Placez le volant sur une table ou autre surface plane.
2. Placez la vis de serrage (16) dans le système de fixation (15) puis vissez l’ensemble dans
l’emplacement prévu, sous le volant, jusqu’à ce que ce dernier soit parfaitement stable. Ne serrez pas
trop fort la vis car vous risquez d’endommager le système de fixation ou la table.
Relier le volant
1. Reliez le câble du pédalier (11) au connecteur du volant (12).
Connecter le volant
(a) console PS2
1. Éteignez votre console avant de brancher le volant.
2. Branchez le connecteur console (13) sur le port 1 de votre console de jeu
puis branchez le connecteur USB (14) sur le port USB supérieur.
3. Placez le commutateur PC/PS2 (9) sur PS2 (
)
4. Rallumez votre console.
5. Une fois votre jeu de course chargé, allumez votre volant en appuyant sur
le bouton PS2:On/Off (7). La diode Mode (8) du volant s’allume en rouge.
Vous êtes maintenant prêt à jouer !
(b) installation USB pour PC
Grâce au connecteur USB, vous pouvez brancher votre volant sans éteindre votre ordinateur.
Placez au préalable le commutateur PC/P PS2 (9) sur la position PC (
)
Démarrez votre ordinateur et reliez le connecteur USB à l’un des ports USB situés au dos de votre
unité centrale. Windows 98/Me/2000/XP détectera alors automatiquement le nouveau périphérique.
Remarque : si vous branchez un périphérique USB pour la première fois, il est possible que, pendant
l’installation, Windows vous demande d’insérer le CD-ROM Windows afin d’installer les fichiers système
nécessaires.
• Sous Windows 98 : l’Assistant Ajout de nouveau matériel se charge de rechercher pour vous les
pilotes appropriés. Cliquez sur Suivant. Suivez les instructions portées à l’écran pour terminer
l’installation.
• Sous Windows Me/2000/XP : l’installation des pilotes s’effectue automatiquement.
Remarque : Si vous utilisez un hub USB, celui-ci doit être alimenté par une source de courant
indépendante afin que le volant Enzo 2-in-1 puisse fonctionner correctement..
SELECTION DU MODE D’ACCELERATION / FREINAGE « SEPARE » (3 AXES) OU « COMBINE » (2
AXES)
Par défaut, les commandes d’accélérateur et de freins de votre volant Enzo 2-in-1 fonctionnent en mode
« combiné », 2 axes (diode rouge), ce qui signifie que les pédales d’accélérateur et de frein fonctionnent
sur le même axe. Un nombre croissant de jeux de course de la nouvelle génération offrent une prise en
charge du mode « séparé », 3 axes, qui peut être activé depuis l’interface de gestion des options du jeu.
Le mode 3 axes permet d’améliorer considérablement la précision de votre pilotage.
Pour activer ce mode sur votre volant Enzo 2-in-1, vous devez télécharger le patch intitulé
Wheelpatch.exe sur le site Web www.thrustmaster.com
(sélectionnez les options Support, puis
Download). Après avoir installé le patch sur votre PC, appuyez simplement sur les boutons 9 et 10 de
votre volant. La diode Mode s’allume en vert. Si vous utilisez un jeu n’offrant aucune prise en charge du
2/4
Page 7

mode 3 axes, vous devez désactiver le mode 3 axes et revenir au mode 2 axes (dans le cas contraire,
votre volant ne fonctionnera peut-être pas correctement).
Remarque : Si vous ne parvenez pas à savoir si vous avez déjà installé ce patch sur votre PC, il vous
suffit d’accéder à la section Contrôleurs de jeu du Panneau de configuration de Windows afin d’y consulter
le nom de votre volant :
- Si vous n’avez pas installé le patch, votre volant sera affiché sous le nom « Enzo PC-PS2 RW »
- Si vous avez installé le patch, votre volant apparaîtra sous le nom « Thrustmaster Enzo PC-PS2 Racing
Wheel »
Activer/désactiver les vibrations (PS2 uniquement)
Accédez aux options de réglage du contrôleur dans votre jeu et sélectionnez l’option de vibration voulue.
Remarque: la fonction de vibration n’est pas disponible sur PC !
Sensibilité du volant (PS2 uniquement)
Par défaut, votre volant est réglé sur « sensibilité élevée » (c’est-à-dire « absence de zone morte » lorsque
le volant est centré). Pour régler votre volant sur « sensibilité réduite » (avec zone morte au niveau de la
position centrale du volant), appuyez simultanément sur les boutons Select (5) et Start (6) (la diode Mode
s’allume alors en vert). Pour revenir à une sensibilité élevée du volant, répétez la même opération (la diode
Mode s’allume alors en rouge).
Correspondance des boutons (PS2 uniquement)
Déconnecter le pédalier
Vous pouvez utiliser le volant Enzo 2-in-1 sans son pédalier. Les leviers analogiques seront alors affectés
aux commandes de frein et d’accélérateur.
- PS2 : Déconnectez le pédalier et appuyez simplement sur le bouton PS2:On/Off pour réinitialiser le
volant.
- PC : Déconnectez le pédalier, puis branchez votre volant sur un port USB de votre ordinateur.
INFORMATIONS DE DEPANNAGE SUR PC
Mon volant n’est pas détecté par mon ordinateur
- Déconnectez la prise USB de votre PC, puis rebranchez-la sur le port USB.
Mon volant est détecté par mon ordinateur, mais ne fonctionne pas avec mon jeu
- Ouvrez l’interface de gestion des options de votre jeu pour configurer votre volant. Reportez-vous au
manuel de l’utilisateur ou à l’aide en ligne de votre jeu pour plus d’informations.
Mon volant ne fonctionne pas correctement, ou semble mal calibré
- Quittez le jeu, puis débranchez le connecteur de votre volant de la prise USB de votre PC et
rebranchez-le à nouveau.
3/4
Page 8

Remarque : ne tournez pas votre volant et n’appuyez sur aucun de ses boutons après l’avoir
rebranché sur votre PC !
- Installez le patch intitulé Wheelpatch.exe sur votre PC et essayez de reconfigurer votre volant depuis
l’interface de configuration de votre contrôleur de jeu (si le mode 3 axes de votre volant semble
incompatible avec votre jeu, essayez d’activer le mode 2 axes).
SUPPORT TECHNIQUE
Si vous rencontrez un problème avec votre produit, rendez-vous sur le site http://ts.thrustmaster.com et cliquez sur Support
Technique. Vous aurez alors accès à différents services (Foire Aux Questions (FAQ), dernières versions des pilotes et
logiciels) susceptibles de résoudre votre problème. Si le problème persiste, vous pouvez contacter le support technique des
produits Thrustmaster (« Support Technique ») :
Par e-mail :
Pour bénéficier du support technique par e-mail, vous devez d’abord vous enregistrer en ligne. Les informations fournies vont
permettre aux techniciens de résoudre plus rapidement votre problème. Cliquez sur Enregistrement à gauche de la page
Support technique et suivez les instructions à l’écran. Si vous êtes déjà enregistré, renseignez les champs Nom d’utilisateur et
Mot de passe puis cliquez sur Connexion.
Par téléphone :
France 0892 690 024
Belgique 02 / 732 55 77
Suisse 22 567 51 20
Canada 514-279-9911
Informations relatives à la garantie
Dans le monde entier, Guillemot Corporation S.A. (« Guillemot ») garantit au consommateur que le présent produit Thrustmaster est exempt de défauts
matériels et de vices de fabrication, et ce, pour une période de deux (2) ans à compter de la date d’achat d’origine. Si, au cours de la période de
garantie, le produit semble défectueux, contactez immédiatement le Support Technique qui vous indiquera la procédure à suivre. Si le défaut est
confirmé, le produit devra être retourné à son lieu d’achat (ou tout autre lieu indiqué par le Support Technique).
Dans le cadre de la garantie, le consommateur bénéficiera, au choix du Support Technique, du remplacement ou de la réparation du produit
défectueux. Lorsque la loi applicable l’autorise, toute responsabilité de Guillemot et ses filiales (y compris pour les dommages indirects) se limite à la
réparation ou au remplacement du produit Thrustmaster. Les droits légaux du consommateur au titre de la législation applicable à la vente de biens de
consommation ne sont pas affectés par la présente garantie.
Cette garantie ne s’appliquera pas : (1) si le produit a été modifié, ouvert, altéré, ou a subi des dommages résultant d’une utilisation inappropriée ou
abusive, d’une négligence, d’un accident, de l’usure normale, ou de toute autre cause non liée à un défaut matériel ou à un vice de fabrication ; (2) en
cas de non-respect des instructions du Support Technique ; (3) aux logiciels non-édités par Guillemot, lesdits logiciels faisant l’objet d’une garantie
spécifique accordée par leurs éditeurs.
Stipulations additionnelles à la garantie
Aux États-Unis d’Amérique et au Canada, cette garantie est limitée au mécanisme interne et au boîtier externe du produit. Toute garantie implicite
applicable, incluant les garanties de qualité marchande ou d’adaptation à un usage particulier, est limitée à deux (2) ans à compter de la date d’achat
et soumise aux conditions de la présente garantie limitée. En aucun cas, Guillemot Corporation S.A. ou ses sociétés affiliées ne sauraient être tenues
responsables envers qui que ce soit de tous dommages indirects ou dommages accessoires résultant du non-respect des garanties expresses ou
implicites. Certains États/Provinces n’autorisent pas la limitation sur la durée d’une garantie implicite, ou l’exclusion ou la limitation de responsabilité
pour les dommages indirects ou accessoires, de sorte que les limitations ou exclusions ci-dessus peuvent ne pas vous être applicab les. Cette garantie
vous confère des droits spécif iques ; vous pouvez également bénéficier d’au tres droits qui peuvent différer d’un État/Prov ince à l’autre.
COPYRIGHT
© 2004 Guillemot Corporation S.A. Tous droits réservés. Thrustmaster® est une marque déposée de Guillemot Corporation S.A. Ferrari® est une
marque déposée de Ferrari Idea S.p.A. Microsoft® Windows® est une marque déposée de Microsoft Corporation aux États-Unis et/ou dans d’autres
pays. PlayStation® est une marque déposée de Sony Computer Entertainment Inc Toutes les autres marques déposées et noms commerciaux sont
reconnus par les présentes et sont la propriété de leurs propriétaires respectifs. Illustrations non contractuelles. Le contenu, la c onception et les
spécifications sont susceptibles de changer sans préavis et de varier selon les pays.
0,34 €/min, du lundi au vendredi de 13h à 17h et de 18h à 22h
prix d’un appel national, du lundi au vendredi de 9h à 12h30 et de 14h à 17h30
prix d’un appel national, du lundi au vendredi de 13h à 22h
prix d’un appel longue distance, du lundi au vendredi
de 7h à 17h (heure de l’Est)
FAQ, astuces et pilotes sur www.thrustmaster.com
4/4
Page 9

TECHNISCHE DATEN
1 2 digitale Schaltwippen
2 2 analoge Gas- und
Bremshebel
3 Bedienungsbuttons
4 D-Pad
5 Auswahlbutton
6 Start Button
7 Mode Auswahlbutton
-PC:2/3 Achse
-PS2:On/Off
8 Modus LED
9 PC/PS 2 Auswahlschalter
Benutzerhandbuch
10 Analoger Pedalsatz
11 Verbindungskabel zum
Pedal
12 Steckverbindung am
Pedalkabel
13 Verbindungskabel zur
Konsole
14 USB Verbindung
15 Tischklemme
16 Klemmschraube
1/4
Page 10

EINRICHTEN DES LENKRADES
Installation
1. Setze das Lenkrad auf einen Tisch oder eine ebene Fläche.
2. Setze die Klemmschraube (16) in die Tischklemme (15) und schraube die Klemmvorrichtung in das
Loch an der Unterseite des Lenkrades, bis es fest ist. Zieh die Schraube nicht zu fest an, damit weder
die Klemmvorrichtung noch der Tisch beschädigt werden.
Verbinden des Pedalsatzes
1. Verbinde das Pedalkabel (11) mit dem Pedalkabelstecker (12).
Anschließen des Lenkrades
(a) Für PS2
1. Konsole vor dem Anschließen des Kabels ausschalten.
2. Verbinde das Konsolenkabel (13) mit Port 1 der Konsole und verbinde das
USB Kabel (14) mit dem oberen USB Port.
3. Setze den PC/PS2 Kabelschalter (9) auf PS2 (
4. Schalte die Konsole wieder ein.
)
5. Wenn das Rennspiel geladen ist, schalte das Lenkrad durch Pressen des
PS2 On/Off Button (7) an. Das Mode LED (8) des Lenkrades wird rot. Das Spiel kann beginnen.
(b) USB Installation für PC
Das USB Kabel erlaubt eine Hot-Plug Installation des Lenkrades am Computer. Zuerst stelle den PC/PS2
Schalter in PC Position(
Starte den Computer und stecke das USB Kabel in einen der USB Ports an der Rückseite des Computers.
).
Windows 98/Me/2000/XP wird nun das Lenkrad als neues Peripheriegerät automatisch erkennen.
Achtung: Bei Erstinstallation eines Peripheriegerätes kann Windows während der Installation nach der
Windows CD-ROM fragen, um die benötigten Systemdateien zu installieren.
Achtung: Bei Benutzung eines USB Hub muss dieser Hub über eine unabhängige Stromquelle verfügen,
damit das Enzo 2-in-1 Lenkrad korrekt arbeiten kann.
• Bei Verwendung von Windows 98: Der Hardware-Installationsassistent wird die richtigen Fahrer für
das Spiel finden. Klicke auf Nächste und befolge die Bildschirmanweisungen zur Vervollständigung der
Installation.
• Bei Verwendung von Windows Me/2000/XP: Installation der Fahrer erfolgt automatisch.
Auswahl von “Separate” (3-Achsen) oder “Combined” (2-Achsen) Beschleunigungs-/Brems
Modus (nur am PC).
Bei Voreinstellung arbeiten die Beschleunigungs-/Bremskontrollen von Enzo 2-in-1 im kombinierten 2Achsen Mode (rote Diode), z.B. mit Brems- und Gaspedalen auf der gleichen Achse. Eine wachsende
Zahl der Rennspiele der neuen Generation bieten „separate“ (3-Achsen) Unterstützung, die in der Sektion
Controller Optionen des Spiels aktiviert werden können. 3-Achsen-Unterstützung verbessert die
Fahrpräzision beim Rennen erheblich.
Um diesen Modus beim Enzo 2-in-1 Lenkrad zu aktivieren, muss der Patch namens Wheelpatch.exe von
der www.thrustmaster.com Website heruntergeladen werden (wähle Support, dann Download). Nach
Installation des Patch auf dem PC wird einfach der PX:2/3 Achsen-Button (7) auf dem Lenkrad gedrückt.
Die Modus-LED wird grün.
2/4
Page 11

Bei Verwendung von Spielen ohne 3-Achsen Mode-Unterstützung muss man auf den Standard 2-Achsen
Modus zurückgreifen, sonst funktioniert das Lenkrad beim Spielen nicht richtig.
Note: Wenn man sich nicht erinnern kann, ob der Patch auf dem Computer installiert ist oder nicht, kann
man es herausfinden, indem man den Namen des Controller im Menü Systemsteuerung > Game
Controller überprüft:
- Bei Nicht-Installation erscheint das Enzo 2-in-1 Lenkrad als “Enzo PC-PS2 RW”
- Bei Installation erscheint das Enzo 2-in-1 Lenkrad als “Thrustmaster Enzo PC-PS2 Racing Wheel”.
Einrichten/Entfernen der Vibrationsfunktion (nur PS2):
Zugang zu den Controller Optionen des Rennspiels, Wahl von „Vibration on” oder „Vibration off“.
Hinweis: Vibrationsfunktion ist auf PC nicht möglich.
Ansprechempfindlichkeit des Lenkrades (nur PS2):
“High Sensitivity” ist die Voreinstellung für das Lenkrad (z.B. keine „Dead Zone“ bei Zentrierung des
Lenkrades). Um das Lenkrad auf “Low Sensitivity” zu bringen (z.B. mit einer “Dead Zone” bei zentriertem
Lenkrad), drücke Select (5) und Start (6) Buttons gleichzeitig (Modus LED wird grün). Um in die “High
Sensitivity” zurückzukommen, wiederhole das obige Vorgehen (Modus LED wird rot).
Mapping (nur PS2)
Trennen der Pedale
Das Enzo 2-in-1 Lenkrad erlaubt das Spielen ohne Pedale – die zwei analogen Hebel werden den
Beschleunigungs- und Bremskontrollen zugeteilt.
- PS2: Trenne die Pedale, dann drücke den PS2:On/Off Button, um das Lenkrad zurückzusetzen.
- PC: Trenne zuerst die Pedale, dann verbinde das Lenkrad mit dem USB-Kabel des PC.
PC TROUBLESHOOTING
Mein Lenkrad wird von meinem Computer nicht akzeptiert.
- Zieh das USB-Kabel heraus und dann stöpsele es wieder ein.
Mein Lenkrad wird von meinem Computer akzeptiert, arbeitet aber nicht im Spiel.
- Greif auf die Spieloptionen zurück, um das Lenkrad zu konfigurieren. Informiere Dich darüber hinaus in
der Bedienungsanleitung des Spiels.
Mein Lenkrad arbeitet nicht korrekt oder erscheint falsch kalibriert:
- Entferne das Spiel, dann trenne das Lenkrad vom USB-Kabel des Computers und stöpsele es
wieder ein.
Achtung: Drehe das Lenkrad nicht oder drücke irgendwelche Buttons, nachdem es mit dem PC wieder
verbunden wurde.
3/4
Page 12

- Installiere das Patch namens Wheelpatch.exe im Computer und versuche, das Lenkrad in den
Controller Optionen des Spiels zu rekonfigurieren (wenn der 3-Achsen Modus des Lenkrads
inkompatibel erscheint, versuche den 2-Achsen Modus zu aktivieren).
TECHNISCHER SUPPORT
Sollten Sie mit Ihrem Produkt ein Problem haben, besuchen Sie bitte die Seite http://ts.thrustmaster.com
klicken Sie auf Technischer Support. Von dort aus können Sie auf verschiedene Instrumente zugreifen (Fragen
und Antworten (FAQ), die neuesten Versionen von Treibern und Software), die Ihnen bei der Lösung Ihres
Problems helfen könnten. Falls das Problem weiterhin besteht, können Sie mit dem technischen Support der
Thrustmaster Produkten in Kontakt treten („Technischer Support“):
Per Email:
Um den Vorzug des technischen Supports per Email in Anspruch nehmen zu können, müssen Sie sich zunächst
online registrieren. Mit den Informationen, die Sie uns so zukommen lassen, können die Mitarbeiter Ihr Problem
schneller lösen. Klicken Sie auf Registrierung links auf der Seite des technischen Supports und folgen Sie den
Instruktionen auf dem Bildschirm. Falls Sie bereits registriert sind, füllen Sie die Textfelder Anwendername und
Paßwort aus und klicken dann auf Login.
und
Per Telefon:
Deutschland 0190/662789
Schweiz 22 567 51 20
GEWÄHRLEISTUNGSINFORMATION
Guillemot Corporation S.A. („Guillemot“) bietet dem Kunde weltweit eine 2-jährige Garantie auf Materialschäden und Herstellungsmängel ab dem
Kaufdatum. Sollte das Produkt dennoch während dieser 2 Jahre Schäden oder Mängel aufweisen, kontaktieren Sie unverzüglich den Technischen
Support, der Ihnen mitteilt, wie weiter zu verfahren ist. Sollte ein Defekt vorliegen, muß das Produkt dort zurückgegeben werden, wo es gekauft
wurde (oder an die vom Technischen Support angegebene Adresse).
Im Rahmen dieser Garantie wird das defekte Produkt des Kunden nach Ermessen des Technischen Supports entweder repariert oder ersetzt.
Überall wo es geltendes Recht zulässt, wird die volle Haftung von Guillemot und seinen Niederlassungen (einschließlich für indirekte
Beschädigungen), begrenzt auf die Reparatur oder den Ersatz des Thrustmaster Produktes, übernommen. Die Rechte des Käufers entsprechend
geltendem Recht im jeweiligen Land werden nicht durch diese Garantie beeinflusst.
Diese Garantie tritt nicht ein bei: (1) falls am Produkt etwas verändert wurde oder es geöffnet wurde, ein Schaden durch unangebrachte Nutzung,
Fahrlässigkeit, einen Unfall, Verschleiß oder irgendeinen anderen Grund verursacht wurde, der nicht im Zusammenhang mit einem Materialdefekt
oder Herstellungsmangel aufgetreten ist; (2) im Falle der Nichteinhaltung der durch den Technischen Support erteilten Anweisungen; (3) Die
Software, die nicht von Guillemot herausgegeben wurde, unterliegt der speziellen Garantie des Herausgebers.
COPYRIGHT
© 2004 Guillemot Corporation S.A. Alle Rechte vorbehalten. Thrustmaster® ist ein eingetragenes Warenzeichen der
Guillemot Corporation S.A. Ferrari® ist ein eingetragenes Warenzeichen der Ferrari S.p.A. Microsoft® Windows® 98, 2000,
Me und XP sind eingetragene Warenzeichen der Microsoft Corporation in den Vereinigten Staaten von Amerika und/oder
anderen Ländern. PlayStation® ist ein eingetragenes Warenzeichen der Sony Computer Entertainment Inc.. Alle anderen
Warenzeichen und Markennamen werden hiermit anerkannt und sind Eigentum ihrer jeweiligen Eigentümer. Fotos und
Abbildungen nicht bindend. Inhalt, Design und Eigenschaften des Produkts können ohne Bekanntmachung geändert
werden und variieren von Land zu Land.
Zum Preis eines landesweiten Telefongesprächs, Montag bis Freitag
0,433 €/Minute, Montag bis Freitag
von 15 bis 18 Uhr und 19 bis 22 Uhr
von 13 bis 22 Uhr
FAQs, Tipps und Driver sind unter www.thrustmaster.com erhältlich
4/4
Page 13

TECHNISCHE KENMERKEN
1 2 digitale schakelflippers
2 2 progressief reagerende
analoge hendels voor gasgeven
en remmen
3 Actieknoppen
4 D-pad
5 Select knop
6 Start knop
7 Knop voor modusselectie
- PC:2/3 As
- PS2:Aan/uit
8 Mode LED
9 Schakelaar selectie PC/PS2
Gebruikershandleiding
10 Analoge pedalen
11 Connector voor pedalen (stuurzijde)
12 Connector voor pedalen (pedaalzijde)
13 Connector voor console
14 USB-connector
15 Tafelklem
16 Klemschroef
1/4
Page 14

HET STUUR INSTALLEREN
Het stuur vastzetten
1. Zet het stuur op een tafel of een ander vlak oppervlak.
2. Stop de klemschroef (16) in de klem (15) en schroef de klembeugel goed vast in het gat aan de
onderzijde van het racestuur. Draai de schroef niet al te vast aan, want dat zou de klem of de tafel
kunnen beschadigen.
De pedalen aansluiten
1. Sluit de beide connectoren voor de pedalen op elkaar aan: stuurzijde (11) en pedaalzijde (12).
Het stuur aansluiten
(a) Voor PS2
1. Zet de gameconsole uit voordat het stuur wordt aangesloten.
2. Sluit de connector voor console (13) aan op poort 1
van de console en sluit de USB-connector (14) aan
op de bovenste USB-poort.
3. Zet de schakelaar voor selectie PC/PS2 (9) in de stand PS2 (
)
4. Zet de gameconsole weer aan.
5. Zet het stuur aan door op de knop PS2:Aan/uit (7) te drukken zodra de racegame is geladen. De Mode
LED (8) gaat rood branden. Nu kan er gespeeld worden!
(b) USB-installatie voor PC
Met de USB-connector kan het stuur op de computer worden aangesloten terwijl deze aan staat. Zet eerst
de schakelaar voor selectie PC/PS2 in de stand PC (
Start de computer en steek de USB-connector in een van de USB-poorten aan de achterzijde van de
computer. Windows 98/Me/2000/XP zal het nieuwe apparaat automatisch herkennen.
Opmerking: als een nieuw USB-apparaat voor het eerst op de computer wordt aangesloten, kan het
)
voorkomen dat bij het installeren gevraagd wordt de Windows CD-ROM te plaatsen zodat de benodigde
systeembestanden kunnen worden geïnstalleerd.
Opmerking: als gebruik wordt gemaakt van een USB-hub, dan dient voor een correcte werking van het
Enzo Two-In-One stuur de hub apart van voedingsspanning te worden voorzien.
• Onder Windows 98: de Wizard Nieuwe hardware zoekt de benodigde drivers. Voltooi de installatie
door de instructies op het scherm te volgen.
• Onder Windows 2000/Me/XP: de installatie van de drivers gebeurt automatisch.
Modus “Separate” (Afzonderlijk, 3 assen) of “Combined” (Gecombineerd, 2 assen) selecteren voor
gas geven / remmen
Standaard vindt de bediening van gas- en rempedaal van het Enzo Two-In-One stuur plaats in een
gecombineerde 2-as modus (rode diode), d.w.z. met rem- en gaspedalen die op dezelfde as werken. Een
groeiend aantal moderne racegames biedt afzonderlijke 3-as ondersteuning hetgeen geactiveerd kan
worden in de sectie opties van de gamecontroller. Het werken met 3 assen zorgt voor aanzienlijk grotere
precisie tijdens het racen.
Om deze modus te activeren op het Enzo Two-In-One stuur dient de patch genaamd Wheelpatch.exe te
worden gedownload van de website www.thrustmaster.com (selecteer Support en vervolgens Download).
2/4
Page 15

Druk na het installeren van de patch op de PC op de knop PX:2/3 as (7) op het stuur. de Mode LED (8)
gaat groen branden.
Bij het spelen van games die geen ondersteuning bieden voor 3-assen, dient teruggeschakeld te worden
naar de standaard 2-as modus (anders kan het zijn dat het stuur niet correct werkt bij het racen).
Opmerking: als het niet duidelijk is of de patch reeds is geïnstalleerd, controleer dan de naam van de
gamecontroller in de Windows-sectie Configuratiepaneel > Spelbesturingen:
- Als de patch nog niet is geïnstalleerd, heeft het Enzo Two-In-One stuur de naam “Enzo PC-PS2 RW”
- Als de patch wel is geïnstalleerd, heeft het Enzo Two-In-One stuur de naam “Thrustmaster Enzo PC-
PS2 Racing Wheel”
Activeren/deactiveren van trilfunctie (alleen PS2)
Ga naar de opties van de gamecontroller en selecteer “Vibration on” of “Vibration off”.
Opmerking: de trilfunctie is niet beschikbaar op een PC!
Gevoeligheid van het stuur (alleen PS2)
Het stuur staat standaard ingesteld op maximale gevoeligheid (sensitivity) zodat er geen dode zone is als
het stuur in de middenstand staat. Stel het stuur in op lage gevoeligheid (d.w.z. met een dode zone in de
middenstand van het stuur) door de knoppen Selecteer (5) en Start (6) tegelijkertijd in te drukken (de
Mode LED gaat groen branden). Herhaal bovenstaande stappen om het stuur weer op hoge gevoeligheid
in te stellen (de Mode LED brandt rood).
Mapping (alleen PS2)
De aansluiting van de pedalen losmaken
Het Enzo Two-In-One stuur kan worden gebruikt zonder de pedalen. Het remmen en gasgeven wordt dan
toegewezen aan de twee analoge stuurflippers.
- PS2: koppel de pedalen los en druk op de knop PS2:Aan/uit om het stuur te resetten.
- PC: koppel eerst de pedalen los en sluit vervolgens het stuur aan op de USB-connector van de PC.
TIPS BIJ PROBLEMEN (PC)
Het stuur wordt niet door de computer herkend.
- Koppel de USB-connector los en sluit deze vervolgens weer aan.
Het stuur wordt door de computer herkend, maar het werkt niet in de game.
- Ga in de game naar de Opties en configureer het stuur. Raadpleeg de handleiding bij de game voor
meer informatie.
Mijn stuur werkt niet goed of het lijkt er op dat dat het stuur niet goed gekalibreerd is.
- Sluit de game af , trek de USB-connector uit de PC en steek deze er opnieuw in..
3/4
Page 16

Opmerking: draai niet aan het stuur en druk niet op een knop nadat het stuur weer op de PC is
aangesloten.
- Installeer de patch genaamd Wheelpatch.exe op de PC en probeer het stuur opnieuw te
configureren in de Controller-opties van de game (probeer de 2-as modus te activeren als de 3-as
modus niet compatibel llijkt te zijn).
TECHNICAL SUPPORT
Als u problemen hebt met uw product, gaat u naar http://ts.thrustmaster.com en klikt u op Technical Support. Vanaf hier
hebt u toegang tot verschillende onderwerpen zoals hulpprogramma’s, de FAQ (veelgestelde vragen) en de meest recente
drivers en software die u helpen bij het vinden van oplossingen. Als het probleem zich blijft voordoen, neem dan contact op
met de Thrustmaster product technical support service (“Technical Support”):
Per e-mail:
Voordat u gebruik kunt maken van technisch ondersteuning per e-mail dient u zich eerst online te registreren. Met de door u
verstrekte informatie kan uw probleem sneller en beter worden opgelost. Klik op Registration aan de linkerzijde van de
pagina Technical Support en volg de aanwijzingen op het scherm. Inidien u reeds geregistreerd bent, vult u de velden
Username en Password in en klikt u op Login.
Per telefoon:
Nederland
0900-202 67 65
België 02 / 732 55 77
0,30 €/minuut, maandag t/m vrijdag van 13:00 tot 22:00
kosten van interlokaal gesprek, maandag t/m vrijdag
van 09:00 tot 12:30 en van 14:00 tot 17:30
GARANTIE INFORMATIE
Wereldwijd garandeert Guillemot Corporation S.A. (“Guillemot”) de consument dat dit Thrustmaster-product gedurende een periode van twee (2)
jaar vanaf de oorspronkelijke aankoopdatum vrij zal zijn van materiaal- en fabricagefouten. Indien u in de garantieperiode een defect meent te
constateren aan dit product, neem dan onmiddellijk contact op met de Technical Support die u zal informeren over de te volgen procedure. Als het
defect wordt bevestigd, dan dient het product te worden geretourneerd naar de plaats van aankoop (of een andere locatie die wordt opgegeven door
Technical Support).
Binnen het gestelde van deze garantie wordt het defecte product van de consument gerepareerd of vervangen, zulks ter beoordeling van Technical
Support. Indien toegestaan door van kracht zijnde wetgeving, beperkt de volledige aansprakelijkheid van Guillemot en haar dochterondernemingen
(inclusief de aansprakelijkheid voor indirecte schade) zich tot het repareren of vervangen van het Thrustmaster product. De wettelijke rechten van
de klant volgens de wetgeving van toepassing op de verkoop van consumentproducten worden op generlei wijze beperkt door deze garantie.
Deze garantie is niet van kracht: (1) indien het product gemodificeerd, geopend of gewijzigd is, of beschadigd ten gevolge van oneigenlijk of
onvoorzichtig gebruik, verwaarlozing, een ongeluk, normale slijtage, of enig andere oorzaak niet gerelateerd aan een materiaal- of fabricagefout; (2)
indien u zich niet houdt aan de instructies zoals verstrekt door Technical Support; (3) op software die niet is gepubliceerd door Guillemot en
daardoor onder de specifieke garantie valt zoals verstrekt door degene die deze software publiceert.
COPYRIGHT
© Guillemot Corporation 2004. Alle rechten voorbehouden. Thrustmaster® is een geregistreerd handelsmerk van Guillemot
Corporation S.A. Ferrari® is een geregistreerd handelsmerk van Ferrari S.p.A. Microsoft® Windows® 98, 2000, Me en XP zijn
geregistreerde handelsmerken van Microsoft Corporation in de Verenigde Staten en/of andere landen.
geregistreerd handelsmerk van Sony Computer Entertainment Inc. Alle andere handelsmerken en merknamen zijn hierbij erkend
en zijn het eigendom van de desbetreffende eigenaren. Illustraties zijn niet bindend. Inhoud, ontwerpen en specificaties kunnen zonder
voorafgaande kennisgeving gewijzigd worden en afwijken in verschillende landen.
PlayStation® is een
4/4
Page 17

CARATTERISTICHE TECNICHE
1 2 leve per il cambio marcia digitale
2 2 leve analogiche per accelerazione e
frenaggio progressivi
3 Pulsanti d'azione
4 D-pad
5 Pulsante di Select
6 Pulsante Start
7 Pulsante di selezione modalità
- PC:2/3 Assi
- PS2:On/Off
8 LED di modalità
9 Interruttore di selezione PC/PS2
10 Set di pedali analogici
11 Connettore dei pedali
12 Ricettore dei pedali
13 Connettore della console
14 connettore USB
15 Morsetto da tavolo
16 Vite fissante
Guida d’uso
1/4
Page 18

INSTALLARE IL VOLANTE
Posizionare il volante
1. Sistemare il volante su un tavolo o un altra superficie piatta.
2. Sistemare la vite di fissaggio (16) sul morsetto da tavolo (15) e avvitare il tutto alla base del volante
finchè le varie parti non sono ben fissate. Non stringere troppo la vite per non rischiare di danneggiare
il volante o il tavolo.
Collegare il set pedali
1. Collegare il connettore dei pedali (11) al ricettore dei pedali(12).
Collegare il volante
(a) PS2
1. Spegnere la console prima di collegare il volante.
2. Collegare il connettore della console (13) alla porta 1
della console e collegare il connettore USB (14) alla
porta USB più in alto.
3. Posizionare l'interruttore di selezione PC/PS2 (9) su PS2 (
)
4. Accendere la console.
5. Dopo aver caricato il gioco scelto, accendere il volante premendo il tasto PS2:On/Off (7). Il LED di
modalità del volante (8) sarà rosso.
(b) Installazione USB per PC
Il connettore USB consente di collegare rapidamente il volante al computer.
Per prima cosa, spostare l'interruttore PC/PS2 in posizione PC (
Avviare il computer e collegare il connettore USB in una delle porte USB che si trovano sul retro del
computer. Windows 98/Me/2000/XP individuerà automaticamente la nuova periferica.
Nota: se si collega una periferica USB per la prima volta, il sistema operativo potrebbe richiedere il CD-ROM di
)
installazione di Windows durante l'installazione per copiare i necessari file di sistema.
•Windows 98: l'utilità Aggiungi nuova periferica troverà i driver corretti.
Basta cliccare su Avanti e seguire le istruzioni per completare l'installazione.
•Windows Me/2000/XP: l'installazione dei driver avverrà automaticamente.
SELEZIONARE IL SISTEMA DI ACCELERAZIONE/FRENATA “SEPARATO” (3-ASSI) O
“COMBINATO” (2-ASSI)
I controlli di accelerazione e frenaggio dell volante Enzo 2-in-1 sono impostati per funzionare in modalità
“combinata” 2-assi (diodo rosso), ovvero coi pedali del freno e dell'accelerazione che lavorano sullo stesso
asse. Un crescente numero di giochi di nuova generazione offre la modalità “separata” (3-assi) che può
essere attivata nella sezione opzioni del controller del gioco . La modalità 3-assi migliora
considerevolmente la precisione della guida durante il gioco.
Per attivare questa modalità, scaricare la patch chiamata Wheelpatch.exe dal sito www.thrustmaster.com
(scegliere Support e poi Download ). Dopo aver installato la patch, premere il pulsante PC:2/3 Axis (7). Il
LED che indica la modalità diventera verde.
Giocando a giochi che non supportano la modalità a 3 assi, si deve reimpostare il volante alla modalità
standard a 2 assi (altrimenti, il volante potrebbe non funzionare in modo corretto).
2/4
Page 19

Nota: per verificare se la patch è stata installata, cercare il controller nella sezione di Windows Pannello di
controll o> Periferiche di gioco:
- Se la patch non è stata installata, il volante Enzo 2-in-1 comparirà come “Enzo PC-PS2 RW”
- Se la patch è stata installata, il volante Enzo 2-in-1 comparirà come “Thrustmaster Enzo PC-PS2 Racing
Wheel”.
Abilitare/disabilitare la vibrazione (Solo per PS2)
Accedere alle opzioni del gioco relative al controller, e selezionare “Vibrazione on” o “Vibrazione off”.
Nota: La funzione di vibrazione non è disponibile per PC
Sensibilità del volante (solo per PS2 )
“Alta sensibilità” è il valore standard del volante (ovvero, non c'è una “zona morta” quando il volante è
centrato). Per impostare il volante su “bassa sensibilità” (ovvero con una “zona morta” nella posizione
centrale del volante), premere i pulsanti Select (5) e Start (6) contemporaneamente (il LED Mode diventa
verde). Per tornare all'impostazione “alta sensibilità”, ripetere l'operazione (il LED Mode diventa verde).
Mapping (solo per PS2)
Scollegare i pedali
Il volante Enzo 2-in-1 permette di giocare senza usare i pedali – le due leve analogiche funzioneranno da
controlli di accelerazione e frenaggio.
- PS2: Scollegare i pedali e premere il pulsante PS2:On/Off per reimpostare il volante.
- PC: Prima scollegare i pedali, poi collegare il volante al connettore USB del PC.
RISOLUZIONE DEI PROBLEMI (PC)
Il volante non viene individuato dal computer.
• Scollegare e ricollegare il connettore USB.
Il volante viene individuato ma non funziona nel gioco.
• Accedere alle opzioni del gioco per configurare il volante. Per ulteriori informazioni, consultare il
manuale del gioco.
Il volante non funziona correttamente o non sembra calibrato in modo corretto:
• Uscire dal gioco, sconnettere il volante dal connettore USB del computer e ricollegarlo.
Nota: Appena si ricollega il volante al PC, non girarlo e non premere nessuno dei suoi pulsanti!
- installare la patch chiamata Wheelpatch.exe provare a riconfigurare il volante nelle opzioni di gioco.
(Se la modalità 3-assi del volante sembra incompatibile col gioco, provare a riattivare la modalità
2-assi
3/4
Page 20

ASSISTENZA TECNICA
Se hai avuto problemi con il tuo prodotto, visita il sito http://ts.thrustmaster.com e clicca su Technical Support. Da lì potrai
accedere a vari servizi (domande più frequenti (FAQ), driver e software più recenti) che potranno aiutarti a risolvere il
problema riscontrato. Qualora il problema dovesse persistere, puoi contattare il servizio di assistenza tecnica dei prodotti
Thrustmaster (“Assistenza Tecnica”):
Tramite email:
Per poter godere di assistenza tecnica tramite email, dovrai prima effettuare la registrazione online. Le informazioni che
fornirai aiuteranno gli esperti a risolvere rapidamente il tuo problema. Nella parte sinistra della pagina “Technical Support”,
clicca su Registration e segui le istruzioni che appariranno sullo schermo. Se sei già registrato, riempi i campi Username e
Password e clicca quindi su Login.
Via telefono:
02 833 1364
INFORMAZIONI SULLA GARANZIA
Internazionalmente, Guillemot Corporation S.A. (“Guillemot”) garantisce l’acquirente che questo prodotto Thrustmaster è
privo di vizi produttivi o difetti di materiale per un periodo di due (2) anni dalla data di acquisto. Nel caso il prodotto si riveli
difettoso durante il periodo di garanzia, contattare immediatamente l’Assistenza Tecnica, che indicherà la procedura da
seguire. Qualora il difetto venga confermato, il prodotto dovrà essere riconsegnato al luogo di acquisto (o in qualsiasi altro
luogo specificato dall’Assistenza Tecnica).
Nel contesto della garanzia, il prodotto difettoso dell’acquirente verrà riparato oppure sostituito, a seconda della scelta
operata dall’Assistenza Tecnica. Dove autorizzato dalla legge vigente, la responsabilità di Guillemot e le sue filiali
(includendo qualsiasi danno indiretto) è limitata alla riparazione o alla sostituzione del prodotto Thrustmaster. I diritti
dell’acquirente nel rispetto della legislazione vigente applicabile alla vendita di beni al consumatore non sono annullati dalla
presente garanzia.
Questa garanzia perde di validità: (1) se il prodotto è stato modificato, aperto, alterato, o ha subito un danno come risultato
da uso inappropriato, negligenza, danni accidentali, normale usura o qualsiasi altra causa non direttamente collegata con
un difetto di materiale o un vizio di produzione; (2) nel caso di mancato adempimento nell’esecuzione delle procedure
indicate dall’Assistenza Tecnica; (3) per il software non prodotto da Guillemot, poiché per questo caso è valida la garanzia
fornita dal suo produttore.
COPYRIGHT
© 2004 Guillemot Corporation S.A. Tutti i diritti riservati. Thrustmaster® è un marchio registrato da Guillemot Corporation S.A. Ferrari® è un marchio
registrato da Ferrari Idea S.A. Microsoft® Windows® 98, 2000, Me e XP sono marchi registrati di Microsoft Corporation negli Stati Uniti e/o in altri
paesi. PlayStation® è un marchio registrato da Sony Computer Entertainment Inc. Tutti gli altri marchi sono qui riconosciuti e registrati ai rispettivi
proprietari. Foto escluse. I contenuti, il design e le caratteristiche possono essere oggetto di modifiche senza preavviso e possono variare da un
paese all’altro.
la tariffa corrisponde ad una normale telefonata nazionale, dal Lunedì al Venerdì, dalle 14:30 alle 18:30
4/4
Page 21

Manual del usuario
CARACTERÍSTICAS TÉCNICAS
1 2 palancas digitales de cambio
de marchas
2 2 palancas analógicas
progresivas de acelerador y
freno
3 Botones de acción
4 D-pad
5 Botón Select (selección)
6 Botón Start (inicio)
7 Botón de selección de modo
- PC: 2/3 Axis
- PS2: On/Off
8 LED Mode (Modo)
9 Interruptor selección PC/PS2
10 Pedales analógicos
11 Conector de los pedales
12 Receptor de los pedales
13 Conector de la consola
14 Conector USB
15 Anclaje para la mesa
16 Tornillo de anclaje
1/4
Page 22

INSTALACIÓN DEL VOLANTE
Fijación del volante
1. Coloca el volante en una mesa u otra superficie plana.
2. Coloca el tornillo de anclaje (16) en el anclaje para la mesa (15) y después atornilla la unidad de
anclaje en el agujero en la parte inferior del volante hasta que quede firmemente fijada. No aprietes
demasiado el tornillo, ya que te arriesgas a dañar la unidad de anclaje y/o la mesa.
Conexión de los pedales
1. Enchufa el conector de los pedales (11) en el receptor de los pedales (12).
Conexión del volante
(a) Para PS2
1. Apaga tu consola antes de conectar el volante.
2. Enchufa el conector de la consola (13) en el puerto 1
de tu consola y enchufa el conector USB (14) en el
puerto USB superior.
3. Coloca el interruptor de selección PC/PS2 (9) en PS2 (
).
4. Enciende tu consola.
5. Una vez que se ha cargado tu juego de carreras, gira tu volante pulsando el botón PS2:On/Off (7). El
LED Mode (8) brilla en rojo. ¡Ya estás listo para jugar!
(b) Instalación USB para PC
El conector USB te permite enchufar en caliente tu volante a tu ordenador. Primero, coloca el interruptor
PC/PS2 en la posición PC (
Arranca tu ordenador y enchufa el conector USB en uno de los puertos USB situados en la parte trasera
de tu ordenador. Windows 98/Me/2000/XP detectará automáticamente el nuevo dispositivo periférico.
Nota: si estás conectando un dispositivo periférico USB por primera vez, Windows puede pedirte el CDROM de instalación de Windows durante la instalación para copiar los archivos de sistema necesarios.
Nota: si estás utilizando un concentrador (hub) USB, este dispositivo debe utilizar una fuente de
alimentación independiente para que tu volante Enzo 2-in-1 funcione correctamente.
• Bajo Windows 98: el Asistente para agregar nuevo hardware encontrará por ti los controladores
).
apropiados. Simplemente haz clic en Siguiente y después sigue las instrucciones en pantalla para
completar la instalación.
• Bajo Windows Me/2000/XP: la instalación de los controladores se lleva a cabo de forma automática.
Selección del modo de aceleración/freno “Separado” (3 ejes) o “Combinado” (2 ejes) (sólo PC)
Por defecto, los controles de aceleración/freno del volante Enzo 2-in-1 funcionan en modo “combinado”
de 2 ejes (diodo rojo), es decir, con los pedales de freno y acelerador funcionando en el mismo eje. Un
número creciente de juegos de carreras de última generación ofrecen compatibilidad con modo
“separado” (3 ejes), que puede activarse en la sección de opciones de mandos del juego. La
compatibilidad con 3 ejes mejora considerablemente la precisión de conducción en las carreras.
Para activar este modo en tu volante Enzo Two-In-One, debes descargarte el parche llamado
Wheelpatch.exe del sitio web www.thrustmaster.com (selecciona Support, y después Download. Después
de instalar el parche en tu PC, simplemente pulsa el botón PC: 2/3 Axis (7) en tu volante. El LED Mode se
volverá verde.
2/4
Page 23

Cuando utilices juegos que no proporcionan compatibilidad con el modo de 3 ejes, debes volver al modo
estándar de 2 ejes (de lo contrario, tu volante puede no funcionar correctamente cuando juegues).
Nota: si no puedes recordar si has instalado o no el parche en tu ordenador, puedes comprobarlo
verificando el nombre de tu mando en la sección de Windows Panel de control > Dispositivos de juego:
- Si el parche no ha sido instalado, tu volante Enzo 2-in-1 aparecerá como “Enzo PC-PS2 RW”.
- Si el parche ha sido instalado, tu volante Enzo 2-in-1 aparecerá como “Thrustmaster Enzo PC-PS2
Racing Wheel”.
Activar/desactivar la vibración (sólo PS2)
Accede a las opciones de mando de tu juego, y selecciona “Vibración activada” o “Vibración desactivada”.
Nota: ¡la función de vibración no está disponible en PC!
Sensibilidad del volante (sólo PS2)
La configuración por defecto para tu volante es de “alta sensibilidad” (es decir, no hay “zona muerta”
cuando el volante está centrado). Para poner tu volante en “baja sensibilidad” (es decir, con una “zona
muerta” situada en la posición central del volante), pulsa los botones Select (5) y Start (6) de forma
simultánea (el LED Mode brilla en verde). Para volver a la configuración de “alta sensibilidad”, repite las
operaciones anteriores (el LED Mode brilla en rojo).
Mapeado (sólo PS2)
Desconexión de los pedales
El volante Enzo 2-in-1 te permite jugar sin utilizar los pedales – los controles de acelerador y freno se
asignarán a las dos palancas analógicas.
- PS2: desenchufa los pedales y después pulsa simplemente el botón PS2:On/Off para reiniciar el volante.
- PC: primero desenchufa, y después enchufa, el volante en el conector USB de tu PC.
RESOLUCIÓN DE PROBLEMAS DE PC
Mi ordenador no detecta el volante
- Desenchufa el conector USB y vuelve a enchufarlo de nuevo.
Mi ordenador detecta el volante pero no funciona en el juego
- Accede a las opciones de tu juego para configurar tu volante. Consulta el manual de tu juego para
más información.
Mi volante no funciona correctamente o parece estar calibrado incorrectamente:
- Sal del juego, después desenchufa tu volante del conector USB de tu PC y enchúfalo de nuevo.
3/4
Page 24

Nota: ¡no gires tu volante ni pulses ninguno de sus botones después de volverlo a enchufar a tu PC!
- Instala el parche llamado Wheelpatch.exe en tu PC e intenta volver a configurar tu volante en las
opciones de mando de tu juego (si el modo de 3 ejes de tu volante parece incompatible, prueba a
activar el modo de 2 ejes).
SOPORTE TÉCNICO
Si encuentras un problema con tu producto, visita http://ts.thrustmaster.com y haz clic en Technical Support. Desde allí
podrás acceder a distintas utilidades (preguntas frecuentes (Frequently Asked Questions, FAQ), las últimas versiones de
controladores y software) que pueden ayudarte a resolver tu problema. Si el problema persiste, puedes contactar con el
servicio de soporte técnico de los productos de Thrustmaster (“Soporte Técnico”):
Por correo electrónico:
Para utilizar el soporte técnico por correo electrónico, primero debes registrarte online. La información que proporciones
ayudará a los agentes a resolver más rápidamente tu problema. Haz clic en Registration en la parte izquierda de la página
de Soporte técnico y sigue las instrucciones en pantalla. Si ya te has registrado, rellena los campos Username y
Password y después haz clic en Login.
Por teléfono:
España 917 54 70 63
Estados
Unidos
Información de garantía
En todo el mundo, Guillemot Corporation S.A. (“Guillemot”) garantiza al consumidor que este producto de Thrustmaster estará libre de defectos
materiales y fallos de fabricación por un periodo de dos (2) años a partir de la fecha de compra original. Si el producto pareciera estar defectuoso
durante el periodo de garantía, contacte inmediatamente con el Soporte Técnico, que le indicará el procedimiento a seguir. Si el defecto se
confirma, el producto debe devolverse a su lugar de compra (o a cualquier otro lugar indicado por el Soporte Técnico).
Dentro del contexto de esta garantía, el producto defectuoso del consumidor será reparado o reemplazado, a elección del Soporte Técnico. En los
casos que lo autorice la ley aplicable, toda la responsabilidad de Guillemot y de sus filiales (incluyendo sobre daños indirectos) está limitada a la
reparación o sustitución del producto de Thrustmaster. Los derechos legales del consumidor con respecto a la legislación aplicable a la venta de
bienes de consumo no se ven afectados por esta garantía.
Esta garantía no se aplicará: (1) si el producto ha sido modificado, abierto, alterado, o ha sufrido daños como resultado de una utilización
inapropiada u ofensiva, negligencia, accidente, desgaste normal, o cualquier otra causa no relacionada con un defecto material o fallo de
fabricación; (2) en caso de no cumplimiento de las instrucciones proporcionadas por el Soporte Técnico; (3) a software no publicado por Guillemot,
o sea, a software que está sujeto a una garantía específica proporcionada por su fabricante.
COPYRIGHT
© 2004 Guillemot Corporation S.A. Reservados todos los derechos. Reservados todos los derechos. Thrustmaster® es una marca
comercial registrada de Guillemot Corporation S.A. Microsoft® Windows® 98, 2000, Me y XP son marcas registradas propiedad de
Microsoft Corporation en los Estados Unidos y/o otros países. PlayStation® es una marca registrada de Sony Computer Entertainment
Inc. Todas las demás marcas comerciales y nombres de marca se reconocen aquí y son propiedad de sus respectivos dueños.
Ilustraciones no definitivas. Los contenidos, diseños y especificaciones están sujetos a cambios sin previo aviso y pueden variar de un
país a otro.
514-279-9911
precio de una llamada telefónica de larga distancia, de lunes a viernes
precio de una llamada telefónica nacional, de lunes a viernes
de 13:00 a 17:00 y de 18:00 a 22:00
de 7:00 a 17:00 (hora del Este)
4/4
Page 25

CARACTERÍSTICAS TÉCNICAS
1 2 alavancas digitais de mudança de
velocidades
2 2 alavancas analógicas progressivas
de aceleração e travagem
3 Botões de acção
4 Almofada direccional
5 Botão Select
6 Botão Start
7 Botão de selecção do modo
- PC:2/3 Axis
- PS2: On/Off
8 LED Mode
9 Interruptor de selecção PC/PS2
Guia do Utilizador
10 Conjunto de pedais analógicos
11 Conector dos pedais
12 Receptor dos pedais
13 Conector da consola
14 Conector USB
15 Grampo de fixação
16 Parafuso do grampo
1/4
Page 26

INSTALAR O VOLANTE
Fixar o volante no sítio
1. Coloque o volante numa mesa ou noutra superfície plana.
2. Coloque o parafuso (16) no grampo de fixação (15) e em seguida aparafuse a unidade de fixação no
orifício situado na parte inferior do volante até estar firmemente segura. Não aperte demasiado o
parafuso, pois corre o risco de danificar a unidade de fixação e/ou a mesa.
Conectar o conjunto de pedais
1. Ligue o conector dos pedais (11) ao receptor respectivo (12).
Conectar o volante
(a) Para PS2
1. Desligue a consola antes de conectar o volante.
2. Ligue o conector da consola (13) à porta 1 da mesma
e o conector USB (14) à respectiva porta superior.
3. Ajuste o interruptor de selecção PC/PS2 (9) para PS2 (
4. Volte a ligar a consola.
).
5. Depois de carregar o jogo, rode o volante premindo o botão PS2: On/Off (7). O LED Mode do volante
(8) ficará vermelho. Agora já pode começar a jogar!
(b) Instalação USB para PC
O conector USB permite ligar directamente o volante ao computador. Em primeiro lugar, coloque o
interruptor PC/PS2 na posição PC (
Inicie o computador e ligue o conector USB a uma das portas USB situadas na retaguarda do PC. O
Windows 98/Me/2000/XP detectará então automaticamente o novo dispositivo periférico.
Nota: Se está a conectar um dispositivo periférico USB pela primeira vez, o Windows pode pedir-lhe o
CD-ROM respectivo durante a instalação a fim de instalar os ficheiros de sistema necessários.
Nota: Se está a usar uma central USB, esta deve utilizar uma fonte de alimentação diferente de modo a
que o seu volante Enzo Two-In-One funcione correctamente.
• No Windows 98: o Assistente Adicionar novo hardware procurará automaticamente os
).
controladores apropriados em seu lugar. Clique simplesmente em Seguinte e depois siga as instruções
que surgirem no ecrã para concluir a instalação.
• No Windows Me/2000/XP: a instalação dos controladores é efectuada automaticamente.
Seleccionar o Modo de Aceleração/Travagem “Separado” (3 eixos) OU “Combinado” (2 eixos)
(apenas para PC)
Os controlos de aceleração/travagem do volante Enzo Two-In-One funcionam por pré-definição no modo
combinado de dois eixos (díodo vermelho), isto é, com os pedais do travão e do acelerador operando no
mesmo eixo. Um número crescente de jogos de competição automóvel da nova geração oferece o modo
“separado” (suporte de três eixos, que podem ser activados na secção das opções do controlador do
jogo). O suporte de três eixos melhora consideravelmente a precisão da condução nas corridas.
Para activar este modo no seu volante Enzo Two-In-One, deve em primeiro lugar transferir para o disco o
patch intitulado Wheelpatch.exe a partir do sítio www.thrustmaster.com (seleccione Support e
seguidamente Download). Depois de instalar o patch no PC, basta premir o botão PX: 2/3 Axis (7) no
volante. O LED Mode ficará verde.
2/4
Page 27

Nos jogos que não suportam o modo de três eixos, terá de reverter ao modo padrão de dois eixos (caso
contrário, o seu volante poderá não funcionar correctamente durante o jogo).
Nota: Se não consegue lembrar-se se instalou ou não o patch no seu computador, pode sabê-lo
verificando o nome do controlador na secção Painel de controlo > Controladores de jogos do Windows:
- Se o patch não foi instalado, o seu volante Enzo Two-In-One aparece como “Enzo PC-PS2 RW”;
- Se o patch foi instalado, o volante Enzo Two-In-One aparece como “Thrustmaster Enzo PC-PS2 Racing
Wheel”.
Activar/desactivar a vibração (apenas para PS2)
Aceda às opções do controlador do seu jogo e seleccione “Vibration on” ou “Vibration off”.
Nota: A função de vibração não está disponível em PC!
Sensibilidade do volante (apenas para PS2)
A pré-definição para o seu volante é “High sensitivity” (significa que não há “zonas mortas” quando o
volante está centrado). A fim de ajustar o volante para “Low sensitivity” (isto é, com uma “zona morta” na
posição central do volante), prima simultaneamente Select (5) e Start (6) (o LED Mode fica verde). Para
repor a definição “High sensitivity”, repita as operações acima indicadas (o LED Mode fica vermelho).
Mapeamento (apenas para PS2)
Desconectar os pedais
O volante Enzo Two-In-One permite jogar sem usar os pedais – os controlos do acelerador e do travão são
atribuídos então às duas alavancas analógicas.
- PS2: Desconecte os pedais e depois prima apenas o botão PS2: On/Off a fim de repor o volante.
- PC: Desconecte primeiro os pedais e depois ligue o volante ao conector USB do seu PC.
RESOLUÇÃO DE PROBLEMAS EM PC
O meu computador não detecta o volante
- Desligue o conector USB e volte a ligá-lo.
O meu computador detecta o volante, mas este não funciona no jogo
- Aceda às opções do jogo para configurar o volante. Por favor consulte o manual do jogo para obter
mais informações.
O volante não funciona devidamente ou parece estar calibrado incorrectamente:
- Saia do jogo, em seguida desligue o volante do conector USB do seu PC e por fim volte a ligá-lo.
Nota: Não rode o volante nem prima nenhum dos seus botões depois de voltar a conectá-lo ao PC!
- Instale no PC o patch Wheelpatch.exe e tente reconfigurar o volante nas opções do controlador do
jogo (se o modo de três eixos do volante for incompatível, experimente activar o modo de dois eixos).
3/4
Page 28

SUPORTE TÉCNICO
Se tiver algum problema com o seu produto, por favor visite o sítio http://ts.thrustmaster.com e clique em Technical
Support. A partir daqui poderá aceder a vários utilitários (perguntas mais frequentes, as mais recentes versões de
controladores e software) capazes de ajudá-lo a resolver o seu problema. Se este se mantiver, poderá contactar o serviço
de suporte técnico (“Suporte Técnico”) dos produtos Thrustmaster:
Por correio electrónico:
De forma a tirar partido do suporte técnico por correio electrónico, primeiro terá de se registar online. As informações que
fornecer ajudarão os agentes a resolver o seu problema mais rapidamente. Clique em Registration no lado esquerdo da
página Technical Support e siga as instruções que surgirem no ecrã. Caso já tenha feito o seu registo, preencha os
campos Username e Password e clique depois em Login.
Por telefone:
Estados Unidos
INFORMAÇÃO DA GARANTIA
A Guillemot Corporation S.A. (“Guillemot”) garante ao consumidor, a nível mundial, que este produto Thrustmaster está isento de defeitos de
material e de fabrico durante um período de dois (2) anos a partir da data de compra original. No caso de o produto apresentar algum defeito
durante o período da garantia, contacte imediatamente o Suporte Técnico, que indicará o procedimento a seguir. Se se confirmar o defeito, o
produto terá de ser devolvido no seu local de compra (ou em qualquer outro local indicado pelo Suporte Técnico).
No âmbito desta garantia, o produto defeituoso do consumidor, por opção do Suporte Técnico, será reparado ou substituído. Sempre que a lei em
vigor o autorize, a responsabilidade total da Guillemot e das suas filiais (incluindo por danos indirectos) está limitada à reparação ou substituição do
produto Thrustmaster. Esta garantia não afecta os direitos legais do consumidor em relação à legislação aplicável à venda de bens de consumo.
Esta garantia não será aplicada: (1) se o produto tiver sido modificado, aberto, alterado ou sofrido danos derivados de uso inadequado ou abusivo,
negligência, acidente, desgaste normal ou qualquer outra causa que não esteja relacionada com um defeito de material ou de fabrico; (2) na
eventualidade de desrespeito pelas instruções fornecidas pelo Suporte Técnico; (3) a software que não tenha sido publicado pela Guillemot,
estando o dito software sujeito a uma garantia específica fornecida pelo respectivo editor.
Provisões adicionais de garantia
Nos Estados Unidos da América e no Canadá, esta garantia está limitada ao mecanismo interno do produto e à sua caixa externa. Quaisquer
garantias implícitas aplicáveis, incluindo garantias de comercialização e adequação a um fim específico, são por este meio limitadas a dois (2) anos
a partir da data de compra e estão sujeitas às condições estabelecidas nesta garantia limitada. Em nenhuma circunstância caberá à Guillemot
Corporation S.A. ou às suas filiais a responsabilidade por danos consequentes ou acidentais resultantes da quebra de quaisquer garantias
expressas ou implícitas. Alguns estados/províncias não permitem limitações nos períodos de duração da garantia ou a exclusão ou limitação de
danos acidentais/consequentes, por isso a limitação supracitada pode não ser aplicada a si. Esta garantia concede-lhe direitos legais específicos,
para além de poder ter outros direitos legais que variam de estado para estado e de província para província.
DIREITOS DE AUTOR
© 2004 Guillemot Corporation S.A. Reservados todos os direitos. Thrustmaster® é uma marca registada da Guillemot Corporation S.A. Ferrari® é
uma marca registada da Ferrari Idea S.p.A. Microsoft® Windows® é uma marca registada da Microsoft Corporation nos Estados Unidos e/ou
noutros países. Todas as outras marcas comerciais e nomes de marcas são por este meio reconhecidas e pertencem aos seus proprietários
respectivos. As ilustrações não são vinculativas. Os conteúdos, desenhos e especificações estão sujeitos a alteração sem aviso prévio e poderão
variar de país para país.
514-279-9911
preço duma chamada telefónica de longa distância, de segunda a sexta-
feira, das 7h00 às 17h00 (hora da Costa Leste)
FAQ, sugestões e controladores disponíveis em www.thrustmaster.com
4/4
 Loading...