

Page 1

User Manual
1/4
7. MODE button (Analog / Digital)
8. MAPPING button (for
programming trigger functions)
9. CONNECT button
10. 2 built-in independent motors
11. USB receiver
TECHNICAL FEATURES
1. Programmable and progressive triggers
2. 8 digital action buttons
3. 2 digital action buttons
4. 2 analog mini-sticks + 2 digital action buttons
5. D-Pad (Point Of View)
6. Switch (Gamepad OFF / Vibration On/Off)
SAFETY NOTICE
• Do not twist or pull on the cable.
• Do not spill liquid on the cable and/or connectors.
• In the event of malfunction during use due to electrostatic emission, please exit the game and unplug
the device from the computer. Resume normal game play by plugging the device back in and restarting
the game.
SYSTEM REQUIREMENTS
PC (Windows 98 and higher) equipped with USB port.
Page 2

DRIVER INSTALLATION
The CD-ROM included with this product allows you to install the Force Feedback drivers.
1. Insert the installation CD-ROM into your CD-ROM drive. Follow the on-screen instructions to install
the Force Feedback drivers. Once installation is complete, click Finish and restart your computer.
2. Once your computer has restarted, connect the USB connector to one of your computer’s USB ports.
Windows 98/Me/2000/XP will automatically detect the new device. (If you are connecting a USB
device for the first time, Windows may ask you to insert the Windows CD-ROM during the installation
procedure in order to install the required system files.)
3. Installing the drivers:
Windows 98: the Add New Hardware Wizard will search for the appropriate drivers. Click Next.
Follow the on-screen instructions to complete the installation.
Windows Me/2000/XP: the drivers are installed automatically.
4. Select Start/Settings/Control Panel, then double-click Game Controllers (or Gaming Options,
depending on your operating system). The Game Controllers dialog box displays the gamepad’s
name with OK status.
Attention: the Game Controllers dialog box does not allow you to test the gamepad’s Force
Feedback effects. You can test them using the “Force Feedback Test” application
(Start/Programs/Thrustmaster FFB Driver).
ADVANCED FUNCTIONS
• Switch (6):
- OFF position = gamepad is turned off.
- ON position = gamepad is turned on, vibration mode is off (saves battery power).
- VIB position = gamepad is turned on, vibration mode is on (uses more battery power).
• MODE button (7): press this button to switch between modes.
- Analog mode (default): MODE button (7) lights up blue. 12 action buttons, left analog mini-stick
(managing X and Y axes) and right analog mini-stick (managing Z and Z rotation axes) and D-Pad
(managing 8 direction POV).
- Digital mode: MODE button (7) is not lit up. 12 action buttons, D-Pad (managing X and Y axes) and 8
programmable directions, left digital mini-stick (managing 8 direction POV) and right analog mini-stick
(managing Z and Z rotation axes).
• CONNECT button (9): press this button to switch between modes.
- “Connect” LED is flashing quickly = no signal between gamepad and receiver.
- “Connect” LED is lit up = strong signal between gamepad and receiver.
- “Connect” LED is off = gamepad is in sleep mode.
- “Connect” LED is flashing slowly = low battery power (vibration function will be disabled in order to
save power). In this case, please change batteries to revert to the normal “vibrating” configuration.
• SLEEP MODE:
- The gamepad automatically turns off when not in use for 5 minutes.
- To “wake” it, press any button.
• MULTIPLAYER / CHANNEL AUTO-SWITCHING INFORMATION:
- You can play with up to 4 Dual Trigger Gamepads. All channels are detected automatically.
- When playing in multiplayer mode, if you wish to switch gamepads in the course of a game, press the
RECEIVER and CONNECT buttons on your gamepad simultaneously.
2/4
Page 3
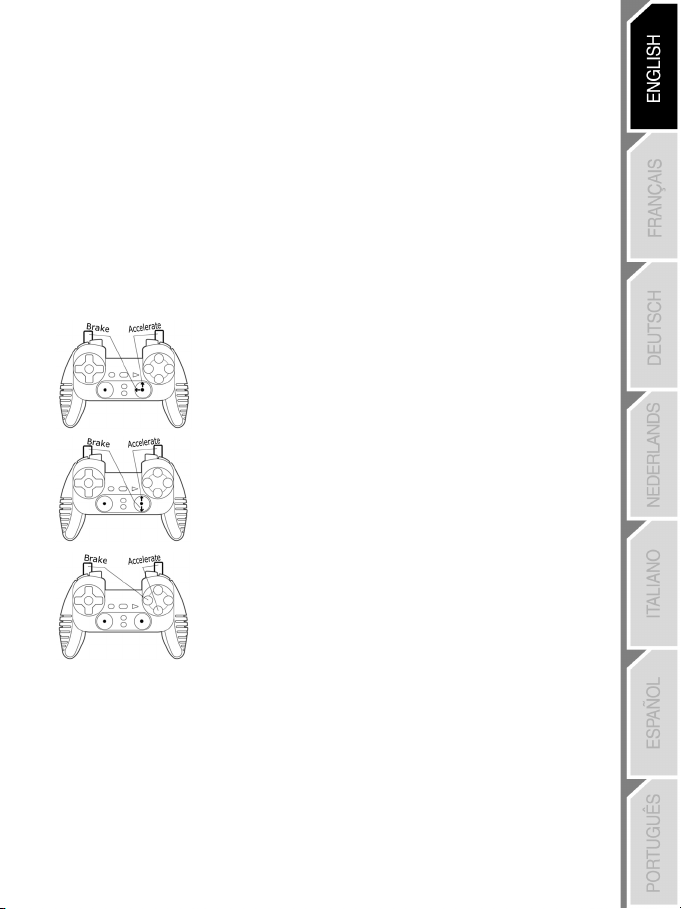
TRIGGER MAPPING TRIGGER MAPPING
All buttons and mini-stick directions (axes) can be mapped to the left and right triggers (except D-Pad and
All buttons and mini-stick directions (axes) can be mapped to the left and right triggers (except D-Pad and
buttons (3) and (4)).
buttons (3) and (4)).
• MAPPING button (8) (used to map left and right triggers): • MAPPING button (8) (used to map left and right triggers):
- Press and release the MAPPING button (LED flashes slowly). - Press and release the MAPPING button (LED flashes slowly).
- Press and release the button or direction you want to assign to the trigger (LED flashes quickly). - Press and release the button or direction you want to assign to the trigger (LED flashes quickly).
- Press and release the trigger assigned to this function (LED turns off). - Press and release the trigger assigned to this function (LED turns off).
• EEPROM: • EEPROM:
Your gamepad includes an internal memory chip, which stores your last mapping configuration even if you
Your gamepad includes an internal memory chip, which stores your last mapping configuration even if you
turn your gamepad off.
turn your gamepad off.
• TRIGGER BEHAVIOR: • TRIGGER BEHAVIOR:
Triggers react differently according to whether you map 2 separate analog axes, one same analog axis Triggers react differently according to whether you map 2 separate analog axes, one same analog axis
or 2 separate digital buttons to them. Below are 3 different examples (in this case, for racing games). or 2 separate digital buttons to them. Below are 3 different examples (in this case, for racing games).
• 2 separate axes are mapped to the 2 triggers.
• This configuration is the most useful (if your game accepts it).
• This enables you to separately regulate analog control of the left and
right triggers (there is no “master” trigger).
• One same axis is mapped to the 2 triggers.
• In this case the left trigger is the “master” trigger.
• If you press the left and right triggers together, your car will brake.
• This allows you to use the right trigger to control your car’s speed,
and briefly use the left trigger for powerful braking control.
• 2 digital buttons are mapped to the 2 triggers.
• This configuration offers separate control of the left and right triggers
(there is no “master” trigger); however, the triggers operate as digital
buttons (and therefore do not offer progressive control).
Thus, many mapping configurations are available, according to the possibilities offered by your game. If
Thus, many mapping configurations are available, according to the possibilities offered by your game. If
your game does not accept your current mapping configuration, the triggers will produce strange reactions;
your game does not accept your current mapping configuration, the triggers will produce strange reactions;
in this case, please try defining another mapping configuration (using other axes and buttons).
in this case, please try defining another mapping configuration (using other axes and buttons).
For a better understanding of all the available possibilities, try them out using the “Game
For a better understanding of all the available possibilities, try them out using the “Game
Controllers” dialog box in the Windows control panel.
Controllers” dialog box in the Windows control panel.
3/4
Page 4

TECHNICAL SUPPORT
If you encounter a problem with your product, please go to
Support. From there you will be able to access various utilities (Frequently Asked Questions (FAQ), the latest
versions of drivers and software) that may help to resolve your problem. If the problem persists, you can contact
the Thrustmaster products technical support service (“Technical Support”):
By email:
In order to take advantage of technical support by email, you must first register online. The information you
provide will help the agents to resolve your problem more quickly. Click Registration on the left-hand side of the
Technical Support page and follow the on-screen instructions. If you have already registered, fill in the Username
and Password fields and then click Login.
http://ts.thrustmaster.com and click Technical
By telephone:
United Kingdom
United States /
Canada
020 7216 0047
514-279-9911
Australia 1902 262 514
Denmark 82 33 28 58
Finland 09 81 71 01 54
Norway 23 50 01 16
Sweden 08-51992032
Warranty information
Worldwide, Guillemot Corporation S.A. (“Guillemot”) warrants to the consumer that this Thrustmaster product will be free
from material defects and manufacturing flaws for a period of two (2) years from the original date of purchase. Should the
product appear to be defective during the warranty period, immediately contact Technical Support, who will indicate the
procedure to follow. If the defect is confirmed, the product must be returned to its place of purchase (or any other location
indicated by Technical Support).
Within the context of this warranty, the consumer’s defective product will, at Technical Support’s option, be either repaired
or replaced. Where authorized by applicable law, the full liability of Guillemot and its subsidiaries (including for indirect
damages) is limited to the repair or replacement of the Thrustmaster product. The consumer’s legal rights with respect to
legislation applicable to the sale of consumer goods are not affected by this warranty.
This warranty shall not apply: (1) if the product has been modified, opened, altered, or has suffered damage as a result of
inappropriate or abusive use, negligence, an accident, normal wear, or any other cause not related to a material defect or
manufacturing flaw; (2) in the event of failure to comply with the instructions provided by Technical Support; (3) to software
not published by Guillemot, said software being subject to a specific warranty provided by its publisher.
Additional warranty provisions
In the United States of America and in Canada, this warranty is limited to the product’s internal mechanism and external
housing. Any applicable implied warranties, including warranties of merchantability and fitness for a particular purpose, are
hereby limited to two (2) years from the date of purchase and are subject to the conditions set forth in this limited warranty.
In no event shall Guillemot Corporation S.A. or its affiliates be liable for consequential or incidental damage resulting from
the breach of any express or implied warranties. Some States/Provinces do not allow limitation on how long an implied
warranty lasts or exclusion or limitation of incidental/consequential damages, so the above limitation may not apply to you.
This warranty gives you specific legal rights, and you may also have other legal rights which vary from State to State or
Province to Province.
COPYRIGHT
© 2004 Guillemot Corporation S.A. All rights reserved. Thrustmaster® is a registered trademark of Guillemot Corporation.
Microsoft® Windows® is a registered trademark of Microsoft Corporation in the United States and/or other countries. All
other trademarks and brand names are hereby acknowledged and are property of their respective owners. Illustrations not
binding. Contents, designs and specifications are subject to change without notice and may vary from one country to
another.
FAQs, tips and drivers available at www.thrustmaster.com
price of a national phone call, Monday to Friday from 12PM to 10PM
price of a long distance phone call, Monday to Friday from 7AM to
5PM (Eastern time)
$1.98/min, Monday to Friday from 9AM to 6PM
price of a national phone call, Monday to Friday from 1PM to 10PM
price of a national phone call, Monday to Friday from 2PM to 11PM
price of a national phone call, Monday to Friday from 1PM to 10PM
price of a national phone call, Monday to Friday from 1PM to 11PM
4/4
Page 5

Manuel de l'utilisateur
CARACTERISTIQUES TECHNIQUES
1. Gâchettes programmables à action progressive
2. 8 boutons d'action digitaux
3. 2 boutons d'action digitaux
4. 2 sticks analogiques/2 boutons d'action digitaux
5. Croix multidirectionnelle
6. Interrupteur (manette éteinte/ vibrations On/Off)
AVERTISSEMENT
• Ne tordez pas et ne tirez pas trop fort sur le cordon.
• Ne renversez pas de liquide sur le cordon ou les connecteurs.
• En cas de mauvais fonctionnement dû à une émission électrostatique, quittez le jeu et débranchez le
périphérique de votre ordinateur. Pour rejouer, rebranchez le périphérique et relancez le jeu.
CONFIGURATION REQUISE
PC (Windows 98 SE, Me, 2000 et XP) équipé d'un port USB.
7. Bouton MODE (analogique /
numérique)
8. Bouton MAPPING (pour
programmation des gâchettes)
9. Bouton CONNECT
10. 2 moteurs intégrés indépendants
11. Récepteur USB
1/4
Page 6

INSTALLATION DES PILOTES
Le CD-ROM fourni avec ce produit permet d'installer les pilotes Force Feedback.
1. Insérez le CD-ROM d'installation dans votre lecteur de CD-ROM. Suivez les instructions affichées à
l'écran pour installer les pilotes Force Feedback. Une fois l'installation terminée, cliquez sur Terminer
et redémarrez votre ordinateur.
2. Au redémarrage de l'ordinateur, reliez le connecteur USB à l'un des ports USB de votre unité centrale.
Windows 98/Me/2000/XP détectera automatiquement le nouveau périphérique. (Si vous branchez un
périphérique USB pour la première fois, il est possible que, pendant l'installation, Windows vous
demande d'insérer le CD-ROM Windows afin d'installer les fichiers système nécessaires.)
3. Installation des pilotes :
Windows 98 : l'Assistant Ajout de nouveau matériel se charge de rechercher pour vous les pilotes
appropriés. Cliquez sur Suivant. Suivez les instructions affichées à l'écran pour terminer l'installation.
Windows Me/2000/XP : l'installation des pilotes est automatique.
4. Sélectionnez Démarrer/Paramètres/Panneau de configuration, puis double-cliquez sur
Contrôleurs de jeu (ou Options de jeu selon votre système d'exploitation). La boîte de dialogue
Contrôleurs de jeu affichera le nom de la manette avec l'état OK.
Attention : la boîte de dialogue Contrôleurs de jeu ne vous permet pas de tester les effets Force
Feedback de la manette. Pour ce faire, utilisez l'application « Force Feedback Test »
(Démarrer/Programmes/Thrustmaster FFB Driver).
FONCTIONS AVANCEES
• Interrupteur (6) :
- Position OFF = la manette est éteinte.
- Position ON = la manette est allumée, le mode vibration est désactivé (économise les piles).
- Position VIB = la manette est allumée, le mode vibration est activé (consomme davantage d'énergie).
• Bouton MODE (7) : ce bouton permet de passer d'un mode à un autre.
- Mode Analog (par défaut) : le bouton
MODE (7) s'allume (bleu). 12 boutons d'action, stick analogique
gauche (gérant les axes X et Y) et stick analogique droit (gérant les axes Z et Z rotation) et la croix
multidirectionnelle (gérant 8 directions).
- Mode Digital : le bouton
axes X et Y) et 8 directions programmables, stick gauche (gérant 8 directions) et stick analogique droit
(gérant les axes Z et Z rotation).
MODE (7) est éteint. 12 boutons d'action, croix multidirectionnelle (gérant les
• Bouton CONNECT (9) : ce bouton permet de passer d'un mode à un autre.
- Le voyant "Connect" clignote rapidement = aucun signal entre la manette et le récepteur.
- Le voyant "Connect" est allumé = présence d'un signal entre la manette et le récepteur.
- Le voyant "Connect" est éteint = la manette est en mode veille.
- Le voyant "Connect" clignote lentement = le niveau des piles est faible (la fonction vibration sera
désactivée afin d'économiser les piles). Pour revenir à la configuration de vibration normale, il
convient de changer les piles.
• MODE VEILLE :
- La manette s'éteint automatiquement après 5 minutes d'inactivité.
- Pour la réactiver, appuyez sur l'un des boutons.
• COMMUTATION AUTOMATIQUE DES CANAUX/MODE MULTIJOUEUR :
- Vous pouvez utiliser jusqu'à 4 manettes Dual Trigger simultanément. Tous les canaux sont détectés
automatiquement. En mode multijoueur, si vous souhaitez connecter des manettes au cours d'un jeu,
appuyez simultanément sur les boutons RECEIVER et CONNECT.
2/4
Page 7

PROGRAMMATION DES GACHETTES
Les boutons et les directions des sticks (axes) peuvent être programmés sur les gâchettes gauche et
droite (à l'exception de la croix multidirectionnelle et des boutons (3) et (4)).
• Bouton MAPPING (8) (pour programmer les gâchettes gauche et droite) :
- Pressez et relâchez le bouton de programmation (le voyant clignote lentement).
- Pressez et relâchez le bouton ou la direction à affecter à la gâchette (le voyant clignote rapidement).
- Pressez et relâchez la gâchette affectée à cette fonction (le voyant s'éteint).
• Mémoire EEPROM :
Votre manette dispose d'une puce interne qui garde en mémoire la dernière configuration de
programmation, même lorsque la manette est éteinte.
• COMPORTEMENT DES GACHETTES :
Les gâchettes réagissent différemment selon que vous leur affectez 2 axes analogiques distincts, un
même axe analogique ou 2 boutons distincts. Trois exemples sont présentés ci-après (dans le cas présent,
il s'agit d'un jeu de course) :
• 2 axes distincts sont affectés aux 2 gâchettes.
• Cette configuration est la plus efficace (si votre jeu l'accepte).
• Elle vous permet de régler séparément le contrôle analogique des
gâchettes gauche et droite (il n'y a pas de gâchette maître).
• Un même axe est affecté aux 2 gâchettes.
• Dans ce cas, la gâchette gauche est la gâchette maître.
• Si vous appuyez simultanément sur les gâchettes gauche et droite,
votre véhicule va freiner.
• Cette configuration vous permet d'utiliser la gâchette droite pour
contrôler la vitesse du véhicule, et d'utiliser brièvement la gâchette
gauche pour un freinage puissant.
• 2 boutons d'action sont affectés aux 2 gâchettes.
• Cette configuration permet un contrôle séparé des gâchettes gauche
et droite (il n'y a pas de gâchette maître) ; en revanche, les gâchettes
fonctionnent comme des boutons numériques (et ne proposent pas de
contrôle progressif).
Il existe donc de nombreuses possibilités de configuration, mais elles dépendent du jeu. Si le jeu n'accepte
pas votre configuration de programmation actuelle, les gâchettes pourront produire un effet non souhaité ;
dans ce cas, essayez de définir une autre configuration de programmation en utilisant les autres axes et
boutons).
Pour bien comprendre toutes les possibilités offertes, essayez-les dans la boîte de dialogue
Contrôleurs de jeu (dans le Panneau de configuration Windows).
3/4
Page 8

SUPPORT TECHNIQUE
Si vous rencontrez un problème avec votre produit, rendez-vous sur le site
Support Technique. Vous aurez alors accès à différents services (Foire Aux Questions (FAQ), dernières versions
des pilotes et logiciels) susceptibles de résoudre votre problème. Si le problème persiste, vous pouvez contacter le
support technique des produits Thrustmaster (« Support Technique ») :
Par e-mail :
Pour bénéficier du support technique par e-mail, vous devez d’abord vous enregistrer en ligne. Les informations
fournies vont permettre aux techniciens de résoudre plus rapidement votre problème. Cliquez sur Enregistrement à
gauche de la page Support technique et suivez les instructions à l’écran. Si vous êtes déjà enregistré, renseignez les
champs Nom d’utilisateur et Mot de passe puis cliquez sur Connexion.
http://ts.thrustmaster.com et cliquez sur
Par téléphone :
France 0892 690 024
Belgique 02 / 732 55 77
Suisse 22 567 51 20
Canada 514-279-9911
Informations relatives à la garantie
Dans le monde entier, Guillemot Corporation S.A. (« Guillemot ») garantit au consommateur que le présent produit
Thrustmaster est exempt de défauts matériels et de vices de fabrication, et ce, pour une période de deux (2) ans à
compter de la date d’achat d’origine. Si, au cours de la période de garantie, le produit semble défectueux, contactez
immédiatement le Support Technique qui vous indiquera la procédure à suivre. Si le défaut est confirmé, le produit
devra être retourné à son lieu d’achat (ou tout autre lieu indiqué par le Support Technique).
Dans le cadre de la garantie, le consommateur bénéficiera, au choix du Support Technique, du remplacement ou de
la réparation du produit défectueux. Lorsque la loi applicable l’autorise, toute responsabilité de Guillemot et ses
filiales (y compris pour les dommages indirects) se limite à la réparation ou au remplacement du produit
Thrustmaster. Les droits légaux du consommateur au titre de la législation applicable à la vente de biens de
consommation ne sont pas affectés par la présente garantie.
Cette garantie ne s’appliquera pas : (1) si le produit a été modifié, ouvert, altéré, ou a subi des dommages résultant
d’une utilisation inappropriée ou abusive, d’une négligence, d’un accident, de l’usure normale, ou de toute autre
cause non liée à un défaut matériel ou à un vice de fabrication ; (2) en cas de non-respect des instructions du
Support Technique ; (3) aux logiciels non-édités par Guillemot, lesdits logiciels faisant l’objet d’une garantie
spécifique accordée par leurs éditeurs.
Stipulations additionnelles à la garantie
Aux États-Unis d’Amérique et au Canada, cette garantie est limitée au mécanisme interne et au boîtier externe du
produit. Toute garantie implicite applicable, incluant les garanties de qualité marchande ou d’adaptation à un usage
particulier, est limitée à deux (2) ans à compter de la date d’achat et soumise aux conditions de la présente garantie
limitée. En aucun cas, Guillemot Corporation S.A. ou ses sociétés affiliées ne sauraient être tenues responsables
envers qui que ce soit de tous dommages indirects ou dommages accessoires résultant du non-respect des
garanties expresses ou implicites. Certains États/Provinces n’autorisent pas la limitation sur la durée d’une garantie
implicite, ou l’exclusion ou la limitation de responsabilité pour les dommages indirects ou accessoires, de sorte que
les limitations ou exclusions ci-dessus peuvent ne pas vous être applicables. Cette garantie vous confère des droits
spécifiques ; vous pouvez également bénéficier d’autres droits qui peuvent différer d’un État/Province à l’autre.
COPYRIGHT
© 2004 Guillemot Corporation S.A. Tous droits réservés. Thrustmaster® est une marque déposée de Guillemot Corporation
S.A. Microsoft® Windows® est une marque déposée de Microsoft Corporation aux États-Unis et/ou dans d’autres pays.
Toutes les autres marques déposées et noms commerciaux sont reconnus par les présentes et sont la propriété de leurs
propriétaires respectifs. Illustrations non contractuelles. Le contenu, la conception et les spécifications sont susceptibles de
changer sans préavis et de varier selon les pays.
0,34 €/min, du lundi au vendredi de 13h à 17h et de 18h à 22h
prix d’un appel national, du lundi au vendredi de 9h à 12h30 et de
14h à 17h30
prix d’un appel national, du lundi au vendredi de 13h à 22h
prix d’un appel longue distance, du lundi au vendredi de 7h à 17h
(heure de l’Est)
FAQ, astuces et pilotes sur www.thrustmaster.com
4/4
Page 9

Benutzerhandbuch
TECHNISCHE DATEN
1. Programmierbare, progressive Trigger
2. 8 digitale Action-Buttons
3. 2 digitale Action-Buttons
4. 2 analoge Mini-Sticks + 2 digitale Action-Buttons
5. D-Pad (Sichtwahl)
6. Schalter (Gamepad AUS / Vibration EIN/AUS)
SICHERHEITSHINWEIS
• Nicht das Kabel knicken oder daran ziehen
• Keine Flüssigkeiten über die Kabel und Stecker verschütten.
• Falls es zu Fehlfunktionen durch elektrostatische Aufladung kommt, beenden Sie bitte Ihr Spiel und
stöpseln Sie den Empfänger aus. Danach stecken Sie ihn wieder ein und können nun das Spiel wieder
starten.
SYSTEMANFORDERUNGEN
PCs (Windows 98 und higher) mit USB Ports.
7. MODE Button (Analog / Digital)
8. MAPPING Button (zur TriggerProgrammierung)
9. CONNECT Button
10. 2 eingebaute Motoren
11. USB-Empfänger
1/4
Page 10

TREIBERINSTALLATION
Die mitgelieferte CD beinhaltet die Treiber für die Force Feedback Funktion.
1. Legen Sie die Installations-CD-ROM in Ihr CD-ROM-Laufwerk. Folgen Sie nun den Anweisungen auf
dem Bildschirm, um die Force Feedback-Treiber zu installieren. Nach Beendigung der Installation
klicken Sie auf Beenden und starten Ihren Computer neu.
2. Nach dem Neustart verbinden Sie den USB-Anschluss des Gempads mit einem freien USB-Port Ihres
PCs. Windows 98/Me/2000/XP erkennt automatisch das neue Gerät. (Beim Erstanschluss eines USBGerätes ist es möglich, dass Windows verlangt die Windows CD-ROM einzulegen, weil von dieser
noch einige Dateien benötigt werden.)
3. Treiberinstallation:
Windows 98: Der Hardware-Assistent sucht die passenden Treiber. Klicken Sie auf Weiter. Folgen
Sie nun den Anweisungen auf dem Bildschirm um die Installation abzuschließen.
Windows Me/2000/XP: Die Treiber sind schon automatisch installiert.
4. Wählen Sie Start/Einstellungen/Systemsteuerung, dann doppelklicken Sie auf Spielekontroller
(oder Spieleoptionen, hängt vom Betriebssystem ab). Das Spieleoptionen-Dialogfenster öffnet sich
und der Name des Gamepads und der Status OK werden angezeigt.
Achtung: Das Spieleoptionen-Dialogfenster erlaubt es nicht, die Force Feedback Effekte des
Gamepads zu testen. Sie können sie testen, indem Sie die “Force Feedback Test” Anwendung nutzen
(Start/Programme/Thrustmaster FFB Driver).
ERWEITERTE FUNKTIONEN
• Schalter (6):
- OFF Position = Das Gamepad ist ausgeschaltet.
- ON Position = Das Gamepad ist eingeschaltet, keine Vibrationen (spart Batterie-Leistung).
- VIB Position = Das Gamepad ist eingeschaltet, Vibrationen auch ein (höhere Stromaufnahme).
• MODE (7) Button: Button drücken um zwischen verschiedenen Modi zu wechseln.
- Analog-Modus (Standard):
MODE (7) Button leuchtet blau. 12 Action Buttons, linker analoger Mini-
Stick (für X- und Y-Achsen) und rechter analoger Mini-Stick (für Z- und Z-Rotations-Achsen) und DPad (für Acht-Richtungs-Sichtwahl).
- Digital-Modus: Der
und 8 programmierbare Richtungen, linker digitaler Mini-Stick (für 8 Acht-Richtungs-Sichtwahl) und
rechter analoger Mini-Stick (für Z- und Z-Rotations-Achsen).
MODE (7) Button leuchtet nicht. 12 Action Buttons, D-Pad (für X- und Y-Achsen)
• CONNECT (9) Button: Umschalten zwischen verschiedenen Verbindungs-Modi.
- “Connect” LED blinkt schnell = kein Signal zwischen Gamepad und Empfänger.
- “Connect” LED leuchtet konstant = optimale Signalstärke zwischen Gamepad und Empfänger.
- “Connect” LED ist aus = Gamepad ist im Schlafmodus.
- “Connect” LED blinkt langsam = Batterie ist fast leer (z.B. Vibration deaktivieren um Strom zu sparen).
Auf jedem Fall sollten die Batterien so schnell wie möglich gewechselt werden um wieder einwandfrei
spielen zu können.
• SCHLAFMODUS:
- Das Gamepad schaltet sich automatisch aus, wenn es 5 Minuten oder länger nicht genutzt wird.
- Irgendeinen Button drücken, um es zu reaktivieren.
• MULTIPLAYER / MULTIKANAL AUTOERKENNUNG INFORMATION:
- Sie können mit bis zu 4 Dual Trigger Gamepads gleichzeitig spielen. Alle Kanäle werden dann
automatisch erkannt.
- Wenn Sie im Multiplayer-Modus spielen und Sie möchten sich während eines Spieles darin einloggen,
drücken Sie die RECEIVER und CONNECT Buttons auf Ihrem Gamepad gleichzeitig.
2/4
Page 11

TRIGGER-BELEGUNG TRIGGER-BELEGUNG
Alle Buttons und alle Mini-Stick-Richtungen (Achsen) können auf die Trigger gelegt werden
Alle Buttons und alle Mini-Stick-Richtungen (Achsen) können auf die Trigger gelegt werden
(ausgenommen D-Pad und Buttons (3) und (4)).
(ausgenommen D-Pad und Buttons (3) und (4)).
• MAPPING (8) Button (zum belegen des rechten und linken Triggers): • MAPPING (8) Button (zum belegen des rechten und linken Triggers):
- Drücken Sie kurz den MAPPING Button (LED blinkt langsam). - Drücken Sie kurz den MAPPING Button (LED blinkt langsam).
- Drücken Sie kurz den Button oder die Richtung mit welcher Sie den Trigger belegen wollen (LED blinkt
- Drücken Sie kurz den Button oder die Richtung mit welcher Sie den Trigger belegen wollen (LED blinkt
schnell).
schnell).
- Bedienen Sie kurz den Trigger, den Sie mit dieser Funktion belegen wollen (LED geht aus). - Bedienen Sie kurz den Trigger, den Sie mit dieser Funktion belegen wollen (LED geht aus).
• EEPROM: • EEPROM:
Das Gamepad verfügt über einen internen Speicherchip, welcher Ihre Tastenbelegung speichert, auch
Das Gamepad verfügt über einen internen Speicherchip, welcher Ihre Tastenbelegung speichert, auch
wenn das Gamepad ausgeschaltet ist.
wenn das Gamepad ausgeschaltet ist.
• TRIGGER-VERHALTEN: • TRIGGER-VERHALTEN:
Das Trigger-Verhalten hängt von der Belegung ab, ob nun 2 separate analoge Achsen, 1 gemeinsame
Das Trigger-Verhalten hängt von der Belegung ab, ob nun 2 separate analoge Achsen, 1 gemeinsame
analoge Achse oder 2 separate digitale Buttons zugewiesen werden. Nachfolgend 3 Beispiele (hier für ein
analoge Achse oder 2 separate digitale Buttons zugewiesen werden. Nachfolgend 3 Beispiele (hier für ein
Rennspiel).
Rennspiel).
• 2 separate Achsen sind zwei Triggern zugewiesen.
• Die Konfiguration ist am zweckvollsten (wenn es Ihr Spiel zulässt).
• Das erlaubt Ihnen unabhängige analoge Steuerung mit dem rechten
und linken Trigger (es gibt keinen Master-Trigger).
• Eine gemeinsame Achse ist zwei Triggern zugewiesen.
• Der linke Trigger ist dann der Master-Trigger.
• Wenn Sie den linken und rechten Trigger gemeinsam bedienen, wird
das Auto bremsen.
• So können Sie mit dem linken Trigger die Geschwindigkeit
kontrollieren und den linken zum kurzen, kräftigen bremsen für
Powerslides nutzen.
• 2 digitale Buttons sind zwei Triggern zugewiesen.
• Beide Trigger reagieren unabhängig, sind aber digital, das heißt,
keine progressive Steuerung mehr.
Es gibt viel verschiedene weitere Möglichkeiten, welche vom jeweils verwendeten Spiel abhängig sind.
Es gibt viel verschiedene weitere Möglichkeiten, welche vom jeweils verwendeten Spiel abhängig sind.
Falls das Spiel die aktuellen Einstellungen nicht unterstützt, kann es zu merkwürdigen Steuereffekten
Falls das Spiel die aktuellen Einstellungen nicht unterstützt, kann es zu merkwürdigen Steuereffekten
kommen. In diesem Fall müssen Sie die Programmierung des Pads dem Spiel anpassen.
kommen. In diesem Fall müssen Sie die Programmierung des Pads dem Spiel anpassen.
Sie können alle möglichen Einstellungen unter “Spieleoptionen” in der Windows-Systemsteuerung
Sie können alle möglichen Einstellungen unter “Spieleoptionen” in der Windows-Systemsteuerung
durchprobieren, um zu einem für Ihr Spiel optimales Ergebnis zu kommen.
durchprobieren, um zu einem für Ihr Spiel optimales Ergebnis zu kommen.
3/4
Page 12

TECHNISCHER SUPPORT
Sollten Sie mit Ihrem Produkt ein Problem haben, besuchen Sie bitte die Seite
klicken Sie auf Technischer Support. Von dort aus können Sie auf verschiedene Instrumente zugreifen (Fragen
und Antworten (FAQ), die neuesten Versionen von Treibern und Software), die Ihnen bei der Lösung Ihres
Problems helfen könnten. Falls das Problem weiterhin besteht, können Sie mit dem technischen Support der
Thrustmaster Produkten in Kontakt treten („Technischer Support“):
Per Email:
Um den Vorzug des technischen Supports per Email in Anspruch nehmen zu können, müssen Sie sich zunächst
online registrieren. Mit den Informationen, die Sie uns so zukommen lassen, können die Mitarbeiter Ihr Problem
schneller lösen. Klicken Sie auf Registrierung links auf der Seite des technischen Supports und folgen Sie den
Instruktionen auf dem Bildschirm. Falls Sie bereits registriert sind, füllen Sie die Textfelder Anwendername und
Paßwort aus und klicken dann auf Login.
Per Telefon:
Deutschland
Schweiz
GEWÄHRLEISTUNGSINFORMATION
Guillemot Corporation S.A. („Guillemot“) bietet dem Kunde weltweit eine 2-jährige Garantie auf Materialschäden
und Herstellungsmängel ab dem Kaufdatum. Sollte das Produkt dennoch während dieser 2 Jahre Schäden oder
Mängel aufweisen, kontaktieren Sie unverzüglich den Technischen Support, der Ihnen mitteilt, wie weiter zu
verfahren ist. Sollte ein Defekt vorliegen, muß das Produkt dort zurückgegeben werden, wo es gekauft wurde
(oder an die vom Technischen Support angegebene Adresse).
Im Rahmen dieser Garantie wird das defekte Produkt des Kunden nach Ermessen des Technischen Supports
entweder repariert oder ersetzt. Überall wo es geltendes Recht zulässt, wird die volle Haftung von Guillemot und
seinen Niederlassungen (einschließlich für indirekte Beschädigungen), begrenzt auf die Reparatur oder den
Ersatz des Thrustmaster Produktes, übernommen. Die Rechte des Käufers entsprechend geltendem Recht im
jeweiligen Land werden nicht durch diese Garantie beeinflusst.
Diese Garantie tritt nicht ein bei: (1) falls am Produkt etwas verändert wurde oder es geöffnet wurde, ein Schaden
durch unangebrachte Nutzung, Fahrlässigkeit, einen Unfall, Verschleiß oder irgendeinen anderen Grund
verursacht wurde, der nicht im Zusammenhang mit einem Materialdefekt oder Herstellungsmangel aufgetreten ist;
(2) im Falle der Nichteinhaltung der durch den Technischen Support erteilten Anweisungen; (3) Die Software, die
nicht von Guillemot herausgegeben wurde, unterliegt der speziellen Garantie des Herausgebers.
COPYRIGHT
© 2004 Guillemot Corporation S.A. Alle Rechte vorbehalten. Thrustmaster® ist ein eingetragenes Warenzeichen
der Guillemot Corporation S.A. Microsoft® Windows® 98, 2000, Me und XP sind eingetragene Warenzeichen der
Microsoft Corporation in den Vereinigten Staaten von Amerika und/oder anderen Ländern. Alle anderen
Warenzeichen und Markennamen werden hiermit anerkannt und sind Eigentum ihrer jeweiligen Eigentümer. Fotos
und Abbildungen nicht bindend. Inhalt, Design und Eigenschaften des Produkts können ohne Bekanntmachung
geändert werden und variieren von Land zu Land.
0190/662
789
22 567
51 20
Zum Preis eines landesweiten Telefongesprächs, Montag bis
0,433 €/Minute, Montag bis Freitag
von 15 bis 18 Uhr und 19 bis 22 Uhr
Freitag von 13 bis 22 Uhr
http://ts.thrustmaster.com und
FAQs, Tipps und Driver sind unter
www.thrustmaster.com erhältlich
4/4
Page 13

Handleiding
1/4
7. MODE knop (analoog / digitaal)
8. MAPPING knop (voor het
programmeren triggerfuncties)
9. CONNECT knop
10. 2 onafhankelijke motoren
11. USB-ontvanger
TECHNISCHE KENMERKEN
1. Programmeerbare, progressief reagerende triggers
2. 8 digitale actieknoppen
3. 2 digitale actieknoppen
4. 2 analoge minijoysticks + 2 digitale actieknoppen
5. D-Pad (Point Of View)
6. Schakelaar (Gamepad UIT / Trilling Aan/uit)
VEILIGHEID & VOORSCHRIFTEN
• Trek nooit aan een kabel en zorg dat er geen knikken in komen.
• Mors geen vloeistoffen op de kabel en/of de connectoren.
• Sluit in geval van storingen door interferentie van buitenaf de game af en koppel de unit los van de
computer. Als de unit daarna weer wordt aangesloten en de game opnieuw wordt gestart, zijn de
problemen in de meeste gevallen verholpen.
SYSTEEMVEREISTEN
Voor PC's (Windows 98 SE of recenter) met USB-poorten.
Page 14

INSTALLATIE VAN DE DRIVER
Met behulp van de meegeleverde CD-ROM kunnen de drivers voor Force Feedback worden geïnstalleerd
1. Plaats de installatie-CD in de CD-ROM-drive. Volg de instructies op het scherm om de Force
Feedback-drivers te installeren. Klik, als de installatieprocedure is afgerond, op Voltooien om de
computer opnieuw te starten.
2. Sluit, als de computer opnieuw is gestart, de USB-connector aan op een van de USB-poorten van de
computer. Windows 98/Me/2000/XP zal het nieuwe apparaat automatisch herkennen. (Als een nieuw
USB-apparaat voor het eerst op de computer wordt aangesloten, kan bij het installeren gevraagd
worden de Windows CD-ROM te plaatsen zodat de benodigde systeembestanden kunnen worden
geïnstalleerd).
3. De drivers installeren:
Windows 98: de Wizard Nieuwe hardware zoekt de benodigde drivers. Klik op Volgende. Voltooi de
installatie door de instructies op het scherm te volgen.
Windows 2000/Me/XP: de drivers worden automatisch geïnstalleerd.
4. Klik achtereenvolgens op Start/Instellingen/Configuratiescherm en dubbelklik vervolgens op Game
Controllers (of Spelbesturingen, afhankelijk van het besturingssysteem). In het dialoogvenster
Game Controllers staat de naam van de gamepad met als status OK.
Let op: in het dialoogvenster Game Controllers kunnen de Force Feedback-effecten van het stuur
niet worden getest. Deze effecten kunnen worden getest met de applicatie “Force Feedback Test”
(Start/Programma's/Thrustmaster FFB Driver).
GEAVANCEERDE FUNCTIES
• Schakelaar (6):
- OFF stand = gamepad staat uit.
- ON stand = gamepad staat aan, trilfunctie staat uit (bespaart batterijen).
- VIB stand = gamepad staat aan, trilfunctie staat aan (gebruikt meer batterijstroom).
• MODE knop (7): druk op deze knop om tussen de modi te schakelen.
- Analoge modus (standaard): MODE knop (7) gaat blauw branden. 12 actieknoppen, linker analoge
minijoystick (voor X- en Y-as) en rechter analoge minijoystick (voor Z- en Z-rotatieassen) en D-pad
(voor 8 richtingen Point of View).
- Digitale modus: de MODE knop (7) knop brandt niet. 12 actieknoppen, D-padd (voor X- en Y-assen)
em 8 programmeerbare richtingen, linker digitale minijoystick (voor 8 richtingen Point of View) en
rechter analoge minijoystick (voor Z- en Z-rotatieassen).
• CONNECT knop (9): druk op deze knop om tussen de modi te schakelen.
- “Connect” LED knippert snel = geen signaal tussen gamepad en ontvanger.
- “Connect” LED brandt = sterk signaal tussen gamepad en ontvanger.
- “Connect” LED brandt niet = gamepad is in slaapstand.
- “Connect” LED knippert langzaam = batterij is bijna leeg (trilfunctie wordt uitgeschakeld om batterijen
te sparen). Vervang in dit geval de batterij om de trilfunctie weer mogelijk te maken.
• SLAAPMODUS:
- De gamepad wordt automatisch uitgeschakeld wanneer deze 5 minuten niet wordt gebruikt.
- De gamepad wordt "gewekt" door op een willekeurige knop te drukken.
• MULTIPLAYER / AUTOMATISCHE KANAALKEUZE:
- Er kan met maximaal 4 Dual Trigger gamepads tegelijkertijd worden gespeeld. Alle kanalen worden
automatisch gedetecteerd.
- In multiplayer-modus kan er van gamepad worden gewisseld door tijdens de game tegelijkertijd op de
knoppen RECEIVER en CONNECT op de gamepad te drukken.
2/4
Page 15

TRIGGERMAPPING TRIGGERMAPPING
Alle knoppen en minijoystickrichtingen (assen) kunnen worden toegekend (mapping) aan de linker en
Alle knoppen en minijoystickrichtingen (assen) kunnen worden toegekend (mapping) aan de linker en
rechtertriggers (met uitzondering van de D-pad en de knoppen (3) en (4)).
rechtertriggers (met uitzondering van de D-pad en de knoppen (3) en (4)).
• MAPPING knop (8) (gebruikt voor het mappen van de linker en rechtertriggers): • MAPPING knop (8) (gebruikt voor het mappen van de linker en rechtertriggers):
- Druk de knop MAPPING in en laat deze weer los (LED knippert langzaam). - Druk de knop MAPPING in en laat deze weer los (LED knippert langzaam).
- Druk de knop (of de richting) in welke toegekend moet worden aan de trigger en laat deze weer los
- Druk de knop (of de richting) in welke toegekend moet worden aan de trigger en laat deze weer los
(LED knippert snel).
(LED knippert snel).
- Druk de trigger die is toegekend aan deze functie en laat deze weer los (LED gaat uit). - Druk de trigger die is toegekend aan deze functie en laat deze weer los (LED gaat uit).
• EEPROM: • EEPROM:
De gamepad bevat een interne geheugenchip waarin de laatste mapping-configuratie wordt bewaard,
De gamepad bevat een interne geheugenchip waarin de laatste mapping-configuratie wordt bewaard,
zelfs als de gamepad wordt uitgezet.
zelfs als de gamepad wordt uitgezet.
• TRIGGERGEDRAG: • TRIGGERGEDRAG:
Triggers reageren verschillend afhankelijk van of er twee afzonderlijke analoge assen worden toegekend
Triggers reageren verschillend afhankelijk van of er twee afzonderlijke analoge assen worden toegekend
of één gezamenlijke analoge as of twee afzonderlijke digitale knoppen. Onder staan drie verschillende
of één gezamenlijke analoge as of twee afzonderlijke digitale knoppen. Onder staan drie verschillende
voorbeeldconfiguraties afgebeeld (in dit geval voor een racegame).
voorbeeldconfiguraties afgebeeld (in dit geval voor een racegame).
• Twee afzonderlijke assen worden toegekend aan de twee triggers.
• Deze configuratie is het handigst (als de game zich zo laat
configureren).
• Hiermee kan de analoge besturing van de linker en rechtertrigger
onafhankelijk van elkaar worden gerealiseerd (er is geen master trigger).
• Een gezamenlijke as wordt toegekend aan de twee triggers.
• In dit geval is de linkertigger de mastertrigger.
• Als de linker en rechtertrigger tegelijkertijd worden ingedrukt zal de
auto remmen.
• Hiermee kan de snelheid van de auto met de rechtertrigger worden
bediend en de linkertrigger kort worden gebruikt voor krachtig remmen.
• Twee digitale knoppen worden toegekend aan de twee triggers.
• Deze configuratie biedt onafhankelijke besturing van de linker en de
rechtertriggers (er is geen mastertrigger). De triggers werken echter als
digitale knoppen (en bieden dus geen progressieve besturing).
Vele mappingconfiguraties zijn dus mogelijk, een en ander afhankelijk van wat de betreffende game biedt.
Vele mappingconfiguraties zijn dus mogelijk, een en ander afhankelijk van wat de betreffende game biedt.
Als de game de huidige mappingconfiguratie niet accepteert, dan zullen de triggers vreemde reacties
Als de game de huidige mappingconfiguratie niet accepteert, dan zullen de triggers vreemde reacties
geven. Probeer in een dergelijk geval een andere mappingconfiguratie voor de assen en de knoppen te
geven. Probeer in een dergelijk geval een andere mappingconfiguratie voor de assen en de knoppen te
configureren.
configureren.
Het uitproberen van alle beschikbare opties met behulp van het dialoogvenster “Spelbesturingen”
Het uitproberen van alle beschikbare opties met behulp van het dialoogvenster “Spelbesturingen”
in het Windows Configuratiescherm geeft een goed inzicht in de vele mogelijkheden van deze
in het Windows Configuratiescherm geeft een goed inzicht in de vele mogelijkheden van deze
gamepad.
gamepad.
3/4
Page 16

TECHNICAL SUPPORT
Als u problemen hebt met uw product, gaat u naar
Vanaf hier hebt u toegang tot verschillende onderwerpen zoals hulpprogramma’s, de FAQ (veelgestelde vragen)
en de meest recente drivers en software die u helpen bij het vinden van oplossingen. Als het probleem zich blijft
voordoen, neem dan contact op met de Thrustmaster product technical support service (“Technical Support”):
Per e-mail:
Voordat u gebruik kunt maken van technisch ondersteuning per e-mail dient u zich eerst online te registreren. Met
de door u verstrekte informatie kan uw probleem sneller en beter worden opgelost. Klik op Registration aan de
linkerzijde van de pagina Technical Support en volg de aanwijzingen op het scherm. Inidien u reeds geregistreerd
bent, vult u de velden Username en Password in en klikt u op Login.
Per telefoon:
Nederland 0900-202 67 65
België 02 / 732 55 77
GARANTIE INFORMATIE
Wereldwijd garandeert Guillemot Corporation S.A. (“Guillemot”) de consument dat dit Thrustmaster-product
gedurende een periode van twee (2) jaar vanaf de oorspronkelijke aankoopdatum vrij zal zijn van materiaal- en
fabricagefouten. Indien u in de garantieperiode een defect meent te constateren aan dit product, neem dan
onmiddellijk contact op met de Technical Support die u zal informeren over de te volgen procedure. Als het defect
wordt bevestigd, dan dient het product te worden geretourneerd naar de plaats van aankoop (of een andere
locatie die wordt opgegeven door Technical Support).
Binnen het gestelde van deze garantie wordt het defecte product van de consument gerepareerd of vervangen,
zulks ter beoordeling van Technical Support. Indien toegestaan door van kracht zijnde wetgeving, beperkt de
volledige aansprakelijkheid van Guillemot en haar dochterondernemingen (inclusief de aansprakelijkheid voor
indirecte schade) zich tot het repareren of vervangen van het Thrustmaster product. De wettelijke rechten van de
klant volgens de wetgeving van toepassing op de verkoop van consumentproducten worden op generlei wijze
beperkt door deze garantie.
Deze garantie is niet van kracht: (1) indien het product gemodificeerd, geopend of gewijzigd is, of beschadigd ten
gevolge van oneigenlijk of onvoorzichtig gebruik, verwaarlozing, een ongeluk, normale slijtage, of enig andere
oorzaak niet gerelateerd aan een materiaal- of fabricagefout; (2) indien u zich niet houdt aan de instructies zoals
verstrekt door Technical Support; (3) op software die niet is gepubliceerd door Guillemot en daardoor onder de
specifieke garantie valt zoals verstrekt door degene die deze software publiceert.
COPYRIGHT
© Guillemot Corporation 2004. Alle rechten voorbehouden. Thrustmaster® is een geregistreerd handelsmerk van
Guillemot Corporation S.A. Microsoft® Windows® 98, 2000, Me en XP zijn geregistreerde handelsmerken van
Microsoft Corporation in de Verenigde Staten en/of andere landen. Alle andere handelsmerken en merknamen zijn
hierbij erkend en zijn het eigendom van de desbetreffende eigenaren. Illustraties zijn niet bindend. Inhoud,
ontwerpen en specificaties kunnen zonder voorafgaande kennisgeving gewijzigd worden en afwijken in
verschillende landen.
http://ts.thrustmaster.com en klikt u op Technical Support.
0,30 €/minuut, maandag t/m vrijdag van 13:00 tot 22:00
kosten van interlokaal gesprek, maandag t/m vrijdag
van 09:00 tot 12:30 en van 14:00 tot 17:30
Veelgestelde vragen, tips en drivers vindt u op
www.thrustmaster.com
4/4
Page 17

Manuale d’uso
CARATTERISTICHE TECNICHE
1. Triggers programmabili e progressivi
2. 8 pulsanti d'azione digitali
3. 2 pulsanti d'azione digitali
4. 2 mini-sticks analogici + 2 pulsanti d'azione digitali
5. D-Pad (Punto di vista)
6. Interruttore (Gamepad OFF / Vibrazione On/Off)
NOTA PER LA SICUREZZA
• Non piegare o tirare il cavo.
• Non versare liquidi sul cavo o sui connettori.
• In caso di malfunzionamento durante l'uso a causa di emissioni elettrostatiche, uscire dal gioco e
scollegare la periferica dal computer. Riavviare il gioco dopo aver ricollegato la periferica.
REQUISITI DI SISTEMA
PC (Windows 98 e superiore) equipaggiati con porta USB.
7. Pulsante MODE (Analogico /
Digitale)
8. Pulsante MAPPING (per
programare funzioni dei trigger)
9. Pulsante CONNECT
10. 2 motori indipendenti integrati
11. Ricevitore USB
1/4
Page 18

INSTALLAZIONE DEI DRIVER
Il CD-ROM incluso col prodotto consente di installare i driver Force Feedback driver.
1. Inserire il CD-ROM di installazione nel lettore CD-ROM del computer. Seguire le istruzioni a video per
installare i driver Force Feedback. A installazione conclusa, cliccare su Terminare e riavviare il
computer.
2. Dopo aver riavviato il computer, collegare il connettore USB a una delle porte USB del computer.
Windows 98/Me/2000/XP individuerà automaticamente la nuova periferica. (Se si connette una
periferica USB per la prima volta, il sistema operativo potrebbe richiedere il CD-ROM di Windows
durante la procedura per installare i file di sistema richiesti.)
3. Installare i driver:
Windows 98: l’Installazione guidata Nuovo Hardware cercherà i driver appropriati. Cliccare su
Avanti. Seguire le istruzioni per completare l'installazione.
Windows Me/2000/XP: i driver verranno installati automaticamente.
4. Selezionare Start/Impostazioni/Pannello di controllo, fare doppio click su Periferiche di gioco (o
Opzioni di gioco, secondo il sistema operativo). La finestra di dialogo Periferiche di gioco mostra il
nome del gamepad e lo status di OK.
Attenzione: la finestra di dialogo Periferiche di gioco non consente di testare gli effetti Force
Feedback del gamepad. Si possono testare questi effetti usando l'applicazione “Force Feedback Test”
(Start/Programmi/Thrustmaster FFB Driver).
FUNZIONI AVANZATE
• Interruttore (6):
- OFF = il gamepad è spento.
- ON = il gamepad è acceso, la vibrazione è spenta (minor consumo di batterie).
- VIB = il gamepad è acceso, la vibrazione è accesa (maggior consumo di batterie).
• Pulsante MODE (7): premere questo pulsante per passare da una modalità all'altra.
- Modalità Analogica (default): il pulsante
MODE (7) si illumina di blu. 12 pulsanti d'azione, mini-stick
analogico sinistro (gestisce gli assi X e Y ) e mini-stick analogico destro (gestisce gli assi Z e rotazione
su Z) e DPad (gestisce il PDV a 8 direzioni).
- Modalità digitale: il pulsante MODE (7) non è acceso. 12 pulsanti d'azione, D-Pad (gestisce gli assi X
e Y) e 8 direzioni programmabili, mini-stick digitale sinistro (gestisce il PDV a 8 direzioni) e mini-stick
analogico destro (gestisce gli assi Z e rotazione su Z).
• Pulsante CONNECT (9): premere questo pulsante per passare da una modalità all'altra.
- Il LED “Connect” lampeggia velocemente = nessun segnale tra il gamepad e il ricevitore.
- Il LED “Connect” è fisso = forte segnale tra il gamepad e il ricevitore.
- Il LED “Connect” è spento = il gamepad è in standby.
- Il LED “Connect” lampeggia lentamente = batterie scariche (la funzione di vibrazione verrà disattivata
per evitare il consumo delle batterie). In questo caso, caricare le batterie per riattivare la vibrazione.
• STANDBY:
- Il gamepad si spegne automaticamente se non in uso per 5 minuti.
- Per “svegliarlo” premere un qualunque pulsante.
• INFORMATIONI PER IL MULTIPLAYER / E L'AUTO SELEZIONE DEI CANALI:
- Si possono utilizzare fino a 4 Dual Trigger Gamepad contemporaneamente. Tutti i canali vengono
individuati automaticamente.
- Giocando in modalità multiplayer, se si desidera cambiare i gamepad nel corso del gioco, premere
contemporaneamente i tasti RECEIVER e CONNECT del gamepad.
2/4
Page 19

MAPPING DEI TRIGGER MAPPING DEI TRIGGER
Tutte le pulsanti e direzioni (assi) dei mini-stick possono essere impostate sui trigger destro e sinistro
Tutte le pulsanti e direzioni (assi) dei mini-stick possono essere impostate sui trigger destro e sinistro
(eccetto il D-Pad e i pulsanti (3) e (4)).
(eccetto il D-Pad e i pulsanti (3) e (4)).
• Pulsante MAPPING (8) (usato per impostare i trigger destro e sinistro): • Pulsante MAPPING (8) (usato per impostare i trigger destro e sinistro):
- Premere e rilasciare il pulsante MAPPING (il LED lampeggia lentamente). - Premere e rilasciare il pulsante MAPPING (il LED lampeggia lentamente).
- Premere e rilasciare il pulsante o la direzione che si vuole assegnare al trigger (il LED lampeggia
- Premere e rilasciare il pulsante o la direzione che si vuole assegnare al trigger (il LED lampeggia
velocemente).
velocemente).
- Premere e rilasciare il trigger assegnato a questa funzione (il LED si spegne). - Premere e rilasciare il trigger assegnato a questa funzione (il LED si spegne).
• EEPROM: • EEPROM:
Il gamepad include un chip di memoria interno, che mantiene in memoria l'ultima configurazione del
Il gamepad include un chip di memoria interno, che mantiene in memoria l'ultima configurazione del
mapping anche se si spegne il gamepad.
mapping anche se si spegne il gamepad.
• COMPORTAMENTO DEI TRIGGER: • COMPORTAMENTO DEI TRIGGER:
I trigger reagiscono differentemente se si impostano 2 separati assi analogici, o uno stesso asse analogico I trigger reagiscono differentemente se si impostano 2 separati assi analogici, o uno stesso asse analogico
o 2 separati pulsanti digitali. Sotto ci sono 3 diversi esempi (in questo caso, per un gioco di corsa). o 2 separati pulsanti digitali. Sotto ci sono 3 diversi esempi (in questo caso, per un gioco di corsa).
• 2 assi separati sono assegnati ai due trigger.
• Questa configurazione è la più utile (se il gioco la supporta).
• Questa configurazione consente di regolare separatamente il
controllo analogico dei trigger destro e sinistro (non c'è un “master”
trigger).
• Stesso asse assegnato ai due trigger.
• In questo caso il trigger sinistro è il “master” trigger.
• Premendo i trigger sinistro e destro contemporaneamente, avverrà
una frenata.
• Questo consente di utilizzare il trigger destro per controllare la
velocità dell'auto e di usare brevemente il trigger sinistro per un potente
controllo dei freni.
• 2 pulsanti digitali assegnati a due trigger.
• Questa configurazione offre un controllo separato dei trigger destro e
sinistro (nessun “master” trigger); tuttavia, i trigger funzionano come
pulsanti digitali (e quindi non offrono un controllo progressivo).
Molte configurazioni di mapping sono possibili, secondo le possibilità supportate dai giochi. Se il gioco non
Molte configurazioni di mapping sono possibili, secondo le possibilità supportate dai giochi. Se il gioco non
supportasse la configurazione scelta, i trigger potrebbero produrre strane reazioni; in questo caso, provare
supportasse la configurazione scelta, i trigger potrebbero produrre strane reazioni; in questo caso, provare
una nuova configurazione.
una nuova configurazione.
Per una completa comprensione di tutte le possibilità, provarle tutte usando la finestra di dialogo
Per una completa comprensione di tutte le possibilità, provarle tutte usando la finestra di dialogo
“Periferiche di gioco” nel Pannello di Windows.
“Periferiche di gioco” nel Pannello di Windows.
3/4
Page 20

ASSISTENZA TECNICA
Se hai avuto problemi con il tuo prodotto, visita il sito
http://ts.thrustmaster.com e clicca su Technical
Support. Da lì potrai accedere a vari servizi (domande più frequenti (FAQ), driver e software più recenti)
che potranno aiutarti a risolvere il problema riscontrato. Qualora il problema dovesse persistere, puoi
contattare il servizio di assistenza tecnica dei prodotti Thrustmaster (“Assistenza Tecnica”):
Tramite email:
Per poter godere di assistenza tecnica tramite email, dovrai prima effettuare la registrazione online. Le
informazioni che fornirai aiuteranno gli esperti a risolvere rapidamente il tuo problema. Nella parte sinistra
della pagina “Technical Support”, clicca su Registration e segui le istruzioni che appariranno sullo
schermo. Se sei già registrato, riempi i campi Username e Password e clicca quindi su Login.
Via telefono:
02 833 1364
la tariffa corrisponde ad una normale telefonata nazionale, dal Lunedì al
Venerdì, dalle 14:30 alle 18:30
INFORMAZIONI SULLA GARANZIA
Internazionalmente, Guillemot Corporation S.A. (“Guillemot”) garantisce l’acquirente che questo prodotto
Thrustmaster è privo di vizi produttivi o difetti di materiale per un periodo di due (2) anni dalla data di
acquisto. Nel caso il prodotto si riveli difettoso durante il periodo di garanzia, contattare immediatamente
l’Assistenza Tecnica, che indicherà la procedura da seguire. Qualora il difetto venga confermato, il
prodotto dovrà essere riconsegnato al luogo di acquisto (o in qualsiasi altro luogo specificato
dall’Assistenza Tecnica).
Nel contesto della garanzia, il prodotto difettoso dell’acquirente verrà riparato oppure sostituito, a seconda
della scelta operata dall’Assistenza Tecnica. Dove autorizzato dalla legge vigente, la responsabilità di
Guillemot e le sue filiali (includendo qualsiasi danno indiretto) è limitata alla riparazione o alla sostituzione
del prodotto Thrustmaster. I diritti dell’acquirente nel rispetto della legislazione vigente applicabile alla
vendita di beni al consumatore non sono annullati dalla presente garanzia.
Questa garanzia perde di validità: (1) se il prodotto è stato modificato, aperto, alterato, o ha subito un
danno come risultato da uso inappropriato, negligenza, danni accidentali, normale usura o qualsiasi altra
causa non direttamente collegata con un difetto di materiale o un vizio di produzione; (2) nel caso di
mancato adempimento nell’esecuzione delle procedure indicate dall’Assistenza Tecnica; (3) per il
software non prodotto da Guillemot, poiché per questo caso è valida la garanzia fornita dal suo
produttore.
COPYRIGHT
© 2004 Guillemot Corporation S.A. Tutti i diritti riservati. Thrustmaster® è un marchio registrato da Guillemot
Corporation S.A. Microsoft® Windows® 98, 2000, Me e XP sono marchi registrati di Microsoft Corporation negli
Stati Uniti e/o in altri paesi. Tutti gli altri marchi sono qui riconosciuti e registrati ai rispettivi proprietari. Foto
escluse. I contenuti, il design e le caratteristiche possono essere oggetto di modifiche senza preavviso e possono
variare da un paese all’altro.
FAQ, consigli e driver sono disponibili al sito
www.thrustmaster.com
4/4
Page 21

Manual del usuario
CARACTERÍSTICAS TÉCNICAS
1. Gatillos programables y progresivos
2. 8 botones de acción digitales
3. 2 botones de acción digitales
4. 2 mini-sticks analógicos + 2 botones de acción
digitales
5. D-Pad (Point Of View, punto de vista)
6. Interruptor (Gamepad OFF / Vibración On/Off)
AVISO DE SEGURIDAD
• No retuerzas ni tires del cable.
• No derrames líquidos ni en el cable ni en los conectores.
• En caso de un mal funcionamiento durante la utilización debido a las emisiones electrostáticas, sal del
juego y desenchufa la unidad del ordenador. Continúa el juego normal enchufando de nuevo la unidad
y reiniciando el juego.
REQUISITOS DE SISTEMA
PC (Windows 98 y superior) equipados con puertos USB.
7. Botón MODE (Analógico/Digital)
8. Botón MAPPING (para
programar funciones de gatillo)
9. Botón CONNECT
10. 2 motores independientes
11. Receptor USB
1/4
Page 22

INSTALACIÓN DE CONTROLADORES
El CD-ROM incluido con este producto te permite instalar los controladores de Force Feedback.
1. Inserta el CD-ROM de instalación en tu unidad de CD-ROM. Sigue las instrucciones en pantalla para
instalar los controladores de Force Feedback. Una vez que se haya terminado la instalación, haz clic
en Finalizar y reinicia tu ordenador.
2. Una vez que tu ordenador se haya reiniciado, enchufa el conector USB a uno de los puertos USB de
tu ordenador. Windows 98/Me/2000/XP detectará automáticamente el nuevo dispositivo. (Si estás
conectando un dispositivo periférico USB por primera vez, Windows puede pedirte que insertes el CDROM de Windows durante la instalación para copiar los archivos de sistema necesarios.)
3. Instalación de los controladores:
Windows 98: el Asistente para agregar nuevo hardware buscará los controladores apropiados. Haz
clic en Siguiente. Sigue las instrucciones en pantalla para completar la instalación.
Windows Me/2000/XP: los controladores se instalan automáticamente.
4. Selecciona Inicio/Configuración/Panel de control, después haz doble clic en Dispositivos de
juego (o en Opciones de juego, dependiendo de tu sistema operativo). El cuadro de dialogo
Dispositivos de juego muestra el nombre del gamepad con el estado OK.
Atención: el cuadro de dialogo Dispositivos de juego no te permite probar los efectos Force
Feedback del gamepad. Puedes probarlos utilizando la aplicación “Force Feedback Test”
(Inicio/Programas/Thrustmaster FFB Driver).
FUNCIONES AVANZADAS
• Interruptor (6):
- Posición OFF = el gamepad está apagado.
- Posición ON = el gamepad está encendido, el modo de vibración está apagado (ahorra energía de las
pilas).
- Posición VIB = el gamepad está encendido, el modo de vibración está encendido (utiliza más energía
de las pilas).
• Botón MODE (7): pulsa este botón para cambiar entre modos.
- Modo analógico (por defecto): el botón
MODE (7) se ilumina en azul. 12 botones de acción, mini-stick
analógico izquierdo (gestionando ejes X e Y) y mini-stick analógico derecho (gestionando los ejes Z y
rotación de Z) y D-Pad (gestionando 8 POV de dirección).
- Modo digital: el botón
MODE (7) no está encendido. 12 botones de acción, D-Pad (gestionando los
ejes X e Y) y 8 direcciones programables, mini-stick digital izquierdo (gestionando 8 POV de
dirección) y mini-stick analógico derecho (gestionando los ejes Z y rotación de Z).
• Botón CONNECT (9): pulsa este botón para cambiar entre modos.
- LED “Connect” está parpadeando rápidamente = no hay señal entre el gamepad y el receptor.
- LED “Connect” está iluminado = señal fuerte entre el gamepad y el receptor.
- LED “Connect” está apagado = el gamepad está en modo durmiente.
- LED “Connect” está parpadeando lentamente = las pilas tienen poca energía (la función de vibración
se desactivará para ahorrar pilas). En este caso, cambia las pilas para volver a la configuración de
“vibración” normal.
• SLEEP MODE:
- El gamepad se apaga automáticamente cuando no se utiliza durante 5 minutos.
- Para “despertarlo”, pulsa cualquier botón.
• INFORMACIÓN DE INTERCAMBIO AUTOMÁTICO DE CANALES / MULTIJUGADOR:
- Puedes jugar con hasta 4 Dual Trigger Gamepads. Todos los canales se detectan automáticamente.
- Cuando estés jugando en modo multijugador, si quieres intercambiar gamepads en el transcurso de
un juego, pulsa simultáneamente los botones RECEIVER y CONNECT en tu gamepad.
2/4
Page 23

MAPEADO DE LOS GATILLOS MAPEADO DE LOS GATILLOS
Todos los botones y direcciones del mini-stick (ejes) pueden mapearse en los gatillos Izquierdo y Derecho
Todos los botones y direcciones del mini-stick (ejes) pueden mapearse en los gatillos Izquierdo y Derecho
(excepto el D-Pad y los botones (3) y (4)).
(excepto el D-Pad y los botones (3) y (4)).
• Botón MAPPING (8) (utilizado para mapear los gatillos Izquierdo y Derecho): • Botón MAPPING (8) (utilizado para mapear los gatillos Izquierdo y Derecho):
- Pulsa y suelta el botón MAPPING (el LED parpadea lentamente). - Pulsa y suelta el botón MAPPING (el LED parpadea lentamente).
- Pulsa y suelta el botón o dirección que quieras asignar al gatillo (el LED parpadea rápidamente). - Pulsa y suelta el botón o dirección que quieras asignar al gatillo (el LED parpadea rápidamente).
- Pulsa y suelta el gatillo asignado a esta función (el LED se apaga). - Pulsa y suelta el gatillo asignado a esta función (el LED se apaga).
• EEPROM: • EEPROM:
Tu gamepad incluye un chip de memoria interno, que almacena tu última configuración de mapeado
Tu gamepad incluye un chip de memoria interno, que almacena tu última configuración de mapeado
incluso si apagas tu gamepad.
incluso si apagas tu gamepad.
• COMPORTAMIENTO DE LOS GATILLOS: • COMPORTAMIENTO DE LOS GATILLOS:
Los gatillos reaccionan de forma diferente según si les mapeas 2 ejes analógicos por separado, o el
Los gatillos reaccionan de forma diferente según si les mapeas 2 ejes analógicos por separado, o el
mismo eje analógico o 2 botones digitales por separado. A continuación hay 3 ejemplos diferentes (en
mismo eje analógico o 2 botones digitales por separado. A continuación hay 3 ejemplos diferentes (en
este caso, para un juego de carreras).
este caso, para un juego de carreras).
• 2 ejes por separado se mapean en los 2 gatillos.
• Esta configuración es la más útil (si tu juego la acepta).
• Esto te permite regular por separado el control analógico de los
gatillos Izquierdo y Derecho (no hay gatillo “maestro”).
• El mismo eje se mapea en los 2 gatillos.
• En este caso, el gatillo Izquierdo es el gatillo “maestro”.
• Si pulsas juntos los gatillos Izquierdo y Derecho, tu coche frenará.
• Esto te permite utilizar el gatillo Derecho para controlar la velocidad
de tu coche, y utilizar brevemente el gatillo Izquierdo para un control
potente del frenado.
• 2 botones digitales se mapean en los 2 gatillos.
• Esta configuración ofrece un control por separado de los gatillos
Izquierdo y Derecho (no hay gatillo “maestro”); sin embargo, los gatillos
funcionan como botones digitales (y por lo tanto no ofrecen control
progresivo).
De este modo, hay disponibles muchas configuraciones de mapeado, según las posibilidades ofrecidas
De este modo, hay disponibles muchas configuraciones de mapeado, según las posibilidades ofrecidas
por tu juego. Si tu juego no acepta tu configuración de mapeado actual, los gatillos producirán reacciones
por tu juego. Si tu juego no acepta tu configuración de mapeado actual, los gatillos producirán reacciones
extrañas; en este caso, intenta definir otra configuración de mapeado (utilizando otros ejes y botones).
extrañas; en este caso, intenta definir otra configuración de mapeado (utilizando otros ejes y botones).
Para conseguir una comprensión total de todas las posibilidades disponibles, pruébalos utilizando
Para conseguir una comprensión total de todas las posibilidades disponibles, pruébalos utilizando
el cuadro de diálogo “Dispositivos de juego” en el panel de control de Windows.
el cuadro de diálogo “Dispositivos de juego” en el panel de control de Windows.
3/4
Page 24

SOPORTE TÉCNICO
Si encuentras un problema con tu producto, visita
http://ts.thrustmaster.com y haz clic en Technical
Support. Desde allí podrás acceder a distintas utilidades (preguntas frecuentes (Frequently Asked
Questions, FAQ), las últimas versiones de controladores y software) que pueden ayudarte a resolver tu
problema. Si el problema persiste, puedes contactar con el servicio de soporte técnico de los productos
de Thrustmaster (“Soporte Técnico”):
Por correo electrónico:
Para utilizar el soporte técnico por correo electrónico, primero debes registrarte online. La información
que proporciones ayudará a los agentes a resolver más rápidamente tu problema. Haz clic en
Registration en la parte izquierda de la página de Soporte técnico y sigue las instrucciones en pantalla.
Si ya te has registrado, rellena los campos Username y Password y después haz clic en Login.
Por teléfono:
España 917 54 70 63
Estados
Unidos
514-279-9911
precio de una llamada telefónica nacional, de lunes a viernes
de 13:00 a 17:00 y de 18:00 a 22:00
precio de una llamada telefónica de larga distancia, de lunes
a viernes de 7:00 a 17:00 (hora del Este)
Información de garantía
En todo el mundo, Guillemot Corporation S.A. (“Guillemot”) garantiza al consumidor que este producto de
Thrustmaster estará libre de defectos materiales y fallos de fabricación por un periodo de dos (2) años a
partir de la fecha de compra original. Si el producto pareciera estar defectuoso durante el periodo de
garantía, contacte inmediatamente con el Soporte Técnico, que le indicará el procedimiento a seguir. Si
el defecto se confirma, el producto debe devolverse a su lugar de compra (o a cualquier otro lugar
indicado por el Soporte Técnico).
Dentro del contexto de esta garantía, el producto defectuoso del consumidor será reparado o
reemplazado, a elección del Soporte Técnico. En los casos que lo autorice la ley aplicable, toda la
responsabilidad de Guillemot y de sus filiales (incluyendo sobre daños indirectos) está limitada a la
reparación o sustitución del producto de Thrustmaster. Los derechos legales del consumidor con
respecto a la legislación aplicable a la venta de bienes de consumo no se ven afectados por esta
garantía.
Esta garantía no se aplicará: (1) si el producto ha sido modificado, abierto, alterado, o ha sufrido daños
como resultado de una utilización inapropiada u ofensiva, negligencia, accidente, desgaste normal, o
cualquier otra causa no relacionada con un defecto material o fallo de fabricación; (2) en caso de no
cumplimiento de las instrucciones proporcionadas por el Soporte Técnico; (3) a software no publicado por
Guillemot, o sea, a software que está sujeto a una garantía específica proporcionada por su fabricante.
COPYRIGHT
© 2004 Guillemot Corporation S.A. Reservados todos los derechos. Thrustmaster® es una marca comercial
registrada de Guillemot Corporation S.A. Microsoft® Windows® 98, 2000, Me y XP son marcas registradas
propiedad de Microsoft Corporation en los Estados Unidos y/o otros países. Todas las demás marcas comerciales
y nombres de marca se reconocen aquí y son propiedad de sus respectivos dueños. Ilustraciones no definitivas.
Los contenidos, diseños y especificaciones están sujetos a cambios sin previo aviso y pueden variar de un país a
otro.
FAQ, consejos y controladores disponibles en www.thrustmaster.com
4/4
Page 25

Manual do utilizador
CARACTERÍSTICAS TÉCNICAS
1. Gatilhos programáveis e progressivos
2. 8 botões de acção digitais
3. 2 botões de acção digitais
4. 2 minialavancas analógicas + 2 botões de acção digitais
5. Almofada direccional (Ponto de Vista)
6. Interruptor (Desligar Gamepad / Ligar/Desligar Vibração)
AVISO DE SEGURANÇA
• Não torça nem puxe o cabo.
• Não derrame líquido sobre o cabo e/ou os conectores.
• Na eventualidade de funcionamento incorrecto devido a uma emissão electrostática, por favor saia do
jogo e desconecte o dispositivo do computador. Retome o funcionamento normal voltando a conectar o
dispositivo e reiniciando o jogo.
REQUISITOS DO SISTEMA
PC (Windows 98 e superior) equipados com portas USB.
7. Botão MODE (Analog / Digital)
8. Botão MAPPING (para
programar funções dos gatilhos)
9. Botão CONNECT
10. 2 motores independentes
11. Receptor USB
1/4
Page 26

INSTALAÇÃO DOS CONTROLADORES
O CD-ROM incluído com este produto permite instalar os controladores dos efeitos de retorno de força.
1. Insira o CD-ROM de instalação na unidade respectiva. Siga as instruções que surgirem no ecrã para
instalar os controladores dos efeitos de retorno de força. Depois de terminar a instalação, clique em
Concluir e reinicie o computador.
2. Quando o computador tiver reiniciado, ligue o conector USB a uma das portas USB do PC. O
Windows 98/Me/2000/XP detectará automaticamente o novo dispositivo. (Se estiver a conectar um
dispositivo USB pela primeira vez, o Windows poderá pedir-lhe o CD-ROM respectivo durante a
instalação a fim de instalar os ficheiros de sistema necessários.)
3. Instalar os controladores:
Windows 98: o Assistente Adicionar novo hardware procurará os controladores adequados. Clique
em Seguinte. Siga as instruções que surgirem no ecrã para concluir a instalação.
Windows Me/2000/XP: os controladores são instalados automaticamente.
4. Seleccione Iniciar/Definições/Painel de controlo e depois faça duplo clique em Controladores de
jogos (ou Opções de jogos, dependendo do seu sistema operativo). A caixa de diálogo
Controladores de jogos exibe o nome do gamepad com o estado OK.
Atenção: a caixa de diálogo Controladores de jogos não permite testar os efeitos de retorno de força
do gamepad. Pode testá-los usando a aplicação “Force Feedback Test” (Iniciar/Programas/
Thrustmaster FFB Driver).
FUNÇÕES AVANÇADAS
• Interruptor (6):
- Posição OFF = o gamepad está desligado.
- Posição ON = o gamepad está ligado, o modo de vibração está desligado (poupa a pilha).
- Posição VIB = o gamepad está ligado, o modo de vibração está ligado (faz mais uso da pilha).
• Botão MODE (7): prima este botão para alternar entre modos.
- Modo Analog (pré-definido): o botão
MODE (7) acende-se a azul. Doze botões de acção,
minialavanca analógica esquerda (para os eixos X e Y), minialavanca analógica direita (para os eixos
de rotação Z e Z) e almofada direccional (para as oito direcções PdV).
- Modo Digital: o botão
os eixos X e Y) e oito direcções programáveis, minialavanca digital esquerda (para as oito direcções
PdV) e minialavanca analógica direita (para os eixos de rotação Z e Z).
MODE (7) não está aceso. Doze botões de acção, almofada direccional (para
• Botão CONNECT (9): prima este botão para alternar entre modos.
- LED “Connect” a piscar rapidamente = não há sinal entre o gamepad e o receptor.
- LED “Connect” aceso = sinal forte entre o gamepad e o receptor.
- LED “Connect” apagado = o gamepad está no modo Sleep.
- LED “Connect” a piscar lentamente = pouca carga da pilha (a função de vibração será desactivada
para poupar a carga). Neste caso, substitua a pilha para regressar à configuração “vibratória” normal.
• MODO SLEEP:
- O gamepad desliga-se automaticamente depois de decorridos 5 minutos da última vez que foi usado.
- Para “acordá-lo”, por favor prima qualquer botão.
• INFORMAÇÃO DE MUDANÇA AUTOMÁTICA MULTIJOGADOR / CANAL:
- Pode jogar usando até quatro gamepads Dual Trigger. Todos os canais são detectados de forma
automática.
- No modo multijogador, se quiser trocar de gamepad durante um jogo, prima os botões RECEIVER e
CONNECT simultaneamente no seu gamepad.
2/4
Page 27

MAPEAMENTO DO GATILHO MAPEAMENTO DO GATILHO
Todos os botões e direcções (eixos) das minialavancas podem ser mapeados para os gatilhos esquerdo e
Todos os botões e direcções (eixos) das minialavancas podem ser mapeados para os gatilhos esquerdo e
direito (excepto a almofada direccional e os botões (3) e (4)).
direito (excepto a almofada direccional e os botões (3) e (4)).
• Botão MAPPING (8) (usado para mapear os gatilhos esquerdo & direito): • Botão MAPPING (8) (usado para mapear os gatilhos esquerdo & direito):
- Prima e solte o botão MAPPING (o LED pisca lentamente). - Prima e solte o botão MAPPING (o LED pisca lentamente).
- Prima e solte o botão ou a direcção que quer atribuir ao gatilho (o LED pisca rapidamente). - Prima e solte o botão ou a direcção que quer atribuir ao gatilho (o LED pisca rapidamente).
- Prima e pressione o gatilho atribuído a esta função (o LED apaga-se). - Prima e pressione o gatilho atribuído a esta função (o LED apaga-se).
• EEPROM: • EEPROM:
O seu gamepad inclui um chip de memória interno, o qual guarda a sua última configuração de
O seu gamepad inclui um chip de memória interno, o qual guarda a sua última configuração de
mapeamento mesmo que desligue o dispositivo.
mapeamento mesmo que desligue o dispositivo.
• COMPORTAMENTO DOS GATILHOS: • COMPORTAMENTO DOS GATILHOS:
Os gatilhos reagem diferentemente se mapear neles dois eixos analógicos distintos, o mesmo eixo
Os gatilhos reagem diferentemente se mapear neles dois eixos analógicos distintos, o mesmo eixo
analógico ou dois botões digitais separados. Abaixo estão três exemplos diferentes (neste caso, para um
analógico ou dois botões digitais separados. Abaixo estão três exemplos diferentes (neste caso, para um
jogo de corridas de automóveis).
jogo de corridas de automóveis).
• Dois eixos distintos mapeados nos dois gatilhos.
• Esta configuração é a mais útil (se o seu jogo a aceitar).
• Permite regular separadamente o controlo analógico dos gatilhos
esquerdo e direito (não há um gatilho “principal”).
• O mesmo eixo mapeado nos dois gatilhos.
• Neste caso, o gatilho esquerdo é o “principal”.
• Se premir os gatilhos esquerdo e direito em conjunto, o carro travará.
• Permite usar o gatilho direito para controlar a velocidade do carro e o
gatilho esquerdo brevemente para controlar a fundo a travagem.
• Dois botões digitais mapeados nos dois gatilhos.
• Esta configuração oferece um controlo separado dos gatilhos
esquerdo e direito (não há um gatilho “principal”); no entanto, os gatilhos
operam como botões digitais (e como tal não proporcionam um controlo
progressivo).
Desta forma, há muitas configurações de mapeamento disponíveis, de acordo com as possibilidades
Desta forma, há muitas configurações de mapeamento disponíveis, de acordo com as possibilidades
oferecidas pelo jogo. Se o jogo não aceitar a sua configuração de mapeamento actual, os gatilhos
oferecidas pelo jogo. Se o jogo não aceitar a sua configuração de mapeamento actual, os gatilhos
produzirão reacções estranhas; neste caso, por favor experimente definir outra configuração de
produzirão reacções estranhas; neste caso, por favor experimente definir outra configuração de
mapeamento usando outros eixos e botões).
mapeamento usando outros eixos e botões).
Para compreender a fundo todas as possibilidades disponíveis, por favor experimente-as usando a
Para compreender a fundo todas as possibilidades disponíveis, por favor experimente-as usando a
caixa de diálogo “Controladores de jogos” no painel de controlo do Windows.
caixa de diálogo “Controladores de jogos” no painel de controlo do Windows.
3/4
Page 28

SUPORTE TÉCNICO
Se tiver algum problema com o seu produto, por favor visite o sítio
Technical Support. A partir daqui poderá aceder a vários utilitários (perguntas mais frequentes, as mais recentes
versões de controladores e software) capazes de ajudá-lo a resolver o seu problema. Se este se mantiver, poderá
contactar o serviço de suporte técnico (“Suporte Técnico”) dos produtos Thrustmaster:
Por correio electrónico:
De forma a tirar partido do suporte técnico por correio electrónico, primeiro terá de se registar online. As
informações que fornecer ajudarão os agentes a resolver o seu problema mais rapidamente. Clique em
Registration no lado esquerdo da página Technical Support e siga as instruções que surgirem no ecrã. Caso já
tenha feito o seu registo, preencha os campos Username e Password e clique depois em Login.
Por telefone:
Estados
Unidos
INFORMAÇÃO DA GARANTIA
A Guillemot Corporation S.A. (“Guillemot”) garante ao consumidor, a nível mundial, que este produto
Thrustmaster está isento de defeitos de material e de fabrico durante um período de dois (2) anos a partir da data
de compra original. No caso de o produto apresentar algum defeito durante o período da garantia, contacte
imediatamente o Suporte Técnico, que indicará o procedimento a seguir. Se se confirmar o defeito, o produto terá
de ser devolvido no seu local de compra (ou em qualquer outro local indicado pelo Suporte Técnico).
No âmbito desta garantia, o produto defeituoso do consumidor, por opção do Suporte Técnico, será reparado ou
substituído. Sempre que a lei em vigor o autorize, a responsabilidade total da Guillemot e das suas filiais
(incluindo por danos indirectos) está limitada à reparação ou substituição do produto Thrustmaster. Esta garantia
não afecta os direitos legais do consumidor em relação à legislação aplicável à venda de bens de consumo.
Esta garantia não será aplicada: (1) se o produto tiver sido modificado, aberto, alterado ou sofrido danos
derivados de uso inadequado ou abusivo, negligência, acidente, desgaste normal ou qualquer outra causa que
não esteja relacionada com um defeito de material ou de fabrico; (2) na eventualidade de desrespeito pelas
instruções fornecidas pelo Suporte Técnico; (3) a software que não tenha sido publicado pela Guillemot, estando
o dito software sujeito a uma garantia específica fornecida pelo respectivo editor.
Provisões adicionais de garantia
Nos Estados Unidos da América e no Canadá, esta garantia está limitada ao mecanismo interno do produto e à
sua caixa externa. Quaisquer garantias implícitas aplicáveis, incluindo garantias de comercialização e adequação
a um fim específico, são por este meio limitadas a dois (2) anos a partir da data de compra e estão sujeitas às
condições estabelecidas nesta garantia limitada. Em nenhuma circunstância caberá à Guillemot Corporation S.A.
ou às suas filiais a responsabilidade por danos consequentes ou acidentais resultantes da quebra de quaisquer
garantias expressas ou implícitas. Alguns estados/províncias não permitem limitações nos períodos de duração
da garantia ou a exclusão ou limitação de danos acidentais/consequentes, por isso a limitação supracitada pode
não ser aplicada a si. Esta garantia concede-lhe direitos legais específicos, para além de poder ter outros direitos
legais que variam de estado para estado e de província para província.
DIREITOS DE AUTOR
© 2004 Guillemot Corporation S.A. Reservados todos os direitos. Thrustmaster® é uma marca registada da
Guillemot Corporation S.A. Microsoft® Windows® é uma marca registada da Microsoft Corporation nos Estados
Unidos e/ou noutros países. Todas as outras marcas comerciais e nomes de marcas são por este meio
reconhecidas e pertencem aos seus proprietários respectivos. As ilustrações não são vinculativas. Os conteúdos,
desenhos e especificações estão sujeitos a alteração sem aviso prévio e poderão variar de país para país.
514-279-
9911
FAQ, sugestões e controladores disponíveis em www.thrustmaster.com
preço duma chamada telefónica de longa distância, de segunda a
sexta-feira, das 7h00 às 17h00 (hora da Costa Leste)
http://ts.thrustmaster.com e clique em
4/4
 Loading...