

THRUSTMASTER
S
S
P
®
QUICK INSTALL
U
TECHNICAL
FEATURES
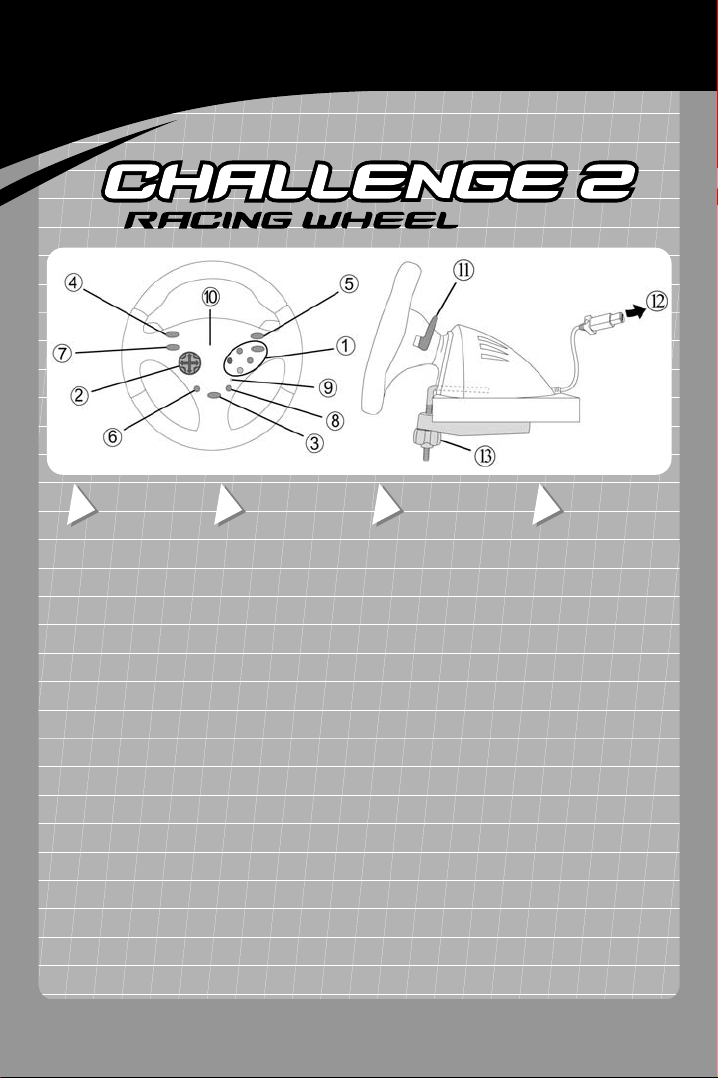
1. 5 digital action buttons
(A, B, X, Y, Z)
2. 4-way D-Pad or digital
“C-stick”
3. Start/Pause button
4. Trigger click L button
5. Trigger click R button
6. Rumble on/off button
(vibrating effects,
function activated by default)
7. Shift D-Pad/C-stick button
8. Program button
9. LED
10. Integrated motor for vibrating
effects
11. 2 analog levers
(gas/brakes controls or
gear shift depending on
the game)l
12. Gamecube™ connector
13. Table clamp system
© Guillemot Corporation 2002. All rights
reserved. Thrustmaster® is a registered
trademark of Guillemot Corporation S.A.
Ferrari® and 360 Modena® are registered
trademarks of Ferrari Idea S.p.A.
Gamecube™ is a trademark of Nintendo
Co., Ltd. All rights reserved. All other
trademarks are the property of their
respective owners. Illustrations not
binding. Contents, designs and
specifications are subject to change
without notice and may vary from one
country to another.
D
TECHNISCHE
MERKMALE
1. 5 digitale Action-Tasten
(A, B, X, Y, Z)
2. 4-Wege Richtungspad oder
digitaler “C-stick”
3. Start/Pause-Taste
4. Trigger click L-Taste
5. Trigger click R-Taste
6. Rumble an/aus-Taste
(Vibrationseffekte, Funktion
standardmäßig aktiviert)
7. Taste D-Pad/C-stick
8. Programmier-Taste
9. LED
10. Integrierter Motor für
Vibrationseffekte
11. 2 analoge Hebel
(Gas-/Brems-Kontrolle oder
Schalthebel, abhängig vom
Spiel)
12. Gamecube™-Anschluss
13. Befestigungssystem zur
Tischmontage
© Guillemot Corporation 2002. Alle Rechte
vorbehalten. Thrustmaster® ist ein
eingetragenes Warenzeichen der
Guillemot Corporation S.A. Ferrari® und
360 Modena® sind eingetragene
Warenzeichen der Ferrari Idea Idea S.p.A.
Gamecube™ ist ein Warenzeichen von
Nintendo Co., Ltd. Alle Rechte
vorbehalten. Alle anderen Warenzeichen
sind Eigentum der entsprechenden
Besitzer. Fotos und Abbildungen sind
nicht verbindlich. Inhalt, Design und
Spezifikationen können ohne
Ankündigung geändert werden und sind in
verschiedenen Ländern unterschiedlich.
E
CARACTERÍSTICA
TÉCNICAS
1. 5 botones de acción digitales
(A, B, X, Y, Z)
2. D-Pad de 4 direcciones
o “C-stick” digital
3. Botón Start/Pause
4. Botón Trigger click L
5. Botón Trigger click R
6. Botón Rumble on/off
(efectos de vibración, función
activada por defecto)
7. Botón Shift D-Pad/C-stick
8. Botón Program
9. LED
10. Motor integrado para efectos
de vibración
11. 2 palancas analógicas
(controles de gas/frenos o de
cambio de marchas
dependiendo del juego)
12. Conector de Gamecube™
13. Sistema de fijación a la mesa
© Guillemot Corporation 2002.
Reservados todos los derechos.
Thrustmaster® es una marca comercial
registrada de Guillemot Corporation S.A.
Ferrari® y 360 Modena® son marcas
comerciales registradas de Ferrari Idea
Idea S.p.A. Gamecube™ es una marca
comercial de Nintendo Co., Ltd.
Reservados todos los derechos. Todas las
demás marcas comerciales son propiedad
de sus respectivos dueños. Ilustraciones
no definitivas. Los contenidos, diseños y
especificaciones están sujetos a cambios
sin previo aviso y pueden variar de un
país a otro.
CARACTERÍSTICAS
TÉCNICAS
1. 5 botões digitais de acção
(A, B, X, Y, Z)
2. Almofada digital de 4 direcções
ou “C-stick” digital
3. Botão Start/Pause
4. Botão Trigger click L
5. Botão Trigger click R
6. Botão Rumble on/off (efeitos
vibratórios, função normalmente
activada)
7. Botão Shift D-Pad/C-stick
8. Botão Program
9. LED
10. Motor integrado para efeitos
vibratórios
11. 2 alavancas analógicas
(controlos do acelerador/travão
ou da alavanca das velocidades,
dependendo do jogo)
12. Conector para Gamecube™
13. Sistema de fixação por grampo
© Guillemot Corporation 2002. Reservados
todos os direitos. Thrustmaster® é uma
marca registada da Guillemot Corporation
S.A. Ferrari® e 360 Modena® são marcas
registadas da Ferrari Idea Idea S.p.A .
Gamecube™ é uma marca comercial da
Nintendo Co., Ltd. Reservados todos os
direitos. Todas as outras marcas comerciais
pertencem aos seus respectivos
proprietários. As ilustrações não são
vinculativas. Os conteúdos, desenhos e
especificações estão sujeitos a alteração
sem aviso prévio, e poderão variar de país
para país.

U
S
r
r
P
INSTALLING THE WHEEL
1. Adjust the clamp (13) to make sure that the wheel is firmly attached to a table or flat surface.
2. Plug the wheel connector (12) into one of your Gamecube™ console ports.
Then enjoy the race!
TRIGGER CLICK L AND TRIGGER CLICK R BUTTONS
The Trigger click L (4) and Trigger click R (5) buttons are digital action buttons which reproduce the digital click produced by the
triggers on the Gamecube™ gamepad, supplied with your console. The effect is not progressive but immediate (e.g. a turbo
boost).
D
LENKRAD INSTALLIEREN
1. Ziehen Sie die Befestigungsklammer an (13) und vergewissern Sie sich, dass das Lenkrad stabil an einem Tisch oder eine
flachen Oberfläche befestigt ist.
2. Stecken Sie das Anschlusskabel des Lenkrads (12) in einen der Gamecube™-Anschlüsse ein.
Viel Spaß beim Rennen!
TRIGGER KLICK L- UND TRIGGER KLICK R-TASTEN
Die Tasten Trigger click L (4) und Trigger click R (5) sind digitale Action-Tasten, die den digitalen Klick reproduzieren, den die
Abzüge des mit dem Gamecube™ mitgelieferten Gamepads erzeugen. Dieser Effekt ist nicht progressiv, sondern hat sofortige
Wirkung (beispielsweise ein Turbo-Schub).
E
INSTALACIÓN DEL VOLANTE
1. Ajusta el tornillo (14) asegurándote que el volante está firmemente fijado a una mesa o superficie plana.
2. Enchufa el conector del volante (13) en uno de los puertos de tu consola Gamecube™.
¡Disfruta de la carrera!
BOTONES TRIGGER CLICK L Y TRIGGER CLICK R
Los botones Trigger click L (4) y Trigger click R (5) son botones de acción digitales que reproducen el clic digital producido po
los gatillos en el gamepad de Gamecube™, incluido con tu consola. El efecto no es progresivo, pero sí inmediato (p.e. una
aceleración turbo).
INSTALAR O VOLANTE
1. Ajuste o grampo (13) para garantir que o volante fica firmemente seguro a uma mesa ou superfície plana.
2. Ligue o conector do volante (12) a uma das portas da sua consola Gamecube™.
Agora, pé a fundo e aprecie a corrida!
BOTÕES TRIGGER CLICK L E TRIGGER CLICK R
Os botões Trigger click L (4) e Trigger click R (5) são botões digitais de acção que reproduzem o estalido digital produzido pelos
gatilhos no gamepad Gamecube™, fornecido com a sua consola. O efeito não é progressivo, mas sim imediato (por exemplo, um
arranque do turbo).
For use with Gamecube™

U
S
D
-
C
-
f
r
C
-
r
D
-
C
-
r
y
P
D
-
C
-
USING THE SHIFT
The Shift D-Pad/C-stick (7) button enables you to use the D-Pad on your wheel to reproduce some of the functions produced by
the C-stick on the Gamecube™ gamepad, supplied with your console. You could use this function to adjust camera angles
during a race, for instance. To do this, press the Shift D-Pad/C-stick (7) button: the LED turns green, then turns off. This will
convert the D-Pad into a digital “C-stick”. When you use the D-Pad in “C-stick” mode the LED will light up.
To obtain an effect similar to the one produced by the analog C-stick on the Gamecube™ gamepad, press and hold down one o
the arrows. For example, if you press and hold down the upwards arrow, the camera will move progressively upwards.
To return to the D-Pad function, press the Shift D-Pad/C-stick (7) button again.
USING THE PROGRAM BUTTON
Overview
• The function of every digital button (A, B, X, Y, Z, Trigger click L, Trigger click R) can be applied to another digital button o
lever.
D
VERWENDEN DER TASTE WECHSEL RICHTUNGSPAD /
Die Taste Wechsel Richtungspad/C-Stick (7) ermöglicht es dem Richtungspad des Lenkrads, einige Funktionen des C-Sticks des
mit dem Gamecube™ mitgelieferten Gamepads zu reproduzieren. Sie können mit dieser Funktion beispielsweise den
Kamerawinkel während eines Rennens einstellen. Dazu drücken Sie die Taste Wechsel Richtungspad/C-Stick (7): Die LED
leuchtet kurz grün auf. So wird aus dem Richtungspad ein digitaler „C-Stick“. Wenn Sie das Richtungspad im „C-Stick”-Modus
verwenden, leuchtet die LED.
Um einen dem C-Stick ähnlichen Effekt zu erzielen, drücken Sie eine der Pfeiltasten und halten diese gedrückt. Wenn Sie
beispielsweise den Pfeil nach oben drücken und gedrückt halten, wird die Kameraperspektive sich progressiv nach oben
verschieben.
Um zur Richtungspad-Funktion zurückzukehren, drücken Sie die Taste Wechsel Richtungspad/C-Stick (7) erneut.
PROGRAMMIER-TASTE VERWENDEN
Übersicht
• Die Funktion jeder digitalen Taste (A, B, X, Y, Z, Trigger Klick L, Trigger Klick R) kann einer anderen digitalen Taste ode
einem Hebel zugewiesen werden.
E
UTILIZACIÓN DEL BOTÓN SHIFT
El botón Shift D-Pad/C-stick (7) te permite utilizar el D-Pad en tu volante para reproducir algunas de las funciones producidas po
el C-stick en el gamepad de Gamecube™, incluido con tu consola. Puedes utilizar esta función para ajustar los ángulos de
cámara durante una carrera, por ejemplo. Para hacerlo, pulsa el botón Shift D-Pad/C-stick (7): el LED se pone en verde,
después se apaga. Esto convertirá el D-Pad en un “C-stick” digital. Cuando utilices el D-Pad en modo “C-stick”, se iluminará el
LED.
Para conseguir un efecto similar al producido por el C-stick analógico en el gamepad de Gamecube™, mantén pulsada una de
las flechas. Por ejemplo, si mantienes pulsada la flecha hacia arriba, la cámara se moverá progresivamente hacia arriba.
Para volver a la función D-Pad, pulsa de nuevo el botón Shift D-Pad/C-stick (7).
UTILIZACIÓN DEL BOTÓN PROGRAM
Visión general
• La función de cada botón digital (A, B, X, Y, Z, Trigger click L, Trigger click R) se puede aplicar a otra palanca o botón digital.
PAD/
STICK BUTTON
PAD/
STICK
STICK
USAR O BOTÃO SHIFT
O botão Shift D-Pad/C-stick (7) permite-lhe usar a almofada digital no seu volante para reproduzir algumas das funções
produzidas pela alavanca C no gamepad Gamecube™, fornecido com a sua consola. Pode usar esta função para ajustar os
ângulos da câmara durante uma corrida, por exemplo. Para tal, prima o botão Shift D-Pad/C-stick (7): o LED fica verde,
apagando-se em seguida. Isto converterá a almofada digital numa “alavanca C” digital. Quando utilizar a almofada digital no
modo de “alavanca C”, o LED acender-se-á.
Para obter um efeito idêntico ao produzido pela alavanca C analógica no gamepad Gamecube™, prima e pressione uma das
setas. Por exemplo, se premir e pressionar a seta que aponta para cima, a câmara avançará progressivamente nessa direcção.
Para regressar à função de almofada digital, prima novamente o botão Shift D-Pad/C-stick (7).
USAR O BOTÃO PROGRAM
Descrição
• A função de cada botão digital (A, B, X, Y, Z, Trigger click L, Trigger click R) pode ser aplicada a outro botão digital ou
alavanca.
PAD/
STICK
Für Gamecube™

U
S
t
P
• The function of each lever can be applied to a digital button or lever.
• If a digital control is programmed onto an analog control, that analog control becomes digital.
• If an analog control is programmed onto a digital control, that digital control remains digital.
N.B. The Start/Pause, Program, Rumble on/off and Shift D-Pad/C-stick buttons, the 4-way D-Pad arrows and the left and righ
wheel directions cannot be programmed.
Button and axis* programming
1. Press the Program button: the LED turns red**.
2. Press the button/axis that you wish to program elsewhere: the LED turns yellow**.
3. Press the button/axis that you wish to program with the same function as the button/axis pressed in Step 2, above: the LED
turns green, and then turns off.
4. The button/axis selected in Step 3 now has the same function as the button/axis selected in Step 2. The button/axis pressed
in Step 2 retains its original function.
D
• Die Funktion jedes Hebels kann einer digitalen Taste oder einem Hebel zugewiesen werden.
• Wenn eine digitale Kontrolle einer analogen Kontrolle zugewiesen wird, wird die analoge Kontrolle digital.
• Wenn die analoge Kontrolle einer digitalen Kontrolle zugewiesen wird, bleibt die digitale Kontrolle digital.
HINWEIS: Die Tasten Start/Pause, Programmieren, Rumble an/aus und Wechsel Richtungspad/C-Stick, das 4-Wege-
Richtungspad sowie die Lenkradrichtungen Links und Rechts können nicht programmiert werden.
Programmierung der Tasten und Achsen*
1. Drücken Sie die Taste Programmieren: die LED leuchtet rot**.
2. Drücken Sie die Taste/Achse, die Sie zuweisen möchten: die LED leuchtet gelb**.
3. Drücken Sie die Taste/Achse, die Sie mit den Funktionen der in Schritt 2 gedrückten Taste/Achse belegen möchten: die LED
leuchtet grün auf und erlischt.
4. Die in Schritt 3 ausgewählte Taste/Achse hat nun die gleichen Funktionen wie die in Schritt 2 ausgewählte Taste/Achse. Die
in Schritt 2 gedrückte Taste/Achse behält ihre Funktionen.
E
• La función de cada palanca puede aplicarse a una palanca o botón digital.
• Si un control digital se programa en un control analógico, ese control analógico se vuelve digital.
• Si un control analógico se programa en un control digital, ese control digital permanece digital.
N.B. Los botones Start/Pause, Program, Rumble on/off y Shift D-Pad/C-stick, las flechas del D-Pad de 4 direcciones y las
direcciones izquierda y derecha del volante no pueden programarse.
Programación de botones y ejes*
1. Pulsa el botón Program: el LED se vuelve rojo**.
2. Pulsa el botón/eje que quieras programar en otra parte: el LED se vuelve amarillo**.
3. Pulsa el botón/eje que quieras programar con la misma función que el botón/eje pulsado en el Paso 2 anterior: el LED se
vuelve verde, y después se apaga.
4. El botón/eje seleccionado en el Paso 3 tiene ahora la misma función que el botón/eje seleccionado en el Paso 2. El
botón/eje pulsado en el Paso 2 mantiene su función original.
• A função de cada alavanca pode ser aplicada a um botão digital ou alavanca.
• Se um controlo digital for programado num controlo analógico, este torna-se digital.
• Se um controlo analógico for programado num controlo digital, este permanece digital.
Nota: Os botões Start/Pause, Program, Rumble on/off e Shift D-Pad/C-stick, as setas da almofada digital de 4 direcções e as
direcções do volante para a esquerda e direita não podem ser programadas.
Programação de botões e eixos*
1. Prima o botão Program: o LED fica vermelho**.
2. Prima o botão/eixo que pretende programar noutro lado: o LED fica amarelo**.
3. Prima o botão/eixo que pretende programar com a mesma função do que o botão/eixo premido no Passo 2, acima: o LED
fica verde, apagando-se em seguida.
4. O botão/eixo seleccionado no Passo 3 tem agora a mesma função do que o botão/eixo seleccionado no Passo 2. O
botão/eixo premido no Passo 2 conserva a sua função original.
Para utilizar con Gamecube™

S
* In this section, the term “axis” is applied to levers. Therefore, “press an axis” or “select an axis” means activate a lever.
t
t
t
r
P
U
** If you do not press another button/axis within 10 seconds, the LED will turn off and no changes will have been made.
Example: If, in a given game, the A button is used for accelerating and you wish to apply this function to the lever on the right-
hand side of the wheel:
1. Press the Program button: the LED turns red.
2. Next press the A button: the LED turns yellow.
3. Finally press the right-hand lever: the LED turns green, then turns off.
The right-hand lever now performs the A button’s function (acceleration) and the A button retains its original function.
To return to the default configuration
Hold down the Program button together with the button which has just been assigned a new function for at least 5 seconds: the
LED turns green when the default configuration has been restored.
Example: If you have applied the A button’s function to the right-hand lever (as in the example above) and you would like to rese
the function of the right-hand lever, hold down the Program button for at least 5 seconds.
D
* In diesem Zusammenhang bezieht sich der Ausdruck „Achse“ auf Hebel. „Drücken oder wählen Sie eine Achse“ is
gleichzusetzen mit „Aktivieren Sie einen Hebel“.
** Wenn Sie keine andere Taste/Achse innerhalb von zehn Sekunden drücken, erlischt die LED und es werden keine
Änderungen gespeichert.
Beispiel: Wenn in einem Spiel die Taste A mit der Funktion Beschleunigen belegt ist und Sie diese Funktion dem rechten
Lenkradhebel zuweisen möchten, gehen Sie wie folgt vor:
1. Drücken Sie die Taste Programmieren: die LED leuchtet rot.
2. Drücken Sie jetzt die Taste A: die LED leuchtet gelb.
3. Drücken Sie jetzt den rechten Hebel: die LED leuchtet grün auf und erlischt.
Der rechte Lenkradhebel ist jetzt mit der Funktion der Taste A belegt (Beschleunigung), die Taste A behält ihre ursprüngliche Funktion.
Standardkonfiguration wiederherstellen
Halten Sie die Taste Programmieren und die neu programmierte Taste für mindestens 5 Sekunden gedrückt: die LED leuchte
grün auf, wenn die Standardkonfiguration wiederhergestellt wurde.
Beispiel: Wenn Sie die Funktion der Taste A dem rechten Lenkradheben zugewiesen haben (Siehe obigen Beispiel) und Sie die
Standardkonfiguration des Hebels wiederherstellen möchten, halten Sie die Taste Programmieren und den Hebel für mindestens 5
Sekunden gedrückt.
E
* En esta sección, el término “ejes” se aplica a las palancas. Por lo tanto, “pulsa un eje” o “selecciona un eje” implica activa
una palanca.
** Si no pulsas otro botón/eje durante 10 segundos, el LED se apagará y no se habrás realizado cambios.
Ejemplo: Si, en un juego dado, el botón A se utiliza para acelerar, y quieres aplicar esta función a la palanca en la parte derecha
del volante:
1. Pulsa el botón Program: el LED se vuelve rojo.
2. Después pulsa el botón A: el LED se vuelve amarillo.
3. Finalmente pulsa la palanca derecha: el LED se vuelve verde, y después se apaga.
Ahora, la palanca realiza la función del botón A (aceleración) y el botón A mantiene su función original.
Para volver a la configuración por defecto
Mantén pulsado durante al menos 5 segundos el botón Program junto con el botón al que acabas de asignar una nueva función:
el LED se pone verde cuando se restaura la configuración por defecto.
Ejemplo: Si has aplicado la función del botón A a la palanca derecha (como en el ejemplo anterior) y quieres restaurar la función
de la palanca derecha, mantén pulsado durante al menos 5 segundos el botón Program.
* Nesta secção, o termo “eixo” é aplicado às alavancas. Por conseguinte, “premir um eixo” ou “seleccionar um eixo” significa
activar uma alavanca.
** Se não premir outro botão/eixo no espaço de 10 segundos, o LED apagar-se-á e não serão efectuadas alterações.
Exemplo: Se, num determinado jogo, o botão A é usado para acelerar e você quiser aplicar esta função à alavanca situada no
lado direito do volante:
1. Prima o botão Program: o LED fica vermelho.
2. Seguidamente, prima o botão A: o LED passa a amarelo.
3. Finalmente, prima a alavanca direita: o LED fica verde, apagando-se depois.
A alavanca direita realiza agora a mesma função do botão A (aceleração), e este conserva a sua função original.
Para repor a configuração padrão
Pressione o botão Program juntamente com o botão ao qual acabou de atribuir uma nova função durante pelo menos
5 segundos: o LED fica verde depois de a configuração padrão ser reposta.
Exemplo: Se aplicou a função do botão A à alavanca direita (como no exemplo acima) e pretende repor a função da alavanca
direita, pressione o botão Program durante 5 segundos no mínimo.
Para a Gamecube™
 Loading...