

Page 1
Guarantee
10 cm
7 cm
10 cm
10 cm
7 cm
The type and production number of your appliance are printed on the guarantee certificate
delivered with your video recorder. Keep this certificate as well as the invoice. These
documents are indispensable for claiming your guarantee rights.
• All repairs during the guarantee period must be carried out by an authorised
technician representing our brand.
• If this condition is not met, your rights will no longer be valid.
• Never open the appliance yourself, since this may be dangerous for you or damage
the equipment.
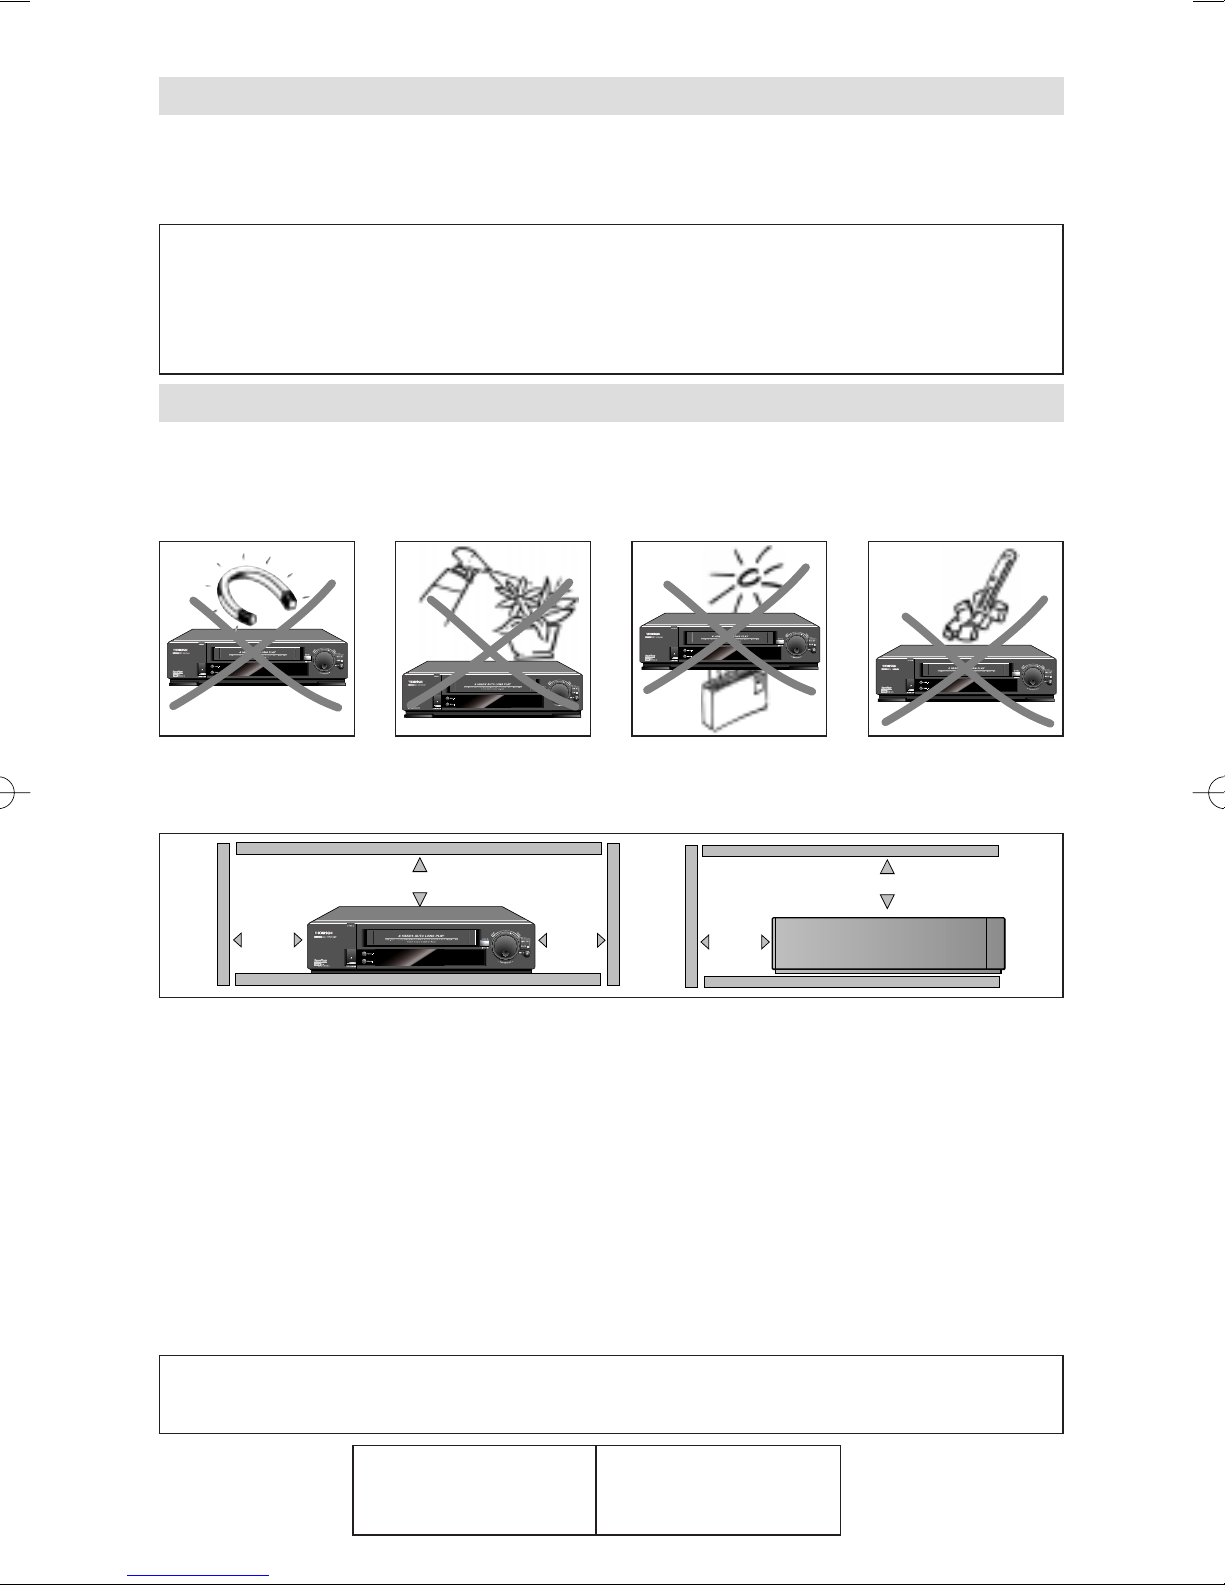
Precautions
Setting up - Ensure that the mains supply in your house complies with that indicated on
the identification sticker located on the back of your appliance.
Install the video recorder horizontally, away from any source of heat (fireplace) or
appliances creating strong magnetic or electric fields.
If you install your video recorder in a purpose-built unit, check that the air vents are not
obstructed. Allow a clearance of 10 cm on either side and at the rear of the appliance and
at least 7 cm above.
Use - If your appliance, or a cassette, has been stored in a very cold atmosphere for a
certain amount of time (transported during winter for example), wait approximately 2
hours before using your video recorder. The openings located on the top and the bottom
are for ventilation purposes. They should not be obstructed. In the event of lightning, the
appliance should be disconnected from the external aerial.
Even when the on/off switch is off, the video recorder is not completely cut off from the
mains. To disconnect it completely, it is necessary to remove the mains plug from the mains
socket
Under no circumstances should this appliance be put to industrial use. It is designed solely
for domestic operation.
Maintenance - Use a dry, clean, soft cloth. Do not use any scouring agents, solvents or
abrasive products, etc. If an object or liquid enters inside the appliance, unplug it
immediately and have it checked by an authorised technician.
It is illegal to make total or partial copies of recordings protected by copyright laws without
explicit permission of the copyright holder.
MINITEL IN FRANCE
3615 THOMSON
*
* 1.29 FF per minute
Page 2
CONTENTS
Before using your video recorder, you
must carry out the installation and
setup procedure described in the
Getting Started guide (1).
!
Guarantee - Precautions
Controlling the TV set 2
Controlling the video recorder 3
Monitoring the operation 4
The menus 5
Viewing a tape 6
Preparing - Recording
Recording a programme
Programming with ShowView codes
a recording Without ShowView codes
Audio/Video 1 - 2 - 3 10-11
VPS/PDC system
Regarding programming
Record with automatic pause
8-9
Programming the VPS/PDC recording
12
Functions available on VPS programmes only
Programming options
Checking the programming
13
Erasing the programming
Recording programmed on a connected set
ENGLISH
7
Additional informations Protection of the tapes - Eco mode 14-16
TV codes 17
Technical features 18
Identifying and correcting problems
Mesecam - Menu language
Modulator - NTSC tape
Transition to the year 2000 - ShowView
ShowView and the satellite demodulator
Page 3
-
+
SIZE AAA 1,5 V 0%MERCURY
GREENELL
EXTRA HEAVY DUTY
-
+
SIZE AAA 1,5 V 0%MERCURY
GREENELL
EXTRA HEAVY DUTY
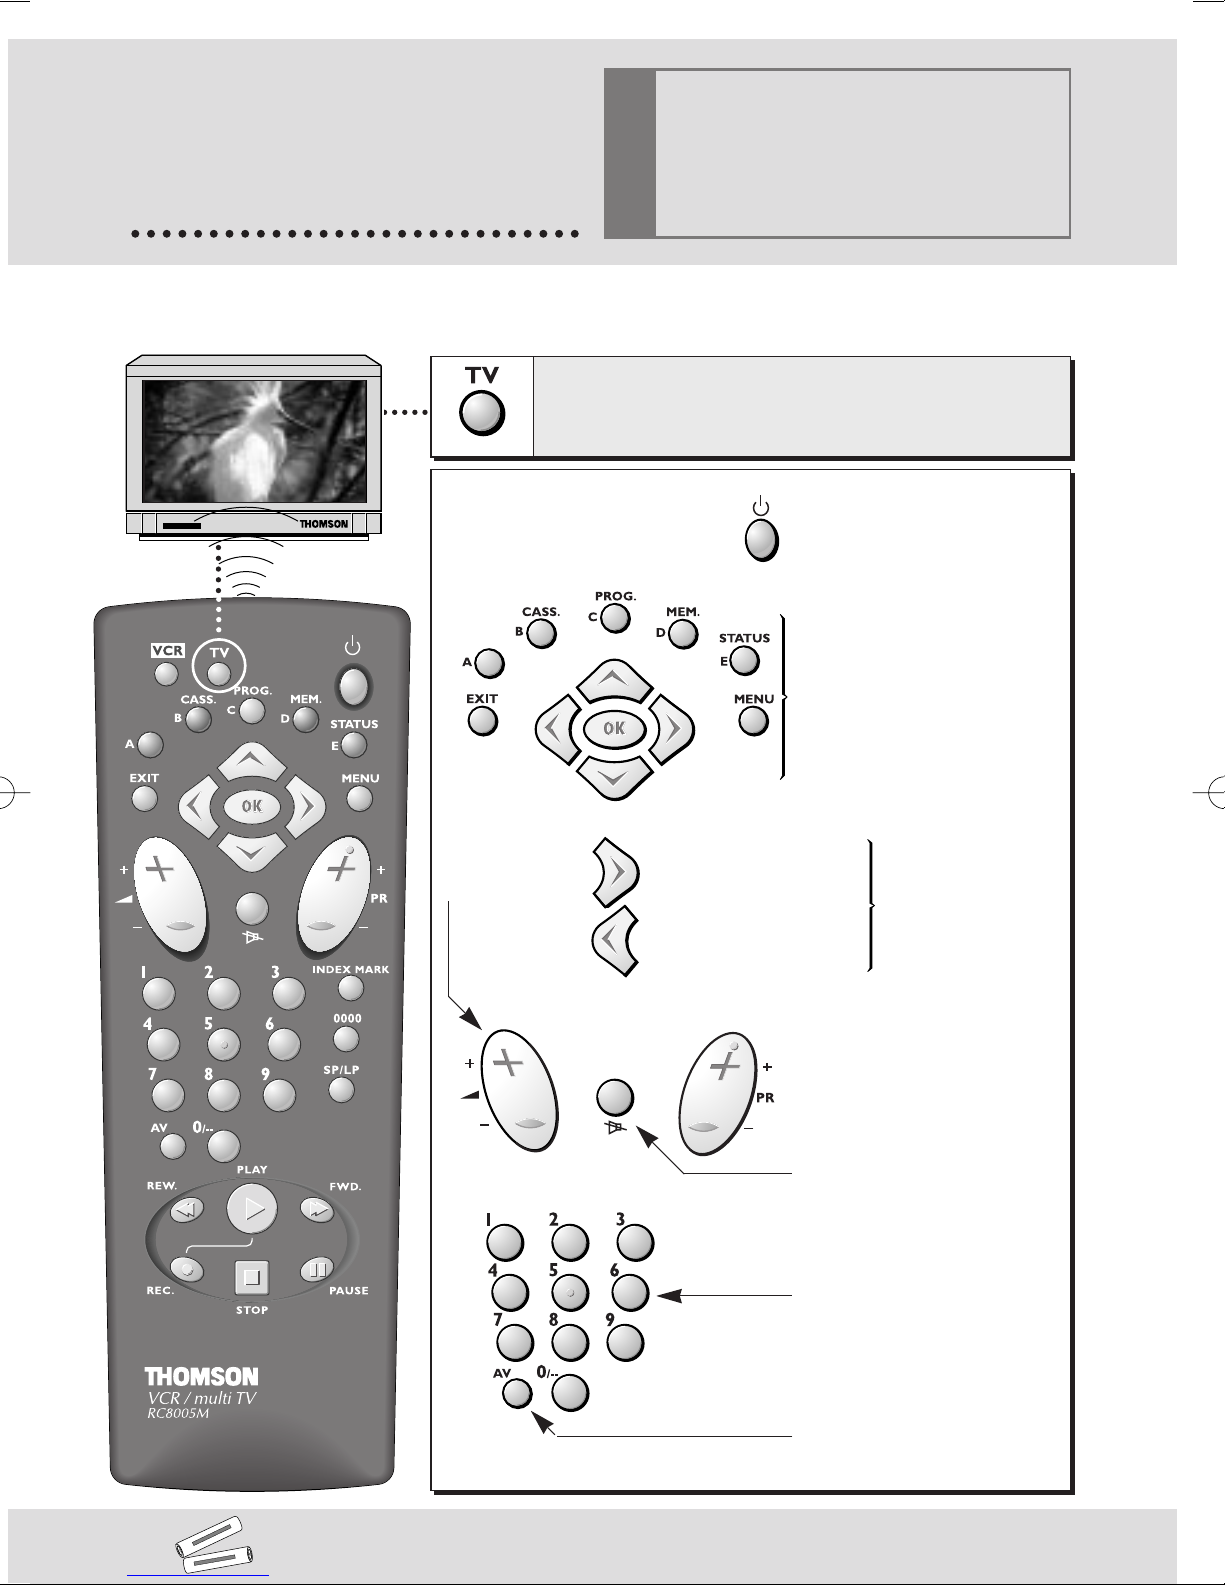
Depending on the type of TV set you
CONTROLLING
own, this remote control may not be
compatible or certain functions may
!
the TV set
Your remote control can be used to control certain functions on most TV sets. Before using it, you need
to program it with one of the codes indicated in the table on the last page of this manual.
Pour commander le téléviseur,
To control your TV set, press this key first.
not be available.
appuyez d’abord sur cette touche.
To switch your TV set
on or off.
These keys are the same as
certain functions on your TV
s remote control (if it is our
brand).
To adjust
the sound
volume.
To increase the
image size / zoom +.
To decrease the
image size / zoom -.
To change the channel.
To switch off the sound.
To switch the TV set on or
to select a channel.
To select a SCART socket
and view the pictures of
the AV unit connected to
this socket.
These two functions
are available on
THOMSON TV sets
only.
2
When you change the batteries, it is necessary to re-enter the brand code.
Page 4
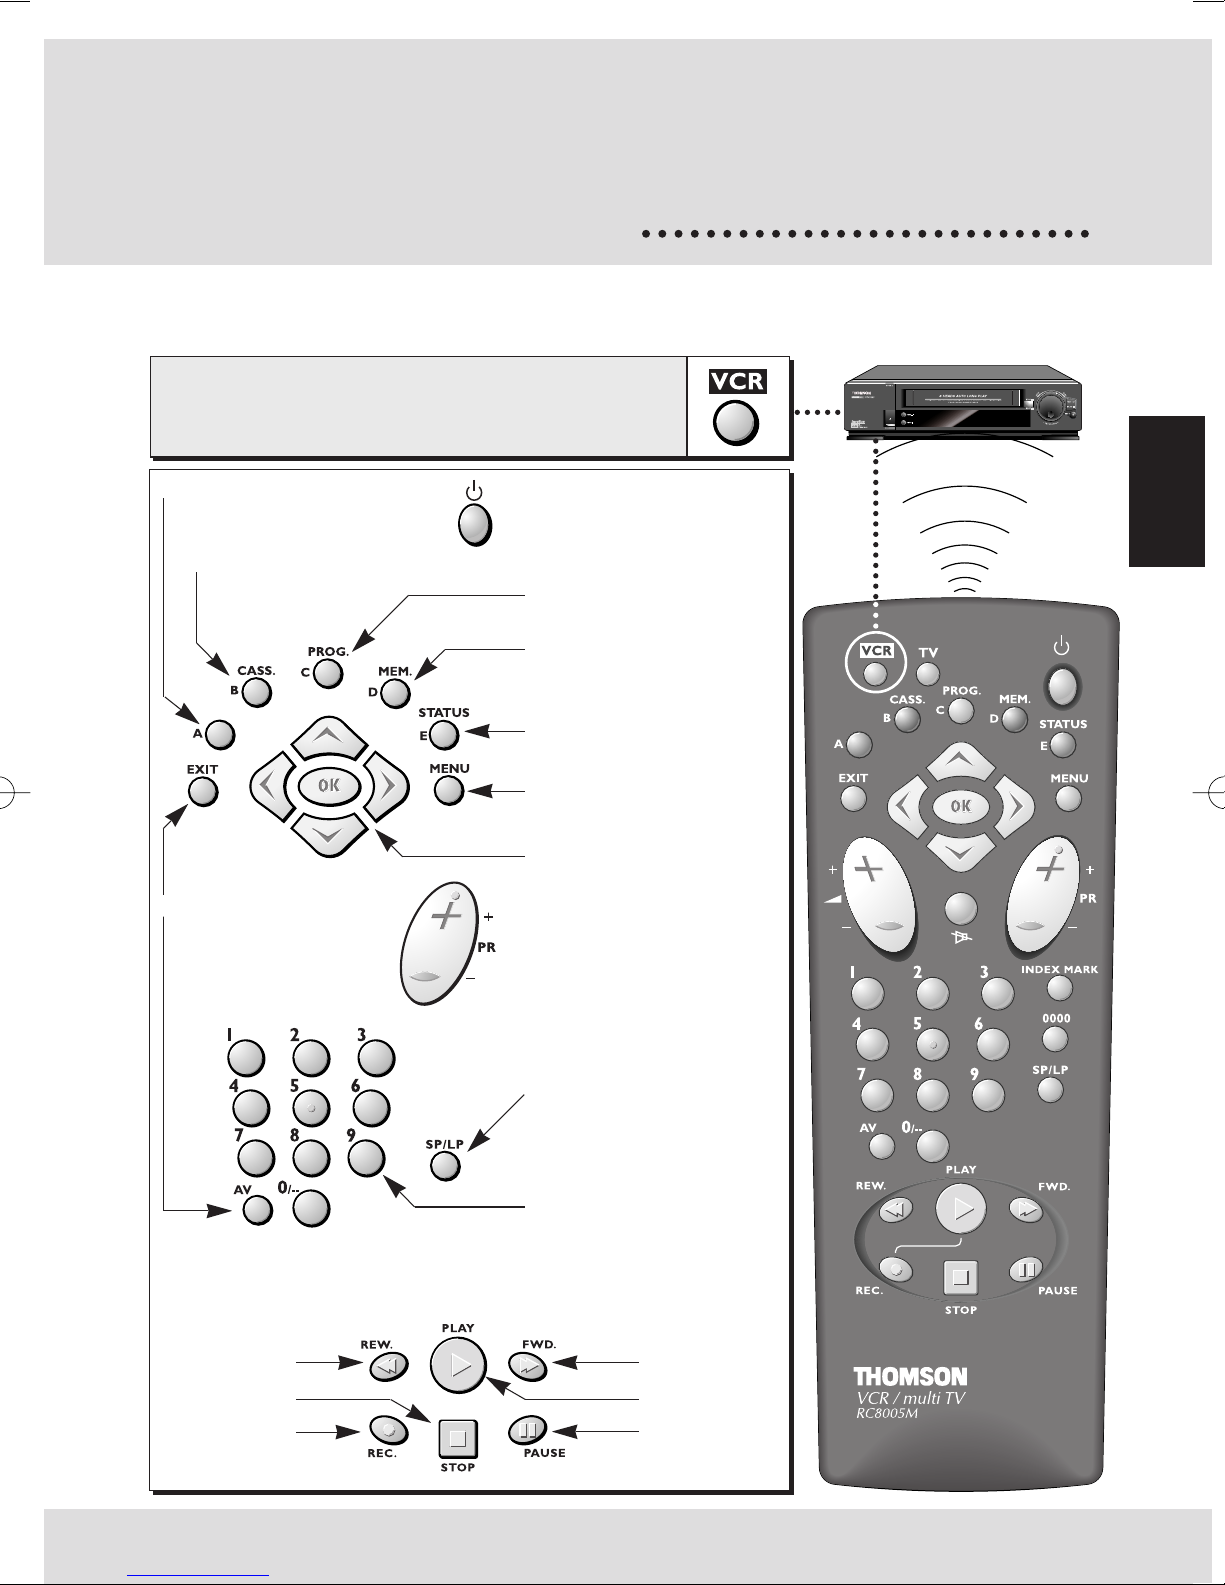
CONTROLLING
the video recorder
Point the remote control towards the video recorder when you press a key.
To control your video recorder,
Pour l’utilisation du magnétoscope,
press this key first.
appuyez d’abord sur cette touche.
To display the main menu.
To adjust the picture.
To leave the
menu at any
time.
To select the AV units
connected to the
audio/video sockets
(AV 1/2/3).
To switch the video
recorder on and off.
To display the programme
menu.
To store or confirm.
To leave the menu at any
time, or display the
information screen.
To display the main menu.
To navigate through the
menus and to validate
with OK.
To change the channel.
To double the recording
time of a tape with LP.
ENGLISH
The controls/functions below are also to be
found on the front of the video recorder.
Reverse
Stop
Record
To select a channel.
For 2-digit channels,
press 0/-- first
(example: 0, 1, 2 for Pr12).
Forward
Play
Pause
3
Page 5

MONITORING
the operation
S P
VIDEO
G
–––––
he display
T
––––– : Play.
–>
––––– : Fast play.
–> –>
––––– : Forward.
–> –> –>
––––– : Reverse (rewinding).
–> –> –>
––––– : Freeze frame.
––––– : Variable slow motion.
<– –>
M : Pause-record (flashing).
M : Currently recording.
: Programmed recording.
Pr3
AU 1-AU 2:AV1-AV2 - Picture and sound from an
AU 3
: Picture and sound from a TV channel.
AV unit connected to the SCART
sockets (AUDIO/VIDEO) on the back
of the video recorder.
:
AV3 - Picture and sound from an AV
unit connected on the front of the
video recorder.
01H15
01H15
H 35S : Tape counter (running time).
09:53
VIDEO: The video recorder transmits the picture
S P : Play/record at standard speed
LP : Play/record in long play (Long Play).
SLP : Very long play of an NTSC tape (Super
VPS : The current programme is in VPS.
PDC : The current programme is in PDC.
VPS
PDC
M
35
S
: Time.
: Presence of a tape in
the video recorder.
and the sound to the TV set.
(Standard Play).
Long Play).
The video recorder automatically detects the type
of standard tape loaded (E30, 60, 120…).
When you call the information screen up, the
video recorder indicates the cassette type and the
time remaining until the end of the tape.
4
n the screen
O
COUNTER REMAIN
00
H03M35S 0H15M E180
PR5
SP
G 14:30
VCR
Page 6
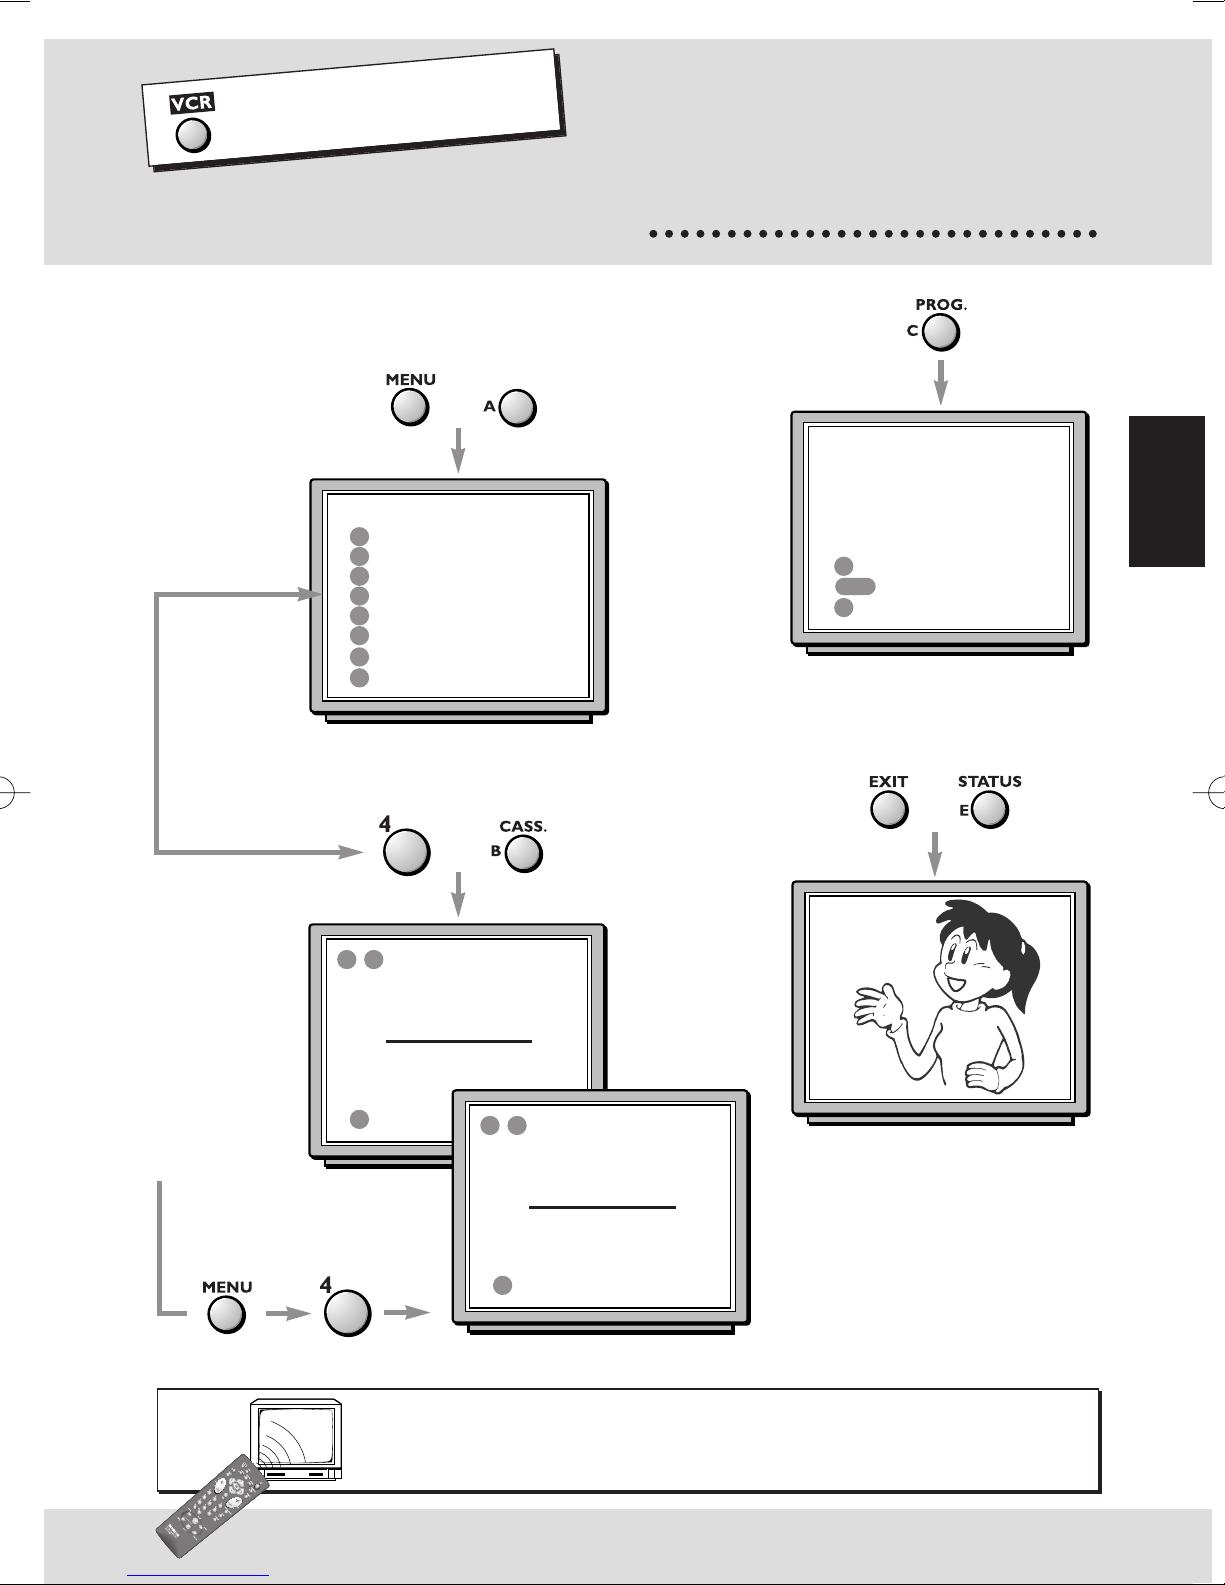
Press the VCR key
on your remote control.
THE
The menus allow access to the functions by
selecting the corresponding numbers.
Example: with a tape
loaded in the play
mode (B).
To choose, enter the
digit found in front of
the function.
TIMER
1
2
SET UP
3
SET CLOCK
4
PICTURE QUALITY
5
MESECAM on/OFF
6
SHOWVIEW
7
ECO. MODE ON/off
E
EXIT
or
MAIN MENU
or
menus
SHOWVIEW
> 5 8 6 2 4
ENTER CODE
CONFIRM
C
0000
ERASE
E
EXIT
To leave a menu at
any time.
or
ENGLISH
-
+
/ TRACKING
-
E
EXIT
With the freeze frame feature
(K) activated, you can
improve the picture quality.
To view the pictures or the menus of the video recorder, you must
switch the TV set on by selecting the channel assigned to the video
recorder (see the Set-up Manual, page 5, step 2).
▼ +
-
+
/ ADJUST STABILITY
-
E
EXIT
▼ +
5
Page 7

Press the VCR key
on your remote control.
VIEWING
a tape
Play
If picture quality is poor, checked that the
MESECAM function is deselected in the main
menu. In case of poor quality PAL sources or
old PAL tapes, please turn MESECAM off.
Fast search
Press several times on the keys to vary the
speed and direction of the fast search.
Freeze a picture - Pause
To view a tape and explore the recordings on it, freeze
a frame, find precise sequences with the fast search,
rewind to the start or the end of the tape.
On your remote
Sur votre
télécommande
control
On the front side of
Sur la façade du
the video recorder
magnétoscope
Press to move onto the next picture.
Variable slow motion
Press several times on the keys to vary the
speed and direction of the slow motion.
Stop
Press the key.
Forward or reverse
Press the keys several times.
End of the tapeStart of the
tape
Ejection of the tape
6
Page 8

Press the VCR key
on your remote control.
RECORDING
You can record TV programmes or pictures
transmitted by a AV unit connected to the back of
the video recorder (SCART sockets AV1/AV2).
Preparing
Insert a tape.
To proceed to the settings for your recording,
always call up the information screen.
Choose a channel or a AV
unit connected to the audio/video
sockets (AV1, AV2 or AV3).
Select the sockets with AV.
For 2-digit channels, press 0/-- first
(example: 0, 1, 2 for Pr12).
Choose the SP or LP length.
SP for normal play.
LP for long play.
aprogramme
COUNTER REMAIN
00
H02M15S 0H17M E180
PR12
AV1
SP
AV2
AV3
G 14:30
COUNTER REMAIN
00
H02M15S 0H17M E180
PR 5
MK
SP
LP
G 14:30
VCR
VCR
ENGLISH
Recording
Switch to pause-record
then start the recording.
Pause then resume recording.
Finish the recording.
Record with
automatic pause
Press the key twice.
Enter the time of the end of the current
programme with the digital keys.
To leave the menus,
press EXIT several times.
then
then
COUNTER REMAIN
00
H02M15S 0H17M E180
PR 5
MK
SP
G 14:30
COUNTER REMAIN
00
H02M15S 0H17M E180
PR4
M - - H - - M
SP
G 14:30
VCR
VCR
7
Page 9

Press the VCR key
on your remote control.
PROGRAMMING
arecording
with ShowView codes
Display the SHOWVIEW menu.
Enter the programme code.
Confirm.
You can programme a recording using the ShowView
codes in your TV listings magazine or using the manual
programming procedure, if you do not know the codes.
SHOWVIEW
> 5 8 6 2 4
ENTER CODE
CONFIRM
C
ERASE
0000
EXIT
E
First programme ?
The first time you programme a channel, the
video recorder asks you to enter the channel
number (PROG-).
For 2-digit channels, press 0/-- first
(example: 0, 1, 2 for Pr12).
To access the programming options,
press B. See also page 12 and 13.
End programming.
1 PROG STAR T STOP DATE
Pr - 17:30 20:00 18.04
B
OPTIONS
EXIT
E
1 PROG STAR T STOP DATE
Pr 5 17:30 20:00 18.04
MON-FRI SP
1
MON-FRI/WEEKLY
2
STOP TIME : +10 MINS
3
SP/LP
4
VPS OR PDC
B
RETURN
Switch off the video recorder
to set it to recording standby.
With a tape loaded, on the display will confirm a successful programming.
!
8
Page 10

ShowView codes
16.2516.25
FUNNY TIMESFUNNY TIMES
filmfilm
Drama-comedy
5862458624
TUESDAY
Without ShowView codes
Your video recorder has 8 programme memories.
You can therefore programme 8 recordings over a
one year period. The memory
number is indicated in the
top left-hand corner
of the screen.
1 PROG DEBUT
1
2
Pr - - - : - -
8
Display MAIN MENU.
Select TIMER.
Select SET TIMER.
Programme the recording of a channel by
entering its number (PR-) or selecting a set
connected to the audio-visual sockets AV1,
AV2 or AV3 if you want to trigger
programming from another programmed
set (satellite receiver).
MAIN MENU
1
TIMER
2
SET UP
3
SET CLOCK
4
PICTURE QUALITY
5
MESECAM on/OFF
SHOWVIEW
6
7
ECO. MODE ON/off
EXIT
E
1 PROG START STOP DATE
PR - - - : - - - - : - - 01.01
1
SET TIMER
2
CANCEL TIMER
3
NEXT TIMER
E
EXIT
1 PROG START STOP DATE
PR - - - : - - - - : - - 01.01
B
OPTIONS
E
EXIT
SP
SP
ENGLISH
For 2-digit channels, press 0/-- first
(example: 0, 1, 2 for Pr12).
Then enter
- start time,
- the time the programme ends and
- the date if the recording is not for the
same day.
To access the programming options,
press B. See also page 12 and 13.
Switch off the video recorder
to set it to recording standby.
With a tape loaded, on the display will confirm a successful programming.
!
1 PROG START STOP DATE
PR - - - : - - - - : - - 01.01
B
OPTIONS
E
EXIT
1 PROG STAR T STOP DATE
Pr 5 17:30 20:00 18.04
MON-FRI SP
1
MON-FRI/WEEKLY
2
STOP TIME : +10 MINS
3
SP/LP
4
VPS OR PDC
B
RETURN
SP
9
Page 11

AUDIO/VIDEO
1/2
To view and/or copy pictures from a connected AV
unit.
Decoder
TV set
Satellite receiver
Other video recorder
Display the control screen with key E and select
socket AV1 or AV2 with the AV key on the remote
control.
Pictures from an appliance switched on play mode
and connected to the AV2 socket are transferred to
the AV1 socket. If your TV set is connected to this
socket, you can view the pictures from the
connected appliance.
Camcorder
Video disk player
COUNTER REMAIN
H02M15S0H17M
00
AV 1
AV 2
SP
G
Other video recorder
Satellite receiver
14:30
A
E180
VCR
1010
Page 12

AUDIO/VIDEO
AUDIO/VIDEO 3 sockets on the front of the video
recorder to view and/or copy your films (filmed on
your camcorder) on video tapes.
3
ENGLISH
Display the control screen with key E and select
AV3 with the AV key on the remote control.
With compatible camcorders, the pause socket
makes copying easy by triggering off recording of
the video recorder when the camcorder transfers
from PAUSE to PLAY.
The video recorder should
be in pause-record M K.
COUNTER REMAIN
H02M15S0H17M
00
AV 3
MK
SP
G
14:30
A
E180
VCR
11
Page 13

Some programmes broadcast on certain channels are
VPS/PDC
system
VPS or PDC appears on the information screen and on the display when the programme you
are watching is transmitted in VPS or in PDC.
In this case, you can use the functions below.
COUNTER REMAIN
-00
H02M15S 0H17M E180
PR 1 VPS
SP
transmitted using VPS (Video Programme System) or
PDC (Programme Delivery Control). These signals
precisely start or stop the recording even when there is
a delay in the programme schedule. Your video
recorder can recognise these signals.
G 14:30
Programming the VPS/PDC recording
The programming menu (pages 8, 9) proposes options in which you will find the VPS or PDC
line.
Select this option to start programming at the real start and finish times of the programme.
Functions available on VPS programmes only
Recording stopped by VPS
During the recording of a VPS programme, press key D.
The recording will stop when the programme is really over.
Recording started by VPS
Switch the video recorder to standby-record, then press the D key. When the next VPS
programme is broadcast, the video recorder activates recording.
VCR
12
Page 14

REGARDING
programming
Programming options
During the programming procedure, you can select the OPTION line that offers the
following additional recording possiblities:
(1) MON-FRI/WEEKLY – to record the same programme every day between
Monday and Friday or every week at the same time.
(2) STOP TIME +10 MINS – to add 10, 20, or 30 minutes to the stop time to allow
for programming delays and overrunning.
(3) SP/LP – LP to double the recording time available on the tape.
(4) VPS or PDC – VPS/PDC for starting the recording the moment the
programmer starts regardless of delays, provided that
the channel broadcasts these signals (VPS or PDC on
the video recorder control screen).
Checking the programming
When the video recorder is on standby with symbols and on its display, press key C
on your remote control to call the checking screen up.
Erasing the programming
Switch on the video recorder and select TIMER in the main menu (keys MENU, 1). Seek the
programming (from 1 to 8) with key 3 and erase it by pressing key 2.
ENGLISH
Recording programmed
Recording of a programme can be triggered by a
satellite receiver or another appliance designed for the
purpose (control voltage applied to pin 8) and
connected to socket AV1 or AV2 with a SCART cable.
This avoids having to programme both set. Programme
the connected set and in the video recorder
programming menu select AV1 or AV2 as
appropriate.
on a connected set
1 PROG START STOP DATE
AV - - : - - - - : - - 01.01
B
OPTIONS
E
EXIT
13
Page 15

ADDITIONAL
informations
Mesecam
Tapes recorded in Mesecam can by viewed
on a PAL-Mesecam video recorder.
Select MESECAM ON in the Main Menu to
record or playback a tape using Mesecam.
Menu language
To change the menu language, display a
menu (keys MENU, 1) and press key E until
the menu changes language (English,
German, Italian, Spanish).
HAUPT-SEITE
MENU PRINCIPAL
1
1
TIMER
2
GRUNDEINSTELLUNGEN
3
UHR STELLEN
4
SPURLAGE/STABILITÄT
5
MESECAM ja/NEIN
SHOWVIEW
6
7
ÖKO. MODE EIN/aus
ENDE
E
MAIN MENU
1
TIMER
2
SET UP
3
SET CLOCK
4
PICTURE QUALITY
5
MESECAM on/OFF
SHOWVIEW
6
7
ECO. MODE ON/off
EXIT
E
MAIN MENU
1
TIMER
2
SET UP
3
SET CLOCK
4
PICTURE QUALITY
5
MESECAM on/OFF
SHOWVIEW
6
7
ECO. MODE ON/off
EXIT
E
In very exceptional cases it might be possible that
interference still appears on the welcome screen (step 3 of
the page «Tuning in the television») even after output
manual setting (21 to 69) of step 5.
In this case, repeat stages 3 and 5 (see above) and look for
the channel which offers least interference, then press the
0000 key to erase the white square on the screen.
14
Modulator
VCR OUTPUT CHANNEL IS
A
CONTINUE
EXIT
E
CH
51
Page 16

ADDITIONAL
VHS
VHS
informations
NTSC tape
NTSC is the television standard used in the United States, Japan and other countries. Your
video recorder can play VHS-NTSC tapes, but you must have a PAL standard TV set. Most
PAL TV sets provide satisfactory pictures from NTSC tapes.
SLP on the video recorder display indicates that the tape was recorded using Super Long Play.
Protection of the tapes
To avoid erasing one of your tapes by accidental over-recording, we recommend you protect
them by breaking the security tab.
To reuse a protected tape, just stick a piece of adhesive tape on this place.
ENGLISH
Unprotected
Protected
Eco mode
Your video recorder can save energy thanks to the ECO MODE
function which decreases the power consuption in STANDBY mode.
Only a red light is on.
With this mode activated, time is no longer displayed.
Press button 7 in the MAIN MENU to select ECO. MODE ON.
MAIN MENU
1
TIMER
2
SET UP
3
SET CLOCK
4
PICTURE QUALITY
5
MESECAM on/OFF
SHOWVIEW
6
7
ECO. MODE ON/off
EXIT
E
Transition to the year 2000
On December 31st 1999 at midnight, the clock of your video recorder will switch over to the
year 2000. However, should your appliance be disconnected from the mains at that moment,
you will have to change the year manually.
Proceed as follows: press MENU, 3, then enter time, day, month. With the keys PR- and PR+,
position the cursor on the 1 of 199- and press 2. To replace the other digits, proceed likewise.
Store by pressing D.
15
Page 17

ADDITIONAL
informations
ShowView
If ShowView programming does not operate correctly, it may be because the video recorder
clock is not set correctly.
If the time is correctly set, check and correct if necessary the ShowView numbers assigned to
the various channels.
Press buttons MENU, 2 ,3 one after the other
to display the menu on the right:
Some television programme guides give the numbers
corresponding to the channels. Follow the screen instructions
to check and change the ShowView numbers.
PROGRAMME SHOWVIEW
Pr 3 155
> Pr 4 123 <
Pr 12 101
-
+
REVIEW
/
0000
ERASE
E
EXIT
Some cable or satellite channels share a transmission channel. To
programme ShowView successfully for these channels, each channel
has to be set up with a different Pr number and must also have a different ShowView number.
Refer to the «Manual Channel Setup» chapter of the Getting Started guide to modify the
channel numbers if necessary.
ShowView and the satellite demodulator
If you programme the recording, using ShowView codes, of a programme broadcast by
satellite, the ShowView programmer can ask you to confirm the channel number (Pr99).
Connection by the aerial cable
- During the automatic channel set-up, the video recorder has
assigned channel number 99 to the satellite receiver connected by the aerial socket. Select
this number to view the pictures of the satellite channels. Should these pictures not come up
on the screen, refer to the Set-up manual, chapter “Manual channel set-up”.
Connection by the AUDIO/VIDEO 1 or 2 socket
video recorder by the audio video socket, do not choose a number but select the AV1 or AV2
socket.
ShowView is a registered trademark of Gemstar Development Corporation.
16
The ShowView system is manufactured under licence from Gemstar Development Corporation.
- If your satellite receiver is connected to the
Page 18

TV
codes
Setting
1 - Press key .
2 - Hold key MENU down and key in the 3-digit code corresponding to the make of your TV
set. Depending on your TV set model, it may be necessary to try several of the proposed
codes.
3 - Release key MENU.
ENGLISH
BRAND OF YOUR
MARQUE DE VOTRE
TV SET
TÉLÉVISEUR
AKAI....................................................008-020
AKARI.........................................................028
BANG & OLUFSEN ..............................009-019
BLAUPUNKT................................................023
BRANDT................................001-000-010-020
BRIONVEGA...............................................019
BLUESKY.....................................................020
CGE ...........................................................016
CONTINENTAL EDISON ..............................004
DAEWOO ...........................................020-025
ELBE .............................................005-015-023
FERGUSON................... 001-003-004-000-010
FINLUX .........................................020-024-019
FISHER........................................................008
FORMENTI..................................................019
GOLDSTAR..................................................020
GRUNDIG ....................................023-024-016
HITACHI......................................................007
IMPERIAL ....................................................016
JVC ............................................................013
KNEISSEL.............................................020-025
LOEWE.......................................................020
LOEWE OPTA ......................................019-020
LUXOR........................................................005
METZ............................................013-019-023
MITSUBISHI...................................017-018-020
MIVAR ........................................................016
NOKIA .......................................................005
NORDMENDE .......................001-010-020-000
BRAND
CODE DE LA
CODE
MARQUE
BRAND OF YOUR
MARQUE DE VOTRE
TV SET
TÉLÉVISEUR
ORION................................................005-020
PANASONIC ................................012-005-026
PHILIPS .........................................019-020-021
PHONOLA....................................019-020-021
PIONEER .............................................001-005
POLYTRON...................................020-027-029
RADIOLA......................................019-020-021
RADIOMARELLI ...........................................019
REX.............................................................005
SABA.............................001-000-005-010-019
SALORA .....................................................005
SAMSUNG ..........................................020-030
SANYO ...............................................008-018
SCHAUB-LORENZ .........................005-016-020
SCHNEIDER ..................................019-020-021
SELECO ......................................................005
SHARP.................................................022-018
SIEMENS ....................................................023
SINGER ........................................001-002-019
SINUDYNE..................................................019
SONITRON.................................................008
SONY..................................................014-018
TELEAVIA......................................001-010-020
TELEFUNKEN...........000-001-002-000-010-020
THOMSON ....................001-000-002-010-020
TOSHIBA...............................006-018-024-016
WEGA........................................................019
YOKAN...............................................020-025
YOKO ........................................................020
BRAND
CODE DE LA
CODE
MARQUE
17
Page 19

Technical features
Mains supply 200 to 240 V ±10% - 50/60 Hz
Consumed power 19 W when ON - 3 W in the eco mode
Clock autonomy approx. 30 minutes
Dimensions (W/H/D) 393 x 90 x 302 mm
Weight approx. 4.0 kg
Functioning conditions +5°C to +40°C - Surrounding humidity: 80 % maximum
Tape heads Video : 4 rotary heads
Audio: 1 fixed head (mono linear track)
Tuner PLL, VPS/PDC Type
Reception band I-III-IV Hertzian (aerial)
Inter-band (cable network)
Hyper-band (cable network)
Frequency ranges 45 to 855,25 MHz
Colour system PAL - SECAM - MESECAM
Playing of an NTSC tape on TV PAL 60Hz
Reception norms LL’ - BG - DKK’
Number of storable channels 99
Modulator UHF - Channel 21 to 69 - Pre-set at the factory on channel 60
Standard L - G - K
Remote control Infrared 33 Khz - Batteries 2 x 1,5 V (AA)
Menu language French - English - German - Italian
Automatic functions On (using any key)
Play (with protected tape)
Rewinding (at the end of the tape)
Long play (LP) - Super long play (SLP)
Tapes VHS format - Rewinding time: 105s with E 180
Identifying and correcting problems
If you have any problems, check the counter measure for each symptoms listed below. If the problem persists, note your
VCR Model Number and Serial Number which can be found on the back of your VCR. Contact your nearest authorized
service centre or dealer for assistance.
VCR set cannot be turned on. 1. Make sure the power cord plug is inserted in an AC power outlet.
2. Ensure the Power On/Off switch is on.
Intermittent or no remote operation. 1. Aim the remote control directly at the VCR. Nothing should be blocking the
remote control and the VCR.
2. Use new batteries. The batteries in the remote control may be weak or dead.
Snowy picture.
Noisy sound.
Dotted lines or stripes Spotted picture
(crosstalk.) Lines or streaks in picture
(interference).
1. Check your aerial or cable VCR connection.
2. Check the antenna connection on the VCR and on the wall.
1. This may be caused by local interference (e.g. cars, neon signs, hair dryers,
personal computer, audio devices, handphone, radio stations, etc.). Try moving
the interfering equipment or adjust the aerial antenna.
Double images or“ghosts”. 1. A highly directional antenna may improve the Picture. This may be caused by
Good picture.
Noisy sound.
No picture.
No. sound.
Recording is impossible: 1. See if the safety tab of the cassette isn’t broken.
In our efforts to improve the quality of our products, we reserve the right to change their features. The information contained in these
18
instructions are therefore liable to change and are not contractual.
reflections from nearby mountains or building.
1. Check the transmission standard selected for the current VCR programme.
1. Ensure the power On/Off switch is on.
2. Check the antenna connection.
2. Check if you have properly performed the steps for the preparation of your
recording as set out on page 7.
B2-S6048CER/GB/SC-BEI/812
 Loading...