


 Loading...
THOMSON TG580
Wireless-n Multi-User ADSL2+ Gateway
Setup and User Guide
THOMSON TG580
Setup and User Guide
Copyright
Copyright ©1999-2009 THOMSON. All rights reserved.
Distribution and copying of this document, use and communication of its contents is not permitted without written authorization from THOMSON. The content of this document is furnished for informational use only, may be subject to change without notice, and should not be construed as a commitment by THOMSON. THOMSON assumes no responsibility or liability for any errors or inaccuracies that may appear in this document.
THOMSON Telecom Belgium
Prins Boudewijnlaan, 47
B-2650 Edegem
Belgium
http://www.thomson.net
Trademarks
The following trademarks may be used in this document:
DECT™ is a trademark of ETSI.
Bluetooth® word mark and logos are owned by the Bluetooth SIG, Inc.
Ethernet™ is a trademark of Xerox Corporation.
Wi-Fi®, WMM® and the Wi-Fi logo are registered trademarks of the Wi-Fi Alliance®. Wi-Fi CERTIFIED, Wi-Fi ZONE, Wi-Fi Protected Access, Wi-Fi Multimedia, Wi-Fi Protected Setup, WPA, WPA2 and their respective logos are trademarks of the Wi-Fi Alliance®.
UPnP™ is a certification mark of the UPnP™ Implementers Corporation.
DLNA® is a registered trademark, DLNA disc logo is a service mark, and DLNA Certified is a trademark of the Digital Living Network Alliance. Digital Living Network Alliance is a service mark of the Digital Living Network Alliance.
Microsoft®, MS-DOS®, Windows®, Windows NT® and Windows Vista® are either registered trademarks or trademarks of Microsoft Corporation in the United States and/or other countries.
Apple® and Mac OS® are registered trademarks of Apple Computer, Incorporated, registered in the United States and other countries.
UNIX® is a registered trademark of UNIX System Laboratories, Incorporated.
Adobe®, the Adobe logo, Acrobat and Acrobat Reader are trademarks or registered trademarks of Adobe Systems, Incorporated, registered in the United States and/or other countries.
Other brands and product names may be trademarks or registered trademarks of their respective holders. All other logos, trademarks and service marks are the property of their respective owners, where marked or not.
Document Information
Status: v1.0 (November 2009)
Reference: E-DOC-CTC-20090507-0002
Short Title: Setup and User Guide TG580 (en)

Contents
|
About this Setup and User Guide............................................. |
1 |
1 |
Installation.................................................................................... |
3 |
1.1 |
Preliminary Steps............................................................................................ |
4 |
1.2 |
Installing your Thomson Gateway .................................................................. |
5 |
1.2.1 |
Manual Installation................................................................................................................................. |
6 |
1.3 |
Adding a New Computer to your Network ..................................................... |
7 |
1.4 |
Connecting a Computer Using the Ethernet Cable ......................................... |
8 |
2 |
Thomson Gateway Basics .......................................................... |
9 |
2.1 |
Thomson Gateway LED Behaviour ................................................................ |
10 |
2.1.1 |
Status LEDs ........................................................................................................................................... |
11 |
2.1.2 |
WPS Button LED ................................................................................................................................... |
14 |
2.2 |
Thomson Gateway GUI ................................................................................. |
15 |
2.3 |
Backing Up/Restoring your Configuration .................................................... |
16 |
3 |
Wireless Access ......................................................................... |
17 |
3.1 |
Connecting Your Wireless Client via WPS .................................................... |
18 |
3.2 |
Connecting Your Wireless Client without WPS ............................................ |
20 |
3.3 |
Securing Your Wireless Connection.............................................................. |
21 |
3.3.1 |
Configuring WPA-PSK Encryption ...................................................................................................... |
23 |
3.3.2 |
Configuring WEP Encryption............................................................................................................... |
24 |
4 |
Thomson Gateway Tools.......................................................... |
25 |
4.1 |
UPnP ............................................................................................................. |
26 |
4.1.1 Accessing Your Thomson Gateway with UPnP ................................................................................. |
27 |
|
4.1.2 Managing your Internet connection with UPnP................................................................................. |
28 |
|
4.1.3 Configuring UPnP on the Thomson Gateway.................................................................................... |
29 |
|
4.1.4 Installing UPnP on Windows XP ......................................................................................................... |
30 |
|
4.2 |
Assigning a service (HTTP, FTP,...) to a computer ........................................ |
32 |
4.3 |
Dynamic DNS ................................................................................................ |
34 |
5 |
Internet Security........................................................................ |
35 |
5.1 |
Firewall.......................................................................................................... |
36 |
E-DOC-CTC-20090507-0002 v1.0
i

Contents
5.2 |
Parental Control............................................................................................ |
37 |
5.2.1 Adding Rules For The Address Based Filter....................................................................................... |
38 |
|
6 |
Thomson Gateway GUI............................................................. |
39 |
6.1 |
Thomson Gateway ........................................................................................ |
41 |
6.1.1 |
Information ........................................................................................................................................... |
42 |
6.1.2 |
Configuration ........................................................................................................................................ |
43 |
6.1.3 |
Event Logs............................................................................................................................................. |
49 |
6.2 |
Broadband Connection.................................................................................. |
50 |
6.2.1 |
Broadband Connection ........................................................................................................................ |
51 |
6.2.2 |
Internet Services................................................................................................................................... |
53 |
6.3 |
Toolbox ......................................................................................................... |
56 |
6.3.1 |
Remote Access/Assistance .................................................................................................................. |
57 |
6.3.2 Game & Application Sharing............................................................................................................... |
59 |
|
6.3.3 |
Parental Control.................................................................................................................................... |
65 |
6.3.4 |
Firewall .................................................................................................................................................. |
67 |
6.3.5 |
Intrusion Detection ............................................................................................................................... |
69 |
6.3.6 |
Dynamic DNS........................................................................................................................................ |
70 |
6.3.7 |
Dynamic Routing .................................................................................................................................. |
72 |
6.3.8 |
User Management................................................................................................................................ |
73 |
6.4 |
Home Network .............................................................................................. |
76 |
6.4.1 |
Devices .................................................................................................................................................. |
77 |
6.4.2 |
Interfaces............................................................................................................................................... |
79 |
7 |
Troubleshooting ........................................................................ |
87 |
7.1 General Thomson Gateway Troubleshooting ................................................ |
88 |
|
7.1.1 |
Wired Connection Troubleshooting.................................................................................................... |
89 |
7.1.2 |
Wireless Connection Troubleshooting ............................................................................................... |
90 |
7.2 Reset to Factory Defaults ............................................................................. |
91 |
|
ii
E-DOC-CTC-20090507-0002 v1.0

About this Setup and User Guide
About this Setup and User Guide
Used Symbols
A note provides additional information about a topic.
A caution warns you about potential problems or specific precautions that need to be taken.
Terminology
Generally, the THOMSON TG580 will be referred to as Thomson Gateway in this Setup and User Guide.
Typographical Conventions
Following typographical convention is used throughout this manual:
Sample text indicates a hyperlink to a Web site.
Example: For more information, visit us at www.thomson.net.
Sample text indicates an internal cross-reference.
Example: If you want to know more about guide, see “1 Introduction” on page 7.
Sample text indicates an important content-related word.
Example: To enter the network, you must authenticate yourself.
Sample text indicates a GUI element (commands on menus and buttons, dialog box elements, file names, paths and folders).
Example: On the File menu, click Open to open a file.
Documentation and software updates
THOMSON continuously develops new solutions, but is also committed to improving its existing products.
For more information on THOMSON's latest technological innovations, documents and software releases, visit us at www.thomson.net.
E-DOC-CTC-20090507-0002 v1.0 |
1 |
|

About this Setup and User Guide
2 |
E-DOC-CTC-20090507-0002 v1.0 |
|

1 Installation
1 Installation
Introduction
In a few minutes you will be able to access the Internet using your Thomson Gateway.
This Setup and User Guide will show you how to set up your Thomson Gateway and how to connect your computer(s) to the Internet.
Main features
As soon as you have completed the installation of your Thomson Gateway you will be able to benefit from all the services offered by your Thomson Gateway. This Setup and User Guide will focus on the following features:
Broadband Internet connection.
This chapter describes how to connect your Thomson Gateway to the Internet.
Wired and wireless access to your local network devices.
For more information, see ”1.4 Connecting a Computer Using the Ethernet Cable” on page 8 and ”3 Wireless Access” on page 17.
Internet Security:
For more information, see ”5 Internet Security” on page 35.
Useful networking tools like UPnP, Dynamic DNS and many more.
Before you can start to use these features, we will first setup your Thomson Gateway.
E-DOC-CTC-20090507-0002 v1.0 |
3 |
|

1 Installation
1.1Preliminary Steps
DSL service
The DSL service must be up and running on your telephone line.
If both conventional telephone and DSL service are simultaneously available from the same copper pair, you will need a central splitter or distributed filters for decoupling DSL and telephone signals.
Public telephone lines carry voltages that can cause electric shock. Only try to set up splitter/ filters that have been designed to be installed by unqualified personnel. For further assistance, contact your Internet Service Provider.
Computer requirements
If you want to connect your computer using:
The Ethernet cable, make sure that the computer is equipped with an Ethernet Network Interface Card (NIC).
A wireless connection, you will need a WiFi-certified wireless client adapter for each computer you want to connect wirelessly.
Internet connection details
You may need the following connection details from your Internet Service Provider (ISP):
Your ISP’s method for connecting to the Internet (for example PPPoE)
The VPI/VCI (for example 8/35)
Your user name and password to connect to the Internet for PPP connections
Your IP settings in case of static configurations
You may have received this information when you subscribed at your Internet Service Provider. You may be prompted for this information at a given step in the installation procedure.
4 |
E-DOC-CTC-20090507-0002 v1.0 |
|
1 Installation
1.2Installing your Thomson Gateway
Overview
How it works
The Setup and User Guide will first help you to connect your computer to the Thomson Gateway. After this is done, you can configure your Thomson Gateway using your web browser.
Requirements
Javascript must be enabled on your web browser.
Getting started
Proceed with ”1.2.1 Manual Installation” on page 6.
E-DOC-CTC-20090507-0002 v1.0 |
5 |
|

1 Installation
1.2.1Manual Installation
Procedure
Proceed as follows:
1Connect the cables
2Configure the Thomson Gateway
Connect the cables
Proceed as follows:
1Connect the Thomson Gateway to the DSL line.
2Connect the power supply.
3Turn on the Thomson Gateway.
4Connect your computer to the Thomson Gateway as described in ”1.3 Adding a New Computer to your Network” on page 7.
Configure the Thomson Gateway
You are now ready to configure your Internet connection and local network.
Proceed as follows:
1Open your web browser, and browse to http://dsldevice.lan or to the IP address of your Thomson Gateway (by default: 192.168.1.254).
2The Thomson Gateway GUI appears. Click the Thomson Gateway menu item on the left-hand side.
3The Thomson Gateway page appears. In the Pick a task list, click Setup.
4The Easy Setup wizard appears. This wizard will guide you through the configuration of your Thomson Gateway.
5Click Next and follow the instructions.
6After running the Easy Setup wizard, you are connected to the Internet.
For more information, see ” Setting up your Thomson Gateway” on page 45.
6 |
E-DOC-CTC-20090507-0002 v1.0 |
|

1 Installation
1.3Adding a New Computer to your Network
Overview
If you want to connect your computer to the Thomson Gateway using:
A Wireless connection, continue with ”3 Wireless Access” on page 17.
An Ethernet cable connection, continue with ”1.4 Connecting a Computer Using the Ethernet Cable” on page 8.
E-DOC-CTC-20090507-0002 v1.0 |
7 |
|
1 Installation
1.4Connecting a Computer Using the Ethernet Cable
Requirements
Your computer must have a free Ethernet port.
Your computer must be configured to obtain an IP address automatically. This is the default setting.
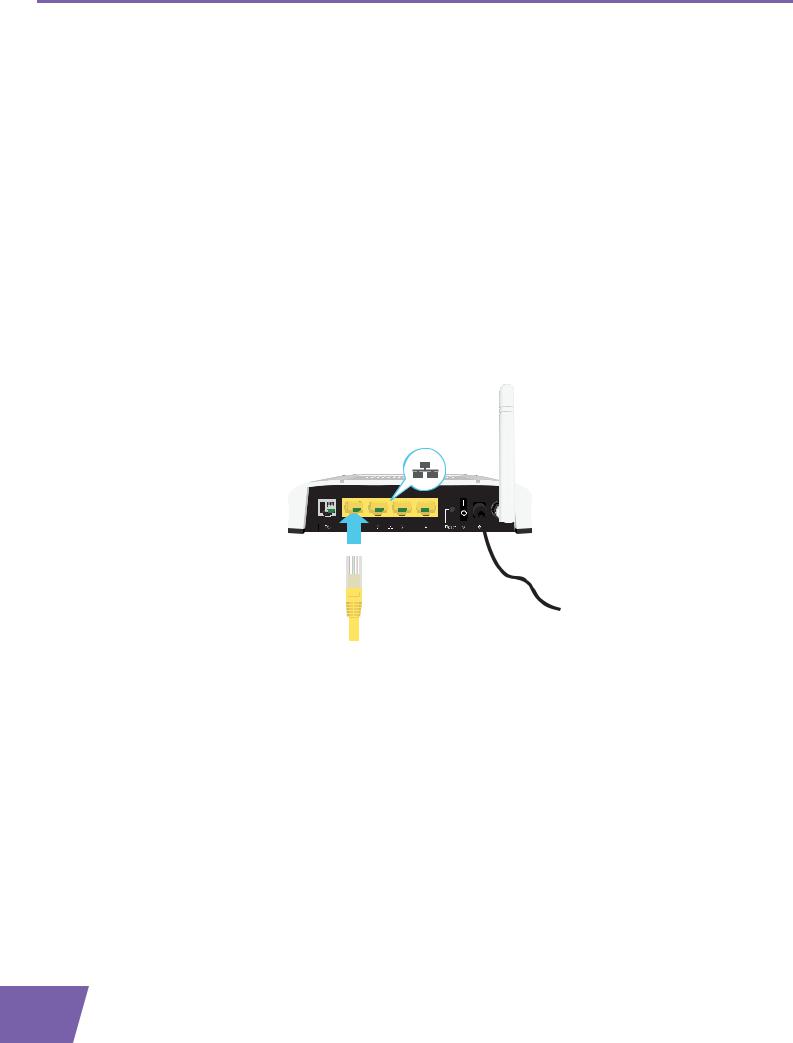
Ethernet cable
In your package, you will find a cable with yellow connectors. This is the Ethernet cable.
Procedure
Proceed as follows:
1 Connect one end of the Ethernet cable to the yellow Ethernet port(s) of your Thomson Gateway:
2Connect the other end of the Ethernet cable to your computer.
3Your computer is now connected to your network. No additional configuration is needed.
8 |
E-DOC-CTC-20090507-0002 v1.0 |
|

|
|
2 Thomson Gateway Basics |
||
|
|
|
|
|
2 Thomson Gateway Basics |
|
|
|
|
In this chapter |
|
|
|
|
|
|
|
|
|
|
Topic |
|
Page |
|
|
|
|
|
|
|
Thomson Gateway LED Behaviour |
|
10 |
|
|
|
|
|
|
|
Thomson Gateway GUI |
|
15 |
|
|
|
|
|
|
|
Backing Up/Restoring your Configuration |
|
16 |
|
|
|
|
|
|
E-DOC-CTC-20090507-0002 v1.0 |
9 |
|

2 Thomson Gateway Basics
2.1Thomson Gateway LED Behaviour
Content
This chapter describes the behaviour of:
Status LEDs
WPS Button LED
10 |
E-DOC-CTC-20090507-0002 v1.0 |
|
2 Thomson Gateway Basics
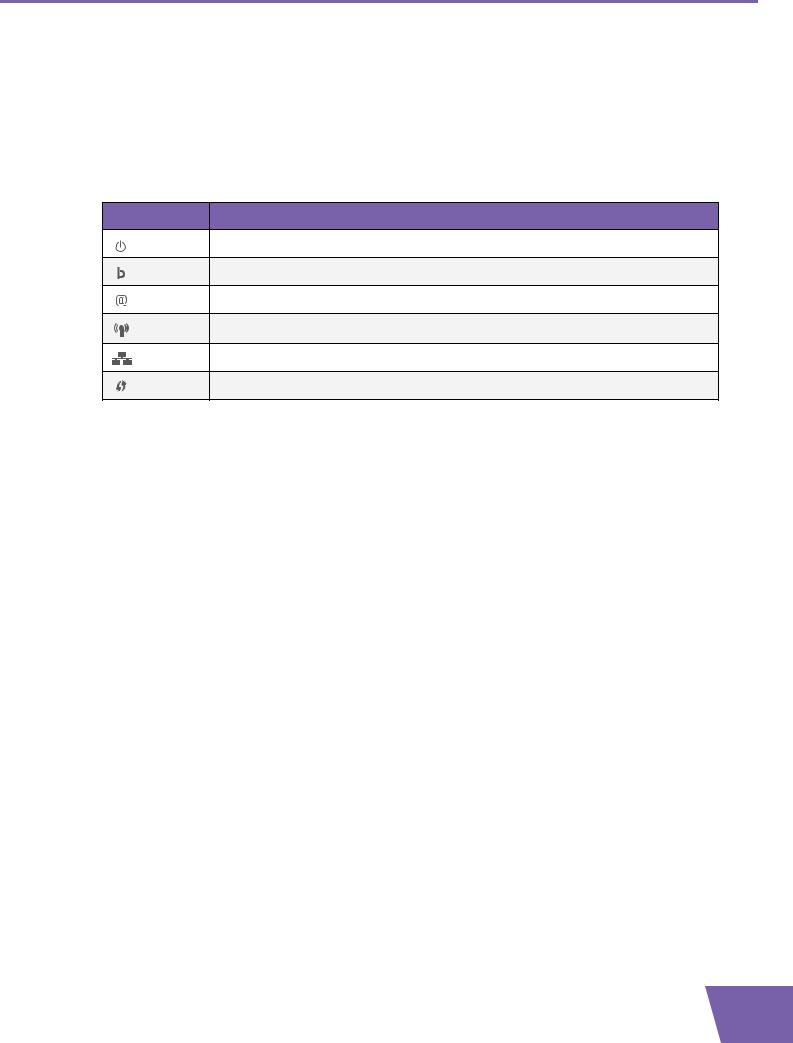
2.1.1Status LEDs
Introduction
On the front panel of your Thomson Gateway, you can find a number of status LEDs, indicating the state of the device during normal operation.
Following LEDs are available on your Thomson Gateway:
LED Name
Power LED
Broadband LED
Internet LED
Wireless LED
Ethernet LED
WPS LED
E-DOC-CTC-20090507-0002 v1.0 |
11 |
|

2 Thomson Gateway Basics
Power LED
Colour |
State |
Description |
|
|
|
Green |
Solid on |
Power on, normal operation |
|
|
|
Red |
Solid on |
Power on, self-test failed, indicating device malfunction |
|
|
|
Amber |
Blinking |
Bootloader active (during upgrade) |
|
|
|
Off |
|
Power off |
|
|
|
Broadband LED
Colour |
State |
Description |
|
|
|
Green |
Blinking |
Pending DSL line synchronisation or No DSL line |
|
|
|
|
Solid on |
DSL line synchronised |
|
|
|
Internet LED
Colour |
State |
Description |
|
|
|
Green |
Blinking |
Internet activity |
|
|
|
|
Solid on |
Internet connectivity, no activity |
|
|
|
Red |
Solid on |
Internet connection setup failed |
|
|
|
Off |
|
No Internet connection |
|
|
|
Wireless LED
Colour |
State |
Description |
|
|
|
Green |
Blinking |
Wireless activity, WPA(2) encryption |
|
|
|
|
Solid on |
No wireless activity, WPA(2) encryption |
|
|
|
Amber |
Blinking |
Wireless activity, WEP encryption |
|
|
|
|
Solid on |
No wireless activity, WEP encryption |
|
|
|
Red |
Blinking |
Wireless activity, no security |
|
|
|
|
Solid on |
No wireless activity, no security |
|
|
|
Red/green |
Toggling |
Wireless client registration phase |
|
|
|
Off |
|
WLAN disabled |
|
|
|
12 |
E-DOC-CTC-20090507-0002 v1.0 |
|

2 Thomson Gateway Basics
Ethernet LED
Colour |
State |
Description |
|
|
|
Green |
Solid on |
Ethernet connection, no activity |
|
|
|
|
Blinking |
Ethernet activity |
|
|
|
Off |
|
No Ethernet connection |
|
|
|
E-DOC-CTC-20090507-0002 v1.0 |
13 |
|
2 Thomson Gateway Basics
2.1.2WPS Button LED
Introduction
The WPS button allows you to add new wireless clients to your network.
For more information, see Connecting Your Wireless Client via WPS.
WPS LED
Colour |
State |
Description |
|
|
|
Green |
Solid On |
Client successfully registered via WPS |
|
|
|
Amber |
Blinking |
WPS registration ongoing |
|
|
|
Red |
Blinking |
Error occurred |
|
|
|
14 |
E-DOC-CTC-20090507-0002 v1.0 |
|
2 Thomson Gateway Basics
2.2Thomson Gateway GUI
Introduction
The Thomson Gateway Graphical User Interface (GUI) allows you to configure your Thomson Gateway using your web browser.
Requirements
Javascript must be enabled on your browser. For more information, consult the help of your Internet browser.
Accessing the Thomson Gateway Web Interface
Proceed as follows:
1Open your web browser.
2Browse to http://dsldevice.lan or the IP address of your Thomson Gateway (by default: 192.168.1.254).
3If you have protected your Thomson Gateway with a user name and password, the Thomson Gateway will prompt you to enter these. Enter your user name and password and click OK.
4The Thomson Gateway GUI appears. For more information, see ”6 Thomson Gateway GUI” on page 39.
If your computer runs Windows Vista or Windows XP, you can also access the Thomson Gateway GUI using the Internet Gateway Device icon. For more information, see ”4.1 UPnP” on page 26.
E-DOC-CTC-20090507-0002 v1.0 |
15 |
|

2 Thomson Gateway Basics
2.3Backing Up/Restoring your Configuration
Introduction
Once you have configured your Thomson Gateway to your needs, it may be a good idea to backup your configuration for later use. This way you can always return to your working configuration in case of problems.
Backing up your configuration
Proceed as follows:
1Browse to the Thomson Gateway GUI.
2On the Thomson Gateway menu, click Configuration.
3In the Pick a task list, click Save or Restore Configuration.
4Under Backup current configuration, click Backup Configuration Now.
5The Thomson Gateway prompts you to save your file.
6Save your file to a location of your choice.
Restoring your configuration
Proceed as follows:
1Browse to the Thomson Gateway GUI.
2On the Thomson Gateway menu, click Configuration.
3In the Pick a task list, click Save or Restore Configuration.
4Under Restore saved configuration, click Browse.
5Browse to your backup file and open it.
These files usually use .bin as extension.
6 The Thomson Gateway restores your configuration.
16 |
E-DOC-CTC-20090507-0002 v1.0 |
|

3 Wireless Access
3 Wireless Access
Introduction
With the built-in wireless access point you are no longer need a cable connection between your computer and your Internet gateway.
What you need to set up a wireless network
To set up a wireless network, you need the following components:
A Wireless Access Point
A Wireless client
Wireless Access Point
You can consider the wireless access point as the heart of your wireless network. The wireless access point:
Connects different wireless devices with each other.
Secures the data sent over wireless connection.
The Thomson Gateway comes with an integrated wireless access point. The only thing you need is a wireless client.
Other devices like media players and smartphones may also have a built-in wireless client. Check the documentation of your device for more information.
Wireless client
The wireless client allows you to connect a device, typically a computer, to a wireless access point. Both builtin and external (for example via USB) are available.
Check the documentation of your computer if you are not sure if your computer is equipped with a wireless client.
Configuring your wireless clients
Before you can start surfing the internet with a wireless connection, you must first connect your wireless client to your wireless access point: the Thomson Gateway.
For more information, see ”3.1 Connecting Your Wireless Client via WPS” on page 18 and ”3.2 Connecting Your Wireless Client without WPS” on page 20.
Secure your wireless connection!
Because you no longer need a physical connection, everyone who is within the range of your Thomson Gateway can access your network. If you do not protect your wireless network, the following could happen:
People can use your connection to access the Internet.
Hackers can use your connection to commit computer crimes.
You can easily prevent this by securing your wireless connection. For more information, see ”3.3 Securing Your Wireless Connection” on page 21.
E-DOC-CTC-20090507-0002 v1.0 |
17 |
|
3 Wireless Access
3.1Connecting Your Wireless Client via WPS
WPS
Wi-Fi Protected Setup (WPS) allows you to add new wireless clients to your network in a swift and easy way, without the need to enter all of your wireless settings (SSID, encryption,...).
Requirements
Your wireless client must supports WPS. Check the documentation of your wireless client for this.
Your Thomson Gateway must use WPA(2)-PSK encryption (default encryption) or no encryption. WPS with WEP encryption is not possible.
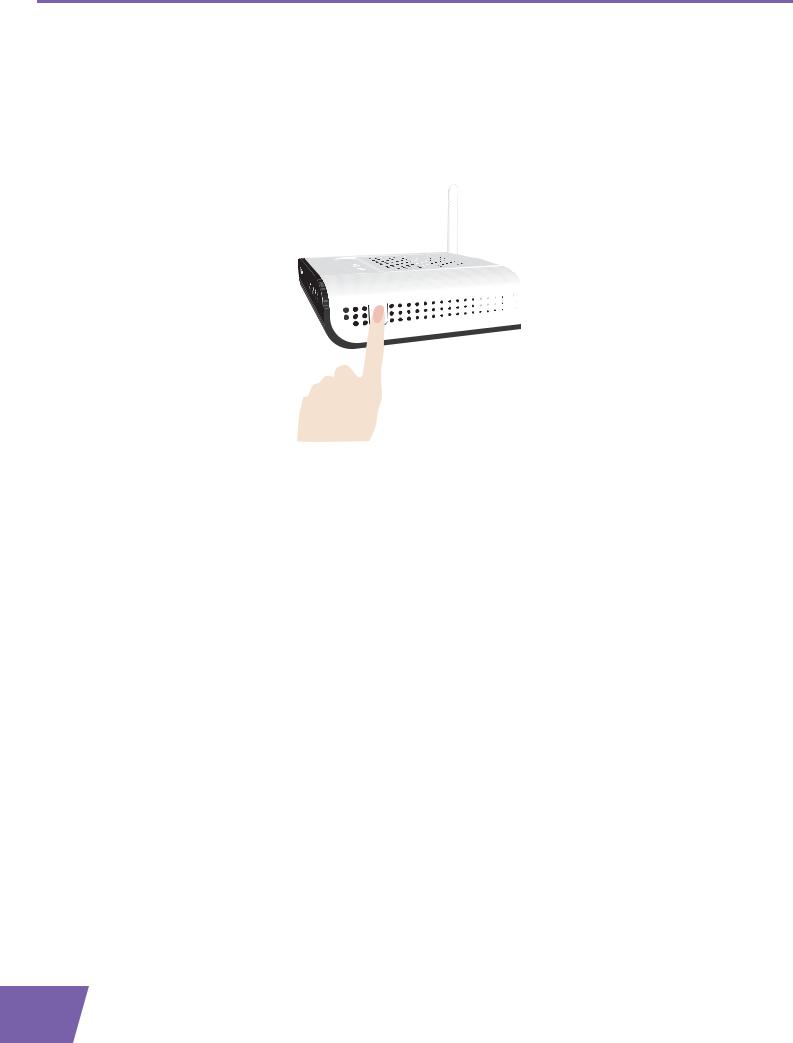
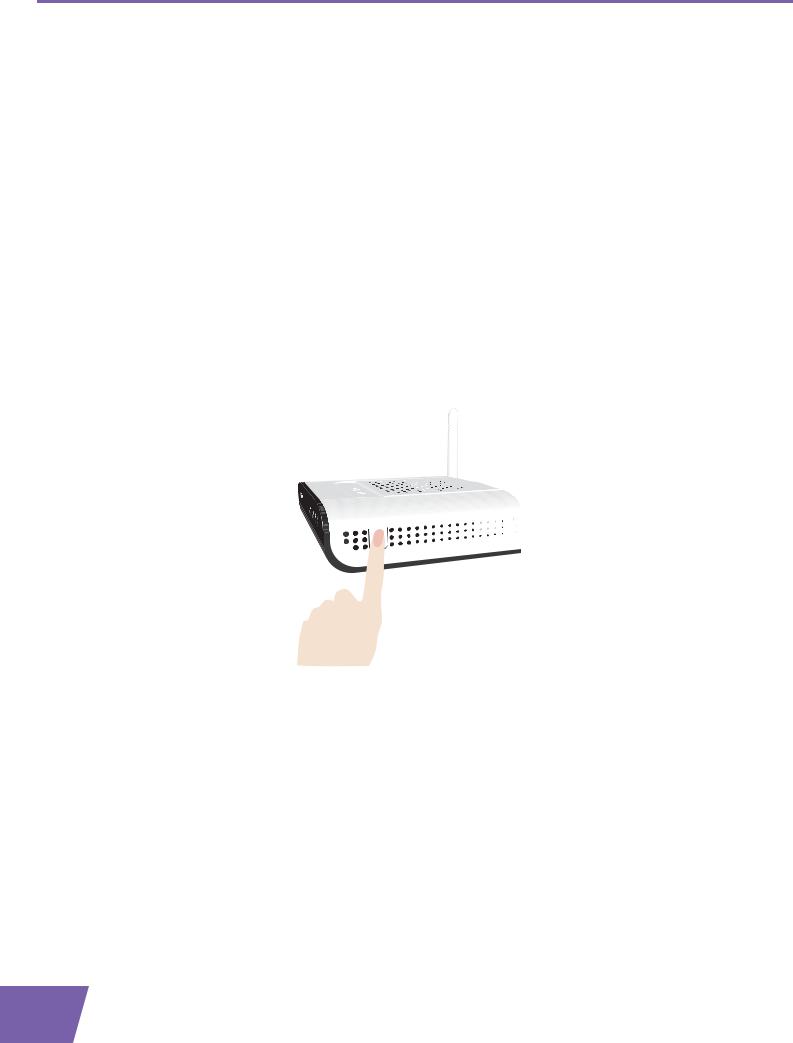
Procedure
Proceed as follows:
1 Shortly press the WPS button on the Thomson Gateway:
2The WPS button LED starts blinking orange. This indicates that the Thomson Gateway is now searching for wireless clients that are in registration mode. You now have two minutes to start WPS on your wireless client.
3Start WPS on your wireless client.
The WPS button LED is solid green
This indicates that you have successfully registered your wireless client. You are now connected to the Thomson Gateway network.
The WPS button LED is blinking red
This indicates that the Thomson Gateway could not find your wireless client.
18 |
E-DOC-CTC-20090507-0002 v1.0 |
|

3 Wireless Access
Make sure that the WLAN LED is blinking amber when you start WPS on your wireless client. If you still have trouble connecting to the Thomson Gateway, try connecting your wireless client without WPS. For more information, see ”3.2 Connecting Your Wireless Client without WPS” on page 20.
Troubleshooting
If you are having trouble connecting your wireless client via WPS, try to configure it manually. For more information, see ”3.2 Connecting Your Wireless Client without WPS” on page 20.
E-DOC-CTC-20090507-0002 v1.0 |
19 |
|

3 Wireless Access
3.2Connecting Your Wireless Client without WPS
Before you start
Before you can connect a computer to your wireless network you need to know which Network Name (SSID) and wireless encryption your Thomson Gateway is using.
What Network Name (SSID) is the Thomson Gateway using?
If you did not change the SSID manually, your Thomson Gateway uses the SSID that is printed on the bottom panel label of your Thomson Gateway.
What wireless security is the Thomson Gateway using?
You have not yet configured your Thomson Gateway
In this case, no encryption is used.
You have already configured your Thomson Gateway
If you have configured the wireless security settings through the Thomson Gateway GUI, the encryption key/ passphrase is the one you typed in the the Encryption Key textbox.
Forgot your wireless settings?
If you have changed the wireless settings manually and you can’t remember your settings, try one of the following:
If one of your computers is already connected to your network:
1Browse to the Thomson Gateway GUI on a computer that is already connected to your network.
2On the Home Network menu, click Wireless.
3In the upper-right corner, click Details.
4Under:
Configuration, you can find the network name (SSID).
Security, you can find the encryption.
If none of your computers is connected to your network, connect a computer using a wired connection and follow the procedure above to find out what your wireless settings are.
Another option is to reset your Thomson Gateway and configure it all over again. For more information, see ”7.2 Reset to Factory Defaults” on page 91.
Procedure
Configure your computer with the same wireless settings as your Thomson Gateway. For more information, consult the help of your wireless client.
20 |
E-DOC-CTC-20090507-0002 v1.0 |
|

3 Wireless Access
3.3Securing Your Wireless Connection
Introduction
By using encryption, communication between the wireless clients and your Thomson Gateway is protected by a passphrase. Only clients which use the correct network name (SSID) and passphrase can connect to your network.
Encryption methods
During the years a number of encryption types have been developed. The list below gives you an overview of the supported encryption types ordered by security level, you will find the highest level of security at the top of the list:
WPA-PSK Encryption:
The wireless data is being encrypted with a user-defined key. Wireless clients must be configured with this key before they can connect to the Thomson Gateway.
WEP Encryption:
The first encryption type used for wireless connections. Like WPA-PSK it uses a user-defined key, but WEP has been proven to have some security issues. We strongly recommend you to use WPA-PSK instead.
WPA-PSK versions
The Thomson Gateway supports the following WPA-PSK versions:
WPA2 (also referred to as WPA2-PSK):
WPA2 is the most secure version, but not all wireless clients already support it. Before you select this version, make sure all of your wireless clients support it.
WPA+WPA2:
If not all of your wireless clients support WPA2 or you are not sure if they support WPA2, we recommend you to choose WPA+WPA2. Wireless clients that support WPA2 will use WPA2, the others will use WPA.
WPA:
If none of your wireless clients support WPA2 choose this option.
If you want to configure WPA2 on the built-in wireless utility of Windows XP Service Pack 2 (SP2), you first have to:
Upgrade your Windows XP to Service Pack 3.
- or -
Install the following update: http://support.microsoft.com/kb/917021.
Which encryption method should I use?
We strongly recommend you to use WPA+WPA2.
Although the Thomson Gateway allows you to use WEP or no security, it is not recommended to use these settings. Only use WEP if you have wireless clients that don’t support a higher encryption level.
Configuring the wireless encryption
Proceed as follows:
1Open the Thomson Gateway GUI.
2On the left menu, click Home Network.
E-DOC-CTC-20090507-0002 v1.0 |
21 |
|

3 Wireless Access
3 Under Wireless, click your access point.
Your access point will be listed in the following format: “WLAN:<Network Name> (<Actual Speed>)”. For example, WLAN: Thomson83C7C7 (54Mbps).
4The Wireless Access Point page appears.
5In the Location bar, click Configure.
6Under Security, you can change the Encryption. If you want to use:
WPA-PSK Encryption, continue with ”3.3.1 Configuring WPA-PSK Encryption” on page 23. WEP Encryption, continue with ”3.3.2 Configuring WEP Encryption” on page 24.
22 |
E-DOC-CTC-20090507-0002 v1.0 |
|

3 Wireless Access
3.3.1Configuring WPA-PSK Encryption
Procedure
Continuing from ” Configuring the wireless encryption” on page 21:
1Select Use WPA-PSK Encryption.
2In the WPA-PSK Encryption Key box, type a pass phrase (also known as Pre-shared key) of your choice. The pass phrase must consist of 8 to 63 alphanumeric characters or 8 to 64 hexadecimal characters (characters from 0 to 9 and from A to F).
3In the WPA-PSK Version list, click the WPA-version of your choice. Following options are available:
WPA2:
WPA2 is the most secure version, but not all wireless clients already support it. Before you select this version, make sure all of your wireless clients support it.
WPA+WPA2:
If not all of your wireless clients support WPA2 or you are not sure if they support WPA2, we recommend you to choose WPA+WPA2. Wireless clients that support WPA2 will use WPA2, the others will use WPA.
WPA:
If none of your wireless clients support WPA2 choose this option.
If you want to configure WPA2 on the built-in wireless utility of Windows XP Service Pack 2 (SP2), you first have to:
Upgrade your Windows XP to Service Pack 3.
- or -
Install the following update: http://support.microsoft.com/kb/917021.
4Click Apply.
5Configure your wireless client(s) with the same settings.
E-DOC-CTC-20090507-0002 v1.0 |
23 |
|

3 Wireless Access
3.3.2Configuring WEP Encryption
Warning
Although the Thomson Gateway allows you to use WEP or no security, it is not recommended to use these settings. Only use WEP if you have wireless clients that don’t support a higher encryption level.
Procedure
Continuing from ” Configuring the wireless encryption” on page 21:
1Select Use WEP Encryption
2In the WEP Key Length list, click the desired key length (a higher key length offers higher security).
3In the Encryption key box, type a Network key of your choice. If you are using:
A 64-bit key:
Type 10 hexadecimal characters (characters from 0 to 9 and from A to F) or 5 alphanumeric characters.
A 128-bit key:
Type 26 hexadecimal characters (characters from 0 to 9 and from A to F) or 13 alphanumeric characters.
4Click Apply.
5Configure your wireless client(s) with the same settings.
24 |
E-DOC-CTC-20090507-0002 v1.0 |
|
Loading...