

Page 1
Universal Garage Door
RemoteControl
Télécommandeuniverselle pour portedegarage
Universal-Garagentor-Fernbedienung
ROCZ907
Page 2

G Operating Instructions
F Mode d‘emploi
D Bedienungsanleitung
E Instrucciones de uso
I Istruzioni per l‘uso
O Manual de instruções
P Instrukcja obsługi
C Návod kpoužití
Q Návod na použitie
Page 3

Pic 1
2
1
4
3
5
Page 4
G Operating instruction
Thank you for choosing aThomson product.
Take your time and read the following instructions and
information completely.Please keep these instructions in a
safe place for futurereference. If you sell the device, please
pass these operating instructions on to the new owner.
1. Explanation of Warning Symbols and Notes
Warning
This symbol is used to indicate safety instructions or
to draw your attention to specichazards and risks.
Note
This symbol is used to indicate additional information
or important notes.
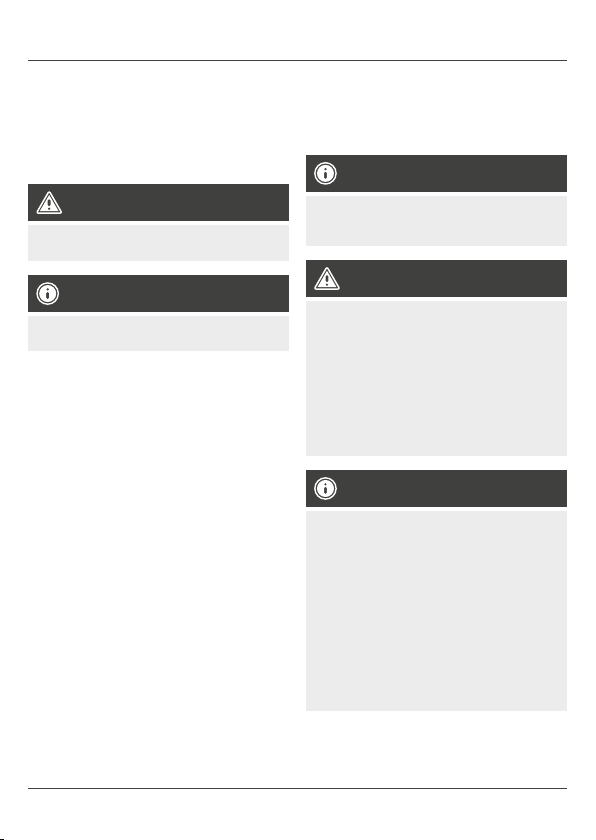
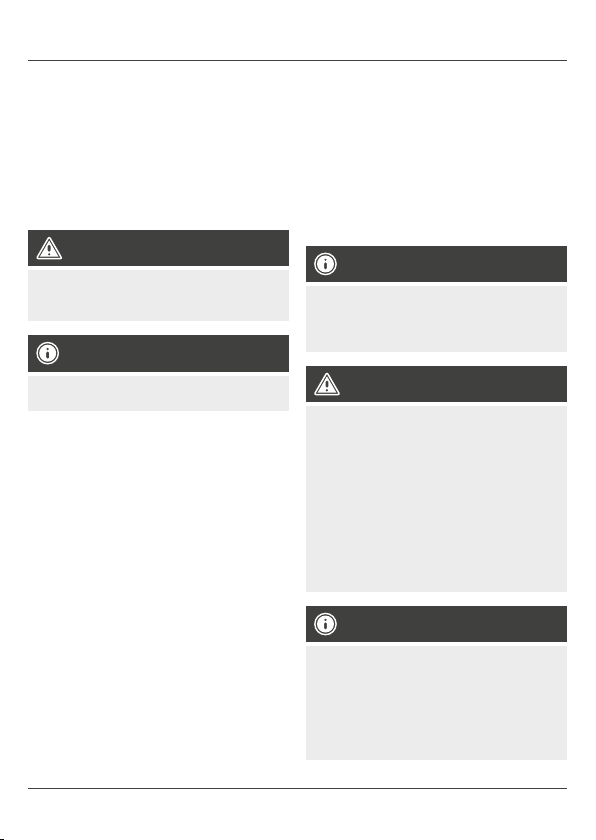
2. Controls and displays
1. Function LED (red)
2. 12 Vcar plug
3. USB connection, 2.1 A
4. Programmable buttons 1–4
5. Operating LED (lit blue in 12 Voperation)
3. Package Contents
•ROC Z907 universal garage door remote control
•These operating instructions
4. Safety Notes
•Use the product for its intended purpose only.
•Donot operate the product outside the power limits
given in the specications.
•Protect the product from dirt, moistureand overheating, and only use it in adry environment.
•Donot use the product in moist environments and
avoid splashes.
•Donot drop the product and do not expose it to any
major shocks.
•Keep this product, as all electrical products, out of the
reach of children!
•Dispose of packaging material immediately according
to locally applicable regulations.
•Donot modify the product in any way.Doing so voids
the warranty.
•When using this product, observe the applicable local
traclaws and regulations.
•Take carethat components such as airbags, safety
areas, controls, instruments, etc. and visibility arenot
blocked or restricted.
Note
Forsome vehicle types, the ignition has to be switched
on to supply power to the 12 Vcar socket. Formore
information, please refer to your vehicle’smanual.
Beforeinitial startup /programming
Risk of accidents: To avoid possible damage and personal injury,make surethereare no people or objects
in the immediate environment during programming
and installation of the product. The garage door may
open or close during installation. We recommend carrying out the programming procedurewith the vehicle
parked outside the garage. Only use the ROCZ907
with adirect view of the door opening system or garage door.Please also observe the safety instructions
for your door operator (operating instructions).
Note
•Tofully program the door operator,the operating
instructions for the door operator may also be
required (for example, registering handheld
transmitters with the door operator).
•Touse the ROCZ907, it is essential to still have at
least one functioning original handheld transmitter.
•Inspite of the broad universal natureofthis
handheld transmitter function, it is possible that
some garage door systems cannot be operated
with this product. Possible causes include other
frequency usage or additionally encrypted radio
technologies (including bidirectional encryption, for
example, 128-bit).
2
Page 5
Note –USB port
Mobile devices, such as smartphones or tablets, can
be charged via the USB port only during operation in
the cigarette lighter socket.
5. Introduction
The ROCZ907 is aradio-based, teachable handheld
transmitter for controlling door operators of all brands;
therefore, you can substitute it for an existing handheld
transmitter (remote control), as well as use it to teach
and control several door operators from different
markets. Forretrotting systems with xed or rolling code
in the 433 MHz and 868 MHz frequency bands, voltage
supply is via the cigarette lighter socket. Thanks to the
integrated high-performance capacitor,the ROCZ907 can
also be operated outside the cigarette lighter socket for
up to three days. The integrated USB port allows charging of asmartphone or tablet during acar journey.
6. Main functional features
•Universally usable for various garage door and outside
door operators
•Power storage without batteries
•For mobile applications outside the car electrical
system (capacitor performance technology)
•Upto150 button clicks (for example, opening/closing
doors) possible when fully charged
•Recharge within 3minutes
•Power storage (standby): up to 3days
•Upto4buttons arecustom programmable (door
operators of all brands) via manual search
•Range: up to 40 metres (depending on buildings and
other local conditions, or on the performance of the
reception antenna)
•Resonant button behaviour on pressing (click and feel)
for secureuse in the vehicle
•Integrated 2.1 AUSB port for charging asmartphone
or tablet
7. Getting started
The ROCZ907 has an integrated high-performance capacitor.Itmust be charged via the cigarette lighter socket
(charging time: 3minutes) before rst-time use. Before
you can use your new ROCZ907 handheld transmitter,you
must rst register/teach it or synchronise it with the motor
control system of the door operator.Herethereare several
possibilities, which aredescribed in the next sections.
Note
•Some garage door operators requiretwo buttons in
order to program opening and closing. In this case,
two buttons must also be copied/programmed on
the ROCZ907.
•With some garage door operators, it can be necessary to carry out synchronisation up to 20 times
beforethe code is recognised.
7.1 Determining the code system (compatibility)
The ROCZ907 covers about 90% of the door control
systems currently on the market. The following code
systems aresupported: xed code, rolling code (also
called ‘hopping code’) and complex rolling code.
Forinformation on the code system used by your original
handheld transmitter,pleaserefer to the instructions for
your door operator,orcontact the manufacturer.
7.2 Copy function – xed code and rolling code
•Beforeperforming the copy function, make surethat
the original handheld transmitter and the ROCZ907
arefacing each other and not morethan 3cmapart.
•Press and hold the ‘1’ button on the ROCZ907 and
keep it held while pressing the ‘2’ button four times.
Release both buttons. The redfunction LED (1) now
ashes about every 2seconds.
•Onthe original handheld transmitter,press and hold
the button you arecopying until the redfunction LED
of the ROCZ907 ashes quickly (= conrmation that the
remote control signal has been successfully accepted).
•Now press the button you wish to program (for
example, ‘1’) on the ROCZ907. After successful
programming, the function LED (1) lights up redfor
about 1second and then goes out.
•Programming has been successfully completed.
•Then check whether the door can be controlled using
the button that has been taught to; if not, repeat
the procedure. If this still does not work after your
renewed attempt, it may be necessary,for your model,
to synchronise/register the ROCZ907 with the receiver
of the door operator system (see below).
3
Page 6

7.2.1 Fixed code/ Rolling code procedure(with
manual registration for synchronisation with the
door system)
Forsome door operator manufacturers, it is additionally
necessary to register/synchronise the handheld transmitter with the receiver of the door operator system.
•Please consult the operating instructions for the door
operator (thereisgenerally asection on registering a
new handheld transmitter).
•Make surethat you areclose to the door operator
receiver (about 50 cm).
•Usually aset button is activated on the door operator
system to register handheld transmitters, and aLED
lights up (can vary according to manufacturer).
•Normally,you now have about 20–30 seconds to
register/synchronise the ROCZ907.
•Synchronisation generally takes place when you press
the programmed/copied button of the ROCZ907 three
times in succession.
7.2.2 Rolling code procedure(with automatic reg-
istration for synchronisation with the door system)
Due to the rolling code principle, it is often necessary to
register/synchronise the handheld transmitter with the
receiver of the door operator system.
•Please consult the operating instructions for the door
operator (thereisgenerally asection on registering a
new handheld transmitter).
•Make surethat you areclose to the door operator
receiver (about 50 cm).
•Usually it is sucient to press and hold the programmed button of the ROCZ907 until the redfunction
LED (1) ashes quickly (about 10 seconds).
•Now release the button. The remote control goes into
synchronisation mode with the door operator system. The
latter conrms the synchronisation after about 5–10 seconds by means of an illuminated or ashing LED. Once
synchronisation has ended, the fast ashing redLED on
the ROCZ907 goes out; registration was successful.
7.3 Copy function –complex rolling code
Some door operator manufacturers requiretransmission
of the source code (often also called SEED code) to be
able to teach in the ROCZ907 onto the door operator.
Here, it is essential to have the original functioning handheld transmitter (master function)with the source code!
Depending on manufacturer,the procedureofthe
original remote control for transmitting the source code
(master remote control) is now implemented.
Details of the procedurecan be found in the original operating instructions for the handheld transmitter or door operator.
7.3.1 Example for BFT (manufacturer):
•Beforeperforming the copy function, make surethat
the original handheld transmitter and the ROCZ907
arefacing each other and not morethan 3cmapart.
•Make surethat you areclose to the door operator
receiver (about 50 cm).
•Press and hold the ‘1’ button on the ROCZ907 and
keep it held while pressing the ‘2’ button four times.
Release both buttons. The redfunction LED (1) now
ashes about every 2seconds.
•Onthe original handheld transmitter,press and hold
the button you arecopying until the redfunction LED
of the ROCZ907 lights up and successively ashes
twice about every 2seconds.
•Now press the button concealed on the back (battery
compartment) (old BFT models) or buttons 1and 2
(newer models) on the original handheld transmitter
(master). The redLED on the ROCZ907 ashes quickly
in succession. Now press and hold the button you
wish to program (for example, ‘1’) until the redLED of
the ROCZ907 goes out.
•Press and hold the programmed button of the ROCZ907
until the redLED ashes quickly (about 10 seconds).
Release the button. Programming has been completed
when the redLED on the ROCZ907 goes out.
•Then check whether the door can be controlled using
the button that has been taught to; if not, repeat the
procedure.
7.3.2 Example for FAAC,Genius, Amigo, Kilo
(manufacturers):
•Beforeperforming the copy function, make surethat
the original handheld transmitter and the ROCZ907
arefacing each other and not morethan 3cmapart.
•Make surethat you areclose to the door operator
receiver (about 50 cm).
•Press and hold the ‘1’ button on the ROCZ907 and
keep it held while pressing the ‘2’ button four times.
Release both buttons. The redfunction LED (1) now
ashes about every 2seconds.
4
Page 7
•Onthe original handheld transmitter,press and hold
the button you arecopying until the redfunction
LED of the ROCZ907 ashes quickly (= conrmation
that the remote control signal has been successfully
accepted).
•Now press buttons 2and 3onthe original handheld
transmitter (master function). While the LED of the
original handheld transmitter ashes quickly,press the
button that you wish to copy (once). The redfunction
LED (1) of the ROCZ907 now ashes quickly.
•Now press the button you wish to program and store
on the ROCZ907 (for example, button ‘1’). The redLED
on the ROCZ907 goes out to conrm programming.
•Then check whether the door can be controlled using
the button that has been taught to; if not, repeat the
procedure. If this still does not work after your renewed attempt, then it is necessary,for your model, to
synchronise the handheld transmitter with the receiver
of the door operator system.
•Tosynchronise the ROCZ907 with the door operator,
press and hold the programmed button of the ROCZ907
until the redLED ashes quickly (about 10 seconds).
Release the button. Programming has been carried out
when the redLED on the ROCZ907 goes out.
7.3.3 Example for V2 (manufacturer):
•Beforeperforming the copy function, make surethat
the original handheld transmitter and the ROCZ907
arefacing each other and not morethan 3cmapart.
•Make surethat you areclose to the door operator
receiver (about 50 cm).
•Press and hold the ‘1’ button on the ROCZ907 and
keep it held while pressing the ‘2’ button four times.
Release both buttons. The redfunction LED (1) now
ashes about every 2seconds.
•Onthe original handheld transmitter,press and hold
the button you arecopying until the redfunction LED
(1) of the ROCZ907 lights up and successively ashes
twice about every 2seconds.
•Again press the button you arecopying on the original
handheld transmitter until the redLED ashes quickly.
•Press the button you wish to program (for example,
‘1’) to conrm. The redfunction LED (1) goes out.
•Press and hold the programmed button of the ROCZ907
until the redLED ashes quickly (about 10 seconds).
Release the button. Programming has been carried out
when the redLED on the ROCZ907 goes out.
•Then check whether the door can be controlled using
the button that has been taught to. If not, repeat the
procedure.
Note
Forinformation on additional possibilities, please
refer to the current compatibility list and the extended
operating instructions at www.hama.com or
www.thomson-av-accessories.eu.
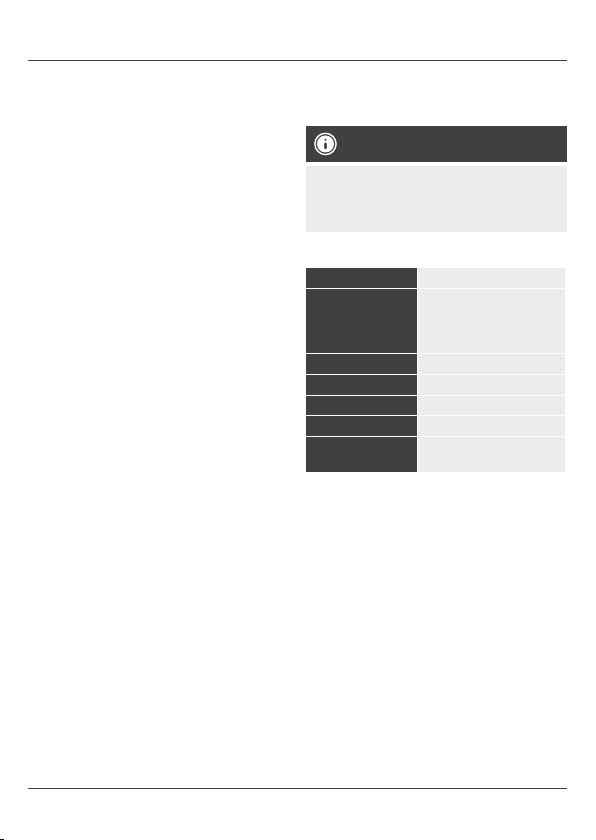
8. Technical Data
Dimensions 76 x27x39mm
max. 40 m(depending on
Range
Input voltage 12 V
Standby max. 72 h
USB output 5V/2100 mA
Frequency band 433 MHz, 868 MHz
Max. emitted
transmitting power
9. Careand Maintenance
Only clean this product with aslightly damp, lint-free
cloth and do not use aggressive cleaning agents. Make
surethat water does not get into the product.
10. Warranty Disclaimer
Hama GmbH &Co. KG assumes no liability and provides
no warranty for damage resulting from improper
installation/mounting, improper use of the product or
from failuretoobserve the operating instructions and/
or safety notes.
11. Service and Support
Please contact Hama Product Consulting if you have any
questions about this product.
Hotline: +49 9091 502-115 (German/English)
Further support information can be found here:
www.hama.com
buildings and other local conditions, or on the performance
of the reception antenna)
10 mW
5
Page 8
12. Recycling Information
Note on environmental protection:
After the implementation of the European
Directive 2012/19/EU and 2006/66/EU in the
national legal system, the following applies:
Electric and electronic devices as well as
batteries must not be disposed of with
household waste. Consumers areobliged by law to return
electrical and electronic devices as well as batteries at
the end of their service lives to the public collecting
points set up for this purpose or point of sale. Details to
this aredened by the national law of the respective
country.This symbol on the product, the instruction
manual or the package indicates that aproduct is subject
to these regulations. By recycling, reusing the materials
or other forms of utilising old devices/Batteries, you are
making an important contribution to protecting our
environment.
13. Declaration of Conformity
Hereby,Hama GmbH &CoKGdeclares that
the radio equipment type [00132680] is in
compliance with Directive 2014/53/EU.The full
text of the EU declaration of conformity is available at the
following internet address:
www.hama.com-> 00132680 -> Downloads.
6
Page 9
F Mode d‘emploi
Nous vous remercions d’avoir choisi un produit Thomson.
Veuillez prendreletemps de lirel‘ensemble des
remarques et consignes suivantes. Veuillez conserver
ce mode d‘emploi àportée de main andepouvoir le
consulter en cas de besoin. Transmettez-le au nouveau
propriétaireavec l’appareil le cas échéant.
1. Explication des symboles d‘avertissement et
des remarques
Avertissement
Ce symbole est utilisé pour indiquer des consignes
de sécurité ou pour attirer votreattention sur des
dangers et risques particuliers.
Remarque
Ce symbole est utilisé pour indiquer des informations
supplémentaires ou des remarques importantes.
2. Éléments de commande et d’achage
1. LED de fonctionnement (rouge)
2. Prise voiture12V
3. Port USB 2,1 A
4. Touches programmables 1-4
5. LED de fonctionnement (s’allume en bleu en
fonctionnement 12 V)
3. Contenu de l'emballage
•Télécommande universelle de porte de garage ROC Z907
•Mode d'emploi
4. Consignes de sécurité
•Utilisez le produit exclusivement conformément àsa
destination.
•N‘utilisez pas le produit en dehors des limites de puis-
sance indiquées dans les caractéristiques techniques.
•Protégez le produit de toute saleté, humidité, sur-
chauffe et utilisez-le uniquement dans des locaux secs.
•N‘utilisez pas le produit dans un environnement
humide et évitez toute projection d‘eau.
•Protégez le produit des secousses violentes et évitez
tout choc ou toute chute.
•Cet appareil, comme tout appareil électrique, doit être
gardé hors de portée des enfants !
•Recyclez les matériaux d’emballage conformément aux
prescriptions locales en vigueur.
•N’apportez aucune modication àl’appareil. Des modications vous feraient perdrevos droits de garantie.
•Veuillez respecter les lois et réglementations locales
en vigueur relatives au code de la route lors de
l‘utilisation du produit.
•Veuillez contrôler que le produit n‘affecte le fonctionnement d‘aucun élément de sécurité tel qu‘un airbag,
zone de sécurité, élément de commande, instrument,
etc. et qu‘il n‘entr
Sur certains types de véhicules, le contact doit être
établi pour alimenter la prise 12 V. Veuillez également
consulter le manuel d‘instructions de votrevéhicule
àcesujet.
Risque d’accident :Assurez-vous qu’aucune personne
ou qu’aucun objet ne se trouve àproximité immédiate
de la porte du garage lors de la programmation et de
l’installation du produit :vous éviterez ainsi tout risque
de dommages matériels ou blessures corporelles.
Pendant l’installation, la porte de garage peut s’ouvrir
ou se fermer.Nous vous recommandons de garer votre
véhicule en dehors du garage pendant la programmation. Utilisez la télécommande ROCZ907 uniquement
avec un contact visuel direct avec votresystème d’ouverturedeporte ou votreporte de garage. Respectez
également les autres consignes de sécurité de votre
système d’entraînement de porte (mode d’emploi).
•Pour programmer entièrement votresystème
d’entraînement de porte, vous aurez éventuellement besoin du mode d’emploi du système (pour
l’enregistrement des émetteurs portatifs sur le
système d’entraînement, par exemple).
ave pas la visibilité.
Remarque
Avant la mise en service /programmation
Remarque
7
Page 10
•Aumoins un émetteur portatif d’origine en état
de fonctionnement est nécessairepour utiliser la
télécommande ROCZ907.
•Certains systèmes de porte de garage ne sont
éventuellement pas utilisables avec ce produit
malgré le caractèreuniversel de l’émetteur portatif.
L’utilisation d’autres fréquences ou de technologies
radio codées (notamment cryptage bi-directionnel
128 bits, par exemple) sont susceptibles d’empêcher le fonctionnement.
Remarque concernant le port USB
Les appareils mobiles (smartphones/tablettes) peuvent
êtrechargés sur le port USB uniquement avec un
allume-cigareenétat de fonctionnement.
5. Introduction
La télécommande ROCZ907 est un émetteur portatif
basé sur radio et programmable, servant àcontrôler des
systèmes d’entraînement de porte de toutes marques.
Vous avez ainsi la possibilité de remplacer un émetteur
portatif existant (télécommande) et pouvez, le cas
échéant, programmer et piloter plusieurs systèmes
d’entraînement de toutes marques. Pour l’équipement
ultérieur de systèmes fonctionnant avec le code Fix ou
Rolling (plage de fréquence de 433 MHz à868 MHz),
l’alimentation s’effectue via la prise de l’allume-cigare
;latélécommande ROCZ907 peut êtreutilisée pendant
3jours sans êtreconnectée àlaprise de l’allume-cigare
grâce àuncondensateur haute performance intégré.
Le port USB intégré vous permet ainsi de recharger un
smartphone /une tablette pendant un trajet.
6. Caractéristiques des fonctions principales
•Utilisation universelle pour différents systèmes
d’entraînement de portails extérieurs et de portes
de garage
•Accumulateur d’énergie sans batterie
•Pour une utilisation mobile en dehors du réseau du tableau de bord(technologie Condensator Performance)
•Jusqu’à 150 clics possibles (ouverture/fermeturede
portes, etc.) avec une charge totale
•Recharge en 3minutes
•Accumulateur d’énergie (veille) :jusqu’à 3jours
8
•Jusqu’à 4touches individuellement programmables
(pour toutes les marques de systèmes d’entraînement
de porte) via la recherche manuelle
•Portée :jusqu’à 40 mètres (en fonction des conditions
locales et structurelles, voiredela puissance de
l’antenne de réception)
•Touches click &feel pour une utilisation sûredans
votrevéhicule
•Port USB 2,1 Aintégré pour recharger un smartphone,
une tablette, etc.
7. Mise en service
La télécommande ROCZ907 dispose d’un condensateur
haute performance intégré. Avant la premièreutilisation,
ce condensateur doit êtrerechargé sur la prise de
l’allume-cigare(temps de charge 3min).
Avant de pouvoir utiliser votrenouvel émetteur portatif
ROCZ907, vous devez commencer par le programmer /
le copier ou l’enregistrer /leprogrammer sur le système
motorisé de commande d’entraînement de votreporte
ou encorelesynchroniser avec ce dernier.Les différentes
possibilités àcet effet sont décrites dans les chapitres
suivants.
Remarque
•Certains entraînements de porte de garage nécessitent deux touches pour programmer l’ouverture
et la fermeture. Dans ce cas, il convient de copier
/programmer également deux touches sur la
télécommande ROCZ907.
•Pour certains entraînements de portes de garage,
il peut êtrenécessairederépéter le processus de
synchronisation jusqu’à 20 fois pour que le code
soit reconnu.
Dénition du système de codage (compatibilité)
7.1
Avec la télécommande ROCZ907, vous couvrez près de
90 %des systèmes de commande de portes sur le marché. Le produit prend en charge les systèmes de codage
suivants :code Fix (codage xe), code Rolling (également
appelé Hopping Code) ou code Complex Rolling.
Vous trouverez des informations sur le système de
codage de votreémetteur portatif d’origine dans le mode
d’emploi de votreentraînement de porte. Le cas échéant,
veuillez consulter le fabricant.
Page 11

7.2 Fonction de copie des codes Fix et Rolling
•Avant d’exécuter la fonction de copie, veillez àce
que l’émetteur portatif d’origine et la télécommande
ROCZ907 soient dirigés l’un vers l’autreetnesoient
pas éloignés de plus de 3cml’un de l’autre.
•Maintenez la touche ”1” de la télécommande
ROCZ907 enfoncée tout en appuyant 4fois sur
la touche ”2”. Relâchez les deux touches. La LED
de fonctionnement rouge (1) clignote toutes les 2
secondes environ.
•Appuyez sur la touche de l’émetteur portatif d’origine
que vous désirez copier jusqu’au clignotement rapide
de la LED de fonctionnement rouge de la télécommande ROCZ907 (= conrmation de la réception du
signal de la télécommande).
•Appuyez ensuite sur la touche de la télécommande
ROCZ907 que vous désirez programmer (touche ”1”,
par exemple). Après une programmation conforme, la
LED de fonctionnement (1) s’allume en rouge pendant
env.1seconde, puis s’éteint.
•Laprocéduredeprogrammation est correctement
terminée.
•Vériez ensuite si vous réussissez àpiloter votreporte
avec la touche programmée, répétez le processus
dans le cas contraire. Si la commande ne fonctionne
toujours pas après un nouvel essai, vous devrez éventuellement synchroniser/enregistrer la télécommande
ROCZ907 avec le récepteur du système d’entraînement
de porte pour votremodèle (voir ci-dessous).
7.2.1 Procédureavec code Fix/Rolling (avec enre-
gistrement manuel pour une synchronisation avec
le système de porte)
Pour les entraînements de porte de certains fabricants,
vous devrez, en plus, enregistrer/synchroniser l’émetteur
portatif sur/avec le récepteur du système d’entraînement
de porte.
•Veuillez consulter le mode d’emploi du système
d’entraînement de porte àcet effet (généralement
”Enregistrement d’un nouvel émetteur portatif”).
•Tenez-vous àproximité directe du récepteur de l’entraînement de porte (environ 50 cm).
•Enrègle générale, une touche de réglage est activée
sur le système d’entraînement de porte (elle permet
d’enregistrer des émetteurs portatifs) et une LED
s’allume (peut varier en fonction du fabricant).
•Normalement, vous disposez de 20-30 secondes pour
enregistrer/synchroniser la télécommande ROCZ907.
•Lasynchronisation est généralement effectuée en
appuyant 3fois de suite sur la touche programmée/
copiée de la télécommande ROCZ907.
7.2.2 ProcédureRolling (avec enregistrement
automatique pour une synchronisation avec le
système de porte)
Avec le principe de code tournant (Rolling), il est souvent
nécessaired’enregistrer/synchroniser l’émetteur portatif
sur/avec le récepteur du système d’entraînement de porte.
•Veuillez consulter le mode d’emploi du système
d’entraînement de porte àcet effet (généralement
”Enregistrement d’un nouvel émetteur portatif”).
•Tenez-vous àproximité directe du récepteur de l’entraînement de porte (environ 50 cm).
•Normalement, il sutd’appuyer sur la touche
programmée de la télécommande ROCZ907 jusqu’au
clignotement rapide de la LED de fonctionnement
rouge (1) (env.10secondes).
•Relâchez ensuite la touche. La télécommande passe
alors en mode synchronisation avec le système d’entraînement de porte. Ce mode conrme la synchronisation au bout de 5-10 secondes (une LED s’allume
ou clignote). Une fois la synchronisation terminée, la
LED rouge clignotante de la télécommande ROCZ907
s’éteint :l’enregistrement est terminé correctement.
7.3 Fonction de copie du code Complex Rolling
Certains entraînements de porte nécessitent la transmission du code source (souvent appelé code SEED) pour
permettrel’apprentissage de la télécommande ROCZ907
par rapport àl’entraînement de porte. Outrelecode
source, il est impératif de disposer de l’émetteur portatif
d’origine (fonction maître)enétat de fonctionnement
pour réaliser ces procédures.
En fonction du fabricant, la procédureutilisée par la
télécommande d’origine s’applique pour la transmission
du code source (télécommande maître).
Vous pouvez consulter cette procéduredans le mode
d’emploi original de l’émetteur portatif ou de l’entraînement de porte.
9
Page 12

7.3.1 Exemple pour le fabricant BFT :
vant d’exécuter la fonction de copie, veil
•A
que l’émetteur portatif d’origine et la télécommande
ROCZ907 soient dirigés l’un vers l’autreetnesoient
pas distancés de plus de 3cml’un de l’autre.
•Tenez-vous àproximité directe du récepteur de l’entraînement de porte (environ 50 cm).
•Maintenez la touche ”1” de la télécommande
ROCZ907 enfoncée tout en appuyant 4fois sur
la touche ”2”. Relâchez les deux touches. La LED
de fonctionnement rouge (1) clignote toutes les 2
secondes environ.
•Appuyez sur la touche àcopier de l’émetteur portatif
d’origine jusqu’à ce que la LED de fonction rouge de la
télécommande ROCZ907 s’allume, puis clignote deux
fois toutes les 2secondes environ.
•Appuyez ensuite sur la touche cachée au dos (compartiment àpiles, vieux modèles BFT) ou sur les touches
1et2(nouveaux modèles) de l’émetteur portatif
d’origine (maître). La LED rouge de la télécommande
ROCZ907 se met àclignoter rapidement. Appuyez
alors sur la touche que vous désirez programmer (“1”,
par exemple) jusqu’à l’extinction de la LED rouge de la
télécommande ROCZ907.
•Appuyez sur la touche programmée de la télécommande
ROCZ907 jusqu’au clignotement rapide de la LED rouge
(env.10secondes). Relâchez ensuite la touche. L’ extinction de la LED rouge de la télécommande ROCZ907
indique la ndela procéduredeprogrammation.
•Vériez ensuite si vous réussissez àpiloter votreporte
avec la touche programmée, répétez le processus dans
le cas contraire.
7.3.2 Exemple pour les fabricants FAAC,Genius,
Amigo, Kilo
•Avant d’exécuter la fonction de copie, veillez àce
que l’émetteur portatif d’origine et la télécommande
ROCZ907 soient dirigés l’un vers l’autreetnesoient
pas distancés de plus de 3cml’un de l’autre.
•Tenez-vous àproximité directe du récepteur de l’entraînement de porte (environ 50 cm).
•Maintenez la touche ”1” de la télécommande ROCZ907
enfoncée tout en appuyant 4fois sur la touche ”2”.
Relâchez les deux touches. La LED de fonctionnement
rouge (1) clignote toutes les 2secondes environ.
lez àce
•Appuyez sur la touche de l’émetteur portatif d’origine
que vous désirez copier jusqu’au clignotement rapide
de la LED de fonctionnement rouge de la télécommande ROCZ907 (= conrmation de la réception du
signal de la télécommande).
•Appuyez désormais sur les touches 2et3del’émetteur
portatif d’origine (fonction maître). Tandis que la LED
de l’émetteur portatif d’origine clignote rapidement,
appuyez 1fois sur la touche àcopier de l’émetteur
portatif d’origine. La LED de fonctionnement rouge
(1) de la télécommande ROCZ907 clignote rapidement.
•Appuyez alors sur la touche que vous désirez
programmer/enregistrer de la télécommande ROCZ907
(“1”, par exemple). L’ extinction de la LED rouge de la
télécommande ROCZ907 indique la ndela procédure
de programmation.
•Vériez ensuite si vous réussissez àpiloter votreporte
avec la touche programmée, répétez le processus
dans le cas contraire. Si la commande ne fonctionne
toujours pas après un nouvel essai, vous devrez
éventuellement synchroniser la télécommande avec le
récepteur de votresystème d’entraînement de porte.
•Pour synchroniser la télécommande ROCZ907 avec
l’entraînement de porte, appuyez sur la touche
programmée de la télécommande ROCZ907 jusqu’au
clignotement rapide de la LED rouge (env.10
secondes). Relâchez ensuite la touche. L’extinction de
la LED rouge de la télécommande ROCZ907 indique la
ndela procéduredeprogrammation.
7.3.3 Exemple pour le fabricant V2 :
•Avant d’exécuter la fonction de copie, veillez àce
que l’émetteur portatif d’origine et la télécommande
ROCZ907 soient dirigés l’un vers l’autreetnesoient
pas distancés de plus de 3cml’un de l’autre.
•Tenez-vous àproximité directe du récepteur de l’entraînement de porte (environ 50 cm).
•Maintenez la touche ”1” de la télécommande ROCZ907
enfoncée tout en appuyant 4fois sur la touche ”2”.
Relâchez les deux touches. La LED de fonctionnement
rouge (1) clignote toutes les 2secondes environ.
•Maintenez la touche àcopier de l’émetteur portatif
d’origine enfoncée jusqu’à ce que la LED de fonction
rouge (1) de la télécommande ROCZ907 s’allume, puis
clignote deux fois toutes les 2secondes environ.
10
Page 13
•Appuyez une nouvelle fois sur la touche àcopier de
l’émetteur portatif d’origine jusqu’à ce que la LED
rouge clignote rapidement.
•Appuyez sur la touche que vous désirez programmer
(touche ”1”, par exemple) andeconrmer la procédure. La LED de fonctionnement rouge (1) s’éteint.
•Appuyez sur la touche programmée de la télécommande
ROCZ907 jusqu’au clignotement rapide de la LED rouge
(env.10secondes). Relâchez ensuite la touche. L’ extinction de la LED rouge de la télécommande ROCZ907
indique la ndela procéduredeprogrammation.
•Vériez ensuite si vous réussissez àpiloter votreporte
avec la touche programmée, répétez le processus dans
le cas contraire.
Remarque
Pour d’autres options supplémentaires, vous trouverez
un tableau actuel des compatibilités ainsi qu’un mode
d’emploi élargi sur les sites www.hama.com ou
www.thomson-av-accessories.eu.
8. Caractéristiques techniques
Dimensions 76 x27x39 mm
40 mmaxi (en fonction des
Portée
Tension d'entrée 12 V
Veille 72 hmaxi
Sortie USB 5V/2100 mA
Gamme de
fréquences
Puissance
d’émission maxi
9. Nettoyage et entretien
Nettoyez ce produit uniquement àl’aide d’un chiffon non
pelucheux légèrement humide ;évitez tout détergent agressif.Veillez àcequ’aucun liquide ne pénètredans le produit.
conditions locales et structurelles ou de lapuissance de
l’antenne de réception)
433 MHz, 868 MHz
10 mW
10. Exclusion de garantie
La société Hama GmbH &Co. KG décline toute
responsabilité en cas de dommages provoqués par
une installation, un montage ou une utilisation non
conformes du produit ou encoreprovoqués par un non
respect des consignes du mode d‘emploi et/ou des
consignes de sécurité.
11. Service et assistance
En cas de question concernant le produit, veuillez
adresser au service de conseil produits de Hama.
Ligne téléphonique directe :+49 9091 502-115
(allemand/anglais)
Vous trouverez ici de plus amples informations concernant l‘assistance :www.hama.com
12. Consignes de recyclage
Remarques concernant la protection de l’envi-
ronnement:
Conformément àladirective européenne
2012/19/EU et 2006/66/CE, et and‘atteindre
uncertain nombred‘objectifs en matièrede
protection de l‘environnement, les règles
suivantes doivent êtreappliquées: Les
appareils électriques et électroniques ainsi que les
batteries ne doivent pas êtreéliminés avec les déchets
ménagers. Le pictogramme “picto” présent sur le produit,
son manuel d‘utilisation ou son emballage indique que le
produit est soumis àcette réglementation. Le
consommateur doit retourner le produit/la batterie usager
aux points de collecte prévus àcet effet. Il peut aussi le
remettreàunrevendeur.Enpermettant ennlerecyclage
des produits ainsi que les batteries, le consommateur
contribueraàla protection de notreenvironnement. C‘est
un acte écologique.
13. Déclaration de conformité
Le soussigné, Hama GmbH &CoKG, déclare
que l‘équipement radioélectrique du type
[00132680] est conforme àladirective
2014/53/UE. Le texte complet de la déclaration UE de
conformité est disponible àl‘adresse internet suivante:
www.hama.com-> 00132680 -> Downloads.
vous
11
Page 14
D Bedienungsanleitung
Vielen Dank, dass Sie sich für ein Thomson Produkt
entschieden haben!
Nehmen Sie sich Zeit und lesen Sie die folgenden Anweisungen und Hinweise zunächst ganz durch. Bewahren
Sie diese Bedienungsanleitung anschließend an einem
sicheren Ort auf,umbei Bedarf darin nachschlagen zu
können. Sollten Sie das Gerät veräußern, geben Sie diese
Bedienungsanleitung an den neuen Eigentümer weiter.
1. Erklärung von Warnsymbolen und Hinweisen
Warnung
Wirdverwendet, um Sicherheitshinweise zu kennzeichnen oder um Aufmerksamkeit auf besondere
Gefahren und Risiken zu lenken.
Hinweis
Wirdverwendet, um zusätzlich Informationen oder
wichtige Hinweise zu kennzeichnen.
2. Bedienungselemente und Anzeigen
1. Funktions-LED (rot)
2. 12V-Kfz-Stecker
3. USB-Anschluss 2.1 A
4. ProgrammierbareTasten1-4
5. Betriebs-LED (leuchtet im 12V-Betrieb blau)
3. Packungsinhalt
•ROC Z907 Universal-Garagentor-Fernbedienung
•diese Bedienungsanleitung
4. Sicherheitshinweise
•Verwenden Sie das Produkt ausschließlich für den dazu
vorgesehenen Zweck.
•Betreiben Sie das Produkt nicht außerhalb seiner in den
technischen Daten angegebenen Leistungsgrenzen.
•Schützen Sie das Produkt vor Schmutz, Feuchtigkeit
und Überhitzung und verwenden Sie es nur in trockenen Umgebungen.
•Verwenden Sie das Produkt nicht in einer feuchten
Umgebung und vermeiden Sie Spritzwasser.
•Lassen Sie das Produkt nicht fallen und setzen Sie es
keinen heftigen Erschütterungen aus.
•Dieses Produkt gehört, wie alle elektrischen Produkte,
nicht in Kinderhände!
•Entsorgen Sie das Verpackungsmaterial sofort gemäß
den örtlich gültigen Entsorgungsvorschriften.
•Nehmen Sie keine Veränderungen am Produkt vor.Dadurch verlieren Sie jegliche Gewährleistungsansprüche.
•Beim Einsatz des Produktes im Straßenverkehr gelten
die Vorschriften der StVZO.
•Beachten Sie, dass keine Komponenten, wie der Airbag, Sicherheitsbereich, Bedienelemente, Instrumente,
etc. oder die Sicht, verdeckt oder eingeschränkt sind.
Hinweis
Bei einigen Fahrzeugtypen muss die Zündung
eingeschaltet sein, damit die Spannung an der
12 VKfz-Steckdose anliegt. Beachten Sie hierzu die
Bedienungsanleitung Ihres Fahrzeugs.
VorInbetriebnahme/Programmierung
Unfallgefahr: Stellen Sie sicher,dass sich während
der Programmierung und Installation des Produktes
keine Personen oder Gegenstände im unmittelbaren
Umfeld benden, damit mögliche Schäden und
z.B. Verletzungen von Personen vermieden werden!
Während der Installation kann das Garagentor sich
öffnen bzw.schließen. Wir empfehlen das Fahrzeug
für den Programmiervorgang außerhalb der Garage
zu parken. Nutzen Sie die ROCZ907 nur im direkten
Blickkontakt zum To röffnungssystem bzw.Garagentor.
Beachten Sie auch die weiteren Sicherheitshinweise
Ihres To rantriebes (Bedienungsanleitung).
Hinweis
•Zur vollständigen Programmierung des Torantriebes
wirdunter Umständen auch die Bedienungsanleitung des To rantriebes benötigt (z.B. Anmelden von
Handsendern an den Torantrieb).
•Unabdingbar für die Nutzung des ROCZ907
ist, dass noch mindestens ein funktionierender
Original-Handsender vorhanden sein muss.
12
Page 15

•Trotz der breitgefächerten universellen Eigenschaft
dieser Handsenderfunktion sind evtl. einige
Garagentorsysteme mit diesem Produkt nicht
bedienbar.Ursache hierzu können u.a. andere
Frequenznutzungen oder zusätzlich verschlüsselte
Funktechnologien sein (u.a. bidirektionale, z.B.
128Bit, Verschlüsselung).
Hinweis –USB-Buchse
Mobile Endgeräte wie z.B. Smartphone/ Tablet können über die USB-Buchse nur während des Betriebes
in der Zigarettenanzünderbuchse geladen werden.
5. Einführung
Der ROCZ907 ist ein funkbasierter und lernfähiger
Handsender zum Steuern von markenübergreifenden
Torantrieben, somit haben Sie die Möglichkeit einen bestehenden Handsender (Fernbedienung) zu ersetzten und
können ggf.auch marktübergreifend mehrereTorantriebe
anlernen und steuern. Zur Nachrüstung von Systemen
mit Fix- oder Rolling-Code im Frequenzbereich von
433 MHz und 868 MHz. Spannungsversorgung erfolgt
über die Zigarettenanzünderbuchse, dank integriertem
Hochleistungs-Kondensator kann der ROCZ907 auch
bis zu 3Tage außerhalb der Zigarettenanzünderbuchse
betrieben werden. Durch die integrierte USB-Buchse können zudem Smartphone/ Tablet während der Autofahrt
geladen werden.
6. Hauptfunktionsmerkmale
•Universell einsetzbar für diverse Garagentor-und
Außentorantriebe
•Batterieloser Energiespeicher
•Zur Nutzung für mobile Anwendung außerhalb des
Bordnetzes (Kondensatorperformance-Technologie)
•Vollgeladen bis zu 150 Ta stenklicks (z.B. Öffnen/
Schließen von To ren) möglich
•Wiederauadung innerhalb von 3Minuten
•Energiespeicher (Standby): bis zu 3Tage
•Bis zu 4Tasten individuell programmierbar (markenübergreifende To rantriebe) über manuelle Suche
•Reichweite: Bis zu 40 Meter (abhängig von baulichen
und örtlichen Gegebenheiten bzw.abhängig von der
Leistung der Empfangsantenne)
•Druckresonanz-Tasten (Klick und Fühl) für eine sichere
Nutzung im Fahrzeug
•Integrierte USB-Buchse mit 2.1A zum Auaden von
z.B. Smartphone/ Ta blet
7. Inbetriebnahme
Der ROCZ907 verfügt über einen integrierten Hochleistungs-Kondensator.Vor der ersten Anwendung muss
dieser über die Zigarettenanzünderbuchse aufgeladen
werden (Ladezeit 3min).
Bevor Sie Ihren neuen Handsender ROCZ907 nutzen
können, müssen Sie diesen erst anlernen/ kopieren bzw.an
das Motorsteuersystem des Torantriebs anmelden/anlernen
oder synchronisieren. Hierzu gibt es mehrereMöglichkeiten, die in den nächsten Kapiteln beschrieben werden.
Hinweis
•Einige Garagentorantriebe benötigen zur Programmierung von Öffnen und Schließen zwei Tasten. In
diesem Falle müssen auf dem ROCZ907 ebenfalls
zwei Tasten kopiert /programmiert werden.
•Bei einigen Garagentorantrieben kann es
notwendig sein, die Synchronisierung bis zu 20 Mal
durchzuführen bis der Code erkannt wird.
7.1 Bestimmen des Codier-Systems (Kompatibilität)
Mit dem ROCZ907 decken Sie etwa 90% der auf dem
aktuellen Markt bendlichen Tor-Steuerungssysteme ab.
Es werden folgende Codier-Systeme unterstützt:
Fix-Code (feste Codierung), Rolling-Code (auch Hopping
Code genannt) oder Complex-Rolling-Code.
Informationen zu dem verwendeten Codier-System Ihres
Original-Handsenders entnehmen Sie bitte der Anleitung
Ihres To rantriebes oder fragen Sie beim Hersteller nach.
7.2 Kopierfunktion Fix-und Rolling-Code
•Achten Sie vor dem Ausführen der Kopierfunktion
darauf,dass der Original-Handsender und der
ROCZ907 einander zugewandt und nicht mehr als
3cmvoneinander entfernt sind.
•Drücken und halten Sie auf dem ROCZ907 die Taste
„1“, während Sie gleichzeitig 4x die Taste „2“ drücken.
Lassen Sie beide Tasten los. Es blinkt nun die rote
Funktions-LED (1) ca. alle 2Sekunden.
13
Page 16

•Drücken Sie die zu kopierende Taste auf dem OriginalHandsender solange bis die rote Funktions-LED des
ROCZ907 schnell blinkt (= Bestätigung Fernbedienungs-Signal erfolgreich angenommen).
•Drücken Sie jetzt die zu programmierende Taste (z.B.
„1“) auf dem ROCZ907. Nach erfolgreicher Programmierung leuchtet die Funktions-LED (1) ca. 1Sekunde
rotund erlischt dann.
•Der Programmiervorgang ist erfolgreich abgeschlossen.
Prüfen Sie anschließend, ob sich das Torüber die angelernte Taste steuern lässt, ansonsten wiederholen Sie
den Vorgang. Sollte dies nach einem erneuten Versuch
noch nicht funktionieren, ist es bei Ihren Modell evtl.
notwendig, den ROCZ907 extramit dem Empfänger
des Torantriebsystem zu synchronisieren/anzumelden
(siehe unten).
7.2.1 Fix-Code/Rolling-Code Verfahren (mit
manueller Anmeldung zur Synchronisation an das
Torsystem)
Bei einigen To rantriebherstellern ist es zusätzlich noch
notwendig den Handsender mit dem Empfänger des
Torantriebssystems anzumelden/synchronisieren.
•Nehmen Sie bitte die Bedienungsanleitung des
Torantriebes zur Hilfe (i.d.R. Anmelden eines neuen
Handsenders).
•Achten Sie darauf sich in direkter Nähe des Torantriebempfängers aufzuhalten (etwa 50 cm).
•Üblicherweise wirdhierbei eine Einstell-Taste am
Torantriebssystem zur Anmeldung von Handsendern
aktiviert und eine LED leuchtet auf (kann je nach
Hersteller variieren).
•Normalerweise haben Sie hierfür ca. 20-30 Sekunden
Zeit, um nun den ROCZ907 anzumelden/synchronisieren.
•Die Synchronisierung erfolgt in der Regel, wenn Sie
3x die programmierte/kopierte Taste des ROCZ907
hintereinander betätigen.
7.2.2 Rolling-Code Verfahren (mit automatischer
Anmeldung zur Synchronisation an das To rsystem)
Durch das Wechsel-Code-Prinzip (Rolling-Code) ist es
häugnötig den Handsender mit dem Empfänger des
Torantriebssystems anzumelden/synchronisieren.
•Nehmen Sie bitte die Bedienungsanleitung des Torantriebes zur Hilfe (i.d.R. Anmelden eines neuen Handsenders).
•Achten Sie darauf sich in direkter Nähe des Torantriebempfängers aufzuhalten (etwa 50 cm).
14
•Üblicherweise reicht es, die programmierte Taste des
ROCZ907 solange zu drücken bis die rote FunktionsLED (1) schnell blinkt (ca. 10 Sekunden).
•Lassen Sie nun die Taste los. Die Fernbedienung
geht hierbei in den Synchronisationsmodus mit dem
Torantriebssystem. Dieser bestätigt die Synchronisation
nach ca. 5-10 Sekunden durch eine leuchtende oder
blinkende LED. Ist die Synchronisation beendet, erlischt
nun auf dem ROCZ907 die rote schnell blinkende LED
und die Anmeldung war erfolgreich.
7.3 Kopierfunktion Complex-Rolling-Code
Einige Torantrieb Hersteller benötigen die Übertragung
des Quellcodes (oft auch SEED Code genannt), um den
ROCZ907 an den Torantrieb anlernen zu können. Hierbei
wirdinjedem Fall der original funktionsfähige Handsender (Masterfunktion)mit dem Quellcode benötigt!
Je nach Hersteller kommt nun die Verfahrensweise der
Original Fernbedienung zur Übermittlung des Quellcodes
(Master-Fernbedienung) zur Umsetzung.
Diese können Sie ggf.der Original Bedienungsanleitung
des Handsenders bzw.des Torantriebes entnehmen.
7.3.1 Beispiel Hersteller BFT:
•Achten Sie vor dem Ausführen der Kopierfunktion
darauf,dass der Original-Handsender und der
ROCZ907 einander zugewandt und nicht mehr als 3
cm voneinander entfernt sind.
•Achten Sie darauf sich in direkter Nähe des Torantriebempfängers aufzuhalten (etwa 50 cm).
•Drücken und halten Sie auf dem ROCZ907 die Taste
„1“, während Sie gleichzeitig 4x die Taste „2“ drücken.
Lassen Sie beide Tasten los. Es blinkt nun die rote
Funktions-LED (1) ca. alle 2Sekunden.
•Drücken Sie die zu kopierende Taste auf dem OriginalHandsender solange bis die rote Funktions-LED des
ROCZ907 aueuchtet und in Folge ca. alle 2Sekunden
zweifach blinkt.
•Drücken Sie nun die auf der Rückseite (Batteriefach)
versteckte Taste (alte Modelle BFT) oder die Tasten 1
und 2(neuereModelle) auf dem Original-Handsender
(Master). Die rote LED auf dem ROCZ907 blinkt in Folge schnell. Drücken Sie nun die zu programmierende
Taste (z.B. 1) bis die rote LED des ROCZ907 erlischt.
Page 17

•Drücken Sie die programmierte Taste des ROCZ907
solange bis die rote LED schnell blinkt (ca. 10 Sekunden).
Lassen Sie die Taste los. Wenn die rote LED auf dem
ROCZ907 erlischt ist die Programmierung abgeschlossen.
•Prüfen Sie anschließend, ob sich das Torüber die
angelernte Taste steuern lässt, ansonsten wiederholen
Sie den Vorgang.
7.3.2 Beispiel Hersteller FAAC bzw.Genius, Amigo,
Kilo
•Achten Sie vor dem Ausführen der Kopierfunktion
darauf,dass der Original-Handsender und der
ROCZ907 einander zugewandt und nicht mehr als 3
cm voneinander entfernt sind.
•Achten Sie darauf sich in direkter Nähe des Torantriebempfängers aufzuhalten (etwa 50 cm).
•Drücken und halten Sie auf dem ROCZ907 die Taste
„1“, während Sie gleichzeitig 4x die Taste „2“ drücken.
Lassen Sie beide Tasten los. Es blinkt nun die rote
Funktions-LED (1) ca. alle 2Sekunden.
•Drücken Sie die zu kopierende Taste auf dem OriginalHandsender solange bis die rote Funktions-LED des
ROCZ907 schnell blinkt (= Bestätigung Fernbedienungs-Signal erfolgreich angenommen).
•Drücken Sie nun die Tasten 2und 3auf dem OriginalHandsender (Masterfunktion). Während die LED des
Original-Handsenders schnell blinkt, drücken Sie 1x
auf die zu kopierende Taste des Original-Handsenders.
Die rote Funktions-LED(1) des ROCZ907 blinkt nun
schnell.
•Nun drücken Sie die zu programmierende Taste (z.B. 1)
auf dem ROCZ907, die Sie speichern möchten. Als
Bestätigung der Programmierung erlischt die rote LED
auf dem ROCZ907.
•Prüfen Sie anschließend, ob sich das Torüber die
angelernte Taste steuern lässt, ansonsten wiederholen
Sie den Vorgang. Sollte dies nach einem erneuten
Versuch noch nicht funktionieren, ist es bei Ihren
Modell notwendig, dieses extramit dem Empfänger
des Torantriebsystems zu synchronisieren.
•Umden ROCZ907 mit dem Torantrieb zu synchronisieren,
drücken Sie die programmierte Taste des ROCZ907
solange bis die rote LED schnell blinkt (ca. 10 Sekunden).
Lassen Sie die Taste los. Wenn die rote LED auf dem
ROCZ907 erlischt ist die Programmierung vollzogen.
7.3.3 Beispiel Hersteller V2:
•Achten Sie vor dem Ausführen der Kopierfunktion
darauf,dass der Original-Handsender und der
ROCZ907 einander zugewandt und nicht mehr als 3
cm voneinander entfernt sind.
•Achten Sie darauf sich in direkter Nähe des Torantriebempfängers aufzuhalten (etwa 50 cm).
•Drücken und halten Sie auf dem ROCZ907 die Taste
„1“, während Sie gleichzeitig 4x die Taste „2“ drücken.
Lassen Sie beide Tasten los. Es blinkt nun die rote
Funktions-LED (1) ca. alle 2Sekunden.
•Drücken und halten Sie die zu kopierende Taste des
Original-Handsenders bis die rote Funktions-LED
(1) des ROCZ907 aueuchtet und in Folge ca. alle 2
Sekunden zweifach blinkt.
•Drücken Sie erneut die zu kopierende Taste des OriginalHandsenders solange bis die rote LED schnell blinkt.
•Drücken Sie die zu programmierende Taste (z.B. 1) zur
Bestätigung. Die rote Funktions-LED (1) erlischt.
•Drücken Sie die programmierte Ta ste des ROCZ907 solange bis die rote LED schnell blinkt (ca. 10 Sekunden).
Lassen Sie die Taste los. Wenn die rote LED auf dem
ROCZ907 erlischt ist die Programmierung vollzogen.
•Prüfen Sie anschließend, ob sich das Torüber die
angelernte Taste steuern lässt, ansonsten wiederholen
Sie den Vorgang.
Hinweis
Für weitereergänzende Möglichkeiten nden Sie
die aktuelle Kompatibilitäts-Liste und die erweiterte
Bedienungsanleitung unter www.hama.com oder
www.thomson-av-accessories.eu.
15
Page 18

8. Technische Daten
Abmessungen 76 x27x39 mm
max. 40 m(abhängig von
Reichweite
Eingangsspannung 12 V
Standby max. 72 h
USB-Ausgang 5V/2100 mA
Frequenzband/
Frequenzbänder
Abgestrahlte max.
Sendeleistung
9. Wartung und Pege
Reinigen Sie dieses Produkt nur mit einem fusselfreien,
leicht feuchten Tu ch und verwenden Sie keine aggressiven Reiniger.Achten Sie darauf,dass kein Wasser in das
Produkt eindringt.
10. Haftungsausschluss
Die Hama GmbH &Co. KG übernimmt keinerlei Haftung
oder Gewährleistung für Schäden, die aus unsachgemäßer
Installation, Montage und unsachgemäßem Gebrauch des
Produktes oder einer Nichtbeachtung der Bedienungsanleitung und/oder der Sicherheitshinweise resultieren.
11. Service und Support
Bitte wenden Sie sich bei Fragen zum Produkt gerne an
die Hama-Produktberatung.
Hotline: +49 9091 502-115 (Deu/Eng)
WeitereSupportinformationen nden sie hier:
www.hama.com
baulichen und örtlichen
Gegebenheiten bzw.abhängig von der Leistung der
Empfangsantenne)
433 MHz, 868 MHz
10 mW
12. Entsorgungshinweise
Hinweis zum Umweltschutz:
Ab dem Zeitpunkt der Umsetzung der
europäischen Richtlinien 2012/19/EU und
2006/66/EG in nationales Recht gilt folgendes:
Elektrische und elektronische Geräte sowie
Batterien dürfen nicht mit dem Hausmüll
entsorgt werden. Der Verbraucher ist gesetzlich
verpichtet, elektrische und elektronische Geräte sowie
Batterien am Ende ihrer Lebensdauer an den dafür
eingerichteten, öffentlichen Sammelstellen oder an die
Verkaufsstelle zurückzugeben. Einzelheiten dazu regelt
das jeweilige Landesrecht. Das Symbol auf dem Produkt,
der Gebrauchsanleitung oder der Verpackung weist auf
diese Bestimmungen hin. Mit der Wiederverwertung, der
stoichen Verwertung oder anderen Formen der
Verwertung von Altgeräten/Batterien leisten Sie einen
wichtigen Beitrag zum Schutz unserer Umwelt.
13. Konformitätserklärung
Hiermit erklärt die Hama GmbH &CoKG, dass
der Funkanlagentyp [00132680] der Richtlinie
2014/53/EU entspricht. Der vollständige Text
der EU-Konformitätserklärung ist unter der folgenden
Internetadresse verfügbar:
www.hama.com-> 00132680 -> Downloads.
16
Page 19

E Instrucciones de uso
Le agradecemos que se haya decidido por un producto
de Thomson.
Tómese tiempo yléase primerolas siguientes instrucciones eindicaciones. Después, guarde estas instrucciones
de manejo en un lugar seguroparapoder consultarlas
cuando sea necesario. Si vende el aparato, entregue
estas instrucciones de manejo al nuevo propietario.
1. Explicación de los símbolos de aviso ydelas
indicaciones
Aviso
Se utiliza paracaracterizar las indicaciones de
seguridad oparallamar la atención sobrepeligros y
riesgos especiales.
Nota
Se utiliza paracaracterizar informaciones adicionales
oindicaciones importantes.
2. Elementos de manejo eindicadores
1. LED de funcionamiento (rojo).
2. Conector paravehículo de 12 V.
3. Puerto USB 2.1 A.
4. Teclas programables 1-4.
5. LED de funcionamiento (se ilumina en azul cuando
funciona con 12 V).
3. Contenido del paquete
•Mando adistancia universal parapuerta de garaje
ROC Z907.
•Estas instrucciones de manejo.
4. Instrucciones de seguridad
•Emplee el producto exclusivamente paralafunción
paralaque fue diseñado.
•Noopereelproducto fueradelos límites de potencia
indicados en los datos técnicos.
•Utilice el producto sólo conectado auna toma de
corriente autorizada. La toma de corriente debe estar
colocada cerca del producto ydeforma accesible.
•Noutilice el producto en entornos húmedos yevite el
contacto con las salpicaduras de agua.
•Nodoble ni aplaste el cable.
•Nodeje caer el producto ni lo someta asacudidas fuertes.
•Parasacar el cable, tiredirectamente de la clavija y
nunca del cable.
•Este aparato, como todos los aparatos eléctricos, no
debe estar en manos de los niños.
•Deseche el material de embalaje en conformidad con
las disposiciones locales sobreeldesecho vigentes.
•Norealice cambios en el aparato. Esto conllevaría la
pérdida de todos los derechos de la garantía.
•Tenga en cuenta al utilizar el producto las disposiciones yleyes locales vigentes paraeltráco rodado.
•Asegúrese de que ni la vista ni ningún componente,
como airbag, áreas de seguridad, elementos de manejo, instrumentos, etc.,se verán tapados olimitados.
Nota
En algunos automóviles es necesario que esté
activada la corriente paraque el enchufe de 12 V
del vehículo reciba la tensión. Observe también las
instrucciones de manejo de su automóvil.
Antes de la puesta en funcionamiento/
programación
¡Peligrodesufrir accidentes! Asegúrese de que
durante la programación einstalación del producto
no haya personas ni objetos en las inmediaciones
parapoder evitar daños ylesiones personales.
Durante la instalación, la puerta del garaje puede
abrirse ocerrarse. Recomendamos aparcar el vehículo
fueradel garaje pararealizar la programación. Utilice
el ROCZ907 solo manteniendo el contacto visual
con el sistema de aperturadelapuerta ocon la
puerta del garaje. Tenga también en cuenta las otras
indicaciones de seguridad del accionamiento de su
puerta (instrucciones de uso).
Nota
•Paraprogramar completamente el accionamiento
de la puerta, en algunos casos, también se necesitan las instrucciones de uso del accionamiento
de la puerta (por ejemplo, registrar transmisores
portátiles en el accionamiento de la puerta).
17
Page 20

•Parautilizar el ROCZ907 es imprescindible disponer
de, al menos, un transmisor portátil original que
funcione.
•Noobstante, apesar del carácter universal de este
transmisor portátil, es posible que algunos sistemas
de puerta de garaje no puedan manejarse con
este producto. Esto puede deberse, por ejemplo,
al uso de otras frecuencias odeotras tecnologías
inalámbricas cifradas (entreotras, la bidireccional,
por ejemplo, 128 bit, codicación, etc.)
Nota –Puerto USB
Durante el funcionamiento, los terminales móviles,
como los smartphone ylas tablet, solo pueden cargarse através del puerto USB del enchufe del encendedor.
5. Introducción
El ROCZ907 es un transmisor portátil inalámbrico yadaptativo que controla accionamientos de puerta de distintas
marcas, lo que le ofrece la posibilidad de sustituir un
transmisor portátil existente (mando adistancia) o, dado
el caso, programar por aprendizaje ycontrolar varios
accionamientos de puerta de distintas marcas. Para
reequipar sistemas con código jo ocódigo evolutivo
(Fixed Code yRolling Code en inglés) en un rango de
frecuencia de 433 MHz a868 MHz, la alimentación de
tensión se realiza através del enchufe del encendedor.
Gracias asucondensador de alto rendimiento integrado,
el ROCZ907 puede funcionar hasta 3días desenchufado
del encendedor.Elpuerto USB integrado permite además
cargar smartphone ytablet durante el trayecto.
6. Características de funcionamiento principales
•Uso universal paradistintos accionamientos de puertas
de exterior ydegaraje.
•Acumulador de energía sin batería.
•Uso portátil fueradelared de abordo (tecnología de
rendimiento del condensador).
•Con carga completa permite accionar las teclas hasta
150 veces (por ejemplo, paraabrir/cerrar puertas).
•Recarga en 3minutos.
•Acumulador de energía (modo standby): hasta 3días.
•Hasta 4teclas de programación individual (accionamientos de puerta de distintas marcas) mediante
búsqueda manual.
•Alcance: hasta 40 metros (en función de las condiciones estructurales ylocales, oenfunción de la potencia
de la antena de recepción).
•Teclas de resonancia de presión (clic ytáctil) paraun
uso seguroenelvehículo.
•Puerto USB integrado con 2,1 Aparacargar,por
ejemplo, smartphone ytablet.
7. Puesta en funcionamiento
El ROCZ907 dispone de un condensador de alto
rendimiento integrado. Antes del primer uso, este debe
cargarse através del enchufe del encendedor (tiempo de
carga 3min).
Antes de poder utilizar su nuevo transmisor portátil
ROCZ907, primerodebe programarlo por aprendizaje/
copiarlo, es decir,registrarlo/programarlo por aprendizaje
osincronizarlo con el sistema de control del motor del
accionamiento de la puerta. Para hacerlo, existen varias
opciones que se explican en los siguientes capítulos.
Nota
•Algunos accionamientos de puerta de garaje
necesitan dos teclas paraprogramar la aperturay
el cierre. En ese caso, en el ROCZ907 también se
pueden copiar/programar dos teclas.
•Enalgunos accionamientos de puerta de garaje
puede ser necesario realizar la sincronización hasta
20 veces hasta que se reconozca el código.
7.1 Determinar el sistema de codicación (compatibilidad)
Con el ROCZ907 se cubren aproximadamente un 90 %
de los sistemas de control de puertas del mercado actual.
Es compatible con los siguientes sistemas de codicación: Fixed Code (codicación ja), Rolling Code (también
conocida como Hopping Code, en español «código
evolutivo») oComplex Rolling Code.
Para obtener información sobreelsistema de codicación
que utiliza su transmisor portátil original, consulte las
instrucciones de su accionamiento de puerta opregunte
al fabricante.
18
Page 21

7.2 Función de copia con el Fixed Code yelRolling
Code
•Antes de llevar acabo la función de copia, fíjese en
que haya comunicación entreeltransmisor portátil
original yelROCZ907, yque no se encuentren amás
de 3cmeluno del otro.
•Pulse ymantenga pulsada la tecla «1» del ROCZ907 y,
al mismo tiempo, pulse 4veces la tecla «2». Suelte las
dos teclas. El LED de funcionamiento rojo (1) parpadea
ahoraaprox. cada 2segundos.
•Pulse la tecla que desea copiar del transmisor portátil
original hasta que el LED de funcionamiento rojo del
ROCZ907 empiece aparpadear rápido (= conrmación de
la señal de mando adistancia correctamente recibida).
•Ahorapulse la tecla que desea programar (por
ejemplo, «1») en el ROCZ907. Una vez programado correctamente, el LED de funcionamiento (1) se ilumina
durante aprox. 1segundo en rojo ydespués se apaga.
•Elproceso de programación ha nalizado correctamente.
•Acontinuación, compruebe si la puerta puede
controlarse con la tecla programada por aprendizaje;
de no ser así, repita el proceso. Si no funcionada
después de un segundo intento, es posible que su
modelo necesite además sincronizar/programar por
aprendizaje el ROCZ907 con el receptor del sistema de
accionamiento de la puerta.
7.2.1 Procedimiento con Fixed Code/el Rolling
Code (con registromanual parasincronización con
el sistema de la puerta)
Con los accionamientos de puerta de algunos fabricantes
también es necesario registrar/sincronizar el transmisor
portátil con el receptor del sistema de accionamiento
de la puerta.
•Consulte las instrucciones de uso del accionamiento
de puerta paraobtener ayuda (por lo general, en el
capítulo «Registrodeun nuevo transmisor portátil»).
•Procureestar cerca del receptor del accionamiento de
la puerta (a unos 50 cm).
•Normalmente, de esa maneraseactiva una tecla de
ajuste en el sistema de accionamiento de la puerta
pararegistrar los transmisores portátiles, yseenciende
un LED (puede variar en función del fabricante).
•Por lo general, dispone de aprox. 20-30 segundos para
registrar/sincronizar el ROCZ907.
•Lasincronización se efectúa normalmente al pulsar 3
veces la tecla programada/copiada del ROCZ907.
7.2.2 Procedimiento con el Rolling Code (con
registroautomático parasincronización con el
sistema de la puerta)
Con el principio de código evolutivo (Rolling Code) a
menudo es necesario registrar/sincronizar el transmisor
portátil con el receptor del sistema de accionamiento
de la puerta.
•Consulte las instrucciones de uso del accionamiento
de puerta paraobtener ayuda (por lo general, en el
capítulo «Registrodeun nuevo transmisor portátil»).
•Procureestar cerca del receptor del accionamiento de
la puerta (a unos 50 cm).
•Normalmente, basta con pulsar la tecla programada
del ROCZ907 hasta que el LED de funcionamiento rojo
(1) empiece aparpadear rápido (aprox. 10 segundos).
•Entonces suelte la tecla. El mando adistancia
cambia al modo de sincronización con el sistema
de accionamiento de la puerta. Este conrma la
sincronización después de unos 5-10 segundos con el
encendido oelparpadeo del LED. Una vez nalizada
la sincronización, en el ROCZ907 se apaga el LED rojo
que estaba encendido oparpadeando yelregistro
queda completado.
7.3 Función de copia con el Complex Rolling Code
Losaccionamientos de puerta de algunos fabricantes
requieren la transmisión del código fuente (también llamado SEED Code) parapoder programar por aprendizaje
el ROCZ907 en el accionamiento de puerta. Para ello,
siempreesnecesario disponer de un transmisor portátil
original yenperfectas condiciones de funcionamiento
(función maestra)con el código fuente.
En función del fabricante, se aplica el procedimiento del
mando adistancia original paralatransmisión del código
fuente (mando adistancia maestro).
Si es necesario, puede consultarlo en las instrucciones de
uso originales del transmisor portátil odel accionamiento
de puerta.
7.3.1 Ejemplo del fabricante de BFT:
•Antes de llevar acabo la función de copia, fíjese en
que haya comunicación entreeltransmisor portátil
original yelROCZ907, yque no se encuentren amás
de 3cmeluno del otro.
•Procureestar cerca del receptor del accionamiento de
la puerta (a unos 50 cm).
19
Page 22

•Pulse ymantenga pulsada la tecla «1» del ROCZ907 y,
al mismo tiempo, pulse 4veces la tecla «2». Suelte las
dos teclas. El LED de funcionamiento rojo (1) parpadea
ahoraaprox. cada 2segundos.
•Pulse la tecla que desea copiar del transmisor portátil
original hasta que el LED de funcionamiento rojo del
ROCZ907 se ilumine y, después, parpadee dos veces
aprox. cada 2segundos.
•Entonces pulse la tecla que está oculta en la parte
trasera(compartimento parapilas) (antiguo modelo
BTF) olas teclas 1y2(nuevo modelo) del transmisor
portátil original (maestro). El LED rojo del ROCZ907
empieza aparpadear rápido. Pulse la tecla que desea
programar (por ejemplo, la 1) hasta que el LED rojo
del ROCZ907 se apague.
•Pulse la tecla programada del ROCZ907 hasta que
el LED rojo empiece aparpadear rápido (aprox.
10 segundos). Suelte la tecla. Cuando el LED rojo
del ROCZ907 se apague, la programación habrá
nalizado.
•Acontinuación, compruebe si la puerta puede controlarse con la tecla programada por aprendizaje; de no
ser así, repita el proceso.
7.3.2 Ejemplo del fabricante de FAAC oGenius,
Amigo, Kilo
•Antes de llevar acabo la función de copia, fíjese en
que haya comunicación entreeltransmisor portátil
original yelROCZ907, yque no se encuentren amás
de 3cmeluno del otro.
•Procureestar cerca del receptor del accionamiento de
la puerta (a unos 50 cm).
•Pulse ymantenga pulsada la tecla «1» del ROCZ907 y,
al mismo tiempo, pulse 4veces la tecla «2». Suelte las
dos teclas. El LED de funcionamiento rojo (1) parpadea
ahoraaprox. cada 2segundos.
•Pulse la tecla que desea copiar del transmisor portátil
original hasta que el LED de funcionamiento rojo del
ROCZ907 empiece aparpadear rápido (= conrmación
de la señal de mando adistancia correctamente
recibida).
•Entonces pulse las teclas 2y3del transmisor portátil
original (función maestra). Mientras que el LED
del transmisor portátil original parpadea rápido,
pulse 1vez la tecla que desea copiar del transmisor
portátil original. El LED de funcionamiento rojo (1) del
ROCZ907 empieza aparpadear rápido.
20
•Ahorapulse la tecla del ROCZ907 que desea programar
(por ejemplo, la 1) yguardar.Como conrmación de la
programación, el LED rojo del ROCZ907 se apaga.
•Acontinuación, compruebe si la puerta puede controlarse con la tecla programada por aprendizaje; de no
ser así, repita el proceso. Si no funcionada después de
un segundo intento, es posible que su modelo necesite
además sincronizarse con el receptor del sistema de
accionamiento de la puerta.
•Parasincronizar el ROCZ907 con el accionamiento
de la puerta, pulse la tecla del ROCZ907 programada
hasta que el LED rojo empiece aparpadear rápido
(aprox. 10 segundos). Suelte la tecla. Cuando el LED
rojo del ROCZ907 se apague, la programación se
habrá completado.
7.3.3 Ejemplo del fabricante de V2:
•Antes de llevar acabo la función de copia, fíjese en
que haya comunicación entreeltransmisor portátil
original yelROCZ907, yque no se encuentren amás
de 3cmeluno del otro.
•Procureestar cerca del receptor del accionamiento de
la puerta (a unos 50 cm).
•Pulse ymantenga pulsada la tecla «1» del ROCZ907 y,
al mismo tiempo, pulse 4veces la tecla «2». Suelte las
dos teclas. El LED de funcionamiento rojo (1) parpadea
ahoraaprox. cada 2segundos.
•Pulse ymantenga pulsada la tecla que desea copiar
del transmisor portátil original hasta que el LED de
funcionamiento rojo (1) del ROCZ907 se ilumine y,
después, parpadee dos veces aprox. cada 2segundos.
•Pulse de nuevo la tecla que desea copiar del transmisor
portátil original hasta que el LED rojo parpadee rápido.
•Paraconrmar,pulse la tecla que desea programar
(por ejemplo, la 1). El LED de funcionamiento rojo (1)
se apaga.
•Pulse la tecla programada del ROCZ907 hasta que
el LED rojo empiece aparpadear rápido (aprox. 10
segundos). Suelte la tecla. Cuando el LED rojo del
ROCZ907 se apague, la programación se habrá
completado.
•Acontinuación, compruebe si la puerta puede controlarse con la tecla programada por aprendizaje, de no
ser así, repita el proceso.
Page 23

Nota
Para ver otras opciones, consulte la lista de compatibilidad actual ylas instrucciones de uso detalladas en
www.hama.com oenwww.thomson-av-accessories.eu.
8. Datos técnicos
Dimensiones 76 x27x39 mm
Máx. hasta 40 m(en función
Alcance
Tensión de entrada 12 V
Standby Máx. 72 h
Salida USB 5V/2100 mA
Banda de
frecuencia
Potencia de
emisión máx.
emitida
9. Mantenimiento ycuidado
Limpie este producto sólo con un paño ligeramente
humedecido que no deje pelusas ynoutilice detergentes
agresivos. Asegúrese de que no entreagua en el
producto.
10. Exclusión de responsabilidad
Hama GmbH &CoKGnoseresponsabiliza ni concede
garantía por los daños que surjan por una instalación,
montaje omanejo incorrectos del producto opor la no
observación de las instrucciones de manejo y/o de las
instrucciones de seguridad.
11. Servicio ysoporte
Si tiene que hacer alguna consulta sobreelproducto,
diríjase al asesoramiento de productos Hama.
Línea directa: +49 9091 502-115 (Alemán/Inglés)
Encontrar más información de soporte aquí:
www.hama.com
de las condiciones estructurales ylocales, oenfunción de
la potencia de la antena de
recepción).
433 MHz, 868 MHz
10 mW
12. Instrucciones paradesecho yreciclaje
Nota sobrelaprotección medioambiental:
Después de la puesta en marcha de la
directiva Europea 2012/19/EU y2006/66/EU
en el sistema legislativo nacional, se aplicara
lo siguiente: Losaparatos eléctricos y
electrónicos, así como las baterías, no se
deben evacuar en la basuradoméstica. El usuario está
legalmente obligado allevar los aparatos eléctricos y
electrónicos, así como pilas ypilas recargables, al nal
de su vida útil alos puntos de recogida comunales oa
devolverlos al lugar donde los adquirió. Losdetalles
quedaran denidos por la ley de cada país. El símbolo en
el producto, en las instrucciones de uso oenelembalaje
hace referencia aello. Gracias al reciclaje, al reciclaje del
material oaotras formas de reciclaje de aparatos/pilas
usados, contribuye Usted de forma importante ala
protección de nuestromedio ambiente.
13. Declaración de conformidad
Porlapresente, Hama GmbH &CoKG, declara
que el tipo de equipo radioeléctrico
[00132680] es conforme con la Directiva
2014/53/UE. El texto completo de la declaración UE de
conformidad está disponible en la dirección Internet
siguiente: www.hama.com-> 00132680 -> Downloads.
21
Page 24

I Istruzioni per l‘uso
Grazie per avereacquistato un prodotto Thomson!
Prima della messa in esercizio, leggete attentamente le
seguenti istruzioni eavvertenze, quindi conservatele in un
luogo sicuroper una eventuale consultazione. In caso di
cessione dell‘apparecchio, consegnate anche le presenti
istruzioni al nuovo proprietario.
1. Spiegazione dei simboli di avvertimento edelle
indicazioni
Attenzione
Viene utilizzato per contrassegnareleindicazioni
di sicurezza oppureper rivolgerel‘attenzione verso
particolari rischi epericoli.
Avvertenza
Viene utilizzato per contrassegnareinformazioni
supplementari oindicazioni importanti.
2. Elementi di comando eindicazioni
1. LED di funzione (rosso)
2. Presa auto da 12V
3. Attacco USB 2.1 A
4. Tasti programmabili 1-4
5. LED di esercizio (si illumina di luce blu con funzionamento a12V)
3. Contenuto della confezione
•Telecomando universale per porte del garage ROC Z907
•Queste istruzioni per l’uso
4. Indicazioni di sicurezza
•Utilizzareilprodotto esclusivamente per lo scopo
previsto.
•Non mettereinesercizio il prodotto al di fuori dei suoi
limiti di rendimento indicati nei dati tecnici.
•Proteggereilprodotto da sporcizia, umidità esurriscal-
damento eutilizzarlo solo in ambienti asciutti.
•Non usareilprodotto in ambienti umidi ed evitareil
contatto con gli spruzzi.
•Non farecadereilprodotto enon sottoporlo aforti
scossoni!
•Tenerequesto apparecchio, come tutte le apparecchia-
tureelettriche, fuori dalla portata dei bambini!
22
•Smaltireimmediatamente il materiale d’imballaggio
attenendosi alle prescrizioni locali vigenti.
•Non apportaremodiche all’apparecchio per evitare
di perdereidiritti di garanzia.
•Durante l’impiego del prodotto, prestareattenzione
alle prescrizioni ealle normative locali vigenti per il
traco stradale.
•Prestareattenzione che nessun componente, come ad
es. settori di sicurezza, elementi di comando, strumenti, ecc. non coprano, né limitino la vista.
Avvertenza
In alcuni tipi di autoveicoli l‘accensione deve essere
avviata anché la presa da 12V dell‘autoveicolo
riceva tensione. Attenersi alle istruzioni per l‘uso
dell‘autoveicolo.
Prima della messa in esercizio/Programmazione
Pericolo di infortuni: assicurarsi che durante le operazioni di programmazione ediinstallazione del prodotto
non vi siano persone ooggetti nel campo di azione.
Ciò permette di evitarepossibili danni alle persone e
infortuni! Durante l’installazione la porta del garage
si può aprireochiudere. Consigliamo di parcheggiare
l’auto fuori dal garage durante la fase di programmazione. Utilizzareiltelecomando ROCZ907 sempre
avendo il contatto visivo con il sistema di azionamento
odella porta del garage. Attenersi quindi alle indicazioni riguardanti la sicurezza del proprio azionamento
della porta del garage (istruzioni per l’uso).
Avvertenza
•Per la programmazione completa dell’azionamento
della porta del garage èalle volte necessario consultareanche le istruzioni per l’uso dell’azionamento stesso (ad es. collegamento del telecomando
all’azionamento).
•Per il funzionamento del telecomando ROCZ907
èassolutamente necessario che si abbia un
telecomando originale.
Page 25

•Sebbene questo telecomando offrauna vasta
gamma di caratteristiche universali può succedere
che alcuni sistemi di azionamento per porte del
garage non siano compatibili aquesto prodotto.
Le ragioni che possono portareaquesto inconveniente sono frequenze diverse oppuretecnologie
criptare(tral’altrosistemi di cifraturabidirezionali
ad. es. 128Bit).
Nota -Presa USB-A
Terminali mobili quali smartphone/tablet possono
solo esserecaricati durante il funzionamento tramite
la presa USB nell’accendisigari.
5. Introduzione
ROCZ907 èuntelecomando basato su diverse funzioni
che si può facilmente impostareper il comando della
maggior parte degli azionamenti per porte per garage
attualmente disponibili sul mercato. Pertanto èpossibile
sostituireuntelecomando già esistente ed èpossibile
comandarediversi azionamenti per porte Peradeguare
isistemi con codici ssi earotazione nelle frequenze di
trasmissione da 433 MHz a868 MHz, la carica di tensione si ottiene tramite la presa dell’accendisigaro. Grazie al
condensatoredialto livello ROCZ907 può funzionare no
a3giorni senza connessione all’accendisigaro. Con la
presa UBS integrata si possono anche caricaresmatphone/tablet anche durante gli spostamenti in auto.
6. Caratteristiche principali
•Per applicazioni universali su diverse porte per garage
oper azionamenti di portoni esterni.
•Accumulatoredienergia privo di batterie
•Per l’utilizzo di applicazioni mobili al difuori del campo
di alimentazione elettrica (prestazioni con tecnologia
acondensatore)
•Acarica completa sono possibili no a150 pressioni
tasto (ad es. aprire/chiudereleporte).
•Carica completa in soli 3minuti
•Accumulatoredienergia (standby) no a3giorni
•Oltre4tasti individualmente programmabili tramite la
ricerca manuale (per la maggior parte degli azionamenti disponibili sul mercato)
•Raggio di azione: no a40metri (dipende dalle
condizioni delle costruzioni in loco odalla capacità
dell’antenna di ricezione)
•Tasti con effetto di risonanza (clic etattile) per un
utilizzo sicuronell’auto
•Presa USB integrata con 2. 1A per la carica ad es. di
smartphone/tablet
7. Messa in funzione
ROCZ907 dispone di un condensatoredialta qualità.
Prima della messa in funzione ènecessario caricarlo con
l’accendisigaro(tempo di carica 3minuti).
Prima di poter utilizzareilproprio ROCZ907, ènecessario
impostarlo ocopiarvi icomandi osincronizzarlo con il
sistema di azionamento amotoredella porta per garage.
Nel capitolo successivo vengono illustrate le diverse
possibilità per effettuarequanto descritto qui sopra.
Avvertenza
•Alcuni azionamento per porte per garage
necessitano per la programmazione due tasti per
l’apertura elachiusura. In questo caso ènecessario
copiare/programmare anche sul ROCZ907 due tasti.
•Per alcuni azionamenti per le porte del garage è
necessario ripetere la sincronizzazione fino a20
volte prima che il codice venga riconosciuto.
7.1 Determinareilsistema di codicazione
(compatibilità)
Con ROCZ907 èpossibile comandareil90% dei sistemi di
azionamento per porte per garage presenti sul mercato.
Sono supportati iseguenti sistemi di codicazione:
codice sso (codicazione ssa), codice arotazione (denito
anche codice hopping) oppurecodice arotazione complesso. Perottenereleinformazioni riguardanti il sistema di
codicazione utilizzato dal proprio telecomando originale,
consigliamo di leggereleistruzioni del proprio azionamento
per porta per garage oppuredirivolgersi al produttore.
7.2 Funzione di copia per codici ssi earotazione
•Nella proceduradicopia fareattenzione che il telecomando originale eROCZ907 siano rivolti l’uno verso
l’altroesiano amassimo 3cml’uno dall’altro.
23
Page 26

•Premereeteneretenuto il tasto „1“ sul ROCZ907
mentreallo stesso tempo si preme 4volte il tasto „2“.
Rilasciareidue tasti. Oralampeggia il LED di funzione
(1) di luce rossa per ca. 2secondi.
•Premereiltasto per copiaresul telecomando originale
no ache il LED rosso di funzione del ROCZ907 si
accende einizia alampeggiarevelocemente (= conferma che il segnale del telecomando èstato ricevuto
correttamente).
•Premereora il tasto da programmare(ad es. „1“) su
ROCZ907. Una volta ultimata la programmazione
corretta il LED di funzione (1) si illumina di luce rossa
per ca. 1secondo.
•Laprogrammazione èstata completata correttamente.
•Vericarequindi se la porta del garage si possa
comandarecon il tasto programmato. Diversamente
ripeterel’operazione descritta sopra. Nel caso che ci
fosseroproblemi anche dopo una seconda programmazione, èforse necessario sicronizzare/collegareil
ROCZ907 ulteriormente con la ricezione del sistema di
azionamento della porta.
Procedimento con il codice sso/codice a
7.2.1
rotazione (con collegamento manuale per la sincronizzazione con l’azionamento della porta del garage)
Peralcuni modelli di azionamento per porte per garage è
inoltrenecessario sincronizzare/collegareiltelecomando
con la ricezione del sistema di azionamento stesso.
•Per fareciò leggereattentamente le istruzioni del sistema di azionamento della porta (alla voce Collegareun
nuovo telecomando).
•Fareattenzione ad esserenelle vicinanze della ricezione del sistema di azionamento (ca. 50 metri).
•Generalmente ènecessario attivareuntasto direttamente sull’azionamento della porta del garage che
rende possibile il collegamento con il telecomando edi
seguito si illumina un LED (ci possono esseredifferenze
da modello amodello).
•Sihanno quindi ca. 20-30 secondi per collegare/
sincronizzareROCZ907.
•Lasincronizzazione avviene generalmente quando
il tasto di programmazione/copia su ROCZ907 viene
premuto 3volte di seguito.
7.2.2 Procedimento con codice arotazione (con
collegamento manuale per la sincronizzazione con
l’azionamento della porta del garage)
Con il principio basato sul cambio del codice (codice a
rotazione) èspesso necessario collegare/sincronizzareil
telecomando con il ricevitoredel sistema di azionamento
della porta del garage.
•Per fareciò leggereattentamente le istruzioni del sistema di azionamento della porta (alla voce Collegareun
nuovo telecomando).
•Fareattenzione ad esserenelle vicinanze della ricezione del sistema di azionamento (ca. 50 metri).
•Generalmente èsuciente premereiltasto di
Programmazione su ROCZ907 così alungo no ache il
LED ifunzione (1) non inizia alampeggiarevelocemente (ca. 10 secondi).
•Quindi rilasciareiltasto. Il telecomando si trova quindi
nella modalità di sincronizzazione con il sistema di
azionamento della porta del garage. Il telecomando
conferma la sincronizzazione dopo ca. 5-10 secondi
quando il LED si illumina olampeggia. Una volta
ultimata la sincronizzazione, il LED sul ROCZ907 che
lampeggia velocemente aluce rossa si spegne eil
collegamento èriuscito.
7.3 Funzione di copia per codici ssi earotazione
Alcuni modelli di azionamento per porte per garage
necessitano il trasferimento del codice fonte (spesso
anche denito codice SEED) per permetteredicollegare
ROCZ907al sistema di azionamento. Perfareciò ènecessario un telecomando originale funzionante (funzione
master)con il codice fonte!
In base al modello èpossibile così trasferiredal telecomando originale il codice fonte (telecomando master).
Le istruzioni per questo passo si trovano nelle istruzioni
del telecomando originale oppureinquelle del sistema di
azionamento della porta del garage.
7.3.1 Esempio modello BFT:
•Nella proceduradicopia fareattenzione che il telecomando originale eROCZ907 siano rivolti l’uno verso
l’altroesiano amassimo 3cml’uno dall’altro.
•Fareattenzione ad esserenelle vicinanze della ricezione del sistema di azionamento (ca. 50 metri).
24
Page 27

•Premereeteneretenuto il tasto „1“ sul ROCZ907
mentreallo stesso tempo si preme 4volte il tasto „2“.
Rilasciareidue tasti. Oralampeggia il LED di funzione
(1) di luce rossa per ca. 2secondi.
•Premeresul telecomando originale il tasto per copiare
no ache il LED rosso di funzione del ROCZ907 si
accende elampeggia due volte di seguito per ca. 2
secondi.
Premereora sul retro(vano batterie) il tasto nascosto
(nei vecchi modelli BFT) oppureiltasti 1e2(modelli
più recenti) sul telecomando originale (master). Il LED
rosso sul ROCZ907 inizia alampeggiarevelocemente.
Premereora il tasto da programmare(ad es. 1) no a
che il LED rosso sul ROCZ907non si spegne.
•Premereiltasto programmato del ROCZ907 così a
lungo no ache il LED rosso inizia alampeggiarevelocemente (ca. 10 secondi). Rilasciareiltasto. Quando
il tasto rosso sul ROCZ907 si spegne signica che la
programmazione èstata ultimata.
•Vericarequindi se la porta del garage si possa
comandarecon il tasto programmato. Diversamente
ripeterel’operazione descritta sopra.
Esempio prodotti FA AC oGenius, Amigo, Kilo
7.3.2
•Nella proceduradicopia fareattenzione che il telecomando originale eROCZ907 siano rivolti l’uno verso
l’altroesiano amassimo 3cml’uno dall’altro.
•Fareattenzione ad esserenelle vicinanze della ricezione del sistema di azionamento (ca. 50 metri).
•Premereeteneretenuto il tasto „1“ sul ROCZ907
mentreallo stesso tempo si preme 4volte il tasto „2“.
Rilasciareidue tasti. Oralampeggia il LED di funzione
(1) di luce rossa per ca. 2secondi.
•Premereiltasto per copiaresul telecomando originale
no ache il LED rosso di funzione del ROCZ907 si
accende einizia alampeggiarevelocemente (= conferma che il segnale del telecomando èstato ricevuto
correttamente).
•Premereora itasti 2e3sul telecomando originale (funzione master). MentreilLED sul telecomando originale
lampeggia velocemente, premere1volta sul tasto per
copiaredel telecomando originale. Il tasto di funzione
LED (1) sul ROCZ907 lampeggia quindi velocemente.
•Ora premereiltasto da programmare(ad es. 1) sul
ROCZ907 dove si desideramemorizzare. Quindi il LED
rosso sul ROCZ907 si spegne, ciò conferma che la
programmazione èstata ultimata.
•Vericarequindi se la porta del garage si possa
comandarecon il tasto programmato. Diversamente
ripeterel’operazione descritta sopra. Nel caso ci
fosseroproblemi anche dopo una seconda programmazione, èforse necessario sicronizzare/collegareil
ROCZ907 ulteriormente con la ricezione del sistema di
azionamento della porta.
•Per sincronizzareilROCZ907 con il sistema di
azionamento delle porta del garage, premereiltasto
programmato del ROCZ907 così alungo no ache il
LED rosso inizia alampeggiarevelocemente (ca. 10
secondi). Rilasciareiltasto. Quando il LED rosso sul
ROCZ907 si spegne signica che la programmazione
èstata ultimata.
7.3.3 Esempio modello V2:
•Nella proceduradicopia fareattenzione che il telecomando originale eROCZ907 siano rivolti l’uno verso
l’altroesiano amassimo 3cml’uno dall’altro.
•Fareattenzione ad esserenelle vicinanze della ricezione del sistema di azionamento (ca. 50 metri).
•Premereeteneretenuto il tasto „1“ sul ROCZ907
mentreallo stesso tempo si preme 4volte il tasto „2“.
Rilasciareidue tasti. Oralampeggia il LED di funzione
(1) di luce rossa per ca. 2secondi.
•Premereetenerepremuto sul telecomando originale
il tasto per copiare no ache il LED rosso di funzione
(1) sul ROCZ907 si accende elampeggia due volte di
seguito per ca. 2secondi.
•Premerenuovamente il tasto per copiaresul
telecomando originale no ache il LED rosso inizia a
lampeggiarevelocemente.
•Premereora il tasto da programmare(ad es. 1) per
confermare. Il LED di funzione rosso (1) si spegne.
•Premereiltasto programmato del ROCZ907 così a
lungo no ache il LED rosso inizia alampeggiare
velocemente (ca. 10 secondi). Rilasciareiltasto.
Quando il LED rosso sul ROCZ907 si spegne signica
che la programmazione èstata ultimata.
•Vericarequindi se la porta si possa comandarecon il
tasto programmato. Diversamente ripeterel’operazione descritta sopra.
25
Page 28

Avvertenza
Ulteriori possibilità di collegamento si trovano
nell’attuale elenco di compatibilità enelle istruzioni
complete riportate sui siti www.hama.com oppure
www.thomson-av-accessories.eu.
8. Dati tecnici
Dimensioni 76 x27x39 mm
max. no a40metri (dipende
Portata
Tensione d’ingresso
Standby max. 72 h
Uscita USB 5V/2100 mA
Gamma di
frequenza
Emissione max. di
potenza di
trasmissione
9. Curaemanutenzione
Pulireilprodotto unicamente con un panno che non
lascia pelucchi eappena inumidito enon ricorrereadetergenti aggressivi. Fare attenzione anon farepenetrare
acqua nel prodotto.
10. Esclusione di garanzia
Hama GmbH &Co.KGnon si assume alcuna responsabilità per idanni derivati dal montaggio ol‘utilizzo scorretto
del prodotto, nonché dalla mancata osservanza delle
istruzioni per l‘uso e/o delle indicazioni di sicurezza.
11. Assistenza esupporto
In casodidomande sul prodotto,rivolgersi alla Consulenza
prodotto Hama.
Hotline:+49 9091502-115 (ted./ing.)
Ulterioriinformazioni sulsupportosono disponibili qui:
www.hama.com
dalle condizioni delle costruzioni in loco odalla capacità
dell’antenna di ricezione)
12 V
433 MHz, 868 MHz
10 mW
12. Indicazioni di smaltimento
Informazioni per protezione ambientale:
Dopo l’implementazione della Direttiva
Europea 2012/19/EU e2006/66/EU nel
sistema legale nazionale, ci sono le seguenti
applicazioni: Le apparecchiatureelettriche ed
elettroniche elebatterie non devono essere
smaltite con iriuti domestici. Iconsumatori sono
obbligati dalla legge arestituireIdispositivi elettrici ed
elettronici elebatterie alla ne della lorovita utile ai
punti di raccolta pubblici preposti per questo scopo onei
punti vendita. Dettagli di quanto riportato sono deniti
dalle leggi nazionali di ogni stato. Questo simbolo sul
prodotto, sul manuale d’istruzioni osull’imballo indicano
che questo prodotto èsoggetto aqueste regole.
Riciclando, ri-utilizzando imateriali outilizzando sotto
altraforma ivecchi prodotti/le batterie, darete un
importante contributo alla protezione dell’ambiente.
13. Dichiarazione di conformità
Il fabbricante, Hama GmbH &CoKG, dichiara
che il tipo di apparecchiaturaradio
[00132680] èconforme alla direttiva 2014/53/
UE. Il testo completo della dichiarazione di conformità UE
èdisponibile al seguente indirizzo Internet:
www.hama.com-> 00132680 -> Downloads.
26
Page 29

O Manual de instruções
Agradecemos que se tenha decidido por este produto
Thomson!
Antes de utilizar oproduto, leia completamente
estas indicações einformações. Guarde, depois, estas
informações num local seguroparaconsultas futuras. Se
transmitir oproduto paraumnovo proprietário, entregue
também as instruções de utilização.
1. Descrição dos símbolos de aviso edas notas
Aviso
Éutilizado paraidenticar informações de segurança
ou chamar aatenção paraperigos eriscos especiais.
Nota
Éutilizado paraidenticar informações adicionais ou
notas importantes.
2. Elementos de comando eindicadores
1. LED de funcionamento (vermelho)
2. Ficha paraautomóvel 12 V
3. Entrada USB 2,1 A
4. Botões programáveis 1-4
5. LED de funcionamento (acende aazul aquando
operação de 12 V)
3. Conteúdo da embalagem
•Telecomando paraportão de garagem Universal
ROC Z907
•este manual de instruções
4. Indicações de segurança
•Utilize oproduto apenas paraanalidade prevista.
•Não utilize oproduto forados limites de desempenho
indicados nas especicações técnicas.
•Proteja oproduto contrasujidade, humidade esobrea-
quecimento eutilize-o somente em ambientes secos.
•Não utilize oproduto em ambientes húmidos eevite
jactos de água.
•Não deixe cair oproduto nem osubmeta achoques
fortes.
•Este aparelho não pode ser manuseado por crianças,
tal como qualquer aparelho eléctrico!
•Elimine imediatamente omaterial da embalagem em
conformidade com as normas locais aplicáveis.
•Não efectue modicações no aparelho. Perdados
direitos de garantia.
•Aoutilizar oproduto, observe os regulamentos e
alegislação nacionais em vigor paraacirculação
rodoviária.
•Assegure-se de que airbags, áreas de segurança,
elementos de comando, instrumentos, etc. não sejam
tapados ou aáreadevisão seja afectada.
Nota
Em alguns tipos de veículos, aignição tem de estar
ligada paraque exista tensão na tomada de 12 Vdo
veículo. Para tal, consulte omanual de instruções do
seu veículo.
Antes da colocação em
funcionamento/programação
Perigo de acidentes: certique-se de que durante a
programação einstalação do produto não existem pessoas ou objetos nas imediações, paraevitar eventuais
danos e, por ex., oferimento de pessoas! Durante a
instalação oportão da garagem pode abrir ou fechar.
Recomendamos que paraoprocesso de programação
oveículo seja estacionado foradagaragem. Utilize
oROCZ907 apenas mediante contacto visual direto
com osistema de aberturadoportão da garagem,
nomeadamente portão de garagem. Tenha também
em atenção as restantes indicações de segurança do
seu acionamento do portão (instruções de operação).
Nota
•Paraaprogramação completa do acionamento
do portão podem também ser necessárias as
instruções de operação do mesmo (por ex., para
registo de emissores portáteis no acionamento
do portão).
•Paraautilização do ROCZ907 éessencial a
existência de, pelo menos, um emissor portátil
original funcional.
27
Page 30

•Apesar da ampla natureza universal desta função
de emissor portátil, alguns sistemas de portões
de garagem podem eventualmente não funcionar
com este produto. Talpode dever-se, por exemplo,
àutilização de outras frequências ou tecnologias
de rádio adicionalmente codicadas (incluindo
codicação bidirecional, por ex., de 128 bits).
Nota –Tomada USB
Dispositivos móveis, tais como, smartphone/tablet
apenas podem ser carregados durante ofuncionamento na tomada de isqueiroatravés da tomada USB.
5. Introdução
OROCZ907 éumemissor portátil de radiocomunicação
programável paracontrolar acionamentos de portões multimarcas, que lhe permite substituir um emissor portátil
existente (telecomando) e, se necessário, também programar econtrolar vários acionamentos de portão de diversas
marcas. Para adaptação de sistemas com código xo ou
rotativo na faixa de frequência de 433 MHz e868 MHz,
aalimentação de tensão efetua-se através da tomada do
isqueiro, através do condensador de elevado desempenho
integrado, oROCZ907 também pode ser operado até 3
dias sem ser através da tomada do isqueiro. Através da
tomada USB integrada podem também ser carregados
smartphones/tablets durante aviagem de automóvel.
6. Principais características funcionais
•Utilização universal paravários acionamentos de
portas exteriores eportões
•Armazenamento de energia sem pilhas
•Parautilização em aplicações móveis foradosistema
elétrico do veículo (tecnologia de desempenho do
condensador)
•Totalmente carregado são possíveis até 150 acionamentos do botão (por ex., abrir/fechar portões)
•Recarregamento no espaço de 3minutos
•Armazenamento de energia (em espera): até 3dias
•Até 4botões individualmente programáveis (acionamentos de portão multimarcas) através de procuramanual
•Alcance: até 40 metros (dependendo das condições
estruturais elocais ou dependendo da potência da
antena recetora)
•Botões de ressonância de pressão (clicar esentir) para
utilização seguranoveículo
•Tomada USB integrada com 2,1 Apararecarregar,por
ex., smartphones/tablets
7. Colocação em funcionamento
OROCZ907 dispõe de um condensador integrado de elevado desempenho. Antes da primeirautilização, carregar
ocondensador através da tomada do isqueiro(tempo de
carregamento 3min).
Antes de poder utilizar oseu novo emissor portátil
ROCZ907, este deve ser primeiroprogramado/copiado ou
registado/programado ou sincronizado com osistema de
controlo do motor do acionamento do portão. Existem
várias possibilidades paraefetuar esta ação que se
encontram descritas nos próximos capítulos.
Nota
•Alguns acionamentos de portão requerem dois
botões paraaprogramação do abrir efechar.
Neste caso, devem também ser copiados/
programadas dois botões no ROCZ907.
•Emalguns acionamentos do portão de garagem
poderá ser necessário repetir asincronização até
20 vezes, até que ocódigo seja reconhecido.
7.1 Determinar osistema de codicação (compatibilidade)
OROCZ907 cobreaprox. 90% dos sistemas de controlo
de portões existentes atualmente no mercado.
São suportados os seguintes sistemas de codicação:
Código xo (codicação xa), código rotativo (também
denominado de código de salto) ou código rotativo
complexo.
Para obter informações sobreosistema de codicação
utilizado no seu emissor portátil original, consulte as
instruções do seu acionamento do portão ou consulte
ofabricante.
7.2 Função de cópia do código xo erotativo
•Antes de efetuar afunção de cópia, certique-se
de que oemissor portátil original eoROCZ907 se
encontram frente afrente eauma distância de, no
máximo, 3cm.
28
Page 31

•Mantenha pressionado obotão "1" no ROCZ907
enquanto, ao mesmo tempo, pressiona 4x obotão "2".
Solte os dois botões. OLED vermelho da função (1)
acende de modo intermitente aprox. acada 2segundos.
•Pressione obotão aser copiado no emissor portátil
original até oLED de função vermelho do ROCZ907
acender de modo intermitente rápido (= conrmação
do sinal do telecomando efetuada com sucesso).
•Pressione agoraobotão aser programado (por ex.
"1") no ROCZ907. Após programação bem-sucedida, o
LED de função (1) acende avermelho durante aprox. 1
segundo edepois apaga.
•Oprocesso de programação foi concluído com sucesso.
•Emseguida, verique se oportão permite ser
controlado através do botão programado, caso tal não
se verique, repita oprocedimento. Caso após uma
nova tentativa oseu modelo continue sem funcionar,
pode ser eventualmente necessário que oROCZ907
tenha de ser sincronizado/registado adicionalmente
com oemissor portátil do acionamento do portão (ver
em baixo).
7.2.1 Procedimento de código xo/rotativo (com
registo manual parasincronização com osistema
do portão)
No caso de alguns fabricantes de acionamentos de portão, énecessário registar/sincronizar oemissor portátil
com orecetor do sistema de acionamento do portão.
•Consulte as instruções de operação do acionamento
do portão como ajuda (em princípio, registar um novo
emissor portátil).
•Certique-se de que se encontranas imediações do
recetor de acionamento do portão (a aprox. 50 cm).
•Normalmente, neste caso, éativado um botão de
conguração no sistema de acionamento do portão
paraoregisto de emissores portáteis eacende-se um
LED (pode variar dependendo do fabricante).
•Normalmente tem ao dispor aprox. 20 a30segundos
pararegistar/sincronizar oROCZ907.
•Asincronização ocorrenormalmente ao pressionar
obotão de programar/copiar do ROCZ907 3x
consecutivamente.
7.2.2 Procedimento de código rotativo (com
registo automático parasincronização no sistema
do portão)
Devido ao princípio do código alternativo (código
rotativo), éfrequentemente necessário registar/sincronizar oemissor portátil com orecetor do sistema de
acionamento do portão.
•Consulte as instruções de operação do acionamento
do portão como ajuda (em princípio, registar um novo
emissor portátil).
•Certique-se de que se encontranas imediações do
recetor de acionamento do portão (a aprox. 50 cm).
•Normalmente basta pressionar obotão de programação do ROCZ907 até oLED de função vermelho
(1) acender de modo intermitente rápido (aprox. 10
segundos).
•Solte depois obotão. Otelecomando passa então para
omodo de sincronização com osistema de acionamento do portão. Este conrma asincronização após
aprox. 5a10segundos através do LED aceso ou aceso
em modo intermitente. Depois de asincronização
terminar,oLED vermelho aceso de modo intermitente
rápido no ROCZ907 apaga-se eoregisto foi bem
sucedido
7.3 Função de cópia código rotativo complexo
Alguns fabricantes de acionamentos de portão requerem
atransmissão do código de origem (frequentemente
denominado de código SEED) parapoder programar o
ROCZ907 no acionamento do portão.
Neste caso ésemprenecessário oemissor portátil
original funcional (função mestre)com ocódigo de
origem! Dependendo do fabricante, éimplementado o
procedimento do telecomando original paratransmitir o
código de origem (telecomando mestre).
Este procedimento pode ser consultado, se necessário,
nas instruções de operação originais do emissor portátil
ou do acionamento do portão.
7.3.1 Exemplo fabricante BFT:
•Antes de efetuar afunção de cópia, certique-se
de que oemissor portátil original eoROCZ907 se
encontram frente afrente eauma distância de, no
máximo, 3cm.
•Certique-se de que se encontranas imediações do
recetor de acionamento do portão (a aprox. 50 cm).
29
Page 32

•Mantenha pressionado obotão "1" no ROCZ907
enquanto, ao mesmo tempo, pressiona 4x obotão "2".
Solte os dois botões. OLED vermelho da função (1)
acende de modo intermitente aprox. acada 2segundos.
•Pressione obotão aser copiado no emissor portátil
original até oLED de função vermelho do ROCZ907
acender edepois acender duplamente de modo
intermitente aprox. acada 2segundos.
•Pressione agoraobotão escondido na parte de trás
(compartimento da pilha) (modelos BFT antigos) ou os
botões 1e2(modelos mais recentes) no telecomando
original (master). OLED vermelho no ROCZ907 acende
de modo intermitente consecutivo. Agorapressione
obotão aser programado (por ex., 1) até oLED
vermelho do ROCZ907 se apagar.
•Pressione obotão programado do ROCZ907 até oLED
vermelho acender de modo intermitente rápido (aprox.
10 segundos). Solte obotão. Quando oLED vermelho
no ROCZ907 se apagar,aprogramação está completa.
•Emseguida, verique se oportão permite ser controlado através do botão programado, caso tal não se
verique, repita oprocedimento.
7.3.2 Exemplo fabricante FAAC ou Genius, Amigo,
Kilo
•Antes de efetuar afunção de cópia, certique-se de que
oemissor portátil original eoROCZ907 se encontram
frente afrente eauma distância de, no máximo, 3cm
•Certique-se de que se encontranas imediações do
recetor de acionamento do portão (a aprox. 50 cm).
•Mantenha pressionado obotão "1" no ROCZ907
enquanto, ao mesmo tempo, pressiona 4x obotão "2".
Solte os dois botões. OLED vermelho da função (1)
acende de modo intermitente aprox. acada 2segundos.
•Pressione obotão aser copiado no emissor portátil
original até oLED de função vermelho do ROCZ907
acender de modo intermitente rápido (= conrmação
do sinal do telecomando efetuada com sucesso).
•Pressione agoraosbotões 2e3notelecomando
original (função mestre). Com oLED do telecomando
aceso de modo intermitente, pressione 1x obotão do
telecomando original aser copiado. OLED de função
vermelho (1) do ROCZ907 está agoraaceso de modo
intermitente rápido.
•Pressione agoraobotão aser programada (por ex.,
1) no ROCZ907 que pretende memorizar.Como
conrmação da programação, oLED vermelho no
ROCZ907 apaga-se
•Emseguida, verique se oportão permite ser
controlado através do botão programado, caso tal não
se verique, repita oprocedimento. Caso após uma
nova tentativa oseu modelo continue sem funcionar,
pode ser eventualmente necessário que tenha de ser
adicionalmente sincronizado com oemissor portátil do
acionamento do portão.
•Parasincronizar oROCZ907 com oacionamento do
portão, pressione obotão programado do ROCZ907
até oLED vermelho acender de modo intermitente
rápido (aprox. 10 segundos). Solte obotão. Quando o
LED vermelho no ROCZ907 se apagar,aprogramação
está completa.
7.3.3 Exemplo fabricante V2:
•Antes de efetuar afunção de cópia, certique-se de que
oemissor portátil original eoROCZ907 se encontram
frente afrente eauma distância de, no máximo, 3cm.
•Certique-se de que se encontranas imediações do
recetor de acionamento do portão (a aprox. 50 cm).
•Mantenha pressionado obotão "1" no ROCZ907
enquanto, ao mesmo tempo, pressiona 4x obotão "2".
Solte os dois botões. OLED vermelho da função (1)
acende de modo intermitente aprox. acada 2segundos.
•Manter pressionado obotão aser copiado no emissor
portátil original até oLED de função vermelho (1) do
ROCZ907 acender edepois acender duplamente de
modo intermitente aprox. acada 2segundos.
•Pressione de novo obotão aser copiado do emissor
portátil original até oLED vermelho acender de modo
intermitente rápido.
•Pressione obotão aser programado (por ex. 1) para
conrmação. OLED de função vermelho (1) apaga-se.
•Pressione obotão programado do ROCZ907 até oLED
vermelho acender de modo intermitente rápido (aprox.
10 segundos). Solte obotão. Quando oLED vermelho
no ROCZ907 se apagar,aprogramação está completa.
•Emseguida, verique se oportão permite ser controlado através do botão programado, caso tal não se
verique, repita oprocedimento.
30
Page 33

Nota
Para outras opções adicionais, consulte aatual lista
de compatibilidade easinstruções de operação
alargadas em www.hama.com ou
www.thomson-av-accessories.eu.
8. Especicações técnicas
Dimensões 76 x27x39 mm
máx. 40 metros (depen-
Alcance
Tensão de entrada
Em espera máx. 72 h
Saída USB 5V/2100 mA
Banda de frequências 433 MHz, 868 MHz
Potência de emissão
máx. reetida
9. Manutenção econservação
limpe oproduto apenas com um pano sem apos ligeiramente humedecido enão utilize produtos de limpeza
agressivos. Certique-se de que não entraágua para
dentrodoproduto.
10. Exclusão de garantia
AHama GmbH &CoKGnão assume qualquer
responsabilidade ou garantia por danos provocados pela
instalação, montagem ou manuseamento incorrectos do
produto enão observação do das instruções de utilização
e/ou das informações de segurança.
11. Contactos eapoio técnico
Em caso de dúvidas sobreoproduto, contacte oserviço
de assistência ao produto da Hama.
Linha de apoio ao cliente: +49 9091 502-115 (alemão/
inglês)
Para mais informações sobreosserviços de apoio ao
cliente, visite: www.hama.com
dendo das condições
estruturais elocais ou
dependendo da potência
da antena recetora)
12 V
10 mW
12. Indicações de eliminação
Nota em Protecção Ambiental:
Após aimplementação da directiva
comunitária 2012/19/EU e2006/66/EU no
sistema legal nacional, oseguinte aplica-se:
Os aparelhos eléctricos eelectrónicos, bem
como baterias, não podem ser eliminados
juntamente com olixo doméstico. Consumidores estão
obrigados por lei acolocar os aparelhos eléctricos e
electrónicos, bem como baterias, sem uso em locais
públicos especícos paraeste efeito ou no ponto de
venda. Os detalhes paraeste processo são denidos por
lei pelos respectivos países. Este símbolo no produto, o
manual de instruções ou aembalagem indicam que o
produto está sujeito aestes regulamentos. Reciclando,
reutilizando os materiais dos seus velhos aparelhos/
baterias, esta afazer uma enorme contribuição paraa
protecção do ambiente.
13. Declaração de conformidade
O(a) abaixo assinado(a) Hama GmbH &CoKG
declaraque opresente tipo de equipamento
de rádio [00132680] está em conformidade
com aDiretiva 2014/53/UE.
Otexto integral da declaração de conformidade está
disponível no seguinte endereço de Internet:
www.hama.com-> 00132680 -> Downloads.
31
Page 34

P Instrukcja obsługi
Dziękujemy za zakup naszego produktu!
Przed pierwszym użyciem należydokładnie przeczytać
instrukcję obsługi. Instrukcję należyprzechować,gdyż
możebyćjeszcze potrzebna.
Objaśnienie symboli ostrzegawczych iwskazówek
1.
Ostrzeżenie
Używane wcelu zwrócenia uwagi na szczególne
niebezpieczeństwo lub ryzyko.
Wskazówki
Używane wcelu zwrócenia uwagi na szczególnie
przydatne informacje.
2. Elementy obsługi isygnalizacji
1. Dioda funkcyjna LED (czerwona)
2. Wtyczka samochodowa 12 V
3. Złącze USB 2,1 A
4. Przyciski programowalne 1–4
5. Dioda LED stanu pracy (w trybie pracy 12 V świeci
na niebiesko)
3. Zawartość opakowania
•Uniwersalny pilot zdalnej obsługi bramy garażowej
ROC Z907
•Niniejsza instrukcja obsługi
4. Wskazówki bezpieczeństwa
•Stosować produkt wyłącznie zgodnie zprzewidzianym
przeznaczeniem.
•Nie stosować produktu poza zakresem mocy podanym
wdanych technicznych.
•Chronić produkt przed zanieczyszczeniem, wilgocią iprze-
grzaniem oraz stosować go tylko wsuchym otoczeniu.
•Nie stosować produktu wwilgotnym otoczeniu i
chronić go przed bryzgami wody.
•Chronić produkt przed upadkiem isilnymi wstrząsami.
•Trzymać urządzenie, jak wszystkie urządzenia elektrycz-
ne, zdala od dzieci!
•Materiałyopakowaniowe należynatychmiast poddać
utylizacji zgodnie zobowiązującymi przepisami
miejscowymi.
•Nie modykować urządzenia. Prowadzi to do utraty
wszelkich roszczeń ztytuługwarancji.
tosowanie pr
•S
obowiązującym przepisom iustawom lokalnym.
•Uważać,aby żadne komponenty,jak poduszki powietrzne,
strefy bezpieczeństwa, elementy obsługi, instrumenty itp.,
nie byłyzakryte oraz nie byłaograniczona widoczność.
Wniektórych typach samochodów trzeba uruchomić
zapłon, aby napięcie 12 Vbyłowgnieździe 12 V.
Należyuwzględnić wszelkie wskazówki podane w
instrukcji obsługi samochodu.
Niebezpieczeństwo wypadku: upewnić się, że
podczas programowania iinstalacji produktu wjego
bezpośrednim otoczeniu nie znajdują siężadne osoby
ani przedmioty,copozwoli uniknąć ewentualnych
szkód inp. obrażeń osób! Podczas instalacji brama
garażowa możesięotworzyć lub zamknąć.Zaleca się,
aby na czas programowania zaparkować samochód
poza garażem. Używać pilota ROCZ907 tylko przy
zachowaniu systemu otwierania bramy lub bramy
garażowej wzasięgu wzroku. Przestrzegać również
pozostałych wskazówek bezpieczeństwa dotyczących
napędu bramy (instrukcja obsługi).
•Wcelu kompletnego zaprogramowania napędu
•Dokorzystania zpilota ROCZ907 niezbędny jest
•Mimo licznych możliwości zastosowania funkcji pi-
oduktu wruchu dr
Wskazówki
Przed uruchomieniem/programowaniem
Wskazówki
bramy konieczna możebyćjego instrukcja
obsługi (np. aby przeprowadzić parowanie pilota z
napędem bramy).
minimum jeden działający ioryginalny pilot.
lota możesięokazać, żeniektórych systemów bram
garażowych nie da się obsługiwać za jego pomocą.
Powodem mogą być różne częstotliwości pracy lub
dodatkowe, szyfrowane technologie radiowe (m.in.
dwukierunkowe, np. 128 bitów,szyfrowanie).
ogowym podlega
32
Page 35

Wskazówka –gniazdo USB
Mobilne urządzenia końcowe, jak np. smartfony i
tablety można ładować za pomocą złącza USB podpiętego do gniazda zapalniczki wyłącznie wtrybie pracy.
5. Wprowadzenie
Pilot ROCZ907 jest pilotem działającym woparciu o
technologię radiową zmożliwością programowania i
służydosterowania napędów bram różnych producentów,copozwala na wymianę posiadanego dotychczas
pilota, zaprogramowanie go isterowanie nim różnymi
napędami bram dostępnymi na rynku. Wprzypadku
systemów ze stałym lub zmiennym kodem ozakresie
częstotliwości 433 MHz i868 MHz zasilanie odbywa
się za pomocą gniazda zapalniczki samochodowej, a
dzięki wbudowanemu kondensatorowi wysokiej mocy
pilot ROCZ907 możepracować bez ładowania nawet do
3dni. Wbudowane złącze USB pozwala dodatkowo na
ładowanie podczas jazdy smartfona lub tabletu.
6. Właściwości funkcji głównych
•Uniwersalne możliwości zastosowania wrozmaitych
napędach bram garażowych izewnętrznych napędach
bram
•Bezbateryjny akumulator energii
•Doużywania waplikacjach mobilnych poza siecią
pokładową (technologia działająca woparciu o
kondensatory)
•Pełne naładowanie umożliwia wciśnięcie przycisku
nawet 150 razy (np. otwieranie/zamykanie bramy)
•Ponowne naładowanie wciągu 3minut
•Akumulator energii (tryb Standby): do 3dni
•Nawet 4przyciski zmożliwością indywidualnego
oprogramowania (do napędów bram różnych marek)
za pomocą wyszukiwania ręcznego
•Zasięg: do 40 m(wzależności od warunków budowlanych ilokalnych lub parametrów anteny odbiorczej)
•Przyciski wrażliwe na nacisk („Wciśnij ipoczuj”) umożliwiające sprawne korzystanie znich wpojeździe
•Wbudowane złącze USB onatężeniu 2,1 Adoładowa-
nia np. smartfona/tabletu
7. Uruchamianie
Pilot ROCZ907 jest wyposażony we wbudowany kondensator wysokiej mocy.Przed pierwszym użyciem należygo
naładować wgnieździe zapalniczki samochodowej (czas
ładowania 3min).
Przed rozpoczęciem korzystania znowego pilota
ROCZ907 należygonajpierw zaprogramować/skopiować
lub zarejestrować/zaprogramować wsystemie sterowania
silnikiem napędu bramy lub zsynchronizować go z
nim. Można to zrobić na kilka sposobów,opisanych w
następnych rozdziałach.
Wskazówki
•Niektórenapędy bram garażowych wymagają do
zaprogramowania otwierania izamykania dwóch
przycisków.Wtakim przypadku również na pilocie
ROCZ907 muszą być sparowane/zaprogramowane
dwa przyciski.
•Wprzypadku niektórych napędów do bram
garażowych możebyćkonieczne przeprowadze-
nie synchronizacji nawet do 20 razy,zanim kod
zostanie rozpoznany.
Ustalenie systemu kodowania (kompatybilność)
7.1
System ROCZ907 jest kompatybilny zok. 90% systemów
sterowania bramami dostępnymi aktualnie na rynku.
Obsługiwane są następujące systemy kodowania:
kod stały(xcode), kod zmienny (rolling/hopping code)
lub złożony kod zmienny (complex rolling code).
Informacje dotyczące stosowanego systemu kodowania
oryginalnego pilota można znaleźć winstrukcji obsługi
napędu bramy lub zwrócić się wtym celu zzapytaniem
do producenta.
7.2 Funkcja kopiowania kodu stałego izmiennego
•Przed uruchomieniem funkcji kopiowania zwrócić uwagę,
aby pilot oryginalny ipilot ROCZ907 byłyzwrócone ku
sobie inie znajdowałysięwodległości większej niż 3cm.
•Napilocie ROCZ907 wcisnąć iprzytrzymać przycisk
„1”, równocześnie wciskającczterokrotnie przycisk „2”.
Zwolnić oba przyciski. Czerwona dioda funkcyjne LED
(1) będzie migać zczęstotliwością ok. 2s.
33
Page 36

•Naoryginalnym pilocie wcisnąć przycisk, który ma
być skopiowany,ażczerwona dioda funkcyjna LED na
pilocie ROCZ907 zacznie szybko migać (jest to potwierdzenie, żesygnał pilota został pomyślnie odebrany).
•Wcisnąć teraz przycisk, który ma być zaprogramowany
(np. „1”) na pilocie ROCZ907. Po pomyślnym zaprogramowaniu czerwona dioda funkcyjna LED (1) zaświeci
przez ok. 1sekundę,anastępnie zgaśnie.
•Proces programowania został pomyślnie zakończony.
•Wdalszej kolejności sprawdzić,czy istnieje możliwość
sterowania bramą za pomocą zaprogramowanego
przycisku iwrazie potrzeby powtórzyć całą procedurę.
Jeśli po przeprowadzeniu kolejnej próby sterowanie nie
będzie działać,wprzypadku posiadanego modelu może
być konieczna dodatkowa synchronizacja/rejestracja
pilota ROCZ907 wsystemie napędu bramy (patrz niżej).
7.2.1 Procedurawprzypadku kodu stałego/zmien-
nego (z ręcznym zgłoszeniem synchronizacji w
systemie bramy)
Niektórzy producenci napędów bram wymagają
dodatkowej synchronizacji/rejestracji pilota wodbiorniku
systemu napędu.
•Należyzapoznać się zinformacjami zawartymi w
instrukcji obsługi napędu bramy (z regułychodzi o
rejestrację nowego pilota).
•Zwrócić uwagę,aby odległość od odbiornika napędu
bramy nie byłazbyt duża(ok. 50 cm).
•Standardowo wcelu rejestracji pilota należywcisnąć
przycisk nastawczy systemu napędu bramy –wówczas
zapala się dioda LED (możesięto różnić wzależności
od producenta).
•Nerejestrację/synchronizację pilota ROCZ907 przeznacza się zwykle 20–30 s.
•Synchronizacja następuje zwykle po trzykrotnym wciśnięciu zaprogramowanego/skopiowanego przycisku
pilota ROCZ907.
7.2.2. Procedurawprzypadku kodu zmiennego
(z automatycznym zgłoszeniem synchronizacji w
systemie bramy)
Zasada kodu zmiennego (rolling code) wymaga często
rejestracji/synchronizacji pilota zodbiornikiem systemu
napędu bramy.
•Należyzapoznać się zinformacjami zawartymi w
instrukcji obsługi napędu bramy (z regułychodzi o
rejestrację nowego pilota).
34
•Zwrócić uwagę,aby odległość od odbiornika napędu
bramy nie byłazbyt duża(ok. 50 cm).
•Zwykle wystarczy wciskać zaprogramowany przycisk pilota ROCZ907 tak długo, aż czerwona dioda funkcyjna
LED (1) zacznie szybko migać (ok. 10 s).
•Następnie zwolnić przycisk. Pilot przechodzi wtryb
synchronizacji zsystemem napędu bramy.System ten
uruchamia synchronizację po upływie ok. 5–10 s,
sygnalizująctozapaloną lub migającą diodą LED. Po
zakończeniu synchronizacji czerwona, migająca szybko
dioda LED na pilocie ROCZ907 gaśnie. Rejestracja
przebiegłapomyślnie.
Funkcja kopiowania złożonego kodu zmiennego
7.3
Niektórzy producenci napędów bram wymagają przekazania kodu źródłowego (zwanego często SEED Code) w
celu zaprogramowania pilota ROCZ907 znapędem bramy.Wtym celu niezbędny jest sprawny pilot oryginalny
(funkcja Master)zkodem źródłowym!
Wzależności od producenta stosowana jest procedura
oryginalnego pilota do przekazania kodu źródłowego
(pilot Master).
Informacje na temat tej procedury można znaleźć w
oryginalnej instrukcji obsługi pilota lub napędu bramy.
7.3.1. Przykład: producent BFT:
•Przed uruchomieniem funkcji kopiowania zwrócić
uwagę,aby pilot oryginalny ipilot ROCZ907 były
zwrócone ku sobie inie znajdowałysięwodległości
większej niż 3cm.
•Zwrócić uwagę,aby odległość od odbiornika napędu
bramy nie byłazbyt duża(ok. 50 cm).
•Napilocie ROCZ907 wcisnąć iprzytrzymać przycisk
„1”, równocześnie wciskającczterokrotnie przycisk „2”.
Zwolnić oba przyciski. Czerwona dioda funkcyjne LED
(1) będzie migać zczęstotliwością ok. 2s.
•Naoryginalnym pilocie wcisnąć przycisk, który ma być
skopiowany,ażzaświeci czerwona dioda funkcyjna
LED na pilocie ROCZ907 ibędzie migać dwukrotnie w
sekwencjach co ok. 2s.
•Wcisnąć przycisk (staremodele BFT) ukryty wtylnej
części (schowek na baterie) lub przyciski 1i2(nowsze
modele) na oryginalnym pilocie (Master). Czerwona
dioda LED na pilocie ROCZ907 zacznie szybko migać.
Wcisnąć przycisk, który ma być zaprogramowany
(np. 1), aż zgaśnie czerwona dioda LED na pilocie
ROCZ907.
Page 37

•Wciskać zaprogramowany przycisk pilota ROCZ907,
aż czerwona dioda LED zacznie szybko migać (ok. 10
s). Następnie zwolnić przycisk. Zgaśnięcie czerwonej
diody LED na pilocie ROCZ907 oznacza zakończenie
procesu programowania.
•Wdalszej kolejności sprawdzić,czy istnieje możliwość
sterowania bramą za pomocą zaprogramowanego
przycisku iwrazie potrzeby powtórzyć całą procedurę.
7.3.2 Przykład: producenci FA AC lub Genius,
Amigo, Kilo
•Przed uruchomieniem funkcji kopiowania zwrócić
uwagę,aby pilot oryginalny ipilot ROCZ907 były
zwrócone ku sobie inie znajdowałysięwodległości
większej niż 3cm.
•Zwrócić uwagę,aby odległość od odbiornika napędu
bramy nie byłazbyt duża(ok. 50 cm).
•Napilocie ROCZ907 wcisnąć iprzytrzymać przycisk
„1”, równocześnie wciskającczterokrotnie przycisk „2”.
Zwolnić oba przyciski. Czerwona dioda funkcyjne LED
(1) będzie migać zczęstotliwością ok. 2s.
•Naoryginalnym pilocie wcisnąć przycisk, który ma
być skopiowany,ażczerwona dioda funkcyjna LED na
pilocie ROCZ907 zacznie szybko migać (jest to potwierdzenie, żesygnał pilota został pomyślnie odebrany).
•Wcisnąć przyciski 2i3na oryginalnym pilocie (funkcja
Master). Gdy dioda LED na oryginalnym pilocie będzie
szybko migać,wcisnąć raznaoryginalnym pilocie
przycisk, który ma być skopiowany.Czerwona dioda funkcyjna LED (1) na pilocie ROCZ907 zacznie szybko migać.
•Wcelu zapisania wcisnąć teraz na pilocie ROCZ907
przycisk (np. 1), który ma być zaprogramowany.Jako
potwierdzenie zaprogramowania zgaśnie czerwona
dioda LED na pilocie ROCZ907.
•Wdalszej kolejności sprawdzić,czy istnieje możliwość
sterowania bramą za pomocą zaprogramowanego
przycisku iwrazie potrzeby powtórzyć całą procedurę.
Jeśli po przeprowadzeniu kolejnej próby sterowanie
nie będzie działać,wprzypadku posiadanego modelu
możebyćkonieczna dodatkowa synchronizacja z
odbiornikiem systemu napędu bramy.
•Wcelu synchronizacji pilota ROCZ907 znapędem bramy wciskać zaprogramowany przycisk pilota ROCZ907,
aż czerwona dioda LED zacznie szybko migać (ok. 10
s). Następnie zwolnić przycisk. Zgaśnięcie czerwonej
diody LED na pilocie ROCZ907 oznacza przeprowadzenie procesu programowania.
7.3.3. Przykład: producent V2:
•Przed uruchomieniem funkcji kopiowania zwrócić
uwagę,aby pilot oryginalny ipilot ROCZ907 były
zwrócone ku sobie inie znajdowałysięwodległości
większej niż 3cm.
•Zwrócić uwagę,aby odległość od odbiornika napędu
bramy nie byłazbyt duża(ok. 50 cm).
•Napilocie ROCZ907 wcisnąć iprzytrzymać przycisk
„1”, równocześnie wciskającczterokrotnie przycisk „2”.
Zwolnić oba przyciski. Czerwona dioda funkcyjne LED
(1) będzie migać zczęstotliwością ok. 2s.
•Naoryginalnym pilocie wcisnąć iprzytrzymać przycisk,
który ma być skopiowany,ażzaświeci czerwona dioda
funkcyjna LED (1) na pilocie ROCZ907 ibędzie migać
dwukrotnie wsekwencjach co ok. 2s.
•Wcisnąć ponownie przycisk na oryginalnym pilocie,
który ma być skopiowany,ażczerwona dioda LED
zacznie szybko migać.
•Wcelu potwierdzenia wcisnąć przycisk, który ma być
zaprogramowany (np. 1). Czerwona dioda funkcyjna
LED (1) zgaśnie.
•Wciskać zaprogramowany przycisk pilota ROCZ907,
aż czerwona dioda LED zacznie szybko migać (ok. 10
s). Następnie zwolnić przycisk. Zgaśnięcie czerwonej
diody LED na pilocie ROCZ907 oznacza przeprowadzenie procesu programowania.
•Wdalszej kolejności sprawdzić,czy istnieje możliwość
sterowania bramą za pomocą zaprogramowanego
przycisku iwrazie potrzeby powtórzyć całą procedurę.
Wskazówki
Informacje ododatkowych możliwościach, aktualną
listę urządzeń kompatybilnych oraz rozszerzoną
instrukcję obsługi można znaleźć na stronie
www.hama.com lub www.thomson-av-accessories.eu.
35
Page 38

8. Dane techniczne
Wymiary 76 x27x39 mm
maks. 40 m(wzależności
Zasięg
Napięcie wejściowe 12 V
Czas czuwania
(Standby)
Wyjście USB 5V/2100 mA
Zakres częstotliwości 433 MHz, 868 MHz
Emitowana maks.
moc nadawania
9. Czyszczenie
Czyścić produkt tylko przy użyciu niestrzępiącej się,
lekko zwilżonej szmatki inie stosować agresywnych
detergentów.Uważać,aby do wnętrza produktu nie
wniknęławoda.
10. Wyłączenie odpowiedzialności
Hama GmbH &Co. KG nie udziela gwarancji ani nie
odpowiada za szkody wskutek niewłaściwej instalacji,
montażuoraznieprawidłowego stosowania produktu
lub nieprzestrzegania instrukcji obsługi i/lub wskazówek
bezpieczeństwa.
11. Serwis ipomoc techniczna
Wrazie pytań dotyczących produktu prosimy zwrócić się
do infolinii Hama.
Gorąca linia: +49 9091 502-115 (niem./ang.)
Dodatkowe informacje są dostępne na stronie:
www.hama.com
od warunków budowlanych
ilokalnych lub parametrów
anteny odbiorczej)
maks
.72h
10 mW
12. Informacje dotycząca recyklingu
Wskazówki dotyczące ochrony środowiska:
Od czasu wprowadzenia europejskiej
dyrektywy 2012/19/EU i2006/66/EU do prawa
narodowego obowiązują następujące
ustalenia: Urządzeń elektrycznych,
elektronicznych oraz baterii jednorazowych nie
należywyrzucać razem zcodziennymi odpadami
domowymi! Użytkownik zobowiązany prawnie do
odniesienia zepsutych, zniszczonych lub niepotrzebnych
urządzeń elektrycznych ielektronicznych do punktu
zbiórki lub do sprzedawcy.Szczegółowe kwestie regulują
przepisy prawne danego kraju. Informuje otym symbol
przekreślonego kosza umieszczony na opakowaniu.
Segregującodpady pomagasz chronićśrodowisko!
13. Deklaracja zgodności
Hama GmbH &CoKGniniejszym oświadcza,
żetyp urządzenia radiowego [00132680] jest
zgodny zdyrektywą 2014/53/UE. Pełny tekst
deklaracji zgodności UE jest dostępny pod następującym
adresem internetowym:
www.hama.com-> 00132680 -> Downloads.
36
Page 39

C Návod kpoužití
Děkujeme, že jste si vybrali výrobek Thomson.
Přečtěte si, prosím, všechny následující pokyny a
informace. Uchovejte tento text propřípadné budoucí
použití. Pokud výrobek prodáte, předejte tento text
novému majiteli.
1. Vysvětlení výstražných symbolů apokynů
Upozornění
Tento symbol označuje bezpečnostní upozornění,
které poukazuje na určitá rizika anebezpečí.
Poznámka
Tento symbol označuje dodatečné informace nebo
důležité poznámky.
2. Ovládací prvky aindikace
1. Funkční LED kontrolka (červená)
2. Zástrčka 12 Vvevozidle
3. USB přípojka 2,1 A
4. Programovatelná tlačítka 1–4
5. Provozní LED kontrolka (připrovozu na 12 Vsvítí
modře)
3. Obsah balení
•Univerzální dálkový ovládač garážových vrat ROC Z907
•tento návod kobsluze
4. Bezpečnostní pokyny
•Výrobek používejte výhradně prostanovený účel.
•Přístroj neprovozujte mimo meze výkonu uvedené v
technických údajích.
•Chraňte výrobek před znečištěním, vlhkostí apřehřátím
apoužívejte ho pouze vsuchých prostorách.
•Výrobek nepoužívejte ve vlhkém prostředí azabraňte
působení stříkající vody.
•Zabraňte pádu výrobku avýrobek nevystavujte velkým
otřesům.
•Tento produkt, stejně jako všechny ostatní elektrické
produkty,nepatřídorukou dětí!
•Obalový materiál likvidujte ihned podle platných
místních předpisů olikvidaci.
•Navýrobku neprovádějte žádné změny.Tím zanikají
veškeré závazky ze záruky.
•Připoužití výrobku dodržujte platné místní předpisy a
zákony silniční dopravy.
•Dbejte na to, aby nedošlo zakrytí nebo omezení funkce
komponent, jako airbag, bezpečnostní oblasti, prvky
obsluhy,instrumenty atd., nebo omezení výhledu.
Poznámka
Uněkterých typů vozidel může být potřeba zapnout
zapalování, aby 12 Vzásuvka byla napájena. Podrobnosti najdete vnávodu kobsluze vašeho vozidla.
Před uvedením do provozu/programováním
Nebezpečíúrazu: Ujistěte se, že během programování
ainstalace produktu nejsou vbezprostřední blízkosti
žádné osoby nebo předměty,můžete tak zabránit
vzniku škod ipřípadnému zranění osob. Během
instalace se mohou garážová vrata otevřít příp. zavřít.
Po dobu programování doporučujeme zaparkovat
vozidlo mimo garáž. Používejte ovládač ROCZ907
pouze vpřímé viditelnosti na systém otevírání brány
nebo garážových vrat. Dodržujte idalší bezpečnostní
pokyny kpohonu vrat (návod kobsluze).
Poznámka
•Kúplnému naprogramování pohonu vrat budete případně také potřebovat návod kobsluze pohonu vrat
(např.pro přihlášení ručních vysílačů kpohonu vrat).
•Nezbytným předpokladem propoužití ovládače
ROCZ907 je, že máte kdispozici ještě alespoň
jeden funkční originální ruční vysílač.
•Ipřes široké auniverzální možnosti použití těchto
ručních vysílačů nemusí být některé systémy garážových vrat pomocí tohoto produktu ovladatelné. Příčinou může být mimo jiné použití odlišných frekvencí
nebo přídavné šifrování utechnologií rádiových
přenosů (např.obousměrné 128bitové šifrování).
37
Page 40

Upozornění –zdířka USB
Mobilní koncové přístroje, jako např.chytrý telefon/
tablet, lze nabíjet ze zásuvky USB pouze během
provozu vzásuvce zapalovačecigaret.
5. Úvod
ROCZ907 je rádiový aadaptivní ruční vysílač (ovládač)
určený kovládání univerzálních pohonů vrat bez ohledu
na značku, proto můžete stávající ruční vysílač (dálkový
ovládač)nahradit tímto výrobkem avpřípadě potřeby
také zaučit aovládat více univerzálních pohonů vrat
určených prorůzné trhy.Kdovybavení systémů spevným
nebo plovoucím kódem (Fix Code nebo Rolling Code) ve
frekvenčním pásmu 433 MHz a868 MHz, napájení je
zajištěno ze zásuvky zapalovačecigaret adíky integrovanému velkokapacitnímu kondenzátoru může ovládač
ROCZ907 pracovat až 3dny mimo zásuvku zapalovače
cigaret. Díky integrované zásuvce USB lze kromě toho
během jízdy vautě nabíjet chytrý telefon/tablet.
6. Hlavní charakteristiky
•Univerzálně použitelný prorůzné pohony garážových
vrat avenkovních bran
•Zásoba energie bez potřeby baterie
•Pro mobilní použití mimo palubní síť vozidla (technologie na bázi kondenzátoru)
•Připlném nabití kdispozici energie až do 150 stisků
tlačítek (např.otevření/zavření vrat)
•Opětovné nabití během 3minut
•Zásoba energie (standby): až na 3dny
•Až4individuálně programovatelná tlačítka (univerzální
pohony bran nezávislé na značce) pomocí manuálního
vyhledávání
•Dosah: Až 40 metrů (v závislosti na stavebním a
místním uspořádání příp. vzávislosti na výkonu
přijímací antény)
•Rezonanční tlačítka (cvaknutí arozpoznatelná hmatová
odezva) prospolehlivé použití ve vozidle
•Integrovaná zásuvka USB zatížitelná 2,1 Aknabíjení
např.chytrého telefonu/tabletu
7. Uvedení do provozu
Dálkový ovládač ROCZ907 má zabudovaný velkokapacitní
kondenzátor.Před prvním použitím je nutné ho nabít ze
zásuvky zapalovačecigaret (nabíjecí doba 3minuty).
Dříve než použijete nový ruční vysílač ROCZ907, musíte
ho nejprve zaučit/zkopírovat příp. přihlásit/zaučit na řídicí
systém motoru propohon vrat nebo ho stímto systémem
synchronizovat. Ktomu existuje několik možností, které
jsou popsány vnásledujících kapitolách.
Poznámka
•Některé pohony garážových vrat vyžadují k
naprogramování otevření azavření dvě tlačítka.
Vtomto případě je třeba na ovládání ROCZ907
rovněžzkopírovat/naprogramovat dvě tlačítka.
•Uněkterých pohonů garážových vrat je nutné
provést synchronizaci až 20krát, dokud kód nebude
rozpoznatelný.
7.1 Určení kódovacího systému (kompatibilita)
Sovládačem ROCZ907 pokryjete asi 90 %ovládacích systémů provrata, které jsou vsoučasné době na trhu.
Podporovány jsou následující kódovací systémy:
Fix Code (pevný kód), Rolling Code (pohyblivý kód) nazývaný také Hopping Code nebo Complex Rolling Code.
Informace ke kódovacímu systému použitému uvašeho
originálního ručního vysílačenajdete vnávodu kpohonu
vrat nebo se obraťte na výrobce.
7.2 Funkce kopírování uFix aRolling Code
•Před provedením funkce kopírování se ujistěte, že origi-
nální ruční vysílač aovládač ROCZ907 jsou nasměrovány
na sebe anejsou od sebe vzdáleny více než 3cm.
•Stiskněte apodržte tlačítko „1“ na ovladačiROCZ907
asoučasně 4x stiskněte tlačítko „2“. Uvolněte obě
tlačítka. Červená funkční LED kontrolka (1) blikne
přibližně každé 2sekundy.
•Stiskněte na originálním ručním vysílačitlačítko, které
chcete kopírovat, apodržte jej tak dlouho, dokud
červená kontrolka funkce LED na ovládačiROCZ907
nezačne blikat (= potvrzení, že signál dálkového
ovládačebyl úspěšně přijat).
38
Page 41

•Nyní stiskněte tlačítko, které chcete programovat
(např.„1“) na ovládačiROCZ907. Po úspěšném
naprogramování se funkční LED kontrolka (1) rozsvítí
červeně asi na 1sekundu, apak zhasne.
•Proces programování je úspěšně dokončen.
•Následně zkontrolujte, zda lze vrata pomocí zaučeného
tlačítka ovládat, pokud ne, postup opakujte. Nebude-li
ovládání ani po dalším pokusu fungovat, bude asi
uvašeho modelu nutné samostatně synchronizovat/
přihlásit ovládač ROCZ907 kpřijímačisystému pohonu
vrat (viz níže).
7.2.1 Postup uFix Code/Rolling Code (s manu-
álním přihlášením ksynchronizaci svratovým
systémem)
Uněkterých výrobců pohonů vrat je navíc nutné přihlásit/
synchronizovat ruční vysílač spřijímačem systému
pohonu vrat.
•Postupujte podle návodu kobsluze pohonu vrat (viz.
Přihlášení nového ručního vysílače).
•Dbejte nato, abyste se zdržovali vbezprostřední
blízkosti přijímačepohonu vrat (asi 50 cm).
•Obvykle se kpřihlášení ručních vysílačů aktivuje
tlačítko nastavení na systému pohonu vrat arozsvítí se
kontrolka LED (může se lišit podle výrobce).
•Normálně máte kdispozici asi 20–30 sekund kpřihlá-
šení/synchronizaci ovládačeROCZ907.
•Synchronizace zpravidla proběhne, když 3x za sebou
stisknete naprogramované/zkopírované tlačítko
ovládačeROCZ907.
7.2.2 Postup uRolling Code (s automatickým
přihlášením ksynchronizaci svratovým systémem)
Vzhledem kprincipu plovoucího kódu (Rolling Code)
je často nutné přihlásit/synchronizovat ruční vysílač s
přijímačem systému pohonu vrat.
•Postupujte podle návodu kobsluze pohonu vrat (viz.
Přihlášení nového ručního vysílače).
•Dbejte nato, abyste se zdržovali vbezprostřední
blízkosti přijímačepohonu vrat (asi 50 cm).
•Obvykle stačístisknout naprogramované tlačítko
ovládačeROCZ907 apodržet ho tak dlouho, dokud
červená funkční LED kontrolka (1) nezačne rychle blikat
(asi 10 sekund).
•Uvolněte nyní tlačítko. Dálkový ovladač přejde do
režimu synchronizace se systémem pohonu dveří. Ten
potvrdí synchronizaci po asi 5–10 sekundách rozsvícením nebo blikáním kontrolky LED. Je-li synchronizace
ukončena, červená rychle blikající kontrolka LED na
ovládačiROCZ907 zhasne, což znamená, že přihlášení
bylo úspěšné.
7.3 Funkce kopírování uComplex Rolling Code
Někteřívýrobci pohonů provrata vyžadují přenos zdrojového kódu (často označovaný jako kód SEED), aby bylo
možné ovládač ROCZ907 zaučit na pohon vrat. Přitom
je vkaždém případě zapotřebí originální funkční ruční
vysílač (Funkce Master)sezdrojovým kódem.
Vzávislosti na výrobci se nyní realizuje procedurapřenosu
zdrojového kódu zoriginálního dálkového ovladače
(dálkový ovládač master).
Vpřípadě potřeby můžete popis najít voriginálním návo-
du kobsluze ručního vysílačenebo obsluze pohonu vrat.
7.3.1 Příklad –výrobce BFT:
•Před provedením funkce kopírování se ujistěte, že origi-
nální ruční vysílač aovládač ROCZ907 jsou nasměrovány
na sebe anejsou od sebe vzdáleny více než 3cm.
•Dbejte nato, abyste se zdržovali vbezprostřední
blízkosti přijímačepohonu vrat (asi 50 cm).
•Stiskněte apodržte tlačítko „1“ na ovladačiROCZ907
asoučasně 4x stiskněte tlačítko „2“. Uvolněte obě
tlačítka. Červená funkční LED kontrolka (1) blikne
přibližně každé 2sekundy.
•Stiskněte na originálním ručním vysílačitlačítko, které
chcete kopírovat, apodržte jej tak dlouho, dokud se
červená funkční LED kontrolka ovládačeROCZ907
nerozsvítí anásledně nezačne sodstupem asi 2sekund
dvakrát blikat.
•Nyní stiskněte na originálním ručním vysílači(master)
tlačítko skryté ustarých modelů BFT na zadní straně
(prostor probaterie) nebo tlačítka 1a2(novější
modely). Červená kontrolka LED ovládačeROCZ907
rychle bliká. Nyní stiskněte tlačítko, které chcete naprogramovat (např.1), apodržte jej tak dlouho, dokud
červená kontrolka LED ovládačeROCZ907 nezhasne.
•Stiskněte naprogramované tlačítko ovládačeROCZ907
apodržte jej tak dlouho, dokud červená kontrolka
LED nezačne rychle blikat (asi 10 sekund). Uvolněte
tlačítko. Když zhasne červená kontrolka LED ovládače
ROCZ907, programování je ukončeno.
39
Page 42

•Následně zkontrolujte, zda lze vrata pomocí zaučeného
tlačítka ovládat, pokud ne, postup opakujte.
7.3.2 Příklad –výrobci FAAC příp. Genius, Amigo,
Kilo
•Před provedením funkce kopírování se ujistěte, že
originální ruční vysílač aovládač ROCZ907 jsou
nasměrovány na sebe anejsou od sebe vzdáleny více
než 3cm.
•Dbejte nato, abyste se zdržovali vbezprostřední
blízkosti přijímačepohonu vrat (asi 50 cm).
•Stiskněte apodržte tlačítko „1“ na ovladačiROCZ907
asoučasně 4x stiskněte tlačítko „2“. Uvolněte obě
tlačítka. Červená funkční LED kontrolka (1) blikne
přibližně každé 2sekundy.
•Stiskněte na originálním ručním vysílačitlačítko, které
chcete kopírovat, apodržte jej tak dlouho, dokud
červená kontrolka funkce LED na ovládačiROCZ907
nezačne blikat (= potvrzení, že signál dálkového
ovládačebyl úspěšně přijat).
•Nyní stiskněte tlačítka 2a3na originálním ručním
vysílači(master funkce). Zatímco kontrolka LED
originálního ručního vysílačerychle bliká, stiskněte 1x
tlačítko na originálním ručním vysílači, které chcete
zkopírovat. Červená funkční LED kontrolka (1) ovládače
ROCZ907 nyní rychle bliká.
•Nyní stiskněte na ovládačiROCZ907 kprogramování
určené tlačítko (např.1), které chcete uložit. Jako
potvrzení programování zhasne červená kontrolka LED
ovládačeROCZ907.
•Následně zkontrolujte, zda lze vrata pomocí zaučeného
tlačítka ovládat, pokud ne, postup opakujte. Nebude-li
ovládání ani po novém pokusu fungovat, bude váš
model nutné samostatně synchronizovat spřijímačem
systému pohonu vrat.
•Chcete-li ovládač ROCZ907 synchronizovat spohonem
vrat, stiskněte naprogramované tlačítko ovládače
ROCZ907 apodržte jej tak dlouho, dokud červená
kontrolka LED nezačne rychle blikat (asi 10 sekund).
Uvolněte tlačítko. Když zhasne červená kontrolka LED
ovládačeROCZ907, programování je dokončeno.
7.3.3 Příklad –výrobce V2:
•Před provedením funkce kopírování se ujistěte, že
originální ruční vysílač aovládač ROCZ907 jsou
nasměrovány na sebe anejsou od sebe vzdáleny více
než 3cm.
40
•Dbejte nato, abyste se zdržovali vbezprostřední
blízkosti přijímačepohonu vrat (asi 50 cm).
•Stiskněte apodržte tlačítko „1“ na ovladačiROCZ907
asoučasně 4x stiskněte tlačítko „2“. Uvolněte obě
tlačítka. Červená funkční LED kontrolka (1) blikne
přibližně každé 2sekundy.
•Stiskněte apodržte na originálním ručním vysílačitlačítko, které chcete kopírovat, dokud se červená kontrolka
funkce LED (1) ovládačeROCZ907 nerozsvítí anásledně
nezačne sodstupem asi 2sekund dvakrát blikat.
•Stiskněte opěttlačítko na originálním ručním vysílači,
které chcete zkopírovat, apodržte jej tak dlouho,
dokud červená kontrolka LED nezačne rychle blikat.
•Stiskněte propotvrzení tlačítko, které chcete
programovat (např.1). Červená funkční LED kontrolka
(1) zhasne.
•Stiskněte naprogramované tlačítko ovládačeROCZ907
apodržte jej tak dlouho, dokud červená kontrolka
LED nezačne rychle blikat (asi 10 sekund). Uvolněte
tlačítko. Když zhasne červená kontrolka LED ovládače
ROCZ907, programování je dokončeno.
•Následně zkontrolujte, zda lze vrata pomocí zaučeného
tlačítka ovládat, pokud ne, postup opakujte
Poznámka
Další rozšiřující možnosti najdete vnejnovějším seznamu
kompatibility arozšířeném návodu kobsluze na
internetové adrese www.hama.com nebo
www.thomson-av-accessories.eu.
8. Technické údaje
Rozměry 76 x27x39mm
max. 40 metrů (v závislosti
Dosah
Vstupní napětí 12 V
Standby max. 72 h
Výstup USB 5V/2100 mA
Frekvenční pásmo 433 MHz, 868 MHz
Vyzařovaný max.
vysílací výkon
na stavebním amístním
uspořádání příp. vzávislosti
na výkonu přijímací antény)
10 mW
Page 43

9. Údržba a čištění
nto výr
Te
obek čistěte pouze mírně navlhčeným hadříkem
nepouštějícím vlákna anepoužívejte agresivní čisticí prostředky.Dbejte na to, aby se do výrobku nedostala voda.
10. Vyloučení záruky
Hama GmbH &Co. KG nepřebírá žádnou odpovědnost
nebo záruku za škody vzniklé neodbornou instalací,
montáží nebo neodborným použitím výrobku nebo
nedodržováním návodu kpoužití a/nebo bezpečnostních
pokynů.
11. Servis apodpora
Máte otázky kpr
oddělení Hama.
Horká linka: +49 9091 502-115 (německy/anglicky)
Další podpůrné informace naleznete na adrese:
www.hama.com
12. Pokyny klikvidaci
Ochrana životního prostředí:
uplynutí jejich životnosti do příslušných sběren.
Podrobnosti stanoví zákon příšlušné země.Symbol na
produktu, návod kobsluze nebo balení na toto
poukazuje. Recyklací ajinými způsoby zužitkování
přispíváte kochraně životního prostředí.
13. Prohlášení oshodě
prohlášení oshodě je kdispozici na této internetové
adrese: www.hama.com -> 00132680 -> Downloads.
oduktu ?Obr
aťte na na por
Evropská směrnice 2012/19/EU a2006/66/EU
ustanovujete následující: Elektrická a
elektronická zařízení stejně jako baterie nepatří
do domovního odpadu. Spotřebitel se zavazuje
odevzdat všechna zařízení abaterie po
Tímto Hama GmbH &CoKGprohlašuje, že typ
rádiového zařízení [00132680] je vsouladu se
směrnicí 2014/53/EU.Úplné znění EU
adenské
41
Page 44

Q Návod na použitie
Ďakujeme, že ste sa rozhodli prevýrobok Thomson.
Prečítajte si všetky nasledujúce pokyny ainformácie.
Uchovajte tento návod na použitie preprípadné budúce
použitie. Ak výrobok predáte alebo darujete, dajte tento
návod novému majiteľovi.
1. Vysvetlenie výstražných symbolov aupozornení
Upozornenie
Tento symbol označuje bezpečnostné upozornenie,
ktoré poukazuje na určité riziká anebezpečenstva.
Poznámka
Tento symbol označuje dodatočné informácie, alebo
dôležité poznámky.
2. Ovládacie prvky aindikácie
1. LED indikujúca funkciu (červená)
2. 12 Vautozástrčka
3. USB prípojka 2,1 A
4. Programovateľné tlačidlá 1–4
5. LED indikujúca prevádzku (v 12 Vprevádzke svieti
namodro)
3. Obsah balenia
•univerzálne diaľkové ovládanie garážovej brány
ROC Z907
•tento návod na obsluhu
4. Bezpečnostné upozornenia
•Výrobok používajte výlučne na stanovený účel.
•Výrobok neprevádzkujte mimo svojich výkonových
medzí uvedených uvedených vtechnických údajoch.
•Chráňte výrobok pred znečistením, vlhkosťou aprehria-
tím apoužívajte ho len vsuchom prostredí.
•Výrobok nepoužívajte vo vlhkom prostredí apredchá-
dzajte kontaktu so striekajúcou vodou.
•Výrobok nenechajte spadnúť anevystavujte ho silným
otrasom.
•Tento prístroj, rovnako ako všetky elektrické zariadenia,
nepatrí do detských rúk!
•Likvidujte obalový materiál okmžite podľaplatných
miestnych predpisov na likvidáciu odpadov.
•Nazariadení/prístroji nerobte žiadne zmeny.Máto
za následok stratu akýchkoľvek nárokov na plnenie
zo záruky.
•Pri používaní výrobku dodržiavajte miestne predpisy
azákony platné precestnú premávku.
•Dbajte na to, aby neboli zakryté alebo obmedzené výhľad ani žiadne komponenty ako airbag, bezpečnostné
oblasti, ovládacie prvky,prístroje adď.
Poznámka
Uniektorých typov vozidiel môže byť potrebné zapnúť
zapaľovanie, aby 12 Vzásuvka bola napájaná. Podrobnosti nájdete vnávode na použitie vášho vozidla.
Pred uvedením do prevádzky/programovaním
Nebezpečenstvo úrazu: Uistite sa, že sa počas programovania ainštalácie výrobku nenachádzajú žiadne osoby
alebo predmety vbezprostrednom okolí, aby bolo možné
zabrániť možným škodám anapr.zraneniam osôb!
Garážová brána sa môže počas inštalácie otvárať,resp.
zatvárať.Odporúčame, aby ste počas programovania
zaparkovali vozidlo mimo garáže. Diaľkové ovládanie
ROCZ907 používajte len vpriamom očnom kontakte k
systému otvárania brány,resp. ku garážovej bráne. Dodr
žiavajte tiež ďalšie bezpečnostné upozornenia týkajúce
sa vášho pohonu brány (návod na obsluhu).
Poznámka
•Naúplné naprogramovanie pohonu brány je za
určitých okolností potrebný aj návod na obsluhu
pohonu brány (napr.prihlásenie ručných vysielačov
na pohon brány).
•Nevyhnutným predpokladom na používanie
diaľkového ovládania ROCZ907 je skutočnosť,že
musí byť kdispozícii ešte minimálne jeden funkčný
originálny ručný vysielač.
-
42
Page 45

•Napriek širokej univerzálnej vlastnosti tejto funkcie
ručného vysielačasaniektoré systémy garážových
brán nedajú prípadne pomocou tohto výrobku
ovládať.Príčinou môžu byť o.i. iné použité frekvencie
alebo dodatočne zakódované bezdrôtové technológie (o.i. obojsmerné, napr.128-bitové zakódovanie).
Upozornenie –zdierka USB
Mobilné koncové zariadenia, ako napr.smartfón/
tablet sa môžu nabíjať cez zdierku USB vzásuvke
zapaľovačacigariet len počas prevádzky.
5. Úvod
Diaľkové ovládanie ROCZ907 je ručný vysielač,ktorý je
založený na bezdrôtovej technológii ajeschopný naučiť
sa ovládanie pohonov brán rôznych značiek. Takto máte
možnosť nahradiť existujúci ručný vysielač (diaľkové
ovládanie) avprípade potreby môžete naučiť aovládať
aj pohony brán rôznych značiek. Pri dovybavení systémov
pevnými alebo plávajúcimi kódmi vo frekvenčnom
rozsahu 433 MHz a868 MHz sa napájanie uskutočňuje
cez zdierku zapaľovačacigariet, vďaka integrovanému
vysokovýkonnému kondenzátoru môže byť ROCZ907
prevádzkovaný až 3dni aj mimo zdierky zapaľovača
cigariet. Vďaka integrovanej USB zdierke sa počas jazdy
autom môže navyše nabíjať smartfón/tablet.
6. Hlavné funkcie avlastnosti
•Univerzálne použiteľné prerôzne pohony garážových
avonkajších brán
•Zásobník elektrickej energie bez batérií
•Napoužitie premobilné aplikácie mimo palubnej siete
(technológia výkonu kondenzátora)
•Pri plnom nabití je možných až 150 kliknutí tlačidla
(napr.otvorenie/zatvorenie brán)
•Opätovné nabitie do 3minút
•Zásobník energie (pohotovostný režim): až na 3dni
•Až4individuálne programovateľné tlačidlá (pohony
brán rôznych značiek) prostredníctvom manuálneho
vyhľadávania
•Dosah: Až 40 metrov (v závislosti od stavebných amiestnych podmienok, resp. od výkonu antény prijímača)
•Tlačidlá stlakovou rezonanciou (stlač avnímaj) pre
bezpečné používanie vo vozidle
•Integrovaná USB zdierka s2,1 Ananabíjanie napr.
smartfónu/tabletu
7. Uvedenie do prevádzky
ROCZ907 disponuje integrovaným vysokovýkonným
kondenzátorom. Pred prvým použitím sa musí nabiť cez
zásuvku zapaľovačacigariet (čas nabíjania 3minúty).
Skôr ako môžete používať svoj nový ručný vysielač
ROCZ907, musíte ho najprv naučiť/skopírovať,resp. ho
prihlásiť/naučiť alebo synchronizovať na systém ovládania
motorapohonu brány.Natento účel existujú viaceré
možnosti, ktoré sú opísané vnasledujúcich kapitolách.
Poznámka
•Niektoré pohony garážových brán potrebujú na naprogramovanie otvárania azatvárania dve tlačidlá.
Vtomto prípade sa musia aj na diaľkovom ovládaní
ROCZ907 skopírovať/naprogramovať dve tlačidlá.
•Pri niektorých pohonoch garážových brán môže byť
potrebné vykonať synchronizáciu až 20 krát, kým
bude kód rozpoznaný.
7.1 Stanovenie kódovacieho systému (kompatibilita)
Sdiaľkovým ovládaním ROCZ907 pokryjete približne
90 %systémov na ovládanie brán, ktoré sa nachádzajú
na aktuálnom trhu.
Zariadenie podporuje nasledovné kódovacie systémy:
pevný kód (pevné kódovanie), plávajúci kód (nazývaný
tiež Hopping kód) alebo komplexný plávajúci kód.
Informácie opoužitom kódovacom systéme vášho
originálneho ručného vysielačanájdete vnávode vášho
pohonu brány alebo si ich vyžiadajte uvýrobcu.
7.2 Kopírovacia funkcia pevného aplávajúceho kódu
•Predvykonaním kopírovacej funkcie dbajte na to, aby
originálny ručný vysielač aovládač ROCZ907 boli k
sebe otočené avzdialené maximálne 3cmodseba.
•Stlačte apodržte tlačidlo „1“ na diaľkovom ovládači
ROCZ907 azároveň 4x stlačte tlačidlo „2“. Uvoľnite
obe tlačidlá. Červená LED indikujúca funkciu (1) teraz
bliká cca každé 2sekundy.
43
Page 46

•Stláčajte tlačidlo na originálnom ručnom vysielači, ktoré
sa má skopírovať,kým nezačne červená LED indikujúca
funkciu ovládačaROCZ907 rýchlo blikať (= potvrdenie
oúspešnom príjme signálu diaľkového ovládania).
eraz stlačte tlačidlo, ktoré sa má naprogramovať (napr.
•T
„1“), na diaľkovom ovládaní ROCZ907. Po úspešnom
naprogramovaní sa rozsvieti LED indikujúca funkciu (1)
na cca 1sekundu načerveno apotom zhasne.
•Programovanie je úspešne ukončené.
•Napokon vyskúšajte, čisabrána dá ovládať pomocou
naučeného tlačidla. Ak nie, proces opakujte. Ak ani
po opätovnom pokuse nefunguje, je pri vašom modeli
prípadne nutné diaľkové ovládanie ROCZ907 osobitne
prihlásiť/synchronizovať (pozri nižšie) sprijímačom
systému pohonu brány.
7.2.1 Postup prepevný kód/plávajúci kód (s
manuálnym prihlásením pri synchronizácii na
systém brány)
Uniektorých výrobcov pohonov brán je okrem toho
ešte potrebné prihlásiť/synchronizovať ručný vysielač s
prijímačom systému pohonu brány.
•Vezmite si na pomoc návod na obsluhu pohonu brány
(spravidla Prihlásenie nového ručného vysielača).
•Dbajte na to, aby ste sa zdržiavali vbezprostrednej
blízkosti prijímačapohonu brány (približne 50 cm).
•Zvyčajne sa pritom aktivuje nastavovacie tlačidlo na
systéme pohonu brány na prihlásenie ručných vysielačov
arozsvieti sa LED dióda (líši sa vzávislosti od výrobcu).
•Bežne máte cca 20 –30sekúnd na prihlásenie/synchronizovanie diaľkového ovládania ROCZ907.
•Synchronizácia sa spravidla uskutoční vtedy,keď3x za
sebou stlačíte naprogramované/skopírované tlačidlo
diaľkového ovládania ROCZ907.
7.2.2 Postup preplávajúci kód (s automatickým
prihlásením pri synchronizácii na systém brány)
Vdôsledku princípu striedavého kódu (plávajúci kód) je
častejšie potrebné ručný vysielač prihlásiť/synchronizovať
sprijímačom systému pohonu brány.
•Vezmite si na pomoc návod na obsluhu pohonu brány
(spravidla Prihlásenie nového ručného vysielača).
•Dbajte na to, aby ste sa zdržiavali vbezprostrednej
blízkosti prijímačapohonu brány (približne 50 cm).
•Zvyčajne stačí, aby ste stláčali naprogramované tlačidlo
diaľkového ovládania ROCZ907, kým nezačne rýchlo blikaťčervená LED indikujúca funkciu (1) (cca 10 sekúnd).
44
•Tlačidlo následne uvoľnite. Diaľkové ovládanie pritom
prejde do synchronizačného režimu so systémom
pohonu brány.Ten potvrdí synchronizáciu po cca 5–
10 sekundách svietiacou alebo blikajúcou LED diódou.
Ak je synchronizácia ukončená, zhasne na diaľkovom
ovládaní ROCZ907 červená rýchlo blikajúca LED dióda
aprihlásenie bolo úspešné.
7.3 Kopírovacia funkcia komplexného plávajúceho
kódu
Niektorí výrobcovia pohonov brán potrebujú prenos zdrojového kódu (často sa označuje aj ako SEED kód), aby bolo
možné diaľkové ovládanie ROCZ907 naučiť na pohon brány.
Pritom je vkaždom prípade potrebný originálny funkčný
ručný vysielač (funkcia master)sozdrojovým kódom!
Vzávislosti od výrobcu sa použije postup originálneho
diaľkového ovládania na prenos zdrojového kódu (diaľkové ovládanie master).
Tennájdete vprípade potreby voriginálnom návode na
obsluhu ručného vysielača, resp. pohonu brány.
7.3.1 Príklad výrobcu BFT:
•Predvykonaním kopírovacej funkcie dbajte na to, aby
originálny ručný vysielač aovládač ROCZ907 boli k
sebe otočené avzdialené maximálne 3cmodseba.
•Dbajte na to, aby ste sa zdržiavali vbezprostrednej
blízkosti prijímačapohonu brány (približne 50 cm).
•Stlačte apodržte tlačidlo „1“ na diaľkovom ovládači
ROCZ907 azároveň 4x stlačte tlačidlo „2“. Uvoľnite
obe tlačidlá. Červená LED indikujúca funkciu (1) teraz
bliká cca každé 2sekundy.
•Stláčajte tlačidlo na originálnom ručnom vysielači,
ktoré sa má skopírovať,kým sa nerozsvieti červená LED
indikujúca funkciu diaľkového ovládania ROCZ907 a
následne cca každé 2sekundy dvakrát nezabliká.
•Teraz stlačte tlačidlo schované na zadnej strane
(priehradka na batérie) (staré modely BFT) alebo
tlačidlá 1a2(novšie modely) na originálnom ručnom
vysielači(master). Červená LED dióda na ROCZ907
bliká rýchlo za sebou. Stláčajte teraz tlačidlo, ktoré sa
má naprogramovať (napr.1), kým nezhasne červená
LED dióda diaľkového ovládania ROCZ907.
•Stláčajte naprogramované tlačidlo diaľkového
ovládania ROCZ907, kým rýchlo nebliká červená LED
dióda (cca 10 sekúnd). Uvoľnite tlačidlo. Keď zhasne
červená LED dióda na diaľkovom ovládaní ROCZ907, je
programovanie ukončené.
Page 47

•Napokon vyskúšajte, čisabrána dá ovládať pomocou
naučeného tlačidla. Ak nie, proces opakujte.
7.3.2 Príklad výrobcu FA AC,resp. Genius, Amigo,
Kilo
•Predvykonaním kopírovacej funkcie dbajte na to, aby
originálny ručný vysielač aovládač ROCZ907 boli k
sebe otočené avzdialené maximálne 3cmodseba.
•Dbajte na to, aby ste sa zdržiavali vbezprostrednej
blízkosti prijímačapohonu brány (približne 50 cm).
•Stlačte apodržte tlačidlo „1“ na diaľkovom ovládači
ROCZ907 azároveň 4x stlačte tlačidlo „2“. Uvoľnite
obe tlačidlá. Červená LED indikujúca funkciu (1) teraz
bliká cca každé 2sekundy.
•Stláčajte tlačidlo na originálnom ručnom vysielači,
ktoré sa má skopírovať,kým nezačne červená LED
indikujúca funkciu ovládačaROCZ907 rýchlo blikať
(= potvrdenie oúspešnom príjme signálu diaľkového
ovládania).
•Stlačte teraz tlačidlá 2a3naoriginálnom ručnom
vysielači(funkcia master). Zatiaľčorýchlo bliká LED
dióda originálneho ručného vysielača, stlačte 1x
tlačidlo originálneho ručného vysielača, ktoré sa má
skopírovať. Červená LED indikujúca funkciu (1) diaľkového ovládania ROCZ907 teraz bliká rýchlo.
•Teraz stlačte tlačidlo na diaľkovom ovládaní ROCZ907,
ktoré sa má naprogramovať (napr.1)aktoré chcete
uložiť.Ako potvrdenie naprogramovania zhasne červená LED dióda na diaľkovom ovládaní ROCZ907.
•Napokon vyskúšajte, čisabrána dá ovládať pomocou
naučeného tlačidla. Ak nie, proces opakujte. Ak tlačidlo ani po opätovnom pokuse nefunguje je nutné váš
model osobitne synchronizovať sprijímačom systému
pohonu brány.
•Nasynchronizovanie diaľkového ovládania ROCZ907
spohonom brány stláčajte naprogramované tlačidlo
ROCZ907, kým rýchlo nezabliká červená LED dióda
(cca 10 sekúnd). Uvoľnite tlačidlo. Keď zhasne červená
LED dióda na diaľkovom ovládaní ROCZ907, je
programovanie ukončené.
7.3.3 Príklad výrobcu V2:
•Predvykonaním kopírovacej funkcie dbajte na to, aby
originálny ručný vysielač aovládač ROCZ907 boli k
sebe otočené avzdialené maximálne 3cmodseba.
•Dbajte na to, aby ste sa zdržiavali vbezprostrednej
blízkosti prijímačapohonu brány (približne 50 cm).
•Stlačte apodržte tlačidlo „1“ na diaľkovom ovládači
ROCZ907 azároveň 4x stlačte tlačidlo „2“. Uvoľnite
obe tlačidlá. Červená LED indikujúca funkciu (1) teraz
bliká cca každé 2sekundy.
•Stlačte apodržte tlačidlo originálneho ručného
vysielača, ktoré sa má skopírovať,kým sa nerozsvieti
červená LED indikujúca funkciu (1) diaľkového
ovládania ROCZ907 anásledne cca každé 2sekundy
dvakrát nezabliká.
•Stlačte znova tlačidlo originálneho ručného vysielača,
ktoré sa má skopírovať,pokým sa rýchlo nerozbliká
červená LED dióda.
•Napotvrdenie stlačte tlačidlo, ktoré sa má naprogramovať (napr.1). Červená LED indikujúca funkciu (1)
zhasne.
•Stláčajte naprogramované tlačidlo diaľkového
ovládania ROCZ907, kým rýchlo nebliká červená LED
dióda (cca 10 sekúnd). Uvoľnite tlačidlo. Keď zhasne
červená LED dióda na diaľkovom ovládaní ROCZ907, je
programovanie ukončené.
•Napokon vyskúšajte, čisabrána dá ovládať pomocou
naučeného tlačidla. Ak nie, proces opakujte.
Poznámka
Ďalšie doplňujúce možnosti nájdete vaktuálnom
zozname kompatibilných zariadení arozšírenom
návode na obsluhu na stránke www.hama.com alebo
www.thomson-av-accessories.eu.
8. Technické údaje
Rozmery 76 x27x39mm
max. 40 m(vzávislosti od
Dosah
Vstupné napätie 12 V
Pohotovostný režim max. 72 h
Výstup USB 5V/2100 mA
Frekvenčné pásmo 433 MHz, 868 MHz
Max. vyžarovaný
vysielací výkon
stavebných amiestnych
podmienok, resp. od výkonu prijímacej antény)
10 mW
45
Page 48

9. Údržba astarostlivosť
Na čistenie tohto výr
utierku, ktorá nepúšťavlákna anepoužívajte žiadne
agresívne čistiace prostriedky.Dbajte na to, aby do
výrobku nevnikla voda.
10. Vylúčenie záruky
Firma Hama GmbH &CoK
škody vyplývajúce zneodbornej inštalácie, montáže alebo
neodborného používania výrobku alebo znerešpektovania návodu na používanie a/alebo bezpečnostných
pokynov.
11. Servis apodpora
Sotázkami týkajúcimi sa výrobku sa prosím obráťte na
poradenské oddelenie rmy Hama.
Hotline: +49 9091 502-115 (nem./angl.)
Ďalšie informácie opodporenájdete tu: www.hama.com
12. Pokyny prelikvidáciu
Ochrana životného prostredia:
zariadenia, rovnako ako batérie na miesta ktomu určené.
Symbolizuje to obrázok vnávode na použitie, alebo na
balení výrobku. Opätovným zužitkovaním alebo inou
formou recyklácie starých zariadení/batérií prispievate k
ochrane životného prostredia.
13. Vyhlásenie ozhode
vyhlásenie ozhode je kdispozícii na tejto internetovej
adrese: www.hama.com -> 00132680 -> Downloads.
obku používajte len navlhčenú
Gneručí/nezodpovedá za
Európska smernica 2012/19/EU a2006/66/EU
stanovuje: Elektrické aelektronické zariadenia,
rovnako ako batérie sa nesmú vyhadzovať do
domáceho odpadu. Spotrebiteľ je zo zákona
povinný zlikvidovať elektrické aelektronické
Hama GmbH &CoKGtýmto vyhlasuje, že
rádiové zariadenie typu [00132680] je v
súlade so smernicou 2014/53/EÚ. Úplné EÚ
46
Page 49

47
Page 50

Thomson is atrademark of Technicolor
0c'A'. or itsafGliates Ásed Ánder
license by HAMA GmbH &CoKGin
86652 Monheim /Germany
www.thomson-av-accessories.eu
ROCZ907/00132680
 Loading...